


STUDIOLOGIC
is a product
FATAR srl
Zona Ind. le Squartabue
62019 RECANATI (MC) - ITALY
PHONE: +39 071 7506078
FAX: +39 071 7506142
ITALIANO - 01
ENGLISH - 09
DEUTSCH - 17
FRANÇAIS - 24
ESPAÑOL - 33
INSTRUCTIONS MANUAL
Italiano
MIDICONTROLLERS
envenuti nel mondo delle Studio Logic Master Contorller Keyboard.
La MASTER CONTROLLER KEYBOARD SL-1100 è un MIDI CONTROLLER completo, versatile e
B
di veloce utilizzo; ottimo sia per uso live che per lavoro di studio.
®
INDICE
• CARATTERISTICHE
• CONNESSIONI
• PROGRAMMAZIONE DELLA STUDIO 1100
• PER CAMBIARE PRESET
• LE ZONE
• PROGRAMMAZIONE DI UNA ZONA
• KEYRANGE O ESTENSIONE DI ZONA
• RCV CHAN Canale MIDI in ricezione
• PROGRAM CHANGE
• BANK SELECT
• CHANNEL Canal MIDI
• WHEELS Ruote di modulazione
• VOLUME
• VELOCITY Dinamica
• AFTER TOUCH
• TRANSPOSE
• CSL Cursore CSL/DATA
• PEDAL
• Movimenti all’interno dell’ambiente <EDIT>
• SAVE/LOAD DATA
• Istruzioni per il salvataggio
• Istruzioni per il carico dati
• PRESET INITIALIZATION Reset Generale
• Memorizzazione delle zone attive
• Lista dei controlli MIDI
Italiano
PAG.
CARATTERISTICHE
La Master Controller Keyboard SL-1100 si presenta con
•Tastiera dinamica a 88 tasti pesati
•After touch
•32 presets
1
1
2
2
2
3
3
3
3
3
3
3
4
4
4
4
4
5
5
5
5
5
5
6
6
CONNESSIONI
•10 switches di cui 4 per abilitare le zone di tastiera,
•2 per cambiare banco di presets e 4 per cambiare preset
•2 sliders di cui uno per il main volume e l’altro assegnabile
•1 display a 3 cifre
•2 wheels per pitch e modulation
•2 midi out paralleli
•1 midi in
•1 ingresso jack per pedale sustain
•1 ingresso jack per pedale volume
•1 interruttore di alimentazione
•1 ingresso di alimentazione DC
•11 dei tasti neri della Master sono usati per funzioni speciali
1) Collegare l’adattatore di tensione alla presa elettrica di rete (verificando che la tensione
dell’adattatore corrisponda alla tensione di linea). Collegare il cavo di uscita dell’adattore
all’ingresso di alimentazione della MASTER CONTROLLER KEYBOARD (SL-1100 accetta
come alimentazione 9V DC con polarità positiva (+) al centro e necessita di una corrente minima di
200 mA).
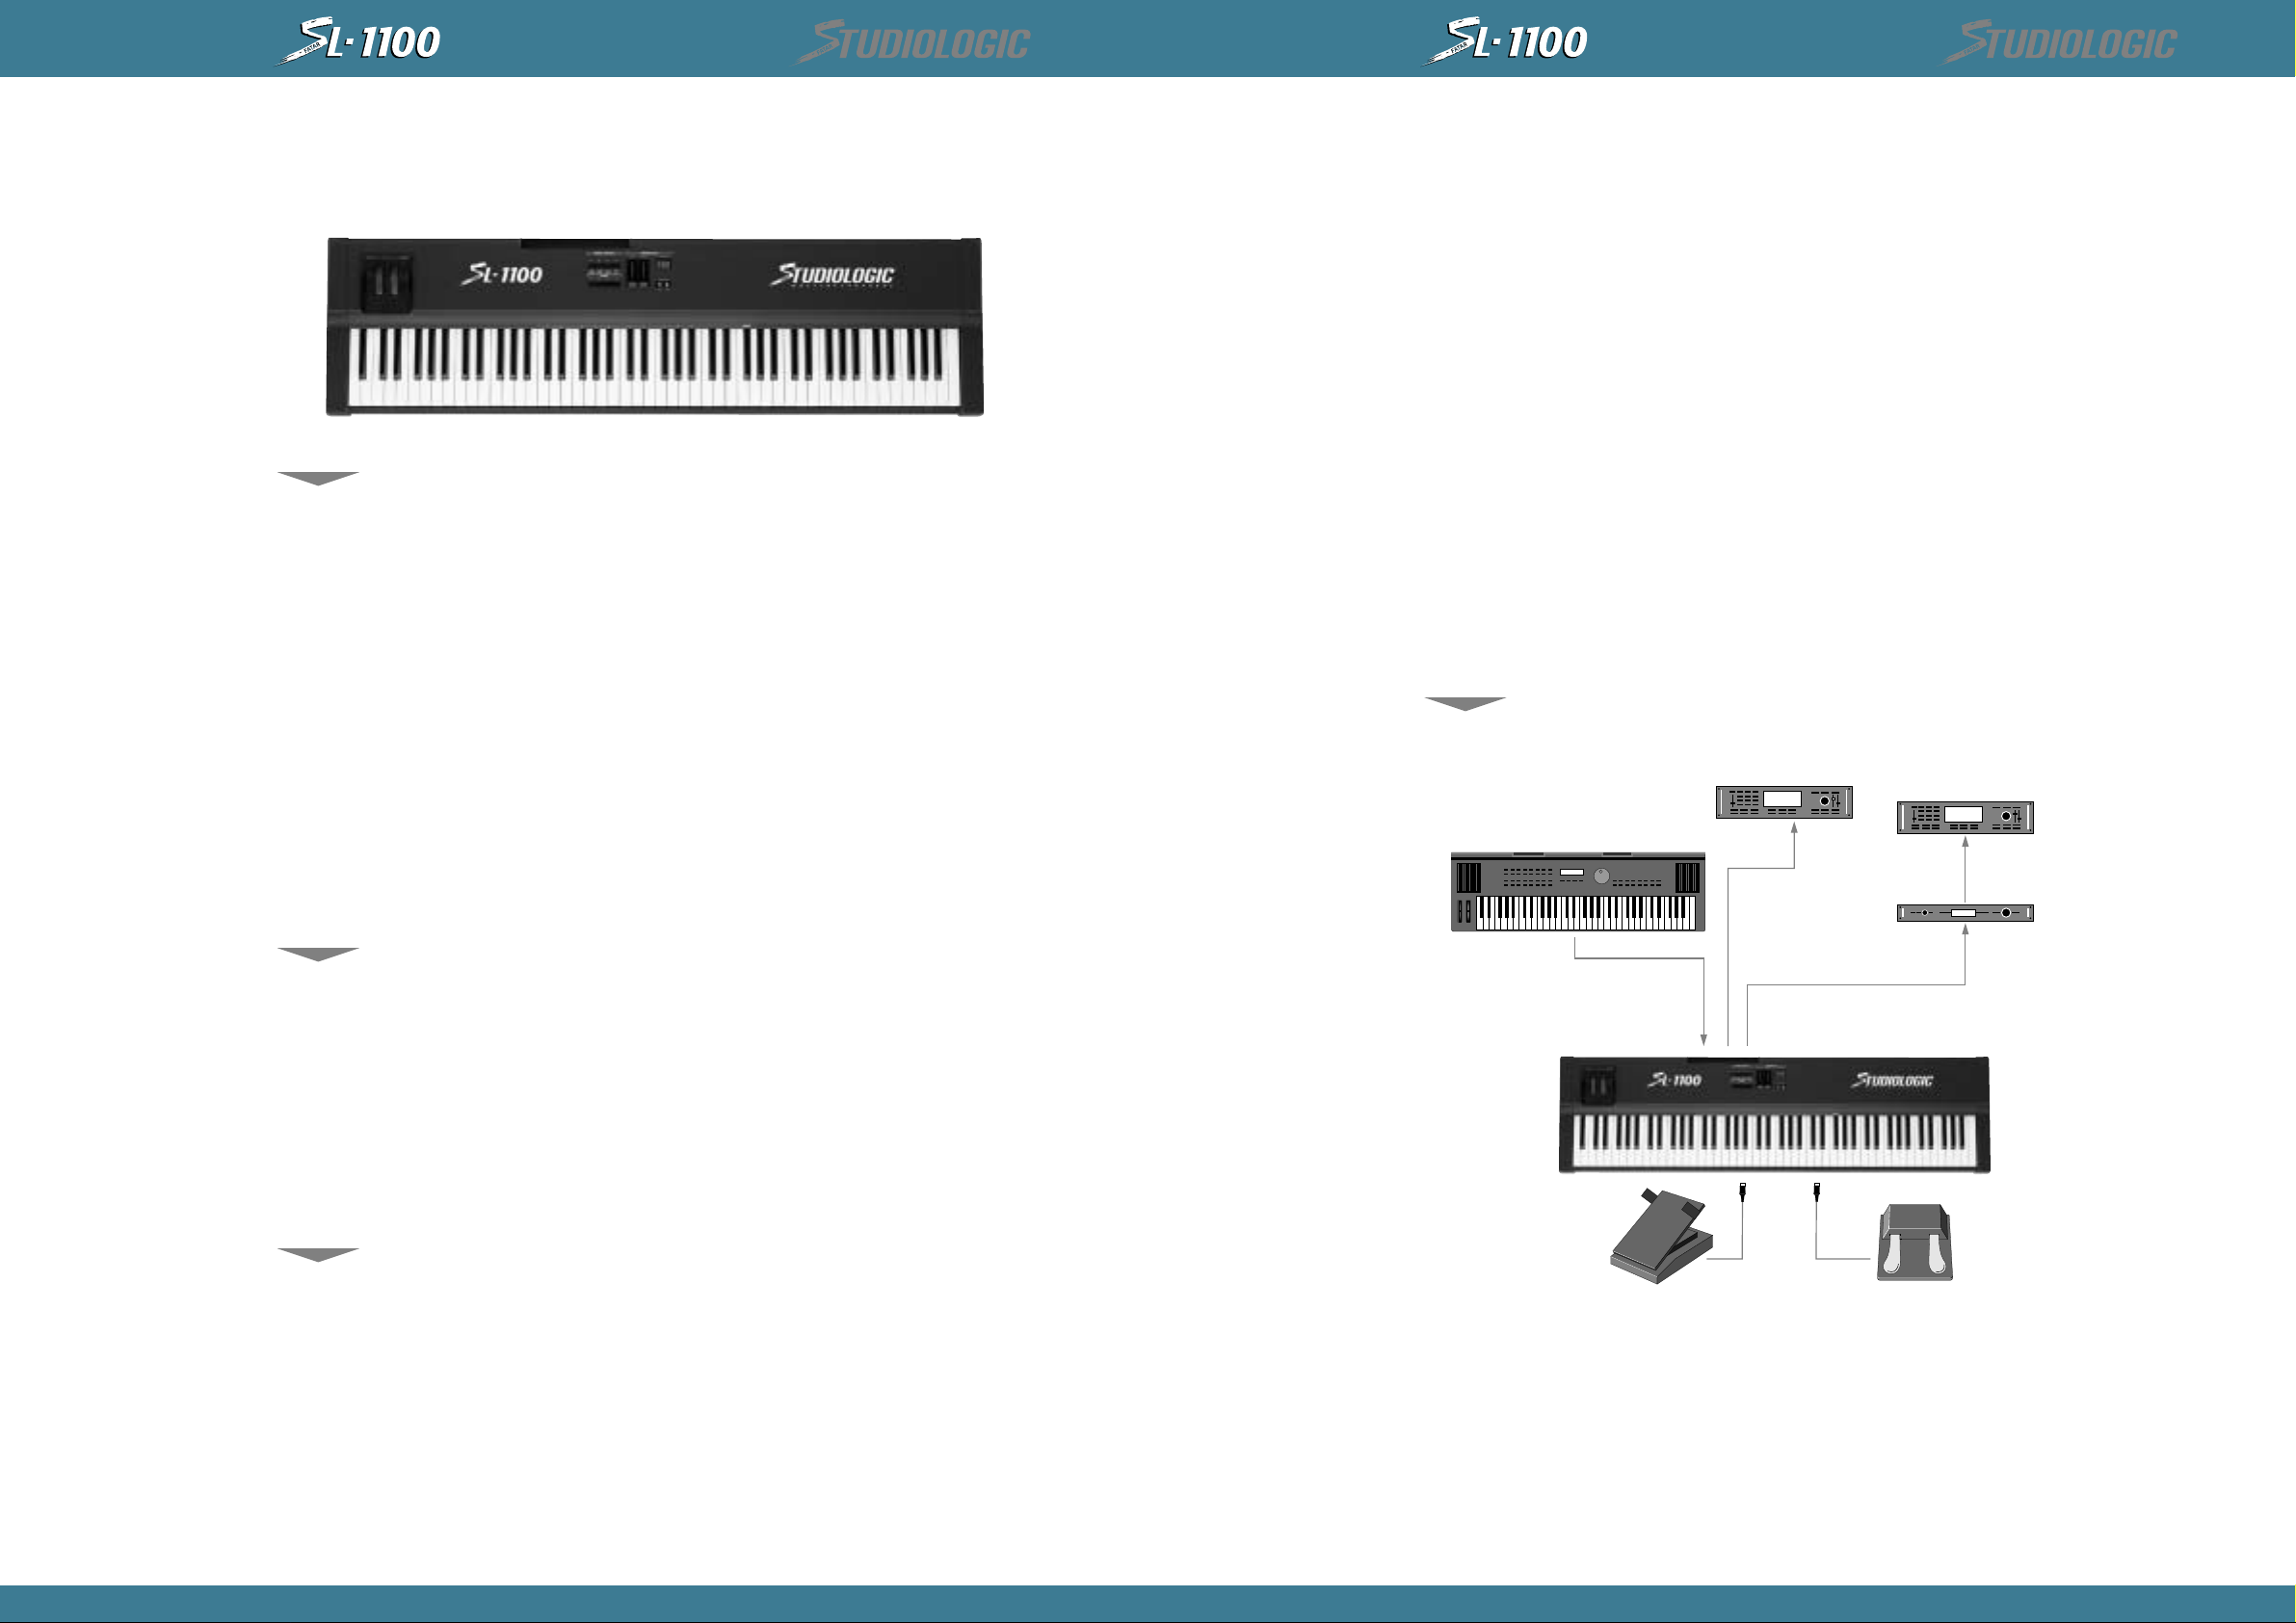
2) Collegare il/i cavi midi al vostro o ai vostri expanders o altri dispositivi MIDI.
3) Attivare la MASTER CONTROLLER KEYBOARD SL-1100 premendo il pulsante POWER e si
predisporrà nel PRESET <11>.
4) Se si ha la necessità di controllare il sustain e il volume, collegare agli appositi jack, per il
sustain un pedale con il contatto normalmente aperto (es.: VFP1/10), per il volume un
pedale di controllo lineare con jack stereo (es.: VP26).
1
INSTRUCTIONS MANUAL
Italiano
MIDI IN
MIDI OUTPUTS
OUT
IN
IN
IN
Sound Module 2
Sound Module 3
Sound Module1
THRU
Sustain
Footswitch
Control pedal
Keyboard
1
243
1
243
LOW KEY
HIGH KEY
RCV CHAN
PROGRAM
CHANNEL
WHEELS
VOLUME
VELOCITY
AFTERTCH
TRANSPOSE
CSL
PEDAL
PERFORM / EDITPRESET / FUNCTION
ZONES
CSL / DATA MASTER VOL PRESET / VALUE
PRESET / ZONE
LOAD SAVE
PROGRAMMAZIONE
DELLA
SL-1100
MIDICONTROLLERS
®
Italiano
MIDICONTROLLERS
®
PROGRAMMAZIONE
DI UNA ZONA
Le istruzioni che seguono riguardano la procedura di edit di una zona, con tutte le possibilità
software che possiede la macchina, ricordando che all’interno di un preset è possibile
combinare fino a 4 zone. È chiaro poi che l’utente programmerà la SL-1100 secondo le proprie
esigenze.
KEY RANGE O
ESTENSIONE
DI ZONA
Tenere premuto lo switch della zona che si vuole creare - premere il tastino funzione n. 1 (in
alto a sinistra) - rilasciare entrambi gli switches - ora il led relativo alla zona lampeggia, e il
display visualizza il numero di tasto più grave - a questo punto ci sono 2 modi per definire il
tasto di inizio e il tasto di fine zona = posso suonare direttamente sulla tastiera la nota più grave
e la nota più acuta ed automaticamente il key range sarà settato e la modalità <EDIT> terminerà
non lampeggiano più il led della zona interessata; oppure tramite lo slider <CSL/DATA> fisserò
il numero di tasto più grave e premendo una seconda volta lo switch funzione n. 1 il display
visualizza il tasto più acuto ed agendo sullo slider <CSL/DATA> fisserò il numero del tasto più
acuto; per uscire dall’ambiente <EDIT> è sufficiente premere lo switch della zona.
RCV CHAN
Canale MIDI
in ricezione
SL-1100 è provvista di un MIDI INPUT, quindi accetterà dati in arrivo da dispositivi esterni e
verrano riportati in uscita sulle MIDI OUT (MIDI MERGE).
Per settare il canale MIDI in ricezione tenere premuto lo switch della zona, premere poi lo
switch funzione n. 1 per tre volte e il display indicherà il numero di canale in ricezione =
muovendo lo slider <CSL/DATA> si deciderà il numero desiderato = se si visualizza un trattino
orizzontale <-> la SL-1100 funzionerà da MIDI MERGE bypassando qualsiasi informazione di
qualsiasi canale MIDI, se ad esempio visualizzo il numero 1 tutti i dati saranno bypassati ma i
messaggi di program change del canale MIDI 1 provenienti da dispositivi esterni saranno
interpretati come program change che cambieranno i preset della SL-1100. Premere lo switch
della zona per uscire dall’ambiente <EDIT>.
PER
CAMBIARE
PRESET
Con i due tastini con frecce sotto il display si incrementa o si decrementa il banco di presets (SL1100 ha la possibilità di storare 32 presets suddivisi in 8 banchi da 4), quindi una volta fissato il
banco desiderato, premere uno dei 4 switch sotto la scritta <PRESET>. Se nel display leggiamo
11 significa che siamo nel preset 1 del banco 1.
LE ZONE
All’interno di ogni singolo preset (o patch) è possibile creare da 1 a 4 zone di tastiera per splits o
sovrapposizioni. Ogni zona può essere programmata per avere tutti i controlli MIDI di cui
l’utente avrà bisogno. Per abilitare o disabilitare ogni zona premere lo switch contrassegnato da
1 a 4 sotto la scritta <ZONES>.
Bass (Zone 2, channel 4) Flute (Zone 4, channel 12)
2
INSTRUCTIONS MANUAL
Piano (Zone 1, channel 5)
Strings (Zone 3, channel 8)
PROGRAM
CHANGE
Per assegnare un program change relativo alla zona desiderata, tenere premuto lo switch della
zona e premere lo switch funzione n. 2, ora il led della zona lampeggia e muovendo lo slider
<CSL/DATA> visualizzo sul display il numero di program change (SL-1100 accetta numeri da 1 a
128). Se non si desidera program change si deve selezionare il trattino orizzontale <->; premere
di nuovo lo switch della zona per uscire da <EDIT>.
Esiste un’altra modalità per memorizzare velocemente il parametro di program change:
tenere premuto lo switch della zona interessata e digitare tramite i 10 tasti neri della tastiera
etichettati da 0 a 9 il numero desiderato, quindi il nuovo dato sarà ora memorizzato nella patch e
sarà trasmesso quando lo switch della zona verrà rilasciato.
BANK
SECLECT
Per far assumere un comando di BANK CHANGE tenere premuto lo switch della zona, premere il
tasto nero etichettato <BANK> e digitare il numero di banco (0-225) tramite i tasti etichettati 0-9.
Il nuovo dato sarà trasmesso quando lo switch della zona verrà rilasciato.
CHANNEL
Canal MIDI
Per settare il canale MIDI della zona, tenere premuto lo switch della zona e premere lo switch
funzione n. 2 per 2 volte; rilasciare entrambi gli switches; ora il led della zona lampeggia.Il
display indica il numero di canale che sarà scelto muovendo lo slider <CSL/DATA>.
Premere lo switch della zona per uscire da <EDIT>.
WHEELS
Ruote
di modulazione
La MASTER CONTROLLER KEYBOARD SL-1100 è provvista di 2 wheels di cui una è dedicata al
Pitch Bend con la molla di ritorno centrale e l’altra è dedicata alla modulation.
3
INSTRUCTIONS MANUAL
Italiano
MIDICONTROLLERS
®
Italiano
MIDICONTROLLERS
®
VOLUME
VELOCITY
Dinamica
AFTER
TOUCH
TRANSPOSE
CSL
Cursore
CSL/DATA
Per ognuna delle 4 zone creabili sulla tastiera c’è la possibilità di abilitare od escludere entrambe
le wheels.
Tenere premuto lo switch della zona interessata e premere lo switch funzione n. 2 per 3 volte;
rilasciare entrambi gli switches; ora il led della zona lampeggia. Il display ora visualizza <ON> o
<OFF>. Usare lo slider <CSL/DATA> per modificare il settaggio. Premere lo switch della zona
per uscire da <EDIT>.
N.B.: per ogni operazione di EDIT la procedura è sempre identica cioè si preme lo switch della
zona interessata e poi lo switch di funzione voluto, premendolo 1 volta se è indicato sulla
prima riga di pagine software e così via fino a 3 volte. Premere lo switch della zona per uscire
da <EDIT>.
Ora senza ripetere le operazioni manuali si chiariranno le altre pagine di EDIT per il PRESET.
Si imposta il volume iniziale di una zona settandolo con lo slider <CSL/DATA>, (i valori sono
compresi tra 0 e 127); se non si desidera una inizializzazione del volume, ma si vuol lasciare
inalterato il valore del preset precedente, si deve impostare il trattino orizzontale <->.
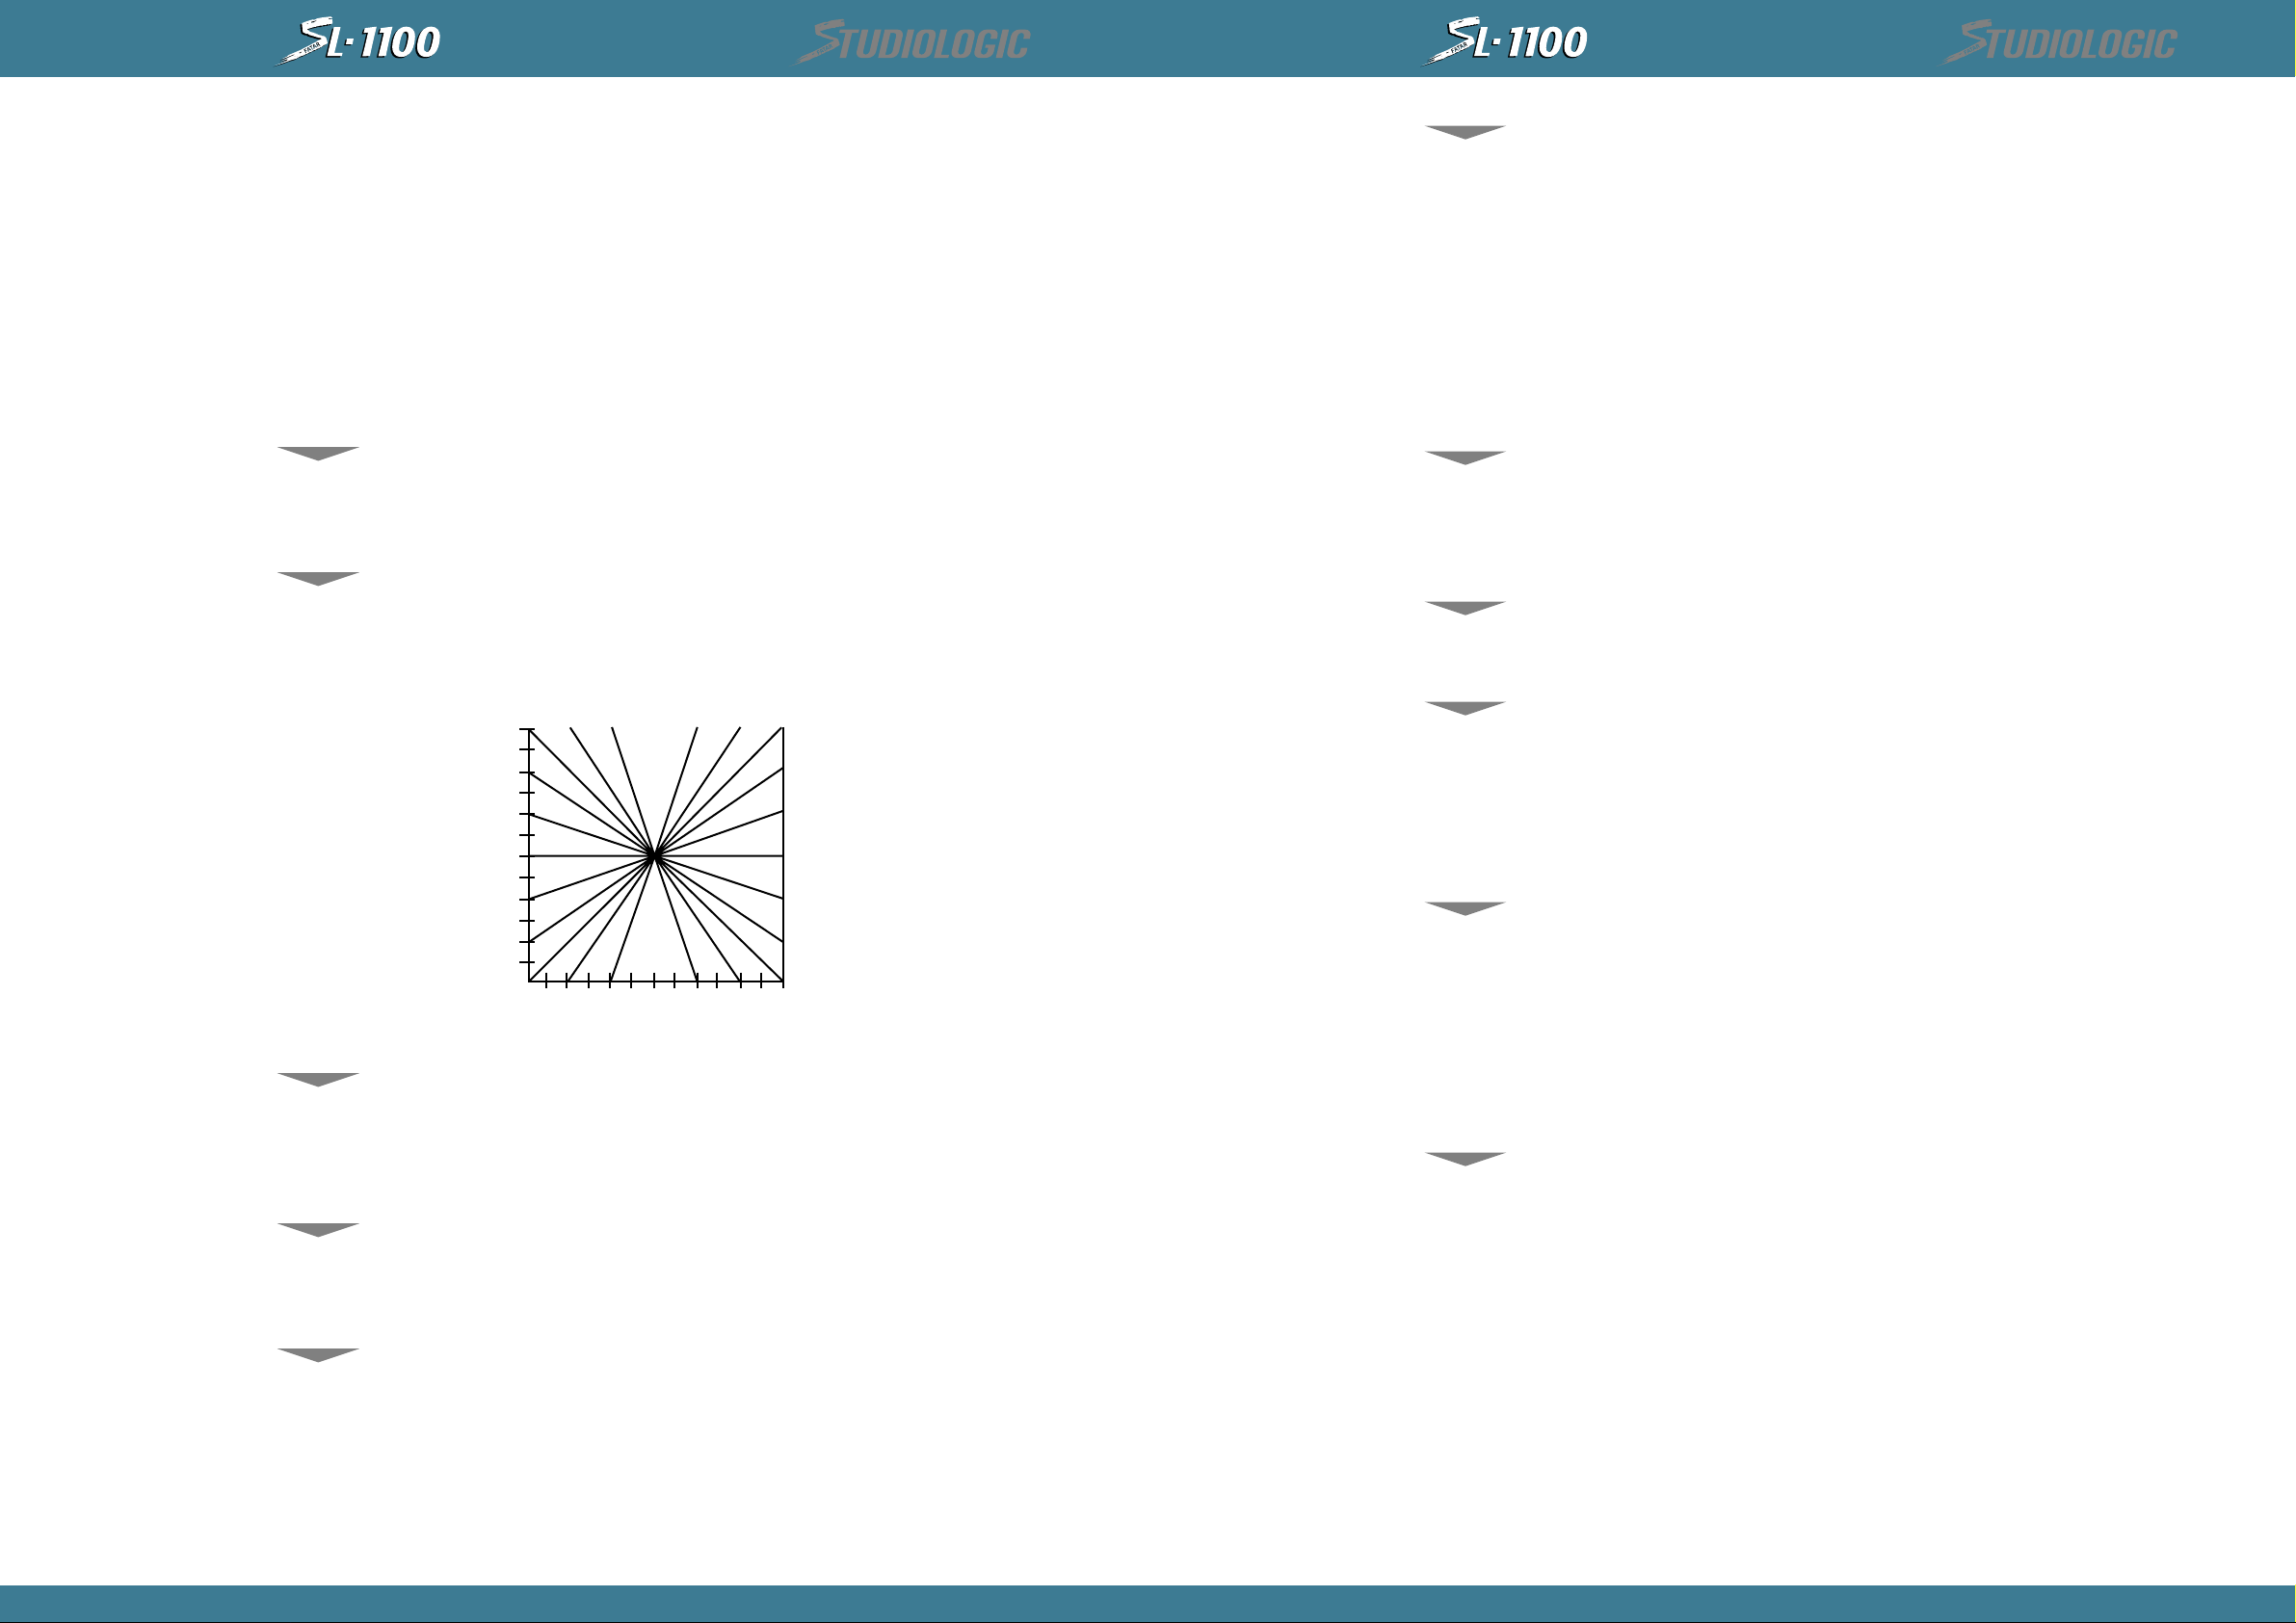
Per assegnare un valore di risposta della dinamica della tastiera differente dal valore di default
(3), agire con lo slider <CSL/DATA> e impostare il valore voluto (la gamma di curve disponibile
va da -5 a +5). Se ad esempio si vuole realizzare un CROSSFADE tra 2 suoni comandato dalla
dinamica di tocco, impostare in una zona un valore positivo e nell’altra un valore negativo.
127
MIDI
Velocity
Value
64
1
Light
54
-4
-5
Medium Heavy
Playing Force
3
2
1
0
-1
-2
-3
Velocity
Parameter
Come per le wheels, si ha la possibilità di escludere o abilitare l’intervento dell’AFTER TOUCH
per ogni singola zona. Muovendo lo slider <CSL/DATA>, decidere l’intervento <ON o OFF>
dell’After Touch.
Per effettuare una trasposizione è sufficiente agire sullo slider <CSL/DATA> per modificar il
valore di default (0). Le variazioni possibili vanno da -24 a +24 cioè 24 semitoni verso il basso e
24 semitoni verso l’alto (+/- 2 ottave).
Lo slider <CSL/DATA> è usato in fase di programmazione per editare i valori voluti, ma in
ambiente perform può agire sullo stesso slider mentre si è in <EDIT>;
se non si vuole assegnare nessun controllo allo slider, selezionare il trattino orizzontale < - >.
PEDAL
Movimenti
all’interno
dell’ambiente
<EDIT>
SAVE/LOAD
DATA
Istruzioni
per il
salvataggio
Istruzioni
per il
carico dati
PRESET
INITIALIZATION
Reset generale
Nella terza funzione dello switch function n. 4 in realtà ci sono 2 possibili programmazioni: la
prima si esegue nel seguente modo = premendo per 3 volte lo switch function n. 4 si può
programmare il controllo di pedale lineare che per default assume il controllo #7 cioè volume,
ma agendo sullo slider <CSL/DATA> si può settare un qualsiasi controllo compreso tra 0 e 127;
naturalmente anche in modo differenziato per ogni singola zona. Se si desidera lasciare il valore
di default, settare il trattino orizzontale <->. Il valore di volume variato con il pedale non è
assunto direttamente ma va ad incrementare o decrementare il valore impostato nella
inizializzazione di volume della zona. La seconda programmazione riguarda il pedale sustain =
tenere premuto il pedale sustain, ora premere per 3 volte lo switch function n. 4, rilasciare il
pedale sustain, ora il display visualizza <ON> o <OFF>, se si desidera disabilittare il pedale
sustain per quella determinata zona settare <OFF>.
Quando si è in <EDIT>, ci si può muovere per editare le differenti zone e le diverse funzioni
senza uscire e velocizzare la programmazione. Per cambiare zona basta premere gli switches
con frecce e ci si sposta tra le 4 zone. Per cambiare e visualizzare i differenti parametri di EDIT
basta premere i diversi switches di funzione.
C’è la possibilità di salvare e caricare tutto il contenuto della memoria dei 32 preset tramite
messaggio di sistema esclusivo per effettuare un MIDI DATA DUMP.
Predisporre l’unità destinata a ricevere e memorizzare il messaggio di SYS-EX (computer o altro
dispositivo con questa possibilità); tenere premuto uno qualsiasi degli switches delle zone;
premere lo switch con la freccia destra sopra la scritta <SAVE>; rilasciare entrambi gli switches;
ora il display visualizza la scritta ‘S’ con una sequenza di numeri da 1 a 8 che rappresentano gli 8
banchi di presets ed in pochi secondi il DUMP sarà eseguito; ora si dovrà memorizzare il file nel
dispositivo esterno.
Tenere premuto uno qualsiasi degli switches delle zone; premere lo switch con la freccia sinistra
sopra la scritta <LOAD>; rilasciare entrambi gli switches; ora il display visualizza la scritta ‘L’ e la
SL-1100 rimane in attesa di dati provenienti dal dispositivo esterno.
Predisporre l’unità destinata a trasmettere il messaggio di SYS-EX; avviare la trasmissione dati;
ora la SL-1100 memorizzerà i 32 presets salvati su dispositivo esterno; dopo aver terminato il
carico dati si predisporrà sull’ultimo preset selezionato.
È chiaro che lo scambio dati avverrà via MIDI tra inputs e outputs.
Se si presenta la necessità di effettuare un reset (o per errori numerosi di programmazione o per
in blocco software), operare come segue = spegnere la MASTER CONTROLLER KEYBOARD,
tenere premuti contemporaneamente i due tastini con frecce (sopra le scritte LOAD/SAVE) ed
accendere la SL-1100 tenendoli premuti ancora per 2/3 secondi.
Ora segue una mappa indicativa della programmazione dei 32 presets dopo aver effettuato il
reset generale che corrisponde alla programmazione di fabbrica.
Preset 11= Zona 1 ON - Zona 2 OFF - Zona 3 OFF - Zona 4 OFF
Zona 1 = Program Change 1 Estensione 88 Tasti
Zona 2 = Program Change 2 Estensione 88 Tasti
Zona 3 = Program Change 3 Estensione 88 Tasti
Zona 4 = Program Change 4 Estensione 88 Tasti
4
INSTRUCTIONS MANUAL
5
INSTRUCTIONS MANUAL
Italiano
Memorizzazione
delle zone attive
al richiamo
del Preset
Lista dei
controlli MIDI
Preset 12 = Zona 1 ON - Zona 2 ON - Zona 3 ON - Zona 4 ON
Zona 1 = Program Change 1 Estensione 88 Tasti
Zona 2 = Program Change 2 Estensione 88 Tasti
Zona 3 = Program Change 3 Estensione 88 Tasti
Zona 4 = Program Change 4 Estensione 88 Tasti
Preset 13 = Zona 1 ON - Zona 2 ON - Zona 3 ON - Zona 4 ON
Zona 1 = Program Change 1 Split 1
Zona 2 = Program Change 2 Split 2
Zona 3 = Program Change 3 Split 3
Zona 4 = Program Change 4 Split 4
Preset 14 = Zona 1 ON - Zona 2 ON - Zona 3 OFF - Zona 4 OFF
Zona 1 = Program Change 1 Estensione 88 Tasti
Zona 2 = Program Change 2 Estensione 88 Tasti
Zona 3 = Program Change 3 Estensione 88 Tasti
Zona 4 = Program Change 4 Estensione 88 Tasti
I presets dal n. 21 al 84 sono tutti identici al preset 11.
Abilitare le zone interessate; entrate in <EDIT>; uscire da <EDIT>.
assegnabili allo Slider <CSL/DATA> e al pedale lineare.
MIDICONTROLLERS
®
Italiano
MIDICONTROLLERS
®
65 Portamento ON/OFF
66 Sostenuto
67 Soft pedal
68 Undefined
69 Hold 2
70-79 Undefined
80 Gen’1 Purpose #1
81 Gen’1 Purpose #2
82 Gen’1 Purpose #3
83 Gen’1 Purpose #4
84-91 Undefined
92 Tremolo depth
93 Chorus depth
94 Detune
95 Phaser depth
96 Data increment
97 Data decrement
98-121 Undefined
122 Local control ON/OFF
123 All notes OFF
124 OMNI OFF
125 OMNI ON
126 Mono ON - Poly OFF
127 Poly ON - Mono OFF
NUMERO DI CONTROLLO FUNZIONI DI CONTROLLO
0 Bank
1 Modulation
2 Breath controller
3 Undefined
4 Foot controller
5 Portamento rate
6 Data entry MSB
7 Volume
8 Balance
9 Undefined
10 Pan
11 Expression
12-15 Undefined
16 Gen’1 Purpose #1
17 Gen’1 Purpose #2
18 Gen’1 Purpose #3
NUMERO DI CONTROLLO FUNZIONI DI CONTROLLO
19 Gen’1 Purpose #4
20-31 Undefined
32 Bank
33-63 Least significant byte for values 0 to 31
64 Sustain (Damper)
6
INSTRUCTIONS MANUAL
7
INSTRUCTIONS MANUAL
English
QUICK
REFERENCE
®
MIDICONTROLLERS
For basic operation please follow the guidelines below. The SL-1100 includes four demonstration
presets which may be used after the instrument is installed into your MIDI system.
1) Connect voltage adapter into a power outlet (make sure voltage specification on power
adapter matches your line voltage). Connect adapter cable to SL-1100 power jack.
2) Connect MIDI cables before switching on any MIDI devices. To use the demonstration
presets, connect a sound module to either of the two MIDI outputs. The sound module must be
multi-timbral and capable of responding to MIDI data on channels one through four.
4) Apply power to the SL-1100, then apply power to all other MIDI devices in the system.
To change SL-1100 presets, make sure that the unit is in Perform Mode (there should be no
blinking lights on the front panel) . To change the preset, press any of the four PRESET switches.
There are 8 banks of four presets; to change to a different bank, press the left or right arrow
switches until the desired bank number is displayed.
INDEX
• QUICK REFERENCE
• DEMONSTRATION PRESETS
• SL-110 SPECIFICATIONS
• BASIC INFORMATION
• BACK PANEL CONNECTIONS
• MIDI SYSTEM CONFIGURATION
• ZONES
• OPERATION
• PERFORM MODE
• EDIT MODE
• ZONE FUNCTIONES
• LOW KEY-HIGH KEY
• PROGRAM
• VOLUME
• TRANSPOSE
• CHANNEL
• VELOCITY
• CSL Control Slider
• WHEELS
• AFTERTOUCH
• PEDAL
• MISCELLANEOUS FUNCTIONS
• RECEIVE CHANNEL
• PROGRAM SAVE AND LOAD
• PRESET INITIALIZATION
English
PAGE
10
10
10
11
12
12
12
13
13
13
13
14
14
14
14
14
15
15
15
15
16
16
16
The Master Volume Slider will adjust the volume on all active zones. Unless programmed
otherwise, the optional pedal controller will also adjust the master volume. The left and right
wheels will control pitch and modulation, unless they have been disabled by the active Studio1100 preset.
MIDI channels may be switched on and off using the four ZONE switches.
9
9
To edit a preset, enter Edit Mode by pressing and holding one of the four ZONE switches.
Press the FUNCTION switch which is labeled with the desired parameter. Release both switches
(the ZONE switch will blink). Pressing any FUNCTION switch repeatedly will cycle through the
three parameters available on the switch. Change the current value with the CSL/DATA slider.
Press the blinking ZONE switch to exit Edit Mode.
DEMONSTRATION
PRESETS
The SL-1100 comes from the factory with four demonstration presets in locations 11 through 14.
The demonstration presets are intended for use with a multi-timbral sound module. The module
must be able to respond to MIDI data on channels one through four.
The demonstration presets illustrate several of the most useful SL-1100 functions, and are
summarized below. When the demonstration presets are selected with the PRESET switches, the
sound modules should change programs automatically. The actual program number on each
sound module may not match the number of the preset selected on the SL-1100. These program
numbers may be easily changed; see the operation guide sections on Edit Mode and the
PROGRAM function.
DEMONSTRATION PRESET 11: This is a very basic preset with one zone (MIDI channel 1) active
across the entire keyboard. The Master Volume control may be used to adjust the level of the
sound.
DEMONSTRATION PRESET 12: MIDI output channels one through four are active and receiving
note information from the keyboard. The ZONE switches may be used to turn off selected
channels to hear different combinations of the sounds. The Master Volume slider on the front
panel may be used to adjust the volume level of all channels simultaneously.
DEMONSTRATION PRESET 13: All four MIDI channels are active, but the keyboard is divided
into four zones, with a different channel active in each zone (refer to the ZONE function for
more information).
9
INSTRUCTIONS MANUAL
MIDI IN
MIDI OUTPUTS
OUT
IN
IN
IN
Sound Module 2
Sound Module 3
Sound Module1
THRU
Sustain
Footswitch
Control pedal
Keyboard
English
MIDICONTROLLERS
®
English
MIDICONTROLLERS
®
SL-1100
SPECIFICATIONS
DEMONSTRATION PRESET 14: This preset demonstrates a velocity cross-fade. For notes
played softly on the keyboard, only MIDI channel 1 should play at maximum volume. As the
notes are struck more forcefully, this sound will become softer, and the sound on MIDI channel
2 will become louder.
- Full-size 88-key weighted action with velocity sensitivity and aftertouch.
- Three digit LED display for preset number and parameter editing.
-
Thirty-two internal presets; internal programs may be saved and loaded via MIDI system exclusive.
- MIDI input is merged into the MIDI output.
- Two parallel MIDI output jacks.
-
Full-size Pitch and Modulation wheels. Wheels may be enabled and disabled for each keyboard zone.
- Programmable control slider. The slider can be programmed to issued and MIDI control change message.
- Input for optional pedal controller to control volume or other functions.
- Four programmable zones may be defined over any region of the keyboard.
- Presets may be changed with an external MIDI device.
- Independent MIDI program change messages issued by each zone.
- Zones programmable to transmit on any MIDI channel.
- Volume initialization messages for each zone.
- Velocity sensitivity control for each zone with positive and negative response.
- Aftertouch may be enabled or disabled for each zone under preset control.
- Programmable transpose for each keyboard zone.
- Power Requirements: 9VDC at 200mA (center contact positive).
The thirty-two SL-1100 internal presets may be loaded from an external computer or storage
device. The output of the storage device must be connected to the MIDI input of the SL-1100. If
the SL-1100 receives the correct system-exclusive identifier, the preset data will be loaded into
memory. If the identifier does not match, the system-exclusive data will be passed to the SL1100 outputs.
MIDI OUTPUTS: Connect sound modules and other MIDI devices to either of the two parallel
MIDI outputs (the data is identical on both outputs). To connect more than two devices, use the
MIDI through on each device to connect to the MIDI input of another device. The SL-1100 will
access up to sixteen separate MIDI channels under preset control. Sound modules with the
same channel settings will be treated as a single sound source by the SL-1100.
The thirty-two internal presets may be saved to an external computer or storage device. The
MIDI output of the SL-1100 must be connected to the MIDI input of the storage device. Consult
the section on Program Save and Load for additional information.
CONTROL VOLTAGE INPUTS: One input is provided for an external analog controller. An
optional control pedal is available from your dealer, or any DC control voltage source may be
used. The input voltage range is 0 to 5 volts DC, which corresponds to a MIDI control range of 0
to 7F hex. The control pedal is most commonly used to control master volume, but it may be
programmed to issue any MIDI control change message.
MIDI SYSTEM
CONFIGURATION
BASIC INFORMATION
BACK PANEL
CONNECTIONS
The SL-1100 serves as the master controller for any group of MIDI instruments and accessories.
A MIDI input is provided which allows flexibility in multi-keyboard setups. Data from this input
is merged into the two MIDI outputs.
Four programmable keyboard zones provided fast and easy control over essential functions. A
large three digit LED displays the current preset as well as parameter data. All programmable
parameters may be accessed quickly via the four ZONE switches and the four FUNCTION
switches.
The SL-1100 will command up to sixteen different MIDI channels, with keyboard control of four
different channels simultaneously. The two parallel MIDI outputs are a convenient way to hook
up several MIDI devices without the use of MIDI splitters or routers.
MIDI INPUT: Messages received by this input are merged with the data from the keyboard zones and
sent to the two parallel MIDI outputs. These messages may include any of the following types:
Notes
Mono Pressure
Song Position
Star
Program Change
Poly Pressure
Song Select
Continue
Pitch
Sys-ex (foreign)
Tune Request
Stop
All Controllers
Midi Time Code
MIDI Clock
System Reset
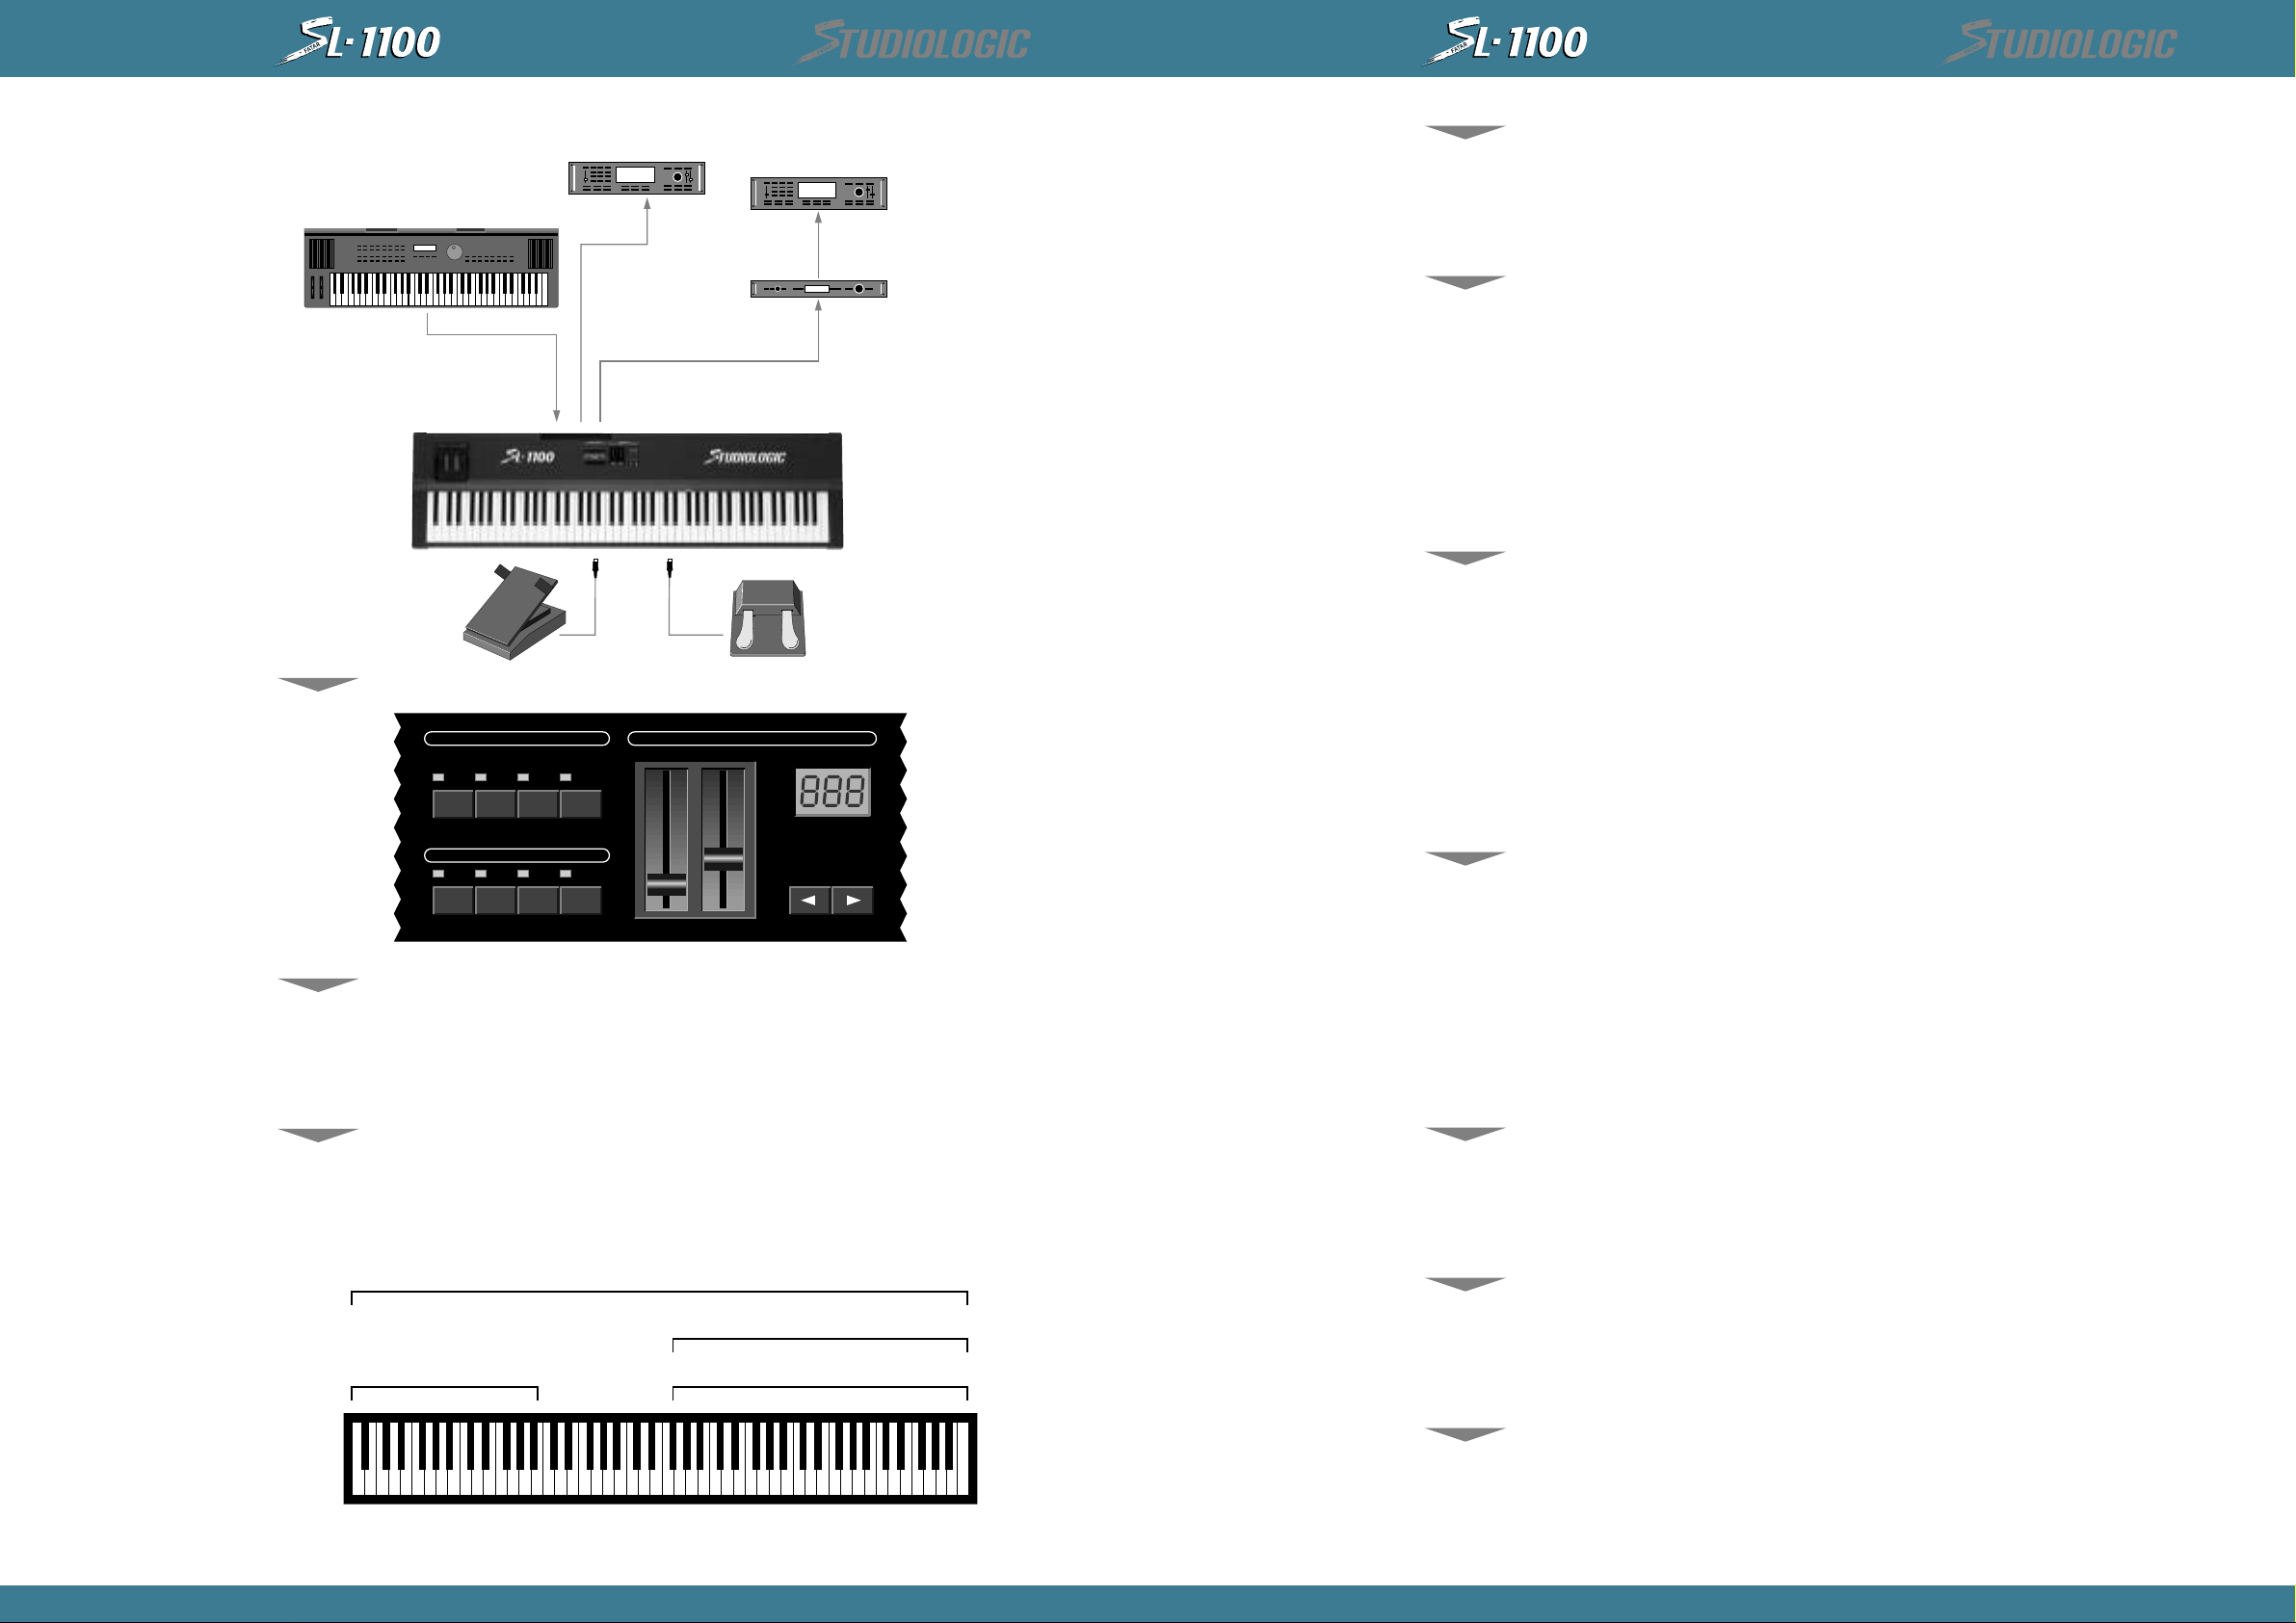
The illustration shows a typical MIDI setup for live performance. The SL-1100 is driving three
sound modules. In this example, Sound Module 1 is multi-timbral, and will respond to MIDI
messages on channels one through 8.
Sound Module 2 is two-part multi-timbral, and is set to respond to MIDI channels nine and ten.
Sound module 3 is not multi-timbral,and is programmed to receive on MIDI channel 11. With
this setup, every channel of the sound modules may be accessed independently by the SL-1100
(there are no overlapping MIDI channels).
10
INSTRUCTIONS MANUAL
11
INSTRUCTIONS MANUAL
 Loading...