

Operation Manual
E
Version 1.3
Bedienungsanleitung
Manuale di Istruzione
D
I

ENGLISH
Operation Manual
NUMA Organ by Studiologic® 3
E

Safety Instructions
Important Safety Instructions
Please read the entire manual. It contains all the information you
need to use this unit.
Please follow the instructions in the manual. The warranty
will be void if unauthorized work is carried out on the NUMA
Organ.
Only accessories that are specied by the manufacturer should
be used with this unit. Use the unit only as specied in this
manual.
DANGER!
Risk of electric shock.
Do not open the chassis. There are no user serviceable parts inside.
The unit should only be serviced by qualied service sta.
Mains
Before connecting the unit to the main power supply, please check
if the power supply is suitable for the NUMA Organ. The unit can be
powered with 100 – 240VAC. The unit is secured by a 250V 500mA F
type fuse. Replace the fuse with one of the same type and value. The
position of the fuse can be found on page 8.
This unit must be earthed.
Do not use a damaged power cord.
Humidity
To reduce the risk of re or electric shock, do not expose the unit
to rain or moisture. Never place containers with liquid on the unit.
Do not use the unit near water, e.g. swimming pool, bathtub or wet
basement.
If the unit is moved from a cold place to a warm room, condensation
may occur inside. To avoid damage please allow the unit to reach
room temperature before switching on.
Installation
Always use a stable rack to place the keyboard on. Please be aware of
its size and weight.
Cleaning / Maintenance
Never use any abrasive detergent, which may damage the
surface. We recommend a slightly moist micro-bre cloth.
Packaging
Please keep all packaging, and use it to protect the keyboard when
transporting, e.g. if servicing is required.
NUMA Organ by Studiologic®
4

Table of contents
Important Safety Instructions
Your new NUMA Organ
What‘s behind NUMA Organ
How a tone wheel organ works
The sound engine of NUMA Organ
Connection / Back view
Control panel
Volume
How functions are shown in this manual
Operation / Drawbars
Drawbars
Aside: How the manual and drawbars are related
Extension with other manuals / keyboards
Operation
Pitch Wheel
Rotary / Modulation Wheel (Rotary Speaker Simulation)
Chorus / Vibrato
Split
Split point
Transpose
Tune
Percussion
Eects (Reverb, Drive, Key Click, Leakage)
EQ / Volume
Fatar dynamic TOUCH
Preset recall / store
External Rotary Speaker Cabinet
System Update
4
6
7
7
7
8
9
9
9
10
10
11
11
12
12
12
12
13
13
13
13
14
14
14
15
15
16
16
MIDI
MIDI connection
Keyboard extension
Control the NUMA Organ via MIDI
Use the NUMA Organ as MIDI masterkeyboard
Record of adjustments
Troubleshooting
Declarations
CE / RoHS
WEEE
Copyright
Appendix
MIDI Implementation Chart
Specications
Pedal specications
Delivery includes
17
17
17
18
19
19
20
21
21
21
21
63
64
65
65
65
E
NUMA Organ by Studiologic® 5

Your new NUMA Organ
Thank you very much for choosing the NUMA Organ. You have obtained a state-of-the-art
instrument made by the renowned manufacturer Studiologic® by Fatar.
Get inspired by the new NUMA Organ! Its Physical Modelling synthesis is the most authentic
revival of the sound of an electromechanical tone wheel organ. But the NUMA Organ is much more. We
recommend that you read the entire manual carefully to take full advantage of all the functions of your new
NUMA Organ.
An overview of the features of the NUMA Organ:
More than just a name:
Joey de Francesco
The brain behind:
Physical Modelling by KeyB
Joey de Francesco is an outstanding Jazz musician from the USA. By
the age of 17 he was already playing with Miles Davis. Since 2002
Down Beat magazine has consistently rated him as its Number One
organist. He is one of the mainsprings of the modern jazz organ
renaissance.
The NUMA Organ is a lifelike model of the original tone wheel organ
of Joey de Francesco. For more than two years, the in the 1950ies
built instrument of this exceptional artist was analyzed and can
now be oered to you as a Physical Model.
Joey de Francesco himself took part of the development and design
of the NUMA Organ. His very high demands and know-how in the
eld of tone wheel organs are reected directly in the instrument.
And this is the reason why Joey de Francesco allows Studiologic to
sign each NUMA Organ with his name.
The master mind of the Physical Model of the NUMA Organ
addicted his life to the tone wheel organ too. This expertise and
the possibility to study the original instrument over more than two
years makes the sound of the NUMA Organ the most authentic tone
wheel sound found in the market today.
Whether it’s the hum and buzz of the motor, mechanical crosstalk
of close together tone wheels or the mechanical clicks of switching
contacts, every detail of an original tone wheel organ found its way
into the physical model of the NUMA Organ. The instrument also
oers an excellent Rotary Speaker simulation
For purists:
External Rotary Speaker and
If one is not enough:
Add more keyboards
Future proof
NUMA Organ by Studiologic®
6
amplier
You can also connect an external Rotary Speaker cabinet to your
NUMA Organ. Use the buttons of the NUMA Organ to switch the
external Rotary Speaker on and o, and control the rotary speed
with the modulation wheel.
Additionally you can use a separate direct out to play the NUMA
Organ over other ampliers.
You can extend the keyboard of your NUMA Organ by optional
MIDI keyboards or MIDI pedal boards. Up to three dierent timbres
are accessible and can be played independently from discrete keyboards.
The integrated USB ports allow your NUMA Organ to connect to
your computer. Updates of the rmware or of new physical models
will be accessible via USB.
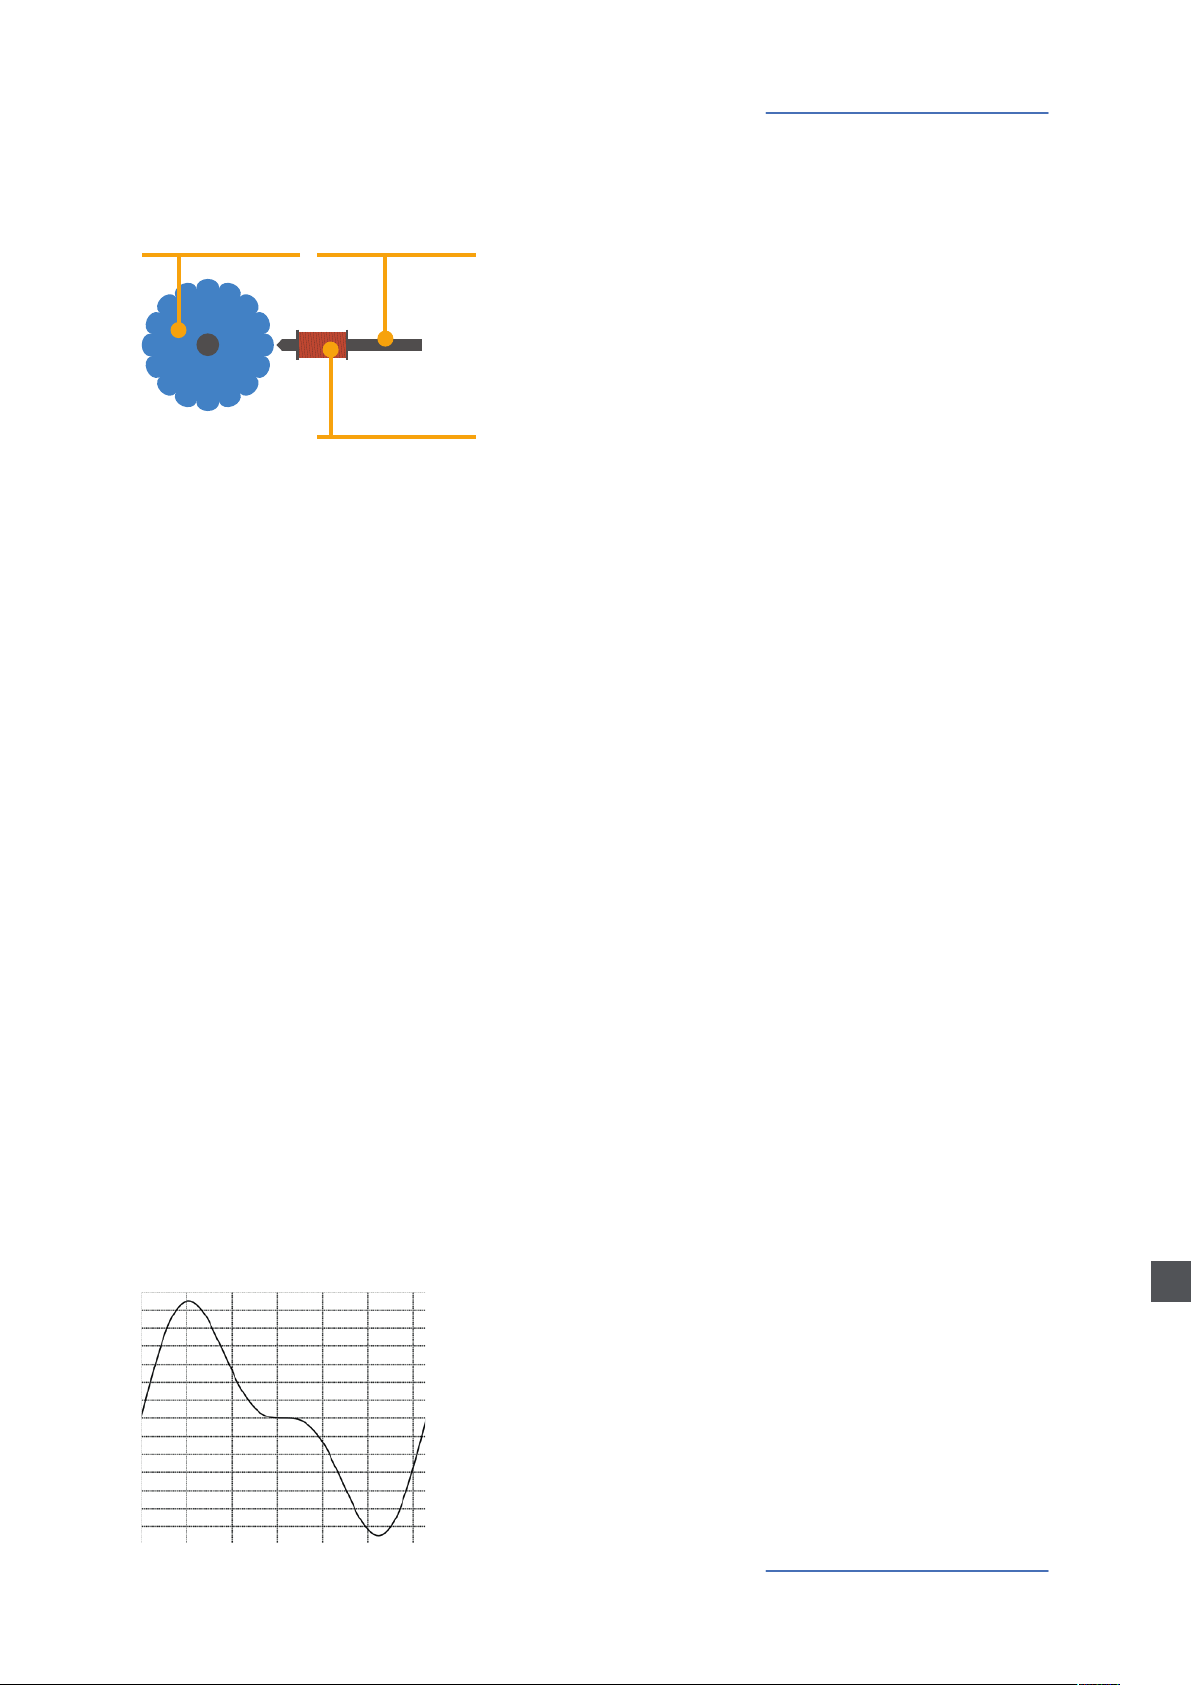
What‘s behind NUMA Organ
In an original tone wheel organ, which was the model for NUMA
Organ, 91 steel wheels with lobes rotate in front of a pick-up
consisting of a permanent bar magnet and a spool.
Tone wheel
Because of the tone wheels‘ shape and rotation, the magnetic eld
in the pick-up changes periodically and generates a sine wave. With
8 dierent tone wheel shapes and 12 dierent gear trains 91 sine
frequencies are generated. This is independent of playing a note or
not. Corresponding to the principle of additive synthesis, those 91
frequencies are the base for creating dierent sound timbres.
By means of a complex circuit layout the sound is mixed via nine
drawbars and nine electrical contacts under each key. In this way
a tone wheel organ is able to create hundreds of perceivably
dierent sound timbres from just 91 generated sine frequencies. In
theory more than 380 million timbres are possible, but lots of those
timbres sound similar or are musically the same, for example an
octave shift.
Magnet
Spool
How a tone wheel organ
works
To generate a sound, NUMA Organ uses physical modelling. With
this technique a mathematical formula is used to describe the
physical behaviour of the tone wheel organ. The physical model
also calculates the impact and interaction of parameters on each
other.
A good example of this is the parameter Leakage. As
mentioned, a tone wheel organ generates all frequencies
at the same time, independent of whether a key is pressed or not.
With Leakage you can control from your NUMA Organ what we
might call the parameter “cross-talk of physically close together
tone wheels“.
The following example shows how the theory of physical modelling
really works:
To generate a “tonic keynote plus its upper octave with the
half level“, a sample based synthesizer would simply play a prerecorded audio le. But physical modelling calculates the formula
f(x)=[sin(x)]+[0,5*sin(2x)].
The graph of that calculation is shown below.
The sound engine of
NUMA Organ
E
NUMA Organ by Studiologic® 7
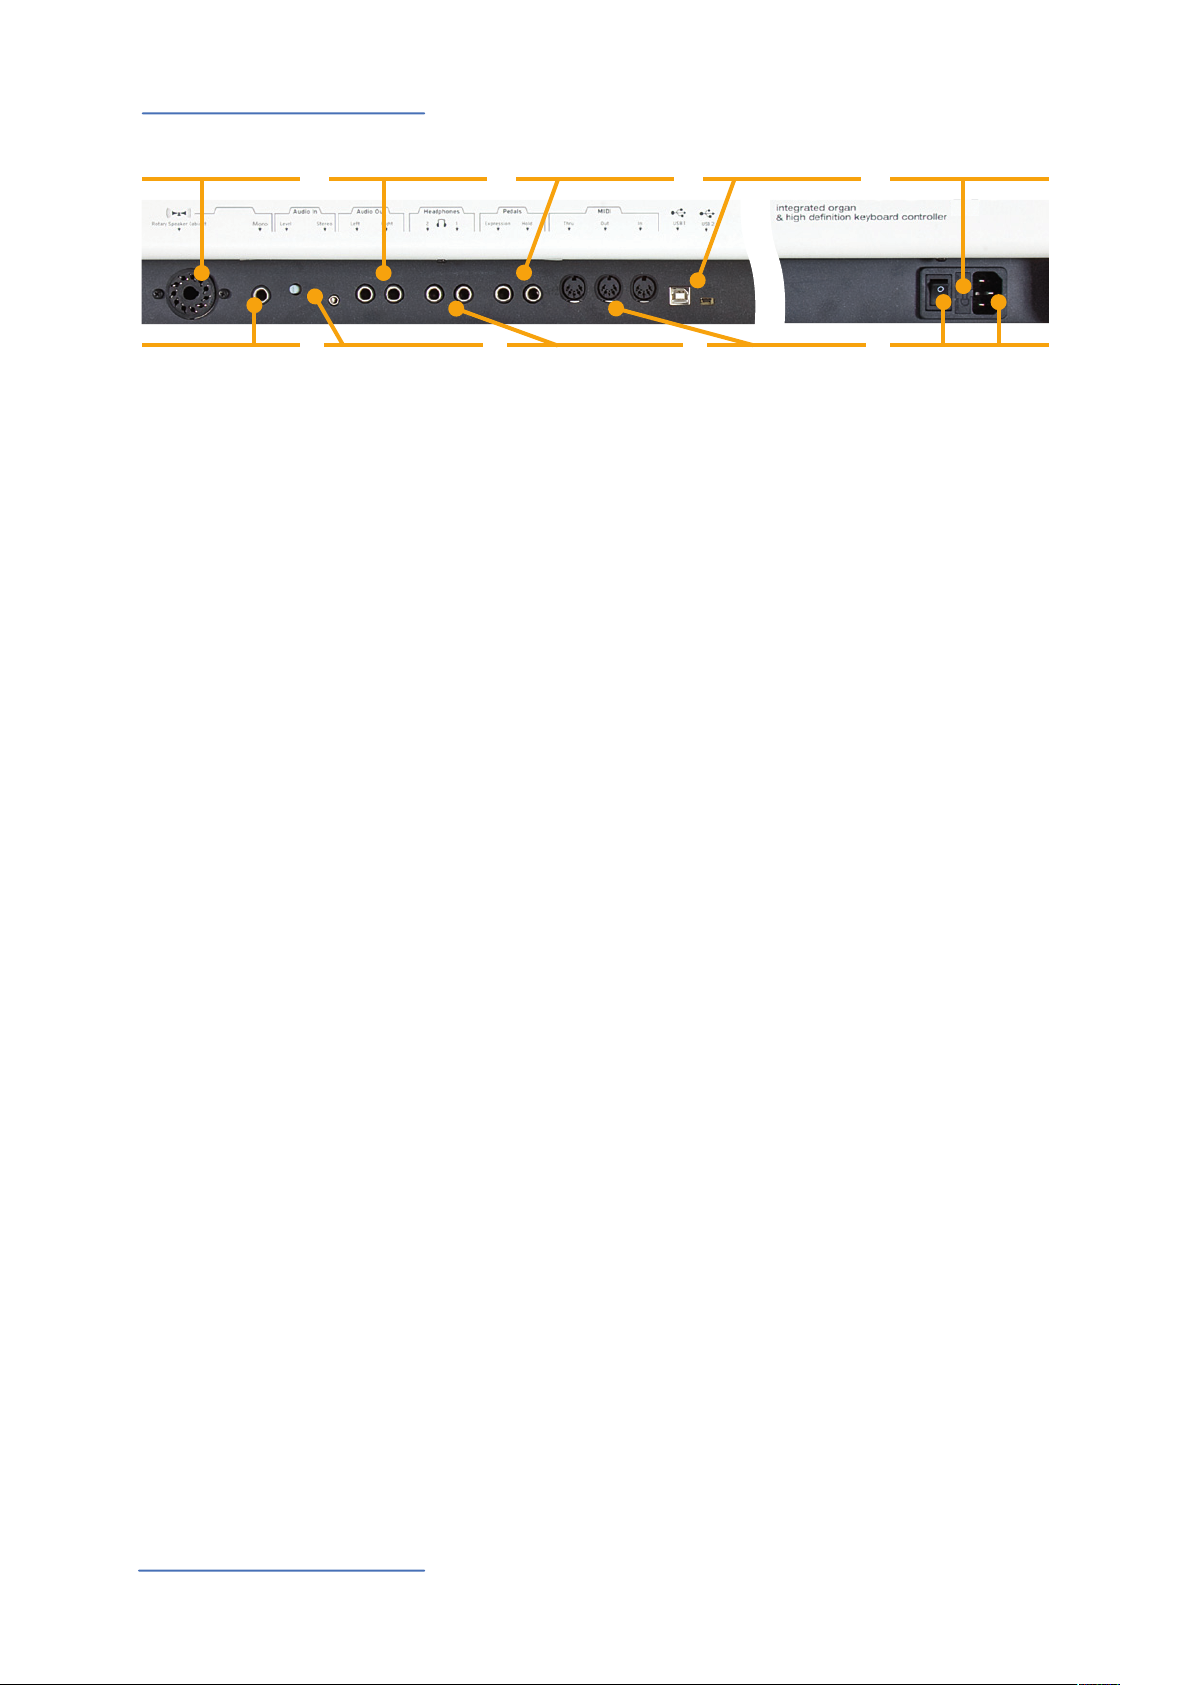
Connection / Back view
Rotary Speaker
Cabinet, Page 16
Direkt-out
Page 8
Power connection
Sustain / Expression pedal
Audio out L/R
Page 8
Stereo audio in • Level
Page 8
Hold • Expression
Page 8, 11
Headphone out 1/2
Page 8
USB 1 • Mini USB 2
Page 8, 16
MIDI In•Out•Thru
Page 17
Fuse
Page 4, 65
Mains • Power
Page 4, 8
Use the power cord supplied with the device to connect the
NUMA Organ to the power socket. Switch the unit on by using
the power button near to the power socket of the NUMA
Organ.
Connect the optional volume / expression pedal FP- 50 or
VP-27 at the socket which is labelled Expression.
At the socket labelled Hold, you can plug in the Studiologic pedal
VFP 1 or PS 100, which is available as an optional extra.
Note: If you would like to attach other pedals, please refer to the required
speci cations on page 65.
Audio out L/R
Direct out
Headphones
Stereo audio in / Level
USB 1
Mini USB 2
MIDI
Connect the audio outputs Left and Right with the inputs of your
mixing desk or ampli er, etc.
Use the separate mono direct out to play the NUMA Organ over
other ampli ers.
Plug in your headphone(s) to one of the headphone outputs. You
can use up to two headphones at the same time.
You can plug in external audio devices, such as mp3-players for
playback or MIDI sound modules, at the audio input. The Level
knob near the jack on the back of the NUMA Organ is for adjusting
the input level.
For MIDI data transmission via USB, connect the NUMA Organ to
your computer with a USB cable. The rst time you switch the NUMA
Organ on, it will be recognised by your computer automatically as
a MIDI device and the appropriate driver will be installed by the OS
(class compliant).
The mini USB connector is destined for future rmware updates and
to load new physical models into the NUMA Organ.
Please refer to page 17.
Rotary Speaker Cabinet
NUMA Organ by Studiologic®
8
Please refer to page 16.

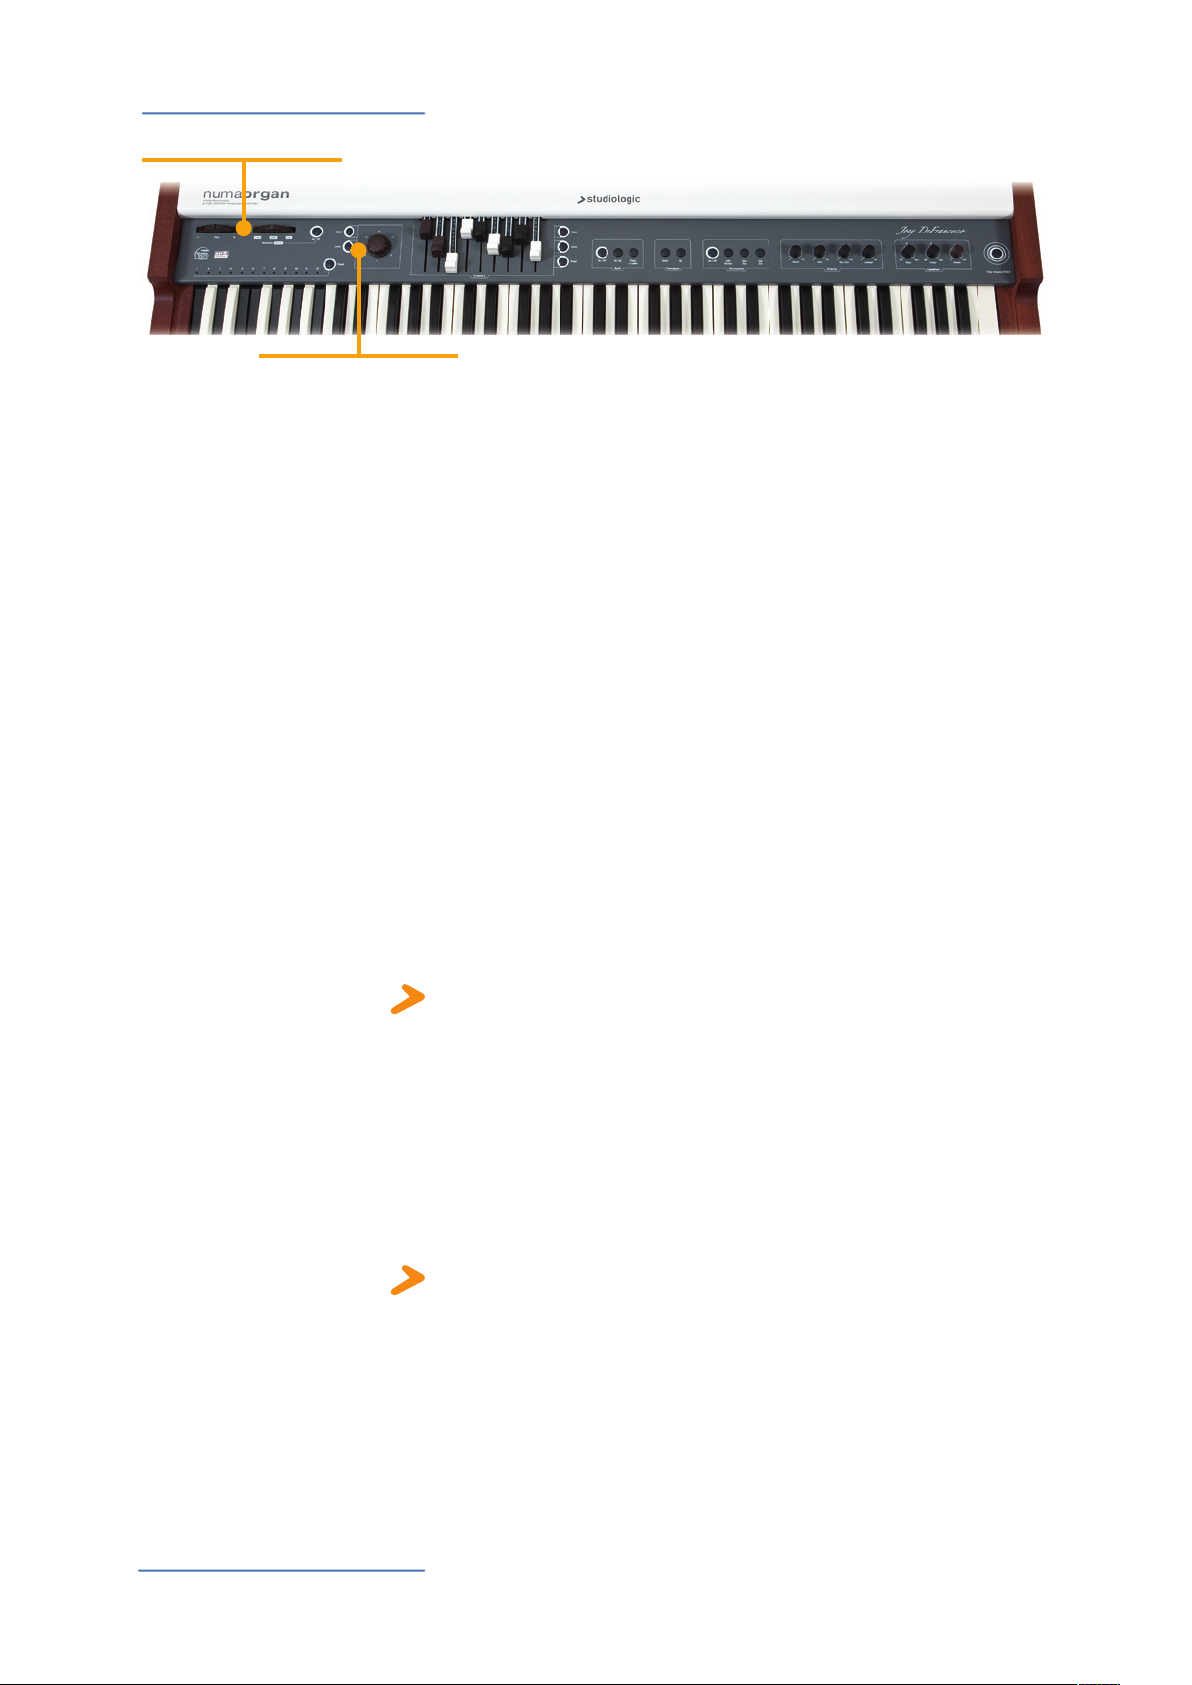
Control panel
Pitch / Modulation /
Rotary
Page 12
Presets
Recall / store
Page 15
Chorus • Vibrato
2 x 3 variations
Page 12
Drawbars
for Upper, Lower, Pedal
Page 10 - 11
Split • Transpose •Tune
Keyboard functions
Page 13
Percussion
Page 14
When you use the NUMA Organ for the rst time, we recommend
you to turn the Volume knob on the Output section to not more
than half way between 0 and Full. While you are playing you can
adjust the volume as you choose. Adjusting the Volume knob
e ects all audio and headphone outputs at the same time.
Eff ects
Reverb, Drive, Click,
Leakage, Page 14
Volume
Fatar dynamic TOUCH
Page 15
EQ / Volume
Output section
Page 14
CAUTION:
To prevent hearing damage you should – as with all audio devices –
avoid using the NUMA Organ at high volume for long periods.
All operation buttons are marked in bold italics in this manual
(eg Leakage).
In classic organs, the keyboard is called a manual. We will use that
term for the NUMA Organ too. The NUMA Organ can be played with
three manuals:
Upper manual (Upper)
Lower manual (Lower)
Bass-Pedalboard (Pedal)
You will nd tips and further information in text passages marked by the
Studiologic logo.
How functions are shown in this manual
E
NUMA Organ by Studiologic® 9
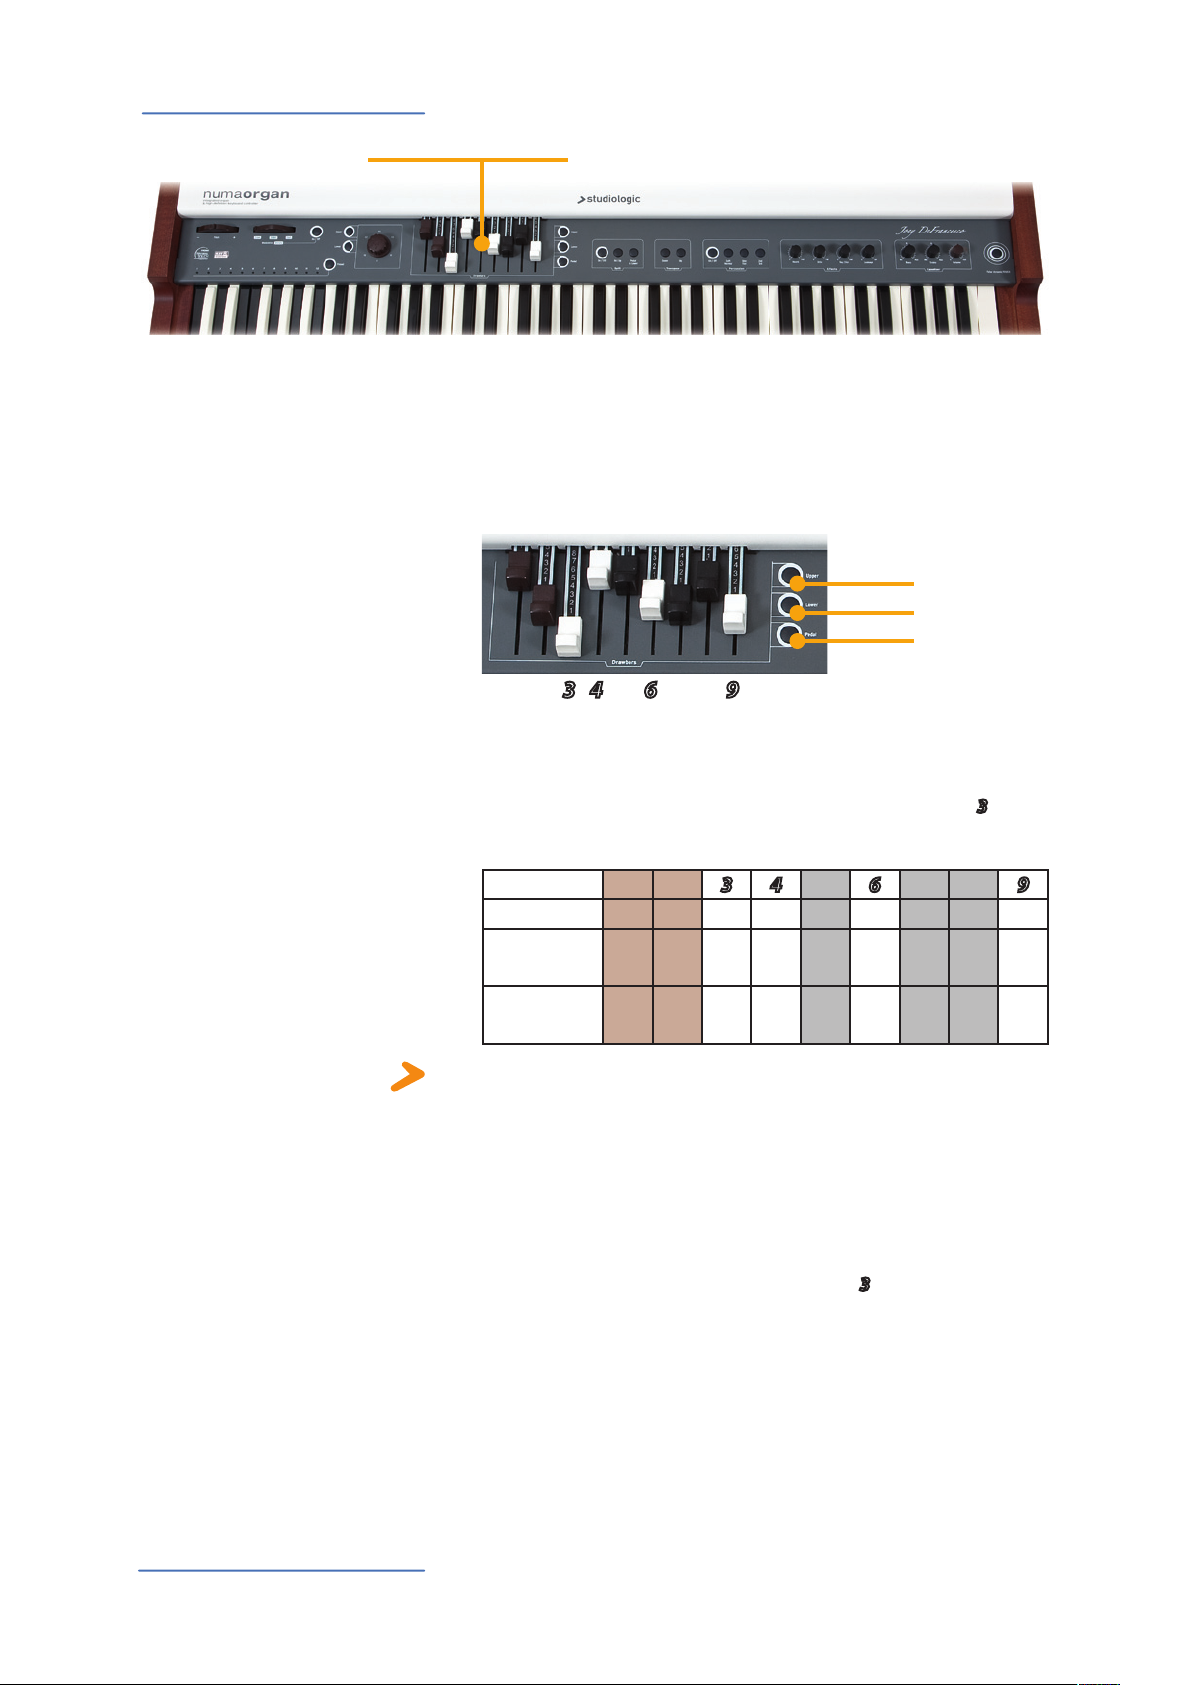
Operation / Drawbars
• Drawbars
Drawbars
Drawbars are a characteristic trait of a tone wheel organ.
Therefore we’ll explore them rst.
In the text the drawbars of the NUMA Organ are indicated by
coloured highlighted digits as shown below.
• Upper
• Lower
• Pedal
1 2 3 4 5 6 7 8 9
You use the drawbars to set the timbre of the NUMA Organ. A sound
can comprise up to nine sine frequencies.
Each drawbar represents a harmonic of the harmonic scale related
to the 8‘ stop of a pipe organ or respectively the drawbar
is also called “native pitch“.
Drawbar
Feet
Harmonic
related to 8‘
Harmonic
related to 16‘
1 2 3 4 5 6 7 8 9
1/3
16‘ 5
- - 1. 2. 3. 4. 5. 6. 8.
1. 3. - - - - - - -
‘ 8‘ 4‘ 2
2/3
‘ 2‘ 1
3/5
‘ 1
3, which
1/3
‘ 1‘
NUMA Organ by Studiologic®
10
Note: The labelling of the drawbars in feet derives from pipe organs, where
it represents the length of the pipes. For the 8‘ stop of a pipe organ the
pipe of the note C is exactly 8 feet long (=2,4m). The pitch is correct to the
key, based on the keys of a piano. Therefore the 8‘ stop is also called native
pitch or unison stop.
The colouring of the drawbars is very intuituive:
Brown drawbars add frequencies below the native pitch.They are
also used to adjust the timbre for Pedal. White drawbars are related
in octaves to each other, at which drawbar 3 (native pitch) represents the fundamental. Finally the black drawbars add fths and a
major third to the timbre.
When a drawbar is pushed all the way in (until you can‘t
see any digit), its harmonic is absent from the timbre. The
maximum volume for the drawbar is achieved, when you
see the digit 8. There are seven more volume positions in
between to add the harmonics of each drawbar to the timbre.
• Drawbars
Operation / Drawbars
At each push of a key all nine harmonics of this particular key are
generated. The drawbars simply adjust the levels among them. Thus
you can change the timbre while keys are pressed.
Note: Located under every single key of an original tone wheel organ were
nine contacts, which were all closed at the same time by pressing the key.
A bus system then regulated the volume for each contact via each of the
nine drawbars.
With your NUMA Organ you can play three di erent timbres at the
same time. To do this you may connect another MIDI keyboard and
a MIDI pedal board to the NUMA Organ (refer to page 17), or split
the manual of the NUMA Organ into two zones (refer to Split on
page 13).
Use the buttons Upper, Lower and Pedal to select the assign of the
drawbars. The active button will light up.
Upper: The drawbars form the timbre of the whole NUMA Organ
manual or, in Split mode, for the upper manual.
Lower: The drawbars form the timbre of an optional additional
keyboard or, in Split mode, for the lower manual.
Pedal:The drawbars form the timbre of an optional additional bass
pedal board or, in Split mode, for the lower manual, if Pedal to
Lower is activated.
Special Drawbar setting for Pedal:
To adjust the timbre for Pedal you can only use the drawbars
1 and 2. Drawbar 1 represents the 16‘ harmonic, while
drawbar 2 now adjusts the 8‘ harmonic!
For Upper and Lower all nine drawbars are accessible as
previously described.
Aside: How the manual and
drawbars are related
Extension with other
manuals / keyboards
Upper
Drawbar
Feet
Lower
Drawbar
Feet
Pedal
Drawbar
Feet
1 2 3 4 5 6 7 8 9
16‘ 5
1/3
‘ 8‘ 4‘ 2
2/3
‘ 2‘ 1
3/5
‘ 1
1/3
‘ 1‘
1 2 3 4 5 6 7 8 9
16‘ 5
1/3
‘ 8‘ 4‘ 2
2/3
‘ 2‘ 1
3/5
‘ 1
1/3
‘ 1‘
1 2 3 4 5 6 7 8 9
16‘ 8‘ - - - - - - -
E
NUMA Organ by Studiologic® 11
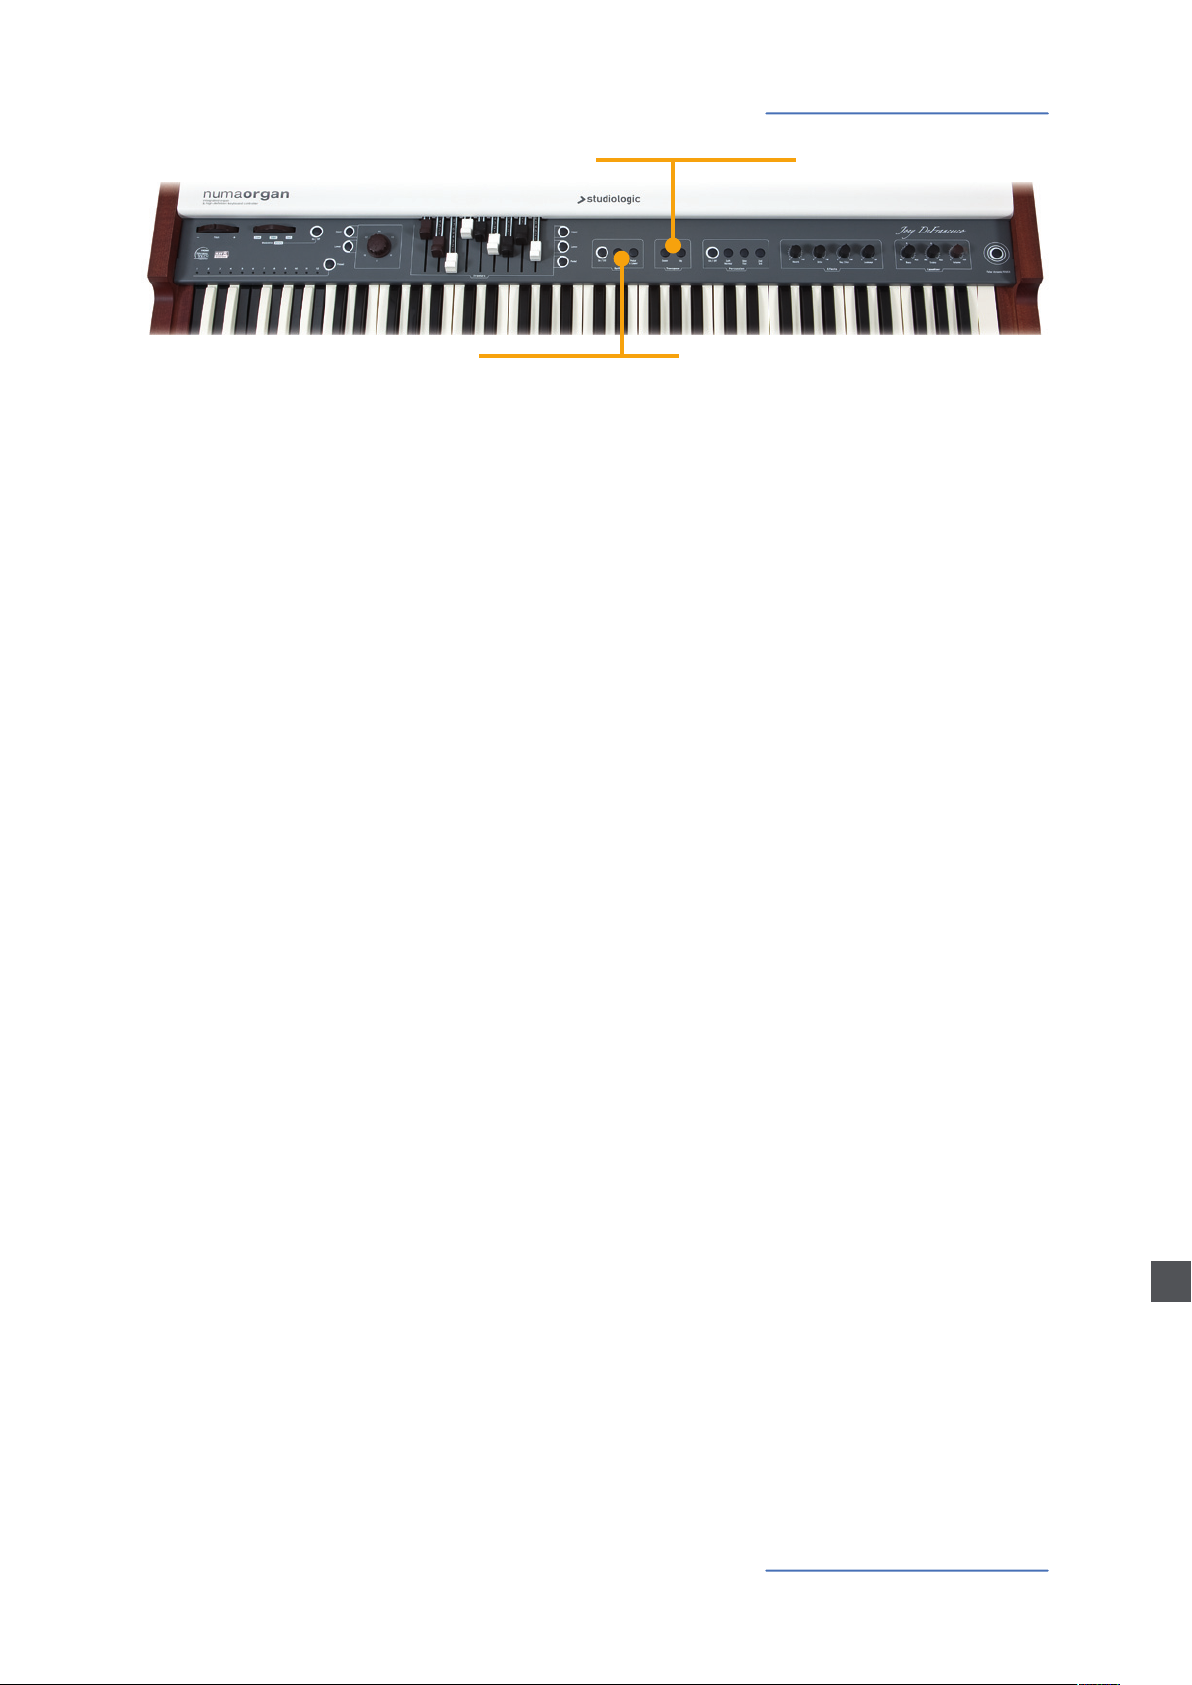
Operation
• Pitch • Rotary / Modulation
• Chorus / Vibrato
Pitch Wheel
Rotary / Modulation Wheel
(Rotary Speaker Simulation)
To vary the pitch while playing by ±2 semitones, use the Pitch
wheel on the left. The wheel is self centring and will go back to its
centre position after being released (i.e. no pitch applied).
Press the On/Off button next to the Modulation / Rotary wheel
to switch the internal Rotary Speaker e ect on. The On/Off button
lights up.
Use the Modulation / Rotary wheel to adjust the speed of the
rotor. There are three states available: At the leftmost position
of the Modulation / Rotary wheel, the rotor runs slow. At the
centre position the rotor slows down and stops, but the sound
is still played back by the Rotary Speaker simulation. This state is
called “Brake“. By turning the Modulation / Rotary wheel to the
right, the simulated rotor spins fast.
If you would like to switch o the Rotary Speaker simulation, press
On/Off again. The lit button will turn o .
You can also change the Rotary Speaker speed with an attached
Sustain pedal.
If the Rotary wheel is set to the positions Slow or Fast, you alter
the Rotary speed with the Sustain pedal from slow to fast and vice
verse. If the Rotary wheel‘s position is Brake, the Sustain pedal
alters the Rotary speed from Brake to Fast (and vice verse).
Note: You can also use the Modulation / Rotary wheel, the On/Off
button and an attached Sustain pedal to control an external Rotary-
Cabinet. Please refer to page 16.
Chorus / Vibrato
NUMA Organ by Studiologic®
12
With the big Vibrato And Chorus knob you can choose from
3 Vibrato or 3 Chorus e ect settings.
To assign the e ect to a manual, press Upper and/or Lower. You
can assign the e ect to the upper and lower manual at the same
time or just to one manual. The button(s) will light up. Press Upper
and/or Lower again, to deactivate the e ect for the particular
manual.
Note: You can attach a second keyboard and an additional bass pedal
board to the NUMA Organ, or use the Split function, to play two manuals
at the same time with the NUMA Organ keyboard. Please refer to pages 33
and 37 respectively.
• Split • Split point
Operation
• Transpose •Tune
Press Split to activate this function. The Split button will light up
and the manual is devided into two zones. Press Upper at the
drawbar section to adjust the timbre of the upper zone. Press Lower
to assign the drawbars to the lower zone.
Alternatively you can assign to the lower keyboard zone the pedal
manual. To do so, press Pedal to Lower. The button will light up. To
assign the drawbars to the lower keyboard zone then, press Pedal
at the drawbar section.
Use the Oct Up button to transpose the lower keyboard zone by
one octave up. The Oct Up button will light up.
To deactivate one of the functions above, just press the corresponding button again.
To adjust the split point, press and hold the On/Off button of the
split section for a few seconds. Using the keyboard (or Value +/-),
select the highest note for the lower split zone.
If you have to play in a demanding key, you can simplify this task
by transposing the keyboard (e.g. from F sharp major by minus one
semitone to F major).
To transpose in steps of a semi-tone, press Transpose+/-. If any
transposition is accessed either Transpose+ or Transpose- will light
up.
The Transposition setting will be kept until NUMA Organ‘s power is
switched o .
Split
Playing two sounds in di erent
keyboard zones is called split
Split point
Transpose
You can tune your NUMA Organ to other instruments. Values from
-99 to +99 cents (hundredths of a semi-tone) are available.
Press and hold both buttons Transpose+ and Transpose- for a few
seconds. Both buttons will start to blink. The tuning can now be
adjusted using Drawbar 1 for values from -99 to 0 cents and
Drawbar 2 for values from 0 to +99 cents.
Press either Transpose+ or Transpose- again to keep the
adjustment and quit the tuning mode. The tune setting will be kept
until NUMA Organ‘s power is switched o .
Tune
E
NUMA Organ by Studiologic® 13

Operation
Percussion
• Percussion
• Eff ects
• EQ / Volume
To add more rhythmic elements to your performance you can
switch on Percussion. This e ect only retriggers when all keys were
released before.
Press On/Off to activate Percussion. With the 2nd/3rd button
you can decide whether Percussion is generated by the second
harmonic (button does not light up), or by the third harmonic
(button lights up).
Slow/Fast de nes the decay of the Percussion. Press Slow/Fast to
shorten the decay from 1 second (button does not light up) to 200
milliseconds (button lights up).
You can also change the level of Percussion. Press Soft to decrease
the volume of Percussion. The button lights up.
Eff ects
Note: For Percussion the 1‘ contact of the Upper manual is used. Thus
drawbar
switched on.
9 is without function for the Upper manual while Percussion is
Reverb
Even old tone wheel organs had already implemented spring
reverbs. This is simulated by the NUMA Organ. Use the Reverb knob
to adjust the intensity of the spring reverb and add depth to your
music.
Drive
With the Drive knob you control the intensity of a simulated tube
ampli er. Drive directly a ects the overall volume of the NUMA
Organ. The higher you set Drive, the more distortion you get. This
typical tube sound can be turned up to an ecstatic “yelling“ sound.
Key Click
The parameter Key Click lets your NUMA Organ age in no time
by adding the clicking noises which are usually associated with
old contacts. Luckily you can decide yourself how old your NUMA
Organ should sound.
Leakage
You can also add nostalgic “dirt“ to the sound of the NUMA Organ
by using Leakage. This parameter simulates the “cross-talk between
proximate tone wheels“.
EQ / Volume
NUMA Organ by Studiologic®
14
To adjust the sound of the NUMA Organ to the environment, you
can cut or boost low and high frequencies using the Bass and
Treble knobs in the Output section. Set the sound level with the
Volume knob.

Operation
• Preset recall / store
You can also use your NUMA Organ as a master keyboard, providing
full MIDI note velocity dynamic range to other sound expanders.
Press Fatar dynamic TOUCH. The button lights up. Now the MIDI
notes will be sent with the full MIDI velocity range through the MIDI
output and USB. In this state the internal sound engine is not active
(Local o , MIDI on).
To play the internal sounds of the NUMA Organ and an external
device via MIDI or USB at the same time, press Fatar dynamic
TOUCH again. The button is now blinking (Local on / MIDI on).
By pressing Fatar dynamic TOUCH a third time, the button will
turn o . You play the internal sound of the NUMA Organ with the
keyboard and no MIDI data are sent via MIDI or USB (Local on / MIDI
o ).
After switching the NUMA Organ on, preset 12 is active by default.
Within this preset you can adjust all settings.
To recall another preset, the Preset function has to be active
(button lights up). You can then choose a preset by pushing one
of the 12 reverse coloured keys in the lowest octave. Immediately
the stored timbre will be recalled. That way you can change very
quickly between di erent sound settings during a performance,
as long as Preset is active and lit up. Preset 12 always keeps your
last adjustments. So you could, for example, switch to preset 5 and
come back to your last changes by switching to preset 12 again.
If the Preset function is deactivated (Preset is not lit up), you are
saved from changing a preset unintentionally. The reversed keys
are then without function. You can activate and deactivate the
Preset function by pressing Preset.
To store your own settings permanently, press and hold Preset.
While pressing Preset you select one of 11 storage memories by
pressing one of the reverse coloured keys 1 to 11. After releasing
Preset your actual settings are stored at the memory position of the
pressed reverse coloured key.
All parameters except the EQ / Volume and Fatar dynamic TOUCH
settings are stored in a preset.
It is not possible to overwrite preset memory 12. It always keeps
your last changes.
• Fatar dynamic TOUCH
Fatar dynamic TOUCH
Preset recall / store
E
NUMA Organ by Studiologic® 15
External Rotary Speaker / Update
External Rotary Speaker
Cabinet
You can operate / amplify your NUMA Organ with an external
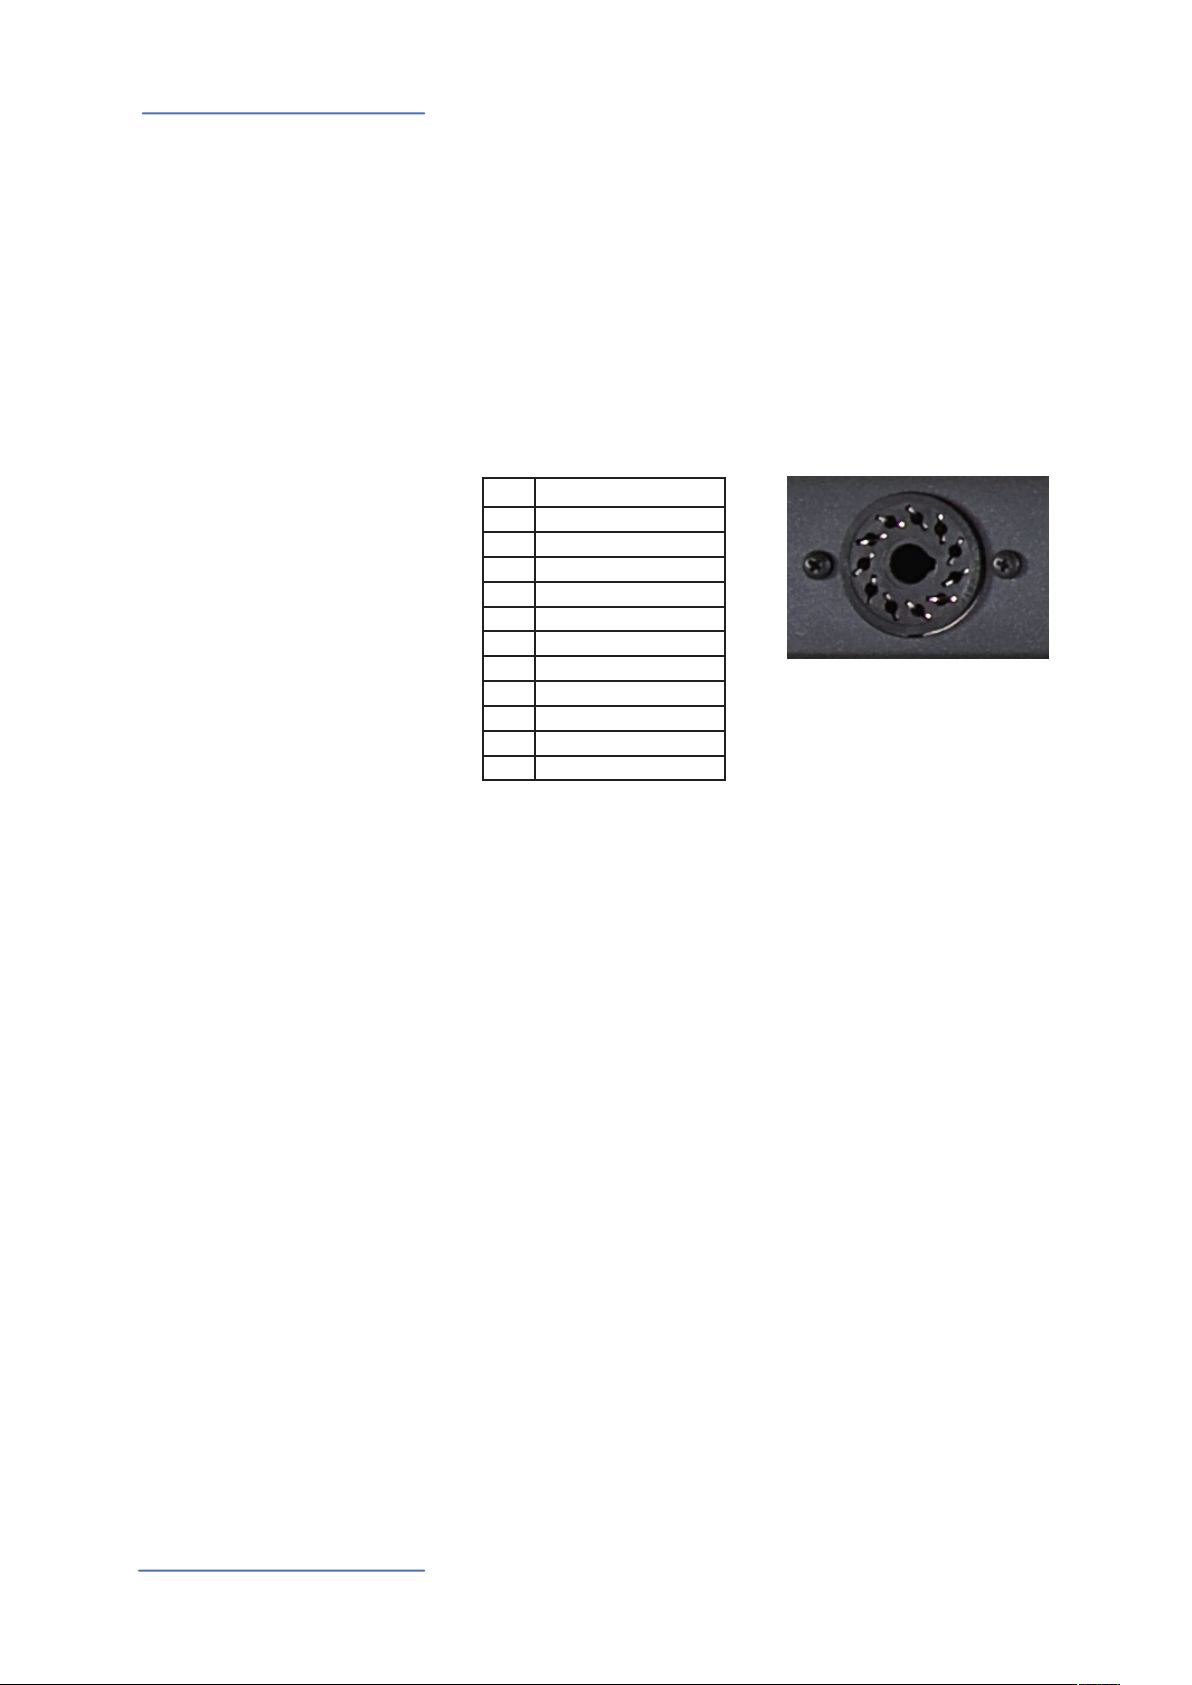
Rotary Speaker cabinet via an 11-Pin connector.
The rotor speed as well as Start/Stop (Brake) are also
controllable with the Rotary wheel and the Sustain pedal. This is
identical to the internal Rotary Speaker simulation (page 10).
Connect the 11-pin socket on the back of the NUMA Organ with
the Rotary Speaker cabinet by using a suitable cable. You can then
use all outputs simultaneously, namely an external Rotary, the
analogue audio outputs with the internal Rotary simulation, and
the “clean” direct outs, as well as both headphone outputs of the
NUMA Organ.
For further Rotary Speaker connection/control information, please
also refer to the operation manual of the external speaker system.
Pin Function
1 Audio (Rotary)
2 Audio (Stationary)
3 Audio (Aux 1)
4 Ground
5 Control Supply
6 Control Circuit
7 Fast
8 Slow
9 Speed Adjust
10 Audio (Aux 2)
11 +29 VDC
6
5
9
8
7
10
11
1
4
2
3
System Update
To update the rmware or physical model of your NUMA Organ,
connect the mini USB jack with a computer where you installed
the computer software available for download from our website
www.studiologic-music.com.
Press and hold Upper while switching on the NUMA Organ. If the
connection to the computer is correct and the appropriate software
installed, all buttons of the NUMA Organ will blink slowly. If the
connection cannot be established, they will blink fast.
Now you can transfer data to the NUMA Organ using the computer
software. After successful data transmission restart your NUMA
Organ by switching power o and on again.
NUMA Organ by Studiologic®
16
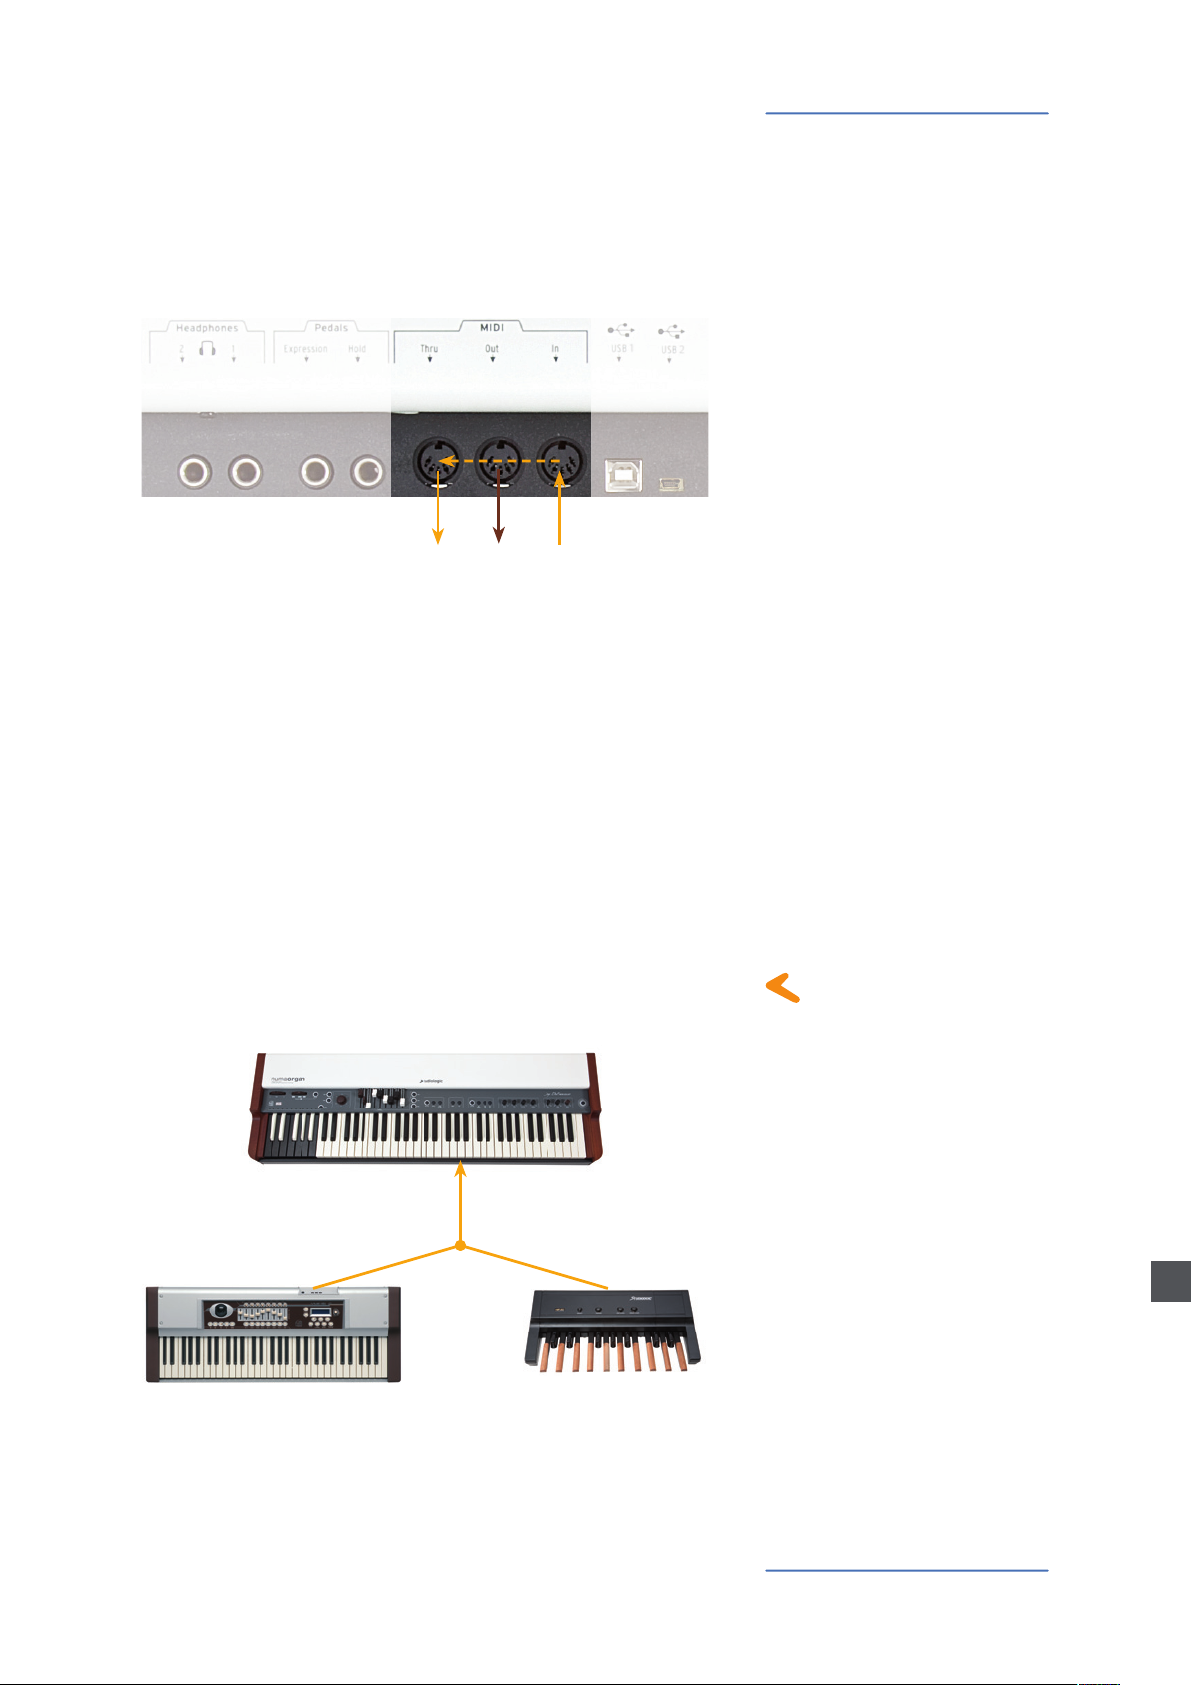
MIDI
MIDI (Musical Instruments Digital Interface) is a standard
for data transmission between sound modules, sythesizers,
drum computers and music software. Please note: The MIDI
Out of a device is connected with the MIDI In of another
device. Incoming data arriving at the MIDI In are duplicated at the
MIDI Thru socket.
The NUMA Organ sends MIDI data on the MIDI Out and at the same
time via the USB port. MIDI data are received via MIDI In.
You can extend the manual of your NUMA Organ by attaching an
optional second MIDI keyboard and/or a MIDI bass-pedalboard.
Connect the MIDI output of the second device to the MIDI input of
the NUMA Organ.
Please be aware of the following:
Drawbar settings for Upper are always related to MIDI channel 1.
Drawbar settings for Lower are always related to MIDI channel 2.
Drawbar settings for Pedal are always related to MIDI channel 3.
If you want to use the second keyboard as Lower manual, it must
send its data on MIDI channel 2. If you want to use a MIDI bass pedal
board to simulate a big organ, make sure it sends its data on MIDI
channel 3.
MIDI connection
Keyboard extension
Note: To attach an additional MIDI keyboard and a MIDI bass pedal board
to the NUMA Organ at the same time, please use a MIDI merger.
MIDI channel 3
MIDI channel 2
VMK 161
plus
Organ MP 117
E
NUMA Organ by Studiologic® 17
MIDI
Control the NUMA Organ via
MIDI
You can play and control the sounds of the NUMA Organ with other
MIDI devices or with your computer.
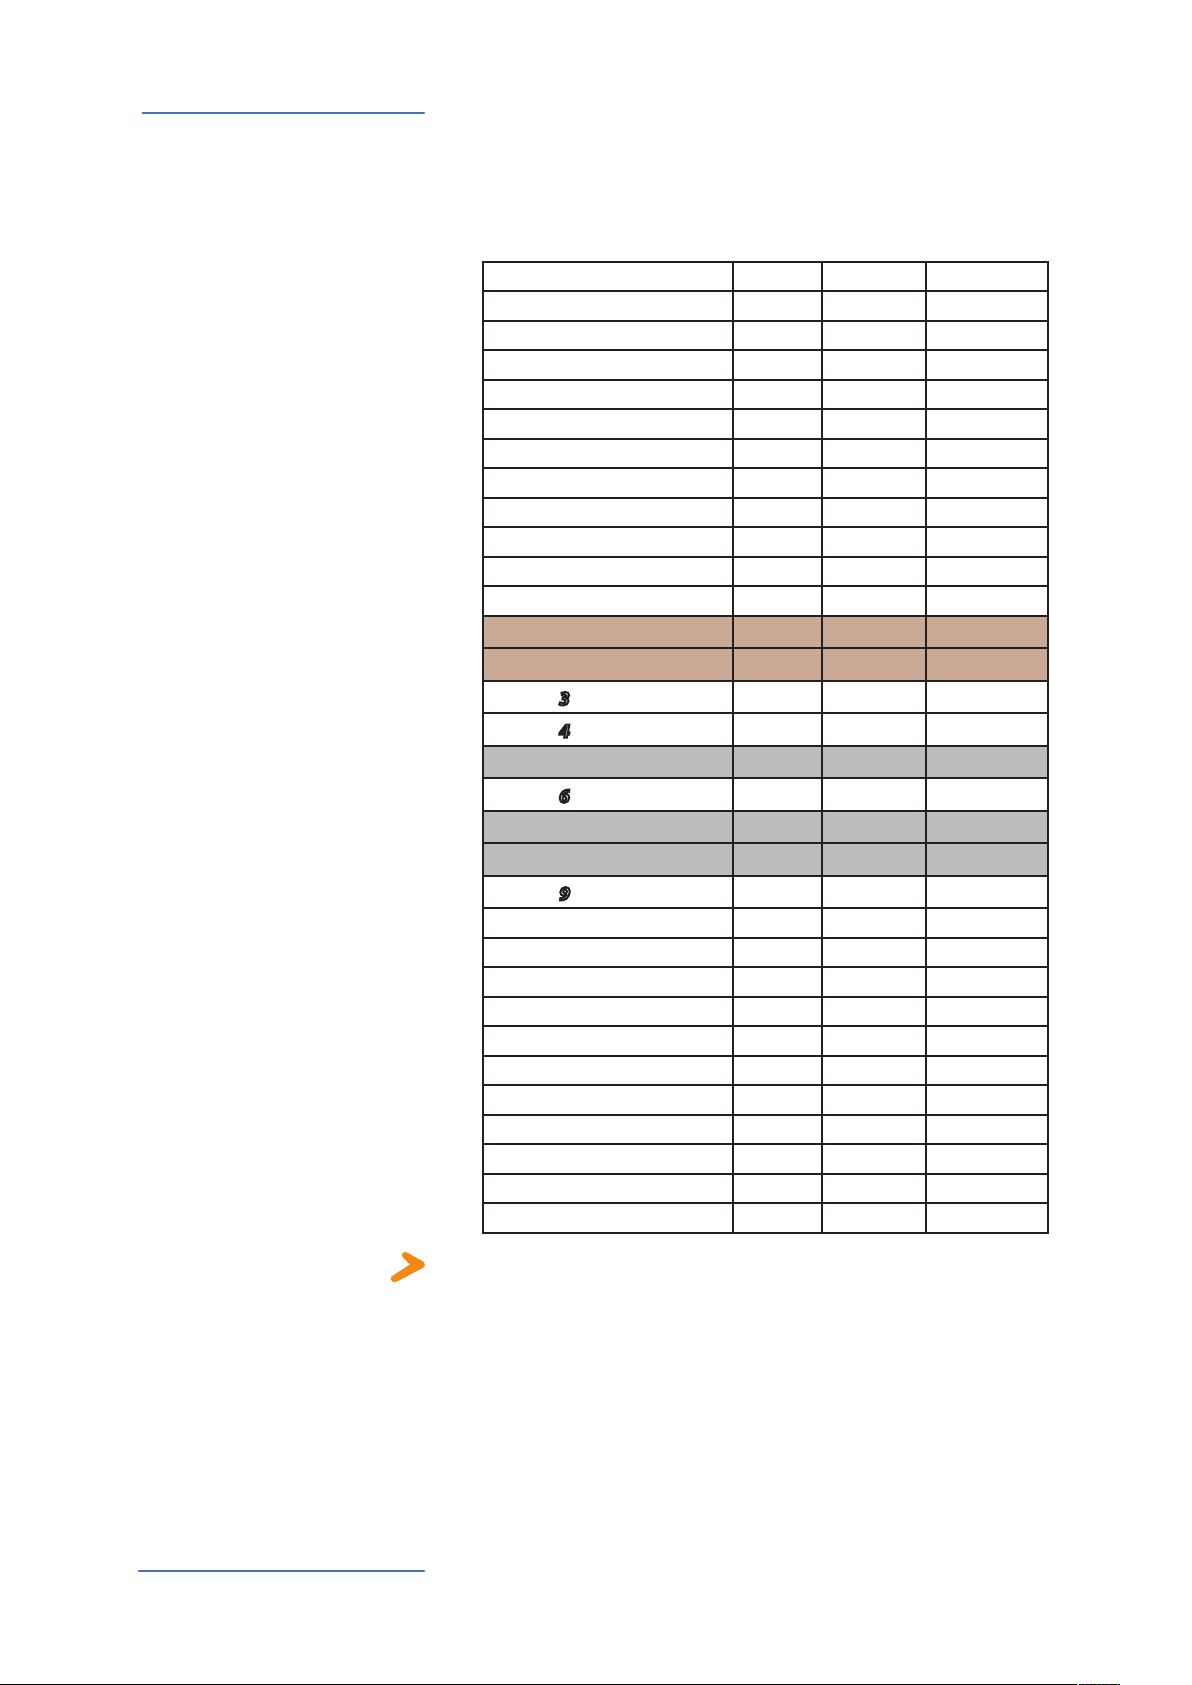
The following chart shows which MIDI Control Change message
remote controls which parameter of the NUMA Organ.
Parameter MIDI CC Value MIDI Channel
Pitch-Bend Pitch 0 - 127 1
Expression - Volume 11 0 - 127 1
Rotary Speed (Brake/Slow/Fast) 68 0 / 64 / 127 1
Vibrato/Chorus On Upper 95 127 / 0 1
Vibrato/Chorus On Lower 95 127 / 0 2, 3
Vibrato/Chorus V1 93 18 1
Vibrato/Chorus C1 93 79 1
Vibrato/Chorus V2 93 36 1
Vibrato/Chorus C2 93 100 1
Vibrato/Chorus V3 93 58 1
Vibrato/Chorus C3 93 122 1
Drawbar
Drawbar
Drawbar
Drawbar
Drawbar
Drawbar
Drawbar
Drawbar
Drawbar
Percussion On/O 73 127 / 0 1
Percussion Normal/Soft 71 127 / 0 1
Percussion Slow/Fast 70 127 / 0 1
Percussion 2nd/3rd 72 127 / 0 1
Reverb 9 0 - 127 1
Drive 91 0 - 127 1
Key Click 89 0 - 127 1
Leakage 90 0 - 127 1
Volume (Main Volume) 7 0 - 127 1
Bass 103 0 - 127 1
Trebble 104 0 - 127 1
1 16‘
2 5
3 8‘
4 4‘
5 2
6 2‘
7 1
8 1
9 1‘
1/3
‘
2/3
‘
3/5
‘
1/3
‘
12 0 - 127 1, 2, 3
13 0 - 127 1, 2
14 0 - 127 1, 2, 3
15 0 - 127 1, 2
16 0 - 127 1, 2
17 0 - 127 1, 2
18 0 - 127 1, 2
19 0 - 127 1, 2
20 0 - 127 1, 2
NUMA Organ by Studiologic®
18
Note: All MIDI data sent over MIDI channel 1 to the NUMA Organ aect
general parameters or settings for the Upper manual. All data sent via MIDI
channel 2 control the Lower manual. With MIDI channel 3 you can control all
parameters related to the bass pedal board.

MIDI
To use your NUMA Organ as MIDI masterkeyboard, switch on the
Fatar dynamic TOUCH function as described on page 15.
Please Note:
If Fatar dynamic TOUCH is activated, an attached Sustain pedal
sends the MIDI sustain message (MIDI CC 64). But for the internal
sound engine of the NUMA Organ the Sustain pedal always
controls the Rotary speed!
The NUMA Organ sends on MIDI channels 1 to 3 all parameters and
adjustments you make. That way you can, for example,record the
dynamic change of the Drawbars in a MIDI sequencer.
Use the NUMA Organ as MIDI masterkyboard
Record of adjustments
NUMA Organ by Studiologic® 19
E
Troubleshooting
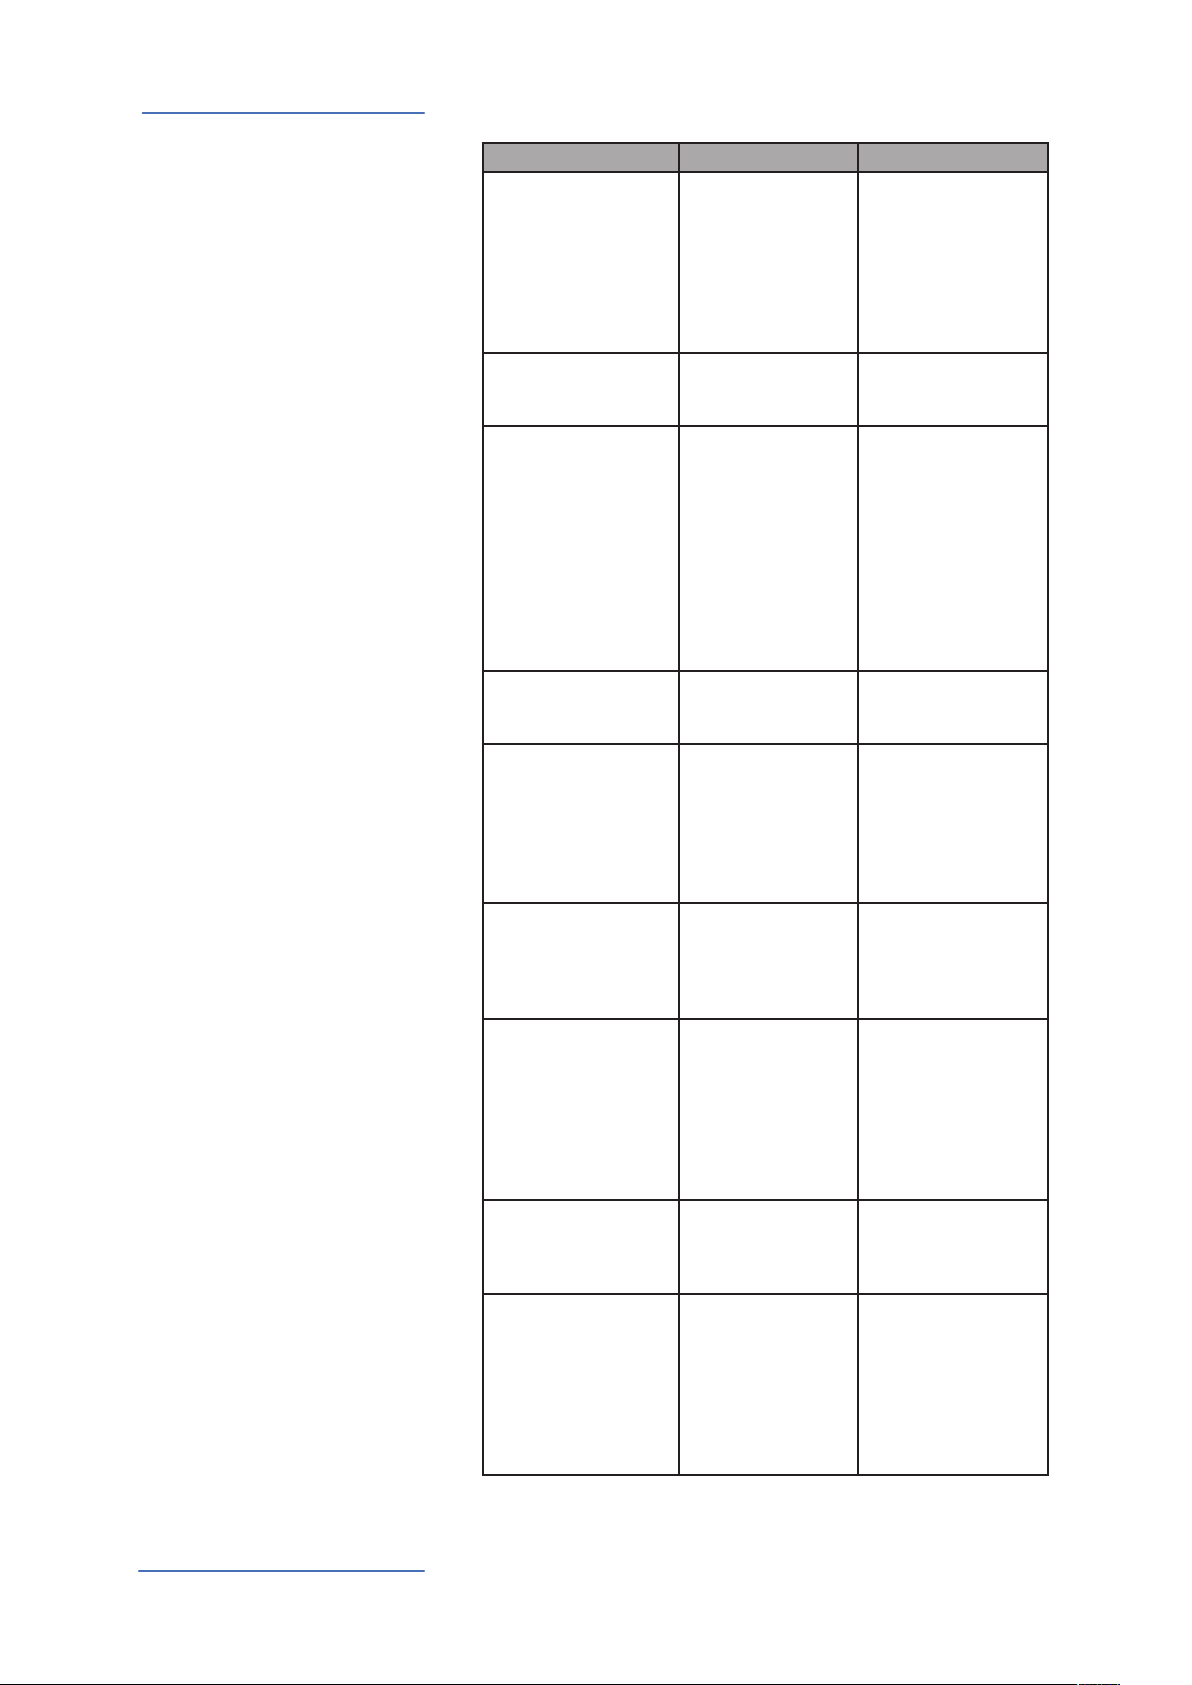
Troubleshooting
Problem Possible cause Solution
NUMA Organ does not
turn on.
NUMA Organ cannot be
controlled via MIDI.
No sound is heard. Fatar dynamic
Only one sound is
heard in split mode.
No sound from the
audio input is heard.
The Sustain pedal just
changes the Rotary
speed from Brake to
fast, but not Slow to
Fast.
Sustain pedal does not
hold notes if pressed.
Sustain pedal holds
notes if it is not pressed,
but cuts notes if
pressed.
Adjustments e.g. of the
drawbars cannot be
recorded with a
sequencer program.
No power is supplied.
Defective power
cable. Fuse is blown
inside the NUMA
Organ.
MIDI data are not
being sent on MIDI
channel 1, 2 or 3.
TOUCH is activated.
All drawbars are
pushed all the way in.
Volume is set to 0.
Defective connecting
cable / headphone.
A sustain pedal is
connected to Expression pedal input.
All drawbars of the
lower zone are
pushed all the way in.
Level of Audio In is
set to minimum.
External sound
device is not playing.
Defective cable
connection.
The Modulation /
Rotary wheel is set to
Brake.
Fatar dynamic
TOUCH is deactiva-
ted.
The contact of the
attached sustain
pedal is closed at rest.
Fatar dynamic
TOUCH is
deactivated.
The MIDI Input of
the sequencer is not
set to MIDI channels
1, 2 and 3 or to “all
inputs”.
Please make sure that
power is available and
switched on. Check
the power cable and
the internal fuse and
replace if needed, with
fuse as specied on
page 65.
Please send MIDI data
only on MIDI channel
1, 2 and/or 3.
Deactivate Fatar
dynamic TOUCH.
Pull at least one
drawbar down.
Set the Volume to a
higher level.
Change the cable /
headphone.
Unplug the sustain
pedal from Expression
pedal in.
Pull at least one drawbar down for the silent
zone.
Adjust Stereo Audio In
Level.
Check if the external sound device is
sending audio signal.
Change the
connection cable.
Set the position of the
Modulation / Rotary
wheel to Fast or Slow.
Please also refer to
page 12.
Activate Fatar
dynamic TOUCH, if
you want to use the
foot switch as sustain
pedal. If Fatar dynamic
TOUCH is not
activated it will control
the Rotary speed.
Plug in a sustain pedal
where contact is open
at rest.
Activate Fatar
dynamic TOUCH.
Set the input of the
sequencer to MIDI
channel 1, 2, 3 or to “all
inputs”.
NUMA Organ by Studiologic®
20
Declarations
Every product from Studiologic® by Fatar has been carefully manufactured,
calibrated and tested, and carries a two year warranty. Please register your
NUMA Organ to get full support. Damage caused by incorrect transport, mounting or handling is not covered by this warranty. Compensation amounting to
more than the price of the device is excluded. This is based on general terms and
condition of the local distributor / FATAR srl, Italy.
FATAR srl
Zona Ind.le Squartabue
62019 Recanati MC Italy
declares that this product complies with the European Directives:
2006/95/EC Low Voltage Directive
EN 60065 Safety requirements for audio, video and
audio-visual apparatus for professional use
2004/108/EC Electromagnetic Compatibility Directive - EMC
EN 55103-1/E1 Product standard - Emission
Audio, video and audio-visual apparatus for
professional use
EN 55103-2/E1 Product standard - Immunity
Audio, video and audio-visual apparatus for
professional use
Recanati, 01. 06. 2010, Marco Ragni, Managing Director
This declaration becomes invalid if the device is modied without approval.
Warranty
CE-Conformity
This product is manufactured according to the 2002/95/EC directive.
The purpose of this EG Directive 2003/108/EG is, as a rst priority, the
prevention of waste electrical and electronic equipment (WEEE), and in
addition, the reuse, recycling and other forms of recovery of such wastes
so as to reduce the disposal of waste. Please help to keep our environment
clean.
To ensure maximum quality all Studiologic® by Fatar devices are always
engineered to be state-of-the-art products, therefore updates, modications
and improvements are made without prior notice. Technical specication and
product appearance may vary from this manual.
All trademarks used in this manual belong to their respective owners.
No part of this manual may be reproduced or transmitted in any form or by
any means without prior consent of the copyright owner:
Synthax GmbH
Semmelweisstraße 8
D-82152 Planegg, Germany
RoHS-Conformity
RoHS
compliant
2002/95/EC
Disposal / WEEE
State of the art
Trademarks ®
Copyright
E
NUMA Organ by Studiologic® 21
 Loading...