

Numa Compact 2x
Rev. 17-07-2018
Operation Manual
Manuale d‘uso
E
I

ENGLISH
Numa Compact 2x
Operation Manual
E
Numa Compact 2x by Studiologic®
2

Index
Safety instructions
Your new Numa Compact 2x
Power - Inputs and connections
Panel - Display and navigation
Sound banks and sound section
Organ Model
5
6
6
7
7
10
10
10
10
11
11
11
12
13
13
13
14
15
16
17
18
19
19
Product overview
Key features
Example of use
Operation diagram
Power connection
USB power
Expression / Universal pedals
Audio output
Headphones
Volume
USB
Sound / MIDI
Demo
SPLIT
Store - User programs
Sound mode
Introduction
Drawbars
Typical Drawbars settings
Original Drawbars settings
Chorus and Vibrato
Percussions
Synthesizer Engine
Eects
Global edit
20
20
20
21
21
23
24
24
25
25
25
25
25
25
26
26
27
27
27
27
28
29
29
Waveforms
Cuto
Resonance
Filter Amplitude Envelope
Store
FX1- FX2
FX Autoset
Strings Resonance (Damper model)
Transposer
Global tuner
Velocity curve
Fixed curve
Strings resonance (Damper eect)
Headphones (mode)
Pedal 2
FX Autoset
Slider mode
Key click
Percussion Volume
Sysex lter
Programs send/receive
Factory reset
Firmware version and update
E
Numa Compact 2x by Studiologic®
3

Index
Program edit
Part edit
MIDI (Zone edit)
30
30
30
31
31
32
32
32
32
32
33
33
35
35
35
36
36
36
36
36
36
37
37
Program name
Split point
Mixer
Volume
Split assign
Transpose
Octave
Fine tuning
Rev send
Pedal 1 - Pedal 2
Stick 1 - Stick 2
Aftertouch
Program Change
LSB - MSB
MIDI channel
Volume
Split assign
Transpose
Octave
Pedal 1 - Pedal 2
Stick 1 - Stick 2
Aftertouch
Sliders programming
Declarations
Appendix
38
154
158
162
164
164
MIDI Implementation chart
(Controller section)
MIDI Implementation chart
(Keyboard section)
Sounds list
Specications
Dimensions
E
Numa Compact 2x by Studiologic®
4
Safety Instructions
Important safety instructions
Please read the entire manual. It contains all the informations
you need to use this unit.
Please follow the instructions in the manual. The warranty
will be void if unauthorized work is carried out on the Numa
Compact 2x. Only accessories that are specied by the
manufacturer should be used with this unit.
Use the unit only as specied in this manual.
DANGER!
Risk of electric shock. Do not open the chassis. There are no
user serviceable parts inside.
The unit should only be serviced by qualied service sta.
Humidity
To reduce the risk of re or electric shock, do not expose the
unit to rain or moisture. Never place containers with liquid on
the unit. Do not use the unit near water, swimming pool, bathtub or wet basement. If the unit is moved from a cold place to a
warm room, condensation may occur inside. To avoid damage
please allow the unit to reach room temperature before switching on.
Installation
Always use a stable rack to place the keyboard on. Please be
aware of its size and weight.
Cleaning / Maintenance
Never use any abrasive detergent, which may damage the surface. We recommend a slightly moist micro-bre cloth.
Packaging
Please keep all packaging, and use it to protect the keyboard
when transporting or if servicing is required.
Mains
Before connecting the unit to the main power supply, please
check if the power supply is suitable for the Numa Compact 2x
adapter. The unit can be powered with 100 – 240VAC, using the
included power adapter.
Important Note: the Numa Compact 2x can be powered directly also by the USB port, if connected to the PC or other suitable
USB power sources.
E
Numa Compact 2x by Studiologic®
5

Your new Numa Compact 2x
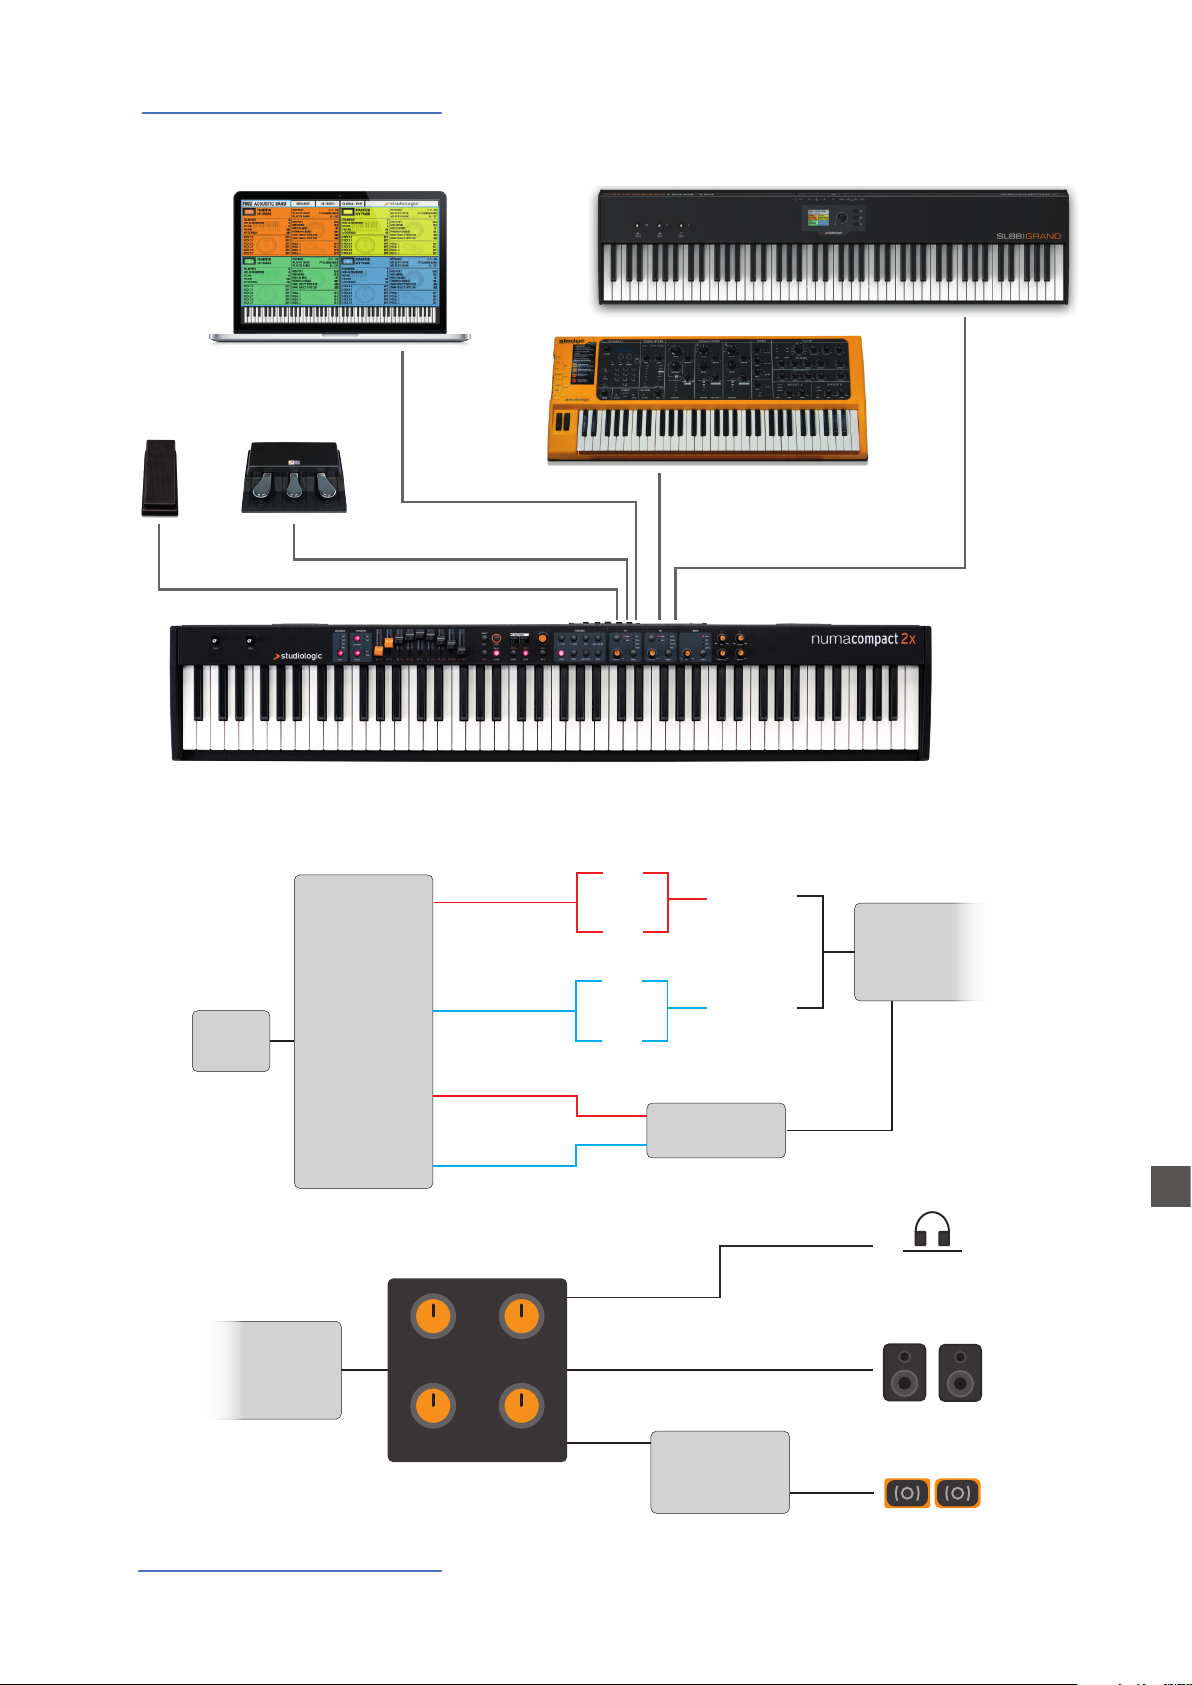
Product overview
The Numa Compact 2x is an incredibly powerful musical instrument, packed in a stylish and slim
cabinet, based on a totally new technology and updated user interface. The keyboard includes an
Aftertouch control and together with the programmable Sticks, allows to have a total control of
the musical performance. The new sound engine is capable of 128 notes of max polyphony and
it includes two independent sections (Lower & Upper) with over 80 sounds, organized in 8 Sound
Banks, assignable to any portion of the keyboard, in Layer or Split mode. The 1GB (ash memory)
sounds are further enhanced by 2 eects post-processors (Fx1-Fx2) each one with a double internal architecture, for a total of 4 independent eects at once.
A controllable Strings Resonance and the Release-Staccato Samples make the main piano sounds
even more real, while a new Stereo Reverb post-processor further enhances the sound. Bass, Treble and Mastering controls allow to reach a studio quality, also noticeable thru the built in digital
amplier and elliptical back-reection speakers. The MIDI Module includes 2 independent MIDI
zones and all parameters can be programmed and stored.
Key features
• 88 notes light weighted keyboard with Aftertouch
• Stick 1: Pitch Bend function on both axis
• Stick 2: Sound Modulation and FX1/2 control (assignable or auto-selection)
• Built in 2x10W amplifier + 2 elliptical back reflection speakers
• 128x64 graphic oled display
• Lower-Upper-Zone A-Zone B
• 4 programmable sections (internal SOUNDS and MIDI) in any combination
• Tonewheel Organ Mode engine, with nine drawbars allowing thousands of possible
combinations, a Percussion type, level and Click control, plus a dedicated Chorus/Vibrato postprocessor (simulating the analogue „Scanner“ vibrato)
• Synth section, with nine real time Sliders assigned to the most usefut Synth parameters
• 1 GB of flash memory, 88 sounds organized in 8 Sound Banks
• Concert Grand piano sounds with release-staccato samples and Strings Resonance
• FX1-2 double effects processors - 4 programmable effects at once
• Stereo Reverb with separate Lower/Upper controllable send level
• Cutoff and Resonance controls editable on all Sounds
• Strings Resonance (Damper model) on acoustic Piano sounds (programmable)
• Global-Program-Part EDIT
• Bass, Treble, Mastering (3D+Compressor) post processing controls
E
• Two additional internal Parts (on MIDI Ch 3 and 4) playable and recordable via MIDI
• Advanced MIDI Implementation, with a separate MIDI Port for the Keyboard (including all
panel controls( and a Controller Port, for the 2 programmable MIDI Zones
• Connections: Usb, MIDI In/Out, Audio L/R, Headphones, Ped1-Ped2
• Audio over USB
• USB power
Numa Compact 2x by Studiologic®
6
Your new Numa Compact 2x
FX1
SPEAKERS
Example of use
USB
PED2PED1
MIDI IN
MIDI OUT
Operation diagram
1GB
Stereo
reverb
Sound
engine
Bass
Mastering
Suggested setting
UPPER
LOWER
UPPER
LOWER
Treble
Volume
FX2
FX1
FX2
Rev send
Rev send
Strings
resonance
Digital
amplier
Stereo
reverb
AUX out
L
AUDIO out
L
E
R
R
Numa Compact 2x by Studiologic®
7
BUILT-IN

Your new Numa Compact 2
An overview of the functions of the Numa Compact 2x:
Light weighted action
8 Sound Banks
88 Internal Sounds
FX1 - FX2- REV
Strings Resonance
The Numa Compact 2 oers the latest innovative technology by Fatar: the sophisticated weighted keyboard TP9-Piano
with Aftertouch. The Numa Compact weighs just 7,1 kg and is
therefore very portable, yet it oers a great keyboard touch,
for which Fatar is famous.
You can immediately start playing the 88 selected high quality sounds, which have been carefully sampled. Experienced
keyboard players and musicians selected those sounds and
were involved in the design of the straightforward operation
of Numa Compact 2. Therefore Numa Compact 2 is your perfect partner on stage, in the studio or at home. 128 voices of
max polyphony is available to add depth and expression.
You can combine two sounds by assigning them to the Lower
and Upper sections in Split or Layer mode.
The 2 double FX processors allow to assign 2 dierent eects
to both Lower and Upper sections, in addition to a Strings
Resonance eect on all piano sounds and a Stereo Reverb, for
an endless variety of combinations of all kind.
Mixer & Mastering
Built-in Amplication
Master keyboard functions
Audio connections
A Volume, Bass, Treble and Mastering controls allow to get
the preferred sound setting and the internal monitor-amplication system with elliptical speakers allow you to play the
instrument using the internal 10+10W amplication system,
digitally controlled and equalized. For the best result a suggested setting is with all pots at halfway, to avoid any possible
distorsion and ensure a correct frequncy responce. Settings
can be modied according to the selected sound.
The master keyboard functions of the Numa Compact 2, with
2 programmable Zones, allow you to control other MIDI devices, select the sounds and adjust the levels directly from
your Numa Compact 2.
As well as the stereo L/R audio output and built in amplication system, the Numa Compact 2 has an additional headphone plug, ideal for late-night jam sessions without disturbing the neighbours. This connection can also be used as an
auxiliary audio output.
The integrated USB port allows your Numa Compact 2 to connect to your computer and be powered directly, without the
need of the external adapter (included). You can use a USB
and MIDI out for MIDI data transmission. In addition, updates
of the rmware or the sound library are accessible via USB.
Please note that the internal amplication system is automatically switched o when the instrument is powered by USB,
to avoid excessive power consumption or power drops.
E
Numa Compact 2x by Studiologic®
8

Your new Numa Compact 2
Interactive Numa
USB <> Computer
Delivery includes
The integrated USB port allows your Numa Compact 2 to connect to your computer and be powered directly, without the
need of the external adapter (included). You can use a USB
and MIDI out for MIDI data transmission. In addition, updates
of the rmware or the sound library are accessible via USB.
Please note that the internal amplication system is automatically switched o when the instrument is powered by USB,
to avoid excessive power consumption or power drops.
Numa Compact 2x
Power Adapter
CD Manual
Numa Compact 2x by Studiologic®
9
E
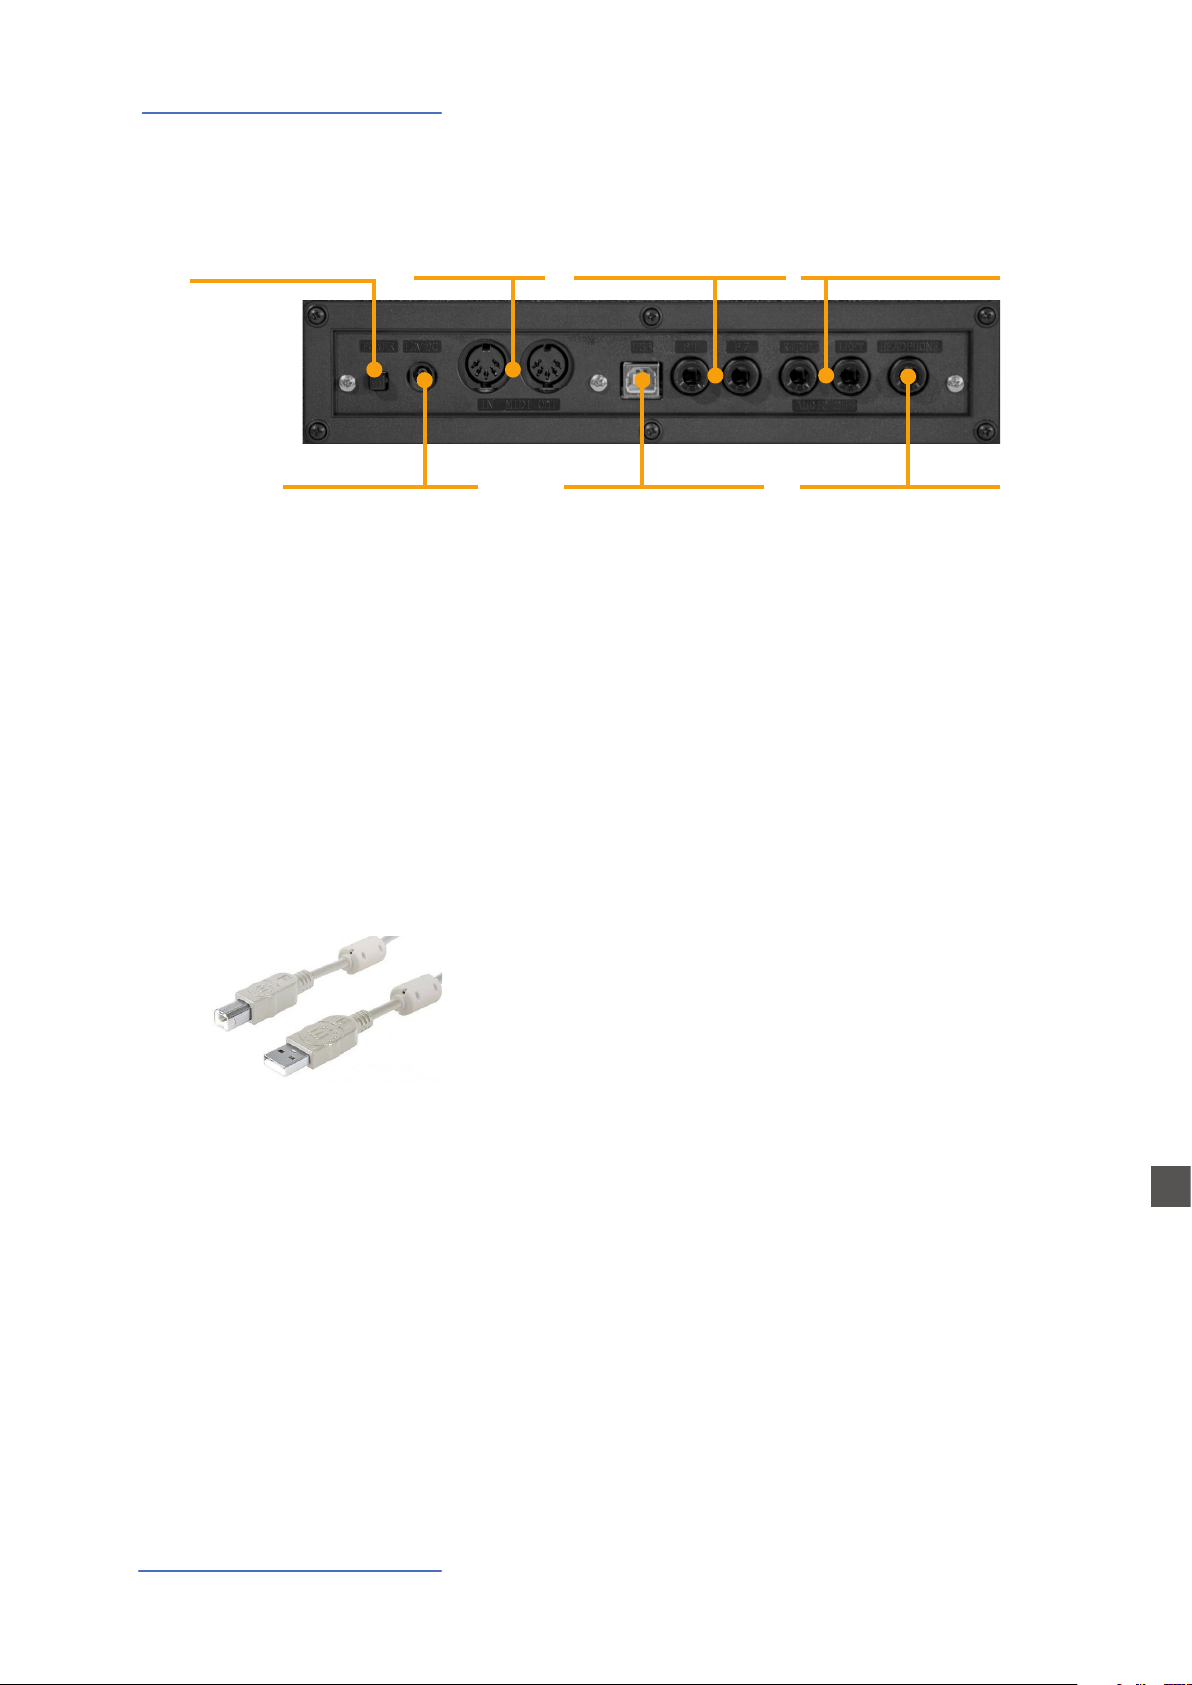
Power - Inputs and connections
Power - Inputs and connections
MIDI In-OutPower On/O
Power
12V - 2,5A
Power connection
Ped 1, Ped 2
Expression pedal,
Universal pedal
USB Port
MIDI I/O, rmware update,
power
Audio L/R Out
2x 6,3mm mono jack
Headphones / Aux Out
1x 6,3mm stereo jack
Use the power adapter supplied with the device to connect
the Numa Compact 2x to the power socket (or use the USB
connection). Switch the unit on by using the power button
next to the power plug of the Numa Compact 2x, set the main
Volume, Bass and Treble controls to the half position and the
Mastering control to zero-minimum (the function will be explained later on this manual) to avoid excessive output power
and allow the internal speakers to play with a correct dynamic range.
USB power
Expression / Universal pedals
Audio output
The instrument can also be powered by USB, using a shielded
quality certied cable and providing that the computer
has enough power and not too many devices are powered
through the same USB port.
When the instrument is USB powered, in most cases the internal amplication system is disconnected if the power consumption exceeds the computer‘s range.
PLEASE NOTE: in case of weak or unstable connection, use
the traditional power (see previous paragraph).
Connect the (optional) pedal or pedals to the related sockets,
labelled Ped1 and Ped2; at the socket labelled Ped 1 you can
plug in the Studiologic VP pedal, typically for volume-expression controls. To the Ped2 socket you can plug either a single
swicth pedal, a volume-expression pedal or the custom triple
pedal SLP3-D, as explained in the related chapter.
If you want to use external amplication systems, or record
the instruments sounds, connect the Left and Right audio
outputs to the inputs of your mixing desk or amplier, or to
your computer audio board inputs, using suitable cables.
E
Numa Compact 2x by Studiologic®
10
Power - Inputs and connections
Headphones
Volume
USB
The Headphones output can be used with an headphones set
or as an extra audio auxiliary output, according to the setting
of the related GLOBAL edit function (explained in this manual). As an auxiliary audio out, you can use this plug to connect
the instrument to a subwoofer or an additional amplication
system, while the L/R outputs are still available for recording
or other audio connections.
When you use the Numa Compact 2x for the rst time, we
recommend you to turn the Volume knob on the Output section to not more than half way between 0 and Full. While you
are playing you can adjust the volume according to the selected sounds. Adjusting the Volume knob will eect all audio and headphone outputs at the same time.
CAUTION:
To prevent hearing damage, you should – as with all audio
devices – avoid using the Numa Compact 2x at high volume
for long periods.
For data transmission via USB, connect the Numa Compact 2x
to your computer with a USB cable. The rst time you switch
the Numa Compact 2x on, it will be recognised by your computer automatically and the appropriate driver will be installed by the OS (cross compliant).
Numa Compact 2x by Studiologic®
11
E
Panel - Display and navigation
P01-JAZZ DUET
A0 - B3
C4 - C8
P01-JAZZ DUET
A0 - B3
C4 - C8
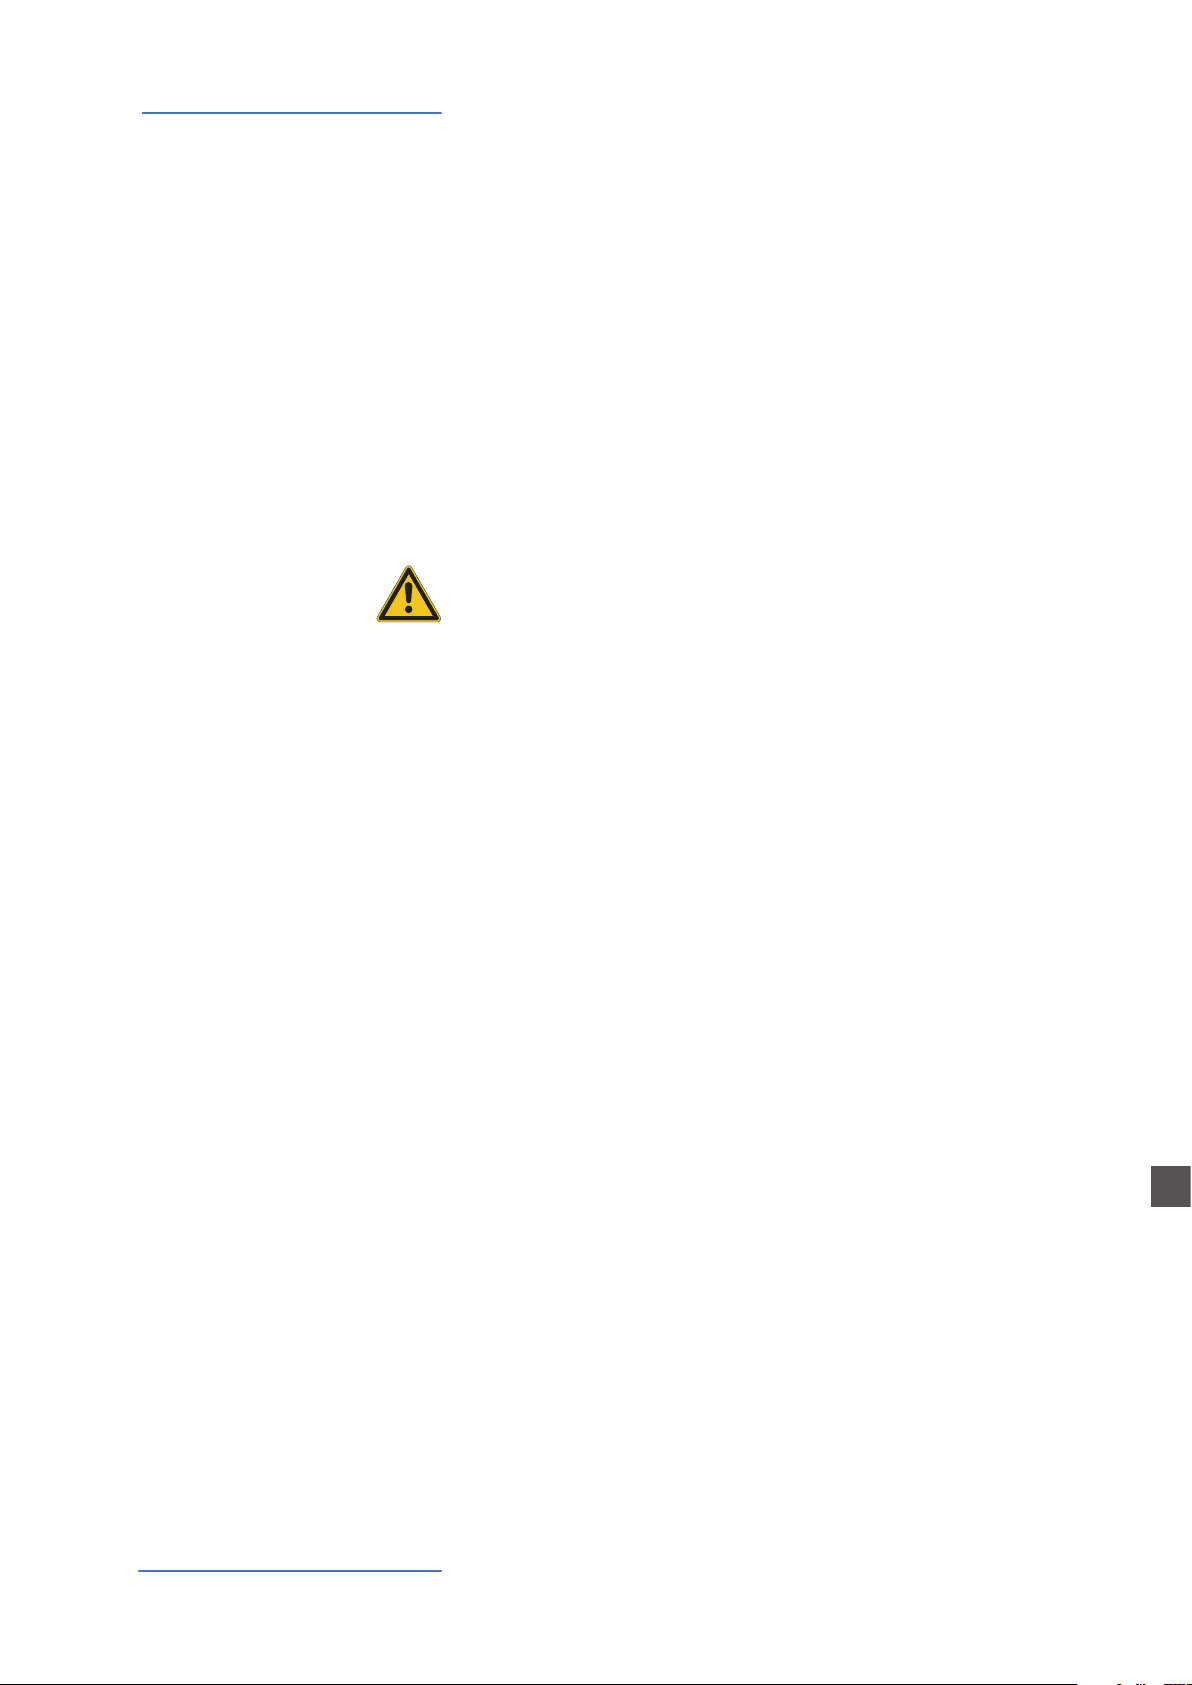
Panel - Display and navigation
Edit / Store
MIDI / Sound /
DEMO
Display
Monochrome
display
Lover - Upper
Parts/Zones
selection
Encoder
Rotation + click
SPLIT / Mix
The main HOME display of the Numa Compact 2x is the one shown at power on and it’s divided in
3 main areas: the top area shows the current Program number and name, the left and right lower
areas are related to the Lower and Upper Sound sections, in SOUND mode, and to the Zone A and
Zone B sections, in MIDI Mode.
To navigate and move the focus (intended as the cursor position on the display) you can use three
controls at your choice:
a) Clicking on the Encoder: the focus will move to the 3 main positions: Programs, Lower, Upper.
b) Pressing the Sound or MIDI buttons, the focus (cursor position) will be moved on top.
c) Pressing Lower or Upper, the focus (cursor position) will be set to the related areas.
Ac-Bass
V: 127
Concert
V: 127
Ac-Bass
V: 127
Concert
V: 127
UPPER
When the focus is on the Program area, rotating the Encoder you will select the various Programs.
When the focus is on the Lower/Upper areas, rotating the Encoder you will control the related
volumes.
Sound / MIDI
The two buttons marked SOUND and MIDI will toggle between the two related views and controls.
When the SOUND button is selected and lighted, the user can
control the SOUND sections and selections, all related display, settings, edit pages and parameter settings.
When the MIDI button is selected and lighted, the display will
show the status of the MIDI Zones A and B and the user can
access to all available parameters, edit functions and values.
E
Numa Compact 2x by Studiologic®
12

Panel - Display and navigation
Demo
SPLIT
STORE / User Programs
The SOUND button can also be pressed for a longer time, to
enable the eight DEMO songs (one for each sound BANK) to
start playing in sequence; clicking on a SOUND BANK you can
also select the related demo; at the end of it, the next demo
song will start for the other BANKS, in a continuous cycling
loop.
This button is a real time control of the SPLIT function, that is
edited and controlled in all details by the GLOBAL EDIT function (Split Point) and PART EDIT function (Split Assign). This
is a fast way to immediately enable and disable the SPLIT and
play the UPPER and LOWER parts all over the keyboard, in layer
mode without split.
As explained in the EDIT sections, the SPLIT button can also
be used as a short cut to select the MIXER page, by keeping it
pressed for a few seconds.
The Numa Compact 2x has 99 user’s programmable memories called Programs, where you can store all SOUND, FX1/2
controls, amounts, functions, split points and all editable parameters also related to the MIDI ZONES, with a programmable NAME for each Program. The only non-storable functions
are the VOLUME, BASS, TREBLE and MASTERING, since they are
pure real-time controls, not related to a particular Program.
All Programs can be sent and received via USB, as explained
in the related paragraph of this manual, in the GLOBAL EDIT
section.
Numa Compact 2x by Studiologic®
13
E
Sound banks and sound section
P01-JAZZ DUET
A0 - B3
C4 - C8
A-PIANO [1/2]
Sound banks and sound section
SOUND BANKS
Sound selection
Sound mode
In SOUND mode, with the related button selected and lighted, the 8 Sound banks can select the
internal sounds, organized according to the Sound Bank names. Each Bank can have a variable
number of sounds, organized in pages of 4 sounds for each one. Selecting a Bank, you will see on
the display the sounds of that Bank, the current Sound Bank and total pages of sounds of the Bank
(shown on the top right area of the display) and the selected sound, in reverse color.
To select another sound of the current Bank, rotate the encoder and all available sounds will be
shown and selected in sequence, from the rst to the last page of the Bank. The selection can be
done during a temporary window (approx 5 seconds) and the last selected sound will be automatically memorized for each Bank. When you select a Bank, the focus will automatically go to the
last selected Sound, to make the sound selection easier and faster. Thanks to this function, you will
have an automatic setting of your preferred sounds for each Bank.
Stage
Studio
SOUND
Ac-Bass
V: 127
Concert
V: 127
A-PIANO
Concert
Vintage
E
Numa Compact 2x by Studiologic®
14
Organ Model
Introduction
In an original tone wheel organ, 91 steel wheels with lobes
rotate in front of a pick-up consisting of a permanent bar
magnet and a spool. Because of the tone wheels shape, the
magnetic eld in the pick-up changes periodically and generates a sine wave.
With 8 dierent tone wheel shapes and 12 dierent gear trains
91 sine frequencies are generated. As in additive synthesis,
the 91 frequencies are the base for creating dierent sound
timbres. By means of a complex circuit lay out, the sound is
mixed thru nine drawbars, allowing a tone wheel organ to
create hundreds sound timbres from just 91 generated sine
frequencies: more than 380 million timbres are theoretically possible. To generate a sound, the NUMA Compact 2 uses
physical modelling, a mathematical implementation of the
tone wheel organ.
Thanks to the Modelling Technology, The Numa Compact
2 have been designed to give a wide variety of sounds, allowing to build combinations using the drawbars and all the
related post eects: Vibrato, Chorus, Percussion with harmonics and decay controls, plus specic GLOBAL Edit pages to
control features like the Key Click and Percussion separate
volumes.
Numa Compact 2x by Studiologic®
15
The sound generated by the Organ Model can be sent to the
same Eects chain of all other Sound Banks, that can further
enhance the quality of the sound, with all possible eects
from the typical Rotary to the Drive, from Chorus to Delay
and many more. The Numa Compact 2 ORGAN Sound Bank
includes this new clone of a Tone Wheel Organs with Drawbars controls, with the addition of accurately sampled Electronic and Classic-Pipe organs, in a complete variety of organ sounds of all kinds. The Organ sounds and all associated
eects and post-processing can be Stored in each of the 99
available Programs.
E

Organ Model
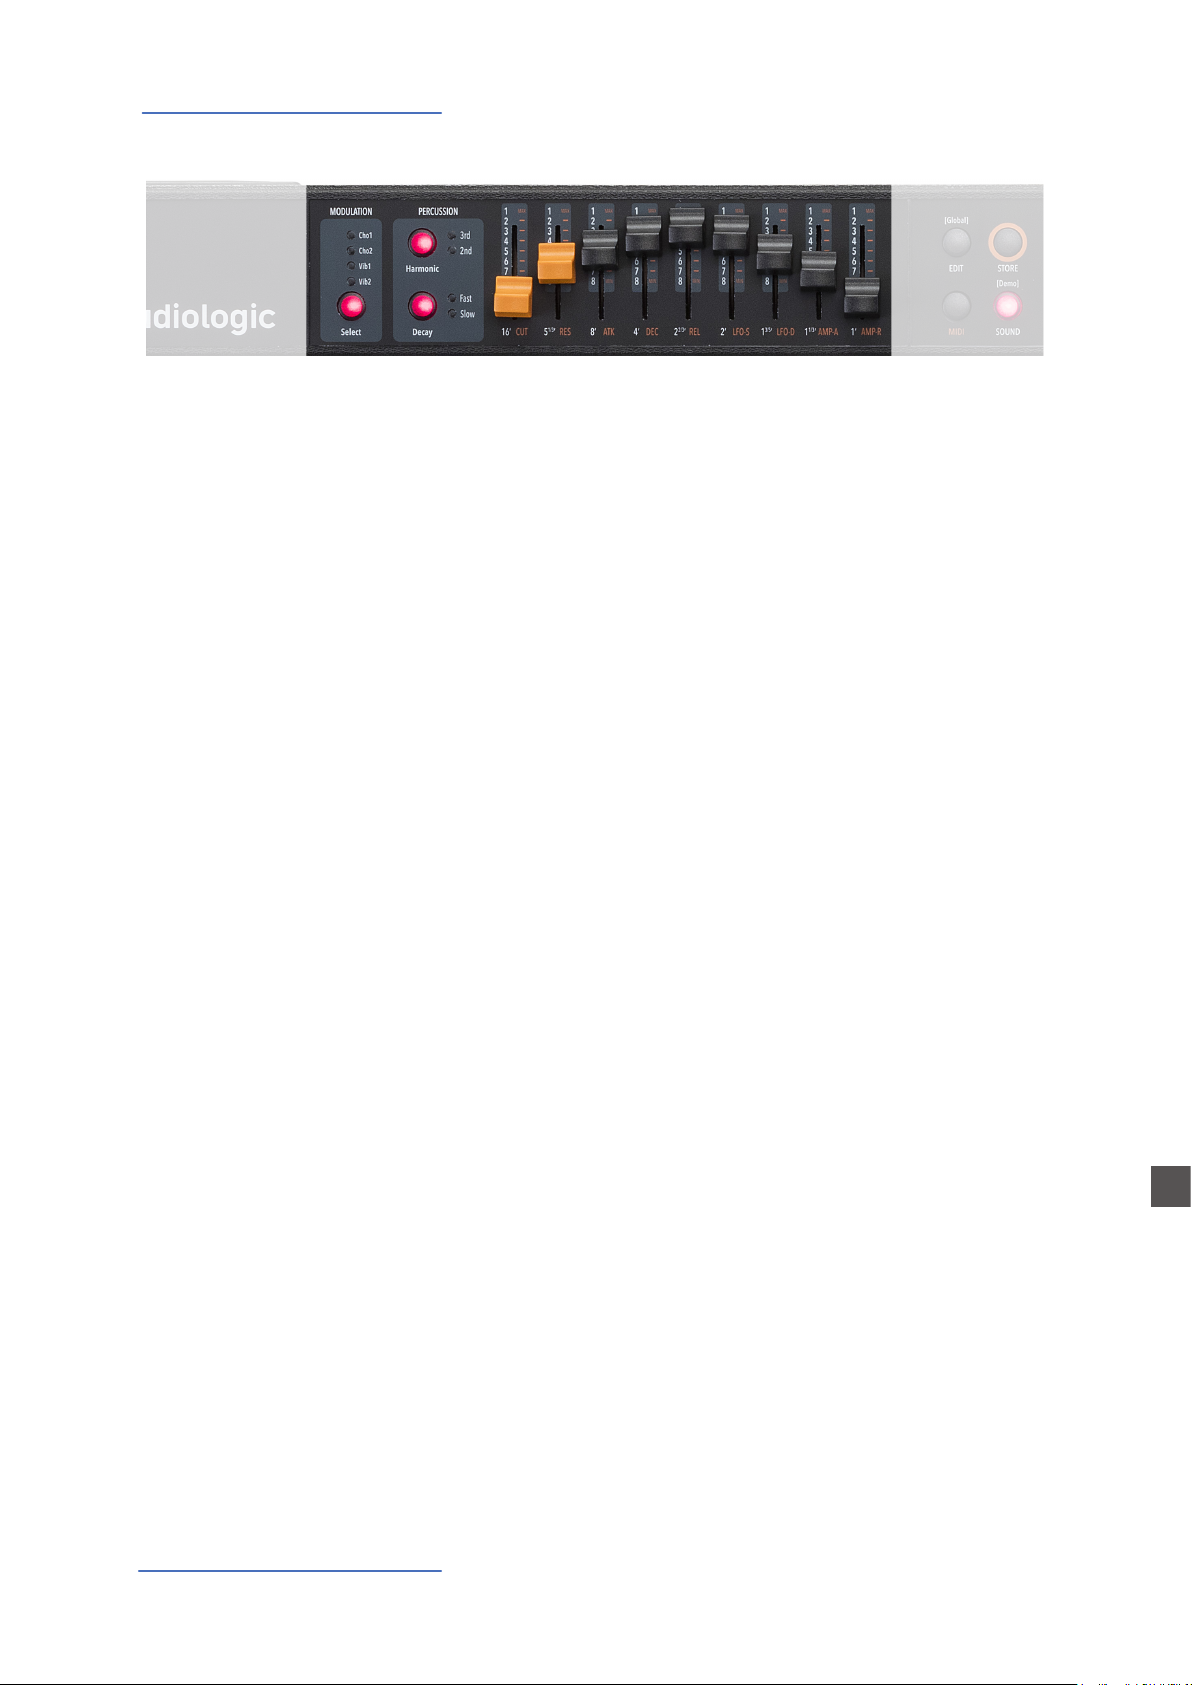
Drawbars
Drawbars are a characteristic trait of a tone wheel organ, therefore we’ll explore them rst; a Tonewheel Organ sound can
be made of nine sine frequencies and each drawbar represents a harmonic of the scale related to the 8‘ stop of a pipe
organ (drawbar 3) which is also called “native pitch“.
Drawbar 1 2 3 4 5 6 7 8 9 correspond to Feet 16‘ 5 1/3‘ 8‘ 4‘ 2
2/3‘ 2‘ 1 3/5‘ 1 1/3‘ 1‘.
The labelling of the drawbars in feet derives from pipe organs, where it represents the length of a reference pipe that
plays the note C is exactly 8 feet long (=2,4m).
Note: the rst two Sliders are made of a dierent color to
show that they play “below” the standard 8’ of a Piano, as it
also was on Vintage Tone wheel organs, where the rst two
Drawbars were Brown, the Even harmonics are were White
and the Odd harmonics were black. In the NC2x they mainly show that they are active on all sounds as controls of the
Synth parameters, while the other Sliders are enabled only
for the Synth Bank sounds.
When a drawbar is pushed all the way in, its harmonic is absent from the timbre, while the maximum volume for the
drawbar is achieved when you pull it all the way down and
you see the digit 8 on the Display, on a pop-up display that
appears any time you move a Drawbar/Slider. The drawbars
simply adjust the levels among them and you can change
and hear the timbre while keys are pressed.
With your NUMA Compact 2x you can play two dierent timbres at the same time, on the Upper and Lower sections, in
Layer or Split mode as all other Sounds and the related Drawbars setting is shown on the Display according to the position of the Focus (selection of Upper or Lower buttons) and
moving the Drawbars when the focus is on the selected part.
E
Numa Compact 2x by Studiologic®
16
Organ Model
876 5 4 3 2 1
876 5 4 3 2 1
876 5 4 3 2 1
876 5 4 3 2 1
876 5 4 3 2 1
876 5 4 3 2 1
876 5 4 3 2 1
876 5 4 3 2 1
876 5 4 3 2 1
876 5 4 3 2 1
876 5 4 3 2 1
876 5 4 3 2 1
876 5 4 3 2 1
876 5 4 3 2 1
876 5 4 3 2 1
876 5 4 3 2 1
876 5 4 3 2 1
876 5 4 3 2 1
876 5 4 3 2 1
876 5 4 3 2 1
876 5 4 3 2 1
876 5 4 3 2 1
876 5 4 3 2 1
876 5 4 3 2 1
876 5 4 3 2 1
876 5 4 3 2 1
876 5 4 3 2 1
876 5 4 3 2 1
876 5 4 3 2 1
876 5 4 3 2 1
876 5 4 3 2 1
876 5 4 3 2 1
876 5 4 3 2 1
876 5 4 3 2 1
876 5 4 3 2 1
876 5 4 3 2 1
876 5 4 3 2 1
876 5 4 3 2 1
876 5 4 3 2 1
876 5 4 3 2 1
876 5 4 3 2 1
876 5 4 3 2 1
876 5 4 3 2 1
876 5 4 3 2 1
876 5 4 3 2 1
876 5 4 3 2 1
876 5 4 3 2 1
876 5 4 3 2 1
876 5 4 3 2 1
876 5 4 3 2 1
876 5 4 3 2 1
876 5 4 3 2 1
876 5 4 3 2 1
876 5 4 3 2 1
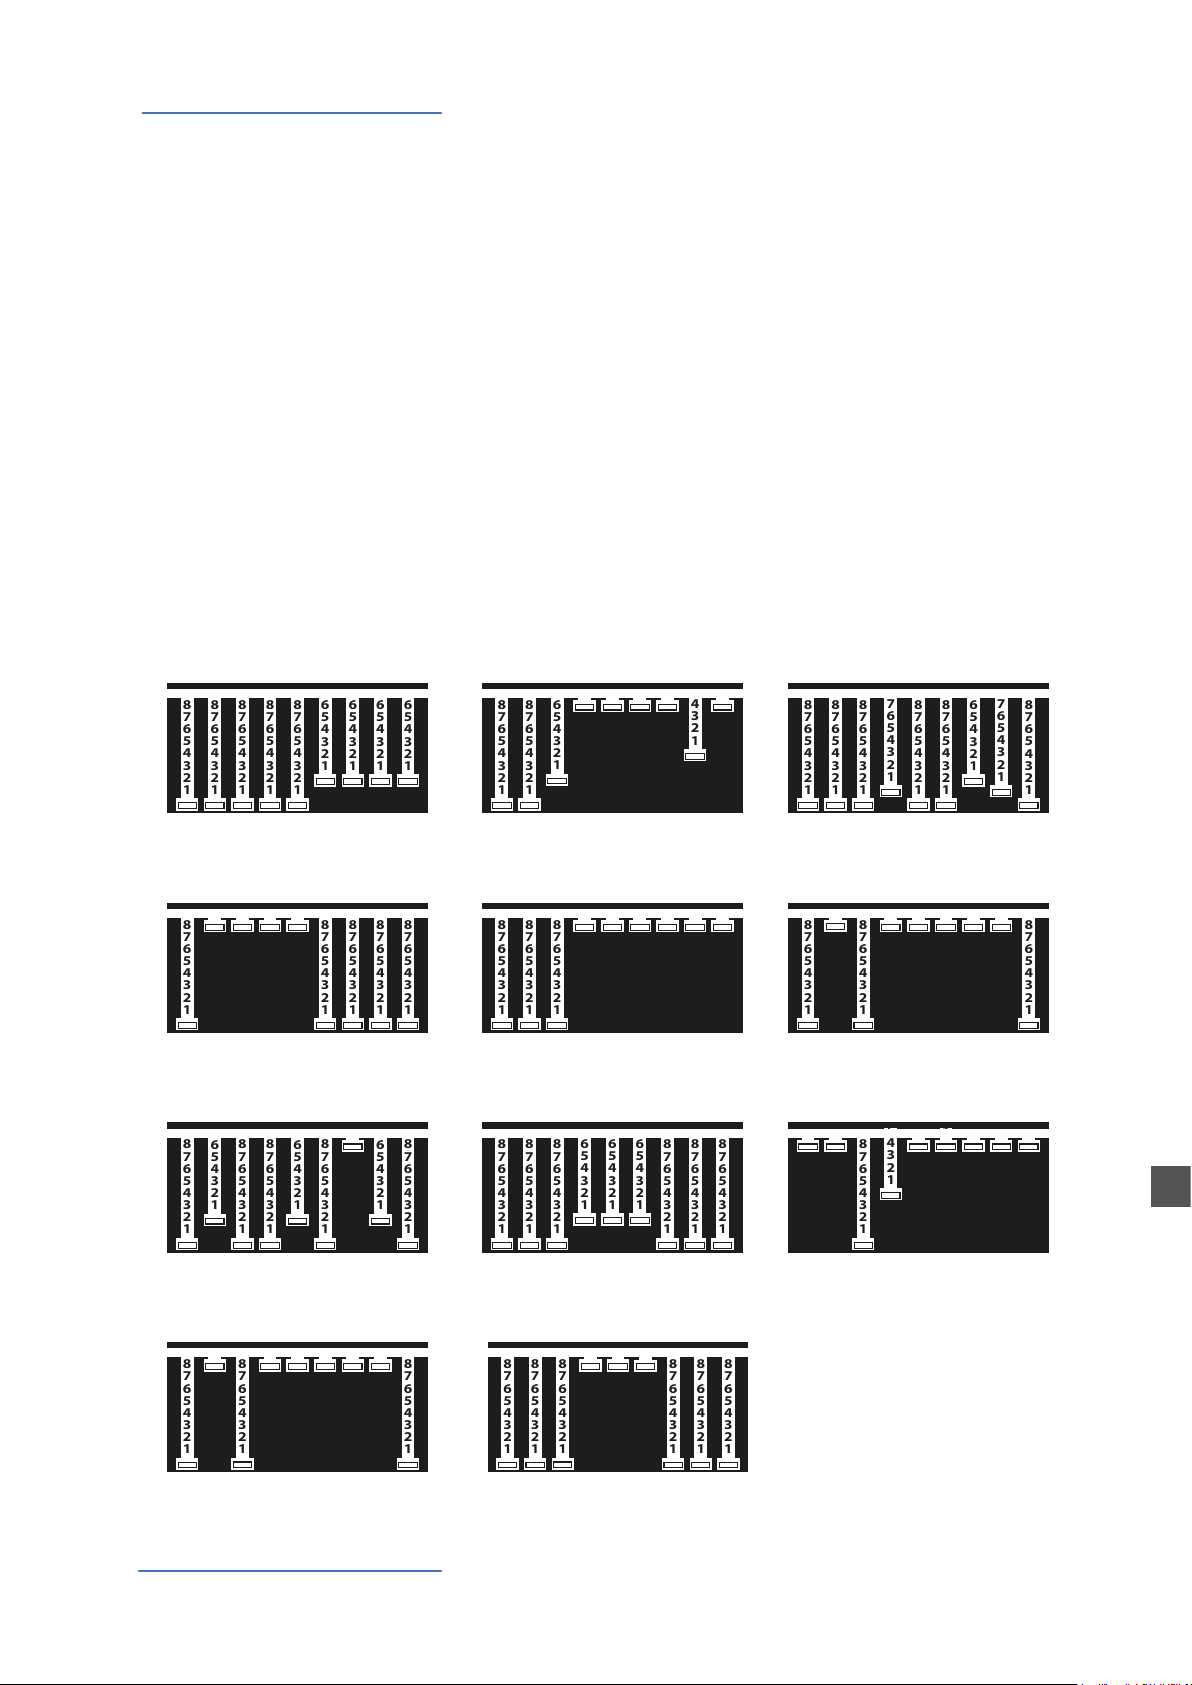
Typical Drawbars settings
VINTAGE 1
88 8886 666
876 5 4 3 2 1
876 5 4 3 2 1
876 5 4 3 2 1
876 5 4 3 2 1
876 5 4 3 2 1
There are thousands of possible examples of Drawbars settings, made famous by organists during decades of live and
recorded Organ music, and you can nd below some of the
most popular jazz, pop, gospel and rock settings.
The use of a Percussion or the addition of a Chorus or Vibrato
eects can be added to your taste and you can nd other examples in the NC2x Factory Programs, that you can also keep
or modify to your taste.
There are many books suggesting Settings for all kinds of music, but the main feature of the Drawbars is the total freedom
they allow you to use, to get the sound you like as well as
“morphing” from one setting to another also with slow and
smooth Drawbars movements, that are part of the beauty of
this Organ Model.
876 5 4 3 2 1
876 5 4 3 2 1
VINTAGE 2
88 6000 040
876 5 4 3 2 1
876 5 4 3 2 1
POP
88 8788 678
876 5 4 3 2 1
876 5 4 3 2 1
876 5 4 3 2 1
876 5 4 3 2 1
JAZZ SHUFFLE
80 0008 888
876 5 4 3 2 1
SWEET 1
86 8868 068
876 5 4 3 2 1
876 5 4 3 2 1
80 8000 008
876 5 4 3 2 1
876 5 4 3 2 1
876 5 4 3 2 1
SILK
THE BOSS
88 8000 000
876 5 4 3 2 1
876 5 4 3 2 1
876 5 4 3 2 1
876 5 4 3 2 1
876 5 4 3 2 1
876 5 4 3 2 1
876 5 4 3 2 1
876 5 4 3 2 1
SWEET 2
88 8666 888
876 5 4 3 2 1
876 5 4 3 2 1
876 5 4 3 2 1
876 5 4 3 2 1
876 5 4 3 2 1
876 5 4 3 2 1
876 5 4 3 2 1
876 5 4 3 2 1
REGGAE
80 8000 008
876 5 4 3 2 1
BALLAD
00 8400 000
876 5 4 3 2 1
876 5 4 3 2 1
E
FAT
88 8000 888
876 5 4 3 2 1
876 5 4 3 2 1
876 5 4 3 2 1
876 5 4 3 2 1
876 5 4 3 2 1
876 5 4 3 2 1
876 5 4 3 2 1
17
Numa Compact 2x by Studiologic®

Organ Model
Original Drawbars settings
In the Vintage Tonewheel Organs , mainly in the Consolle versions (2x61 notes keyboard) the last octave on the left was
made with reverse colors, since those keys were dedicated to
the selection of factory presets, in addition to them selection
of the 2 live Drawbars groups available for each keyboard
(named Swell and Great as in the Pipe Organs.
At that time the Pipe Organ builders association tried to prevent, through legal actions, that electromechanical instruments (and any other electronic instrumet) could be called
Organs and used also in churches for religious services; for
this reason one of the attempts made by the manufacturers
of electromechanical instruments was to simulate the sounds
of the pipe organs and to name the factory preselections with
typical names of the classical organ combinations.
The ocial test took place in the presence of legal and musical representatives in USA and saw the electromechanical
instruments winning the challenge and being allowed to be
called Organs.
The Factory settings of the Drawbars levels were mainly intended to imitate some typical pipe Organ sounds and they
were hardware wired settings, that could be modied only by
expert technicians.
The following are few examples of the millions of possible
combinations.
French Horn
00 8740 000
Tibias
00 8408 004
Clarinet
00 8080 840
Novel Solo
08 8800 880
Theater Solo
60 8088 000
Trumpet
00 6888 654
Full Theater Brass‘
76 8878 667
Stopped Flute
00 5320 000
Dulciana
00 4432 000
French Horn
00 8740 000
Oboe Horn
00 4675 300
Swell Diapason
00 5644 320
Trumpet
00 6876 540
Full Swell
32 7645 222
E
Numa Compact 2x by Studiologic®
18
Oboe Horn
00 4685 300
Full tibias
60 8807 006
Salicional
00 4544 222
Flutes
00 5403 000

Organ Model
Chorus and Vibrato
Percussion
The original vintage Tone Wheel instruments (not all the models) had a special and very complex circuit called Scanner
Vibrato to add to the sound a very nice simulated frequency
and phase modulation, that became another typical eect of
these instruments. This particular post-processing is also part
of the NC2x Organ Model and with the dedicated buttons
you can choose from 2 Vibrato or 2 Chorus eect settings and
assign them to one or both parts. To do this you can select the
focus position pressing Upper and/or Lower and control the
eects, in all details and separately for the 2 parts.
To add more rhythmic elements to your performance you can
switch on the Percussion, another very typical and important
feature of the vintage electro-mechanical organs, included in
the NC2x Organ model. This eect only retriggers when all
keys are released before, allowing to control the eect by playing “legato” or “staccato”. Playing legato, the Percussion will
work only on the rst notes played and it fades away during
the decay, allowing to make short and aggressive solo parts
followed by legato chords or scales, without Percussion.
You can press the On/O butto to activate Percussion and select the 2nd/3rd button to decide if the Percussion is generated by the second harmonic, equivalent to the 4’ Drawba), or
by the third harmonic, corresponding to the 2 2/3 Drawbar.
The Slow/Fast control denes the decay of the Percussion
and the related Volume can be separately controlled in the
related page of the GLOBAL Edit.
As explained in another part or this manual, the original Tonewheel Organs had a direct panel control for the Percussion
Volume, but it was made only of 2 possible settings: SOFT or
NORMAL. In the NC2x Global parameter you have a continuos
control on the Percussion level with 64 values, indipendently
associated to the Fast and Slow decay.
E
Numa Compact 2x by Studiologic®
19
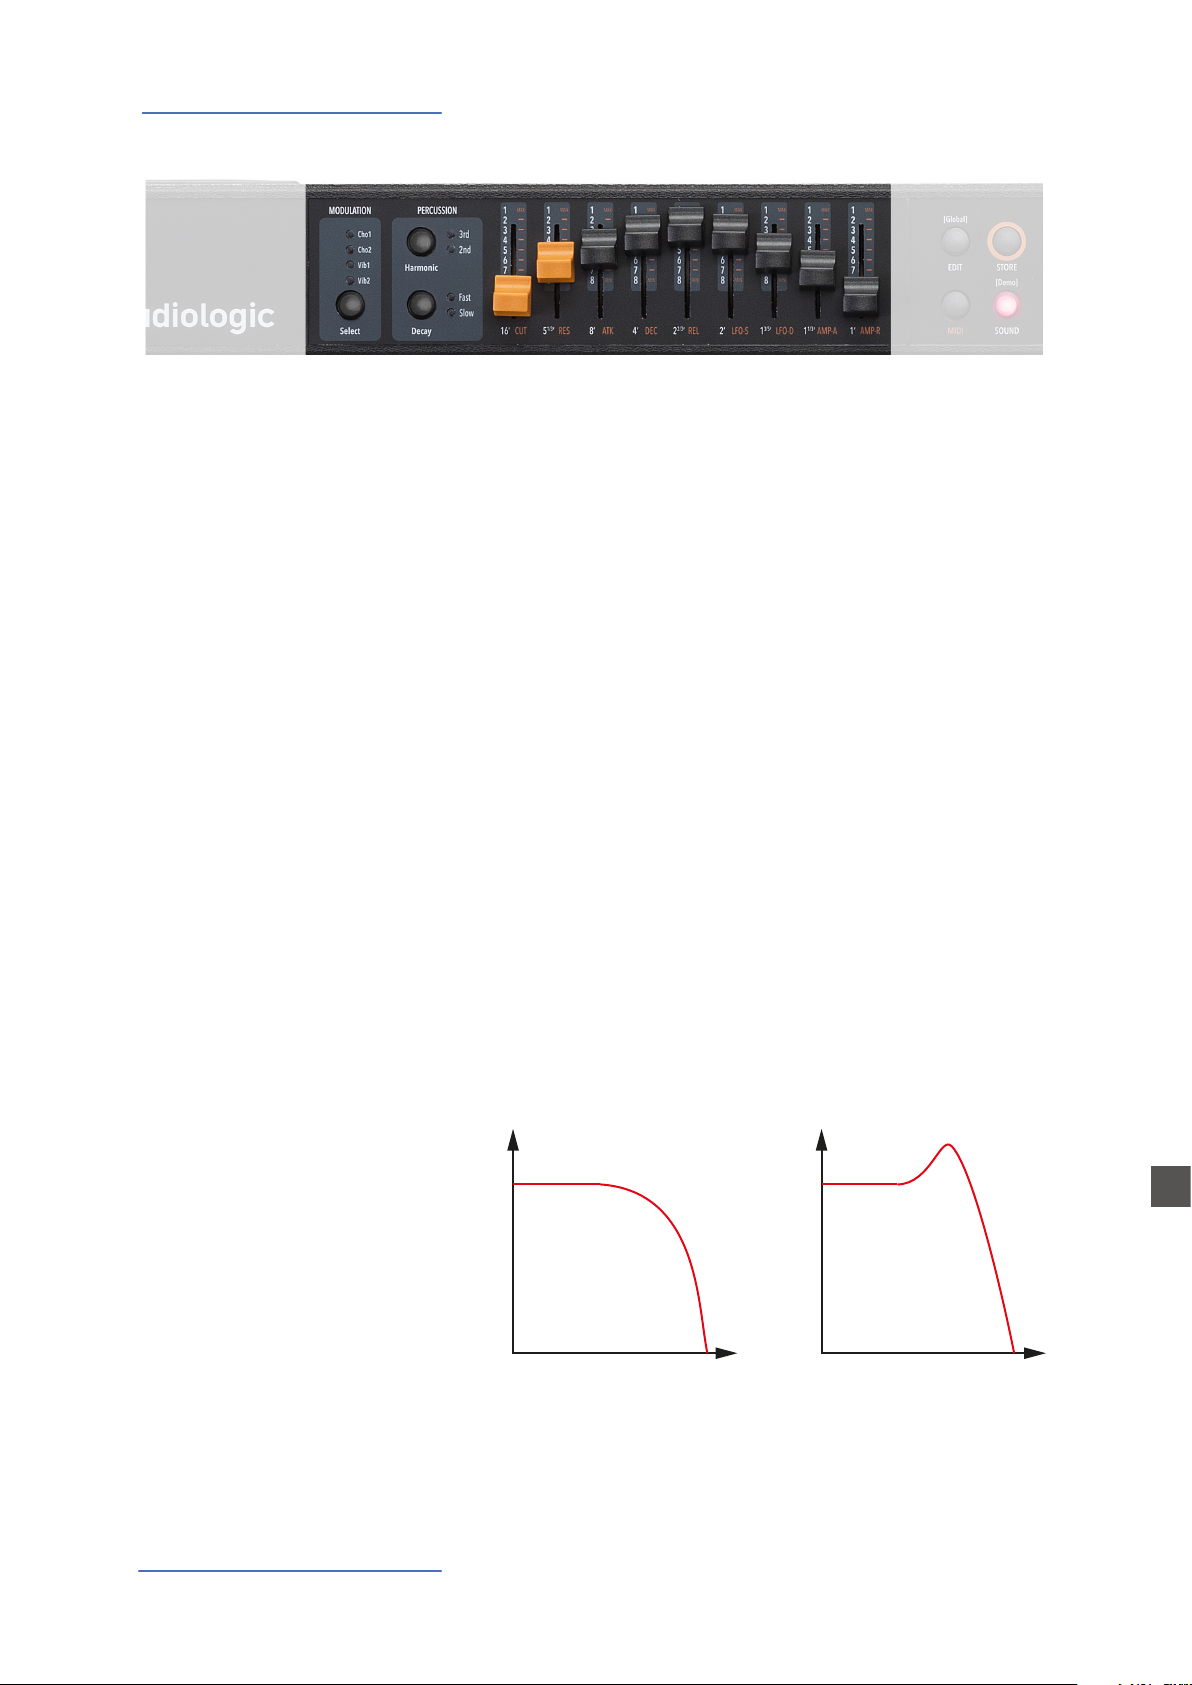
Synthesizer Engine
AMPLITUDE (dB)
-12
Cuto
AMPLITUDE (dB)
Resonance
The Numa Compact 2x Synth Sound Bank is bases on a simplied Synthesis engine, with the following features:
Waveforms
Cuto
Resonance
The selection if various Waveform is made by selecting one of
the Sounds of the Synth Bank; the various waveforms shape
is shown on the display when the Sound is selected and can
vary from the standard Sawtooth and Square Waves, to the
Pulse with Modulation (a Pulse waveform with a modulated
with by a low frequency modulator) and FM or complex Synthesis waveforms.
The Synth Sounds (basic or complex) are controlled by the
nine Sliders, each one assigned to control a specic parameter, that allows to modify slightly or completely the starting
selected Synth Sounds.
Controls the frequency for the 2 poles low pass lter, use lower values in the range o to give more warm spectrum to the
sound; at higher levels the sound becomes more brilliant, as
the lter let pass thru it all frequencies of the selected Waveform of the starting sound.
When the setting is raised to mid-hi values, the lter starts
to emphasize the frequencies around the Cuto value; this
feature can be used to create analog-style eects, as well as
make a part of the Sound spectrum emphasized by an accurate setting of the Resonance.
20
Numa Compact 2x by Studiologic®
0
-6
FREQUENCY (Hz)
-12
0
-6
FREQUENCY (Hz)
E
Synthesizer Engine
FILTER ENVELOPE
FREQUENCY
RELEASE
Slider 3 Slider 4 Slider 5
PLEASE NOTE:
If set at values too close to the maximum, the Resonance
could create a signal level gain and consequent distortion
possible problems of the overall sound; with hi levels of Resonance, the part Volume (Upper or Lower) should be reduced
proportionally, to avoid clippings or unwanted side-eects.
PLEASE NOTE:
Both Cuto and Resonance parameters are enabled to control any other Sound of the instrument
(not only Synth Sounds) making possible to edit the starting sound, as an example make a Strings
sound mellower or an Electric Piano sound emphasized at the Cuto Frequency with the addition
or a certain level of Resonance. As mentioned before, with some setting of the Cuto + Resonance
you might have to re-balance the part Volume, to avoid clippings of unwanted side-eects, unless
you want to reach a certain sound that could also include some clipping as a desired eect.
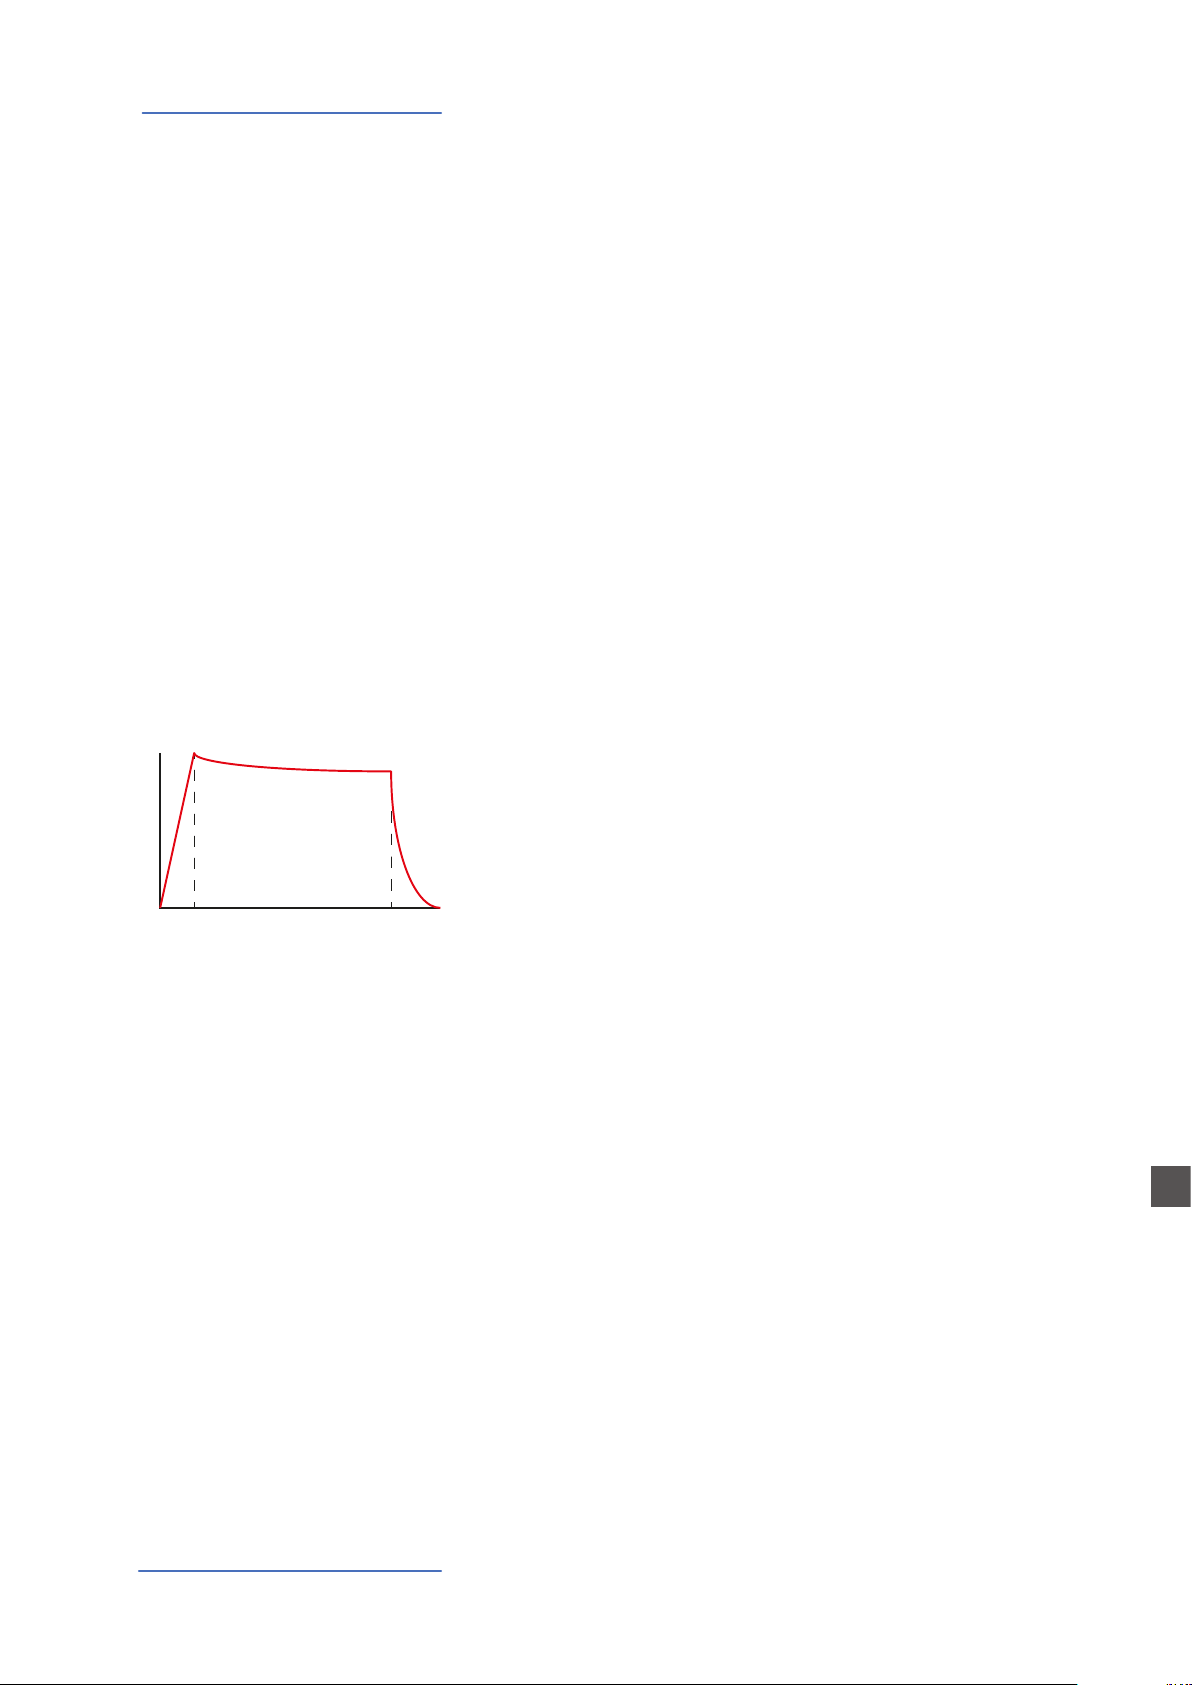
Filter and Amplitude
TIME
ATTACK DECAY
Envelope
A typical Synthesizer section is made of controls named ADSR
(Attack, Decay, Sustain, Release) and they are normally duplicated for the FILTER and the AMPLITUDE controlled sections.
The simplied parameters available on the NC2x are a sub-set
of these controls, selected from the ones more eective in
the instrument’s SYNTH engine sound generation.
The ATTACK Slider controls the time that the FILTER needs to
reach the desired CUTOFF starting frequency.
The DECAY Slider controls the time that the FILTER needs to
reach the nal CUTOFF frequency, when the keys are kept played.
NOTE: as a simplied setting, the DECAY also eects the SUSTAIN Level (a parameter not listed within the nine Sliders) and
a long DECAY time will also simulate the nal Cuto Frequency
almost identical to the starting frequency: the sound will not
change after the ATTACK, while keeping the note played, or it
will change very slowly.
Numa Compact 2x by Studiologic®
21
The RELEASE Slider controls the time needed by the FILTER to
reach the nal Cuto when the Keys are released.
The LFO Rate and Speed allow to control the related parameters of the LFO that is internally assigned to the CUTOFF Frequency; as an example, setting the values in a certain way, while the Resonance is set to mid-hi levels, could create SOUDS
with a kind of looping WOW eect.
NOTE: this LFO’s destination is the FILTER, while the Modulation (Vibrato etc) is controlled either by the STICK 2 and the
AFTERTOUCH, allowing to select all possible combinations of
all settings.
E

Synthesizer Engine
AMPLITUDE ENVELOPE
FREQUENCY
RELEASE
Slider 8 Slider 9
TIME
ATTACK KEY ON
The last two sliders are controlling the ATTACK and DECAY of
the AMPLIFIER and they do not change the FILTER parameters,
that have separate A/D/R controls; they are able to create Slow
attacks and Long release eects, without any change on the
FILTER settings.
Please note that the A/R Amplier control are the nal block of
the SOUND Synthesis chain; as an example, if you want a long
Release on the FILTER you also have to set a long Release on
the Amplier, to make possible to hear the Filter Release when
the keys are rereleased, and so on.
Store
Once you have created a sound, also starting from a Synth
SOUND and making all possible variations with the nine available Sliders, you can STORE the result in a PROGRAM, as with
any other SOUND. When you will select the Synth SOUND, the
display will show a small image of the Slider settings, according to the selected focus (Lower or Upper parts) allowing you
to see the value-position of each Slider, further modify it and
save the result in the current or in another Program.
Numa Compact 2x by Studiologic®
22
E
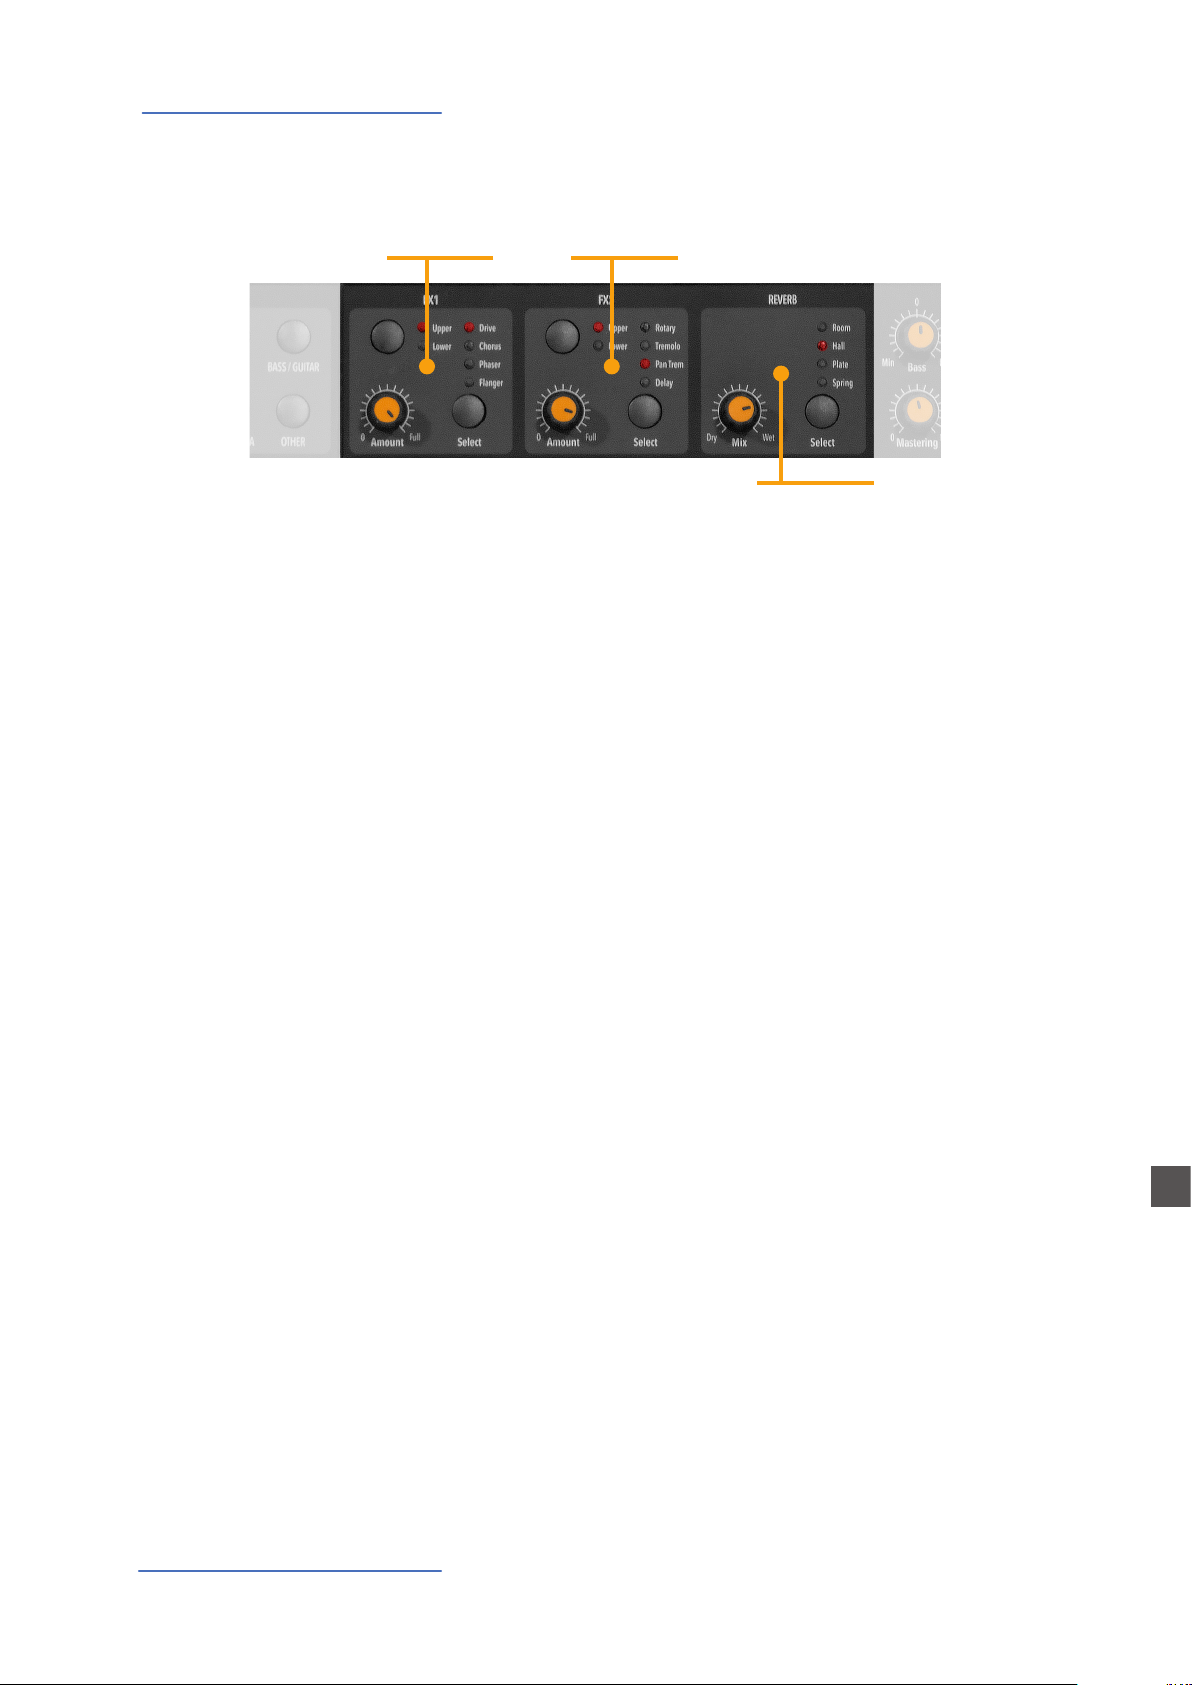
Eects
Eects
FX1
FX1 - FX2
FX2
REVERB
The 2 double eects processors allow to assign 2 separate effects to the Lower and Upper sections, for a total of 4 dierent
eects at once. As an example, the FX1 can be set to Drive for
the Upper section and, at the same time, to Chorus for the Lower section. Using the Upper/Lower button, you can toggle
between the related parts and show or select the eect for
that part. In addition, you will see or change the associated
FX using the 2 main LOWER and UPPER buttons below the
display.
You can visualize the Sound and FX structure and signal ow
as it follows:
Upper > FX1 (one of the four) > FX2 (one of the four) > Reverb
(programmable send in Edit)
Lower > FX1 (one of the four) > FX2 (one of the four) > Reverb
(programmable send in Edit)
Amount: the 2 potentiometers control the Amount of the
selected eect, like the dry/wet ratio (for modulating eects
like the Chorus) or other parameters, like the distortion level
of the DRIVE eects.
E
Numa Compact 2x by Studiologic®
23

Eects
FX Autoset
The FX Autoset function (a real-time function also explained
in the GLOBAL Edit section) automatically memorizes the last
selected FX 1-2 for each Sound, without the need of storing a
dedicated Program.
This real-time function will also control the association between the Stick2 and the Sound or FX controls (modulation or
eect speed etc) in a logic and automatic way. When a particular FX is selected on a section, the Stick 2 will control a
particular parameter, like the Slow/Fast speed of the Rotary
or the Speed and Feedback of the Phaser.
The control will also be automatically set according to the
focus position: if you have a Lower part without FX and the
focus on Lower, the Stick 2 will control the Modulation; if the
focus is on Upper and you have an Organ sound with Rotary,
the Stick 2 will control the Rotary Slow/Fast speed.
If the FX Autoset function is set to o (see the GLOBAL Edit
section) the function of the Stick 2 will be under Part EDIT,
with not automatic assignments, and you can store all settings in each Program.
STRINGS RESONANCE
(Damper model)
With the FX Autoset o, the automatic association between
each sound and the last selected FX will be disabled and the
FX selection will be only manual or controlled by the FX setting stored in each of the 99 Program.
In addition to the powerful FX1-2 double eect processors,
the Numa Compact 2x also has a built in STRINGS RESONANCE post-processing eect, dedicated to the ACOUSTIC
PIANOS sound bank and controlled by the related parameter
of the GLOBAL EDIT. This eect, created using the experience
of the Numa STAGE and CONCERT renowned Studiologic instruments, adds an even more realistic eect to the piano
sounds, reproducing the resonances of the real strings and
sound boards of the acoustic instrument.
E
Numa Compact 2x by Studiologic®
24

Global edit
Global edit
To enable the GLOBAL edit, keep pressed the EDIT button for a few seconds; you will nd various
pages (shown on the top right area of the display) with functions that will aect the instrument,
regardless what Program is selected. To escape from the function, press again the EDIT button and
all settings will be memorized automatically.
When the focus (cursor) is on the top area of the display, rotating the encoder you can select the
various pages; clicking on the cursor, the focus will be moved on the parameter and rotating the
encoder you can change the related value.
The GLOBAL EDIT main functions are:
TRANSPOSER
GLOBAL TUNER
VELOCITY CURVE
FIXED CURVE
STRINGS RESONANCE
DAMPER EFFECT
You can transpose the instrument to any other key; click on
the encoder to move the cursor on the value and rotate it to
input the desired transposition range.
This function allows to “tune” the instrument, in case you
have to play along with another instrument that is not tuned
to the standard (A=440 Hz).
You can select a dierent velocity curve, according to your taste and playing technique. There are 3 factory curves (SOFT/
NORMAL/HARD) and a programmable FIXED velocity setting,
with the related value.
You can set here the xed velocity value (from 1 to 127) when
the FIXED velocity is selected.
Here you can control the amount of the STRINGS RESONANCE
post-processing, that adds a more realistic eect to all acoustic
PIANO sounds. Please note that the CONCERT GRAND sound
also has a separate “release and resonance” built in natural effect, not controlled by this parameter.
HEADPHONES MODE
Numa Compact 2x by Studiologic®
25
When the parameter is set to AUTO ON, plugging the headphones will automatically switch o the internal amplication system.
If the parameter is set to AUTO OFF, the internal amplication
system will be active also when a jack is inserted in the Headphones plug; this will allow to use the headphones out as an
extra auxiliary output, for recording or to connect it to an active-amplied subwoofer, in addition to the internal speakers.
E
Global edit
PEDAL 2
FX AUTOSET
While the PED1 is always suitable for expression-volume pedals, the PED2 can be programmed to connect almost all possible pedals, as it follows:
• SINGLE SWITCH normally open;
• SINGLE SWITCH normally closed;
• EXPRESSION (volume function, pedals with potentiometer
and stereo plug);
• SLP3-D – Triple pedal with Soft/Sostenuto/Sustain function with half-damper control.
When the function is set to AUTO ON, the following automatic
functions are enabled:
The last selected eects (FX1-2) for each sound are memorized
by the instrument, allowing to select a sound and the related
preferred eect, with no need of storing the combination in a
Program. The FX Autoset not only will memorize and recall the
eects associated by the user for each sound, but also the value of the parameters controlled by the Stick 2 for each eect.
The STICK 2 control will be automatically assigned to a function, according to the setting and the position of the FOCUS
/ cursor.
If the focus is on UPPER (as an example) and you have selected
an Organ sound with the ROTARY eect, the STICK2 will control
the Rotary SLOW/FAST speed.
If you move the focus on LOWER (by clicking on the encoder
or pressing the LOWER button) and you have another FX on
Lower, the STICK2 will control the LOWER eect.
If you don’t have any FX on a section (LOWER or UPPER) and
you move the focus on it, the STICK 2 will control the MODULATION on the selected section.
As a typical example, imagine to have an ORGAN on UPPER
with Rotary and a BASS on LOWER with no eects: moving the
cursor on UPPER, the Stick 2 will control the Rotary Speed; moving the focus on LOWER; the STICK2 will control the Modulation.
E
Numa Compact 2x by Studiologic®
26
Note: this automatic function is an arbitrary selection done by
the instrument, based on a statistic playing situation; if you
want to control all parameters directly and manually, you can
set the function to OFF and select the function of the STICK 2
in the related PART EDIT; storing the desired setting in a PROGRAM.
Global edit
SLIDER MODE DIRECT/SNAP
CLICK KEY ON /
CLICK KEY OFF
The 9 Sliders (Drawbars in Organ mode) can have two dierent
way of operate, to be selected in the related Global Edit page,
according to your preferences and playing needs.
Selecting the DIRECT mode, when a Slider/Drawbar is moved,
the new value corresponding to the physical position is immediatly read and sent to the Sound generation, allowing to
instantly input the new value, from 0 to 8 in Drawbars-Organ
mode and from 1 to 127 in Slider mode, either for Synth parameters and MIDI assignable values.
Selecting the SNAP mode, when a Slider/Drawbar is moved,
new values are read and updated one after the new position
corresponds to the original stored value; as an example, if the
Cuto value of a Sound was 100, the Slider will input a new
value only after you reach the original 100 position.
The Key Click adds the typical noise associated with the tone
wheels vintage organ‘s technology that became part of their
sound. With the related Key ON and key OFF controls you can
set the level of the noise according to your taste: this Global
Edit function allows to control the Click level separately for Key
on and Key O, in order to reach the desired eect when playing the keys and when releasing them.
FAST/SLOW PERCUSSION
VOLUME
SYSEX FILTER
This GLOBAL function allows to control the Percussion Volume; the original Tonewheel Organs had a direct panel control
for the Percussion Volume, but it was made of 2 steps: SOFT
or NORMAL- With this Global parameter you have a continous
control on the Percussion level with 64 values, independently
associated to the Fast and Slow decay.
To lter (cut out) some MIDI message (besides the standard
ones) when merging a MIDI in source to the selected destination
E
Numa Compact 2x by Studiologic®
27

Global edit
PROGRAMS SEND / RECEIVE
This function allows to send or receive all Programs to your
computer (PC or Mac). Once the function is selected, rotating
the encoder you can select SEND or RECEIVE, with the following procedures.
WINDOWS
You can use a program like MIDI-Ox as it follows (be sure that
the Numa Compact 2x is seen by the computer USB/MIDI ports
and MIDI-Ox settings).
To send data to your computer:
- Connect the Numa Compact 2x to your computer via USB;
- Open MIDI-Ox and choose View/Sysex;
- In the Sysex window, choose Sysex > Receive manual dump;
- Click on the encoder when the GLOBAL function SEND is
active, conrm YES and wait till is done;
- In the MIDI-Ox Display Window, save the Bulk data in a le;
- When the dump is completed, choose Display Window > Save
as... ;
- Save with the name you prefer;
To receive the data back to your instrument:
- In the PROGRAMS SEND/RECEIVE window select RECEIVE
- Open MIDI-Ox, in the Sysex window, choose Command >
Window > Load File and navigate the location where you
stored the le.
- Choose Command Window > Send Sysex and wait till done.
MAC OS
You can use a program like SysEx Librarian as it follows (be sure
that the Numa Compact 2x is seen by the computer USB/MIDI
ports and SysEx Librarian settings).
To send data to your computer:
- Open SysEx Librarian;
- In the toolbar, select “Numa Compact 2x” as device;
- Click “Record many” button on SysEx Librarian;
- Click on the encoder when the GLOBAL function SEND is
active, conrm YES and wait till is done;
- When the transmission is done, press the Done button in
SysEx Librarian.
E
Numa Compact 2x by Studiologic®
28
To receive the data back to your instrument:
- In the PROGRAMS SEND/RECEIVE window select RECEIVE
- In SysEx Librarian’s toolbar, there’s a pop-up menu named
Destination. Click it and choose the MIDI port that you want
to send to.
- In SysEx Librarian select the right le from the list of Sysex les
and press “Play” button to transfer it.

Global edit
FACTORY RESET
FIRMWARE VERSION
AND UPDATE
This function allows to make a complete Factory Reset, that
will cancel all user settings and reset all factory parameters to
the original status. Please note that this could make you lose
custom settings or programming and the function should be
done very carefully. To protect the user from unwanted reset,
a caution YES/NO message appears when trying to reset the
unit, allowing to conrm or not the factory restore.
To update the Firmware (upload) follow these steps:
- Download the rmware from www.studiologic-music.com
and save it in a known folder;
- Connect the instrument to the power and then to your
computer with the USB cable;
- Verify that is seen by your computer and selected as MIDI Out
device, in the related settings;
- Turn on the instrument while keeping pressed the A0 (rst
white key on the left) and D1 (fourth white key from the left);
the display will show the message “Firmware Upload”;
- Open any program able to “play” a midile (i.e. MIDI-Ox for
PC, QMidi for Mac etc);
MIDI-Ox:
- Open MIDI-Ox
- In the menu bar, choose Actions > Play MIDI... , MIDI Bar
will be opened;
- In the MIDI BAR windows, click on “Select MCI Port” button
and select Numa Compact 2x;
- In MIDI BAR open the le you have downloaded;
- Press the play button and wait for the end of the
procedure;
- When the Numa Compact 2x display shows
“UPLOAD FINISHED”, restart the instrument (o and on).
Numa Compact 2x by Studiologic®
29
QMidi:
- Open QMidi;
- Select the rmware le you have downloaded;
- In the menu bar choose QMidi > Audio/MIDI settings and
select Numa Compact 2x as output device;
- In the main window press the play button and wait for the
complete procedure;
- When the Numa Compact 2x display shows
“UPLOAD FINISHED”, restart the instrument (o and on).
E

PROGRAM EDIT [1/3]
PROGRAM EDIT [2/3]
C4
MIXER
P01-JAZZ DUET
A0 - B3
C4 - C8
PROGRAM EDIT [1/3]
Program edit
Program edit
If the focus (cursor) is on the upper part of the display on Programs selection, pressing the EDIT
button will enable the Program Edit, with the following parameter and settings.
Ac-Bass
V: 127
Concert
V: 127
PROGRAM NAME
PROGRAM NAME
JAZZ DUET
SPLIT POINT
SPLIT POINT
PROGRAM NAME
EDIT
JAZZ DUET
After having selected this function, click on the encoder and
input the letters of number rotating it; a small triangle will
show what digit you are editing.
To conrm the new name or keep the previous, press STORE
and a popup window will ask you to conrm the change or
not, rotating the encoder to YES or NO and conrm by clicking.
This function allows to select the SPLIT point for each PROGRAM, by rotating the encoder till the desired note is shown.
Please note that, as per international standard, the instrument keyboard is named from A0 (rst key on the left) to C8
(last key on the right) and consequently the middle C below
the display is C4. The reference pitch of A=440 Hz is on A4,
the A of the same octave of C4 (below the sound banks) for all
sounds that are based on the standard 8’ of the piano range.
Only some ORGAN sounds will play one octave below, if based on a 16’ pitch drawbar of the vintage tone wheel organs
or the related Pipe Organs 16’ classic organ stops; in these
cases the foundamental of the selected sound on A4 will be
220 Hz (one octave below 440 Hz).
30
MIXER
L 127 U 127
A
Numa Compact 2x by Studiologic®
64 B 64
The Mixer allows to control all four parts and zones (LOWER/
UPPER/ZONEA/ZONEB) at once, in a single organized page.
This function can also be accessed with a shortcut, keeping
pressed the SPLIT button also marked MIXER with brackets.
E

Part edit
PART EDIT [1/11]
127
127
PART EDIT [2/11]
P01-JAZZ DUET
A0 - B3
C4 - C8
PART EDIT [1/11]
Part edit
If the focus is on one of the parts and you are in SOUND mode (with the SOUND button selected
and lighted) you will enter in the PART edit mode. When you have selected PART edit you can always press the LOWER or UPPER buttons to select the part to be edited, or click on the encoder.
Ac-Bass
V: 127
Concert
V: 127
SOUND
The PART EDIT includes the following parameters:
VOLUME
Rotating the encoder, after having moved the focus on the
parameter by clicking on it, you can control the selected part
VOLUME
VOLUME
SPLIT ASSIGN
Volume, in a range from 0 to 127.
Once you have selected the SPLIT point for the current PROGRAM (ref: PROGRAM EDIT) you can decide where the selected
SPLIT ASSIGN
TO LEFT
SPLIT ASSIGN
TO RIGHT
LOWER or UPPER section (either for the SOUND and MIDI zones) should play, in a totally independent way as it follows:
TO LEFT: the part will play to the left section of the keyboard
(from A0 to the SPLIT note);
TO RIGHT: the part will play to the right section of the keyboard
(from the SPLIT note to C8);
TO ALL: the part will play with no split all over the keyboard.
EDIT
VOLUME
127
VOLUME
127
Numa Compact 2x by Studiologic®
31
This function will allow many musical combinations, such as
the few following examples and their opposite settings:
PIANO on the right + BASS on the left, of the split point;
PIANO and STRINGS on the right + MIDI ZONES on the left
(controlling external devices);
ORGAN on the entire keyboard (TO ALL) and CHOIR on the
right part only.
Even with one SPLIT point (programmable for each PROGRAM)
the possible settings are almost one hundred, considering the
status and combinations of LOWER+UPPER+ZONEA+ZONEB
and the SPLIT settings made possible by this function.
E

Part edit
PART EDIT [3/11]
PART EDIT [4/11]
0
0
PART EDIT [6/11]
64
PART EDIT [7/11]
ON
ON
PART EDIT [5/11]
0
TRANSPOSE
TRANSPOSE0TRANSPOSE
0
OCTAVE
OCTAVE
OCTAVE
This function allows to transpose a part; dierently from the
GLOBAL TRANSPOSER, that will eects the entire instrument,
this function can be set independently for each SOUND section or MIDI zone and stored in each PROGRAM, with dierent
values. Interesting combinations are obtained by transposing
a sound with musical intervals, like a lower quint = minus 5
semitones, to get what is commonly known as a “cluster” with
xed intervals. Try to select a TRUMPET on UPPER and a SAX on
LOWER, setting the SAX 5 semitones lower, in a typical JAZZ
setting.
You can set the octave (intervals of 12 semitones each) separately for each part; normally you will need to move a LOWER
part one or two octave up, if you want to play chords in a better range. On the other way, sometimes you can get a better
sound, when the SPLIT is activated, if you move the UPPER part
one or two octaves down, as you could prefer if you select a TENOR sax in combination with a splitted BASS sound on the left,
since the Sax lower and nicer notes could probably be on the
left of the splitted keyboard portion. Simply experiment the
setting you prefer and then store it in the current PROGRAM.
FINE TUNING
FINE TUNE0FINE TUNE
REV SEND
REV REND64REV SEND
PEDAL 1 PEDAL 2
PEDAL 1
PEDAL 1
This parameter allows tone- tune the Upper and Lower
sounds within a semitone range; it could be useful to create “beating” sligthly detuned sounds, when assigning a
pure Waveform to both sections (i.e. Sawtooth, Square
etc) or enhance some Orchestral 2 sections mix, making
it reacher.
The function allows to control the amount of signal to be sent
to the REVERB processor, independently for the LOWER and
UPPER parts and programmable with dierent settings for
each PROGRAM. As a typical setting, if you SPLIT the keyboard
and assign a BASS sound to the left, you might want to reduce
or minimize the amount of REVERB on the left part, or control
the setting also on the UPPER part to get the desired eect. The
MIX potentiometer, on the front panel, will change the overall
reverberation mix (Dry/Wet) with any reverb type selected or
send value.
Here you can decide if the pedals are enabled or not for each
section (UPPER/LOWER or ZONEA and ZONE B if the MIDI button is activated).
E
Numa Compact 2x by Studiologic®
32

Part edit
PART EDIT [11/11]
ON
PART EDIT [9/11]
STICK 1 STICK 2
STICK 1
ON
AFTERTOUCH
A.TOUCHONA.TOUCH
STICK 1
ON
As for the pedals, also the Sticks can be enabled separately for
the Parts and Zones; please note that the Stick 2 will be set
automatically to AUTO if the related FX-AUTOSET function is
set to ON in the GLOBAL EDIT area. To control the Stick 2 assignment manually, you can set to OFF the FX-AUTOSET and
the function can be switched ON or OFF and stored in the Programs.
This parameter enables or disables the aftertouch function on the selected Part or Zone; the function of the
Aftertouch will be in most cases similar-same of the Stick
2 modulation control, adding some kind of vibrato or similar modulation to the sound, according to the setting.
Normally you will set the Aftertouch ON for the UPPER
part, that is commonly used for the main musical part or
solo performances, while the LOWER part is normally associated to accompaniments or bass lines, if the SPLIT is
active.
Numa Compact 2x by Studiologic®
33
E

MIDI (Zone edit)
MIDI
The NC2x has a complete MIDI Implementation, that includes 2 separate software MIDI Ports, that
you can see connecting the instrument with the USB Cable to your computer, named KEYBOARD
and CONTROLLER ports (PORT 2 and PORT 2).
The KEYBOARD port is programmed to send and receive all MIDI controls related to the internal
SOUNDS, EFFECTS and PROGRAMS, allowing to control all functions of the instrument, sending and
receiving what you physically do on it, from the notes you play on the keyboard, to the SOUNDS
you select on the 2 local sections (Upper and Lower) and for the other 2 additional sections (Part3
and Part4) that can be played via MIDI. Via MIDI you can also set the Part 3 and Part 3 SOUNDS and
Reverb levels (they cannot be sent to the internal Eects) creating a total of 4 parts MIDI Sequence.
You can play a Drums & Bass groove on MIDI CH3 and 4 and record a live part on UPPER and/or
LOWER, creating a 4 part arrangement of any kind.
The four KEYBOARD Parts (as summarized in the MIDI IMPLEMENTATION CHART at the end of this
manual) have a separate MIDI Channel each one, corresponding to the following MIDI structure:
KEYBOARD MIDI PORT
Upper= MIDI Ch1 (send and receive) Part3: MIDI Ch3 (receive only)
Lower= MIDI Ch2 (send and receive) Part 4: MIDI Ch4 (receive only)
MIDI KEYBOARD
• CONTROLLER PORT
• CONTROLLER PORT
USBMIDI
• KEYBOARD PORT
numacompact 2x
All real time Panel controls (Organ Drawbars and Synth Sliders, SOUNDS, FX selection and related
Amounts and settings etc) are sent and received, as listed in the MIDI IMPLEMENTATION CHART.
The last four potenziometers are only for local settings (VOLUME, MASTERING, BASS & TREBLE) as
they should not be sent or received via MIDI.
E
In other words, anything you do and play on the NC2x can be transmitted, recorded and received
via MIDI, allowing a full control of all functions.
The second separate MIDI PORT is dedicated to the CONTROLLER section (ZONE A and ZONE B)
and thru this separate PORT you can send all MIDI controls related to the MIDI Zones and their related settings, controls, Stick functions (Pitch and Modulation, as well as the Aftertouch) etc.
Being this PORT 2 related to the MIDI function, the IMPLEMENTATION only includes the SENT MIDI
Messages, while no MIDI controls are needed and implemented as MIDI IN.
Numa Compact 2x by Studiologic®
34

MIDI (Zone edit)
ZONE EDIT [1/16]
0
ZONE EDIT [2/16]
0
ZONE EDIT [4/16]
P01-JAZZ DUET
ZONE EDIT [1/16]
0
Naturally this double KEYBOARD/CONTROLLER PORT structure is meant to be used when a MIDIUSB connection is made to a Computer.
As explained in the GLOBAL EDIT parameters, the COMMON Midi channel allows to send all incoming MIDI data (notes etc) to the main instrument’s section, allowing to change the main PROGRAMS and play the instrument’s UPPER and LOWER parts as you would play on the local keyboard (with Split or Layers, the related key range etc).
Connecting the NC2x via MIDI OUT (not USB) the instrument only transmits the implemented
CONTROLLER messages when you connect a physical MIDI cable to the MIDI OUT socket.
Program edit
The PROGRAM EDIT, explained in the related chapter, is common for SOUND and MIDI; it refers
to general parameters associated to both the SOUND and MIDI sections. With the following ZONE
EDIT chapters you can set the specic MIDI Zone parameters according to your choices and STORE
them in the same Program, under the same name and number, with all the other parameters set
for the internal SOUNDS.
Zone edit
If the focus is on one of the zones and you are in MIDI mode (with the MIDI button selected and
lighted) you will enter in the ZONE edit mode; when you have selected ZONE edit you can always
press the ZONE A or ZONE B buttons to select the zone to be edited, or click on the encoder to
move the cursor/focus as for all other instrument’s functions.
MIDI
Zone A
V: 64
A0 - B3
Zone B
V: 64
C4 - C8
PRG CHG0PRG CHG
EDIT
The ZONE EDIT includes the following parameters:
PROGRAM CHANGE
Here you can input the Program Change number of the controlled device or sound generator, referring to the specic
PRG CHG0PRG CHG
Sound Map of the connected device/vst/sound generator.
The value range is 1-127.
LSB - MSB
LSB stands for Least signicant Byte, MSB stands for Most
signicant byte and they allow to control and select more
BANK LSB0BANK LSB
banks of the standard 127 Program Changes or many other
functions, dened by the MIDI standards; to input the correct
numbers, you have to refer to the implementation chart of
the controlled device, where each Sound is dened with the
MIDI data to select and control it.
E
MIDI CHANNEL
MIDI CH
2
Numa Compact 2x by Studiologic®
35
You can select the MIDI channel (value 1-16) for each Zone,
to control 2 dierent external devices or sound generators.
MIDI CH
1

MIDI (Zone edit)
ZONE EDIT [5/16]
ZONE EDIT [6/16]
TO LEFT
TO RIGHT
ZONE EDIT [7/16]
ZONE EDIT [8/16]
0
0
ZONE EDIT [9/16]
ON
ON
ZONE EDIT [11/16]
ON
ON
VOLUME
VOLUME
64
SPLIT ASSIGN
SPLIT ASSIGN
SPLIT ASSIGN
VOLUME
64
Rotating the encoder, after having moved the focus on the parameter by clicking on it, you can control the selected part Volume, in a range from 0 to 127; the Zone volumes can be controlled directly also not in EDIT mode, when the MIDI button is
lighted and the cursor-focus is on one of the Zones.
Once you have selected the SPLIT point for the current PROGRAM (ref: PROGRAM EDIT) you can decide where the selected
ZONE should play, in a totally independent way as it follows:
TO LEFT: the zone will play to the left section of the keyboard
(from A0 to the SPLIT note);
TO RIGHT: the zone will play to the right section of the keyboard (from the SPLIT note to C8);
TO ALL: the zone will play with no split all over the keyboard.
Even with one common SPLIT point (programmable for
each PROGRAM) the possible settings are almost one
hundred, considering the status and combinations of
LOWER+UPPER+ZONEA+ZONEB and the SPLIT settings made
possible by this function.
TRANSPOSE
TRANSPOSE0TRANSPOSE
0
OCTAVE
OCTAVE
OCTAVE
PEDAL 1 - PEDAL 2
PEDAL 1
PEDAL 1
STICK 1 - STICK 2
STICK 1
STICK 1
This function allows to transpose a Zone; dierently from the
GLOBAL TRANSPOSER, that will eect the entire instrument,
this function can be set independently for each MIDI zone and
stored in each PROGRAM, with dierent values.
You can set the octave (intervals of 12 semitones each) separately for each Zone; normally you will need to move a zone one
or two octave up, to the LEFT Zone of a split keyboard, to play
chords in a better range. On the other way, sometimes you can
get a better sound if you move the UPPER zone one or two octaves down; simply experiment the setting you prefer and then
store it in the current PROGRAM.
Here you can decide if the pedals are enabled or not for each
Zone independently, according to where the cursor-focus is
set (on ZONE A or ZONE B).
As for the pedals, also the Sticks can be enabled separately for
the Zones; please note that the Stick 2 will be set automatically
to AUTO if the related FX-AUTOSET function is set to ON in the
GLOBAL EDIT area. To control the Stick 2 assignment manually,
you can set to OFF the FX-AUTOSET and the function can be
switched ON or OFF and stored in the Programs.
E
Numa Compact 2x by Studiologic®
36

MIDI (Zone edit)
ZONE EDIT [13/16]
ZONE EDIT [14/16]
ZONE EDIT [15/16]
0
ZONE EDIT [16/16]
127
127
AFTERTOUCH
This parameter enables or disables the aftertouch function on
the selected Zone; the function of the Aftertouch will be in
A.TOUCHONA.TOUCH
ON
most cases similar-same of the Stick 2 modulation control, adding some kind of vibrato or similar modulation to the sound,
according to the setting. Normally you will set the Aftertouch
ON for the UPPER zone, that is commonly used for the main
musical zone or solo performances, while the LOWER zone is
normally associated to accompaniments or bass lines, if the
SPLIT is active, however the setting is totally under your control and choice.
Sliders Programming
Selecting one of the pages dedicated to Sliders programming, moving one of the Sliders will automatically enable the selected editing for that Slider; repeating the procedure for each Slider will
allow you to make the complete Sliders programming, for the various functions and settings.
All sliders settings can be memorized in any Programs, with same procedure of the Store Function.
CC SLIDER
This page allows to select the CC function for each one of the
nine sliders, some selection is only numeric, if the related CC
CC SLIDER 1
00-BankSel
CC SLIDER 1
01-ModWhl
is generally undened by a standard, while others are also referring to the name of the function, in addition to the number,
such as cc 64 = Damper etc.
MIN SLIDER
Selecting this function, for each slider, you can decide the MIDI
value sent by the Slider when is moved on the lowest position,
MIN SLIDER 10MIN SLIDER 1
MAX SLIDER
(with the function programmed in the page CC Slider).
Selecting this function, for each slider, you can decide the MIDI
value sent by the Slider when is moved on the top-highest po-
MAX SLIDER 1
MAX SLIDER 1
sition.
The MIN and MAX Sliders values determine the total range of the selected function, as well as the
direction of the programmed control.
Setting the MIN Slider to hi values (for instance 127) and the MAX Slider to lower values (for instance:
0) the result is a reversed control, from MAX (top position) to MIN (lowest position) as can be requested to control Drawbars settings of some Organ VST on your computer.
These settings allow to create for the MIDI Sliders similar functions of an ORGAN or SYNTH sound,
where the Drawbars and Sliders are automatically associated to the selected Sound, with the related
MIN/MAX dierent positions; to increase the Drawbars volume you will pull down the sliders, while
the selected Slider’s function will increase moving the slider to the top position.
E
Numa Compact 2x by Studiologic®
37

Declarations
Warranty
CE-Conformity
Every product from Studiologic by Fatar has been carefully manufactured, calibrated and tested, and carries a warranty. Damage caused
by incorrect transport, mounting or handling is not covered by this
warranty. Compensation amounting to more than the price of the
device is excluded. For any further informations please refer exlusively to your dealer and/or local distributor. This is based on general
terms and condition of the local distributor / FATAR srl, Italy.
FATAR srl
Zona Ind.le Squartabue
62019 Recanati MC Italy
declares that this product complies with the European Directives:
2004/108//EC EMC Directive
DIN EN 55013 EMC radio disturbance of sound, TV and
associated equipment
DIN EN 55020 EMC immunity of sound, TV and
associated equipment
Recanati, 17. 01. 2017 Marco Ragni, Chief Executive Ocer
This declaration becomes invalid if the device is modied without
approval.
RoHS-Conformity
RoHS
compliant
2002/95/EC
Disposal / WEEE
State of the art
Trademarks
Copyright
This product is manufactured according to the 2002/95/EC directive.
The purpose of this EC Directive 2003/108/EC is, as a rst priority, the
prevention of waste electrical and electronic equipment (WEEE), and
in addition, the reuse, recycling and other forms of recovery of such
wastes so as to reduce the disposal of waste. Please help to keep our
environment clean.
To ensure maximum quality all Studiologic by Fatar devices are always engineered to be state-of-the-art products, therefore updates,
modications and improvements are made without prior notice.
Technical specication and product appearance may vary from this
manual.
All trademarks used in this manual belong to their respective owners.
No part of this manual may be reproduced or transmitted in any form
or by any means without prior consent of the copyright owner:
E
Numa Compact 2x by Studiologic®
38
FATAR Srl
Zona Ind.le Squartabue
62019 Recanati, Italy

ITALIANO
Numa Compact 2x
Manuale d‘uso
I
Numa Compact 2x by Studiologic®
39

Indice
Informazioni di sicurezza
Il tuo nuovo Numa Compact 2x
Alimentazione - Ingressi e connessioni
Pannello - Display e navigazione
Banchi suoni e sezione suoni
Modello di organo
42
43
43
44
44
47
47
47
47
48
48
48
49
50
50
50
51
52
53
54
55
56
56
Panoramica del prodotto
Caratteristiche principali
Esempio d‘uso
Schema di funzionamento
Connessione alimentazione
Alimentazione USB
Pedali Universali / Espressione
Uscita audio
Cue
Volume
USB
Sound / MIDI
Demo
Split
Store - User programs
Modalità Sound
Introduzione
Drawbar
Tipiche impostazione dei Drawbar
Impostazioni originali dei Drawbar
Chorus e Vibrato
Percussioni
Motore di sintesi
Eetti
Global edit
57
57
57
58
59
60
61
61
62
62
62
62
62
62
63
63
64
64
64
64
65
66
66
Forme d‘onda
Cuto
Resonance
Inviluppo di Filter e Amplitude
Store
FX1- FX2
FX Autoset
String Resonance (Damper model)
Transposer
Global tuner
Velocity curve
Fixed curve
String resonance (Damper eect)
Headphones (mode)
Pedal 2
FX Autoset
Modalità Slider
Click Key
Volume percussione
Sisex lter
Factory reset
Firmware version and update
Programs send/receive
I
Numa Compact 2x by Studiologic®
40

Indice
Program edit
Part edit
MIDI (Zone edit)
67
67
67
68
68
69
69
69
69
69
70
70
72
72
72
73
73
73
73
73
73
74
74
Program name
Split point
Mixer
Volume
Split assign
Transpose
Octave
Fine tuning
Rev send
Pedal 1 - Pedal 2
Stick 1 - Stick 2
Aftertouch
Program Change
LSB - MSB
MIDI channel
Volume
Split assign
Transpose
Octave
Pedal 1 - Pedal 2
Stick 1 - Stick 2
Aftertouch
Programmazione degli Slider
Dichiarazioni
Appendix
75
154
158
162
164
MIDI Implementation chart
(Sezione Controller)
MIDI Implementation chart
(Sezione Keyboard)
Speciche
Dimensioni
I
Numa Compact 2x by Studiologic®
41

Informazioni di sicurezza
Importanti informazioni di sicurezza
Si prega di leggere l‘intero manuale. Esso contiene tutte le
informazioni di cui si ha bisogno per usare questa unità.
Si prega di seguire le istruzioni riportate nel manuale. La
garanzia sarà annullata se operazioni non autorizzate verranno
svolte sulla Numa Compact 2x. Solo gli accessori specicati dal
fabbricante devono essere utilizzati con questa unità. Utilizzare
l‘unità solo come specicato in questo manuale.
PERICOLO!
Rischio di scosse elettriche. Non aprire l‘unità. Non ci sono parti
riparabili dall‘utente. L‘unità deve essere riparata solo dal per-
sonale di assistenza tecnica.
Umidità
Al ne di ridurre rischi di incendio o di scossa elettrica, non esporre lo strumento alla pioggia o all‘umidità. Non lasciare mai
contenitori con liquidi sullo strumento. Non usare lo strumento vicino all‘acqua, piscina, vasca, posti bagnati. Se lo strumento viene spostato da un posto freddo ad una stanza calda, si
potrebbe formare della condensa all‘interno. Per evitare danni,
attendere che lo strumento raggiunga la temperatura della
stanza prima di accenderlo.
Installazione
Usa sempre un supporto stabile dove posizionare la tastiera,
facendo attenzione al suo peso e alle sue dimensioni.
Pulizia / Manutenzione
Non usare mai detergenti abrasivi che potrebbero danneggiare la supercie. Raccomandiamo l‘uso di un panno in microbra, leggermente umido.
Imballo
Conserva tutti gli elementi dell‘imballo ed usali se devi
trasportare lo strumento al centro di assistenza.
Informazioni principali
Prima di connettere lo strumento all‘alimentazione di rete,
vericare che questa sia adeguata all‘alimentatore del Numa
Compact 2x. L‘unità può essere alimentata a 100 - 240V con
l‘adattatore fornito.
Nota: il Numa Compact 2x può essere alimentato direttamente
dalla presa USB se connesso ad un PC o ad una alimentazione
compatibile.
I
Numa Compact 2x by Studiologic®
42

Il tuo nuovo Numa Compact 2x
Panoramica del prodotto
Il Numa Compact 2x è uno strumento musicale incredibilmente potente, racchiuso in un cabinet
elegante e leggero, basato su una tecnologia totalmente nuova e un‘interfaccia utente aggiornata.
La tastiera include il controllo „After Touch“ e, unitamente agli Sticks programmabili, consente di
avere un controllo totale della performance musicale. Il nuovo motore sonoro è in grado di gestire
128 note di polifonia e comprende due sezioni indipendenti (Lower e Upper) con più di 80 suoni,
organizzati in 8 banchi, assegnabili in qualsiasi zona della tastiera in modalità Layer o Split. La memoria ash di 1 GB di suoni è supportata da due processori di eetti (Fx1 e Fx2) ognuno dei quali
a doppia architettura interna per un totale di 4 eetti indipendenti simultanei.
L‘eetto di Risonanza delle Corde controllabile e i campioni al Rilascio-Staccato rendono il suono
del piano principale molto realistico, mentre il processore di riverbero stereofonico ne migliora
ulteriormente il suono. I controlli dei Bassi, degli Acuti e del Mastering consentono di ottenere una
qualità da Studio, percepibile anche attraverso gli amplicatori digitali e i diusori ellittici integrati.
Il Modulo Midi include 2 zone MIdi indipendenti e tutti i parametri possono essere programmati
e memorizzati.
Caratteristiche principali
Tastiera 88 note con Aftertouch
Stick 1: funzione Pitch Bend nei due assi
Stick 2: Sound Modulation e controllo FX1/2 (assignabile o auto-selection)
2 Amplificatori integrati da 10W + 2 diffusori ellitici a riflessione posteriore
Display Oled 128x64
Zone Lower e Upper
4 Sezioni programmabili (Suoni interni e MIDI esterno) in ogni combinazione
Modello di organo Tonewheel, con 9 drawbar che consentono migliaia di combinazioni possibili,
un tipo di percussione, un livello e un controllo Click, oltre a un post-processore Chorus / Vibrato
dedicato (simulando il vibrato analogico “Scanner“)
Sezione Synth, with 9 Sliders che controllano i parametri Synth più comuni
1 GB di memoria flash, 88 suoni organizzati in 8 Sound Banks
Couni di Concert Grand piano con capionamenti rilascio-staccato e effetto Strings Resonance
Cutoff and Resonance regolabili per tutti i suoni
Doppi processori di effetto FX1-2 - 4 effetti programmabilisimultanei
Riverbero Stereo con controllo di mandata separato per Lower e Upper
Strings Resonance (modello Damper) nei suoni di Piano acustico programmabile
2 Parti addizionali (canali MIDI 3 e 4)
Implementazione MIDI avanzata con una porta MIDI addizionale che include tutti i controlli sul
I
pannello dello strumento
Controlli di Bassi, Acuti e Mastering (3D+Compressor)
Connessioni: Usb, MIDI In/Out, Audio L/R, Cuffie, Pedale1-Pedale2
Alimentabile via USB
Numa Compact 2x by Studiologic®
43

Il tuo nuovo Numa Compact 2x
FX1
SPEAKERS
Esempio d‘uso
USB
PED2PED1
MIDI IN
MIDI OUT
Schema di funzionamento
1GB
Sound
engine
Stereo
reverb
UPPER
LOWER
UPPER
LOWER
Bass
Mastering
Treble
Volume
Suggested setting
FX2
FX1
FX2
Rev send
Rev send
Strings
resonance
Digital
amplier
Stereo
reverb
AUX out
L
AUDIO out
L
I
R
R
Numa Compact 2x by Studiologic®
44
BUILT-IN

Il tuo nuovo Numa Compact 2x
Panoramica delle funzioni del Numa Compact 2x:
Tastiera “Light Weighted“
8 Banchi di suoni
88 Suoni interni
FX1 - FX2- REV
Strings Resonance
Il Numa Compact 2x ore l‘ultima tecnologia innovativa di
Fatar: la sosticata tastiera pesata TP9 Piano con Aftertouch.
Il Numa Compact 2x pesa solo 7 Kg ed è quindi veramente
portabile, ore un tocco veramente professionale che ha reso
famosa la Fatar.
Puoi iniziare direttamente suonando i 88 suoni interni di alta
qualità accuratamente campionati. Tastieristi e musicisti con
molta esperienza hanno selezionato questi suoni e sono stati
coinvolti nella progettazione dell‘operatività di Numa Compact 2x. Per questo Numa Compact 2x è il partner perfetto sul
palco, in studio o a casa, in base al tuo modo di fare musica.
Sono disponibili 128 note di polifonia per aggiungere profondità ed espressione.
È possibile combinare due suoni assegnandoli alle sezioni
Lower e Upper in modalità Split o Layer, in ogni combinazione con le 2 Zone dedicate a moduli MIDI esterni. I due doppi
processori FX ti consentono di assegnare 2 dierenti tipi di
eetto ad entrambe le sezioni Lower e Upper, in aggiunta alla
sezione Riverbero per una varietà innta di combinazioni.
Mixer & Mastering
Amplicazione interna
Funzioni Master Keyboard
Connessioni audio
I controlli di Volume, Bassi, Acuti e Mastering consentono di
ottenere settaggi di suono preferiti e il sistema di amplicazione interno con diusori ellittici permette di suonare lo strumento con i suoi 10-10W controllati digitalmente ed equalizzati. Per il miglior risultato sonoro suggeriamo di posizionare
le quattro manopole a circa metà corsa, per evitare possibili distorzioni ed ottimizzare la resa sonora. Le regolazioni si
possono adattare ai suoni selezionati.
Le funzioni di masterkeyboard di Numa Compact 2x, con le 2
Zone programmabili, ti permettono di controllare altri strumenti Midi, selezionandone il suono e aggiustandone il livello direttamente dal Numa Compact 2x senza dover toccare
gli altri strumenti.
Oltre alle uscite audio stereo e al sistema di amplicazione
integrata, Numa Compact 2x ha l‘uscita per cua, ideale per
suonare a qualsiasi ora senza arrecare disturbo agli altri.
I
Numa Compact 2x by Studiologic®
45

Il tuo nuovo Numa Compact 2x
Interactive Numa
USB <> Computer
La confezione include
La porta integrata USB, ti permette di connettere Numa Compact 2x al tuo computer e di alimentarlo direttamente, senza
utilizzare l‘adattatore esterno (fornito). Puoi usare la porta
MIDI e la porta USB per la trasmissione dei dati MIDI. Puoi inoltre aggiornare il rmware e la libreria di suoni via USB.
Avvertenza: il sistema di amplicazione interno viene automaticamente disattivato quando lo strumento è alimentato
dalla porta USB al ne di evitare un consumo eccessivo.
Per la trasmissione dati via USB, collega il Numa Compact 2x
al computer con un cavo USB. Lo strumento sarà riconosciuto
automaticamente dal tuo computer appena acceso e il driver
sarà installato dal sistena operativo (cross compliant).
Numa Compact 2x
Alimentatore esterno
Manuale CD
Numa Compact 2x by Studiologic®
46
I

Alimentazione - Ingressi e connessioni
Alimentazione - Ingressi e connessioni
MIDI In-OutTasto On/O
Alimentazione
12V - 2,5A
Connessione alimentazione
Ped 1, Ped 2
Pedale Espressione,
Pedale universale
Porta USB
MIDI I/O, alimentazione,
aggiornamento rmware
Uscita audio L/R
2x 6,3mm mono jack
Cue / Aux Out
1x 6,3mm stereo jack
Usa l‘alimentatore fornito con lo strumento per connettere
la Numa Compact 2x all‘alimentazione (o usa la connessione USB). Accendi l‘unità utilizzando il pulsante posto vicino
alla presa di alimentazione del Numa Compact 2x, imposta il
Volume principale e i controlli di Bassi e Acuti alla posizione
intermedia e il controllo “Mastering” al valore minimo (la funzione sarà spiegata successivamente nel manuale) per evitare
di avere un livello audio di uscita eccessivo e permettere ai
diusori interni di suonare con una escursione dinamica corretta.
Alimentazione USB
Pedali Universali/Espressione
Uscita audio
Lo strumento può essere alimentato anche dall‘USB, utilizzando un cavo schermato di qualità certicata e assicurandosi che il computer abbia potenza suciente e non troppe
periferiche collegate nella stessa porta USB. Quando lo strumento è alimentato dalla porta USB, il sistema di amplicazione interno viene disabilitato per evitare che il consumo di
corrente sia eccessivo per il computer.
NOTA: in caso di connessione debole o instabile, utilizzare
l‘alimentazione tradizionale (vedi paragrafo precedente).
Connetti il pedale (opzionale) o i pedali ai due relativi ingressi (Ped1 e Ped2). Nell‘ingresso con l‘etichetta Ped1, puoi collegare il pedale Studiologic VP, usato per i controlli di Volume-Expression. All‘ingresso etichettato Ped2 puoi collegare
un pedale switch singolo, un pedale Volume-Expression o il
triplo pedale custom SLP3-D, come spiegato nel capitolo di
questa guida relativo ai pedali.
Per usare un sistema di amplicazione esterno, o registrare
il suono dello strumento, collegare le uscite audio L/R alle
entrate del vostro amplicatore o console, o alle entrate della
scheda audio del vostro computer, utilizzando cavi idonei.
I
Numa Compact 2x by Studiologic®
47

Alimentazione - Ingressi e connessioni
Cue
Volume
USB
L‘uscita cue può essere utilizzata con un set di cue o come
un‘uscita audio ausiliaria, in base alle impostazioni della
funzione GLOBAL EDIT (spiegata in questo manuale). Come
uscita audio ausiliaria, puoi usare questa connessione per
collegare lo strumento ad un subwoofer o ad un sistema di
amplicazione addizionale, lasciando le uscite L/R disponibili
per la registrazione o per altre connessioni audio.
Quando usi il Numa Compact 2x per la prima volta, ti raccomandiamo di impostare il Volume della sezione Output ad un
valore intermedio tra lo 0 e il massimo. Mentre suoni potrai
regolare il volume come desideri. La regolazione del Volume
agisce anche sul volume dell‘uscita per la cua.
CAUTION:
Attenzione: Al ne di revenire danni all‘udito, dovresti – come
per tutti i dispositivi audio – evitare di usare il Numa Compact
2x ad alti livelli di volume per lunghi periodi.
Per la trasmissione dei dati USB, collega il Numa Compact 2x
al tuo computer con un cavo USB. La prima volta che accendi
il Numa Compact 2x, esso verrà riconosciuto dal tuo computer automaticamente e i driver dedicati saranno installati dal
sistema operativo (cross compilant).
Numa Compact 2x by Studiologic®
48
I

Pannello - Display e navigazione
P01-JAZZ DUET
A0 - B3
C4 - C8
P01-JAZZ DUET
A0 - B3
C4 - C8
Pannello - Display e navigazione
Edit / Store
MIDI / Sound /
DEMO
Display
Display monocromatico
Lover - Upper
Selezione parti
e/o zone
Encoder
Rotazione + click
SPLIT / Mix
La pagina HOME del display del Numa Compact 2x è quella mostrata all‘accenzione ed è divisa in
3 aree principali: l‘area superiore indica il numero ed il nome di Program corrente, le aree inferiori
di sinistra e destra sono relative alle sezioni Lower e Upper nella modalità SOUND, e alle Zone A e
B dela modalità MIDI.
Per navigare e muovere il “focus“ (la posizione del cursore nel display) puoi usare tre controlli a
scelta:
a) Cliccando sull‘Encoder: il focus si sposterà tra le 3 posizioni principali: Programs, Lower e Upper;
b) Premendo i pulsanti Sound o Midi: il focus sisposterà nell‘area superiore;
c) Premendo i pulsanti Lower o Upper: il focus si posizionerà nelle aree relative.
Ac-Bass
V: 127
Concert
V: 127
Ac-Bass
V: 127
Concert
V: 127
UPPER
Quando il focus si trova nell‘area Program, ruotando l‘Encoder selezionerai i vari Programs.
Quando il focus si trova nelle aree Lower/Upper, ruotando l‘Encoder controllerai i volumi relativi.
Sound / MIDI
I due pulsanti etichettati SOUND e MIDI portano alternativamente alle due relative sezioni e controlli.
Quando è selezionato ed illuminato il pulsante SOUND,
l‘utente può controllare tutte le sezioni, selezioni, impostazioni, pagine edit e parametri delle sezioni SOUND.
Quando è selezionato e illuminato il pulsante MIDI, il display
mostrerà la stato delle Zone MIDI A e B e l‘utente potrà accedere a tutti i parametri disponibili, funzioni di edit e valori.
I
Numa Compact 2x by Studiologic®
49

Pannello - Display e navigazione
Demo
SPLIT
STORE / User Programs
Il pulsante SOUND può anche essere premuto a lungo per
abilitare le 8 DEMO songs (una per ogni banco) che suoneranno in sequenza; cliccando su un SOUND BANK puoi anche
selezionare la demo relativa. Alla ne di un brano partirà il
brano del banco successivo a ciclo continuo.
Questo pulsante è un controllo generale in tempo reale della
funzione Split, programmabile e controllata in tutti i suoi dettagli dalla funzione GLOBAL EDIT (Split Point) e PART EDIT (Split
Assign). Quest è un modo veloce per abilitare e disabilitare immediatamente lo SPLIT e suonare le parti UPPER o LOWER in
tutta la tastiera in modo Layer, senza split.
Come spiegato nelle sezioni EDIT, il pulsante SPLIT può anche
essere usato come scorciatoia per selezionare la pagina MIXER,
tenendolo premuto per alcuni secondi.
Il Numa Compact 2x ha 99 memorie programmambili dall’utente chiamate “Programs”, in cui puoi memorizzare i Suoni, i
controlli FX1/2, funzioni, split points e tutti i parametri editabili relativi alle MIDI ZONES, con un nme programmabile per
ciascun Program. Le uniche funzioni non memorizzabili sono:
VOLUME, BASS, TREBLE e MASTERING, dato che sono controlli
puramente real-time non legati ad un Program particolare.
Numa Compact 2x by Studiologic®
50
I

Banchi suoni e sezione suoni
P01-JAZZ DUET
A0 - B3
C4 - C8
A-PIANO [1/2]
Banchi suoni e sezioni suoni
SOUND BANKS
Selezione dei suoni
Modalità SOUND
Nella modalità SOUND, col pulsante relativo selezionato e illuminati, gli 8 Sound Banks posson
selezionare i suoni interni, organizzate organizzati secondo i nomi dei Bank. Ogni banco può avere
un numero variabile di suoni, organizzati in pagine di 4 suoni ciascuno. Selezionando un Bank,
potrai vedere nel display i suoni di quel Bank, quello corrente, il numero complessivo di pagine di
suoni del Bank (mostrato in alto a destra nel display) e il suono selezionato a colore invertito.
Per selezionare un altro suono del Bank corrente, ruota l‘encoder e tutti i suoni saranno mostrati e eselezionati in sequenza, dalla prima all‘ultima pagina del Bank. La selezion può esser fatta
nell‘arco di breve lasso di temnpo (approssimativamente 5 secondi) e l‘ultimo suono selezionato
verrà automaticamente memorizzato. Quando selezioni un Bank, il focus andrà automaticamente
nell‘ultimo Sound selezionado in modo da semplicare e velocizzare la selezione dei suoni, dopo
una prima selezione dei suoni. Grazie a questa funzione, avrai un‘impostazione automatica dei
tuoi suoni preferiti per ogni Bank.
Stage
Studio
SOUND
Ac-Bass
V: 127
Concert
V: 127
A-PIANO
Concert
Vintage
I
Numa Compact 2x by Studiologic®
51

Modello di organo
Introduzione
In un vero organo Tonewheel, 91 ruote in acciaio con lobi ruotano davanti a un pick-up costituito da un magnete a barra
permanente e una bobina. A causa della forma delle Tonewheel, il campo magnetico nel pick-up cambia periodicamente e genera un‘onda sinusoidale. Con 8 diverse forme di
timbri e 12 diversi gruppi di ingranaggi vengono generate 91
frequenze sinusoidali. Come nella sintesi additiva, le 91 frequenze sono la base per creare timbri sonori diversi. Per mezzo di un circuito complesso, il suono viene mixato su nove
drawbar, consentendo a un organo a toni di creare centinaia
di timbri sonori da sole 91 frequenze sinusoidali generate:
sono teoricamente possibili oltre 380 milioni di timbri. Per
generare un suono, Numa Compact 2 utilizza la modellazione
sica, un‘implementazione matematica dell‘organo a timone.
Grazie alla Tecnologia di modellazione, il Numa Compact 2x è
stato progettato per orire un‘ampia varietà di suoni, consentendo di creare combinazioni utilizzando i drawbar e tutti i relativi eetti post: Vibrato, Chorus, Percussion con armoniche
e controlli di decadimento, oltre a speciche GLOBAL Edit pagine per controllare funzionalità come i volumi separati Key
Click e Percussion. Il suono generato dal modello di organo
può essere inviato alla stessa catena di eetti di tutti gli altri
banchi di suoni, che possono migliorare ulteriormente la qualità del suono, con tutti i possibili eetti dal tipico Rotary al
disco, chorus, delay e molti altri . La banca sonora ORGAN di
Numa Compact 2x include questo nuovo clone di un organo
a ruota di tono con controlli Drawbars, con l‘aggiunta di organi elettronici e di pipa classica accuratamente campionati,
in una varietà completa di suoni d‘organo di tutti i tipi. I suoni
di Organo e tutti gli eetti associati e la post-elaborazione
possono essere memorizzati in ciascuno dei 99 programmi
disponibili.
I
Numa Compact 2x by Studiologic®
52

Modello di organo
Drawbar
I drawbar sono un tratto caratteristico di un organo Tonewheel, quindi li esamineremo per primi; un suono di organo
Tonewheel può essere composto da nove frequenze sinusoidali e ogni drawbar rappresenta un‘armonica della scala relativa all‘arresto di 8 ‚di un organo a canne (drawbar 3) che
viene anche chiamato “pitch nativo“.
I Drawbar 1 2 3 4 5 6 7 8 9 corrisponde ai piedi 16 ‚5 1/3‘ 8 ‚4‘ 2
2/3 ‚2‘ 1 3/5 ‚1 1/3‘ 1‘.
L‘etichettatura dei drawbar in piedi deriva dagli organi a canne, dove rappresenta la lunghezza di un tubo di riferimento
che suona la nota C è esattamente lunga 8 piedi (= 2,4 m).
NOTA: i primi due Slider sono fatti di un colore diverso per
mostrare che suonano “sotto“ lo standard 8‘ ‚di un Piano,
come anche negli organi a ruota del tono Vintage, dove i primi due Drawbar erano Brown, gli armonici Even sono erano
bianchi e le armoniche dispari erano nere. Nel NC2x mostrano principalmente che sono attivi su tutti i suoni come controlli dei parametri Synth, mentre gli altri Slider sono abilitati
solo per i suoni Synth Bank.
Quando una drawbar viene spinta no in fondo, la sua armonica è assente dal timbro, mentre il volume massimo per
la drawbar viene raggiunto quando lo si trascina completamente verso il basso e si vede la cifra 8 sul display, su un popup mostra ciò che appare ogni volta che muovi un Drawbar/
Slider. I drawbar regolano semplicemente i livelli tra di loro e
puoi cambiare e sentire il timbro mentre i tasti vengono premuti.
Con il tuo Numa Compact 2x puoi suonare due timbri diversi
allo stesso tempo, nelle sezioni Upper e Lower, in modalità Layer o Split poiché tutti gli altri suoni e le relative impostazioni
Drawbars sono visualizzati sul display in base alla posizione
del Focus (selezione dei pulsanti UPPER o LOWER) e lo spostamento dei Drawbar quando il focus è sulla parte selezionata.
I
Numa Compact 2x by Studiologic®
53

Modello di organo
876 5 4 3 2 1
876 5 4 3 2 1
876 5 4 3 2 1
876 5 4 3 2 1
876 5 4 3 2 1
876 5 4 3 2 1
876 5 4 3 2 1
876 5 4 3 2 1
876 5 4 3 2 1
876 5 4 3 2 1
876 5 4 3 2 1
876 5 4 3 2 1
876 5 4 3 2 1
876 5 4 3 2 1
876 5 4 3 2 1
876 5 4 3 2 1
876 5 4 3 2 1
876 5 4 3 2 1
876 5 4 3 2 1
876 5 4 3 2 1
876 5 4 3 2 1
876 5 4 3 2 1
876 5 4 3 2 1
876 5 4 3 2 1
876 5 4 3 2 1
876 5 4 3 2 1
876 5 4 3 2 1
876 5 4 3 2 1
876 5 4 3 2 1
876 5 4 3 2 1
876 5 4 3 2 1
876 5 4 3 2 1
876 5 4 3 2 1
876 5 4 3 2 1
876 5 4 3 2 1
876 5 4 3 2 1
876 5 4 3 2 1
876 5 4 3 2 1
876 5 4 3 2 1
876 5 4 3 2 1
876 5 4 3 2 1
876 5 4 3 2 1
876 5 4 3 2 1
876 5 4 3 2 1
876 5 4 3 2 1
876 5 4 3 2 1
876 5 4 3 2 1
876 5 4 3 2 1
876 5 4 3 2 1
876 5 4 3 2 1
876 5 4 3 2 1
876 5 4 3 2 1
876 5 4 3 2 1
876 5 4 3 2 1
Impostazioni tipiche
dei Drawbars
VINTAGE 1
88 8886 666
876 5 4 3 2 1
876 5 4 3 2 1
876 5 4 3 2 1
876 5 4 3 2 1
876 5 4 3 2 1
Ci sono migliaia di possibili esempi di impostazioni di Drawbars, resi famosi dagli organisti durante decenni di musica organistica dal vivo e registrata, e puoi trovare qui sotto alcune
delle più famose impostazioni di jazz, pop, gospel e rock.
L‘uso di una percussione o l‘aggiunta di un eetto Chorus o
Vibrato possono essere aggiunti secondo i tuoi gusti e puoi
trovare altri esempi nei Programmi Factory NC2x, che puoi
anche conservare o modicare secondo i tuoi gusti.
Ci sono molti libri che suggeriscono impostazioni per tutti i
tipi di musica, ma la caratteristica principale di Drawbars è la
totale libertà che ti permettono di usare, per ottenere il suono che ti piace e il “morphing“ da un‘impostazione all‘altra,
anche con slow e movimenti armoniosi, che fanno parte della
bellezza di questo modello di organo.
876 5 4 3 2 1
876 5 4 3 2 1
VINTAGE 2
88 6000 040
876 5 4 3 2 1
876 5 4 3 2 1
POP
88 8788 678
876 5 4 3 2 1
876 5 4 3 2 1
876 5 4 3 2 1
876 5 4 3 2 1
JAZZ SHUFFLE
80 0008 888
876 5 4 3 2 1
SWEET 1
86 8868 068
876 5 4 3 2 1
876 5 4 3 2 1
80 8000 008
876 5 4 3 2 1
876 5 4 3 2 1
876 5 4 3 2 1
SILK
THE BOSS
88 8000 000
876 5 4 3 2 1
876 5 4 3 2 1
876 5 4 3 2 1
876 5 4 3 2 1
876 5 4 3 2 1
876 5 4 3 2 1
876 5 4 3 2 1
876 5 4 3 2 1
SWEET 2
88 8666 888
876 5 4 3 2 1
876 5 4 3 2 1
876 5 4 3 2 1
876 5 4 3 2 1
876 5 4 3 2 1
876 5 4 3 2 1
876 5 4 3 2 1
876 5 4 3 2 1
REGGAE
80 8000 008
876 5 4 3 2 1
BALLAD
00 8400 000
876 5 4 3 2 1
876 5 4 3 2 1
I
FAT
88 8000 888
876 5 4 3 2 1
876 5 4 3 2 1
876 5 4 3 2 1
876 5 4 3 2 1
876 5 4 3 2 1
876 5 4 3 2 1
876 5 4 3 2 1
54
Numa Compact 2x by Studiologic®

Modello di organo
Original Drawbars settings
Negli organi Tonewheel vintage, principalmente nelle versioni Consolle (tastiera a 2x61 note), l‘ultima ottava a sinistra
è stata realizzata con colori invertiti, poiché quei tasti erano
dedicati alla selezione dei preset di fabbrica. In aggiunta erano presenti 2 gruppi di Drawbars per ogni tastiera (chiamati
Swell e Great come nell‘organo a canne), per i settaggi in tempo reale.
A quel tempo l‘associazione costruttori degli organi a canne
cercava di impedire, attraverso azioni legali, che gli strumenti
elettromeccanici (e qualsiasi altro strumento elettronico) potessero essere chiamati Organi e usati anche nelle chiese per
i servizi religiosi; per questo motivo uno dei tentativi fatti dai
produttori di strumenti elettromeccanici consisteva nel simulare i suoni degli organi a canne e nel nominare le preselezioni di fabbrica con i nomi tipici delle combinazioni di organo
classiche.
Il test uciale si è svolto in presenza di rappresentanti legali
e musicali negli Stati Uniti e ha visto gli strumenti elettromeccanici vincere la sda e poter essere chiamati Organi.
Le impostazioni di fabbrica dei livelli Drawbars erano principalmente intese ad imitare alcuni suoni tipici di organo a
canne ed erano impostazioni hardware cablate, che potevano essere modicate solo da tecnici esperti.
Di seguito sono riportati alcuni esempi delle milioni di combinazioni possibili.
French Horn
00 8740 000
Tibias
00 8408 004
Clarinet
00 8080 840
Novel Solo
08 8800 880
Theater Solo
60 8088 000
Trumpet
00 6888 654
Full Theater Brass‘
76 8878 667
Stopped Flute
00 5320 000
Dulciana
00 4432 000
French Horn
00 8740 000
Oboe Horn
00 4675 300
Swell Diapason
00 5644 320
Trumpet
00 6876 540
Full Swell
32 7645 222
I
Numa Compact 2x by Studiologic®
55
Oboe Horn
00 4685 300
Full tibias
60 8807 006
Salicional
00 4544 222
Flutes
00 5403 000

Modello di organo
Chorus e Vibrato
Percussioni
Gli originali organi Tonewheel vintage (non tutti i modelli)
avevano un circuito speciale e molto complesso chiamato
Scanner Vibrato per aggiungere al suono una frequenza simulata e una modulazione di fase molto piacevoli, che divennero un altro tipico eetto di questi strumenti. Questa
particolare post-elaborazione fa anche parte del modello di
organo NC2x e con i pulsanti dedicati è possibile scegliere
tra 2 impostazioni di eetti Vibrato o 2 Chorus e assegnarli a
una o entrambe le parti. Per fare ciò è possibile selezionare il
premendo Upper e/o Lower e controllare gli eetti, in tutti i
dettagli e separatamente per le 2 parti.
Per aggiungere più elementi ritmici alle tue prestazioni puoi
attivare la percussione, un‘altra caratteristica molto tipica e
importante degli organi elettro-meccanici vintage, inclusa
nel modello di organo NC2x. Questo eetto si riattiva solo
quando tutti i tasti vengono rilasciati prima, consentendo di
controllare l‘eetto suonando „legato“ o „staccato“. Suonando il legato, la percussione funziona solo sulle prime note
suonate e svanisce durante il decadimento, consentendo di
eseguire parti soliste brevi e aggressive seguite da accordi o
scale in legato, senza percussioni.
Puoi premere On/O ma per attivare Percussion e selezionare
il 2 ° / 3 ° pulsante per decidere se la percussione è generata
dalla seconda armonica, equivalente al Drawbar 4‘), o dalla
terza armonica, corrispondente al Drawbar 2 2 / 3.
Il controllo Slow/Fast denisce il decadimento della percussione e il relativo volume può essere controllato separatamente nella relativa pagina di GLOBAL Edit.
Come spiegato in un‘altra parte o in questo manuale, gli Organi Tonewheel originali avevano un controllo diretto del
pannello per il Volume percussioni, ma era costituito solo
da 2 impostazioni possibili: SOFT o NORMAL. Nel parametro
NC2x Global si ha un controllo continuo sul livello Percussion
con 64 valori, associati indipendentemente al decadimento
Fast e Slow.
I
Numa Compact 2x by Studiologic®
56

Motore di sintesi
AMPLITUDE (dB)
-12
AMPLITUDE (dB)
Resonance
Il banco SYNTH del Numa Compact 2x si basa su un motore si sintesi semplicato, con le seguenti
caratteristiche:
Forme d‘onda
Cuto
Resonance
La selezione delle varie forme d‘onda viene eettuata selezionando uno dei suoni della banco SYNTH; la forma delle
varie forme d‘onda viene mostrata sul display quando viene
selezionato il suono e può variare dalle onde standard a dente di sega e quadra, all‘impulso con modulazione (una forma
d‘onda a impulsi modulata da un modulatore a bassa frequenza) e forme d‘onda di sintesi FM o complesse .
I suoni Synth (base o complessi) sono controllati dai nove cursori, ciascuno assegnato per controllare un parametro specico, che consente di modicare leggermente o completamente i suoni di synth selezionati di partenza.
Controlla la frequenza del ltro passa basso a 2 poli, usa valori
più bassi nell‘intervallo per dare più spettro caldo al suono; a
livelli più alti il suono diventa più brillante, poiché il ltro lascia passare attraverso tutte le frequenze della forma d‘onda
selezionata del suono di partenza.
Quando l‘impostazione viene aumentata a valori medio-alti,
il ltro inizia a enfatizzare le frequenze attorno al valore Cuto; questa funzione può essere utilizzata per creare eetti in
stile analogico, oltre a rendere una parte dello spettro sonoro
enfatizzata da un‘accurata impostazione della risonanza.
Numa Compact 2x by Studiologic®
57
0
-6
FREQUENCY (Hz)
Cuto
-12
0
-6
FREQUENCY (Hz)
I

Motore di sintesi
FILTER ENVELOPE
FREQUENCY
RELEASE
Slider 3 Slider 4 Slider 5
NOTA:
Se impostato su valori troppo vicini al massimo, la Resonance
potrebbe creare un guadagno del livello del segnale e conseguenti distorsioni con possibili problemi del suono generale;
con alti livelli di risonanza, il volume della parte (superiore o
inferiore) deve essere ridotto proporzionalmente, per evitare
ritagli o eetti collaterali indesiderati.
NOTA:
Entrambi i parametri Cuto e Resonance sono abilitati a controllare qualsiasi altro Sound dello
strumento (non solo i suoni Synth) rendendo possibile modicare il suono di partenza, come ad
esempio far suonare un Strings più dolce o un suono Electric Piano enfatizzato alla Cuto Frequency con l‘aggiunta di un certo livello di risonanza. Come accennato in precedenza, con alcune
impostazioni di Cuto + Resonance potrebbe essere necessario riequilibrare il volume della Parte,
per evitare ritagli di eetti collaterali indesiderati, a meno che non si desideri raggiungere un determinato suono che potrebbe includere anche un ritaglio come eetto desiderato .
Inviluppo di Filter e
TIME
ATTACK DECAY
Amplitude
Una tipica sezione sintetizzatore è fatta di controlli denominati ADSR (Attack, Decay, Sustain, Release) e sono normalmente duplicati per il ltro e le sezioni AMPIEZZA controllata.
I parametri semplicati disponibili su NC2x sono un sottoinsieme di questi controlli, scelti tra quelli più ecaci nella generazione del suono del motore SYNTH dello strumento.
Il cursore ATTACK controlla il tempo necessario al FILTRO per
raggiungere la frequenza di avvio CUTOFF desiderata.
Il cursore DECAY controlla il tempo necessario al FILTRO per
raggiungere la frequenza CUTOFF nale, quando i tasti vengono mantenuti in riproduzione.
NOTA: come impostazione semplicata, il DECAY inuenza anche il livello SUSTAIN (un parametro non elencato
all‘interno dei nove cursori) e una lunga DECAY simulerà anche la frequenza di taglio nale quasi identica alla frequenza
di partenza: il suono non cambierà dopo l‘ATTACK, mentre si
tiene la nota suonata, o cambierà molto lentamente.
Numa Compact 2x by Studiologic®
58
Lo slider RELEASE controlla il tempo necessario al FILTRO per
raggiungere il Cuto nale quando vengono rilasciate i tasti.
Ritmo e velocità dell‘LFO consentono di controllare i relativi parametri dell‘LFO che è internamente assegnato alla frequenza CUTOFF; ad esempio, impostando i valori in un certo
modo, mentre Resonance è impostato su livelli medio-alti,
potrebbe creare SOUDS con un tipo di eetto WOW looping.
I

AMPLITUDE ENVELOPE
FREQUENCY
Slider 8 Slider 9
Motore di sintesi
TIME
ATTACK KEY ON
RELEASE
NOTA: La destinazione di questo LFO è il FILTRO, mentre la
modulazione (Vibrato, ecc) è controllato dallo Slider 2 e
l‘AFTERTOUCH, che permette di selezionare tutte le possibili
combinazioni di tutte le impostazioni.
Gli ultimi due cursori controllano ATTACK e DECAY dell’AMPLIFIER e non modicano i parametri FILTER, che hanno controlli
A/D/R separati; sono in grado di creare attacchi Lenti e eetti
di rilascio lunghi, senza alcuna modica delle impostazioni FILTER.
Si noti che il controllo A/R Amplier è il blocco nale della catena SOUND Synthesis; ad esempio, se desideri una versione
lunga sul FILTER devi anche impostare una versione lunga
sull’amplicatore, per rendere possibile ascoltare il rilascio del
ltro quando i tasti vengono rilasciati nuovamente, e così via.
Store
Una volta creato un suono, anche partendo da un suono Synth,
e facendo tutte le possibili variazioni con i nove Slider disponibili, è possibile memorizzare il risultato in un PROGRAMM,
come con qualsiasi altro suono. Quando selezioni Synth
SOUND, il display mostrerà una piccola immagine con le impostazioni degli slider, in base al focus (parte Lower o Upper),
mostrando il valore di ciascun Slider, modicarlo ulteriormente
e salvare il risultato nel PROGRAM corrente o in un altro.
Numa Compact 2x by Studiologic®
59
I

Eetti
Eetti
FX1
FX1 - FX2
FX2
REVERB
Reverbero
I due doppi processori di eetto, permettono di assegnare
due eetti separati alle sezioni Lower e Upper, per un totale di
4 eetti contemporaneamente. Ad esempio, l‘FX1 può essere
impostato su Drive per la sezione Upper e, nello stesso tempo, su Chorus per la sezione Lower. Usando il pulsante Upper/
Lower, puoi passare da un aparte all‘altra per vedere o selezionare l‘eetto. Inoltre, puoi vedere o cambiare l‘FX associato
tramite i pulsanti principali LOWER e UPPER sotto al display.
Puoi visualizzare la struttura del Sound e dell‘FX e il usso del
segnale come segue:
Upper > FX1 (uno dei quattro)>FX2 (uno dei quattro)>Reverb
(mandata programmabile in Edit)
Lower > FX1 (uno dei quattro)>FX2 (uno dei quattro)>Reverb
(mandata programmabile in Edit)
Amount: i due potenziometri controllano la quantità
dell‘eetto selezionato, come il rapporto dry/wet (per gli effetti di modulazione come il Chorus) o altri parametri, come il
livello di distorsione dell‘eetto Drive.
I
Numa Compact 2x by Studiologic®
60

Eetti
FX Autoset
La funzione FX Autoset (spiegata anche nella sezione Global
Edit) memorizza automaticamente l‘ultima impostazione FX1
e 2 per ogni Sound, senza la necessità di memorizzarle in un
Program dedicato.
Questa funzione controllerà anche l‘associazione tra lo Stick2
e il Sound o i controlli FX (modulation, speed ecc..) in modo
logico e automatico. Quando un particolare FX è selezionato
in una sezione, lo Stick 2 controllerà un parametro specico,
come la velocità Slow/Fast del Rotary o lo Speed e il Feedback
del Phaser.
Il controllo sarà impostato automaticamente nella posizione
evidenziata (focus): se hai la parte Lower senza FX e il focus
su Lower, lo Stick2 controllerà la Modsulation; se il focus è su
Upper e hai un suono di organo con il Rotary, lo Stick2 ne
controllerà la velocità Slow/Fast.
Se la funzione FX Autoset è impostata su O (vedi la sezione GLOBAL Edit) la funzione degli Stick 1 e 2 dipenderà dalla
Part Edit, senza assegnazioni automatiche, e potrai impostare
e memorizzare ogni controllo possibile in un Program.
STRINGS RESONANCE
(Damper model)
In aggiunta ai potenti doppi processori di eetto FX1 e 2, il
Compact 2 dispone anche di un eetto STRING RESONANCE,
dedicato ai suoni del Bank ACOUSTIC PIANOS controllato
dal parametro relativo nel GLOBAL EDIT. Questo eetto,
creato sulla base dell‘esperienza maturata sul Numa Stage e
Concert, aggiunge un carattere di grande realismo ai suoni
di piano, riproducendo la risonanza delle corde vere e della
tavola armonica dello strumento acustico.
I
Numa Compact 2x by Studiologic®
61

Global edit
Global edit
Per abilitare il GLOBAL edit, tieni premuto il pulsante EDIT per alcuni secondi; troverai varie pagine
(in alto a destra nel display) con funzioni che riguardano lo strumento, indipendentemente dal
Program selezionato. Per uscire dalla funzione, premi di nuovo il pulsante EDIT e tutte le impostazioni verranno memorizzate automaticamente.
Quando il Focus (cursore) è nella parte superiore del display, ruotando l‘encoder puoi selezionare
le varie pagine, cliccando sull‘encoder il focus si sposterà sul parametro e ruotandolo di nuovo
potrai cambiare il relativo valore.
Le funzioni principali del GLOBAL EDIT sono:
TRANSPOSER
GLOBAL TUNER
VELOCITY CURVE
FIXED CURVE
STRINGS RESONANCE
DAMPER EFFECT
Puoi trasporre lo strumento in un’altra tonalità; clicca sull’encoder per muovere il cursore nel valore e ruotalo per inserire
la trasposizione desiderata.
Quesa funzione ti permette di accordare lo strumento, nel
caso volesso suoare conun altro strumento che non h al’accordatura standard (A=440 Hz).
Puoi selezionare curve dinamiche diverse secondo il tuo tocco e la tua tecnica esecutiva. Ci sono 3 curve di fabbrica (Soft/
NORMAL/HARD) e una curva FIXED programmabile, col relativo valore.
E’ possibile settare una valore sso (da 1 a 127) per la curva
FIXED, quando selezionata.
Qui puoi controllare la quantità di eetto STRING RESONANCE,
che aggiunge più realismo ai suoni di PIANO.
Considera che il suono CONCERT GRAND ha anche un eetto
separato di “release asnd resonance” non controllabile da questo parametro.
HEADPHONES MODE
Numa Compact 2x by Studiologic®
62
Quando il parametro pè impostato su AUTO ON, l’inserimento
delle cue disattiva automaticamente il sistema di amplicazione.
Se il parametro è impostato su AUTO OFF, il sistema di amplicazione interno resterà attivo anche nel caso di inserimento
del jack nell’ingresso cue: questo ti permette di usare l’uscita
cue come un ulteriore uscita ausiliaria, per registrazioni o per
collegare un subwoofer attivo, in aggiunta ai diusori interni.
I

Global edit
PEDAL 2
FX AUTOSET
Mentre il PED1 è sempre utilizzabile per pedali di espressione/
volume, il PED2 può essere programmato per collegare molti
tipi di pedale:
• SINGLE SWITCH normalmente aperto;
• SINGLE SWITCH normalmente chiuso;
• EXPRESSION (funzione di volume, pedale con potenziometro
e plug stereo);
• SLP3-D: Pedale triplo con funzioni SOFT/SOSTENUTO/SUSTAIN con controllo di mezzo pedale.
Quando la funzione è impostata su AUTO ON, sono abilitate le
seguenti funzioni:
L’ultimo eetto selezionato (FX1-2) per ogni suono viene memorizzato dallo strumento, consentendo di selezionare un
suono e il relativo eetto preferito, senza la necessità di memorizzare la combinazione in un Program. L’FX AUTOSET non
memorizzerà e richiamerà soltanto l’eetto associato dall’utente al suono, ma anche i valori dei paramtri controllati dallo Stick
2 per ogni eetto.
Il controllo STICK 2 sarà assegnato automaticamente ad una
funzione, secondo l’impostazione e la posizione del FOCUS
(cursore).
Se il Focus è su UPPER (ad esempio) e hai selezionato un suono
di Organ con l’eetto Rotary, lo STICK 2 controllerà la velocità
SLOW/FAST del Rotary.
Se sposti il Focus su LOWER (cliccando sull’encoder o premendo il pulsante LOWER) e hai un altro FX su LOWER, lo STICK2
controllerà l’eetto LOWER.
Se non c’è nessun FX impostato in una sezione (LOWER O UPPER) e sposti il Focus su di essa, lo STICK2 controllerà la MODULATION della sezione selezionata.
Esempio tipico: immagina di avere un suono Organ su UPPER
con Rotary e un suono BASS su LOWER senza eetti: spostando
il cursore su UPPER, lo STICK 2 controllerà la velocità del Rotary,
spotando il Focus su LOWER, lo Stick2 ontrollerà la Modulation.
I
Numa Compact 2x by Studiologic®
63
Nota: questa funzione automatica è una selezione arbitraria
fatta dallo strumento, basata su una situazione esecutiva statistica; se vuoi controllare tutti i parametri direttamente e manualmente, puoi impostare la funzione su OFF e selezionare la
funzione dello STICK 2 nella relativa PART EDIT, memorizzando
poi l’impostazione desiderata in un PROGRAM.

Global edit
MODALITA‘ SLIDER
DIRECT/SNAP
CLICK KEY ON /
CLICK KEY OFF
I 9 Sliders (Drawbars in modalità Organ) possono avere due diversi modi di operare, da selezionare nella relativa pagina di
Global Edit, in base alle preferenze ed esigenze musicali.
Selezionando la modalità DIRECT, quando si sposta uno Slider / Drawbar il nuovo valore corrispondente alla posizione
sica viene immediatamente letto e inviato alla generazione
del suono, consentendo di ottenere istantaneamente il nuovo
valore: da 0 a 8 in modalità Drawbars-Organ e da Da 1 a 127 in
modalità Slider sia per i parametri Synth, sia per i valori MIDI
assegnabili.
Selezionando la modalità SNAP, quando uno Slider / Drawbar
viene mosso i nuovi valori vengono letti e aggiornati solo dopo
che la nuova posizione corrisponde al valore original memorizzato nel Program; ad esempio, se il valore di Cuto di un suono
era 100, lo slider inserirà un nuovo valore solo dopo aver raggiunto la posizione corrispondente al valore 100.
Il Click aggiunge il tipico rumore associato alla tecnologia delle
timbriche vintage degli organi elettromeccanici, che è diventato parte del loro suono. Con il controllo continuo è possibile
impostare il livello del Click in base ai propri gusti. separatamente per tasto premuto o rilasciato (Key On e Key O) per
ottenere l’eetto desiderato.
VOLUME PERCUSSIONE
FAST/SLOW
SYSEX FILTER
Questa funzione GLOBAL consente di controllare il volume
della percussione; gli Organi Tonewheel originali avevano un
controllo diretto del pannello per il volume delle percussioni,
ma erano costituiti solo da 2 selezioni: SOFT o NORMAL- Con
questo parametro globale si ha un controllo continuo sul livello delle percussioni con 64 valori, indipendentemente associati
al Decay Slow o Fast della Percussione.
Per ltrare (cut o) alcuni messaggi MIDI (oltre a quelli standard), quando si collega una sorgente MIDI alla destinazione
selezionata.
I
Numa Compact 2x by Studiologic®
64

Global edit
PROGRAMS SEND / RECEIVE
Questa funzione permette di ricevere o inviare tutti i Program
al computer (Mac o PC). Una volta selezionata, ruotando l’encoder, puoi selezionare SEND o RECEIVE con le procedure seguenti:
WINDOWS
Puoi usare un’applicazione come “Midi-Ox” nel modo seguente (assicurati che il Numa Compact 2x sia visto dalle porte del
USB/MIDI del computer e nei settaggi di “MIDI-Ox”).
Per inviare i dati al computer:
- Collega la tua Numa Compact 2x al computer via USB;
- Apri “MIDI-Ox” e scegli “View/Sysex;
- Nella nestra “Sysex”, scegli “Sysex>Receive manual dump”;
- Clicca sull’encoder della Numa Compact 2x quando la funzione
Global SEND è attiva e conferma con YES;
- Nella nestra Display del programma “MIDI-OX” salva i dati
Bulk in un le;
- Quando il dump è completato, scegli “Display Window >
Save as...
Per ricevere i dati dal computer al tuo strumento:
- Nella nestra “Program Send/Receive” seleziona “Receive”;
- Apri il programma “MIDI-Ox”, nella nestra Sysex scegli
“Command>WindowZLoad File” e cerca il le nella cartella
dove l’avevi memorizzato;
- Scegli “Command Window>Send Sysex e aspetta no alla
conclusione.
MAC OS
Poi usare un’applicazione come “SysEx Librarian” nel modo seguente (assicurati che il Numa Compact 2x sia visto dalle porte
del USB/MIDI del computer e nei settaggi di “SysEx Librarian”).
Per inviare i dati al computer:
- Collega la tua Numa Compact 2x al computer via USB;
- Apri “SysEx Librarian” e nella toolbar seleziona la periferica
“Numa Compact 2x”;
- Clicca il pulsante “Record many” in “SysEx Librarian”;
- Clicca sull’encoder della Numa Compact 2x quando la funzione
Global SEND è attiva e conferma con YES;
- Quando la trasmissione è completata, premi il pulsante
“Done” su “ SysEx Librarian”.
I
Numa Compact 2x by Studiologic®
65
Per ricevere i dati dal computer al tuo strumento:
- Nella nestra “Program Send/Receive” seleziona “Receive”;
- Nella barra degli strumenti di SysEx Librarian, fare click sul
menu a discesa “Destinatione” e selezionare la porta MIDI da
cui ricevere i dati;
- Nel programma “SysEx Librarian” seleziona il le Sysex dalla
lista posta nella nestra e premi il pulsante “Play” per iniziare
la trasmissione.

Global edit
FACTORY RESET
FIRMWARE VERSION
AND UPDATE
Questa funzione consente di fare un Reset di Fabbrica completo che cancellerà tutte le impostazioni utente e reimposterà
tutti i parametri allo stato originario. Considera che questo potrebbe farti perdere tutte le impostazioni utente e la funzione
dovrebb essere attivata molto attentamente. Per proteggere
l’utente da reset indesiderati, viene visualizzato un messaggio
precauzionale YES/NO quando provi a resettare lo strumento,
consentendoti di confermare o meno l’operazione.
Per aggiornare il rmware seguire queste istruzioni:
- Scarica il rmware dal sito www.studiologic-music.com e
salvalo in una cartella conosciuta;
- Collega lo strumento all’alimentazione e successivamente al
computer via USB;
- Accendi lo strumento tenendo premuto i tasti A0 (primo
tasto bianco da sinistra) e D1 (quarto tasto bianco da sinistra);
il display mostrerà il messaggio “Firmware Upload”;
- Aprire qualsiasi programma in grado di leggere un midile
(es. MIDI-Ox per PC, QMidi per Mac etc);
MIDI-Ox:
- Aprire MIDI-Ox;
- Nella barra dei menu, scegliere Actions > Play MIDI... , e si
aprirà MIDI BAR;
- nella nestra di MIDI BAR, fare click sul tasto
“Select MCI Port” e selezionare Numa Compact 2x;
- In MIDI BAR aprire il le precedentemente scaricato;
- Premere il tasto play e attendere la ne della procedura;
- Quando il display del Numa Compact 2x mostra il
messaggio “UPLOAD FINISHED”, riavviare lo strumento.
QMidi:
- Aprire QMidi;
- Selezionare il le precedentemente scaricato;
- Nella barra dei menu scegliere QMidi > Audio/MIDI settings
e selezionare Numa Compact 2x come dispositivo in output;
- Nella nestra principale premere il tasto play ed attendere
la ne della procedura
- Quando il display del Numa Compact 2x mostra il
messaggio “UPLOAD FINISHED”, riavviare lo strumento.
I
Numa Compact 2x by Studiologic®
66

PROGRAM EDIT [1/3]
PROGRAM EDIT [2/3]
C4
MIXER
P01-JAZZ DUET
A0 - B3
C4 - C8
PROGRAM EDIT [1/3]
Program edit
Program edit
Se il Focus (cursore) è nella parte superiore del display nella selezione dei Program, premendo il
pulsante EDIT si entra in PROGRAM EDIT, con i seguenti parametri e impstazioni.
Ac-Bass
V: 127
Concert
V: 127
PROGRAM NAME
PROGRAM NAME
JAZZ DUET
SPLIT POINT
SPLIT POINT
PROGRAM NAME
EDIT
JAZZ DUET
Dopo aver selezionato questa funzione, clicca sull‘encoder e
inserisci le lettere ruotandolo; un piccolo triangolo mostrerà
quale numero stai editando.
Per confermare il nuovo nome, o mantenere il precedente,
premi STORE e una nestra popup ti chiederà conferma, ruota l‘encoder su YES o NO e conferma cliccandoci.
Questa funzione consente di selezionare il punto di SPLIT per
ogni PROGRAM, ruotanto l‘encoder no a che la nota desiderata viene visualizzata. Considera che, per stadard internazionale, la tastiera dello strumento è nominata da A0 (primo
tasto a sinistra) a C8 (ultimo tasto a destra), di conseguenza il
DO centrale sotto al display è il C4. L‘intonazione di riferimento di A= 440 Hz è su A4, il La della stessa ottava del Do centrale
(sotto i Sound Banks) per tutti i suoni basat sullo standard 8‘
del piano. Solo alcuni suoni di ORGAN suoneranno un‘ottava
sotto, se basati sui drawbar a 16‘ degli organi vintage a ruote
foniche o gli organ a canne con registro a 16‘: in questi casi
la fondamentale del suono selezionato su A4 sarà di 220 Hz
(un‘ottava sotto i 440 Hz).
67
MIXER
L 127 U 127
A
Numa Compact 2x by Studiologic®
64 B 64
Il MIXER consente di controllare tutte le quattro parti e
zone (LOWER/UPPER/ZONEA/ZONEB) inuna singola pagina. Questa funzione è accessibile tramite una sscorciatoia, tenendo premuti i pulsanti SPLIT e MIXER.
I

Part edit
PART EDIT [1/11]
PART EDIT [2/11]
TO LEFT
TO RIGHT
P01-JAZZ DUET
A0 - B3
C4 - C8
PART EDIT [1/11]
Part edit
Se il focus è in una delle parti e sei nella modalità SOUND (con il pulsante SOUND selezionato ed
illuminato) entrerai nella modalità PART EDIT. Una volta selezionato PART EDIT puoi sempre premere i pulsanti LOWER o UPPER per selezionare la parte da editare, o cliccare sull‘encoder.
Ac-Bass
V: 127
Concert
V: 127
SOUND
Il PART EDIT comprende i seguenti parametri:
VOLUME
Ruotando l’encoder, dopo aver spostato il Focus nel parametro
cliccando su di esso, puoi controllare il Volume della parte sele-
VOLUME
127
VOLUME
127
SPLIT ASSIGN
zionata con una escursione da 0 a 127.
Una volta selezionato lo SPLIT POINT per il PROGRAM corrente,
(vedi PROGRAM EDIT) puoi decidere dove far suonare la sezio-
SPLIT ASSIGN
SPLIT ASSIGN
ne selezionata (LOWER/UPPER o ZONEA/ZONEB) in modo totalmente indipendente come segue:
TO LEFT: la parte suonerà nella sezione sinistra della tastiera
(da A0 alla nota di SAPLIT)
TO RIGHT: la parte suonerà nella sezione destra delal tastiera
(dalla nota di Split a C8)
TO ALL: la parte suonerà senza punto di SPLIT in tutta la tastiera.
EDIT
VOLUME
127
VOLUME
127
Numa Compact 2x by Studiologic®
68
Questa funzione ti permetterà molte combinazioni musicali
come questi esempi:
PIANO sulla destra + BASS sulla sinistra del punto di Split
PIANO e STRINGS sulla destra + Zone MIDI sulla sinistra (che
controllano moduli sonori esterni)
ORGAN in tutta la tastiera (TO ALL) e CHOIR solo nella parte
destra
I
Anche con un solo punto di SPLIT (programmabile per
ogni PROGRAM) le possibili combinazioni sono quasi un centinaio, considerando le varie combinazioni tra
LOWER+UPPER+ZONEA+ZONEB.

Part edit
PART EDIT [3/11]
PART EDIT [4/11]
0
0
PART EDIT [6/11]
64
PART EDIT [7/11]
ON
ON
PART EDIT [5/11]
0
TRANSPOSE
TRANSPOSE0TRANSPOSE
0
OCTAVE
OCTAVE
OCTAVE
Questa funzione consente di trasporre una parte a dierenza
del GLOBAL TRASPOSER che ha eetto su tutto lo strumento.
Questa funzione può essere impostat dierentemente per
ogni sezione di SOUND o Midi Zone e memorizzata in un PROGRAM con dierenti valori. Combinazioni interessanti si possono ottenere trasponendo un suono con intervalli musicali
come una quinta inferiore (- 5 semitoni) per ottenere quello
che è comunement conosciuto come un “cluster” ad intervalli
ssi. prova a selezionare una Tromba su Upper e un Sax su Lower, impostando il Sax 5 semitoni sotto inuna tipica impostazione Jazz!
Puoi impostare l’ottava (intervallo di 12 semitoni) separatamente per ogni parte; normalmente avrai bisogno di spostare
la parte LOWER una o due ottave sopra, se vuoi suonare degli
accordi in un registro migliore. A volte invece puoi ottenere
un suono migliore quando lo SPLIT è attivato se sposti la parte UPPER una o due ottave sotto, se selezioni un Sax Tenore
in combinazione con un suono di Basso splittato sulla sinistra,
dato che le note più belle e più gravi del sax sarebber probabilmente nella pozione sinistra della tastiera. Sperimenta semplicemente le tue impostazioni preferite e memorizzale nel
PROGRAM.
FINE TUNING
FINE TUNE0FINE TUNE
REV SEND
REV REND64REV SEND
PEDAL 1 PEDAL 2
PEDAL 1
PEDAL 1
Questo parametro consente di sintonizzare i suoni Upper e
Lower entro un intervallo di semitoni; potrebbe essere utile
creare suoni leggermente detunati, quando assegnate una forma d’onda pura ad entrambe le sezioni (cioè a dente di sega,
quadrato ecc.) o migliorate alcune sezioni di Orchestral 2, rendendola “reacher”.
La funzione consente di controllare la quantità di segnale che
deve essere inviata al processore di REVERB, indipendentemente per le parti LOWER e UPPER, programmabile con impostazioni diverse per ogni PROGRAM. Un’impostazione tipica,
se splitti la tastiera e assegni un suono di BASS sulla sinistra,
potresti voler ridurre la quantità di REVERB per la parte sinistra
o controllare l’impostazione anche nella parte UPPER per ottenere l’eetto desiderato. Il potenziometro MIX nel pannello
frontale, cambierà il rapporto (DRY/WET) con ogni tipo di riverbero selezionato o valore di mandata.
Qui puoi decidere se i pedali sono abilitati o no per ogni sezione (UPPER/LOWER o ZONEA/ZONEB se il pulsante MIDI è
attivato).
I
Numa Compact 2x by Studiologic®
69

Part edit
PART EDIT [11/11]
PART EDIT [9/11]
ON
ON
STICK 1 STICK 2
STICK 1
AFTERTOUCH
A.TOUCHONA.TOUCH
STICK 1
ON
Come per i pedali, anche gli STICK possono essere abilitati separatamente per le Parti e le Zone. Considera che lo STICK 2
sarà impostato automaticamente su AUTO se la funzione FXAUTOSET è impostata su ON nell’area GLOBAL EDIT. Per controllare manualmente lo STICK 2, puoi impostare su OFF l’FXAUTOSET e la funzione potrà essere impostata su ON o OFF e
memorizzata nei Program.
Questo parametro abilita o disabilita la funzione Aftertouch nella Parte o Zona selezionata. La funzione Aftertouch sarà in molti casi simile al controllo di modulazione
dello STICK 2, aggiunge una spece di vibrato o modulazione al suono secondo le impostazioni. Normalmente
imposterai l’Aftertouch ON per la parte UPPER, usata comunemente per la parte musicale principale o per i soli,
mentre la parte LOWER è normalmente associata ad accompagnamenti o a parti di basso, se lo SPLIT è attivo.
Numa Compact 2x by Studiologic®
70
I

MIDI (Zone edit)
MIDI
L‘NC2x ha un‘implementazione MIDI completa, che include 2 porte MIDI software separate, che puoi vedere collegando
lo strumento con il cavo USB al tuo computer, chiamate porte KEYBOARD e CONTROLLER (PORT 2 e PORT 2).
La porta KEYBOARD è programmata per inviare e ricevere tutti i controlli MIDI relativi a SOUNDS, EFFECTS e PROGRAMS
interni, consentendo di controllare tutte le funzioni dello strumento, inviando e ricevendo ciò che si fa sicamente su di
esso, dalle note suonate sulla tastiera, ai SOUNDS selezionati sulle 2 sezioni locali (Upper e Lower) e per le altre 2 sezioni aggiuntive (Part3 e Part4) che possono essere riprodotte via MIDI. Tramite MIDI è inoltre possibile impostare i livelli
SOUNDS e Reverb della parte 3 e della parte 4 (non possono essere inviati agli eetti interni) creando un totale di 4 parti
di sequenza MIDI.
Puoi suonare un groove Drums & Bass su MIDI CH3 e 4 e registrare una parte live su UPPER e / o LOWER, creando un
accordo di 4 parti di qualsiasi tipo.
Le quattro parti KEYBOARD (come riassunto nella MIDI IMPLEMENTATION CHART alla ne di questo manuale) hanno un
canale MIDI separato, corrispondente alla seguente struttura MIDI:
PORTA MIDI KEYBOARD
Upper= MIDI Ch1 (invio e ricezione) Part 3: MIDI Ch3 (solo ricezione)
Lower= MIDI Ch2 (invio e ricezione) Part 4: MIDI Ch4 (solo ricezione)
MIDI KEYBOARD
• CONTROLLER PORT
• CONTROLLER PORT
USBMIDI
• KEYBOARD PORT
numacompact 2x
Tutti i controlli del pannello in tempo reale (Organ Drawbars e Synth Sliders, SOUNDS, selezione
FX e relative quantità e impostazioni, ecc.) Vengono inviati e ricevuti, come elencato nella TABELLA
IMPLEMENTAZIONE MIDI.
Gli ultimi quattro potenziometri sono solo per le impostazioni locali (VOLUME, MASTERING, BASS
e TREBLE) in quanto non dovrebbero essere inviati o ricevuti via MIDI.
In altre parole, qualsiasi cosa tu faccia e suoni sull‘NC2x può essere trasmessa, registrata e ricevuta
via MIDI, permettendo un controllo completo di tutte le funzioni.
La seconda porta MIDI separata è dedicata alla sezione CONTROLLER (ZONE A e ZONE B) e attraverso questa PORT separata è possibile inviare tutti i controlli MIDI relativi alle Zone MIDI e le relative
impostazioni, controlli, funzioni Stick (Passo e Modulazione, anche come l‘Aftertouch) ecc.
Essendo questa PORT 2 correlata alla funzione MIDI, IMPLEMENTATION include solo i messaggi
MIDI SENT, mentre non sono necessari controlli MIDI e implementati come MIDI IN.
Naturalmente questa doppia struttura KEYBOARD / CONTROLLER PORT è pensata per essere utilizzata quando viene eettuata una connessione MIDI-USB a un Computer.
Numa Compact 2x by Studiologic®
71
I

MIDI (Zone edit)
ZONE EDIT [1/16]
ZONE EDIT [2/16]
ZONE EDIT [4/16]
2
1
P01-JAZZ DUET
A0 - B3
C4 - C8
ZONE EDIT [1/16]
0
Come spiegato nei parametri GLOBAL EDIT, il canale COMMON Midi consente di inviare tutti i dati
MIDI in entrata (note ecc.) Alla sezione dello strumento principale, consentendo di modicare i
PROGRAMMI principali e suonare le parti UPPER e LOWER dello strumento come si suona sul locale
tastiera (con Split o Layer, il relativo intervallo di tasti, ecc.).
Collegando l‘NC2x tramite MIDI OUT (non USB) lo strumento trasmette solo i messaggi CONTROLLER implementati quando si collega un cavo MIDI sico alla presa MIDI OUT.
Program edit
Il PROGRAM EDIT, spiegato nel relativo capitolo, si riferisce ai parametri comuni per entrambe le
modalità SOUND e MIDI. Seguendo il successivo paragravo ZONE EDIT sarà possibile impostare i
parametri di una specica Zona MIDI e salvarli nello stesso PROGRAM insieme a tutti gli altri parametri memorizzati per gli suoni interni.
Zone edit
Premendo il tasto EDIT quando una delle due zone in modalità MIDI è attualmente selezionata,
si entrerà nel menu di modica delle Zone. A questo punto scegliere il paramentro desiderato
ruotando l‘Encoder e selezionare la Zona con i tasti ZONE A e ZONE B o eettuando dei click con
l‘Encoder. Ruotare l‘Encoder per impostare il valore desiderato.
Zone A
V: 64
MIDI
Zone B
V: 64
EDIT
Il menu ZONE EDIT permette di modicare i seguenti parametri:
PROGRAM CHANGE
Il numero di Program Change del dispositivo controllato e del
generatore di suono, facendo riferimento alla specica map-
PRG CHG0PRG CHG
0
LSB - MSB
pa di suoni di dispositivo/vst/generatore di suoni.
Il valore deve essere compreso tra 1 e 127.
LSB (Byte meno signicativo) e MSB (Byte più signicativo)
consentono di controllare e selezionare più dei normali 127
BANK LSB0BANK LSB
0
banchi o altre funzioni denite nello standard MIDI. Per scegliere un valore corretto, fare riferimento alla tabella di implementazione del dispositivo controllato,
MIDI CHANNEL
E‘ possibile selezionare un canale MIDI per ogni Zona in modo
da controllare 2 dierenti dispositivi.
MIDI CH
MIDI CH
PRG CHG0PRG CHG
I
Numa Compact 2x by Studiologic®
72

MIDI (Zone edit)
ZONE EDIT [5/16]
64
64
ZONE EDIT [6/16]
TO LEFT
TO RIGHT
ZONE EDIT [7/16]
0
ZONE EDIT [8/16]
0
0
ZONE EDIT [9/16]
ON
ON
ZONE EDIT [11/16]
VOLUME
VOLUME
SPLIT ASSIGN
SPLIT ASSIGN
SPLIT ASSIGN
VOLUME
Volume della Zona, regolabile direttamente anche senza entrare nel menù EDIT, ruotando l’Encoder quando una delle 2
Zone è selezionata e ci si trova in modalità MIDI.
Una volta che il punto di SPLIT è abilitato sul PROGRAM corrente, è possibile decidere come esso deve comportarsi in ognuna
delle Zone:
TO LEFT: la Zona suonerà nella sezione sisnistra della tastiera
(da A0 alla nota di SPLIT)
TO RIGHT: la Zona suonerà nella sezione destra della tastiera
(dalla nota di SPLIT a C8)
TO ALL: la Zona suonerà intutta la tastiera senza tener contro
dello SPLIT
Anche con un punto di SPLIT comune (programmabile per ciascun PROGRAM), gli scenari possibili sono quasi cento, considerando lo stato e le combinazioni di LOWER + UPPER + ZONEA + ZONEB e le impostazioni SPLIT rese possibili da questa
funzione.
TRANSPOSE
TRANSPOSE0TRANSPOSE
OCTAVE
OCTAVE
OCTAVE
PEDAL 1 - PEDAL 2
PEDAL 1
PEDAL 1
STICK 1 - STICK 2
STICK 1
ON
STICK 1
ON
Consente di trasporre una zona; diversamente dal GLOBAL
TRANSPOSER, che attua l’eetto sull’intero strumento, questa
funzione può essere impostata indipendentemente per ciascuna zona MIDI e memorizzata in ciascun PROGRAM, con valori diversi.
È possibile impostare l’ottava (intervalli di 12 semitoni ciascuno) separatamente per ciascuna zona; normalmente dovrete
spostare una zona di una o due ottave verso l’alto, nella zona
SINISTRA di una tastiera divisa per suonare gli accordi in una
gamma migliore. D’altra parte, a volte è possibile ottenere un
suono migliore se si sposta la zona SUPERIORE di una o due
ottave verso il basso; semplicemente sperimenta l’impostazione che preferisci e quindi memorizzala nel PROGRAM corrente.
Abilita o meno i pedali per ciascuna zona indipendentemente,
a seconda di dove è impostato il cursore-focus (su ZONE A o
ZONE B).
Come per i pedali, anche gli Stick possono essere abilitati separatamente per le Zone; si noti che lo Stick 2 verrà impostato
automaticamente su AUTO se la relativa funzione FX-AUTOSET
è impostata su ON nell’area GLOBAL EDIT. Per controllare manualmente l’assegnazione dello Stick 2, è possibile impostare
su OFF l’FX-AUTOSET e la funzione può essere attivata o disattivata e memorizzata nei Programmi.
I
Numa Compact 2x by Studiologic®
73

MIDI (Zone edit)
ZONE EDIT [13/16]
ZONE EDIT [14/16]
ZONE EDIT [15/16]
0
ZONE EDIT [16/16]
127
127
AFTERTOUCH
Questo parametro abilita o disabilita la funzione Aftertouch
sulla zona selezionata; la funzione di Aftertouch sarà nella mag-
A.TOUCHONA.TOUCH
ON
gior parte dei casi simile, come nel controllo di modulazione di
Stick 2, aggiungendo al suono una sorta di vibrato o una modulazione simile, secondo l’impostazione. Normalmente imposterai l’Aftertouch ON per la zona UPPER, che è comunemente
usato per la zona musicale principale o per le performance da
solista, mentre la zona LOWER è normalmente associata ad accompagnamenti o linee di basso, se lo SPLIT è attivo, tuttavia
l’impostazione è totalmente sotto il tuo controllo e scelta.
Programmazione degli Slider
Selezionando una delle pagine dedicate alla programmazione degli Slider, spostando uno degli Slider si attiva automaticamente la modica selezionata per quello Slider; ripetere la procedura per
ogni Slider ti permetterà di eettuare la programmazione completa degli Slider, per le varie funzioni
e impostazioni.
Tutte le impostazioni degli Slider possono essere memorizzate in qualsiasi programma, con la stessa
procedura della funzione Store.
CC SLIDER
Questa pagina consente di selezionare la funzione CC per ciascuno dei nove Slider, alcune selezioni sono solo numeriche,
CC SLIDER 1
00-BankSel
CC SLIDER 1
01-ModWhl
se il CC correlato è generalmente indenito da uno standard,
mentre altri si riferiscono anche al nome della funzione, oltre al
numero , come cc 64 = Damper ecc.
MIN SLIDER
Selezionando questa funzione, per ogni Slider, è possibile decidere il valore MIDI inviato dallo Slider quando viene spostato
MIN SLIDER 10MIN SLIDER 1
nella posizione più bassa (con la funzione programmata nella
pagina CC Slider).
MAX SLIDER
Selezionando questa funzione, per ogni Slider, è possibile decidere il valore MIDI inviato dallo Slider quando viene spostato
MAX SLIDER 1
MAX SLIDER 1
nella posizione più alta.
I valori MIN e MAX determinano il range totale della funzione selezionata, così come la direzione del
controllo programmato.
Impostando il cursore MIN su valori alti (ad esempio 127) e il cursore MAX su valori più bassi (ad
esempio: 0) il risultato è un controllo inverso, da MAX (posizione superiore) a MIN (posizione più
bassa) come può essere richiesto per controllare Impostazioni Drawbars di alcuni Organ VST sul tuo
computer.
Queste impostazioni consentono di creare per i MIDI Slider funzioni simili di un suono ORGAN o
SYNTH, in cui i Drawbars e Slider sono automaticamente associati al Sound selezionato, con le relative posizioni MIN / MAX diverse; per aumentare il volume di Drawbars, farai scorrere verso il basso
i cursori, mentre la funzione del dispositivo di scorrimento selezionato aumenterà il movimento del
cursore nella posizione superiore.
I
Numa Compact 2x by Studiologic®
74

Dichiarazioni
Garanzia
Conformità CE
Tuti i prodotti Studiologic sono costruiti attentamente, calibrati,
testati, e sono soggetti a garanzia. Danni causati da trasporto non
conforme, montaggio o errata manutenzione, non sono coperti da
questa garanzia. Per eventuali informazioni rivolgersi al proprio negoziante e/o al distributore di zona.
FATAR srl
Zona Ind.le Squartabue
62019 Recanati MC Italy
dichiara che questo prodotto è conforme alle Direttive Europee:
2004/108//EC EMC Directive
DIN EN 55013 EMC radio disturbance of sound, TV and
associated equipment
DIN EN 55020 EMC immunity of sound, TV and
associated equipment
Recanati, 17. 01. 2017 Marco Ragni, Chief Executive Ocer
Questa dichiarazione diventa non valida nel caso di modiche non
autorizzate.
Conformità RoHS
RoHS
compliant
2002/95/EC
Disposizioni / WEEE
Stato dell‘arte
Marchi
Copyright
Questo prodotto è costruito secondo le direttive 2002/95/EC.
L‘adozione delle direttive EG 2003/108/EG è volta a prevenire e limitare il usso di riuti di apparecchiature destinati alle discariche,
attraverso politiche di riuso e riciclaggio degli apparecchi e dei loro
componenti (WEEE). Aiutaci a mantenere il mondo pulito.
Per garantire il massimo della qualità, i prodotti Studiologic sono
sempre progettati allo stato dell‘arte, per questo sono consentite,
senza preavviso: modiche, migliorie variazioni. Speciche tecniche
e di aspetto possono essere diverse da quanto indicato in questo manuale.
Tutti i marchi usati in questo manuale appartengono ai rispettivi proprietari.
Coyright Nessuna parte di questo manuale può essere riprodotta o
trasmessa in ogni forma senza il consenso del proprietrio del Copyright:
I
Numa Compact 2x by Studiologic®
75
FATAR Srl
Zona Ind.le Squartabue
62019 Recanati, Italia

Appendix
Numa Compact 2x
Appendix
Numa Compact 2 by Studiologic® 76

Appendix
MIDI Implementation Chart - Controller section
Studiologic Numa Compact 2x, Version 1.00
Basic information Transmit/Export Recognized/Import Remarks
MIDI channels 1 - 16
Note numbers 0 - 127
Program change 0 -127
Bank select yes no
Note-On velocity yes no
Note-O velocity yes no
Channel Aftertouch yes no
Poly (key) Aftertouch no no
Active Sensing no no
System reset no no
Tune request no no
Pitch Bend yes no
Universal System Exclusive:
Sample Dump Standard, Device Inquiry,
File Dump, MIDI Tuning ,Master Volume,
Master Balance, Notation Information, Turn GM1 System On, Turn GM2
System On, Turn GM System O, DLS-1,
File Reference, Controller Destination,
Key-based Instrument Ctrl, Master Fine/
Coarse Tune, Othe Universal System
Exclusive
Manufacturer or Non-Commercial System
Exclusive
NRPNs no no
RPN 00 (Pitch Bend Sensitivity) RPN 01
(Channel Fine Tune)
RPN 02 (Channel Coarse Tune)
RPN 03 (Tuning Program Select) RPN 04
(Tuning Bank Select)
RPN 05 (Modulation Depth Range)
MIDI Tuning and Synchronization Transmit/Export Recognized/Import Remarks
MIDI Clock no no
Song Position Pointer no no
Song Select no no
Start - Continue - Stop no no
MIDI Time code no no
MIDI Machine Control no no
MIDI Show control no no
Extension Compatibility Transmitted Recognized Remarks
General MIDI Compatible no no
DLS compatible no no
Standard MIDI Files no no
XMF Files no no
SL-MIDI compatible no no
yes no F0, 41, 00, 42, 12, 40, 00, 00, 00,
xx, xx, xx, 00, F7
yes yes *See proper Sysex List Chart
no no
Numa Compact 2x by Studiologic®
77

Appendix
MIDI CC Transmitted Recognized Remarks
0 Bank Select (MSB) yes no
1 Modulation Wheel (MSB) yes no
2 Breath Controller yes no
3 yes no
4 Foot Controller (MSB) yes no
5 Portamento Time (MSB) yes no
6 Data Entry (MSB) yes no
7 Channel Volume (MSB) yes no
8 Balance (MSB) yes no
9 yes no
10 Pan (MSB) yes no
11 Expression (MSB) yes no
12 Eect Control 1 (MSB) yes no
13 Eect Control 2 (MSB) yes no
14 yes no
15 yes no
16 General Purpose Controller 1 (MSB) yes no
17 General Purpose Controller 2 (MSB) yes no
18 General Purpose Controller 3 (MSB) yes no
19 General Purpose Controller 4 (MSB) yes no
20 yes no
21 yes no
22 yes no
23 yes no
24 yes no
25 yes no
26 yes no
27 yes no
28 yes no
29 yes no
30 yes no
31 yes no
32 Bank Select (LSB) yes no
33 Modulation Wheel (LSB) yes no
34 Breath Controller (LSB) yes no
35 yes no
36 Foot Controller (LSB) yes no
37 Portamento Tim e(LSB) yes no
38 Data Entry (LSB) yes no
39 Channel Volume (LSB) yes no
40 Balance (LSB) yes no
41 yes no
42 Pan (LSB) yes no
43 Expression (LSB) yes no
44 Eect Control 1 (LSB) yes no
45 Eect Control 2 (LSB) yes no
Numa Compact 2x by Studiologic®
78

Appendix
46 yes no
47 yes no
48 General Purpose Controller 1 (LSB) yes no
49 General Purpose Controller 2 (LSB) yes no
50 General Purpose Controller 3 (LSB) yes no
51 General Purpose Controller 4 (LSB) yes no
52 yes no
53 yes no
54 yes no
55 yes no
56 yes no
57 yes no
58 yes no
59 yes no
60 yes no
61 yes no
62 yes no
63 yes no
64 Sustain Pedal yes no
65 Portamento On/O yes no
66 Sostenuto yes no
67 Soft Pedal yes no
68 Legato Footswitch yes no
69 Hold 2 yes no
70 Sound Controller 1
(default: Sound Variation)
71 Sound Controller 2
(default: Timber/Harmonic Quality)
72 Sound Controller 3
(default: Release Time)
73 Sound Controller 4
(default: Attach Time)
74 Sound Controller 5
(default: Brightness)
75 Sound Controller 6
(GM2 default: Decay Time)
76 Sound Controller 7
(GM2 default: Vibrato Time)
77 Sound Controller 8
(GM2 default: Vibrato Depth)
78 Sound Controller 9
(GM2 default: Vibrato Delay)
79 Sound Controller 10
(GM2 default: Undened)
80 General Purpose Controller 5 yes no
81 General Purpose Controller 6 yes no
82 General Purpose Controller 7 yes no
83 General Purpose Controller 8 yes no
84 Portamento Control yes no
85 yes no
yes no
yes no
yes no
yes no
yes no
yes no
yes no
yes no
yes no
yes no
Numa Compact 2x by Studiologic®
79

Appendix
86 yes no
97 yes no
88 yes no
89 yes no
90 yes no
91 Eect 1 Depth
(default: Reverb Send)
92 Eect 2 Depth
(default: Tremolo Depth)
93 Eect 3 Depth
(default: Chorus Send)
94 Eect 4 Depth
(default: Celeste [Detune] Depth)
95 Eect 5 Depth
(default: Phaser Depth)
96 Data Increment yes no
97 Data Decrement yes no
98 Not-registered Parameter No. (LSB) yes no
99 Not-registered Parameter No. (MSB) yes no
100 Registered Parmeter No. (LSB) yes no
101 Registered Paramenter No. (MSB) yes no
102 FX1 Change yes no 0=bypass, 1=drive, 2=chorus, ...
103 FX2 Change yes no 0=bypass, 1=rotary, 2=tremolo, ..
104 Reverb Change yes no 0=bypass, 1=room, 2=hall,
105 yes no
106 yes no
107 yes no
108 yes no
109 yes no
110 yes no
111 yes no
112 yes no
113 yes no
114 yes no
115 yes no
116 yes no
117 yes no
118 yes no
119 yes no
120 All Sound O yes no
121 Reset All Controllers yes no
122 Local Control On/O yes no
123 All Notes O yes no
124 Omni Mode O yes no
125 Omni Mode On yes no
126 Poly Mode O yes no
127 Poly Mode On yes no
yes no Ch 1,2: reverb send;
Ch 16: reverb level
yes no Ch 1,2: FX1 level
yes no Ch 1,2: FX2 level
yes no
yes no
3=plate, 4=spring
Numa Compact 2x by Studiologic®
80

Appendix
MIDI Implementation Chart - Keyboard section
Studiologic Numa Compact 2x, Version 1.00
Basic information Transmit/Export Recognized/Import Remarks
MIDI channels 1,2,16 1,2,3,4,16 16 = common channel
Note numbers 0 - 127 0-127
Program change 0 -127 0-127 *See proper Sound List Chart
NOTE: Patch change
Bank select yes yes *See proper Sound List Chart
Note-On velocity yes yes 16 = common channel
Note-O velocity yes yes 16 = common channel
Channel Aftertouch yes yes
Poly (key) Aftertouch no no
Pitch Bend yes yes 16 = common channel
Active Sensing no no
System reset no no
Tune request no no
Pitch Bend yes no
Universal System Exclusive:
Sample Dump Standard, Device Inquiry,
File Dump, MIDI Tuning ,Master Volume,
Master Balance, Notation Information, Turn GM1 System On, Turn GM2
System On, Turn GM System O, DLS-1,
File Reference, Controller Destination,
Key-based Instrument Ctrl, Master Fine/
Coarse Tune, Othe Universal System
Exclusive
Manufacturer or Non-Commercial System
Exclusive
NRPNs no no
RPN 00 (Pitch Bend Sensitivity) RPN 01
(Channel Fine Tune)
RPN 02 (Channel Coarse Tune)
RPN 03 (Tuning Program Select) RPN 04
(Tuning Bank Select)
RPN 05 (Modulation Depth Range)
MIDI Tuning and Synchronization Transmit/Export Recognized/Import Remarks
MIDI Clock no no
Song Position Pointer no no
Song Select no no
Start - Continue - Stop no no
MIDI Time code no no
MIDI Machine Control no no
MIDI Show control no no
Extension Compatibility Transmitted Recognized Remarks
General MIDI Compatible no no
DLS compatible no no
Standard MIDI Files no no
XMF Files no no
SL-MIDI compatible no no
yes no F0, 41, 00, 42, 12, 40, 00, 00, 00,
xx, xx, xx, 00, F7
yes yes *See proper Sysex List Chart
no no
Numa Compact 2x by Studiologic®
81

Appendix
MIDI CC Transmitted Recognized Remarks
0 Bank Select (MSB) yes yes Ch 1,2
1 Modulation Wheel (MSB) yes yes * Stick2 = Sound
2 Breath Controller no no
3 yes no
4 Foot Controller (MSB) no no
5 Portamento Time (MSB) no no
6 Data Entry (MSB) no no
7 Channel Volume (MSB) yes no
8 Balance (MSB) no yes
9 yes no
10 Pan (MSB) no yes
11 Expression (MSB) yes yes 16 = Common channel
12 Eect Control 1 (MSB) yes yes Organ Model Drawbar #1
13 Eect Control 2 (MSB) yes yes Organ Model Drawbar #2
14 yes yes Organ Model Drawbar #3
15 yes yes Organ Model Drawbar #4
16 General Purpose Controller 1 (MSB) yes yes Organ Model Drawbar #5
17 General Purpose Controller 2 (MSB) yes yes Organ Model Drawbar #6
18 General Purpose Controller 3 (MSB) yes yes Organ Model Drawbar #7
19 General Purpose Controller 4 (MSB) yes yes Organ Model Drawbar #8
20 yes yes Organ Model Drawbar #9
21
22
23
24
25
26
27
28
29
30
31
32 Bank Select (LSB) yes yes
33 Modulation Wheel (LSB)
34 Breath Controller (LSB)
35
36 Foot Controller (LSB)
37 Portamento Tim e(LSB)
38 Data Entry (LSB)
39 Channel Volume (LSB)
40 Balance (LSB)
41
42 Pan (LSB)
43 Expression (LSB)
44 Eect Control 1 (LSB)
45 Eect Control 2 (LSB)
Numa Compact 2x by Studiologic®
82

Appendix
46
47
48 General Purpose Controller 1 (LSB)
49 General Purpose Controller 2 (LSB)
50 General Purpose Controller 3 (LSB)
51 General Purpose Controller 4 (LSB)
52
53
54
55
56
57
58
59
60
61
62
63
64 Sustain Pedal yes yes
65 Portamento On/O
66 Sostenuto yes yes
67 Soft Pedal yes yes
68 Legato Footswitch
69 Hold 2
70 Sound Controller 1
(default: Sound Variation)
71 Sound Controller 2
(default: Timber/Harmonic Quality)
72 Sound Controller 3
(default: Release Time)
73 Sound Controller 4
(default: Attach Time)
74 Sound Controller 5
(default: Brightness)
75 Sound Controller 6
(GM2 default: Decay Time)
76 Sound Controller 7
(GM2 default: Vibrato Time)
77 Sound Controller 8
(GM2 default: Vibrato Depth)
78 Sound Controller 9
(GM2 default: Vibrato Delay)
79 Sound Controller 10
(GM2 default: Undened)
80 General Purpose Controller 5
81 General Purpose Controller 6
82 General Purpose Controller 7
83 General Purpose Controller 8
84 Portamento Control
85
Filter Resonance
EG Release
EG Attack
Filter Cuto
EG2 Decay
Numa Compact 2x by Studiologic®
83

Appendix
86
97
88
89
90
91 Eect 1 Depth
(default: Reverb Send)
92 Eect 2 Depth
(default: Tremolo Depth)
93 Eect 3 Depth
(default: Chorus Send)
94 Eect 4 Depth
(default: Celeste [Detune] Depth)
95 Eect 5 Depth
(default: Phaser Depth)
96 Data Increment no
97 Data Decrement no
98 Not-registered Parameter No. (LSB) no
99 Not-registered Parameter No. (MSB) no
100 Registered Parmeter No. (LSB) no
101 Registered Paramenter No. (MSB) no
102 FX1 Change yes (ch 1,2) yes 0=bypass, 1=drive, 2=chorus, ...
103 FX2 Change yes (ch 1,2) yes 0=bypass, 1=rotary, 2=tremolo, ..
104 Reverb Change yes (ch 16) yes 0=bypass, 1=room, 2=hall,
105 no
106 no
107 no
108 no
109 no
110 FX1 Modwheel yes* yes *Stick 2 = FX1
111 FX2 Modwheel yes* yes *Stick 2 = FX2
112 no
113 no
114 no
115 no
116 no
117 no
118 no
119 no
120 All Sound O no
121 Reset All Controllers no yes
122 Local Control On/O no
123 All Notes O no yes
124 Omni Mode O no
125 Omni Mode On no
126 Poly Mode O no
127 Poly Mode On no
yes yes Ch 1,2: reverb send;
Ch 16: reverb level
yes yes Ch 1,2: FX1 level
yes yes Ch 1,2: FX2 level
no
no
3=plate, 4=spring
Numa Compact 2x by Studiologic®
84

Appendix
Sounds list
Sound # Sound Name Family Bank Select MSB Program Change
1 Concert APIANO 0 0
2 Stage APIANO 1 0
3 Vintage APIANO 2 0
4 Studio APIANO 3 0
5 Rock APIANO 0 1
6 Upright APIANO 0 3
7 E-Grand1 APIANO 0 2
8 E-Grand2 APIANO 1 2
9 EP-Mark1 EPIANO 0 4
10 Wurlix EPIANO 1 4
11 E-Pno1 EPIANO 0 5
12 E-Pno2 EPIANO 1 5
13 DxFm1 EPIANO 2 5
14 DxFm2 EPIANO 3 5
15 DxFm3 EPIANO 4 5
16 DxFm4 EPIANO 5 5
17 Clavi KEYS 0 7
18 Harpsi KEYS 0 6
19 Vibes KEYS 0 11
20 Marimba KEYS 0 12
21 FunKlav KEYS 1 7
22 Cembalo KEYS 1 6
23 ReedOrg KEYS 0 20
24 GloKeys KEYS 0 9
25 Ac-Bass BASS_GUITAR 0 32
26 El-Bass BASS_GUITAR 1 33
27 Slap BASS_GUITAR 0 36
28 Plicked BASS_GUITAR 0 34
29 Ny-Guitar BASS_GUITAR 0 24
30 El-Guitar BASS_GUITAR 0 27
31 Ac-Guitar BASS_GUITAR 0 25
32 Jz-Guitar BASS_GUITAR 0 26
33 2 Guitars BASS_GUITAR 1 24
34 12 Strings BASS_GUITAR 1 25
35 BassRide1 BASS_GUITAR 1 32
36 BassRide2 BASS_GUITAR 1 33
37 JazzOrg1 ORGAN 0 17
38 JazzOrg2 ORGAN 1 17
39 DrawbVib ORGAN 0 16
40 AllDrawb ORGAN 1 16
41 888-Pure ORGAN 0 18
42 888-Scan ORGAN 1 18
43 MildSet ORGAN 2 16
44 PopSet ORGAN 6 16
45 AllEven ORGAN 3 16
46 VintSet ORGAN 3 18
47 FullSwell ORGAN 3 17
48 FullGreat ORGAN 7 16
49 VintOrg1 ORGAN 4 16
Numa Compact 2x by Studiologic®
85

Appendix
50 VintOrg2 ORGAN 5 16
51 PipeOrg1 ORGAN 1 19
52 PipeOrg2 ORGAN 0 19
53 SynthPad SYNTH 0 89
54 SynthHouse SYNTH 1 7
55 SweetSaw SYNTH 2 7
56 WowPad SYNTH 0 95
57 Soloist SYNTH 4 7
58 Funky SYNTH 5 7
59 SynBass1 SYNTH 6 7
60 SynBass2 SYNTH 7 7
61 JumpSaw SYNTH 0 81
62 SynBrass SYNTH 9 7
63 SquareMix SYNTH 0 80
64 Cluster SYNTH 11 86
65 BigDance SYNTH 0 96
66 Monster SYNTH 0 97
67 FmVibe SYNTH 0 98
68 SledgeMix SYNTH 0 99
69 Sawtooth SYNTH 1 81
70 Square SYNTH 1 80
71 Triangle SYNTH 1 89
72 Pulse SYNTH 3 7
73 Strings1 ORCHESTRA 0 49
74 Strings2 ORCHESTRA 0 50
75 Horns ORCHESTRA 0 60
76 Brass ORCHESTRA 0 61
77 Baroque ORCHESTRA 1 49
78 BigBand ORCHESTRA 1 61
79 BrassFall ORCHESTRA 2 61
80 SaxBand ORCHESTRA 1 66
81 TenorSax ORCHESTRA 0 66
82 JazzFlute ORCHESTRA 0 73
83 Trumpet ORCHESTRA 0 56
84 Oboe ORCHESTRA 0 68
85 Cassotto OTHER 0 23
86 Accordion OTHER 0 21
87 Musette OTHER 1 21
88 Harmonica OTHER 0 22
89 ChoirAh OTHER 0 52
90 Choir Oh OTHER 0 53
91 ChoirUh OTHER 1 53
92 ChoirSint OTHER 0 54
93 Bouzouki OTHER 1 104
94 Kanoun OTHER 1 107
95 Oud OTHER 1 105
96 Cawala OTHER 1 75
97 Mizmar OTHER 1 111
98 Nai OTHER 1 72
99 StndKit OTHER 14 5
100 WorldKit OTHER 15 5
Numa Compact 2x by Studiologic®
86

Appendix
Specications
Speciche tecniche
Studiologic Numa Compact 2x
Keyboard Number of Keys 88
Type Semi-weighted Action
TP/9 PIANO with Aftertouch
Velocity Curves 3 default velocity curves +
xed curve with
programmable value
Display Type OLED
Resolution 128 x 64 dots
User Interface Encoder Rotation + push
Controls 7 potentiometer
23 buttons
2 sticks
9 Slider / Drawbars
Inputs Pedals Expression + universal
Connections MIDI In - Out
USB Midi In/Out, USB to HOST,
power
Power Supply DC IN 12V - 2,5A
Adapter Input:100-240V
Output: 12V-2,5A
Weight 7,1 Kg / 15,6 lbs
Dimensions
Dimensioni
1270 mm | 50”
230 mm
9”
100 mm
4”
Design and Specications are subject to change without notice.
Il design e le speciche tecniche sono soggette a modica senza preavviso.
Numa Compact 2x by Studiologic®
87
 Loading...