

Operation Manual
E
Rev. 15-05-2017
Manuale d‘uso
Bedienungsanleitung
Mode d’emploi
I
D
F
Important safety instructions
Please read the entire manual. It contains all the informations
you need to use this unit.
Please follow the instructions in the manual. The warranty
will be void if unauthorized work is carried out on the
Numa Compact 2. Only accessories that are specied by the
manufacturer should be used with this unit.
Use the unit only as specied in this manual.
DANGER!
Risk of electric shock. Do not open the chassis. There are no
user serviceable parts inside.
The unit should only be serviced by qualied service sta.
Humidity
To reduce the risk of re or electric shock, do not expose the
unit to rain or moisture. Never place containers with liquid on
the unit. Do not use the unit near water, swimming pool, bathtub or wet basement. If the unit is moved from a cold place to a
warm room, condensation may occur inside. To avoid damage
please allow the unit to reach room temperature before switching on.
Installation
Always use a stable rack to place the keyboard on. Please be
aware of its size and weight.
Cleaning / Maintenance
Never use any abrasive detergent, which may damage the surface. We recommend a slightly moist micro-bre cloth.
Packaging
Please keep all packaging, and use it to protect the keyboard
when transporting or if servicing is required.
Mains
Before connecting the unit to the main power supply, please
check if the power supply is suitable for the Numa Compact 2
adapter. The unit can be powered with 100 – 240VAC, using the
included power adapter.
Important Note: the Numa Compact 2 can be powered directly
also by the USB port, if connected to the PC or other suitable
USB power sources.
ENGLISH
Operation Manual
Numa Compact 2 by Studiologic® 3
E

Index
Safety instructions
Your new Numa Compact 2
Power - Inputs and connections
Panel - Display and navigation
Sound banks and sound section
2
6
6
7
7
10
10
10
10
11
11
11
12
13
13
13
14
15
Product overview
Key features
Example of use
Operation diagram
Power connection
USB power
Expression / Universal pedals
Audio output
Headphones
Volume
USB
Sound / MIDI
Demo
SPLIT
Store - User programs
Sound mode
Sounds
Eects
Global edit
Program edit
Part edit
16
17
17
18
18
18
18
18
18
19
19
20
20
21
22
22
22
23
23
24
24
24
24
24
25
FX1- FX2
FX Autoset
Strings Resonance (Damper model)
Transposer
Global tuner
Velocity curve
Fixed curve
Strings resonance (Damper eect)
Headphones (mode)
Pedal 2
FX Autoset
Factory reset
Firmware version and update
Programs send/receive
Program name
Split point
Mixer
Volume
Split assign
Transpose
Octave
Rev send
Pedal 1 - Pedal 2
Stick 1 - Stick 2
Aftertouch
Numa Compact 2 by Studiologic®
4

Index
MIDI (Zone edit)
Declarations
Appendix
26
26
26
27
27
27
27
27
27
28
29
118
119
120
120
Program Change
LSB - MSB
MIDI channel
Volume
Split assign
Transpose
Octave
Pedal 1 - Pedal 2
Stick 1 - Stick 2
Aftertouch
Sound map
MIDI Implementation chart
Specications
Dimensions
Numa Compact 2 by Studiologic® 5
E

Your new Numa Compact 2
Product overview
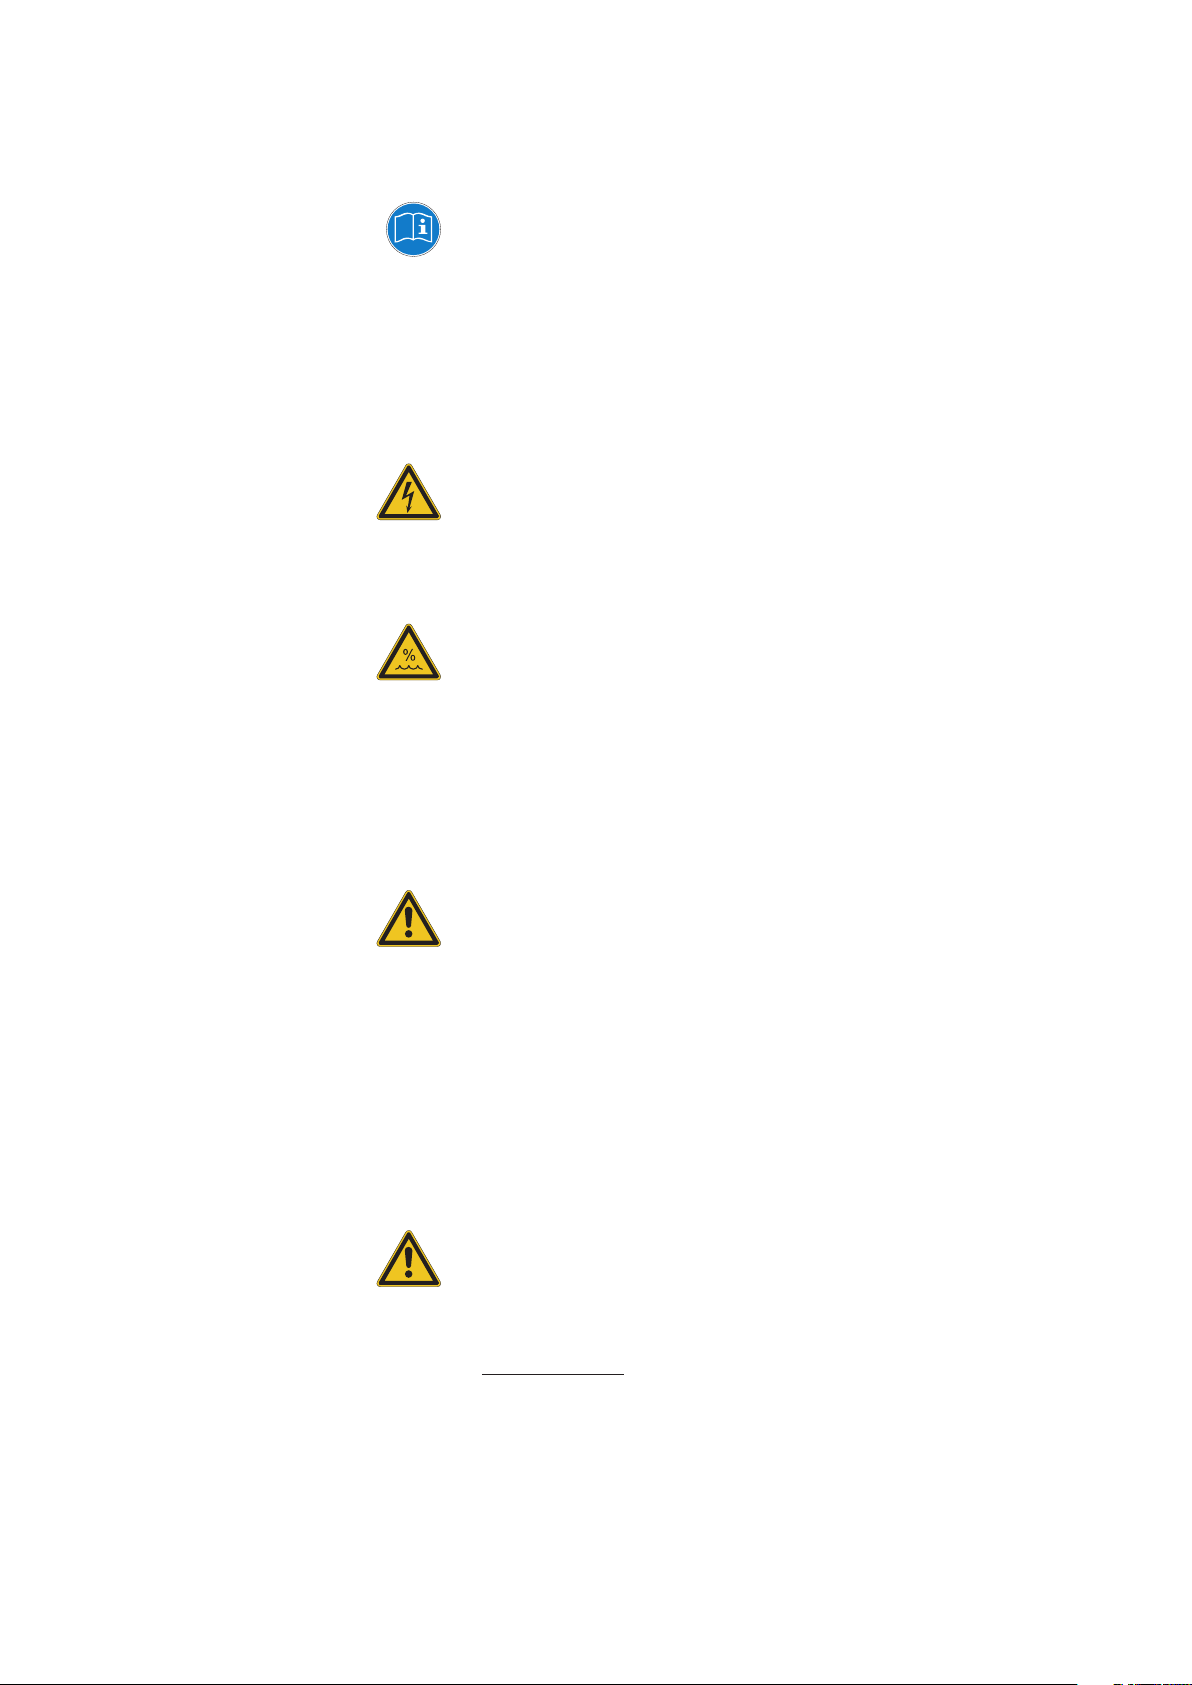
The Numa Compact 2 is an incredibly powerful musical instrument, packed in a stylish and slim
cabinet, based on a totally new technology and updated user interface. The keyboard includes an
Aftertouch control and together with the programmable Sticks, allows to have a total control of
the musical performance. The new sound engine is capable of 128 notes of max polyphony and
it includes two independent sections (Lower & Upper) with over 80 sounds, organized in 8 Sound
Banks, assignable to any portion of the keyboard, in Layer or Split mode. The 1GB (ash memory)
sounds are further enhanced by 2 eects post-processors (Fx1-Fx2) each one with a double internal architecture, for a total of 4 independent eects at once.
A controllable Strings Resonance and the Release-Staccato Samples make the main piano sounds
even more real, while a new Stereo Reverb post-processor further enhances the sound. Bass, Treble and Mastering controls allow to reach a studio quality, also noticeable thru the built in digital
amplier and elliptical back-reection speakers. The MIDI Module includes 2 independent MIDI
zones and all parameters can be programmed and stored.
Key features
88 notes light weighted keyboard
Aftertouch
Stick 1: Pitch Bend function on both axis
Stick 2: Sound Modulation and FX1/2 control (assignable or auto-selection)
Built in 2x10W amplifier + 2 elliptical back reflection speakers
128x64 graphic Oled display
Direct control User Interface
Lower-Upper-Zone A-Zone B
4 programmable sections (internal SOUNDS and MIDI) in any combination
1 GB of flash memory, 88 sounds organized in 8 Sound Banks
Concert Grand piano sounds with release-staccato samples and Strings Resonance
FX1-2 double effects processors - 4 programmable effects at once
Stereo Reverb with separate Lower/Upper controllable send level
Strings Resonance (Damper model) on acoustic Piano sounds (programmable)
Global-Program-Part EDIT
Bass, Treble, Mastering (3D+Compressor) post processing controls
MIDI module with 2 independent programmable Zones
Connections: Usb, MIDI In/Out, Audio L/R, Headphones, Ped1-Ped2
USB power
Numa Compact 2 by Studiologic®
6
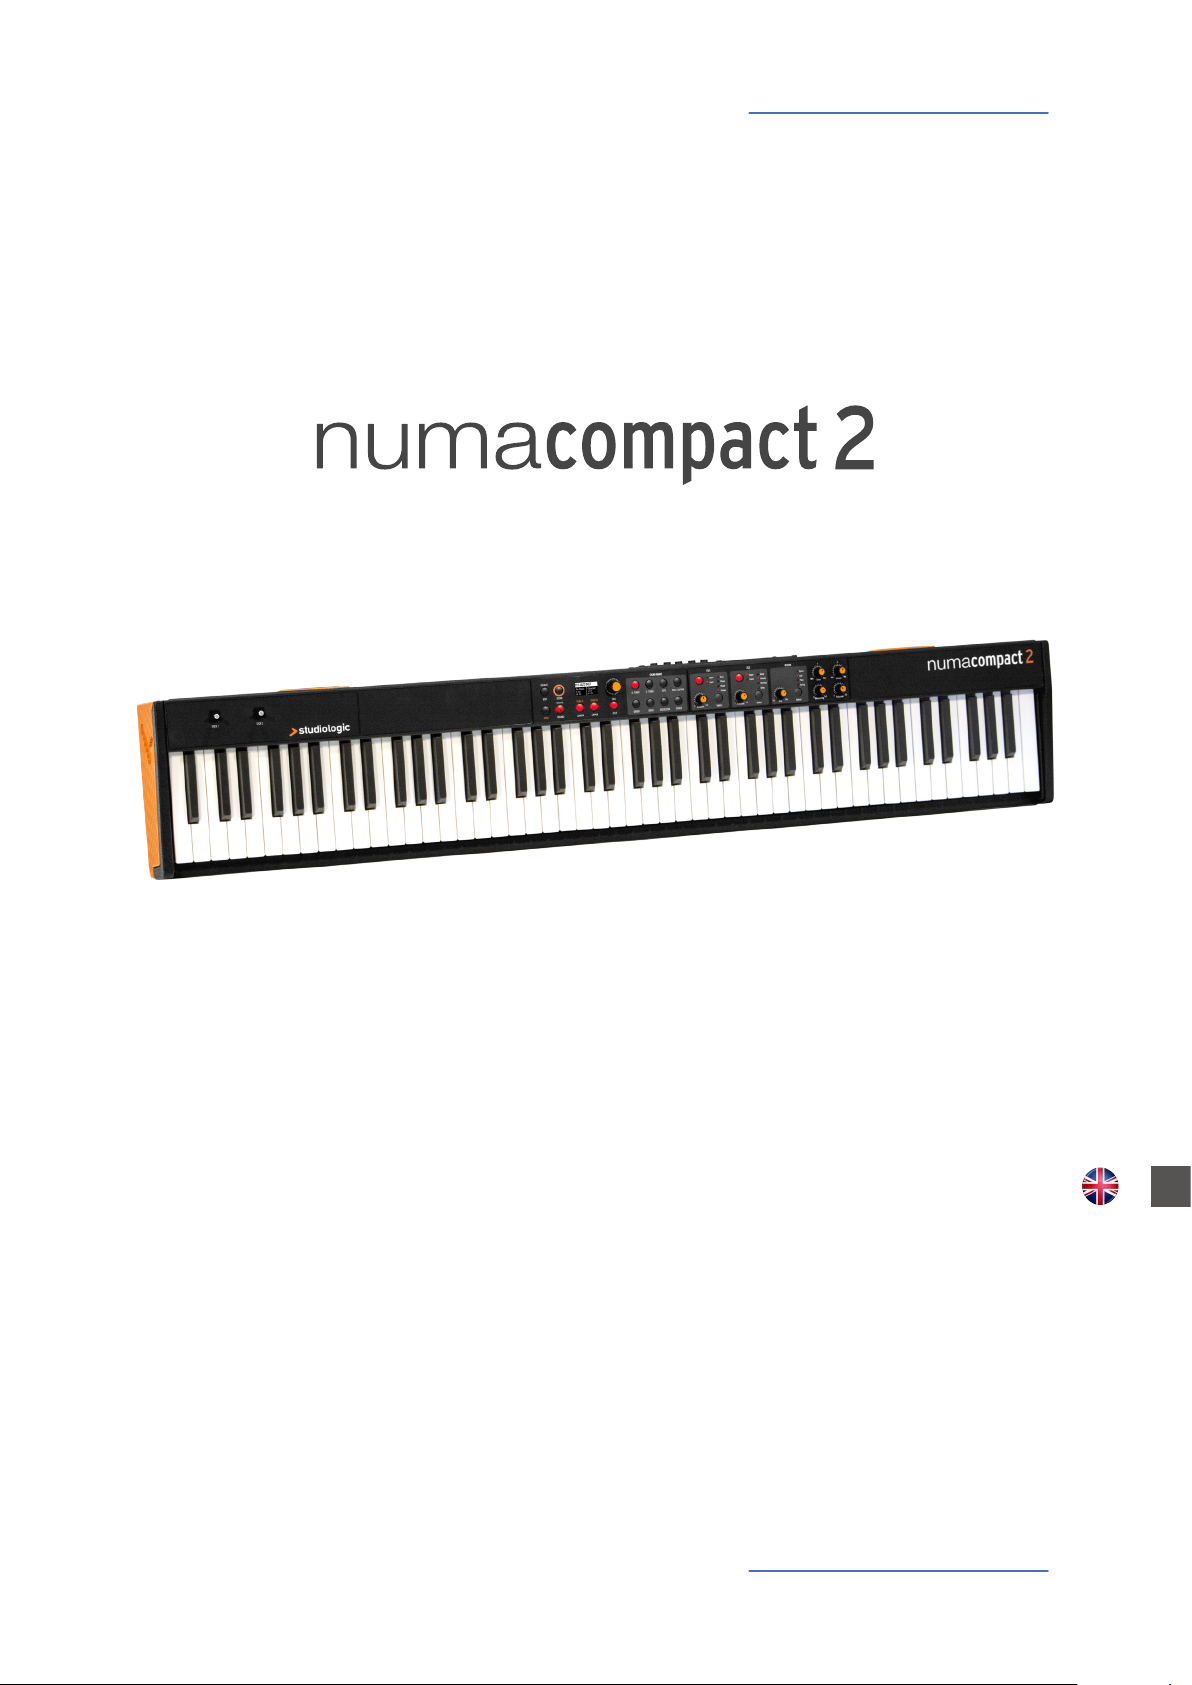
Example of use
FX1
SPEAKERS
PED2PED1
Your new Numa Compact 2
MIDI IN
USB
MIDI OUT
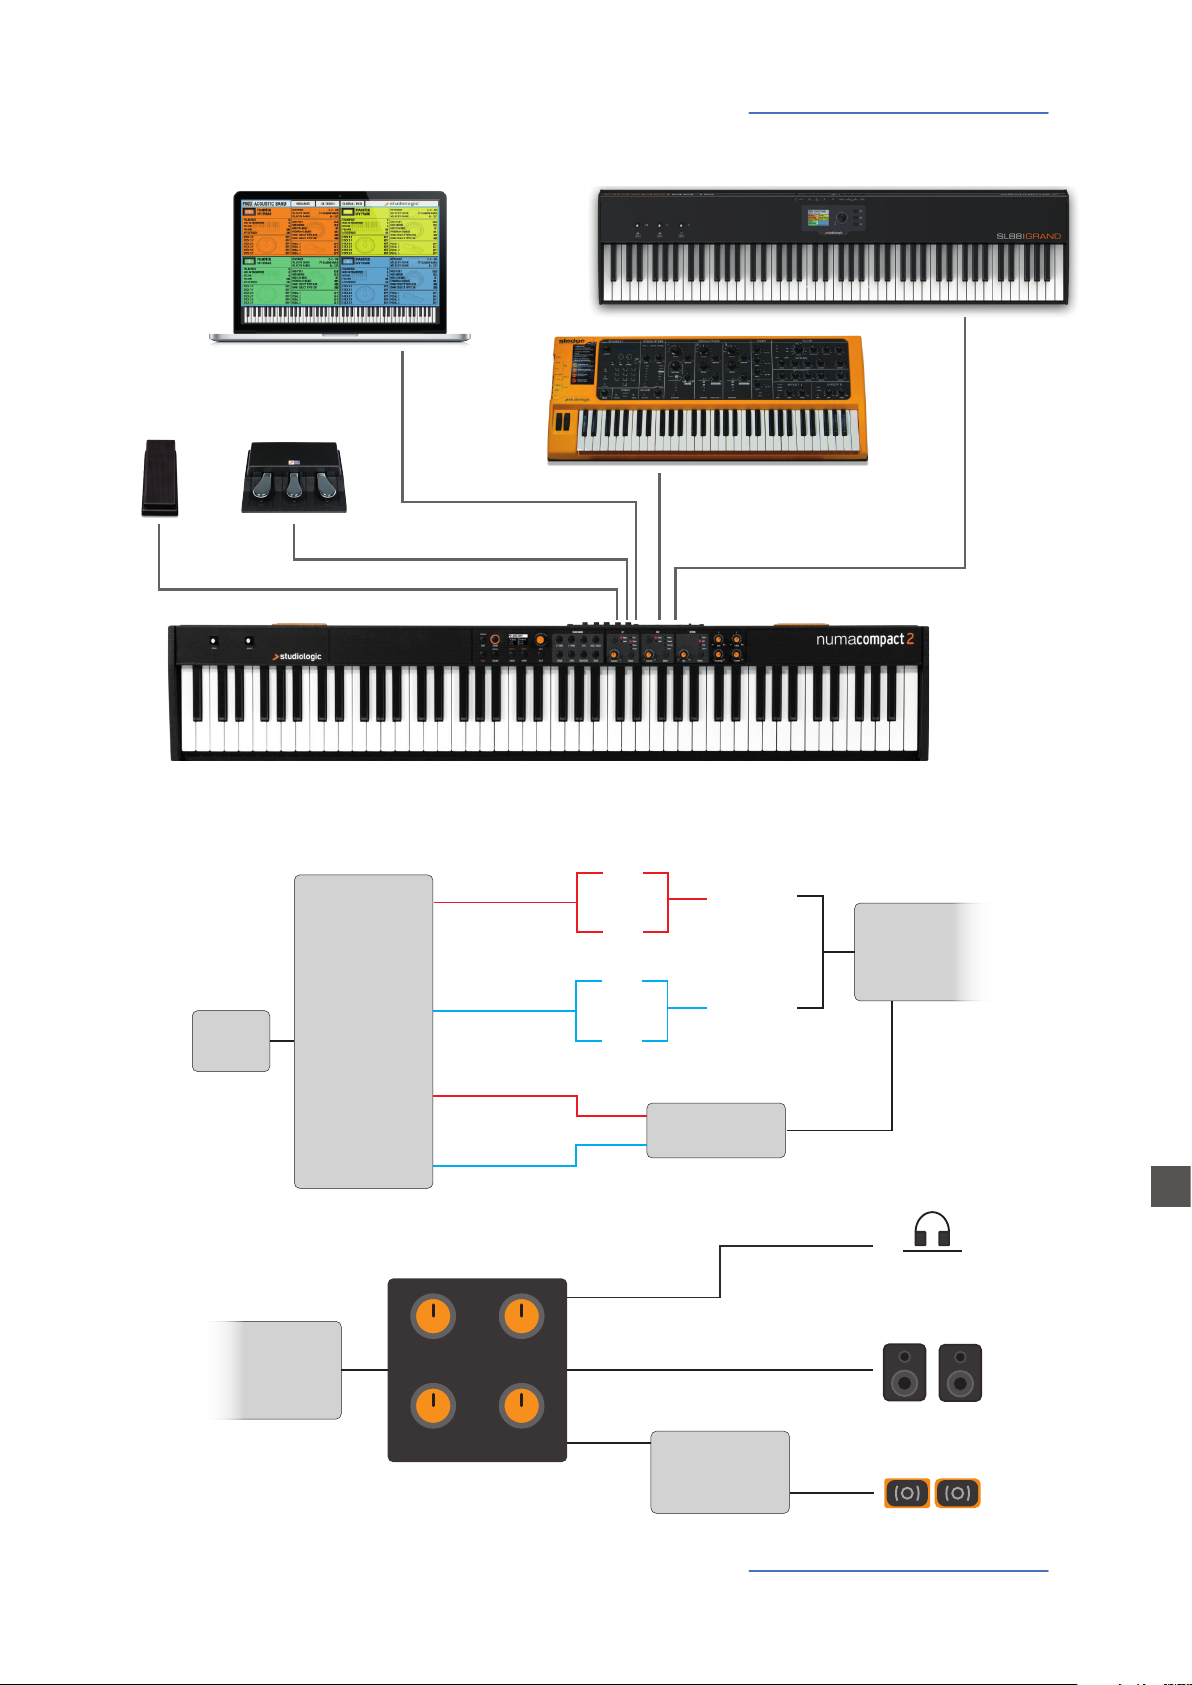
Operation diagram
1GB
Stereo
reverb
Sound
engine
Bass
Mastering
Suggested setting
UPPER
LOWER
UPPER
LOWER
Treble
Volume
FX2
FX1
FX2
Rev send
Rev send
Strings
resonance
Digital
amplier
Stereo
reverb
AUX out
L
AUDIO out
L
E
R
R
BUILT-IN
Numa Compact 2 by Studiologic® 7

Your new Numa Compact 2
An overview of the functions of the Numa Compact 2:
Light weighted action
8 Sound Banks
88 Internal Sounds
FX1 - FX2- REV
Strings Resonance
The Numa Compact 2 oers the latest innovative technology by Fatar: the sophisticated weighted keyboard TP9-Piano
with Aftertouch. The Numa Compact weighs just 7,1 kg and is
therefore very portable, yet it oers a great keyboard touch,
for which Fatar is famous.
You can immediately start playing the 88 selected high quality sounds, which have been carefully sampled. Experienced
keyboard players and musicians selected those sounds and
were involved in the design of the straightforward operation
of Numa Compact 2. Therefore Numa Compact 2 is your perfect partner on stage, in the studio or at home. 128 voices of
max polyphony is available to add depth and expression.
You can combine two sounds by assigning them to the Lower
and Upper sections in Split or Layer mode.
The 2 double FX processors allow to assign 2 dierent eects
to both Lower and Upper sections, in addition to a Strings
Resonance eect on all piano sounds and a Stereo Reverb, for
an endless variety of combinations of all kind.
Mixer & Mastering
Built-in Amplication
Master keyboard functions
Audio connections
A Volume, Bass, Treble and Mastering controls allow to get
the preferred sound setting and the internal monitor-amplication system with elliptical speakers allow you to play the
instrument using the internal 10+10W amplication system,
digitally controlled and equalized. For the best result a suggested setting is with all pots at halfway, to avoid any possible
distorsion and ensure a correct frequncy responce. Settings
can be modied according to the selected sound.
The master keyboard functions of the Numa Compact 2, with
2 programmable Zones, allow you to control other MIDI devices, select the sounds and adjust the levels directly from
your Numa Compact 2.
As well as the stereo L/R audio output and built in amplication system, the Numa Compact 2 has an additional headphone plug, ideal for late-night jam sessions without disturbing the neighbours. This connection can also be used as an
auxiliary audio output.
Numa Compact 2 by Studiologic®
8

Your new Numa Compact 2
The integrated USB port allows your Numa Compact 2 to connect to your computer and be powered directly, without the
need of the external adapter (included). You can use a USB
and MIDI out for MIDI data transmission. In addition, updates
of the rmware or the sound library are accessible via USB.
Please note that the internal amplication system is automatically switched o when the instrument is powered by USB,
to avoid excessive power consumption or power drops.
Numa Compact 2
Power Adapter
CD Manual
Interactive Numa
USB <> Computer
Delivery includes
Numa Compact 2 by Studiologic® 9
E
Power - Inputs and connections
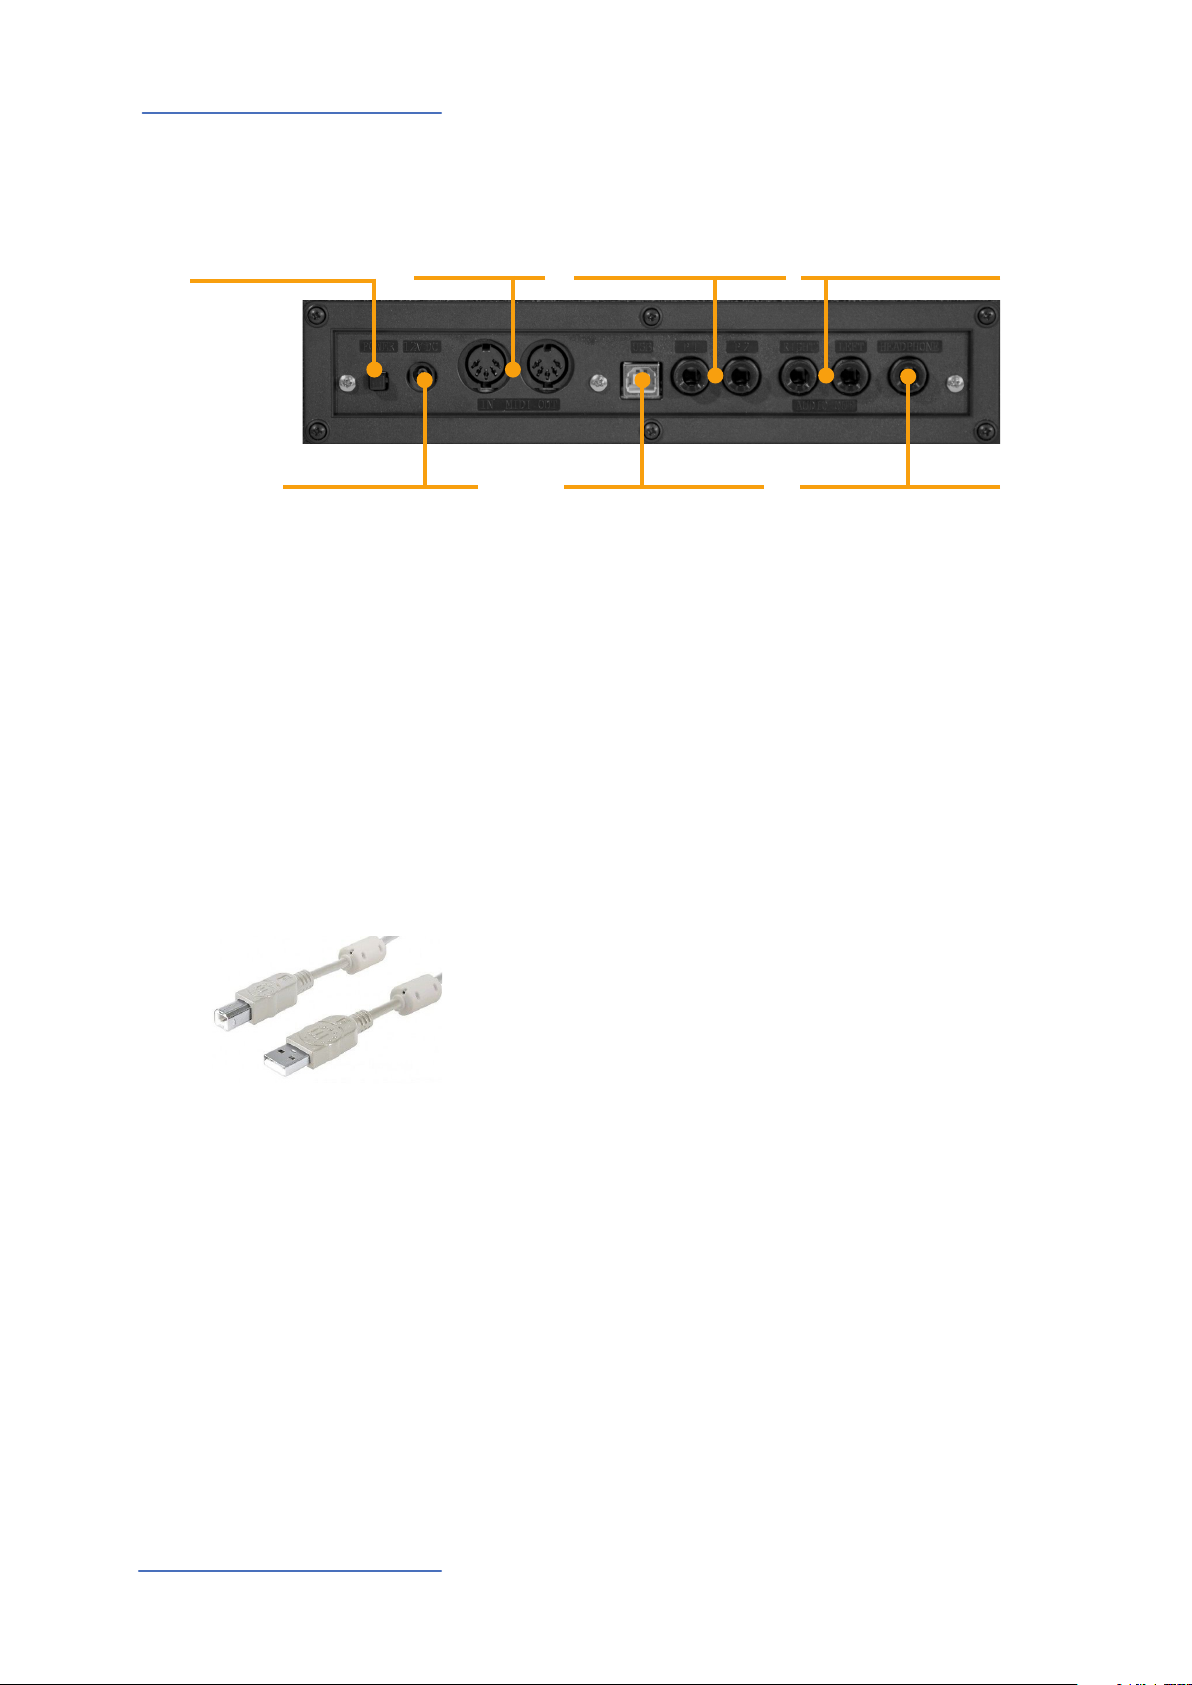
Power - Inputs and connections
MIDI In-OutPower On/O
Power
12V - 2,5A
Power connection
Ped 1, Ped 2
Expression pedal,
Universal pedal
USB Port
MIDI I/O, rmware update,
power
Audio L/R Out
2x 6,3mm mono jack
Headphones / Aux Out
1x 6,3mm stereo jack
Use the power adapter supplied with the device to connect
the Numa Compact 2 to the power socket (or use the USB
connection). Switch the unit on by using the power button
next to the power plug of the Numa Compact 2, set the main
Volume, Bass and Treble controls to the half position and the
Mastering control to zero-minimum (the function will be explained later on this manual) to avoid excessive output power
and allow the internal speakers to play with a correct dynamic range.
USB power
Expression / Universal pedals
Audio output
The instrument can also be powered by USB, using a shielded
quality certied cable and providing that the computer
has enough power and not too many devices are powered
through the same USB port.
When the instrument is USB powered, in most cases the internal amplication system is disconnected if the power consumption exceeds the computer‘s range.
PLEASE NOTE: in case of weak or unstable connection, use
the traditional power (see previous paragraph).
Connect the (optional) pedal or pedals to the related sockets,
labelled Ped1 and Ped2; at the socket labelled Ped 1 you can
plug in the Studiologic VP pedal, typically for volume-expression controls. To the Ped2 socket you can plug either a single
swicth pedal, a volume-expression pedal or the custom triple
pedal SLP3-D, as explained in the related chapter.
If you want to use external amplication systems, or record
the instruments sounds, connect the Left and Right audio
outputs to the inputs of your mixing desk or amplier, or to
your computer audio board inputs, using suitable cables.
Numa Compact 2 by Studiologic®
10
The Headphones output can be used with an headphones set
or as an extra audio auxiliary output, according to the setting
of the related GLOBAL edit function (explained in this manual). As an auxiliary audio out, you can use this plug to connect
the instrument to a subwoofer or an additional amplication
system, while the L/R outputs are still available for recording
or other audio connections.
When you use the Numa Compact 2 for the rst time, we recommend you to turn the Volume knob on the Output section to not more than half way between 0 and Full. While you
are playing you can adjust the volume according to the selected sounds. Adjusting the Volume knob will eect all audio and headphone outputs at the same time.
CAUTION:
To prevent hearing damage, you should – as with all audio
devices – avoid using the Numa Compact 2 at high volume
for long periods.
Power - Inputs and connections
Headphones
Volume
For data transmission via USB, connect the Numa Compact 2
to your computer with a USB cable. The rst time you switch
the Numa Compact 2 on, it will be recognised by your computer automatically and the appropriate driver will be installed
by the OS (cross compliant).
USB
E
Numa Compact 2 by Studiologic® 11
Panel - Display and navigation
P01-JAZZ DUET
A0 - B3
C4 - C8
P01-JAZZ DUET
A0 - B3
C4 - C8
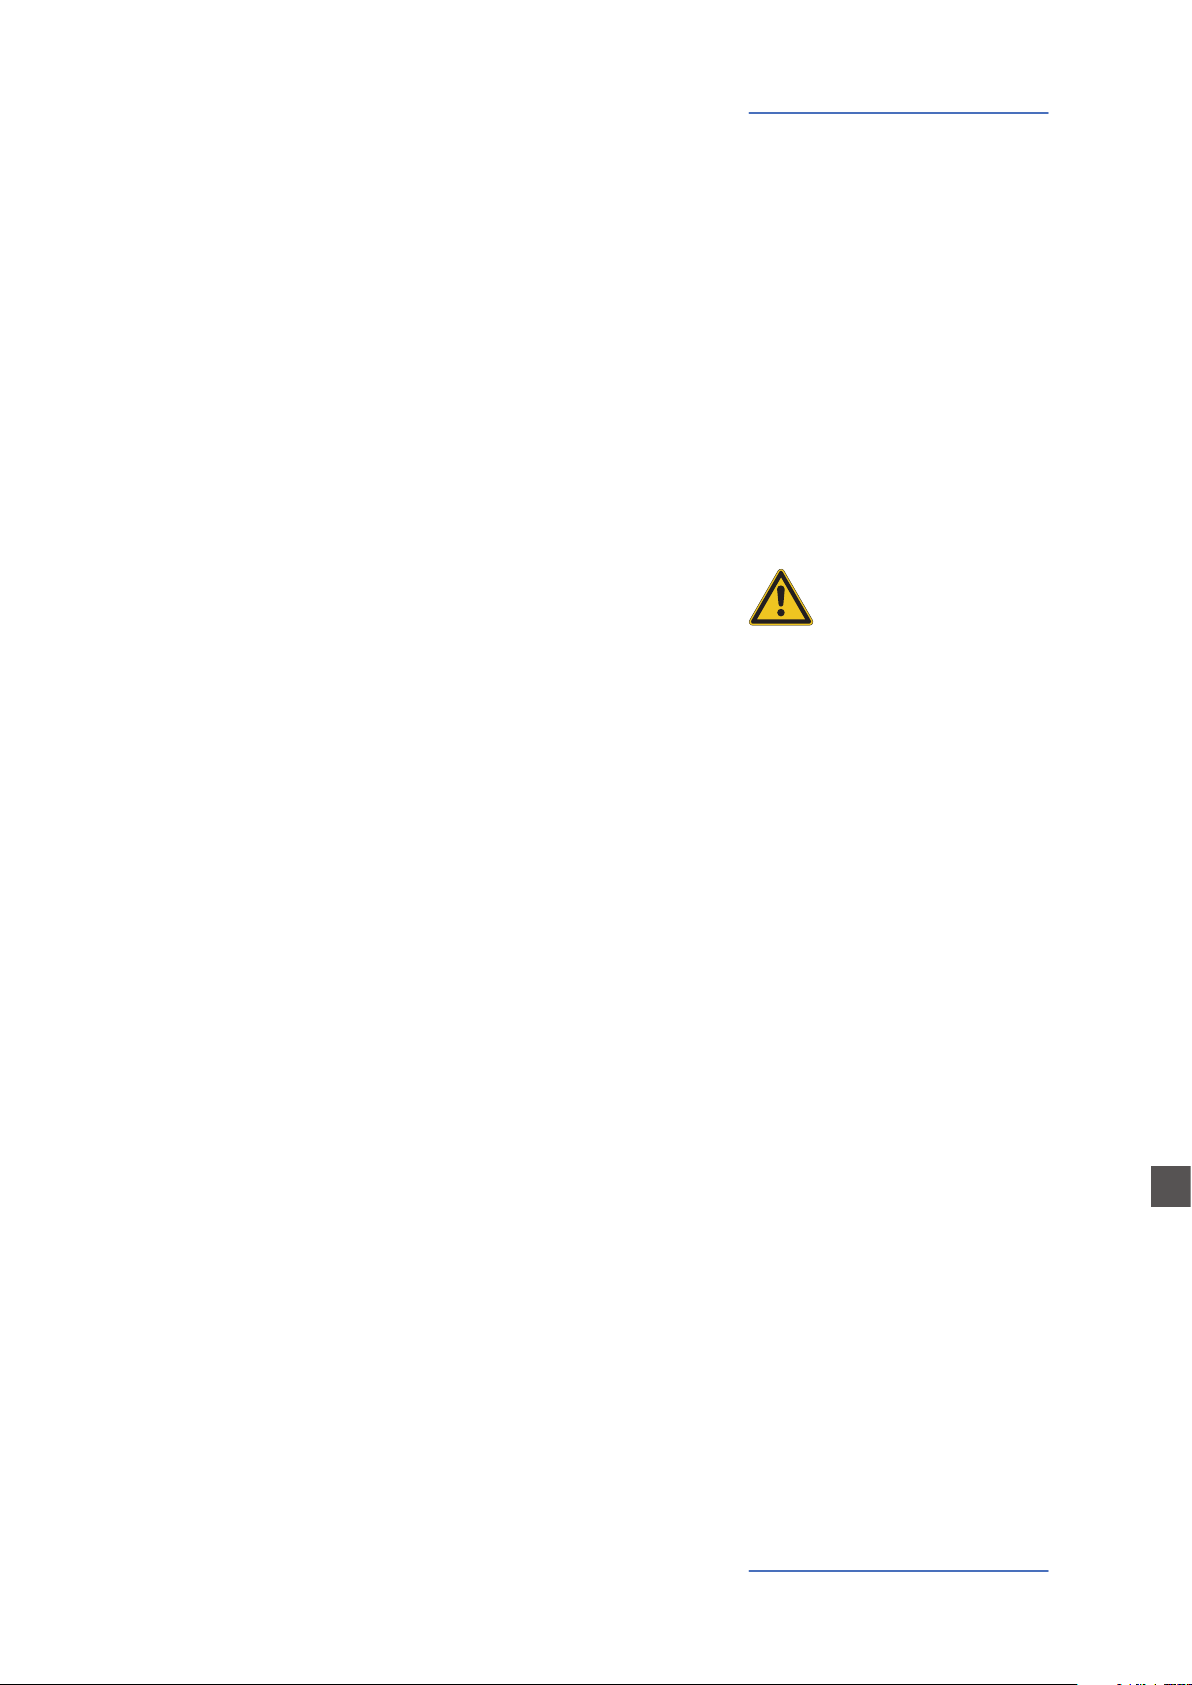
Panel - Display and navigation
Edit / Store
MIDI / Sound /
DEMO
Display
Monochrome
display
Lover - Upper
Parts/Zones
selection
Encoder
Rotation + click
SPLIT / Mix
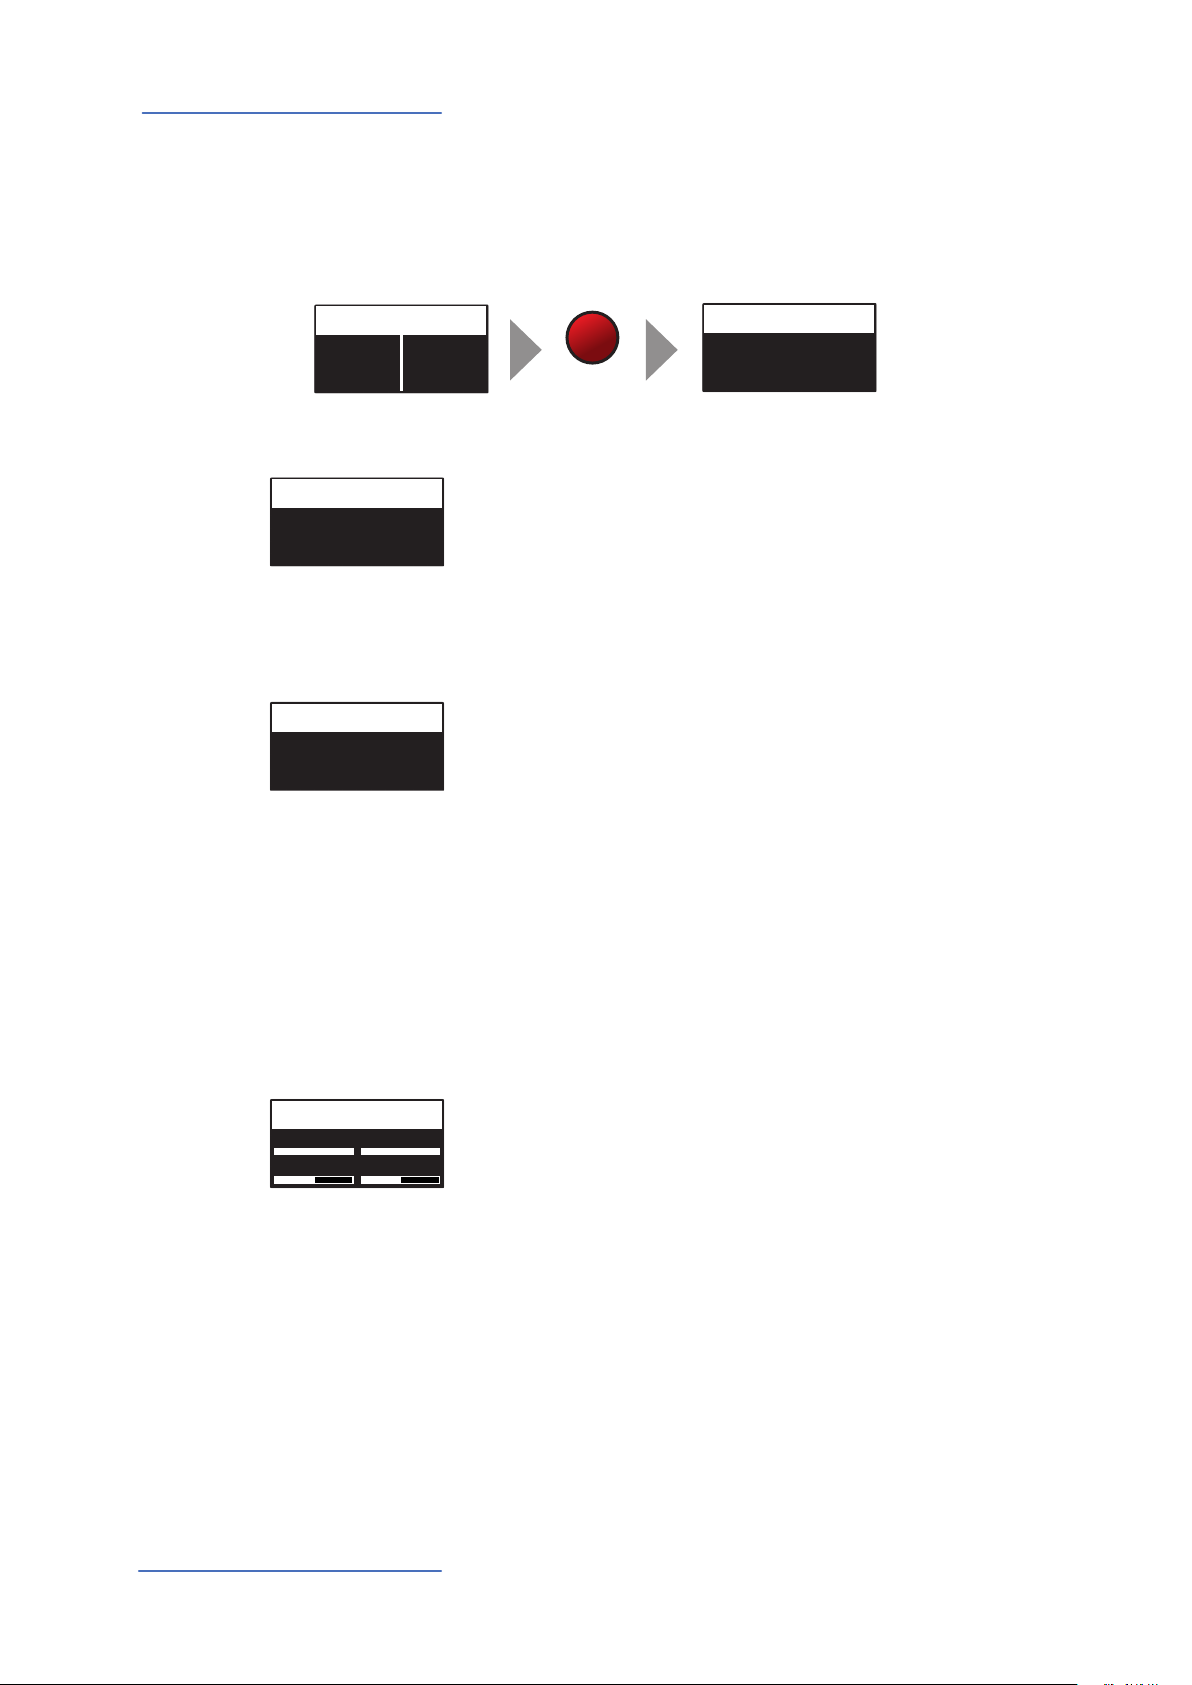
The main HOME display of the Numa Compact 2 is the one shown at power on and it’s divided in
3 main areas: the top area shows the current Program number and name, the left and right lower
areas are related to the Lower and Upper Sound sections, in SOUND mode, and to the Zone A and
Zone B sections, in MIDI Mode.
To navigate and move the focus (intended as the cursor position on the display) you can use three
controls at your choice:
a) Clicking on the Encoder: the focus will move to the 3 main positions: Programs, Lower, Upper.
b) Pressing the Sound or MIDI buttons, the focus (cursor position) will be moved on top.
c) Pressing Lower or Upper, the focus (cursor position) will be set to the related areas.
Ac-Bass
V: 127
Concert
V: 127
Ac-Bass
V: 127
Concert
V: 127
UPPER
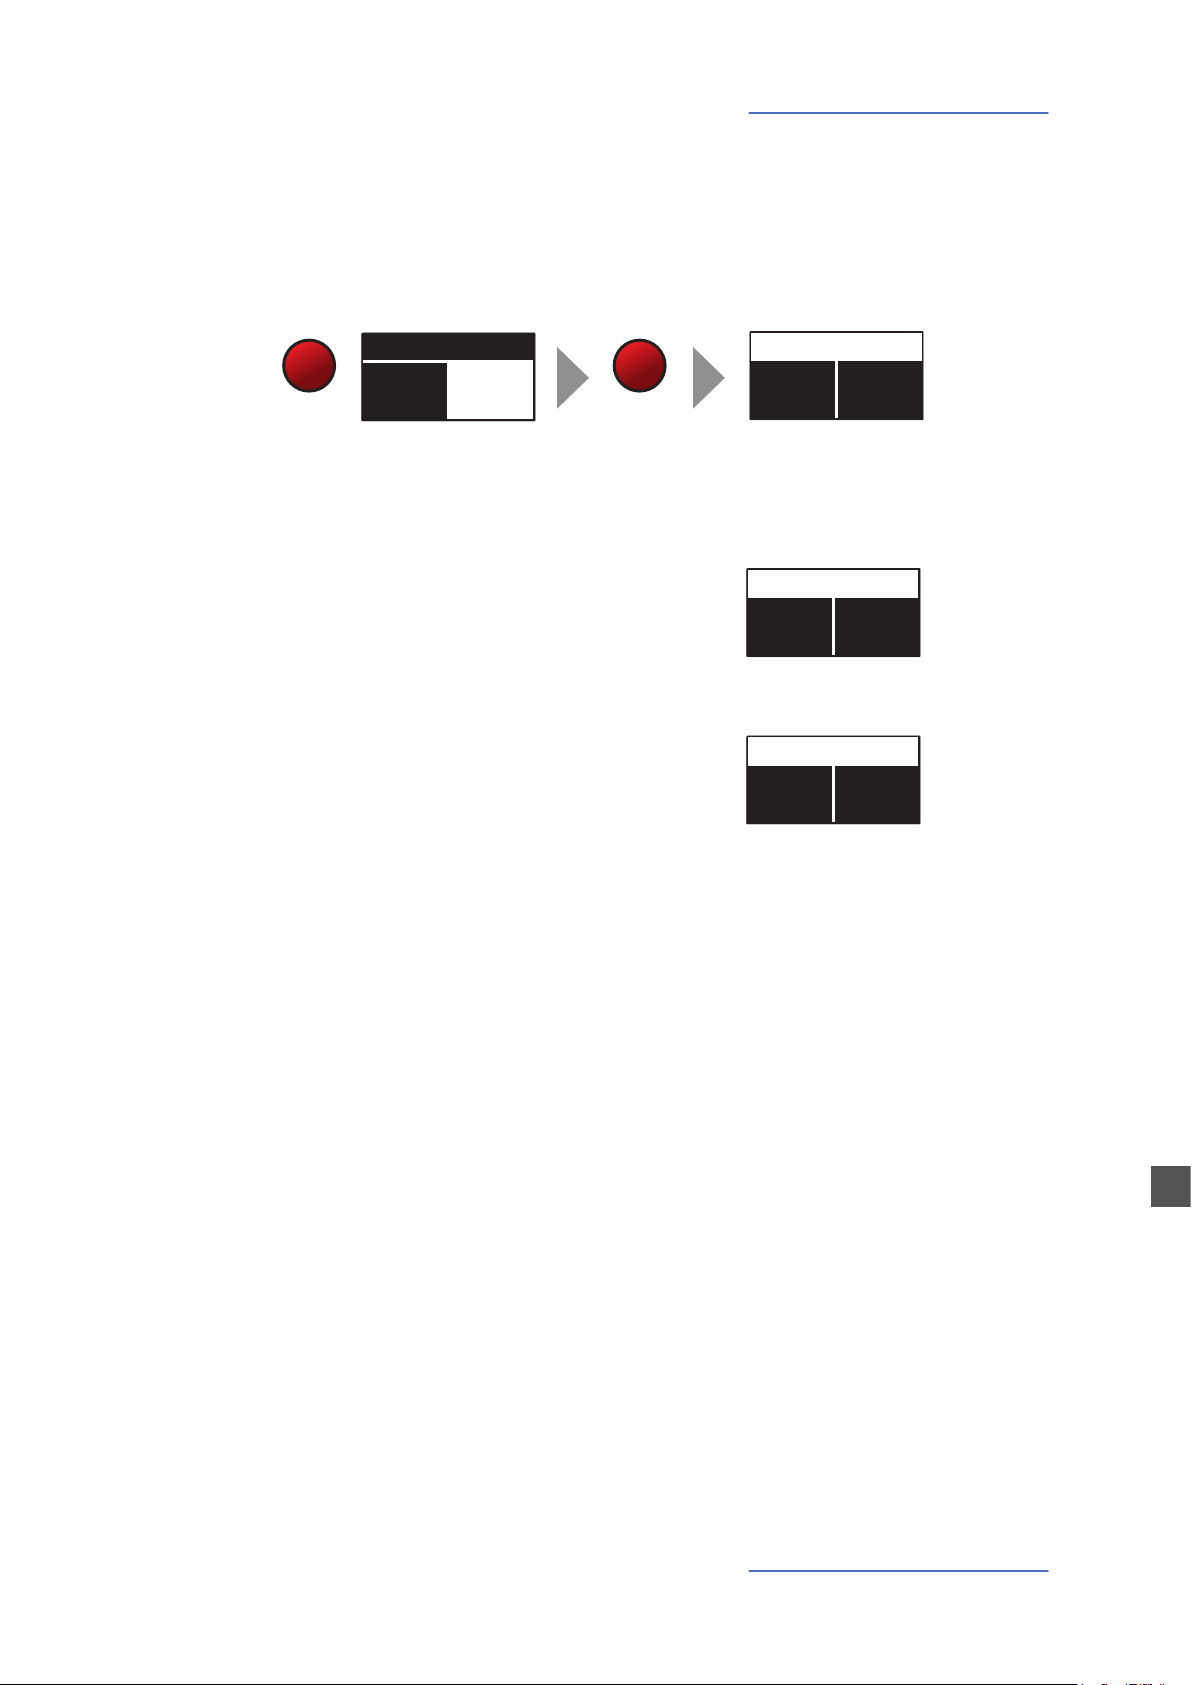
When the focus is on the Program area, rotating the Encoder you will select the various Programs.
When the focus is on the Lower/Upper areas, rotating the Encoder you will control the related
volumes.
Sound / MIDI
The two buttons marked SOUND and MIDI will toggle between the two related views and controls.
When the SOUND button is selected and lighted, the user can
control the SOUND sections and selections, all related display, settings, edit pages and parameter settings.
When the MIDI button is selected and lighted, the display will
show the status of the MIDI Zones A and B and the user can
access to all available parameters, edit functions and values.
Numa Compact 2 by Studiologic®
12

Panel - Display and navigation
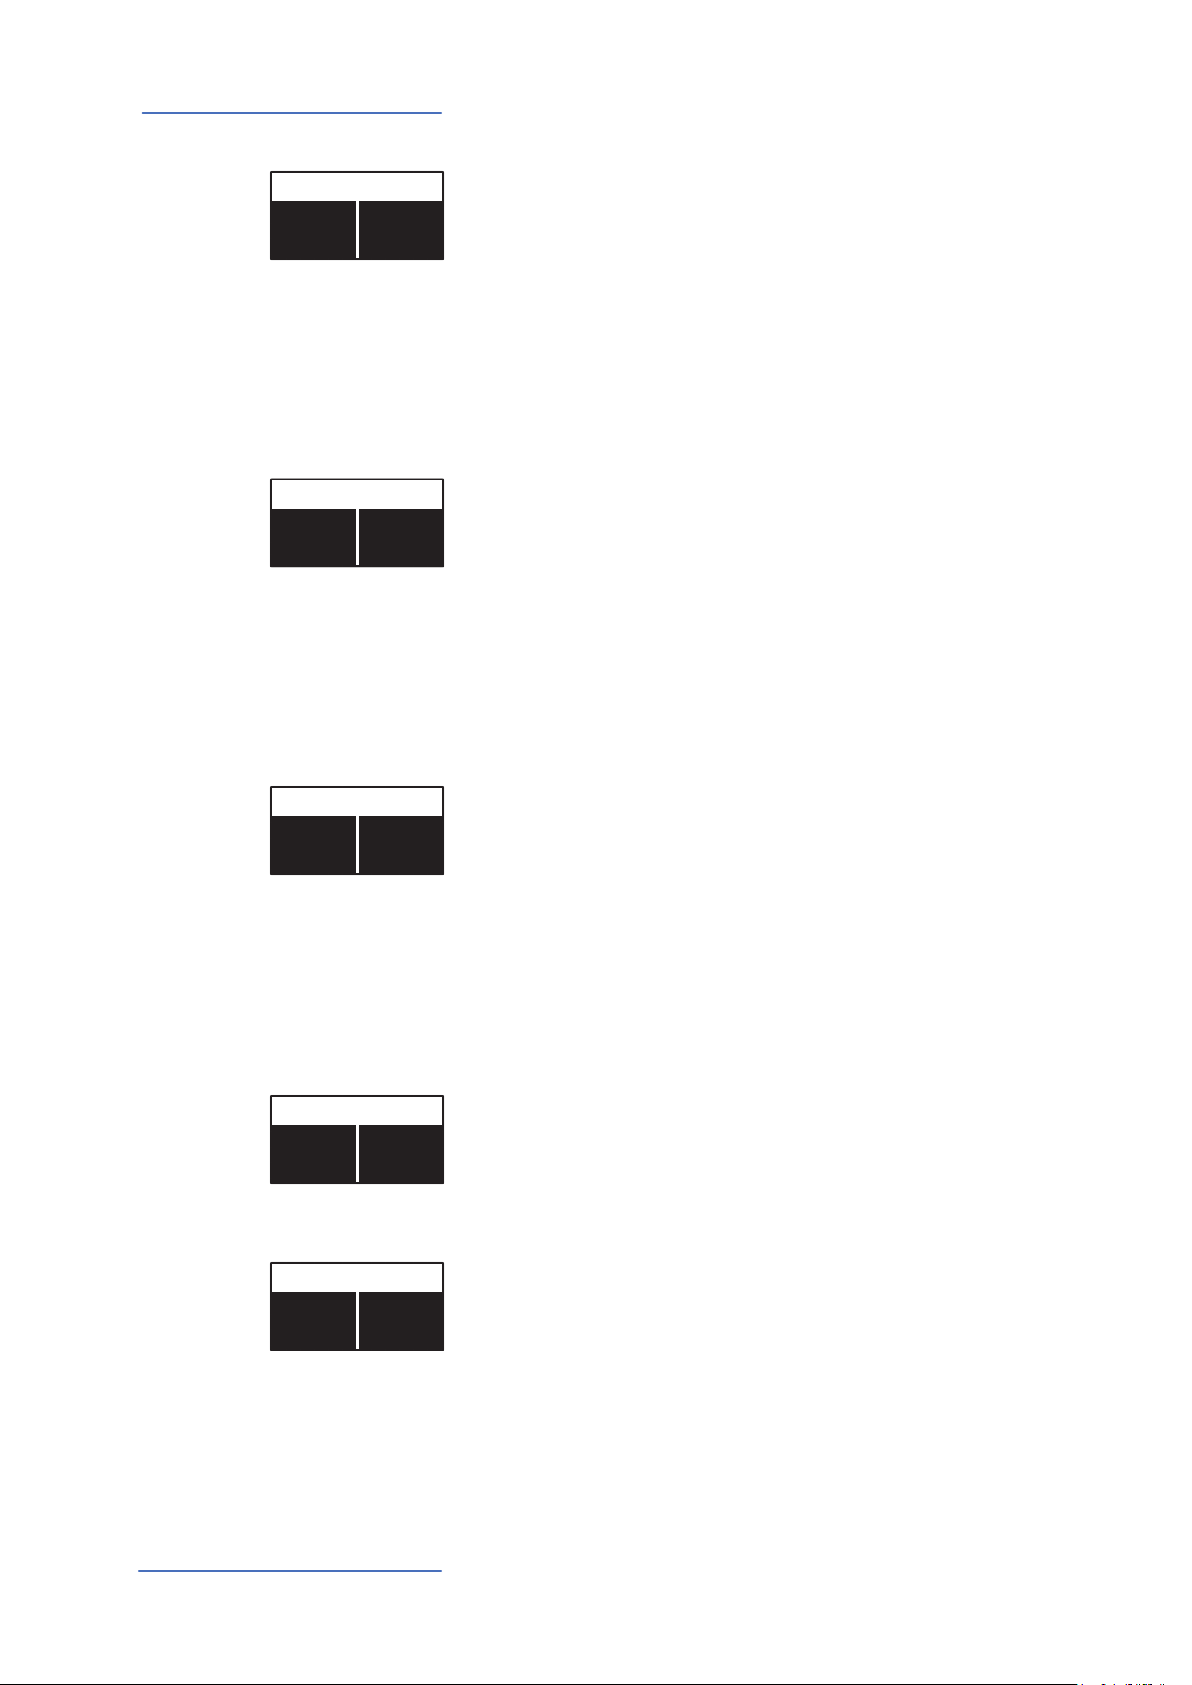
The SOUND button can also be pressed for a longer time, to
enable the eight DEMO songs (one for each sound BANK) to
start playing in sequence; clicking on a SOUND BANK you can
also select the related demo; at the end of it, the next demo
song will start for the other BANKS, in a continuous cycling
loop.
This button is a real time control of the SPLIT function, that is
edited and controlled in all details by the GLOBAL EDIT function (Split Point) and PART EDIT function (Split Assign). This
is a fast way to immediately enable and disable the SPLIT and
play the UPPER and LOWER parts all over the keyboard, in layer
mode without split.
As explained in the EDIT sections, the SPLIT button can also
be used as a short cut to select the MIXER page, by keeping it
pressed for a few seconds.
The Numa Compact 2 has 99 user’s programmable memories called Programs, where you can store all SOUND, FX1/2
controls, amounts, functions, split points and all editable parameters also related to the MIDI ZONES, with a programmable NAME for each Program. The only non-storable functions
are the VOLUME, BASS, TREBLE and MASTERING, since they are
pure real-time controls, not related to a particular Program.
All Programs can be sent and received via USB, as explained
in the related paragraph of this manual, in the GLOBAL EDIT
section.
Demo
SPLIT
STORE / User Programs
Numa Compact 2 by Studiologic® 13
E
Sound banks and sound section
P01-JAZZ DUET
A0 - B3
C4 - C8
A-PIANO [1/2]
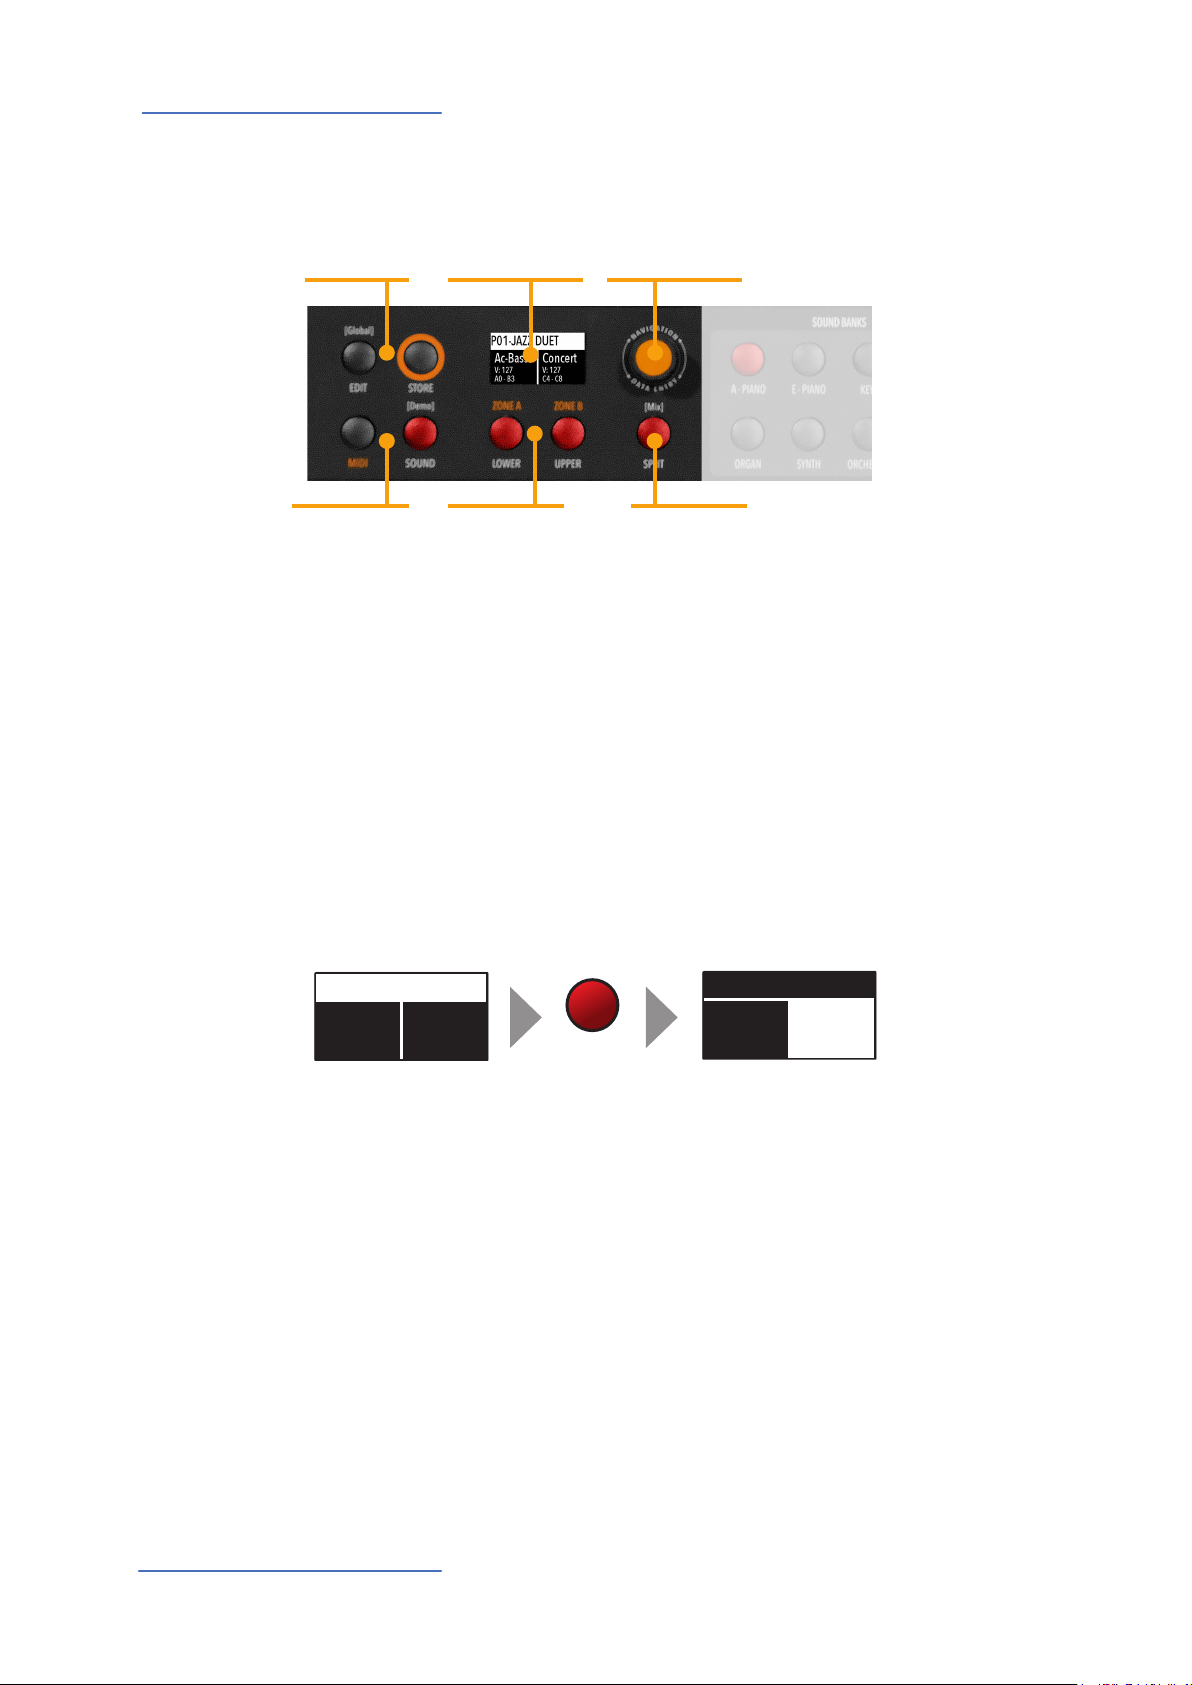
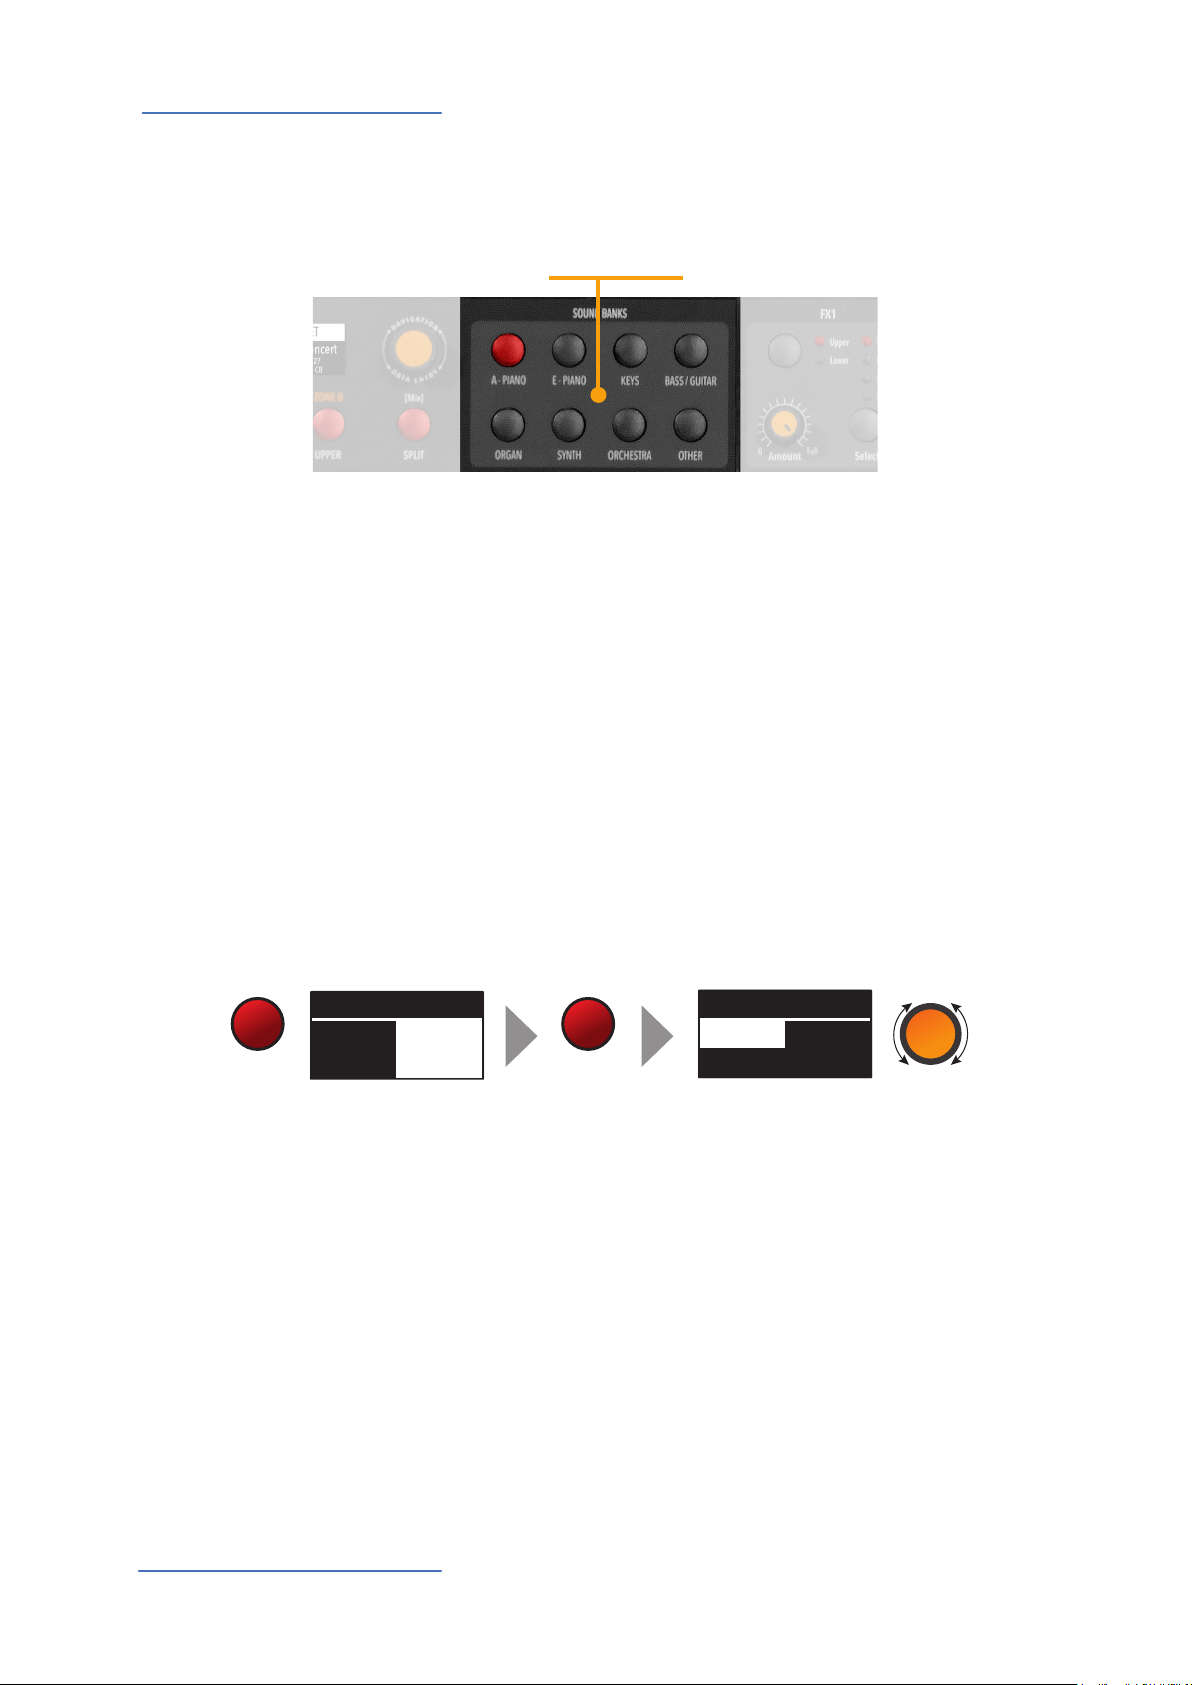
Sound banks and sound section
SOUND BANKS
Sound selection
Sound mode
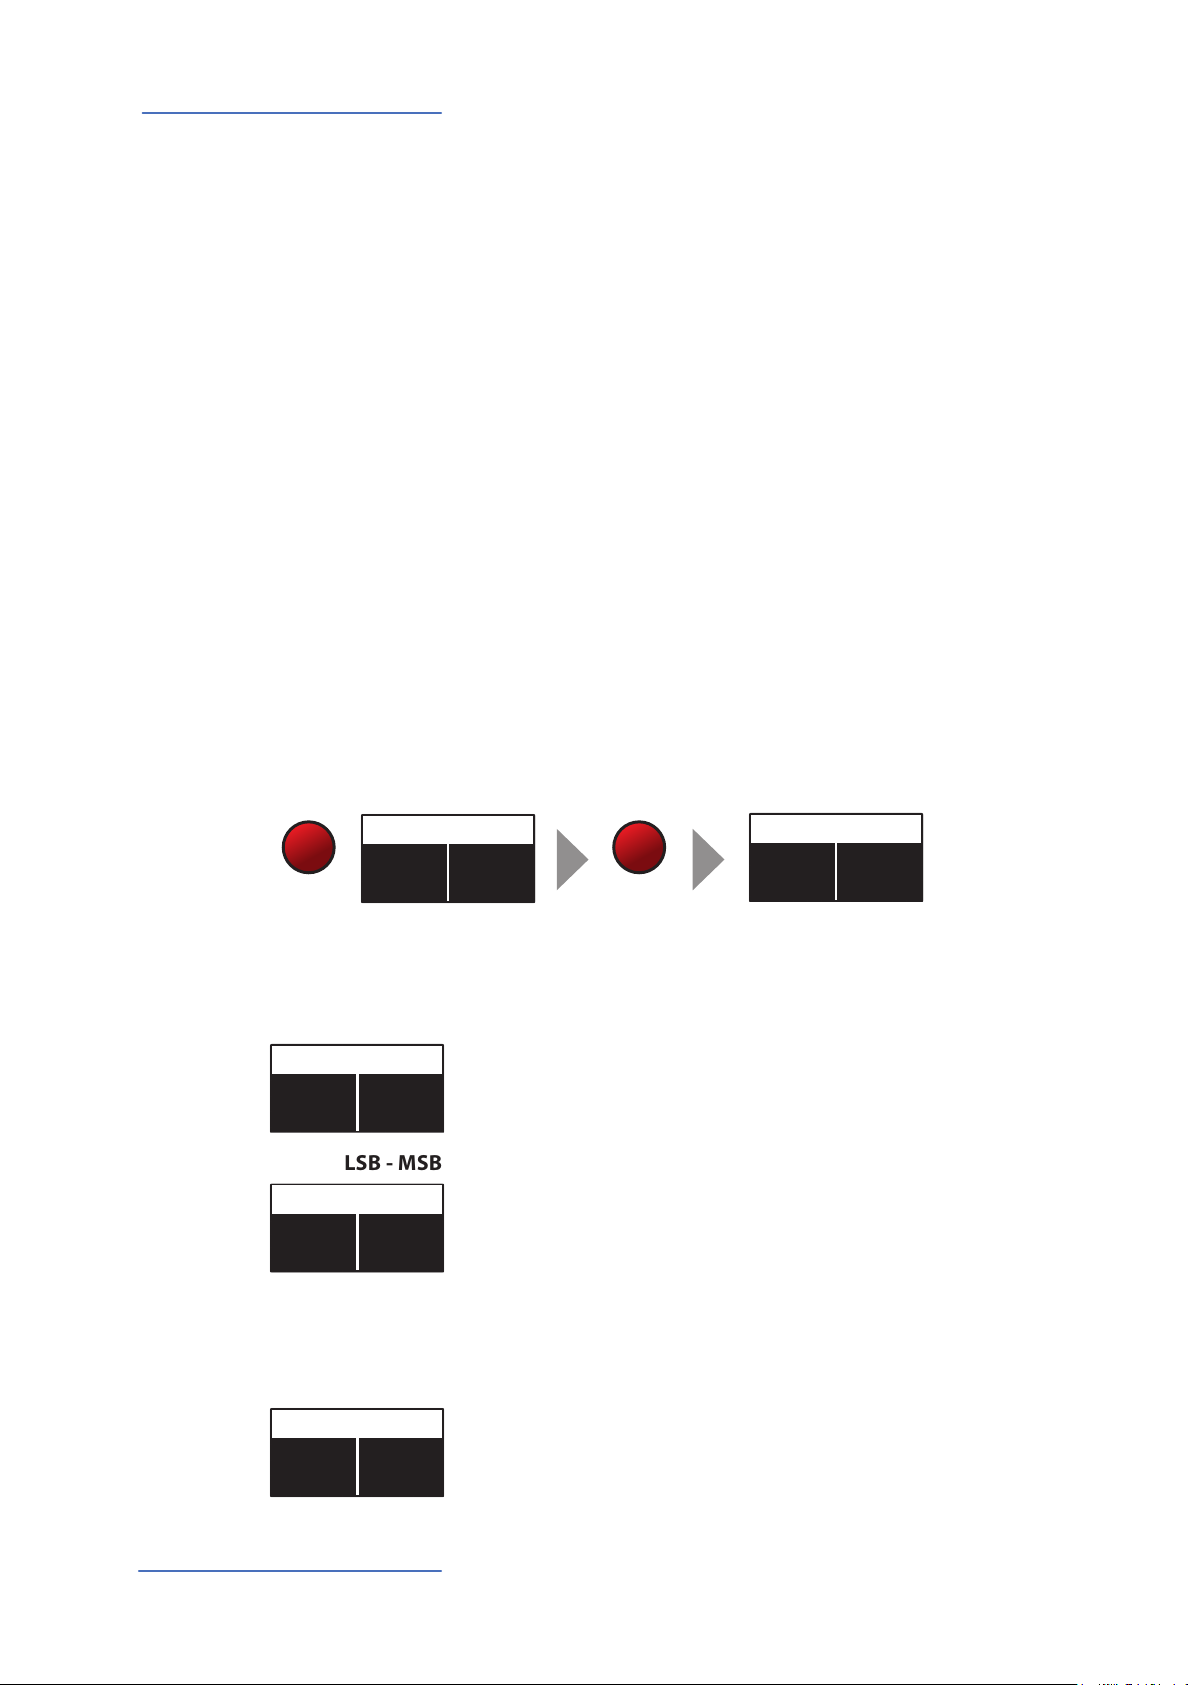
In SOUND mode, with the related button selected and lighted, the 8 Sound banks can select the
internal sounds, organized according to the Sound Bank names. Each Bank can have a variable
number of sounds, organized in pages of 4 sounds for each one. Selecting a Bank, you will see on
the display the sounds of that Bank, the current Sound Bank and total pages of sounds of the Bank
(shown on the top right area of the display) and the selected sound, in reverse color.
To select another sound of the current Bank, rotate the encoder and all available sounds will be
shown and selected in sequence, from the rst to the last page of the Bank. The selection can be
done during a temporary window (approx 5 seconds) and the last selected sound will be automatically memorized for each Bank. When you select a Bank, the focus will automatically go to the
last selected Sound, to make the sound selection easier and faster. Thanks to this function, you will
have an automatic setting of your preferred sounds for each Bank.
Stage
Studio
SOUND
Ac-Bass
V: 127
Concert
V: 127
A-PIANO
Concert
Vintage
Numa Compact 2 by Studiologic®
14

Sound bank and sound section
Sounds
The factory list of SOUNDS is listed below; please note that specications are subject to change and
the Sound list could be slightly modied or updated in dierent or future rmware versions.
A.PIANO
Concert
Stage
Vintage
Studio
Rock
Upright
E-Grand1
E-Grand2
E.PIANO
Rhodx
Wurlix
E-Pno1
E.Pno2
DxFm1
DxFm2
DxFm3
DxFm4
KEYS
Clavi
Harpsi
Vibes
Marimba
FunKlav
Cembalo
ReedOrg
GloKeys
BASS/GUITAR
Ac-Bass
El-Bass
Slap
Plucked
Ny-Guitar
El-Guitar
Ac-Guitar
Jz-Guitar
2 Guitars
12 Strings
BassRide1
BassRide2
ORGANS
JazzOrg1
JazzOrg2
DrawbVib
AllDrawb
888-Pure
888-Scan
MildSet
AllEven
V-Org
F-Org
Pipe1
Pipe2
SYNTH
SynthPad
SynHouse
SweetSaw
WowPad
Soloist
Funky
SynBass1
SynBass2
Jump
SynBrass
Square
Cluster
ORCHESTRA
Strings1
Strings2
Horns
Brass
Baroque
BigBand
BrassFall
SaxBand
TenorSax
JazzFlute
Trumpet
Oboe
OTHER
Cassotto
Accordion
Musette
Harmonica
ChoirAh
ChoirOh
ChoirUh
ChoirSint
Bouzouki
Kanoun
Oud
Cawala
Mizmar
Nai
StndKit
WorldKit
E
Numa Compact 2 by Studiologic® 15
Eects
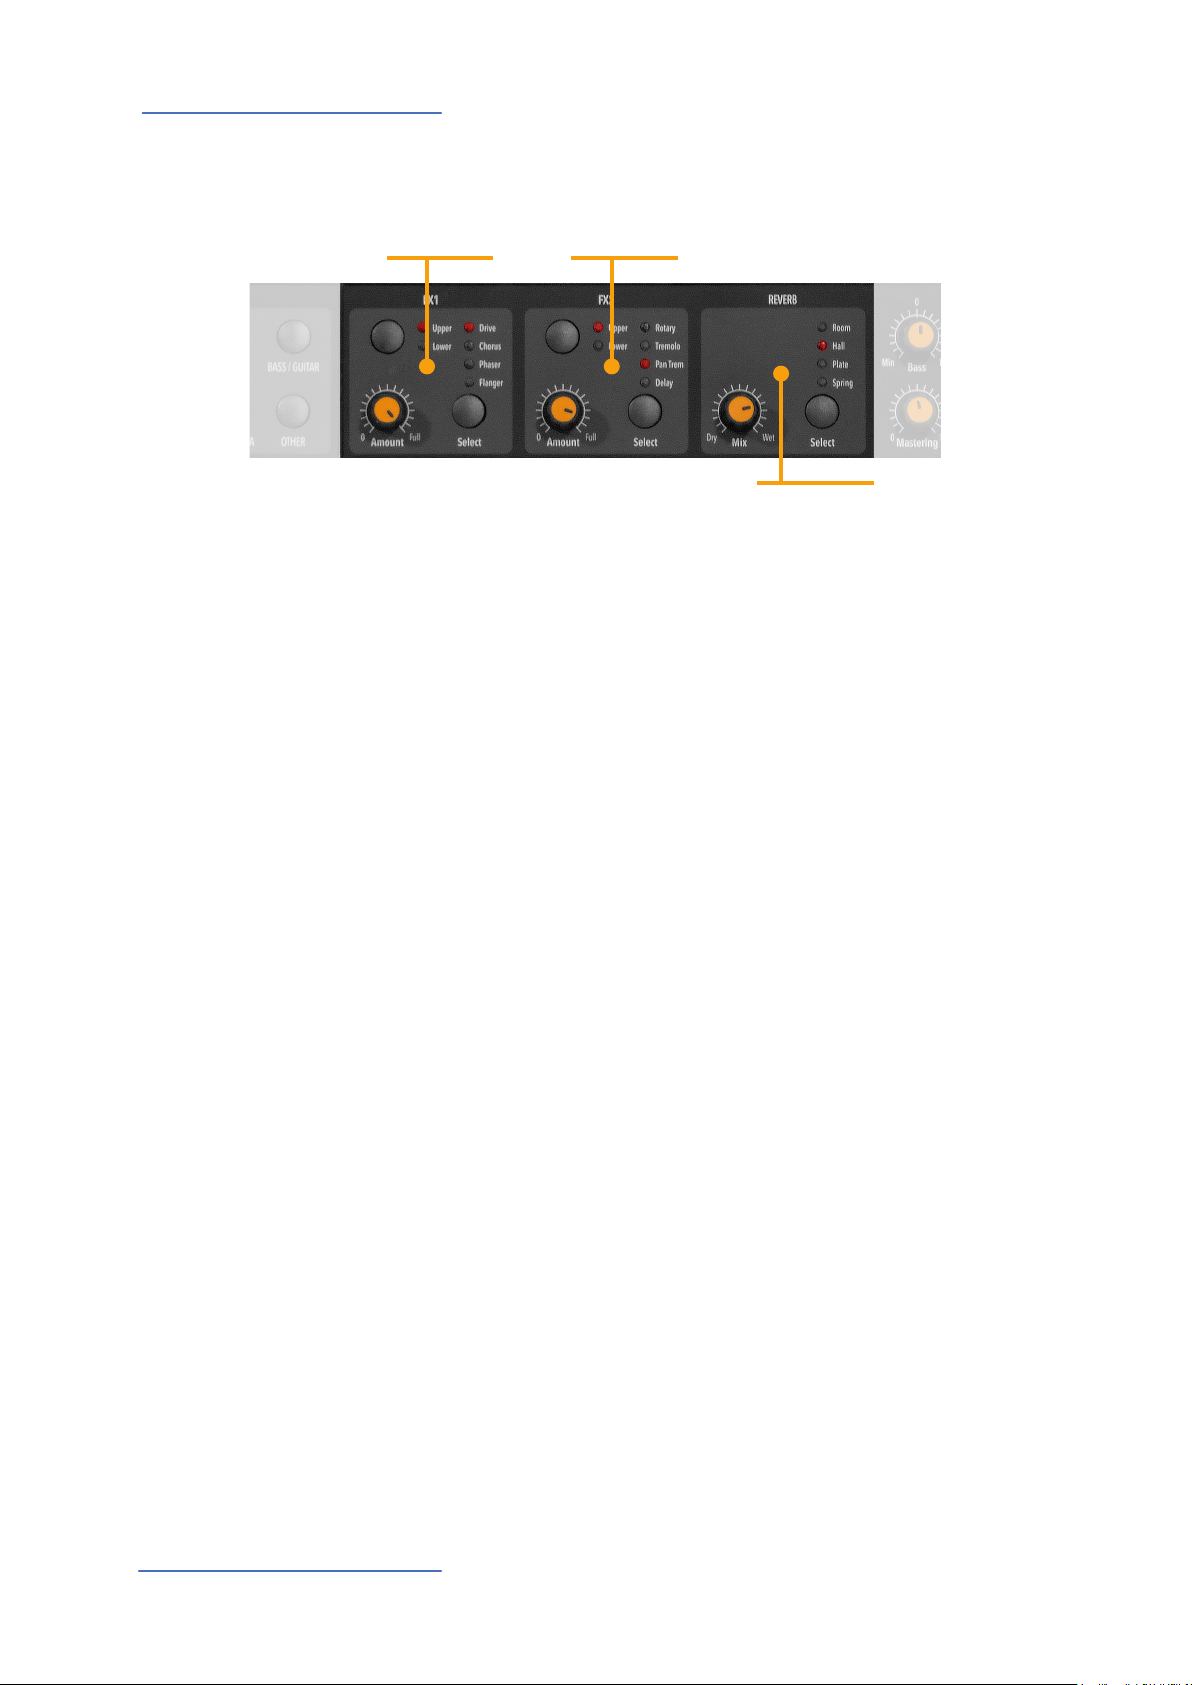
Eects
FX1
FX1 - FX2
FX2
REVERB
The 2 double eects processors allow to assign 2 separate effects to the Lower and Upper sections, for a total of 4 dierent
eects at once. As an example, the FX1 can be set to Drive for
the Upper section and, at the same time, to Chorus for the Lower section. Using the Upper/Lower button, you can toggle
between the related parts and show or select the eect for
that part. In addition, you will see or change the associated
FX using the 2 main LOWER and UPPER buttons below the
display.
You can visualize the Sound and FX structure and signal ow
as it follows:
Upper > FX1 (one of the four) > FX2 (one of the four) > Reverb
(programmable send in Edit)
Lower > FX1 (one of the four) > FX2 (one of the four) > Reverb
(programmable send in Edit)
Amount: the 2 potentiometers control the Amount of the
selected eect, like the dry/wet ratio (for modulating eects
like the Chorus) or other parameters, like the distortion level
of the DRIVE eects.
Numa Compact 2 by Studiologic®
16

Eects
The FX Autoset function (a real-time function also explained
in the GLOBAL Edit section) automatically memorizes the last
selected FX 1-2 for each Sound, without the need of storing a
dedicated Program.
This real-time function will also control the association between the Stick2 and the Sound or FX controls (modulation or
eect speed etc) in a logic and automatic way. When a particular FX is selected on a section, the Stick 2 will control a
particular parameter, like the Slow/Fast speed of the Rotary
or the Speed and Feedback of the Phaser.
The control will also be automatically set according to the
focus position: if you have a Lower part without FX and the
focus on Lower, the Stick 2 will control the Modulation; if the
focus is on Upper and you have an Organ sound with Rotary,
the Stick 2 will control the Rotary Slow/Fast speed.
If the FX Autoset function is set to o (see the GLOBAL Edit
section) the function of the Stick 2 will be under Part EDIT,
with not automatic assignments, and you can store all settings in each Program.
FX Autoset
With the FX Autoset o, the automatic association between
each sound and the last selected FX will be disabled and the
FX selection will be only manual or controlled by the FX setting stored in each of the 99 Program.
In addition to the powerful FX1-2 double eect processors,
the Numa Compact 2 also has a built in STRINGS RESONANCE
post-processing eect, dedicated to the ACOUSTIC PIANOS
sound bank and controlled by the related parameter of the
GLOBAL EDIT. This eect, created using the experience of the
Numa STAGE and CONCERT renowned Studiologic instruments, adds an even more realistic eect to the piano sounds,
reproducing the resonances of the real strings and sound
boards of the acoustic instrument.
STRINGS RESONANCE
(Damper model)
E
Numa Compact 2 by Studiologic® 17
Global edit
Global edit
To enable the GLOBAL edit, keep pressed the EDIT button for a few seconds; you will nd various
pages (shown on the top right area of the display) with functions that will aect the instrument,
regardless what Program is selected. To escape from the function, press again the EDIT button and
all settings will be memorized automatically.
When the focus (cursor) is on the top area of the display, rotating the encoder you can select the
various pages; clicking on the cursor, the focus will be moved on the parameter and rotating the
encoder you can change the related value.
The GLOBAL EDIT main functions are:
TRANSPOSER
GLOBAL TUNER
VELOCITY CURVE
FIXED CURVE
STRINGS RESONANCE
DAMPER EFFECT
You can transpose the instrument to any other key; click on
the encoder to move the cursor on the value and rotate it to
input the desired transposition range.
This function allows to “tune” the instrument, in case you
have to play along with another instrument that is not tuned
to the standard (A=440 Hz).
You can select a dierent velocity curve, according to your taste and playing technique. There are 3 factory curves (SOFT/
NORMAL/HARD) and a programmable FIXED velocity setting,
with the related value.
You can set here the xed velocity value (from 1 to 127) when
the FIXED velocity is selected.
Here you can control the amount of the STRINGS RESONANCE
post-processing, that adds a more realistic eect to all acoustic
PIANO sounds. Please note that the CONCERT GRAND sound
also has a separate “release and resonance” built in natural effect, not controlled by this parameter.
HEADPHONES MODE
Numa Compact 2 by Studiologic®
18
When the parameter is set to AUTO ON, plugging the headphones will automatically switch o the internal amplication system.
If the parameter is set to AUTO OFF, the internal amplication
system will be active also when a jack is inserted in the Headphones plug; this will allow to use the headphones out as an
extra auxiliary output, for recording or to connect it to an active-amplied subwoofer, in addition to the internal speakers.
While the PED1 is always suitable for expression-volume pedals, the PED2 can be programmed to connect almost all possible pedals, as it follows:
• SINGLE SWITCH normally open;
• SINGLE SWITCH normally closed;
• EXPRESSION (volume function, pedals with potentiometer
and stereo plug);
• SLP3-D – Triple pedal with Soft/Sostenuto/Sustain function
with half-damper control.
When the function is set to AUTO ON, the following automatic
functions are enabled:
The last selected eects (FX1-2) for each sound are memorized
by the instrument, allowing to select a sound and the related
preferred eect, with no need of storing the combination in a
Program. The FX Autoset not only will memorize and recall the
eects associated by the user for each sound, but also the value of the parameters controlled by the Stick 2 for each eect.
Global edit
PEDAL 2
FX AUTOSET
The STICK 2 control will be automatically assigned to a function, according to the setting and the position of the FOCUS
/ cursor.
If the focus is on UPPER (as an example) and you have selected
an Organ sound with the ROTARY eect, the STICK2 will control
the Rotary SLOW/FAST speed.
If you move the focus on LOWER (by clicking on the encoder
or pressing the LOWER button) and you have another FX on
Lower, the STICK2 will control the LOWER eect.
If you don’t have any FX on a section (LOWER or UPPER) and
you move the focus on it, the STICK 2 will control the MODULATION on the selected section.
As a typical example, imagine to have an ORGAN on UPPER
with Rotary and a BASS on LOWER with no eects: moving the
cursor on UPPER, the Stick 2 will control the Rotary Speed; moving the focus on LOWER; the STICK2 will control the Modulation.
E
Note: this automatic function is an arbitrary selection done by
the instrument, based on a statistic playing situation; if you
want to control all parameters directly and manually, you can
set the function to OFF and select the function of the STICK 2
in the related PART EDIT; storing the desired setting in a PROGRAM.
Numa Compact 2 by Studiologic® 19

Global edit
FACTORY RESET
FIRMWARE VERSION
AND UPDATE
This function allows to make a complete Factory Reset, that
will cancel all user settings and reset all factory parameters to
the original status. Please note that this could make you lose
custom settings or programming and the function should be
done very carefully. To protect the user from unwanted reset,
a caution YES/NO message appears when trying to reset the
unit, allowing to conrm or not the factory restore.
To update the Firmware (upload) follow these steps:
- Download the rmware from www.studiologic-music.com
and save it in a known folder;
- Connect the instrument to the power and then to your
computer with the USB cable;
- Verify that is seen by your computer and selected as MIDI Out
device, in the related settings;
- Turn on the instrument while keeping pressed the A0 (rst
white key on the left) and D1 (fourth white key from the left);
the display will show the message “Firmware Upload”;
- Open any program able to “play” a midile (i.e. MIDI-Ox for
PC, QMidi for Mac etc);
MIDI-Ox:
- Open MIDI-Ox
- In the menu bar, choose Actions > Play MIDI... , MIDI Bar
will be opened;
- In the MIDI BAR windows, click on “Select MCI Port” button
and select Numa Compact 2;
- In MIDI BAR open the le you have downloaded;
- Press the play button and wait for the end of the
procedure;
- When the Numa Compact 2 display shows
“UPLOAD FINISHED”, restart the instrument (o and on).
Numa Compact 2 by Studiologic®
20
QMidi:
- Open QMidi;
- Select the rmware le you have downloaded;
- In the menu bar choose QMidi > Audio/MIDI settings and
select Numa Compact 2 as output device;
- In the main window press the play button and wait for the
complete procedure;
- When the Numa Compact 2 display shows
“UPLOAD FINISHED”, restart the instrument (o and on).
This function allows to send or receive all Programs to your
computer (PC or Mac). Once the function is selected, rotating
the encoder you can select SEND or RECEIVE, with the following procedures.
WINDOWS
You can use a program like MIDI-Ox as it follows (be sure that
the Numa Compact 2 is seen by the computer USB/MIDI ports
and MIDI-Ox settings).
To send data to your computer:
- Connect the Numa Compact 2 to your computer via USB;
- Open MIDI-Ox and choose View/Sysex;
- In the Sysex window, choose Sysex > Receive manual dump;
- Click on the encoder when the GLOBAL function SEND is
active, conrm YES and wait till is done;
- In the MIDI-Ox Display Window, save the Bulk data in a le;
- When the dump is completed, choose Display Window > Save
as... ;
- Save with the name you prefer;
Global edit
PROGRAMS SEND / RECEIVE
To receive the data back to your instrument:
- In the PROGRAMS SEND/RECEIVE window select RECEIVE
- Open MIDI-Ox, in the Sysex window, choose Command >
Window > Load File and navigate the location where you
stored the le.
- Choose Command Window > Send Sysex and wait till done.
MAC OS
You can use a program like SysEx Librarian as it follows (be sure
that the Numa Compact 2 is seen by the computer USB/MIDI
ports and SysEx Librarian settings).
To send data to your computer:
- Open SysEx Librarian;
- In the toolbar, select “Numa Compact 2” as device;
- Click “Record many” button on SysEx Librarian;
- Click on the encoder when the GLOBAL function SEND is
active, conrm YES and wait till is done;
- When the transmission is done, press the Done button in
SysEx Librarian.
E
To receive the data back to your instrument:
- In the PROGRAMS SEND/RECEIVE window select RECEIVE
- In SysEx Librarian’s toolbar, there’s a pop-up menu named
Destination. Click it and choose the MIDI port that you want
to send to.
- In SysEx Librarian select the right le from the list of Sysex les
and press “Play” button to transfer it.
Numa Compact 2 by Studiologic® 21
PROGRAM EDIT [1/3]
PROGRAM EDIT [2/3]
C4
MIXER
P01-JAZZ DUET
A0 - B3
C4 - C8
PROGRAM EDIT [1/3]
Program edit
Program edit
If the focus (cursor) is on the upper part of the display on Programs selection, pressing the EDIT
button will enable the Program Edit, with the following parameter and settings.
Ac-Bass
V: 127
Concert
V: 127
PROGRAM NAME
PROGRAM NAME
JAZZ DUET
SPLIT POINT
SPLIT POINT
PROGRAM NAME
EDIT
JAZZ DUET
After having selected this function, click on the encoder and
input the letters of number rotating it; a small triangle will
show what digit you are editing.
To conrm the new name or keep the previous, press STORE
and a popup window will ask you to conrm the change or
not, rotating the encoder to YES or NO and conrm by clicking.
This function allows to select the SPLIT point for each PROGRAM, by rotating the encoder till the desired note is shown.
Please note that, as per international standard, the instrument keyboard is named from A0 (rst key on the left) to C8
(last key on the right) and consequently the middle C below
the display is C4. The reference pitch of A=440 Hz is on A4,
the A of the same octave of C4 (below the sound banks) for all
sounds that are based on the standard 8’ of the piano range.
Only some ORGAN sounds will play one octave below, if based on a 16’ pitch drawbar of the vintage tone wheel organs
or the related Pipe Organs 16’ classic organ stops; in these
cases the foundamental of the selected sound on A4 will be
220 Hz (one octave below 440 Hz).
22
MIXER
L 127 U 127
A
Numa Compact 2 by Studiologic®
64 B 64
The Mixer allows to control all four parts and zones (LOWER/
UPPER/ZONEA/ZONEB) at once, in a single organized page.
This function can also be accessed with a shortcut, keeping
pressed the SPLIT button also marked MIXER with brackets.
Part edit
PART EDIT [1/10]
127
127
PART EDIT [2/10]
P01-JAZZ DUET
A0 - B3
C4 - C8
PART EDIT [1/10]
Part edit
If the focus is on one of the parts and you are in SOUND mode (with the SOUND button selected
and lighted) you will enter in the PART edit mode. When you have selected PART edit you can always press the LOWER or UPPER buttons to select the part to be edited, or click on the encoder.
Ac-Bass
V: 127
SOUND
Concert
V: 127
EDIT
The PART EDIT includes the following parameters:
Rotating the encoder, after having moved the focus on the
parameter by clicking on it, you can control the selected part
Volume, in a range from 0 to 127.
Once you have selected the SPLIT point for the current PROGRAM (ref: PROGRAM EDIT) you can decide where the selected
LOWER or UPPER section (either for the SOUND and MIDI zones) should play, in a totally independent way as it follows:
TO LEFT: the part will play to the left section of the keyboard
(from A0 to the SPLIT note);
TO RIGHT: the part will play to the right section of the keyboard
(from the SPLIT note to C8);
TO ALL: the part will play with no split all over the keyboard.
VOLUME
127
VOLUME
127
VOLUME
VOLUME
VOLUME
SPLIT ASSIGN
SPLIT ASSIGN
TO LEFT
SPLIT ASSIGN
TO RIGHT
This function will allow many musical combinations, such as
the few following examples and their opposite settings:
PIANO on the right + BASS on the left, of the split point;
PIANO and STRINGS on the right + MIDI ZONES on the left
(controlling external devices);
ORGAN on the entire keyboard (TO ALL) and CHOIR on the
right part only.
Even with one SPLIT point (programmable for each PROGRAM)
the possible settings are almost one hundred, considering the
status and combinations of LOWER+UPPER+ZONEA+ZONEB
and the SPLIT settings made possible by this function.
E
Numa Compact 2 by Studiologic® 23
Part edit
PART EDIT [3/10]
PART EDIT [4/10]
0
0
PART EDIT [5/10]
64
PART EDIT [6/10]
PART EDIT [8/10]
ON
ON
TRANSPOSE
TRANSPOSE0TRANSPOSE
0
OCTAVE
OCTAVE
OCTAVE
This function allows to transpose a part; dierently from the
GLOBAL TRANSPOSER, that will eects the entire instrument,
this function can be set independently for each SOUND section or MIDI zone and stored in each PROGRAM, with dierent
values. Interesting combinations are obtained by transposing
a sound with musical intervals, like a lower quint = minus 5
semitones, to get what is commonly known as a “cluster” with
xed intervals. Try to select a TRUMPET on UPPER and a SAX on
LOWER, setting the SAX 5 semitones lower, in a typical JAZZ
setting.
You can set the octave (intervals of 12 semitones each) separately for each part; normally you will need to move a LOWER
part one or two octave up, if you want to play chords in a better range. On the other way, sometimes you can get a better
sound, when the SPLIT is activated, if you move the UPPER part
one or two octaves down, as you could prefer if you select a TENOR sax in combination with a splitted BASS sound on the left,
since the Sax lower and nicer notes could probably be on the
left of the splitted keyboard portion. Simply experiment the
setting you prefer and then store it in the current PROGRAM.
REV SEND
REV REND64REV SEND
PEDAL 1 PEDAL 2
PEDAL 1
ON
PEDAL 1
ON
STICK 1 STICK 2
STICK 1
STICK 1
The function allows to control the amount of signal to be sent
to the REVERB processor, independently for the LOWER and
UPPER parts and programmable with dierent settings for
each PROGRAM. As a typical setting, if you SPLIT the keyboard
and assign a BASS sound to the left, you might want to reduce
or minimize the amount of REVERB on the left part, or control
the setting also on the UPPER part to get the desired eect. The
MIX potentiometer, on the front panel, will change the overall
reverberation mix (Dry/Wet) with any reverb type selected or
send value.
Here you can decide if the pedals are enabled or not for each
section (UPPER/LOWER or ZONEA and ZONE B if the MIDI button is activated).
As for the pedals, also the Sticks can be enabled separately for
the Parts and Zones; please note that the Stick 2 will be set
automatically to AUTO if the related FX-AUTOSET function is
set to ON in the GLOBAL EDIT area. To control the Stick 2 assignment manually, you can set to OFF the FX-AUTOSET and
the function can be switched ON or OFF and stored in the Programs.
Numa Compact 2 by Studiologic®
24

Part edit
PART EDIT [10/10]
This parameter enables or disables the aftertouch function on the selected Part or Zone; the function of the
Aftertouch will be in most cases similar-same of the Stick
2 modulation control, adding some kind of vibrato or similar modulation to the sound, according to the setting.
Normally you will set the Aftertouch ON for the UPPER
part, that is commonly used for the main musical part or
solo performances, while the LOWER part is normally associated to accompaniments or bass lines, if the SPLIT is
active.
AFTERTOUCH
A.TOUCHONA.TOUCH
ON
E
Numa Compact 2 by Studiologic® 25
MIDI (Zone edit)
ZONE EDIT [1/13]
0
ZONE EDIT [2/13]
0
ZONE EDIT [4/13]
2
1
P01-JAZZ DUET
A0 - B3
C4 - C8
ZONE EDIT [1/13]
0
MIDI
The Numa Compact 2 allows to control 2 separate MIDI Zones, with all related parameters; the
result can be stored in the current PROGRAM, together with the settings of the internal LOWER
and UPPER sections, with a common SPLIT point and separate settings. Step through the functions
with the MIDI button selected and EDIT button activated: the value of the actual function will be
shown on the display and can be adjusted rotating the Encoder. Rotating the Encoder when the
MIDI button is lighted, will allow you to directly change the selected MIDI Zone volume.
Program edit
The PROGRAM EDIT, explained in the related chapter, is common for SOUND and MIDI; it refers
to general parameters associated to both the SOUND and MIDI sections. With the following ZONE
EDIT chapters you can set the specic MIDI Zone parameters according to your choices and STORE
them in the same Program, under the same name and number, with all the other parameters set
for the internal SOUNDS.
Zone edit
If the focus is on one of the zones and you are in MIDI mode (with the MIDI button selected and
lighted) you will enter in the ZONE edit mode; when you have selected ZONE edit you can always
press the ZONE A or ZONE B buttons to select the zone to be edited, or click on the encoder to
move the cursor/focus as for all other instrument’s functions.
Zone A
V: 64
MIDI
Zone B
V: 64
PRG CHG0PRG CHG
EDIT
The ZONE EDIT includes the following parameters:
PROGRAM CHANGE
Here you can input the Program Change number of the controlled device or sound generator, referring to the specic
PRG CHG0PRG CHG
Sound Map of the connected device/vst/sound generator.
The value range is 1-127.
LSB - MSB
LSB stands for Least signicant Byte, MSB stands for Most
signicant byte and they allow to control and select more
BANK LSB0BANK LSB
banks of the standard 127 Program Changes or many other
functions, dened by the MIDI standards; to input the correct
numbers, you have to refer to the implementation chart of
the controlled device, where each Sound is dened with the
MIDI data to select and control it.
MIDI CHANNEL
MIDI CH
Numa Compact 2 by Studiologic®
26
You can select the MIDI channel (value 1-16) for each Zone,
to control 2 dierent external devices or sound generators.
MIDI CH
MIDI (Zone edit)
ZONE EDIT [5/13]
ZONE EDIT [6/13]
ZONE EDIT [7/13]
0
ZONE EDIT [8/13]
0
0
ZONE EDIT [9/13]
ON
ON
ZONE EDIT [11/13]
ON
ON
Rotating the encoder, after having moved the focus on the parameter by clicking on it, you can control the selected part Volume, in a range from 0 to 127; the Zone volumes can be controlled directly also not in EDIT mode, when the MIDI button is
lighted and the cursor-focus is on one of the Zones.
Once you have selected the SPLIT point for the current PROGRAM (ref: PROGRAM EDIT) you can decide where the selected
ZONE should play, in a totally independent way as it follows:
TO LEFT: the zone will play to the left section of the keyboard
(from A0 to the SPLIT note);
TO RIGHT: the zone will play to the right section of the keyboard (from the SPLIT note to C8);
TO ALL: the zone will play with no split all over the keyboard.
Even with one common SPLIT point (programmable for
each PROGRAM) the possible settings are almost one
hundred, considering the status and combinations of
LOWER+UPPER+ZONEA+ZONEB and the SPLIT settings made
possible by this function.
VOLUME
VOLUME
64
VOLUME
64
SPLIT ASSIGN
SPLIT ASSIGN
TO LEFT
SPLIT ASSIGN
TO RIGHT
This function allows to transpose a Zone; dierently from the
GLOBAL TRANSPOSER, that will eect the entire instrument,
this function can be set independently for each MIDI zone and
stored in each PROGRAM, with dierent values.
You can set the octave (intervals of 12 semitones each) separately for each Zone; normally you will need to move a zone one
or two octave up, to the LEFT Zone of a split keyboard, to play
chords in a better range. On the other way, sometimes you can
get a better sound if you move the UPPER zone one or two octaves down; simply experiment the setting you prefer and then
store it in the current PROGRAM.
Here you can decide if the pedals are enabled or not for each
Zone independently, according to where the cursor-focus is
set (on ZONE A or ZONE B).
As for the pedals, also the Sticks can be enabled separately for
the Zones; please note that the Stick 2 will be set automatically
to AUTO if the related FX-AUTOSET function is set to ON in the
GLOBAL EDIT area. To control the Stick 2 assignment manually,
you can set to OFF the FX-AUTOSET and the function can be
switched ON or OFF and stored in the Programs.
TRANSPOSE
TRANSPOSE0TRANSPOSE
OCTAVE
OCTAVE
OCTAVE
PEDAL 1 - PEDAL 2
PEDAL 1
PEDAL 1
STICK 1 - STICK 2
STICK 1
STICK 1
E
Numa Compact 2 by Studiologic® 27

MIDI (Zone edit)
ZONE EDIT [13/13]
AFTERTOUCH
A.TOUCHONA.TOUCH
ON
This parameter enables or disables the aftertouch function on
the selected Zone; the function of the Aftertouch will be in
most cases similar-same of the Stick 2 modulation control, adding some kind of vibrato or similar modulation to the sound,
according to the setting. Normally you will set the Aftertouch
ON for the UPPER zone, that is commonly used for the main
musical zone or solo performances, while the LOWER zone is
normally associated to accompaniments or bass lines, if the
SPLIT is active, however the setting is totally under your control and choice.
Numa Compact 2 by Studiologic®
28
Declarations
Every product from Studiologic by Fatar has been carefully manufactured, calibrated and tested, and carries a warranty. Damage caused
by incorrect transport, mounting or handling is not covered by this
warranty. Compensation amounting to more than the price of the
device is excluded. For any further informations please refer exlusively to your dealer and/or local distributor. This is based on general
terms and condition of the local distributor / FATAR srl, Italy.
FATAR srl
Zona Ind.le Squartabue
62019 Recanati MC Italy
declares that this product complies with the European Directives:
2004/108//EC EMC Directive
DIN EN 55013 EMC radio disturbance of sound, TV and
associated equipment
DIN EN 55020 EMC immunity of sound, TV and
associated equipment
Recanati, 17. 01. 2017 Marco Ragni, Chief Executive Ocer
This declaration becomes invalid if the device is modied without
approval.
Warranty
CE-Conformity
This product is manufactured according to the 2002/95/EC directive.
The purpose of this EC Directive 2003/108/EC is, as a rst priority, the
prevention of waste electrical and electronic equipment (WEEE), and
in addition, the reuse, recycling and other forms of recovery of such
wastes so as to reduce the disposal of waste. Please help to keep our
environment clean.
To ensure maximum quality all Studiologic by Fatar devices are always engineered to be state-of-the-art products, therefore updates,
modications and improvements are made without prior notice.
Technical specication and product appearance may vary from this
manual.
All trademarks used in this manual belong to their respective owners.
No part of this manual may be reproduced or transmitted in any form
or by any means without prior consent of the copyright owner:
RoHS-Conformity
RoHS
compliant
2002/95/EC
Disposal / WEEE
State of the art
Trademarks
Copyright
E
FATAR Srl
Zona Ind.le Squartabue
62019 Recanati, Italy
Numa Compact 2 by Studiologic® 29
Importanti informazioni di sicurezza
Si prega di leggere l‘intero manuale. Esso contiene tutte le
informazioni di cui si ha bisogno per usare questa unità.
Si prega di seguire le istruzioni riportate nel manuale. La
garanzia sarà annullata se operazioni non autorizzate verranno
svolte sulla Numa Compact 2. Solo gli accessori specicati dal
fabbricante devono essere utilizzati con questa unità. Utilizzare
l‘unità solo come specicato in questo manuale.
PERICOLO!
Rischio di scosse elettriche. Non aprire l‘unità. Non ci sono parti
riparabili dall‘utente. L‘unità deve essere riparata solo dal per-
sonale di assistenza tecnica.
Umidità
Al ne di ridurre rischi di incendio o di scossa elettrica, non esporre lo strumento alla pioggia o all‘umidità. Non lasciare mai
contenitori con liquidi sullo strumento. Non usare lo strumento vicino all‘acqua, piscina, vasca, posti bagnati. Se lo strumento viene spostato da un posto freddo ad una stanza calda, si
potrebbe formare della condensa all‘interno. Per evitare danni,
attendere che lo strumento raggiunga la temperatura della
stanza prima di accenderlo.
Installazione
Usa sempre un supporto stabile dove posizionare la tastiera,
facendo attenzione al suo peso e alle sue dimensioni.
Pulizia / Manutenzione
Non usare mai detergenti abrasivi che potrebbero danneggiare la supercie. Raccomandiamo l‘uso di un panno in microbra, leggermente umido.
Imballo
Conserva tutti gli elementi dell‘imballo ed usali se devi
trasportare lo strumento al centro di assistenza.
Informazioni principali
Prima di connettere lo strumento all‘alimentazione di rete,
vericare che questa sia adeguata all‘alimentatore del Numa
Compact 2. L‘unità può essere alimentata a 100 - 240V con
l‘adattatore fornito.
Nota: il Numa Compact 2 può essere alimentato direttamente
dalla presa USB se connesso ad un PC o ad una alimentazione
compatibile.

ITALIANO
Manuale d‘uso
Numa Compact 2 by Studiologic® 31
I

Indice
Informazioni di sicurezza
Il tuo nuovo Numa Compact 2
Alimentazione - Ingressi e connessioni
Pannello - Display e navigazione
Banchi suoni e sezione suoni
30
34
34
35
35
38
38
38
38
39
39
39
40
41
41
41
42
43
Panoramica del prodotto
Caratteristiche principali
Esempio d‘uso
Schema di funzionamento
Connessione alimentazione
Alimentazione USB
Pedali Universali / Espressione
Uscita audio
Cue
Volume
USB
Sound / MIDI
Demo
Split
Store - User programs
Modalità Sound
Suoni
Eetti
Global edit
Program edit
Part edit
44
45
45
46
46
46
46
46
46
47
47
48
48
49
50
50
50
51
51
52
52
52
52
52
53
FX1- FX2
FX Autoset
String Resonance (Damper model)
Transposer
Global tuner
Velocity curve
Fixed curve
String resonance (Damper eect)
Headphones (mode)
Pedal 2
FX Autoset
Factory reset
Firmware version and update
Programs send/receive
Program name
Split point
Mixer
Volume
Split assign
Transpose
Octave
Rev send
Pedal 1 - Pedal 2
Stick 1 - Stick 2
Aftertouch
Numa Compact 2 by Studiologic®
32

Indice
MIDI (Zone edit)
Dichiarazioni
Appendix
54
54
54
55
55
55
55
55
55
56
57
118
119
120
120
Program Change
LSB - MSB
MIDI channel
Volume
Split assign
Transpose
Octave
Pedal 1 - Pedal 2
Stick 1 - Stick 2
Aftertouch
Sound map
MIDI Implementation chart
Speciche
Dimensioni
Numa Compact 2 by Studiologic® 33
I

Il tuo nuovo Numa Compact 2
Panoramica del prodotto
Il Numa Compact 2 è uno strumento musicale incredibilmente potente, racchiuso in un cabinet
elegante e leggero, basato su una tecnologia totalmente nuova e un‘interfaccia utente aggiornata.
La tastiera include il controllo „After Touch“ e, unitamente agli Sticks programmabili, consente di
avere un controllo totale della performance musicale. Il nuovo motore sonoro è in grado di gestire
128 note di polifonia e comprende due sezioni indipendenti (Lower e Upper) con più di 80 suoni,
organizzati in 8 banchi, assegnabili in qualsiasi zona della tastiera in modalità Layer o Split. La memoria ash di 1 GB di suoni è supportata da due processori di eetti (Fx1 e Fx2) ognuno dei quali
a doppia architettura interna per un totale di 4 eetti indipendenti simultanei.
L‘eetto di Risonanza delle Corde controllabile e i campioni al Rilascio-Staccato rendono il suono
del piano principale molto realistico, mentre il processore di riverbero stereofonico ne migliora
ulteriormente il suono. I controlli dei Bassi, degli Acuti e del Mastering consentono di ottenere una
qualità da Studio, percepibile anche attraverso gli amplicatori digitali e i diusori ellittici integrati.
Il Modulo Midi include 2 zone MIdi indipendenti e tutti i parametri possono essere programmati
e memorizzati.
Caratteristiche principali
Caratteristiche principali
Tastiera 88 note
Aftertouch
2 Sticks
Stick 1: funzione Pitch Bend nei due assi
Stick 2: Sound Modulation e controllo FX1/2 (assignabile o auto-selection)
2 Amplificatori integrati da 10W + 2 diffusori ellitici a riflessione posteriore
Display Oled 128x64
Interfaccia utente a controllo diretto
Zone Lower e Upper
4 Sezioni programmabili (Suoni interni e MIDI esterno) in ogni combinazione
1 GB di memoria flash, 88 suoni organizzati in 8 Sound Banks
Couni di Concert Grand piano con capionamenti rilascio-staccato e effetto Strings Resonance
Doppi processori di effetto FX1-2 - 4 effetti programmabilisimultanei
Riverbero Stereo con controllo di mandata separato per Lower e Upper
Strings Resonance (modello Damper) nei suoni di Piano acustico programmabile
Global-Program-Part EDIT
Controlli di Bassi, Acuti e Mastering (3D+Compressor)
Modulo MIDI con 2 Zone indipendenti programmabili
Connessioni: Usb, MIDI In/Out, Audio L/R, Cuffie, Pedale1-Pedale2
Alimentabile via USB
Numa Compact 2 by Studiologic®
34

Esempio d‘uso
FX1
SPEAKERS
PED2PED1
Il tuo nuovo Numa Compact 2
MIDI IN
USB
MIDI OUT
Schema di funzionamento
1GB
Sound
engine
Stereo
reverb
UPPER
LOWER
UPPER
LOWER
Bass
Mastering
Treble
Volume
Suggested setting
FX2
FX1
FX2
Rev send
Rev send
Strings
resonance
Digital
amplier
Stereo
reverb
AUX out
L
AUDIO out
L
I
R
R
BUILT-IN
Numa Compact 2 by Studiologic® 35

Il tuo nuovo Numa Compact 2
Panoramica delle funzioni del Numa Compact 2:
Tastiera “Light Weighted“
8 Banchi di suoni
88 Suoni interni
FX1 - FX2- REV
Strings Resonance
Il Numa Compact 2 ore l‘ultima tecnologia innovativa di Fatar: la sosticata tastiera pesata TP9 Piano con Aftertouch. Il
Numa Compact 2 pesa solo 7 Kg ed è quindi veramente portabile, ore un tocco veramente professionale che ha reso
famosa la Fatar.
Puoi iniziare direttamente suonando i 88 suoni interni di alta
qualità accuratamente campionati. Tastieristi e musicisti con
molta esperienza hanno selezionato questi suoni e sono stati
coinvolti nella progettazione dell‘operatività di Numa Compact 2. Per questo Numa Compact 2 è il partner perfetto sul
palco, in studio o a casa, in base al tuo modo di fare musica.
Sono disponibili 128 note di polifonia per aggiungere profondità ed espressione.
È possibile combinare due suoni assegnandoli alle sezioni
Lower e Upper in modalità Split o Layer, in ogni combinazione con le 2 Zone dedicate a moduli MIDI esterni. I due doppi
processori FX ti consentono di assegnare 2 dierenti tipi di
eetto ad entrambe le sezioni Lower e Upper, in aggiunta alla
sezione Riverbero per una varietà innta di combinazioni.
Mixer & Mastering
Amplicazione interna
Funzioni Master Keyboard
Connessioni audio
I controlli di Volume, Bassi, Acuti e Mastering consentono di
ottenere settaggi di suono preferiti e il sistema di amplicazione interno con diusori ellittici permette di suonare lo strumento con i suoi 10-10W controllati digitalmente ed equalizzati. Per il miglior risultato sonoro suggeriamo di posizionare
le quattro manopole a circa metà corsa, per evitare possibili distorzioni ed ottimizzare la resa sonora. Le regolazioni si
possono adattare ai suoni selezionati.
Le funzioni di masterkeyboard di Numa Compact 2, con le 2
Zone programmabili, ti permettono di controllare altri strumenti Midi, selezionandone il suono e aggiustandone il livello direttamente dal Numa Compact 2 senza dover toccare gli
altri strumenti.
Oltre alle uscite audio stereo e al sistema di amplicazione
integrata, Numa Compact 2 ha l‘uscita per cua, ideale per
suonare a qualsiasi ora senza arrecare disturbo agli altri.
Numa Compact 2 by Studiologic®
36

Il tuo nuovo Numa Compact 2
La porta integrata USB, ti permette di connettere Numa Compact 2 al tuo computer e di alimentarlo direttamente, senza
utilizzare l‘adattatore esterno (fornito). Puoi usare la porta
MIDI e la porta USB per la trasmissione dei dati MIDI. Puoi inoltre aggiornare il rmware e la libreria di suoni via USB.
Avvertenza: il sistema di amplicazione interno viene automaticamente disattivato quando lo strumento è alimentato
dalla porta USB al ne di evitare un consumo eccessivo.
Per la trasmissione dati via USB, collega il Numa Compact 2 al
computer con un cavo USB. Lo strumento sarà riconosciuto
automaticamente dal tuo computer appena acceso e il driver
sarà installato dal sistena operativo (cross compliant).
Numa Compact 2
Alimentatore esterno
Manuale CD
Interactive Numa
USB <> Computer
La confezione include
Numa Compact 2 by Studiologic® 37
I

Alimentazione - Ingressi e connessioni
Alimentazione - Ingressi e connessioni
MIDI In-OutTasto On/O
Alimentazione
12V - 2,5A
Connessione alimentazione
Ped 1, Ped 2
Pedale Espressione,
Pedale universale
Porta USB
MIDI I/O, alimentazione,
aggiornamento rmware
Uscita audio L/R
2x 6,3mm mono jack
Cue / Aux Out
1x 6,3mm stereo jack
Usa l‘alimentatore fornito con lo strumento per connettere
la Numa Compact 2 all‘alimentazione (o usa la connessione USB). Accendi l‘unità utilizzando il pulsante posto vicino
alla presa di alimentazione del Numa Compact 2, imposta il
Volume principale e i controlli di Bassi e Acuti alla posizione
intermedia e il controllo “Mastering” al valore minimo (la funzione sarà spiegata successivamente nel manuale) per evitare
di avere un livello audio di uscita eccessivo e permettere ai
diusori interni di suonare con una escursione dinamica corretta.
Alimentazione USB
Pedali Universali/Espressione
Uscita audio
Lo strumento può essere alimentato anche dall‘USB, utilizzando un cavo schermato di qualità certicata e assicurandosi che il computer abbia potenza suciente e non troppe
periferiche collegate nella stessa porta USB. Quando lo strumento è alimentato dalla porta USB, il sistema di amplicazione interno viene disabilitato per evitare che il consumo di
corrente sia eccessivo per il computer.
NOTA: in caso di connessione debole o instabile, utilizzare
l‘alimentazione tradizionale (vedi paragrafo precedente).
Connetti il pedale (opzionale) o i pedali ai due relativi ingressi (Ped1 e Ped2). Nell‘ingresso con l‘etichetta Ped1, puoi collegare il pedale Studiologic VP, usato per i controlli di Volume-Expression. All‘ingresso etichettato Ped2 puoi collegare
un pedale switch singolo, un pedale Volume-Expression o il
triplo pedale custom SLP3-D, come spiegato nel capitolo di
questa guida relativo ai pedali.
Per usare un sistema di amplicazione esterno, o registrare
il suono dello strumento, collegare le uscite audio L/R alle
entrate del vostro amplicatore o console, o alle entrate della
scheda audio del vostro computer, utilizzando cavi idonei.
Numa Compact 2 by Studiologic®
38

Alimentazione - Ingressi e connessioni
L‘uscita cue può essere utilizzata con un set di cue o come
un‘uscita audio ausiliaria, in base alle impostazioni della
funzione GLOBAL EDIT (spiegata in questo manuale). Come
uscita audio ausiliaria, puoi usare questa connessione per
collegare lo strumento ad un subwoofer o ad un sistema di
amplicazione addizionale, lasciando le uscite L/R disponibili
per la registrazione o per altre connessioni audio.
Quando usi il Numa Compact 2 per la prima volta, ti raccomandiamo di impostare il Volume della sezione Output ad un
valore intermedio tra lo 0 e il massimo. Mentre suoni potrai
regolare il volume come desideri. La regolazione del Volume
agisce anche sul volume dell‘uscita per la cua.
CAUTION:
Attenzione: Al ne di revenire danni all‘udito, dovresti – come
per tutti i dispositivi audio – evitare di usare il Numa Compact
2 ad alti livelli di volume per lunghi periodi.
Per la trasmissione dei dati USB, collega il Numa Compact 2 al
tuo computer con un cavo USB. La prima volta che accendi il
Numa Compact 2, esso verrà riconosciuto dal tuo computer
automaticamente e i driver dedicati saranno installati dal sistema operativo (cross compilant).
Cue
Volume
USB
Numa Compact 2 by Studiologic® 39
I

Pannello - Display e navigazione
P01-JAZZ DUET
A0 - B3
C4 - C8
P01-JAZZ DUET
A0 - B3
C4 - C8
Pannello - Display e navigazione
Edit / Store
MIDI / Sound /
DEMO
Display
Display monocromatico
Lover - Upper
Selezione parti
e/o zone
Encoder
Rotazione + click
SPLIT / Mix
La pagina HOME del display del Numa Compact 2 è quella mostrata all‘accenzione ed è divisa in 3
aree principali: l‘area superiore indica il numero ed il nome di Program corrente, le aree inferiori di
sinistra e destra sono relative alle sezioni Lower e Upper nella modalità SOUND, e alle Zone A e B
dela modalità MIDI.
Per navigare e muovere il “focus“ (la posizione del cursore nel display) puoi usare tre controlli a
scelta:
a) Cliccando sull‘Encoder: il focus si sposterà tra le 3 posizioni principali: Programs, Lower e Upper;
b) Premendo i pulsanti Sound o Midi: il focus sisposterà nell‘area superiore;
c) Premendo i pulsanti Lower o Upper: il focus si posizionerà nelle aree relative.
Ac-Bass
V: 127
Concert
V: 127
Ac-Bass
V: 127
Concert
V: 127
UPPER
Quando il focus si trova nell‘area Program, ruotando l‘Encoder selezionerai i vari Programs.
Quando il focus si trova nelle aree Lower/Upper, ruotando l‘Encoder controllerai i volumi relativi.
Sound / MIDI
I due pulsanti etichettati SOUND e MIDI portano alternativamente alle due relative sezioni e controlli.
Quando è selezionato ed illuminato il pulsante SOUND,
l‘utente può controllare tutte le sezioni, selezioni, impostazioni, pagine edit e parametri delle sezioni SOUND.
Quando è selezionato e illuminato il pulsante MIDI, il display
mostrerà la stato delle Zone MIDI A e B e l‘utente potrà accedere a tutti i parametri disponibili, funzioni di edit e valori.
Numa Compact 2 by Studiologic®
40

Pannello - Display e navigazione
Il pulsante SOUND può anche essere premuto a lungo per
abilitare le 8 DEMO songs (una per ogni banco) che suoneranno in sequenza; cliccando su un SOUND BANK puoi anche
selezionare la demo relativa. Alla ne di un brano partirà il
brano del banco successivo a ciclo continuo.
Questo pulsante è un controllo generale in tempo reale della
funzione Split, programmabile e controllata in tutti i suoi dettagli dalla funzione GLOBAL EDIT (Split Point) e PART EDIT (Split
Assign). Quest è un modo veloce per abilitare e disabilitare immediatamente lo SPLIT e suonare le parti UPPER o LOWER in
tutta la tastiera in modo Layer, senza split.
Come spiegato nelle sezioni EDIT, il pulsante SPLIT può anche
essere usato come scorciatoia per selezionare la pagina MIXER,
tenendolo premuto per alcuni secondi.
Il Numa Compact 2 ha 99 memorie programmambili dall’utente chiamate “Programs”, in cui puoi memorizzare i Suoni, i
controlli FX1/2, funzioni, split points e tutti i parametri editabili relativi alle MIDI ZONES, con un nme programmabile per
ciascun Program. Le uniche funzioni non memorizzabili sono:
VOLUME, BASS, TREBLE e MASTERING, dato che sono controlli
puramente real-time non legati ad un Program particolare.
Demo
SPLIT
STORE / User Programs
Numa Compact 2 by Studiologic® 41
I

Banchi suoni e sezione suoni
P01-JAZZ DUET
A0 - B3
C4 - C8
A-PIANO [1/2]
Banchi suoni e sezioni suoni
SOUND BANKS
Selezione dei suoni
Modalità SOUND
Nella modalità SOUND, col pulsante relativo selezionato e illuminati, gli 8 Sound Banks posson
selezionare i suoni interni, organizzate organizzati secondo i nomi dei Bank. Ogni banco può avere
un numero variabile di suoni, organizzati in pagine di 4 suoni ciascuno. Selezionando un Bank,
potrai vedere nel display i suoni di quel Bank, quello corrente, il numero complessivo di pagine di
suoni del Bank (mostrato in alto a destra nel display) e il suono selezionato a colore invertito.
Per selezionare un altro suono del Bank corrente, ruota l‘encoder e tutti i suoni saranno mostrati e eselezionati in sequenza, dalla prima all‘ultima pagina del Bank. La selezion può esser fatta
nell‘arco di breve lasso di temnpo (approssimativamente 5 secondi) e l‘ultimo suono selezionato
verrà automaticamente memorizzato. Quando selezioni un Bank, il focus andrà automaticamente
nell‘ultimo Sound selezionado in modo da semplicare e velocizzare la selezione dei suoni, dopo
una prima selezione dei suoni. Grazie a questa funzione, avrai un‘impostazione automatica dei
tuoi suoni preferiti per ogni Bank.
Stage
Studio
SOUND
Ac-Bass
V: 127
Concert
V: 127
A-PIANO
Concert
Vintage
Numa Compact 2 by Studiologic®
42

Sound bank and sound section
Suoni
Ecco la lista di fabbrica dei Sounds, considera che le speciche sono soggette a cambiamenti e la lista
dei Sounds potrebbe essere modicata o aggiornata nelle future versioni di rmware.
A.PIANO
Concert
Stage
Vintage
Studio
Rock
Upright
E-Grand1
E-Grand2
E.PIANO
Rhodx
Wurlix
E-Pno1
E.Pno2
DxFm1
DxFm2
DxFm3
DxFm4
KEYS
Clavi
Harpsi
Vibes
Marimba
FunKlav
Cembalo
ReedOrg
GloKeys
BASS/GUITAR
Ac-Bass
El-Bass
Slap
Plucked
Ny-Guitar
El-Guitar
Ac-Guitar
Jz-Guitar
2 Guitars
12 Strings
BassRide1
BassRide2
ORGANS
JazzOrg1
JazzOrg2
DrawbVib
AllDrawb
888-Pure
888-Scan
MildSet
AllEven
V-Org
F-Org
Pipe1
Pipe2
SYNTH
SynthPad
SynHouse
SweetSaw
WowPad
Soloist
Funky
SynBass1
SynBass2
Jump
SynBrass
Square
Cluster
ORCHESTRA
Strings1
Strings2
Horns
Brass
Baroque
BigBand
BrassFall
SaxBand
TenorSax
JazzFlute
Trumpet
Oboe
OTHER
Cassotto
Accordion
Musette
Harmonica
ChoirAh
ChoirOh
ChoirUh
ChoirSint
Bouzouki
Kanoun
Oud
Cawala
Mizmar
Nai
StndKit
WorldKit
I
Numa Compact 2 by Studiologic® 43

Eetti
Eetti
FX1
FX1 - FX2
FX2
REVERB
Reverbero
I due doppi processori di eetto, permettono di assegnare
due eetti separati alle sezioni Lower e Upper, per un totale di
4 eetti contemporaneamente. Ad esempio, l‘FX1 può essere
impostato su Drive per la sezione Upper e, nello stesso tempo, su Chorus per la sezione Lower. Usando il pulsante Upper/
Lower, puoi passare da un aparte all‘altra per vedere o selezionare l‘eetto. Inoltre, puoi vedere o cambiare l‘FX associato
tramite i pulsanti principali LOWER e UPPER sotto al display.
Puoi visualizzare la struttura del Sound e dell‘FX e il usso del
segnale come segue:
Upper > FX1 (uno dei quattro)>FX2 (uno dei quattro)>Reverb
(mandata programmabile in Edit)
Lower > FX1 (uno dei quattro)>FX2 (uno dei quattro)>Reverb
(mandata programmabile in Edit)
Amount: i due potenziometri controllano la quantità
dell‘eetto selezionato, come il rapporto dry/wet (per gli effetti di modulazione come il Chorus) o altri parametri, come il
livello di distorsione dell‘eetto Drive.
Numa Compact 2 by Studiologic®
44

Eetti
La funzione FX Autoset (spiegata anche nella sezione Global
Edit) memorizza automaticamente l‘ultima impostazione FX1
e 2 per ogni Sound, senza la necessità di memorizzarle in un
Program dedicato.
Questa funzione controllerà anche l‘associazione tra lo Stick2
e il Sound o i controlli FX (modulation, speed ecc..) in modo
logico e automatico. Quando un particolare FX è selezionato
in una sezione, lo Stick 2 controllerà un parametro specico,
come la velocità Slow/Fast del Rotary o lo Speed e il Feedback
del Phaser.
Il controllo sarà impostato automaticamente nella posizione
evidenziata (focus): se hai la parte Lower senza FX e il focus
su Lower, lo Stick2 controllerà la Modsulation; se il focus è su
Upper e hai un suono di organo con il Rotary, lo Stick2 ne
controllerà la velocità Slow/Fast.
Se la funzione FX Autoset è impostata su O (vedi la sezione GLOBAL Edit) la funzione degli Stick 1 e 2 dipenderà dalla
Part Edit, senza assegnazioni automatiche, e potrai impostare
e memorizzare ogni controllo possibile in un Program.
FX Autoset
In aggiunta ai potenti doppi processori di eetto FX1 e 2, il
Compact 2 dispone anche di un eetto STRING RESONANCE,
dedicato ai suoni del Bank ACOUSTIC PIANOS controllato
dal parametro relativo nel GLOBAL EDIT. Questo eetto,
creato sulla base dell‘esperienza maturata sul Numa Stage e
Concert, aggiunge un carattere di grande realismo ai suoni
di piano, riproducendo la risonanza delle corde vere e della
tavola armonica dello strumento acustico.
STRINGS RESONANCE
(Damper model)
I
Numa Compact 2 by Studiologic® 45

Global edit
Global edit
Per abilitare il GLOBAL edit, tieni premuto il pulsante EDIT per alcuni secondi; troverai varie pagine
(in alto a destra nel display) con funzioni che riguardano lo strumento, indipendentemente dal
Program selezionato. Per uscire dalla funzione, premi di nuovo il pulsante EDIT e tutte le impostazioni verranno memorizzate automaticamente.
Quando il Focus (cursore) è nella parte superiore del display, ruotando l‘encoder puoi selezionare
le varie pagine, cliccando sull‘encoder il focus si sposterà sul parametro e ruotandolo di nuovo
potrai cambiare il relativo valore.
Le funzioni principali del GLOBAL EDIT sono:
TRANSPOSER
GLOBAL TUNER
VELOCITY CURVE
FIXED CURVE
STRINGS RESONANCE
DAMPER EFFECT
Puoi trasporre lo strumento in un’altra tonalità; clicca sull’encoder per muovere il cursore nel valore e ruotalo per inserire
la trasposizione desiderata.
Quesa funzione ti permette di accordare lo strumento, nel
caso volesso suoare conun altro strumento che non h al’accordatura standard (A=440 Hz).
Puoi selezionare curve dinamiche diverse secondo il tuo tocco e la tua tecnica esecutiva. Ci sono 3 curve di fabbrica (Soft/
NORMAL/HARD) e una curva FIXED programmabile, col relativo valore.
E’ possibile settare una valore sso (da 1 a 127) per la curva
FIXED, quando selezionata.
Qui puoi controllare la quantità di eetto STRING RESONANCE,
che aggiunge più realismo ai suoni di PIANO.
Considera che il suono CONCERT GRAND ha anche un eetto
separato di “release asnd resonance” non controllabile da questo parametro.
HEADPHONES MODE
Numa Compact 2 by Studiologic®
46
Quando il parametro pè impostato su AUTO ON, l’inserimento
delle cue disattiva automaticamente il sistema di amplicazione.
Se il parametro è impostato su AUTO OFF, il sistema di amplicazione interno resterà attivo anche nel caso di inserimento
del jack nell’ingresso cue: questo ti permette di usare l’uscita
cue come un ulteriore uscita ausiliaria, per registrazioni o per
collegare un subwoofer attivo, in aggiunta ai diusori interni.

Global edit
Mentre il PED1 è sempre utilizzabile per pedali di espressione/
volume, il PED2 può essere programmato per collegare molti
tipi di pedale:
• SINGLE SWITCH normalmente aperto;
• SINGLE SWITCH normalmente chiuso;
• EXPRESSION (funzione di volume, pedale con potenziometro
e plug stereo);
• SLP3-D: Pedale triplo con funzioni SOFT/SOSTENUTO/SUSTAIN con controllo di mezzo pedale.
Quando la funzione è impostata su AUTO ON, sono abilitate le
seguenti funzioni:
L’ultimo eetto selezionato (FX1-2) per ogni suono viene memorizzato dallo strumento, consentendo di selezionare un
suono e il relativo eetto preferito, senza la necessità di memorizzare la combinazione in un Program. L’FX AUTOSET non
memorizzerà e richiamerà soltanto l’eetto associato dall’utente al suono, ma anche i valori dei paramtri controllati dallo Stick
2 per ogni eetto.
PEDAL 2
FX AUTOSET
Il controllo STICK 2 sarà assegnato automaticamente ad una
funzione, secondo l’impostazione e la posizione del FOCUS
(cursore).
Se il Focus è su UPPER (ad esempio) e hai selezionato un suono
di Organ con l’eetto Rotary, lo STICK 2 controllerà la velocità
SLOW/FAST del Rotary.
Se sposti il Focus su LOWER (cliccando sull’encoder o premendo il pulsante LOWER) e hai un altro FX su LOWER, lo STICK2
controllerà l’eetto LOWER.
Se non c’è nessun FX impostato in una sezione (LOWER O UPPER) e sposti il Focus su di essa, lo STICK2 controllerà la MODULATION della sezione selezionata.
Esempio tipico: immagina di avere un suono Organ su UPPER
con Rotary e un suono BASS su LOWER senza eetti: spostando
il cursore su UPPER, lo STICK 2 controllerà la velocità del Rotary,
spotando il Focus su LOWER, lo Stick2 ontrollerà la Modulation.
I
Nota: questa funzione automatica è una selezione arbitraria
fatta dallo strumento, basata su una situazione esecutiva statistica; se vuoi controllare tutti i parametri direttamente e manualmente, puoi impostare la funzione su OFF e selezionare la
funzione dello STICK 2 nella relativa PART EDIT, memorizzando
poi l’impostazione desiderata in un PROGRAM.
Numa Compact 2 by Studiologic® 47

Global edit
FACTORY RESET
FIRMWARE VERSION
AND UPDATE
Questa funzione consente di fare un Reset di Fabbrica completo che cancellerà tutte le impostazioni utente e reimposterà
tutti i parametri allo stato originario. Considera che questo potrebbe farti perdere tutte le impostazioni utente e la funzione
dovrebb essere attivata molto attentamente. Per proteggere
l’utente da reset indesiderati, viene visualizzato un messaggio
precauzionale YES/NO quando provi a resettare lo strumento,
consentendoti di confermare o meno l’operazione.
Per aggiornare il rmware seguire queste istruzioni:
- Scarica il rmware dal sito www.studiologic-music.com e
salvalo in una cartella conosciuta;
- Collega lo strumento all’alimentazione e successivamente al
computer via USB;
- Accendi lo strumento tenendo premuto i tasti A0 (primo
tasto bianco da sinistra) e D1 (quarto tasto bianco da sinistra);
il display mostrerà il messaggio “Firmware Upload”;
- Aprire qualsiasi programma in grado di leggere un midile
(es. MIDI-Ox per PC, QMidi per Mac etc);
MIDI-Ox:
- Aprire MIDI-Ox;
- Nella barra dei menu, scegliere Actions > Play MIDI... , e si
aprirà MIDI BAR;
- nella nestra di MIDI BAR, fare click sul tasto
“Select MCI Port” e selezionare Numa Compact 2;
- In MIDI BAR aprire il le precedentemente scaricato;
- Premere il tasto play e attendere la ne della procedura;
- Quando il display del Numa Compact 2 mostra il messaggio
“UPLOAD FINISHED”, riavviare lo strumento (o e on).
QMidi:
- Aprire QMidi;
- Selezionare il le precedentemente scaricato;
- Nella barra dei menu scegliere QMidi > Audio/MIDI settings
e selezionare Numa Compact 2 come dispositivo in output;
- Nella nestra principale premere il tasto play ed attendere
la ne della procedura
- Quando il display del Numa Compact 2 mostra il messaggio
“UPLOAD FINISHED”, riavviare lo strumento (o e on).
Numa Compact 2 by Studiologic®
48

Global edit
Questa funzione permette di ricevere o inviare tutti i Program
al computer (Mac o PC). Una volta selezionata, ruotando l’encoder, puoi selezionare SEND o RECEIVE con le procedure seguenti:
WINDOWS
Puoi usare un’applicazione come “Midi-Ox” nel modo seguente
(assicurati che il Numa Compact 2 sia visto dalle porte del USB/
MIDI del computer e nei settaggi di “MIDI-Ox”).
Per inviare i dati al computer:
- Collega la tua Numa Compact 2 al computer via USB;
- Apri “MIDI-Ox” e scegli “View/Sysex;
- Nella nestra “Sysex”, scegli “Sysex>Receive manual dump”;
- Clicca sull’encoder della Numa Compact 2 quando la funzione
Global SEND è attiva e conferma con YES;
- Nella nestra Display del programma “MIDI-OX” salva i dati
Bulk in un le;
- Quando il dump è completato, scegli “Display Window >
Save as...
Per ricevere i dati dal computer al tuo strumento:
- Nella nestra “Program Send/Receive” seleziona “Receive”;
- Apri il programma “MIDI-Ox”, nella nestra Sysex scegli
“Command>WindowZLoad File” e cerca il le nella cartella
dove l’avevi memorizzato;
- Scegli “Command Window>Send Sysex e aspetta no alla
conclusione.
PROGRAMS SEND / RECEIVE
MAC OS
Poi usare un’applicazione come “SysEx Librarian” nel modo seguente (assicurati che il Numa Compact 2 sia visto dalle porte
del USB/MIDI del computer e nei settaggi di “SysEx Librarian”).
Per inviare i dati al computer:
- Collega la tua Numa Compact 2 al computer via USB;
- Apri “SysEx Librarian” e nella toolbar seleziona la periferica
“Numa Compact 2”;
- Clicca il pulsante “Record many” in “SysEx Librarian”;
- Clicca sull’encoder della Numa Compact 2 quando la funzione
Global SEND è attiva e conferma con YES;
- Quando la trasmissione è completata, premi il pulsante
“Done” su “ SysEx Librarian”.
Per ricevere i dati dal computer al tuo strumento:
- Nella nestra “Program Send/Receive” seleziona “Receive”;
- Nella barra degli strumenti di SysEx Librarian, fare click sul
menu a discesa “Destinatione” e selezionare la porta MIDI da
cui ricevere i dati;
- Nel programma “SysEx Librarian” seleziona il le Sysex dalla
lista posta nella nestra e premi il pulsante “Play” per iniziare
la trasmissione.
I
Numa Compact 2 by Studiologic® 49

PROGRAM EDIT [1/3]
PROGRAM EDIT [2/3]
C4
MIXER
P01-JAZZ DUET
A0 - B3
C4 - C8
PROGRAM EDIT [1/3]
Program edit
Program edit
Se il Focus (cursore) è nella parte superiore del display nella selezione dei Program, premendo il
pulsante EDIT si entra in PROGRAM EDIT, con i seguenti parametri e impstazioni.
Ac-Bass
V: 127
Concert
V: 127
PROGRAM NAME
PROGRAM NAME
JAZZ DUET
SPLIT POINT
SPLIT POINT
PROGRAM NAME
EDIT
JAZZ DUET
Dopo aver selezionato questa funzione, clicca sull‘encoder e
inserisci le lettere ruotandolo; un piccolo triangolo mostrerà
quale numero stai editando.
Per confermare il nuovo nome, o mantenere il precedente,
premi STORE e una nestra popup ti chiederà conferma, ruota l‘encoder su YES o NO e conferma cliccandoci.
Questa funzione consente di selezionare il punto di SPLIT per
ogni PROGRAM, ruotanto l‘encoder no a che la nota desiderata viene visualizzata. Considera che, per stadard internazionale, la tastiera dello strumento è nominata da A0 (primo
tasto a sinistra) a C8 (ultimo tasto a destra), di conseguenza il
DO centrale sotto al display è il C4. L‘intonazione di riferimento di A= 440 Hz è su A4, il La della stessa ottava del Do centrale
(sotto i Sound Banks) per tutti i suoni basat sullo standard 8‘
del piano. Solo alcuni suoni di ORGAN suoneranno un‘ottava
sotto, se basati sui drawbar a 16‘ degli organi vintage a ruote
foniche o gli organ a canne con registro a 16‘: in questi casi
la fondamentale del suono selezionato su A4 sarà di 220 Hz
(un‘ottava sotto i 440 Hz).
50
MIXER
L 127 U 127
A
Numa Compact 2 by Studiologic®
64 B 64
Il MIXER consente di controllare tutte le quattro parti e
zone (LOWER/UPPER/ZONEA/ZONEB) inuna singola pagina. Questa funzione è accessibile tramite una sscorciatoia, tenendo premuti i pulsanti SPLIT e MIXER.

Part edit
PART EDIT [1/10]
127
127
PART EDIT [2/10]
P01-JAZZ DUET
A0 - B3
C4 - C8
PART EDIT [1/10]
Part edit
Se il focus è in una delle parti e sei nella modalità SOUND (con il pulsante SOUND selezionato ed
illuminato) entrerai nella modalità PART EDIT. Una volta selezionato PART EDIT puoi sempre premere i pulsanti LOWER o UPPER per selezionare la parte da editare, o cliccare sull‘encoder.
Ac-Bass
V: 127
SOUND
Concert
V: 127
EDIT
Il PART EDIT comprende i seguenti parametri:
Ruotando l’encoder, dopo aver spostato il Focus nel parametro
cliccando su di esso, puoi controllare il Volume della parte selezionata con una escursione da 0 a 127.
Una volta selezionato lo SPLIT POINT per il PROGRAM corrente,
(vedi PROGRAM EDIT) puoi decidere dove far suonare la sezione selezionata (LOWER/UPPER o ZONEA/ZONEB) in modo totalmente indipendente come segue:
TO LEFT: la parte suonerà nella sezione sinistra della tastiera
(da A0 alla nota di SAPLIT)
TO RIGHT: la parte suonerà nella sezione destra delal tastiera
(dalla nota di Split a C8)
TO ALL: la parte suonerà senza punto di SPLIT in tutta la tastiera.
VOLUME
127
VOLUME
127
VOLUME
VOLUME
VOLUME
SPLIT ASSIGN
SPLIT ASSIGN
TO LEFT
SPLIT ASSIGN
TO RIGHT
Questa funzione ti permetterà molte combinazioni musicali
come questi esempi:
PIANO sulla destra + BASS sulla sinistra del punto di Split
PIANO e STRINGS sulla destra + Zone MIDI sulla sinistra (che
controllano moduli sonori esterni)
ORGAN in tutta la tastiera (TO ALL) e CHOIR solo nella parte
destra
I
Anche con un solo punto di SPLIT (programmabile per
ogni PROGRAM) le possibili combinazioni sono quasi un centinaio, considerando le varie combinazioni tra
LOWER+UPPER+ZONEA+ZONEB.
Numa Compact 2 by Studiologic® 51

Part edit
PART EDIT [3/10]
PART EDIT [4/10]
0
0
PART EDIT [5/10]
PART EDIT [6/10]
ON
ON
PART EDIT [8/10]
TRANSPOSE
TRANSPOSE0TRANSPOSE
0
OCTAVE
OCTAVE
OCTAVE
REV SEND
REV REND64REV SEND
64
PEDAL 1 PEDAL 2
PEDAL 1
PEDAL 1
Questa funzione consente di trasporre una parte a dierenza
del GLOBAL TRASPOSER che ha eetto su tutto lo strumento.
Questa funzione può essere impostat dierentemente per
ogni sezione di SOUND o Midi Zone e memorizzata in un PROGRAM con dierenti valori. Combinazioni interessanti si possono ottenere trasponendo un suono con intervalli musicali
come una quinta inferiore (- 5 semitoni) per ottenere quello
che è comunement conosciuto come un “cluster” ad intervalli
ssi. prova a selezionare una Tromba su Upper e un Sax su Lower, impostando il Sax 5 semitoni sotto inuna tipica impostazione Jazz!
Puoi impostare l’ottava (intervallo di 12 semitoni) separatamente per ogni parte; normalmente avrai bisogno di spostare
la parte LOWER una o due ottave sopra, se vuoi suonare degli
accordi in un registro migliore. A volte invece puoi ottenere
un suono migliore quando lo SPLIT è attivato se sposti la parte UPPER una o due ottave sotto, se selezioni un Sax Tenore
in combinazione con un suono di Basso splittato sulla sinistra,
dato che le note più belle e più gravi del sax sarebber probabilmente nella pozione sinistra della tastiera. Sperimenta semplicemente le tue impostazioni preferite e memorizzale nel
PROGRAM.
La funzione consente di controllare la quantità di segnale che
deve essere inviata al processore di REVERB, indipendentemente per le parti LOWER e UPPER, programmabile con impostazioni diverse per ogni PROGRAM. Un’impostazione tipica,
se splitti la tastiera e assegni un suono di BASS sulla sinistra,
potresti voler ridurre la quantità di REVERB per la parte sinistra
o controllare l’impostazione anche nella parte UPPER per ottenere l’eetto desiderato. Il potenziometro MIX nel pannello
frontale, cambierà il rapporto (DRY/WET) con ogni tipo di riverbero selezionato o valore di mandata.
Qui puoi decidere se i pedali sono abilitati o no per ogni sezione (UPPER/LOWER o ZONEA/ZONEB se il pulsante MIDI è
attivato).
STICK 1 STICK 2
STICK 1
ON
Numa Compact 2 by Studiologic®
52
STICK 1
ON
Come per i pedali, anche gli STICK possono essere abilitati separatamente per le Parti e le Zone. Considera che lo STICK 2
sarà impostato automaticamente su AUTO se la funzione FXAUTOSET è impostata su ON nell’area GLOBAL EDIT. Per controllare manualmente lo STICK 2, puoi impostare su OFF l’FXAUTOSET e la funzione potrà essere impostata su ON o OFF e
memorizzata nei Program.

Part edit
PART EDIT [10/10]
Questo parametro abilita o disabilita la funzione Aftertouch nella Parte o Zona selezionata. La funzione Aftertouch sarà in molti casi simile al controllo di modulazione
dello STICK 2, aggiunge una spece di vibrato o modulazione al suono secondo le impostazioni. Normalmente
imposterai l’Aftertouch ON per la parte UPPER, usata comunemente per la parte musicale principale o per i soli,
mentre la parte LOWER è normalmente associata ad accompagnamenti o a parti di basso, se lo SPLIT è attivo.
AFTERTOUCH
A.TOUCHONA.TOUCH
ON
I
Numa Compact 2 by Studiologic® 53

MIDI (Zone edit)
ZONE EDIT [1/13]
0
ZONE EDIT [2/13]
0
ZONE EDIT [4/13]
2
1
P01-JAZZ DUET
A0 - B3
C4 - C8
ZONE EDIT [1/13]
0
MIDI
The Numa Compact 2 allows to control 2 separate MIDI Zones, with all related parameters; the
result can be stored in the current PROGRAM, together with the settings of the internal LOWER
and UPPER sections, with a common SPLIT point and separate settings. Step through the functions
with the MIDI button selected and EDIT button activated: the value of the actual function will be
shown on the display and can be adjusted rotating the Encoder. Rotating the Encoder when the
MIDI button is lighted, will allow you to directly change the selected MIDI Zone volume.
Program edit
The PROGRAM EDIT, explained in the related chapter, is common for SOUND and MIDI; it refers
to general parameters associated to both the SOUND and MIDI sections. With the following ZONE
EDIT chapters you can set the specic MIDI Zone parameters according to your choices and STORE
them in the same Program, under the same name and number, with all the other parameters set
for the internal SOUNDS.
Zone edit
If the focus is on one of the zones and you are in MIDI mode (with the MIDI button selected and
lighted) you will enter in the ZONE edit mode; when you have selected ZONE edit you can always
press the ZONE A or ZONE B buttons to select the zone to be edited, or click on the encoder to
move the cursor/focus as per all other instrument’s functions.
Zone A
V: 64
MIDI
Zone B
V: 64
PRG CHG0PRG CHG
EDIT
The ZONE EDIT includes the following parameters:
PROGRAM CHANGE
Here you can input the Program Change number of the controlled device or sound generator, referring to the specic
PRG CHG0PRG CHG
Sound Map of the connected device/vst/sound generator.
The value range is 1-127.
LSB - MSB
LSB stands for Least signicant Byte, MSB stands for Most
signicant byte and they allow to control and select more
BANK LSB0BANK LSB
banks of the standard 127 Program Changes or many other
functions, dened by the MIDI standards; to input the correct
numbers, you have to refer to the implementation chart of
the controlled device, where each Sound is dened with the
MIDI data to select and control it.
MIDI CHANNEL
MIDI CH
Numa Compact 2 by Studiologic®
54
You can select the MIDI channel (value 1-16) for each Zone,
to control 2 dierent external devices or sound generators.
MIDI CH

MIDI (Zone edit)
ZONE EDIT [5/13]
ZONE EDIT [6/13]
ZONE EDIT [7/13]
0
ZONE EDIT [8/13]
0
0
ZONE EDIT [9/13]
ON
ON
ZONE EDIT [11/13]
ON
ON
Rotating the encoder, after having moved the focus on the parameter by clicking on it, you can control the selected part Volume, in a range from 0 to 127; the Zone volumes can be controlled directly also not in EDIT mode, when the MIDI button is
lighted and the cursor-focus is on one of the Zones.
Once you have selected the SPLIT point for the current PROGRAM (ref: PROGRAM EDIT) you can decide where the selected
ZONE should play, in a totally independent way as it follows:
TO LEFT: the zone will play to the left section of the keyboard
(from A0 to the SPLIT note);
TO RIGHT: the zone will play to the right section of the keyboard (from the SPLIT note to C8);
TO ALL: the zone will play with no split all over the keyboard.
Even with one common SPLIT point (programmable for
each PROGRAM) the possible settings are almost one
hundred, considering the status and combinations of
LOWER+UPPER+ZONEA+ZONEB and the SPLIT settings made
possible by this function.
VOLUME
VOLUME
64
VOLUME
64
SPLIT ASSIGN
SPLIT ASSIGN
TO LEFT
SPLIT ASSIGN
TO RIGHT
This function allows to transpose a Zone; dierently from the
GLOBAL TRANSPOSER, that will eects the entire instrument,
this function can be set independently for each MIDI zone and
stored in each PROGRAM, with dierent values.
You can set the octave (intervals of 12 semitones each) separately for each Zone; normally you will need to move a zone one
or two octave up, to the LEFT Zone of a split keyboard, to play
chords in a better range. On the other way, sometimes you can
get a better sound if you move the UPPER zone one or two octaves down; simply experiment the setting you prefer and then
store it in the current PROGRAM.
Here you can decide if the pedals are enabled or not for each
Zone independently, according to where the cursor-focus is
set (on ZONE A or ZONE B).
As for the pedals, also the Sticks can be enabled separately for
the Zones; please note that the Stick 2 will be set automatically
to AUTO if the related FX-AUTOSET function is set to ON in the
GLOBAL EDIT area. To control the Stick 2 assignment manually,
you can set to OFF the FX-AUTOSET and the function can be
switched ON or OFF and stored in the Programs.
TRANSPOSE
TRANSPOSE0TRANSPOSE
OCTAVE
OCTAVE
OCTAVE
PEDAL 1 - PEDAL 2
PEDAL 1
PEDAL 1
STICK 1 - STICK 2
STICK 1
STICK 1
I
Numa Compact 2 by Studiologic® 55

MIDI (Zone edit)
ZONE EDIT [13/13]
AFTERTOUCH
A.TOUCHONA.TOUCH
ON
This parameter enables or disables the aftertouch function on
the selected Zone; the function of the Aftertouch will be in
most cases similar-same of the Stick 2 modulation control, adding some kind of vibrato or similar modulation to the sound,
according to the setting. Normally you will set the Aftertouch
ON for the UPPER zone, that is commonly used for the main
musical zone or solo performances, while the LOWER zone is
normally associated to accompaniments or bass lines, if the
SPLIT is active, however the setting is totally under your control and choice.
Numa Compact 2 by Studiologic®
56

Dichiarazioni
Tuti i prodotti Studiologic sono costruiti attentamente, calibrati,
testati, e sono soggetti a garanzia. Danni causati da trasporto non
conforme, montaggio o errata manutenzione, non sono coperti da
questa garanzia. Per eventuali informazioni rivolgersi al proprio negoziante e/o al distributore di zona.
FATAR srl
Zona Ind.le Squartabue
62019 Recanati MC Italy
dichiara che questo prodotto è conforme alle Direttive Europee:
2004/108//EC EMC Directive
DIN EN 55013 EMC radio disturbance of sound, TV and
associated equipment
DIN EN 55020 EMC immunity of sound, TV and
associated equipment
Recanati, 17. 01. 2017 Marco Ragni, Chief Executive Ocer
Questa dichiarazione diventa non valida nel caso di modiche non
autorizzate.
Garanzia
Conformità CE
Questo prodotto è costruito secondo le direttive 2002/95/EC.
L‘adozione delle direttive EG 2003/108/EG è volta a prevenire e limitare il usso di riuti di apparecchiature destinati alle discariche,
attraverso politiche di riuso e riciclaggio degli apparecchi e dei loro
componenti (WEEE). Aiutaci a mantenere il mondo pulito.
Per garantire il massimo della qualità, i prodotti Studiologic sono
sempre progettati allo stato dell‘arte, per questo sono consentite,
senza preavviso: modiche, migliorie variazioni. Speciche tecniche
e di aspetto possono essere diverse da quanto indicato in questo manuale.
Tutti i marchi usati in questo manuale appartengono ai rispettivi proprietari.
Coyright Nessuna parte di questo manuale può essere riprodotta o
trasmessa in ogni forma senza il consenso del proprietrio del Copyright:
Conformità RoHS
RoHS
compliant
2002/95/EC
Disposizioni / WEEE
Stato dell‘arte
Marchi
Copyright
I
FATAR Srl
Zona Ind.le Squartabue
62019 Recanati, Italia
Numa Compact 2 by Studiologic® 57

Wichtige Sicherheitshinweise
Bitte lesen Sie die Bedienugsanleitung vollständig durch. Sie
enthält alle Informationen die Sie benötigen, um dieses Gerät
zu verwenden.
Bitte folgen Sie den Anweisungen in dieser Bedienugsanleitung.
Bei Fremdeingri am NUMA Compact 2 erlischt die Garantie. Es
wird empfohlen nur das vom Hersteller vorgesehene Zubehör
zu verwenden. Verwenden Sie das Gerät ausschließlich wie in
dieser Bedienugsanleitung beschrieben.
Achtung!
Gefahr durch Stromschlag! Önen Sie das Gerät nicht. Im Inneren benden sich keine vom Benutzer verwendbaren Teile.
Reparaturarbeiten dürfen nur von qualiziertem Fachpersonal
durchgeführt werden.
Feuchtigkeit
Um eine Gefährdung durch Feuer oder Stromschlag auszuschließen, darf dieses Gerät weder Regen noch Feuchtigkeit
ausgesetzt werden. Auch Spritzwasser oder tropfende Flüssigkeiten dürfen nicht in das Gerät gelangen. Stellen Sie keine Gefäße mit Flüssigkeiten, z.B. Getränke oder Vasen auf das
Gerät. Wenn das Gerät von einem kalten an einen warmen Ort
gebracht wird, kann sich im Inneren Kondensfeuchtigkeit bilden. Erst einschalten, wenn sich das Gerät auf Raumtempera-
tur erwärmt hat.
Aufstellung
Achten Sie bei der Aufstellung auf eine stabile Unterlage um
Kippen oder Herunterfallen zu vermeiden!
Reinigung / Pflege
Verwenden Sie keine scharfen Reinigungsmittel. Am besten
eignet sich ein Mikrofasertuch, dass Sie bei Bedarf leicht anfeuchten.
Hinweis zur Verpackung
Bitte bewahren Sie die Verpackung des Gerätes auf. Damit ist
Ihr Gerät beim Transport, z.B. im Service-Fall, geschützt.
Netzanschluss
Bevor Sie das Gerät mit dem Stromnetz verbinden, überprüfen
Sie bitte sorgfältig, ob die Netzspannung für das mitgelieferte Netzteil geeignet ist. Das Netzteil kann mit einer WechselSpannung von 100V bis 240V betrieben werden. Verwenden
Sie für den Anschluss an das Versorgungsnetz nur den entsprechenden Netzsteckeradapter. Verwenden Sie keine defekten
Netzteile oder Netzteile mit defekten Anschlussleitungen.
Wichtiger Hinweis: Das Numa Compact 2 kann auch direkt über
den USB-Port mit Strom versorgt werden, wenn es an den PC
oder eine andere geeignete USB-Stromquelle angeschlossen ist.

DEUTSCH
Bedienungsanleitung
Numa Compact 2 by Studiologic® 59
D

Index
Sicherheitshinweise
Das Numa Compact 2
Stromversorgung und Anschlüsse
Bedienfeld-Display und Navigation
Sound- Bänke und Rubriken
58
62
62
63
63
66
66
66
66
67
67
67
68
69
69
69
70
71
Produktübersicht
Die Hauptfunktionen
Anwendungsbeispiel
Funktionsdiagramm
Stromversorgung
Stromversorgung USB-Power
Expression- / Universal-Pedale
Audioanschlüsse
Kopfhöreranschluss
Lautstärkeregelung
USB-Anschluss
Sound / MIDI
Demo
Split
Speichern von Presets (User Programs)
Sound modus
Sounds
Eekte
Allgemeine Einstellungen
Programmeinstellungen
Menüeinstellungen
72
73
73
74
74
74
74
74
74
75
76
77
77
78
80
80
80
81
81
82
82
82
82
83
83
FX1- FX2
FX Autoset
Saitenresonanz (Damper model)
Transposer
Stimmgerät
Velocity curve
Fixed curve
Saitenresonanz (dämpfbar)
Kopfhörer (Betriebsart)
Pedal 2
FX Autoset
Werkseinstellung
Firmware Version und Update
Programme Senden/Empfangen
Programm Name
Splitpunkt
Mixer
Lautstärke
Splitpunkt setzen
Transponieren
Octave
Rev send
Pedal 1 - Pedal 2
Stick 1 - Stick 2
Aftertouch
Numa Compact 2 by Studiologic®
60

Index
MIDI (Zonen-Edit)
Anmerkungen
Anhang
84
84
85
85
85
85
85
86
86
86
84
118
119
120
120
Programmwechsel
LSB - MSB
MIDI Kanäle
Volume
Split assign
Transpose
Octave
Pedal 1 - Pedal 2
Stick 1 - Stick 2
Aftertouch
Sound Map
MIDI Implementation Chart
Spezikifationen
Maße/Gewichte
Numa Compact 2 by Studiologic® 61
D

Das Numa Compact 2
Produktübersicht
Das NUMA Compact 2 ist ein höchst leistungsfähiges Musikinstrument, dass in einem stilvollen
und schlanken Gehäuse geliefert wird und auf einer völlig neuen Technologie und einer aktualisierten Benutzeroberäche basiert. Die Tastatur ist mit Aftertouch ausgestattet und zusammen
mit den programmierbaren Sticks erhält man, die volle Kontrolle über das Instrument. Die neue
Sound-Engine umfasst 128 Noten max. Polyphonie und es besitzt zwei unabhängige Bereiche
auf der Tastatur (Unten & Oben) mit über 80 Sounds, organisiert in 8 Sound-Bänken, zuweisbar
an jeden Teil der Tastatur, im Layer- oder Split-Modus. Die Klänge aus dem Flashmemory mit 1
GB Speicherinhalt können mit zwei Eektprozessoren nachträglich noch weiter bearbeitet bzw.
aufgewertet werden. Jeder Prozessor (FX1-FX2) ist in der Lage, zwei voneinander unabhängige
Eekte gleichzeitig zu erzeugen, so dass insgesamt vier jeweils getrennt einstellbare Eekte zur
Verfügung stehen. Eine kontrollierbare Saitenresonanz und die Dämpfergeräusch-Samples machen die Klavierklänge noch realer, während der neue Stereo Reverb den Sound anschließend
weiter verbessert. Bass-, Treble- und Mastering- Regler erreichen Studioqualität, die auch durch
den eingebauten Digitalverstärker und die ovalen Rückreexionslautsprecher spürbar ist. Das MIDI-Modul verfügt über zwei unabhängige MIDI-Zonen. Alle Parameter können programmiert und
abgespeichert werden.
Ausstattung
Tastatur mit 88 Tasten, leichtgewichtig, Aftertouch
Stick 1: Pitch Bend Funktion auf beiden Achsen
Stick 2: Klangmodulation und FX1/2 Regelung (Zuweisbar oder automatische Auswahl) 2x10W
Verstärkerleistung + 2 ovale Rückreflexionslautsprecher
128x64 grafisches OLED Display
Benutzeroberfläche mit Direktzugriff
Untere und obere Tastaturzone (A – B)
4 programmierbare Bereiche (interne SOUNDS und MIDI) in beliebiger Kombination
1 GB of Flash Speicher, 88 Sounds organisiert in 8 Sound Bänken
Concert Grand Piano Sounds mit Dämppfergräusch Samples und virtueller Saitenresonanz
FX1-2 Zweifacher-Effektprozessor - 4 gleichzeitig programmierbare Effekte
Stereo Reverb mit separat (unten/oben) regelbarem Pegel
Saitenresonanz (Damper Modell) auf akustischen Piano Sounds (programmierbar)
Allgemein-, Programm- und Menüeinstellungen
Bass, Treble, Mastering (3D+Compressor) Regelöglichkeiten zur Nachbearbeitung
MIDI Modul mit 2 unabhängig programmierbaren Zonen
Anschlüsse: USB, MIDI In/Out, Audio L/R, Kopfhöreranschluss, Pedal 1+2, Netzanschluss
Numa Compact 2 by Studiologic®
62

Anwendungsbeispiel
FX1
SPEAKERS
PED2PED1
Das Numa Compact 2
MIDI IN
USB
MIDI OUT
Funktionsdiagramm
1GB
Stereo
reverb
Sound
engine
Bass
Mastering
Suggested setting
UPPER
LOWER
UPPER
LOWER
Treble
Volume
FX2
FX1
FX2
Rev send
Rev send
Strings
resonance
Digital
amplier
Stereo
reverb
AUX out
L
AUDIO out
L
R
D
R
BUILT-IN
Numa Compact 2 by Studiologic® 63

Das Numa Compact 2
Ein Überblick über die Funktionen des NUMA Compact 2:
Die leichtgewichtige Tastatur
8 Sound-Bänke
88 Integrierte Sounds
FX1 - FX2- REV
Saitenresonanz
Das NUMA Compact 2 bietet die neueste innovative Technologie von Fatar: die anspruchsvolle, gewichtete Tastatur
TP9-Piano mit Aftertouch. Das NUMA Compact wiegt nur 7,1
kg und ist daher leicht zu transportieren und bietet darüber
hinaus ein hervorragendes Spielgefühl für das Fatar berühmt
ist.
Sie können sofort beginnen die 88 hochqualitativen Sounds
anzuspielen die sorgfältig gesampelt wurden. Erfahrene Keyboarder und Musiker wählten diese Klänge aus und waren
am Design der praxisgerechten Bedienung des NUMA Compact 2 beteiligt. Daher ist das NUMA Compact 2 Ihr perfekter
Partner auf der Bühne, im Studio oder zu Hause. 128 Stimmen
max. Polyphonie sind verfügbar, um Tiefe und Ausdruck zu
erzeugen. Sie können zwei Sounds kombinieren, indem Sie
diese dem Unteren- und Oberen Tastaturbereich im Splitoder Layer-Modus zuordnen.
Die zwei Doppel-FX-Prozessoren erlauben es, zwei verschiedene Eekte dem unteren- und oberen Tastaturbereich zuzuordnen. Zusätzlich zum Saitenresonanz-Eekt für alle Piano-Sounds und dem Stereo-Reverb, gibt es eine unendliche
Vielfalt von Kombinationsmöglichkeiten.
Mixer &Mastering Eingebaute
Verstärkung
Masterkeyboard Funktionen
Audio-Anschlüsse
Lautstärke-, Bass-, Höhen- und Mastering-Regler stehen für
die gewünschte Klangregelung zur Verfügung und mit den
integrierten Lautsprechern mit 2x 10W Verstärkerleistung,
können Sie das Instrument auch ohne externen Verstärker
sofort anspielen.
Die Masterkeyboard-Funktionen des NUMA Compact 2 mit
den zwei programmierbaren Zonen ermöglichen es Ihnen,
andere MIDI-Geräte zu steuern, deren Sounds auszuwählen
und den Pegel direkt von Ihrem NUMA Compact 2 aus anzupassen.
Neben dem Stereo- (L/R) Audioausgang und dem eingebauten Verstärkersystem verfügt der NUMA Compact 2 über
einen zusätzlichen Kopfhöreranschluss. Ideal für Late-NightJam-Sessions, ohne die Nachbarn zu stören. Diese Verbindung kann auch als Zweit-Audio-Ausgang verwendet werden.
Numa Compact 2 by Studiologic®
64

Your new Numa Compact 2
Der integrierte USB-Port ermöglicht es das NUMA Compact
2 an Ihren Computer anzuschließen und direkt mit Strom
versorgt zu werden, ohne dass der externe Adapter (im Lieferumfang enthalten) benötigt wird. Sie können einen USBund MIDI-Ausgang für die MIDI-Datenübertragung verwenden. Darüber hinaus sind die Daten der Firmware oder der
Soundbibliothek über USB zugänglich. Bitte beachten Sie,
dass das interne Verstärkersystem automatisch ausgeschaltet ist, wenn das Gerät über USB mit Strom versorgt wird, um
übermäßigen Stromverbrauch oder einen Leistungsabfall zu
vermeiden.
Numa Compact 2
Netzteil
CD Bedienungsanleitung
Interactive NUMA
USB <> Computer
Lieferumfang
Numa Compact 2 by Studiologic® 65
D

Stromanschluss und Anschlussbuchsen
Stromanschluss und Anschlussbuchsen
Power
12V - 2,5A
Stromanschluss
Inbetriebnahme
MIDI In-OutEin-/Ausschalter
USB Port
MIDI Ein- und Ausgang, Firmware- Update,
Stromversorgung ohne Lautsprecherbetrieb
Ped 1, Ped 2
Expression pedal,
Universal pedal
Audio-Ausgang L/R
2 x 6,3 mm Klinke
Headphones / Aux Out
1x 6,3mm stereo jack
Verwenden Sie den mitgelieferten Netzadapter, um das
Numa Compact 2 an die Steckdose anzuschließen (oder verwenden Sie den USB-Anschluss). Schalten Sie das Gerät mit
dem Netzschalter Numa Compact 2 ein, stellen Sie die Lautstärkeregler-, Bass- und Höhenregler auf die 12 Uhr Position
und den Mastering-Regler auf Null-Minimum (die MasteringFunktion wird in dieser Bedienungsanleitung später erklärt),
um ein Übersteuern der Lautsprecher zu vermeiden.
USB Stromversorgung
Expression / Universal
Pedalanschlüsse
Audio Ausgänge
Das Instrument kann auch über den USB-Port mit Strom versorgt werden, vorausgesetzt, dass der zur Verbindung mit
dem Numa Compact 2 verwendete Computer genügend
Strom über die USB-Buchse an das Numa Compact 2 liefert.
Wenn das Numa Compact 2 mit Strom vom Computer versorgt wird, wird in den meisten Fällen der Verstärker und die
internen Lautsprecher abgeschaltet, sobald der Strombedarf
des Gerätes die Leistung der USB-Buchse des Computers
übersteigt.
Verbinden Sie das (optionale) Pedal oder die Pedale mit den
dazugehörigen Anschlussbuchsen mit der Bezeichnung Ped1
und Ped2. An der Buchse mit der Bezeichnung Ped 1 können
Sie ein Studiologic VP Pedal (VP25 oder VP27) anschließen, typischerweise für die Lautstärkeregelung. An die Ped2-Buchse
können Sie entweder ein einzelnes Fußtaster-Pedal, ein Volume-Expression-Pedal oder das Custom Triple Pedal SLP3-D
anschließen, wie im entsprechenden Kapitel erläutert.
Wenn Sie externe Verstärkersysteme verwenden oder das Instrument aufnehmen möchten, schließen Sie den linken und
rechten Audioausgang an die Eingänge Ihres Mischpultes
oder Verstärker oder an Ihre Soundkarte mit geeigneten Kabeln an.
Numa Compact 2 by Studiologic®
66

Stromanschluss und Anschlussbuchsen
Der Kopfhörerausgang kann mit einem Kopfhörer verbunden
oder als zusätzlicher Audio-Hilfsausgang verwendet werden,
entsprechend der Einstellung der zugehörigen GLOBAL-Editierfunktion (in diesem Handbuch beschrieben). Den HilfsAudio-Ausgang können Sie verwenden, um das Instrument
an einen Subwoofer oder ein zusätzliches Verstärkersystem
anzuschließen, während die L / R-Ausgänge für Aufnahmen
oder andere Audio-Anschlüsse verfügbar sind.
Wenn Sie das Numa Compact 2 zum ersten Mal verwenden,
empfehlen wir Ihnen, den Lautstärkeregler auf nicht mehr als
die Hälfte zwischen 0 und Maximal zu drehen. Während Sie
spielen, können Sie die Lautstärke des ausgewählten Sound
einstellen. Wenn Sie den Lautstärkeregler betätigen, werden
alle Audio- und Kopfhörerausgänge gleichzeitig angespasst.
ACHTUNG:
Um Hörschäden zu vermeiden, sollten Sie - wie bei allen Audiogeräten, die Verwendung des Numa Compact 2 bei hoher
Lautstärke über längere Zeit vermeiden.
Kopfhöreranschluss
Lautstärkeregelung
Zur Datenübertragung über USB verbinden Sie das Numa
Compact 2 mit einem USB-Kabel mit Ihrem Computer. Wenn
Sie das Numa Compact 2 zum ersten Mal anschließen, wird es
von Ihrem Computer automatisch erkannt und der entsprechende Treiber wird vom Betriebssystem installiert (class compliant).
USB
Numa Compact 2 by Studiologic® 67
D

Bedienfeld - Display und Navigation
P01-JAZZ DUET
A0 - B3
C4 - C8
P01-JAZZ DUET
A0 - B3
C4 - C8
Bedienfeld - Display und Navigation
Edit / Store
MIDI / Sound /
DEMO
Display
Einfarbig display
Bereiche: Unten/Oben
Parts/Zones selection
Encoder
Rotation + klicken
SPLIT / Mix
Die Haupt-HOME-Anzeige des Numa Compact 2 wird beleuchtet sobald das Gerät eingeschaltet
wird und ist in 3 Hauptbereiche eingeteilt: Der obere Bereich zeigt die aktuelle Programmnummer
und den Programmnamen an, die linken und rechten unteren Bereiche beziehen sich auf die unteren (lower) und oberen (upper) Soundbereiche im SOUND-Modus und auf die Zone A und die
Zone B im MIDI-Modus.
Um zu navigieren und den Cursor zu bewegen (Cursorposition auf dem Display) haben Sie zwei
Regelmöglichkeiten zur Auswahl:
a) Klick auf den Encoder: Mit dem Cursor navigieren Sie zu den 3 Hauptpositionen: Programm,
Lower, Upper
b) Durch Drücken der SOUND- oder MIDI-Tasten bewegt sich der Cursor nach Oben.
c) Durch Drücken von LOWER oderUPPER, bewegt sich der Cursor zu den entsprechenden
Bereichen
Ac-Bass
V: 127
Concert
V: 127
Ac-Bass
V: 127
Concert
V: 127
UPPER
Sobald der Cursor auf dem Programmbereich steht, drehen Sie den Encoder, um die verschiedenen Programme auszuwählen Wenn der Cursor auf dem LOWER / Upper Bereich steht, drehen
Sie den Encoder, um die Lautstärke zu regeln.
Sound / MIDI
Die beiden Tasten SOUND und MIDI schalten zwischen den
beiden Ansichten und den dazugehörigen Regelmöglichkeiten um.
Sobald die SOUND-Taste gedrückt und beleuchtet ist, kann
der Benutzer die SOUND-Bereiche, die Display-Einstellungen
und die Parametereinstellungen bearbeiten.
Sobald die MIDI-Taste gedrückt und beleuchtet ist, zeigt das
Display den Status der MIDI-Zonen A und B an und der Benutzer kann auf alle verfügbaren Parameter zugreifen, die Funktionen und Werte bearbeiten.
Numa Compact 2 by Studiologic®
68

Bedienfeld - Display und Navigation
Wenn Sie die SOUND-Taste längere Zeit gedrückt halten, werden die acht DEMO-Songs (eine für jede Sound-Bank) gestartet. Die DEMO-Songs werden dann nacheinander abgespielt.
Mit einem Klick auf die entsprechende Sound-Bank können
Sie auch den zugehörigen Demo-Song auswählen. Am Ende
jedes Demo-Songs wird der nächste Demo-Song für die weiteren Sound-Bänke gestartet und in einer kontinuierlichen
Schleife wiederholt.
Dieser Taster steuert die SPLIT-Funktion in Echtzeit. Der Parameter läßt sich mit Hilfe der GLOBAL EDIT-Funktion „Split Point“
und der PART EDIT-Funktion „Split Assign“ je nach Wunsch und
Situation anpassen. Diese Möglichkeit gestattet es, die SPLITFunktion sofort zu aktivieren und zu deaktivieren und den
oberen und unteren Tastaturbereich im Layer-Modus über den
gesamten Tastaturumfang zu spielen.
Die SPLIT-Taste kann auch als Abkürzung verwendet werden,
um die MIXER-Funktion auszuwählen,
indem man sie für einige Sekunden gedrückt hält.
Demo
SPLIT
Das Numa Compact 2 verfügt über 99 Speicherplätze, die “Programs” genannt werden. In diesen können Sie alle SOUND-,
FX1 / 2-Einstellungen, Intensität, Funktionen, Splitpunkte und
alle editierbaren Parameter auch für die MIDI ZONEN mit einem NAMEN für jedes Programm abspeichern. Die einzigen
nicht-speicherbaren Funktionen sind VOLUME, BASS, TREBLE und MASTERING, da es sich um reine Echtzeit-Kontrollen
handelt, die nicht mit einem bestimmten Programm zusammenhängen. Alle Programme können per USB gesendet und
empfangen werden, wie im entsprechenden Abschnitt dieses
Handbuchs beschrieben, im Abschnitt GLOBAL EDIT.
STORE / Speicherplätze
Numa Compact 2 by Studiologic® 69
D

Sound Bänke und Sound Auswahl
P01-JAZZ DUET
A0 - B3
C4 - C8
A-PIANO [1/2]
Sound Bänke und Sound Auswahl
Sound Bänke
Sound Auswahl
Sound modus
Im SOUND-Modus können die 8 Soundbänke über die Tasten ausgewählt werden und leuchten
sobald der jeweilige Sound aktiv ist. Jede Soundbank kann mehrere Sounds haben, die in Gruppen
von 4 Sounds für jede Soundbank organisiert ist. Wird eine Soundbank ausgewählt, sieht man die
Sounds dieser Bank auf dem Display. Den aktuell gewählten Sound und die weiteren Sounds dieser Soundbank, nden sich im oberen rechten Bereich des Displays und den aktuell ausgewählten
Sound mit umgekehrter Farbgebung.
Um einen anderen Sound der aktuellen Bank auszuwählen, drehen Sie den Encoder und alle verfügbaren Sounds werden nacheinander von der ersten zur letzten Seite der Bank angezeigt und
ausgewählt. Die Auswahl kann während ein Fenster temporär angezeigt wird (ca. 5 Sekunden)
erfolgen und der zuletzt gewählte Sound jeder Bank wird automatisch gespeichert. Wenn Sie eine
Bank auswählen, geht der Fokus automatisch auf den zuletzt gewählten Sound, um die Soundwahl einfacher und schneller zu gestalten. Dank dieser Funktion haben Sie eine automatische Einstellung Ihrer bevorzugten Sounds für jede Bank.
Stage
Studio
SOUND
Ac-Bass
V: 127
Concert
V: 127
A-PIANO
Concert
Vintage
Numa Compact 2 by Studiologic®
70

Sound Bänke und Sound Auswahl
Sounds
Die Werksliste der SOUNDs ist unten aufgeführt. Bitte beachten Sie, dass die Spezikationen Änderungen unterliegen und die Soundliste in verschiedenen oder zukünftigen Firmwareversionen leicht
geändert oder aktualisiert werden kann.
A.PIANO
Concert
Stage
Vintage
Studio
Rock
Upright
E-Grand1
E-Grand2
E.PIANO
Rhodx
Wurlix
E-Pno1
E.Pno2
DxFm1
DxFm2
DxFm3
DxFm4
KEYS
Clavi
Harpsi
Vibes
Marimba
FunKlav
Cembalo
ReedOrg
GloKeys
BASS/GUITAR
Ac-Bass
El-Bass
Slap
Plucked
Ny-Guitar
El-Guitar
Ac-Guitar
Jz-Guitar
2 Guitars
12 Strings
BassRide1
BassRide2
ORGANS
JazzOrg1
JazzOrg2
DrawbVib
AllDrawb
888-Pure
888-Scan
MildSet
AllEven
V-Org
F-Org
Pipe1
Pipe2
SYNTH
SynthPad
SynHouse
SweetSaw
WowPad
Soloist
Funky
SynBass1
SynBass2
Jump
SynBrass
Square
Cluster
ORCHESTRA
Strings1
Strings2
Horns
Brass
Baroque
BigBand
BrassFall
SaxBand
TenorSax
JazzFlute
Trumpet
Oboe
OTHER
Cassotto
Accordion
Musette
Harmonica
ChoirAh
ChoirOh
ChoirUh
ChoirSint
Bouzouki
Kanoun
Oud
Cawala
Mizmar
Nai
StndKit
WorldKit
D
Numa Compact 2 by Studiologic® 71

Eekte
Eekte
FX1
FX1 - FX2
FX2
REVERB
Die 2 Doppeleektprozessoren erlauben es, den unteren
und oberen Abschnitten 2 getrennte Eekte zuzuweisen,
und zwar insgesamt 4 verschiedene Eekte zur gleichen Zeit.
Zum Bei-spiel kann der FX1 auf Drive für den oberen Bereich
und gleichzeitig auf Chorus für den unteren Bereich gestellt
werden. Mit der Auswahltaste (Select) für den oberen / unteren Tastaturbereich können Sie zwischen diesen Tastaturbereichen umschalten und den Eekt für diesen Bereich anzeigen lassen oder diesen auswählen. Zusätzlich sehen oder
ändern Sie die zugehörige FX mit den 2 Haupt-LOWER- und
UPPER-Tasten unterhalb des Displays.
Sie können sich die Sound- und FX-Struktur und den Signaluss, wie folgt veranschaulichen:
Upper (oberer Tastaturbereich) > FX1 (einer der vier Eekte) >
FX2 (einer der vier Eekte)
> Reverb (send ist programmierbar in EDIT)
Lower (unterer Tastaturbereich) > FX1 (einer der vier Eekte)
> FX2 (einer der vier Eekte) > Reverb (send ist programmierbar in EDIT)
Amount-Regler: Die 2 Potentiometer steuern den Anteil des
ausgewählten Eekts, wie das “Wet” / “Dry”-Verhältnis (für
Modulationseekte wie der Chorus) oder andere Parameter,
wie die Verzerrung des DRIVE-Eekts.
Numa Compact 2 by Studiologic®
72

Eekte
Die FX Autoset-Funktion (eine Echtzeit-Funktion, die auch im
GLOBAL Edit-Bereich erklärt wird) speichert automatisch den
zuletzt ausgewählten FX 1-2 für jeden Sound, ohne dies extra
abspeichern zu müssen.
Diese Echtzeit-Funktion steuert auch die Verknüpfung zwischen dem Stick 2 und den Sound- oder FX-Reglern
(Modulations- oder Eektgeschwindigkeit etc.) logisch und
automatisch. Wenn ein bestimmter FX auf einem
Abschnitt ausgewählt wird, steuert der Stick 2 einen bestimmten Parameter, wie die Langsam- /
Schnellgeschwindigkeit des Rotary oder die Geschwindigkeit
und die Rückmeldung des Phaser-Eekts.
Die Steuerung wird auch automatisch entsprechend der Fokusposition eingestellt:
Wenn man den unteren Tastaturabschnitt (Lower) ohne Effekt (FX) nutzt und den Fokus auf Lower hat, wird der Stick
2 die Modulation steuern. Wenn der Fokus auf Upper liegt
und Sie einen Orgelklang mit Rotary verwenden, steuert
der Stick 2 die Rotary Slow / Fast Geschwindigkeit.
FX Autoset
Sobald die FX Autoset-Funktion ausgeschaltet ist (siehe GLOBAL Edit), wird die Funktion des Sticks 2 im EDIT
Bereich, nicht automatisch zugeordnet und Sie können alle
Einstellungen in jedem Programm abspeichern.
Wenn der FX Autoset ausgeschaltet ist, wird die automatische
Zuordnung zwischen jedem Sound und dem zuletzt
ausgewählten FX deaktiviert und die FX-Auswahl wird nur
manuell oder kontrolliert durch die FX-Einstellung in
jedem der 99 Programme gespeichert.
Zusätzlich zu den leistungsstarken FX1-2 Doppeleektprozessoren verfügt die ACOUSTIC PIANOS Soundbank über einen STRINGS RESONANCE (Saitenresonanz) Eekt, der vom
Parameter des GLOBAL EDIT gesteuert wird.
Dieser Eekt, der mit den Erfahrungen der NUMA STAGE und
CONCERT-Instrumente entwickelt wurde, fügte den Klavierklängen einen noch realistischeren Eekt hinzu und reproduziert die Resonanzen der echten Saiten und des Resonanzbodens des akustischen Instruments.
STRINGS RESONANCE
(Saitenresonanz für die
Akustik-Piano Sounds)
Numa Compact 2 by Studiologic® 73
D

Global edit
Global edit (Allgemeine Einstellungen)
Um die GLOBAL-Bearbeitung zu aktivieren, halten Sie die EDIT-Taste für einige Sekunden gedrückt;
Sie nden verschiedene Seiten (im oberen rechten Bereich des Displays angezeigt) mit der Funktion, die das Instrument beeinusst, unabhängig davon, welches Programm ausgewählt ist. Um die
Funktion zu verlassen, drücken Sie erneut die EDIT-Taste und alle Einstellungen werden automatisch gespeichert.
Wenn sich der Fokus (Cursor) im oberen Bereich des Displays bendet, können Sie die verschiedenen Seiten anwählen indem Sie den Encoder drehen. Klicken Sie auf den Cursor, wird der Fokus
auf den Parameter verschoben und drehen Sie den Encoder, um den entsprechenden Wert zu
ändern.
Die Hauptfunktionen von GLOBAL EDIT sind:
TRANSPOSER
Transposition
GLOBAL TUNER
VELOCITY CURVE
FIXED CURVE
STRINGS RESONANCE
DAMPER EFFECT
Sie können das Instrument auf eine beliebige andere Tonhöhe
transponieren.
Klicken Sie auf den Encoder, um den Cursor auf das Eingabefeld zu bewegen. Drehen Sie ihn, um den gewünschten Transpositionsbereich einzugeben (-6 bis +5).
Diese Funktion ermöglicht es, das Instrument zu “stimmen”,
falls Sie mit einem anderen Instrument zusammen spielen,
welches nicht auf den Standard abgestimmt ist (A = 440 Hz).
Sie können eine Geschwindigkeitskurve (velocity curve)
wählen, je nach Geschmack und Spieltechnik. Es gibt 3 vordenierte Kurven (SOFT / NORMAL / HARD) und eine programmierbare FIXED Velocity Einstellung (1 bis 127).
Sie können hier den festen Geschwindigkeitswert (xed curve)
von 1 bis 127 einstellen, wenn die FIXED velocity Einstellung
ausgewählt ist.
Hier können Sie die Intensität des STRINGS RESONANCE Anteils steuern, der allen akustischen PIANO-Sounds einen realistischeren Eekt verleiht.
Bitte beachten Sie, dass der CONCERT GRAND Sound auch eine
eigene “release und resonance” Charakteristik hat, die nicht
von diesem Parameter gesteuert werden kann.
HEADPHONES MODE
Numa Compact 2 by Studiologic®
74
Wenn der Parameter auf AUTO ON eingestellt ist, schaltet
das Anschließen des Kopfhörers das interne Verstärkersystem automatisch ab. Sobald der Parameter auf AUTO OFF
gestellt ist, ist das interne Verstärkersystem auch dann aktiv,
wenn eine Buchse in den Kopfhörer gesteckt ist. Dadurch
kann die Kopfhörerbuchse als zusätzlicher Hilfsausgang, zur
Aufzeichnung oder zum Anschluss an einen aktivverstärkten
Subwoofer zusätzlich zu den internen Lautsprechern verwendet werden.

dale geeignet ist, kann der PED2 Anschluss so programmiert
werden, dass fast alle Pedaltypen angeschlossen werden können:
• Sustain-Pedal Öner
• Sustain-Pedal Schließer
• Expression-Pedal
(Volume Funktion, Pedale mit
Potentiometer und Stereo-Klinkenstecker)
• SLP3-D Dreifachpedal Soft/Sostenuto/Sustain mit
Halbdämpfer-Funktion
Global edit
PEDAL 2Während der PED1 Anschluss für Expression- oder Volumepe-
Numa Compact 2 by Studiologic® 75
D

Global edit
FX AUTOSET
Wenn die Funktion auf AUTO ON eingestellt ist, sind folgende
automatische Funktionen aktiviert:
Die zuletzt ausgewählten Eekte (FX1-2) für jeden Klang
werden vom Instrument gespeichert, so dass ein Klang und
der damit verbundene bevorzugte Eekt ausgewählt werden
kann, ohne dass dies extra abgespeichert werden muss. Der FX
Autoset speichert nicht nur die Eekte, die der Benutzer für jeden Sound zuweist, sondern auch den Wert der vom Stick 2
gesteuerten Wert für jeden Eekt.
Die STICK 2-Steuerung wird entsprechend der Einstellung und
der Position des FOCUS (Cursors) automatisch einer Funktion
zugewiesen.
Wenn der Fokus auf UPPER (oberer Tastaturbereich, als Beispiel) steht und Sieden ROTARY-Eekt ausgewählt haben und
der Organsound mit dem ROTARY-Eekt aktiviert ist, steuert
der STICK2 die Rotary SLOW / FAST-Geschwindigkeit.
Wenn Sie den Fokus auf LOWER (unterer Tastaturbereich)
bewegen (indem Sie auf den Encoder klicken oder die LOWERTaste drücken) und Sie einen weiteren FX auf Lower haben,
steuert der STICK2 den LOWER-Eekt.
Wenn Sie keinen FX auf einem Abschnitt (LOWER oder UPPER)
haben und du den Fokus darauf verschieben, steuert der STICK
2 die MODULATION oder den gewählten Abschnitt.
Ein typisches Beispiel: ORGAN Sound auf UPPER (oberer Tastaturbereich) mit Rotary Eekt und einem BASS Sound auf
LOWER (unterer Tastaturbereich) ohne Eekte: Durch Bewegen des Cursors auf UPPER, steuert der Stick 2 die Rotary Geschwindigkeit. Durch Bewegen des Cursors
auf LOWER, steuert der STICK2 die Modulation.
Hinweis: Diese automatische Funktion ist eine beliebige
Auswahl die durch das Instrument erfolgt.
Möchte man alle Parameter direkt und manuell steuern, kann
die Funktion auf OFF gestellt werden und die Funktion des
STICK 2 im zugehörigen EDIT Bereich ausgewählt werden und
die gewünschte Einstellung in einem PROGRAM (Speicherplatz) abgespeichert werden.
Numa Compact 2 by Studiologic®
76

Global edit
Mit dieser Funktion können Sie die Werkseinstellungen (Factory Reset) wieder herstellen. Die Benutzereinstellungen werden gelöscht und alle Einstellungen auf den ursprünglichen
Status zurückgesetzt. Bitte beachten Sie, dass dies zum Verlust
der benutzerdenierten Einstellungen oder der Programmierung führen kann. Diese Funktion sollte sehr sorgfältig und
nur im Bedarfsfall benutzt werden . Um den Benutzer vor einer
unerwünschtem Rücksetzung zu schützen, erscheint bei der
Rücksetzung des Gerätes eine Warnung YES/NO (JA/NEIN), um
dieWieder- herstellung der Werkseinstellungen zu bestätigen.
Gehen Sie folgendermaßen vor, um die Firmware zu aktualisieren:
- Laden Sie die Firmware von www.studiologic-music.com
herunter und speichern Sie diese in einem Ordner.
- Verbinden Sie das Gerät mit der Stromversorgung und dann
mit Ihrem Computer über das USB-Kabel.
- Vergewissern Sie sich, dass das Gerät von Ihrem Computer
erkannt wurde und als MIDI Out-Gerät in den entsprecheden
Einstellungen ausgewählt ist.
- Schalten Sie das Instrument ein, während Sie die A0 gedrückt
halten (erste weiße Taste links) und D1 (vierte weiße Taste
von links).
Im Display erscheint die Meldung “Firmware Upload”.
- Önen Sie ein Programm, das in der Lage ist, eine Midi-Datei
“abzuspielen” (z.B. MIDI-Ox für PC, QMidi für Mac etc.).
FACTORY RESET
FIRMWARE VERSION
AND UPDATE
MIDI-Ox:
- Önen Sie MIDI-Ox.
- Wählen Sie in der Menüleiste Aktionen > MIDI abspielen ...,
MIDI Bar wird geönet.
- Klicken Sie im MIDI BAR-Fenster auf “Select MCI Port” und
wählen Sie das Numa Compact 2 aus.
- Önen Sie in der MIDI BAR die Datei, die Sie heruntergeladen
haben.
- Drücken Sie die Play-Taste und warten Sie auf das Ende des
Vorgangs.
- Wenn das Numa Compact 2 Display “UPLOAD FINISHED”
azeigt, starten Sie das Gerät neu (aus und wieder einschalten).
QMidi:
- Önen Sie QMidi
- Wählen Sie die Firmware-Datei aus, die Sie heruntergeladen
haben.
- Wählen Sie in der Menüleiste QMidi > Audio / MIDI-Einstel lungen und wählen Sie Numa Compact 2 als Ausgabegerät.
- Im drücken Sie im Hauptfenster die Play-Taste und warten
Sie bis zum Ende des Vorganges.
- Wenn das Numa Compact 2 Display “UPLOAD FINISHED”
anzeigt, starten Sie das Gerät neu (aus und wieder
einschalten).
D
Numa Compact 2 by Studiologic® 77

Global edit
PROGRAMME
SENDEN/EMPFANGEN
Diese Funktion ermöglicht das Senden oder Empfangen aller
Programme auf Ihren Computer (PC oder Mac). Sobald die
Funktion ausgewählt ist, können Sie durch Drehen des Encoders SEND (Senden) oder RECEIVE (Empfangen) auf folgende
Weise auswählen.
WINDOWS
Sie können zur Datenübertragung ein Programm wie z.B. “MIDI-Ox” verwenden. Stellen Sie sicher, dass das Numa Compact
2 von Ihrem Computer (Überprüfen Sie die USB / MIDI- und die
MIDI-Ox- Einstellungen) erkannt wird.
Datenübertragung an den Computer:
- Verbinden Sie das Numa Compact 2 mit Ihrem Computer
über USB.
- Önen Sie MIDI-Ox und wählen Sie View / Sysex aus.
- Wählen Sie im Sysex-Fenster, Sysex > Receive manuelle
Übertragung.
- Klicken Sie auf den Encoder, wenn die GLOBAL-Funktionen
SEND aktiv ist, bestätigen Sie mit YES (JA) und warten Sie, bis
der Vorgang beendet ist.
- Speichern Sie die im MIDI-Ox Fenster angezeigten Bulk-Daten
in einer Datei.
- Wenn die Übertragung abgeschlossen ist, wählen Sie im
Anzeigefenster> Speichern unter…
Datenübertragung auf das Instrument:
- Wählen Sie im Fenster PROGRAMS (SEND / RECEIVE) RECEIVE
aus.
- Önen Sie MIDI-Ox, im Sysex-Fenster wählen Sie Befehl>
Fenster> Datei laden und navigieren Sie zum dem
Speicherort, in dem Sie die Datei gespeichert haben.
- Wählen Sie das Befehlsfenster > Sysex senden und warten Sie
bis der Vorgang abgeschlossen ist.
MAC OS
Sie können zur Datenübertragung ein Programm wie z.B.
“SysEx Librarian” verwenden. Stellen Sie sicher, dass das Numa
Compact 2 von Ihrem Computer (Überprüfen Sie die USB /
MIDI- und die SysEx Librarian - Einstellungen) erkannt wird.
Datenübertragung an den Computer:
- Önen Sie SysEx Librarian.
- Wählen Sie in der Symbolleiste “Numa Compact 2” als Gerät
aus.
- Klicken Sie auf die “Record many” - Taste in SysEx Librarian.
- Klicken Sie auf den Encoder, sobald die GLOBAL-Funktion
SEND aktiv ist, bestätigen Sie mit YES (JA) und warten Sie, bis
der Vorgang abgeschlossen ist.
- Sobald die Übertragung erfolgt ist, drücken Sie die Taste
“Done” im Programm SysEx-Librarian.
Numa Compact 2 by Studiologic®
78

Datenübertragung auf das Instrument:
- Drücken Sie im Programm SysEx-Librarian die Schaltäche
“Add” (Hinzufügen) in der unteren linken Ecke des Fensters
und wählen Sie die .syx-Datei, die Sie übertragen möchten.
Diese Datei wird nun zur Liste der .syx-Dateien im Programm
SysEx Librarian hinzugefügt.
- In der Symbolleiste von SysEx Librarian bendet sich ein
Popup-Menü Namens “Destination”.
- Klicken Sie darauf und wählen Sie den MIDI-Port, über den Sie
senden möchten.
- Wählen Sie auf dem Numa Compact 2 die Funktion RECEIVE
(Empfangen) aus.
- Im Programm SysEx Librarian drücken Sie die “Play” -Taste
und warten, bis die Übertragung abgeschlossen ist.
Global edit
Numa Compact 2 by Studiologic® 79
D

PROGRAM EDIT [1/3]
PROGRAM EDIT [2/3]
C4
MIXER
P01-JAZZ DUET
A0 - B3
C4 - C8
PROGRAM EDIT [1/3]
Program edit
Program edit (Programmbearbeitung)
Sobald der Fokus (Cursor) im oberen Teil des Displays auf Programmauswahl steht, wird durch
Drücken der EDIT-Taste die Programmbearbeitung für die Parameter und Einstellungen aktiviert.
Ac-Bass
V: 127
Concert
V: 127
PROGRAM NAME
PROGRAM NAME
JAZZ DUET
SPLIT POINT
SPLIT POINT
PROGRAM NAME
EDIT
JAZZ DUET
Nachdem Sie diese Funktion ausgewählt haben, klicken Sie
auf den Encoder und verändern Sie die Buchstaben oder
Nummer/Zeichen durch Drehen. Ein kleines Dreieck zeigt an,
welche Stelle Sie gerade bearbeiten. Um den neuen Namen
zu bestätigen oder den vorherigen zu behalten, drücken Sie
STORE und ein Popup-Fenster wird Sie bitten, die Änderung
zu bestätigen oder nicht, drehen Sie den Encoder auf YES
oder NO (JA oder NEIN) und bestätigen Sie mit einem Klick.
Mit dieser Funktion können Sie den SPLIT-Punkt für jedes
PROGRAM (Programm) wählen, indem Sie den Encoder drehen, bis die gewünschte Note angezeigt wird. Bitte beachten Sie, dass die Instrumententastatur nach internationalem
Standard von A0 (erste Taste links) bis C8 (letzte Taste rechts)
benannt ist und folglich das mittlere C unterhalb der Anzeige C4 ist. Die Referenztonhöhe A = 440 Hz liegt bei A4. Dies
gilt für alle Sounds, welche sich am Standard Tonumfang
eines Pianos orientieren. Nur einige ORGAN-Sounds spielen
eine Oktave darunter, wenn sie auf einer 16‘ Zugriegel Vintage Tone-Wheel-Orgel oder der verwandten klassischen 16‘
Kirchenorgel basieren. In diesen Fällen ist der Referenzton
des ausgewählten Sounds A4 220 Hz, also eine Oktav unter
440Hz.
80
MIXER
L 127 U 127
A
Numa Compact 2 by Studiologic®
64 B 64
Der Mixer erlaubt es, alle vier Bereiche und Zonen (LOWER /
UPPER / ZONE A / ZONE B) sofort auf einer einzigen Seite zu
steuern. Diese Funktion kann auch mit einer Taste aufgerufen
werden, wobei die SPLIT [Mix]- Taste gedrückt gehalten wird.

Part edit
PART EDIT [1/10]
127
127
PART EDIT [2/10]
P01-JAZZ DUET
A0 - B3
C4 - C8
PART EDIT [1/10]
Part edit
Wenn der Fokus (Cursor) auf einem der Teilbereiche (Part) liegt und das Gerät sich im SOUNDModus bendet (die Taste SOUND ist ausgewählt und beleuchtet), gelangen Sie in den PART-Editiermodus. Wenn Sie PART-Edit gewählt haben, können Sie immer die LOWER- oder UPPER-Tasten
drücken, um den zu bearbeitenden Teilbereich auszuwählen, oder klicken Sie auf den Encoder.
Ac-Bass
V: 127
SOUND
Concert
V: 127
EDIT
PART EDIT beinhaltet folgende Parameter:
Durch drehen des Encoders (nachdem Sie den Fokus (Cursor)
auf den Parameter verschoben haben, indem Sie auf den Encoder klicken) können Sie im ausgewählten Teilbereich die
Lautstärke (Volume) in einem Bereich von 0 bis 127 regeln.
Sobald Sie den SPLIT-Punkt für das aktuelle PROGRAM
(Programm) gewählt haben (bez. PROGRAM EDIT), können
Sie entscheiden, wo der ausgewählte LOWER- oder UPPER
-Abschnitt (entweder für die SOUND- und MIDI-Zonen) auf
eine völlig unabhängige Weise spielen soll:
TO LEFT (Linker Bereich): Der Teil auf der linken Seite der Tastatur spielt (von A0 bis zur SPLIT Note).
TO RIGHT (Rechter Bereich): Der Teil auf der rechten Seite der
Tastatur spielt (von der SPLIT Note zu C8).
TO ALL (Gesamter Bereich): Die Tastatur ohne Splitpunkt
spielen.
VOLUME
127
VOLUME
127
VOLUME
VOLUME
VOLUME
SPLIT ASSIGN
SPLIT ASSIGN
TO LEFT
SPLIT ASSIGN
TO RIGHT
Diese Funktion erlaubt viele musikalische Kombinationen.
Einige Beispiele:
PIANO auf der rechten Seite + BASS auf der linken Seite, des
Splitpunkts.
PIANO und STRINGS auf der rechten Seite + MIDI ZONES auf
der linken Seite (Steuerung externer Geräte).
ORGAN auf der ganzen Tastatur (TO ALL) und CHOIR nur auf
der rechten Seite.
D
Selbst mit einem SPLIT-Punkt (programmierbar für jedes PROGRAM) gibt es fast hundert mögliche Einstellungen unter
Berücksichtigung des Status und der Kombination von LOWER
+ UPPER + ZONE A + ZONE B und den SPLIT-Einstellungen, die
durch diese Funktion ermöglicht werden.
Numa Compact 2 by Studiologic® 81

Part edit
PART EDIT [3/10]
PART EDIT [4/10]
PART EDIT [5/10]
64
PART EDIT [6/10]
ON
ON
TRANSPOSE
TRANSPOSE0TRANSPOSE
0
OCTAVE
OCTAVE
0
OCTAVE
0
Diese Funktion erlaubt es, einen Bereich zu transponieren.
Anders als der GLOBAL TRANSPOSER, der das das gesamte
Instrument beeinusst, kann diese Funktion unabhängig für jeden SOUND-Bereich oder MIDI-Zone eingestellt und in jedem
PROGRAM mit unterschiedlichen Werten gespeichert werden.
Interessante Kombinationen erhält man durch transponieren
eines Sounds mit musikalischen Intervallen, (wie eine unterer
Quint = minus 5 Halbtöne), was für gewöhnlich als “Cluster”
mit festen Intervallen bekannt ist. Wählen Sie, einen TRUMPET
Sound auf UPPER und einen SAX Sound auf LOWER aus, und
stellen Sie den SAX Sound 5 Halbtöne tiefer in einer typischen
JAZZ Einstellung ein.
Sie können die Oktave (Intervalle von jeweils 12 Halbtönen)
einzeln für jeden Bereich einstellen. Normalerweise muss man
den LOWER (Unteren) Bereich ein oder zwei Oktaven erhöhen,
wenn man Akkorde in einer passenderen Tonhöhe spielen
möchte. Andererseits können Sie manchmal einen besseren
Klang erzielen, sobald die SPLIT-Funktion aktiviert ist und Sie
den UPPER (Oberen) Bereich ein oder zwei Oktaven nach unten regeln. Probieren Sie einfach die Einstellung aus die Sie
bevorzugen und speichern Sie diese dann im aktuell verwendeten PROGRAM (Speicherplatz).
REV SEND
REV REND64REV SEND
PEDAL 1 PEDAL 2
PEDAL 1
PEDAL 1
Diese Funktion erlaubt es, die Signalmenge, die an den REVERBProzessor gesendet werden soll, unabhängig für den unteren
Tastaturbereich (LOWER) und den oberen Tastaturbereich (UPPER) zu regeln und mit unterschiedlichen Einstellungen für
jedes PROGRAM(M) abzuspeichern. Eine typische Einstellung:
Sie SPLIT(TEN) die Tastatur und legen einen BASS-Sound auf
den unteren Tastaturbereich, möchten die Menge an REVERB
auf dem linken unteren Teil reduzieren oder minimieren oder
die Einstellung auch auf dem oberen (UPPER)-Teil regeln, um
den gewünschten Eekt zu erhalten. Das MIX-Potentiometer,
auf dem Bedienfeld, ändert den allgemeinen Hall-Mix (Dry /
Wet) für jeden gewählten Hall-Typ oder Sende-Wert.
Hier können Sie entscheiden, ob die Pedale für jeden Abschnitt aktiviert sind (UPPER / LOWER oder ZONEA und ZONE B,
sobald die MIDI-Taste aktiviert ist).
\
Numa Compact 2 by Studiologic®
82

PART EDIT [8/10]
ON
ON
Part edit
PART EDIT [10/10]
Wie für die Pedale können auch die Sticks separat für die Bereiche und Zones aktiviert werden; Bitte beachten Sie, dass der
Stick 2 automatisch auf AUTO gesetzt wird, wenn die entsprechende FX-AUTOSET-Funktion im GLOBAL EDIT-Bereich auf ON
gesetzt ist.
Um die Stick 2-Zuordnung manuell zu steuern, können Sie den
FX-AUTOSET auf OFF stellen und die Funktion kann ein- oder
ausgeschaltet und in den Programmen gespeichert werden.
Dieser Parameter aktiviert oder deaktiviert die AftertouchFunktion des ausgewählten Bereiches oder der Zone. Die
Funktion des Aftertouch ist in den meisten Fällen der Stick 2
Modulationsregelung ähnlich oder gleich und fügt dem Sound
eine Art von Vibrato oder ähnlicher Modulation hinzu, je nach
Einstellung. Im Normalfall stellen Sie den Aftertouch auf ON für
den oberen Bereich (UPPER), der üblicherweise für die meisten
Musikstücke oder das Solo verwendet wird, während der untere Bereich (LOWER) normalerweise mit Begleitungen oder
Basslinien verbunden ist, wenn die SPLIT – Funktion aktiv ist.
STICK 1 STICK 2
STICK 1
STICK 1
AFTERTOUCH
A.TOUCHONA.TOUCH
ON
D
Numa Compact 2 by Studiologic® 83

MIDI (Zonen edit)
ZONE EDIT [1/13]
0
ZONE EDIT [2/13]
0
P01-JAZZ DUET
A0 - B3
C4 - C8
ZONE EDIT [1/13]
0
MIDI
Mit dem NUMA Compact 2 können Sie 2 separate MIDI-Zonen mit allen zugehörigen Parametern steuern. Das Ergebnis kann im aktuellen PROGRAM(M) zusammen mit den Einstellungen der
Tastaturbereiche (LOWER- und UPPER) mit einem gemeinsamen SPLIT-Punkt und separaten Einstellungen abgespeichert werden. Gehen Sie die Funktionen durch in dem Sie die MIDI-Taste auswählen und die EDIT-Taste aktivieren: Der Wert der aktuellen Funktion wird auf dem Display angezeigt und kann eingestellt werden, in dem Sie den Encoder drehen. Wenn Sie den Encoder drehen,
sobald die MIDI-Taste leuchtet, können Sie die ausgewählte MIDI-Zonenlautstärke direkt ändern.
Program edit
Das PROGRAM(M) EDIT, im entsprechenden Kapitel erläutert, ist für SOUND und MIDI zuständig;
Es bezieht sich auf allgemeine Parameter, die sowohl der SOUND- als auch der MIDI-Sektion zugeordnet sind. Mit den folgenden ZONE EDIT-Kapiteln können Sie die spezischen MIDI-ZonenParameter nach Ihrer Wahl einstellen und sie im selben Programm unter gleichem Namen und
Nummer mit allen anderen Parametern für die internen SOUNDS abspeichern.
Zone edit
Wenn der Cursor (Focus) auf einer der Zonen steht und Sie im MIDI-Modus sind (die MIDI-Taste
ausgewählt und beleuchtet), gelangen Sie in den ZONE-Editiermodus; Sobald die ZONE(N)-Bearbeitung ausgewählt wurde, kann man immer die ZONE A- oder ZONE-B-Tasten drücken, um die
zu bearbeitende Zone auszuwählen oder auf den Encoder klicken, um den Cursor (Focus) auf alle
weiteren Instrumentenfunktionen zu bewegen.
Zone A
V: 64
MIDI
Zone B
V: 64
PRG CHG0PRG CHG
EDIT
ZONE EDIT unfasst folgende Parameter:
PROGRAM CHANGE
Hier können Sie die Programmwechselnummer (Program
Change) des zu steuernden Gerätes oder Klangerzeugers ein-
PRG CHG0PRG CHG
geben, wobei auf die jeweilige Soundbibilothek des angeschlossenen Gerätes / vst / sound Generators Bezug genommen wird. Der Regelbereich liegt bei 1-127.
LSB - MSB
LSB steht für Least signicant Byte, MSB steht für Most signi-
BANK LSB0BANK LSB
cant Byte und sie erlauben es, mehr Bänke zu regeln und auszuwählen als die Standard 127 Programmänderungen (Program Changes) oder viele andere Funktionen, die durch die
MIDI-Standards deniert sind. Um die korrekten Werte einzugeben, müssen Sie sich auf das Implementierungsdiagramm
(MIDI implementation chart) des zu steuernden Gerätes beziehen. In diesem wird jeder Sound mit den MIDI-Daten deniert, um ihn auszuwählen und zu regeln.
Numa Compact 2 by Studiologic®
84

ZONE EDIT [4/13]
2
1
MIDI (Zonen edit)
ZONE EDIT [5/13]
64
64
ZONE EDIT [6/13]
TO LEFT
TO RIGHT
ZONE EDIT [7/13]
0
ZONE EDIT [8/13]
Sie können den MIDI-Kanal (Wert 1-16) für jede Zone auswählen, um zwei verschiedene externe Geräte oder Klangerzeuger zu steuern.
Nachdem Sie den Cursor (Fokus) den Parameter verschoben
haben, in dem Sie auf den Encoders (Drehgeber) klicken, können Sie durch Drehen des Encoders (Drehgeber), die Lautstärke in einem Bereich von 0 bis 127 steuern. Die Zonenlautstärke
kann auch im EDIT-Modus direkt gesteuert werden, sobald die
MIDI-Taste leuchtet und der Cursor-Fokus auf einer der Zonen
steht.
Sobald Sie den SPLIT-Punkt für das aktuelle PROGRAM(M)
(ref: PROGRAM EDIT) ausgewählt haben, können Sie entscheiden, wo die gewählte ZONE spielen soll, und zwar völlig
unabhängig voneinander:
LINKS: Die Zone ist auf der linken Seite der Tastatur spielbar
(von A0 bis zur SPLIT Note).
RECHTS: Die Zone ist auf der linken Seite der Tastatur spielbar
(von der SPLIT Note bis C8).
LINKS/RECHTS: Die Zone ist ohne Split über die gesamte Tastatur spielbar.
MIDI CHANNEL
MIDI CH
MIDI CH
VOLUME
VOLUME
VOLUME
SPLIT ASSIGN
SPLIT ASSIGN
SPLIT ASSIGN
Auch bei einem gemeinsamen SPLIT-Punkt (programmierbar
für jedes PROGRAM(M)) gibt es fast 100 mögliche Einstellungen, unter Berücksichtigung des Status und der Kombination
von LOWER + UPPER + ZONEA + ZONEB und den SPLIT-Einstellungen, die durch diese Funktion ermöglicht werden.
Mit dieser Funktion kann die Tonhöhe einer Zone verändert
werden. Anders als der GLOBAL TRANSPOSER, der das gesamte Instrument beeinusst, kann diese Funktion für jede
MIDI-Zone unabhängig voneinander eingestellt und in jedem
PROGRAM(M) mit unterschiedlichen Werten gespeichert werden.
Sie können die Oktave (Intervalle von jeweils 12 Halbtönen)
einzeln für jede Zone einstellen. Normalerweise muss eine
Zone um eine oder zwei Oktaven nach oben in die Linke (LEFT)
Zone einer gesplitteten - Tastatur verschieben, um Akkorde in
einer passenderen Tonlage zu spielen. Auf der anderen Seite
klingt es manchmal besser, wenn man die Obere (UPPER) Zone um ein oder zwei Oktaven absenkt.
Einfach die gewünschte Einstellung ausprobieren und dann im
aktuellen PROGRAM(M) abspeichern.
TRANSPOSE
TRANSPOSE0TRANSPOSE
OCTAVE
OCTAVE
OCTAVE
0
0
D
Numa Compact 2 by Studiologic® 85

MIDI (Zonen edit)
ZONE EDIT [13/13]
ON
ZONE EDIT [9/13]
ON
ON
ZONE EDIT [11/13]
PEDAL 1 - PEDAL 2
PEDAL 1
PEDAL 1
STICK 1 - STICK 2
STICK 1
ON
STICK 1
ON
AFTERTOUCH
A.TOUCHONA.TOUCH
Hier können Sie entscheiden, ob die Pedale für jede Zone
unabhängig voneinander aktiviert sind oder nicht, je nachdem,
wo der Cursor - Fokus eingestellt ist (auf ZONE A oder ZONE B).
Wie für die Pedale können auch die Sticks separat für jede
Zone aktiviert werden. Bitte beachten Sie, dass der Stick 2 automatisch auf AUTO gesetzt wird, sobald die entsprechende
FX-AUTOSET-Funktion im GLOBAL EDIT-Bereich auf ON gesetzt
ist. Um die Stick 2-Zuordnung manuell zu steuern, können Sie
den FX-AUTOSET auf OFF stellen und die Funktion kann einoder ausgeschaltet und in den Programmen gespeichert werden.
Dieser Parameter aktiviert oder deaktiviert die AftertouchFunktion in der ausgewählten Zone. Die Funktion des Aftertouch ist in den meisten Fällen ähnlich oder gleich der Stick
2 Modulations- Kontrolle und fügt dem Klang eine Art von
Vibrato oder Modulation hinzu, je nach Einstellung. Normalerweise stellen Sie Aftertouch auf ON für die obere (UPPER)
Zone, die üblicherweise als die Hauptmusikzone oder bei Soloauührungen verwendet wird, während die untere (LOWER)
Zone normalerweise mit Begleitungen oder Basslinien verbunden ist, wenn der SPLIT aktiv ist, aber die Einstellung ist völlig
unter Ihrer Kontrolle und nach Ihrer Wahl.
Numa Compact 2 by Studiologic®
86

Anmerkungen
Jedes Gerät von Studiologic von Fatar wird einzeln geprüft und einer vollständigen Funktionskontrolle unterzogen. Die Verwendung
ausschließlich hochwertigster Bauteile erlaubt die Gewährung von
zwei Jahren Garantie. Als Garantienachweis dient der Kaufbeleg /
Quittung. Schäden, die durch unsachgemäßen Einbau oder unsac
gemäße Behandlung entstanden sind, unterliegen nicht der Garantie
und sind daher bei Beseitigung kostenpichtig. Schadensersatzansprüche jeglicher Art, insbesondere von Folgeschäden, sind ausgeschlossen. Eine Haftung über den Warenwert des Gerätes hinaus ist
ausgeschlossen. Es gelten die Allgemeinen Geschäftsbedingungen
der Firma Synthax GmbH.
Synthax GmbH Fon: +49 (89) 97 880 38 0
Semmelweisstr. 8 Fax: +49 (89) 97 880 38 0
D-82152 Planegg Email: gmbh@synthax.de
Dieses Produkt entspricht den europäischen Richtlinien:
2014-30-EU Elektromagnetische Verträglichkeit (EMV)
DIN EN 55013 Funkstöreigenschaften von Rundfunkg räten und verwandten Geräten der
Unterhaltungselektronik
DIN EN 55020 Störfestigkeit von Rundfunkgeräten und
verwandten Geräten
Geräten der Unterhaltungselektronik
Garantle
CE-Conformity
Recanati, 17.01.2017 Marco Ragni, Chief Executive Ocer
Bei einer nicht von uns genehmigten Änderung des Gerätes verliert
diese Erklärung ihre Gültigkeit.
Das Produkt wurde conform zur Richtlinie 2011/65/EU gefertigt.
Nach dem Elektro- und Elektronikgesetz 2012-19-EU sind Besitzer
von Altgeräten gesetzlich gehalten, das Altgerät getrennt vom Hausmüll zu entsorgen. Helfen Sie bitt emit und leisten einen Beitrag zum
Umweltschutz. Weitere Informationen zur Entsorgung dieses Gerätes
erhalten Sie beim nächstgelegenen Wertstohof.
Um höchste Qualität zu gewährleisten, werden die Geräte von Studiologic® by Fatar immer dem aktuellen Stand der Technik angepasst.
Erforderliche Änderungen in Konstruktion und Schaltung werden
ohne Ankündigung vorgenommen. Technische Daten und Erscheinungsbild können daher von der vorliegenden Bedienungsanleitung
abweichen.
Alle in dieser Anleitung verwendeten Warenzeichen und eingetragenen Warenzeichen Marken sind Eigentum der jeweiligen Inhaber.
RoHs II – Konformität
RoHS
compliant
2002/95/EC
Alteräteentsorgung
Stand der Technik
Warenzeichen
D
Diese Anleitung ist urheberrechtlich geschützt. Jede Vervielfältigung Urheberrecht bzw. jeder Nachdruck, auch auszugsweise, ist
nur mit schriftlicher Genehmigung der Firma Synthax GmbH gestattet. Dies gilt auch fürdie verwendeten Bilder und Graken.
Urheberrecht
Numa Compact 2 by Studiologic® 87

Consignes de sécurité importantes
Veuillez lire la totalité du mode d'emploi. Il contient toutes les informations dont vous avez besoin pour utiliser cette unité.
Veuillez suivre les instructions du mode d'emploi. La garantie sera
caduque si des interventions non autorisées sont eectuées sur le
Numa Compact 2. Seuls des accessoires spéciés par le fabricant
doivent être utilisés avec cette unité.
N'utilisez l'unité que de la façon indiquée dans ce mode d'emploi.
DANGER!
Risque de choc électrique. N'ouvrez pas le châssis. Il n'y a aucune pièce
réparable par l'utilisateur à l'intérieur.
L'unité ne doit être réparée que par un service après-vente qualié.
Humidité
Pour réduire le risque d'incendie ou de choc électrique, n'exposez pas
l'unité à la pluie ni à l'humidité. Ne placez jamais de récipients contenant du liquide sur l'unité. N'utilisez pas l'unité avec de l'eau à proximité, près d'une piscine, d'une baignoire ou dans un sous-sol humide.
Si l'unité est déplacée d'un endroit froid vers un endroit chaud, de la
condensation peut se former à l'intérieur. Pour éviter les dommages,
veuillez laisser l'unité atteindre la température de la pièce avant de la
mettre en service.
Installation
Utilisez toujours un support stable pour poser le clavier. Tenez bien
compte de sa taille et de son poids.
Nettoyage et entretien
N'utilisez jamais de détergent abrasif qui pourrait endommager la surface. Nous recommandons l'emploi d'un chion en microbres légèrement humide.
Emballage
Veuillez conserver tous les emballages et les réutiliser pour protéger le
clavier lors du transport, par exemple si une réparation est nécessaire.
Alimentation secteur
Avant de raccorder l'unité au secteur, veuillez vérier que la tension
fournie par ce dernier est adaptée à l'adaptateur du Numa Compact2.
L'unité peut être alimentée par un courant alternatif de 100 - 240V, à
l'aide du cordon d'alimentation fourni.
Remarque importante: le Numa Compact2 peut également être alimenté directement par le port USB, s'il est connecté à un ordinateur ou
à d'autres sources d'alimentation USB appropriées.

FRANÇAIS
Mode d’emploi
Numa Compact 2 by Studiologic® 89
F

Index
Consignes de sécurité
Votre nouveau Numa Compact2
Alimentation - Entrées et connexions
Façade – Écran et navigation
Banques de sons et mode SOUND
86
90
90
91
91
94
94
94
95
95
95
95
96
97
97
97
98
99
Présentation du produit
Caractéristiques principales
Exemple d'utilisation
Schéma de fonctionnement
Connexion électrique
Alimentation par USB
Pédales d'expression/universelles
Sortie audio
Casque
Volume
USB
SOUND / MIDI
Demo
SPLIT
STORE/programmes personnels
Mode SOUND
Sons
Eets
Édition globale
Édition de programme
Édition de partie
100
101
101
102
102
102
102
102
102
103
103
104
104
105
106
106
106
107
107
108
108
108
108
108
109
FX1- FX2
Réglage automatique d'eet (AUTOSET)
Résonance des cordes (STRINGS
RESONANCE)
Transposer
Global tuner
Velocity curve
Fixed curve
Strings resonance (Damper eect)
Headphones (mode)
Pedal 2
FX Autoset
Factory reset
Firmware version and update
Programs send/receive
Program name
Split point
Mixer
Volume
Split Assign
Transpose
Octave
Rev send
Pedal 1 - Pedal 2
Stick 1 - Stick 2
A. Touch
Numa Compact 2 by Studiologic®
90

Index
MIDI (édition de zone)
Déclarations
Annexe
110
110
110
111
111
111
111
111
111
112
113
118
119
120
120
Prg Chg
BANK LSB - MSB
MIDI Ch
Volume
Split Assign
Transpose
Octave
Pedal 1 - Pedal 2
Stick 1 - Stick 2
A.Touch
Tableau des sons
Tableau d'équipement MIDI
Caractéristiques techniques
Dimensions
Numa Compact 2 by Studiologic® 91
F

Votre nouveau Numa Compact2
Présentation du produit
Le Numa Compact 2 est un instrument de musique d'une puissance incroyable, au design élégant et
épuré, reposant sur une technologie totalement nouvelle et une interface utilisateur actualisée. Le
clavier réagit à la pression («aftertouch») et, avec les Sticks programmables, vous permet d'avoir un
contrôle total sur l'interprétation musicale. Le nouveau moteur sonore a une polyphonie maximale
de 128notes et comprend deux sections indépendantes (haute [Upper] et basse [Lower]) avec plus
de 80sons organisés en 8banques, assignables à n'importe quelle partie du clavier en mode Layer
(superposition des sons) ou Split (partage du clavier). Le gigaoctet de sons (en mémoire ash) est
encore amélioré par 2processeurs d'eets (FX1-FX2), chacun ayant une double architecture interne
pour orir un total de 4eets indépendants à la fois.
Une résonance contrôlable des cordes et des échantillons de relâchement en jeu staccato rendent
les sons de piano principaux toujours plus réalistes, tandis qu'un nouveau processeur de réverbération stéréo met encore plus en valeur le son. Les commandes de graves, d'aigus et de mastering
permettent d'atteindre une qualité studio qui se reète également dans l'amplicateur numérique
intégré et les haut-parleurs elliptiques à réexion arrière. Le module MIDI comprend 2zones MIDI
indépendantes et tous les paramètres peuvent être programmés et mémorisés.
Caractéristiques principales
Clavier léger lesté de 88 notes
Aftertouch (pression)
Stick 1: fonction Pitch Bend sur les deux axes
Stick 2: modulation du son et contrôle des effets FX1/2 (assignable ou sélection automatique)
Amplificateur 2 x 10W intégré + 2 haut-parleurs elliptiques à réflexion arrière
Écran graphique OLED 128x64
Interface utilisateur à contrôle direct
Partie basse [Lower] - Partie haute [Upper] - Zone A - Zone B
4 sections programmables (sons internes et MIDI) dans n'importe quelle combinaison.
1 Go de mémoire flash, 88 sons organisés en 8 banques
Sons de piano à queue de concert avec échantillons de relâchement de jeu staccato et résonance
des cordes
Processeurs FX1-2 à double effet – 4 effets programmables à la fois
Reverb stéréo avec niveaux de départ indépendants pour les parties Lower/Upper
Résonance des cordes (modélisation d'amortissement) sur les sons de piano acoustique
(programmable)
Édition globale/de programme/de partie
Commandes de post-traitement de graves, aigus, mastering (3D + compresseur)
Module MIDI avec 2 zones programmables indépendantes
Branchements: USB, MIDI In/Out, audio G/D, casque, pédale 1-pédale 2
Alimentation par USB
Numa Compact 2 by Studiologic®
92

Exemple d'utilisation
FX1
PED2PED1
Votre nouveau Numa Compact2
MIDI IN
USB
MIDI OUT
Schéma de fonctionnement
1GB
Sound
engine
Stereo
reverb
Suggested setting
UPPER
LOWER
UPPER
LOWER
Bass
Mastering
Treble
Volume
FX2
FX1
FX2
Rev send
Rev send
Strings
resonance
Digital
amplier
Stereo
reverb
AUX out
L
AUDIO out
L
R
F
R
BUILT-IN
SPEAKERS
Numa Compact 2 by Studiologic® 93

Votre nouveau Numa Compact2
Aperçu des fonctions du NUMA Compact2:
Mécanique légère lestée
8 banque de sons
88 sons internes
FX1 - FX2- REV
Résonance des cordes
Le Numa Compact2 ore la toute dernière innovation technologique de Fatar: le clavier lesté sophistiqué de piano TP9 avec
aftertouch. Le Numa Compact2 ne pèse que 7,1kg et est donc
très portable, tout en orant le remarquable toucher de piano
qui a fait la célébrité de Fatar.
Vous pouvez immédiatement commencer à jouer des 88sons
de haute qualité, qui ont été soigneusement échantillonnés.
Des musiciens et claviéristes expérimentés ont sélectionné ces
sons et ont participé à la conception ergonomique du Numa
Compact2. Le Numa Compact2 est par conséquent le partenaire idéal sur scène, en studio ou à la maison. Une polyphonie
maximale de 128voix permet d'ajouter de la profondeur et de
l'expression.
Vous pouvez combiner deux sons en les assignant aux sections
Lower (basse) et Upper (haute) en mode Split (partage du clavier) ou Layer (superposition des sons).
Les deux doubles processeurs d'eets (FX) permettent d'assigner 2 eets diérents à la fois aux sections Lower et Upper, en
plus d'un eet de résonance des cordes (Strings Resonance)
sur tous les sons de piano et une reverb stéréo pour une variété innie de combinaisons de toutes sortes.
Mixage et mastering
Amplication intégrée
Fonctions de clavier maître
Connexions audio
Des commandes de volume, graves, aigus et mastering permettent de régler les sons à votre goût et le système d'amplication d'écoute interne avec haut-parleurs elliptiques vous
permet de jouer de l'instrument au travers d'un amplicateur
10 +10 W contrôlé numériquement et d’un égaliseur pour
donner le meilleur résultat.
Les fonctions de clavier maître du NUMA Compact 2, avec 2
zones programmables, vous permettent de contrôler d'autres
appareils MIDI, de sélectionner les sons et de régler les niveaux
directement depuis votre Numa Compact2.
En plus de la sortie audio stéréo G/D et du système d'amplication intégré, le Numa Compact2 possède une prise casque
supplémentaire, idéale pour jouer tard la nuit sans déranger
les voisins. Cette prise peut également servir de sortie audio
auxiliaire.
Numa Compact 2 by Studiologic®
94

Votre nouveau Numa Compact2
Le port USB intégré permet à votre Numa Compact de se
connecter à votre ordinateur et d'être alimenté directement,
sans recourir à l'adaptateur secteur externe (inclus). Vous pouvez utiliser le port USB et la sortie MIDI Out pour la transmission des données MIDI. En outre, l'USB permet les mises à jour
du micrologiciel interne (rmware) et de la bibliothèque de
sons. Veuillez noter que le système d'amplication interne est
automatiquement désactivé quand l'instrument est alimenté
par USB an d'éviter une consommation d'énergie excessive
ou des variations d'alimentation.
Numa Compact 2
Adaptateur secteur
Mode d'emploi sur CD
Interactivité Numa
USB <> Ordinateur
L'emballage comprend
Numa Compact 2 by Studiologic® 95
F

Alimentation - Entrées et connexions
Alimentation - Entrées et connexions
d'alimentation
Alimentation
12V - 2,5A
Connexion électrique
Entrée/sortie MIDIInterrupteur
Pédale 1, Pédale 2
Pédale d'expression, pédale
universelle
Port USB
Entrée/sortie MIDI, mise à jour
du rmware, alimentation
Sortie audio G/D
2 jacks 6,35mm mono
Sortie casque/auxiliaire
Jack 6,35mm stéréo
Utilisez l'adaptateur électrique fourni avec l'appareil pour raccorder le Numa Compact2 à une prise électrique (ou utilisez
la connexion USB). Allumez l'unité à l'aide de son interrupteur
d'alimentation situé à côté de la prise d'alimentation du NUMA
Compact 2, réglez les commandes Volume, Bass (graves) et
Treble (aigus) en position médiane et la commande Mastering
au minimum (cette fonction sera expliquée plus loin dans ce
mode d'emploi) an d'éviter une puissance de sortie excessive
et de permettre aux haut-parleurs internes de diuser avec
une plage dynamique correcte.
Alimentation par USB
Pédales d'expression/
universelles
L'instrument peut également être alimenté par USB, à condition que l'ordinateur soit capable de fournir une alimentation
susante et qu'il n'y ait pas trop d'appareils alimentés par le
même port USB.
Lorsque l'instrument est alimenté par USB, le système d'amplication interne est dans la plupart des cas désactivé si sa
consommation électrique dépasse les possibilités de l'ordinateur.
À NOTER: en cas de connexion faible ou instable, utilisez l'alimentation traditionnelle (voir le paragraphe précédent).
Branchez la ou les pédales (en option) aux prises correspondantes marquées P1 et P2; à la prise P1, vous pouvez brancher
la pédale Studiologic VP, typiquement destinée à contrôler l'expression/volume. À la prise P2, vous pouvez brancher soit une
pédale commutateur simple, soit une pédale d'expression/volume, soit la triple pédale spécique SLP3-D, comme expliqué
dans le chapitre correspondant.
Numa Compact 2 by Studiologic®
96

Alimentation - Entrées et connexions
Si vous souhaitez utiliser des systèmes d'amplication externes
ou enregistrer les sons des instruments, raccordez les sorties
audio gauche et droite aux entrées de votre table de mixage
ou amplicateur, ou aux entrées de la carte son de votre ordinateur, à l'aide de câbles appropriés.
La sortie casque peut être employée avec des écouteurs ou
comme sortie audio auxiliaire supplémentaire, selon le réglage
de la fonction d'édition globale correspondante (expliquée
dans ce mode d'emploi). En tant que sortie audio auxiliaire,
vous pouvez utiliser cette prise pour brancher l'instrument à
un caisson de graves ou à un système d'amplication supplémentaire, les sorties G/D restant alors disponibles pour l'enregistrement ou d'autres connexions audio.
Lors de la première utilisation du Numa Compact2, nous vous
recommandons de ne pas tourner le bouton Volume de la
section de sortie à plus de la moitié de sa course entre 0 et
Full. Pendant que vous jouez, vous pouvez régler le volume en
fonction des sons sélectionnés. La position du bouton Volume
agira à la fois sur les sorties audio et sur la sortie casque.
Sortie audio
Casque
Volume
ATTENTION:
Pour éviter les troubles auditifs, vous devez éviter, comme avec
tous les appareils audio, d'utiliser le Numa Compact2 de façon
prolongée à un volume élevé.
Pour la transmission de données par USB, reliez le Numa Compact2 à votre ordinateur par un câble USB. La première fois
que vous allumez le Numa Compact2, il est automatiquement
reconnu par votre ordinateur et le pilote approprié est installé
par le système d'exploitation (compatibilité native dite «class
compliant»).
USB
Numa Compact 2 by Studiologic® 97
F

Façade – Écran et navigation
P01-JAZZ DUET
A0 - B3
C4 - C8
P01-JAZZ DUET
A0 - B3
C4 - C8
Façade – Écran et navigation
EDIT / STORE
MIDI / SOUND /
Demo
Écran
Écran monochrome
LOWER / UPPER
Sélection des
parties/zones
Encodeur
Rotation + pression
SPLIT / Mix
L'écran d'accueil principal du Numa Compact2 est celui qui s'ache à la mise sous tension et il est
divisé en 3 champs principaux: le champ supérieur ache le numéro et le nom du programme actuel, les champs inférieurs gauche et droit sont associés aux sections de son Lower (basse) et Upper
(haute), dans le cas du mode Sound (son), et aux sections Zone A et Zone B, dans le cas du mode
MIDI.
Pour naviguer et déplacer le curseur dans l'écran, vous avez le choix entre trois commandes:
a) Presser l'encodeur: le curseur ira sur les 3 champs principaux: Programme, Lower, Upper.
b) Presser les touches SOUND ou MIDI et le curseur reviendra en haut.
c) Presser LOWER ou UPPER et le curseur ira sur le champ correspondant.
Ac-Bass
V: 127
Concert
V: 127
Ac-Bass
V: 127
Concert
V: 127
UPPER
Quand le curseur est sur le champ Programme, tourner l'encodeur vous permet de sélectionner les
diérents programmes.
Quand le curseur est sur les champs Lower/Upper, tourner l'encodeur vous permet de contrôler les
volumes correspondants.
SOUND / MIDI
Les deux touches marquées SOUND et MIDI font alterner entre
les deux achages et jeux de commandes correspondants.
Quand la touche SOUND est sélectionnée et allumée, l'utilisateur peut contrôler les sections et sélections de sons, tous les
achages, réglages, pages d'édition et paramètres correspondants.
Quand la touche MIDI est sélectionnée et allumée, l'écran afche le statut des Zones MIDI A et B et l'utilisateur peut accéder
à tous les paramètres, fonctions d'édition et valeurs disponibles.
Numa Compact 2 by Studiologic®
98

Façade – Écran et navigation
La touche SOUND peut également être pressée de façon plus
prolongée pour lancer la lecture en séquence des huit morceaux de démonstration (un pour chaque banque de sons);
presser une touche de banque de sons (SOUND BANKS) vous
permet de sélectionner la démo lui correspondant; à la n de
celle-ci, le morceau de démonstration de la banque suivante
démarre, et cela selon une boucle continue.
Cette touche est une commande en temps réel de la fonction
SPLIT qui partage le clavier entre deux sons et qui peut être modiée et contrôlée en détail grâce à la fonction Split Point du
mode d’édition globale et à la fonction Split Assign du mode
d’édition de partie. C'est un moyen rapide pour activer et désactiver immédiatement le Split et pour faire jouer les parties
UPPER et LOWER sur la totalité du clavier, en superposition
(Layer) sans partage du clavier.
Comme expliqué dans les sections d'édition (EDIT), la touche
SPLIT peut également être utilisée comme raccourci pour sélectionner la page MIXER, si on la maintient pressée quelques
secondes.
Demo
SPLIT
Le Numa Compact 2 a 99mémoires programmables par l'utilisateur appelées Programmes, dans lesquelles vous pouvez mémoriser tous les paramètres de son (SOUND), les commandes d'eet
FX1/2, les valeurs, fonctions, points de split et autres paramètres
éditables relatifs aux Zones MIDI, avec un nom (NAME) personnalisable pour chaque Programme. Les seules fonctions qui ne sont
pas mémorisées sont les réglages des boutons VOLUME, BASS,
TREBLE et MASTERING, puisque ce sont de pures commandes en
temps réel, non liées à un Programme particulier.
Tous les Programmes peuvent être envoyés et reçus par USB,
comme expliqué dans le paragraphe correspondant de ce
mode d'emploi, dans la section Édition globale.
STORE /
Programmes personnels
Numa Compact 2 by Studiologic® 99
F

Banques de sons et mode SOUND
P01-JAZZ DUET
A0 - B3
C4 - C8
A-PIANO [1/2]
Banques de sons et mode SOUND
SOUND BANKS
Sélection des banques de sons
Mode SOUND
En mode SOUND, c'est-à-dire avec la touche en question sélectionnée et allumée, les 8 banques de
sons (SOUND BANKS) permettent de sélectionner les sons internes, qui sont classés logiquement
par rapport au nom des banques de sons. Chaque banque peut avoir un nombre de sons variable,
organisés par pages de 4 sons chacune. Quand vous sélectionnez une banque, vous voyez à l'écran
le nom de cette banque, le numéro de la page achée et le nombre total de pages de sons de la
banque (en haut à droite de l'écran) tandis que le son sélectionné est aché en négatif.
Pour sélectionner un autre son de cette même banque, tournez l'encodeur et tous les sons disponibles s'acheront et seront sélectionnés tour à tour, de la première à la dernière page de la banque.
La sélection peut se faire dans un certain laps de temps (d'environ 5secondes) et le dernier son
sélectionné sera automatiquement mémorisé pour chaque banque. Quand vous sélectionnez une
banque, le curseur va automatiquement sur le dernier son sélectionné pour rendre la sélection de
son à la fois plus rapide et plus facile. Grâce à cette fonction, vous disposez d'une sélection automatique de vos sons préférés pour les diérentes banques.
Stage
Studio
SOUND
Ac-Bass
V: 127
Concert
V: 127
A-PIANO
Concert
Vintage
Numa Compact 2 by Studiologic®
100
 Loading...