


Rev. 20181214
USER MANUAL
ENGLISH
Important safety instructions
DANGER!
Risk of electric shock. Do not open the chassis. There are no user serviceable parts inside.
The unit should only be serviced by qualied
service sta.
Humidity
To reduce the risk of re or electric shock, do
not expose the unit to rain or moisture. Never place containers with liquid on the unit.
Do not use the unit near water, swimming
pool, bathtub or wet basement. If the unit
is moved from a cold place to a warm room,
condensation may occur inside. To avoid damage please allow the unit to reach room
temperature before switching on.
Please read the entire manual. It contains all
the informations you need to use this unit.
Alternatively to the battery supply, the
device can be directly powered by the
USB Device port, if connected to a PC or to
another compatibile and certied external
power source.
Installation
Always use a stable rack to place the product
on. Please be aware of its size and weight.
Cleaning / Maintenance
Never use any abrasive detergent, which may
damage the surface. We recommend a slightly moist micro-bre cloth.
Packaging
Please keep all packaging, and use it to protect the product when transporting or if servicing is required.
Please follow the instructions in the manual.
The warranty will be void if unauthorized
work is carried out on the product. Only
accessories that are specied by the
manufacturer should be used with this unit.
Use the unit only as specied in this manual.
SL Mixface by Studiologic®
2

Index
Your new SL Mixface ................................................4
Product overview .................................................................4
The DAW mode .....................................................................4
The Controller mode (CTRL) ..............................................4
Video tutorial ........................................................................4
Firmware update ..................................................................4
In the package ......................................................................4
Connections / Examples of use ...............................5
Connections ..........................................................................5
Power supply ........................................................................5
USB ports ...............................................................................5
Installing batteries ...............................................................5
Bluetooth ...............................................................................5
Kensington security slot .....................................................5
Examples of use....................................................................6
Panel and user interface .........................................8
Controller mode .......................................................9
Introduction ..........................................................................9
Connect a MIDI device to the Host port ..........................9
Connect a SL Controller to the Host port ........................9
Congure Mixface .................................................10
Introduction ....................................................................... 10
Store Current Program ..................................................... 10
Zone Edit ................................................................11
MIDI Settings ..................................................................... 11
Controls mapping ............................................................. 11
Global .....................................................................12
Introduction ....................................................................... 12
DAW (Digital Audio Workstation) selection ................. 12
Bluetooth ............................................................................ 12
MIDI Merge ......................................................................... 12
Factory restore .................................................................. 12
Declarations ...........................................................13
Declaration of conformity ............................................... 13
Warranty ............................................................................. 14
State of the art ................................................................... 14
Disclaimer ........................................................................... 14
Trademarks ........................................................................ 14
Copyright ............................................................................ 14
FCC information ................................................................ 14
DAW mode ..............................................................10
Introduction ....................................................................... 10
Use ....................................................................................... 10
Conguring your DAW for use with Mixface ............... 10
SL Mixface by Studiologic®
3
Your new SL Mixface
Product overview
Thank you for choosing SL Mixface, an instrument
designed and built for your production or musical
performance, in the studio or on stage.
We recommend that you read the whole manual
carefully, to understand the instrument and its controls,
starting from a general description of the structure up
to the detailed programming.
We remind you to frequently visit the Studiologic
website, to download rmware updates and product
support software.
Let's start with a general overview of the Mixface
functions.
Mixface contains two instruments in a single device:
a traditional remote Control Surface (DAW mode) and
a MIDI Controller (CTRL mode) with the possibility to
communicate with the MIDI Controllers and expand
the Studiologic SL88/73 with new functions.
To switch from one mode to another, simply press the
"DAW | CTRL" button below the display.
The Controller mode (CTRL)
The Controller mode transforms Mixface into a fully
programmable MIDI Control Surface; it can be used
to control your software or hardware synthesizers and
sound modules, or any controllable device via MIDI1.
In addition, using the USB Host port, Mixface can
become an extension of your Studiologic SL series
Controller (SL88 Grand, SL88/73 Studio), or turn any
MIDI Controller1 into a 4 Zone Master Keyboard and 50
Zone controls.
The buttons of the Transport section (to manage your
DAW) remain active also in Controller mode.
Video tutorial
On the website studiologic-music.com/products/mixface/
you can nd some video tutorials about the use of
Mixface.
Firmware update
Check the Studiologic website to always have the
latest version of the system rmware.
The version installed in Mixface is shown for a few
seconds at power on.
The DAW mode
The DAW mode allows you to control your DAW (Digital
Audio Workstation) with 9 sliders, 8 potentiometers
for the Pan and 8 multi-function buttons (Rec, Mute,
Solo, Select). To the right of the mixer section are the
Transport controls and selection buttons for the 4
modes (Rec, Mute, Solo, Select) located below the
sliders.
The procedure for updating the Firmware (intended
as a set of functions and parameters and/or
improvements to the operating system) together
with the updating Software, are published on the
Studiologic or authorized distributors websites, with
related instructions.
In the package
SL Mixface;
Micro USB cable;
Anti-slip desktop pad;
Informative material.
1Mixface is compatible with USB class compliant MIDI controllers
limited to the MIDI subclass, meaning that they do not require the
installation of specic drivers to communicate with Windows, MacOS
and iOS operating systems. Devices that use USB Audio cannot be
used.
SL Mixface by Studiologic®
4
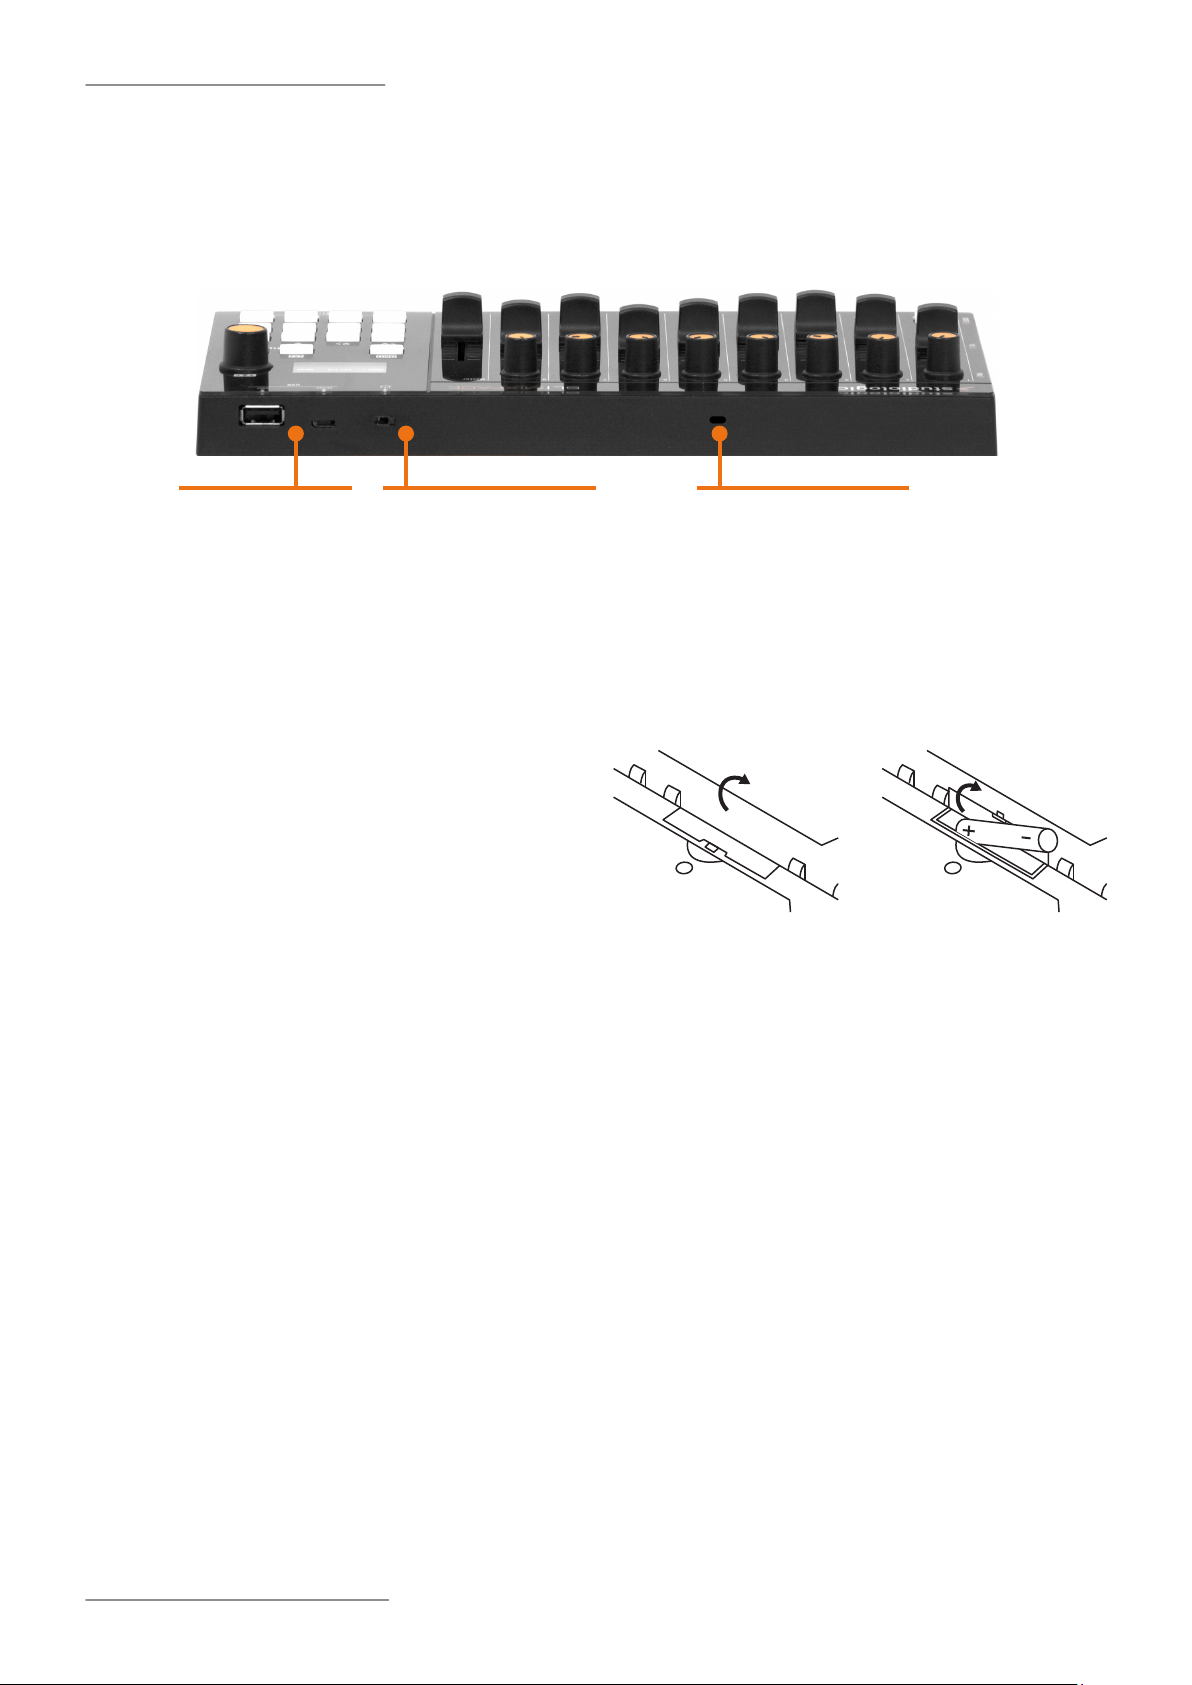
Connections / Examples of use
Connections
All connections are located on the back of the instrument.
USB
Host, Device
Power switch
◄ Turn on (USB)
● O
► Turn on (battery)
Power supply
Mixface can be directly powered from the USB Device
port, from a PC or other compatile and certied supply
sources or with a set of 3 standard 1,5V AAA batteries.
The main switch has three positions that correspond,
from right to left, respectively to battery power, device
o and power via USB.
IMPORTANT NOTE
Never connect power sources to the USB HOST port.
USB ports
There are two USB ports on Mixface: the Device-type
socket for computer connection and the Host-type
socket for connection to a MIDI Controller (SL or not).
The "Device" type USB connector (Universal Serial Port)
allows connection with compatible external units (eg:
Computers) and to update the rmware.
Kensington security slot
Installing batteries
Make sure that the device if o. Raise the stand and
open the battery cover. Making sure to observe the
correct polarity, Insert the batteries. Close the battery
cover.
NOTE
Be sure to remove the batteries in order to prevent it
from leaking when the unit is not in use for extended
periods.
Bluetooth
In Bluetooth mode, there is only one MIDI port called
"SLMIX BT".
When Mixface is connected to the computer via USB,
3 MIDI ports are visible:
• "SLMIX USB" (Port 1): to be used as a Controller;
• "SLMIX USB" (Port 2): rmware updates;
• "SLMIX USB" (Port 3): to be used as control surface
in DAW mode.
NOTE
Mixface can supply an external device connected to its
USB Host port, only if connected to an external power
supply through its USB Device port.
SL Mixface by Studiologic®
5
IMPORTANT NOTE
Since the Bluetooth connection does not allow to have
multiple MIDI ports, you can not use the device in the
two modes (DAW and CTRL) at the same time, if you
use the connection via Bluetooth only.
For the same reason, in some cases, not all DAW's are
supported via Bluetooth. The DAW selection menu
and the communication port will guide you in the
selection of the allowed options.
Kensington security slot
This connector can be used with a Kensington®-style
security lock to protect your SL Mixface from possible
theft.

Connections / Examples of use
Examples of use
Connections using SL MIDI Controller.
SLEDGE
MIDI IN
CTRL MODE
VST / AU plugin
Instruments
(Program Change,
Control assignment and
keyboard range)
MIXFACE USB DEVICE
SL MIXFACE
DAW MODE
Transport and
channel controls
MIXFACE BLUETOOTH
MIXFACE USB HOST
CTRL MODE
iOS instruments
(Program Change,
Control assignment and
keyboard range)
SL USB PORT
SL MIDI OUT PORT
SL GRAND/ STUDIO MASTER KEYBOARD
CTRL MODE
Hardware Instruments
(Program Change, Control
assignment and keyboard
range)
The example illustration shows how Mixface can be used in a system that includes a SL MIDI Controller.
The connections in the example are:
• Mixface USB HOST port connected with SL USB port;
• Mixface USB device port connected with computer USB port;
• Matching via Bluetooth Mixface with an iPad;
• MIDI Out 1 port of SL connected with Sledge's MIDI In port.
In this conguration the Zones are set in SL, choosing the destination ports corresponding to the instruments
that you want to control in CTRL mode; for example, Zone 1 is assigned to USB device port to control a VST plugin
on the computer, Zone 2 is set to MIDI OUT 1 to control Sledge and Zone 3 via the Bluetooth port can control a
MIDI app on the iPad.
In DAW mode, after correctly setting the DAW and the USB port, it is possible to manage the track controls and
the Transport buttons.
SL Mixface by Studiologic®
6

Connections / Examples of use
Connections using a USB MIDI Class compliant device.
CTRL MODE
VST / AU plugin
Instruments
MIXFACE ANY USB MIDI CLASS COMPLIANT KEYBOARD
DAW MODE
Transport and
channel controls
MIXFACE USB DEVICE
MIXFACE BLUETOOTH
MIXFACE USB HOST
CTRL MODE
iOS instruments
The example illustration shows how Mixface can be used in a generic system.
The connections made in the example are:
• Mixface USB HOST port connected with USB port of a USB MIDI Controller
• Mixface USB device port connected with computer USB port;
• Matching via Bluetooth Mixface with an iPad.
USB MIDI PORT
1
;
In this conguration the Zones are set in EDIT of Mixface, choosing the destination ports corresponding to the
instruments that you want to control in CTRL mode; for example, Zone 1 is assigned to the USB device port to
control a VST plugin on the computer. Zone 3 through the Bluetooth port can control a MIDI app on the iPad.
In DAW mode, after correctly setting the DAW and the USB port, it is possible to manage the track controls and
the Transport buttons.
1Mixface is compatible with USB class compliant MIDI controllers limited to the MIDI subclass, meaning that they do not require the installation
of specic drivers to communicate with Windows, MacOS and iOS operating systems. Devices that use USB Audio cannot be used.
SL Mixface by Studiologic®
7

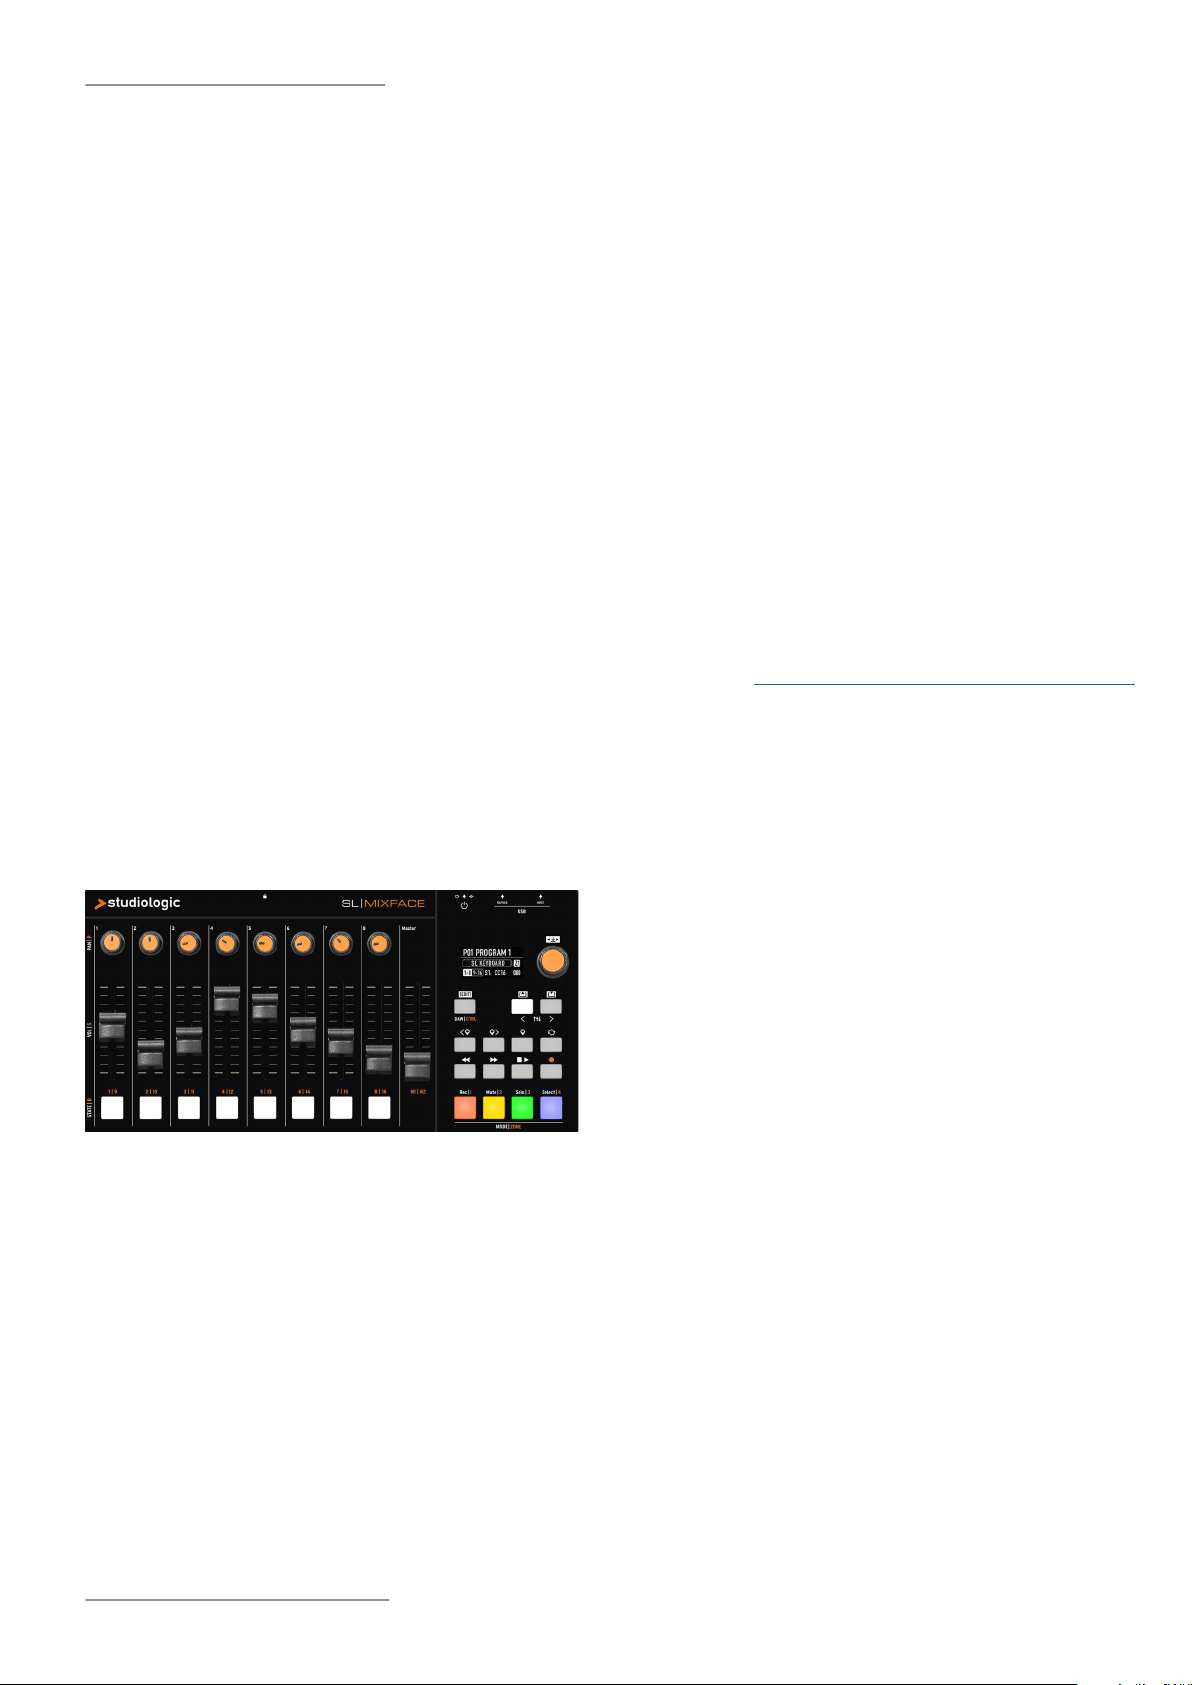
Panel and user interface
The Mixface control panel consists of:
• 1 Backlit display (TFT - LCD 320 x 240);
• 1 Rotary Encoder with built-in click;
• 3 Main buttons: DAW / CTRL (to select the two
operating modes and to access the EDIT menu by
long press) - IN & OUT / PREVIOUS & NEXT TRACK
(to navigate the EDIT menus or to select the set of
controls (1- 8 / 9-16 in CTRL mode) or to access the
tracks (when they are more than 8 in DAW mode);
• 8 buttons in the Transport section to control your
DAW;
• 4 Mode / Zones buttons to select the function of the
buttons below the sliders in the Mixer mode or to
select the Zones in the CTRL mode;
• 8 potentiometers in the Mixer section for PAN
management;
• 9 linear cursors (slider);
• 8 multi-function buttons.
To access to the EDIT menu, long press the DAW/CTRL
button; the navigation is possible by the main rotary
Encoder and the IN & OUT buttons, indicated by the
white background icons on the panel.
Through the Encoder, select the menu item or the
parameter to be edited, while the IN / OUT buttons
access the selected item or go back one level. Click in
the main Encoder or press the IN key to conrm.
SL Mixface by Studiologic®
8

Controller mode
Introduction
The Controller mode allows you to use Mixface in
combination with the Studiologic SL MIDI Controllers.
In this way it is possible to Program all Mixface controls
to manage the instrument parameters (hardware or
software) assigned to each of the four Zones.
The Transport buttons in the right section of Mixface
works the same way in both the DAW and CTRL modes.
The main Mixface (HOME) screen is a summary of the
conguration and state of the device:
In CTRL mode, they show:
• Number and name of the selected Program;
• The current mode (CTRL);
• The selected Zone (Zone 1 in the example);
• The output port of the current Zone (USB DEV);
• The MIDI Channel of the current Zone (Ch 1);
• The current active slider set (1-8 or 9-16);
• The activated control, the associated parameter (eg
"S1: cc16" = Slider 1: Control Change 16) and the
corresponding value (000).
Connect a MIDI device to the Host port
Connect a SL Controller to the Host port
Before any other action, make sure you have
downloaded the latest SL Controller rmware from the
Studiologic website.
By connecting a Studiologic SL MIDI Controller to the
USB Host port2, Mixface becomes its natural extension,
adding all its fully programmable controls to each
Program of your SL. The 4 Zones are managed in
"plug & play" mode with the possibility of selecting
and muting each of the 4 pads that becomes colored
with the Zone colours. From the SL Controller it is
also possible to associate to each Program a Mixface
Program, that adds its 50 controls (2 sets of 9 sliders, 8
rotary sliders and 8 buttons) to each of the 4 available
Zones.
IMPORTANT NOTE
The MIDI Zone settings (such as the port, the channel,
Keyboard range, etc.) are ignored because, in this
mode, Mixface is an extension of the SL MIDI Controller,
and the related settings are programmed in the SL.
Through the SL Edit menu you can also access the
selection of the Bluetooth MIDI port, made possible by
the connection with Mixface.
Mixface in Controller mode can manage (via the "Usb
Host" port2) any MIDI Controller, transforming it into
a Master Keyboard with 4 programmable Zones and
with all its controls available to the user.
When a MIDI Controller is connected to the USB Host
port, the display shows the status of the unit labeled
"EXT".
In this mode, Mixface receives as input the MIDI
events coming from the Controller or the connected
unit and distributes them to the 4 Zones, that can be
assigned to MIDI ports and channels to control various
instruments, split them or layer them.
2
Mixface can supply an external device connected to its USB Host port,
only if connected to an external power supply through its USB Device
port.
SL Mixface by Studiologic®
9

DAW mode
Congure Mixface
Introduction
The DAW (Digital Audio Workstation) mode allows you
to use Mixface as a control surface for your favorite
music software (eg Cubase, Digital Performer etc.).
The DAW mode home screen shows:
• The name of the selected DAW;
• The DAW mode;
• The used port;
• How to use the multi-function buttons (rec, mute,
solo or select);
• The value of the control in use.
Use
After selecting your DAW from the Global mode (eg
Cubase), Mixface is ready to be used as a control
surface.
Introduction
The EDIT menu allows access to the programming of
the current Program or to the global parameters.
To enter the "EDIT" mode, press and hold the "[EDIT]"
button for 2 seconds.
The menu displays the following options:
• Zone Edit;
• Store Current Program;
• Global Settings.
Turn the main Encoder to select the desired option,
press the Encoder or the IN key to access it, and the
OUT key to exit a level or press again EDIT to exit.
Store Current Program
The STORE page of the EDIT mode allows you to store
and name a Program.
Conguring your DAW for use with
Mixface
Each DAW works in a slightly dierent way and can use
dierent protocols. In some cases it is only necessary
to set some conguration parameters, in others you
will need to install les.
Please check the conguration instructions for your
DAW on the Studiologic website.
• Store Under: is the location where you want to save
the Program. Mixface has 99 memory locations.
• Name: to rename the Program by clicking (to move
the cursor to the next digit) and rotating the Encoder
(to select letters or numbers)
Press IN to save the changes or OUT to not conrm the
operation.
Mixface detects if changes have been made to the
Program, so outgoing asks the user if he wants them to
be saved in the current Program. This allows to directly
save and overwrite the current Program.
SL Mixface by Studiologic®
10

Zone Edit
1. Rotate the Encoder to select one of the 4 Zones,
shown on the display and press IN;
2. Once the Zone is selected, the submenu allows you
to enable the Zone, set its MIDI settings and map the
controls available on the panel.
MIDI Settings
The page related to MIDI Settings allows you to set the
following parameters:
• Port: (USB Host, USB Device, Bluetooth);
• MIDI Ch (MIDI channel);
• PRG (Program Change) that is sent to the Mixface
Program selection;
• Bank select (MSB + LSB);
• Key range (Lower and Upper);
• Transpose;
• Octave.
Controls mapping
The "Controls Mapping" editing section allows
programming of all Mixface controllers (sliders,
potentiometers and buttons) for each of the 4 Zones.
Mixface provides the user with two complete sets of
control surfaces for a total of 18 sliders (8x2 + 2 master),
16 buttons, 16 rotary sliders.
Choose the set of controls
to program;
Operate the physical
control you want to
program (press a button,
rotate a potentiometer o
move a slider);
Once the Mixface control
has been selected, the
page for assigning the
MIDI message is shown.
In the example picture, a Control Change 16 is assigned
to the Slider 1:
Turn the Encoder to scroll through the parameters of
the left column; once the desired parameter has been
selected, press on the Encoder to move the focus to
the right column and set the desired value.
NOTE
These parameters are ignored in SL KEYBOARD mode,
because Mixface extends the Zones of a SL MIDI
Controller.
From the MIDI message assignment screen, by clicking
on the "OUT" button, you go back to the editing page
structure and you can then activate a second physical
control of Mixface (for example Slider 2) for the related
assignment.
In this way you can assign two sets of 9 sliders, 8 rotary
sliders and 8 buttons with a total of 50 MIDI controls
for each Zone in Controller mode.
SL Mixface by Studiologic®
11

Global
Introduction
The last editing section of Mixface allows edit the
global settings of the unit.
There are 3 functions available:
• DAW Port and Type;
• Bluetooth;
• MIDI Merge;
• Factory restore.
DAW (Digital Audio Workstation) selection
When selecting DAW, the user can choose the control
port of his Digital Audio Workstation (USB or Bluetooth)
and the software used (Cubase, Digital Performer,
Ableton Live, Presonus Studio One, Avid Protools).
Bluetooth
The Bluetooth function allows the Bluetooth wireless
communication to be activated and deactivated
towards the computer.
This mode allows you to remotely control the Mixface
(DAW and CTRL mode) wirelessly and to implement in
your Studiologic MIDI Controller the ability to play, for
example, a virtual instrument wirelessly.
NOTE
In Bluetooth mode, Mixface make available only one
port (called SLMIX BT), and the transport buttons of
Mixface work only in DAW mode in order to avoid
possible interferences in the workow.
If required, the PIN code is "0000".
The list of compatible DAW's will be updated and
extended over time, thanks to the possibility of
updating the rmware of Mixface via USB port.
Currently you can check the following DAW (Digital
Audio Workstation):
• Steinberg Cubase / Nuendo;
• Motu Digital Performer;
• Ableton Live;
• Presonus Studio One;
• Propellerhead Reason;
• Apple Logic / GarageBand;
• Avid ProTools.
MIDI Merge
The MIDI Merge function allows to mix the MIDI
data of the Bluetooth and USB Device ports to
other outputs in the following combinations:
• From Bluetooth to: none (none), USB Device,
USB Host;
• From USB Device to: none (none), USB Host.
Factory restore
The Factory Restore function deletes all userprogrammed settings and Programs and
restores the factory settings. The screen asks for
conrmation, in order to avoid unwanted actions.
To proceed press IN.
SL Mixface by Studiologic®
12

Declarations
Declaration of conformity
FATAR srl
Zona Ind.le Squartabue
62019 Recanati MC Italy
declares under their own responsibility that this products comply the requirements of the following standards:
Standard International reference Description
EN 55032 (2015) CISPR 32 (2015) Electromagnetic compatibility of multimedia equipment -
Emission requirements
EN 55035 (2017) CISPR 35 (2016) Electromagnetic compatibility of multimedia equipment –
Immunity requirements
EN 60065 (2014)
EN 60065/AC (2016)
EN 62368-1 (2014) IEC 62368-1 (2014) Audio/video, information and communication technology
EN 62479 (2010) IEC 62479 (2010) Assessment of the compliance of low power electronic and
ETSI EN 301 489-1
V3.1.1 (2017)
ETSI EN 301 489-17
V3.1.1 (2017)
ETSI 300 228
V2.1.1 (2016)
EN 60950-1 (2006)
A11 (2009)
A12 (2011)
A1 (2010)
A2 (2013)
IEC 60065 (2014) Audio, video and similar electronic apparatus - Safety
requirements
equipmentPart 1: Safety requirements
electrical equipment with the basic restrictions related to
human exposure to electromagnetic elds (10 MHz to 300 GHz)
- ElectroMagnetic Compatibility (EMC) standard for radio
equipment and services; Part 1: Common technical
requirements; Harmonised Standard covering the essential
requirements of article 3.1(b) of Directive 2014/53/EU and the
essential requirements of article 6 of Directive 2014/30/EU
- Electromagnetic compatibility and Radio spectrum Matters
(ERM); ElectroMagnetic Compatibility (EMC) standard for radio
equipment; Part 17: Specic conditions for Broadband Data
Transmission Systems
- Wideband transmission systems; Data transmission equipment
operating in the 2,4 GHz band; Harmonised Standard for access
to radio spectrum
IEC 60950-1 (2006) Information technology equipment - Safety
Part 1: General requirements
EN 50581 (2012) - Technical documentation for the assessment of electrical and
electronic products with respect to the restriction of hazardous
substances
And comply the requirements of the following European directives and their amendements:
Directive/Regulation Description
Directive 2014/30/EU DIRECTIVE 2014/30 / EU OF THE EUROPEAN PARLIAMENT AND OF THE COUNCIL of 26 February
2014 on the harmonization of the Member States relating to electromagnetic compatibility
Directive 2014/53/EU Directive 2014/53/EU of the European Parliament and of the Council of 16 April 2014 on the
harmonisation of the laws of the Member States relating to the making available on the market
of radio equipment and repealing Directive 1999/5/EC Text with EEA relevance.
Directive 2011/65/EU Directive 2011 /65/CE of the European Parliament and of the Council of the June 8, 2011 on the
restriction of the use of certain hazardous substances in electrical and electronic equipment.
Directive 2012/19/EU Directive 2012/19/EU of the European Parliament and of the Council of 4 July 2012 on waste
electrical and electronic equipment (WEEE)
Recanati, 6. 11. 2018 Marco Ragni, Chief Executive Ocer
SL Mixface by Studiologic®
13

Declarations
Warranty
Every product from Studiologic by Fatar has been
carefully manufactured, calibrated and tested, and
carries a warranty. Damage caused by incorrect
Transport, mounting or handling is not covered by
this warranty. Compensation amounting to more than
the price of the device is excluded. For any further
informations please refer exlusively to your dealer
and/or local distributor. This is based on general terms
and condition of the local distributor / FATAR srl, Italy.
State of the art
To ensure maximum quality all Studiologic by Fatar
devices are always engineered to be state-of-theart products, therefore updates, modications
and improvements are made without prior notice.
Technical specication and product appearance may
vary from this manual.
Disclaimer
This product is equipped with a USB Host port,
designed and tested for plug & play use with SL MIDI
Controllers. This port can also be used with thirdparty MIDI controllers USB class compliant, limited
to the MIDI subclass. Devices that use USB Audio
cannot be used. Studiologic does not guarantee
compatibility with third-party products and cannot be
held responsible for damages or malfunctions related
to the connection of devices to the Host port of this
product.
FCC information
Changes or modications not expressly approved by
the party responsible for compliance could void the
user‘s authority to operate the equipment. (Part. 15.21)
This equipment has been tested and found to
comply with the limits for a Class B digital device,
pursuant to part 15 of the FCC Rules. These limits are
designed to provide reasonable protection against
harmful interference in a residential installation. This
equipment generates, uses and can radiate radio
frequency energy and, if not installed and used in
accordance with the instructions, may cause harmful
interference to radio communications. However, there
is no guarantee that interference will not occur in a
particular installation. If this equipment does cause
harmful interference to radio or television reception,
which can be determined by turning the equipment
o and on, the user is encouraged to try to correct the
interference by one or more of the following measures:
• Reorient or relocate the receiving antenna
• Increase the separation between the equipment
and receiver
• Connect the equipment into an outlet on a circuit
dierent from that to which
• the receiver is connected
• Consult the dealer or an experienced radio/TV
technician for help
Contains FCC ID: S9NSPBTLE1S
Trademarks
All trademarks used in this manual belong to their
respective owners.
Copyright
No part of this manual may be reproduced or
transmitted in any form or by any means without prior
consent of the copyright owner:
FATAR Srl
Zona Ind.le Squartabue
62019 Recanati, Italy
Specications are subject to change without notice.
SL Mixface by Studiologic®
14
 Loading...