

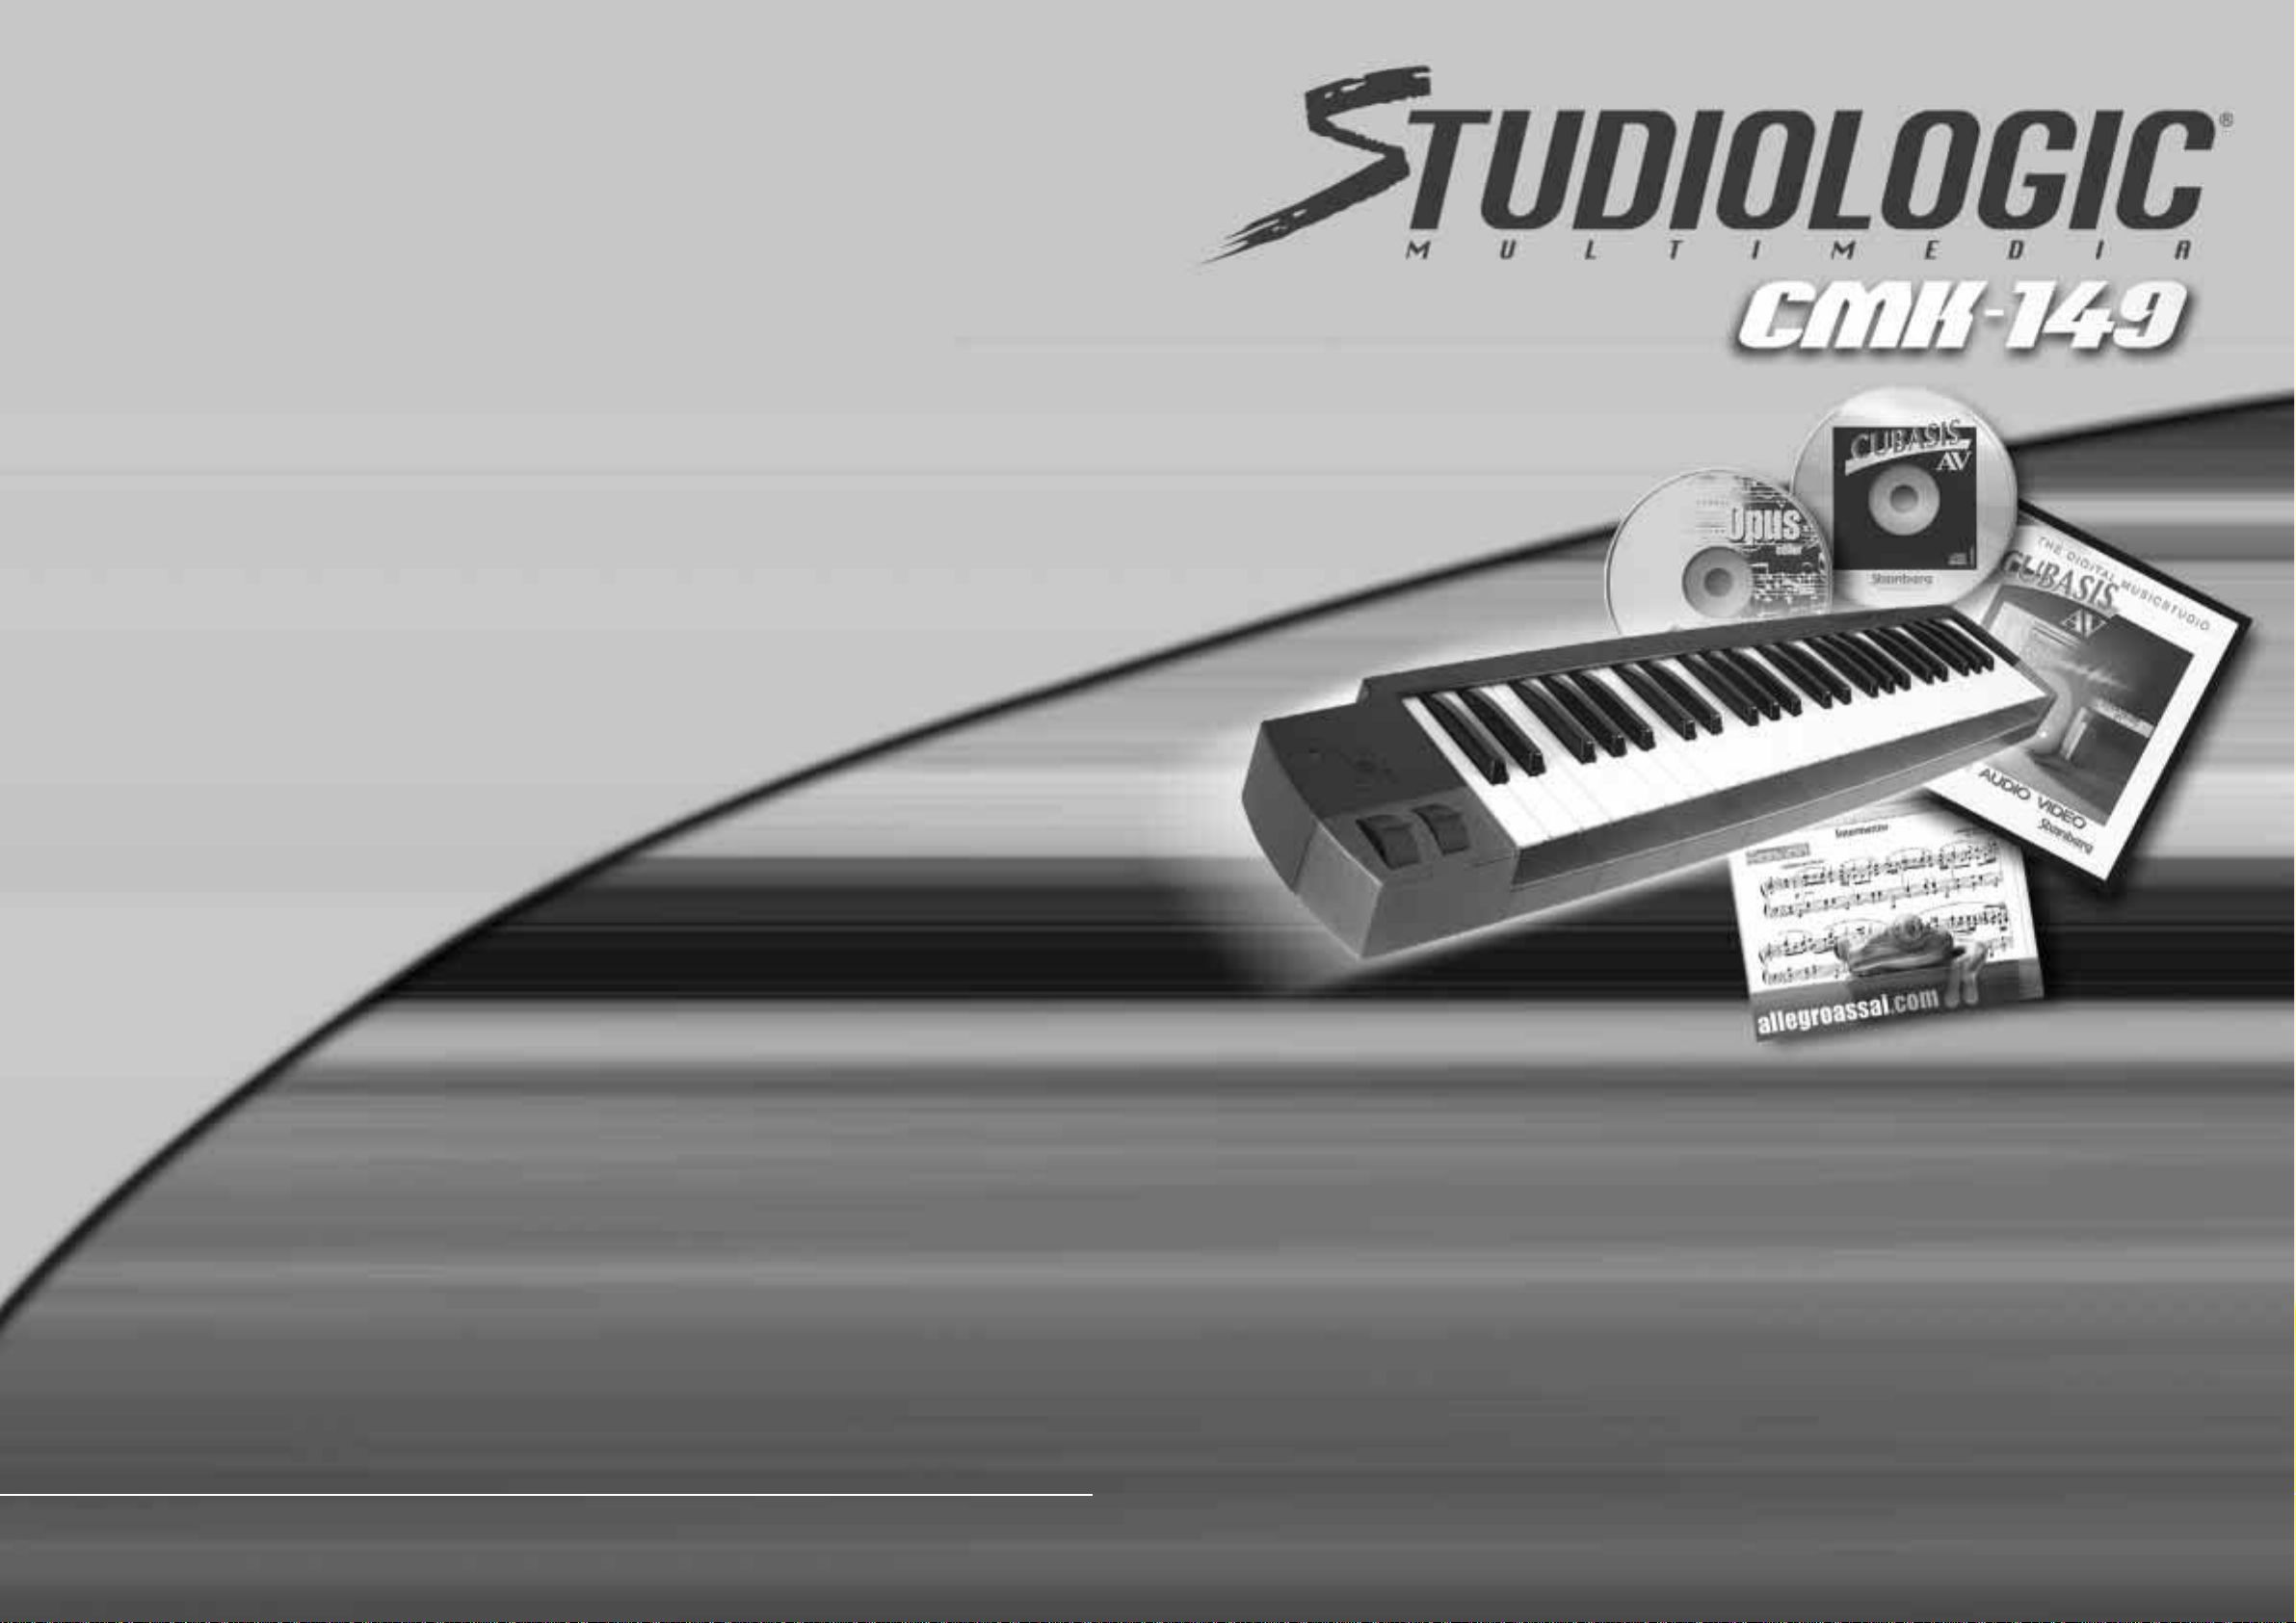
CMK-149 is a product
ENGLISH
ITALIANO
FRANÇAIS
FATAR srl
Zona Ind.le Squartabue
62019 RECANATI (MC) - ITALY
TEL +39 071 7506078
FAX +39 071 7506142
DEUTSCH
ESPAÑOL
INSTRUCTIONS MANUAL
CAUTION: Avoid leaving in car with closet windows,near heater or in direct sunlight,otherwise deformation
or other problem may occur. Keep pack aging away from small children.
APPROVAL: This device complies with part 15 of the FCC rules in accordance with the related U.S.Directives.
And also carrying the CE-mark in accordance with the related European Directives.FATAR srl declares that
the product it is conforms to the following Standard:EMC:EN 55013
RESPONSIBLE: FATAR srl,62019 Recanati (MC), Italia is responsible for the FCC and CE marking
TRADEMARKS: All marks and trademarks used in this packaging are propertied of their respectively registe-
red company. Specification and features subject to change without notice.
This product has been manufactured in Italy
AVVERTENZE: Non lasciare il prodotto chiuso all’interno degli auto veicoli con i finestrini chiusi;tenerlo lontano da fonti di calore;non lasciarlo alla diretta esposizione dei raggi solari.Tenere fuori dalla portata dei
bambini.
APPROVAZIONI: Prodotto conforme con la regola n.15 della Normativa FCC – USA.
FATAR srl dichiara che il prodotto è conforme allo standard:EMC EN 55013 in ottemperanza alla Normativa CE.
RESPONSABILITÀ: FATAR srl,62019 Recanati (MC), Italia si dichiara responsabile dei marchi FCC e CE
MARCHI: I marchi utilizzati in questo prodotto sono di proprietà delle rispettive Case
NOTE: Specifiche e caratteristiche tecniche potranno subire cambiamenti e/o modifiche senza obbligo di
preavviso.
Prodotto in Italia
AVERTISSEMENT:Ne pas laisser le produit à l’intérieur d’un véhicule dont les vitres sont fermées ;ne pas
l’exposer à des sources de chaleur ;ne pas le soumettre à l’action directe des rayons du soleil.Conser ver hors
de portée des enfants.
APPROBATIONS: Produit conforme à la règle n° 15 de la Réglementation FCC – USA.
FATAR srl déclare que le produit est conforme au standard :EMC EN 55013 conformément à la
Réglementation C E.
RESPONSABILITÉ: FATAR srl,62019 Recanati (MC), Italie se déclare responsable des marques FCC et CE
MARQUES: Les marques utilisées dans ce produit appartiennent à leur Maison respective
NOTES: Des techniques spécifiques et caractéristiques pourront subir des changements et /ou des modifica-
tions sans obligation de préavis.
Fabriqué en Italie
BITTE BEACHTEN: Lassen Sie das Produkt nicht im geschlossenen Auto bei geschlossenen Fenstern und
halten Sie es von Wärmequellen fern. S etzen Sie das Produkt nicht direkter Sonnenbestrahlung aus.
Bewahren Sie es außerhalb der Reichweite von Kindern auf.
NORMENENTSPRECHUNG: Produkt erfüllt die Anforderungen der Regel Nr.15 der amerikanischen FCCNorm.
Die Firma FATAR srl bestätigt,dass das Produkt den Anforderungen der EMV-Richtlinie EN 55013 gemäß CENorm entspricht.
HERSTELLERERKLÄRUNG: Die FATAR srl,62019 Recanati (MC), Italien erklärt die Übereinstimmung des
Produktes mit den Anforderungen der FCC- und CE-Norm.
MARKEN:Die in dieser Dokumentation enthaltenen Marken sind Eigentum der entsprechenden Firmen.
Bemerkungen:Änderungen der Produktdaten und technischen Eigenschaften vorbehalten
Hergestellt in Italien
ADVERTENCIAS: No dejad el producto cerrado dentro de coches con las ventanillas cerradas;mantenerlo
lejos de fuentes de calor;no dejarlo a la luz directa del sol. Mantener fuera del alcance de los niños.
APROBACIONES:Producto conforme a la regla n.15 de la Norma FCC – USA.
FATAR srl declara que el producto cumple las normas:EMC EN 55013 conforme a las Normas C E.
RESPONSABILIDAD:FATAR srl,62019 Recanati (MC),Italia se declara responsable de las marcas FCC y CE puestas
MARCAS: Las marcas utilizadas en este producto son propiedad de sus respectivas Casas.
NOTAS: Especificaciones y características técnicas están sujetas a cambios y/o modificaciones sin obligación
de previo aviso.
Fabricado en Italia

Con Módulo Sonidos y/o sistema Midi
Después de haber efectuado la conexión antedicha vuestro sistema está listo para el uso.
El CMK 149 está activo para transmitir en el canal MIDI Nº1 con extensión completa de 49 teclas.
El Do central se encuentra ubicado al comienzo de la tercera octava.
Al presionar las teclas del teclado CMK 149 envía datos MIDI de nota con informaciones de dinámica y velocidad.Si se mantiene presionado uno de los 5 pulsadores de función y se presionan las teclas del CMK 149 no se
transmiten datos MIDI porque se encuentra habilitada la segunda octava del teclado,como teclado numérico
para introducir los valores para los parámetros deseados.
ELABORACIONES PARA LA IMPLEMENTACIÓN DE LOS PARÁMETROS:
Pulsador MIDI Channel:Mantener presionado el pulsador MIDI Cannel, digitar en el teclado numérico el Nº de
canal MIDI que interesa (1-16).
Al soltar el pulsador,CMK 149 transmitirá la variación.
Ejemplo: Si se desea transmitir en el canal MIDI Nº8,mantener presionado el pulsador MIDI Channel,digitar en
el teclado numérico el número 8, soltar el pulsador MIDI Chanel,en este momento el teclado CMK 149 transmite en el canal MIDI 8.
Pulsador Progam Change: Mantener presionado el pulsador Progam Change,digitar en el teclado numérico
el número del sonido que se desea obtener (1-128).
Al soltar el pulsador,CMK 149 transmitirá la variación.
Ejemplo: Si se desea obtener el sonido Nº56 del dispositivo MIDI,es necesario mantener presionado el pulsador Program Change,digitar en el teclado numérico el número 56, soltar el pulsador Program Change;desde
este momento el teclado CMK 149 tocará con el sonido Nº56.
Pulsador Bank Select:Mantener presionado el pulsador Bank Select,ahora,si vuestro dispositivo MIDI necesita solamente el Control 32 para cambiar banco de sonidos,digitar en el teclado numérico el número de banco
que se desea;si en cambio vuestro dispositivo MIDI necesita el mando completo de cambio de banco Control
32+ Control 0,pulsar la tecla marcada con H y digitar el número para el control 0.
Al soltar el pulsador,CMK 149 transmitirá la variación.
NOTA: El CMK 149, asociado al mando Bank Select, envía además el último Nº de Program Change que había
sido variado con anterioridad:esto se debe a que no todos los dispositivos MIDI conmutan el banco sin recibir
sucesivamente el Program Change.
Ejemplo:Si se desea obtener un sonido del banco 4 de un dispositivo MIDI que requiere solamente el Control
32,mantener presionado el pulsador Bank Select,digitar en el teclado numérico el número 4,soltar el pulsador
Back Select,ahora el teclado CMK 149 tocará con un sonido del banco Nº4.
Si se desea obtener un sonido del banco Nº1 para el Control 32 y del banco 6 para el Control 0 del dispositivo
MIDI, mantener presionado el pulsador Bank Select, digitar en el teclado numérico el número 1, presionar el
signo H en el teclado numérico y luego el número 6,y soltar el pulsador Bank Select;ahora el teclado CMK 149
tocará con un sonido del banco Nº1 para Control 32 y del banco 6 para Control 0.
Pulsador Tr anspose:Mantener presionado el pulsador T ranspose ,digitar el Nº de semitonos que se desean para
la transposición (±24 semitonos - ±2 octavas).
Al soltar el pulsador,CMK 149 transmitirá la variación.
Si se desea anular la transposición y hacerla retornar al valor 0 es suficiente presionar una vez el pulsador
Transpose sin digitar ningún número.
Ejemplo:Si se desea obtener una transposición de entonación de 7 semitonos sobre (una 5ª),mantener presionado el pulsador Transpose, digitar en el teclado numérico el número 7 soltar el pulsador Transpose; ahora el
teclado CMK 149 tocará con la entonación transportada de 7 semitonos (en el lugar del Do tendremos un Sol).
Funciones de memorización
Al finalizar el trabajo de elaboraciones MIDI,se tiene la posibilidad de memorizar la fijación de los parámetros
que se habían efectuado en 100 posiciones de memoria que pueden ser rápidamente recuperadas:
Para memorizar los parámetros que más les agradan,mantener presionados simultáneamente los pulsadores
Bank Select & MEMO,digitar el número de posición donde se desea memorizar.
Al soltar los pulsadores,CMK 149 transmitirá la variación.
Para recuperar los parámetros que se habían fijado anteriormente,mantener presionado el pulsador MEMO y
digitar el número de localización de la memoria que interesa.
Al soltar el pulsador,CMK 149 transmitirá la variación.
Nota:En el caso que se encuentre en estado de confusión con la programación y no recuerde lo que ha hecho,
inmediatamente después del encendido,presionando el pulsador Bank Selec t y digitando el Nº1 del teclado
numérico;al soltar el pulsador,CMK 149 enviará mandos de Program Change con el Nº1 y de Bank Select con el
Nº1 de modo que se pueda tener la certeza que se están fijando los parámetros del dispositivo MIDI en condiciones conocidas y controlables.
INDEX
ENGLISH
4
INTRODUCTION
5
INSTRUCTIONS FOR USE
6
CHANGING THE SETTINGS
IT ALIANO
7
GENERALITÀ
8
FACILE DA COLLEGARE
9
UTILIZZO
FRANÇAIS
GÉNÉRALITÉS
10
MODE D’EMPLOI
11
ELABORATIONS DE RÉGLAGE
12
DEUTSCH
ALLGEMEINES
13
GEBRAUCHSANWEISUNG
14
15
EINSTELLUNGSOPERATIONEN
ESPAÑOL
16
GENERALIDADES
17
INSTRUCCIONES PARA EL USO
18
ELABORACIONES PARA LA IMPLEMENTACIÓN DE LOS PARÁMETROS:
18
español
3

english
MIDI OUT
SWITCH ON-OFF
SWITCH ON-OFF
MIDI OUT
SWITCH ON-OFF
9V DC 500 mA
SWITCH ON-OFF
MIDI OUT
AUDIO OUT
MIDI IN
MIDI OUT
MIDI IN
SWITCH ON-OFF
9V DC 500 mA
SWITCH ON-OFF
MIDI OUT
MIDI INAUDIO OUT
SWITCH ON-OFF
9V DC 500 mA
The CMK 149 is a MIDI keyboard which connects to the sound card of a PC (game port) or to a sound module
(expander). If the CMK149 is connected to a PC with the cable supplied,it is powered directly from the PC and
does not require the use of an external power adapter .As soon as you have installed the software supplied you
can begin to make music. If you connect the CMK 149 to a sound module you will need to use an external
power adapter (9VDC,500ma,Tip Positive (+)).
Contents:
- CMK 149
- 1.8-metre (6-feet) Midi to game port cable (1xD-sub 15 male / 2xDIN 5 male)
- Two CD-ROMs
- Instruction manual
Conseguir en el proveedor habitual una interfaz MIDI con conexión USB.Conectar la salida MIDI situada en la
parte izquierda del teclado controlador MIDI a la entrada MIDI de la interfaz MIDI USB mediante un cable MIDI
estàndar.Después,conectar la salida USB al Mac mediante un cable USB.
Conexión con un módulo de sonido
Conectar el adaptador de voltaje a la toma de alimentación de electricidad y conectar el cable de salida en la
toma situada en la parte izquierda del teclado controlador MIDI (CMK 149 sólo funciona con una fuente de alimentación 9V DC 500 mA positivo -+-).
Conectar la salida MIDI situada en la parte izquierda del teclado controlador MIDI a la entrada MIDI del módulo de sonido mediante un cable MIDI estàndar.Después,conectar las salidas de audio del módulo de sonido al
sistema de amplificación.
Technical Specifications
- 49 full size synth action keys (4 octaves C-C)
- Velocity Sensitive
- Compatible with all PC Sound Cards and/or or sound modules
- Pitch & Modulation Wheels
- MIDI Out jack
- 3 power systems:
1) Input for external power adapter (9VDC,500mA,Tip Positive (+))
2) PC sound card through the MIDI cable provided
3) 9 v.battery
- Sustain Pedal Jack
- ON/OFF switch with LED
- 1 switch for Program change
- 1 switch for Bank Select
- 1 switch for Transpose
- 1 switch for Midi Channel
- 1 switch for DEMO SONG/ MEMORY functions
- Dimensions:cm 81 x 18 x 6 (in.32 x 7 x 2.5)
- Weight: kg 2,5 (5.5 lb.)
Easy to connect:
Connection to PC
Using the cable supplied,insert the D-Sub 15 male plug into the serial port of the sound card already installed
in your PC,then insert the Din 5 male IN connector in the M idi Out por t of your CMK 149 keyboard.Your CMK
149 keyboard will also be powered through this connection.
Conexión a un sistema MIDI
Conectar el adaptador de voltaje a la toma de alimentación de electricidad y conectar el cable de salida en la
toma situada en la parte izquierda del teclado controlador MIDI (CMK 149 sólo funciona con una fuente de alimentación 9V DC 500 mA positivo -+-).
Conectar la salida MIDI situada en la parte izquierda del teclado controlador MIDI a la entrada MIDI del teclado
maestro mediante un cable MIDI estàndar. D espués,conectar la salida MIDI del teclado maestro a la entrada
MIDI de los módulos de sonido y las salidas de audio al mezclador o al sistema de amplificación.
USO:
Con PC y/o Mac
Tras efectuar la conexión del CMK 149 con vuestro PC y/o Mac y una vez instalados los programas incluidos en
el suministro,hay que reiniciar el ordenador; ahora también el CMK 149 debería tener el LED rojo encendido;
abrid el programa musical y empezad con vuestras composiciones o con las producciones multipista.
Connection to an Apple (Macintosh) Computer
Connect the power adapter to the power input socket located on the left hand side of the CMK 149.Then connect the power adapter to the electrical wall socket.Please note that the CMK 149 works only with a 9VDC,
500ma,Tip Positive (+) power supply.
4
N.B.: Atención,si presionando las teclas del teclado no oís ningún sonido hay que comprobar que:
· el ordenador esté encendido,
· el LED rojo del teclado esté encendido,
· estén conectados los altavoces,
· los altavoces estén encendidos,
· haya sido lanzado el programa musical,
tras comprobar todos los puntos antedichos,si el teclado sigue sin emitir sonidos,entonces comprobar la con-
figuración Midi de la vuestra tarjeta sonora.
español
17

español
MIDI OUT
SWITCH ON-OFF
SWITCH ON-OFF
MIDI OUT
SWITCH ON-OFF
9V DC 500 mA
SWITCH ON-OFF
MIDI OUT
AUDIO OUT
MIDI IN
MIDI OUT
MIDI IN
SWITCH ON-OFF
9V DC 500 mA
SWITCH ON-OFF
MIDI OUT
MIDI INAUDIO OUT
SWITCH ON-OFF
9V DC 500 mA
CMK 149 es un teclado MIDI a conectar a una tarjeta sonora de un PC (game port) o a un módulo de sonidos
(expander). Conectando el CMK 149 a un PC con el cable incluido en el suministro,es alimentado directamente por el PC por lo que no precisa utilizar un alimentador externo.Instalando el software incluido en el suministro podréis acometer vuestras composiciones.Conectando el CMK 149 a un módulo de sonidos es necesario
utilizar un alimentador externo (9Vcc 500mA con el + en el centro).
Contenido:
- CMK 149
- Cable Midi de 1,8 metros (1xD-sub 15 macho / 2xDIN 5 macho)
- Dos CD-Rom
- Manual de instrucciones
It will be necessary to purchase a separate USB MIDI interface from your music instrument retailer.Install the
USB interface according to manufacturer’s instructions. Then, connect the MIDI Out por t, located on the left
hand side of your controller,to the MIDI Port on the USB inter face labeled "IN" using a standard MIDI cable
Connection to a Sound Module (Tone Generator)
Connect the power adapter to the power input socket located on the left hand side of the CMK 149.Then connect the power adapter to the electrical wall socket.Please note that the CMK 149 works only with a 9VDC,
500ma,Tip Positive (+) power supply.
Connect the MIDI Out port,located on the left hand side of your controller,to the MIDI Port labeled "IN" on the
Sound Module (Tone Generator) using a standard MIDI cable (not included).The connect the Sound Module
(Tone Generator) Audio Outputs to an appropriate amplification device. (EX; Home stereo, Mixing Board,
Amplifier, etc.)
Características técnicas
- 49 teclas con dimensiones estándar tipo piano (4 octavas Do-Do)
- Teclas dinámicas
- Compatible con todas las tarjetas de sonido de PC y/o expander
- Ruedas “Pitch Bend”y modulación
- 1 salida MIDI
- 2 sistemas de alimentación:
1) 1 enchufe DC para alimentación externa (9VDC 5000mA con + en el centro)
2) Alimentación por tarjeta de sonido de PC mediante el cable MIDI proporcionado
- Entrada jack para pedal de sustain
- 1 interruptor On/Off con luz piloto
- 1 switch para Program change
- 1 switch para Bank Select
- 1 switch para Transpose
- 1 switch para Midi Channel
- 1 switch para funciones DEMO SONG/ MEMORY
- Dimensiones:81 x 18 x 6
- Peso:kg 2,5
FÁCIL DE CONECTAR:
Conexión al PC
Utilizando el cable incluido en el suministro,enchufar la clavija D-Sub 15 macho en el puerto serie de la tarjeta
sonora previamente instalada en vuestro PC,seguidamente enchufar el conector Din 5 macho IN en el puerto
Midi Out de vuestro teclado CMK 149,por esta conexión también será alimentado vuestro teclado CMK 149.
Connection to any other MIDI device
Connect the power adapter to the power input socket located on the left hand side of the CMK 149.Then connect the power adapter to the electrical wall socket.Please note that the CMK 149 works only with a 9VDC,
500ma,Tip Positive (+) power supply.
Connect the MIDI Out port,located on the left hand side of your controller,to the MIDI Port labeled "IN" on the
MIDI device that you wish to control,using a standard MIDI cable.
USE:
With PC and/or Mac
After connecting the CMK 149 to your PC and/or Mac and installing the software supplied,restart your computer.At this point the CMK 149 should have the red LED light on.Start the musical software and begin your
compositions or multi-track productions.
Conexión al MAC
Conectar el adaptador de voltaje a la toma de alimentación de electricidad y conectar el cable de salida en la
toma situada en la parte izquierda del teclado controlador MIDI (CMK 149 sólo funciona con una fuente de alimentación 9V DC 500 mA positivo -+-).
16
NOTE: Important - if there is no sound when you press the keys on the keyboard check that:
· the computer is on,
· the red LED light on the keyboard is on,
· the speakers are connected,
· the speakers are on,
· the music programme is running,
If there is still no sound after you have checked all these points,check the MIDI settings of your sound card.
english
5

With a Sound Module and/or MIDI System
After checking the connection described above your system is ready for use.CMK 149 is ready to transmit on
MIDI channel 1 from the full range of 49 keys.
Middle C is located at the start of the third octave.Pressing the keys of the CMK 149 keyboard sends MIDI note
data with velocity information.
Changing the settings:
MIDI Channel button - The MIDI Channel function is used to select which MIDI channel you want the CMK-
149 to send messages on.You can select the MIDI channel number by pressing and holding the MIDI Channel
button and entering the number in the second octave/numeric entry field which corresponds to the channel
you desire. Values run from 1-16
The CMK 149 will transmit on the chosen channel when you let go of the button.
Example:If you want to transmit on MIDI Channel 8,hold down the MIDI Channel button, enter the number 8
on the numeric entry field and let go of the MIDI Channel button.The CMK 149 keyboard will now transmit on
MIDI Channel 8.
Program Change Button -The program change function is used to select which preset sound you want from your
MIDI module.You can select the program change number by pressing and holding the Program Change button
and entering the number in the second octave/numeric entry field which corresponds to the preset sound you
desire.When you release the Program Change button,the message will be sent.Values run from 1-128.
The CMK 149 will transmit the program change when you let go of the button.
Example:I f you want to play sound No.56 on the MIDI device,hold down the Program Change button,enter
the number 56 on the numeric entry field and let go of the Program Change button.The CMK 149 will now
play with sound No.56.
Bank Select Button - The bank select function allows you to change the patch bank of your MIDI module or
keyboard.Due to different manufacturer approaches to this function, the format for entering this parameter
depends on the model and manufacturer of your MIDI module or keyboard. Please refer to the MIDI
Implementation Chart found in the manual of your MIDI module or keyboard for information on the format
that your unit requires.
1) If your module requires a value sent only on control channel 32,you will simply need to press and hold the
Bank Select button,and enter the bank number desired in the second octave/numeric entry field. When you
release the Bank Select button,the message will be sent.
2) If your module requires values to be sent on control channel 32 and control channel 0,you will need to press
and hold the Bank Select button,and first enter the value needed for cc;32 in the second octave/numeric entry
field.Then,while continuing to hold the Bank Select button,press the key labeled “-/H”(indicates that what follows is the “higher byte”) and then enter the value needed for cc;0 in the second octave/numeric entry field.
When you release the Bank Select button,the messages will be sent.
The CMK 149 will transmit the bank change when you let go of the button.
NOTE: Together with the Bank Select command, the CMK 149 also sends the last Program Change number
entered. This is because not all MIDI devices will switch the bank unless they subsequently receive a Program
Change.
Transpose Button - The Transposition function is used to transpose the output of the CMK-149.The transposition range is +/- 24 semitones. You can select the transposition amount (up or down) by pressing and holding the Transpose button and entering the number in the second octave/numeric entry field which corresponds to the transposition amount you desire. Please note that to enter negative (down) transposition
amount you must first enter “-“,which can be found on the “Bb”key (-/H)
When you let go of the button,the CMK 149 will now be transposed by the amount chosen.
If you want to cancel the transposition and return to a value of 0,just press the Transpose button once without
entering any number.
Example:If you want to obtain a transposition of pitch to 7 semitones higher (a 5th),hold down the T r anspose
button,enter the number 7 on the numeric entr y field and let go of the Transpose button. The CMK 149 will
now play 7 semitones higher.(EX; A played ‘C’will sound as a ‘G’).
Memory functions.
The CMK 149 can store MIDI settings in 100 memory locations for quick recall.
To stor e a setting,hold down both the 1) Bank Select and 2) MEMORY buttons and enter the memory location
number that you wish to store the settings to on the second octave/numeric entry field.
The CMK 149 will store your settings in the memory location when you let go of the buttons.
To recall a setting stored previously,hold down the MEMORY button and enter your chosen memory location
number.
The CMK 149 will quickly recall the stored setting when you let go of the button.
NOTE: If you become confused during programming and cannot remember what you have done,press the
Bank Select button and enter the number 1 on the second octave/numeric entry field immediately after turning on the CMK 149. When you let go of the button,the CMK 149 will send a Program Change command with
number 1 and a Bank Select command with number 1 so that you can be sure of finding the MIDI device in a
known and controllable setting.
Mit Klangmodul und/oder MIDI-System
Nachdem der oben beschriebene Anschluss durchgeführt wurde,ist Ihr System bereit für den Gebrauch.
Das CMK 149 ist betriebsbereit,um auf dem MIDI - Kanal Nr.1 den vollständigen Tonbereich der 49 Tasten zu
übertragen.Das mittlere C befindet sich am Beginn der dritten Oktave.
Wenn die Tasten der Tastatur gedrückt werden, überträgt das CMK 149 MIDI - Notendaten inklusive
Informationen zur Dynamikgeschwindigkeit.
EINSTELLUNGSOPERATIONEN:
MIDI Channel - Taste - Die MIDI Channel Taste wird gedrückt gehalten und auf der Nummerntastatur die
Nummer des gewünschten Midi - Kanals eingegeben.(1 - 16)
Beispiel: Wenn man auf dem MIDI - Kanal Nr. 8 über tragen möchte,muss die MIDI Channel - Taste gedrückt
werden,dann ist auf der Nummerntastatur die Zahl 8 einzugeben; wenn die MIDI Channel - Taste nun losgelassen wird,dann überträgt die - Tastatur auf dem Midi - Kanal 8.
Program Change -Taste - Die Program Change - Taste wird gedrückt und auf der Nummerntastatur wird die
Zahl des gewünschten Sounds eingegeben (1 - 128)
Beispiel: Wenn der Sound Nummer 56 des MIDI - Elements gewählt werden soll, muss die Taste Program
Change gedrückt gehalten und auf der Nummerntastatur die Zahl 56 eingegeben werden;daraufhin wird die
Taste Program Change losgelassen und das CMK 149 - Tastatur spielt mit dem Sound Nr.56.
Bank Select - Taste - Die Bank Select - Taste wird gedrückt gehalten; falls nun Ihr Midi - Element, um die
Klangkanalgruppe zu wechseln, nur Control 32 benötigt, dann wird auf der Nummerntastatur die Zahl der
gewünschten Kanalgruppe angegeben,wenn statt dessen Ihr MIDI - Element den vollständigen Befehl für den
Kanalgruppenwechsel Control 32 + Control 0 benötigt, dann wird die Zahl für Control 32 eingegeben,
daraufhin wird die mit H gekennzeichnete Taste gedrückt und die Zahl für Control 0 eingegeben.
Beim Loslassen der Taste wird das CMK 149 die Änderung weitergeben.
ANMERKUNG: Wenn das CMK 149 an den Befehl von Bank Select gebunden ist,leitet es ebenfalls die letzte
Nummer des zuvor geänderten Program Changes weiter;dies geschieht,weil nicht alle MIDI - Elemente die
Kanalgruppe umschalten,ohne im Folgenden den Program Change zu erhalten.
Beispiel:Wenn ein Sound aus der Klanggruppe 4 eines MIDI - Elements erzeugt werden soll,welches ausschließlich Control 32 benötigt,wird die Taste Bank Select gedrückt gehalten und auf der Nummerntastatur die
Nummer 4 eingegeben,dann wird die Taste Bank Select losgelassen und nun wird die Tastatur das CMK 149
mit dem Sound der Klanggruppe 4 spielen.
Wenn ein Sound der Klanggruppe 1 für Control 32 und ein Sound der Klanggruppe 6 für Control 0 des Midi Elements erzeugt werden soll,dann wird die Taste Bank Select gedrückt gehalten,auf der Nummerntastatur
die Zahl 1 eingegeben, der Buchstabe H der Nummerntastatur eingegeben und daraufhin die Zahl 6.Wenn
nun die Taste Bank Select freigegeben wird, dann spielt die Tastatur das CMK 149 mit einem Sound der
Klanggruppe 1 auf Control 32 und einem Sound der Klanggruppe 6 auf Control 0.
Transpose - Taste - Die Transpose - Taste wird gedrückt gehalten und die Zahl der gewünschten Halbtöne für
die Transponierung eingegeben (+/- 24 Halbtöne - +/- 2 Oktaven).
Beim Loslassen der Taste wird das CMK 149 die Änderung weitergeben.
Wenn die Transponierung aufgehoben und auf den Wert 0 zurückgebracht werden soll,reicht es aus,einmal
die Transpose - Taste zu drücken ohne irgendeine Zahl einzugeben.
Beispiel:Wenn eine Klangtransponierung von 7 Halbtönen aufwärts (eine Quinte) erzielt werden soll,wird die
Transpose - Taste gedrückt gehalten,auf der Nummerntastatur die Zahl 7 eingegeben, die Transpose - Taste
wieder freigegeben und die CMK 149 - Tastatur wird in der um sieben Halbtöne transponierten Tonlage spielen (anstatt eines C’s wird ein G erzeugt).
Speicherfunktionen
Zum Abschluss der MIDI - Einstellungsoperationen hat man die Möglichkeit,die durchgeführten Einstellungen
hundert,schnell abrufbaren Speicherlok alisierungen zuzweisen:
Um eine gewünschte Einstellung zu speichern, werden die MEMO - und die Bank Select - Taste gleichzeitig
gedrückt,sodann wird die Zahl der gewünschten Speicherlokalisation eingegeben.
Beim Loslassen der Tasten wird die CMK 149 die Einstellung speichern.
Um eine zuvor gespeicherte Einstellung zurückzurufen,wird die MEMO - Taste gedrückt gehalten und die Zahl
der gewünschten Speicherlokalisation eingegeben.
Beim Loslassen der Taste wird die CMK 149 rasch die gespeicherte Einstellung zurückrufen.
ANMERKUNG: Falls man bei der Programmierung in Verwirrung geraten ist und sich nicht mehr darüber im
Klaren ist, welche Einstellungen durchgeführt worden sind, wird das CMK 149, sofort nach dem Anstellen,
wenn die Bank Select - Taste gedrückt wird und auf der Nummerntastatur die Zahl 1 eingegeben wird,bei der
Tastenfreigabe Program Change - Befehle mit der Nummer 1 und Bank Select - Befehle mit der Nummer 1
übertragen, so dass man die Sicherheit hat, das MIDI - Element in einer bekannten und kontrollierbaren
Situation einzustellen.
6
english
deutsch
15

Controllers,welcher sich an der linken Rückseite befindet, mit einem üblichen standard MIDlk abel, mit dem
SWITCH ON-OFF
MIDI OUT
SWITCH ON-OFF
9V DC 500 mA
SWITCH ON-OFF
MIDI OUT
AUDIO OUT
MIDI IN
MIDI OUT
MIDI IN
SWITCH ON-OFF
9V DC 500 mA
SWITCH ON-OFF
MIDI OUT
MIDI INAUDIO OUT
SWITCH ON-OFF
9V DC 500 mA
MIDI OUT
SWITCH ON-OFF
MlDI-INput Ihres MIDI-USB Interface.Den USB-lnterface Output verbinden Sie mit dem MAC Soundboard via
USB Kabel.
Anschluss an MIDI Soundmodulen (Tone Generator)
Verbinden Sie das optional erhältliche Netzteil mit dem kleinen Netzteilanschluß,welcher sich auf der linken
Rückseite Ihres MlDlcontroller-Keyboards befindet.Danach verbinden Sie den Netzstecker mit lhrem häuslichen Stromnetz 240V/16A.(CMK 149 arbeitet nur mit Netzteilen,die mit einer Spannung von 9V DC 500mA
arbeiten.Die Polarität muß innen plus ( + ),und außen minus ( - ) sein.
Verbinden Sie den MlDl-Out, welcher sich auf der linken Rückseite Ihre MlDI-Controllers befindet, mit dem
MIDI INPUT Ihres Sound Modules oder MlDI-Expander mit einem standard MlDlkabel.Dann verbinden Sie den
Audio Out Ihres Modules mit Ihrem Hifi-oder PA System.Wir wünschen Ihnen viel Vergnügen mit Ihrer eigenen Musik.
italiano
CMK 149 è una tastiera MIDI da collegare ad una scheda audio di un PC (game port) o ad un modulo suoni
(expander). Collegando la CMK 149 ad un PC tramite il cavo in dotazione,essa viene direttamente alimentata
dal PC quindi non necessita l’utilizzo di un alimentatore esterno.Installando il software in dotazione potrete
iniziare le Vostre composizioni. Collegando la cmk 149 ad un modulo suoni è necessario l’utilizzo di un alimentatore esterno (9VDC 500mA con il + al centro).
Contenuto:
- CMK 149
- Cavo Midi da 1,8 metri (1xD-sub 15 maschio / 2xDIN 5 maschio)
- Due CD-Rom
- Manuale istruzioni
Anschluss an einem MIDI System
Verbinden Sie das optional erhältliche Netzteil mit dem kleinen Netzteilanschluß,welcher sich auf der linken
Rückseite Ihres MlDlcontroller-Keyboards befindet.Danach verbinden Sie den Netzstecker mit lhrem häuslichen Stromnetz 240V/16A.(CMK 149 arbeitet nur mit Netzteilen,die mit einer Spannung von 9V DC 500mA
arbeiten.Die Polarität muß innen plus ( + ),und außen minus ( - ) sein.
Verbinden Sie den MlDl-Out Ihres MIDI-Controllers, welcher sich auf der linken Rückseite Ihres Keyboards
befindet, mit dem MIDI Input Ihres Masterkeyboards mit einem handelsüblichen standard MIDI kabel.
Verbinden Sie den MIDI OUT Ihres Masterkeyboards mit dem MIDI Input Ihres Expanders und den AudioOutput mit einem Mischpult,Hifi oder PA System um ein professionelles Heimstudio zusammenzustellen.
GEBRAUCH:
Mit PC und/oder Mac
Nachdem Sie die CMK 149 an Ihren PC und/oder Mac angeschlossen und die mitgelieferte Software installiert
haben,führen Sie einen Neustart Ihres Computers durch:nun sollte auch die rote LED auf der CMK 149 leuchten.Starten Sie das Musik programm und beginnen Sie Ihre Kompositionen oder Multi-Track-Produktionen.
N.B.: Achtung! Falls durch Drücken der Tasten Ihrer Tastatur keine hörbaren Töne erzeugt werden,überprüfen Sie,ob alle folgenden Bedingungen erfüllt sind:
· der Computer ist eingeschaltet,
· die rote LED der Tastatur leuchtet,
· es sind Lautsprecher vorhanden,
· die Lautsprecher sind eingeschaltet,
· ein Musikprogramm wurde gestartet.
Sind alle oben stehenden Punkte erfüllt,und die Tastatur erzeugt noch immer keine Töne,dann überprüfenSie
die MIDI-Einstellungen Ihrer Soundkarte.
deutsch
Specifiche T ecniche:
- 49 tasti di dimensioni standard tipo Pianoforte (4 ottave DO-DO)
- Tastiera dinamica
- Compatibile con tutte le schede audio PC e/o moduli suoni
- Ruota per controllo di Modulazione
- Ruota per controllo Pitch Bender
- 1 uscita midi
- Due sistemi di alimentazione:
1.Ingresso DC per alimentazione esterna (9VDC 500mA con + al centro)
2.Alimentazione da scheda audio PC tramite cavo midi incluso
- Ingresso Jack per Pedale Sustain
- Interruttore ON/OFF con spia luminosa
- Switch per Cambio Programmi
- Switch per Selezione Banchi
- Switch per Selezione Canale Midi
- Switch per Trasposizione
- Switch per Funzione di Memoria
- Dimensioni:cm 81 x 18 x 6
- Peso:Kg 2,5
FACILE DA COLLEGARE:
Collegamento a PC
Utilizzando il cavo in dotazione,inserite la presa D-Sub 15 maschio alla porta seriale della sound board precedentemente installata al Vostro PC, poi inserite il connettore Din 5 maschio IN alla porta Midi Out della Vostra
tastiera CMK 149,da questo collegamento la Vs.tastiera CMK 149 sarà anche alimentata.
Collegamento a MAC
Collegare l’adattatore di tensione alla presa elettrica di rete, e collegare il cavo di uscita all’ingresso di alimentazione della Vostra tastiera midi posizionata nel lato sinistro.(CMK 149 utilizza come alimentazione solo
9VDC 500mA con polarità positiva + al centro)
14
7

Chiedete al Vostro negoziante di fiducia un interfaccia Midi-USB, poi collegate l’uscita Midi-Out della Vostra
SWITCH ON-OFF
MIDI OUT
SWITCH ON-OFF
9V DC 500 mA
SWITCH ON-OFF
MIDI OUT
AUDIO OUT
MIDI IN
MIDI OUT
MIDI IN
SWITCH ON-OFF
9V DC 500 mA
SWITCH ON-OFF
MIDI OUT
MIDI INAUDIO OUT
SWITCH ON-OFF
9V DC 500 mA
MIDI OUT
SWITCH ON-OFF
tastiera alla uscita Midi-In dell’interfaccia,utilizzando un cavo midi standard,poi collegare l’uscita USB al Vostro
computer MAC utilizzando un cavo USB standard.
Collegamento a modulo suoni (expander)
Collegare l’adattatore di tensione alla presa elettrica di rete, e collegare il cavo di uscita all’ingresso di alimentazione della V ostra tastier a midi posizionata nel lato sinistr o.(CMK 149 utilizza come alimentazione solo 9VDC
500mA con polarità positiva + al centro)
Collegare l’uscita Midi-Out della Vostra tastiera cmk 149 all’ingresso Midi-in del modulo Suoni utilizzando un
cavo midi standard,poi collegare il modulo suoni al Vs.impianto stereo utilizzando l’apposito cavo Audio.
Collegamento ad un sistema midi
Collegare l’adattatore di tensione alla presa elettrica di rete, e collegare il cavo di uscita all’ingresso di alimentazione della V ostra tastier a midi posizionata nel lato sinistr o.(CMK 149 utilizza come alimentazione solo 9VDC
500mA con polarità positiva + al centro)
Collegare l’uscita Midi-Out della Vostra tastiera cmk 149 all’ingresso Midi-in della Vostra masterkeyboard utilizzando un cavo midi standard,poi collegare la masterkeyboard utilizzando l’uscita Midi-Out con il Vostro
sistema di expander all’ingresso Midi-In, e collegare l’expander al sistema Audio utilizzando l’apposito cavo
Audio.
deutsch
CMK 149 ist eine MIDI-Tastatur zum Anschluss an die an Soundkarte eines PCs (Spiel-Schnittstelle) oder an ein
Klangmodul (Expander).Sobald Sie das CMK 149 mit Hilfe des mitgelieferten Kabels mit dem PC verbinden,
wird dieses direkt vom PC versorgt,es ist also kein externes Netzteil erforderlich.Sobald Sie die mitgelieferte
Software installiert haben, können Sie mit dem Komponieren beginnen. Wenn Sie das CMK 149 an ein
Klangmodul Anschließen,ist der Einsatz eines Netzteils (9 V/DC 500 mA,mit dem“+”Pol in der Steckerbuchse)
notwendig.
Inhalt:
- CMK 149
- Midi-Kabel 1,8 m lang (1xD-sub 15 Stecker / 2xDIN 5 Stecker)
- Zwei CD-Rom
- Bedienungsanleitung
Technische Besonderheiten
- 49 Tasten in Standarddimensionen vom Typ einer Klaviertastatur (vier Oktaven DO - DO)
- Dynamische Tasten
- Kompatibel mit allen Soundkarten PC und/oder expander
- Höhen- und Modulationseinstellungsräder
- Ein Ausgang Midi
- 2 Versorgungssysteme:
1) Buchse für externe Netzstromversorgung (9 VDC 500 mA mit + in der Mitte)
2) Versorgung aus PC Soundkarte durch MIDI-Kabel (eingeschlossen)Eine DC Buchse
- Buchse - Jack - Buchse
- 1 Taster für Program change
- 1 Taster für Bank Select
- 1 Taster für Transpose
- 1 Taster für Midi Channel
- 1 Taster für DEMO SONG/ MEMORY funktionen
- Ein ON/OFF - Schalter mit Kontrolllämpchen
- Maße:cm 81 x 18 x 6
- Gewicht:kg 2,5
UTILIZZO:
Con PC e/o Mac
Dopo aver effettuato il collegamento della CMK 149 al Vs PC e/o Mac e installati i software in dotazione eseguire il riavvio del Vostro computer, a questo punto anche la CMK 149 dovrebbe avere il led rosso acceso,aprite il
software musicale e iniziate le Vostre composizioni o produzioni multi-track.
N.B.: Attenzione se premendo i tasti della tastiera non udite un qualsiasi suono verificate che:
· il computer sia acceso,
· il led rosso della tastiera sia acceso,
· siano presenti delle casse,
· siano accese le casse,
· sia stato lanciato il programma musicale,
italiano
8
ANSCHLUSS LEICHT GEMACHT:
Anschluss an einen PC
Mit Hilfe des mitgelieferten Kabels schließen Sie den 15- poligen Sub-D Steckverbinder an die serielle
Schnittstelle der auf Ihrem PC installierten Soundkarte an.Dann schließen Sie den 5-poligen DIN-Stecker an die
Midi-Out-Buchse Ihrer CMK 149-Tastatur an.Durch diese Verbindung wird Ihr CMK 149-Tastatur auch versorgt.
Anschluss an MAC
Verbinden Sie das optional erhältliche Netzteil mit dem kleinen Netzteilanschluß,welcher sich auf der linken
Rückseite Ihres MlDlcontroller-Keyboards befindet.Danach verbinden Sie den Netzstecker mit lhrem häuslichen Stromnetz 240V/16A.(CMK 149 arbeitet nur mit Netzteilen,die mit einer Spannung von 9V DC 500mA
arbeiten.Die Polarität muß innen plus ( + ),und außen minus ( - ) sein.
Fragen Sie Ihren Fachhändler nach einem MIDI-USB Interface. Verbinden Sie den MIDI OUT Ihres MlDI-
13

Avec Module de Sons et/ou Système Midi
Après avoir effectué la connexion décrite ci-dessus,votre système est prêt à l’emploi.Le CMK 149 est actif pour
transmettre sur le canal MIDI n° 1 sur l’étendue complète des 49 touches.
Le Do central est situé au début de la troisième octave.En frappant sur les touches du clavier, le CMK 149
envoie des données MIDI de note avec des renseignements de dynamique et de vélocité.
RÉGLAGES :
Bouton MIDI Channel : maintenir enfoncé le bouton MIDI Channel,entrer sur le clavier numérique le n° du
canal MIDI souhaité (1-16).
En libérant le bouton,le CMK 149 transmet la variation.
Exemple :Si l’on veut transmettre sur le canal MIDI n°8,maintenir enfoncé le bouton MIDI Channel,entrer sur
le clavier numérique le numéro 8,relâcher le bouton MIDI Channel; le clavier CMK 149 transmet sur le canal
MIDI 8.
Bouton Program Change : maintenir enfoncé le bouton Program Change,entrer sur le clavier numérique le
n° du son que l’on souhaite obtenir (1-128).En libérant le bouton,le CMK 149 transmet la variation.
Exemple :si l’on désire obtenir le son n° 56 du dispositif MIDI, maintenir enfoncé le bouton Program Change,
entrer sur le clavier numérique le numéro 56,libérer le bouton Program Change; le clavier CMK 149 joue le
son n° 56.
Bouton Bank Select: maintenir enfoncé le bouton Bank Select ; si votre appareil MIDI n’a besoin que du
Control 32 pour changer de banque de son,entrer sur le clavier numérique le n° de banque souhaité ;au contraire, si votre appareil MIDI a besoin de la commande complète de changement de banque, Control 32 +
Control 0,entrez le numéro pour Control 32 puis entrez la touche indiquée par H et entrez enfin le numéro
pour le Control 0.En libérant le bouton,CMK 149 transmet la variation.
N.B.Le CMK 149 associé à la commande de Bank Select envoie aussi le dernier n° de Program Change précédemment effectué,tous les dispositifs MIDI ne changeant pas de banque sans recevoir de Program Change.
Exemple :si l’on désire obtenir un son de la banque 4 d’un appareil MIDI qui n’a besoin que du Control 32,
maintenir enfoncé le bouton Bank Select,entrer sur le clavier numérique le numéro 4,libérer le bouton Bank
Select ;le clavier CMK 149 joue un son de la banque n°4.
Si l’on désire obtenir un son de la banque 1 pour le Control 32 et de la banque 6 pour le Control 0 du dispositif MIDI,maintenir enfoncé le bouton Bank Select, entrer sur le clavier numérique le numéro 1,entrer le signe
H sur le clavier numérique et ensuite le numéro 6,libérer le bouton Bank Select ;le clavier CMK 149 joue alors
un son de la banque n°1 pour Control 32 et de la banque 6 pour Control 0.
Bouton Transpose :maintenir enfoncé le bouton Transpose,entrer le n° de demi-tons souhaités pour la transposition (+/- 24 demi-tons - 1/-2 octaves)
En libérant le bouton,le CMK 149 transmet la variation.
Si l’on souhaite annuler la transposition et la ramener à la valeur 0, il suffit d’enfoncer une fois le bouton
Transpose sans frapper aucun numéro.
Exemple :si l’on désire obtenir une transposition de 7 demi-tons au-dessus (une 5ème),maintenir enfoncé le
bouton Transpose,entrer sur le clavier numérique le numéro 7,libérer le bouton Transpose;le clavier CMK 149
joue alors avec une transposition de 7 demi-tons (au lieu d’un DO nous aurons un Sol).
Fonctions de stockage
A la fin du travail de réglages MIDI,il est possible de stocker les réglages effectués dans 100 emplacements de
mémoire rapidement rappelables.
Pour stocker un réglage,appuyez en même temps sur les boutons Bank Select & MEMO,entrez le n° d’emplacement où vous désirez mettre en mémoire.
En libérant les boutons,le CMK 149 met en mémoire votre travail.
Pour rappeler un réglage effectué auparavant, maintenir enfoncé le bouton MEMO et frapper le n° d’emplacement de mémoire choisi.
En libérant le bouton,CMK 149 rappelle immédiatement le réglage stocké.
N.B. En cas de doute sur la programmation et si vous ne vous souvenz pas de ce que vous avez programmé,
appuyez sur le bouton Bank Select et entrez le n° 1 sur le clavier numérique,dès l’allumage du clavier. Après
avoir libéré le bouton,le CMK 149 enverra des commandes de Program Change avec le n°1 et une commande de Bank Select avec n° 1 de tlle sorte que vous aurez la certitude de trouver l’appareil MIDI dans une configuration connue et vérifiable.
una volta verificati i punti sopra elencati se la tastiera non emette ancora suoni,allora verificare il settaggio
midi della Vostra sound board.
Con Modulo Suoni e/o Sistema Midi
Dopo aver effettuato il collegamento sopra descritto il Vs.sistema è pronto per l’utilizzo,CMK 149 è attiva per
trasmettere sul canale MIDI n°1 ad estensione completa di 49 tasti.
Il DO centrale è posizionato all’inizio della terza ottava.Premendo i tasti della tastiera,CMK 149 invia dati midi
di nota con informazioni di dinamica e di velocità.
ELABORAZIONI DI SETTAGGIO:
Pulsante MIDI Channel - Tenere premuto il pulsante MIDI Channel, digitare sulla tastierina numerica il n° di
canale MIDI che interessa (1-16).
Al rilascio del pulsante CMK 149 trasmetterà la variazione.
Esempio:Se si vuole trasmettere sul canale MIDI n°8,tenere premuto il pulsante MIDI Channel,digitare sulla
tastierina numerica il numero 8,rilasciare il pulsante MIDI Channel,ora la tastiera CMK 149 trasmette sul canale MIDI 8.
Pulsante Program Change -Tenere premuto il pulsante Program Change,digitare sulla tastierina numerica
il n° di suono che si vuole ottenere (1- 128).
Al rilascio del pulsante CMK 149 trasmetterà la variazione.
Esempio:Se si vuole ottenere il suono n° 56 del dispositivo MIDI ,tenere premuto il pulsante Program Change,
digitare sulla tastierina numerica il numero 56,rilasciare il pulsante Program Change,ora la tastiera CMK 149
suonerà con il suono n°56.
Pulsante Bank Select - Tenere premuto il pulsante Bank Select,ora se il vostro dispositivo MIDI per cambiare
banco di suoni ha bisogno solamente del Control 32 digitare sulla tastierina numerica il n°di banco voluto;se
invece il vostro dispositivo MIDI necessita del c omando completo di cambio banco C ontrol 32 + C ontrol 0 digitare il numero per il Control 32 poi premere il tasto contrassegnato con H e digitare il numero per il Control 0.
Al rilascio del pulsante CMK 149 trasmetterà la variazione.
N.B.CMK 149 associato al comando di Bank Select invia anche l’ultimo n° di Program Change
precedentemente variato;questo perché non tutti i dispositivi MIDI commutano il banco senza ricevere successivamente il Program Change.
Esempio:S e si vuole ottenere un suono del banco 4 di un dispositivo MIDI che necessita del solo Control 32,
tenere premuto il pulsante Bank Select,digitare sulla tastierina numerica il numero 4,rilasciare il pulsante Bank
Select,ora la tastiera CMK 149 suonerà con un suono del banco n°4.
Se si vuole ottenere un suono del banco 1 per il Control 32 e del banco 6 per il Control 0 del dispositivo MIDI,
tenere premuto il pulsante Bank Select,digitare sulla tastierina numerica il numero 1,premere il segno H sulla
tastierina numerica e successivamente il numero 6,rilasciare il pulsante Bank Selec t, ora la tastiera CMK 149
suonerà con un suono del banco n°1 per Control 32 e del banco 6 per Control 0.
Pulsante Tr anspose - Tenere premuto il pulsante Transpose ,digitare il n° di semitoni voluti
per la trasposizione (+/- 24 semitoni - +/- 2 ottave).
Al rilascio del pulsante CMK 149 trasmetterà la variazione.
Se si vuole annullare la trasposizione e riportarla al valore 0 è sufficiente premere una volta il pulsante
Transpose senza digitare alcun numero.
Esempio:Se si vuole ottenere una trasposizione di intonazione di 7 semitoni sopra (una 5a),tenere premuto
il pulsante T ranspose ,digitare sulla tastierina numerica il numero 7,rilasciare il pulsante Transpose ,ora la tastiera CMK 149 suonerà con l’intonazione trasportata di 7 semitoni.(al posto di un Do avremo un Sol).
Funzioni di memorizzazione.
Alla fine del lavoro di elaborazioni MIDI si ha la possibilità di memorizzare i settaggi effettuati
in 100 locazioni di memoria velocemente richiamabili:
Per memorizzare un settaggio di vostro gradimento tenere premuti contemporaneamente i pulsanti Bank
Select & MEMO,digitare il n° di locazione dove desiderate memorizzare.
Al rilascio dei pulsanti CMK 149 memorizzerà il vostro lavoro.
Per richiamare un settaggio precedentemente eseguito tenere premuto il pulsante MEMO e digitare il n° di
locazione di memoria che interessa.
Al rilascio del pulsante CMK 149 richiamerà velocemente il settaggio memorizzato.
N.B.Nel caso che ci si trovi in condizioni di confusione nella programmazione e di non sapere
che cosa si sia fatto,CMK 149 appena dopo l’accensione premendo il pulsante Bank Select
e digitando il n° 1 della tastierina numerica,al rilascio del pulsante,invierà comandi di
Program Change con n°1 e di Bank Select con n° 1 in modo da poter avere la certezza di settare il dispositivo
MIDI in situazione conosciuta e controllabile.
12
français
italiano
9

français
MIDI OUT
SWITCH ON-OFF
SWITCH ON-OFF
MIDI OUT
SWITCH ON-OFF
9V DC 500 mA
SWITCH ON-OFF
MIDI OUT
AUDIO OUT
MIDI IN
MIDI OUT
MIDI IN
SWITCH ON-OFF
9V DC 500 mA
SWITCH ON-OFF
MIDI OUT
MIDI INAUDIO OUT
SWITCH ON-OFF
9V DC 500 mA
Demandez à votre revendeur une interface MIDI-USB,connectez la sortie MIDI située sur le côté gauche de
votre clavier de contrôle MIDI à l'entrée MIDI de cette interface en utilisant un câble MIDI standard,puis connectez la sortie MIDI de l'interface USB au port son de votre Mac au moyen du câble USB.
Connexion à un module de sons (expandeur)
Connectez l'adaptateur à la prise de courant et connectez le câble de sortie à la prise d'entrée d'alimentation
située sur le côté gauche de votre clavier de contrôle MIDI (le CMK 149 ne fonctionne qu'avec une alimentation 9 V DC 500 mA positive (+)).
Le CMK 149 est un clavier MIDI qui se connecte à la carte-son d’un PC (game port) ou à un module de sons
(expandeur). En reliant le CMK 149 à un PC par l’intermédiaire du câble fourni avec le clavier, ce dernier est
directement alimenté par le PC et n’a donc pas besoin d’une alimentation externe.Après avoir installé le logiciel fourni,vous pouvez commencer vos compositions.Pour connecter le CMK 149 à un module de sons,il est
nécessaire d’utiliser une alimentation externe (9VDC 500mA avec le + au centre).
Contenu:
- CMK 149
- Câble Midi de 1,8 mètres (1xD-sub 15 mâle / 2xDIN 5 mâle)
- Deux CD-Rom
- Manuel d’instructions
Caractéristiques T echniques
- 49 touches standard (4 Octaves DO-DO)
- Clavier dynamique
- Compatible avec toutes les cartes-son de PC et/ou expandeur
- Molettes de Pitch-Bend et de Modulation
- 1 sortie Midi
- 2 systèmes d'alimentation:
1) 1 entrée DC pour alimentation externe (9VDC 500mA avec + au centre)
2) Alimentation par la Carte-son de l’ordinateur par le biais du câble MIDI inclus.
- Entrée jack pour pédale Sustain
- 1 interrupteur ON/OFF avec témoin lumineux
- 1 switch pour Program change
- 1 switch pour Bank Select
- 1 switch pour Transpose
- 1 switch pour Midi Channel
- 1 switch pour fonctions DEMO SONG/ MEMORY
- Dimensions:cm 81 x 18 x 6
- Poids:2,5 kg
Connectez la sortie MIDI située sur le côté gauche de votre clavier de contrôle MIDI à l'entrée MIDI de votre
module de son ou expandeur en utilisant le câble MIDI standard. Puis connectez la sortie audio de votre
module de son à votre système Hi-Fi,et en avant la musique !
Connexion à votre systéme MIDI
Connectez l'adaptateur à la prise de courant et connectez le câble de sortie à la prise d'entrée d'alimentation
située sur le côté gauche de votre clavier de contrôle MIDI (le CMK 149 ne fonctionne qu'avec une alimentation 9 V DC 500 mA positive (+)).
Connectez la sortie MIDI située sur le côté gauche de votre clavier de contrôle MIDI à l'entrée MIDI de votre
clavier-maître en utilisant le câble MIDI standard puis connectez la sortie MIDI de votre clavier-maître à l'entrée MIDI de votre expandeur et connectez la sortie audio au mixeur et au systéme Hi-Fi pour créer votre
Home-Studio professionnel.
Facile à connecter :
Connexion à un PC
En utilisant le câble fourni,insérez la prise D-Sub 15 mâle au por t série de la carte-son installée sur votre PC,
puis insérez le connecteur Din 5 mâle IN au port Midi Out de votre clavier CMK 149;ce dernier sera alimenté
par cette connexion.
Connexion à un MAC
Connectez l'adaptateur à la prise de courant et connectez le câble de sortie à la prise d'entrée d'alimentation
située sur le côté gauche de votre clavier de contrôle MIDI (le CMK 149 ne fonctionne qu'avec une alimentation 9 V DC 500 mA positive (+)).
10
UTILISATION:
Avec PC et/ou Mac
Après avoir effectué la connexion du CMK 149 à votre PC et/ou Mac et après avoir installé les logiciels fournis,
procédez à la mise en route de votre ordinateur.A ce moment-là, le voyant lumineux rouge du CMK 149 doit
s’allumer;démarrez le logiciel musical et commencez vos compositions ou productions multi-pistes.
N.B.: Attention ! Si en enfonçant les touches du clavier,vous n’entendez aucun son,vérifiez que :
· l’ordinateur est bien allumé,
· le voyant lumineux rouge du clavier est allumé,
· des haut-parleurs sont connectés au système,
· les haut-parleurs sont allumés,
· le programme musical a été lancé,
Si,après avoir vérifié les points énoncés ci-dessus,le clavier ne produit aucun son,vérifiez alors l’installation de
votre carte-son.
français
11
 Loading...