

Page 1

USER MANUAL
Version 1.2
Page 2
Riverside - Multistage Drive
Read Before Using
This manual covers the feature set for Riverside pedals running version 1.2 firmware and later. To
check if your Riverside is running version 1.2 firmware, follow the instructions in the note at the
bottom of page
The User Manual for Riverside version 1.0 is available here.
Riverside version 1.2 adds the ability to remotely control your Riverside via a MIDI connection.
If you wish to install the latest update, go to strymon.net/firmwareupdate and follow the directions.
20.
Technology Overview – Multistage Drive Topology
®
Riverside achieves its sound by passing the signal through a cascade of individual gain stages. Dynamic
complexity and additional harmonics are generated at each stage as the signal travels from one stage to
the next.
STAGE ONE: Class A Analog JFET Input Gain Stage
Touch response and dynamic interaction with your guitar are
optimized with the class A JFET input gain stage. This analog
gain stage is digitally controlled to maximize headroom and noise
performance while adding as much as 20dB of analog gain.
STAGE TWO, THREE AND FOUR: Tube-Inspired DSP Gain Stages
Our analysis of tube gain circuits has resulted in a wide-band series
of cascading gain stages that are detailed, rich and full of complex
harmonics. At each stage, more harmonics are generated and the
signal dynamically evolves as the inter-stage circuitry optimally
conditions the response for the following stage.
VARIABLE CIRCUIT TUNING
Riverside’s continuously variable circuit tuning dynamically tweaks
multiple parameters as you adjust the Drive, optimizing the signal
path to sit in the ‘sweet spot’ at any gain setting. This results in a
super-versatile drive pedal that is equally comfortable providing
sparking clean and mildly-overdriven tones, to high-gain lead and
heavily saturated distortion.
pg 2
Page 3
Riverside - Multistage Drive
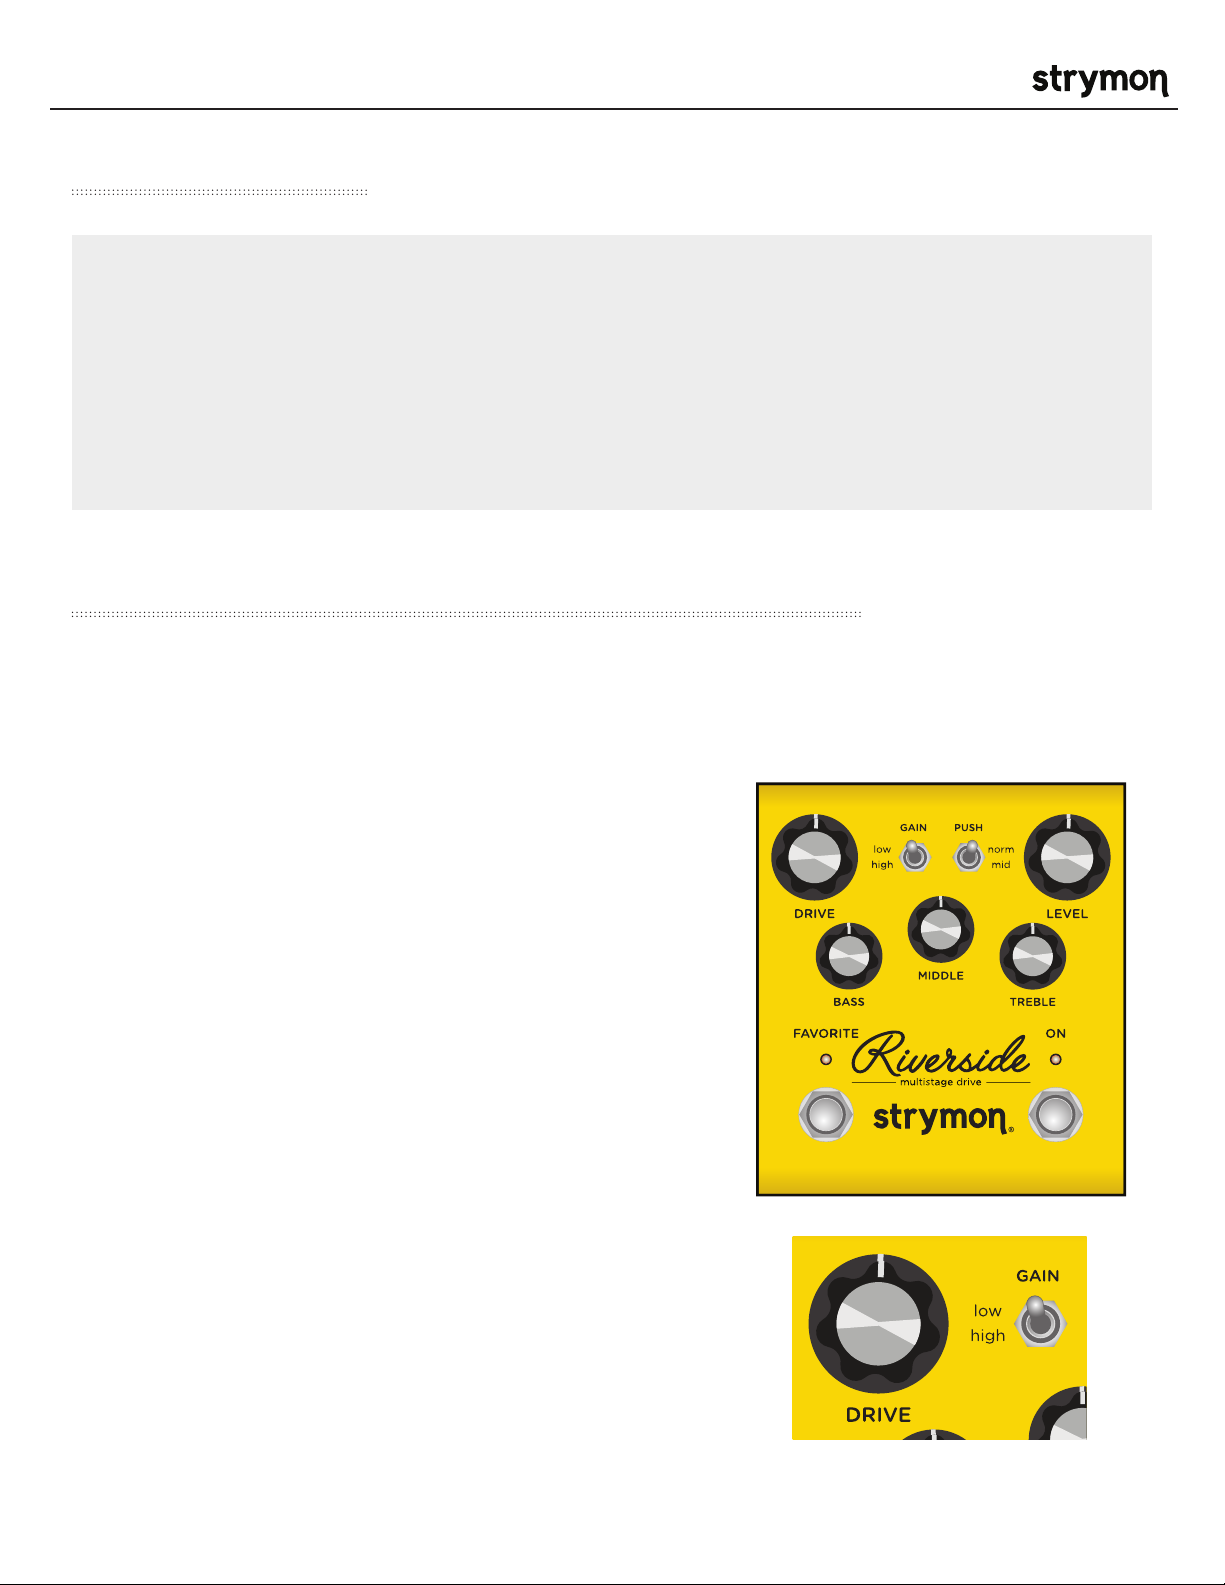
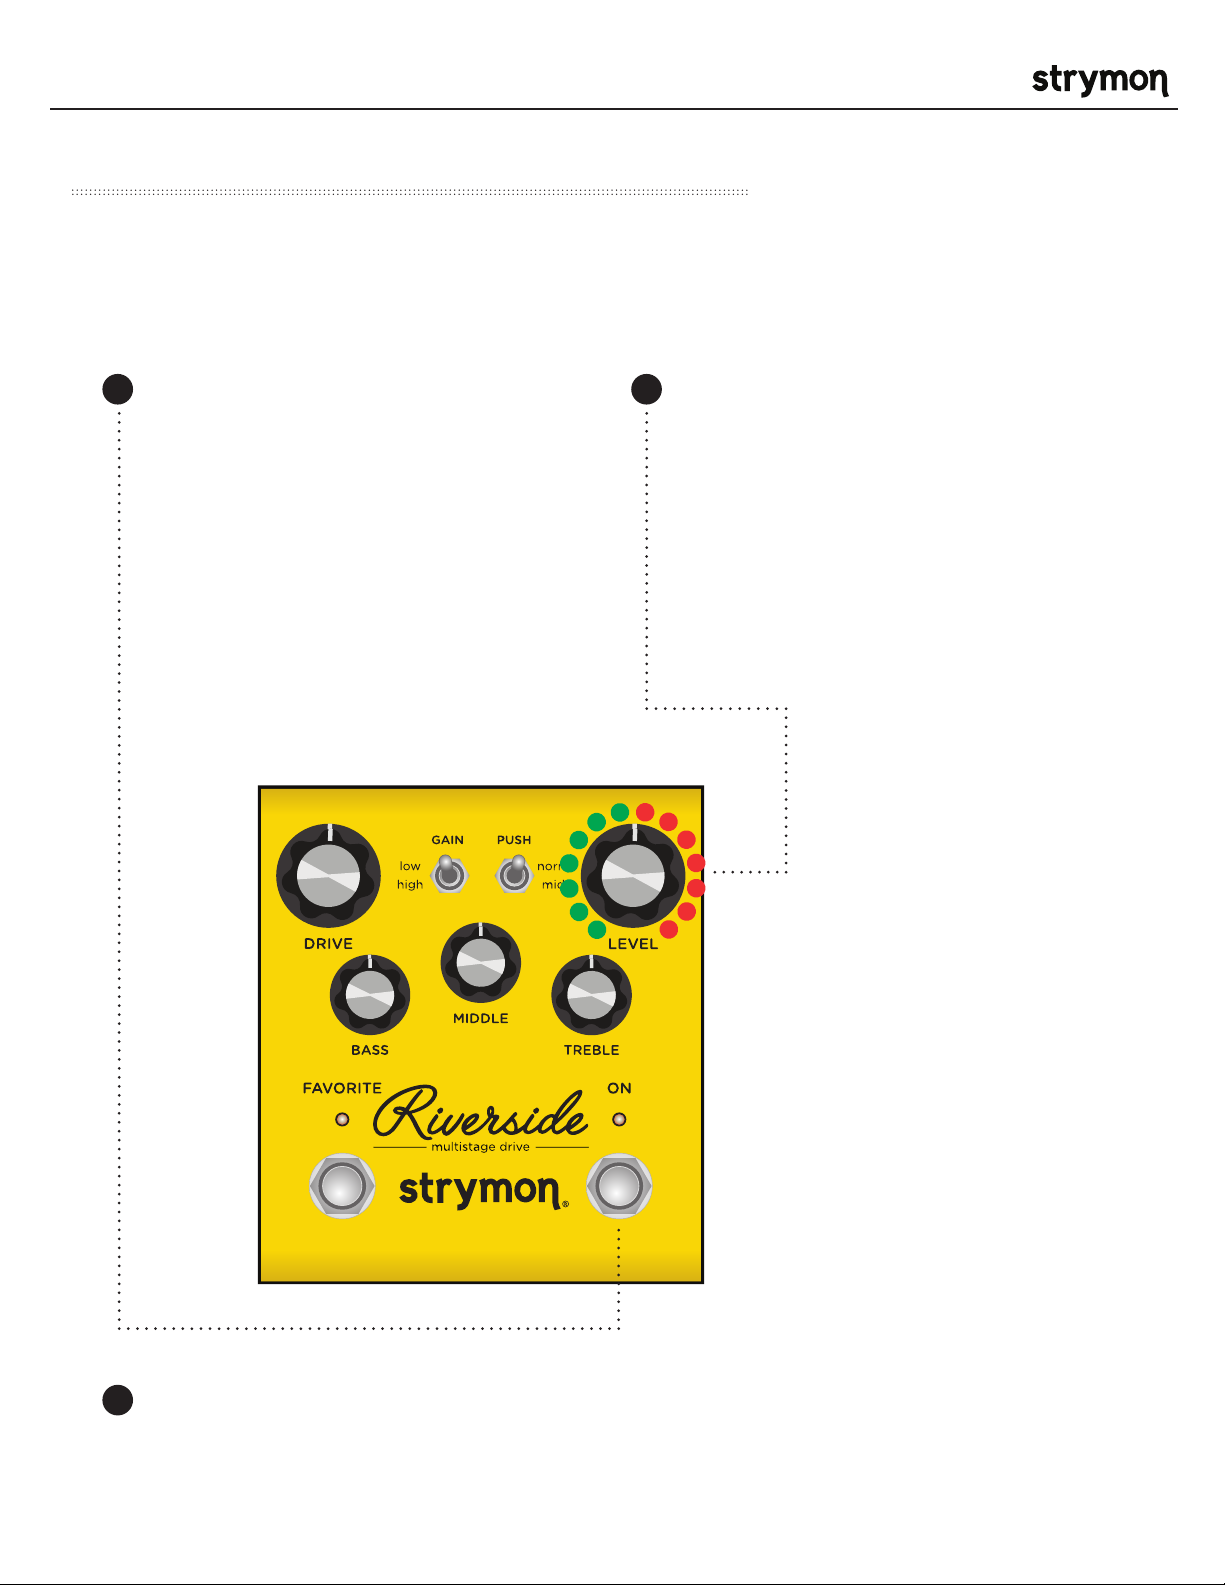
Controls and Connections – Controls
3BAND EQ
®
PRESENCE SWITCH
The minus (-) position provides
clarity with a controlled top end
that works well with many amps
that have a brighter voice or
extended top end character. The
enhanced (center) position extends the top end to
allow for more sizzle on high gain tones. This works
well with amps that have a warmer voicing, or if you
want enhanced detail in the uppermost frequencies.
When plugging directly into a power amp, the plus (+)
position further increases high end detail that may
be required. The plus (+) position will also deliver
extended high end detail to the darkest amps.
Riverside’s 3 band EQ, with independent Bass, Middle
and Treble knobs, is designed to complement your
amp’s tone with the flexibility needed to dial in your
sound effectively and efficiently. The controls are
post-drive, meaning they effectively sculpt and shape
the harmonics generated in Riverside’s gain stages.
PUSH SWITCH
Adding a mid-band EQ push just
after the analog front-end gain
results in pushing the subsequent
drive stages harder, and tightens
up the response. This works great
when looking for fat drive tones, or for pushing a
distorted or on-the-edge amp into further breakup.
For cleaner or more transparent tones, select the
‘normal’ position.
GAIN SWITCH
The ‘low’ channel selects a gain
structure that allows for a wide
range of low to medium gain sounds
while still getting heavily overdriven
at maximum Drive settings. The
voicing is dynamic and touch-sensitive, and at high
Drive settings is slightly ‘loose’ like a dimed vintage
amp.
The ‘high’ channel increases the gain throughout the
signal path and tightens things up. While still staying
clean at lower Drive settings, the ‘high’ gain mode
goes to heavy crunch and high gain as the Drive knob
is increased.
pg 3
Page 4

Riverside - Multistage Drive
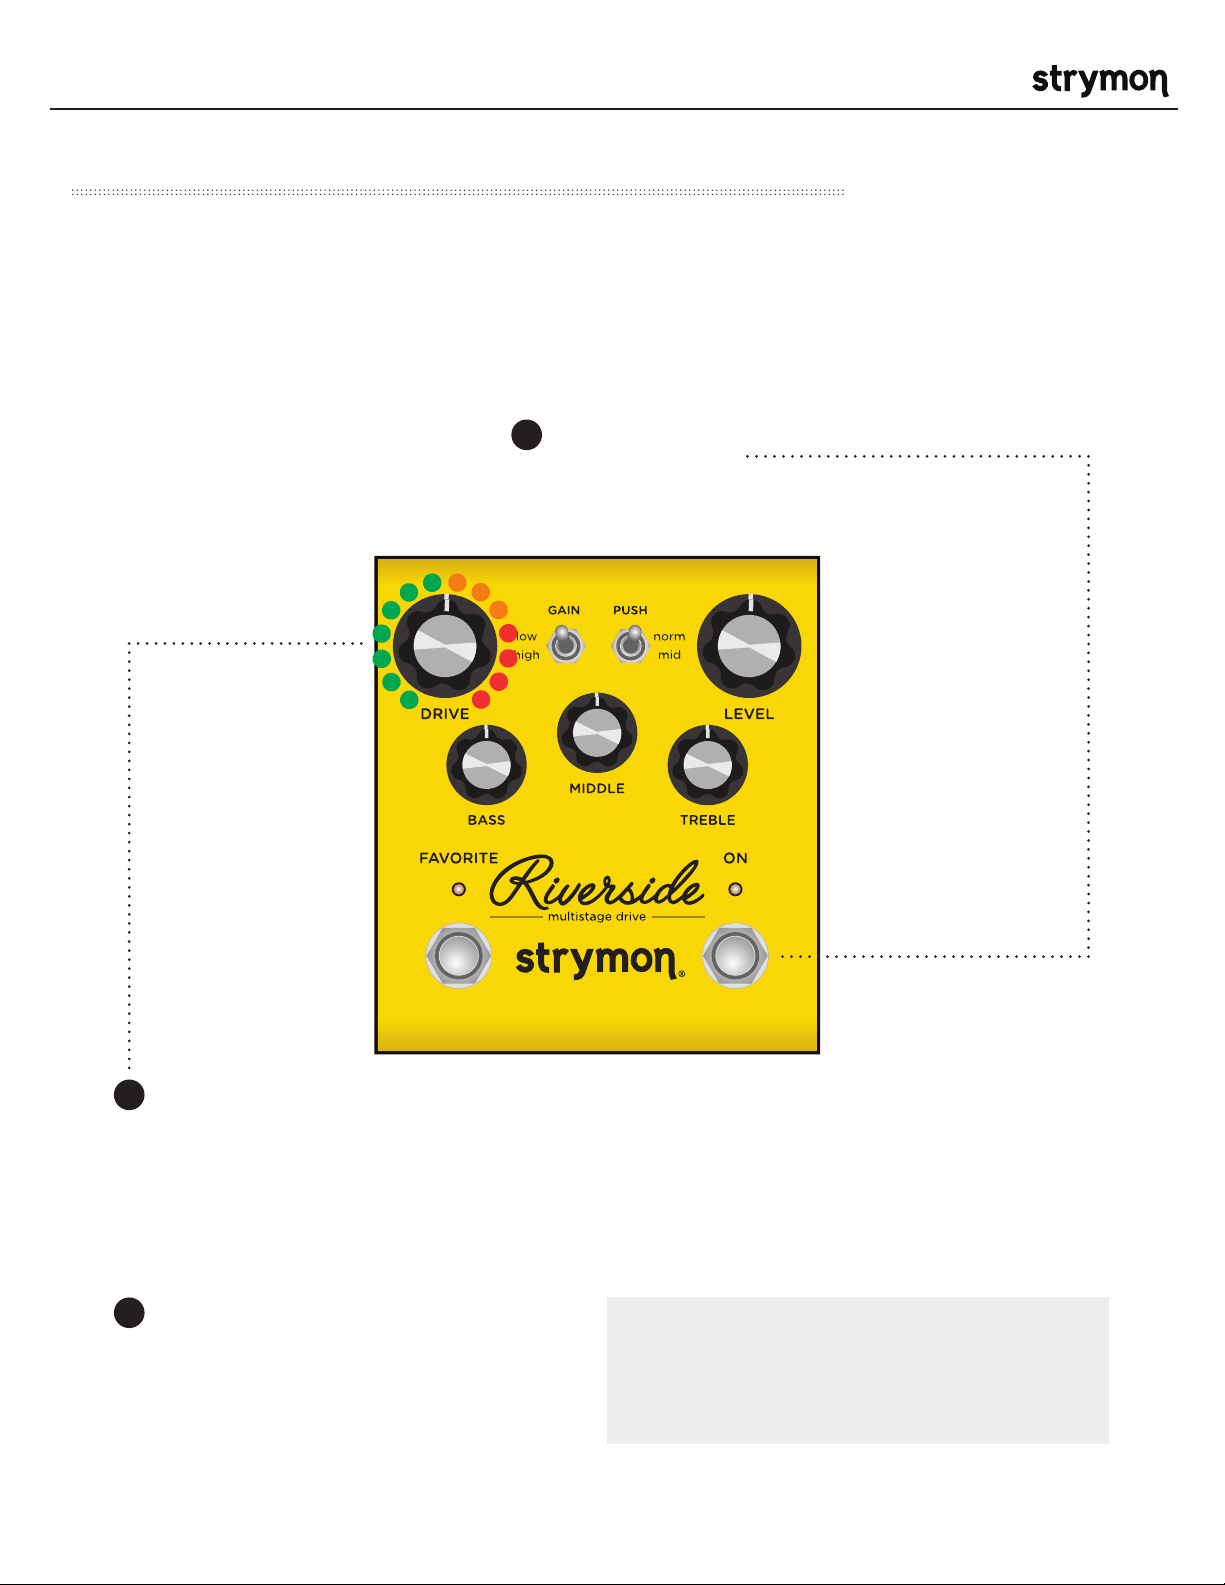
Controls and Connections – Front Panel
®
• GAIN
Toggles between the low or
high gain channel.
• DRIVE
Adjusts the amount of
gain applied to the signal.
Employs continuously
variable circuit tuning
to adjust many circuit
parameters as you turn the
knob.
• BASS
Active shelving/parametric
low frequency control.
• FAVORITE
• PUSH
Toggles between flat
or enhanced midrange
frequencies.
• LEVEL
Controls the output volume
level when the effect is ON.
• TREBLE
Wide-ranging high frequency
active shelf control.
• MIDDLE
Parametric mid boost/
cut control with optimized
frequency center.
Used to recall a single stored on-board favorite setting, which consists of all
knob, switch, and noise gate settings.
RED LED indicates that the on-board Favorite setting is selected. Press and
hold FAVORITE switch for 2 seconds to save a new on-board favorite sound.
COMPARE MODE
With FAVORITE on, LED turns from RED to GREEN if current position is
identical to saved favorite.
NOTES:
Saving Presets works differently when using MIDI. (See page 20 for
more info.)
When using MIDI, RED LED still indicates that the on-board Favorite
setting (MIDI Preset 0) has been selected, and AMBER LED indicates
that any other MIDI Preset is currently selected.
Pressing the FAVORITE switch while any MIDI preset is active will
return back to the manual (knobs and switches) setting of Riverside.
The FAVORITE switch will always toggle between the MANUAL MODE
setting and the on-board Favorite setting regardless of whether a
different MIDI Preset was previously selected.
• ON
Bypasses analog and digital
gain stages. Defaults to
relay based true bypass, but
can also be set to buffered
bypass mode in which the
volume pedal and boost
functionality are preserved.
pg 4
Page 5
Riverside - Multistage Drive
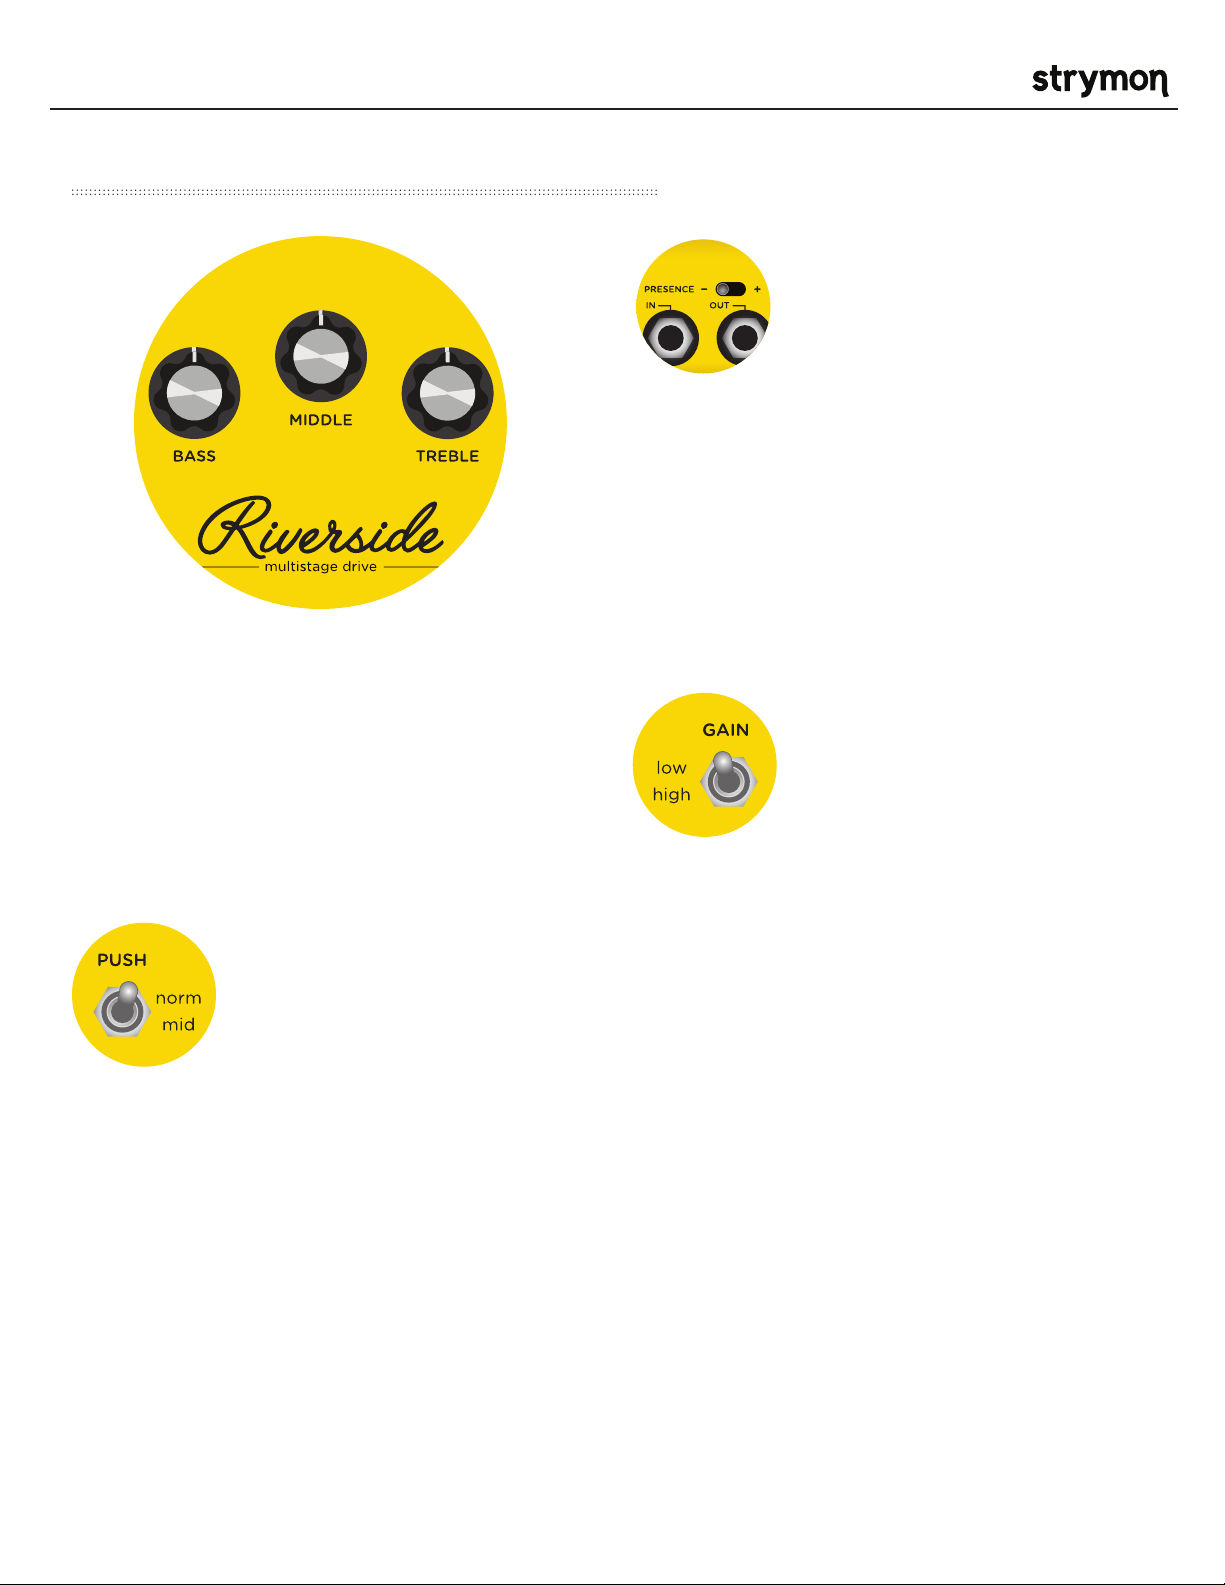
Controls and Connections – Rear Panel
®
• PRESENCE SWITCH
Tailors the top end character of the output
to match your amp. Try minus (-) or center
in front of an amp. Try plus (+) when
plugging straight into a power amp.
• IN
Mono instrument input.
• OUT
Mono signal output.
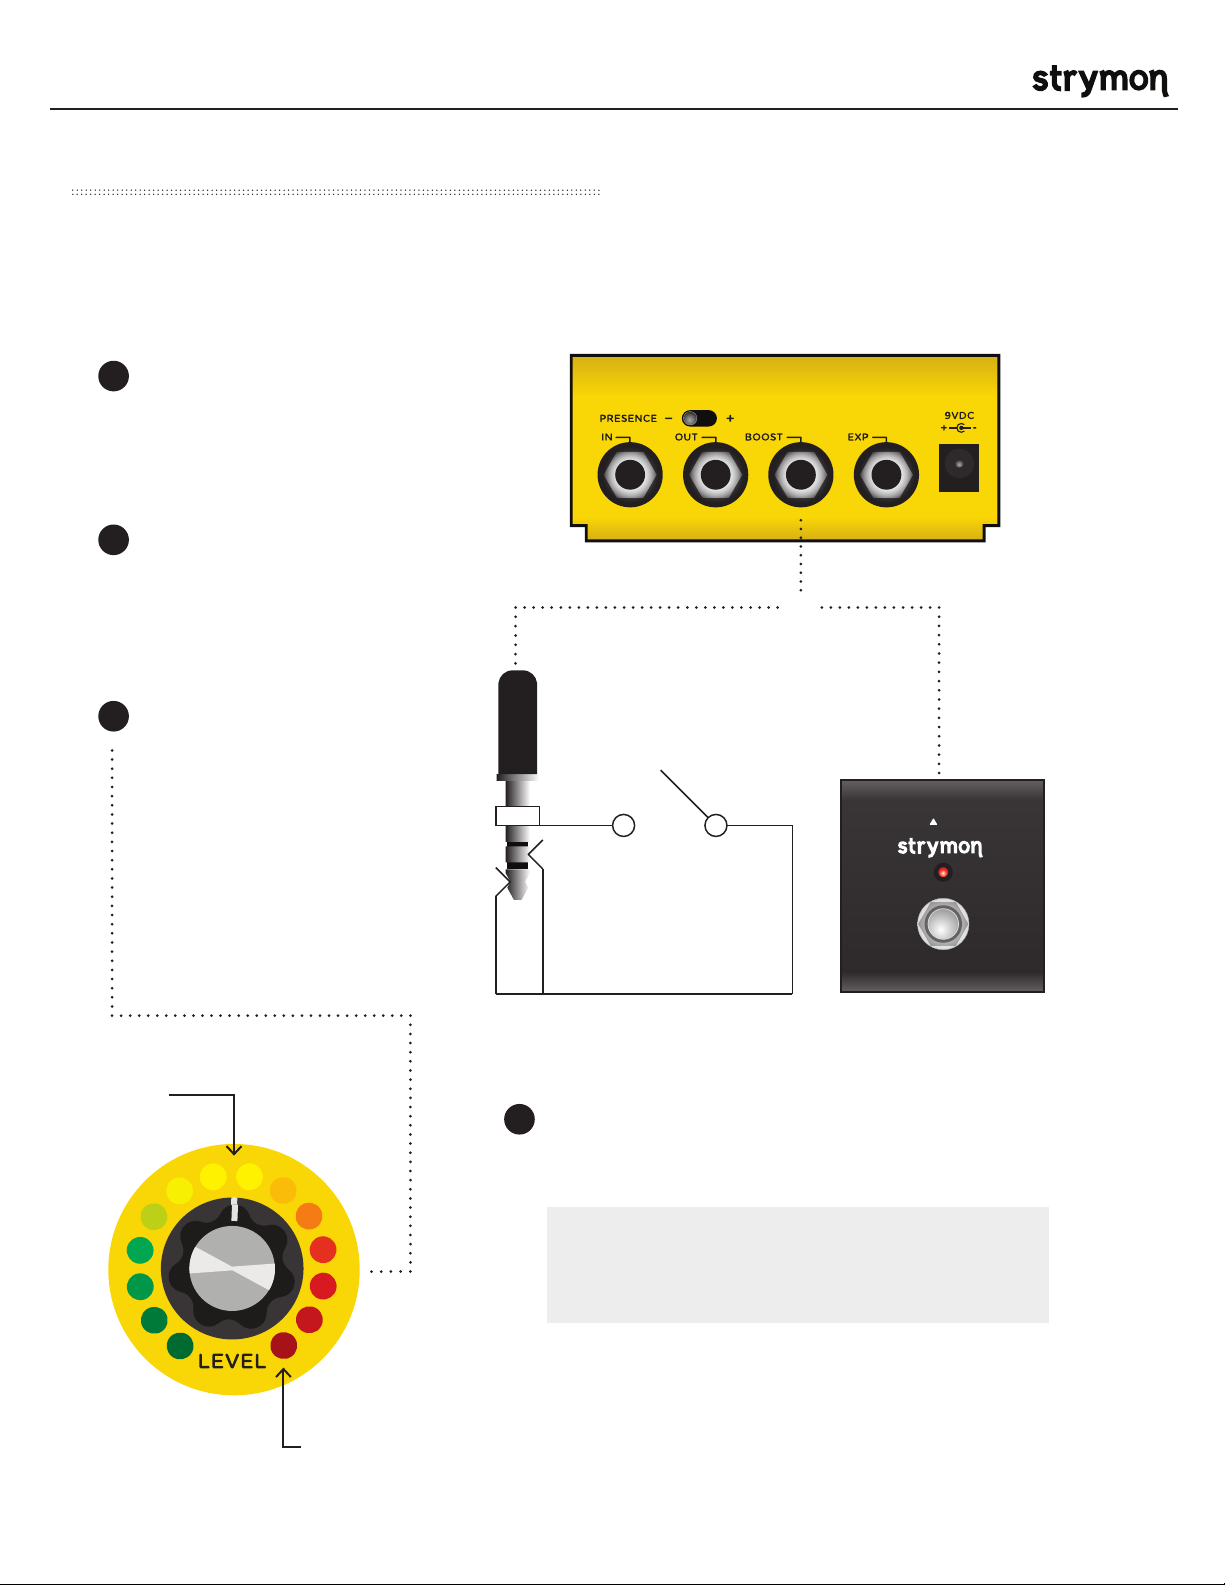
• BOOST
• POWER
Use an adapter with the following rating:
9VDC center negative. 250mA minimum.
• EXP
Can be used in one of four ways:
Boost Switch Mode – Use an external Favorite
switch to toggle up to +6dB of post boost on/off
(See page 9 for setup.)
Favorite Output Mode – Connect to the EXP
input of another Strymon pedal set to work in
Favorite EXP mode to toggle the Favorite setting
of that pedal with Riverside’s on-board FAVORITE
switch. (See page 12 for more info.)
Expression Pedal Mode – Allows continuous
control over any of the knobs with a standard
TRS expression pedal. (See page 13 for more info.)
Volume Mode – Allows control of the output
volume of the effect with a standard TRS
expression pedal. (See page 14 for more info.)
Can be used in one of four ways:
Expression Pedal Mode – Allows continuous
control over any of the knobs with a standard
TRS expression pedal. (See page 13 for more info.)
Volume Mode – Allows control of the output
volume of the effect with a standard TRS
expression pedal. (See page 14 for more info.)
MIDI Mode – Allows a MIDI connection for remote
preset changes and control messages. (See page
18 for more info.)
Favorite Input Mode – Use a Strymon MiniSwitch
to remotely toggle the saved Favorite setting on
and off. (See page 11 for more info.)
pg 5
Page 6
Riverside - Multistage Drive
Live Edit Functions – Noise Reduction Threshold
Riverside has a variable-threshold noise reduction feature to tame hum and buzz
when you’re not playing. A downward expander with advanced signal detection
techniques creates a seamless transition to noise reduced silence with all types of
input signal dynamics, including staccato bursts and slowly sustained notes.
Press and hold the ON footswitch until the
1
LED rapidly blinks.
Release the ON footswitch.
®
Turn the DRIVE knob past the 12 o’clock noon position to engage the noise reduction.
2
The FAVORITE LED will change from GREEN to AMBER to indicate the noise reduction has been
engaged. Turning DRIVE past 12 o’clock increases the noise reduction threshold for louder and
noisier setups. The FAVORITE LED will change from AMBER to RED to indicate the increased
noise reduction threshold level.
Press the ON footswitch to store the new
3
noise reduction setting to Riverside.
NOTE: The noise reduction setting can be
saved independently for the onboard Favorite
setting, MIDI presets and the MANUAL
settings of Riverside.
pg 6
Page 7
Riverside - Multistage Drive
Live Edit Functions – Boost Level
Connect an external footswitch with a TRS cable to toggle the boost of up to +6dB on
and off.
Press and hold the ON
1
footswitch until the LED rapidly
blinks.
Release the ON footswitch.
2
OR
®
Turn the LEVEL knob to set the
3
amount of boost up to +6dB. As
you turn the boost amount up,
the color of the blinking LED
changes from GREEN for low
boost settings to RED for high
boost settings.
+3dB
Press the ON footswitch to store the new boost
4
level to Riverside.
NOTE: The Boost setting is saved globally to
the Manual, Favorite, and Bypass settings of
Riverside.
TRS
®
+6dB
pg 7
Page 8
Riverside - Multistage Drive
Power Up Modes – Bypass Mode Selection
Setting Riverside to Buffered Bypass mode preserves the high frequency response
of your guitar signal through your pedal chain and long cable runs.
®
Press and hold the ON footswitch while
1
powering up the pedal. Once both LEDs
flash, release the footswitch.
Turn the LEVEL knob to select True Bypass
2
or Buffered Bypass
GREEN - True Bypass (default)
RED - Buffered Bypass: Using Buffered
Bypass allows Volume mode and Boost
Switch mode.
Press the ON or FAVORITE footswitch to store
3
The Bypass mode and begin using Riverside.
pg 8
Page 9
Riverside - Multistage Drive
Power Up Modes - BOOST Jack Options
Select what the BOOST jack will do.
FAVORITE (Press and hold the
1
FAVORITE footswitch while
powering up the pedal.) Once both
LEDs flash, release the footswitch.
®
NOTE: If version 1.0
firmware is installed,
Expression and Volume
modes are not available.
Please refer to the
Riverside version 1.0
manual at strymon.net/
support/riverside.
2
Turn the DRIVE knob to set the BOOST jack mode.
GREEN – Expression Pedal Mode
(See page 13 for more info)
RED – Volume Mode
(See page 14 for more info)
AMBER – Favorite OUT Mode
(See page 12 for more info)
PURPLE – Boost Switch Mode (default)
(See page 7 for more info)
3
Press the ON or FAVORITE
footswitch once again to store
power up modes and begin using
Riverside.
pg 9
Page 10

Riverside - Multistage Drive
Power Up Modes - EXP Jack Options
Select what the EXP jack will do.
Press and hold the FAVORITE
1
footswitch while powering up
the pedal. Once both LEDs
flash, release the footswitch.
Turn the LEVEL knob to set the EXP
2
jack mode.
®
NOTE: Power up modes are saved for all future
power ups until they are changed again with the
steps above.
GREEN - Expression Pedal Mode
RED - Volume Mode (default)
AMBER - Favorite IN Mode: Toggle the
Favorite preset on and off remotely.
BLUE - MIDI Mode: Remote preset
changes and control messages via
external MIDI controller. (See page 18
for more detail about using MIDI.)
Press the ON or FAVORITE footswitch
3
once again to store power up modes
and begin using Riverside.
NOTE: If version 1.0 firmware is installed, MIDI
mode is not available. Please refer to the Riverside
version 1.0 manual at strymon.net/support/
riverside.
pg 10
Page 11

Riverside - Multistage Drive
External Control – Using Favorite Input
Connect a MiniSwitch with a TRS cable to toggle the on-board Favorite preset on
and off.
®
Ensure that the EXP jack is configured
1 2
for FAV IN. (See page 10 for more info.)
Connect a Switch with a TRS cable to the
EXP jack of Riverside.
Dial in a setting on Riverside using the
knobs and switches for your desired
sound.
or
Press and hold Riverside’s on-board
3
FAVORITE switch for 2 seconds to
save this setting as a new on-board
Favorite sound.
TRS
®
NOTES:
The on-board FAVORITE switch will not toggle the
Favorite preset when Riverside is set to Favorite In
mode and a MiniSwitch is connected to the EXP jack.
Saving Presets works differently when using MIDI.
(See page 20 for more info.)
pg 11
Page 12

Riverside - Multistage Drive
External Control – Using Favorite Output
Use Riverside to recall the Favorite setting of another connected Strymon pedal.
®
Configure the BOOST jack to send
1 2
Favorite Out messages. (See page 9 for
more detail about configuring the Boost
jack.)
Connect the BOOST jack of Riverside
to the EXP input of another Strymon
pedal with a TRS cable.
Make sure the connected pedal is set to
Favorite EXP mode.
Please refer to the favorite switch setup
section of the connected pedal’s owner’s
manual for details. All manuals available at
strymon.net/support.
INPUT
EXP
RIGHT OUTLEFT OUT
9VDC
+
-
Save a Favorite setting on the
3 4
connected Strymon pedal.
OPTIONAL STEP: Store a new Favorite
setting on Riverside to go along with
the Favorite setting on the connected
Strymon pedal.
Pressing the FAVORITE switch on
Riverside will toggle the Favorite
setting on both Riverside and the
connected Strymon pedal as well.
pg 12
Page 13

Riverside - Multistage Drive
External Control – Expression Mode
Use a TRS Expression pedal to control the knobs of Riverside
Connect the Expression pedal to the
1
EXP jack of Riverside using a TRS
cable.
NOTE: It is also possible to assign
the BOOST jack as the input for
Expression mode. This is useful if you
wish to connect MIDI to the EXP jack,
but still wish to use a pedal to control
Expression. (See page 9 for details
about assigning the BOOST jack.)
Press and hold both FAVORITE and ON
2
footswitches for a few seconds until
both LEDs begin blinking GREEN.
®
Rock the expression pedal back to the
3
HEEL position and only the FAVORITE
LED will blink GREEN.
Set the knobs the way you would
4
like them to be in the HEEL position.
The FAVORITE LED will turn RED to
indicate that the setting has changed.
Rock the xpression pedal forward to
5
the TOE position and only the ON LED
will blink GREEN.
Set the knobs you would like to control
6
to the setting for the TOE position of
the expression pedal. The ON LED will
turn red to indicate that the setting
has changed.
Press the FAVORITE or ON footswitch
7
once to save the expression settings.
NOTE: Expression pedal settings are saved and recalled as
part of the on-board Favorite setting and MIDI accessible
presets.
NOTE: If you are using the EXP jack for MIDI communication,
it is possible to connect the pedal to the BOOST jack
instead to use an expression pedal. (See page 9 for details on
configuring the BOOST jack for Expression mode.)
pg 13
Page 14

Riverside - Multistage Drive
External Control – Volume Mode
Use a TRS Volume pedal to control the output volume.
Connect the expression pedal to the
1
EXP jack of Riverside.
Set the LEVEL knob to the setting you
2
would like for the highest TOE down
position of the expression pedal.
®
When the FAVORITE setting is
3
engaged, the highest TOE down
position of the expression pedal will
correspond to the setting that the
LEVEL knob was saved as for the
favorite setting.
NOTE: When Riverside is in Buffered Bypass
mode and the Expression jack is configured for
Volume mode, the pedal will still function as a
Volume pedal whether the effect is bypassed or
engaged.
NOTE: The default assignment for the EXP jack
is Volume mode. If this has been changed, the
EXP jack assignment must be changed back
to Volume mode. (See page 10 for details on
configuring the EXP jack to Volume mode.)
NOTE: If you are using the EXP jack for MIDI
communication, it is possible to connect the
pedal to the BOOST jack instead to control the
volume. (See page 9 for details on configuring the
BOOST jack for Volume mode.)
pg 14
Page 15

Riverside - Multistage Drive
Factory Reset
Press and hold the ON footswitch
1
during power up. Once both LEDs
flash, release the footswitch.
®
Turn the BASS knob from 0-100% and back two (2) times (back and forth) to
2
reset the pedal to factory power up modes and secondary functions.
FACTORY SETTINGS
• EXP Input Jack: Assigned to work in VOLUME PEDAL mode.
• Expression Pedal Mode Assignment: Assigned to control DRIVE.
• BOOST Input Jack: Assigned to work in BOOST SWITCH mode.
• BOOST Amount: Set to 50%.
• Noise Reduction: OFF
• Bypass Mode: True Bypass
• MIDI channel: 1
• MIDI Expression On/Off: On
• MIDI Output Mode: Off
pg 15
Page 16

Riverside - Multistage Drive
Features
®
• Custom cascading multistage distortion topology
provides a wide range of tube-inspired drive tones
• Digitally controlled analog class A JFET input gain
stage maximizes headroom while adding up to
20dB of pure analog gain
• Precision crafted DSP gain stages provide detailed
complexity and responsiveness
• Low gain channel for smooth classic overdrive
• High gain channel for modern saturated distortion
• 3-band EQ with independent Bass, Middle and
Treble controls
• Selectable post-analog gain mid-band EQ push
• Presence switch to tailor the sound for use with all
amplifiers from dark to bright
• Optional variable-threshold noise reduction helps
tame noisy guitar pickups
• High impedance mono input
• Mono output
• Favorite footswitch to save and recall a favorite
setting
• Expression pedal input allows the connection
an expression pedal for simultaneous morphing
control over multiple parameters (Expression
mode), or logarithmic taper for smooth volume
control (Volume mode)
• Boost pedal input allows connection of an external
footswitch for up to +6dB of analog boost, or
to toggle the Favorite preset on other Strymon
pedals (Favorite Out mode)
• MIDI accessible via EXP Jack for remote
parameter control and access to 300 preset
locations
• Ultra low noise, high performance 24-bit 96kHz
A/D and D/A converters provide uncompromising
audio quality
• Premium analog front end and output section
• Super high performance SHARC DSP in a compact
form factor
• 32-bit floating point processing
• True Bypass (electromechanical relay switching)
• Designed and built in the USA
Specifications
Input Impedance 500k Ohm
Output Impedance 100 Ohm
A/D & D/A 24-bit 96kHz
Max Input Level +8dBu
Frequency Response 20Hz to 20kHz
DSP performance 1585 MegaFLOPS
Bypass Switching True Bypass (electromechanical relay switching)
Dimensions 4.5” deep x 4” wide x 1.75” tall
(11.4 cm deep x 10.2 cm wide x 4.4 cm tall)
Power Adapter Requirements
Use an adapter with the following rating: 9VDC center negative; 250mA minimum.
pg 16
Page 17

Riverside - Multistage Drive
®
Appendix 1
MIDI Functionality
pg 17
Page 18

Riverside - Multistage Drive
MIDI – Configuring Riverside to Use MIDI
Using MIDI unlocks a set of tools that can be used to load any of Riverside’s 300 preset locations and
automate knob changes using a suitable MIDI controller or interface connected to Riverside’s EXP jack.
This requires a MIDI controller/interface with at least one quarter-inch output or a Strymon MIDI EXP
cable. (Check strymon.net/support/riverside for a list of compatible devices.)
®
Step 1 – Set EXP jack to MIDI Mode
(See page 10 for an illustrated guide to configuring
the EXP jack for MIDI communication. Steps reprinted
here.)
• Press and hold the FAVORITE footswitch while
powering up the pedal.
• Turn the LEVEL knob until the ON LED turns BLUE to
set the EXP jack mode to MIDI Mode.
• Press either footswitch to store the EXP jack
assignment.
Step 2 – Set MIDI Channel
This determines which MIDI channel Riverside will use to send and receive MIDI data. See the illustrated
guide below for complete instructions.
NOTE: To select channel 4-16, you will need to connect Riverside to a MIDI device.
Press and
1
hold the ON
footswitch while
powering up
the pedal. Once
both LEDs flash,
release the
footswitch.
2
Turn the DRIVE knob on the to set
the MIDI receive channel. Both
LEDs will flash momentarily as the
channel is changed.
GREEN - Channel 1 (default)
Press the ON footswitch again to
3
store the MIDI channel and begin.
AMBER - Channel 2
RED - Channel 3
BLUE - Channel 4-16 (Requires ¼”
MIDI connection.) Once the LED
turns BLUE, it will blink until the
pedal receives a MIDI Program
Change message. Once a message
is received, the pedal will be set
to the MIDI channel that carried
the message and the LED will stop
blinking.
pg 18
Page 19

Riverside - Multistage Drive
MIDI – Configuring Riverside to Use MIDI (cont.)
This determines what kind of MIDI data is sent out by Riverside. Note that if you are only sending MIDI
data to Riverside – the most common configuration – the MIDI Output mode must be set to OFF.
Step 3 – Set MIDI Output Mode
®
Press and hold
1
the FAVORITE
footswitch while
powering up
the pedal. Once
both LEDs flash,
release the
footswitch.
Turn the MIDDLE knob to select
2
what kind of MIDI data is sent
from Riverside to other MIDI
devices. Both LEDs will flash
momentarily as the mode is
changed.
GREEN - ON: Using Riverside’s
knobs and switches generates
MIDI messages that are sent
out of Riverside.
AMBER - THROUGH: Incoming
MIDI messages are sent out of
Riverside without any additional
MIDI messages generated by
Riverside.
RED - OFF (default): No MIDI
messages are sent out of
Riverside.
TIP: A simple way to check that communication
is working is to send CC #10 with a value of
127 when the FAVORITE footswitch is off. This
will turn the FAVORITE footswitch on if MIDI is
properly connected and configured.
pg 19
Page 20

Riverside - Multistage Drive
MIDI – Expression On/Off
This setting selects whether Riverside will respond to incoming MIDI Expression
messages. If your rig uses MIDI Expression messages with multiple pedals that are
set to the same MIDI Channel, this setting can be used to determine which pedal(s)
will respond to expression messages for a given preset.
®
Press and
1
hold the ON
footswitch until
both LEDs blink.
Release the ON
footswitch.
Turn the TREBLE knob to
2
select whether Riverside will
respond to incoming MIDI
Expression messages (CC
#100).
RED (momentary flash) -
Riverside will not respond to
MIDI Expression messages.
BLUE (momentary flash) -
(default) Riverside will respond
to MIDI Expression messages.
Press the ON footswitch to
3
store the setting to Riverside.
NOTE: An easy way to check if your
Riverside is running version 1.0 or
version 1.2 firmware is to try setting
the MIDI Expression functionality. If you
are running version 1.0 firmware, the
ON LED will not change as you turn the
TREBLE knob.
Saving Presets in MIDI Mode
• When in MIDI mode, the currently loaded settings can be
saved to any of Riverside’s 300 preset locations at any time.
• To enter SAVE mode, press and hold the FAVORITE
footswitch. The LED will illuminate in BLUE.
• Send the unit a patch change message from the connected
MIDI device. The LED will flash and Riverside will save the
settings to that preset location.
• To save the preset to the currently loaded preset location,
press the FAVORITE footswitch.
pg 20
Page 21

Riverside - Multistage Drive
MIDI – Controlling Riverside With an External Device
®
To begin using Riverside with an external MIDI
device, connect the MIDI out jack from a pedal,
controller or computer interface to the EXP jack on
Riverside. The following can be used to do this:
- Strymon MIDI EXP cable
- Compatible 5-pin MIDI to ¼” MIDI Interface
(check strymon.net/support/riverside for a list
of compatible devices)
Once you have connected Riverside to a MIDI
source, choose a channel for MIDI communication
with Riverside. Riverside is set to MIDI channel 1
by default. (See page 18 for detailed instructions for
changing the MIDI channel.)
Refer to Riverside’s MIDI Specification on page 22 for
additional details about the specific parameters that
can be controlled via MIDI.
1) Strymon MIDI
EXP Cable
OR
MIDI Enabled Stompbox
MIDI Controller with
5-pin MIDI Outputs
NOTE: If you are only sending data to Riverside
– the most common configuration – the MIDI
Output mode must be set to OFF. (See page 19
for details on configuring the MIDI Output Mode.)
2) Standard ¼”
TRS Cable
MIDI Controller with
1/4” TRS Output
OR
MIDI 1/4”
TRS Interface
pg 21
Page 22

Riverside - Multistage Drive
MIDI – Specifications
MIDI Patch Changes
Riverside contains 300 preset locations, numbered sequentially from 0-299. Because MIDI Program
Change messages have a maximum number of 128 (0-127) the presets are grouped into three MIDI patch
banks.
- MIDI BANK 0 = PRESETS 0-127
- MIDI BANK 1 = PRESETS 128-255
- MIDI BANK 2 = PRESETS 256-299
Riverside always powers up in MIDI Patch Bank 0, so if you plan to stay within the first 127 presets, simply
send a standard MIDI Program Change message to load a preset.
If you will be using MIDI Banks 1 and/or 2, it is advisable to send a standard MIDI Bank Change message
“MIDI CC# 0 with a value equal to the MIDI Bank#” before each MIDI Program Change.
Selecting bank 0, patch 127 will put Riverside into Manual mode. In this mode, the pedal will be set to the
current knob and switch settings. No preset data can be stored at this preset location.
®
MIDI CC Numbers
PARAMETERS CC# RANGE NOTES
MIDI Patch Bank
Volume Pedal
Level
Drive
Bass
Mid
Treble
Boost Level
Boost Off/On
Gain (low/high)
Push
Presence
Noise Gate
MIDI Expression Off/On
Expression Pedal
Bypass/On
0
7
12
13
14
15
16
17
18
19
20
21
22
60
100
102
0-2
0-127
0-127
0-127
0-127
0-127
0-127
0-127
0, 127
1-2
1-2
1-3
0-127
0,127
0-127
0,127
(0=off, 1-127=on)
(1=low, 2=high)
(1=norm, 2=mid)
(1= +, 2= -, 3=middle)
(0=off)
(0=off, 1-127=on)
(0=off, 1-127=on)
pg 22
Page 23

Riverside - Multistage Drive
Live Edit Functions and
®
Appendix 2
Powerup Modes
pg 23
Page 24

Riverside - Multistage Drive
Live Edit Functions
Below is a list that details how to access all secondary parameters that are adjustable
from Riverside’s interface that do not have dedicated knobs or switches. All secondary
control parameters are saved per-preset.
Press and Hold the ON footswitch until both LEDs start blinking to enter Live Edit mode.
Release and use knobs as described below.
Press ON again to store your changes and exit Live Edit mode.
®
NOISE GATE
THRESHOLD
(Separate for Preset/Man)
(See page 6 for an
illustrated description)
MIDI EXPRESSION
ON/OFF
(Off= ignore CC100)
(See page 20 for an
illustrated description)
BOOST LEVEL
(See page 7 for an
illustrated description)
Turn DRIVE knob - status shown on FAVORITE LED
Off = Green (default)
Engaged = Amber
Extreme = Red
Turn TREBLE knob - BOTH LEDs show status momentarily
Off = Red (default)
On = Blue
Turn LEVEL knob - Status shown on ON LED
Sweeps from 0dB (Green) to +6dB (Red)
pg 24
Page 25

Riverside - Multistage Drive
Power Up Modes
Below is a list of global parameters and functions that are accessed via a power up
procedure. All power up functions persist through power cycles.
®
GENERAL SETTINGS
BYPASS MODE
(See page 8 for an
illustrated description)
SET MIDI CHANNEL
(See page 18 for an
illustrated description)
FACTORY RESET
(See page 15 for an
illustrated description)
JACK OPTIONS
Press and Hold the ON footswitch at power up until the LEDs flash. Release and
use knobs as described below. Press any footswitch to store settings & exit.
Turn LEVEL knob - status shown on ON LED
True Bypass = Green (default)
Buffered Bypass = Red
Turn DRIVE knob - status shown on FAVORITE LED
1 = Green (default)
2 = Amber
3 = Red
4-16 = Blue (channel set by next MIDI Program Change message)
Sweep MIDDLE knob twice to RESET - status shown on FAVORITE LED
Turn 1 = Amber
Turn 2 = Red
Turn 3 = Amber
Turn 4 = Both LEDs flash Red, pedal resets & power cycles
Press and Hold the FAVORITE footswitch at power up until the LEDs flash.
Release and use knobs as described below. Press any footswitch to store
settings & exit.
EXP
(See page 10 for an
illustrated description)
BOOST
(See page 9 for an illustrated
description)
MIDI OUT MODE
(See page 19 for an
illustrated description)
Turn LEVEL knob – status shown on ON LED
Expression = Green
Volume = Red (default)
Favorite Input = Amber
MIDI = Blue
Turn DRIVE knob – status shown on FAVORITE LED
Expression = Green
Volume = Red
Favorite Out = Amber
Boost = Purple (default)
Turn TREBLE knob - both LEDs show status momentarily
On = Green
Through = Amber
Off = Red (default)
pg 25
Page 26

Riverside - Multistage Drive
®
Appendix 3
Sample Settings
pg 26
Page 27

Riverside - Multistage Drive
Sample Settings
BOOST DRIVE FAT DRIVE
®
EDGY TRANSPARENT & MILD
DROP TUNE SINGING LEAD
pg 27
Page 28

Riverside - Multistage Drive
Strymon Non-Transferrable Limited Warranty
Warranty
Strymon warranties the product to be free from defects in material and workmanship for a period of two (2)
years from the original date of purchase when bought new from an authorized dealer in the United States of
America or Canada. If the product fails within the warranty period, Strymon will repair or, at our discretion,
replace the product at no cost to the original purchaser. Please contact your dealer for information on warranty
and service outside of the USA and Canada.
Exclusions
This warranty covers defects in manufacturing discovered while using this product as recommended by
Strymon. This warranty does not cover loss or theft, nor does the coverage extend to damage caused by
misuse, abuse, unauthorized modification, improper storage, lightning, or natural disasters.
Limits of Liability
®
In the case of malfunction, the purchaser’s sole recourse shall be repair or replacement, as described in the
preceding paragraphs. Strymon will not be held liable to any party for damages that result from the failure of
this product. Damages excluded include, but are not limited to, the following: lost profits, lost savings, damage
to other equipment, and incidental or consequential damages arising from the use, or inability to use this
product. In no event will Strymon be liable for more than the amount of the purchase price, not to exceed the
current retail price of the product. Strymon disclaims any other warranties, expressed or implied. By using the
product, the user accepts all terms herein.
How to Obtain Service Under this Warranty
For North American customers: Contact Strymon through our website at strymon.net/support for Return
Authorization and information. Proof of original ownership may be required in the form of a purchase receipt.
For International Customers: Contact the Strymon dealer from which the product was purchased from in order
to arrange warranty repair service.
®
Strymon
is a division of Damage Control®, LLC.
REV B - 08.21.2018
pg 28
 Loading...