

Page 1
Page 2
WELCOME TO OJAI R30 ULTRA-LOW NOISE WORLD TOUR READY
Ojai R30 is the highest horsepower, most technologically
advanced effects pedal power supply of its size. You get
clean, rock-steady power for your 9V, 12V and 18V effect
pedals in a low profile, expandable package, giving you
room to grow.
Ojai R30’s dual-stage topology, pre-regulated outputs,
optically isolated feedback, and advanced multistage
filtering allow your pedals to achieve their highest
possible dynamic range.
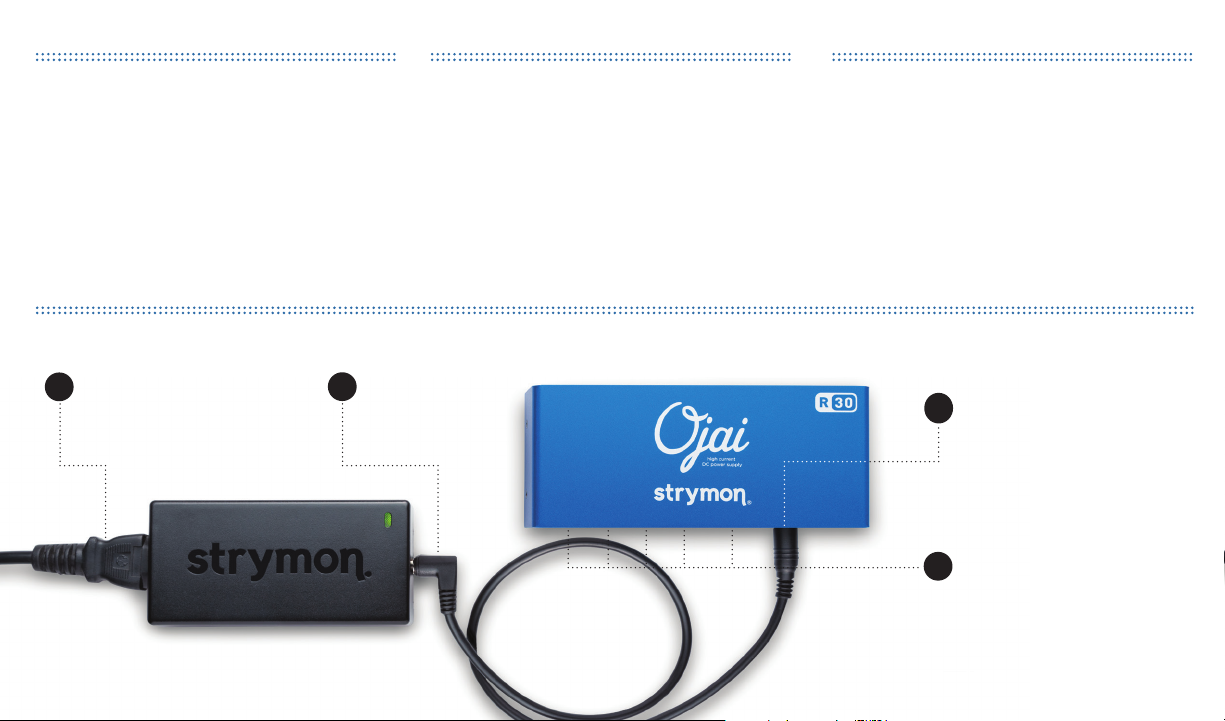
GETTING STARTED
Connect one end of the included IEC
1
cable to the 24V power adapter, and
the other end to an AC power outlet.
Connect one end of the
2
included power adapter
cable to the 24V power
adapter.
Ojai R30’s all analog circuitry offers two stages of
isolation. The 24V DC is isolated from the AC input
power, and each of the five output channels is isolated
from the 24V DC, eliminating ground loop and AC line
noise issues.
Your new Ojai R30 power supply unit went through the
same rigorous audio tests that all Strymon pedals go
through. With Ojai R30, your pedals will sound the way
they were designed to sound.
Playing gigs all around the world? No need to purchase
separate power supplies for your international tour.
Ojai R30 has automatic worldwide power compatibility
built-in (when connected with the appropriate IEC
cable). Whether you’re on 120V, 240V, 100V, or any
variation in between, Ojai R30 delivers clean, reliable
power to all of your pedals.
Connect the other end of the
3
power adapter cable to Ojai
R30’s 24V IN jack.
Connect up to five pedals here
4
with the included pedal cables.
See next page for connection
details.
Page 3

CONNECT YOUR PEDALS
PEDAL OUTPUTS: Connect up to five DC
pedals with the included 5.5mm x 2.1mm
pedal cables. Each output is dual-isolated
for noise-free operation.
LED INDICATOR
Each output features an LED indicator.
LED illuminates green when a pedal
cable is plugged in. LED will turn off
if cable is unplugged, or the current
draw on the output exceeds the
maximum amount available.
Use non-adjustable outputs first to power
your Strymon pedals. If using adjustable
outputs with Strymon pedals, make sure
these outputs are set to 9V.
9V OUTPUTS
Three outputs provide 500mA of
available current at 9V and have
center negative polarity.
ADJUSTABLE OUTPUTS
Two outputs provide selectable 9V, 12V, or 18V DC, each with center
negative polarity. Each output provides 500mA of available current
at 9V, 375mA at 12V, and 250mA at 18V. Make sure these outputs
are set to 9V before connecting your Strymon pedals.
Check with each pedal manufacturer for recommended voltage,
polarity, and required current. If a pedal requires more than 500mA
of current, or voltages other than 9, 12 or 18, please find details on
those configurations here: strymon.net/support/ojai-r30
Page 4

OJAI R30 IS EXPANDABLE
IS YOUR PEDALBOARD GROWING?
Gain more outputs by linking Ojai units
(sold separately) to the 24V THRU jack. Ojai
R30 is part of a truly expandable, modular
power distribution system that can grow
with your pedalboard.
Learn more about linking Ojai units to your
Ojai R30: strymon.net/support/ojai-r30
Ojai R30 provides a huge amount of power. You can link together as many as 7
Ojai units powered from one 24V power adapter, powering up to 35 effects pedals
(depending on the total current requirements for the pedals). While it’s unlikely
that anyone would go to such extremes, we wanted to ensure that the Ojai
product family delivers maximum flexibility and expandability. A much more likely
scenario would be to link 2 or 3 Ojai units together, powering a combination of up
to 15 high and low current draw pedals. Also note that the Ojai R30 units can be
linked to a Strymon Zuma power supply for the ultimate in power and flexibility.
WHAT’S IN THE BOX SPECIFICATIONS
TO CONNECT OJAI UNITS TO YOUR OJAI R30:
1. Power your Ojai R30 with the included PS-124
power adapter, or the 24V OUT of a Strymon
Zuma power supply using the included EIAJ05 cable.
2. Connect the 24V THRU on your Ojai R30 to the
24V IN on another Ojai unit using its included
EIAJ-05 cable.
3. Link additional Ojai units in the same manner.
• Quick Start Guide
• Ojai R30 high-current DC power supply
• 24V power adapter (PS-124)
• One (1) IEC cable (region-specific)
• One (1) EIAJ-05 power adapter cable
• Five (5) 2.1mm x 5.5mm pedal cables (18” long, right angle to
right angle connectors)
• Two (2) #4 (3/8”) wide pan head screws for mounting the Ojai
R30 to your pedalboard
• Drill Template & Strymon sticker
>> Have any questions? strymon.net/support/ojai-r30 <<
• Five (5) isolated custom transformers deliver clean, consistent power
- Three (3) 9V DC, 500mA, center-negative outputs
- Two (2) selectable DC center-negative outputs offer 9V (500mA),
12V (375mA), or 18V (250mA) options
• 24V power adapter delivers a maximum of 24W
• Worldwide power compatibility ensures no-hassle international touring
• Energy efficient, compact design
• Lightweight anodized midnight blue aluminum chassis
• Designed and built in the USA
PEDALBOARD MOUNTING:
Ojai R30 features built in threaded hardware
for easy mounting to the top or bottom of most
pedalboards. Refer to the Mounting Instructions
on the back of this manual and included Drill
Template. The Drill Template can also be
downloaded from strymon.net/support/ojai-r30.
Page 5

OJAI R30 MOUNTING INSTRUCTIONS
DRILL TEMPLATE
#4 SCREWS
HOLE LOCATIONS
CHOOSE YOUR MOUNTING LOCATION
1
Tape the Drill Template (included in this box)
logo side up in the location you want to install
your Ojai R30.
This illustration shows mounting to the top of
your pedalboard. To mount Ojai R30 to the bottom
of your pedalboard, turn the pedalboard over
before placing the Drill Template logo side up in
the location you want to install your Ojai R30.
DRILL HOLES
2
Drill through the two marked hole locations with
a 1/8” (3mm) bit.
ATTACH OJAI R30
3
Place the Ojai R30 over the holes. Install from
the reverse side of your pedalboard using the
provided #4 screws (3/8”).
>> Have any installation questions? strymon.net/support/ojai-r30 <<
REV A
 Loading...