

Page 1
USER MANUAL
Page 2
OJAI R30 - High Current DC Power Supply User Manual
Getting Started
®
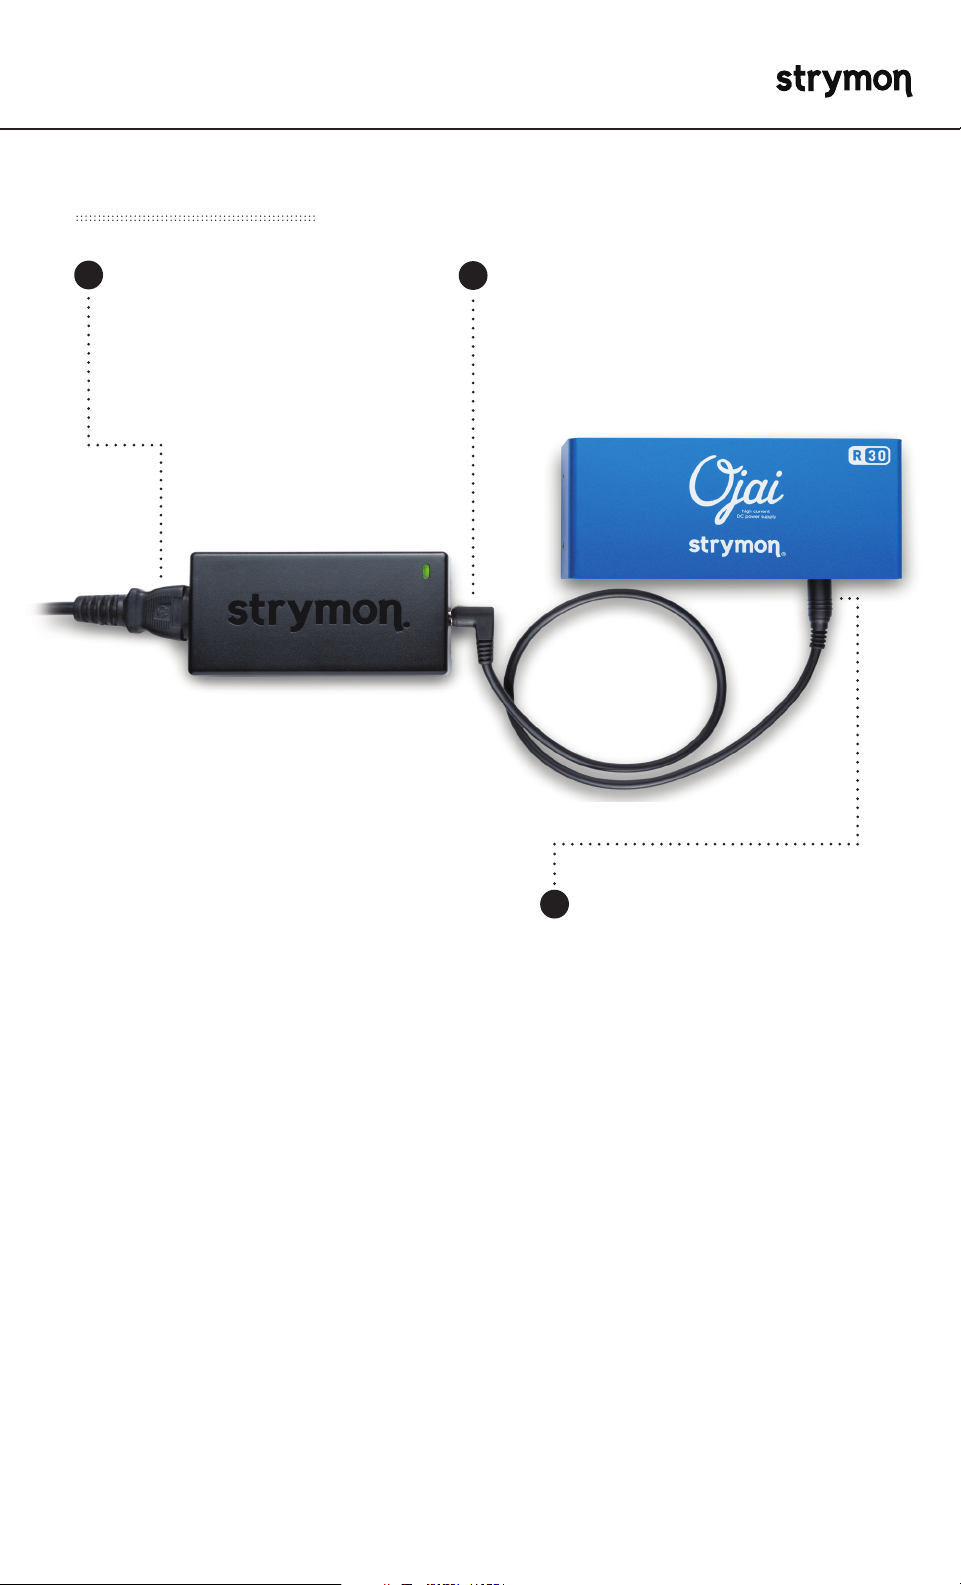
1
Connect one end of the
included IEC cable to the
24V power adapter, and
the other end to an AC
power outlet.
2
Connect one end of the
included power adapter cable
to the 24V power adapter.
3
Connect the other end of
the power adapter cable
to Ojai R30’s 24V IN jack.
pg 2
Page 3
OJAI R30 - High Current DC Power Supply User Manual
Connect Your Pedals
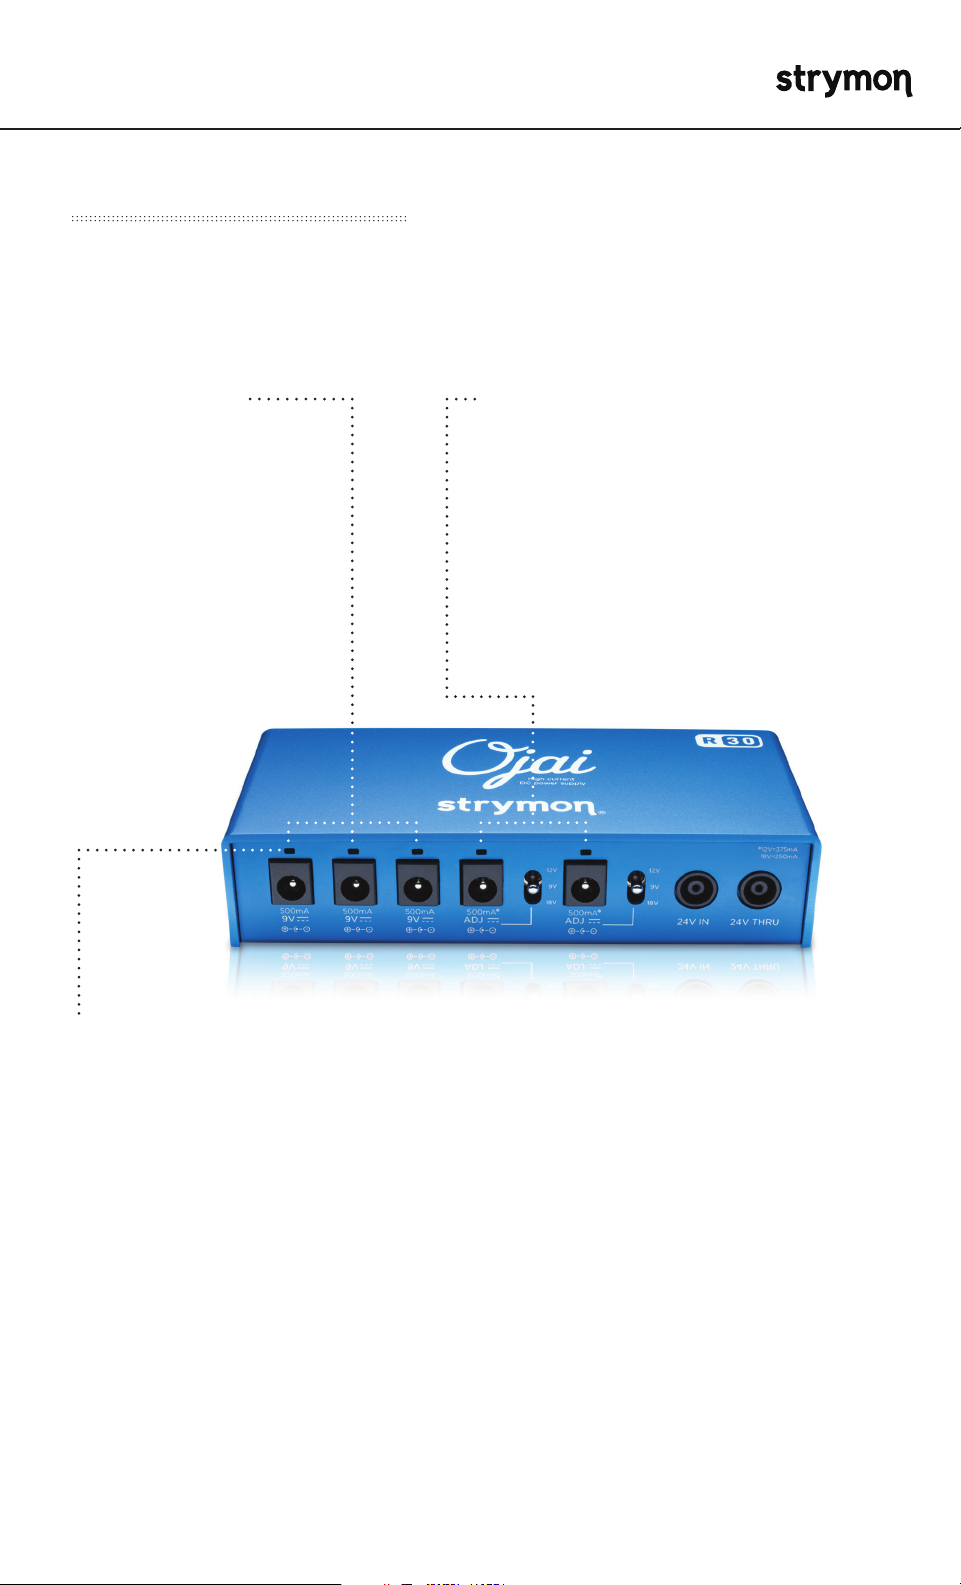
PEDAL OUTPUTS: Connect up to five DC pedals with the included
5.5mm x 2.1mm pedal cables. Each output is dual-isolated for
noise-free operation.
®
• 9V OUTPUTS
Three outputs provide
500mA of available
current at 9V and
have center negative
polarity.
• ADJUSTABLE OUTPUTS
Two outputs provide selectable
9V, 12V, or 18V DC, each with
center negative polarity. Each
output provides 500mA of available
current at 9V, 375mA at 12V, and
250mA at 18V. Make sure these
outputs are set to 9V before
connecting your Strymon pedals.
• LED INDICATOR
Each output features an LED indicator.
LED illuminates green when a pedal
cable is plugged in. LED will turn off if
cable is unplugged, or the current draw
on the output exceeds the maximum
amount available.
pg 3
Page 4

OJAI R30 - High Current DC Power Supply User Manual
Connect Your Pedals (cont.)
®
NOTE: Use non-adjustable outputs first to power your Strymon pedals.
If using adjustable outputs with Strymon pedals, make sure these
outputs are set to 9V.
Check with each pedal manufacturer for recommended voltage,
polarity, and required current. If a pedal requires more than 500mA of
current, or voltages other than 9, 12 or 18, please find details on those
configurations here: strymon.net/support/ojai-r30
pg 4
Page 5

OJAI R30 - High Current DC Power Supply User Manual
Ojai R30 is Expandable
Is your pedalboard growing?
Gain more outputs by linking Ojai units (sold separately) to the 24V
THRU jack. Ojai R30 is part of a truly expandable, modular power
distribution system that can grow with your pedalboard.
Learn more about linking Ojai units to your Ojai R30: strymon.net/
support/ojai-r30
®
TO CONNECT OJAI UNITS TO YOUR OJAI R30:
1
Power your Ojai R30 with the included PS-124 power adapter, or
the 24V OUT of another Strymon power supply using the included
EIAJ-05 cable.
2
Connect the 24V THRU on your Ojai R30 to the 24V IN on another
Ojai unit using its included EIAJ-05 cable.
3
Link additional Ojai units in the same manner.
Ojai R30 provides a huge amount of power. You can link together as
many as 7 Ojai units powered from one 24V power adapter, powering
up to 35 effects pedals (depending on the total current requirement for
the pedals). While it’s unlikely that anyone would go to such extremes,
we wanted to ensure that the Ojai product family delivers maximum
flexibility and expandability. A much more likely scenario would be to
link 2 or 3 Ojai units together, powering a combination of up to 15 high
and low current draw pedals.
NOTE: Ojai units can be linked to a Strymon Zuma power supply for the
ultimate in power and flexibility.
pg 5
Page 6

OJAI R30 - High Current DC Power Supply User Manual
Installation Instructions
Ojai R30 features built in threaded hardware for easy mounting to the
top or bottom of most pedalboards.
1
Locate the Drill Template that is included in the box. It is also
available for download at strymon.net/support/ojai-r30.
2
Choose your mounting location. Tape the Drill Template, logo side
up, in the location you want to install your Ojai R30.
This illustration shows mounting to the top of your pedalboard.
To mount Ojai R30 to the bottom of your pedalboard, turn the
pedalboard over before placing the Drill Template logo side up in
the location you want to install your Ojai R30.
®
HOLE LOCATIONS
DRILL TEMPLATE
#4 SCREWS
3
Drill holes. Drill through the two marked hole locations with a 1/8”
(3mm) bit. Remove the drilling template.
4
Attach Ojai R30. Place the Ojai R30 over the holes. Install from
the reverse side of your pedalboard using the provided #4 screws
(3/8”).
pg 6
Page 7

OJAI R30 - High Current DC Power Supply User Manual
Features
• Five (5) high current, fully isolated outputs with center-negative
polarity
- Three (3) dedicated 9V DC outputs (500mA)
- Two (2) selectable outputs offer 9V (500mA), 12V (375mA), or 18V
(250mA) DC options
• 500mA per output powers nearly any pedal
• Five (5) pedal cables included (5.5mm x 2.1mm barrel connectors,
right angle to right angle, 18” length)
• 24V power adapter (PS-124) and IEC power cable included
®
• 24V Thru jack allows connection to additional Strymon Ojai units
(sold separately)
• Five (5) individual custom transformers (one per channel) deliver
clean, consistent power
• Worldwide power compatibility ensures no-hassle international
touring
• Energy efficient, compact design
• Lightweight and rugged anodized midnight blue aluminum chassis
• Ultra low profile design fits under nearly any pedalboard
• Designed and built in the USA
pg 7
Page 8

OJAI R30 - High Current DC Power Supply User Manual
Specifications
Ojai R30 Dimensions 5.1” x 2.3” x 1.15” (130mm x 58mm x 29mm)
Ojai R30 Weight 6.0 oz. (171g)
PS-124 Dimensions 4.2” x 2.15” x 1.25” (107mm x 55mm x 32mm)
PS-124 Weight 4.7 oz. (133g)
Ojai R30 Input 24V DC, center-positive
9V DC Outputs Three 9V DC, 500mA, center-negative
Adjustable Outputs Two Selectable 9V (500mA), 12V (375mA),
or 18V (250mA) DC, center-negative
PS-124 Input 100-240V AC 50/60Hz
®
PS-124 Output 24V DC, 1000mA, 24W max EIAJ-05 center-
positive output
What’s In the Box?
• Ojai R30 high-current DC power supply
• 24V power adapter (PS-124)
• One (1) IEC cable (region-specific)
• One (1) EIAJ-05 power adapter cable
• Five (5) 2.1mm x 5.5mm pedal cables (18” long, right angle to right
angle connectors)
• Two (2) #4 3/8” wide pan head screws for mounting the Ojai R30 to
your pedalboard
• Mounting Guide
• Quick Start Guide
• Strymon sticker
pg 8
Page 9

OJAI R30 - High Current DC Power Supply User Manual
Questions?
For additional help with setup, connections, power, and mounting,
please visit strymon.net/support/ojai-r30 or email us at support@
strymon.net.
Strymon Non-Transferrable Limited Warranty
Warranty
Strymon warranties the product to be free from defects in material
and workmanship for a period of five (5) years from the original date
of purchase when bought new from an authorized dealer in the United
States of America or Canada. If the product fails within the warranty
period, Strymon will repair or, at our discretion, replace the product
at no cost to the original purchaser. Please contact your dealer for
information on warranty and service outside of the USA and Canada.
®
Exclusions
This warranty covers defects in manufacturing discovered while using
this product as recommended by Strymon. This warranty does not
cover loss or theft, nor does the coverage extend to damage caused by
misuse, abuse, unauthorized modification, improper storage, lightning,
or natural disasters.
Limits of Liability
In the case of malfunction, the purchaser’s sole recourse shall be
repair or replacement, as described in the preceding paragraphs.
Strymon will not be held liable to any party for damages that result
from the failure of this product. Damages excluded include, but are
not limited to, the following: lost profits, lost savings, damage to other
equipment, and incidental or consequential damages arising from
the use, or inability to use this product. In no event will Strymon be
liable for more than the amount of the purchase price, not to exceed
the current retail price of the product. Strymon disclaims any other
warranties, expressed or implied. By using the product, the user
accepts all terms herein.
How to Obtain Service Under this Warranty
For North American customers: Contact Strymon through our website
at strymon.net/support for Return Authorization and information.
Proof of original ownership may be required in the form of a purchase
receipt.
For International Customers: Contact the Strymon dealer from which
the product was purchased from in order to arrange warranty repair
service.
REVA 08.30.17
pg 9
 Loading...