

Page 1

USER MANUAL
Page 2

MultiSwitch Plus - Extended Control
Table of Contents
OVERVIEW
PRESET MODE
CUSTOM MODE
TIMELINE, BIGSKY & MOBIUS MODE
TAP, FAV, BOOST & SPEED MODE
COMBO MODE
APPENDIX
PRESET MODE PEDAL SETUP
TIMELINE, BIGSKY & MOBIUS MODE SETUP
TAP, FAV, BOOST & SPEED MODE PEDAL SETUP
COMPATIBILITY CHART
SPECIFICATIONS
WARRANTY
3
4
5
6
7
8
10
11
13
15
16
17
pg 2
Page 3

MultiSwitch Plus - Extended Control
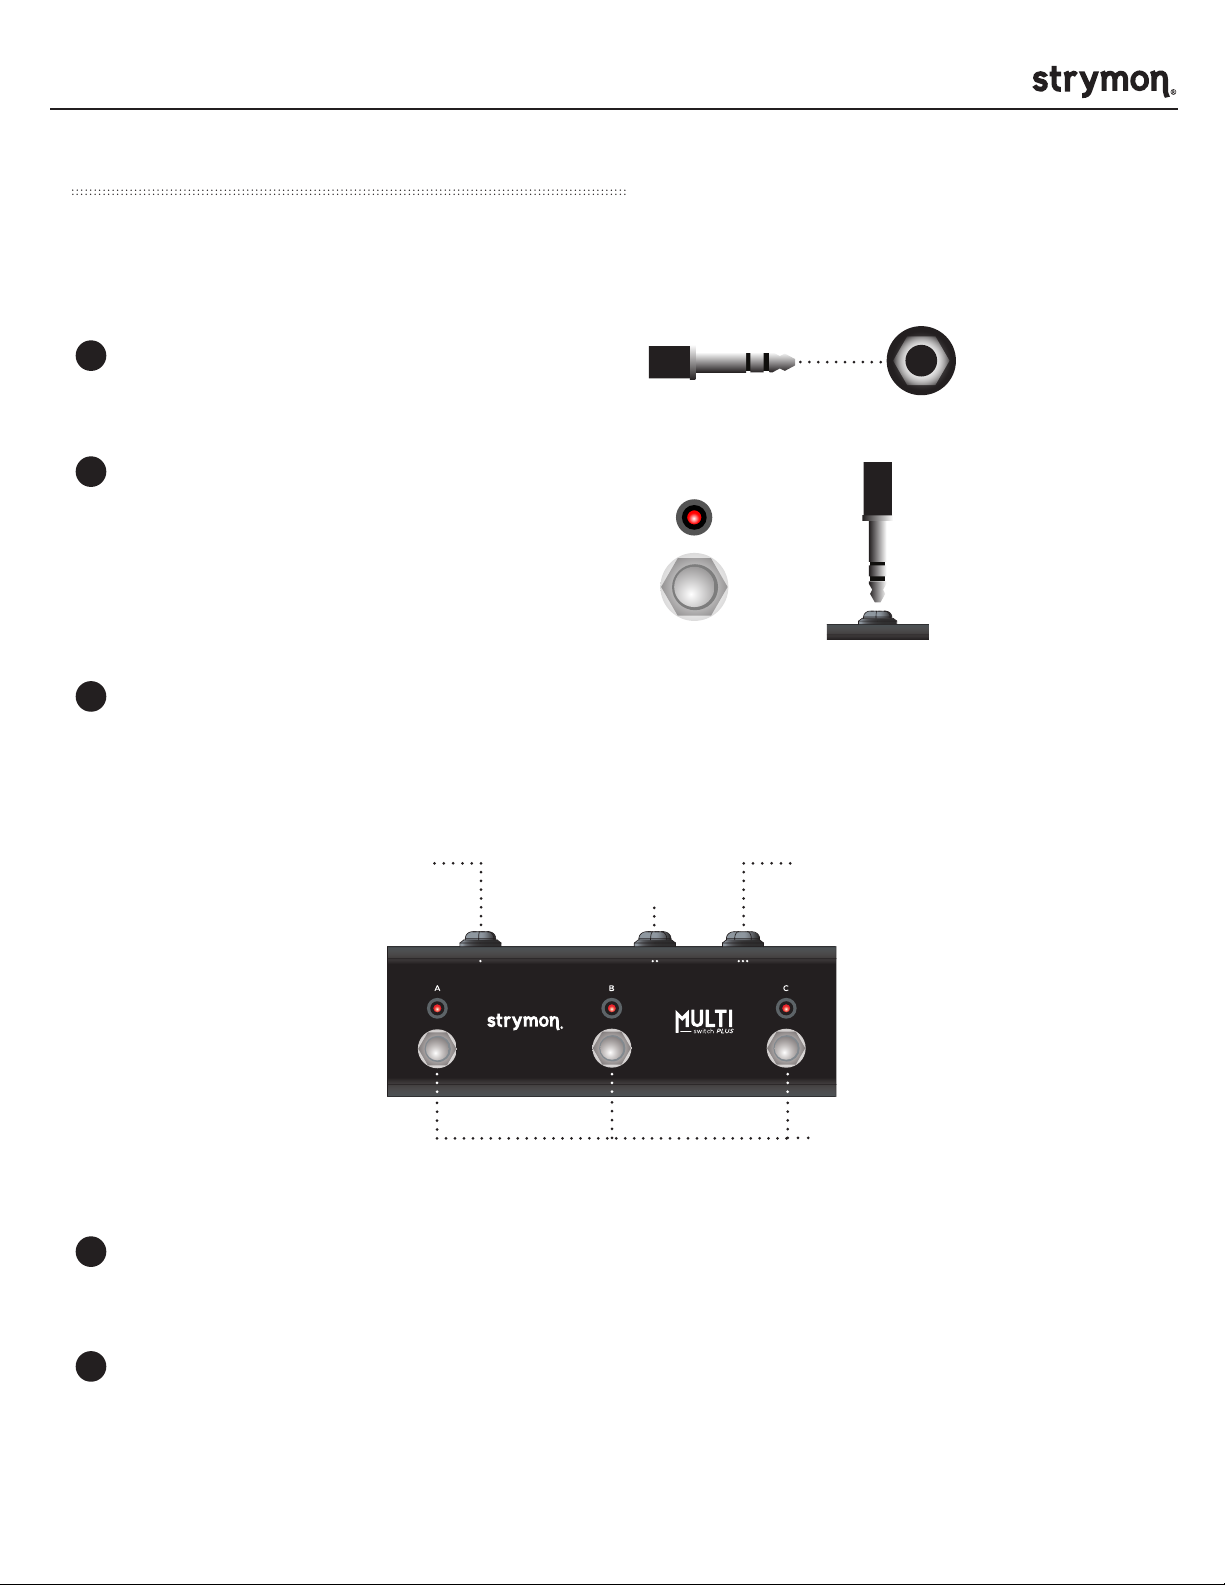
Overview
MultiSwitch Plus enhances your ability to control Strymon pedals at your feet
without the complexity of MIDI. MultiSwitch Plus has three LEDs, output jacks,
and footswitches.
OUTPUT JACKS
The output jacks allow commands to be sent to your
pedals and provide power from these pedals. These
output jacks are referred to as • (one), •• (two), and
••• (three).
FOOTSWITCHES
The footswitches can be programmed to send
a variety of different commands to your pedals.
These footswitches are referred to as A, B, and C.
pg 3
Page 4

MultiSwitch Plus - Extended Control
B C
EXP
Preset Mode
This mode adds the ability to select and bypass three presets on supported pedals.1
Press a footswitch with an unlit LED to select that preset on connected pedals. Step
on the same footswitch again to bypass the pedals.
1
Connect the included TRS cable to the EXP
jack of the pedal you wish to control.
2
Enter Preset Mode by holding down the A
footswitch while connecting the TRS cable to
MultiSwitch Plus. The A LED will flash RED
to confirm the selection.
A
+
3
Release the footswitch. The LEDs on
MultiSwitch Plus will flash GREEN when
configuration is complete.
All outputs carry the same signal in this
mode.
4
Check the Appendix for instructions on
how to configure the connected pedal for
use in this mode.
1
Check the Compatibility Chart on pg.15 for details
and a list of compatible pedals.
NOTE: These three presets correspond to MIDI
Program Change messages 1-2-3.
NOTE: For Volante, this is equivalent to the
presets stored on playback buttons 2-3-4. For
Sunset and Riverside, these are independent
of the preset that is associated with the FAV
footswitch, which is equivalent to MIDI PC# 0.
pg 4
Page 5

MultiSwitch Plus - Extended Control
EXP
Custom Mode
This mode adds remote control functionality unique to the supported pedal.
1
Connect the included TRS cable to the EXP
jack of the pedal you wish to control.
2
Enter Custom Mode by holding down the C
C
footswitch while connecting the TRS cable to
MultiSwitch Plus. The C LED will flash RED
to confirm the selection.
3
Release the footswitch. The LEDs on
+
MultiSwitch Plus will flash GREEN when
configuration is complete. All three
outputs carry the same signal in this mode.
4
Check the manual for the connected
pedal for for specific functionality and
instructions on how to configure the pedal
for use in this mode.
1
1
Check the Compatibility Chart on pg.15 for details
and a list of compatible pedals.
pg 5
Page 6

MultiSwitch Plus - Extended Control
C
EXP
TimeLine, BigSky & Mobius Mode
This mode adds expanded preset selection control for TimeLine, BigSky, and
Mobius and dedicated Looper controls for TimeLine.
May require firmware update. Check the Compatibility Chart on pg.15 for details.
1
Connect the included TRS cable to the EXP
jack of the pedal you wish to control.
2
Enter TimeLine, BigSky and Mobius Mode by
holding down the B and C footswitches at the
same time while connecting the TRS cable
to MultiSwitch Plus. The B and C LEDs will
flash RED to confirm the selection.
B
+ +
C
3
Release the footswitches. The LEDs on
MultiSwitch Plus will flash GREEN when
configuration is complete.
All outputs carry the same signal in this mode.
4
Check the Appendix for instructions on how
to configure the connected pedal for use in
this mode.
NOTE: MultiSwitch Plus LEDs remain unlit in
this mode. The TimeLine, BigSky and Mobius
are not capable of bidirectional communication
which is required to support MultiSwitch Plus
LED functionality.
pg 6
Page 7
MultiSwitch Plus - Extended Control
C
EXP
Tap, Favorite, Boost & Speed Mode
This mode allows you to connect up to three supported pedals1 for independent,
dedicated footswitch functions.
1
Connect the included TRS cable to the EXP or
FAV jack of the pedal you wish to control.
2
Enter Tap, Favorite, Boost & Speed Mode by
holding down the B footswitch while connecting
the TRS cable to MultiSwitch Plus. The B LED
will flash RED to confirm the selection and all
LEDs will illuminate.
B
+
3
Release the footswitch. The LEDs on MultiSwitch
Plus will all be lit. Press the footswitches to
assign each switch and jack pair to control Tap
(GREEN LED) or FAV/Boost/Speed (RED LED).
Footswitch A
Output Signal
4
Press and hold the B footswitch to exit
configuration mode.
Footswitch B
Output Signal
Footswitch C
Output Signal
Tap, Boost,
Fav or Speed
5
Check the Appendix for instructions on
how to configure the connected pedal for
use in this mode.
1
Check the Compatibility Chart on pg.15 for
details and a list of compatible pedals.
pg 7
Page 8

MultiSwitch Plus - Extended Control
B C
C
EXP
Combo Mode
Footswitches A / B and output jacks 1 / 2 match the behavior of Preset mode. Footswitch C
and output jack 3 match the behavior of TAP, FAV, BOOST & SPEED MODE.
1
Connect the included TRS cable from output 1
or 2 to the appropriate jack of one of the pedals
you wish to control.
2
Enter Combo Mode by holding down the A and
B footswitches while connecting the TRS cable
to MultiSwitch Plus. The A and B LEDs will flash
RED to confirm the selection.
A
B
+ +
3
After entering Combo Mode the C footswitch
LED will indicate whether it is assigned to
control Tap (GREEN LED) or FAV/Boost/Speed
(RED LED). Press the C footswitch to toggle
between these two options.
4
Press and hold B to exit configuration.
5
Connect an additional TRS cable from output 3
to the pedal receiving Tap, Boost, Fav or Speed
signal.
6
Check the Appendix for instructions on how to
configure the connected pedal for use in this
mode.
Check the Compatibility Chart on pg.15 for details
and a list of compatible pedals.
PRESET Output Footswitch C
Output Signal
PRESET 1
PRESET 2 Tap, Boost,
Fav or Speed
pg 8
Page 9

MultiSwitch Plus - Extended Control
Connected Pedal Setup
Appendix
pg 9
Page 10

MultiSwitch Plus - Extended Control
Preset Mode Pedal Setup
A quick reference for the connected pedal setup. For more details see pedal user manual.
Riverside
Setting EXP jack to MIDI mode.
1
Press and hold the FAVORITE footswitch while
powering up the pedal.
2
Turn the LEVEL knob until the ON LED turns
BLUE to set the EXP jack mode to MIDI Mode.
3
Press either footswitch to store the EXP jack
assignment.
Sunset
Setting EXP jack to MIDI mode.
1
Press and hold the A footswitch while
powering up the pedal.
Volante
Setting EXP jack to Preset mode.
1
To configure the EXP jack, press and hold
the TAP button while powering up Volante.
2
Turn the ECHO LEVEL knob until the TAP
LED turns BLUE.
3
Press the TAP footswitch to store this setting.
2
Turn the LEVEL knob on the B side until the B
LED turns BLUE to set the EXP jack mode to
MIDI Mode.
3
Press either footswitch to store the EXP jack
assignment.
pg 10
Page 11
MultiSwitch Plus - Extended Control
TIME
REPEATS MIX
TIME
REPEATS MIX
TIME
REPEATS MIX
TimeLine, BigSky & Mobius Mode Pedal Setup
A quick reference for the connected pedal setup. For more details see pedal user manual.
1
TimeLine, BigSky and Mobius may require
firmware update to work with MultiSwitch Plus.
Check the Compatibility Chart on pg.15 for
details.
2
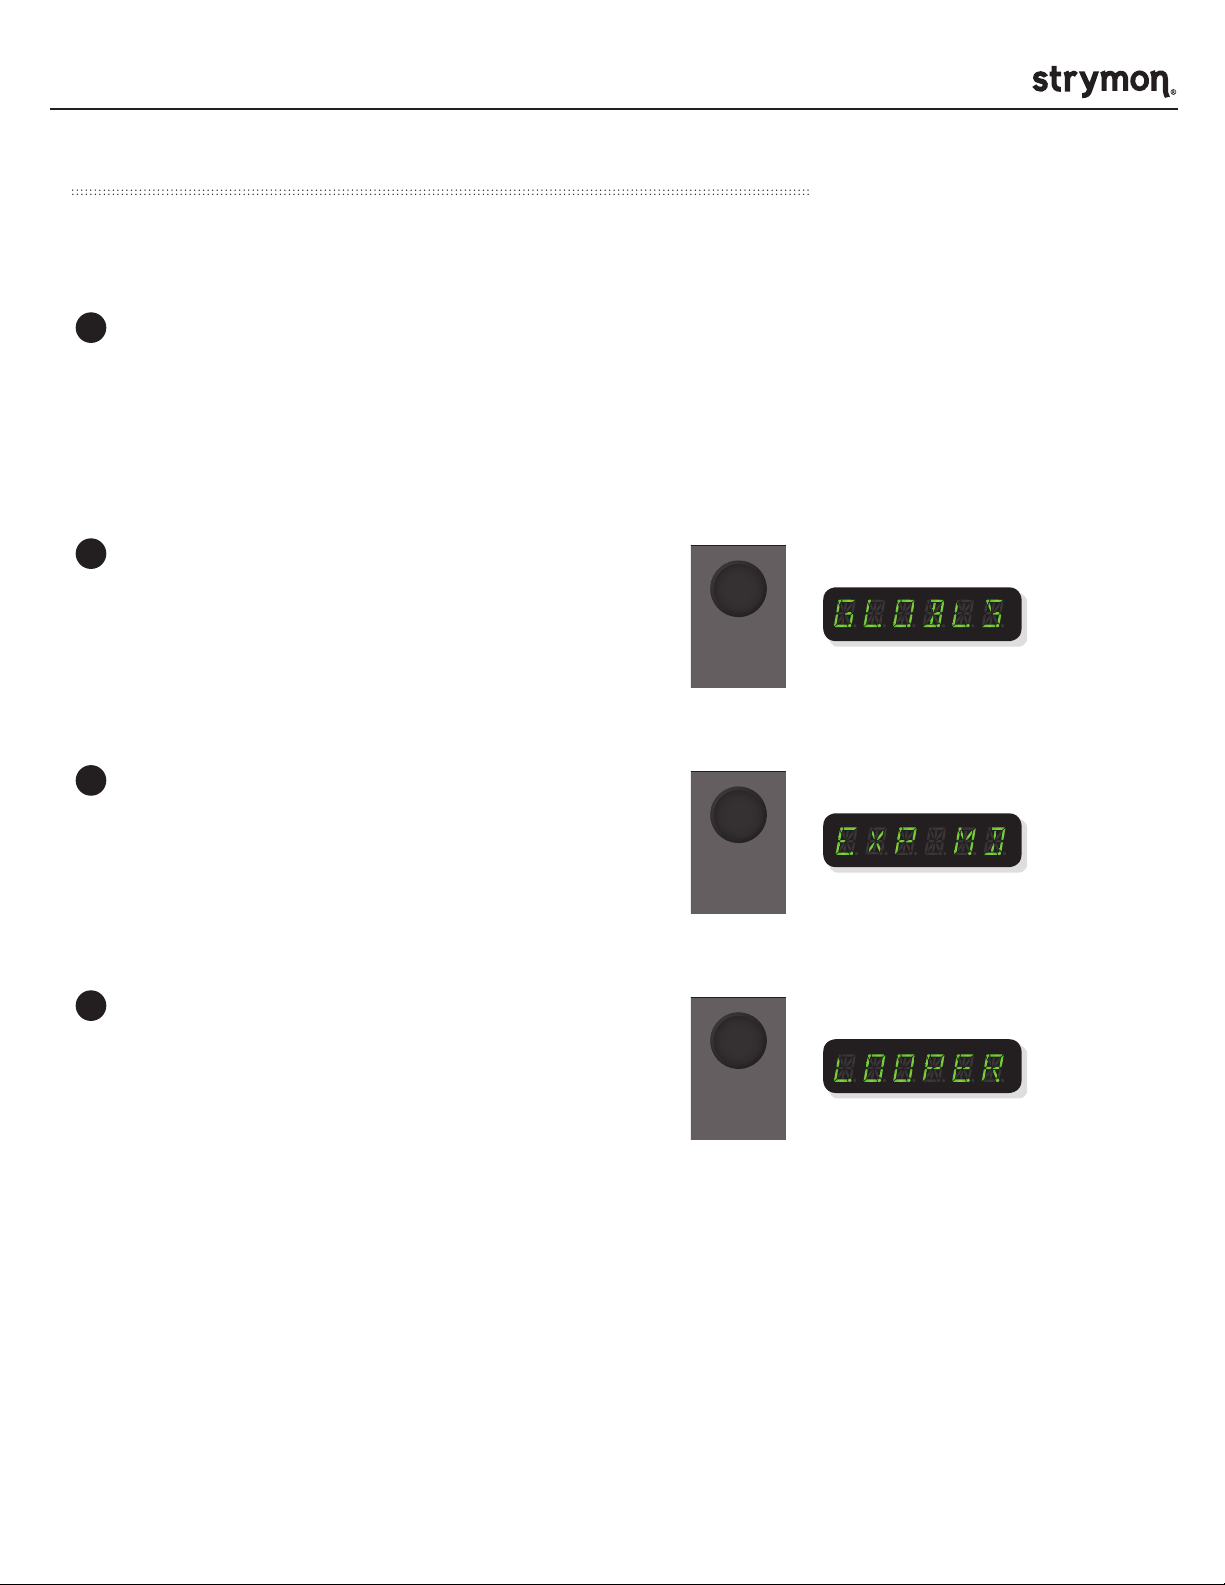
Press and hold the VALUE knob on your
TimeLine, BigSky or Mobius for at least 2
seconds to access the GLOBALS menu. Release
the VALUE knob.
VALUE
push (param)
hold (global)
3
Turn the VALUE knob until the display reads EXP
MD (Expression Mode).
4
Press and release the VALUE knob again, then
turn the VALUE knob to select an Expression
Mode.
These modes are detailed on the next page.
VALUE
push (param)
hold (global)
VALUE
push (param)
hold (global)
pg 11
Page 12

MultiSwitch Plus - Extended Control
A
BC
TimeLine, BigSky & Mobius Mode Pedal Setup (cont.)
Description of footswitch functionality in TimeLine,
BigSky & Mobius mode. LEDs will remain unlit.
TAP MODE
Use the left switch to scroll down through your saved
presets, the right switch to scroll up, and the middle
switch to tap your tempo.
BANK MODE
Use the left footswitch to move down a bank, right
footswitch to move up a bank, and middle footswitch to
cycle through your presets within the current bank.
PRESET MODE
Scroll through saved presets using the left and right
footswitches, and engage/bypass the preset you have
selected with the middle footswitch.
PRESET
DOWN
BANK DOWN
PRESET
DOWN
TAP TEMPO
BYPASS/
ENGAGE
PRESET UP
BANK UP
PRESET UP
3 - BUTTON LOOPER (Timeline Only)
REC/DUB
PLAY
STOP
MultiSwitch Plus allows instant access to TimeLine’s
Record/Overdub, Play, and Stop functions without holding
the TAP switch to enter Looper Mode. Access looping
features while retaining footswitch control over your
delay sounds.
6 - BUTTON LOOPER (TimeLine Only)
REVERSE
HALF SPEED
UNDO/REDO
Hold TimeLine’s TAP footswitch to enter looper mode,
and MultiSwitch Plus now gives you instant access to
Reverse, Half Speed, and Undo/Redo.
pg 12
Page 13

MultiSwitch Plus - Extended Control
Tap, FAV, Boost & Speed Mode Pedal Setup
A quick reference for the connected pedal setup. For more details see pedal user manual.
BigSky, Mobius, TimeLine
Setting EXP jack to Tap Tempo mode.
1
Press and hold the VALUE knob on your
TimeLine, BigSky or Mobius for at least
2 seconds to access the GLOBALS menu.
Release the VALUE knob.
2
Turn the VALUE knob until the display reads
EXP MD (expression mode).
3
Press and release the VALUE knob again,
then turn the VALUE knob to select the TAP
expression mode: TAP.
NOTE: On BigSky, tap tempo sets the Pre-Delay
time.
Deco
Setting EXP jack to Tap Tempo mode.
1
Power up holding BOTH footswitches.
2
While holding footswitches, turn the
SATURATION knob to the 12 o’clock position.
Volante
Setting EXP jack to Tap Tempo mode.
1
Press and hold TAP footswitch at power up.
2
Turn ECHO LEVEL knob to the left until TAP LED
lights up AMBER.
Brigadier, DIG, El Capistan, Flint
Setting EXP jack to Tap Tempo Mode.
1
Set both toggles to DOWN position.
2
Power up holding BOTH footswitches.
3
Press TAP footswitch to exit.
Riverside
Setting BOOST jack to Boost mode.
1
Press and hold FAVORITE footswitch at
power up.
2
Turn DRIVE knob all the way to the right.
The FAVORITE LED will light up PURPLE.
3
Press the ON or FAVORITE footswitch once again
to store this setting and begin using Riverside.
pg 13
Page 14

MultiSwitch Plus - Extended Control
Tap, FAV, Boost & Speed Mode Pedal Setup (cont.)
Brigadier, DIG, El Capistan, Flint
Setting EXP jack to Favorite mode.
1
Set both toggles to middle position.
2
Power pedal holding down both footswitches.
SAVE FAVORITE: Press and hold BYPASS to save a
new Favorite setting. Flint: Press and hold REVERB
BYPASS to save a new Favorite setting.
Deco
Setting EXP jack to Favorite mode.
1
Power up holding BOTH footswitches.
2
While holding down the footswitches, turn the
SATURATION all the way to the right.
Riverside
Setting EXP jack to Favorite mode.
1
Press and hold FAVORITE footswitch at power
up.
2
Turn LEVEL knob just past the 12 o’clock
position. The FAVORITE LED will light up
AMBER.
3
Press the ON or FAVORITE footswitch once again
to store this setting and begin using Riverside.
SAVE FAVORITE: Press and hold FAVORITE to save a
new Favorite setting.
Sunset
Setting FAV jack to Favorite mode.
1
Press and hold A footswitch at power up.
SAVE FAVORITE SETTING: Press and hold TAPE
SATURATION BYPASS to save a new Favorite setting.
Lex
Setting EXP jack to Favorite/Speed modes.
1
Set both toggles to DOWN position.
2
While holding both footswitches:
• Turn FAST ROTOR SPEED knob full clockwise
for Favorite EXP mode
• Turn FAST ROTOR SPEED knob to 12 o’clock
for SPEED switch EXP mode
SAVE FAVORITE: Press and hold BYPASS to save a
new Favorite setting.
2
Turn A side LEVEL knob all the way to the left.
The A LED will light up AMBER.
3
Press the A or B footswitches once again to
store this setting and begin using Sunset.
SAVE FAVORITE: Press and hold A footswitch to save
a new Favorite setting.
pg 14
Page 15
MultiSwitch Plus - Extended Control
Compatibility Chart
Here is the list of MultiSwitch Plus compatibility. For the latest list of compatible product visit
strymon.net/multiswitchplus.
Mode
Preset Mode
Custom Mode
TimeLine, BigSky,
and Mobius Mode
Tap/Fav/Boost/
Speed Mode
Description Compatibility
Adds the ability to select and bypass
onboard presets 1, 2, and 3.
Provides remote access to Volante’s Speed
switch, and enhances transport controls.
Expanded preset selection control.
Dedicated looper controls (TimeLine).
Each footswitch is paired with the closest
output and its function can be independently
assigned.
Sunset, Riverside, Volante
Volante
TimeLine v1.87, BigSky v1.49,
Mobius v1.39*
Tap:BigSky, Deco, DIG, Flint,
Mobius, TimeLine, Volante
Fav:Brigadier, Deco, DIG, El
Capistan, Flint, Lex, Riverside,
Sunset
Boost:Riverside
Speed:Lex
Combo Mode
*NOTE: To check firmware on TimLine BigSky and Mobius, press and hold far right footswitch on
power up. Turn the TYPE knob until the display shows REVISN and then push the TYPE knob again.
Footswitches A and B will select between
presets 1 and 2 for pedals connected to
outputs 1 and 2. Footswitch C can be used
for remote Tap Tempo, Favorite, Boost, or
Speed for the pedal connected to output 3.
Presets:Sunset, Riverside,
Volante
Tap:BigSky, Deco, DIG, Flint,
Mobius, TimeLine, Volante
Fav:Brigadier, Deco, DIG, El
Capistan, Flint, Lex, Riverside,
Sunset
Boost:Riverside
Speed:Lex
pg 15
Page 16

MultiSwitch Plus - Extended Control
Specifications
Cable 1/4” Right Angle TRS (tip / ring / sleeve)
Power Supply No additional power supply required
Chassis Rugged black anodized aluminum chassis
Dimensions 6.8” wide x 2.2” deep x 1.7” tall
(172mm wide x 57mm deep x 42mm tall)
Additional TRS cables can be purchased from strymon.net/store.
Designed and built in the USA.
pg 16
Page 17

MultiSwitch Plus - Extended Control
Strymon Non-Transferrable Limited Warranty
Warranty
Strymon warranties the product to be free from defects in material and workmanship for a period of two (2)
years from the original date of purchase when bought new from an authorized dealer in the United States of
America or Canada. If the product fails within the warranty period, Strymon will repair or, at our discretion,
replace the product at no cost to the original purchaser. Please contact your dealer for information on warranty
and service outside of the USA and Canada.
Exclusions
This warranty covers defects in manufacturing discovered while using this product as recommended by
Strymon. This warranty does not cover loss or theft, nor does the coverage extend to damage caused by
misuse, abuse, unauthorized modification, improper storage, lightning, or natural disasters.
Limits of Liability
In the case of malfunction, the purchaser’s sole recourse shall be repair or replacement, as described in the
preceding paragraphs. Strymon will not be held liable to any party for damages that result from the failure of
this product. Damages excluded include, but are not limited to, the following: lost profits, lost savings, damage
to other equipment, and incidental or consequential damages arising from the use, or inability to use this
product. In no event will Strymon be liable for more than the amount of the purchase price, not to exceed the
current retail price of the product. Strymon disclaims any other warranties, expressed or implied. By using the
product, the user accepts all terms herein.
How to Obtain Service Under this Warranty
For North American customers: Contact Strymon through our website at strymon.net/support for Return
Authorization and information. Proof of original ownership may be required in the form of a purchase receipt.
For International Customers: Contact the Strymon dealer from which the product was purchased from in order
to arrange warranty repair service.
Strymon® is a division of Damage Control®, LLC.
REV A - 03.07.2019
pg 17
 Loading...