


Mobius - User Manual
Front Panel Controls
®
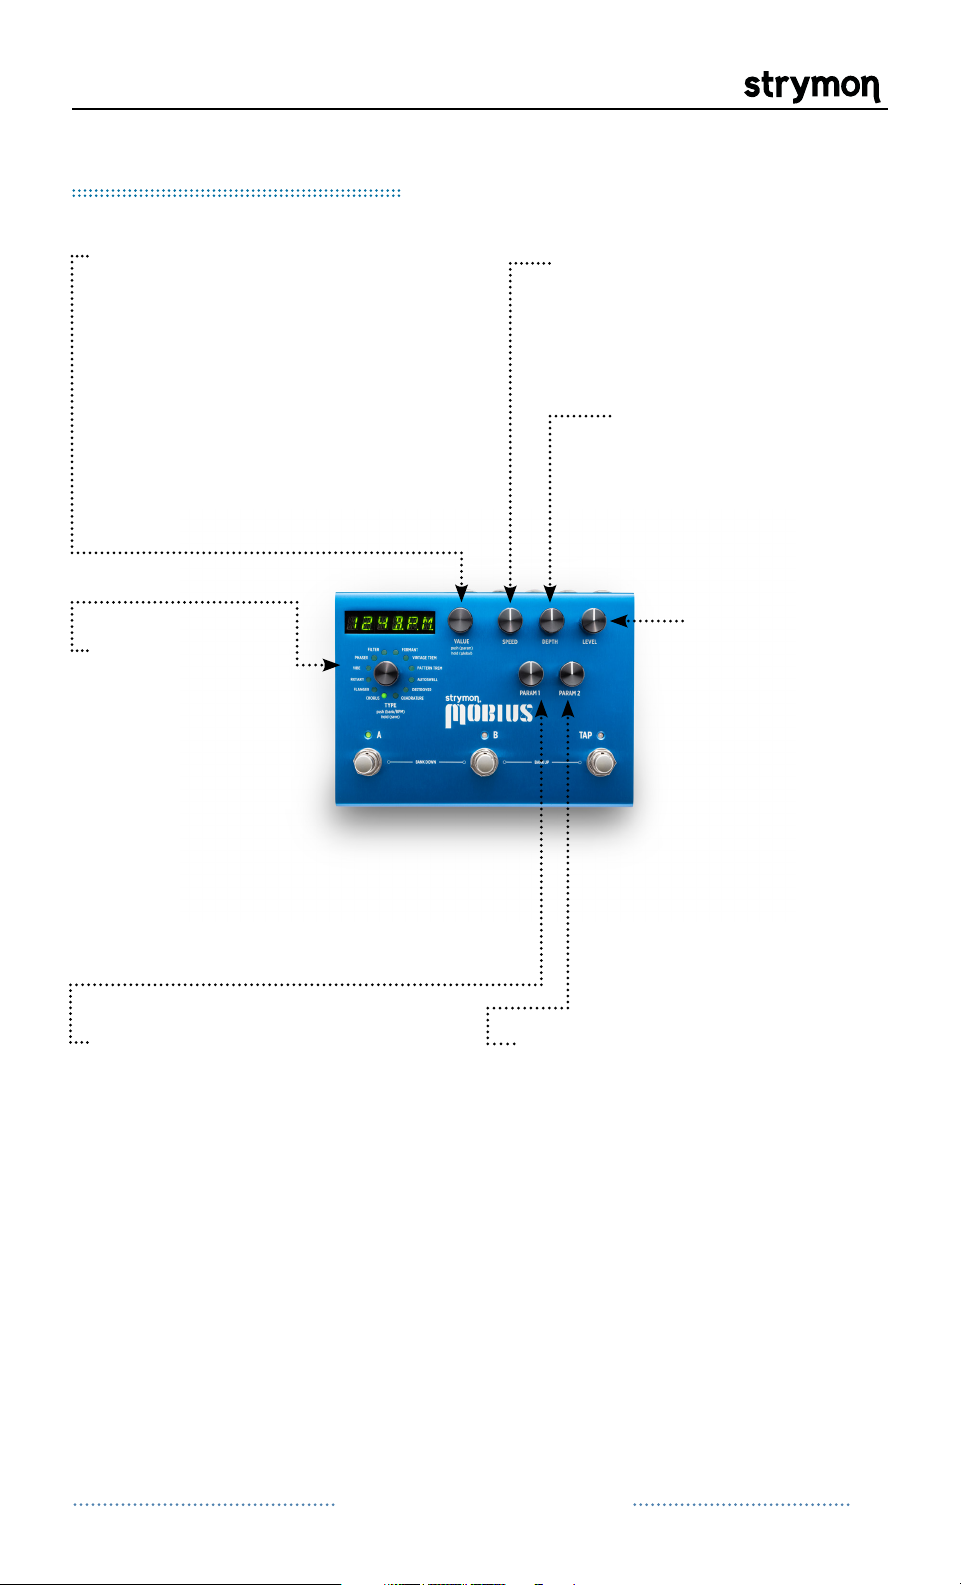
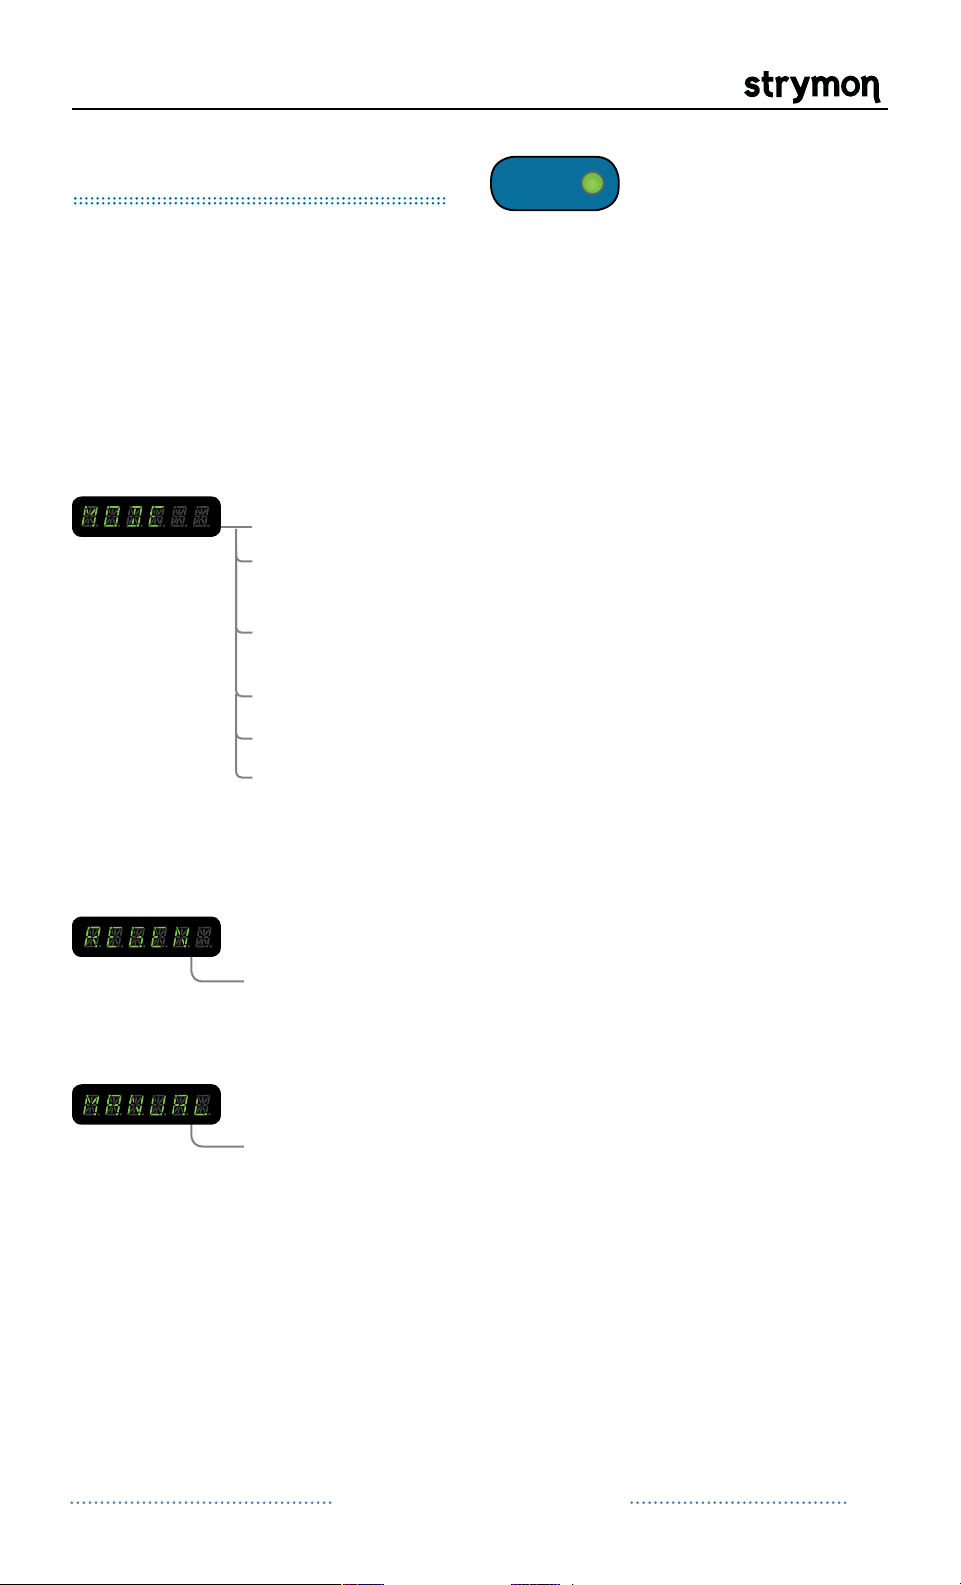
VALUE: Provides fine
adjustment of LFO speed
when the speed is displayed.
Scrolls through presets
when bank or name is
displayed. PUSH to access
the parameter menu for the
current mod machine. HOLD
to access the global menu.
TYPE:
Turn to
select desired
Mod Machine.
Push to toggle
the display
between showing
BPM or the
current bank.
Hold to save
current preset.
SPEED: Provides coarse
adjustment of LFO speed.
DEPTH: Sets the
modulation depth
for the current mod
machine.
LEVEL: Adjusts
the output level
from -3dB to
+3dB. Set to 12
o’clock for unity
gain.
PARAM 1: Assignable to the
parameters in the current
mod machine. To assign the
PARAM 1 knob, navigate to
the desired parameter, press
and hold the value encoder
and turn the PARAM 1 knob.
Continued on Next Page
PARAM 2: Assignable to the
parameters in the current mod
machine. To assign the PARAM
2 knob, navigate to the desired
parameter, press and hold
the value encoder and turn the
PARAM 2 knob.
pg 2
Mobius - User Manual
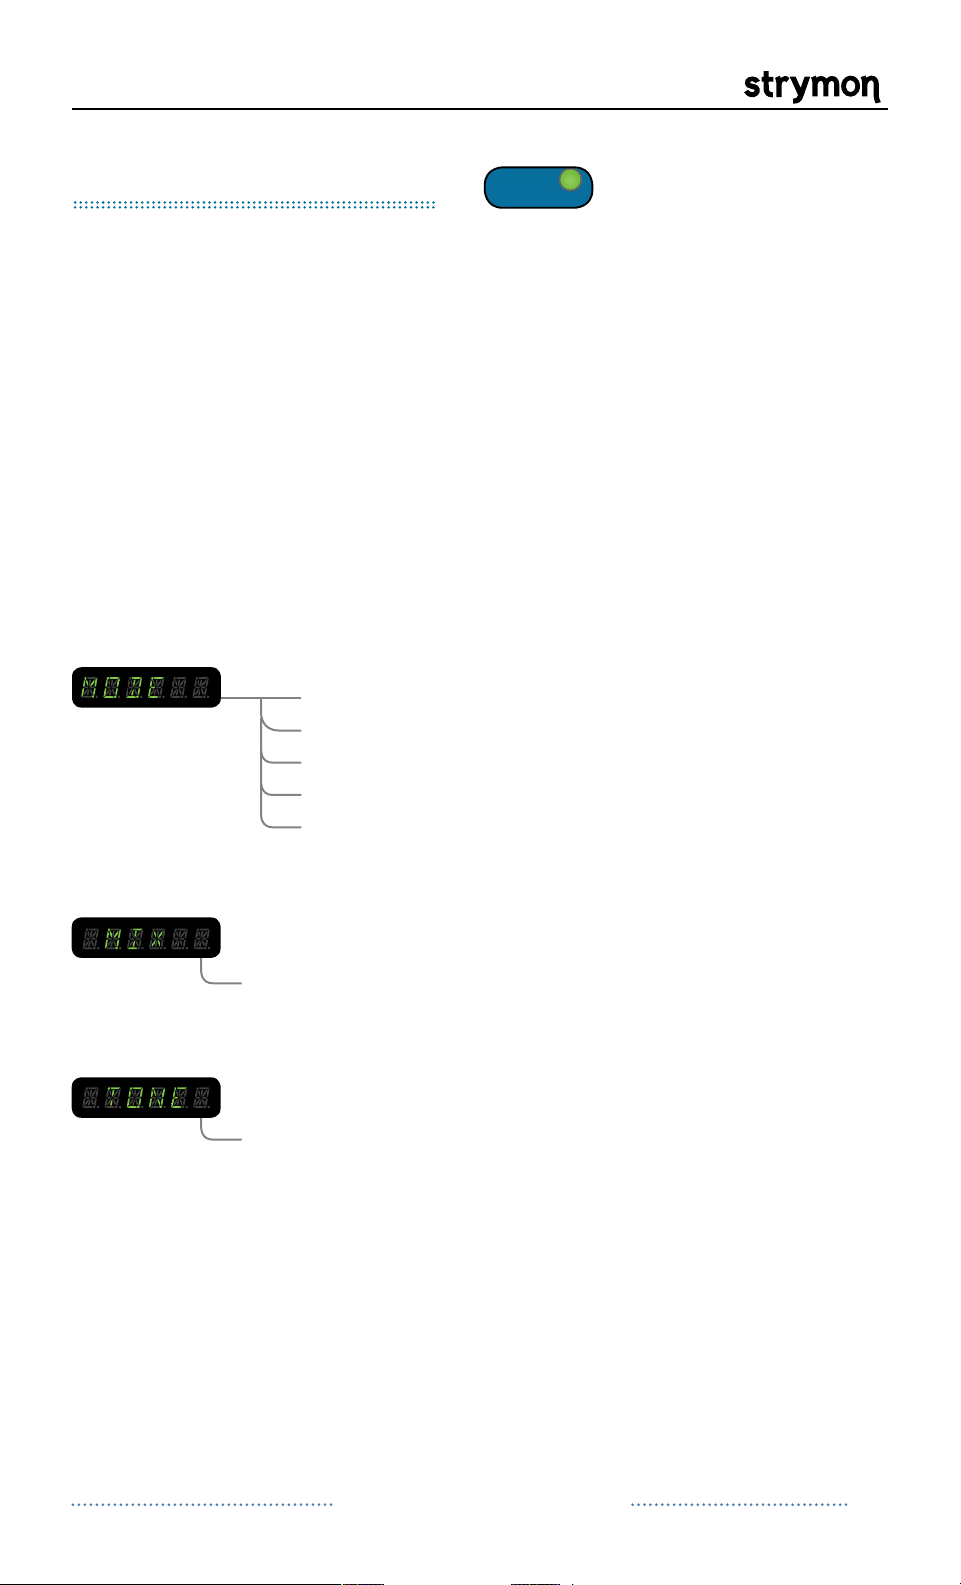
Front Panel Controls Continued
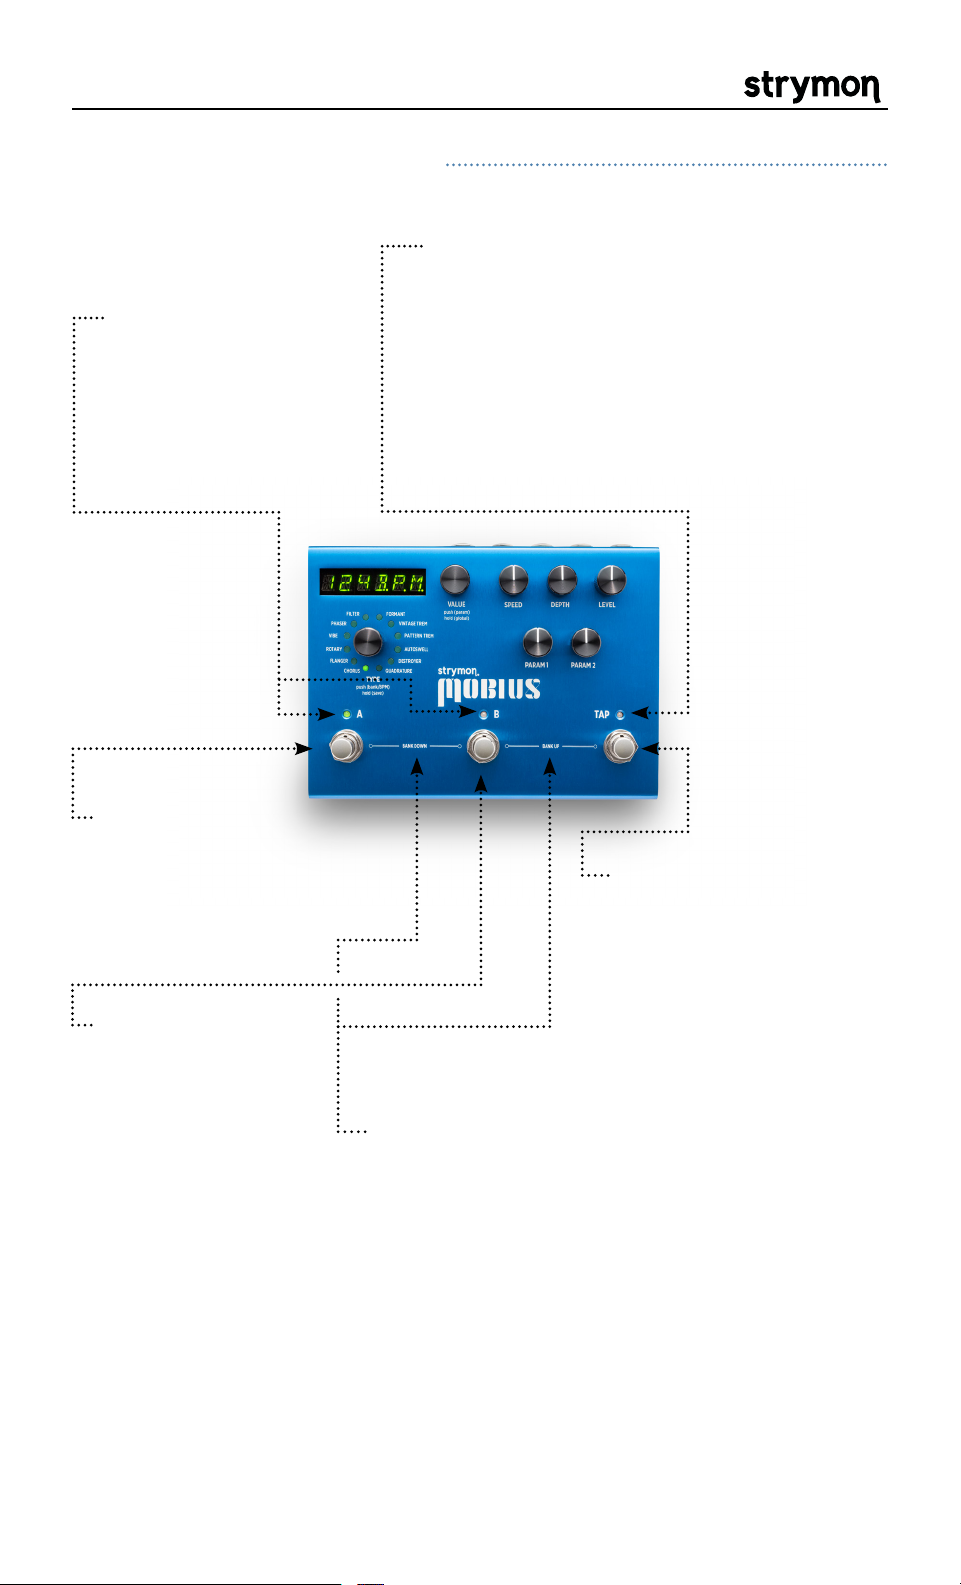
A & B LEDS:
if active. Amber
if the preset has
been edited. Off if
bypassed.
Green
TAP LED: Pulses to indicate current
LFO rate. Flashes amber to indicate
that a tap division is active.
To find the knob positions of a
TIP:
saved preset, turn each knob until the
LED returns to GREEN after glowing
Amber.
®
FOOTSWITCH A:
Press to engage
or bypass preset
A of the current
bank.
FOOTSWITCH B:
Press to engage
or bypass preset
B of the current
bank.
TAP: Tap to set the LFO
speed. Press once to
sync LFO for Phaser,
Filter, Formant, Pattern
Trem and Quadrature.
Assignable to tap or
speed select for Rotary.
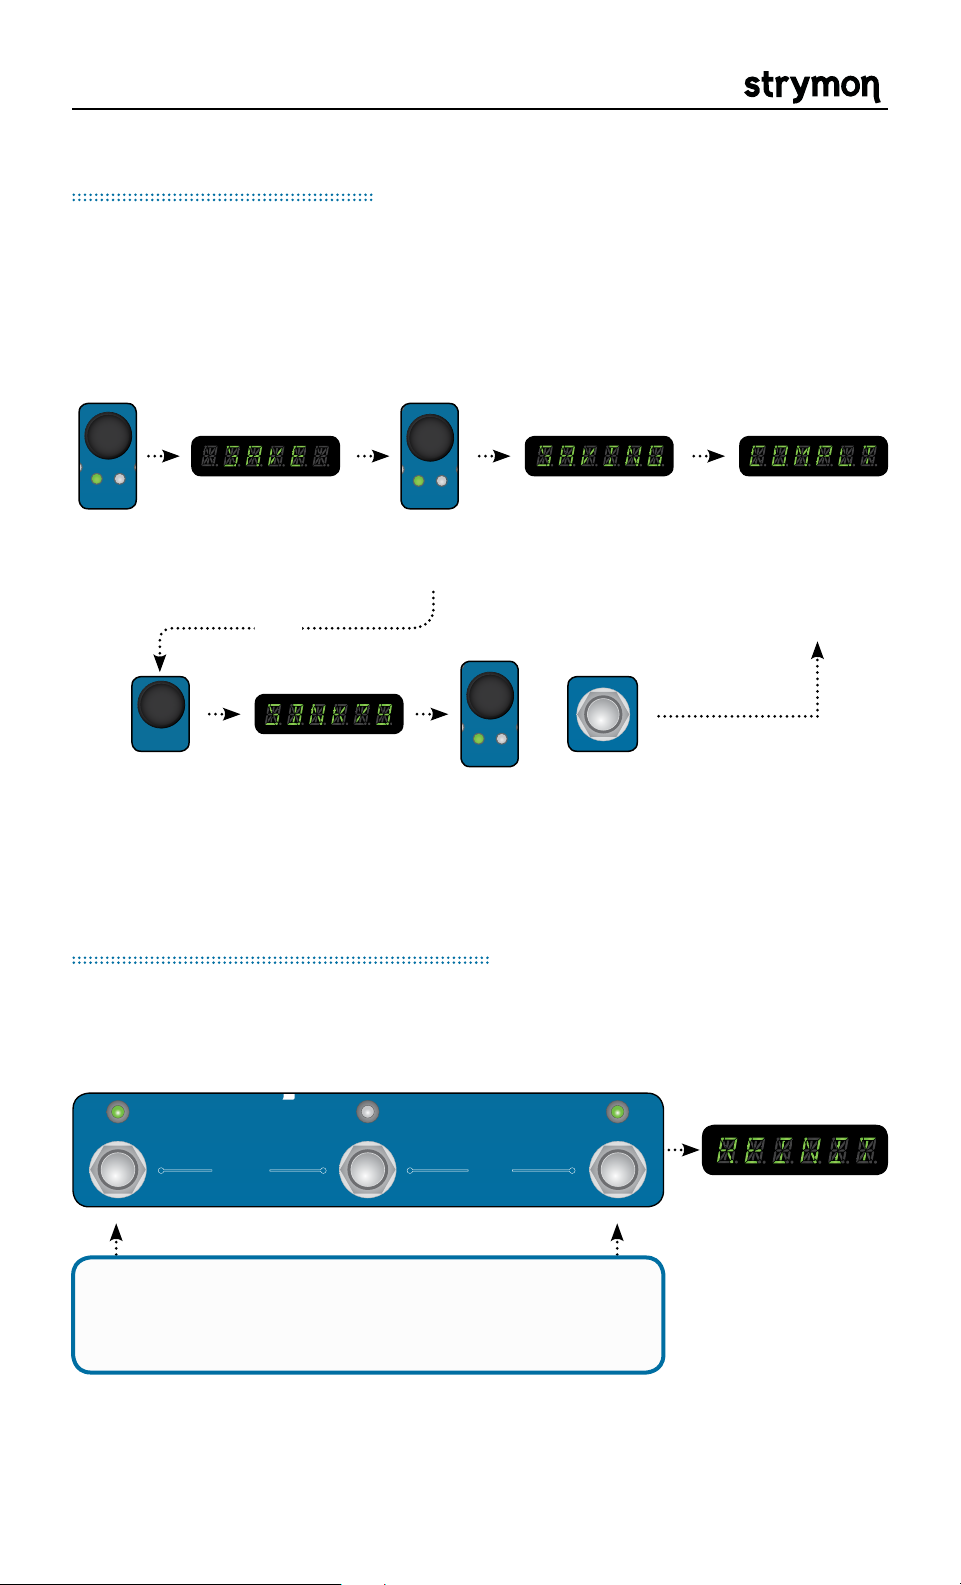
BANK SELECT: Press A & B to select a lower
bank. Press B & TAP to select a higher bank.
While the selected bank is pending it is
displayed as “BANKXX” where XX is the bank
number.After the desired bank is selected,
press A or B to activate a preset from that
bank.
pg 3
Mobius - User Manual
Rear Panel
®
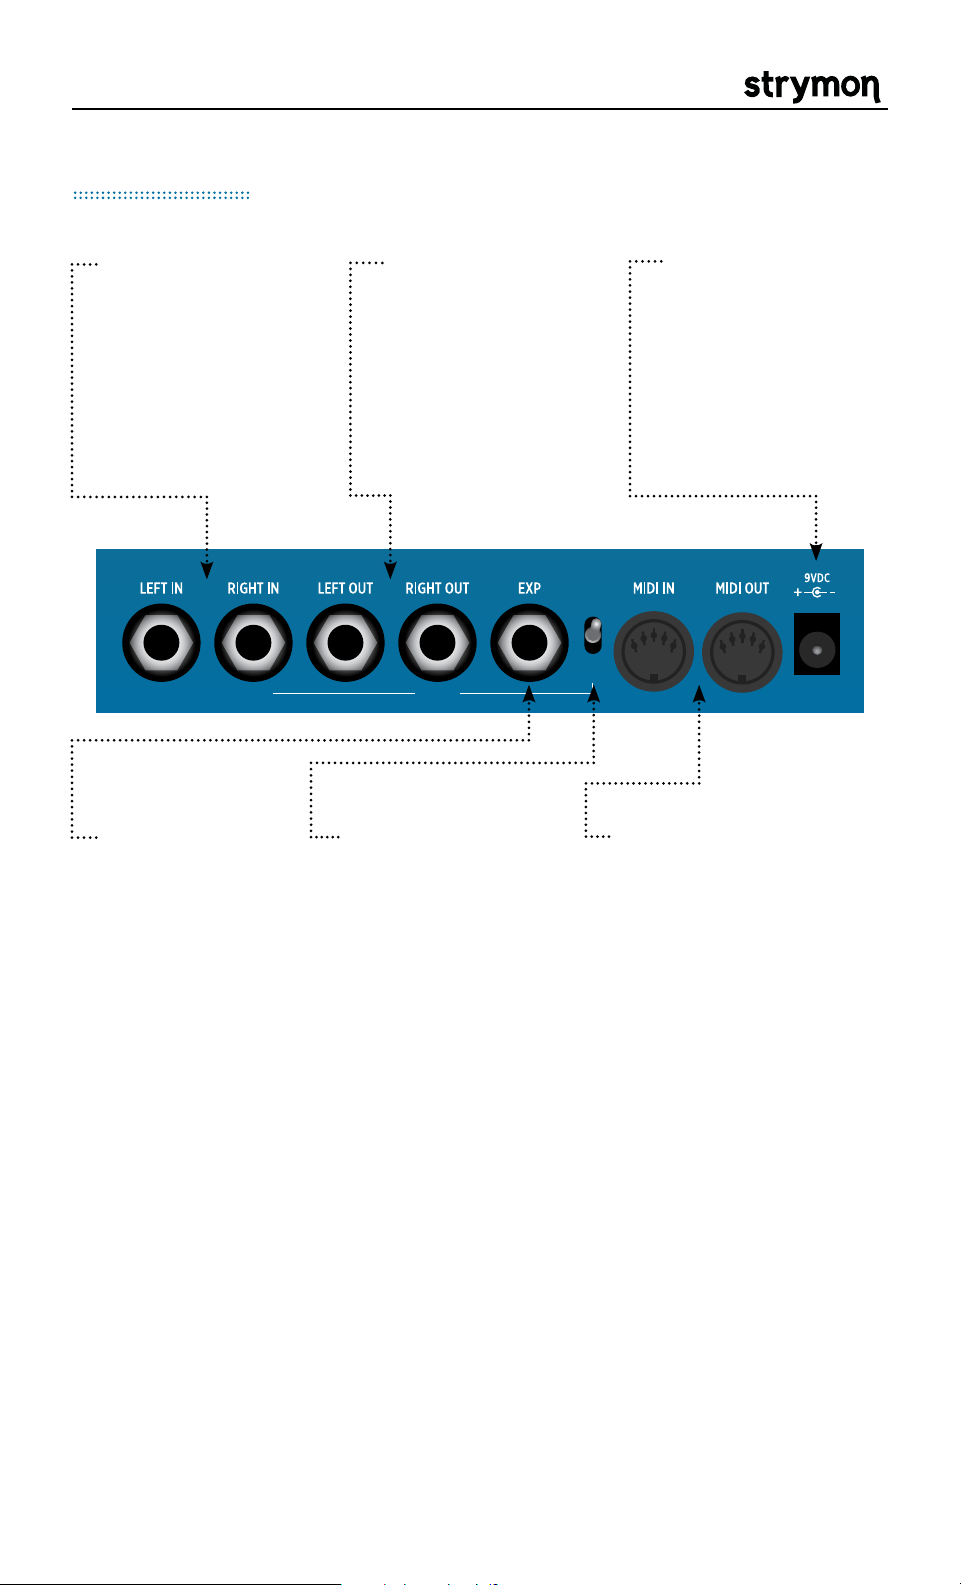
INPUTS: High
impedance inputs.
Use LEFT input for
mono. RIGHT IN
is used as input 2
if using a pre/post
configuration.
EXP: Connect
an expression
pedal or switch
for external tap
tempo.
OUTPUTS: Use
LEFT output for
mono. RIGHT OUT
is used as output 2
if using a pre/post
configuration.
OUTPUT 2INPUT 2
SIGNAL ROUTING
SWITCH: Choose
between standard
stereo in/out
operation or pre/
post mode. Turn to
Pre/Post section for
more details.
POWER: NEVER
plug into voltage
higher than 9VDC.
Requires at least
300mA of available
current.
STEREO
IN/OUT
PRE /
POST
MIDI: Full featured
MIDI input and output
supporting MIDI CCs,
Program changes,
etc. Consult MIDI
Specifications section
for full MIDI spec.
pg 4
Mobius - User Manual
VALUE
SPEED
DEPTH LEVEL
VALUE
SPEED
DEPTH LEVEL
VALUE
SPEED
DEPTH LEVEL
PARAM 1 PARAM 2
DEPTH LEVEL
push (param)
hold (global)
VALUE
SPEED
DEPTH LEVEL
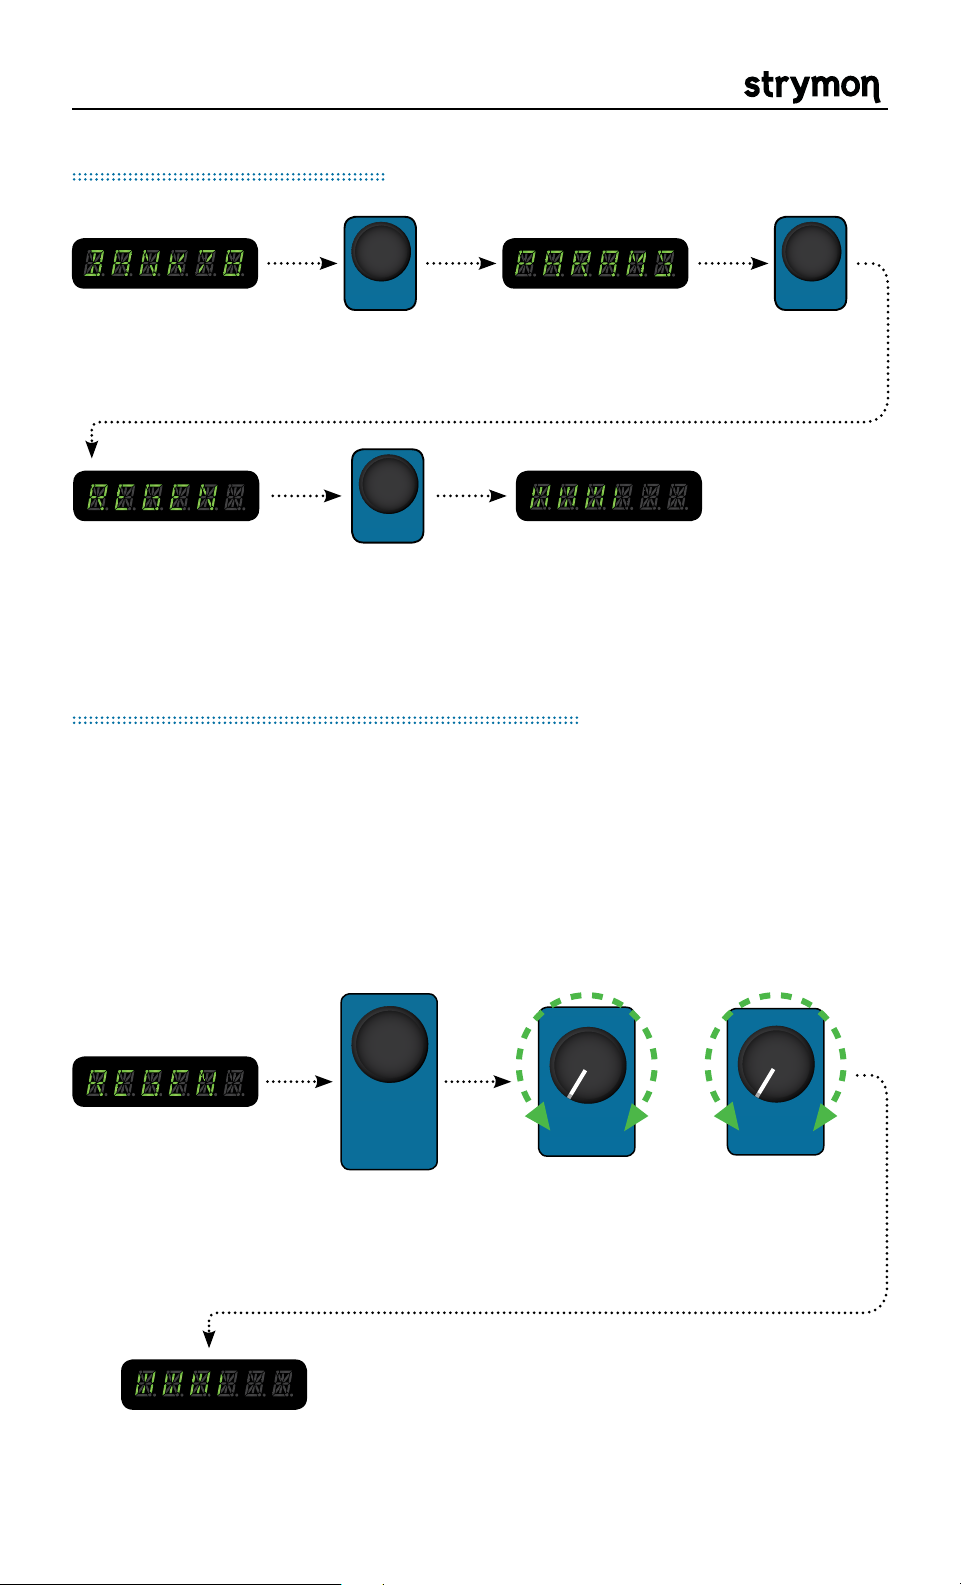
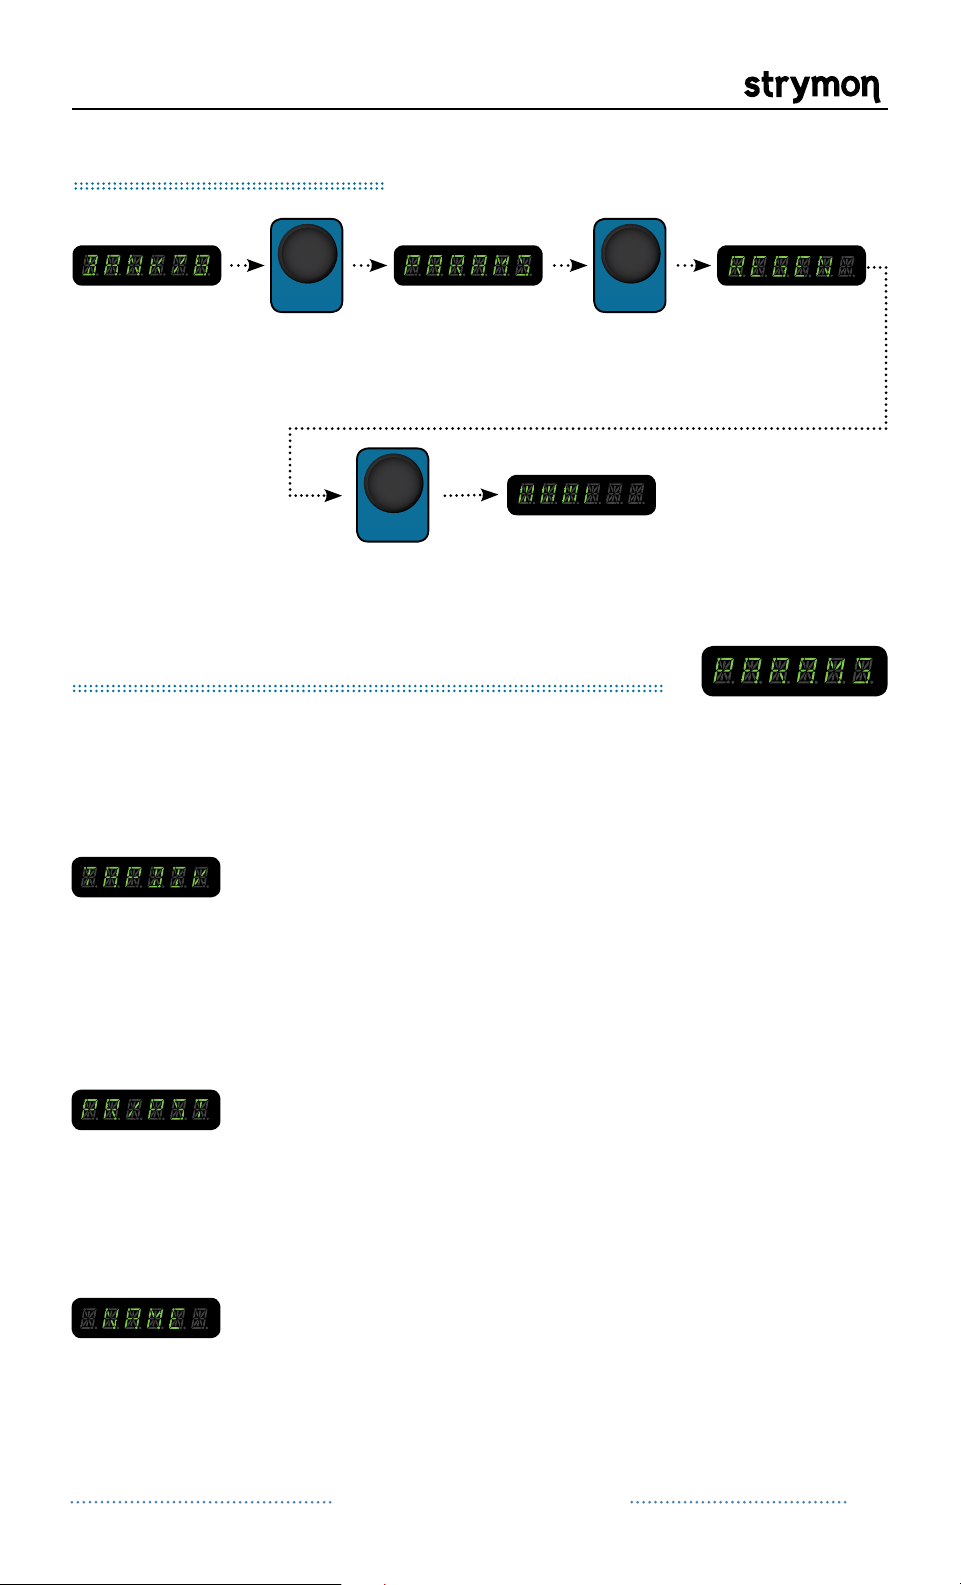
Editing Parameters
®
While displaying
BANK, NAME, or
BPM
push the
value encoder
to enter PARAMS
menu
turn the
value
encoder
to select
the desired
PARAMETER
push the value
encoder again
and turn to edit
the selected
PARAMETER
In Depth: PARAM 1 & 2 Controls
The PARAM 1 & PARAM 2 knobs allow you to continuously control any
desired parameter of the currently active mod machine. This can be
very convenient in allowing continuous control over the various mod
machines. For example, REGEN in a flanger can be assigned to one of
the parameter knobs to allow for continuous control over the flanger
feedback.
ASSIGNING A PARAMETER
STEP 1:
Navigate to
the desired
parameter to be
assigned.
STEP 4: Turn the newly
assigned PARAM knob to
adjust your parameter.
STEP 2: Press
and hold the
value encoder.
OR
STEP 3: While holding the
value encoder, turn either the
PARAM 1 or PARAM 2 knob to
assign a parameter.
pg 5

Mobius - User Manual
STEREO
IN/OUT
PRE /
POST
OUTPUT 2INPUT 2
OR
®
TRS
®
TRS
EXP Connections
Connect a Strymon
MiniSwitch to tap
tempo remotely.
Use a standard TRS
cable to connect the
external switch. Set
the EXP MD global
setting to TAP to use
external tap.
®
Connect a standard
TRS expression
pedal for continuous
control over any
knob. To select the
knob(s) controlled
by the expression
pedal, use the EP SET
parameter in each
preset. All knobs
can be controlled
simultaneously. See
Common Parameters
for set up instructions.
Connect a Strymon MultiSwitch for external tap tempo,
bank selection, or preset selection. Set the EXP MD
global setting to either TAP, BANK, or PRESET. Please
refer to the MultiSwitch user manual for detailed setup
information: www.strymon.net/support/multiswitch
pg 6
Mobius - User Manual
TYPE
push (param)
hold (global)
VALUE
PARAM 1 PARAM 2
SPEED
DEPTH LEVEL
DESTROYER
FORMANT
AUTOSWELL
VINTAGE TREM
PATTERN TREM
QUADRATURE
®
TYPE
push (param)
hold (global)
VALUE
PARAM 1 PARAM 2
SPEED
DEPTH LEVEL
DESTROYER
FORMANT
AUTOSWELL
VINTAGE TREM
PATTERN TREM
QUADRATURE
®
VALUE
SPEED
DEPTH LEVEL
TYPE
push (bank/BPM)
hold (save)
push (param)
hold (global)
VALUE
PARAM 1 PARAM 2
B TAPA
SPEED
DEPTH LEVEL
BANK DOWN BANK UP
FILTER
DESTROYER
VIBE
ROTARY
FLANGER
PHASER
CHORUS
FORMANT
AUTOSWELL
VINTAGE TREM
PATTERN TREM
QUADRATURE
®
TYPE
push (param)
hold (global)
VALUE
PARAM 1 PARAM 2
SPEED
DEPTH LEVEL
DESTROYER
FORMANT
AUTOSWELL
VINTAGE TREM
PATTERN TREM
QUADRATURE
®
TYPE
push (bank/BPM)
hold (save)
push (param)
hold (global)
VALUE
PARAM 1 PARAM 2
B TAPA
SPEED
DEPTH LEVEL
BANK DOWN BANK UP
FILTER
DESTROYER
VIBE
ROTARY
FLANGER
PHASER
CHORUS
FORMANT
AUTOSWELL
VINTAGE TREM
PATTERN TREM
QUADRATURE
®
Banks and Patches
Mobius has 100 banks with A & B patches in each bank. Banks are
numbered 0 to 99 on the display. The patches in banks 0-49 are
duplicated in banks 50-99 at the factory.
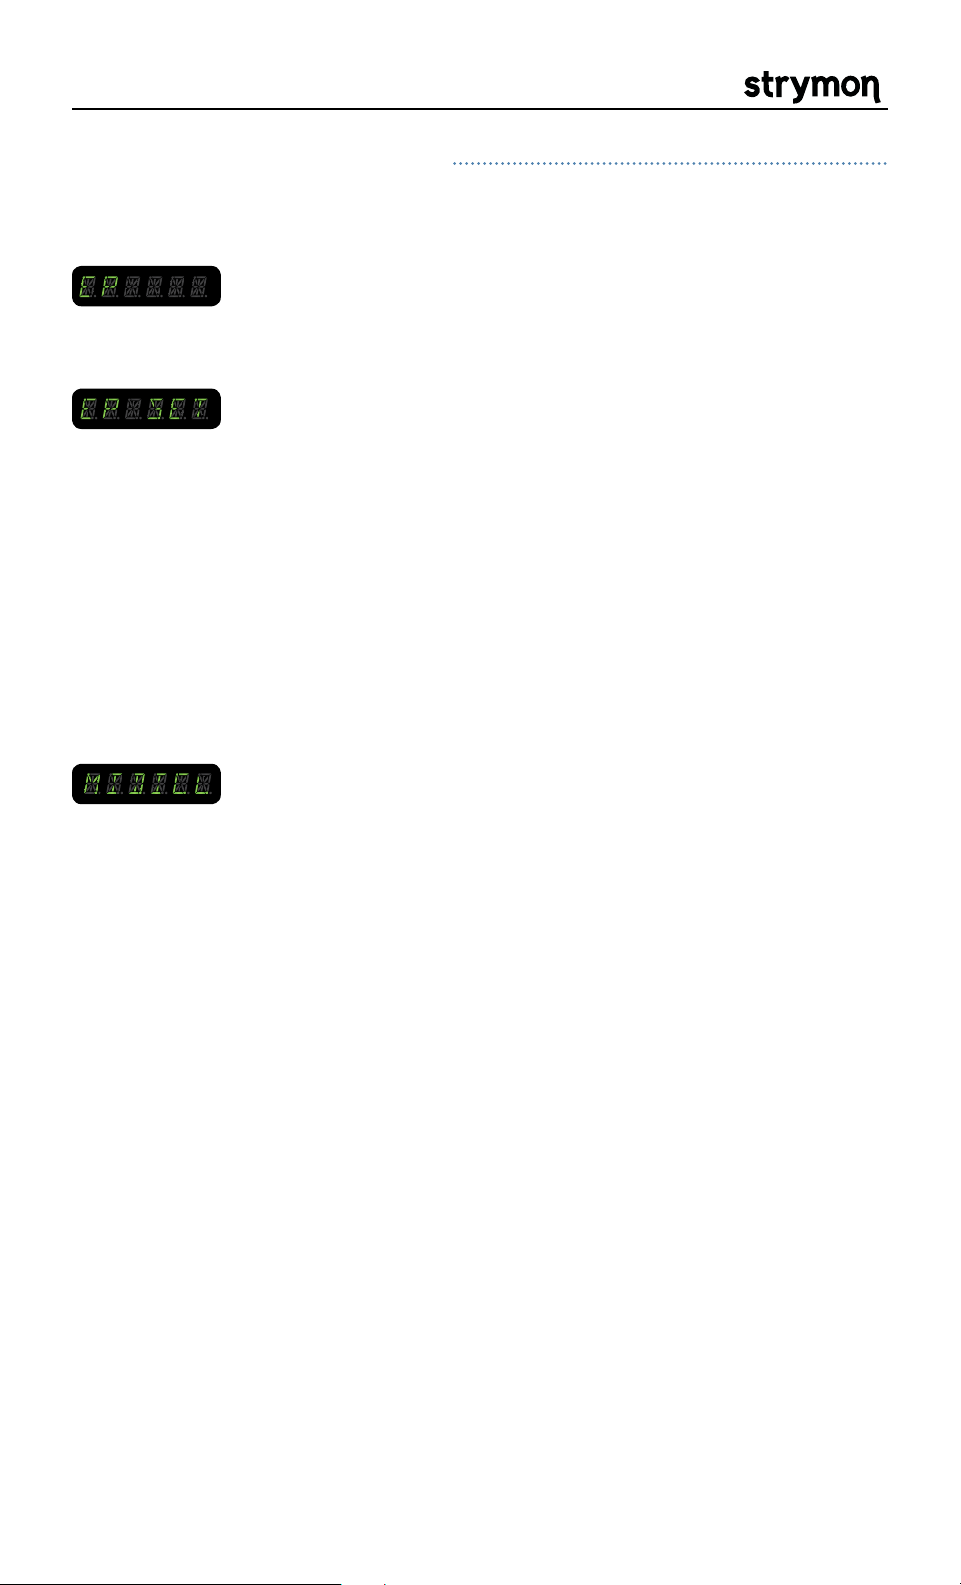
Saving Patches
®
to save to the
current patch
location
will be
displayed
when the
patch has
been saved
hold the
TYPE
encoder
to SAVE
your current
settings
OR
push the TYPE
encoder again
or
to select the
turn the
value
encoder
bank to save to
push the TYPE
encoder or the A
or B footswitch
Restoring Factory Patches
CAUTION: This procedure will erase any custom patches saved in the
Mobius and restore them to factory
POWER UP while holding A & TAP. Keep holding for 5
seconds after Mobius has powered up.
REINIT will be
displayed and all
factory patches
will automatically
be restored
pg 7
Mobius - User Manual
VALUE
SPEED
DEPTH LEVEL
VALUE
SPEED
DEPTH LEVEL
VALUE
SPEED
DEPTH LEVEL
Editing Parameters
®
While
displaying
BANK or BPM
push the
value
encoder
to enter
PARAMS
menu
turn the
value
encoder
to select
the desired
PARAMETER
and turn to edit
push the value
encoder again
the selected
PARAMETER
Mod Machines: Common Parameters
All Mod Machines share a set of parameters. These parameters are
saved with each preset and include:
TAP DIVISION: Selects the subdivision to use for LFO speed when
tapping in a tempo. Tap division options include:
Whole, Half, Quarter(default), Dotted Eight, Eighth,
Triplets, Sixteenth notes
NOTE: If TAPDIV is set to anything other than Quarter
notes, the TAP LED will pulse in amber
PRE / POST: Allows configuration per preset of the pre/post
configuration available via the rear panel toggle
switch. When Mobius is used in pre/post configuration,
set to “PRE” to place the modulation effect in front of
your amp and set to “POST” to place the modulation
effect in your amp’s effect loop.
NAME: Allows editing the 16 character name of the current
patch. Use the VALUE encoder to change the selected
character. Use the TYPE encoder to select a character.
Exit by pressing the VALUE encoder, then press and
hold the TYPE encoder to SAVE the name permanently.
NOTE: For the patch name to be displayed the NAMES
global must be set to ON or SCROLL.
Continued on Next Page
pg 8
Mobius - User Manual
Common Parameters Continued
EXPRESSION PEDAL ON/OFF: Enables or disables the expression
pedal input for each patch.
®
EXPRESSION PEDAL SET:
Enters the expression pedal setup for each
patch. All knobs can be configured to be used with the
expression pedal. To set up which knobs are controlled
by the expression pedal, push the Value encoder when
it displays “EP SET” and it will then display “HEEL”.
Turn the knob(s) to the position desired at heel
down on the expression pedal. Then, turn the Value
encoder right to display”TOE” and set the knobs to
their desired values at the toe down position on the
expression pedal. An expression pedal can control all
of the knobs simultaneously.
MIDI CLOCK ON/OFF: When set to ON, Mobius will respond to external
MIDI clock from the MIDI input. This parameter is
saved independently so that only presets with this
parameter set to ON will respond to MIDI clock.
pg 9
Mobius - User Manual
push (param)
hold (global)
VALUE
PARAM 1 PARAM 2
SPEED
DEPTH LEVEL
FILTER
DESTROYER
CHORUS
FORMANT
AUTOSWELL
VINTAGE TREM
PATTERN TREM
QUADRATURE
®
Mod Machines: Chorus
A full featured Chorus with 5 distinct modes. dBucket, Multi and
Vibrato all utilize our dBucket variable clock technology for classic
analog bucket brigade style chorusing. dBucket utilizes a single LFO
while Multi utilizes multiple LFOs simultaneously for a distinctly rich
sounding chorus. Vibrato is a pitch modulation effect reminiscent of
bucket brigade style pitch modulation effects. The Detune and Digital
modes are clean digital chorus effects reminiscent of the rack effects
of the ‘80s. Detune applys a “thickening” effect to your signal while
Digital is a crystal clear chorusing algorithm.
®
PARAMETERS:
MODE: Selects the current Chorus algorithm. Each algorithm
is completely unique in its sonic character.
dBucket
Multi
Vibrato
Detune
Digital
MIX: Sets the Mix of the wet Chorus signal relative to the
uneffected dry signal. A 50/50 mix is usually the most
typical setting.
||||||||
TONE: Allows adjustment of the brightness of the effected
signal.
- | +
Continued on Next Page
pg 10

Mobius - User Manual
Mod Machines: Chorus Continued
TIPS & TRICKS:
dBCKET mode covers the sounds of the classic analog choruses
from the 1970’s. Turn the DEPTH Knob to 12:00 and the MIX
parameter at around 80% for the coveted large-box chorus sound.
Turn the MIX back to half-way to experience the sound of the first
compact chorus pedal.
MULTI mode’s three dBucket modulated-delay- lines allow for
super-lush modulation at high mix and depth levels without
excessive ‘warble’. If you have a stereo rig, you owe it to yourself to
check this out. Try preset 00A for starters.
VIBRTO mode uses our dBucket and variable-clock technology to
capture the warmth of old-school stomp circuits. Set the MIX param
to maximum for pure vibrato. Reduce the MIX to add some dry signal
to give a vibrato-influenced chorus.
®
DETUNE mode mixes a pitch-detuned signal with the dry input to
create a chorus that doesn’t use an LFO. The SPEED knob controls
the pitch shift from -25 cents to +25 cents, while the DEPTH knob
adds a widening or doubling effect as it is turned up for a distinctive
‘80s feel. Set MIX to 50% for the fullest effect.
DIGITL mode uses a classic modulated digital delay line to produce
clean, pristine, unadulterated chorus tones. Set MIX to 50% for
traditional digital chorus sounds.
pg 11
Mobius - User Manual
push (param)
hold (global)
VALUE
PARAM 1 PARAM 2
SPEED
DEPTH LEVEL
FILTER
DESTROYER
VIBE
ROTARY
FLANGER
PHASER
FORMANT
AUTOSWELL
VINTAGE TREM
PATTERN TREM
Mod Machines: Flanger
A deep and rich Flanger with a wide pallete of sonic possibilities. Six
separate modes cover a variety of flanger sounds. Each separate
algorithm uses dBucket technology at its heart for authentic
recreations of classic bucket brigade flangers.
PARAMETERS:
MODE: Sets the currently active Flanger algorithm.
®
Silver
Grey
a re-creation of the classic “silver box” flanger
the classic “grey box” flanger featuring its
unusual LFO waveshape
Black+
one of the most sought after flange sounds in
history, with positive regeneration
Black-
Zero+
Zero-
the black box flanger with negative regeneration
a through zero flanger with positive regeneration
a through zero flanger with negative
regeneration
REGEN:
Adjusts the amount of feedback in the flanger’s delay
line. Adjust high for more extreme flanging sounds.
|||||||||||
MANUAL: Controls the delay time of the flanger. Higher settings
produce higher frequency flanging effects and vice
versa.
|||||||||||
Continued on Next Page
pg 12

Mobius - User Manual
Mod Machines: Flanger Continued
TIPS & TRICKS:
SILVER mode creates textured, airy flanging. Turn up the Depth and
Regen params to add color to stacatto rhythm parts, or turn back for
a mellower chorus-like effect.
GREY mode’s logarithmic LFO creates a dramatic sweep that lingers
at the higher registers when the DEPTH knob is high and the speed
is slow. Increase the REGEN parameter to intensify the effect.
BLACK mode’s super-wide sweep creates a signature ‘swoop’ at
high depth settings. At fast speeds, this mode will get crazy.
In the ZERO modes with the MANUAL parameter at minimum, the
‘top’ of the sweep just passes through zero. Increasing the MANUAL
parameter moves the sweep even further past zero. Increase the
DEPTH to add lower frequency flanging at the ‘bottom’ of the sweep.
®
pg 13

Mobius - User Manual
push (param)
hold (global)
VALUE
SPEED
DEPTH LEVEL
FILTER
VIBE
ROTARY
PHASER
FORMANT
AUTOSWELL
VINTAGE TREM
PATTERN TREM
DEPTH LEVEL
Mod Machines: Rotary
A realistic recreation of a rotary speaker cabinet commonly used with
tonewheel organs and guitars. Just like an actual rotating speaker
cabinet, the speed of rotation can be varied between slow and fast
speeds.
PARAMETERS:
®
HORN LEVEL:
Controls the output of the high frequency rotating horn
driver.
||||||||
PREAMP DRIVE: Controls the drive of the rotary cabinet’s tube
preamp and phase inverter stages. Turn up for a more
overdriven cab sound.
||||
SLOW ROTOR SPEED: Controls the speed of the rotors in SLOW speed.
||||||||
ACCELERATION: Controls how quickly the rotors transition from Fast
to Slow and from Slow to Fast speed. The rotors will
accelerate independently.
|||||||
TAP SWITCH: Determines whether to use the TAP footswitch as a
tap tempo or a slow/fast speed toggle.
Tap
Speed
MIC DISTANCE: Varies the distance of the two stereo microphones
from the rotating horn driver. The DEPTH knob takes
this function on the Rotary machine.
TIPS & TRICKS: In the ROTARY machine, the SPEED knob controls
the fast rotor speed. Set the DEPTH control high for close-miking
and maximum intensity, and dial it back for a more mellow effect.
pg 14

Mobius - User Manual
push (param)
hold (global)
VALUE
SPEED
DEPTH LEVEL
FILTER
VIBE
PHASER
FORMANT
VINTAGE TREM
PATTERN TREM
Mod Machines: Vibe
A recreation of the late ‘60s “vibe” circuit which was one of the first
modulation effects of its time. A staple in classic rock lead guitar of
the era and originally intended to be a recreation of a rotary speaker
sound, the vibe has its own unique niche in the world of modulation.
PARAMETERS:
WAVESHAPE: Varies the shape of the LFO by warping its waveform
and duty cycle.
||||||
LOW END CONTOUR: Allows for shaping the low-end from full low-
end to progressive high-passing.
+ | | -
®
HEADROOM: Adjusts the amount of distortion within the vibe
circuitry. Set to maximum for the cleanest vibe tones,
and dial back to add the feel and grit of dirtier vibe
tones.
|||||||||
MODE: Toggles the vibe mode between vibe (vibrato) and
chorus.
Vibrato
Chorus
TIPS & TRICKS:
The DEPTH knob changes the character of the VIBE from a smooth
pulsing to a warbled undulation, most noticeable at slower speeds.
For maximum throb, set the LO END param to the ‘+’ side.
The quintessential VIBE sound occurs in the VIBE machine’s
CHORUS mode. This mode combines the input signal with the wet
effect signal, producing the psychedelic phasey sound. The vintage
vibe effects had a switch that removed the unaffected dry signal from
the output, which results in a unique ‘phase-shift vibrato’. Select the
VIBRTO mode for this vibrato effect. Try setting the WAVSHP param
to maximum to get some vintage-amp-inspired vibrato mojo.
pg 15

Mobius - User Manual
push (param)
hold (global)
VALUE
SPEED
DEPTH LEVEL
FILTER
PHASER
FORMANT
VINTAGE TREM
Mod Machines: Phaser
From the thick and chewy 2, 4 and 6 stage modes, to the rich and swirly
8, 12 and 16 stage modes, the PHASER machine offers a full palette
of traditional and innovative phaser sounds. For added fun, a unique
BARBER mode is added, derived from the frequency shifters developed
in the 1970’s.
PARAMETERS:
®
MODE:
Selects the current phaser algorithm.
2 Stage
4 Stage
6 Stage
8 Stage
12 Stage
16 Stage
Barber Pole
REGEN: Adjusts the amount of feedback signal. Adjust high for
more extreme phaser sounds.
|||||||||||
WAVESHAPE:
Selects the current LFO (low frequency oscillator)
waveform to apply to the phase stages.
Sine
Square
Ramp
Tri
Saw
HEADROOM:
Adjusts the amount of distortion within the phaser
circuitry. Set to maximum for the cleanest phaser
tones, and dial back to add the feel and grit of dirtier
phase tones.
|||||||||
Continued on Next Page
pg 16

Mobius - User Manual
Mod Machines: Phaser Continued
SPREAD: Determines the offset between the Left and Right
channel LFO signals. Listen to the effect it has on the
stereo image as you adjust the parameter. Note: Only
applies when using the unit in Stereo Configuration.
Off
1/4
Half
3/4
Full
TIPS & TRICKS: For classic orange phaser sounds, set MODE to ‘4
STG’, Depth knob to about 2 o’clock, and the REGEN param at half or
a bit less to taste. Switch to ‘6 STG’ for chewy funky phasing.
®
For infinite rising barber pole phaser, set MODE to BARBER,
WAVSHP to RAMP, and set the Depth control to maximum. Change
the WAVSHP to SAW to get infinitely falling barber pole phaser.
Adjust REGEN to dial in the intensity.
Try slow speed SINE or TRI waveforms on the 8, 12, and 16 stage
phasers. For maximum swirl, experiment with the SPREAD param in
a stereo setup.
pg 17

Mobius - User Manual
push (param)
hold (global)
VALUE
SPEED
DEPTH LEVEL
FILTER
FORMANT
Mod Machines: Filter
An LFO synced filter with three filter types, eight LFO waveshapes and
variable resonance. Envelope filtering and traditional Wah effects (with
an Expression pedal) are available.
PARAMETERS:
MODE: Selects the current filter type. The low pass filter will
cut high frequencies, the high passfilter will cut low
frequencies, and wah is a classic wah wah bandpass
type filter.
Low Pass
Wah
High Pass
®
WAVESHAPE: Sets waveform shape that the LFO will utilize. Both +
and - envelope modes trigger the filter based on the
input level but in opposite directions.
Sine
Triangle
Square
Ramp
Saw
Random
Envelope +
Envelope -
FREQUENCY MID: Adjusts the frequency midpoint of the filter sweep.
L | H
RESONANCE: Sets the amount of feedback in the filter. High
resonance causes ringing at the cutoff frequency and
subsequently a boost around the cutoff.
OFF
|||||||||
DRY LEVEL: Sets the amount of unfiltered signal at the output.
OFF
|||||||||
Continued on Next Page
pg 18

Mobius - User Manual
Mod Machines: Filter Continued
SPREAD: Determines the phase offset between the Left and
Right LFO signals. Listen to the effect it has on the
stereo image as you adjust the parameter. NOTE: Only
applies when using the unit in a stereo configuration.
Off
1/4
1/2
TIPS & TRICKS: With the MODE set to WAH and the DEPTH knob
at minimum, attach an expression pedal to control the F MID
param and you’ve got a great sounding wah effect with adjustable Q
(resonance).
3/4
FULL
®
When using the Env+ or Env- waveshapes, adjust the DEPTH knob
to set the response of the filter to your playing dynamics. Try higher
DEPTH for weaker input signals, or back it off with hotter inputs.
The SPEED knob controls how quickly the filter follows the envelope.
Set high for funky single line riffs, or lower for smoother response
for rhythm work. Add some dry signal to make more subtle filtering
effects.
pg 19

Mobius - User Manual
push (param)
hold (global)
VALUE
SPEED
DEPTH LEVEL
FORMANT
Mod Machines: Formant
A special filter type that emulates the human vocal tract. The formant
machine also features selectable LFO wafeforms.
PARAMETERS:
®
VOWEL 1:
Sets the first vowel of the formant filter. Setting Vowel
1 to random will choose a new vowel sound every time
the LFO triggers the vowel.
AA
EE
EYE
OH
OOH
Random
VOWEL 2: Sets the second vowel of the formant filter. Setting
Vowel 2 to random will choose a new vowel sound
every time the LFO triggers the vowel.
AA
EE
EYE
OH
OOH
Random
WAVESHAPE: Selects the current LFO (low frequency oscillator)
waveform to apply to the formant filter.
Sine
Square
Ramp
Saw
Random
Envelope
Expression
SPREAD: Determines the phase offset between the Left and
Right LFO signals. Listen to the effect it has on the
stereo image as you adjust the parameter. NOTE: Only
applies when using the unit in a stereo configuration.
Off
1/4
1/2
3/4
Full
Continued on Next Page
pg 20

Mobius - User Manual
Mod Machines: Formant Continued
TIPS & TRICKS: Many cool vocal effects happen in the transition
between vowels. With that in mind, experiment with the DEPTH knob
to dial in the desired vocal effects.
The DEPTH knob is similarly important when using the ENV
WAVSHP, as it sets the dynamic vocal response to your playing. The
SPEED knob controls how quickly the formants follow the envelope.
Connect an expression pedal and select EXPR under the WAVSHP
param, and Mobius will blend between the two vowels based on the
position of the pedal giving you a vocal Wah experience.
®
pg 21

Mobius - User Manual
push (param)
hold (global)
VALUE
SPEED
DEPTH LEVEL
FORMANT
VINTAGE TREM
Mod Machines: Vintage Trem
The Vinage Trem features three classic tremolo sounds from the ‘60s.
The distinctly different tremolo circuits in vintage combo amps of the
era resulted in three unique tremolos, each with their own signature
sound.
PARAMETERS:
MODE: Selects the current tremolo type. The tube tremolo
accomplished its tremolo sound by varying the bias on
the output tube circuit. The harmonic trem used band
filtering to achieve tremolo with a unique “phasey”
sound. The photoresistor tremolo cut the amplifier
in and out with a bulb/photoresistor combination for
the most choppy and square sounding tremolo of the
three.
Tube
Harmonic
Photoresistor
®
PAN: Determines the offset between the Left and Right
channel LFO signals. Listen to the effect it has on the
stereo image as you adjust the parameter. NOTE: Only
applies when using the unit in Stereo Configuration.
Off
Half
Full
TIPS & TRICKS: For thick atmospheric trems, choose the HARM
mode at slower speeds. For moody sultry trems, try the TUBE mode.
For spy and surf sounds, check out the PHOTO mode at higher
speeds.
pg 22

Mobius - User Manual
push (param)
hold (global)
VALUE
SPEED
DEPTH LEVEL
VINTAGE TREM
PATTERN TREM
Mod Machines: Pattern Trem
A pattern-sequenced tremolo with user definable patterns. Up to eight
beats can be sequenced, with one to sixteen trem cycles per beat. The
unique and rhythmic effects can be sync’ed with a single press of the
TAP footswitch.
PARAMETERS:
®
WAVESHAPE:
Selects the waveform shape of the tremolo LFO.
Sine
Triangle
Square
Rectangle
Pulse
Ramp
Saw
BEAT 1: Sets the number of subdivisions for each beat.
Additionally, when set to full, the signal is present with
no tremolo applied during that beat. When set to zero,
no signal is present for that beat.
1
2
3
4
5
6
7
8
9
10
11
12
13
14
15
16
FULL
ZERO
BEAT 2-8: Has the same parameters as beat 1 but includes a ‘--
--‘ option to ignore the beat and all subsequent beats,
which signifies the end of the sequence.
---[ ... additional parameters identical to beat 1 ]
PAN: Determines the phase offset between the Left and
Right LFO signals. Listen to the effect it has on the
stereo image as you adjust the parameter. NOTE: Only
applies when using the unit in a stereo configuration.
Off
On
Continued on Next Page
pg 23

Mobius - User Manual
Mod Machines: Pattern Trem Continued
TIPS & TRICKS: Tap the TAP footswitch once to start the pattern
sequence from the beginning. This is a powerful performance
feature to sync the pattern with specific song cues.
Select SINE waveshape and set PAN to ON for a traditional panning
effect in a stereo rig. Experiment with different LFO shapes and see
how the stereo field is changed. Complex patterns can take on a
psychedelic nature when PAN is ON in stereo rigs.
You can create a simple geometric LFO waveform trem by setting
BEAT 1 param to ‘1’, and Beat 2 to ‘---‘.
®
pg 24

Mobius - User Manual
push (param)
hold (global)
VALUE
SPEED
DEPTH LEVEL
AUTOSWELL
VINTAGE TREM
PATTERN TREM
Mod Machines: Autoswell
An automatic volume swell effect triggered by the input signal. Various
rise times and swell curves are available. A chorus effect can be added
to the swelled signal.
PARAMETERS:
®
RISE TIME:
Sets the time constant of the swell rise time. The
display indicates the ramp time in seconds.
0.08
0.10
0.12
0.14
0.17
0.20
0.25
0.30
0.35
0.40
0.50
0.60
0.70
0.80
0.90
1.00
1.20
1.40
1.70
2.00
2.50
3.00
4.00
SHAPE: Sets the shape of the swell.
Exponential – Traditional ‘first order’ response. It
starts to rise quickly, and then slows as it approaches
full volume.
Exponential
Quadratic – A ‘second order’ swell response. This
Quadratic
Ramp
Ramp – A linear ramp that has a constant slope from
Logarithmic
gives a smoother rise and approach to full volume.
rise to full volume.
Logarithmic – The opposite of the Exponential
response, this choice rises slowly and picks up steam
as it approaches full volume.
TIPS & TRICKS: The SPEED and DEPTH knobs control a chorus
effect that is added to the swelled signal. With the DEPTH knob at
minimum, no chorus effect is added.
Try the LOGARITHMIC shape with fast rise times to allow for more
separation between notes when playing single-note phrases.
Try the QUAD Shape with longer rise times to get smooth ambient
swells for chordal work.
pg 25

Mobius - User Manual
push (param)
hold (global)
VALUE
PARAM 1 PARAM 2
SPEED
DEPTH LEVEL
DESTROYER
FORMANT
AUTOSWELL
VINTAGE TREM
PATTERN TREM
Mod Machines: Destroyer
An intricate tool to mangle your audio. The speed knob controls
rotational speed of the virtual record for the Vinyl effect.
®
PARAMETERS:
BIT DEPTH: Reduces the digital bit depth from 32 bits down to 4
bits. Fuzzy crunchy artifacts are introduced as the bit
depth is reduced.
4 Bit
4.5 Bit
5 Bit
5.5 Bit
6 Bit
6.5 Bit
7 Bit
7.5 Bit
8 Bit
9 Bit
10 Bit
11 Bit
12 Bit
13 Bit
14 Bit
15 Bit
16 Bit
18 Bit
20 Bit
24 Bit
32 Bit
SAMPLE RATE: Selects the sample rate from 96 KHz to 750Hz. As the
sample rate is reduced, aliasing artifacts damage the
fidelity of the signal.
750Hz
1 kHz
1.5 kHz
2 kHz
3 kHz
4 kHz
5 kHz
6 kHz
7 kHz
8 kHz
9 kHz
10 kHz
11 kHz
12 kHz
14 kHz
16 kHz
19 kHz
24 kHz
32 kHz
48 kHz
96 kHz
FILTER SHAPE: A collection of filters inspired by telephones, victrolas,
am radios, bull horns, and other gadgets. The mixed
lofi and full-resolution signal (along with any dVinyl
noise) goes through the selected filter.
OFF
1
(Portable Vintage Amp)
2 (Victrola Phonograph)
3 (70s Clock Radio)
4 (Bullhorn Megaphone)
Continued on Next Page
5 (Cheerleader’s Plastic Megaphone)
6 (Antique Telephone Ear Piece)
7 (Cell Phone)
8 (Apartment Intercom)
pg 26

Mobius - User Manual
Mod Machines: Destroyer Continued
VINYL: Our dVinyl technology introduces random vinyl dust
noise and scratches from a 33 1/3 to 78 rpm record.
Effect speed determines the rotational speed of the
record.
||||||
OFF
MIX: Mixes the lo-fi (bit and sample-rate dependent) signal
with the full resolution signal. Heinously corrupted
audio can sit on top of the full resolution signal. Set to
full lo-fi mix for just destroyed signal.
D | L
®
TIPS & TRICKS: Change your sonic landscape and add some instant
atmosphere with the FILTER parameter. The FILTER parameter can
be a powerful tone-shaping element just used on its own.
The DEPTH knob introduces Vinyl warping that tracks the record
speed set by the Speed knob. Add some warping in conjunction with
the dVinyl noise for an authentic old-school vinyl experience.
pg 27

Mobius - User Manual
push (param)
hold (global)
VALUE
PARAM 1 PARAM 2
SPEED
DEPTH LEVEL
DESTROYER
FORMANT
AUTOSWELL
VINTAGE TREM
PATTERN TREM
QUADRATURE
®
Mod Machines: Quadrature
The Quadrature machine handles another spectrum of signal
corruption featuring Quadrature oscillators. Choose from AM
(amplitude modulation), FM (frequency modulation), or Frequency
Shifting (single side band modulation) to go where few have gone
before. This mode is highly flexible with a variety of waveshapes to
modulate the modulation.
PARAMETERS:
®
MODE:
Selects the current Quadrature algorithm.
AM – like a tremolo with a crazy-wide speed range.
Also commonly referred to as a Ring Modulator.
FM – like a vibrato with a crazy-wide speed range.
Positive Frequency Shifter – Offsets all frequencies by
the same amount in the positive direction.
Negative Frequency Shifter – Offsets all frequencies
AM
FM
Frequency Shifter +
Frequency Shifter -
by the same amount in the negative direction.
SHIFT: Sets the modulating frequency of the selected Mode.
Mild effects are achieved at the lowest settings, and
more extreme effects come about at higher settings.
||||||||
WAVESHAPE: Selects the LFO waveshape to modulate the SHIFT
param for the selected Mode.
Sine
Triangle
Square
Ramp
Saw
Random
Envelope
Continued on Next Page
pg 28

Mobius - User Manual
Mod Machines: Quadrature Continued
TIPS & TRICKS: The DEPTH knob sets the amount of modulation of
the shift frequency. With the DEPTH at minimum, the shift frequency
is unaltered and set by the SHIFT param. Turning up the DEPTH
will modulate the shift frequency. This is most easily understood
when heard with large SHIFT param settings, but will create many
interesting sounds with lower shift settings.
When the DEPTH knob is set to maximum, the shift frequency will
approach 0 during the LFO cycle. Try using a SQR LFO waveshape
with a high SHIFT value and the DEPTH knob at maximum. One
half of the square wave will sound like input signal (when the shift
frequency is 0) and the other half will sound like the effect at the
shift frequency set by the SHIFT param.
®
pg 29

Mobius - User Manual
Globals Menu
Global parameters affect Mobius regardless of what patch is currently
active.
BPM DISPLAY: Configures the display to show BPM in Hz or Beats Per
Minute.
BPM
Hz
GLOBAL TAP: Allows the last tapped tempo to affect all presets
regardless of the tempo saved in the preset.
®
PRESET
- when patch is changed, delay time will
change to save value in preset
GLOBAL
- delay time will remain at the last tapped
tempo regardless of current preset
BYPASS SET-UP: Changes the bypass mode between True
Bypass and Buffered Bypass. In True Bypass,
electromechanical relays are used to bypass Mobius
so that no components are touching the input signal.
In Buffered Bypass the bypassed signal runs through a
high quality analog buffer.
TRUE BYPASS
BUFFERED BYPASS
MIDI CHANNEL: Sets the MIDI Channel. Can be set to 1 - 16.
CH 1 - 16
MIDI CONTINUOUS CONTROLLERS: Turns MIDI CC messaging
(continuous controllers) ON or OFF.
ON
OFF
MIDI PATCH CHANGE: Turns MIDI patch change messaging ON or OFF.
ON
OFF
Continued on Next Page
pg 30

Mobius - User Manual
Globals Menu Continued
MIDI THROUGH: When set to THRU, MIDI messages that arrive at the
MIDI input are sent to the MIDI output without ANY
additional MIDI messages generated by Mobius. When
set to MERGE, MIDI messages that arrive at the input
THRU
MERGE
OFF
BANK SCROLL: Sets the maximum bank number to scroll to.
EXP INPUT MODE: Configures the EXP input to use an Expression
and those that are generated by Mobius are merged
together to be sent to the MIDI output. When set to
OFF, only MIDI messages generated by the controls on
Mobius are sent to the MIDI output.
BNK 1-99
Pedal or an external TAP footswitch.
®
PEDAL
TAP
- for use with Expression Pedal
- for use with external TAP footswitch or
MultiSwitch for tap and preset select
BANK
PRESET
- for use with MultiSwitch to select banks
- for use with MultiSwitch to select presets
Please refer to the MultiSwitch user manual for detailed MultiSwitch
setup information: www.strymon.net/support/multiswitch
PATCH NAMES: Enables or disables the display of patch names when
displaying the current bank. If set to ON or SCROLL,
when incrementing through banks with the VALUE
ENCODER, the bank number will be displayed with 2
digits followed by the first 3 characters of the patch
name.
OFF
- bank numbers are displayed instead of patch names
ON
- the first 6 characters of the patch name are displayed
SCROLL
- the patch name will scroll once completely through
its 16 characters then settle on the first 6 characters
NOTE: If any of the above options do not appear in the GLOBLS
menu, you may need to update the firmware to the latest
version. Visit the link below for instructions:
www.strymon.net/update
pg 31

Mobius - User Manual
PRE/POST Setup in an Amplifier’s Effect Loop
Set the PRE/POST switch to the down position to use
Mobius in a pre/post type setup.
STEREO
IN/OUT
PRE /
OUTPUT 2INPUT 2
Amp Input
POST
®
Instrument Send Return
Connect INPUT 2 and OUTPUT 2 to your amplifier’s effects
loop. Then you can select whether the modulation effect occurs
before the amplifier input or in the amplifier effects loop. This is
selectable per preset.
When connected as above, the PRE/POST setting in the preset
menu has the following effect:
PRE
DEPTH LEVEL
VALUE
SPEED
push (param)
FORMANT
FILTER
hold (global)
VINTAGE TREM
PHASER
PATTERN TREM
VIBE
AUTOSWELL
ROTARY
DESTROYER
INSTRUMENT
FLANGER
QUADRATURE
CHORUS
TYPE
push (bank/BPM)
hold (save)
®
B TAPA
BANK DOWN BANK UP
PARAM 1 PARAM 2
POST
VALUE
SPEED
push (param)
FORMANT
FILTER
hold (global)
VINTAGE TREM
PHASER
PATTERN TREM
VIBE
AUTOSWELL
ROTARY
DESTROYER
INSTRUMENT
FLANGER
QUADRATURE
CHORUS
TYPE
push (bank/BPM)
hold (save)
®
B TAPA
BANK DOWN BANK UP
PARAM 1 PARAM 2
DEPTH LEVEL
pg 32

Mobius - User Manual
PRE/POST Setup in an Chain of Pedal Effects
Set the PRE/POST switch to the down position
to use Mobius in a pre/post type setup.
STEREO
IN/OUT
PRE /
OUTPUT 2INPUT 2
POST
Amp/Pedals
®
Connect INPUT 2 to your
other pedal(s) output
and OUTPUT 2 to the
input of your amplifier
or other pedal(s). Then
Instrument
DISTORTION
InOut
you can select whether
the modulation effect
occurs before or after
the other pedal(s). This is
selectable per preset.
When connected as above, the PRE/POST setting in the preset
menu has the following effect:
PRE
DEPTH LEVEL
VALUE
SPEED
push (param)
FORMANT
FILTER
hold (global)
VINTAGE TREM
PHASER
PATTERN TREM
VIBE
AUTOSWELL
ROTARY
DESTROYER
INSTRUMENT
FLANGER
QUADRATURE
CHORUS
TYPE
push (bank/BPM)
hold (save)
®
B TAPA
BANK DOWN BANK UP
PARAM 1 PARAM 2
DISTORTION
MORE PEDALS
AMP OR
INSTRUMENT
DISTORTION
POST
FILTER
PHASER
VIBE
ROTARY
FLANGER
CHORUS
TYPE
push (bank/BPM)
hold (save)
VALUE
push (param)
FORMANT
hold (global)
VINTAGE TREM
PATTERN TREM
AUTOSWELL
DESTROYER
QUADRATURE
®
BANK DOWN BANK UP
B TAPA
SPEED
DEPTH LEVEL
PARAM 1 PARAM 2
AMP OR
MORE PEDALS
pg 33

Mobius - User Manual
MIDI Specification
®
KNOBS:
CC# Value Range
Type encoder 19 0-11
Speed 17 0-127
Depth 18 0-127
Level 15 0-127
Param 1 9 0-127
Param 2 16 0-127
PARAMETERS:
Tap Division 21 0-6
Pre/Post 22 0-1
Tap Switch 39 0-1
Expression Off/On 60 0-1
MIDI Clock Off/On 70 0-1
CHORUS - Mode 28 0-4
CHORUS - Mix 29 0-17
CHORUS - Tone 30 0-20
FLANGER - Mode 24 0-5
FLANGER - Regen 25 0-17
FLANGER - Manual 26 0-17
ROTARY - Horn Level 34 0-17
ROTARY - Preamp Drive 35 0-17
ROTARY - Slow Rotor Speed 36 0-17
ROTARY - Acceleration 37 0-17
ROTARY - Tap Select 39 0-1
VIBE - Waveshape 40 0-17
VIBE - Low End 41 0-20
VIBE - Headroom 42 0-17
VIBE - Mode 43 0-1
PHASER - Mode 44 0-6
PHASER - Regen 45 0-17
PHASER - Waveshape 46 0-3
PHASER - Stereo Spread 47 0-4
PHASER - Headroom 68 0-17
FILTER - Mode 48 0-2
FILTER - Waveshape 49 0-7
FILTER - Resonance 50 0-18
FILTER - Dry Level 51 0-18
FILTER - Frequency Middle 52 0-20
FILTER - Stereo Spread 69 0-4
FORMANT - Vowel 1 65 0-5
FORMANT - Vowel 2 66 0-5
Continued on Next Page
pg 34

Mobius - User Manual
MIDI Specification Continued
CC# Value Range
FORMANT - LFO 67 0-6
FORMANT - Stereo Spread 115 0-4
VINTAGE TREM - Mode 31 0-2
VINTAGE TREM - Pan 32 0-1
PATTERN TREM - Waveshape 113 0-6
PATTERN TREM - Beat 1 105 0-17
PATTERN TREM - Beat 2 106 0-18
PATTERN TREM - Beat 3 107 0-18
PATTERN TREM - Beat 4 108 0-18
PATTERN TREM - Beat 5 109 0-18
®
PARAMETERS:
CC# Value Range
PATTERN TREM - Beat 6 110 0-18
PATTERN TREM - Beat 7 111 0-18
PATTERN TREM - Beat 8 112 0-18
PATTERN TREM - Pan 114 0-1
AUTOSWELL - Rise Time 57 0-22
AUTOSWELL - Shape 58 0-3
DESTROYER - Bit Depth 59 0-20
DESTROYER - Sample Rate 61 0-20
DESTROYER - Filter 62 0-8
DESTROYER - Vinyl 63 0-18
DESTROYER - Mix 64 0-20
QUADRATURE - Mode 53 0-3
QUADRATURE - Shift 1 54 0-17
QUADRATURE - LFO 56 0-6
QUADRATURE - Mix 55 0-20
Continued on Next Page
pg 35

Mobius - User Manual
MIDI Specification Continued
MIDI PATCH CHANGES:
Mobius presets are arranged in a grid of 100 numbered Banks (00-99)
with 2 presets (A and B) within each Bank for a total of 200 presets.
Because MIDI Program Change messages have a maximum number of
128 (0-127), the presets are grouped into 2 MIDI Patch Banks:
MIDI BANK 0 = PRESETS 00A-63B
MIDI BANK 1 = PRESETS 64A-99B
The presets are numbered sequentially within each bank:
PRESET 00A = MIDI program # 0
PRESET 00B = MIDI program # 1
PRESET 01A = MIDI program # 2
PRESET 01B = MIDI program # 3
PRESET 02A = MIDI program # 4 etc. up to #127...
®
Mobius always powers up in MIDI Patch Bank 0, so if you plan to stay
within the first 127 presets (00A-63B), simply send a standard MIDI
Program Change message to load a preset.
If you will be using MIDI Bank 1, it is advisable to send a standard MIDI
Bank Change message [MIDI CC# 0 with a value equal to the MIDI
Bank #] before each MIDI Program Change.
OTHER MIDI CC NUMBERS:
CC# Value Range
A footswitch 80 down=0 up=127
B footswitch 82 down=0 up=127
TAP footswitch 81 off=0 on=127
Remote TAP 93 any
Expression Pedal 100 0-127
Bypass 102 byp=0 eng=127
Phase Reset 125 any
MIDI Patch Bank 0 0-1
- Send a 0 value to access presets 00A - 63B
- Send a 1 value to access presets 64A - 99A
MIDI CLOCK:
Mobius will accept MIDI clock at the MIDI input and sync modulation
speed. A MIDI start clock message resets the modulation phase.
pg 36

Mobius - User Manual
Features
• 12 hand crafted modulation machines
• Modulation machine subtypes for 33 total discrete algorithms
• Ultra Low Noise, high performance A/D and D/A Converters
• Premium analog front end and output section
• High Performance DSP
• 200 presets, selectable via encoder, MIDI or on the fly via footswitch
• Numerous deep edit parameters on all mod machines
• Stereo Input & Output
• Pre-post mode for flexible routing, allowing you to place Mobius in
two different places in your mono signal chain.
• Expression pedal input with selectable simultaneous control over
multiple knob parameters
®
• Pre/Post configuration available via rear panel toggle switch
• Full time Tap Tempo footswitch and external Tap footswitch available
via EXP input
• Rugged & Lightweight Anodized Aluminum Chassis
• Intuitive, performance friendly User Interface
• Global bypass selectable between True Bypass or Analog Buffered
Bypass on the fly via footswitch/MIDI
Specifications
Input Impedance 1Meg Ohm
Output Impedance 100 Ohm
Signal to Noise 115 dB typical
A/D & D/A 24-bit 96kHz
Frequency Response 20Hz to 20kHz
Max Input Level +8dBu
Bypass Switching True Bypass (electromechanical relay
switching) or Analog Buffered Bypass
Dimensions 5” deep x 6.75” wide x 1.87” tall
Power Supply
Input Voltage 9VDC Center Negative
Required Current 300mA
pg 37

Mobius - User Manual
STRYMON NON-TRANSFERRABLE LIMITED WARRANTY
Warranty
Strymon warrants the product to be free from defects in material
and workmanship for a period of one (1) year from the original date
of purchase. If the product fails within the warranty period, Strymon
will repair or, at our discretion, replace the product at no cost to the
original purchaser.
Exclusions
This warranty covers defects in manufacturing discovered while using
this product as recommended by Strymon. This warranty does not
cover loss or theft, nor does the coverage extend to damage caused by
misuse, abuse, unauthorized modification, improper storage, lightning,
or natural disasters.
Limits of Liability
In the case of malfunction, the purchaser’s sole recourse shall be
repair or replacement, as described in the preceding paragraphs.
Strymon will not be held liable to any party for damages that result
from the failure of this product. Damages excluded include, but are
not limited to, the following: lost profits, lost savings, damage to other
equipment, and incidental or consequential damages arising from
the use, or inability to use this product. In no event will Strymon be
liable for more than the amount of the purchase price, not to exceed
the current retail price of the product. Strymon disclaims any other
warranties, express or implied. By using the product, the user accepts
all terms herein.
®
How to Obtain Service Under this Warranty
For North American customers: Contact Strymon through our website
at http://www.strymon.net/support for Return Authorization and
information. Proof of original ownership may be required in the form of
a purchase receipt.
For International Customers: Contact the Strymon dealer from which
the product was purchased from in order to arrange warranty repair
service.
®
Strymon
REV F 11.11.17
is a division of Damage Control®, LLC.
pg 38
 Loading...