

Page 1
USER MANUAL
Page 2

MiniSwitch - User Manual
Table of Contents
®
Connect to Your Strymon Pedal
BigSky
Brigadier
Deco
DIG
El Capistan
Flint
Lex
Mobius
Riverside
TimeLine
Specifications & Warranty
3
5
6
7
8
9
10
11
12
13
14
15
pg 2
Page 3
MiniSwitch - User Manual
EXP
9VDC
+
-
RIGHT OUTLEFT OUT
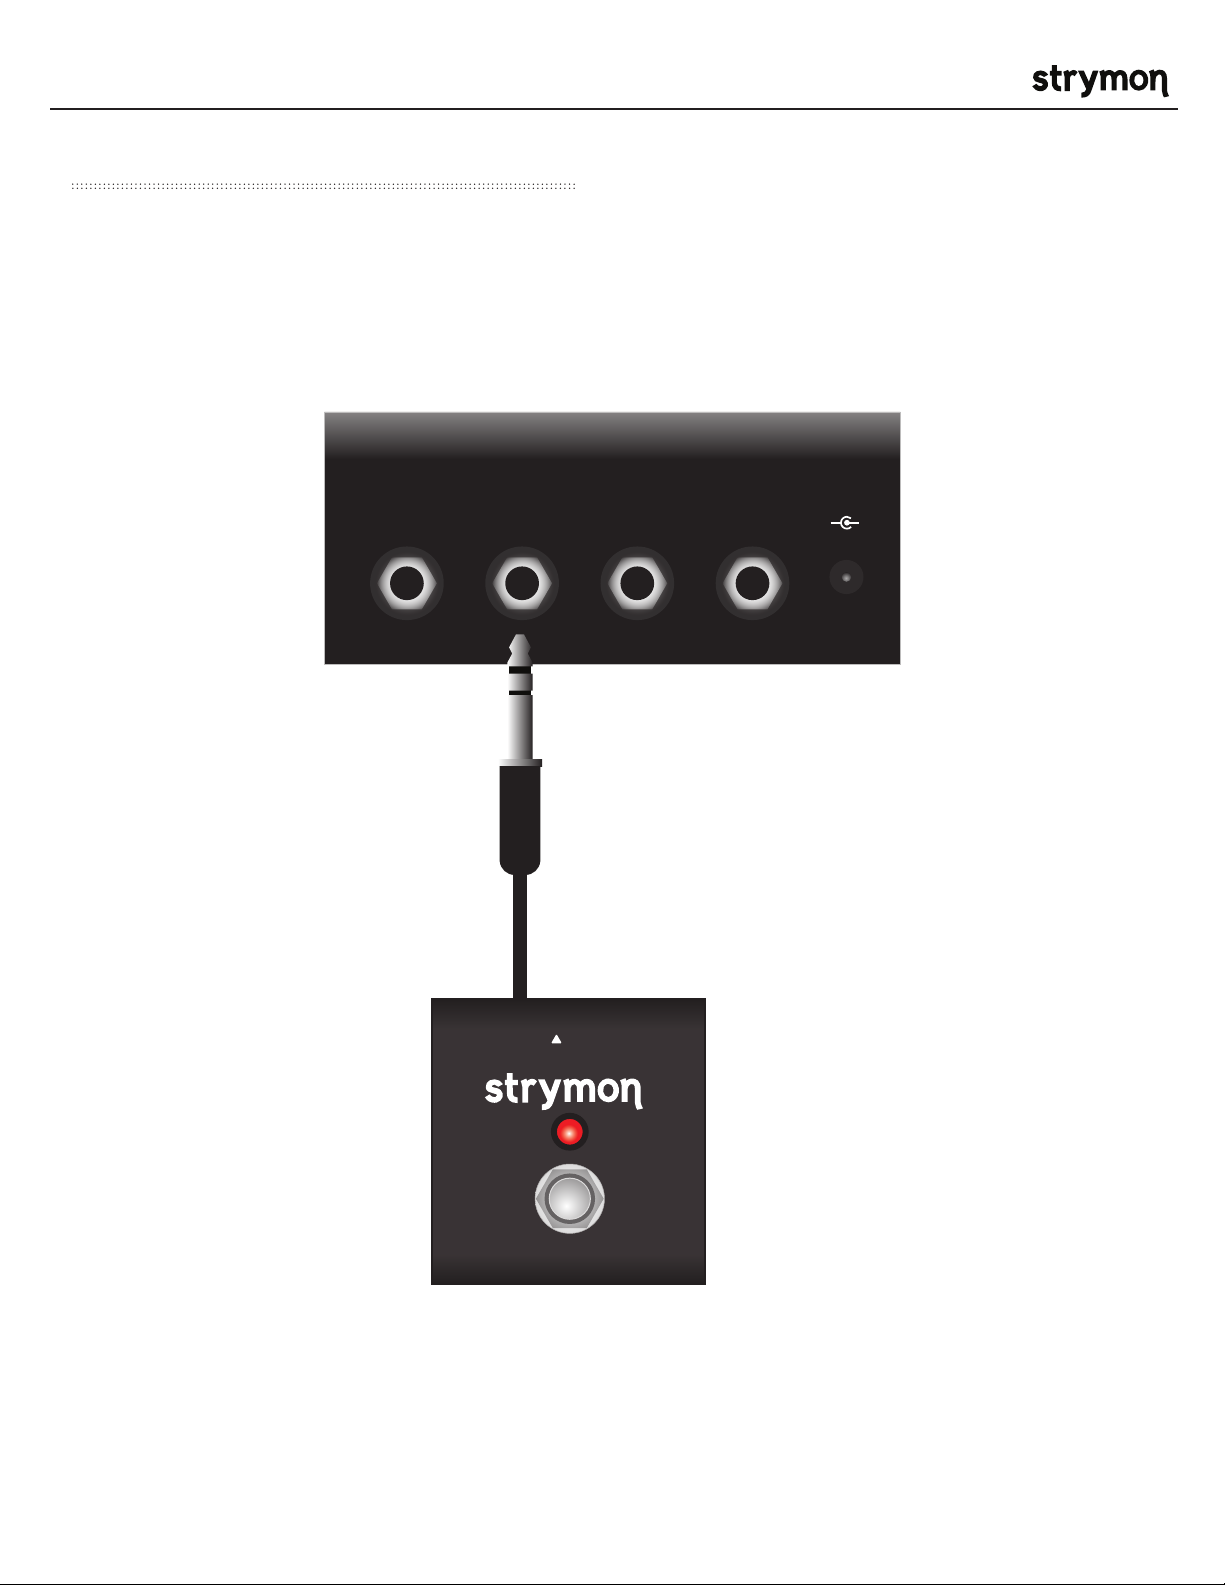
Connect to Your Strymon Pedal
Connect MiniSwitch to the expression or boost jack of
your Strymon pedal with the included TRS cable.
®
INPUT
EXP
TRS
RIGHT OUTLEFT OUT
9VDC
+
-
®
pg 3
Page 4
MiniSwitch - User Manual
FAV/BOOST
TAP
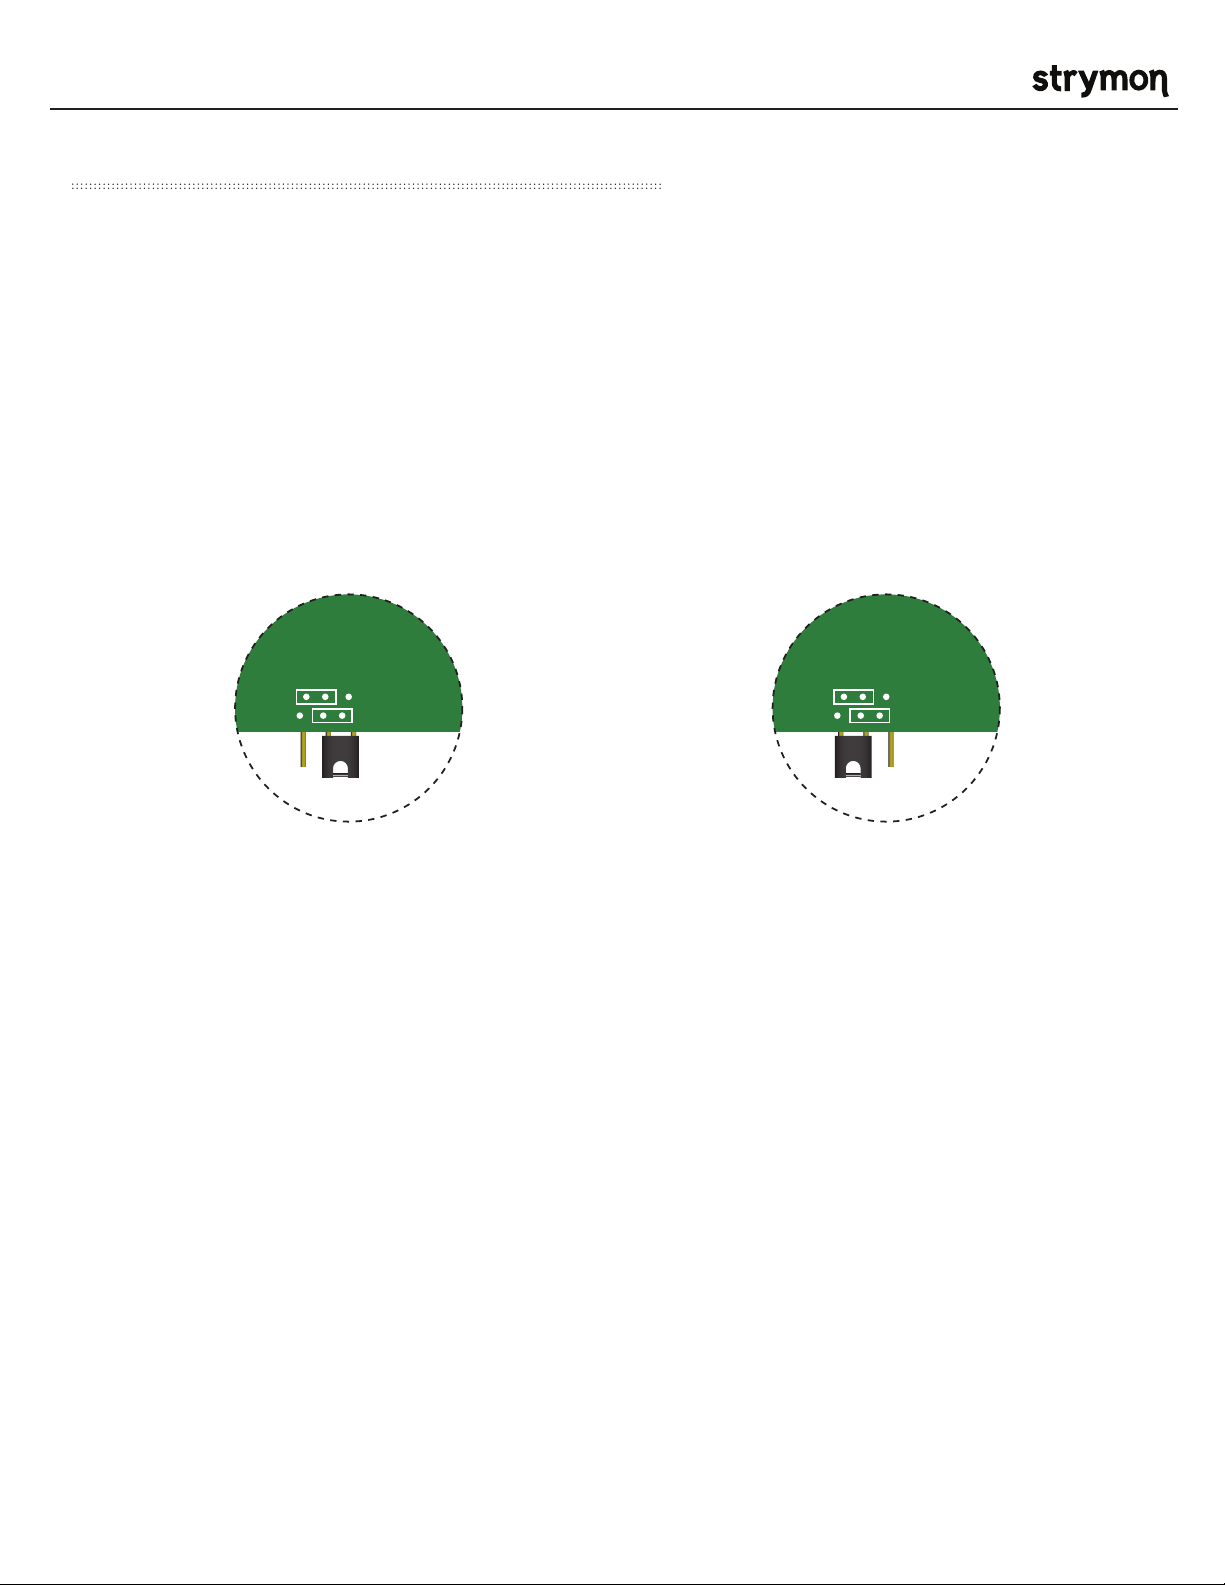
Connect to Your Strymon Pedal (cont.)
Operation & Set-up for Products with Toggle Switches
With MiniSwitch, you can place your pedal anywhere on your board and tap in your tempos remotely. Perfect for
large rigs or boards with pedals fighting for real estate.
Remove the back cover of your pedal to gain access to the internal jumper switch. Select either FAV / BOOST
MODE or TAP TEMPO mode.
*Close up view of circuit boards.
®
TAP
FAV/BOOST
FAV / BOOST MODE
Place the jumper on the RIGHT 2 pins.
(this is how MiniSwitch ships from the
factory).
TAP
FAV/BOOST
TAP TEMPO MODE
Place the jumper on the LEFT 2 pins.
Products that support TAP TEMPO MODE:
pg 4
Page 5
MiniSwitch - User Manual
BigSky
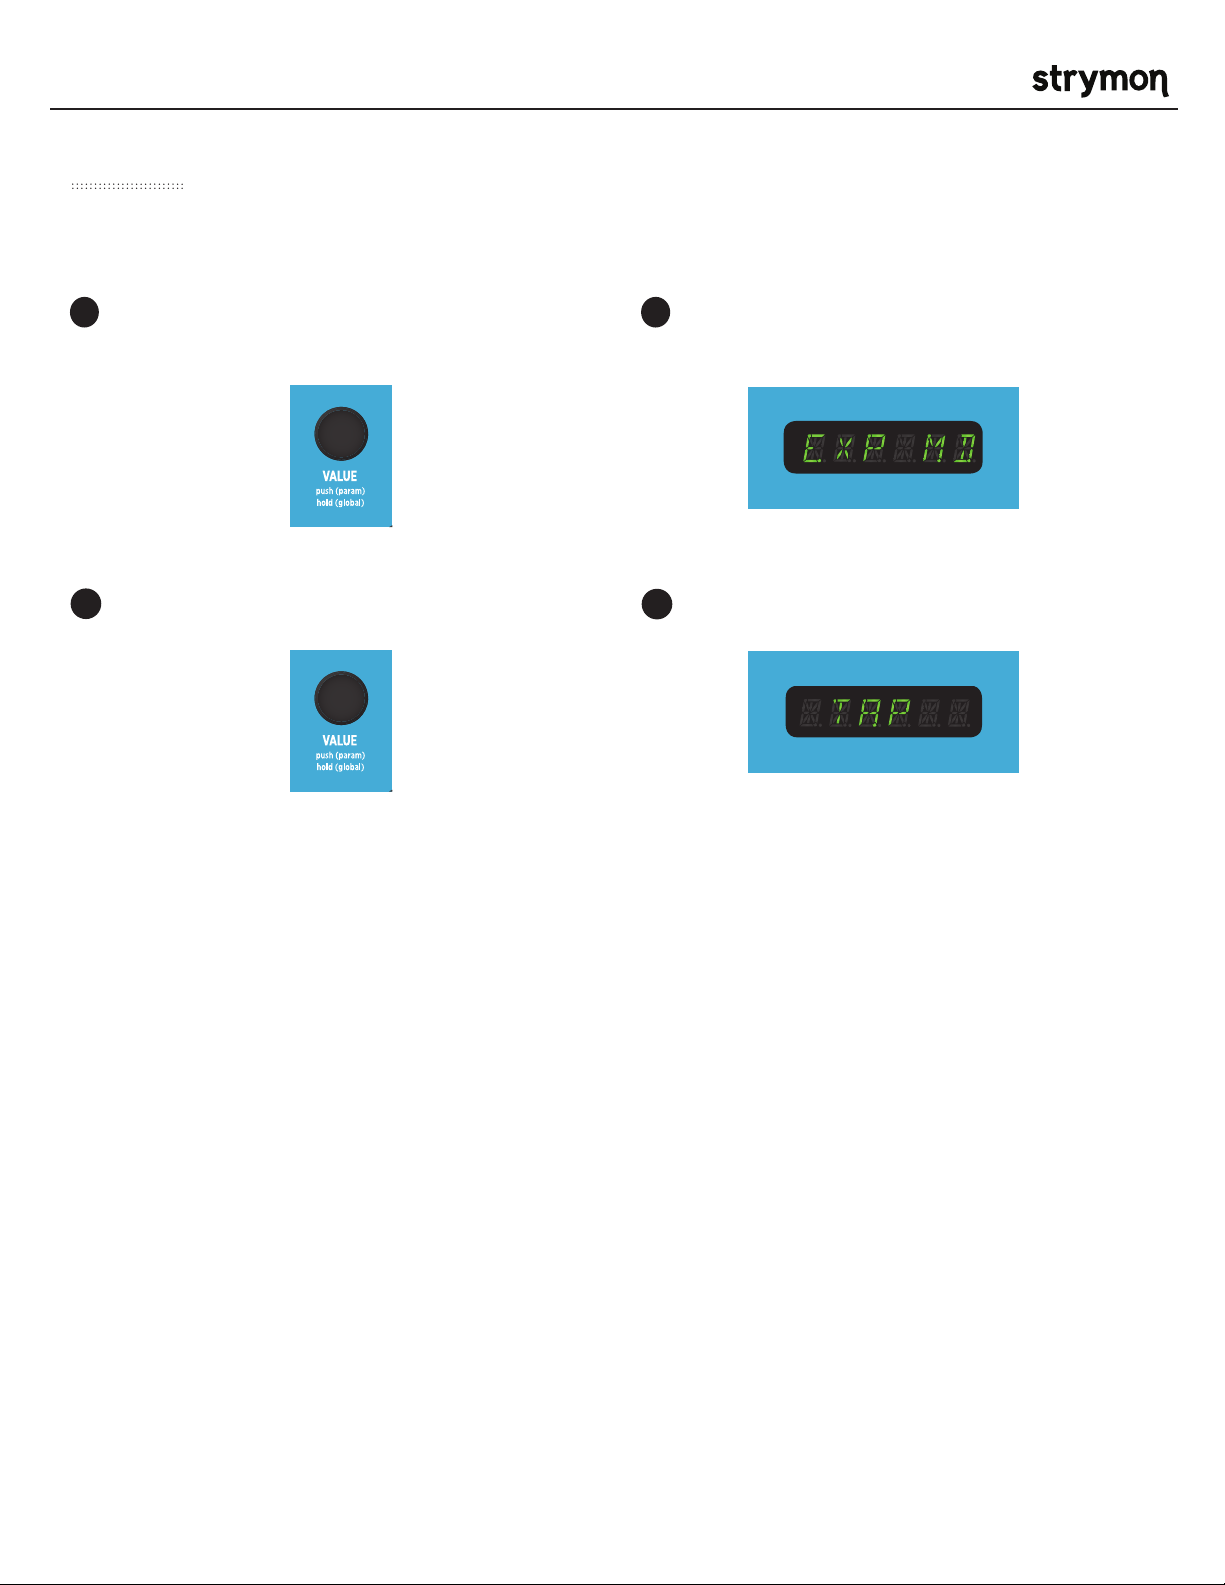
TAP TEMPO MODE SETUP
®
Press and hold the VALUE knob for 2 seconds
1
to access the Globals menu.
Press the VALUE knob.
3
NOTE: To switch back to Expression pedal operation, follow steps 1-3 above,
and then turn the VALUE knob until the display reads EXP MD.
Turn until the display reads EXP MD
2
(expression mode).
4
Turn until the display reads TAP.
pg 5
Page 6

MiniSwitch - User Manual
MIXTIME
REPEATS
short
med
long
BYPASSTAP
MODBUCKET LOSS
MODE
TAP
quarter
dot
triplet
MIXTIME
REPEATS
short
med
long
BYPASSTAP
MODBUCKET LOSS
MODE
TAP
quarter
dot
triplet
®
dTape Echo
Brigadier
FAVORITE MODE SETUP
®
Set both toggles to the MIDDLE position.
1
MODE
short
med
long
TAP
quarter
dot
triplet
How to save and access a favorite setting:
Press and hold BYPASS on your Strymon pedal
1
to save a new favorite setting.
®
Power up holding BOTH footswitches.
2
®
To switch back to Expression pedal operation, set
both toggles to the TOP position and power up
holding both footswitches.
Press footswitch to engage favorite setting.
2
TRS
®
pg 6
Page 7

MiniSwitch - User Manual
®
dTape Echo
Deco
FAVORITE MODE SETUP
®
Power up holding BOTH footswitches.
1
Press footswitch to toggle between the saved
3
favorite setting and the current state of knobs &
switches.
TRS
®
While holding footswitches, turn the
2
SATURATION all the way to the right.
TAP TEMPO MODE SETUP
With Deco set to Tap tempo mode use MiniSwitch to
tap in your Lag Time. Tapping quarter notes sets the
Lag Time to 8th notes.
Power up holding BOTH footswitches.
1
While holding footswitches, turn the
2
SATURATION to the 12 o’clock position.
pg 7
Page 8

MiniSwitch - User Manual
®
dTape Echo
DIG
FAVORITE MODE SETUP
®
Set both toggles to the MIDDLE position.
1
How to save and access a favorite setting:
Press and hold BYPASS on your Strymon pedal to
1
save a new favorite setting.
Power up holding BOTH footswitches.
2
To switch back to Expression pedal operation, set
both toggles to the TOP position and power up
holding both footswitches.
Press footswitch to toggle between the saved
2
favorite setting and the current state of knobs &
switches.
TRS
®
TAP TEMPO MODE SETUP
Set both toggles to the DOWN position.
1
Power up holding BOTH footswitches.
2
To switch back to Expression pedal operation, set
both toggles to the TOP position and power up
holding both footswitches.
pg 8
Page 9

MiniSwitch - User Manual
MIXTIME
REPEATS
fixed
multi
single
BYPASSTAP
WOW & FLUTTERTAPE AGE
TAPE HEAD
MODE
A
B
C
MIXTIME
REPEATS
fixed
multi
single
BYPASSTAP
WOW & FLUTTERTAPE AGE
TAPE HEAD
MODE
A
B
C
®
dTape Echo
El Capistan
FAVORITE MODE SETUP
®
Set both toggles to the MIDDLE position.
1
TAPE HEAD
fixed
multi
single
MODE
A
B
C
How to save and access a favorite setting:
Press and hold BYPASS on your Strymon pedal
1
to save a new favorite setting.
®
Power up holding BOTH footswitches.
2
®
To switch back to Expression pedal operation, set
both toggles to the TOP position and power up
holding both footswitches.
Press footswitch to toggle between the saved
2
favorite setting and the current state of knobs &
switches.
TRS
®
pg 9
Page 10

MiniSwitch - User Manual
‘61 harm
‘63
tube
‘65 photo
TREMOLO REVERB
‘60s
‘70s
‘80s
MIXINTENSITY
COLORSPEED
DECAY
‘61 harm
‘63
tube
‘65 photo
REVERB
BYPASS
TREMOLO
BYPASS
TREMOLO REVERB
‘60s
‘70s
‘80s
®
dTape Echo
MIXINTENSITY
COLORSPEED
DECAY
‘61 harm
‘63
tube
‘65 photo
REVERB
BYPASS
TREMOLO
BYPASS
TREMOLO REVERB
‘60s
‘70s
‘80s
MIXINTENSITY
COLORSPEED
DECAY
‘61 harm
‘63
tube
‘65 photo
REVERB
BYPASS
TREMOLO
BYPASS
TREMOLO REVERB
‘60s
‘70s
‘80s
Flint
FAVORITE MODE SETUP
®
Set both toggles to the MIDDLE position.
1
How to save and access a favorite setting:
Press and hold BYPASS on your Strymon pedal to
1
save a new favorite setting.
®
Power up holding BOTH footswitches.
2
®
To switch back to Expression pedal operation, set
both toggles to the TOP position and power up
holding both footswitches.
Press footswitch to toggle between the saved
2
favorite setting and the current state of knobs &
switches.
TRS
®
TAP TEMPO MODE SETUP
Set both toggles to the DOWN position.
1
TREMOLO REVERB
‘61 harm
‘63
tube
‘65 photo
‘60s
‘70s
‘80s
Power up holding BOTH footswitches.
2
®
To switch back to Expression pedal operation, set
both toggles to the TOP position and power up
holding both footswitches.
pg 10
Page 11

MiniSwitch - User Manual
PREAMP
DRIVE
FAST ROTOR
SPEED
BYPASSSLOW/FAST
MIC DISTANCE
HORN LEVEL
®
dTape Echo
PREAMP
DRIVE
FAST ROTOR
SPEED
BYPASSSLOW/FAST
MIC DISTANCE
HORN LEVEL
PREAMP
DRIVE
PREAMP
DRIVE
Lex
FAVORITE MODE SETUP
®
Power up holding BOTH FOOTSWITCHES.
®
While holding both footswitches:
• Turn TOPMOST LEFT KNOB full
clockwise to use MiniSwitch as a
favorite preset select switch.
FAST ROTOR
SPEED
• Turn TOPMOST LEFT KNOB to
12 o’clock to use MiniSwitch as
an external speed switch.
FAST ROTOR
SPEED
How to save and access a favorite setting:
Press and hold BYPASS on your Strymon pedal
1
to save a new favorite setting.
®
Press footswitch to toggle between the saved
2
favorite setting and the current state of knobs &
switches.
TRS
®
*To switch back to Expression pedal operation, while
powering up hold both footswitches, and turn the
TOPMOST LEFT KNOB full counterclockwise.
pg 11
Page 12

MiniSwitch - User Manual
SPEED
DEPTH LEVEL
SPEED
DEPTH LEVEL
Mobius
TAP TEMPO MODE SETUP
®
Press and hold the VALUE knob for 2 seconds
1
to access the Globals menu.
VALUE
push (param)
hold (global)
Press the VALUE knob.
3
VALUE
push (param)
hold (global)
Turn until the display reads EXP MD
2
(expression mode).
Turn until the display reads TAP.
4
NOTE: To switch back to Expression pedal operation, follow steps 1-3 above,
and then turn the VALUE knob until the display reads EXP MD.
pg 12
Page 13

MiniSwitch - User Manual
®
dTape Echo
Riverside
BOOST SWITCH SETUP:
Press and hold the FAVORITE footswitch at
1
power up until both LEDs flash.
To enable the BOOST switch for the BOOST
2
jack, turn the DRIVE knob counter-clockwise.
The FAVORITE LED will light up GREEN.
®
Press the ON or FAVORITE footswitch once
3
again to store this setting and begin using
Riverside.
FAVORITE MODE SETUP:
Press and hold the FAVORITE footswitch at
1
power up until both LEDs flash.
To enable Favorite In for the EXP jack, turn
2
the LEVEL knob fully clockwise. The ON
LED will light up RED.
Press the ON or FAVORITE footswitch once
3
again to store this setting and begin using
Riverside.
Press footswitch to toggle between the saved
4
favorite setting and the current state of knobs &
switches.
TRS
®
pg 13
Page 14

MiniSwitch - User Manual
TIME
REPEATS MIX
TIME
REPEATS MIX
Timeline
TAP TEMPO MODE SETUP
®
Press and hold the VALUE knob for 2 seconds
1
Turn until th ).
2
to access the Globals menu.
VALUE
push (param)
hold (global)
Press the VALUE knob.
3
VALUE
push (param)
hold (global)
Turn until the display reads TAP.
4
NOTE: To switch back to Expression pedal operation, follow steps 1-3 above,
and then turn the VALUE knob until the display reads EXP MD.
pg 14
Page 15

MiniSwitch - User Manual
Specification
Dimensions 2.25” deep x 2” wide x 1.8” tall
Cable 1/4” TRS (tip / ring / sleeve)
Strymon Non-Transferrable Limited Warranty
Warranty
Strymon warranties the product to be free from defects in material and workmanship for a period of two (2)
years from the original date of purchase when bought new from an authorized dealer in the United States of
America or Canada. If the product fails within the warranty period, Strymon will repair or, at our discretion,
replace the product at no cost to the original purchaser. Please contact your dealer for information on warranty
and service outside of the USA and Canada.
®
Exclusions
This warranty covers defects in manufacturing discovered while using this product as recommended by
Strymon. This warranty does not cover loss or theft, nor does the coverage extend to damage caused by
misuse, abuse, unauthorized modification, improper storage, lightning, or natural disasters.
Limits of Liability
In the case of malfunction, the purchaser’s sole recourse shall be repair or replacement, as described in the
preceding paragraphs. Strymon will not be held liable to any party for damages that result from the failure of
this product. Damages excluded include, but are not limited to, the following: lost profits, lost savings, damage
to other equipment, and incidental or consequential damages arising from the use, or inability to use this
product. In no event will Strymon be liable for more than the amount of the purchase price, not to exceed the
current retail price of the product. Strymon disclaims any other warranties, expressed or implied. By using the
product, the user accepts all terms herein.
How to Obtain Service Under this Warranty
For North American customers: Contact Strymon through our website at strymon.net/support for Return
Authorization and information. Proof of original ownership may be required in the form of a purchase receipt.
For International Customers: Contact the Strymon dealer from which the product was purchased from in order
to arrange warranty repair service.
®
Strymon
REV B - 11.18.2016
is a division of Damage Control®, LLC.
pg 15
 Loading...