


USER MANUAL
IRIDIUM - Amp & IR Cab
Table of Contents
Connecting Iridium
Controls and Connections
Live Edit Functions
Power Up Modes
External Control
MIDI Functionality
Factory Reset
Features
Specifications
Appendices
Live Edit and Power Up Quick Reference
IR Cab Details
3
6
13
15
18
23
31
32
33
35
39
Audio Routing
Sample Settings
Warranty
43
47
49
pg 2

IRIDIUM - Amp & IR Cab
DIRECT
BOX
HOUSE
PA SYSYTEM
Connecting Iridium
Iridium delivers responsive tube amp tones, ultra-high quality impulse
response speaker cabinets, and natural sounding room ambience. It
shines as the centerpiece of many different playing applications.
1
ON STAGE
HOUSE
PA SYSYTEM
DIRECT
BOX
Connect a pedalboard containing Iridium to a house PA system for
excellent repeatable tone, control, and flexibility in a live situation.
Monitor through the house monitoring system or in-ear monitors.
For a dedicated personal on-stage monitor, connect your pedalboard
to a powered full-range speaker.
POWERED
FULL-RANGE
MONITOR(S)
NOTE: Because the purpose of Iridium is to deliver amp and cab
tones, it is not desirable to enable Iridium in front of a guitar
amp. If you use the same pedalboard both with an amp and in
direct situations, simply bypass Iridium when using your board
with an amp.
pg 3

IRIDIUM - Amp & IR Cab
DIRECT
BOX
POWERED
FULL-RANGE
MONITOR(S)
HOUSE
PA SYSYTEM
DIRECT
BOX
POWERED
FULL-RANGE
MONITOR(S)
HOUSE
PA SYSYTEM
Connecting Iridium (cont.)
2
IN THE STUDIO
Connect Iridium directly to a recording interface for great guitar tone
instantly without the need to set up an amp or microphones.
3
AT HOME
Connect headphones directly to Iridium to experience immersive
classic amp tones in a natural sounding room without an amp
ADDITIONAL TIPS FOR STAGE, STUDIO, AND HOME
Iridium can be used on its own or as part of a pedalboard.
• Place Iridium at the end of your signal chain to capture the sound
of the entire pedalboard connected to the front of an amp.
.
• Place Iridium before time-based effects for a different tonal
character if you prefer.
• Use headphones to check out a pedalboard that normally connects
to an amp by connecting its output(s) to Iridium.
pg 4

IRIDIUM - Amp & IR Cab
Connecting Iridium (cont.)
4
OTHER WAYS TO USE IRIDIUM
Iridium also allows for specialized use cases.
Amp processing without IR cabs
Select Iridium’s Cab Bypass mode and connect the output(s) to the
effects return or power amp input on a guitar amp.
(See page 15 for Cab Bypass mode configuration details.)
IR cab processing without amps
Select Iridium’s Amp Bypass mode and connect a preamp or preamp
pedal (such as Riverside) to Iridium’s input.
(See page 15 for Amp Bypass mode configuration details.)
WARNING: Never connect the Speaker Output of a guitar amplifier
to Iridium! If you wish to use Iridium’s IR cabs with a guitar amp,
you can either use a line out from the amp or the amp’s effects
send. Note that you will still need to connect a load to the speaker
output with either of these options. You may also need to set
Iridium to Line input level.
(See page 16 for Input level configuration details.)
Non-cab WAV files
It is possible to load any 24bit/96kHz WAV impulse response into
Iridium, including impulses of bass cabs, acoustic instrument body
resonance, samples of music, etc.
pg 5

IRIDIUM - Amp & IR Cab
STEREO
SUM
USB
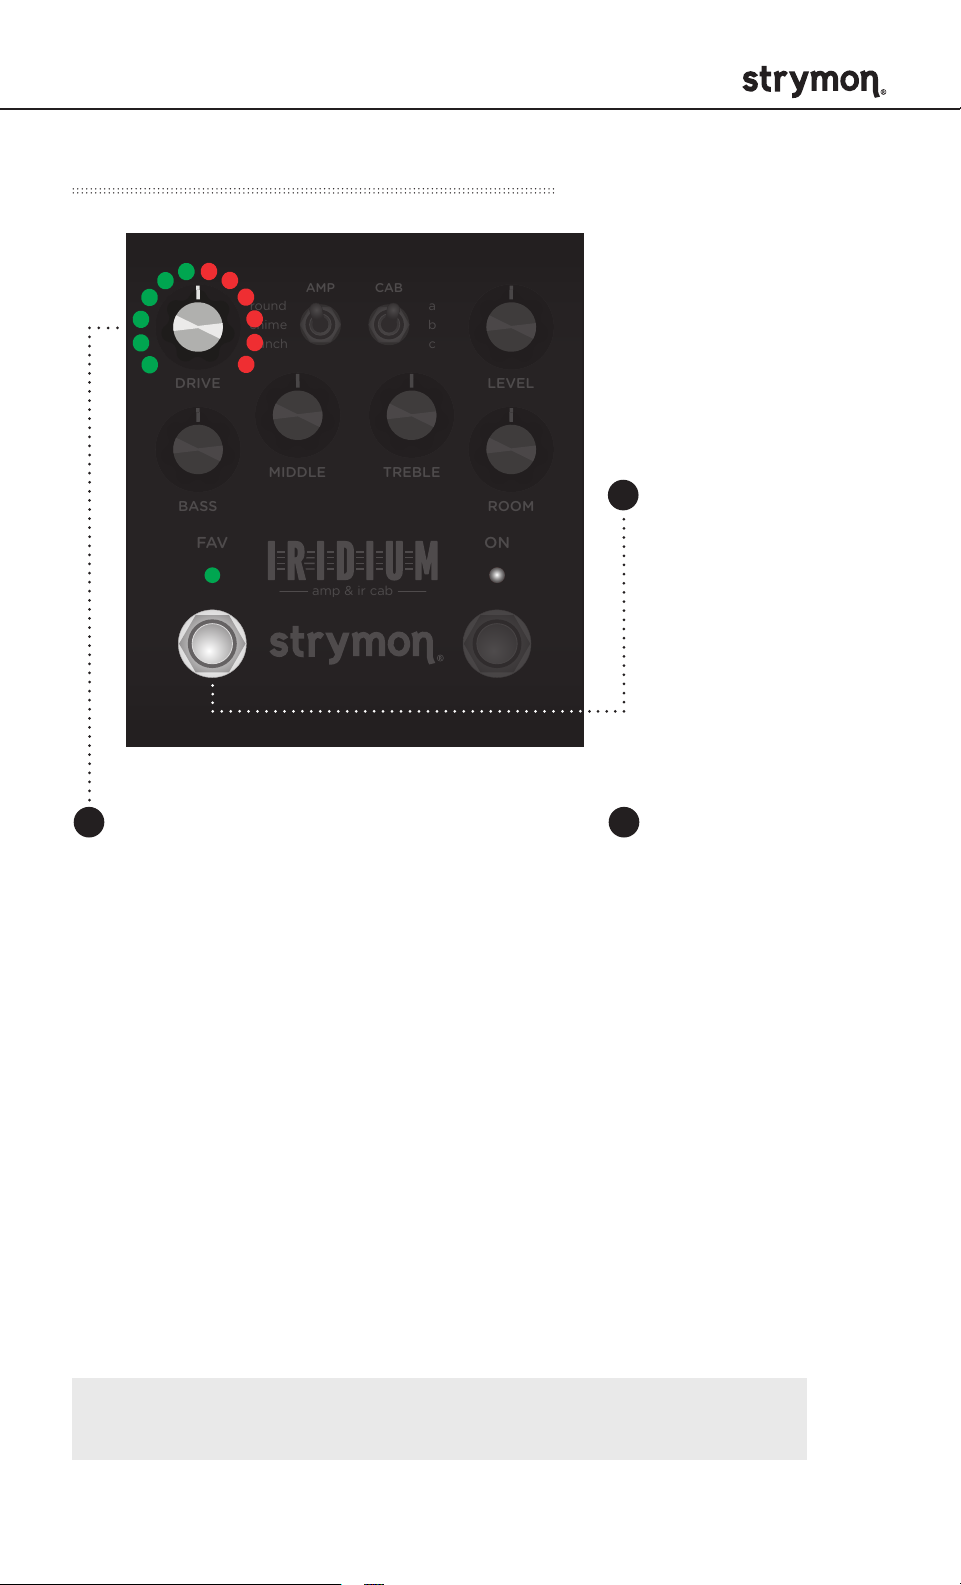
Controls and Connections - Front Panel
AMP
Selects one of three different amp types.
CAB
CABAMP
round
Based on* a Fender
®
Deluxe Reverb®, this amp
round
round
chime
chime
punch
punch
AMP
is clean, bright, and mid-scooped, with plenty
of headroom. While preserving access to all the tones originally
available from the Deluxe’s Normal channel, our amp gives you
something extra: a midrange control. With the MIDDLE knob at
noon, you get the original fixed-resistor value and standard tonal
characteristics of the Deluxe. Turn down the MIDDLE control for a
more scooped sound, or turn it up for tweed-era tones.
chime
®
Based on* the Brilliant channel of a Vox
AC30TB, this amp is jangly
and bright, providing air for subtle passages with a light touch, and
bite when you want to dig in. The MIDDLE knob acts a tone cut knob,
providing high-end roll-off just before the power tubes, per the
AC30TB design. In addition to the full available gain of the original
amp, toward the top end of the DRIVE knob’s range of travel, we’ve
added a frequency-shaped front end boost to tighten the low end
while driving the amp further into saturation.
a
a
b
b
c
c
punch
®
Based on* a Marshall
Plexi (Super Lead model number 1959), this
powerful amp is meatier, with higher gain than the other two amps,
and has a powerful midrange response. This amp features a buttery,
smooth overdrive. Setting the DRIVE control at around 2 o’clock
gets you the maximum gain the original Plexi design allowed. Turn
the DRIVE beyond 2 o’clock to access custom hot-rodded Plexi high
gain tones.
*All product names are trademarks of their respective owners, which are in no way associated or
affiliated with Strymon. These product names, descriptions and images are provided for the sole
purpose of identifying the specific products that were studied during Strymon’s sound design process.
See page 34 for a list of U.S. registered trademarks.
pg 6

IRIDIUM - Amp & IR Cab
STEREO
SUM
USB
Controls and Connections - Front Panel
CAB
The CAB switch selects one of three speaker
cabinet options for each amp type. Each cab is
made up of left and right 24 bit/96 kHz 500ms
round
round
round
chime
chime
chime
punch
punch
punch
AMP
AMP
CABAMP
CAB
impulse responses. Mono cabs have the same IR
loaded into both sides.
Iridium is pre-loaded with a curated set of 9 speaker cabinet IRs from
®
top IR vendors Cabir.eu, Celestion
, OwnHammer, and Valhallir.at.
The factory installed IRs are based on* the following:
round
®
a: 1x12 Fender
Deluxe Reverb
b: 1x12 Fender® Blues Junior
c: 2x10 Fender® Vibrolux
®
®
®
chime
®
a: 2x12 Vox
b: 1x12 Custom cab w/ Celestion
c: 4x12 Mesa/Boogie
AC30-6 open back fawn
®
Blue AlNiCo
®
Half-Back
®
a
a
b
b
c
c
punch
®
a: 4x12 Marshall
b: 2x12 Custom cab w/ Celestion
c: 8x12 Marshall
w/ Celestion® G12M-25s
®
Vintage 30s
®
w/ Celestion® T652s
A more complete description of these IRs and the original speaker
cabinets can be found on Appendix 2. Additionally, the factory installed
IRs can be replaced with any 24 bit/96 kHz WAV format IRs using our
free Strymon Impulse Manager software available at strymon.net/
support/iridium.
*All product names are trademarks of their respective owners, which are in no way associated or
affiliated with Strymon. These product names, descriptions and images are provided for the sole
purpose of identifying the specific products that were studied during Strymon’s sound design process.
See page 34 for a list of U.S. registered trademarks.
pg 7

IRIDIUM - Amp & IR Cab
STEREO
MONO
IN OUT L OUT R EXP
SUM
USB
Controls and Connections - Front Panel (cont.)
DRIVE
Adjusts the amount of gain applied to the incoming
signal, controlling both the analog JFET input stage
and the preamp gain of the selected amp. As the DRIVE
amount is increased, the LEVEL knob is compensated
allowing the gain to increase while the output level
remains the same.
CABAMP
round
chime
punch
DRIVE LEVEL
DRIVE LEVEL
a
b
c
BASS
MIDDLE
FAV ON
amp & ir cab
TREBLE
ROOM
ON
LEVEL
Controls the output volume when the pedal is ON. Controls
the left and right outputs as well as the headphone output.
NOTE: For a better listening experience, we have included a LEVEL TRIM
Live Edit function that allows for the overall output volume from both
the OUT L and OUT R outputs along with the headphone output to be
compensated without affecting the leveling between your saved presets.
This is a useful way to adjust the level when using headphones.
(See
page 14 for details.)
pg 8

IRIDIUM - Amp & IR Cab
STEREO
MONO
IN OUT L OUT R EXP
SUM
USB
Controls and Connections - Front Panel (cont.)
Each tone knob on a classic amplifier controls a potentiometer that
interacts with the other components that make up the tone stack,
creating a complex, interdependent frequency response. Our Matrix
Modeling™ process captures all these subtleties, faithfully delivering
the unique tonal qualities of each amp type.
MIDDLE
Adjusts the tone stack of the round
and punch amp types to highlight the
middle frequencies.
Rolls off high frequencies as the knob
is turned up for the chime amp type.
DRIVE LEVEL
BASS
BASS
CABAMP
TREBLE
TREBLE
a
b
c
ROOM
ROOM
round
chime
punch
MIDDLE
MIDDLE
FAV ON
TREBLE
Adjusts the tone
stack of the selected
amp type to highlight
the high frequencies.
BASS
Adjusts the tone
stack of the
selected amp type
to highlight the
low frequencies.
amp & ir cab
ROOM
Controls the level of natural room ambience,
placing your amp and cab in a natural sounding
room by combining 256ms impulse responses of
real rooms with algorithmic reverb for extended
decay. The IR portion of the hybrid rooms is not
replaceable.
(See page 13 for details about adjusting the Room Size.)
pg 9

IRIDIUM - Amp & IR Cab
STEREO
MONO
IN OUT L OUT R EXP
SUM
USB
Controls and Connections - Front Panel (cont.)
CABAMP
round
chime
punch
DRIVE LEVEL
a
b
c
BASS
FAV ON
FAV ON
FAV
Recalls a stored Favorite setting.
Includes all knob and switch
settings. Press and hold until
the FAV LED blinks to save a new
Favorite setting.
Favorite presets can also be
saved using MultiSwitch Plus or
an external MIDI device.
(See page 22 for details about saving
while using MultiSwitch Plus.)
MIDDLE
TREBLE
ROOM
amp & ir cab
ON
Activates amp, cab, and room
processing. LED indicates On/Off
state, LED color indicates Output
mode.
LED color indicates the selected
Output mode. RED indicates
Normal mode (default).
(See page 15 for Output mode
configuration details.)
(See page 28 about saving while using
MIDI.)
pg 10

IRIDIUM - Amp & IR Cab
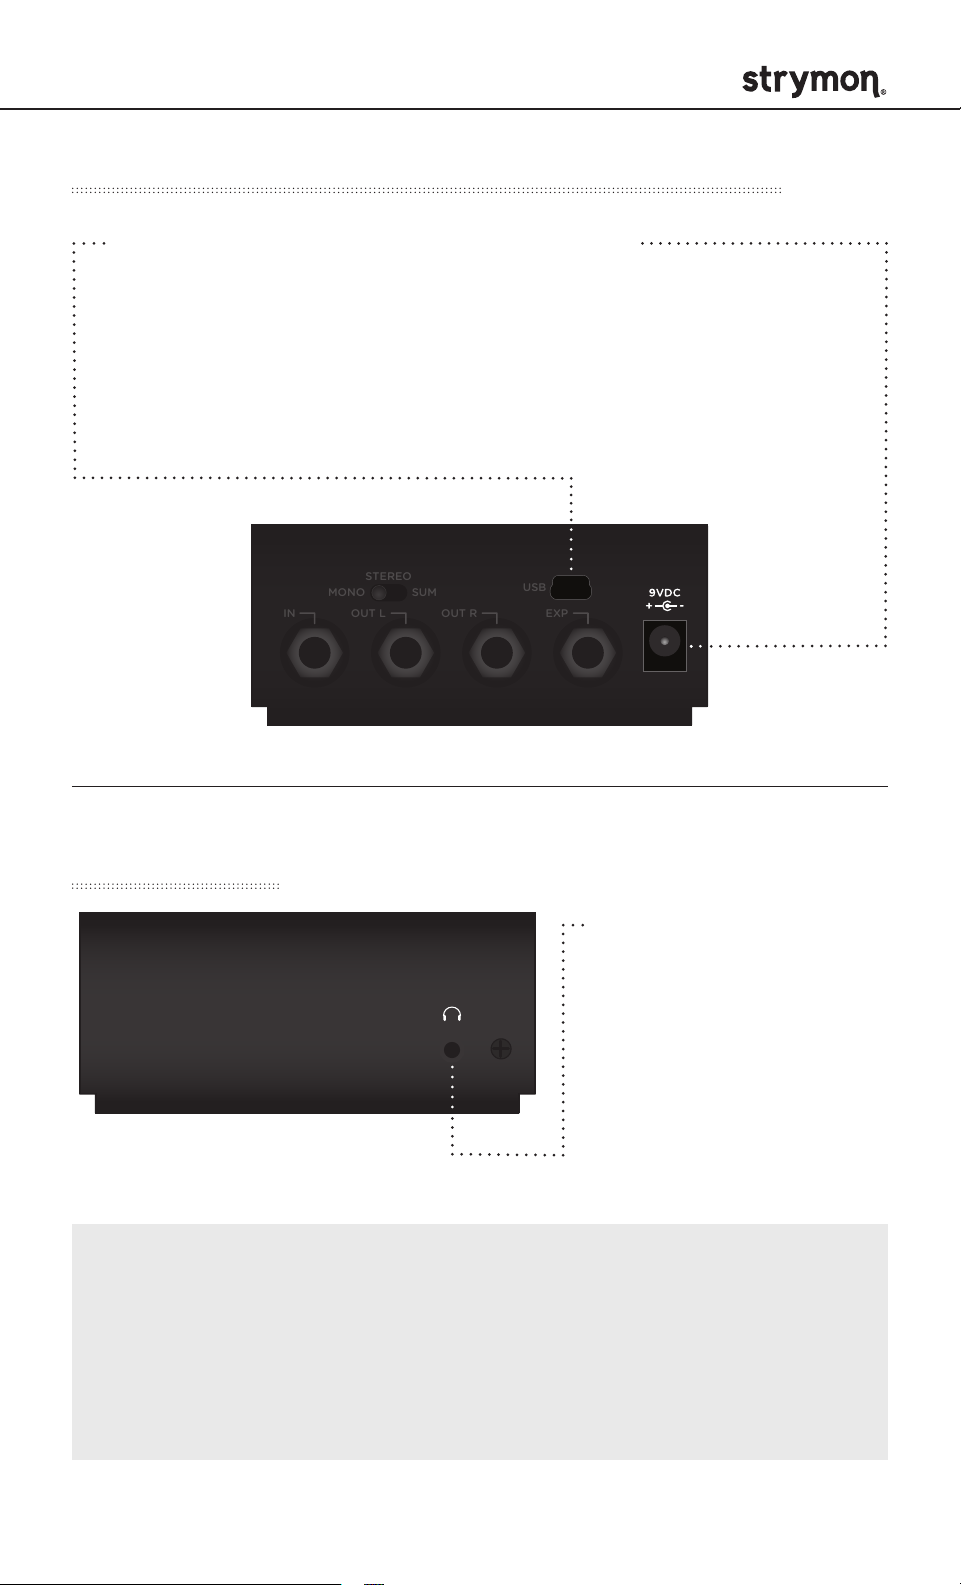
Controls and Connections - Rear Panel
Audio Input Selector
MONO : Use with a mono input signal such as a guitar. Output is
stereo. Use OUT L for mono connection.
STEREO : Use with a stereo input signal. Output is stereo.
SUM : Use with a stereo input signal that you would like to sum to
mono. Use OUT L for summed output.
(See Appendix 3 for signal flow illustrations.)
STEREO
STEREO
MONO
MONO
IN OUT L OUT R EXP
IN OUT L OUT R
IN
Stereo high impedance
input. Use a standard
instrument cable for mono.
Use a TRS stereo adapter/
cable for stereo input.
(See page 16 for configuration
details.)
OUTPUTS
Stereo audio signal outputs.
Use OUT L for mono.
SUM
SUM
USB
EXP
EXP
Multifunction communication jack
for external control of Iridium’s
features and functions. Use a
standard TRS expression pedal to
act as a volume pedal before the
amp (default configuration). EXP
input can also be used to connect
a Strymon MultiSwitch Plus,
MiniSwitch, or MIDI EXP cable for
remote preset selection and MIDI
automation.
(See page 19 for configuration details.)
pg 11
IRIDIUM - Amp & IR Cab
STEREO
MONO
IN OUT L OUT R EXP
SUM
USB
CABAMP
ROOM
TREBLE
BASS
FAV ON
DRIVE LEVEL
a
b
c
amp & ir cab
MIDDLE
round
chime
punch
USB
Controls and Connections - Rear Panel (cont.)
USB
Can be used to load IR files
and firmware updates via
computer. More information
and the latest downloads can
be found at: strymon.net/
support/iridium
IN OUT L OUT R EXP
MONO
STEREO
SUM
POWER
Use the included power
supply or an adapter with
the following rating:
• 9VDC center negative
• 500mA minimum
USB
USB
Facing Panel
HEADPHONE OUT
Stereo 1/8 inch
headphone output.
Designed to be used with
relatively highimpedance
headphones (between 25
to 70 ohms). LEVEL knob
adjusts volume.
NOTE: The headphone output provides the same signal as the
quarter-inch outputs. Using higher impedance headphones
will lower the signal level from the headphone output. Use the
convenient LEVEL TRIM function to adjust the output level without
affecting the level saved to a Favorite setting or MIDI preset.
(See page 14 for details.)
pg 12

IRIDIUM - Amp & IR Cab
STEREO
MONO
IN OUT L OUT R EXP
SUM
USB
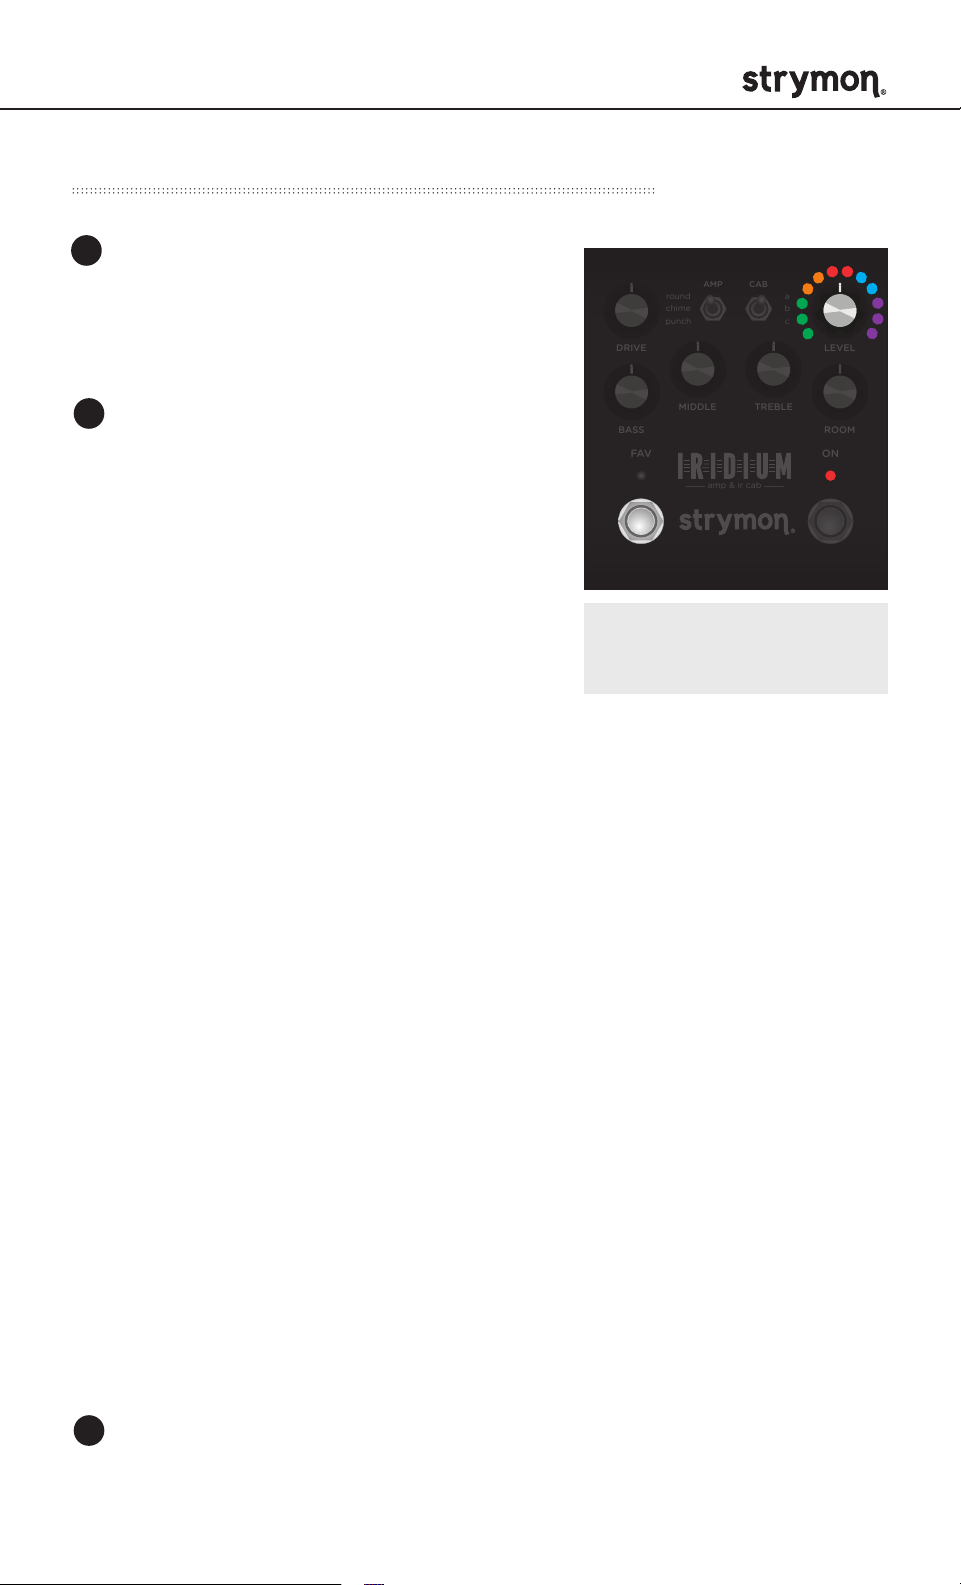
Live Edit Functions - Room Size
Determines the size of the room reverb.
round
chime
punch
DRIVE LEVEL
CABAMP
a
b
c
1
Press and hold
the ON footswitch.
Once both LEDs
flash, release the
footswitch.
2
Turn the ROOM knob to select the size of the Room.
ON LED indicates status.
Small - GREEN
Medium - AMBER (default)
Large - RED
MIDDLE
BASS
FAV ON
amp & ir cab
TREBLE
ROOM
ROOM
ON
3
Press the ON or FAV footswitch to exit and store the
Room Size setting.
NOTE: Room size is saved per Favorite setting or preset.
pg 13

IRIDIUM - Amp & IR Cab
STEREO
MONO
IN OUT L OUT R EXP
SUM
USB
Live Edit Functions - Level Trim
Adjusts the output volume without altering the level that is saved to a
Favorite setting. This is useful when monitoring with headphones.
CABAMP
round
chime
punch
a
b
c
1
Press and hold
the ON footswitch.
Once both LEDs
flash, release the
footswitch.
2
Turn the LEVEL knob to adjust the output level. FAV LED
indicates status.
Sweeps from -20 dB (GREEN) to +3 dB (AMBER).
LED turns RED when there is no boost or cut of the
output level, near the 12 o’clock position.
DRIVE LEVEL
MIDDLE
BASS
FAV
amp & ir cab
TREBLE
LEVEL
ROOM
ON
ON
3
Press the ON or FAV footswitch to exit and store the
Level Trim setting.
NOTE: The Level Trim value is not stored as part of a preset
and resets each time the pedal powers up.
pg 14

IRIDIUM - Amp & IR Cab
STEREO
MONO
IN OUT L OUT R EXP
SUM
USB
Power Up Modes - Output Mode
CABAMP
round
chime
punch
DRIVE LEVEL
DRIVE
a
b
c
MIDDLE
BASS
FAV ON
FAV ON
2
Turn the DRIVE knob to select the
desired mode. FAV LED indicates
status.
Amp Bypass mode - GREEN
Cab and Room processing are active,
but Amp processing is disabled.
amp & ir cab
TREBLE
ROOM
1
Press and hold the
ON footswitch while
connecting power to
the pedal. Once both
LEDs flash, release
the footswitch.
3
Press the ON or FAV
footswitch to exit
and store the Output
mode setting.
Cab Bypass mode - AMBER
Amp and Room processing are active,
but Cab processing is disabled.
Normal mode - RED (default)
Amp, Cab and Room processing are
active.
NOTE: All Power Up functions persist through power cycles.
During normal operation, the ON LED will take on the color
of the selected mode when processing is enabled.
pg 15
IRIDIUM - Amp & IR Cab
STEREO
MONO
IN OUT L OUT R EXP
SUM
USB
Power Up Modes - Input Level
CABAMP
round
chime
punch
DRIVE LEVEL
DRIVE
a
b
c
MIDDLE
BASS
FAV ON
FAV
Turn the DRIVE knob to select the
Input Level mode. FAV LED indicates
status.
Instrument - GREEN (default)
Input headroom set for guitar level
source.
amp & ir cab
TREBLE
ROOM
1
Press and hold the
FAV footswitch while
connecting power to
the pedal. Once both
LEDs flash, release
the footswitch.
32
Press the ON or FAV
footswitch to exit
and store the Input
Level mode.
Line - RED
Use with line level source. Adds 10dB
of headroom.
NOTE: All Power Up functions persist through power cycles.
pg 16
IRIDIUM - Amp & IR Cab
STEREO
MONO
IN OUT L OUT R EXP
SUM
USB
Power Up Modes - EXP Jack Options
1
Press and hold the FAV footswitch
while connecting power to the pedal.
Once both LEDs flash, release the
footswitch.
DRIVE LEVEL
round
chime
punch
CABAMP
a
b
c
LEVEL
2
Turn the LEVEL knob to select the EXP
Jack functionality. ON LED indicates
status.
MIDDLE
BASS
FAV ON
FAV
TREBLE
amp & ir cab
Expression - GREEN LED
Connect a TRS expression pedal to
remotely control knob settings.
(See page 19 for configuration details.)
NOTE: All Power Up functions
persist through power cycles.
Volume PRE - AMBER (default)
Connect a TRS expression pedal to function as a volume pedal
located before the amp, cab and room.
Volume POST - RED
Connect a TRS expression pedal to function as a volume pedal
located after the amp and cab, but before the room.
Digital - BLUE
• Connect a MultiSwitch Plus to remotely select three (3) presets.
ROOM
ON
(See page 21 for configuration details.)
• Connect a MIDI EXP cable or MIDI > TRS interface to access 300
presets and remotely control patch parameters via MIDI.
(See page 23 for configuration details.)
External Favorite - PURPLE
Connect a MiniSwitch to toggle the on-board Favorite setting
on and off remotely. The on-board FAV switch is disabled when
External Favorite EXP mode is selected and a MiniSwitch is
connected to the EXP jack.
(See page 18 for configuration details.)
3
Press the ON or FAV footswitch to exit and store the EXP Jack setting.
pg 17
IRIDIUM - Amp & IR Cab
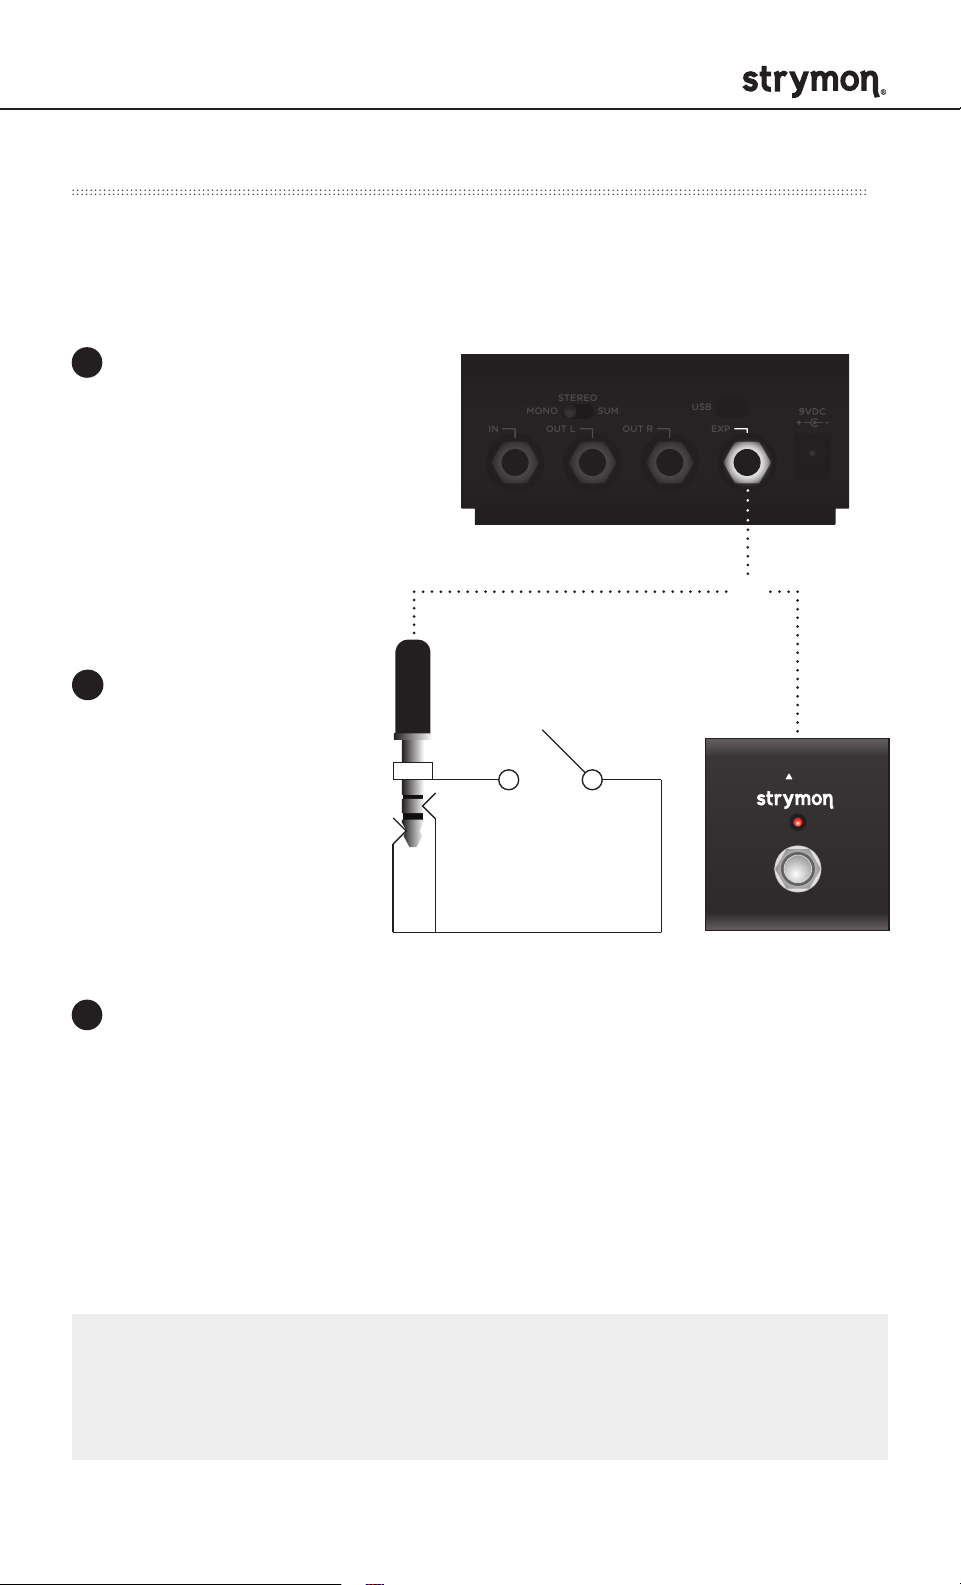
External Control – External Favorite Switch Setup
Connect a Strymon MiniSwitch with a TRS cable to toggle the
on-board Favorite preset on and off.
1
Configure the EXP jack
for External Favorite
mode.
(See page 17 for more info.)
IN OUT L OUT R EXP
MONO
STEREO
SUM
USB
EXP
OR
2
Connect an external
switch with a TRS
cable to the EXP jack
of Iridium.
3
To save this setting as a new on-board Favorite
sound, press and hold Iridium’s on-board FAV switch
for 2 seconds.
TRS
®
NOTE: The on-board FAV switch will not toggle the Favorite preset
when Iridium is set to External Favorite mode and a MiniSwitch is
connected to the EXP jack.
pg 18
IRIDIUM - Amp & IR Cab
RIGHT IN LEFT OUT RIGHT OUT EXP
MIDI IN
USB
MIDI OUT
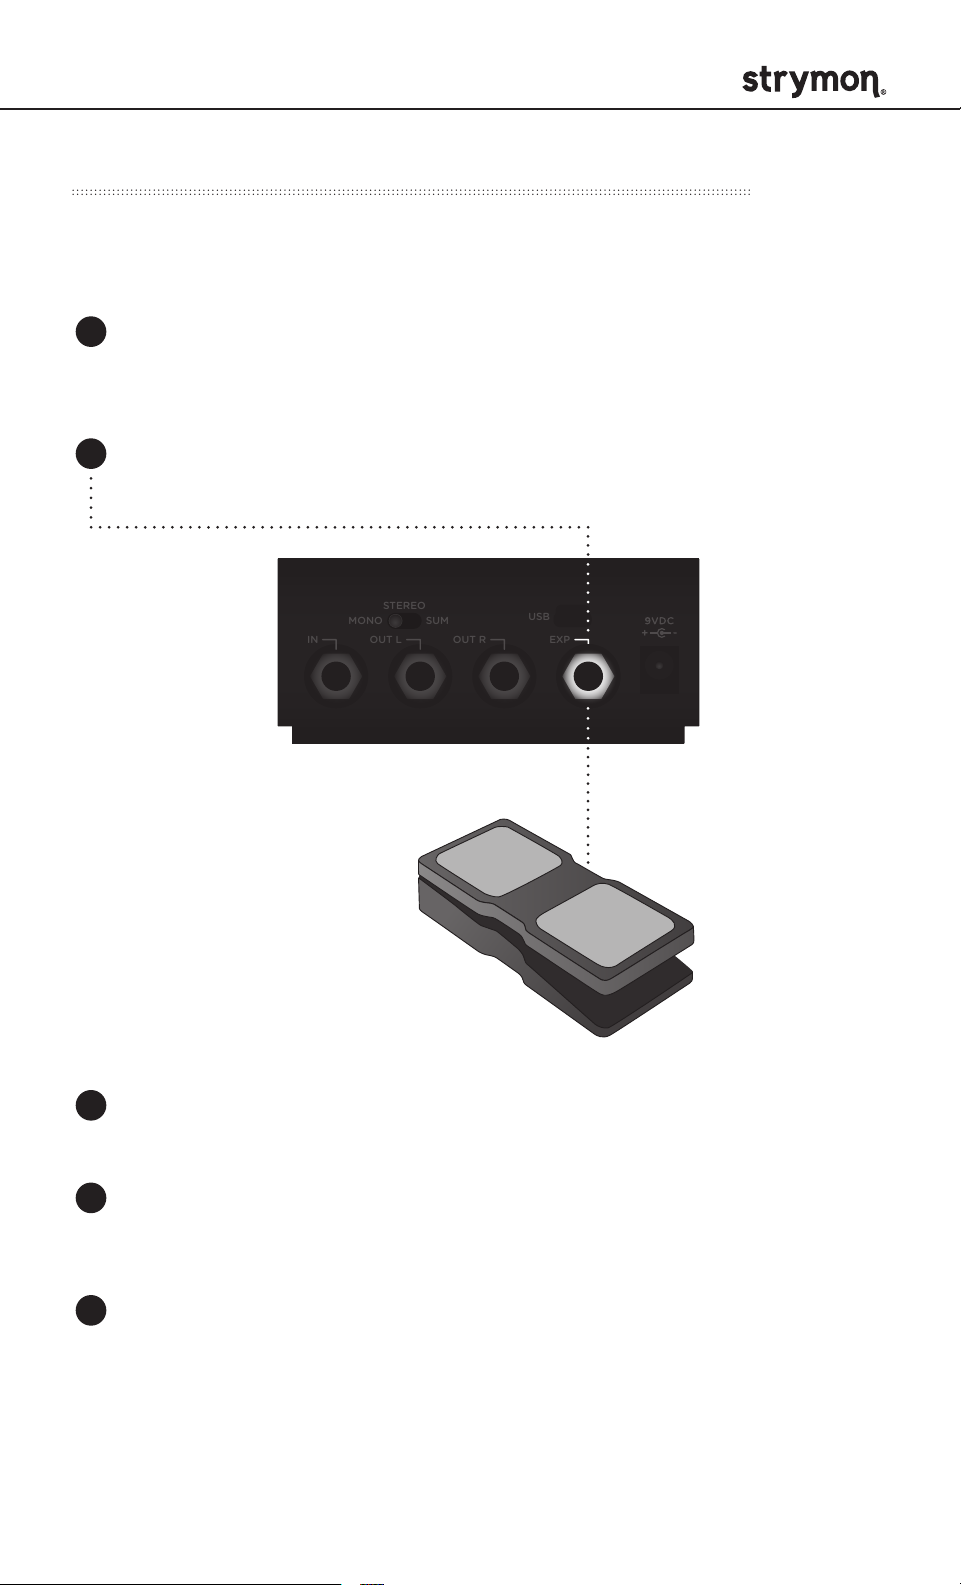
External Control - Expression Pedal Setup
Use a TRS Expression pedal to control the knobs of Iridium.
1
Configure the EXP jack for Expression mode.
(See page 17 for configuration instructions.)
2
Connect an Expression pedal to the EXP jack of Iridium using a
TRS cable.
STEREO
MONO
IN OUT L OUT R EXP
3
Press and hold both footswitches until both LEDs blink GREEN.
SUM
USB
EXP
4
Rock the expression pedal to the HEEL position. Only the FAV LED
will blink GREEN.
5
Set the knob(s) you would like to control to the desired settings for
the HEEL position of the expression pedal. Only the FAV LED will
turn RED.
pg 19
IRIDIUM - Amp & IR Cab
External Control - Expression Pedal Setup (cont.)
6
Now, rock the expression pedal to the TOE position. Now only the
ON LED will blink GREEN.
7
Set the knob(s) you would like to control to the desired settings
for the TOE position of the expression pedal. Only the ON LED will
turn RED.
8
Press the ON or FAV footswitch to exit and store the expression
pedal setup.
NOTE: Expression pedal assignment is saved independently per
Favorite/MIDI preset.
pg 20
IRIDIUM - Amp & IR Cab
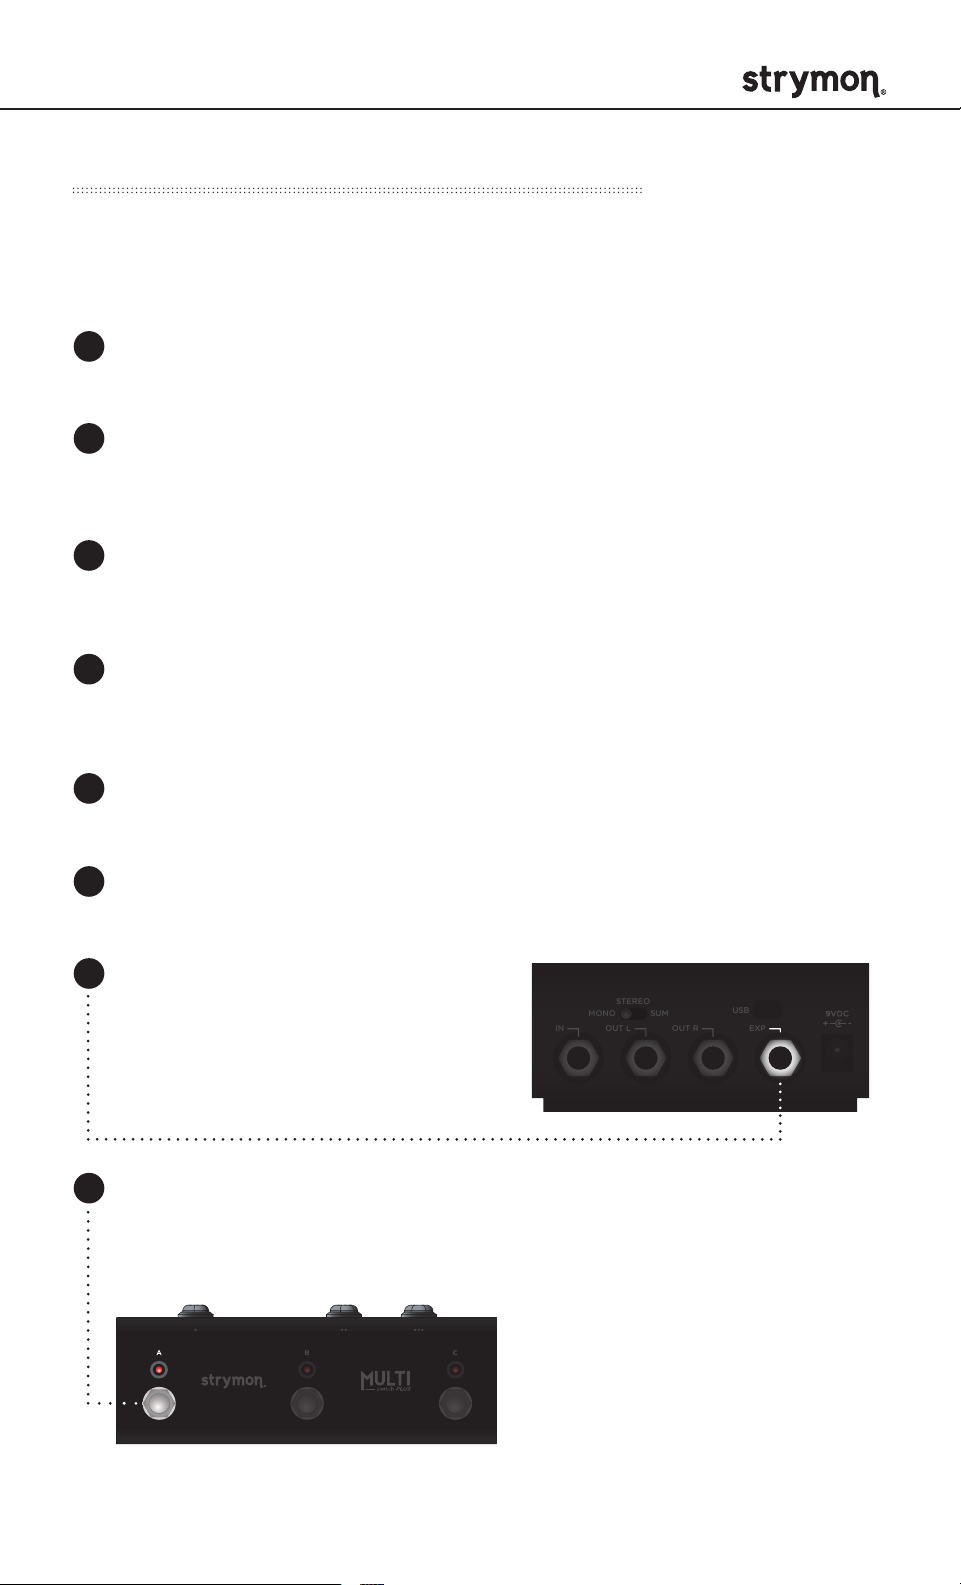
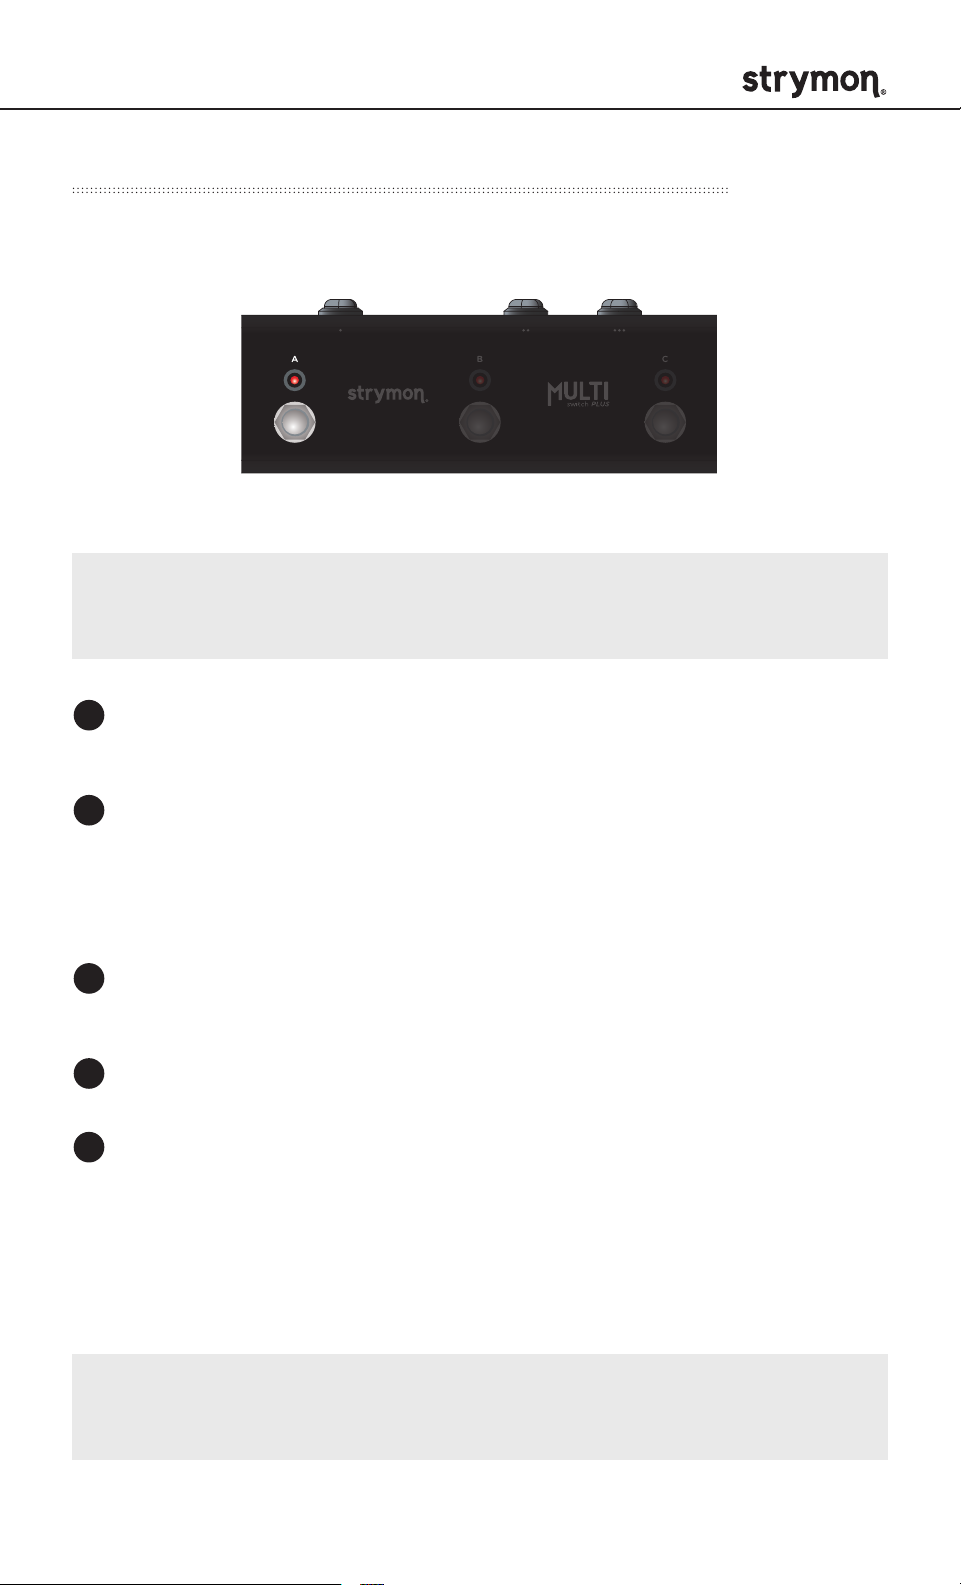
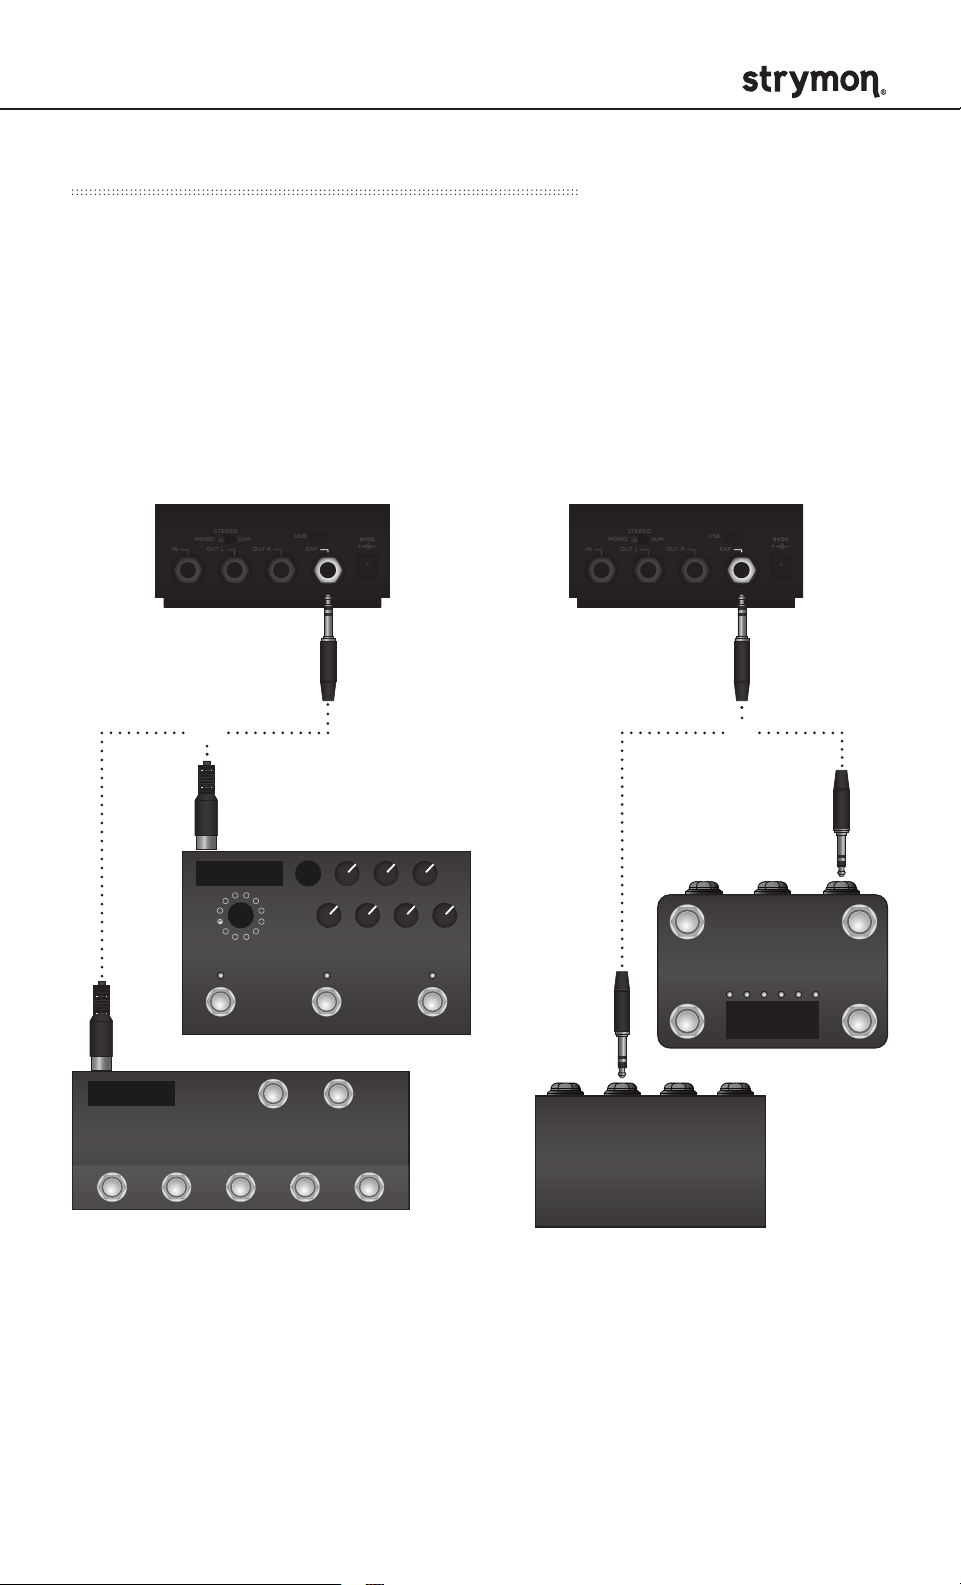
External Control - MultiSwitch Plus
Configure Iridium and MultiSwitch Plus for remote access to three
additional presets in addition to the onboard Favorite setting.
1
Disconnect USB from Iridium, if connected.
2
Disconnect power from Iridium and reconnect while holding down
both footswitches. Hold until both LEDs stop blinking.
3
Turn the DRIVE knob all the way counter-clockwise to set the MIDI
channel to Channel 1. The FAV LED should be GREEN.
4
Turn the LEVEL knob all the way counter-clockwise to set the MIDI
Out mode to On. The ON LED should be GREEN.
5
Press the ON or FAV footswitch to exit and store the MIDI channel
and the MIDI Output setting.
6
Configure the EXP jack for Digital mode.
7
Connect a TRS cable to the
EXP jack on Iridium.
8
Press and hold the A footswitch on MultiSwitch Plus while
(See page 14 for details.)
STEREO
MONO
IN OUT L OUT R EXP
SUM
USB
EXP
connecting the TRS cable to MultiSwitch Plus to select
Preset mode on MultiSwitch Plus.
pg 21
IRIDIUM - Amp & IR Cab
External Control - MultiSwitch Plus (cont.)
Selecting Iridium presets with MultiSwitch Plus:
Preset 1 Preset 2 Preset 3
NOTE: Footswitches 1, 2, and 3 on MultiSwitch Plus correspond to
MIDI program changes 1, 2, and 3.
1
Step on a switch that is not illuminated (or the onboard FAV) to
recall the relevant preset.
2
Step on an illuminated switch to revert to the current set of knob
positions.
Saving Iridium presets with MultiSwitch Plus:
1
Dial in the sound that you would like to save as your preset on
Iridium.
2
Press and hold the FAV footswitch until the FAV LED blinks BLUE.
Press the A, B, or C footswitch on MultiSwitch Plus to save the
3
desired preset location. Press the onboard FAV footswitch on
Iridium to save to the desired location.
NOTE: The onboard FAV footswitch preset on Iridium corresponds
to MIDI program change 0.
pg 22
IRIDIUM - Amp & IR Cab
Configuring Iridium to Use MIDI
Using MIDI unlocks a set of tools that can be used to load any of
Iridium’s 300 preset locations and automate knob changes using a
suitable MIDI controller or interface connected to Iridium’s EXP jack.
This requires a MIDI controller/interface with at least one quarter-inch
output or a Strymon MIDI EXP cable.
Check strymon.net/support/iridium for a list of compatible devices.
STEREO
MONO
IN OUT L OUT R EXP
USB
SUM
EXP
STEREO
MONO
IN OUT L OUT R EXP
SUM
MIDI EXP cable TRS cable
OR
MIDI Enabled Stompbox
MIDI Controller with
USB
EXP
OR
1/4” TRS Output
MIDI Controller with
5-pin MIDI Outputs
MIDI 1/4”
TRS Interface
pg 23

IRIDIUM - Amp & IR Cab
STEREO
MONO
IN OUT L OUT R EXP
SUM
USB
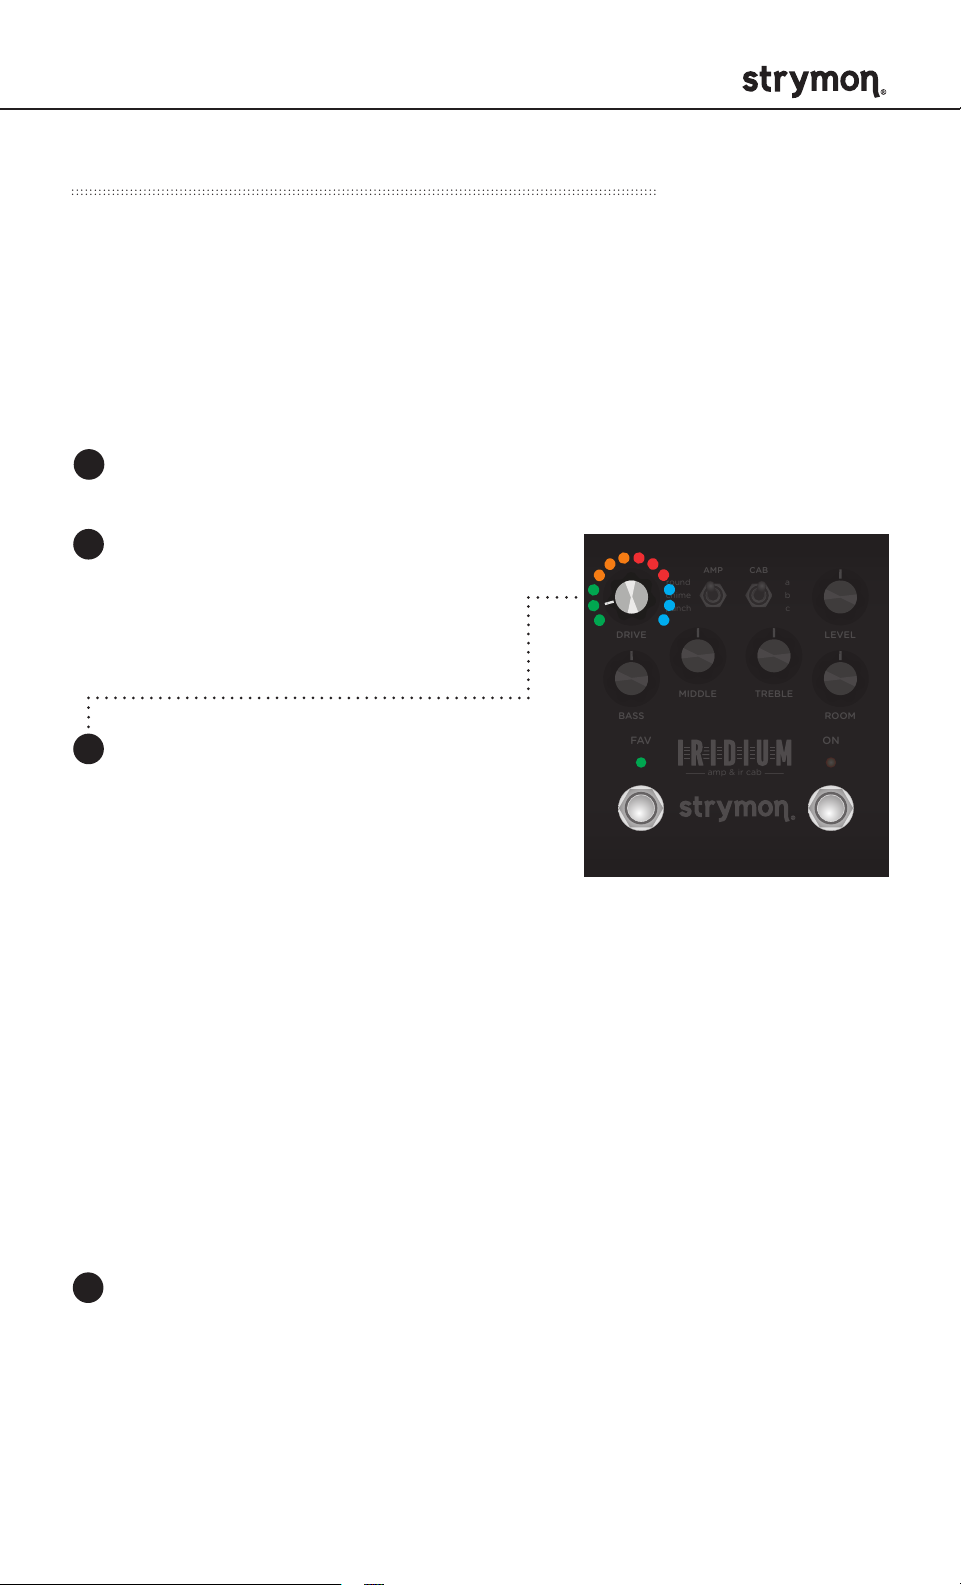
Configuring Iridium to Use MIDI (cont.)
Step 1 – Set EXP to Digital Mode
1
Press and hold the FAV
footswitch while connecting
power to the pedal. Once
both LEDs flash, release the
footswitch.
2
Turn the LEVEL knob until the ON
LED is BLUE.
DRIVE LEVEL
BASS
FAV ON
FAV
round
chime
punch
MIDDLE
amp & ir cab
CABAMP
TREBLE
a
b
c
LEVEL
ROOM
ON
3
Press the ON or FAV footswitch to
exit and store the EXP Jack setting.
NOTE: If you are only sending data to Iridium – the most common
configuration – the MIDI Output mode must be set to OFF.
(See page 23 for details on configuring the MIDI Output Mode.)
pg 24
IRIDIUM - Amp & IR Cab
STEREO
MONO
IN OUT L OUT R EXP
SUM
USB
Configuring Iridium to Use MIDI (cont.)
Step 2 – Set MIDI Channel
This determines which MIDI channel Iridium will use to send and
receive MIDI data. See the illustrated guide below for complete
instructions. To select channel 4-16, you will need to connect Iridium to
a MIDI device.
1
Disconnect USB from Iridium, if connected.
2
Press and hold both
CABAMP
TREBLE
a
b
c
ROOM
ON
footswitches while connecting
power to the pedal. Once
both LEDs flash, release the
footswitches.
3
Turn the DRIVE knob to set the MIDI
communication channel. FAV LED
round
chime
punch
DRIVE LEVEL
DRIVE
MIDDLE
BASS
FAV ON
FAV
amp & ir cab
indicates status.
Channel 1 - GREEN (default)
Channel 2 - AMBER Channel 2
Channel 3 - RED
Channel 4-16 - BLUE (Requires ¼” MIDI connection.) Once the LED
turns BLUE, it will blink until the pedal receives a MIDI Program
Change message. Once a message is received, the pedal will be
set to the MIDI channel that carried the message and the LED will
stop blinking.
4
Press the ON footswitch again to store the MIDI channel and begin.
pg 25

IRIDIUM - Amp & IR Cab
STEREO
MONO
IN OUT L OUT R EXP
SUM
USB
Configuring Iridium to Use MIDI (cont.)
Step 3 – Set MIDI Output Mode
This determines what kind of MIDI data is sent out by
that if you are only sending MIDI data to
Iridium – the most common
Iridium. Note
configuration – the MIDI Output mode must be set to OFF.
1
Disconnect USB from Iridium, if connected.
2
Press and hold both footswitches
while connecting power to the
pedal. Once both LEDs flash,
release the footswitches.
3
Turn the LEVEL knob to select
what kind of MIDI data is sent from
Iridium to other MIDI devices. Both
LEDs flash momentarily to indicate
status.
ON - GREEN
round
chime
punch
DRIVE LEVEL
MIDDLE
BASS
FAV ON
FAV
CABAMP
amp & ir cab
TREBLE
a
b
c
LEVEL
ROOM
ON
Using Iridium’s knobs and switches generates MIDI
messages that are sent out of Iridium. (Set to ON when using
MultiSwitch Plus.)
THROUGH - AMBER
Incoming MIDI messages are sent out of Iridium without any
additional MIDI messages generated by Iridium.
OFF - RED (default)
No MIDI messages are sent out of Iridium.
4
Press the ON or FAV footswitch again to set the MIDI output
channel and exit.
TIP: A simple way to check that communication is working is to send CC
#27 with a value of 127 when the FAV footswitch is off. This will turn the
FAV footswitch on if MIDI is properly connected and configured.
pg 26

IRIDIUM - Amp & IR Cab
STEREO
MONO
IN OUT L OUT R EXP
SUM
USB
MIDI Functionality - MIDI Expression On/Off
This setting selects whether Iridium will respond to incoming MIDI
Expression messages. If your rig uses MIDI Expression messages
with multiple pedals that are set to the same MIDI Channel, this
setting can be used to determine which pedal(s) will respond to
expression messages for a given preset.
1
Press and hold the ON footswitch
while connecting power to the
pedal. Once both LEDs flash,
release the footswitch.
round
chime
punch
DRIVE LEVEL
CABAMP
a
b
c
2
Turn the MIDDLE knob to select
whether Iridium will respond
to incoming MIDI Expression
messages (CC #100). ON LED
indicates status.
OFF - RED
Iridium will not respond to MIDI
Expression messages.
ON - BLUE (default)
Iridium will respond to MIDI
Expression messages.
3
Press the ON or FAV footswitch to
store the setting to Iridium.
MIDDLE
MIDDLE
BASS
FAV ON
TREBLE
amp & ir cab
ROOM
ON
NOTE: MIDI Expression setting is saved per preset.
pg 27

IRIDIUM - Amp & IR Cab
STEREO
MONO
IN OUT L OUT R EXP
SUM
USB
CABAMP
ROOM
TREBLE
BASS
DRIVE LEVEL
a
b
c
MIDDLE
round
chime
punch
MIDI Functionality - Saving Presets with MIDI
When in MIDI mode, the currently loaded settings can be saved to
any of Iridium’s 300 preset locations at any time.
1
To enter SAVE mode, press
and hold the FAV footswitch.
The LED will blink BLUE
to indicate that it is waiting
to receive a MIDI Program
Change message.
2
Send the unit a MIDI Program Change message from
FAV ON
FAV
amp & ir cab
ON
the connected MIDI device. The LED will flash and
Iridium will save the settings to that preset location.
OR
To save the preset to the currently loaded preset
location, press the FAV footswitch.
pg 28

IRIDIUM - Amp & IR Cab
MIDI Specifications
MIDI PROGRAM CHANGES
Iridium contains 300 preset locations, numbered sequentially from
0-299. Because MIDI Program Change messages have a maximum
number of 128 (0-127) the presets are grouped into three MIDI patch
banks.
MIDI BANK 0 = PRESETS 0-127
MIDI BANK 1 = PRESETS 128-255
MIDI BANK 2 = PRESETS 256-299
Iridium always powers up in MIDI Patch Bank 0, so if you plan to stay
within the first 127 presets, simply send a standard MIDI Program
Change message to load a preset.
If you will be using MIDI Banks 1 and/or 2, it is advisable to send a
standard MIDI Bank Change message (MIDI CC# 0 with a value equal
to the MIDI Bank#) before each MIDI Program Change.
Selecting bank 0, patch 127 will put Iridium into Manual mode. In this
mode, the pedal will be set to the current knob and switch settings. No
preset data can be stored at this preset location.
pg 29

IRIDIUM - Amp & IR Cab
MIDI Specifications (cont.)
MIDI CC NUMBERS
PARAMETERS
Bank Select
Volume Pedal
Level
Drive
Bass
Mid
Treble
Room Level
Room Size
Amp
Cab
CC#
0
7
12
13
14
15
16
17
18
19
20
RANGE
0-2
0-127
0-127
0-127
0-127
0-127
0-127
0-127
1-3
1-3
0-2
NOTES
(1=small, 2= medium,
3= large)
(1=small, 2= medium,
3= large)
(round a, b, c)
Footswitch Fav
Footswitch On
MIDI Expression Off/On
Expression Pedal
Bypass/On
20
20
27
28
60
100
102
3-5
6-8
0, 127
0, 127
0, 127
0-127
0, 127
(chime a, b, c)
(punch a, b, c)
(0=release, 1-127=press)
(0=release, 1-127=press)
(0=off, 1-127=on)
(0=bypass, 1-127=on)
pg 30

IRIDIUM - Amp & IR Cab
STEREO
MONO
IN OUT L OUT R EXP
SUM
USB
Factory Reset
Factory Reset restores Iridium to its factory default state by erasing
all custom IR cabs, stored presets, Power Up modes, expression pedal
assignments, and Live Edit parameters.
CABAMP
TREBLE
a
b
c
1
ROOM
ON
Press and hold the
ON footswitch while
connecting power to
the pedal. Once both
LEDs flash, release
the footswitch.
round
chime
punch
DRIVE LEVEL
MIDDLE
MIDDLE
BASS
FAV ON
amp & ir cab
2
Sweep the MIDDLE knob from 0% to 100% and back twice to
RESET. The status is shown on both LEDs:
Turn 1 - AMBER
Turn 2 - RED
Turn 3 - AMBER
Turn 4 - Both LEDs blink RED, pedal resets, and power cycles
NOTE: Performing a Factory Reset will erase all custom IRs
you have loaded into Iridium and replace them with the factory
default IRs.
pg 31

IRIDIUM - Amp & IR Cab
Features
• Three Matrix Modeled™ amps
with the sound, feel, and
response of classic tube amps
• Nine Impulse Response
speaker cabinets (three per
amp type) - 24bit / 96kHz
500ms Stereo, pre-loaded
with a curated set of IRs from
popular IR providers
• Hybrid IR/algorithmic Room
control with selectable small/
medium/large room sizes
• Simple, responsive amp-style
controls for Drive, Level, Bass,
Middle, and Treble
• Stereo Input (requires TRS
adapter cable) and Stereo
Output
• Selectable Input Level for
Instrument or Line Level input
sources
• Expression pedal input provides
seamless morphing between
knob positions (Expression
mode), or smooth pre/post
volume control with logarithmic
taper (Volume mode)
• USB jack for connecting to free
Strymon Impulse Manager
software to load and edit your
own speaker cabinet IRs
• Full featured MIDI accessible
via EXP Jack for remote
parameter control and access
to 300 preset locations
(requires Strymon MIDI EXP
cable or MIDI > TRS interface)
• Ability to globally bypass amps
and cabs independently
• Ultra-low noise, high
performance 24-bit 96kHz A/D
and D/A converters provide
uncompromising audio quality
• Premium stereo high
impedance discrete JFET
analog front end with up to
22dB of pure analog gain
• Discrete transistor headphone
amplifier with 1/8” output
• Dedicated footswitch to save
and recall a Favorite setting
• Compatible with Strymon
MultiSwitch Plus and
MiniSwitch for remote selection
of up to (3) three presets in
addition to the onboard Favorite
• Super high performance
SHARC DSP
• 32-bit floating point processing
• Designed and built in the USA
pg 32
IRIDIUM - Amp & IR Cab
Specifications
Input Impedance 1M Ohm
Output Impedance 100 Ohm
A/D & D/A 24-bit 96kHz
Max Input Level +8dBu
Frequency Response 20Hz to 20kHz
Signal to Noise 110dB typical
DSP performance 1585 MegaFLOPS
Bypass Switching buffered bypass
Dimensions 4.5” deep x 4” wide x 1.75” tall
(11.4 cm deep x 10.2 cm wide x 4.4 cm tall)
Power Adapter Requirements
Use an adapter with the following rating: 9VDC center negative;
500mA minimum.
pg 33

IRIDIUM - Amp & IR Cab
US Registered Trademarks
Fender®, Deluxe Reverb®, Blues Junior®, and Vibrolux® are registered trademarks
of Fender Musical Instruments Corporation. Vox
R&D Limited. Marshall
Mesa/Boogie
®
, Half-Back®, and Black Shadow® are registered trademarks of Mesa/
Boogie, Ltd. Celestion
®
Voice
is a registered trademark of Robert Bosch, GmbH. Jensen® is a registered
®
is a registered trademark of Marshall Amplification Plc.
®
is a registered trademark of Rola Celestion, Ltd. Electro-
trademark of Sica Altoparlanti S.R.L.
®
is a registered trademark of Vox
pg 34

IRIDIUM - Amp & IR Cab
Live Edit Functions and
Appendix 1
Power Up Modes
pg 35

IRIDIUM - Amp & IR Cab
Live Edit Functions Quick Reference
Below is a list that details how to access parameters that are
adjustable from Iridium’s interface but do not have dedicated
knobs or switches.
Press and Hold the ON footswitch until both LEDs start blinking
to enter Live Edit mode. Release the footswitch and use knobs as
described below.
Press ON or FAV to store your changes and exit Live Edit mode.
ROOM SIZE
(See page 13 for an
illustrated description.)
MIDI EXPRESSION
ON/OFF
(See page 27 for an
illustrated description.)
LEVEL TRIM
(See page 14 for an
illustrated description.)
Turn ROOM knob - status shown on ON LED
Small = GREEN
Medium = AMBER
Large = RED
Turn MIDDLE knob - status shown on BOTH
LEDs
Off = RED
On = BLUE
Turn LEVEL knob - status shown on FAV LED
-10 dB = GREEN
0 dB = RED
+3 dB = AMBER
pg 36

IRIDIUM - Amp & IR Cab
Power Up Modes Quick Reference
Power Up functions persist through power cycles. Return all
function defaults with factory reset.
Press and Hold the ON footswitch while connecting power to Iridium
until both LEDs start blinking to enter Power Up mode. Release the
footswitch and use knobs as described below.
Press ON or FAV to store your changes and exit.
OUTPUT MODE
(See page 15 for an
illustrated description.)
Turn DRIVE knob - status shown on FAV LED
Amp Bypass = GREEN
Cab Bypass = AMBER
Normal = RED
FACTORY RESET
(See page 31 for an
illustrated description.)
Turn MIDDLE knob - status shown on BOTH
LEDs. Turn the MIDDLE knob from 0-100%
and back two (2) times.
Press and Hold the FAV footswitch while connecting power to Iridium
until both LEDs start blinking to enter Power Up mode. Release the
footswitch and use knobs as described below.
Press FAV again to store your changes and exit.
INPUT LEVEL
(See page 16 for an
illustrated description.)
Turn DRIVE knob - status shown on FAV LED
Instrument = GREEN
Line = RED
EXP JACK MODE
(See page 17 for an
illustrated description.)
Turn LEVEL knob - status shown on ON LED
Expression - GREEN
Volume PRE - AMBER
Volume POST - RED
Digital - BLUE
External Favorite - PURPLE
pg 37

IRIDIUM - Amp & IR Cab
MIDI Power Up Settings Quick Reference
Below is a list that details how to access all Power Up parameters
that are adjustable from Iridium’s interface and do not have
dedicated knobs or switches. Power Up functions persist through
power cycles. Return all function defaults with factory reset.
Disconnect USB from Iridium, if connected. Press and Hold the FAV
and ON footswitch while connecting power to Iridium until both LEDs
start blinking to enter Live Edit mode. Release the footswitches and
use knobs as described below.
Press FAV again to store your changes and exit.
MIDI CHANNEL
(See page 25 for an
illustrated description.)
MIDI OUTPUT MODE
(See page 26 for an
illustrated description.)
Turn DRIVE knob - status shown on FAV LED
1 - GREEN
2 - AMBER
3 - RED
4-16 - BLUE
Turn LEVEL knob - status shown on ON LED
On = GREEN
Through = AMBER
Off = RED
pg 38

IRIDIUM - Amp & IR Cab
IR Cab Details
Appendix 2
pg 39
IRIDIUM - Amp & IR Cab
Cab File Details - round
Iridium’s curated cabinet IRs are based on* the following:
round - a
Name:
Cab:
Speaker:
Provided by:
File Name:
round - b
Name:
Cab:
Speaker:
Provided by:
File Name:
112 DVRB (stereo)
®
1x12 Fender
Deluxe Reverb
Fender® CTS ceramic
OwnHammer
OH 112 DVRB CTS.wav
112 FE-Junior (mono)
1x12 Fender
®
Blues Junior
Jensen® C12N
cabIR.eu
JUNIOR_FOCUS_CAB.wav
®
®
round - c
Name:
Cab:
Speaker:
Provided by:
File Name:
*All product names are trademarks of their respective owners, which are in no way associated or
affiliated with Strymon. These product names, descriptions and images are provided for the sole
purpose of identifying the specific products that were studied during Strymon’s sound design process.
See page 34 for a list of U.S. registered trademarks.
212 FE-VLUX65 (stereo)
®
2x10 Fender
Jensen
®
Vibrolux®
C10NS
cabIR.eu
VLUX65-M-Re1-15-Re2-15.wav
pg 40

IRIDIUM - Amp & IR Cab
Cab File Details - chime
Iridium’s curated cabinet IRs are based on* the following:
chime - a
Name:
Cab:
Speaker:
Provided by:
File Name:
chime - b
Name:
Cab:
Speaker:
Provided by:
File Name:
212 V30 Blue (stereo)
®
2x12 Vox
Celestion
AC30/6 open back fawn
®
T0530 Blue AlNiCo
OwnHammer
OH 212 VC30 BLU-12C CLASC-06.wav
112 Blue Closed (mono)
1x12 custom closed back
Celestion
Celestion
®
Blue AlNiCo
®
Cel Blue 112 C Hi-Gn 421+57 Celestion.wav
chime - c
Name:
Cab:
Speaker:
Provided by:
File Name:
*All product names are trademarks of their respective owners, which are in no way associated or
affiliated with Strymon. These product names, descriptions and images are provided for the sole
purpose of identifying the specific products that were studied during Strymon’s sound design process.
See page 34 for a list of U.S. registered trademarks.
412 V2-MHB (mono)
4x12 Mesa/Boogie
®
Half-Back
®
Celestion® Black Shadow® MC-90 + Electro-Voice®
®
Black Shadow
EVM12-L
Valhallir.at
V2-MHB412-d-e906-C5.wav
pg 41

IRIDIUM - Amp & IR Cab
Cab File Details - punch
Iridium’s curated cabinet IRs are based on* the following:
punch - a
Name:
Cab:
Speaker:
Provided by:
File Name:
punch - b
Name:
Cab:
Speaker:
Provided by:
File Name:
412 MRBW GNR (stereo)
4x12 Marshall
®
Celestion® T1221 G12M-25
OwnHammer
OH 412 MRBW M75-GNR BROWN-00.wav
212 V30 Open (mono)
2x12 custom open back
Celestion
Celestion
®
Vintage 30
®
V30 212 O R-121 Dark2 Celestion.wav
punch - c
Name:
Cab:
Speaker:
Provided by:
File Name:
*All product names are trademarks of their respective owners, which are in no way associated or
affiliated with Strymon. These product names, descriptions and images are provided for the sole
purpose of identifying the specific products that were studied during Strymon’s sound design process.
See page 34 for a list of U.S. registered trademarks.
Punch C: 812 PETE (mono)
8x12 Marshall
®
Celestion® T652 AlNiCo
cabIR.eu
PETE_CAB_M01_MULTI_I.wav
pg 42

IRIDIUM - Amp & IR Cab
Audio Routing
Appendix 3
pg 43

IRIDIUM - Amp & IR Cab
IN L
OUT L
OUT R
BUFFER
MONO BYPASSED
LEFT IN
SUMMING
BLOCK
LEFT IN
LEFT IN
RIGHT IN
LEFT IN
RIGHT IN
LEFT IR
RIGHT IR
LEFT IN
RIGHT IN
LEFT IN
RIGHT IN
SUMMING
BLOCK
STEREO INPUT
STEREO INPUT
MONO INPUT
LEFT OUT RIGHT OUT
LEFT IN LEFT OUT
RIGHT OUT
LEFT OUT
SLEEVE
RING (R)
TIP (L)
MONO
MONO BYPASSED
STEREO BYPASS
STEREO
INPUT OUTPUT
SUM BYPASS
SUM
LEFT 1/4” INPUT
RIGHT 1/4” INPUT
SLEEVE TIP
Audio Routing - MONO Input
Mono signal (e.g. a guitar or pedal) connected to IN. Stereo Output
appears at OUT L and OUT R.
LEFT REVERB
IN L
LEFT AMP LEFT IR
RIGHT AMP RIGHT IR
RIGHT REVERB
STEREO
MONO
MONO
IN OUT L OUT R EXP
IN OUT L OUT R
SUM
ROOM KNOB
ROOM KNOB
USB
OUT L
OUT R
MONO BYPASS
pg 44

IRIDIUM - Amp & IR Cab
LEFT IN
SUMMING
BLOCK
LEFT IN
LEFT IN
RIGHT IN
LEFT IR
RIGHT IR
LEFT IN
RIGHT IN
LEFT IN
RIGHT IN
SUMMING
BLOCK
STEREO INPUT
STEREO INPUT
LEFT OUT RIGHT OUT
LEFT IN LEFT OUT
RIGHT OUT
LEFT OUT
SLEEVE
RING (R)
TIP (L)
MONO
MONO BYPASSED
STEREO BYPASS
STEREO
INPUT OUTPUT
SUM
LEFT 1/4” INPUT
RIGHT 1/4” INPUT
LEFT IN
IN L
IN R
OUT L
OUT R
BUFFERED BYPASS
BUFFERED BYPASS
LEFT OUT
RIGHT OUT
DSP PASS
THROUGH
MONO BYPASSED
STEREO BYPASS
Audio Routing - STEREO Input
Stereo signal is connected to IN via a TRS cable. Stereo output appears
at OUT L and OUT R.
STEREO
STEREO
MONO
IN OUT L OUT R EXP
IN OUT L OUT R
SUM
USB
ROOM KNOB
LEFT REVERB
IN L
IN R
STEREO BYPASS
LEFT AMP LEFT IR
RIGHT AMP RIGHT IR
RIGHT REVERB
ROOM KNOB
OUT L
OUT R
pg 45

IRIDIUM - Amp & IR Cab
LEFT IN
IN L
IN R
OUT L
LEFT IN
RIGHT IN
LEFT OUT
RIGHT OUT
DSP PASS THROUGH
DSP PASS THROUGH
LEFT OUT
RIGHT OUT
DSP PASS
THROUGH
LEFT IN
RIGHT IN
SUMMING
BLOCK
LEFT AMP
RIGHT AMP
LEFT IR
RIGHT IR
STEREO
REVERB
STEREO BYPASS
SUM BYPASS
SUM
BUFFERED BYPASS
LEFT IN
SUMMING
BLOCK
LEFT IN
LEFT IN
RIGHT IN
LEFT IR
RIGHT IR
LEFT IN
RIGHT IN
LEFT IN
RIGHT IN
SUMMING
BLOCK
STEREO INPUT
STEREO INPUT
LEFT OUT RIGHT OUT
LEFT IN LEFT OUT
RIGHT OUT
LEFT OUT
SLEEVE
RING (R)
TIP (L)
MONO
MONO BYPASSED
STEREO BYPASS
STEREO
INPUT OUTPUT
SUM
LEFT 1/4” INPUT
RIGHT 1/4” INPUT
Audio Routing - SUM Input (Stereo In - Mono Out)
Stereo signal is connected to IN via TRS cable. The stereo signal is
summed to mono, and mono output appears at OUT L.
IN R
LEFT AMP LEFT IR
STEREO
MONO
IN OUT L OUT R EXP
IN OUT L
LEFT REVERB
SUM
SUM
ROOM KNOB
USB
OUT LIN L
SUM BYPASS
pg 46

IRIDIUM - Amp & IR Cab
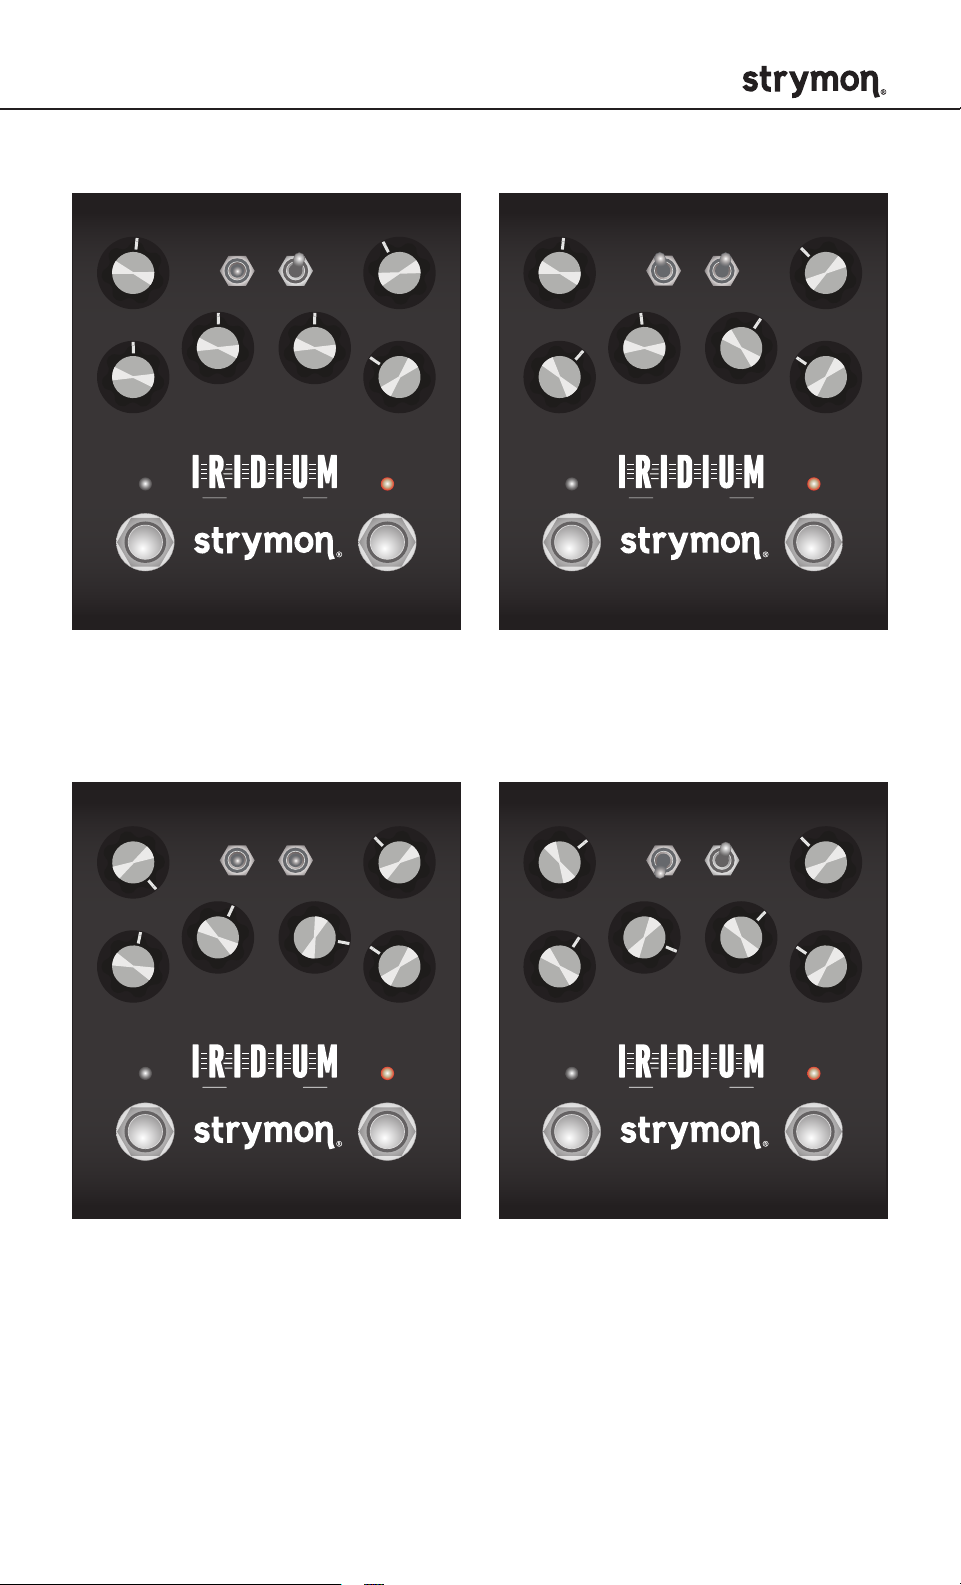
Sample Settings
Appendix 4
pg 47
IRIDIUM - Amp & IR Cab
STEREO
MONO
IN OUT L OUT R EXP
SUM
USB
STEREO
MONO
IN OUT L OUT R EXP
SUM
USB
STEREO
MONO
IN OUT L OUT R EXP
SUM
USB
STEREO
MONO
IN OUT L OUT R EXP
SUM
USB
CABAMP
round
chime
punch
DRIVE LEVEL
MIDDLE
BASS
a
b
c
TREBLE
ROOM
FAV ON
amp & ir cab
CLEAN JANGLE
Room Size: Small
(onboard Favorite setting)
CABAMP
round
chime
punch
DRIVE LEVEL
MIDDLE
BASS
a
b
c
TREBLE
ROOM
FAV ON
amp & ir cab
CLASSIC CLEAN
Room Size: Medium
round
chime
punch
DRIVE LEVEL
MIDDLE
BASS
FAV ON
amp & ir cab
CROWN JEWEL
Room Size: Medium
CABAMP
TREBLE
CABAMP
a
b
c
DRIVE LEVEL
ROOM
BASS
round
chime
punch
MIDDLE
a
b
c
TREBLE
ROOM
FAV ON
amp & ir cab
PUNCHED UP
Room Size: Large
pg 48

IRIDIUM - Amp & IR Cab
Strymon Non-Transferrable Limited Warranty
Warranty
Strymon warranties the product to be free from defects in material and
workmanship for a period of two (2) years from the original date of purchase
when bought new from an authorized dealer in the United States of America
or Canada. If the product fails within the warranty period, Strymon will repair
or, at our discretion, replace the product at no cost to the original purchaser.
Please contact your dealer for information on warranty and service outside
of the USA and Canada.
Exclusions
This warranty covers defects in manufacturing discovered while using this
product as recommended by Strymon. This warranty does not cover loss or
theft, nor does the coverage extend to damage caused by misuse, abuse,
unauthorized modification, improper storage, lightning, or natural disasters.
Limits of Liability
In the case of malfunction, the purchaser’s sole recourse shall be repair or
replacement, as described in the preceding paragraphs. Strymon will not
be held liable to any party for damages that result from the failure of this
product. Damages excluded include, but are not limited to, the following:
lost profits, lost savings, damage to other equipment, and incidental or
consequential damages arising from the use, or inability to use this product.
In no event will Strymon be liable for more than the amount of the purchase
price, not to exceed the current retail price of the product. Strymon disclaims
any other warranties, expressed or implied. By using the product, the user
accepts all terms herein.
How to Obtain Service Under this Warranty
For North American customers: Contact Strymon through our website at
strymon.net/support for Return Authorization and information. Proof of
original ownership may be required in the form of a purchase receipt.
For International Customers: Contact the Strymon dealer from which the
product was purchased from in order to arrange warranty repair service.
Strymon
REV A - 10.17.2019
®
is a division of Damage Control Engineering®, LLC.
pg 49
 Loading...