

Page 1

QUICK START GUIDE
Page 2
WELCOME TO CONDUIT
GETTING STARTED
Conduit is a premium, easily configurable,
ultra-reliable MIDI interface that will work
with most 1/4" MIDI equipped effects pedals.
It also offers the best USB computer
connection available for TRS MIDI pedals.
SMART MIDI DISTRIBUTION
Each of Conduit’s four bi-directional 1/4" TRS jacks are
independently configurable to work with a variety of 1/4" MIDI
communication modes. Enjoy easy configuration with no DIP
switches, custom cables, or screwdriver required. Built-in ground
isolation ensures the quiet operation you expect from Strymon.
Link multiple Conduits to control additional 1/4" MIDI pedals.
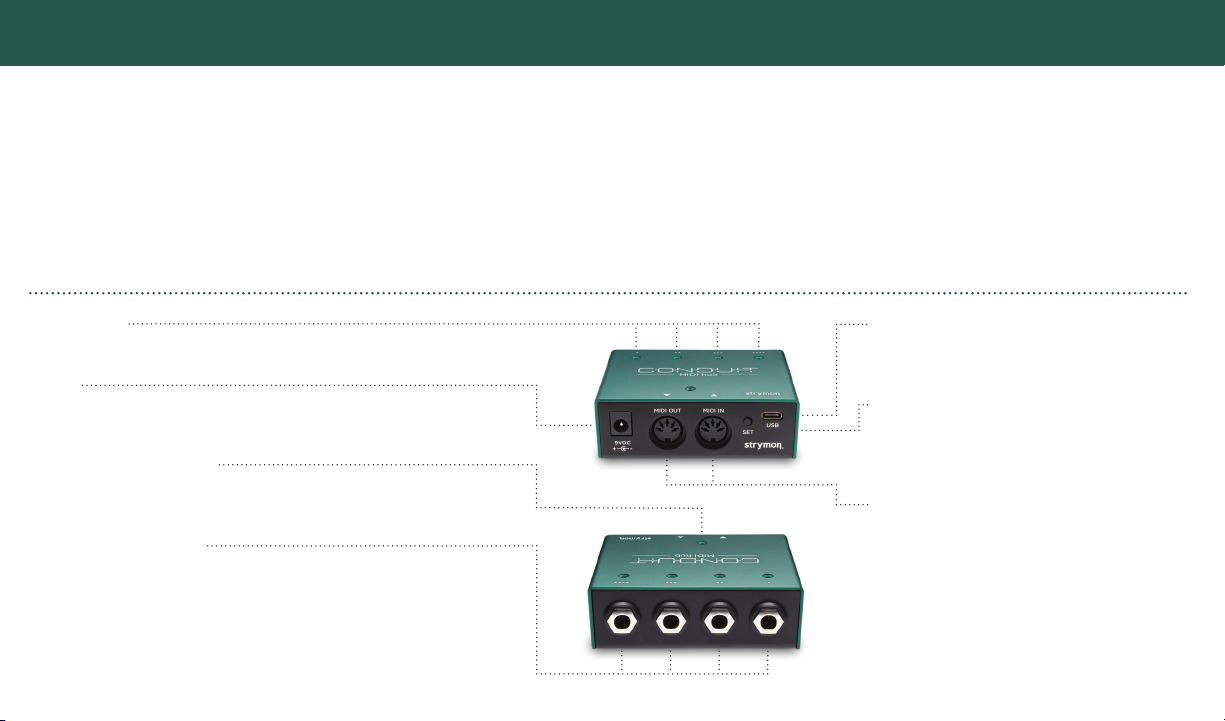
CONTROLS AND CONNECTIONS
ACTIVITY LEDs
Activity LEDs will blink GREEN when MIDI information is present at a 1/4" jack.
POWER
Use an adapter with the following rating: 9VDC center negative, 50mA
minimum. Power supply is not required when connected via USB.
STATUS LED for 5-pin DIN I/O
Status LED lights up GREEN to indicate Conduit is powered on and will
flash AMBER when MIDI data is passing through Conduit to the 1/4" jacks.
1/4" TRS MIDI I/O Jacks 1-4
Out of the box, Conduit’s 1/4" TRS MIDI jacks are configured to work with
Strymon pedals, with no further setup necessary. Each jack is capable
of sending and receiving MIDI data, and can be configured to work with a
variety of different 1/4" MIDI communication modes. You can find out which
configuration will work with your specific pedals by visiting strymon.net/
support/conduit.
USB INTERFACE FOR YOUR PEDALS
Send MIDI control change messages from a sequencer to
perfectly sync pedal parameter changes, automate pedal
preset changes, load and save presets, or send SysEx
messages—all from your computer.
USBC
Used for computer connectivity. See the Using
Conduit with a Computer section.
SET BUTTON
Used for TRS MIDI I/O Jack configuration.
The SET button can be pressed at any time to
show configuration state of 1/4" TRS jacks.
DIN MIDI I/O Jacks
MIDI IN receives MIDI data from an external MIDI
controller and sends the data to all four 1/4" jacks.
All MIDI data sent back from 1/4" TRS connected
pedals is merged and sent to the MIDI OUT.
When USB is connected, MIDI data received at the
1/4" jacks from the connected pedals is no longer
merged to the MIDI OUT port, but is instead sent to
the connected computer via it’s own MIDI port.
Page 3

MIDI CONTROLLER
CONNECTING YOUR 1/4" MIDI DEVICES TO CONDUIT
Connect a power supply (not included) that provides 9V DC
1
center-negative power and at least 50mA of current to the 2.1mm
9VDC power input.
When Conduit powers up, the LEDs will light up to show that
2
the device is powered. The color of the four 1/4" OUTPUT LEDs
will show the current I/O configuration. The factory default I/O
configuration for all four 1/4" TRS jacks is NORMAL mode (GREEN
- Tip send). This is the configuration used by Strymon pedals.
Go to strymon.net/support/conduit for details on changing the
output configuration for non-Strymon pedals.
Connect a 5-pin DIN MIDI cable from the MIDI OUT port of your
3
MIDI controller or MIDI interface into the MIDI IN port on Conduit.
Connect one of the included 1/4" TRS cables to one of the 1/4" I/O
4
jacks on Conduit. Connect the other end to the 1/4" MIDI control
input on your pedal. On compatible Strymon pedals, connect to the
EXP or MIDI jack set to MIDI mode.*
TRS 1/4” CABLE
5PIN DIN MIDI CABLE
Set the MIDI Channel that your pedal will be communicating on.
5
The default MIDI Channel on Strymon pedals is Channel 1.*
Set the MIDI OUT mode on the pedal. If you are only sending
6
MIDI data to the pedal without sending anything back out from
the pedal, set the MIDI OUT of the pedal mode to OFF.
If you would like to echo the MIDI data received from the
pedals connected to the 1/4" jacks, set the MIDI OUT mode to
THROUGH.*
Sending MIDI messages from your MIDI controller or interface
to Conduit will now distribute these messages to devices
connected to the 1/4" TRS jacks and 5 pin DIN MIDI OUT port.
All MIDI data received at the 1/4" jacks from the pedals are
merged and sent to the 5 pin DIN MIDI port.
* Go to strymon.net/support/conduit for more details on configuring your
Strymon pedals to communicate via MIDI. For third party 1/4" MIDI
capable pedals, please see the user manual for the device.
Page 4

ADDITIONAL INFORMATION
USING CONDUIT WITH A COMPUTER
When USB is connected, the computer will recognize 6 MIDI I/O ports.
• Conduit MIDI Ports 1-4 correspond with the 1/4" TRS jacks numbered 1-4.
• Conduit MIDI Port 5 corresponds with the 5-DIN MIDI IN/MIDI OUT ports.
• Conduit MIDI Port 6 will appear as a background USB communication port.
MIDI PORTS
• Conduit (PORT 1)
• Conduit (PORT 2)
• Conduit (PORT 3)
• Conduit (PORT 4)
• Conduit (PORT 5)
• Conduit (PORT 6)
Port 6 is a background
communication port
used for updating
Conduit’s firmware.
The diagram above shows how the MIDI ports corresponding to each of the
devices connected to Conduit will show up in your computer/DAW.
FEATURES
• One opto-isolated 5-pin DIN MIDI interface (IN and OUT ports)
• Four 1/4" TRS bi-directional MIDI ports
• Five MIDI status indicator LEDs
• One USB Type-C to USB-A Male cable
• Lightweight, compact anodized aluminum chassis with threaded
mounting hardware
WHAT’S IN THE BOX
• Conduit MIDI hub
• Four (4) 18" right-angle to
straight TRS cables
• One USB Type-C to USB-A
Male cable
• Drill Template
• Two (2) mounting screws
• Four (4) rubber feet
• Quick Start Guide
• Strymon sticker
Page 5

CONDUIT MOUNTING INSTRUCTIONS
Conduit features built-in threaded hardware for easy mounting on the top
or bottom of most pedalboards.
CHOOSE YOUR MOUNTING LOCATION
1
Tape the Drill Template (included in this box)
logo side up in the location you want to install
your Conduit.
This illustration shows mounting on the top of
your pedalboard.
DRILL TEMPLATE
HOLE LOCATIONS
#4 SCREWS
DRILL HOLES
2
Drill through the two marked hole locations with
a 1/8" (3mm) bit.
ATTACH CONDUIT
3
Place Conduit over the holes. Install from
the reverse side of your pedalboard using the
provided #4-40 screws (3/8").
>> Have any questions? strymon.net/support/conduit <<
Page 6

strymon.net
REV A
 Loading...