

Page 1
MAINTENANCE MANUAL
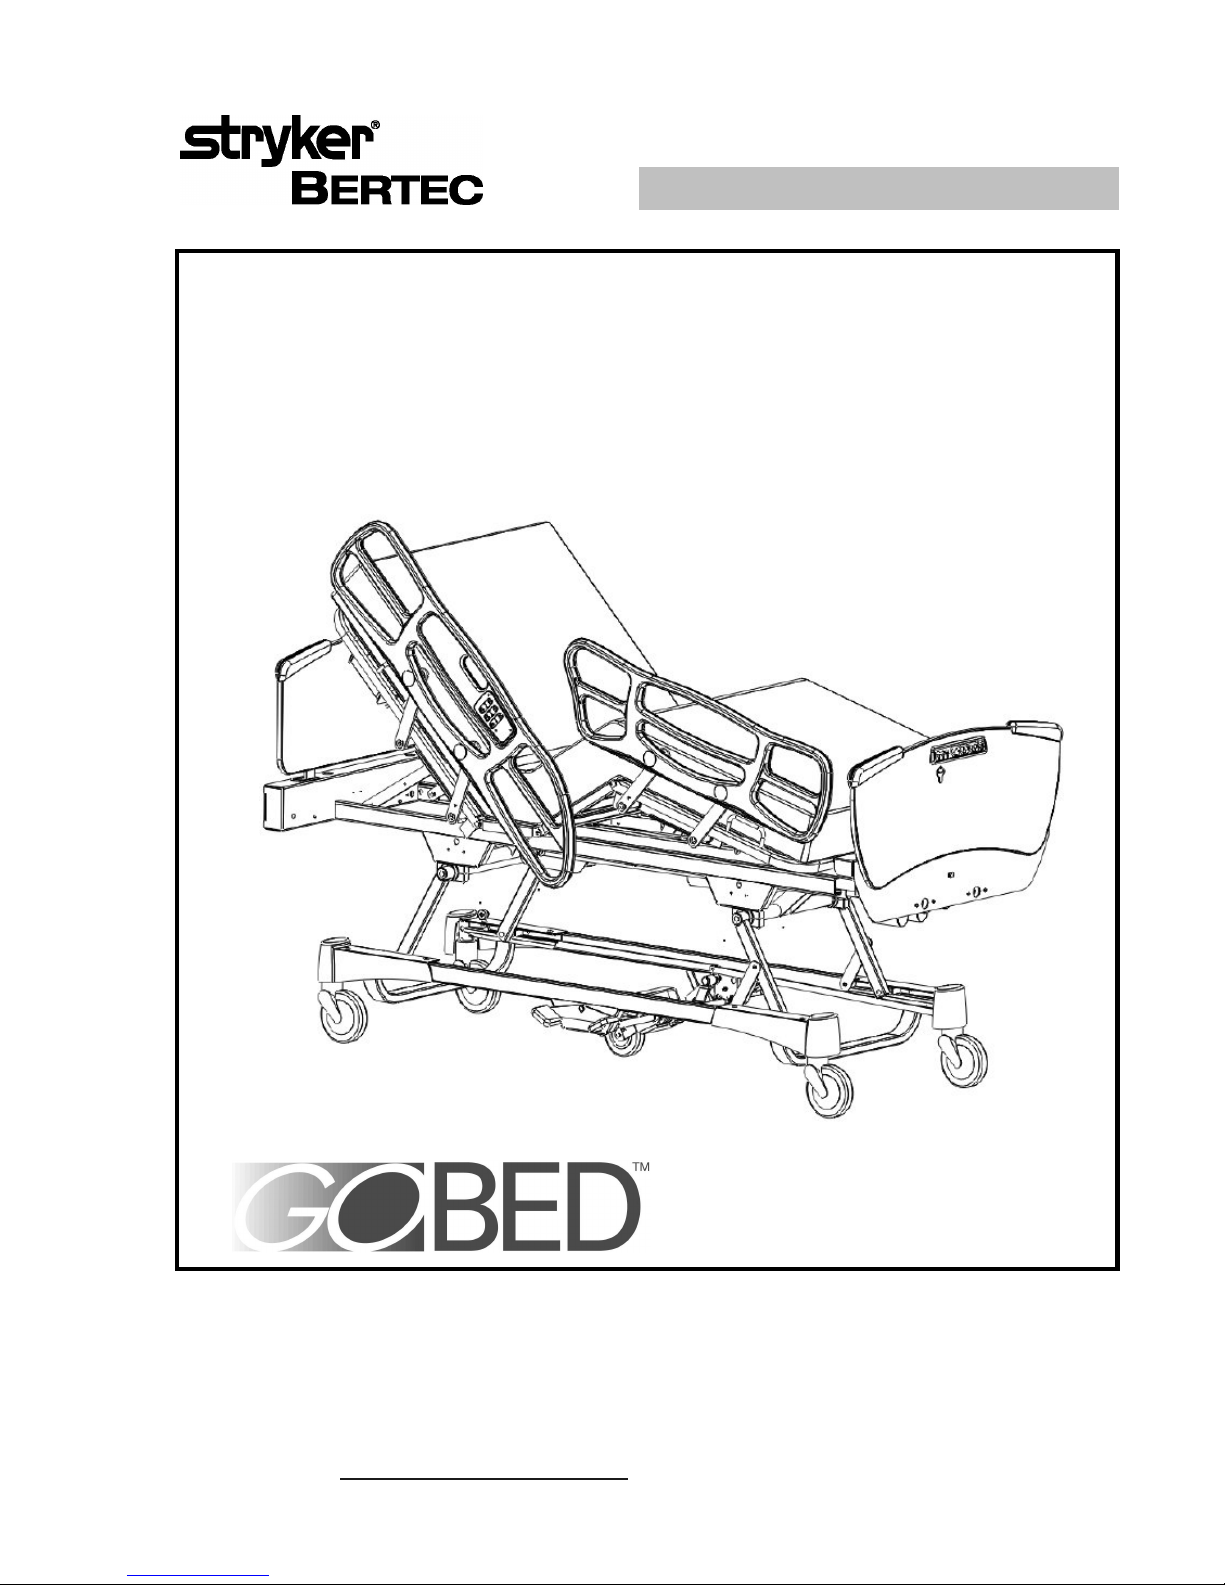
The GO BED
TM
ELECTRIC ACUTE CARE BED
Product Number: FL17E
Product Number for the United States: 2500
TECHNICAL ASSISTANCE AND PARTS
1 800 428-5025 (Service in English in Canada)
1 800 361-2040 (Service in French in Canada)
1 800 327-0770 (In United States)
E-mail (Canada): service@bertec.strykercorp.com
Manufactured by Stryker Bertec Medical Inc 72-0173 R1.0
Printed in Canada
December 2000
Page 2

Page 3

TABLE OF CONTENTS
1. INTRODUCTION.......................................................................................................................................5
1.1 BED SPECIFICATIONS ..................................................................................................................5
1.2 TECHNICAL SUPPORT..................................................................................................................5
1.3 SAFETY...........................................................................................................................................6
Warning / Caution / Note Definition ................................................................................................6
Safety Tips and Guidelines.............................................................................................................6
Static Discharge Precautions..........................................................................................................8
1.4 WARRANTY....................................................................................................................................8
Limited Warranty.............................................................................................................................8
To Obtain Service and/or Parts ......................................................................................................8
To Require Service ......................................................................................................................8
To Order Parts..............................................................................................................................9
Return Authorization.....................................................................................................................10
Damaged Merchandise.................................................................................................................10
1.5 SET-UP PROCEDURE ..................................................................................................................10
Checklist .......................................................................................................................................10
1.6 BED ILLUSTRATION.....................................................................................................................12
2. PREVENTIVE MAINTENANCE..............................................................................................................13
2.1 BED CLEANING AND MATTRESS CARE....................................................................................13
Cleaning Beds...............................................................................................................................13
Bed Mattress Care........................................................................................................................13
2.2 LUBRICATION...............................................................................................................................14
Annual Checklist...........................................................................................................................14
Two Years Time Interval Checklist...............................................................................................14
Five Years Time Interval Checklist...............................................................................................14
Lubrication Points Illustrated.........................................................................................................15
2.3 PREVENTIVE MAINTENANCE PROGRAM.................................................................................16
Checklist .......................................................................................................................................16
PC Board Maintenance Program..................................................................................................17
Recommended Spare Parts .........................................................................................................18
3. TROUBLESHOOTING............................................................................................................................19
3.1 TROUBLESHOOTING GUIDE ......................................................................................................19
4. MAINTENANCE PROCEDURES...........................................................................................................24
4.1 SIDE-RAIL ASSEMBLY REPLACEMENT.....................................................................................24
Foot Side-Rail Assembly Replacement........................................................................................24
Head Side-Rail Assembly Replacement.......................................................................................25
4.2 SIDE-RAIL REPLACEMENT (RAIL ONLY)...................................................................................27
Foot Side-Rail Replacement (Rail Only).......................................................................................27
Head Side-Rail Replacement (Rail Only) .....................................................................................27
4.3 MEMBRANE REPLACEMENT (FOOT BOARD CONTROL PANEL)...........................................28
4.4 MEMBRANE REPLACEMENT ( SIDE-RAIL CONTROL).............................................................29
4.5 NURSE CALL SYSTEM COMPONENT REPLACEMENT............................................................30
4.6 FOOT BOARD CONNECTOR REPLACEMENT...........................................................................32
4.7 FOOT END CASE CONNECTOR REPLACEMENT.....................................................................33
4.8 PC BOARD REPLACEMENT........................................................................................................34
4.9 ON/OFF SWITCH REPLACEMENT..............................................................................................35
Page 4

4.10 BED POWER CORD REPLACEMENT.........................................................................................35
4.11 NIGHT LIGHT SYSTEM COMPONENT REPLACEMENT............................................................36
4.12 120V AUXILIARY OUTLET COMPONENT REPLACEMENT.......................................................38
4.13 MATTRESS SUPPORT SECTION REPLACEMENT....................................................................39
Foot Section Replacement ...........................................................................................................39
Thigh Section Replacement..........................................................................................................40
Center Section Replacement........................................................................................................41
Head Section Replacement..........................................................................................................42
Bed without Optional CPR .........................................................................................................42
Bed with Optional CPR ..............................................................................................................43
4.14 ACTUATOR REPLACEMENT.......................................................................................................45
Knee Gatch Actuator Replacement..............................................................................................46
Head Actuator Replacement.........................................................................................................47
Hi-Lo Actuator Replacement.........................................................................................................48
4.15 ACTUATOR SCREW LUBRICATION PROCEDURE ...................................................................49
Head and Knee Gatch Actuator Screws.......................................................................................49
Head Actuator Screw Guide.........................................................................................................49
Hi-Lo Actuator Screws..................................................................................................................50
4.16 CPR MECHANISM SPRINGS AND/OR DAMPER REPLACEMENT...........................................51
4.17 CPR MICRO SWITCH REPLACEMENT.......................................................................................52
Micro Switch Located Under the Head Section............................................................................52
Micro Switch Located Under the Mattress Support......................................................................53
4.18 AUTO CONTOUR MICRO SWITCH REPLACEMENT.................................................................54
Knee Gatch Micro Switch .............................................................................................................54
Head Section Micro Switch...........................................................................................................54
4.19 BRAKE /STEER PEDAL REPLACEMENT....................................................................................55
4.20 5TH WHEEL MECHANISM COMPONENT REPLACEMENT.......................................................56
5th Wheel Replacement ...............................................................................................................56
5th Wheel Activation Lever Replacement.....................................................................................56
5th Wheel Swing Arm Assembly Replacement............................................................................57
4.21 CASTER REPLACEMENT ............................................................................................................59
4.22 HI-LO LEVER REPLACEMENT ....................................................................................................61
APPENDIX A: CONNECTION DIAGRAM .................................................................................................63
APPENDIX B: BED POSITIONS FOR MAINTENANCE PURPOSE.........................................................64
E
NNOOTTE
Stryker Bertec gives special attention to the quality of the information found in this document. Any
comments on its content will be most welcomed. Please forward your remarks to our Technical Service
department (see section 1.2).
Page 5

Introduction Chapter 1
1. INTRODUCTION
This maintenance manual is designed to assist you with the servicing of the GO BED. Before
servicing the bed, it is important to read and understand all information in this manual. Qualified
maintenance personnel should be able to refer to this manual at all time when servicing the bed.
An operations manual, included in the Customer's Guide, is also available to assist you with the
operation of the bed.
This maintenance manual is an integral part of the unit and should be turned over to the new
user should the bed be sold or transferred.
1.1 BED SPECIFICATIONS *
Maximum Weight Capacity 500 lb including 100 lb of boards and
accessories
227 kg including 45.5 kg of boards and
accessories
Overall Bed Length/Width - Steel Side-rails
Overall Bed Length/Width - Plastic side-rails
93" x 41 9/16" (steel side-rails up)
93" x 38 3/8" (steel side-rails down)
236.2 cm x 105.5 cm (steel side-rails up)
236.2 cm x 97.5 cm (steel side-rails down)
93" x 42 9/16" (plastic side-rails up)
93" x 38 3/4" (plastic side-rails down)
236.2 cm x 108.1 cm (plastic side-rails up)
236.2 x 98.4 cm (plastic side-rails down)
Overall Weight (w/o boards and accessories) 385 lb - 175 kg
Patient Sleeping Surface 35" x 80" extendable to 82" and 84"
89 cm x 203 cm extendable to 208 cm and
213 cm
Minimum/Maximum Bed Height 14" to 29" - 35.5 cm to 74.7 cm
Sound Level
< 58 dBa
Fowler Angle 0° to 65°
Knee Gatch w/o Contour Positioning
Knee Gatch w/Contour Positioning
0° to 32°
0° to 24°
Trendelenburg/Reverse Trendelenburg -14° to +14°
Electrical Requirements - All electrical
requirements meet the CSA standard C22.2 No
125 and UL 544 specifications for Class 2G
100 VAC, 50-60 Hz, 7.5 A
120 VAC, 50-60 Hz, 9.8 A w/o outlet
120 VAC, 50-60 Hz, 14.8 A w/outlet
200 VAC, 50-60 Hz, 3.2 A
220 VAC, 50-60 Hz, 2.9 A
240 VAC, 50-60 Hz, 2.7 A
* Stryker Bertec Medical affords special attention to product improvement and reserve the right to change
specifications without notice.
1.2 TECHNICAL SUPPORT
For questions regarding this product, contact one the following Technical Service department or
your local representative:
In Canada: In the United States:
Stryker Bertec Medical Inc Stryker Medical
Service in English: 1 800 428-5025 1 800 327-0770
Service in French: 1 800 361-2040 6300, Sprinkle Road
E-mail (Canada): service@bertec.strykercorp.com Kalamazoo, MI 49001-9799
70, 5th Avenue, P.O. Box 128 USA
L’Islet (Québec), G0R 2C0, Canada
5
Page 6

Chapter 1 The GO BED Maintenance Manual
WWAARRNNIINNGG
WWAARRNNIINNGG
CCAAUUTTIIOON
N
1.3 SAFETY
Warning / Caution / Note Definition
The words WARNING, CAUTION and NOTE carry special meanings and should be carefully
reviewed.
The personal safety of the patient or user may be involved. Disregarding this information could
result in injury to the patient or user.
These instructions point out special procedures or precautions that must be followed to avoid
damaging the equipment.
E
NNOOTTE
Notes provides special information to make maintenance easier or important instruction clearer.
Safety Tips and Guidelines
The following is a list of safety precautions that must be observed when operating or servicing
the GO BED. They are repeated throuhout the guide, where applicable. Carefully read and
strictly follow them before operating or servicing this unit.
• The GO BED is not intended for pediatric use.
• It is important that all users have been trained and educated on the inherent hazards
associated with the use of manual and electric beds. Bed mechanisms can cause serious
injury to the patient or user. Operate bed only when all people are clear of the mechanisms.
• This bed is equipped with a hospital grade plug for protection against shock hazard. It must
be plugged directly into a properly grounded receptacle. Grounding reliability can be
achieved only when a hospital grade receptacle is used.
• Possible fire hazard exists when this bed is used with oxygen administering equipment other
than nasal, mask type or half bed-length tent type. It is recommended to disconnect the bed
in such circumstances. When using a half bed-length tent type, ensure the side-rails are
outside the oxygen tent and oxygen tent should not extend below the mattress support level.
• Always keep the caster brakes applied when a patient is on the bed (except during
transport). Serious injury could result if the bed moves while a patient is getting in or out of
bed. After the brake pedal is applied, push on the bed to ensure the wheels are locked.
• To help reduce the number and severity of falls by patients, always leave the bed in the
lowest position and side-rails fully up when the patient is unattended. After raising a siderail, pull firmly on the side-rail to ensure it is securely locked into position.
• Always keep side-rails in the fully raised position and the sleeping surface horizontal in its
lowest position when the patient is sleeping unless the patient's medical conditions dictates
otherwise. If the sleeping surface is not in a horizontal position and the bed is equipped with
half-length side-rails, it is strongly recommended that only the head side-rails be kept in
their highest position and the foot side-rails be stored on the side of the bed to avoid the
risks of a patient becoming caught between the two side-rail sections.
6
Page 7

Introduction Chapter 1
CCAAUUTTIIOON
N
• Side-rails, with or without their padded covers or nets, are not intended to serve as restraint
devices to keep patient from exiting the bed. Side-rails are designed to keep a patient from
inadvertently rolling off the bed. It is the responsibility of the attending medical personnel to
determine the degree of restraint necessary to ensure a patient will remain safely in bed.
Failure to utilize the side-rails properly could result in serious patient injury.
• When a patient's condition requires greater safety measures for his security, use the lockout
switches in the foot board control panel to deactivate the side-rail or pendant control
commands and install protective pads on the side-rails.
• When the sleeping surface sections are articulated, ensure that all spaces created by the
raised side-rails are clear in order to avoid the patient's limb becoming trapped between
side-rails or between side-rails and boards.
• When moving the bed with a patient in it, ensure that the bed is in the lowest position with
side-rails fully raised and securely locked in order to reduce risks of injuries to the patient.
• Do not attempt to move the bed directly sideways with the 5th wheel activated. The 5th
wheel can not pivot. Attempting to do so may cause injury to the patient or user.
• The instant CPR release is for emergency use only. When activating the CPR release, all
people and equipment must be removed from the area below and around the head and foot
sections of the bed or serious personal injury or damage to equipment could occur.
• When large fluid spills occur in the area of the circuit board, cables and motors, immediately
unplug the bed. Remove the patient from the bed and clean up the fluid. Have maintenance
completely check the bed. Fluids can have an adverse effect on operational capabilities of
any electrical product. DO NOT put the bed back into service until it is completely dried and
has been thoroughly tested for safe operation.
• Do not steam clean, hose off or ultrasonically clean the bed. Do not immerse any part of the
bed. The internal electrical parts may be damaged by exposure to water. Hand wash
regularly all surfaces of the bed with warm water and a mild detergent. Wipe cleaned
surfaces dry to avoid build up of cleaning substance. Inspect the mattress after each use.
Discontinue use if any cracks or rips are found in the mattress cover which may allow fluid to
enter the mattress. Failure to properly clean the mattress, or dispose of it if defective, may
increase the risk of exposure to pathogenic substances and may cause injury to the patient
or user.
• Always unplug the bed power cord from the wall outlet when cleaning or servicing the bed.
When working under the bed with the bed in the high position, always place blocks under
the frame and lock the casters to prevent injury in case the Bed Down switch is accidentally
pressed.
• When using the emergency crank during a power failure, unplug the power cord from the
wall receptacle so that unexpected resumption of power will not rotate handle. Remove and
store the crank before reconnecting the bed.
• Ensure that any bed malfunction is promptly reported to service personnel for immediate
attention. Preventive maintenance should be performed periodically to ensure all bed
features are functioning properly.
• Never move the bed using the raised side-rails nor hit the side-rails against any object found
in the room, for example: other furniture, walls, door frame, etc. Damage to the equipment
could result from such actions. Use the push/pull handles integrated on the head and foot
boards to move the bed, they provide a solid grip when moving the bed.
7
Page 8
Chapter 1 The GO BED Maintenance Manual
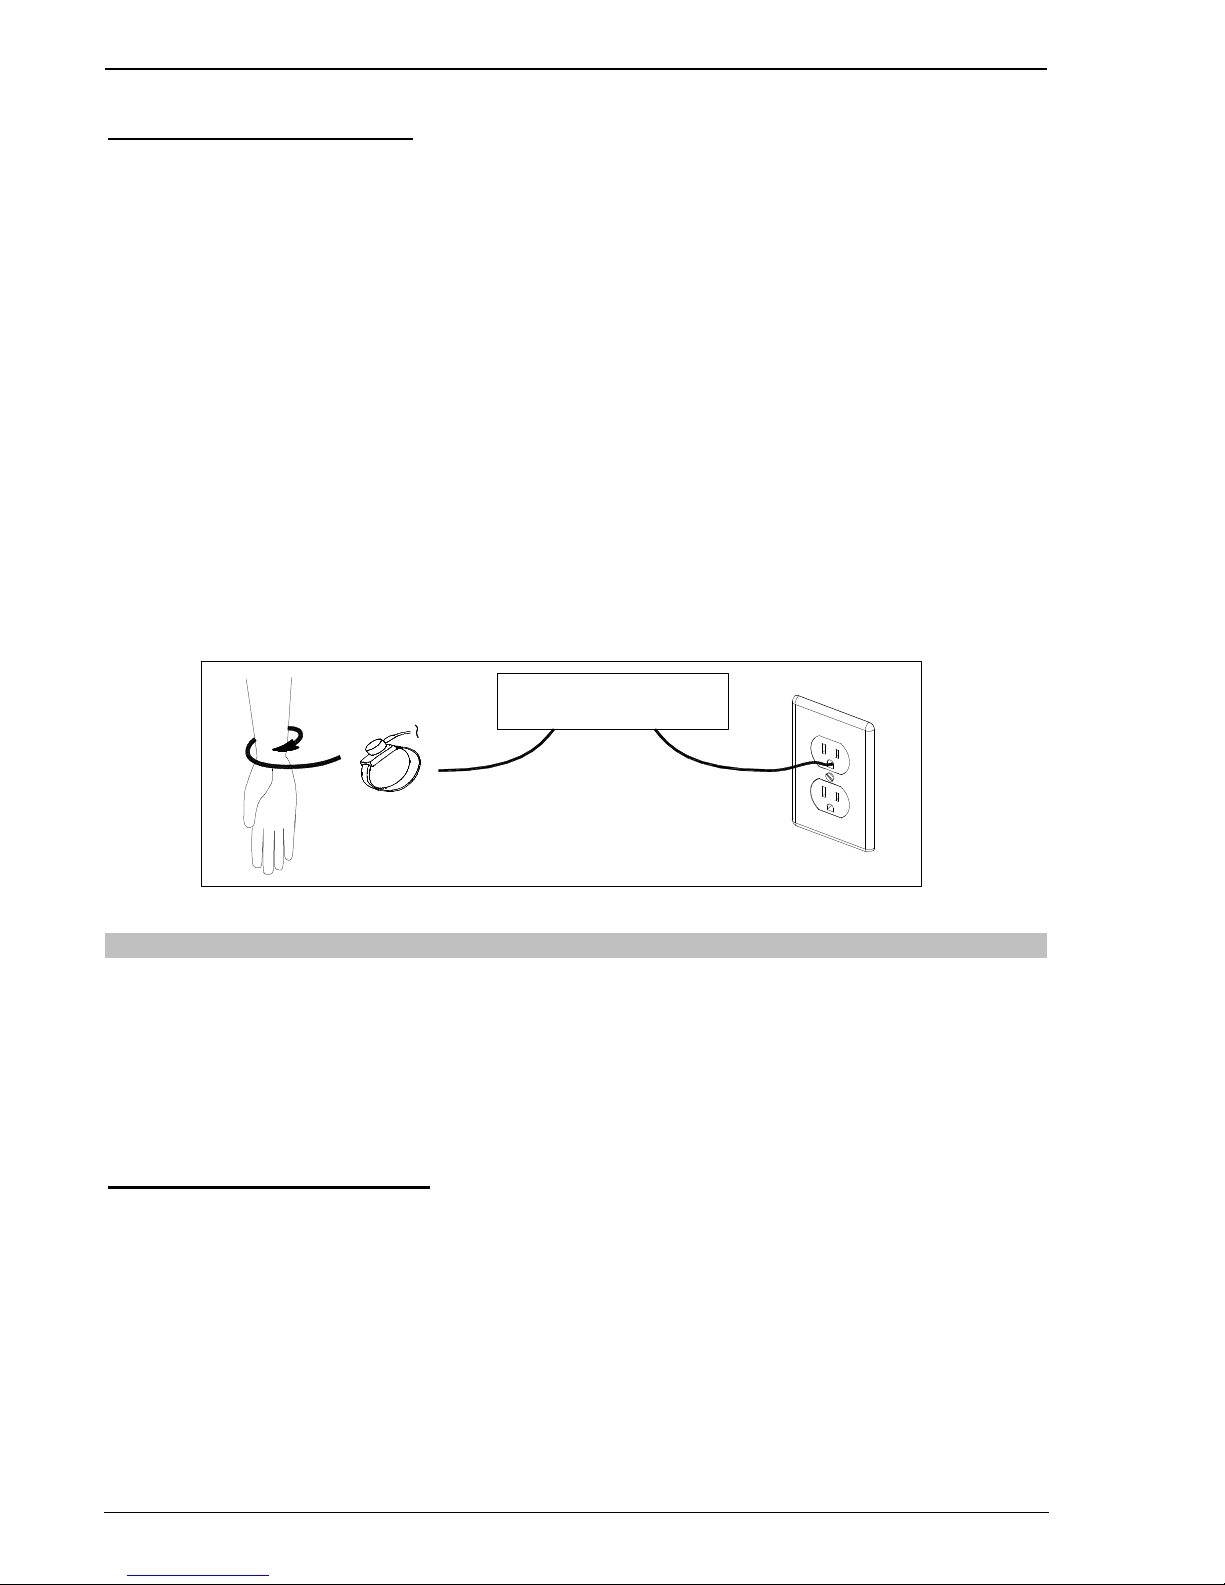
Static Discharge Precautions
The electronic circuits of the bed are protected from static electricity damage only while the bed
is assembled. It is extremely important that all service personnel always use adequate static
protection when servicing the electronic components of the bed.
Static Protection Equipment
The necessary equipment for a proper static protection is:
• 1 static wrist strap
• 1 grounding plug
• 1 test lead with a banana plug on one end and a alligator clip on the other.
Static Protection Procedure
1. Unplug the bed power cord from the wall receptacle.
2. Insert the grounding plug into a properly grounded hospital grade wall receptacle. Plug the
banana plug of the test lead into the receptacle on the grounding plug. Connect the alligator
clip on the other end of the test lead to a ground point on the bed.
3. Place the static control wrist strap on your wrist. Connect the clip at the other end of the
wrist strap cord to a ground point on the bed.
BED
GROUNDING DIAGRAM
1.4 WARRANTY
Limited Warranty
All Stryker Bertec products are guaranteed against material or manufacturing defects, improper
operation of mechanisms, and premature wear of bed components under normal use
conditions.
For questions regarding warranty, please contact Stryker Bertec Technical Service department
(see section 1.2) or your local representative.
To Obtain Service and/or Parts
NOTE
Throughout this maintenance guide, the words "right" and "left" refer to the right and left sides of
a patient lying face up on the bed.
To Require Service
To obtain the service of a Stryker Field Service Representative for an on-site diagnosis and/or
repair of a bed malfunction, contact the Stryker Bertec Technical Service department or your
local representative.
8
Page 9
Introduction Chapter 1
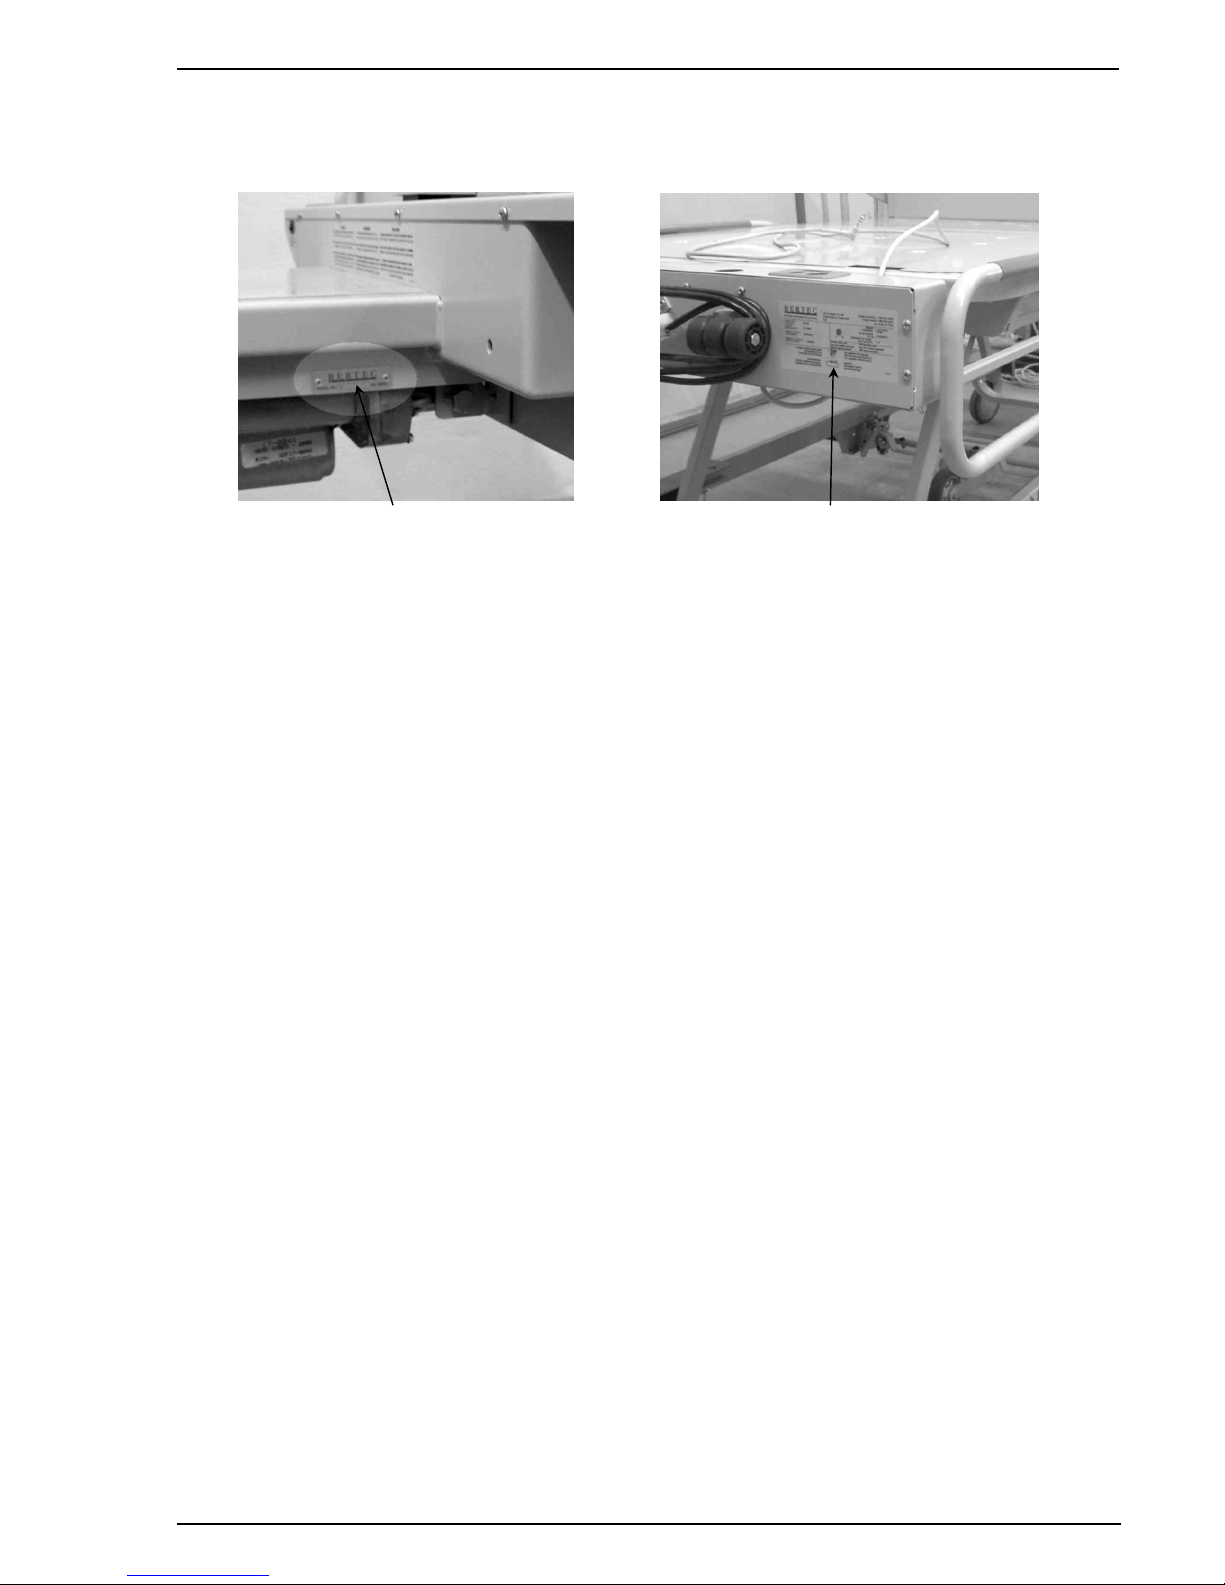
To Order Parts
SERIAL NUMBER PLATE
MANUFACTURER'S NAMEPLATE
Figure 1.4
In order to correctly identify and order parts to be replaced, proceed as follow:
• Once you have established the nature of the problem, locate the serial number plate (fig.
1.4) and the manufacturer's nameplate (fig. 1.4) affixed respectively on the right side of the
mobile frame at the foot end of the bed, and on the right side of the head end casing cover.
• Write down the serial number, the production number (e.g. FL17-XXXX) and the bed model
(manufacturer's nameplate). Make sure that the bed is indeed a Stryker Bertec bed. At first
glance, beds manufactured by other companies may resemble ours.
• Locate the Parts Manual or Customer's Guide (containing the Parts Lists needed) number
on the manufacturer's nameplate and refer to its drawings and part lists to identify the
defective part. Write down the name of the part and its part number. Also write down the
problem encountered while using the equipment.
E
NNOOTTE
It is very important that you refer to the Customer's Guide drawings and part lists that are
specific to the bed needing repair.
• Contact Stryker Bertec Technical Service department (see section 1.2) or your local
representative and provide all the previously noted information.
• Bed model
• Serial number and production number
• Name and part number of the defective part
• Problem encountered
E
NNOOTTE
We will do our best to help you identify the parts to be replaced. However, if an error occurs
when ordering, the user remains responsible for identifying parts to change.
Stryker Bertec will take back wrong parts ordered but will not assume shipping charges and
restocking fees will be charged to the user unless a Technical Service representative has been
requested for an on-site diagnosis of the malfunction.
9
Page 10

Chapter 1 The GO BED Maintenance Manual
WWAARRNNIINNGG
Return Authorization
Merchandise cannot be returned without approval from the Stryker Bertec Technical Service
department. An authorization number will be provided, which must be clearly printed on the
returned merchandise. Stryker Bertec reserves the right to charge shipping and restocking fees
on returned items.
Damaged Merchandise
Claims for damaged merchandise must be made with the carrier within fifteen (15) days of
receipt of merchandise. DO NOT ACCEPT DAMAGED SHIPMENTS UNLESS SUCH DAMAGE
IS NOTED ON THE DELIVERY RECEIPT AT THE TIME OF RECEIPT. Upon prompt
notification, Stryker Bertec will file a freight claim with the appropriate carrier for damages
incurred. Claims will be limited in amount to the actual replacement cost. In the event that this
information is not received by Stryker Bertec within the fifteen (15) days period following the
delivery of the merchandise, or the damage was not noted on the delivery notice at the time of
receipt, the customer will be responsible for payment of the original invoice in full.
Claims for any short shipment must be made within 5 days of invoice.
1.5 SET-UP PROCEDURES
Checklist
It is important to ensure that the bed is working properly before it is put into service. The
following list will help ensure that each part of the bed is tested.
q Install the foot and head boards on the bed. Insert the foot board carefully so that the board
connector connects smoothly to the foot end casing connector.
q Plug the power cord into a properly grounded hospital grade wall receptacle and ensure that
the Power LED light at the foot end of the bed comes on when the "On/Off" switch is turned
on.
The bed is equipped with a hospital grade plug for protection against shock hazard. It must be
plugged directly into a properly grounded receptacle. Grounding reliability can be achieved only
when a hospital grade receptacle is used.
q Depress and engage the red "TOTAL BRAKE" side of the pedal at either side of the bed to
set the brakes. Two of the four wheels, diagonally opposed, should lock, ensure it is so.
Ensure brakes disengage when the pedal opposite green "AXIAL STEER" side is depressed
to bring pedal to neutral position (horizontal position).
q Depress the green "AXIAL STEER" side of the pedal on either side of the bed to engage the
5th wheel. Ensure the 5th wheel is engaged.
q Ensure the 5th wheel disengages when the pedal opposite red "TOTAL BRAKE" side is
depressed to bring pedal to neutral position (horizontal).
q Ensure the side-rails raise and lower smoothly and lock in the up position.
q Run through each function on the foot board control panel and ensure that each function is
working properly.
q Ensure all functions are working properly on the side-rail control panels (inner and outer
sides).
10
Page 11

Introduction Chapter 1
q Raise the bed to full up position and activate the Trendelenburg function (see
"Trendelenburg Switch (E)", Operations Manual, page 21). Ensure that the head end lowers
to the full down position.
q Raise the bed to the full up position and activate the reverse Trendelenburg function (see
"Trendelenburg Switch (E)", Operations Manual, page 21). Ensure that the foot end lowers
to the full down position.
q Ensure that the optional Auto Contour function works properly (see "Auto Contour",
Operations Manual, page 21).
q Leaving the bed in the Auto Contour position, pull the instant CPR release handle (optional
equipment) and ensure the Fowler and Knee Gatch will drop with minimal effort. Wait and
listen for the typical noise indicating that the Fowler actuator has reset itself (during the
resetting period, no bed functions are available).
q Check following optional equipment for proper operation: 120V auxiliary outlet, photoelectric
night light, two or three function pendant control, etc.
If any problems are found during bed set-up, contact our Technical Service department (see
section 1.2).
11
Page 12
Chapter 1 The GO BED Maintenance Manual
HEAD SIDE
-
RAIL
FOOT SIDE
-
RAIL
CONTROL PANEL
THIGH SECTION
FOOT SECTION
HOLDERS
SIDE MATTRESS
RETAINERS
FOOT MATTRESS
RETAINERS
1.6 BED ILLUSTRATION (Bed may differ from illustration)
SIDE-RAIL INSIDE
HEAD SECTION
PUSH/PULL HANDLE
HEAD BOARD
SIDE-RAIL OUTSIDE
CONTROL PANEL
SIDE-RAIL
LATCH LEVER
FIFTH WHEEL
BRAKE/STEER
PEDAL
PATIENT HELPER
MOUNTING SOCKETS
HEAD END
CASING
CENTRE SECTION
FOOT BOARD
CONTROL PANEL
FOOT BOARD
ON/OFF SWITCH
SIDE MATTRESS
RETAINERS
EMERGENCY
CRANK STORED
HEAD I. V. POLE
RESTRAINT STRAP
LOCATIONS
FOLEY BAG HOOKS
Figure 1.6
RESTRAINT STRAP
LOCATIONS
FOOT I. V. POLE
HOLDERS
EMERGENCY
CRANK OPENINGS
FOOT END
CASING
12
Page 13
Preventive Maintenance Chapter 2
CCAAUUTTIIOON
N
WWAARRNNIINNG
G
2. PREVENTIVE MAINTENANCE
This section contains a recommended spare parts list as well as cleaning instructions and a
checklist to assist with the preventive maintenance and cleaning of your equipment.
In the text, the words "right" and "left" refer to the right and left sides of a patient lying face up on
the bed.
2.1 BED CLEANING AND MATTRESS CARE
Do not use harsh cleaners, solvents or detergents. Do not steam clean, hose off or
ultrasonically clean the bed. Do not immerse any part of the bed. The bed electrical parts may
be damaged by exposure to water.
Germicidal disinfectant, used as directed, and/or Chlorine Bleach products are not considered
mild detergents. These products are corrosive in nature and may cause damage to your bed if
used improperly. If these types of products are used, ensure the beds are rinsed with clean
water and thoroughly dried following cleaning. Failure to properly rinse and dry the beds will
leave a corrosive residue on the surface of the bed, possibly causing premature corrosion of
critical components. Failure to follow the above directions when using these types of cleaners
may void this product warranty.
Cleaning Beds
• Hand wash all surfaces of the bed with a soft cloth moistened with a solution of lukewarm
water and a mild detergent.
• Wipe the bed clean and dry thoroughly to avoid build up of cleaning solution.
Bed Mattress Care
Failure to properly clean mattress or dispose of them if defective will increase the risk of
exposure to pathogenic substances which may cause injury to the patient or user.
Inspection
• Implement local policies to address regular care, maintenance, and cleaning of mattresses
and covers. The cover cleaning and sterilization procedures can be found below and on the
bed label.
• Inspect mattress cover surface (also zip fasteners and cover inner surface if mattresses
have zip fasteners) regularly for signs of damage. If the mattress cover is stained, soiled, or
torn, examine the mattress, and seek instructions from the infection control nurses, as the
mattress may harbour micro-organisms. If the mattress is wet or badly stained, withdraw
the mattress from service.
• Seek the advice of infection control nurse in case of heavy soiling or infection, as general
cleaning procedures are unlikely to be adequate.
Cleaning and Sterilization
• Stains:
Wash with lukewarm water using a mild detergent. Rinse with water and let dry.
• Tough stains and sterilization:
Use bleach diluted with ten parts of water.
13
Page 14

Chapter 2 The GO BED Maintenance Manual
CCAAUUTTIIOON
N
WWAARRNNIINNG
G
2.2 LUBRICATION
Listed below are the lubrication points and their recommended time interval check. When
needed, lubricate these points with OG2 grease (Stryker Bertec part number M0027).
The use of types of grease other than the one recommended (OG2 grease) could lead to
deterioration of critical parts and to mechanism failure, resulting in injury to the patient or user
and damage to the bed.
The GO BED uses oil-impregnated shoulder spacers at hinge points. Do not lubricate these
shoulder spacers. When shoulder spacers are found worn, replace them.
Annual Checklist:
q The Hi-lo lever nylon sliders and their shafts (see fig. 2.2A, page 15). Check that grease is
still present along the course of the sliders (inner surfaces (bottom and side) of the rail).
q Lower mounting points (see fig. 2.2A, page 15) of the lifting system stabilizer.
q Side-rail plungers and plunger springs (see fig. 2.2B, page 15).
q The side-rail arm glide rods (see fig. 2.2B, page 15).
Two Years Interval Checklist:
q The two Hi-lo actuator tubes (see fig. 2.2C, page 15) to facilitate their sliding into the
support tubes. Bring the bed to its highest position before greasing the tubes.
q Head, foot and Hi-lo actuator screws (see fig. 2.2C, page 15).
q Head actuator screw guide (see fig. 2.2C, page 15).
q Clevis pins and nylon washers linking the actuator tubes to the head and Knee Gatch
section lever arms and the two Hi-lo lever arms (see fig. 2.2C, page 15).
q Actuator bolts that hold actuators to their brackets as well as the inner sides of the brackets,
including the pivot pin (see fig. 2.2C, page 15).
q Micro-switch activator (see fig. 2.2E, page 15) of the optional Auto Contour mechanism.
Five Years Interval Checklist:
q The side-rail shafts and transfer plate handles (see fig. 2.2B, page 15).
q Inside of the Hi-lo lever moulded bearings (see fig. 2.2A, page 15).
q The damper bearings, the pivot shaft of the CPR support, and the activation rod pivot sleeve
(see fig. 2.2D, page 15) all from the instant CPR release mechanism.
Serial Number:_______________ _______________ _______________
_______________ _______________ _______________
_______________ _______________ _______________
_______________ _______________ _______________
Completed by:______________________________ Date:_______________
14
Page 15
Preventive Maintenance Chapter 2
Figure 2.2E
Figure 2.2C
Lubrication Points Illustrated
LEGEND:
1 YEAR 2 YEARS 5 YEARS
Figure 2.2A
Figure 2.2D
Figure 2.2B
Figure 2.2
15
Page 16

Chapter 2 The GO BED Maintenance Manual
CCAAUUTTIIOON
N
WWAARRNNIINNG
G
2.3 PREVENTIVE MAINTENANCE PROGRAM
The following periodic maintenance and inspection program has been devised to ensure a long
and productive life to your GO BED. Each item on the schedule should be checked and any
necessary adjustment made during the preventive maintenance process. Persistence in
performing it annually will help minimize bed failures and reduce downtimes.
Only qualified and authorized maintenance personnel should perform the procedures detailed in
this maintenance guide. Failure to observe this restriction can result in serious damage to
material and/or severe injury to people.
Checklist
The GO BED uses oil-impregnated shoulder spacers at hinge points. Do not lubricate these
shoulder spacers. When shoulder spacers are found worn at preventive maintenance, replace
them.
q Inspection for excessive wear of all the oil-impregnated bronze shoulder spacers found in
the following components of the bed. Replace as needed
q Linkage of the mattress support sections together
q Linkage of the head section lever arms to the head section and the fixed frame
q 5th wheel activation mechanism
q Instant CPR release mechanism
q Inspect and lubricate, if needed, bed lubrication points described in section 2.2
q Inspection of all bolt, locknut and screw tightening, tighten if necessary
q Engage brake pedal and push on the bed to ensure that casters lock securely
q Using the Axial Steer pedal, ensure that the 5th wheel engages and disengages properly
q Side-rails move, latch and stow properly
q All functions on the foot board control panel working properly (give special attention to lock-
out switches and their LED indicators). See "PC Board Integrated Maintenance Program",
next page.
q Check the Fowler, Knee Gatch, Hi-lo, optional Auto Contour, and the Trendelenburg limits to
ensure that actuator built-in limit switches are working properly.
q All functions on side-rail control panels (inner and outer) working properly. See "PC Board
Integrated Maintenance Program", next page.
q On/Off switch and LED power indicator working properly
q Optional 120 volt auxiliary outlet working properly
q Optional photoelectric night light working properly
q Optional instant CPR release working properly
q Optional Auto Contour working properly
q Fowler slides securely in tracks without making noise (grease applied on the assembly line
along the path of the mobile frame wheels and on the wheel shafts should last as long as
the bed life. Should a problem occur with this part of the bed, please contact our Technical
Service department (see section 1.2).
16
Page 17

Preventive Maintenance Chapter 2
q Automatic foot prop rod working properly when Knee Gatch or Auto Contour function is
activated.
q No cracks or splits in head and foot boards
q Head end bumpers tightly secured to frame and working properly
q No rips or cracks in mattress cover
q Power cord not frayed
q No cables worn or pinched
q All electrical connections tight
q All ground secure to the frame
q All casters roll properly. Check caster tire for cuts, wear, tread life, etc
q Ground chain intact and in place
q Measure bed current leakage and ground impedance (check with our Technical Service
department for the acceptable values).
q Measure optional 120V auxiliary ground impedance (check with our Technical Service
department for the acceptable value).
E
NNOOTTE
Preventive maintenance may need to be performed more frequently based on the usage level of
the bed.
Serial Number: _______________ _______________ _______________
_______________ _______________ _______________
_______________ _______________ _______________
_______________ _______________ _______________
Completed By:___________________________________ Date:_______________
PC Board Integrated Maintenance Program
This bed has a PC Board equipped with a maintenance program. To activate and process the
program, perform the following steps:
• Unplug the bed power cord, remove the foot board and the foot end casing cover (see
section 4.7, step 1 through 4 and fig. 4.7A) to gain access to the PC Board.
• Move the board four dip switches to the ON position and replace temporarily the casing
cover and the foot board (do not fasten the cover to the casing for the moment).
• Plug the bed power cord and turn the main power switch on. Note that the LED of the
Trendelenburg function switch may light up, do not mind it.
• Press all function switches of the control panels (foot board and side-rails) one after the
other. The green LED of the Fowler lock-out switch will be the maintenance test indicator. It
should lit up when a function switch is pressed and go out when the same function switch is
pressed again thus indicating that the wiring and the membrane are working properly. If the
LED does not light up when a function switch is pressed, the wiring and/or the membrane
may be defective.
• After completion of the test, unplug the bed power cord, remove the foot board and the
casing cover, readjust the dip switches to their normal position (1= Off; 2= On; 3= Off; 4=
Off), fasten the cover to the foot end casing, and replace the foot board.
17
Page 18

Chapter 2 The GO BED Maintenance Manual
Recommended Spare Parts
The following is a list of recommended on hand spare parts for the GO BED.
Electronic/Electrical Assembly Parts
PC Board QDF14-0990
PC Board stand off pins QDF8011
Strain relief bushing QPNC0604
S.A. power cord 120V/Connector QDF17-0236/QDF8042
Micro switch 1325P003
Night light QDF9539
Actuator Assembly Parts
Hi-lo actuator QDF17-0005
Knee Gatch actuator QDF17-0006
Head actuator 17-0041
Control Panel Assembly Parts
Nurse control plate and membrane QDF17-0180/QDF17-0127
S.A. Fixed 3 way patient control (H-B-F) 13-0220
S.A. Fixed 3 way patient control (F-B-H) 13-0221
S.A. Fixed 2 way patient control (F-H) 17-0193
S.A. Fixed 2 way patient control (H-F) 17-0194
Side-Rail assembly parts
Head side-rail protector 17-0220
Foot side-rail protector 17-0221
3M adhesive tape #950 x 1" QDF7826
Side-rail right handed release 17-0306-P
Side-rail left handed release 17-0307-P
Dome cap DP1250 1-1/4" QDFP1514
Protective cap QPN-18748
Mattress support Assembly
Warm grey mattress retainer QPN-14034-2
Base Assembly Parts
"Tente" caster with locking system RT61C
"Tente" caster without locking system T61CSW
5th wheel RL5
Pedal green treadle tip QPN-18028
Pedal red treadle tip QPN-18029
Anchor washer for 3/16 dia. stud VW00A06
Rue ring cotter dia. 3/8" p.z. QDF7878
Miscellaneous
OG-2 grease M0027
Tread locker - medium strength (blue) M008
"Sand Grey" aerosol spray paint DDCAP-GSP
18
Page 19

Troubleshooting Chapter 3
WWAARRNNIINNG
G
3. TROUBLESHOOTING
This section contains a troubleshooting chart to assist you with the diagnosis of problems with your
equipment.
In the text, the words "right" and "left" refer to the right and left sides of a patient lying face up on the
bed.
3.1 TROUBLESHOOTING GUIDE
Only qualified and authorized maintenance personnel should perform the procedures detailed in
this maintenance guide. Failure to observe this restriction can result in serious damage to
material and/or severe injury to people.
PROBLEM POSSIBLE CAUSES RECOMMENDED ACTION
ON/OFF switch is on, power
LED is off and bed does not
respond to any command.
Power cord loosely or not
connected to wall receptacle.
Bed connected into a defective
Make sure plug fits tightly in
wall receptacle.
Check wall receptacle.
wall receptacle.
Power cord severed. Replace power cord
(see section 4.10).
Bed power cord connector
improperly or not connected to
the PC Board power cord
connector in the head end
casing
PC Board power cord
improperly or not connected to
PC Board
Check cable connection
(see section 4.10). Refer to
Connection Diagram in
Appendix A for proper
connecting position.
Check cable connection
(see section 4.8). Refer to
Connection Diagram in
Appendix A for proper
connecting position.
PC Board power cord
defective
Replace PC Board power
cord. See the "120V
electrical system" parts list
and drawing in the GO BED
Parts List manual.
ON/OFF switch cable
ON/OFF switch or cable
PC Board defective. Replace PC Board (see
disconnected or improperly
connected to PC Board.
defective.
Check cable connection
(see section 4.9). Refer to
Connection Diagram in
Appendix A for proper
connecting position.
Replace ON/OFF switch
and cable (see section 4.9).
section 4.8).
19
Page 20

Chapter 3 The GO BED Maintenance Manual
PROBLEM POSSIBLE CAUSES RECOMMENDED ACTION
ON/OFF switch is on, the bed
responds to commands but
the LED power indicator does
not light up.
ON/OFF switch is on but the
bed fails to respond or
responds erratically to:
* foot board panel control
**side-rail control panels
E
NNOOTTE
In the possible causes
column, one * refers to
causes affecting only the
foot board control panel and
two ** refer to causes
affecting only side-rail
control panels. * **
combined refer to causes
affecting both control panels.
ON/OFF switch LED defective. Replace ON/OFF switch
(see section 4.9).
* Foot board control
membrane cable improperly or
Check cable connection
(see section 4.3).
not connected to the foot
board connector.
* PC Board to foot end casing
connector cable improperly or
not connected to PC Board.
Check cable connection
(see G fig. 4.7A, section
4.7). Refer to Connection
Diagram in Appendix A for
proper connecting position.
* Foot board panel membrane
defective.
* Foot board connector
defective.
Replace membrane (see
section 4.3).
Replace connector (see
section 4.6).
* Foot end casing connector
defective.
** Side-rail panel functions not
activated through the foot
board control panel lock-outs.
** Side-rail bed function cable
not connected to the bed.
Replace connector (see
section 4.7).
Turn the lock-out switches
on (see section 2.16 of the
User Guide).
Connect the side-rail cable
into receptacle located
under the centre section of
the mattress support.
** Side-rail panel membrane
(inner or outer) defective.
** Side-rail control cable
improperly or not connected to
the PC Board.
Replace membrane (see
section 4.4).
Check cable connection
(see section 4.8). Refer to
wiring diagram in Appendix
A for proper connecting
position.
** Side-rail control cable
running from the control panel
to the bed receptacle
Replace cable (see section
4.5, step 13 and note
following it.)
defective.
20
Page 21

Troubleshooting Chapter 3
PROBLEM POSSIBLE CAUSES RECOMMENDED ACTION
* ** PC Board dip switches
improperly set.
Set Dip switches properly.
DIP #1 = off; DIP #2 = on;
DIP #3 = off; DIP #4 = off.
* ** If your bed is equipped
with the optional CPR release
and only the Knee Gatch
functions, the CPR mechanism
may have not returned to
Check CPR mechanism
and both micro switch
assembly. Replace
component as needed (see
section 4.16 and 4.17).
original position and/or the
head section actuator may
have not reset itself after CPR
usage.
* ** Actuator automatic thermal
protection switch has turned
the actuator off.
Refrain from using the bed
for about twenty minutes.
The actuator will then reset
itself.
* ** Actuator cables improperly
or not connected to the PC
Board.
Check actuator connections
(see section 4.8 and 4.14).
Refer to the Connection
Diagram in Appendix A for
proper connecting position.
* ** An actuator defective.
Identify faulty actuator and
replace it (see section
4.14).
* ** PC Board defective.
Replace PC Board
(see section 4.8).
Bed functions operate
without being activated or
don't stop after command
has been released.
Foot board or side-rail panel
membrane defective.
Replace membrane
(see section 4.3 and 4.4).
PC Board defective. Replace PC Board
(see section 4.8).
Instant CPR release does not
function properly: the head
section actuator does not
reset automatically and/or
the Knee Gatch does not
return to horizontal position
following the use of the
instant CPR release.
Micro switches detecting the
mattress support movement
not functioning properly
Check the CPR mechanism
under the head section.
(see section 4.16)
Check that micro switches
and the micro switch
activator(located on the
right side of the fixed
frame) are tightly fastened.
Check wires connected to
micro switches for proper
connection.
Check micro switches.
Replace component as
needed (see section 4.17).
21
Page 22

Chapter 3 The GO BED Maintenance Manual
PROBLEM POSSIBLE CAUSES RECOMMENDED ACTION
The micro switch cable
improperly connected to the
PC Board.
Check cable connection
(see section 4.8). Refer to
Connection Diagram in
Appendix A for proper
connecting position.
The micro switch cable running
from the micro switch to the
PC Board connector defective.
Head or Knee Gatch actuator
defective.
Replace micro switch
cable.
Replace head or Gatch
actuator (see section 4.14).
PC Board defective. Replace PC Board
(see section 4.8).
Fowler and Knee Gatch are
out of synchronization when
optional Contour Positioning
is activated.
Micro switches detecting the
relative positions of the
mattress support sections not
functioning properly.
Check that micro switches
and micro switch activator
(located on the left side of
the fixed frame) are tightly
fastened.
Check micro switches and
wires connected to them for
proper connection. Replace
component as needed (see
section 4.18).
Micro switch cable improperly
connected to the PC Board.
Check cable connection
(see section 4.8). Refer to
Connection Diagram in
Appendix A for proper
connecting position.
Micro switch cable running
from the micro switch to the
Replace micro switch
cable.
PC Board defective
Head or Gatch actuator
defective.
Replace head or Gatch
actuator (see section 4.14)
PC Board defective. Replace PC Board
(see section 4.8)
Nurse call command does
not function.
Nurse call wall connection
cable plugged into a defective
Check wall receptacle.
wall receptacle.
Nurse call wall connection
cable disconnected or
improperly connected to the
Check cable wire
connection to the multiple
connector (see section 4.5).
multiple connector.
Nurse call wall connection
cable severed or defective.
Replace nurse call wall
connection cable (see
section 4.5)
22
Page 23

Troubleshooting Chapter 3
PROBLEM POSSIBLE CAUSES RECOMMENDED ACTION
Nurse call switch defective. Replace nurse call switch
(see section 4.5).
Nurse call switch cable
defective
Safety side-rails jam, move
with difficulty, do not latch in
high position or latch with
difficulty.
Side-rail mechanisms poorly
greased and/or mechanism
parts loosened.
Side-rail parts misaligned
following a blow.
Brake does not engage when
activated or do not release.
Fasteners of the brake
activation mechanism not
secured or parts misaligned.
One or both casters that are
part of the locking mechanism
defective.
Replace nurse call cable
(see section 4.5)
Apply grease on the side-
rail plungers, plunger
springs, arm glide rods and
rail shafts (see section 2.2,
"Lubrication"). Check all
applicable hardware and
parts alignment. Replace
parts as needed (see
section 4.1).
Replace side-rail assembly
(see section 4.1)
Check all applicable
linkage, hardware and parts
alignment. Replace parts
as needed (see sect. 4.19,
"Brake/steer pedal…")
Replace caster (see section
4.21).
Steer wheel (5th wheel) does
not engage when activated or
does not disengage.
Fasteners of the 5th wheel
activation mechanism not
secured or parts misaligned.
Swing arm assembly spring
warped
Check all applicable
linkage, hardware and parts
alignment. Replace parts
as needed (see sect. 4.20).
Replace the 5th wheel
swing arm assembly (see
section 4.20)
23
Page 24

Chapter 4 The GO BED Maintenance Manual
WWAARRNNIINNG
G
CCAAUUTTIIOON
N
4. MAINTENANCE PROCEDURES
This section contains step-by-step procedures to assist with the maintenance and servicing of
the GO BED.
In the text, the words "right and "left" refer to the right and left sides of a patient lying face up on
the bed.
Only qualified maintenance personnel should perform the procedures detailed in this
maintenance guide. Failure to observe this restriction can result in serious damage to material
and/or severe injury to people.
The use of types of grease other than the one recommended (OG2 grease, Stryker Bertec part
number M0027) could lead to deterioration of critical parts and mechanism failure, resulting in
injury to the patient or user and damage to the bed.
Always unplug the bed power cord from the wall outlet when cleaning or servicing the bed.
The GO BED uses oil-impregnated shoulder spacers at hinge points. Do not lubricate these
shoulder spacers. When shoulder spacers are found worn at preventive maintenance, replace
them.
E
NNOOTTE
Except for rare exceptions, reference points - i.e. A, B, C appearing in sequence of instructions
will refer to a figure immediately preceding this sequence of instructions.
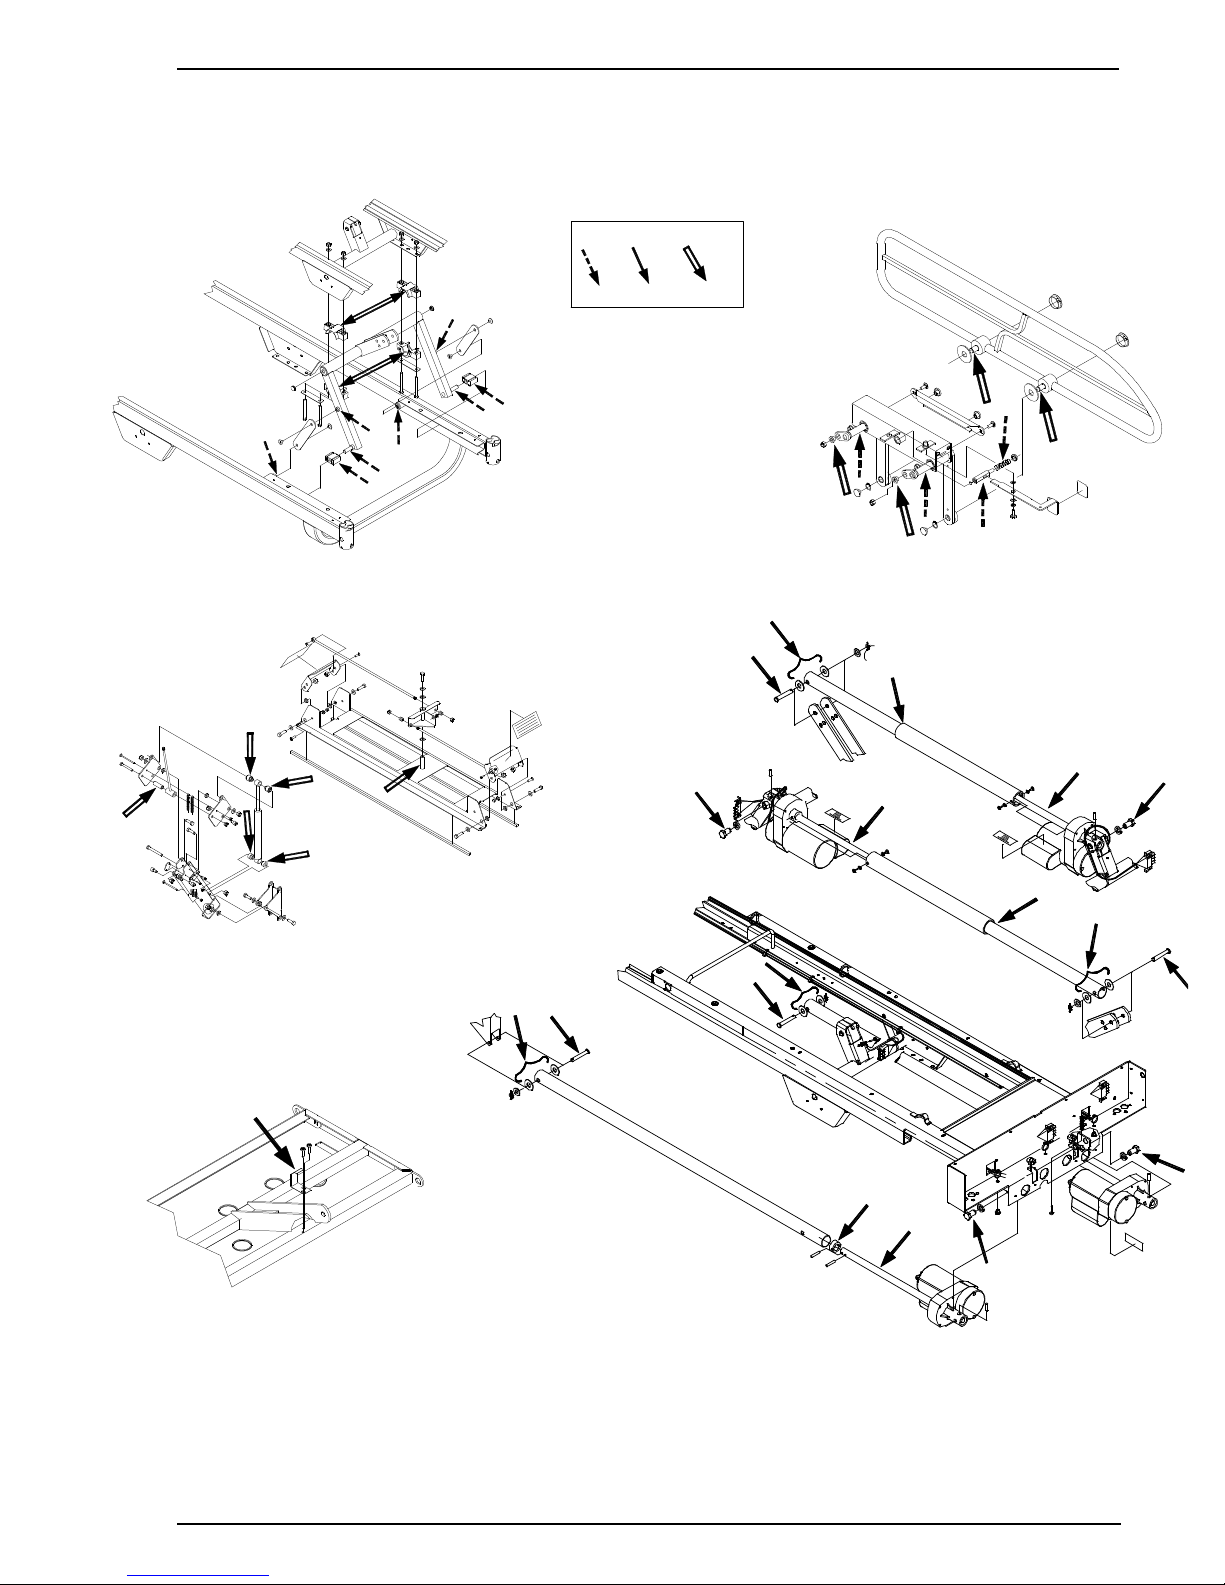
4.1 SIDE-RAIL ASSEMBLY REPLACEMENT
Foot Side-Rail Assembly Replacement
FOOT SECTION
FOOT SIDE-RAIL
1. Raise the bed to the high position and lock casters.
2. Put the head side-rails in the down position and raise the foot side-rails.
3. Raise the Knee Gatch to the high position.
4. Unplug the power cord from the wall receptacle.
24
Figure 4.1A
Page 25

Maintenance Procedures Chapter 4
C C E D
F H G
5. Manually lift and fold the foot section back towards the head end of the bed (see figure 4.1
in Appendix B).
6. Remove the four bolts / lock washers (A) holding the side-rail assembly to the foot section.
E
NNOOTTE
Apply medium strength tread locker (blue) on the bolt treads, before replacing the four bolts.
7. Lift up assembly to disengage from anchor point (B) and remove assembly
8. Reverse the above steps to install the replacement foot side-rail assembly.
9. Test foot side-rail for proper operation before returning the bed to service.
Head Side-Rail Assembly Replacement
E
NNOOTTE
If the bed being maintain is equipped with the nurse call option, be sure to mention it to the
Service representative when ordering a new head side-rail assembly.
1. Raise the bed to the high position and lock casters.
2. Raise head side-rail to be replaced and raise Fowler to high position.
3. Unplug the power cord from the wall receptacle.
4. Unscrew the lock ring of the side-rail cable plug (J, fig. 4.1C, page 25) and remove cable
from the bed receptacle.
5. If the bed being repaired is not equipped with the optional nurse call function, proceed with
step 10.
If the bed being repaired is equipped with the optional nurse call function, and its version is prior
to version 03 (bed with serial number [ C02025), proceed with step 6. For version 03 (bed with
serial number / C02026) and higher of the GO BED (equipped with the optional nurse call
function, proceed with step 10.
AU MUR D'HOPITAL
TO HOSPITAL WALL
Figure 4.1B
6. Remove the fourteen screws (C) holding the head end casing (D) cover and remove the
cover (E).
7. Identify the right (F) or left (G) nurse call cable wires in the head end casing, cut the cable
tie if necessary.
8. Loosen the two screws holding the two groups of red and black wires on the multiple
connector (H), remove both groups of wires and segregate from them the red and black
wires of the nurse call cable involved in the procedure.
25
Page 26

Chapter 4 The GO BED Maintenance Manual
J
HEAD SECTION
K
9. Pull on the cable to slide it out of the cable ties holding it along its path under the bed. It
might be necessary to cut the cable ties to install the new nurse call cable.
HEAD SIDE-RAIL
Figure 4.1C
10. Remove the four bolts/lock washers (K) holding the side-rail assembly to the head section.
Begin with the two bolts located near the latch lever followed by the two others. Support the
assembly when removing the two last bolts.
E
NNOOTTE
Apply medium strength tread locker (blue) on the bolt treads before replacing the four bolts.
11. Lift up assembly to disengage from anchor pin and remove it.
12. Reverse the above steps to install the replacement head side-rail assembly.
E
NNOOTTE
Be sure to connect the side-rail cable to the bed receptacle before testing the bed.
13. Test side-rail motion, all side-rail controls, and if present the nurse call function for proper
operation before returning bed to service.
26
Page 27

Maintenance Procedures Chapter 4
B C
D
4.2 SIDE-RAIL REPLACEMENT (RAIL ONLY)
Foot Side-Rail Replacement (Rail Only)
A
Figure 4.2
1. Raise the bed to the high position and lock casters.
2. Raise side-rail needing a rail replacement.
3. Unplug the power cord from the wall receptacle.
4. Use a small screwdriver to remove the plastic dome caps (A) sealing the front part of the
two rail shafts.
E
NNOOTTE
We recommend that you have some of these dome caps on hand because they can hardly be
removed without damaging them.
5. Use a hammer and a blunt-ended tool to remove the nylon protective caps (B) from the rear
part of the two rail shafts.
6. Remove lock rings (C) from each shaft and remove the defective barrier. Keep the nylon
washers (D).
7. Reverse the above steps to install the replacement rail.
E
NNOOTTE
Apply grease on the rail shafts before installing the rail.
Head Side-Rail Replacement (Rail Only)
Replacing the rail of head side-rail is a complex task requiring a good knowledge of the product.
We recommend that you contact our Technical Service department (see section 1.2) in order for
them to suggest an appropriate solution to the problem.
27
Page 28

Chapter 4 The GO BED Maintenance Manual
A
B
C
D
E
F
Figure 4.3
4.3 MEMBRANE REPLACEMENT (FOOT BOARD CONTROL PANEL )
E
NNOOTTE
The membrane comes with the control panel plate, already affixed to it.
1. Raise the bed to the high position and lock casters.
2. Unplug the power cord from the wall receptacle.
3. Remove the head board and lay it on a workbench
4. Remove the 7 screws (A) securing the support cover (B) to the inner face of the foot
board and remove cover.
5. Remove the screw (C) holding the membrane support to the foot board.
6. Disconnect the defective membrane cable (E) from the board connector (D).
7. Remove the control panel plate (F).
8. Reverse the above steps to install the replacement membrane.
E
NNOOTTE
Be sure to connect the new membrane cable correctly. The side of the membrane connector
bearing the inscription "1" must face the black wire of the foot board connector.
9. Test all the foot board control panel functions for proper operation before returning bed
to service.
28
Page 29

Maintenance Procedures Chapter 4
4.4 MEMBRANE REPLACEMENT ( SIDE-RAIL CONTROL)
C
A
D
A
B
Figure 4.4
1. Raise the bed to high position and lock casters.
2. Raise the head side-rail needing a membrane replacement.
3. Unplug the power cord from the wall receptacle.
4. Remove the four screws (A) holding together the two sections of the side-rail control panel
housing (B).
5. Open the side-rail control panel housing. Both sections of the housing contains a membrane
permanently fixed to it. Changing a side-rail control panel membrane means replacing one
of the two sections of the control panel housing.
6. Disconnect the faulty membrane cable (C) from the side-rail connecting board (D) and
remove the membrane.
7. Reverse the above steps to install the replacement side-rail control membrane.
E
NNOOTTE
Make sure to connect the new membrane cable correctly. The side of the connector bearing the
inscription "1" must face the brown wire of the connecting board.
8. Test all side-rail control panel functions (inner and outer sides) for proper operation before
returning bed to service.
29
Page 30

Chapter 4 The GO BED Maintenance Manual
B
A C
Figure 4.5
F G
D D K
L J H E
CONNECTOR
4.5 NURSE CALL SYSTEM COMPONENT REPLACEMENT
TO WALL
RECEPTACLE
1. Raise the bed to high position and lock casters.
2. Remove the head board.
3. Remove the fourteen screws (C, fig. 4.1 B, page 24) holding the head end casing cover (E
fig. 4.1B, page 24) to the head end casing and remove the cover.
4. Identify the wires (A) of the nurse call wall connector cable (B). Loosen the two screws
holding the cable wires to the multiple connector (C) and remove wires.
E
NNOOTTE
If the wall connector cable is made of three wires, ensure that the red and orange wires are
connected together in the same multiple connector slot.
TO MULTIPLE
5. Test the nurse call wall connector cable.
- if defective, proceed with step 6 through step 8 and end procedure.
- if functioning properly, proceed with step 9.
6. Remove nurse call wall connection cable.
30
Figure 4.5A
Page 31

Maintenance Procedures Chapter 4
7. Reverse the above steps to install the replacement cable.
8. Test nurse call function for proper operation before returning bed to service.
End of procedure.
9. Identify the right (F, fig. 4.5, page 29) or left (G, fig. 4.5, page 29) nurse call cable wires, cut
the cable tie if necessary.
10. Loosen the two screws holding the two groups of red and black wires on the multiple
connector (C, fig. 4.5, page 29), remove both groups of wires and segregate the two red and
black wires of the defective nurse call control.
11. Remove the four screws (D) holding together the two sections of the nurse call control
housing (E).
12. Remove the two screws (H) holding the switch support to the housing. Remove the nurse
call button (J) and clean it as well as its housing, if dirt has accumulated.
13. Test the switch and the two sections of the nurse call cable to determine which is
responsible for the problem. Note that in prior versions of the GO BED (beds with a serial
number [ C02025), the nurse call cable is in one section, running from the nurse call switch
to the multiple connector located in the head end casing.
- if the switch is defective but the cable functions properly, proceed with step 14 through
step 18 and end procedure.
- if one of the cable sections is defective, read the following note and end procedure.
E
NNOOTTE
Replacing a defective nurse call cable is a complex task requiring a good knowledge of the
product. We recommend that you contact our Technical Service department (see section 1.2) in
order for them to suggest an appropriate solution.
End of procedure.
14. Unsolder the two nurse call cable wires (K) from the defective switch (L). Note the position
of each soldered wire on the switch.
15. Unsolder from the replacement switch the two wires of the cable attached to it. Keep the
cable as an on-hand replacement part.
16. Solder to the replacement switch the two wires of the original nurse call cable.
17. Reverse the above steps to install the replacement nurse call switch and finalize installation
of the nurse call assembly.
18. Test nurse call function for proper operation before returning bed to service.
31
Page 32

Chapter 4 The GO BED Maintenance Manual
A B C D E F
4.6 FOOT BOARD CONNECTOR REPLACEMENT
Figure 4.6
1. Raise the bed to high position and lock casters.
2. Remove head board and lay on a workbench.
3. Remove the 7 screws (A) securing the support cover (B) to the inner face of the foot board
and remove cover.
4. Disconnect the foot board control panel membrane (C) from the connector.
5. Remove the two bolts/washers/sleeves/locknuts (D) holding the connector (E) to its support
(F) and remove defective connector.
6. Reverse steps to install replacement foot board connector.
E
NNOOTTE
Make sure to connect the foot board control panel cable correctly. The side of the cable
connector bearing the inscription "1" must be aligned with the black wire of the foot board
connector.
7. Test all foot board control panel functions for proper operation before returning bed to
service.
32
Page 33

Maintenance Procedures Chapter 4
A
A
B
D E F G
L
4.7 FOOT END CASING CONNECTOR REPLACEMENT
C
Figure 4.7A
1. Raise the bed to high position, lock casters and remove the foot board.
2. Unplug the power cord from the wall receptacle.
3. Remove the 12 screws (A, B) holding the foot end casing cover (C) and the two IV pole
holders (E) to the foot end casing (D).
4. Lift up and hold cover while disconnecting from the PC Board the On/Off switch cable (F)
and the PC Board to foot end casing connector cable (G). Note carefully the connecting
positions of the cable connectors to the PC Board connectors (On/Off switch: cable
connector green wire facing pin 11; foot end casing connector cable: connector black wire
facing pin 1). Lay cover on a workbench.
K
H
J
C
H
5. Remove the two bolts/shoulder sleeves/locknuts (H) holding the connector (J) to the foot
end casing cover (C) and remove defective connector. Keep the seal (K).
6. Reverse the above steps to install replacement foot end casing connector.
E
NNOOTTE
Make sure to properly connect the foot casing connector cable to the PC Board connector. See
step 4
7. Test all nursing control functions for proper operation before returning bed to service.
Figure 4.7B
33
Page 34

Chapter 4 The GO BED Maintenance Manual
Figure 4.8
B
C
D
F
4.8 PC BOARD REPLACEMENT
1. Raise the bed to high position and lock casters.
2. Unplug the power cord from the wall receptacle.
3. Remove the foot panel.
4. Properly ground yourself (see "Static Discharge Precautions", page 8).
5. Remove the 12 screws (A, B, fig. 4.7A, page 32) holding the foot end casing cover (C, fig.
4.7A, page 32) and the two IV pole holders (E, fig. 4.7A, page 32) to the foot end casing.
6. Lift up and hold cover while disconnecting from the PC Board the On/Off switch cable (F)
and the PC Board to foot end casing connector cable (G). Note carefully the connecting
positions of the cable connectors to the PC Board connectors (On/Off switch: cable
connector green wire facing pin 11; foot end casing connector cable: connector black wire
facing pin 1). Lay cover aside.
E
D
A
FOOT END CASING
COVER
7. Carefully identify the position of all the cables connected to the PC Board before
disconnecting them. Disconnect cables.
8. Remove locknut (B) holding the PC Board ground wire (C).
9. Remove the two screws (D) holding the PC Board support (E) to the frame and remove the
PC Board.
10. Disengage PC Board from the support stand off pins and remove it.
11. Reverse the above steps to install replacement PC Board.
E
NNOOTTE
Before closing the foot end casing, ensure that the PC Board dip switches are in the following
positions: dip switch #1 = off; dip switch #2 = on; dip switch #3 = off; dip switch #4 = off.
12. Test all bed functions for proper operation before returning bed to service.
34
Page 35

Maintenance Procedures Chapter 4
Figure 4.10
CASING
4.9 ON/OFF SWITCH REPLACEMENT
E
NNOOTTE
Refer to fig. 4.7A, page 33, for illustration of the reference points mentioned in this section.
1. Raise the bed to high position and lock casters.
2. Unplug the power cord from the wall receptacle.
3. Remove the foot panel.
4. Properly ground yourself (see "Static Discharge Precautions", page 8).
5. Remove the 12 screws (A, B) holding the foot end casing cover (C) and the two IV pole
holders (E) to the foot end casing.
6. Lift up and hold cover while disconnecting from the PC Board the On/Off switch cable (F)
and the PC Board to foot end casing connector cable (G). Note carefully the connecting
positions of the cable connectors to the PC Board connectors (On/Off switch: cable
connector green wire facing pin 11; foot end casing connector cable: connector black wire
facing pin 1). Lay cover on a workbench.
7. Remove the On/Off switch (L) by squeezing both sides and passing it through its housing
aperture.
8. Reverse the above steps to install replacement On/Off switch.
9. Test On/Off switch and LED state indicator for proper operation before returning bed to
service.
4.10 BED POWER CORD REPLACEMENT
E
NNOOTTE
Step 9 of this procedure requires that the connector be removed from the extremity of the power
cord in order to remove the cord from the head end casing. The connector does not pass
through the orifice provided for the power cord. A special tool exists that enables the removal of
the connector without damaging the cord wires or the connector female sockets. If this tool is
not available and you have to cut the wires to remove the connector, be sure to order the
connector (P/N QDF8042) in addition to the power cord.
HEAD END
1. Unplug the power cord from the wall receptacle.
2. Remove the head panel.
3. Remove the fourteen screws (C, fig. 4.1B, page 24) holding the head end casing cover (E,
fig. 4.1B, page 24) and remove cover.
35
Page 36

Chapter 4 The GO BED Maintenance Manual
4. Cut cable tie holding wires together.
5. Disconnect the bed power cord connector (A) from the PC Board power cord connector (B).
Note the connecting position of the connectors, white wire opposite white wire, black
opposite black.
6. Remove locknut (C) holding the power cord ground wire (green) (D) to the head end casing.
Note position of the ground wire among the others. Remove wire.
E
NNOOTTE
Replace the power cord ground wire exactly at the same position it was before being
removed.
7. Use pliers to squeeze the strain relief bushing (E) and remove it from its location by pulling
the cable from under the head end casing. Remove bushing from cable.
8. Remove connector (A) from end of power cord to remove power cord from head end casing.
E
NNOOTTE
Do not install connector before having inserted the power cord extremity in the head end
casing through the orifice provided. Remember that the connector does not pass through
the orifice provided for the power cord.
9. Remove defective power cord.
10. Reverse the above steps to install replacement power cord.
11. Test power cord for proper operation before returning bed to service.
4.11 NIGHT LIGHT SYSTEM COMPONENT REPLACEMENT
E
NNOOTTE
The following procedure aims at troubleshooting and replacing a defective part in the
photoelectric night light assembly.
1. Raise bed to maximum elevation and lock casters.
2. Put the head side-rails in the down position and raise the foot side-rails.
3. Raise the Knee Gatch to the high position.
4. Unplug the power cord from the wall receptacle.
5. Remove the head panel.
6. Manually lift and fold the foot section back towards the head end of the bed (see figure 4.1
in Appendix B).
7. Remove night light located on the left rail at the foot end of the bed (see fig. 4.11, page 37).
8. Check bulb and replace if necessary with a 120V, 7W type bulb and/or check that bulb is
correctly inserted into the socket. Plug night light into a 120V wall power receptacle and
mask the photoelectric cell. Does the bulb light up?
NO: Proceed to step 9. YES: Plug night light back into bed socket.
Does night light work properly when plugged back to bed and photo cell masked?
NO: Proceed to step 9. YES: End the procedure.
9. Replace photoelectric night light with a new 120V, 7.5W max. type and test on a 120V wall
power receptacle for proper functioning. Plug night light back into bed socket.
Does night light work properly when plugged back to bed and photo cell masked?
NO: Proceed with step 10. YES: End the procedure.
10. Remove night light from the bed socket.
11. Use the necessary equipment for proper static protection (see "Static Discharge
Precautions, page 8).
36
Page 37

Maintenance Procedures Chapter 4
C
A
12. Remove the 12 screws (A, B, fig. 4.7A, page 32) holding the foot end casing cover (C, fig.
4.7A, page 32) and the two IV pole holders (E, fig. 4.7A, page 32) to the foot end casing.
13. Lift up and hold cover while disconnecting from the PC Board the On/Off switch cable (F, fig.
4.7A, page 32) and the PC Board to foot end casing connector cable (G, fig. 4.7A, page 32).
Note carefully the connecting positions of the cable connectors to the PC Board connectors
(On/Off switch: cable connector green wire facing pin 11; foot end casing connector cable:
connector black wire facing pin 1). Lay cover aside.
D
B
NIGHT LIGHT
FOOT END
CASING
Figure 4.11
14. Disconnect the night light cable connector (A) from the PC Board power cord connector (B).
Note the connecting position of the connectors, white wire facing white wire, black facing
black.
15. Cut the cable tie holding cables together.
16. Remove the 3 screws (C) holding the rail cover (D) to the left rail and slowly remove rail
cover from its location. The night light wiring will follow.
17. Make necessary tests to detect faulty component.
18. Reverse steps to install night light assembly with replacement component.
19. Test night light for proper operation before returning bed to service.
37
Page 38

Chapter 4 The GO BED Maintenance Manual
WWAARRNNIINNG
G
Figure 4.12
A
C
D E
4.12 120V AUXILIARY OUTLET COMPONENT REPLACEMENT
Always unplug the power cord from the wall outlet when cleaning or servicing the bed.
Danger: 120V current.
E
NNOOTTE
The following procedure aims at troubleshooting and replacing a defective part in the 120V
auxiliary outlet assembly.
1. Raise the bed to high position and lock casters.
2. Unplug the power cord from the wall receptacle.
3. Remove the 12 screws (A, B, fig. 4.7A, page 32) holding the foot end casing cover (C, fig.
4.7A, page 32) and the two IV pole holders (E, fig. 4.7A, page 32) to the foot end casing.
4. Lift up and hold cover while disconnecting from the PC Board the On/Off switch cable (F, fig.
4.7A, page 32) and the PC Board to foot end casing connector cable (G, fig. 4.7A, page 32).
Note carefully the connecting positions of the cable connectors to the PC Board connectors
(On/Off switch: cable connector green wire facing pin 11; foot end casing connector cable:
connector black wire facing pin 1). Lay cover aside.
B
G
FOOT END
CASING
5. Disconnect the two wires (A) connected to the 5A circuit breaker (note their connecting
positions) and remove circuit breaker (B) from its location by squeezing both sides
simultaneously and passing it through its housing aperture.
6. Test the circuit breaker.
- if defective, proceed with step 7 through step 9 and end procedure.
- if functioning properly, go to step 10.
7. Replace the defective circuit breaker with a new 5A type circuit breaker.
8. Reverse steps to reassemble the auxiliary outlet with the replacement 5A circuit breaker.
9. Test auxiliary outlet for proper operation before returning bed to service.
End of procedure.
38
Page 39

Maintenance Procedures Chapter 4
D
D
A
B
C A
10. Remove the screw (C) holding the duplex receptacle (D) to the housing.
11. Loosen the screws holding the wires to the duplex receptacle. Note their connecting
positions.
12. Test the duplex receptacle.
- if defective, proceed with step 13 through step 15 and end procedure.
- if functioning properly, go to step 16.
13. Replace defective duplex receptacle by one of the same type (Leviton 8200-W).
14. Reverse above steps to reassemble auxiliary outlet with replacement duplex receptacle.
15. Test auxiliary outlet for proper operation before returning bed to service.
End of procedure.
16. Disconnect auxiliary outlet cable (E) from PC Board.
17. Remove locknut (F) holding cable ground wire (G) to the PC Board housing and remove
outlet cable. Note the position of the ground wire among the other.
E
NNOOTTE
Replace the auxiliary outlet cable ground wire exactly at the same position it was before being
removed.
18. Test the auxiliary outlet cable:
- if defective, proceed with step 19 through 21.
- if functioning properly, suspect a problem with the PC Board (refer to section 4.8 for the PC
Board Replacement procedure).
19. Replace defective auxiliary outlet cable.
20. Reverse above steps to reassemble auxiliary outlet with replacement cable.
21. Test auxiliary outlet for proper operation before returning bed to service.
4.13 MATTRESS SUPPORT SECTION REPLACEMENT
Foot Section Replacement
HEAD
TÊTE
END
KNEE GATCH SECTION
Figure 4.13A
1. Raise the bed to high position and lock casters.
2. Put the head side-rails in the down position and raise the foot side-rails.
3. Raise the Knee Gatch to maximum height.
FOOT SECTION
39
Page 40

Chapter 4 The GO BED Maintenance Manual
A A
B C
4. Unplug the power cord from the wall receptacle.
5. Manually lift and fold the foot section back towards the head end of the bed (see figure 4.1
in Appendix B).
6. Remove from the foot section the parts that will be transferred to the replacement foot
section, i.e. foot mattress retainer (B), prop rod (C) and side mattress retainers (two) (A).
7. Remove both foot end side-rail assemblies. Refer to the "Foot End Side-Rail Replacement"
procedure, section 4.1, page 24.
8. Manually bring the foot section back to normal position. Plug the bed power cord and bring
the Knee Gatch down to flat position. Unplug bed power cord again.
9. Remove the two bolts/shoulder spacers/flat washers/locknuts (D) linking the foot and thigh
sections together and remove the foot section.
10. Reverse the above steps to install replacement foot section.
11. Test foot section mobility for proper operation before returning bed to service.
Thigh Section Replacement
E
NNOOTTE
Before ordering a replacement thigh section, check if the bed is equipped with the Auto Contour
option and, if so, mention it when ordering the part.
KNEE GATCH SECTION
HEAD
TÊTE
END
FOOT SECTION
CENTRE SECTION
Figure 4.13B
1. Raise the bed to high position, lock casters and bring mattress support to horizontal
position.
2. Unplug the power cord from the wall receptacle.
3. Lower the four safety side-rails without pushing them against the bed.
4. Remove the Rue ring/washer/nylon washers(2)/clevis pin (A, fig. 4.14, page 44 ) hooking up
the Knee Gatch actuator tube to the thigh section lever arm.
E
NNOOTTE
Apply grease on the clevis pin and the nylon washers before hooking back the thigh section to
the actuator tube.
5. Remove the four bolts/shoulder spacers/flat washers/locknuts (A) linking the thigh section to
the foot and centre sections. Remove thigh section.
40
Page 41

Maintenance Procedures Chapter 4
A
A B
6. If the bed is equipped with the Auto Contour option, remove the two screws (B) holding
the micro switch activator (C) underneath the thigh section and save activator for the
replacement thigh section.
E
NNOOTTE
Apply grease on the activator after having replaced it back underneath the replacement thigh
section.
7. Reverse the above steps to install replacement Knee Gatch section.
8. Test Knee Gatch mobility for proper operation before returning bed to service.
Centre Section Replacement
KNEE GATCH SECTION
HEAD
TÊTE
END
CENTRE SECTION
HEAD SECTION
RETRACTABLE FRAME
Figure 4.13C
1. Raise the bed to high position, lock casters and bring mattress support to horizontal
position.
2. Unplug the power cord from the wall receptacle.
3. Lower the four side-rails without pushing them against the bed.
4. Remove the four bolts/shoulder spacers/flat washers/locknuts (A) linking the centre section
to the thigh and head sections.
5. Remove the four bolts/washers (B) holding the centre section to the mobile frame and
remove centre section.
E
NNOOTTE
Before replacing the bolts, apply medium strength tread locker (blue) on the bolt treads.
6. Reverse the above steps to install replacement centre section.
7. Test Fowler and Knee Gatch mobility for proper operation before returning bed to service.
41
Page 42

Chapter 4 The GO BED Maintenance Manual
A
END
D C B
Head Section Replacement
HEAD SECTION
CENTRE SECTION
HEAD
TÊTE
D
Figure 4.13D
Bed without Optional CPR
1. Raise the bed to high position, lock casters and bring mattress support to horizontal
position.
2. Remove the head board.
3. Raise Fowler to high position.
4. Unplug the power cord from the wall receptacle.
5. Remove both head safety side-rails. Refer to the "Head Safety Side-Rail Replacement"
procedure, section 4.1, page 24).
6. Remove the two mattress side retainers (A) and save them for the replacement head
section.
7. Plug the bed power cord and bring Fowler back to horizontal position.
8. Remove the Rue ring/washer/nylon washers(2)/clevis pin (G, fig. 4.14, page 44) hooking up
the head actuator tube to the head section lever arms.
E
NNOOTTE
Apply grease on the clevis pin and the nylon washers before hooking up the actuator tube to the
head section.
9. Manually lift the head section completely and attach it to the foot section using a ratchet tiedown strap to stabilize it.
42
Page 43

Maintenance Procedures Chapter 4
WWAARRNNIINNGG
F G
HEAD SECTION
E
Figure 4.13E
10. Remove the bolt/locknut (E) holding the upper part of the compression bar (F) to the head
section and lay it down.
11. Remove the bolt/flat washers(2)/locknut (G) linking the lower part of the compression bar to
the head section and remove the compression bar.
12. Remove the two bolts/shoulder spacers(4)/locknuts (B, fig. 4.13D, page 41) holding the
upper part of the two head arms (C, fig. 4.13D, page 41) to the head section. Lay them
down.
13. Remove the ratchet tie-down strap and bring the head section back to horizontal position.
14. Remove the two bolts/shoulder spacers/flat washers/locknuts (D, fig. 4.13D, page 41) linking
the head section to the centre section. Remove the head section.
15. Reverse the above steps to install replacement head section.
16. Test Fowler mobility for proper operation before returning bed to service.
Bed with Optional CPR
When activating the CPR release, all people and equipment must be removed from the area
below and around the head and foot sections of the bed or serious personal injury or damage to
equipment could occur.
1. Raise the bed to high position, lock casters and bring mattress support to horizontal
position.
2. Remove the head board.
3. Raise Fowler to high position.
4. Unplug the power cord from the wall receptacle.
5. Remove both head safety side-rails. Refer to the "Head Safety Side-Rail Replacement"
procedure, section 4.1, page 24).
6. Remove the two mattress side retainers (A, fig. 4.13D, page 41) and save them for the
replacement head section.
43
Page 44

Chapter 4 The GO BED Maintenance Manual
E
F H J K G G L
L
7. Plug the bed, bring Fowler back to horizontal position and unplug the bed.
8. Remove the Rue ring/washer/nylon washers(2)/clevis pin (G, fig. 4.14, page 44) hooking up
the head actuator tube to the head section lever arms.
E
NNOOTTE
Apply grease on the clevis pin and the nylon washers before hooking up the actuator tube to the
head section.
9. Manually lift the head section completely and attach it to the foot section using a ratchet tiedown strap to secure is position.
G
HEAD SECTION
MICRO-SWITCH CONNECTION
RED WIRE
BLACK WIRE
Figure 4.13F
10. Remove locknut (E) holding the activation rod (F) to the activation lever, disengage rod and
lay it down.
11. Remove the four bolts/flat washers/locknuts (G) holding the CPR support (H) to the head
section and remove CPR support.
12. Disconnect the two wires (J) from the micro switch. Note the wire connecting positions.
13. Remove the bolt/locknut (K) holding the upper part of the small locking lever to the head
section and lay the assembly down.
14. Remove the bolt/shoulder spacers(2)locknut (L) linking the upper part of the mattress
support lever to the head section and lay assembly aside.
15. Remove the two bolts/shoulder spacers(4)/locknuts (B, fig. 4.13D, page 41) holding the
upper part of the two head arms (C, fig. 4.13D, page 41) to the head section. Lay them
down.
16. Remove the ratchet tie-down strap and bring the head section back to horizontal position.
17. Remove the two bolts/shoulder spacers/flat washers/locknuts (D, fig. 4.13D, page 41) linking
the head section to the centre section. Remove head section
18. Reverse the above steps to install replacement head section.
19. Test Fowler mobility and instant CPR release for proper operation before returning bed to
service.
44
Page 45

Maintenance Procedures Chapter 4
A C B D F E G K J L K L
J
N M
O
P Q H R S
4.14 ACTUATOR REPLACEMENT
HI-LO ACTUATOR
HI-LO ACTUATOR
E
NNOOTTE
Unless otherwise stated, all reference points of each actuator replacement procedure will refer
to figure 4.14 above.
KNEE GATCH
ACTUATOR
HEAD ACTUATOR
Figure 4.14
45
Page 46

Chapter 4 The GO BED Maintenance Manual
CCAAUUTTIIOON
N
Knee Gatch Actuator Replacement
1. Raise bed to maximum elevation, lock casters and bring mattress support to horizontal
position.
2. Bring the head safety side-rails down and raise the foot safety side-rails.
3. Unplug the power cord from the wall receptacle.
4. Remove the foot board.
5. Remove the Rue ring/washer/nylon washers(2)/clevis pin (A) holding the Knee Gatch
actuator tube to the thigh section lever arms.
E
NNOOTTE
Apply grease on the clevis pin and the nylon washers before hooking up the actuator tube to the
thigh section.
6. Manually lift and fold the foot and thigh sections back towards the head end of the bed until
they come to rest on the head section.
7. Remove the 12 screws (A, B, fig. 4.7A, page 32) holding the foot end casing cover (C, fig.
4.7A, page 32) and the two IV pole holders (E, fig. 4.7A, page 32) to the foot end casing.
8. Lift up and hold cover while disconnecting from the PC Board the On/Off switch cable (F, fig.
4.7A, page 32) and the PC Board to foot end casing connector cable (G, fig. 4.7A, page 32).
Note carefully the connecting positions of the cable connectors to the PC Board connectors
(On/Off switch: cable connector green wire facing pin 11; foot end casing connector cable:
connector black wire facing pin 1). Lay cover aside.
9. Disconnect the Knee Gatch actuator cable (B) from the PC Board and disengage it from the
strain relief bushing (C).
10. Loosen the bolt (D) holding the Knee Gatch actuator to the bracket until the actuator can be
rotated downward and removed from its location.
E
NNOOTTE
Apply grease on the bolt, the spring washer and the inner sides of the bracket, including the
pivot pin, when reassembling the actuator.
11. Reverse the above steps to install the replacement Knee Gatch actuator.
It is of utmost importance that the Knee Gatch replacement actuator be adjusted prior to
hooking up its tube to the thigh section. An improper adjustment of the actuator can damage the
bed mechanisms.
11.1 Proceed as follow to adjust the new Knee Gatch actuator:
• Plug the bed. Make sure that the Knee Gatch actuator cable is connected to the PC
Board.
• Hold firmly the actuator tube and run the Knee Gatch actuator up for a few seconds
then run it down until it stops. This will be the Knee Gatch actuator lower limit.
• Turn, if needed, the tube in either direction to align the tube holes with the thigh
lever arm holes and insert clevis pin.
12. Test Knee Gatch for proper operation before returning bed to service.
46
Page 47

Maintenance Procedures Chapter 4
CCAAUUTTIIOON
N
Head Actuator Replacement
1. Raise bed to high position, lock casters and bring Fowler to horizontal position.
2. Raise the Knee Gatch to high position.
3. Unplug the power cord from the wall receptacle.
4. Remove the foot board.
5. Manually lift and fold the foot section back towards the head end of the bed (see figure 4.1
in Appendix B).
6. Remove the 12 screws (A, B, fig. 4.7A, page 32) holding the foot end casing cover (C, fig.
4.7A, page 32) and the two IV pole holders (E, fig. 4.7A, page 32) to the foot end casing.
7. Lift up and hold cover while disconnecting from the PC Board the On/Off switch cable (F,
fig. 4.7A, page 32) and the PC Board to foot end casing connector cable (G, fig. 4.7A, page
32). Note carefully the connecting positions of the cable connectors to the PC Board
connectors (On/Off switch: cable connector green wire facing pin 11; foot end casing
connector cable: connector black wire facing pin 1). Lay cover aside.
8. Disconnect the head actuator cable (E) from the PC Board and disengage it from the strain
relief bushing (F).
9. Remove the Rue ring/washer/nylon washers(2)/clevis pin (G) holding the head actuator tube
to the head section lever arms.
E
NNOOTTE
Apply grease on the clevis pin and the nylon washers before hooking up the actuator tube to the
head section.
10. Loosen the bolt (H) holding the head actuator to the bracket until the actuator can be rotated
downward and removed from its location.
E
NNOOTTE
Apply grease on the bolt, the spring washer and the inner sides of the bracket, including the
pivot pin, when reassembling the actuator.
11. Reverse the above steps to install the replacement head actuator.
It is of utmost importance that the head replacement actuator be adjusted prior to hooking up
its tube to the head section. An improper adjustment of the actuator can damage the bed
mechanisms.
11.1. Proceed as follow to adjust the new head actuator:
• Plug the bed. Make sure that the head actuator cable is connected to the PC
Board.
• Hold firmly the actuator tube and run the head actuator up for a few seconds then
run it down until it stops. This will be the head actuator lower limit.
• Turn, if needed, the tube in either direction to align the tube holes with the head
lever arm holes and insert clevis pin.
12. Test Fowler for proper operation before returning bed to service.
47
Page 48

Chapter 4 The GO BED Maintenance Manual
CCAAUUTTIIOON
N
Hi-lo Actuator Replacement
E
NNOOTTE
In order to preserve the adjustment of the bed lowest position when replacing a Hi-lo
actuator, a special tool kit designed for that purpose must be used.
To obtain this kit, contact our Service department (see section 1.2) and order part number
KR0054.
1. Bring the head side-rails down and raise the foot side-rails.
2. Raise Fowler by approximately 50°, so that the loosening of the bolt (L) holding the Hi-lo
actuator to its support is not hindered.
3. Raise the Knee Gatch to the high position.
4. Manually lift and fold the foot section back towards the head end of the bed (see figure
4.1 in Appendix B).
5. Place the alignment jigs on the base of the bed as illustrated in figure 4.14A in Appendix
B.
6. Lower the bed until it rests completely on the jigs. If one or both Hi-lo actuators are
defective, use a ratchet and the socket included in the tool kit to lower the bed on the
jigs.
7. Unplug the power cord from the wall receptacle.
8. Disconnect the actuator cable (J) connector and cut the cable ties holding it onto the
frame.
9. Remove the Rue ring/washer/nylon washers(2)/clevis pin (K) holding the Hi-lo actuator
tube to the Hi-lo lever arms.
E
NNOOTTE
Apply grease on the clevis pin and the nylon washers before hooking back the actuator tube
to the Hi-lo lever arms.
10. Loosen the bolt (L) holding the Hi-lo actuator to the bracket until the actuator can be
rotated downward and removed from its location.
E
NNOOTTE
Apply grease on the bolt, the spring washer and the inner sides of the bracket, including the
pivot pin, when reassembling the actuator.
11. Reverse the above steps to install replacement Hi-lo actuator.
It is of utmost importance that the Hi-lo replacement actuator be adjusted prior to hooking
up its tube to the Hi-lo lever arms. An improper adjustment of the actuator can damage the
bed mechanisms.
11.1. Proceed as follow to adjust the new Hi-lo actuator:
• Plug the bed. Make sure that the Hi-lo actuator cable is connected.
• Hold firmly the actuator tube and run the Hi-lo function up for a few seconds then
run it down until it stops. This will be the Hi-lo actuator lower limit.
• Turn, if necessary, the tube in either direction to align the tube holes with the Hilo lever arm holes and insert clevis pin.
12. Test Hi-lo function for proper operation before returning bed to service.
48
Page 49

Maintenance Procedures Chapter 4
4.15 ACTUATOR SCREW LUBRICATION PROCEDURE
The basic rule to grease the actuator screws is to extend the actuator to its maximum length so
as to uncover a maximum of its screw treads.
E
NNOOTTE
Unless otherwise stated, refer to fig. 4.14, page 45 for illustration of the reference points
mentioned in this section.
Head and Knee Gatch Actuator Screws
1. Raise the bed to high position and lock casters. Bring the head side-rails down and raise the
foot side-rails.
2. Raise Fowler to the high position (in this position, the head actuator will reach its maximum
extension) and bring Knee Gatch down until flat (in this position, the Knee Gatch actuator
will reach its maximum extension).
3. Unplug the power cord from the wall receptacle.
4. Manually lift and fold the foot section back towards the head end of the bed. You must
secure this position by tying the foot section to another part of the bed head end section with
a ratchet tie-down strap.
5. Remove the two screws (M) holding the plastic dust tubes (N) of the head and Knee Gatch
actuators (the two screws and the dust tube of the Knee Gatch are not illustrated on fig.
4.14) and remove dust covers to uncover the actuator screws.
6. Apply grease all over the screw treads with a brush making sure the grease reaches the
bottom of the treads and replace the two dust covers.
7. Remove the ratchet tie-down strap, replace the foot section to horizontal position and run
both head section and Knee Gatch up and down completely a few times to spread grease
evenly.
8. Test Knee Gatch and Fowler mobility for proper operation before returning bed to service.
Head Actuator Screw Guide
1. Raise bed to high position, lock casters and bring Fowler to horizontal position.
2. Raise the Knee Gatch to high position and remove the foot board.
3. Unplug the power cord from the wall receptacle.
4. Manually lift and fold the foot section back towards the head end of the bed (see figure 4.1
in Appendix B).
5. Remove the 12 screws (A, B, fig. 4.7A, page 32) holding the foot end casing cover (C, fig.
4.7A, page 32) and the two IV pole holders (E, fig. 4.7A, page 32) to the foot end casing.
6. Lift up and hold cover while disconnecting from the PC Board the On/Off switch cable (F,
fig. 4.7A, page 32) and the PC Board to foot end casing connector cable (G, fig. 4.7A, page
32). Note carefully the connecting positions of the cable connectors to the PC Board
connectors (On/Off switch: cable connector green wire facing pin 11; foot end casing
connector cable: connector black wire facing pin 1). Lay cover aside.
7. Disconnect the head actuator cable (E) from the PC Board and disengage it from the strain
relief bushing (F).
8. Remove the Rue ring/washer/nylon washers(2)/clevis pin (G) holding the head actuator tube
to the head section lever arms.
E
NNOOTTE
Apply grease on the clevis pin and the nylon washers before hooking up the actuator tube to the
head section.
49
Page 50

Chapter 4 The GO BED Maintenance Manual
CCAAUUTTIIOON
N
9. Loosen the bolt (H) holding the head actuator to its bracket until the actuator can be rotated
downward and removed from its location. Lay actuator on a workbench.
E
NNOOTTE
Apply grease on the bolt, the spring washer and the inner sides of the bracket, including the
pivot pin, when reassembling the actuator.
10. Remove the two screws (M) holding the plastic dust cover (N) to the actuator and remove
cover.
11. Unscrew the actuator tube (Q) until you see through the tube holes (P) (holes used to hook
the actuator tube to the head section) the screw nylon guide (O). Unscrew the tube a little
more until the nylon guide has passed the tube holes.
12. Apply grease generously into the actuator tube through the holes.
13. Screw the actuator tube back into original position (approximately). Do not worry about the
position where you will bring back the tube, the final adjustment at step 15.1 will correctly
position the tube.
14. Reverse above steps to replace the head actuator. Run Fowler a few time up and down
completely to spread grease and check and to check its functioning.
It is of utmost importance that the head actuator be adjusted prior to hooking up its tube to
the head section. An improper adjustment of the actuator can damage the bed mechanisms.
15.1. Proceed as follow to adjust the head actuator:
• Plug the bed. Make sure that the head actuator cable is connected to the PC
Board.
• Hold firmly the actuator tube and run the head actuator up for a few seconds then
run it down until it stops. This will be the head actuator lower limit.
• Turn the tube in either direction to line up the tube holes with the head lever arm
holes and insert clevis pin.
Hi-lo Actuator Screws
1. Raise the bed to high position (in this position, the two Hi-lo actuators will reach their
maximum extension) and lock casters.
2. Raise Fowler and Knee Gatch to the high position.
3. Unplug the power cord from the wall receptacle.
4. Bring the head side-rails down and raise the foot side-rails.
5. Manually lift and fold the foot section back towards the head end of the bed (see figure
4.1 in Appendix B).
6. Remove the two screws (R) holding the tube support (S) of the two Hi-lo actuators and
remove the tube supports to uncover the actuator screws.
7. Apply grease all over the screw treads with a brush making sure the grease penetrates
to the bottom of the treads.
8. Replace the two tube supports.
9. Replace the foot section to horizontal position and run the Hi-lo function up and down
completely a few times to spread grease evenly and test Hi-lo mechanism.
50
Page 51

Maintenance Procedures Chapter 4
WWAARRNNIINNGG
4.16 CPR MECHANISM SPRINGS AND/OR DAMPER REPLACEMENT
When activating the CPR release, all people and equipment must be removed from the area
below and around the head and foot sections of the bed or serious personal injury or damage to
equipment could occur.
E
NNOOTTE
Unless otherwise stated, refer to fig. 4.13F, page 44 for illustration of the reference points
mentioned in this section.
1. Raise the bed to high position, lock casters and bring mattress support to horizontal
position.
2. Remove the head board.
3. Free the head actuator tube by removing the Rue ring/washer/nylon washers(2)/clevis pin
(G, fig. 4.14, page 44 ) holding it to the head section lever arms.
E
NNOOTTE
Apply grease on the clevis pin and the nylon washers before hooking up the actuator tube to the
head section.
4. Manually lift the head section to maximum height and attach it to the foot section using a
ratchet tie-down strap.
5. Unplug the power cord from the wall outlet
6. Remove nut (E) holding the activation rod (F) to the activation lever, disengage rod and lay it
down.
7. Remove the bolt/locknut (K) holding the upper part of the small locking lever to the head
section and lay the assembly down.
8. Remove the bolt/shoulder spacers(2)locknut (L) linking the upper part of the mattress
support lever to the head section. Remove the CPR mechanism and lay on a workbench.
9. Replace defective part (springs and/or damper) in the CPR mechanism and lay on a
workbench.
E
NNOOTTE
Apply grease on the damper bearings before replacing the damper.
10. Reverse above steps to install CPR mechanism.
11. Test CPR mechanism for proper operation before returning bed to service.
51
Page 52

Chapter 4 The GO BED Maintenance Manual
Figure 4.17
A
B
WWAARRNNIINNGG
4.17 CPR MICRO SWITCH REPLACEMENT
When activating the CPR release, all people and equipment must be removed from the area
below and around the head and foot sections of the bed or serious personal injury or damage to
equipment could occur.
Micro Switch Located Under the Head Section
1. Raise the bed to the high position and lock casters.
2. Raise Fowler to the high position and attach it to the foot section using a ratchet tie-down
strap to prevent the head section from dropping off when the upper part of the small locking
lever is removed from the head section.
3. Unplug the power cord from the wall receptacle.
4. Remove head panel.
5. Disconnect the two wires (J, fig. 4.13F, page 43) from the micro switch. Note the wire
connecting positions.
6. Remove the bolt/locknut (K, fig. 4.13F, page 43) linking the upper part of the small locking
lever to head section. Disengage lever and lay the assembly down.
C
7. Remove the two screws (A) holding the micro switch (B) to the head section long lever.
Keep the mounting plate (C). Remove defective micro switch.
8. Reverse the above steps to install replacement micro switch.
9. Test CPR mechanism for proper operation before returning bed to service.
52
Page 53

Maintenance Procedures Chapter 4
C E B
Micro Switch Located Under the Mattress Support
A
BLACK WIRE
RED WIRE
D
MICRO-SWITCH CONNECTIONS
BLACK WIRE
BLACK WIRE
Figure 4.17A
1. Raise the bed to the high position and lock casters.
2. Raise Knee Gatch to maximum height.
3. Manually lift and fold the foot section back towards the head end of the bed (see figure 4.1
in Appendix B).
4. Remove the two screws (A) holding the micro switch support (B) to the mobile frame right
rail. Remove support.
5. Disconnect the two wires (C) from the micro switch (D). Note the wire connecting positions.
6. Remove the two screws (E) holding the micro switch to its support.
7. Reverse the above steps to install replacement micro switch.
8. Test CPR mechanism for proper operation before returning bed to service.
53
Page 54

Chapter 4 The GO BED Maintenance Manual
B C D E F G H J K
LEFT MOBILE RAIL
FOOT END
4.18 AUTO CONTOUR MICRO SWITCH REPLACEMENT
A
Figure 4.18
Knee Gatch Micro Switch
1. Raise the bed to the high position and lock casters.
2. Unplug the power cord from the wall receptacle.
3. Remove the two screws (A) holding the micro switch support (B) to the mobile frame left
rail. Remove support.
4. Disconnect the two wires (C) from the micro switch (D). Note the wire connecting
positions.
5. Remove the two screws (E) holding the micro switch to its support and remove micro
switch.
6. Reverse the above steps to install replacement micro switch.
7. Test Auto Contour function for proper operation before returning bed to service.
Head Section Micro Switch
1. Raise the bed to the high position and lock casters.
2. Raise Fowler to approximately 40 degrees.
3. Remove the two screws (F) holding the micro switch support (G) to the mobile frame left
rail. Remove support.
4. Disconnect the two wires (H) from the micro switch (J). Note the wire connecting
positions.
5. Remove the two screws (K) holding the micro switch to its support and remove micro
switch.
6. Reverse the above steps to install replacement micro switch.
7. Test Auto Contour function for proper operation before returning bed to service.
54
Page 55

Maintenance Procedures Chapter 4
A B B C
C
D D E
4.19 BRAKE /STEER PEDAL REPLACEMENT
Figure 4.19
1. Raise the bed to the high position, lock casters and unplug the power cord.
2. Bring pedal to horizontal position (neutral) and remove the machine screw (A) located at the
end of the right or left pedal shaft. Note that in prior versions (beds with serial number [
C01340), the GO BED is equipped with a protective cap instead of a machine screw. If it's
the case with your bed, disregard the following note and proceed with step 5.
E
NNOOTTE
Before replacing the machine screw, apply medium strength tread locker (blue) on its tread.
When reassembling, the machine screw must first be inserted and tightened before tightening
the pressure screws mentioned in steps 5 and 6.
3. Remove the pressure screw (G, fig. 4.20, page 55) located on the right or left socket (H, fig.
4.20, page 55) of the 5th wheel activation lever (J, fig. 4.20, page 55).
E
NNOOTTE
Before replacing the pressure screw, apply medium strength tread locker (blue) on its tread.
4. Remove the pressure screw (B) located on the head or foot locking lever (E).
E
NNOOTTE
Before replacing the pressure screw, apply medium strength tread locker (blue) on its tread.
5. Remove the defective pedal. Leave the pedal sleeve (C) in place. Keep the two nylon
washers (D).
E
NNOOTTE
Apply grease on the new pedal shaft before placing it.
6. Reverse the above steps to install replacement pedal. Be sure to position the pedal
horizontally (neutral) before inserting its shaft into the sockets of the locking lever and the
5th wheel activation lever. Test pedal for proper operation.
E
NNOOTTE
When inserting the pedal shaft into the sockets, make sure that the locking lever (E) is vertically
positioned and that the upper flat part of the 5th wheel activation lever (J, fig. 4.20, page 55) is
parallel to the floor (bring the wheel near the floor by exerting a pressure on it to ease this
operation).
55
Page 56

Chapter 4 The GO BED Maintenance Manual
G G H
M L M L N N P O O Q Q R R S S W W
T
ASSEMBLY
4.20 5TH WHEEL MECHANISM COMPONENT REPLACEMENT
E
NNOOTTE
Unless otherwise stated, all reference points mentioned in the procedures contained in section
4.20 will refer to figure 4.20 below.
H
J
B
V
U
F
5TH WHEEL SWING ARM
A
B
A
FOOT END
K
Figure 4.20
5th Wheel Replacement
1. Raise the bed to the high position.
2. Unplug the power cord from the wall receptacle.
3. Bring pedal to horizontal position (neutral).
4. Remove the bolt/locknut (F) holding the 5th wheel to the swing arms. Remove defective
wheel.
5. Reverse the above steps to install the replacement 5th wheel.
6. Test 5th wheel for proper operation before returning bed to service.
K
PIED /
5th Wheel Activation Lever ( J, fig. 4.20) Replacement
1. Raise the bed to the high position and lock casters.
2. Unplug the power cord from the wall receptacle.
3. Bring pedal to horizontal position (neutral).
56
Page 57

Maintenance Procedures Chapter 4
4. Remove the machine screw (A, fig. 4.19, page 54) located at the end of the right and left
pedal shafts. Note that in prior versions (beds with serial number [ C01340), the GO BED is
equipped with protective caps instead of machine screws. If it's the case with your bed,
disregard the following note and proceed with step 5.
E
NNOOTTE
Before replacing the machine screws, apply medium strength tread locker (blue) on their treads.
When reassembling, the machine screws must first be inserted and tightened before tightening
the pressure screws mentioned in steps 5 and 6.
5. Remove the pressure screws (G) located on the right and left sockets (H) of the 5th wheel
activation lever (J).
E
NNOOTTE
Before replacing the pressure screws, apply medium strength tread locker (blue) on their treads.
6. Remove the pressure screws (B, fig. 4.19, page 54) located on the head and foot locking
levers (E, fig. 4.19, page 54).
7. Gradually pull out each pedal until the pedal shafts (K) disengage from the 5th wheel
activation lever sockets (H), then stop.
8. Remove the two bolts/shoulder spacers(4)/locknuts (L) holding both extremities of the
activation lever to the upper part of the two counter-levers (M).
9. Remove the 5th wheel activation lever (J).
10. Reverse the above steps to install the replacement 5th wheel activation lever.
E
NNOOTTE
Be sure to position the activation lever horizontally before inserting each pedal shaft into its
corresponding socket. To do so, position the top flat part of the lever parallel to the floor (bring
5th wheel near the floor by pressing it to facilitate this operation).
11. Test 5th wheel mechanism for proper operation before returning bed to service.
5th Wheel Swing Arm Assembly Replacement
E
NNOOTTE
Although the 5th wheel swing arm assembly is shown with its different components in the Parts
Lists 5th wheel drawing, it is sold completely assembled, except for the 5th wheel, when needed
for a replacement on a GO BED.
1. Raise the bed to the high position and lock casters.
2. Unplug the power cord from the wall receptacle.
3. Bring pedal to horizontal position (neutral).
4. Remove the machine screws (A, fig. 4.19, page 54) located at the end of the right and left
pedal shafts. Note that in prior versions, the GO BED is equipped with protective caps
instead of machine screws. If it's the case with your bed, disregard the following note and
proceed with step 5.
E
NNOOTTE
Before replacing the machine screws, apply medium strength tread locker (blue) on their treads.
When reassembling, the machine screws must first be inserted and tightened before tightening
the pressure screws mentioned in steps 5 and 6.
5. Remove the pressure screws (G) located on the right and left sockets (H) of the 5th wheel
activation lever (J).
E
NNOOTTE
Before replacing the pressure screws, apply medium strength tread locker (blue) on their treads.
57
Page 58

Chapter 4 The GO BED Maintenance Manual
6. Remove the pressure screws (B, fig. 4.19, page 54) located on the head and foot locking
levers (E, fig. 4.19, page 54).
7. Remove both pedals completely. Remove the two pedal sleeves (C, fig. 4.19. page 54).
Keep the four nylon washers (D, fig. 4.19, page 54).
E
NNOOTTE
Apply grease on the pedal shafts before replacing them.
8. Remove the bolt/locknut (N) holding each 5th wheel mechanism support (O) to the retaining
plates (P).
E
NNOOTTE
When reassembling, tighten definitely the bolts/locknuts holding the supports to the retaining
plates only after the pedal shafts are inserted into the lever sockets. Do not tighten too strongly,
the supports could buckle.
9. Remove the complete 5th wheel mechanism from the retaining plates by doing the following:
• Slide both 5th wheel mechanism supports (O) inside the retaining plate (P) towards the
head of the bed and rotate them downwards through the orifice provided at the bottom of
the retaining plates. The supports will then be partially disengaged from the plates.
• Seize both supports and position them diagonally to completely disengage them from the
retaining plates.
E
NNOOTTE
Note the spring positions and the position of the two supports when removing them from the
retaining plates, mark their position to help their re assembly.
10. Remove the supports (O) from the 5th wheel mechanism. Keep the torsion springs (Q).
11. Remove the bolts/shoulder spacers(4)/locknuts (R) holding the torsion levers (S) to the
lower part of the two counter-levers (M).
12. Remove the two torsion levers (S) from both ends of the torque shaft (T) by first removing
the two locknuts (U) then the two screws (V).
E
NNOOTTE
Apply grease on the portion of the torsion levers that inserts into the nylon bushings (W) before
replacing them.
When reassembling, screw down tightly the two screws (V) holding the torsion levers to the
torque shaft before tightening the two locknuts (U).
13. Remove bolt/nut (F) holding the 5th wheel to the swing arm and remove wheel.
14. Reverse the above steps to install the replacement swing arm assembly. Read carefully the
following note to properly reinstall the pedals.
E
NNOOTTE
Be sure to position the pedal horizontally (neutral) when inserting its shaft into the sockets of the
locking levers and the 5th wheel activation levers.
When inserting the pedal shaft into the sockets, make sure that the locking lever is vertically
positioned and that the upper flat part of the 5th wheel activation lever is parallel to the floor
(bring the 5th wheel near the floor by exerting a pressure on it to ease this operation).
15. Test 5th wheel mechanism for proper operation before returning bed to service.
58
Page 59

Maintenance Procedures Chapter 4
B C D E G F H J J H
4.21 CASTER REPLACEMENT
A
K
Figure 4.21
1. Raise the bed enough to place under the frame at the head or foot end of the bed
(depending on the caster to be changed) two jack stands adjusted to a height of 20" (see
figure 4.21A in Appendix B).
2. Lower the bed until it rests on the jack stands and the caster lower part is at least 5" clear of
the ground.
3. Unplug the power cord from the wall receptacle.
4. Remove the two pop-on screw covers (A) and the two screws (B) holding the caster cover
(C) to the base.
5. If the caster to be replaced is part of the locking mechanism, proceed with step 9.
If the caster to be replaced is not part of the locking mechanism, proceed with step 6
through step 8 and end procedure.
6. Support the caster while removing the bolt/washer (H) holding the caster shaft to the
mounting socket (J) and remove caster.
7. Reverse the above steps to install the replacement caster.
8. Test casters before returning bed to service
End of procedure.
9. Remove the Rue ring (D) at the inner end of the locking axle (E).
10. Remove the pressure screw (F) located on the locking lever (G) and remove locking lever
from the locking axle. Keep the nylon washer (K).
E
NNOOTTE
Before replacing the pressure screw, apply medium strength tread locker (blue) on its tread.
59
Page 60

Chapter 4 The GO BED Maintenance Manual
11. Remove the bolt/washer (H) holding the caster shaft to the mounting socket (J).
E
NNOOTTE
Before replacing the bolt, apply medium strength tread locker (blue) on its tread.
12. Support caster while pulling the locking axle (E) out its location. Note the nearly vertical
position of the Rue ring hole to correctly replace the locking axle later on. Remove caster.
E
NNOOTTE
Ensure that the pedal is in horizontal position when the locking axle is inserted into the new
caster shaft orifice.
13. Reverse the above steps to install the replacement caster. Read the following note carefully
before completing the installation of the replacement caster
E
NNOOTTE
The shaft of a caster which is part of the locking mechanism must be oriented correctly before
attaching it to the mounting socket, otherwise the caster will not lock when the brake pedal is
activated.
13.1. Perform the following steps to correctly orient the caster shaft before finalizing the
replacement caster installation:
• Ensure the new caster shaft mechanism is in the neutral position (brake/steer
pedal horizontal). To do so, insert the locking axle in the new caster shaft orifice
and rotate the locking axle using a 7/16" open key to identify the three possible
positions of the shaft mechanism: 5th wheel engaged, neutral, brake engaged).
Set the mechanism to the neutral position (middle position). Once done, remove
the locking axle from the caster shaft orifice.
• Insert the caster shaft into the mounting socket (J) and insert the locking axle (E)
completely (reverse the pulled out move with the Rue ring hole nearly vertical).
Replace the locking lever on the locking axle (make sure the pedal is in the
neutral position before replacing the locking lever on the locking axle), but not
completely so as to have enough room between the mounting socket (J) and the
locking lever to insert a 7/16" open key.
• Using the 7/16" open key, rotate the locking axle while observing the pedal
movements created by the rotation of the axle, it will occupy three positions:
o Green side of the pedal depressed: 5th wheel engaged.
o Pedal in horizontal position: neutral position.
o Red side of the pedal depressed: locking system engaged.
• When the pedal red side is depressed, check if the caster locks.
If the caster does not lock, the shaft is incorrectly oriented.
• Remove the locking lever and the locking axle (E) while supporting the caster.
Remove caster and rotate its shaft 180°. Replace caster shaft into the mounting
socket and replace locking axle and locking lever as previously described. Rotate
again the axle while observing the pedals movement created by the rotation of
the axle.
• This time, when the pedal red side depresses, the caster should lock. The caster
shaft is now correctly oriented and its installation can now be finalized.
14. Test casters and locking system for proper operation before returning bed to service.
60
Page 61

Maintenance Procedures Chapter 4
B C C D E E D G F H H J K
A G
4.22 HI-LO LEVER REPLACEMENT
A
TÊTE /
HEAD
B
FOOT END
Figure 4.22
1. Raise the bed to the high position and lock casters.
2. Adjust mattress support depending on the Hi-lo lever to be replaced:
Hi-lo lever located at the head end of the bed
Raise Fowler to maximum.
Hi-lo lever located at the foot end of the bed
Lower the head safety side-rails and raise the foot side-rails. Raise the Knee Gatch to
maximum. Manually lift and fold the foot section back towards the head end of the bed (see
figure 4.1 in Appendix B).
3. Place two jack stands, adjusted to the height of 20", under the frame, at the head end or foot
end of the bed depending on the Hi-lo lever to be replaced (see fig. 4.21A in Appendix B).
4. Lower the bed. Once in contact with the stands, still lower the bed until the clevis pin (see
step 6) holding the Hi-lo actuator tube to the Hi-lo lever arms is free from stress and easy to
remove. The Hi-lo lever can now be easily dismantled.
5. Unplug the power cord from the wall receptacle.
6. Remove the Rue ring/washer/nylon washers(2)/clevis pin (K, fig. 4.14, page 44) holding the
Hi-lo actuator tube to the Hi-lo lever arms (A) . Avoid rotating the Hi-lo actuator tube.
E
NNOOTTE
Apply grease on the clevis pin and the nylon washers before hooking up the Hi-lo actuator tube
to the Hi-lo lever arms.
7. If you are replacing the Hi-lo lever located at the foot end of the bed, remove the two
machine screws (B) holding the upper part of the right and left stabilizers (C) to the Hi-lo
lever (D).
E
NNOOTTE
Before replacing the machine screws, apply medium strength tread locker (blue) on their treads.
61
Page 62

Chapter 4 The GO BED Maintenance Manual
8. Remove the four bolts/washers/locknuts/reinforcement plates (two) (E) holding the Hi-lo
lever (D) and the moulded bearings (F) to the mobile frame (G).
E
NNOOTTE
Apply grease inside the moulded bearings before replacing them.
9. Remove the Hi-lo lever from its location by rotating it horizontally on one side to disengage
the nylon sliders (H) from the rails (J).
E
NNOOTTE
Apply grease on the nylon slider shafts (K) and under the sliders (H) before replacing the Hi-lo
lever. Ensure the rail is greased on its inner lower and side surfaces.
10. Reverse the above steps to install the replacement Hi-lo lever.
11. Test Hi-lo function for proper operation before returning bed to service.
62
Page 63

Appendix A: Connection Diagram GO bed Maintenance Guide
63
63
APPENDIX A: CONNECTION DIAGRAM
SCHÉMA DE BRANCHEMENT
CONNECTION DIAGRAM
DIAGRAMA DE CONNEXIÓN
Commande patient
Patient control
Controles del paciente
Tableau de commande
Nursing control centre
Centro de control del personal
Interrupteurs Auto-contour 1 et 2(J2 pos. 4,5,6,7)/
Contour positioning switch (J2 pos. 4,5,6,7) /
Interruptor de contorno autopostura(J2 pos. 4,5,6,7)
Interrupteurs Auto-CPR(J2 pos. 2,3)/
Auto-CPR switchs (J2 pos. 2,3) /
Interruptor automático del
somier de cabecera(J2 pos. 2,3)
Interrupteur mise en marche(J3 pos. 7 à 11)
Power switch (J3 pos. 7 to 11) /
Interruptor de marcha(J3 pos.7 a 11)
Assembler les fils
dans les connecteurs
comme ceci;
Assemble wires
as shown;
Connectar los cables
según al diagrama;
17
Rouge = #1 / Red = #1 / Rojo = no 1
Brun = #3 / Brown = #3 / Marron = no 3
Vert = #4 / Green = #4 / Verde = no 4
Bleu = #6 / Blue = #6 / Azul = no 6
Orange = #9 / Orange = #9 / Naranja = no 9
Blanc = #7 / White = #7 / Blanco = no 7
Noir = #8 / Black = #8 / Negro = no 8
Lit modèle
Bed model
FL17E-_ _ _ _
Cama modelo
1
17
17
Tête descend / Head down / Baja cabecera
Tête monte / Head up / Sube cabecera
Centre descend / Centre down / Baja centro
Centre monte / Centre up / Sube centro
Pied monte / Feet up / Sube pie
Pied descend / Feet down / Baja pie
Commun / Ground / Tierra
Commande patient
Patient control
Controles del paciente
120V
ou/or/o
Vivant/Line/Línea viva
Neutre/Neutral/Línea neatra
Fiche 120V/120V Plug/
Moteur de tête / Head motor / Motor de la cabecera
Moteur de pied / Foot motor / Motor del pie
Mise à la masse / Ground / Tierra
Moteur de lit / Bed motor /
Motor de la cama
Moteur de lit / Bed motor /
Motor de la cama
Enchufe 120V
QE71-0262-T
Transformateur /
Transformer /
Transformador
100V/200V/
220V/240V
Moteur de tête
Head motor
Motor de la cabacera
120V
Vert/Green/Verde
Rouge/Red/Rojo
No.
Moteur pied/Foot motor/Motor del pie
01
Moteur lit/Bed motor/Motor de la cama
02
Moteur tête/Head motor/Motor de la cabecera
03
Carte de contrôle/PC Board/Tarjeta de circuitos impresos
04
Commande infir./Nursing control/Controles del paciente
05
Veilleuse/Nigth light/Luz nocturna(option/opción)
06
Fiche type hôpital/Hospital grade plug/Enchufe para hospitales
07
Fil en "Y" (7 pins)/"Y" cable (7 pins)/cable en "y" de 7 espigas
08
Commandes patient/Patient controls/Controles paciente(option,opción)
09
Fil d'alimention/Power cable/Cable de alimentación10
Transformateur/Transformer/Transformador(option,opción)
11
Prise veilleuse/Night light socket/Enchufe para luz nocturna(opt., opc.)
12
Noir/Black/Negro
Blanc/White/Blanco
Vert/Green/Verde
Rouge/Red/Rojo
Foot motor
120V
Moteur de pied
Motor del pie
Noir/Black/Negro
Blanc/White/Blanco
Vert/jaune branché au châssis/
Green/yellow connect to frame/
Moteur de lit
Bed motor
Motor de la cama
120V
Rouge/Red/Rojo
No.
Qté
13
Disjoncteur 5A/Breaker 5A/Disyuntor 5A(option,opción)
1
14
Interrupteur CRP/CPR switch/Inter. automático del somier decabecera(option,opción)
2
15
Rallonges commande infir./Nurse command extentions/alargaderas del control enfermero
1
16
Fil mise à la masse/Ground cable/Cable tierra
1
17
Rallonge moteur/Motor extention/Alargaderas de motor
1
Inter. auto-contour/Contour positioning switch/Inter. contorno autopostura (option,opción)
18
1
Fil interrupteur CPR/CPR cable/Cable automático del somier de cabecera(option,opción)
19
1
20
Interrupteur mise en marche/power switch/Interruptor de marcha
1
Connecteur 17 positions/17pins connector/Conector de 17 espigas
21
2
Fil interrupteur/Interruptor cable/Cable interruptor(option,opción)
22
1
Fil commande patient/Patient control cable/Cable control. del paciente(option,opción)
23
1
Prise auxilière/Auxilary socket/Enchufe auxiliar(option,opción)
1
24
Noir/Black/Negro
Blanc/White/Blanco
Noir/Black/NegroVert/Green/Verde
Blanc/White/Blanco
Vert/Green/Verde
Rouge/Red/Rojo
Verde/amarillo conectads al chasis
Vert/green/verde
Moteur de lit
Bed motor
120V
Motor de la cama
Noir/Black/Negro
Blanc/White/Blanco
Qté
1
2
2
1
2
2
1
1
1
1
2
1
Page 64

Chapter 4 The GO BED Maintenance Manual
Figure 4.14A
D OF
F
APPENDIX B: BED POSITIONS FOR MAINTENANCE PURPOSE
Figure 4.1
KNEE GATCH AND FOOT SECTION FOLDED BACK TOWARDS
HEAD END OF THE BED
ALIGNMENT JIGS POSITIONED ON THE BED BASE
FOR A HI-LO ACTUATOR REPLACEMENT
JACK STANDS POSITIONED UNDER THE HEAD EN
THE BED
64
JACK STANDS POSITIONED UNDER THE FOOT END O
THE BED
Figure 4.21A
 Loading...