

Page 1
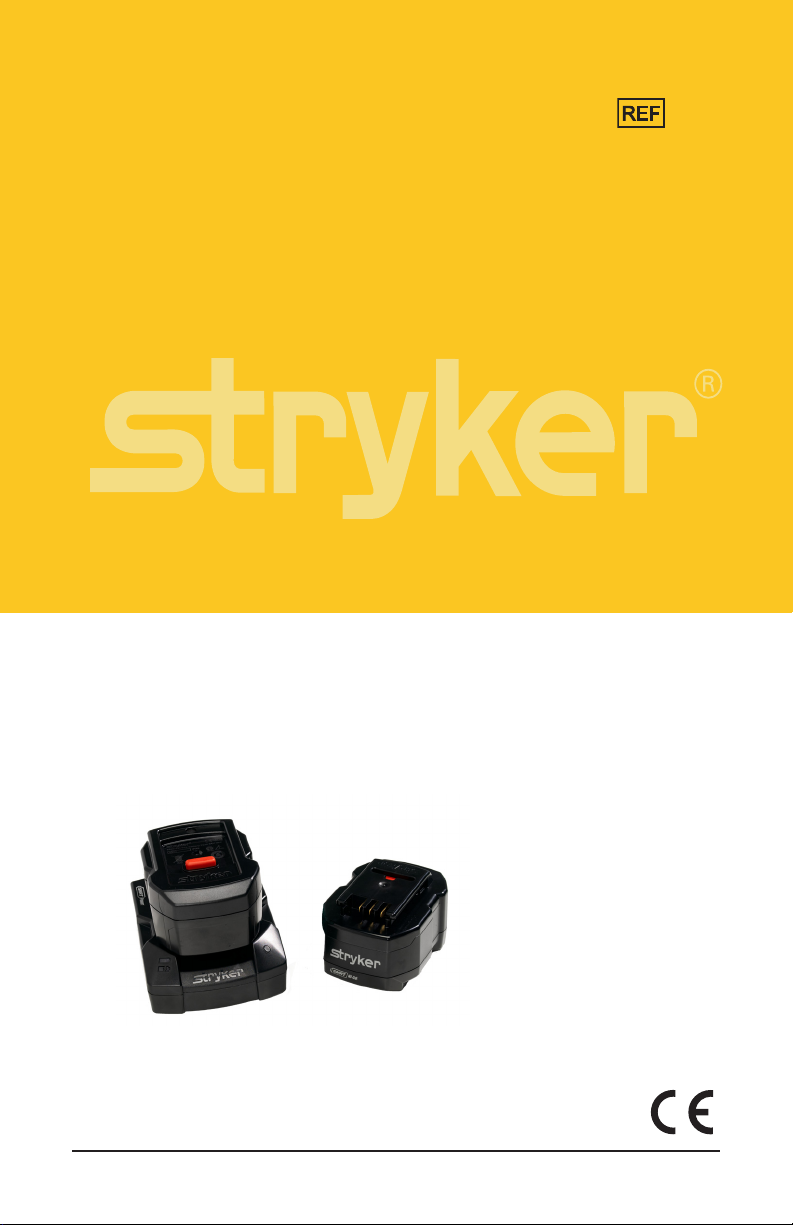
SMRT™ Power System
6500
Operations/Maintenance Manual
Manuel d’utilisation et d’entretien
Bedienungs- und Wartungshandbuch
Gebruiks-/onderhoudshandleiding
Manuale d’uso e manutenzione
Manual de uso y mantenimiento
Manual de funcionamento/manutenção
Handbok för drift/underhåll
Betjenings-/vedligeholdelsesmanual
Handbok för drift/underhåll
Käyttö- ja huolto-ohjekirja
Instrukcja obsługi/konserwacji
Návod k obsluze a údržbě
2013/03 A .1 6500 -109-105 R EV A www.stryker.com
Page 2

Page 3
Operating instructions
~
CE Mark
Manufacturer
General warning sign
Caution
Alternating current
Direct current
Symbols
Class II equipment
Non-protected
IPX0
Protected against powerful water jets
IPX6
Medical Equipment Classified by Underwriters Laboratories LLC
With Respect to Electric Shock, Fire, and Mechanical Hazards
Only in Accordance with ANSI/AAMI ES60601-1:2005 and CAN/
CSA-C22.2 No. 60601-1:08.
www.stryker.com 6500 -109-105 R EV A 1
Page 4
Cd
_
DATA
KRX
23/44
2300
mAh
(1.2A/2h)
Symbols
In accordance with European Directive 2002/96/EC on Waste
Electrical and Electronic Equipment (WEEE), this symbol indicates
that the product must not be disposed of as unsorted municipal
waste, but should be collected separately. Refer to your local
distributor for return and/or collection systems available in your
country.
WEEE Directive (2002/96/EC). Contains cadmium.
The Rechargeable Battery Recycling Corporation (RBRC) is a nonprofit, public service organization that promotes the recycling of
portable rechargeable batteries. Batteries must be delivered to a
battery collection site. Visit the RBRC website (www.rbrc.org) to
find a nearby collection site or call the phone number shown on the
recycling symbol.
Contains nickel cadmium cells and should be recycled accordingly
Battery terminal identification (data line, negative and positive)
+
Ni-Cd cell identification per IEC 61951-1:2003
Battery capacity, typical charge current and duration
2 650 0-10 9-105 R EV A www.stryker.com
Page 5

International Addresses
DENMARK
Stryker Denmark
Filial of Stryker AB
EUROPE HEADQUARTERS
Stryker SA
Cite-Centre, Grand-Rue 90
P.O. Box 1568
1820 Montreux, Switzerland
Phone: 41-21-966 -12-01
Fax: 41-21-966-12-00
EASTERN EUROPE
Stryker SA - Export Business
Grand-Rue 90
P.O. Box 1567
1820 Montreux, Switzerland
Phone: 41-21-966 -14-00
Fax: 41-21-966-14-01
AUSTRALIA
Stryker Australia
8 Herbert Street
St Leonards NSW 2065
Australia
Phone: 61-2-9467-1000
Fax: 61-2-9467-1010
AUSTRIA
Stryker GmbH
Euro Plaza, Gebäude G
Am Euro Platz 2
1120 Wie n
Austria
Phone: 43-1-8132000
Fax: 43-1-8131616
BELGIUM
NV Stryker SA
Ikaros Business Park- Fase III
Ikaroslaan 12
1930 Zaventem, Brussels
Belgium
Phone: 32-2-717-9210
Fax: 32-2-717-9249
Postbox 772
1532 Copenhagen
Denmark
Phone: 45-33-93-6099
Fax: 45-33-93-2069
UK/IRELAND
Stryker UK Limited
Stryker House
Hambridge Road
Newbury, Berkshire
RG14 5EG, England
Phone: 44-1635-556-500
Phone: 44-1635-262-400
Fax: 44-1635-580-300
FINLAND
Stryker AB, Finland
PO 80 Makelankatu 2
00501 Helsinki
Finland
Phone: 35-89-774-4680
Fax: 35-89-774-46820
FRANCE
Stryker France S.A.S.
ZAC - Avenue de Satolas Green
69330 Pusignan
France
Phone: 33-472-45-36-00
Fax: 33-472-45-36-99
GERMANY
Stryker Howmedica GmbH
Dr. Homer Stryker Platz 1
47228 Duisburg
Germany
Phone: 49-2065-837-0
Fax: 49-2065-837-837
GREECE
Stryker Hellas EPE
455 Messogion Ave
153 43 Agia Paraskevi
Athens, Greece
Phone: 30-2-10-600-32-22
Fax: 30-2-10-600-48-12
Page 6

International Addresses
ITA LY
Stryker Italia SrL
Via Ghisalba 15B
00188 Roma
Italy
Phone: 39-06-33-05-41
Fax: 39-06-33-614-067
MIDDLE EAST / NORTH AFRICA
Stryker Osteonics SA
Twin Towers
11th Floor, Suite 1101 & 1102
P.O. Box 41446
Baniyas Road
Dubai, Deira, UAE
Phone: 97-14-222-2842
Fax: 97-14-224-7381
NEDERLANDS
Stryker Nederlands BV
(P.O. Box 13, 4180 BA Waardenburg)
4181 CD Waardenburg
The Nederlands
Phone: 31-418-569-700
Fax: 31-418-569-777
NOR WAY
Stryker Norway
Norsk Fillial
Nedre Vollgate 3
0158 Oslo
Norway
Phone: 47-22-42-22-44
Fax: 47-22-42-22-54
POLAND
Stryker Polska Sp. ZO.O
Kolejowa 5/7
01-217 Warsaw
Poland
Phone: 48-22-434-88-50
Fax: 48-22-434-88-60
ROMANIA
Stryker Osteonics Romania S.R.L.
19, Leonida Str.
District 2
7000 Bucharest
Romania
Ph one: 4 0-2-12-12-11-22
Fa x: 40-2-12-12-11-33
SOUTH AFRICA
Stryker Osteonis PTY. LTD.
3 Susan Street
Strydom Park
Johannesburg, 2194 - South Africa
Mailing Address:
P.O. Box 48039
2129 Roosevelt Park
Johannesburg, South Africa
Phone: 27-11-791-4644
Fax: 27-11-791-4696
SPAIN
Stryker Iberia SL
c/Sepulveda n17
28108 Alcobendas
Madrid
Spain
Phone: 34-91-728-35-00
Phone: 34-91-358-20-44
Fax: 34 -91-358-07-48
SWEDEN
Stryker AB/Scandinavia
Box 50425
SE-204 14 Malmo
Sweden
Phone: 46-40-691-81-00
Fax: 46-40-691-81-91
PORTUGAL
Stryker Portugal Produtos Medicos,
LTDA .
Avenida Marechal Gomes da Costa, 35
1800-255 Lisboa
Portugal
Ph one: 3 5-1-21-83 9 -49-10
Fa x: 35-1-21- 83 9-49 -19
Page 7

Table of Contents
Symbols ...................................................1-3
Warning/Caution/Note Definition .................................1- 5
Introduction.................................................1-6
Intended Use of Product ....................................1- 6
Expected Service Life......................................1-6
Contraindications .........................................1- 6
Product Illustration ........................................ 1-7
Specifications ...........................................1- 8
Contact Information .......................................1-9
Summary of Safety Precautions..................................1-10
General Inspection ...........................................1-13
Compatibility Information .......................................1-14
Cot Compatibility .........................................1-14
Charger Compatibility......................................1-14
Charger Installation ...........................................1-15
Installing the SMRT Charger .................................1-15
Electrical Power Installation Requirements .......................1-15
Installing the Optional Mounting Bracket ........................1-16
Installing the Charger onto the Optional Mounting Bracket ...........1-18
Charger Features ............................................1-19
Charger Operation ..........................................1-2 0
Powering the Charger..................................... 1-2 0
Disconnecting the Charger ................................. 1-20
Charging the Battery .....................................1-21
SMRT Pak Temperature Delay ..............................1-22
SMRT Pak Error......................................... 1-2 2
Battery Operation ........................................... 1-2 3
Battery Considerations . . . . . . . . . . . . . . . . . . . . . . . . . . . . . . . . . . . . 1-2 3
Replacing the Battery..................................... 1-23
Storing the Battery ....................................... 1-2 3
Removing the Battery from the Cot ........................... 1-24
Reinstalling or Replacing the Battery .........................1-2 4
English
www.stryker.com 6500 -109-105 R EV A 1-1
Page 8

Table of Contents
English
Cleaning.................................................. 1-2 5
Recommended Cleaners ..................................1-25
Cleaning the Charger .....................................1-2 5
Cleaning the Battery...................................... 1-2 6
Troubleshooting ............................................ 1-2 8
SMRT Power System Component Locator ......................1-2 8
SMRT Charger Troubleshooting.............................. 1-29
SMRT Pak Troubleshooting................................. 1-31
Quick Reference Replacement Parts List . . . . . . . . . . . . . . . . . . . . . . . . . . 1-3 2
Service Information .......................................... 1-3 3
12 VDC Automotive Cable Fuse Replacement ...................1-33
Preventative Maintenance .....................................1-3 4
Maintenance Intervals..................................... 1-34
Storage and Handling..................................... 1-3 4
Best Practices .............................................1-3 4
Frequently Asked Questions (FAQs) ..............................1-3 5
Recycling Passport ..........................................1-3 6
EMC Information............................................ 1-3 9
1-2 65 00-109-105 RE V A www.stryker.com
Page 9
Operating instructions
~
CE Mark
Manufacturer
General warning sign
Caution
Alternating current
Direct current
Symbols
English
Class II equipment
Non-protected
IPX0
Protected against powerful water jets
IPX6
Medical Equipment Classified by Underwriters Laboratories LLC
With Respect to Electric Shock, Fire, and Mechanical Hazards
Only in Accordance with ANSI/AAMI ES60601-1:2005 and CAN/
CSA-C22.2 No. 60601-1:08.
Return To Table of Contents
www.stryker.com 6500 -109-105 R EV A 1-3
Page 10
Symbols
English
Cd
_
DATA
KRX
23/44
2300
mAh
(1.2A/2h)
In accordance with European Directive 2002/96/EC on Waste
Electrical and Electronic Equipment (WEEE), this symbol indicates
that the product must not be disposed of as unsorted municipal
waste, but should be collected separately. Refer to your local
distributor for return and/or collection systems available in your
country.
WEEE Directive (2002/96/EC). Contains cadmium.
The Rechargeable Battery Recycling Corporation (RBRC) is a nonprofit, public service organization that promotes the recycling of
portable rechargeable batteries. Batteries must be delivered to a
battery collection site. Visit the RBRC website (www.rbrc.org) to
find a nearby collection site or call the phone number shown on the
recycling symbol.
Contains nickel cadmium cells and should be recycled accordingly
Battery terminal identification (data line, negative and positive)
+
Ni-Cd cell identification per IEC 61951-1:2003
Battery capacity, typical charge current and duration
Return To Table of Contents
1-4 6500-109-105 RE V A www.stryker.com
Page 11
Warning/Caution/Note Definition
The words WARNING, CAUTION and NOTE carry special meanings and should
be carefully reviewed.
WARNING
Alerts the reader about a situation which, if not avoided, could result in death or
serious injury. It may also describe potential serious adverse reactions and safety
hazards.
CAUTION
Alerts the reader of a potentially hazardous situation which, if not avoided, may
result in minor or moderate injury to the user or patient or damage to the equipment
or other property. This includes special care necessary for the safe and effective
use of the device and the care necessary to avoid damage to a device that may
occur as a result of use or misuse.
NOTE
Provides special information to make maintenance easier or important instructions
clearer.
English
Return To Table of Contents
www.stryker.com 6500 -109-105 R EV A 1-5
Page 12

Introduction
English
This manual is designed to assist you with the operation and maintenance of
the SMRT™ Power System. Read it thoroughly before using the equipment or
beginning any maintenance on it.
INTENDED USE OF PRODUCT
The SMRT™ Power System consists of a SMRT™ Charger and a SMRT™
Pak. The SMRT™ Pak powers the hydraulic lift system of the Stryker Powered
ambulance cots.
For a full product description and intended use, see the Power-PRO™ Operations/
Maintenance Manual.
EXPECTED SERVICE LIFE
• 7 years for SMRT™ charger
• 2 years for SMRT™ Pak battery
CONTRAINDICATIONS
There are no known contraindications to use for this product.
Return To Table of Contents
1-6 6 500-109-105 RE V A www.stryker.com
Page 13
Introduction
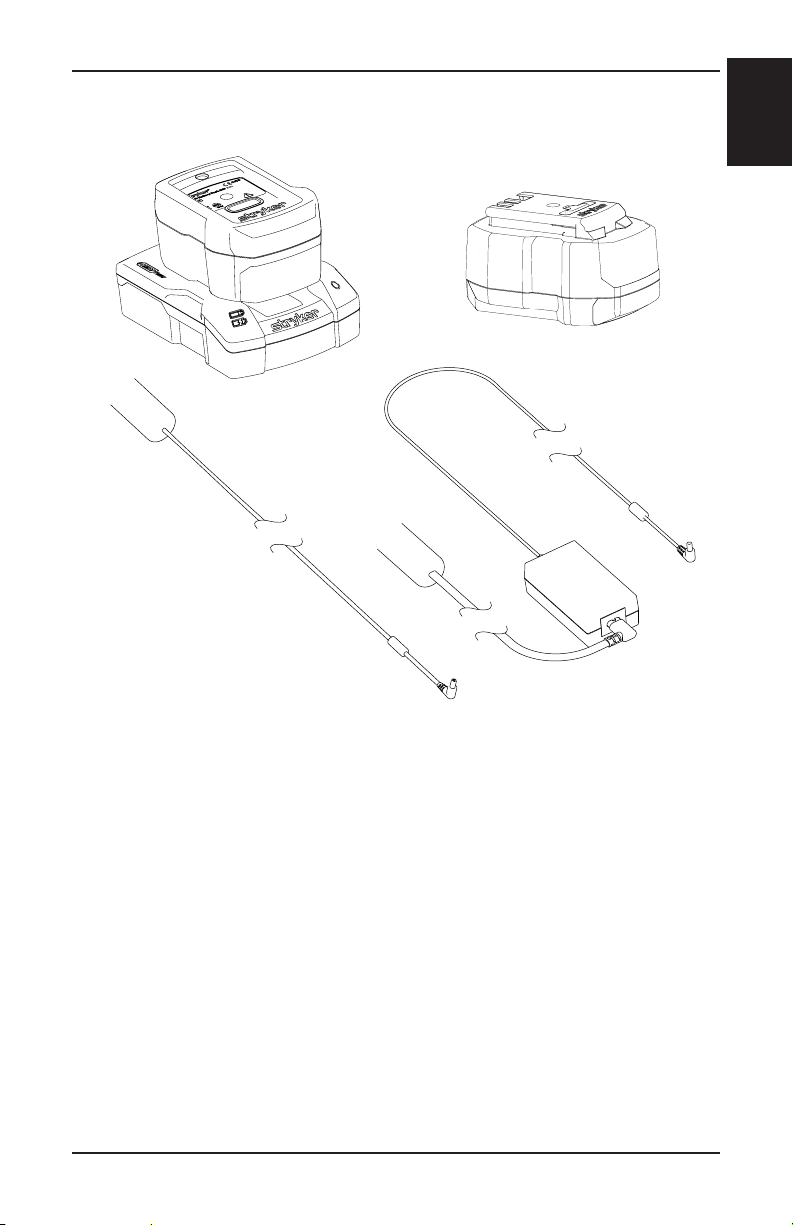
PRODUCT ILLUSTRATION
DC Cable
English
SMRT Pak
SMRT Charger
Output
Cord
AC Power
Cord
AC Power
Supply
Figure 1: SMRT Power System
Return To Table of Contents
www.stryker.com 6500 -109-105 R EV A 1-7
Page 14
Introduction
English
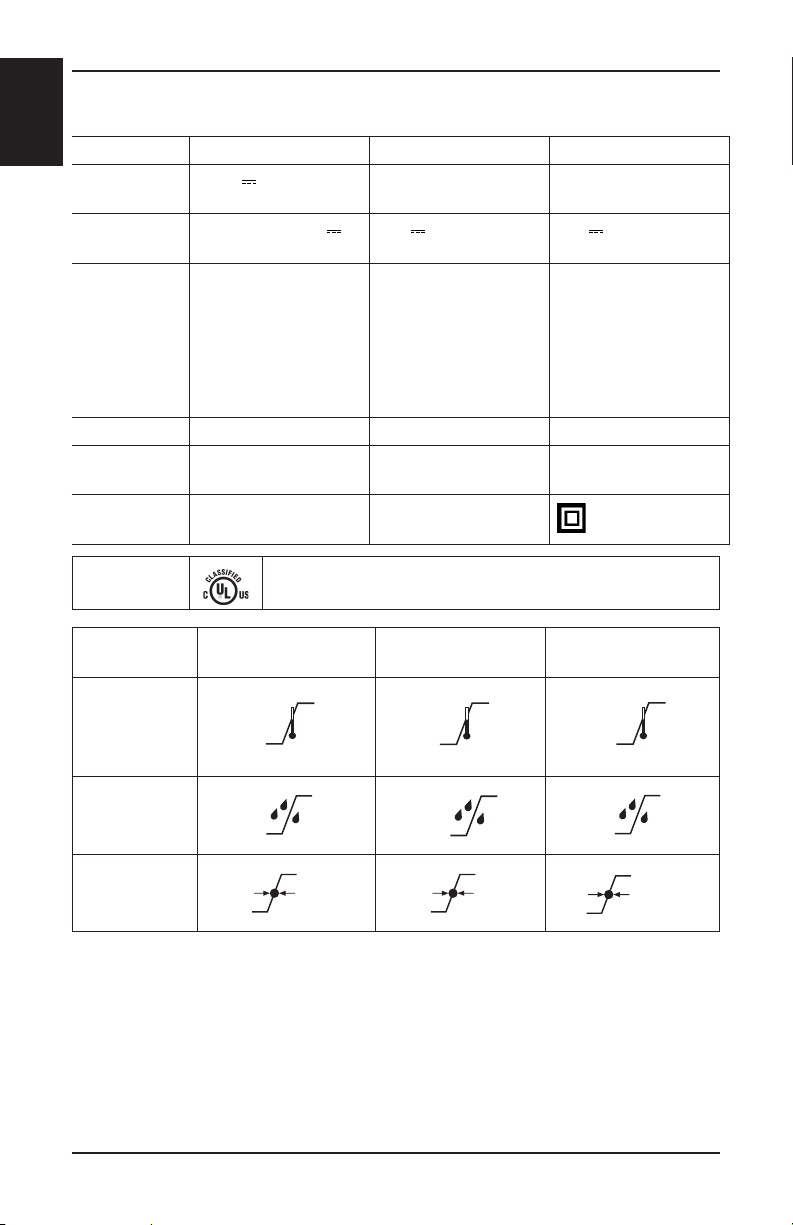
SPECIFICATIONS
Model SMRT Charger SMRT Pak AC Power Supply
Electrical
Input
Electrical
Output
Size 2.375 in. [60.325 mm]
Weight 1.3 lb [.59 kg] 3.8 lb [1.7 kg] .61 lb [.28 kg]
Enclosure
Protection
Equipment
Type
13.9V 4.16 A Not applicable 100-240V ~1.20 A,
50/60Hz
Open Circuit 40V
24V 12V 4.16 A
1.20 A
height
5.125 in. [130.175 mm]
width
7 in. [177.8 mm]
length
3.25 in. [82.55 mm]
height
4 in. [101.6 mm]
width
5.75 in. [146.05 mm]
length
1.61 in. [40.89 mm]
height
2.56 in. [65.02 mm]
width
4.72 in. [119.89 mm]
length
IPX0 IPX6 IPX0
Not applicable Not applicable
Class II
Charger
Approvals
Environmental
Conditions
Temperature
Relative
Humidity
Atmospheric
Pressure
Operation Charging Storage and
ANSI/AAMI ES60601-1: 2005
CAN/CSA-C22.2 No. 60601-1:08
0
130 F
0
(54 C)
93%
1060 hPa
43 F
(6 C)
700
0
30%
-30 F
(-34 C)
0%
700
0
0
Transportation
0
88 F
0
0
(31 C)
75%
1060 hPa
(-20 C)
500
-4 F
0
0
0%
1060 hPa
104 F
(40 C)
93%
0
0
Specifications are approximate and may vary from unit to unit or as a result of power
supply fluctuations. Stryker reserves the right to change specifications without notice.
Return To Table of Contents
1-8 6 500-109-105 RE V A www.stryker.com
Page 15
Introduction
CONTACT INFORMATION
Contact Stryker Customer Service or Technical Support at (800) 327-0770 or
(269) 324-6500.
Stryker Medical
3800 E. Centre Avenue
Portage, MI 49002
USA
Please have the serial number or lot number of your Stryker product when calling
Stryker Technical Support. Include the serial number in all written communication.
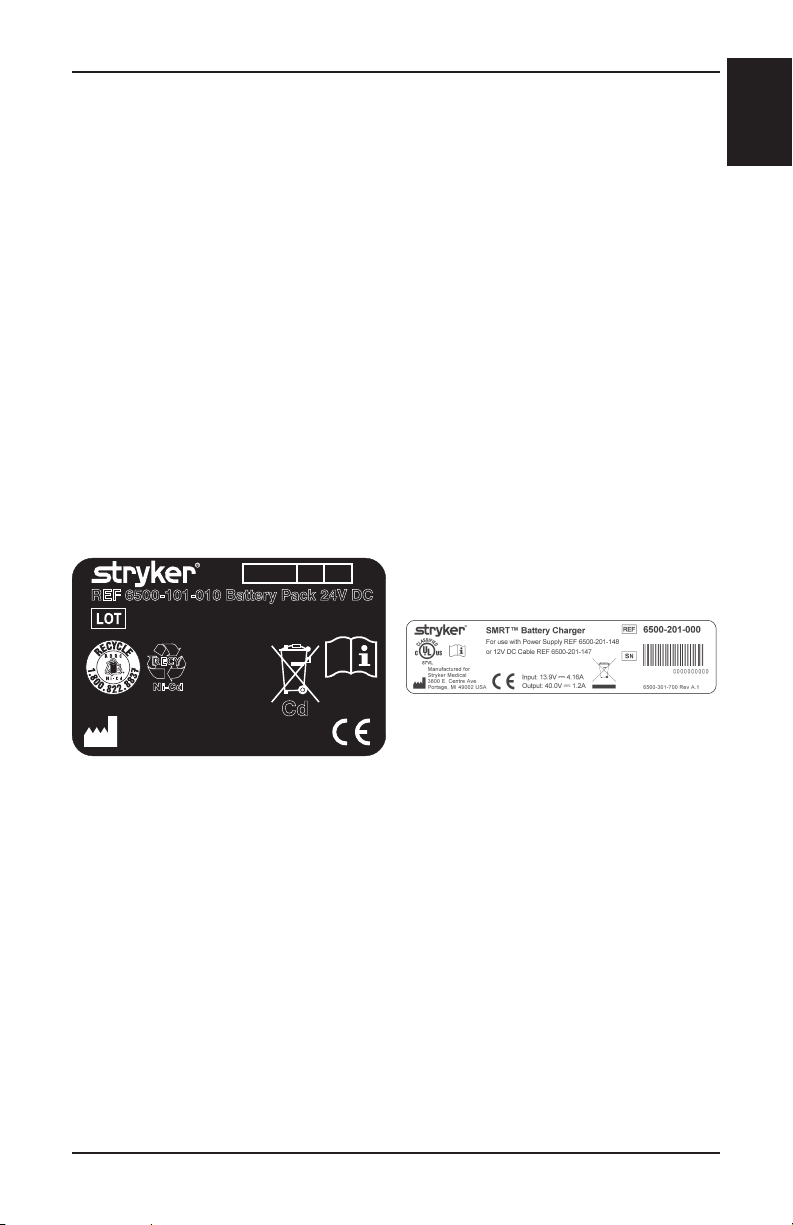
The serial number for the SMRT Charger is located on the bottom of the unit.
The lot number for the SMRT Pak is located on the top of the SMRT Pak (above
the red release button).
_
DATA
REF 6500-101-010 Battery Pack 24V DC
2300 mAh (1.2A/2h)
+
English
Manufactured for
Stryker Medical
3800 E. Centre Ave.
Portage, MI 49002 USA
SMRT Pak Label
with Lot Number
KRX 23/44
Cd
IPX6
SMRT Charger Label
with Serial Number
Return To Table of Contents
www.stryker.com 6500 -109-105 R EV A 1-9
Page 16
Summary of Safety Precautions
English
Carefully read and strictly follow the warnings and cautions listed on these pages.
Service only by qualified personnel.
WARNING
• When charging a SMRT Pak in an ambulance, locate the SMRT Charger in
an enclosed cabinet and out of patient reach during transport.
• To comply with established ambulance crash test standards, mount the
SMRT Charger to the optional mounting bracket in an enclosed cabinet and
out of patient reach during transport.
• For ambulance installation, a certified mechanic that is familiar with
ambulance requirements should install the optional mounting bracket and
the SMRT Charger. Improper SMRT Charger installation may cause injury to
the patient or operator and/or damage to the SMRT Charger or SMRT Pak.
• Ensure that the mounting bracket is securely attached to the surface.
• If the SMRT Pak is cracked or damaged, do not insert it into the SMRT
Charger. Return damaged SMRT Paks to a service center for recycling.
• To reduce the risk of electric shock, do not remove the SMRT Pak when the
Power-PRO cot is activated.
• Always wear rubber gloves when cleaning the SMRT Charger to reduce the
risk of injury.
• To avoid electrical hazards, always disconnect the SMRT Charger from the
wall outlet before cleaning.
• Do not spray fluid directly onto the SMRT Charger.
• Do not power wash the SMRT Charger.
• To reduce the risk of electric shock, do not immerse the SMRT Charger in
liquid.
• Do not use solvents, lubricants, or other chemicals to clean the SMRT
Charger unless otherwise directed.
• To reduce the risk of electric shock, do not allow water to collect on top of
the SMRT Charger.
• In addition to personal protective equipment (PPE), always wear insulative
rubber gloves when cleaning the SMRT Pak to reduce the risk of injury.
• While power washing, use any appropriate personal safety equipment
(goggles, respirator, etc.) to avoid the risk of inhaling contagion. Use of
power washing equipment can aerate contamination collected during the
use of the cot.
• To reduce the risk of injury, do not directly handle or make contact with the
SMRT Pak terminals while cleaning.
• Use only non-conductive materials to wipe the SMRT Pak clean.
Return To Table of Contents
1-10 6500 -109-105 R EV A www.stryker.com
Page 17
Summary of Safety Precautions
WARNING (CONTINUED)
• To reduce the risk of injury, do not directly handle or make contact with the
SMRT Pak terminals while rinsing.
• Avoid excessive water exposure to the SMRT Pak terminals.
• To reduce the risk of electric shock, do not immerse the SMRT Pak in liquid.
• Do not use solvents, lubricants, or other chemicals to clean the SMRT Pak
unless otherwise directed.
• Refer to the disinfectant’s Material Safety Data Sheet (MSDS) to verify the
pH range. Disinfectants with pH levels higher than 10.5 may cause the SMRT
Pak housing material to crack.
• Use only Stryker-approved parts. Other parts may result in increased
electromagnetic emissions or decreased electromagnetic immunity of the
system. Do not modify any parts. Failure to comply may result in injury.
• Always maintain the SMRT Charger in an area that is free of moisture and
dust, and especially metallic or conductive materials including, but not
limited to, steel wool, aluminum foil, grinding dust, or salt spray.
• Do not use this equipment in the presence of a mixture consisting of
flammable anesthetic and air or oxygen or nitrous oxide.
• Take special precautions regarding electromagnetic compatibility (EMC)
when using medical electrical equipment like the SMRT Charger. Install and
place the SMRT Charger into service according to the EMC information in
this manual. Portable and mobile RF communications equipment can affect
the function of the SMRT Charger.
• Do not operate the SMRT Charger using a voltage inconsistent with the
rating on the back of the unit.
• Always recharge SMRT Paks with SMRT Chargers. Failure to comply may
result in injury.
• Always place and maintain the power cord such that it will not be damaged
or cause a hazard.
• Never use a SMRT Charger that has a damaged housing, damaged power
supply, or damaged power cord. Failure to comply may result in electric shock
or fire. Before attempting any maintenance or cleaning, ALWAYS disconnect
the power cord from the SMRT Charger to reduce the risk of electric shock.
Never clean the SMRT Charger when it is connected to an electrical power
source.
• To reduce the risk of electric shock, never attempt to open the SMRT
Charger or SMRT Pak for any reason.
• Avoid direct contact with a wet SMRT Pak or SMRT Charger. Contact may
cause injury to the patient or operator.
English
Return To Table of Contents
www.stryker.com 6500 -109-105 R EV A 1-11
Page 18
Summary of Safety Precautions
English
WARNING (CONTINUED)
• Inspect SMRT Paks for damage before every use. Do not charge or use if
there is any evidence of damage. During cleaning, moisture may enter a
cracked housing and damage the electrical components or cause leaking
or venting of battery electrolyte. This may result in chemical burns of skin
and eyes.
• Never incinerate the SMRT Pak, even if it is severely damaged, because the
SMRT Pak can explode in a fire.
• Never short-circuit the SMRT Pak by connecting the terminals with any
conductive material.
CAUTION
• Only use the SMRT Pak and SMRT Charger as specified.
• Place the electrical power cord where it will not be stepped on, tripped over,
or otherwise subjected to damage or stress.
• Do not touch the SMRT Pak receptacle terminals with metal objects.
• To reduce the risk of damage to the electrical plug and cord, grasp and pull
the plug, not the cord when disconnecting the SMRT Charger.
• Make sure that the SMRT Pak is fully charged prior to placing into service.
An uncharged or depleted SMRT Pak may cause poor cot performance.
• Remove the SMRT Pak if the Power-PRO cot is not going to be used for an
extended period of time (over 1 week).
• Remove the SMRT Pak before washing the Power-PRO cot. See page 1-25
for cleaning instructions.
• Dry the SMRT Paks before placing them in the SMRT Charger to avoid
damage to the batteries or charger.
• Replace a SMRT Pak in the Power-PRO cot at the first indication that it is
losing power. Using a SMRT Pak until it is completely drained may cause
permanent damage and will shorten the life and output of the SMRT Pak.
NOTE
• The cot indicator LED does not have to flash amber before removing and
charging the SMRT Pak, however this is considered to be a “best practice.”
• For extended storage, the SMRT Pak should remain on the SMRT Charger
to trickle charge and ensure that the SMRT Pak remains fully charged. The
SMRT Charger keeps the SMRT Pak charged and ready for use.
• To maximize available battery power, only use SMRT Paks that have been
fully charged within the last 48 hours.
• Fully charge the SMRT Pak for two hours before troubleshooting the Pak.
Return To Table of Contents
1-12 6500 -109-105 R EV A www.stryker.com
Page 19

General Inspection
The condition of the SMRT Charger and SMRT Pak is the responsibility of the
owner. Have a qualified service person use the following list and the operation
instructions to check the SMRT Charger and SMRT Pak before the product is
put into service.
Unpack the cartons and check all items for proper operation.
Item Routine Page
SMRT Charger and
SMRT Pak
AC Power Components Check the AC power supply for any damage
DC Power Components Check the DC cable for any damage N/A
Accessories Check the mounting bracket for any damage N/A
Unpack batteries and charger
Charge SMRT Pak according to instructions 1-21
N/A
Check the AC power cord for any damage
WARNING
When charging a SMRT Pak in an ambulance, locate the SMRT Charger in an
enclosed cabinet and out of patient reach during transport.
Note: This manual should be considered a permanent part of the SMRT Power
System and should remain with the product even if the system is subsequently
sold.
English
Return To Table of Contents
www.stryker.com 6500 -109-105 R EV A 1-13
Page 20

Compatibility Information
English
COT COMPATIBILITY
The Stryker SMRT Pak is designed to be compatible with the Power-PRO XT,
Power-PRO TL, and Power-PRO IT cots. The 24 VDC Power-PRO system and
the SMRT Pak is rated for 2.4 amp-hours of electric energy. A SMRT Pak that is
in good working condition and is fully charged provides up to 15-20 “calls” with
a 250 pound patient (actual results may vary).
Running the SMRT Pak repeatedly, without rest periods, can increase the
temperature within the cells and reduce life. For example, lifting a heavy patient
up and down several times in rapid succession can reduce the SMRT Pak life.
For best results, use the SMRT Pak on the Power-PRO cot until the cot indicator
LED changes from green to flashing amber.
Note: The cot indicator LED does not have to flash amber before removing and
charging the SMRT Pak, however this is considered to be a “best practice.”
Once the SMRT Pak has been discharged, remove the SMRT Pak from the
Power-PRO cot and replace it with a fully charged SMRT Pak.
CHARGER COMPATIBILITY
The Stryker SMRT Pak is intended for use with the Stryker SMRT Charger only.
Return To Table of Contents
1-14 6500 -109-105 R EV A www.stryker.com
Page 21
Charger Installation
INSTALLING THE SMRT CHARGER
When installing the SMRT Charger:
• Locate the SMRT Charger in an environmentally controlled location that is
free of excessive dust and moisture.
• Locate the SMRT Charger in an area that is kept within a constant
temperature range. An allowable temperature range is 43°F to 88°F (6°C to
31°C). The optimal temperature range is 65°F to 75°F (18°C to 24°C).
• Position the SMRT Charger where it can be readily accessed for use.
• Locate and maintain the power supply and power cords to minimize the risk
of damage and inadvertent disconnections.
WARNING
To comply with established ambulance crash test standards, mount the SMRT
Charger to the optional mounting bracket in an enclosed cabinet and out of
patient reach during transport.
To mount the SMRT Charger to a horizontal or vertical surface, follow the steps
on page 1-16 to install the optional mounting bracket.
ELECTRICAL POWER INSTALLATION REQUIREMENTS
English
When configuring the electrical power source for SMRT Charger installation,
reference the following electrical power requirements to ensure reliable and
effective operation.
Power
Type
AC 100-240 VAC 50/60 Hz 1.20 A 0.05 A N/A
DC 12.5 -16 VDC N/A 4.16 A 0.20 A 10 VDC
www.stryker.com 6500 -109-105 R EV A 1-15
Operational
Voltage Range
Frequency Maximum
Current
Draw
Standby
Current
Draw
Return To Table of Contents
Low
Voltage
Shut Off
Page 22
Charger Installation
English
INSTALLING THE OPTIONAL MOUNTING BRACKET
WARNING
• For ambulance installation, a certified mechanic that is familiar with
ambulance requirements should install the optional mounting bracket and
the SMRT Charger. Improper SMRT Charger installation may cause injury to
the patient or operator and/or damage to the SMRT Charger or SMRT Pak.
• When charging a SMRT Pak in an ambulance, locate the SMRT Charger in
an enclosed cabinet and out of patient reach during transport.
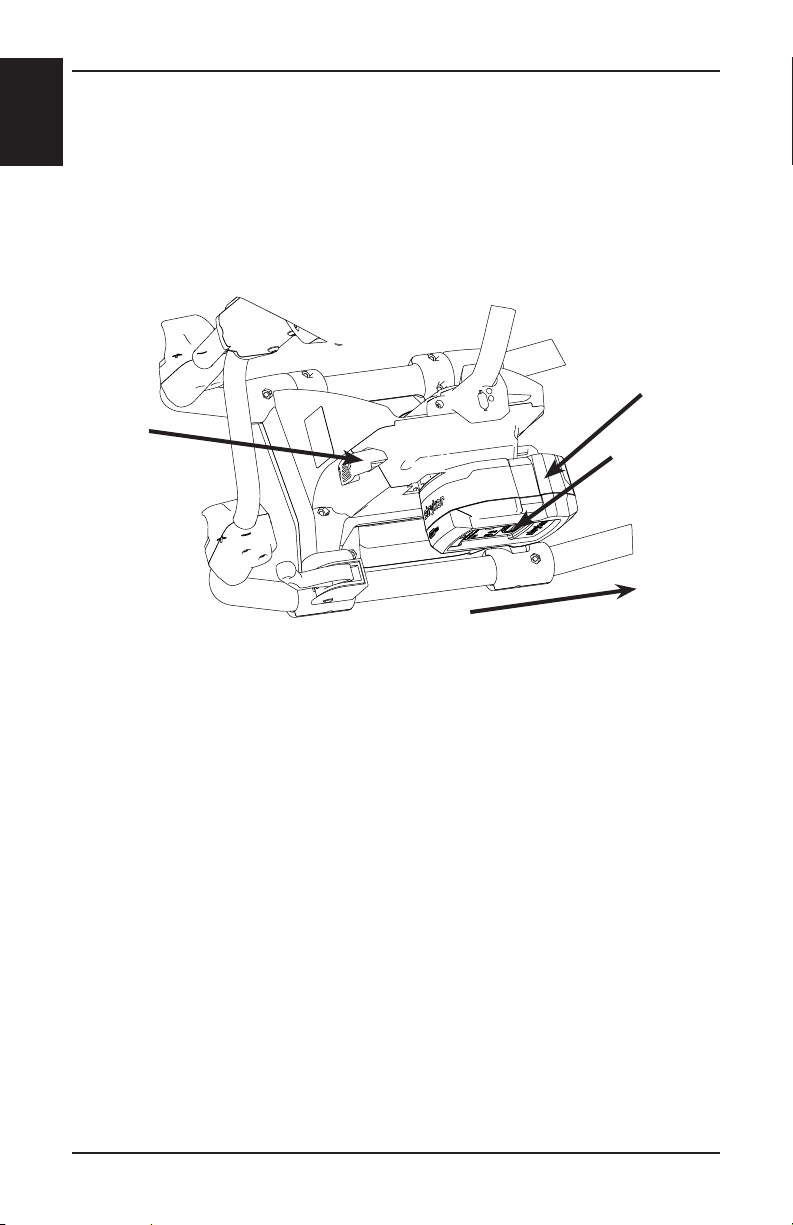
To install the optional mounting bracket (Figure 2):
1. Use the SMRT Charger mounting bracket as a template to mark the location
of the mounting holes at the area where the mounting bracket will be
installed.
Charger
Mounting Points
Spring
Tab
Figure 2: Mounting Bracket
Return To Table of Contents
1-16 6500 -109-105 R EV A www.stryker.com
Page 23
Charger Installation
INSTALLING THE OPTIONAL MOUNTING BRACKET (CONTINUED)
2. Position the mounting bracket, by making sure that the:
• Spring tab is located at the rear of the SMRT Charger.
Note: When mounting the bracket to a vertical surface, the spring tab
should be horizontal with the spring tab pointing to the left as shown in
Figure 2 on page 1-16.
• Power cord easily plugs into the rear of the SMRT Charger.
• SMRT Charger slides from front to back to engage the bracket after
mounting.
• Bracket is installed correctly for the ambulance or station location:
Location Considerations
Ambulance • Secure the bracket to a horizontal structural support
surface or shelf using size #10, grade 5 screws minimum
(not supplied).
• Make sure that the selected mounting surface is strong
enough to securely hold the SMRT Charger and SMRT
Pak during transport.
• Locate the bracket in an enclosed cabinet and out of
patient reach during transport.
• Allow for easy SMRT Pak installation and removal.
• Locate the power supply within reach of the power cord.
Station • Secure the bracket to a horizontal or vertical structural
support surface using size #10, grade 5 screws minimum
(not supplied).
• For vertical installation, position the mounting bracket,
so the spring tab is directly below the mounting screws
to ensure that the SMRT Pak remains supported by the
SMRT Charger even if the release button is accidently
pressed.
• Allow for easy SMRT Pak installation and removal.
• Locate the power supply within reach of the power cord.
English
WARNING
Ensure that the mounting bracket is securely attached to the surface.
Return To Table of Contents
www.stryker.com 6500 -109-105 R EV A 1-17
Page 24
Charger Installation
English
INSTALLING THE CHARGER ONTO THE OPTIONAL MOUNTING BRACKET
To install the SMRT Charger
onto the optional mounting
bracket:
1. Align the rear keyway
slots (Figure 3) onto
the bracket fasteners
(Figure 4).
2. Slide the SMRT Charger
in until it locks into the
mounting bracket as shown
in Figure 4. Make sure that
the SMRT Charger is fully
engaged and secured onto
the bracket.
Rear Keyway Slots
Figure 3: Charger Rear Keyway Slots
SMRT
Charger
Mounting
Bracket
Figure 4: Installing the Charger
Return To Table of Contents
1-18 6500 -109-105 R EV A www.stryker.com
Bracket
Fasteners
Page 25
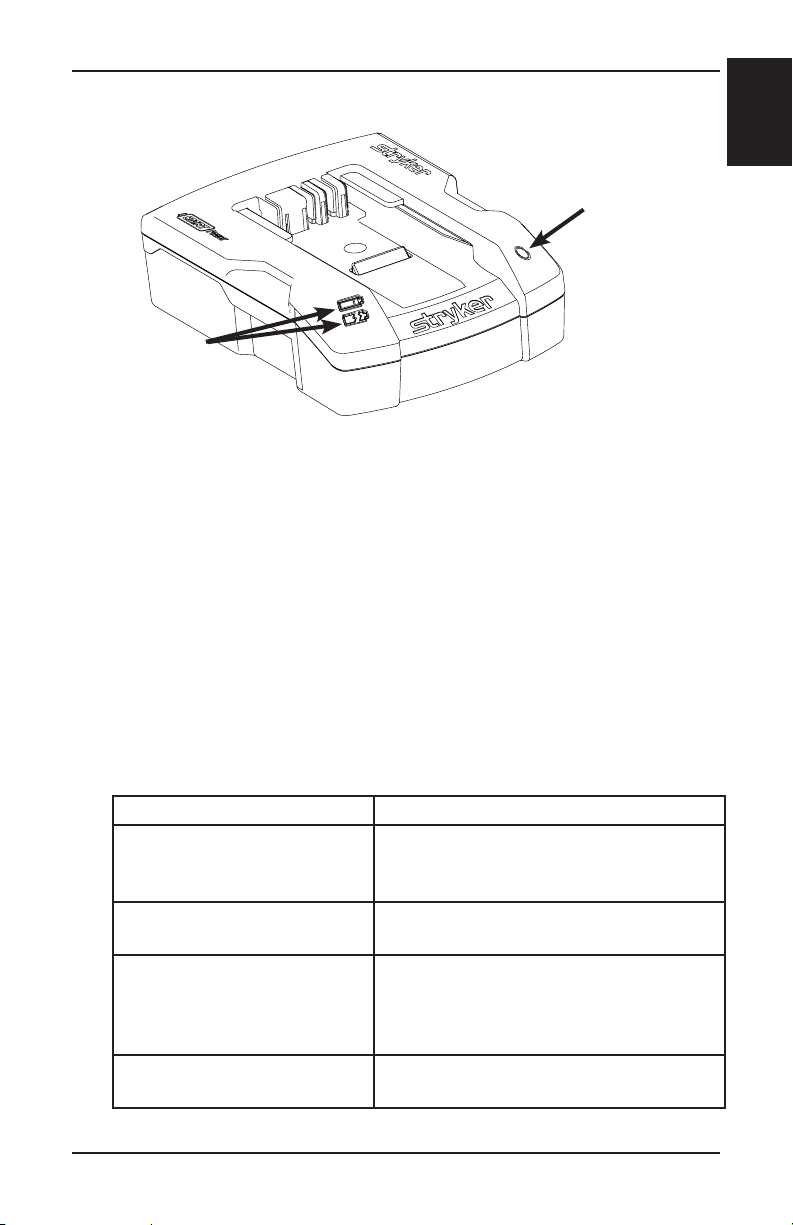
Charger Features
SMRT Charger
Power LED
SMRT Charger
Indicator LEDs
Figure 5: Charger Features
• Power connection - Use this outlet to connect or disconnect the SMRT
Charger from the appropriate power source as shown in Figure 6 on
page 1-20.
• SMRT Charger power LED - The green power LED provides charger status
information. If the LED is illuminated, then the SMRT Charger has power.
English
• SMRT Charger indicator LEDs - The green and amber charger indicator
LEDs provide SMRT Pak status information. The LEDs may be in a steady
or flashing state based on the condition of the SMRT Charger or SMRT Pak.
SMRT Charger Indicator LED Status
GREEN (flashing) SMRT Charger is charging the SMRT
Pak. The optimum charge time is two
hours.
GREEN (solid) SMRT Pak is fully charged and ready for
use.
AMBER (flashing) SMRT Pak temperature delay. The SMRT
Charger is waiting for the SMRT Pak to
reach an allowable temperature range of
43°F to 88°F (6°C to 31°C).
AMBER (solid) SMRT Pak error. See page 1-28 for
additional troubleshooting information.
Return To Table of Contents
www.stryker.com 6500 -109-105 R EV A 1-19
Page 26
Charger Operation
English
POWERING THE CHARGER
CAUTION
• Place the electrical power cord where it will not be stepped on, tripped over,
or otherwise subjected to damage or stress.
• Do not touch the SMRT Pak receptacle terminals with metal objects.
To power the SMRT Charger:
1. Locate the power connection
on the back of the SMRT
Charger (Figure 6).
2. Push the power cord
retention tab in to insert the
power cord outlet connector
into the SMRT Charger
power connection.
3. Plug the power adaptor end
of the power cord into the
power source.
It is a best practice to use a
clean, uninterruptible power
source. The SMRT Charger
continuously illuminates a solid
green power LED when it is
properly connected to a power
supply.
Use only Stryker-approved parts to power the SMRT Charger. For a list of Strykerapproved parts, see page 1-32.
Figure 6: Powering the Charger
Power
Connection
Power
Cord
Retention
Tab
DISCONNECTING THE CHARGER
CAUTION
To reduce the risk of damage to the electrical plug and cord, grasp and pull the
plug, not the cord when disconnecting the SMRT Charger.
To disconnect the SMRT Charger, unplug the power cord from the AC or DC
power source.
Return To Table of Contents
1-20 6500 -109-105 R EV A www.stryker.com
Page 27
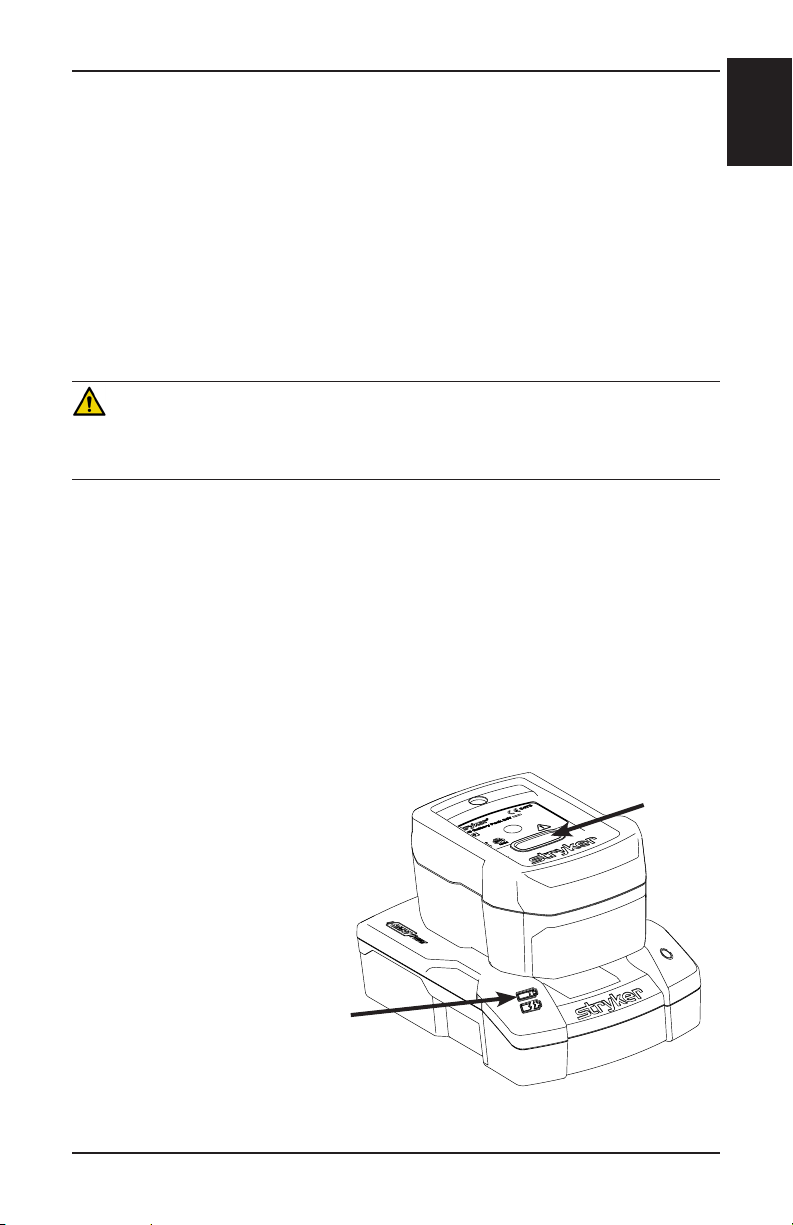
Charger Operation
CHARGING THE BATTERY
Note:
• For extended storage, the SMRT Pak should remain on the SMRT Charger
to trickle charge and ensure that the SMRT Pak remains fully charged. The
SMRT Charger keeps the SMRT Pak charged and ready for use.
• The SMRT Pak should be at room temperature, within the allowable
temperature charge range of 43°F to 88°F (6°C to 31°C). Charging the SMRT
Pak outside of this recommended temperature range reduces SMRT Pak life
and extends charge time.
WARNING
If the SMRT Pak is cracked or damaged, do not insert it into the SMRT Charger.
Return damaged SMRT Paks to a service center for recycling.
To charge the SMRT Pak:
1. Insert a clean, dry SMRT Pak into the SMRT Charger. Make sure that the
SMRT Pak is properly seated. The SMRT Pak locks into the SMRT Charger.
2. The SMRT Charger indicator LED will flash green while charging. The
optimum charge time is two hours.
3. When the SMRT Pak is fully charged and ready, the charger indicator LED
turns to solid green, as shown in Figure 7.
4. Press the RED release button (Figure 7) and slide the SMRT Pak to release
the fully charged and ready SMRT Pak from the SMRT Charger.
English
RED
Release
Button
LED Status
GREEN (Flashing): Charging
GREEN (Solid): Charged & Ready
Figure 7: SMRT Charger Green Indicator LED
Return To Table of Contents
www.stryker.com 6500 -109-105 R EV A 1-21
Page 28
Charger Operation
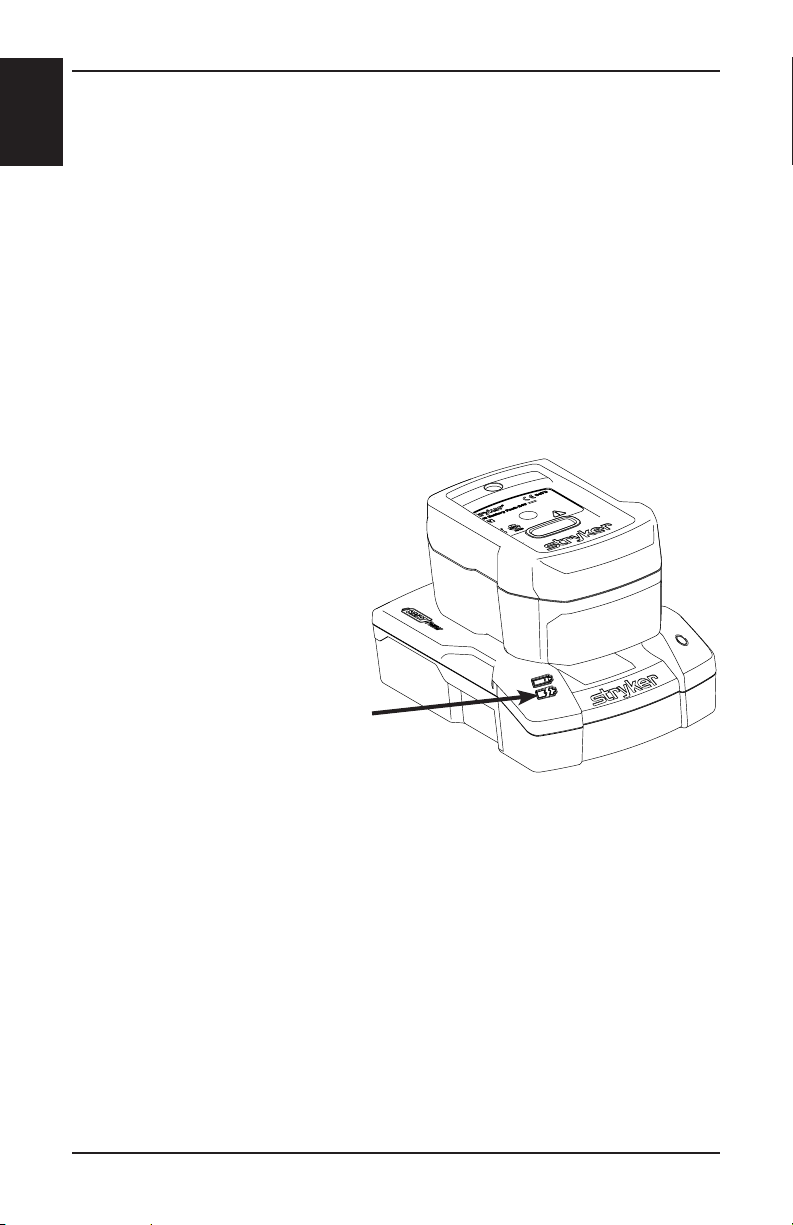
English
The AMBER indicator LED as shown in Figure 8 also provides battery status
information.
SMRT PAK TEMPERATURE DELAY
A flashing AMBER indicator LED indicates a SMRT Pak temperature delay. The
SMRT Charger is waiting for the SMRT Pak to reach an allowable temperature
range of 43°F to 88°F (6°C to 31°C).
SMRT PAK ERROR
A solid AMBER indicator LED indicates a SMRT Pak error. See page 1-28 for
additional troubleshooting information.
LED Status
AMBER (Flashing): Temperature Delay
AMBER (Solid): SMRT Pak Error
Figure 8: SMRT Charger AMBER Indicator LED
Return To Table of Contents
1-22 6500 -109-105 R EV A www.stryker.com
Page 29
Battery Operation
BAT TERY CONSIDERATIONS
• Fully charge all SMRT Paks prior to use.
• Replace a discharged SMRT Pak with a fully charged and ready SMRT Pak.
• Remove the SMRT Pak from the Power-PRO cot or SMRT Charger before
cleaning.
• The SMRT Pak is sealed and can be power washed separately. See
page 1-25 for cleaning instructions.
REPLACING THE BATTERY
WARNING
To reduce the risk of electric shock, do not remove the SMRT Pak when the
Power-PRO cot is activated.
The Power-PRO cot indicator LED flashes amber when the SMRT Pak needs to
be recharged or replaced. However, the SMRT Pak can be removed and charged
at any time. The SMRT Charger properly manages charging regardless of the
SMRT Pak charge state.
The SMRT Pak can remain on the Power-PRO cot between service calls for up
to one week or until the cot indicator LED flashes amber.
English
CAUTION
Make sure that the SMRT Pak is fully charged prior to placing it into service. An
uncharged or depleted SMRT Pak may cause poor cot performance.
The Power-PRO cot indicator LED is solid green when the SMRT Pak is fully
charged or has adequately charged battery power.
STORING THE BATTERY
All batteries lose charge during storage or periods of inactivity. A SMRT Pak can
lose up to 30 percent of its charge within 48 hours after being removed from the
SMRT Charger. Stored SMRT Paks should be used and fully charged every three
months to maintain top performance.
Return To Table of Contents
www.stryker.com 6500 -109-105 R EV A 1-23
Page 30
Battery Operation
English
REMOVING THE BATTERY FROM THE COT
To remove the SMRT Pak from the Power-PRO cot:
1. Press the RED one hand release button or push the battery release button
to release the SMRT Pak from the cot as shown in Figure 9.
2. Slide the released SMRT Pak out of the enclosure.
Battery
Release
Button
Slide to
Release
Figure 9: SMRT Pak Removal and Replacement
SMRT
Pak
One
Hand
Release
Button
REINSTALLING OR REPLACING THE BATTERY
Note: To maximize available battery power, only use SMRT Paks that have been
fully charged within the last 48 hours.
To reinstall or replace the SMRT Pak into the Power-PRO cot:
1. Align the tabs in the battery enclosure.
2. Push the SMRT Pak into the enclosure until the latch clicks into place.
• The cot indicator LED is solid green if the SMRT Pak is fully charged
and ready.
• The cot indicator LED flashes amber if the SMRT Pak needs to be
recharged or replaced.
Return To Table of Contents
1-24 6500 -109-105 R EV A www.stryker.com
Page 31

Cleaning
RECOMMENDED CLEANERS
In general, when used in those concentrations recommended by the manufacturer,
either phenolic type or quaternary (excluding Virex® TB) type disinfectants can
be used. Iodophor type disinfectants are not recommended for use because
staining may result.
Suggested cleaners include:
• Quaternary Cleaners (active ingredient - ammonium chloride)
• Phenolic Cleaners (active ingredient - o-phenylphenol)
• Chlorinated Bleach Solution (5.25% - less than 1 part bleach to 100 parts water)
CAUTION
Do not use Virex® TB to clean the SMRT Charger or SMRT Pak.
CLEANING THE CHARGER
WARNING
• Always wear rubber gloves when cleaning the SMRT Charger to reduce the
risk of injury.
• To avoid electrical hazards, always disconnect the SMRT Charger from the
wall outlet before cleaning.
• Do not spray fluid directly onto the SMRT Charger.
• Do not power wash the SMRT Charger.
• To reduce the risk of electric shock, do not immerse the SMRT Charger in
• Do not use solvents, lubricants, or other chemicals to clean the SMRT
• To reduce the risk of electric shock, do not allow water to collect on top of
liquid.
Charger unless otherwise directed.
the SMRT Charger.
English
To clean the SMRT Charger:
1. Disconnect the SMRT Charger from the wall outlet
to avoid electrical hazards during cleaning.
2. Wipe the surfaces of the SMRT Charger with a
soft cloth dampened with a non-abrasive, hospital
disinfectant (see the Recommended Cleaners list).
3. Wipe with a cloth moistened with clean water to
remove any cleaning chemicals or residue.
4. Dry thoroughly before placing the SMRT Charger
back into service.
www.stryker.com 6500 -109-105 R EV A 1-25
Figure 10: SMRT
Charger
Return To Table of Contents
Page 32

Cleaning
English
CLEANING THE BATTERY
WARNING
• In addition to personal protective equipment (PPE), always wear insulative
rubber gloves when cleaning the SMRT Pak to reduce the risk of injury.
• While power washing, use any appropriate personal safety equipment
(goggles, respirator, etc.) to avoid the risk of inhaling contagion. Use of power
washing equipment can aerate contamination collected during the use of the
cot.
The SMRT Pak is designed to be power washable. The preferred method for
power washing the SMRT Pak is with the standard hospital surgical cart washer
or hand held wand unit.
CAUTION
• DO NOT STEAM CLEAN OR ULTRASONICALLY CLEAN THE SMRT PAK.
• Maximum water temperature should not exceed 180°F/82°C.
• Maximum air dry temperature (cart washers) is 240°F/115°C.
• Maximum water pressure should not exceed 1500 psi/130.5 bar. If a hand
held wand is being used to wash the unit, the pressure nozzle must be kept
a minimum of 24 inches (61 cm) from the SMRT Pak.
Return To Table of Contents
1-26 6500 -109-105 R EV A www.stryker.com
Page 33

Cleaning
CLEANING THE BATTERY (CONTINUED)
To clean the SMRT Pak:
1. Remove the SMRT Pak from the Power-PRO cot
or SMRT Charger.
2. Inspect the SMRT Pak housing for any cracks
or damage.
3. Clean the SMRT Pak with a hospital grade
disinfectant with a pH range of 6.5 to 10.5. See
the Recommended Cleaners list on page 1-25.
Figure 11: SMRT
Pak
WARNING
• To reduce the risk of injury, do not directly handle or make contact with the
SMRT Pak terminals while cleaning.
• Use only non-conductive materials to wipe the SMRT Pak clean.
4. Rinse the SMRT Pak thoroughly with clean water to remove any cleaning
chemicals or residue. Position the SMRT Pak as shown in Figure 11 to avoid
water from pooling near the terminals.
WARNING
• To reduce the risk of injury, do not directly handle or make contact with the
SMRT Pak terminals while rinsing.
• Avoid excessive water exposure to the SMRT Pak terminals.
English
5. Dry thoroughly before inserting the SMRT Pak into a Power-PRO cot or
SMRT Charger.
WARNING
• To reduce the risk of electric shock, do not immerse the SMRT Pak in liquid.
• Do not use solvents, lubricants, or other chemicals to clean the SMRT Pak
unless otherwise directed.
• Refer to the disinfectant’s Material Safety Data Sheet (MSDS) to verify the
pH range. Disinfectants with pH levels higher than 10.5 may cause the SMRT
Pak housing material to crack.
Return To Table of Contents
www.stryker.com 6500 -109-105 R EV A 1-27
Page 34

Troubleshooting
English
SMRT POWER SYSTEM COMPONENT LOCATOR
Refer to the SMRT Power System components as shown in Figure 12 while
troubleshooting the system. See page 1-29 for troubleshooting details.
SMRT Charger
SMRT Charger
Indicator LEDs
Power LED
SMRT Charger
SMRT Pak
Data Power (-)
Power (+)
Output
Cord
DC Cable
AC Power
Cord
AC Power
Supply
Figure 12: SMRT Power System Components
If assistance is needed at any time during troubleshooting, contact a service
technician at (800) 327-0770 or (269) 324-6500.
Return To Table of Contents
1-28 6500 -109-105 R EV A www.stryker.com
Page 35

Troubleshooting
SMRT CHARGER TROUBLESHOOTING
Problem/Failure Recommended Action
SMRT Charger
power LED is
not illuminated
SMRT Charger
will not charge
the Pak
1. Verify that the AC power supply or DC cable is
connected properly.
A. If using an AC power supply, make sure that the:
a. AC power cord is plugged into a wall outlet and
the wall outlet has AC power.
b. AC power cord is plugged into the power supply.
c. AC power supply output cord is plugged into the
charger.
B. If using a DC cable, make sure that the:
a. DC cable is plugged into a power source with
12.5 - 16 VDC.
Note: The DC power supply output cord
adaptor LED should be illuminated.
b. Power cord adaptor internal fuse has continuity.
If not, replace the fuse (see page 1-33).
c. DC cable is plugged into the charger.
2. Check for 12.5 - 16 VDC at the power supply output
cord that plugs into the charger.
A. If 12.5 - 16 VDC is not present, replace the power
supply assembly.
B. If 12.5 - 16 VDC is present, replace the charger.
1. Verify that the charger power LED is illuminated.
A. If not, see the “SMRT Charger power LED is not
illuminated” section.
2. Verify that the charger indicator LEDs flash when the
charger is first powered.
A. If the LEDs flash at start up, go to step 3.
B. If the LEDs do not flash at start up, replace the
charger.
3. Reinsert the Pak on the charger and check the charger
indicator LEDs for the status of the Pak:
A. Solid amber = a Pak error. See Pak Troubleshooting
on page 1-31.
B. Flashing amber = a temperature delay. Allow the
Pak time to get to normal operating temperature.
Reinstall the Pak and recheck step 3.
C. Solid green = See Pak Troubleshooting on
page 1-31.
English
Return To Table of Contents
www.stryker.com 6500 -109-105 R EV A 1-29
Page 36

Troubleshooting
English
SMRT CHARGER TROUBLESHOOTING (CONTINUED)
Problem/Failure Recommended Action
The SMRT
Charger
indicator
LEDs are NOT
illuminated
when the Pak
is inserted
1. Unplug the charger, wait five seconds, and plug the
charger back into the wall outlet.
2. Verify that the charger power LED is illuminated.
A. If not, see the “SMRT Charger power LED is not
illuminated” section.
3. Verify that the Pak is fully inserted into the charger.
A. If not, reinsert the Pak fully, listen for an audible
click and verify the charger indicator LEDs.
4. Try another Pak to identify any Pak issues.
Note: Separate and label Paks during troubleshooting.
A. If the charger indicator LEDs do not illuminate,
replace the charger.
B. If the charger indicator LEDs illuminate, replace the
original Pak.
Return To Table of Contents
1-30 6500 -109-105 R EV A www.stryker.com
Page 37

Troubleshooting
SMRT PAK TROUBLESHOOTING
Note: Fully charge the SMRT Pak for two hours before troubleshooting the Pak.
Problem/Failure Recommended Action
A fully charged
SMRT Pak
does not
provide
sufficient
power for cot
operation
Charger
indicates a
SMRT Pak
error (amber
LED), but the
Pak performs
well on the cot
Charger
indicates a
temperature
delay (flashing
amber LED),
but the Pak
is within
the normal
operating
temperature
range
www.stryker.com 6500 -109-105 R EV A 1-31
1. Fully charge the SMRT Pak for two hours.
A. If the charger indicator LED is solid green indicating
a fully charged and ready Pak, go to step 2.
B. If the charger indicator LED is solid amber
indicating a Pak error, replace the Pak.
2. Immediately following a full charge, remove the Pak
from the charger and check the voltage at the power
terminals on the Pak (see Figure 12 on page 1-28) for
26 VDC minimum.
A. If the Pak has 26 VDC minimum, go to step 3.
B. If the VDC is less than 26 VDC, replace the Pak.
3. Wait exactly one hour and charge the Pak again.
A. If the charger indicator LED turns solid green
(indicating a fully charged and ready Pak) in less
than one minute, call Tech Support.
B. If the charger indicator LED flashes green for
longer than one minute, replace the Pak.
1. Fully discharge the SMRT Pak by powering a cot until
the cot indicator LED flashes red.
2. Recharge the Pak.
A. If the charger indicator LED is solid green indicating
a fully charged and ready Pak, then the Pak is
ready for use.
B. If the charger indicator LED is solid amber
indicating a Pak error, call Tech Support.
1. Remove the SMRT Pak from the charger and allow the
Pak to cool for at least four hours at room temperature.
2. Insert the Pak onto the charger.
A. If the charger indicator LED is flashing green, then
the Pak is charging.
B. If the charger indicator LED is flashing amber
indicating a temperature delay, replace the Pak.
Return To Table of Contents
English
Page 38

Quick Reference Replacement Parts List
English
WARNING
Use only Stryker-approved parts. Other parts may result in increased
electromagnetic emissions or decreased electromagnetic immunity of the system.
Do not modify any parts. Failure to comply may result in injury.
DESCRIPTION PART NUMBER
SMRT Charger 6500-201-000
SMRT Pak 6500-700-046
SMRT Charger Mounting Bracket (optional) 6500-201-100
Power Components - AC
Charger Power Supply 6500-201-148
North America Power Cord 6500-201-149
Europe Power Cord 6500-201-150
United Kingdom Power Cord 6500-201-151
Australia Power Cord 6500-201-153
Power Components - DC
12 VDC Cable, Automotive 6500-201-147
SMRT Power Kit (includes 1 SMRT Charger, 2 SMRT Paks, and 1 power cord)
SMRT Power Kit - 12 VDC, Domestic 6500-700-040
SMRT Power Kit - 120 VAC, Domestic 6500-700-041
SMRT Power Kit - 240 VAC, United Kingdom, International 6500-700-043
SMRT Power Kit - 240 VAC, Europe, International 6500-700-044
SMRT Power Kit - 240 VAC, Australia, International 6500-700-045
Contact your Stryker sales representative for a complete list of additional parts.
Return To Table of Contents
1-32 6500 -109-105 R EV A www.stryker.com
Page 39

Service Information
12 VDC AUTOMOTIVE CABLE FUSE REPLACEMENT
Tools Required:
• None
Procedure:
1. Unplug the adaptor cable from the source and the charger.
2. Unscrew the tip on the source end and remove the fuse as shown in
Figure 13.
Note: The source tip and the fuse tension spring are loose and could be
dropped.
3. Install the new 10A 250V fuse into the source end of the adaptor cable and
screw the tip back on.
4. Plug both ends back in to the source and the charger.
5. Test the charger for functionality before returning to service.
Plug Connector (Charger)
Plug (Source)
English
Figure 13: 12 VDC Automotive Cable
Return To Table of Contents
www.stryker.com 6500 -109-105 R EV A 1-33
Page 40

Preventative Maintenance
English
MAINTENANCE INTERVALS
The following schedule is intended as a general guide to maintenance. Factors
such as weather, terrain, geographical location, and individual usage will alter the
required maintenance schedule.
Routine Interval
Inspect the SMRT Charger and parts for
cuts in the cord, bent pins or contacts and/
or cracks in the housing.
Inspect the SMRT Pak housing and
terminal area for cracks or damage.
STORAGE AND HANDLING
To ensure the longevity, performance, and safety of this equipment, use the
original packaging materials when storing or transporting this equipment.
Stored SMRT Paks should be used and fully charged every three months to
maintain top performance.
Before first and every use.
Before first and every use.
Best Practices
• Fully charge all SMRT Paks prior to use.
• Replace the discharged battery with a fully charged and ready SMRT Pak.
• When charging a SMRT Pak in an ambulance, locate the SMRT Charger in
an enclosed cabinet and out of patient reach during transport.
• Locate the SMRT Charger in an area that is kept within a constant
temperature range. An allowable temperature range is 43°F to 88°F (6°C to
31°C). The optimal temperature range is 65°F to 75°F (18°C to 24°C).
• Remove the SMRT Pak from the Power-PRO cot or SMRT Charger before
cleaning.
• The SMRT Pak is sealed and can be power washed. See page 1-25 for
cleaning instructions.
• Do not submerge the SMRT Pak for any reason.
For assistance with any questions regarding your Power-PRO equipment,
consult your Account Manager or call Stryker at 1-800-784 4336 (Option 2).
Return To Table of Contents
1-34 6500 -109-105 R EV A www.stryker.com
Page 41

Frequently Asked Questions (FAQs)
• CanIleavetheSMRTPakontheSMRTChargerforlongperiodsoftime?
YES, the SMRT Charger will keep the SMRT Pak charged and ready for
use.
• CanIleavetheSMRTPakonthePower-PROcotbetweenservicecalls?
YES, keep the SMRT Pak on the Power-PRO for up to one week, unless
the cot indicator LED flashes amber.
• CanIchangeoutandchargetheSMRTPakbeforethePower-PROcot
indicatorLEDflashesamber?
YES, the SMRT Charger properly manages charging, regardless of the
SMRT Pak charge state.
• WilltheSMRTPakdischargeduringstorage?
YES, all batteries lose charge during storage. A SMRT Pak loses 30% of
its charge within 48 hours after removal from the charger. Stored SMRT
Paks should be used and fully charged every 3 months to maintain top
performance.
• CanIusetheAC/DCpowersupplywithmyambulanceinverter?
YES, have a qualified technician verify that the power supply is appropriate
for the service requirements.
• CanIusemedicalcleaningproductsontheSMRTPaks?
YES, the SMRT Power System is compatible with all Stryker approved
cleaning products. Remove the SMRT Pak from the Power-PRO cot or
SMRT Charger before cleaning. See page 1-25 for cleaning instructions.
English
• WillwatersprayhaveanyadverseeffectonSMRTPakperformance?
NO, the SMRT Pak is sealed and therefore resistant to water spray and
rain. Do not submerge the SMRT Pak for any reason.
• WilltheSMRTPaksworkonanyotherequipment?
NO, the SMRT Power System components only work with specified Stryker
EMS equipment. See page 1-14 for compatibility information.
• Isitbestto“condition”theSMRTPaksbyfullydischargingthem?
NO, SMRT Paks are maintained by the SMRT Charger and “conditioning”
is not required for SMRT Pak maintenance and performance.
Return To Table of Contents
www.stryker.com 6500 -109-105 R EV A 1-35
Page 42

Recycling Passport
English
Part Number: 6500-101-010 (Reference Only)
A
Item Recycling/Material Code Important Information
A 6500 -101-14 0 (Bat tery P CB) NiCd
The Rechargeable Battery Recycling Corporation (RBRC) is
a non-profit, public service organization that promotes the
recycling of portable rechargeable batteries. Batteries must be
delivered to a battery collection site. Visit the RBRC website
(www.rbrc.org) to find a nearby collection site or call the phone
number shown on the recycling symbol.
Return To Table of Contents
1-36 6500 -109-105 R EV A www.stryker.com
Page 43

Recycling Passport
Part Number: 6500-201-148 (Reference Only)
A
English
Item Recycling/Material Code Important Information
A 6500-201-248 (Power Supply)
Return To Table of Contents
www.stryker.com 6500 -109-105 R EV A 1-37
Page 44

Recycling Passport
English
Part Number: 6500-201-000 (Reference Only)
A
Item Recycling/Material Code Important Information
A 6500-201-140 (Charger PCB)
Return To Table of Contents
1-38 6500 -109-105 R EV A www.stryker.com
Page 45

EMC Information
Guidance and manufacturer's declaration - electromagnetic emissions
The SMRT Charger is intended for use in the electromagnetic environment specified below. The customer or the
Emissions test Compliance Electromagnetic environment - guidance
RF emissions
RF emissions
Harmonic emissions
IEC 61000-3-2
Voltage fluctuations/
flicker emissions
IEC 61000-3-3
user of the SMRT Charger should assure that it is used in such an environment.
CISPR 11
CISPR 11
Group 1 The SMRT Charger uses RF energy only for its internal function.
Class A The SMRT Charger is suitable for use in all establishments other than
Class A
Complies
Therefore, its RF emissions are very low and are not likely to cause
any interference in nearby electronic equipment.
domestic and those directly connected to the public low-voltage power
supply network that supplies buildings used for domestic purposes.
English
Return To Table of Contents
www.stryker.com 6500 -109-105 R EV A 1-39
Page 46

EMC Information
English
SPECIFICATIONS (CONTINUED)
Guidance and manufacturer's declaration - electromagnetic immunity
The SMRT Charger is intended for use in the electromagnetic environment specified below. The customer
or the user of the SMRT Charger should assure that it is used in such an environment.
Immunity test IEC 60601 test level Compliance level Electromagnetic
Electrostatic discharge
(ESD)
IEC 61000-4-2 ±8 kV air ±2, 4, 8 kV air
Electrical fast transient/
burst
IEC 61000-4-4 ±1 kV for input/output
Surge ±1 kV line(s) to line(s) ±1 kV line(s) to line(s) Mains power quality
IEC 61000-4-5 ±2 kV line(s) to earth ±2 kV line(s) to earth
Voltage dips, short
interruptions and voltage
variations on power supply
input lines
IEC 61000-4-11 40% U
Power frequency
(50/60 Hz)
magnetic field
IEC 61000-4-8
NOTE: UT is the alternating current mains voltage prior to application of the test level.
±6 kV contact ±2, 4, 6 kV contact Floors should be wood,
±2 kV for power
supply lines
lines
<5%U
(>95% dip in UT )
(>95% dip in UT )
T
for 0,5 cycle
T
(60% dip in UT)
for 5 cycles
70% UT
(30% dip in UT)
for 25 cycles
<5%U
T
for 5 seconds
3 A/m 3 A/m
±2 kV for power
supply lines
±1 kV for input/output
lines
95% Reduction
(10 ms)
60% Reduction
(100 ms)
30% Reduction
(500 ms)
95% Reduction
(5 sec)
at 50 Hz
environment - guidance
concrete or ceramic tile.
If floors are covered with
synthetic material, the
relative humidity should be at
least 30%.
Mains power quality
should be that of a typical
commercial or hospital
environment.
should be that of a typical
commercial or hospital
environment.
Mains power quality
should be that of a typical
commercial or hospital
environment. If the user of
the SMRT Charger requires
continued operation during
power mains interruptions,
it is recommended that the
SMRT Charger be powered
from an uninterruptible power
supply or a battery.
Power frequency magnetic
fields should be at levels
characteristic of a typical
location in a typical
commercial or hospital
environment.
Return To Table of Contents
1-40 6500 -109-105 R EV A www.stryker.com
Page 47

EMC Information
SPECIFICATIONS (CONTINUED)
Guidance and manufacturer's declaration - electromagnetic immunity
The SMRT Charger is intended for use in the electromagnetic environment specified below. The customer or
Immunity test IEC 60601 test level Compliance level Electromagnetic environment - guidance
Conducted RF
IEC 61000-4-6
Radiated RF
IEC 61000-4-3
the user of the SMRT Charger should assure that it is used in such an environment.
Portable and mobile RF communications
equipment should be used no closer to any
part of the SMRT Charger, including cables,
than the recommended separation distance
calculated from the equation applicable to the
frequency of the transmitter.
Recommended separation distance
d=1.17√P
d=1.17√P
80 MHz to 800 MHz
d=2.33√P
800 MHz to 2.5 GHz
WhereP is the maximum output power rating
of the transmitter in watts (W) according to
the transmitter manufacturer and d is the
recommended separation distance in meters
Field strengths from fixed RF transmitters, as
determined by an electromagnetic site survey,
a
should be less than the compliance level in
each frequency range.
Interference may occur in the vicinity of
equipment marked with the following symbol:
(m)
b
3 Vrms
150 kHz to 80 MHz
3 V/m
80 MHz to 2.5 GHz
3 Vrms
150 kHz to 80
MHz
3 V/m
80 MHz to 2.5
GHz
English
NOTE 1: At 80 MHz and 800 MHz, the higher frequency range applies.
NOTE 2: These guidelines may not apply in all situations. Electromagnetic propagation is affected by absorption
and reflection from structures, objects and people.
a
Field strengths from fixed transmitters, such as base stations for radio (cellular/cordless) telephones and land
mobile radios, amateur radio, AM and FM radio broadcast, and TV broadcast cannot be predicted theoretically
with accuracy. To assess the electromagnetic environment due to fixed RF transmitters, an electromagnetic
site survey should be considered. If the measured field strength in the location in which the SMRT Charger
is used exceeds the applicable RF compliance level above, the SMRT Charger should be observed to verify
normal operation. If abnormal performance is observed, additional measures may be necessary, such as reorienting or relocating the SMRT Charger.
b
Over the frequency range 150 kHz to 80 MHz, field strengths are less than 20 V/m.
Return To Table of Contents
www.stryker.com 6500 -109-105 R EV A 1-41
Page 48

EMC Information
English
SPECIFICATIONS (CONTINUED)
Recommended separation distances between portable and
mobile RF communications equipment and the SMRT Charger
The SMRT Charger is intended for use in the electromagnetic environment in which radiated RF disturbances
are controlled. The customer or the user of the SMRT Charger can help prevent electromagnetic interference by
maintaining a minimum distance between portable and mobile RF communications equipment (transmitters) and
the SMRT Charger as recommended below, according to the maximum output power of the communications
Rated maximum
output power of
transmitter
W
0.01 0.12 0.12 0.23
0.1 0.37 0.37 0.74
1 1. 2 1. 2 2.3
10 3.7 3.7 7.4
100 12 12 23
For transmitters rated at a maximum output power not listed above, the recommended separation distance d in
meters (m) can be estimated using the equation applicable to the frequency of the transmitter, where P is the
maximum output power rating of the transmitter in watts (W) according to the transmitter manufacturer.
NOTE 1: At 80 MHz and 800 MHz, the separation distance for the higher frequency range applies.
NOTE 2: These guidelines may not apply in all situations. Electromagnetic propagation is affected by absorption
and reflection from structures, objects and people.
150 kHz to 80 MHz
Separation distance according to frequency of transmitter
d=1.17√P
equipment.
80 MHz to 800 MHz
m
800 MHz to 2.5 GHz
d=1.17√P
d=2.33√P
Return To Table of Contents
1-42 6500 -109-105 R EV A www.stryker.com
Page 49

Table des matières
Symboles .....................................................2-3
Définition des termes « Avertissement », « Mise en garde » et « Remarque » ....2-5
Introduction....................................................2-6
Utilisation prévue du produit ....................................2-6
Durée de vie prévue..........................................2-6
Contre-indications ...........................................2-6
Illustration du produit .........................................2-7
Caractéristiques techniques ....................................2-8
Coordonnées...............................................2-9
Résumé des précautions d’emploi.................................. 2-10
Inspection générale............................................. 2 -13
Informations de compatibilité ...................................... 2 -14
Civières compatibles ........................................ 2 -14
Chargeurs compatibles....................................... 2 -14
Installation du chargeur.......................................... 2-15
Installation du chargeur SMRT ................................. 2 -15
Exigences électriques pour l’établissement ........................ 2-15
Installation du support de montage en option....................... 2-16
Installation du chargeur sur le support de montage en option ........... 2-18
Caractéristiques du chargeur...................................... 2 -19
Utilisation du chargeur ..........................................2-20
Mise sous tension du chargeur.................................2-20
Déconnexion du chargeur ....................................2-20
Charge de la batterie .......................................2-21
Délai de température du SMRT Pak .............................2-22
Erreur du SMRT Pak ........................................2-22
Utilisation de la batterie..........................................2-23
Considérations relatives à la batterie.............................2-23
Remplacement de la batterie ..................................2-23
Stockage de la batterie ......................................2-23
Retrait de la batterie de la civière ...............................2-24
Réinstallation ou remplacement de la batterie ......................2-24
Français
www.stryker.com 6500-109-105 REV A 2-1
Page 50

Table des matières
Nettoyage....................................................2-25
Produits nettoyants recommandés...............................2-25
Nettoyage du chargeur.......................................2-25
Nettoyage de la batterie ......................................2-26
Dépannage...................................................2-28
Français
Référence des composants du système d’alimentation SMRT ..........2-28
Dépannage du chargeur SMRT.................................2-29
Dépannage du SMRT Pak ....................................2-31
Liste de référence rapide des pièces de rechange ......................2-32
Informations d’entretien ..........................................2-33
Remplacement du fusible du câble 12 VCC pour voiture ..............2-33
Maintenance préventive..........................................2-34
Intervalles de maintenance....................................2-34
Stockage et manipulation .....................................2-34
Bonnes pratiques ..............................................2-34
Questions fréquentes ...........................................2-35
Recyclabilité..................................................2-36
Informations sur la CEM .........................................2-39
2-2 6500-109-105 REV A www.stryker.com
Page 51

Symboles
~
Instructions d’utilisation
Marquage CE
Fabricant
Signe d’avertissement général
Mise en garde
Courant alternatif
Courant continu
Français
Équipement de classe II
Non protégé
IPX0
Protégé contre les jets d’eau puissants
IPX6
Matériel médical homologué par Underwriters Laboratories LLC
uniquement en ce qui concerne la protection contre les risques de chocs
électriques, d’incendie, les risques mécaniques, conformément aux
normes ANSI/AAMI ES60601-1:2005 et CAN/CSA-C22.2 No. 60601-1:08.
Retour à la table des matières
www.stryker.com 6500-109-105 REV A 2-3
Page 52

Français
_
Cd
DATA
KRX
23/44
2300
mAh
(1,2 A/
2 h)
Symboles
Conformément à la Directive européenne 2002/96/CE relative aux
Waste Electrical and Electronic Equipment (Déchets d’équipements
électriques et électroniques) (WEEE), ce symbole indique que le produit
ne doit pas être jeté avec les déchets municipaux non triés mais doit
faire l’objet d’une collecte sélective. Consulter le distributeur local pour
connaître les systèmes de retour et/ou de collecte disponibles dans
votre pays.
Directive WEEE (2002/96/CE). Contient du cadmium.
La Rechargeable Battery Recycling Corporation (Société de recyclage
des piles rechargeables) (RBRC) est une association de services
publics à but non lucratif qui fait la promotion du recyclage des piles
rechargeables portables. Les piles doivent être expédiées à un centre
de collecte de piles. Consulter le site Web de la RBRC (www.rbrc.org)
pour trouver un centre de collecte proche ou appeler le numéro de
téléphone qui figure sur le symbole de recyclage.
Contient des cellules de nickel-cadmium et doit être recyclé en
conséquence
Identification des bornes de la batterie (ligne de données, négative
+
et positive)
Identification de la cellule Ni-Cd selon CEI 61951-1:2003
Capacité, courant de charge type et durée de la batterie
Retour à la table des matières
2-4 6500-109-105 REV A www.stryker.com
Page 53

Définition des termes « Avertissement »,
« Mise en garde » et « Remarque »
Les termes AVERTISSEMENT, MISE EN GARDE et REMARQUE ont des significations
particulières et doivent faire l’objet d’une lecture attentive.
AVERTISSEMENT
Avertit le lecteur des précautions à prendre afin d’éviter une situation présentant un
risque potentiel de décès ou de blessure grave. Peut également attirer l’attention sur
l’existence potentielle d’effets indésirables graves ou de risques d’accident.
MISE EN GARDE
Avertit le lecteur des mesures à prendre afin d’éviter une situation potentiellement
dangereuse susceptible de causer des blessures mineures ou modérées à l’utilisateur
ou au patient ou d’endommager le matériel en question ou d’autres biens. Couvre
notamment les précautions à prendre afin d’assurer l’utilisation sûre et efficace
du matériel et d’éviter les dommages qui pourraient découler de l’usage ou d’une
utilisation incorrecte du matériel.
REMARQUE
Il s’agit d’informations spécifiques destinées à faciliter l’entretien ou à clarifier des
instructions importantes.
Français
Retour à la table des matières
www.stryker.com 6500-109-105 REV A 2-5
Page 54

Introduction
Ce manuel a pour but d’aider l’opérateur à utiliser et à entretenir le système
d’alimentation SMRT™. Il convient de le lire attentivement et intégralement avant de
procéder à la mise en service ou à la maintenance du produit.
UTILISATION PRÉVUE DU PRODUIT
Français
Le système d’alimentation SMRT™ consiste en un chargeur SMRT™ et un SMRT™
Pak. Le SMRT™ Pak alimente le système de levage hydraulique des civières
d’ambulances à batterie Stryker.
Pour obtenir une description complète du produit et de l’utilisation prévue, consultez
le manuel d’utilisation et d’entretien du système Power-PRO™.
DURÉE DE VIE PRÉVUE
• 7 ans pour le chargeur SMRT™
• 2 ans pour la batterie SMRT™ Pak
CONTRE-INDICATIONS
Il n’existe aucune contre-indication connue à l’utilisation de ce produit.
Retour à la table des matières
2-6 6500-109-105 REV A www.stryker.com
Page 55

ILLUSTRATION DU PRODUIT
Introduction
SMRT Pak
Câble CC
Chargeur SMRT
Cordon
d’alimentation
de sortie
Figure 1 : Système d’alimentation SMRT
Français
Cordon
de sortie
Bloc
d’alimentation CA
Retour à la table des matières
www.stryker.com 6500-109-105 REV A 2-7
Page 56

CARACTÉRISTIQUES TECHNIQUES
Modèle Chargeur SMRT SMRT Pak Bloc d’alimentation
Français
Tension
d’entrée
Tension de
sortie
Dimensions Hauteur : 60,325 mm
Poids 59 kg 1,7 kg 0,28 kg
Protection du
boîtier
Type
d’équipement
13,9 V 4,16 A Sans objet 100 à 240 V ~1,20 A,
Circuit ouvert 40 V
1,20 A
Largeur : 130,175 mm
Longueur : 177,8 mm
IPX0 IPX6 IPX0
Sans objet Sans objet
Introduction
24 V 12 V 4,16 A
Hauteur : 82,55 mm
Largeur : 101,6 mm
Longueur : 146,05 mm
CA
50/60 Hz
Hauteur : 40,89 mm
Largeur : 65,02 mm
Longueur : 119,89 mm
Classe II
Approbations
pour
ANSI/AAMI ES60601-1 : 2005
CAN/CSA-C22.2 No. 60601-1:08
le chargeur
Conditions
environne-
Fonctionnement Chargement Stockage et
transport
mentales
Température
Humidité
relative
Pression
atmosphérique
-30 F
(-34 C)
0%
700
0
0
0
130 F
0
(54 C)
93%
1060 hPa
43 F
(6 C)
700
0
0
30%
0
88 F
0
(31 C)
75%
1060 hPa
(-20 C)
500
-4 F
0
0
0%
1060 hPa
104 F
(40 C)
93%
0
0
Ces caractéristiques techniques sont approximatives et peuvent varier d’une unité à
l’autre ou selon les fluctuations du courant. Stryker se réserve le droit de modifier ces
caractéristiques sans préavis.
Retour à la table des matières
2-8 6500-109-105 REV A www.stryker.com
Page 57

Introduction
COORDONNÉES
Contacter le service clientèle ou le support technique de Stryker au (800) 327-0770
ou au (269) 324-6500.
Stryker Medical
3800 E. Centre Avenue
Portage, MI 49002
USA
Se munir du numéro de série ou du numéro de lot de votre produit Stryker avant
d’appeler le support technique de Stryker. Inclure le numéro de série dans toutes les
communications écrites.
Le numéro de série du chargeur SMRT se situe sur la face inférieure de l’unité.
Le numéro de lot du SMRT Pak se situe sur le dessus du SMRT Pak (au-dessus du
bouton de dégagement rouge).
_
DATA
REF 6500-101-010 Battery Pack 24V DC
2300 mAh (1.2A/2h)
+
Français
Manufactured for
Stryker Medical
3800 E. Centre Ave.
Portage, MI 49002 USA
KRX 23/44
Étiquette du SMRT Pak
avec numéro de lot
Cd
IPX6
Étiquette du chargeur SMRT
avec numéro de série
Retour à la table des matières
www.stryker.com 6500-109-105 REV A 2-9
Page 58

Résumé des précautions d’emploi
Lire attentivement et respecter rigoureusement les avertissements et les mises en
garde contenus dans ces pages.
Toute réparation doit être effectuée exclusivement par du personnel qualifié.
AVERTISSEMENT
Français
• Lors du chargement d’un SMRT Pak dans une ambulance, placer le chargeur
SMRT dans un placard fermé et hors de portée du patient pendant le transport.
• Pour assurer la conformité aux normes d’essais de choc établies pour les
ambulances, monter le chargeur SMRT sur le support de montage en option dans
un placard fermé et hors de portée du patient pendant le transport.
• Pour l’installation dans une ambulance, le support de montage en option et le
chargeur SMRT doivent être installés par un mécanicien certifié familiarisé aux
exigences applicables aux ambulances. Une installation incorrecte du chargeur
SMRT risque de blesser le patient ou l’opérateur, et/ou d’endommager le chargeur
SMRT ou le SMRT Pak.
• Vérifier que le support de montage est fermement fixé sur la surface.
• En présence d’une fissure ou d’un endommagement du SMRT Pak, ne pas
l’insérer dans le chargeur SMRT. Renvoyer tout SMRT Pak endommagé à un
centre de service pour recyclage.
• Pour réduire le risque de choc électrique, ne pas retirer le SMRT Pak lorsque la
civière Power-PRO est activée.
• Toujours porter des gants en caoutchouc lors du nettoyage du chargeur SMRT
pour réduire le risque de blessure.
• Pour éviter les dangers électriques, toujours déconnecter le chargeur SMRT de
la prise murale avant le nettoyage.
• Ne pas vaporiser de liquide directement sur le chargeur SMRT.
• Ne pas effectuer un lavage sous pression du chargeur SMRT.
• Pour réduire le risque de choc électrique, ne pas immerger le chargeur SMRT
dans un liquide.
• Sauf indication contraire, ne pas utiliser de solvants, de lubrifiants ou d’autres
produits chimiques pour nettoyer le chargeur SMRT.
• Pour réduire le risque de choc électrique, ne pas laisser de l’eau s’accumuler sur
le dessus du chargeur SMRT.
• En plus du personal protective equipment (Équipement de protection individuelle -
PPE), toujours porter des gants isolants en caoutchouc lors du nettoyage du
SMRT Pak pour réduire le risque de blessure.
• Pendant un lavage sous pression, utiliser l’équipement de protection individuelle
adapté (lunettes, respirateur, etc.) pour éviter le risque d’inhaler des micro-
organismes contagieux. L’utilisation d’un équipement de lavage sous pression est
susceptible de diffuser sous forme d’aérosols les contaminants collectés lors de
l’utilisation de la civière.
• Pour réduire le risque de blessure, ne pas manipuler ou éviter tout contact direct
avec les bornes du SMRT Pak pendant le nettoyage.
• Utiliser uniquement des matériaux non conducteurs pour essuyer le SMRT Pak.
Retour à la table des matières
2-10 6500-109-105 REV A www.stryker.com
Page 59

Résumé des précautions d’emploi
AVERTISSEMENT (SUITE)
• Pour réduire le risque de blessure, ne pas manipuler ou éviter tout contact direct
avec les bornes du SMRT Pak pendant le rinçage.
• Éviter une exposition excessive à l’eau des bornes du SMRT Pak.
• Pour réduire le risque de choc électrique, ne pas immerger le SMRT Pak dans
un liquide.
• Sauf indication contraire, ne pas utiliser de solvants, de lubrifiants ou d’autres
produits chimiques pour nettoyer le SMRT Pak.
• Consulter la Material Safety Data Sheet (Fiche signalétique des désinfectants -
MSDS) pour vérifier la plage du pH. Les désinfectants avec un pH supérieur à
10,5 peuvent provoquer des fissures du matériau du boîtier du SMRT Pak.
• Utiliser exclusivement des pièces approuvées par Stryker. D’autres pièces
peuvent augmenter les émissions électromagnétiques ou diminuer l’immunité
électromagnétique du système. Ne modifier aucune pièce. Le non-respect de cet
avertissement risque de provoquer des blessures.
• Toujours conserver le chargeur SMRT dans un lieu exempt d’humidité et de
poussière, et en particulier de matériaux conducteurs ou métalliques comme,
entre autres, la laine d’acier, le papier aluminium, la poussière de meulage ou les
vapeurs salines.
• Ne pas utiliser cet équipement en présence d’un mélange d’anesthésique
inflammable et d’air, d’oxygène ou d’oxyde nitreux.
• Prendre des précautions particulières concernant la compatibilité
électromagnétique (CEM) lors de l’utilisation de équipement médical électrique
tel que le chargeur SMRT. Installer et mettre en service le chargeur SMRT selon
les informations de CEM de ce manuel. Les appareils de communication RF
portables et mobiles peuvent affecter le fonctionnement du chargeur SMRT.
• Ne pas utiliser le chargeur SMRT avec une tension différente de celle indiquée
à l’arrière de l’unité.
• Toujours recharger un SMRT Pak avec un chargeur SMRT. Le non-respect de cet
avertissement risque de provoquer des blessures.
• Toujours placer et entretenir le cordon d’alimentation de manière à ce qu’il ne soit
pas endommagé et qu’il ne présente pas de danger.
• Ne jamais utiliser un chargeur SMRT dont le boîtier, le bloc d’alimentation ou le
cordon d’alimentation sont endommagés. Le non-respect de cet avertissement
peut provoquer un choc électrique ou un incendie. Avant de procéder à l’entretien
ou au nettoyage, TOUJOURS déconnecter le cordon d’alimentation du chargeur
SMRT pour réduire le risque de choc électrique. Ne jamais nettoyer le chargeur
SMRT lorsqu’il est connecté à une source d’alimentation électrique.
• Pour réduire le risque de choc électrique, ne tenter en aucun cas d’ouvrir le
chargeur SMRT ou le SMRT Pak.
• Éviter tout contact direct avec un SMRT Pak ou un chargeur SMRT mouillés. Un
contact risque de porter atteinte à la sécurité du patient ou de l’opérateur.
Français
Retour à la table des matières
www.stryker.com 6500-109-105 REV A 2-11
Page 60

Résumé des précautions d’emploi
AVERTISSEMENT (SUITE)
• Avant chaque utilisation, vérifier que les SMRT Pak ne sont pas endommagés.
Ne pas les charger ni les utiliser s’ils sont visiblement endommagés. Pendant le
nettoyage, de l’humidité peut pénétrer dans un boîtier fissuré et endommager les
composants électriques, ou provoquer une fuite ou une aération des électrolytes
Français
de batterie. Ceci peut provoquer des brûlures chimiques de la peau et des yeux.
• Ne jamais incinérer un SMRT Pak, même s’il est très endommagé, car il risque
d’exploser lorsqu’il prend feu.
• Ne jamais court-circuiter le SMRT Pak en raccordant les bornes à un matériau
conducteur.
MISE EN GARDE
• Utiliser le SMRT Pak et le chargeur SMRT uniquement selon les indications.
• Disposer le cordon d’alimentation électrique de façon à ce que personne ne
marche dessus, ne se prenne les pieds dedans et qu’il ne soit pas exposé à
d’autres dommages ou contraintes.
• Ne pas toucher les bornes du SMRT Pak destinées au logement avec des objets
métalliques.
• Pour réduire le risque d’endommager la fiche et le cordon électriques, tirer sur la
fiche et non sur le cordon pour déconnecter le chargeur SMRT.
• Vérifier que le SMRT Pak est complètement chargé avant de le mettre en service.
Un SMRT Pak non chargé ou épuisé risque de nuire aux performances de la civière.
• Retirer le SMRT Pak si la civière Power-PRO ne sera pas utilisée pendant une
durée prolongée (plus d’une semaine).
• Retirer le SMRT Pak avant de laver la civière Power-PRO. Voir page 2-25 pour
connaître les instructions de nettoyage.
• Sécher le SMRT Pak avant de le placer dans le chargeur SMRT pour éviter
d’endommager la batterie ou le chargeur.
• Remplacer un SMRT Pak dans une civière Power-PRO dès le premier signe
d’épuisement de l’alimentation. L’utilisation d’un SMRT Pak jusqu’à son épuisement
complet risque de produire des dommages permanents et raccourcir la durée de
vie et la puissance du SMRT Pak.
REMARQUE
• Il n’est pas nécessaire que le voyant à DEL de la civière clignote en orange avant
de retirer et de charger le SMRT Pak, toutefois ceci est la meilleure pratique à
appliquer.
• Lors d’un stockage prolongé, le SMRT Pak doit rester sur le chargeur SMRT
pour qu’il reçoive un faible courant de recharge et reste complètement chargé.
Le chargeur SMRT conserve le SMRT Pak chargé et prêt à l’emploi.
• Pour maximiser la charge de batterie disponible, utiliser uniquement des SMRT Pak
qui ont été complètement chargés dans les dernières 48 heures.
• Charger complètement le SMRT Pak pendant deux heures avant de procéder à son
dépannage.
Retour à la table des matières
2-12 6500-109-105 REV A www.stryker.com
Page 61

Inspection générale
Il revient au propriétaire d’assurer l’état du chargeur SMRT et du SMRT Pak. Demander
à un technicien qualifié d’utiliser la liste suivante et les instructions d’utilisation pour
vérifier le chargeur SMRT et le SMRT Pak avant la mise en service du produit.
Déballer les cartons et s’assurer que tous les articles fonctionnent correctement.
Article Routine Page
Chargeur SMRT et
SMRT Pak
Composants
d’alimentation CA
Composants
d’alimentation CC
Accessoires Vérifier que le support de montage n’est pas
Déballer les batteries et le chargeur
Charger le SMRT Pak en suivant les
instructions
Vérifier que le bloc d’alimentation CA n’est pas
endommagé
Vérifier que le cordon d’alimentation CA n’est
pas endommagé
Vérifier que le câble CC n’est pas endommagé S.O.
endommagé
2-21
S.O.
S.O.
AVERTISSEMENT
Lors du chargement d’un SMRT Pak dans une ambulance, placer le chargeur
SMRT dans un placard fermé et hors de portée du patient pendant le transport.
Remarque : Ce manuel doit être considéré comme partie intégrante et permanente du
système d’alimentation SMRT et doit accompagner le produit même en cas de vente
du système.
Français
Retour à la table des matières
www.stryker.com 6500-109-105 REV A 2-13
Page 62

Informations de compatibilité
CIVIÈRES COMPATIBLES
Le SMRT Pak de Stryker est conçu pour être compatible avec les civières Power-PRO
XT, Power-PRO TL et Power-PRO IT. La capacité électrique nominale du système
Power-PRO 24 VCC et du SMRT Pak est de 2,4 ampères-heures. Un SMRT Pak en
bon état de fonctionnement et complètement chargé fournit entre 15 et 20 heures de
Français
service avec un patient de 113,40 kg (les résultats actuels peuvent varier).
L’utilisation continue du SMRT Pak, sans pause, peut augmenter la température à
l’intérieur des cellules et réduire sa durée de vie. Par exemple, soulever et abaisser
plusieurs fois, en succession rapide, un patient lourd peut réduire la durée de vie du
SMRT Pak.
Pour des résultats optimaux, utiliser le SMRT Pak sur la civière Power-PRO jusqu’à ce
que le voyant à DEL de la civière passe du vert au orange clignotant.
Remarque : Il n’est pas nécessaire que le voyant à DEL de la civière clignote en
orange avant de retirer et de charger le SMRT Pak, toutefois ceci est la meilleure
pratique à appliquer.
Lorsque le SMRT Pak est déchargé, le retirer de la civière Power-PRO et le remplacer
par un SMRT Pak complètement chargé.
CHARGEURS COMPATIBLES
Le SMRT Pak de Stryker est destiné à être utilisé uniquement avec le chargeur SMRT
de Stryker.
Retour à la table des matières
2-14 6500-109-105 REV A www.stryker.com
Page 63

Installation du chargeur
INSTALLATION DU CHARGEUR SMRT
Lors de l’installation du chargeur SMRT :
• Placer le chargeur SMRT dans un milieu ambiant contrôlé exempt d’humidité et
de poussière excessive.
• Placer le chargeur SMRT dans un lieu dont la plage de température est constante.
Une plage de température acceptable est comprise entre 6 et 31 °C. La plage de
température optimale est comprise entre 18 et 24 °C.
• Placer le chargeur SMRT de façon à ce qu’il soit facile d’accès.
• Placer et entretenir le bloc et les cordons d’alimentation de façon à réduire au
minimum le risque d’endommagement et de déconnexion accidentelle.
AVERTISSEMENT
Pour assurer la conformité aux normes d’essais de choc établies pour les ambulances,
monter le chargeur SMRT sur le support de montage en option dans un placard fermé
et hors de portée du patient pendant le transport.
Pour monter le chargeur SMRT sur une surface horizontale ou verticale, suivre les
étapes de la page 2-16 d’installation du support de montage en option.
Français
EXIGENCES ÉLECTRIQUES POUR L’ÉTABLISSEMENT
Lors de la configuration de la source d’alimentation électrique en vue de l’installation
du chargeur SMRT, tenir compte des conditions électriques suivantes pour assurer un
fonctionnement fiable et efficace.
Type
d’alimentation
CA 100 à 240 VCA 50/60 Hz 1,20 A 0,05 A S.O.
CC 12,5 à16 VCC S.O. 4,16 A 0,20 A 10 VCC
Plage de
tensions de
fonctionnement
Fréquence Courant
maximum
consommé
Courant
minimum
consommé
Retour à la table des matières
Arrêt pour
tension
faible
www.stryker.com 6500-109-105 REV A 2-15
Page 64

Installation du chargeur
INSTALLATION DU SUPPORT DE MONTAGE EN OPTION
AVERTISSEMENT
• Pour l’installation dans une ambulance, le support de montage en option et le
Français
chargeur SMRT doivent être installés par un mécanicien certifié familiarisé aux
exigences applicables aux ambulances. Une installation incorrecte du chargeur
SMRT risque de blesser le patient ou l’opérateur, et/ou d’endommager le chargeur
SMRT ou le SMRT Pak.
• Lors du chargement d’un SMRT Pak dans une ambulance, placer le chargeur
SMRT dans un placard fermé et hors de portée du patient pendant le transport.
Pour installer le support de montage en option (Figure 2) :
1. Utiliser le support de montage du chargeur SMRT comme gabarit pour marquer
l’emplacement des trous de montage à l’endroit où le support sera installé.
Points de montage
du chargeur
Languette
à ressort
Figure 2 : Support de montage
Retour à la table des matières
2-1 6 6500-109-105 REV A www.stryker.com
Page 65

Installation du chargeur
INSTALLATION DU SUPPORT DE MONTAGE EN OPTION (SUITE)
2. Positionner le support de montage, en vérifiant que :
• La languette à ressort est située à l’arrière du chargeur SMRT.
Remarque : Lors du montage du support sur une surface verticale, la
languette à ressort doit être horizontale et orientée vers la gauche, tel
qu’illustré sur la Figure 2, à la page 2-16.
• Le cordon d’alimentation se branche facilement à l’arrière du chargeur SMRT.
• Le chargeur SMRT glisse de l’avant vers l’arrière pour engager le support
après le montage.
• En fonction de son emplacement, dans une ambulance ou sur un poste, le
support est correctement installé si les étapes suivantes sont respectées :
Emplacement
Ambulance • Fixer le support sur la surface d’un montant structurel
Considérations
horizontal ou d’une étagère avec des vis n° 10 de grade
5 minimum (non fournies).
• Vérifier que la surface de montage choisie est capable de
soutenir le chargeur SMRT et le SMRT Pak au cours du
transport.
• Placer le support dans un placard fermé et hors de portée
du patient pendant le transport.
• Assurer une installation et un retrait faciles du SMRT Pak.
• Placer le bloc d’alimentation pour que le cordon
d’alimentation puisse l’atteindre.
Français
Poste • Fixer le support sur la surface d’un montant structurel
horizontal ou vertical avec des vis n° 10 de grade 5 minimum
(non fournies).
• Pour une installation verticale, positionner le support
de montage de manière à ce que la languette à ressort
soit juste sous les vis de montage, pour assurer que le
SMRT Pak soit soutenu par le chargeur SMRT même si le
bouton de dégagement est enfoncé par accident.
• Assurer une installation et un retrait faciles du SMRT Pak.
• Placer le bloc d’alimentation pour que le cordon d’alimenta-
tion puisse l’atteindre.
AVERTISSEMENT
Vérifier que le support de montage est fermement fixé sur la surface.
Retour à la table des matières
www.stryker.com 6500-109-105 REV A 2 -17
Page 66

Installation du chargeur
INSTALLATION DU CHARGEUR SUR LE SUPPORT DE MONTAGE EN OPTION
Pour installer le chargeur SMRT
sur le support de montage en
option :
Français
1. Aligner les fentes clavetées
arrière (Figure 3) sur les
plots de fixation du support
(Figure 4).
2. Glisser le chargeur SMRT
dessus jusqu’à ce qu’il
s’enclenche dans le support
de montage, tel qu’illustré
dans la Figure 4. Vérifier
que le chargeur SMRT est
complètement enclenché et
fixé sur le support.
Fentes clavetées arrière
Figure 3 : Fentes clavetées arrière du chargeur
Chargeur
SMRT
Support
de montage
Figure 4 : Installation du chargeur
Retour à la table des matières
Plots de fixation
du support
2-18 6500-109-105 REV A www.stryker.com
Page 67

Caractéristiques du chargeur
Voyant à DEL
du chargeur
SMRT
Voyants à DEL
du chargeur
SMRT
Figure 5 : Caractéristiques du chargeur
• Branchement électrique : utiliser cette prise pour brancher ou débrancher le
chargeur SMRT de la source d’alimentation appropriée, tel qu’illustré sur la
Figure 6, à la page 2-20.
• Voyant à DEL d’alimentation du chargeur SMRT : le voyant à DEL vert donne
des informations sur l’état du chargeur. Si le voyant à DEL est allumé, le chargeur
SMRT est sous tension.
Français
• Voyants à DEL du chargeur SMRT : les voyants à DEL vert et orange du chargeur
indiquent l’état du SMRT Pak. Ces DEL peuvent être fixes ou clignoter, selon
l’état du chargeur SMRT et du SMRT Pak.
Voyant à DEL du chargeur
SMRT
VERT (clignotant) Le chargeur SMRT charge activement le
VERT (fixe) Le SMRT Pak est complètement chargé et
ORANGE (clignotant) Délai de température du SMRT Pak. Le
ORANGE (fixe) Erreur du SMRT Pak. Voir la page 2-28
État
SMRT Pak. La durée de charge optimale est
de deux heures.
prêt à l’emploi.
chargeur SMRT doit attendre que le SMRT
Pak atteigne la plage de température acceptable de 6 à 31 °C.
pour des informations de dépannage
supplémentaires.
Retour à la table des matières
www.stryker.com 6500-109-105 REV A 2 -19
Page 68

Utilisation du chargeur
MISE SOUS TENSION DU CHARGEUR
MISE EN GARDE
• Disposer le cordon d’alimentation électrique de façon à ce que personne ne
Français
marche dessus, ne se prenne les pieds dedans et qu’il ne soit pas exposé à
d’autres dommages ou contraintes.
• Ne pas toucher les bornes du SMRT Pak destinées au logement avec des objets
métalliques.
Pour mettre le chargeur SMRT sous tension :
1. Placer la connexion
d’alimentation au dos du
chargeur SMRT (Figure 6).
2. Enfoncer la languette
de rétention du cordon
d’alimentation pour insérer le
connecteur du cordon dans
la connexion d’alimentation
du chargeur SMRT.
3. Brancher l’extrémité du
cordon d’alimentation munie
de l’adaptateur d’alimentation
sur la source d’alimentation.
Les bonnes pratiques
recommandent l’utilisation d’une
source d’alimentation sans
coupure propre. Le voyant à DEL vert du chargeur SMRT est allumé en continu quand
le chargeur est correctement branché à une source d’alimentation.
Utiliser uniquement les pièces approuvées par Stryker pour alimenter le chargeur
SMRT. Pour une liste des pièces approuvées par Stryker, voir la page 2-32.
Figure 6 : Mise sous tension du chargeur
Connexion
d’alimentation
Languette
de rétention
du cordon
d’alimentation
DÉCONNEXION DU CHARGEUR
MISE EN GARDE
Pour réduire le risque d’endommager la fiche et le cordon électriques, tirer sur la fiche
et non sur le cordon pour déconnecter le chargeur SMRT.
Pour déconnecter le chargeur SMRT, débrancher le cordon d’alimentation de la source
d’alimentation CA ou CC.
Retour à la table des matières
2-20 6500-109-105 REV A www.stryker.com
Page 69

Utilisation du chargeur
CHARGE DE LA BATTERIE
Remarque :
• Lors d’un stockage prolongé, le SMRT Pak doit rester sur le chargeur SMRT
pour qu’il reçoive un faible courant de recharge et reste complètement chargé.
Le chargeur SMRT conserve le SMRT Pak chargé et prêt à l’emploi.
• Le SMRT Pak doit être à température ambiante, dans la plage de température
acceptable de 6 à 31 °C. Un chargement du SMRT Pak en dehors de cette plage
de température recommandée réduit sa durée de vie et ralentit le chargement.
AVERTISSEMENT
En présence d’une fissure ou d’un endommagement du SMRT Pak, ne pas l’insérer
dans le chargeur SMRT. Renvoyer tout SMRT Pak endommagé à un centre de service
pour recyclage.
Pour charger le SMRT Pak :
1. Insérer un SMRT Pak propre et sec dans le chargeur SMRT. Vérifier que le
SMRT Pak est correctement mis en place. Le SMRT Pak s’enclenche en position
dans le chargeur SMRT.
2. Le voyant à DEL du chargeur SMRT clignote en vert pendant la charge. La durée
de charge optimale est de deux heures.
3. Lorsque le SMRT Pak est complètement chargé et prêt à l’emploi, le voyant à
DEL passe au vert fixe, tel qu’illustré sur la Figure 7.
4. Appuyer sur le bouton de dégagement ROUGE (Figure 7) et glisser le SMRT Pak
complètement chargé et prêt hors du chargeur SMRT.
Français
État des DEL
VERT (clignotant) : Chargement
VERT (fixe) : Chargé et prêt à l’emploi
Figure 7 : Voyant à DEL vert du chargeur SMRT
Retour à la table des matières
www.stryker.com 6500-109-105 REV A 2-21
Bouton de
dégagement
ROUGE
Page 70

Utilisation du chargeur
Le voyant à DEL ORANGE, tel qu’indiqué dans la Figure 8, indique également l’état
de la batterie.
DÉLAI DE TEMPÉRATURE DU SMRT PAK
Un voyant à DEL ORANGE clignotant indique un délai de température du SMRT Pak.
Français
Le chargeur SMRT doit attendre que le SMRT Pak atteigne la plage de température
acceptable de 6 à 31 °C.
ERREUR DU SMRT PAK
Un voyant à DEL ORANGE fixe indique une erreur du SMRT Pak. Voir la page 2-28
pour des informations de dépannage supplémentaires.
État des DEL
ORANGE (clignotant) : Délai de
température
ORANGE (fixe) : Erreur du SMRT Pak
Figure 8 : Voyant à DEL ORANGE du chargeur SMRT
Retour à la table des matières
2-22 6500-109-105 REV A www.stryker.com
Page 71

Utilisation de la batterie
CONSIDÉRATIONS RELATIVES À LA BATTERIE
• Charger complètement tous les SMRT Pak avant l’utilisation.
• Remplacer un SMRT Pak déchargé par un autre complètement chargé et prêt
à l’emploi.
• Retirer le SMRT Pak de la civière Power-PRO ou du chargeur SMRT avant le
nettoyage.
• Le SMRT Pak est étanche et peut faire l’objet d’un lavage sous pression séparé.
Voir la page 2-25 pour connaître les instructions de nettoyage.
REMPLACEMENT DE LA BATTERIE
AVERTISSEMENT
Pour réduire le risque de choc électrique, ne pas retirer le SMRT Pak lorsque la civière
Power-PRO est activée.
Le voyant à DEL de la civière Power-PRO clignote en orange lorsque e SMRT Pak
a besoin d’être rechargé ou remplacé. Le SMRT Pak peut cependant être retiré et
rechargé à tout moment. Le chargeur SMRT contrôle correctement le chargement,
quel que soit l’état de charge du SMRT Pak.
Le SMRT Pak peut rester sur la civière Power-PRO entre les appels de service,
pendant une semaine au maximum ou jusqu’à ce le voyant à DEL de la civière clignote
en orange.
Français
MISE EN GARDE
S’assurer que le SMRT Pak est complètement chargé avant de le mettre en service.
Un SMRT Pak non chargé ou épuisé risque de nuire aux performances de la civière.
Le voyant à DEL de la civière est vert fixe quand le SMRT Pak est complètement
chargé ou suffisamment chargé.
STOCKAGE DE LA BATTERIE
Toutes les batteries se déchargent pendant le stockage ou les périodes d’inactivité.
Un SMRT Pak peut perdre jusqu’à 30 % de sa charge dans les 48 heures après son
retrait du chargeur SMRT. Les SMRT Pak stockés doivent être utilisés et complètement
chargés tous les 3 mois pour entretenir des performances optimales.
Retour à la table des matières
www.stryker.com 6500-109-105 REV A 2-23
Page 72

Utilisation de la batterie
RETRAIT DE LA BATTERIE DE LA CIVIÈRE
Pour retirer le SMRT Pak de la civière Power-PRO :
1. Appuyer sur le bouton de dégagement à une main ROUGE ou appuyer sur le
bouton de dégagement de la batterie pour libérer le SMRT Pak de la civière,
Français
de dégagement
comme illustré sur la Figure 9.
2. Faire glisser le SMRT Pak libéré hors du boîtier.
Bouton
de la batterie
Faire glisser
pour libérer
Figure 9 : Retrait et remplacement du SMRT Pak
SMRT Pak
Bouton de
de dégagement
à une main
RÉINSTALLATION OU REMPLACEMENT DE LA BATTERIE
Remarque : Pour maximiser la charge de batterie disponible, utiliser uniquement des
SMRT Pak qui ont été complètement chargés dans les dernières 48 heures.
Pour réinstaller ou remplacer le SMRT Pak dans la civière Power-PRO :
1. Aligner les languettes dans le boîtier de la batterie.
2. Enfoncer le bloc-batterie SMRT dans le boîtier jusqu’à ce que le loquet
s’enclenche en place.
• Le voyant à DEL de la civière est vert fixe si le SMRT Pak est complètement
chargé et prêt à l’emploi.
• Le voyant à DEL de la civière clignote en orange si le SMRT Pak doit être
rechargé ou remplacé.
Retour à la table des matières
2-24 6500-109-105 REV A www.stryker.com
Page 73

Nettoyage
PRODUITS NETTOYANTS RECOMMANDÉS
En général, les désinfectants de type phénolique ou quaternaire (sauf le Virex® TB)
peuvent être utilisés à condition de respecter les concentrations recommandées par
le fabricant. Les désinfectants iodés ne sont pas recommandés car ils risquent de
laisser des taches.
Les produits nettoyants recommandés comprennent :
• Nettoyants quaternaires (substances active : chlorure d’ammonium)
• Nettoyants phénoliques (substance active : o-phénylphénol)
• Solution d’eau de Javel (5,25 % – moins d’une part d’eau de Javel pour 100 parts d’eau)
MISE EN GARDE
Ne pas utiliser Virex® TB pour nettoyer le chargeur SMRT ou le SMRT Pak.
NETTOYAGE DU CHARGEUR
AVERTISSEMENT
• Toujours porter des gants en caoutchouc lors du nettoyage du chargeur SMRT
pour réduire le risque de blessure.
• Pour éviter les dangers électriques, toujours déconnecter le chargeur SMRT de
la prise murale avant le nettoyage.
• Ne pas vaporiser de liquide directement sur le chargeur SMRT.
• Ne pas effectuer un lavage sous pression du chargeur SMRT.
• Pour réduire le risque de choc électrique, ne pas immerger le chargeur SMRT
• Sauf indication contraire, ne pas utiliser de solvants, de lubrifiants ou d’autres
• Pour réduire le risque de choc électrique, ne pas laisser de l’eau s’accumuler sur
dans un liquide.
produits chimiques pour nettoyer le chargeur SMRT.
le dessus du chargeur SMRT.
Français
Pour nettoyer le chargeur :
1. Déconnecter le chargeur SMRT de la prise murale pour
éviter tout danger électrique pendant le nettoyage.
2. Essuyer les surfaces du chargeur SMRT avec un
linge doux humecté avec un désinfectant hospitalier
non abrasif (consulter la liste des Produits nettoyants
recommandés).
3. Essuyer avec un linge humecté d’eau propre pour
éliminer les traces de produit chimique nettoyant ou
résidus.
4. Sécher soigneusement avant de remettre le chargeur
SMRT en service.
Figure 10 : Chargeur
SMRT
Retour à la table des matières
www.stryker.com 6500-109-105 REV A 2-25
Page 74

Nettoyage
NETTOYAGE DE LA BATTERIE
AVERTISSEMENT
• En plus du personal protective equipment (Équipement de protection individuelle -
Français
PPE), toujours porter des gants isolants en caoutchouc lors du nettoyage du
SMRT Pak pour réduire le risque de blessure.
• Pendant un lavage sous pression, utiliser l’équipement de protection individuelle
adapté (lunettes, respirateur, etc.) pour éviter le risque d’inhaler des microorganismes contagieux. L’utilisation d’un équipement de lavage sous pression est
susceptible de diffuser sous forme d’aérosols les contaminants collectés lors de
l’utilisation de la civière.
Le SMRT Pak est conçu pour pouvoir être lavé sous pression. La méthode
recommandée pour le lavage sous pression du SMRT Pak consiste à utiliser le laveur
de chariot chirurgical standard de l’hôpital ou un jet à main.
MISE EN GARDE
• NE PAS NETTOYER LE SMRT PAK À LA VAPEUR OU AUX ULTRASONS.
• La température maximum de l’eau ne doit pas dépasser 82 °C.
• La température maximale de l’air de séchage (laveurs de chariot) ne doit pas
dépasser 115 °C.
• La pression maximale de l’eau ne doit pas dépasser 130,5 bars (1 500 psi). Si un
jet à main est utilisé pour laver l’unité, tenir le bec sous pression à au moins
61 cm du SMRT Pak.
Retour à la table des matières
2-26 6500-109-105 REV A www.stryker.com
Page 75

Nettoyage
NETTOYAGE DE LA BATTERIE (SUITE)
Pour nettoyer le SMRT Pak :
1. Retirer le SMRT Pak de la civière Power-PRO ou du
chargeur SMRT.
2. Examiner le boîtier du SMRT Pak pour détecter des
fissures ou des signes d’endommagement.
3. Nettoyer le SMRT Pak avec un désinfectant de
qualité hôpital dont le pH est compris dans une
plage de 6,5 à 10,5. Consulter la liste des Produits
nettoyants recommandés, à la page 2-25.
AVERTISSEMENT
• Pour réduire le risque de blessure, ne pas manipuler ou éviter tout contact direct
avec les bornes du SMRT Pak pendant le nettoyage.
• Utiliser uniquement des matériaux non conducteurs pour essuyer le SMRT Pak.
4. Rincer soigneusement le SMRT Pak avec de l’eau propre pour éliminer les traces
de produit chimique nettoyant ou résidus. Positionner le SMRT Pak tel qu’illustré
dans la Figure 11 pour éviter toute accumulation d’eau près des bornes.
Figure 11 : SMRT
Pak
Français
AVERTISSEMENT
• Pour réduire le risque de blessure, ne pas manipuler ou éviter tout contact direct
avec les bornes du SMRT Pak pendant le rinçage.
• Éviter une exposition excessive à l’eau des bornes du SMRT Pak.
5. Sécher soigneusement le SMRT Pak avant de l’insérer dans une civière PowerPRO ou un chargeur SMRT.
AVERTISSEMENT
• Pour réduire le risque de choc électrique, ne pas immerger le SMRT Pak dans
un liquide.
• Sauf indication contraire, ne pas utiliser de solvants, de lubrifiants ou d’autres
produits chimiques pour nettoyer le SMRT Pak.
• Consulter la Material Safety Data Sheet (Fiche signalétique des désinfectants MSDS) pour vérifier la plage du pH. Les désinfectants avec un pH supérieur à
10,5 peuvent provoquer des fissures du matériau du boîtier du SMRT Pak.
Retour à la table des matières
www.stryker.com 6500-109-105 REV A 2-27
Page 76

Dépannage
RÉFÉRENCE DES COMPOSANTS DU SYSTÈME D’ALIMENTATION SMRT
Consulter les composants du système d’alimentation SMRT tels qu’ils sont illustrés
dans la Figure 12 pendant le dépannage du système. Voir la page 2-29 pour des
informations de dépannage supplémentaires.
Français
DEL d’alimentation
du chargeur SMRT
Données
Alimentation
(-)
Alimentation
(+)
Voyants à DEL
du chargeur SMRT
Câble CC
Figure 12 : Composants du système d’alimentation SMRT
Chargeur SMRT
SMRT Pak
Cordon de
sortie
Cordon
d’alimentation
CA
Bloc
d’alimentation CA
Pour une assistance lors du dépannage, contactez un technicien au +1 (800) 327-0770
ou +1 (269) 324-6500.
Retour à la table des matières
2-28 6500-109-105 REV A www.stryker.com
Page 77

Dépannage
DÉPANNAGE DU CHARGEUR SMRT
Problème /
défaillance
Le voyant à
DEL d’alimentation
du chargeur
SMRT n’est
pas allumée
Le chargeur
SMRT ne
charge pas
le SMRT
Pak
Action recommandée
1. Vérifier que le bloc d’alimentation CA ou le câble CC sont
correctement connectés.
A. Si un bloc d’alimentation CA est utilisé, s’assurer que :
a. Le cordon d’alimentation CA est branché à une prise
murale approvisionnée en alimentation CA.
b. Le cordon d’alimentation CA est branché à une
alimentation électrique.
c. Le cordon de sortie d’alimentation CA est branché au
chargeur.
B. Si un câble CC est utilisé, s’assurer que :
a. Le câble CC est branché à une source d’alimentation
approvisionnée de 12,5 à 16 VCC.
Remarque : le voyant à DEL de l’adaptateur du cordon de
sortie du bloc d’alimentation CC doit être allumé.
b. La continuité du fusible interne de l’adaptateur du cordon
d’alimentation est intacte.
Si ce n’est pas le cas, remplacer le fusible (voir à la
page 2-33).
c. Le câble CC est branché au chargeur.
2. Vérifier la présence d’une alimentation de 12,5 à 16 VCC au
niveau du cordon de sortie du bloc d’alimentation qui se branche
sur le chargeur.
A. En l’absence d’une alimentation de 12,5 à 16 VCC, remplacer
l’ensemble du bloc d’alimentation.
B. Si une alimentation de 12,5 à 16 VCC est présente, remplacer
le chargeur.
1. Vérifier que le voyant à DEL d’alimentation du chargeur est allumé.
A. Si ce n’est pas le cas, consulter la section « Le voyant à DEL
d’alimentation du chargeur SMRT n’est pas allumé », plus haut.
2. Vérifier que les voyants à DEL du chargeur clignotent lors de sa
mise sous tension initiale.
A. Si les DEL clignotent à la mise sous tension, passer à l’étape 3.
B. Si les DEL ne clignotent pas à la mise sous tension, remplacer
le chargeur.
3. Réinsérer le SMRT Pak sur le chargeur et vérifier son état en
observant les voyants à DEL du chargeur :
A. Orange fixe = erreur du SMRT Pak. Voir La section
« Dépannage du SMRT Pak », page 2-31.
B. Orange clignotant = délai de température. Attendre que le SMRT
Pak atteigne une température de fonctionnement normale.
Réinstaller le SMRT Pak et répéter l’étape 3.
C. Vert fixe = voir la section « Dépannage du SMRT Pak »,
page 2-31.
Français
Retour à la table des matières
www.stryker.com 6500-109-105 REV A 2-29
Page 78

Dépannage
DÉPANNAGE DU CHARGEUR SMRT (SUITE)
Français
Problème /
défaillance
Les voyants
à DEL du
chargeur
SMRT ne
s’allument
PAS quand
le SMRT
Pak est
inséré
Action recommandée
1. Débrancher le chargeur, attendre cinq minutes puis rebrancher
le chargeur sur la prise murale.
2. Vérifier que le voyant à DEL d’alimentation du chargeur est
allumé.
A. Si ce n’est pas le cas, consulter la section « Le voyant à DEL
d’alimentation du chargeur SMRT n’est pas allumé », plus
haut.
3. Vérifier que le SMRT Pak est complètement inséré dans le
chargeur.
A. Si ce n’est pas le cas, réinsérer le SMRT Pak complètement
jusqu’à entendre un clic, et vérifier les voyants à DEL du
chargeur.
4. Essayer un autre SMRT Pak pour identifier un problème
potentiel à ce niveau.
Remarque : Séparer et étiqueter les différents SMRT Pak
pendant le dépannage.
A. Si les voyants à DEL du chargeur ne s’allument pas,
remplacer le chargeur.
B. Si les voyants à DEL du chargeur s’allument, remplacer le
SMRT Pak d’origine.
Retour à la table des matières
2-30 6500-109-105 REV A www.stryker.com
Page 79

Dépannage
DÉPANNAGE DU SMRT PAK
Remarque : Charger complètement le SMRT Pak pendant deux heures avant de
procéder à son dépannage.
Problème /
défaillance
Un SMRT Pak
complètement
chargé ne
fournit pas
suffisamment
d’alimentation
pour faire
fonctionner la
civière
Le chargeur
indique une
erreur du
SMRT Pak
(DEL orange),
mais le SMRT
Pak fonctionne bien
sur la civière
Le chargeur
indique un
délai de
température
(DEL orange
clignotant),
mais le SMRT
Pak est dans
la plage de
température
de fonctionnement normale
Action recommandée
Français
1. Charger complètement le SMRT Pak pendant deux heures.
A. Si le voyant à DEL du chargeur est vert fixe, indiquant un
SMRT Pak complètement chargé et prêt à l’emploi, passer
à l’étape 2.
B. Si le voyant à DEL du chargeur est orange fixe, indiquant
une erreur du SMRT Pak, remplacer ce dernier.
2. Juste après une charge complète, retirer le SMRT Pak
du chargeur et vérifier la tension au niveau des bornes
d’alimentation du SMRT Pak (voir Figure 12, à la page 2-28),
qui doit être de 26 VCC minimum.
A. Si le SMRT Pak dispose d’une alimentation de 26 VCC au
minimum, passer à l’étape 3.
B. Si le courant continu affiche moins de 26 V, remplacer le
SMRT Pak.
3. Attendre une heure exactement et recharger le SMRT Pak.
A. Si le voyant à DEL du chargeur devient vert fixe (indiquant
un SMRT Pak complètement chargé et prêt à l’emploi) en
moins d’une minute, appeler le service technique.
B. Si le voyant à DEL du chargeur est vert clignotant pendant
plus d’une minute, remplacer le SMRT Pak.
1. Décharger complètement le SMRT Pak en l’utilisant sur une
civière jusqu’à ce que le voyant à DEL de la civière clignote en
rouge.
2. Recharger le SMRT Pak.
A. Si le voyant à DEL du chargeur est vert fixe, indiquant un
SMRT Pak complètement chargé et prêt à l’emploi, le SMRT
Pak est prêt à l’emploi.
B. Si le voyant à DEL du chargeur est orange fixe, indiquant
une erreur du SMRT Pak, appeler le service technique.
1. Retirer le SMRT Pak du chargeur et le laisser refroidir pendant
au moins quatre heures à température ambiante.
2. Insérer le SMRT Pak dans le chargeur.
A. Si le voyant à DEL du chargeur est vert clignotant, le SMRT
Pak est en cours de charge.
B. Si le voyant à DEL du chargeur est orange clignotant
indiquant un délai de température, remplacer le SMRT Pak.
Retour à la table des matières
www.stryker.com 6500-109-105 REV A 2-31
Page 80

Liste de référence rapide des pièces de rechange
AVERTISSEMENT
Utiliser exclusivement des pièces approuvées par Stryker. D’autres pièces peuvent
augmenter les émissions électromagnétiques ou diminuer l’immunité électromagnétique
du système. Ne modifier aucune pièce. Le non-respect de cet avertissement risque de
provoquer des blessures.
Français
DESCRIPTION NUMÉRO
DE PIÈCE
Chargeur SMRT 6500-201-000
SMRT Pak 6500-700-046
Support de montage du chargeur SMRT (en option) 6500-201-100
Composants d’alimentation - CA
Bloc d’alimentation du chargeur 6500-201-148
Cordon d’alimentation, Amérique du Nord 6500-201-149
Cordon d’alimentation, Europe 6500-201-150
Cordon d’alimentation, Royaume-Uni 6500-201-151
Cordon d’alimentation, Australie 6500-201-153
Composants d’alimentation - CC
Câble 12 VCC pour voiture 6500-201-147
Kit d’alimentation SMRT (inclut 1 chargeur SMRT, 2 SMRT Pak et 1 cordon
d’alimentation)
Kit d’alimentation SMRT - 12 VCC, États-Unis 6500-700-040
Kit d’alimentation SMRT - 120 VCA, États-Unis 6500-700-041
Kit d’alimentation SMRT - 240 VCA, Royaume-Uni, international 6500-700-043
Kit d’alimentation SMRT - 240 VCA, Europe, international 6500-700-044
Kit d’alimentation SMRT - 240 VCA, Australie, international 6500-700-045
Contacter le représentant Stryker local pour obtenir une liste complète des pièces
supplémentaires.
Retour à la table des matières
2-32 6500-109-105 REV A www.stryker.com
Page 81

Informations d’entretien
REMPLACEMENT DU FUSIBLE DU CÂBLE 12 VCC POUR VOITURE
Outils nécessaires :
• Aucun
Procédure :
1. Débrancher le câble adaptateur de la source et du chargeur.
2. Dévisser l’extrémité du côté source et retirer le fusible, tel qu’illustré dans la
Figure 13.
Remarque : L’extrémité du côté source et le ressort de tension du fusible sont
desserrés et peuvent tomber.
3. Installer un nouveau fusible 250 V 10 A dans l’extrémité source du câble
adaptateur et revisser l’extrémité.
4. Rebrancher les deux extrémités sur la source et le chargeur.
5. Tester le fonctionnement du chargeur avant de le remettre en service.
Plug Connector (Charger)
Connecteur de prise (chargeur)
Plug (Source)
Prise (source)
Figure 13 : Câble 12 VCC pour voiture
Français
Retour à la table des matières
www.stryker.com 6500-109-105 REV A 2-33
Page 82

Maintenance préventive
INTERVALLES DE MAINTENANCE
Le programme suivant a pour but de servir de guide général de maintenance.
Tenir compte du fait que des facteurs tels que le climat, le terrain, l’emplacement
géographique et l’utilisation individuelle ont un effet sur le programme de maintenance
requis.
Français
Routine Intervalle
Vérifier que le chargeur SMRT et les pièces
ne présentent aucune coupure de cordon,
aucune broche ni borne tordue et/ou aucune
fissure du boîtier.
Examiner le boîtier du SMRT Pak et la zone
des bornes pour des fissures ou des signes
d’endommagement.
STOCKAGE ET MANIPULATION
Pour assurer la longévité, la bonne performance et la sécurité de cet équipement,
utiliser les matériaux d’emballage d’origine pour le conserver et le transporter.
Les SMRT Pak stockés doivent être utilisés et complètement chargés tous les 3 mois
pour entretenir des performances optimales.
Avant la première utilisation et
toute utilisation ultérieure.
Avant la première utilisation et
toute utilisation ultérieure.
Bonnes pratiques
• Charger complètement tous les SMRT Pak avant l’utilisation.
• Remplacer la batterie déchargée par un SMRT Pak complètement chargé et prêt
à l’emploi.
• Lors du chargement d’un SMRT Pak dans une ambulance, placer le chargeur
SMRT dans un placard fermé et hors de portée du patient pendant le transport.
• Placer le chargeur SMRT dans un lieu dont la plage de température est constante.
Une plage de température acceptable est comprise entre 6 et 31 °C. La plage de
température optimale est comprise entre 18 et 24 °C.
• Retirer le SMRT Pak de la civière Power-PRO ou du chargeur SMRT avant le
nettoyage.
• Le SMRT Pak est étanche et peut faire l’objet d’un lavage sous pression. Voir la
page 2-25 pour connaître les instructions de nettoyage.
• Le SMRT Pak ne doit en aucun cas être immergé.
En cas de questions concernant le matériel Power-PRO, consulter un responsable
de compte ou appeler Stryker au +1(800) 784 4336 (Option 2).
Retour à la table des matières
2-34 6500-109-105 REV A www.stryker.com
Page 83

Questions fréquentes
• Peut-onlaisserleSMRTPaksurlechargeurSMRTpendantunedurée
prolongée?
OUI, le chargeur SMRT conserve le SMRT Pak chargé et prêt à l’emploi.
• Peut-onlaisserleSMRTPaksurlacivièrePower-PROentrelesappelsde
service?
OUI, il est possible de conserver le SMRT Pak sur le Power-PRO pendant une
semaine au maximum, à moins que le voyant à DEL de la civière ne clignote en
orange.
• Peut-onremplaceretchargerleSMRTPakavantquelevoyantàDELdela
civièrePower-PROneclignoteenorange?
OUI, le chargeur SMRT contrôle correctement la charge, quel que soit l’état de
charge du SMRT Pak.
• LeSMRTPaksedécharge-t-ilpendantlestockage?
OUI, toutes les batteries se déchargent pendant le stockage. Un SMRT Pak
perd 30 % de sa charge dans les 48 heures qui suivent son retrait du chargeur.
Les SMRT Pak stockés doivent être utilisés et complètement chargés tous les
3 mois pour entretenir des performances optimales.
• Peut-onutiliserleblocd’alimentationCA-CCavecl’onduleurdel’ambulance?
OUI, demander à un technicien qualifié de vérifier que le bloc d’alimentation est
adapté aux exigences de mise en service.
Français
• Peut-onutiliserdesproduitsdenettoyagedequalitémédicalesurleSMRTPak?
OUI, le système d’alimentation SMRT est compatible avec tous les produits de
nettoyage approuvés par Stryker. Retirer le SMRT Pak de la civière Power-PRO
ou du chargeur SMRT avant le nettoyage. Voir la page 2-25 pour connaître les
instructions de nettoyage.
• Leséclaboussuresd’eaunuisent-ellesauxperformancesduSMRTPak?
NON, le SMRT Pak est étanche et donc résistant aux éclaboussures d’eau et à
la pluie. Le SMRT Pak ne doit en aucun cas être immergé.
• LeSMRTPakfonctionne-t-ilsurd’autreséquipements?
NON, les composants du système d’alimentation SMRT ne fonctionnent
qu’avec des équipements Stryker EMS spécifiques. Voir la page 2-14 pour des
informations de sur la compatibilité des équipements.
• Est-ilpréférablede«conditionner»leSMRTPakenledéchargeant
complètement?
NON, le SMRT Pak est géré par le chargeur SMRT et un « conditionnement »
n’est pas requis pour assurer l’entretien et les performances du SMRT Pak.
Retour à la table des matières
www.stryker.com 6500-109-105 REV A 2-35
Page 84

Recyclabilité
Numéro de référence : 6500-101-010 (à titre de référence uniquement)
Français
A
Article Code de recyclage/matériel Renseignements
importants
A 6500-101-140 (boîtier PCB de batterie) NiCd
La Rechargeable Battery Recycling Corporation (Société de
recyclage des piles rechargeables) (RBRC) est une association de
services publics à but non lucratif qui fait la promotion du recyclage
des piles rechargeables portables. Les piles doivent être expédiées
à un centre de collecte de piles. Consulter le site Web de la
RBRC (www.rbrc.org) pour trouver un centre de collecte proche
ou appeler le numéro de téléphone qui figure sur le symbole de
recyclage.
Retour à la table des matières
2-36 6500-109-105 REV A www.stryker.com
Page 85

Recyclabilité
Numéro de référence : 6500-201-148 (à titre de référence uniquement)
A
Français
Article Code de recyclage/matériel Renseignements
importants
A 6500-201-248 (bloc d’alimentation)
Retour à la table des matières
www.stryker.com 6500-109-105 REV A 2-37
Page 86

Recyclabilité
Numéro de référence : 6500-201-000 (à titre de référence uniquement)
Français
A
Article Code de recyclage/matériel Renseignements
importants
A 6500-201-140 (boîtier PCB du chargeur)
Retour à la table des matières
2-38 6500-109-105 REV A www.stryker.com
Page 87

Informations sur la CEM
Directives et déclaration du fabricant – Émissions électromagnétiques
Le chargeur SMRT doit être utilisé dans l’environnement électromagnétique spécifié ci-dessous. L’acheteur ou
tension/scintillement
l’utilisateur du chargeur SMRT doit s’assurer qu’il est utilisé dans un tel environnement.
Test d’émissions Conformité Environnement électromagnétique - directives
Émissions RF
CISPR 11
Émissions RF
CISPR 11
Émissions
harmoniques
IEC 61000-3-2
Émissions de
fluctuations de
IEC 61000-3-3
Groupe 1 Le chargeur SMRT utilise une énergie RF uniquement pour ses
Classe A Le chargeur SMRT convient à une utilisation dans tous les
Classe A
Conforme
fonctions internes. Par conséquent, ses émissions RF sont très faibles
et ne risquent pas de générer des interférences avec les équipements
électroniques situés à proximité.
établissements autres que les établissements domestiques et ceux
directement raccordés au réseau basse tension public alimentant les
bâtiments à usage domestique.
Français
Retour à la table des matières
www.stryker.com 6500-109-105 REV A 2-39
Page 88

Informations sur la CEM
CARACTÉRISTIQUES TECHNIQUES (SUITE)
Directives et déclaration du fabricant – Immunité électromagnétique
Le chargeur SMRT doit être utilisé dans l’environnement électromagnétique spécifié ci-dessous. L’acheteur ou
Français
Rafale/transitoire électrique
REMARQUE : UT représente la tension secteur du courant alternatif avant l’application du niveau de test.
l’utilisateur du chargeur SMRT doit s’assurer qu’il est utilisé dans un tel environnement.
Test d’immunité Niveau de test IEC
Décharge électrostatique
(DES)
IEC 61000-4-2 ± 8 kV air ± 2, 4, 6 kV air
rapide
IEC 61000-4-4 ± 1 kV pour les lignes
Pics de tension ± 1 kV ligne(s) à
IEC 61000-4-5 ± 2 kV ligne(s) à terre ± 2 kV ligne(s) à terre
Baisse de tension,
interruptions brèves et
variations de tension des
lignes électriques
IEC 61000-4-11 40 % U
Fréquence du secteur
(50/60 Hz)
champ magnétique
IEC 61000-4-8
60601
± 6 kV contact ± 2, 4, 6 kV contact Les sols doivent être en bois,
± 2 kV pour les lignes
d’alimentation
d’entrée/sortie
ligne(s)
<5 %U
(>95 % baisse en UT)
pendant 0,5 cycle
(60 % baisse en UT)
pendant 5 cycles
70 % UT
(30 % baisse en UT)
pendant 25 cycles
<5 %U
(>95 % baisse en UT)
pendant 5 secondes
3 A/m 3 A/m
Niveau de conformité Environnement
± 2 kV pour les lignes
d’alimentation
± 1 kV pour les lignes
d’entrée/sortie
± 1 kV ligne(s)
à ligne(s)
T
T
T
Réduction de 95 %
(10 ms)
Réduction de 60 %
(100 ms)
Réduction de 30 %
(500 ms)
Réduction de 95 %
(5 s)
50 Hz
électromagnétique -
directives
en béton ou en dalles de
céramique. Si les sols sont
recouverts de matériaux
synthétiques, l’humidité
relative doit être au moins
égale à 30 %.
La qualité de l’alimentation
secteur doit être égale à
celle des environnements
commerciaux ou hospitaliers.
La qualité de l’alimentation
secteur doit être égale à
celle des environnements
commerciaux ou hospitaliers.
La qualité de l’alimentation
secteur doit être égale à
celle des environnements
commerciaux ou hospitaliers.
Si l’utilisateur du chargeur
SMRT a besoin du maintien
du fonctionnement durant
les coupures de courant
secteur, il est recommandé
d’alimenter le chargeur
SMRT avec un onduleur ou
une batterie.
Les champs magnétiques
à la fréquence du réseau
électrique doivent présenter
des niveaux égaux à
ceux des environnements
commerciaux ou hospitaliers.
Retour à la table des matières
2-40 6500-109-105 REV A www.stryker.com
Page 89

Informations sur la CEM
CARACTÉRISTIQUES TECHNIQUES (SUITE)
Directives et déclaration du fabricant – Immunité électromagnétique
Le chargeur SMRT doit être utilisé dans l’environnement électromagnétique spécifié ci-dessous. L’acheteur ou
d’immunité
Conduction RF
IEC 61000-4-6
RF rayonnées
IEC 61000-4-3
l’utilisateur du chargeur SMRT doit s’assurer qu’il est utilisé dans un tel environnement.
Test
Niveau de test IEC
60601
3 Vrms
150 kHz à 80 MHz
3 V/m
80 kHz à 2,5 GHz
Niveau de
conformité
3 Vrms
150 kHz à 80 MHz
3 V/m
80 kHz à 2,5 GHz
Environnement électromagnétique - directives
Les appareils de communication RF portables
et mobiles ne doivent pas être utilisés en deçà
de la limite de distance recommandée, calculée
avec l’équation applicable à la fréquence
de l’émetteur, par rapport à toute partie du
chargeur SMRT, y compris les câbles.
Distance de séparation recommandée
d = 1,17 √P
d = 1,17 √P
80 kHz à 800 MHz
d = 2,33 √P
800 MHz à 2,5 GHz
où P correspond à la puissance de sortie
maximale nominale de l’émetteur en watts
(W) selon le fabricant de ce dernier, et d à la
distance de séparation recommandée en mètres
Les intensités de champ produites par les
émetteurs RF fixes, telles que déterminées par
une étude de site électromagnétique a doivent
être inférieures au niveau de conformité de
chaque gamme de fréquences.
(m).
b
Français
Des interférences peuvent se produire à
proximité d’équipements sur lesquels le symbole
REMARQUE 1 : À 80 et 800 MHz, la plage de fréquences la plus élevée s’applique.
REMARQUE 2 : Il est possible que ces directives ne s’appliquent pas à toutes les situations. La propagation
électromagnétique est modifiée par l’absorption et la réflexion sur les structures, les objets et les personnes.
a
Les intensités des champs émis par des émetteurs fixes, comme les stations de base pour les radiotéléphones
(cellulaires/sans fil) et les radios mobiles terrestres, les radio-amateurs, la radiodiffusion AM et FM et la
diffusion télévisuelle, ne peuvent pas être prévues théoriquement avec exactitude. Pour évaluer l’environnement
électromagnétique engendré par des émetteurs RF fixes, une étude électromagnétique sur site doit être
envisagée. Si l’intensité de champ mesurée à l’emplacement où le chargeur SMRT est utilisé dépasse le niveau
de conformité RF applicable indiqué ci-dessus, il convient d’observer le chargeur SMRT pour vérifier qu’il
fonctionne normalement. Si des performances anormales sont observées, des mesures supplémentaires peuvent
être nécessaires, telles que la réorientation ou le déplacement du chargeur SMRT.
b
Dans la plage de fréquences de 150 kHz à 80 MHz, les intensités des champs sont inférieures à 20 V/m.
suivant est apposé :
Retour à la table des matières
www.stryker.com 6500-109-105 REV A 2-41
Page 90

Informations sur la CEM
CARACTÉRISTIQUES TECHNIQUES (SUITE)
Distances de séparation recommandées entre les équipements
de communication RF portables et mobiles et le chargeur SMRT
Le chargeur SMRT doit être utilisé dans un environnement électromagnétique où les perturbations
Français
RF rayonnées sont contrôlées. L’acheteur ou l’utilisateur du chargeur SMRT peut contribuer à prévenir les
interférences électromagnétiques en respectant la distance minimum entre les appareils de communication
RF portables et mobiles (émetteurs) et le chargeur SMRT, recommandée ci-dessous en fonction de la
Puissance de sortie
nominale maximale
de l’émetteur
W
0,01 0,12 0,12 0,23
0,1 0,37 0,37 0,74
1 1,2 1,2 2,3
10 3,7 3,7 7,4
100 12 12 23
En cas d’utilisation d’un émetteur dont la puissance de sortie maximum n’est pas listée ci-dessus, la distance
de séparation d en mètres (m) peut être estimée à l’aide de l’équation applicable à la fréquence de l’émetteur,
où P correspond à la puissance de sortie nominale maximum de l’émetteur en watts (W) donnée par le
fabricant.
REMARQUE 1 : A 80 et 800 MHz, la distance de séparation pour la plage de fréquences la plus élevée
s’applique.
REMARQUE 2 : Il est possible que ces directives ne s’appliquent pas à toutes les situations. La propagation
électromagnétique est modifiée par l’absorption et la réflexion sur les structures, les objets et les personnes.
puissance de sortie maximum des appareils de communication.
Distance de séparation en fonction de la fréquence de l’émetteur
150 kHz à 80 MHz
d = 1,17 √P
m
80 kHz à 800 MHz
d = 1,17 √P
800 MHz à 2,5 GHz
d = 2,33 √P
Retour à la table des matières
2-42 6500-109-105 REV A www.stryker.com
Page 91

Inhaltsverzeichnis
Symbole...................................................3-3
Definition von Warnung/Vorsicht/Hinweis ...........................3-5
Einführung .................................................3-6
Bestimmungsgemäße Verwendung ............................3-6
Erwartete Einsatzdauer.....................................3-6
Kontraindikationen ........................................3-6
Produktabbildung . . . . . . . . . . . . . . . . . . . . . . . . . . . . . . . . . . . . . . . . . 3-7
Technische Daten ........................................3-8
Kontaktinformationen ......................................3-9
Zusammenfassung der Sicherheitsvorkehrungen ....................3 -10
Allgemeine Sichtprüfung ...................................... 3-13
Informationen zur Kompatibilität................................. 3-14
Kompatibilität mit Tragen................................... 3 -14
Kompatibilität mit Ladegeräten .............................. 3 -14
Installation des Ladegeräts .................................... 3 -15
Das SMRT-Ladegerät installieren............................. 3 -15
Anforderungen an die Elektroinstallation........................ 3 -15
Installation der optionalen Halterung ..........................3 -16
Das Ladegerät in der optionalen Halterung installieren ............. 3-18
Merkmale des Ladegeräts ..................................... 3 -19
Betrieb des Ladegeräts .......................................3-20
Stromversorgung des Ladegeräts ............................3-20
Trennen des Ladegeräts von der Stromversorgung ................3-20
Aufladen der Batterie .....................................3-21
Temperatur-Wartezeit des SMRT Paks.........................3-22
Fehler am SMRT Pak .....................................3-22
Akkubetrieb ...............................................3-23
Beim Akku zu beachten ...................................3-23
Akkuwechsel ...........................................3-23
Aufbewahrung des Akkus . . . . . . . . . . . . . . . . . . . . . . . . . . . . . . . . . . 3-23
Den Akku aus der Trage nehmen ............................3-24
Den Akku wieder einsetzen bzw. austauschen ..................3-24
Deutsch
www.stryker.com 6500-109-105 REV A 3-1
Page 92

Inhaltsverzeichnis
Reinigung.................................................3-25
Empfohlene Reinigungsmittel ...............................3-25
Reinigung des Ladegeräts..................................3-25
Reinigung des Akkus .....................................3-26
Störungsbehebung ..........................................3-28
Anordnung der Komponenten des SMRT-Stromversorgungssystems ...3-28
Störungsbehebung am SMRT-Ladegerät .......................3-29
Störungsbehebung am SMRT Pak ............................3-31
Kurzgefasste Ersatzteilliste ....................................3-32
Wartungsinformationen .......................................3-33
Deutsch
Austausch der Sicherung des 12-V-Gleichstrom-Autokabels .........3-33
Funktionskontrolle ...........................................3-34
Wartungsintervalle .......................................3-34
Lagerung und Handhabung.................................3-34
Beste Methoden ............................................3-34
Häufig gestellte Fragen .......................................3-35
Recyclingpass .............................................3-36
EMV-Angaben..............................................3-39
3-2 6500-109-105 REV A www.stryker.com
Page 93

Anleitungen
~
CE-Zeichen
Hersteller
Symbole
IPX0
IPX6
Allgemeines Warnsymbol
Deutsch
Vorsicht
Wechselstrom
Gleichstrom
Gerät der Klasse II
Nicht geschützt
Geschützt gegen starke Wasserstrahlen
Medizinische Ausrüstung, die von Underwriters Laboratories LLC
in Bezug auf Stromschlag, Feuer und mechanische Gefahren nur
ANSI/AAMI ES60601-1:2005 und CAN/CSA-C22.2 No. 60601-1:08
entsprechend klassifiziert wurde.
Zurück zum Inhaltsverzeichnis
www.stryker.com 6500-109-105 REV A 3-3
Page 94

Deutsch
Cd
_
+
DATA
KRX
23/44
2300
mAh
(1,2 A/2 h)
Symbole
In Übereinstimmung mit der europäischen Richtlinie 2002/96/EG über
Elektro- und Elektronik-Altgeräte (WEEE) bedeutet dieses Symbol,
dass das Produkt nicht als unsortierter kommunaler Abfall beseitigt
werden darf, sondern separat gesammelt werden muss. Auskünfte über
länderspezifische Rückgabe- und/oder Sammelsysteme sind beim
jeweiligen Händler erhältlich.
WEEE-Richtlinie (2002/96/EG). Enthält Cadmium.
Die Rechargeable Battery Recycling Corporation (RBRC) ist eine
gemeinnützige Organisation, die sich für die Wiederverwertung von
tragbaren Akkus einsetzt. Die Akkus müssen an einer Sammelstelle
abgegeben werden. Eine Sammelstelle in Ihrer Nähe finden Sie auf der
RBRC-Website (www.rbrc.org). Sie können auch die Telefonnummer
auf dem Recyclingsymbol anrufen.
Enthält Nickel-Cadmium-Zellen und muss entsprechend entsorgt werden
Batterieanschluss-Identifikation (Datenleitung, Negativ- und Positivpol)
Ni-Cd-Zellen-Identifikation per IEC 61951-1:2003
Batteriekapazität, üblicher Ladestrom und übliche Ladedauer
Zurück zum Inhaltsverzeichnis
3-4 6500-109-105 REV A www.stryker.com
Page 95

Definition von Warnung/Vorsicht/Hinweis
Die Begriffe WARNUNG, VORSICHT und HINWEIS kennzeichnen wichtige Stellen dieses Handbuchs, die besonders zu beachten sind.
WARNUNG
Warnt den Leser vor einer Situation, welche bei Nichtvermeiden zum Tod oder zu
schwerer Verletzung führen könnte. Zudem kann hiermit auch auf mögliche schwere
Nebenwirkungen oder Sicherheitsrisiken aufmerksam gemacht werden.
VORSICHT
Warnt den Leser vor einer möglichen gefährlichen Situation, welche bei Nichtvermeiden
zu gering- oder mittelgradiger Verletzung des Benutzers oder Patienten oder zu
Beschädigung der Ausrüstung oder anderer Gegenstände führen könnte. Solche
Hinweise beinhalten auch die nötigen besonderen Vorsichtsmaßnahmen zur sicheren
und effektiven Benutzung des Systems und die nötigen Vorsichtsmaßnahmen, um
Beschädigungen des Systems zu vermeiden, die als Folge des Gebrauchs bzw. der
unsachgemäßen Benutzung auftreten könnten.
HINWEIS
Enthält Informationen, die die Wartung erleichtern oder wichtige Anweisungen
verdeutlichen.
Deutsch
Zurück zum Inhaltsverzeichnis
www.stryker.com 6500-109-105 REV A 3-5
Page 96

Einführung
Dieses Handbuch enthält Anleitungen zur Bedienung und Wartung des SMRT™-
Stromversorgungssystems. Bitte gründlich durchlesen, bevor Sie das Produkt
verwenden oder Wartungsmaßnahmen daran durchführen.
BESTIMMUNGSGEMÄSSE VERWENDUNG
Das SMRT™-Stromversorgungssystem besteht aus einem SMRT™-Ladegerät
und einem SMRT™ Pak. Der SMRT™ Pak treibt das hydraulische Hubsystem der
strombetriebenen Krankentragen von Stryker an.
Eine vollständige Produktbeschreibung und Erklärung zum Verwendungszweck ist dem
Power-PRO™-Bedienungs- und Wartungshandbuch zu entnehmen.
Deutsch
ERWARTETE EINSATZDAUER
• 7 Jahre für SMRT™-Ladegerät
• 2 Jahre für SMRT™ Pak-Akku
KONTRAINDIKATIONEN
Es gibt keine bekannten Kontraindikationen zur Verwendung dieses Produkts.
Zurück zum Inhaltsverzeichnis
3-6 6500-109-105 REV A www.stryker.com
Page 97

PRODUKTABBILDUNG
Einführung
SMRT Pak
SMRT-Ladegerät
Gleichstromkabel
Wechselstrom-
kabel
Wechselstromnetzteil
Abbildung 1: SMRT-Stromversorgungssystem
Ausgangs-
kabel
Deutsch
Zurück zum Inhaltsverzeichnis
www.stryker.com 6500-109-105 REV A 3-7
Page 98

Einführung
TECHNISCHE DATEN
Modelle SMRT-Ladegerät SMRT Pak Wechselstromnetzteil
Eingangs-
spannung
Ausgangs-
spannung
Abmessun-
gen
Gewicht 0,59 kg 1,7 kg 0,28 kg
Gehäuse-
Deutsch
schutz
Gerätetyp Nicht zutreffend Nicht zutreffend
13,9 V 4,16 A Nicht zutreffend 100–240 V ~1,20 A,
50/60 Hz
40 V 1,20 A
24 V 12 V 4,16 A
(offener Stromkreis)
60,325 mm Höhe
130,175 mm Breite
177,8 mm Länge
60,325 mm Höhe
101,6 mm Breite
146,05 mm Länge
40,89 mm Höhe
65,02 mm Breite
119,89 mm Länge
IPX0 IPX6 IPX0
Klasse II
Ladegerätzulassungen
Umgebungsbedingungen
Temperatur
Relative
Luftfeuchtigkeit
Luftdruck
Betrieb Laden Aufbewahrung und
ANSI/AAMI ES60601-1: 2005
CAN/CSA-C22.2 No. 60601-1:08
0
130 F
0
(54 C)
0
-30 F
0
(-34 C)
93%
0%
1060 hPa
700
43 F
(6 C)
700
0
0
30%
0
88 F
0
(31 C)
75%
1060 hPa
Transport
0
-4 F
0
(-20 C)
0%
500
104 F
(40 C)
93%
1060 hPa
0
0
Bei den technischen Daten handelt es sich um ungefähre Werte, die je nach Gerät bzw. durch
Netzschwankungen leicht variieren können. Stryker behält sich das Recht vor, technische Daten
ohne Vorankündigung zu ändern.
Zurück zum Inhaltsverzeichnis
3-8 6500-109-105 REV A www.stryker.com
Page 99

Einführung
KONTAKTINFORMATIONEN
Sie können den Stryker Kundendienst bzw. technischen Support unter +1-800-327-0770
oder +1-269-324-6500 erreichen.
Stryker Medical
3800 E. Centre Avenue
Portage, MI 49002
USA
Halten Sie bei Anrufen beim technischen Support von Stryker bitte die Seriennummer
bzw. Chargennummer des betreffenden Stryker-Produkts bereit. Die Seriennummer
bei allen schriftlichen Mitteilungen angeben.
Die Seriennummer des SMRT-Ladegeräts befindet sich an der Unterseite des Geräts.
Die Chargenbezeichnung des SMRT Paks befindet sich oben am SMRT Pak (oberhalb
der roten Freigabetaste).
_
DATA
REF 6500-101-010 Battery Pack 24V DC
2300 mAh (1.2A/2h)
+
Deutsch
Manufactured for
Stryker Medical
3800 E. Centre Ave.
Portage, MI 49002 USA
SMRT Pak-Etikett
mit Chargennummer
KRX 23/44
Cd
IPX6
SMRT-Ladegerät-Etikett
mit Seriennummer
Zurück zum Inhaltsverzeichnis
www.stryker.com 6500-109-105 REV A 3-9
Page 100

Zusammenfassung der Sicherheitsvorkehrungen
Die auf dieser Seite aufgeführten Warnungen und Vorsichtshinweise sind sorgfältig zu
lesen und genau zu befolgen. Nur von qualifiziertem Personal warten lassen.
WARNUNG
• Wenn der SMRT Pak im Krankenwagen aufgeladen wird, muss das SMRT-
Ladegerät in einem verschlossenen Fach und für den Patienten während der
Fahrt unzugänglich installiert werden.
• Um die geltenden Crashtest-Normen für Krankenwagen zu erfüllen, muss das
SMRT-Ladegerät mit der optionalen Halterung in einem verschlossenen Fach und
für den Patienten während der Fahrt unzugänglich installiert werden.
• Im Falle einer Installation im Krankenwagen sollten die optionale Halterung
Deutsch
und das SMRT-Ladegerät durch einen zugelassenen Mechaniker, der mit
den Anforderungen an Krankenwagen vertraut ist, installiert werden. Eine
unsachgemäße Installation des SMRT-Ladegeräts kann Verletzungen des
Patienten bzw. Anwenders und/oder Schäden am SMRT-Ladegerät oder SMRT
Pak verursachen.
• Die Halterung muss sicher an der Oberfläche befestigt werden.
• Falls der SMRT Pak Risse oder Schäden aufweist, darf er nicht in das
SMRT-Ladegerät geschoben werden. Geben Sie beschädigte SMRT Paks zur
Wiederverwertung in einem Servicezentrum ab.
• Um das Risiko eines Stromschlags zu senken, entfernen Sie den SMRT Pak nicht,
während die Power-PRO-Trage aktiv ist.
• Tragen Sie beim Reinigen des SMRT-Ladegeräts stets Gummihandschuhe, um
das Verletzungsrisiko zu senken.
• Trennen Sie zur Vermeidung von Stromschlaggefahren das SMRT-Ladegerät vor
der Reinigung stets von der Wandsteckdose.
• Sprühen Sie keine Flüssigkeiten direkt auf das SMRT-Ladegerät.
• Das SMRT-Ladegerät darf nicht mit dem Hochdruckreiniger gereinigt werden.
• Tauchen Sie zur Senkung der Stromschlaggefahr das SMRT-Ladegerät nicht in
Flüssigkeiten.
• Verwenden Sie keine Lösemittel, Schmiermittel oder sonstigen Chemikalien zum
Reinigen des SMRT-Ladegeräts, sofern nicht anders angegeben.
• Lassen Sie zur Senkung der Stromschlaggefahr keine Wasseransammlungen
oben auf dem SMRT-Ladegerät zu.
• Tragen Sie zur Senkung des Verletzungsrisikos bei der Reinigung des SMRT Paks
stets Schutzkleidung und isolierende Gummihandschuhe.
• Tragen Sie bei der Hochdruckreinigung geeignete Schutzkleidung (Schutzbrille,
Atemmaske usw.), um das Risiko zu vermeiden, dass Kontaminationen eingeatmet
werden. Beim Gebrauch von Hochdruckwaschgeräten können Kontaminationen,
die sich beim Gebrauch der Trage angesammelt haben, in die Luft gelangen.
• Fassen Sie zur Senkung des Verletzungsrisikos bei der Reinigung die
Anschlussklemmen des SMRT Paks nicht an.
• Wischen Sie den SMRT Pak nur mit nicht leitfähigen Materialien ab.
Zurück zum Inhaltsverzeichnis
3-10 6500-109-105 REV A www.stryker.com
 Loading...