

Page 1
M-1® Roll-In System
6100
Operations Manual
International - EN | CS | DA | DE | ES | FI | FR
| NL | PL | PT | SV | NN | HU | IT
2018/08 B.2 6100-109-005 REV B www.stryker.com
Page 2

sample text
Page 3
M-1® Roll-In System
6100
Operations Manual
2018/08 B.2 6100-109-005 REV B www.stryker.com
Page 4

sample text
Page 5
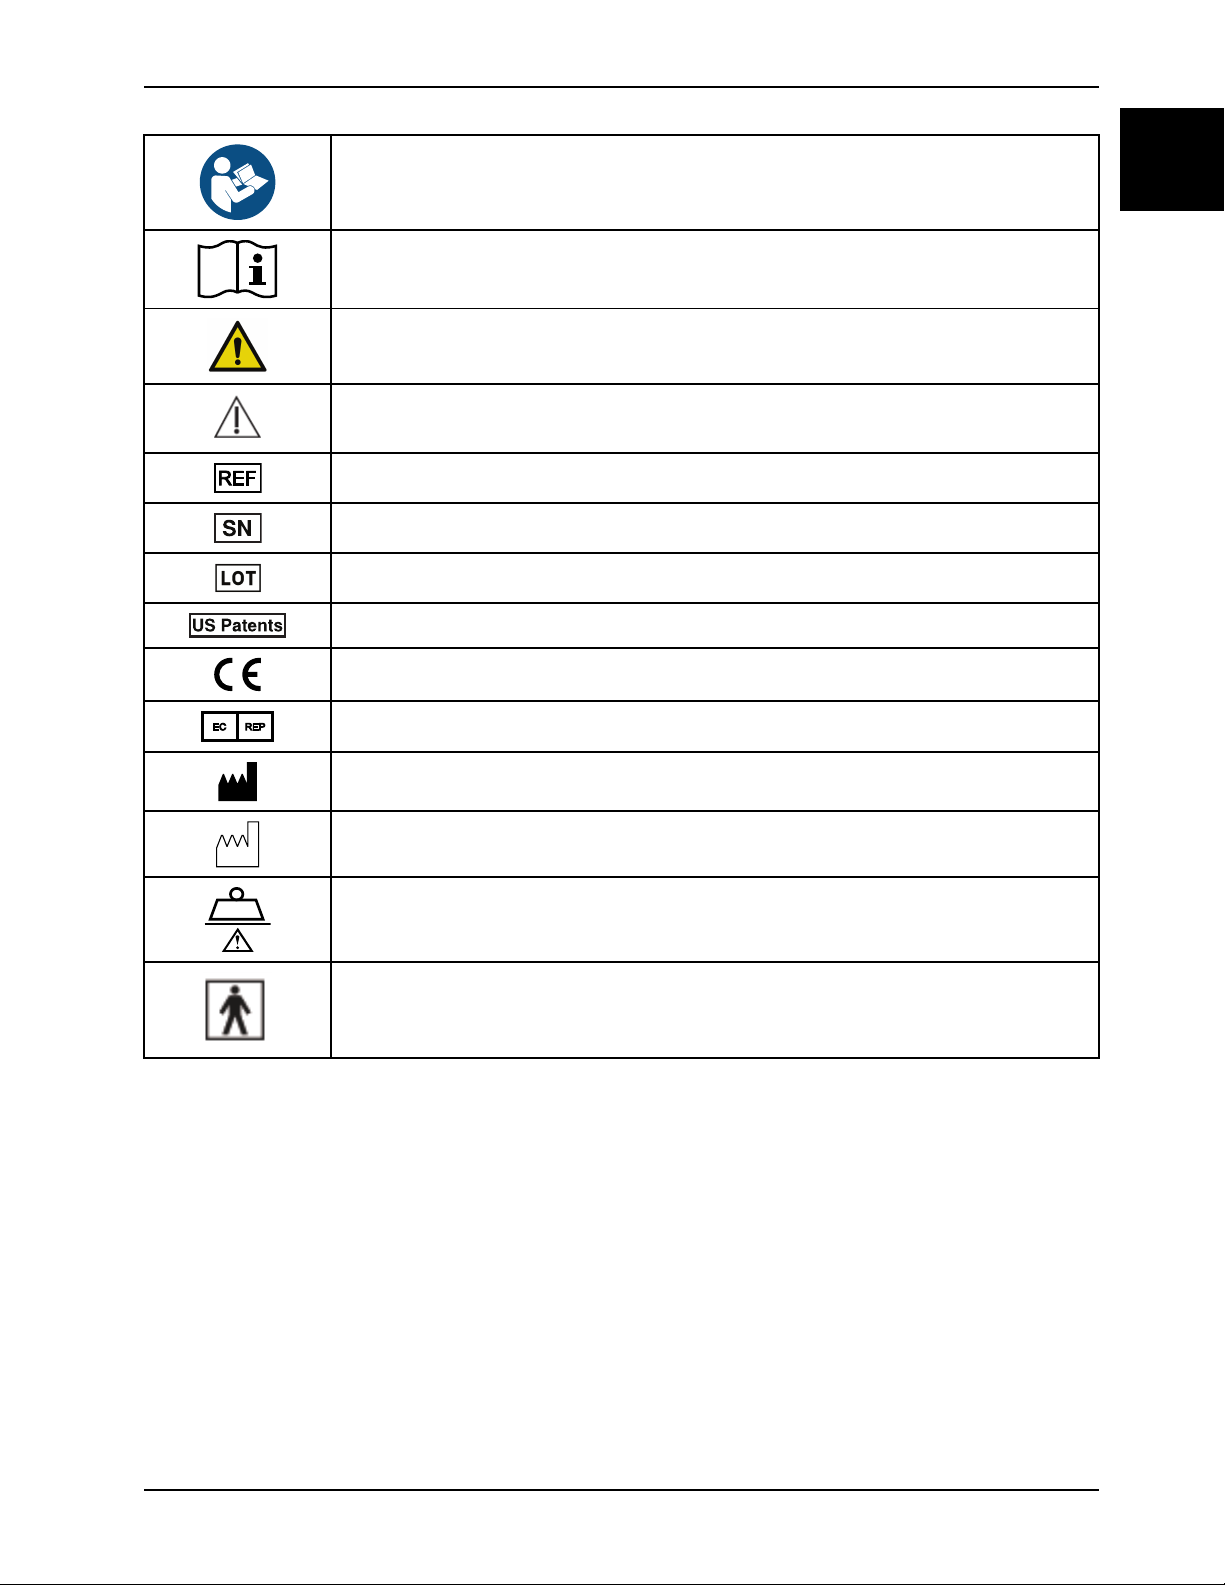
Symbols
Refer to instruction manual/booklet
Operating instructions/Consult instructions for use
General warning
Caution
Catalogue number
Serial number
Lot (batch) code
For US Patents see www.stryker.com/patents
English
EN
CE mark
EC REP
Manufacturer
Date of manufacture
Safe working load
Type BF applied part
www.stryker.com 6100-109-005 REV B
Page 6

sample text
Page 7

Table of Contents
Warning/Caution/Note Definition ............................................................................................................... 1-3
Summary of safety precautions................................................................................................................. 1-4
Introduction........................................................................................................................................... 1-6
Product description........................................................................................................................... 1-6
Indications for use ............................................................................................................................ 1-6
Expected service life......................................................................................................................... 1-7
Contraindications ............................................................................................................................. 1-7
Specifications.................................................................................................................................. 1-7
Product illustration............................................................................................................................ 1-8
Contact information .......................................................................................................................... 1-9
Serial number location .................................................................................................................... 1-10
Date of manufacture....................................................................................................................... 1-10
Setup................................................................................................................................................. 1-11
Installation .......................................................................................................................................... 1-12
Installing the cot fastener................................................................................................................. 1-12
Operation ........................................................................................................................................... 1-14
Operating guidelines....................................................................................................................... 1-14
Proper lifting techniques .................................................................................................................. 1-14
Transferring the patient to the cot...................................................................................................... 1-15
Rolling the cot with a patient............................................................................................................. 1-15
Changing the cot height................................................................................................................... 1-15
Loading the cot into a vehicle............................................................................................................ 1-16
Unloading the cot from a vehicle ....................................................................................................... 1-17
Positioning operators and helpers...................................................................................................... 1-17
Raising or lowering the backrest........................................................................................................ 1-18
Raising or lowering the siderails ........................................................................................................ 1-18
Raising or lowering the footrest ......................................................................................................... 1-18
Raising or lowering the optional knee gatch ......................................................................................... 1-19
Applying or releasing a wheel lock..................................................................................................... 1-19
Applying or releasing the caster Steer-Lock......................................................................................... 1-20
Connecting the litter to the base........................................................................................................ 1-21
Removing the litter from the base ...................................................................................................... 1-21
Changing cot height with the optional base head end retractable lifting handles .......................................... 1-22
Extending or retracting the retractable lifting handles............................................................................. 1-23
Securing the patient with the restraint straps ........................................................................................ 1-23
Adjusting restraint straps ................................................................................................................. 1-24
Adding a restraint strap extension...................................................................................................... 1-25
Securing the patient with the Pedi-Mate® infant restraint system ............................................................. 1-25
Installing the defibrillator platform...................................................................................................... 1-26
Installing the head extension with pillow .............................................................................................. 1-28
Positioning the optional three-stage IV pole ......................................................................................... 1-28
Attaching an oxygen bottle to the oxygen bottle holder ........................................................................... 1-29
Accessories ........................................................................................................................................ 1-30
English
EN
www.stryker.com 6100-109-005 REV B 1-1
Page 8

Table of Contents
English
EN
Cleaning............................................................................................................................................. 1-31
Disinfecting......................................................................................................................................... 1-32
Preventive maintenance ........................................................................................................................ 1-33
Regular inspection and adjustments................................................................................................... 1-33
1-2 6100-109-005 REV B www.stryker.com
Page 9

Warning/Caution/Note Definition
The words WARNING, CAUTION, and NOTE carry special meanings and should be carefully reviewed.
WARNING
Alerts the reader about a situation which, if not avoided, could result in death or serious injury. It may also describe
potential serious adverse reactions and safety hazards.
CAUTION
Alerts the reader of a potentially hazardous situation which, if not avoided, may result in minor or moderate injury to the
user or patient or damage to the product or other property. This includes special care necessary for the safe and
effective use of the device and the care necessary to avoid damage to a device that may occur as a result of use or
misuse.
Note: Provides special information to make maintenance easier or important instructions clearer.
English
EN
www.stryker.com 6100-109-005 REV B 1-3
Page 10

Summary of safety precautions
English
EN
Always read and strictly follow the warnings and cautions listed on this page. Service only by qualified personnel.
WARNING
• Always replace the cot fastener if it has been involved in an accident to avoid the risk of injury due to product
damage.
• Always make sure that all cots meet the installation specifications for the Stryker cot fastener system.
• Improper usage of the product can cause injury to the patient or operator. Operate the product only as described in
this manual.
• Do not allow untrained assistants to assist in the operation of the product.
• Always follow proper hand placement on hand grips. Keep all hands clear of the red safety bar pivots when you
load or unload the cot or change cot height position.
• Do not ride on the base of the cot.
• Do not transport the cot sideways to avoid the risk of tipping. Always transport the cot in a lowered position, head
end or foot end first to minimize the risk of tipping.
• Always keep hands, fingers, and feet away from moving parts. Use caution when placing your hands and feet near
the base tubes while you raise or lower the cot.
• Do not leave a patient unattended. Hold the product while a patient is on the product.
• Do not apply a wheel lock when a patient is on the product or when you move the product to avoid the risk of tipping.
• Do not use siderails as a patient restraint device.
• Always transport the cot at a lower height to reduce the risk of a cot tip. If possible, obtain additional assistance or
take an alternate route.
• Always avoid high obstacles, such as curbing, steps, or rough terrain to avoid the risk of the product tipping over.
• Always lock the caster Steer-Lock knob and casters when you load or unload the cot from a vehicle or loading tray
system to avoid the risk of the product tipping.
• Always lock the caster Steer-Lock knob and casters when change the cot height to avoid the risk of the product
tipping.
• Always lock the base frame before you remove the loading wheels from the vehicle patient compartment floor or
loading tray system. An unlocked base frame will not support the cot and injury to the patient or operator could
result.
• Practice changing height positions and loading the cot until you fully understand the operation of the product.
• Always support the load of the patient, cot, and accessories after the weight is off of the ground.
• Do not apply a wheel lock when a patient is on the product or when you move the product to avoid the risk of tipping.
• Do not install or apply a wheel lock on a product with worn wheels that are less than 6 in. diameter.
• Always use all restraint straps to secure the patient on the cot. An unrestrained patient may fall from the cot.
• Do not attach restraint straps to the base tubes or cross tubes.
• Always locate the buckle away from obstructions or accessories on the cot to avoid the risk of accidental release of
Pedi-Mate® infant restraint system and injury to the infant.
• Always use any appropriate personal protective equipment while power washing to avoid inhaling contagion. Power
washing equipment may aerate contamination.
CAUTION
• Improper usage of the product can cause injury to the patient or operator. Operate the product only as described in
this manual.
• Do not modify the product or any components of the product. Modifying the product can cause unpredictable
operation resulting in injury to patient or operator. Modifying the product also voids its warranty.
1-4 6100-109-005 REV B www.stryker.com
Page 11

Summary of safety precautions
CAUTION (CONTINUED)
• The cot fastener system must be installed by qualified personnel. 1/4" steel backing plates (or equivalent) are
required beneath the mounting surface (ambulance floor or tray system) at all mounting points.
• Always clear any obstacles that may interfere and cause injury to the operator or patient before operating the
product.
• Do not apply the Steer-Lock and attempt to push the product sideways.
• Do not entangle the restraint straps in the base frame when you raise or lower the cot.
• Always secure the defibrillator platform to the product when you use the defibrillator platform.
• Always use and adjust the straps that are provided with the defibrillator platform to secure the defibrillator.
• Always change the installation location or adjust the straps for your specific defibrillator size or shape.
• Do not load the defibrillator platform above the safe working load of 30 lb (13.6 kg).
• Do not load the oxygen bottle holder above the safe working load of 15 lb (6.8 kg).
• Do not use two oxygen bottle holders at the same time.
• Do not steam clean or ultrasonically clean the product.
• Do not exceed 180° F (82° C) as the maximum water temperature.
• Do not exceed 1500 psi (130.5 bar) as the maximum water pressure. If you are using a hand held wand to wash the
product, keep the pressure nozzle at a minimum of 24 in. (61 cm) from the product.
• Always allow to air dry.
• Do not clean, disinfect, service, or perform maintenance while the product is in use.
• Always wipe the product with clean water and dry after cleaning. Some cleaning products are corrosive in nature
and may cause damage to the product. Failure to properly rinse and dry the product leaves a corrosive residue on
the surface of the product and may cause premature corrosion of critical components.
• Always use authorized parts to avoid the risk of product damage.
English
EN
www.stryker.com 6100-109-005 REV B 1-5
Page 12

Introduction
English
EN
This manual assists you with the operation or maintenance of your Stryker product. Read this manual before operating
or maintaining this product. Set methods and procedures to educate and train your staff on the safe operation or
maintenance of this product.
CAUTION
• Improper usage of the product can cause injury to the patient or operator. Operate the product only as described in
this manual.
• Do not modify the product or any components of the product. Modifying the product can cause unpredictable
operation resulting in injury to patient or operator. Modifying the product also voids its warranty.
Notes
• This manual is a permanent part of the product and should remain with the product even if the product is sold.
• Stryker continually seeks advancements in product design and quality. This manual contains the most current
product information available at the time of printing. There may be minor discrepancies between your product and
this manual. If you have any questions, contact Stryker Customer Service or Technical Support at 1-800-327-0770.
Product description
The Stryker Model 6100 M-1® Roll-In System is a manual ambulance cot. The platform on a wheeled frame supports
and transports a maximum weight of 500 lb (227 kg). The product is for use in pre-hospital and hospital environments.
The product is collapsible for use in emergency vehicles. The removable litter and patented Steer-Lock System™
provide enhanced maneuverability. To assist with patient transport, the product features:
• Lift handles at four corners
• Patient restraint straps
• Adjustable pneumatic backrest
• Optional accessories
For maximum patient comfort, you can select from one of three different litter positions, including:
• Shock
• Flat leg
• Optional Gatch
Indications for use
The Stryker Model 6100 M-1® Roll-In System is a non-powered, wheeled stretcher. The product supports and
transports the entire body of a traumatized, ambulatory or non-ambulatory human patient (including infants and adults).
In emergency or transport vehicles, the product:
• Supports patients in a supine (horizontal) or sitting position
• Facilitates the transportation of associated medical equipment (for example, oxygen bottles, or IV bags)
This product is for use in pre-hospital and hospital environments. You can use the product for emergency and nonemergency applications. The maximum weight capacity is 500 lb (227 kg), which is the sum of the patient, mattress, and
accessory weight. Intended operators of the product include:
• Trained professionals
• Emergency medical service
• Medical care center personnel
• Medical first responders
Ambulance cots are for transportation purposes. They are not intended for extended stay or for use as hospital beds.
They are also not intended for use in devices that change air pressure, such as hyperbaric chambers.
1-6 6100-109-005 REV B www.stryker.com
Page 13

Introduction
Expected service life
The Stryker Model 6100 M-1 Roll-In System has a five year expected service life under normal use conditions and with
appropriate periodic maintenance.
Contraindications
None known.
Specifications
For the Stryker Model 6100 M-1 Roll-In System base unit (6100-003-000), knee gatch litter (6100-031-000), and flat
foot section litter (6100-033-000).
Safe working load
Note: Safe working load indicates
the sum of the patient, mattress,
and accessory weight.
Backrest articulation/shock position ( 6100-031-000
and 6100-033-000)
Length/width (6100-003-000) 77 in. / 21 in. 195.6 cm / 53.3 cm
500 lb 227 kg
0° to 75°
English
EN
Length/width (6100-031-000) 74.5 in. / 22.1 in. 189.2 cm / 56.1 cm
Length/width (6100-033-000) 74.8 in. / 22.1 in. 189.9 cm / 56.1 cm
1
Height
003-000)
Height
Weight
Weight
Weight
Maximum weight capacity (6100-031-000 and 6100033-000)
Wheel diameter/ width (6100-031-000 and 6100-033-
000)
(6100-
1
(6100-031-000 and 6100-033-000) 7.3 in. 18.5 cm
2
(6100-003-000) 77.7 lb 35.2 kg
2
(6100-031-000) 44.6 lb 20.2 kg
2
(6100-033-000) 40.2 lb 19.0 kg
Position 1 14.4 in. 36.6 cm
Position 2 24.4 in. 62.0 cm
Position 3 30.0 in. 76.2 cm
Position 4 34.6 in. 87.9 cm
Position 5 37.6 in. 95.5 cm
Position 6 39.3 in. 99.8 cm
Position 7 13.0 in. 33.0 cm
Position 8 Not applicable Not applicable
500 lb 227 kg
4.0 in. / 0.8 in. 10.2 cm / 2.0 cm
Handle extension (6100-031-000 and 6100-033-000) 7.75 in. 19.7 cm
www.stryker.com 6100-109-005 REV B 1-7
Page 14
Introduction
A
B
C
D
E
F
G
H
I
K
L
M
N
P
J
N
M
G
F
F
English
EN
Specifications (Continued)
Caster diameter/width (6100-003-000)
Shock position (6100-031-000)
Knee gatch position (6100-031-000) 30°
Minimum operators required for loading/ unloading
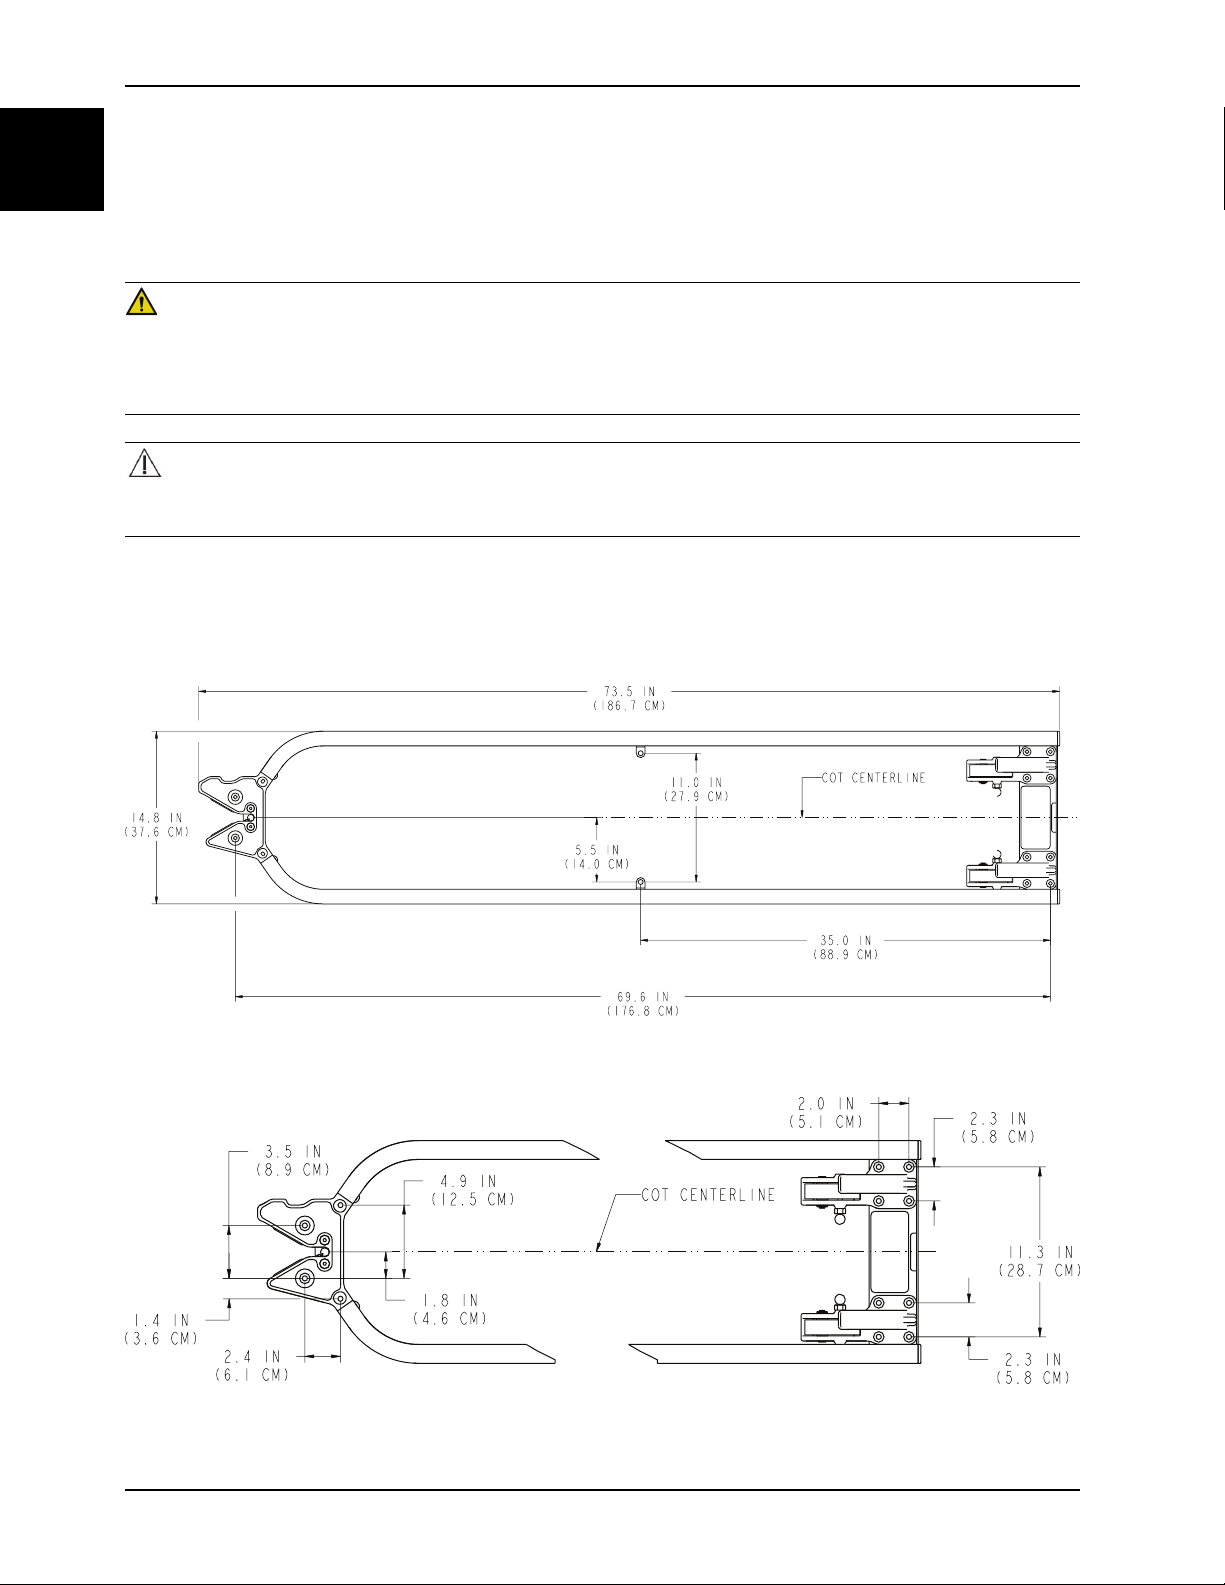
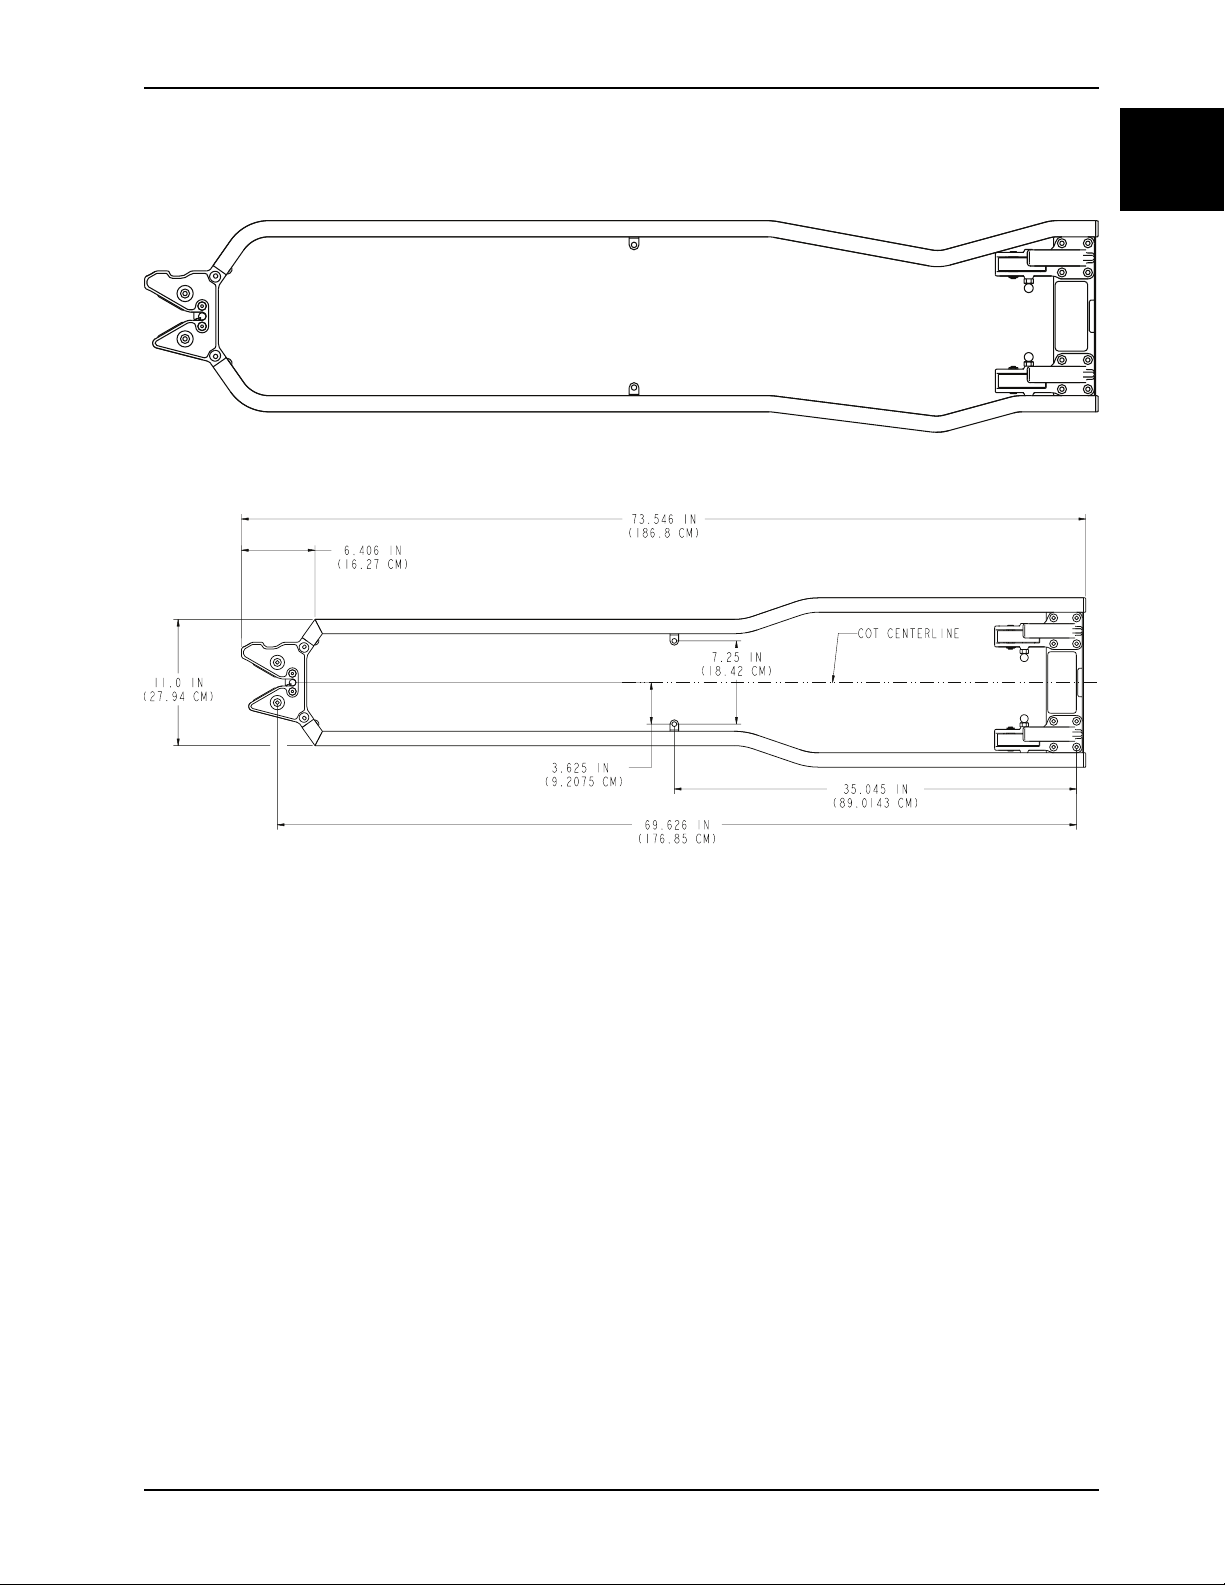
Recommended fastener systems Model 638 1 Floor Mounted - Center Mount, Straight
Recommended floor/tray height
1
Height is measured from bottom of mattress at seat section to ground level.
2
Standard base unit is weighed without optional accessories.
Stryker reserves the right to change specifications without notice.
The yellow and black color scheme is a proprietary trademark of Stryker Corporation.
6 in. / 2 in. 15.2 cm / 5.1 cm
+17°
1
Guide
Model 6373 Tray Mounted - Center Mount, DIN Guide
Model 6376 Floor Mounted - Center Mount, Straight
Guide - No side restraints
27 in. - 31 in. 68.6 cm - 78.7 cm
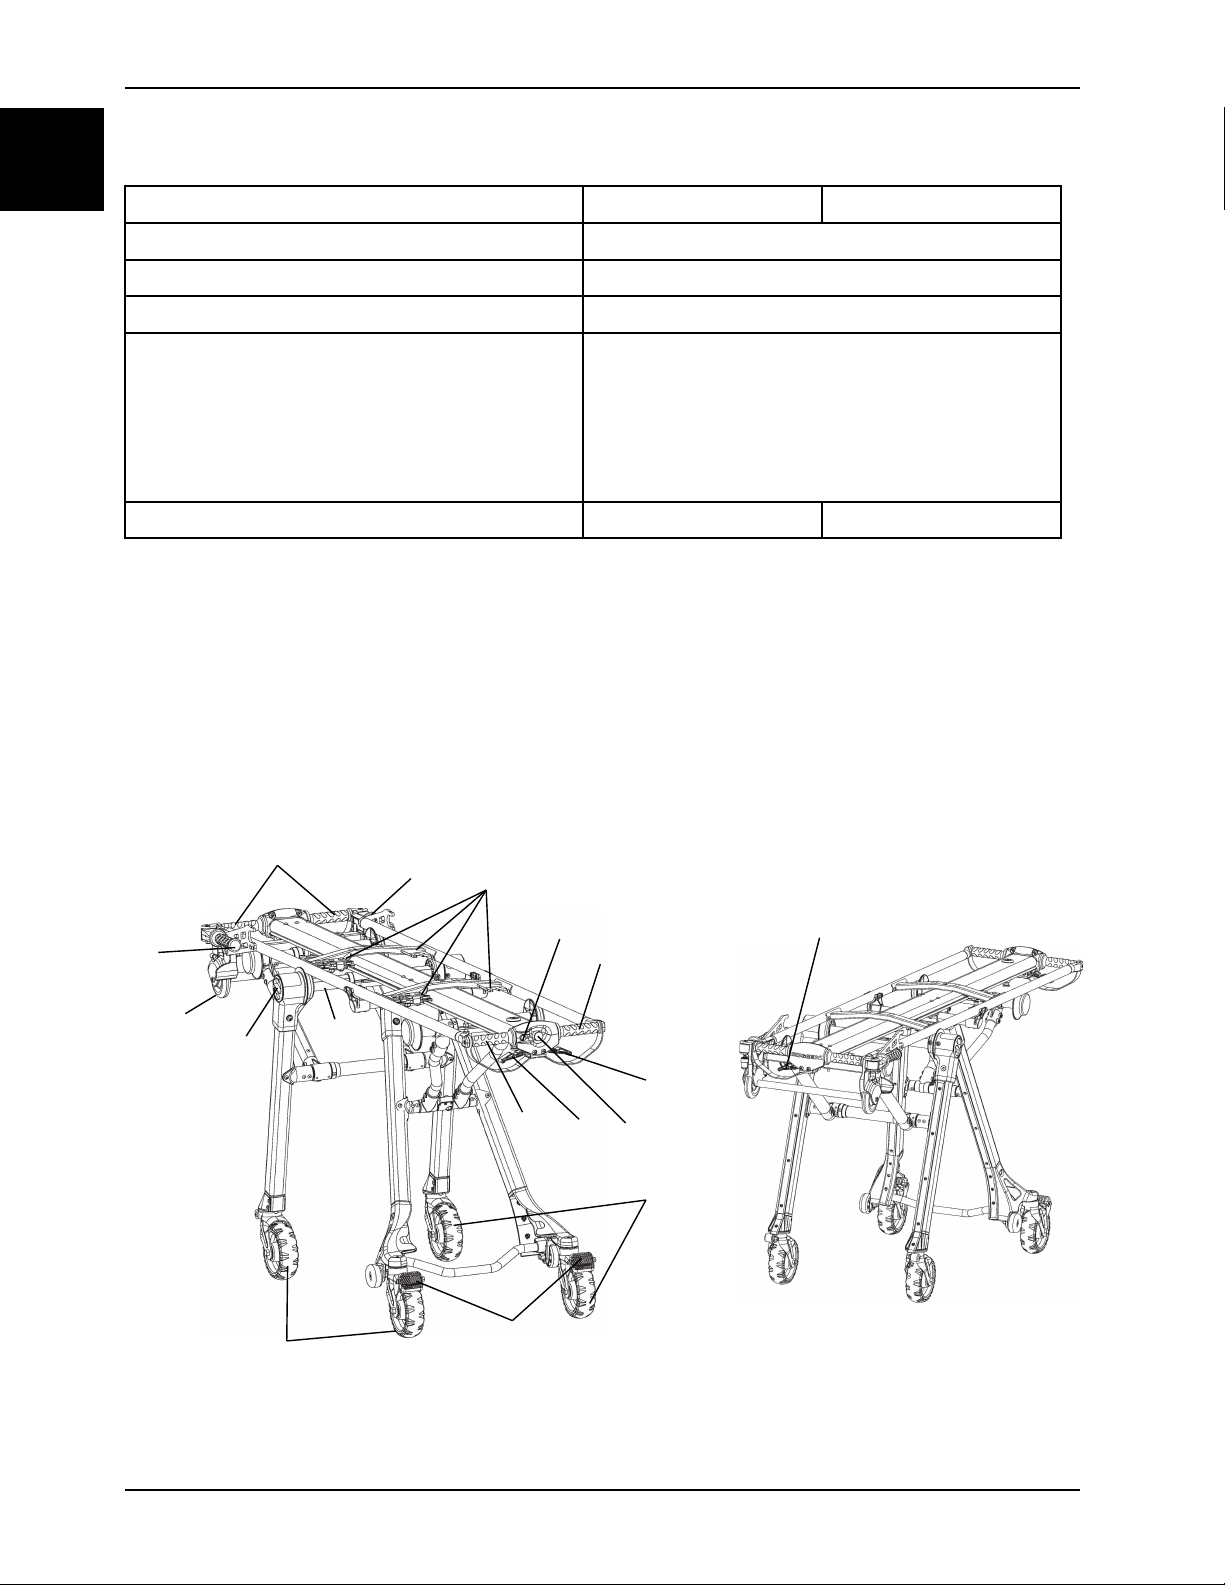
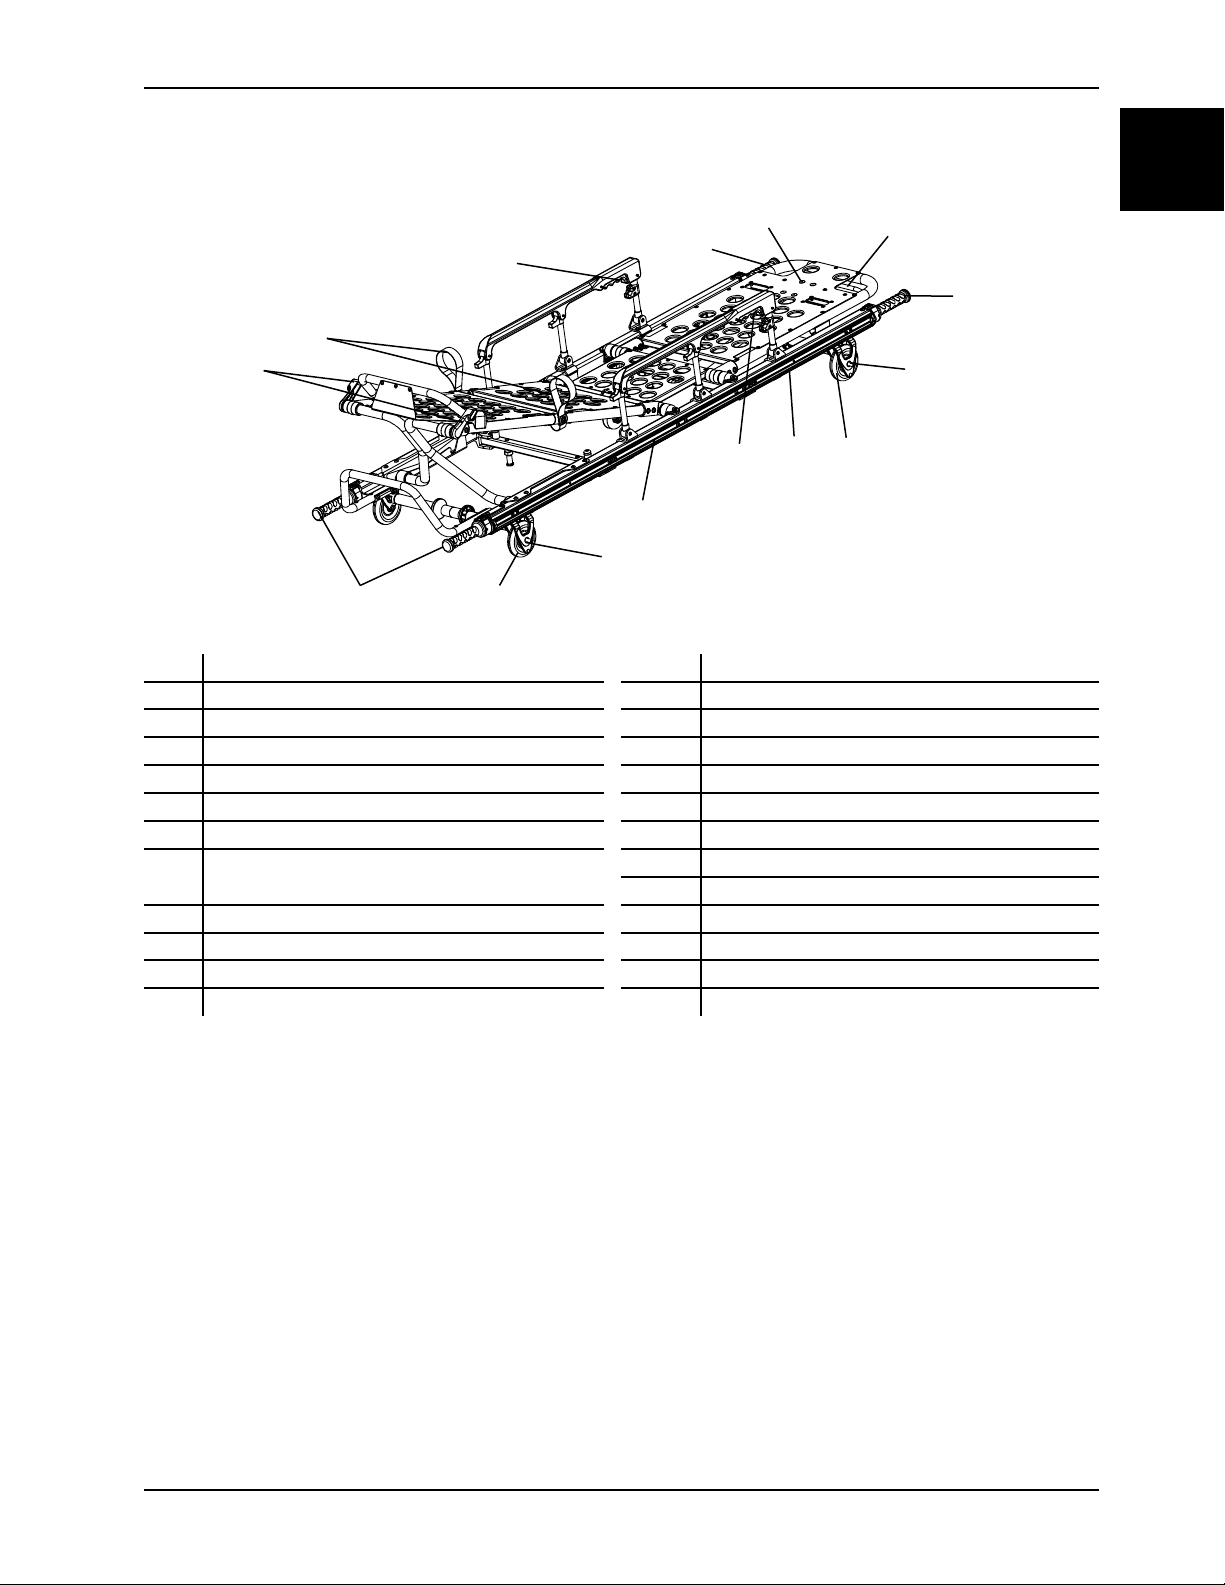
Product illustration
1-8 6100-109-005 REV B www.stryker.com
Page 15
Introduction
R
T
U
V
W
X
Y
Z
R
R
V
W
Y
AA
AB
Product illustration (Continued)
A Base frame N
B Caster Steer-Lock knob P Wheel locks
C Foot end R
Foot end release handle (green)
D
Foot end release handle (red)
E
Hand grips
F
G Head end W
Head end release handle (red)
H
Litter release button (blue)
I
J Litter retention brackets Z
Loading wheel
K
Release button (green)
L
Retractable base lifting handle (optional)
M
T
U
V Roller wheel
X Litter frame
Y Siderail release handle
AA Backrest
AB
Transport wheels
Retractable litter lifting handles
Knee gatch release levers
Knee gatch lifting handle
Optional DIN retention pin
Perimeter bumper
Backrest adjustment release handle
English
EN
Contact information
Contact Stryker Customer Service or Technical Support at: 1-800-327-0770.
Stryker Medical
3800 E. Centre Avenue
Portage, MI 49002
USA
To view your operations or maintenance manual online, see https://techweb.stryker.com/.
Have the serial number (A) of your Stryker product available when calling Stryker Customer Service or Technical
Support. Include the serial number in all written communication.
www.stryker.com 6100-109-005 REV B 1-9
Page 16
Introduction
A
English
EN
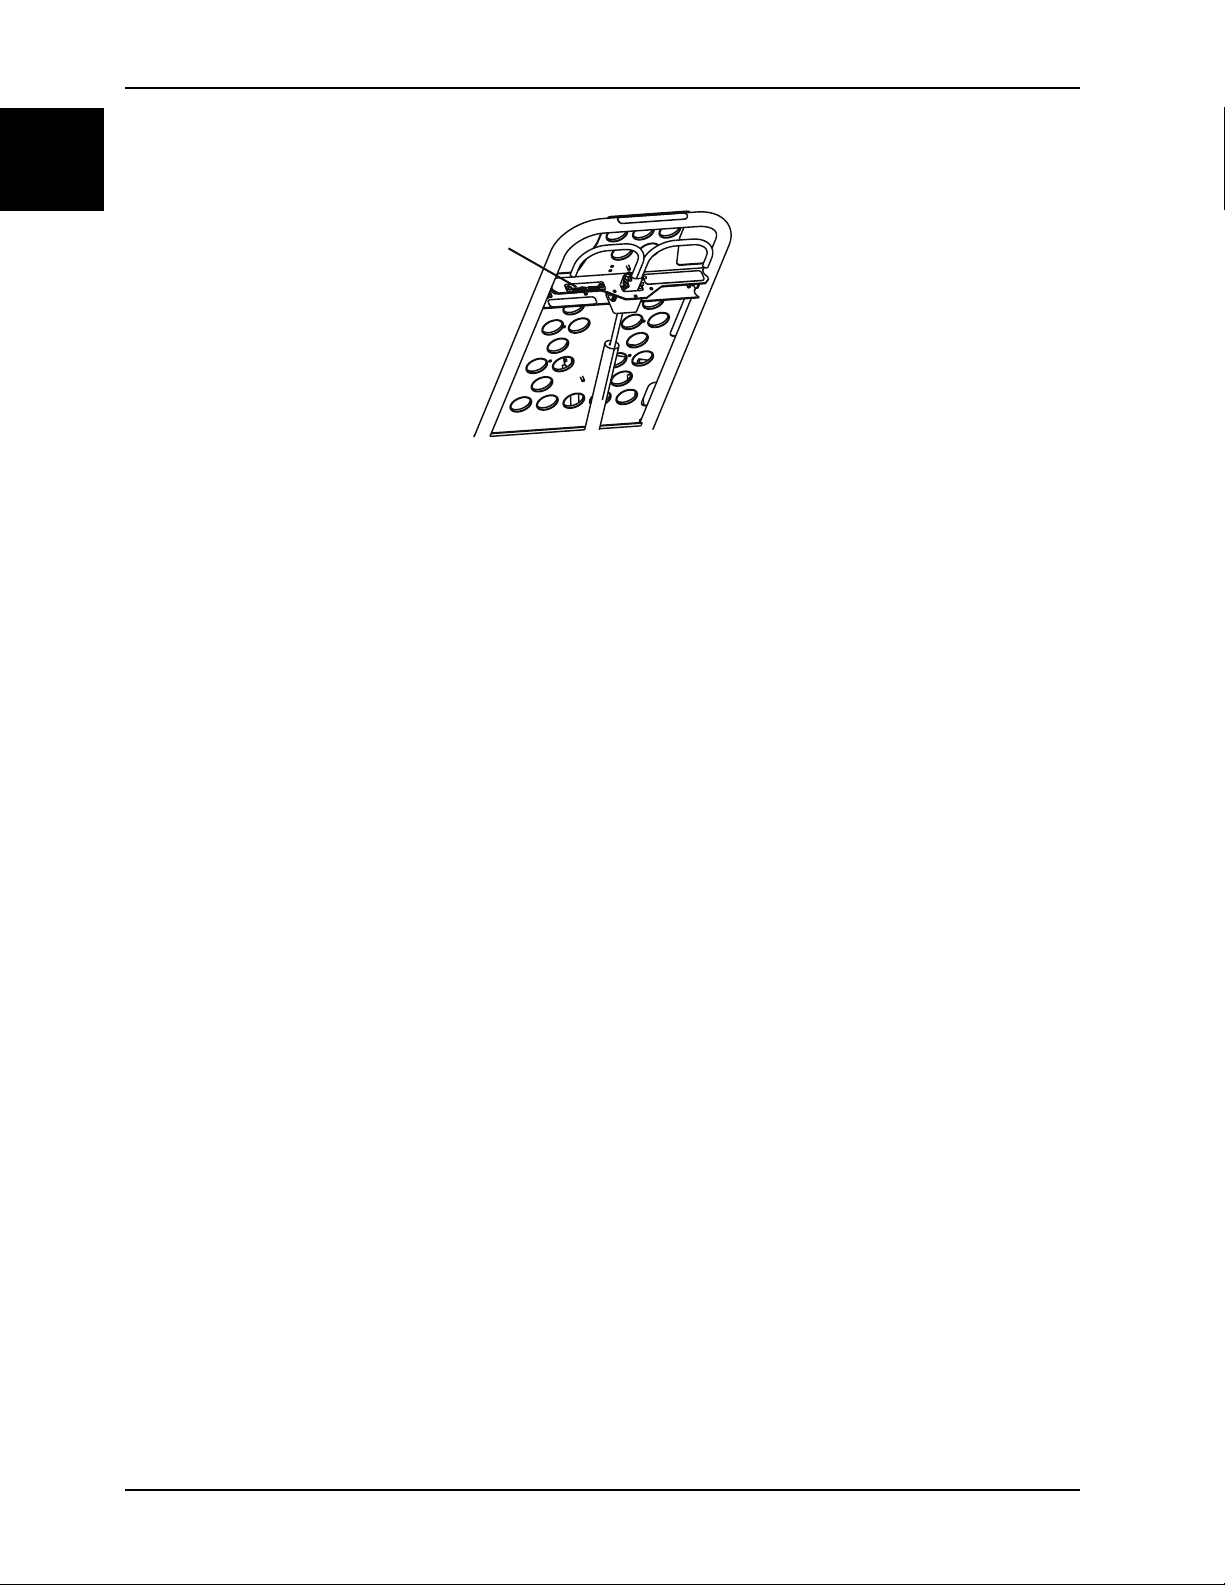
Serial number location
Figure 1-1: Serial number location
Date of manufacture
The year of manufacture is the first 2 digits of the serial number.
1-10 6100-109-005 REV B www.stryker.com
Page 17

Setup
CAUTION
• Improper usage of the product can cause injury to the patient or operator. Operate the product only as described in
this manual.
• Do not modify the product or any components of the product. Modifying the product can cause unpredictable
operation resulting in injury to the patient or operator. Modifying the product also voids its warranty.
Remove all shipping and packaging materials from the product prior to use.
Unpack the cartons and check all items for proper operation. Make sure that the product is working properly before it is
put into service.
Make sure that the patient compartment of the vehicle where you will be using the product has a:
• Smooth rear edge for product loading.
• Level floor that his large enough for the folded product and cot fastener system.
• Stryker Model 6373, 6376, or 6381 cot fastener system (not included)
• Floor or tray system loading height between 27.0 in. (68.6 cm) and 31.0 in. (78.7)
Note: Always remove loose items or debris from the patient compartment floor. Loose items or debris may interfere with
the cot rolling smoothly or the operation of the cot faster.
When necessary, modify the vehicle to fit the cot. Do not modify the cot.
This manual should be considered a permanent part of the product and should remain with the product even if the
product is subsequently sold.
Stryker continually seeks advancements in product design and quality. Therefore, while this manual contains the most
current product information available at the time of printing, there may be minor discrepancies between your product
and this manual. If you have any questions, contact Stryker Customer Service or Technical Support at 1-800-327-0770.
English
EN
www.stryker.com 6100-109-005 REV B 1-11
Page 18
Installation
English
EN
Installing the cot fastener
The Stryker Model 6373, 6376, and 6381 cot fastener systems are compatible only with cots that conform to the
installation specifications. Cots that meet these specifications include:
• Stryker Model 6100 M-1 Roll-In System
• Ferno-Washington Model X-2
WARNING
• Always replace the cot fastener if it has been involved in an accident to avoid the risk of injury due to product
damage.
• Always make sure that all cots meet the installation specifications for the Stryker cot fastener system.
CAUTION
The cot fastener system must be installed by qualified personnel. 1/4" steel backing plates (or equivalent) are required
beneath the mounting surface (ambulance floor or tray system) at all mounting points.
For more information about the Stryker cot fastener systems, see the Cot Fastener Operations and Maintenance
Manuals.
1
2000 model year or earlier. Stryker is not responsible for changes in specifications to other manufacturer’s cots.
1
Figure 1-2: Model 6376: View 2A
Figure 1-3: Model 6376: View 2B
1-12 6100-109-005 REV B www.stryker.com
Page 19
Installation
Installing the cot fastener (Continued)
Figure 1-4: Model 6373: View 2C
English
EN
Figure 1-5: Model 6373: View 2D
www.stryker.com 6100-109-005 REV B 1-13
Page 20
Operation
English
EN
Operating guidelines
WARNING
• Improper usage of the product can cause injury to the patient or operator. Operate the product only as described in
this manual.
• Do not allow untrained assistants to assist in the operation of the product.
• Always follow proper hand placement on hand grips. Keep all hands clear of the red safety bar pivots when you
load or unload the cot or change cot height position.
• Do not ride on the base of the cot.
• Do not transport the cot sideways to avoid the risk of tipping. Always transport the cot in a lowered position, head
end or foot end first to minimize the risk of tipping.
• Always keep hands, fingers, and feet away from moving parts. Use caution when placing your hands and feet near
the base tubes while you raise or lower the cot.
CAUTION
Always clear any obstacles that may interfere and cause injury to the operator or patient before operating the product.
• Operate the product only as described in this manual.
• Read all labels and instructions on the product before use.
• Practice changing height positions and loading the cot until you fully understand the operation of the product.
• Always load or unload an occupied cot with a minimum of two trained operators. Two operators must be present
when a cot is occupied. Stryker recommends that both operators are at the foot end to reduce the load on each
operator. One or two operators can lift from the foot end of the cot.
• Do not adjust, roll, or load the cot into a vehicle without advising the patient. Stay with the patient and control the
product at all times.
• You can transport the cot in any position. Stryker recommends that the operators transport the patient in the lowest
comfortable position to maneuver the cot.
• Only use the wheel locks during patient transfer or without a patient on the product.
• Do not apply a wheel lock when an occupant is on the product or when moving the product to avoid the risk of
tipping.
• Always use all restraint straps to secure the patient on the product. An unrestrained patient may fall from the
product.
• Use properly trained helpers to control the cot, when necessary.
Proper lifting techniques
When you lift the product and occupant, follow these proper lifting techniques to avoid the risk of injury:
• Keep your hands close to your body
• Keep your back straight
• Coordinate all movement with your partner
• Lift with your legs
• Avoid twisting
1-14 6100-109-005 REV B www.stryker.com
Page 21

Operation
Transferring the patient to the cot
WARNING
• Always use all restraint straps to secure the patient on the product. An unrestrained patient may fall from the
product and be injured.
• Do not leave a patient unattended. Hold the product while a patient is on the product.
• Do not apply a wheel lock when a patient is on the product or when you move the product to avoid the risk of tipping.
• Do not use siderails as a patient restraint device.
To transfer the patient to the product:
1. Roll the product to the patient (Rolling the cot with a patient on page 1-15).
2. Place the product beside the patient and raise or lower the product to the level of the patient.
3. Lower the siderails and open the restraint straps.
4. Transfer the patient to the product. Follow accepted EMS procedures.
5. Secure the patient to the product with all of the restraint straps.
6. Raise the siderails and adjust the backrest and footrest as necessary.
Note: Use the Transfer Flat (6005-001-001) to transfer larger patients.
Rolling the cot with a patient
English
EN
WARNING
• Always transport the cot at a lower height to reduce the risk of a cot tip. If possible, obtain additional assistance or
take an alternate route.
• Always avoid high obstacles, such as curbing, steps, or rough terrain to avoid the risk of the product tipping over.
To roll the cot with a patient:
1. Position one operator at the foot end and one operator at the head end of the cot.
2. Make sure that the litter is perpendicular when you approach door sills or other low obstacles.
3. Lift each set of wheels over the door sill or obstacle separately.
Changing the cot height
WARNING
• Always lock the caster Steer-Lock knob and casters when you load or unload the cot from a vehicle or loading tray
system to avoid the risk of the product tipping.
• Always lock the caster Steer-Lock knob and casters when change the cot height to avoid the risk of the product
tipping.
• Always lock the base frame before you remove the loading wheels from the vehicle patient compartment floor or
loading tray system. An unlocked base frame will not support the cot and injury to the patient or operator could
result.
• Practice changing height positions and loading the cot until you fully understand the operation of the product.
• Always keep hands, fingers, and feet away from moving parts. Use caution when placing your hands and feet near
the base tubes while you raise or lower the cot.
www.stryker.com 6100-109-005 REV B 1-15
Page 22

Operation
English
EN
Changing the cot height (Continued)
Notes
• Always make sure that both operators communicate to achieve the intended operation.
• One operator can lower the cot alone by releasing alternate ends of the cot.
Always use additional assistance if needed. A minimum of one trained operator is required for this task. You must be
able to lift the total weight of the patient, cot, and any other items on the cot. The higher you must lift the cot, the more
difficult it becomes to hold the weight. You may need help to load the cot into a vehicle if you are too short or if the
patient is too heavy to safely lift.
See Positioning operators and helpers on page 1-17.
To change the cot height:
1. Position one operator at the foot end and one at the head end of the cot.
2. Grasp the hand grips on the base unit.
3. Lift the cot up approximately 1/4 in. until the weight is off of the latching mechanism.
4. Squeeze and hold the red release handle to raise or lower the cot to the desired height.
5. Release grip on the release handle to stop the cot in the next available cot position.
Loading the cot into a vehicle
WARNING
• Always lock the caster Steer-Lock knob and casters when you load or unload the cot from a vehicle or loading tray
system to avoid the risk of the product tipping.
• Always lock the caster Steer-Lock knob and casters when you change the cot height to avoid the risk of the product
tipping.
• Always keep hands, fingers, and feet away from moving parts. Use caution when placing your hands and feet near
the base tubes while you raise or lower the cot.
• Always support the load of the patient, cot, and accessories after the weight is off of the ground.
Note: Always remove loose items or debris from the patient compartment floor. Loose items or debris may interfere with
the cot rolling smoothly or the operation of the cot faster.
Always use additional assistance if needed. A minimum of one trained operator is required for this task. You must be
able to lift the total weight of the patient, cot, and any other items on the cot. The higher you must lift the cot, the more
difficult it becomes to hold the weight. You may need help to load the cot into a vehicle if you are too short or if the
patient is too heavy to safely lift.
See Positioning operators and helpers on page 1-17.
To load the cot into a vehicle:
1. Place the cot in a loading position. Make sure that load wheels meet the vehicle floor height.
2. Lift the vehicle bumper to the raised position, if equipped.
3. Roll the cot to the open door of the patient compartment or loading tray system.
4. Push the cot forward until the load wheels are on the patient compartment floor or the loading tray system.
5. Guide the cot forward until the front legs touch the rear of the vehicle or loading tray system.
6. At the foot end of the cot, push and hold the green release button while you squeeze and hold the green release
handle.
7. Guide the cot forward until the rear legs touch the rear of the vehicle or loading tray system. The front legs will fold
back.
8. Relax your grip on the green release handle and let go of the green release button.
1-16 6100-109-005 REV B www.stryker.com
Page 23

Operation
Loading the cot into a vehicle (Continued)
9. Lift the foot end of the cot until the weight is off of the cot base.
10. Squeeze and hold the red release handle to guide the cot into the vehicle or loading tray system. The rear legs will
fold back.
11. Make sure that the cot is secure in the cot fastener system.
Unloading the cot from a vehicle
WARNING
• Always lock the caster Steer-Lock knob and casters when you load or unload the cot from a vehicle or loading tray
system to avoid the risk of the product tipping.
• Always lock the caster Steer-Lock knob and casters when you change the cot height to avoid the risk of the product
tipping.
• Always lock the base frame before you remove the loading wheels from the vehicle patient compartment floor or
loading tray system. An unlocked base frame will not support the cot and injury to the patient or operator could
result.
• Always keep hands, fingers, and feet away from moving parts. Use caution when placing your hands and feet near
the base tubes while you raise or lower the cot.
• Always support the load of the patient, cot, and accessories after the weight is off of the ground.
Always use additional assistance if needed. A minimum of one trained operator is required for this task. You must be
able to lift the total weight of the patient, cot, and any other items on the cot. The higher you must lift the cot, the more
difficult it becomes to hold the weight. You may need help to load the cot into a vehicle if you are too short or if the
patient is too heavy to safely lift.
English
EN
See Positioning operators and helpers on page 1-17.
To unload the cot from a vehicle:
1. Lift the vehicle bumper to the raised position, if equipped.
2. Release the cot from the cot fastener.
3. At the foot end of the cot, hold the hand grips while you squeeze and hold the red release handle.
4. Guide the cot out of the vehicle or loading tray system until the rear legs of the cot lower and fully extend.
5. Release the red release handle after the legs are fully extended.
6. Make sure the rear legs are securely locked.
7. Guide the cot backward out of the vehicle or loading tray system until the front legs of the cot lower and fully extend.
8. Make sure that the front legs are locked. If required, slightly lift the cot to allow the legs to fully extend and lock.
9. Remove the load wheels from the patient compartment of the vehicle.
10. Roll the cot away from the vehicle.
Positioning operators and helpers
WARNING
Always keep your hands clear of the red safety bar pivots when you load, unload, or change the height position of the
cot.
www.stryker.com 6100-109-005 REV B 1-17
Page 24

Operation
English
EN
Positioning operators and helpers (Continued)
Changing levels
Two operators (O)
Two helpers (H)
Two operators (O)
Four helpers (H)
Rolling Loading and unloading
Raising or lowering the backrest
To raise the backrest, squeeze the backrest adjustment handle to move the backrest to the desired height.
To lower the backrest, squeeze the backrest adjustment handle while you push down on the backrest to the desired
height.
Raising or lowering the siderails
Always lower the siderails when you transfer a patient to the cot or from the cot.
WARNING
Do not use siderails as a patient restraint device.
To raise the siderails, lift up on the siderail until the latch clicks and the siderail locks into place. Always keep the
siderails in the raised position unless you are transferring the patient.
To lower the siderails, squeeze the siderail release handle to release the siderail latch. Guide the siderail down toward
the foot end of the cot until the siderail lays flat. Always lower the siderails when you transfer a patient to or from the cot.
Raising or lowering the footrest
You can adjust the footrest to elevate the patient’s legs.
1-18 6100-109-005 REV B www.stryker.com
Page 25
Operation
A
B
C
Raising or lowering the footrest (Continued)
To raise the footrest, lift the frame as high as possible. The support bracket automatically secures the frame when you
release the footrest.
To lower the footrest, lift the frame and lift up on the footrest release handle until the frame releases the support
bracket. Lower the footrest until it lays flat.
Raising or lowering the optional knee gatch
To raise the optional knee gatch:
1. Lift either of the red lifting loops (A) until the knee gatch is in the highest position (Figure 1-6 on page 1-19).
2. Lower the knee gatch to secure the support bracket to the locking mechanism.
3. Make sure that the locking mechanism is secure before you release the lifting loop.
To lower the knee gatch, lift either of the red lifting loops (A) to relieve pressure on the locking mechanism, and while
holding the loop, push on the red footrest release handle (B) until the support bracket is released. Lower the knee gatch
until it lays flat.
To raise the knee gatch in trend, lift the footrest frame (C) as high as possible until the frame locks into place. The
support bracket automatically connects when you release the frame.
To lower the knee gatch in trend, lift the footrest frame (C), and while holding the frame, lift up on the red footrest
release handle (B) until the frame releases the support bracket. Lower the footrest until it lays flat.
English
EN
Figure 1-6: Gatch
Applying or releasing a wheel lock
WARNING
• Do not apply a wheel lock when a patient is on the product or when you move the product to avoid the risk of tipping.
• Do not install or apply a wheel lock on a product with worn wheels that are less than 6 in. diameter.
• Do not leave a patient or occupant unattended. Hold the product while a patient or occupant is on the product.
To apply a wheel lock, press down on the pedal until it stops and is resting against the surface of the wheel.
To release a wheel lock, press down on the top of the pedal with your foot or lift up on the pedal with your toe. The top
of the pedal will rest against the caster frame when you release the wheel lock.
www.stryker.com 6100-109-005 REV B 1-19
Page 26
Operation
A
English
EN
Applying or releasing a wheel lock (Continued)
Note: Wheel locks help prevent the product from rolling while unattended. Wheel locks may not provide sufficient
resistance on all surfaces or under loads.
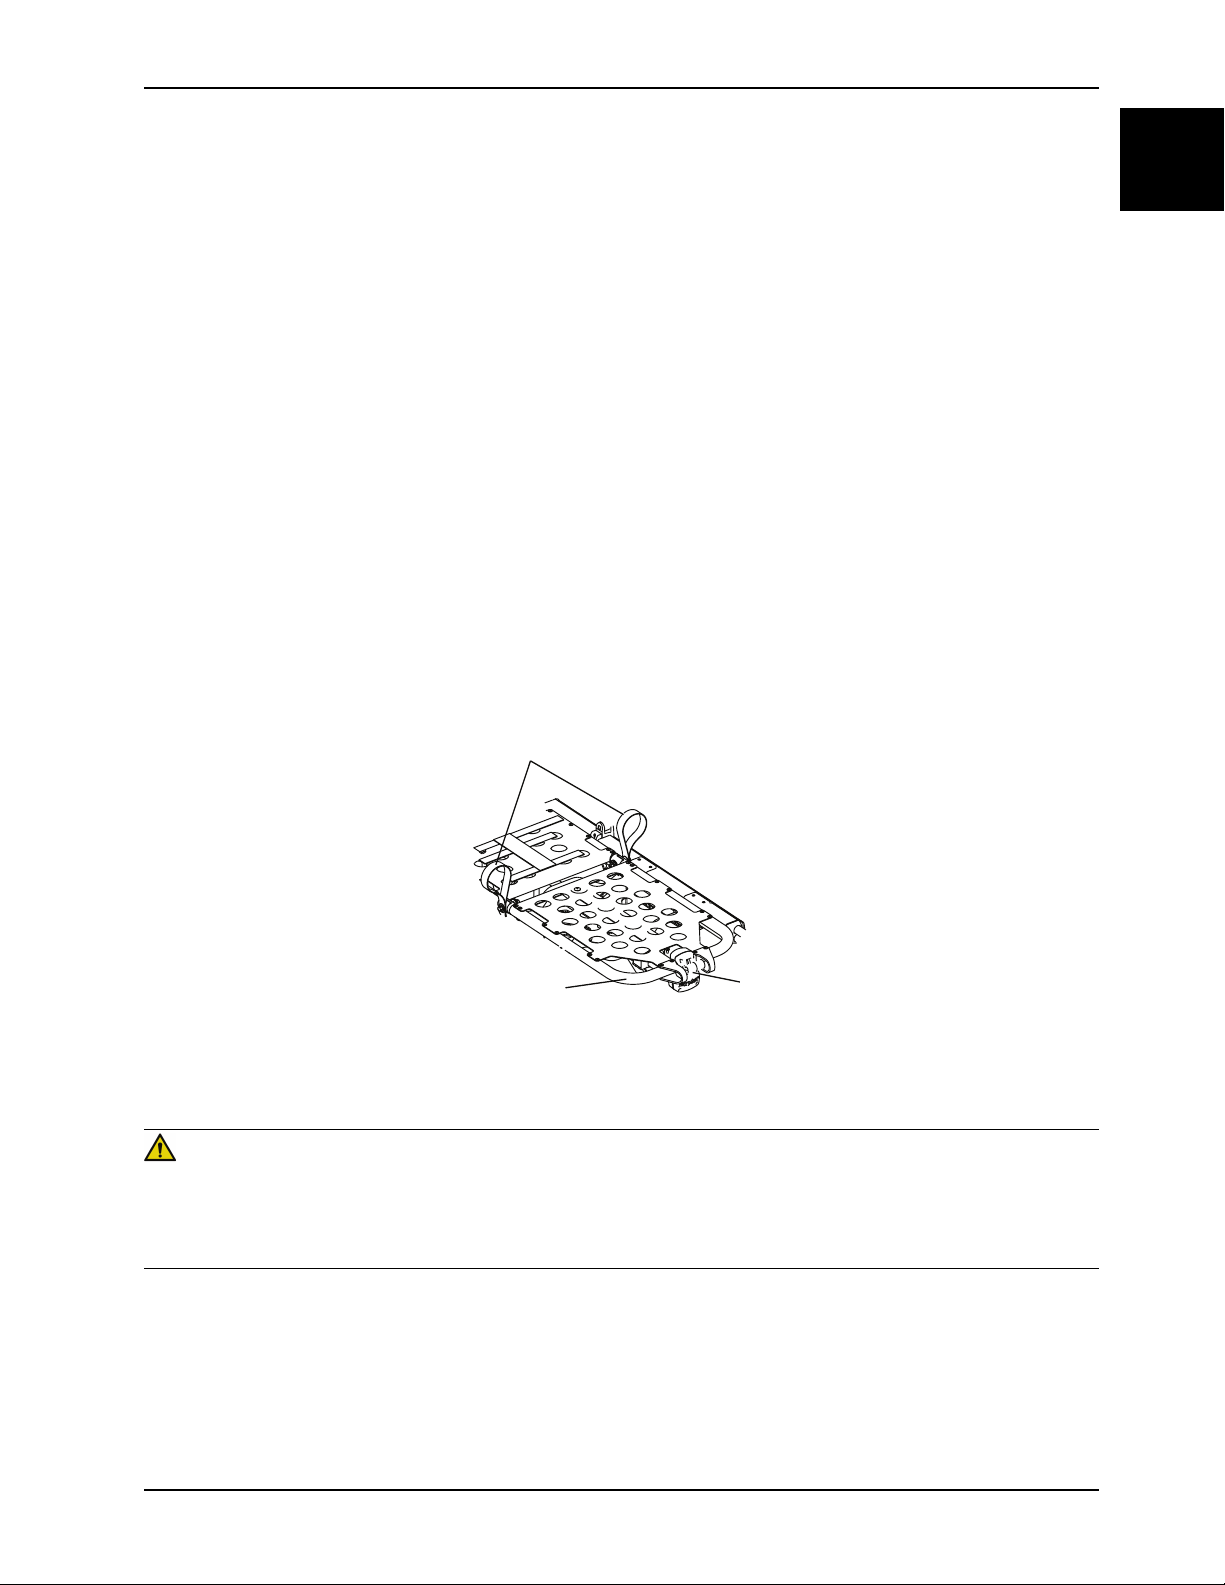
Applying or releasing the caster Steer-Lock
The Steer-Lock feature applies the head end casters to improve steering control, when needed. You can release the
Steer-Lock to allow for free swiveling for greater mobility.
WARNING
• Always lock the caster Steer-Lock knob and casters when you load or unload the cot from a vehicle or loading tray
system to avoid the risk of the product tipping.
• Always lock the caster Steer-Lock knob and casters when you change the cot height to avoid the risk of the product
tipping.
CAUTION
Do not apply the Steer-Lock and attempt to push the product sideways.
Notes
• You can apply or release the caster Steer-Lock from either side of the base frame.
• Always release the caster Steer-Lock when you load the product into the cot fastener. This allows the head end
casters to swivel freely so that the head end of the cot aligns with the fastener.
To apply the Steer-Lock, rotate the red locking knob into the locked position. Push the cot forward so the head end
casters swivel and lock into position.
To release the Steer-Lock, rotate the red locking knob into the unlocked position. Push the cot in any direction. Make
sure that the casters swivel freely.
Figure 1-7: Steer-Lock knob location
1-20 6100-109-005 REV B www.stryker.com
Page 27
Operation
A
Connecting the litter to the base
Note: You can attach the Model 6100-031-000 knee gatch litter and the Model 6100-033-000 flat foot section litter
in either direction.
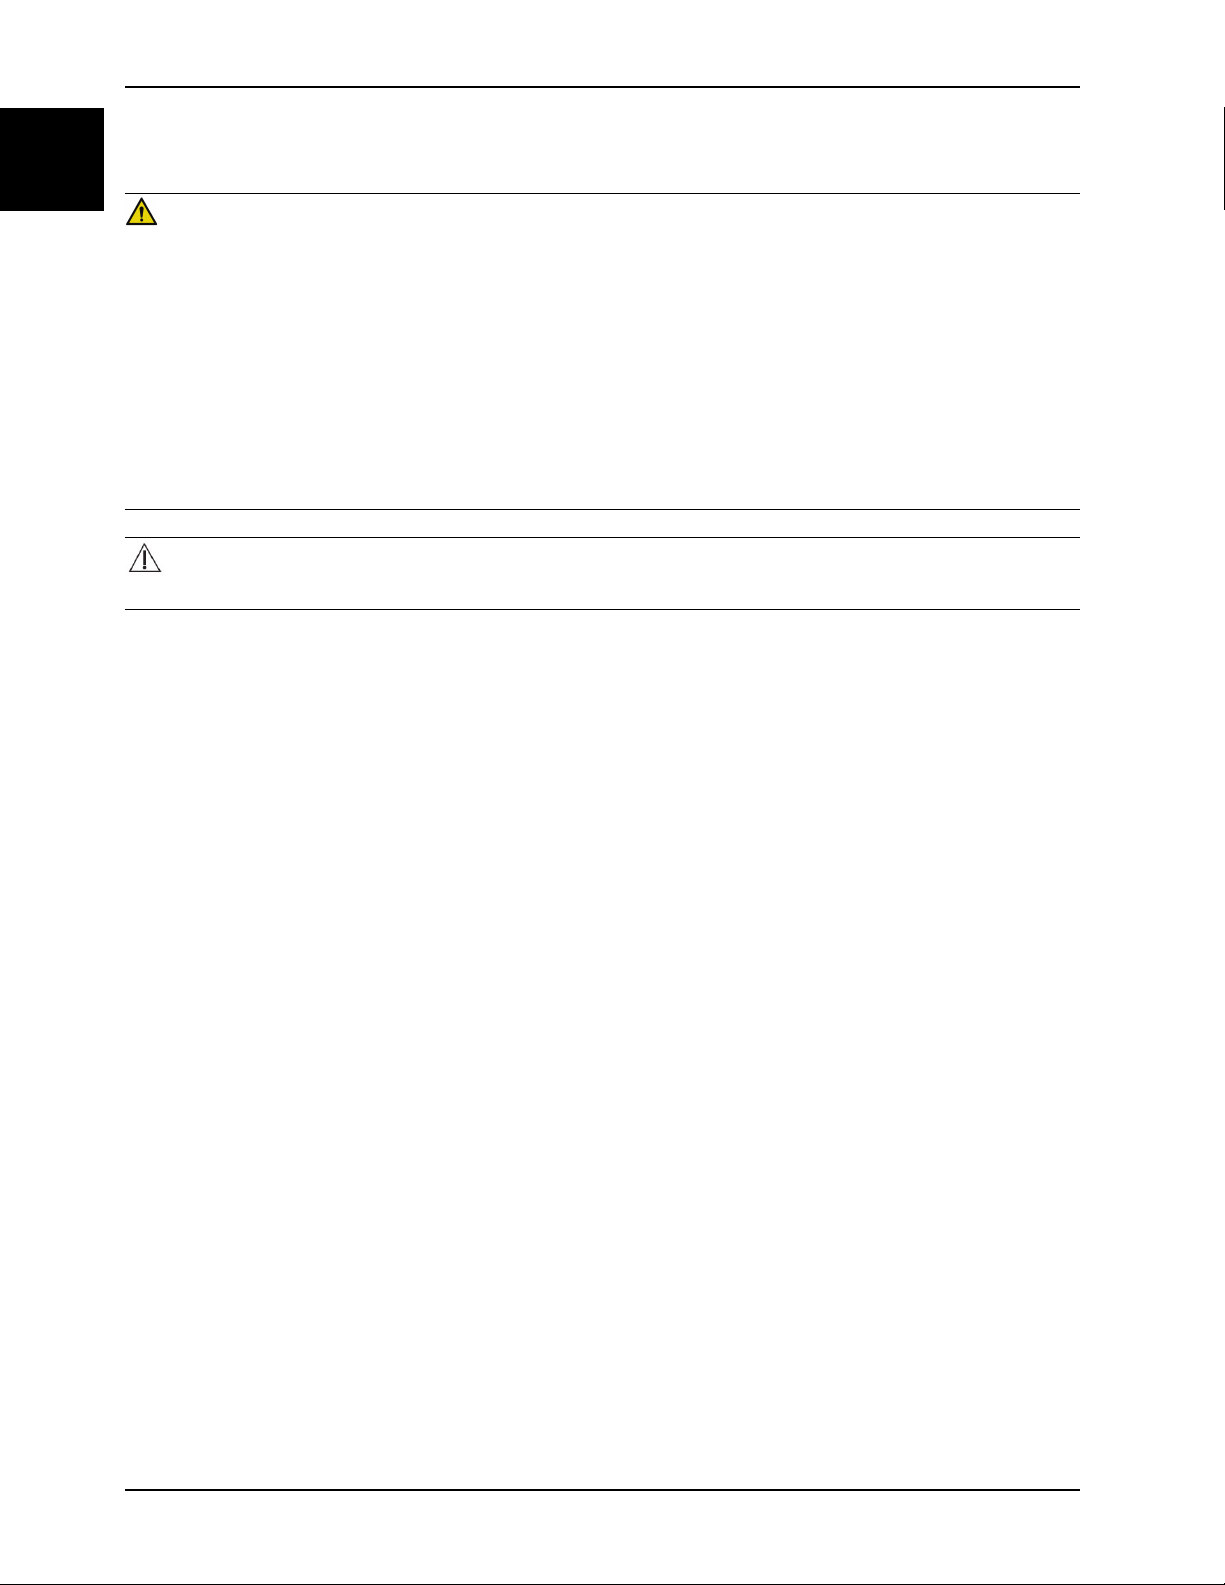
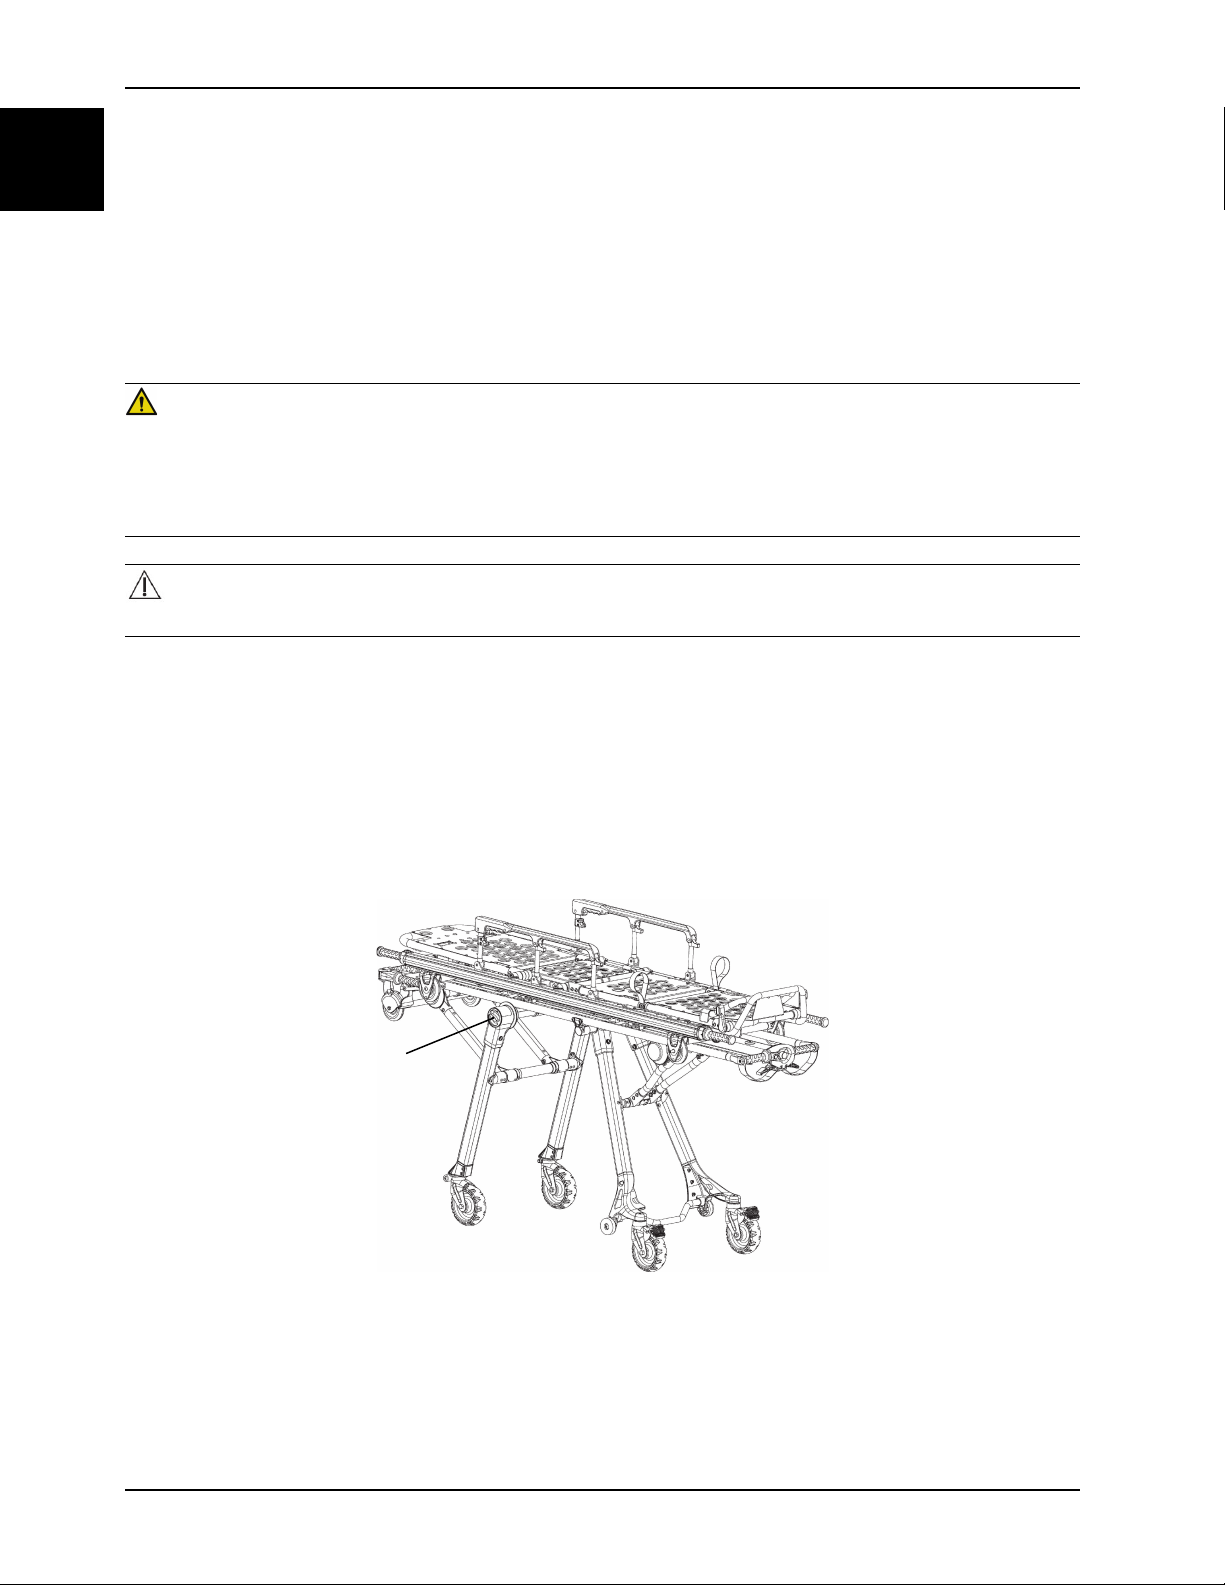
To connect the removable litter to the base (Figure 1-8 on page 1-21):
1. Lower the litter onto the base.
2. Align the roller guides on the litter with the center base tube.
3. Push the litter forward toward the head end to attach to the litter retention brackets.
4. Make sure that you lock the litter onto the base before you release your grip on the litter.
English
EN
Figure 1-8: Connecting and removing the litter
Removing the litter from the base
To remove the removable litter from the base (Figure 1-8 on page 1-21):
1. Push and hold the blue litter release button that is located at the foot end of the base.
2. Pull the litter toward the food end of the cot to remove the litter from the litter retention brackets.
3. Lift to remove the litter from the base.
www.stryker.com 6100-109-005 REV B 1-21
Page 28
Operation
A
English
EN
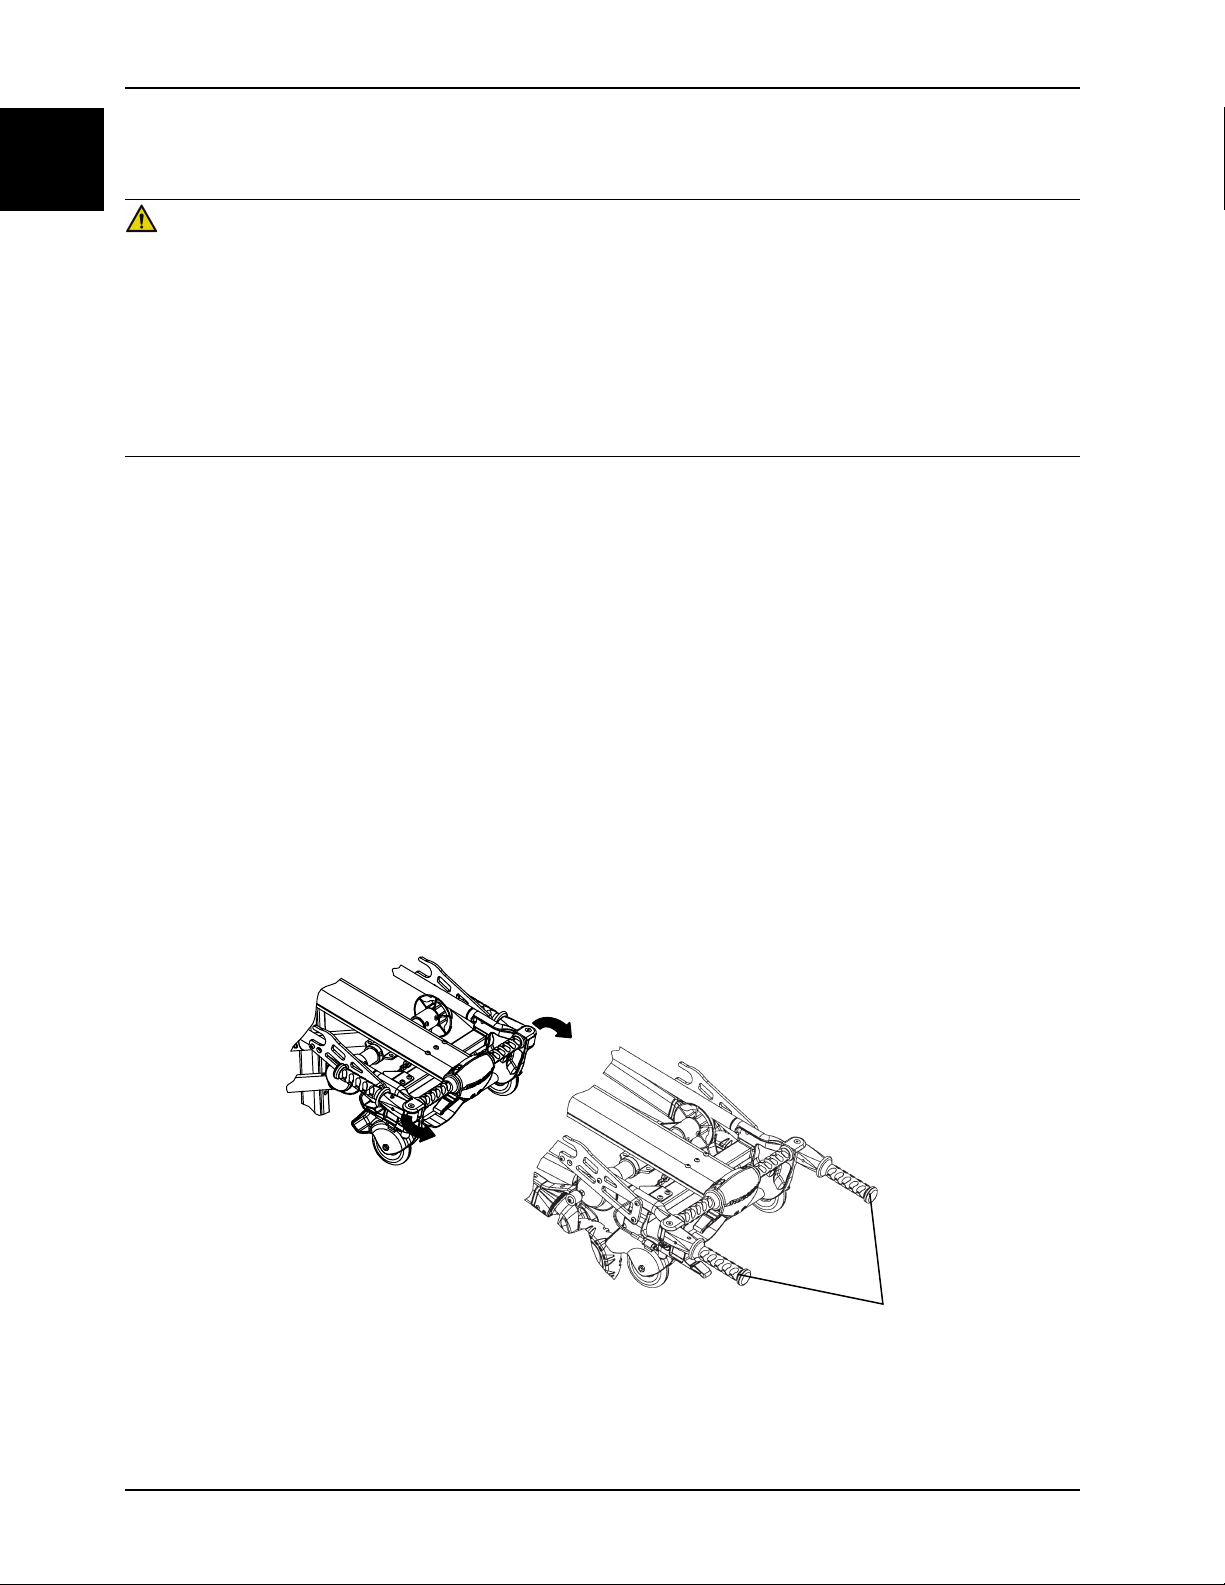
Changing cot height with the optional base head end retractable lifting handles
WARNING
• Always lock the caster Steer-Lock knob and casters when you load or unload the cot from a vehicle or loading tray
system to avoid the risk of the product tipping.
• Always lock the caster Steer-Lock knob and casters when you change the cot height to avoid the risk of the product
tipping.
• Always lock the base frame before you remove the loading wheels from the vehicle patient compartment floor or
loading tray system. An unlocked base frame will not support the cot and injury to the patient or operator could
result.
• Practice changing height positions and loading the cot until you fully understand the operation of the product.
Notes
• Always make sure that both operators communicate to achieve the intended operation.
• One operator can lower the cot alone by releasing alternate ends of the cot.
Always use additional assistance if needed. A minimum of one trained operator is required for this task. You must be
able to lift the total weight of the patient, cot, and any other items on the cot. The higher you must lift the cot, the more
difficult it becomes to hold the weight. You may need help to load the cot into a vehicle if you are too short or if the
patient is too heavy to safely lift.
See Positioning operators and helpers on page 1-17.
To change the cot height:
1. Pivot the retractable lifting handles (A) into position (Figure 1-9 on page 1-22).
2. Position an operator at the foot end and one at the head end of the cot.
3. Grasp the hand grips on the base unit.
4. Lift the cot up approximately 1/4 in. until the weight is off of the latching mechanism.
5. Squeeze and hold the red release handle to raise or lower the cot to the desired height.
6. Release grip on the release handle to stop the cot in the next available cot position.
Figure 1-9: Positioning the lifting handles
1-22 6100-109-005 REV B www.stryker.com
Page 29
Operation
AA
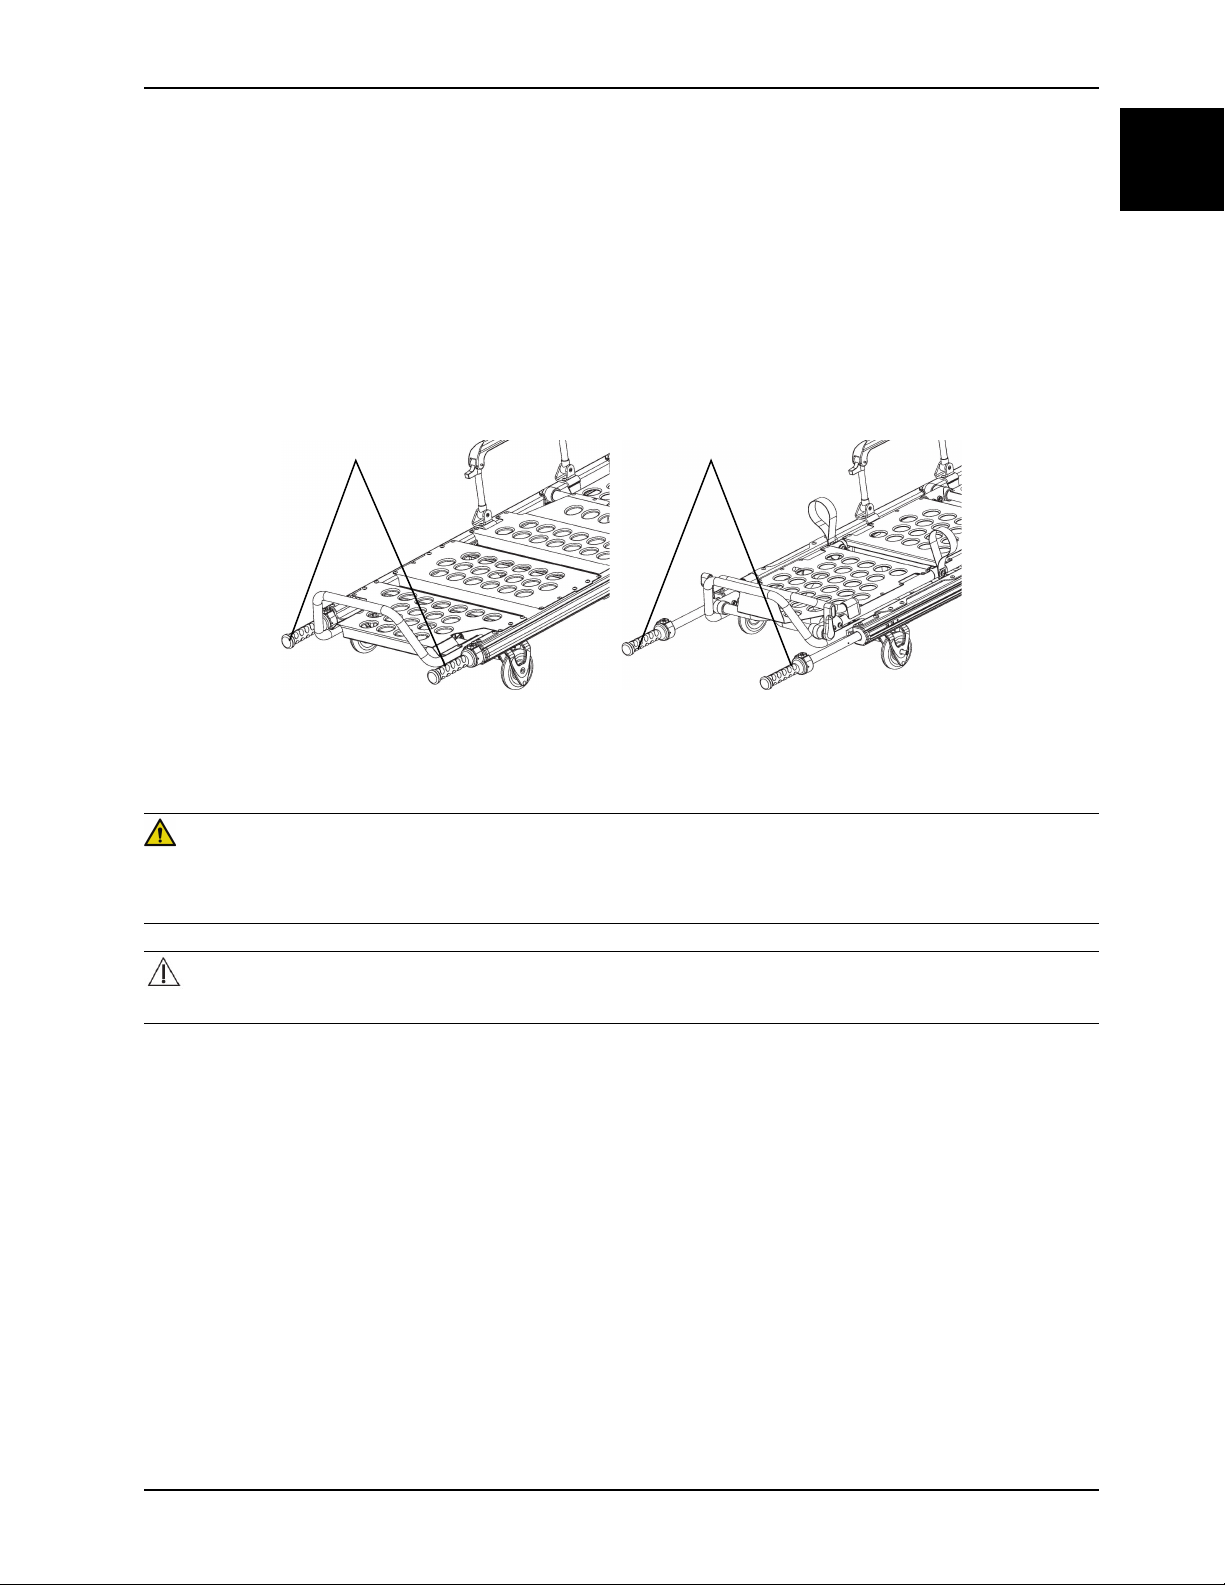
Extending or retracting the retractable lifting handles
Note: Always make sure that you lock the retractable lifting handles before you lift the product.
To extend or retract the retractable lifting handles (Figure 1-10 on page 1-23):
1. Press the release buttons to pull out or push in the retractable lifting handles.
2. Release the release buttons when the handles lock into the intermediate position.
3. Press the release buttons to pull out or push in the retractable lifting handles again.
4. Release the release buttons when the handles lock into the fully extended or retracted position.
Figure 1-10: Extending and retracting the lifting handles
English
EN
Securing the patient with the restraint straps
WARNING
• Always use all restraint straps to secure the patient on the cot. An unrestrained patient may fall from the cot.
• Do not attach restraint straps to the base tubes or cross tubes.
CAUTION
Do not entangle the restraint straps in the base frame when you raise or lower the cot.
Secure restraint straps to the cot in the required attachment locations (Figure 1-11 on page 1-24 and Figure 1-12 on
page 1-24). Restraint strap attachment locations should provide strong anchorage and proper restraint position. Do not
allow restraint straps to interfere with equipment or accessories. Buckle the restraint straps across the patient’s
shoulders, waist, and legs. Buckle restraint straps when the cot is not in use.
To install the restraints:
1. Wrap the restraint strap around the cot frame.
2. Push the restraint strap buckle through the loop.
3. Pull the buckle around the loop to secure the restraint strap to the cot.
www.stryker.com 6100-109-005 REV B 1-23
Page 30

Operation
English
EN
Securing the patient with the restraint straps (Continued)
Figure 1-11: Restraint strap attachment points
Figure 1-12: Restraint strap attachment points - BS EN
1789:2007+A1:2010
Adjusting restraint straps
Open the restraint straps and place them at either side of the cot while you position the patient on the cot mattress.
Lengthen the restraint straps, buckle them around the patient, and shorten them to tighten.
• To open the restraint strap, press the red button on the front of the buckle receiver. This allows you to release the
buckle latch plate and pull it out of the receiver.
• To close the restraint strap, push the latch plate into the receiver until you hear a click.
• To lengthen the restraint strap, grasp the buckle latch plate, turn it at an angle to the webbing, then pull it out. A
hemmed tab at the end of the webbing prevents the latch plate from coming off of the strap.
• To shorten the restraint strap, grasp the hemmed tab and pull the webbing back through the latch plate to tighten.
When you buckle a restraint strap around a patient, secure the latch plate and remove any loose webbing from the cot.
Inspect the restraint straps at least once a month (more if used often). Check for a bent or broken receiver or latch plate,
or torn or frayed webbing. Replace any worn or inoperable restraint strap.
1-24 6100-109-005 REV B www.stryker.com
Page 31

Operation
Adjusting restraint straps (Continued)
Figure 1-13: Buckle the straps
around the patient
Figure 1-14: Lengthen the restraint
Adding a restraint strap extension
English
EN
Figure 1-15: Shorten the restraint
strap
strap
Add a restraint strap extension (6082-160-050) for extra length when you buckle the lap belt around larger patients.
Figure 1-16: Restraint strap extension
Securing the patient with the Pedi-Mate® infant restraint system
WARNING
Always locate the buckle away from obstructions or accessories on the cot to avoid the risk of accidental release of
Pedi-Mate® infant restraint system and injury to the infant.
To secure the patient with the Pedi-Mate® infant restraint system:
1. Remove any restraints from the cot.
2. Raise the cot backrest to the full upright position.
3. Position the Pedi-Mate® pad flat on the cot backrest with the black backrest straps facing out.
4. Wrap the straps around the cot backrest and insert the ends of the straps through the brackets.
5. Fasten the buckle.
6. Pull on the end of the adjustable backrest strap to tighten.
7. Insert the mainframe straps between the product frame and the mattress.
8. Insert the buckle behind the litter cross brace and bring it up in front of the litter cross brace.
9. Fasten the buckle around the litter cross brace. Leave slack in the strap for final adjustment.
www.stryker.com 6100-109-005 REV B 1-25
Page 32

Operation
English
EN
Securing the patient with the Pedi-Mate® infant restraint system (Continued)
10. Tighten all straps.
Note: For more information about the Pedi-Mate® infant restraint system, see the manufacturer’s instructions for use,
operation, and care. Safe and proper use of the Pedi-Mate® infant restraint system is at the discretion of the user. Set
methods and procedures to educate and train your staff on the safe operation or maintenance of this product. These
are general instructions only. Keep these instructions for future reference. These instructions are a permanent part of
the product and should remain with the product even if the product is sold.
Pedi-Mate® is a registered trademark of Ferno Washington, Inc.
Installing the defibrillator platform
CAUTION
• Always secure the defibrillator platform to the product when you use the defibrillator platform.
• Always use and adjust the straps that are provided with the defibrillator platform to secure the defibrillator.
• Always change the installation location or adjust the straps for your specific defibrillator size or shape.
• Do not load the defibrillator platform above the safe working load of 30 lb (13.6 kg).
To install the defibrillator platform:
1. Place the defibrillator platform in the stored position (Figure 1-17 on page 1-26).
2. Open and expand the defibrillator platform legs (Figure 1-18 on page 1-26).
Figure 1-17: Stored position
Figure 1-18: Open defibrillator platform legs
3. If the product is equipped with an IV pole, raise the IV pole (A) to the up position (Figure 1-19 on page 1-27).
4. Place the defibrillator platform on the product frame.
5. Position the inside legs (B) of the defibrillator platform toward the head end of the product (Figure 1-19 on page 1-
27).
1-26 6100-109-005 REV B www.stryker.com
Page 33

Operation
A
B
C
D
E
F
Installing the defibrillator platform (Continued)
6. Place the latch hook (C) under the litter frame or foot end fastener and push the tab (D) up until it locks into place
on one side with an audible click. Repeat on the other side. For Power-LOAD compatible cots, if equipped, you
must lengthen and attach the straps to the foot end fastener (Figure 1-21 on page 1-27).
Figure 1-19: Raise IV pole and position defibrillator
tray
English
EN
Figure 1-20: Latch hook placement
7. Make sure that the defibrillator platform is secured to the product.
8. Place the defibrillator on the defibrillator platform.
9. Secure the straps (E) to hold the defibrillator on the defibrillator platform (Figure 1-22 on page 1-27).
Figure 1-22: Attach defibrillator platform to the cot
Figure 1-21: Tab
www.stryker.com 6100-109-005 REV B 1-27
Page 34

Operation
English
EN
Installing the defibrillator platform (Continued)
Note: If the defibrillator platform is not attached to the product after you connect both latch hooks, unlatch the tab. To
adjust, loosen or tighten the strap and then push the tab up until it locks into place with an audible click.
Installing the head extension with pillow
You can install the head extension assembly on the backrest to provide head end support.
To attach the pillow to the head extension, place the support into the flap on the bottom of the pillow. Secure the pillow
to the Velcro® on the bottom of the support.
Notes
• The head extension with pillow (6100-044-000) is not compatible with the optional equipment hook (6500-147-000)
or optional fowler oxygen bottle holder (6500-241-000).
• The head extension pillow is a Type BF applied part.
Positioning the optional three-stage IV pole
CAUTION
Do not load the IV pole above the safe working load of 25 lb (11.3 kg).
Note: The dual three-stage IV poles (6500-317-000) are not compatible with either the patient right (6500-315-000) or
the patient left (6500-316-000) three-stage IV pole options.
To position the IV pole (Figure 1-23 on page 1-29):
1. Lift and pivot the IV pole from the storage position and push down until the IV pole locks into the receptacle (A).
2. To raise the height of the pole, turn the lock actuator (B) counterclockwise and pull up on the telescoping portion (C)
of the pole to raise it to the desired height.
3. Turn the lock actuator (B) clockwise to lock the telescoping portion in place.
4. For a higher IV pole, pull up on section (D) until the spring clip (E) connects.
5. Hang the IV bags on the IV hook (F).
6. To lower the IV pole, push in on the spring clip (E) and slide section (D) down into section (C). Turn the lock
actuator (B) counterclockwise and slide section (C) into the bottom tube.
7. Turn the lock actuator (B) clockwise to tighten.
8. Lift up and pivot the pole down into the storage position.
1-28 6100-109-005 REV B www.stryker.com
Page 35

Operation
A
B
C
D
E
F
A
B
E
D
C
F
Positioning the optional three-stage IV pole (Continued)
English
EN
Figure 1-23: IV pole raised position
Attaching an oxygen bottle to the oxygen bottle holder
CAUTION
• Do not load the oxygen bottle holder above the safe working load of 15 lb (6.8 kg).
• Do not use two oxygen bottle holders at the same time.
To attach an oxygen bottle to the oxygen bottle holder:
1. Place an oxygen bottle in the holder.
2. Insert the lower strap through the buckle and affix the strap onto itself to secure the oxygen bottle to the holder.
Notes
• Do not use the oxygen bottle holder to hold an oxygen bottle holder when the transport vehicle is in motion. Always
place the oxygen bottle holder in an appropriate storage location when the transport vehicle is in motion.
• Inspect the straps and clips for wear between use. Replace the strap if it no longer holds the oxygen bottle.
www.stryker.com 6100-109-005 REV B 1-29
Page 36

Accessories
English
EN
These accessories may be available for use with your product. Confirm availability for your configuration or region. Call
Stryker Customer Service: 1-800-327-0770.
Name Number
Base option, non AS/NZS 4535
Base option, AS/NZS 4535
Defibrillator platform
Head extension with pillow 6100-044-000
Int. head end retractable lift handles
IV pole, three-stage, right 6100-115-000
IV pole, three-stage, left
Litter, flat foot section
Litter, knee gatch 6100-031-000
Mattress, bolster 6100-041-020
Mattress, flat
Mattress, none 6100-040-000
Mattress, premium bolster 6100-041-010
Pillow (premium mattress only) 6100-041-030
6100-003-950
6100-018-000
6100-170-000
6100-010-000
6100-116-000
6100-033-000
6090-042-010
Pins, DIN lock down 6100-042-060
Pins, no lock down 6100-043-000
Removable oxygen bottle holder 6080-140-000
Siderails, fold down
Siderails, none
6100-020-000
6100-021-000
1-30 6100-109-005 REV B www.stryker.com
Page 37

Cleaning
WARNING
Always use any appropriate personal protective equipment while power washing to avoid inhaling contagion. Power
washing equipment may aerate contamination.
CAUTION
• Do not steam clean or ultrasonically clean the product.
• Do not exceed 180° F (82° C) as the maximum water temperature.
• Do not exceed 1500 psi (130.5 bar) as the maximum water pressure. If you are using a hand held wand to wash the
product, keep the pressure nozzle at a minimum of 24 in. (61 cm) from the product.
• Always allow to air dry.
• Do not clean, disinfect, service, or perform maintenance while the product is in use.
The product is power washable. The product may show some signs of oxidation or discoloration from continuous
washing. No degradation of the product’s performance will occur from power washing as long as you follow the proper
procedures.
• Follow the cleaning solution manufacturer’s dilution recommendations exactly.
• The preferred method Stryker Medical recommends for power washing the product is with the standard hospital
surgical cart washer or hand held wand unit.
• Clean the cot once a month.
• Clean Velcro® after each use. Saturate Velcro® with disinfectant and allow disinfectant to evaporate. Appropriate
disinfectant for nylon Velcro® should be determined by the service.
• Immersing restraint strap metal buckles can cause buckle corrosion and is not recommended. Rinse with clean
water and allow to air dry to reduce chance of corrosion. Replace restraints if metal buckles are corroded.
English
EN
Note: Water that gets into the M-1 Roll-In System will drain through the drain tube to the underside of the vehicle.
www.stryker.com 6100-109-005 REV B 1-31
Page 38

Disinfecting
English
EN
CAUTION
• Do not clean, disinfect, service, or perform maintenance while the product is in use.
• Always wipe the product with clean water and dry after cleaning. Some cleaning products are corrosive in nature
and may cause damage to the product. Failure to properly rinse and dry the product leaves a corrosive residue on
the surface of the product and may cause premature corrosion of critical components.
In general, when used in concentrations recommended by the manufacturer, you can use either phenolic or quaternary
(excluding Virex® TB) type disinfectants. Iodophor type disinfectants are not recommended for use because staining
may occur.
The recommended disinfectants for this product’s surfaces include the following:
• Quaternary (active ingredient - ammonium chloride)
• Phenolic (active ingredient - o-phenylphenol)
• Chlorinated bleach solution (use up to UK disinfecting 10,000 ppm available chlorine (941 mL of a 5.25% sodium
hypochlorite solution per 4000 mL of water)
• Alcohol (active ingredient - 70% isopropyl alcohol)
To wipe down the product with disinfectant between uses:
1. Follow the manufacturer’s dilution recommendations exactly.
2. Apply the recommended disinfectant solution by spray or pre-soaked wipes.
3. Hand wash all surfaces of the product with the recommended disinfectant.
4. Disinfect all exposed surfaces. Pay attention to high contact areas.
5. Follow the disinfecting solution manufacturer’s instructions for appropriate contact time and rinsing requirements.
6. Dry the product thoroughly before returning the product to service.
Avoid over saturation. Do not allow the product to remain wet.
Follow the manufacturer’s dilution recommendations for appropriate contact time and rinsing requirements. Follow the
chemical manufacturer’s guidelines for proper disinfecting.
Note: Failure to follow the above directions when using these types of cleaners may void this product’s warranty.
1-32 6100-109-005 REV B www.stryker.com
Page 39

Preventive maintenance
CAUTION
• Always use authorized parts to avoid the risk of product damage.
• Improper usage of the product can cause injury to the patient or operator. Operate the product only as described in
this manual.
• Do not modify the product or any components of the product. Modifying the product can cause unpredictable
operation resulting in injury to patient or operator. Modifying the product also voids its warranty.
Establish and follow a maintenance schedule and keep records of the maintenance activity. Remove product from
service before you perform the preventive maintenance inspection. You may need to perform preventive maintenance
checks more often based on your level of product usage. Service only by qualified personnel.
When using maintenance products, follow the directions of the manufacturer and reference all material safety data
sheets (MSDS).
Operation Schedule
Cleaning and disinfecting Cleaning on page 1-31 and Disinfecting on page 1-32
Inspection For 1-25 calls per month, inspect the cot
every 6 months
For 26-200 calls per month, inspect the cot
every 3 months
For 201+ calls per month, inspect the cot
monthly
Procedure
See checklist below
English
EN
Regular inspection and adjustments
The following schedule is a general guide to maintenance. Factors such as weather, terrain, geographical location, and
individual usage will alter the required maintenance schedule. If you are unsure how to perform these checks, contact
your Stryker service technician. If you are in doubt as to what intervals to follow to maintain your product, consult your
Stryker service technician. Check each routine and replace worn parts if necessary.
Every month or two hours
Inspect these items every month or two hours, whichever comes first.
Item Inspect
Settings Cot and fastener fit and function
Litter Frame and litter
Restraints
Base Frame and base
Wheels All wheels are secure, roll, and swivel
Restraints function with no excessive wear (such as a
bent or broken receiver or latch plate or torn or frayed
webbing)
Load wheels are secure and roll
Every three months or six hours
Inspect these items every three months or six hours, whichever comes first.
www.stryker.com 6100-109-005 REV B 1-33
Page 40

Preventive maintenance
English
EN
Regular inspection and adjustments (Continued)
Item Inspect
Litter
Mattress No cracks or tears
Base
Accessories (optional) All accessories operate (such as IV pole, head extension
All fasteners are secure
Backrest cylinder operates
Adjust pneumatic cylinder for full range of motion, if
required
Dead stop (6085-001-094) for wear, replace if required
All fasteners are secure
Plastic wear strips are intact on the front and rear leg
assemblies
and pillow, defibrillator platform, and Pedi-Mate®
restraint package)
Every six months or 12 hours
Inspect these items every six months or 12 hours, whichever comes first.
Item Inspect
Litter No bent, broken, or damaged components
No damage or tears on cot grips
Siderails operate and latch
Footrest operates
Base No bent, broken, or damaged components
Wheels
Free of debris
Every 12 months or 24 hours
Inspect these items every 12 months or 24 hours, whichever comes first.
Item Inspect
Litter All welds are intact, not cracked, or broken
Warning labels present, legible
Fowler bumper and screws intact and secure
Perimeter bumpers are intact
Backrest operates
Extension lift handles operate
Siderails operate and latch
Knee gatch/Trendelenburg operates
1-34 6100-109-005 REV B www.stryker.com
Page 41

Preventive maintenance
Regular inspection and adjustments (Continued)
Item Inspect
Litter retention pins are secure and not bent or broken
Base All welds are intact, not cracked, or broken
Wheels Rubber is in good condition
Check and adjust wheel locks
Check and adjust caster Steer-Lock system
Accessories (optional)
Straps and clips on the oxygen bottle holder for wear
English
EN
www.stryker.com 6100-109-005 REV B 1-35
Page 42

sample text
Page 43

Systém Roll-In M-1®
6100
Příručka pro obsluhu
2018/08 B.2 6100-109-005 REV B www.stryker.com
Page 44

sample text
Page 45

Symboly
Prostudujte si příručku/brožuru s pokyny
Provozní příručka / Přečtěte si návod k použití
Obecná varování
Upozornění
Katalogové číslo
Sériové číslo
Číslo šarže
Patenty USA viz www.stryker.com/patents
Značka CE
Zástupce pro ES
Výrobce
Datum výroby
Česky
CS
Bezpečná pracovní zátěž
Příložná část typu BF
www.stryker.com 6100-109-005 REV B
Page 46

sample text
Page 47

Obsah
Definice varování/upozornění/poznámka..................................................................................................... 2-3
Přehled bezpečnostních opatření .............................................................................................................. 2-4
Úvod.................................................................................................................................................... 2-6
Popis výrobku.................................................................................................................................. 2-6
Indikace k použití ............................................................................................................................. 2-6
Očekávaná životnost......................................................................................................................... 2-7
Kontraindikace................................................................................................................................. 2-7
Technické parametry ........................................................................................................................ 2-7
Obrázek výrobku.............................................................................................................................. 2-8
Kontaktní informace..........................................................................................................................2-9
Umístění sériového čísla.................................................................................................................. 2-10
Datum výroby ................................................................................................................................ 2-10
Příprava ............................................................................................................................................. 2-11
Instalace ............................................................................................................................................ 2-12
Montáž systému pro připevnění lehátka .............................................................................................. 2-12
Provoz ............................................................................................................................................... 2-14
Návod k obsluze............................................................................................................................. 2-14
Správné postupy zvedání ................................................................................................................. 2-14
Přemístění pacienta na lehátko......................................................................................................... 2-15
Jízda lehátka s pacientem................................................................................................................ 2-15
Změna výšky lehátka....................................................................................................................... 2-15
Naložení lehátka do vozidla.............................................................................................................. 2-16
Vyložení lehátka z vozidla ................................................................................................................ 2-17
Umístění pracovníků obsluhy a pomocného personálu ........................................................................... 2-17
Zvednutí nebo snížení zádové části.................................................................................................... 2-18
Zvednutí nebo spuštění postranic ...................................................................................................... 2-18
Zvýšení nebo snížení opěrky nohou.................................................................................................... 2-18
Zvýšení nebo snížení volitelné podkolenní části.................................................................................... 2-19
Zabrzdění nebo odbrzdění koleček .................................................................................................... 2-19
Aktivace nebo uvolnění zámku řízení koleček....................................................................................... 2-20
Připojení nosítek k podvozku ............................................................................................................ 2-20
Sejmutí nosítek z podvozku .............................................................................................................. 2-21
Změna výšky lehátka s volitelnými zatahovacími zvedacími rukojeťmi na horním konci ................................. 2-22
Vytažení a zatažení zatahovacích zvedacích rukojetí............................................................................. 2-23
Zajištění pacienta s popruhy zádržného systému................................................................................... 2-23
Úprava upínacích pásů.................................................................................................................... 2-24
Přidání prodlužovacího upínacího pásu............................................................................................... 2-25
Upevnění pacienta dětským zádržným systémem Pedi-Mate®................................................................. 2-25
Montáž desky pro defibrilátor............................................................................................................ 2-26
Montáž podhlavníku s polštářem ....................................................................................................... 2-28
Umístění volitelného trojdílného infuzního stojanu ................................................................................. 2-28
Připevnění kyslíkové láhve k držáku kyslíkové láhve .............................................................................. 2-29
Doplňky.............................................................................................................................................. 2-30
Česky
CS
www.stryker.com 6100-109-005 REV B 2-1
Page 48

Česky
CS
Obsah
Čištění ............................................................................................................................................... 2-31
Dezinfekce ......................................................................................................................................... 2-32
Preventivní údržba................................................................................................................................ 2-33
Pravidelná prohlídka a seřízení ......................................................................................................... 2-33
2-2 6100-109-005 REV B www.stryker.com
Page 49

Definice varování/upozornění/poznámka
Text uvedený slovy VAROVÁNÍ, UPOZORNĚNÍ a POZNÁMKA má důležitý význam a je nutno si jej pečlivě přečíst.
VAROVÁNÍ
Upozorňuje čtenáře na situaci, jež by mohla vést k úmrtí nebo vážnému poranění, pokud se jí nevyvarujete. Může také
popisovat možné vážné nežádoucí reakce a bezpečnostní rizika.
UPOZORNĚNÍ
Upozorňuje čtenáře na možnou nebezpečnou situaci, jež by mohla mít za následek menší nebo středně vážné poranění
uživatele nebo pacienta, nebo poškození výrobku či jiného majetku, pokud se jí nevyvarujete. To zahrnuje zvláštní péči
nezbytnou pro bezpečné a efektivní používání prostředku a péči nutnou k tomu, aby nedošlo k poškození prostředku,
které by mohlo nastat v důsledku jeho používání nebo nesprávného používání.
Poznámka: Poskytuje speciální informace pro usnadnění údržby nebo objasnění důležitých pokynů.
Česky
CS
www.stryker.com 6100-109-005 REV B 2-3
Page 50

Česky
CS
Přehled bezpečnostních opatření
Pečlivě si přečtěte a vždy přísně dodržujte varování a upozornění uvedená na této stránce. Servis smí provádět pouze
kvalifikovaný personál.
VAROVÁNÍ
• Systém pro připevnění lehátka se musí v případě nehody vyměnit, aby se zamezilo riziku zranění v důsledku
poškození výrobku.
• Vždy se ujistěte, že všechna lehátka odpovídají instalačním parametrům pro připevňovací systém značky Stryker.
• Nesprávné používání výrobku může způsobit poranění pacienta nebo obsluhy. Výrobek používejte pouze tak, jak
popisuje tato příručka.
• Nedovolte, aby u provozování výrobku asistovaly nevyškolené osoby.
• Úchopy je nutno vždy správně uchopit. Při nakládání, vykládání nebo změnách výšky lehátka mějte ruce vždy mimo
červené čepy bezpečnostní tyče.
• Nepokoušejte se jezdit na podvozku lehátka.
• Nepohybujte lehátkem do strany, aby se nepřevrhlo. Lehátko vždy přepravujte ve snížené poloze horním nebo
dolním koncem dopředu, aby se minimalizovalo riziko převrácení.
• Vždy mějte ruce, prsty a nohy mimo kontakt s pohyblivými částmi. Pokud máte ruce a nohy v blízkosti trubek
podvozku při zvedání a spouštění lehátka, buďte opatrní.
• Pacienta nenechávejte bez dozoru. Pokud je pacient na výrobku, pevně výrobek držte.
• Pokud je pacient na výrobku nebo výrobek přemisťujete, neaktivujte brzdu koleček, aby nedošlo k jeho převrácení.
• Nepoužívejte postranice jako prostředek pro zajištění pacienta.
• Lehátko vždy přemísťujte ve snížené poloze, aby se omezilo riziko převrácení. Pokud je to možné, vyžádejte si
pomoc dalších osob nebo zvolte alternativní trasu.
• Vždy se vyhněte vysokým překážkám, jako jsou obrubníky, schody nebo nerovný terén, aby nedošlo k převrácení.
• Když lehátko nakládáte do vozidla nebo nakládacího systému nebo když ho z nich vykládáte, musí být knoflík
zámku řízení a kolečka uzamknuty, aby nedošlo k převrácení výrobku.
• Když měníte výšku lehátka, musí být knoflík zámku řízení a kolečka uzamknuty, aby nedošlo k převrácení výrobku.
• Než zvednete nakládací kolečka z podlahy prostoru pro pacienta nebo nakládacího systému ve vozidle, vždy
zajistěte podvozek. Nezajištěný podvozek nebude lehátko podepírat a hrozí poranění pacienta nebo pracovníka
obsluhy.
• Vyzkoušejte si změny výšky a nakládání lehátka, abyste plně porozuměli obsluze výrobku.
• Jakmile je naložené lehátko nadzvednuté nad podlahu, vždy podpírejte celou váhu pacienta, lehátka a příslušenství.
• Nemontujte a nepoužívejte brzdu koleček na výrobku s opotřebenými kolečky, která měří v průměru méně než 15,2
cm.
• K zajištění pacienta na lehátku vždy používejte všechny upínací pásy. Nezajištěný pacient může z lehátka spadnout.
• Upínací pásy nepřipevňujte k trubkám podvozku ani k příčným trubkám.
• Přezku vždy umístěte dostatečně daleko od překážek nebo příslušenství na lehátku, aby se zabránilo riziku
náhodného odjištění dětského zádržného systému Pedi-Mate® a zranění dítěte.
• Při tlakovém mytí vždy používejte jakékoli vhodné osobní ochranné pomůcky, aby se zabránilo vdechování nákazy.
Vybavení pro tlakové mytí může vytvářet kontaminovaný aerosol.
UPOZORNĚNÍ
• Nesprávné používání výrobku může způsobit poranění pacienta nebo operátora. Výrobek používejte pouze tak, jak
popisuje tato příručka.
• Výrobek ani žádné jeho součásti neupravujte. Úpravy výrobku mohou způsobit nepředvídatelný provoz a způsobit
poranění pacienta nebo operátora. Úprava výrobku také zruší jeho záruku.
2-4 6100-109-005 REV B www.stryker.com
Page 51

Přehled bezpečnostních opatření
UPOZORNĚNÍ (POKR.)
• Aby systém pro připevnění lehátka této normě vyhovoval, musí jej instalovat pouze kvalifikovaný personál. Pod
montážním povrchem (podlahou sanitky nebo nakládacím systémem) musí být ve všech montážních bodech 0,635
cm ocelové podložné desky (nebo jejich ekvivalent).
• Při obsluze výrobku vždy odstraňte jakékoli překážky, které by se vám mohly dostat do cesty a způsobit poranění
obsluhy nebo pacienta.
• Nepokoušejte se výrobek tlačit do strany po aktivaci zámku řízení.
• Při zvedání nebo pokládání lehátka dejte pozor, aby se upínací pásy nezapletly do rámu podvozku.
• Při použití desky pro defibrilátor tuto vždy řádně upevněte k výrobku.
• K zajištění defibrilátoru vždy použijte popruhy, které jsou příslušenstvím desky pro defibrilátor, a správně je nastavte.
• Místo upevnění nebo délku popruhů vždy upravte podle konkrétní velikosti nebo tvaru defibrilátoru.
• Desku pro defibrilátor nezatěžujte nad limit jejího bezpečného pracovního zatížení (13,6 kg).
• Držák kyslíkové láhve nezatěžujte nad limit jeho bezpečného pracovního zatížení (6,8 kg).
• Nepoužívejte dva držáky kyslíkové láhve současně.
• Výrobek nečistěte parou ani ultrazvukem.
• Dbejte, aby maximální teplota vody nepřekročila 180 °F (82 °C).
• Dbejte, aby tlak vody nepřekročil 1500 psi (130,5 bar). Pokud k čištění výrobku používáte ruční mycí jednotku, držte
tlakovou trysku v minimální vzdálenosti 24 palců (61 cm) od výrobku.
• Vždy nechte uschnout na vzduchu.
• Pokud se výrobek používá, neprovádějte čištění, servis ani údržbu.
• Po čištění výrobek vždy otřete utěrkou navlhčenou čistou vodou a osušte. Některé čisticí prostředky jsou svým
charakterem žíraviny a mohou způsobit poškození výrobku. Pokud výrobek řádně neopláchnete a neosušíte, na
jeho povrchu se mohou usadit korozivní zbytky, které mohou způsobit předčasnou korozi důležitých součástí.
• Vždy používejte schválené díly, abyste předešli riziku poškození výrobku.
Česky
CS
www.stryker.com 6100-109-005 REV B 2-5
Page 52

Česky
CS
Úvod
Tato příručka vám pomáhá s provozem a údržbou vašeho výrobku Stryker. Tuto příručku si přečtěte dříve, než budete
pracovat s tímto výrobkem nebo provádět jeho údržbu. Zaveďte metody a postupy výuky a školení zaměstnanců v
oblasti bezpečného provozu a údržby tohoto výrobku.
UPOZORNĚNÍ
• Nesprávné používání výrobku může způsobit poranění pacienta nebo operátora. Výrobek používejte pouze tak, jak
popisuje tato příručka.
• Výrobek ani žádné jeho součásti neupravujte. Úpravy výrobku mohou způsobit nepředvídatelný provoz a způsobit
poranění pacienta nebo operátora. Úprava výrobku také zruší jeho záruku.
Poznámky
• Tuto příručku je třeba považovat za trvalou součást výrobku a musí zůstat s výrobkem i v případě, že dojde k jeho
prodeji.
• Společnost Stryker trvale usiluje o zlepšení konstrukce a kvality výrobku. Tato příručka obsahuje aktuální informace
o výrobku dostupné v době tisku. Mezi vaším výrobkem a touto příručkou mohou být malé rozdíly. V případě
jakýchkoli dotazů kontaktujte prosím zákaznický servis nebo technickou podporu společnosti Stryker na čísle +1800-327-0770.
Popis výrobku
Stryker Model 6100 M-1® Roll-In System je ručně ovládané lehátko pro sanitky. Ložná plocha na podvozku opatřeném
kolečky má maximální nosnost 227 kg. Výrobek je určen k použití v prostředí přednemocniční a nemocniční péče.
Výrobek je skládací pro účely použití v pohotovostních vozidlech. Snímatelná ložná plocha (nosítka) a patentovaný
systém Steer-Lock System™ zlepšují manévrovatelnost. Funkce výrobku, které pomáhají při přepravě pacientů:
• Zvedací rukojeti ve čtyřech rozích
• Upínací pásy pro pacienta
• Upravitelná opěrka zad s hydraulikou
• Volitelné doplňky
Pro maximální pohodlí pacienta můžete zvolit jednu ze tří poloh nosítek:
• Šok
• Nochy naplocho
• Volitelná podkolenní část
Indikace k použití
Stryker Model 6100 M-1® Roll-In System je lehátko s kolečky bez elektrického pohonu. Výrobek je určen pro uložení a
přepravu těla zraněného, ambulantního nebo neambulantního pacienta (dětí i dospělých). V pohotovostních nebo
transportních vozidlech výrobek:
• Poskytuje pacientovi podporu vleže nebo v sedě
• Umožňuje přepravu souvisejících zdravotnických prostředků (kyslíkových láhví nebo IV sáčků)
Výrobek je určen k použití v prostředí přednemocniční a nemocniční péče. Lze jej použít v pohotovostních situacích i
mimo ně. Maximální zatížení je 227 kg, což zahrnuje váhu pacienta, matrace a příslušenství. Výrobek mohou obsluhovat:
• Vyškolení pracovníci
• Pracovníci pohotovostní služby
• Pracovníci zdravotnických center
• Zdravotničtí záchranáři
Lehátka pro sanitky jsou určena pro účely přepravy. Nejsou určena pro delší pobyt nebo použití jako nemocniční lůžka.
Nejsou také určena k použití v zařízeních modifikujících tlak vzduchu, jako jsou hyperbarické komory.
2-6 6100-109-005 REV B www.stryker.com
Page 53

Úvod
Očekávaná životnost
Stryker Model 6100 M-1 Roll-In System má očekávanou životnost pět let při normálních podmínkách používání a řádné
pravidelné údržbě.
Kontraindikace
Nejsou známy.
Technické parametry
Podvozku lehátka Stryker Model 6100 M-1 Roll-In System, (6100-003-000), podkolenní části nosítek (6100-031-000) a
ploché části nosítek pro nohy (6100-033-000).
Česky
CS
Bezpečná pracovní zátěž
Poznámka: Bezpečná pracovní
zátěž uvádí souhrn hmotnosti
pacienta, matrace a doplňků.
Nastavení opěrky zad / šoková poloha (6100-031-000
a 6100-033-000)
Délka/šířka (6100-003-000)
Délka/šířka (6100-031-000)
Délka/šířka (6100-033-000)
1
Výška
(6100-
003-000)
1
Výška
(6100-031-000 a 6100-033-000)
Hmotnost
Hmotnost
Hmotnost
2
(6100-003-000) 77,7 libry 35,2 kg
2
(6100-031-000) 44,6 libry 20,2 kg
2
(6100-033-000) 40,2 libry 19,0 kg
Pozice 1 14,4 palce 36,6 cm
Pozice 2 24,4 palce 62,0 cm
Pozice 3
Pozice 4 34,6 palce 87,9 cm
Pozice 5 37,6 palce 95,5 cm
Pozice 6 39,3 palce 99,8 cm
Pozice 7
Pozice 8 Nevztahuje se Nevztahuje se
500 liber 227 kg
0° až 75°
77 palců / 21 palců
74,5 palce / 22,1 palce 189,2 cm / 56,1 cm
74,8 palce / 22,1 palce 189,9 cm / 56,1 cm
30,0 palců
13,0 palců
7,3 palce 18,5 cm
195,6 cm / 53,3 cm
76,2 cm
33,0 cm
Maximální nosnost (6100-031-000 a 6100-033-000)
Průměr/šířka kolečka (6100-031-000 a 6100-033-000)
Nástavec rukojeti (6100-031-000 a 6100-033-000)
Průměr/šířka kolečka (6100-003-000) 6 palců / 2 palce
www.stryker.com 6100-109-005 REV B 2-7
500 liber 227 kg
4,0 palce / 0,8 palce 10,2 cm / 2,0 cm
7,75 palce 19,7 cm
15,2 cm / 5,1 cm
Page 54

Technické parametry (Pokr.)
A
B
C
D
E
F
G
H
I
K
L
M
N
P
J
N
M
G
F
F
Úvod
Česky
CS
Šoková poloha (6100-031-000)
Poloha podkolenní části (6100-031-000)
Minimální počet pracovníků obsluhy potřebných k
naložení/vyložení
Doporučené připevňovací systémy Model 638 1, připevnění na podlahu – montáž doprostřed,
Doporučená výška podlahy / nakládací desky
1
Výška se měří od dolní hrany matrace v sedací části po úroveň země.
2
Standardní podvozek se váží bez volitelných doplňků.
Společnost Stryker si vyhrazuje právo změnit technické parametry bez předchozího upozornění.
Žlutočerné barevné schéma je ochranná známka společnosti Stryker Corporation.
+17°
30°
1
rovné vodítko
Model 6373, připevnění na nakládací desku – montáž
doprostřed, vodítko podle normy DIN
Model 6376, připevnění na podlahu – montáž doprostřed,
rovné vodítko, bez postranních zádržných prvků
27 až 31 palců
68,6 až 78,7 cm
Obrázek výrobku
2-8 6100-109-005 REV B www.stryker.com
Page 55

Obrázek výrobku (Pokr.)
R
T
U
V
W
X
Y
Z
R
R
V
W
Y
AA
AB
Úvod
Česky
CS
Rám podvozku
A
B Umístění knoflíku zámku řízení koleček P
C Dolní konec R
Odjišťovací rukojeť na dolním konci (zelená)
D
Odjišťovací rukojeť na dolním konci (červená)
E
F Úchopy pro ruce V Kolečko
G Horní konec W
Odjišťovací rukojeť na horním konci (červená)
H
Knoflík pro odjištění nosítek (modrý)
I
Zajišťovací západky nosítek
J
K Nakládací kolečko AA
Tlačítko pro odjištění (zelené)
L
Zatahovací rukojeť pro zvednutí podvozku
M
(volitelná)
N
T
U
X Rám nosítek
Y
Z
AB
Přepravní kolečka
Zámky kol
Zatahovatelné rukojeti pro zvednutí nosítek
Páky pro uvolnění podkolenní části
Rukojeť pro zvednutí podkolenní části
Volitelný přídržný čep podle normy DIN
Rukojeť pro odjištění postranice
Obvodový nárazník
Opěrka zad
Rukojeť pro odjištění opěrky zad
Kontaktní informace
Kontaktujte zákaznický servis Stryker nebo technickou podporu na čísle: +1-800-327-0770.
Stryker Medical
3800 E. Centre Avenue
Portage, MI 49002
USA
Příručka k provozu a údržbě je k dispozici online na adrese https://techweb.stryker.com/.
Při volání zákaznickému servisu nebo technické podpoře společnosti Stryker si připravte sériové číslo (A) vašeho
výrobku Stryker. Sériové číslo uveďte ve veškeré písemné komunikaci.
www.stryker.com 6100-109-005 REV B 2-9
Page 56

Česky
A
CS
Úvod
Umístění sériového čísla
Obrázek 2-1: Umístění sériového čísla
Datum výroby
První 2 číslice sériového čísla označují rok výroby.
2-10 6100-109-005 REV B www.stryker.com
Page 57

Příprava
UPOZORNĚNÍ
• Nesprávné používání výrobku může způsobit poranění pacienta nebo obsluhy. Výrobek používejte pouze tak, jak
popisuje tato příručka.
• Výrobek ani žádné jeho součásti neupravujte. Úpravy výrobku mohou způsobit nepředvídatelný provoz a způsobit
poranění pacienta nebo obsluhy. Úprava výrobku má také za následek zánik platnosti záruky.
Před použitím výrobku odstraňte všechny přepravní a balicí materiály.
Rozbalte krabice a zkontrolujte, zda všechny položky správně fungují. Před uvedením výrobku do provozu zkontrolujte,
zda správně funguje.
Prostor pro pacienta ve vozidle, kde se bude výrobek používat, musí mít tyto vlastnosti:
• Hladký zadní okraj pro nakládání výrobku.
• Dostatečně velká rovná podlaha pro složený výrobek a systém pro připevňování lehátka.
• Systém pro připevňování lehátka Stryker, modely 6373, 6376 nebo 6381 (nejsou součástí dodávky)
• Výška podlahy nebo nakládacího systému mezi 68,6 cm a 78,7 cm.
Poznámka: Z podlahy prostoru pro pacienta ve vozidle vždy odstraňte volné předměty a nečistoty. Volné předměty nebo
nečistoty na podlaze prostoru pro pacienta mohou narušit hladkou jízdu lehátka a funkci připevňovacího systému.
Česky
CS
Pokud to bude třeba, upravte vozidlo tak, aby bylo pro lehátko vhodné. Lehátko neupravujte.
Tuto příručku je třeba považovat za trvalou součást výrobku a musí zůstat s výrobkem i v případě, že později dojde k
jeho prodeji.
Společnost Stryker trvale usiluje o zlepšení konstrukce a kvality výrobku. Proto i když tato příručka obsahuje nejnovější
informace o výrobku dostupné v době tisku, mohou existovat drobné rozdíly mezi vaším výrobkem a touto příručkou. V
případě jakýchkoli dotazů kontaktujte prosím zákaznický servis nebo technickou podporu společnosti Stryker na čísle 1800-327-0770.
www.stryker.com 6100-109-005 REV B 2-11
Page 58

Česky
CS
Instalace
Montáž systému pro připevnění lehátka
Systémy pro připevňování lehátek značky Stryker, modely 6373, 6376 a 6381, jsou kompatibilní pouze s lehátky, která
odpovídají příslušným instalačním parametrům. Těmto parametrům odpovídají následující lehátka:
• Stryker Model 6100 M-1 Roll-In System
• Ferno-Washington, model X-2
VAROVÁNÍ
• Systém pro připevnění lehátka se musí v případě nehody vyměnit, aby se zamezilo riziku zranění v důsledku
poškození výrobku.
• Vždy se ujistěte, že všechna lehátka odpovídají instalačním parametrům pro připevňovací systém značky Stryker.
UPOZORNĚNÍ
Aby systém pro připevnění lehátka této normě vyhovoval, musí jej instalovat pouze kvalifikovaný personál. Pod
montážním povrchem (podlahou sanitky nebo nakládacím systémem) musí být ve všech montážních bodech 0,635 cm
ocelové podložné desky (nebo jejich ekvivalent).
Další informace o připevnovacích systémech lehátek Stryker viz příslušné návody k obsluze a údržbě jednotlivých
systémů.
1
1
Rok výroby modelu 2000 nebo dřívější. Společnost Stryker neodpovídá za změny ve specifikacích lehátek jiných
výrobců.
Obrázek 2-2: Model 6376: Pohled 2A
2-12 6100-109-005 REV B www.stryker.com
Page 59

Instalace
Montáž systému pro připevnění lehátka (Pokr.)
Obrázek 2-3: Model 6376: Pohled 2B
Česky
CS
Obrázek 2-4: Model 6373: Pohled 2C
Obrázek 2-5: Model 6373: Pohled 2D
www.stryker.com 6100-109-005 REV B 2-13
Page 60

Česky
CS
Provoz
Návod k obsluze
VAROVÁNÍ
• Nesprávné používání výrobku může způsobit poranění pacienta nebo obsluhy. Výrobek používejte pouze tak, jak
popisuje tato příručka.
• Nedovolte, aby u provozování výrobku asistovaly nevyškolené osoby.
• Úchopy je nutno vždy správně uchopit. Při nakládání, vykládání nebo změnách výšky lehátka mějte ruce vždy mimo
červené čepy bezpečnostní tyče.
• Nepokoušejte se jezdit na podvozku lehátka.
• Nepohybujte lehátkem do strany, aby se nepřevrhlo. Lehátko vždy přepravujte ve snížené poloze horním nebo
dolním koncem dopředu, aby se minimalizovalo riziko převrácení.
• Vždy mějte ruce, prsty a nohy mimo kontakt s pohyblivými částmi. Pokud máte ruce a nohy v blízkosti trubek
podvozku při zvedání a spouštění lehátka, buďte opatrní.
UPOZORNĚNÍ
Při obsluze výrobku vždy odstraňte jakékoli překážky, které by se vám mohly dostat do cesty a způsobit poranění
obsluhy nebo pacienta.
• Výrobek používejte pouze tak, jak popisuje tato příručka.
• Před zahájením používání výrobku si přečtěte všechny štítky a pokyny.
• Vyzkoušejte si změny výšky a nakládání lehátka, abyste plně porozuměli obsluze výrobku.
• Lehátko s pacientem musí vždy nakládat nebo vykládat minimálně dva vyškolení pracovníci obsluhy. Když je na
lehátku pacient, musí být přítomni dva pracovníci obsluhy. Společnost Stryker doporučuje, aby oba pracovníci
obsluhy stáli na dolním konci, aby se snížila zátěž na jednu osobu obsluhy. Jeden nebo dva pracovníci obsluhy
mohou zvedat lehátko za dolní konec.
• Lehátko neupravujte, neotáčejte ani nenakládejte do vozidla, aniž byste pacienta upozornili. Po celou dobu zůstaňte
u pacienta a mějte výrobek pod kontrolou.
• Lehátko lze přepravovat v libovolné poloze. Společnost Stryker doporučuje, aby pracovníci obsluhy pacienta
přepravovali v nejnižší poloze pohodlné pro ovládání lehátka.
• Brzdu koleček používejte pouze během přepravy pacienta nebo při převážení výrobku bez pacienta.
• Když je na výrobku pacient nebo když výrobek přemísťujete, neaktivujte brzdu koleček, aby nedošlo k jeho
převrácení.
• K zajištění pacienta na výrobku vždy používejte všechny upínací pásy. Nezajištěný pacient může z výrobku
spadnout.
• V případě potřeby použijte k ovládání lehátka řádně vyškolené pomocníky.
Správné postupy zvedání
Při zvedání výrobku s pacientem dodržujte níže popsané postupy správného zvedání, aby nedošlo ke zranění:
• Držte ruce blízko u těla
• Mějte záda neustále rovná
• Veškerý pohyb koordinujte s partnerem
• Váhu zvedejte nohama
• Nerotujte trupem
2-14 6100-109-005 REV B www.stryker.com
Page 61

Provoz
Přemístění pacienta na lehátko
VAROVÁNÍ
• K zajištění pacienta na výrobku vždy používejte všechny upínací pásy. Nezajištěný pacient může z výrobku
spadnout a zranit se.
• Pacienta nenechávejte bez dozoru. Pokud je pacient na výrobku, pevně výrobek držte.
• Pokud je pacient na výrobku nebo výrobek přemisťujete, neaktivujte brzdu koleček, aby nedošlo k jeho převrácení.
• Nepoužívejte postranice jako prostředek pro zajištění pacienta.
Přemístění pacienta na výrobek:
1. Přivezte výrobek k pacientovi (Jízda lehátka s pacientem straně 2-15).
2. Umístěte výrobek vedle pacienta a zvedněte ho nebo spusťte na úroveň pacienta.
3. Snižte postranice a otevřete upínací pásy.
4. Přemístěte pacienta na výrobek. Postupujte podle zavedených postupů EMS.
5. Zajistěte pacienta na výrobku všemi upínacími pásy.
6. Zvedněte postranice a podle potřeby upravte opěrku zad a nohou.
Poznámka: K přemístění těžších pacientů používejte přepravní podložku (6005-001-001).
Česky
CS
Jízda lehátka s pacientem
VAROVÁNÍ
• Lehátko vždy přemísťujte ve snížené poloze, aby se omezilo riziko převrácení. Pokud je to možné, vyžádejte si
pomoc dalších osob nebo zvolte alternativní trasu.
• Vždy se vyhněte vysokým překážkám, jako jsou obrubníky, schody nebo nerovný terén, aby nedošlo k převrácení.
Jak přemísťovat lehátko s pacientem:
1. Jeden pracovník obsluhy se postaví k dolnímu konci a druhý k hornímu konci lehátka.
2. K prahu dveří nebo jiným nízkým překážkám vždy najíždějte kolmo.
3. Přes práh nebo jinou překážku přeneste každý pár koleček zvlášť.
Změna výšky lehátka
VAROVÁNÍ
• Když lehátko nakládáte do vozidla nebo nakládacího systému nebo když ho z nich vykládáte, musí být knoflík
zámku řízení a kolečka uzamknuty, aby nedošlo k převrácení výrobku.
• Když měníte výšku lehátka, musí být knoflík zámku řízení a kolečka uzamknuty, aby nedošlo k převrácení výrobku.
• Než zvednete nakládací kolečka z podlahy prostoru pro pacienta nebo nakládacího systému ve vozidle, vždy
zajistěte podvozek. Nezajištěný podvozek nebude lehátko podepírat a hrozí poranění pacienta nebo pracovníka
obsluhy.
• Vyzkoušejte si změny výšky a nakládání lehátka, abyste plně porozuměli obsluze výrobku.
• Vždy mějte ruce, prsty a nohy mimo kontakt s pohyblivými částmi. Pokud máte ruce a nohy v blízkosti trubek
podvozku při zvedání a spouštění lehátka, buďte opatrní.
www.stryker.com 6100-109-005 REV B 2-15
Page 62

Česky
CS
Provoz
Změna výšky lehátka (Pokr.)
Poznámky
• Oba pracovníci obsluhy spolu musí dobře komunikovat, aby zamýšlený postup vedl k úspěchu.
• Jeden pracovník obsluhy může sám lehátko snížit postupným uvolněním obou konců lehátka.
Vždy si vyžádejte asistenci, pokud je to nutné. Pro tento úkol je potřeba alespoň jedna vyškolená osoba. Musíte být
schopni zvednout celkovou hmotnost pacienta, lehátka a všech předmětů na lehátku. Čím výše musíte lehátko zvednout,
tím může být náročnější zátěž udržet. Při nakládání lehátka do vozidla můžete potřebovat pomoc, pokud jste menší
postavy nebo pokud je pacient na bezpečné zvednutí příliš těžký.
Viz Umístění pracovníků obsluhy a pomocného personálu straně 2-17.
Postup změny výšky lehátka:
1. Jeden pracovník obsluhy se postaví k dolnímu konci a druhý k hornímu konci lehátka.
2. Uchopte úchopy na podvozku.
3. Zvedejte lehátko, dokud zcela neodlehčíte západkový mechanismus (přibližně 0,635 cm).
4. Stiskněte a přidržte červenou odjišťovací rukojeť a zvedněte nebo snižte lehátko na požadovanou úroveň.
5. Uvolněte stisk na odjišťovací rukojeti, a tak zastavte lehátko v nejbližší dostupné poloze.
Naložení lehátka do vozidla
VAROVÁNÍ
• Když lehátko nakládáte do vozidla nebo nakládacího systému nebo když ho z nich vykládáte, musí být knoflík
zámku řízení a kolečka uzamknuty, aby nedošlo k převrácení výrobku.
• Když měníte výšku lehátka, musí být knoflík zámku řízení a kolečka uzamknuty, aby nedošlo k převrácení výrobku.
• Vždy mějte ruce, prsty a nohy mimo kontakt s pohyblivými částmi. Pokud máte ruce a nohy v blízkosti trubek
podvozku při zvedání a spouštění lehátka, buďte opatrní.
• Jakmile je naložené lehátko nadzvednuté nad podlahu, vždy podpírejte celou váhu pacienta, lehátka a příslušenství.
Poznámka: Z podlahy prostoru pro pacienta ve vozidle vždy odstraňte volné předměty a nečistoty. Volné předměty nebo
nečistoty na podlaze prostoru pro pacienta mohou narušit hladkou jízdu lehátka a funkci připevňovacího systému.
Vždy si vyžádejte asistenci, pokud je to nutné. Pro tento úkol je potřeba alespoň jedna vyškolená osoba. Musíte být
schopni zvednout celkovou hmotnost pacienta, lehátka a všech předmětů na lehátku. Čím výše musíte lehátko zvednout,
tím může být náročnější zátěž udržet. Při vykládání lehátka můžete potřebovat pomoc, pokud jste menší postavy nebo
pokud je pacient na bezpečné zvednutí příliš těžký.
Viz Umístění pracovníků obsluhy a pomocného personálu straně 2-17.
Postup naložení lehátka do vozidla:
1. Lehátko umístěte do nakládací polohy. Zajistěte, aby nakládací kolečka byla na úrovni podlahy vozidla.
2. Pokud je vozidlo vybaveno zvedacím nárazníkem, zvedněte jej.
3. S lehátkem zajeďte k otevřeným dveřím prostoru pro pacienta nebo k nakládacímu systému.
4. Zatlačte lehátko dopředu, až jeho nakládací kolečka spočinou na podlaze prostoru pro pacienta nebo na
nakládacím systému.
5. Veďte lehátko vpřed, až se přední kolečka dotknou zadní části vozidla nebo nakládacího systému.
6. Stiskněte a podržte zelený odjišťovací knoflík a zároveň zmáčkněte a podržte zelenou odjišťovací rukojeť na
dolním konci lehátka.
7. Veďte lehátko vpřed, až se zadní kolečka dotknou zadní části vozidla nebo nakládacího systému. Přední nohy se
složí.
8. Přestaňte držet zelenou odjišťovací rukojeť a zelený odjišťovací knoflík.
2-16 6100-109-005 REV B www.stryker.com
Page 63

Provoz
Naložení lehátka do vozidla (Pokr.)
9. Zvednutím lehátka na dolním konci zcela odlehčete podvozek lehátka.
10. Stiskněte a přidržte červenou odjišťovací rukojeť a zasuňte lehátko do vozidla nebo do nakládacího systému. Zadní
nohy se složí.
11. Ujistěte se, že je lehátko upevněno v připevňovacím systému.
Vyložení lehátka z vozidla
VAROVÁNÍ
• Když lehátko nakládáte do vozidla nebo nakládacího systému nebo když ho z nich vykládáte, musí být knoflík
zámku řízení a kolečka uzamknuty, aby nedošlo k převrácení výrobku.
• Když měníte výšku lehátka, musí být knoflík zámku řízení a kolečka uzamknuty, aby nedošlo k převrácení výrobku.
• Než zvednete nakládací kolečka z podlahy prostoru pro pacienta nebo nakládacího systému ve vozidle, vždy
zajistěte podvozek. Nezajištěný podvozek nebude lehátko podepírat a hrozí poranění pacienta nebo pracovníka
obsluhy.
• Vždy mějte ruce, prsty a nohy mimo kontakt s pohyblivými částmi. Pokud máte ruce a nohy v blízkosti trubek
podvozku při zvedání a spouštění lehátka, buďte opatrní.
• Jakmile je naložené lehátko nadzvednuté nad podlahu, vždy podpírejte celou váhu pacienta, lehátka a příslušenství.
Česky
CS
Vždy si vyžádejte asistenci, pokud je to nutné. Pro tento úkol je potřeba alespoň jedna vyškolená osoba. Musíte být
schopni zvednout celkovou hmotnost pacienta, lehátka a všech předmětů na lehátku. Čím výše musíte lehátko zvednout,
tím může být náročnější zátěž udržet. Při nakládání lehátka do vozidla můžete potřebovat pomoc, pokud jste menší
postavy nebo pokud je pacient na bezpečné zvednutí příliš těžký.
Viz Umístění pracovníků obsluhy a pomocného personálu straně 2-17.
Postup vyložení lehátka z vozidla:
1. Pokud je vozidlo vybaveno zvedacím nárazníkem, zvedněte jej.
2. Uvolněte lehátko z připevňovacího systému.
3. Uchopte rukojeti na dolním konci lehátka a zároveň stiskněte a podržte červenou odjišťovací rukojeť.
4. Vytahujte lehátko z vozidla nebo nakládacího systému, až se zadní nohy lehátka plně roztáhnou dolů.
5. Jakmile jsou nohy zcela vysunuté, červenou odjišťovací rukojeť uvolněte.
6. Ověřte, že jsou zadní nohy bezpečně zajištěné.
7. Vytahujte lehátko z vozidla nebo nakládacího systému pozpátku, až se přední nohy lehátka plně roztáhnou dolů.
8. Ověřte, že jsou přední nohy zajištěné. V případě potřeby lehátko mírně nazvedněte, aby se nohy mohly plně
roztáhnout a zajistit.
9. Nakládací kolečka zvedněte z podlahy prostoru pro pacienta ve vozidle.
10. Odjeďte lehátkem od vozidla.
Umístění pracovníků obsluhy a pomocného personálu
VAROVÁNÍ
Při nakládání, vykládání nebo změnách výšky lehátka mějte ruce vždy mimo červené čepy bezpečnostní tyče.
www.stryker.com 6100-109-005 REV B 2-17
Page 64

Česky
CS
Provoz
Umístění pracovníků obsluhy a pomocného personálu (Pokr.)
Změna úrovní Jízda Nakládání a vykládání
Dva pracovníci obsluhy (O)
Dva pomocníci (H)
Dva pracovníci obsluhy (O)
Čtyři pomocníci (H)
Zvednutí nebo snížení zádové části
Chcete-li zvednout zádovou část, stiskněte rukojeť pro nastavení zádové části a nastavte zádovou část do požadované
výšky.
Chcete-li zádovou část sklopit níže, stiskněte rukojeť pro nastavení zádové části a stlačte zádovou část do požadované
výšky.
Zvednutí nebo spuštění postranic
Při přemísťování pacienta na lehátko nebo z něho musí být postranice vždy spuštěné dolů.
VAROVÁNÍ
Nepoužívejte postranice jako prostředek pro zajištění pacienta.
Chcete-li postranice zvednout, nadzvedněte je, aby zaklapla západka a postranice se zaklesla do požadované polohy.
Pokud pacienta nepřemísťujete na lehátko nebo z něho, nechte postranice vždy zvednuté.
Chcete-li postranice nastavit níže, stisknutím rukojeti pro odjištění postranice uvolněte její západku. Postranici spusťte
dolů směrem k dolnímu konci lehátka tak, aby spočívala vodorovně. Při přemísťování pacienta na lehátko nebo z něho
musí být postranice vždy spuštěné dolů.
Zvýšení nebo snížení opěrky nohou
Chcete-li zvednout pacientovy nohy, můžete nastavit opěrku nohou.
2-18 6100-109-005 REV B www.stryker.com
Page 65

Provoz
A
B
C
Zvýšení nebo snížení opěrky nohou (Pokr.)
Chcete-li nastavit opěrku nohou výše, zvedněte rám až nadoraz. Když opěrku nohou uvolníte, podpěra rám automaticky
zajistí.
Chcete-li nastavit opěrku nohou níže, zvedněte rám a zatlačte na rukojeť pro odjištění opěrky nohou, aby se podpěra
uvolnila z rámu. Sklopte opěrku nohou do vodorovné polohy.
Zvýšení nebo snížení volitelné podkolenní části
Jak nastavit volitelnou podkolenní část výše:
1. Zatáhněte za libovolné ze dvou červených zvedacích poutek (A) nahoru, aby se podkolenní část zvedla až nadoraz
(Obrázek 2-6 straně 2-19).
2. Podkolenní část spusťte níž, aby se podpěra zaklesla do pojistného mechanismu.
3. Před uvolněním zvedacího poutka se ujistěte, že podpěra pevně drží v pojistném mechanismu.
Chcete-li podkolenní část sklopit níže, zatažením za libovolné ze dvou červených zvedacích poutek (A) nahoru uvolněte
tlak působící na pojistný mechanismus a zatímco poutko držíte nahoře, zatlačením na červenou rukojeť pro odjištění
opěrky nohou (B) uvolněte podpěru. Sklopte podkolenní část do vodorovné polohy.
Chcete-li zvednout podkolenní část ve sklonu, zvedněte rám opěrky nohou (C) až nadoraz, aby zapadl do příslušné
polohy. Když rám uvolníte, podpěra rám automaticky zajistí.
Česky
CS
Chcete-li podkolenní část snížit ve sklonu, podržte rám opěrky nohou (C) nadzvednutý a zároveň zvednutím červené
rukojeti pro odjištění opěrky nohou (B) uvolněte podpěru z rámu. Sklopte opěrku nohou do vodorovné polohy.
Obrázek 2-6: Podkolenní část
Zabrzdění nebo odbrzdění koleček
VAROVÁNÍ
• Když je výrobek obsazený nebo když ho přesouváte, neaktivujte brzdu koleček, aby nedošlo k jeho převrácení.
• Nemontujte a nepoužívejte brzdu koleček na výrobku s opotřebenými kolečky, která měří v průměru méně než 15,2
cm.
• Pacienta nebo jinou osobu na lehátku nenechávejte bez dozoru. Pokud je pacient nebo jiná osoba na lehátku,
pevně lehátko držte.
Chcete-li zabrzdit kolečka, sešlápněte pedál až nadoraz tak, aby spočíval na povrchu kolečka.
Chcete-li kolečka odbrzdit, šlápněte na horní stranu pedálu nebo pedál nadzvedněte prsty nohy. Při odbrzdění kolečka
se horní strana pedálu opře o rám kolečka.
www.stryker.com 6100-109-005 REV B 2-19
Page 66

Provoz
A
Zabrzdění nebo odbrzdění koleček (Pokr.)
Poznámka: Brzdy pomáhají zajistit, aby se výrobek bez dozoru nerozjel. Brzdy nemusí být dostatečně účinné na všech
druzích povrchu nebo při zatížení.
Česky
CS
Aktivace nebo uvolnění zámku řízení koleček
Funkce zámku řízení aktivuje kolečka horního konce, aby se v případě potřeby vylepšila funkce řízení. Zámek řízení
můžete uvolnit, a tak umožnit lepší otáčení a větší mobilitu.
VAROVÁNÍ
• Když lehátko nakládáte do vozidla nebo nakládacího systému nebo když ho z nich vykládáte, musí být knoflík
zámku řízení a kolečka uzamknuty, aby nedošlo k převrácení výrobku.
• Když měníte výšku lehátka, musí být knoflík zámku řízení a kolečka uzamknuty, aby nedošlo k převrácení výrobku.
UPOZORNĚNÍ
Nepokoušejte se výrobek tlačit do strany po aktivaci zámku řízení.
Poznámky
• Zámek řízení koleček můžete ovládat z obou stran podvozku.
• Když nakládáte výrobek do připevňovacího zařízení, zámek řízení koleček musíte uvolnit. Kolečka horního konce se
pak mohou volně otáčet a horní konec lehátka se zarovná na úroveň připevňovacího systému.
Zámek řízení zamknete otočením červeného zamykacího knoflíku do zamknuté polohy. Zatlačte lehátko vpřed, aby se
kolečka horního konce natočila a zajistila.
Zámek řízení odemknete otočením červeného zamykacího knoflíku do odemčené polohy. Zatlačte lehátko libovolným
směrem. Ujistěte se, že se kolečka volně natáčejí.
Obrázek 2-7: Umístění knoflíku řízení
Připojení nosítek k podvozku
Poznámka: Model 6100-031-000 podkolenní části nosítek a model 6100-033-000 ploché spodní části můžete
připevnit v kterémkoli směru.
2-20 6100-109-005 REV B www.stryker.com
Page 67

Provoz
A
Připojení nosítek k podvozku (Pokr.)
Postup připojení snímatelných nosítek k podvozku (Obrázek 2-8 straně 2-21):
1. Položte nosítka na podvozek.
2. Válečková vodítka nosítek zarovnejte se střední trubkou podvozku.
3. Zatlačte nosítka směrem k hornímu konci, aby zapadla do západek.
4. Nosítka musíte nejdříve zajistit k podvozku a pak je můžete přestat přidržovat.
Česky
CS
Obrázek 2-8: Připojení a sejmutí nosítek
Sejmutí nosítek z podvozku
Postup sejmutí snímatelných nosítek z podvozku (Obrázek 2-8 straně 2-21):
1. Stiskněte a podržte modrý knoflík pro odjištění nosítek, který je na dolním konci podvozku.
2. Nosítka posuňte směrem k dolnímu konci lehátka, aby se vysunula ze zajišťovacích západek.
3. Zvedněte nosítka z podvozku.
www.stryker.com 6100-109-005 REV B 2-21
Page 68

Česky
A
CS
Provoz
Změna výšky lehátka s volitelnými zatahovacími zvedacími rukojeťmi na horním
konci
VAROVÁNÍ
• Když lehátko nakládáte do vozidla nebo nakládacího systému nebo když ho z nich vykládáte, musí být knoflík
zámku řízení a kolečka uzamknuty, aby nedošlo k převrácení výrobku.
• Když měníte výšku lehátka, musí být knoflík zámku řízení a kolečka uzamknuty, aby nedošlo k převrácení výrobku.
• Než zvednete nakládací kolečka z podlahy prostoru pro pacienta nebo nakládacího systému ve vozidle, vždy
zajistěte podvozek. Nezajištěný podvozek nebude lehátko podepírat a hrozí poranění pacienta nebo pracovníka
obsluhy.
• Vyzkoušejte si změny výšky a nakládání lehátka, abyste plně porozuměli obsluze výrobku.
Poznámky
• Oba pracovníci obsluhy spolu musí dobře komunikovat, aby zamýšlený postup vedl k úspěchu.
• Jeden pracovník obsluhy může sám lehátko snížit postupným uvolněním obou konců lehátka.
Vždy si vyžádejte asistenci, pokud je to nutné. Pro tento úkol je potřeba alespoň jedna vyškolená osoba. Musíte být
schopni zvednout celkovou hmotnost pacienta, lehátka a všech předmětů na lehátku. Čím výše musíte lehátko zvednout,
tím může být náročnější zátěž udržet. Při nakládání lehátka do vozidla můžete potřebovat pomoc, pokud jste menší
postavy nebo pokud je pacient na bezpečné zvednutí příliš těžký.
Viz Umístění pracovníků obsluhy a pomocného personálu straně 2-17.
Postup změny výšky lehátka:
1. Otočte zatahovací zvedací rukojeti (A) do příslušné polohy (Obrázek 2-9 straně 2-22).
2. Jeden pracovník obsluhy se postaví k dolnímu konci a druhý k hornímu konci lehátka.
3. Uchopte úchopy na podvozku.
4. Zvedejte lehátko, dokud zcela neodlehčíte západkový mechanismus (přibližně 0,635 cm).
5. Stiskněte a přidržte červenou odjišťovací rukojeť a zvedněte nebo snižte lehátko na požadovanou úroveň.
6. Uvolněte stisk na odjišťovací rukojeti, a tak zastavte lehátko v nejbližší dostupné poloze.
Obrázek 2-9: Polohy zvedacích rukojetí
2-22 6100-109-005 REV B www.stryker.com
Page 69

Provoz
AA
Vytažení a zatažení zatahovacích zvedacích rukojetí
Poznámka: Před zvedáním výrobku ověřte, že zatahovací zvedací rukojeti jsou zajištěné.
Postup vytažení/zatažení zatahovacích zvedacích rukojetí (Obrázek 2-10 straně 2-23):
1. Stiskněte odjišťovací tlačítka a zatahovací zvedací rukojeti buď vytáhněte, nebo zatlačte zpět.
2. Uvolněte odjišťovací tlačítka, když se rukojeti zajistí v mezipoloze.
3. Stiskněte odjišťovací tlačítka a zatahovací zvedací rukojeti můžete opět vytáhnout nebo zatlačit zpět.
4. Uvolněte odjišťovací tlačítka, když se rukojeti zajistí v plně vytažené nebo plně zatažené poloze.
Česky
CS
Obrázek 2-10: Vytažení a zatažení zvedacích rukojetí
Zajištění pacienta s popruhy zádržného systému
VAROVÁNÍ
• K zajištění pacienta na lehátku vždy používejte všechny upínací pásy. Nezajištěný pacient může z lehátka spadnout.
• Upínací pásy nepřipevňujte k trubkám podvozku ani k příčným trubkám.
UPOZORNĚNÍ
Při zvedání nebo pokládání lehátka dejte pozor, aby se upínací pásy nezapletly do rámu podvozku.
Připevněte upínací pásy k lehátku v požadovaných místech připevnění (Obrázek 2-11 straně 2-24, Obrázek 2-12 straně
2-24). Místa připevnění upínacích pásů by měla poskytovat pevné ukotvení a správnou upínací polohu. Nedovolte, aby
upínací pásy překážely použitému vybavení nebo příslušenství. Upínací pásy zapněte pacientovi přes ramena, v pase a
přes nohy. Když se lehátko nepoužívá, upínací pásy nechte zapnuté.
K instalaci opěrek hlavy:
1. Upínací pás oviňte kolem rámu lehátka.
2. Vzniklou smyčkou provlékněte sponu upínacího pásu.
3. Tahem za sponu kolem smyčky připevněte upínací pás k lehátku.
www.stryker.com 6100-109-005 REV B 2-23
Page 70

Česky
CS
Provoz
Zajištění pacienta s popruhy zádržného systému (Pokr.)
Obrázek 2-11: Body uchycení upínacích pásů
Obrázek 2-12: Body uchycení upínacích pásů - BS EN
1789:2007+A1:2010
Úprava upínacích pásů
Rozepněte upínací pásy, nechte je po obou stranách lehátka a na matraci lehátka položte pacienta. Prodlužte upínací
pásy, zapněte je kolem pacienta a poté je zkrácením utáhněte.
• Chcete-li upínací pás rozepnout, stiskněte červené tlačítko na přední straně zámku přezky. Uvolníte tím sponu pásu,
kterou následně můžete vytáhnout ze zámku.
• Upínací pás zapnete tak, že sponu zasunete do štěrbiny zámku a zatlačíte, dokud neuslyšíte cvaknutí.
• Chcete-li upínací pás prodloužit, uchopte sponu, pootočte ji tak, aby byla šikmo vůči popruhu, a pak zatáhněte
směrem ven. Obroubená ploška na konci popruhu zabraňuje sesmeknutí spony z pásu.
• Chcete-li upínací pás zkrátit, uchopte obroubenou plošku a zatažením za popruh směrem zpět skrz sponu pás
utáhněte.
Při zapínání upínacího pásu kolem pacienta zajistěte sponu v zámku a přebytečnou část popruhu umístěte mimo ložnou
plochu lehátka.
Upínací pásy kontrolujte nejméně jednou měsíčně (v případě častějšího používání i několikrát měsíčně). Zkontrolujte,
zda zámek pásu nebo spona nejsou ohnuté nebo prasklé a zda není popruh potrhaný nebo roztřepený. Všechny
opotřebené nebo nefunkční upínací pásy vyměňte.
2-24 6100-109-005 REV B www.stryker.com
Page 71

Úprava upínacích pásů (Pokr.)
Obrázek 2-13: Zapněte pásy kolem
pacienta
Provoz
Česky
CS
Obrázek 2-15: Zkraťte upínací pás
Obrázek 2-14: Prodlužte upínací
pás
Přidání prodlužovacího upínacího pásu
Při obepínání větších pacientů v pase použijte prodlužovací upínací pás (6082-160-050).
Obrázek 2-16: Prodlužovací upínací pás
Upevnění pacienta dětským zádržným systémem Pedi-Mate®
VAROVÁNÍ
Přezku vždy umístěte dostatečně daleko od překážek nebo příslušenství na lehátku, aby se zabránilo riziku náhodného
odjištění dětského zádržného systému Pedi-Mate® a zranění dítěte.
Jak upevnit pacienta pomocí dětského zádržného systému Pedi-Mate®:
1. Z lehátka odstraňte veškeré upínací pásy.
2. Zádovou část lehátka zvedněte do zcela vzpřímené polohy.
3. Podložku systému Pedi-Mate® položte na zádovou část lehátka tak, aby černé popruhy pro připevnění k zádové
části lehátka směřovaly ven.
4. Popruhy oviňte kolem zádové části lehátka a jejich konce protáhněte skrz úchyty.
5. Zapněte přezku.
6. Tahem za konec nastavitelného pásu pro připevnění k zádové části lehátka uchycení utáhněte.
7. Popruhy pro připevnění k hlavnímu rámu protáhněte mezi rámem lehátka a matrací.
8. Přezku vsuňte za příčnou výztuhu ložné plochy lehátka a vytáhněte ji nahoru před výztuhou.
www.stryker.com 6100-109-005 REV B 2-25
Page 72

Česky
CS
Provoz
Upevnění pacienta dětským zádržným systémem Pedi-Mate® (Pokr.)
9. Zapnutím přezky připevněte pás kolem výztuhy ložné plochy lehátka. Určitou délku popruhu nechte prověšenou,
abyste mohli upevnění nakonec doladit.
10. Utáhněte všechny popruhy.
Poznámka: Další informace o dětském zádržném systému Pedi-Mate® najdete v pokynech výrobce k použití a údržbě.
Bezpečné a správné používání dětského zádržného systému Pedi-Mate® je plně na rozhodnutí uživatele. Zaveďte
metody a postupy výuky a školení zaměstnanců v oblasti bezpečného provozu a údržby tohoto výrobku. Toto jsou pouze
všeobecné pokyny. Tyto pokyny si uložte, abyste do nich mohli v případě potřeby později nahlédnout. Tyto pokyny je
třeba považovat za trvalou součást výrobku a musí zůstat s výrobkem i v případě, že dojde k jeho prodeji.
Pedi-Mate® je registrovaná ochranná známka společnosti Ferno Washington, Inc.
Montáž desky pro defibrilátor
UPOZORNĚNÍ
• Při použití desky pro defibrilátor tuto vždy řádně upevněte k výrobku.
• K zajištění defibrilátoru vždy použijte popruhy, které jsou příslušenstvím desky pro defibrilátor, a správně je nastavte.
• Místo upevnění nebo délku popruhů vždy upravte podle konkrétní velikosti nebo tvaru defibrilátoru.
• Desku pro defibrilátor nezatěžujte nad limit jejího bezpečného pracovního zatížení (13,6 kg).
Jak namontovat desku pro defibrilátor:
1. Desku pro defibrilátor dejte do složené polohy (Obrázek 2-17 straně 2-26).
2. Vyklopte nožičky desky pro defibrilátor (Obrázek 2-18 straně 2-26).
Obrázek 2-17: Složená poloha
Obrázek 2-18: Vyklopte nožičky desky pro
defibrilátor
3. Pokud je jím výrobek opatřen, vztyčte infuzní stojan (A) do vzpřímené polohy (Obrázek 2-19 straně 2-27).
4. Desku pro defibrilátor umístěte na rám výrobku.
5. Vnitřní nožičky (B) desky pro defibrilátor dejte směrem k hornímu konci výrobku (Obrázek 2-19 straně 2-27).
2-26 6100-109-005 REV B www.stryker.com
Page 73

Provoz
A
B
C
D
E
F
Montáž desky pro defibrilátor (Pokr.)
6. Upínací hák (C) umístěte pod rám ložné plochy lehátka nebo úchyt dolního konce a destičku (D) zatlačte nahoru,
aby se slyšitelným cvaknutím zaklapla na své místo. Totéž zopakujte na druhé straně. U lehátek kompatibilních se
systémem Power-LOAD, pokud je používáte, musíte popruhy prodloužit a upevnit k úchytu dolního konce (Obrázek
2-21 straně 2-27).
Česky
CS
Obrázek 2-19: Vztyčte infuzní stojan a umístěte
desku pro defibrilátor
Obrázek 2-20: Umístění upínacího háku
7. Ujistěte se, že je deska pro defibrilátor řádně upevněna k výrobku.
8. Defibrilátor položte na desku pro defibrilátor.
9. Pomocí popruhů (E) uchyťte defibrilátor na desce pro defibrilátor (Obrázek 2-22 straně 2-27).
Obrázek 2-21: Destička
www.stryker.com 6100-109-005 REV B 2-27
Obrázek 2-22: Desku pro defibrilátor připevněte k
lehátku
Page 74

Provoz
Montáž desky pro defibrilátor (Pokr.)
Poznámka: Pokud deska pro defibrilátor po zaháknutí obou upínacích háků nedrží na výrobku, destičku odepněte.
Povolte nebo utáhněte popruh a potom destičku zatlačte nahoru, aby se slyšitelným cvaknutím zaklapla na své místo.
Česky
CS
Montáž podhlavníku s polštářem
Na zádovou část můžete namontovat sestavu podhlavníku, na který si může pacient položit hlavu.
Chcete-li k podhlavníku připevnit polštář, umístěte podpěru do vybrání na dolní straně polštáře. Polštář přichyťte k
suchému zipu na dolní straně podpěry.
Poznámky
• Podhlavník s polštářem (6100-044-000) není kompatibilní s volitelným hákem na vybavení (6500-147-000) nebo
volitelným držákem kyslíkové láhve pod polohovací zádovou částí (6500-241-000).
• Polštář podhlavníku je aplikovaná část typu BF.
Umístění volitelného trojdílného infuzního stojanu
UPOZORNĚNÍ
Infuzní stojan nezatěžujte nad limit jeho bezpečného pracovního zatížení (11,3 kg).
Poznámka: Dvojité trojdílné infuzní stojany (6500-317-000) nejsou kompatibilní ani s pravým (6500-315-000) ani s
levým (6500-316-000) (z pohledu pacienta) trojdílným infuzním stojanem.
Jak umístit infuzní stojan (Obrázek 2-23 straně 2-29):
1. Infuzní stojan nadzvedněte a otočením vztyčte ze sklopené polohy a pak jej zatlačením zajistěte v jeho loži (A).
2. Chcete-li stojan zvýšit, pootočte pojistnou objímkou (B) proti směru hodinových ručiček a zatažením za
teleskopickou část (C) upravte stojan na požadovanou výšku.
3. Pootočením pojistné objímky (B) po směru hodinových ručiček zajistěte teleskopickou část ve zvolené poloze.
4. Chcete-li stojan zvýšit, táhněte za část (D), dokud se nezajistí pružinová západka (E).
5. Infuzní vaky zavěste na závěsné oko (F).
6. Chcete-li stojan snížit, stiskněte pružinovou západku (E) a zasuňte část (D) do části (C). Pojistnou objímkou (B)
pootočte proti směru hodinových ručiček a zasuňte část (C) do spodní trubky.
7. Pootočením po směru hodinových ručiček pojistnou objímku (B) utáhněte.
8. Infuzní stojan nadzvedněte a otočením vraťte do sklopené polohy.
2-28 6100-109-005 REV B www.stryker.com
Page 75

Provoz
A
B
C
D
E
F
A
B
E
D
C
F
Umístění volitelného trojdílného infuzního stojanu (Pokr.)
Česky
CS
Obrázek 2-23: Infuzní stojan ve vztyčené poloze
Připevnění kyslíkové láhve k držáku kyslíkové láhve
UPOZORNĚNÍ
• Držák kyslíkové láhve nezatěžujte nad limit jeho bezpečného pracovního zatížení (6,8 kg).
• Nepoužívejte dva držáky kyslíkové láhve současně.
Jak připevnit kyslíkovou láhev k držáku kyslíkové láhve:
1. Kyslíkovou láhev vložte do držáku.
2. Dolní popruh protáhněte sponou a připevněte jej na protilehlý povrch popruhu, čímž kyslíkovou láhev upevníte do
držáku.
Poznámky
• V držáku kyslíkové láhve by neměla být kyslíková láhev umístěna během jízdy vozidla. Pří jízdě vždy držák kyslíkové
láhve uložte na vhodné úložné místo.
• Mezi jednotlivými použitími popruhy a spony kontrolujte, zda nejsou opotřebené. Pokud již popruh nedokáže
kyslíkovou láhev udržet, vyměňte jej.
www.stryker.com 6100-109-005 REV B 2-29
Page 76

Doplňky
Tyto doplňky mohou být k dispozici k použití s výrobkem. Ověřte si jejich dostupnost pro vaši konfiguraci nebo region.
Volejte zákaznický servis Stryker: 1-800-327-0770.
Česky
CS
Název
Volitelný podvozek bez AS/NZS 4535
Volitelný podvozek s AS/NZS 4535
Deska pro defibrilátor
Podhlavník s polštářem
Integr. zatahovací zvedací rukojeti
Infuzní stojan trojdílný, pravý
Infuzní stojan trojdílný, levý
Nosítka, plochá spodní část
Nosítka, podkolenní část
Matrace, s podpěrou
Matrace, plochá
Matrace, žádná
Matrace, s prémiovou podpěrou
Polštář (pouze u prémiové matrace)
Zajišťovací čepy podle normy DIN
Číslo
6100-003-950
6100-018-000
6100-170-000
6100-044-000
6100-010-000
6100-115-000
6100-116-000
6100-033-000
6100-031-000
6100-041-020
6090-042-010
6100-040-000
6100-041-010
6100-041-030
6100-042-060
Čepy bez pojistného mechanismu
Držák kyslíkové láhve, snímatelný
Postranice, skládací
Postranice, žádné
6100-043-000
6080-140-000
6100-020-000
6100-021-000
2-30 6100-109-005 REV B www.stryker.com
Page 77

Čištění
VAROVÁNÍ
Při tlakovém mytí vždy používejte jakékoli vhodné osobní ochranné pomůcky, aby se zabránilo vdechování nákazy.
Vybavení pro tlakové mytí může vytvářet kontaminovaný aerosol.
UPOZORNĚNÍ
• Výrobek nečistěte parou ani ultrazvukem.
• Dbejte, aby maximální teplota vody nepřekročila 180 °F (82 °C).
• Dbejte, aby tlak vody nepřekročil 1500 psi (130,5 bar). Pokud k čištění výrobku používáte ruční mycí jednotku, držte
tlakovou trysku v minimální vzdálenosti 24 palců (61 cm) od výrobku.
• Vždy nechte uschnout na vzduchu.
• Pokud se výrobek používá, neprovádějte čištění, servis ani údržbu.
Výrobek je možné čistit tlakovou čističkou. Při častém čištění může výrobek jevit známky oxidace nebo ztráty barev. Při
tlakovém čištění nedojde ke zhoršení výkonu výrobku, pokud dodržujete správný postup.
• Přesně dodržujte doporučení výrobce k ředění čisticích prostředků.
• Upřednostňovaná metoda, kterou společnost Stryker Medical doporučuje pro tlakové mytí výrobku, je standardní
nemocniční myčka chirurgických vozíků nebo ruční mycí jednotka.
• Lehátko myjte jednou za měsíc.
• Suchý zip Velcro® vyčistěte po každém použití. Napusťte suchý zip Velcro® dezinfekčním prostředkem a nechejte
tento prostředek odpařit. Správný dezinfekční prostředek pro nylonový suchý zip Velcro® by měl určit pracovník
servisu.
• Ponoření kovových spon upínacích pásů může způsobit korozi spon a nedoporučuje se. Opláchněte čistou vodou a
nechte uschnout na vzduchu, aby se snížilo riziko koroze. Upínací pásy vyměňte, pokud jsou spony zkorodované.
Poznámka: Voda, která vnikne do lehátka M-1 Roll-In System, bude odvedena odtokovou hadicí na spodní stranu
vozidla.
Česky
CS
www.stryker.com 6100-109-005 REV B 2-31
Page 78

Česky
CS
Dezinfekce
UPOZORNĚNÍ
• Pokud se výrobek používá, neprovádějte čištění, dezinfekci, servis ani údržbu.
• Po čištění výrobek vždy otřete utěrkou navlhčenou čistou vodou a osušte. Některé čisticí prostředky jsou svým
charakterem žíraviny a mohou způsobit poškození výrobku. Pokud výrobek řádně neopláchnete a neosušíte, na
jeho povrchu se mohou usadit korozivní zbytky, které mohou způsobit předčasnou korozi důležitých součástí.
Obecně platí, že pokud se používají v koncentracích doporučených výrobcem, lze používat dezinfekční prostředky na
bázi fenolů nebo kvartérních amoniových sloučenin (s výjimkou přípravku Virex® TB). Jodoforové dezinfekční
prostředky se nedoporučuje používat, protože mohou způsobovat vznik skvrn.
Doporučené dezinfekční prostředky pro povrchy tohoto výrobku:
• Dezinfekční prostředky na bázi kvartérních amoniových sloučenin (aktivní složka chlorid amonný)
• Fenolové dezinfekční prostředky (aktivní složka o-fenylfenol)
• Roztok chlorového bělidla [dezinfekční roztok s až 10 000 ppm aktivního chloru (941 ml 5,25% roztoku chlornanu
sodného na 4 000 ml vody)]
• Alkohol (aktivní složka 70% izopropylalkohol)
Postup otírání výrobku dezinfekčním prostředkem mezi jednotlivými použitími:
1. Přesně dodržujte doporučení výrobce k ředění prostředků.
2. Naneste doporučený dezinfekční roztok postřikem nebo předem namočenými vlhkými ubrousky.
3. Ručně omyjte všechny povrchy výrobku doporučeným dezinfekčním prostředkem.
4. Dezinfikujte všechny povrchy vystavené prostředí. Věnujte pozornost oblastem častého kontaktu.
5. Dodržujte pokyny výrobce dezinfekčního roztoku ohledně vhodné doby kontaktu a požadavků na oplachování.
6. Před vrácením výrobku do provozu jej důkladně osušte.
Zamezte promočení. Výrobek nesmí zůstávat mokrý.
Dodržujte pokyny výrobce ohledně ředění, vhodné doby kontaktu a požadavků na oplachování. Dodržujte pokyny
výrobce chemikálie pro řádnou dezinfekci.
Poznámka: Nedodržení výše uvedených pokynů při používání těchto typů čisticích prostředků může vést k zániku
platnosti záruky na tento výrobek.
2-32 6100-109-005 REV B www.stryker.com
Page 79

Preventivní údržba
UPOZORNĚNÍ
• Vždy používejte schválené díly, abyste předešli riziku poškození výrobku.
• Nesprávné používání výrobku může způsobit poranění pacienta nebo obsluhy. Výrobek používejte pouze tak, jak
popisuje tato příručka.
• Výrobek ani žádné jeho součásti neupravujte. Úpravy výrobku mohou způsobit nepředvídatelný provoz a způsobit
poranění pacienta nebo operátora. Úprava výrobku také zruší jeho záruku.
Stanovte si a dodržujte plán údržby a veďte záznamy o aktivitách údržby. Před zahájením kontroly preventivní údržby
vyřaďte výrobek z provozu. Podle úrovně používání výrobku bude možná nutné provádět preventivní kontroly a údržbu
častěji. Servis smí provádět pouze kvalifikovaný personál.
Při používání výrobků pro údržbu dodržujte pokyny výrobce a nahlížejte do všech bezpečnostních listů materiálu.
Provoz Harmonogram Postup
Čištění a dezinfekce Čištění straně 2-31 a Dezinfekce straně 2-32
Kontrola
Při 1-25 výjezdech měsíčně kontrolujte
lehátko každých 6 měsíců
Při 26-200 výjezdech měsíčně kontrolujte
lehátko každé 3 měsíce
Viz kontrolní seznam níže
Česky
CS
Při více než 201 výjezdech měsíčně
kontrolujte lehátko každý měsíc
Pravidelná prohlídka a seřízení
Tento harmonogram představuje všeobecný návod k údržbě. Na harmonogram nezbytné údržby bude mít vliv řada
faktorů, jako je počasí, terén, zeměpisná poloha a individuální používání. Pokud si nejste jisti, jak a kdy se mají provádět
tyto kontroly, obraťte se na servisního technika společnosti Stryker. Pokud si nejste jisti, jaké intervaly při údržbě
výrobku dodržovat, poraďte se se servisním technikem společnosti Stryker. Zkontrolujte každý jednotlivý bod a
opotřebené díly v případě potřeby vyměňte.
Každý měsíc nebo po dvou hodinách provozu
Následující položky kontrolujte každý měsíc nebo po dvou hodinách provozu, podle toho, která situace nastane dříve.
Položka
Nastavení Připevnění a funkčnost lehátka a připevňovacího systému
Nosítka Rám a nosítka
Upínací pásy Upínací pásy fungují a jsou bez známek nadměrného
Podvozek
Kontrola
opotřebení (např. ohnutý nebo nefunkční zámek přezky
nebo spona, případně přetržené nebo prodřené popruhy)
Rám a podvozek
Kolečka Všechna kolečka jsou bezpečná, otáčejí se a rotují do
stran
Nakládací kolečka jsou bezpečná a otáčejí se
www.stryker.com 6100-109-005 REV B 2-33
Page 80

Česky
CS
Preventivní údržba
Pravidelná prohlídka a seřízení (Pokr.)
Každé tři měsíce nebo po šesti hodinách používání
Následující položky kontrolujte každé tři měsíce nebo po šesti hodinách používání, podle toho, která situace nastane
dříve.
Položka
Nosítka Všechny upínací prvky pevně drží
Kontrola
Válec opěrky zad funguje
V případě potřeby upravte pneumatický válec na plný
rozsah pohybu
Případné opotřebení zarážky (6085-001-094), v případě
potřeby vyměňte
Matrace
Podvozek
Příslušenství (volitelné) Funkčnost veškerého příslušenství (např. IV stojan,
Žádné praskliny ani trhliny
Všechny upínací prvky pevně drží
Celistvost ochranných plastových proužků na sestavě
přední a zadní nohy
podhlavník a polštář, deska pro fibrilátor a sada
upínacích pásů Pedi-Mate®)
Každých šest měsíců nebo po 12 hodinách provozu
Následující položky kontrolujte každých šest měsíců nebo po 12 hodinách provozu, podle toho, která situace nastane
dříve.
Položka
Nosítka
Podvozek
Kontrola
Žádné ohnuté, prasklé nebo poškozené komponenty
Žádná poškození nebo opotřebení na úchytech lehátka
Postranice jsou funkční a zaklapávají
Opěrka nohou funguje
Žádné ohnuté, prasklé nebo poškozené komponenty
Kolečka
Žádné nečistoty
Každých 12 měsíců nebo po 24 hodinách provozu
Následující položky kontrolujte každých 12 měsíců nebo po 24 hodinách provozu, podle toho, která situace nastane
dříve.
Položka
Nosítka Všechny svary jsou nedotčené, nepopraskané a
2-34 6100-109-005 REV B www.stryker.com
Kontrola
nepolámané
Štítky s varováním jsou na místě a jsou čitelné
Page 81

Preventivní údržba
Pravidelná prohlídka a seřízení (Pokr.)
Položka
Podvozek
Kolečka Pryž je v dobrém stavu
Příslušenství (volitelné) Popruhy a svorky na držáku kyslíkové láhve nejsou
Kontrola
Nárazník a šrouby zádové části jsou neporušené a
bezpečné
Obvodové nárazníky jsou neporušené
Opěrka zad funguje
Prodloužení zvedacích rukojetí funguje
Postranice jsou funkční a zaklapávají
Fungují polohy pro podkolenní část/a Trendelenburgova
Čepy zajišťovacího systému lehátka jsou bezpečné,
nejsou zohýbané ani prasklé
Lehátko se uzamkne na podvozku a válečková vodítka
nejsou zohýbaná aní prasklá
Všechny svary jsou nedotčené, nepopraskané a
nepolámané
Kontrola a nastavení brzd koleček
Zkontrolujte a nastavte systém Steer-LOCK koleček
opotřebované
Česky
CS
www.stryker.com 6100-109-005 REV B 2-35
Page 82

sample text
Page 83

M-1® Roll-In-system
6100
Betjeningsmanual
2018/08 B.2 6100-109-005 REV B www.stryker.com
Page 84

sample text
Page 85

Symboler
Se betjeningsvejledningen/-brochuren
Betjeningsvejledning/Se brugsanvisningen
Generel advarsel
Forsigtig
Katalognummer
Serienummer
Partikode
Se www.stryker.com/patents vedrørende patenter i USA
CE-mærke
EU-REP
Producent
Fremstillingsdato
Sikker arbejdsbelastning
Dansk
DA
Type BF anvendt del
www.stryker.com 6100-109-005 REV B
Page 86

sample text
Page 87

Indholdsfortegnelse
Definition af betegnelserne Advarsel/Forsigtig/Bemærk ................................................................................. 3-3
Oversigt over sikkerhedsforanstaltninger..................................................................................................... 3-4
Indledning............................................................................................................................................. 3-6
Produktbeskrivelse ........................................................................................................................... 3-6
Indikationer ..................................................................................................................................... 3-6
Forventet levetid ..............................................................................................................................3-7
Kontraindikationer ............................................................................................................................ 3-7
Specifikationer ................................................................................................................................3-7
Produktillustration............................................................................................................................. 3-8
Kontaktinformation ........................................................................................................................... 3-9
Serienummerets placering ............................................................................................................... 3-10
Fremstillingsdato............................................................................................................................ 3-10
Opsætning.......................................................................................................................................... 3-11
Installation .......................................................................................................................................... 3-12
Installation af bårens beslag............................................................................................................. 3-12
Drift................................................................................................................................................... 3-14
Betjeningsvejledning ....................................................................................................................... 3-14
Korrekte løfteteknikker .................................................................................................................... 3-14
Overførsel af patient til båre............................................................................................................. 3-15
Sådan rulles båren med patienten ..................................................................................................... 3-15
Ændring af bårehøjde ..................................................................................................................... 3-15
Indladning af båren i et køretøj.......................................................................................................... 3-16
Udladning af båren fra et køretøj....................................................................................................... 3-17
Positionering af operatører og hjælpere .............................................................................................. 3-18
Sådan hæves og sænkes ryglænet .................................................................................................... 3-18
Hævning eller sænkning af sengehestene ........................................................................................... 3-18
Sådan hæves og sænkes fodpladen................................................................................................... 3-19
Sådan hæves og sænkes den valgfri bevægelige knæsektion.................................................................. 3-19
Aktivering eller udløsning af en hjullås................................................................................................ 3-19
Låsning og udløsning af svinghjulets styrelås....................................................................................... 3-20
Fastgørelse af bårelejet til bunden..................................................................................................... 3-21
Fjernelse af bårelejet fra bunden....................................................................................................... 3-21
Ændring af bårehøjde med de valgfri udtrækkelige løftehåndtag til hovedendens bund................................. 3-22
Ud- og tilbagetrækning af løftehåndtagene .......................................................................................... 3-23
Fiksering af patienten med seler........................................................................................................ 3-23
Justering af seler ........................................................................................................................... 3-24
Tilføjelse af en forlængersele........................................................................................................... 3-25
Fiksering af patienten med Pedi-Mate® selesystemet til spædbørn .......................................................... 3-25
Installation af defibrillatorplatformen .................................................................................................. 3-26
Installation af forlænget hovedgærde med pude ................................................................................... 3-28
Positionering af det valgfri tredelte dropstativ....................................................................................... 3-28
Fastgøring af iltflaske i iltflaskeholderen ............................................................................................. 3-29
Tilbehør ............................................................................................................................................. 3-30
Dansk
DA
www.stryker.com 6100-109-005 REV B 3-1
Page 88

Dansk
DA
Indholdsfortegnelse
Rengøring........................................................................................................................................... 3-31
Desinfektion........................................................................................................................................ 3-32
Forebyggende vedligeholdelse................................................................................................................ 3-33
Regelmæssige inspektioner og justeringer........................................................................................... 3-33
3-2 6100-109-005 REV B www.stryker.com
Page 89

Definition af betegnelserne Advarsel/Forsigtig/Bemærk
Betegnelserne ADVARSEL, FORSIGTIG og BEMÆRK har særlige betydninger og skal læses omhyggeligt.
ADVARSEL
Gør læseren opmærksom på en situation, der kan medføre død eller alvorlig personskade, hvis situationen ikke undgås.
Den kan også beskrive potentielle alvorlige hændelser og sikkerhedsfarer.
FORSIGTIG
Gør læseren opmærksom på en potentielt farlig situation, der kan medføre mindre eller moderat personskade på bruger
eller patient eller beskadige udstyret eller andre genstande, hvis situationen ikke undgås. Dette omfatter særlig omhu,
der er nødvendig for sikker og effektiv brug af udstyret og den omhu, der er nødvendig for at undgå beskadigelse af
udstyr, som kan opstå som et resultat af brug eller misbrug.
Bemærk: Her gives særlige oplysninger, der letter vedligeholdelse eller uddyber vigtige anvisninger.
Dansk
DA
www.stryker.com 6100-109-005 REV B 3-3
Page 90

Dansk
DA
Oversigt over sikkerhedsforanstaltninger
Læs altid omhyggeligt advarslerne og forholdsreglerne på denne side, og følg dem nøje. Service må kun foretages af
kvalificeret personale.
ADVARSEL
• Udskift altid bårebeslaget, hvis det har været involveret i en ulykke for at undgå risikoen for tilskadekomst pga.
produktskader.
• Sørg altid for, at alle bårer opfylder installationsspecifikationerne for Stryker-bårens beslagsystem.
• Forkert brug af produktet kan medføre, at patienten eller operatøren kommer til skade. Produktet må kun betjenes
som beskrevet i denne manual.
• Lad ikke utrænet personale hjælpe med at betjene produktet.
• Placér altid hænderne korrekt på håndtagene. Ved indladning eller udladning eller ændring af bårens højdeposition
skal alle hænder holdes væk fra de røde sikkerhedsbøjlers led.
• Kør ikke på bårens bund.
• Undlad at transportere båren sidelæns for at undgå, at den vælter. Transporter altid båren i en sænket position med
hovedenden eller fodenden forrest for at mindske risikoen for, at den vælter.
• Hold altid hænder, fingre og fødder væk fra bevægelige dele. Vær forsigtig, hvis hænder og fødder anbringes nær
stængerne i bunden, mens båren hæves eller sænkes.
• Lad ikke patienten være uden opsyn. Hold fast i produktet, mens patienten ligger på det.
• Brug ikke en hjullås, når en patient befinder sig på produktet, eller når du flytter produktet, for at undgå, at det
vælter.
• Brug ikke sengehestene til at fiksere patienten.
• Transportér altid båren i den laveste højde for at reducere risikoen for, at den vælter. Få hjælp, hvis det er muligt,
eller vælg en anden rute.
• Undgå altid stejle steder, som f.eks. fortovskanter, trin eller ujævnt terræn for at undgå risikoen for, at produktet
vælter.
• Aktivér altid svinghjulenes styrelåsknap og svinghjul, når båren anbringes eller fjernes fra køretøjet, eller når
bakkesystemet anbringes, for at undgå at produktet vælter.
• Aktivér altid svinghjulenes styrelåsknap og svinghjul, når bårehøjden skal ændres for at undgå, at produktet vælter.
• Lås altid understellet, inden indladningshjulene fjernes fra gulvet i køretøjets patientrum eller fra
indladningsbakkesystemet. En ulåst bundramme støtter ikke båren og kan medføre, at patienten eller operatøren
kommer til skade.
• Ændring af højdepositioner og indladning af båren skal øves, indtil man har sat sig fuldstændigt ind i, hvordan
produktet betjenes.
• Hold altid hænder, fingre og fødder væk fra bevægelige dele. Vær forsigtig, hvis hænder og fødder anbringes nær
stængerne i bunden, mens båren hæves eller sænkes.
• Understøt altid patientens, bårens og tilbehørets vægt, når vægten er løftet op over jorden.
• Installér eller aktivér ikke en hjullås på et produkt med slidte hjul med en diameter under 6 tommer (15,2 cm).
• Brug altid alle seler til fiksering af patienten på båren. En patient, der ikke er fikseret med sele, kan falde af båren.
• Fastgør ikke selerne til bundens rør eller tværstængerne.
• Brug altid spændet længst væk fra obstruktioner eller tilbehør på båren for at undgå risikoen for utilsigtet udløsning
af Pedi-Mate® selesystemet til spædbørn og skade på spædbarnet.
• Brug altid passende personligt beskyttelsesudstyr under højtryksrensning for at undgå indånding af smitstoffer.
Højtryksrensningsudstyr kan medføre, at forureningsstoffer blandes med luften.
3-4 6100-109-005 REV B www.stryker.com
Page 91

Oversigt over sikkerhedsforanstaltninger
FORSIGTIG
• Forkert brug af produktet kan medføre, at patienten eller operatøren kommer til skade. Produktet må kun betjenes
som beskrevet i denne manual.
• Hverken produktet eller dets komponenter må modificeres. Ændring af produktet kan forårsage uforudsigelig drift,
hvilket kan medføre personskade på patient eller operatør. Ændring af produktet vil også ugyldiggøre garantien.
• Bårebeslagssystemet skal installeres af kvalificeret personale for at være i overensstemmelse med denne standard.
0,635 cm tykke stålplader (eller tilsvarende) er påkrævet under monteringsfladen (ambulancens gulv eller
bakkesystem) på alle monteringssteder.
• Fjern altid eventuelle forhindringer, der kan komme i vejen og forårsage skade på operatøren eller patienten, inden
produktet tages i brug.
• Undlad at låse styrelåsen og derefter forsøge at skubbe produktet sidelæns.
• Kontrollér, at selerne ikke vikles ind i bundrammen, når båren hæves eller sænkes.
• Fastgør altid defibrillatorplatformen til produktet, når defibrillatorplatformen anvendes.
• Brug og justér altid de stropper, der følger med defibrillatorplatformen for at sikre defibrillatoren.
• Ændr altid installationssted eller justér stropperne i overensstemmelse med jeres defibrillators størrelse eller facon.
• Belast ikke defibrillatorplatformen med mere end den sikre arbejdsbelastning på 30 pund (13,6 kg).
• Lad ikke iltflaskeholderens belastning overstige den sikre arbejdsbelastning på 15 pund (6,8 kg).
• Benyt ikke to iltflaskeholdere samtidigt.
Dansk
DA
• Du må ikke rengøre produktet med damprens eller ultralyd.
• Den maksimale vandtemperatur må ikke overstige 180 °F (82 °C).
• Det maksimale vandtryk må ikke overstige 1500 psi (130,5 bar). Hvis du bruger en håndbetjent renseenhed til at
vaske produktet med, skal trykdysen holdes mindst 24 tommer (61 cm) fra produktet.
• Lad det altid lufttørre.
• Der må ikke foretages rengøring, service eller vedligeholdelse, mens produktet er i brug.
• Tør altid produktet af med rent vand, og tør det tørt efter rengøringen. Visse rengøringsprodukter er ætsende og
kan forårsage skade på produktet. Hvis produktet ikke skylles og tørres ordentligt af, kan det efterlade ætsende
reststoffer på produktets overflader, som kan forårsage førtidig korrosion af kritiske komponenter.
• Brug altid autoriserede dele for at undgå risiko for beskadigelse af produktet.
www.stryker.com 6100-109-005 REV B 3-5
Page 92

Indledning
Denne vejledning hjælper dig med betjening eller vedligeholdelse af dit produkt fra Stryker. Læs vejledningen grundigt
igennem, før du betjener eller vedligeholder produktet. Fastlæg metoder og procedurer til uddannelse og optræning af
personalet med henblik på sikker betjening eller vedligeholdelse af dette produkt.
FORSIGTIG
• Forkert brug af produktet kan medføre, at patienten eller operatøren kommer til skade. Produktet må kun betjenes
som beskrevet i denne manual.
• Hverken produktet eller dets komponenter må modificeres. Ændring af produktet kan forårsage uforudsigelig drift,
hvilket kan medføre personskade på patient eller operatør. Ændring af produktet vil også ugyldiggøre garantien.
Dansk
DA
Bemærkninger
• Denne vejledning skal betragtes som en permanent del af produktet, og den skal opbevares sammen med
produktet, selv hvis dette senere sælges.
• Stryker tilstræber hele tiden forbedringer i produktdesign og -kvalitet. Vejledningen indeholder den seneste
produktinformation, der er tilgængelig på tidspunktet for trykning. Der kan være mindre forskelle mellem dit produkt
og denne vejledning. Hvis du har spørgsmål, bedes du kontakte Stryker kundeservice eller teknisk support på +1800-327-0770.
Produktbeskrivelse
Stryker Model 6100 M-1® Roll-In-systemet er en manuel ambulancebåre. Platformen på en hjulforsynet ramme
understøtter og transporterer en maksimal vægt på 227 kg. Produktet anvendes i præhospitals- og hospitalsmiljøer.
Produktet kan foldes sammen til brug i udrykningskøretøjer. Det aftagelige båreleje og patentbeskyttede Steer-Lock
System™ giver øget manøvredygtighed. Som hjælp til transport af patienter er produktet udstyret med:
• Løftehåndtag i alle fire hjørner
• Patientseler
• Justerbart pneumatisk ryglæn
• Valgfrit tilbehør
For maksimal patientkomfort kan der vælges mellem tre forskellige bårelejepositioner:
• Stød
• Fladt ben
• Valgfri bevægelig sektion
Indikationer
Stryker Model 6100 M-1® Roll-In-systemet er en ikke-strømført båre med hjul. Produktet understøtter og transporterer
hele legemsvægten af en ambulant eller ikke-ambulant traumepatient (inklusive spædbørn og voksne). I ambulancer og
transportkøretøjer gør produktet følgende:
• Støtter patienten i liggende (vandret) eller siddende stilling
• Letter transporten af ledsagende medicinsk udstyr (f.eks. iltflasker eller infusionsposer)
Produktet anvendes i præhospitals- og hospitalsmiljøer. Produktet kan anvendes i akutte og ikke-akutte situationer.
Produktets maksimale vægtkapacitet er 227 kg, hvilket er den samlede vægt af patienten, madrassen og tilbehøret.
Tilsigtede brugere af produktet inkluderer:
• Udlært fagpersonale
• Ambulanceberedskab
• Hospitals-/klinikpersonale
• Førstehjælpsydere
Ambulancebårer er beregnet til transport. De er ikke beregnet til længerevarende ophold eller til brug som
hospitalssenge. De er heller ikke beregnet til brug i udstyr, der ændrer lufttryk, f.eks. højtrykskamre.
3-6 6100-109-005 REV B www.stryker.com
Page 93

Indledning
Forventet levetid
Stryker Model 6100 M-1 Roll-In-systemet har en forventet levetid på fem år under normale brugsforhold og med
passende periodisk vedligeholdelse.
Kontraindikationer
Ingen kendte.
Specifikationer
For Stryker Model 6100 M-1 Roll-In-systemets bundenhed (6100-003-000), båreleje med bevægelig sektion (6100-031-
000) og båreleje med flad fodsektion (6100-033-000).
Dansk
DA
Sikker arbejdsbelastning
Bemærk: Sikker arbejdsbelastning
angiver summen af patientens,
madrassens og tilbehørets vægt.
Ryglænsartikulation/stødposition ( 6100-031-000 og
6100-033-000)
Længde/bredde (6100-003-000) 77 tommer /21 tommer 195,6 cm / 53,3 cm
Længde/bredde (6100-031-000) 74,5 tommer / 22,1 tommer 189,2 cm / 56,1 cm
Længde/bredde (6100-033-000) 74,8 tommer / 22,1 tommer 189,9 cm / 56,1 cm
1
Højde
(6100-
003-000)
1
Højde
(6100-031-000 og 6100-033-000) 7,3 tommer 18,5 cm
2
Vægt
(6100-003-000) 77,7 pund 35,2 kg
2
Vægt
(6100-031-000) 44,6 pund 20,2 kg
2
Vægt
(6100-033-000) 40,2 pund 19,0 kg
Position 1
Position 2 24,4 tommer 62,0 cm
Position 3 30,0 tommer 76,2 cm
Position 4 34,6 tommer 87,9 cm
Position 5 37,6 tommer 95,5 cm
Position 6 39,3 tommer 99,8 cm
Position 7 13,0 tommer 33,0 cm
Position 8 Ikke relevant Ikke relevant
500 pund 227 kg
0° til 75°
14,4 tommer
36,6 cm
Maks. vægtkapacitet (6100-031-000 og 6100-033-000) 500 pund 227 kg
Hjuldiameter/ bredde (6100-031-000 og 6100-033-000) 4,0 tommer / 0,8 tommer 10,2 cm / 2,0 cm
Forlængerhåndtag (6100-031-000 og 6100-033-000)
Svinghjulenes diameter/bredde (6100-003-000)
www.stryker.com 6100-109-005 REV B 3-7
7,75 tommer
6 tommer /2 tommer 15,2 cm / 5,1 cm
19,7 cm
Page 94

Indledning
A
B
C
D
E
F
G
H
I
K
L
M
N
P
J
N
M
G
F
F
Specifikationer (Fortsat)
Position ved stød (6100-031-000) +17°
Dansk
DA
Position af bevægelig knæsektion (6100-031-000)
Påkrævet minimumsantal operatører til indladning/
udladning
Anbefalede beslagsystemer
Anbefalet gulv-/bakkehøjde
1
Højde målt fra bunden af madrassen ved sædesektionen til gulvniveau.
2
Standard bundenhed vejet uden valgfrit tilbehør.
Stryker forbeholder sig retten til at ændre specifikationerne uden varsel.
De gule og sorte farver er et proprietært varemærke, der tilhører Stryker Corporation.
Produktillustration
30°
1
Model 638 1 gulvmonteret – Montering i midten, lige
guide
Model 6373 bakkemonteret – Montering i midten, DINguide
Model 6376 gulvmonteret – Montering i midten, lige guide
– Ingen spændebælter i siderne
27 tommer – 31 tommer 68,6 cm – 78,7 cm
3-8 6100-109-005 REV B www.stryker.com
Page 95

Produktillustration (Fortsat)
R
T
U
V
W
X
Y
Z
R
R
V
W
Y
AA
AB
Indledning
Dansk
DA
A Bundramme N
Svinghjulenes styrelåsknap
B
C Fodende R
Udløserhåndtag (grønt) til fodende
D
Udløserhåndtag (rødt) til fodende
E
Håndgreb
F
G Hovedende W
Udløserhåndtag (rødt) til hovedende
H
Bårelejets udløserknap (blå)
I
Bårelejebeslag
J
Indladningshjul
K
Udløserknap (grøn)
L
Udtrækkeligt løftehåndtag (valgfrit) til bund
M
P
T
U
V
X
Y
Z
AA
AB
Kontaktinformation
Kontakt Stryker kundeservice eller teknisk support på: +1-800-327-0770.
Stryker Medical
3800 E. Centre Avenue
Portage, MI 49002
USA
Transporthjul
Hjullåse
Udtrækkelige løftehåndtag til båreleje
Udløsergreb til bevægelig knæsektion
Løftehåndtag til bevægelig knæsektion
Rullehjul
Valgfri DIN fastholdelsesstift
Bårelejeramme
Udløsergreb til sengehest
Støddæmper i bårens omkreds
Ryglæn
Udløserhåndtag til ryglænsjustering
Du finder betjenings- eller vedligeholdelsesvejledningen online ved at gå ind på https://techweb.stryker.com/.
Hav serienummeret (A) på dit Stryker-produkt klart, når du ringer til Stryker kundeservice eller teknisk support. Inkluder
serienummeret i al skriftlig kommunikation.
www.stryker.com 6100-109-005 REV B 3-9
Page 96

Dansk
A
DA
Indledning
Serienummerets placering
Fig. 3-1: Serienummerets placering
Fremstillingsdato
Fremstillingsåret er de to første tal i serienummeret.
3-10 6100-109-005 REV B www.stryker.com
Page 97

Opsætning
FORSIGTIG
• Forkert brug af produktet kan medføre, at patienten eller operatøren kommer til skade. Produktet må kun betjenes
som beskrevet i denne manual.
• Hverken produktet eller dets komponenter må modificeres. Ændring af produktet kan forårsage uforudsigelig drift,
hvilket kan medføre personskade på patient eller operatør. Ændring af produktet vil også ugyldiggøre garantien.
Fjern alle forsendelses- og pakningsmaterialer fra produktet inden brug.
Pak alle kasser ud, og undersøg alle genstande med henblik på korrekt funktion. Kontrollér, at produktet fungerer
korrekt, inden det tages i brug.
Sørg for at patientrummet i køretøjet, hvor produktet skal anvendes har:
• Afrundet bagkant til indladning af produktet.
• Et fladt gulv, der er stort nok til at rumme det sammenfoldede produkt og bårebeslagssystem.
• Stryker Model 6373, 6376 eller 6381 bårebeslagssystem (ikke inkluderet).
• En indladningshøjde af gulv eller bakkesystem mellem 68,6 cm og 78,7 cm.
Bemærk: Ryd altid løse genstande eller snavs væk fra gulvet i patientrummet. Løse genstande eller snavs kan
forårsage, at båren ikke kan rulle jævnt eller forstyrre bårebeslagets funktion.
Modificér evt. køretøjet, så det passer til båren. Båren må ikke modificeres.
Denne manual skal betragtes som en permanent del af produktet, og den skal opbevares sammen med produktet, selv
hvis dette senere sælges.
Stryker tilstræber hele tiden forbedringer i produktdesign og -kvalitet. Selv om denne manual indeholder de mest
aktuelle produktoplysninger, som er tilgængelige på indeværende tidspunkt, kan der være mindre uoverensstemmelser
mellem dit produkt og denne manual. Hvis du har spørgsmål, bedes du kontakte Stryker kundeservice eller teknisk
support på +1-800-327-0770.
Dansk
DA
www.stryker.com 6100-109-005 REV B 3-11
Page 98

Dansk
DA
Installation
Installation af bårens beslag
Stryker Model 6373, 6376 og 6381 bårebeslagssystemer er kun kompatible med bårer, der opfylder
installationsspecifikationerne. Bårer, der opfylder disse specifikationer, inkluderer:
• Stryker Model 6100 M-1 Roll-In-system
• Ferno-Washington Model X-2
ADVARSEL
• Udskift altid bårebeslaget, hvis det har været involveret i en ulykke for at undgå risikoen for tilskadekomst pga.
produktskader.
• Sørg altid for, at alle bårer opfylder installationsspecifikationerne for Stryker-bårens beslagsystem.
FORSIGTIG
Bårebeslagssystemet skal installeres af kvalificeret personale for at være i overensstemmelse med denne standard.
0,635 cm tykke stålplader (eller tilsvarende) er påkrævet under monteringsfladen (ambulancens gulv eller bakkesystem)
på alle monteringssteder.
Flere oplysninger om Stryker bårebeslagssystemer kan ses i de relevante bårebeslags betjenings- og
vedligeholdelsesmanualer.
1
1
2000 modelår eller tidligere. Stryker er ikke ansvarlig for ændringer i specifikationer af andre producenters bårer.
Fig. 3-2: Model 6376: Eksempel 2A
3-12 6100-109-005 REV B www.stryker.com
Page 99

Installation
Installation af bårens beslag (Fortsat)
Fig. 3-3: Model 6376: Eksempel 2B
Dansk
DA
Fig. 3-4: Model 6373: Eksempel 2C
Fig. 3-5: Model 6373: Eksempel 2D
www.stryker.com 6100-109-005 REV B 3-13
Page 100

Dansk
DA
Drift
Betjeningsvejledning
ADVARSEL
• Forkert brug af produktet kan medføre, at patienten eller operatøren kommer til skade. Produktet må kun betjenes
som beskrevet i denne manual.
• Lad ikke utrænet personale hjælpe med at betjene produktet.
• Placér altid hænderne korrekt på håndtagene. Ved indladning eller udladning eller ændring af bårens højdeposition
skal alle hænder holdes væk fra de røde sikkerhedsbøjlers led.
• Kør ikke på bårens bund.
• Undlad at transportere båren sidelæns for at undgå, at den vælter. Transporter altid båren i en sænket position med
hovedenden eller fodenden forrest for at mindske risikoen for, at den vælter.
• Hold altid hænder, fingre og fødder væk fra bevægelige dele. Vær forsigtig, hvis hænder og fødder anbringes nær
stængerne i bunden, mens båren hæves eller sænkes.
FORSIGTIG
Fjern altid eventuelle forhindringer, der kan komme i vejen og forårsage skade på operatøren eller patienten, inden
produktet tages i brug.
• Produktet må kun betjenes som beskrevet i denne manual.
• Læs alle etiketter og instruktioner på produktet før ibrugtagningen.
• Ændring af højdepositioner og indladning af båren skal øves, indtil man har sat sig fuldstændigt ind i, hvordan
produktet betjenes.
• Der skal altid være mindst to uddannede operatører om at ind- eller udlade en båre med en patient. Der skal være
to operatører til stede, når der er en patient på båren. Stryker anbefaler, at begge operatører befinder sig i
fodenden for at mindske den belastning, som den enkelte operatør udsættes for. En eller to operatører kan løfte fra
fodenden af båren.
• Båren må ikke justeres, køres eller anbringes i køretøjet uden først at informere patienten. Bliv hos patienten og
sørg for, at produktet konstant er under kontrol.
• Du kan transportere båren i en hvilken som helst position. Stryker anbefaler, at operatørerne transporterer
patienten i den laveste komfortable position, når båren skal manøvreres.
• Benyt kun hjullåsene, når en patient overføres, eller når der ikke er nogen patient på produktet.
• Brug ikke en hjullås, når en person befinder sig på produktet, eller hvis produktet flyttes for at undgå, at det vælter.
• Brug altid alle seler til at fastgøre patienten på produktet. En patient, der ikke er fastgjort med sele, kan falde ud af
produktet.
• Brug korrekt uddannet hjælpepersonale til at styre båren, når det er nødvendigt.
Korrekte løfteteknikker
Ved løft af produktet og patienten skal disse korrekte løfteteknikker følges, så risikoen for skader undgås:
• Hold hænderne tæt ved kroppen
• Hold ryggen ret
• Koordinér dine bevægelser med din partners
• Løft med benene
• Undgå at vride kroppen
3-14 6100-109-005 REV B www.stryker.com
 Loading...