

User Manual
Digital Interactive Terrestrial mhp
Receiver SRT 5510 MHP
Picture similar

PART 2 • English
TABLE OF CONTENTS
1.0 INTRODUCTION 2
1.1 Safety Instructions 2
1.2 Storage 2
1.3 Equipment Set-up
1.4 Features & Accessories
2.0 CONNECTIONS 4
2.1 Connection to Terrestrial Antenna 4
2.2 Connecting to TV & VCR
2.3 Connecting to a Digital Audio Amplifier
2.4 Connecting to PC 4
3.0 YOUR RECEIVER
3.1 Front Panel 4
3.2 Rear Panel 5
3.3 Remote Control 6
4.0 STARTING UP
4.1 Language Setting
4.2 Channel Setting
5.0 USAGE
5.1 Your Guide 9
6.0 YOUR PREFERENCES
6.1 Display options
6.2 Language options 10
6.3 Sort Channels
6.4. Timer
7.0 INSTALLATION
7.1 System Setup 11
7.2 PIN Changing
7.3 Channel Search
7.4 Time Setup
7.5 Factory Settings
7.6 Internet Setup 12
8.0 DECODER STATUS
8.1 Signal level 13
8.2 System Info 13
8.3 Decoder Upgrade 13
8.4 Loader Status
8.5 Help
A.1 TECHNICAL SPECIFICATIONS 14
A.2 TROUBLESHOOTING 15
7
8
10
11
13
3
3
4
4
4
7
7
10
10
10
11
12
12
12
13
13
English
1

1.0 INTRODUCTION
1.1 Safety Instructions
DO NOT INSTALL YOUR RECEIVER:
n In a closed or poorly ventilated cabinet; directly on top of or under any another equipment; on
a surface which might obstruct the ventilation slots.
DO NOT EXPOSE THE RECEIVER OR ITS ACCESSORIES:
n To direct sunlight or near any other equipment that generates heat; to rain or intense
moisture; to intense vibration and to any shock which may cause permanent damage to your
receiver or to any magnetic objects, such as loudspeakers, transformers, etc.
n Do not use a damaged power cord. It may cause a fire or an electrical shock. Do not touch a
power cord with wet hands. It may cause an electric shock.
n Never open the cover. It is dangerous to touch the inside of the receiver due to high voltage
currents and possible electrical hazards. Your warranty will be void if the receiver has been
opened.
n When the receiver is not used for a long period of time, you should unplug the power cord
from the wall socket.
n Do not use alcohol or ammonia based liquids to clean the receiver. If you wish, you may clean
your receiver with a soft lint-free cloth slightly made damp with a mild soap solution, only
after disconnecting from the mains voltage supply. Make sure no foreign objects fall through
the ventilation slots because this could cause fire or an electric shock.
n Do not place any objects on top of the receiver because this might prevent proper cooling of
the components inside.
PART 2 • English
Safety Precautions
n Do not open the receiver cover, as you will be exposed to a shock hazard. It will also void your
warranty. Refer all maintenance or servicing to suitably qualified personnel
n When you are connecting the cables, be sure that the receiver is disconnected from the
mains supply voltage. Wait a few seconds after switching off the receiver before you move the
receiver or disconnect any equipment.
n It is a necessity that you only use an approved extension and compatible wiring that is
suitable for the electrical power consumption of the installed equipment. Please ensure that
the electrical power supply corresponds with the voltage on the electrical identification plate
at the back of the receiver.
If the receiver does not operate normally even after strictly following the instructions in this user manual,
it is recommended to consult your dealer.
1.2 Storage
Your receiver and its accessories are stored and delivered in a packaging designed to protect against
electric shocks and moisture. When unpacking it, make sure that all the parts are included and keep the
packaging away from children. When transporting the receiver from one place to another or if you are
returning it under warranty make sure to repack the receiver in its original packaging with its accessories.
Failing to comply with such packaging procedures could void your warranty.
2

PART 2 • English
1.3 Equipment Set-up
We recommend you consult a professional installer to set up your equipment. Otherwise, please follow
the instructions below:
n Refer to the user manual of your TV and your antenna.
n Make sure that the SCART cable and outdoor components are in a good condition and the
SCART connections are well shielded
This manual provides complete instructions for installing and using this receiver. The following symbols
will serve as follow.
WARNING: Indicates warning information.
TIPS Indicates any other additional important or helpful information.
MENU Represents a button on the remote control or the receiver (Bold Character)
Move to Represents a menu item within a window. (Italic Character)
1.4 Features & Accessories
n For all digital Free-To-Air TV and Radio programmes (with outdoor- or indoor* antenna)
n Quick installation to TV set and antenna
n Picture in DVD quality
n Audio in CD quality (Dolby digital)
n Interactive mhp receiver with Ethernet connector
n Multimedia Services with mhp Multitext (Multimedia Home Platform
n Embedded Smart card reader for future encrypted services.
n Electronic Programme Guide (EPG) for present and following event information and
programme information for up to 7 days
n Timer function, e.g. for starting recording automatically at a chosen date and time
n Multilingual OSD on screen display menu in German and English
n 1 000 channels memory capacity
n Supporting teletext and subtitling
n Infrared Sensor input - to connect external IR sensor (optional accessory)
n Automatic and manual channel scan options
n Software Update via Terrestrial Service (OTA)
* Depending on local signal conditions
English
Accessories:
n User’s Manual
n 1 Remote control unit
n Batteries
NOTE: The batteries should not be recharged, disassembled, electrically short-circuited or be mixed or
used with other types of batteries.
3
PART 2 • English
2.0 CONNECTIONS
2.1 Connection to Terrestrial Antenna
To receive the broadcast signal, the terrestrial antenna cable should be connected to the ANT IN
connector at the back of the receiver.
2.2 Connecting to TV & VCR
The TV set should be connected with the receiver through a SCART cable. This terrestrial receiver may
also be operated together with a VCR using the loop through function. The loop-through function of this
terrestrial receiver is active when the receiver is powered off. As soon as the VCR is turned on, its video
and audio signals are looped through the terrestrial receiver.
2.3 Connecting to a Digital Audio Amplifier
The Digital Audio Amplifier is connected with the receiver from the S/PDIF connector.
2.4 Connecting to PC
The RS-232 connector on the receiver is to connect to the PC using a serial cable. This serial cable can
be used to connect your PC with your receiver, and allows you to download new versions of software to
your receiver.
3.0 YOUR RECEIVER
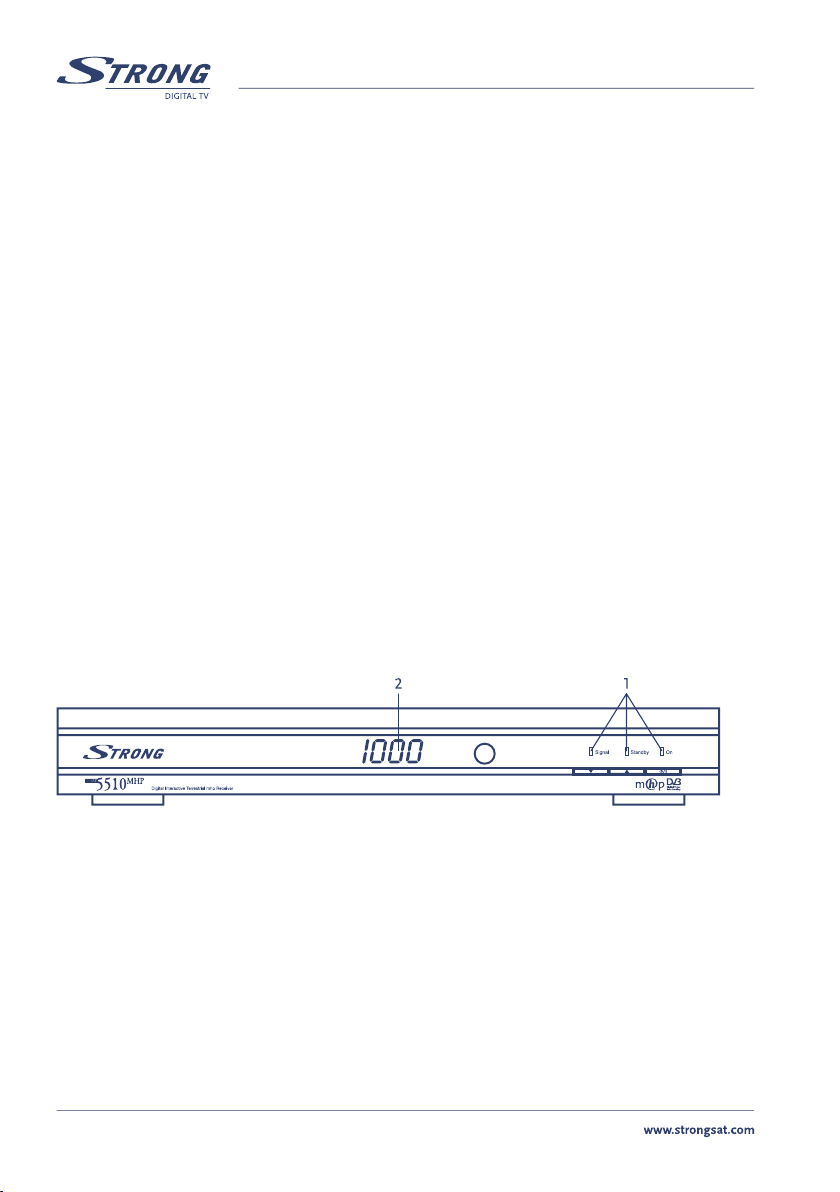
3.1 Front Panel
1. Mode indicator
ON
Standby
Signal
2. 4 Digits display
In STAND-BY mode indicates current time.
In AWAKE mode indicates current channel number
4
PART 2 • English
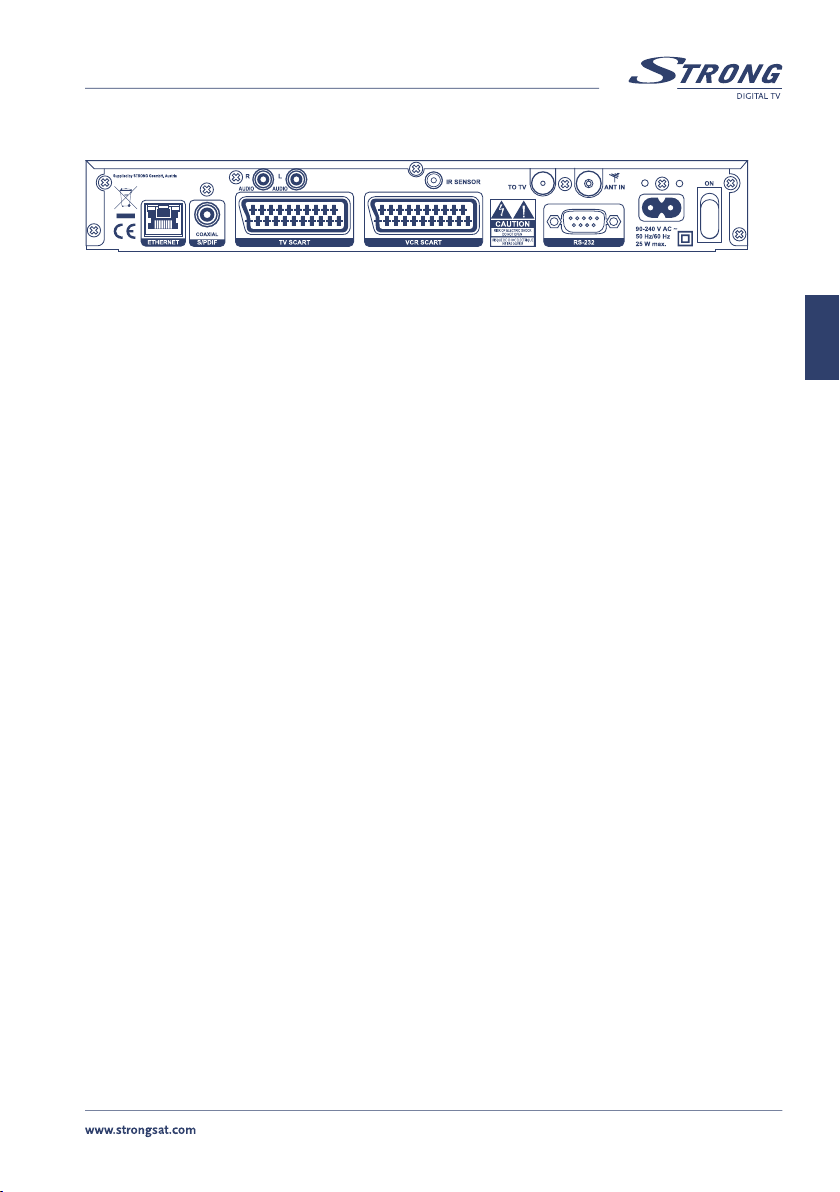
3.2 Rear Panel
1. ANT IN To connect a digital aerial antenna for receiving broadcasting signal.
2. TO TV To connect a TV set to receive analogue channels or to
connect an
extra receiver.
3. TV SCART To connect your receiver with your TV set using a SCART cable.
4. VCR SCART Use this connector to connect your receiver to your video recorder
using a SCART cable. Your video signal will now be .looped through
the receiver and your video recorder to your TV set.
5. RS-232 Serial Port Connect a PC to your receiver to download new software versions.
6. S/PDIF Digital audio output Use this coaxial output to connect your receiver to the
input of your digital audio amplifier.
7. Audio L/R To connect your receiver to your TV set or amplifier using RCA cable.
8. Power Cord Your receiver requires a current of 90~240V AC (Auto-selectable),
50~60Hz +/-5%. Make sure to check the power specification before
connecting your receiver to the wall outlet.
9. IR Sensor
10. Power ON/OFF Switch
English
5

3.3 Remote Control
Turns the receiver On/Off.
Mutes audio output of the receiver.
TV/RAD Toggle between TV or RADIO mode
EPG Shows the EPG (Electronic Program Guide) during No-menu
state only
V+ / V- Use to increase or decrease the receiver volume level.
PROG+ / PROG-
pq Menu On: Moves the cursor up/down
tu Menu On: Change the setting values in specific Menu item.
Shows information of the current channel
OK Activates the highlighted menu item. Displays a channel list
according to TV /Radio Mode
MENU
0~9
EXIT Exits from the menu or sub-menu and cancels the
progressing function if applicable.
Page up and down in menu list.
Opens the main menu.
Channel selection
PART 2 • English
6

PART 2 • English
4.0 STARTING UP
Ensure that your receiver is correctly connected to your television and DVB-T antenna, and that your
terrestrial signal is of good quality. (If you are not sure about this then ask your local STRONG dealer to
check your installation or terrestrial signal).
4.1 Language Setting
The launch of the Receiver for the first time could last around one minute. Your screen will be black for of
the time during this. After that you are asked to set your language of the OSD. Press pq to select your
desired language and OK for confirmation and the next menu screen.
4.2 Channel Setting
This operation allows setting of the channels. But first scroll down to “Amp. Power” by pressing pq
and select “Yes” if you are using an active antenna, which needs to be powered by the receiver. If you are
not sure about this ask your local STRONG dealer. You’ll find the following submenus in Menu “
Setting”: Install, Update, Add One Channel, Antenna Power.
1.
Install: it is recommended to use this option in case of first time installation. Highlight this
option by pressing pq and press the OK button. The receiver will start an automatic channel
scan to find the DVB-T channels that are available in your area.
Update: This function allows to re-allocate the channels list and to add channels without
2.
modifying the positions of the actual channels. In case of first time installation this function
involves as function “First Installation Search”.
Channel
English
3.
Add One Channel: This function allows searching for specific channels and frequencies. This is
an option recommended for experienced users who know the channel number, frequency and
the bandwidth.
Type in the frequency with the numeric keys. Select “
pressing tu and press OK to start searching.
Press OK for saving the channels. Then the channel which is programmed on position 1 will be seen. In the
event, that no channel could be found, change the direction of your antenna and repeat “Install”.
Bandwidth” by pressing pq and the bandwidth by
7

PART 2 • English
5.0 USAGE
In the main menu you’ll find all important settings and functions. You get there by pressing the MENU
button on your remote control. By pressing BACK you’ll always get back to the previous menu.
Your Guide
TV Channels
Radio Channels
Application Channels
Stored Services
Program Guide
Your Preferences
Display options
Time and Date
Channel Number
Channel Banner Timeout
Volume Bar
Application Autostart
Language options
On-Screen Language
First Audio Language
Second Audio Language
First Subtitle Language
Second Subtitle Language
Dolby Digital
Sort channels
TV Channels
Radio Channels
Application Channels
Timer
Enable Timer
Channel List
Channel Name
Start Date
Start Time
End Time
Frequency
Installation (PIN Input necessarily)
System Setup
TV Aspect Ratio
Display Format
TV SCART Output
VCR SCART Output
Amp. Power
OTA in standby
Chance PIN Code
8

PART 2 • English
Channel Search
Install
Update
Add One Channel
Time Setup
Factory Settings
Internet Setup
Decoder Status
Signal Level
System Info
Decoder Upgrade
Loader Status
Help
Using Your Box
Using Your PIN
MHP
Software Update
5.1 Your Guide
5.1.1 TV Channels
Select “TV channels” with the buttons pq and press OK. Select a channel with the buttons pq and
press OK. The selected channel will be shown.
5.1.2 Radio Channels
Select “Radio Channels” with the buttons pq and press OK. Choose the channel with the buttons pq
and press OK for confirmation. The selected channel will be shown.
English
5.1.3 Programme Guide (EPG)
EPG (Electronic Program Guide) is transmitted by broadcasters to display information about program
content. Select “Programme Guide” with the buttons pq and press OK. To access the EPG function
directly during TV/Radio, press the key EPG on your remote control. It will open the EPG which contains
the following information:
n Actual date and hour
n Actual programme
n Actual and following programs (if available)
n Title of the programme (if available)
For scrolling, use
pq. For selecting a programme, use tu. You’ll see start/end time and title of
programme. If you want watch the selected channel press OK. Press OK to exit the EPG.
9

PART 2 • English
6.0 YOUR PREFERENCES
This menu contains the personal settings. Display options, Language options, Sort channels.
6.1 Display options
In this menu you can modify the layout of the on-screen information banner and the settings of the
applications MHP. Select “Display options” in “Your Preferences” and press OK.
The following parameters can be set:
Time and Date: date and time to be visible or non-visible
Channel number: channel number to be visible or non-visible
Channel banner timeout: duration of the presence of the banner during channel changing
Volume Bar: volume bar to be visible or non-visible
Application Autostart: this parameter is used in channels that contain MHP applications. It allows
the receiver to automatically or manually launch the MHP applications. For
automatically set the parameter to “YES”, for the manual to “No” and will be
launched by pressing OK on the remote control.
6.2 Language options
Select “Language options” in menu “Your preferences” and press OK. You can select the language (German
or English) for the On-Screen language, first and second audio language, first and second subtitle
language and you can activate/deactivate Dolby Digital.
6.3 Sort Channels
This menu allows you to sort the the position of the TV and Radio channels. The procedure for both lists
is identical.
Select “Sort Channels” in menu “Your Preferences” and press OK. Select TV or Radio Channels with pq
and press OK for confirmation.
To modify the position:
Select the channel you want to move by pressing the RED key on your remote control. Move the channel
to the desired position using the keys pq and press OK to confirm the new position. Press the YELLOW
key to escape and restore previous settings.
6.4. Timer
This menu offers you the opportunity to start the receiver at a chosen time and date automatically for
example to record your preferred TV or Radio Program on your recorder when you’re not at home. Set
“Enable Timer” with the tu keys to “active” and move with the pq keys up and down. Set the “Channel
List” and “Channel Name” by using the tu keys. Use the numbered buttons to type in the ”Start Date”,
“Start Time” and “End Time”. In “Frequency” you can choose how often the timer should be activated:
“once”, “daily” or “weekly”. The “Duration” shows you for how long the “Timer” is activated. To confirm
the settings press OK.
10

PART 2 • English
7.0 INSTALLATION
The change of some menu settings can jeopardize the correct operation of the receiver. We recommend
therefore, to read this section of the manual carefully before proceeding. For this section you’ll need the
safety code (PIN). The factory setting is “1 2 3 4”.
7.1 System Setup
7.1.1 TV Aspect Ratio
This function allows you to adjust the format to your TV screen (4:3 or 16:9).
7.1.2 Display Format
This function allows the receiver to adapt automatically to the picture format.
Ignore: the receiver adjusts the picture automatically to the TV screen by compressing.
Letter Box: The receiver extends the picture with black bars.
Pan-Scan: The receiver adjusts the picture vertically and horizontally.
7.1.3 TV SCART Output
This function allows you to set your TV to RGB, CVBS (video-composite) or S-VHS.
7.1.4 VCR SCART Output
This function allows you to set your VCR to CVBS (video-composite) or S-VHS.
English
7.1.5 Amp. Power
This function enables to feed the antenna through your receiver. The receiver emits from the income
connector 5 Volts “aerial” tension.
7.1.6 OTA in Standby
This function allows you to search for Software Updates only in Standby Mode.
7.2 PIN Changing
The PIN (Personal Identification Number) is a four-digit code that is used for locking/unlocking, e.g. with
the parental control feature. Factory set is “
Enter the old PIN code (factory setting is “1 2 3 4”) and the new one. After confirmation by re-entering
the new PIN, you’ll return to the Installation menu.
Your Personal PIN Code: _ _ _ _ _ _ _ _ _ _ _ _ _ _
To disable the function, enter as new PIN: “
more.
1 2 3 4”.
0 0 0 0” and entering the PIN code will not be needed further
11

PART 2 • English
7.3 Channel Search
This function allows you search for channels. Several ways are possible: Install, Update, Add one channel.
7.3.1 Install
First Time Search allows the receiver to search for all DVB-T available TV and Radio channels.
Select in “Channel Search” the submenu “Install” and press OK. Search starts automatically. The TV and
Radio channels founded are shown. Press OK to save the settings.
7.3.2 Update
With this function you can manually delete single and/or all channels and rescan new ones.
Select in “Channel Search” the submenu “Update” and press OK. Search starts automatically. The
founded TV and Radio channels are shown. Press OK to save the settings.
7.3.3 Add One Channel
This is an option for experienced users in order to load single channels as the channel frequency and the
bandwidth needs to be known.
Select in “Channel Search” the submenu “Add One Channel” and press OK. Enter the frequency, select
“Bandwidth” with the buttons tu and pq and press OK to start the search. The founded TV and Radio
channels are shown. Press OK to save the settings.
7.4 Time Setup
The system uses GMT (Greenwich Mean Time) as a default. To change the time, apply the following
steps:
Select in menu “Time Setup” the desired time zone with the buttons tu and press OK.
7.5 Factory Settings
Be careful when using this function, because it will erase all the data and parameters you may have set
earlier to your receiver. Once you have made a Factory Reset you will have to re-install your preferences
and re-scan your channels.
Select in menu “Factory Settings” YES with the buttons tu and press OK. You’ll get back to factory
default settings and settings can be set as for your first time installation.
7.6 Internet Setup
Within “Internet Setup” you can choose between “None” or “Ethernet”. If you select “Ethernet” by
pressing OK you can set the configuration to “Automatic” or “Manual” mode. Using “Manual” you
need to type in several IP numbers. Move with the pq keys to the following items: IP-Number, Mask,
Gateway, Primary DNS and Secondary DNS. Use the numbered keys for typing the IP numbers. For
further details concerning the IP addresses please refer to the manual of your router or the website of
your internet provider.
12

PART 2 • English
8.0 DECODER STATUS
8.1 Signal level
This menu shows the intensity and quality signal of the selected channel. The taller the bar level, the
better is the level and quality of the signal
Select a channel or frequency in “Signal Level” and press OK.
8.2 System Info
This menu shows the information of the MHP software version.
In menu “Decoder Status” select “System info” with the buttons pq and press OK.
8.3 Decoder Upgrade
This menu allows the updating of the software of the receiver by OTA (Over the Air).
Select in “Decoder Status” the submenu “Decoder Upgrade” and press OK. Select “Automatic” or
“Manual” as search modus and press OK. By selecting automatic, the receiver will start searching
automatically for new software.
You will be notified, if there is no newer software version available. You will be asked for confirmation if a
newer software version is available.
English
8.4 Loader Status
This menu shows the current firmware version and serial number of the receiver.
8.5 Help
This menu gives information in using your receiver, PIN code; MHP as well as Software Update.
Select “Help” and then the desired information with the keys pq and confirm with OK.
13

A.1 TECHNICAL SPECIFICATIONS
Demodulation
Demodulation: COFDM/16 QAM, 64 QAM
Transmission spectrum: 2 K, 8 K
Tuner
Frequency range: 177.5 ~ 466.0 MHz; 474.0 ~ 858.0 MHz
Bandwidth 8 / 7 MHz
Video Decoder
MPEG-2 MP@ML
Data rate: up to 15 Mbits/s
Video format: 4:3, 16:9
Audio Decoder
MPEG MusiCam Layer I & II
Sampling rate: 32, 44.1, 48 kHz
Audio mode: Mono, Stereo, Dual Channel
System and Memory
32 Bit RISC, MHP 1.1.2
Flash Memory: 48 MB
SDRAM: 64 MB
PART 2 • English
Connectors
ANT Input - IEC Female
TO TV - IEC Male
2 SCARTs: TV (RGB/CVBS/S-VHS), VCR (CVBS/S-VHS)
2 RCA (Audio Links und Rechts)
S/PDIF coaxial output, Smart card reader
Ethernet for interactivity: Standard RJ-45 Socket
Data Interface- serial port: RS-232, 9-Pin D-Sub Male type
External Infrared sensor
General Data:
Supply Voltage: 90 ~ 240 V AC, 50 / 60 Hz
Power Consumption (max): 25 W
Standby Power Consumption: 7.5 W
Operating Temperature: + 5 °C ~ +45 °C
Storage Temperature: - 40 °C ~ +50 °C
Operating Humidity Range: 20 ~ 80 %
Weight: 1.1 Kg
Size (W x D x H) in mm: 280 x 205 x 45
14

PART 2 • English
A.2 TROUBLESHOOTING
Occasionally receivers can hang-up (just like with a PC) so you are recommended to reset the receiver by
disconnecting it from mains power. Wait 30 seconds and connect to mains power again and now check if
the unit is working as expected. If the receiver does not work properly after checking the trouble shooting
section, please contact the dealer. Don’t open the receiver cover, it may cause an electrical shock due to
high current voltage and the warranty of your receiver will be void if the receiver has been opened.
Symptoms Cause Solution
The green/red lights on front
panel do not light up
No picture and sound TV is set to wrong channel Check if the TV is switched on and
The power cord is not plugged in
Problem in cable connections
between receiver and TV
Receiver “hang-up” Switch off receiver; disconnect the
Check that the power cord is
plugged in to the wall outlet.
set your TV to the correct EXT / AV
channel
Check if the scart and/or RF cable is
connected correctly to the TV and to
the BACK of the receiver
main power cord of the receiver
from the 220V main power. After 30
seconds reconnect to the main power
and check if it is working properly
English
No sound The receiver or TV is in
No sound or picture
No picture
The receiver displays the
message “No or bad signal”
during bad weather conditions
The receiver displays the
Message “No or bad signal”
The remote control is not
working
“MUTE” mode
Problem in SCART cable
connections between receiver
and TV
Antenna is not strong enough Check the signal strength with a
This is normal, the bad
weather is interfering the
signal of the antenna
Wrong parameters set in the
menu
The batteries of the remote
control are not inserted or
exhausted
Press the MUTE button on the
remote control unit of your receiver
and TV
Firmly press the SCART connectors
on the backside of the TV and
receiver. Replace the SCART cable
spectrum analyzer and adjust your
antenna correctly
Once the weather is better the
picture will appear. If not: check if
there is no snow on your antenna
Check settings of antenna and
Channel set up menu
Check whether the batteries are
inserted correctly in your remote
control. Check the batteries, and if
they are exhausted, replace them.
15

PART 2 • English
16
 Loading...