

Page 1
SP-PT237
Page 2

HAMMER DRILL 1/2”
Assemble and Operating instructions
Certificate Number: E222615
GRNERAL SAFETY INSTRUCTIONS
WARNING! Read and understand all instructions. Failure to follow all instructions listed below may
result in electrical shock, fire and/or serious personal injury.
SAVE THESE INSTRUCTIONS
WORK AREA
~Keep your work area clear, clean and well lit. Cluttered work surfaces and dark areas invite accidents.
~Keep people not involved in the work, especially children away from the work area while operating a
power tool. Distractions can cause you to lose control of the tool.
~Do not operate power tools in an unsafe environment such as explosive atmosphere, flammable
liquids, gases and dust. A spark created by a power tool may ignite the fumes or dust.
ELECTRICAL SAFETY
~Double insulated tools are equipped with a polarized plug(one blade is wider than the other.) This plug
will fit into a polarized outlet only one way. If it does not fit fully in the outlet, reverse the plug and try
again. If it still does not fit fully, contact a qualified electrician to install a polarized plug. Do not modify
the plug in any way. Double insulation eliminates the need for the three wire grounded power cord and
grounded electrical system.
~ Avoid body contact with grounded surfaces such as radiators, pipes ranges and refrigerators. There is
an increased risk of electrical shock if your body is grounded.
~ Do not operate power tools in the rain or wet conditions. Water entering a power tool increases the
risk of electrical shock.
~Do not stress the power cord. Never carry the power tool by the cord or disconnect the plug from the
receptacle by yanking on the cord. Keep cord away from sharp edges, heat, solvents and oil.
Replace damaged cord immediately. Damaged cords increase the risk of electrical shock.
~Use outdoor extension cords when operating the power tool outside .Outdoor power cords are marked
"W-A" or "W" and are rated for outdoor use. These cords reduce the risk of electrical shock.
PERSONAL SAFETY
~Dress appropriately. Do not wear loose clothing or jewelry. Keep long hair in place and contained.
Keep clothing, hair and gloves away from moving parts. Loose clothing, jewelry and hair can be
snagged in moving parts.
~ Use common sense, stay alert and watch what you are doing while operating a power tool. Do not
use tools while under the influence of alcohol, medication, or drugs. Keep focused on the work at hand
while using a power tool to prevent personal injury.
~ Make sure the power switch is in the "OFF" position before plugging it into the receptacle.
This will prevent accidental starting. Carrying tools with your finger on the switch or plugging in the
tools with the switch in the “ON” position invites accidents.
~Remove adjusting tools such as wrenches or keys before turning the tool on. A wrench or key left
attached to a rotating part will fly off and may cause personal injury.
Page 3

~Do not overreach while operating a power tool. Keep proper footing and balance at all times. Good
balance and solid footing enables better control in unexpected situations.
~Always wear appropriate safety equipment. Always wear eye protection while operating a power tool.
Use appropriate dust respirators, hearing protection, hard-hat, face shield or safety shoes as dictated by
the work and tool.
TOOL USE AND CARE
~ Secure the work piece with clamps or other practical methods to provide a secure work platform.
Holding the work by hand or against your body is not secure and may lead to loss of control.
~Use the correct tool for the work. The proper tool will do the work faster and safer.
~Do not use the tool if the "ON/OFF" switch is not working. Operating a tool that cannot be controlled
by you is dangerous and must be repaired before use.
~Always disconnect the power cord from the electrical outlet before storing the tool, making
adjustments or adding/replacing accessories. This simple prevention will reduce the risk of accidentally
starting the tool.
~ Store the tool in a secure place out of reach of children. A secure storage location will prevent the
unauthorized use by untrained users.
~ Properly maintain tools. Keep all cutting tools sharp and clean. Remove contaminants from the tool
and keep clean. Check for broken parts or binding of moving parts; before use. If damaged, have the tool
serviced before use. Prevent accidents caused by poorly m aintai ned to ols,
~Use only accessories recommended for your model. Accessories suitable for one tool may become
hazardous when used on another tool.
SERVICE
~Tool service mechanical and/or electrical is to be performed only by qualified repair personnel.
Service performed by unqualified personnel may result in a risk of injury.
~When servicing a tool, use only identical replacement parts. Use of unauthorized parts or failure to
follow' maintenance instructions may create a risk of electrical shock or injury.
ADDITIONAL SAFETY INSTRUCTIONS
~Care must be taken when drilling into walls, ceilings or other areas where electrical wires may come
in contact. Do not touch the bit, chuck or other metal parts on the front end of the tool when drilling into
these areas. Hold the tool only by the insulated handle and/or insulated housing to minimize electric
shock.
~Disconnect plug from power supply before changing bits or inspecting or cleaning the tool.
~Do not use dull or damaged bits or other accessories.
~Do not run drill while carrying it at your side.
~Secure drilling surface before drilling; never hold it in your hand or across legs.
~Position the electric cord clear of the bit. Do not operate the drill with a damaged cord.
OPERATION
Your drill is a variable speed hammer drill. A selector switch is located on the top of the drill, which is
used to determine the drilling manner. When the switch is moved to the left, the drill will function in a
normal manner. A spiral symbol will be visible to the right of the switch, if the switch is moved to the
Page 4

right, a hammer symbol will be visible to the left of the switch. The drill now adds an impact function to
the drilling rotation. The impact function greatly speeds up the drilling of cement-based materials such
as mortar, concrete, brick and block. Use this function only with carbide tipped masonry bits designed
for hammer drills. Variable speed drills operate at any speed from 0 to maximum RPM shown on the
name-plate. The pressure you apply to the trigger controls the speed. Apply more pressure to increase the
speed and release pressure to decrease speed. This accurate speed control enables you to drill without
center punching. It also permits you to use the drill as a power screwdriver. Using the knob located in
the trigger switch (speed control button) can control maximum RPM. Rotating the knob counter
clockwise decreases maximum RPM. Rotating the knob in a clockwise direction increases the maximum
RPM. Use this speed control when you need a specific speed and want to use the lock button. The lock
button is located to the right of the trigger switch in the handle. The lock button allows continuous
operation at maximum RPM without holding the trigger. To activate, pull the trigger back, press the lock
button and release the trigger. To stop the drill, pull the trigger and then release finger pressure. This
feature is convenient on long jobs such as sanding or polishing and when using the drill in a drill stand.
WARNING Do not use the lock button on jobs, which require stopping the drill suddenly to prevent
possible loss of control.
The reverse lever over the trigger permits changing the direction of the rotation of the accessory. The
speed control trigger and lock button u ill operate in either direction. Moving the switch to the right
rotates the accessory in a clockwise (forward) manner. Moving the switch to the left changes the rotation
to counter clockwise (reverse). CAUTION To prevent damage to the tool the drill must be completely
stopped before moving the reverse lever.
The auxiliary handle included with your drill is used to provide safe control and ease of operation.
Place the clamp in the desired position on the front housing collar of your drill. Secure the clamp with
the wing nut provided. Be sure to put the depth guide in the hole next to the wing nut before tightening
the wing nut.
The chuck key is located on the power cord and is readily accessible.
To insert bits, open the jaws of the chuck enough to insert the bit. For small bits, insert up to the flutes,
for large bits, insert the bit as far as it will go. Center the bit as you close the jaws by hand. Use the
chuck key for final tightening.
TIPS
You will extend the life of your drill bits and do neater work if you always put the bit in contact with the
work before pulling the trigger. During the operation, hold the drill firmly and exert light, steady
pressure. Too much pressure at low speed will stall the drill. Too little pressure will keep the bit from
cutting and cause excess friction by sliding over the surface. This can be damaging to both drill and bit.
The variable speed control feature eliminates the need for center punches in hard materials. By using a
slow starting speed, you are able to keep the bit from "wandering”. You can increase the speed as the bit
“bites” into the work.
Page 5

Variable speed drills will double as a power screw driver by using screwdriver bits. The technique is to
start slowly, increasing the speed as the screw runs down. Set the screw snugly by slowing to a stop.
Prior to driving screws, pilot and clearance holes should be drilled.
In drilling wood, you will drill a cleaner hole if you ease up on the pressure just before the bit breaks
through the wood. Then complete the hole from the backside.
In drilling metal, there are two rules for drilling hard materials. First, the harder the material, the greater
the pressure. Second, the harder the material, the slower the speed. Here are a Couple of tips for drilling
in metal. Lubricate the tip of the bit occasionally with oil except when drilling in soft metal such as
aluminum, copper, or cast iron. If the hole to be drilled is large, drill a smaller hole first, and then
enlarge to the required size. It's often faster in the long run. Maintain enough pressure to assure that the
bit does not spin in the hole. This will dull the bit and shorten its life.
In drilling masonry, use the hammer function with masonry bits designed for hammering. Be careful in
drilling softer materials such as brick. The drill will penetrate very quickly.
MAINTENANCE
The power cord and drill should be wiped occasionally to prevent deterioration from oil and grease.
Clean the air vent holes with compressed air. If compressed air is not available, clean vent holes with a
brush. This will keep the motor cool and lengthen its life. When using compressed air, wear safety
goggles.
CAUTION Certain cleaning agents and solvents can damage plastic parts. Some of these are, gasoline,
carbon tetrachloride, chlorinated cleaning solven ts, ammonia and household cleaners containing
ammonia. Avoiding use of these and other types of cleaning agents will minimize the probability of
damage.
WARNING All repairs, electrical or mechanical should be done only by trained repairmen. Use only
parts authorized by the manufacturer as replacement parts.
SPECIFICATIONS
1/2 inch Hammer Drill
Voltage: l20Volts 60Hz
Current Draw: 5Amps
No Load Speed: 0 to 2800RPM
HAMMER DRILL 1/2" EXPLOSION DRAWING
Page 6
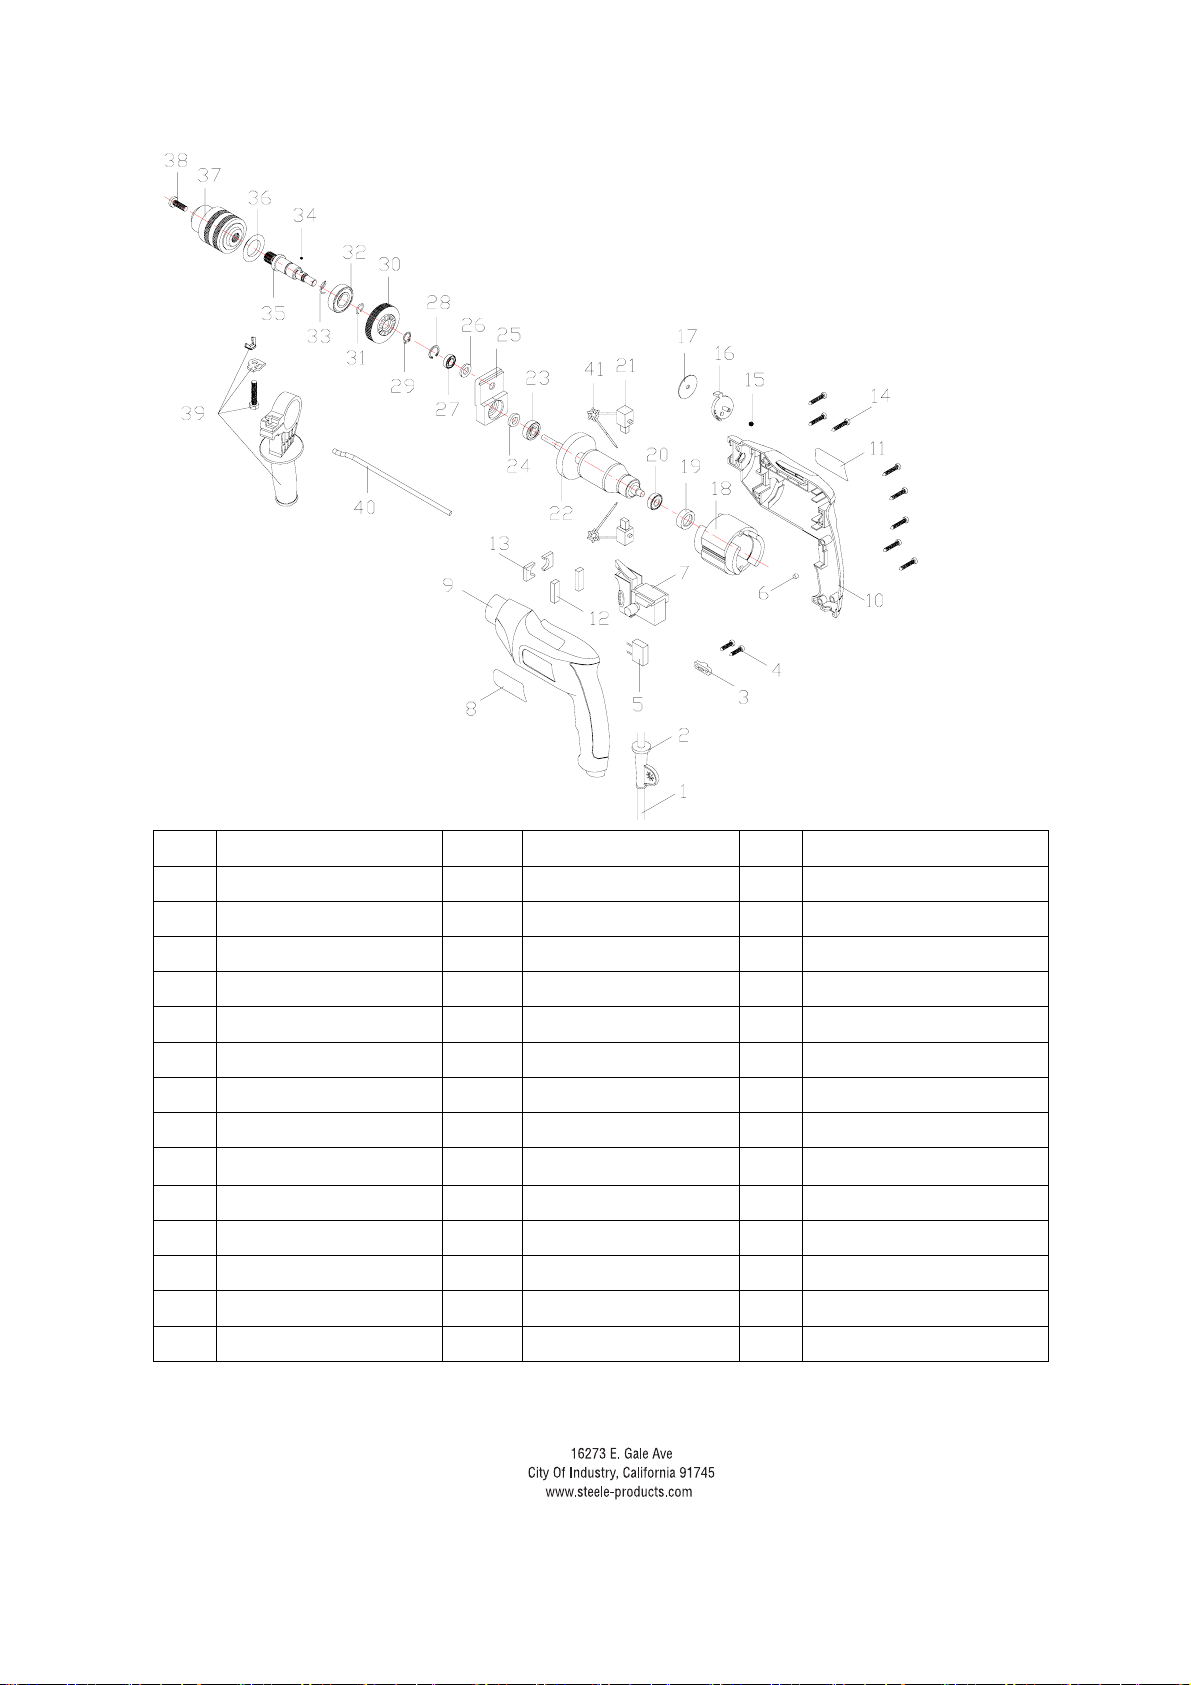
NO. Part Name NO. Part Name NO. Part Name
1 Power cord 15 6mm steel ball 29 Circlip for shaftΦ9 ㎜
2 Rubber sleeve 16 Change knob 30 Big gear
3 Cord clip 17 Flat washer 31 Sanpring
Screw ST4.2×16
4
18 Stator 32 Bearing 6002
5 Electric capacity 19 Bearing holder 33 spring
Rubber pole
6
20 Bearing 607 34 Steel ball 3mm
7 Switch 21 Brush holder 35 spindle
8 Nameplate 22 Rotor 36 Gasket sealer
9 Left half housing 23 Bearing 608 37 chuck
10 Right half housing 24 FeltΦ16×3 38 Sunk head screwM6×24
11 Nameplate 25 Center support 39 Auxiliary handle
12 FeltΦ16×3 26 Felt 40 Depth gauge
13 Felt 27 Bearing 688
14 Screw ST4.2×20 28 SanpringΦ16 ㎜
 Loading...