

Page 1

Page 2
Circular Saw
2
CONTENTS
WARNING! READ AND UNDERSTAND ALL SAFETY PRECAUTIONS IN
THIS MANUAL BEFORE OPERATING. FAILURE TO COMPLY WITH
INSTRUCTIONS IN THIS MANUAL COULD RESULT IN PERSONAL
INJURY, PROPERTY DAMAGE, AND/ OR VOIDING OF YOUR WARRANTY.
STEELEⓇ WILL NOT BE LIABLE FOR ANY DAMAGE BECAUSE
OF FAILURE TO FOLLOW THESE INSTRUCTIONS.
GENERAL SAFETY RULES 3
SPECIFIC SAFETY RULES 5
FEATURES 8
ASSEMBLY 9
OPERATION 10
MAINTENANCE 12
ACCESSORIES 12
SPECIFICATIONS 13
LIMITED WARRANTY 14
Page 3

Owner’s Manual
GENERAL SAFETY RULES
WARNING!
Please read and understand all instructions. Failure to follow all instructions listed below may
result in electric shock, fire and/or serious personal injury.
SAVE THESE INSTRUCTIONS
Work Area
1. Keep your work area clean and well lit. Cluttered benches and dark areas will invite accidents.
2. Do not operate power tools in explosive atmospheres such as in the presence of flammable
liquids, gases, or dust. Power tools create sparks which may ignite the dust or fumes.
3. Keep bystanders, children, and visitors away while operating a power tool. Distraction can
cause you to loose control.
Electrical Safety
1. Power tool plugs must match the outlet.Never modify the plug in any way.Do not use any
adapter plugs with earthed(grounded)power tools.Unmodified plugs and matching outlets
will reduce risk of electric shock.
2. Avoid body contact with grounded surfaces such as pipes, radiators, ranges and refrigerators.
There is an increased risk of electric shock if your body is grounded.
3. Don’t expose power tools to rain or wet conditions. Water entering a power tool will increase
the risk of electric shock.
4. Do not abuse the cord. Never use the cord to carry the tools or pull the plug from an outlet.
Keep the cord away from heat, oil, sharp edges or moving parts. Damaged cords should be
replaced immediately by qualified repair personnel. Damaged cords will increase the risk of
electric shock.
5. When operating a power tool outside, use an outdoor heavy duty extension cord and use in
conjunction with a residual currect device (RCD).
3
Page 4

Circular Saw
6. If operating a power tool in a damp location is unvoidable, use a residual currect device(RCD)
protected supply. Use of an RCD reduces the risk of electric shock.
7. Recommendation for the use of a residual current device with a rated residual current of 30 mA
or less.
Personal Safety
1. Stay alert, watch what you are doing and use common sense when operating a power tool.
Do not use the tool while tired or under the influence of drugs, alcohol, or medication.
A moment of inattention while operating power tools may result in serious personal injury.
2. Dress properly. Do not wear loose clothes or jewellery. Contain long hair. Keep your hair,
clothes, and gloves away from moving parts.
3. Avoid accidental starting. Be sure switch is off before plugging in. Carrying tools with your
finger on the switch or plugging in tools that have the switch on may invite accidents.
4. Remove adjusting keys or wrenches before turning the tool on. A wrench or a key that is
left attached to a rotating part of the tool may result in personal injury.
5. Do not overreach. Keep proper footing and balance at all times. Proper footing and balance
enable better control of the tool in unexpected situations.
6. Use safety equipment. Always wear eye protection. Dust mask, non-skid safety shoes, hard
hat, or hearing protection must be used for appropriate conditions. Ordinary eye or sun
glasses are NOT suitable for eye protection.
Tool Use and Care
1. Use clamps or other practical way to secure and support the workpiece to a stable platform.
Holding the workpiece by hand or against your body is unstable and may lead to loss of
control.
2. Do not force the tool. Use the correct tool for your application. The correct tool will do the
job better and safer at the rate for which it is designed.
3. Do not use the tool if the switch cannot be turned on or off. Any tool that cannot be
controlled with the switch is dangerous and must be repaired before use.
4. Disconnect the plug from the power source before making any adjustment, changing
accessories, or storing the tool. Such preventive safety measures can reduce the risk of
starting the tool accidentally.
4
Page 5

Owner’s Manual
5. Store idle tools out of reach of children or other untrained persons. Tools are dangerous in
the hands of untrained users.
6. Maintain tools with care. Keep the cutting tools sharp and clean. Properly maintained tools
with sharp cutting edges are less likely to bind and are easier to control.
7. Check for misalignment or binding of moving parts, breakage of parts and any other
condition that may affect the tools operation. If damaged, have the tool serviced before
using. Many accidents are caused by poorly maintained tools.
8. Some accessories suitable for one tool may become hazardous when used on another tool.
Please check all accessories to be used are suitable.
Service
1. Tool service must be performed only by qualified repair personnel. Service or maintenance
performed by unqualified personnel could result in a risk of injury.
2. When servicing a tool, use only identical replacement parts. Follow instructions in the
maintenance section of this manual. Use of unauthorized parts or failure to follow
maintenance instructions may create a risk of electric shock or injury.
SPECIFIC SAFETY RULES
Warning: Keep hands away from the cutting area and blade. NEVER place your hands behind the saw
blade since kickback could cause the saw to jump backwards over your hand. Keep your body
positioned to either side of the saw blade.
SAVE THESE INSTRUCTIONS
1. Check the lower guard for proper closing before each use. If the saw is accidentally dropped,
the lower guard may be bent. Raise the lower guard with the lower guard lever and make
sure it can move freely and does not touch the blade or any other parts in all angles and
depths of cutting. Do not operate the saw if the lower guard does not move and close freely.
Never clamp or tie the lower guard into the open position.
2. Adjust the cutting depth to the thickness of the workpiece.Less than a full tooth of the blade
teeth should be visible below the workpiece.
3. Never hold piece being cut in your hands or across your leg.Secure the workpiece to a stable
platform.It is important to support the work properly to minimize body exposure,blade
binding,or loss of control.
5
Page 6

Circular Saw
4. Hold tool by insulated gripping surfaces when performing an operation where the cutting
tool may contact hidden wiring or its own cord. Contact with a “live” wire will make
exposed metal parts of the tool “live” and shock the operator.
5. Always observe the lower guard to see if it covers the entire blade before placing the saw
on the bench or floor. Please pay attention to the time it needs to take for the blade to stop
after released the switch.
6. When operating the saw, keep the cord away from the cutting area and position so that it
might be caught by the work piece during the cutting operation.
7. Keep your second hand on the motor housing or auxiliary handle, not close to the blade.
Do not reach underneath the work or attempt to remove the cutting material when the blade
is still moving.
8. It is important to support the work properly and to hold the saw firmly to prevent from loss
of control, which might cause personal injury. NEVER hold the pieces for cutting in your
hands or across your legs.
9. Making a “Pocket Cut” into existing walls or other blind area is dangerous. the protruding
blade may cut “live wires” or objects that may cause kickback.
10. When cutting is interrupted or the blade bound, please release the trigger immediately and
hold the saw firmly in the material until the blade comes to a complete stop. Never attempt
to remove the saw from the work or pull the saw backward while the blade is in motion,
otherwise, kickback might happen.
11. Use a rip fence or straight edge guide when ripping.
12. Avoid cutting nails, inspect the material that is being cut to see if there are nails in it and
remove before cutting.
13. Do not run the saw while carrying it at your side.
14. Make sure the depth and bevel adjusting locking levers are tight and secure before making
a cut.
15. Do not use damaged or dull blades. Because unshaped or improperly set blades will produce
narrow kerfs which may cause excessive friction, blade binding or kickback etc.
16. Always use blades with correct size arbor holes, never use defective or incorrect blade
washers or bolts.
6
Page 7

Owner’s Manual
KICKBACK
Kickback is a sudden reaction to a pinched,bound or misaligned saw blade,causing an uncontrolled
saw to lift up and out of the workpiece toward the operator.
1. When a blade is pinched or bound tightly by the kerf closing down, the blade stalls and the
motor reaction may drive the unit back toward the operator rapidly.
2. If the blade is twisted or misaligned in the cut, the teeth at the back edge of the blade can
dig into the top surface of the wood which may cause the blade to climb out of the kerf or
jump back toward the operator.
3. Using dull blades or improperly supported work will increase the tendency of kickback.
4. To prevent kickback, wet lumber, green lumber or pressure treated lumber all require.
SPECIAL ATTENTION DURING CUTTING OPERATIONS
Kickback is the result of saw misuse and/or incorrect operating procedures or conditions and can
be avoided by taking proper precautions as given below.
1. Maintain a firm grip with both hands on the saw and position your arms to resist kickback
forces.Position your body to either side of the blade,but not in line with the blade. Kickback
could cause the saw to jump backwards,but kickback force can be controlled by the
operator,if proper precautions are taken.
2. When a blade is binding,or when interrupting a cut for any reason,release the trigger and
hold the saw motionless in the material until the blade comes to a complete stop. Never
attempt to remove the saw from the work or pull the saw backward while the blade is in
motion or kickback may occur.Investigate and take corrective actions to eliminate the
cause of blade binding.
3. When restarting a saw in the workpiece,centre the saw blade in the kerf and check that
saw teeth are not engaged into the matieral.If saw blade is binding,it may walk up or
kickback from the workpiece as the saw is restarted.
4. Support large panels to minimise the risk of blade pinching and kickback.Large panels
tend to sag under their own weight.Support must be placed under the panel on both sides,
near the line of cut and near the edge of the panel.
5. Do not use dull or damaged blades.Unsharpened or improperly set blades produce narrow
kerf causing excessive friction,blade binding and kickback.
7
Page 8

Circular Saw
6. Blade depth and bevel adjusting locking levers must be tight and secure before making a cut.
If blade adjustment shifts while cutting,it may cause binding and kickback.
7. Use extra caution when making a”plunge cut” into existing walls or other blind areas.The
protruding blade may cut objects that can cause kickback.
Safety instruction for saws
1. Check lower guard for proper closing before each use.Do not operate the saw if lower guard
does not move freely and close instantly.Never clamp or tie the lower guard into the open
position.If saw is accidentally dropped,lower guard may be bent.Raise the lower guard with
the retracting handle and make sure it moves freely and does not touch the blade or any other
part,in all angles and depth of cut.
NOTE: Alternate wording may be substituted for “retracting handle”
2. Check the operation of the lower guard spring.If the guard and the spring are not operating
properly,they must be serviced before use.Lower guard may operate sluggishly due to
damaged parts,gummy deposits,or a build-up of debris.
3. Lower guard should be retracted manually only for special cuts such as “plunge cuts”and
”compound cuts.” Raise lower guard by retracting handle and as soon as blade enters the
material,the lower guard must be released.For all other sawing,the lower guard should
operate automatically.
4. Always observe that the lower guard is covering the blade before placing saw down on bench
or floor. An unprotected,coasting blade will cause the saw to walk backwards,cutting
whatever is in its path.Be aware of the time it takes for the blade to stop after switch is
released.
FEATURES
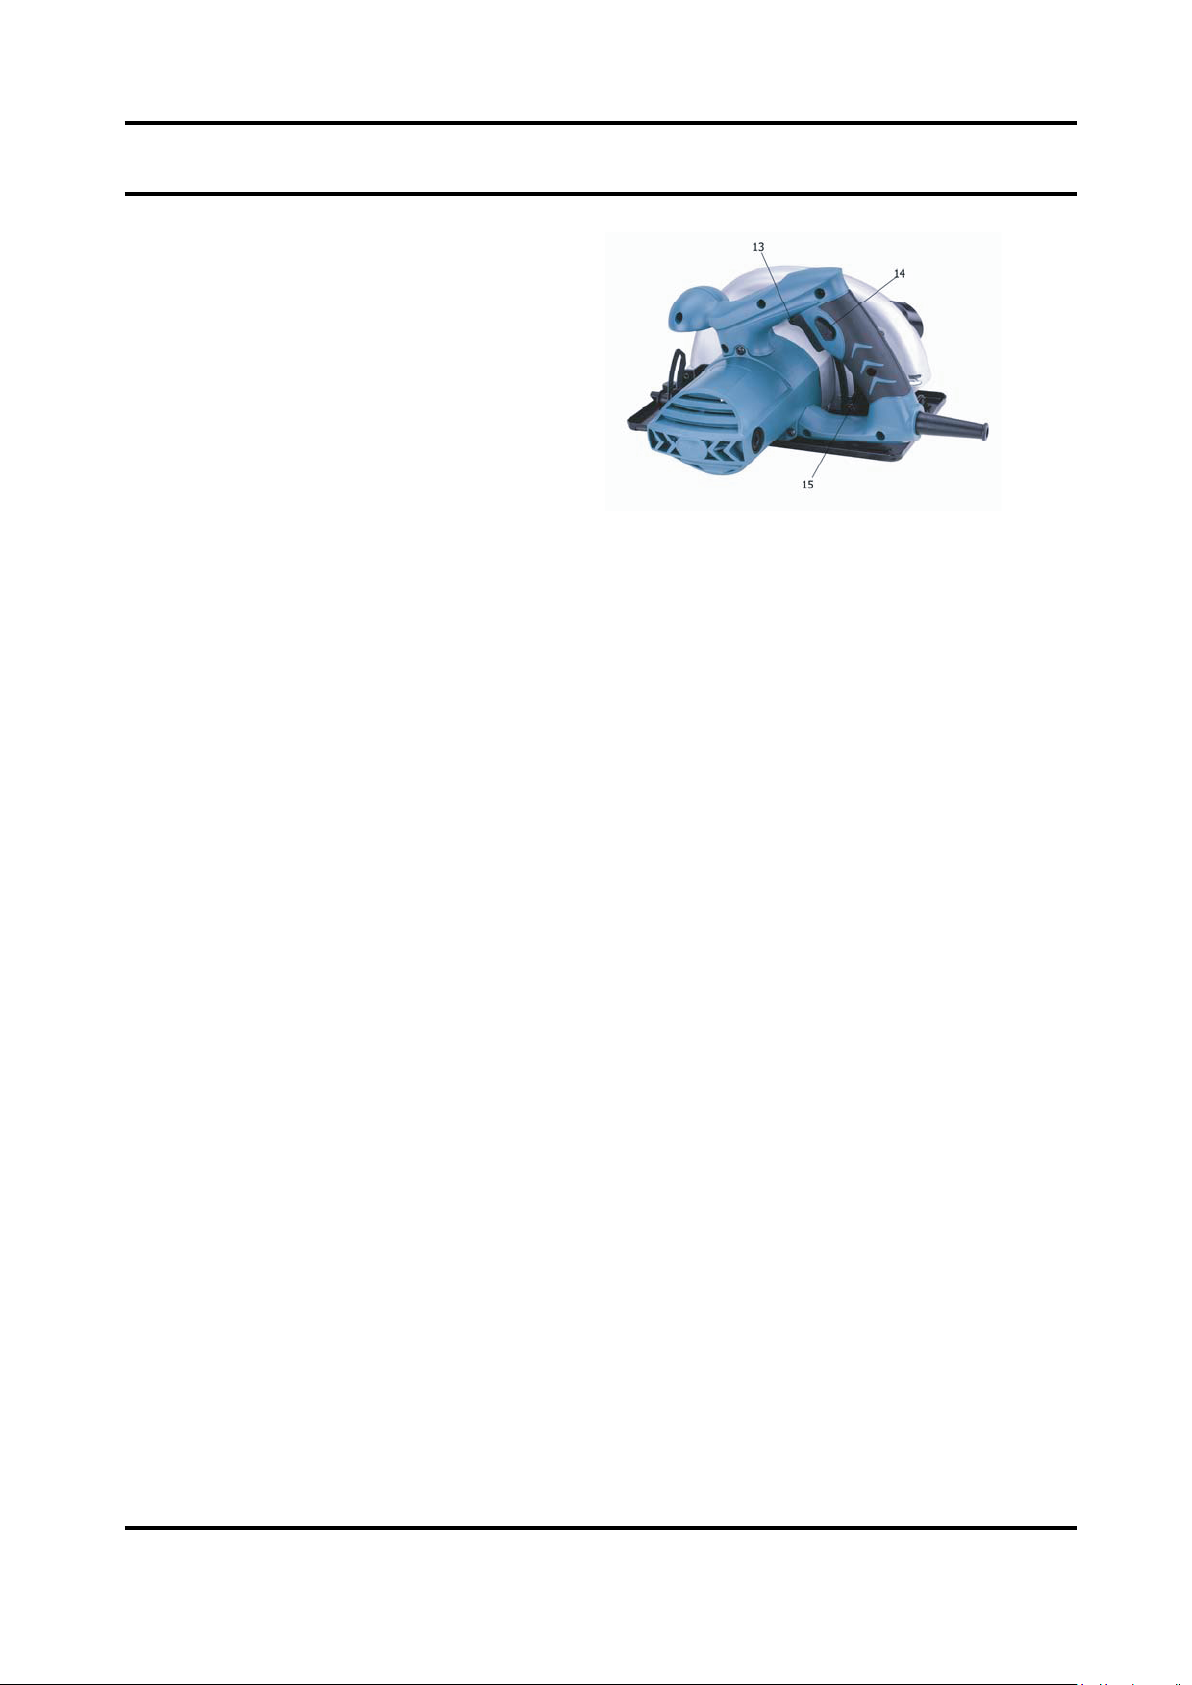
Please refer to fig.1&2 to familiarize yourself with the major components of this tool before using it.
1. Rear Handle
2. Dust Extraction Port
3. Lower Guard Lever
4. Shoe
5. Blade Clamp Screw
6. Saw Blade
7. Lower Guard
8. Edge guide Locking Screw
Fig.1
8
Page 9
Owner’s Manual
9. Angle Locking knob
10. Spindle Lock
11. Brush Cap
12. Front Handle
13. Trigger Switch
14. Lock-off Button
15. Depth Locking Lever
Fig. 2
ASSEMBLY
Check for damage to the tool, parts and accessories which may have occurred during transportation.
Take some time to read this manual carefully and understand all the content prior to assembly and
operation.
CAUTION!
Always ensure that the tool is switched off and unplugged from the mains supply before assembly.
Changing the Blade
1. Place the saw on a side of a flat surface.
2. Rotate the saw blade by hand while depressing the Spindle Lock Button until the blade is locked,
Turn the blade clamp screw use the wrench provided in anti-clockwise direction.
3. Remove the blade clamp screw, outer flange, and washer.
4. Lift the lower guard by using the lower guard lever and remove the blade.
5. Clean the saw blade flanges, and then mount the new saw blade onto the spindle, which is
against the inner flange.
6. Make sure the saw teeth and arrow on the blade is to the same direction as the arrow on the
lower guard.
7. Reinstall the outer flange, washer and tighten the blade clamp screw.
8. Make sure the saw blade can run freely by turning the blade by hand.
9
Page 10

Circular Saw
Parallel cut adjustment
1. Loosen the edge guide locking screw.
2. Slide the edge guide through the slots in the shoe to the desired width.
3. Tighten the lock screw to secure it in the position.
4. Ensure that the edge guide rests against the wood along it entire length to give a consistent
parallel cuts.
OPERATION
Switching on and off
Note: Before engaging the on/off switch, check the saw blade to see if it is fitted properly and runs
smoothly, and the blade clamp screw is well tightened.
1. Connect the plug to the power supply.
2. To start the tool, depress the lock-off button and pull the switch trigger.
3. Release the trigger to turn the tool off.
Depth Adjustment
1. Loosen the depth adjustment screw using the depth locking lever.
2. Hold the base plate flat against the body of the work piece and lift the body of the saw until the
blade is at the right depth.
3. Tighten the depth locking lever.
Angle adjustment
1. Loosen the angle locking knob.
2. Adjust the shoe to the desired angle between 0ºand 45º.
3. Retighten the angle locking knob.
Note: for best cutting results, always ensure that saw blade protrudes no more than 3mm below the
bottom surface of the workpiece.
10
Page 11

Owner’s Manual
General Cut
1. Mark a cutting line on the workpiece.
2. Rest the front part of the shoe flat on the workpiece surface with the blade not making any
contact with the workpiece.
3. Switch on the tool and allow it to reach its full speed.
4. Align the saw blade with the cutting line on the workpiece, gently push the saw forward. Never
force the saw but maintain a light and continuous pressure when completing the cut. Switch
off the tool only after the tool is completely away from the workpiece. When the tool If the
cutting is interrupted, resume the cut by allowing the blade to reach full speed and then
reentering the cut slowly.
5. When cutting across the grain, the fibers of the wood will have a tendency to lift and tear,
moving the saw slowly to minimize this effect.
Note: there are two notches on the front edge of the shoe as an aid for alignment. When making a 450
bevel cut, just align the left notch marked with 450 with the cutting line on the workpiece. For a straight
900 cut, align the right notch marked with 00 with the cutting line on the workpiece. For precise cutting,
always make a trial cut before carrying out operation.
Pocket Cut
1. Disconnect the plug from the power supply before making any adjustments. Set the depth
adjustment based on the thickness of the line drawing for the cut. Raise the lower guard by
using the lower guide lever.
2. With the blade is barely above the material to be cut, start the saw and allow the blade to attain
full speed. Using the front end of the shoe as a pivot point, lower the blade gradually onto the
material which being cut. Release the lower guard when the blade starts to cutting. When the
shoe is resting flat on the surface being cut, proceed cutting in a forward direction to the end
of the cut. Allow the blade to come to a full stop before removing it from the cut. Never pull the
saw backward since the blade will climb out of the cut, as a result, kickback may occur.
Turn the saw around and finish the cut in a normal manner, sawing forward. Use a jigsaw or a
hand saw to finish the cut in the corners if it is necessary.
Cutting Large Sheets
1. Large sheet or boards require support to prevent from bending or sags. If you attempt to cut
without leveling and supporting the work piece properly, the blade will tend to bind or result in
kickback.
11
Page 12

Circular Saw
2. Support the panel or board close to the cut. Be sure to set the blade adjustment so that you
can cut through the material without cutting into the table or workbench. Suggestion: use two
by fours (2”× 4”) to support the board or panel to be cutting. If the work piece is too large for
the workbench, use the floor with two by fours (2”× 4”) to support the wood.
MAINTENANCE
Warning !
Preventive maintenance performed by unauthorized personnel may result in misplacing of internal
wires and components which could cause serious hazard.
CAUTION !
Always be sure that the tool is switched off and unplugged before attempting to perform inspection
or maintenance.
Regularly clean the tool’s air vents with compressed dry air. do not attempt to clean by inserting
pointed objects through openings.
CAUTION!
Certain cleaning agents and solvents may damage plastic parts. Some of these are: gasoline, carbon
tetrachloride, chlorinated cleaning solvents, ammonia and household detergents that contain ammonia.
WARNING!
If any of the following events occur during normal operation, the power supply should be shut off at
once and tool thoroughly inspected by a qualified person and repaired if necessary:
> The rotating parts get stuck or speed drops abnormally low.
> The tool shakes abnormally accompanied by some unusual noise.
> The motor housing gets abnormal hot.
> Heavy sparks occur around the motor area.
ACCESSORIES
Hex Wrench ---------------------------------1pc
Edge guide-----------------------------------1pc
Instruction Manual--------------------------1pc
12
Page 13

Owner’s Manual
13
Model: SP-PT211 (M1Y-185X)
Voltage: 120V~60Hz
Rated Power: 10 A
Max. Cutting Depth (90º): 2-1/2”(65mm)
(45º): 1-3/4”(43mm)
No Load Speed: 5000 rpm
Blade Size: 7.3”x0.8”x24 teeth (185mm×20mm×24 teeth)
SPECIFICATIONS
Page 14

Owner’s Manual
14
LIMITED WARRANTY
STEELEⓇ
warrants to the original purchaser who uses the product in a consumer
application (personal, residential or household usage) that all products covered under this warranty
are free from defects in material and workmanship for two years from the date of purchase.
All products covered by this limited warranty which are used in commercial applications
(i.e. income producing) are warranted to be free of defects in material and workmanship for 90 days
from the date of original purchase. Products covered under this warranty include air compressors,
tools, service parts, pressure washers, and generators.
STEELEⓇ
will repair or replace, at
STEELEⓇ
’s sole option, products or
components which have failed within the warranty period. Service will be scheduled according to
the normal work flow and business hours at the service center location, and the availability of
replacement parts. All decisions of
STEELEⓇ
with regard to this limited warranty shall be
final. This warranty gives you specific legal rights, and you may also have other rights which vary
from state to state.
RESPONSIBILITY OF ORIGINAL PURCHASER (initial User):
• To process a warranty claim on this product. DO NOT return item to the retailer. The product must
be evaluated by an Authorized Warranty Service Center. For the location of the nearest Authorized
Warranty Service Center contact the retailer place of purchase.
• Retain original cash register sales receipt as proof of purchase for warranty work.
• Use reasonable care in the operation and maintenance of the product as described in the Owners
Manual(s).
• Deliver or ship the product to the nearest Authorized Warranty Service Center. Freight costs, if any,
must be paid by the purchaser.
• Air compressors with 60 and 80 gallon tanks will be inspected at the site of installation. Contact the
nearest Authorized Warranty Service Center that provides on-site service calls for service call
arrangements.
• If the purchaser does not receive satisfactory results from the Authorized Warranty Service Center,
the purchaser should contact
STEELEⓇ
.
Page 15

Circular Saw
15
LIMITED WARRANTY
THIS WARRANTY DOES NOT COVER:
Merchandise sold as reconditioned, used as rental equipment, or floor or display models.
Merchandise that has become damaged or inoperative because of ordinary wear, misuse, cold, heat,
rain, excessive humidity, freeze damage, use of improper chemicals, negligence, accident, failure to
operate the product in accordance with the instructions provided in the Owners Manual(s) supplied
with the product, improper maintenance, the use of accessories or attachments not recommended
by
STEELEⓇ
, or unauthorized repair or alterations. Repair and transportation costs of
merchandise determined not to be defective. Costs associated with assembly, required oil,
adjustments or other installation and start-up costs.
Expendable parts or accessories supplied with the product which are expected to become
inoperative or unusable after a reasonable period of use. Merchandise sold by
STEELEⓇ
which has been manufactured by and identified as the product of another company, such as gasoline
engines. The product manufacturer’s warranty, if any, will apply.
ANY INCIDENTAL, INDIRECT OR CONSEQUENTIAL LOSS, DAMAGE, OR EXPENSE THAT MAY
RESULT FROM ANY DEFECTS, FAILURE OR MALFUNCTION OF THE PRODUCT IS NOT COVERED BY
THIS WARRANTY.
Some states do not allow the exclusion, so it may not apply to you.
IMPLIED WARRANTIES, INCLUDING THOSE OF MERCHANTABILITY OR FITNESS FOR A
PARTICULAR PURPOSE, ARE LIMITED TO TWO YEARS FROM THE DATE OF ORIGINAL PURCHASE.
Some states do not allow limitations on how long an implied warranty lasts, so the above limitations
may not apply to you.
Distributed by:
730 S.Epperson Dr.
City Of Industry,CA91748
www.steele-products.com
all rights reserved
 Loading...