

Page 1
Page 2
Owner’s Manual
CONGRATULATIONS!
The Oil Filled Radiator you have just purchased is a safe and powerful heater, designed to heat a room after
a few minutes of operation. The radiator heater technology has been in use for many years and has proven
as an excellent system for safely heating whole rooms, while saving on heating bills.
Additionally, this radiator heaters have added safety features and operate quietly.
Before using your new Radiator Heater, please take a few minutes to read these instructions, review the
product limited warranty, and complete and mail the Warranty Registration Card,Thank you!
.
WARNING! To reduce the risk of fire, electric shock, or
personal injury, read all the instructions before using this
CAUTION
feet (0.9m) from the front of the heater and away from the sides and rea
- High temperature, keep electrical cords, drapery, and other furnishings at least 3
r.
IMPORTANT INSTRUCTIONS
When using this appliance, basic precautions should always be followed to reduce the risk of fire, electric
shock and injury to persons, including the following:
1. Read all the instructions before using this heater.
2. This heater is hot when in use. To avoid burns, do not let bare skin touch hot surfaces. If provided, use
handles when moving this heater. Keep combustible materials, such as furniture, pillows, bedding, papers,
clothes, and curtains at least 3 feet (0.9m) from the front of the heater and keep them away from the sides
and rear.
3. Extreme caution is necessary when any heater is used by or near children or invalids and whenever the
heater is left operating and unattended.
4. Always unplug heater when not in use.
5. Do not operate the heat
or damaged in any manner. Return the heater to an authorized service facility for examination, electrical or
mechanical adjustment, or repair.
6. Do not use outdoors.
7. This heater is not intended for use in bathrooms, laundry areas, or similar indoor locations. Never locate
the heater where it may fall into a bathtub or other water container.
8. Do not run the cord under carpeting and do not cover the cord with throw rugs, runners or the like. Arrange
the cord away from traffic areas and where it will not be tripped over.
9. To disconnect heater, turn controls to OFF, then remove plug from outlet.
10. Do not insert or allow foreign objects
electric shock, fire, or damage to the heater.
11. To prevent a possible fire, do not block air intakes or exhaust openings in any manner. Do not use on soft
surfaces, like a bed, where openings may become blocked. Use the heater on flat, dry surfaces only.
12. A heater has hot and arcing or sparking parts inside. Do not use the heater in areas where gasoline, paint,
or flammable liquids are used or stored.
13. Use this heater only as described in this manual. Any other use not recommended by the manufacturer
may cause fire, electric shock, or injury to persons.
14. Never clean this heater while it is plugged in. Do not immerse in water. To disconnect,
then remove the plug from the outlet by grasping it and pulling it from the outlet. Never yank on the cord.
15. Avoid the use of an extension cord because the extension cord may overheat and cause a risk of fire. If
this heater is used with an extension cord, the cord should be 14 AWG minimum size and rated not less
than 1875W.
16. This heater includes an overheat protection system that shuts off the heater when parts of the heater are
getting excessively hot.
er with a damaged cord or plug, or after the heater malfunctions, has been dropped,
to enter any ventilation or exhaust opening as this may cause an
turn control to OFF,
SAVE THESE INSTRUCTIONS
2
Page 3
Owner’s Manual
CAUTION: THIS APPLIANCE HAS A POLARIZED PLUG (ONE BLADE IS WIDER THAN THE OTHER) TO
REDUCE THE RISK OF ELECTRIC SHOCK. THIS PLUG IS INTENDED TO FIT IN A POLARIZED OUTLET
ONLY ONE WAY. IF THE PLUG DOES NOT FIT FULLY IN THE OUTLET, REVERSE THE PLUG. IF IT STILL
DOES NOT FIT, CONTACT A QUALIFIED ELECTRICIAN. DO NOT ATTEMPT TO DEFEAT THIS SAFETY
FEATURE.
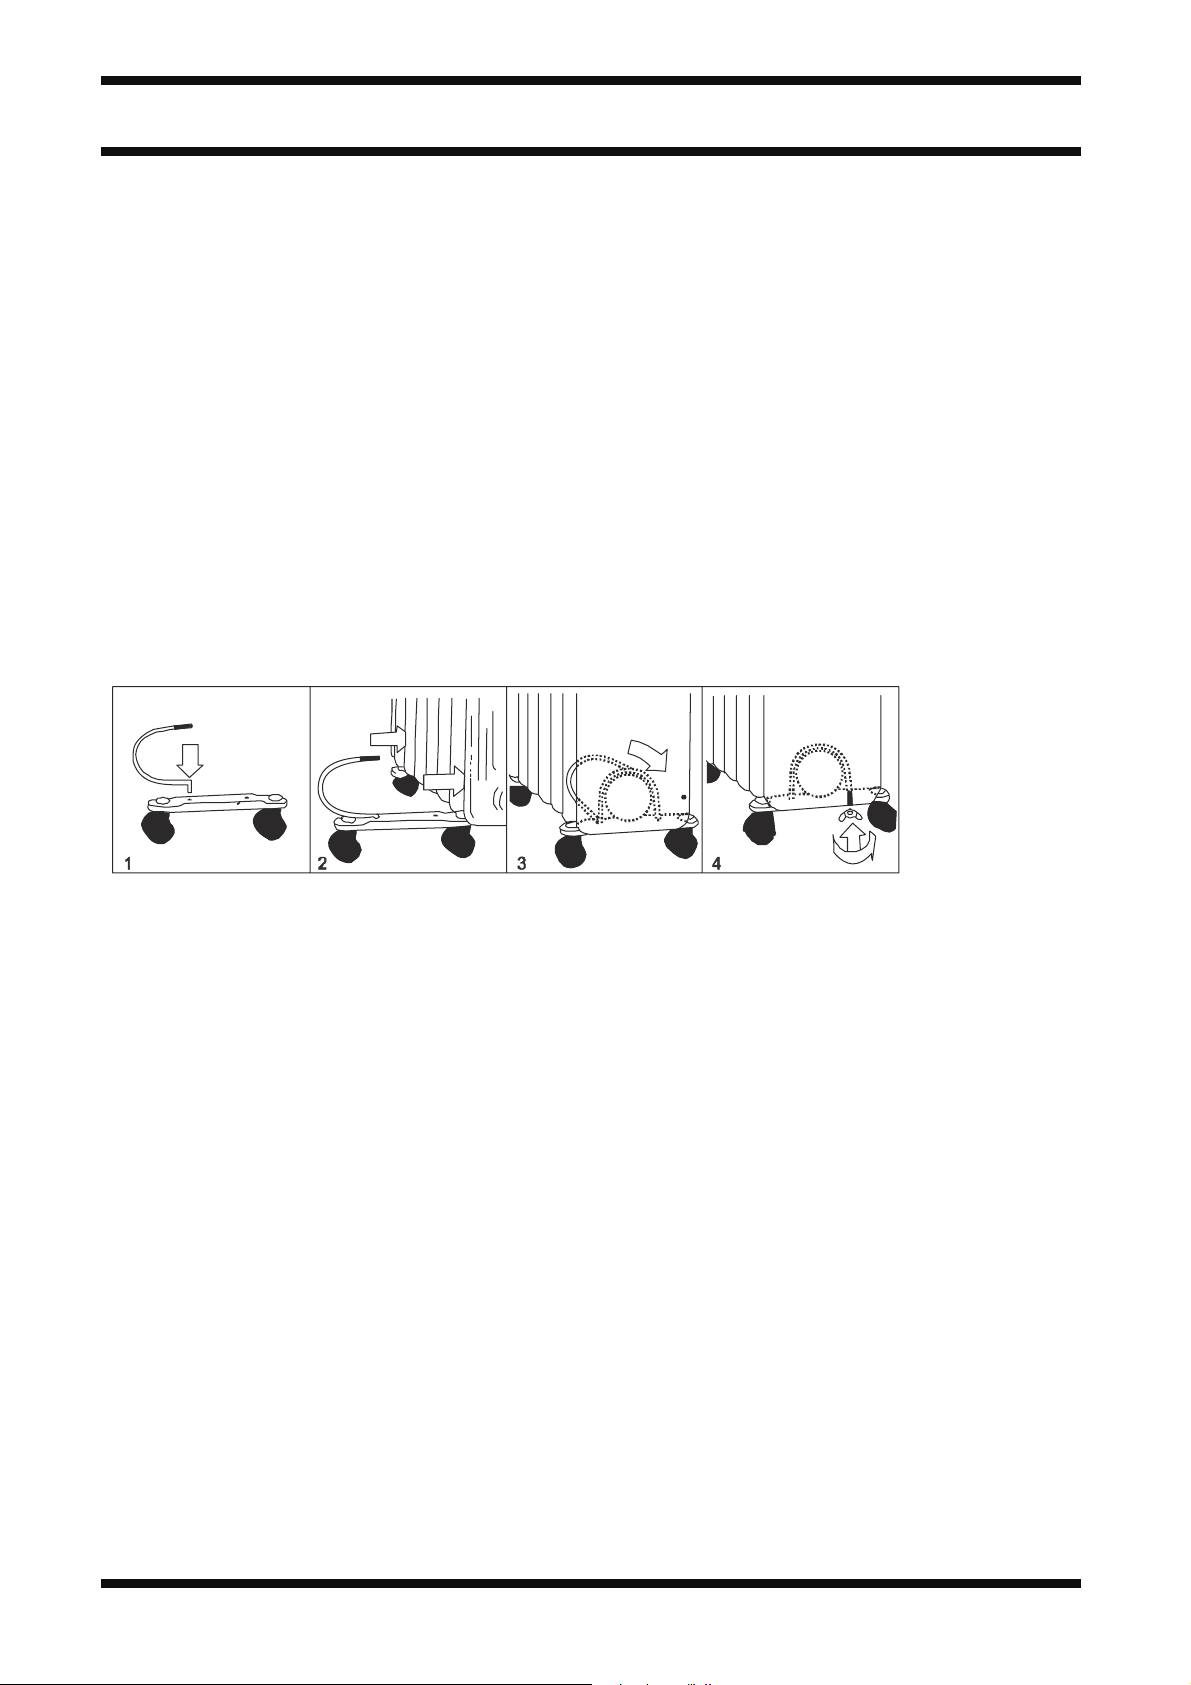
ASSEMBLE
The heater is packaged with the feet unattached. You must attach them before operating the heater.
1. Place the radiator body upside-down on a scratch-free location, make sure it is stable and will not fall.
2. Screw off the wing nuts from the U-shaped bolt provided, attach the U-shaped bolt to the U-facing flange
between the last 2 fins.
3. To attach the castor mounting plate to the radiator body, you should insert the threaded ends of the U bolt
in the holes on the castor mounting plate.
4. Screw the wing nuts back to the U bolt and fasten the wing nut properly.
See figure 2
Figure 2
Note: do not over tighten, which may cause the damage of radiator flange.
5、Screw off spherical nut from the castor, align the shaft to the hole of the castor mounting plate, insert in,
and screw on the spherical nut. See figure 2
6. Turn the heater upright.
Now your heater is ready for use
Note: the rear castors must be mounted between the end two fins.
CAUTION- Risk of fire-Do not operate without legs attached.
CAUTION- Operate the heater in upright position only (wheels on the bottom; controls on the top).Any
other position could create a hazardous situation.
OPERATION
1. LOCATION
Before using the heater make sure that it is on a flat and stable surface. Damage may occur if it is placed on
an incline or decline.
Place heater on floor beneath coldest window in the room or any desired location. Your heater will minimize
3
Page 4
Owner’s Manual
the effect of cold drafts.
2. CONNECTION
The radiator must be connected to a properly household outlet in perfect working conditions.
Keep loose clothing or bedding, furniture and flammable material away from the wall outlet where the heater
plug is fitted in.
3. OPERATIONS AND USE
1) TURNING HEATER ON:
Turn the master power switch (located below the digital control panel on the side of the heater) to the ON
position. The switch will illuminate when in the ON position. This master power switch allows power to go to
the digital controls. Operating instructions below will show you how to operate the digital controls.
2) OPERATING INSTRUCTIONS:
This heater is equipped with digital controls that provide the ability to set the temperature to the exact degree
desired. To operate, simply follow these instructions. NOTE: The temperature display will not reflect the
accurate room temperature until the heater has been operating for at least 20 minutes.
3) OPERATING INSTRUCTIONS (continued):
* Press the power button once to start the heater on High Power ( symbol), Continuous Run. If left at this
setting, the unit will run continuously on High Power and will not shut off until the unit is manually turned off.
* Press the power button again to change to Lower Power ( symbol), Continuous Run. If left at this setting,
the unit will run continuously on Lower Power and will not shut off until the unit is manually turned off.
* Press the power button a third time to turn the heater OFF.
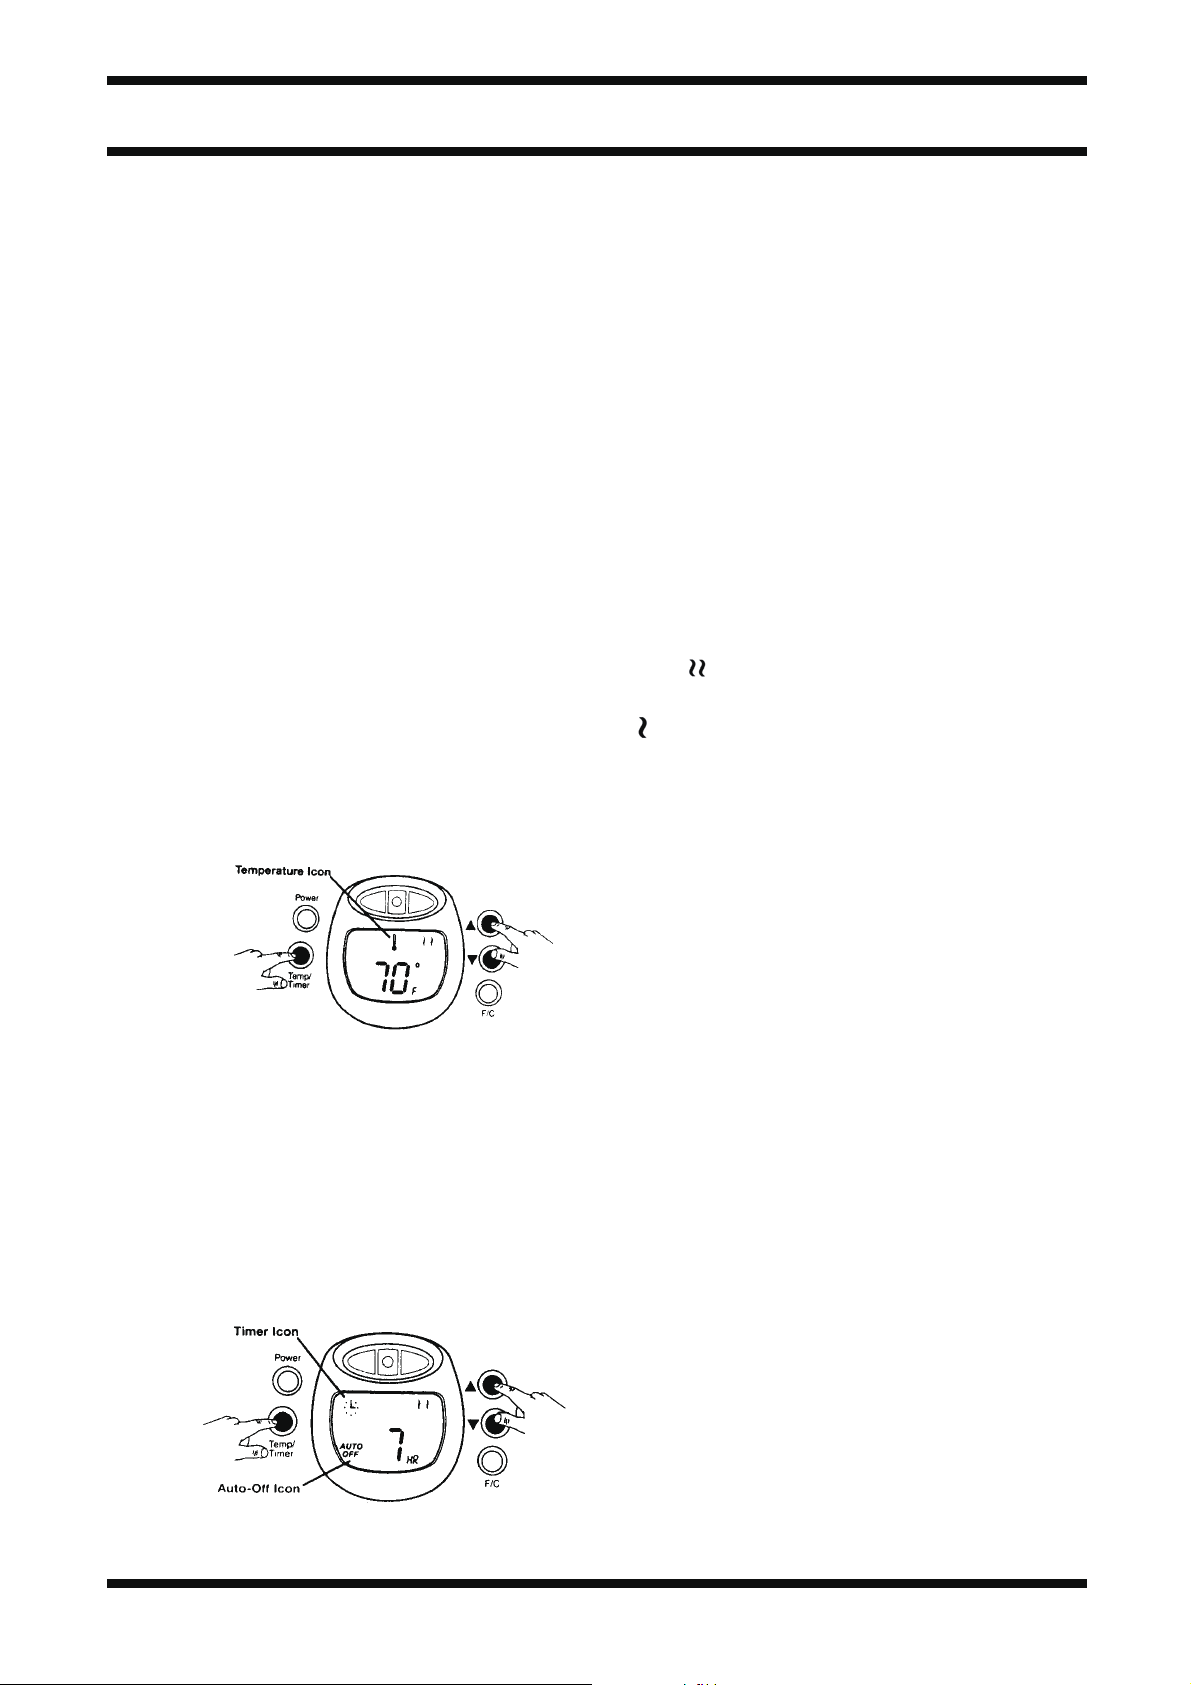
4) TEMPERATURE SETTING:
*P r e s s the Temp/Ti m er button unt i l the tempera t ure icon blink s .
*U s e the Up and D o w n arrows to s e t the desired t emperature.
*T h e temperature icon will stop b linking and t he c u rrent room te m perature will ap p e ar after the
de s ired temperatu r e is set.
*T h e heat will tu r n -off shortly afte r the desired t e mperature is reach e d and the temp e rature
di s p lay will bli n k .
*T h e heater will t u r n back on when t he room temp e r ature drops below t he desired tem p e rature.
Th e temperature d i splay will the n stop blinkin g and will di s p lay the curren t room temperat u re.
5) TIMER SETTING:
4
Page 5
Owner’s Manual
AUTO-OFF
NO T E : This functio n should only b e set if you de s ire that the h e a ter be auto matically shut o f f
af t e r a certain p e r iod of time ( 1 t o 10 hours from th e time the fu n c t ion is set)
NO T E : Always set th e desired te m p erature prio r t o setting the T i mer, so that t he heater wil l
sh u t off at the d e s ired temperat u re setting.
*P r e ss the Temp/ T i mer button unti l the timer ic on b l inks. The hou r di s play will a p p ear. The
Au t o Off icon will a lso appear.
*U s e the Up and D o w n arrow butto n s to set the h e ater operation t ime between 1 and 10 hour s .
Th i s function wil l activate once the t imer icon sto p s blinking.
*T h e heater will a u tomatically turn- o f f when time r u n s out.
NO T E : If the desir e d temperature was set prior t o setting the ti m e r function, the heater will
cy c le on and off a s per the sele c ted desired tempera t u r e setting an d will discon t inue operation
on c e the program m e d timer setting has been reac h e d .
AUTO-ON
NO T E : This functio n provides a d e layed start o p t ion and shou l d only be set i f you desire t h at
th e heater be a u tomatically tur n e d ON after a certain per i o d of time (1 t o 10 hours from t he
ti m e the functio n is set).
NO T E : Always set t h e desired t e mper a t ure prior to s e t ting the timer, s o that the heat e r will turn
on a t the desired t emperature se t t i ng
*P r e ss the Temp/ T i mer button unti l the timer ic on b l inks. The hou r di s play will a p p ear .The
Au t o On icon will a lso appear.
*U s e the Up and D o w n arrow butto n s to set the h e ater start tim e between 1 an d 10 hours. Th is
fu n c t ion will acti vate once the timer icon sto p s blinking.
*T h e heater will a u tomatically turn o n when time ex p i res.
NO T E : If the desir e d temperature was set prior t o setting the ti m e r function, the heater will
cy c le on and of f as per the s e l ected desire d t emperature s e t t i ng once the he a ter begins t o
op e r ate.
.
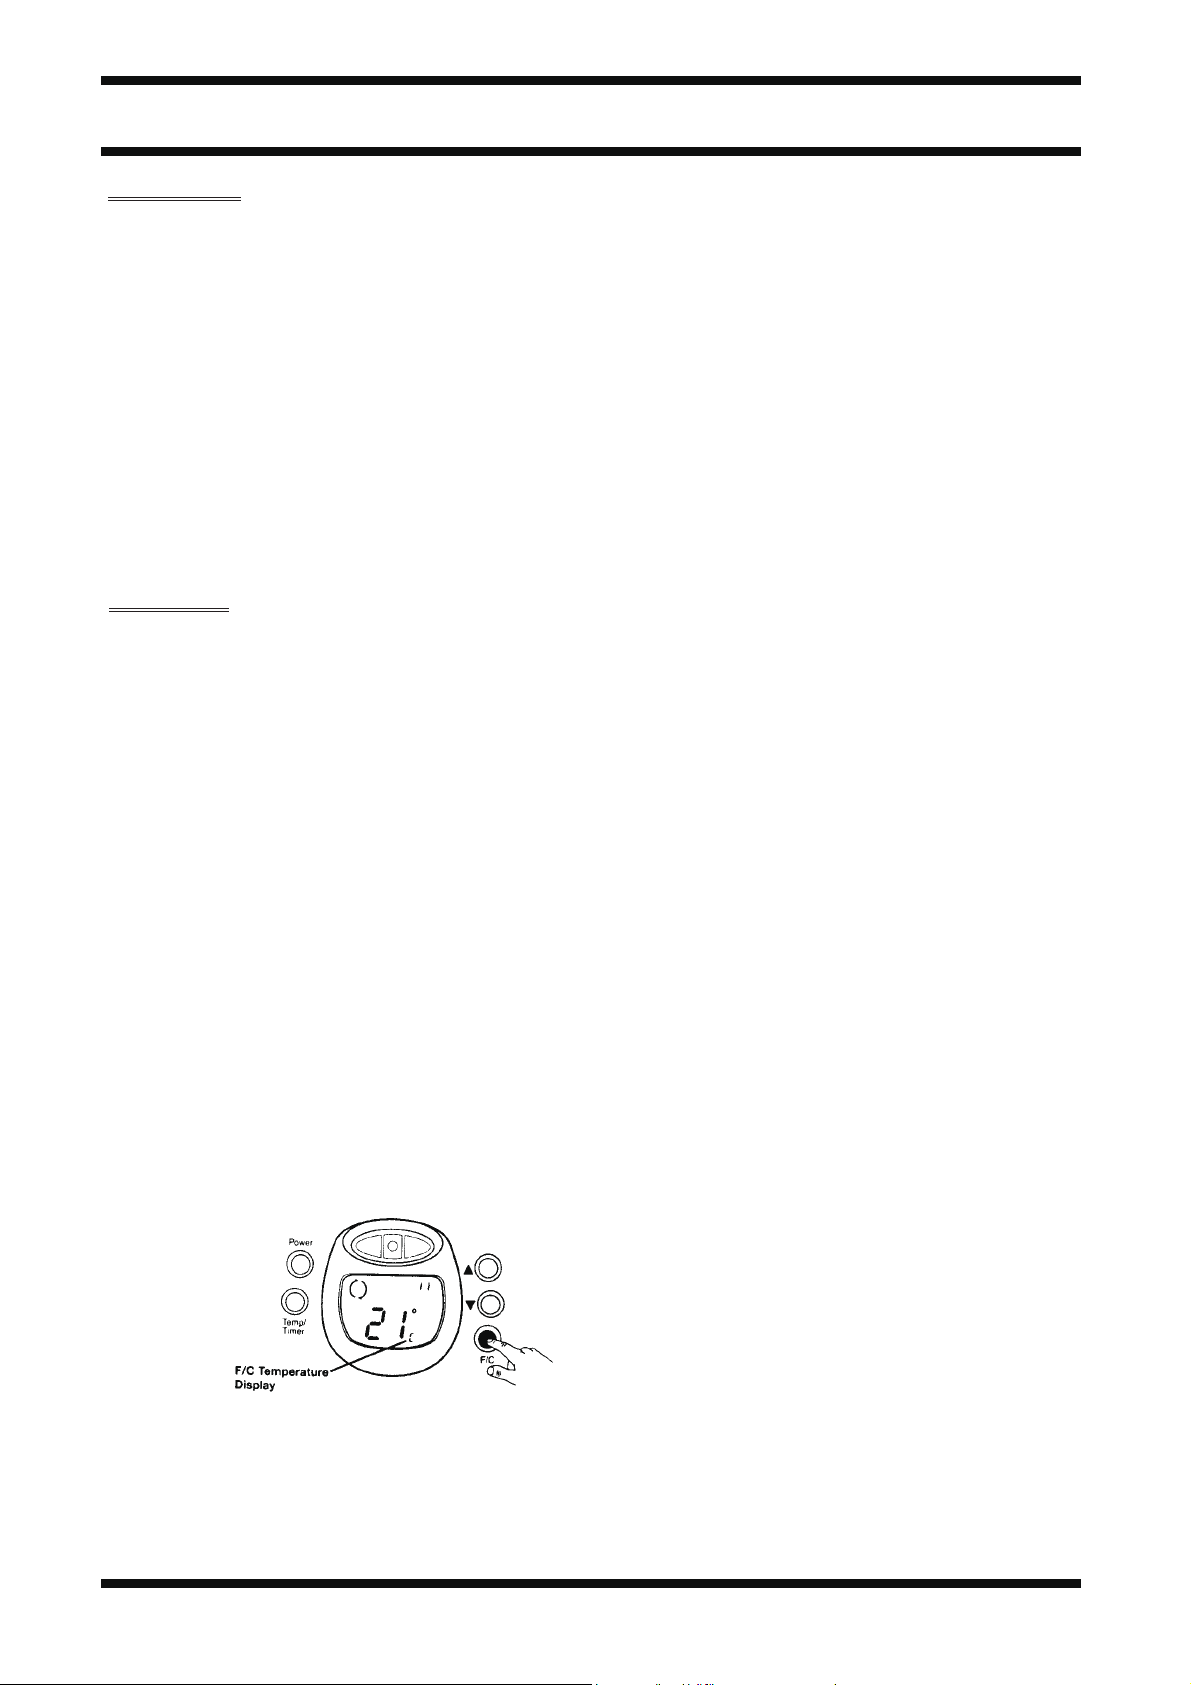
6) FAHRENHEIT/CELSIUS FUNCTION:
NO T E : This heate r offers the o p t ion to read th e temperature s etting in ei t h er
Fa h r enheit or Cel s i u s scales.
*F/C feature functions from only the power or set temperature screens.
*Press F/C button to toggle between Fahrenheit and Celsius.
NOTE: If not use the heater, please turn off the master power switch (located below the digital control panel on
the side of the heater) to OFF position.
5
Page 6

Owner’s Manual
require the heater to be off, push the button “hour” and “minute” until your required operating time appears.
The operating time has a span of 24 hours. Auto on and auto off default value is “00:00”.
c) Auto
Press the button “booking timer” until the LCD appears “AUTO”. This indicates that the auto mode comes
into effect. The timing pilot lamp (yellow lamp) now lights up.
During operating in the auto mode, you can use the button “+”or “-“to set the desired comfort temperature as
described above and the appliance will automatically switch on or off at the preset time and automatically
maintain the preset comfort temperature.
NOTE: Do not press the button “power setting” when operating in the auto mode, this will cancel the function
of “booking timer”.
To
cancel the function of “booking timer”, press the button “booking timer” until blank appears and wait for 5
seconds or press the button “power setting” , the timing pilot lamp (yellow lamp) will be extinguished.
NOTE: To keep the heater’s memory programmed, always leave the heater plugged in at the mains socket.
If the heater looses its electricity supply, e.g. switched off at the mains socket or in the event of a power
failure, the heater’s programs will be lost, and the heater will not work until reset.
This heater includes an overheat protection system that shuts off the heater when parts of the heater are
getting excessively hot. Once it occurs, the heater’s programs will be lost.
To completely shut the heater off, set the button “power setting” to OFF, then remove plug from the
socket-outlet
.
POWER SUPPLY CORD
Plug the power supply cord into a wall outlet (120V AC 60Hz).
This plug will fit into the power outlet only one way. This is a safety feature. If you are unable to insert the
plug fully into the outlet, try reversing the plug.
MAINTENANCE
1. Always remove the plug from the power socket and allow the radiator to cool down. Wipe radiator with a
soft damp (not wet) cloth. Do not use detergents and abrasives. Do not allow the interior to get wet as
this could create a hazard.
2. To store away the heater, wind the cable around the cord bobbin, and store in a clean dry place.
3. This appliance has been built to give many years of trouble-free service. In case of malfunction of doubt,
do not try to repair the radiator yourself; it may results in a fire hazard of ele
Service Center.
ctric shock. Call the nearest
6
Page 7
Owner’s Manual
A
E
H
B
C
D
F
G
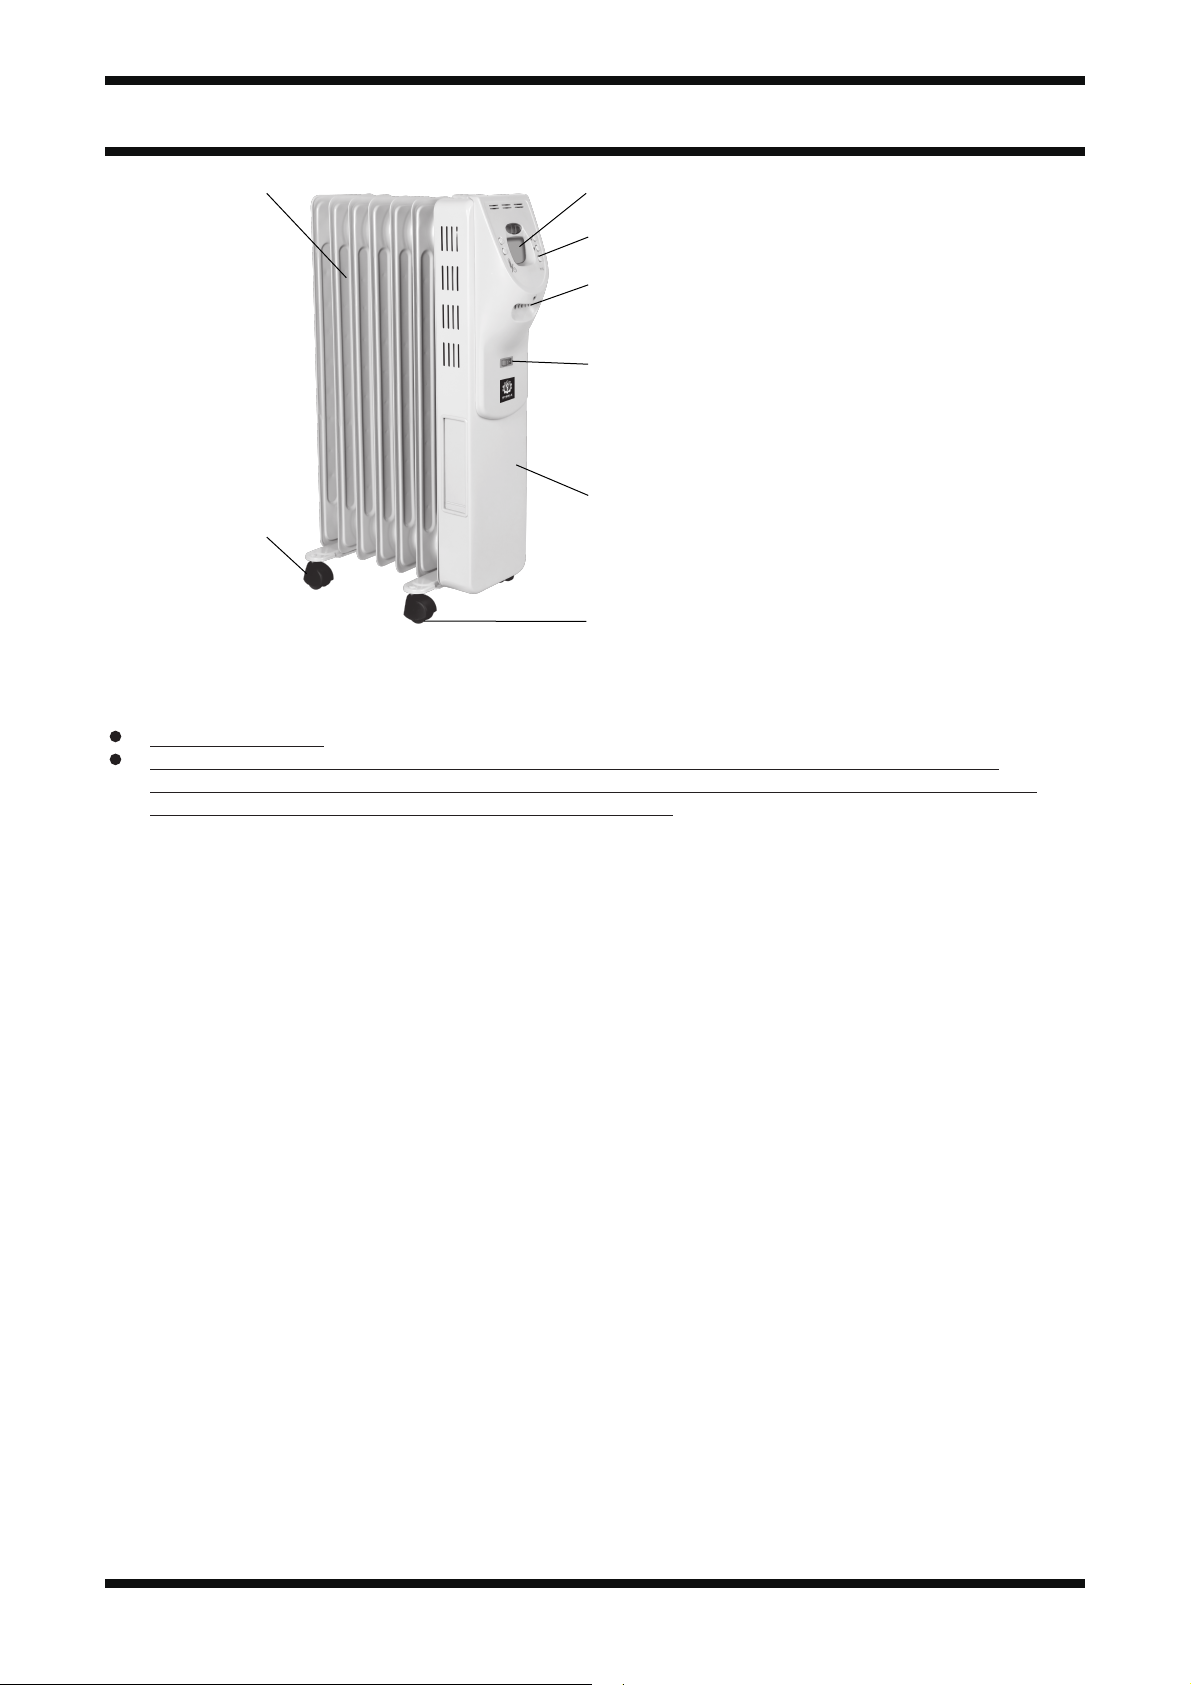
Features
A. LCD
B. Function button
C. Carry handle
D. Master power switch
E. Radiator fins
F. Front cover
G.
Castor
H.
Castor mounting plate
Special Features
Power Cord Bobbin-For safe to wind the electrical cord.
Safety Tip Over Protection-Your heater is designed to automatically shut-off when tipped. When
returned to normal upright position, heat will automatically come on again. This is a safety feature to
avoid the possibility of fire once the unit accidentally upsets
PRODUCT SPECIFICATIONS
● Model No: SP-HO76
●
Voltage: AC 120V, 60 Hz
●
Current : Maximum continuous draw: 12.5 amps
● Output : 2050/3070/5120BTUS
●
Power:
Operating Costs: Variable, depending upon electric Kwh cost, ambient temperature, Revalue of
●
insulation, outside or cooler air infiltration, filter cleanliness and other factors.
Tolerances on all specifications: +5%, -10%
●
I : 900Watts
II : 1500Watts
WARNING
This heater is intended for use on floors, not on elevated locations such as table or counters.
Avoid the use of an extension cord because the extension cord may over-heat and cause risk of fire.
However, if you have to use an extension cord, the cord
Shall be No. 14 AWG minimum size and rated not less than 1875W.
This heater is hot when in use. To avoid burns, do not let bare skin touch hot surfaces. If provided, use
handles when moving the heater. Keep combustible materials, such as furniture, pillows, bedding, papers,
clothes, and curtains at least 3 feet(0.9m) from the front of the hea
and rear.
ter and keep them away from the sides
This heater is not intended for use in bathrooms, laundry areas, and similar indoor locations. Never locate a
heater where it may fall into a bathtub or other water container.
7
 Loading...