

Page 1
IntellipH
™
Automatic pH Dispenser
Installation and User’s Guide
IMPORTANT SAFETY INSTRUCTIONS
READ AND FOLLOW ALL INSTRUCTIONS
SAVE THESE INSTRUCTIONS
IntellipH™ Automatic Dispenser Installation and User’s Guide
Page 2

Technical Support
Phone: (800) 831-7133 - Fax: (800) 284-4151
Web sites: www.pentairpool.com and www.staritepool.com:
IMPORTANT WARNINGS AND SAFETY INSTRUCTIONS................................... i
IntellipH System Overview ........................................................................................ 1
Operating IntellipH ................................................................................................... 1
IntellipH Kit Contents ................................................................................................. 1
IntellipH Controller Control Panel .......................................................................... 2
Operating Mode ........................................................................................................ 3
Menu Button ............................................................................................................ 3
Add Acid Manually...................................................................................................... 3
Dispense Amount ...................................................................................................... 4
Setting up the system for the first time .................................................................... 5
Operation with IntelliTouch and EasyTouch Automation Systems ..................... 5
Operating IntellipH in winter ..................................................................................... 5
Superchlor Mode ....................................................................................................... 6
History Data................................................................................................................. 6
Troubleshooting ........................................................................................................ 7
IntellipH Installation ................................................................................................. 8
Saddle Clamp Mount Installation .. ......................................................................... 9
© 2011 Pentair Water Pool and Spa, Inc. All rights reserved.
1620 Hawkins Ave., Sanford, NC 27330 • (919) 566-8000
10951 West Los Angeles Ave., Moorpark, CA 93021 • (805) 553-5000
IntellipH
™
IntelliChlor® EasyTouch®, IntelliTouch® and Pentair Water Pool and Spa® are
registered trademarks of Pentair Water Pool and Spa, Inc. and/or its affiliated companies in
the United States and/or other countries. Unless noted, names and brands of others that
may be used in this document are not used to indicate an affiliation or endorsement between
the proprietors of these names and brands and Pentair Water Pool and Spa, Inc. Those
names and brands may be the trademarks or registered trademarks of those parties or
others.
P/N 521396 Rev A - 04/14/11
IntellipH™ Automatic Dispenser Installation and User’s Guide
Page 3
IMPORTANT WARNINGS AND SAFETY INSTRUCTIONS
Most states and local codes regulate the construction, installation, and
operation of public pools and spas, and the construction of residential
pools and spas. It is important to comply with these codes, many of which directly
regulate the installation and use of this product. Consult your local building and health
codes for more information.
IMPORTANT NOTICE - Attention Installer: This Installation and User’s
Guide (“Guide”) contains important information about the installation,
operation and safe use of this underwater pool and spa light. This Guide
should be given to the owner and/or operator of this equipment.
Before installing this product, read and follow all warning notices
and instructions in this Guide. Failure to follow warnings and
instructions can result in severe injury, death, or property damage.
Call (800) 831-7133 for additional free copies of these instructions. Please refer to
www.pentairpool.com for more information related to this products.
Working with muriatic acid can be dangerous. When cleaning the
IECG always wear rubber gloves and eye protection. Always add
acid to water, do not add water to acid. Always work in a wellventilated area. Splashing or spilling acid can cause severe
personal injury and/or property damage.
Be sure that the pool or spa meets the requirements of the current
National Electrical Code (N.E.C.) Article 680-22 and all local codes
and ordinances. A licensed or certified electrician must install the
electrical system to meet or exceed those requirements before the
underwater light is installed.
i
READ THE FOLLOWING BEFORE HANDLING AND WORKING
WITH MURIATIC ACID (ALSO KNOWN AS HYDROCHLORIC
ACID) AND CHLORINE (SODIUM DICHLOR)
MURIATIC ACID AND CHLORINE (LIQUID AND MIST) CAN
CAUSE SEVERE BURNS TO SKIN, MOUTH AND EYES. MAY
BE FATAL IF SWALLOWED OR INHALED. INHALATION CAN
CAUSE SEVERE LUNG DAMAGE.
IMPORTANT! CHLORINE CONTAINER
MIXING CHEMICALS WITH CHLORINE OR CHLORINE
RESIDUE IN CONTAINER CAN CREATE A DEADLY GAS OR
AN EXPLOSION.
IntellipH™ Automatic Dispenser Installation and User’s Guide
Page 4

ii
IMPORTANT WARNINGS AND SAFETY INSTRUCTIONS
READ AND FOLLOW ALL INSTRUCTIONS
SAVE THESE INSTRUCTIONS
INHALATION
Inhalation of vapors can cause coughing, inflammation of the nose,
throat and upper respiratory tract and death. In case of inhalation,
move to an area of fresh air immediately.
INGESTION
Swallowing can be fatal. Contact local poison control center or
physician immediately. Give large amounts of water or milk. Allow
person to vomit. If vomiting occurs, keep head lower than hips to
avoid aspiration. If person is unconscious, turn their head to the side.
Seek immediate medical attention.
STORAGE:
Store container and chlorine in a dry, ventilated place protected from
excess heat and direct sunlight. Should be stored at a temperature
below 52°C (12.2°C).
SKIN CONTACT
Wash skin with soap and water for at least 20 minutes and remove
contaminated clothing and shoes. Contaminated clothes should be
thoroughly cleaned before re-use.
EYE CONTACT
Flush eyes immediately with water for at least 20 minutes. Seek
immediate medical attention.
PERSONAL PROTECTION
VENTILATION
Use container outside and in a well-ventilated area.
EYE PROTECTION
Use splash-resistant safety goggles.
CLOTHING
Wear chemical-resistant clothing when handling or working with
chlorine.
GLOVES
Wear chemical-resistant gloves when handling or working with
chlorine.
DISPOSAL
Because of its corrosive nature, muriatic acid is a hazardous waste
when spilled or discarded. Dispose of used acid at an approved
hazardous waste facility or at your municipal household hazardous
waste collection facility. Small spills of acid may be neutralized using
baking soda. Carefully pour the baking soda onto the spilled material
until the fizzing stops, then mop or scoop up the residue. Leave
cleanup of large spills to the experts; call your local fire department
or hazardous materials spill team.
IntellipH™ Automatic Dispenser Installation and User’s Guide
Page 5

IntellipH System Overview
This manual describes how to installation and setup the IntellipH.
Operating IntellipH
The IntellipH controller adds acid to the pool every hour. The dispense amount is based
on the user's settings. The amount of acid added each hour can be quickly changed by
pressing either the MORE or LESS button, with a range of 1% - 100% in 1% increments.
If 0% is selected, no acid will be dispensed.
All acid for the IntellipH system is stored in a four gallons storage canister with a
built-in pump. A small tube, provided in the kit, carries the acid pumped from the canister
directly to the main water line. The 60 minute timer will restart again.
After each dose, the IntellipH control panel display will show a 60-minute countdown
timer. When the timer equals zero, the pump on the canister is activated and acid is
pumped into the pool's main waterline.
Note: Once an IntelliChlor cell is connected to the IntellipH controller, the cell sanitizer
output will be adjusted through the IntellipH controller menu, NOT through the cell. Set
the IntelliChlor output from the SET CELL OUTPUT menu on IntellipH controller . The
More and Less buttons on IntelliChlor cell will be disabled.
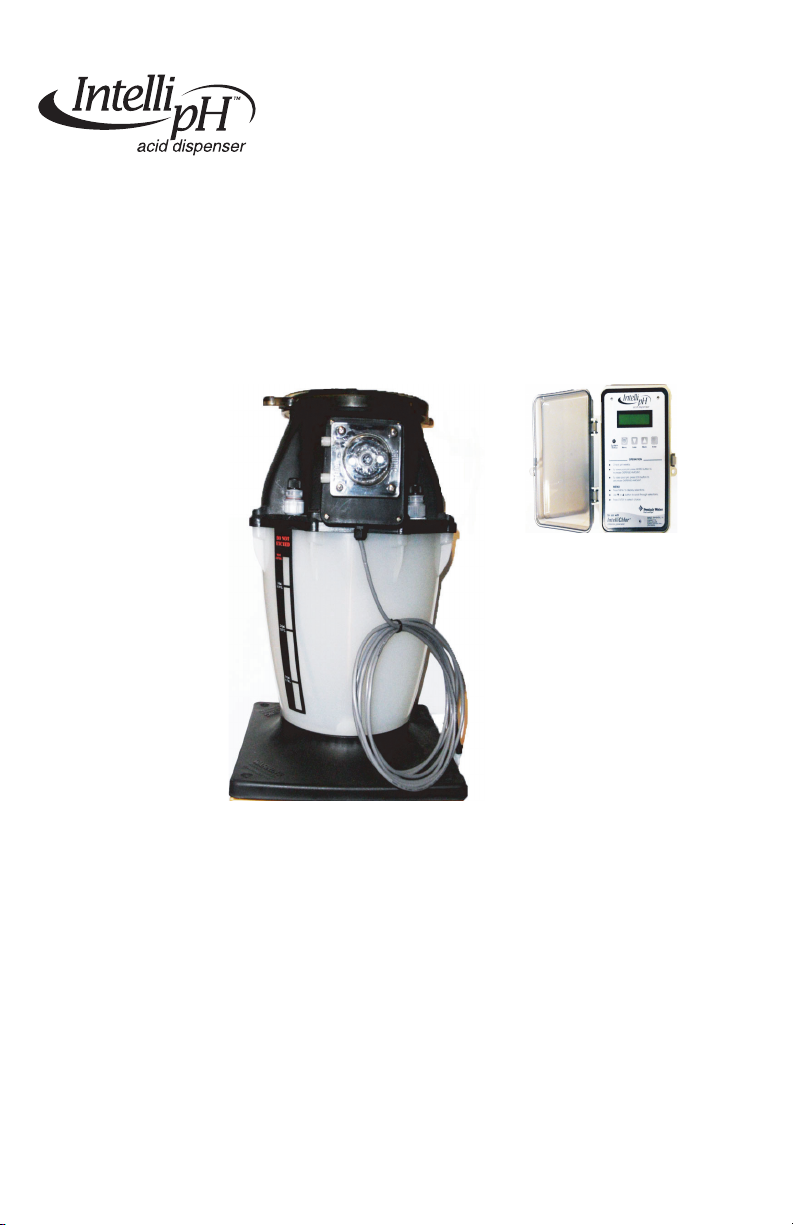
IntellipH Kit Contents
1
• One IntellipH control panel
• Four-gallon storage canister, with pump
• 15 ft Acid resistant tubing, from canister to cell
• Two saddle clamps (1.5" and 2")
• Injection fitting
IntellipH™ Automatic Dispenser Installation and User’s Guide
Page 6

2
IntellipH Controller Control Panel
1
2
5
4
3
6
1
Liquid Crystal Display (LCD): The system LCD displays backlighting for easy
viewing of the menu items and status messages. Each button press will light the
display. When an event message is displayed, the backlight also lights.
2
System Status LED indication: Shows green when the system is running normally,
and red if an error occurred. See page 6 for error conditions.
3
Menu/Button: Access and exit from the menu. While in a menu or sub-menu, use
this button to go back to a previous menu level or item. If no menu activity is
detected after 30 seconds, the main screen is displayed. All menu settings are
permanently saved and retained in the control panel even after the IntellipH is
power off.
Less / More buttons: Scroll through the main menu items and adjust or change
4
settings. Use these buttons after pressing the Menu button to access the main menu
items.
Enter button: Select a menu choice or save changes. While system is in normal
5
mode, press this button to show the system settings. The display will automatically
revert back to the normal display mode after 30 seconds from the last selection.
IntellipH™ Automatic Dispenser Installation and User’s Guide
Page 7

Operating Mode
In normal operating mode the display will alternate between IntellipH pH CONTROLLER
and MIN UNTIL NEXT DISPENSE. Each message is displayed a few seconds before
rotating to the next message. The "XX" is a minute countdown timer, showing from
60 to 00.
3
IntellipH
pH CONTROLLER
XX MIN UNTIL
NEXT DISPENSE
ENTER button
If the ENTER button is pressed during normal display mode, system information is
displayed for four seconds:
IntelliChlor Cell
Sanitizer output
selection
00-100%
Cell Model
IC40 60% V1.09
IpH SET TO 50%
Dispense Amount
01-100%
Software version of IpH
Menu Button
Press the MENU button to display the system choices. Use the MORE or LESS button to
scroll through each choice. Press the ENTER button to select that choice. Pressing the
MENU button will exit that menu.
Add Acid Manually
When this selection is displayed, press the ENTER key to begin dispensing acid. The
pump will turn on for 60 seconds and a countdown timer will be displayed, along with a
running total of acid being dispensed (approximately 4 oz. of acid will be dispensed). If
the acid hose has air bubbles, the amount pumped will be slightly less than amount
displayed on the LCD screen. Press the ENTER key at any time to exit this mode. If the
ENTER key is not depressed the system will return to normal operation after the 60
seconds has elapsed.
IntellipH™ Automatic Dispenser Installation and User’s Guide
Page 8

4
Dispense Amount
Press either the MORE or LESS button.
The following will display:
This setting controls the acid dose size every hour, and has a range of 00-100%, out of
the box initial factory setting is at 50%. Increasing this percentage will increase the acid
dispense amount that occurs every 60 minutes. Decreasing this percentage will
decrease the acid dispense amount. Check the pool pH level weekly and adjust this
value accordingly, to maintain your pool at a pH of 7.2 to 7.4. Dispense amount can also
be accessed through the menu system.
Press the MORE button to raise this percentage, or press the LESS button to lower this
percentage. Press the MENU key to exit this mode. The new settings will be saved in
memory.
If the water pH is low, press the LESS button to decrease the acid dispensed every hour.
Likewise, if water pH is high, press the MORE button to increase the acid dispensed
every hour.
Your IntellipH is designed to maintain pH levels. If pH was too high, utilize the manual
acid dispense to stabilize your pool and then operate for at least one week under new
settings and re-check pool water pH level.
It may take several weeks of adjusting percentage setting that is perfect for your pool.
Bather load, organic loads, filter pump time, and chlorine produced all affect the pH level.
DISPENSE AMOUNT
50% _ _ _
Note: 128 Oz. = 1 Gallon
IntellipH™ Automatic Dispenser Installation and User’s Guide
Page 9

Setting up the system for the first time
For best operation, the IntellipH system should be configured to match your basic acid
needs. Perform the following steps to setup the system:
• Use a Test Kit to balance the pool water
• Measure the water pH
• Operate the IntellipH system for one week
• Monitor pH regularly and adjust acid dispensing amount using the "More"
or "Less" buttons as required.
Operation with IntelliTouch and EasyTouch Automation Systems
When the IntellipH is connected to an IntelliTouch®, EasyTouch® automatation system,
IntellipH monitors the communication link between the IntelliChlor cell and automation
system.
When IntelliChlor cell is connected to an automation system, the cell sanitizer output will
be adjusted through the panel menu, NOT the cell. The "MORE and LESS" buttons on
IntelliChlor will be disabled.
If the automation system sends out a 0% output command to the IntelliChlor, the cell
output percentage display will be blank, for no chlorine. The IntellipH will display
SYSTEM OFF, WILL NOT DISPENSE. No acid will be dispensed during this time.
5
If the automation panel is in SPA MODE or the IntelliChlor output is set to 1% -5%, the
IntellipH will display SPA MODE, WILL NOT DISPENSE. Acid will not be dispensed while
this is displayed. This is a safety feature.
Operating IntellipH in Winter
If the cell is in “COLD water cutoff” mode, where the water temperature is 52°F (12.2°C)
or below, the IntellipH will display “COLD WATER WILL NOT DISPENSE”.
Winterize the IntellipH using the same method as the IntelliChlor: Remove the IntellipH
panel from the wall and store it in a safe place until the pool is re-opened.
IntellipH™ Automatic Dispenser Installation and User’s Guide
Page 10

6
Superchlor Mode
This setting controls the IntelliChlor cell sanitizer output, and has a range of 0% -100%
(default factory setting is 60%). Increasing or decreasing this percentage will increase or
decrease chlorine in your pool.
This feature replaces the MORE and LESS button on the IntelliChlor cell. Once the
IntelliChlor cell is connected to the IntellipH, the 'More' and 'Less' buttons on the
IntelliChlor will be disabled.
Note: The IntellipH controller will increase and decrease chlorine output in 1%
increments.
Cell output IntelliChlor "Sanitizer Output"
setting LED Display
1 - 29 20%
30 - 49 40%
50 - 69 60%
70 - 89 80%
90 - 100 100%
History Data
The History Data feature allows you to collect and view the operating history of the
IntellipH unit. To access the IntellipH history data, press ENTER. The following list is
displayed: - - - - DISPENSE. The number of hourly dispenses performed since
installation. Press the MORE button to scroll down to the next screen. Every automatic
dispense will increment this counter. This is useful to verify the unit is dispensing acid.
IntellipH™ Automatic Dispenser Installation and User’s Guide
Page 11

Troubleshooting
Refer to the following tips to help to resolve problems that might occur while operating
IntellipH.
7
IntellipH™ Automatic Dispenser Installation and User’s Guide
Page 12

8
IntellipH Installation
The IntellipH controller is installed "in series" with the IntelliChlor cell. The IntelliChlor
cell cord plugs into the IntellipH controller and the controller plugs into the IntelliChlor
power center, EasyTouch® or IntelliTouch® load center power connector.
To install the IntellipH Controller:
1. Choose a location on a wall or vertical surface near the IntelliChlor power
center (p/n 520556), EasyTouch load center or IntelliTouch load center.
Secure the IntellipH controller to the surface with the three screws
(provided in kit).
2. SWITCH OFF or REMOVE POWER to the IntelliChlor cell.
3. Remove the IntelliChlor cell cord from the power center, EasyTouch or
IntelliTouch load center. Insert the plug into bottom of the IntellipH
controller.
4. Plug the IntellipH controller cord into the IntelliChlor power center,
IntelliTouch or EasyTouch load center, where the cell originally was
plugged in.
5. Switch power ON to the IntelliChlor cell. The IntellipH controller will now
power up.
®
IntellipH Controller Installation Diagram
IntellipH™ Automatic Dispenser Installation and User’s Guide
Page 13

Saddle Clamp Mount Installation
The saddle clamp is designed to mount the injection fitting on the main water line. The
outside of the pipe must be clean and free of surface imperfections. To ensure a
leak-free installation.
Drill the Mounting Hole
1. Select an area on the pipe close to the IntelliChor® cell (Between the filter
and c InteliChlor cell) on the Flow Switch side of the cell inlet.
2. Drill a 1/2” diameter hole through the center of the pipe wall (Be sure not to
drill through the pipe).
3. Clean all burrs from inside and outside of the hole. If necessary, use fine
sandpaper to remove the burrs.
Install the Saddle Clamp
1. Thread the injector fitting into the top of the saddle clamp. Place the
supplied o-ring in the groove. IMPORTANT! Be sure the o-ring is properly
aligned in the groove on the saddle clamp.
2. Place the pipe hose clamps around the pipe and the slots on the saddle
clamp. Tighten the pipe clamps using the alternative method (i.e. left, right,
left, etc.).
9
Saddle Clamp
IntellipH™ Automatic Dispenser Installation and User’s Guide
Page 14

Notes
IntellipH™ Automatic Dispenser Installation and User’s Guide
Page 15

Notes
IntellipH™ Automatic Dispenser Installation and User’s Guide
Page 16

SAVE THESE INSTRUCTIONS
*521396*
P/N 521396 Rev A
IntellipH™ Automatic Dispenser Installation and User’s Guide
 Loading...