

Standard Horizon HX280E Owner's Manual
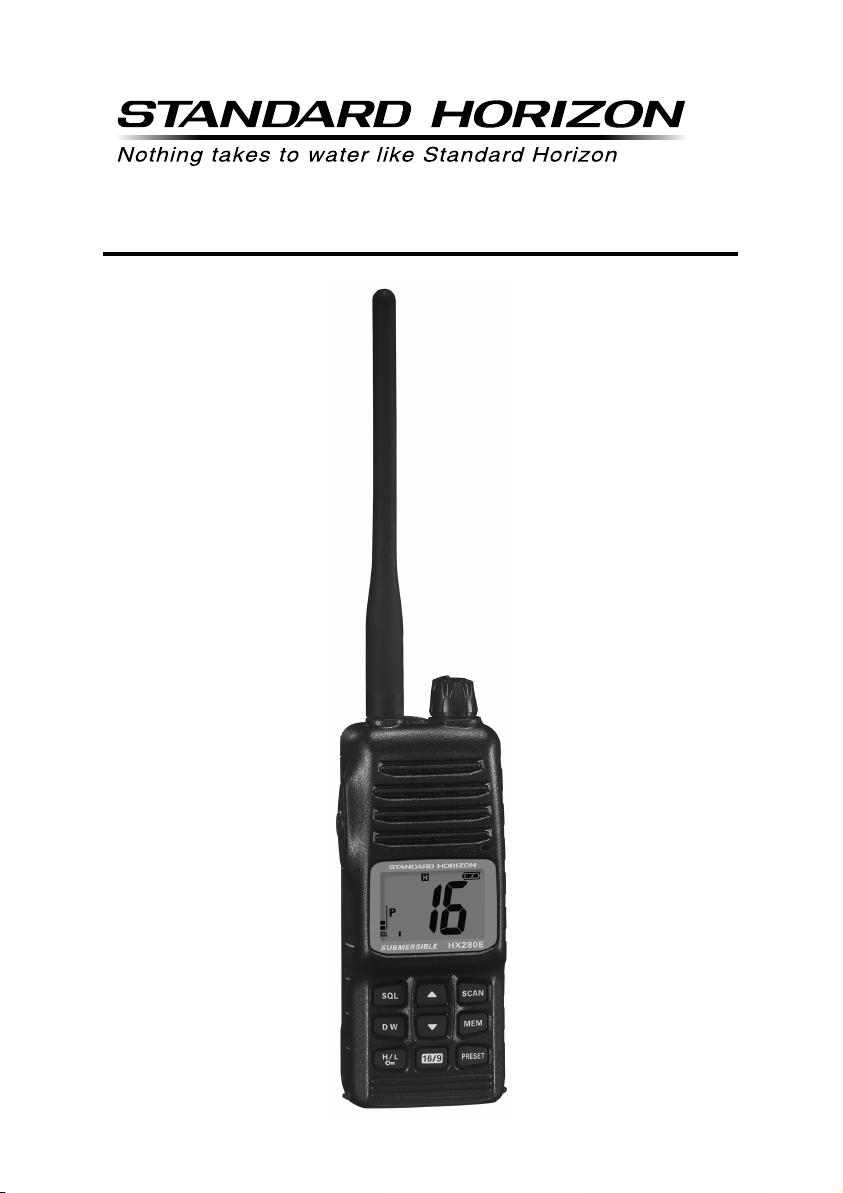
HX280E
VHF FM Marine Transceiver
Owner’s Manual
Page 1HX280E

TABLE OF CONTENTS
1. GENERAL INFORMATION .................................................................................... 4
1.1 INTRODUCTION ........................................................................................... 4
2. ABOUT THIS RADIO ............................................................................................ 4
2.1 ABOUT THE VHF MARINE BAND ........................................................... 4
3. ACCESSORIES ....................................................................................................... 5
2.1 PACKING LIST ............................................................................................. 5
2.2 OPTIONS ...................................................................................................... 5
4. GETTING STARTED .............................................................................................. 6
4.1 RADIO CARE ................................................................................................ 6
4.2 BATTERIES AND CHARGERS .................................................................. 6
4.2.1 BATTERY SAFETY ........................................................................... 6
4.2.2 BATTERY INSTALLATION / REMOVAL ........................................... 8
4.2.3 BATTERY CHARGING ...................................................................... 8
4.3 INSTALLATION OF OPTION ........................................................................ 9
4.3.1 FBA-40 ALKALINE BATTERY CASE ................................................ 9
5. CONTROLS AND INDICATORS ........................................................................ 10
5.1 CONTROLS AND SWITCHES ................................................................. 10
5.2 INDICATORS............................................................................................... 13
6. BASIC OPERATION ............................................................................................ 14
6.1 PROHIBITED COMMUNICATIONS .......................................................... 14
6.2 INITIAL SETUP .......................................................................................... 14
6.3 RECEPTION ............................................................................................... 14
6.4 TRANSMISSION ......................................................................................... 15
6.4.1 TRANSMIT TIME-OUT TIMER (TOT)............................................. 15
6.5 USA, CANADIAN, AND INTERNATIONAL CHANNELS........................ 16
6.6 SIMPLEX/DUPLEX CHANNEL USE ........................................................ 16
6.7 KEYPAD LOCKING.................................................................................... 16
6.8 PRESET CHANNELS (0 ~ 9): INSTANT ACCESS ................................. 17
6.8.1 PROGRAMMIMG ............................................................................ 17
6.8.2 OPERATION .................................................................................... 17
6.9 SCANNING ................................................................................................. 18
6.9.1 SELECTING THE SCAN TYPE ...................................................... 18
6.9.2 MEMORY SCANNING (M-SCAN)................................................... 18
6.9.3 PRIORITY SCANNING (P-SCAN).................................................. 19
6.10 DUAL WATCH ............................................................................................ 20
6.11 EMERGENCY (CHANNEL 16 USE)......................................................... 20
6.12 CALLING ANOTHER VESSEL (CHANNEL 16 OR 9)........................... 21
6.13 OPERATING ON CHANNEL 13 .............................................................. 22
6.14 OPERATING ON CHANNEL 67 .............................................................. 22
7. MENU (“SET”) MODE .......................................................................................... 23
8. MAINTENANCE .................................................................................................... 24
8.1 GENERAL ................................................................................................... 24
8.2 REPLACEMENT PARTS ........................................................................... 24
8.3 TROUBLESHOOTING CHART ................................................................. 25
9. VHF MARINE CHANNEL ASSIGNMENT ......................................................... 26
10. SPECIFICATIONS ................................................................................................. 30
10.1 GENERAL ................................................................................................... 30
10.2 TRANSMITTER........................................................................................... 30
10.3 RECEIVER .................................................................................................. 30
HX280EPage 2
Congratulations on your purchase of the HX280E! Whether this is your first
portable marine VHF transceiver, or if you have other STANDARD HORIZON
equipment, the STANDARD HORIZON organization is committed to ensuring
your enjoyment of this high performance transceiver, which should provide
you with many years of satisfying communications even in the harshest of
environments. STANDARD HORIZON technical support personnel stands
behind every product sold, and we invite you to contact us should you require
technical advice or assistance.
We appreciate your purchase of the HX280E, and encourage you to read this
manual thoroughly, so as to learn and fully understand the capabilities of the
HX280E.
Disposal of your Electronic and Electric Equipment
Products with the symbol (crossed-out wheeled bin) cannot be disposed
as household waste.
Electronic and Electric Equipment should be recycled at a facility capable of handling these items and their waste byproducts.
In EU countries, please contact your local equipment supplier
representative or service center for information about the waste
collection system in your country.
Attention in Case of Use
This transceiver works on frequencies which are not generally permitted. For frequency allocation, apply for a licence at your local spectrum
management authority. For actual
usage contact your dealer or sales
shop in order to get your transceiver adjusted to the allocated frequency range.
List of the practicable area
AUT BEL BGR CYP CZE DEU DNK
ESP EST FIN FRA GBR GRC HUN
IRL ITA LTU LUX LVA MLT NLD
POL PRT ROM SVK SVN SWE CHE
ISL LIE NOR
Page 3HX280E

1. GENERAL INFORMATION
1.1 INTRODUCTION
The HX280E is a Submersible 5-Watt portable two way marine transceiver.
The transceiver has all allocated USA, International, or Canadian channels. It
has emergency channel 16 which can be immediately selected from any channel by pressing the [16/9] key.
The HX280E includes the following features: Memory Scanning, Priority Scanning, easy-to-read large LCD display, EEPROM memory back-up, Battery Life
displayed on LCD, and a transmit Time-Out Timer (TOT).
The HX280E transmitter provides a full 5 Watt of transmit power and also is
selectable to 1 Watt to assist the user in ensuring maximum battery life.
2. ABOUT THIS RADIO
2.1 ABOUT THE VHF MARINE BAND
WARNING
The radio frequencies used in the VHF marine band lie between 156
and 158 MHz. The marine VHF band provides communications over
distances that are essentially “Line of sight” Actual transmission range
depends much more on antenna type, gain and height than on the power
output of the transmitter. On a fixed mount 25 W radio transmission
expected distances can be greater than 15 miles, for a portable 5 W
radio transmission the expected distance can be greater than 5 miles in
“Line of sight”.
The user of a Marine VHF radio is subject to severe fines if the radio is
used on land. The reasoning for this is you may be near an inland waterway, or propagation anomalies may cause your transmission to be heard
in a waterway. If this occurs, depending upon the marine VHF channel
on which you are transmitting, you could interfere with a search and
rescue case, or contribute to a collision between passing ships. For
VHF Marine channel assignments refer to page 32 section 10.
HX280EPage 4

3. ACCESSORIES
3.1 PACKING LIST
When the package containing the transceiver is first opened, please check it
for the following contents:
HX280E Transceiver
CAT460 Antenna
FNB-V105LI 7.4 V, 1650 mAh Li-Ion Battery Pack
CD-46 Charger Cradle for HX280E
PA-48C/U AC AC Adapter for CD-46
CLIP-920 Belt Clip
Owner’s Manual
3.2 OPTIONS
CN-3 Radio-to-Ship’s-Antenna Adapter
CD-46 Charger Cradle
FNB-V105LI 7.4 V, 1650 mAh Li-Ion Battery Pack
FBA-40 Alkaline Battery Case
E-DC-19A
PA-48B/C/U2AC Adapter for the CD-46
1: E-DC-19A supply voltage 10.4 V ~ 14.4 VDC only. Fuse rating of 3A only
to be used.
2:“B” suffix is for use with 120 VAC
(Type-A plug), “C” suffix is for use with
230 VAC (Type-C plug), and “U” suffix is for use with 230 VAC (Type-BF
plug).
1
DC Cable with 12 V Cigarette Lighter Plug
Note: Before operating the HX280E for
the first time, it is recommended that the
battery be charged. Please see section
“4.2.3 BATTERY CHARGING” for details.
Page 5HX280E

4. GETTING STARTED
4.1 RADIO CARE
CAUTION
Before following the instructions below, insure the battery pack is in place
and firmly tightened. Care must be taken if the radio was dropped and a
close inspection may be needed to insure the radio case and gaskets
are in adequate condition.
Clean the radio with fresh water after exposure to salt water by rinsing the
radio under a sink faucet or by dunking the radio in a bucket of fresh water.
After washing, use a soft cloth and thoroughly dry all parts of the radio. This is
to keep the rubber switches and speaker grill clean and in top operating condition.
CAUTION
There is rare case that water is in between the radio and battery pack. In
this case, the radio and battery pack keep the submersible performance
individually. However, remove the battery pack from the radio, then clean
the radio and battery pack individually by a procedures described above.
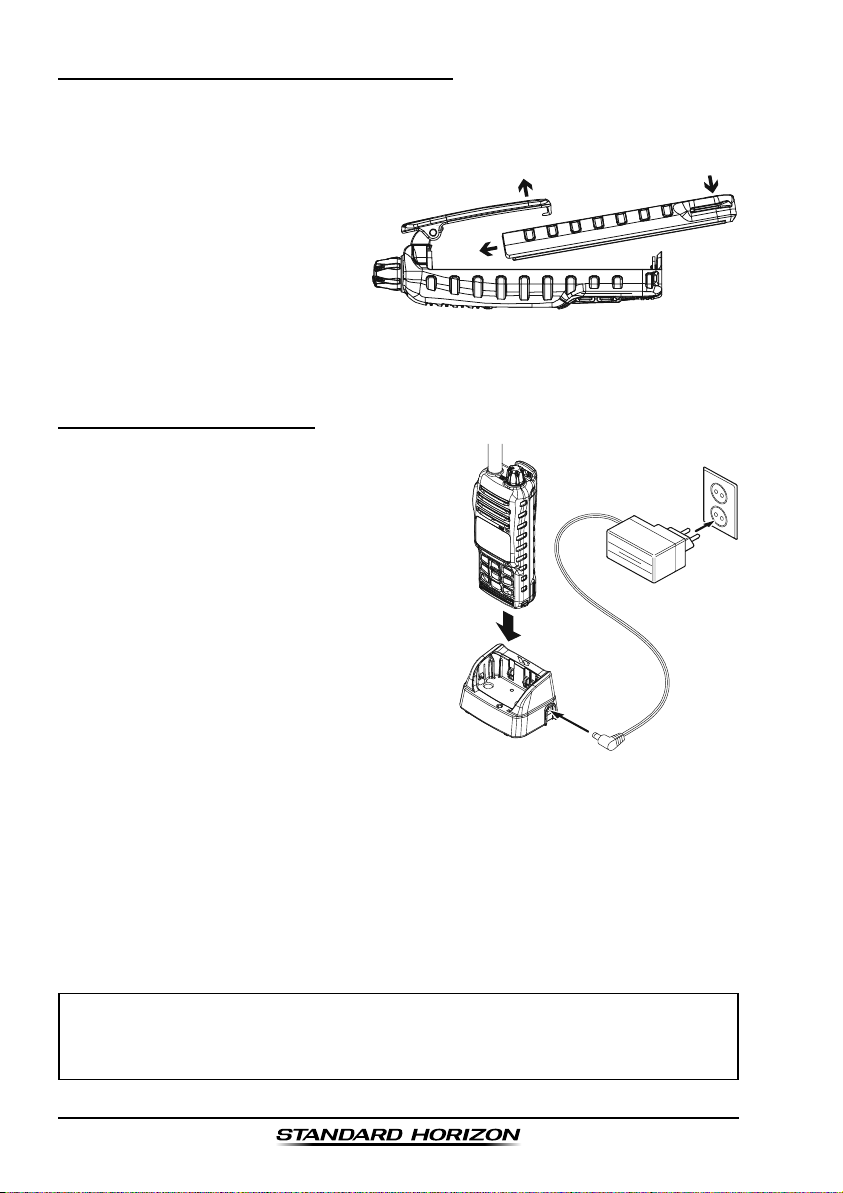
4.2 BATTERIES AND CHARGERS
If the radio has never been used, or its charge is depleted, it may be charged
by connecting the CD-46 Charger Cradle with the PA-48C/U AC Adapter, as
shown in the illustration on page 8. The PA-48C/U will charge a completely
discharged FNB-V105LI battery pack in about 6 hours.
The FNB-V105LI is a high performance Li-Ion battery providing high capacity
in a compact package.
CAUTION
To avoid risk of explosion and injury, FNB-V105LI battery pack should
only be removed, charged or recharged in non-hazardous environments.
4.2.1 BATTERY SAFETY
Battery packs for your transceiver contain Li-Ion batteries. This type of battery
stores a charge powerful enough to be dangerous if misused or abused, especially when removed from the transceiver. Please observe the following precautions:
HX280EPage 6

DO NOT SHORT BATTERY PACK TERMINALS: Shorting the terminals that
power the transceiver can cause sparks, severe overheating, burns, and battery cell damage. If the short is of sufficient duration, it is possible to melt
battery components. Do not place a loose battery pack on or near metal surfaces or objects such as paper clips, keys, tools, etc. When the battery pack is
installed on the transceiver, the terminals that transfer current to the transceiver are not exposed. The terminals that are exposed on the battery pack
when it is mounted on the transceiver are charging terminals only and do not
constitute a hazard.
DO NOT INCINERATE: Do not dispose of any battery in a fire or incinerator.
The heat of fire may cause battery cells to explode and/or release dangerous
gases.
Battery Maintenance
For safe and proper battery use, please observe the following:
Battery packs should be charged only in non-hazardous environments;
Use only STANDARD HORIZON-approved batteries;
Use only a STANDARD HORIZON approved charger. The use of any
other charger may cause permanent damage to the battery.
Follow charging instructions provided with the chargers.
Keep the battery contacts clean.
Battery Storage
Store the batteries in a cool place to maximize storage life. Since batteries are
subject to self-discharge, avoid high storage temperatures that cause large
self-discharge rates. After extended storage, a full recharge is recommended.
Battery Recycling
DO NOT PLACE USED BATTERIES IN YOUR REGULAR TRASH!
LI-ION BATTERIES MUST BE COLLECTED, RECYCLED OR DISPOSED
OF IN AN ENVIRONMENTALLY SOUND MANNER.
The incineration, land filling or mixing of Li-Ion batteries with the municipal
solid waste stream is PROHIBITED BY LAW in most areas.
Return batteries to an approved Li-Ion battery recycler. This may be where
you purchased the battery.
Contact your local waste management officials for other information regarding
the environmentally sound collection, recycling and disposal of Li-Ion batteries.
Page 7HX280E
4.2.2 BATTERY INSTALLATION/REMOVAL
To install the battery pack, hold the transceiver with your left hand, so your
palm is over the speaker and your thumb is on the top of the belt clip. Insert
the battery pack into the battery compartment on the back
of the radio while tilting the Belt
Clip outward, then push the
bottom side of the battery pack
Tilt the Belt Clip
Push the bottom side of
the battery pack
Insert the Battery Pack
until the battery pack locks with
the Battery Pack Latch.
To remove the battery, turn the radio off. Slide the Battery Pack Latch on
the bottom of the radio, then slide the battery downward and out from the
radio while holding the Belt Clip.
4.2.3 BATTERY CHARGING
1. Turn the transceiver off.
2. PA-48C/U: Insert the DC plug from the
PA-48C/U into the DC jack on the CD-46
side panel, then plug the PA-48C/U into
the AC line outlet.
E-DC-19A: Insert the DC plug from the
E-DC-19A into the DC jack on the CD-46
PA-48C/U
side panel, then insert the 12 V DC connector into a suitable DC supply (10 - 14
VDC).
3. Insert the HX280E (with the battery pack)
into the CD-46; the antenna should be at
the left side when viewing the charger
CD-46
from the front.
4. If the HX280E is inserted correctly, the Red “CHARGING” indicator will
glow. A fully-discharged pack will be charged completely in approximately
6 hours.
5. When charging is completed, the red LED indicator will change to green.
Remove the transceiver from the CD-46, and unplug the NC-90C/U from
the AC line outlet (PA-48C/U) or unplug the E-DC-19A from the DC supply
(E-DC-19A).
CAUTION
The CD-46 is NOT designed to be waterproof. Do not attempt to charge
in water hazardous locations.
HX280EPage 8
NOTE
The CD-46 is only designed for the charging of the HX280E’s battery,
and is not suitable for other purposes. The CD-46 may contribute noise
to TV and radio reception in the immediate vicinity, so we do not recommend its use adjacent to such device.
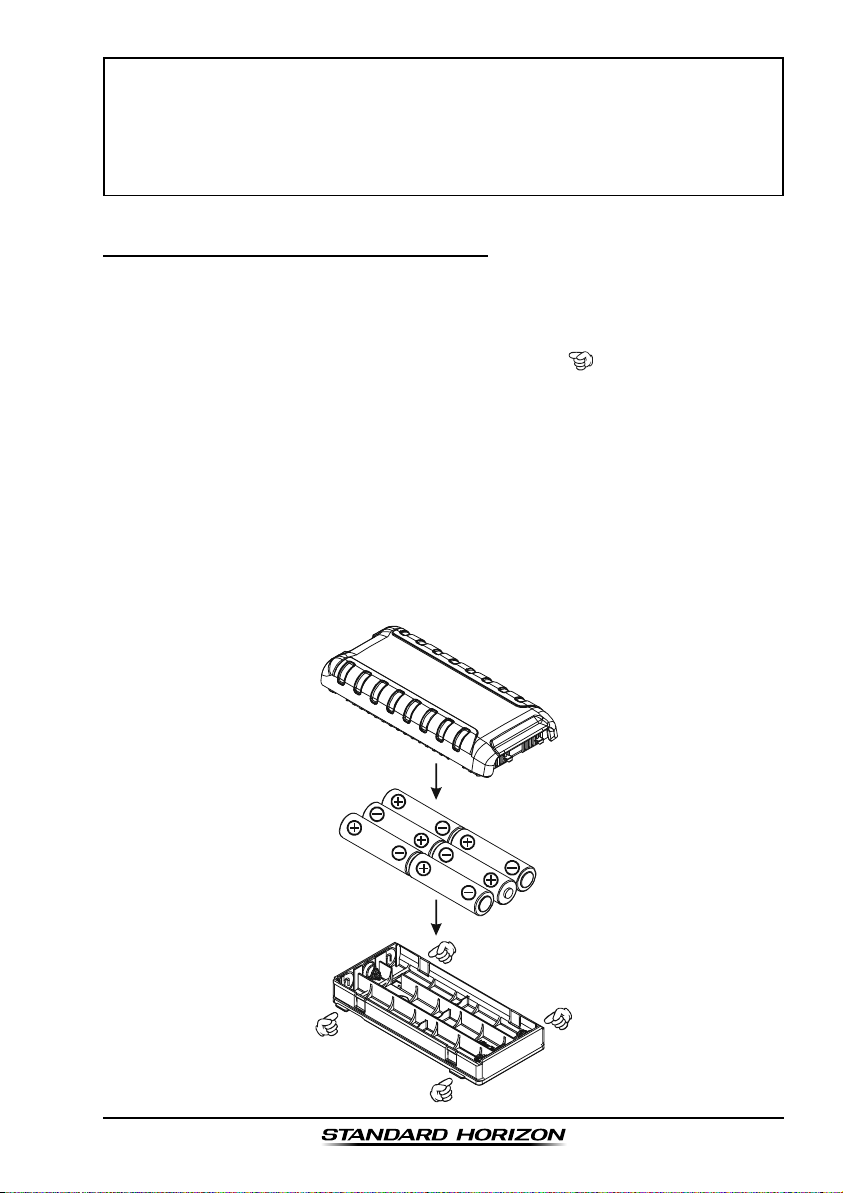
4.3 INSTALLATION OF OPTION
4.3.1 FBA-40 ALKALINE BATTERY CASE
FBA-40 is a battery case that holds six LR6 size Alkaline batteries and is used
with the HX280E transceiver. When the FBA-40 is installed into the HX280E
the radio can withstand immersion in water up to 3.3ft for 30 minutes.
1. On the FBA-40, remove the battery case cover ( ).
2. Slide the six LR6 size Alkaline batteries into the FBA-40 Battery Case with
the Negative (–) side of the batteries touching the spring connections inside the FBA-40 Battery Case.
3. Attach the battery cover to the FBA-40 Battery Case while being careful so
that o-ring is not twisted.
4. Insert the FBA-40 Battery Case into the battery compartment on the back
of the HX280E transceiver while tilting the Belt Clip outward, then push the
bottom side of the FBA-40 Battery Case until the Battery Case locks with
the Battery Pack Latch.
Page 9HX280E
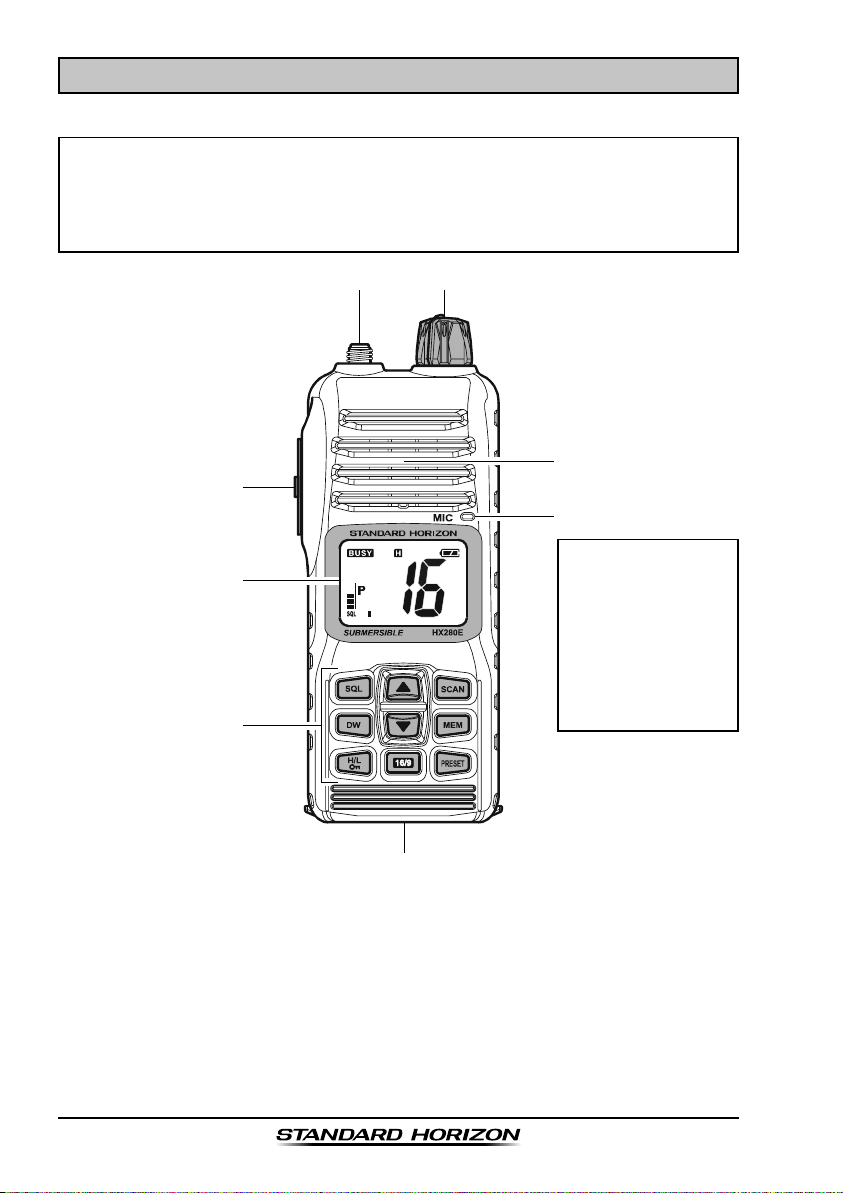
5. CONTROLS AND INDICATORS
5.1 CONTROLS AND SWITCHES
NOTE
This section defines each control of the transceiver. For detailed operating instructions, refer to section 6 “BASIC OPERATION”. Refer to illustrations for the location of the following controls, switches, and connections.
NOTE
When transmitting,
position your mouth
about 1.0 ~ 2.5 cm
away from the small
mic hole.
Speak slowly and
clearly into the microphone.
ANT Jack (Top Panel
The supplied CAT460 flexible antenna is attached here.
POWER Switch/VOLUME Control (VOL
Turns the transceiver on and off as well as adjusts the speakers audio
volume.
Turn this knob clockwise to turn the radio on and increase the speakers
audio volume.
Turn fully counter-clockwise to turn the radio off.
)
)
HX280EPage 10
 Loading...