

®
128 x 64 OLED Passive Matrix Controller-Driver
Main Features
■ Support 128 x 64 Dot Matrix Panels
■ Embedded DC-DC Step-up Converter
STV8102
PRODUCT PREVIEW
I2C Parallel SPI
Interface Interface Interface
■ Display Power Supply up to 20V
■ Device Power Supply: 1.8V to 3.3V
■ Low-power Consumption Suitable for
Battery-operated systems
■ Column Source Current: 500µA (max.)
■ Row Sink Current: 64mA
■ On-chip Oscillator
■ Programmable Multiplexing Rate
■ Self Adaptive Panel Addressing Scheme
■ Powermizer
■ Brightness Control with Built-in Aging
Compensation
■ Built-in Display Pattern Generator
■ Selectable 8-bit Parallel Interface (68xx, 80xx
series), Serial Peripheral Interface and I²C
interface
■ Embedded 128 x 64 x 1-bit Graphic RAM
■ Row and Column Re-mapping
■ Screen Saver Mode
■ -40° to +85°C Operating Temperature
Driving Scheme
R
Status
Register
Row
Drivers
Screen
Saver
Pattern
Generator
Instruction
Decoder
Display RAM
64 X 128 bits
Self-adaptive
Scanning Control
Column Drivers
Control
Register
Clocks
Generator
Powermizer
Panel
Supply
Reference
Current
FT
Description
The STV8102 is a low-power controller chip for
Organic Light Emitting Diode (OLED) dot passive
matrix display systems. The STV8102 supports
A
black-and-white monochrome displays with a
definition of up to 128 columns and 64 rows.
The STV8102 provides all necessary functions in a
single chip, including on-chip OLED supply control
and bias current generators, resulting in a minimum
of external components and in very low-power
consumption.
The STV8102 communicates with the system via
fully configurable interfaces (parallel, serial or I
D
10 November 2004 Draft of Revision 1.7 ADCS 7476489 STMicroelectronics Confidential 1/65
This is preliminary information on a new product now in development . Details are subje ct to change without notice.
to ease interfacing with the host microcontroller.
The STV8102 has a set of control and status
registers that can be addressed by the interfaces.
2
C)

STV8102
Chapter 1 General Overview . . . . . . . . . . . . . . . . . . . . . . . . . . . . . . . . . . . . . . . . . . . . . . . . . .4
1.1 Bump Die Pad Description ...................................................................................................5
1.2 Pad Signal Descript ion . ..... ....................................... ............................................................6
1.3 Lead Pad Reference Chart ..................................................................................................7
1.4 Mechanical Dimensions .....................................................................................................15
1.5 Functional Description ........................................................................................................15
Chapter 2 Bus Interfaces . . . . . . . . . . . . . . . . . . . . . . . . . . . . . . . . . . . . . . . . . . . . . . . . . . . .16
2.1 I²C Interface .......................................................................................................................16
2.2 Serial Interface ...................................................................................................................18
2.3 Parallel Interface ................................................................................................................21
Chapter 3 Display RAM . . . . . . . . . . . . . . . . . . . . . . . . . . . . . . . . . . . . . . . . . . . . . . . . . . . . .25
3.1 RAM Writing .......................................................................................................................25
Chapter 4 Display Modes . . . . . . . . . . . . . . . . . . . . . . . . . . . . . . . . . . . . . . . . . . . . . . . . . . .26
4.1 Normal Horizontal/Vertical Display .....................................................................................26
4.2 Mirrored Modes ................. ...... ..... ...... ...................................... ..........................................26
4.2.1 Mirrored Vertical ....................................... ..... .... ............................ ..... .... .............................................................26
4.2.2 Mirrored Horizontal ....................................... .... ..... ............................ .... ..... ........................................................27
4.2.3 Full Mirror ............................................................................................................................................................27
4.3 Display Panning .................................................................................................................28
4.4 Screen Saver .....................................................................................................................29
4.4.1 Limit-to-Limit .......................................................................................................................................................29
4.4.2 Bounce Only .......................................................................................................................................................30
4.4.3 Wrap Only ...........................................................................................................................................................31
4.4.4 Wrap and Bounce ...............................................................................................................................................32
4.5 Flash Mode ............ ...... ...................................... ...................................... ..........................33
4.6 Pattern Generator ..............................................................................................................34
R
A
FT
D
Chapter 5 Display Addressing Scheme . . . . . . . . . . . . . . . . . . . . . . . . . . . . . . . . . . . . . . . .35
5.1 Row Driver .........................................................................................................................35
5.2 Column Driver .......................................................................... ..... .....................................36
5.2.1 Column Pre-charge/Discharge ...........................................................................................................................36
5.2.2 Active Period .......................................................... ..... ........................................................................................37
5.3 Optimization of the Column Driving Scheme .....................................................................37
5.4 Examples of the Row/Column Driving Waveforms ............................................................38
Chapter 6 Scanning Control . . . . . . . . . . . . . . . . . . . . . . . . . . . . . . . . . . . . . . . . . . . . . . . . .41
STMicroelectronics Confidential Draft of Revision 1.7 2/65

STV8102
Chapter 7 Power Supply Management - PowermizerTM . . . . . . . . . . . . . . . . . . . . . . . . . .42
Chapter 8 Oscillator – Timing Generator . . . . . . . . . . . . . . . . . . . . . . . . . . . . . . . . . . . . . . .44
Chapter 9 STV8102 Configuration . . . . . . . . . . . . . . . . . . . . . . . . . . . . . . . . . . . . . . . . . . . .45
9.1 Reset Configuration ...........................................................................................................45
9.2 Display OFF Configuration .................................................................................................45
9.3 Example Configuration .......................................................................................................45
Chapter 10 Control and Status Registers Descri ption . . . . . . . . . . . . . . . . . . . . . . . . . . . . .48
10.1 Register Map ......................................................................................................................48
10.2 Register Description Ordered by Name .............................................................................49
Chapter 11 Electrical Characteristics . . . . . . . . . . . . . . . . . . . . . . . . . . . . . . . . . . . . . . . . . .61
11.1 Absolute Maximum Ratings ...............................................................................................61
11.2 Thermal Data .....................................................................................................................61
11.3 Recommend ed Op erat ing Conditio ns ...................... ..... ...... ..... ..........................................61
11.3.1 DC Characteristics ..............................................................................................................................................61
11.3.2 Timing Generator ................................................................................................................................................62
11.3.3 Row Drivers ........................................................................................................................................................62
11.3.4 Column Drivers ...................................................................................................................................................62
11.3.5 DC-to-DC Converter ...........................................................................................................................................63
11.3.6 Voltage Generator ...............................................................................................................................................63
Chapter 12 Revision History . . . . . . . . . . . . . . . . . . . . . . . . . . . . . . . . . . . . . . . . . . . . . . . . . .64
A
FT
R
D
3/65 Draft of Revision 1.7 STMicroelectronics Confidential

STV8102 General Overview
1 General Overview
The STV8102 is a monochrome, black and white, low-power controller from STMicroelectronics’
family of controllers for OLED displays. It has been developed to bring a flexible solution to
applications and systems based on OLED passive matrixes.
The STV8102 is processed in 0.35µm BCD technology. The supply of the digital core of the
controller is typically 3.3V. The controller can operate with a display supply of up to 20V.
The device can be used with many different host microcontrollers. It supports two kinds of serial bus
and two parallel interfaces, covering most of the possible application architectures. This provides
easy access to the set of status and control registers to properly program the STV8102.
The STV8102 includes a display RAM of 128×64 bits to support the full display capabilities of the
128 column drivers and 64 row drivers with several display functions like mirroring, panning and
screen saver. These are described in more detail in Chapter 4: Display Modes.
Processed in BCD technology, the digital core consumes very little power even when the display
driver outputs are sourcing 500µA max for executing column commands or sinking 64mA max for
row commands. Thanks to a Powermizer
total power consumption of the STV8102 fits within the specification of several Nomadic
applications. With the STV8102, the number of external components is drastically reduced. See
Chapter 5: Display Addressing Scheme and Cha pter 7: Power Supply Management PowermizerTM for more details. Refer Chapter 11: Electrical Characteristics for the operating
ranges and timings of the various parameters and interfaces.
TM
supply control and Self-adaptive Scanning scheme,
EXT_CLK
RST
CS0
SEL0
SEL1
SDA
SCL
SDIN
SDOUT
SCLK
D0…D7
R/W-(WR)
E-(RD
SD/C
TEST_MODE
Figure 1: STV8102 Input/Output Diagram
VDD_D
VDD_A
FT
VDD_BG
A
STV8102
R
D
)
GND_D
GND_A
GND_BG
GND_COL
GND_SENSE
GND_SUB
Columns
C0...C127
Rows
R0
…
R63
VROW_OFF
VCOL_PRE
HSYNC
VSYNC
VHIGH
VDRIVE
VSENSE
VPP
VCAPA_HOLD
STMicroelectronics Confidential Draft of Revision 1.7 4/65
General Overview STV8102
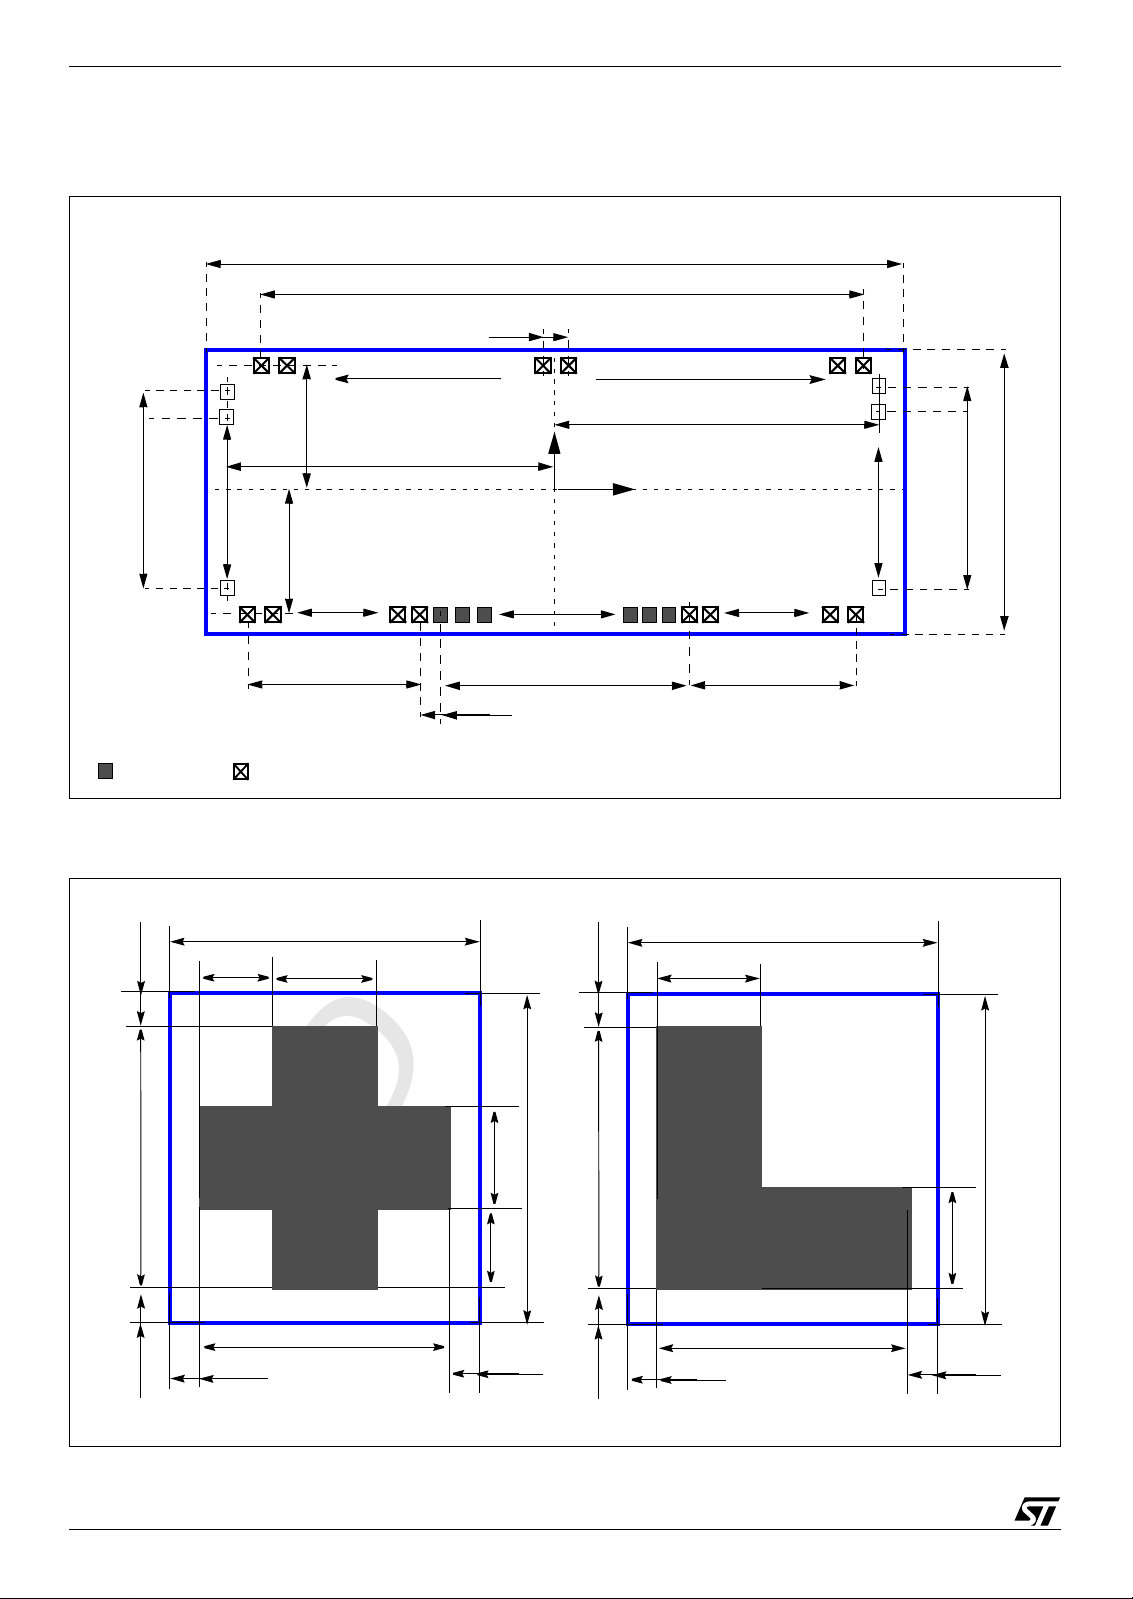
1.1 Bump Die Pad Description
Figure 2: Die Description (Bump-side View)
TOP SIDE
8.58mm
128 pinsx64µm = 8.192mm
80µm
A1
A2
C0
C1
658.95µm
Columns
4245.3µm
128µm
C63
C64
(X=0.0, Y=0.0)
Columns
4245.3µm
C126
B1
B2
C127
80µm
LEFT SIDE
Host pads
13µm
1203.2µm
Dummy (A)
A8
Even Rows
R31
31x64µm = 1984µm
Display pads
Figure 3: COF Alignment and Die Positioning Marks
681µm
R1
VDD_BG
R0
74.7µm
Interface Pins
44 pins 4085.75µm
BOTTOM SIDE
VROW_OFF
R63
R62
31x64µm = 1984µm
FT
Dummy (B)
Odd Rows
B8
R32
1.45mm
1204.45µm
RIGHT SIDE
A
22µm
90µm
20µm
13µm
20µm
90µm
R
METAL X
METAL X
64µm
64µm
13µm
5/65 Draft of Revision 1.7 STMicroelectronics Confidential
13µm
COF Alignment Mark
D
13µm
20µm
22µm
90µm
64µm
13µm
64µm
13µm
Die Positioning Mark
90µm
20µm
13µm

STV8102 General Overview
1.2 Pad Signal Description
Table 1: STV8102 Pad Description (Sheet 1 of 2)
Ball Name Input/Output Description
CS0 IChip select
SD/C
-(WR) I 68XX Parallel interface: read/write or 80XX Parallel interface: write
R/W
) I 68XX Parallel interface: data enable or 80XX Parallel interface: read
E-(RD
D0 to D7 I/O Parallel interface 8 bit data bus (bi-directional pins)
SDOUT O Serial interface data output
SDIN I Serial interface data input
SCLK I Serial interface clock
SCL I I²C bus clock
SDA I/O I²C data input/output
RST
HSYNC O Horizontal synchronization triggering signal
VSYNC O Vertical synchronization triggerin g signal
I Interface data/command selection
I Hardware Reset pin
SEL1 I Interface mode selection
SEL0 I Interface mode selection
VDD_D Supply Low Voltage Digital Supply
VDD_A Supply Low Voltage Analog Supp ly
VDD_BG Supply Low Voltage Reference Supply
GND_D Supply Digital Ground
GND_SUB Supply Substrate Ground
GND_BG Supply Low Voltage Reference Ground
GND_A Supply Analog Ground
TEST_MODE I Must be grounded
GND_COL Supply Analog Ground f or Column Driver
GND_SENSE Supply Ground of current detection for Step-up Circuitry
VSENSE I Current detection of Step-up Circuitry
EXT_CLK I External Clock input
VCAPA_HOLD I Pre-charge supply filtering
VHIGH I High Voltage Step-up Circuit
VDRIVE O Control Signal for Output Voltage Generator
D
R
A
FT
VPP Supply High voltage Supply for Display Addressing
VCOL_PRE I Voltage reference for Column Electrode Pre-charge Sequence
VROW_OFF I Voltage reference for row electro de off-mode
C0 to C127 O OLED Column Driver Output
STMicroelectronics Confidential Draft of Revision 1.7 6/65

General Overview STV8102
Table 1: STV8102 Pad Description (Sheet 2 of 2)
Ball Name Input/Output Description
R0 to R63 O OLED Row Driver Output
1.3 Lead Pad Reference Chart
The reference for the following tables is the center of the die (X = 0.0, Y = 0.0)
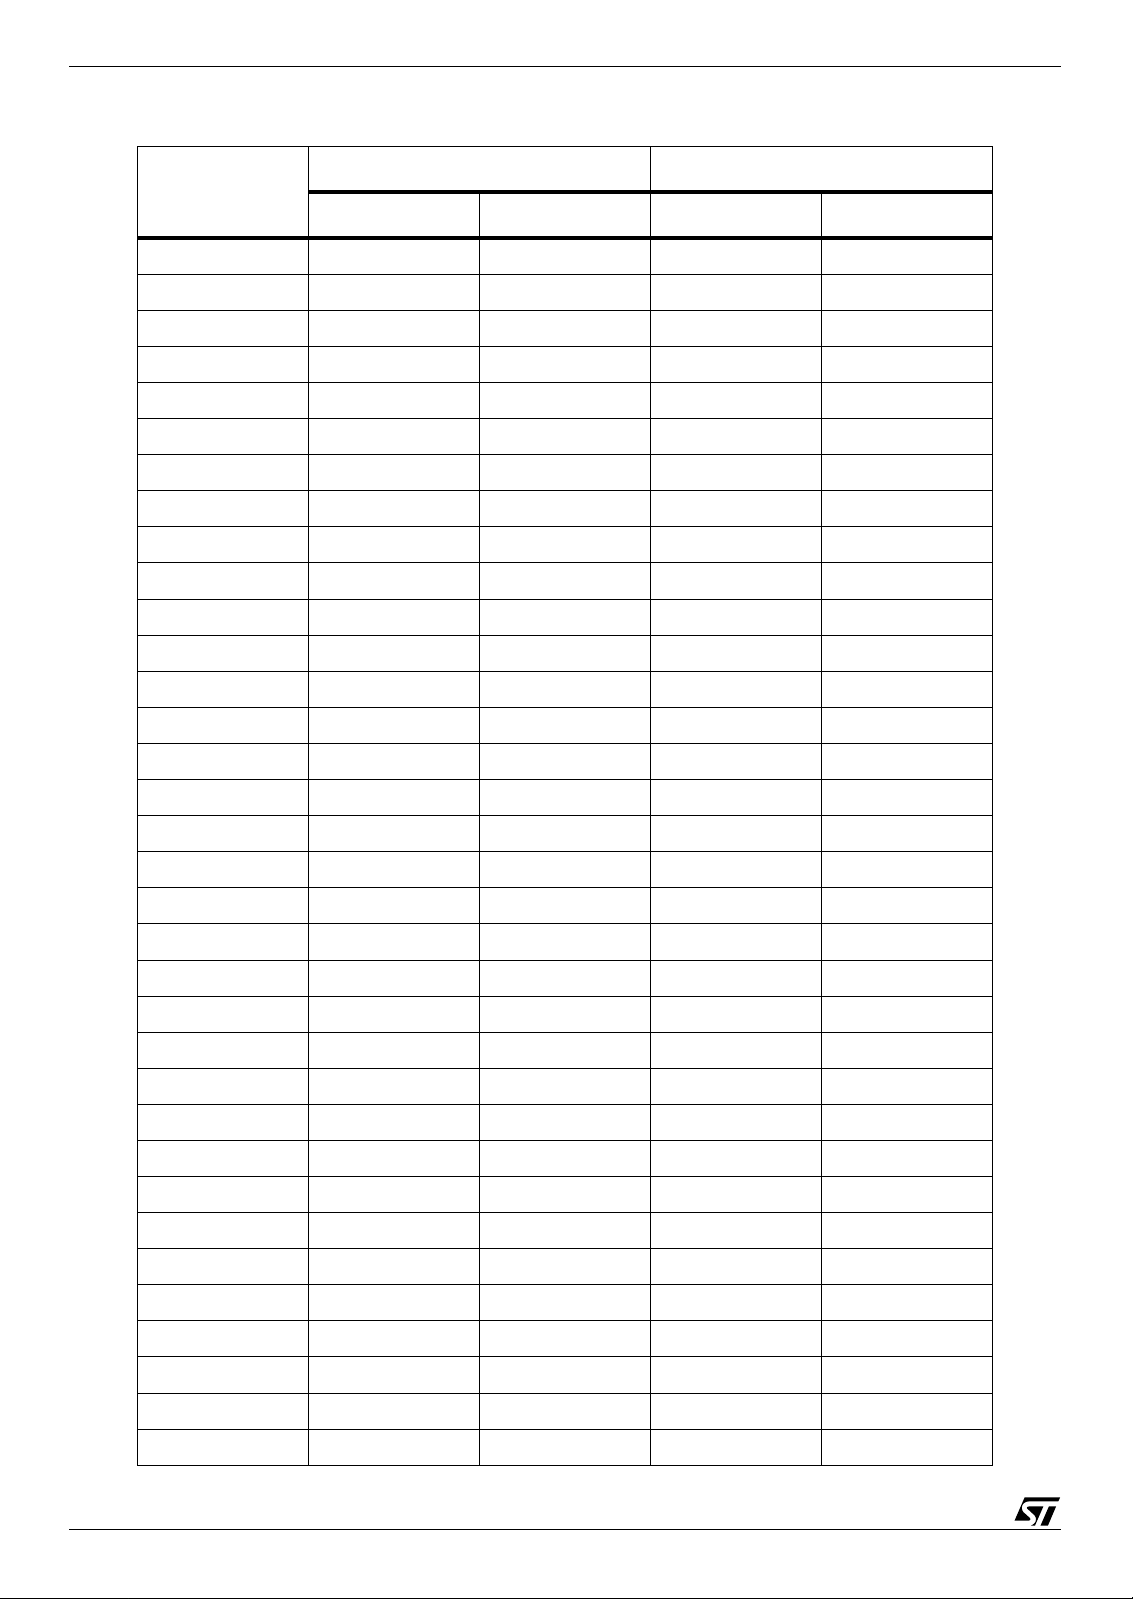
Table 2: Top Side (from left to right) (Sheet 1 of 4)
Pad Placements (center), µm Pad Dimensions, µm
Lead Pad Name
XYXY
COL0 -4095.550 658.95 26.000 60.000
COL1 -4031.550 658.95 26.000 60.000
COL2 -3967.550 658.95 26.000 60.000
COL3 -3903.550 658.95 26.000 60.000
COL4 -3839.550 658.95 26.000 60.000
COL5 -3775.550 658.95 26.000 60.000
COL6 -3711.550 658.95 26.000 60.000
COL7 -3647.550 658.95 26.000 60.000
COL8 -3583.550 658.95 26.000 60.000
COL9 -3519.550 658.95 26.000 60.000
COL10 -3455.550 658.95 26.000 60.000
COL11 -3391.550 658.95 26.000 60.000
COL12 -3327.550 658.95 26.000 60.000
COL13 -3263.550 658.95 26.000 60.000
COL14 -3199.550 658.95 26.000 60.000
COL15 -3135.550 658.95 26.000 60.000
COL16 -3071.550 658.95 26.000 60.000
COL17 -3007.550 658.95 26.000 60.000
COL18 -2943.550 658.95 26.000 60.000
COL19 -2879.550 658.95 26.000 60.000
COL20 -2815.550 658.95 26.000 60.000
D
R
A
FT
COL21 -2751.550 658.95 26.000 60.000
COL22 -2687.550 658.95 26.000 60.000
COL23 -2623.550 658.95 26.000 60.000
COL24 -2559.550 658.95 26.000 60.000
COL25 -2495.550 658.95 26.000 60.000
COL26 -2431.550 658.95 26.000 60.000
7/65 Draft of Revision 1.7 STMicroelectronics Confidential

STV8102 General Overview
Table 2: Top Side (from left to right) (Sheet 2 of 4)
Pad Placements (center), µm Pad Dimensions, µm
Lead Pad Name
XYXY
COL27 -2367.550 658.95 26.000 60.000
COL28 -2303.550 658.95 26.000 60.000
COL29 -2239.550 658.95 26.000 60.000
COL30 -2175.550 658.95 26.000 60.000
COL31 -2111.550 658.95 26.000 60.000
COL32 -2047.550 658.95 26.000 60.000
COL33 -1983.550 658.95 26.000 60.000
COL34 -1919.550 658.95 26.000 60.000
COL35 -1855.550 658.95 26.000 60.000
COL36 -1791.550 658.95 26.000 60.000
COL37 -1727.550 658.95 26.000 60.000
COL38 -1663.550 658.95 26.000 60.000
COL39 -1599.550 658.95 26.000 60.000
COL40 -1535.550 658.95 26.000 60.000
COL41 -1471.550 658.95 26.000 60.000
COL42 -1407.550 658.95 26.000 60.000
COL43 -1343.550 658.95 26.000 60.000
COL44 -1279.550 658.95 26.000 60.000
COL45 -1215.550 658.95 26.000 60.000
COL46 -1151.550 658.95 26.000 60.000
COL47 -1087.550 658.95 26.000 60.000
COL48 -1023.550 658.95 26.000 60.000
COL49 -959.550 658.95 26.000 60.000
COL50 -895.550 658.95 26.000 60.000
COL51 -831.550 658.95 26.000 60.000
COL52 -767.550 658.95 26.000 60.000
COL53 -703.550 658.95 26.000 60.000
COL54 -639.550 658.95 26.000 60.000
D
R
A
FT
COL55 -575.550 658.95 26.000 60.000
COL56 -511.550 658.95 26.000 60.000
COL57 -447.550 658.95 26.000 60.000
COL58 -383.550 658.95 26.000 60.000
COL59 -319.550 658.95 26.000 60.000
COL60 -255.550 658.95 26.000 60.000
STMicroelectronics Confidential Draft of Revision 1.7 8/65
General Overview STV8102
Table 2: Top Side (from left to right) (Sheet 3 of 4)
Pad Placements (center), µm Pad Dimensions, µm
Lead Pad Name
XYXY
COL61 -191.550 658.95 26.000 60.000
COL62 -127.550 658.95 26.000 60.000
COL63 -63.550 658.95 26.000 60.000
COL64 64.450 658.95 26.000 60.000
COL65 128.450 658.95 26.000 60.000
COL66 192.450 658.95 26.000 60.000
COL67 256.450 658.95 26.000 60.000
COL68 320.450 658.95 26.000 60.000
COL69 384.450 658.95 26.000 60.000
COL70 448.450 658.95 26.000 60.000
COL71 512.450 658.95 26.000 60.000
COL72 576.450 658.95 26.000 60.000
COL73 640.450 658.95 26.000 60.000
COL74 704.450 658.95 26.000 60.000
COL75 768.450 658.95 26.000 60.000
COL76 832.450 658.95 26.000 60.000
COL77 896.450 658.95 26.000 60.000
COL78 960.450 658.95 26.000 60.000
COL79 1024.450 658.95 26.000 60.000
COL80 1088.450 658.95 26.000 60.000
COL81 1152.450 658.95 26.000 60.000
COL82 1216.450 658.95 26.000 60.000
COL83 1280.450 658.95 26.000 60.000
COL84 1344.450 658.95 26.000 60.000
COL85 1408.450 658.95 26.000 60.000
COL86 1472.450 658.95 26.000 60.000
COL87 1536.450 658.95 26.000 60.000
COL88 1600.450 658.95 26.000 60.000
D
R
A
FT
COL89 1664.450 658.95 26.000 60.000
COL90 1728.450 658.95 26.000 60.000
COL91 1792.450 658.95 26.000 60.000
COL92 1856.450 658.95 26.000 60.000
COL93 1920.450 658.95 26.000 60.000
COL94 1984.450 658.95 26.000 60.000
9/65 Draft of Revision 1.7 STMicroelectronics Confidential
STV8102 General Overview
Table 2: Top Side (from left to right) (Sheet 4 of 4)
Pad Placements (center), µm Pad Dimensions, µm
Lead Pad Name
XYXY
COL95 2048.450 658.95 26.000 60.000
COL96 2112.450 658.95 26.000 60.000
COL97 2176.450 658.95 26.000 60.000
COL98 2240.450 658.95 26.000 60.000
COL99 2304.450 658.95 26.000 60.000
COL100 2368.450 658.95 26.000 60.000
COL101 2432.450 658.95 26.000 60.000
COL102 2496.450 658.95 26.000 60.000
COL103 2560.450 658.95 26.000 60.000
COL104 2624.450 658.95 26.000 60.000
COL105 2688.450 658.95 26.000 60.000
COL106 2752.450 658.95 26.000 60.000
COL107 2816.450 658.95 26.000 60.000
COL108 2880.450 658.95 26.000 60.000
COL109 2944.450 658.95 26.000 60.000
COL110 3008.450 658.95 26.000 60.000
COL111 3072.450 658.95 26.000 60.000
COL112 3136.450 658.95 26.000 60.000
COL113 3200.450 658.95 26.000 60.000
COL114 3264.450 658.95 26.000 60.000
COL115 3328.450 658.95 26.000 60.000
COL116 3392.450 658.95 26.000 60.000
COL117 3456.450 658.95 26.000 60.000
COL118 3520.450 658.95 26.000 60.000
COL119 3584.450 658.95 26.000 60.000
COL120 3648.450 658.95 26.000 60.000
COL121 3712.450 658.95 26.000 60.000
COL122 3776.450 658.95 26.000 60.000
D
R
A
FT
COL123 3840.450 658.95 26.000 60.000
COL124 3904.450 658.95 26.000 60.000
COL125 3968.450 658.95 26.000 60.000
COL126 4032.450 658.95 26.000 60.000
COL127 4096.450 658.95 26.000 60.000
STMicroelectronics Confidential Draft of Revision 1.7 10/65
General Overview STV8102
Table 3: Right Side (from top to bottom)
Pad Placements Pad Dimensions
Lead Pad Name
XYXY
DUMMY_B1 4245.300 600 60.000 26.000
DUMMY_B2 4245.300 520 60.000 26.000
DUMMY_B3 4245.300 60.65 60.000 26.000
DUMMY_B4 4245.300 -3.35 60.000 26.000
DUMMY_B5 4245.300 -67.35 60.000 26.000
DUMMY_B6 4245.300 -131.35 60.000 26.000
DUMMY_B7 4245.300 -540.45 60.000 26.000
DUMMY_B8 4245.300 -604.45 60.000 26.000
Table 4: Bottom Side (from righ t to left) (Sheet 1 of 4)
Pad Placements Pad Dimensions
Lead Pad Name
XYXY
ROW32 4096.950 -681 26.000 60.000
ROW33 4032.950 -681 26.000 60.000
ROW34 3968.950 -681 26.000 60.000
ROW35 3904.950 -681 26.000 60.000
ROW36 3840.950 -681 26.000 60.000
ROW37 3776.950 -681 26.000 60.000
ROW38 3712.950 -681 26.000 60.000
ROW39 3648.950 -681 26.000 60.000
ROW40 3584.950 -681 26.000 60.000
A
FT
R
ROW41 3520.950 -681 26.000 60.000
ROW42 3456.950 -681 26.000 60.000
ROW43 3392.950 -681 26.000 60.000
ROW44 3328.950 -681 26.000 60.000
ROW45 3264.950 -681 26.000 60.000
D
ROW46 3200.950 -681 26.000 60.000
ROW47 3136.950 -681 26.000 60.000
ROW48 3072.950 -681 26.000 60.000
ROW49 3008.950 -681 26.000 60.000
ROW50 2944.950 -681 26.000 60.000
ROW51 2880.950 -681 26.000 60.000
ROW52 2816.950 -681 26.000 60.000
11/65 Draft of Revision 1.7 STMicroelectronics Confidential

STV8102 General Overview
Table 4: Bottom Side (from righ t to left) (Sheet 2 of 4)
Pad Placements Pad Dimensions
Lead Pad Name
XYXY
ROW53 2752.950 -681 26.000 60.000
ROW54 2688.950 -681 26.000 60.000
ROW55 2624.950 -681 26.000 60.000
ROW56 2560.950 -681 26.000 60.000
ROW57 2496.950 -681 26.000 60.000
ROW58 2432.950 -681 26.000 60.000
ROW59 2368.950 -681 26.000 60.000
ROW60 2304.950 -681 26.000 60.000
ROW61 2240.950 -681 26.000 60.000
ROW62 2176.950 -681 26.000 60.000
ROW63 2112.950 -681 26.000 60.000
VROW_OFF 2048.950 -681 26.000 60.000
VROW_OFF 1984.950 -681 26.000 60.000
VCOL_PRE 1920.950 -681 26.000 60.000
VCOL_PRE 1856.950 -681 26.000 60.000
VPP 1792.950 -681 26.000 60.000
VPP 1728.950 -681 26.000 60.000
VDRIVE 1664.950 -681 26.000 60.000
VHIGH 1540.700 -681 26.000 60.000
VCAPA_HOLD 1476.700 -681 26.000 60.000
EXT_CLK 1376.700 -681 26.000 60.000
VSENSE 1274.700 -681 26.000 60.000
GND_SENSE 1168.700 -681 26.000 60.000
GND_COL 1064.900 -681 26.000 60.000
TEST_MODE 964.850 -681 26.000 60.000
GND_A 844.350 -681 26.000 60.000
GND_S 780.350 -681 26.000 60.000
GND_D 663.250 -681 26.000 60.000
D
R
A
FT
GND_D 563.200 -681 26.000 60.000
GND_BG 463.200 -681 26.000 60.000
VDD_A 363.200 -681 26.000 60.000
VDD_D 263.200 -681 26.000 60.000
SEL0 163.200 -681 26.000 60.000
SEL1 63.200 -681 26.000 60.000
STMicroelectronics Confidential Draft of Revision 1.7 12/65
General Overview STV8102
Table 4: Bottom Side (from righ t to left) (Sheet 3 of 4)
Pad Placements Pad Dimensions
Lead Pad Name
XYXY
VSYNC -36.800 -681 26.000 60.000
HSYNC -136.800 -681 26.000 60.000
RST
SDA -336.800 -681 26.000 60.000
SCL -436.800 -681 26.000 60.000
SCLK -536.800 -681 26.000 60.000
SDIN -636.800 -681 26.000 60.000
SDOUT -736.800 -681 26.000 60.000
D0 -836.800 -681 26.000 60.000
D1 -936.800 -681 26.000 60.000
D2 -1036.800 -681 26.000 60.000
D3 -1136.800 -681 26.000 60.000
D4 -1236.800 -681 26.000 60.000
D5 -1336.800 -681 26.000 60.000
D6 -1436.800 -681 26.000 60.000
D7 -1536.800 -681 26.000 60.000
) -1636.800 -681 26.000 60.000
E-(RD
-(WR) -1736.800 -681 26.000 60.000
R/W
SD/C
-236.800 -681 26.000 60.000
FT
A
-1836.800 -681 26.000 60.000
CS0
VDD_BG -2036.800 -681 26.000 60.000
ROW0 -2111.500 -681 26.000 60.000
ROW1 -2175.500 -681 26.000 60.000
ROW2 -2239.500 -681 26.000 60.000
ROW3 -2303.500 -681 26.000 60.000
ROW4 -2367.500 -681 26.000 60.000
ROW5 -2431.500 -681 26.000 60.000
ROW6 -2495.500 -681 26.000 60.000
ROW7 -2559.500 -681 26.000 60.000
ROW8 -2623.500 -681 26.000 60.000
ROW9 -2687.500 -681 26.000 60.000
ROW10 -2751.500 -681 26.000 60.000
ROW11 -2815.500 -681 26.000 60.000
ROW12 -2879.500 -681 26.000 60.000
13/65 Draft of Revision 1.7 STMicroelectronics Confidential
-1936.800 -681 26.000 60.000
R
D

STV8102 General Overview
Table 4: Bottom Side (from righ t to left) (Sheet 4 of 4)
Pad Placements Pad Dimensions
Lead Pad Name
XYXY
ROW13 -2943.500 -681 26.000 60.000
ROW14 -3007.500 -681 26.000 60.000
ROW15 -3071.500 -681 26.000 60.000
ROW16 -3135.500 -681 26.000 60.000
ROW17 -3199.500 -681 26.000 60.000
ROW18 -3263.500 -681 26.000 60.000
ROW19 -3327.500 -681 26.000 60.000
ROW20 -3391.500 -681 26.000 60.000
ROW21 -3455.500 -681 26.000 60.000
ROW22 -3519.500 -681 26.000 60.000
ROW23 -3583.500 -681 26.000 60.000
ROW24 -3647.500 -681 26.000 60.000
ROW25 -3711.500 -681 26.000 60.000
ROW26 -3775.500 -681 26.000 60.000
ROW27 -3839.500 -681 26.000 60.000
ROW28 -3903.500 -681 26.000 60.000
ROW29 -3967.500 -681 26.000 60.000
ROW30 -4031.500 -681 26.000 60.000
ROW31 -4095.500 -681 26.000 60.000
Table 5: Left Side (from bottom to top)
R
Pad Placements Pad Dimensions
Lead Pad Name
XYXY
DUMMY_A8 -4245.300 -603.2 60.000 26.000
DUMMY_A7 -4245.300 -539.2 60.000 26.000
DUMMY_A6 -4245.300 -131.35 60.000 26.000
DUMMY_A5 -4245.300 -67.35 60.000 26.000
D
A
FT
DUMMY_A4 -4245.300 -3.35 60.000 26.000
DUMMY_A3 -4245.300 60.65 60.000 26.000
DUMMY_A2 -4245.300 520 60.000 26.000
DUMMY_A1 -4245.300 600 60.000 26.000
STMicroelectronics Confidential Draft of Revision 1.7 14/65

General Overview STV8102
1.4 Mechanical Dimensions
Table 6: Mechanical Dimensions
Description Dimension
Die Size 8.73mm x 1.6mm
Pad Pitch 64µm (min.), 100µm (max)
Pad Siz e 26µm x 60µm
Wafer Thickness 450µm
Bump Size 40µm x 74µm x 20µm
Bump Characteristics gold, electrolytic
Bump Hardness 30 -80Hv
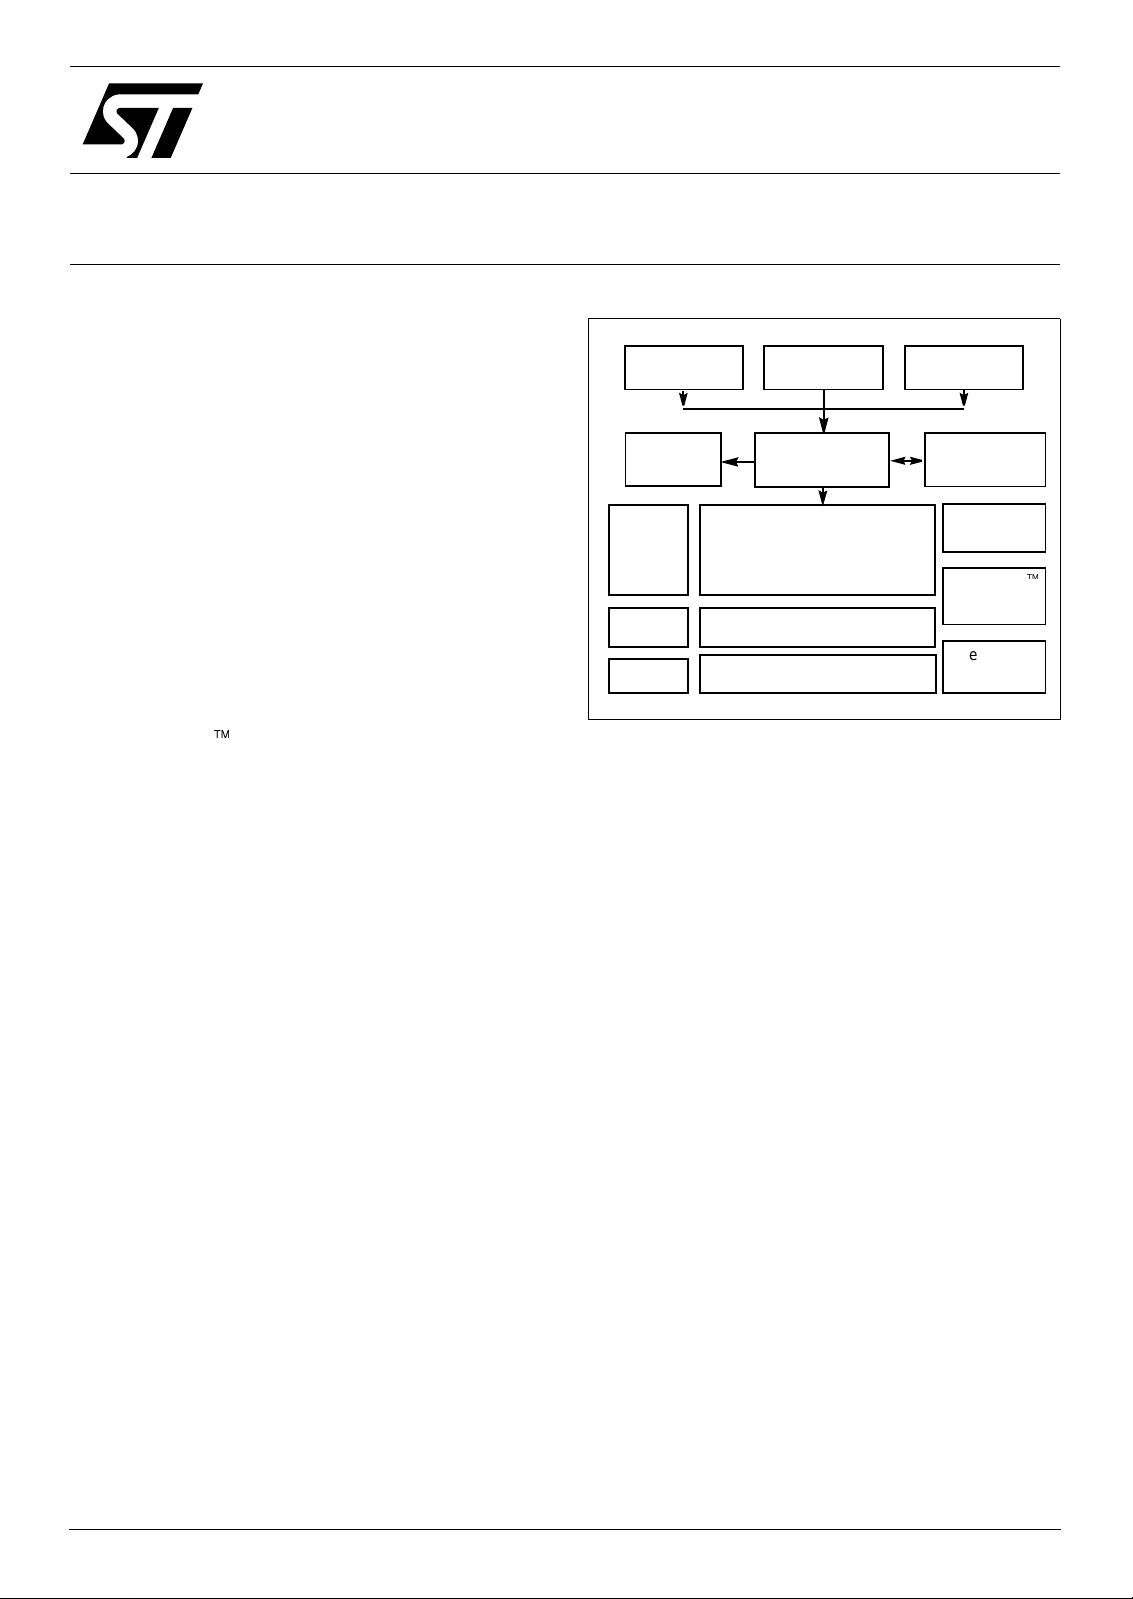
1.5 Functional Description
The architecture of the STV8102 provides all the functions to drive the OLED displays. The block
diagram gives an overview of the different on-chip components and their links.
Figure 4: STV8102 Block Diagram
I2C Parallel SPI
Interface Interface Interface
Status
Register
Row
Drivers
Screen
Saver
Pattern
Generator
D
Instruction
A
Decoder
Display RAM
64 X 128 bits
R
Self-adaptive
Scanning Control
Column Drivers
FT
Control
Register
Clocks
Generator
Powermizer
Panel
Supply
Reference
Current
The description of the STV8102 functions is given in the following sections, starting with the bus
interfaces.
15/65 Draft of Revision 1.7 STMicroelectronics Confidential

STV8102 Bus Interfaces
2 Bus Interfaces
The STV8102 is always set in a slave configuration whatever the bus choice (the host is always
providing the communication clock). For any kind of communication, the device has to be activated
first by correctly positioning the chip select pins.
Table 7: Chip Select Pins
CS0
0 Communications enabled
1 Interfaces disabled and rese t (device remains f unctional)
Moreover, each received data may be either a graphic data or a device instruction. That has to be
indicated on the SD/C
SD/C
0 Access to the registers (command &/or data)
1 Access to the display RAM (pixel data)
²
In I
C mode, the SD/C pin must be kept at “0”. To provide the widest flexibility and ease of use, the
STV8102 features four different solutions for interfacing with the host controller. The SEL1 and
SEL0 input pins select the appropriate interface as described in Table 9.
SEL1 SEL0 Interface
pin.
Table 8: Data/Instruction Selection
Table 9: Interface Selection
A
Note
Note
FT
00
01Serial
1 0 Parallel (68xx)
1 1 Parallel (80xx)
Non-selected interfaces are reset.
The definitions and the specifications of the signals and timing diagrams given in the following
sections provide functional information of the different interfaces.
2.1 I²C Interface
The I²C interface is compliant with the I²C bus specification and able to work in both Standard
(100kHz) and Fast Speed (400kHz) modes. The write address is 78h and the read address is 79h
for the register access, and 7Ah for RAM write. (No RAM read available).
STMicroelectronics Confidential Draft of Revision 1.7 16/65
²
C (Standard or Fast)
I
R
D
Bus Interfaces STV8102
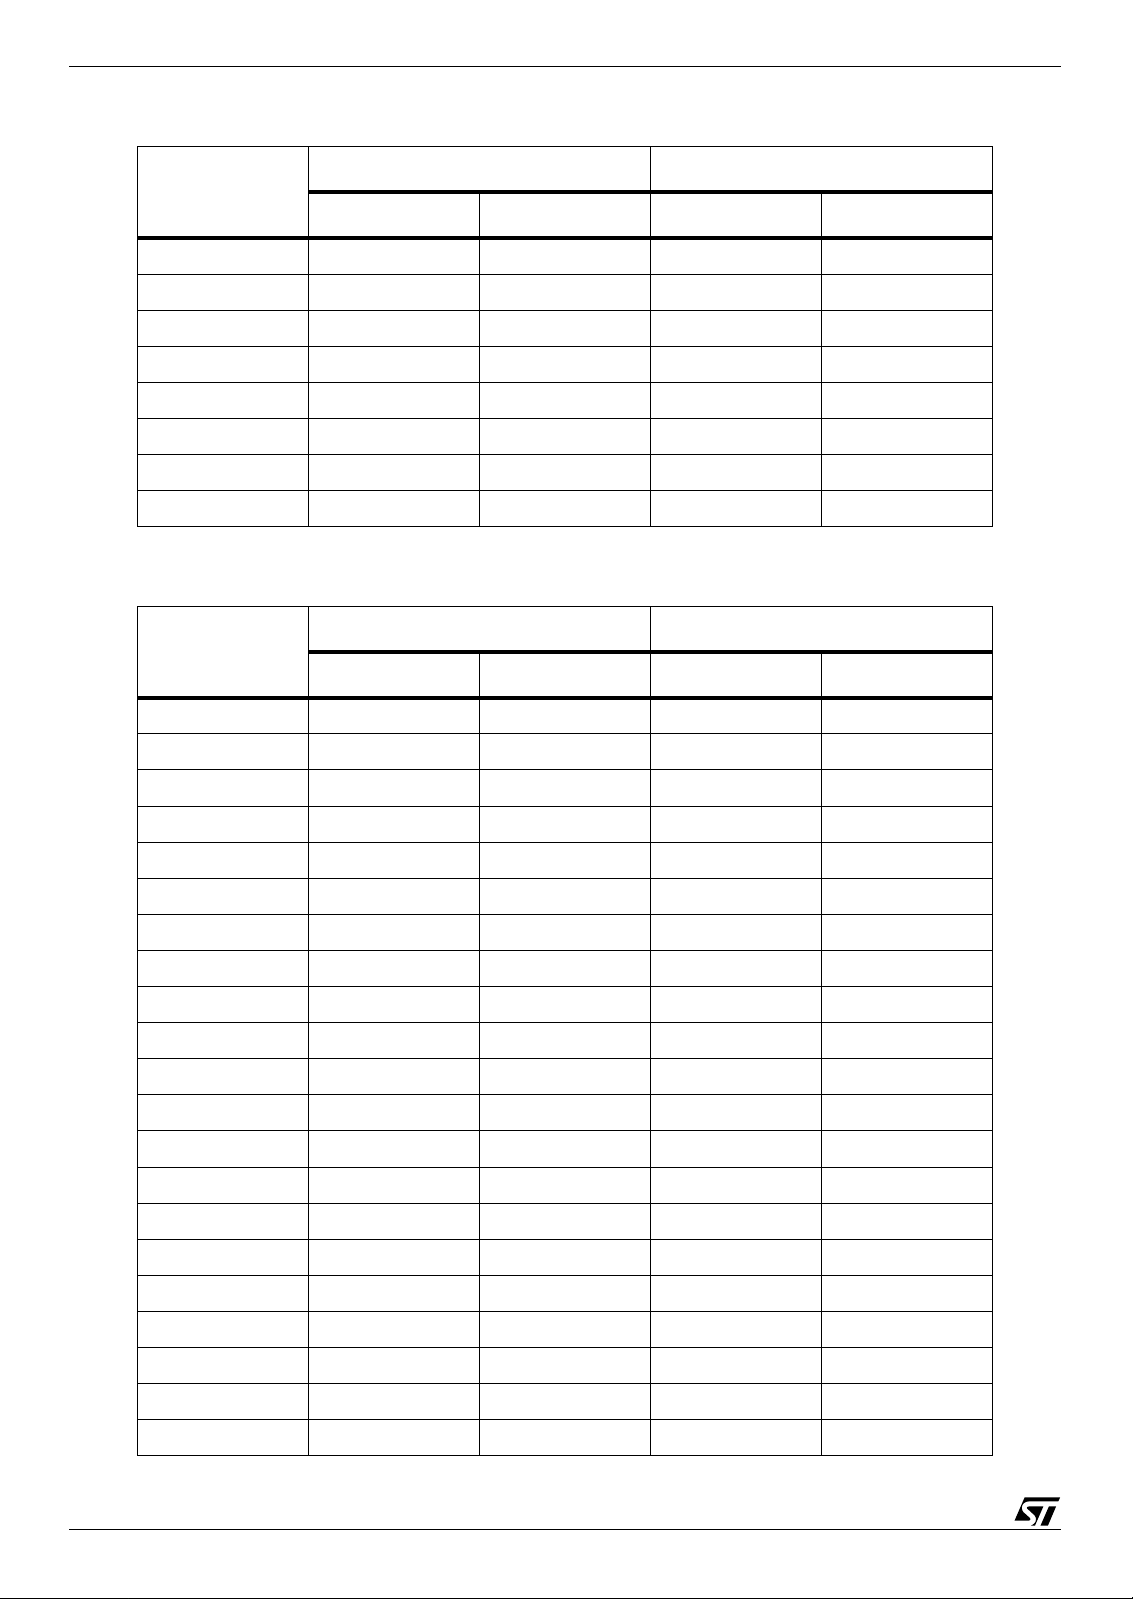
This bus is intended for communication between ICs. It consists of two lines: one bi-directional for
data signals (SDA) and one input for clock signal (SCL). Both the SDA and SCL lines must be
connected to a positive supply voltage via an active or passive pull-up.
During the communication, the SD/C
MASTER (data_out for transmitter)
Start
I²C Write Address (78h)
SCL
SDA
SD/C
CS0
SDA
SLAVE (data_out for receiver)
MASTER (data_out for transmitter)
SCL
SDA
SD/C
76543210
Start
I²C Write Address (7Ah)
76543210
pin must be kept grounded.
Figure 5: I²C Interface Timing Diagram for Register Write
Data_1 Data_2
76543210
ack
Figure 6: I²C Interface Timing Diagram for RAM Write
Data_1 Data_2
76543210
ack
76543210
ack
FT
76543210
76543210
76543210
Data_i
Data_i
Stop
ack
Stop
CS0
A
SDA
SLAVE (data_out for receiver)
Item Description Min. Typ. Max. Unit
Tscl_cycle 2.5
Tscl_low / Tscl _high 100/100 ns
Tscl_rise / Tscl_fall 15/15 ns
Tdatas / Tdatah Data setup & hold 100/100 ns
Tcs0s / Tcs0h Chip Select setup & hold 120/120 ns
ack
R
Table 10: I²C Interface Write Timing
D
ack
ack
ack
µs
17/65 Draft of Revision 1.7 STMicroelectronics Confidential

STV8102 Bus Interfaces
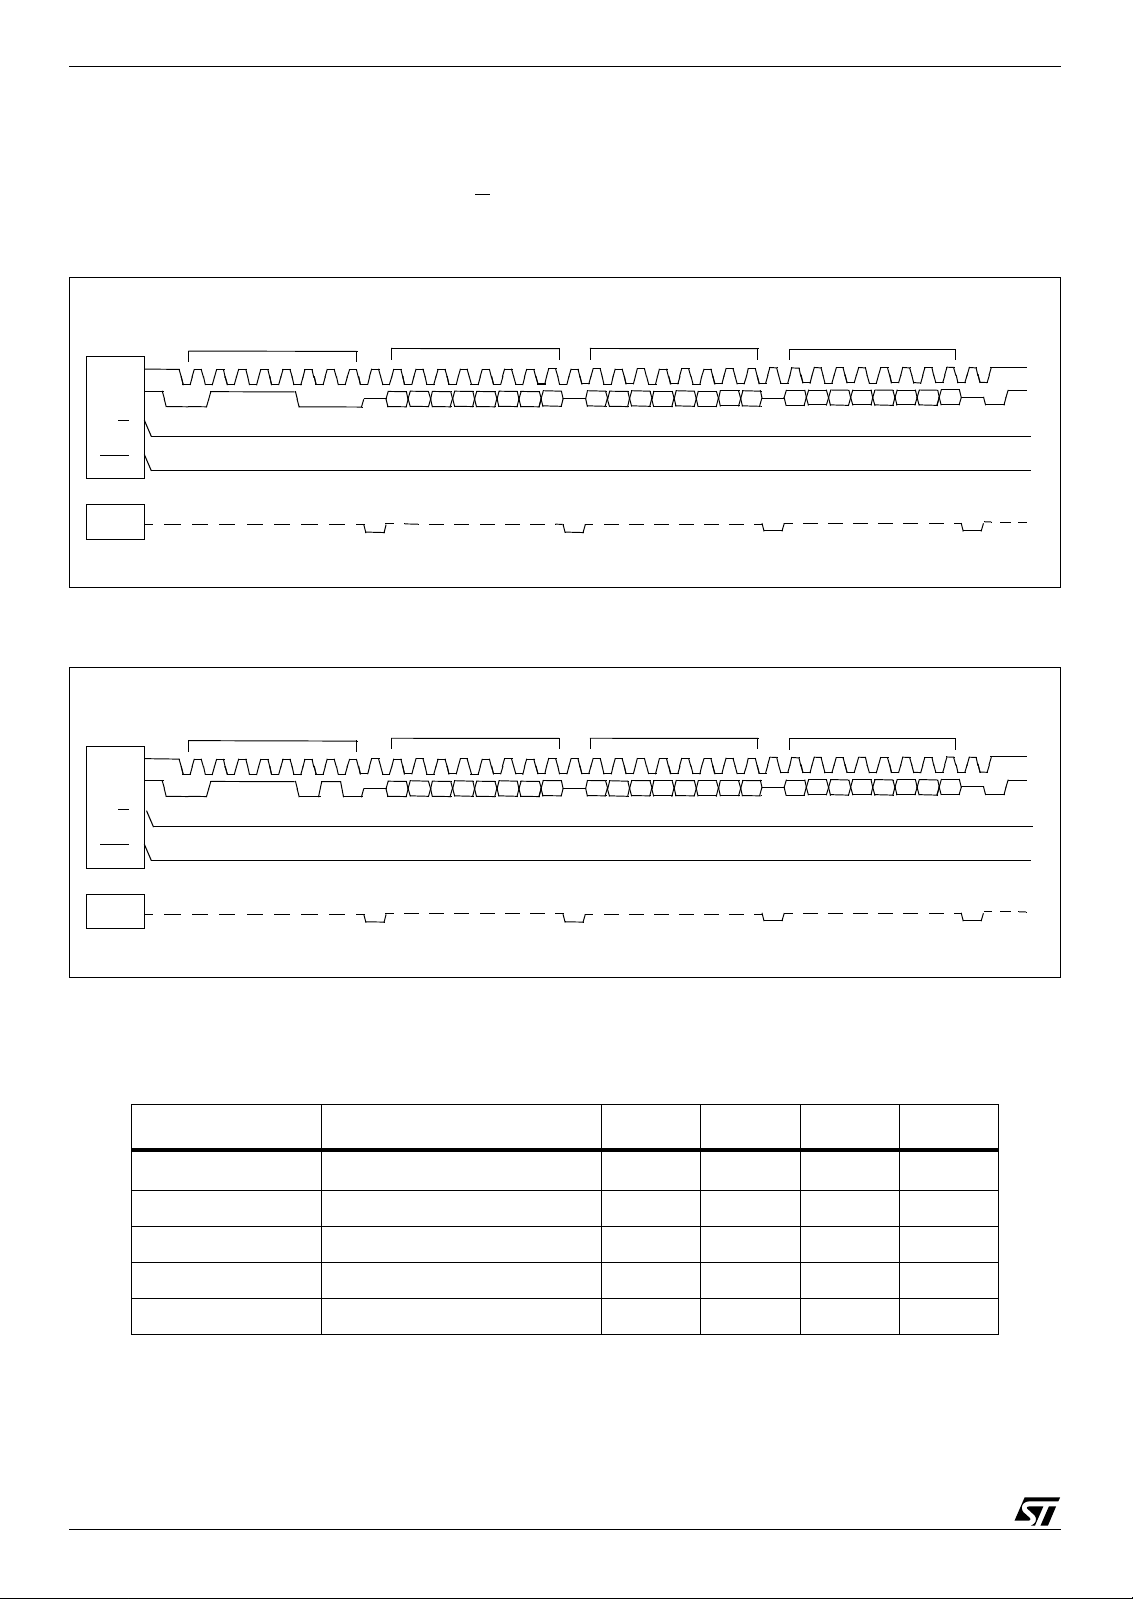
Figure 7: I²C Interface Read Timing Diagram (Register only)
MASTER (data_out for transmitter)
Start
I²C Read Address (79h)
SCL
SDA
SD/C
CS0
SDA
SLAVE (data_out for receiver)
Item Description Min. Typ. Max. Unit
76543210
ack
76543210
Table 11: I²C Interface Read Timing (Register only)
Status
Stop
nack
Tscl_cycle 2.5
Tscl_low / T scl_high 100/100 ns
Tscl_ri se / Tscl_fall 15/15 ns
Tdatas / Tdatah Data setup & hold 100/100 ns
Tcs0s / Tcs0h Chip Select setup & hold 120/120 ns
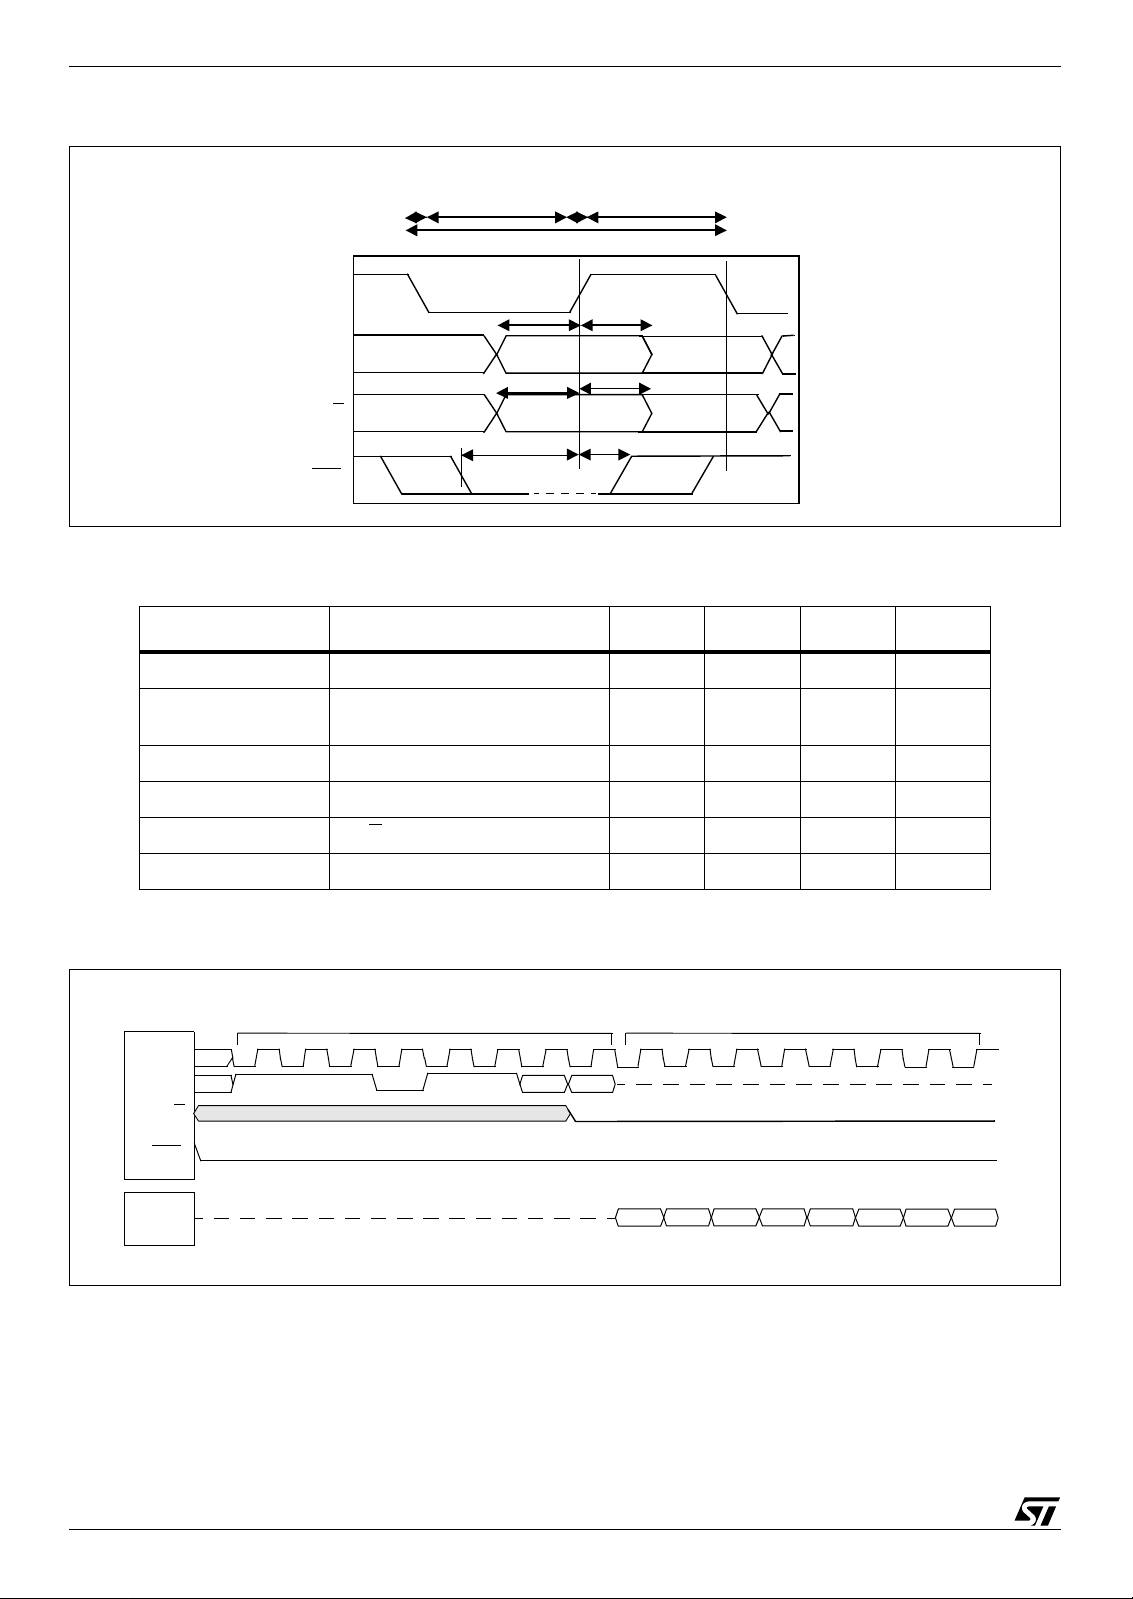
2.2 Serial Interface
The STV8102 serial interface is a bi-directional link between the display controller and the
application supervisor. It consists of three lines: SDIN for data input, SDOUT for data output, SCLK
for clock signal plus two control lines: CS0
The SDIN and SDOUT pins can be connected together.
During data transfer, the data line is sampled on the positive SCLK edge shifting bits 8 per 8 starting
from the chip selection.
Figure 8: Serial Peripheral Interface Timing Diagram (Write Mode)
MASTER (transmitter)
SCLK
SDIN
SD/C
76
FT
A
for chip sel ect and SD/ C for command or data selection.
R
Data_1 Data_2
D
54
3
2
1
0
76
54
µs
3
2
1
0
CS0
SDOUT
SLAVE (receiver)
STMicroelectronics Confidential Draft of Revision 1.7 18/65
Bus Interfaces STV8102
Figure 9: Serial Peripheral Interface Timing (Write Mode)
Tsclk_ fall
Tsclk_cycle
SCLK
Tsdins Tsdinh
SDIN
Tsdcs Tsdch
SD/C
Tcs0s Tcs0h
CS0
Table 12: Serial Peripheral Interface Timing (Write Mode)
Item Description Min. Typ. Max. Unit
Tsclk_cycle 250 ns
Tsclk_low /
Tsclk_high
Tsclk_rise / Tsclk_fall 15/15 ns
Tsclk_ highTsckl_ low Tsclk_ rise
100/100 ns
FT
Tsdins / Tsdinh SDIN setup & hold 100/100 ns
Tsdcs / Tsdch SD/C
Tcs0s / Tcs0h Chip Select setup & hold 150/150 ns
Figure 10: Serial Peripheral Interface Timing Diagram for Register Read (only)
MASTER (transmitter)
SCLK
SDIN
SD/C
CS0
SDOUT
SLAVE (receiver)
76
setup & hold 150/150 ns
A
Read Command Status
54
R
3
2
1
0
D
76
54
3
2
1
0
19/65 Draft of Revision 1.7 STMicroelectronics Confidential
STV8102 Bus Interfaces
Figure 11: Serial Peripheral Interface Timing Diagram for Register Read (only)
SCLK
SDOUT
CS0
SD/C
Tsclk_ high
Tsclk_cycle
Tsclk_ rise
Tsclkdatout
Bit 7
Tcs0datout
Tcs0s
= 0
Table 13: Serial Peripheral Interface Timing Diagram for Register Read (only)
Tsckl_ low
Tsclk_ fall
Tsclkdatout
Bit 6
FT
Item Description Min. Typ. Max. Unit
Tsclk_cycle 250 ns
Tsclkdathiz
Bit 0
Tcs0dathiz
Tsclk_low /
Tsclk_high
Tsclk_rise / Tsclk_fall 15/15 ns
Tsclkdatout
Tsclkdathiz
Tcs0datout
Tcs0dathiz
Tcs0s
Data output time after SCLK
falling edge
Data output Hiz state time after
SCLK falling edge
Data output time after CS0
edge
Data output Hiz state time after
rising edge
CS0
D
Chip Select setup before SCLK
rising edge
R
A
falling
100/100 ns
TBD 50 ns
TBD 50 ns
TBD 50 ns
TBD 50 ns
0ns
STMicroelectronics Confidential Draft of Revision 1.7 20/65

Bus Interfaces STV8102
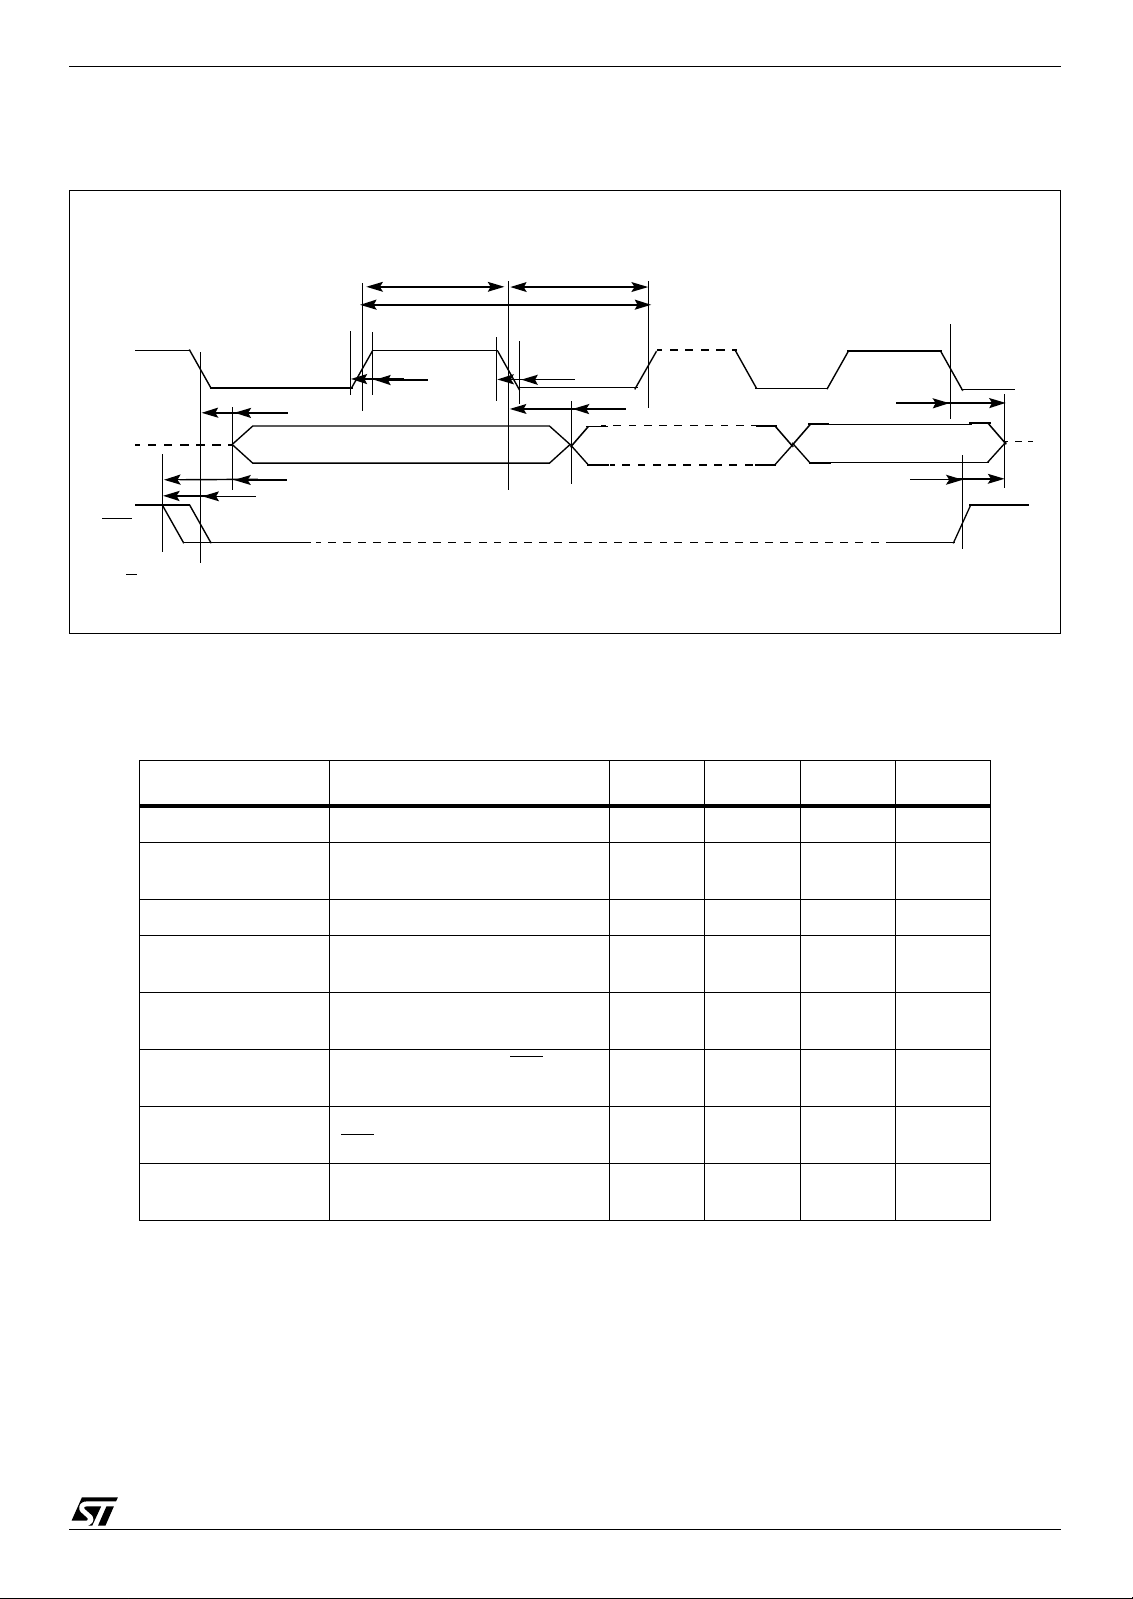
2.3 Parallel Interface
The STV8102 parallel interface is a bi-directional link between the display driver and the application
supervisor. It consists of twelve lines: eight data lines and four control lines: E-(RD
SD/C
and CS0. The control lines are used as for 68xx or 80xx series.
Figure 12: 8-Bit Parallel 68XX interface Timing Diagram (Write Mode)
), R/W-(WR),
Te_rise
E
Twrs
R/W
D[ 7:0 ] (in)
SD/C
Tcs0s
CS0
Table 14: 8-bit Parallel 68XX Interface Timing (Write Mode)
Item Description Min. Typ. Max. Unit
Te_cycle 300 ns
Te_low / Te_high 60/60 ns
Te_fall
Te_cycle
Twrh
Tdatas Tdatah
Tsdcs Tsdch
Tcs0h
A
Te_lowTe_high
FT
Te_rise / Te_fall 15/15 ns
Twrs / Twrh Write
Tdatas / Tdatah Data Address setup & hold 25/25 ns
Tsdcs / Tsdch SD/C
Tcs0s / Tcs0h Chi p Select setu p & hold TBD 120/60 ns
Data setup & hold TBD 50/50 ns
setup & hold TBD 60/60 ns
R
D
21/65 Draft of Revision 1.7 STMicroelectronics Confidential

STV8102 Bus Interfaces
Figure 13: 8-Bit Parallel 68XX interface Timing Diagram for Register Read (only)
Te_cycle
Te_high
Te_low
E
R/W
D[7:0] (out)
CS0
= 0
SD/C
Item Description Min. Typ. Max. Unit
Te_cycle 300 ns
Te_low / Te_high 120/60 ns
Te_rise / Te_fall 15/15 ns
Trds
Trdh
Te_rise
Trds
Tcs0s
Table 15: 8-bit Parallel 68XX Interface Timing (Read Mode)
Tedatout
Te_fall
Tcs0h
Trdh
Tedathiz
Tcs0dathiz
FT
READ setup to E rising edge (with
CL = 100pF)
READ hold from E falling edge
(with CL = 100pF)
TBD 50 ns
TBD 50 ns
A
Tedatout Data out from E rising edge - 20 TBD ns
Tedathiz Data Hiz from E falling edge - TBD ns
Tcs0dathiz Data Hiz from CS0
Tcs0s / Tcs0h Chip Select setup & hold 120/60 ns
R
rising edge - TBD ns
D
STMicroelectronics Confidential Draft of Revision 1.7 22/65

Bus Interfaces STV8102
Figure 14: 8-bit Parallel 80XX Interface Timing Diagram (Write Mode)
RD-(E)
Twr_fall
Twr_rise
-(R/W)
WR
D[7:0] (in)
SD/C
CS0
Table 16: 8-bit Parallel 80XX Interface Timing (Write Mode)
Item Description Min. Typ. Max. Unit
Twr_low 60 ns
Twr-rise / Twr_fall 15/15 ns
Tdatas / Tdatah Data Address setup & hold 25/25 ns
Tsdcs / Tsdch SD/C
Tcs0s / Tcs0h Chip Select setup & hold TBD 120/60 ns
Twr_low
Tdatas Tdatah
Tsdcs
Tcs0s
Tsdch
Tcs0h
FT
setup & hold TBD 60/60 ns
- (E)
RD
WR
- (R/W)
D[7:0] (out)
CS0
SD/C = 0
A
Figure 15: 8-bit Parallel 80XX Interface Timing Diagram (Read Mode)
R
Trd_rise
Trddatout
D
Tcs0s
Trd_low
Trd_fall
Tcs0h
Trddathiz
Tcs0dathiz
23/65 Draft of Revision 1.7 STMicroelectronics Confidential

STV8102 Bus Interfaces
Table 17: 8-bit Parallel 80XX Interface Timing (Read Mode)
Item Description Min. Typ. Max. Unit
Trd_low 120 ns
Trd_rise / Trd_fall 15/15 ns
Trddatout
Trddathiz
Tcs0dathiz Data Hiz from CS0
Tcs0s / Tcs0h Chip Select setup & hold 120/60 ns
Data out from RD
(with CL = 100pF)
Data Hiz from RD
(with CL = 100pF)
falling edge
rising edge
rising edge TBD
20 TBD ns
TBD ns
FT
R
D
A
STMicroelectronics Confidential Draft of Revision 1.7 24/65

Display RAM STV8102
3 Display RAM
The RAM of the STV8102 stores data to be displayed on the OLED matrix in a format of one bit per
pixel. If the bit value is a logical “1”, the corresponding pixel is ON; if “0” the pixel is OFF. The RAM
organization is always seen by the user as a set of sixty-four rows (Y0 to Y63) of sixteen bytes (X0
to X15) as described in Figure 16. There are several ways to display the bits of the RAM on the
pixels of the screen. These ways are detailed in Chapter 4: Display Modes. As the pixel location
depends on the application and the hardware mapping of the display, the bit/pixel selection is mainly
done during start-up. For more information, refer to Chapter 4 : Display Modes and
Chapter 9: STV8102 Configuration.
RAM loading is done through the selected interface in 8-bit format. The RAM access mode is
sequential with the possibility to select the starting location. A row mode is provided for fast loading
and clearing.
Figure 16: Display RAM Organization
BYTE
Row Y0
Row Y1
Row Y2
Row Y62
Row Y63
3.1 RAM Writing
The RAM organization is a set of in sixty-four rows (Y0 to Y63) of sixteen bytes (X0 to X15) as
described in Figure 16.
Writing to a RAM location starts at the address defined by the XSTART (0 to 15) and YST ART (0 to
63) registers. On a hardware reset, the registers are cleared, so any write to the RAM starts at
location (X0, Y0). To be loaded as RAM data, pin SD/C
transfer, otherwise the data is decoded as a command or a register setting. By default (PIXLMAP
register), bytes are loaded into RAM with the most significant bit the first received in serial mode
and/or with the most significant as bit 7 in parallel mode (See Control and Status Register
Description chapte r for detail ).
The XSTART & YSTART registers are automatically incremented after each byte write, so writes
can be automatically done from X0 and Y0,... up to X15 & Y63 and back to X0 & Y0. Without any
update of XSTART & YSTART registers, continued RAM access restarts at the last accessed
location (+1). Any RAM location can be loaded by programming the XSTART & YSTART registers
with the right value.
X0 X1 X13 X14 X15
b0---b7 b0---b7
b0---b7
b0---b7 b0---b7
FT
A
R
must be held high during the interface
D
Updating the RAM can be done in Row Access mode using the RAMROW command. (For more
information, refer to Chapter 10: Control and Status Registers Description.) In this mode, the write
starts at the row defined by the current YST AR T register . All the 16 bytes of the row (X0 to X15) are
loaded with the same byte data. The YSTART register is automatically incremented at each written
data. For example, it takes 64 writes of data “00h” to clear the entire RAM in Row Access mode.
25/65 Draft of Revision 1.7 STMicroelectronics Confidential

STV8102 Display Modes
4 Display Modes
The STV8102 can be connected to the display electrodes with different configurations to drive most
of the OLED matrixes. A set of configuration registers brings the flexibility required by the different
system architectures. These capabilities are described in more detail in Chapter 9: STV8102
Configuration.
In the following sections, it is assumed that the hardware display configuration leads to display pixel
0,0 at the top-left side of the display when registers and commands are set to “Normal Horizontal/
V ertical display” and when the data RAM is loaded from X0-Y0 to X15-Y63 with the most significant
bit first. Note that the row and column display counters are independent of the Xn-Yn RAM access
counters and are not user-accessible.
4.1 Normal Horizontal/Vertical Display
This is the default mode after power-up and reset of the controller taking into account the above
mentioned assumptions. The STV8102 starts to display pixel 0,0 at the top-left side of the scr een
reading bit 0 of RAM location X0-Y0 (refer to Figure 17). The complete row (X0 to X15) is loaded in
the column drivers and the row display counter is automatically incremented and so on up to the last
pixel 127,63 read at RAM location X15-Y63.
Row and column display counters restart at location X0-Y0 at each frame. The column drivers are
loaded with RAM data. Frame scanning starts from the top to the bottom of the screen.
1 2 125 126 127
Col 0
Row 0
Row 1
Frame
scanning
Row 63
4.2 Mirrored Modes
4.2.1 Mirrored Vertical
In this mode, the first pixel of the frame is displayed at the bottom-left side of the screen loading bit0
of X0-Y0 location up to bit127 of X15-Y0 in the column drivers (refer to Figure 18).
The row display counter is automatically decremented down to row 0 (corresponding to RAM row
Y63) and restarts at row 63 (RAM row Y0) at each frame. Frame scanning starts from the bottom to
the top of the screen.
Pixel 0,0
Display Screen
Figure 17: Normal Horizontal-Vertical Mode
A
FT
X0
Row Y0
Row Y1
Row Y62
Row Y63
b0---b7 b0---b7
b0---b7
R
D
X1 X13 X14 X15
b0---b7 b0---b7
b0---b7
Display RAM
STMicroelectronics Confidential Draft of Revision 1.7 26/65

Display Modes STV8102
Figure 18: Vertical Mirrored Mode
X0
Col 0
1 2 125 126 127
Row 63
Row 62
Frame
scanning
Row 0
4.2.2 Mirrored Horizontal
Using this mode the first pixel of the frame is displayed at the top-right side of the screen loading bit
0 of location X0-Y0 up to bit 127 of location X15-Y0 in the column drivers (refer to Figure 19).
The display of the row is the reverse order of the bits of RAM locations X0/X15-Yn. Frame scanning
starts from the top to the bottom of the screen.
Pixel 0,0
Display Screen
Row Y0
Row Y1
Row Y62
Row Y63
b0---b7 b0---b7
X1 X13 X14 X15
b0---b7
Display RAM
b0---b7
b0---b7 b0---b7
Row 0
Row 1
Frame
scanning
Row 63
4.2.3 Full Mirror
This mode is the combination of Horizontal and Vertical Mirrored modes.
The first pixel of the frame is displayed at the bottom-right side of the screen loading bit 0 of location
X0-Y0 up to bit 127 of location X15-Y0 in the column drivers (refer to Figure 20).
Frame scanning starts from the bottom to the top of the screen.
Display Screen
D
Figure 19: Horizontal Mirrored Mode
12125126127
Col 0
Pixel 0,0
A
FT
Row Y0
Row Y1
Row Y62
Row Y63
b0---b7 b0---b7
b0---b7
R
Figure 20: Full Mirrored Mode
X0
X1 X13 X14 X15
b0---b7
Display RAM
b0---b7 b0---b7
12125126127
Col 0
Row 63
Row 62
Frame
scanning
Row 0
Display Screen
27/65 Draft of Revision 1.7 STMicroelectronics Confidential
Pixel 0,0
Row Y0
Row Y1
Row Y62
Row Y63
X0
X1 X13 X14 X15
b0---b7 b0---b7
b0---b7
b0---b7
Display RAM
b0---b7 b0---b7

STV8102 Display Modes
4.3 Display Panning
The STV8102 provides a panning mode to shift the display in a selected direction for a given
number of pixels. The panning is a static function. The horizontal shift is controlled with the HSHIFT
command followed by a signed byte giving the shift value in pixel units (from -128 to +127).
The vertical shift is controlled with the VSHIFT command followed by a signed byte giving the shift
value in row unit (from -64 to +63).
After a hardware reset, HSHIFT and VSHIFT are set to 0 (their default value), the display perfectly
fits the screen, and all pixels are displayed.
Remark: Display Panning and Screen Saver functions are disabled when “divide-by-4” of the
reference clock is selected, that is when DIV.OSCCTRL is Set. Refer to Table 20: List of Registers.
The description of the panning behavior is based on assumptions mentioned for the “Normal
Horizontal/Vertical display” mode. It can be used with a Mirrored mode.
Vertical and horizontal shifts can be combined. Display examples are given in Figure 21 and
Figure 22.
The Display RAM contents are not modified by the panning mode.
The “external” pixels of a shifted image can be blanked (default mode) or displayed in the folded
area (wrapping mode). The wrapping mode is selected by the dedicated MOVE.HMOVE and/or
MOVE.VMOVE bitfields. (For more information, refer to Section 10: Control and Status Registers
Description.)
RAM Image
RAM Image
Figure 21: Display Panning Mode (without Wrapping)
FT
Hshift 2 pixels left
bit 0 bit 1
bit 128
bit 256
bit 8064
Figure 22: Display Panning Mode (with Wrapping)
Hshift 2 pixels left
bit 130
bit 258
bit 8066
bit 2
Col 0
Vshift 1 pixel up
bit 2
bit 129
bit 130
bit 258
bit 257
bit 8065
bit 8066
Pxl off
Col 0
R
D
Vshift 1 pixel up
bi 254
bit 126
1
2
Display Screen
bit 127
bit 126
bit 255
Pxl off
Pxl off
bit 383
Pxl off
A
bit 8191
Pxl off
1
2
Display Screen
bit 128
bit 256
bit 8064
bit 0
126 127
bit 129
bit 257
bit 8065
bit 1
bit 255
bit 383
bit8191
bit 8191
bit 127
Pxl off
Pxl off
126 127
Row 0
Wrapped areas
Folded image
Row 63
Wrapping Mode OFF
Row 0
Blanked areas
Pxl off
Row 63
Wrapping Mode ON
STMicroelectronics Confidential Draft of Revision 1.7 28/65

Display Modes STV8102
4.4 Screen Saver
The STV8102 provides an automatic means for uniform pixel aging-compensation during periods
when the system is not operated. The STV8102 stand-alone screen saver saves the host processor
from having to provide the image and load it into the RAM. Once initialized, the screen saver
operates “stand-alone”.
The description of the screen saver behavior is based on the assumptions mentioned for the
“Normal Horizontal/Vertical display” mode. It can be used with a Mirrored mode.
The Pattern Generator function cannot be activated when the screen saver is operating.
The screen saver is an improvement of the panning function described previously. The shift of the
image is done gradually, frame after frame, by selecting the speed of the motion with the HSPEED
and/or VSPEED registers.
The horizontal speed can be 1 pixel per 1, 2 or 3 frames. The vertical speed can be 1 row per 1, 2
or 3 frames.
The HSHIFT and VSHIFT registers are incremented at each frame with one selected unit of speed.
Their starting default values are 0. If the HSHIFT and VSHIFT values are different from 0, the start
of the motion begins with a jump to the position defined by HSHIFT and VSHIFT.
The start of the motion is selectable for top/bottom and left/right directions using the VSPEED and
HSPEED commands, respectively.
When started, the STV8102 automatically controls the motion of the picture within the limits set in
the boundary registers.
The horizontal limits are set in HMIN and HMAX registers with a range of -128 to +127 pixels.
Vertically, registers VMIN and VMAX cover a range of -64 to +63 rows.
Different display effects can be selected when the picture reaches one of these limits (HSHIFT and/
or VSHIFT registers value equals HMIN/HMAX and/or VMIN/VMAX).
To simplify the description of the cases, let us assume that only the horizontal motion is activated.
The same description applies to the vertical direction with the corresponding registers and both
directions can be activated at the same time.
Remark: Display Panning and Screen Saver functions are disabled when “divide-by-4” of the
reference clock is selected, that is when DIV.OSCCTRL is Set. Refer to Table 20: List of Registers.
Example 1
Consider the motion of display row 0 only, with a full RAM display data row (X0 to X15 loaded with
active pixels) HSHIFT is 0, HMAX is +100, HMIN is +32 and HSPEED is 1 pixel per frame to the
right. HSHIFT is incremented frame after frame up to HMAX (+100).
Example 2
The conditions are the same as the first example, but the limits are set to the minimum/maximum
with HMIN at -128 and HMAX +127.
D
R
A
FT
In case of inconsistency between the starting positions and the limit settings, the logic of the
controller forces the image within the limits. In the first example, at the first frame, the pixel 0,0 of the
picture is moved from position 0,0 to position 32,0 of the screen and HSHIFT is loaded with HMIN
(+32), in the second example the pixel 0,0 stays in position 0,0 and starts to move from this position
because it is within the horizontal limits.
4.4.1 Limit-to-Limit
29/65 Draft of Revision 1.7 STMicroelectronics Confidential

STV8102 Display Modes
If the “Limit-to-Limit” effect (which is without wrapping) is selected using HMOVE register, the
entire row shift to the right and when HSHIFT reaches HMAX, HSHIFT is loaded with HMIN and the
picture row jumps back to the corresponding position (pixel 0,0 in position 32,0) as shown in
Example 1. The motion restarts to the right. The pixels of the screen on the left of pixel 0,0 of the
picture are blanked from the start of the motion (see Figure 23 and Figure 24).
Figure 23: Limit to Limit Effect - Example 1 (Without Wrapping)
Starting Position
Row 0
Blank
H
MIN
32,0
Pxl 0,0
Display screen
H
-128,0
Pxl 0,0
Shift from 32,0 to 100,0
First Example
Figure 24: Limit-to-Limit Effect - Example 2 (without Wrapping)
MIN
Pixel Virtual Position
Shift from -128,0 to +127,0
H
MAX
100,0
Final Position
Row 0
Pxl 127,0
Pixel out of
the screen after
the first shift
Pxl 95,0
Display Screen
Starting Position
H
MIN
32,0
Blank
Jump back to 32,0 in one step
to starting position
FT
Blank
Display scre e n
A
H
MIN
-128,0
Intermediate Picture Position
H
MAX
100,0
Pxl 0,0
H
MAX
+127,0
H
MAX
+127,0
Pxl 27,0
Row 0
H
MIN
-128,0
Second Example
4.4.2 Bounce Only
If the “Bounce Only” effect is selected, the entire row shift to the right starting from position 32,0 (as
shown in Example 1) and when HSHIFT reaches HMAX, HSHIFT is decremented up to HMIN and
so on. All the pixels of the screen on the left of pixel 0,0 of the picture are blanked. Only the right
side of the row is displayed (see Figure 25 and Figure 26).
STMicroelectronics Confidential Draft of Revision 1.7 30/65
Blank
Pxl 0,0
R
Pixel Positions
Blank
D
Jump back to -128,0 in one step to starting position
Pxl 127,0
Display scre e n
Final Picture Position
Display scre e n
Blank
Blank
H
MAX
+127,0
Pxl 0,0
Row 0
Row 0

Display Modes STV8102
Figure 25: Bounce Only - Example 1
Starting Position
Row 0
Blank
H
MIN
32,0
Pxl 0,0
Display screen
H
MIN
-128,0
Pxl 0,0
Shift from 32,0 to 100,0
First Example
Figure 26: Bounce Only - Example 2
Pixels virtual position
Shift from -128,0 to +127,0
H
MAX
100,0
Final Position
Row 0
Pxl 127,0
Pixel out of
the screen after
the first shift
Pxl 95,0
H
MIN
32,0
Blank
Shift back gradually to 32,0
Display screen
Starting posi tio n
Blank
FT
Display screen
H
MAX
100,0
Pxl 0,0
H
MAX
+127,0
Pxl 27,0
Row 0
Second Example
4.4.3 Wrap Only
If the “Wrap Only” effect is selected, the display effect is the same as the previous one, but all
pixels of the row are displayed in a folded way (pixel 127,0 and pixel 0,0 remain consecutive and
there are no blank pixels (see Figure 27 and Figure 28)).
H
MIN
-128,0
H
MIN
-128,0
Blank
D
Pixels
Pxl 0,0
Blank
Intermediate picture position
A
R
Pxl 127,0
Display screen
Reversing shif t direction
Display screen
Blank
Blank
shift back to starting position at -128,0
H
MAX
+127,0
H
MAX
+127,0
Pxl 0,0
Row 0
Row 0
31/65 Draft of Revision 1.7 STMicroelectronics Confidential

STV8102 Display Modes
Figure 27: Wrap Only - Example 1
Starting position
Row 0
Pxl 96,0
First Example
Pxl 127,0
Display screen
Second Example
H
MIN
32,0
Pxl 0,0
H
MAX
100,0
Shift from 32,0 to 100,0
Final position
Pxl 28,0
Row 0
Figure 28: Wrap Only - Example 2
Starting Position
Pxl 0,0
Display Screen
Intermediate Picture Position
Pxl 0,0
Pxl 127,0
Display Screen
Final Position
Screen after
the first shift
Pxl 95,0
A
Pxl 1,0
Jump back to 0,0 in one step
Display Screen
H
MIN
32,0
Pxl 127,0
Display screen
Jump back to 32,0 in one step
to starting position
H
MAX
+127,0
H
MAX
+127,0
Row 0
Pxl 127,0
FT
Row 0
Shift Direction
H
MAX
+127,0
Pxl 0,0
Pxl 127,0
Row 0
H
MAX
100,0
Pxl 0,0
Pxl 27,0
4.4.4 Wrap and Bounce
Selecting the “Wrap and Bounce” effect brings the same display effect as Bounce Only, except
that all pixels of the picture are displayed in a folded way instead of being blanked (see Figure 29
and Figure 30).
STMicroelectronics Confidential Draft of Revision 1.7 32/65
R
D

Display Modes STV8102
Figure 29: Wrap and Bounce - Example 1
Row 0
Starting position
Pxl 0,96
First Example
Pxl 127,0
Display screen
H
MIN
32,0
Pxl 0,0
Shift from 32,0 to 100,0
Figure 30: Wrap and Bounce - Example 2
H
100,0
Reversing shift direction
Row 0
Starting Position
Pxl 0,0
Display Screen
Intermediate Pic ture Position
MAX
Pxl 28,0
Screen after
the first shift
Pxl 95,0
H
MIN
32,0
Display screen
Shift Direction
FT
Shift back from 100,0 to 32,0
H
MAX
+127,0
Pxl 127,0
H
MAX
+127,0
Row 0
Pxl 127,0
H
MAX
100,0
Pxl 0,0
Pxl 0,27
Second Example
In “Screen Saver mode”, the brightness control and the scanning control are still operating. It is
recommended to limit the number of active lines to minimize power consumption while the system
is not operating. It is also recommended to set display brightness to a low value to optimize power
consumption during screen saving operations.
4.5 Flash Mode
The STV8102 supports two Flash modes. In both case the Host has to send a dedicated command.
The first is to control the display with the Display ON/OFF instruction; this mode drastically reduces
power dissipation. For more information, refer to Chapter 6: Scanni ng Control and
Chapter 11: Electrical Characteristics.
Pxl 127,0
Display Screen
Final Position
Pxl 1,0
Display Screen
R
D
Pxl 0,0
A
Shift back to starting position
Shift Direction
Pxl 127,0
H
MAX
+127,0
Pxl 0,0
Row 0
Row 0
The second way uses the passive mode of the SCANMODE command and the RAMSCAN control
register by selecting all row blocks OFF and ON at the flashing frequency. For more information,
refer to Chapter 6: Scanning Control and Chapter 10: Control and Status Registers Description.
33/65 Draft of Revision 1.7 STMicroelectronics Confidential

STV8102 Display Modes
4.6 Pattern Generator
The pattern generator block has been designed to help debugging of the application and simplify
the panel pre-aging process during production.
Pattern generation is activated by sending the PATTERN_EN command. (Activated by sending
D7h, de-activated by sending D6h.)
The pattern is selected with bits 0, 1 and 2 of the PATTERN_SEL command.
The displayed pattern is not written in the data RAM. The 'Display Control' block directly drives the
row and column drivers with the appropriate control signals. Each pattern is a full screen picture of
128 x 64. The pattern mode has priority over all other selected display modes.
The 8 patterns implemented in the STV8102 are listed in Table 18.
The activation of the PATTERN_ON input pin (from “0” to “1”) resets the selection to the 1st pattern
of the table. The different patterns are accessed sequentially by the mean of the pulses applied on
the PATTERN_SELECT pin. After 8 pulses, the 1st pattern is activated again.
Table 18: Display Pattern Selection
b2 b1 b0 Description
0 0 0 All columns, all rows with blanked pixels (black screen)
0 0 1 All rows with black-white pixels (black and white columns)
0 1 0 Odd rows with black-white pixels, even rows with white-black pixels (Checker board)
0 1 1 Odd rows with all white pixels, even rows with all black pixels (white and black rows)
1 0 0 Odd rows with all black pixels, even rows with all whi te pixels (black and white rows) (complement of pattern 4)
1 0 1 All rows with white-black pixels (white and black columns, complement of pattern 2)
1 1 0 Odd rows with white-black pixels, Even rows with black-white pixels (complement of pattern 3)
1 1 1 All columns, all rows with on pixels (white screen) (complement of pattern 1)
A
FT
R
D
STMicroelectronics Confidential Draft of Revision 1.7 34/65

Display Addressing Scheme STV8102
5 Display Addressing Scheme
LEP/OLED panels are matrix displays driven in a progressive way. Lines 1 to N of the panel are
selected successively during the row period while the data information is applied on the column
electrodes. The active pixels are defined by the intersection of the selected line and the column
electrodes.
Prior to the latching of the data information on the column electrodes, a dedicated sequence is
applied on both row and column electrodes of the panel as described in the following sections.
5.1 Row Driver
The elementary row driver output stage consists of a N-channel DMOS that sinks the various
column currents collected in the row electrode during the “on” (active) period and a PMOS that
switches the off rows to the V
To address the OLED display, the selected row is switched at low level (on state), the (N-1) rows of
the circuit are switched at high level (off state). The V
● an internal voltage adjusted automatically to the brightness level and the pixel operating
voltages,
● an external voltage connected to pins VROW_OFF. It is important to note that V
be lower than V
● a tank capacitor connected to pins VROW_OFF in order to collect capacitive current losses
and to provide a row off state voltage close to the OLED threshold voltage.
PP
,
ROW_OFF
off-state voltage.
ROW_OFF
off-state voltage can be selected as:
FT
ROW_OFF
must
The 3 off state voltages are selected by register ROWOFFVOL.
Figure 31: Row Driver Voltage Diagram
A
V
PP
ROWOFFVOL
VROW_OFF
Detection
ROW_OFF
Active Row
Register
R
D
Row 0 Row 63
VROW_OFF
GND_A
External
Voltage Generator
Tank Capacitor
To reduce power consumption, the R
refer to Chapter 11: Electrical Characteristics.)
35/65 Draft of Revision 1.7 STMicroelectronics Confidential
of the sink DMOS transistor is low. (F or more information,
ON

STV8102 Display Addressing Scheme
An optional, High Impedance mode (register ROWHIZ) can be used when no row off voltage is
applied.
5.2 Column Driver
The elementary column driver output stage consists in a current mirror that sources brightness
current in the column electrode of the display, in a P-channel MOS that switches the column
electrodes to the precharge voltage and in a N-channel DMOS that switches the column electrode
to low level (ground leve l or a v oltage closed to ground V
The column addressing sequence is divided into 2 different subsequences defined as column
discharge/precharge and active period.
5.2.1 Column Pre-charge/Discharge
The column pre-charge occurs at the beginning of each row address period.
An “off” pixel (black pixel) will be discharged to the ground to block current flowing in the diode
(resetting pixel) while the “on” pixel (white pixel) will be precharged closed to the “on” threshold
voltage, defined as the precharge voltage (V
“on” row (presetting pixe l). The parasitic col umn capacitance is loaded during the precharge
sequence. Using the precharge addressing method improves the efficiency of the display and
makes th e luminance directly proportional to the column brightness current and current duty-cycle .
COL_PRE
COL_GND
) before the current flows through the selected
).
Discharging only the “off” pixel reduces capacitance losses.
This is an accurate method that regroups the discharge and precharge sequences, thus increasing
the duration of the active cycle.
The optimal precharge voltage presets the diodes at their turn-on point. This voltage is directly
related to the brightness level and provides an accurate activation of the pixel diodes. The column
current source only provides energy to the pixel diode and does not participate in charging the
column capacitance.
FT
A
Figure 32: Column Driver Voltage Diagram
V
PP
VCOL_PRE
Detection
PREVOL
R
Register
VCOL_PRE
External
Voltage Generator
D
PRECHARGE
DISCHARGE
V
PP
V
PP
Tank Capacitor
GND_COL
Col 0 Col 127
STMicroelectronics Confidential Draft of Revision 1.7 36/65

Display Addressing Scheme STV8102
The precharge voltage V
● an internal voltage adjusted automatically on the brightness level and pixel operating voltages,
● an external voltage connected to the VCOL_PRE pins. It is important to note that V
must be lower than V
● a tank capacitor connected to the VCOL_PRE pins. Capacitive currents can be collected to this
tank capacitor and used to generate a precharge voltage. This way is less accurate than the
internally -gen erated V
The precharge voltage options are selected in regis ter PREVOL.
The resulting discharge and precharge waveforms are controlled to prevent too fast transitions.
5.2.2 A ct ive Period
The active period corresponds to the light-emission period. The global brightness setting defines
the current delivered by the column driver output stage. The STV8102 allows up to 127 steps of
brightness adjustment to set the active current in the column driver.
The column driver output current is a linear function of the reference current defined by:
The maximum brightness in this case is 255µA.
A high current option selected by the MAX.BRIGHT bit is used to double the current delivered by
the column driver.
COL_PRE
,
PP
COL_PRE
I
can be selected as:
.
OUT
= I
x N, where N = 0 to 127
REF
COL_PRE
= (2 x I
I
OUT
The maximum brightness in this case is 500µA.
The output current defined by the brightness adjustment flows through the column electrodes
during the active write period. The current sources of the output stage are automatically turned in
high impedance mode at the end of the active period during a single internal clock step.
) x N, where N = 0 to 127
REF
FT
A
5.3 Optimization of the Column Driving Scheme
To reduce power consumption, the OLED display can be driven with optimized driving schemes
adapted to the application requirements.
R
Register PREDIS_SEL defines the presence (absence) of the discharge and/or precharge or the
use of a dedicated sequence without discharge and that connects together all “off” column outputs
to collect current losses on the common VCOL_PRE node.
Register PREDISDUR defines the duration of precharge and discharge sequences and the
temporal position of the signal edges in relation to the row sequence.
The recommended sequence simultaneously performs a precharge for an “on” (white) pixel and a
discharge for an “off” (black) pixel. This results in an optimization of the power consumption by
reducing the capacitive losses and increasing the active sequence.
However, for each of these modes, the user can force the driving scheme to the following cycles:
1. Pre-charge and discharge
2. No pre-charge, no discharge
3. No Pre-charge, discharge
4. Pre-charge, no discharge
D
37/65 Draft of Revision 1.7 STMicroelectronics Confidential

STV8102 Display Addressing Scheme
The user can choose between a sequential or parallel mode of the discharge and pre-charge
periods.
The row period is divided in 20 cycles which are a Hi-Z period (1 cycle), discharge period (0 or 1
cycle), pre-charge period (1 or 2 cycles), the remaining number of cycles being the active period.
The duration of each pre-charge can be selected between one or two cycles. It must be noted that
the STV8102 operates in a voltage pre-charge mode.
5.4 Examples of the Row/Column Driving Waveforms
The activation of the precharge/discharge function is done with the PREcharge DIScharge
SELection register and the selection of the sequential/parallel scheme and duration is done with the
PREDIS DURation register. (For more information, refer to Chapter 10 : Control and Status
Registers Desc ription.)
Figure 33: Parallel Precharge/Discharge Scheme (optimized sequence)
HSYNC
Column X1
Column X2
Column X3
Column X4
Row N
Row N+1
Pre
Pre
Dis
W
W
B
B
N
Dis
Pre
A
R
Active drive
Parallel precharge/discharge, 1 cycle
Active drive
D
W
FT
B
W
B
N+1
Dis
Dis
Pre
STMicroelectronics Confidential Draft of Revision 1.7 38/65

Display Addressing Scheme STV8102
Figure 34: Sequential Precharge/Discharge Scheme
HSYNC
Pixel Transition
Column X1
Column X2
Column X3
Column X4
Row N
Row N+1
W
W
B
B
N
Dis Pre
Discharge/precharge ON, sequential discharge/precharge, 1 cycle each
Active drive
Dis Pre
W
B
W
B
N+1
Active drive
Dis Pre
FT
A
W to W
W to B
B to W
B to B
R
D
39/65 Draft of Revision 1.7 STMicroelectronics Confidential

STV8102 Display Addressing Scheme
Figure 35: Sequential 2-Cycle Precharge Scheme
HSYNC
Pixe l Tra n s it io n
Column X1
Column X2
Column X3
Column X4
Row N
Row N+1
W
W
B
B
N
Dis
Pre
Active drive
Sequential discharge/precharge, 1-cycle discharge, 2-cycle precharge
Dis
Pre
W
B
W
B
N+1
Active drive
Dis
Pre
FT
A
W to W
W to B
B to W
B to B
R
D
STMicroelectronics Confidential Draft of Revision 1.7 40/65

Scanning Control STV8102
6 Scanning Control
The STV8102 features a “Self-adaptive Scanning” processing which leads to adapt the row period
to the picture contents. This “Self-adaptive Scanning” drastically decreases the overall display
power consumption.
This feature is implemented in the scanning control block which generates the row/column driving
signals. The STV8102 can operate in active mode without host processing or in passive mode with
host control. The “Self-adaptive Scanning” modes are selected using 2 registers.
The scanning control block monitors the display RAM contents with a resolution of 8 blocks of 8
consecutive rows starting at row 0. A checksum is performed of each frame on each block. If the
block holds at least one pixel, the block is displayed, else it is blanked. Only row driver signals
corresponding to row drivers blocks with active data are generated. The line duration is adapted to
the number of active rows, while the frame frequency remains unchanged to minimize system
power consumption.
The active mod e is selected by “clearing” the AUTO
then automatically runs the “Self-adaptive Scanning”, driving the panel at the lowest line frequency
to minimize power consumption. In addition, the driving current is also decreased in the same ratio
which results in a further decrease of power consumption and to an increase in the lifetime of the
panel. Reading the RAMCHECK register gives the block status.
The passi v e m ode is selected by “setting” the A UTO
then check the contents of 8 blocks in the display RAM by reading the RAMCHECK register and
decide to blank, or not, some of the 8 row blocks by writing to the RAMSCAN control register. The
line frequency is adapted accordingly (see Figure 36).
In either active or passive mode, the adjustment of the line frequency requires a fine-tuning of the
column current to keep a constant luminance level on the panel. This fine-tuning is automatically
controlled by the logic control block through the ‘Current Management’ block.
The ‘Current Management’ block generates the reference current for the column driver stage.
Figure 36: Self-adaptive Scanning Block Diagram
Display RAM
Y0
Block 0
Y7
Block 1
X15X1 X14X0
Block
Checksum
Internal
Result Register
R
A
B0
B1
D
Block 6
Block 7
B6
B7
bit of the SCANMODE register. The STV8102
bit of the SCANMODE register. The host can
FT
RAMSCAN
RAMSCAN
Control Register
Control Register
B0
B0
B1
B1
B6
B6
SCANMODE
Control Register
RAMCHECK
Status Register
B0
B1
B6
B7
SCANNING
CONTROL
BLOCK
Row
Signals
Column
Signals
Control
Signals
B7
B7
41/65 Draft of Revision 1.7 STMicroelectronics Confidential

STV8102 Power Supply Management - PowermizerTM
7 Power Supply Management - Powermizer
The STV8102 has an enhanced power supply control scheme named Powermizer.
The ‘Power Supply Management’ block controls the external step-up circuitry that generates the
high-voltage supply (V
step-up circuitry to regulate the V
row-off internal voltages. The control loop tracks the panel operating characteristics and adjusts the
power supply to ensure minimum power dissipation independently of the OLED/LEP material
characteristics over time and temperature. This function is particularly interesting in case of strong
brightness decrease. In this type of configuration, the driving voltage of the display is always
adapted to the optimum pixel operating voltage. If the STV8102 is powered with an external fixed
V
supply, the power supply management must be disabled.
PP
The column pre-charge voltage is internally generated. V
VCOL_PRE
register. It is also possible to connect an external capacitor to the VCOL_PRE pin. The column precharge voltage is then an average of the ON voltage of the display.
The same configuration is valid for the V
These different operating modes are defined by registers (see Chapter 10: Control and Status
Registers Desc ription).
The DC-to-DC Converter is a step-up converter with an input voltage V
V
(from 5 to 18V). The switching frequency (350kHz, typ.) is internally generated.
PP
During start-up, V
pins VHIGH and VDRIVE allows V
is high enough to switch the external NMOS transistor. Both the internal and external NMOS
transistors work in parallel. The external NMOS transistor is always required. The internal NMOS
transistor is not sized to switch the normal operating current of the application.
is externally supplied, the internal generation must be disabled using the PREVOL
PP
for the panel (see Figure 37). The STV8102 continuously controls the
PP)
equals V
supply and the derived V
PP
ROW_OFF
BATT
- V
to rise until the voltage on pin VDRIVE (stemming from VPP)
PP
and an internal NMOS transistor connected between
DIODE
COL_PRE
COL_PRE
row-off voltage. (See register ROWOFFVOL.)
precharge and V
is set [1.5V to 2V] below VPP. If
FT
A
TM
ROW_OFF
and an output voltage
BATT
R
D
STMicroelectronics Confidential Draft of Revision 1.7 42/65

Power Supply Management - PowermizerTM STV8102
Figure 37: Power Supply Management Block Diagram
VBAT
COIL
VPP
STV8102
VCAPA_HOLD
RSENSE
VHIGH
VDRIVE
VSENSE
GNDSENSE
VCOL_PRE
Column x
Row x
VROW_OFF
GND_A
STEPUP_EN register
Step-up
Converter
Internal
Row_off
Supply
Row_off
Selection
Active Row
Selection
Comp.
Internal
Precharge
Supply
Precharge
Selection
A
Controlled
Reference
BRIGHT register
Column
Control
FT
Column discharge
Selection
GND_COL
Active column
R
D
43/65 Draft of Revision 1.7 STMicroelectronics Confidential

STV8102 Oscillator – Timing Generator
8 Oscillator – Timing Generator
The ‘Oscillator, Timing Generator’ block generates the internal clocks for the STV8102 digital
blocks. The reference clock can be fed externally on the EXT-CLK pin or come internally from the
on-chip oscillator. The necessary signals are generated to control the external DC-to-DC converter
and all the scanning signals.
Figure 38 shows the timing generator block diagram.
Different commands can be used to adapt the timing generator to several configurations (See
Register Description chapter).
EXT_CLK
The DC-to-DC conve rter clock (f
The frame and row clocks can be automatically or manually adapted to the display mode (full
picture, screen saver, …).
A basic scanning clock period (f
sequence (precharge, discharge, …) The row period is automatically controlled by the scanning
block to fit the running display mode (active, screen saver, …) and the selected frame rate.
Figure 38: Timing Generator Block Diagram
External
(
f
Internal
Oscillator
680kHz typ.
Clock
EXT_OSC
(
f
INT_OSC
Internal/External Clock
(OSCDCDC Register)
)
)
(OSCDIG-INT Register)
) is half the frequency of the selected reference clock.
DCDC
) of 1/20th the row period is used to run the selected column
SCAN
Reference
Clock
/2
/4
A
/8
f
)
(
DCDC
To DC-to-DC Converter
FT
60 to 120Hz
(OSCDIG-DIV Register)
Scanning Clock
f
)
(
SCAN
Shift Clock
f
(
HIGHSCAN
)
R
The frame duration is:
f
f
Using a typical internal reference clock frequency of 680kHz (f
● a 60Hz (minimum) frame frequency is obtained by a d ivision rate of 8
f
● a 120Hz (minimum) frame frequency is obtained by a division rate of 4
f
* With 64 rows active
If the Self-adaptive Scanning system skips some blank rows, the row frequency decreases but the
frame frequency remains close to the selected value.
In case the factor 4 is used (to run at a higher frame frequency), the screen saver mode can operate
in or on a reduced area.
STMicroelectronics Confidential Draft of Revision 1.7 44/65
FRAME
= f
ROW
= 85kHz*, f
SCAN
= 170kHz*, f
SCAN
= f
SCAN
ROW
/64*
/20*
D
ROW
ROW
= 4.25kHz* and f
= 8.5kHz* and f
FRAME
FRAME
= 66Hz*
= 132Hz*
INT_OSC
):

STV8102 Configuration STV8102
9 STV8102 Configuration
The STV8102 provides a set of registers to configure the device to the hardware of the display . This
chapter gives a summary of the controller state after a hardware reset and provides an example of
configuration to adapt the controller to a given screen.
9.1 Reset Configuration
Before starting operation, a configuration sequence must initialize the STV8102 registers with a set
of values in accordance with the application and with the display hardware. The register initialization
sequence is loaded through the bus interface. When enabled, the selected interface (with SEL0,
SEL1) can operate usi ng the interface signals provided by the host.
The configuration has to be performed during the software initialization sequence by the host after
any reset.
The default configuration of the STV8102 after a hardware reset is:
● all the control registers are cleared (display OFF, DC-DC step-up OFF, internal oscillator OFF,
scanning OFF ),
● the RAM contents are unchanged (on Power ON: RAM contents are defined)
Note: the hardware reset must be applied all the power-up sequence long, until the supplies reach
the minimum value specified in Chapter 11: Electrical Characteristics.
9.2 Display OFF Configuration
After the Display OFF command the configuration is as follows:
● Internal registers unchanged
● RAM unchanged
● Internal oscillator is inactive
● DC-DC step-up is OFF
9.3 Example Configuration
This section describes an example of a standard “like” configuration. This configuration is sent in
order to have a normally functioning display. It is listed below in Table 19: Configuration Sequence
and corresponds to the display of Figure 39.
The configuration sequence brings the necessary flexibility to adapt the generated signals to the
hardware and the characteristics of the screen.
The values of registers used in the example are given in two ways, the binary/hexadecimal value
when applicable or the bit name/position/value and the name of the corresponding register when
needed. Only registers implied in the configuration are documented (with type name = “config” in
the Control and Status Register chapter). The resulting pin assignment is summarized in the
corresponding Figure 39. Registers not mentioned keep their default reset value.
D
R
FT
A
Refer to the Control and Status Register chapter for the detailed register description.
45/65 Draft of Revision 1.7 STMicroelectronics Confidential

STV8102 STV8102 Configuration
Screen features: The columns start from 0 to 128, left to right, at the bottom of the screen. The
even rows start from 0 to 62, top to bottom, on the left side and odd rows from 1 to 63, top to bottom,
on the right side.
Table 19: Configuration Sequence
Register Name Value Description
OSCCTRL 12h
STEPUP_EN 19h Step-up converter enabled
PREDIS_SEL 26h With precharge/with discharge
ROWHIZ 28h Inactive rows to VROW_OFF
EXTMOS_EN 2Bh Extern al MOS enabled
PREVOL 2Ch Internal precharge supply
ROWOFFVOL 2Eh Internal row_off supply
ROWMAP 3Ah Row mapping, see Figure 39
VPPCLAMP A614h Set Vpp clamp value
PIXLMAP B1h Fill RAM using bit7 as MSB
BRIGHT CE19h Set up Brightness valu e
PREDISDUR D020h Parallel precharge /discharge mode
DISPON AFh Turn display on
Internal clock/internal oscillator enabled/divide by 8
(60Hz)
FT
R
D
A
STMicroelectronics Confidential Draft of Revision 1.7 46/65

STV8102 Configuration STV8102
Figure 39: Row - Column Assignment
EVEN ROWS
Y62
Y0
R31
C0
C0
DISPLAY
SCREEN
STV8102 - DIE
DD_BG
R0
V
Interface
Signals
Y1
ODD ROWS
C127
Y63
C127
VROW_OFF
R63
R32
FT
Row-Column Interconnects for ROWMAP = 3Ah
A
R
D
47/65 Draft of Revision 1.7 STMicroelectronics Confidential

STV8102 Control and Status Registers Description
10 Control and Status Registers Description
The STV8102 has a set of control and status registers to configure and monitor the display system.
They are accessed with the interface bus as described in Chapter 2: Bus Interfaces.
The display RAM, organized as a byte array, is also accessed in write mode through the interface
bus with the selection of the SD/C
The following rules are used in this datasheet to describe bits, bit-fields and registers:
- SPICCTRL is the register name,
- FADON.SPICCTRL is the FADON bit of the SPICCTRL register,
- EFFECT.SPICCTRL is the EFFECT bit-field of the SPICCTRL register.
Unused bits are read as 0 and must be written at 0.
In the following sections the registers are described with the same rules. The reset default values
are given and the bit or bit-fields are detailed.
10.1 Register Map
pin at “1” . It is described in Chapter 3: Display RAM.
Table 20: List of Registers (Sheet 1 of 2)
Name msb lsb
XSTART 000 0 XSTART[3:0]
EXT/
OSCCTRL 000 1 0
STEPUP_EN 0001100
PREDIS_SEL 001 0 0
ROWHIZ 0010100
EXTMOS_EN 0010101
PREVOL 0010110
ROWOFFVOL 0010111
ROWMAP 001 1
YSTART 01
MOVE 100 0
HSPEED 100 10
VSPEED 100 1 1
HVEN 1010000
INVIDEO 1010001
VPPCLAMP 1010011 0 000
DISPON 1010111
PIXLMAP 101 1 0
RAMROW 1011100
SCANMODE 1011101
HMIN 1100000 0
HMAX 1100001 0
YSTART[5:0]
HMOVE[1:0] VMOVE[1:0]
D
OSC
INT
ON
PREDIS_SEL[2:0)
R
ROWMAP[3:0]
HSPEED[2:0]
VSPEED[2:0]
B2T R2L MSB
DIV
STEPUP_EN
A
ROWHIZ
EXTMOS_EN
PREVOL
ROWOFFVO L
HVEN
INVID
DISPON
RAMROW
AUTO
FT
VPPCLAMP[4:0]
HMIN[7:0]
HMAX[7:0]
STMicroelectronics Confidential Draft of Revision 1.7 48/65

Control and Status Registers Description STV8102
Table 20: List of Registers (Sheet 2 of 2)
Name msb lsb
HSHIFT 1100010 0 HSHIFT[7:0]
VMIN 1100011 0 0
VMAX 1100100 0 0
VSHIFT 1100101 0 0
RAMSCAN 1100110 0
BRIGHT 1100111 0
PREDISDUR 1101000 0 0
PATTERN_EN 1101011
PATTERN_SEL 110 1 1
NOP 1110001 0
RAMCHECK 1110110 0
IDCHIP 1110111 0
PATEN
SEL[2:0]
MAX BRIGHT[6:0]
SEP DISEL CYC0000
RAMSCANCHECK[7:0]
VMIN[6:0]
VMAX[6:0]
VSHIFT[6:0]
RAMSCAN[7:0]
IDCHIP[7:0]
10.2 Register Description Ordered by Name
BRIGHT - W - Brightness Range Selection Default value: 00h
Bit 15 Bit 14 Bit 13 Bit 12 Bit 11 Bit 10 Bit 9 Bit 8 Bit 7 Bit 6 Bit 5 Bit 4 Bit 3 Bit 2 Bit 1 Bit 0
Command code Data
CEh MAX BRIGHT[6:0]
FT
A
Bit Name Reset Function
MAX 0 Brightness Range Selection (I
0: I
selection - 250uA
BR1
selection - 500uA
1: I
BR2
BRIGHT[6:0] 0000000b Bright ne ss Value
0000000b: 0
0000001b: 1/127 of I
xxxxxxxb: -1 row shift to the bottom
1111111b: I
D
R
BRx
max value
BRx
BRX
)
DISPON - W - Display Enable Def ault value: AEh
Bit 7 Bit 6 Bit 5 Bit 4 Bit 3 Bit 2 Bit 1 Bit 0
1010111DISPON
49/65 Draft of Revision 1.7 STMicroelectronics Confidential

STV8102 Control and Status Registers Description
Bit Name Reset Function
DISPON 0 Display Enable
0: Disable, Blank Screen
1: Enable
EXTMOS_EN - W - External MOS Enable Default value: 2Ah
Bit 7 Bit 6 Bit 5 Bit 4 Bit 3 Bit 2 Bit 1 Bit 0
0010101EXTMOS_EN
Bit Name Reset Function
EXTMOS_EN 0
HMAX - W - Horizontal Left Shift Limit Default value: 00h
Bit 15 Bit 14 Bit 13 Bit 12 Bit 11 Bit 10 Bit 9 Bit 8 Bit 7 Bit 6 Bit 5 Bit 4 Bit 3 Bit 2 Bit 1 Bit 0
External Power MOSFET Enable
0: Disabled
1: External MOS Enabled
Command code Data
FT
C2h HMAX[7:0]
Bit Name Reset Function
A
HMAX[7:0] 00h Horizontal Left Shi ft Limit
80h: -128 pixel shift to the left
-----FFh: -1 pixel shift to the left
00h: no shift
01h: 1 pixel shift to the right
------7Fh: 127 pixel shift to the right
R
HMIN - W - Horizontal Right Shift Limit Default value: 00h
D
Bit 15 Bit 14 Bit 13 Bit 12 Bit 11 Bit 10 Bit 9 Bit 8 Bit 7 Bit 6 Bit 5 Bit 4 Bit 3 Bit 2 Bit 1 Bit 0
Command code Data
C0h HMIN[7:0]
STMicroelectronics Confidential Draft of Revision 1.7 50/65

Control and Status Registers Description STV8102
Bit Name Reset Function
HMIN[7:0] 00h Horizontal Right Shift Limit
80h: -128 pixel shift to the left
-----FFh: -1 pixel shift to the left
00h: no shift
01h: 1 pixel shift to the right
------7Fh: 127 pixel shift to the right
HSHIFT - W - Horizontal Shift Selection Default value: 00h
Bit 15 Bit 14 Bit 13 Bit 12 Bit 11 Bit 10 Bit 9 Bit 8 Bit 7 Bit 6 Bit 5 Bit 4 Bit 3 Bit 2 Bit 1 Bit 0
Command code Data
C4h HSHIFT[7:0]
Bit Name Reset Function
HSHIFT[7:0] 00h Horizontal Shift Selection
80h: -128 pixel shift to the left
-----FFh: -1 pixel shift to the left
00h: No shift
01h: 1 pixel shift to the right
------7Fh: 127 pixel shift to the right
HSPEED - W - Screen Saver Horizontal Speed Default value: 90h
Bit 7 Bit 6 Bit 5 Bit 4 Bit 3 Bit 2 Bit 1 Bit 0
10010 HSPEED[2:0]
A
FT
R
Bit Name Reset Function
HSPEED[2:0] 000b Horizontal Moving Speed selection
000: no shift, no motion
001: shift to HSHIFT and move 1 step to the right every 3 frame
D
010: shift to HSHIFT and move 1 step to the right every 2 frames
011: shift to HSHIFT and move 1 step to the right every 1 frames
100: shift to HSHIFT, no motion
101: shift to HSHIFT and move 1 step to the left every 3 frames
110: shift to HSHIFT and move 1 step to the left every 2 frames
111: shift to HSHIFT and move 1 step to the left every 1 frame
HVEN - W - Horizontal/Vertical Enable Default value: A0h
Bit 7 Bit 6 Bit 5 Bit 4 Bit 3 Bit 2 Bit 1 Bit 0
1010000HVEN
51/65 Draft of Revision 1.7 STMicroelectronics Confidential

STV8102 Control and Status Registers Description
Bit Name Reset Function
HVEN 0
IDCHIP - R - Chip Identification Value: 07h
Bit 15 Bit 14 Bit 13 Bit 12 Bit 11 Bit 10 Bit 9 Bit 8 Bit 7 Bit 6 Bit 5 Bit 4 Bit 3 Bit 2 Bit 1 Bit 0
Bit Name
IDCHIP[7:0] 07h IDchip = 0111b
INVIDEO - W - Inverse Video Enable Default value: A2h
Bit 7 Bit 6 Bit 5 Bit 4 Bit 3 Bit 2 Bit 1 Bit 0
1010001INVIDEO
Fixed
Value
Horizontal/Vertical Enable
0: Disabled
1: Horizontal/Vertical Enable
Command code Data
EEh IDCHIP[7:0]
Function
FT
Bit Name Reset Function
INVIDEO 0
MOVE - W - Screen Saver Effect Selection Default value: 80h
Bit 7 Bit 6 Bit 5 Bit 4 Bit 3 Bit 2 Bit 1 Bit 0
1000 HMOVE[1:0] VMOVE[1:0]
Inverse Video Enable
0: Disabled
1: Inverse Video Enabled
R
A
D
Bit Name Reset Function
HMOVE[1:0] 00b Horizontal Moving Effect selection
00: Limit to Limit
01: Bounce Only
10: Wrap Only
11: Bounce and Wrap
VMOVE[1:0] 00b Vertical Moving Effect selection
00: Limit to Limit
01: Bounce Only
10: Wrap Only
11: Bounce and Wrap
STMicroelectronics Confidential Draft of Revision 1.7 52/65

Control and Status Registers Description STV8102
OSCCTRL - W - Clock Control Register Default val u e: 14h
Bit 7 Bit 6 Bit 5 Bit 4 Bit 3 Bit 2 Bit 1 Bit 0
00010EXT/INT
Bit Name Reset Function
EXT/INT 0 Clock Selection
0: Internal
1: External
OSC ON 1 Internal Oscillator Enable
0: Disabled
1: Enabled
DIV 0 Reference Clock Divider selecti on
0: Divided by 8 -> 60Hz
1: Divided b y 4 -> 120Hz but display p anning and screen saver functions are disabled, see remark
in Section 4.3 and in Section 4.4
PATTERN_EN - W - Pattern Enable Default value: D6h
Bit 7 Bit 6 Bit 5 Bit 4 Bit 3 Bit 2 Bit 1 Bit 0
1101011PATEN
FT
OSC ON DIV
Bit Name Reset Function
PATEN 0
PATTERN_SEL - W - Pattern Select Default value: D8h
Bit 7 Bit 6 Bit 5 Bit 4 Bit 3 Bit 2 Bit 1 Bit 0
11011 SEL
Pattern Enable
0: Disabled
1: Pattern Enabled
A
R
D
Bit Name Reset Function
SEL 000b
Pattern Select
000b: blank screen, refer to Table 18: Display Pattern Selection
001b: black and white columns, refer to Table 18: Display Pattern Selection
010b: checker board pattern, refer to Table 18: Display Pattern Selection
-----111b: white screen, refer to Table 18: Display Pattern Selection
53/65 Draft of Revision 1.7 STMicroelectronics Confidential

STV8102 Control and Status Registers Description
PIXLMAP - W - Mirror Effect Selection Default value: B1h
Bit 7 Bit 6 Bit 5 Bit 4 Bit 3 Bit 2 Bit 1 Bit 0
10110B2TR2LMSB
Bit Name Reset Function
B2T 0 Vertical Display selection
0: top to bottom display (normal vertical display, display corresponds to RAM contents)
1: bottom to top display (display reversed compared to RAM contents)
R2L 0 H orizontal Display selection
0: left to right display (normal horizontal display, display corresponds to RAM contents)
1: right to left display (display reversed compared to RAM contents)
MSB 1 MSB Receive Po sition (RAM write only)
Serial interfaces Parallel interf ac es
0: MSB is the 8th received bit MSB is Bit[0] RAM data write only
1: MSB is the 1st received bit MSB is Bit[7] default value
PREDISDUR
Bit 15 Bit 14 Bit 13 Bit 12 Bit 11 Bit 10 Bit 9 Bit 8 Bit 7 Bit 6 Bit 5 Bit 4 Bit 3 Bit 2 Bit 1 Bit 0
Bit Name Reset Function
SEP 0 Parallel or Sequential Precharge/Discharge selection
DISEL 0 Discharge mode
CYC 0 Precharge cycle selection
Bits[3:0] 0000b Reserved, must be kept to 0000b
- W - Parallel or Sequential Pre/Discharge Selection Default value: 00h
Command code Data
D0h 0 SEP DISEL CYC 0 0 0 0
FT
A
0: Parallel Precharge/Discharge (in the same cycle)
1: Sequential Precharge/Discharge (different cycles)
0: All columns discharged (in the same cycle)
1: Selective discharge (only white to black transition columns)
0: 1 cycle long precharge
1: 2 cycles long precharge
R
D
PREDIS_SEL - W - Precharge/Discharge Select ion Default value: 20h
Bit 7 Bit 6 Bit 5 Bit 4 Bit 3 Bit 2 Bit 1 Bit 0
00100 PREDIS_SEL[2:0]
STMicroelectronics Confidential Draft of Revision 1.7 54/65

Control and Status Registers Description STV8102
Bit Name Reset Function
PREDIS_SEL[2:0] 000b
* Enable with PREDISDUR.DISEL = 1 only.
PREVOL - W - Precharge Supply Selection Default value: 2Ch
Bit 7 Bit 6 Bit 5 Bit 4 Bit 3 Bit 2 Bit 1 Bit 0
0010110PREVOL
Bit Name Reset Function
PREVOL 0 Precharge Supply selection
All Column Precharge Discharge selection *
000: No Precharge, No Discharge
001: No Precharge, No Discharge, Off pixels connected to V
010: With Precharge, No Discharge
011: Not used.
100: no precharge, with discharge
101: Not used.
110: with precharge, with discharge
111: Not used.
FT
1: External supply on pin VCOL_PRE
0: Internal precharge supply
COL_PRE
RAMCHECK - R - Row Block Checksum Result Reset value: 00h
Bit 15 Bit 14 Bit 13 Bit 12 Bit 11 Bit 10 Bit 9 Bit 8 Bit 7 Bit 6 Bit 5 Bit 4 Bit 3 Bit 2 Bit 1 Bit 0
Command code Data
ECh RAMSCANCHECK[7:0]
A
R
Bit Name Reset Function
RAMSCANCHEC
K[7:0]
00h 8 Row Block Checksum Result
Bit 7: Block 7, lines 56 to 63
D
Bit 6: Block 6, lines 48 to 55
Bit 5: Block 5, lines 40 to 47
Bit 4: Block 4, lines 32 to 39
Bit 3: Block 3, lines 24 to 31
Bit 2: Block 2, lines 16 to 23
Bit 1: Block 1, lines 8 to 15
Bit 0: Block 0, lines 0 to 7
When a bit is set, the corresponding block is activated. When the bit is reset, the corresponding
block is blanked. Example: FFh means that all blocks are activated.
55/65 Draft of Revision 1.7 STMicroelectronics Confidential

STV8102 Control and Status Registers Description
RAMROW - W - RAM Access in Row Mode Default value: B8h
Bit 7 Bit 6 Bit 5 Bit 4 Bit 3 Bit 2 Bit 1 Bit 0
1011100RAMROW
Bit Name Reset Function
RAMROW 0
RAMSCAN - W - ROW Block Blanking Default value: 00h
Bit 15 Bit 14 Bit 13 Bit 12 Bit 11 Bit 10 Bit 9 Bit 8 Bit 7 Bit 6 Bit 5 Bit 4 Bit 3 Bit 2 Bit 1 Bit 0
Bit Name Reset Function
RAMSCAN[7:0] 00h 8 Row Block Blanking
Access the RAM in Row Access mode
0: Disable
1: Enable
Command code Data
CCh RAMSCAN[7:0]
Bit 7: Block 7, lines 56 to 63
Bit 6: Block 6, lines 48 to 55
Bit 5: Block 5, lines 40 to 47
Bit 4: Block 4, lines 32 to 39
Bit 3: Block 3, lines 24 to 31
Bit 2: Block 2, lines 16 to 23
Bit 1: Block 1, lines 8 to 15
Bit 0: Block 0, lines 0 to 7
When a bit is set, the corresponding block is activated. When the bit is reset, the corresponding
block is blanked. Example: FFh means that all blocks are activated.
A
FT
ROWHIZ - W - Row OFF Selection Register Default value: 28h
Bit 7 Bit 6 Bit 5 Bit 4 Bit 3 Bit 2 Bit 1 Bit 0
0010100ROWHIZ
R
D
Bit Name Reset Function
ROWHIZ 0 ROW HiZ selection
0: Off-rows swit che d to V
1: Inactive or of f-rows in High Impedance state.
STMicroelectronics Confidential Draft of Revision 1.7 56/65
ROW_OFF

Control and Status Registers Description STV8102
ROWMAP - W - Row Mapping Selection Default value: 30h
Bit 7 Bit 6 Bit 5 Bit 4 Bit 3 Bit 2 Bit 1 Bit 0
0011 ROWMAP[3:0]
Bit Name Reset Function
ROWMAP[3:0] 0000b Row Mapping o n Driver Output
Pin R0 to R31 pin R32 to R63 driver outputs
0000: line 0 to 31 line 32 to 63 continuous set
0001: line 1, 3,…to 63 line 0, 2,…to 62 odd set and even set
0010: line 0, 2,…to 62 line 1, 3,…to 63 even set and odd set
0011: line 32 to 63 line 0 to 31 continuous set
0100: line 31 to 0 line 63 to 32 continuous set
0101: line 63, 61,…to 1 line 62, 60,…to 0 odd set and even set
0110: line 62, 60,…to 0 line 63, 61,…to 1 even set and odd set
0111: line 63, 62,…to 32 line 31, 30,…to 0 continuous set
1000: line 0 to 31 line 63 to 32 continuous set
1001: line 1, 3,…to 63 line 62, 60,…to 0 odd set and even set
1010: line 0, 2,…to 62 line 63, 61,…to 1 even set and odd set
1011: line 32 to 63 line 31 to 0 continuous set
1100: line 31 to 0 line 32 to 63 continuous set
1101: line 63, 61,…to 1 line 0, 2,…to 62 odd set and even set
1110: line 62, 60,…to 0 line 1, 3,…to 63 even set and odd set
1111: line 63, 62,…to 32 line 0, 1,…to 31 continuous set
FT
ROWOFFVOL - W - Row OFF Supply Selection Default value: 2Eh
Bit 7 Bit 6 Bit 5 Bit 4 Bit 3 Bit 2 Bit 1 Bit 0
0010111ROWOFFVOL
Bit Name Reset Function
ROWOFFVOL 0 Discharge Supply selection
1: External supply on pin VROW_OFF
0: Internal row-off supply
SCANMODE - W - Self-adaptive Scanning Selection Default value: BAh
R
A
D
Bit 7 Bit 6 Bit 5 Bit 4 Bit 3 Bit 2 Bit 1 Bit 0
1011101AUTO
Bit Name Reset Function
AUTO 0 Self-adaptive Scanning enable
1: Disable, passive mode, the host reads R AMCHECK and selects the rows with RAMSCAN
0: Enable, automatic blanking of the black row blocks
57/65 Draft of Revision 1.7 STMicroelectronics Confidential

STV8102 Control and Status Registers Description
STEPUP_EN - W - Setup Converter Control Register Default value: 18h
Bit 7 Bit 6 Bit 5 Bit 4 Bit 3 Bit 2 Bit 1 Bit 0
0001100STEPUP_EN
Bit Name Reset Function
STEPUP_EN 0
VMAX - W - Vertical Bottom Shift Limit Default value: 00h
Bit 15 Bit 14 Bit 13 Bit 12 Bit 11 Bit 10 Bit 9 Bit 8 Bit 7 Bit 6 Bit 5 Bit 4 Bit 3 Bit 2 Bit 1 Bit 0
Bit Name Reset Function
VMAX[6:0] 00h Vertical Bottom Shift Limit (bit 7 must be kept to 0)
Step-up Converter selection
0: external supply on V
1: step-up converter enabled, internally generated supply
Command code Data
C8h 0 VMAX[6:0]
40h: -64 row shift to the bottom
-----7Fh: -1 row shift to the bottom
00h: no shift
01h: 1 row shift to the top
------3Fh: 63 row shift to the top
PP
FT
A
VMIN - W - Vertical Top Shift Limit Default value: 00h
Bit 15 Bit 14 Bit 13 Bit 12 Bit 11 Bit 10 Bit 9 Bit 8 Bit 7 Bit 6 Bit 5 Bit 4 Bit 3 Bit 2 Bit 1 Bit 0
Command code Data
C6h 0 VMIN[6:0]
Bit Name Reset Function
VMIN[6:0] 00h Vertical Top Shift Limit (bit 7 must be kept to 0)
STMicroelectronics Confidential Draft of Revision 1.7 58/65
D
40h: -64 row shift to the bottom
-----7Fh: -1 row shift to the bottom
00h: no shift
01h: 1 row shift to the top
------3Fh: 63 row shift to the top
R

Control and Status Registers Description STV8102
VPPCLAMP - W - VPP Clamp Value Default value: 00h
Bit 15 Bit 14 Bit 13 Bit 12 Bit 11 Bit 10 Bit 9 Bit 8 Bit 7 Bit 6 Bit 5 Bit 4 Bit 3 Bit 2 Bit 1 Bit 0
Command code Data
A6h 0 0 0 VPPCLAMP[4:0]
Bit Name Reset Function
VPPCLAMP[4:0] 00000b VPP Clamp Value *
00000b: 5V, the min. VPP clamp value - corresponds to max. OLED display protection
00001b: 5.42 V
-----10000b: 11.7V
-----11110b: 17.58V
11111b: 18V, the max. VPP clamp value - corresponds to min. OLED display protection
* under the recommended operating conditions of Section 11.3
VSHIFT - W - Vertical Shift Sele ction Default value: 00h
Bit 15 Bit 14 Bit 13 Bit 12 Bit 11 Bit 10 Bit 9 Bit 8 Bit 7 Bit 6 Bit 5 Bit 4 Bit 3 Bit 2 Bit 1 Bit 0
Command code Data
CAh 0 VSHIFT[6:0]
Bit Name Reset Function
VSHIFT[6:0] 00h Vertical Shift Selection (bit 7 must be kept to 0)
40h: -64 row shift to the bottom
-----7Fh: -1 row shift to the bottom
00h: no shift
01h: 1 row shift to the top
------3Fh: 63 row shift to the top
VSPEED - W - Screen Saver Vertical Spee d Default value: 98h
Bit 7 Bit 6 Bit 5 Bit 4 Bit 3 Bit 2 Bit 1 Bit 0
10011 VSPEED[2:0]
D
R
A
FT
59/65 Draft of Revision 1.7 STMicroelectronics Confidential

STV8102 Control and Status Registers Description
Bit Name Reset Function
VSPEED[2:0] 000b Vertical Moving Speed selection
000: no shift, no motion
001: shift to VSHIFT and move 1 step to the bottom every 3 frame
010: shift to VSHIFT and move 1 step to the bottom every 2 frames
011: shift to VSHIFT and move 1 step to the bottom every 1 frames
100: shift to VSHIFT, no motion
101: shift to VSHIFT and move 1 step to the top every 3 frames
110: shift to VSHIFT and move 1 step to the top every 2 frames
111: shift to VSHIFT and move 1 step to the top every 1 frame
XSTART - W - RAM Write Column Register De fa u lt value: 00h
Bit 7 Bit 6 Bit 5 Bit 4 Bit 3 Bit 2 Bit 1 Bit 0
0000 XSTART[3:0]
Bit Name Reset Function
XSTART[3:0] 0000b RAM Write Column Start Position
0000b: Byte X0, column 0 to 7
0001b: Byte X1, column 8 to 15
−−−−−
1111b: Byte X15, column 120 to 127
FT
YSTART - W - RAM Write Row S tart Position Default value: 40h
Bit 7 Bit 6 Bit 5 Bit 4 Bit 3 Bit 2 Bit 1 Bit 0
01 YSTART[5:0]
Bit Name Reset Function
YSTART[5:0] 000000b RAM Write Row Start Position
00 0000b: Row 0
00 0001b: Row1
----11 1111b: Row 15?
R
A
D
STMicroelectronics Confidential Draft of Revision 1.7 60/65

Electrical Characteristics STV8102
11 Electrical Characteristics
11.1 Absolute Maxi mum Ratings
Maximum ratings are the values beyond which damage to the device may occur. Functional
operation should be restricted to the limits defined in the electrical characteristics table.
Symbol Parameter Value Unit
V
DD_D
/ V
DD_A
Low Voltage Supply Range -0.3, +4.6 V
V
BATT
V
PP
I
PP
V
INPUT
I
INPUT
Pd Total Power Dissipation TBD mW
T
J
T
STG
High Voltage Supply Range -0.3, +6 V
Analog Displ ay Supply Range -0.3, +22 V
DC Display Current Range 64 mA
DD
+0.3
Logic Input Voltage Range
DC Logic Input Current Range 10 mA
Junction Temperature 150 °C
Storage Temperature -50, +150 °C
-0.3, V
FT
11.2 Thermal Data
Symbol Parameter Value Unit
R
thJA
11.3 Recommended Operating Conditions
Junction-ambient Thermal Resistance (Maximum) on a single-layer
board
A
TBD °C/W
V
V
= 3.3V, V
DD_D
25°C, f
11.3.1 DC Characteristics
Symbol Parameter Test Conditions Min. Typ. Max. Unit
V
BATT
V
DD_A, VDD_D
V
PP
I
STAND_BY
I
DD_D
I
DD_A
61/65 Draft of Revision 1.7 STMicroelectronics Confidential
= 60Hz, unless specified otherwise
FRAME
High Voltage Supply 2.7 5.0 V
Controller Suppl y 1.8 3.6 V
Display Supply
Stand-by Curre nt
Digital Supply Current mA
Analog Supply Cur rent mA
= 3.3V, VPP = 15V, V
DD_A
D
R
V
BATT
Device biased but not
operating (reset or dis play
off mode)
= 4.2V, GND_A = GND_D = GND_S = 0V, T
BATT
< V
PP
5.0 12 20 V
5µA
AMB
=

STV8102 Electrical Characteristics
Symbol Parameter Test Conditions Min. Typ. Max. Unit
I
PP
V
V
IH
I
IL
I
IH
V
COL_GND
IL
Display Supply Current 64 mA
Low level of input logic signal
High level of input logic signal
Low level Input current of logic
signals
High level Input current of logic
signals
Column low-voltage reference
V
V
V
V
=0
IL
=0
IH
DD_A
DD_A
=3.3V
=1.8V
GND
0.7 x
V
0
0
_D
DD_D
0.3 x
V
DD_D
V
DD
1µA
1µA
1.5
0.4
11.3.2 Timing Generator
Symbol Parameter Test Conditions Min. Typ. Max. Unit
f
INT_OSC
f
EXT_OSC
f
HSYNC
f
VSYNC
Frequency of Internal clock
oscillator
Frequency of external clock signal. 600 1400 kHz
Row Frequency 0.48 7.68 kHz
Frame Frequency 60 120 Hz
FT
680 - kHz
V
V
V
11.3.3 Row Drivers
A
Symbol Parameter Test Conditions Min. Typ. Max. Unit
I
ROW
V
ROW_ON
R
ROW_OFF
Sink row Supply Current Maximum Brightness 64 mA
ROW_ON Voltage drop
R
of Row high-side transistor V
DSON
=64mA, V
I
ROW
R
=3.3V
DD_A
DD_A
=3.3V
0.5 V
350 ohm
11.3.4 Column Drivers
D
Symbol Parameter Test Conditions Min. Typ. Max. Unit
I
COL
R
COL_PRE
R
COL_DIS
D
COL
Column Supply Current
Column output impedance during
precharge
Column output impedance during
discharge
Column differential uniformity
D
I
AVG1
COL
= ABS(I
= (I
COL_N
COL_N
+ I
– I
COL_N+1
COL_N+1
)/2
)/I
AVG1,
Minimum Brightness
Maximum Bright ness
=3.3V,V
V
DD_A
-250µA<I
-50µA<I
GND_COL
COL
COL
=0V
<-500µA
<-250µA
-5
-500
750 ohms
280 ohms
1
5
µA
%
STMicroelectronics Confidential Draft of Revision 1.7 62/65

Electrical Characteristics STV8102
Symbol Parameter Test Conditions Min. Typ. Max. Unit
Device differential uniformity
D
CHIP
D
CHIP
and I
= ABS(I
= (I
AVG2
COL_MAX
COL_1
– I
+ to + I
COL_MIN
COL_128
)/I
AVG2,
)/128
5%
I
BR1
I
BR2
Maximum bright ness current
Maximum bright ness current
BRIGHT.MAX = 0
BRIGHT.BRIGHT = 127
BRIGHT.MAX =1
BRIGHT.BRIGHT = 127
250 µA
500 µA
11.3.5 DC-to-DC Converter
Symbol Parameter Test Conditions Min. Typ. Max. Unit
V
DRIVE_H
V
DRIVE_L
V
DRIVE_CYCLE
R
VHIGH_ON
Efficiency 80 %
V
CAPA_HOLD
External MOS gate: ON mode
External MOS gate: OFF mode
External MOS gate: turn ON duty
cycle
Internal MOS impedance: during
Ton
I
= -20mA VPP-1
DRIVE
= 20mA
I
DRIVE
= 20mA
I
VHIGH
FT
10 V
100 mV
080%
050 Ohm
020V
11.3.6 Voltage Generator
Symbol Parameter Test Conditions Min. Typ. Max. Unit
V
COL_PRE
Precharge power supply
R
V
ROW_OFF
Row-off power supply
A
Internal generator
- I
COL_PRE
- I
COL_PRE
External generator
Internal generator
- I
ROW_OFF
- I
ROW_OFF
External generator
=-450mA
=100µA
=-450mA
=450mA
TBD
TBD
TBD
TBD
TBD
TBD
V
PP
V
PP
D
V
V
63/65 Draft of Revision 1.7 STMicroelectronics Confidential

STV8102 Revision History
12 Revision History
The following table summarizes the modifications applied to this document.
Revision Description Date
1.0 First Issue 28 October 20 02
1.1
1.2
1.3
1.4
1.5
1.6 Update of Figure 2: Die Description (Bump-s ide View). 29 April 2003
1.7
Updated diagrams. Addition of T able2: Top Side ( from left to right) , Section 10.1:Register
Map.
Modification of Figure 2: Die Descriptio n (Bump-side Vi ew) and addition of Table 2: Top
Side (from left to right), Table 3: Right Side (from top to bottom), Table 4: Bottom Side
(from right to left), Table 5: Left Side (from bottom to top) and Table 6: Mechanical
Dimensions.
IDchip = 0101b
Modification of Figure 28: Wrap Only - Example 2, Figure 30: Wrap and Bounc e -
Example 2, Figure 31: Row Driver Voltage Diagram, Figure 32: Column Driver Voltage
Diagram, Section 5.2.1: Column Pre-charge/Discharge, Chapter 7: Power Supply
Management - PowermizerTM and register PREDISDUR.
IDchip = 0110b
Modification of Figure 1: STV8102 Input/Output Diagram and Figure 2: Die Description
(Bump-side Vie w). Update of Table1: STV8102 P ad D escription and Table 4: Bottom Side
(from right to left). Minor update s in Cha pter2: Bus Interfaces on page 16. Modification of
Figure 37: Power Supply Management Block Diagram. Updat e of Chapter 9: STV8102
Configuration and Chapter 10: Control and Status Registers Description on page 48.
Update of Figure 2: Die Description (B ump-side View). Inclusion of Figure 3: COF
Alignment and Die Positioning Marks. Update of pad placement and pad dimensions in
Section 1.3: Lead Pad Reference Chart. Update of Figure 36: Self-adaptive Scanning
Block Diagram. Other minor modifications.
FT
A
First issue for Cut 2.0 of the product
Pins
PATTERN_EN and PATTERN_SEL replaced by registers PATTERN_EN and
PATTERN_SEL. Remark regarding functioning of screen panning introduced in
Section 4.3. Similar remark about screen saver functioning introduced in Section4.4.
Table 19 modified to correspond to Figure 39.
18 November 2002
21 November 2002
27 November 2002
17 Februar y 2003
17 April 2003
10 November 2004
R
D
STMicroelectronics Confidential Draft of Revision 1.7 64/65

Revision History STV8102
FT
A
R
Informati o n furnished is believed to be accurate and reliable. However, STMicroelectronics assumes no responsibility for the
consequences of us e o f such information n or for any infringement of patents or oth er r igh ts of third parties w hic h m ay re su lt f rom its
use. No license is granted by implication or otherwise under any patent or patent rights of STMicroelectronics. Specifications
mentioned in this publ ication are subject to ch ange without notice. Thi s publication supers edes and replaces all information previously
supplied. STMicroelectronics products are not authorized for use as critical components in life support devices or systems without
D
express wri tten approva l of STMicroelectronics.
The ST logo is a registered trademark of STMicroelectronics
© 2004 STMicroelect ron ics - All Rights Reserved
All other names are the property of their respective owners.
STMicroelectronics GROUP OF COMPANIES
Australia - Belgium - Braz il - Canada - Chi na - Czech Rep ublic - Finland - France - Germ any - Hong Kong - Ind ia - Israel - Ital y - Japan
Malaysia - Malta - Morocco - Singapore - Spain - Sweden - Switzerland - United Kingdom - United States
www.st.com
65/65 Draft of Revision 1.7 STMicroelectronics Confidential
 Loading...