


SPEEDZONE SPORT CYCLOCOMPUTER
Congratulations on your purchase! You are now the owner of the world’s
finest cyclocomputer. Your Specialized® SpeedZone® Sport features a revolutionary new display screen that allows you to view five functions simultaneously. Additionally, it has been designed to provide the best combination of performance, features, durability and ease of use.
This illustration describes the screen display and buttons:
Average Speed Needle |
11 |
9 |
Current Speed Needle |
|
|
||
(Flashing) |
|
3 |
Analog Clock |
|
|
||
Speed Indication Bezel |
8 |
10 |
Maximum Speed Needle |
|
|
||
Digital Display Area |
5 |
4 |
Dot-Matrix Display Area |
|
Km/h |
||
Wheel Indicator |
6 |
7 |
MPH or KM/H Indicator |
|
|
||
SET Button |
2 |
1 |
MODE Button |
|
|
1
The following functions are available on your SpeedZone Comp:
•SPEED – Current Speed
•AVSPD – Average speed
•MXSPD – Maximum Speed
•ODO – Odometer (total distance)
•TRIP – Trip Distance
•ATM – Automatic Start/Timer
•Digital 12/24 Hour Clock
•Analog Clock
This computer also features:
•Five function LCD Display
•Easy Calibration Mode
•Heavy-duty abrasion resistant pick-up wire
•Water resistant housing
•1 Year Warranty
What is included in your SpeedZone Sport package:
1.SpeedZone Computer (1)
2.SpeedZone CR-2032 Lithium Battery (1)
3.SpeedZone Battery Door
4.Mounting bracket (1)
5.Speed Sensor Wire
6.Magnet with screw (1)
7.Adhesive backed magnet (1)
8.Cable tie wraps (4)
9.Mounting bracket sizing straps (3)
2

|
|
|
|
1 |
|
BATTERY INSTALLATION AND |
|
|
|
|
|
REPLACEMENT |
|
|
|
|
|
|
8 |
|
|
|
|
|
|
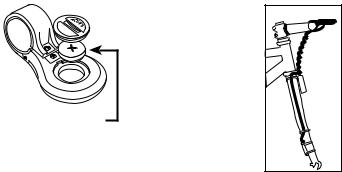
Before using your SpeedZone Sport |
|
4 |
|
|
|
|
|
|
|
|
|
|
|
Computer you will need to install the |
|
|
|
|
|
|
|
|
|
|
|
|
|
|
battery. Turn the computer over so the |
|
3 |
|
|
|
|
display is facing downward. Use a |
|
|
|
|
|
coin to unthread the battery cap from |
|
|
|
|
|
6 |
|
|
|
|
|
|
|
the computer. Install the battery |
|
|
|
|
7 |
|
|
|
|
|
|
|
|
(model CR2032, Specialized P/N |
|
|
|
|
|
|
|
|
|
|
|
|
|
|
481-3004) with the positive pole (+) |
|
|
|
|
|
|
facing upward. Carefully thread the |
|
|
|
|
|
|
battery cap back onto the case with a |
|
|
|
|
|
|
coin. (See Figure 3) If, after battery |
|
|
9 |
|
|
|
replacement, the LCD display is blank |
|
|
|
|
|
or shows incomplete digits, turn the |
|
|
|
|
|
|
|
|
|
|
|
|
|
|
computer over and press the "AC" |
|
|
|
|
|
|
button on the bottom of the case with |
|
|
|
|
|
|
the tip of a pen or a paper clip. This |
|
|
|
|
|
|
will clear all the data and re-start the |
|
|
|
|
|
|
computer. If you need to replace the |
3
battery, make a note of your odometer reading and wheel circumference settings before
removing it. |
CR2032 battery |
You can then |
FIGURE 3. |
re-enter the data |
when you restart the computer.
MOUNTING
THE SPEEDZONE SPORT
The SpeedZone Sport sensor can mount on the right or the left side of the fork blade. Use the cable tiewraps provided to position the sensor. Do not tighten until the final placement of the sensor magnet is correct. (See figure 4). Wheel
magnets have been |
|
provided for both tra- |
|
ditional round spokes |
Brake |
and bladed (flat) |
Cable |
|
|
aerodynamic spokes. |
|
|
Cable |
For wheels with |
Tie |
Wraps |
|
round spokes: |
|
Attach the magnet to |
Sensor |
a spoke across from |
|
the transmitter with |
FIGURE 4. |
the magnet screw. The |
SENSOR |
clearance between the |
PLACEMENT |
magnet and the transmitter should be approximately 1/32"-1/16" (1-2mm). Tighten the magnet and transmitter. Do not over-tighten the magnet screw.
(See figure 5).
4
For wheels with
bladed spokes:
Use some isopropyl
(rubbing) alcohol or a mild detergent to thoroughly clean the
spoke that you plan to attach the magnet to. Remove the backing from the adhesive tape and firmly press the magnet onto spoke. The tape uses
a special pressure sensitive adhesive. To ensure a strong bond, please wait at least 12 hours for the adhesive to cure before riding your bicycle.
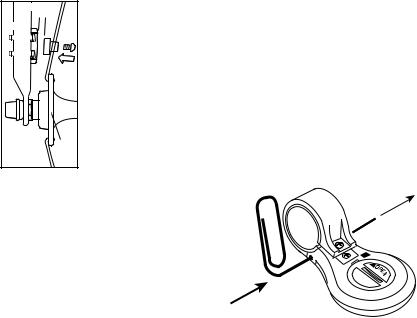
Your SpeedZone Sport comes preconfigured with a strap to fit standard road and mountain bike handlebars.
Attach the mount to the handlebar using the Philips head screw provided. Tighten so that the bracket cannot rotate on the handlebar. There are several sizing shims provided to fit different diameter bars. If you are using the new 31.8mm diameter bars, you will need to purchase the 31.8mm Handlebar Mount Kit (Specialized P/N 4812-3100) from
FIGURE 6. STRAP INSTALLATION
5
your Specialized dealer. To install the 31.8mm diameter strap onto your SpeedZone Comp, remove the two Philips head screws from the bottom of the computer and push out the retaining pin with a small screwdriver or a straightened paperclip. (See figure 6) Use caution not to lose the pin once you have removed it. Install the other mounting strap and reinsert the pin and screws. To test for proper installation of the magnet, transmitter and computer, activate the computer by pushing the ‘MODE’ (right side) button. Pick up the front of the bicycle and spin the front wheel. The "wheel option" indicator will flash. If it does not flash, check the sensor and magnet alignment. Realign as necessary
until the "wheel option" indicator flashes while spinning the wheel.
OPERATION AND
PROGRAMMING
When your SpeedZone Sport has not detected any speed input for 30 minutes, it will enter sleep-mode in order to conserve battery power. During sleep mode only the analog and digital clocks are displayed. The computer will wake up as soon as wheel speed is detected. Additionally, you can wake it up by pushing the "MODE" or "SET" button once. In order to operate your computer it must be placed in various "modes" (i.e. odometer mode, distance mode). The computer can be cycled through these
6
modes by pressing the "MODE" button located on the right-hand side of the housing. There are six cycling modes available: 1) Speed Mode, 2) Average Speed Mode, 3) Maximum Speed Mode, 4) Odometer Mode, 5) Trip Distance Mode and 6) Auto-timer Mode. Once you familiarize yourself with the mode selection operation you will find it very easy to navigate. The following flowchart outlines the mode/side-mode sequence.
Once a particular mode has been entered, its values can be reset or adjusted by pressing and holding the "SET " button for three seconds. Some operations may require that you use a combination of the "MODE" and "SET" buttons.
1. Setting the Display Language
Your SpeedZone Sport can display information on the dot-matrix display area in six different languages: English (ENGL), German (GER), French (FR), Italian (ITA), Dutch (NED), and Spanish (ESP). To select your language, depress hold the "MODE" and "SET" buttons simultaneously for three seconds. The selected language will be displayed. Use the "MODE" button to scroll through the languages. When the selected language is displayed (default language is English), press the "SET" button once to confirm your selection and exit display language mode.
7
 Loading...