

Page 1
Sophos SafeGuard® Disk Encryption 4.60
help
Document date: June 2009
Page 2

Contents
1 Overview................................................................................................................................................. 4
2 Getting started...................................................................................................................................... 11
3 Local installation ................................................................................................................................. 13
4 Central installation............................................................................................................................... 21
5 Troubleshooting an installation with SGEInteg................................................................................. 28
6 Uninstallation....................................................................................................................................... 29
7 System boot and logon ........................................................................................................................ 32
8 Administration overview..................................................................................................................... 37
9 The Administration function .............................................................................................................. 39
10 Configuration File Wizard................................................................................................................... 42
11 Changing frequently-used settings with the administrative template .............................................. 54
12 Pre-Boot Authentication (PBA).......................................................................................................... 57
13 Encryption............................................................................................................................................ 61
14 Creating user profiles........................................................................................................................... 66
15 Password settings ................................................................................................................................. 76
16 Configuring Windows logon............................................................................................................... 87
17 Sophos SafeGuard Disk Encryption workstation lock....................................................................... 97
18 Secure Wake-On-LAN....................................................................................................................... 100
2
Page 3

19 Hibernation........................................................................................................................................ 103
20 FIPS 140-2 (Level 1) certification...................................................................................................... 106
21 Sophos SafeGuard Disk Encryption and Lenovo Rescue and Recovery™...................................... 108
22 Compatibility with Absolute Computrace software ........................................................................ 118
23 Remote maintenance (Challenge/Response).................................................................................... 119
24 Saving the system kernel and creating emergency media................................................................ 128
25 Displaying Sophos SafeGuard Disk Encryption system status ........................................................ 143
26 Logging ............................................................................................................................................... 145
27 Error messages.................................................................................................................................... 148
28 Technical Support.............................................................................................................................. 166
29 Copyright............................................................................................................................................ 168
3
Page 4

Sophos SafeGuard® Disk Encryption 4.60, help
1 Overview
Personal computers often contain personal data, confidential and company information or other
sensitive data.
The danger caused by the theft of notebooks should not be underestimated. Highly sensitive client
information on a sales representative’s notebook could fall into the hands of a competitor,
resulting in serious damage for the company.
Sophos SafeGuard Disk Encryption is the ideal way to safeguard against such risks without
spending too much time on implementing security measures.
How does Sophos SafeGuard Disk Encryption protect workstations against unauthorized access?
The program’s most important security features are its drive encryption and pre-boot
authentication which prevent unauthorized
The benefits of Sophos SafeGuard Disk Encryption are:
Simply but effectively protects the confidentiality of stored data.
access to a workstation or notebook.
Can be implemented quickly.
Is very user-friendly.
Is based on market leading encryption technology certified FIPS 140 compliant.
You will find an overview on the Sophos SafeGuard Disk Encryption in the list below. To enhance
Sophos SafeGuard Disk Encryption we recommend to deploy SafeGuard Enterprise.
Sophos SafeGuard Disk Encryption (SDE) SafeGuard Enterprise
Small to medium business (< 1000 users) Medium to large business (>1000 users)
Sector-level disk encryption; Removable
media encryption via SafeGuard Private
Crypto
Scalable data protection platform; centralized
and enforceable management of full disk
encryption; removable media encryption, file &
folder encryption
Logging and reporting of encryption state
via Sophos Compliance and Control
Comprehensive auditing trail for compliance via
detailed reports and logs.
Authentication via keyboard Authentication via keyboard, smartcards/tokens
and biometrics (Lenovo Fingerprint)
4
Page 5
1.1 Central security functions
Encryption
Sophos SafeGuard Disk Encryption uses online encryption to protect the confidentiality of data
that is stored on hard disks in a simple and effective manner. Here, "online" means that the data
is decrypted, when it is read and loaded into RAM, and then automatically encrypted again when
it is saved. The key is determined from the user’s Sophos SafeGuard Disk Encryption password,
each time the PC is switched on.
Sophos SafeGuard Disk Encryption encrypts the entire contents of hard disks. For data
encryption the AES-256 algorithm is provided in Sophos SafeGuard Disk Encryption.
For a broader data security solution, we recommend the modularly structured data security suite
SafeGuard Enterprise. SafeGuard Enterprise supports central administration and, among other
features, encryption of removable media.
Access control with Pre-Boot Authentication (PBA)
Sophos SafeGuard® Disk Encryption 4.60, help
Pre-Boot Authentication is a crucial security function in Sophos SafeGuard Disk Encryption. PBA
ensures that only the Sophos SafeGuard Disk Encryption user who is registered on the system can
log on to it.
When the hard disk is encrypted, any attempt to boot the computer from another data medium,
such as a system floppy disk, a CD-ROM or another hard disk, will fail: the hard disk remains
blocked. In fact, this means that the system actually does boot, but it is not possible to read the
encrypted data on the hard disk.
5
Page 6

Sophos SafeGuard® Disk Encryption 4.60, help
1.2 Other security functions
Password rules
Sophos SafeGuard Disk Encryption offers several options for implementing special password
rules in the PBA such as a configurable list of forbidden passwords, extended rules for special
characters etc. to provide even better functionality for implementing pre-defined corporate rules.
Logging in PBA and operating system
Sophos SafeGuard Disk Encryption also logs events involving security issues, such as failed logon
attempts, in the Pre-Boot phase, and later passes on these log entries to the Windows Event Log
for evaluation.
Local administration
As an administrator, you can change settings for the authentication and encryption of your
computer in the Sophos SafeGuard Disk Encryption Administration. As an administrator, you
can set up user profiles.
Secure Automatic Logon to Windows (SAL)
Automatic logon is a function that helps to make the logon procedure more user-friendly. A user
only needs to enter their Windows logon data once. In future logons, they are automatically
logged on to Windows, and the user then only needs the Sophos SafeGuard Disk Encryption
logon data to authenticate themselves during PBA.
Secure Wake-On-LAN support
Sophos SafeGuard Disk Encryption’s Pre-Boot Authentication offers the best-possible protection
against attacks from hackers. However, maximum security is also needed when distributing
software via Wake-On-LAN when active hard disk encryption is in operation, and so Sophos
SafeGuard Disk Encryption offers a range of functions for that purpose.
Secure remote maintenance (Challenge/Response)
Helpdesk staff can help users who have forgotten their password. The Challenge/Response
procedure is secure and ideal for mobile users, since it does not require a PC to have a direct
online link with the help desk.
Windows Installer-based installation
As the installation procedure is fully compliant with the current Windows Installer (MSI)
standard it can be distributed and installed easily and efficiently in Windows networks.
6
Page 7

Sophos SafeGuard® Disk Encryption 4.60, help
Customization of Pre-Boot Authentication for legal requirements
When a user is logging on, Sophos SafeGuard Disk Encryption can also add an additional
message, specified by the administrator, that informs the user of legal requirements, ownership of
the device, or similar.
Emergency boot from CD, USB memory stick, and diskette
Sophos SafeGuard Disk Encryption accepts CDs and floppies alongside USB memory sticks as
emergency media. Boot media are supported for both MS DOS and Windows PE.
Sophos SafeGuard design for Windows logon dialog
Customers may customize the default logon to Windows and use a dialog that is based on the
Sophos SafeGuard design instead of the Windows logon design.
Hibernation (Suspend to Disk) support
Hibernation is especially useful for mobile device users who usually avoid booting by simply
"pausing" and then later "restoring" their current work session, because these options are
provided by modern operating systems. Sophos SafeGuard Disk Encryption supports use of
hibernation mode. This provides round-the-clock security, reduces power consumption and
saves time, in comparison with normal boot procedures that are currently in use.
Compatibility with Absolute’s Computrace software
When Computrace is installed, a stolen computer can report its location via a network. Sophos
SafeGuard Disk Encryption has been prepared to ensure it is compatible with Computrace. This
compatibility with Sophos SafeGuard Disk Encryption implies that this feature also works with
encrypted hard disks.
Support for Lenovo’s ThinkVantage - Rescue and Recovery 4.20
Sophos SafeGuard Disk Encryption supports Lenovo’s Rescue and Recovery (RnR). This means
customers can use this efficient backup and recovery method along with Sophos SafeGuard Disk
Encryption encrypted operating system partitions. This functionality is unique amongst disk
encryption products. Backups from encrypted Sophos SafeGuard Disk Encryption systems can be
stored on any disk drive used by RnR. Therefore, in an emergency, a system can be restored by
loading a backup from CD/DVD, a network drive, a second internal hard disk or a USB hard disk
or stick.
Certification to FIPS 140-2 Level 1
Sophos SafeGuard Disk Encryption complies with the guidelines of FIPS 140-2 Level 1 (FIPS=
Federal Information Processing Standard) certification set out by the American National Institute
of Standards and Technology (NIST). NIST defines the security criteria for encryption products
used by the American government.
7
Page 8

Sophos SafeGuard® Disk Encryption 4.60, help
1.3 System requirements
Supported operating systems
The minimum requirements for supported 32 bit versions of the operating systems are as follows
(tested service packs in brackets):
Windows 2000 Professional Service Pack 4 (SP 4)
Windows XP Home Edition Service Pack 2 (SP 3)
Windows XP Professional Edition Service Pack 2 (SP 3)
Current Service Packs are recommended.
Upgrading Windows Service Packs
It is possible to upgrade a service pack while Sophos SafeGuard Disk Encryption is installed. For
example, you may upgrade from Windows XP Home Edition SP 2 to SP 3 while Sophos
SafeGuard Disk Encryption is installed. §
Supported file systems
FAT-32
NTFS
Supported memory media
Hard disks (IDE, SCSI, serial ATA, Firewire, USB)
RAID 0 (Hardware-RAID 0)
Sophos SafeGuard Disk Encryption does not support:
additional RAID classes
Software-RAID 0
Supported processors
AMD
Intel
Multi-processors/hyperthreading
We recommend to use AMD or Intel processors.
8
Page 9

Hardware requirements
Hard disk capacity
Sophos SafeGuard Disk Encryption requires ca. 25 MB of disk space. Sophos SafeGuard Disk
Encryption has the same minimum requirements as the operating system currently in use.
Although Sophos SafeGuard Disk Encryption runs smoothly and without any problems on the
systems described, encryption comes at a cost. For this reason we recommend that you use
hardware that exceeds these requirements.
Number of hard disks
Sophos SafeGuard Disk Encryption supports a maximum of 4 devices per machine, with a
maximum of 8 partitions per device. The system displays a warning if an unsupported
partition type is found.
1.4 Documentation
Sophos SafeGuard Disk Encryption is supplied with a startup guide and this help.
Sophos SafeGuard® Disk Encryption 4.60, help
1.5 General notes
In normal operation, the following points should be taken into account:
Sophos SafeGuard Disk Encryption does not support Windows XP’s "Fast User Switching".
After Sophos SafeGuard Disk Encryption has been installed, the Welcome screen switches off
automatically.
If the workstation is integrated in a peer-to-peer LAN, parts of hard disks must not be assigned
to other users of this LAN.
Hard disk encryption and decryption are protected against power cuts and similar disruptions.
As soon as the power is restored, the process continues from the correct place without any
need for a user action.
Hint: The initial encryption of hot-pluggable hard disks must not be interrupted!
For further notes on the encryption of hot-pluggable hard disks see About hard disk encryption on
page 61.
When you leave the workstation for a short time, you should enable Windows screen-blanking
(Lock workstation button). If you want to leave the workstation for a longer period of time,
switch off the PC and then switch it on, and reboot it, when you return.
By correctly setting the recommended installation system configuration, you prevent logical
access to hard disks after booting from diskettes. To further protect the system against trojan
viruses that might be used to find out a Sophos SafeGuard Disk Encryption password, use a
mechanical lock or any other internal measure to protect the workstation from being booted
from diskette.
9
Page 10

Sophos SafeGuard® Disk Encryption 4.60, help
1.6 License note
All cases of unauthorized duplication of this help or the software supplied by Sophos SafeGuard
Disk Encryption will be pursued in law. You can only install Sophos SafeGuard Disk Encryption
on one PC.
If you misuse the backup copy to install Sophos SafeGuard Disk Encryption on several PCs, you
will contravene the terms of the license and be liable to punishment. If you want to protect several
PCs you must purchase a license for each PC.
Patent rights of Ascom Tech Ltd. given in EP, JP, US. IDEA is a trademark of Ascom, Tech Ltd.
Credits:
Special thanks go to Dr. Brian Gladman, whose AES implementation we used as the basis for
building our AES encryption drivers.
10
Page 11

2 Getting started
This chapter explains how to prepare for, and perform, your Sophos SafeGuard Disk Encryption
installation successfully.
2.1 Preparing for installation
You must make some preparations prior to installation: please read the following list carefully and
ensure that you comply with all the points.
General Preparations
Close all open applications.
Ensure that there is enough free hard disk space.
Preparations for encryption
Sophos SafeGuard® Disk Encryption 4.60, help
Create a complete back up of your data.
All the hard disks that are to be encrypted must already be connected to the PC and switched
on before Sophos SafeGuard Disk Encryption is installed.
The partitions on your hard disk should be completely formatted and should have a drive
letter assigned to them.
Check hard disk(s) for errors with this command:
chkdsk %systemdrive% /F /V /L /X
In some cases you might be prompted to restart the computer and run chkdsk again.
You will find more information on this subject in the knowledgebase:
http://www.sophos.com/support/knowledgebase/article/57554.html.
If the boot partition has been converted from FAT to NTFS, and the system has not been reset
by rebooting, Sophos SafeGuard Disk Encryption should not be installed. In this case it may
be that the installation will not be completed because the file system was still FAT at the time
of installation while NTFS was found when it was activated. In this case you have to reboot the
machine once before Sophos SafeGuard Disk Encryption is installed.
2.2 User interface language
If you start the installation via "setup.exe", the user interface language used during and after the
installation of Sophos SafeGuard Disk Encryption is the one set using the Regional Options in the
Control Panel. Sophos SafeGuard Disk Encryption supports German, English and French. If, for
example, "German" is the current Regional Option, the user interface is displayed in German. The
same applies for "English (United States)" and "French".
11
Page 12

Sophos SafeGuard® Disk Encryption 4.60, help
The online help is always available in whatever language you selected during installation. If you
change the Regional Options you do not change the language in which the online help is
displayed.
If you start the installation via the msi file, the user interface language is always English. To
support other languages (French/German) you must perform a number of "transforms". The
Windows Installer uses transform files to automatically toggle the installation package to the new
language. The following transform files are currently available:
SDE_f.mst (for French) and SDE_g.mst (for German).
To change the language in which text appears during installation, run this command before
installation:
msiexec /I <MSI package> TRANSFORMS=<transform file>
For example, for a German-language installation you must execute this command line:
msiexec /I SDE.msi TRANSFORMS=SDE_g.mst
Note that the TRANSFORMS parameter must always be written in capital letters!
To simplify installation you can use the
language for the Installation Wizard and runs
setup.exe file which automatically selects the set
SDE.msi. SDE.msi uses the Setup.ini file in
which additional parameters can be defined, provided they are entered using the syntax
CmdLine= {Parameter1, Parameter2,..}.
Note: When using
setup.exe the parameter TRANSFORMS is not supported.
12
Page 13
Sophos SafeGuard® Disk Encryption 4.60, help
3 Local installation
In a local installation, Sophos SafeGuard Disk Encryption is installed on a single stand alone
computer. To perform a local installation, follow these steps.
The user who is to install Sophos SafeGuard Disk Encryption must be logged on with Windows
Administrator rights, as it will be necessary to access the hard disk, and install drivers and system
services that also require administrator rights.
3.1 Installing Sophos SafeGuard Disk Encryption
Do as follows:
1. Log on to your computer as an administrator.
2. Using the web address and download credentials provided by your system administrator, go
to the Sophos website and download the standalone installer for your version of Windows.
3. Locate the installer in the folder where it was downloaded. Double-click the installer. In the
installer window, click Install to extract the installer’s contents to your computer and start the
installation wizard. The Sophos SafeGuard Disk Encryption Installer guides you through the
necessary steps.
4. Accept the default on the next dialogs.
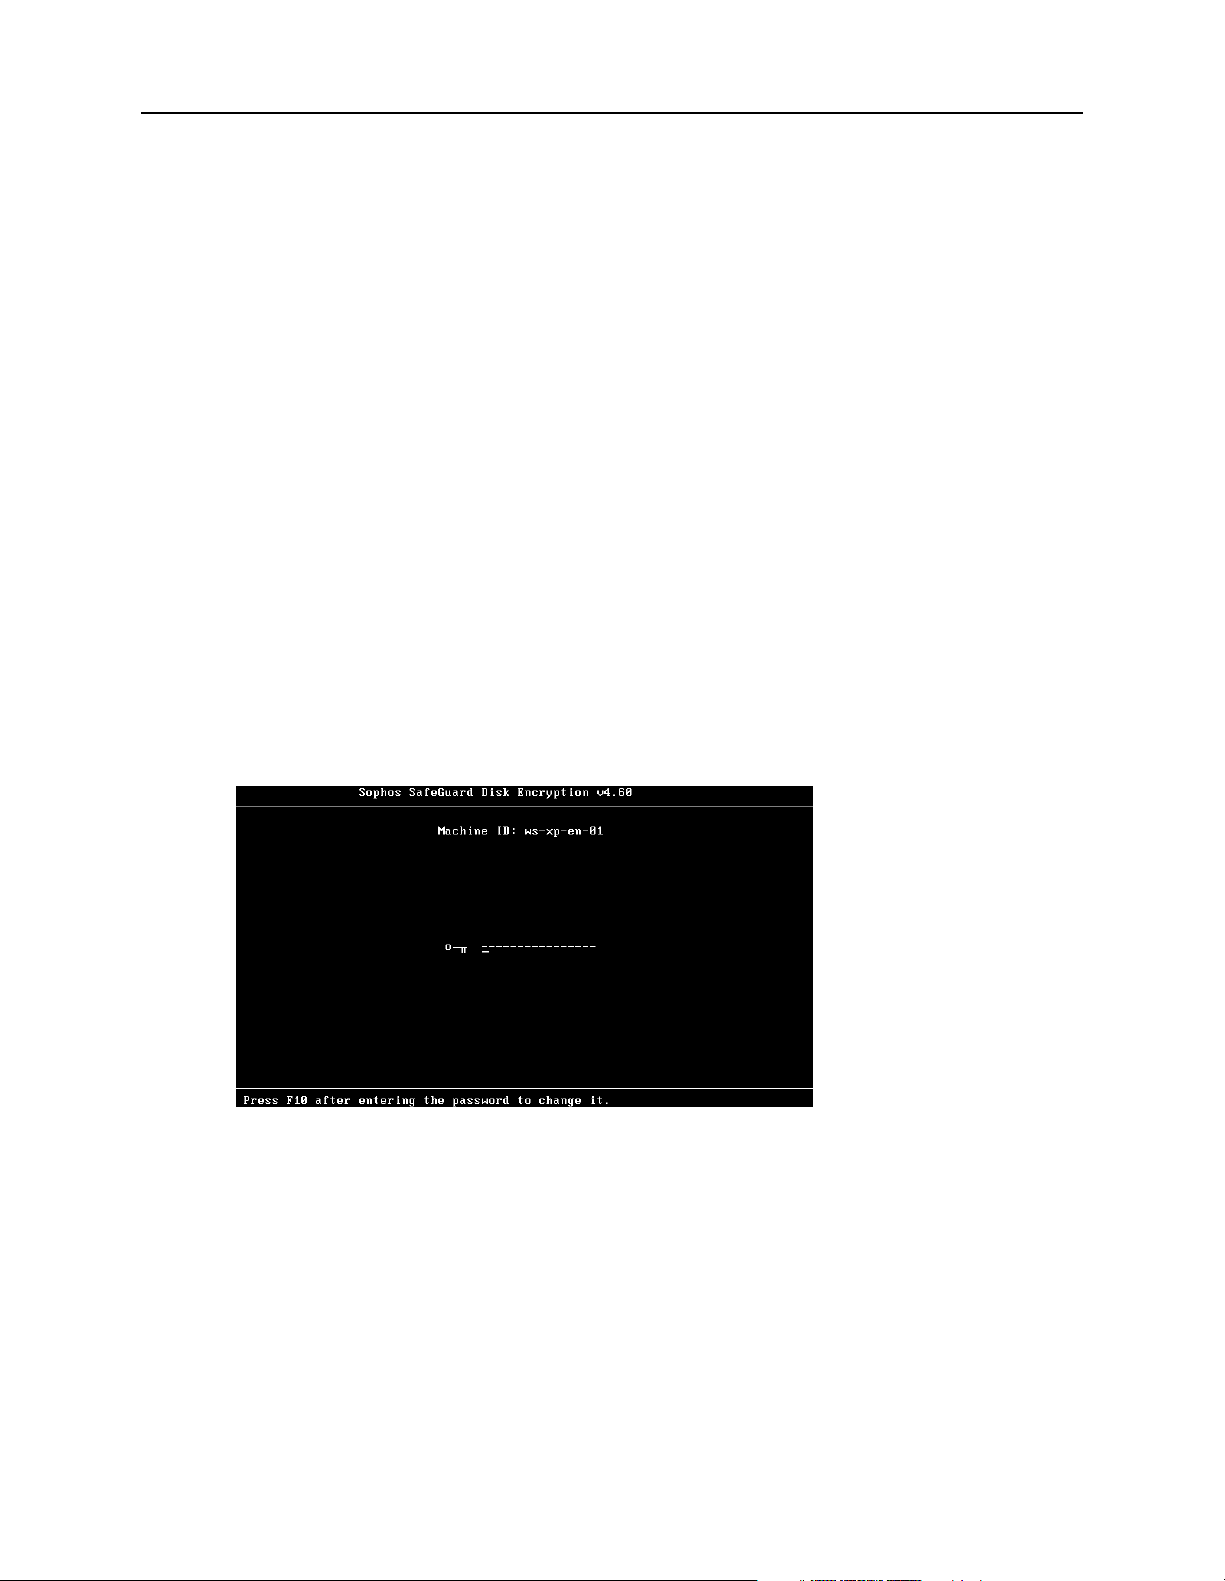
5. In Select Installation Type, select which type of installation you would like to carry out and
click Next. The following installation types are available.
Distribution to networked computers
This installs the Administration Tools you use to automate the installation of Sophos
SafeGuard Disk Encryption on computers on your network.
13
Page 14

Sophos SafeGuard® Disk Encryption 4.60, help
Distribution and Encryption
This installs the Administration Tools and Sophos SafeGuard Disk Encryption with Pre-Boot
Authentication and encryption of partition C: by default, as well as Secure Automatic Logon
to Windows (SAL). The computer will be encrypted and you will have to restart it after
installation.
Encryption on this computer
This installs Sophos SafeGuard Disk Encryption with Pre-Boot-Authentication enabled and
encryption of partition C: by default, as well as Secure Automatic Logon to Windows (SAL).
The computer will be encrypted and you will have to restart it after installation.
Custom
This enables you to select all of the above features separately.
Additionally you may install the feature FIPS mode.
The next steps depend on your choices taken in Select installation type.
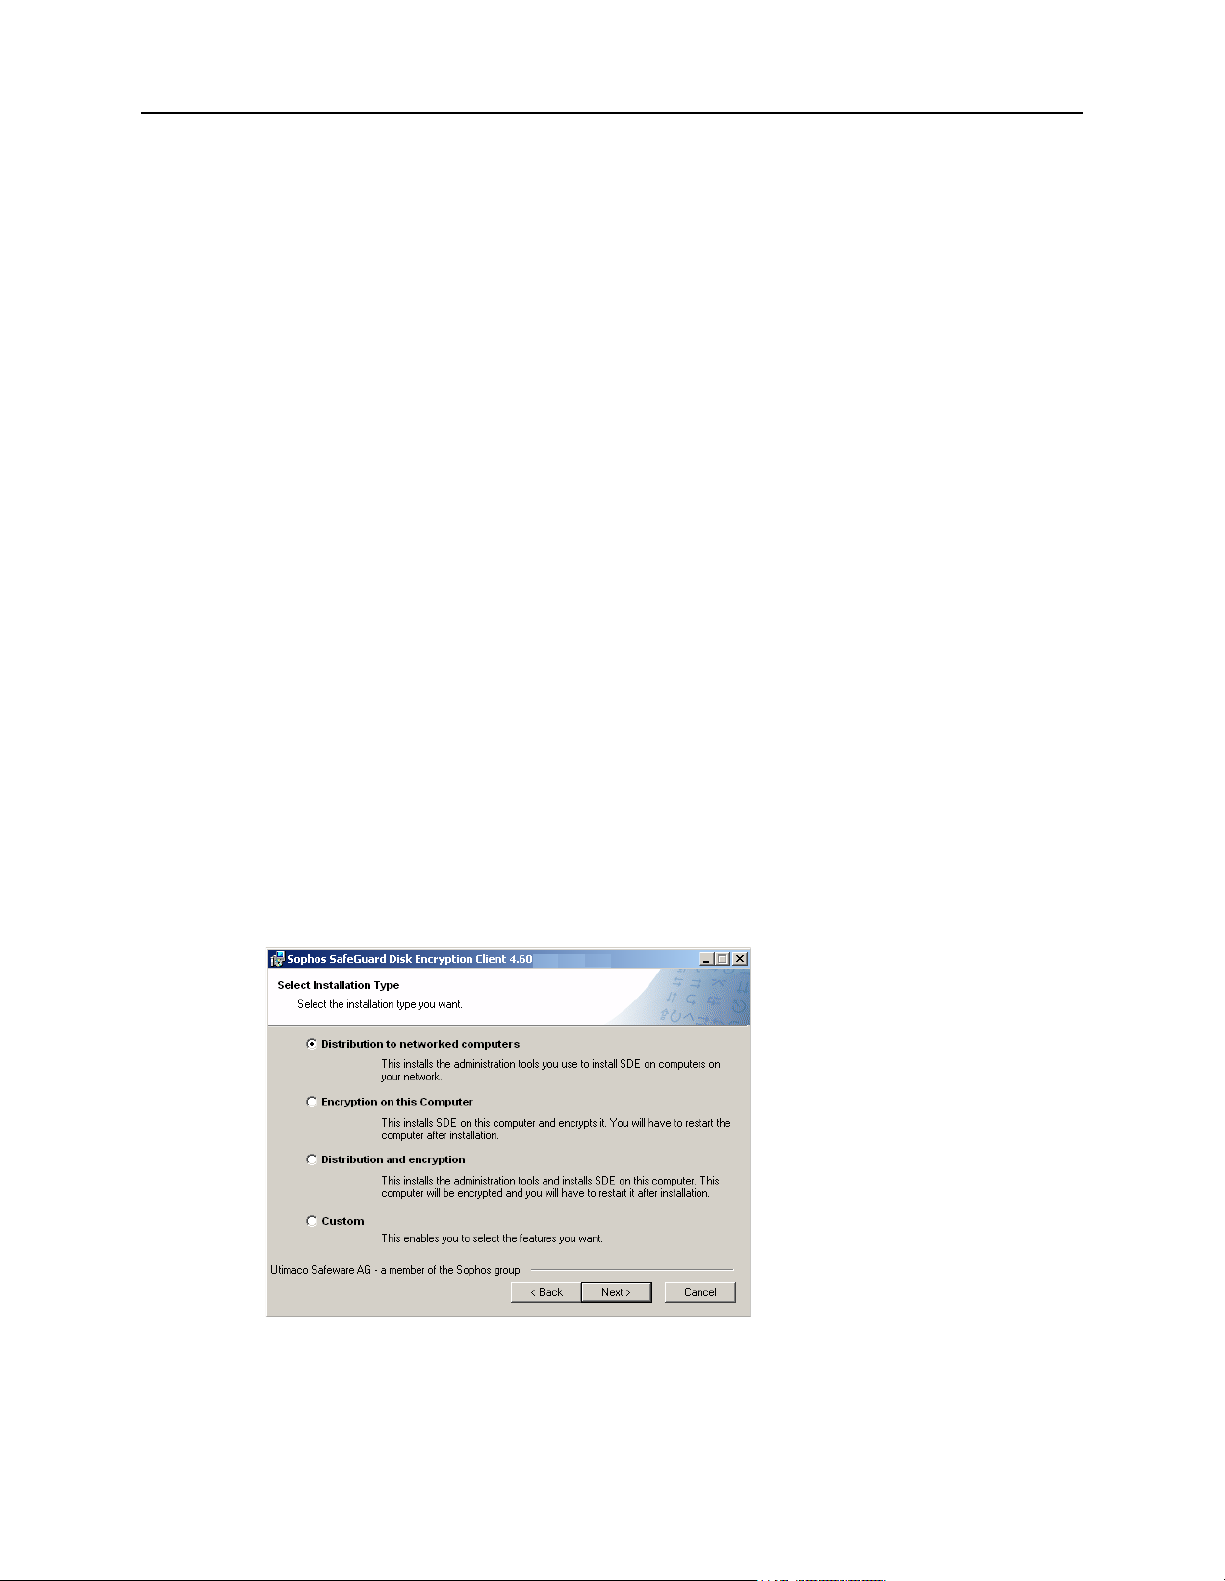
If you have chosen an installation involving encryption ...
You are prompted to enter and confirm passwords for the pre-defined Sophos SafeGuard Disk
Encryption user types system user (SYSTEM) and default user (USER). These are the passwords
that will be used to access the computer. The passwords must correspond to the Sophos
SafeGuard Disk Encryption password rules.
The password for the default user (USER) is the initial password the default user needs to log
on to their computer once Sophos SafeGuard Disk Encryption is installed. The default user is
prompted to change it at first logon to Sophos SafeGuard Disk Encryption.
The SYSTEM password is needed by the system user. The system user is the administrator with
the top-level administrative rights. The SYSTEM password is needed for administrative tasks
and to change user settings.
Note: Please remember the passwords that are entered here.
Make a note of the SYSTEM password and keep it in a safe place! If you lose it you will not be able
to access your computer any more in case of an emergency!
14
Page 15
Sophos SafeGuard® Disk Encryption 4.60, help
.
The default encryption and security settings (encryption of partition C: and activated Pre-Boot
Authentication and Secure Automatic Logon to Windows) are set automatically.
To use the default configuration settings, just click Next to finish the installation. Then carry
out post-installation tasks on your computer (
To change or display the default configuration for general, encryption and user settings, check
see Carry out post-installation tasks on page 17).
Show Advanced Settings. Then click Next. If necessary, make the required changes in the
Workstation Configuration dialogs.
If you have chosen an installation of type Distribution to networked computers ...
Click Next to finish the installation. Then create a configuration file for unattended installation
to deploy Sophos SafeGuard Disk Encryption on computers on your network (
see Configuration
File Wizard on page 42).
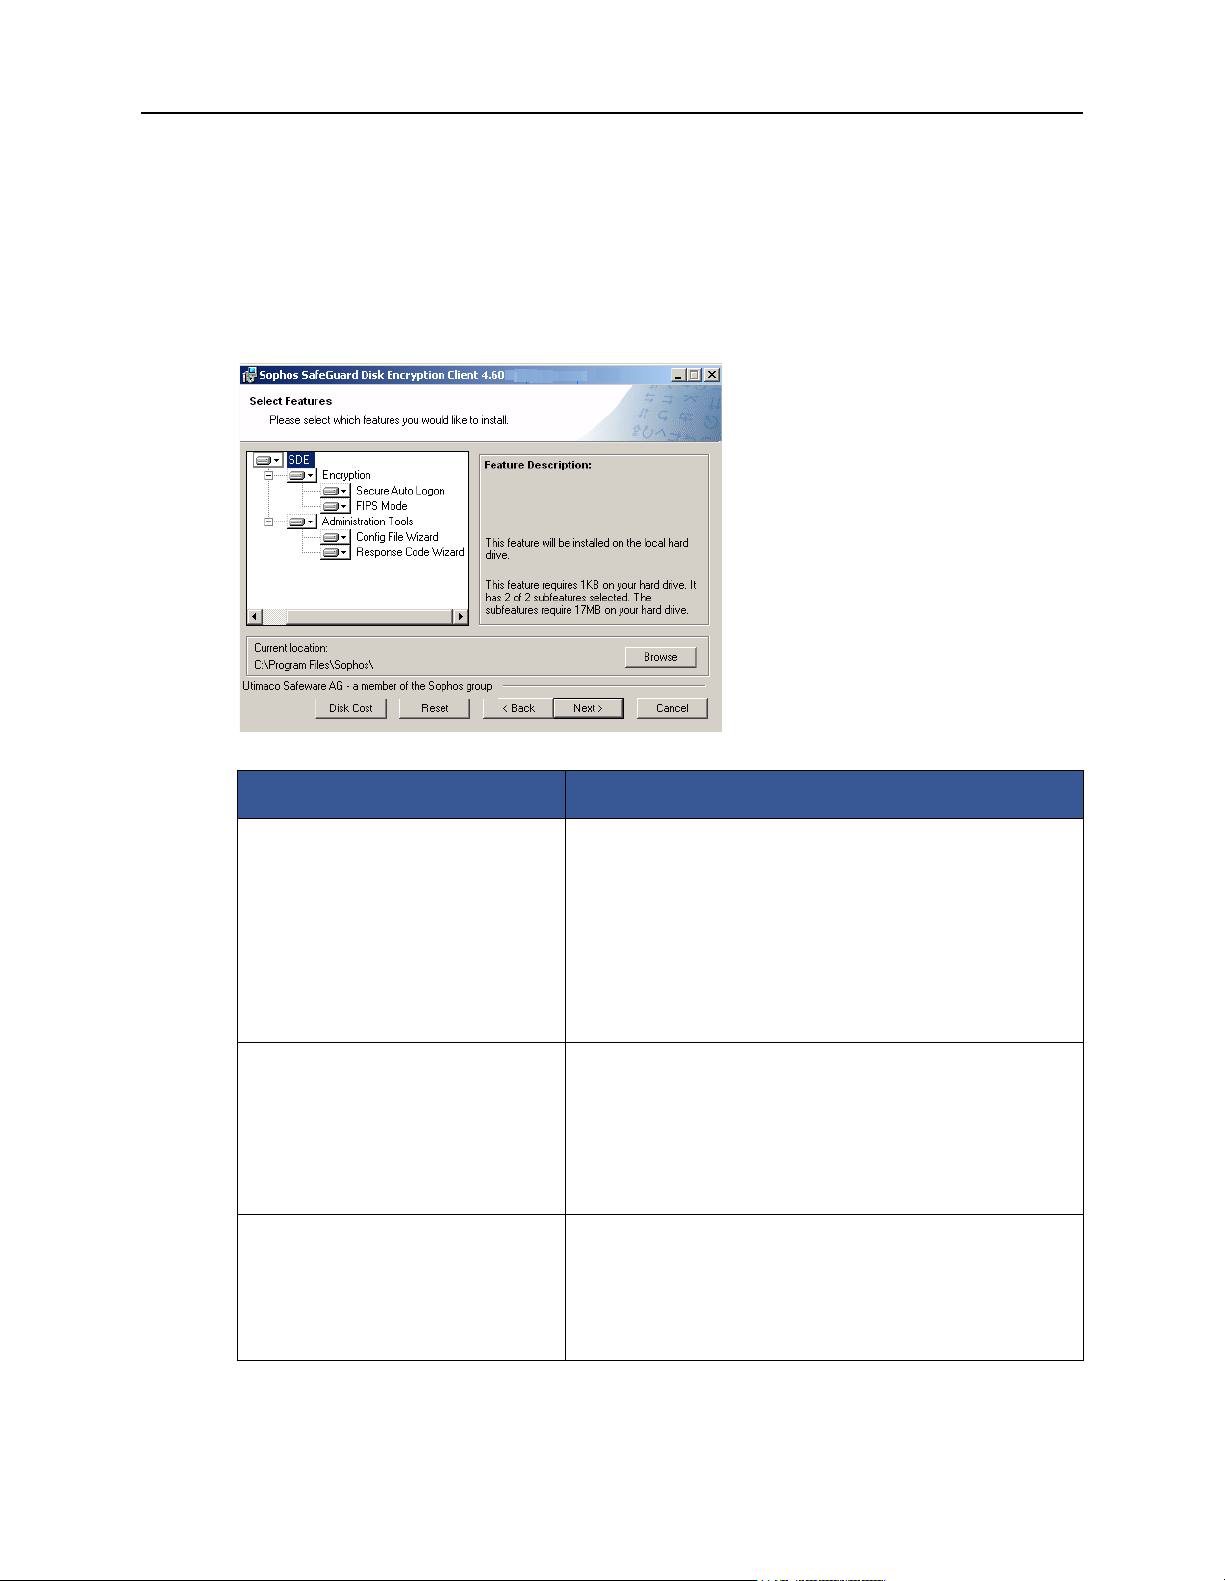
If you have chosen an installation of type Custom ...
Select the desired features and click Next to continue.
15
Page 16
Sophos SafeGuard® Disk Encryption 4.60, help
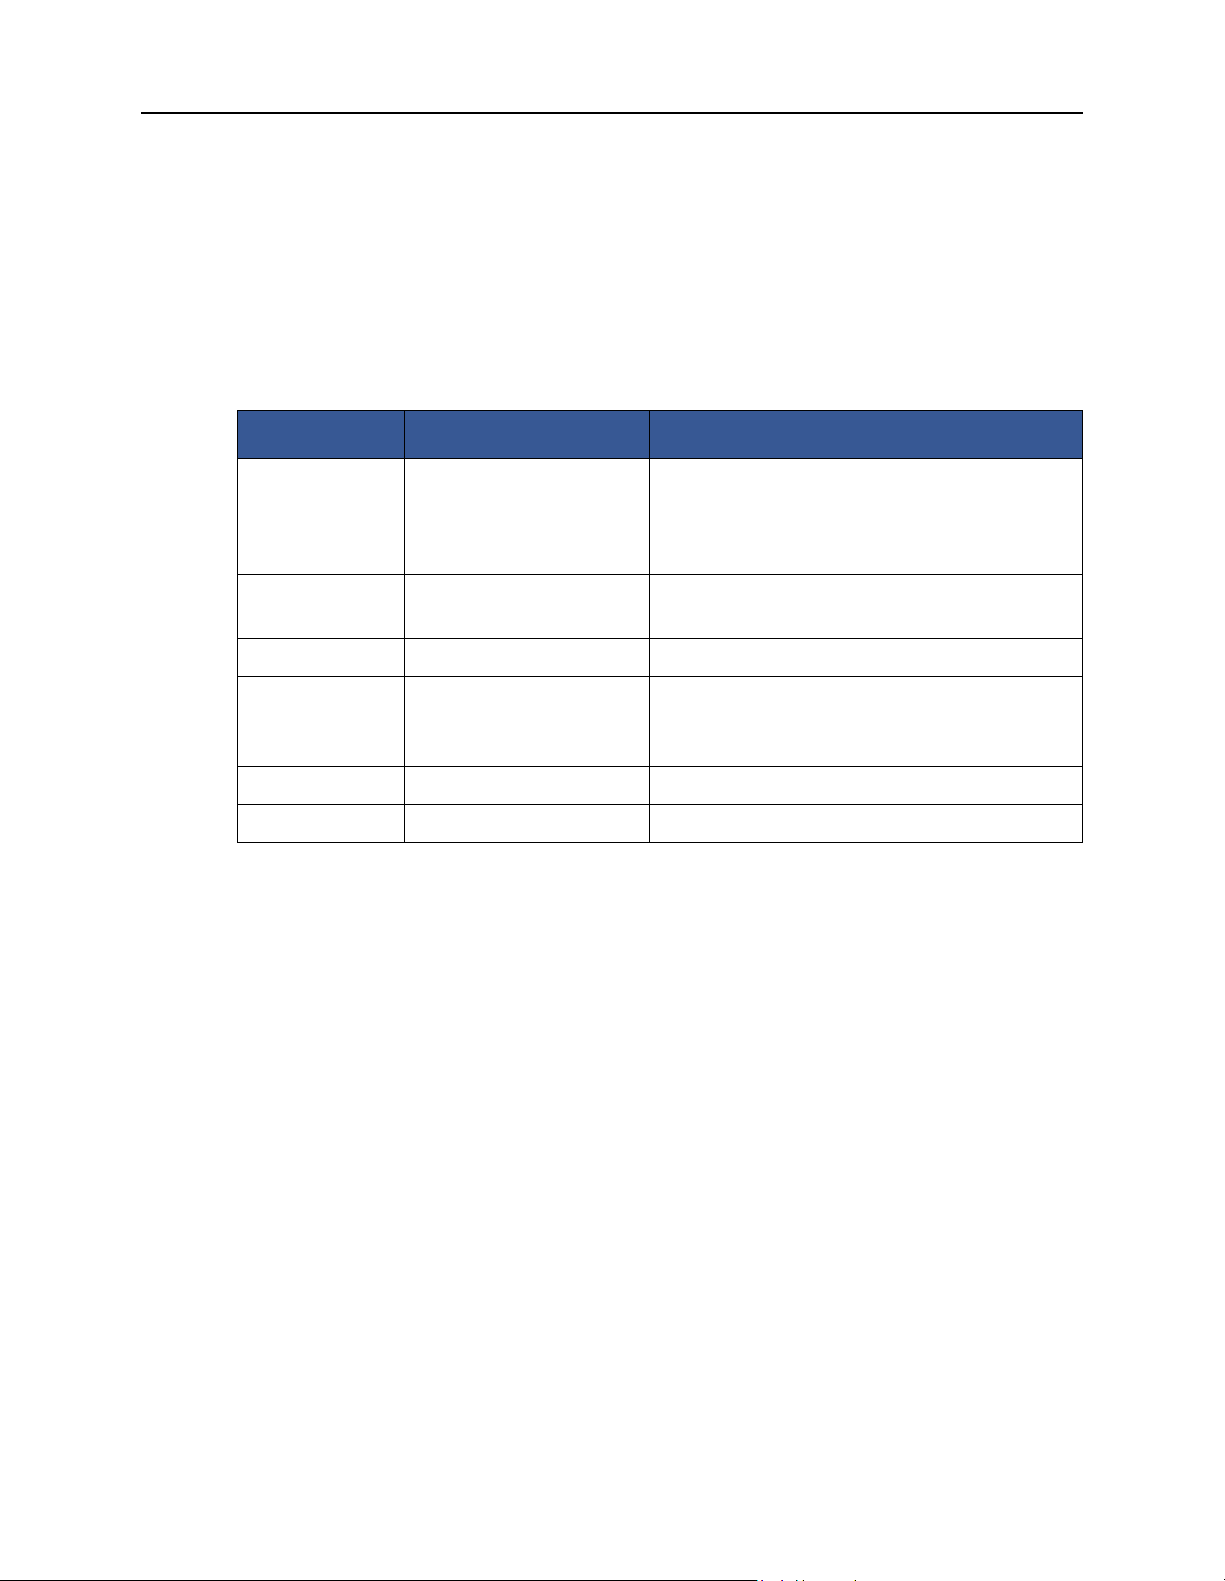
3.1.1 Sophos SafeGuard Disk Encryption installable features
The following table shows the available features of Sophos SafeGuard Disk Encryption and
describes which installation type they are included in. This dialog is displayed when you have
selected an installation of type Custom.
Installation Type Installed Feature
Distribution to networked
computers
Encryption on this compute Encryption
Administration Tools:
Configuration File Wizard
Automates the installation, configuration and
uninstallation of Sophos SafeGuard Disk Encryption.
Administrative tasks such as changing an existing Sophos
SafeGuard Disk Encryption installation can be triggered
using configuration files (see Creating a new
configuration file on page 42).
Response Code Wizard
Wizard permitting help desk staff to grant certain
permissions to users for specific actions (for example, set
new password), even if the administrator is not present
(see Remote maintenance (Challenge/Response) on page
119).
This installs Sophos SafeGuard Disk Encryption with
Pre-Boot-Authentication enabled and encryption of
partition C: by default. Partition C: will be encrypted
and you will have to restart it after installation (.
16
Page 17
Sophos SafeGuard® Disk Encryption 4.60, help
Installation Type Installed Feature
Secure Auto Logon (SAL)
Remembers the Windows credentials used in initial
logon so that you only need to enter the Sophos
SafeGuard Disk Encryption logon data in Pre-Boot
Authentication to log on to the computer (see Secure
Automatic Logon (SAL) on page 87).
Emergency Disk Wizard
Supports you in creating bootable emergency media that
contains the system kernel backup and several
emergency files to help you resolve Sophos SafeGuard
Disk Encryption errors and access the computer again.
Installed by default with Encryption.
Distribution and Encryption All of the above features are installed.
Custom Select any of the above features and/or additionally:
FIPS Mode
Guarantees that Sophos SafeGuard Disk Encryption runs
in accordance with FIPS 140-2 Level 1 (see FIPS 140-2
(Level 1) certification on page 106).
3.2 Carry out post-installation tasks
If you have chosen an installation involving encryption, carry out the following tasks on your
computer after installation.
1. Restart your computer. The Windows logon dialog is displayed.
2. Enter your Windows credentials.
3. Restart the computer for a second time. The Sophos SafeGuard Disk Encryption Pre-Boot
Authentication is displayed.
4. Enter the Sophos SafeGuard Disk Encryption user password defined during installation.
5. You are prompted to change this password.
6. You are prompted to enter your Windows credentials again.
7. Confirm to use Secure Automatic Logon to windows to be automatically logged on to
Windows. You are logged on to your computer.
What will happen next?
Initial encryption
17
Page 18
Sophos SafeGuard® Disk Encryption 4.60, help
Encryption of hard disk partition C: will start automatically by default. This will take some
time. A progress indicator will be displayed. You may continue working at the computer.
Automatic kernel backup
The system kernel will be backed up automatically without the user noticing, see Automatic
system kernel backup on page 129. The system kernel contains the drivers for Sophos SafeGuard
Disk Encryption and the master boot record. You may carry on working at the computer.
Automatic pass-through to Windows
If you have confirmed to use Secure automatic logon to Windows: Next time you start the
computer, you will only have to enter your Sophos SafeGuard Disk Encryption user password
at the Pre-Boot Authentication and will be automatically passed through to Windows.
3.3 Initial encryption
In a default installation involving encryption, hard disk partition C: will be encrypted
automatically. The encryption procedure runs entirely in the background, i.e. you can continue
working at your computer throughout the encryption process. Allow between 20 and 30 minutes
for Sophos SafeGuard Disk Encryption to perform initial encryption on 10 GB of data, with AES256, on a modern notebook.
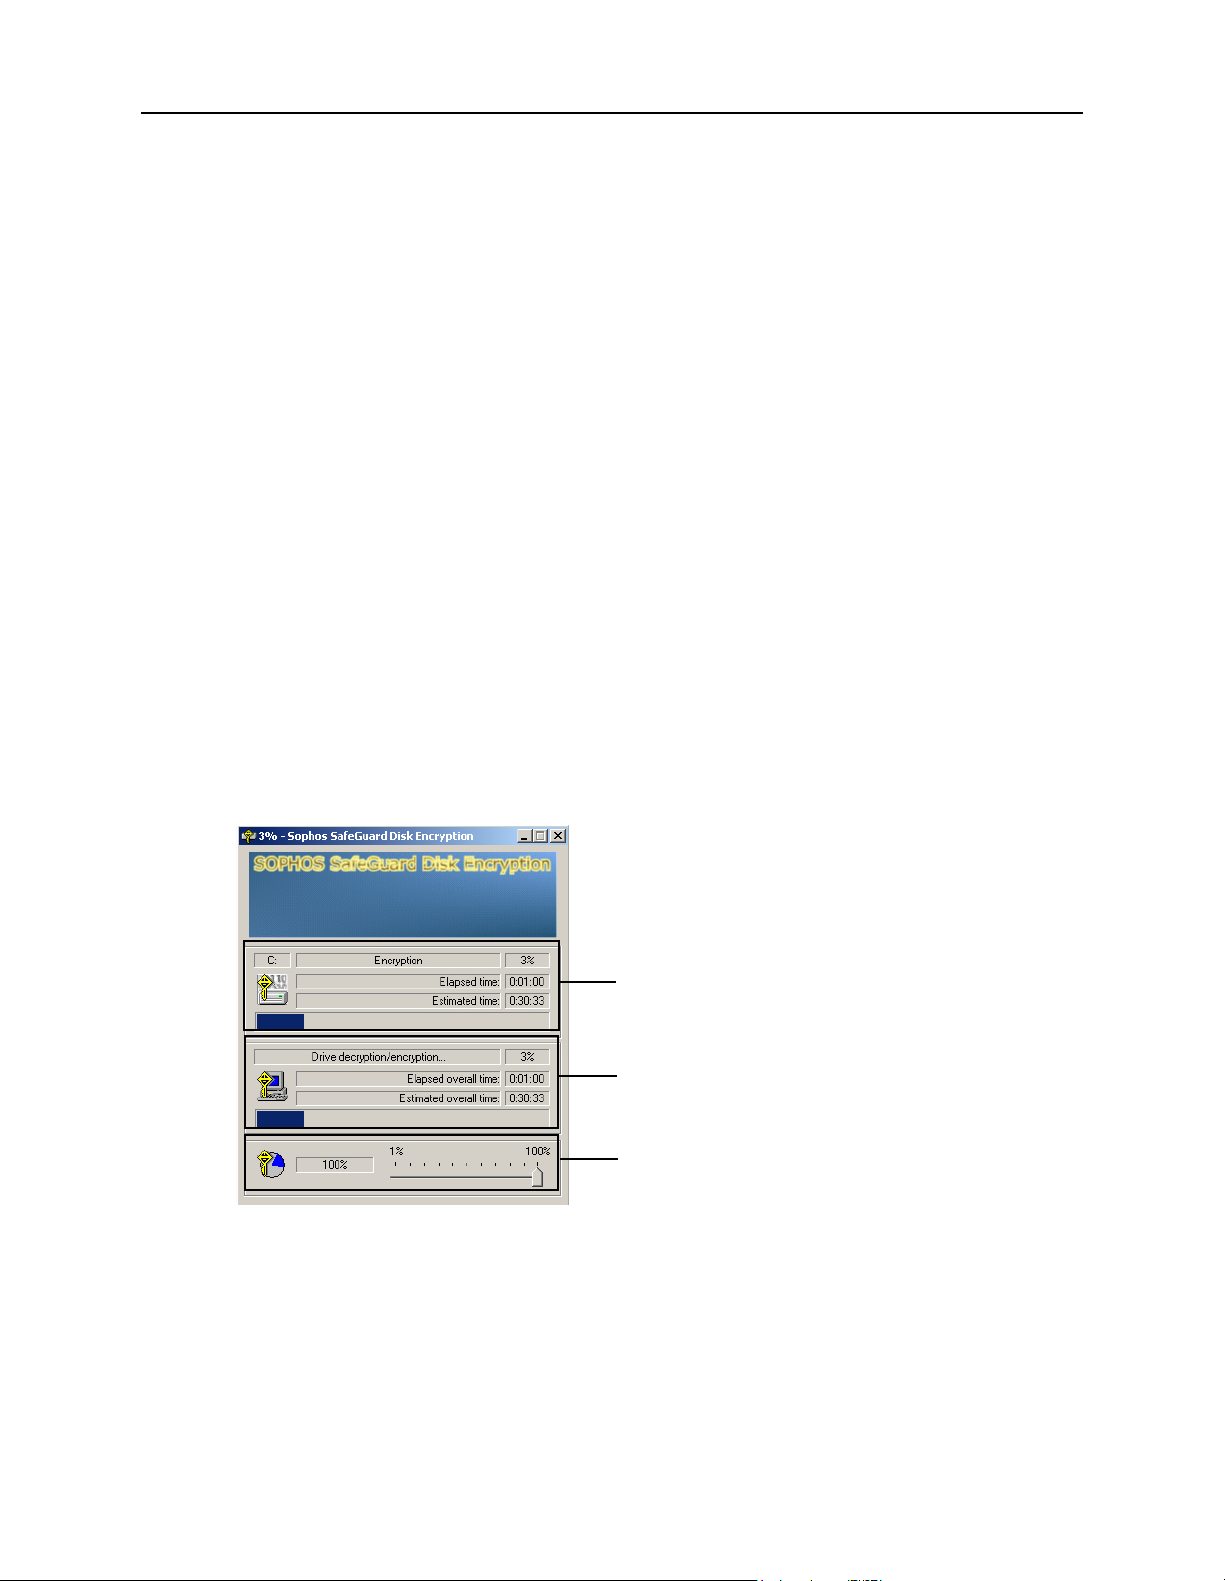
The encryption status screen is displayed: it shows the encryption progress. If very small partitions
are being encrypted, the screen may not be displayed.
Encryption progress of a drive
Encryption progress of all drives
Encryption speed
If the computer is shut down before initial encryption is complete ...
If the system has not yet finished encrypting the hard disk partition when a session is ended, the
computer ALWAYS reboots directly from the hard disk. It is not possible to boot from a system
floppy disk in this case. This also applies to the first restart after encryption has completed.
18
Page 19
Do not interrupt the initial encryption of "Hot-Pluggable" hard disks.
"Hot-pluggable" is the term used to describe USB hard disk that can be connected and
disconnected without the need to reboot the computer. You must not interrupt the initial
encryption of hot-pluggable hard disks.
Do not change the partitioning on the hard disk.
If the first hard disk partition was encrypted, do not add or remove partitions! To reorganize the
first hard disk drive, uninstall Sophos SafeGuard Disk Encryption (=decrypt the first hard disk
drive), create/remove partitions and re-install Sophos SafeGuard Disk Encryption again.
Note: For further information on hard disk encryption see About hard disk encryption on page 61.
Note: If, for any reason the initial encryption fails and the computer cannot be booted anymore,
please contact the technical support.
3.3.1 Defining encryption speed
Sophos SafeGuard® Disk Encryption 4.60, help
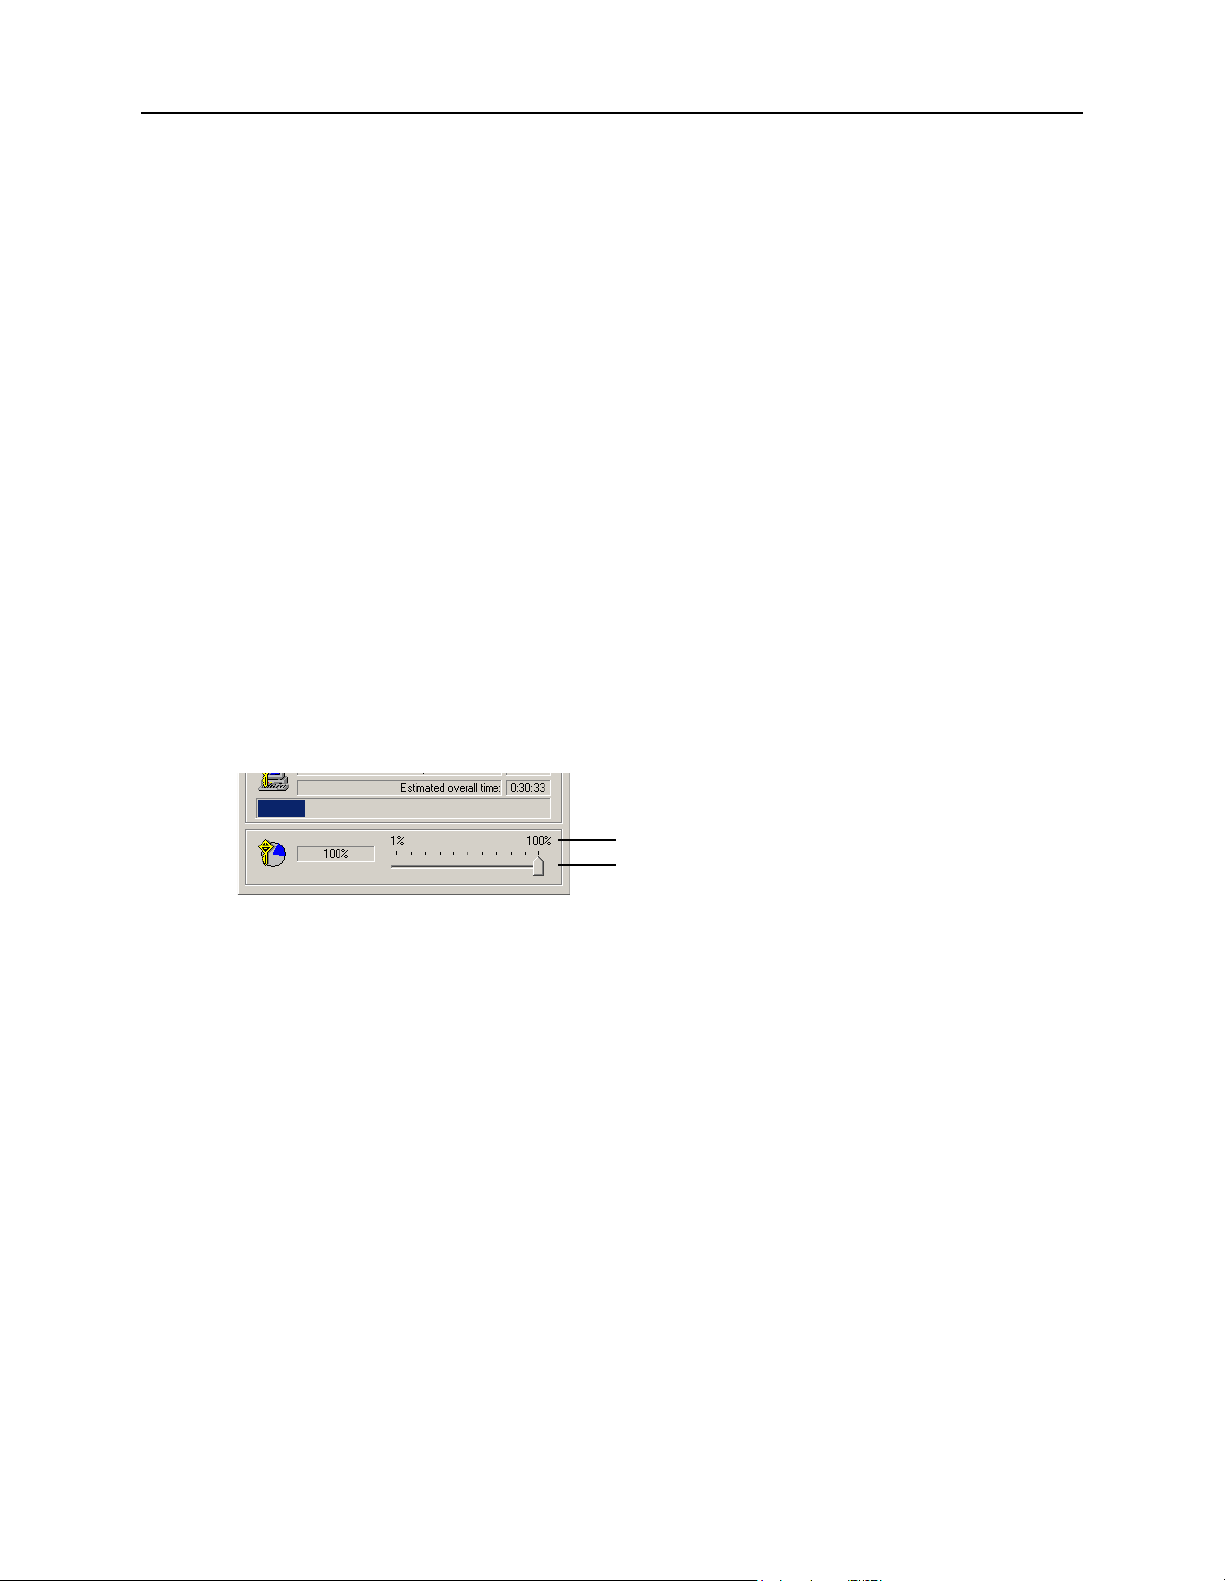
The default setting for the encryption speed is 100%, but you can use the regulator to adjust this.
The higher the selected percentage, the faster encryption takes place.
percentage
regulator
If you use the regulator to reduce the encryption speed, Sophos SafeGuard Disk Encryption does
not save the reduced encryption speed. After the workstation is rebooted, encryption starts again
at full speed (100%).
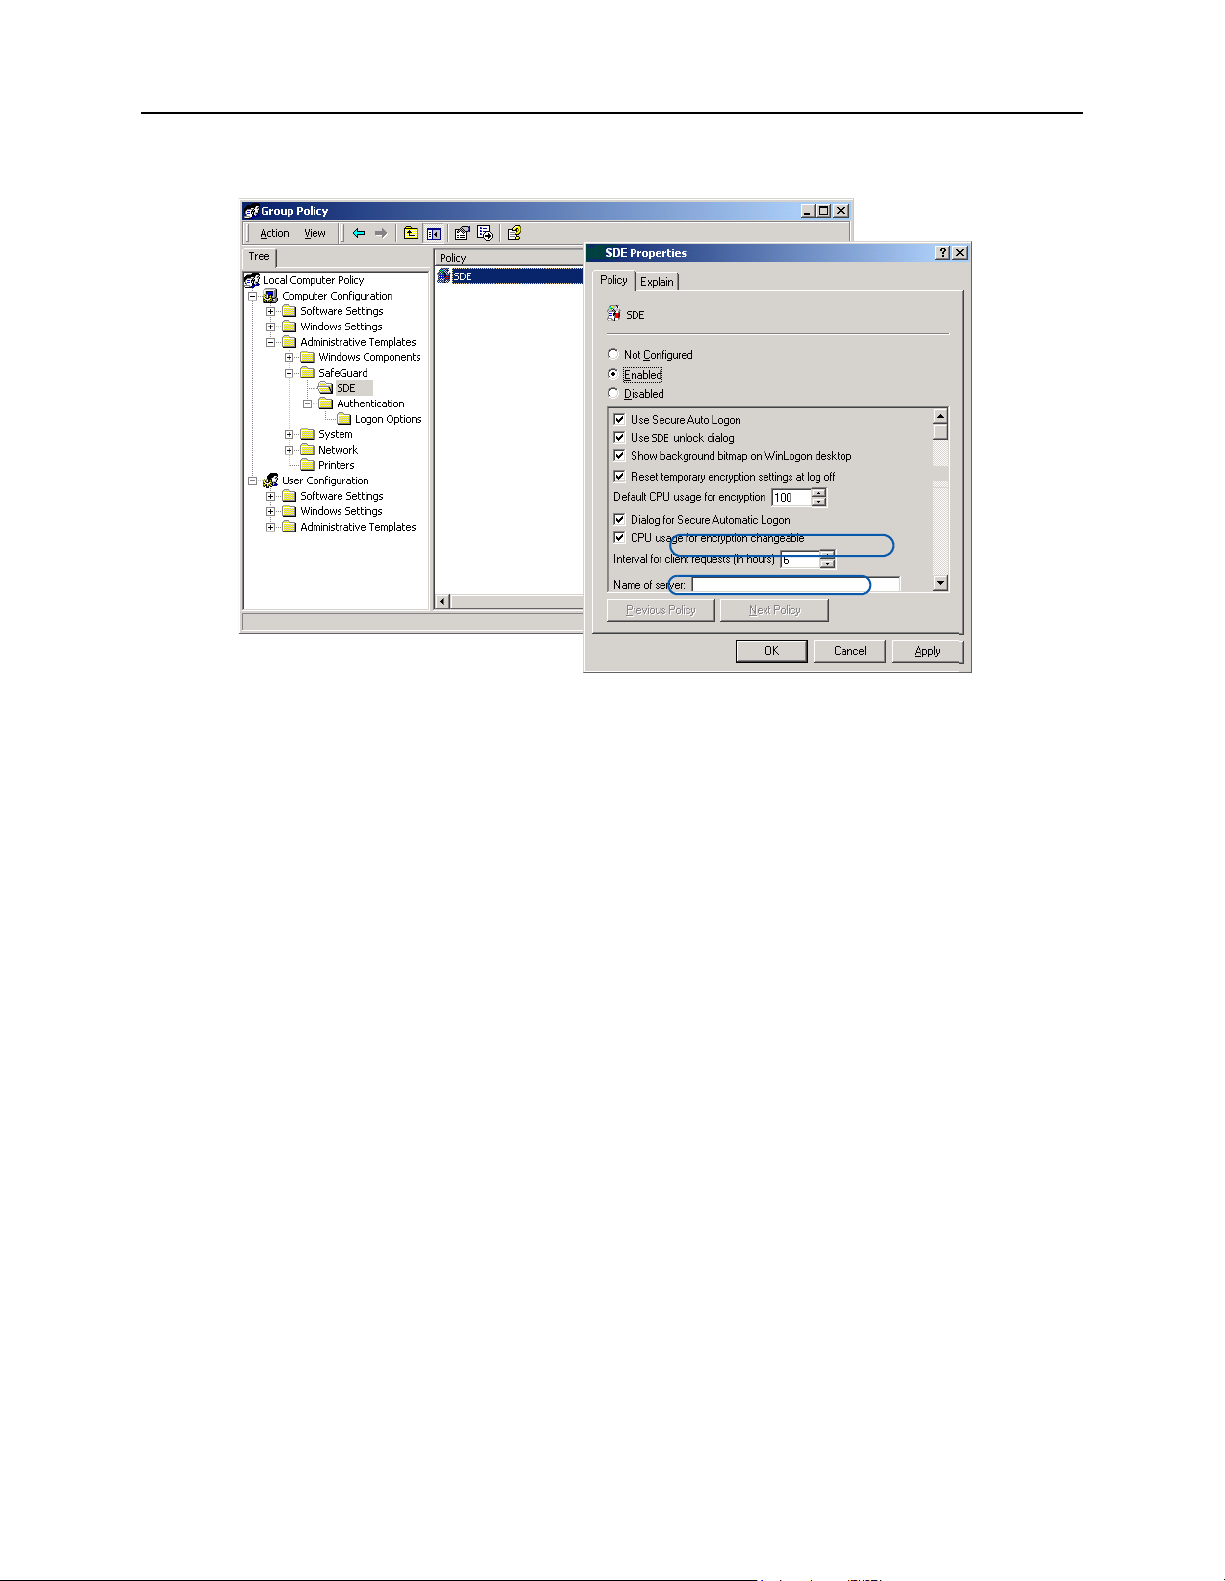
Changing encryption speed settings in the administrative template
The CPU settings can also be switched on or off via a policy in the SafeGuard administrative
template (see Changing frequently-used settings with the administrative template on page 54).
You will find this policy in
Computer configuration
\Administrative templates
\SafeGuard
\SDE
On the Properties tab of the "SDE" policy the "Default CPU usage for encryption" and "CPU usage
for encryption changeable" options are provided for this purpose.
19
Page 20
Sophos SafeGuard® Disk Encryption 4.60, help
20
Page 21

Sophos SafeGuard® Disk Encryption 4.60, help
4 Central installation
Administrators can set up the entire configuration for user PCs as part of central software
distribution.
To do so, an Administrator creates a file on their PC that contains all necessary Sophos SafeGuard
Dis k Encryption se ttings for t he user PCs. Th is file is calle d "configura tion file". Th e configurati on
file is used to install Sophos SafeGuard Disk Encryption on the user PCs. You can always make
changes to the Sophos SafeGuard Disk Encryption configuration later via other configuration
files. Sophos SafeGuard Disk Encryption can be installed in an environment in which Active
Directory is also installed, or not.
For information on creating configuration files,see Configuration File Wizard on page 42.
4.1 Installation with Active Directory
You install Sophos SafeGuard Disk Encryption on computers in an Active Directory environment
by adding a (modified) MSI package (
policy object (GPO).
SDE.msi) to the software distribution function of a group
You may only modify the MSI file by creating a so-called "Transform" file (MST). To do this, you
need an editor that can edit MSI files, for example ORCA. ORCA is provided in the Microsoft
Windows Installer Software Development Kit (SDK).
Note: Please refer to the appropriate Microsoft documentation to learn more about modifying
MSI files with ORCA.
4.1.1 Prerequisites
All the devices on which installation is to be performed must first have been added to the
organizational unit for which the configured GPO (group policy object) is used.
Client PCs are assigned to the directory domain for central software distribution, and a
computer account has been set up and is active for each PC.
There is enough disk space available on the system partition.
21
Page 22
Sophos SafeGuard® Disk Encryption 4.60, help
4.1.2 Deploying MSI files
To do this:
1. Share a local drive on the Administrator’s PC (remove the write-protection) and copy all the
required .msi files to this drive.
Ensure that the clients can access the shared drive!
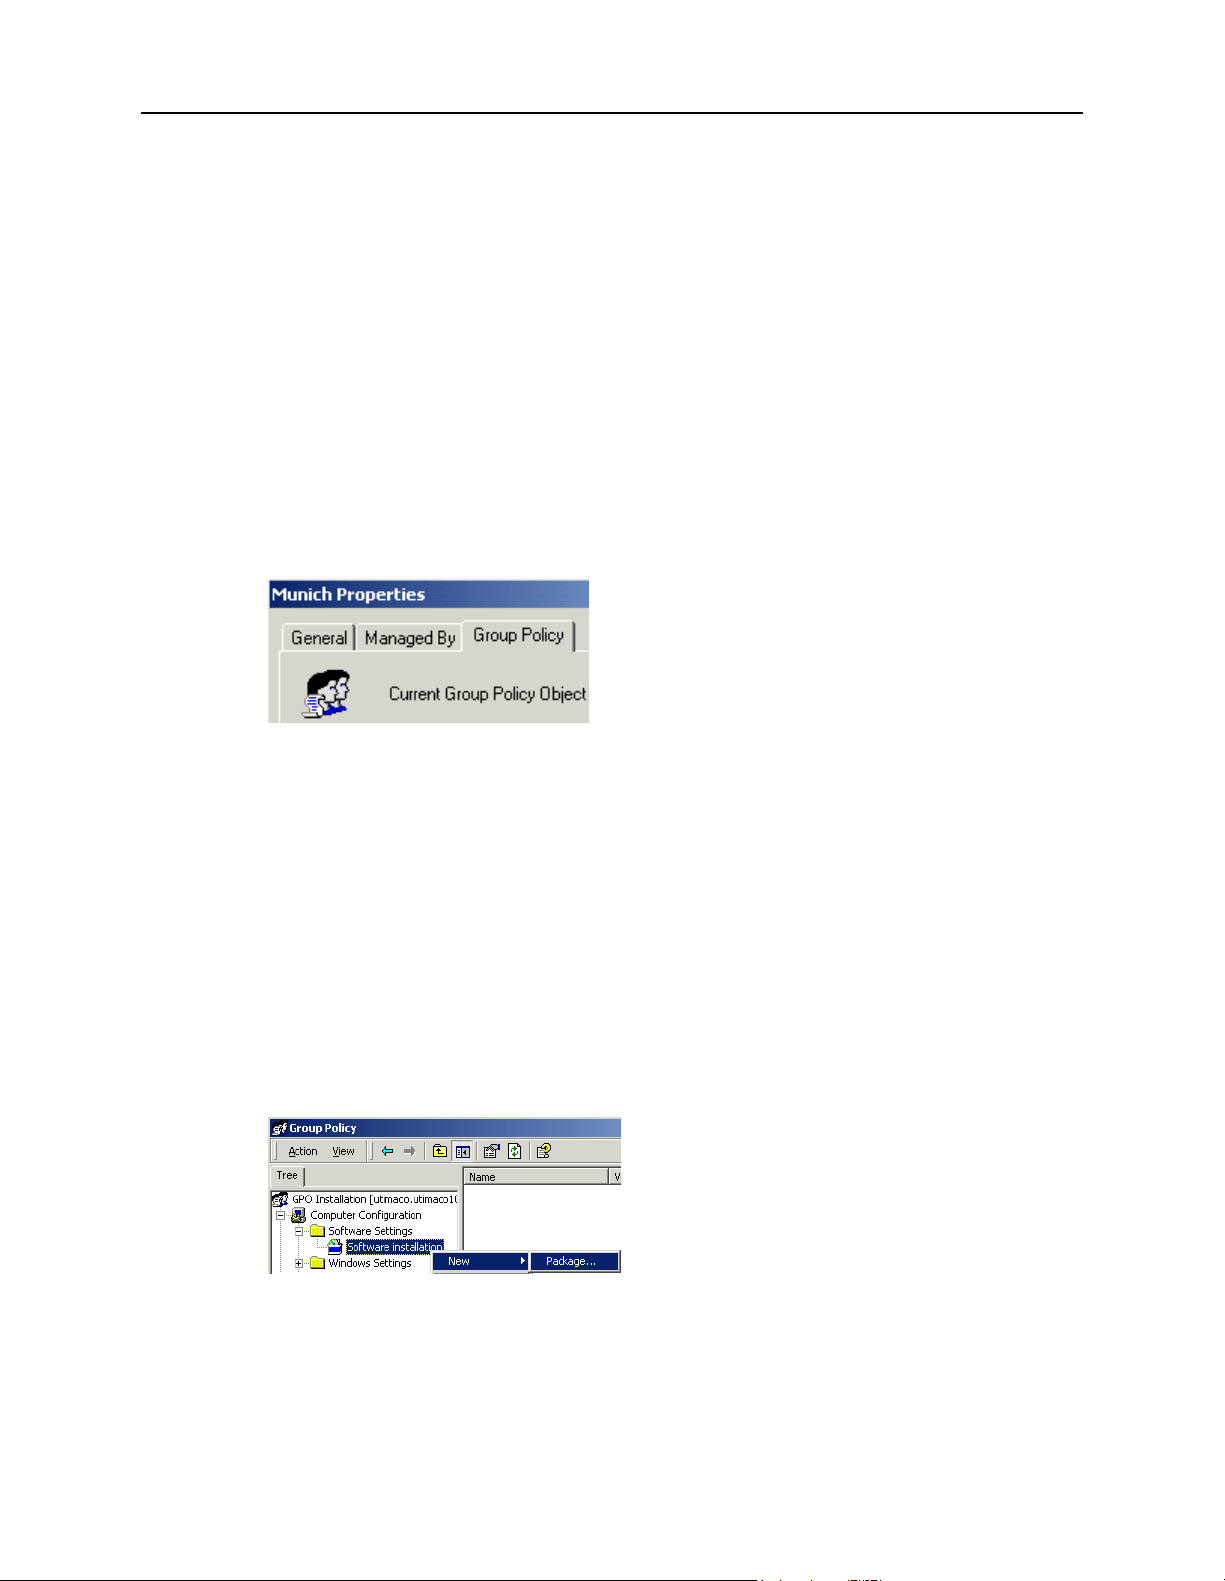
2. In Windows, click Start\Settings\Control Panel\Administrative Tools. There, select Active
Directory users and computers.
3. Right-click a domain or organizational unit and select Properties.
4. Select the Group Policy tab in the Properties dialog.
5. Create a new group policy object (e.g. "GPO installation") by clicking New.
6. Click Edit.
7. Windows displays the "GPO installation" group policy.
8. Select Computer Configuration\Software Settings\Software Installation. In the Software
Installation’s context menu, create a link to the file server that will deploy the software
packages.
Hint: Only add msi packages to the Software installation of the Computer Configuration.
Installations via User Configuration are not supported.
9. Right-click Software installation and then select New and Package.
10.Select one (or more) .msi files from the shared directory. Load the files from the real network
path (UNC path)!
22
Page 23

Sophos SafeGuard® Disk Encryption 4.60, help
11. When you have confirmed all the prompts, Windows adds the .msi file to the group policy
object’s installation routine.
12.Close the dialog.
13.If you want the operating system language to be ignored on the client side, open the context
menu of the installed .msi package and select Properties\Deployment\Advanced\Ignore
language when deploying that package.
The "GPO installation" group policy object will now be used on all computers/users present
within the domains of an organizational unit.
The next time these workstations are rebooted, the packages will be installed on the target
computers unattended.
Before rebooting the connected PCs, please check, if
the computers designated for installation have also been added to the organizational unit for
which the GPO is configured.
the computers are attached to the folder domain to perform central software distribution. In
addition, an active computer account for the client PCs must be created on the domain.
there is enough space available on the system partition.
4.2 Installation without Active Directory
To install Sophos SafeGuard Disk Encryption without an Active Directory environment you need
software distribution programs from third-party suppliers.
1. Use your own tools to create and distribute an installation package to be installed on the end
user computers. The package must include:
installation package SDE.msi which you will find in the downloaded product folder.
generated base configuration file Install.cfg
a script with the command line for the pre-configured installation
2. Create a folder Software on the administrator computer to use as a central store for all
applications.
3. Create the script.
4. Distribute the installation package to the end user computers.
5. Communicate the default SDE user password to the end users and inform them about postinstallation tasks.
23
Page 24

Sophos SafeGuard® Disk Encryption 4.60, help
4.2.1 Command line syntax for unattended installation
If you to install Sophos SafeGuard Disk Encryption without Active Directory, use the MSIEXEC
program. MSIEXEC comes as standard with Windows 2000 and Windows XP. If the system
administrator creates configuration files, this installation program is used to run them
automatically. In this program the system administrator can specify both the source and target for
installation, so that a uniform installation can be performed on a number of PCs.
Command line syntax
msiexec /i <path+msi Package Name> /qn ADDLOCAL=ALL |
<features> <setup parameters+configuration file>
The command line syntax contains the following information:
parameters used by Windows Installer that, for example, log warnings and error messages in
a file during installation.
Sophos SafeGuard Disk Encryption features that are to be installed with a Sophos SafeGuard
Disk Encryption packet (for example, Response Code Wizard).
Sophos SafeGuard Disk Encryption’s own parameters, used, for example, to specify which
configuration files are to be used.
a configuration file, for an installation with the "Installation" property.
Example:
msiexec /i C:\Software\Sophos\SDE.msi
/L*VX \\%distributionserver%\Sophos\%computername%_SDE_inst.log
CFGFILE=C:\Software\Sophos\Install.cfg /QN
Sophos SafeGuard Disk Encryption is installed with the default feature set in the default
installation folder
The log file
C:\Program Files\Sophos\SafeGuard Disk Encryption.
SDE_inst.log is created on the network.
The pre-configured settings for Sophos SafeGuard Disk Encryption are stored in the
Install.cfg configuration file.
24
Page 25

Sophos SafeGuard® Disk Encryption 4.60, help
4.2.2 Selected options used by Windows Installer
Hint: Run msiexec.exe from the Windows command prompt. The system then displays all
available Windows Installer options.
/i <path + file name>
Installs the Sophos SafeGuard Disk Encryption installation package from the specified storage
location to the default installation directory
Encryption.
The following is installed by default: encryption of partition C: including
activation of the Pre-Boot Authentication and Secure Automatic Logon to Windows.
/qn
Installs without user interaction and does not display a user interface.
ADDLOCAL=
Lists the features that are to be installed. If this parameter is not specified, the default features PreBoot Authentication, partitioned encryption and Secure Automatic Logon are installed. For a
complete list of feature names and their parents, see Sophos SafeGuard Disk Encryption installable
features on page 26.
C:\Program Files\Sophos\SafeGuard Disk
Note: List the individual features, separated only by a comma, with no additional blank spaces.
Ensure you spell the names of individual features using the correct upper and lower case letters.
If you select a feature you must also add all the parent features to the command line!
ALL
Installs all available features.
REBOOT=Forcerestart | NORESTART
Forces or prevents restart after installation. If you do not specify a value, restart is forced after
installation (default = Force).
/L*VX <path + file name>
Logs all warnings and error messages in the specified log file. and creates a useful log file that can
be analyzed automatically by using
wilogutl.exe.
To always be able to access the installation log file when you deploy the encryption software on
the end user computers, ensure to save it to a UNC path on the network.
V expands the logging option to verbose mode.
To only log error messages, enter the parameter
Installdir= <folder>
/Le <path + file name>.
Specifies the folder in which Sophos SafeGuard Disk Encryption is installed. If you do not specify
a value, the default installation folder is used: <SYSTEM>:\Program Files\Sophos.
25
Page 26
Sophos SafeGuard® Disk Encryption 4.60, help
4.2.3 Sophos SafeGuard Disk Encryption installable features
The following tables show all the Sophos SafeGuard Disk Encryption features that can be installed
automatically with the Sophos SafeGuard Disk Encryption’s .msi file. They are exactly the same
as the features that can be selected during a Custom stand alone installation.
Features that can be installed with SDE.msi
Feature Feature Parent Description
Encryption SDE Installs a working Sophos SafeGuard Disk
Encryption (incl. SafeGuard GINA). PBA is
installed and partition C: will be encrypted by
default.
SGSAL Encryption Installs SAL, Secure Automatic Logon that
enables pass-through to Windows.
FIPS Encryption Installs FIPS mode.
AdmTools SDE Installs the administration tools
(Configuration File Wizard, Response Code
Wizard).
CfgWiz AdmTools Installs the Configuration File Wizard.
RcWiz AdmTools Installs the Response Code Wizard.
4.2.4 Sophos SafeGuard Disk Encryption setup parameters
Hint: You must use upper case letters to enter all the parameters in the command line syntax.
AUTOBACKUP=0|1
Specifies whether the Emergency Disk Wizard is to run automatically, to generate a system kernel
backup, after a successful installation. By default it runs automatically (AUTOBACKUP=1).
CFGFILE=<configuration file>
This parameter specifies the complete name of a Sophos SafeGuard Disk Encryption
configuration file for an installation.
PARTCHECK=0|1
Specifies whether the partition types present support known file systems (FAT32, NTFS). If the
partition type is unknown, the installation is cancelled. By default the check is active
(PARTCHECK=1).
26
GINASYS=0|1
Page 27

Sophos SafeGuard® Disk Encryption 4.60, help
Specifies whether the SafeGuard GINA system is to be installed to control Windows logon. The
default setting is that SafeGuard GINA is installed (GINASYS=1).
Notice: We recommend that you always implement the SafeGuard GINA.
The SafeGuard GINA system is an important element of Sophos SafeGuard Disk Encryption. A
missing GINA might impair future migrations.
If you do not install the SafeGuard GINA, some Sophos SafeGuard Disk Encryption functions will
not be available after installation:
The dialog for encryption/decryption (ECVIEW) will not be displayed if the user is not logged
on.
SAL logon does not work.
Windows logon cannot be blocked with active Wake-On-LAN.
27
Page 28

Sophos SafeGuard® Disk Encryption 4.60, help
5 Troubleshooting an installation with SGEInteg
If the initial installation has not been successful despite the fact that all preparations have been
followed, you may use the repair program SGEInteg to troubleshoot the installation. SGEInteg
reports both repairable and fatal errors.
You can run the repair program SGInteg from the product folder.
Useful SGEInteg parameters
You may call the following useful parameters:
SGEINTEG [/?] [/c] [/v]
/?
Help
Displays all parameters.
/c
/v
Starts the analysis of the file system.
Activates Verbose mode
Verbose mode displays more detailed status/error
messages on screen.
Example
sgeinteg.exe /c /v > C:\Software\SGEInteg.log
The repair program SGEInteg is called.
The file system is analyzed.
Detailed status and error messages are stored in the specified log file.
28
Page 29
Sophos SafeGuard® Disk Encryption 4.60, help
6 Uninstallation
The uninstallation of Sophos SafeGuard Disk Encryption has the following effects:
All formerly encrypted areas of the hard disk(s) are decrypted.
Pre-Boot Authentication is removed.
The original Windows logon appears again if SAL was installed.
All Sophos SafeGuard Disk Encryption files are deleted.
All Sophos SafeGuard Disk Encryption registry entries are removed.
By default, Sophos SafeGuard Disk Encryption can only be uninstalled by the SYSTEM user. If
another person has been granted the uninstall right, this person can also carry out an uninstall.
Do not attempt to remove Sophos SafeGuard Disk Encryption by simply deleting the files. If
Sophos SafeGuard Disk Encryption is not uninstalled correctly, its registry entries will remain.
This may prevent Sophos SafeGuard Disk Encryption from being re-installed. In this case you
must re-install your operating system.
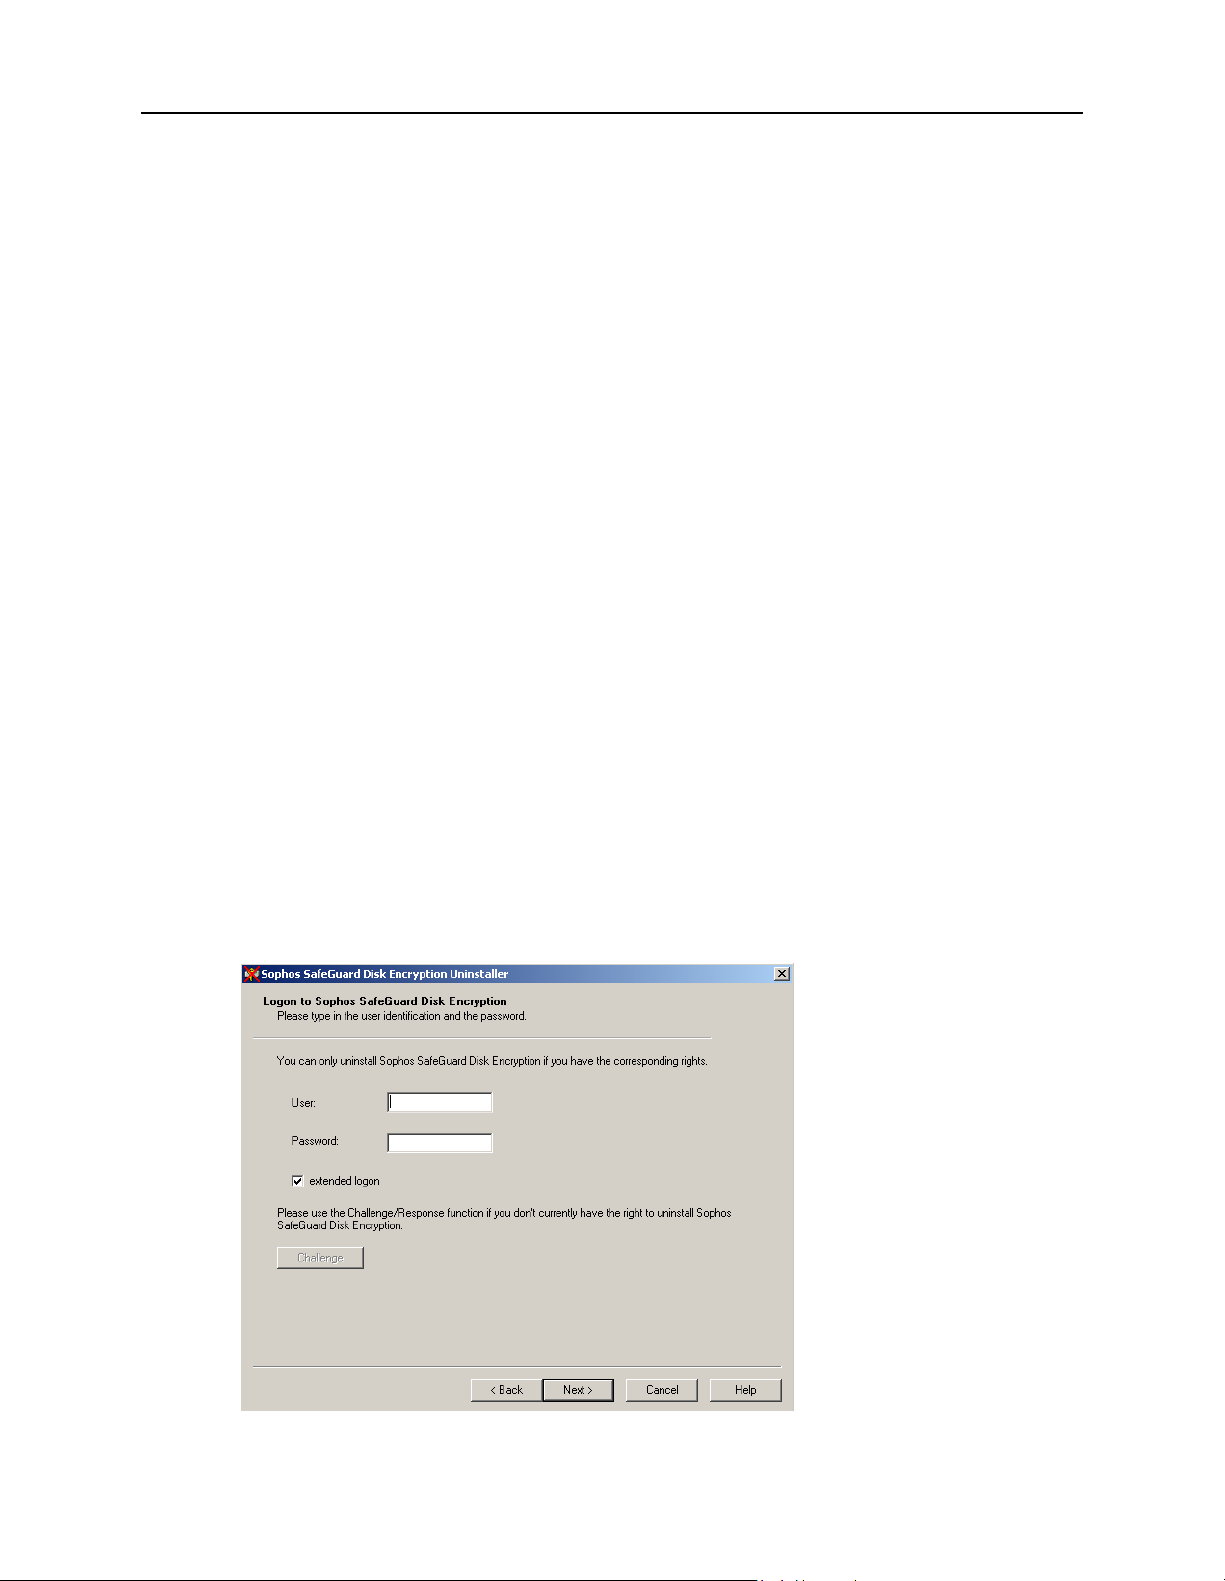
6.1 Local uninstallation
Select Start\Settings\Control Panel\Add\Remove Programs and then "Sophos SafeGuard Disk
Encryption".
If you select Remove and click Next, in the welcome screen, you access the Logon to Sophos
SafeGuard Disk Encryption dialog.
29
Page 30
Sophos SafeGuard® Disk Encryption 4.60, help
The user who wants to uninstall the program is prompted to enter their Sophos SafeGuard Disk
Encryption user name and password. This user must have the right to remove Sophos SafeGuard
Disk Encryption. After entering the correct user data, click Next and confirm the security check.
Sophos SafeGuard Disk Encryption will be removed automatically.
6.2 Uninstall with Challenge/Response
If a Sophos S afeGuard Disk Encryption user is not authorized to uninstall Sophos SafeGuard Disk
Encryption, according to their user profile, the Administrator can assign them this right by using
the Challenge/Response procedure. To do this, the user and the administrator exchange a
challenge code and response code.
The person generating the response code (Administrator) must know a Sophos SafeGuard Disk
Encryption user profile on the user PC that is permitted to uninstall Sophos SafeGuard Disk
Encryption. This user profile must also always have at least the same rights as the user, on the user’s
computer.
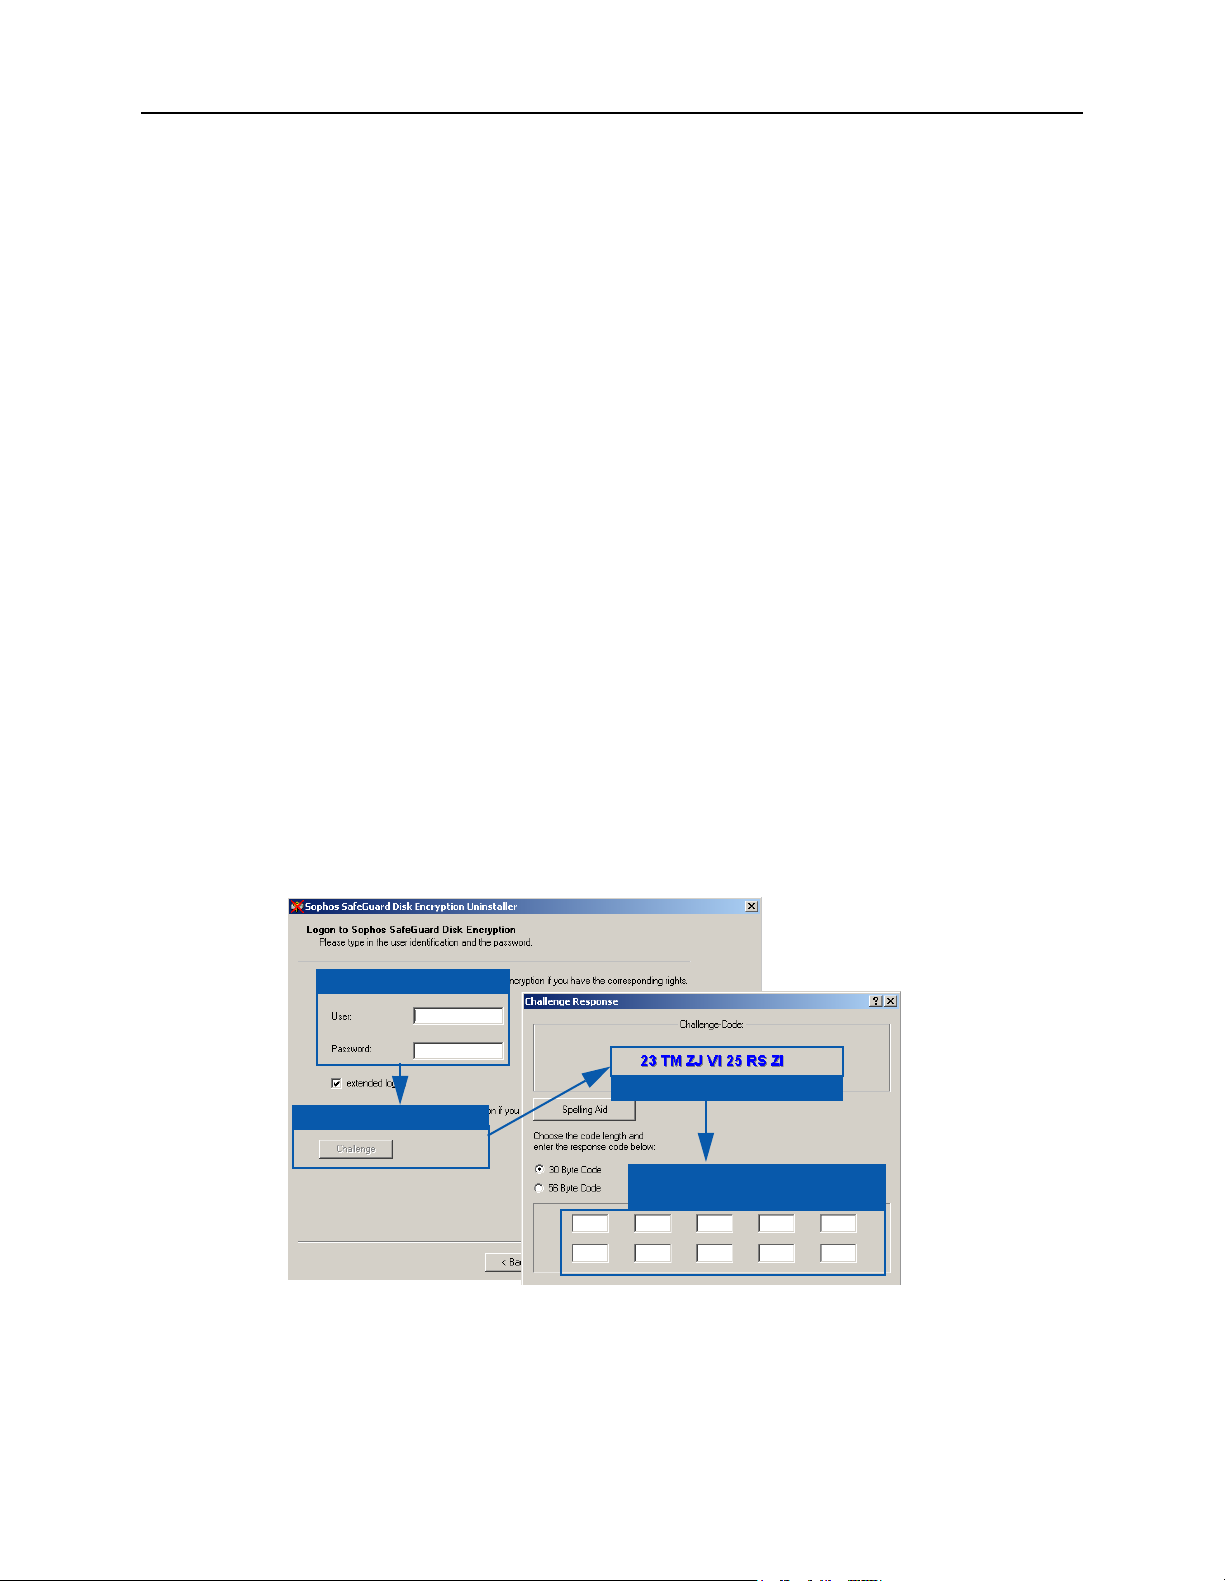
How to uninstall Sophos SafeGuard Disk Encryption with Challenge/Response:
1. The user initiates the uninstall procedure (see Local uninstallation on page 29) and reaches the
Logon to Sophos SafeGuard Disk Encryption dialog.
2. In Logon to Sophos SafeGuard Disk Encryption dialog, they enter their Sophos SafeGuard
Disk Encryption data, request the challenge code and use the telephone, SMS or
e-mail to pass it to the administrator.
1. Enter SDE credentials
3. Pass on to administrator
2. Request challenge code
4. Enter response code
administrator
from
30
Page 31

Sophos SafeGuard® Disk Encryption 4.60, help
3. The administrator uses the Response Code Wizard to generate a response code containing the
Sophos SafeGuard Disk Encryption access data of the user. The response code is assigned the
right to uninstall Sophos SafeGuard Disk Encryption.
Sophos SafeGuard Disk Encryption is uninstalled once the challenge code and response code have
been exchanged.
6.3 Unattended uninstall with configuration file
Uninstalling Sophos SafeGuard Disk Encryption can be automated if the MSIEXEC command is
used to run a configuration file with the property "Uninstallation".
For information on creating a configuration file of type "Uninstallation" see Creating a
configuration file for uninstalling Sophos SafeGuard Disk Encryption on page 47.
Command line syntax
msiexec /x C:\Program Files\Sophos\SafeGuard Disk Encryption\SDE.msi
CFGFILE=D:\Deinstall.cfg /qn
31
Page 32

Sophos SafeGuard® Disk Encryption 4.60, help
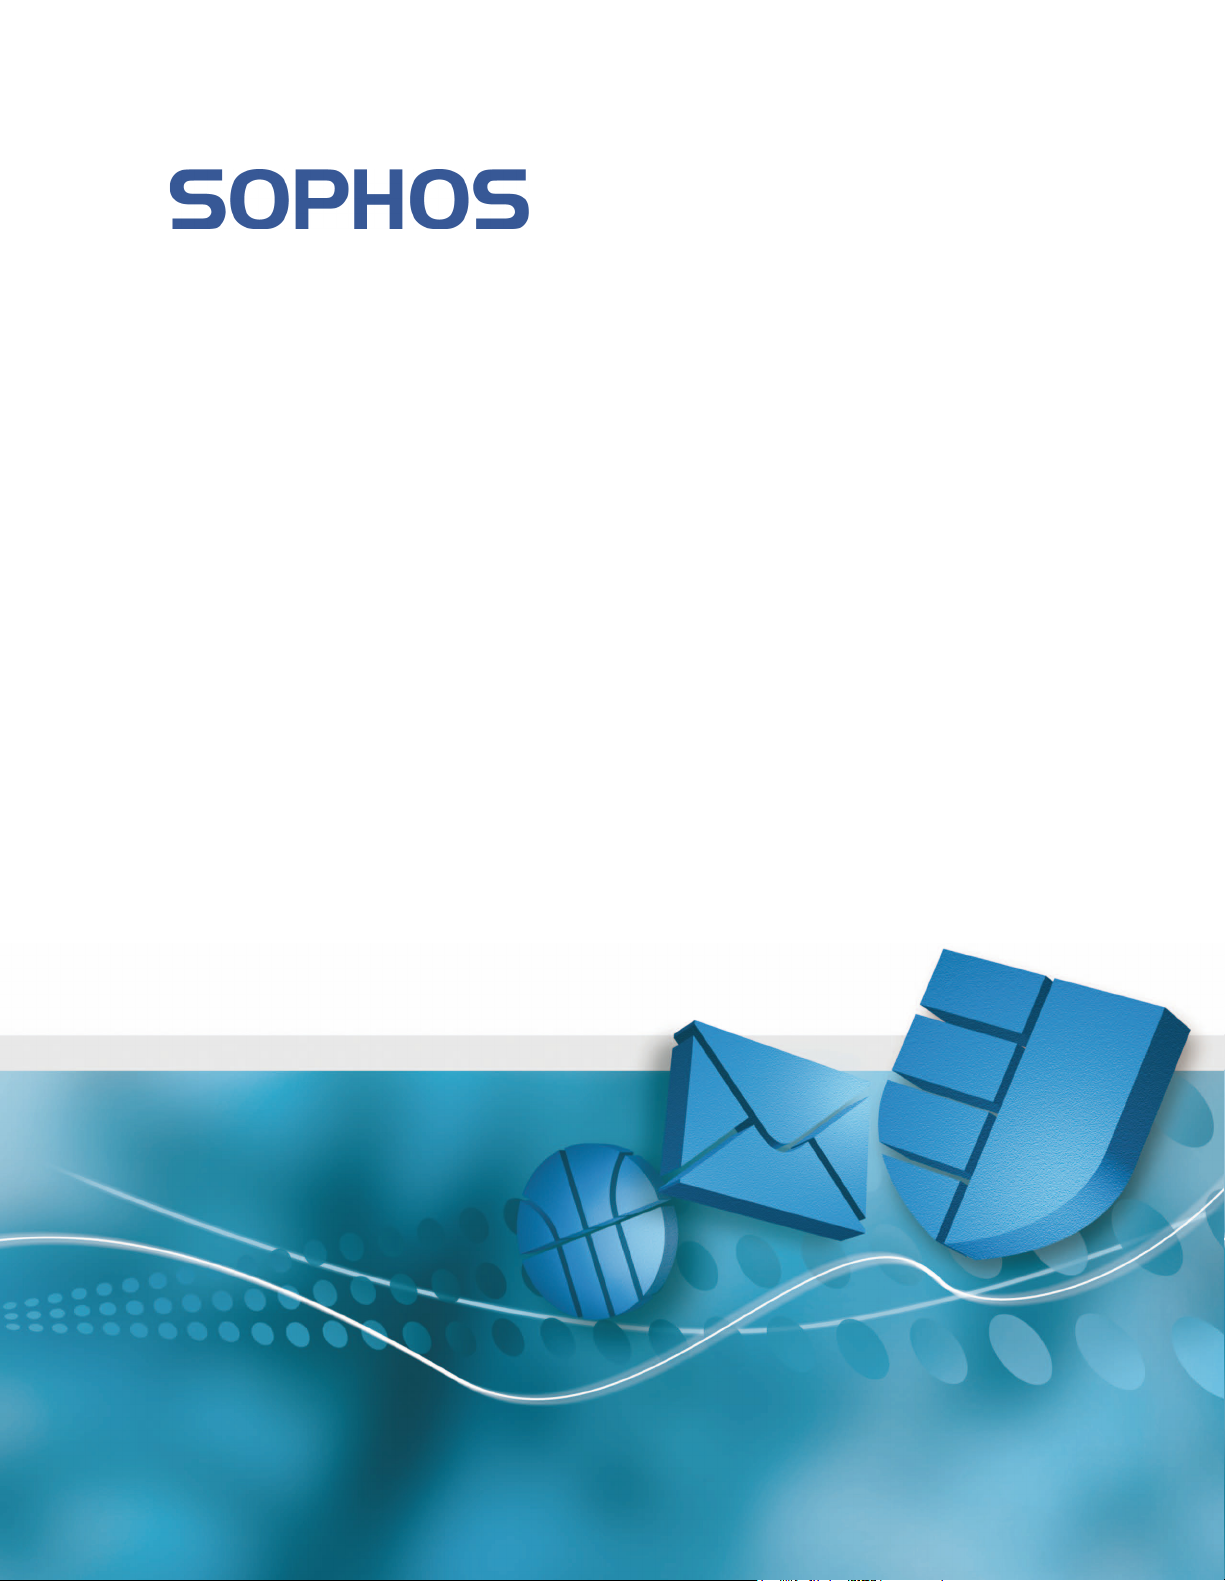
7 System boot and logon
Before Windows’ own authentication mechanism loads, Sophos SafeGuard Disk Encryption
displays a logon dialog. This is the Pre-Boot Authentication (PBA). Logon to PBA is the default
method after installation.
If Pre-Boot Authentication is enabled, a user can only log on with their Sophos SafeGuard Disk
Encryption access data. The password a user enters is used to calculate the key that is required for
booting: the key is used to decipher an encrypted hard disk.
If Pre-Boot Authentication is disabled, the hard disk will still be encrypted, but boot without any
user interaction at the Windows logon screen. This option requires that hidden Pre-Boot (Sophos
SafeGuard Disk Encryption) credentials are stored on the hard disk itself and therefore has a lower
security level than a system that runs PBA.
Note: For security reasons it is strongly recommended o keep Pre-Boot Authentication (PBA)
enabled, otherwise the system will boot without requiring a password.
Users can log on to PBA
as a regular user (with user name and password)
as a default user (with password only)
The PBA logon screen has these features and functions:
Name of the workstation and text for legal information
Help function for changing the Sophos SafeGuard Disk Encryption password
Help function for resetting forgotten passwords
32
Page 33

7.1 Logging on as a default user
A Sophos SafeGuard Disk Encryption "default" user only logs on to PBA with the Sophos
SafeGuard Disk Encryption user password. Default users do not need to enter their user name.
Sophos SafeGuard® Disk Encryption 4.60, help
7.1.1 Extended logon via function key [F2]
If someone other than the default user wants to log on, then extended logon must be switched on.
This means that, in addition to the Sophos SafeGuard Disk Encryption password, they will also
have to enter their user name.
If they press F2, the field for entering their user name is displayed above the password file.
Notice: The SYSTEM user must always log on with their user name and password.
7.2 Logging on as a regular user
33
Page 34

Sophos SafeGuard® Disk Encryption 4.60, help
A regular user logs on to PBA with their Sophos SafeGuard Disk Encryption user name and user
password.
Below the product name, the name of the workstation is displayed. This data is taken from the
system settings for your workstation.
7.3 Changing the Sophos SafeGuard Disk Encryption password via the [F10] key
Users can change their own Sophos SafeGuard Disk Encryption password independently by
pressing F10. To do so, the user enters their current Sophos SafeGuard Disk Encryption data and
confirms it by pressing F10. Then they are prompted to enter their new password.
Alternatively, the Sophos SafeGuard Disk Encryption administrator can specify that users have to
define a new password after a certain amount of time has passed.
7.4 Help function for resetting forgotten passwords via the [F9] key
Sophos SafeGuard Disk Encryption includes a Challenge/Response procedure for resetting
"forgotten" passwords. If a user requires this help, they must generate a challenge code in PBA by
pressing F9.
This challenge code is displayed as an ASCII character string (14 characters) on the user’s screen.
The user then calls their administrator and tells them their user information and the challenge
code. The administrator then generates a response code. When the user enters this response code
on their PC they can reset their password.
For details of the Challenge/Response procedure, see Remote maintenance (Challenge/Response)
on page 119.
.
34
Page 35

7.5 Failed logon
Logon fails if
the Sophos SafeGuard Disk Encryption user name is incorrect.
the Sophos SafeGuard Disk Encryption user password is incorrect.
the user name has expired.
If a user enters their PBA password incorrectly, the waiting period increases after the second logon
attempt. The waiting period can be reset by a valid logon.
Resetting a failed logon
You can reset the waiting period as follows:
1. Insert the emergency disk and boot the system from the A: drive.
2. Run the Sgeasy.exe program.
Sophos SafeGuard® Disk Encryption 4.60, help
3. Type in the Sophos SafeGuard Disk Encryption user password.
4. In the next menu you see (Options Uninstall, Repair, Restore), select "Cancel".
5. Reboot the system.
This resets the waiting period.
7.6 Pressing [F2] to force logon with PBA
If PBA is switched off, you can wait until a floppy disk icon appears in the top left-hand corner of
the monitor, and then press F2 to call PBA and log on in the usual way.
7.7 Logging on to the operating system automatically
Sophos SafeGuard Disk Encryption carries out an automatic logon to Windows. Sophos
SafeGuard Disk Encryption calls this function Secure Automatic Logon (or SAL for short). Once
35
Page 36

Sophos SafeGuard® Disk Encryption 4.60, help
the Windows data has been entered, the SAL places it in a protected area and loads it again
whenever the user successfully logs on in PBA.
The only prerequisite for SAL is that PBA is switched on.
Users then only need their Sophos SafeGuard Disk Encryption data to log on.
For details of Automatic Logon, see Configuring Windows logon on page 87.
7.8 Compatibility with logon components supplied by other vendors
To guarantee the best possible security, the SafeGuard logon component ensures that it is always
the first Windows logon component called by the operating system. Should anything change the
call order the Sophos SafeGuard logon component will automatically reinstate itself as the first
component to be called. If, as a result, logging on to Windows becomes impossible, or Windows
no longer responds after logging on, there are two possible ways to undo the changes introduced
by the logon component:
To manually define the logon component that is to be called by Sophos SafeGuard logon
component, press and hold down F8 key when the system first switches from the text display
to the (as yet empty) desktop.
If F8 is not pressed, a dialog will appear. The user must define the logon component that is to
be called by the Sophos SafeGuard logon component, either the original Microsoft logon
component or a third-party logon component. This dialog will reappear at each login until the
user disables it. After that, the current logon component setting remains. Selecting the original
Microsoft component will ensure that logon is performed correctly but may disable some
features of the third-party product. Due to a lack of standardization it is not always possible to
run every set of different Windows logon components together.
36
Page 37

8 Administration overview
You can configure Sophos SafeGuard Disk Encryption using the Configuration File Wizard or the
Sophos SafeGuard Disk Encryption Administration function. By using the Administration
function you gain direct access to the PC’s Sophos SafeGuard Disk Encryption configuration. This
is ideal for local administration on a single PC. The Configuration File Wizard does not change
the local settings but collects Sophos SafeGuard Disk Encryption settings in a file which you may
then distribute to other computers.
These administration programs have very similar settings. In both programs, the user must
authenticate themselves with the correct Sophos SafeGuard Disk Encryption data before they can
make any changes.
Which of the two programs you use depends on your individual situation, and is described below.
8.1 Separation of functions
Sophos SafeGuard® Disk Encryption 4.60, help
First you must specify whether the functions of the system administrator (system user) are to be
combined with the functions of the user, or kept separate. If the functions are kept separate, you
can integrate one or more administration aids.
Combined function: The user is also the system administrator (system user). The user
configures Sophos SafeGuard Disk Encryption on their PC for their own use (one person). All
settings are made in the Administration function. The configuration program is not required.
There is no need to create a configuration file.
Separate functions on one PC: The system administrator (system user) configures Sophos
SafeGuard Disk Encryption on the user PC. If the system administrator creates an
"administrator" account, in addition to the "user" account, three people then have access to the
PC. The Administration function is used to set up configuration. The configuration program
is not required as no configuration file has to be created.
Separate functions on several PCs: The system administrator (system user) configures Sophos
SafeGuard Disk Encryption on their own PC. This configuration is to be deployed to several
workstations. For this task you use the Configuration File Wizard to create a file in which the
definitions are saved. A preconfigured installation is used to pass on the configuration file to
the user PCs. To change settings on the system administrator PC, you use the Administration
function.
37
Page 38

Sophos SafeGuard® Disk Encryption 4.60, help
8.2 Starting the Administration function and the Configuration File Wizard
After installation a SafeGuard Disk Encryption folder is created in Program Files\Sophos. You can
use it to run the Administration function or the Configuration File Wizard.
38
Page 39

Sophos SafeGuard® Disk Encryption 4.60, help
9 The Administration function
After the Administration function runs, you see the logon dialog. Enter your valid Sophos
SafeGuard Disk Encryption user data to access the Administration function.
To log on as a user, enter your user password.
To log on as an administrator (system user), check extended logon and enter your user name
(SYSTEM) and the SYSTEM password.
You cannot make more than five logon attempts. After five unsuccessful attempts, you must
restart the system and try logging on again.
39
Page 40

Sophos SafeGuard® Disk Encryption 4.60, help
9.1 Administration window
When you have correctly entered the Sophos SafeGuard Disk Encryption user data, the
Administration window opens.
The left-hand pane shows a list of all available configuration pages. If you select a configuration
page in the left-hand pane, its details are displayed in the right-hand pane.
The settings are the same as those you can make while installing Sophos SafeGuard Disk
Encryption using with advanced settings.
The bottom section of the Administration window displays additional information:
Encryption mode and the encryption status of the disk drives.
The status of the keys for the number pad and the Shift key.
40
Page 41

9.2 Toolbar
The Administration function has a toolbar with buttons for the most important commands:
Save
Stores new settings. If changed settings mean that the must be PC rebooted, a dialog is
displayed.
Configure Workspace
Ensures that, when the Administration function is opened after the next logon, it is in exactly
the same state as when it was closed (same window size and position, same configuration page,
etc.).
Help
Displays the online help.
Plus/Minus characters
In the right-hand pane the plus character displays all subordinate settings, and the minus
character minimizes the view to the settings titles.
Sophos SafeGuard® Disk Encryption 4.60, help
Create user
Creates a new user (display depends on the rights profiles of the user who is currently logged
on).
Copy user
Copies an existing user (display depends on the rights profiles of the user who is currently
logged on).
Delete user
Removes the user from the list (display depends on the rights profiles of the user who is
currently logged on).
Change password
The logged on user can use this to change their password.
You can also access all these commands via the menus (Files, View, User, Extras, Help).
41
Page 42

Sophos SafeGuard® Disk Encryption 4.60, help
10 Configuration File Wizard
The Configuration File Wizard is used to generate files that automate the installation,
configuration and uninstallation of Sophos SafeGuard Disk Encryption on end user computers.
Administrative tasks such as changing an existing Sophos SafeGuard Disk Encryption installation
can be triggered using configuration files. In network environments, the administrator sends the
configuration files to the user PCs. They are run without user interaction. After the same
configuration file has been run on several PCs, Sophos SafeGuard Disk Encryption provides the
same configuration on all of them.
A configuration file is system-independent, so it can also be used on other systems besides the one
on which it was generated.
Note: You need the Administration Tools installed to generate a configuration file. Configuration
files must be protected from unauthorized access. Regular users must not access configuration
files.
10.1 Creating a new configuration file
To generate new configuration files, select Start\Programs\Sophos\SafeGuard Disk Encryption\
Configuration File Wizard. Step-by-step, the Configuration File Wizard records the required
information.
Decide what purpose the configuration file is to be generated for:
Installation
To modify an existing Sophos SafeGuard Disk Encryption installation ("delta" file)
Uninstallation
42
Page 43

Sophos SafeGuard® Disk Encryption 4.60, help
10.2 Creating a configuration file for installation
Select file type Installation to generate a configuration file that is used to install Sophos SafeGuard
Disk Encryption automatically on the end user computers (see Central installation on page 21).
The configuration file is generated once all the required settings and entries have been made in
the configuration wizard. It is called
Install.cfg file contains all the details of the required configuration on the target
This
computer. It is encrypted and contains the keys for the hard disks and the passwords for the users.
10.2.1 Base configuration
Specify whether a base configuration is to be used for the new configuration file.
A base configuration is an existing configuration file that is used as a template/basis for a new
installation/configuration.
Install.cfg by default.
If you have not yet created a configuration file or if you wan to create a new configuration file,
just click Next. You will be able to save the configuration settings as a base configuration later.
To continue,
If you have previously created a configuration file, you may select it here to use it as a base for
this configuration. Then click Next. To continue,
see Passwords and encryption settings on page 44.
see Authenticating to a base configuration file
on page 45.
43
Page 44

Sophos SafeGuard® Disk Encryption 4.60, help
10.2.2 Passwords and encryption settings
You are prompted to enter and confirm passwords for the pre-defined Sophos SafeGuard Disk
Encryption user types system user (SYSTEM) and default user (USER). These are the passwords
that will be used to access the target computer. The passwords must correspond to the Sophos
SafeGuard Disk Encryption password rules.
The password for the default user (USER) is the initial password the default user needs to log
on to their computer once Sophos SafeGuard Disk Encryption is installed. The default user is
prompted to change it at first logon to Sophos SafeGuard Disk Encryption.
The SYSTEM password is needed by the system user. The system user is the administrator with
the top-level administrative rights. The SYSTEM password is needed for administrative tasks
and to change user settings.
Note: Please remember the passwords that are entered here.
Make a note of the SYSTEM password and keep it in a safe place! If you lose it you will not be able
to access your computer any more in case of an emergency!
You should also set up a helpdesk user with the right to reset passwords. To do this, check the
Show Advanced Settings box. Click Next.
In Workstation Configuration, select Users. Then click the Create User icon .
In the New User dialog box, in New User Name, enter the name
Helpdesk. The features assigned
to user "Helpdesk"are displayed. Set the options as follows:
44
Page 45

Sophos SafeGuard® Disk Encryption 4.60, help
Issue abbreviated C/R code: set to Yes.
Password change allowed: set to No.
Password: Click Password, then click [...] to configure a password. A dialog is displayed. Enter
and confirm a new password for the helpdesk user.
Rights: Click Rights, then click [...]. In the User Rights dialog, double-click the Change user
settings box so that the helpdesk user can set a new user password and allow a one time logon.
Check Uninstall if you want the helpdesk user to be able to uninstall SDE.
The default configuration (encryption of partition C: and activated Pre-Boot Authentication and
Secure Automatic Logon to Windows enabled) are set automatically. You can change these if you
check the Show Advanced Settings box.
10.2.3 Authenticating to a base configuration file
The settings for a selected base configuration file are not visible unless the Sophos SafeGuard Disk
Encryption system user SYSTEM has logged on.
Log on as user SYSTEM and enter the SYSTEM password. The Workstation Configuration
dialogs are displayed.
45
Page 46

Sophos SafeGuard® Disk Encryption 4.60, help
10.2.4 Define advanced settings
In Workstation Configuration the different configuration pages are displayed. If a base
configuration file is used, its settings are loaded. If not, the default settings are displayed.
You will find a detailed description of the configuration pages in the relevant chapters.
Make your changes and confirm with Next.
10.2.5 Saving the configuration file
Specify where you want to store the configuration file Install.cfg to use as a base
configuration or accept the default storage location.
To avoid problems we recommend that you write down the details of the configuration file
settings.
Changes to a base configuration file:
If you chose to use an existing base configuration file, you are prompted to confirm that you
want to replace the existing base configuration file. If you do so, by clicking Yes, all changes
will be written to the existing base configuration file.
Here we recommend that you create a new base configuration file, so that you can retain your
original base configuration file.
46
Page 47

Sophos SafeGuard® Disk Encryption 4.60, help
10.3 Creating a configuration file for uninstalling Sophos SafeGuard Disk Encryption
Select file type Uninstallation to generate a configuration file that uninstalls Sophos SafeGuard
Disk Encryption.
The user entered here must be present on the workstation on which the configuration file is to be
run, and needs to have the "Uninstall" right.
When you have entered User ID and password, click Next.
The Safe configuration file dialog is opened. Enter a name and a storage location for the
configuration file of type Uninstallation.
47
Page 48

Sophos SafeGuard® Disk Encryption 4.60, help
10.4 Creating a configuration file for a modify installation ("delta file")
Select configuration file type Modification to generate a configuration file that changes an existing
Sophos SafeGuard Disk Encryption configuration.
Essentially, a delta file changes the settings of an existing Sophos SafeGuard Disk Encryption
installation. You can also use a base configuration in the same way as an installation file, to create
a delta file, if required.
To change the options on the individual configuration pages for a delta file, first click the
appropriate check box.
48
Page 49

Sophos SafeGuard® Disk Encryption 4.60, help
On the Users configuration page, please note the functionality of the buttons for creating, copying
and deleting users.
Create user
When you run the configuration file, this option generates a new Sophos SafeGuard Disk
Encryption user on the target machine (in this example, the user Simon).
Copy user
Takes all settings from the copied entry, and the new Sophos SafeGuard Disk Encryption user
is also assigned the attribute "Create".
Change user
Generates a user who is already present on a target machine and assigns new properties to that
user (in this example, users User, Peter and Paul with the attribute "Modify").
All users loaded from a base configuration automatically have the "Modify" attribute. If a base
configuration is not used, users must first be generated with this attribute.
Delete user
Specifies the name of an existing user, who is then deleted when the configuration file is run
on this target system (in this example, User Mary).
Hint: In delta files without a base configuration, use the "Configuration command" field to
"Delete" a user from the target system.
49
Page 50

Sophos SafeGuard® Disk Encryption 4.60, help
When you have entered all data, click Next. The Wizard opens the Authentication dialog.
The Sophos SafeGuard Disk Encryption user you enter in the "Authentication" dialog must be
present on the target machine and have the appropriate rights.
When you have entered all data, click Next. The Safe configuration file dialog is displayed. Enter
a name and a storage location for the configuration file
50
Page 51

10.4.1 Run the delta file
How to run the delta file:
1. Start MS DOS mode.
2. Switch to the Sophos SafeGuard Disk Encryption directory.
3. Enter the following command in the command line:
EXECCFG.EXE /f:<Path and name of configuration file>
Do not leave blank spaces between "/f" and the delta file’s folder name.
Sophos SafeGuard® Disk Encryption 4.60, help
Parameters regarding
EXECCFG.EXE are displayed with the command EXECCFG.EXE /?
Additionally EXECCFG supports the /Reboot parameter that issues a shutdown after the defined
configuration file has run successfully.
Example:
C:\Program Files\Sophos\SafeGuard Disk Encryption\EXECCFG /f:D:\Delta.cfg /
Reboot
This command calls the delta file and issues a reboot.
10.4.2 Changing a configuration file of type Installation
You can also change the settings of configuration files with the Installation attribute at a later
point in time.
How to change a configuration file:
1. Run the Configuration File Wizard.
2. Select file type Installation and load the file you want to change in the Base configuration file
dialog.
3. Click Next to load the configuration file.
4. The settings stored in it are displayed and you can change them.
If you attempt to load a file that has the attributes "Modify" or "Delete", an error message is
displayed.
51
Page 52

Sophos SafeGuard® Disk Encryption 4.60, help
10.5 Example of use
You use the Configuration File Wizard to generate a file with which Sophos SafeGuard Disk
Encryption can be installed on several workstations in a company without user interaction. The
configuration file should also support a hierarchical administration concept and contain the
following user profiles:
SYSTEM: Sophos SafeGuard Disk Encryption administrator who has all the rights.
SUBADMIN: sub-administrator to whom administrative tasks are delegated. Can change user
settings.
USER: end user who has no rights.
Procedure:
1. Run the Configuration File Wizard.
2. Select configuration file type Installation.
3. Do not select any base configuration.
4. Enter the SYSTEM and USER passwords and select Show Advanced Settings.
5. Select General Password settings > Password at system start.
6. Select Encryption > Hard Disk encrypted. Select partitions C: and D: to be encrypted.
7. In User Settings, make the following settings:
SYSTEM (Password: System)
Rights: All
SUBADMIN (Subadmin)
Issue abbreviated C/R Code: YES
Rights
- Change user settings
USER (User)
Rights: none
8. Accept the default storage location for the base configuration file Install.cfg.
9. Distribute Install.cfg.
52
Page 53

Sophos SafeGuard® Disk Encryption 4.60, help
10.6 Command line syntax for creating a configuration file
If you want to perform unattended creation of a configuration file, use the CfgWiz program.
CfgWiz comes as standard with Sophos SafeGuard Disk Encryption.
CfgWiz can be called with these parameters:
/cmd:install | change | uninstall
This option replaces the CFGWIZ Configuration file type dialog.
/base:<filename>
This option names the input configuration to be used. For install, this option replaces the
CFGWIZ Base Configuration dialog. For change, this option replaces the install configuration
selection dialog.
/instfile:<filename>
The name of the install configuration to be generated as output. When present, the administrator
is not prompted for the save. If the file already exists, it is overwritten with the new configuration.
/changefile:<filename>
The name of the change configuration to be generated as output. When present, the administrator
is not prompted for the save. If the file already exists, it is overwritten with the new configuration.
/uninstfile:<filename>
The name of the uninstall configuration to be generated as output. When present, the
administrator is not prompted for the save. If the file already exists, it is overwritten with the new
configuration.
Example:
CfgWiz /cmd:change /base:C:\install.cfg /instfile:C:\Change.cfg
53
Page 54

Sophos SafeGuard® Disk Encryption 4.60, help
11 Changing frequently-used settings with the
administrative template
To make the configuration procedure more user-friendly Sophos has created its own
administrative template for the group policy editor (Gpedit.msc). You can then use this template
(file name: Sguard.adm) to make specific Sophos SafeGuard Disk Encryption settings quickly and
conveniently.
An administrator can change the administrative template settings for a user PC either locally, via
the group policy editor (Gpedit.msc), or centrally via group policy objects (GPOs) in an Active
Directory environment. As a rule, users in an IT environment do not have administrator rights
and therefore cannot change Sophos SafeGuard Disk Encryption policies themselves.
The next section briefly describes how to integrate a Sophos template into a local system. Please
refer to current Microsoft Documentation to find out how to use administrative templates in an
Active Directory environment.
1. Log on as a user with Windows Administrator rights.
2. In the Start menu select Run... and enter the command gpedit.msc and start the local group
policy editor.
3. Add the SafeGuard template Sguard.adm via Administrative templates > Insert templates.
Sguard.adm is stored in the Sophos SafeGuard Disk Encryption installation folder in the
\ADM directory.
54
Page 55

Sophos SafeGuard® Disk Encryption 4.60, help
4. The "SafeGuard" folder appears next to the previous folders in the computer configuration.
5. Non-Windows templates present a problem for this preconfigured view. As a result the
following setting must be
disabled for the individual policies view:
Windows 2000:
Mark "Administrative templates", select the "View" menu and deselect "Show policies only"
Windows XP:
Mark the Administrative templates folder, select the View menu, then Filtering and deselect
Only show policy settings that can be fully managed.
6. Double-click a policy to open it and make the settings for the features under SDE Properties.
55
Page 56

Sophos SafeGuard® Disk Encryption 4.60, help
Polices can have one of three different states:
Not Configured
The settings currently used by the user have not been changed i.e. previously-made settings are
retained.
Enabled
The settings are transferred.
Disabled
The settings are removed.
56
Page 57

Sophos SafeGuard® Disk Encryption 4.60, help
12 Pre-Boot Authentication (PBA)
Pre-Boot Authentication (PBA) is the Sophos SafeGuard Disk Encryption logon function that
requires the user who is attempting to log on to authenticate themselves before the boot process.
For more information on Pre-Boot Authentication, see System boot and logon on page 32.
You specify the PBA settings on the "General" configuration page.
12.1 Changing the language used in Pre-Boot Authentication at a later point in time
The logon screen uses the language selected during installation (German, English or French),
Users do not have to de-install Sophos SafeGuard Disk Encryption to display the Pre-Boot
Authentication texts in a different language.
Hint: You can only change the texts displayed in the Pre-Boot Authentication phase
retrospectively: you cannot change the keyboard layout.
Parameters for changing the user interface language
You can call SetPBALang with these parameters:
SetPBALang [en | de | fr] | [n]
57
Page 58

Sophos SafeGuard® Disk Encryption 4.60, help
[en | de | fr]
[n]
After you restart the PC, the changed language setting applies.
You will find SetPBALang in the Sophos SafeGuard Disk Encryption program folder.
Specifies the new language
Uses a number (1-255) for the language setting
The following languages are supported:
9=English
7=German
12=French
12.2 Switching on password at system start (PBA)
The "Password at system start" option switches Pre-Boot Authentication (PBA) on/off. If PBA is
switched on, a logon screen is displayed before the operating system is loaded. Windows does not
run until after successful authentication with the correct Sophos SafeGuard Disk Encryption
access data.
If you switch off Pre-Boot Authentication, no logon is necessary before the system boots.
Authentication then uses the familiar existing operating system functions. However, this reduces
the security level on the computer.
Notice: For security reasons it is strongly recommended to never deactivate the Pre-Boot
Authentication as the system will otherwise boot without requiring a password!
58
Page 59

12.3 Machine identification
You can use the options in "Machine Identification" to display freely definable texts in the PBA
dialog.
Machine
identification
Legal notice
Sophos SafeGuard® Disk Encryption 4.60, help
12.3.1 Specifying Machine identification
The text you enter here appears in the PBA logon dialog. You can, for example, specify an exact
name for your workstation in this field, which enables you to identify the machine precisely. If a
machine name is already set in the Windows network settings, it is transferred automatically.
You can set a maximum of 63 characters.
The machine ID string can contain references to environment variables. These will be expanded
at the time of installation. This is especially useful for configuration files that are installed on more
than one computer.
Example:
The entry "This is %USERDOMAIN% booting from %WINDIR%"
will expand to "This is PC1234 booting from C:\WINNT"
during installation.
A special variable, %COMPUTERNAME%, is available on all operating systems to provide a
non-platform-specific way of adding the computer name. %COMPUTERNAME% will always
expand to the computer’s NETBIOS name.
59
Page 60

Sophos SafeGuard® Disk Encryption 4.60, help
The following rules also apply:
Undefined variables expand to an empty string.
If the contents of a variable are too large to fit the machine ID field, it is expanded to "[...]".
Variable names are not case sensitive.
If you need a percentage sign in the string, use the character sequence "%%"
Variable expansion is performed once during installation, not every time the computer is
booted.
12.3.2 Text box for legal notice
You can freely define the contents of a text box for PBA. In some countries there is a legal
requirement for a text field with particular contents to be displayed. The title can contain up to
68 characters and the text block can contain up to 10 lines with 70 characters each.
The text box is displayed in PBA before entering the Sophos SafeGuard Disk Encryption logon
data. The user must confirm the text box before the system continues booting.
60
Page 61

Sophos SafeGuard® Disk Encryption 4.60, help
13 Encryption
Sophos SafeGuard Disk Encryption’s core task is to encrypt data on hard drives.
For encryption keys algorithm AES 256 is used. The key is encrypted after it has been randomly
defined and is not stored in the system, for security reasons. During the boot procedure, the key
is regenerated each time from a code saved on the hard disk and the Sophos SafeGuard Disk
Encryption password of the user.
You can decide to encrypt a maximum of four devices, or simply the system areas or individual
partitions. The number of partitions on a device is limited to eight. The following file systems are
supported: FAT-32 and NTFS.
We recommend the modularly structured data security solution SafeGuard Enterprise as an even
more professional and companywide data security solution for among other features, encryption
of removable media.
13.1 Supported disk drives
The following hard disks are supported for encryption:
IDE/SCSI hard disks
Serial ATA hard disks (hot-pluggable)
Firewire hard disks (hot-pluggable)
USB hard disks (hot-pluggable)
13.2 About hard disk encryption
Note the following on hard disk encryption:
Hot-pluggable hard disks
All hard disks that are to be encrypted must already be connected to the PC before Sophos
SafeGuard Disk Encryption is installed.
Do not interrupt the initial encryption of hot-pluggable hard disks!
The hot-pluggable hard disks must also still be connected during the first reboot after initial
encryption. After initial encryption the disk drive can be connected and removed again as
required, provided that the user always uses the same hard disk, for regular data backups, for
example. There are usually no problems if they do so.
61
Page 62

Sophos SafeGuard® Disk Encryption 4.60, help
Problems may arise if several hard disks are used (for example, an encrypted hard disk is
removed and an unencrypted hard disk is then connected), such as corrupting the Sophos
SafeGuard Disk Encryption encryption table.
It is essential that the disk numbering (Disk Management) during operation is the same as the
numbering used during the installation process or initial encryption.
The restrictions mentioned apply to Serial ATA hard disk drives only if they are used as hot
pluggable hard disk drives
.
Mixing hard disk types
If possible, avoid mixing different hard disk types (IDE/SCSI) on one system.
Additional hard disks
Sophos SafeGuard Disk Encryption automatically recognizes whether your computer has one or
more hard disks. After installing Sophos SafeGuard Disk Encryption, do not install additional
hard disks in the system. If you want to install an additional hard disk in the system, you should
first completely remove Sophos SafeGuard Disk Encryption. After removing, install the new hard
disk and re-install the Sophos SafeGuard Disk Encryption program.
Re-partitioning
If a hard disk has been re-partitioned, you must restart the PC BEFORE installing Sophos
SafeGuard Disk Encryption.
After encryption, do not change the partitioning on the hard disk. This can lead to data loss.
Key
Only one hard disk key is defined, no matter how many hard disks there are.
62
Page 63

13.3 Configuring encryption
You specify the encryption settings on the "Encryption" configuration page in the Sophos
SafeGuard Disk Encryption Administration or the Configuration File Wizard.
By default, partition C: will always be encrypted. This is automatically set.
To encrypt further hard disk drives, do as follows:
1. Under Drives, click Hard disk. Then click [...].
Sophos SafeGuard® Disk Encryption 4.60, help
Click
2. The Specify Encrypted Drives dialog is displayed.
.
3. The key icon indicates that encryption is activated for the disk drive/ partition.
To activate encryption for further partitions, double-click the respective drive.
To deactivate encryption, double-click the drive letter again. The key icon disappears and
encryption is deactivated for that drive.
63
Page 64

Sophos SafeGuard® Disk Encryption 4.60, help
13.4 Keys
Only users who authenticate themselves correctly can access encrypted disk drives. A key consists
of a sequence of characters (numbers, letters, particular special characters), and it is also subject
to specific rules, like a password.
13.4.1 Key and algorithm type
Sophos SafeGuard Disk Encryption supports randomly created keys. A random key always has the
length 32 bytes (256 bits).
Sophos SafeGuard Disk Encryption supports the AES-256 algorithm.The encryption algorithm
Advanced Encryption Standard (AES) replaces the DES algorithm. The National Institute for
Standards and Technology (USA) has selected the Rijndael algorithm, a very fast and secure
encryption algorithm, for AES-256. AES-256 operates with a 256-bit-key and a block length of
128 bit.
Algorithm Key length
AES-256 32 bytes (256 bits)
13.4.2 Key management
The Sophos SafeGuard Disk Encryption key management function stores keys securely. All the
keys are stored in an encrypted area of the Sophos SafeGuard Disk Encryption system kernel, and
enciphered with an encryption key (known as the "KEK", from Key Encryption Key). The KEK
itself is not stored on the hard disk, but is generated from the Sophos SafeGuard Disk Encryption
password.
If PBA is switched on: The keys for decrypting the disk drives are only generated if the correct
Sophos SafeGuard Disk Encryption data is entered during PBA.
If PBA is switched off: The keys are one-way encrypted and saved on the hard disk. Despite this,
encryption and key management are absolutely identical to the selection "PBA switched on". On
the other hand, they handle the password (or the scan code) in different ways: during PBA, instead
of waiting for a user to enter the user name and password manually, Sophos SafeGuard Disk
Encryption has this data to use. To arrange this, whenever PBA is switched off, Sophos SafeGuard
Disk Encryption always creates a user called "*AUTOUSER" and creates a random password for
this user. This password is split into different parts and stored in the Sophos SafeGuard Disk
Encryption kernel. During the boot procedure Sophos SafeGuard Disk Encryption can recover
the complete password (or actually the complete scan code sequence) from this stored password.
64
Page 65

Sophos SafeGuard® Disk Encryption 4.60, help
13.5 Displaying encryption status in Windows Explorer
The encryption status of the disk drives is indicated with a colored key in Windows Explorer.
Yellow key indicates that a disk drive is encrypted.
Red key indicates that an encrypted disk drive has just been decrypted (or vice versa).
Encrypted disk drive.
Disk drive is being decrypted/
encrypted.
65
Page 66

Sophos SafeGuard® Disk Encryption 4.60, help
14 Creating user profiles
In this area you specify which users can work at a workstation that has been protected with Sophos
SafeGuard Disk Encryption. Here you can create new Sophos SafeGuard Disk Encryption users,
change existing users, or delete users that are no longer required. In addition you specify which
additional properties and rights the defined Sophos SafeGuard Disk Encryption users have.
Sophos SafeGuard Disk Encryption allows a maximum of 16 users (including *AUTOUSER) to
have access to the system. The defaults are SYSTEM and USER, of which the SYSTEM user can
never be deleted.
Hint: The Configuration File Wizard only shows SYSTEM and USER if a file of type Install has
been generated or used as a base configuration.
For detailed information on how to set up a HELPDESK user see Passwords and encryption
settings on page 44 or the following knowledgebase article:
http://www.sophos.com/support/knowledgebase/article/56457.html.
66
Page 67

14.1 Defining admin tasks
In Sophos SafeGuard Disk Encryption, users with admin tasks and users without admin tasks are
handled differently.
Users with admin tasks include the
system administrator and
users with administration functions.
The person without admin tasks is the
user
The administration function can be kept separate from the user function, or not, as required. The
admin tasks can be carried out by one or more people. Sophos SafeGuard Disk Encryption can be
configured for at least one user, and a maximum of 16 users (including *AUTOUSER).
However, depending on the needs of your organization, it may be sensible to create a multi-level
roles system in which the system or sub-system administrator are granted different hierarchical
rights. The following hierarchical structure is possible:
Sophos SafeGuard® Disk Encryption 4.60, help
System administrator (system user)
Only the system administrator can perform all program functions. They can define a deputy and
assign them particular administration rights. The system administrator must never forgot their
password. They should write it down and save it in a safe place.
Sub-system administrator
Sub-system administrators such as helpdesk staff can help the user if, for example, they have
forgotten their password. The extent to which a sub-system administrator can support the system
administrator in their work depends on the sub-system administrator’s pre-defined rights.
To set up a helpdesk user, see Passwords and encryption settings on page 44 or see the following
knowledgebase article: http://www.sophos.com/support/knowledgebase/article/56457.html.
Users
The user can only see their settings in read-only mode. By default, they can only run the function
for changing their user password. In addition, the system administrator (system user) can assign
the user different rights.
67
Page 68

Sophos SafeGuard® Disk Encryption 4.60, help
14.2 Pre-defined users
During installation, Sophos SafeGuard Disk Encryption automatically creates profiles for the
following users:
SYSTEM
USER
*AUTOUSER
14.2.1 The SYSTEM user
This system user (administrator) has the highest hierarchy level, which they do not share with any
other user. Even the SYSTEM user cannot change their own settings. The SYSTEM user data
cannot be deleted by anyone, and cannot be administered by anyone. The SYSTEM user is the
only one who can change the settings of all other user profiles. For this reason, only the top-level
system security officer should be able to log on with the user name SYSTEM. In addition, only the
top-level system security officer should know the password for the SYSTEM user. They should
write it down and leave it in a secure place such as a safe.
14.2.2 The USER user
Like the SYSTEM user, the user USER is automatically present after Sophos SafeGuard Disk
Encryption has been installed. This user profile only has the right to change their password and
can be deleted at any time.
14.2.3 The *AUTOUSER
The *AUTOUSER is a special feature. Whenever PBA is switched off, Sophos SafeGuard Disk
Encryption always creates a user called "*AUTOUSER" and creates a random password for them.
This password is split into different parts and stored in the Sophos SafeGuard Disk Encryption
kernel. During the boot procedure Sophos SafeGuard Disk Encryption can recover the complete
password from this stored password, and carry out the logon.
By default the *AUTOUSER has no rights.
If PBA is switched off, all users log on with the *AUTOUSER’s profile. If PBA is activated again,
the *AUTOUSER is automatically deleted.
68
Page 69

14.3 Creating users
You create a new user profile in the Workstation Configuration dialog of the Administration
functions, in the "Users" configuration page.
After clicking the "Create User" icon you see the New User dialog.
Sophos SafeGuard® Disk Encryption 4.60, help
Give the new user a name by entering it in the text field. The new user name must not be more
than 16 characters long. If the name has already been assigned, an error message appears. By
default the new profile has no rights. For more information about assigning rights, see User rights
on page 74.
69
Page 70

Sophos SafeGuard® Disk Encryption 4.60, help
14.4 Copying a user
You can copy user profiles that are similar, and then change them if required. This procedure
saves time.
After clicking the "Copy User" icon you see the Copy User dialog.
In the profile, select the existing profile that you want to copy. All profiles in your area of
administration are displayed. However you can only copy profiles that are at a lower hierarchy
level than your own profile.
The SYSTEM user cannot be copied.
Give the new user a name and click OK to confirm your entry is correct. If the name has already
been assigned, an error message is displayed.
After this, you can change the new profile if required.
70
Page 71

14.5 Deleting users
You can delete user profiles that are no longer required.
After you clicking the "Delete user" icon you see the Delete User dialog.
Sophos SafeGuard® Disk Encryption 4.60, help
In the user list, select the existing user profile you want to delete. All profiles in your area of
administration are displayed. Click the pull-down menu next to the user names and assign the
attribute "Delete" to the relevant user name.
You can only delete profiles that are at a lower hierarchy level than your own profile.
You cannot undo the deletion of a user.
71
Page 72

Sophos SafeGuard® Disk Encryption 4.60, help
14.6 User features
The features assigned to a user are displayed next to the user names.
14.6.1 Minimum user name length
You define the minimum length of a Sophos SafeGuard Disk Encryption user name (number of
characters). You can either type in the number of characters, or increase or decrease it by pressing
the direction keys. You can enter any value between 1 and 16.
14.6.2 Default user (password only)
One single Sophos SafeGuard Disk Encryption user can be set as a default user - except the
SYSTEM user. To log on, a default user only enters the Sophos SafeGuard Disk Encryption
password. If other users besides the default user want to log onto the workstation, they must
activate "Extended logon" (during PBA, by pressing F2).
72
Page 73

14.6.3 User account template
Templates serve a very special purpose and should only be used for that purpose. They may be
useful to copy users and to define individual user names for every computer if this is requested by
corporate guidelines. Corporate organizational guidelines might stipulate that there must be
individual user names, such as surnames, personnel numbers, etc. In this situation, a Sophos
SafeGuard Disk Encryption user name can be defined as a template for this type of environment.
When a templa te is used, th is Sophos Sa feGuard Dis k Encryptio n user is a ssigned a new user name
when they log on to PBA for the first time, so they are individualized.
A template can either be used to rename or copy a user.
A template is implemented as follows:
Sophos SafeGuard Disk Encryption is installed on a workstation and one Sophos SafeGuard Disk
Encryption user is defined as a template user. This workstation’s user is informed of the access
data (user name and password) for the user template. When the user logs on for the first time,
they must enter this access data in the logon screen. They are then requested to enter their new
Sophos SafeGuard Disk Encryption user name and a new password, which they must also use for
identification at their next logon.
Sophos SafeGuard® Disk Encryption 4.60, help
Renaming a user
If you want to ensure that only one user can log on by using the template, you must assign the
"Rename" attribute to the user template. If you do, the template is overwritten with the new user
data, and it is no longer possible to log on with the template’s access data.
Copying a user
The new user name is added to the list of Sophos SafeGuard Disk Encryption users but the user
template remains unchanged. Other users can log on with the template’s access data. A maximum
of 13 new users can be added, when SYSTEM and USER are already on the workstation.
For security reasons we recommend that you use the "Rename" template.
14.6.4 Expiration date
The expiration date specifies the maximum period of validity for a Sophos SafeGuard Disk
Encryption user profile. You can set a deadline date or time period at which the user can log on
to the system for the last time. You can simply type in the date or a particular period in time.
This setting is especially suitable if, for example, staff such as temporary staff or students on work
experience are only intended to use a workstation for a particular time period. After the predefined deadline has passed, the workstation is blocked for the user.
This setting has no validity for the SYSTEM user.
73
Page 74

Sophos SafeGuard® Disk Encryption 4.60, help
14.7 User rights
You need to decide which access rights are to be assigned to the individual Sophos SafeGuard Disk
Encryption users, for instance for helpdesk staff. For security reasons this needs careful
consideration.
You can assign users rights for temporary and permanent settings. Temporary settings are settings
that only apply for the duration of one work session. When the computer restarts, the temporary
settings are no longer valid and the system settings are applied again. Permanent settings are
settings that still apply after the computer restarts.
You can assign the following rights:
Set encryption
settings
Change password rules Permits the user to change all general password rules.
Change user settings Permits the user to change all user settings.
Permits the user to change the encryption state and the keys.
Must be set before other users can be assigned rights!
Uninstall Permits the user to remove Sophos SafeGuard Disk Encryption.
Boot from external
media
Permits a system protected with Sophos SafeGuard Disk Encryption
to boot from external media such as floppies or CDs.
allowed
Change general
settings
Allows changes to the following general settings:
- Wake-On-LAN
- Change password on system boot
- Hidden password entry
- Identification
74
Page 75

14.7.1 Assigning user rights
If you double-click "User Rights" in the Workstation Configuration dialog tab "User", you see all
the rights that can be assigned. If you double-click a right, its status toggles to "Granted" or "Not
Granted" depending on its previous setting.
Sophos SafeGuard® Disk Encryption 4.60, help
Initially, all new users have no rights except the right to change their password. Only the SYSTEM
user has all rights. Rights that the user is not authorized to change are not displayed in the view
and cannot be changed or edited.
14.7.2 Transferring user rights
A user can also transfer their own rights (and only those rights) to another user. If an
administrator (for example, a sub-system administrator) would like to change their own rights,
they cannot do so themselves. They must ask an administrator who is more senior in the hierarchy
(for example, the system user) to make the required changes.
To transfer their own rights to other users, the user must have a user profile with the right
"Change user settings".
75
Page 76

Sophos SafeGuard® Disk Encryption 4.60, help
15 Password settings
The password plays a central role in Sophos SafeGuard Disk Encryption: the Sophos SafeGuard
Disk Encryption password entered during Pre-Boot Authentication is used to generate the key
needed to decrypt an encrypted hard disk, for booting.
You should choose your Sophos SafeGuard Disk Encryption password carefully. Users often tend
to use the same passwords, or trivial passwords, such as their first or last names, company names,
sequences of letters or numbers, etc. If a Sophos SafeGuard Disk Encryption password is too
obvious it makes it easier for unauthorized outsiders to access a workstation. Careful
consideration is needed to agree the strategy for defining how consistently password restrictions
are to be applied, and they should also be tested before being implemented.
15.1 Pre-defined password rules
For security reasons Sophos SafeGuard Disk Encryption predefines several rules for all user
passwords.
A Sophos SafeGuard Disk Encryption password can
have a maximum number of 16 characters.
A Sophos SafeGuard Disk Encryption password is rejected, if
more than 50% of it consists of the same character
(for example "aaabba", "222122").
it contains characters in sequence
(for example "abcdef", "1234567").
it contains keyboard rows
(for example "asdfghj").
it is identical to the Sophos SafeGuard Disk Encryption user name
(except password for user "SYSTEM").
it is significantly similar to the Sophos SafeGuard Disk Encryption user name
(except password for user "SYSTEM").
it is significantly similar to the previous password.
"Significantly similar" in this context means that the character sequence of the new password
differs from the character sequence of the user name/old password by less than 20% . For
example, the Sophos SafeGuard Disk Encryption user "USER" is allowed to use the password
"U2SER13", "U345SER" etc., but Sophos SafeGuard Disk Encryption does not accept passwords
like "USER1", "USER2", "USERab", "12USER", "1USERF" etc.
76
Page 77

Sophos SafeGuard® Disk Encryption 4.60, help
15.2 Permitted keys for the Sophos SafeGuard Disk Encryption password
The Sophos SafeGuard Disk Encryption password can consist of a mixture of alphanumeric
characters and punctuation marks.
Sophos SafeGuard Disk Encryption accepts
all the keys marked with "*" in the figure.
The Shift key and Caps Lock key (marked with "#" in the figure).
Sophos SafeGuard Disk Encryption does not accept
the Shift key, if the Caps Lock key is already pressed.
the Alt key
the Ctrl key
the Num number keys
the F keys (for example, F1, F2)
the direction keys
15.3 Configuring Sophos SafeGuard Disk Encryption for use in international environments
Sophos SafeGuard Disk Encryption stores all character strings in "scan code" form since, usually,
no keyboard drivers are loaded in the Pre-Boot phase. The scan code is a code number
(hexadecimal scan code) which the keyboard returns to the PC when a key is pressed. This code
is independent of which letters, numbers or symbols are mapped to the key. It is a special
identifier for the key itself, and is always the same for a particular key.
77
Page 78

Sophos SafeGuard® Disk Encryption 4.60, help
15.3.1 The effects of different keyboard layouts
As Sophos SafeGuard Disk Encryption stores all the character strings in "scan code" form, the scan
code sequence for example for the password "system" on a US keyboard layout is: 1f-15-1f-14-12-
32.
.
The scan code sequence for "system" on a German keyboard layout is: 1f-2d-1f-14-12-32.
Hint: Y and Z are swapped round! A German-language user would therefore have to enter
"szstem" to successfully authenticate themselves
The password "system" on a French keyboard layout produces yet another scan code: 1f-15-1f-
14-12-27.
A French-language user would therefore have to enter "syste," (note the comma replacing the
"m") to successfully authenticate themselves.
You will find other keyboard layouts at
http://www.microsoft.com/globaldev/reference/keyboards.mspx.
78
Page 79

Sophos SafeGuard® Disk Encryption 4.60, help
15.3.2 Generating internationally uniform data for SDE
If Sophos SafeGuard Disk Encryption is implemented in international environments, it is
necessary to ensure that passwords and keys can be correctly entered (typed by the user) on all
available keyboards. It is especially important to ensure that the Sophos SafeGuard Disk
Encryption user profiles for performing administrative tasks can be implemented world-wide.
An example is the Challenge/Response procedure, if the user making the call and the help desk
person using the Response Code Wizard do not use a keyboard with the same layout.
If the Sophos SafeGuard Disk Encryption data (or, to put it more clearly, keystroke sequence) is
created from a combination of the following 21 keys, it is very likely that Sophos SafeGuard Disk
Encryption can be used without problems in international environments.
Printed values on the keys Hexadecimal scan code
b30
c2E
d20
e12
f21
g22
h23
i17
j24
k25
l26
n31
o18
p19
r13
s1F
t14
u16
x2D
v2F
[blank space] 39
79
Page 80

Sophos SafeGuard® Disk Encryption 4.60, help
15.4 General password rules
You can use the General Password Settings in the Workstation Configuration dialogs of the
Administration functions to define further rules for the formation of Sophos SafeGuard Disk
Encryption passwords, such as the proportion of letters and numbers or their minimum length.
These specifications apply to each Sophos SafeGuard Disk Encryption user, and no passwords are
accepted that do not comply with these standards.
15.4.1 Password at system start
For details, see Pre-Boot Authentication (PBA) on page 57.
The default value is "PBA enabled".
15.4.2 Minimum password length
You specify the password length in this field. In doing so you define the minimum length of a
password (number of characters) when it is entered by the user.
You can either type in the number of characters, or increase or decrease it by pressing the
direction keys. You can enter any value between 1 and 16 for the password length. The default
value is 6 characters.
15.4.3 Minimum password age
The password age sets a minimum period of validity in days. During this time period the user
cannot change the password. This option prevents the user from resetting the original password.
The default value is 0.
80
Page 81

15.4.4 Password history
To prevent the user from constantly changing between a small number of passwords you can set
the number of password generations to be higher. Each password is compared with the ones used
in the past and rejected if it matches an old password. This setting controls how many passwords,
that were used in the past, are saved for comparison.
The maximum number of used passwords that can be saved is 16. After clicking in the input field
you can set the value, either by typing it or by clicking on the direction keys. It is especially useful
to specify a number of password generations in combination with the setting "Change password
after "n" days" (see Password change after on page 85).
Example:
The number of password generations has been set to 4 for the user Miller, and the number of
days after which the user must change their password has been set to 30. Up to now, the user
Miller has logged on using the Sophos SafeGuard Disk Encryption password
After the period has expired, Miller is prompted to change their password in the Sophos
SafeGuard Disk Encryption logon screen during PBA. User Miller types "Computing" again,
and sees an error message that this password has already been used, and they must choose a
different password. User Miller cannot reuse "Computing" again until after the fourth prompt
to enter a new password (since Password Generations has been set to 4).
Sophos SafeGuard® Disk Encryption 4.60, help
"Computing".
81
Page 82

Sophos SafeGuard® Disk Encryption 4.60, help
15.4.5 Syntax rules (letters, digits, symbols, opposite case)
To increase the effectiveness of passwords you can require a mixture of letters and numbers (and/
or symbols). The number entered is always a minimum value.
Symbols are special characters such as * # !"§$%&/() etc.
Opposite Case means that exactly the specified number of capital letters and lower case letters
must be used in the password.
Example:
The example below shows the correct usage of syntax rules:
Settings
Letters: 1
Numbers: 2
Symbols: 1
Opposite case: 2
Result:
AAaa12# is allowed
aaAA123## is allowed
3456## is rejected
AAB1# is rejected
Existing user passwords still apply, even if they not longer meet the specifications. The rules
only take effect if the user changes their password.
82
Page 83

15.5 Forbidden passwords
You can use the Undesirable Passwords setting to define particular character strings that cannot
be used in Sophos SafeGuard Disk Encryption passwords. Every new password is compared
against the list and only accepted if it is not present in the list.
You can import an existing list or enter forbidden passwords yourself.
15.5.1 Defining forbidden passwords
Double-click "Passwords" below "Undesirable Passwords". In the "Configure Undesirable
Passwords" text box, enter character combinations that are not permitted, separating them with
Ctrl +Enter keys.
Sophos SafeGuard® Disk Encryption 4.60, help
Enter trivial passwords such as test, system, user etc. in the list. Each password which is
significantly similar to the forbidden password will be rejected. "Significantly similar" in this
context means that the character sequence of the password differs from the character sequence of
the forbidden password by less than 20%. For example, if "tester" is on the list the password
"tester1234" is allowed whereas "tester12" is forbidden.
You can also use wildcards to define trivial passwords. The only accepted wildcard character is "*"
(asterisk). This means that, at the position indicated by the character "*", the password can
contain one different character. For example, if you enter "Saf*Gu*rd", any password like
"SafeGuard", "Saf1Gu2rd" is forbidden.
Hint: If you only enter the wildcard, or a lar ge enough num ber of wild cards in the list of for bidden
passwords, users will be unable to log on to the system again after being forced to change their
password.
83
Page 84

Sophos SafeGuard® Disk Encryption 4.60, help
15.5.2 Importing a password list
If a list of forbidden passwords already exists, you can import it. In this way you can use the same
list on several workstations. The list can be created with any editor, and could look like this:
The different passwords are separated with a blank space or a line break.
Hint: Users should not have access to this file!
15.6 User-specific password rules
84
The user-specific password rules involve options for changing the password.
Page 85

15.6.1 Password change allowed
This option defines whether a user can change their Sophos SafeGuard Disk Encryption password
within PBA or in Administration, or not.
15.6.2 Password change after
A Sophos SafeGuard Disk Encryption password is valid for an unlimited time period. However,
there is a great danger that it will become known. To minimize the security risk, you can specify
that a user must change their password after a pre-defined number of days.
Use the direction keys to set the time period after which the user must change their password, or
type it in.
The time period for the validity of the passwords can lie between 1 and 365 days. The default
setting is 90 days. Once the time period has expired, the user must change their password next
time they log on.
Sophos SafeGuard® Disk Encryption 4.60, help
15.6.3 Change password at next logon
Specifies that the user must change their Sophos SafeGuard Disk Encryption password at their
next logon. To use this function Pre-Boot Authentication must be active.
15.6.4 Issue abbreviated C/R Code
This property influences the length of the response code that is exchanged during a Challenge/
Response procedure.
Users with the "Issue abbreviated C/R Code" property (and the SYSTEM user) generate short
response codes that have only 30 characters, whereas normal Sophos SafeGuard Disk Encryption
users generate response codes that are 56 characters long. When these are typed in or passed on
to the user, this can lead to increased errors.
To successfully carry out a Challenge/Response this option must be set to YES for a helpdesk user.
For details of the Challenge/Response procedure, see Remote maintenance (Challenge/Response)
on page 119.
85
Page 86

Sophos SafeGuard® Disk Encryption 4.60, help
15.7 Defining a password
The choice of user passwords should be made carefully so they cannot be easily guessed. They can
contain any letters (capitals or lower case), numbers and special characters (!„§$%&/()*+;,:._-),
provided the combination has not been restricted by the General Password Rules.
The numbers in the number block must not be used.
If you double-click "Password", you see the dialog in which you define the password.
In the top line, enter the required password and repeat it in the Confirm field below. You have to
repeat the entry to prevent typing errors. The system checks that the characters entered are
identical, and displays an error message if the passwords do not match up or are trivial (such as
"12345" or "AAABBB"). For security reasons the entry is only represented by "*" characters. To
correct entries, use the Backspace key.
You are not permitted to "copy and paste" a password: you must type it in by hand.
86
Page 87

16 Configuring Windows logon
During Pre-Boot Authentication (PBA) Sophos SafeGuard Disk Encryption requires
authentication as its first system component. The usual Windows logon dialog is not displayed
until the system has been unlocked using valid Sophos SafeGuard Disk Encryption logon data.
Sophos SafeGuard Disk Encryption provides Secure Automatic Logon functionality to take the
burden of multiple authentication off users. Users then only need to enter their user data once,
during PBA. The administrative template includes a range of other options that can be used to
make Windows logon even more user-friendly.
16.1 Secure Automatic Logon (SAL)
Automatic logon is a function that helps make the logon procedure more user-friendly. A user
only needs to enter their Windows logon data once. In future logons, they automatically log on to
Windows, and they then only need their Sophos SafeGuard Disk Encryption user data to
authenticate themselves during PBA. Sophos SafeGuard Disk Encryption calls this logon
procedure Secure Automatic Logon or SAL for short.
Sophos SafeGuard® Disk Encryption 4.60, help
Logging on to the operating system automatically can be switched off later with the Sophos
SafeGuard Disk Encryption command
Hint: SAL is installed by default. User are prompted to enable it at first logon.
All subsequent logons to other applications must be carried out manually.
During the installation of Windows, if the "Always logon this user" option is selected, SAL cannot
be performed.
In technical terms, SAL works like this: a user uses their Sophos SafeGuard Disk Encryption access
data to log on during PBA and then enters their Windows user data in the Windows logon screen.
SAL creates a relationship between the Sophos SafeGuard Disk Encryption user who has logged
on and the Windows user, and stores it in an encrypted file called
at <system drive>
Windows user data on to the Windows logon screen, without user interaction.
\SYSTEM32. When the user logs on to PBA again, SAL automatically passes the
Chgsal.exe.
SGSAL.dat. The file is stored
87
Page 88

Sophos SafeGuard® Disk Encryption 4.60, help
Do as follows:
1. Authenticate yourself in PBA with the Sophos SafeGuard Disk Encryption user data.
2. After logon, the familiar Windows logon dialog is displayed, if this is the first time you have
ever logged on, after SAL has been installed.
3. Enter the correct Windows credentials in the input fields and click OK.
4. You then see the SAL dialog.
Yes: Activates the relationship between the Sophos SafeGuard Disk Encryption user and
the Windows user.
No: Does not use SAL functionality.
The status of the check box labeled "Don’t ask this question again for the current Sophos
SafeGuard Disk Encryption user" specifies whether the dialog is to be displayed again on every
logon or not.
5. Click OK and select the check box. This associates the Sophos SafeGuard Disk Encryption user
with the Windows user.
Next time the PC is restarted, and the user enters their Sophos SafeGuard Disk Encryption user
data during PBA, they are automatically logged on to Windows.
Changing the Windows password
Windows passwords have to be changed regularly for security reasons. However, the way in which
a newly-defined password is integrated into the Secure Auto Logon process depends on the
method used to change the user password.
Forced Password Change
Users can be forced to change their operating system passwords by the "User must change
password after next logon" option in their user profile. If the user has to change their password
when logging on, they are prompted to do so by a system message. SAL is deactivated for this
logon.
You must confirm the system message by clicking on OK. The following dialog requires the
88
Page 89

Sophos SafeGuard® Disk Encryption 4.60, help
user to enter a new password. As soon as the user confirms the new password, the system
updates the SAL file. At next logon, the user can log on without having to re-enter their
Windows access data, and Secure Auto Logon is run without notification.
User Changes Password
If the user changes the password in the Windows logon dialog (e.g. by pressing
CTRL+ALT+DEL on their desktop), they can change their password by selecting "Change
password". If they change their password in this way, the system automatically accepts the
new Windows password, and stores it in the
Sgsal.dat file. When logging on after a
password change, the user does not have to re-enter their Windows access data, and Secure
Auto Logon is run without notification.
If the password is changed via Windows user administration, the system does not
automatically accept the new Windows password and it is not stored it in the
Sgsal.dat
file. Instead a warning message appears on the screen saying that the Windows password is
not valid and the user must enter the correct new one in the logon screen. After the
password has been changed, the user can log on without having to re-enter their Windows
access data, and SAL is run without notification.
16.1.1 Switching Secure Auto Logon off temporarily
If Secure Auto Logon is enabled, it can be disabled later, by a user with Windows administrator
rights, and enabled again by running
directory.
To do so, proceed as follows:
1. Boot in MS DOS mode or select the Run command in the Windows Start Menu, and then run
"cmd" to display the DOS prompt.
2. Switch to the directory in which Sophos SafeGuard Disk Encryption is stored (e.g. on a
network drive). Enter the following command with the appropriate parameters:
CHGSAL.EXE /SAL:ON | /SAL:OFF | [ /? ]
/SAL:ON
/SAL:OFF
/?
Enable Secure Auto Logon
Disable Secure Auto Logon
Summary help
This tool only works if Sophos SafeGuard Disk Encryption is installed with SAL.
CHGSAL.EXE from the Sophos SafeGuard Disk Encryption
89
Page 90

Sophos SafeGuard® Disk Encryption 4.60, help
16.1.2 Removing data for SAL
If you delete Sgsal.dat (<System drive>\SYSTEM32), all saved user data is also removed. After
you restart the computer you can assign new data to a Sophos SafeGuard Disk Encryption user.
If a Sophos SafeGuard Disk Encryption user, who has already established a connection, is deleted
on a system, this connection continues to exist when the same user is created again.
16.1.3 Restriction
SAL is temporarily switched off if a user logs on with the "One-time logon" option. One-time
logon allows a user to log on to Sophos SafeGuard Disk Encryption in the Pre-Boot
Authentication (PBA) even if he/she does not know the Sophos SafeGuard Disk Encryption user
credentials, provided the Challenge Code and Response Code were exchanged successfully (see
Remote maintenance (Challenge/Response) on page 119).
If a user is granted a "One-time logon" at PBA level, they are not automatically logged on to
Windows - even if SAL is enabled. The operating system stops, the familiar Windows Logon
dialog appears and they must enter their Windows user credentials manually. Every action
performed at the PC is then recorded with the name of the logged on Windows user.
After a "normal" logon with valid Sophos SafeGuard Disk Encryption credentials at PBA level,
SAL and automatic Windows logon is performed in the usual way.
16.2 Additional Windows Logon options
You can use the Sguard.adm administrative template to predefine settings concerning Windows
logon via group policies. Additionally it is possible, for example, to set screen saver options which
normally cannot be influenced with the regular Windows settings.
90
Page 91

Sophos SafeGuard® Disk Encryption 4.60, help
16.3 Tailoring the Windows Logon screen
These settings define the desktop view, which is displayed at logon/logoff and when the
workstation is locked.
You will find the policy in the administrative template at
Computer Configuration
\Administrative Templates
\SafeGuard
\Authentication
\Logon Options
\Windows logon
Use Sophos logon dialog
If you select this check box, the Sophos logon dialog appears at logon. If you deselect this check
box, you can log on to the system using the Windows logon dialog.
Use Sophos start dialog
If you select this check box, the Sophos Logon dialog is displayed when the PC boots. You are
prompted to press Ctrl+ Alt + Del to open the logon dialog. If you deselect this check box, the
appropriate Windows logon dialog appears
.
91
Page 92

Sophos SafeGuard® Disk Encryption 4.60, help
Use Sophos lock dialog
During workstation lock with Ctrl + Alt + Del, the Sophos lock dialog will be displayed instead
of the Windows dialog. If an invalid user logon has been registered, it will be displayed within
the Sophos lock dialog.
Disable precheck of user data with RAS
If you select this check box, the system performs no preliminary check of user accounts when
establishing RAS connections.
Disable check box for RAS logon in Sophos logon dialog
Defines if the "Logon using Dialup Networking" check box is automatically disabled or not, in
the Sophos logon screen.
Replace bitmap with
In this edit field a bitmap displayed in the logon dialog can be specified, for example a company
logo to a suitable background. The bitmap must be in .bmp format, and must reside in the
System32 folder of the Windows installation folder. The bitmap size is 413x140 pixel.
16.3.1 Changing the background bitmap in the Windows logon dialog
You can choose a different bitmap for the system to display when the user enters their Sophos
SafeGuard Disk Encryption user data. This allows customers to modify the background displayed
for Sophos SafeGuard Disk Encryption to meet their company’s own requirements.
To swap the title bitmap, simply replace the default bitmap with a modified bitmap with the same
name and size.
You can switch off the background bitmap via the SafeGuard administrative template. You will
find the policy in
Computer configuration
\Administrative Templates
\SafeGuard
\SDE
On the "SDE" property page deselect the "Show background image on Winlogon Desktop" option
and the Sophos SafeGuard Disk Encryption bitmap will no longer appear.
92
Page 93

Sophos SafeGuard® Disk Encryption 4.60, help
16.3.2 Workstation lock
Workstation lock sets how many login attempts a user can make before the PC is locked, and how
the time delay between these login attempts increases. The mechanism only works for local users
who are not members of the local administrator group.
You will find the policy in the administrative template at
Computer Configuration
\Administrative Templates
\SafeGuard
\Authentication
\Logon Options
\Workstation Lock
The mechanism only applies for users who are not members of the local administrator group. For
restrictions related to Terminal Server usage see chapter Terminal Server Support.
Logon Attempts
In this field you set the number of logon attempts a user can make with an invalid user name
or password. If you enter "3", for example, the PC will be locked if the user enters their user
name or password incorrectly three times in a row, when logging on.
Minimum/maximum values: 0-999
Delay in Seconds
Enter the base value here. The base value is the figure which, multiplied by the multiplier, is
used to calculate the waiting time after the first unsuccessful logon attempt. If there is another
93
Page 94

Sophos SafeGuard® Disk Encryption 4.60, help
unsuccessful logon attempt, the waiting time of the previous attempt is taken as the base value.
Default value is 10.
Minimum/maximum values: 0-999
Multiplier
The Multiplier is multiplied by the Delay in seconds value. The default value is 3.
Minimum/maximum values: 0-99
Disable CTRL+ALT+DEL when workstation is locked
Workstation remains locked after the user presses CTRL+ALT+DEL
.
Example:
The delay is 10 sec. and the multiplier is 5 sec:
st
1
unsuccessful attempt: 50 seconds waiting time (10 x 5)
nd
unsuccessful attempt: 250 seconds waiting time (50 x 5)
2
rd
unsuccessful attempt: 1250 seconds waiting time (250 x5)
3
Hint: The lock can be deactivated
by rebooting the PC.
when a local administrator logs on.
by data replication from the domain controller.
In this context, also note the Windows user lock.
16.3.3 Screen saver
You can specify the system’s reaction if a screen saver is switched on. To do so the Windows screen
saver must be enabled!
You will find the policy in the administrative template at
Computer Configuration
\Administrative Templates
\SafeGuard
\Authentication
\Logon Options
\Screensaver
Action
Under Action you can define the following reactions when a screen saver runs.
A) Logoff user:
The current user will be logged off the machine. Other users registered on the workstation or
within the network are now able to log on to the workstation.
94
Page 95

Sophos SafeGuard® Disk Encryption 4.60, help
B) Shut down the workstation:
The workstation will automatically shut down and has to be rebooted for another logon.
C) Restart the workstation:
The workstation will be automatically restarted.
D) Hibernate the workstation
The computer is hibernated.
E) Disconnect the session
Has no effect on a local workstation.
F) Standby
The computer is put on standby.
Possible actions and their effect on the local workstation or in a terminal server session:
Setting Action
<None> no action
Logoff user logoff
Shut down the
shut down
workstation
Restart the
restart
workstation
Hibernate the
hibernate
workstation
Disconnect the
no action
session
Standby Standby
Delay (default 15 minutes)
"Delay" defines the time after which one of the actions described above takes place. The default
setting is 15 minutes. You can change the setting by clicking the entry field and using the
keyboard, or with the direction arrows.
Maximum/minimum values: 0-900
Disable Screensaver
Usually a screen saver is cancelled when the user moves the mouse or uses the keyboard.
Afterwards a user can continue working without entering their user data. If the "Disable
screensaver" check box is selected, the workstation is locked. Once the PC is locked, the only
way to access the PC again is to enter the correct user data.
95
Page 96

Sophos SafeGuard® Disk Encryption 4.60, help
Example:
A workstation’s screen saver should be activated ten minutes after the last user action. If "Shut
down the workstation" is selected as the action, and a 13 minutes delay is set, the PC will be
automatically shut down 23 minutes after.
16.3.4 GINA repair
Sophos uses its own logon component (SafeGuard GINA (SGGINA.dll)). After installation it is
always the first Windows logon component called by the operating system.
The installation of any other product can change the position of the logon components.
You will find the policy in the administrative template at
Computer Configuration
\Administrative Templates
\SafeGuard
\Authentication
\Logon Options
\GINA Repair
Repair GinaDLL entry in registry when changed:
The "Repair GinaDLL entry when changed" option ensures that the SafeGuard GINA is
automatically set as the first logon component called by the operating system.
Unknown Gina handling
Ask User
When the GINA is initialized for the first time, a dialog opens in which the user is prompted
to select the unknown or the original Microsoft GINA. If the check box "Don’t show this
message again" is selected, the user’s choice is stored in the registry and this registry value is
used after the system is rebooted.
Use Original Microsoft GINA
The original Microsoft GINA is used as the first logon component called by the operating
system.
Use unknown GINA
An unknown GINA is used as the first logon component called by the operating system.
96
Page 97

Sophos SafeGuard® Disk Encryption 4.60, help
17 Sophos SafeGuard Disk Encryption workstation lock
Sophos SafeGuard Disk Encryption replaces the regular Windows workstation lock with its own
dialog.
If the PC is in rest mode, only the user that locked it can activate the user interface again by
entering their Sophos SafeGuard Disk Encryption password.
The screen and user interface lock:
when you press CTRL + ALT + Del and Lock Computer.
after a set time has passed without any user operations (wait time).
When the PC is in rest mode, the same background bitmap is displayed as during logon, but this
can be changed (see Tailoring the Windows Logon screen on page 91).
17.1 Prerequisites
The workstation lock only works if
Pre-Boot Authentication is active.
the user has logged on to the operating system automatically via SAL.
the Windows screen saver with password protection is switched on.
After activating the Windows screen saver settings you must reboot the PC.
The Sophos SafeGuard Disk Encryption workstation lock is switched off afterwards if a user logs
off, and then logs on again, after successfully logging on to Windows.
97
Page 98

Sophos SafeGuard® Disk Encryption 4.60, help
17.2 Activating the Windows Screen Saver with password protection
You control the Sophos SafeGuard Disk Encryption workstation lock in the Windows settings in
Start/Settings/Control Panel/Display/Screen Saver.
Restart your workstation after enabling the screen saver.
First you must select a screen saver. Then set the "Password protected" and "Wait" (wait time)
options.
Password protected
Forces a prompt to enter the Sophos SafeGuard Disk Encryption password, must be activated.
Wait
Specifies the time (in minutes) that must pass without the workstation being used before the
screen saver is switched on.
If you set 15 here, for example, the screen will be switched off after 15 minutes without
keyboard entry or mouse movements. The user must enter their Sophos SafeGuard Disk
Encryption password again to continue working.
To protect the workstation against unauthorized users, we recommend you switch on the
workstation lock.
98
Page 99

Sophos SafeGuard® Disk Encryption 4.60, help
17.3 Switching off the Sophos SafeGuard Disk Encryption workstation lock
If you wish, you can switch off the Sophos SafeGuard Disk Encryption Workstation Lock and
display the standard Windows dialog instead.
Hint: The standard Windows dialog is not locked with the Sophos SafeGuard Disk Encryption
password but with the Windows password. This means that Sophos SafeGuard Disk Encryption
password protection is then no longer provided for Workstation Lock!
If the Sophos SafeGuard Disk Encryption-Workstation Lock is NOT to be displayed, you can
configure this using the "Use SDE unlock dialog" policy (deselect tick to the left of the policy).
You will find the policy in Sophos SafeGuard Disk Encryption’s Administrative Template at
Computer Configuration
\Administrative Template
\SafeGuard
\SDE
99
Page 100

Sophos SafeGuard® Disk Encryption 4.60, help
18 Secure Wake-On-LAN
Secure Wake-On-LAN mode in Sophos SafeGuard Disk Encryption is the most secure way of
combining the benefits of Wake-On-LAN with hard disk encryption to protect the PC. To do this,
Sophos SafeGuard Disk Encryption’s WOL allows Pre-Boot Authentication to be deactivated for
a pre-defined number of restarts. After this it can be reactivated so that, for example, new software
can be distributed. However, with WOL in use, it is not possible to use inactive PBA and attempt
to sneak into the system using a Windows logon.
WOL is the best possible compromise between Pre-boot protection and the performing of
centrally-controlled tasks.
18.1 Overview
In general, Secure Wake-On-LAN allows any computer within a local network to be switched on
by another computer in that network. This may happen so that new software updates can be
loaded or to carry out routine maintenance tasks.
With the WOL technology in Sophos SafeGuard Disk Encryption, administrators can allow
Sophos SafeGuard Disk Encryption clients to have a pre-defined number of restarts before PreBoot Authentication automatically becomes active again. For example, if the number of
automatic logons is set to "3", the PC can be booted three times one after the other with PBA
switched off. The fourth time the PC is booted, PBA is automatically displayed again (provided
that it is active).
During these automatic logon boot phases, the Windows logon dialog is not displayed. The
computer boots automatically and the automatic software update can be carried out over the
network.
100
 Loading...