

Page 1
Sophos Endpoint Security and Control
network startup guide: NetWare edition
Document date: June 2009
Page 2

Contents
1 About this guide........................................................................................................................................4
2 Plan installation........................................................................................................................................5
3 System requirements.................................................................................................................................9
4 Create the EM Library user account on the NetWare server................................................................10
5 Install the management tools.................................................................................................................12
6 Download software and set up updating...............................................................................................13
7 Create groups for your computers.........................................................................................................20
8 Set up policies..........................................................................................................................................21
9 Search for computers and add them to groups.....................................................................................24
10 Protect computers using Enterprise Console......................................................................................25
11 Protect computers with a script...........................................................................................................29
12 Protect NetWare servers........................................................................................................................31
13 Check computers are protected............................................................................................................33
14 Set up a firewall policy..........................................................................................................................34
15 Detect suspicious behavior...................................................................................................................35
16 Scan for suspicious files........................................................................................................................37
17 Scan for adware and potentially unwanted applications (PUAs).......................................................38
18 Scan for controlled applications...........................................................................................................40
19 Set up network access control..............................................................................................................42
20 Check the health of your network........................................................................................................43
21 Clean up viruses, PUAs and suspicious files........................................................................................45
22 Protect Windows computers without using Enterprise Console........................................................46
23 Protect Windows computers with manual installation.......................................................................49
24 Protect Mac OS X computers...............................................................................................................50
25 Protect Linux computers......................................................................................................................51
2
Page 3

26 Protect UNIX computers with Sophos Anti-Virus version 4.............................................................54
27 Protect UNIX computers with Sophos Anti-Virus version 7.............................................................56
28 Protect standalone computers..............................................................................................................61
29 Protect computers with a command-line installation........................................................................62
30 Technical support..................................................................................................................................63
31 Copyright..............................................................................................................................................64
3
Page 4

Sophos Endpoint Security and Control network startup guide: NetWare edition
1 About this guide
This guide is for customers who
■
Want to install Sophos software for the first time or reinstall it.
■
Have a NetWare-based network (that is, one that uses NDS networking).
■
Have Windows, Mac, Linux, NetWare or UNIX computers on that network.
If this does not describe you, you need a different guide, as shown below.
If you have a Windows-based network (that is, workgroups or domains), or you use Active
Directory, see the Sophos Endpoint Security and Control network startup guide.
You can find Sophos documentation on the Sophos website (www.sophos.com/support/docs/)
or on the User documentation page of the Sophos Network Install CD.
4
Page 5

Sophos Endpoint Security and Control network startup guide: NetWare edition
2 Plan installation
You protect your computers with the following key steps:
Install the Sophos management tools.
■
Set up automatic downloading of Sophos software and updates.
■
Create groups for computers.
■
Set up security policies for those groups.
■
Search for computers on the network and put them into groups.
■
Protect computers.
■
This section helps you think about the choices you will make at each step.
2.1 Plan the installation of management tools
The Sophos management tools are:
■
Sophos Enterprise Console.
■
Sophos NAC server (optional).
■
Sophos role-based administration tools (optional).
2.1.1 Sophos Enterprise Console
Sophos Enterprise Console includes four components:
Management console Enables you to protect and manage computers.
Management server Handles updating and communications.
Database Stores data about computers on the network.
EM Library Downloads updates from Sophos automatically.
This guide assumes that you:
Place all the components on one computer.
■
Install another copy of the management console on a workstation, so that you can manage
■
networked computers conveniently.
Note: You can install some components separately, for example, you may want to install the
database on a server with plenty of space. In that case, see Sophos Endpoint Security and Control
large networks configuration guide .
5
Page 6

Sophos Endpoint Security and Control network startup guide: NetWare edition
2.1.2 Sophos NAC server
If you want to use Sophos network access control, you need to install the Sophos NAC server and
Enterprise Console.
You can install the Sophos NAC server and Enterprise Console on the same computer or on
separate computers. If you have more than 1000 computers, you should do the latter.
The order in which you install the management tools depends on the type of database you want
to use.
■
If you want to use an MSDE database for both tools, you must install Enterprise Console first.
■
If you want to use SQL server, you can install Sophos NAC first.
Sophos NAC is optional. If you want to install it, see Sophos NAC for Endpoint Security and Control
installation guide.
2.1.3 Sophos role-based administration tools
Role-based administration allows you to specify which computers a user can access and which
tasks they can carry out, depending on their role in your organization.
Sophos provides two role-based administration tools:
Sophos Helpdesk Console
This console enables a user, such as an IT help desk administrator, to monitor selected parts of
your network and to carry out remedial actions.
Sophos Enterprise Read-only Console
This console enables a user to monitor your network and generate reports, but not to carry out
any remedial actions.
These consoles are optional. If you want to install and run them, see Sophos Endpoint Security and
Control role-based administration guide.
2.2 Plan how to set up automatic downloading and updating
Enterprise Console downloads the latest software to a “software library” and places it in central
installation directories. This makes it available to networked computers.
This guide describes how to set up a single software library and a default set of central installation
directories. If you have a large network, you may want to make updating more efficient by creating:
Multiple central installation directories.
■
Additional software libraries.
■
6
Page 7

Sophos Endpoint Security and Control network startup guide: NetWare edition
See theSophos Endpoint Security and Control large networks configuration guide, available from the
Sophos website or from the Sophos Network Install CD.
2.3 Plan the computer groups
Think about whether you group computers according to location, operating system, or other
criteria. For example, you could put Exchange servers in a group of their own, as you do not want
to run on-access scanning on them. See support knowledgebase article 12421
(http://www.sophos.com/support/knowledgebase/article/12421.html.
You should normally have no more than 1000 computers in a group.
2.4 Plan the security policies
A policy is a collection of settings that can be applied to the computers in a group or groups.
When you create groups, default policies are applied to them. You can edit these policies or create
new ones. The policies are as follows:
Updating policy
If you have more than one group with the same policy (or just the default policy), you should
normally have no more than 1000 computers altogether updating from the same location. The
optimum number updating from the same location is 600-700.
Note: The number of computers that can update from the same directory depends on the server
holding that directory and on the network connectivity.
Anti-virus and HIPS policy
Note: Host Intrusion Prevention System (HIPS) is a security technology that protects computers
from suspicious files, unidentified viruses, and suspicious behavior.
By default, all files likely to contain viruses/spyware are scanned on access. But you might also
want to:
Turn off on-access scanning on Exchange servers or other servers where performance might
■
be affected. See Sophos support knowledgebase article 12421
(http://www.sophos.com/support/knowledgebase/article/12421.html).
Scan for adware/PUAs. See Scan for adware and potentially unwanted applications (PUAs) (page
■
38).
Application control policy
By default, all applications are allowed to run. However, you can configure Sophos Anti-Virus to
detect and block “controlled applications”, that is, legitimate applications that are not a security
threat, but that you decide are unsuitable for use in your office environment. See Scan for controlled
applications (page 40).
7
Page 8

Sophos Endpoint Security and Control network startup guide: NetWare edition
Firewall policy
By default, the firewall blocks all non-essential connections. Therefore, you must create your own
firewall policy. We recommend that you install the firewall on a few sample computers, customize
it and use these settings as your policy. See Set up a firewall policy (page 34).
NAC policy
By default, computers are allowed to access the network (unless you have modified the default
policy or changed the “policy mode” in the NAC server). If you want to set conditions that
computers must comply with before they can access the network, you configure and apply one of
the NAC policies. See Set up network access control (page 42).
2.5 Plan the search for networked computers
Before you can install security software on networked computers, they must be added to the
computer list in Enterprise Console. You can do this by using one of the following:
■
Microsoft network browsing.
■
IP range.
Searching for computers can take some time so you may want to search in stages.
2.6 Plan how to protect computers
You can install security software on Windows NT, Windows 2000 or later automatically from the
console.
Note: You cannot install Sophos Client Firewall or Sophos NAC (the agent component) on
computers running server operating systems.
If you have other operating systems on your network, you must install the software manually or
by using scripts, or by another method. This guide gives details of manual installation for Windows,
Mac OS X, Linux, UNIX and NetWare, as well as scripted installation.
8
Page 9

Sophos Endpoint Security and Control network startup guide: NetWare edition
3 System requirements
For system requirements, see the system requirements page of the Sophos website
(http://www.sophos.com/products/all-sysreqs.html).
3.1 Requirements for the NetWare server
You need a NetWare server with:
■
A version of NetWare that is supported by Novell, up to version 6.5 inclusive.
■
Up to 300 MB disk space for the central installation directories where updates are made available
for networked computers.
9
Page 10
Sophos Endpoint Security and Control network startup guide: NetWare edition
4 Create the EM Library user account on the NetWare
server
Important: You must create a directory on the NetWare server to which EM Library can download
updates. This should be \\<NetWare server>\SYS\SWEEP (where <NetWare server> is the name
of the NetWare server).
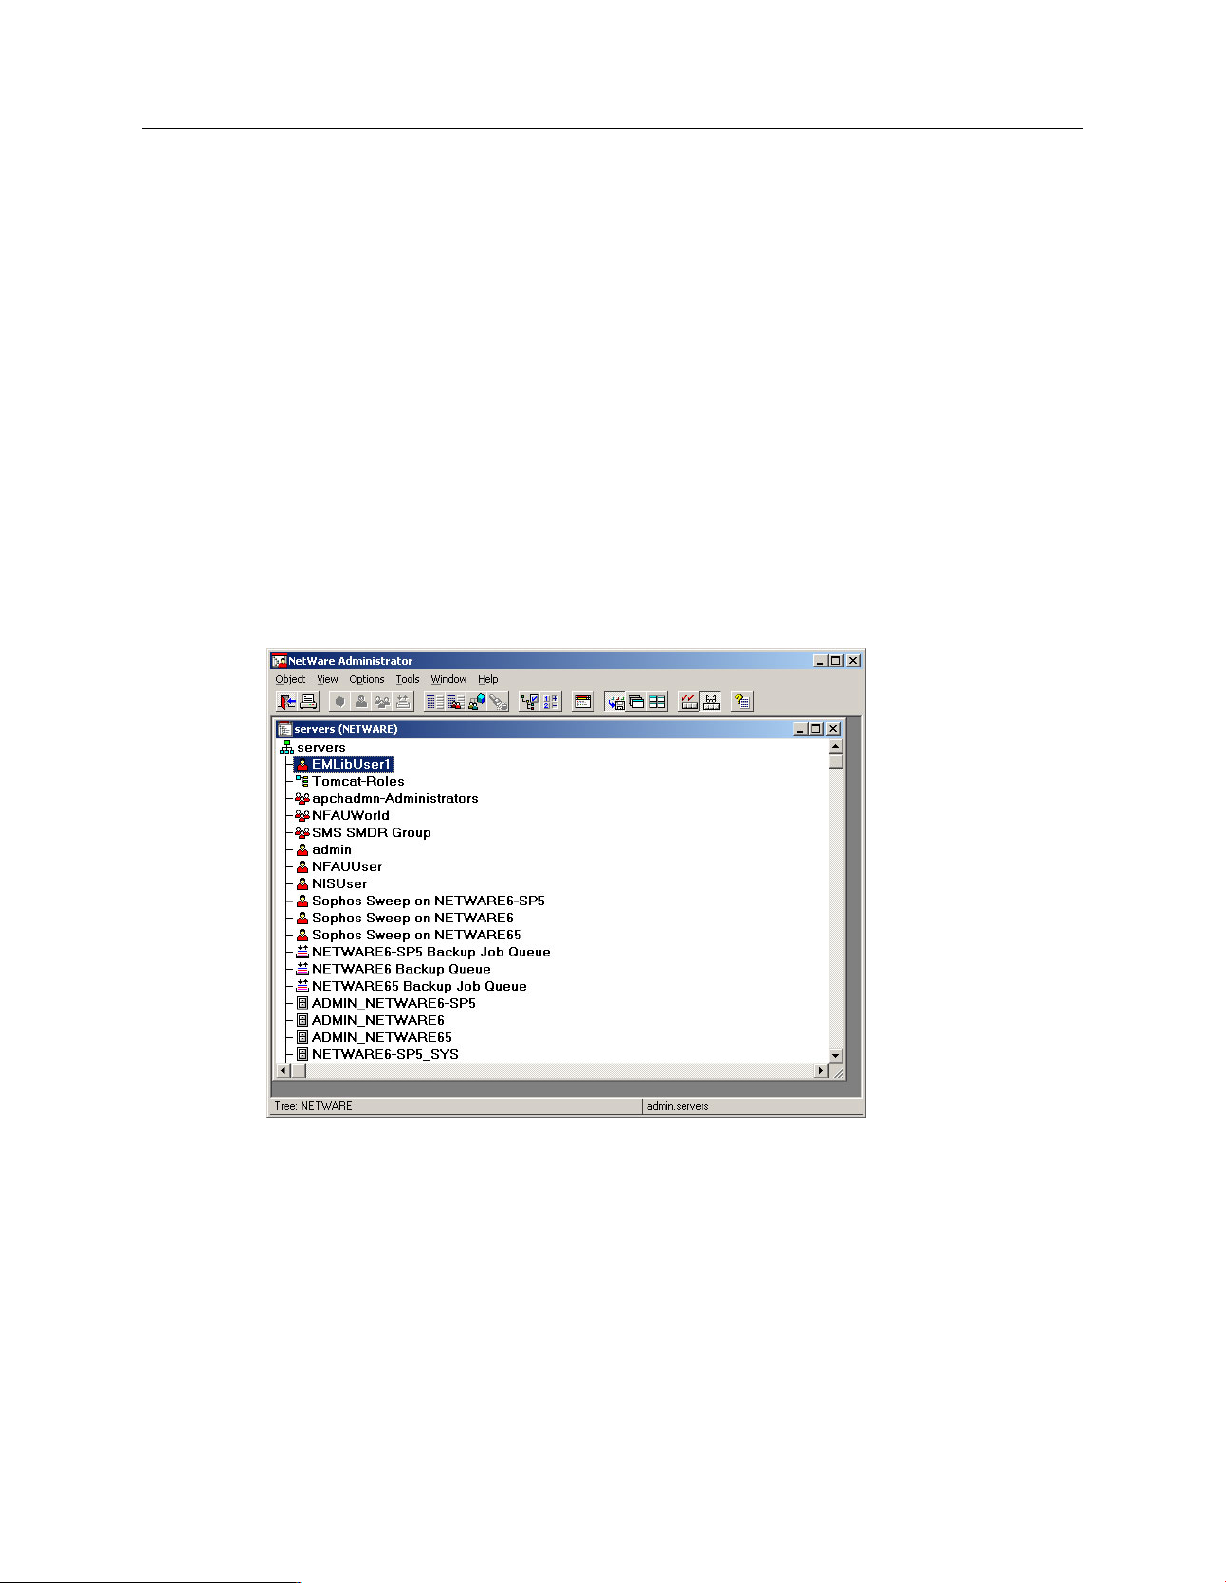
1.
At the Windows computer on which you want to installEM Library, run Nwadmn2.exe.
2.
In the NetWare Administrator window, on the Object menu, clickCreate.
3.
In the New Object dialog box, select User and click OK.
4.
In the Create User dialog box, in the Login name text box, type EMLibUser1. In the Last
name text box, type EM Library User Account. Click Create.
5.
In the NetWare Administrator window, your tree name is shown at the bottom of the window,
on the left. Make a note of it. Right-clickEMLibUser1 to display a menu. Select Details.
10
6.
In the Identification page of the User : EMLibUser1 dialog box, your login name is shown.
This is the full contextual user account name. Make a note of it. Click Password Restrictions.
7.
In the Password Restrictions page of the User : EMLibUser1 dialog box, deselect Allow user
to change password. ClickChange Password.
8.
In the Change Password dialog box, type and confirm a password. The password is
case-sensitive. Make a note of the password. ClickOK.
Page 11
Sophos Endpoint Security and Control network startup guide: NetWare edition
9.
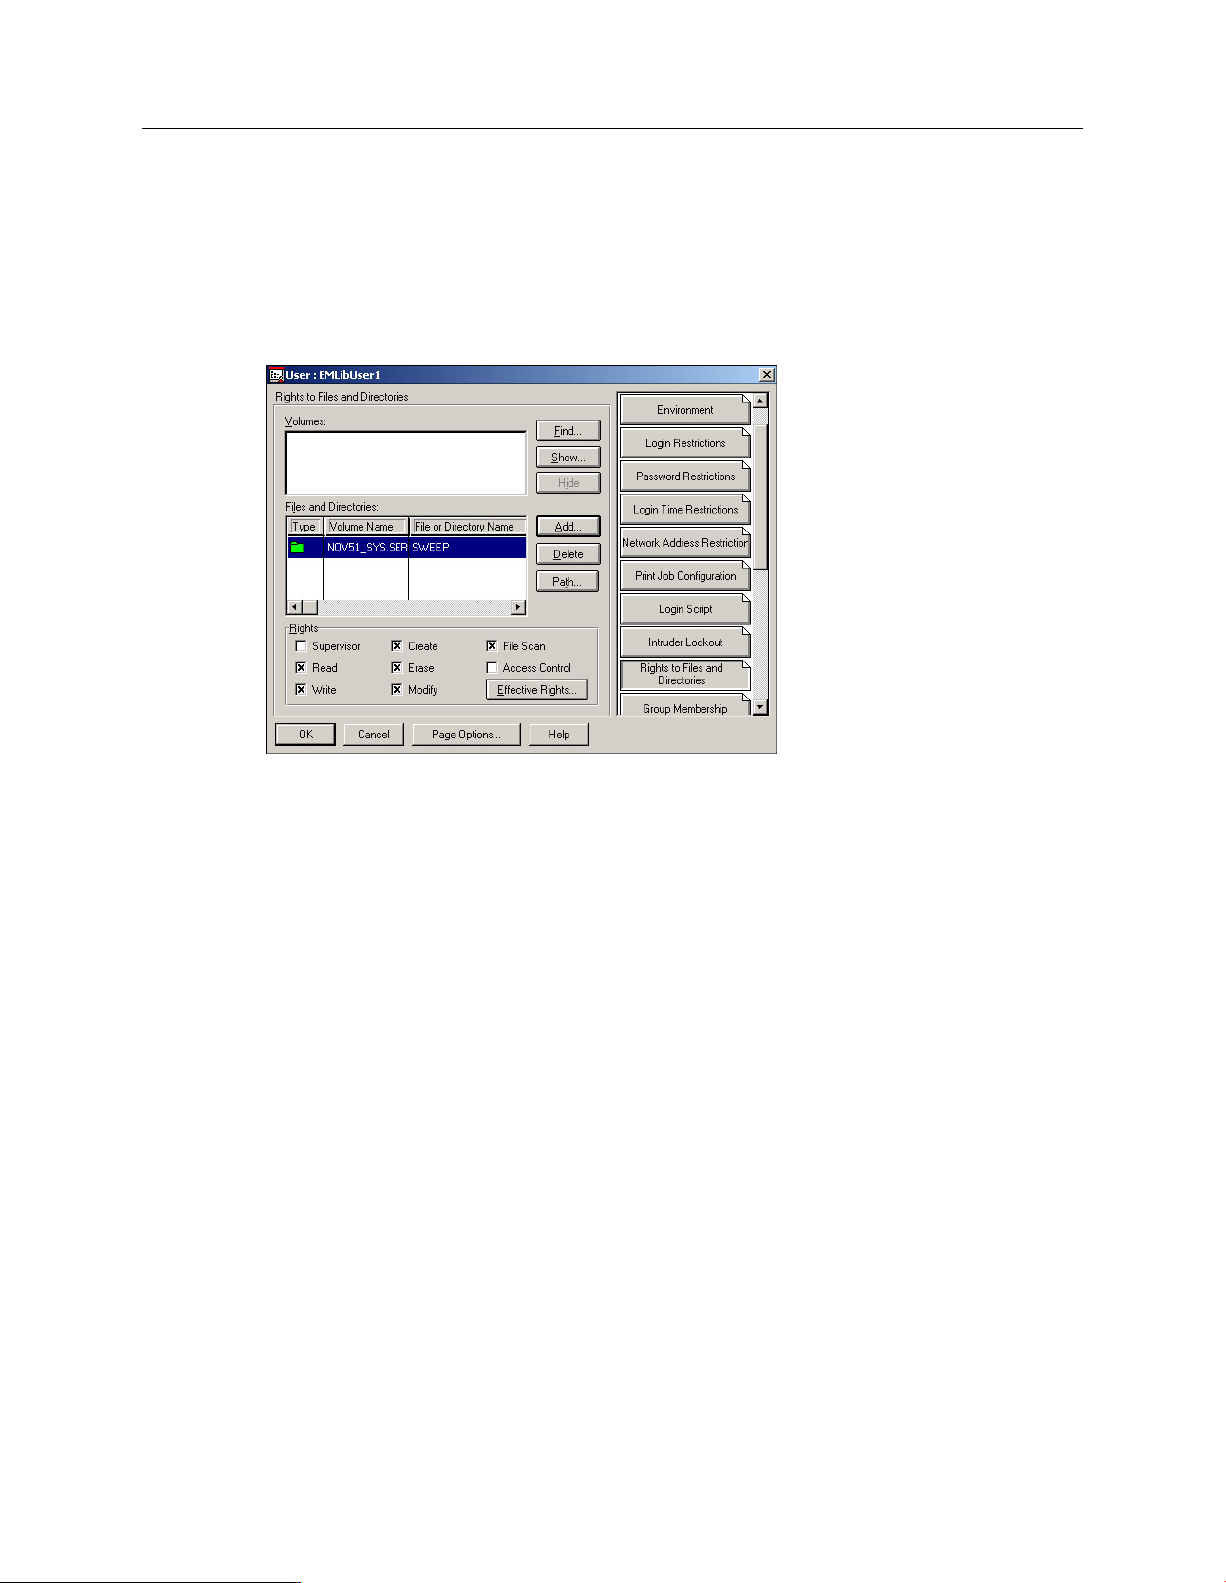
In the User : EMLibUser1 dialog box, click Rights to Files and Directories. Click Add. Browse
to the<NetWare server>_SYS.<Organization> volume (where<NetWare server> is the name
of the NetWare server and<Organization> is the name of the Organization), and theSWEEP
directory. Click OK. Ensure that Read, Write, Create, File Scan,Modify, and Erase are selected.
Click OK.
10.
In the NetWare Administrator window, find the NetWare server. Right-click it to display a
menu. Select Details.
11. At the top of the Identification page of the dialog box, the full contextual server name is shown.
Make a note of it.
You have created the EM Library user account on the NetWare server.
Now install the management tools (see next section).
11
Page 12

Sophos Endpoint Security and Control network startup guide: NetWare edition
5 Install the management tools
This section describes installation of Sophos Enterprise Console. For information about installing
the Sophos NAC server, see Sophos NAC for Endpoint Security and Control installation guide.
Go to a server that meets the system requirements. Ensure that you are connected to the internet.
If the server is running Windows Server 2008, do the following before you start:
Install SQL Server 2005 or SQL Server 2005 Express (if it isn't already installed) and create a
■
'SOPHOS' instance.
Turn off User Account Control (UAC) and restart the server. You can turn UAC on again after
■
you have installed Enterprise Console and subscribed to Sophos updates.
If the server is running Windows 2000, be prepared to restart it after installation.
1. Log on as a local administrator.
2.
Go to the Sophos website, download the Sophos Endpoint Security and Control Network
Installer and run it.
Alternatively, insert the Sophos Network Install CD . The CD should auto-run. When the
home page is displayed, click Install .
3.
An installation wizard is launched. In the welcome dialog box, click Next.
4.
In the License Agreement dialog box, accept the terms of the license agreement if you want to
continue. Click Next.
5.
In the Destination folder dialog box, accept the default and click Next.
6.
In the Setup type dialog box, Complete is selected by default. Click Next.
7.
In the Feedback to Sophos dialog box, you specify whether you are willing for Enterprise
Console to send details of the number and type of managed computers to Sophos each week.
■
If you are willing, selectI agree and clickNext.
■
If you are not, leave this option unselected and go to step 9.
8. If you agreed to send feedback to Sophos, you are prompted to enter the username printed on
your license schedule and an email contact address. Both are optional. Click Next.
9.
In theReady to install dialog box, clickInstall.
10.
When installation is complete, you are prompted to log off or restart. Click Yes or Finish to
continue with the setup.
The management tools have been installed.
Note: If ever you replace the server, ensure the replacement has the same name and IP address,
so that Enterprise Console can continue to manage computers.
Next you download the software you need and set up automatic updating (see next section).
12
Page 13

Sophos Endpoint Security and Control network startup guide: NetWare edition
6 Download software and set up updating
When you log on for the first time after installing the management tools, you are prompted to set
up downloads and updating.
In the Welcome to Sophos Endpoint Security and Control dialog box, selectAdvanced setup.
❖
Note: If you installed Sophos Enterprise Console by using Remote Desktop, you are not
prompted to continue the setup. You should select Start|Programs|Sophos|EM Library.
EM Library is displayed. The Welcome to EM Library view is open.
Follow the instructions in the following sections.
6.1 Create a software library
1.
In the Welcome to EM Library view, click Create library.
2.
In the Setup - EM Library (Welcome) dialog box, Local Installation is selected by default.
Click Next.
If you want to install a library on a remote Windows computer, select Remote Installation
and follow the instructions.
3.
In the Location dialog box, you can specify the folder where the library is installed and the
share name used for that folder. Click Next.
4.
In the Central Installation dialog box, you specify the location of the shared folder where EM
Library will place downloaded Sophos software, ready for distribution to networked computers.
Accept the defaults for now: a later section explains how to change the location to the share
that you created on the NetWare server. Click Next.
5.
In the Install Files dialog box, click Install to begin installing the library. A progress bar is
displayed. When the process is complete, click Finish.
When installation is complete, a SETUP message box is displayed. Click OK. This starts a wizard
that guides you through setting up an account that EM Library can use (see next section).
6.2 Select a user account
To select the account that EM Library uses to place software in central locations on your network:
1.
In the Welcome to the Network Account Configuration Wizard dialog box, click Next.
2.
In the Select network account type dialog box, click Create a new local account.EM Library
will create an account called EMLibUser1. This is a member of “Administrators”. Click Next.
3.
In the Enter account password dialog box, enter and confirm the password. It must be the
same as that which you set when you created the account on the NetWare server (see Create
the EM Library user account on the NetWare server (page 10)). Click Next.
13
Page 14
Sophos Endpoint Security and Control network startup guide: NetWare edition
4.
In the Completing the Network Account Configuration Wizard dialog box, click Finish.
Now you set up automatic downloading of software (see next section).
6.3 Set the library to download updates automatically
Now you configure the library to download and update software automatically.
6.3.1 Select where you will download updates from
1.
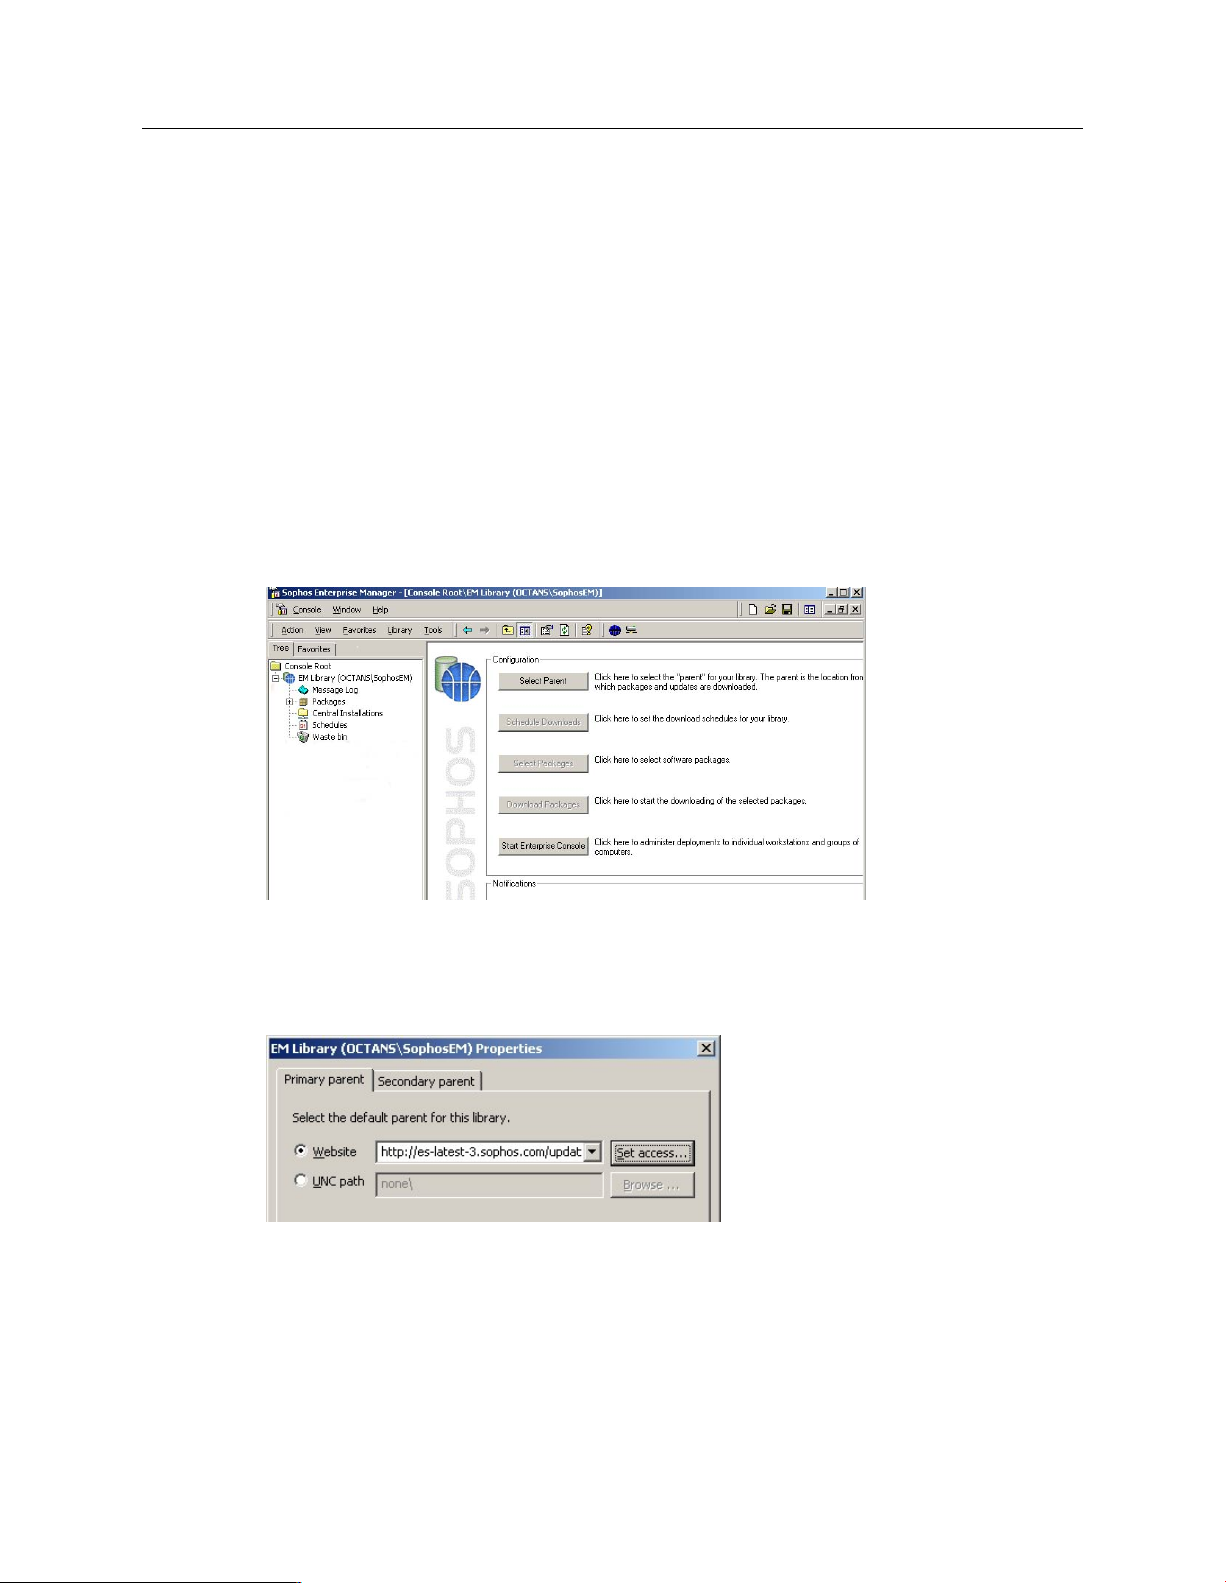
In the console, in the details pane, the Configuration view is displayed. Click Select Parent.
The parent is the location from which you download software.
14
2.
In the Primary parenttabbed page, select Website. Click the drop-down arrow and select
http://es-latest-3.sophos.com/update/. Click Set access.
Page 15
Sophos Endpoint Security and Control network startup guide: NetWare edition
3.
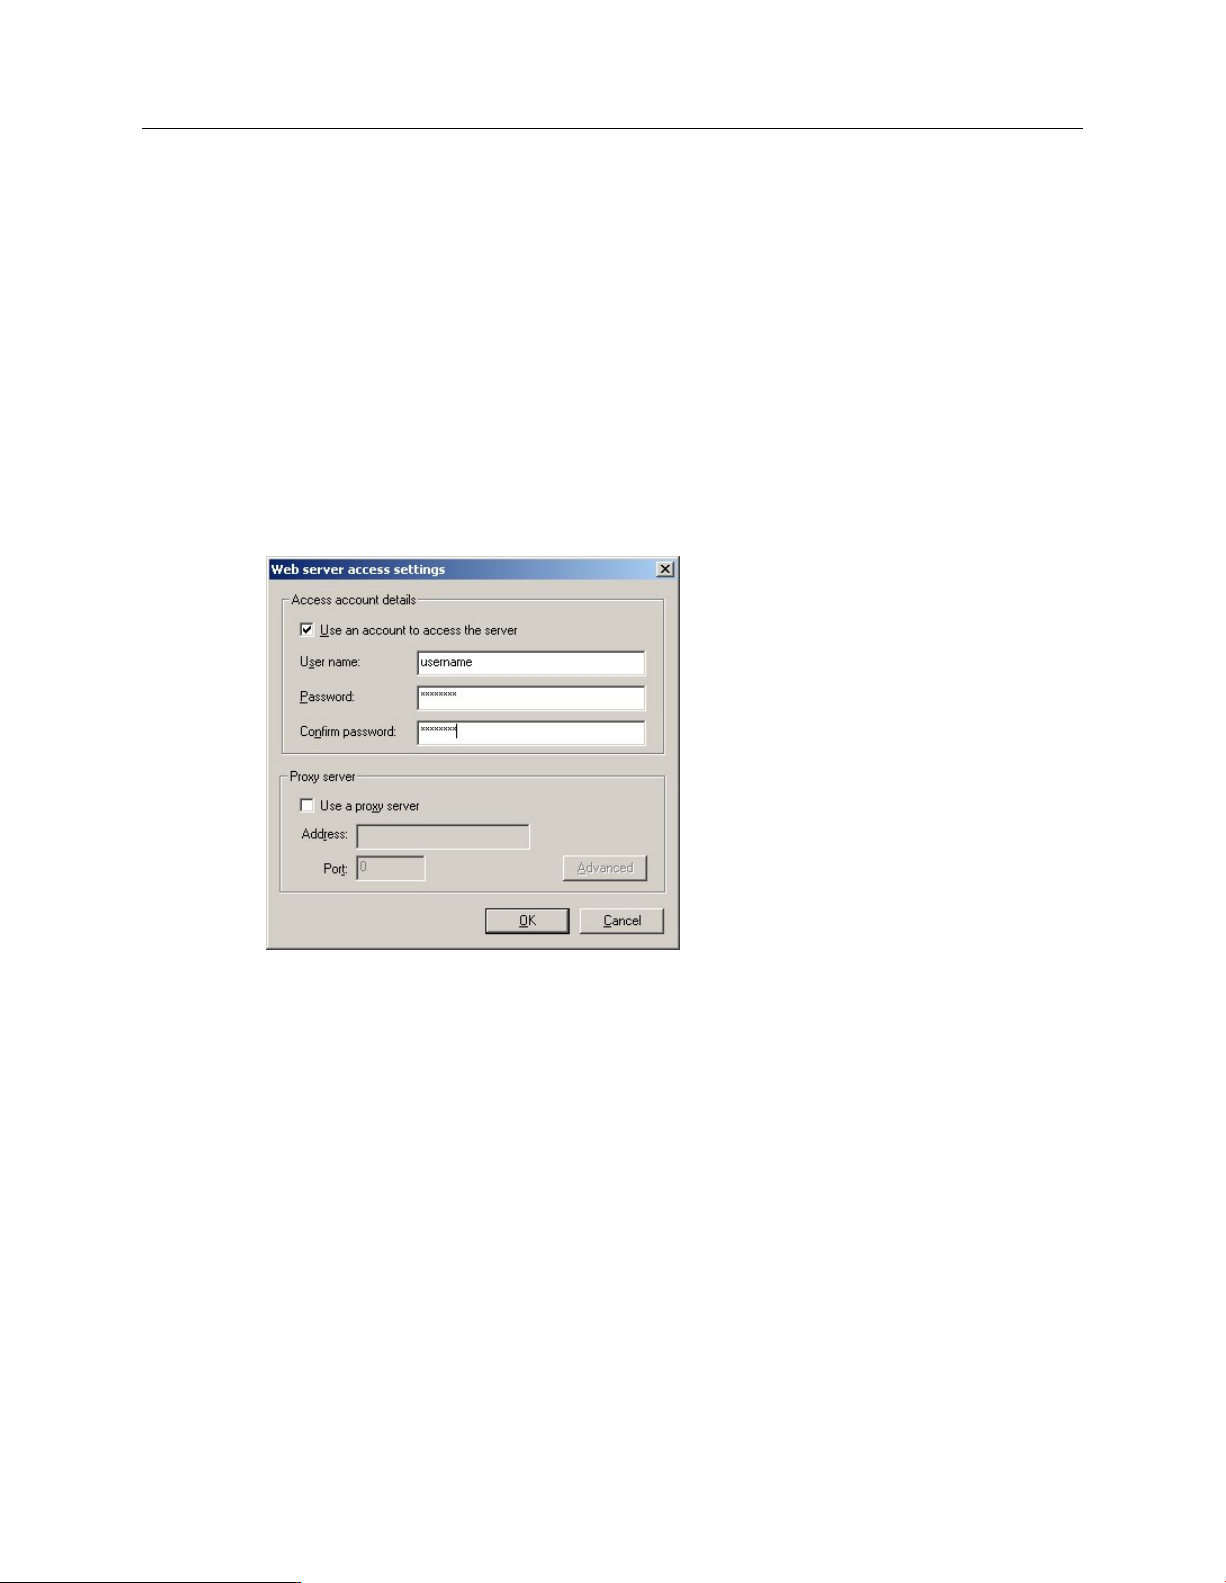
In the Web server access settings dialog box, do as follows:
a)
Select Use an account to access the server.
b)
In the User nameand Password fields, enter the username and password that are printed
on your license schedule.
c)
If you access the internet through a proxy server, select Use a proxy server and enter the
server’s address and port number. If you need to enter credentials to use the proxy, click
Advanced and enter the proxy username and password.
If you access the internet via a dial-up connection, make sure you have changed your internet
connection settings as described in EM Library supplement for companies with a dial-up
connection to the internet.
EM Library attempts to validate your account details. If it cannot (for example, because the details
are incorrect, or because no network connection has been made), it prompts you to make changes
and try again.
When the account details are validated, the primary parent is displayed in the Configuration view.
Next you schedule downloads (see next section).
15
Page 16

Sophos Endpoint Security and Control network startup guide: NetWare edition
6.3.2 Schedule the downloads
To schedule downloads:
1.
In the Configuration view, click Schedule Downloads.
2.
In the Update schedules tabbed page, click New schedule. A wizard guides you through the
steps for creating a schedule.
In the Schedule type dialog box, Sophos recommends that you select Frequent updates, as
this ensures that you have the most up-to-date protection possible.
3.
When the schedule has been set up, it is displayed in the list on the Update schedules tabbed
page. Ensure that the check box beside it is selected and click OK.
Note: You can activate only one schedule (by selecting its check box) at a time.
Next select the software you want EM Library to download and update (see next section).
6.3.3 Select the software you want to download
1.
In the Configuration view, click Select Packages.
Packages are the files needed to install and update Sophos Anti-Virus and Sophos Client Firewall.
There is a package for each operating system.
2.
In the Packages dialog box, the default packages for Windows and Mac are shown. Do as
follows:
a)
If you need to see other packages, for example for NetWare, clear the Show default packages
only check box.
b)
Select the check box(es) beside the packages you want. Click OK.
For Sophos Anti-Virus for UNIX, version 7, select the relevant package that says
(Manageable).
16
The Sophos Endpoint Security and Control package includes Sophos Anti-Virus, Sophos Client
Firewall, and Sophos Network Access Control.
Page 17
Sophos Endpoint Security and Control network startup guide: NetWare edition
Next select where EM Library places downloads (see next section).
6.3.4 Select where you will place downloads
When EM Library downloads software, it places it in central installation directories (CIDs), from
which it can be distributed across your network. By default, EM Library creates these CIDs on the
same computer as the library.
However, Sophos recommends that you change the default directories to subdirectories of the
directory that you created on the NetWare server (see Create the EM Library user account on the
NetWare server (page 10) ), as follows.
1. In the console tree, click Central Installations.
The default CIDs created by EM Library are displayed.
2. Right-click the CID that you want to change and select Properties.
17
Page 18
Sophos Endpoint Security and Control network startup guide: NetWare edition
3.
In the Properties dialog box, click the Location tab. Click Custom CID location. Replace the
InterChk share with the path of the directory on the NetWare server.
For example, the default location of the CID for the Sophos Anti-Virus for NetWare package
is
\\<Windows server>\InterChk\NLMINST
which should be changed to
\\<NetWare server>\SYS\SWEEP\NLMINST
where <Windows server> and <NetWare server> are the names of the Windows and NetWare
servers, respectively.
4.
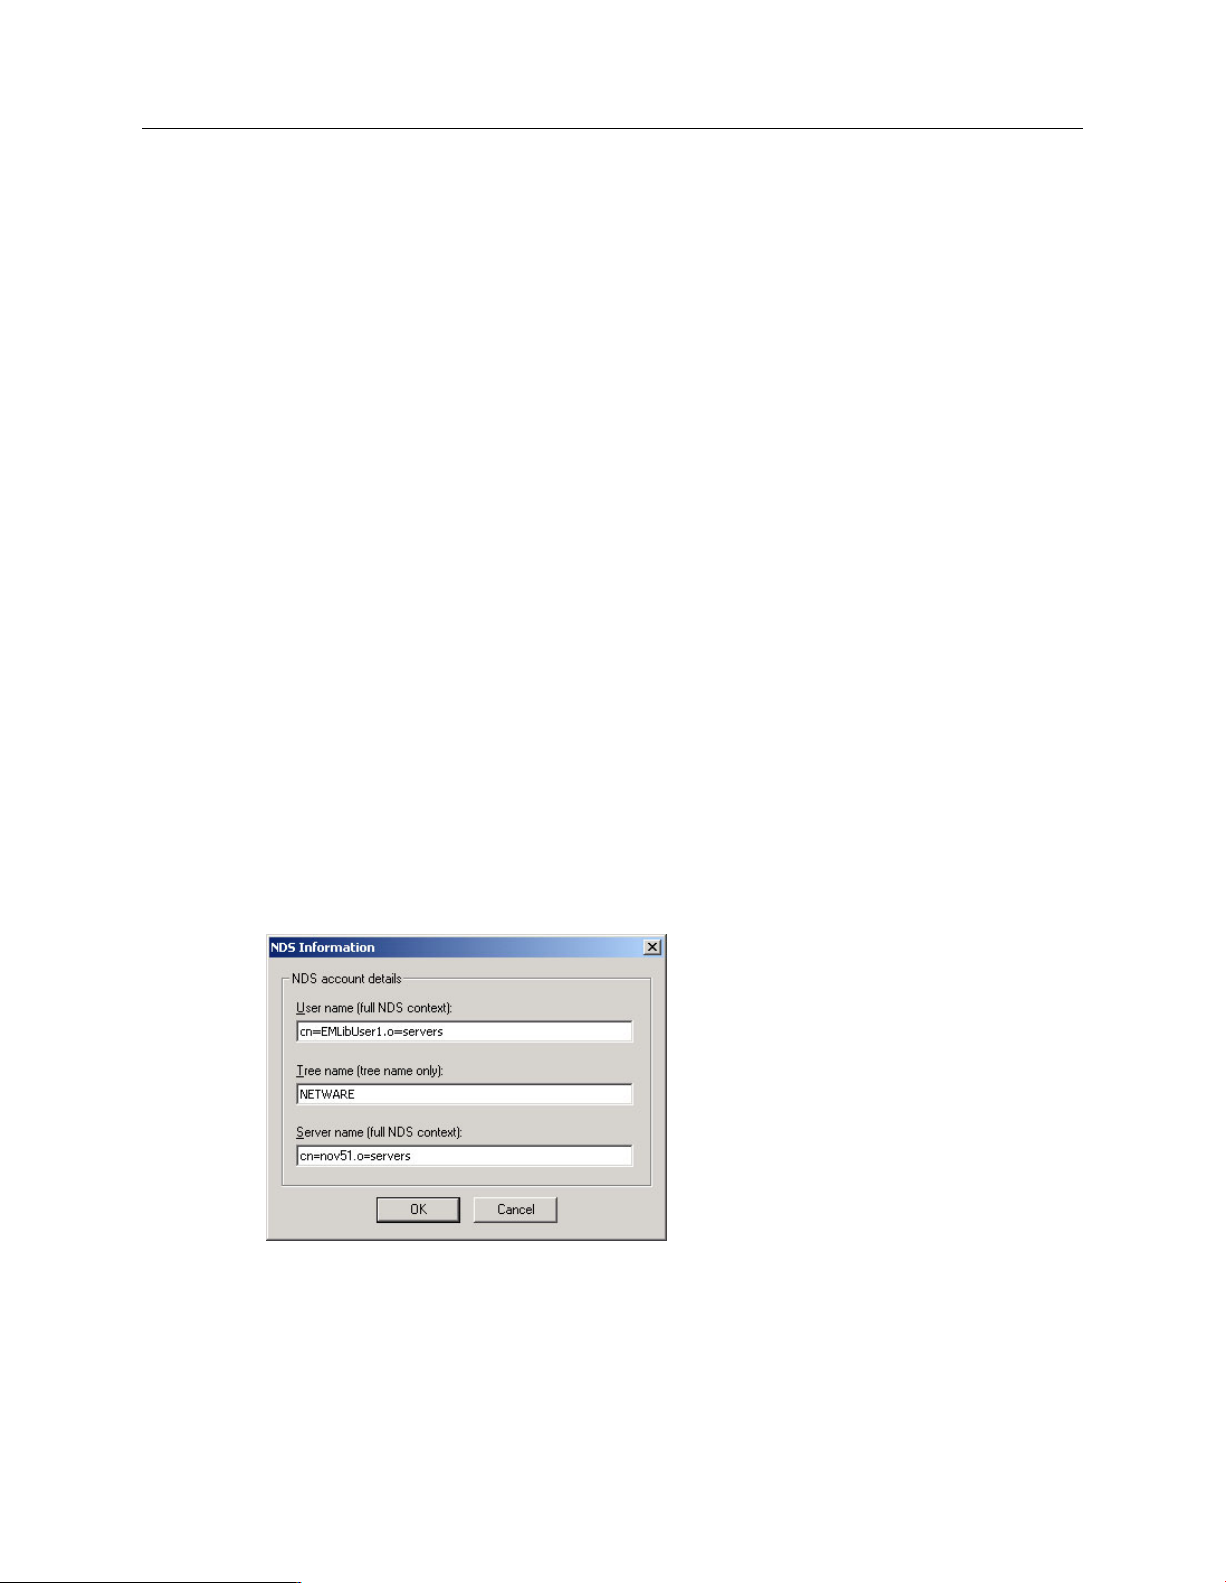
Click the Credentials tab. Click NDS details. In the NDS Information dialog box, enter the
details of the EM Library user account.
You must enter:
■
The fully distinguished User name as noted in step 5 of Create the EM Library user account
on the NetWare server (page 10). For example:
cn=<user>.o=<Organization>
■
The Tree name.
■
The fully distinguished Server name as noted in step 10 of Create the EM Library user account
on the NetWare server (page 10). For example:
cn=<NetWare server>.o=<Organization>
Click OK.
18
Page 19
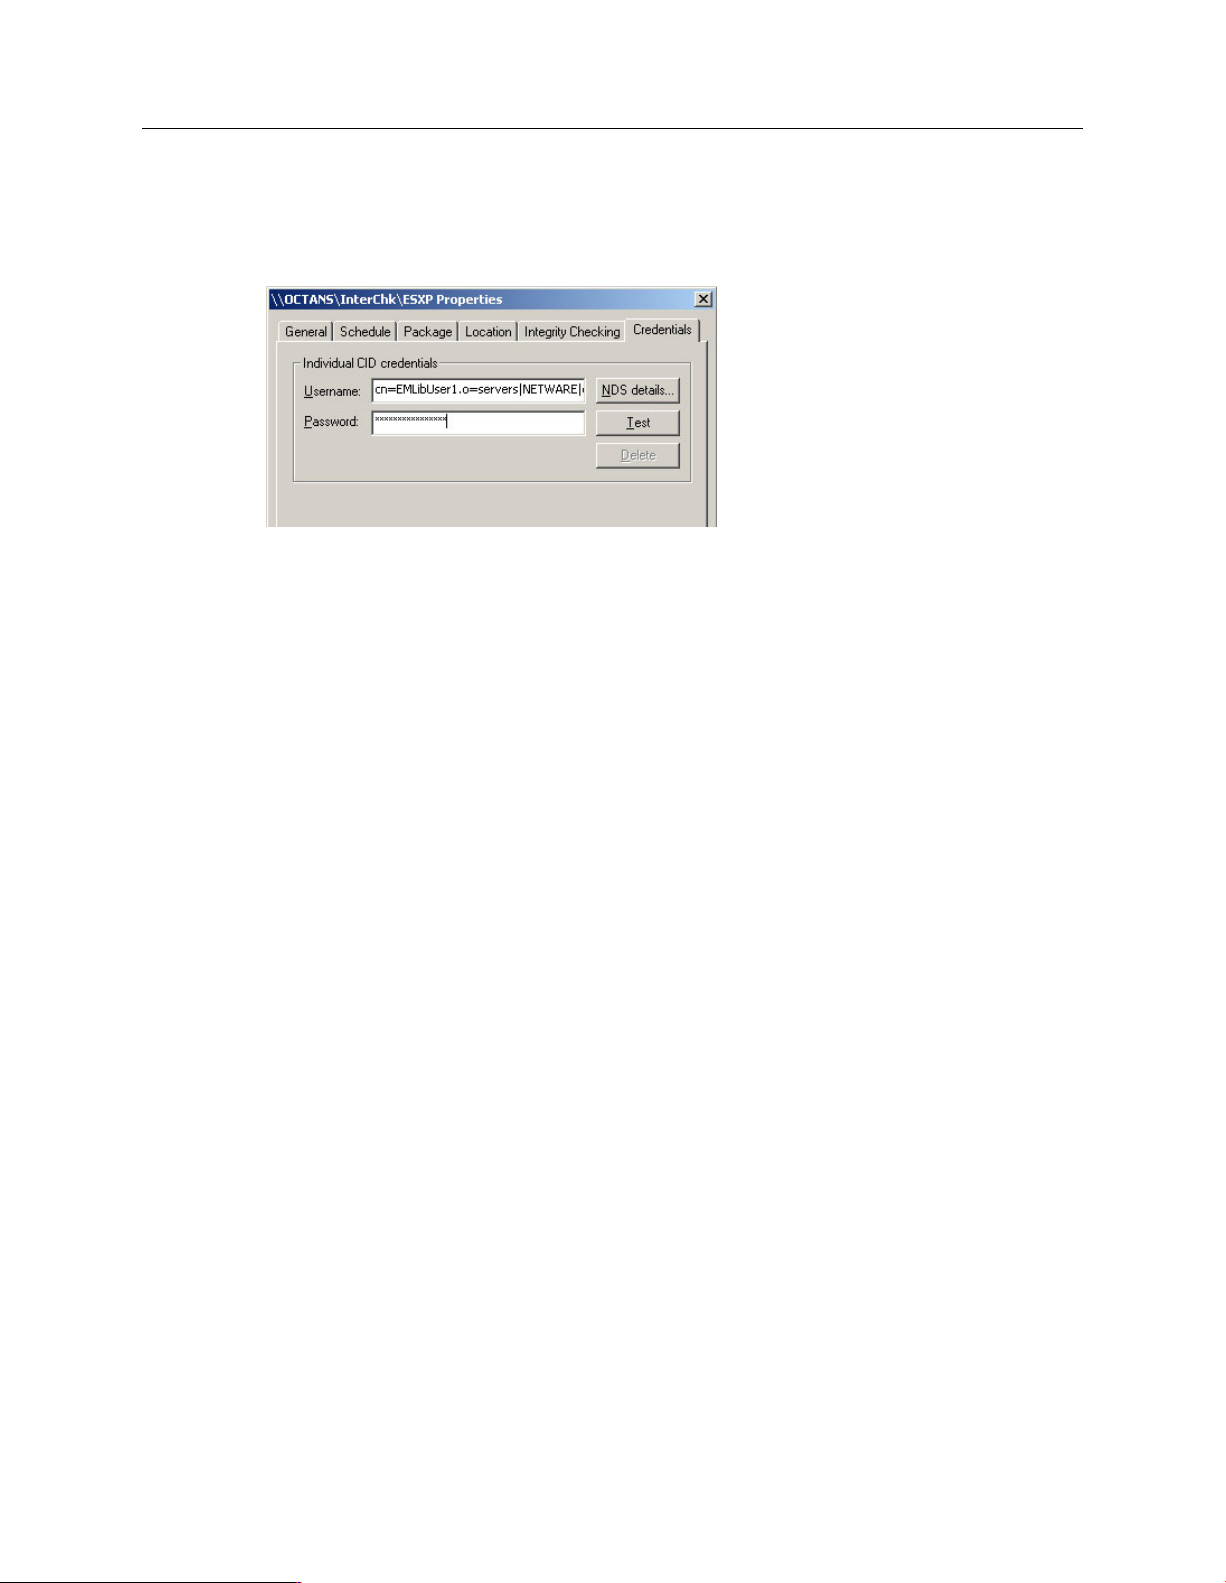
Sophos Endpoint Security and Control network startup guide: NetWare edition
5.
In the Properties dialog box, click Test to check that the account can access the CID. Click
OK to close the Properties dialog box.
6. In the details pane, check that the new CID location is displayed.
Repeat steps 1 to 6 for all the packages that you are downloading. You must download one of the
packages for Windows 2000 or later to be able to protect the computer that is running EM Library.
Next download the software for the first time (see next section).
6.4 Download software
Now download Sophos software and place it in central installation directories, as follows:
1.
In the Configuration view, click Download Packages.
2.
In the EM Library message box, click Yes.
The Updating packages from the parent progress bar is displayed.
When downloading is complete, the Updating your central installations progress bar is displayed.
You are ready to pre-configure your anti-virus software and install it on your networked computers.
Note: If you turned off User Account Control before installation, you can now turn it on again.
Note: Even if you do not want to manage your anti-virus software from a central console, you
should set up the updating and anti-virus policies for Windows computers as explained in Create
groups for your computers (page 20) and Set up policies (page 21). You should then protect a few
Windows computers that are typical of those on your network (Protect computers with a script
(page 29)), then set up policies for suspicious behavior (Detect suspicious behavior (page 35)),
suspicious files (Scan for suspicious files (page 37)), adware/PUAs (Scan for adware and potentially
unwanted applications (PUAs) (page 38)), and controlled applications (Scan for controlled
applications (page 40)). Then protect the rest of your Windows computers (Protect Windows
computers without using Enterprise Console (page 46)) and protect your NetWare servers (Protect
NetWare servers (page 31)).
Click the Start Enterprise Console button in the Configuration view and go to the next section.
19
Page 20
Sophos Endpoint Security and Control network startup guide: NetWare edition
7 Create groups for your computers
You can protect computers only if they are in groups, with policies applied to them.A group holds
a number of computers (which do not all have to run the same operating system). The computers
in the group use the same policies and update from the same location.
You can use groups to put together computers that need a special configuration. For example,
you could have a group for Exchange servers on which you do not want to run on-access scanning.
Note: The computers on which you want to install Sophos Anti-Virus for Mac OS X, version 4.9
must be in a different group from those computers on which you want to install Sophos Anti-Virus
for Mac OS X, version 7.
1.
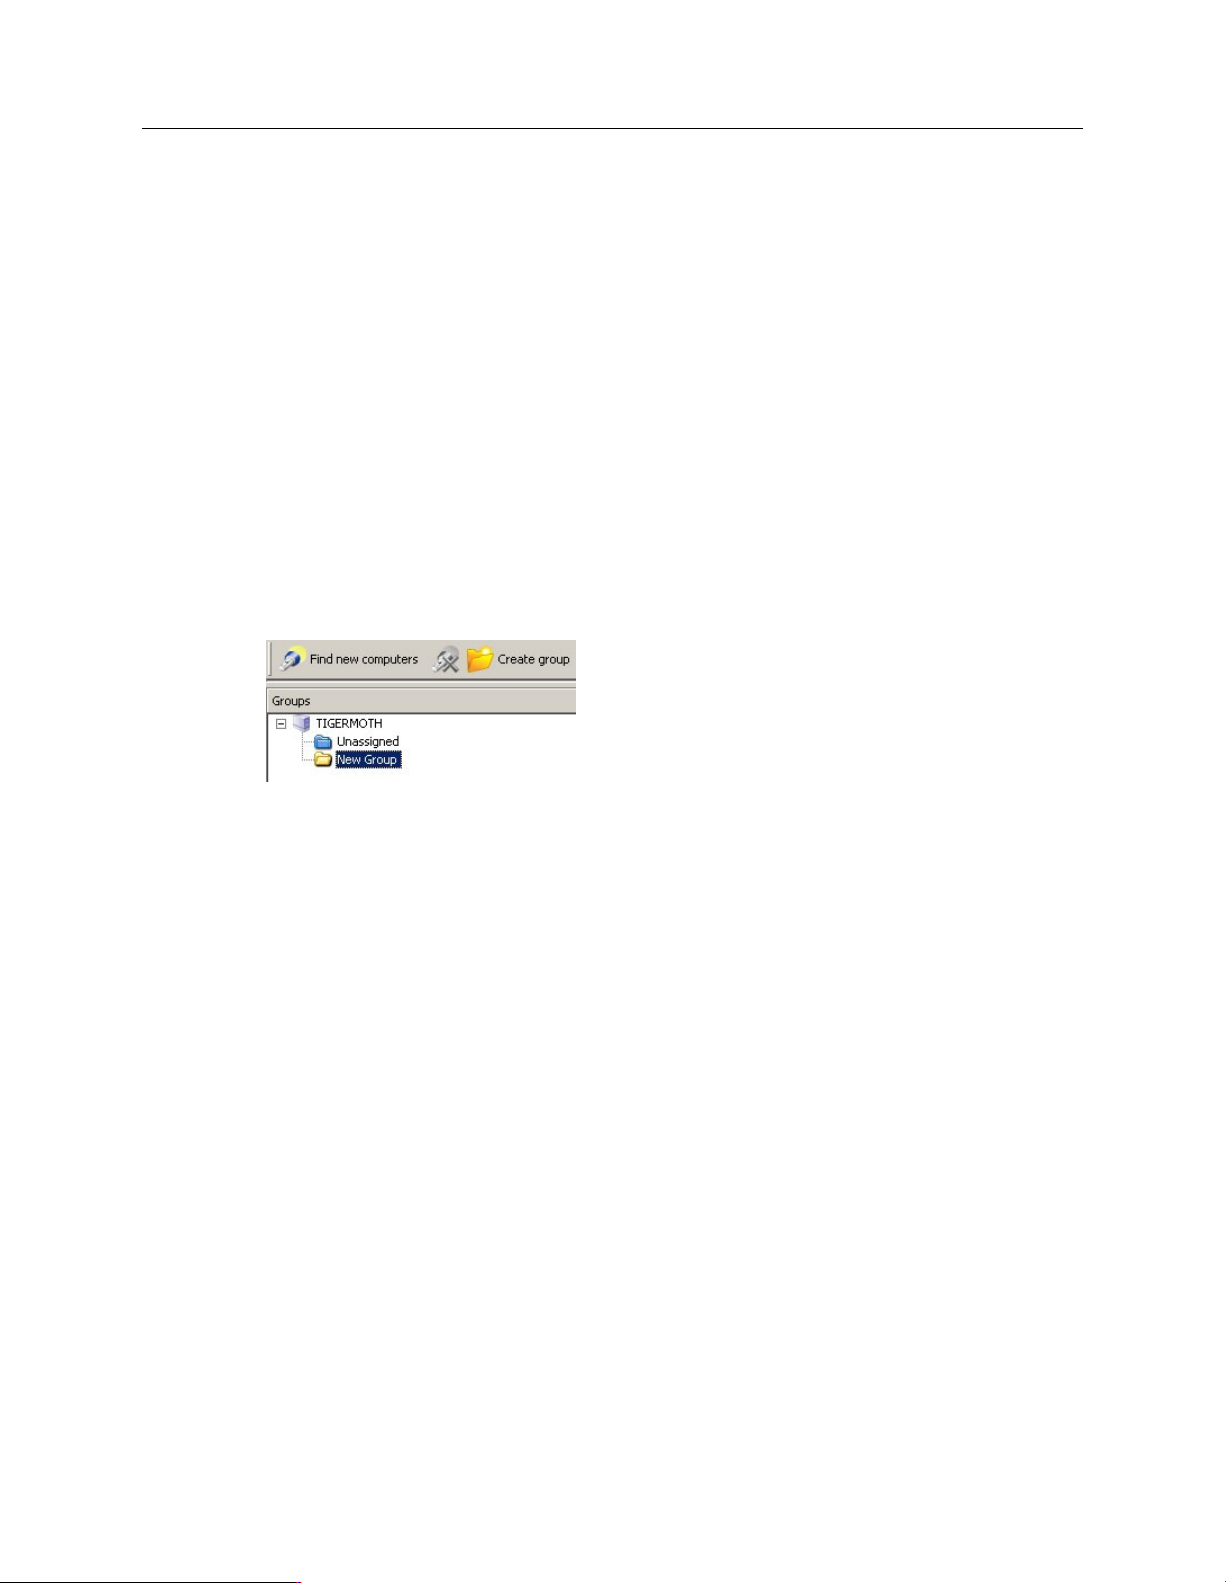
To create your first group, click the Create group icon.
2.
A New Group is added in the left-hand pane, with its name highlighted. Type in the name you
want to use for the group.
3. To create further groups, go to the left-hand pane. Select the server shown at the top if you
want another top-level group. Select a group if you want a sub-group within it. Then repeat
step 1.
Each new top-level group has a set of default policies applied to it. A new sub-group initially uses
the same settings as the group it is within.
Now you can create policies.
20
Page 21

Sophos Endpoint Security and Control network startup guide: NetWare edition
8 Set up policies
Note: A policy is a collection of settings that can be applied to the computers in a group or groups.
When groups are created, default policies are applied.You can edit these policies or create new
policies. This section describes:
■
How to create or edit a policy.
■
How to apply a policy to your computer groups.
■
What the default policies are and whether you need to change them.
8.1 Create or edit a policy
Note: You cannot create NAC policies. You can only edit them.
To create or edit a policy:
1.
In the Policies pane (bottom, left-hand side of the window), do one of the following:
■
To create a new policy, right-click the type of policy you want, for example, Updating Policy,
and select Create policy.
■
To edit a default policy, double-click the type of policy you want to edit. Then highlight
Default.
If you created a policy, aNew Policy is added to the list, with its name highlighted. Type a name.
2. Double-click the policy. Enter the settings you want.
Now you need to apply your policy to a computer group (see next section).
8.2 Apply policies to groups
1.
In the Policies pane, highlight the policy.
2. Click the policy and drag it onto the group to which you want to apply the policy.
8.3 Default policies
This section tells you about the default policies and about any changes you should make.
21
Page 22

Sophos Endpoint Security and Control network startup guide: NetWare edition
8.3.1 Updating policy
You must set up updating policies as follows:
1. In the Policies pane, double-click Updating and then double-click Default. This enables you
to edit the default policy, which is already applied to your new group(s).
Alternatively, you can create a new policy. Right-click Updating and select Create policy.
Note: The computers on which you want to install Sophos Anti-Virus for Mac OS X, version
4.9 must use a different updating policy from those computers on which you want to install
Sophos Anti-Virus for Mac OS X, version 7.
2.
In the Updating policy dialog box, select an operating system used by computers in that group,
for example, Windows 2000 and later. Click Configure.
3. Click the Primary server tab. In the Address field, click the drop-down arrow and select the
directory from which computers will fetch updates, for example, the directory
\\<NetWare server>\SYS\SWEEP\SAVSCFXP for Windows 2000 or later. Enter the Username
and Password for the EM Library user account that you created.
The username should be NDS fully distinguished in the form
<account>|<tree>|<NetWare server>
22
Note: Sophos Anti-Virus for Mac OS X, version 4.9 must update from the directory ESOSX,
and version 7 must update from ESCOSX.
Page 23

Sophos Endpoint Security and Control network startup guide: NetWare edition
8.3.2 Anti-virus and HIPS policy
By default, Sophos Anti-Virus will
Deny access to any file that contains viruses/spyware.
■
Detect suspicious behavior by programs that are running.
■
Send an alert to the console whenever a threat is detected.
■
You may want to
Turn off on-access scanning on servers where performance might be affected. See support
■
knowledgebase article 12421 (http://www.sophos.com/support/knowledgebase/article/12421.html.
Block suspicious behavior. See Detect suspicious behavior (page 35).
■
Scan for suspicious files. See Scan for suspicious files (page 37).
■
Scan for adware/potentially unwanted applications. See Scan for adware and potentially unwanted
■
applications (PUAs) (page 38).
To edit the anti-virus and HIPS policy:
1. Check which anti-virus and HIPS policy is used by the group(s) of computers you want to
configure. To do this, find the group in theGroups pane, right-click it and select View group
policy details.
2. In the Policies pane, double-click Anti-virus and HIPS. Then double-click the policy you want
to change.
3.
In the Anti-virus and HIPS policy dialog box, edit the settings.
8.3.3 Application control policy
By default, application control is not enabled. For details of how to set it up, see Scan for controlled
applications (page 40).
8.3.4 Firewall policy
By default, the firewall blocks all non-essential connections. Therefore you must create your own
firewall policy. For details of how to do this, see Set up a firewall policy (page 34).
8.3.5 NAC policy
By default, computers are allowed to access the network (unless you have modified the default
policy or changed the “policy mode” in the NAC server). If you want to set conditions that
computers must comply with before they can access the network, you configure and apply one of
the NAC policies. See Set up network access control (page 42).
23
Page 24

Sophos Endpoint Security and Control network startup guide: NetWare edition
9 Search for computers and add them to groups
Important: If you do not intend to use the console for installing or managing your anti-virus
software, do not continue. You should protect a few Windows computers that are typical of those
on your network as explained in Protect computers with a script (page 29), then set up policies for
suspicious behavior (Detect suspicious behavior (page 35)), suspicious files (Scan for suspicious files
(page 37)), adware/PUAs (Scan for adware and potentially unwanted applications (PUAs) (page
38)), and controlled applications (Scan for controlled applications (page 40)). Then protect the
rest of your Windows computers (Protect Windows computers without using Enterprise Console
(page 46)) and protect your NetWare servers (Protect NetWare servers (page 31)).
You must search for computers on the network before Enterprise Console can protect and manage
them.
Important: This section assumes that you use the “Find” function, but you can import computers
from a file (File|Import computers from file).You must do this if the network doesn’t use
Microsoft networking. For details, see the Enterprise Console Help.
1. Click the Find new computers icon in the toolbar.
2. Select the method you want to use to search for computers.
3. If you selected one of the Find options, you are prompted to enter a username and password.
You need to do this if you have computers (for example,Windows XP Service Pack 2) that
cannot be accessed without account details. The account must have full administrative rights
on the target Windows XP computer.
4. Next select the workgroups where you want to search for computers. Click OK.
The console searches for computers and adds them to the Unassigned folder.
5.
Click the Unassigned folder. Select the computers you want and drag and drop them onto
your chosen group in the Groups pane.
You can put computers with different operating systems in the same group.
A wizard is launched to help you protect the computers (see next section).
24
Page 25

Sophos Endpoint Security and Control network startup guide: NetWare edition
10 Protect computers using Enterprise Console
Now you protect your computers by installing Sophos security software on them.
Important: This section assumes that the computers have the Microsoft networking client installed.
If they don’t, you must protect them manually (Protect Windows computers with manual installation
(page 49)) or using a script (Protect computers with a script (page 29)).
10.1 Prepare to install security software
Before you begin, you may need to:
Prepare for removal of third-party security software.
■
Prepare for removal of a third-party update tool.
■
Prepare for anti-virus software installation.
■
Prepare for firewall installation.
■
10.1.1 Prepare for removal of third-party software
As part of the deployment of Sophos security software, you can optionally decide to remove
previously installed third-party security software automatically, if it is supported for removal.
Note: The installer cannot remove all third-party products. To see which it can remove, go to
http://sec.p.link.sophos.com/k/en/crt.
Note: If you have another vendor’s network access control software installed, you must remove
it before you begin. The Sophos installer cannot remove it automatically.
If you plan to use the automatic removal option, you should do as follows first:
If computers are running another vendor’s software, ensure that its user interface is closed.
■
If computers are running another vendor’s firewall or HIPS product, ensure that it is turned
■
off or configured to allow the Sophos installer to run.
If computers have another vendor’s update tool installed and you wish to remove it, follow
■
the instructions in Removing a third-party update tool below. This ensures that the tool does
not reinstall another vendor’s software automatically.
Note: You will have to restart any computers from which you remove third-party anti-virus
software.
10.1.2 Prepare for removal of a third-party update tool
If you want to remove another vendor’s update tool, you must edit the configuration file that the
Sophos installer will use.
25
Page 26

Sophos Endpoint Security and Control network startup guide: NetWare edition
Note: If computers are running another vendor’ s firewall or HIPS product, you may need to leave
that vendor’s update tool intact. See that vendor’s documentation for clarification.
1. In the Central Installation Directory from which computers will install and update Sophos
software, find the data.zip file.
2. Extract the crt.cfg configuration file from data.zip.
3. Edit the crt.cfg file to change the line reading “RemoveUpdateTools=0” to
“RemoveUpdateTools=1”.
4. Save your changes and save crt.cfg to the same directory that contains data.zip.
Do not put crt.cfg back into data.zip or it will be overwritten the next time the data.zip file is
updated.
The Sophos installer is now configured to remove any update tool.
10.1.3 Prepare for anti-virus software installation
As well as ensuring that computers meet the general system requriements, you must perform
further steps before you can install software on them automatically.
Windows 2000, XP Pro, 2003 and NT computers
Ensure that these computers:
Run the Remote Registry, Server, Computer Browser and Task Scheduler services.
■
Have the C$ admin share enabled.
■
Have “Simple File Sharing” turned off (XP only).
■
Note: Sophos strongly recommends the use of Novell NetWare clients on Windows computers,
rather than Microsoft NetWare clients.
Windows XP Service Pack 2 computers
On Windows XP Service Pack 2 computers, you must:
Enable “File and Printer Sharing for Microsoft Networks”.
■
Make sure TCP ports 8192, 8193 and 8194 are open.
■
Restart the computer to make the changes effective.
■
Windows Vista computers
On Windows Vista computers, you must:
Ensure that the Remote Registry Service is started and that its startup type is set to Automatic.
■
This service is not on by default on Windows Vista.
26
Turn off User Account Control. This is accessed via Start|Control Panel|User Accounts|Turn
■
User Account Control on or off. When installation is complete, you should turn this back on.
Page 27

Sophos Endpoint Security and Control network startup guide: NetWare edition
Open Windows Firewall with Advanced Security. This is accessed via Start|Control
■
Panel|Administrative Tools. Change the Inbound rules to enable the processes below. When
installation is complete, disable them again.
Remote Administration (NP-In) Domain
Remote Administration (NP-In) Private
Remote Administration (RPC) Domain
Remote Administration (RPC) Private
Remote Administration (RPC-EPMAP) Domain
Remote Administration (RPC-EPMAP) Private
10.1.4 Prepare for firewall installation
If you want to use Sophos Client Firewall, you should plan to install it on only a few sample
computers first. The firewall initially prevents network access and must be configured before you
install it on all computers.
For full details, see Sophos support knowledgebase article 14197
(http://www.sophos.com/support/knowledgebase/article/14197.html).
Note: You have to restart any computers on which you install Sophos Client Firewall.
10.2 Install security software
1.
Select the computers you want to protect. Right-click and selectProtect computers to launch
a wizard.
The wizard is launched automatically if you move unprotected computers into a group.
2.
In the Welcome dialog box, click Next.
3.
In the Select security software dialog box, select the software you want. Leave Remove
third-party security software selected if you want to have another vendor’ s software removed
automatically. Click Next.
Before you can install Sophos Network Access Control, you must click the link to Set up the
NAC server URL. Enter the URL if it is not already displayed.
Note: If Sophos NAC is installed on more than one server, use the URL of the computer
running the application, not the computer with the database.
Third-party software removal uninstalls only products with the same functionality as those
you install.
4. If you selected the firewall or network access control software, you are prompted to check that
your license entitles you to use it. Click OK to continue.
27
Page 28

Sophos Endpoint Security and Control network startup guide: NetWare edition
5.
In the Protection summary dialog box, any problems with installation are shown in
theProtection issues column. Note the problems and Click Next.
Common problems are:
Automatic installation is not possible on that operating system. Perform a manual
■
installation. See Protect Windows computers with manual installation (page 49) or Protect
Mac OS X computers (page 50) or Protect Linux computers (page 51).
Operating system could not be determined.
■
The computers are running a firewall (usually this is the case on Windows XP SP2
■
computers).
6.
In the Protect computers credentials dialog box, enter details of an account that can be used
to install software on the computers. Click Finish.
It must:
■
Have local administrator rights on computers you want to protect.
■
Be able to log on to the computer where you installed the management server.
■
Have read access to the location that computers will update from (to check this location,
in the Policies pane, double-click Updating, then double-click Default).
Installation is staggered, so that the process may not be complete on all the computers for some
time.
7.
When installation is complete, look at the list of computers again. In the On-access column,
you should see the word “Active”: this shows that the computer is running on-access virus
scanning.
If you have installed the firewall for the first time, make sure you follow the instructions in Set
up a firewall policy (page 34).
Computers need to be restarted to scan files accessed by DFS (Windows 2000/XP) or via
non-Microsoft file systems (Windows 2000).
8. Repeat the above steps for each group of computers.
You should now protect your NetWare server(s) (Protect NetWare servers (page 31)).
28
Page 29

Sophos Endpoint Security and Control network startup guide: NetWare edition
11 Protect computers with a script
This section describes in brief how to protect computers by using a script.
You can protect computers with anti-virus software (and with the firewall if your licence includes
it) by running the installation program with a script or a systems management software program.
Enterprise Console will subsequently manage and update these installations, provided that you
have put the computers into a group or groups.
You need to:
Find the appropriate installation program.
■
Follow the instructions for your operating system or systems.
■
11.1 Finding the installation program you need
The installation program is in the directory where EM Library places Sophos updates. To check
which directory this is, look in the computer list and find the computer(s) you want to protect.
Click the Update details tab and look in the “Primary server” column.
11.2 Protect Windows computers with a login script
1. You must enter in the login script the username and password that you used when you set up
automatic updating (Updating policy (page 22)). Sophos recommends that you use the Sophos
obfuscation utility to obfuscate the username and password so that they are not obvious in the
login script. If you don’t want this extra level of security, continue to the next step.
Otherwise, the utility and instructions for the utility’s use are on the Sophos Network Install
CD, in the Tools folder, or in the sec31\Tools folder that is created when the Sophos Endpoint
Security and Control Network Installer is downloaded from the website and extracted. When
you have obfuscated the username and password, continue to the next step.
2. At a Windows workstation, run Nwadmn32.exe.
3.
In the NetWare Administrator window, right-click the Organization name to display a menu.
Select Details.
4.
In the Organization dialog box, click Login Script.
5. If you obfuscated the username and password in step 1, in theLogin Script text box, type (the
command should be all on one line):
<path>\setup.exe -ouser <obfuscated username> -opwd
<obfuscated password> -login -s
where <path> is the location of the central installation directory, and <obfuscated username>
and <obfuscated password> are the obfuscated username and password that you created in
step 1.
29
Page 30

Sophos Endpoint Security and Control network startup guide: NetWare edition
6. If you did not obfuscate the username and password in step 1, in the Login Script text box,
type:
<path>\setup.exe -user <username> -pwd <password> -login -s
where <path> is the location of the central installation directory, and <username> and
<password> are the username and password that you used when you set up automatic updating
(Updating policy (page 22)).
7. Specify further setup options as required by adding the following options to the setup command:
DescriptionOption
Uninstall third-party security software-crt R
Force a reinstallation of Sophos Anti-Virus-rlogin instead of -login
-mng no
-nac http://<NAC server address>
Note: If Sophos NAC is installed on more than one server, use the address of the computer
running the application, not the computer with the database.
8. If you have any Windows 95 computers, you must install the Windows Socket 2 Update on
them before installation. You should visit
http://download.microsoft.com/download/0/e/0/0e05231b-6bd1-4def-a216-c656fbd22b4e/W95ws2setup.exe
and place a copy of the update on your NetWare server. Then insert a line in the login script,
before the setup command, to run this update.
9. Click OK.
10. Close Nwadmn32.exe.
11.3 Protect Mac OS X computers
For Mac OS X computers, use Apple Remote Desktop. Go to the central installation directory and
copy the installer to the computer running Apple Remote Desktop before using it.
Do not manage the computers with
Enterprise Console
Install firewall (Windows 2000 or later only)-scf
Install network access control (Windows 2000 or
later only)
30
You should now protect your NetWare server(s) (see next section).
Page 31

Sophos Endpoint Security and Control network startup guide: NetWare edition
12 Protect NetWare servers
To protect NetWare servers, you must:
■
Install Sophos Anti-Virus.
■
Load Sophos Anti-Virus.
Note: These instructions assume that you downloaded Sophos Anti-Virus for NetWare when you
set up your library. If not, open the library and follow the instructions in the following sections:
Select the software you want to download (page 16), Select where you will place downloads (page
17), and Download software (page 19).
12.1 Install Sophos Anti-Virus
To install Sophos Anti-Virus:
1. Log on to the NetWare server with write access rights equivalent to ADMIN.
2. Go to \\<NetWare server>\SYS\SWEEP\NLMINST where <NetWare server> is the name of
the NetWare server.
3. Copy all the files there to \\<NetWare server>\SYS\SWEEP.
You have installed Sophos Anti-Virus.
Now load Sophos Anti-Virus.
12.2 Load Sophos Anti-Virus
To load Sophos Anti-Virus:
1. At the server console, or using RCONSOLE from a workstation, add the default installation
directory to the search path:
SEARCH ADD SYS:\SWEEP\
2. Type:
LOAD SWEEP
Sophos recommends that you add the commands in this step and the previous step to the file
AUTOEXEC.NCF in the same order, so that Sophos Anti-Virus will be restarted if the server
is restarted.
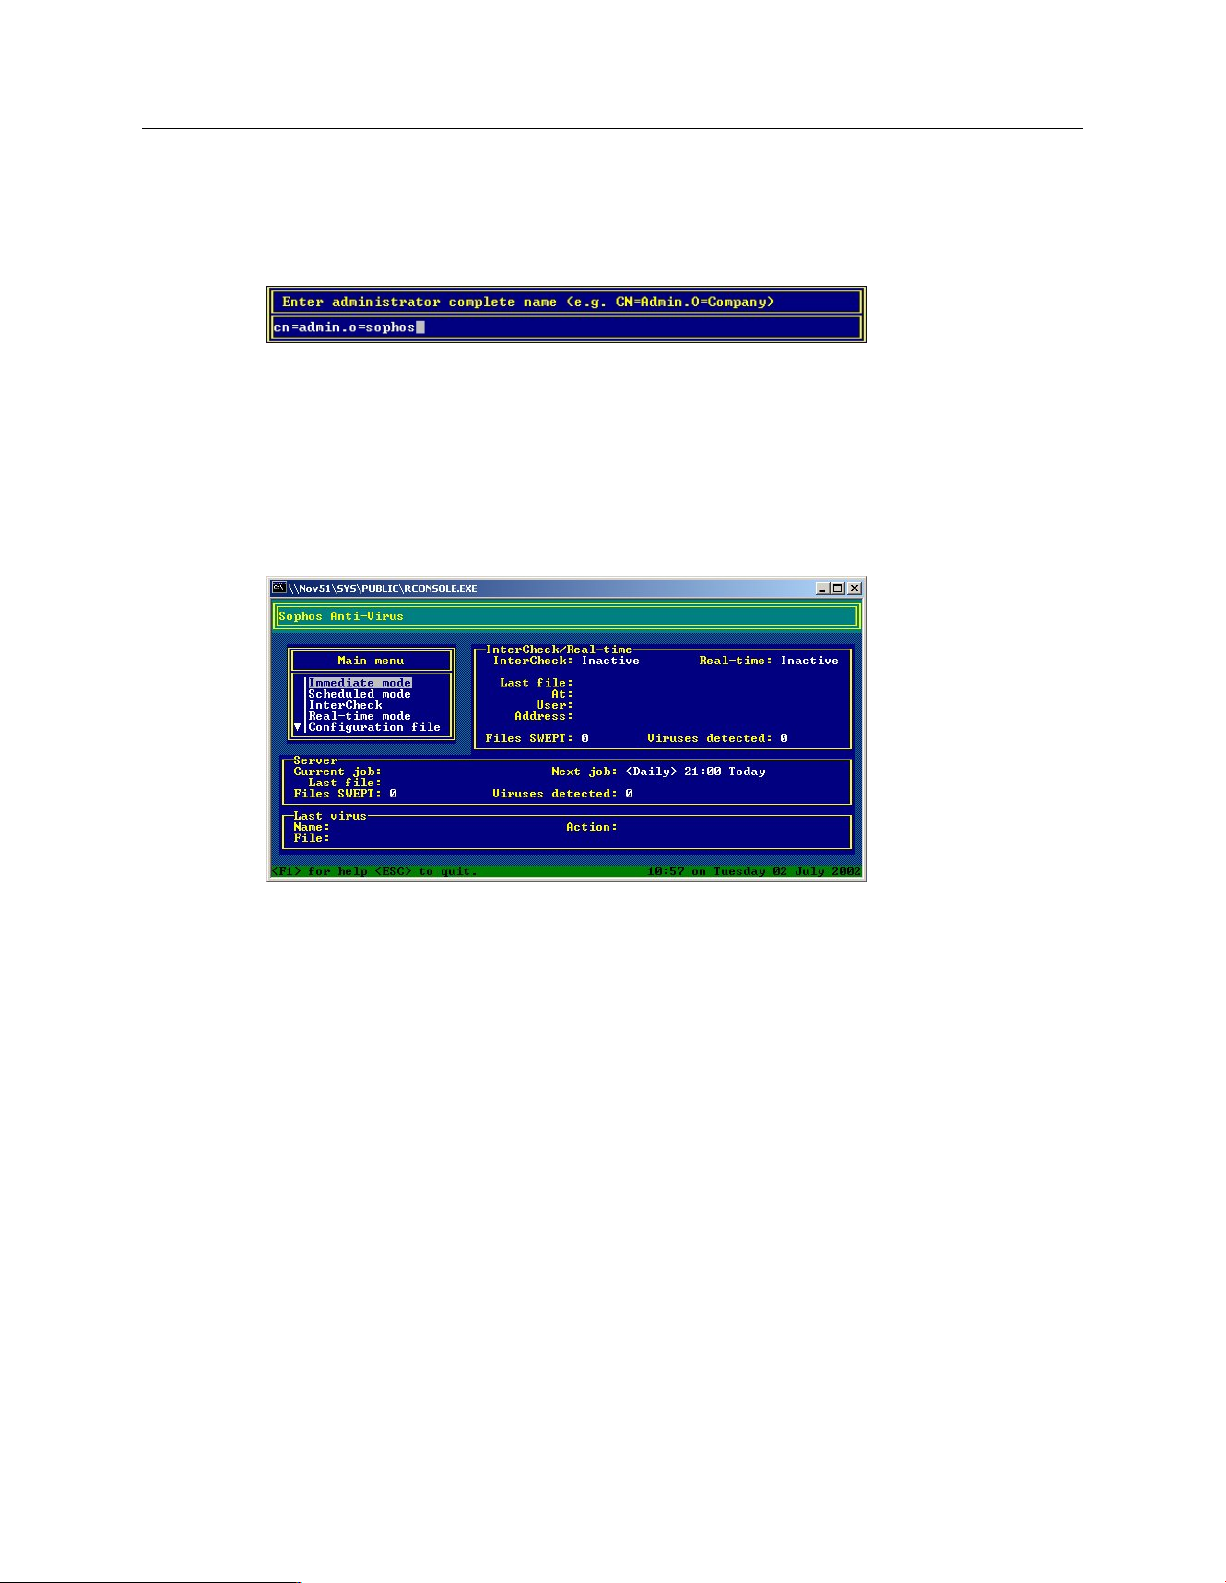
3. The first time you load Sophos Anti-Virus, it prompts you to enter Administrator details. Press
any key.
31
Page 32
Sophos Endpoint Security and Control network startup guide: NetWare edition
4. At the login prompt, type the fully qualified distinguished name of an Administrator, and press
Return.
5.
Type the Administrator password and press Return.
Make a note of the fully qualified distinguished name of the Administrator and (in a secure
place) the password. Sophos Anti-Virus will log in as this user every time it is started, enabling
it to see the complete eDirectory tree.
The Sophos Anti-Virus screen is displayed.
32
You have loaded Sophos Anti-Virus. From now on Sophos Anti-Virus will be updated automatically.
You should now check that computers are fully protected and up to date (see next section).
Page 33

Sophos Endpoint Security and Control network startup guide: NetWare edition
13 Check computers are protected
To check that computers are protected, do as follows:
1. Select the group of computers you want to check.
2.
If you want to check computers in sub-groups of the group, select At this level and below in
the drop-down menu.
3. Check the status computers as follows:
a)
Look in the On-access column. If you see “Active”, the computer is protected by on-access
scanning. If you see a gray shield and “Inactive”, it is not.
You may decide to have on-access scanning disabled on Exchange servers or other servers
where performance might be affected.
b)
Look in the Firewall enabled column. If you see “Yes”, the computer is protected by the
firewall. If you see a grayed-out firewall icon and “No”, it is not.
c)
Look in the NAC column. If you see “Installed”, network access control is installed. If the
column is blank, it is not.
d)
Look in the Up to date column. If you see “Yes”, the computer is up to date. If you see a
clock icon and “Not since ....”, it is not.
If any computers are unprotected, see the help files for advice. Open the “How do I check whether
my network is protected?” section and click “Find computers that are unprotected”.
33
Page 34

Sophos Endpoint Security and Control network startup guide: NetWare edition
14 Set up a firewall policy
By default, the firewall blocks all non-essential connections. Therefore, you must create your own
firewall policy. We recommend that you install the firewall on a few sample computers, customize
it and use these settings as your policy.
Once you have installed the firewall on computers that are typical of your network (using the steps
in Protect computers using Enterprise Console (page 25) or Protect computers with a script (page
29)), do as follows:
1. Go to each computer and restart it to activate the firewall.
2.
Right-click the firewall icon in the system tray and select Configure.
3.
In the SCF Configuration Editor dialog box, click the Applications tab.
a)
Click Add and browse to each application you want. The application is then “trusted”.
b)
For greater security, highlight the program, click Custom (bottom right-hand of the dialog
box) and create a rule.
Alternatively, on the General tabbed page, select Interactive . The firewall will prompt you to
allow or block each application when it is used.
4.
When the firewall is configured, on the General tabbed page, click Export to export the
configuration to your chosen location.
5. Repeat the above steps on each computer you want to use as a sample.
6.
Now go to Enterprise Console. In the Policies pane, double-click Firewall and then double-click
the policy you want to edit.
7.
In the Firewall policy dialog box, on the General tabbed page, click Import and import a
configuration you developed earlier.
When you import each configuration, you are given the option to merge it with other
configurations you have already imported.
8. Now you are ready to protect the rest of your computers. Repeat the steps in Protect computers
using Enterprise Console (page 25) or Protect computers with a script (page 29).
34
Page 35

Sophos Endpoint Security and Control network startup guide: NetWare edition
15 Detect suspicious behavior
By default, Sophos Anti-Virus analyzes the behavior of all programs running on a computer and
can detect the following:
Suspicious behavior, for example, changes to the registry that could allow a virus to run
■
automatically when the computer is restarted.
Buffer overflow attacks.
■
Note: Buffer overflow detection is not available for Windows Vista and 64-bit versions of Windows.
These operating systems are protected against buffer overflows by Microsoft’s Data Execution
Prevention (DEP) feature.
When Sophos Anti-Virus is first installed, it detects such behavior and sends alerts to Enterprise
Console. However, it does not block any of the programs detected.
Sophos recommends that you introduce blocking of suspicious behavior as follows:
Pre-authorize any programs you want to continue to run in future.
■
When you are ready, configure Sophos Anti-Virus to block programs that are detected from
■
now on.
This approach avoids blocking programs that your users may need.
15.1 Authorize programs you want
If suspicious behavior is detected, an alert icon is displayed next to the computer name in Enterprise
Console. To see more details, click the Alert and error details tab.
Authorize programs you want as follows:
1. Check which anti-virus and HIPS policy is used by the group(s) of computers you want to
configure. To do this, find the group in the Groups pane, right-click it and select View group
policy details.
2.
In the Policies pane, double-click Anti-virus and HIPS . Then double-click the policy you
want to change.
3.
In the Anti-virus and HIPS policy dialog box, click Authorization.
4.
In theAuthorization Manager dialog box, select the tab for the type of behavior that has been
detected, for example, Buffer overflow.
5.
Find the program that has been detected and move it from the Known list to the Authorized
list. Click OK.
When you have run Sophos Anti-Virus in alert-only mode for a time and are confident that you
have authorized the programs you need, you are ready to enable automatic blocking of suspicious
behavior.
35
Page 36

Sophos Endpoint Security and Control network startup guide: NetWare edition
15.2 Turn on blocking of suspicious behavior
To block suspicious behavior:
1.
Open the Anti-virus and HIPS policy dialog box (as in step 2 in the previous section). Click
HIPS runtime behavior.
2.
In the HIPS runtime behavior analysis settings dialog box, ensure that the forms of detection
you want to use are enabled. Then clear the Alert only check box. Click OK.
From now on, Sophos Anti-Virus will block programs that are behaving suspiciously, according
to the rules set by Sophos.
Sophos updates the behavioral rules regularly to respond to new threats.You may want to be
notified in advance of any changes, so that you can decide whether you need to authorize programs
that might otherwise be blocked. To subscribe to the “Behavioral rule notification”, go to
http://www.sophos.com/security/notifications .
36
Page 37

Sophos Endpoint Security and Control network startup guide: NetWare edition
16 Scan for suspicious files
By default, Sophos Anti-Virus detects known and unknown viruses, Trojans, worms, and spyware.
You can also configure it to detect suspicious files.
Note: A suspicious file is a file that contains certain characteristics that are common to malware
but not sufficient for the file to be identified as a new piece of malware (for example, a file
containing dynamic decompression code commonly used by malware).
Note: This option applies only to Sophos Anti-Virus 7 or later for Windows 2000 or later.
1. Check which anti-virus and HIPS policy is used by the group(s) of computers you want to
configure. To do this, find the group in the Groups pane, right-click it and select View group
policy details.
2.
In the Policies pane, double-click Anti-virus and HIPS . Then double-click the policy you
want to change.
3.
In the Anti-virus and HIPS policy dialog box, ensure the Enable on-access scanning check
box is selected. Click On - access.
4.
On the Scanning tab, in the Scanning options panel, select the Scan for suspicious files (HIPS)
check box. Click OK.
If you want to authorize suspicious files to run on computers, open the Anti-virus and HIPS
policy that applies to them, clickAuthorization , and then select the Suspicious files tabbed page.
37
Page 38

Sophos Endpoint Security and Control network startup guide: NetWare edition
17 Scan for adware and potentially unwanted applications
(PUAs)
By default, Sophos Anti-Virus detects viruses, Trojans and worms. You can also configure it to
detect adware and potentially unwanted applications (PUAs).
Note: This option applies only to Sophos Anti-Virus 6 or later running on Windows 2000 or later.
When you first use this form of scanning, it may generate many alerts and cause problems for
applications that are already running on your network. Sophos recommends that you:
Use a full system scan to detect adware/PUAs.
■
Authorize or remove any applications that are detected.
■
Enable on-access scanning to protect your computers in future.
■
17.1 Run a full system scan
We recommend a full system scan, which scans computers now.
Note: If you prefer, you can set up a scheduled scan, as described in the Sophos Enterprise Console
help files. Open the “How do I change anti-virus and HIPS settings?” section and click “Scan
computers at set times”.
1.
Select the computers you want to scan in the computer list or the group in the Groups pane.
Right-click and select Full system scan .
2.
In the Full system scan dialog box, review the details of the computers to be scanned and click
OK to start the scan.
When the scan is carried out, Sophos Anti-Virus may report some adware/PUAs.
Now you can authorize such applications for use or remove them.
17.2 Authorize applications you want
If you want your computers to run the applications, do as follows:
1.
In the Anti-virus and HIPS policy dialog box, click Authorization.
2.
In theAuthorization Manager dialog box, select theAdware/PUAs tab.
3.
In the Known adware/PUAs list, applications that have been detected are shown. Select the
applications that you want and add them to the Authorized adware/PUAs list. Click OK.
If you want to remove applications, see Clean up viruses, PUAs and suspicious files (page 45).
38
Now you can enable on-access scanning for adware/PUAs.
Page 39

Sophos Endpoint Security and Control network startup guide: NetWare edition
17.3 Enable on-access scanning
To enable on-access scanning for adware/PUAs, do as follows.
Note: Some applications monitor files and attempt to access them frequently. If you have on-access
scanning enabled, it detects each access and sends multiple alerts.
1.
In the Anti-virus and HIPS policy dialog box, click On-access.
2.
In the On-access scan settings dialog box, select Scan for adware/PUAs.
If you want full detection and cleanup of potentially unwanted applications or multi-component
threats on external disk drives, you must configure Windows to report such drives as local.
39
Page 40

Sophos Endpoint Security and Control network startup guide: NetWare edition
18 Scan for controlled applications
You can configure Sophos Anti-Virus to detect and block “controlled applications”, i.e. legitimate
applications that are not a security threat, but that you decide are unsuitable for use in your office
environment, for example, games or instant messaging programs.
This option applies only to Sophos Anti-Virus 7 or later running on Windows 2000 or later.
When Sophos Anti-Virus is first installed, all applications are allowed by default. Sophos
recommends that you introduce application control as follows:
Select the applications that you want to control.
■
Run a full system scan for controlled applications.
■
Remove any applications you do not want.
■
Enable on-access scanning for controlled applications.
■
By taking this approach, you avoid generating large numbers of alerts and blocking applications
that your users may need.
18.1 Select the applications you want to control
To select applications to control, do as follows:
1.
In the Policies pane, double-clickApplication control. Then double-click the policy you want
to change.
2.
In the Application control policy dialog box, click the Authorization tab.
3.
On the Authorization tabbed page, select an Application type, for example, File sharing
application . A full list of the applications included in that group is displayed in the Authorized
list below.
■
To block an application, select it and move it to theBlocked list.
■
To block any new applications that Sophos adds to that type in the future, moveAll added
by Sophos in the future to the Blocked list.
You are recommended to leave applications installed with Windows (such as games) unblocked
until after you run a scan to find out which other applications are in use. This is because these
common applications will give rise to a large number of alerts.
4.
On the Scanning tabbed page, select Enable on-demand and scheduled scanning. Click OK
.
Now run a full system scan.
18.2 Run a full system scan
We recommend a full system scan, which scans computers now.
40
Page 41

Sophos Endpoint Security and Control network startup guide: NetWare edition
Note: If you prefer, you can set up a scheduled scan, as described in the Sophos Enterprise Console
help files. Open the “How do I change anti-virus and HIPS settings?” section and click “Scan
computers at set times”.
1.
Select the computers you want to scan in the computer list or the group in the Groups pane.
Right-click and select Full system scan.
2.
In the Full system scan dialog box, review the details of the computers to be scanned and click
OK to start the scan.
When the scan is carried out, alerts are displayed in Enterprise Console for any controlled
applications that are found.
18.3 Uninstall applications you do not want
Before you uninstall controlled applications, ensure that on-access scanning for controlled
applications is disabled. This type of scanning blocks the programs used to install and uninstall
applications, so it may interfere with uninstallation.
You can remove an application in one of two ways:
Go to each computer and run the uninstaller for that product.You can usually do this by
■
opening the Windows Control Panel and using Add/Remove Programs.
At the server, use your usual script or administration tool to run the uninstaller for that product
■
on your networked computers.
Now you can enable on-access scanning.
18.4 Enable on-access scanning
To enable on-access scanning for controlled applications:
1.
In the Policies pane, double-click Application control. Then double-click a policy.
2.
In the Application control policy dialog box, on the Scanning tabbed page, select Enable
on-access scanning.
On-access scanning is enabled.Your anti-virus and HIPS policy settings determine which files are
scanned (i.e. the extensions and exclusions).
You can also have alerts sent to particular users if a controlled application is found on any of the
computers in the group. For instructions, see the Sophos Enterprise Console help files. Open the
“How do I set up alerts?” section and click “Set up application control alerts”.
41
Page 42

Sophos Endpoint Security and Control network startup guide: NetWare edition
19 Set up network access control
You can set up network access control (NAC), so that computers are only allowed to log on to the
network if they comply with conditions you set.
Enterprise Console works together with Sophos NAC to provide this network protection. You
need to have installed the following:
The Sophos NAC server. You install this separately from Enterprise Console.
■
The Sophos NAC agent. You install this on your networked computers, so that they can
■
communicate with the NAC server. You perform the installation when you protect computers,
as described in Protect computers using Enterprise Console (page 25) and Protect computers with
a script (page 29).
This section assumes you have installed both.
If you are using the default policy supplied with the NAC server and have not changed the “policy
mode”, network access is not blocked.
If you want to set conditions that computers must comply with before they can access the network,
you configure and apply one of the NAC policies.
19.1 Configure and apply a NAC policy
Before you can configure a NAC policy, you must have set up the NAC server URL when you
protected Windows computers. You can check that you have done this by clicking Configure
NAC URL on the Tools menu in Enterprise Console.
You can change the settings for any of the pre-defined NAC policies:
The Default and Managed policies can be used for computers that are managed by Enterprise
■
Console.
TheUnmanaged policy can be used for computers from outside the company, which are not
■
managed by Enterprise Console and do not have Sophos NAC installed. For more information,
see “Using predefined policies” in theSophos NAC Manager Guide.
To configure a NAC policy:
1.
In thePolicies pane, double-click NAC. Double-click the policy you want to configure.
Sophos NAC Manager is launched.
2. In NAC Manager, log in with your credentials.
3. In the page for the policy, edit the options.
For information on the options, see “Updating policies” in the Sophos NAC Manager Guide.
4. In Enterprise Console, click the policy and drag it onto the group to which you want to apply
the policy.
42
Page 43

Sophos Endpoint Security and Control network startup guide: NetWare edition
20 Check the health of your network
You can check the health of your network at a glance. You do this by viewing the Enterprise
Console dashboard.
On the menu bar, click the Dashboard icon. The Dashboard is displayed in the upper part of the
window.
In the left-hand panel, the dashboard shows you
How many computers are managed by Enterprise Console.
■
When your software was last updated from Sophos.
■
In the centre and right-hand panels, it also shows statistics for computers that
Have detected threats or controlled applications.
■
Are out of date.
■
Do not comply with your policies.
■
Have reported errors.
■
To see a list of the affected computers, click the heading for each section. In each section, the
Dashboard displays a health indicator as follows:
Healthy
Warning level
Critical level
If you want to, you can
Customise the threshold at which Enterprise Console will display each of these indicators.
■
Configure Enterprise Console to send email alerts when the thresholds are exceeded.
■
To do this, on the menu bar, click Tools|Configure dashboard .
43
Page 44

Sophos Endpoint Security and Control network startup guide: NetWare edition
You can find more information in the Enterprise Console help files. See the “How do I check
whether my network is protected?” section, which includes a “Configure the dashboard” page.
44
Page 45

Sophos Endpoint Security and Control network startup guide: NetWare edition
21 Clean up viruses, PUAs and suspicious files
You can use Enterprise Console to clean up computers that report viruses/spyware or
adware/potentially unwanted applications (PUAs).
1.
In the list of computers, right-click the computer(s) that you want to clean up. Select Clean
up detected items.
2.
In the Clean up detected items dialog, select the check box for each threat you want to clean
up, or click Select all. Click OK to clean the computer(s).
If the cleanup is successful, the alert(s) shown in the list of computers will no longer be displayed.
If cleanup is not successful, go to http://www.sophos.com/security/analyses and look for information
about the threat and advice on cleanup. Then go to each computer and clean it up manually.
If you want Sophos Anti-Virus to attempt to clean up computers automatically in future, see the
Enterprise Console help files. Open the “How do I clean up computers?” section and click on “Set
up automatic cleanup”.
45
Page 46

Sophos Endpoint Security and Control network startup guide: NetWare edition
22 Protect Windows computers without using Enterprise
Console
You may decide not to use Enterprise Console to manage Sophos security software on your
Windows computers. However, you can still protect your computers by creating central anti-virus
and autoupdating policies in a central installation directory (CID). When a computer installs or
updates from the CID, it also imports the appropriate policy settings for Sophos Anti-Virus and
Sophos AutoUpdate.
Note: You cannot create a network access control policy in a CID without using Enterprise Console.
1. Use Enterprise Console to configure your policy settings for auto-updating (Updating policy
(page 22)), anti-virus (Anti-virus and HIPS policy (page 23)), suspicious behavior (Detect
suspicious behavior (page 35)), suspicious files (Scan for suspicious files (page 37)), adware/PUAs
(Scan for adware and potentially unwanted applications (PUAs) (page 38)), and controlled
applications (Scan for controlled applications (page 40)).
Make sure that the user account you specify in the updating policy does not have access to any
directories except the one that computers will update from. Access to that directory should be
read-only.
2. Use the ExportConfig.exe utility to export your policy settings to two XML configuration files:
a)
Copy the utility from the folderTOOLS on the Sophos Network Install CD
toC:\Program Files\Sophos\Enterprise Console.
b) Make sure that you are logged on as a member of the Sophos Console Administrators group.
By default, the user who installed Enterprise Console is in this group.
c) Run the utility at a command prompt, using the following syntax (the command should
be all on one line):
exportconfig -type {AU|SAV} -group <group name> -output
<destination>
DefinitionParameter
AU - updating policy{AU|SAV}
SAV - Anti-virus policy
<group name>
Specifies the group name to retrieve the policy
from (for example \tom\harry, where the group
“harry” is a sub-group of “tom”). The group
name is case sensitive.
46
The full path of the file you want to create.<destination>
Updating policy file - sauconf.xml
Page 47

Sophos Endpoint Security and Control network startup guide: NetWare edition
DefinitionParameter
Anti-virus policy file - savconf.xml
For example, type:
exportconfig -type AU -group \company\dept -output
c:\temp\sauconf.xml
exportconfig -type SAV -group \company\dept -output
c:\temp\savconf.xml
3. Place the XML configuration files in the CID for each operating system:
XML fileOperating system
with Sophos Client
Firewall
without Sophos Client
Firewall
CID (<NetWare server> is the name of the NetWare
server)
\\<NetWare server>\SYS\SWEEP\SAVSCFXP\savxp\savconf.xmlWindows 2000 and later
\\<NetWare server>\SYS\SWEEP\SAVSCFXP\sau\sauconf.xml
\\<NetWare server>\SYS\SWEEP\ESXP\savxp\savconf.xmlWindows 2000 and later
\\<NetWare server>\SYS\SWEEP\ESXP\sau\sauconf.xml
\\<NetWare server>\SYS\SWEEP\ESNT\sav\savconf.xmlWindows NT version 4
\\<NetWare server>\SYS\SWEEP\ESNT\sau\sauconf.xml
\\<NetWare server>\SYS\SWEEP\ES9X\sav9x\savconf.xmlWindows 95/98/Me
\\<NetWare server>\SYS\SWEEP\ES9X\sau\sauconf.xml
4. Use the ConfigCID.exe utility to update the catalog files for the CID so that your XML files are
used. You can run the utility from the folder TOOLS on the Sophos Network Install CD.
a) Make sure that you have write access to the CID.
b) Run the utility at a command prompt, specifying the path to the CID. Use the following
syntax (the command should be all on one line):
configcid \\<NetWare server>\SYS\SWEEP\
{SAVSCFXP|ESXP|ESNT|ES9X}
where <NetWare server> is the name of the NetWare server.
When your computers update themselves subsequently, they will use the central anti-virus and
auto-updating policy settings.
47
Page 48

Sophos Endpoint Security and Control network startup guide: NetWare edition
5. Protect your computers, either manually (Protect Windows computers with manual installation
(page 49)) or by using a script (Protect Windows computers with a login script (page 29)).
48
Page 49

Sophos Endpoint Security and Control network startup guide: NetWare edition
23 Protect Windows computers with manual installation
You can protect Windows 2000 and later computers automatically from Enterprise Console, as
described in Protect computers using Enterprise Console (page 25).
If you cannot protect Windows computers automatically, or if you have WIndows 95/98/Me or
NT computers, you can protect them by running the installation program manually.
Note: If you have many computers, use a script or a systems management software program to
run the installation program automatically. See Protect computers with a script (page 29).
1. Find the installation program. The program is in the central installation directory from which
computers will update in future.
To check which directory this is select the computer(s) you want to protect. Click the Update
details tab and look in the Primary server column.
If your licence includes the firewall or network access control, you can install these, along with
the anti-virus software, on Windows 2000 or later computers. Look for the directory called
SAVSCFXP.
2. Go to each computer and log on with local administrator rights.
3. Locate setup.exe in the central installation directory and double-click it.
4.
In theSetup dialog box, do as follows:
a)
In theSelect security software dialog pane, select the software you want to install.
LeaveRemove Third-party security software selected if you want to have another vendor’ s
software removed automatically.
b)
In theCredentials pane, enter the details of an account that can fetch updates from the
server. The account can be the one you used in Protect computers using Enterprise Console
(page 25) or Protect Windows computers with a login script (page 29).
The account used must:
Be able to log on to the computers you want to protect.
■
Have read access to central installation directories (see step 1).
■
After installation,Windows computers need to be restarted to scan files accessed by DFS (Windows
2000/XP) or via non-Microsoft file systems (Windows 2000).
49
Page 50

Sophos Endpoint Security and Control network startup guide: NetWare edition
24 Protect Mac OS X computers
24.1 Prepare to install Sophos Anti-Virus
To protect Mac OS X version 10.4 or later computers, Sophos recommends that you use
Sophos Anti-Virus version 7. To protect Mac OS X version 10.2 or 10.3 computers, you must use
Sophos Anti-Virus version 4.9.
To use Sophos Anti-Virus version 7, ensure that you have done the following:
1. Download Sophos Anti-Virus version 7. To do this, on the toolbar, click the Libraries icon
and follow the instructions in Select the software you want to download (page 16) and Download
software (page 19).
2. If you want to protect Mac OS X computers with both version 4.9 and 7 of Sophos Anti-Virus:
a) Add the computers on which you want to install version 7 to a different group from those
computers on which you want to install version 4.9.
b) Create an updating policy for the computers on which you want to install version 7 that is
different to that for those computers on which you want to install version 4.9. For
information, see Updating policy (page 22).
24.2 Install Sophos Anti-Virus
1. Find the installation program, Sophos Anti-Virus.mpkg. The program is in the central
installation directory from which computers will update in future. The default paths of the
program are shown in the following table:
Sophos Anti-Virus version
2. Copy Sophos Anti-Virus.mpkg to each computer that you want to protect.
3. Go to each computer and log on with local administrator rights.
4. Double-click Sophos Anti-Virus.mpkg.
5. Follow the instructions in the installation program.
Path of installation program (<NetWare
server> is the name of the NetWare server)
\\<NetWare server>\SYS\SWEEP\ESCOSX7
smb://<NetWare server>/SYS/SWEEP/ESCOSX
\\<NetWare server>\SYS\SWEEP\ESOSX4.9
smb://<NetWare server>/SYS/SWEEP/ESOSX
50
Page 51

Sophos Endpoint Security and Control network startup guide: NetWare edition
25 Protect Linux computers
To protect Linux computers, you must:
■
Create a deployment package.
■
Install Sophos Anti-Virus on the Linux computer(s).
Note: These instructions assume that you downloaded Sophos Anti-Virus for Linux when you
set up your library. If not, open the library and follow the instructions in the following sections:
Select the software you want to download (page 16), Select where you will place downloads (page
17), and Download software (page 19).
25.1 Create a deployment package
You can use the mkinstpkg script to create a deployment package for your end-users. This script
prompts you for information about how Sophos Anti-Virus will be installed on your Linux
computers, and the answers gathered are inserted into the deployment package.When the end-user
installs from this deployment package, it will not prompt for any information and will set up both
the update location and credentials correctly. You can create a package in tar or RPM format.
Note: The mkinstpkg script is for use within your organization only. Please read the license
agreement and legal notice displayed by the mkinstpkg script.
1. Log on to your Linux server as root.
2. Mount the shared directory on the NetWare server that contains the central installation
directories (CIDs), using the following syntax (the commands should each be all on one line):
mkdir -p /mnt/SWEEP
ncpmount -S <NetWare server> -U <username> -P <password> -V
SYS:/SWEEP -m -A <fully qualified distinguished name of
NetWare server> /mnt/SWEEP
where <username> and <password> are the credentials needed to access the NetWare
server. For example:
mkdir -p /mnt/SWEEP
ncpmount -S netware6 -U admin -P opensesame -V SYS:/SWEEP -m
-A netware6.domain.com /mnt/SWEEP
(To enable this directory to be mounted automatically on system boot, use distribution-specific
tools for doing so, or edit fstab.)
3. Change to the Sophos Anti-Virus for Linux CID, savlinux:
cd /mnt/SWEEP/savlinux
51
Page 52

Sophos Endpoint Security and Control network startup guide: NetWare edition
4. To create the package, do as follows:
■
To create a deployment package in tar format, called savinstpkg.tgz, run
./mkinstpkg.sh
■
To create a deployment package in RPM format, called savinstpkg-0.0-1.i586.rpm, run
./mkinstpkg.sh -r
Note: The filename might differ depending on the RPM setup.
5. When prompted for the location, enter the location of the CID (as seen from the Linux
computers).
Now you are ready to install Sophos Anti-Virus using this deployment package.
25.2 Install Sophos Anti-Virus using the deployment package
You use the package to install Sophos Anti-Virus in one of two ways:
Automatically across the network. This approach can be used only with a package in RPM
■
format.
Manually on each computer. This approach can be used with a package in RPM or tar format.
■
25.2.1 Install Sophos Anti-Virus manually
You can install Sophos Anti-Virus manually as follows:
1. Use your own tools to copy the deployment package to the computers where you want to install
Sophos Anti-Virus.
2. Go to each computer and log in as root.
3.
Ensure that root is able to access the CID, for example, by using the command mount.
4. Place the deployment package in a temporary directory and change to that directory.
5. To perform the installation, do as follows:
■
To untar the tar package and run the manual update script, enter
tar -zxvf savinstpkg.tgz ./sophos-av/install.sh
■
To install from the RPM package, enter
rpm -i <RPM package>
52
This copies the necessary files from the server and installs Sophos Anti-Virus. From now on,
Sophos Anti-Virus will be updated automatically whenever the CID is updated.
Page 53

Sophos Endpoint Security and Control network startup guide: NetWare edition
25.2.2 Install Sophos Anti-Virus automatically
You can install Sophos Anti-Virus automatically from the deployment package by using one of
the Linux administration tools that support remote deployment. Refer to the documentation for
that tool.
Once Sophos Anti-Virus is installed, it will be started and will be updated automatically whenever
the CID is updated.
53
Page 54

Sophos Endpoint Security and Control network startup guide: NetWare edition
26 Protect UNIX computers with Sophos Anti-Virus version 4
Sophos provides two versions of Sophos Anti-Virus for UNIX.
Version 4:
Supports a wide range of platforms.
■
Cannot be managed using Enterprise Console.
■
Version 7:
Supports a narrow range of platforms.
■
Can be managed using Enterprise Console.
■
Can be automatically updated.
■
Can be scheduled to scan.
■
For information about the platforms that are supported by each version, go to the system
requirements page of the Sophos website (http://www.sophos.com/products/all-sysreqs.html).
To protect computers with version 7, see Protect UNIX computers with Sophos Anti-Virus version 7
(page 56) instead of this section.
Note: These instructions assume that you downloaded Sophos Anti-Virus for UNIX when you
set up your library. If not, open the library and follow the instructions in the following sections:
Select the software you want to download (page 16), Select where you will place downloads (page
17), and Download software (page 19).
1. Go to the root of the directory where EM Library has placed the Sophos Anti-Virus files (the
CID).
2. Copy the file eminstall.sh into an executable path location such as /etc on each UNIX client.
From now on, this location is shown as <path>.
3. Enter cd <path>
4. To change the permissions, enter chmod +x eminstall.sh
5. Create a file called /etc/eminstall.conf.
54
Page 55

Sophos Endpoint Security and Control network startup guide: NetWare edition
6. Add the following lines to it:
EM install CID=<install_cid>
EM cache dir=<cache_path>
SAV install dir=<install_path>
<install_cid> is the location of the CID.
<cache_path> is the location of the cache where a copy of the installation files is placed when
performing an update.
<install_path> is the root location where Sophos Anti-Virus is going to be installed, or has
previously been installed.
Note: The files in <cache_path> must not be deleted as this will cause them to be downloaded
again. For this reason, you should not place the files in the /tmp directory, which is sometimes
purged by the UNIX system.
7. Run
eminstall.sh
8. Create a cron job to run eminstall periodically. This will check for updates and install them
automatically. See support knowledgebase article 12176
(http://www.sophos.com/support/knowledgebase/article/12176.html).
55
Page 56

Sophos Endpoint Security and Control network startup guide: NetWare edition
27 Protect UNIX computers with Sophos Anti-Virus version 7
Sophos provides two versions of Sophos Anti-Virus for UNIX.
Version 4:
■
Supports a wide range of platforms.
■
Cannot be managed using Enterprise Console.
Version 7:
■
Supports a narrow range of platforms.
■
Can be managed using Enterprise Console.
■
Can be automatically updated.
■
Can be scheduled to scan.
For information about the platforms that are supported by each version, go to the system
requirements page of the Sophos website (http://www.sophos.com/products/all-sysreqs.html).
To protect computers with version 4, see Protect UNIX computers with Sophos Anti-Virus version 4
(page 54) instead of this section.
To protect UNIX computers, you can use one of the following methods:
■
Install Sophos Anti-Virus using a deployment package.
■
Download and use a tarball.
Note: These instructions assume that you downloaded Sophos Anti-Virus for UNIX when you
set up your library. If not, open the library and follow the instructions in the following sections:
Select the software you want to download (page 16), Select where you will place downloads (page
17), and Download software (page 19).
If you have an earlier version of Sophos Anti-Virus or a third-party product using SAV Interface,
read the following subsections.
Working with an earlier version of Sophos Anti-Virus
If you install Sophos Anti-Virus for UNIX, version 7 on a computer where Sophos Anti-Virus,
version 4 is installed, this will not uninstall Sophos Anti-Virus 4. If you want to remove
Sophos Anti-Virus 4 from the computer, uninstall it before installing Sophos Anti-Virus 7.
If you uninstall Sophos Anti-Virus 4, Sophos Anti-Virus 7 will install the sweep command as well
as savscan. You can use either command for on-demand scans. Both commands will send reports
to Enterprise Console.
56
If you do not uninstall Sophos Anti-Virus 4 before installing Sophos Anti-Virus 7, both versions
will coexist on the computer. In this case, sweep will start a Sophos Anti-Virus 4 on-demand scan
and will not report to Enterprise Console. To scan on demand with Sophos Anti-Virus 7, use
savscan. Sophos Anti-Virus 4 will not be updated by the Sophos Anti-Virus 7 updating mechanism.
Page 57

Sophos Endpoint Security and Control network startup guide: NetWare edition
Working with an earlier version of Sophos Anti-Virus and a third-party product using
SAV Interface
When Sophos Anti-Virus for UNIX, version 7 is installed on a computer which has an earlier
version of Sophos Anti-Virus installed, together with a third-party product using SAV Interface,
it may be necessary to edit the Sophos Anti-Virus configuration file sav.conf to specify the correct
path to the shared Sophos Anti-Virus libraries (libsavi.*).
After installing Sophos Anti-Virus 7, open the /etc/sav.conf file in a text editor. If necessary, edit
the file to specify the correct path to the libsavi.* files. Check that the correct location is given for
the SAV virus data directory. The default location is Sophos Anti-Virus 7 install path/lib/sav.
27.1 Protect UNIX computers using a deployment package
To protect UNIX computers, you must:
■
Install Sophos Anti-Virus on a UNIX computer for the first time manually.
■
Update the computer to download the mkinstpkg script used to create a deployment package.
■
Create a deployment package.
■
Install Sophos Anti-Virus on the UNIX computer(s) using the deployment package.
27.1.1 Install Sophos Anti-Virus for the first time
To install Sophos Anti-Virus on a UNIX computer for the first time manually, do as follows:
1. Log on to your UNIX server as root.
2. Mount the shared directory on the NetWare server that contains the central installation
directories (CIDs), using the following syntax:
mkdir -p /mnt/SWEEP
mount -t nfs <NetWare server>:/SYS/SWEEP /mnt/SWEEP
(To enable this directory to be mounted automatically on system boot, use distribution-specific
tools for doing so, or edit fstab.)
3. Change to the Sophos Anti-Virus for UNIX CID.
For example, type:
cd /mnt/SWEEP/EESAVUNIX/SUNOS_9_SPARC
4. Run the install script:
./install.sh
5. When prompted, choose to enable remote management.
In Enterprise Console, the UNIX computer will appear in the Unassigned folder.
57
Page 58

Sophos Endpoint Security and Control network startup guide: NetWare edition
6. If you have not done so already, in Enterprise Console create a new group where you want to
put the UNIX computer.
7. Drag the computer from the Unassigned folder and drop it onto the group.
8. If you have not already set up updating for UNIX computers in Enterprise Console, follow
these steps:
a) In the Policies pane, double-click Updating and then double-click the policy you want to
update.
b) In the Updating policy dialog box, select UNIX and click Configure.
c) On the Primary server tab, in the Address field enter the directory from which computers
will fetch updates, for example:
/mnt/SWEEP/EESAVUNIX/SUNOS_9_SPARC
d) Enter the User name and Password for the account that will be used for updating.
9. On the UNIX computer, trigger the first update:
/opt/sophos-av/bin/savupdate
Now you are ready to create a deployment package.
27.1.2 Create a deployment package
After you install Sophos Anti-Virus on the computer and update it for the first time, you can create
a deployment package for your end-users.
You can use the mkinstpkg script to create a deployment package in tar format. This script prompts
you for information about how Sophos Anti-Virus will be installed on your UNIX computers,
and the answers gathered are inserted into the deployment package. When the end-user installs
from this deployment package, it will not prompt for any information and will set up both the
update location and credentials correctly.
Note: The mkinstpkg script is for use within your organization only. Please read the license
agreement and legal notice displayed by the mkinstpkg script.
1. On the UNIX computer where you installed Sophos Anti-Virus, change to the directory
/opt/sophosav/update/cache/Primary-unpacked
2. To create a deployment package called savinstpkg.tar, run
./mkinstpkg.sh
3. When prompted, choose to have the computers managed by Enterprise Console.
58
Now you are ready to install Sophos Anti-Virus using this deployment package.
Page 59

Sophos Endpoint Security and Control network startup guide: NetWare edition
27.1.3 Install Sophos Anti-Virus using the deployment package
You can install Sophos Anti-Virus from the deployment package as follows:
1. Use your own tools to copy the deployment package to the computers where you want to install
Sophos Anti-Virus.
2. Go to each computer and log in as root.
3. Place the deployment package in a temporary directory and change to that directory.
4. To perform the installation, untar the tar package and run the install script. Type:
tar -xvf savinstpkg.tar
./sophos-av/install.sh
This copies the necessary files from the server and installs Sophos Anti-Virus. From now on,
Sophos Anti-Virus will be updated automatically whenever the CID is updated.
27.2 Protect UNIX computers using a tarball
To update your UNIX computers and manage them from Enterprise Console after the installation,
you must:
Set up updating for UNIX computers in Enterprise Console.
■
Install Sophos Anti-Virus on UNIX computers and manage them from Enterprise Console.
■
27.2.1 Set up updating
If you have not already set up updating for UNIX computers in Enterprise Console, follow these
steps:
1. In the Policies pane, double-click Updating and then double-click the policy you want to
update.
2. In the Updating policy dialog box, select UNIX and click Configure.
3. On the Primary server tab, in the Address field, enter the directory from which computers
will fetch updates, for example:
/mnt/SWEEP/EESAVUNIX/SUNOS_9_SPARC
4. Enter the User name and Password for the account that will be used for updating.
27.2.2 Install Sophos Anti-Virus using a tarball
1. Log on to your UNIX server as root.
2. Download the Sophos Anti-Virus for UNIX tarball from the Sophos Anti-Virus for UNIX
download web page to a temporary directory.
59
Page 60

Sophos Endpoint Security and Control network startup guide: NetWare edition
3. Change to the temporary directory and untar the tarball:
tar -xvf <tarball>
4. Run the install script:
./sophos-av/install.sh
5. When prompted for the update location, enter the managed CID address or UNC path.
Your UNIX computer will become managed after the first update.
Note: You can start an update immediately by entering:
/opt/sophos-av/bin/savupdate
60
Page 61

Sophos Endpoint Security and Control network startup guide: NetWare edition
28 Protect standalone computers
Some computers are never on the network and are not easy to access, for example, computers that
staff use at home. To protect these computers, you ask each user to install Sophos security software
individually using a “standalone” setup program. The software is then kept up to date via the
internet. There are three possible approaches:
The user can download the software from Sophos. Thereafter it is updated automatically from
■
the same location. See support knowledgebase article 12391
(http://www.sophos.com/support/knowledgebase/article/12391.html).
You can republish the software and all subsequent updates on your own website. The user
■
downloads the software and updates from that site. For information on how to republish
Sophos updates on your own website, see support knowledgebase article 12134
(http://www.sophos.com/support/knowledgebase/article/12134.html).
You can copy the software onto a CD and send it to the user. The user installs the software and
■
configures it to update from the location you prefer. See support knowledgebase article 13093
(http://www.sophos.com/support/knowledgebase/article/13093.html).
28.1 What standalone users will need
Send any users who are not on your network the following:
The location from which they can download Sophos Anti-Virus (unless you are providing it
■
on CD).
The Sophos Endpoint Security and Control standalone startup guide. This is an electronic
■
document available from the the Sophos website or the Sophos Network Install CD.
The username and password they need (whether they are downloading from Sophos directly
■
or from your own web site).
When you send the username and password, note the following:
Do not send the credentials to an infected computer by email, as they might be stolen.
■
If necessary, send credentials by fax or letter post.
■
For Sophos credentials, the correct username begins with “em”.
■
61
Page 62

Sophos Endpoint Security and Control network startup guide: NetWare edition
29 Protect computers with a command-line installation
You can protect computers by running the installation program manually from a command line.
Note: If you have a previous version of Sophos Anti-Virus on Windows 95, 98 or Me, you must
uninstall it before installing the latest version.
1. Locate setup.exe in the central installation directory.
2. Run setup.exe with the relevant options (see below).
29.1 Command-line options for the installer program
By default, the installation program install anti-virus software. You can also use command-line
options to install other security software or remove third-party software.
Note: Sophos Client Firewall and Sophos Network Access Control (NAC)are available only for
Windows 2000 or later.
Note: Third-party software removal uninstalls only products with the same functionality as those
you install.
-nac http://<NAC server address>
DescriptionOption
Uninstall third-party security software-crt R
Install firewall (Windows 2000 or later only)-scf
Install network access control (Windows 2000 or
later only)
62
Page 63

Sophos Endpoint Security and Control network startup guide: NetWare edition
30 Technical support
For technical support, visit http://www.sophos.com/support.
If you contact technical support, provide as much information as possible, including the following:
■
Sophos software version number(s)
■
Operating system(s) and patch level(s)
■
The exact text of any error messages
63
Page 64

Sophos Endpoint Security and Control network startup guide: NetWare edition
31 Copyright
Copyright © 2008, 2009 Sophos Group.All rights reserved. No part of this publication may be
reproduced, stored in a retrieval system, or transmitted, in any form or by any means, electronic,
mechanical, photocopying, recording or otherwise unless you are either a valid licensee where the
documentation can be reproduced in accordance with the licence terms or you otherwise have
the prior permission in writing of the copyright owner.
Sophos and Sophos Anti-Virus are registered trademarks of Sophos Plc and Sophos Group. All
other product and company names mentioned are trademarks or registered trademarks of their
respective owners.
OpenSSL cryptographic toolkit
The OpenSSL toolkit stays under a dual license, i.e. both the conditions of the OpenSSL License
and the original SSLeay license apply to the toolkit. See below for the actual license texts.Actually
both licenses are BSD-style Open Source licenses. In case of any license issues related to OpenSSL
please contact openssl-core@openssl.org.
OpenSSL license
Copyright © 1998–2006 The OpenSSL Project. All rights reserved.
Redistribution and use in source and binary forms, with or without modification, are permitted
provided that the following conditions are met:
1. Redistributions of source code must retain the above copyright notice, this list of conditions
and the following disclaimer.
2. Redistributions in binary form must reproduce the above copyright notice, this list of conditions
and the following disclaimer in the documentation and/or other materials provided with the
distribution.
3. All advertising materials mentioning features or use of this software must display the following
acknowledgment:
“This product includes software developed by the OpenSSL Project for use in the OpenSSL
Toolkit. (http://www.openssl.org/)”
4. The names “ OpenSSL Toolkit” and “OpenSSL Project” must not be used to endorse or promote
products derived from this software without prior written permission. For written permission,
please contact openssl-core@openssl.org.
5. Products derived from this software may not be called “OpenSSL” nor may “ OpenSSL” appear
in their names without prior written permission of the OpenSSL Project.
6. Redistributions of any form whatsoever must retain the following acknowledgment:
“This product includes software developed by the OpenSSL Project for use in the OpenSSL
Toolkit (http://www.openssl.org/)”
64
THIS SOFTWARE IS PROVIDED BY THE OpenSSL PROJECT “AS IS”AND ANY EXPRESSED
OR IMPLIED WARRANTIES, INCLUDING, BUT NOT LIMITED TO, THE IMPLIED
WARRANTIES OF MERCHANTABILITY AND FITNESS FOR A PARTICULAR PURPOSE ARE
Page 65

Sophos Endpoint Security and Control network startup guide: NetWare edition
DISCLAIMED. IN NO EVENT SHALL THE OpenSSL PROJECT OR ITS CONTRIBUTORS BE
LIABLE FOR ANY DIRECT, INDIRECT, INCIDENTAL, SPECIAL, EXEMPLARY, OR
CONSEQUENTIAL DAMAGES (INCLUDING, BUT NOT LIMITED TO, PROCUREMENT OF
SUBSTITUTE GOODS OR SERVICES; LOSS OF USE, DATA, OR PROFITS; OR BUSINESS
INTERRUPTION) HOWEVER CAUSED AND ON ANY THEORY OF LIABILITY, WHETHER
IN CONTRACT, STRICT LIABILITY, OR TORT (INCLUDING NEGLIGENCE OR OTHERWISE)
ARISING IN ANY WAY OUT OF THE USE OF THIS SOFTWARE, EVEN IF ADVISED OF THE
POSSIBILITY OF SUCH DAMAGE.
This product includes cryptographic software written by Eric Young (eay@cryptsoft.com). This
product includes software written by Tim Hudson (tjh@cryptsoft.com).
Original SSLeay license
Copyright © 1995–1998 Eric Young (eay@cryptsoft.com) All rights reserved.
This package is an SSL implementation written by Eric Young (eay@cryptsoft.com). The
implementation was written so as to conform with Netscape’s SSL.
This library is free for commercial and non-commercial use as long as the following conditions
are adhered to. The following conditions apply to all code found in this distribution, be it the RC4,
RSA, lhash, DES, etc., code; not just the SSL code. The SSL documentation included with this
distribution is covered by the same copyright terms except that the holder is Tim Hudson
(tjh@cryptsoft.com).
Copyright remains Eric Young’s, and as such any Copyright notices in the code are not to be
removed. If this package is used in a product, Eric Young should be given attribution as the author
of the parts of the library used. This can be in the form of a textual message at program startup
or in documentation (online or textual) provided with the package.
Redistribution and use in source and binary forms, with or without modification, are permitted
provided that the following conditions are met:
1. Redistributions of source code must retain the copyright notice, this list of conditions and the
following disclaimer.
2. Redistributions in binary form must reproduce the above copyright notice, this list of conditions
and the following disclaimer in the documentation and/or other materials provided with the
distribution.
3. All advertising materials mentioning features or use of this software must display the following
acknowledgement:
“This product includes cryptographic software written by Eric Young (eay@cryptsoft.com)”
The word “cryptographic” can be left out if the routines from the library being used are not
cryptographic related :-).
4. If you include any Windows specific code (or a derivative thereof) from the apps directory
(application code) you must include an acknowledgement:
“This product includes software written by Tim Hudson (tjh@cryptsoft.com)”
65
Page 66

Sophos Endpoint Security and Control network startup guide: NetWare edition
THIS SOFTWARE IS PROVIDED BY ERIC YOUNG “AS IS” AND ANY EXPRESS OR IMPLIED
WARRANTIES, INCLUDING, BUT NOT LIMITED TO, THE IMPLIED WARRANTIES OF
MERCHANTABILITY AND FITNESS FOR A PARTICULAR PURPOSE ARE DISCLAIMED. IN
NO EVENT SHALL THE AUTHOR OR CONTRIBUTORS BE LIABLE FOR ANY DIRECT,
INDIRECT, INCIDENTAL, SPECIAL, EXEMPLARY, OR CONSEQUENTIAL DAMAGES
(INCLUDING, BUT NOT LIMITED TO, PROCUREMENT OF SUBSTITUTE GOODS OR
SERVICES; LOSS OF USE, DATA, OR PROFITS; OR BUSINESS INTERRUPTION) HOWEVER
CAUSED AND ON ANY THEORY OF LIABILITY,WHETHER IN CONTRACT, STRICT
LIABILITY, OR TORT (INCLUDING NEGLIGENCE OR OTHERWISE) ARISING IN ANY WAY
OUT OF THE USE OF THIS SOFTWARE, EVEN IF ADVISED OF THE POSSIBILITY OF SUCH
DAMAGE.
The licence and distribution terms for any publically available version or derivative of this code
cannot be changed. i.e. this code cannot simply be copied and put under another distribution
licence [including the GNU Public Licence.]
ACE™, TAO™, CIAO™, and CoSMIC
™
ACE1, TAO2, CIAO3, and CoSMIC4 (henceforth referred to as “DOC software”) are copyrighted
by Douglas C. Schmidt5 and his research group6 at Washington University7, University of
California8, Irvine, and Vanderbilt University9, Copyright © 1993–2005, all rights reserved.
Since DOC software is open-source10, free software, you are free to use, modify, copy, and
distribute–perpetually and irrevocably–the DOC software source code and object code produced
from the source, as well as copy and distribute modified versions of this software. You must,
however, include this copyright statement along with code built using DOC software.
You can use DOC software in commercial and/or binary software releases and are under no
obligation to redistribute any of your source code that is built using DOC software. Note, however,
that you may not do anything to the DOC software code, such as copyrighting it yourself or
claiming authorship of the DOC software code, that will prevent DOC software from being
distributed freely using an open-source development model.You needn’t inform anyone that
you’re using DOC software in your software, though we encourage you to let us11 know so we can
promote your project in the DOC software success stories12.
DOC software is provided as is with no warranties of any kind, including the warranties of design,
merchantability, and fitness for a particular purpose, noninfringement, or arising from a course
of dealing, usage or trade practice. Moreover, DOC software is provided with no support and
without any obligation on the part of Washington University, UC Irvine, Vanderbilt University,
their employees, or students to assist in its use, correction, modification, or enhancement. A
number of companies13 around the world provide commercial support for DOC software, however.
DOC software is Y2K-compliant, as long as the underlying OS platform is Y2K-compliant.
66
Washington University, UC Irvine, Vanderbilt University, their employees, and students shall
have no liability with respect to the infringement of copyrights, trade secrets or any patents by
DOC software or any part thereof. Moreover, in no event will Washington University, UC Irvine,
or Vanderbilt University, their employees, or students be liable for any lost revenue or profits or
other special, indirect and consequential damages.
Page 67

Sophos Endpoint Security and Control network startup guide: NetWare edition
The ACE14, TAO15, CIAO16, and CoSMIC17 web sites are maintained by the DOC Group18 at the
Institute for Software Integrated Systems (ISIS)19 and the Center for Distributed Object Computing
of Washington University, St. Louis20 for the development of open-source software as part of the
open-source software community21. By submitting comments, suggestions, code, code snippets,
techniques (including that of usage), and algorithms, submitters acknowledge that they have the
right to do so, that any such submissions are given freely and unreservedly, and that they waive
any claims to copyright or ownership. In addition, submitters acknowledgethat any such submission
might become part of the copyright maintained on the overall body of code, which comprises the
DOC software. By making a submission, submitter agree to these terms. Furthermore, submitters
acknowledge that the incorporation or modification of such submissions is entirely at the discretion
of the moderators of the open-source DOC software projects or their designees.
The names ACE, TAO, CIAO, CoSMIC, WashingtonUniversity, UC Irvine, and Vanderbilt
University, may not be used to endorse or promote products or services derived from this source
without express written permission from Washington University, UC Irvine, or Vanderbilt
University. Further, products or services derived from this source may not be called ACE, TAO,
CIAO, or CoSMIC nor may the name Washington University, UC Irvine, or Vanderbilt University
appear in their names, without express written permission from Washington University, UC
Irvine, and Vanderbilt University.
If you have any suggestions, additions, comments, or questions, please let me22 know.
Douglas C. Schmidt
23
The ACE home page is http://www.cs.wustl.edu/ACE.html
References
1. http://www.cs.wustl.edu/~schmidt/ACE.html
2. http://www.cs.wustl.edu/~schmidt/TAO.html
3. http://www.dre.vanderbilt.edu/CIAO/
4. http://www.dre.vanderbilt.edu/cosmic/
5. http://www.dre.vanderbilt.edu/~schmidt/
6. http://www.cs.wustl.edu/~schmidt/ACE-members.html
7. http://www.wustl.edu/
8. http://www.uci.edu/
9. http://www.vanderbilt.edu/
10. http://www.the-it-resource.com/Open-Source/Licenses.html
11. mailto:doc_group@cs.wustl.edu
12. http://www.cs.wustl.edu/~schmidt/ACE-users.html
13. http://www.cs.wustl.edu/~schmidt/commercial-support.html
14. http://www.cs.wustl.edu/~schmidt/ACE.html
15. http://www.cs.wustl.edu/~schmidt/TAO.html
16. http://www.dre.vanderbilt.edu/CIAO/
17. http://www.dre.vanderbilt.edu/cosmic/
18. http://www.dre.vanderbilt.edu/
67
Page 68

Sophos Endpoint Security and Control network startup guide: NetWare edition
19. http://www.isis.vanderbilt.edu/
20. http://www.cs.wustl.edu/~schmidt/doc-center.html
21. http://www.opensource.org/
22. mailto:d.schmidt@vanderbilt.edu
23. http://www.dre.vanderbilt.edu/~schmidt/
68
 Loading...