

Page 1

How to hardwire the Sony DSC-S600 Digital Camera
Copyright, PixController http://www.PixController.com, all rights reserved.
This document covers in detail how to modify the Sony DSC-S600 digital camera for remote shutter control from the
PixController Universal or LE camera control board. Please see http://www.pixcontroller.com or email
support@pixcontroller.com for more information.
Please note that if you make this modification to your Sony camera that you will void your
camera’s warranty. This modification can also result in damage to your digital camera if
you do not follow the instructions properly.
Tools/Parts Needed
1. 2.4 mm #0 Philips Screwdriver & Small Flat Blade Screwdriver.
2. Fine tipped soldering iron with heat control.
3. 30 Gauge wire. Wire Wrap type wire can be purchased from your local Radio Shack store. Find one of the 3
part numbers: 278-501, 278-502, 278-503. They come in a spool of 50 feet of wire for $2.99
4. Small tweezers.
5. Flat blade screw driver or knife.
6. PixController Universal board with Sony S40-U PIC chip, or LE board with LE II PIC chip (Use the Sony DSCS40 mode for the DSC-S600 camera)
Page 2
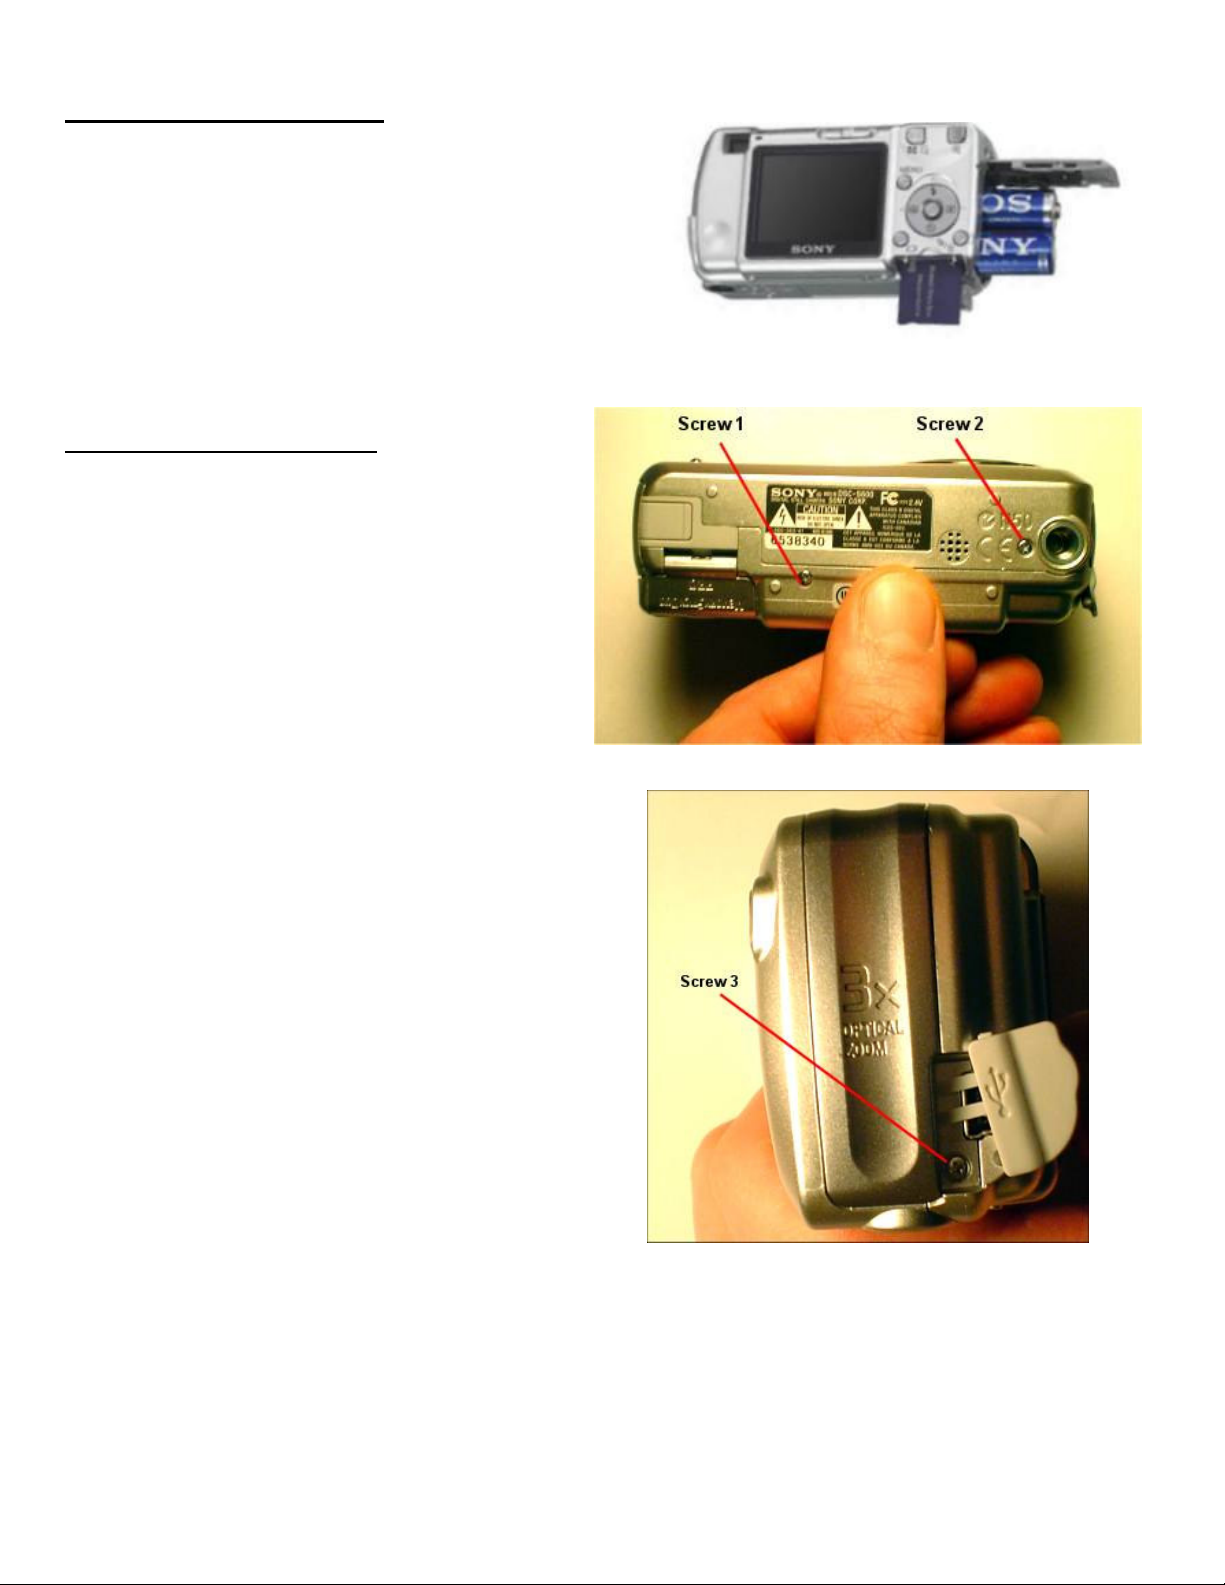
Remove batteries and media card
Before starting your project be sure to remove the 2 AA internal
batteries and the Media Card.
Remove the camera case screws
Remove all 4 screws from the camera case. Be sure to
place the screws in a safe place while modifying the
camera.
Remove the 2 AA batteries and Media Card
Remove screws 1,and 2 from the bottom of the camera case.
Remove screw 3 from under the USB connector door.
Page 3

Remove the case
Carefully remove the back of the camera case from
the camera exposing the interior electronics. Next,
remove the front of the camera case. This is a little
harder to remove, but take your time and unsnap all
of the hinges. The front of the case will be attached
with a small ribbon cable, so take care as not to
handle this too hard or damage the ribbon cable.
Remove screw 4 from under the battery door.
Page 4

Adding some tape…
Before you go any further you need to add some
masking tape or scotch tape as shown in Figure 1
and Figure 2.
In Figure you 1 need to add some tape to hold the
LCD screen in place during the camera
modifications. If you do not add this the LCD will fall
out and can be damaged.
In Figure 2 you need to add the tape here to mask
off the flash contact points. If you do not add this
tape and touch these contact points you will be
shocked.
Be sure to remove this tape when closing the
case back up after your modification is finished.
Figure 1
Remove the shutter board screw
Next remove the shutter board screw as shown and
carefully lift the shutter board and plastic housing
from the camera.
Figure 2
Page 5

Remove Shutter Board
Next carefully turn the shutter board plastic housing
upside down and remove the tabs holding the shutter
board to the plastic housing as shown.
Lift out the shutter board and turn upright.
Locating the Shutter/Power/Common Contacts
The PixController board contact points are shown in
Figure 3. These are the locations where you will
solder your small gauge wire and will be connected
to your PixController board.
You will need a fine tipped soldering iron in order to
perform this task. You may need to remove some of
the fine plastic covering around the Power On/Off
and Common contacts with a tool like and Exacto
Knife.
Add the wires…
Add the small gauge wires as shown in Figure 4
Figure 3
Figure 4
Page 6

Route the wires
Put the shutter board back into the plastic housing
and screw the housing back to the camera. Twist
the wires into a small cable and route the cable
around the LCD display as shown in Figure 5.
Secure the cable to the bottom with some tape.
From here you can drill a hole in the bottom of the
case and export the cable there, or add a 2.5mm
female connector inside of the tri pod port, or even
add a 3-wire servo connector. We leave this up to
the person who does the modification since this is
a personal preference.
Re-attach case and replace the screws
Once you are complete with this process place
the camera case back together and replace the
camera case screws.
Figure 5
Attaching the Sony S40 to the PixController LE
Board and Universal Board
1. Wiring your S40 camera to the PixController
LE board.
Connect the following wires to your LE board:
Shutter – Shutter on LE, J2-1
Ground – Ground on LE, J2-2
Power – Refresh on LE, J2-3
Last, remove the R17 resistor from the LE board,
see: http://www.pixcontroller.com/PixLE
/PixLE_ResistorRemoval.htm
PixController LE Camera Port Diagram
Page 7

2. Wiring your S40 camera to the PixController
Universal board.
Connect the following wires to your Universal
board:
Shutter – Shutter, J14-1, or Phone Cable Shutter
Wire
Ground – Ground, J14-7, or Phone Cable Ground
Wire
Power – Power, J14-3, or Phone Cable Power
Wire
PixController Universal Camera Port Diagram
PixController Universal Phone Port
Page 8

Zoom Lens issue
Because of the zoom lens on the Sony S600
this can be an issue to get a good seal between
the camera lens and the case as to not get flash
bleed during night photos.
Figure 6 shows a simple solution to this problem
by adding 3 of the Large Flash Masking
Washers sold on the www.pixcontorller.com web
site under the camera accessories. These 3
washers can be easily glued together using
Marine GOOP.
Figure 6
Page 9

Building a trail camera
In the photos below, Figure 7 and Figure 8 we show a completed trail camera system using a camo dipped Pelican
1020 case (note: Pelican will be selling Pelican 1020 and 1040 camo dipped cases in a Mossy Oak pattern in 2006).
In this example we are using a PixController LE board with the LE II PIC chip in Sony S40 mode. The Sony S40 board
setting are the same for the Sony DSC-S600 (both in the LE and Universal PixController boards). This layout uses a
9V battery holder w/ on-off switch, which can be purchased from the www.pixcontroller.com web site.
Figure 7
Camera Setting
We suggest the following Sony DSC-S600 setting for maximum trail camera performance:
• Red Eye Reduction: Off
• AF Illuminator: Off
• Auto Review: Off
• Beep: Off
• Set your Date/Time
The shutter time from PIR motion event is under 2 seconds for this camera, and if setup in ISO 1000 mode you will
get a flash range beyond 40 feet.
Copyright, PixController http://www.PixController.com, all rights reserved.
1-18-06
Figure 8
• Setup Camera in “Program Mode”
• ISO 1000 (brightest night photos)
• Picture Quality: Fine
 Loading...