

Page 1
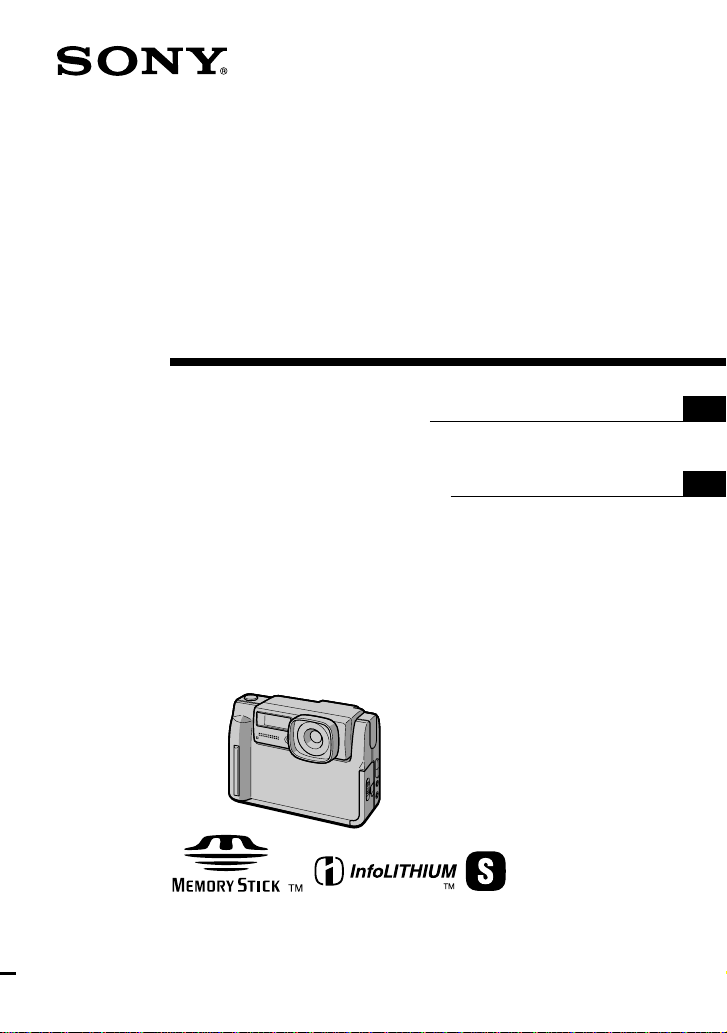
Digital Still
Camera
3-866-309-12 (1)
Operating Instructions
Before operating the unit, please read this manual thoroughly, and
retain it for future reference.
Manual de instrucciones
Antes de utilizar la unidad, lea detenidamente este manual de
instrucciones y consérvelo para futuras referencias.
Owner‘s Record
The model and serial numbers are located on the bottom. Record the
serial number in the space provided below. Refer to these numbers
whenever you call upon your Sony dealer regarding this product.
Model No. DSCSerial No. ________________________
DSC-F55/F55E
1999 by Sony Corporation
GB
ES
Page 2
English
WARNING
To prevent fire or shock
hazard, do not expose the
unit to rain or moisture.
This symbol is intended
to alert the user to the
presence of uninsulated
“dangerous voltage”
within the product’s
enclosure that may be of
sufficient magnitude to
constitute a risk of
electric shock to persons.
This symbol is intended
to alert the user to the
presence of important
operating and
maintenance (servicing)
instructions in the
literature accompanying
the appliance.
For the Customers in the
U.S.A. and CANADA
CAUTION
TO PREVENT ELECTRIC SHOCK, DO
NOT USE THIS POLARIZED AC PLUG
WITH AN EXTENSION CORD,
RECEPTACLE OR OTHER OUTLET
UNLESS THE BLADES CAN BE FULLY
INSERTED TO PREVENT BLADE
EXPOSURE.
You are cautioned that any changes or
modifications not expressly approved in
this manual could void your authority to
operate this equipment.
2-GB
Declaration of Conformity
Trade Name: SONY
Model No.: DSC-F55
Responsible Party: Sony Electronics Inc.
Address: 1 Sony Drive, Park
Ridge, NJ.07656 USA
Telephone No.: 201-930-6970
This device complies with Part 15 of the
FCC Rules. Operation is subject to the
following two conditions: (1) This device
may not cause harmful interference, and
(2) this device must accept any
interference received, including
interference that may cause undesired
operation.
Note:
This equipment has been tested and found
to comply with the limits for a Class B
digital device, pursuant to Part 15 of the
FCC Rules. These limits are designed to
provide reasonable protection against
harmful interference in a residential
installation. This equipment generates, uses,
and can radiate radio frequency energy and,
if not installed and used in accordance with
the instructions, may cause harmful
interference to radio communications.
However, there is no guarantee that
interference will not occur in a particular
installation. If this equipment does cause
harmful interference to radio or television
reception, which can be determined by
turning the equipment off and on, the user
is encouraged to try to correct the
interference by one or more of the following
measures:
— Reorient or relocate the receiving
antenna.
— Increase the separation between the
equipment and receiver.
— Connect the equipment into an outlet on
a circuit different from that to which the
receiver is connected.
— Consult the dealer or an experienced
radio/TV technician for help.
The shielded interface cable recommended
in this manual must be used with this
equipment in order to comply with the
limits for a digital device pursuant to
Subpart B of Part 15 of FCC Rules.
Page 3

For the customers in the
U.S.A. and Canada
DISPOSAL OF LITHIUM ION
BATTERY.
LITHIUM ION BATTERY.
DISPOSE OF PROPERLY.
You can return your unwanted lithium ion
batteries to your nearest Sony Service
Center or Factory Service Center.
Note: In some areas the disposal of lithium
ion batteries in household or business
trash may be prohibited.
For the Sony Service Center nearest you call
1-800-222-SONY (United States only)
For the Sony Factory Service Center nearest
you call 416-499-SONY (Canada only)
Caution: Do not handle damaged or
leaking lithium ion battery.
NOTICE FOR THE CUSTOMERS
IN THE UNITED KINGDOM
A moulded plug complying with BS 1363 is
fitted to this equipment for your safety and
convenience.
Should the fuse in the plug supplied
need to be replaced, a 5 AMP fuse
approved by ASTA or BSI to BS 1362, (i.e.
marked with 2 or @ mark) must be
used.
If the plug supplied with this equipment
has a detachable fuse cover, be sure to
attach the fuse cover after you change the
fuse. Never use the plug without the fuse
cover. If you should lose the fuse cover,
please contact your nearest Sony service
station.
Attention
The electromagnetic fields at the specific
frequencies may influence the picture and
sound of this camera.
Memory Stick
N50
For the Customers in CANADA
This Class B digital apparatus complies
with Canadian ICES-003.
For the Customers in the
U.S.A.
This device complies with Part 15 of
the FCC Rules. Operation is subject to
the following two conditions: (1) This
device may not cause harmful
interference, and (2) this device must
accept any interference received,
including interference that may cause
undesired operation.
For the Customers in Germany
Directive: EMC Directive 89/336/
EEC.92/31/EEC
This equipment complies with the EMC
regulations when used under the
following circumstances:
• Residential area
• Business district
• Light-industry district
(This equipment complies with the EMC
standard regulations EN55022 Class B.)
Battery Pack
For the Customers in the U.S.A.
and Canada
THIS CLASS B DIGITAL DEVICE
COMPLIES WITH PART 15 OF THE
FCC RULES AND THE CANADIAN
ICES-003. OPERATION IS SUBJECT
TO THE FOLLOWING TWO
CONDITIONS: (1) THIS DEVICE
MAY NOT CAUSE HARMFUL
INTERFERENCE, AND (2) THIS
DEVICE MUST ACCEPT ANY
INTERFERENCE RECEIVED,
INCLUDING INTERFERENCE
THAT MAY CAUSE UNDESIRED
OPERATION.
3-GB
Page 4

About the Carl Zeiss lens
This camera is equipped with a Carl
Zeiss lens which can reproduce a fine
image.
The lens for this camera was
developed jointly by Carl Zeiss, in
Germany, and Sony Corporation. It
adopts the MTF* measurement
system for camera and offers a quality
as the Carl Zeiss lens.
* MTF is an abbreviation of
Modulation Transfer Function/
Factor.
The value number indicates the
amount of light of a subject
penetrating into the lens.
• IBM PC/AT is a registered trademark
of International Business Machines
Corporation of the U.S.A.
• MS-DOS and Windows are registered
trademarks licensed to Microsoft
Corporation, registered in the U.S.A.
and other countries.
• Macintosh is a trademark licensed to
Apple Computer, Inc., registered in the
U.S.A. and other countries.
• All other product names mentioned
herein may be the trademarks or
registered trademarks of their
respective companies.
Furthermore, “™‘” and “®” are not
mentioned in each case in this manual.
4-GB
Page 5

Table of contents
Parts identification .......... 7
Preparation
1 Charging the battery pack .... 9
2 Installing the battery pack .. 10
3 Inserting a Memory Stick.... 11
4 Setting the date and time .... 12
Recording
1 Recording still images ......... 14
2 Recording moving images
............................................... 15
Playing back
1 Playing back still images.....17
2 Playing back moving images
............................................... 18
3 Viewing images using a
personal computer ............. 21
Various ways of recording
Changing the lens orientation
– Face to face recording ........... 24
Using the self-timer ....................... 24
Selecting brightness of the flash
(FLASH LEVEL) ....................... 25
Recording images in macro..........25
Recording enlarged images
– Zoom recording.....................26
Enjoying Picture Effect..................26
Selecting image quality
(QUALITY) ............................... 27
Selecting image size.......................28
Selecting recording mode
(REC MODE) ............................ 29
Adjusting exposure
(EXPOSURE)............................. 31
Adjusting the white balance ........32
Various ways of playback
Playing back multiple images at a
time (INDEX) ............................ 33
Enlarging a part of the image
– Zoom and trimming ............. 34
Rotating image (ROTATE) ........... 35
Playing back images in a continuous
loop (SLIDE SHOW)................ 36
Preventing accidental erasure
(PROTECT) ............................... 37
Deleting images (DELETE) .......... 38
Formatting (initializing) a Memory
Stick ............................................ 40
Changing the menu setting
Changing the menu setting .......... 41
Setting the mode of each item......42
Using image data with
other equipment
Using the house current (mains)
.................................................... 45
Watching images on a TV screen
.................................................... 45
Printing the recorded images.......46
Marking a print mark on an image
.................................................... 46
Additional information
Precautions ..................................... 48
Troubleshooting............................. 50
Self-diagnosis display ................... 52
Warning and notice messages ..... 53
Specifications.................................. 54
Index ................................................ 55
GB
5-GB
Page 6

Be sure to read the following before using your camera
LCD screen
The LCD screen is manufactured using high-precision technology. However, there
may be some tiny black points and/or bright points (red, blue or green in color) that
constantly appear on the LCD screen. These points are normal in the manufacturing
process and do not affect the recorded image in any way. Over 99.99 % are operational
for effective use.
Trial recording
Before you record one-time events, you may want to make a trial recording to make
sure that the camera is working correctly.
No compensation for contents of the recording
Contents of the recording cannot be compensated for if recording or playback is not
made due to a malfunction of the camera, etc.
Note on image data compatibility
Image data files recorded on Memory Sticks by your camera conform with the Design
Rules for Camera File Systems universal standard established by the JEIDA (Japan
Electronic Industry Development Association).
You cannot play back on your camera still images recorded on other equipment (DCRTRV890E/TRV900/TRV900E, DSC-D700) that does not conform with this universal
standard. (These models are not sold in some areas.)
Precaution on copyright
Television programs, films, video tapes, and other materials may be copyrighted.
Unauthorized recording of such materials may be contrary to the provision of the
copyright laws.
Before using your camera
This digital still camera uses a Memory Stick as a medium for recording images.
Do not shake or strike the unit
Malfunctions, inability to record images as well as inability to use Memory Sticks or
image and memory data breakdown, damage or loss may occur.
Do not get the unit wet
When taking pictures outdoors in the rain or under similar conditions, be careful not to
get the unit wet.
If moisture condensation occurs, refer to page 48 and follow instructions on how to
remove it before using.
Back up recommendations
To avoid the potential risk of data loss always copy (back up) data to disk.
Supplied accessories
AC-VF10 AC power adaptor/charger (1)
A/V connecting cable (1)
NP-F10 Battery pack (1)
DK-115 DC connecting cable (1)
Hand strap (1)
Lens cap (1)
Lens cap strap (1)
Your dealer may not handle some of the above listed accessories. Please ask the dealer for
detailed information about the accessories in your country.
Memory Stick (4 MB) (1)
PC serial cable (1)
Power cord (1)
Sony PictureGear 3.2 Lite (1)
Operating instructions (1)
6-GB
Page 7
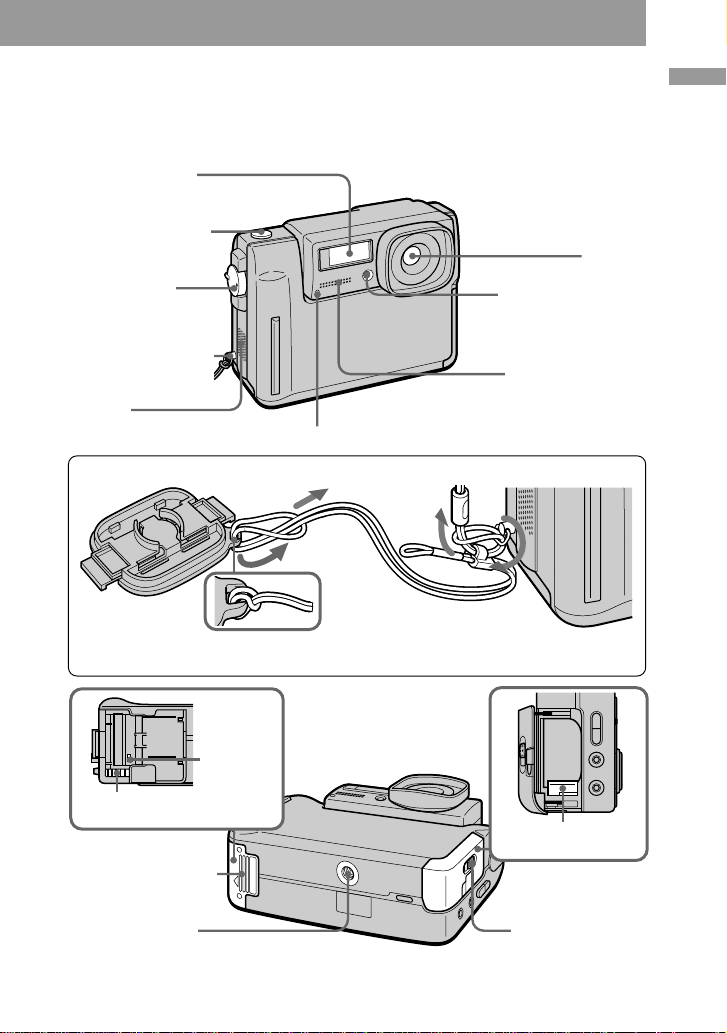
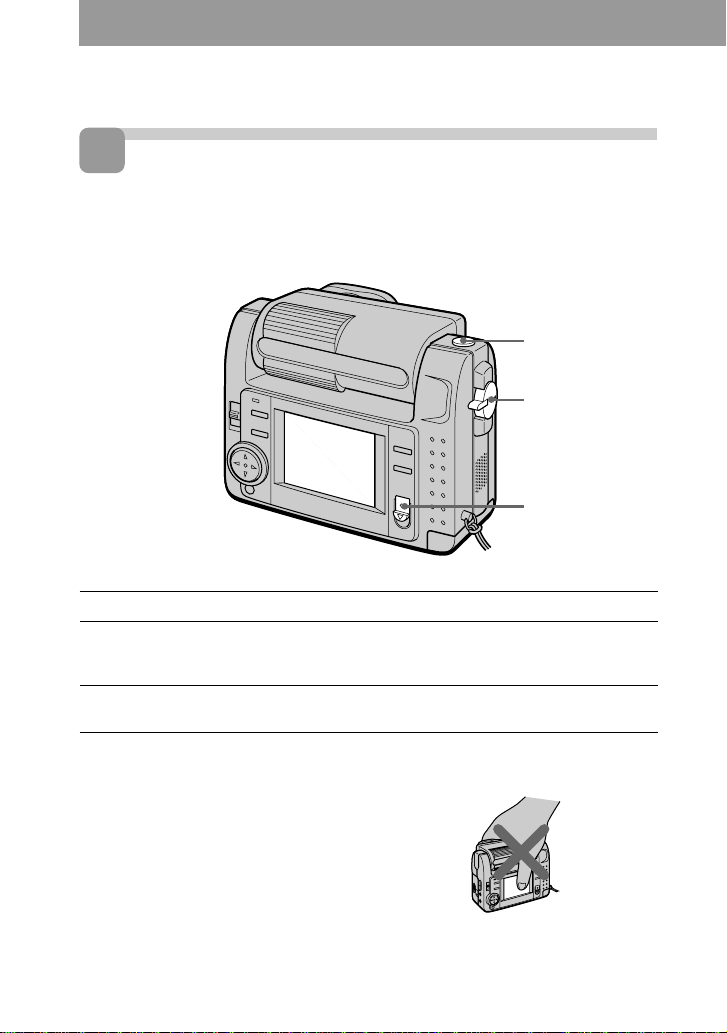
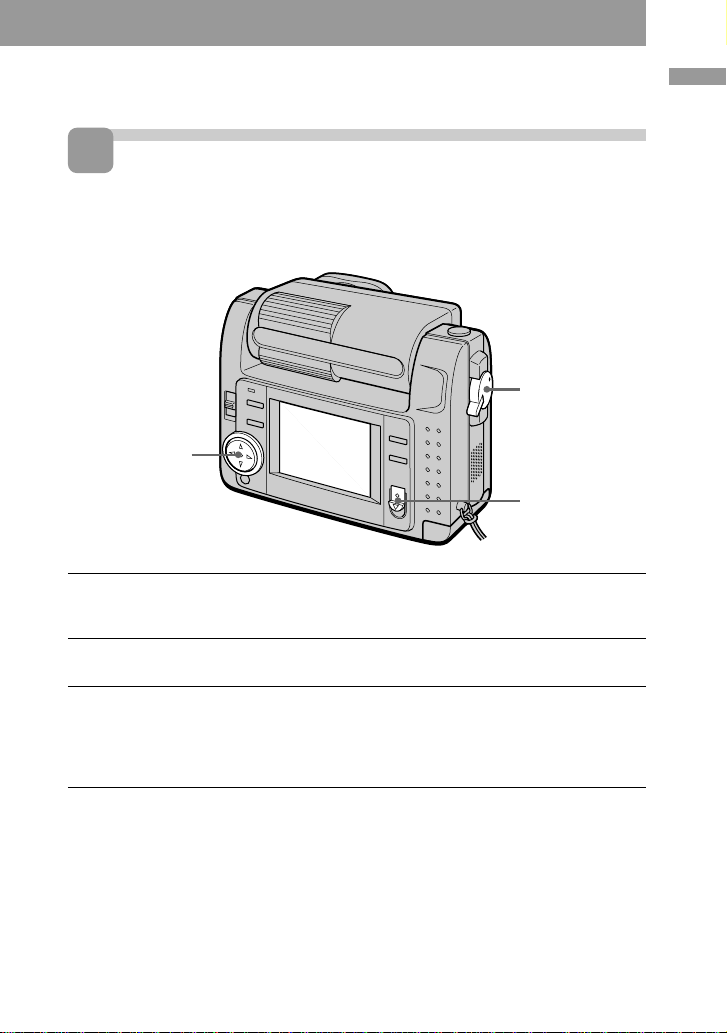
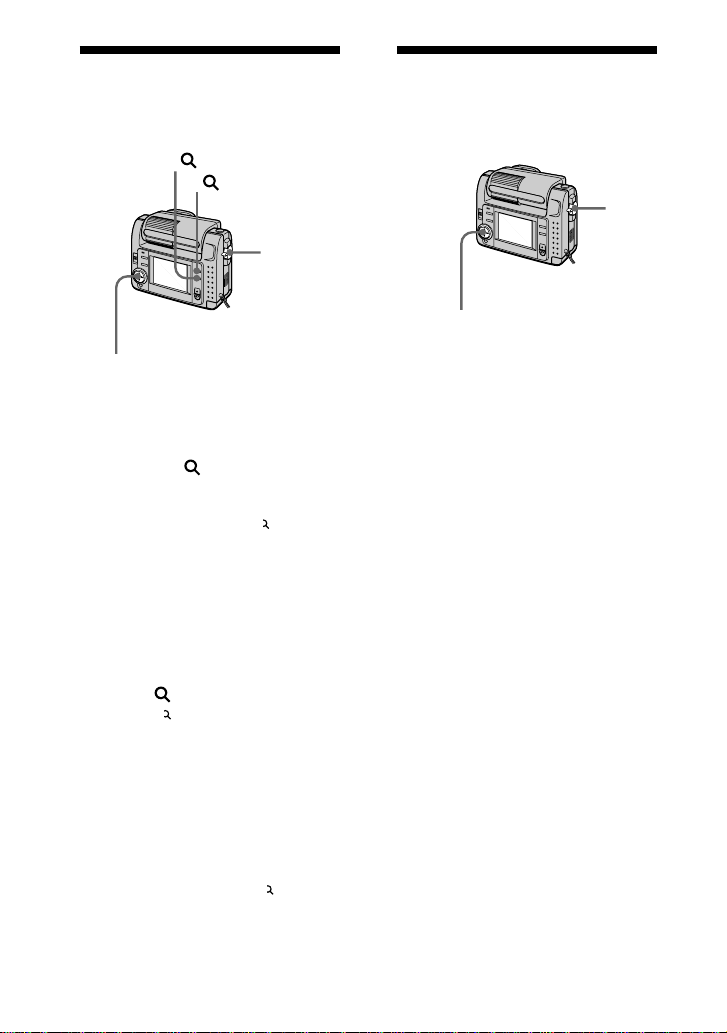
Parts identification
See pages in parentheses for more details.
Flash emitter (25)
Shutter button (14)
Lens
MODE selector
(PLAY/STILL/MOVIE)
(14)
Hook for hand strap
Speaker
Recording lamp
Attaching the lens cap (supplied) and the hand strap (supplied).
Lens cap
Be careful that the lens cap strap does not touch the projections on both sides of the
lens cap hole.
Hand strap
Lens cap strap
Photocell window
for flash
Do not block when
recording.
MIC (Microphone)
Parts identification
Access
lamp (11)
Memory Stick eject
button (11)
Memory Stick cover
(11)
Tripod receptacle
Make sure that the length of the tripod
screw is less than 7/32 inch (6.5 mm).
Battery eject
switch (10)
OPEN (BATT)
switch (10)
7-GB
Page 8
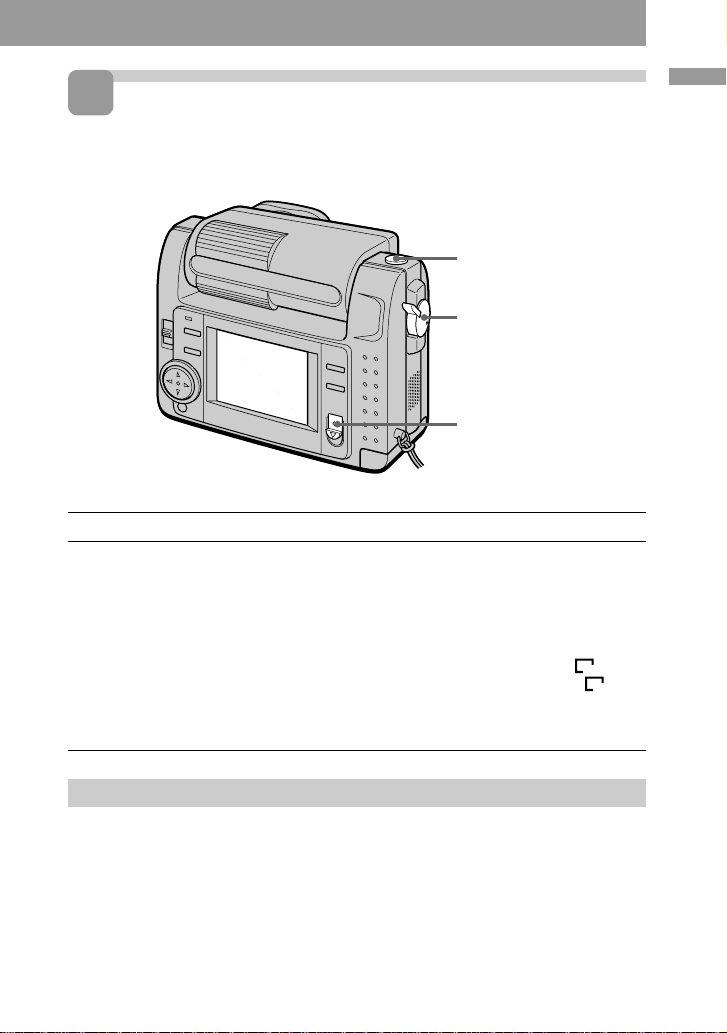
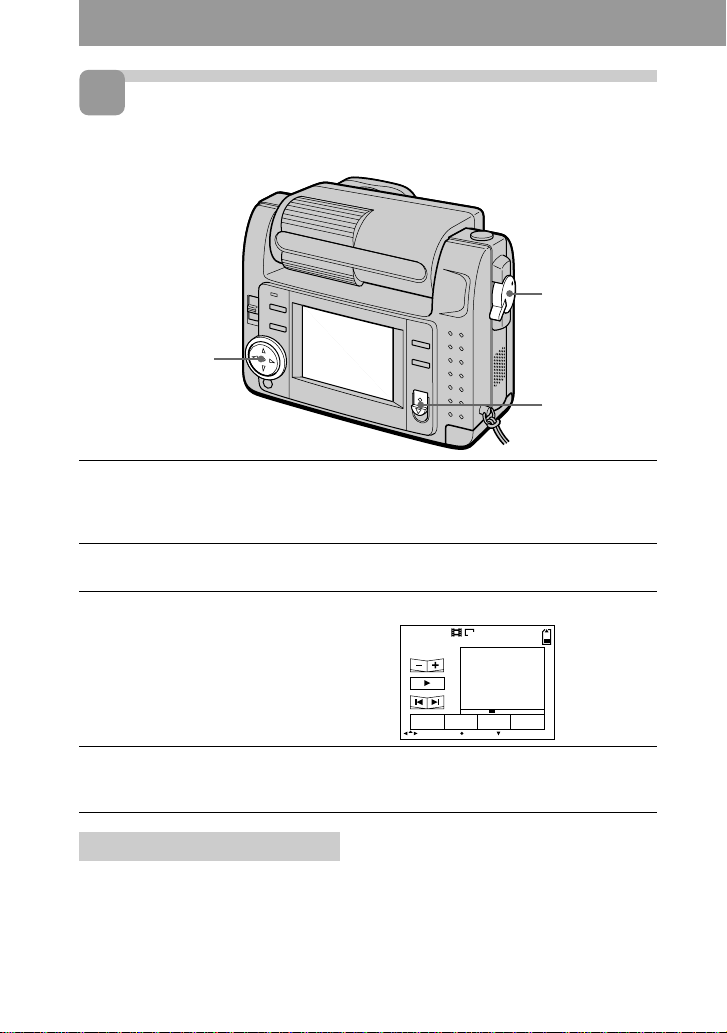
LCD BACK LIGHT switch
Normally set to ON.
Set to OFF to save the
battery if you use the
camera in bright place.
LCD BRIGHT +/–
buttons
Press to adjust the
brightness of the
LCD screen.
Slot cover for AC
power adaptor/
charger (45)
A/V OUT jack
(45, 46)
Audio is monaural.
DIGITAL I/O jack (22)
DISPLAY button
Press to display or turn
off the indicators on the
LCD screen.
Control button
(Macro) button (25)
Flash lamp (25)
LCD screen
(16, 19)
+ (Zoom)
button (26, 34)
– (Zoom)
button (26, 34)
POWER switch/
POWER lamp
(12)
(Flash) button (25)
AUTO (no indication) is set at the
factory.
Each time you press the button, the
flash mode changes as follows:
AUTO (no indication) t forced-
flash t no flash t AUTO.
In AUTO mode, flashes automatically
according to the brightness of the
surroundings.
The subject must be 11 7/8 inches to
8 1/3 feet (0.3 m to 2.5 m) away.
8-GB
Control button
Upper side
Left
side
Lower
side
Right
side
Press to
execute
Function of the control button
You can execute the functions by
pressing the upper, lower, left, or right
side of the control button. When an
item is selected in the menu, the color
of the item changes from blue to
yellow. To enter your selection, press
the center of the control button.
Page 9
Preparation
1
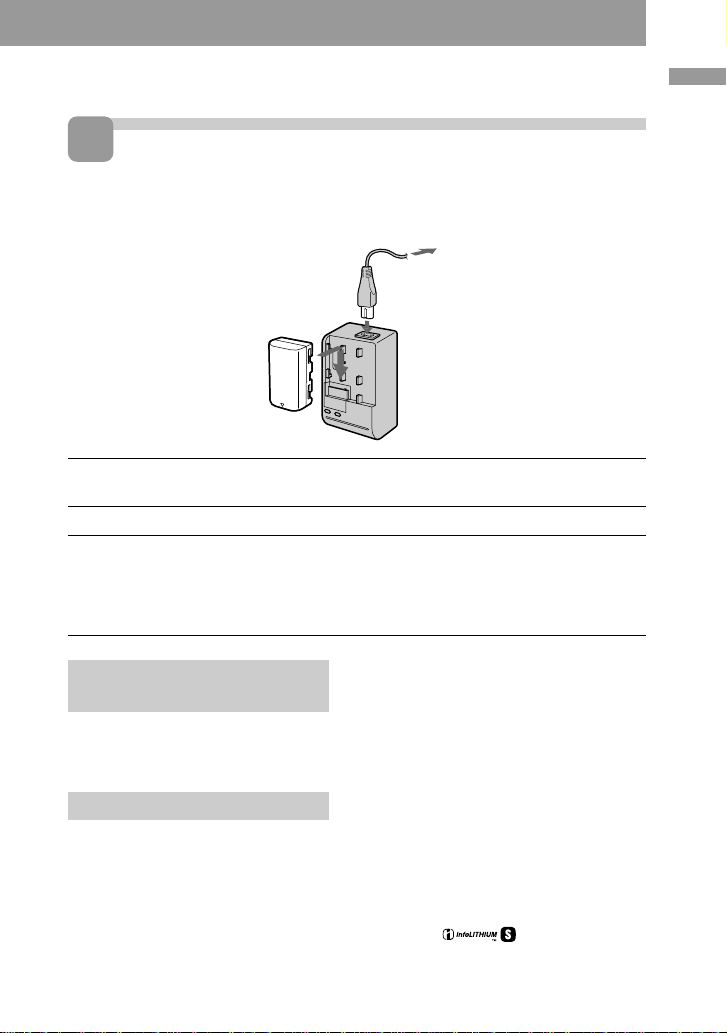
Charging the battery pack
To charge the battery pack, use the AC power adaptor/charger.
Your camera operates only with the “InfoLITHIUM” battery pack (S series).
“InfoLITHIUM” is a trademark of Sony Corporation.
3
2
1
1 Insert the battery pack in the direction of the V mark. Slide the
battery pack in the direction of the arrow.
2 Connect the power cord to the AC power adaptor/charger.
3 Connect the power cord to a wall outlet.
The CHARGE lamp (orange) lights up when charging begins.
When the CHARGE lamp goes off, normal charge is completed. For full charge,
which allows you to use the battery longer than usual, leave the battery pack
attached for about one hour after normal charge is completed.
Preparation
To remove the battery
pack
Slide the battery pack in the opposite
direction of the arrow as illustrated
above.
Charging time
Battery Full charge* Normal charge**
NP-F10 145 min. 85 min.
Approximate minutes to charge a
discharged battery pack using the AC
power adaptor/charger AC-VF10.
(Lower temperature require a longer
charging time.)
* Charging for about one hour after
the CHARGE lamp goes out.
** Charging just until the CHARGE
lamp goes out.
For details on battery life, see page 20.
What is “InfoLITHIUM”?
The ”InfoLITHIUM” is a lithium ion
battery pack which can exchange data
such as battery consumption with
compatible video equipment. This unit is
compatible with the “InfoLITHIUM”
battery pack (S series). Your camera
operates only with the “InfoLITHIUM”
battery. “InfoLITHIUM” battery packs
have the
“InfoLITHIUM” is a trademark of Sony
Corporation.
mark.
9-GB
Page 10

2
Installing the battery pack
12 3
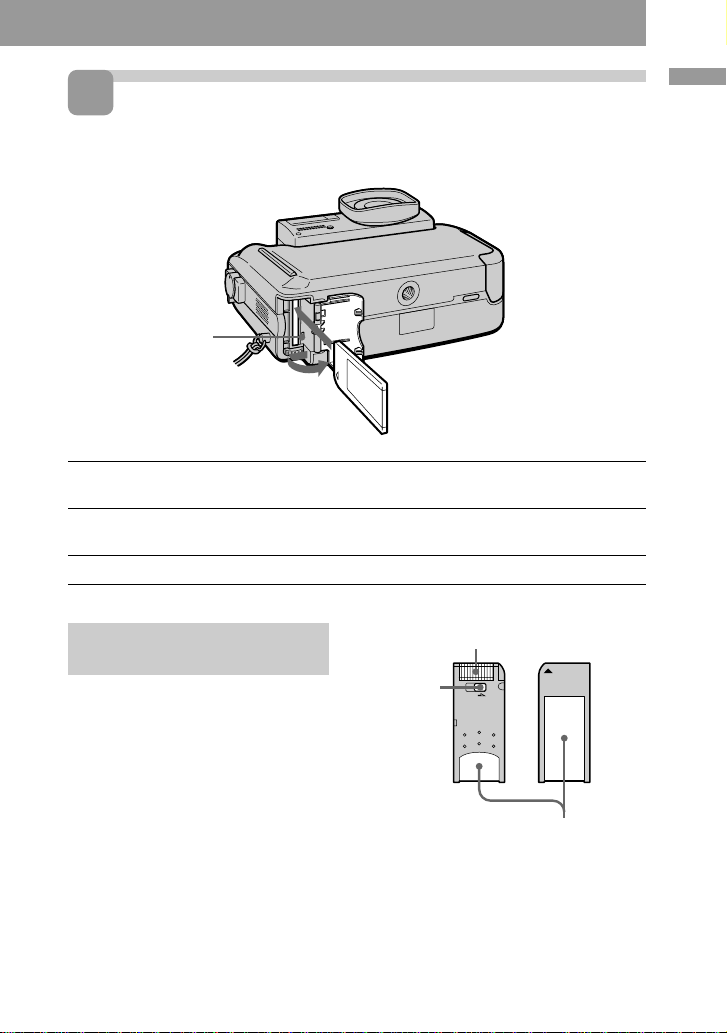
1 Open the battery cover.
Open the cover while sliding the OPEN (BATT) switch in the direction of the
arrow.
2 Install the battery pack.
While sliding down the battery eject switch, insert the battery pack with the v mark
facing toward the battery compartment.
3 Close the cover.
Press the cover until it clicks.
To remove the battery
pack
Open the battery cover. Slide down
the battery eject switch, and remove
the battery pack.
Be careful not to drop the battery pack
when removing.
10-GB
Battery remaining indicator
This camera shows on the LCD screen
how many minutes you can still keep on
recording or playing back images.
Auto power-off function
During recording if you leave the camera
inactivate for about three minutes while
the power is on, the camera turns off
automatically to prevent wearing down
the battery.
Auto power-off does not function when
you use the AC power adaptor/charger.
Page 11
3
Inserting a Memory Stick
“Memory Stick” is a trademark of Sony Corporation.
Access lamp
1 Open the Memory Stick cover.
Slide it in the direction of the arrow mark on the cover.
2 Insert the Memory Stick.
Insert it with the v mark pointing inward.
3 Close the Memory Stick cover.
Preparation
To remove the Memory
Stick
Open the Memory Stick cover, then
press the Memory Stick eject button.
PNote
When the access lamp lights up, be
sure not to remove the Memory Stick
or turn off the power.
Connector
LOCK
switch
PNote on Memory Stick
You cannot record on a Memory Stick
if the LOCK switch is set to LOCK
position.
LOCK
Label space
11-GB
Page 12
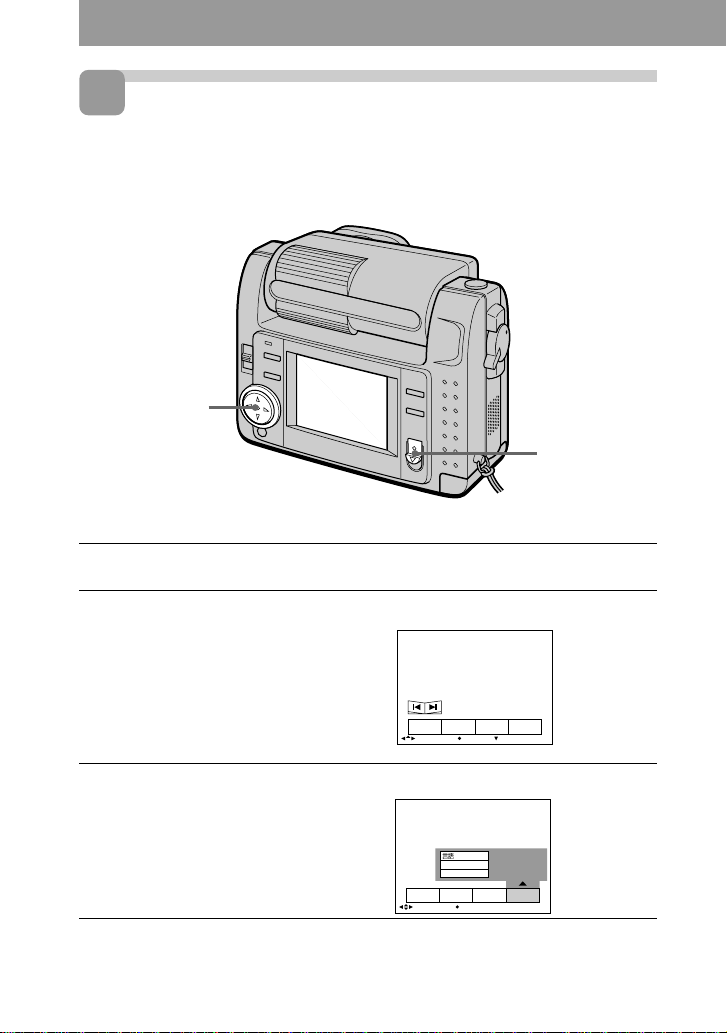
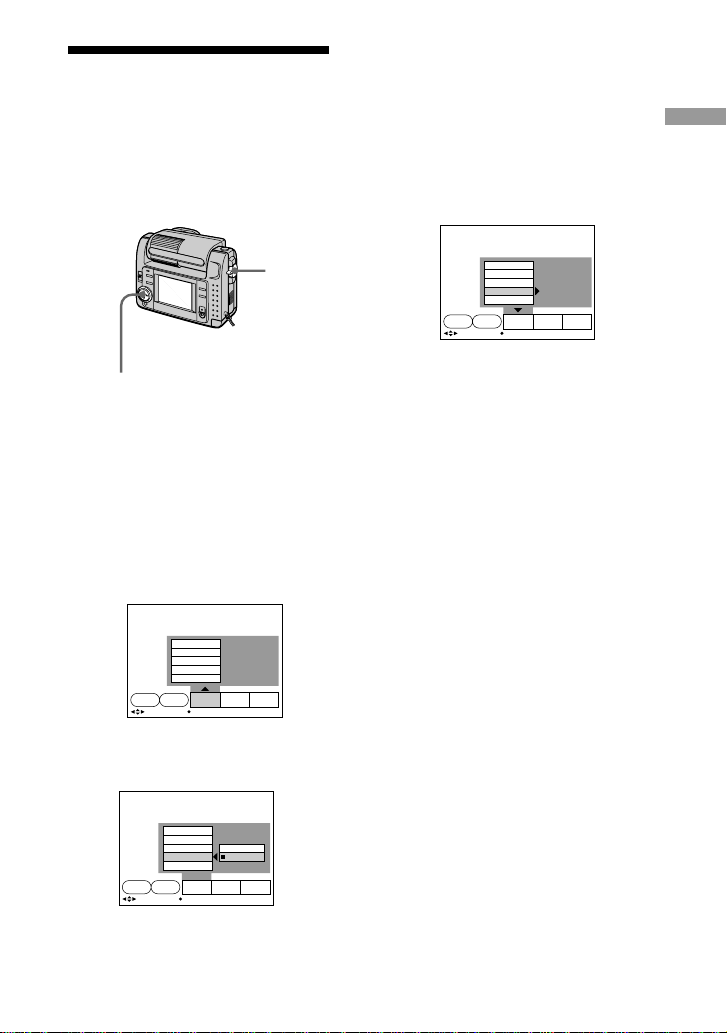
4
Setting the date and time
When you use the camera first, set the date and time. If they are not set, incorrect date
and time are recorded, and CLOCK SET screen in the step 5 appears whenever you
turn on the camera in STILL/MOVIE mode.
Control button
POWER switch
1 Slide the POWER switch down to turn on the power.
The POWER lamp lights up.
2 Press v of the control button.
The menu bar appears on the LCD screen.
INDEX FILEDELETE SETUP
SELECT OK
3 Select “SETUP” with the control button, then press it.
/LANGUAGE
CLOCK SET
BEEP
INDEX FILEDELETE SETUP
SELECT OK
12-GB
MENU BAR OFF
Page 13
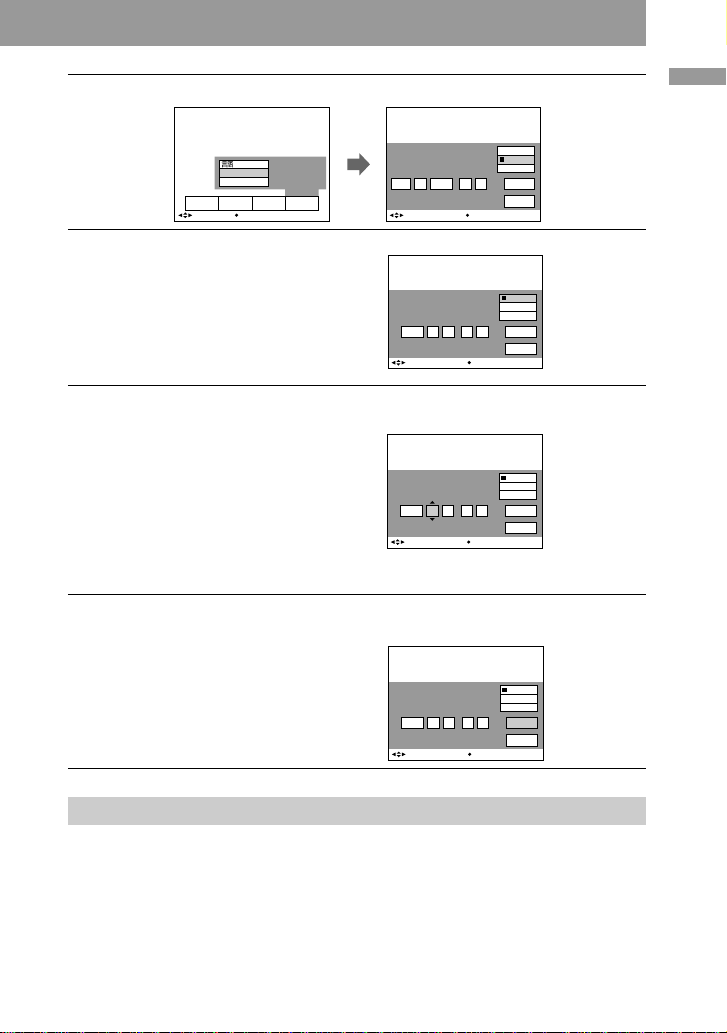
4 Select “CLOCK SET” with the control button, then press it.
Preparation
/LANGUAGE
CLOCK SET
BEEP
INDEX FILEDELETE SETUP
SELECT OK
CLOCK SET
1999JAN AM// : 1 12 00
SELECT/ADJUST OK
Y/M/D
M/D/Y
D/M/Y
ENTER
CANCEL
5 Select the desired display of the date with the control button,
then press it.
Y/M/D (year/month/day)
M/D/Y (month/day/year)
D/M/Y (day/month/year)
CLOCK SET
1999 AM// : 1 1 12 00
SELECT/ADJUST OK
Y/M/D
M/D/Y
D/M/Y
ENTER
CANCEL
6 Select the date and time with the control button, then press it.
The item to be changed is indicated with
v/V. Select number by pressing v/V of
the control button, then press it to enter
the number.
After entering the number, v/V moves
to the next item.
When “D/M/Y” is selected, set the time
on a 24-hour cycle.
CLOCK SET
1999 AM// : 1 1 12 00
SELECT/ADJUST OK
Y/M/D
M/D/Y
D/M/Y
ENTER
CANCEL
7 Select “ENTER” with the control button, then press it at the
desired moment to begin clock movement.
CLOCK SET
1999 PM// : 7 4 10 30
SELECT/ADJUST OK
Y/M/D
M/D/Y
D/M/Y
ENTER
CANCEL
To cancel the date and time setting
Select “CANCEL” with the control button, then press it.
13-GB
Page 14
Recording
1
Recording still images
To record images, slide the POWER switch down to turn on the power (The POWER
lamp lights up) and insert the Memory Stick.
Shutter button
MODE selector
POWER switch
1 Set the MODE selector to STILL.
2 Press the shutter button halfway down.
When AE (auto exposure), AWB (auto white balance) and AF (auto focus) are
frozen, the AE lock indicator z (green) lights up.
3 Press the shutter button fully down.
The image is recorded on the Memory Stick.
PNote
When the image is recorded on the
Memory Stick, “RECORDING” appears
on the LCD screen. When this indication
appears, never shake or strike the unit.
Also, do not turn the power off, or
remove the battery pack or Memory Stick.
Otherwise, an image data breakdown
may occur and the Memory Stick may
become unusable.
14-GB
Do not hold the camera by the LCD
screen.
Page 15
2
Recording moving images
To record images, slide the POWER switch down to turn on the power (The POWER
lamp lights up) and insert the Memory Stick.
Shutter button
MODE selector
POWER switch
1 Set the MODE selector to MOVIE.
2 Press the shutter button fully down momentarily.
The image and sound are recorded for five seconds, 10 seconds, or 15 seconds. (The
time is set at “REC TIME SET” in the menu.) (page 43)
Hold the shutter button fully down.
The image and sound are recorded until you release it.
Video mail mode: maximum 60 seconds when recording 160 × 112 size
Presentation mode: maximum 15 seconds when recording 320 × 240 size
However, the minimum recording time depends on the “REC TIME SET” setting
above.
Moving images will be softer than still images.
160
320
Recording
Checking the last recorded image (Review)
When you want to check the last
recorded image, press b of the control
button. The last recorded image is
displayed on the LCD screen. To
return to normal mode, press the
shutter button or select “RETURN”
with the control button, then press it.
15-GB
Page 16
The indicators during recording
The indicators on the LCD screen are not recorded.
Image size indicator (28)/
Zoom indicator (26)
Recording mode indicator (29)
AE/Focus lock indicator (14)
Battery remaining
indicator (10)
Focus mode
indicator (25)
Flash level indicator (25)
SELF
TIMER
White balance indicator (32)
Picture effect indicator (26)/
LCD bright level indicator* (8)/
Volume level indicator* (18)
60
min
+1.0
Image quality indicator (27)
Number of stored images
When “FILE NUMBER” is
set to “SERIES,” the
numbers are put to files in
sequence even if the
Memory Stick is changed.
Remaining
memory capacity
indicator
FINE
1600
EV
REC
15sBRT
0:10
48
Self-diagnosis
function indicator
(52)/Recording
time indicator (43)
Recording time
indicator (43)
FILE
SETUPCAMERAEFFECT
MENU BAR OFFSELECT OK
Menu bar and
guide menu
They appear by
pressing v of the
control button and
disappear by
pressing V of it.
EV level indicator (31)
* Only displayed during operation.
16-GB
Self-timer indicator (24)
Page 17
Playing back
1
Playing back still images
To play back images, slide the POWER switch down to turn on the power (The
POWER lamp lights up) and insert the Memory Stick.
MODE selector
Control button
POWER switch
1 Set the MODE selector to PLAY.
The last recorded image appears on the LCD screen.
“NO FILE” indicator appears on the LCD screen when there is no image.
2 Press v of the control button to display the menu bar on the LCD
screen.
3 Select the recorded image with the control button.
Select the button on the LCD screen with the control button, then press it.
'b: To display the preceding recorded image.
B': To display the next image.
INDEX: To display six recorded images at a time (INDEX screen).
Playing back
z When the menu bar is not
displayed
You can directly select the image with b
or B of the control button.
17-GB
Page 18
2
Playing back moving images
To play back moving images, slide the POWER switch down to turn on the power (The
POWER lamp lights up) and insert the Memory Stick.
MODE selector
Control button
POWER switch
1 Set the MODE selector to PLAY.
The last recorded image appears on the LCD screen.
The image recorded in MOVIE mode is displayed one-size smaller than the other
normal-sized images.
2 Press v of the control button to display the menu bar on the LCD
screen.
3 Select the recorded moving image with the control button.
Select the button on the LCD screen with
the control button, then press it.
'b: To display the preceding recorded
image.
B': To display the next image.
INDEX: To display six recorded
images at a time (INDEX screen).
VOL.
INDEX FILEDELETE SETUP
SELECT OK
160
6/8
MENU BAR OFF
4 Select the B (playback) button on the screen with the control
button, then press it.
Moving images and sound are played back.
Adjusting the volume
Select the VOL. +/– buttons on the
screen with the control button, then
adjust the volume with b or B of it.
18-GB
z When the menu bar is not
displayed
You can directly select the image with b
or B of the control button, and play back
the image with z of it.
Page 19

The indicators during playback
During playback still images (STILL)
Zoom scaling indicator (34)
Recording mode indicator (29)
Image size indicator (28)
Image number
60
min
2.0
640
DSC00007
During playback moving images (MOVIE)/still images with sounds (VOICE)
10/48
12:00AM1999 7 4
Remaining memory capacity
indicator
Number of stored images in Memory
Stick
Print mark indicator (46)
Protect indicator (37)
Recording date of the playback
image (12)/Menu bar and guide
menu (41)
File name
VOL. (Volume) buttons (18)
Moving image file indicator (18)
Image size indicator (28)
Playing back
min
VOL.
INDEX FILEDELETE SETUP
SELECT OK
320
6/860
0:10
MENU BAR OFF
Image number/number of stored
images in Memory Stick
Remaining memory capacity
indicator
Counter
Playback image (18)
Play bar (18)
Menu bar and guide menu (41)
Fast-forward/rewind buttons (18)
Search buttons (18)
B is displayed during stop, and X
during playback.
19-GB
Page 20

Battery life/the number of images that can be recorded/
played back
STILL mode
Continuous recording
LCD BACK LIGHT Battery life (min.) Number of images (record/playback)
ON 50 (45) 1000 (900)
OFF 60 (55) 1200 (1100)
Continuous playing*
LCD BACK LIGHT Battery life (min.) Number of images (record/playback)
ON 65 (60) 1000 (900)
OFF 75 (70) 1200 (1100)
Approximate battery life and the number of images that can be recorded/played back
at a temperature of 77°F (25°C), 640 × 480 image size, in NORMAL recording and
STANDARD quality mode. Shooting without the flash. Numbers in parentheses
indicate the time when you use a normally charged battery.
* Playing back single image at about 3-second intervals
MOVIE mode
Continuous recording
LCD BACK LIGHT Battery life (min.)
ON 40 (35)
OFF 50 (45)
Approximate minutes that can be recorded at a temperature of 77°F (25°C) and 160 ×
112 image size. Numbers in parentheses indicate the time when you use a normally
charged battery.
• Battery life and the number of images will be decreased if you use the camera while
you repeat turning the power on/off.
• The capacity of a Memory Stick is limited. The above figures are a guide when
continuously recording/playing back while replacing Memory Sticks.
• The battery life will be shorter when you carry out recording in a cold place. When
using the battery pack in a cold place, keep it warm by putting it into your pocket
and install it in the camera just before recording.
20-GB
Page 21

3
Viewing images using a personal computer
With this camera, the still image data is compressed in JPEG format and moving image
data is compressed with MPEG-1 format.
These data can be viewed using a personal computer which installed JPEG and MPEG
browsing software as Sony PictureGear 3.2 Lite (supplied). For further information to
use the browsing software, refer to the software and the personal computer instruction
manual.
Using the optional PC card adaptor
PC card adaptor (not supplied)
Playing back
Memory Stick
Personal computer
Example: personal computer with Windows 95 installed
1 Start up personal computer and insert the optional PC card
adaptor (with the Memory Stick inside) into the PC card drive of
your personal computer.
2 Open “My computer” and double-click “PC card drive.”
Double-click folders in the following order as described below:
Recording mode STILL MOVIE VOICE E-MAIL
Folder 1 Dcim 1 Mssony 1 Mssony 1 Mssony
2 100msdcf 2 Moml0001 2 Momlv100 2 Imcif100
3 Double-click the desired data file.
21-GB
Page 22
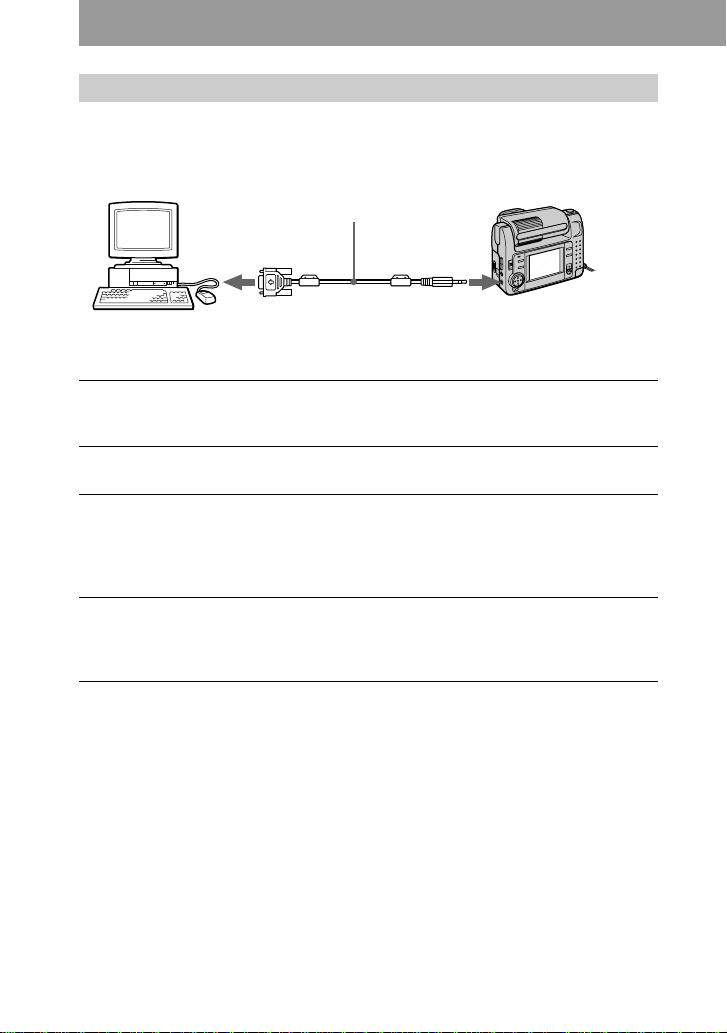
Using the supplied accessories
You can send image data from the camera to an IBM PC/AT compatible PC (via the
serial port), using the supplied PC serial cable and Sony PictureGear 3.2 Lite.
Personal computer
PC serial cable
to the serial port
Digital still camera
to the DIGITAL I/O jack
1 Install the supplied application software Sony PictureGear 3.2 Lite
into the personal computer.
For details, refer to the instruction manual of the Sony PictureGear 3.2 Lite.
2 Connect one end of the PC serial cable to the DIGITAL I/O jack, and
other end to the serial port of IBM PC/AT compatible PC.
3 Turn on the power of the camera, and check that the PC serial
cable is connected to the DIGITAL I/O jack of the camera. Set the
MODE selector to PLAY.
“PC MODE” appears on the LCD screen, and the camera turns to standby for
communication.
4 Operate the personal computer to receive and use image file from
the camera.
For details on the operation of the personal computer, refer to the instruction
manual of personal computer and Sony PictureGear 3.2 Lite.
22-GB
Page 23

P Notes
• While you are operating the personal
computer, you cannot operate the
camera.
• Before making connections, turn off
each equipment. After connections are
completed, turn on each equipment.
• When you use the camera with
connecting to other equipment for a
long time, use the AC power adaptor/
charger.
Recommended OS/
applications example
OS
Windows 3.1
Windows 95 or later
Mac OS system 7.5 or later
Applications
Sony PictureGear 3.2 Lite
Microsoft Internet Explorer 4.0
Netscape Navigator, etc.
P Notes
• To play back an MPEG file, install
Active Movie Player (Direct Show).
• For playing back a file recorded in
MOVIE or VOICE mode, first copy it to
the hard disk of the personal computer.
If you play back the file from a Memory
Stick, the picture and sound may break
off.
• You cannot play back an MPEG file
with Windows 3.1.
• For Macintosh, you can use the Memory
Stick recorded with this camera using
the PC Exchange with Mac OS system
7.5 or later. A viewing application for
Macintosh is also necessary for viewing
images. To play back an MPEG file,
install Quick Time 3.2.
• For details on system requirements,
refer to the operating instructions of
your application software.
• Information on image rotating and faceto-face recording may not be sent to a
personal computer.
Notes on sending a
sound file with a still
image recorded in VOICE
mode to a personal
computer
• You cannot send a sound file with a
still image recorded in VOICE mode
to a personal computer connected
with the supplied PC serial cable.
• A sound file with a still image
recorded in VOICE mode can be
played back with the DSC-F55/F55E
Digital Still Camera.
• You can send a sound file with a still
image recorded in VOICE mode to a
personal computer if you use the
optional PC card adaptor.
Playing back
23-GB
Page 24
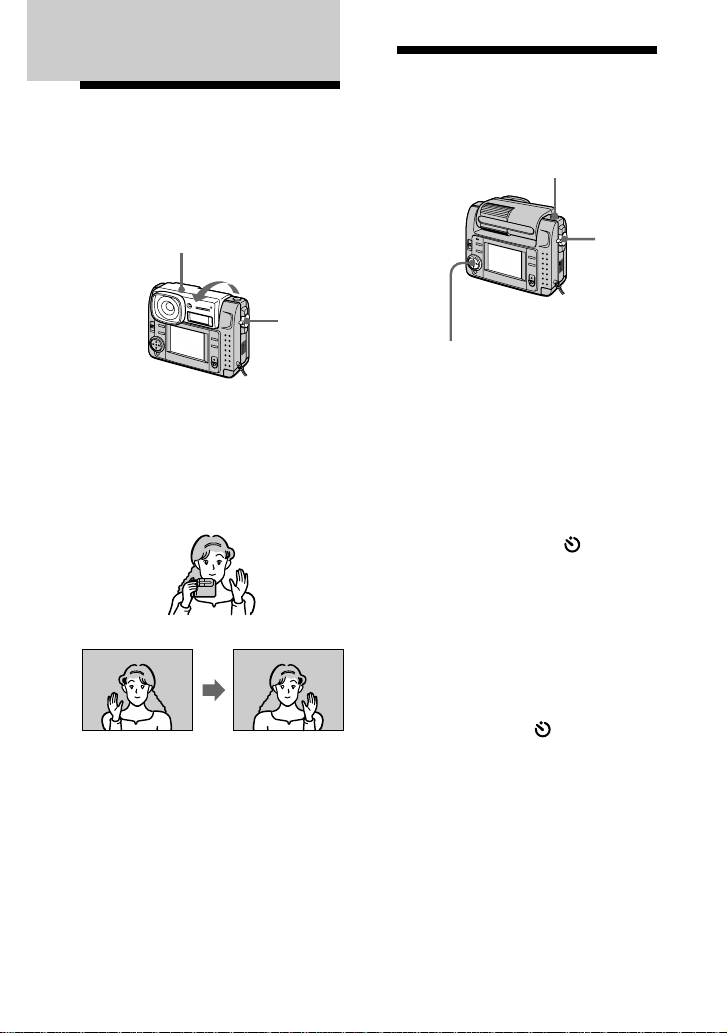
zVarious ways of recording
Using the self-timer
Changing the lens
orientation – Face to
face recording
You can shoot yourself by placing
yourself and the LCD screen face to
face.
Lens part
MODE
selector
1 Set the MODE selector to MOVIE
or STILL.
2 Adjust the lens angle.
Rotate the lens part at about 180
degrees when face to face
recording.
With the self-timer about 10 seconds
after you press the shutter button, the
subject is recorded.
Shutter button
MODE
selector
Control button
1 Set the MODE selector to MOVIE
or STILL.
2 Press v of the control button.
The menu bar appears on the LCD
screen.
3 Select “SELFTIMER” with the
control button, then press it.
Self-timer indicator ( ) appears
on the screen.
4 Press the shutter button halfway
down.
The AE lock indicator (z) appears
on the screen.
Image on the
LCD screen
Recorded image
3 Start recording.
PNote
The images displayed on the LCD screen
are mirror images. But they are stored in
Memory Stick in the same way as you see
through the lens.
24-GB
5 Press the shutter button fully.
The recording lamp and the selftimer indicator ( ) flashes, then
the shutter is released in about 10
seconds and the image is recorded.
Page 25
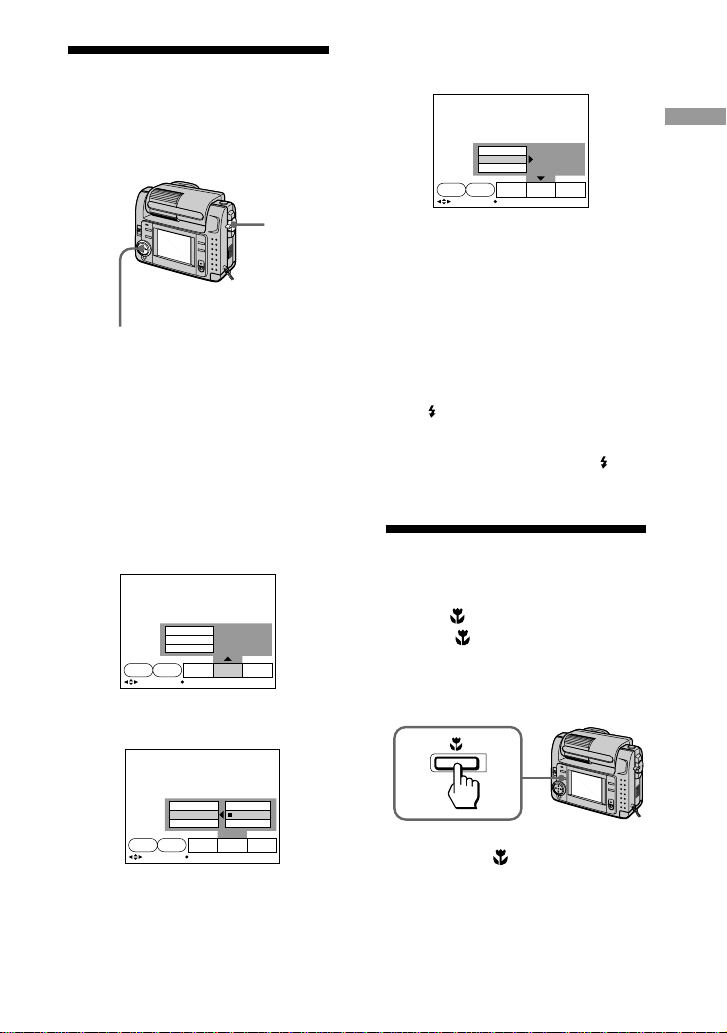
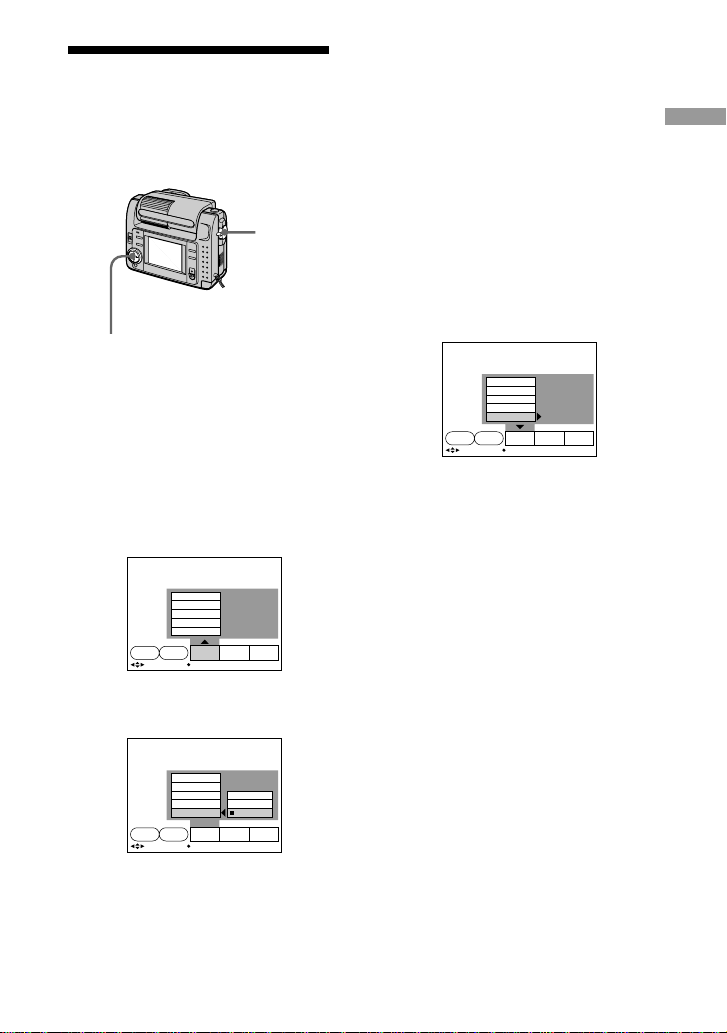
Selecting brightness of the flash (FLASH LEVEL)
You can select brightness of the flash.
MODE
selector
5 Select the brightness of flash with
the control button.
SELF
TIMER
SELECT OK
WHITE BALANCE
FLASH LEVEL
EXPOSURE
HIGH
SETUPCAMERAEFFECT
FILE
6 Press V of the control button
repeatedly.
The menu bar disappears from the
screen.
Various ways of recording
Control button
1 Set the MODE selector to STILL.
2 Press v of the control button.
The menu bar appears on the LCD
screen.
3 Select “CAMERA” with the
control button, then press it.
The CAMERA menu appears on
the screen.
WHITE BALANCE
FLASH LEVEL
EXPOSURE
SELF
TIMER
SELECT OK
SETUPCAMERAEFFECT
FILE
4 Select “FLASH LEVEL” with the
control button, then press it.
HIGH
NORMAL
LOW
SETUPCAMERAEFFECT
FILE
SELF
TIMER
SELECT OK
WHITE BALANCE
FLASH LEVEL
EXPOSURE
z Hints for setting the flash
adjustment
When the subject or background is dark,
the flash adjustment may become too
high. In this case, set FLASH LEVEL to
LOW (
–). On the other hand, when the
subject or background is bright, the flash
adjustment may become too low. In this
case, set FLASH LEVEL to HIGH (
+). To
set the flash level properly, we
recommend you to do a trial recording.
Recording images in macro
Press the (macro) button. The macro
indicator ( ) appears on the LCD
screen. You can shoot a subject that is
about 4 inches (10 cm) away from the
lens surface in macro mode.
If you press the (macro) button
again, macro mode is released and you
can record images in normal mode.
25-GB
Page 26
Recording enlarged
images – Zoom
recording
– button
+ button
MODE
selector
Control button
1 Set the MODE selector to STILL.
2 Press the + button.
The image on the LCD screen is
enlarged by 2.5 times.
The zoom indicator (
on the screen.
640
) appears
3 Press the shutter button fully.
The image is recorded at 640 × 480
size on a Memory Stick.
To return to the original
size
Press the – button. The zoom
indicator (
screen.
P Note
The image displayed on the screen is
degraded than the one to be recorded on
the Memory Stick.
z On zoom scaling
Zoom scaling fixes by 2.5 times and the
zoom indicator appears as (
640
) disappears from the
640
).
Enjoying Picture Effect
You can make pictures like those of
television with the Picture Effect
function.
MODE
selector
Control button
1 Set the MODE selector to MOVIE
or STILL.
2 Press v of the control button.
The menu bar appears on the LCD
screen.
3 Select “EFFECT” with the control
button, then press it repeatedly
until the desired picture effect is
displayed.
❐ NEG. ART: The color and
brightness of the picture is
reversed.
❐ SEPIA: The picture is sepia.
❐ B&W: The picture is
monochrome (black and
white).
❐ SOLARIZE: The light intensity
is more clear, and the picture
looks like an illustration.
4 Press V of the control button.
The menu bar disappears from the
screen.
To cancel the picture effect
Select “EFFECT” in the step 3, then
press the control button repeatedly
until the picture effect indicator
disappears.
26-GB
Page 27
Selecting image quality (QUALITY)
You can select one of two available
image quality modes. The number of
images you can record is different
depending on which image quality
mode you select.
MODE
selector
Control button
1 Set the MODE selector to STILL.
2 Press v of the control button.
The menu bar appears on the LCD
screen.
3 Select “FILE” with the control
button, then press it.
The FILE menu appears on the
screen.
FORMAT
FILE NUMBER
IMAGE SIZE
QUALITY
REC MODE
SELF
TIMER
SELECT OK
SETUPCAMERAEFFECT
FILE
❐ FINE (FINE): Use this mode
when giving priority to image
quality.
❐ STANDARD (STD): Use this
mode as a standard image
quality.
5 Select the image quality with the
control button, then press it.
FORMAT
FILE NUMBER
SELF
TIMER
SELECT OK
IMAGE SIZE
QUALITY
REC MODE
FINE
SETUPCAMERAEFFECT
FILE
6 Press V of the control button
repeatedly.
The menu bar disappears from the
screen.
z What is the difference in the
image quality mode?
An image is compressed in the JPEG
format before recording. The memory
capacity allocated to each image is
different depending on the image
quality.
P Note
Depending on the image, changing the
image quality may not affect the image
appearance on the screen.
Various ways of recording
4 Select “QUALITY” with the
control button, then press it.
FORMAT
FILE NUMBER
SELF
TIMER
SELECT OK
IMAGE SIZE
QUALITY
REC MODE
FINE
STANDARD
SETUPCAMERAEFFECT
FILE
27-GB
Page 28

Selecting image size
You can change the image size
according to your recording
conditions.
MODE
selector
Control button
1 Set the MODE selector to MOVIE
or STILL.
2 Press v of the control button.
The menu bar appears on the LCD
screen.
3 Select “FILE” with the control
button, then press it.
The FILE menu appears on the
screen.
FORMAT
FILE NUMBER
IMAGE SIZE
QUALITY
REC MODE
SELF
TIMER
SELECT OK
SETUPCAMERAEFFECT
FILE
Items for STILL mode
❐ 1600 × 1200: Records a 1600 ×
1200 JPEG file.
❐ 1024 × 768: Records a 1024 × 768
JPEG file.
❐ 640 × 480: Records a 640 × 480
JPEG file.
Items for MOVIE mode
❐ 320 × 240: Records a 320 × 240
MPEG file.
❐ 160 × 112: Records a 160 × 112
MPEG file.
5 Select the desired image size with
the control button, then press it.
FORMAT
SELF
TIMER
SELECT OK
FILE NUMBER
IMAGE SIZE
QUALITY
REC MODE
1600×1200
SETUPCAMERAEFFECT
FILE
6 Press V of the control button
repeatedly.
The menu bar disappears from the
screen.
4 Select “IMAGE SIZE” with the
control button, then press it.
FORMAT
FILE NUMBER
IMAGE SIZE
QUALITY
REC MODE
28-GB
SELF
TIMER
SELECT OK
FILE
1600
×
1024×768
640×480
1200
SETUPCAMERAEFFECT
Page 29
Selecting recording mode (REC MODE)
You can record a still image and sound
together, or a still image which is
suitable for e-mail transmission.
MODE
selector
Control button
1 Set the MODE selector to STILL.
2 Press v of the control button.
The menu bar appears on the LCD
screen.
❐ VOICE: Records a still image
and sound together besides a
JPEG file.
❐ E-MAIL: Records a 320 × 240
JPEG file besides a 1600 ×
1200, 1024 × 768, or 640 × 480
JPEG file. E-mail files are
suitable for e-mail
transmission, etc. because they
contain compressed data.
❐ NORMAL: Records a JPEG file
in selected image size.
5 Select the desired recording mode
with the control button, then press
it.
FORMAT
FILE NUMBER
IMAGE SIZE
SELF
TIMER
SELECT OK
QUALITY
REC MODE
E-MAIL
SETUPCAMERAEFFECT
FILE
Various ways of recording
3 Select “FILE” with the control
button, then press it.
The FILE menu appears on the
screen.
FORMAT
FILE NUMBER
IMAGE SIZE
QUALITY
REC MODE
SELF
TIMER
SELECT OK
SETUPCAMERAEFFECT
FILE
4 Select “REC MODE” with the
control button, then press it.
FORMAT
FILE NUMBER
SELF
TIMER
SELECT OK
IMAGE SIZE
QUALITY
REC MODE
VOICE
E-MAIL
NORMAL
SETUPCAMERAEFFECT
FILE
6 Press V of the control button
repeatedly.
The menu bar disappears from the
screen.
29-GB
Page 30

The MODE selector is set to “STILL”
Recording
mode
NORMAL
E-MAIL
VOICE
Image
size
1600 × 1200
1024 × 768
640 × 480
1600 × 1200
1024 × 768
640 × 480
1600 × 1200
1024 × 768
640 × 480
Recording
file
JPEG (1600 × 1200)
JPEG (1024 × 768)
JPEG (640 × 480)
JPEG (1600 × 1200)
JPEG (320 × 240)
JPEG (1024 × 768)
JPEG (320 × 240)
JPEG (640 × 480)
JPEG (320 × 240)
JPEG (1600 × 1200)
MPEG audio with
still image (320 × 240)
JPEG (1024 × 768)
MPEG audio with
still image (320 × 240)
JPEG (640 × 480)
MPEG audio with
still image (320 × 240)
The MODE selector is set to “MOVIE”
Mode
Presentation
Video mail
* Continuous recording time
Image
size
320 × 240
160 × 112
Recording
file
MPEG (320 × 240)
MPEG (160 × 112)
File name
(ex.)
Dsc
00001.jpg
00001.jpg
00001.jpg
00001.jpg
00001.jpg
00001.jpg
00001.jpg
00001.mpg
00001.jpg
00001.mpg
00001.jpg
00001.mpg
File name
(ex.)
Mov
00001.mpg
00001.mpg
No. of images that
can be recorded on a
Memory Stick
STANDARD FINE
10 – 15 5 – 8
27 – 49 14 – 27
47 – 63 27 – 38
10 – 14 5 – 8
24 – 48 13 – 24
38 – 48 24 – 32
9 – 12 5 – 7
19 – 27 11 – 19
27 – 32 19 – 24
Maximum recording
time on a Memory
Stick (sec.) *
40
160
z On directory
The directory of the file depending on
the recording mode is as follows:
NORMAL: ¥Dcim¥100msdcf
E-MAIL: ¥Mssony¥Imcif100
VOICE: ¥Mssony¥Momlv100
Moving image: ¥Mssony¥Moml0001
30-GB
Page 31

Adjusting exposure (EXPOSURE)
You can adjust the exposure according
to your conditions.
When
to use?
The subject is too dark or
bright against the
background because of
backlighting, a light source
near by, etc.
MODE
selector
Control button
1 Set the MODE selector to MOVIE
or STILL.
2 Press v of the control button.
The menu bar appears on the LCD
screen.
3 Select “CAMERA” with the
control button, then press it.
The CAMERA menu appears on
the screen.
5 Select the desired exposure value
with the control button, then press
it.
You can select values ranging
from – 1.5EV to + 1.5EV in steps of
0.5EV.
WHITE BALANCE
SELF
TIMER
SELECT OK
FLASH LEVEL
0 EVEXPOSURE
SETUPCAMERAEFFECT
FILE
6 Press V of the control button
repeatedly.
The menu bar disappears from the
screen.
Various ways of recording
WHITE BALANCE
FLASH LEVEL
EXPOSURE
SELF
TIMER
SELECT OK
SETUPCAMERAEFFECT
FILE
4 Select “EXPOSURE” with the
control button, then press it.
WHITE BALANCE
SELF
TIMER
SELECT OK
FLASH LEVEL
EXPOSURE
+
1.5EV
SETUPCAMERAEFFECT
FILE
31-GB
Page 32

Adjusting the white balance
White balance adjustment allows more
natural color balance for camera
recording. Normally white balance is
automatically adjusted.
MODE
selector
Control button
1 Set the MODE selector to MOVIE
or STILL.
2 Press v of the control button.
The menu bar appears on the LCD
screen.
3 Select “CAMERA” with the
control button, then press it.
The CAMERA menu appears on
the screen.
❐ IN DOOR (n):
• Lighting condition changes
quickly
• Too bright place such as
photography studios
• Under sodium lamps or
mercury lamps
❐ OUT DOOR ( ):
• Recording a sunset/sunrise,
just after sunset, just before
sunrise, neon signs, or
fireworks
• Under a color matching
fluorescent lamp
❐ HOLD (HOLD): Recording a
single-colored subject or
background
❐ AUTO: Adjusting the white
balance automatically
5 Select the desired white balance
mode with the control button, then
press it.
OUT DOOR
SETUPCAMERAEFFECT
FILE
SELF
TIMER
SELECT OK
WHITE BALANCE
FLASH LEVEL
EXPOSURE
WHITE BALANCE
FLASH LEVEL
EXPOSURE
SELF
SELECT OK
FILE
TIMER
4 Select “WHITE BALANCE” with
the control button, then press it.
IN DOOR
OUT DOOR
HOLD
AUTO
FILE
32-GB
SELF
TIMER
SELECT OK
WHITE BALANCE
FLASH LEVEL
EXPOSURE
6 Press V of the control button
repeatedly.
The menu bar disappears from the
SETUPCAMERAEFFECT
SETUPCAMERAEFFECT
screen.
To return to automatic
adjustment
Select “AUTO” in the step 5 with the
control button, then press it.
Page 33

zVarious ways of
playback
Playing back multiple images at a time (INDEX)
You can play back six recorded images
at a time. You can also select a specific
image from the six images and enlarge
it to full-size.
When
to use?
To search for an image you
want from all the recorded
images.
MODE
selector
Control button
1 Set the MODE selector to PLAY.
2 Press v of the control button.
The menu bar appears on the LCD
screen.
: Moving image file
: Still image with sound file
: E-mail mode file
: Print mark
To display the other six images
Select “v/V” at the lower left on the
screen with the control button, then
press v/V of the control button.
v Displays preceding six images
V Displays following six images
To return to the normal
playback
• Select the desired image with the
control button, then press it.
• Select “RETURN” with the control
button, then press it.
PNote
You cannot clear the menu bar in INDEX
mode.
Various ways of playback
3 Select “INDEX” with the control
button, then press it.
Six images are displayed at a time
(INDEX screen).
1999 7 4 10:30PMDSC00100
RETURN
SELECT SINGLE DISPLAY
Showing the position of an image
whose number is displayed
FILEDELETE SETUP
33-GB
Page 34

Enlarging a part of the
image – Zoom and
trimming
You can enlarge and display a part of
the recorded image.
– button
+ button
MODE
selector
Control button
1 Set the MODE selector to PLAY.
2 Display the image to enlarge.
3 Zoom in/out the image by
pressing the + or – button
repeatedly.
The zoom scaling indicator ( ×
2.0) appears on the LCD screen.
To record an enlarged
image (trimming)
1Enlarge the image.
2Press the shutter button. The image
is recorded at 640 × 480 size.
PNotes
•You cannot use this function on moving
images.
•Zoom scaling is up to 5× regardless of
the original size.
• The enlarged image is recorded at 640 ×
480 size.
4 Press the control button repeatedly
to trim the image.
v : Image moves downward
V : Image moves upward
b : Image moves rightward
B : Image moves leftward
To return to the normal
size
Press the – button repeatedly, until
the zoom scaling indicator ( × 2.0)
disappears from the screen, or simply
press the control button.
The zoom scaling indicator ( × 2.0)
disappears from the screen.
34-GB
Page 35

Rotating image (ROTATE)
You can rotate the playback picture.
Information on the direction of the
rotated image is written to the data
file.
When
to use?
To play back vertical
images recorded to
horizontal images.
MODE
selector
Control button
1 Set the MODE selector to PLAY.
2 Display the image to rotate.
3 Press v of the control button.
The menu bar appears on the LCD
screen.
4 Select “FILE” with the control
button, then press it.
The FILE menu appears on the
screen.
5 Select “ROTATE (90°)” with the
control button, then press it.
ROTAT E
SELECT OK
❐ : Rotates the image clockwise
by 90 degrees
❐ : Rotates the image counter-
clockwise by 90 degrees
RETURN
6 Rotate the image, and select
“RETURN” with the control
button, then press it.
To return to the original
image
Select or in the step 6 until the
image returns to the original image.
Select “RETURN” with the control
button, then press it.
PNotes
• The image recorded with other
equipment may not be rotated.
• If the write protect tab on the Memory
Stick is set to LOCK, or the image is
protected, you cannot rotate the image.
• Information on image rotating may not
be sent to a personal computer.
Various ways of playback
FORMAT
ROTATE (90°)
SLIDE SHOW
PRINT MARK
PROTECT
INDEX FILEDELETE SETUP
SELECT OK
35-GB
Page 36

Playing back images in a continuous loop (SLIDE SHOW)
Plays back all recorded images in
succession automatically.
When
For a presentation, etc.
to use?
MODE
selector
Control button
1 Set the MODE selector to PLAY.
2 Press v of the control button.
The menu bar appears on the LCD
screen.
3 Select “FILE” with the control
button, then press it.
The FILE menu appears on the
screen.
FORMAT
ROTATE (90°)
SLIDE SHOW
PRINT MARK
PROTECT
INDEX FILEDELETE SETUP
SELECT OK
4 Select “SLIDE SHOW” with the
control button, then press it.
10/48
5 Set “INTERVAL” with the control
button.
Set it with b/B of the control
button.
You can select from 1 MIN (one
minute), 30 SEC (30 seconds), 10
SEC (10 seconds), 5 SEC (five
seconds), or 3 SEC (three seconds).
6 Set “REPEAT” with the control
button.
❐ ON: Plays back images in a
continuous loop until
“RETURN” is selected.
❐ OFF: After all images played
back, slide show ends.
7 Select “START” with the control
button.
Slide show begins.
To cancel the setting
Select “CANCEL” with the control
button, then press it.
PNote
Interval time may not stay in adjustment
depending on setting of image size and
quality.
To operate the slide show
• Playback pause
Select “X” with the control button,
then press it.
• Playback pause release
Select “B” with the control button,
then press it.
• Search
Select “'b/B'” with the control
button, then press b/B of it. You
can also operate with the control
button only.
• Cancel
Select “RETURN ” with the control
button, then press it.
36-GB
SELECT OK
SLIDE SHOW
INTERVAL
REPEAT
30 SEC
CANCELSTART
OFFON
Page 37

Preventing accidental erasure (PROTECT)
5 Select “ON” with the control
button, then press it.
The displayed image is protected.
To prevent accidental erasure, you can
protect all or selected images.
MODE
selector
Control button
In single mode
1 Set the MODE selector to PLAY,
then display the image to protect.
2 Press v of the control button.
The menu bar appears on the LCD
screen.
3 Select “FILE” with the control
button, then press it.
The FILE menu appears on the
screen.
FORMAT
ROTATE (90°)
SLIDE SHOW
PRINT MARK
PROTECT
INDEX FILEDELETE SETUP
SELECT OK
4 Select “PROTECT” with the
control button, then press it.
6 Press V of the control button
repeatedly.
The menu bar disappears from the
screen.
“-” appears on the protected
image.
To release protection
Select “OFF” with the control button in
the step 5, then press it.
In INDEX mode
1 Display the INDEX screen.
2 Select “PROTECT” of the FILE
menu with the control button,
then press it.
The FILE menu appears on the
LCD screen.
3 Select “ALL” to protect (or
unprotect) all images, or
“SELECT” to protect (or
unprotect) selected images with
the control button, then press it.
When selecting “ALL”
PROTECT: ALL
ON
FORMAT
OFF
PRINT MARK
CANCEL
PROTECT
SELECT
To protect all images
Select “ON” with the control
button, then press it.
FILEDELETE SETUPRETURN
SINGLE DISPLAY
Various ways of playback
FORMAT
ROTATE (90°)
SLIDE SHOW
PRINT MARK
PROTECT
INDEX FILEDELETE SETUP
SELECT OK
ON
OFF
To release protection of all
images
Select “OFF” with the control
button, then press it.
Continue to the next page c
37-GB
Page 38

When selecting
“SELECT”
0001-0006/0100
SELECT OK
To protect images
1 Select the image to protect
with the control button, then
press it.
The protect indicator (-)
appears on the selected image.
ENTERPROTECT CANCEL
Deleting images (DELETE)
You can delete all or selected images
that you no longer want to keep.
MODE
selector
2 After selecting all images to
protect, select “ENTER” with
the control button, then press
it.
The protect indicator (-)
changes from green to white.
To release protection
Select the images to unprotect in
the step 1, then select “ENTER”
with the control button then press
it.
Control button
In single mode
1 Set the MODE selector to PLAY,
then display the image to delete.
2 Press v of the control button.
The menu bar appears on the LCD
screen.
3 Select “DELETE” with the control
button, then press it.
DELETE
OK
SELECT OK
CANCEL
4 Select “OK” with the control
button, then press it.
The image is deleted.
PNote
Once you delete an image, you cannot
restore it. Check the image to delete
carefully before deleting.
38-GB
Page 39

In INDEX mode
1 Display the INDEX screen.
2 Select “DELETE” with the control
button, then press it.
3 Select “ALL” to delete all images,
or “SELECT” to delete selected
images with the control button,
then press it.
When selecting “ALL”
DELETE ALL ?
OK
ALL
SELECT
CANCEL
FILEDELETE SETUPRETURN
OK
SELECT
Select “OK” with the control
button, then press it.
When selecting
“SELECT”
0001-0006/0100
SELECT OK
1 Select the image to delete with
the control button, then press
it.
The delete indicator (green)
( ) appears on the selected
image.
ENTERDELETE CANCEL
To cancel deleting
Select “CANCEL” with the
control button, then press it.
PNotes
• Even if you select “ALL,” you cannot
delete the protected image.
• When you select “SELECT,” you
cannot select a protected image.
Various ways of playback
2 After selecting all the images
to delete, select “ENTER” with
the control button, then press
it.
The selected images are
deleted.
39-GB
Page 40

Formatting (initializing) a Memory Stick
MODE
selector
Control button
1 Press v of the control button.
The menu bar appears on the LCD
screen.
2 Select “FILE” with the control
button, then press it.
The FILE menu appears.
FORMAT
FILE NUMBER
IMAGE SIZE
QUALITY
REC MODE
SELF
TIMER
SELECT OK
SETUPCAMERAEFFECT
FILE
3 Select “FORMAT” with the control
button, then press it.
PNote
If you initialize the Memory Stick, all the
images stored in Memory Stick are lost
even if the image is protected. Before
initialization, make sure to copy the
images you want to store on your
computer, etc.
FORMAT
FILE NUMBER
IMAGE SIZE
QUALITY
REC MODE
SELF
TIMER
SELECT
FILE
OK
4 Select “OK” with the control
button, then press it.
To cancel formatting
Select “CANCEL” with the control
button in the step 4, then press it.
40-GB
OK
CANCEL
SETUPCAMERAEFFECT
Page 41

BChanging the menu
setting
Changing the menu setting
2 Select the desired item with the
control button, then press it.
The color of the item changes from
blue to yellow.
1 Press v of the control button.
The menu bar appears on the LCD
screen.
MOVIE/STILL
SELF
TIMER
PLAY (single mode)
INDEX FILEDELETE SETUP
SELECT OK
PLAY (INDEX mode)
SELECT
FILE
MENU BAR OFFSELECT OK
MENU BAR OFF
1999 7 4 10:30PMDSC00100
FILEDELETE SETUPRETURN
SINGLE DISPLAY
SETUPCAMERAEFFECT
/LANGUAGE
CLOCK SET
BEEP
INDEX FILEDELETE SETUP
OK
SELECT
3 Select the desired setting with the
control button, then press it.
The screen returns to the menu in
the step 2.
To clear the menu
Press V of the control button
repeatedly until the menu bar
disappears.
Changing the menu setting
41-GB
Page 42

Setting the mode of each item
Menu items that can be modified differ depending on the setting of the MODE
selector. The LCD screen shows only the items you can operate at the moment.
Initial settings are indicated in bold letters.
Items in STILL/MOVIE mode
SELF TIMER
Select this item to record with the self-timer. (page 24)
EFFECT
<NEG. ART/SEPIA/B&W/SOLARIZE>
• Select NEG. ART to record the image color reversed.
• Select SEPIA to record sepia image.
• Select B&W to record monochrome image.
• Select SOLARIZE to record illustrational image.
FILE
FORMAT
<OK/CANCEL>
• Select OK to format a Memory Stick.
• Select CANCEL to cancel formatting a Memory Stick.
FILE NUMBER <SERIES/NORMAL>
• Select SERIES to put numbers to files in sequence even if the Memory Stick is
changed.
• Select NORMAL to reset the numbering of files each time the Memory Stick is
changed.
IMAGE SIZE (during STILL mode) <1600 × 1200/1024 × 768/640 × 480>
• Select 1600 × 1200 to record a 1600 × 1200 JPEG image.
• Select 1024 × 768 to record a 1024 × 768 JPEG image.
• Select 640 × 480 to record a 640 × 480 JPEG image.
(during MOVIE mode) <320 × 240/160 × 112>
• Select 320 × 240 to record a 320 × 240 MPEG image.
• Select 160 × 112 to record a 160 × 112 MPEG image.
QUALITY (only in STILL mode) <FINE/STANDARD>
• Select FINE when giving priority to image quality.
• Select STANDARD as a standard image quality.
REC MODE (only in STILL mode) <VOICE/E-MAIL/NORMAL>
• Select VOICE to record a still image and sound together besides a JPEG file.
• Select E-MAIL to record a 320 × 240 JPEG file besides a 1600 × 1200, 1024 × 768,
or 640 × 480 JPEG file.
• Normally select NORMAL. A JPEG file is recorded in selected image size.
42-GB
Page 43

REC TIME SET (only in MOVIE mode) <15 SEC/10 SEC/5 SEC>
Adjust the recording time of the moving image.
CAMERA
WHITE BALANCE <IN DOOR/OUT DOOR/HOLD/AUTO>
• Select IN DOOR to record images inside.
• Select OUT DOOR to record images outside.
• Select HOLD to record single colored subject or background.
• Select AUTO to adjust the white balance automatically.
FLASH LEVEL (only in STILL mode) <HIGH/NORMAL/LOW>
• Select HIGH to make the flash level higher than normal.
• Normally select NORMAL.
• Select LOW to make the flash level lower than normal.
EXPOSURE <+1.5EV to –1.5EV>
Select this item to adjust exposure.
SETUP
DEMO <STBY/ON or OFF>
Only when you use the AC power adaptor/charger during MOVIE or STILL
mode, DEMO appears in the menu.
To stop the demonstration, turn off the camera.
• Select ON to make the demonstration appear. The demonstration will start
about 10 minutes after the power is turned on if the camera has not been
operated.
• Select OFF to deactivate the demonstration mode.
/LANGUAGE <ENGLISH or /JPN>
• Select ENGLISH to display all items in English.
• Select /JPN to display all items in Japanese.
Changing the menu setting
CLOCK SET
Select this item to set the date and time.
BEEP <SHUTTER/ON/OFF>
• Select SHUTTER to turn off the beep only.
• Normally set to ON.
• Select OFF to turn off the beep/shutter sound.
Items in PLAY (single) mode
INDEX
Select this item to display six recorded images at a time.
43-GB
Page 44

DELETE
<OK/CANCEL>
• Select OK to delete displayed image.
• Select CANCEL to cancel deleting image.
FILE
FORMAT
<OK/CANCEL>
• Select OK to format a Memory Stick.
• Select CANCEL to cancel formatting a Memory Stick.
ROTATE (90°)
Select this item to rotate an image.
SLIDE SHOW
Select this item to play back images in a continuous loop.
PRINT MARK <ON/OFF>
• Select ON to mark the print mark on the image.
• Select OFF to unmark the mark.
PROTECT <ON/OFF>
• Select ON to protect displayed image.
• Select OFF to release protection of the image.
Items in PLAY (INDEX) mode
DELETE
<ALL/SELECT>
• Select ALL to delete all images.
• Select SELECT to delete selected images.
FILE
FORMAT
<OK/CANCEL>
• Select OK to format a Memory Stick.
• Select CANCEL to cancel formatting a Memory Stick.
PRINT MARK <ALL/SELECT/CANCEL>
• Select ALL to unmark the print marks on all images.
• Select SELECT to mark or unmark the print mark on the selected images.
• Select CANCEL to cancel the setting.
PROTECT <ALL/SELECT/CANCEL>
• Select ALL to protect all images.
• Select SELECT to protect or unprotect selected images.
• Select CANCEL to cancel the setting.
44-GB
Page 45

z
Using image data with other equipment
Using the house current (mains)
Power cord (mains
lead) (supplied)
AC power adaptor/
charger AC-VF10
(supplied)
DK-115 DC
connecting cable
(supplied)
Slot cover for AC
power adaptor/charger
1 Open the battery cover.
2 Insert the one end of the DK-115
DC connecting cable to the battery
terminal, and close the cover.
When inserting the cable, open the
slot cover for AC power adaptor/
charger and be careful not to pinch
the cable.
3 Connect the other end of the DC
connecting cable to the AC power
adaptor/charger.
4
Connect the power cord (mains
lead) to the AC power adaptor/
charger, and to a wall outlet (mains).
Watching images on a TV screen
Connect the camera to the TV that has
a video input jack. You can enjoy a
“SLIDE SHOW“ on the TV screen.
When shooting an image in macro, you
can adjust the focus more easily on the
TV screen.
Set the TV/video
input selector to
the video position
A/V connecting
cable (supplied)
to A/V OUT
1 Connect the A/V OUT jack of the
camera to the video input jack of
the TV.
2 Start playback on the camera.
Playback picture appears on the
TV screen.
PNotes
•Before making connections, turn off
each equipment. After connections are
completed, turn on each equipment.
• When you use the camera with
connecting other equipment for a long
time, use the AC power adaptor/charger.
• You cannot use a TV that has an
antenna (aerial) connector only.
• When the MODE selector is set to
MOVIE or STILL and the lens is rotated
to the same side as the LCD screen (face
to face shooting), the mirror image
appears upside-down on the TV screen.
• Beep does not sound when connecting
with the A/V connecting cable. The
image does not appear on the LCD
screen.
45-GB
Using image data with other equipment
Page 46

Printing the recorded images
Marking a print mark on an image
Using a printer, you can print images
recorded on this camera.
You can send the image data to the
printer that has video input jack. For
details on printing, refer to the
instruction manual of the printer.
TV
Watching an image
Color video
printer
Printing images
to video input
A/V connecting
cable (supplied)
to A/V OUT
1 Connect the A/V OUT jack of the
camera to the video input jack of
the printer.
2 Start playback on the camera.
Playback picture appears on the
TV screen.
You can mark a print mark on images
recorded with this camera. This mark
is convenient for checking the images
to print.
Your camera conforms with the DPOF
(Digital Print Order Format) standard
for specifying the still images to print
out.
MODE
selector
Control button
In single mode
1 Set the MODE selector to PLAY
and display the image to mark.
2 Press v of the control button.
The menu bar appears on the LCD
screen.
3 Select “FILE” with the control
button, then press it.
The FILE menu appears on the
screen.
3 The printer receives image data
from the camera and starts
printing.
For the detailed procedures, refer
to the instruction manual of the
printer.
46-GB
FORMAT
ROTATE (90°)
SLIDE SHOW
PRINT MARK
PROTECT
INDEX FILEDELETE SETUP
SELECT OK
Page 47

4 Select “PRINT MARK” with the
control button, then press it.
FORMAT
ROTATE (90°)
SLIDE SHOW
PRINT MARK
PROTECT
INDEX FILEDELETE SETUP
SELECT
ON
OFF
OK
5 Select “ON” with the control
button, then press it.
The print mark is marked on an
image.
6 Press V of the control button
repeatedly.
The menu bar disappears from the
screen.
“ ” is marked on the image.
To unmark the print mark
Select “OFF” with the control button in
the step 5, then press it.
In INDEX mode
To unmark the all print
marks
Select “OFF” with the control
button, then press it.
When selecting
“SELECT”
0001-0006/0100
SELECT OK
To mark the print mark
1 Select the image to mark with
the control button, then press
it. “ ” appears on the
selected image.
2 After selecting all the images
to mark, select “ENTER” with
the control button, then press
it.
“ ” changes from green to
white.
ENTERPRINT MARK CANCEL
Using image data with other equipment
1 Display the INDEX screen.
2 Select “PRINT MARK” of “FILE”
with the control button, then press
it.
3 Select “ALL” to unmark all
images, or “SELECT” to mark (or
unmark) selected images with the
control button, then press it.
When selecting “ALL”
PRINT MARK: ALL
OFF
FORMAT
CANCEL
PRINT MARK
PROTECT
SELECT
FILEDELETE SETUPRETURN
OK
To unmark the selected print
mark
Select the images to unmark in the step
1, then select “ENTER” with the
control button, then press it.
47-GB
Page 48

z
Additional information
Precautions
On Memory Stick
• Do not remove the battery or the AC
power adaptor/charger during
recording or playback. Always turn off
the power before you remove the
battery or disconnect the AC power
adaptor/charger.
• Do not touch the terminal of the
Memory Stick by your hand or a metal
object.
• Do not attach any other material than
the supplied label on the label space of
the Memory Stick.
• Do not strike, bend, or drop the
Memory Stick.
• Do not disassemble or convert the
Memory Stick.
• Do not wet the Memory Stick.
• Do not use or store the Memory Stick in
the following areas:
– Hot locations such as the inside of a
car or the outdoors under hot weather.
– Humid or corrosive locations.
• Carry or store the Memory Stick in its
supplied case.
• Setting the write-protect switch to
“LOCK” disables you to record, delete,
or format data.
• We recommend that you make a
backup copy important data.
• Do not remove the Memory Stick while
reading or writing data.
• Recorded data may be lost or damaged
in the following situations:
– When you remove the Memory Stick
or turn off the camera while reading
or writing data.
– When you use the Memory Stick in
the locations subject to static
electricity or noise.
• This camera is not guaranteed to
properly play back images shot with
other equipment. The images shot with
this camera are not guaranteed to be
played back properly with other
equipment.
On moisture condensation
If the camera is brought directly from a
cold to a warm location, or is placed in
a very damp room, moisture may
condense inside or outside the camera.
Should this occur, the camera will not
operate properly. In this case, remove
the battery pack and open the battery
cover and wait about an hour for the
moisture to evaporate.
How to prevent moisture
condensation
When bringing the camera from a cold
place to a warm place, put the camera
in a plastic bag and allow it to adapt to
room conditions over a period of time.
1 Be sure to tightly seal the plastic
bag containing the camera.
2 Remove the bag when the air
temperature inside it has reached
the temperature surrounding it
(about an hour).
On cleaning
Cleaning the LCD screen
Wipe the screen surface with the
cleaning cloth (not supplied) or a LCD
cleaning kit (not supplied) to remove
fingerprints, dust, etc.
Cleaning the camera surface
Clean the camera surface with a soft
cloth slightly moistened with water.
Do not use any type of solvent such as
alcohol or benzene as it may mar the
finish of the casing.
If you have any questions or problems
concerning your camera, please
consult your nearest Sony dealer.
48-GB
Page 49

About the lithium battery
Your camera is supplied with a
rechargeable lithium battery installed
so as to retain the date and time, etc.,
regardless of the setting of the POWER
switch. The lithium battery is always
charged as long as you are using the
camera. The battery, however, will get
discharged gradually if you do not use
the camera. It will be completely
discharged in about six months if you
do not use the camera at all. Even if the
lithium battery is not charged, it will
not affect the camera operation. To
retain the date and time, etc., charge
the battery if the battery is discharged.
The following are charging methods:
• Connect the camera to a wall outlet
(mains) using the supplied AC
power adaptor/charger, and leave
the camera with the POWER switch
turned off for more than 24 hours.
• Or, install the fully charged battery
pack in the camera, and leave the
camera with the POWER switch
turned off for more than 24 hours.
Using your camera abroad
Power sources
You can use your camera in any
country or area with the supplied
battery charger within 100 V to 240 V
AC, 50/60 Hz. Use a commercially
available AC plug adaptor [a], if
necessary, depending on the design of
the wall outlet (mains) [b].
Watching the playback picture on TV
If you want to view the playback
picture on a TV, you need a TV having
a video input jack and a video
connecting cable.
The color system of the TV must be the
same as that of your digital still
camera. TV color systems differ from
country to country. Check the
following list:
NTSC system countries
Bahama Islands, Bolivia, Canada,
Central America, Chile, Colombia,
Ecuador, Jamaica, Japan, Korea,
Mexico, Peru, Surinam, Taiwan, the
Philippines, the U.S.A., Venezuela, etc.
PAL system countries
Australia, Austria, Belgium, China,
Denmark, Finland, Germany, Great
Britain, Holland, Hong Kong, Italy,
Kuwait, Malaysia, New Zealand,
Norway, Portugal, Singapore, Spain,
Sweden, Switzerland, Thailand, etc.
PAL-M system country
Brazil
PAL-N system countries
Argentina, Paraguay, Uruguay
SECAM system countries
Bulgaria, Czech Republic, France,
Guiana, Hungary, Iran, Iraq, Monaco,
Poland, Russia, Slovak Republic,
Ukraine, etc.
Additional information
AC-VF10
[a] [b]
49-GB
Page 50

Troubleshooting
Should any problem persist after you have made these checks, consult your nearest
Sony dealer. If warning and notice messages appear on the LCD screen, see page 52.
Symptom
The camera does not
work.
You cannot record
images.
The picture is out of
focus.
The picture is noisy.
The picture is too
dark.
Cause/Solution
•The battery is weak (the indicator appears on the
LCD screen).
b
Charge the battery. (page 9)
•The AC power adaptor/charger is not connected
securely.
b
Connect it to the battery terminal of the camera
and a wall outlet (mains) firmly. (page 45)
•The built-in micro computer does not work properly.
b
Disconnect any power sources and reconnect it
after one minute. Then turn the power on by
sliding the POWER switch down.
•The MODE selector is not set to MOVIE or STILL.
b
Set it to MOVIE or STILL. (pages 14, 15)
•Memories are full.
b
Delete certain images you do not want to keep,
and then start recording. (page 38)
•No Memory Stick has been inserted into this camera.
b
Insert a Memory Stick. (page 11)
•The write protect tab on the Memory Stick is set to
LOCK.
b
Set it to recording position.
•The battery is weak (the indicator appears on the
LCD screen).
b
Charge the battery. (page 9)
•The camera is not in macro recording mode if you
shoot a subject that is about 4 to 19 3/4 inches (10 to
50 cm) away from the lens.
b
Press the (macro) button to be in macro
recording mode. (page 25)
•The camera is placed near a TV or other equipment
that uses strong magnets.
b
Place the camera away from the TV, etc.
•You are shooting a subject with the light source
behind the subject or light is insufficient.
b
Adjust exposure. (page 31)
b
Adjust brightness of the LCD screen. (page 8)
50-GB
Page 51

Symptom
Vertical streaks
appear when shooting
a very bright subject.
Black points and/or
bright (red, blue or
green) points appear
on the LCD screen.
The battery life
deteriorates too fast.
You cannot play back
the images.
You cannot delete an
image.
Cause/Solution
• The smear phenomenon.
b
The camera is not malfunctioning.
•These points are normal with the LCD screen and do
not affect the recorded image in any way.
b
The camera is not malfunctioning.
•The battery is not charged enough.
b
Charge the battery fully. (page 9)
•The battery is dead.
b
Replace the battery with a new one. (page 10)
•The MODE selector is not set to PLAY.
b
Set it to PLAY. (pages 17, 18)
•No Memory Stick has been inserted, or no image has
been recorded on the Memory Stick.
b
Insert the recorded Memory Stick. (page 11)
•The battery is discharged.
b
Charge the battery. (page 9)
•The image is protected.
b
Cancel the protection of the image . (page 37)
•The write protect tab on the Memory Stick is set to
LOCK.
b
Set it to recording position.
Additional information
51-GB
Page 52

Self-diagnosis display
The camera has a self-diagnosis
display. This function displays the
camera condition with five-digits (a
combination of a letter and figures) on
the LCD screen. If this occurs check the
following code chart. The five-digits
display informs you of the camera’s
current condition. The last two digits
(indicated by ss) will differ
depending on the state of the camera.
C:32:
Self-diagnosis display
•C:ss:ss
You can reverse the camera
malfunction yourself.
•E:ss:ss
Contact your Sony dealer or local
authorized Sony service facility.
First three digits
C:32:ss
C:13:ss
E:61:ss
E:91:ss
52-GB
Cause and/or Corrective Action
• Trouble is with the hardware.
t Turn the power off and on again.
• An unformatted Memory Stick is inserted.
t Format the Memory Stick. (page 40)
• A Memory Stick is broken.
t Insert a new Memory Stick. (page 11)
• A camera malfunction which you can not reverse
has occurred.
t Contact your Sony dealer or local authorized
Sony service facility and inform them of the
five digits. (example: E:61:10)
Page 53

Warning and notice messages
Various messages appear on the LCD screen. Check them with the following list.
Message
NO MEMORY STICK
SYSTEM ERROR
MEMORY STICK
ERROR
FORMAT ERROR
MEMORY STICK
LOCKED
NO MEMORY SPACE
FILE ERROR
FILE PROTECT
NO FILE
for “InfoLITHIUM”
BATTERY ONLY
Meaning/Remedy
• No Memory Stick has been inserted.
b
Insert a Memory Stick. (page 11)
•Abnormal conditions are encountered with the
hardware.
b
Turn on the power again.
•An inserted Memory Stick is broken.
•An inserted Memory Stick is malfunction.
b
Insert the proper Memory Stick. (page 11)
•Failed to format the Memory Stick.
b
Format the Memory Stick. (page 40)
•The tab on the Memory Stick is set to LOCK position.
b
Set it to recording position.
•The capacity of the Memory Stick is full.
b
Delete images you do not want to keep, or insert a
new Memory Stick, then start recording. (pages 11,
38)
•The file is broken down.
b
Delete the broken file. (page 38)
•The image is protected.
b
Cancel the protection using the menu. (page 37)
•No image has been recorded on the Memory Stick.
b
Insert the recorded Memory Stick.
•An inserted Memory Stick does not usable with this
camera.
b
Insert the proper Memory Stick.
•The battery is not the “InfoLITHIUM” type.
b
Use the “InfoLITHIUM” battery. (page 9)
•The battery is weak.
b
Charge the battery. (page 9)
Additional information
53-GB
Page 54

Specifications
System
Recording format
Digital (JPEG based)/Field
recording
Video signal
NTSC color, EIA standards
(DSC-F55)
PAL colour CCIR standards
(DSC-F55E)
Image device
1/2-inch CCD (total number
of square pixels: 1636 ×
1236), square grid, primary
color filter, Interlace format
Lens
f = 6.85 mm (37 mm, when
converted into a 35 mm still
camera)
(0.5 m – ∞)
Macro (0.1 m – ∞)
F = 2.8
Photometric system
TTL system
Exposure control
Automatic exposure
White balance
Automatic, Indoor,
Outdoor, Hold
Data compression system
Movie: MPEG-1
Still: JPEG
Audio (with still image):
MPEG AUDIO (Monaural)
Data format
Still: 1600 × 1200, 1024 × 768,
640 × 480
Movie: 320 × 240, 160 × 112
E-mail: 320 × 240
Memory
Memory Stick
Flash
Recording distance
limitations: 11 7/8 inches to
8 1/3 feet (0.3 m to
2.5 m), automatic flash
control system
Shutter speed
Automatic (1/30 - 1/1000)
(DSC-F55)
Automatic (1/25 - 1/1000)
(DSC-F55E)
LCD screen
Screen size
2 inches (559 wide × 220
long)
LCD panel
TFT
Total dot number
122,980 dots
Input and output
connectors
A/V OUT (Monaural)
Minijack
Video: 1Vp-p, 75 ohms,
unbalanced, sync negative
Audio: monaural, 327 mV
(at output, impedance more
than 47 kilohms)
Output impedance with less
than 2.2 kilohms
Digital I/O
Minijack
RS-232C based, 9.6 Kbps to
115.2 Kbps
General
Power consumption
Using the AC power
adaptor/charger:
Recording: 3.6 W
Playback: 3.1 W
Using the rechargeable
NP-F10 lithium ion
battery:
Recording: 3.3 W
Playback: 2.7 W
Operation temperature
32°F to 104°F (0°C to 40°C)
Storage temperature
–4°F to +140°F (–20°C to
+60°C)
Dimensions
Approx. 4
(103 × 79.1 × 48 mm) (w/h/
d)
Mass
Approx. 9 oz (250 g)
(excluding batteries)
Approx.1 lb 11 oz (300 g)
(including batteries,
Memory Stick, and Lens cap
etc.)
1
⁄8 × 3 1⁄8 × 1 15⁄16 in.
AC-VF10 AC power
adaptor/charger
Power requirements
100 to 240 V AC, 50/60 Hz
Power consumption
13 W
Output voltage
DC OUT: 4.2 V, 1.8 A in
operating mode
Battery charge terminal:
4.2 V, 1.5 A in charge mode
Operation temperature
32°F to 104°F (0°C to 40°C)
Storage temperature
–4°F to +140°F (–20°C to
+60°C)
Dimensions
Approx. 1
3
(49 × 39 × 85 mm) (w/h/d)
Mass
Approx. 4.2 oz (120 g)
(excluding batteries)
3
⁄8 in.
15
⁄16 × 1 9⁄16 ×
NP-F10 battery pack
Voltage
DC 3.6 V
Capacity
3.6 Wh
Type
Lithium ion type
Design and specifications
are subject to change
without notice.
54-GB
Page 55

Index
A
Access lamp 11
Adjusting
flash 25
image 32
LCD screen 8
AE (Automatic
Exposure) 14
Auto power-off function
10
AWB (Automatic White
Balance) 14
B
Battery 9
Battery charger 9
Battery life 20
Battery remaining
indicator 16
C
Charging 9
Cleaning 48
Connecting
TV 45
personal computer 22
printer 46
D
Deleting 38
E
Exposure 31
I, J, K, L
Image quality 27
Indicators on the LCD
screen 16, 19
M
Menu 41
Messages 53
Moisture condensation
48
Multi screen 33
N, O
NTSC system 49
P, Q
PAL system 49
Personal computer 21
Playback 33
Power sources
battery 9
house current (mains)
45
Printing 46
Protect 37
R
Recording 14
Recording mode 30
Recording in macro 25
Rotating an image 35
S
SECAM system 49
Self-timer 24
Setting the date and time
12
Slide show 36
T
Tripod 7
Troubleshooting 50
TV color system 49
U
Using abroad 49
V
VOICE 29
W
Warning messages 53
Z
Zoom 34
Additional information
F, G
Face to face recording 24
Flash adjustment 25
H
Hand strap 7
55-GB
Page 56

Español
Memory Stick
AVISO
Para evitar el riesgo de
incendios y electrocución, no
exponga la unidad a la lluvia
ni a la humedad.
Para evitar descargas
eléctricas, no abra la unidad.
Solicite asistencia técnica
sólo a personal
especializado.
Para los usuarios en Estados
Unidos y Canadá
FORMA DE DESHACERSE DE
LAS PILAS DE IONES DE LITIO
PILA DE IONES DE LITIO
FORMA APROPIADA DE
DESHACERSE DE LAS PILAS
Usted podrá devolver las pilas de iones de
litio a un centro de reparaciones Sony o a
una fábrica Sony.
Nota: En ciertas zonas puede estar
prohibido tirar las pilas de iones de
litio a la basura.
Para información sobre el centro de
reparaciones Sony más cercano, llame a
1-800-222-SONY (EE. UU. solamente)
Para información sobre la fábrica Sony más
cercana, llame a 416-499-SONY (Canadá
solamente)
Precaución: No utilice pilas de iones de
litio dañadas o con fugas de
electrólito.
N50
Acerca del objetivo Carl Zeiss
Esta cámara está equipada con un
objetivo Carl Zeiss que puede reproducir
imágenes con precisión.
El desarrollo del objetivo de esta cámara
contó con la participación conjunta de
Carl Zeiss, Alemania, y Sony
Corporation. En él se ha adoptado el
sistema de medida MTF* para cámaras y
ofrece una calidad equivalente a la de los
objetivos de Carl Zeiss.
* MTF es la abreviatura de Modulation
Transfer Function/Factor
(Coeficiente/Función de transferencia
por modulación).
El valor numérico indica la cantidad
de luz del sujeto que penetra en el
objetivo.
• IBM PC/AT es una marca comercial
registrada de International Business
Machines Corporation de EE.UU.
• MS-DOS y Windows son marcas
comerciales registradas de Microsoft
Corporation, registradas en EE.UU. y en
otros países.
• Macintosh es una marca comercial de
Apple Computer, Inc., registrada en
EE.UU. y en otros países.
• Los nombres de otros productos
mencionados en este manual pueden ser
marcas comerciales o marcas comerciales
registradas de sus respectivas compañías.
Además, “™” y “®” no se mencionan en
todos los casos en este manual.
2-ES
Page 57

Índice
Identificación de los
componentes ................... 5
Preparativos
1 Carga de la batería ................. 7
2 Instalación de la batería ........8
3 Inserción de un Memory
Stick ........................................ 9
4
Ajuste de la fecha y la hora ...
10
Grabación
1
Grabación de imágenes fijas....
2 Grabación de imágenes en
movimiento ......................... 13
12
Reproducción
1 Reproducción de imágenes
fijas........................................15
2 Reproducción de imágenes en
movimiento ......................... 16
3 Visualización de imágenes con
un ordenador personal ...... 19
Distintas formas de
grabación
Cambio de la orientación del objetivo
–
Grabación cara a cara ................
Uso del temporizador ................... 22
Selección del brillo del flash
(FLASH LEVEL) ....................... 23
Grabación de imágenes en modo
macro ......................................... 23
Grabación de imágenes ampliadas
– Grabación con zoom ............. 24
Función de efecto de imagen ....... 24
Selección de la calidad de imagen
(QUALITY) ............................... 25
Selección del tamaño de la imagen ...
Selección del modo de grabación
(REC MODE) ............................ 27
Ajuste de la exposición
(EXPOSURE)............................. 29
Ajuste del balance de blancos ...... 30
22
26
Distintas formas de
reproducción
Reproducción de varias imágenes
a la vez (INDEX) ...................... 31
Ampliación de una parte de la
imagen – Zoom y recorte ........ 32
Rotación de imagen (ROTATE) ... 33
Reproducción de imágenes en bucle
continuo (SLIDE SHOW) ........ 34
Prevención contra borrados
accidentales (PROTECT) ......... 35
Eliminación de imágenes
(DELETE) ..................................36
Formateo (inicialización) de un
Memory Stick............................38
Cambio del ajuste de
menú
Cambio del ajuste de menú .......... 39
Ajuste del modo de cada
opción ........................................ 40
Uso de datos de imagen
con otro equipo
Uso de corriente doméstica .......... 43
Visualización de imágenes en la
pantalla de un TV.....................43
Impresión de las imágenes
grabadas .................................... 44
Inserción de una marca de
impresión en una imagen ....... 44
Información
complementaria
Precauciones ................................... 46
Solución de problemas.................. 48
Indicación de autodiagnóstico ..... 50
Mensajes de advertencia y aviso ....
Especificaciones ............................. 52
Índice alfabético ............................. 53
ES
51
3-ES
Page 58

Asegúrese de leer lo siguiente antes de emplear la cámara
Pantalla LCD
La pantalla LCD está fabricada con tecnología de alta precisión. No obstante, es posible que se
observen constantemente en la misma pequeños puntos negros y/o brillantes (rojos, azules o
verdes en color). Estos puntos son normales en el proceso de fabricación y no afectan en absoluto
a la imagen grabada. Más del 99,99 % son operativos para el uso efectivo.
Grabación de prueba
Antes de grabar acontecimientos únicos, es posible que desee realizar una grabación de
prueba para asegurarse de que la cámara funciona correctamente.
Imposibilidad de compensar el contenido de la grabación
El contenido de la grabación no podrá compensarse si la grabación o la reproducción
no se realiza debido a algún fallo de funcionamiento de la cámara, etc.
Nota sobre la compatibilidad de datos
Los archivos de datos de imágenes grabados en Memory Sticks con su cámara están de
acuerdo con la norma universal Design Rules for Camera File Systems (Reglas de
diseño para sistemas de archivos de cámaras) establecida por la JEIDA (Asociación
para el desarrollo de industrias electrónicas de Japón). Usted no podrá reproducir en
su cámara imágenes fijas grabadas con otros equipos (DCR-TRV890E/TRV900/
TRV900E, DSC-D700) que no sean compatibles con esta norma universal. (Estos
modelos no se venden en ciertas zonas.)
Precaución sobre el copyright
Los programas de televisión, películas, cintas de vídeo y demás materiales pueden
estar protegidos por copyright. La grabación no autorizada de tales materiales puede ir
en contra de lo establecido por las leyes de copyright.
Antes de emplear la cámara
Esta cámara digital emplea un Memory Stick como medio para grabar imágenes.
No agite ni golpee la unidad
Pueden producirse fallos de funcionamiento, imposibilidad de poder grabar imágenes y
emplear Memory Sticks o fallos en los datos de memoria e imagen, así como daños o pérdidas.
No moje la unidad
Cuando filme imágenes en exteriores bajo la lluvia o en condiciones similares, tenga
cuidado para que la unidad no se moje.
Si se condensa humedad, consulte la página 46 y siga las instrucciones
correspondientes a cómo eliminarla antes del empleo.
Recomendaciones sobre copias de seguridad
Para evitar el riesgo potencial de pérdida de datos, haga siempre copias de seguridad
en un disco.
Accesorios suministrados
Adaptador/cargador de alimentación
de CA AC-VF10 (1)
Cable de conexión de A/V (1)
Batería NP-F10 (1)
Cable de conexión de CC DK-115 (1)
Asa de mano (1)
Tapa del objetivo (1)
Es posible que su proveedor no disponga de algunos de los accesorios anteriormente
mencionados. Pídale información detallada sobre los accesorios disponibles en su país.
Correa de la tapa del objetivo (1)
Memory Stick (4 MB) (1)
Cable serie de PC (1)
Cable de alimentación (1)
Sony PictureGear 3.2 Lite (1)
Manual de instrucciones (1)
4-ES
Page 59

Identificación de los componentes
Consulte las páginas que aparecen entre paréntesis para obtener más información.
Emisor de flash (23)
Botón del
obturador (12)
Selector MODE
(PLAY/STILL/MOVIE)
(12)
Gancho para el asa
de mano
Altavoz
Indicador de grabación
Fijación de la tapa del objetivo (suministrada) y del asa de mano (suministrada).
Tapa del objetivo
Tenga cuidado para que la correa de la tapa del objetivo no entre en contacto con
las partes salientes situadas a ambos lados del orificio de la cubierta del objetivo.
Asa de mano
Correa de la tapa del objetivo
Ventana de la fotocélula para el flash
No la bloquee
mientras graba.
MIC (Micrófono)
Objetivo
Identificación de los componentes
Indicador
de acceso
(9)
Botón de expulsión del
Memory Stick (9)
Cubierta del
Memory Stick (9)
Receptáculo para trípode
Compruebe que la longitud del tornillo del
trípode sea inferior a 6,5 mm.
Interruptor de expulsión
de la batería (8)
Interruptor OPEN
(BATT) (8)
5-ES
Page 60

Interruptor LCD BACK LIGHT
Normalmente ajústelo en ON.
Ajústelo en OFF para ahorrar
energía de la batería cuando
utilice la cámara en un sitio con
mucha luz.
Botones LCD
BRIGHT +/–
Púlselos para ajustar
el brillo de la
pantalla LCD.
Cubierta de la
ranura para el
adaptador/cargador
de alimentación de
CA (43)
Toma A/V OUT
(43, 44)
El sonido es monofónico.
Toma DIGITAL I/O
(20)
Botón DISPLAY
Púlselo para visualizar o
desactivar los
indicadores de la
pantalla LCD.
Botón de control
macro) (23)
Botón (Modo
Indicador de
flash (23)
Pantalla LCD
(14, 17)
+ Botón
(Zoom) (24,
32)
– Botón
(Zoom) (24, 32)
Interruptor
POWER/
Indicador
POWER (10)
Botón (Flash) (23)
El ajuste de fábrica es AUTO (ninguna
indicación).
Cada vez que pulse el botón, el modo
de flash cambiará de la siguiente
forma:
AUTO (ninguna indicación) t
flash forzado t sin flash
t AUTO.
En el modo AUTO, el flash se activa
automáticamente de acuerdo con el
brillo que exista en el entorno.
El sujeto debe encontrarse a una
distancia comprendida entre 0,3 m y
2,5 m.
6-ES
Botón de control
Lado superior
Lado
izquierdo
Lado
inferior
Lado
derecho
Púlselo
para
ejecutar
Función del botón de control
Es posible ejecutar las funciones
pulsando el lado superior, inferior,
izquierdo o derecho del botón de
control. Al seleccionar alguna opción
en el menú, el color de la misma
cambia de azul a amarillo. Para
introducir selecciones, pulse el centro
del botón de control.
Page 61

Preparativos
1
Carga de la batería
Para cargar la batería, utilice el adaptador/cargador de alimentación de CA.
La cámara sólo funciona con baterías “InfoLITHIUM” (serie S).
“InfoLITHIUM” es una marca comercial de Sony Corporation.
3
2
1
1 Inserte la batería en la dirección de la marca V. Deslice dicha
batería en la dirección de la flecha.
2 Conecte el cable de alimentación al adaptador/cargador de
alimentación de CA.
3 Conecte el cable de alimentación a una toma mural.
El indicador CHARGE se ilumina (en naranja) cuando comienza la carga.
Cuando el indicador CHARGE se apaga, significa que la carga normal ha
finalizado. Para obtener una carga completa, que permite emplear la batería
durante un espacio de tiempo superior al normal, deje dicha batería fijada durante
una hora aproximadamente una vez finalizada la carga normal.
Preparativos
Para extraer la batería
Deslícela en la dirección contraria a la
flecha como muestra la ilustración anterior.
Tiempo de carga
Batería Carga completa* Carga normal**
NP-F10 145 min. 85 min.
Minutos aproximados para cargar una
batería descargada mediante el
adaptador/cargador de alimentación de
CA AC-VF10. (Las temperaturas bajas
requieren un tiempo de carga mayor.)
* Carga realizada durante una hora
aproximadamente después de
apagarse el indicador CHARGE.
** Carga realizada justo hasta que el
indicador CHARGE se apaga.
Para obtener información detallada sobre
la duración de las pilas, consulte la
página 18.
Descripción de “InfoLITHIUM”
“InfoLITHIUM” es una batería de ion de
litio que puede intercambiar datos, como
el consumo de batería, con equipos de
vídeo compatibles. Esta unidad es
compatible con la batería “InfoLITHIUM”
(serie S). Esta cámara sólo funciona con
baterías “InfoLITHIUM”. La marca
aparece impresa en dicho
tipo de baterías.
“InfoLITHIUM” es una marca comercial
de Sony Corporation.
7-ES
Page 62

2
Instalación de la batería
12 3
1 Abra la cubierta de batería.
Abra la cubierta mientras desliza el interruptor OPEN (BATT) en la dirección de la
flecha.
2 Instale la batería.
Mientras desliza hacia abajo el interruptor de expulsión de batería, inserte ésta con
la marca v orientada hacia el compartimiento de la batería.
3 Cierre la cubierta.
Ejerza presión sobre la cubierta hasta que oiga un clic.
Para extraer la batería
Abra la cubierta de batería. Deslice
hacia abajo el interruptor de
expulsión de batería y extráigala.
Tenga cuidado de no dejar caer la
batería al extraerla.
8-ES
Indicador de batería restante
Esta cámara muestra en la pantalla LCD
los minutos durante los cuales puede
continuar grabando o reproduciendo
imágenes.
Función de apagado automático
Durante la grabación, si deja la cámara
inactiva durante unos tres minutos con la
alimentación activada, dicha cámara se
apagará automáticamente para evitar el
desgaste de la batería.
El apagado automático no funcionará
cuando emplee el adaptador/cargador de
CA.
Page 63

3
Inserción de un Memory Stick
“Memory Stick” es una marca comercial de Sony Corporation.
Indicador de acceso
1 Abra la cubierta del Memory Stick.
Deslícelo en la dirección de la marca de flecha de la cubierta.
2 Inserte el Memory Stick.
Insértelo con la marca v orientada hacia adentro.
3 Cierre la cubierta del Memory Stick.
Preparativos
Para extraer el Memory
Stick
Abra la cubierta del Memory Stick y, a
continuación, pulse el botón de
expulsión de Memory Stick.
PNota
Si el indicador de acceso está
iluminado, asegúrese de no extraer el
Memory Stick ni de desactivar la
alimentación.
Conector
Interruptor
LOCK
(bloqueo)
PNota sobre el Memory Stick
No es posible grabar en los Memory
Stick si el interruptor LOCK está
ajustado en la posición LOCK.
LOCK
Espacio para
etiqueta
9-ES
Page 64

4
Ajuste de la fecha y la hora
Ajuste la fecha y la hora antes de emplear la cámara por primera vez. Si no están
ajustadas, se registrará una fecha y hora incorrectas, y la pantalla CLOCK SET del paso
5 aparecerá siempre que active la cámara en el modo STILL/MOVIE.
Botón de
control
Interruptor
POWER
1 Deslice el interruptor POWER hacia abajo para activar la
alimentación.
El indicador POWER se ilumina.
2 Pulse v del botón de control.
La barra de menús aparece en
la pantalla LCD.
INDEX FILEDELETE SETUP
SELECT OK
3 Seleccione “SETUP” con el botón de control, y púlselo.
/LANGUAGE
CLOCK SET
BEEP
INDEX FILEDELETE SETUP
SELECT OK
10-ES
MENU BAR OFF
Page 65

4 Seleccione “CLOCK SET” con el botón de control, y púlselo.
Preparativos
/LANGUAGE
CLOCK SET
BEEP
INDEX FILEDELETE SETUP
SELECT OK
CLOCK SET
1999JAN AM// : 1 12 00
SELECT/ADJUST OK
Y/M/D
M/D/Y
D/M/Y
ENTER
CANCEL
5 Seleccione con el botón de control la indicación deseada
correspondiente a la fecha, y pulse dicho botón.
Y/M/D (año/mes/día)
M/D/Y (mes/día/año)
D/M/Y (día/mes/año)
CLOCK SET
1999 AM// : 1 1 12 00
SELECT/ADJUST OK
Y/M/D
M/D/Y
D/M/Y
ENTER
CANCEL
6 Seleccione la fecha y la hora con el botón de control, y púlselo.
La opción que vaya a cambiar se indica
mediante v/V. Seleccione el número
pulsando v/V del botón de control, y
púlselo para introducir dicho número.
Una vez introducido el número, v/V se
desplaza a la opción siguiente.
Si ha seleccionado “D/M/Y”, ajuste la
hora en el ciclo de 24 horas.
CLOCK SET
1999 AM// : 1 1 12 00
SELECT/ADJUST OK
Y/M/D
M/D/Y
D/M/Y
ENTER
CANCEL
7 Seleccione “ENTER” con el botón de control, y púlselo en el
momento que desee que el reloj se ponga en funcionamiento.
CLOCK SET
1999 PM// : 7 4 10 30
SELECT/ADJUST OK
Para cancelar el ajuste de fecha y hora
Seleccione “CANCEL” con el botón de control, y púlselo.
Y/M/D
M/D/Y
D/M/Y
ENTER
CANCEL
11-ES
Page 66

Grabación
1
Grabación de imágenes fijas
Para grabar imágenes, deslice el interruptor POWER hacia abajo para activar la
alimentación (el indicador POWER se ilumina) e inserte el Memory Stick.
Botón del
obturador
Selector MODE
Interruptor
POWER
1 Ajuste el selector MODE en la posición STILL.
2 Pulse el botón del obturador hasta la mitad.
Si AE (exposición automática), AWB (balance de blancos automático) y AF
(enfoque automático) están congelados, el indicador de bloqueo AE z (verde) se
iluminará.
3 Pulse el botón del obturador a fondo.
La imagen se grabará en el Memory Stick.
PNota
Si la imagen se graba en el Memory Stick,
en la pantalla LCD aparece
“RECORDING”. Cuando aparezca esta
indicación, no golpee ni agite la unidad,
no desconecte la alimentación ni extraiga
la batería o el Memory Stick. De lo
contrario, los datos de la imagen pueden
presentar interrupciones y el Memory
Stick puede quedar inservible.
12-ES
No agarre la cámara por la pantalla
LCD.
Page 67

2
Grabación de imágenes en
movimiento
Para grabar imágenes, deslice el interruptor POWER hacia abajo para activar la
alimentación (el indicador POWER se ilumina) e inserte el Memory Stick.
Botón del obturador
Selector MODE
Interruptor POWER
1 Ajuste el selector MODE en la posición MOVIE.
2 Pulse a fondo el botón del obturador momentáneamente.
La imagen y el sonido se graban durante 5, 10 o 15 segundos (el espacio de tiempo
se ajusta en “REC TIME SET” en el menú) (página 41).
Mantenga pulsado el botón del obturador a fondo.
La imagen y el sonido se graban mientras lo mantenga pulsado.
Modo de correo de vídeo: máximo de 60 segundos al grabar con tamaño de
160 × 112
Modo de presentación: máximo de 15 segundos al grabar con tamaño de
320 × 240
No obstante, el tiempo mínimo de grabación depende del anterior ajuste “REC
TIME SET”.
Las imágenes en movimiento son más suaves que las fijas.
160
320
Grabación
Comprobación de la última imagen grabada (Revisión)
Si desea comprobar la última imagen
grabada, pulse b del botón de control.
Dicha imagen aparecerá en la pantalla
LCD. Para recuperar el modo normal,
pulse el botón del obturador o
seleccione “RETURN” con el botón de
control, y púlselo.
13-ES
Page 68

Indicadores mostrados durante la grabación
Los indicadores de la pantalla LCD no se graban.
Indicador de tamaño de imagen (26)/
Indicador de zoom (24)
Indicador de modo de
grabación (27)
Indicador de bloqueo de
enfoque/AE (12)
Indicador de batería
restante (8)
Indicador de modo
de enfoque (23)
Indicador de nivel de
flash (23)
SELF
TIMER
Indicador de balance de
blancos (30)
Indicador de efecto de imagen
(24)/Indicador de nivel de brillo
de la pantalla LCD* (6)/Indicador
de nivel de volumen* (16)
60
min
+1.0
Indicador de calidad de
imagen (25)
Número de imágenes
almacenadas
Si “FILE NUMBER” se
ajusta en “SERIES”, la
unidad asignará los
números a los archivos
secuencialmente aunque
cambie el Memory Stick.
Indicador de
capacidad
restante de la
memoria
FINE
1600
EV
REC
15sBRT
0:10
48
Indicador de función
de autodiagnóstico
(50)/Indicador de
tiempo de
grabación (41)
Indicador de
tiempo de
grabación (41)
FILE
SETUPCAMERAEFFECT
MENU BAR OFFSELECT OK
Barra de menús y
menú guía
Aparece al pulsar v
del botón de control
y desaparece al
pulsar V de dicho
botón.
Indicador de nivel EV (29)
* Sólo aparece durante el funcionamiento.
14-ES
Indicador de
temporizador (22)
Page 69

Reproducción
1
Reproducción de imágenes fijas
Para reproducir imágenes, deslice el interruptor POWER hacia abajo para activar la
alimentación (el indicador POWER se ilumina) e inserte el Memory Stick.
Selector MODE
Botón de
control
Interruptor
POWER
1 Ajuste el selector MODE en la posición PLAY.
La pantalla LCD mostrará la última imagen grabada.
Si no hay ninguna imagen, la pantalla LCD mostrará el indicador “NO FILE”.
2 Pulse v del botón de control para que aparezca la barra de menús
en la pantalla LCD.
Reproducción
3 Seleccione la imagen grabada con el botón de control.
Seleccione el botón en la pantalla LCD con el botón de control, y púlselo.
'b: Para visualizar la anterior imagen grabada.
B': Para visualizar la siguiente imagen.
INDEX: Para ver simultáneamente seis imágenes grabadas (pantalla INDEX).
z Si no aparece la barra de menús
La imagen se puede seleccionar
directamente mediante b o B del botón
de control.
15-ES
Page 70

2
Reproducción de imágenes en movimiento
Para reproducir imágenes en movimiento, deslice el interruptor POWER hacia abajo
para activar la alimentación (el indicador POWER se ilumina) e inserte el Memory
Stick.
Selector MODE
Botón de
control
Interruptor
POWER
1 Ajuste el selector MODE en la posición PLAY.
La pantalla LCD muestra la última imagen grabada.
La imagen grabada en el modo MOVIE aparece con un tamaño menor que las
otras imágenes con tamaño normal.
2 Pulse v del botón de control para que aparezca la barra de menús
en la pantalla LCD.
3
Con el botón de control, seleccione la imagen en movimiento grabada.
Seleccione el botón en la pantalla LCD con
el botón de control, y púlselo.
'b: Para visualizar la anterior imagen
grabada.
B': Para visualizar la siguiente imagen.
INDEX: Para ver simultáneamente seis
imágenes grabadas (pantalla INDEX).
VOL.
INDEX FILEDELETE SETUP
SELECT OK
160
6/8
MENU BAR OFF
4 Seleccione el botón B (reproducción) en pantalla con el botón de
control, y púlselo.
Se reproducen las imágenes en movimiento y el sonido.
Ajuste del volumen
Seleccione los botones VOL. +/– de la
pantalla con el botón de control y, a
continuación, ajuste el volumen
mediante b o B de dicho botón.
16-ES
z Si no aparece la barra de menús
Es posible seleccionar la imagen
directamente utilizando b o B del botón
de control y reproducirla mediante z de
dicho botón.
Page 71

Indicadores mostrados durante la reproducción
Durante la reproducción de imágenes fijas (STILL)
Indicador de escala de zoom (32)
Indicador de modo de grabación (27)
Indicador de tamaño de imagen (26)
Número de imagen
Reproducción
60
min
2.0
640
10/48
Indicador de capacidad de memoria
restante
Número de imágenes almacenadas
en el Memory Stick
Indicador de marca de impresión (44)
Indicador de protección (35)
DSC00007
12:00AM1999 7 4
Fecha de grabación de la imagen de
reproducción (10)/Barra de menús y
menú guía (39)
Nombre de archivo
Durante la reproducción de imágenes en movimiento (MOVIE)/imágenes fijas con
sonido (VOICE)
Botones VOL. (volumen) (16)
Indicador de archivo de imagen en
movimiento (16)
Indicador de tamaño de imagen (26)
Número de imagen/número de imágenes
almacenadas en el Memory Stick
Indicador de capacidad de memoria
restante
Contador
VOL.
min
320
6/860
0:10
Imagen de reproducción (16)
Barra de reproducción (16)
INDEX FILEDELETE SETUP
SELECT OK
MENU BAR OFF
Barra de menús y menú guía (39)
Botones de avance rápido/
rebobinado (16)
Botones de búsqueda (16)
B aparece durante la parada, y X
durante la reproducción.
17-ES
Page 72

Duración de la batería/número de imágenes que pueden
grabarse/reproducirse
Modo STILL
Grabación continua
LCD BACK LIGHT Duración de la Número de imágenes
ON 50 (45) 1000 (900)
OFF 60 (55) 1200 (1100)
Reproducción continua*
LCD BACK LIGHT Duración de la Número de imágenes
ON 65 (60) 1000 (900)
OFF 75 (70) 1200 (1100)
Duración aproximada de la batería y número de imágenes que pueden grabarse/
reproducirse con una temperatura de 25°C, un tamaño de imagen de 640 × 480, en el
modo de grabación NORMAL y calidad STANDARD. Filmación sin flash. Los
números entre paréntesis indican el espacio de tiempo cuando se utiliza una batería
con carga normal.
* Reproducción de una sola imagen a intervalos de unos 3 segundos
Modo MOVIE
Grabación continua
LCD BACK LIGHT Duración de la
ON 40 (35)
OFF 50 (45)
batería (min.) (grabación/reproducción)
batería (min.) (grabación/reproducción)
batería (min.)
Minutos aproximados durante los cuales puede grabarse con una temperatura de 25°C
y un tamaño de imagen de 160 × 112. Los números entre paréntesis indican el espacio
de tiempo cuando se utiliza una batería con carga normal.
• La duración de la batería y el número de imágenes disminuirán si emplea la cámara
mientras activa y desactiva la alimentación.
•
La capacidad de los Memory Sticks está limitada. Las anteriores cifras son una referencia
al grabar/reproducir de forma continua a la vez que sustituye Memory Sticks.
• La duración de la batería se reducirá cuando grabe en lugares fríos. Cuando emplee
la batería en un lugar frío, manténgala caliente. Para ello, guárdela en su bolsillo e
instálela en la cámara inmediatamente antes de grabar.
18-ES
Page 73

3
Visualización de imágenes con
un ordenador personal
Con esta cámara, los datos de las imágenes fijas se comprimen en formato JPEG y los
de las imágenes en movimiento lo hacen en formato MPEG-1.
Dichos datos pueden visualizarse con un ordenador personal que disponga de
software de visualización de imágenes JPEG y MPEG, como el Sony PictureGear 3.2
Lite (suministrado). Para obtener información detallada sobre el empleo del software
de visualización de imágenes, consulte el manual de instrucciones del ordenador
personal y del software.
Uso del adaptador opcional de tarjeta de PC
Adaptador de tarjeta de PC
(no suministrado)
Memory Stick
Ordenador personal
Ejemplo: ordenador personal con Windows 95
1 Inicie el ordenador e inserte el adaptador opcional (con el
Memory Stick insertado) de tarjeta de PC en la unidad de tarjetas
de PC del ordenador.
Reproducción
2 Abra “My computer” y haga doble clic en “PC card drive”.
Haga doble clic en las carpetas en el siguiente orden como se describe a
continuación:
Modo de grabación
Carpeta 1 Dcim 1 Mssony 1 Mssony 1 Mssony
3 Haga doble clic en el archivo de datos que desee.
STILL MOVIE VOICE E-MAIL
2 100msdcf 2 Moml0001 2 Momlv100 2 Imcif100
19-ES
Page 74

Uso de los accesorios suministrados
Es posible enviar datos de imagen de la cámara a un PC IBM PC/AT compatible
(mediante el puerto serie), utilizando el cable serie de PC suministrado y el software
Sony PictureGear 3.2 Lite.
Ordenador personal
Cable serie de PC
al puerto serie
Cámara digital
a la toma DIGITAL I/O
1 Instale en el ordenador el software de aplicación Sony PictureGear
3.2 Lite suministrado.
Para más información, consulte el manual de instrucciones del Sony PictureGear
3.2 Lite.
2 Conecte un extremo del cable serie de PC a la toma DIGITAL I/O, y
el otro extremo al puerto serie del PC IBM PC/AT compatible.
3 Encienda la cámara y cerciórese de que el cable serie de PC está
conectado a la toma DIGITAL I/O de la cámara. Ajuste el selector
MODE en PLAY.
“PC MODE” aparece en la pantalla LCD y la cámara entra en el modo de espera
de comunicaciones.
4 Ajuste el ordenador de forma que pueda recibir y emplear el
archivo de imagen de la cámara.
Para obtener información detallada sobre el empleo del ordenador, consulte su
manual de instrucciones y el del Sony PictureGear 3.2 Lite.
20-ES
Page 75

P Notas
• Mientras emplee el ordenador, la
cámara no podrá utilizarse.
• Antes de realizar las conexiones,
apague todos los equipos. Una vez
realizadas, encienda dichos equipos.
• Si emplea la cámara conectada a otros
equipos durante mucho tiempo, utilice
el adaptador/cargador de alimentación
de CA.
Ejemplo de aplicaciones/
OS recomendados
OS
Windows 3.1
Windows 95 o posterior
Sistema Mac OS 7.5 o posterior
Aplicaciones
Sony PictureGear 3.2 Lite
Microsoft Internet Explorer 4.0
Netscape Navigator, etc.
P Notas
• Para reproducir un archivo MPEG,
instale el programa Active Movie
Player (Direct Show).
• Para reproducir archivos grabados en el
modo MOVIE o VOICE, cópielos
primero en el disco duro del ordenador.
Si reproduce el archivo de un Memory
Stick, es posible que la imagen y el
sonido se interrumpan.
• No es posible reproducir archivos
MPEG con Windows 3.1.
• En el caso de sistemas Macintosh, es
posible utilizar el Memory Stick
grabado con esta cámara si se emplea
PC Exchange con el sistema Mac OS 7.5
o posterior. Para ver las imágenes,
también se necesita una aplicación de
visualización para Macintosh. Para
reproducir un archivo MPEG, instale
Quick Time 3.2.
• Para obtener información detallada
sobre requisitos de sistema, consulte los
manuales de instrucciones del software
de aplicación.
• Es posible que la información sobre el
giro de imágenes y la grabación cara a
cara no pueda enviarse al ordenador.
Notas sobre el envío de
archivos de sonido con
una imagen fija grabada
en modo VOICE a un
ordenador personal
• No es posible enviar archivos de
sonido con una imagen fija grabada
en modo VOICE a un ordenador
personal conectado con el cable serie
de PC suministrado.
• Los archivos de sonido que incluyan
una imagen fija grabada en modo
VOICE pueden reproducirse con la
cámara digital DSC-F55/F55E.
• Si utiliza el adaptador opcional de
tarjeta de PC, podrá enviar archivos
de sonido con una imagen fija
grabada en modo VOICE a un
ordenador personal.
21-ES
Reproducción
Page 76

z Distintas formas de
grabación
Uso del temporizador
Cambio de la
orientación del
objetivo – Grabación
cara a cara
El usuario puede filmarse así mismo.
Para ello, éste y la pantalla LCD deben
colocarse cara a cara.
Parte del objetivo
Selector
MODE
1 Ajuste el selector MODE en la
posición MOVIE o STILL.
2 Ajuste el ángulo del objetivo.
Gire la parte del objetivo unos 180
grados cuando realice la grabación
cara a cara.
El temporizador permite grabar el
sujeto transcurridos unos 10 segundos
después de pulsar el botón del
obturador.
Botón del obturador
Selector
MODE
Botón de control
1 Ajuste el selector MODE en la
posición MOVIE o STILL.
2 Pulse v del botón de control.
La barra de menús aparece en la
pantalla LCD.
3 Seleccione “SELFTIMER” con el
botón de control, y púlselo.
El indicador del temporizador
( ) aparece en pantalla.
4 Pulse el botón del obturador hasta
la mitad.
El indicador de bloqueo AE (z)
aparece en pantalla.
Imagen de la
pantalla LCD
Imagen grabada
3 Inicie la grabación.
PNota
Las imágenes mostradas en la pantalla
LCD son imágenes espejo. Éstas se
almacenan en el Memory Stick de la
misma forma que se ven por el objetivo.
22-ES
5 Pulse el botón del obturador a
fondo.
El indicador de grabación y el
indicador del temporizador ( )
parpadean, el obturador se
desactiva en 10 segundos
aproximadamente y la imagen se
graba.
Page 77

Selección del brillo del
flash (FLASH LEVEL)
5 Seleccione el brillo del flash con el
botón de control.
Es posible seleccionar el brillo del
flash.
Selector
MODE
Botón de control
1 Ajuste el selector MODE en la
posición STILL.
2 Pulse v del botón de control.
La barra de menús aparece en la
pantalla LCD.
3 Seleccione “CAMERA” con el
botón de control, y púlselo.
El menú CAMERA aparece en
pantalla.
WHITE BALANCE
FLASH LEVEL
EXPOSURE
SELF
TIMER
SELECT OK
SETUPCAMERAEFFECT
FILE
4 Seleccione “FLASH LEVEL” con el
botón de control, y púlselo.
SELF
TIMER
SELECT OK
WHITE BALANCE
FLASH LEVEL
EXPOSURE
HIGH
SETUPCAMERAEFFECT
FILE
6 Pulse varias veces V del botón de
control.
La barra de menús desaparece de
la pantalla.
z Consejos para realizar el ajuste
del flash
Si el sujeto o el fondo es oscuro, es posible
que el ajuste del flash sea demasiado alto.
En este caso, ajuste FLASH LEVEL en
LOW (
–). Si por el contrario el sujeto o el
fondo es brillante, el ajuste del flash
puede ser demasiado bajo. En este caso,
ajuste FLASH LEVEL en HIGH (
definir el nivel de flash adecuadamente,
se recomienda realizar una grabación de
prueba.
Grabación de
imágenes en modo
macro
Pulse el botón (macro). El indicador
del modo macro ( ) aparece en la
pantalla LCD. Es posible filmar un
sujeto que se encuentre a unos 10 cm
de la superficie del objetivo en el modo
macro.
+). Para
Distintas formas de grabación
SELF
TIMER
SELECT OK
WHITE BALANCE
FLASH LEVEL
EXPOSURE
FILE
HIGH
NORMAL
LOW
SETUPCAMERAEFFECT
Si vuelve a pulsar el botón (macro),
el modo macro se desactivará y podrá
grabar imágenes en el modo normal.
23-ES
Page 78

Grabación de
imágenes ampliadas –
Grabación con zoom
Botón –
Botón +
Selector
MODE
Función de efecto de
imagen
La función de efecto de imagen
permite obtener imágenes como las de
televisión.
Selector
MODE
Botón de control
Botón de control
1 Ajuste el selector MODE en la
posición STILL.
2 Pulse el botón + .
La imagen de la pantalla LCD se
ampliará 2,5 veces.
El indicador de zoom (
aparece en pantalla.
640
)
3 Pulse el botón del obturador a
fondo.
La imagen se graba con un tamaño
de 640 × 480 en el Memory Stick.
Para recuperar el tamaño
original
Pulse el botón – . El indicador de
640
zoom (
P Nota
La imagen en pantalla se muestra
degradada en relación con la que se va a
grabar en el Memory Stick.
z Sobre la escala de zoom
La escala de zoom se fija en 2,5 veces y el
indicador de zoom aparece como (
) desaparece de la pantalla.
640
).
1 Ajuste el selector MODE en la
posición MOVIE o STILL.
2 Pulse v del botón de control.
La barra de menús aparece en la
pantalla LCD.
3 Seleccione “EFFECT” con el botón
de control, y después púlselo
varias veces hasta que aparezca el
efecto de imagen que desee.
❐ NEG. ART: El color y brillo de
la imagen se invierte.
❐ SEPIA: La imagen aparece en
sepia.
❐ B&W: La imagen aparece en
blanco y negro.
❐ SOLARIZE: La intensidad de la
luz es más clara y la imagen
parece una ilustración.
4 Pulse V del botón de control.
La barra de menús desaparece de
la pantalla.
Para cancelar el efecto de
imagen
Seleccione “EFFECT” en el paso 3 y,
después, pulse el botón de control
varias veces hasta que el indicador de
efecto de imagen desaparezca.
24-ES
Page 79

Selección de la calidad
de imagen (QUALITY)
Es posible realizar la selección entre los
dos modos de calidad de imagen
disponibles. El número de imágenes
que pueden grabarse difiere en función
del modo de calidad de imagen que
seleccione.
Selector
MODE
Botón de control
1 Ajuste el selector MODE en la
posición STILL.
2 Pulse v del botón de control.
La barra de menús aparece en la
pantalla LCD.
3 Seleccione “FILE” con el botón de
control, y púlselo.
El menú FILE aparece en pantalla.
FORMAT
FILE NUMBER
IMAGE SIZE
QUALITY
REC MODE
SELF
TIMER
SELECT OK
SETUPCAMERAEFFECT
FILE
❐ FINE (FINE): Utilice este modo
cuando dé prioridad a la
calidad de imagen.
❐ STANDARD (STD): Emplee
este modo como calidad de
imagen estándar.
5 Seleccione la calidad de imagen
con el botón de control, y púlselo.
FORMAT
FILE NUMBER
SELF
TIMER
SELECT OK
IMAGE SIZE
QUALITY
REC MODE
FINE
SETUPCAMERAEFFECT
FILE
6 Pulse varias veces V del botón de
control.
La barra de menús desaparece de
la pantalla.
z ¿Qué diferencia hay en el modo
de calidad de imagen?
En el formato JPEG, la imagen se
comprime antes de la grabación. La
capacidad de memoria asignada a cada
imagen difiere en función de la calidad
de la misma.
P Nota
En función de la imagen, la modificación
de la calidad de ésta puede no afectar al
aspecto de la imagen en pantalla.
Distintas formas de grabación
4 Seleccione “QUALITY” con el
botón de control, y púlselo.
FORMAT
FILE NUMBER
SELF
TIMER
SELECT OK
IMAGE SIZE
QUALITY
REC MODE
FINE
STANDARD
SETUPCAMERAEFFECT
FILE
25-ES
Page 80

Selección del tamaño
de la imagen
Es posible cambiar el tamaño de la
imagen en función de las condiciones
de grabación.
Selector
MODE
Botón de control
Opciones del modo STILL
❐ 1600 × 1200: Graba un archivo
JPEG de 1600 × 1200.
❐ 1024 × 768: Graba un archivo
JPEG de 1024 × 768.
❐ 640 × 480: Graba un archivo
JPEG de 640 × 480.
Opciones del modo MOVIE
❐ 320 × 240: Graba un archivo
MPEG de 320 × 240.
❐ 160 × 112: Graba un archivo
MPEG de 160 × 112.
5 Seleccione el tamaño de imagen
que desee con el botón de control,
y púlselo.
1 Ajuste el selector MODE en la
posición MOVIE o STILL.
2 Pulse v del botón de control.
La pantalla LCD muestra la barra
de menús.
3 Seleccione “FILE” con el botón de
control, y púlselo.
La pantalla muestra el menú FILE.
FORMAT
FILE NUMBER
IMAGE SIZE
QUALITY
REC MODE
SELF
TIMER
SELECT OK
SETUPCAMERAEFFECT
FILE
4 Seleccione “IMAGE SIZE” con el
botón de control, y púlselo.
SELF
TIMER
SELECT OK
FORMAT
FILE NUMBER
IMAGE SIZE
QUALITY
REC MODE
1600
×
1200
1024×768
640×480
SETUPCAMERAEFFECT
FILE
FORMAT
SELF
TIMER
SELECT OK
FILE NUMBER
IMAGE SIZE
QUALITY
REC MODE
1600×1200
SETUPCAMERAEFFECT
FILE
6 Pulse varias veces V del botón de
control.
La barra de menús desaparece de
la pantalla.
26-ES
Page 81

Selección del modo de
grabación (REC MODE)
Es posible grabar una imagen fija junto
con el sonido, o bien una imagen fija
adecuada para transmisión mediante
correo electrónico.
Selector
MODE
Botón de control
1 Ajuste el selector MODE en la
posición STILL.
2 Pulse v del botón de control.
La barra de menús aparece en la
pantalla LCD.
3 Seleccione “FILE” con el botón de
control, y púlselo.
El menú FILE aparece en pantalla.
FORMAT
FILE NUMBER
IMAGE SIZE
QUALITY
REC MODE
SELF
TIMER
SELECT OK
SETUPCAMERAEFFECT
FILE
❐ VOICE: Graba una imagen fija
junto con el sonido en un
archivo JPEG.
❐ E-MAIL: Graba un archivo
JPEG de 320 × 240 en otro
JPEG de 1600 × 1200, 1024 ×
768 o 640 × 480. Los archivos
de correo electrónico son
adecuados para transmisiones
por correo electrónico, etc., ya
que contienen datos
comprimidos.
❐ NORMAL: Graba un archivo
JPEG con el tamaño de
imagen seleccionado.
5 Seleccione el modo de grabación
que desee con el botón de control,
y púlselo.
FORMAT
FILE NUMBER
IMAGE SIZE
SELF
TIMER
SELECT OK
QUALITY
REC MODE
E-MAIL
SETUPCAMERAEFFECT
FILE
6 Pulse varias veces V del botón de
control.
La barra de menús desaparece de
la pantalla.
Distintas formas de grabación
4 Seleccione “REC MODE” con el
botón de control, y púlselo.
FORMAT
FILE NUMBER
SELF
TIMER
SELECT OK
IMAGE SIZE
QUALITY
REC MODE
VOICE
E-MAIL
NORMAL
SETUPCAMERAEFFECT
FILE
27-ES
Page 82

Selector MODE ajustado en “STILL”
Modo de
grabación
NORMAL
E-MAIL
VOICE
Tamaño de
imagen
1600 × 1200
1024 × 768
640 × 480
1600 × 1200
1024 × 768
640 × 480
1600 × 1200
1024 × 768
640 × 480
Archivo de
grabación
JPEG (1600 × 1200)
JPEG (1024 × 768)
JPEG (640 × 480)
JPEG (1600 × 1200)
JPEG (320 × 240)
JPEG (1024 × 768)
JPEG (320 × 240)
JPEG (640 × 480)
JPEG (320 × 240)
JPEG (1600 × 1200)
MPEG audio con
imagen fija (320 × 240)
JPEG (1024 × 768)
MPEG audio con
imagen fija (320 × 240)
JPEG (640 × 480)
MPEG audio con
imagen fija (320 × 240)
Selector MODE ajustado en “MOVIE”
Modo
Presentación
Correo de vídeo
* Tiempo de grabación continua
z Sobre el directorio
El directorio del archivo que depende
del modo de grabación es de la
siguiente forma:
NORMAL: ¥Dcim¥100msdcf
E-MAIL: ¥Mssony¥Imcif100
VOICE: ¥Mssony¥Momlv100
Imagen en movimiento
28-ES
¥Mssony¥Moml0001
Tamaño
de
imagen
320 × 240
160 × 112
:
Archivo de
grabación
MPEG (320 × 240)
MPEG (160 × 112)
Nombre de
archivo
(ex.)
Dsc
00001.jpg
00001.jpg
00001.jpg
00001.jpg
00001.jpg
00001.jpg
00001.jpg
00001.mpg
00001.jpg
00001.mpg
00001.jpg
00001.mpg
Nombre
de archivo
(ex.)
Mov
00001.mpg
00001.mpg
Número de imágenes
que pueden grabarse
en un Memory Stick
STANDARD FINE
10 – 15 5 – 8
27 – 49 14 – 27
47 – 63 27 – 38
10 – 14 5 – 8
24 – 48 13 – 24
38 – 48 24 – 32
9 – 12 5 – 7
19– 27 11 – 19
27 – 32 19 – 24
Tiempo máximo
de grabación en
un Memory
Stick (sec.) *
40
160
Page 83

Ajuste de la exposición
(EXPOSURE)
Es posible ajustar la exposición en
función de las condiciones.
¿Cuándo
debe
emplearse?
Cuando el sujeto presente
demasiada oscuridad o
brillo contra un fondo
debido a la luz de fondo,
una fuente de luz cercana,
etc.
5 Seleccione el valor de exposición
deseado con el botón de control, y
púlselo.
Es posible seleccionar valores
dentro del margen de – 1,5EV a +
1,5EV en intervalos de 0,5EV.
WHITE BALANCE
SELF
TIMER
SELECT OK
FLASH LEVEL
0 EVEXPOSURE
SETUPCAMERAEFFECT
FILE
Distintas formas de grabación
Selector
MODE
Botón de control
1 Ajuste el selector MODE en la
posición MOVIE o STILL.
2 Pulse v del botón de control.
La barra de menús aparece en la
pantalla LCD.
3 Seleccione “CAMERA” con el
botón de control, y púlselo.
El menú CAMERA aparece en
pantalla.
WHITE BALANCE
FLASH LEVEL
EXPOSURE
SELF
TIMER
SELECT OK
SETUPCAMERAEFFECT
FILE
4 Seleccione “EXPOSURE” con el
botón de control, y púlselo.
6 Pulse varias veces V del botón de
control.
La barra de menús desaparece de
la pantalla.
SELF
TIMER
SELECT OK
WHITE BALANCE
FLASH LEVEL
EXPOSURE
FILE
+
1.5EV
SETUPCAMERAEFFECT
29-ES
Page 84

Ajuste del balance de blancos
El ajuste del balance de blancos
permite obtener un balance de color
más natural al grabar con la cámara.
Normalmente, el balance de blancos se
ajusta automáticamente.
Selector
MODE
Botón de control
1 Ajuste el selector MODE en la
posición MOVIE o STILL.
2 Pulse v del botón de control.
La barra de menús aparece en la
pantalla LCD.
3 Seleccione “CAMERA” con el
botón de control, y púlselo.
La pantalla muestra el menú
CAMERA.
WHITE BALANCE
FLASH LEVEL
EXPOSURE
SELF
TIMER
SELECT OK
SETUPCAMERAEFFECT
FILE
4 Seleccione “WHITE BALANCE”
con el botón de control, y púlselo.
IN DOOR
OUT DOOR
HOLD
AUTO
SETUPCAMERAEFFECT
FILE
SELF
TIMER
SELECT OK
WHITE BALANCE
FLASH LEVEL
EXPOSURE
❐ IN DOOR (n):
• Las condiciones de
iluminación cambian
rápidamente
• Lugares con demasiado brillo,
como estudios fotográficos
• Iluminación de lámparas de
sodio o de mercurio
❐ OUT DOOR ( ):
• Grabación de puestas de sol/
amaneceres, inmediatamente
después de la puesta de sol,
inmediatamente antes del
amanecer, letreros de neón o
fuegos artificiales
• Iluminación de una lámpara
fluorescente de colores
coincidentes
❐ HOLD (HOLD): Grabación de
un sujeto o fondo de un solo
color
❐ AUTO: Ajuste automático del
balance de blancos
5 Seleccione el modo de balance de
blancos deseado con el botón de
control, y púlselo.
SELF
TIMER
SELECT OK
WHITE BALANCE
FLASH LEVEL
EXPOSURE
OUT DOOR
SETUPCAMERAEFFECT
FILE
6 Pulse varias veces V del botón de
control.
La barra de menús desaparece de
la pantalla.
Para recuperar el modo de
ajuste automático
Seleccione “AUTO” en el paso 5 con el
botón de control, y púlselo.
30-ES
Page 85

zDistintas formas de
reproducción
Reproducción de
varias imágenes a la
vez (INDEX)
Es posible reproducir simultáneamente
seis imágenes grabadas. También es
posible seleccionar una imagen
específica entre las seis y ampliarla a
tamaño completo.
¿Cuándo
debe
emplearse?
Cuando desee buscar la
imagen entre todas las
grabadas.
Selector
MODE
Botón de control
1 Ajuste el selector MODE en la
posición PLAY.
2 Pulse v del botón de control.
La barra de menús aparece en la
pantalla LCD.
: Archivo de imagen en
movimiento
: Archivo de imagen fija con
sonido
: Archivo de modo de correo
electrónico
:Marca de impresión
Para visualizar las otras seis
imágenes
Seleccione “v/V” en el ángulo inferior
izquierdo de la pantalla mediante el
botón de control y, a continuación,
pulse v/V de dicho botón.
v Muestra seis imágenes
anteriores
V Muestra seis imágenes
posteriores
Para recuperar el modo de
reproducción normal
• Seleccione la imagen deseada con el
botón de control, y púlselo.
• Seleccione “RETURN” con el botón
de control, y púlselo.
!Nota
No es posible eliminar la barra de menús
en el modo INDEX.
Distintas formas de reproducción
3 Seleccione “INDEX” con el botón
de control, y púlselo.
Aparecen seis imágenes a la vez
(pantalla INDEX).
1999 7 4 10:30PMDSC00100
RETURN
SELECT SINGLE DISPLAY
Visualización de la posición de una
imagen cuyo número se muestra en
pantalla
FILEDELETE SETUP
31-ES
Page 86

Ampliación de una
parte de la imagen
–
Zoom y recorte
Es posible ampliar y mostrar una parte
de la imagen grabada.
Botón –
Botón +
Selector
MODE
Botón de control
1 Ajuste el selector MODE en la
posición PLAY.
2 Muestre la imagen que desee
ampliar.
3 Amplíe la imagen hacia una
panorámica de detalle o general.
Para ello, pulse el botón + o
– varias veces.
El indicador de escala de zoom
( × 2.0) aparece en la pantalla
LCD.
Para recuperar el tamaño
normal
Pulse el botón – varias veces hasta
que el indicador de escala de zoom (
× 2.0) desaparezca de la pantalla, o
simplemente pulse el botón de control.
El indicador de escala de zoom ( ×
2.0) desaparece de la pantalla.
Para grabar una imagen
ampliada (recorte)
1 Amplíe la imagen.
2 Pulse el botón del obturador. La
imagen se grabará con un tamaño
de 640 × 480.
!Notas
•No es posible emplear esta función con
imágenes en movimiento.
•La escala de zoom es hasta de 5×
independientemente del tamaño
original.
• La imagen ampliada se graba con un
tamaño de 640 × 480.
4 Pulse el botón de control varias
veces para recortar la imagen.
v : La imagen se desplaza hacia
abajo
V : La imagen se desplaza hacia
arriba
b : La imagen se desplaza hacia la
derecha
B : La imagen se desplaza hacia la
izquierda
32-ES
Page 87

Rotación de imagen
(ROTATE)
Es posible hacer rotar la imagen de
reproducción.
La información sobre el sentido de la
imagen rotada se registra en el archivo
de datos.
¿Cuándo
debe
emplearse?
Cuando se deseen
reproducir imágenes
verticales grabadas en
horizontal.
Selector
MODE
Botón de control
1 Ajuste el selector MODE en la
posición PLAY.
2 Muestre la imagen que desee
hacer rotar.
3 Pulse v del botón de control.
La barra de menús aparece en la
pantalla LCD.
4 Seleccione “FILE” con el botón de
control, y púlselo.
El menú FILE aparece en pantalla.
5 Seleccione “ROTATE (90°)” con el
botón de control, y púlselo.
ROTAT E
SELECT OK
❐ : La imagen gira 90 grados en
el sentido de las agujas del
reloj
❐ : La imagen gira 90 grados en
el sentido contrario a las
agujas del reloj
RETURN
6 Gire la imagen, seleccione
“RETURN” con el botón de
control y, a continuación, púlselo.
Para recuperar la imagen
original
Seleccione o en el paso 6 hasta
recuperar la imagen original.
Seleccione “RETURN” con el botón de
control, y púlselo.
!Notas
• Es posible que no pueda hacer girar
imágenes grabadas con otro equipo.
• Si la lengüeta de protección contra
escritura del Memory Stick está
ajustada en la posición LOCK, o si las
imágenes están protegidas, no podrá
hacer girar éstas.
• Es posible que la información sobre la
rotación de imágenes no pueda enviarse
a un ordenador personal.
Distintas formas de reproducción
FORMAT
ROTATE (90°)
SLIDE SHOW
PRINT MARK
PROTECT
INDEX FILEDELETE SETUP
SELECT OK
33-ES
Page 88

Reproducción de
imágenes en bucle
continuo (SLIDE SHOW)
Es posible reproducir
automáticamente de forma sucesiva
todas las imágenes grabadas.
¿Cuándo
debe
emplearse?
Para presentaciones, etc.
Selector
MODE
Botón de control
5 Ajuste “INTERVAL” con el botón
de control.
Ajústelo con b/B del botón de
control.
Es posible seleccionar 1 MIN (un
minuto), 30 SEC (30 segundos), 10
SEC (10 segundos), 5 SEC (5
segundos) o 3 SEC (3 segundos).
6 Ajuste “REPEAT” con el botón de
control.
❐ ON: Reproduce imágenes en
bucle continuo hasta que se
seleccione “RETURN”.
❐ OFF: Una vez reproducidas
todas las imágenes, el modo
SLIDE SHOW finaliza.
7 Seleccione “START” con el botón
de control.
El modo SLIDE SHOW se pondrá
en funcionamiento.
1 Ajuste el selector MODE en la
posición PLAY.
2 Pulse v del botón de control.
La barra de menús aparece en la
pantalla LCD.
3 Seleccione “FILE” con el botón de
control, y púlselo.
El menú FILE aparece en pantalla.
FORMAT
ROTATE (90°)
SLIDE SHOW
PRINT MARK
PROTECT
INDEX FILEDELETE SETUP
SELECT OK
4 Seleccione “SLIDE SHOW” con el
botón de control, y púlselo.
10/48
SLIDE SHOW
INTERVAL
30 SEC
REPEAT
SELECT OK
34-ES
CANCELSTART
Para cancelar el ajuste
Seleccione “CANCEL” con el botón de
control, y púlselo.
!Nota
Es posible que el tiempo de intervalo no
permanezca en el ajuste. Esto estará
determinado por el ajuste de calidad y
tamaño de imagen.
Para emplear el modo SLIDE
SHOW
• Pausa de reproducción
Seleccione “X” con el botón de
control, y púlselo.
• Desactivación de la pausa de
reproducción
Seleccione “B” con el botón de
control, y púlselo.
• Búsqueda
Seleccione “‘'b/B’” con el botón de
control y, a continuación, pulse b/B
de dicho botón. También es posible
realizar la operación con el botón de
control solamente.
OFFON
• Cancelación
Seleccione “RETURN” con el botón
de control, y púlselo.
Page 89

Prevención contra
borrados accidentales
(PROTECT)
Para evitar borrados accidentales,
puede proteger todas las imágenes o
bien las que seleccione.
Selector
MODE
5 Seleccione “ON” con el botón de
control, y púlselo.
La imagen mostrada queda
protegida.
6 Pulse varias veces V del botón de
control.
La barra de menús desaparece de
la pantalla.
“-” aparece en la imagen
protegida.
Para cancelar la protección
Seleccione “OFF” con el botón de
control en el paso 5, y púlselo.
Distintas formas de reproducción
Botón de control
Modo de protección de una
sola imagen
1 Ajuste el selector MODE en la
posición PLAY y, a continuación,
muestre la imagen que desee
proteger.
2 Pulse v del botón de control.
La barra de menús aparece en la
pantalla LCD.
3 Seleccione “FILE” con el botón de
control, y púlselo.
El menú FILE aparece en pantalla.
FORMAT
ROTATE (90°)
SLIDE SHOW
PRINT MARK
PROTECT
INDEX FILEDELETE SETUP
SELECT OK
4 Seleccione “PROTECT” con el
botón de control, y púlselo.
FORMAT
ROTATE (90°)
SLIDE SHOW
PRINT MARK
PROTECT
INDEX FILEDELETE SETUP
SELECT OK
ON
OFF
Modo INDEX
1 Muestre la pantalla INDEX.
2 Seleccione “PROTECT” del menú
FILE con el botón de control, y
púlselo.
El menú FILE aparece en pantalla
LCD.
3 Seleccione “ALL” para proteger (o
eliminar la protección de) todas las
imágenes, o “SELECT” para
proteger (o eliminar la protección
de) las imágenes seleccionadas.
Para ello, emplee el botón de
control y, a continuación, púlselo.
Si selecciona “ALL”
PROTECT: ALL
ON
FORMAT
OFF
PRINT MARK
CANCEL
PROTECT
SELECT
Para proteger todas las imágenes
Seleccione “ON” con el botón de
control, y púlselo.
Para cancelar la protección de
todas las imágenes
Seleccione “OFF” con el botón de
control, y púlselo.
Continúa en la página siguiente c
FILEDELETE SETUPRETURN
SINGLE DISPLAY
35-ES
Page 90

Si selecciona “SELECT”
0001-0006/0100
SELECT OK
Para proteger imágenes
1 Seleccione la imagen que desee
proteger. Para ello, emplee el
botón de control y, a
continuación, púlselo.
El indicador de protección (-)
aparece en la imagen
seleccionada.
2 Una vez seleccionadas todas las
imágenes que desee proteger,
seleccione “ENTER” con el
botón de control, y púlselo.
El indicador de protección (-)
cambia de verde a blanco.
Para desactivar la protección
En el paso 1, seleccione las
imágenes cuya protección desee
desactivar; a continuación
seleccione “ENTER” con el botón
de control y después púlselo.
ENTERPROTECT CANCEL
Eliminación de
imágenes (DELETE)
Es posible eliminar todas las imágenes,
o bien las seleccionadas, que no desee
conservar.
Selector
MODE
Botón de control
Modo de una sola imagen
1 Ajuste el selector MODE en la
posición PLAY y, a continuación,
muestre la imagen que desee
eliminar.
2 Pulse v del botón de control.
La barra de menús aparece en la
pantalla LCD.
3 Seleccione “DELETE” con el botón
de control, y púlselo.
36-ES
DELETE
OK
SELECT OK
CANCEL
4 Seleccione “OK” con el botón de
control, y púlselo.
La imagen queda eliminada.
!Nota
No es posible recuperar las imágenes
eliminadas. Antes de eliminar la imagen,
asegúrese de que es la que desea borrar.
Page 91

Modo INDEX
1 Muestre la pantalla INDEX.
2 Seleccione “DELETE” con el botón
de control, y púlselo.
3 Seleccione “ALL” para eliminar
todas las imágenes, o “SELECT”
para borrar las imágenes
seleccionadas. Para ello, emplee el
botón de control y, a continuación,
púlselo.
Si selecciona “ALL”
DELETE ALL ?
OK
ALL
SELECT
CANCEL
SELECT
Seleccione “OK” con el botón de
control, y púlselo.
Si selecciona “SELECT”
FILEDELETE SETUPRETURN
OK
Para cancelar la eliminación
Seleccione “CANCEL” con el
botón de control, y púlselo.
!Notas
• Aunque seleccione “ALL”, no podrá
eliminar imágenes protegidas.
• Si selecciona “SELECT”, no podrá
seleccionar imágenes protegidas.
Distintas formas de reproducción
0001-0006/0100
SELECT OK
ENTERDELETE CANCEL
1 Elija la imagen que desee
eliminar con el botón de control,
y púlselo.
El indicador de eliminación
(verde) ( ) aparece en la
imagen seleccionada.
2 Una vez elegidas todas las
imágenes que desee eliminar,
seleccione “ENTER” con el
botón de control, y púlselo.
Las imágenes seleccionadas
quedan eliminadas.
37-ES
Page 92

Formateo
(inicialización) de un
Memory Stick
Selector
MODE
Botón de control
1 Pulse v del botón de control.
La barra de menús aparece en la
pantalla LCD.
2 Seleccione “FILE” con el botón de
control, y púlselo.
Aparece el menú FILE.
FORMAT
FILE NUMBER
IMAGE SIZE
QUALITY
REC MODE
SELF
TIMER
SELECT OK
SETUPCAMERAEFFECT
FILE
3 Seleccione “FORMAT” con el
botón de control, y púlselo.
PNota
Al inicializar el Memory Stick, se
borrarán todas las imágenes almacenadas
en él aunque estén protegidas. Antes de
realizar la inicialización, asegúrese de
copiar en un ordenador, etc., las imágenes
que desee almacenar.
SELF
TIMER
SELECT
FORMAT
FILE NUMBER
IMAGE SIZE
QUALITY
REC MODE
OK
CANCEL
FILE
OK
4 Seleccione “OK” con el botón de
control, y púlselo.
Para cancelar el formateo
En el paso 4, seleccione “CANCEL”
con el botón de control y púlselo.
38-ES
SETUPCAMERAEFFECT
Page 93

BCambio del ajuste de
menú
Cambio del ajuste de
menú
1 Pulse v del botón de control.
La barra de menús aparece en la
pantalla LCD.
MOVIE/STILL
SELF
TIMER
PLAY (modo de una sola
imagen)
INDEX FILEDELETE SETUP
SELECT OK
FILE
SETUPCAMERAEFFECT
MENU BAR OFFSELECT OK
MENU BAR OFF
2 Seleccione la opción deseada con
el botón de control, y púlselo.
El color de la opción cambia de
azul a amarillo.
/LANGUAGE
CLOCK SET
BEEP
INDEX FILEDELETE SETUP
OK
SELECT
3 Seleccione el ajuste deseado con el
botón de control, y púlselo.
La pantalla mostrará el menú del
paso 2.
Para que el menú
desaparezca
Pulse V del botón de control varias
veces hasta que la barra de menús
desaparezca.
Cambio del ajuste de menú
PLAY (modo INDEX)
1999 7 4 10:30PMDSC00100
SELECT
FILEDELETE SETUPRETURN
SINGLE DISPLAY
39-ES
Page 94

Ajuste del modo de cada opción
Las opciones de menú que pueden modificarse difieren en función del ajuste del
selector MODE. La pantalla LCD muestra solamente las opciones que pueden
utilizarse en el momento.
Los ajustes iniciales se indican en negrita.
Opciones del modo STILL/MOVIE
SELF TIMER
Seleccione esta opción para grabar con el temporizador (página 22).
EFFECT
<NEG. ART/SEPIA/B&W/SOLARIZE>
• Seleccione NEG. ART para grabar el color de la imagen invertido.
• Seleccione SEPIA para grabar la imagen en sepia.
• Seleccione B&W para grabar imágenes en blanco y negro.
• Seleccione SOLARIZE para grabar imágenes con aspecto de ilustración.
FILE
FORMAT
<OK/CANCEL>
• Seleccione OK para formatear un Memory Stick.
• Seleccione CANCEL para cancelar el formateo del Memory Stick.
FILE NUMBER <SERIES/NORMAL>
• Seleccione SERIES para asignar números a los archivos de forma secuencial
aunque cambie el Memory Stick.
• Seleccione NORMAL para restaurar la numeración de los archivos cada vez que
cambie el Memory Stick.
IMAGE SIZE (durante el modo STILL) <1600 × 1200/1024 × 768/640 × 480>
• Seleccione 1600 × 1200 para grabar una imagen JPEG de 1600 × 1200.
• Seleccione 1024 × 768 para grabar una imagen JPEG de 1024 × 768.
• Seleccione 640 × 480 para grabar una imagen JPEG de 640 × 480.
(durante el modo MOVIE) <320 × 240/160 × 112>
• Seleccione 320 × 240 para grabar una imagen MPEG de 320 × 240.
• Seleccione 160 × 112 para grabar una imagen MPEG de 160 × 112.
QUALITY (en modo STILL solamente) <FINE/STANDARD>
• Seleccione FINE cuando dé prioridad a la calidad de imagen.
• Seleccione STANDARD como calidad de imagen estándar.
REC MODE (en modo STILL solamente) <VOICE/E-MAIL/NORMAL>
• Seleccione VOICE para grabar una imagen fija junto con el sonido en un archivo
JPEG.
• Seleccione E-MAIL para grabar un archivo JPEG de 320 × 240 en otro JPEG de
1600 × 1200, 1024 × 768 o 640 × 480.
• Normalmente, seleccione NORMAL. Se grabará un archivo JPEG con el tamaño
de imagen seleccionado.
40-ES
Page 95

REC TIME SET (en modo MOVIE solamente) <15 SEC/10 SEC/5 SEC>
Ajuste el tiempo de grabación de la imagen en movimiento.
CAMERA
WHITE BALANCE <IN DOOR/OUT DOOR/HOLD/AUTO>
• Seleccione IN DOOR para grabar imágenes en interiores.
• Elija OUT DOOR para grabar imágenes en exteriores.
• Seleccione HOLD para grabar sujetos o fondos de un solo color.
• Elija AUTO para ajustar automáticamente el balance de blancos.
FLASH LEVEL (en modo STILL solamente) <HIGH/NORMAL/LOW>
• Seleccione HIGH para que el nivel del flash sea superior al normal.
• Normalmente, elija NORMAL.
• Seleccione LOW para que el nivel del flash sea inferior al normal.
EXPOSURE <+1,5EV a –1,5EV>
Seleccione esta opción para ajustar la exposición.
SETUP
DEMO <STBY/ON o OFF>
La demostración (DEMO) aparecerá en el menú sólo cuando emplee el adaptador/
cargador de alimentación de CA durante el modo MOVIE o STILL.
Para detener la demostración, apague la cámara.
• Seleccione ON para que aparezca la demostración. Ésta se iniciará unos 10
minutos después de activar la alimentación si no se ha empleado la cámara.
• Seleccione OFF para desactivar el modo de demostración.
/LANGUAGE <ENGLISH o /JPN>
• Seleccione ENGLISH para que todas las opciones aparezcan en inglés.
• Seleccione /JPN para que todas las opciones aparezcan en japonés.
CLOCK SET
Seleccione esta opción para ajustar la fecha y la hora.
Cambio del ajuste de menú
BEEP <SHUTTER/ON/OFF>
• Seleccione SHUTTER para desactivar solamente los pitidos.
• Normalmente, ajústelo en ON.
• Seleccione OFF para desactivar el sonido del obturador/pitidos.
Opciones del modo PLAY (una sola imagen)
INDEX
Seleccione esta opción para visualizar simultáneamente seis imágenes grabadas.
41-ES
Page 96

DELETE
<OK/CANCEL>
• Seleccione OK para eliminar la imagen mostrada.
• Seleccione CANCEL para cancelar la eliminación de la imagen.
FILE
FORMAT
<OK/CANCEL>
• Seleccione OK para formatear Memory Sticks.
• Seleccione CANCEL para cancelar el formateo de Memory Sticks.
ROTATE (90°)
Seleccione esta opción para hacer rotar la imagen.
SLIDE SHOW
Seleccione esta opción para reproducir imágenes en bucle continuo.
PRINT MARK <ON/OFF>
• Seleccione ON para añadir una marca de impresión en la imagen.
• Seleccione OFF para eliminar la marca.
PROTECT <ON/OFF>
• Seleccione ON para proteger la imagen mostrada.
• Seleccione OFF para desactivar la protección de la imagen.
Opciones del modo PLAY (INDEX)
DELETE
<ALL/SELECT>
• Seleccione ALL para eliminar todas las imágenes.
• Seleccione SELECT para eliminar imágenes seleccionadas.
FILE
FORMAT
<OK/CANCEL>
• Seleccione OK para formatear Memory Sticks.
• Seleccione CANCEL para cancelar el formateo de Memory Sticks.
PRINT MARK <ALL/SELECT/CANCEL>
• Seleccione ALL para eliminar las marcas de impresión de todas las imágenes.
• Elija SELECT para añadir o eliminar la marca de impresión en las imágenes
seleccionadas.
• Elija CANCEL para cancelar el ajuste.
PROTECT <ALL/SELECT/CANCEL>
• Elija ALL para proteger todas las imágenes.
• Seleccione SELECT para proteger o eliminar la protección de las imágenes
seleccionadas.
• Elija CANCEL para cancelar el ajuste.
42-ES
Page 97

z
Uso de datos de imagen con otro equipo
Uso de corriente doméstica
Cable de alimentación
(cable de corriente)
(suministrado)
Adaptador/cargador
de alimentación de
CA AC-VF10
(suministrado)
Cable de conexión de CC
DK-115 (suministrado)
Cubierta de la ranura
para el adaptador/
cargador de
alimentación de CA
1 Abra la cubierta de la batería.
2 Inserte un extremo del cable de
conexión de CC DK-115 en el
terminal de batería, y cierre la
cubierta.
Al insertar el cable, abra la
cubierta de la ranura para el
adaptador/cargador de CA y
tenga cuidado de no atrapar el
cable.
3 Conecte el otro extremo del cable
de conexión de CC al adaptador/
cargador de CA.
4 Conecte el cable de alimentación
(cable de corriente) al adaptador/
cargador de CA y a una toma
mural (toma de corriente).
Visualización de imágenes
en la pantalla de un TV
Conecte la cámara a un TV que
disponga de toma de entrada de vídeo.
Podrá visualizar el modo “SLIDE
SHOW” en la pantalla del TV. Al
filmar imágenes en modo macro,
podrá ajustar el enfoque con mayor
facilidad en la pantalla del TV.
Ajuste el selector de
entrada de TV/vídeo
en la posición de
vídeo
Cable de conexión de
A/V (suministrado)
a A/V OUT
Uso de datos de imagen con otro equipo
1 Conecte la toma A/V OUT de la
cámara a la toma de entrada de
vídeo del TV.
2 Inicie la reproducción en la
cámara.
La imagen de reproducción
aparece en la pantalla del TV.
!Notas
• Antes de realizar las conexiones,
apague todos los equipos. Una vez
realizadas, encienda los equipos.
•
Cuando emplee la cámara con otro
equipo conectado durante mucho tiempo,
utilice el adaptador/cargador de CA.
•
No es posible utilizar un TV que disponga
solamente de un conector de antena.
• Si el selector MODE está ajustado en
MOVIE o STILL y el objetivo se gira
hacia el mismo lado que la pantalla
LCD (grabación cara a cara), la imagen
reflejada aparecerá invertida en la
pantalla del TV.
• Si conecta el cable de conexión de A/V,
no se oirán los pitidos. La imagen no
aparece en la pantalla LCD.
43-ES
Page 98

Impresión de las
imágenes grabadas
Mediante el empleo de una impresora,
podrá imprimir imágenes grabadas en
esta cámara.
Es posible enviar los datos de imagen a
una impresora que disponga de toma
de entrada de vídeo. Para obtener
información detallada sobre la
impresión, consulte el manual de
instrucciones de la impresora.
TV
Visualización de
imágenes
Inserción de una
marca de impresión
en una imagen
Es posible añadir una marca de
impresión en las imágenes grabadas
con esta cámara. Dicha marca resulta
útil para comprobar las imágenes que
desee imprimir.
Esta cámara cumple con la norma
DPOF (Formato de orden de impresión
digital) para especificar imágenes fijas
a fin de imprimirlas.
Impresora de
vídeo en color
Impresión de
imágenes
a entrada
de vídeo
Cable de conexión de
A/V (suministrado)
a A/V OUT
1 Conecte la toma A/V OUT de la
cámara a la toma de entrada de
vídeo de la impresora.
2 Inicie la reproducción en la
cámara.
La imagen de reproducción
aparece en la pantalla del TV.
3 La impresora recibe los datos de
imagen de la cámara e inicia la
impresión.
Para obtener información
detallada sobre los
procedimientos, consulte el
manual de instrucciones de la
44-ES
impresora.
Selector
MODE
Botón de control
Modo de una sola imagen
1 Ajuste el selector MODE en la
posición PLAY y muestre la
imagen que desee marcar.
2 Pulse v del botón de control.
La barra de menús aparece en la
pantalla LCD.
3 Seleccione “FILE” con el botón de
control, y púlselo.
El menú FILE aparece en pantalla.
FORMAT
ROTATE (90°)
SLIDE SHOW
PRINT MARK
PROTECT
INDEX FILEDELETE SETUP
SELECT OK
Page 99

4 Seleccione “PRINT MARK” con el
botón de control, y púlselo.
FORMAT
ROTATE (90°)
SLIDE SHOW
PRINT MARK
PROTECT
INDEX FILEDELETE SETUP
SELECT
ON
OFF
OK
Para eliminar todas las
marcas de impresión
Seleccione “OFF” con el botón de
control, y púlselo.
Si selecciona “SELECT”
5 Seleccione “ON” con el botón de
control, y púlselo.
La marca de impresión se añade
en la imagen.
6 Pulse varias veces V del botón de
control.
La barra de menús desaparece de
la pantalla.
“ ” se marca en la imagen.
Para eliminar la marca de
impresión
En el paso 5, seleccione “OFF” con el
botón de control y púlselo.
Modo INDEX
1 Muestre la pantalla INDEX.
2 Seleccione “PRINT MARK” de
“FILE” con el botón de control, y
púlselo.
3 Seleccione “ALL” para eliminar la
marca de todas las imágenes, o
“SELECT” para marcar (o eliminar
la marca de) las imágenes
seleccionadas. Para ello, emplee el
botón de control y, a continuación,
púlselo.
0001-0006/0100
SELECT OK
ENTERPRINT MARK CANCEL
Para añadir la marca de
impresión
1 Seleccione la imagen en la que
desee añadir una marca. Para
ello, utilice el botón de control
y, a continuación, púlselo.
“ ” aparece en la imagen
seleccionada.
2 Una vez seleccionadas todas las
imágenes que desee marcar,
seleccione “ENTER” con el
botón de control, y púlselo.
“ ” cambia de verde a blanco.
Para eliminar la marca de
impresión seleccionada
En el paso 1, seleccione las imágenes
cuya marca desee eliminar, seleccione
“ENTER” con el botón de control y, a
continuación, púlselo.
Uso de datos de imagen con otro equipo
Si selecciona “ALL”
PRINT MARK: ALL
OFF
FORMAT
CANCEL
PRINT MARK
PROTECT
SELECT
FILEDELETE SETUPRETURN
OK
45-ES
Page 100

zInformación
complementaria
Precauciones
Memory Stick
• No extraiga la batería ni el adaptador/
cargador de CA durante la grabación o
la reproducción. Desactive siempre la
alimentación antes de extraer la batería
o de desconectar el adaptador/cargador
de CA.
• No toque el terminal del Memory Stick
con la mano ni con un objeto metálico.
• No adhiera otro material que no sea la
etiqueta suministrada en el espacio
destinado a la misma del Memory Stick.
• No golpee, doble ni deje caer el
Memory Stick.
• No desmonte ni convierta el Memory
Stick.
• No moje el Memory Stick.
• No emplee ni guarde el Memory Stick
en los siguientes sitios:
– Lugares cálidos, como el interior de un
automóvil, o en exteriores con clima
caluroso.
– Lugares húmedos o corrosivos.
• Transporte y guarde el Memory Stick
en el estuche suministrado.
• Si ajusta el interruptor de protección
contra escritura en la posición “LOCK”,
no podrá grabar, eliminar ni formatear
datos.
• Se recomienda realizar copias de
seguridad de datos importantes.
• No extraiga el Memory Stick mientras
se leen o se escriben datos.
• Los datos grabados pueden perderse o
dañarse en las siguientes situaciones:
– Si extrae el Memory Stick o si apaga la
cámara mientras se leen o se escriben
datos.
– Si emplea el Memory Stick en lugares
sujetos a electricidad estática o ruido.
• No se garantiza que esta cámara pueda
reproducir correctamente imágenes
filmadas con otro equipo. Igualmente,
tampoco se garantiza que las imágenes
filmadas con esta cámara puedan
reproducirse adecuadamente con otro
equipo.
Condensación de humedad
Si traslada la cámara directamente de
un lugar frío a otro cálido, o si la
coloca en una sala muy húmeda,
puede condensarse humedad en el
interior o exterior de dicha cámara.
Si esto ocurre, ésta no funcionará
correctamente. En este caso, extraiga la
batería, abra la cubierta de batería y
espere una hora aproximadamente
hasta que se evapore la humedad.
Cómo evitar la condensación de
humedad
Cuando traslade la cámara de un lugar
frío a otro cálido, introdúzcala en una
bolsa de plástico y deje que se adapte a
las condiciones de la sala durante
algún tiempo.
1 Asegúrese de cerrar
herméticamente la bolsa que
contiene la cámara.
2 Sáquela de la bolsa cuando la
temperatura del aire del interior de
ésta alcance la temperatura
ambiental (aproximadamente una
hora).
Limpieza
Limpieza de la pantalla LCD
Limpie la superficie de la pantalla con
un paño de limpieza (no suministrado)
o con un kit de limpieza de pantallas
LCD (no suministrado) para eliminar
huellas dactilares, polvo, etc.
Limpieza de la superficie de la
cámara
Limpie la superficie de la cámara con
un paño suave ligeramente
humedecido con agua.
No utilice ningún tipo de disolventes,
como alcohol o bencina, ya que
pueden deteriorar el acabado de la
cámara.
Si desea realizar consultas o solucionar
problemas relativos a la cámara,
póngase en contacto con el proveedor
Sony más próximo.
46-ES
 Loading...