

Page 1

Compact Disc
Stereo System
OPERATING INSTRUCTIONS
En (English)
XR-EM70
U
Owner’s record
For your convenience, record the model number and serial
number (you will find them on the rear of your set) in the space
provided below. Please refer to them when you contact your
Aiwa dealer in case of difficulty.
Model No. Serial No. (Lot No.)
For assistance and information
(United States and Puerto Rico)
8B-CLX-903-01
011120AYK-H-M
MANUAL DE INSTRUCCIONES
MODE D'EMPLOI
E (Español)
F (Français)
Page 2
En
WARNING
To reduce the risk of fire or electric shock, do not expose
this appliance to rain or moisture.
CAUTION
RISK OF ELECTRIC SHOCK
DO NOT OPEN
“CAUTION:TO REDUCE THE RISK OF
ELECTRIC SHOCK,
DO NOT REMOVE COVER (OR BACK).
NO USER-SERVICEABLE PARTS INSIDE.
REFER SERVICING TO QUALIFIED
SERVICE PERSONNEL.”
Explanation of Graphical Symbols:
The lightning flash with arrowhead
symbol, within an equilateral triangle,
is intended to alert the user to the
presence of uninsulated “dangerous
voltage” within the product’s enclosure
that may be of sufficient magnitude to
constitute a risk of electric shock to
persons.
The exclamation point within an
equilateral triangle is intended to alert
the user to the presence of important
operating and maintenance (servicing)
instructions in the literature
accompanying the appliance.
2
IMPORTANT SAFETY INSTRUCTIONS
Read the Operating Instructions carefully and completely before
operating the unit. Be sure to keep the Operating Instructions for
future reference. All warnings and cautions in the Operating
Instructions and on the unit should be strictly followed, as well as
the safety suggestions below.
Warning
To prevent electric shock or injury, these safety instructions should
be followed in the installation, use and servicing the unit.
Installation
Attachments - Do not use attachments not recommended by the
unit manufacturer as they may result in the risk of fire, electric shock
or injury to persons.
Water and Moisture - Do not use this unit near water - for
example, near a bathtub, washbowl, kitchen sink, or laundry tub, in
a wet basement, or near a swimming pool, and the like.
Heat - Do not use this unit near sources of heat, including heating
vents, stoves, or other appliances that generate heat. It also should
not be placed in temperatures less than 5˚C (41˚F) or greater than
35˚C (95˚F ).
Mounting surface - Place the unit on a flat, even surface.
Accessories - Do not place this unit on an unstable cart, stand,
tripod, bracket, or table. The unit may fall, causing serious injury
to a child or an adult, and serious damage to the appliance. Use
only with a cart, stand, tripod, bracket, or table recommended by
the manufacturer, or sold with the unit. Any mounting of the
appliance should follow the manufacturer’s instructions, and should
use a mounting accessory recommended by the manufacturer.
Portable cart - An appliance and cart
combination should be moved with care. Quick
stops, excessive force, and uneven surfaces may
cause the appliance and cart combination to
overturn.
Ventilation - The unit should be situated with adequate space
around it so that proper heat ventilation is assured. Allow 10 cm
clearance from the rear and the top of the unit, and 5 cm from the
each side.
Slots and openings in the cabinet and the back or bottom are
provided for ventilation, and to ensure reliable operation of the unit
and to protect it from overheating, these openings must not be
blocked or covered. The openings should never be blocked by
placing the unit on a bed, sofa, rug or other similar surface. This
unit should not be placed in a built-in installation such as a bookcase
unless proper ventilation is provided.
Object and Liquid Entry - Never push objects of any kind into
this unit through the cabinet slots as they may touch dangerous
voltage points or short-circuit parts that could result in a fire or
electric shock. Never spill liquid of any kind on the unit.
Electric Power
Power Sources - This unit should be operated only from the type
of power source indicated on the marking label. If you are not sure
of the type of power supply to your home, consult your appliance
dealer or local power company. To operate unit on battery power, or
other sources, refer to the operating instructions.
Grounding or Polarization - This unit is provided with a polarized
alternating-current line plug (a plug having one blade wider than
the other). This plug will fit into the power outlet only one way.
This is a safety feature. If you are unable to insert the plug fully into
the outlet, try reversing the plug. If the plug should still fail to fit,
contact your electrician to replace your obsolete outlet. Do not defeat
the safety purpose of the polarized plug.
Power-Cord Protection - Power-supply cords should be routed
so that they are not likely to be walked on or pinched by items
placed upon or against them, paying particular attention to cords at
plugs, convenience receptacles, and the point where they exit from
the product.
Overloading - Do not overload wall outlets, extension cords,
integral convenience receptacles as this can result in a risk of fire
or electric shock.
Page 3

Outdoor Antenna
Power lines - An outside antenna system should not be located
in the vicinity of overhead power lines or other electric light or power
circuits, or where it can fall into such power lines or circuits. When
installing an outside antenna system, extreme care should be taken
to keep from touching such power lines or circuits as contact with
them might be fatal.
Outdoor Antenna Grounding - If an outside antenna or cable
system is connected to the unit, be sure the antenna or cable system
is grounded so as to provide some protection against voltage surges
and built-up static charges. Section 810 of the National Electrical
Code, ANSI/NFPA No.70, provides information with regard to proper
grounding of the mast and supporting structure, grounding of the
lead-in wire to an antenna discharge unit, size of grounding
conductors, location of antenna-discharge unit, connection to
grounding electrodes, and requirements for the grounding electrode.
See the figure.
Lightning
For added protection for this unit receiver during a lightning storm,
or when it is left unattended and unused for long periods of time,
unplug it from the wall outlet and disconnect the antenna or cable
system. This will prevent damage to the unit due to lightning and
powerline surges.
Maintenance
Cleaning - Unplug this unit from the wall outlet before cleaning.
Do not use liquid cleaners or aerosol cleaners. Use a damp cloth
for cleaning.
Damage Requiring Service
Unplug this unit from the wall outlet and refer servicing to qualified
service personnel under the following conditions:
1) When the power cord or plug is damaged.
2) If liquid has been spilled, or objects have fallen into the unit.
3) If the unit has been exposed to rain or water.
4) If the unit does not operate normally by following the operating
instructions. Adjust only those controls that are covered by the
operating instructions as improper adjustment of other controls
may result in damage and will often require extensive work by a
qualified technician to restore the unit to normal operation.
5) If the unit has been dropped or the cabinet has been damaged.
6) When the unit exhibits a distinct change in performance - this
indicates a need for service.
Do not attempt to service this unit yourself as opening or removing
covers may expose you to dangerous voltage or other hazards. Refer
all servicing to qualified service personnel.
Replacement Parts - When replacement parts are required, be
sure the service technician has used replacement parts specified
by the manufacturer or having the same characteristics as the original
part. Unauthorized substitutions may result in fire, electric shock
or other hazards.
Safety Check - Upon the completion of any service or repairs to
this unit, ask the service technician to perform safety checks to
determine that the unit is in proper operating condition.
TABLE OF CONTENTS
PRECAUTIONS .................................... 2
PREPARATIONS ................................... 4
PARTS AND CONTROLS ......................... 5
ADJUSTMENTS BEFORE OPERATION.......... 7
CD OPERATIONS.................................. 9
RADIO OPERATIONS ........................... 11
SOUND ADJUSTMENTS........................ 12
TAPE PLAYBACK ................................ 13
TAPE RECORDING .............................. 14
TIMER OPERATIONS ........................... 16
REFERENCE ..................................... 18
System and accessories
Main unit CX-LEM70 Remote control
Speakers SX-LEM70 FM antenna
Speaker cords AM antenna
En
3
Page 4

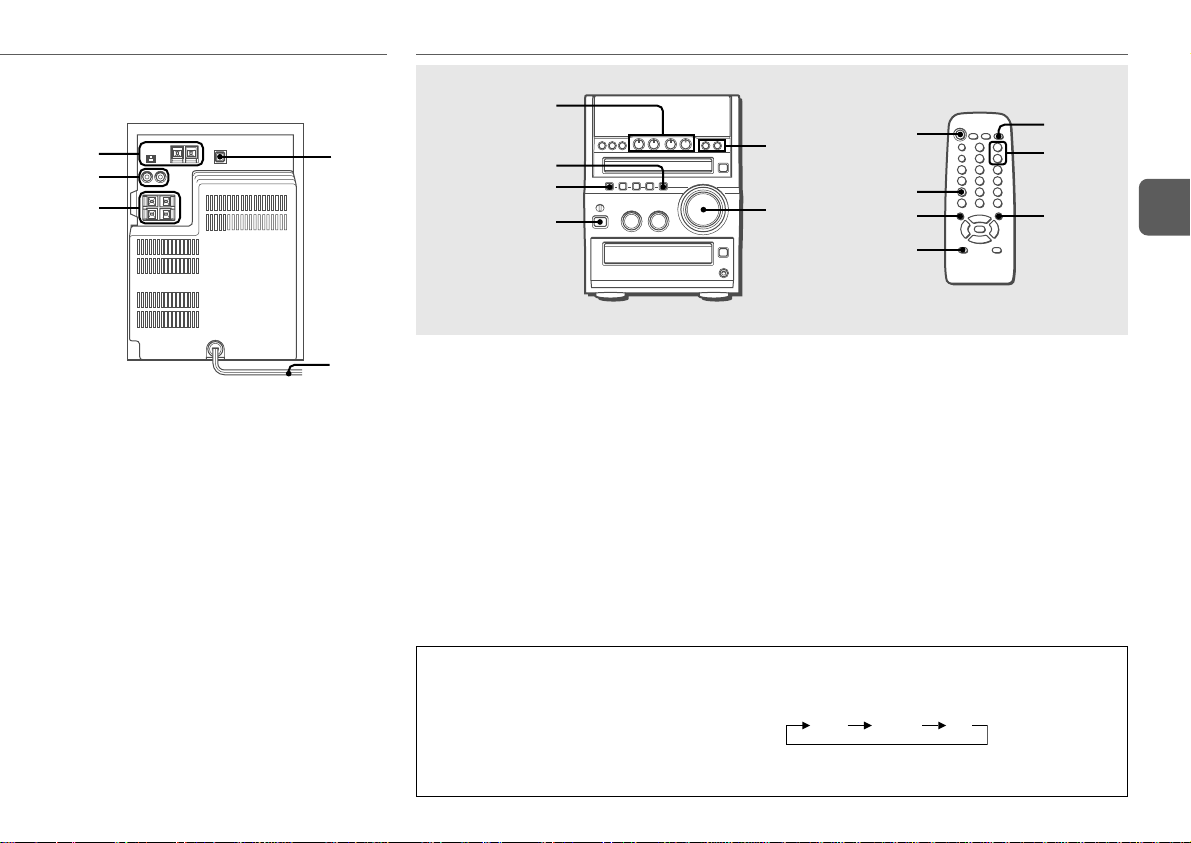
R6(AA)
PREPARATIONS
Connection
Plug in the AC power cord to the AC outlet after all other
connections are made.
1
Connect the speaker cords to the speakers.
Connect the copper cords to the + terminals and the silver
En
cords to the – terminals.
2
Connect the speakers to the main unit.
Connect the right speaker to the SPEAKERS R terminals
and the left to the SPEAKERS L terminals. The copper
cords go to the 0 terminals.
3
Connect the supplied antennas.
Connect the FM antenna to the FM 75 Ω terminals and
the AM antenna to the AM LOOP jack.
FM antenna
AM antenna
4
Connect the AC power cord to an AC outlet.
The clock will flash on the display.
For setting the clock, see page 8.
Speakers
•Do not short-circuit the 0 and 9 speaker cord leads.
•Do not leave objects generating magnetism or objects
affected by magnetism near the speakers.
Antennas
Keep antennas away from metallic objects, electrical
equipment and cords.
•FM antenna: Extend fully in a T-shape. If reception is poor,
connect an optional outdoor antenna to the FM 75 Ω
terminals. Be sure to connect the shield braid of the antenna
to the 2 terminal.
•AM antenna: Rotate to find best reception.
Remote control
Detach the battery compartment lid at the rear of the remote
control and insert two R6 (size AA) batteries with correct
polarity.
•Replace the batteries with new ones when the operational
distance between the remote control and main unit becomes
shorter.
•Remove the batteries if the unit is not going to be used for
an extended period of time.
•The remote control may not operate if it is used under intense
sunlight or if its line of sight is obstructed.
4
Page 5

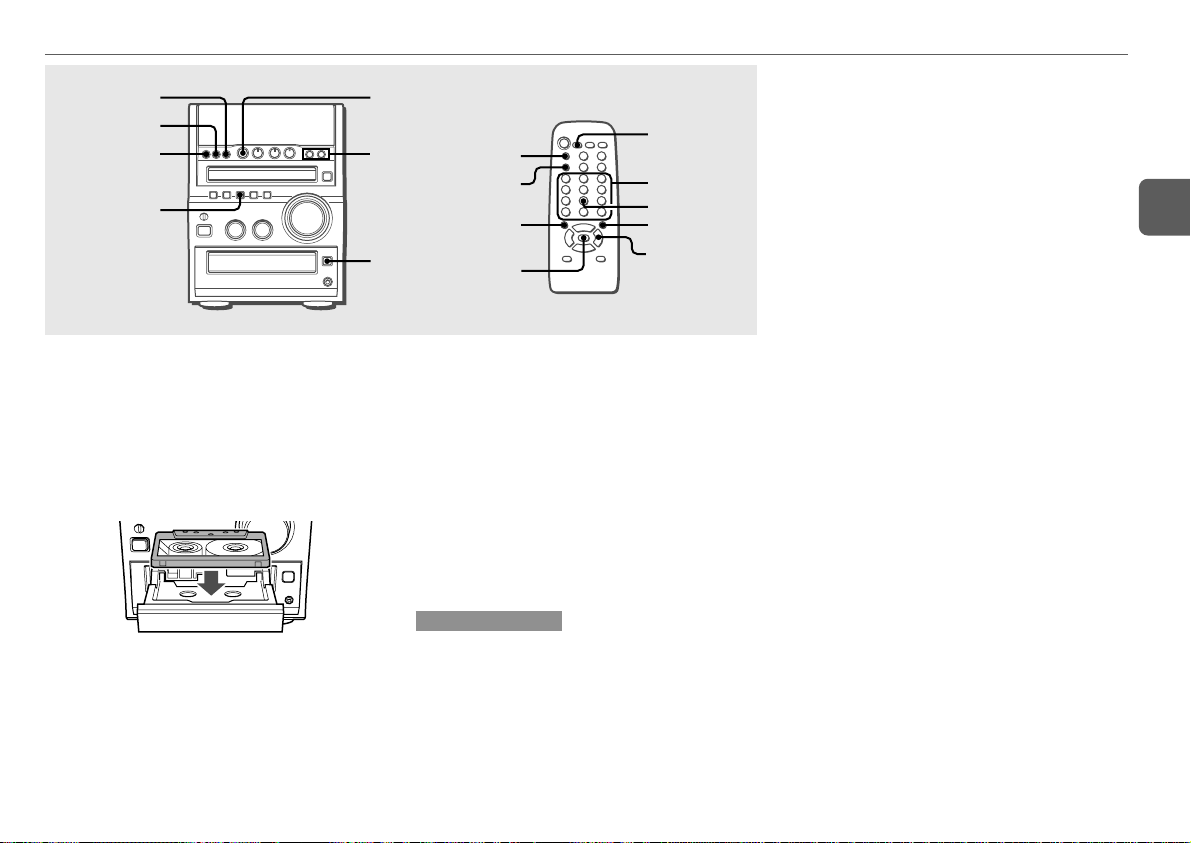
PARTS AND CONTROLS
Main unit: front
1
2
3
4
5
6
1 dTAPE/REC MUTE
Starts playback and changes the playback side.
Also used to enter 4-second blank spaces during
recording.
TUNER/BAND
Selects Radio function and the radio band.
AUX
Selects the function of external equipment connected to
AUX IN jacks.
ECD
Starts and pauses play.
2 wREC/REC PAUSE
Starts and pauses recording.
SYNCHRO REC
Starts recording and CD play simultaneously.
sCLEAR
CD and Tape: stops playback.
Radio: clears a preset station.
7
8
9
0
!
3 ECO/DIMMER
Selects ECO mode and dimmer mode.
PRESET
Tune in a preset station.
MODE
CD: selects random and repeat playback mode.
Tape: selects a reverse mode.
DISPLAY
CD: displays the track number being played and
remaining time of play.
SET
Determines the mode.
Stores the received station to preset.
4 POWER 6STANDBY/ON
Switches the unit on and off (standby).
5 BASS
Adjusts the bass level.
6 TREBLE
Adjusts the treble level.
7 f/r, t/g (TUNING DO WN, UP)
CD: skips to a previous or a succeeding track when
pressed, searches a track in fast forward or reverse
playback when held down.
Tape: rewinds or fast forwards the tape.
Radio: manually tunes up or down within the band.
8 zCD OPEN/CLOSE
Opens or closes the disc compartment.
9 VOLUME
Adjusts the volume.
0 zTAPE OPEN/CLOSE
Opens or closes the tape tray.
! PHONES jack
Plug in an optional headphones set with a stereo mini
plug (ø3.5 mm,
1
/8 in.). Speaker output is canceled.
En
5
Page 6

Remote control
1
2
En
3
4
5
6
Buttons with the same or similar names on the main unit
basically have the same function.
1 POWER
2 REC MODE
Selects recording mode.
3 PRESET (N/M)
4 wREC/REC PAUSE
7
8
9
0
!
@
5 0–10, +10
CD: selects a track of the specified number.
Radio: tunes in the station with the specified preset
number.
The numbered buttons take on the following functions when pressed
with SHIFT held down
PROGRAM
Selects programmed CD playback mode.
RANDOM/REPEAT
Selects random or repeat CD playback mode.
TUNER MODE
Switches between stereo or monaural FM reception.
DISPLAY
CD: displays the track number being played and
remaining time of play.
TIMER
Selects timer setting mode.
SLEEP
Selects sleep-timer setting mode.
CLOCK
Selects clock setting mode.
CD EDIT/CHECK
Selects edited CD recording.
6 SHIFT
Hold down when pressing a numbered button to change
its function to that printed above the number.
7 REV MODE
Selects a reverse mode.
:
8 SOUND
Selects BASS and TREBLE setting mode.
9 SET
0 VOLUME (+/–)
! sCLEAR
TUNER/BAND
AUX
dTAPE
ECD
f/r, t/g (DOWN, UP)
@ FUNCTION
Switches the active function among TAPE, TUNER, AUX
and CD.
6
Page 7
Main unit: rear
1
2
3
4
ADJUSTMENTS BEFORE OPERATION
dTAPE,
TUNER/BAND,
AUX, ECD
SET
ECO/DIMMER
POWER
6STANDBY/ON
f,g
VOLUME
POWER
CLOCK
fg
SHIFT
SET
VOLUME
(+/–)
En
5
1 AM LOOP jack and FM 75 Ω terminals
Plug in the supplied AM and FM antennas.
2 AUX IN jacks
Accept analog sound signals from external equipment.
Connect external equipment using an optional connecting
cable with RCA phono plugs (red plug to R jack, white
plug to L jack). Refer also to the operating instructions
for your equipment.
To switch function to external input, press AUX.
3 SPEAKERS3 terminals
Connect the supplied speaker cords of the supplied
speakers.
4 DIGITAL OUT (OPTICAL) jack
CD digital sound signals can be output through this jack.
Use an optical cable to connect digital audio equipment.
Remove the dust cap from the DIGITAL OUT (OPTICAL)
jack. Then connect an optical cable plug to the DIGITAL
OUT (OPTICAL) jack.
5 AC power cord
Power
Turning the unit on
Press POWER 6STANDBY/ON (POWER on the remote
control).
Alternatively, press TAPE, TUNER/BAND, AUX or CD. Playback
will start automatically if a disc or tape is loaded.
Turning the unit off
Press POWER 6STANDBY/ON again.
The unit goes into standby.
To adjust the input level of the equipment
connected to the AUX IN jacks
Press AUX to select the function of external equipment
connected to the AUX IN jacks, then press f or g
repeatedly.
The input level can be adjusted to "NORMAL" or
"–6 dB".
Volume
Turn VOLUME (press VOLUME (+/–) on the remote
control).
Adjust from 0 (minimum) to 49 and MAX (maximum).
Tip:
Volume level setting is retained during power-off standby. If
the unit is turned off with the volume set to 36 or higher, it is
automatically turned down to 35 the next time the unit is turned
on.
To change a source name in the display of the AUX
function
Hold down AUX and press POWER while the power is on.
AUX VIDEO TV
7
Page 8

Power economizing mode
Reduces power consumption with the following operations.
When power economizing mode is set to "ON" or
"AUTO"
•When power shuts off, all indications of the display window
including the clock are turned off.
En
•When power turns on by timer recording (page 17), the
display window brightness is set to "DIMMER 3", all
button lamps go off.
•The display window brightens only when the unit is being
operated. When the unit has not been operated for 8 seconds,
the brightness switches to the level chosen by the "DIM
MODE" setting. (If the brightness is set to
"DIM - OFF", the brightness does not change.)
When power economizing mode is set to "AUTO"
In addition to the above:
•If the tape and CD are stopped and there is no audio input
from any connected external equipment for 10 minutes,
power shuts off. (When listening to the radio, however, power
does not shut off automatically.)
1
Press ECO/DIMMER while the unit is turned on.
"ECO MODE" is displayed.
2
Within 8 seconds, press SET.
The current power economizing mode status is displayed.
If power economizing mode is off : "ECO OFF"
If power economizing mode is auto : "ECO AUTO"
If power economizing mode is on : "ECO ON"
3
Within 8 seconds, press f or g to select
the desired power economizing mode.
4
Within 8 seconds, press SET.
Standby power consumption
When power economizing mode is off : 14 W
When power economizing mode is on or auto : 0.7 W
If the clock display flashes when the power
economizing mode is on
The power economizing mode cannot be activated. Reset the
clock.
Dimmer
The display window brightness can be adjusted to the following
four levels: "
"
DIMMER 2
"
DIM-OFF
When "
and all button lamps go off.
1
Press ECO/DIMMER twice while the unit is turned
on.
"DIM MODE" is displayed.
2
Within 8 seconds, press SET.
The currently selected brightness is displayed.
3
Within 8 seconds, press f or g to select
the desired brightness.
4
Within 8 seconds, press SET.
DIM-OFF
", and "
" is the brightest level.
DIMMER 3
", "
DIMMER 3
DIMMER 1
".
" is selected, the display is darkest,
Setting the clock
1
Hold down SHIFT and press CLOCK on the remote
control.
When the unit is turned off, you can also press SET.
2
Press f or g to set the time.
Each press changes the time in 1-minute steps.
Holding these buttons down will vary the time in 10-minute
units.
If f or g is not pressed within 8 seconds, setting
",
is canceled.
3
Press SET.
The time display stops flashing and the clock starts from
00 seconds.
To display the time while the power is on
Hold down SHIFT and press CLOCK on the remote control.
The time will be displayed for 8 seconds.
To switch to the 24-hour standard
Display the time and press s within 8 seconds.
With each press, the clock alternates between 12- and 24hour standard time.
Tip:
In the 12-hour standard, "AM12:00" indicates midnight and
"PM12:00" noon.
If the clock display flashes when the unit is turned
off
There has been a power interruption. Reset the clock.
8
Page 9

CD OPERATIONS
s
MODE
DISPLAY
This unit plays back finalized CD-R/RW discs as well as audio
CDs.
Playing a CD
1
Press z CD OPEN/CLOSE to open the disc
compartment.
Place a disc with the label side up. Then close the disc
compartment by pressing zCD OPEN/CLOSE.
2
Press E to start play.
To stop play
Press s.
ECD
f,g
zCD OPEN/
CLOSE
PROGRAM
DISPLAY
f
SHIFT
s
To pause play
Press E. Press again to resume play.
To skip to the beginning of the current/preceding/
succeeding track
Press f or g repeatedly .
To search (playback in fast forward or reverse)
Hold down f or g. Release at the desired point.
To select a track with the remote control (Direct play)
Press the numbered buttons to select a track.
- To select the 25th track, press +10, +10 and 5.
- To select the 11th track, press +10 and 1.
To change the display in playback mode
Press DISPLAY (hold down SHIFT and press DISPLAY on the
remote control) during play.
The display changes in the following order:
1 Track number being played and elapsed playing time
2 Remaining time of a disc
•Remaining time of play cannot be displayed during random
play or programmed play.
RANDOM/
REPEAT
0–10, +10
ECD
g
Random/Repeat play
In random play mode the unit plays all the tracks in random
order. In repeat play mode it plays repeatedly all the tracks or
the track being played. You can select random and repeat all
play at the same time.
1
Press MODE (hold down SHIFT and press
RANDOM/REPEAT on the remote control)
repeatedly to select one of the following modes:
"" 1": Repeat 1 playback
""": Repeat all playback
"RANDOM": Random playback
"RANDOM "": Random/Repeat all playback
2
Press E to start play.
To cancel random/repeat play
Press MODE (hold down SHIFT and press RANDOM/REPEAT
on the remote control) repeatedly until "RANDOM",
"" 1" or """ disappears.
Direct selection of the tracks with the numbered buttons
cancels random play mode.
To repeat a selected set of tracks
First select the tracks with programmed play (see
"Programmed play" on page 10).
Then select repeat playback.
En
9
Page 10

Programmed play
Plays back up to 30 selected tracks in programmed order.
1
Hold down SHIFT and press PROGRAM on the
remote control in stop mode.
"PRGM" flashes on the display.
2
En
Press the numbered buttons on the remote
control to program a track.
-To select the 25th track, press +10, +10 and 5.
-To select the 11th track, press +10 and 1.
The selected track number lights up on the display.
3
Repeat step 2 to program other tracks.
The total number of selected tracks and total playing time
will be displayed.
4
Press E to start play.
The track number for the current track flashes on the
display.
•During programmed play, you cannot select a track with the
numbered buttons. "Can’t USE" is displayed when you
try to select a track .
•If the total playing time of the program exceeds 99 minutes
and 59 seconds, or if a track with a track number exceeding
30 is programmed, the playing time is displayed as
"- -:- -".
•You cannot program more than 30 tracks. "FULL" is
displayed.
To check the program
Press f or g repeatedly in stop mode. The track
number and program number are displayed in succession.
To clear the program
Press s in stop mode. "PRGM" disappears from the display.
To add tracks to the program
Repeat step 2 before starting playback. The tracks are added
to the end of the program.
To change the programmed tracks
Clear the program and repeat all the steps again.
Notes on CDs
•Do not place more than one disc.
•Do not tilt the unit with a disc loaded.
•The unit may not play CD-R/RW discs recorded on personal
computers or certain kinds of CD-R/RW recorders.
•Do not attach adhesive label to either side of
CD-R/RW discs, as doing so may cause malfunction.
•Do not load an unrecorded CD-R/RW disc. The disc may be
damaged.
•Do not use irregular-shaped CDs.
10
Page 11

RADIO OPERATIONS
TUNER/BAND
sCLEAR
PRESET
MODE
Manual tuning
1
Press TUNER/BAND repeatedly to select a band.
The unit switches to the radio from any other function
and alternates between FM and AM.
2
Press f or g repeatedly to tune in a station.
"TUNE" is displayed when a station is tuned in.
"STEREO" is displayed for FM stereo reception.
To search for a station automatically (Auto search)
Hold down f or g.
The unit searches for a station and stops at reception.
To stop the search manually, press f or g.
•Auto search may not stop at stations with weak signals.
PRESET
(N,M)
f,g
SET
TUNER/BAND
POWER
fg
SHIFT
SET
TUNER MODE
0–10, +10
sCLEAR
Preset tuning
Preset up to 32 of your favourite stations and tune them in
directly.
Presetting stations
1
Tune in the desired station.
2
Press SET to store the station.
The preset number, beginning from "1" flashes on the
display.
3
Repeat steps 1 and 2 to preset other stations.
The next station will not be stored if a total of 32 preset
stations have already been stored.
("FULL" is displayed.)
•The unit can store a maximum of 20 stations for each band.
However, that it can only store a total of 32 preset stations.
•If power is interrupted for more than approximately 12 hours,
all settings stored in memory after purchase need to be reset.
Tuning in preset stations
1
Select the band.
2
Press PRESET (N,M) repeatedly.
With each press, the station with the succeeding preset
number is tuned in.
You can tune in the desired preset station directly by
pressing the numbered buttons on the remote control.
- To select preset number 11, press +10 and 1.
- To select preset number 15, press +10 and 5.
To clear a preset station
1 Tune in the station by preset tuning.
2 Press s, then press SET within 8 seconds.
Preset station numbers in the band which are higher than
the cleared number decrease by one.
En
11
Page 12

Adjustments
SOUND ADJUSTMENTS
To switch to monaural FM reception
Press MODE (hold down SHIFT and press TUNER MODE on
the remote control) so that "MONO" is displayed.
To cancel, press MODE (hold down SHIFT and press TUNER
MODE on the remote control) again.
En
Tip:
When FM stereo reception is poor, switching to monaural
reduces noise.
To switch the AM tuning interval
The default setting of the AM tuning interval is 10 kHz/step. If
you use this unit in an area where the frequency allocation
system is 9 kHz/step, change the tuning interval.
Hold down TUNER/BAND and press POWER.
Tip:
When the AM tuning interval is changed, all preset stations
are cleared.
BASS
TREBLE
BASS
Adjust the bass level.
On the main unit
Turn BASS.
The bass level can be adjusted from "–5" to"+5".
On the remote control
Press SOUND repeatedly so that "BAS" is displayed, and
press f or g to adjust the level.
•If the sound becomes distorted with the BASS effect, cancel
the effect.
SOUND
fg
TREBLE
Adjust the treble level.
On the main unit
Turn TREBLE.
The treble level can be adjusted from "–5" to"+5".
On the remote control
Press SOUND repeatedly so that "TRE" is displayed, and
press f or g to adjust the level.
•If the sound becomes distorted with the TREBLE effect,
cancel the effect.
12
Page 13
TAPE PLAYBACK
s
SYNCHRO REC
wREC/
REC PAUSE
MODE
Playback
Use type I (normal) or type II (high/CrO2)tapes.
1
Press zTAPE OPEN/CLOSE to open the tape tray.
2
Insert the tape.
Insert with the exposed the side facing forward, and press
zTAPE OPEN/CLOSE to close the tape tray.
3
Press d to start play.
To select a reverse mode
Press MODE (REV MODE on the remote control) repeatedly.
•To play one side only, select p.
•To play from the side facing upward to the opposite side
once only, select [.
•To play both sides repeatedly, select ].
dTAPE/
REC MUTE
f,g
zTAPE OPEN/
CLOSE
REC MODE
wREC/
REC PAUSE
fg
s
To stop playback
Press s.
To change the playback side
Press d in playback mode.
To rewind or fast forward
Press f or g.
To reset the tape counter
Press s in stop mode, and the tape counter on the display is
reset to "0000".
Opening and closing the tape tray will also reset the tape
counter.
Notes on cassettes
•Use of 120-minute or longer tapes is not recommended
since they are extremely thin and easily deformed or
damaged.
•Wind up any slack in the tape with a pencil or similar tool
before use. Slack tape may jam in the mechanism.
REV MODE
0–10, +10
CD EDIT/CHECK
dTAPE
Music sensor
If there is a 4-second or longer blank between each track, a
search for the beginning of the current or next track during
playback can be done easily.
When the X indicator on the display is appearing, press
f to move to the next track, or g to move to the
begininng of the current track.
When the C indicator on the display is appearing, press
g to move to the next track, or f to move to the
beginning of the currect track.
The search function may not be able to detect tracks under
the following conditions:
•Blanks of less than 4 seconds between tracks
•Noisy tracks
•Long passage of low-end sound
•Low overall recording levels
13
En
Page 14

TAPE RECORDING
Basic recording
Use type I (normal) or type II (high/CrO2) tapes.
1
Press zTAPE OPEN/CLOSE to open the tape tray.
2
Insert the recording tape.
Insert with the exposed side facing forward, and the side
En
to be recorded on first facing upward. Press
zTAPE OPEN/CLOSE to close the tape tray.
3
Press FUNCTION on the remote control to select
the TAPE function.
4
Press MODE (REV MODE on the remote control)
to select the reverse mode.
To record on one side only, select p.
To record on both sides, select [.
5
Press FUNCTION on the remote control to select
the source to be recorded.
6
Prepare the source.
To record CD, load a disc.
To record a radio broadcast, tune in the desired station.
To record from connected external equipment, press AUX
and prepare the equipment.
7
Press w REC/REC PAUSE twice to start
recording.
When recording a CD, CD playback starts automatically.
When recording input from connected equipment,
manually start playback of the source.
•Volume or tone adjustment(s) does not affect recording.
When the tape reaches its end, the recording stops.
To start CD recording more easily
Insert the tape to be recorded, load the disc, and press
SYNCHRO REC. Regardless of the function currently selected,
CD play and tape recording start simultaneously.
•In CD stop mode, tape recording starts from the beginning
of the track.
When CD playback stops, tape recording stops
simultaneously.
•In CD playback mode, the only current track is recorded.
When the current track playback finishes, tape recording
stops. To stop CD playback, press s.
To stop recording
Press s.
To pause recor ding (only for TUNER or AUX source)
Press wREC/REC PAUSE. Press again to resume.
To record a selected set of tracks from a CD
Program the desired tracks (see "Programmed play") and then
press SYNCHRO REC.
To start recording with the remote control
Press REC MODE repeatedly to display "SYNC REC" or
"REC".
SYNC REC: recording CD
REC: recording radio, CD or connected external equipment
Then press wREC/REC PAUSE to start recording.
When selected "REC", press wREC/REC PAUSE again to
start recording.
To record a 4-second blank space (only for TUNER
or AUX source)
Inserting 4-second blank spaces may help you locate the
beginning of the track.
1 Press d TAPE/REC MUTE during recording or in
recording pause mode.
"REC MUTE" flashes on the display for 4 seconds (a
blank space is added) and then the unit enters recording
pause mode.
2 Press wREC/REC PAUSE to resume recording.
To erase a tape
1 Insert the tape. Set the tape to the desired point if needed.
2 Press AUX.
If optional equipment is connected to the AUX IN jacks, turn
it off.
3 Press wREC/REC PAUSE twice.
14
Page 15

Edited CD recording
AI Edit Recording
Preparation
Prepare a tape that is longer than the CD length.
When recording a whole CD, AI Edit Recording takes the length
of your tape into account and rearranges the recording order of
the tracks if necessary, so that no track is cut short at the end
of the side.
(AI: Artificial Intelligence)
•Recording cannot start from a point halfway in the tape.
•AI Edit Recording cannot be used with discs containing more
than 30 tracks.
1
Insert the recording tape.
2
Press FUNCTION on the remote control to select
the CD function, and load the disc.
3
Hold down SHIFT and press CD EDIT/CHECK on
the remote control in stop mode.
"AI EDIT" and "AI C--00" are displayed.
4
Press the numbered buttons on the remote
control to enter the length of the recording tape.
10 to 99 minutes can be specified.
- For a 60-minute tape press 6 and 0.
In a few seconds, the unit determines the tracks to be
recorded for each side.
The recording time left for side A appears on the display.
•f or g can also be used to specify tape length.
5
Press SYNCHRO REC to start recording.
When you start recording with the remote control, press
REC MODE repeatedly to display "SYNC REC", then
press wREC/REC PAUSE.
The tape is rewound to the beginning of the side facing
upward, "REC MUTE" flashes on the display and the
lead segment is played through for 10 seconds, and
recording starts.
When recording on the side facing upward (side A)
finishes, recording on the opposite side (side B) starts.
Programmed Edit Recording
As you program the CD tracks to record, Programmed Edit
Recording displays the remaining recording time for each side
of the tape, so you can easily select a set of desired tracks
within the length of your tape.
•Recording cannot start from a point halfway in the tape.
•You cannot program more than 30 tracks.
•You cannot program a track with a track number larger than
30.
1
Insert the recording tape.
2
Press FUNCTION on the remote control to select
the CD function, and load the disc.
3
Hold down SHIFT and press CD EDIT/CHECK
twice on the remote control in stop mode.
"PRGM EDIT" and "PRGM C--00" are displayed.
4
Press the numbered buttons on the remote
control to enter the length of the recording tape.
10 to 99 minutes can be specified.
- For a 60-minute tape press 6 and 0.
•f or g can also be used to specify tape length.
5
Press the numbered buttons on the remote
control to select the first track to be recorded on
side A.
-To select the 25th track, press +10, +10 and 5.
-To select the 11th track, press +10 and 1.
6
Repeat step 5 to select the rest of the tracks for
side A.
The remaining recording time of side A is displayed. You
cannot select a track with a longer playing time.
7
Hold down SHIFT and press CD EDIT/CHECK on
the remote control to switch to side B and select
the tracks for the side.
8
Press SYNCHRO REC to start recording.
When you start recording with the remote control, press
REC MODE repeatedly to display "SYNC REC", then
press wREC/REC PAUSE.
The tape is rewound to the beginning of the side facing
upward, "REC MUTE" flashes on the display and the
lead segment is played through for 10 seconds, and
recording starts.
When recording on the side facing upward (side A)
finishes, recording on the opposite side (side B) starts.
To stop recording
Press s. Recording and CD playback stop simultaneously.
To check the program
1 Before recording, hold down SHIFT and press
CD EDIT/CHECK on the remote control to select side A or
B.
2 Press f or g repeatedly. The track number and
program number are displayed in succession.
To change the program of each side
Hold down SHIFT and press CD EDIT/CHECK on the remote
control to select side A or B, and press s to clear the program
for the selected side. Then, select tracks again.
To clear the edit program
Press s twice.
15
En
Page 16

To prevent accidental erasure
Break off the plastic tab of the cassette tape with a screwdriver
or other pointed tool.
En
Side A
TIMER OPERATIONS
SET
POWER
6STANDBY/ON
f,g
POWER
TIMER
fg
SHIFT
SET
SLEEP
Type II tape
detection
slot
To record on the tape again, cover the tab openings with
adhesive tape. (On type II tapes, take care not to cover the
type II tape detection slot.)
Tab for side
A
16
Sleep timer
Turns off the unit automatically after a specified time.
1
Hold down SHIFT and press SLEEP on the remote
control.
"SLEEP" is displayed.
2
Press f or g repeatedly to set the sleep
timer duration.
With each press, the timer duration changes in 5-minute
steps between 5 to 240 minutes. If there is no button input
for 8 seconds, the current setting is entered automatically.
The unit turns off after the selected time.
To check the remaining time until the unit turns off
Hold down SHIFT and press SLEEP on the remote control.
The remaining time is displayed for 8 seconds.
To cancel the sleep timer
Hold down SHIFT and press SLEEP on the remote control
repeatedly so that "SLEEPoFF" is displayed.
Timer playback
Turns on the unit at a specified time for the specified duration.
Make sure the clock is set correctly.
1
Hold down SHIFT and press TIMER on the remote
control repeatedly so that "5" lights up and
"5 PLAY" is displayed.
2
Within 8 seconds, press SET.
3
Press f or g to set the timer -on time, and
press SET.
Each press changes the time in 1-minute steps.
Holding these buttons down will vary the time in 10-minute
units.
4
Press f or g to select the source, and press
SET.
•For timer play of a CD, select "CD".
•For timer play of a tape, select "TAPE".
•For timer play of a radio broadcast, select "TUNER".
You will select the band later in step 7.
•For timer play of the equipment connected to the AUX
IN jacks, select "AUX".
Page 17

5
Press f or g to set the timer-activated
duration, then press SET.
With each press, the timer-activated duration changes in
5-minute steps between 5 to 240 minutes.
6
Press f or g to adjust the volume for timer
playback, and press SET.
The volume level can be adjusted from 0 to 35.
7
Prepare the source.
To play CD, load a disc.
To play a tape, insert the tape.
To play the radio, select the band and tune in the desired
station.
To play external equipment connected to the AUX IN jacks,
set an external timer for the equipment so that its playback
begins at the same time.
8
Press POWER 6STANDBY/ON (POWER) to turn
the unit off.
"5" remains on the display to indicate the timer standby
mode (when ECO mode is deactivated).
At timer-on time, the unit turns on and plays the selected
source. After the specified timer-activated duration, the
unit turns off again.
•Timer playback will not begin unless the unit is turned off
first.
•Connected equipment cannot be turned on or off by the builtin timer of this unit. Use an external timer.
Timer recording
Timer recording is available only for TUNER and AUX (with an
external timer) sources.
1
Hold down SHIFT and press TIMER on the remote
control repeatedly so that "5 REC" lights up and
"5 REC" is displayed.
2
Within 8 seconds, press SET.
3
Press f or g to set the timer -on time, and
press SET.
Each press changes the time in 1-minute steps.
Holding these buttons down will vary the time in 10-minute
units.
4
Press f or g to select the source, and press
SET.
•For timer recording of a radio broadcast, select "TUNER".
You will select the band later in step 7.
•For timer recording of the equipment connected to the
AUX IN jacks, select "AUX".
5
Press f or g to set the timer-activated
duration, then press SET.
With each press, the timer-activated duration changes in
5-minute steps between 5 to 240 minutes.
6
Press f or g to adjust the volume for timer
recording, and press SET.
The volume level can be adjusted from 0 to 35.
7
Prepare the source.
To record the radio, select the band and tune in the desired
station.
To record external equipment connected to the AUX IN
jacks, set an external timer for the equipment so that its
playback begins at the same time.
8
Insert the recording tape and then turn the unit
off.
"5 REC" remains on the display to indicate the timer
standby mode (when ECO mode is deactivated).
At timer-on time, the unit turns on and records the selected
source. After the specified timer-activated duration, the
unit turns off again.
•Connected equipment cannot be turned on or off by the builtin timer of this unit. Use an external timer.
To check the timer setting
Hold down SHIFT and press TIMER on the remote control
repeatedly so that "5 PLAY" or "5 REC" appears on the
display.
The timer-on time, the source and the timer-activated duration
are displayed for 8 seconds.
To change the timer setting
Reset the timer again.
To cancel the timer
Hold down SHIFT and press TIMER on the remote control
repeatedly until "5 OFF" is displayed. "5 " or
"5 REC" disappears from the display.
Tip:
Your timer setting is retained even if the timer is canceled.
Next time the timer is activated, you can change your previous
setting, or simply use the same setting again.
En
17
Page 18

REFERENCE
Care and maintenance
Occasional care and maintenance of the unit and the software
are needed to optimize the performance of your unit.
To clean the cabinet
Use a soft and dry cloth. If the unit surfaces are extremely
dirty, use a soft cloth lightly moistened with mild detergent
En
solution. Do not use strong solvents such as alcohol, benzene
or thinner.
To clean the tape heads
Dirty tape heads cause sound deterioration. After every 10
hours of use, clean the tape heads with a head cleaning
cassette. Refer to the instructions of the cleaning cassette.
To demagnetize the tape heads
Use a demagnetizing cassette after every 20 to 30 hours of
use. Refer to the instructions of the demagnetizing cassette.
Care of CDs
When a CD becomes dirty, wipe it from the center out with a
cleaning cloth. After playing a CD, store it in its case. Do not
keep it in hot or humid places.
Care of tapes
Store tapes in their cases after use. Do not leave tapes near
magnets, motors, television sets, or any source of magnetism.
Do not expose tapes to direct sunlight, or leave them in a car
parked in direct sunlight.
18
Troubleshooting
If your unit fails to perform properly, check the following guide
and the relevant sections of the Operating Instructions.
There is no sound
•Are the speakers and AC power cord connected properly?
The unit shut off suddenly
•Possibly a short circuit in the speaker terminals. Disconnect
the AC power cord from the AC outlet and reconnect the
speaker cords correctly.
Erroneous display
•Reset the unit. (See "Resetting the unit" on this page.)
Poor radio reception
•Check antenna connection. Adjust the antenna to find the
best reception.
•Move the unit and antenna away from other electric
appliances and cords.
Poor tape sound
•Check for dirty heads. Clean them if needed.
Cannot record
•Is the erasure prevention tab of the tape broken off? If so,
cover the detection slot with adhesive tape.
The CD player works poorly
•Is the disc correctly loaded?
•Is the disc dirty?
•Is the lens affected by condensation? If so, wait
approximately one hour and try again.
Condensation
Moisture may form on the CD pickup lens when:
•The unit is moved from a cold spot to a warm spot
•The heating system has just been turned on
•The unit is used in a very humid room
•The unit is cooled by an air conditioner
When this unit has condensation inside, it may not function
normally. Should this occur, leave the unit for a few hours,
then try to operate again.
Resetting the unit
If an unusual condition occurs in the display window or the
cassette deck, reset the unit as follows:
1 Press POWER to turn off the power.
If the power cannot be turned off, disconnect the AC power
cord, then plug it in again.
2 Hold down s and press POWER.
Everything stored in memory after purchase is cleared.
Page 19

Specifications
MAIN UNIT CX-LEM70
TUNER
FM tuning range 87.5 MHz to 108 MHz
FM usable sensitivity (IHF) 13.2 dBf
FM antenna terminal 75 ohms (unbalanced)
AM tuning range 530 kHz to 1710 kHz (10 kHz step)
531 kHz to 1602 kHz (9 kHz step)
AM usable sensitivity 350 µV/m
AM antenna Loop antenna
AMPLIFIER
Power output 28 W + 28 W (40 Hz - 20 kHz, THD
less than 1%, 6 ohms)
35 W + 35 W (1 kHz, THD 10 %, 6
ohms)
Total harmonic distortion 0.15 % (17.5 W, 1kHz, 6 ohms, DIN
AUDIO)
Input AUX IN: 700 mV
Outputs SPEAKERS: 6 ohms or more
PHONES: 32 ohms or more
DIGITAL OUT (OPTICAL) jack
CASSETTE DECK
Track format 4 tracks, 2 channels stereo
Frequency response 50 Hz – 15000 Hz
Recording system AC bias
Heads Recording/playback × 1, erase × 1
CD PLAYER
Laser Semiconductor laser (λ = 780 nm)
D/A converter 1 bit dual
Signal-to-noise ratio 88 dB (1 kHz, 0 dB)
Harmonic distortion Unmeasurable (1 kHz, 0 dB)
Wow and flutter Unmeasurable
GENERAL
Power requirements 120 V AC, 60 Hz
Power consumption 60 W
Power consumption in standby mode
With ECO mode on or AUTO: 0.7 W
With ECO mode off: 14 W
Dimensions (W × H × D) 191.5 × 249.0 × 389.0 mm
(7 5/8 × 9 7/8 × 15 3/8 in.)
Weight 5.3 kg (11 lbs 12 oz)
SPEAKER SYSTEM SX-LEM70
Speakers system 2 way, bass reflex (magnetic
shielded)
Speaker units Woofer: 120 mm (4 7/8 in.) cone
Tweeter: 25 mm (1 in.) dome
Impedance 6 ohms
Dimensions (W × H × D) 155 × 250 × 218 mm
(6 1/8 × 10 × 8 5/8 in.)
Weight 2.4 kg (5 lbs 6 oz)
Specifications and external appearance are subject to change
without notice.
COPYRIGHT
Check copyright laws relevant to recordings from discs, radio
or tape for the country where the unit is to be used.
NOTE
This equipment has been tested and found to comply with the
limits for a Class B digital device, pursuant to Part 15 of the
FCC Rules. These limits are designed to provide reasonable
protection against harmful interference in a residential
installation.
This equipment generates, uses, and can radiate radio frequency
energy and, if not installed and used in accordance with the
instructions, may cause harmful interference to radio
communications. However, there is no guarantee that
interference will not occur in a particular installation. If this
equipment does cause harmful interference to radio or television
reception, which can be determined by turning the equipment
off and on, the user is encouraged to try to correct the
interference by one or more of the following measures:
- Reorient or relocate the receiving antenna.
- Increase the separation between the equipment and receiver.
- Connect the equipment into an outlet on circuit different from
that to which the receiver is connected.
- Consult the dealer or an experienced radio/TV technician for
help.
CAUTION
Modifications or adjustments to this product, which are
not expressly approved by the manufacturer, may void the
user’s right or authority to operate this product.
En
19
Page 20

ADVERTENCIA
Para reducir el riesgo de incendios o de descargas
eléctricas, no exponga esta unidad a la lluvia ni a la
humedad.
CAUTION
RISK OF ELECTRIC SHOCK
DO NOT OPEN
“CAUTION:TO REDUCE THE RISK OF
ELECTRIC SHOCK,
DO NOT REMOVE COVER (OR BACK).
E
NO USER-SERVICEABLE PARTS INSIDE.
REFER SERVICING TO QUALIFIED
SERVICE PERSONNEL.”
Explicación de los símbolos gráficos:
El símbolo de un rayo con flecha en la
punta, dentro del triángulo equilátero,
es una alerta al usuario de la existencia
de "tensión peligrosa" sin aislar en el
interior de la unidad que puede ser lo
suficientemente fuerte como para
provocar descargas eléctricas en
personas.
El signo de exclamación, dentro del
triángulo equilátero, es una alerta al
usuario de la existencia de
instrucciones de funcionamiento y de
mantenimiento (servicio) importantes
en los manuales que vienen con la
unidad.
INSTRUCCIONES IMPORTANTES DE SEGURIDAD
Lea cuidadosa y completamente el manual de instrucciones antes
de utilizar la unidad. Asegúrese de guardar el manual de
instrucciones para utilizarlo como referencia en el futuro. Todas las
advertencias y precauciones del manual de instrucciones y de la
unidad deberán cumplirse estrictamente, así como también las
sugerencias de seguridad mencionadas más abajo.
Advertencia
Para evitar descargas eléctricas o lesiones, estas instrucciones de
seguridad deberán seguirse durante la instalación, la utilización, y
el mantenimiento de la unidad.
Instalación
Aditamentos - No utilice accesorios no recomendados por el
fabricante de la unidad, ya que esto podría resultar en el riesgo de
descargas eléctricas, lesiones, o incendios.
Agua y humedad - No utilice la unidad cerca del agua como, por
ejemplo, cerca de una bañera, palangana, fregadero de cocina, o
lavadora, en un sótano húmedo, ni cerca de una piscina, etc.
Calor - No utilice esta unidad cerca de fuentes de calor como, por
ejemplo, salidas de aire caliente, estufas, u otros aparatos que
generen calor. No deberá colocarse tampoco en lugares donde la
temperatura sea inferior a 5°C o superior a 35°C.
Superficie de montaje - Coloque la unidad sobre una superficie
plana y nivelada.
Accesorios - No coloque la unidad sobre un carrito, soporte,
trípode, ménsula, ni mesa inestable. La unidad podría caerse y
provocar lesiones serias a niños y adultos. Utilícela solamente sobre
un carrito, soporte, trípode, ménsula, o mesa recomendada por el
fabricante, o que se venda con dicha unidad. El montaje de la unidad
deberá realizarse de acuerdo con las instrucciones y los accesorios
recomendados por el fabricante.
Carrito portátil - La combinación de un aparato
y un carrito deberá moverse con cuidado. Las
paradas repentinas, la fuerza excesiva, y las
superficies desniveladas podrían hacer que la
unidad y la combinación se cayese.
Ventilación - La unidad deberá colocarse solamente donde tenga
espacio adecuado a su alrededor para asegurar su ventilación
adecuada. Deje un espacio libre de 10 cm en la parte posterior y
superior de la unidad, y de 5 cm a cada lado.
Las ranuras y aberturas de la caja y la parte posterior o la base son
para ventilación y para proteger la unidad contra el recalentamiento,
motivo por el que no deberán bloquearse. Estas aberturas no deberán
bloquearse nunca colocando la unidad sobre una cama, sofá,
alfombra, ni ninguna otra superficie similar.
(Esta unidad no deberá colocarse nunca cerca ni sobre un aparato o
salida de calefacción.) Esta unidad no deberá colocarse en una
instalación empotrada, como una librería, a menos que la ventilación
sea adecuada.
Entrada de objetos sólidos y líquidos - No introduzca objetos
de ningún tipo en la unidad a través de las ranuras de la caja ya que
podrían tocar puntos con tensión peligrosa o provocar cortocircuitos,
lo que podría resultar en descargas eléctricas o incendios. No vierta
nunca ningún tipo de líquido sobre la unidad.
Energía eléctrica
Fuentes de alimentación - Esta unidad solamente deberá
utilizarse con la fuente de alimentación del tipo indicado en la
etiqueta. Si no está seguro del tipo de fuente de alimentación de su
hogar, póngase en contacto con el proveedor de unidad o con la
compañía de suministro eléctrico. Para alimentar la unidad con una
batería u otras fuentes, refiérase al manual de instrucciones.
Puesta a tierra o polarización - Esta unidad se suministra con
un enchufe para tomacorriente de corriente alterna polarizado (una
de las cuchillas es más ancha que la otra). Este enchufe solamente
entrará en el tomacorriente de una forma. Esto es por motivos de
seguridad. Si no puede insertar a fondo el enchufe, pruebe a
invertirlo. Si todavía no puede insertar el enchufe, póngase en
contacto con un electricista para que le cambie el tomacorriente
obsoleto. No anule el fin de seguridad del enchufe polarizado.
Protección del cable de alimentación - El cable de alimentación
deberá enrutarse de forma que nadie pueda pisarlo, que no interfiera
con otros aparatos, y en eligiendo un lugar de fácil acceso.
20
Page 21

Sobrecarga - No sobrecargue los tomacorrientes ni los cables de
prolongación, ya que esto podría resultar en descargas eléctricas o
incendios.
Antena exterior
Líneas eléctricas - No instale un sistema de antenas exteriores
cerca de líneas eléctricas, sistemas de iluminación, etc., donde pueda
caer y provocar problemas.
Cuando instale un sistema de antenas exteriores, tenga mucho
cuidado para que no entre en contacto con líneas eléctricas, ya que
tal contacto podría resultar fatal.
Puesta a tierra de la antena exterior - Si conecta una antena
exterior o un sistema de cable a la unidad, cerciórese de realizar una
puesta a tierra adecuada como protección contra rayos y cargas
estáticas. La sección 810 del código National Electrical Code, ANSI/
NFPA No. 70, ofrece información relativa a la puesta a tierra adecuada
del mástil, de la estructura de soporte, y de la conexión de la bajada
de antena a una unidad pararrayos, el tamaño de los conductores de
puesta a tierra, la conexión de los electrodos de puesta a tierra, y los
requisitos sobre dichos electrodos. Consulte la figura siguiente.
Tormentas eléctricas
Para proteger bien esta unidad contra tormentas eléctricas, o cuando
no vaya a utilizarse durante mucho tiempo, desenchúfela del
tomacorriente de la red, o desconecte la antena o el sistema de cable.
Esto evitará que se dañe la unidad debido a rayos o a sobrecorrientes
de la red.
Mantenimiento
Limpieza - Antes de limpiar la unidad, desenchúfela del
tomacorriente de la red. No utilice limpiadores líquidos ni aerosoles.
Para la limpieza, emplee un paño húmedo.
Daños que requieren el servicio de reparación
Desconecte la unidad del tomacorriente de la red, y solicite los
servicios de personal cualificado en las condiciones siguientes:
1) Cuando el cable de alimentación o el enchufe esté dañado.
2) Si dentro de la unidad ha entrado líquido u otros objetos.
3) Si la unidad estuvo expuesta a la lluvia o al agua.
4) Si la unidad no funciona normalmente aunque se sigan las
indicaciones del manual de instrucciones. Utilice solamente los
controles indicados en el manual de instrucciones, ya que el ajuste
inadecuado de otros controles podría resultar en daños que un
técnico cualificado necesitaría mucho tiempo para devolver la
unidad a su funcionamiento normal.
5) Cuando la unidad haya caído o se haya estropeado su exterior.
6)Cuando la unidad muestre un cambio notable en su
funcionamiento - esto significará que necesita ser reparada.
No intente reparar la unidad por usted mismo, ya que el abrirla podría
exponerle a tensiones peligrosas u otros riesgos.
En caso de avería, solicite los servicios de personal cualificado.
Piezas de reemplazo - Cuando necesite piezas de reemplazo,
cerciórese de que el técnico de reparación haya utilizado las que
cumplan con las características de las originales. La substitución
no autorizada podría resultar en descargas eléctricas, lesiones,
incendios, etc.
Comprobación de seguridad - Después de cualquier reparación
de esta unidad, solicite al centro de reparación que realice pruebas
para ver si la unidad funciona adecuadamente.
ÍNDICE
PRECAUCIONES ................................ 20
PREPARACIONES ............................... 22
PARTES Y CONTROLES ........................ 23
AJUSTES ANTES DEL FUNCIONAMIENTO... 25
FUNCIONAMIENTO DEL REPRODUCTOR
DE DISCOS COMPACTOS ...................... 27
FUNCIONAMIENTO DEL SINTONIZADOR .... 29
AJUSTES DE SONIDO .......................... 30
REPRODUCCIÓN DE UNA CINTA.............. 31
GRABACIÓN DE UNA CINTA................... 32
FUNCIONAMIENTO DEL PROGRAMADOR... 34
REFERENCIA .................................... 36
Sistema y accesorios
Unidad principal CX-LEM70 Mando a distancia
Altavoces SX-LEM70 Antena de FM
Cables de altavoces Antena de AM
E
21
Page 22

R6(AA)
PREPARACIONES
Conexión
Conecte el cable de alimentación de CA a la toma de CA después
de haber realizado todas las demás conexiones.
1
Conecte los cables de los altavoces a los
altavoces.
Conecte los cables de cobre a los terminales + y los cables
plateados a los terminales –.
E
2
Conecte los altavoces a la unidad principal.
Conecte el altavoz derecho a los terminales SPEAKERS R
y el izquierdo a los terminales SPEAKERS L. Los cables
de cobre van a los terminales 0.
3
Conecte las antenas suministradas.
Conecte la antena de FM al terminal FM 75 Ω y la antena
de AM a la toma AM LOOP.
Antena de FM
Antena de AM
4
Conecte el cable de alimentación de CA a una
toma de CA.
El reloj parpadeará en la pantalla.
Para ajustar el reloj, consulte la página 26.
Altavoces
•No cortocircuite los cables 0 y 9 de los altavoces.
•No deje objetos que generen magnetismo ni objetos a los
que les afecte el magnetismo cerca de los altavoces.
Antenas
Mantenga las antenas alejadas de objetos metálicos,
equipamiento eléctrico y cables.
• Antena de FM: Extienda totalmente en forma de T. Si la
recepción no es buena, conecte una antena externa opcional
a los terminales FM 75 Ω terminals. Asegúrese de conectar
la trenza acorazada de la antena al terminal 2.
•Antena de AM: Gire para encontrar la mejor recepción.
Mando a distancia
Quite la tapa del portapilas de la parte posterior del mando a
distancia e inserte dos pilas R6 (tamaño AA) asegurándose
de que la polaridad es la correcta.
•Recambie las pilas por otras nuevas cuando la distancia
operacional entre el mando a distancia y la unidad comience
a reducirse.
•Quite las pilas si no va a utilizarse la unidad por un largo
período de tiempo.
•El mando a distancia puede no funcionar si se utiliza bajo
una luz solar intensa, o si se obstruye su línea de visión.
22
Page 23

PARTES Y CONTROLES
Unidad principal: Parte delantera
1
2
3
4
5
6
1 dTAPE/REC MUTE
Inicia la reproducción y cambia la cara de reproducción.
También se utiliza para introducir espacios en blanco de
4 segundos durante la grabación.
TUNER/BAND
Selecciona la función de radio y la banda de radio.
AUX
Selecciona la función de equipo externo conectado a las
tomas AUX IN.
ECD
Inicia y hace pausas en la reproducción.
2 wREC/REC PAUSE
Inicia y hace pausas en la grabación.
SYNCHRO REC
Inicia simultáneamente la grabación y la reproducción
de un disco compacto.
7
8
9
0
!
sCLEAR
Disco compacto y cinta: detiene la reproducción.
Radio: borra una emisora presintonizada.
3 ECO/DIMMER
Selecciona el modo ECO y el modo de atenuación de
brillo de pantalla.
PRESET
Sintoniza una presintonía.
MODE
Disco compacto: selecciona el modo de reproducción
repetida y aleatoria.
Platina: selecciona un modo inverso.
DISPLAY
CD: hace aparecer en pantalla el número de pista que se
está reproduciendo y el tiempo de reproducción restante.
SET
Determina el modo.
Guarda la emisora recibida como presintonía.
4 POWER 6STANDBY/ON
Enciende y apaga la unidad (en espera).
5 BASS
Ajusta el nivel de agudos.
6 TREBLE
Ajusta el nivel de graves.
7 f/r, t/g (TUNING DO WN, UP)
Disco compacto: salta a una pista anterior o posterior
cuando se pulsa, busca una pista en avance o retroceso
rápido cuando se mantiene pulsado.
Cinta: avance rápido o rebobinado de la cinta.
Radio: sintoniza manualmente hacia arriba o abajo de la
banda.
8 zCD OPEN/CLOSE
Abre y cierra el compartimento de discos.
9 VOLUME
Ajusta el volumen.
0 zTAPE OPEN/CLOSE
Abre o cierra la bandeja de las cintas.
! Toma PHONES
Conecta un juego de auriculares opcional con una
miniclavija estéreo (ø3,5 mm). La salida por altavoces
se cancela.
E
23
Page 24

Mando a distancia
1
2
3
4
5
E
6
Los botones con nombres similares o idénticos de la unidad
principal realizan básicamente las mismas funciones.
1 POWER
2 REC MODE
Selecciona el modo de grabación.
3 PRESET (N/M)
4 wREC/REC PAUSE
7
8
9
0
!
@
5 0–10, +10
Disco compacto: selecciona una pista con el número
especificado.
Radio: sintoniza una emisora con el número de
presintonía especificado.
Los botones numerados asumen estas funciones cuando se pulsan
con la tecla SHIFT pulsado:
PROGRAM
Selecciona el modo de reproducción programada de
discos compactos.
RANDOM/REPEAT
Selecciona el modo de reproducción aleatorio o repetido
de discos compactos
TUNER MODE
Cambia entre recepción de FM estéreo o monoaural.
DISPLAY
Discos compactos: muestra el número de pista que se
está reproduciendo y el tiempo de reproducción restante.
TIMER
Selecciona el modo de ajuste con programador.
SLEEP
Selecciona el modo de ajuste del programador de
apagado.
CLOCK
Selecciona el modo de ajuste del reloj.
CD EDIT/CHECK
Selecciona la grabación editada de discos compactos.
6 SHIFT
Mantenga pulsada esta tecla cuando pulse un botón
numerado para cambiar su función a la impresa sobre el
número.
7 REV MODE
Selecciona el modo inverso.
8 SOUND
Selecciona el modo de ajuste de graves y agudos.
9 SET
0 VOLUME (+/–)
! sCLEAR
TUNER/BAND
AUX
dTAPE
ECD
f/r, t/g (DOWN, UP)
@ FUNCTION
Cambia la función activa entre TAPE, TUNER, AUX y CD.
24
Page 25

Unidad principal: Parte posterior
1
2
3
1 Toma AM LOOP y terminal FM 75 Ω
Conecte las antenas de FM y AM suministradas.
2 Tomas AUX IN
Aceptan señales de sonido analógicas provenientes de un
equipo externo. Conecte el equipo externo utilizando un
cable de conexión opcional con clavijas fonográficas RCA
(clavija roja a la toma R, clavija blanca a la toma L). Consulte
también el manual de instrucciones de su equipo. Para
cambiar la función a toma externa, pulse AUX.
3 Terminales SPEAKERS3
Conecte los cables de altavoces de los altavoces
suministrados.
4 Toma DIGITAL OUT (OPTICAL)
A través de esta toma puede darse salida a las señales
de sonido digital de los discos compactos. Utilice un
cable óptico para conectar equipo de audio digital. Quite
la caperuza antipolvo de la toma DIGITAL OUT
(OPTICAL). A continuación conecte la clavija del cable
óptico a la toma DIGITAL OUT (OPTICAL).
5 Cable de alimentación de CA
4
5
AJUSTES ANTES DEL FUNCIONAMIENTO
dTAPE,
TUNER/BAND,
AUX, ECD
SET
ECO/DIMMER
POWER
6STANDBY/ON
Alimentación
Encendido de la unidad
Pulse POWER 6STANDBY/ON (POWER en el mando a
distancia).
Alternativamente, pulse TAPE, TUNER/BAND, AUX o CD. La
reproducción comenzará automáticamente si hay un disco o
cinta cargado.
Apagado de la unidad
Pulse POWER 6STANDBY/ON otra vez
La unidad pasa al modo de espera.
Para ajustar el nivel de entrada del equipo
conectado a las tomas AUX IN.
Pulse AUX para seleccionar la función de equipo externo
conectado a las tomas AUX IN y a continuación, pulse
f o g repetidamente.
El nivel del entrada puede ajustarse "NORMAL" o
"–6 dB".
f,g
VOLUME
Volumen
Gire VOLUME (pulse VOLUME (+/–) en el mando a
distancia).
Ajuste desde 0 (mínimo) a 49 y MAX (máximo).
Consejo:
El valor del nivel de volumen queda retenido mientras está
apagado en modo de espera. Si la unidad se apaga con el
volumen ajustado a 36 o más, la próxima vez que se encienda
la unidad se reducirá automáticamente a 35.
Cómo modificar el nombre de la fuente en la
pantalla de la función AUX
Mantenga pulsado AUX y pulse POWER con el aparato
encendido.
POWER
CLOCK
fg
SHIFT
AUX VIDEO TV
SET
VOLUME
(+/–)
E
25
Page 26

Modo de ahorro de energía
Reduce el consumo eléctrico con las siguientes operaciones.
Cuando el modo de ahorro de energía está ajustado
a "ON" o "AUTO"
•Cuando la alimentación se apaga, todas las indicaciones
de la pantalla, incluyendo el reloj, se apagan.
•Cuando la alimentación se activa mediante la grabación por
programador (página 35), el brillo de la pantalla se ajusta a
"DIMMER 3" y todas las luces de botones están
apagadas.
•La pantalla se ilumina sólo cuando se opera la unidad. Si la
unidad no se opera durante 8 segundos, el brillo cambia al
E
nivel elegido en el ajuste "DIM MODE". (Si el brillo se
ajusta a "DIM-OFF" el brillo no cambia).
Cuando el modo de ahorro de energía está ajustado
a "AUTO"
Además de lo anterior:
•Si se para la cinta y el disco compacto y no hay entrada de
audio de ningún equipo externo conectado durante 10
minutos, se apaga la alimentación. (Sin embargo, cuando
se escucha la radio la alimentación no se apaga
automáticamente).
1
Pulse ECO/DIMMER mientras la unidad esté
encendida.
"ECO MODE" aparecerá en pantalla.
2
Pulse SET antes de 8 segundos.
El estado del modo de ahorro de energía actual aparecerá
en pantalla.
Si el modo de ahorro de energía está desactivado: "ECO
OFF"
Si el modo de ahorro de energía está en automático: "ECO
AUTO"
Si el modo de ahorro de energía está activado: "ECO
ON"
3
Antes de 8 segundos pulse f o g para
seleccionar el modo de ahorro de energía
deseado.
4
Antes de 8 segundos pulse SET.
Consumo de energía en espera
Cuando el modo de ahorro de energía está desactivado: ·14
W
Cuando el modo de ahorro de energía está activado o en
automático: 0,7 W
Si la pantalla del reloj parpadea cuando el modo
de ahorro de energía está activado.
El modo de ahorro de energía no puede activarse. Ajuste de
nuevo el reloj.
Atenuador de brillo
El brillo de la pantalla puede ajustarse a los cuatro niveles
siguientes: "
"
DIMMER 2
"
DIM-OFF
Cuando se selecciona "
más oscura, todas las luces de botones se apagan.
1
Pulse ECO/DIMMER mientras la unidad esté
encendida dos veces.
"DIM MODE" aparecerá en pantalla.
2
Antes de 8 segundos pulse SET.
El nivel de brillo actualmente seleccionado aparecerá
en pantalla.
3
Antes de 8 segundos pulse f o g para
seleccionar el brillo deseado.
4
Antes de 8 segundos pulse SET.
DIM-OFF
", y "
", "
DIMMER 3
" es el nivel más brillante.
DIMMER 3
DIMMER 1
".
" la pantalla es la
Ajuste de la tecla reloj
1
Mantenga SHIFT pulsada y pulse CLOCK en el
mando a distancia.
Cuando la unidad está apagada también puede pulsar
SET.
2
Pulse f o g para ajustar la hora.
Cada pulsación cambia la hora en intervalos de 1 minuto.
Manteniendo estos dos botones pulsados se variará la
hora en intervalos de 10 minutos.
Sif o g no se pulsan antes de 8 segundos se
cancelará el ajuste.
3
Pulse SET.
La pantalla de la hora deja de parpadear y el reloj comienza
desde 00 segundos.
Para ver la hora mientras la alimentación está
activada
",
Mantenga SHIFT pulsado y pulse CLOCK en el mando a
distancia.
La hora aparecerá en pantalla durante 8 segundos.
Para cambiar al estándar horario de 24 horas
Vea la hora y pulse s antes de 8 segundos.
Con cada pulsación, el reloj se alterna entre el estándar horario
de 12 y de 24 horas.
Consejo:
En el horario estándar de 12 horas "AM12:00" indica
medianoche y "PM12:00" mediodía.
Si la pantalla del reloj parpadea cuando se apaga
la unidad
Se ha producido un corte eléctrico. Ajuste de nuevo el reloj.
26
Page 27

FUNCIONAMIENTO DEL REPRODUCTOR DE DISCOS COMPACTOS
Reproducción aleatoria/repetida
sCLEAR
MODE
DISPLAY
Esta unidad reproduce discos CD-R/RW finalizados así como
discos compactos de audio.
Reproducción de un disco compacto
1
Pulse z CD OPEN/CLOSE para abrir el
compartimento de discos.
Coloque un disco con la cara de la etiqueta hacia arriba.
A continuación cierre el compartimento de discos
pulsando zCD OPEN/CLOSE.
2
Pulse E para comenzar la reproducción.
Para detener la reproducción
Pulse s.
ECD
f,g
zCD OPEN/
CLOSE
PROGRAM
DISPLAY
f
SHIFT
sCLEAR
Para hacer una pausa en la reproducción
Pulse E. Pulse de nuevo para reanudar la reproducción.
Para saltar al comienzo de la pista actual/anterior/
siguiente
Pulse f o g repetidamente.
Para buscar (reproducción rápida hacia delante o
hacia atrás)
Mantenga pulsado f o g. Suelte en el punto deseado.
Para seleccionar una pista con el mando a distancia
(Reproducción directa)
Pulse los botones numerados para seleccionar una pista.
- Para seleccionar la pista 25, pulse +10, +10 y 5.
- Para seleccionar la pista 11, pulse +10 y 1.
Para cambiar la visualización en modo de
reproducción
Pulse DISPLAY (mantenga pulsada la tecla SHIFT y pulse
DISPLAY en el mando a distancia) durante la reproducción.
La pantalla cambia en el orden siguiente:
1Número de pista que se está reproduciendo y tiempo de
reproducción transcurrido
2 Tiempo restante del disco
•El tiempo de reproducción restante no puede mostrarse
durante la reproducción aleatoria o programada.
RANDOM/
REPEAT
0–10, +10
ECD
g
En modo de reproducción aleatoria la unidad reproduce todas
las pistas en orden aleatorio. En modo de reproducción repetida
reproduce repetidamente todas las pistas o la pista que se está
reproduciendo. Puede seleccionar reproducción aleatoria y
repetida de todas las pistas al mismo tiempo.
1
Pulse MODE (mantenga pulsada la tecla SHIFT y
pulse RANDOM/REPEAT en el mando a distancia)
repetidamente para seleccionar uno de los modos
siguientes:
"" 1": Reproducción repetida de 1 pista
""": Reproducción repetida de todas las pistas
"RANDOM": Reproducción aleatoria
"RANDOM "": Reproducción aleatoria/repetida de
todas las pistas
2
Pulse E para comenzar la reproducción.
Para cancelar la reproducción aleatoria/repetida
Pulse MODE (mantenga pulsada la tecla SHIFT y pulse
RANDOM/REPEAT en el mando a distancia) repetidamente
hasta que desaparezca "RANDOM", "" 1" o """.
La selección directa de las pistas con los botones numerados
cancela el modo de reproducción aleatorio.
Para repetir un grupo seleccionado de pistas
En primer lugar seleccione las pistas con la reproducción
programada (consulte "Reproducción programada" en la
página 28).
A continuación, seleccione la reproducción repetida.
E
27
Page 28

Reproducción programada
Reproduce hasta 30 pistas seleccionadas en el orden
programado.
1
Mantenga pulsada la tecla SHIFT y pulse
PROGRAM en el mando a distancia en modo de
parada.
"PRGM" parpadeará en la pantalla.
2
Pulse los botones numerados en el mando a
distancia para programar una pista.
- Para seleccionar la pista 25, pulse +10, +10 y 5.
E
- Para seleccionar la pista 11, pulse +10 y 1.
El número de pista seleccionado se iluminará en pantalla.
3
Repita el paso 2 para programar otras pistas.
El número total de pistas seleccionadas y el tiempo total
de reproducción aparecerán en pantalla .
4
Pulse E para comenzar la reproducción.
El número de pista de la pista actual parpadeará en
pantalla.
•Durante la reproducción programada, no podrá seleccionar
una pista con los botones numerados. "Can’t USE"
aparecerá en pantalla cuando intente seleccionar una pista.
•Si el tiempo total de reproducción del programa supera los
99 minutos y 59 segundos, o si se programa una pista con
un número de pista superior a 30, el tiempo de reproducción
aparecerá en pantalla como "- -:- -".
•No se pueden programar más de 30 pistas. "FULL"
aparecerá en pantalla.
Para comprobar el programa
Pulse f o g repetidamente en modo de parada. El
número de pista y el número de programa aparecerán en
pantalla consecutivamente.
Para borrar el programa
Pulse s en modo de parada. "PRGM" desaparecerá de la
pantalla.
Para añadir pistas al programa
Repita el paso 2 antes de comenzar la reproducción. Las pistas
se añadirán al final del programa.
Para cambiar las pistas programadas
Borre el programa y repita de nuevo todos los pasos.
Notas sobre discos compactos
•No introduzca más de un disco.
•No incline la unidad con un disco dentro.
•La unidad puede no reproducir discos CD-R/RW grabados
en ordenadores personales o ciertos tipos de grabadoras
de CD-R/RW.
•No pegue ninguna etiqueta adhesiva, etc. a ninguna cara de
los discos CD-R/RW, ya que ello podría ocasionar un mal
funcionamiento de la unidad.
•No introduzca un disco CD-R/RW virgen. Podría dañarse el
disco.
•No utilice discos compactos con formas irregulares.
28
Page 29

FUNCIONAMIENTO DEL SINTONIZADOR
TUNER/BAND
sCLEAR
PRESET
MODE
f,g
SET
Sintonización manual
1
Pulse TUNER/BAND repetidamente para
seleccionar una banda. La unidad cambiará al
sintonizador desde cualquier otra función y
alternará entre FM, y AM.
2
Pulse f o g repetidamente para sintonizar
una emisora.
"TUNE" aparecerá en pantalla cuando se sintonice una
emisora.
"STEREO" aparecerá en pantalla si hay recepción de
FM estéreo.
Para buscar una emisora automáticamente
(Búsqueda automática)
Mantenga pulsado f o g.
La unidad buscará una emisora y se detendrá cuando haya
recepción.
Para detener la búsqueda manualmente, pulse f o g.
•La búsqueda automática puede no detenerse en emisoras
con señales débiles.
POWER
fg
TUNER/BAND
SHIFT
Sintonización de presintonías
Presintonice hasta 32 de sus emisoras favoritas y sintonícelas
directamente.
Presintonización de emisoras
1
Sintonice la emisora deseada.
2
Pulse SET para guardar la emisora.
El número de presintonía, comenzando por "1" parpadeará
en pantalla.
3
Repita los pasos 1 y 2 para presintonizar otras
emisoras.
No se guardará la próxima emisora si ya se han guardado
un total de 32 presintonías. ("FULL" aparece en pantalla).
•La unidad puede guardar un máximo de 20 emisoras de
cada banda. Sin embargo, sólo puede guardar un total de
32 presintonías.
•Si se corta el suministro eléctrico durante más de unas 12
horas, necesitará volver a configurar todos los ajustes
guardados en memoria después de la compra.
PRESET
(N,M)
SET
TUNER MODE
0–10, +10
sCLEAR
Sintonización de emisoras
presintonizadas
1
Seleccione la banda.
2
Pulse PRESET (N,M) repetidamente.
Con cada pulsación, se sintonizará la emisora con el
número de presintonización siguiente.
Puede sintonizar la persintonía deseada directamente
pulsando los botones numerados del mando a distancia.
- Para seleccionar el número de presintonía 11, pulse
+10 y 1.
- Para seleccionar el número de presintonía 15, pulse
+10 y 5
Para borrar una presintonía
1 Sintonice la emisora con la presintonía.
2 Pulse s y, a continuación, pulse SET antes de 8 segundos.
Los números de presintonía de la banda superiores al
número borrado se reducirán en una unidad.
E
29
Page 30

Ajustes
AJUSTES DE SONIDO
Para cambiar a recepción FM monoaural
Pulse MODE (mantenga pulsada la tecla SHIFT y pulse TUNER
MODE en el mando a distancia) para que "MONO" aparezca
en pantalla.
Para cancelar, pulse MODE (mantenga pulsada la tecla
SHIFT y pulse TUNER MODE en el mando a distancia)
repetidamente.
Consejo:
Cuando la recepción FM estéreo sea de mala calidad, el
cambio a monoaural reducirá el ruido.
E
Para cambiar el intervalo de sintonización de AM
El valor por defecto del intervalo de sintonización de AM es
de 10 kHz/intervalo. Si utiliza esta unidad en un área donde el
sistema de asignación de frecuencias sea de 9 kHz/intervalo,
cambie el intervalo de sintonización.
Mantenga pulsado TUNER/BAND y pulse POWER.
Consejo:
Cuando se cambia el intervalo de sintonización de AM se
borran todas las presintonías.
BASS
TREBLE
GRAVES (BASS)
Ajusta el nivel de graves.
En la unidad principal
Gire el dial BASS.
El nivel de graves puede ajustarse desde "–5" a "+5".
En el mando a distancia
Pulse SOUND repetidamente de forma que "BAS" aparezca
en pantalla y pulse f o g para ajustar el nivel.
•Si el sonido se distorsiona con el efecto de graves, cancele
el efecto.
SOUND
fg
AGUDOS (TREBLE)
Ajusta el nivel de agudos.
En la unidad principal
Gire el dial TREBLE.
El nivel de agudos puede ajustarse desde "–5" a "+5".
En el mando a distancia
Pulse SOUND repetidamente de forma que "TRE" aparezca
en pantalla y pulse f o g para ajustar el nivel.
•Si el sonido se distorsiona con el efecto de agudos, cancele
el efecto.
30
Page 31

REPRODUCCIÓN DE UNA CINTA
s
SYNCHRO REC
wREC/
REC PAUSE
MODE
Reproducción
Utilice cintas de tipo I (normal) o tipo II (alto/CrO2).
1
Pulse zT APE OPEN/CLOSE para abrir la bandeja
de las cintas.
2
Introduzca la cinta.
Introduzca con la cara expuesta mirando hacia delante y
pulse zTAPE OPEN/CLOSE para cerrar la bandeja de
las cintas.
3
Pulse d para iniciar la reproducción.
dTAPE/
REC MUTE
f,g
zTAPE OPEN/
CLOSE
REC MODE
wREC/
REC PAUSE
Para seleccionar un modo inverso
Pulse MODE (REV MODE en el mando a distancia)
repetidamente.
•Para reproducir sólo una cara, seleccione p.
•Para reproducir desde la cara que mira hacia arriba a la
cara opuesta sólo una vez, seleccione [.
•Para reproducir ambas caras repetidamente, seleccione
].
Para detener la reproducción
Pulse s.
Para cambiar la cara de reproducción
Pulse d en modo de reproducción.
Para rebobinar o avanzar rápidamente
Pulse f o g.
Para poner a cero el contador de la cinta.
Pulse s en modo de parada y el contador de la cinta en
pantalla se pondrá a "0000".
El contador de la cinta también se pondrá a cero abriendo y
cerrando la bandeja de la cinta.
Notas sobre casetes
•No se recomienda el uso de las cintas de 120 minutos o
REV MODE
0–10, +10
CD EDIT/CHECK
fg
dTAPE
s
•Bobine la cinta con un lápiz o herramienta similar antes del
Sensor musical
Un espacio en blanco de 4 segundos o más entre pistas facilita
la búsqueda del principio de la pista actual o de la siguiente
pista durante la reproducción.
Cuando aparece el indicador X de la pantalla, pulse f
para ir a la pista siguiente, o g para ir al principio de la
pista actual.
Cuando el indicador C aparece en pantalla, pulse g para
ir a la pista siguiente, o f para ir al principio de la pista
actual.
La función de búsqueda puede no detectar las pistas en los
siguientes casos:
•Espacios en blanco de menos de 4 segundos entre pistas
•Espacios con ruido
•Largos espacios con sonidos bajos
•Nivel de grabación bajo en todo el disco
más porque son muy finas y se deforman o dañan fácilmente.
uso si observa que, en el interior de la carcasa, está
combada. Una cinta combada puede atascarse en el
mecanismo.
E
31
Page 32

GRABACIÓN DE UNA CINTA
Grabación básica
Utilice cintas de tipo I (normal) o tipo II (alto/CrO2).
1
Pulse zT APE OPEN/CLOSE para abrir la bandeja
de las cintas.
2
Introduzca la cinta a grabar.
Introduzca con la cara expuesta mirando hacia delante y
la cara a grabar primero mirando hacia arriba. Pulse
zTAPE OPEN/CLOSE para cerrar la bandeja de cintas.
3
Pulse FUNCTION en el mando a distancia para
seleccionar la función TAPE.
E
4
Pulse MODE (REV MODE en el mando a distancia)
para selecionar el modo inverso.
Para grabar en una sola cara, seleccione p.
Para grabar en ambas caras, seleccione [.
5
Pulse FUNCTION en el mando a distancia para
seleccionar la fuente a grabar.
6
Prepare la fuente.
Para grabar un disco compacto, cárguelo.
Para grabar una emisión radiofónica, sintonice la emisora
deseada.
Para grabar desde un equipo conectado, pulse AUX y
prepare el equipo.
7
Pulse w REC/REC PAUSE dos veces para
comenzar la grabación.
Cuando se graba un disco compacto, su reproducción
comienza automáticamente. Cuando se grabe la señal de
un equipo conectado, inicie la reproducción de la fuente
manualmente.
•El/los ajuste/s de volumen o tono no afectan a la grabación.
Cuando la cinta alcance su final se detendrá la grabación.
Para comenzar la grabación de un disco compacto
más fácilmente
Introduzca la cinta a grabar, cargue el disco y pulse SYNCHRO
REC. Independientemente de la función seleccionada en esos
momentos, la reproducción del disco compacto y la grabación
de la cinta comienzan simultáneamente.
•En el modo de parada del disco compacto, la grabación de
la cinta se inicia desde el principio de la pista.
La grabación de la cinta se detiene simultáneamente cuando
la reproducción del disco compacto se detiene.
•En el modo de reproducción del disco compacto, sólo se
graba la pista actual.
La grabación de la cinta se detiene cuando termina la
reproducción de la pista actual. Pulse s para detener la
reproducción del disco compacto.
Para detener la grabación
Pulse s.
Para hacer una pausa en la grabación (sólo para
TUNER o fuente AUX)
Pulse w REC/REC PAUSE. Pulse otra vez para reanudar.
Para grabar un grupo seleccionado de pistas de un
disco compacto.
Programe las pistas deseadas (consulte
"Reproducción programada") y, a continuación, pulse
SYNCHRO REC.
Para iniciar la grabación con el mando a distancia.
Pulse REC MODE repetidamente hasta que aparezca "SYNC
REC" o "REC" en la pantalla.
SYNC REC: grabando un disco compacto
REC: grabando de la radio, disco compacto o equipo externo
conectado.
A continuación, pulse w REC/REC PAUSE para iniciar la
grabación.
Una vez haya seleccionado "REC", pulse de nuevo
w REC/REC PAUSE para iniciar la grabación.
Para grabar un espacio en blanco de 4 segundos
(sólo para TUNER o fuente AUX)
La introducción de espacios en blanco de 4 segundos puede
ayudarle a localizar el comienzo de la pista.
1 Pulse dTAPE/REC MUTE durante la grabación o en el
modo de pausa de grabación.
"REC MUTE" parpadearán en pantalla durante 4 segundos
(se añade un espacio en blanco) y, a continuación, la unidad
entrará en modo de pausa de grabación.
2 Pulse w REC/REC PAUSE para reanudar la grabación.
Para borrar una cinta
1 Introduzca la cinta. Si es preciso lleve la cinta al punto
deseado.
2 Pulse AUX.
Si hay algún equipo opcional conectado a las tomas AUX
IN, apáguelo.
3 Pulse w REC/REC PAUSE dos veces.
32
Page 33

Grabación de discos compactos editada
Grabación con edición de AI
Preparación
Prepare una cinta que sea de mayor duración que el disco
compacto.
Cuando se grabe un disco compacto completo, la grabación
con edición de AI tiene en cuenta la duración de la cinta y si es
preciso varía el orden de grabación de las pistas de forma que
ninguna pista quede cortada al final de una cara.
(AI: Artificial Intelligence — Inteligencia artificial)
•La grabación no empezará desde un punto situado en la
unidad de de la cinta.
•La grabación con edición de AI no puede utilizarse con
discos de más de 30 pistas.
1
Introduzca la cinta a grabar.
2
Pulse FUNCTION en el mando a distancia para
seleccionar la función de disco compacto y
cargue el disco.
3
Mantenga pulsada la tecla SHIFT y pulse CD EDIT/
CHECK en el mando a distancia en modo de
parada.
"AI EDIT" y "AI C--00" aparecerán en pantalla.
4
Pulse los botones numerados del mando a
distancia para introducir la duración de la cinta a
grabar.
Se puede especificar desde 10 a 99 minutos.
- Para una cinta de 60 minutos pulse 6 y 0.
En unos pocos segundos la unidad determina las pistas
a grabar en cada cara.
El tiempo de grabación restante para la cara A aparecerá
en pantalla.
•También pueden utilizarse f o g para
especificar la duración de la cinta.
5
Pulse SYNCHRO REC para comenzar la
grabación.
Cuando inicie la grabación con el mando a distancia, pulse
REC MODE repetidamente hasta que aparezca "SYNC
REC", en pantalla y, a continuación, pulse
w REC/REC PAUSE.
La cinta se rebobina hasta el comienzo de la cara que
mira hacia arriba, "REC MUTE" parpadearán en pantalla
y el segmento en blanco se reproduce durante 10
segundos, y la grabación se inicia.
Cuando finalice la grabación en la cara que mira hacia
arriba (cara A) comenzará la grabación en la cara opuesta
(cara B).
Grabación con edición programada
Cuando programe las pistas del disco compacto a grabar, la
Grabación con Edición Programada mostrará el tiempo de
grabación restante para cada cara de la cinta, para que así
pueda seleccionar fácilmente un grupo de pistas deseado que
no sobrepase la duración de su cinta.
•La grabación no empezará desde un punto en el medio de
la cinta.
•No se pueden programar más de 30 pistas.
•No se puede programar una pista con un número de pista
superior a 30.
1
Introduzca la cinta a grabar.
2
Pulse FUNCTION en el mando a distancia para
seleccionar la función de disco compacto y
cargue el disco.
3
Mantenga pulsado SHIFT y pulse CD EDIT/CHECK
dos veces en el mando a distancia en modo de
parada.
"PRGM EDIT" y "PRGM C--00" aparecerán en pantalla.
4
Pulse los botones numerados del mando a
distancia para introducir la duración de la cinta a
grabar.
Se puede especificar desde 10 a 99 minutos.
- Para una cinta de 60 minutos pulse 6 y 0.
•También puede utilizarse f o g para especificar
la duración de la cinta.
5
Pulse los botones numerados en el mando a
distancia para seleccionar la primera pista a
grabar en la cara A.
-Para seleccionar la pista 25, pulse +10, +10 y 5.
-Para seleccionar la pista 11, pulse +10 y 1.
6
Repita el paso 5 para seleccionar el resto de las
pistas para la cara A.
El tiempo de grabación restante en la cara A aparecerá en
pantalla. No se puede seleccionar una pista con un tiempo
de reproducción superior.
7
Mantenga pulsada la tecla SHIFT y pulse CD EDIT/
CHECK en el mando a distancia para cambiar a la
cara B y seleccionar las pistas para la cara.
8
Pulse SYNCHRO REC para comenzar la
grabación.
Cuando inicie la grabación con el mando a distancia, pulse
REC MODE repetidamente hasta que aparezca "SYNC
REC", en pantalla y, a continuación, pulse w REC/REC
PAUSE.
La cinta se rebobina hasta el comienzo de la cara que
mira hacia arriba, "REC MUTE" parpadearán en pantalla
y el segmento en blanco se reproduce durante 10
segundos, y la grabación se inicia.
Cuando finalice la grabación en la cara que mira hacia
arriba (cara A) comenzará la grabación en la cara opuesta
(cara B).
Para detener la grabación
Pulse s. La grabación y la reproducción del disco compacto
se detienen simultáneamente.
Para comprobar el programa
Antes de la grabación, mantenga pulsada la tecla SHIFT y
1
pulse CD EDIT/CHECK
seleccionar la cara A o B.
2 Pulse f o g repetidamente. El número de pista y el
número de programa se verán sucesivamente.
en el mando a distancia para
E
33
Page 34

Para cambiar el programa de cada cara
Mantenga pulsado SHIFT y pulse CD EDIT/CHECK en el
mando a distancia para seleccionar la cara A o B y pulse s
para borrar el programa de la cara seleccionada. A
continuación, seleccione de nuevo las pistas.
Para salir del programa de edición
Pulse s dos veces.
Para evitar el borrado accidental
Rompa la lengüeta de plástico de la cinta con un destornillador
o alguna otra herramienta punzante.
E
FUNCIONAMIENTO DEL PROGRAMADOR
SET
f,g
POWER
6STANDBY/ON
POWER
TIMER
fg
SHIFT
SET
SLEEP
Cara A
Ranura de
detección
de cintas
tipo II
Para grabar de nuevo en la cinta, cubra las lengüetas con una
cinta adhesiva. (En las cintas tipo II, recuerde no cubrir la
ranura de detección del tipo II).
Lengüeta de
la cara A
34
Programador de apagado
Apaga la unidad automáticamente después de un tiempo
especificado
1
Mantenga pulsada la tecla SHIFT y pulse SLEEP
en el mando a distancia.
Verá aparecer "SLEEP" en pantalla.
2
Pulse f o g repetidamente para establecer
la duración del apagado.
Con cada pulsación, la duración que memorizará el
programador cambia en intervalos de 5 minutos entre 5 y
240 minutos. Si no se pulsa ningún botón en 8 segundos,
el valor de ese momento se acepta automáticamente.
La unidad se apagará después del tiempo seleccionado.
Para comprobar el tiempo restante hasta que la
unidad se apague
Mantenga pulsada la tecla SHIFT y pulse SLEEP en el mando
a distancia. El tiempo restante se verá 8 segundos en pantalla.
Para cancelar el programador de apagado
Mantenga pulsada la tecla SHIFT y pulse SLEEP en el mando
a distancia repetidamente de forma que "SLEEPoFF"
aparezca en pantalla.
Reproducción con programador
Enciende la unidad a una hora especificada y durante un espacio
de tiempo establecido. Verifique que el reloj está correctamente
ajustado.
1
Mantenga pulsada la tecla SHIFT y pulse TIMER
en el mando a distancia repetidamente hasta que
vea iluminarse "5" y "5 PLAY" aparezca en
pantalla.
2
Antes de que pasen 8 segundos, pulse SET.
3
Pulse f o g para establecer la duración
del tiempo en el que el programador estára
activado y pulse SET.
Cada pulsación cambia la hora en intervalos de 1 minuto.
Manteniendo estos dos botones pulsados la hora
cambiará en intervalos de 10 minutos.
4
Pulse f o g para seleccionar la fuenta y
pulse SET.
•Para la reproducción con programador de un disco
compacto, seleccione "CD".
•Para la reproducción con programador de una cinta,
seleccione "TAPE".
Page 35

•Para reproducción con programador de una transmisión
radiofónica, seleccione "TUNER". La banda la
seleccionará más adelante en el paso 7.
•Para reproducción con programador del equipo
conectado a las tomas AUX IN, seleccione "AUX".
5
Pulse f o g para ajustar la duración del
tiempo activado por programador. A continuación
pulse SET.
Con cada pulsación la duración del tiempo activado por
programador cambia en intervalos de 5 minutos entre 5 y
240 minutos.
6
Pulsef o g para ajuste el volumen para la
reproducción con programador y pulse SET.
El nivel del volumen puede ajustarse de 0 hasta 35.
7
Prepare la fuente.
Para reproducir un disco compacto, cárguelo.
Para reproducir una cinta, insértela.
Para escuchar la radio, seleccione la banda y sintonice la
emisora deseada.
Para reproducir equipo externo conectado a las tomas
AUX IN, configure un programador externo de modo que
la reproducción comience al mismo tiempo.
8
Pulse POWER 6STANDBY/ON (POWER) para
pagar la unidad.
"5" seguirá en pantalla para indicar el modo de espera
con temporizador (cuando el modo ECO está desactivado).
A la hora de activación por programador, la unidad se
encenderá y reproducirá la fuente seleccionada.
Transcurrido el tiempo especificado de activación por
programador, la unidad se apagará de nuevo.
•La reproducción por temporizador no comenzará a menos
que la unidad se apague primero.
•El equipo conectado no puede encenderse ni apagarse con
el temporizador incorporado de esta unidad. Utilice un
temporizador externo.
Grabación con programador
La grabación con programador sólo está disponible cuando las
fuentes son TUNER y AUX (con un programador externo).
1
Mantenga pulsada la tecla SHIFT y pulse TIMER
en el mando a distancia repetidamente hasta que
vea iluminarse "5 REC" y "5 REC" aparezca en
pantalla.
2
Antes de 8 segundos, pulse SET.
3
Pulse f o g para establecer la hora de
activación del programador y pulse SET.
Cada pulsación cambia la hora en intervalos de 1 minuto.
Manteniendo estos dos botones pulsados la hora
cambiará en intervalos de 10 minutos.
4
Pulse f o g para seleccionar la fuente y
pulse SET.
•Para grabación con programador de una transmisión
radiofónica, seleccione "TUNER". La banda se
seleccionará más adelante en el paso 7.
•Para grabación con programador del equipo conectado
a las tomas AUX IN, seleccione "AUX".
5
Pulse f o g para establecer la hora de
activación del programador y pulse SET.
Con cada pulsación, el tiempo activado por programador
cambia en intervalos de 5 minutos entre 5 y 240 minutos.
6
Pulse f o g para ajustar el volumen de la
grabación con programador y pulse SET.
El nivel del volumen puede ajustarse de 0 hasta 35.
7
Prepare la fuente.
Para grabar de la radio, seleccione la banda y sintonice la
emisora deseada.
Para reproducir equipo externo conectado a las tomas
AUX IN, configure un programador externo de modo que
la reproducción comience al mismo tiempo.
8
Introduzca la cinta a grabar y luego apague la
unidad.
Observará que "5 REC" permanece en la pantalla para
indicar el modo de espera del programador (el momento
en el que se desactiva el modo ECO).
A la hora de activación por programador, la unidad se
encenderá y grabará la fuente seleccionada. Después del
tiempo especificado activado por programador, la unidad
se apagará de nuevo.
•El equipo conectado no puede encenderse ni apagarse con
el programador incorporado de esta unidad. Utilice un
programador externo.
Para comprobar el ajuste del programador
Mantenga pulsada la tecla SHIFT y pulse TIMER en el mando
a distancia repetidamente de modo que "5 PLAY" o "5
REC" aparezcan en la pantalla .
La hora de activación por programador, la fuente y la duración
del tiempo activado por programador aparecerán en pantalla
durante 8 segundos.
Para cambiar el ajuste del programador
Vuelva a ajustar el programador de nuevo.
Para cancelar el programador
Mantenga pulsada la tecla SHIFT y pulse TIMER en el mando
a distancia repetidamente hasta que "5 OFF" aparezca en
pantalla . "5" o "5 REC" desaparecerán de la pantalla.
Consejo:
El ajuste del programador se retiene incluso si se cancela. La
próxima vez que se active el programador, podrá cambiar su
ajuste previo o sencillamente utilizar el mismo ajuste de nuevo.
E
35
Page 36

REFERENCIA
Cuidados y mantenimiento
Es necesario un cuidado y mantenimiento ocasionales de la
unidad y del software para un óptimo funcionamiento de su
sistema.
Para limpiar el mueble
Utilice un paño suave y seco. Si las superficies están muy
sucias, utilice un paño suave ligeramente humedecido en una
solución detergente neutra. No utilice disolventes fuertes tales
como alcohol, bencina o diluyente de pintura.
Para limpiar los cabezales de la platina
Unos cabezales de platina sucios provocan un deterioro del
sonido. Cada 10 horas de uso, limpie los cabezales de la
E
platina con una cinta limpiadora de cabezales. Consulte las
instrucciones de la cinta limpiadora.
Para desmagnetizar los cabezales de la platina
Utilice una cinta desmagnetizadora cada 20 ó 30 horas de
uso. Consulte las instrucciones de la cinta desmagnetizadora.
Cuidado de los discos compactos
Cuando se ensucie un disco, límpielo desde el centro hacia
afuera con un paño de limpieza. Después de utilizar un disco
compacto, guárdelo en su caja. No lo deje en lugares calientes
o húmedos.
Cuidado de las cintas
Guarde las cintas en sus cajas después del uso. No deje las
cintas cerca de imanes, motores, televisores ni cualquier otra
fuente de magnetismo. No exponga las cintas a la luz solar
directa, ni las deje en un vehículo aparcado bajo la luz solar
directa.
36
Localización de problemas
Si la unidad no funciona correctamente, compruebe la siguiente
guía y las secciones relevantes del Manual de Instrucciones.
No hay sonido.
•¿Están correctamente conectados los altavoces y el cable
de alimentación de CA?
La unidad se desactiva repentinamente
•Posiblemente un cortocircuito en los terminales de los
altavoces. Desconecte el cable de alimentación de CA de la
toma de CA y vuelva a conectar los cables de los altavoces
correctamente.
Pantalla errónea
•Ajuste de nuevo la unidad. (Consulte "Reajuste de la unidad"
en esta página).
Mala recepción de la radio
•Compruebe la conexión de la antena. Ajuste la antena para
encontrar la mejor recepción.
•Aleje la unidad y la antena de otros aparatos y cables
eléctricos.
Sonido de la cinta de mala calidad
•Compruebe si los cabezales están sucios. Límpielos si es
preciso.
No se puede grabar
•¿Está rota la lengüeta de prevención de borrado de la cinta?
Si es así, cubra la ranura de detección con cinta adhesiva.
El reproductor de discos compactos no funciona
óptimamente
•¿Está bien introducido el disco?
•¿Está sucio el disco?
•¿Está la lente afectada por condensación? Si es así, espere
aproximadamente una hora y vuelva a intentarlo.
Condensación
Puede formarse condensación en la lente del fonocaptor del
reproductor de discos compactos cuando:
•La unidad pase de un lugar frío a uno caliente
•El sistema de calefacción se acabe de encender
•La unidad se utilice en una habitación muy húmeda
•La unidad se enfríe mediante aire acondicionado
Esta unidad puede no funcionar debidamente cuando se forme
condensación en su interior. En este caso, deje en reposo la
unidad unas pocas horas y repita de nuevo la operación.
Reajuste de la unidad
Si se da una condición no habitual en la pantalla o en la platina
de casetes, reinicie la unidad de la forma siguiente:
1 Pulse POWER para apagar el aparato.
Si no puede apagarse el aparato, desconecte el cable de
alimentación de CA y enchúfelo de nuevo.
2 Mantenga pulsado s y pulse POWER.
Se borrará todo lo que se haya guardado en memoria
después de la compra.
Page 37

Especificaciones
UNIDAD PRINCIPAL CX-LEM70
SINTONIZADOR
Gama de sintonización de FM
87,5 MHz a 108 MHz
Sensibilidad utilizable de FM (IHF)
13,2 dBf
Terminal de antena FM 75 ohmios (desequilibrado)
Gama de sintonización de AM
530 kHz a 1710 kHz (incrementos
de 10 kHz)
531 kHz a 1602 kHz (incrementos
de 9 kHz)
Sensitividad utilizable de AM 350 µV/m
Antena de AM Antena de cuadro
AMPLIFICADOR
Salida de potencia 28 W + 28 W (40 Hz - 20 kHz, D.A.T.
inferior al 1%, 6 ohmios)
35 W + 35 W (1 kHz, D.A.T. 10%,
6 ohmios)
Distorsión armónica total 0,15 % (17,5 W, 1 kHz, 6 ohms, DIN
AUDIO)
Entrada AUX IN: 700 mV
Salidas SPEAKERS: 6 ohmios o más
PHONES: 32 ohmios o más
Toma DIGITAL OUT (OPTICAL)
PLATINA DE CASETES
Formato de pista 4 pistas, 2 canales estéreo
Respuesta de frecuencia 50 Hz - 15000 Hz
Sistema de grabación Polarización CA
Cabezales Grabación/reproducción × 1,
borrado × 1
REPRODUCTOR DE DISCOS COMPACTOS
Láser Láser semiconductor (λ = 780 nm)
Convertidor D/A 1 bit doble
Relación de señal a ruido 88 dB (1 kHz, 0 dB)
Distorsión armónica No mensurable (1 kHz, 0 dB)
Fluctuación y trémolo No mensurable
GENERAL
Requisitos eléctricos CA 120 V, 60 Hz
Consumo eléctrico 60 W
Consumo eléctrico en modo de espera
Con el modo ECO activado o en
AUTO: 0,7 W
Con el modo ECO desactivado:
14 W
Dimensiones (An. x Al. x Prof.)
191,5 × 249,0× 389,0 mm
Peso 5,3 kg
SISTEMA DE ALTAVOCES SX-LEM70
Sistema de altavoces 2 vías, reflejo de graves (protección
magnética)
Unidades de altavoces Graves: cono de 120 mm
Agudos: cúpula de 25 mm
Impedancia 6 ohmios
Dimensiones (An. x Al. x Prof.)
155 × 250 × 218 mm
Peso 2,4 kg
Las especificaciones y aspecto exterior están sujetos a
cambios sin previo aviso.
DERECHOS DE AUTOR
Verifique la legislación sobre derechos de autor relativa a
grabaciones de discos, radio o cintas para el país en que vaya a
utilizarse la unidad.
NOTA
Este equipo ha sido probado y se ha encontrado que cumple
con los límites para los dispositivos digitales de la clase B
relativos a la Parte 15 y las normas de la FCC. Estos límites
han sido diseñados para ofrecer una protección razonable contra
interferencias dañinas en una instalación residencial.
Este equipo genera, utiliza, y puede radiar frecuencia de radio
y, si no está instalado y no se utiliza de acuerdo con las
instrucciones, puede causar interferencias nocivas en las
comunicaciones de radio. Sin embargo, no se garantiza el que
no puedan producirse interferencias en una instalación
particular. Si esta unidad provoca interferencias molestas en
la recepción de radio o televisión, que podrán determinarse
desconectando y volviendo a conectar su alimentación, se
aconseja que el usuario trate de corregir tales interferencias
mediante una o más de las medidas siguientes:
- Cambio de la orientación o reubicación de la antena receptora
- Aumento de la separación entre la unidad y el receptor
- Conexión del equipo a un tomacorriente o un circuito
diferente del que esté conectada la unidad
- Consulta a su proveedor o un técnico de radio/televisión
especializad
PRECAUCIÓN
Las modificaciones o los ajustes de este producto no
expresamente aprobados por el fabricante pueden hacer
que el usuario pierda el derecho a utilizar el mismo.
E
37
Page 38

ATTENTION
Pour réduire les risques d’incendie ou de décharge
électrique, ne pas exposer cet appareil à la pluie ou à
l’humidité.
CAUTION
RISK OF ELECTRIC SHOCK
DO NOT OPEN
“CAUTION:TO REDUCE THE RISK OF
ELECTRIC SHOCK,
DO NOT REMOVE COVER (OR BACK).
NO USER-SERVICEABLE PARTS INSIDE.
REFER SERVICING TO QUALIFIED
SERVICE PERSONNEL.”
Explication des symboles graphiques:
Le symbole de l’éclair fléché dans un
F
triangle équilatéral est destiné à
informer l’utilisateur de la présence
d’une "tension dangereuse" non isolée
dans le coffret du produit d’une
intensité suffisante pour constituer un
risque de décharge électrique pour des
personnes.
Le point d’exclamation dans un
triangle équilatéral est destiné à
informer l’utilisateur de la présence
d’instructions importantes concernant
le fonctionnement et la maintenance
(entretien) dans la documentation
accompagnant l’appareil.
38
INSTRUCTIONS IMPORTANTES CONCERNANT LA SECURITE
Lisez attentivement et entièrement le Mode d’emploi avant de faire
fonctionner l’appareil. Conservez-le bien pour toute référence
ultérieure. Tous les avertissements et les précautions dans le Mode
d’emploi et sur l’appareil doivent être suivis à la lettre, ainsi que le
suggestions concernant la sécurité ci-dessous.
Avertissements
Ces instructions pour la sécurité doivent être suivies pour
l’installation, l’utilisation et l’entretien afin d’éviter toute décharge
électrique.
Installation
Fixations - N’utilisez pas d’accessoires non recommandés par le
fabricant de l’appareil, car ils pourraient engendrer un incendie,
une décharge électrique ou des blessures pour des personnes.
Eau et humidité - N’utilisez pas cet appareil près de l’eau - par
exemple, près d’une baignoire, d’un lavabo, d’un évier ou d’une
cuve de machine à laver, dans un sous-sol humide, ou près d’une
piscine ou similaire.
Chaleur - N’utilisez pas cet appareil près d’une source de chaleur,
comme la sortie d’un appareil de chauffage, un poêle ou d’autres
appareils générateurs de chaleur. Il ne doit pas non plus être soumis
à des températures inférieures à 5˚C ou supérieures à 35˚C.
Surface de montage - Placez cet appareil sur une surface plate
et uniforme.
Accessoires - Ne placez pas cet appareil sur un chariot, un support,
un trépied, une console ou une table instables. Il pourrait tomber,
blessant gravement un enfant ou un adulte, et s’endommageant
sérieusement. Utilisez-le seulement avec un chariot, un support,
un trépied, une console ou une table recommandés par le fabricant,
ou vendus avec l’appareil. Tout montage de l’appareil doit être
conforme aux instructions du fabricant, et être effectué avec un
accessoire de montage recommandé par le fabricant.
Chariot portable - Toute combinaison appareil
- chariot doit être déplacée avec soin. Des arrêts
brutaux, une force excessive et des surfaces
inégales peuvent provoquer son renversement.
Ventilation - Ménagez un espace suffisant autour de l’appareil
pour assurer une bonne ventilation. Laissez 10 cm à l’arrière et sur
le dessus, et 5 cm de chaque côté.
Les fentes et les ouvertures dans le coffret, à l’arrière et sur le dessous
sont prévues pour la ventilation, et pour assurer un fonctionnement
fiable de l’appareil et le protéger contre la surchauffe; elles ne doivent
pas être bloquées ou couvertes. Elles ne doivent jamais être bloquées
en plaçant l’appareil sur un lit, un sofa, un tapis ou une surface
similaire. Cet appareil ne doit pas être placé dans une installation
encastrée comme une étagère, à moins qu’une ventilation suffisante
soit assurée.
Pénétration d’objets et de liquides - Ne poussez jamais
d’objets de quelque nature qu’ils soient dans les fentes de l’appareil.
Ils pourraient toucher des emplacements à tension dangereuse ou
court-circuiter des pièces, ce qui pourrait provoquer un incendie
ou une décharge électrique. Ne répandez jamais de liquide quel
qu’il soit sur l’appareil.
Alimentation
Sources d’alimentation - Cet appareil doit être opéré seulement
sur un type de source d’alimentation indiqué sur l’étiquette de
repérage. Si vous n’êtes pas sûr du type de source d’alimentation
de votre domicile, consultez votre revendeur ou la compagnie
d’électricité locale. Reportez-vous ou le mode d’emploi pour faire
fonctionner cet appareil sur piles ou d’autres sources.
Mise à la terre ou polarisation - Cet appareil est doté d’une
fiche pour ligne de courant alternatif polarisée (fiche avec une lame
plus large que l’autre). Par mesure de sécurité, cette fiche pourra
être introduite seulement dans un sens dans une prise murale
secteur. S’il est impossible d’insérer la fiche à fond dans la prise
secteur, retournez-la et essayez à nouveau. Si elle ne s’insère
toujours pas, appelez votre électricien pour remplacer la prise
désuète. Ne déjouez pas l’objectif de sécurité de la fiche polarisée.
Protection du cordon d’alimentation - Les cordons
d’alimentation doivent être acheminés de sorte qu’on ne marche pas
dessus et qu’ils ne soient pas pincés par des objets placés sur ou
contre eux, en prêtant une attention particulière aux emplacements
des fiches, aux prises multiples et à la sortie du produit.
Surcharge - Ne surchargez pas les prises murales et les rallonges,
et les prises cela pourrait provoquer un incendie ou une décharge
électrique.
Page 39

Antenne extérieure
Lignes d’alimentation - Un système d’antenne extérieure doit
être localisé aux environs de lignes d’alimentation aériennes, d’une
d’autre circuits d’éclairage ou d’alimentation électrique, ou à un
emplacement où il peut tomber dans de tels circuits ou lignes
d’alimentation. A l’installation du système d’antenne extérieure, évitez
absolument de toucher de tels circuits ou lignes d’alimentation, car
le contact pourrait être fatal.
Mise à la terre de l’antenne extérieure - Si un système
d’antenne extérieure ou de câbles est raccordé à l’appareil, vérifiez
qu’il est mis à la terre pour assurer une certaine protection contre
les surtensions et les charges statiques formées. La Section 810
du Code national de l’électricité, ANSI/NFPA n˚ 70, fournit des
informations concernant la mise à la terre correcte du mât et du
bâti, la mise à la terre du fil de descente d’antenne à une unité de
décharge d’antenne, la taille des conducteurs de mise à la terre,
l’emplacement de l’unité de décharge d’antenne, la connexion des
électrodes de mise à la terre, et les exigences pour l’électrode de
mise à la terre. Voir la figure.
Foudre
Pour renforcer la protection de l’appareil par temps d’orage
s’accompagnant de foudre ou s’il est laissé sans surveillance et
inutilisé pendant des périodes prolongées, débranchez-le de la prise
murale et déconnectez le système d’antenne ou de câble. Cela évitera
tout dommage à l’appareil dû à la foudre et aux surintensités du secteur.
Entretien
Nettoyage - Débranchez l’appareil de la prise murale avant le
nettoyage. N’utilisez pas de produit de nettoyage liquide ou en
aérosol. Employez un chiffon humide pour le nettoyage.
Dommages nécessitant réparation
Débranchez l’appareil de la prise murale et confiez la réparation à
un agent de service qualifié dans les cas suivants:
1) Si le cordon d’alimentation ou sa fiche sont endommagés.
2) Si du liquide ou des pénétré dans l’appareil.
3) Si l’appareil a été exposé à la pluie ou à l’eau.
4) Si l’appareil ne fonctionne pas normalement en suivant les
instructions du mode d’emploi. Ajustez uniquement les
commandes couvertes par le mode d’emploi. L’ajustement
incorrect d’autres commandes pourrait engendrer des dommages
et la remise de l’appareil en fonctionnement normal exigera
souvent un long travail d’un agent de service qualifié.
5) Si l’appareil est tombé ou si le coffret a été endommagé.
6) Quand l’appareil présente un changement considérable dans son
fonctionnement - ce qui indique la nécessité d’une réparation.
N’essayez pas de réparer l’appareil vous-même, car l’ouverture ou
le retrait des couvercles pourrait vous exposer à une tension
dangereuse ou à d’autres dangers. Confiez toutes les réparations à
un agent de service qualifié.
Remplacement de pièces - Quand le remplacement de pièces
est requis, vérifiez que l’agent de service qualifié a bien utilisé des
pièces de rechange spécifiées par le fabricant ou ayant les mêmes
caractéristiques que les pièces d’origine. Des substitutions non
autorisées pourraient provoquer un incendie, une décharge
électrique ou d’autres risques.
Contrôle de sécurité -
réparation sur l’appareil, demandez à l’agent de service d’effectuer les
contrôles de sécurité pour vérifier qu’il est en bon état de fonctionnement.
A la fin de toute opération d’entretien ou de
TABLE DES MATIÈRES
PRÉCAUTIONS .................................. 38
PRÉPARATIFS ................................... 40
PARTIES ET CONTRÔLES...................... 41
RÉGLAGE AVANT LA MISE EN MARCHE..... 43
POUR OPÉRER LE CD .......................... 45
POUR OPÉRER LA RADIO ..................... 47
RÉGLAGES DU SON ............................ 48
LECTURE DES CASSETTES .................... 49
ENREGISTREMENT SUR CASSETTE ......... 50
POUR OPÉRER LA MINUTERIE ............... 52
RÉFÉRENCE ..................................... 54
Système et accessoires
Unité principale CX-LEM70 Télécommande
Enceintes SX-LEM70 Antenne FM
Cordons d’enceinte Antenne AM
F
39
Page 40

R6(AA)
PRÉPARATIFS
Raccordement
Branchez le cordon d’alimentation secteur à la prise
d’alimentation secteur après avoir fait tous les autres
raccordements.
1
Raccordez les cordons d’enceinte aux enceintes.
Raccordez les cordons cuivrés aux bornes + et les cordons
argentés aux bornes –.
2
F
Raccordez les enceintes à l’unité principale.
Raccordez l’enceinte droite aux bornes SPEAKERS R et
celle de gauche aux bornes SPEAKERS L. Les cordons
d’enceinte cuivrés vont aux bornes 0.
40
3
Raccordez les antennes fournies.
Raccordez l’antenne FM à la borne FM 75 Ω tet l’antenne
AM à la prise AM LOOP.
Antenne FM
Antenne AM
4
Raccordez le cordon d’alimentation secteur à une
prise d’alimentation secteur.
L’horloge clignotera sur l’affichage.
Pour régler l’horloge, voir la page 44.
Enceintes
•Ne court-circuitez pas les fils des cordons d’enceinte 0 et
9.
•Ne laissez pas d’objet créant du courant magnétique ou
d’objets affectés par du courant magnétique à proximité des
enceintes.
Antennes
Maintenez les antennes éloignées d’objets métalliques,
d’appareils électriques et de cordons.
•Antenne FM: Déployez-la complètement en forme de T. Si
la réception est pauvre, raccordez une antenne extérieure
optionnelle aux bornes FM 75 Ω. Vérifiez de raccorder la
tresse de protection de l’antenne à la borne 2.
•Antenne AM: Tournez-la afin de trouver la meilleure
réception.
Télécommande
Détachez le couvercle du compartiment à piles qui se trouve
à l’arrière de la télécommande et insérez-y deux piles R6 (taille
AA) en respectant la polarité.
•Remplacez les piles par d’autres nouvelles lorsque la
distance de fonctionnement entre la télécommande et l’unité
principale diminue.
•Retirez les piles si l’unité n’est pas utilisée pendant une
longue période.
•La télécommande peut ne pas fonctionner si elle est exposée
en plein soleil ou si sa ligne de visée est obstaculisée.
Page 41

PARTIES ET CONTRÔLES
Unité principale: avant
1
2
3
4
5
6
1 dTAPE/REC MUTE
Démarre la lecture et change la face de lecture.
Aussi utilisée pour entrer un espace vierge de 4 secondes
pendant l’enregistrement.
TUNER/BAND
Sélectionne la fonction radio et la bande radio.
AUX
Sélectionne la fonction de l’appareil externe raccordé aux
prises AUX IN.
ECD
Démarre et met en pause la lecture.
2 wREC/REC PAUSE
Démarre et met en pause l’enregistrement.
SYNCHRO REC
Démarre l’enregistrement et la lecture d’un CD
simultanément.
7
8
9
0
!
sCLEAR
CD et cassette : arrête la lecture.
Radio: supprime une station préréglée.
3 ECO/DIMMER
Sélectionne le mode ECO et le mode dimmer (variation
d’intensité).
PRESET
Règle une station préréglée.
MODE
CD: sélectionne le mode lecture aléatoire et lecture
répétée.
Cassette : sélectionne un mode d’inversion.
DISPLAY
CD: affiche le numéro de la piste en cours de lecture et
la durée de lecture restante.
SET
Détermine le mode.
Mémorise la station à mettre en réception par préréglage.
4 POWER 6STANDBY/ON
Allume ou éteind (mode d’attente) l’unité.
5 BASS
Règle le niveau des graves.
6 TREBLE
Règle le niveaux des aigus.
7 f/r, t/g (TUNING DO WN, UP)
CD: saute à une piste précédente ou suivante quand on
appuie dessus, cherche une piste en lecture avance ou
recul rapide, quand on l’enfonce.
Cassette: rebobine ou avance rapidement la cassette.
Radio: règle manuellement vers le haut ou vers le bas
sur la bande.
8 zCD OPEN/CLOSE
Ouvre ou ferme le logement à disque.
9 VOLUME
Règle le volume.
0 zTAPE OPEN/CLOSE
Ouvre ou ferme le plateau à cassette.
! Prise PHONES
Branchez-y des écouteurs optionnels avec une mini fiche
stéréo (ø3,5 mm). La sortie des enceintes est annulée.
F
41
Page 42
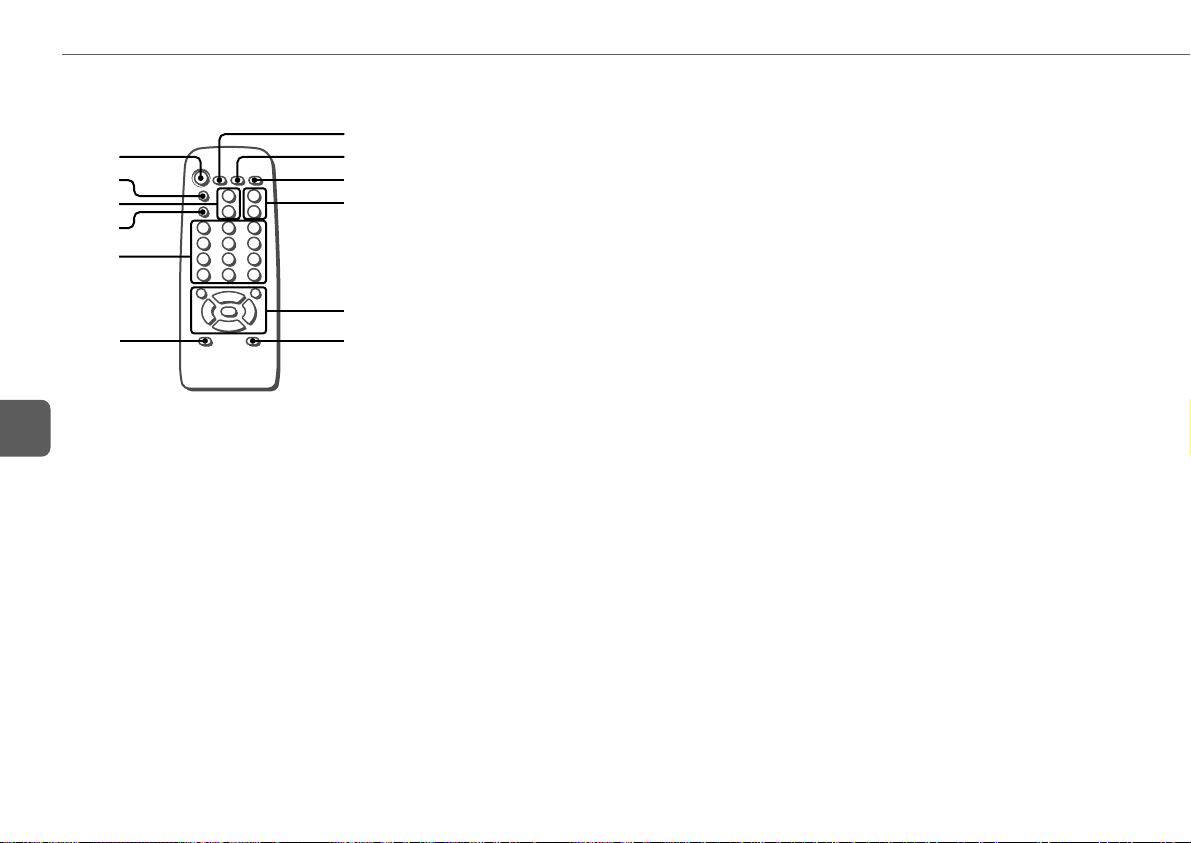
Télécommande
1
2
3
4
5
6
F
Les touches ayant le même nom ou un nom similaire à celles
de l’unité principale ont principalement les mêmes fonctions.
1 POWER
2 REC MODE
Sélectionne un mode d’enregistrement.
3 PRESET (N/M)
4 wREC/REC PAUSE
7
8
9
0
!
@
5 0–10, +10
CD: sélectionne une piste avec le numéro spécifié.
Radio : règle la station avec le numéro de préréglage
spécifié.
Les touches numérotées prennent ces fonctions lorsque vous
appuyez dessus tout en enfonçant SHIFT
PROGRAM
Sélectionne le mode lecture programmée d’un CD.
RANDOM/REPEAT
Sélectionne le mode lecture aléatoire ou répétée d’un CD.
TUNER MODE
Change entre la réception FM stéréo ou mono.
DISPLAY
CD: affiche le numéro de la piste en cours de lecture et
la durée de lecture restante.
TIMER
Sélectionne le mode réglage temporisé.
SLEEP
Sélectionne le mode réglage de la minuterie de sommeil.
CLOCK
Sélectionne le mode réglage de l’horloge.
CD EDIT/CHECK
Sélectionne le montage d’un enregistrement d’un CD.
6 SHIFT
Maintenez-la enfoncée tout en appuyant sur une touche
numérotée pour changer sa fonction à celle inscrite audessus du numéro.
7 REV MODE
Sélectionne un mode d’inversion.
:
8 SOUND
Sélectionne le mode réglage de BASS et TREBLE.
9 SET
0 VOLUME (+/–)
! sCLEAR
TUNER/BAND
AUX
dTAPE
ECD
f/r, t/g (DOWN, UP)
@ FUNCTION
Commute la fonction active parmi TAPE, TUNER, AUX et
CD.
42
Page 43

Unité principale: arrière
1
2
3
4
RÉGLAGES AVANT LA MISE EN MARCHE
dTAPE,
TUNER/BAND,
AUX, ECD
SET
ECO/DIMMER
POWER
6STANDBY/ON
f,g
VOLUME
POWER
CLOCK
fg
SHIFT
SET
VOLUME
(+/–)
1 Prise AM LOOP et borne FM 75 Ω
Branchez-y les antennes fournies AM et FM.
2 Prises AUX IN
Acceptent les signaux sonores analogiques provenant
d’appareils externes. Raccordez l’appareil externe en
utilisant un câble de connexion optionnel avec des fiches
phono RCA (la fiche rouge sur la prise R, la fiche blanche
sur la prise L).Reportez-vous également au mode
d’emploi de votre appareil.
Pour commuter la fonction sur une entrée externe,
appuyez sur AUX.
3 Bornes SPEAKERS3
Raccordez-y les cordons d’enceintes fournis des
enceintes fournies.
4 Prise DIGITAL OUT (OPTICAL)
À travers cette prise des signaux sonores numériques
qualité CD peuvent s’obtenir. Utilisez un câble optique
pour raccorder l’appareil audio numérique. Enlevez le
capuchon de protection contre la poussière de la prise
DIGITAL OUT (OPTICAL). Raccordez ensuite une fiche
de câble optique à la prise DIGITAL OUT (OPTICAL).
5 Cordon d’alimentation secteur
5
Alimentation
Pour allumer l’unité
Appuyez sur POWER 6 STANDBY/ON (POWER sur la
télécommande).
Alternativement, appuyez sur TAPE, TUNER/BAND, AUX ou
CD. La lecture commencera automatiquement si un disque
ou une cassette est introduit(e).
Pour éteindre l’unité
Appuyez de nouveau sur POWER 6STANDBY/ON.
L’unité se met en attente.
Pour régler le niveau d’entrée de l’appareil
raccordé aux prises AUX IN
Appuyez sur AUX pour sélectionner la fonction de
l’appareil raccordé aux prises AUX IN, puis appuyez
plusieurs fois surf ou g.
Le niveau d’entrée peut se régler à "NORMAL" ou
"–6 dB".
Volume
Tournez VOLUME (appuyez sur VOLUME (+/–) sur la
télécommande).
Réglez de 0 (minimum) à 49 et MAX (maximum).
Conseil:
Le réglage du niveau de volume est conservé lorsque l’appareil
est éteint—en attente. Si vous éteignez l’unité alors que le
volume est réglé sur 36 ou plus, il sera automatiquement
baissé à 35 la prochaine fois que l’unité sera allumée.
Pour changer le nom d’une source sur l’affichage
de la fonction AUX
Maintenez enfoncée AUX et appuyez sur POWER avec l’unité
allumée.
AUX VIDEO TV
43
F
Page 44

Mode d’économie d’énergie
Réduit la consommation d’énergie avec les opérations suivantes
Lorsque le mode économie d’énergie est réglé à
"ON" ou "AUTO"
•Lorsque l’unité s’éteint, toutes les indications de la fenêtre
d’affichage y compris l’horloge s’éteignent.
•Lorsque l’appareil s’allume par enregistrement temporisé
(page 53), l’éclairage de la fenêtre d’affichage est réglé à
"DIMMER 3", et tous les témoins des touches sont
coupés.
•La fenêtre d’affichage s’éclaire uniquement quand l’unité est
opérée. Lorsque l’unité est inopérée pendant 8 secondes,
l’éclairage passe au niveau choisi par le réglage
"DIM MODE". (Si l’éclairage est réglé à "DIM-OFF",
l’éclairage ne change pas.)
Lorsque le mode économie d’énergie est réglé à
"AUTO"
En plus des indications ci-dessus:
F
•Si la cassette et le CD sont arrêtés et aucun appareil externe
raccordé ne reçoit d’audio pendant 10 minutes, l’alimentation
se coupe. (À l’écoute de la radio, cependant, l’alimentation
ne se coupe pas automatiquement.)
1
Appuyez sur ECO/DIMMER avec l’unité allumée.
"ECO MODE" est affiché.
2
Dans les 8 secondes, appuyez sur SET.
L’état actuel du mode économie d’énergie est affiché.
Si le mode économie d’énergie est désactivé:
"ECO OFF"
Si le mode économie d’énergie est automatique :
"ECO AUTO"
Si le mode économie d’énergie est activé: "ECO ON"
3
Dans les 8 secondes, appuyez sur f ou g
pour sélectionner le mode économie d’énergie
souhaité.
4
Dans les 8 secondes, appuyez sur SET.
Consommation en attente
Lorsque le mode économie d’énergie est désactivé: 14 W
Lorsque le mode économie d’énergie est activé ou
automatique: 0,7 W
Si l’affichage de l’horloge clignote lorsque le mode
d’economie d’énergie est activé
Le mode d’economie d’énergie ne peut pas s’activer. Remettez
l’horloge à l’heure.
Dimmer (Variateur d’intensité)
L’éclairage de la fenêtre d’affichage peut être réglé aux quatre
niveaux suivants: "
"
DIMMER 2
"
DIM-OFF
Quand "
DIMMER 3
sombre, tous les témoins des touches sont coupés.
1
Appuyez deux fois sur ECO/DIMMER avec l’unité
allumée.
"DIM MODE" est affiché.
2
Dans les 8 secondes, appuyez sur SET.
L’éclairage actuellement sélectionné est affiché.
3
Dans les 8 secondes, appuyez sur f ou g
pour sélectionner l’éclairage souhaité.
4
Dans les 8 secondes, appuyez sur SET.
DIM-OFF
", et "
DIMMER 3
", "
DIMMER 1
".
" correspond au niveau avec plus d’éclairage.
" est sélectionné, l’afficheur est plus
Pour régler l’horloge
1
Maintenez enfoncée SHIFT et appuyez sur CLOCK
sur la télécommande.
Lorsque l’unité est éteinte, vous pouvez également appuyez
sur SET.
2
Appuyez sur f ou g pour régler l’heure.
Chaque pression change l’heure par étape d’une minute.
En maintenant ces touches pressées l’heure variera par
unités de 10 minutes.
Si f ou g n’est pas pressée dans les 8 secondes,
le réglage est annulé.
3
Appuyez sur SET.
L’affichage de l’heure cesse de clignoter et l’horloge
démarre à partir de 00 secondes.
",
Pour afficher l’heure quand l’unité est allumée
Maintenez enfoncée SHIFT et appuyez sur CLOCK sur la
télécommande.
L’heure s’affichera pendant 8 secondes.
Pour passer au système 24 heures
Affichez l’heure et appuyez sur s dans les 8 secondes.
Avec chaque pression, l’horloge alterne entre l’heure standard
de 12 et 24 heures .
Conseil:
Dans le système 12 heures, "AM12:00" indique qu’il est
minuit et "PM12:00" qu’il est midi.
Si l’affichage de l’horloge clignote quand l’unité est
éteinte
Il y a eu une coupure de courant. Refaites le réglage de
l’horloge.
44
Page 45

POUR OPÉRER LE CD
s
MODE
DISPLAY
Cette unité lit des disques CD-R/RW finalisés ainsi que des CD
audio.
Pour lire un CD
1
Appuyez sur zCD OPEN/CLOSE pour ouvrir le
logement à disque.
Placez un disque avec l’étiquette tournée vers le haut. Puis
fermez le logement à disque en appuyant sur zCD OPEN/
CLOSE.
2
Appuyez sur E pour démarrer la lecture.
Pour arrêter la lecture
Appuyez sur s.
ECD
f,g
zCD OPEN/
CLOSE
PROGRAM
DISPLAY
f
SHIFT
s
Pour mettre en pause la lecture
Appuyez sur E. Appuyez de nouveau pour reprendre la
lecture.
Pour sauter au début de la piste actuelle/précédente/
suivante
Appuyez plusieurs fois sur f ou g .
Pour faire une recherche (lecture en avance ou recul
rapide)
Maintenez enfoncée f ou g. Relâchez-la à l’endroit
souhaité.
Pour sélectionner une piste avec la télécommande
(Lecture directe)
Appuyez sur les touches numérotées pour sélectionner une
piste.
- Pour sélectionner la piste 25, appuyez sur +10, +10 et 5.
- Pour sélectionner la piste 11, appuyez sur +10 et 1.
Pour changer d’affichage en mode de lecture
Appuyez sur DISPLAY (maintenez enfoncée SHIFT et appuyez
sur DISPLAY sur la télécommande) pendant la lecture.
RANDOM/
REPEAT
0–10, +10
ECD
g
L’affichage change dans l’ordre suivant:
1 Numéro de la piste en cours de lecture et temps écoulé
de lecture
2 Durée restante du disque
•Le temps restant de lecture ne peut pas s’afficher pendant la
lecture alétoire ou la lecture programmée.
Lecture aléatoire/répétée
Dans le mode lecture aléatoire, l’unité lit toutes les pistes dans
un ordre aléatoire. Dans le mode lecture répétée, elle lit de
façon répétée toutes les pistes ou la piste en cours de lecture.
Vous pouvez sélectionner à la fois la lecture aléatoire et la
lecture répétée de toutes les pistes.
1
Appuyez plusieurs fois sur MODE (maintenez
enfoncée SHIFT et appuyez sur RANDOM/
REPEAT sur la télécommade) pour sélectionner
un des modes suivants:
"" 1": Lecture répétée d’une piste
""": Lecture répétée de toutes les pistes
"RANDOM": Lecture aléatoire
"RANDOM "": Lecture aléatoire/répétée de toutes les
pistes
2
Appuyez sur E pour démarrer la lecture.
Pour annuler la lecture aléatoire/répétée
Appuyez plusieurs fois sur MODE (maintenez enfoncée SHIFT
et appuyez sur RANDOM/REPEAT sur la télécommade) jusqu’à
ce que "RANDOM", "" 1" ou """ disparaisse.
La sélection directe des pistes avec les touches numérotées
annule le mode lecture aléatoire.
Pour répéter un programme de pistes sélectionné
Sélectionnez d’abord les pistes avec la lecture programmée
(voir "Lecture programmée" à la page 46).
Puis sélectionnez la lecture répétée.
F
45
Page 46

Lecture programmée
Lit jusqu’à 30 pistes sélectionnées dans un ordre programmé.
1
Maintenez enfoncée SHIFT et appuyez sur
PROGRAM sur la télécommande en mode arrêt.
"PRGM" clignote sur l’affichage.
2
Appuyez sur les touches numérotées de la
télécommande pour programmer une piste.
-Pour sélectionner la piste 25, appuyez sur +10, +10 et 5.
-Pour sélectionner la piste 11, appuyez sur +10 et 1.
Le numéro sélectionné s’allume sur l’affichage.
3
Répétez l’étape 2 pour programmer d’autres
pistes.
Le nombre total des pistes sélectionnées et le temps total
de lecture s’afficheront.
4
Appuyez sur E pour démarrer la lecture.
F
Le numéro de la piste actuelle clignote sur l’affichage.
•Pendant la lecture programmée. Vous ne pouvez pas
sélectionner de piste avec les touches numérotées.
"Can’t USE" s’affiche quand vous essayez de sélectionner
une piste.
•Si le temps total de lecture du programme dépasse 99
minutes et 59 secondes, ou si une piste au numéro supérieur
à 30 est programmée, le temps de lecture est affiché sous
"- -:- -".
•Vous ne pouvez pas programmer plus de 30 pistes. "FULL"
est affiché.
Pour vérifier le programme
Appuyez plusieurs fois sur f ou g en mode arrêt. Le
numéro de la piste et le numéro du programme s’affichent
successivement.
Pour effacer le programme
Appuyez sur s en mode arrêt. "PRGM" disparaît de
l’affichage.
Pour ajouter des pistes au programme
Répétez l’étape 2 avant de démarrer la lecture. Les pistes sont
ajoutées à la fin du programme.
Pour changer les pistes programmées
Effacez le programme et répétez de nouveau toutes les étapes.
Remarques sur les CD
•N’introduisez pas plus d’un disque.
•Ne soulevez pas l’unité si un disque se trouve à l’intérieur.
•L’unité peut ne pas lire de disques CD-R/RW enregistrés
sur un ordinateur personnel ou sur certain type
d’enregistreur de CD-R/RW.
•Ne collez d’étiquette adhésive sur aucun des côtés des
disques CD-R/RW, au risque d’entraîner un mauvais
fonctionnement.
•N’introduisez pas de disque vierge CD-R/RW. Le disque
pourrait s’endommager.
•N’utilisez pas de CD avec des formes irrégulières.
46
Page 47

POUR OPÉRER LA RADIO
TUNER/BAND
sCLEAR
PRESET
MODE
Réglage manuel
1
Appuyez plusieurs fois sur TUNER/BAND pour
sélectionner une bande.
L’unité passe d’une fonction quelconque à la
fonction radio et alterne entre FM et AM.
2
Appuyez plusieurs sur f ou g pour régler
une station.
"TUNE" est affiché lorsqu’une station est réglée.
"STEREO" est affiché s’il s’agit d’une réception FM
stéréo.
Pour rechercher une station automatiquement
(Recherche automatique)
Maintenez enfoncée f ou g.
L’unité recherche une station et s’arrête lorsque celle-ci est
trouvée.
Pour arrêter la recherche manuellement, appuyez sur f
ou g.
•La recherche automatique peut ne pas s’arrêter sur des
stations à faibles signaux.
f,g
SET
PRESET
(N,M)
POWER
fg
TUNER/BAND
SHIFT
SET
TUNER MODE
0–10, +10
sCLEAR
Réglage programmé
Présélectionnez jusqu’à 32 de vos stations préférées et réglezles directement.
Programmation manuelle
1
Réglez la station souhaitée.
2
Appuyez sur SET pour mémoriser la station.
Le numéro de préréglage, commençant par "1", clignote
sur l’affichage.
3
Répétez les étapes 1 et 2 pour programmer
d’autres stations.
La station suivante ne sera pas mémorisée si 32 stations
préréglées au total ont déjà été mémorisées.
("FULL" est affiché.)
•L’unité peut mémoriser un total de 20 stations pour chaque
bande. Cependant, elle peut mémoriser uniquement un total
de 32 stations préréglées.
•Si l’alimentation est interrompue pendant plus de 12 heures,
tous les réglages mémorisés après l’achat doivent être réglés
à nouveau.
Réception des stations préréglées
1
Sélectionnez la bande.
2
Appuyez plusieurs fois sur PRESET (N,M).
Avec chaque pression, la station au numéro de préréglage
suivant est reçue.
Vous pouvez directement mettre en réception la station
préréglée que vous souhaitez en appuyant sur les touches
numérotées de la télécommande.
- Pour sélectionner le numéro préréglage 11, appuyez sur
+10 et 1.
- Pour sélectionner le numéro préréglage 15, appuyez sur
+10 et 5.
Pour effacer une station préréglée
1 Mettez la station par réception préréglée.
2 Appuyez surs, puis appuyez sur SET dans les 8 secondes.
Les numéros des stations préréglées sur la bande supérieurs
au numéro qui a été effacé diminueront d’une unité.
F
47
Page 48

Réglages
RÉGLAGES DU SON
Pour passer à une réception FM monophonique
Appuyez sur MODE (maintenez enfoncée SHIFT et appuyez
sur TUNER MODE sur la télécommande) afin que "MONO"
soit affiché.
Pour annuler, appuyez plusieurs fois sur MODE (maintenez
enfoncée SHIFT et appuyez sur TUNER MODE sur la
télécommande).
Conseil:
Lorsque la réception FM stéréo est faible, le passage à
monophonique réduit les bruits.
Pour passer à l’intervalle d’accord AM
Le réglage par défaut de l’intervalle de réception AM est de
10 kHz/pas. Si vous utilisez cette unité dans une zone où le
système d’allocation de fréquences est de 9 kHz/pas, changez
l’intervalle d’accord.
Maintenez enfoncée TUNER/BAND et appuyez sur POWER.
F
Conseil:
Lorsque l’intervalle d’accord AM est changé, toutes les stations
préréglées sont annulées.
BASS
TREBLE
BASS
Réglez le niveau des graves.
On the main unit
Tournez BASS.
Le niveau des graves peut être réglé de "–5" to"+5".
Sur la télécommande
Appuyez plusieurs fois sur SOUND afin que "BAS" est
affiché, et appuyez sur f ou g pour régler le niveau.
•Si le son devient distorsionné avec l’effet BASS, annulezle.
SOUND
fg
TREBLE
Réglez le niveau des aigus.
Sur l’unité principale
Tournez TREBLE.
Le niveau des aigus peut être réglé de "–5" to"+5".
Sur la télécommande
Appuyez plusieurs fois sur SOUND afin que "TRE" est affiché
et appuyez sur f ou g pour régler le niveau.
•Si le son devient distorsionné avec l’effet TREBLE, annulezle.
48
Page 49

LECTURE DES CASSETTES
s
SYNCHRO REC
wREC/
REC PAUSE
MODE
Lecture
Utilisez des cassettes du type I (normale) ou du type II (haute/CrO2).
1
Appuyez sur zTAPE OPEN/CLOSE pour ouvrir
le plateau à cassette.
2
Insérez la cassette.
Insérez-la avec le côté exposé dirigé vers l’avant, et
appuyez sur zTAPE OPEN/CLOSE pour refermer le
plateau à cassette.
3
Appuyez sur d pour démarrer la lecture.
Pour sélectionner un mode d’inversion
Appuyez plusieurs fois sur MODE (REV MODE sur la
télécommande).
dTAPE/
REC MUTE
f,g
zTAPE OPEN/
CLOSE
REC MODE
wREC/
REC PAUSE
fg
s
•Pour lire une seule face, sélectionnez p.
•Pour lire depuis la face dirigée vers le haut judqu’à la face
contraire une seule fois, sélectionnez [.
•Pour lire les faces plusieurs fois, sélectionnez ].
Pour arrêter la lecture
Appuyez sur s.
Pour changer la face de lecture
Appuyez sur d en mode lecture.
Pour rembobiner ou avancer rapidement
Appuyez sur f ou g.
Pour remettre le compteur de bande à zéro
Appuyez sur s en mode arrêt, et le compteur de bande sur
l’affichage est remis à "0000".
L’ouverture et la fermeture du plateau à cassette remettront
également à zéro le compteur de bande.
Remarques sur les cassettes
•Il est déconseillé d’utiliser des cassettes de 120 minutes ou
plus car elles sont si fines qu’elles peuvent facilement se
déformer ou s’endommager.
REV MODE
0–10, +10
CD EDIT/CHECK
dTAPE
•Tendez la bande à l’aide d’un crayon ou autre instrument
similaire avant de l’utiliser. Une bande détendue peut
s’emmêler dans le mécanisme.
Détecteur de musique
S’il y a un espace vierge de 4 secondes ou plus entre deux
précédente pistes, la recherche du début de la piste présente
ou de la piste suivante peut se faire facilement pendant la
lecture.
Quand l’indicateur X de l’afficheur est visible, appuyez sur
la touche f pour passer à la piste précédente, ou sur la
touche g pour passer au début de la piste présente.
Quand l’indicateur C de l’afficheur est visible, appuyez sur
la touche g pour passer à la piste suivante, ou sur la touche
f pour passer au début de la piste présente.
La fonction de recherche peut être incapable de détecter des
pistes dans les conditions suivantes:
•Espaces vierges de moins de 4 secondes entre les pistes
•Espaces vierges parasités
•Longs passages à son très bas
•Niveau d’enregistrement général bas
F
49
Page 50

ENREGSTREMENT SUR CASSETTE
Enregistrement de base
Utilisez des cassettes du type I (normale) ou du type II (haute/CrO2).
1
Appuyez sur zTAPE OPEN/CLOSE pour ouvrir
le plateau à cassette.
2
Insérez la cassette à enregistrer.
Insérez-la avec le côté exposé dirigé vers l’avant, et la
face à enregistrer dirigée vers le haut. Appuyez sur
zTAPE OPEN/CLOSE pour refermer le plateau à cassette.
3
Appuyez sur FUNCTION sur la télécommande
pour sélectionner la fonction TAPE.
4
Appuyez sur MODE (REV MODE sur la
télécommande) pour sélectionner la source à
enregistrer.
Pour enregistrer sur une seule face, sélectionnez p.
Pour enregistrer sur les deux faces, sélectionnez [.
5
Appuyez sur FUNCTION sur la télécommande
F
pour sélectionner la source à enregistrer.
6
Préparez la source.
Pour enregistrer un CD, chargez un disque.
Pour enregistrer une émission de radio, réglez la station
souhaitée.
Pour enregistrer depuis un appareil externe raccordé,
appuyez sur AUX et préparez l’appareil.
7
Appuyez deux fois sur w REC/REC PAUSE pour
démarrer l’enregistrement.
À l’enregistrement d’un CD, la lecture du CD démarre
automatiquement.
À l’enregistrement d’une entrée depuis un appareil
raccordé, démarrez manuellement la lecture de la source.
•Le(s) réglage(s) du volume et de la tonalité sont sans effets
sur l’enregistrement.
Lorsque la cassette arrive à la fin de la bande, l’enregistrement
s’arrête.
50
Pour démarrer l’enregistrement d’un CD plus
facilement
Insérez la cassette à enregistrer, chargez le disque et appuyez
sur SYNCHRO REC. Indépendamment de la fonction
actuellement sélectionnée, la lecture du CD et l’enregistrement
de la cassette démarrent simultanément.
•En mode arrêt de CD, l’enregistrement sur cassette démarre
depuis le début de la piste.
Lorsque la lecture du CD s’arrête, l’enregistrement sur
cassette s’arrête simultanément.
•En mode lecture de CD, uniquement la piste en cours est
enregistrée.
Lorsque la piste en cours termine, l’enregistrement sur
cassette s’arrête. Pour arrêter la lecture du CD, appuyez sur
s.
Pour arrêter l’enregistrement
Appuyez sur s.
Pour mettre en pause l’enregistrement (uniquement
pour la source TUNER ou AUX)
Appuyez sur w REC/REC PAUSE. Appuyez de nouveau pour
reprendre.
Pour enregistrer un programme de pistes sélectionné
depuis un CD
Programmez les pistes souhaitées (voir "Lecture
programmée") et appuyez ensuite sur SYNCHRO REC.
Pour démarrer l’enregistrement avec la
télécommande
Appuyez plusieurs fois sur REC MODE pour afficher "SYNC
REC" ou "REC".
SYNC REC: enregistrement du CD
REC: enregistrement de la radio, du CD ou d’un appareil
externe raccordé
Puis appuyez sur w REC/REC PAUSE pour démarrer
l’enregistrement.
Si "REC", est sélectionné, appuyez de nouveau sur w REC/
REC PAUSE pour démarrer l’enregistrement.
Pour enregistrer un espace vierge de 4 secondes
(uniquement pour la source TUNER ou AUX)
L’insertion d’un espace vierge de 4 secondes peut vous aider à
localiser le début de la piste.
1 Appuyez sur dTAPE/REC MUTE lors de l’enregistrement
ou en mode pause d’enregistrement.
"REC MUTE" clignote sur l’affichage pendant 4 secondes
(un espace vierge est ajouté) et ensuite l’unité entre en mode
pause d’enregistrement.
2 Appuyez sur w REC/REC PAUSE pour reprendre
l’enregistrement.
Pour effacer une cassette
1 Insérez la cassette. Réglez la bande à l’emplacement souhaité
le cas échéant.
2 Appuyez sur AUX.
Si un appareil optionnel est raccordé aux prises AUX IN,
éteignez-le.
3 Appuyez deux fois sur w REC/REC PAUSE.
Page 51

Montage de l’enregistrement d’un CD
Enregistrement avec montage AI
Préparatifs
Préparez une cassette ayant une durée supérieure à celle du
CD.
À l’enregistrement de tout un CD, l’enregistrement avec montage
AI tient compte de la longueur de votre cassette et réarrange le
cas échéant, l’ordre d’enregistrement des pistes afin qu’aucune
piste ne soit coupée à la fin de la face.
(AI : Artificial Intelligence — Intelligence artificielle)
•L’enregistrement ne peut pas démarrer en milieur de bande.
•L’enregistrement avec montage AI ne peut pas s’utiliser avec
des disques contenant plus de 30 pistes.
1
Insérez la cassette à enregistrer.
2
Appuyez sur FUNCTION sur la télécommande
pour sélectionner la fonction CD, et chargez le
disque.
3
Maintenez enfoncée SHIFT et appuyez sur CD
EDIT/CHECK sur la télécommande en mode arrêt.
"AI EDIT" et "AI C--00" sont affichés.
4
Appuyez sur les touches numérotées sur la
télécommande pour saisir la longueur de la
cassette à enregistrer.
Vous pouvez spécifier de 10 à 99 minutes.
- Pour une cassette de 60 minutes appuyez sur 6 et 0.
En quelques secondes l’unité détermine les pistes à
enregistrer sur chaque face.
La durée d’enregistrement laissée pour la face A apparaît
sur l’affichage.
•f ou g peut également s’utiliser pour spécifier
la longueur de la cassette.
5
Appuyez sur SYNCHRO REC pour démarrer
l’enregistrement.
Lorsque vous démarrez l’enregistrement avec la
télécommande, appuyez plusieurs fois sur w REC MODE
pour afficher "SYNC REC", puis appuyez sur REC/REC
PAUSE.
La cassette est rembobinée jusqu’au début de la face
dirigée vers le haut, "REC MUTE" clignote sur
l’affichage et le segment d’en-tête est lu pendant 10
secondes, puis l’enregistrement démarre.
Lorsque l’enregistrement sur la face dirigée vers le haut
(face A) termine, l’enregistrement sur la face contraire (face
B) démarre.
Montage d’un enregistrement programmé
En programmant les pistes d’un CD à enregistrer, le montage
d’un enregistrement programmé affiche le temps restant
d’enregistrement pour chaque face de la cassette, afin que
vous puissiez sélectionner facilement un programme de pistes
souhaitées en respectant la longueur de votre cassette.
•L’enregistrement ne peut pas démarrer en milieu de bande.
•Vous ne pouvez pas programmer plus de 30 pistes.
•Vous ne pouvez pas programmer une piste ayant un numéro
supérieur à 30.
1
Insérez la cassette à enregistrer.
2
Appuyez sur FUNCTION sur la télécommande
pour sélectionner la fonction CD, et chargez le
disque.
3
Maintenez enfoncée SHIFT et appuyez deux fois
sur CD EDIT/CHECK sur la télécommande en
mode arrêt.
"PRGM EDIT" et "PRGM C--00" sont s’affichés.
4
Appuyez sur les touches numérotées sur la
télécommande pour saisir la longueur de la
cassette à enregistrer.
Vous pouvez spécifier de 10 à 99 minutes.
- Pour une cassette de 60 minutes, appuyez sur 6 et 0.
•f ou g peut également s’utiliser pour spécifier
la longueur de la cassette.
5
Appuyez sur les touches numérotées sur la
télécommande pour sélectionner la première piste
à enregistrer sur la face A.
-Pour sélectionner la piste 25, appuyez sur +10, +10 et 5.
-Pour sélectionner la piste 11, appuyez sur +10 et 1.
6
Répétez l’étape 5 pour sélectionner le reste des
pistes pour la face A.
Le temps restant d’enregistrement de la face A s’affiche.
Vous ne pouvez pas sélectionner une piste ayant une durée
de lecture supérieure.
7
Maintenez enfoncée SHIFT et appuyez sur CD
EDIT/CHECK sur la télécommande pour passer à
la face B et sélectionnez les pistes pour la face.
8
Appuyez sur SYNCHRO REC pour démarrer
l’enregistrement.
Lorsque vous démarrez l’enregistrement avec la
télécommande, appuyez plusieurs fois sur REC MODE
pour afficher "SYNC REC", puis appuyez sur wREC/
REC PAUSE.
La cassette est rembobinée jusqu’au début de la face
dirigée vers le haut "REC MUTE" clignote sur l’affichage
et le segment d’en-tête est lu pendant 10 secondes, puis
l’enregistrement démarre.
Lorsque l’enregistrement sur la face dirigée vers le haut
(face A) termine, l’enregistrement sur la face contraire
(face B) démarre.
Pour arrêter l’enregistrement
Appuyez sur s. L’enregistrement et la lecture du CD s’arrêtent
simultanément.
Pour vérifier le programme
1 Avant d’enregistrer, maintenez enfoncée SHIFT et appuyez
sur CD EDIT/CHECK sur la télécommande pour sélectionner
la face A ou B.
2 Appuyez plusieurs fois sur f ou g. Le numéro de
la piste et le numéro du programme s’affichent
successivement.
Pour changer le programme de chaque face
Maintenez enfoncé SHIFT et appuyez sur CD EDIT/CHECK
sur la télécommande pour sélectionner la face A ou B, et
appuyez sur s pour supprimer le programme de la face
sélectionnée. Ensuite, sélectionnez de nouveau des pistes.
Pour supprimer le montage programmé
Appuyez deux fois sur s.
51
F
Page 52

Pour empêcher des effacements accidentels
Brisez la languette de la cassette avec un tournevis ou autre
outil pointu.
POUR OPÉRER LA MINUTERIE
f,g
SET
POWER
TIMER
SET
SLEEP
Face A
Fente de détection
dela cassette
du type II.
F
Pour enregistrer de nouveau sur la cassette, recouvrez les
ouvertures de la languette avec du ruban adhésif. (Sur les
cassettes du type II, prenez soin de ne pas recouvrir la fente
de détection de cassette du type II.)
Languette
de la face A
52
POWER
6STANDBY/ON
Minuterie de sommeil
Eteint automatiquement l’unité au bout d’une durée spécifiée
1
Maintenez enfoncée SHIFT et appuyez sur SLEEP
sur la télécommande.
"SLEEP" est affiché.
2
Appuyez plusieurs fois sur f ou g pour
régler la durée de la minuterie de sommeil.
À chaque pression, la durée d’activation temporisée
change par étapes de 5 minutes, entre 5 et 240 minutes.
S’il n’y a aucune entrée de touche pendant 8 secondes, le
réglage actuel est automatiquement saisi. L’unité s’éteint
à la fin de la durée sélectionnée.
Pour vérifier la durée restante avant que l’unité
s’éteigne
Maintenez enfoncée SHIFT et appuyez sur SLEEP sur la
télécommande. La duré restante est affichée pendant 8
secondes.
Pour annuler la minuterie de sommeil
Maintenez enfoncée SHIFT et appuyez plusieurs fois sur
SLEEP sur la télécommande afin que "SLEEPoFF" s’affiche.
fg
SHIFT
Lecture temporisée
Allume l’unité à une heure spécifiée pendant la durée spécifiée.
Vérifiez que l’horloge est à l’heure.
1
Maintenez enfoncée SHIFT et appuyez plusieurs
fois sur TIMER sur la télécommande afin que "5"
s’allume et "5 PLAY" s’affiche.
2
Dans les 8 secondes, appuyez sur SET.
3
Appuyez sur f ou g pour régler l’heure
d’activation temporisée et appuyez sur SET.
Chaque pression change l’heure par étape d’une minute.
En maintenant ces touches pressées l’heure variera par
unités de 10 minutes.
4
Appuyez sur f ou g pour sélectionner la
source, et appuyez sur SET.
•Pour la lecture temporisée d’un CD, sélectionnez "CD".
•Pour la lecture temporisée d’une cassette, sélectionnez
"TAPE".
•Pour la lecture temporisée d’une émission de radio,
sélectionnez "TUNER". Vous sélectionnerez la bande
plus tard dans l’étap 7.
•Pour la lecture temporisée de l’appareil raccordé aux
prises AUX IN, sélectionnez "AUX".
Page 53

5
Appuyez sur f ou g pour régler la durée
d’activation temporisée, puis appuyez sur SET.
À chaque pression, la durée d’activation temporisée
change par étapes de 5 minutes entre 5 et 240 minutes.
6
Appuyez sur f ou g pour régler le volume
pour la lecture temporisée, et appuyez sur SET.
Le niveau du volume peut être réglé de 0 à 35.
7
Préparez la source.
Pour lire un CD, chargez un disque.
Pour lire une cassette, insérez la cassette.
Pour lire la radio, sélectionnez la bande et réglez la station
souhaitée.
Pour lire l’appareil externe raccordé aux prises AUX IN,
réglez une minuterie externe pour l’appareil afin que la
lecture commence en même temps.
8
Appuyez sur POWER 6STANDBY/ON (POWER)
pour éteindre l’unité.
"5"reste sur l’affichage pour indiquer le mode d’attente
de la minuterie (quand le mode ECO est désactivé).
À l’heure de l’allumage temporisé, l’unité s’allume et lit la
source sélectionnée. Après la durée spécifiée d’activation
temporisée, l’unité s’éteint à nouveau.
•La lecture temporisée ne commencera pas si l’unité n’a pas
été éteinte d’abord.
•L’appareil raccordé ne peut pas être allumé ou éteint par la
minuterie intégrée de cette unité. Utilisez une minuterie
externe.
Enregistrement temporisé
L’enregistrement temporisé est également disponible pour les
sources TUNER et AUX (avec une minuterie externe).
1
Maintenez enfoncée SHIFT et appuyez plusieurs
fois sur TIMER sur la télécommande afin que "5
REC" lights up and "5 REC" s’affiche.
2
Dans les 8 secondes, appuyez sur SET.
3
Appuyez sur f ou g pour régler l’heure
d’activation temporisée et appuyez sur SET.
Chaque pression change l’heure par étape d’une minute.
En maintenant ces touches pressées l’heure variera par
unités de 10 minutes.
4
Appuyez sur f ou g pour sélectionner la
source, et appuyez sur SET.
•Pour l’enregistrement temporisé d’une émission de
radio, sélectionnez "TUNER". Vous sélectionnerez la
bande plus tard dans l’étape 7.
•Pour l’enregistrement temporisé de l’appareil raccordé
aux prises AUX IN, sélectionnez "AUX".
5
Appuyez sur f ou g pour régler la durée
d’activation temporisée, puis appuyez sur SET.
À chaque pression, la durée d’activation temporisée
change par étapes de 5 minutes, entre 5 et 240 minutes.
6
Appuyez sur f or g pour régler le volume
pour l’enregistrement temporisé, et appuyez sur
SET.
Le niveau du volume peut être réglé de 0 à 35.
7
Préparez la source.
Pour enregistrer la radio, sélectionnez la bande et réglez
la station souhaitée.
Pour enregistrer l’appareil raccordé aux prises AUX IN,
réglez une minuterie externe pour l’appareil afin que la
lecture commence en même temps.
8
Insérez la cassette à enregistrer puis éteignez
l’unité.
"5 REC" reste sur l’affichage pour indiquer le mode
d’attente de la minuterie (quand le mode ECO est
désactivé).
À l’heure de l’allumage temporisé, l’unité s’allume et
enregistre la source sélectionnée. Après la durée spécifiée
d’activation temporisée, l’unité s’éteint de nouveau.
•L’appareil raccordé ne peut pas s’allumer et s’éteindre par la
minuterie incorporée de cette unité. Utilisez une minuterie
externe.
Pour vérifier le réglage de la minuterie
Maintenez enfoncée SHIFT et appuyez plusieurs fois sur
TIMER sur la télécommande afin que "5 PLAY" ou "5
REC" apparaisse sur l’affichage.
L’heure d’allumage temporisé, la source et la durée d’activation
temporisée sont affichées pendant 8 secondes.
Pour changer le réglage de la minuterie
Réglez de nouveau la minuterie.
Pour annuler la minuterie.
Maintenez enfoncée SHIFT et appuyez plusieurs fois sur
TIMER sur la télécommande jusqu’à ce que "5 OFF"
s’affiche. "5" ou "5 REC" disparaît de l’affichage.
Conseil :
Votre réglage de minuterie est conservé même si la minuterie
est annulée. La prochaine fois que la minuterie sera activée,
vous pourrez changer votre précédent réglage, ou simplement
utiliser de nouveau le même réglage.
F
53
Page 54

RÉFÉRENCE
Entretien et maintenance
L’entretien et la maintenance occasionnels de l’unité et du
logiciel sont nécessaires pour optimiser le rendement de votre
unité.
Pour nettoyer le meuble
Utilisez un chiffon doux et sec. Si les surfaces de l’unité sont
extrêmement sales, utilisez un chiffon doux légèrement imbibé
d’une solution nettoyante. N’utilisez pas de solvants forts tels
que l’alcool, le benzène ou le diluant.
Pour nettoyer les têtes de la platine cassette
Des têtes de platine cassette sales entraînent une détérioration
du son. Toutes les 10 heures d’utilisation, nettoyez les têtes
avec une cassette de nettoyage de têtes. Consultez le mode
d’emploi de la cassette de nettoyage.
Pour démagnétiser les têtes de la platine cassette
Utilisez une cassette démagnétisante à la suite de 20 à 30
heures d’utilisation. Consultez le mode d’emploi de la cassette
F
démagnétisante.
Entretien des CD
Lorsqu’un CD se salit, essuyez-le du centre vers l’extérieur
avec un chiffon de nettoyage. Après avoir lu un CD, rangez-le
dans son boîtier. Ne le placez pas dans un endroit chaud ou
humide. Entretien des CD.
Entretien des cassettes
Rangez les cassettes dans leur boîtier après les avoir utilisées.
Ne laissez pas les cassettes près d’aimants, de moteurs, de
téléviseurs ou de toute source magnétique. N’exposez pas les
cassettes en plein soleil, ou ne les laissez pas dans une voiture
garée en plein soleil.
54
Guide de dépannage
Si votre appareil cesse de fonctionner correctement, suivez le
guide suivant et les sections appropriées de ce mode d’emploi.
Il n’y a pas de son
•Les enceintes et le cordon d’alimentation secteur sont-ils
raccordés correctement?
L’unité s’est brusquement éteinte
•Il y a possiblement un court-circuit sur les bornes des
enceintes. Débranchez le cordon d’alimentation secteur de
la prise secteur et raccordez de nouveau les cordons
d’enceintes correctement.
Affichage erroné
•Réglez de nouveau l’unité. (Voir "Comment réinitialiser
l’unité" sur cette page.)
Faible réception radio
•Vérifiez la connexion de l’antenne. Ajustez l’antenne pour
trouver la meilleure réception.
•Placez l’appareil et l’antenne à l’écart d’autres appareils
électriques et de cordons.
Son faible de la cassette
•Vérifiez si les têtes sont sales. Nettoyez-les le cas échéant.
Enregistrement impossible
•La languette pour éviter tout effacement est-elle brisée? Si
oui, recouvrez la fente de détection avec du ruban adhésif.
Le lecteur CD marche mal
•Le disque est-il correctement introduit?
•Le disque est-il sale?
•La lentille est-elle affectée par la condensation? Si c’est le
cas, attendez approximativement une heure et essayez de
nouveau.
Condensation
De l’humidité peut se former sur la lentille de lecture du CD
quand:
•L'appareil est déplacé d'un endroit froid à un endroit chaud
•Le chauffage vient juste d'être allumé
•L'appareil est utilisé dans une pièce humide
•L'appareil est refroidi par un climatiseur
Quand il y a condensation dans l'appareil, il ne fonctionne
pas normalement. Dans ce cas, laissez l'appareil tel quel
quelques heures avant d'essayer à nouveau de le faire
fonctionner.
Comment réinitialiser l’unité
Si un problème inhabituel se produit sur la fenêtre d’affichage
ou la platine cassette, refaites le réglage de l’unité de la manière
suivante :
1 Appuyez sur POWER pour couper l’alimentation.
Si l’alimentation ne peut pas se couper, débranchez le cordon
d’alimentation secteur, puis rebranchez-le.
2 Maintenez enfoncée s et appuyez sur POWER.
Tout ce qui a été mémorisé après l’achat est supprimé.
Page 55

Spécifications
UNITÉ PRINCIPALE CX-LEM70
TUNER
Plage d’accord FM 87,5 MHz à 108 MHz
Sensibilité utilisable FM (IHF)13,2 dBf
Borne d’antenne FM 75 ohms (asymétrique)
Plage d’accord AM 530 kHz à 1710 kHz
(étapes de 10 kHz)
531 kHz à 1602 kHz
(étapes de 9 kHz)
Sensibilité utilisable AM 350 µV/m
Antenne AM Antenne cadre
AMPLIFICATEUR
Sortie de puissance 28 W + 28 W (40 Hz - 20 kHz, DHT
Moins de 1%, 6 ohms)
35 W + 35 W (1 kHz, DHT 10 %,
6 ohms)
Distorsion harmonique totale 0,15 % (17,5 W, 1kHz, 6 ohms, DIN
AUDIO)
Entrée AUX IN: 700 mV
Sorties SPEAKERS: 6 ohms ou plus
PHONES: 32 ohms ou plus
Prise DIGITAL OUT (OPTICAL)
PLATINE CASSETTE
Format de piste 4 pistes, 2 canaux stéréo
Réponse en fréquence 50 Hz-15000 Hz
Système d’enregistrement Polarisation c.a.
Têtes 1 tête lecture/enregistrement,
1 tête effacement
LECTEUR CD
Laser Laser semi-conducteur (λ = 780nm)
Convertisseur N-A 1 bit double
Rapport signal/bruit 88 dB (1 kHz, 0 dB)
Distorsion harmonique Non mesurable (1 kHz, 0 dB)
Pleurage et scintillement Non mesurable
GÉNÉRALITÉS
Alimentation 120 V secteur, 60 Hz
Consommation 60 W
Consommation en mode d’attente
Avec le mode ECO activé ou AUTO:
0,7 W
Avec le mode ECO désactivé: 14 W
Dimensions (L × H × P) 191,5 × 249,0 × 389,0 mm
Poids 5,3 kg
SYSTÈME ACOUSTIQUE SX-LEM70
Système d’enceintes Basse réflexe, à 2 voies (à blindage
magnétique)
Unités de haut-parleurs Enceinte de basses: cône de 120 mm
Enceinte d’aigus: voûte de 25 mm
Impédance 6 ohms
Dimensions (L × H × P) 155 × 250 × 218 mm
Poids 2,4 kg
Les spécifications et l’apparence externe sont sujettes à des
modifications sans préavis.
DROITS D’AUTEUR
Veuillez vérifier les lois concernant les droits d’auteur des
enregistrements des disques, de la radio ou de cassettes
extérieures du pays dans lequel cet appareil est utilisé.
REMARQUE
Cet appareil a été testé et jugé conforme aux limites des
appareils numériques de Classe B, conformément à la Partie
15 des Règles FCC. Ces limites sont conçues pour fournir une
protection raisonnable contre les interférences néfastes dans
une installation résidentielle.
Cet appareil produit, utilise et peut rayonner une énergie de
fréquence radio et, s'il n'est pas installé et utilisé conformément
aux instructions, peut provoquer des interférences gênantes
pour les communications radio. Mais rien ne garantit qu'une
telle interférence ne se produira pas dans une installation
particulière. Si cet appareil produit des interférences gênantes
pour la réception radio ou de télévision, ce qui peut se
déterminer en allumant et éteignant l'appareil, il est
recommandé à l'utilisateur d'essayer de corriger cette
interférence en appliquant une ou plusieurs des mesures
suivantes:
-Réorientation ou déplacement de l'antenne réceptrice.
- Éloignement de l'appareil du récepteur.
- Raccordement de l'appareil à une prise d'un circuit différent
de celui du récepteur.
- Consultez le revendeur ou un technicien radio/télévision
expérimenté.
PRÉCAUTION
Les modifications ou ajustements de ce produit, non
expressément approuvés par le fabricant, peuvent invalider le
droit ou l'autorité de l'utilisateur à utiliser ce produit.
F
55
Page 56

Printed in Malaysia
 Loading...