

Sony XBR-65Z9D Users guide
Help Guide
Television
Use this Help Guide if you have any questions on how to use your TV. The Online Help Guide includes the latest
information. For details, see “ Using the Help Guide ”.
Recommended Topics
Using the remote control
Using the “ Content Bar” (DISCOVER)
Home menu
Using the Action Menu
Introducing Android TV
Troubleshooting
If you want to print the complete Help Guide, see “ Help Guide (Print Version) ”.
To check the models that this Help Guide applies to, visit this page .

Table Of Contents
TOC-1
Help Guide i.......................................................................................................................................
Using the Help Guide 1.....................................................................................................................
Using the “Content Bar” (DISCOVER) 5...........................................................................................
Home menu 7....................................................................................................................................
Using the Action Menu 9...................................................................................................................
Introducing Android TV 10.................................................................................................................
Displaying the picture in a small screen 129...............................................................................
Downloading apps from the Google Play 131.............................................................................
Moving apps to a USB memory device 133................................................................................
Viewing Internet media 135.........................................................................................................
Enjoying content from your mobile device on the TV with Google Cast 136...............................
Enjoying safe apps and video streaming services (Security & restrictions) 137..........................
Searching by using your voice 138..............................................................................................
Troubleshooting 11............................................................................................................................
Start here 139..............................................................................................................................
Self diagnostics 158...............................................................................................................
Software updates 121............................................................................................................
If a full reset (restart) of the TV is required 159.....................................................................
Picture (quality)/screen 140.........................................................................................................
Picture quality is not as good as viewed at the store. 160.....................................................
Distorted picture. 161.............................................................................................................
The screen flickers. 162.........................................................................................................
No color/Dark picture/Color is not correct/Picture is too bright. 163......................................
Dark screen. How to brighten the screen. 164......................................................................
Color is not correct. How to adjust the color tone. 165..........................................................
Screen format/wide mode changes automatically. 166.........................................................
The screen suddenly changes to a video you do not recognize while
watching TV. 167...................................................................................................................
Suddenly the picture becomes small. 168.............................................................................
Black bands appear at the edges of the screen. 169............................................................
A black box appears on the screen. 170...............................................................................
There are banners/tickers at the top or bottom of the screen. 171........................................
3D pictures are not displayed. The 3D effect is weak. (3D models only) 172.......................
Black bars appear on both sides of the screen when watching 3D
pictures. (3D models only) 173..............................................................................................
You cannot turn off 3D display while watching 3D content. (3D models
only) 174................................................................................................................................
The message [3D signal has been detected.] automatically appears when

The message [3D signal has been detected.] automatically appears when
TOC-2
3D signal is detected. (3D models only) 175.........................................................................
A message about an app asking for permission to access a TV function is
displayed. 176........................................................................................................................
The screen becomes darker after a certain period of time. (only models
equipped with an OLED panel) 177.......................................................................................
The message [Panel refresh did not finish] is displayed. (only models
equipped with an OLED panel) 178.......................................................................................
You are concerned about an image retention. (only models equipped with
an OLED panel) 179..............................................................................................................
A white line appears on the screen. (only models equipped with an OLED
panel) 180..............................................................................................................................
Panel refresh does not complete. (only models equipped with an OLED
panel) 181..............................................................................................................................
Keyboard 142..............................................................................................................................
Broadcast reception 143..............................................................................................................
Check these things first to troubleshoot your TV reception. 182...........................................
Block noise or an error message appears and you cannot watch
broadcasts. 183.....................................................................................................................
Ghosting or double images appear. 184................................................................................
Only snow noise or a black picture appears on the screen. 185...........................................
There is picture or sound noise when viewing an analog TV channel. 186...........................
Some channels are blank. 187..............................................................................................
Poor reception or poor picture quality with digital broadcasts. 188.......................................
You cannot view digital channels. 189...................................................................................
You cannot receive or select channels. 190..........................................................................
Some digital cable channels are not displayed. 191..............................................................
Broadcast HD formats have poor quality. 192.......................................................................
Sound 144...................................................................................................................................
No sound but good picture. 193.............................................................................................
Audio noise. 194....................................................................................................................
No audio or low audio with a home theater system. 195.......................................................
Distorted sound. 196..............................................................................................................
Headphone/Bluetooth audio device volume cannot be adjusted. 197...................................
You want to output sound from both the headphones/Bluetooth audio
device and the TV speakers. 198..........................................................................................
You are concerned about a delay between the picture and sound. 199................................
Network (Internet/home)/apps 145..............................................................................................
The network name (SSID) of the wireless router to which you want to
connect is not displayed. 200................................................................................................

Sometimes video streaming quality is poor. 201...................................................................
TOC-3
Wi-Fi connection is lost or intermittent. 202...........................................................................
Certain Internet video content displays a loss of detail. 203..................................................
Good picture quality but no sound on Internet video content. 204........................................
Apps are inaccessible. 205....................................................................................................
The TV cannot access the Internet when IPv6 is set. 206.....................................................
Your TV cannot connect to the server. 207...........................................................................
A message appears stating that the TV cannot connect to your network. 208......................
You can connect to the Internet, but not to Google services. 209.........................................
Remote control/accessories 146.................................................................................................
The remote control does not operate. 127.............................................................................
You cannot turn the Active 3D Glasses on. (3D models only) 210........................................
The LED indicator on the Active 3D Glasses blinks. (3Dmodels only) 211...........................
Power 147...................................................................................................................................
The TV turns off automatically. 212.......................................................................................
The TV turns on automatically. 213.......................................................................................
After turning on the TV, it turns off immediately. 214.............................................................
After unplugging the TV and plugging it in again, the TV does not turn on
even if you press the power button on the remote control or the TV. 215.............................
Connected devices 148...............................................................................................................
No picture from a connected device. 216..............................................................................
You cannot select a connected device in the Home Menu. 217............................................
Certain programs on digital sources display a loss of detail. 218..........................................
Photo images or folders take time to display. 219.................................................................
You cannot find a connected BRAVIA Sync HDMI device. 220............................................
You cannot turn off the set-top box (cable/satellite box) using the TV's
remote control through the IR Blaster function. 221..............................................................
You cannot control a second AV receiver. 222......................................................................
An external device (such as a set-top box or AV receiver) cannot be
controlled via the IR Blaster. (IR Blaster compatible models only) 223.................................
Some media files in the USB device or server are not displayed. 224..................................
The TV cannot be found by a Wi-Fi Direct device. 225.........................................................
Operation cuts out, or a device does not work. 226..............................................................
What kind of devices can be connected using the Screen mirroring
function? 227.........................................................................................................................
The TV cannot connect to a Miracast device or Screen mirroring
compatible device. 228..........................................................................................................
Video or sound sometimes cuts out. 229...............................................................................
Some paid content cannot be played. 230............................................................................
Illumination LED 150...................................................................................................................

The illumination LED sometimes lights up. 231.....................................................................
TOC-4
You want to disable the illumination LED so that it does not light up or
blink. 232...............................................................................................................................
Help Guide 12....................................................................................................................................
Getting Started 120...........................................................................................................................
Using the Help Guide 1...............................................................................................................
Keeping the TV updated 151.......................................................................................................
Introducing Android TV 10...........................................................................................................
Displaying the picture in a small screen 129.........................................................................
Downloading apps from the Google Play 131.......................................................................
Moving apps to a USB memory device 133...........................................................................
Viewing Internet media 135...................................................................................................
Enjoying content from your mobile device on the TV withGoogle Cast 136..........................
Enjoying safe apps and video streaming services (Security &restrictions) 137.....................
Searching by using your voice 138........................................................................................
Basic Operations 126..................................................................................................................
Using the remote control 3.....................................................................................................
Home menu 7........................................................................................................................
Using the “Content Bar” (DISCOVER) 5...............................................................................
Using the Action Menu 9........................................................................................................
Selecting devices that are connected to the TV 155.............................................................
Illumination LED 156..............................................................................................................
Accessibility features 152............................................................................................................
Support Site 153..........................................................................................................................
Connecting to a Network 128............................................................................................................
Connecting to a network using a LAN cable 122.........................................................................
Connecting to a network using a wireless connection 154..........................................................
Using Wi-Fi to connect the TV to your network 124..............................................................
Using Wi-Fi Direct to connect to the TV (no wireless routerrequired) 233.............................
Home network features 157........................................................................................................
Adjusting home network settings 237....................................................................................
Playing content from a computer 238....................................................................................
Playing content from a media server 239..............................................................................
RVU statement (RVU compliant models only) 240................................................................
BRAVIA Sync-compatible devices 252..............................................................................................
BRAVIA Sync overview 268........................................................................................................
Using features available for BRAVIA Sync-compatibledevices 269............................................
Adjusting BRAVIA Sync settings 271..........................................................................................
Using the TV with Other Devices 253................................................................................................
USB devices 273.........................................................................................................................

Playing content stored on a USB device 297........................................................................
TOC-5
Information about USB devices used for storing photos and music 299...............................
Supported files and formats 255............................................................................................
Photos 280.......................................................................................................................
Music 281........................................................................................................................
Videos 283.......................................................................................................................
Audio sampling rates (for videos) 288.............................................................................
External subtitles 289......................................................................................................
Blu-ray and DVD players 274......................................................................................................
Connecting a Blu-ray or DVD player 300...............................................................................
Watching Blu-ray and DVD discs 303....................................................................................
Set-top box (cable/satellite box) with an IR Blaster (IR Blastercompatible
models only) 275.........................................................................................................................
Connecting an IR Blaster (IR Blaster compatible models only) 254......................................
(cable/satellite box) (IR Blaster compatible models only) 304...............................................
Smartphones and tablets 276......................................................................................................
Displaying the screen of a smartphone/tablet on the TV using the Screen
mirroring function 257............................................................................................................
Computers, cameras, and camcorders 277................................................................................
Connecting a computer and viewing stored content 305.......................................................
Connecting a camera or camcorder and viewing stored content 307....................................
Computer video signal specifications 309.............................................................................
Audio system 267........................................................................................................................
Connecting an audio system 246..........................................................................................
Adjusting audio system-related settings 250.........................................................................
Bluetooth devices 256.................................................................................................................
Connecting a Bluetooth device 290.......................................................................................
Adjusting the AV sync setting 249.........................................................................................
Supported Bluetooth profiles 291..........................................................................................
Sony wireless subwoofer (optional) (Sony wireless subwoofersupported
models only) 278.........................................................................................................................
Connecting a wireless subwoofer (optional) 311...................................................................
Adjusting wireless subwoofer-related settings (optional) 313................................................
BRAVIA Sync-compatible devices 252........................................................................................
BRAVIA Sync overview 268..................................................................................................
Using features available for BRAVIA Sync-compatible devices 269.....................................
Adjusting BRAVIA Sync settings 271....................................................................................
Viewing pictures in 4K from compatible devices 279..................................................................
Viewing pictures in 4K resolution 315....................................................................................
Settings for viewing pictures in 4K resolution with higher quality 317...................................

Settings 259.......................................................................................................................................
TOC-6
Configuring the TV 260................................................................................................................
[TV] 241.................................................................................................................................
[Network & Accessories] 292.................................................................................................
[System Preferences] 293.....................................................................................................
[Personal] 294........................................................................................................................
[Accounts] 295.......................................................................................................................
[Expert panel settings](only models equipped with an OLEDpanel) 245...............................
Setting a timer 236......................................................................................................................
Watching TV 261...............................................................................................................................
Watching TV programs 296.........................................................................................................
Using the program guide 318................................................................................................
Using interactive broadcast TV services 319.........................................................................
Watching in 3D (3D models only) 262.........................................................................................
Understanding the basics of 3D TV (3D models only) 243....................................................
Preparing your 3D glasses (3D models only) 263.................................................................
Watching TV in 3D (3D models only) 265..............................................................................
Help Guide
1
> Getting Started > Using the Help Guide
Using the Help Guide
This Help Guide explains how to use this TV. Additionally, you can also refer to the Setup Guide for descriptions about TV
installation, and the Reference Guide for parts descriptions and specifications of this TV.
In this Help Guide, you can read the desired information in order or search for it directly. To search, select at the top
of the screen.
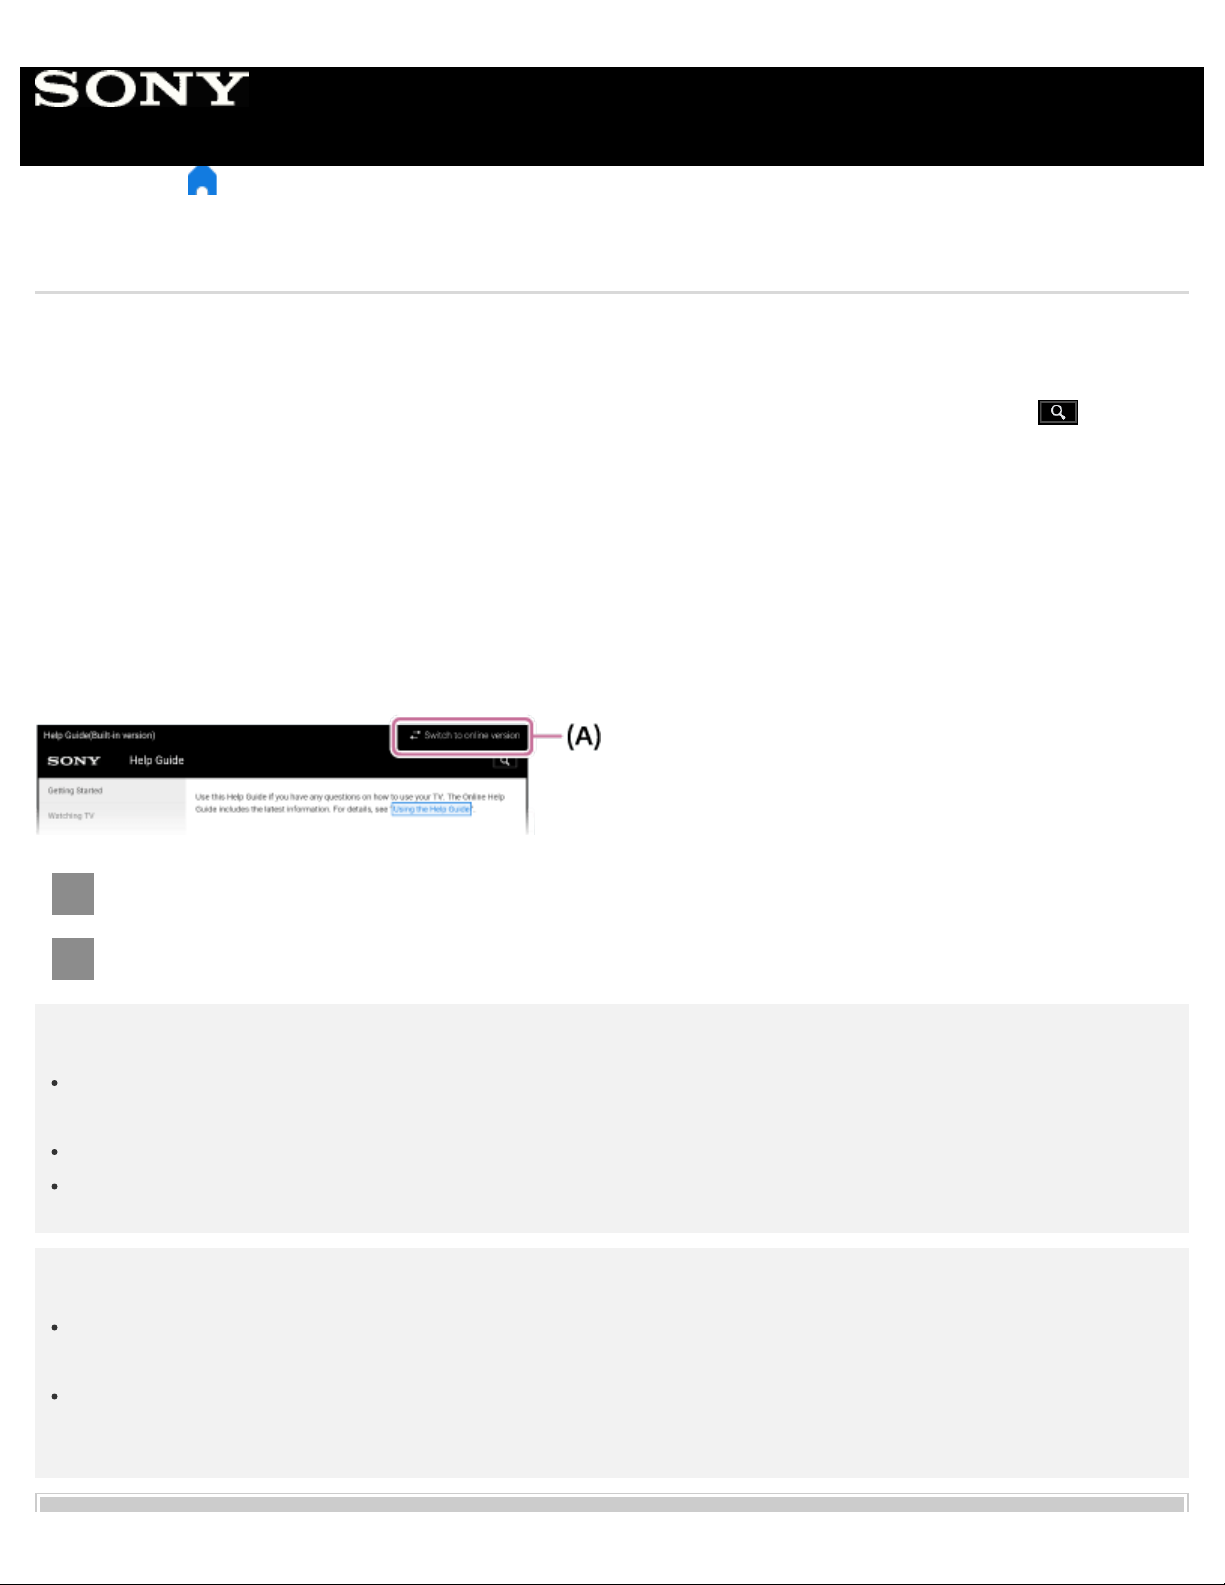
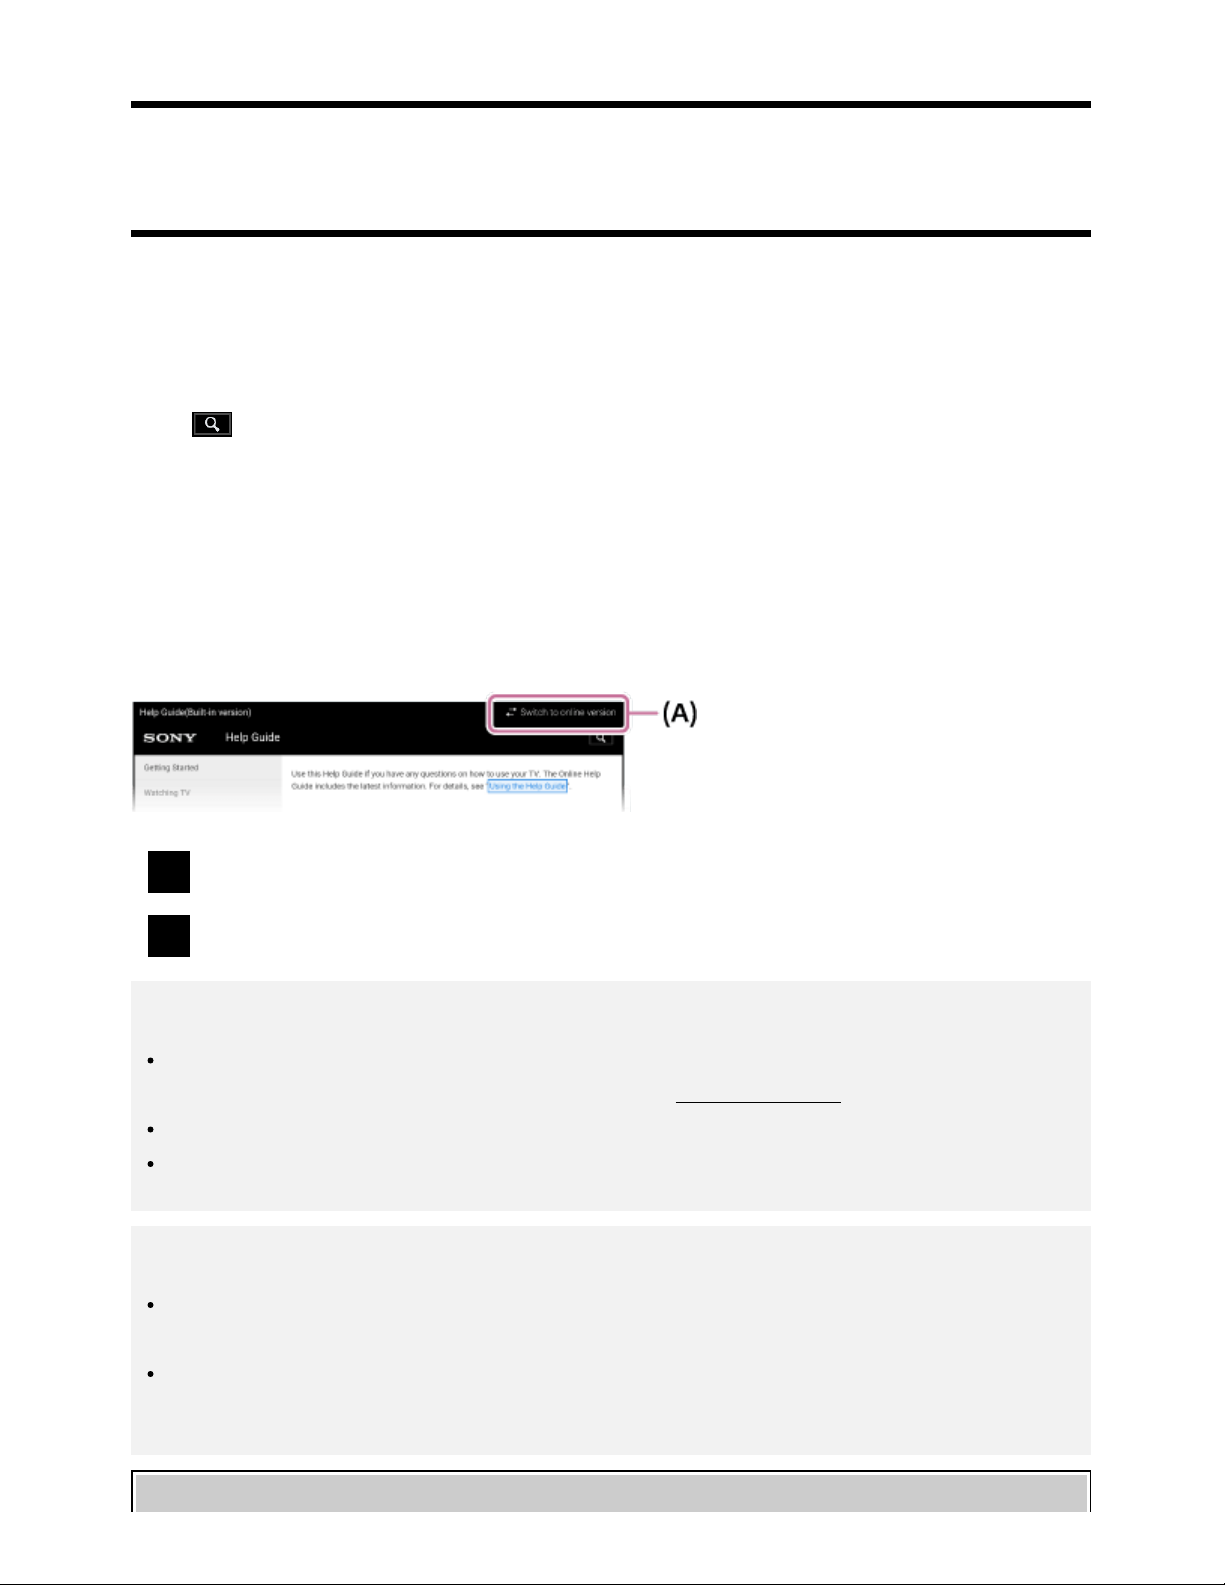
Help Guide versions
There are two versions of the Help Guide for your TV: the Built -in Help Guide and the Online Help Guide. To view the
Online Help Guide, your TV must be connected to the Internet. To switch between the Built-in and Online versions, use
the switch button (A) at the top of the screen. You can check which Help Guide is currently displayed by looking at the title
at the top of the screen.
Connect the TV to the Internet.
1
Select (A) to switch the Help Guide version.
2
Note
To use the latest features described in the Help Guide, you may need to update the TV's software. For details about
software updates, see the Software updates page.
The images and illustrations used in the Help Guide may differ depending on your TV model.
Design and specifications are subject to change without notice.
Hint
To see if your TV is equipped with one of the functions described in the Help Guide, refer to the paper manual or a
Sony product catalog.
This Help Guide is written for all regions/countries. Some descriptions contained in this Help Guide do not apply to
some regions and countries.

Related topics
Connecting to a network using a LAN cable
2
Using Wi-Fi to connect the TV to your network
> Getting Started > Using the Help Guide
C-271-100-18(1)
Copyright 2018 Sony Visual Products Inc.
Go to page top
Help Guide
3
> Getting Started > Basic Operations > Using the remote control
Using the remote control
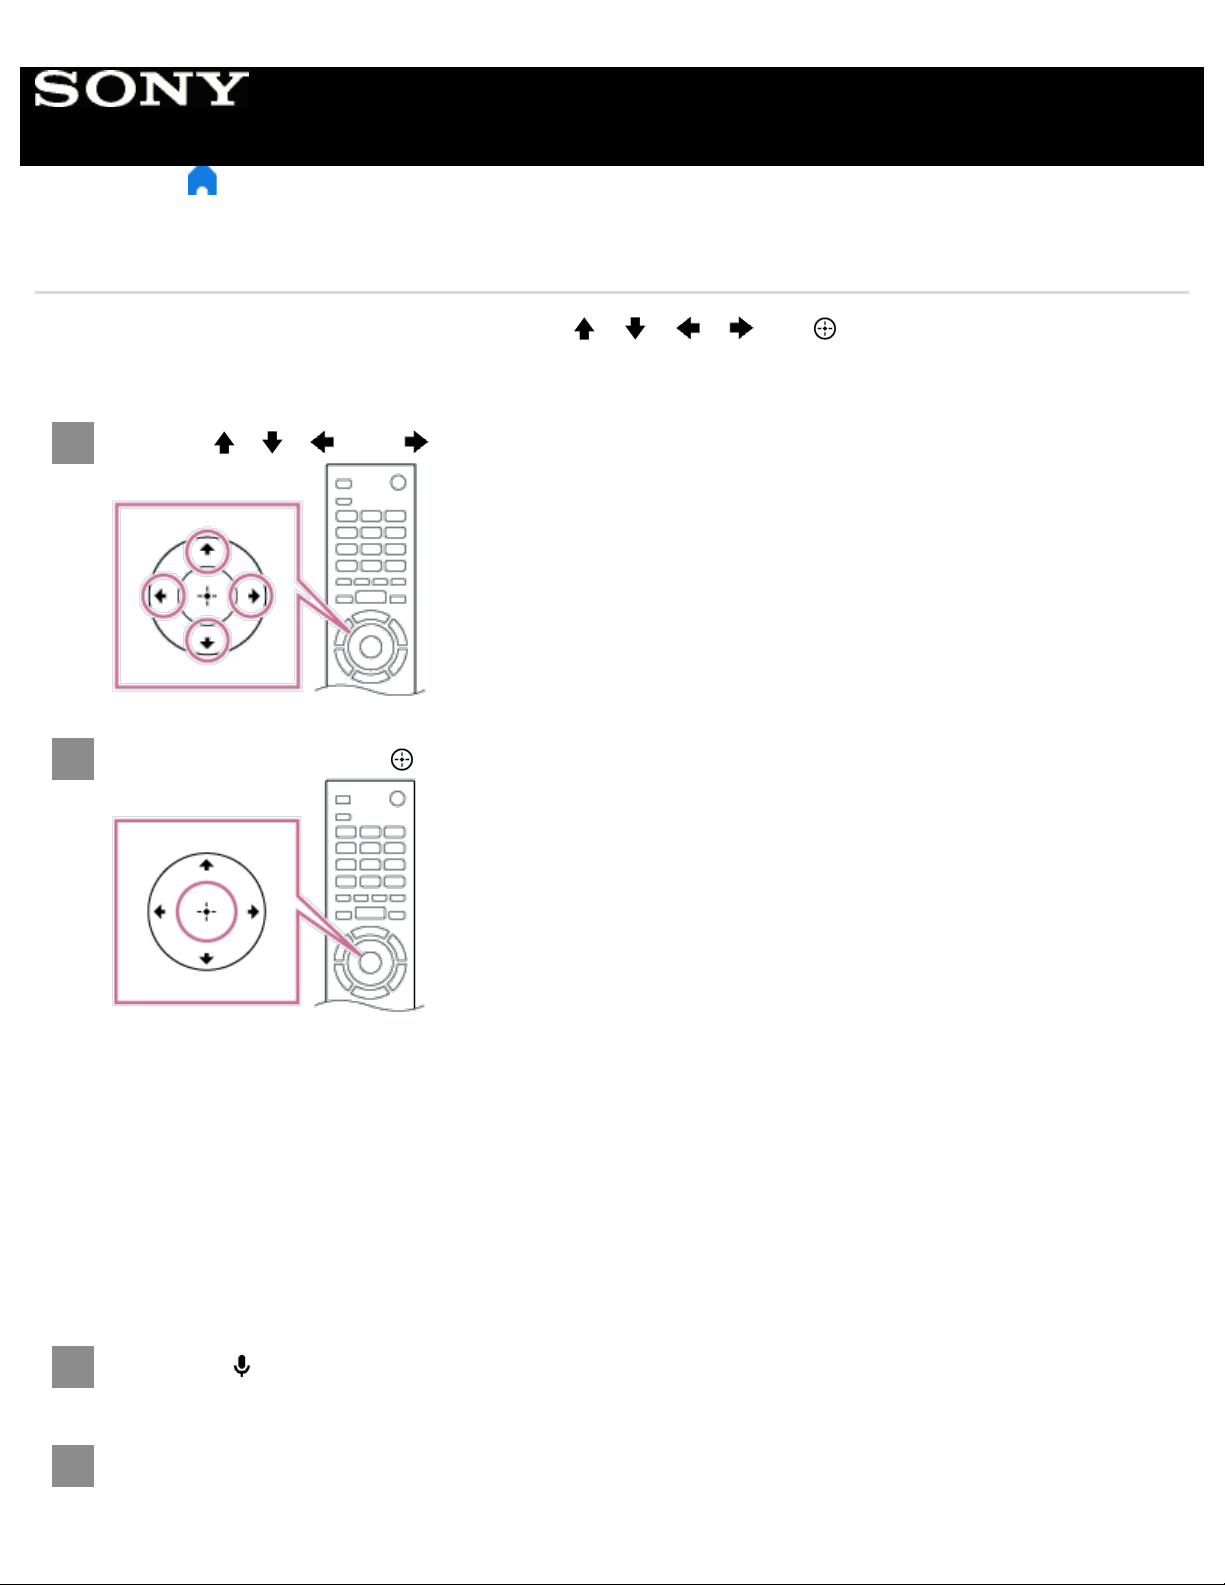
You can operate many of the TV’s features by using the / / / and buttons.
For descriptions of the remote control buttons, refer to the Reference Guide.
Use the
1
Press the center of the button to select the item currently in focus.
2
, , and buttons to “focus” on the desired item.
To return to the previous screen
Press the BACK button.
Using Voice search (Voice search supported models only)
For Voice search supported models, the remote control has a built- in microphone. By speaking into the microphone, you
can search for content on the Internet.
Press the
1
The LED on the remote control will light up.
Speak into the built-in microphone.
2
Speech examples may be displayed depending on your model.
button.

When your voice is not being recognized
4
Confirm the following:
The button is activated.
To confirm these settings, press the HOME button, then select [Settings] — [ Voice Remote Control].
Note
An Internet connection is required to use Voice search.
The type of remote control supplied with the TV, and the availability of a remote control with a built-in microphone
varies depending on your model/region/country. An optional remote control is available in some
models/regions/countries.
Related topics
The remote control does not operate.
Connecting to a Network
> Getting Started > Basic Operations > Using the remote control
C-271-100-18(1)
Copyright 2018 Sony Visual Products Inc.
Go to page top
Help Guide
5
> Getting Started > Basic Operations > Using the “Content Bar” (DISCOVER)
Using the “Content Bar” (DISCOVER)
You can use the “Content Bar” to search for various content such as TV programs and Internet videos. The content
displayed in the “Content Bar” varies depending on your model/region/country.
Press the DISCOVER button.
1
The “Content Bar” is displayed at the bottom of the screen.
Move the focus up or down to select the desired category.
2
Move the focus left or right to select the desired item.
3
Press the
4
button to launch the selected item.
To change the settings of this function
Press the DISCOVER button.
1
The “Content Bar” is displayed at the bottom of the screen.
Move the focus down to the [ Settings] category.
2
Select the desired item to change the settings.
3
Available options
[Show/Hide categories ]
Select content categories to be shown in DISCOVER. You cannot hide [ Settings].
You can hide [Top Picks] depending on your TV model.
[Reorder categories ]
Select a content category to reorder.
6
[Add channels to Favorites ]
Add your favorite channels to DISCOVER.
[Add genre categories ]
Add genres to create your own custom content category.
[Add keyword categories]
Add keywords to create your own custom content category.
[Display size ]
Select the display size of the menu.
[Sort TV channels]
Select the type of TV program sorting.
Note
Some options may not be available depending on your model/region/country.
> Getting Started > Basic Operations > Using the “Content Bar” (DISCOVER)
C-271-100-18(1)
Copyright 2018 Sony Visual Products Inc.
Go to page top
Help Guide
7
> Getting Started > Basic Operations > Home menu
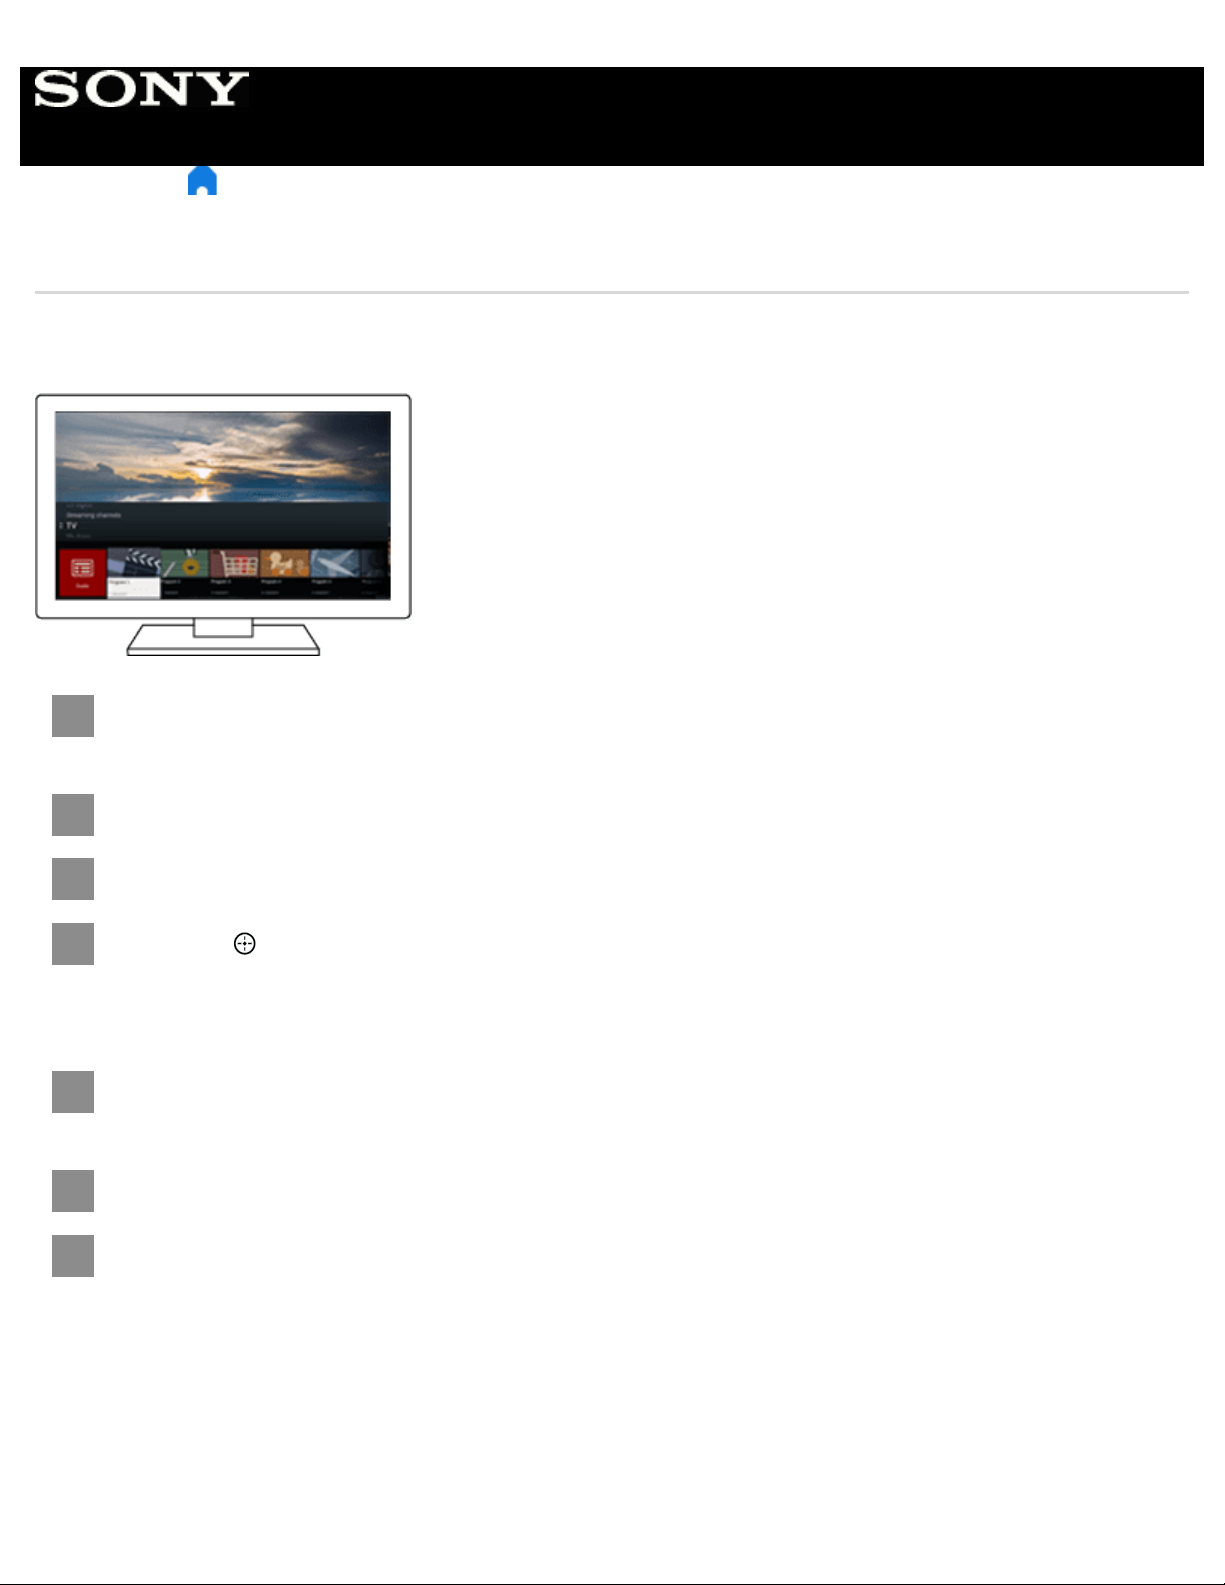
Home menu
The Home Menu allows you to search for content, provides content recommendations, and provides access to apps and
settings. Available items vary depending on your region/country and the current screen.
Searching
You can search for various content by entering a search keyword using the on-screen keyboard or by voice. The
availability of the remote control with a built-in microphone depends on your model/region/country.
Press the HOME button.
1
Select the microphone icon at the top of the screen.
2
Enter a search keyword by speaking into the microphone on the remote control, or by
3
pressing the
button and then using the on - screen keyboard.
Browsing for content, apps, or other items
Press the HOME button.
1
Select the desired item from the desired category.
2
Category list
Recommendations
This category shows content based on your history.
[Featured apps ], [Apps] and [ Games]
These categories provide access to apps (such as Video, Album, Music, and Screen mirroring) and games.
[Inputs]
You can select the input source from the list of connected devices and jacks (sockets), such as HDMI.
8
[Settings]
This category includes [Settings], [Network Settings], [Timers], and [Help].
Hint
By connecting the TV to the Internet, you can access various network services and features.
Related topics
Connecting to a network using a LAN cable
Using Wi-Fi to connect the TV to your network
> Getting Started > Basic Operations > Home menu
C-271-100-18(1)
Copyright 2018 Sony Visual Products Inc.
Go to page top

Help Guide
9
> Getting Started > Basic Operations > Using the Action Menu
Using the Action Menu
By pressing the ACTION MENU button, a menu appears and provides quick access to the functions that are available for
the currently displayed screen, such as picture adjustments, sound adjustments, volume adjustment for a connected
device (such as headphones), and display/audio settings. The items in the menu differ depending on the selected screen.
Press the ACTION MENU button.
1
Move the focus left or right to select the desired category.
2
Move the focus up or down to select the desired item.
3
Press the
4
> Getting Started > Basic Operations > Using the Action Menu
C-271-100-18(1)
Copyright 2018 Sony Visual Products Inc.
button to launch the selected item.
Go to page top
Help Guide
10
> Getting Started > Introducing Android TV
Introducing Android TV
Displaying the picture in a small screen
Downloading apps from the Google Play
Moving apps to a USB memory device
Viewing Internet media
Enjoying content from your mobile device on the TV with Google Cast
Enjoying safe apps and video streaming services ( Security & restrictions)
Searching by using your voice
> Getting Started > Introducing Android TV
C-271-100-18(1)
Copyright 2018 Sony Visual Products Inc.
Go to page top

Help Guide
11
> Troubleshooting
Troubleshooting
Start here
Experiencing trouble? Start here.
Picture (quality)/screen
Keyboard
Broadcast reception
Sound
Network (Internet/home)/apps
Remote control/accessories
Power
Connected devices
Illumination LED
> Troubleshooting
C-271-100-18(1)
Copyright 2018 Sony Visual Products Inc.
Go to page top

Television
12
Getting Started [1]
Using the Help Guide [2]
Keeping the TV updated [3]
Introducing Android TV [4]
Displaying the picture in a small screen [5]
Downloading apps from the Google Play [6]
Moving apps to a USB memory device [7]
Viewing Internet media [8]
Enjoying content from your mobile device on the TV with Google Cast [9]
Enjoying safe apps and video streaming services (Security & restrictions) [10]
Searching by using your voice [11]
Basic Operations [12]
Using the remote control [13]
Home menu [14]
Using the “Content Bar” (DISCOVER) [15]
Using the Action Menu [16]
Selecting devices that are connected to the TV [17]
Illumination LED [18]
Accessibility features [19]
Support Site [20]
Watching TV [21]
Watching TV programs [22]
Using the program guide [23]
Using interactive broadcast TV services [24]
Watching in 3D (3D models only) [25]
Understanding the basics of 3D TV (3D models only) [26]
Preparing your 3D glasses (3D models only) [27]
Watching TV in 3D (3D models only) [28]
Using the TV with Other Devices [29]

USB devices [30]
Playing content stored on a USB device [31]
13
Information about USB devices used for storing photos and music [32]
Supported files and formats [33]
Photos [34]
Music [35]
Videos [36]
Audio sampling rates (for videos) [37]
External subtitles [38]
Blu-ray and DVD players [39]
Connecting a Blu-ray or DVD player [40]
Watching Blu-ray and DVD discs [41]
Set-top box (cable/satellite box) with an IR Blaster (IR Blaster compatible
models only) [42]
Connecting an IR Blaster (IR Blaster compatible models only) [43]
Setting up the IR Blaster to control the set-top box (cable/satellite box) (IR Blaster
compatible models only) [44]
Smartphones and tablets [45]
Displaying the screen of a smartphone/tablet on the TV using the Screen mirroring
function [46]
Computers, cameras, and camcorders [47]
Connecting a computer and viewing stored content [48]
Connecting a camera or camcorder and viewing stored content [49]
Computer video signal specifications [50]
Audio system [51]
Connecting an audio system [52]
Adjusting audio system-related settings [53]
Bluetooth devices [54]
Connecting a Bluetooth device [55]
Adjusting the AV sync setting [56]
Supported Bluetooth profiles [57]
Sony wireless subwoofer (optional) (Sony wireless subwoofer supported
models only) [58]
Connecting a wireless subwoofer (optional) [59]
Adjusting wireless subwoofer-related settings (optional) [60]

BRAVIA Sync-compatible devices [61]
BRAVIA Sync overview [62]
14
Using features available for BRAVIA Sync-compatible devices [63]
Adjusting BRAVIA Sync settings [64]
Viewing pictures in 4K from compatible devices [65]
Viewing pictures in 4K resolution [66]
Settings for viewing pictures in 4K resolution with higher quality [67]
Connecting to a Network [68]
Connecting to a network using a LAN cable [69]
Connecting to a network using a wireless connection [70]
Using Wi-Fi to connect the TV to your network [71]
Using Wi-Fi Direct to connect to the TV (no wireless router required) [72]
Home network features [73]
Adjusting home network settings [74]
Playing content from a computer [75]
Playing content from a media server [76]
RVU statement (RVU compliant models only) [77]
Settings [78]
Configuring the TV [79]
[TV] [80]
[Network & Accessories] [81]
[System Preferences] [82]
[Personal] [83]
[Accounts] [84]
[Expert panel settings](only models equipped with an OLED panel) [85]
Setting a timer [86]
Troubleshooting [87]
Start here [88]
Self diagnostics [89]
Software updates [90]
If a full reset (restart) of the TV is required [91]
Picture (quality)/screen [92]
Picture quality is not as good as viewed at the store. [93]

Distorted picture. [94]
The screen flickers. [95]
15
No color/Dark picture/Color is not correct/Picture is too bright. [96]
Dark screen. How to brighten the screen. [97]
Color is not correct. How to adjust the color tone. [98]
Screen format/wide mode changes automatically. [99]
The screen suddenly changes to a video you do not recognize while watching TV.
[100]
Suddenly the picture becomes small. [101]
Black bands appear at the edges of the screen. [102]
A black box appears on the screen. [103]
There are banners/tickers at the top or bottom of the screen. [104]
3D pictures are not displayed. The 3D effect is weak. (3D models only) [105]
Black bars appear on both sides of the screen when watching 3D pictures. (3D
models only) [106]
You cannot turn off 3D display while watching 3D content. (3D models only) [107]
The message [3D signal has been detected.] automatically appears when 3D signal
is detected. (3D models only) [108]
A message about an app asking for permission to access a TV function is displayed.
[109]
The screen becomes darker after a certain period of time. (only models equipped
with an OLED panel) [110]
The message [Panel refresh did not finish] is displayed. (only models equipped with
an OLED panel) [111]
You are concerned about an image retention. (only models equipped with an OLED
panel) [112]
A white line appears on the screen. (only models equipped with an OLED panel)
[113]
Panel refresh does not complete. (only models equipped with an OLED panel) [114]
Keyboard [115]
Broadcast reception [116]
Check these things first to troubleshoot your TV reception. [117]
Block noise or an error message appears and you cannot watch broadcasts. [118]
Ghosting or double images appear. [119]
Only snow noise or a black picture appears on the screen. [120]
There is picture or sound noise when viewing an analog TV channel. [121]

Some channels are blank. [122]
16
Poor reception or poor picture quality with digital broadcasts. [123]
You cannot view digital channels. [124]
You cannot receive or select channels. [125]
Some digital cable channels are not displayed. [126]
Broadcast HD formats have poor quality. [127]
Sound [128]
No sound but good picture. [129]
Audio noise. [130]
No audio or low audio with a home theater system. [131]
Distorted sound. [132]
Headphone/Bluetooth audio device volume cannot be adjusted. [133]
You want to output sound from both the headphones/Bluetooth audio device and the
TV speakers. [134]
You are concerned about a delay between the picture and sound. [135]
Network (Internet/home)/apps [136]
The network name (SSID) of the wireless router to which you want to connect is not
displayed. [137]
Sometimes video streaming quality is poor. [138]
Wi-Fi connection is lost or intermittent. [139]
Certain Internet video content displays a loss of detail. [140]
Good picture quality but no sound on Internet video content. [141]
Apps are inaccessible. [142]
The TV cannot access the Internet when IPv6 is set. [143]
Your TV cannot connect to the server. [144]
A message appears stating that the TV cannot connect to your network. [145]
You can connect to the Internet, but not to Google services. [146]
Remote control/accessories [147]
The remote control does not operate. [148]
You cannot turn the Active 3D Glasses on. (3D models only) [149]
The LED indicator on the Active 3D Glasses blinks. (3D models only) [150]
Power [151]
The TV turns off automatically. [152]
The TV turns on automatically. [153]
After turning on the TV, it turns off immediately. [154]

After unplugging the TV and plugging it in again, the TV does not turn on even if you
press the power button on the remote control or the TV. [155]
17
Connected devices [156]
No picture from a connected device. [157]
You cannot select a connected device in the Home Menu. [158]
Certain programs on digital sources display a loss of detail. [159]
Photo images or folders take time to display. [160]
You cannot find a connected BRAVIA Sync HDMI device. [161]
You cannot turn off the set-top box (cable/satellite box) using the TV's remote
control through the IR Blaster function. [162]
You cannot control a second AV receiver. [163]
An external device (such as a set-top box or AV receiver) cannot be controlled via
the IR Blaster. (IR Blaster compatible models only) [164]
Some media files in the USB device or server are not displayed. [165]
The TV cannot be found by a Wi-Fi Direct device. [166]
Operation cuts out, or a device does not work. [167]
What kind of devices can be connected using the Screen mirroring function? [168]
The TV cannot connect to a Miracast device or Screen mirroring compatible device.
[169]
Video or sound sometimes cuts out. [170]
Some paid content cannot be played. [171]
Illumination LED [172]
The illumination LED sometimes lights up. [173]
You want to disable the illumination LED so that it does not light up or blink. [174]
Index [175]
[1]
Getting Started
Using the Help Guide
Keeping the TV updated
Introducing Android TV
Basic Operations
Accessibility features
Support Site
[2] Getting Started
18
Using the Help Guide
This Help Guide explains how to use this TV. Additionally, you can also refer to the Setup Guide for
descriptions about TV installation, and the Reference Guide for parts descriptions and specifications
of this TV.
In this Help Guide, you can read the desired information in order or search for it directly. To search,
select
at the top of the screen.
Help Guide versions
There are two versions of the Help Guide for your TV: the Built -in Help Guide and the Online Help
Guide. To view the Online Help Guide, your TV must be connected to the Internet. To switch between
the Built-in and Online versions, use the switch button (A) at the top of the screen. You can check
which Help Guide is currently displayed by looking at the title at the top of the screen.
Connect the TV to the Internet.
1
Select (A) to switch the Help Guide version.
2
Note
To use the latest features described in the Help Guide, you may need to update the TV's
software. For details about software updates, see the
The images and illustrations used in the Help Guide may differ depending on your TV model.
Design and specifications are subject to change without notice.
Software updates page.
Hint
To see if your TV is equipped with one of the functions described in the Help Guide, refer to the
paper manual or a Sony product catalog.
This Help Guide is written for all regions/countries. Some descriptions contained in this Help
Guide do not apply to some regions and countries.
Related topics

Connecting to a network using a LAN cable
19
Using Wi-Fi to connect the TV to your network
[3] Getting Started
Keeping the TV updated
The functions below are performed when the TV is in standby mode. To keep your TV updated, we
recommend that you turn off the TV normally by using the power button on the remote control or TV.
Download of data such as program guides
Software download (when [Automatic software download] is enabled)
[4] Getting Started
Introducing Android TV
Displaying the picture in a small screen
Downloading apps from the Google Play
Moving apps to a USB memory device
Viewing Internet media
Enjoying content from your mobile device on the TV with Google Cast
Enjoying safe apps and video streaming services (Security & restrictions)
Searching by using your voice
[5] Getting Started | Introducing Android TV
Displaying the picture in a small screen
You can display the picture that you are watching (TV programs or content from HDMI-connected
devices) as a small screen in the corner.

Displaying the picture as a small screen
20
Press the ACTION MENU button while watching a TV program or content
1
from an HDMI device, and then select [ Picture-in-picture].
The current picture is displayed as a small screen in the corner.
Note
The small screen is displayed on top of the last app used. However, the app that is displayed
may vary depending on certain conditions.
Operations such as changing the channel is disabled while watching with a small screen.
TV program, external input such as an HDMI device, apps that play back movies, or some apps
that play back pictures or music cannot be displayed at the same time.
The position of the small screen is automatically adjusted. You cannot set it manually.
Closing the small screen or returning it to full screen
Press and hold the HOME button to display a list of recently used apps.
1
Close the small screen by selecting the desired button under the small
2
screen, or return it to full screen (A).
The image below is a visual representation and may vary from the actual screen.
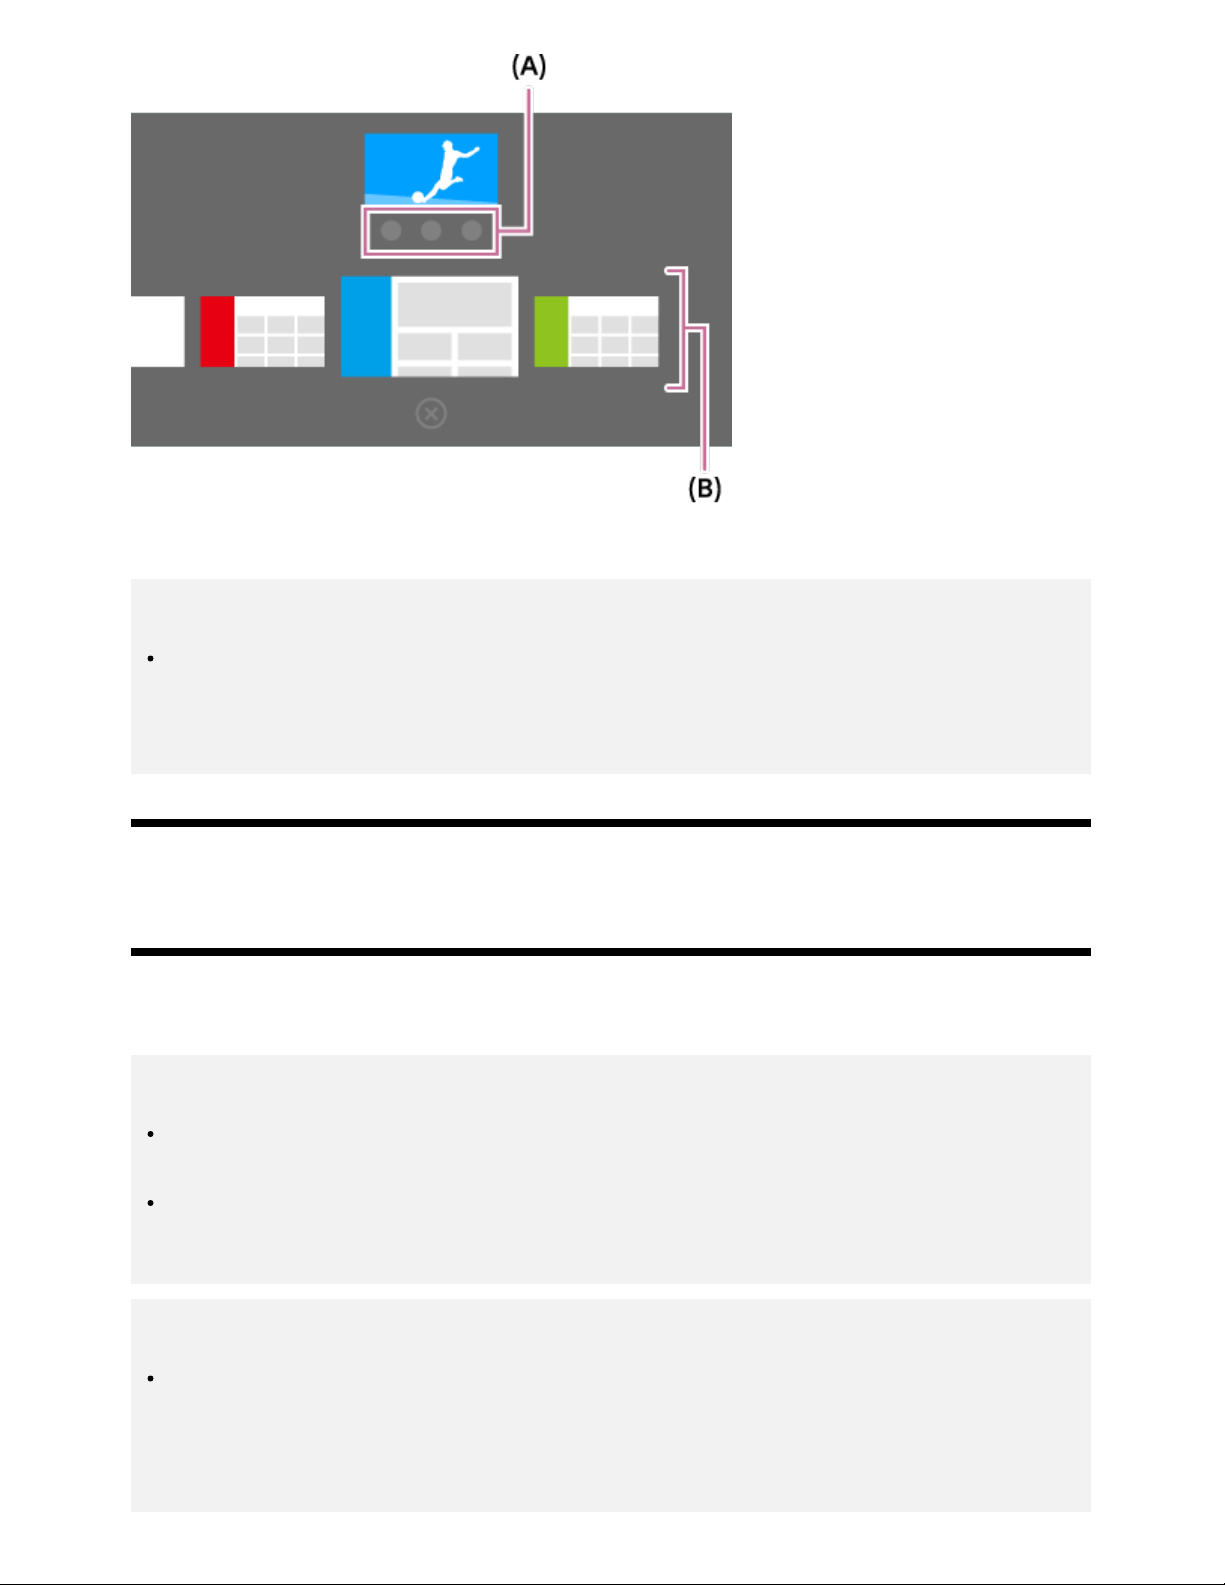
A list of recently used apps (B) is displayed under the small screen.
21
Note
If you switch to an app that plays back movies, pictures, or music from the list of recently used
apps, the small screen closes (the TV program or playback from the HDMI device closes). To
return to the TV program or HDMI device, press the TV button or switch the input.
[6] Getting Started | Introducing Android TV
Downloading apps from the Google Play
You can download apps from the Google Play to the TV, just like you do with smartphones and
tablets.
Note
You can only download apps that are compatible with TVs. They may differ from apps for
smartphones/tablets.
An Internet connection and Google account are required to download apps from the Google
Play.
Hint
If you do not have a Google account or want to create a shared account, create a new account
by accessing the following website.
https://accounts.google.com/signup
The website above may vary depending on your region/country. It is also subject to change
without notice. For details, refer to the Google homepage.
We recommend that you create a Google account on a computer or mobile device.
22
Press the HOME button, then select [Google Play Store] under [Apps].
1
To install an app, select an app you want to download. The app will start
2
downloading.
After downloading, the app is automatically installed and added. Its icon appears in the Home Menu,
allowing you to launch it.
About paid apps
There are free apps and paid apps in the Google Play. To purchase a paid app, a prepaid Google
Play gift card code or credit card information is required. You can purchase a Google Play gift card
from various retailers.
To delete an app
Press the HOME button, select [ Google Play Store] under [Apps], and then
1
select [ My Apps].
Select an app to be deleted, and then uninstall the app.
2
Related topics
Connecting to a network using a LAN cable
Using Wi-Fi to connect the TV to your network
Moving apps to a USB memory device
[7] Getting Started | Introducing Android TV
Moving apps to a USB memory device
You can move downloaded apps to a USB memory device to increase the space available in the TV.
Note
When you format a USB memory device, all data saved in the USB memory device will be
deleted. Back up your important data before formatting.
Performing this procedure formats the USB memory device for exclusive use with the TV.
Therefore, you may be unable to use the USB memory device with a computer, etc.
Some apps cannot be moved to a USB memory device.
23
Connect a USB memory device to the TV.
1
Press the HOME button, select [ Settings] — [ Storage & reset] — the desired
2
USB memory device.
Format it as an internal storage device.
3
When formatting is finished, press the HOME button, then select [Settings]
4
— [Apps].
Select the app that you want to move to the USB memory device.
5
Select the USB memory device from the used storage. The app is moved to
6
the USB memory device.
Hint
Repeat steps 4 to 6 to move additional apps to the USB memory device.
To remove a USB memory device
Press the HOME button, select [ Settings] — [ Storage & reset] — the desired
1
USB memory device, and then select the option to remove it.
Note
The USB memory device is used only for saving apps. To use the USB memory device for
other purposes, you must format it again.
If you delete an app in the USB memory device using a computer, you will be unable to launch
it from the TV.
If you remove a USB memory device from the TV, you will be unable to use the apps that were
moved to the USB memory device.
You cannot specify a USB memory device as the installation location of an app. First install the
app on the TV as normal, and then move it to the USB memory device.
[8] Getting Started | Introducing Android TV
Viewing Internet media
 Loading...