

Page 1
©
3-216-785-42 (1)
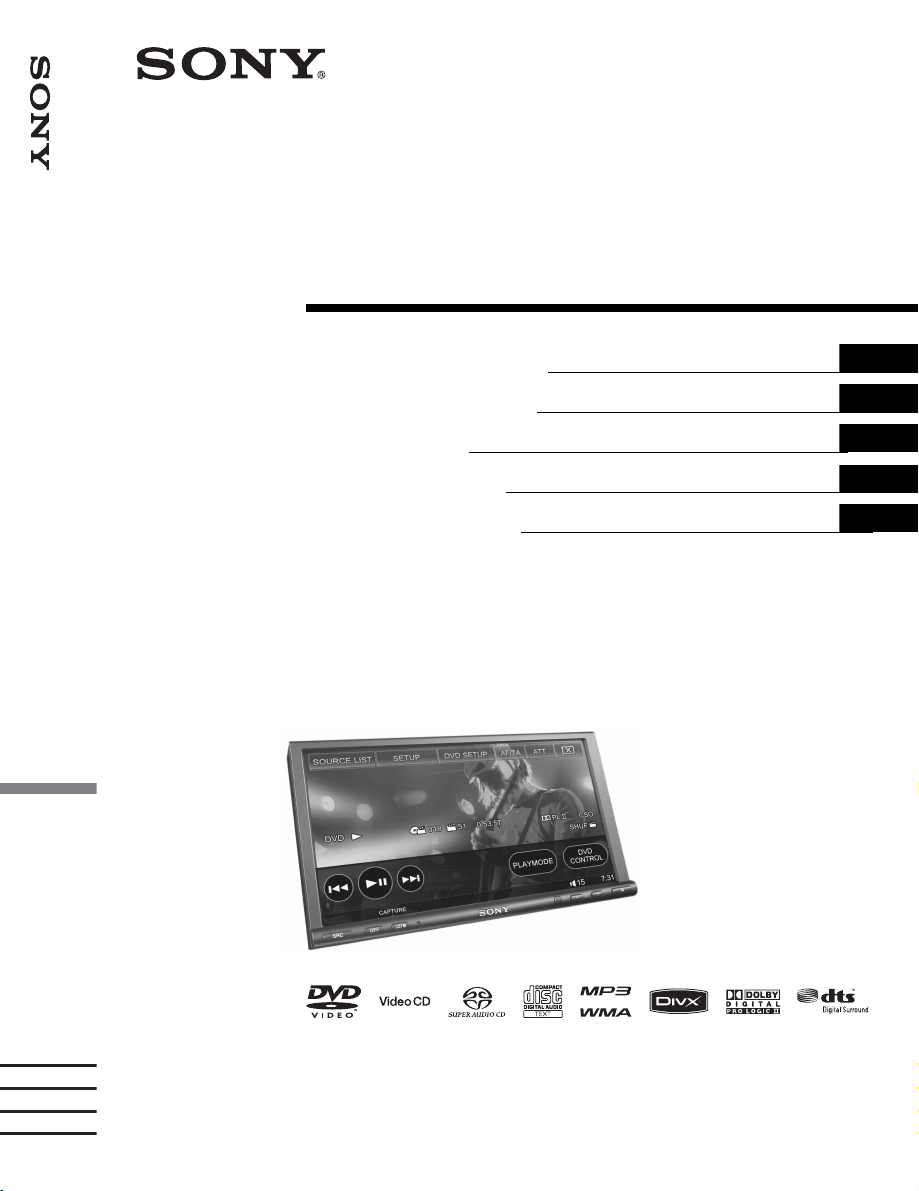
AV Center
AV Center
Operating Instructions
Bedienungsanleitung
Mode d’emploi
Istruzioni per l’uso
Gebruiksaanwijzing
GB
DE
FR
IT
NL
XAV-W1
2007 Sony Corporation
Page 2
Warning
To prevent fire or shock hazard, do not
expose the unit to rain or moisture.
To avoid electrical shock, do not open the
cabinet. Refer servicing to qualified
personnel only.
CAUTION
The use of optical instruments with this product
will increase eye hazard. As the laser beam used
in this CD/DVD player is harmful to eyes, do not
attempt to disassemble the cabinet. Refer
servicing to qualified personnel only.
This label is located on the bottom of the
chassis.
CAUTION
RADIATION WHEN OPEN AND INTERLOCKS DEFEATED.
DO NOT VIEW DIRECTLY WITH OPTICAL INSTRUMENTS.
This label is located on the drive unit’s internal
chassis.
packaging indicates that this product shall not be treated
as household waste. Instead it shall be handed over to the
applicable collection point for the recycling of electrical
and electronic equipment. By ensuring this product is
disposed of correctly, you will help prevent potential
negative consequences for the environment and human
health, which could otherwise be caused by inappropriate
waste handling of this product. The recycling of materials
will help to conserve natural resources. For more detailed
information about recycling of this product, please contact
your local Civic Office, your household waste disposal
service or the shop where you purchased the product.
Applicable accessory: Remote commander
:
CLASS 1M VISIBLE/INVISIBLE LASER
Disposal of Old Electrical &
Electronic Equipment (Applicable in
the European Union and other
European countries with separate
collection systems)
This symbol on the product or on its
Warning if your car’s ignition has no
ACC position
Be sure to set the Auto Off function
(page 43).
The unit will shut off completely and
automatically in the set time after the unit is
turned off, which prevents battery drain.
If you do not set the Auto Off function, press
and hold (OFF) until the display disappears
each time you turn the ignition off.
To cancel the demonstration (Demo) display,
see page 48.
After resetting the unit, if you fail to set the
initial speaker settings correctly due to time
out or a mistake, the settings can be
reconfigured in other menus. To set the
speaker connection status, see page 34. To
set the listening position, see page 33.
2
Page 3

On safety
• Comply with your local traffic rules, laws and
regulations.
• While driving
– Do not watch or operate the unit, as it may
lead to distraction and cause an accident. Park
your car in a safe place to watch or operate
the unit.
– Do not use the setup feature or any other
function which could divert your attention
from the road.
– When backing up your car, be sure to
look back and watch the surroundings
carefully for your safety, even if the
back camera is connected. Do not
depend on the back camera
exclusively.
• While operating
– Do not insert your hands, fingers or foreign
object into the unit while functioning, as it
may cause injury or damage to the unit.
– Keep small articles out of the reach of
children.
– Be sure to fasten seatbelts to avoid injury in
the event of a sudden movement of the car.
Preventing an accident
Pictures and karaoke function are available
only after you park the car and set the parking
brake.
If the car starts moving during video playback
or karaoke mode, the picture is automatically
switched to the wallpaper after displaying the
caution below.
The monitor connected to the REAR VIDEO
OUT is active while the car is in motion.
The picture on the display is switched to the
wallpaper and the karaoke mode is
deactivated, but audio source can be heard.
• “Video blocked for your safety.”
• “KARAOKE function blocked.”
• “Video and KARAOKE function
blocked for your safety.”
Do not operate the unit or watch the monitor
while driving.
On installation
• We recommend this unit should be installed by
a qualified technician or service personnel.
– If you try to install this unit by yourself, see
the supplied installation/connections manual
and install the unit properly.
– Improper installation may cause battery drain
or a short circuit.
• If the unit does not work properly, check the
connections first, referring to the supplied
installation/connections manual. If everything
is in order, check the fuse.
• Protect the unit surface from damage.
– Do not expose the unit surface to chemicals,
such as insecticide, hair spray, insect
repellent, etc.
– Do not leave rubber or plastic materials in
contact with the unit for a long time.
Otherwise, the finish of the unit may be
impaired, or deformation may occur.
• When installing, be sure to fix securely.
• When installing, be sure to turn the ignition off.
Installing the unit with the ignition on may
cause battery drain or a short circuit.
• When installing, be sure not to damage any car
parts such as pipes, tubes, fuel tank or wiring
by using a drill, as it may cause a fire or an
accident.
THIS PRODUCT IS LICENSED UNDER THE
MPEG-4 VISUAL PATENT PORTFOLIO
LICENSE FOR THE PERSONAL AND NONCOMMERCIAL USE OF A CONSUMER FOR
DECODING MPEG-4 VIDEO THAT WAS
ENCODED BY A CONSUMER ENGAGED IN
A PERSONAL AND NON-COMMERCIAL
ACTIVITY AND/OR WAS OBTAINED FROM
A VIDEO PROVIDER LICENSED BY MPEG
LA TO PROVIDE MPEG-4 VIDEO. NO
LICENSE IS GRANTED OR SHALL BE
IMPLIED FOR ANY OTHER USE.
ADDITIONAL INFORMATION INCLUDING
THAT RELATING TO PROMOTIONAL,
INTERNAL AND COMMERCIAL USES AND
LICENSING MAY BE OBTAINED FROM
MPEG LA, LLC. SEE
HTTP://WWW.MPEGLA.COM
3
Page 4

Table of Contents
Welcome ! . . . . . . . . . . . . . . . . . . . . . . . . . . . . .6
Features . . . . . . . . . . . . . . . . . . . . . . . . . . . . .6
Copyrights . . . . . . . . . . . . . . . . . . . . . . . . . . .7
Playable discs and symbols used in this
manual . . . . . . . . . . . . . . . . . . . . . . . . . . . . . . . .8
Location and function of controls . . . . . . . . . . 10
Main unit . . . . . . . . . . . . . . . . . . . . . . . . . . .10
Card remote commander RM-X160 . . . . . . 12
Getting Started
Resetting the unit . . . . . . . . . . . . . . . . . . 14
Performing initial settings. . . . . . . . . . . 14
Preparing the card remote
commander . . . . . . . . . . . . . . . . . . . . . . . 14
Basic Operations
Playing discs . . . . . . . . . . . . . . . . . . . . . 15
Listening to the radio. . . . . . . . . . . . . . . 18
Enjoying Surround Sound
Creating an ideal field for multi-channel
sound . . . . . . . . . . . . . . . . . . . . . . . . . . . . . . . . 20
Advanced Operations — Discs
Using PBC functions — Playback control. . . .21
Configuring audio settings . . . . . . . . . . . . . . . .21
Changing the audio language/format. . . . . .21
Adjusting the audio output level
— DVD level. . . . . . . . . . . . . . . . . . . . . . . . 22
Locking discs — Parental control . . . . . . . . . . 23
Activating parental control . . . . . . . . . . . . .23
Changing the area and its movie rating
level . . . . . . . . . . . . . . . . . . . . . . . . . . . . . . . 24
Repeat and shuffle play . . . . . . . . . . . . . . . . . .24
Direct search play. . . . . . . . . . . . . . . . . . . . . . .25
Enjoying karaoke . . . . . . . . . . . . . . . . . . . . . . .26
Enjoying different sources in front and rear
— Zone × Zone . . . . . . . . . . . . . . . . . . . . . . . .26
Listing up tracks/images/video files
— LIST . . . . . . . . . . . . . . . . . . . . . . . . . . . . . . 27
Selecting a track/image/video file . . . . . . . .27
Selecting a file type . . . . . . . . . . . . . . . . . . .27
4
Configuring playback settings for Super Audio
CD . . . . . . . . . . . . . . . . . . . . . . . . . . . . . . . . . . 28
Selecting a playback layer . . . . . . . . . . . . . 28
Selecting the sound quality. . . . . . . . . . . . . 28
Advanced Operations — Radio
Storing and receiving stations . . . . . . . . . . . . . 29
Storing automatically — BTM . . . . . . . . . . 29
Storing manually. . . . . . . . . . . . . . . . . . . . . 29
Receiving stored stations . . . . . . . . . . . . . . 29
RDS . . . . . . . . . . . . . . . . . . . . . . . . . . . . . . . . . 29
Overview. . . . . . . . . . . . . . . . . . . . . . . . . . . 29
Setting AF and TA . . . . . . . . . . . . . . . . . . . 30
Selecting PTY . . . . . . . . . . . . . . . . . . . . . . . 30
Setting CT . . . . . . . . . . . . . . . . . . . . . . . . . . 31
Sound Settings
Selecting the sound quality — EQ7 . . . . . . . . 31
Customizing the equalizer curve
— EQ7 Tune. . . . . . . . . . . . . . . . . . . . . . . . 32
Adjusting the sound characteristics. . . . . . . . . 32
Multi-channel output of 2-channel sources
— Pro Logic II. . . . . . . . . . . . . . . . . . . . . . . . . 33
Optimizing sound for the listening position
— Intelligent Time Alignment . . . . . . . . . . . . 33
Precisely calibrating the listening position
— Intelligent Time Alignment Tune . . . . . 34
Speaker configuration and volume setup . . . . 34
Creating a virtual center speaker
— CSO . . . . . . . . . . . . . . . . . . . . . . . . . . . . 34
Setting the speaker connection status . . . . . 34
Adjusting the speaker volume. . . . . . . . . . . 35
Monitor Settings
Adjusting the monitor angle . . . . . . . . . . . . . . 35
Touch panel calibration . . . . . . . . . . . . . . . . . . 35
Setting the background screen. . . . . . . . . . . . . 36
Setting the wallpaper and spectrum analyzer
pattern . . . . . . . . . . . . . . . . . . . . . . . . . . . . . 36
Capturing images for wallpaper . . . . . . . . . 37
Selecting the picture quality
— Picture EQ . . . . . . . . . . . . . . . . . . . . . . . . . 37
Customizing the picture quality . . . . . . . . . 38
Selecting the aspect ratio . . . . . . . . . . . . . . . . . 38
Page 5

General Settings
DVD setup . . . . . . . . . . . . . . . . . . . . . . . . . . . . 39
Basic operation of DVD setup . . . . . . . . . . 39
Language settings for display or
soundtrack. . . . . . . . . . . . . . . . . . . . . . . . . . 40
Audio/visual settings. . . . . . . . . . . . . . . . . . 40
Parental control settings . . . . . . . . . . . . . . . 41
Play mode settings . . . . . . . . . . . . . . . . . . . 41
Resetting all settings . . . . . . . . . . . . . . . . . . 41
Setup . . . . . . . . . . . . . . . . . . . . . . . . . . . . . . . . 42
Basic setup operation . . . . . . . . . . . . . . . . . 42
System settings — System . . . . . . . . . . . . . 43
Sound/speaker settings — Sound . . . . . . . . 46
Screen settings — Screen . . . . . . . . . . . . . . 48
Disc playback settings — Disc . . . . . . . . . . 49
Setting the security code . . . . . . . . . . . . . . . 50
Setting the clock . . . . . . . . . . . . . . . . . . . . . 50
Using Optional Equipment
Auxiliary audio/video equipment . . . . . . . . . . 51
Back camera/navigation device . . . . . . . . . . . . 51
Displaying the picture . . . . . . . . . . . . . . . . . 51
Back camera settings . . . . . . . . . . . . . . . . . 52
CD changer . . . . . . . . . . . . . . . . . . . . . . . . . . . 52
Rotary commander RM-X4S. . . . . . . . . . . . . . 53
Additional Information
For installation and connections, see the
supplied installation/connections manual.
Precautions . . . . . . . . . . . . . . . . . . . . . . . . . . . 54
Notes on LCD panel . . . . . . . . . . . . . . . . . . 54
Notes on discs . . . . . . . . . . . . . . . . . . . . . . . 54
Playback order of MP3/WMA/JPEG/DivX
files . . . . . . . . . . . . . . . . . . . . . . . . . . . . . . . 55
About MP3 files . . . . . . . . . . . . . . . . . . . . . 55
About WMA files . . . . . . . . . . . . . . . . . . . . 56
About JPEG files . . . . . . . . . . . . . . . . . . . . 56
About DivX
Maintenance . . . . . . . . . . . . . . . . . . . . . . . . . . 56
Removing the unit . . . . . . . . . . . . . . . . . . . . . . 56
Specifications . . . . . . . . . . . . . . . . . . . . . . . . . 57
Troubleshooting. . . . . . . . . . . . . . . . . . . . . . . . 58
Error displays/Messages . . . . . . . . . . . . . . . 60
Glossary. . . . . . . . . . . . . . . . . . . . . . . . . . . . . . 61
Language code/area code list. . . . . . . . . . . . . . 63
Index . . . . . . . . . . . . . . . . . . . . . . . . . . . . . . . . 64
®
files . . . . . . . . . . . . . . . . . . . 56
®
5
Page 6
Welcome !
Thank you for purchasing this Sony AV Center.
Before operating this unit, read this manual
thoroughly and retain it for future reference.
Features
Follow the page reference for details.
7 inch wide VGA*1 TFT touch monitor
Features intuitive touch panel operation, as well
as colorful high resolution video playback with
our latest G-Processor*
Capture function
t page 37
You can capture and store up to 4 images from a
video/image disc (or auxiliary video device)
and set as wallpaper.
DVD, VCD, Super Audio CD, CD playback
t page 8
Compatible with various disc formats.
2
.
t page 33
Produces 5 full-bandwidth output channels
from 2-channel sources, using an advanced,
high-purity matrix surround decoder.
Sony’s new sound engine creates an ideal in-car
sound field with digital signal processing.
X-DSP includes the following features.
t page 31
7 preset equalizer curves, which can be
further customized by tuning 7 different
bands.
t page 33
Changes the localization of the sound by
delaying the sound output from each
speaker, and provides the feeling of being in
the center of the sound field, wherever you
sit in the car.
2000MP3, 2000WMA
Can play up to 2,000 tracks*
DVD-R DL/DVD+R DL in MP3/WMA format.
Multi-disc resume playback
t page 41
Stores the point where playback is stopped for
up to 5 discs and can resume DVD VIDEO/
VCD playback even after the disc is ejected.
For surround sound such as Dolby Digital, Pro
Logic II, DTS surround, multi-channel of Super
Audio CD, etc., and allows for the 5.1-channel
sound system by connecting an amplifier and
speakers.
3
recorded on
6
t page 34
Creates a virtual center speaker and
simulates a multi-channel sound field
without a center speaker.
t page 37
Picture tone selectable from preset settings
according to the car’s interior/ambient light.
t page 26
You can connect a microphone (not supplied)
and enjoy karaoke.
Page 7
t page 26
You can simultaneously enjoy different sources
in the front and rear of the car.
3 AV IN and NAVI/CAMERA IN
t page 51
3 AV IN allows connection from the front
(using the supplied extension cord) of up to 3
optional devices, such as a portable media
player, game, etc.
For details, see the supplied installation/
connections manual.
NAVI/CAMERA IN allows connection of
either back camera or navigation device, and
the input can be switched accordingly. If the
back camera input is selected, its picture
automatically appears when the back lamp
lights up.
*1 Abbreviation for Video Graphics Array (800 × RGB
× 480 = 1,152,000).
*2 Dedicated processor which renders the graphic
user interface on the screen translucently.
*3 Depending on track length and recorded sampling
rate.
Copyrights
This product incorporates copyright protection
technology that is protected by U.S. patents and
other intellectual property rights. Use of this
copyright protection technology must be
authorized by Macrovision, and is intended for
home and other limited viewing uses only unless
otherwise authorized by Macrovision. Reverse
engineering or disassembly is prohibited.
Manufactured under license
from Dolby Laboratories.
“Dolby,” “Pro Logic,” and the
double-D symbol are trademarks of Dolby
Laboratories.
Manufactured under license
under U.S. Patent #'s:
5,451,942; 5,956,674;
5,974,380; 5,978,762; 6,487,535 & other U.S.
and worldwide patents issued & pending. DTS
and DTS Digital Surround are registered
trademarks and the DTS logos and Symbol are
trademarks of DTS, Inc. © 1996-2007 DTS, Inc.
All Rights Reserved.
Microsoft, Windows Media,
and the Windows logo are
trademarks or registered
trademarks of Microsoft
Corporation in the United States and/or other
countries.
“DVD VIDEO,” “DVD-R,” “DVD-RW,”
“DVD+R,” and “DVD+RW” are trademarks.
“DivX” and “DivX Certified” are
registered trademarks or trademarks
of DivX, Inc.
7
Page 8

Playable discs and symbols used in this manual
This unit can play various video/audio discs.
The following chart helps you to check if a disc is supported by this unit, as well as what functions are
available for a given disc type.
Disc symbol in manual Disc format Disc logo
DVD VIDEO
DVD-R*
DVD-R DL*
1
1
(Video mode/VR mode)
DVD-RW*
1
(Video mode/VR mode)
VIDEO
DVD+R*
DVD+R DL*
DVD+RW*
1
1
1
Video CD
(Ver. 1.0/1.1/2.0)
Super Audio CD
Audio CD
AUDIO
CD-ROM*
CD-R*
2
2
CD-RW*
*1 Audio files can also be stored. For details, see page 9.
*2 Video/image files can also be stored. For details, see page 9.
Note
“DVD” may be used in this manual as a general term for DVD VIDEOs, DVD-Rs/DVD-RWs, and DVD+Rs/
DVD +RWs.
2
8
Page 9
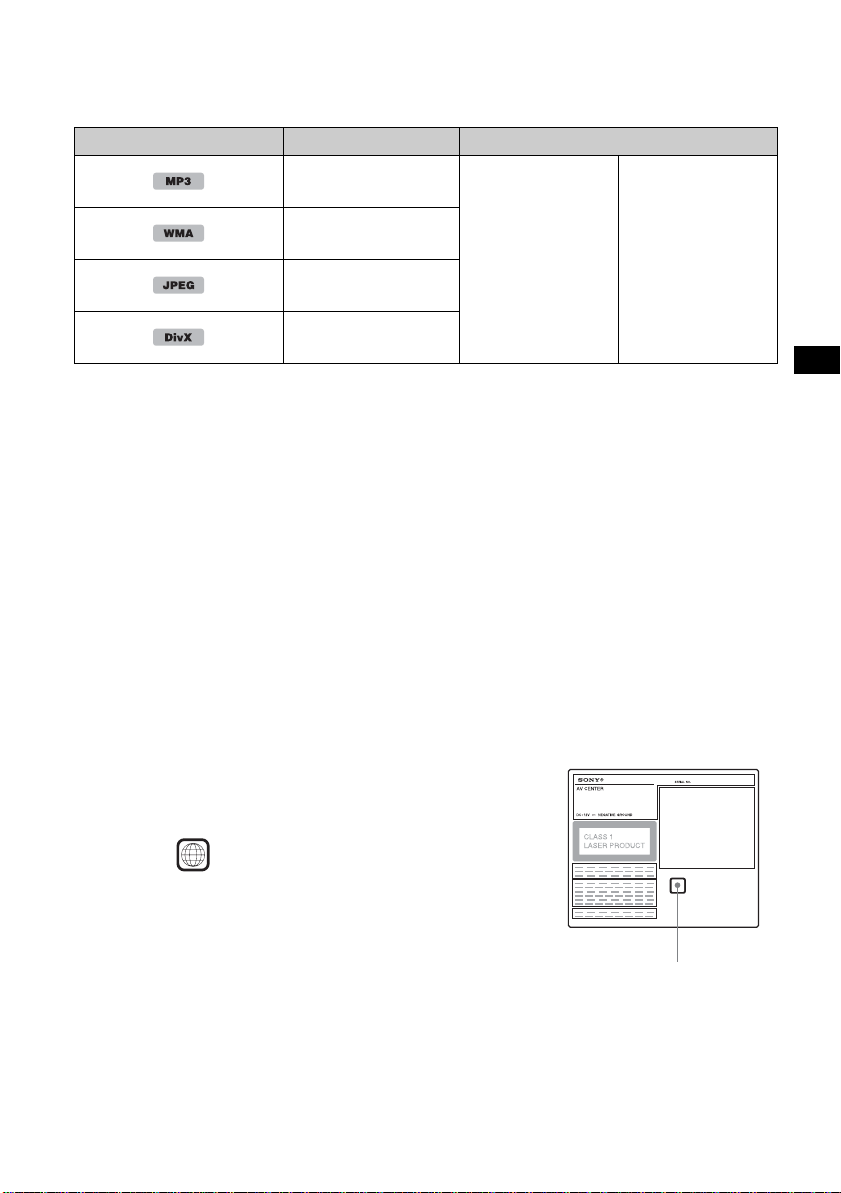
The following chart shows the supported compression formats, their file types, and the disc types on
which those files can be stored.
Available functions differ depending on the format, regardless of disc type. The format symbols below
appear next to the description of functions available for that format.
Format symbol in manual File type Storable disc type
MP3 audio file
DATA DVDs
DVD -RO M
WMA audio file
DVD -R
DVD-R DL
JPEG image file
DVD -RW
DVD +R
DVD+R DL
®
DivX
video file
Tip
For details on compression formats, see page 55.
DVD+RW
Unsupported discs
The following discs cannot be played on this unit.
•8 cm (3
• 12 cm (4
• CD-ROM containing files other than MP3/WMA/JPEG/DivX
•CD-G
• Photo-CD
• VSD (Video Single Disc)
• DVD-ROM containing files other than MP3/WMA/JPEG/DivX
•DVD-RAM
• DVD-Audio
• Active-Audio (Data)
• SVCD (Super Video CD)
•CDV
• Discs created in Packet Write format
Note
Even compatible discs may not be playable on this unit, depending on their recorded condition.
1
/4 in) discs
3
/4 in) discs utilizing only the inner 8 cm (3 1/4 in) data portion (the rest is transparent)
®
®
DATA CDs
CD-ROM
CD-R
CD-RW
Region code
The region system is used to protect software copyrights.
The region code is located on the bottom of the unit, and only DVDs
labeled with an identical region code can be played on this unit.
DVDs labeled can also be played.
If you try to play any other DVD, the message “Playback prohibited
by region code.” will appear on the display. Depending on the DVD,
no region code may be labeled even though playing the DVD is
prohibited by area restrictions.
ALL
Region code
9
Page 10
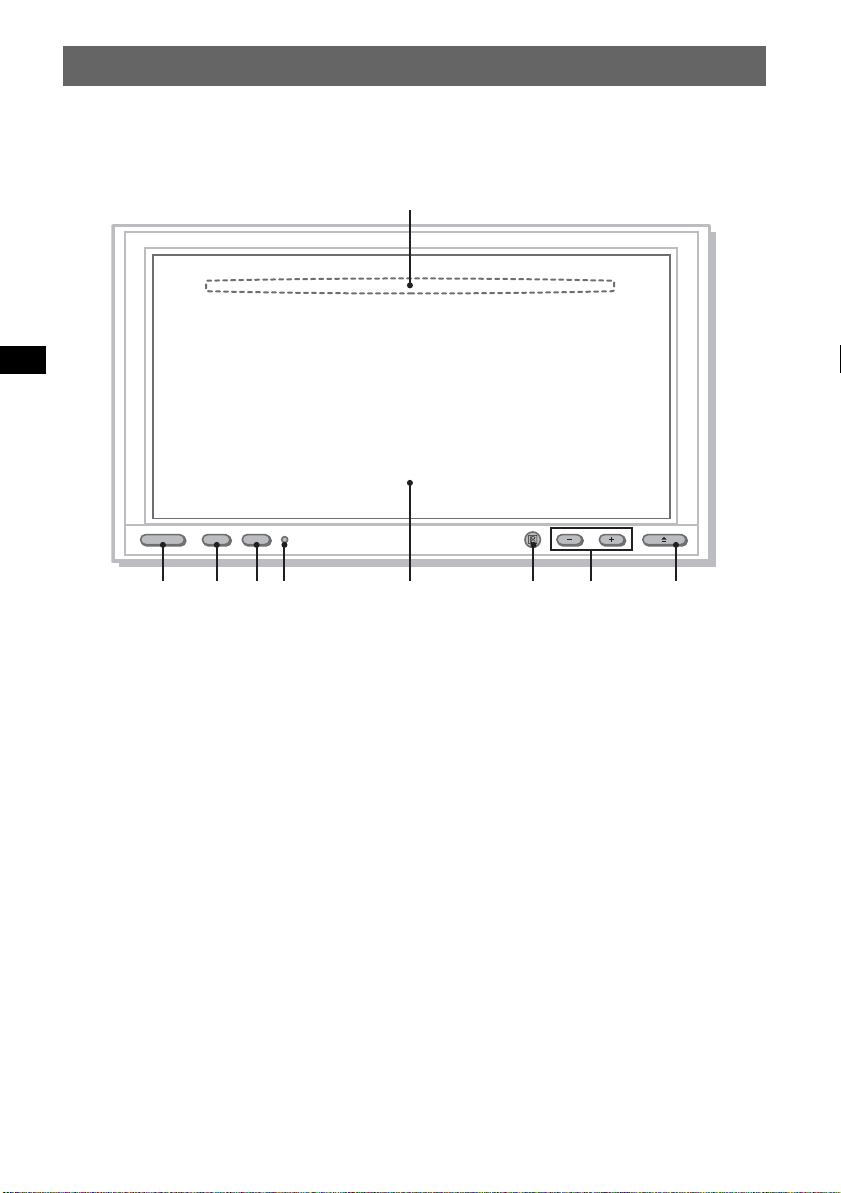
Location and function of controls
Main unit
1
SRC OFF
CSTM
2 3 45 7986
Refer to the pages listed for details.
A Disc slot (located behind the front panel)
15
To insert the disc.
B SRC (Source) button 14
To power on; change the source* (Radio/
Disc/AUX).
C OFF button 14, 15, 21
To power off/stop the source (press); shut off
completely (press and hold).
D CSTM (Custom) button 44
To perform the assigned function (one of the
following).
Capture: 37
To capture and store an image during
video/image playback to set as a wallpaper.
Screen: 36
To switch the background screen.
Picture EQ: 37
To select the picture quality.
10
XAV-W1
Aspect: 38
To select the screen aspect ratio.
EQ7: 31
To select an equalizer type (Xplod/Vocal/
Edge/Cruise/Space/Gravity/Custom/OFF).
Zone × Zone: 27
To activate Zone × Zone.
E Reset button 14
F Display window/touch panel
G Receptor for the card remote
commander
H VOL (Volume) –/+ buttons
To adjust the volume.
I Z (Open/Close) button 15
To open/close the front panel/eject the disc
when inserted.
Page 11
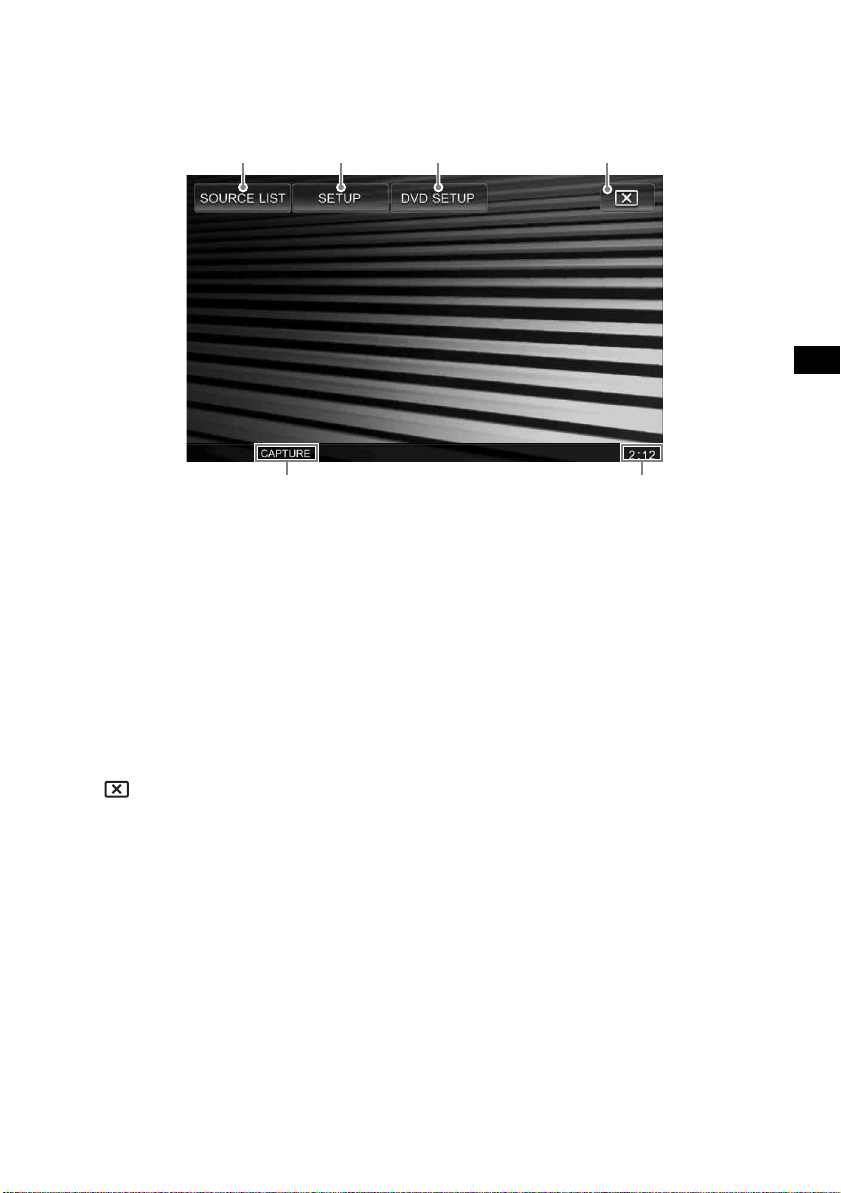
Screen display
56
When no source is selected:
123 4
A SOURCE LIST key 18, 29, 52
To open the source list and change the
source* (Radio/Disc/AUX).
B SETUP key 42
To open the setup menu.
C DVD SETUP key 39
To open the DVD setup menu.
D (Monitor Off) key
To turn off the monitor and the button
illumination. To turn back on, touch
anywhere on the display.
E Function name on the CSTM button
44
Indicates the function name currently
assigned to the CSTM button on the main
unit.
F Clock display 48
* If an optional device (such as a CD changer or
interface adaptor for iPod XA-110IP) is connected to
the BUS terminals, the optional device can also be
selected.
11
Page 12
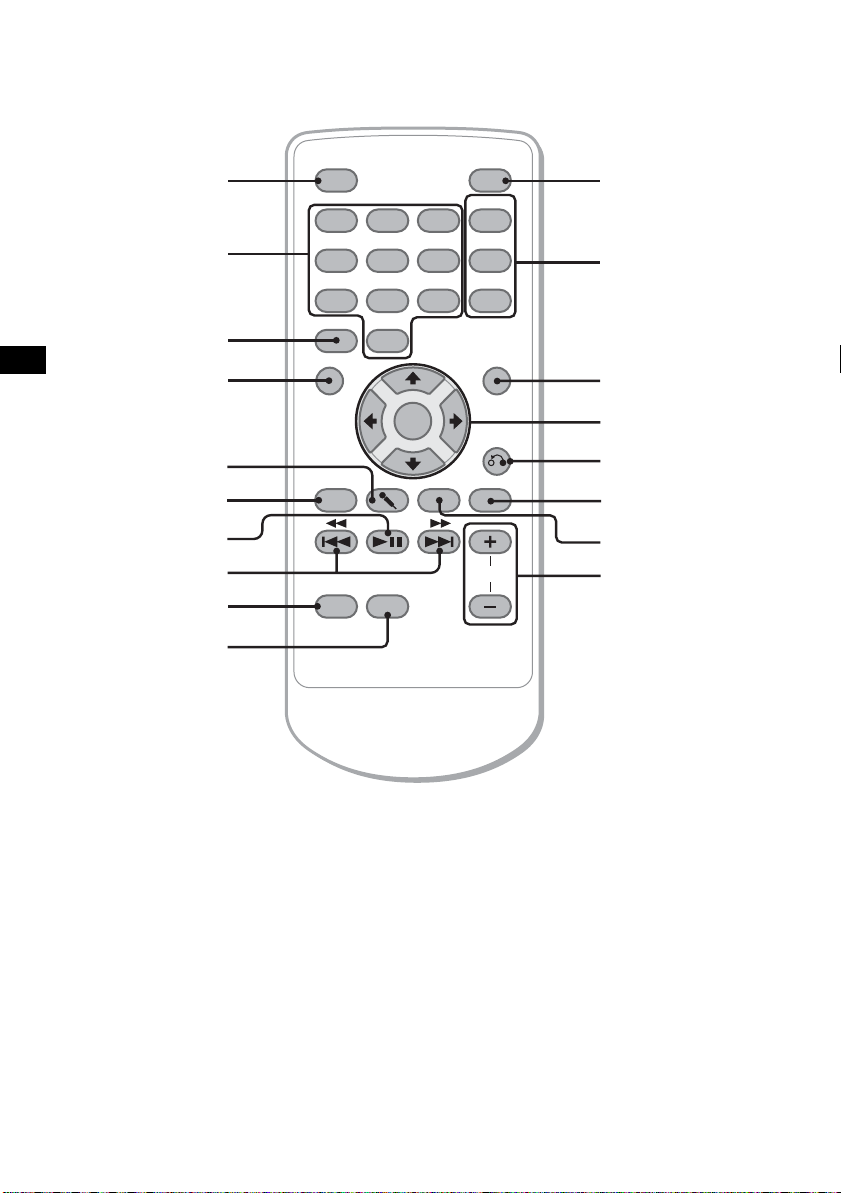
Card remote commander RM-X160
2
3
4
5
6
7
8
9
0
OFF ATT
1
23
44 55 66
77 88 99
CLEAR
0
TOP MENU
ENTER
ZXZ
ZxZ
SRC
SCREEN CAPTURE
MODE
AUDI O
SUBTITLE
ANGLE
MENU
VOL
qa1
qs
qd
qf
qg
qh
qj
qk
The card remote commander can be generally
used to operate the audio controls simply. For
menu operations, use the touch panel.
Refer to the pages listed for details.
Remove the insulation film before use (page 14).
A OFF button 14, 15, 21
To power off/stop the source (press); shut off
completely (press and hold).
B Number buttons 21, 23, 25, 50
Disc:
To locate a title/chapter/track.
Radio:
To receive stored stations (press); store
12
stations (press and hold).
C CLEAR button
To delete an entered number.
D TOP MENU button
To open the top menu on a DVD.
E m (Microphone) button
To activate the karaoke mode.
F Z×Z (Zone × Zone) button
To activate Zone × Zone.
G u (Play/Pause) button
To start/pause playback.
Page 13

H .m/M> buttons
Disc:
To skip a chapter/track/scene/file (press);
reverse/fast-forward disc (press and hold
momentarily); reverse/fast-forward track
(press and hold).*
1
Radio:
To tune in stations automatically (press); find
a station manually (press and hold).
I SRC (Source) button 14
To power on; change the source*2 (Radio/
Disc/AUX).
J MODE button
To select the radio band (FM/MW/LW);
select an external device*
3
.
K ATT (Attenuate) button
To attenuate the sound (to cancel, press
again).
L DVD playback setting buttons
(AUDIO): 22
To change the audio language/format.
(For VCD/CD/MP3/WMA, to change the
audio channel.)
(SUBTITLE):
To change the subtitle language.
(ANGLE):
To change the viewing angle.
*1 Operation differs depending on the disc (page 16).
*2 If an optional device (such as a CD changer or
interface adaptor for iPod XA-110IP) is connected
to the BUS terminals, the optional device can also
be selected.
*3 When two or more external devices are used.
*4 When playing with PBC function.
Note
If the unit is turned off and the display disappears, it
cannot be operated with the card remote commander
unless (SRC) on the main unit is pressed, or a disc is
inserted to activate the unit first.
Tip
For details on how to replace the battery, see
“Replacing the lithium battery of the card remote
commander” on page 56.
M MENU button
To open the menu on a disc.
N </M/m/, (Cursor)/ENTER buttons
To move the cursor and apply a setting.
O O (Return) button 21
To return to the previous display; return to
the menu on a VCD*
4
.
P CAPTURE button 37
To capture and store an image during video/
image playback to set as a wallpaper.
Q SCREEN button
To switch the background screen.
R VOL (Volume) +/– buttons
To adjust the volume.
13
Page 14
Getting Started
Resetting the unit
Before operating the unit for the first time, or
after replacing the car battery or changing the
connections, you must reset the unit.
Press the reset button with a pointed object, such
as a ball-point pen.
Reset button
Note
Pressing the reset button will erase the clock setting
and some stored contents.
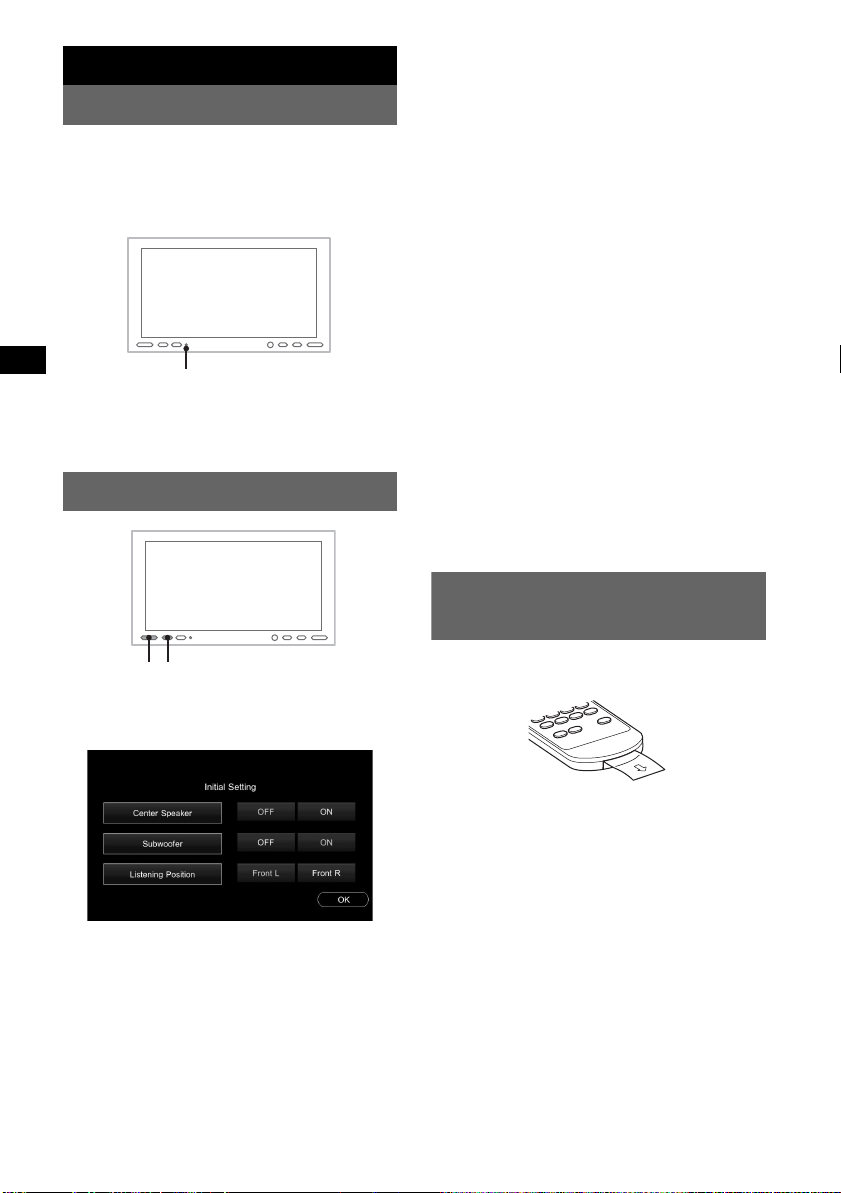
Performing initial settings
1 Set the center speaker connection
status.
Touch “ON” if a center speaker is connected,
or “OFF” if not.
2 Set the subwoofer connection status.
Touch “ON” if a subwoofer is connected, or
“OFF” if not.
3 Set the listening position.
Touch “Front L” if your listening position is
front left, or “Front R” if front right.
4 Touch “OK.”
The source list appears when the setting is
complete.
This setting can then be further configured in
setup.
For details on setting the speaker connection
status, see “Setting the speaker connection
status” on page 34. For details on setting the
listening position, see “Optimizing sound for the
listening position — Intelligent Time
Alignment” on page 33.
Note
If you set to “Center Speaker ON” without connecting
the center speaker, vocal sound is not output, and if
you set to “Subwoofer ON” without connecting the
subwoofer, bass sound is not output.
Preparing the card remote
commander
SRC OFF
After resetting, the display for the initial speaker
settings appears.
Be sure to set correctly following the procedure
below to enjoy the various sound functions of
this unit.
To skip the initial settings, press (OFF)/(SRC),
or insert a disc.
Note
The initial setting display automatically disappears if
no operation is performed for 30 seconds.
During setup procedure, it is canceled if no operation
is performed for 15 seconds.
14
Before using the card remote commander for the
first time, remove the insulation film.
Page 15
Basic Operations
Playing discs
Depending on the disc, some operations may be different or restricted.
Refer to the operating instructions supplied with your disc.
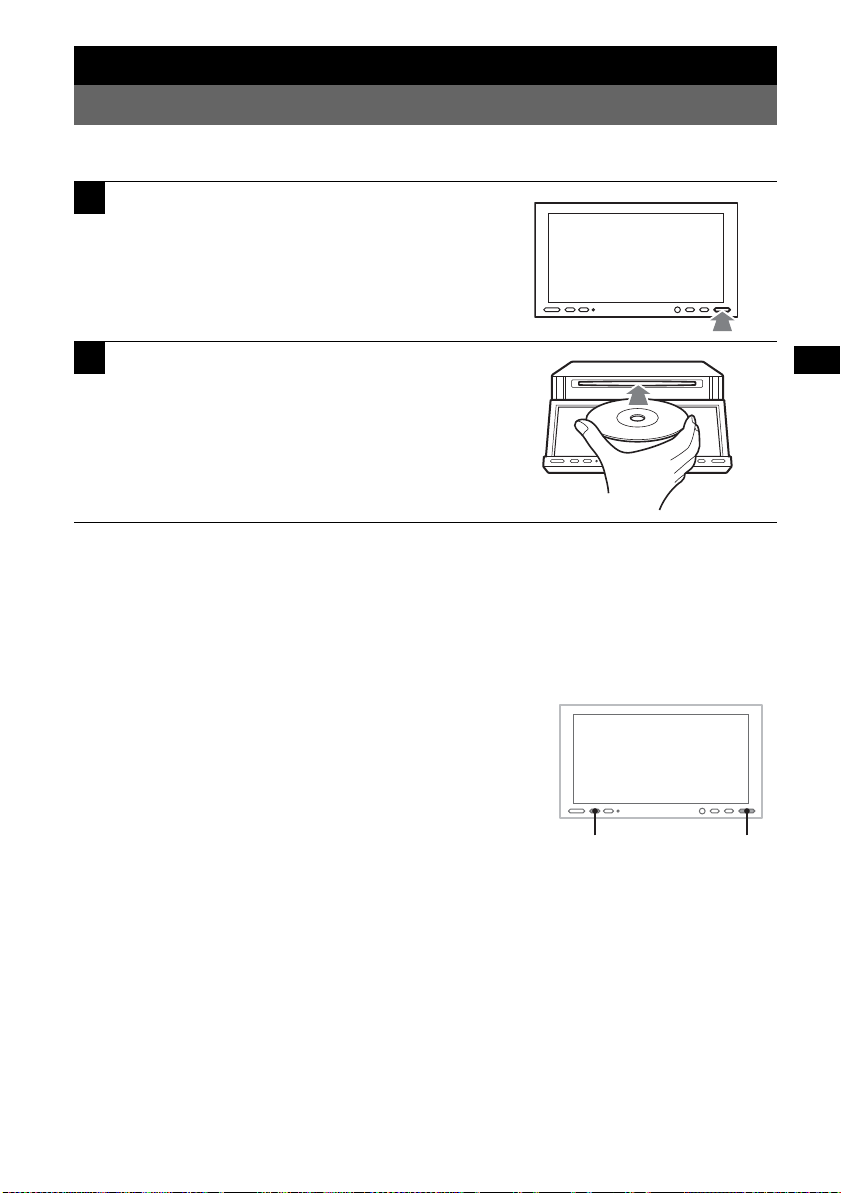
1
Press Z on the main unit.
The front panel opens automatically.
2
Insert the disc (label side up).
The front panel closes automatically, then playback
starts automatically.
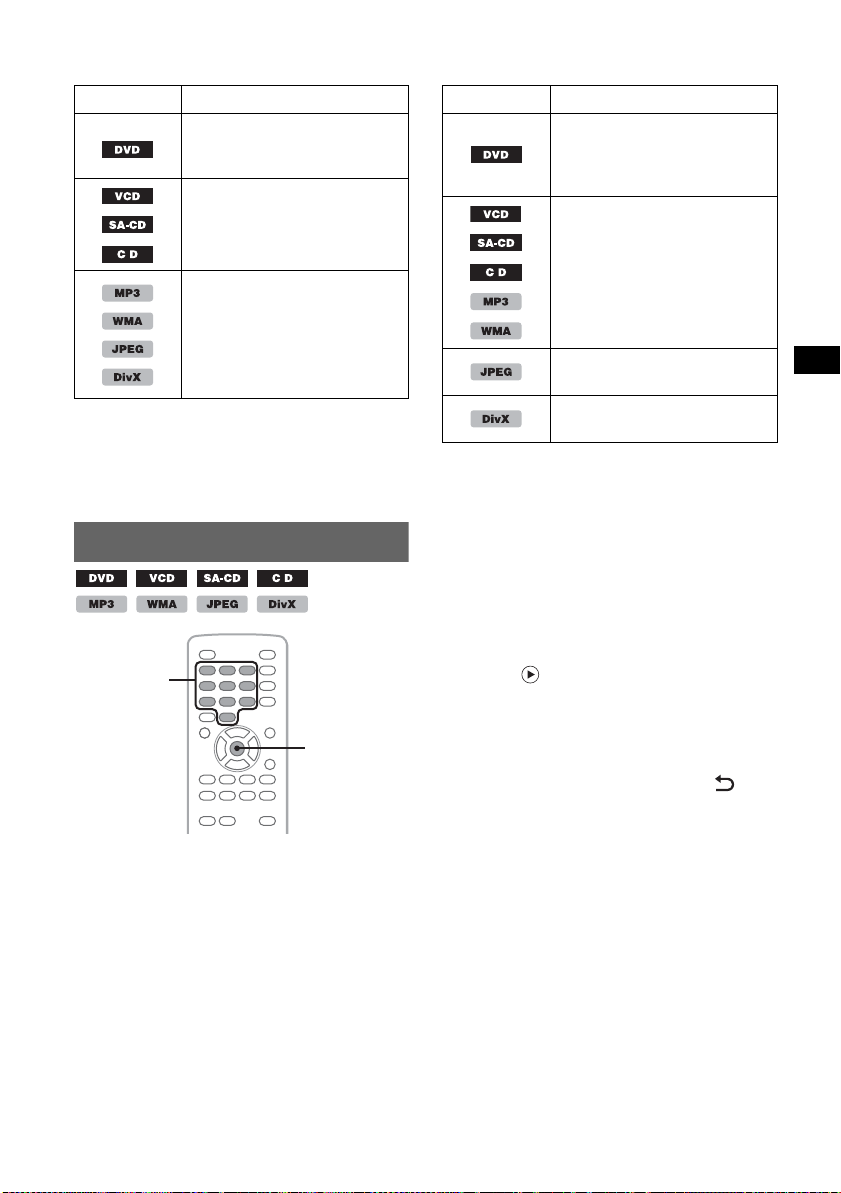
If the DVD menu appears
Touch the display in the desired place to show the controls for item selection.
Touch b/v/V/B to move the cursor, then “Enter” to confirm.
If the controls do not appear by touching the display, use the card remote commander.
If the disc contains JPEG files
The slide show starts automatically.
To stop playback
Press (OFF).
To eject the disc
1 Press Z on the main unit.
The front panel opens automatically, then the disc is ejected.
2 Press Z on the main unit to close the front panel.
Note
The front panel closes automatically after the caution alarm sounds.
About the DVD menu
A DVD is divided into several sections, which make up a picture or music feature. These sections are
called “titles.” When you play a DVD that contains several titles, you can select a desired title using the
DVD’s top menu. For DVDs that allow you to select items such as subtitle/sound language(s), select
these items using the DVD menu.
continue to next page t
ZOFF
15
Page 16
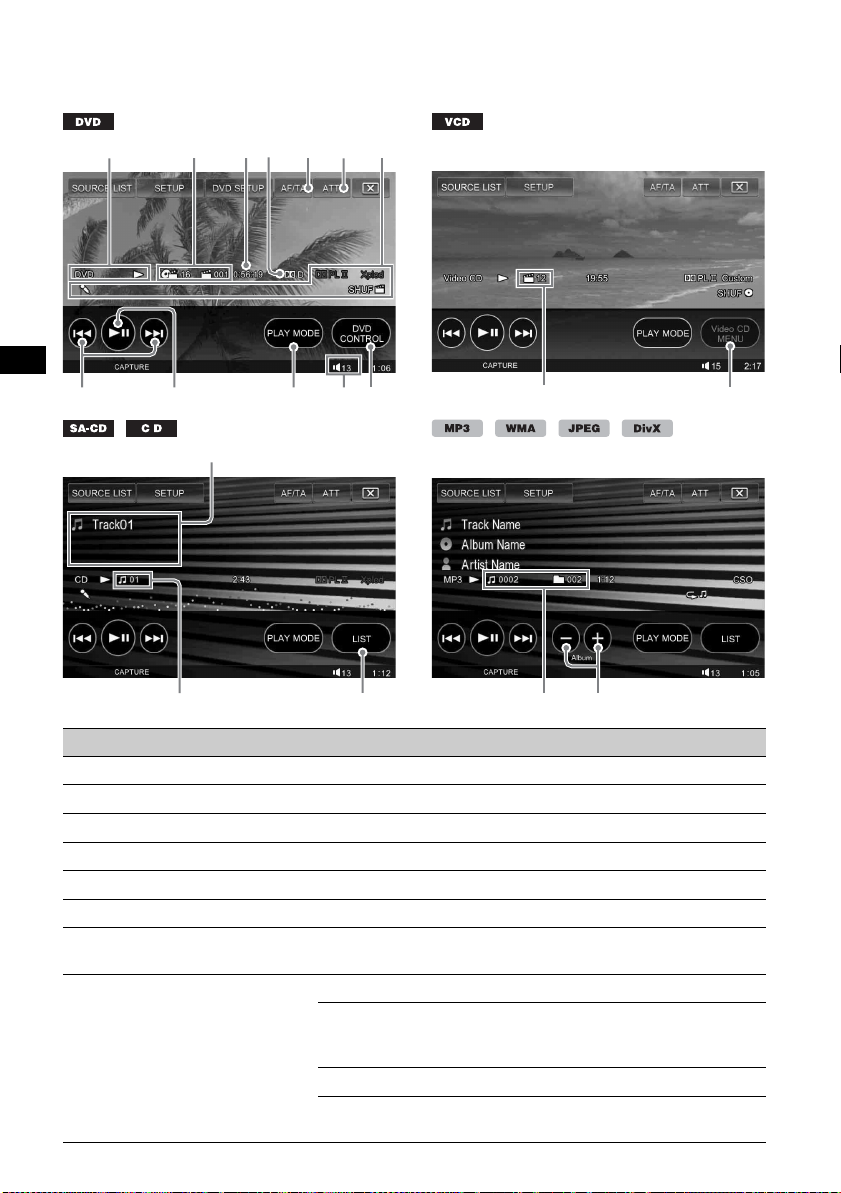
Playback displays and controls
LKJ
G
IH
AFEBCD
QP
O
For video/image discs, the following display appears when the display is touched.
For audio discs, the following display appears during playback.
NM
R S
No. Item Explanation
A Format/playback status Indicates the current format and playback status (N, X, etc.).
B Chapter/title number Indicates the current chapter/title number of the DVD.
C Playback time Indicates the elapsed playback time.*
1
D Audio format Indicates the current audio format of DVD/DivX®. (page 21)
E AF/TA To set AF and TA in RDS. (page 30)
F ATT Touch to attenuate the sound. To cancel, touch again.
G Active function Indicates the currently active functions (Pro Logic II, EQ7,
karaoke, Zone × Zone, or repeat/shuffle play).
H ./> Touch to skip a chapter/track/scene/image/file.
Touch and hold momentarily to reverse/fast-forward video disc;
and then repeatedly to switch the speed (× 2 t × 12 t × 120
t × 2…)*
2
. To cancel, touch u.
Touch and hold to reverse/fast-forward the audio track.
During pause, touch and hold down > to play the video disc in
16
slow motion. To cancel, release the key.
Page 17

I u Touch to pause/resume play after pause.
J PLAY MODE Touch to open the play mode menu, which contains the
following.
• Repeat/Shuffle (page 24)
• KARAOKE (DVD/VCD/CD/MP3 playback only) (page 26)
• DVD Level (DVD VIDEO playback only) (page 22)
• Sound (VCD playback only) (page 22)
• Image Turn (JPEG playback only): Touch to rotate an image
left/right.
• Audio (DivX
• Subtitle (DivX
select the subtitle language.*
®
playback only) (page 22)
®
playback only): Touch repeatedly to turn off/
3*4
K Volume level Indicates the volume level. When ATT is activated, appears.
L DVD CONTROL Touch to open the DVD control menu, which contains the
following.
• Audio: Touch repeatedly to select the audio language/format.
(page 21)*
• Subtitle: Touch repeatedly to turn off/select the subtitle
language.*
• Angle: Touch repeatedly to change the viewing angle.*
• To p M e nu: Touch to open the top menu on the DVD.*
• Menu: Touch to open the menu on the disc.*
M Track number Indicates the current track number of VCD.*
3
3*4
3
3
3
5
N Video CD MENU Touch to open the menu on the VCD.
O Disc information Indicates the current track/album/artist name of Super Audio CD/
CD/MP3/WMA, the current image/album name of JPEG, or the
current file/album (folder) name of DivX
®
.
P Track number Indicates the current track number of Super Audio CD/CD.
Q LIST Touch to list up tracks/images/video files. (page 27)
R Track/album number Indicates the current track (file) number and current album
(folder) number of MP3/WMA/JPEG/DivX
®
.
S ALBUM –/+ Touch to skip an album (folder).
*1 During JPEG playback or VCD playback with the PBC function, no indication appears.
*2 The speed depends on the format or the recording method.
*3 Unavailable depending on the disc.
*4 When the 4-digit input prompt appears, input the language code (page 63) for the desired language.
*5 When playing a VCD with the PBC function (page 21), no indication appears.
Note
If the disc contains multiple file types, only the selected file type (audio/video/image) can be played. For details on
how to select the file type,
Note on DivX® files
DivX® is a video file compression technology, developed by DivX, Inc. This product is an official DivX® Certified
product and can play all versions of DivX
Notes on JPEG playback
• If a large-sized image is rotated, it may take longer to display.
• Progressive JPEG files cannot be displayed.
see “Selecting a file type” on page 27.
®
video (including DivX® 6) with standard playback of DivX® media files.
17
Page 18
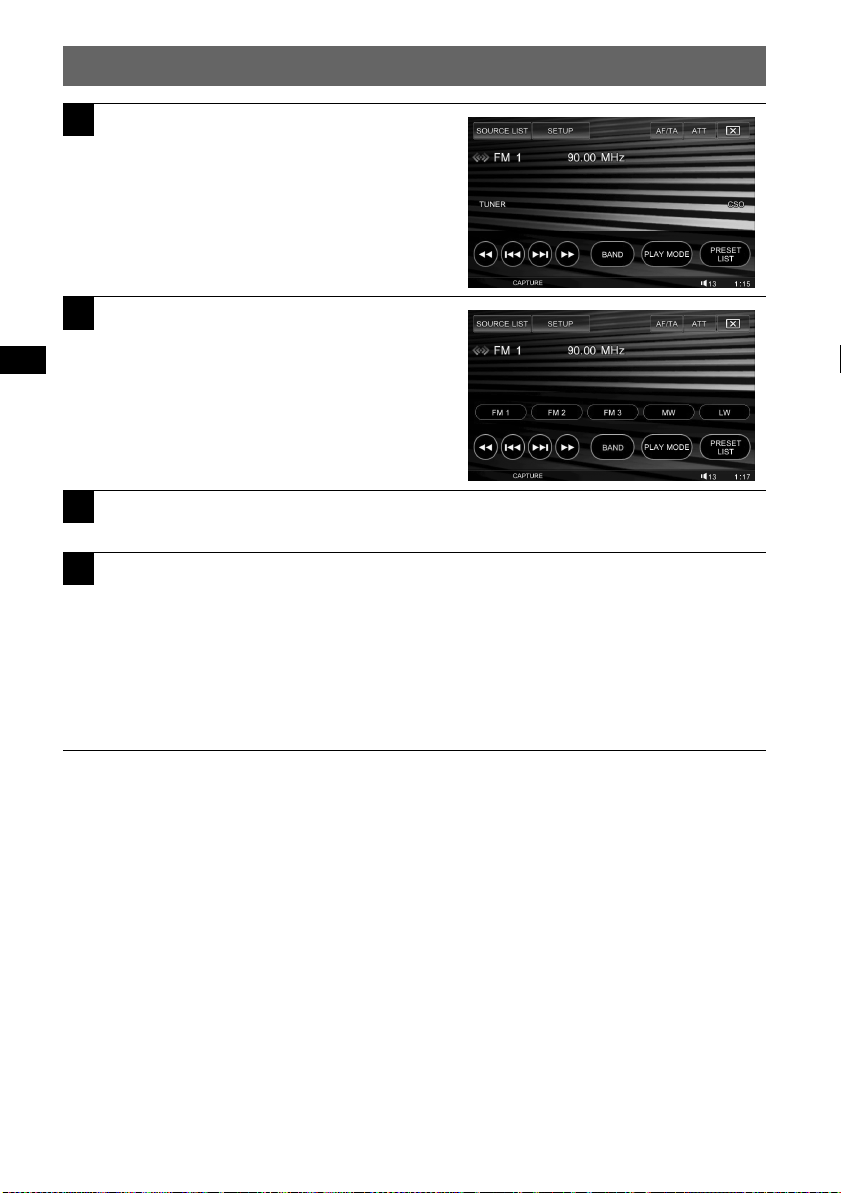
Listening to the radio
1
Touch “SOURCE LIST,” then
“TUNER.”
The radio reception display appears.
2
Touch “BAND.”
The band list appears.
3
Touch the desired band (FM 1, FM 2, FM 3, MW or LW).
Touch “BAND” to close the band list.
4
Perform tuning.
To tune automatically
Touch
./>.
Scanning stops when the unit receives a station. Repeat this procedure until the desired station
is received.
To t une manu ally
Touch
m/M repeatedly until the desired frequency is received.
To skip frequencies continuously, touch and hold
m/M.
18
Page 19
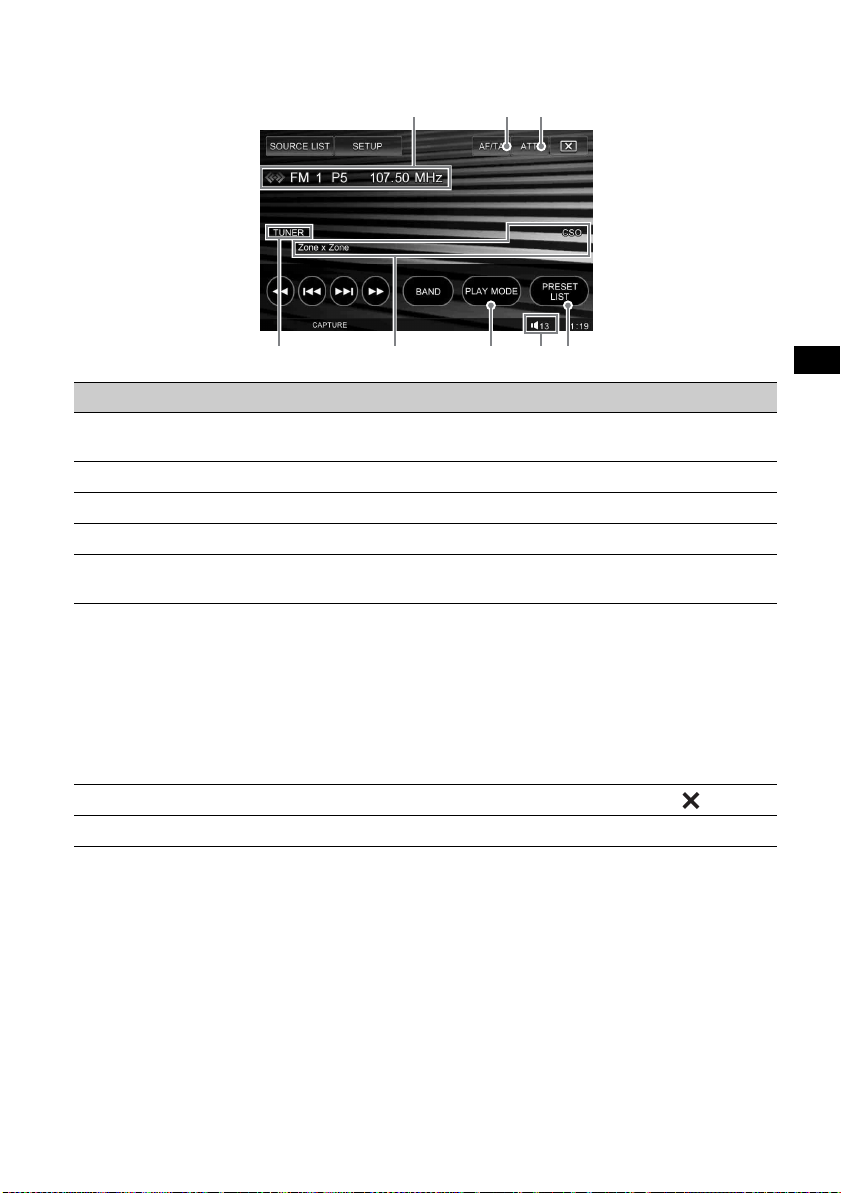
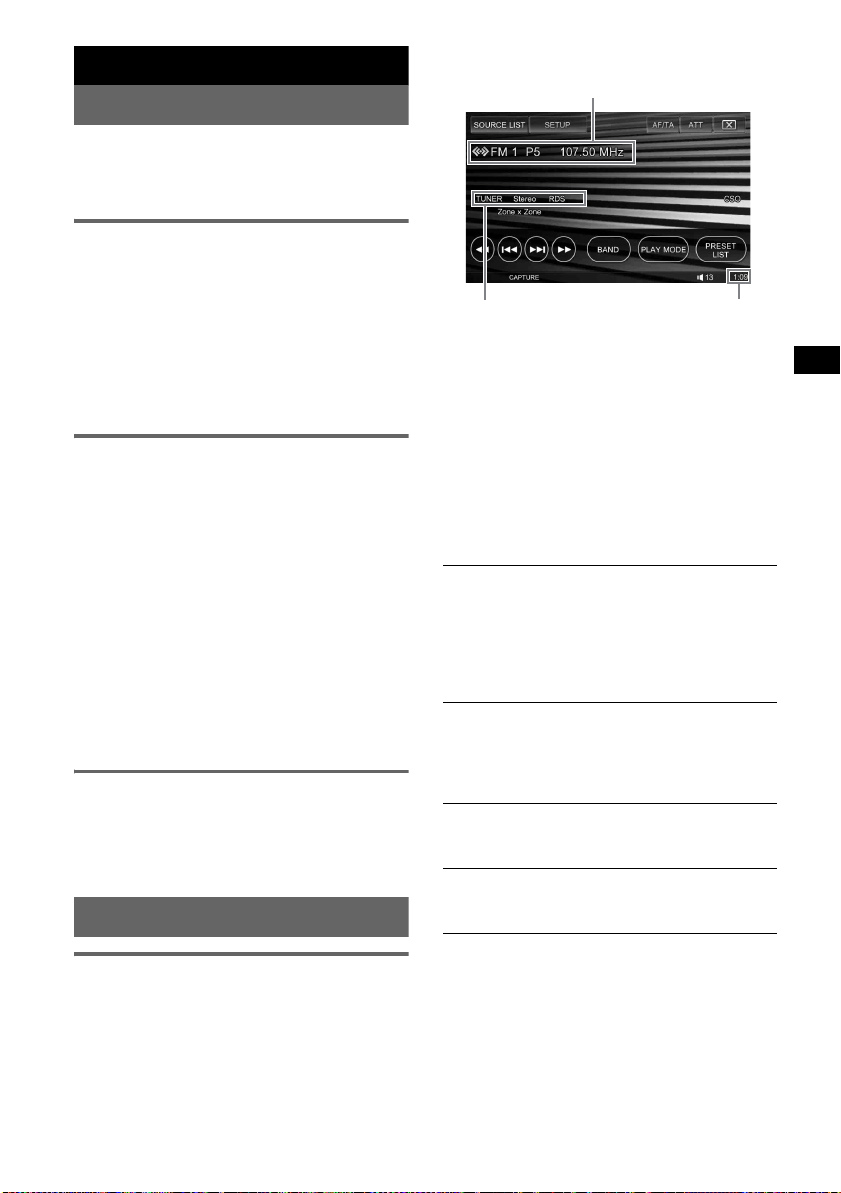
Radio reception display and controls
HFGED
C
BA
The following display appears during radio reception.
No. Item Explanation
A Station information Indicates the current band number, preset number*1, or
frequency*
B AF/TA To set AF and TA in RDS. (page 30)
C ATT Touch to attenuate the sound. To cancel, touch again.
D Source Indicates the current source.
E Active function Indicates the currently active functions (Pro Logic II, EQ7, or
Zone × Zone).
F PLAY MODE Touch to open the play mode menu, which contains the
following.
• Mono: Touch to activate the monaural mode if FM reception is
poor. To restore stereo reception, select “OFF.”
• Local: Touch to only tune into stations with stronger signal. To
tune normal stations, select “OFF.”
• Regional (page 30)
• PTY LIST (page 30)
G Volume level Indicates the volume level. When ATT is activated, appears.
H PRESET LIST Touch to list up stored stations, or store stations. (page 29)
*1 Appears only when the station stored in memory is received.
*2 While receiving an RDS station, program service name appears. For details, see “RDS” on page 29.
Tip
For details on other radio functions, see “Advanced Operations — Radio” on page 29.
2
/status.
19
Page 20

Enjoying Surround Sound
Creating an ideal field for
multi-channel sound
A procedure example to create an ideal field for
multi-channel (5.1-channel) sound is introduced
in this section. Follow the page reference for
details.
2 Enjoying 2-channel sources in
multi-channel sound
x For VCD/CD/MP3/AUX playback or
radio reception
1Activate Dolby Pro Logic II mode.
tpage 33
2Activate CSO if a center speaker is not
connected.
tpage 34
1 Preparation
1 Set the speaker configuration.
Set the connection status of the center speaker
and subwoofer.
tBy initial settings (page 14)
tBy setup (page 34)
2 Select your listening position.
To select from preset options
tpage 33
To calibrate precisely
tpage 34
3 Adjust the volume of each connected
speaker.
Adjust the volume from each speaker so that
their perceived level is equal from your
listening position.
tpage 35
4 Set the cut-off frequencies of the front/
rear speaker (HPF) and subwoofer
(LPF).
tpage 47
3 Enjoying multi-channel sources
x For playback of DVD/CD in multi-
channel format (Dolby Digital, DTS,
etc.)
1Activate CSO if a center speaker is not
connected.
tpage 34
x For playback of the multi-channel area
of an Super Audio CD
1Set “Super Audio CD Mode” to “High
Quality.”
tpage 28
Note
HPF/LPF (page 47) settings are deactivated when
set to “High Quality.”
4 Sound characteristic adjustment
Adjust the following items according to your
preference.
1 Set EQ7*.
* Not available if CSO is activated.
tpage 31
2 Adjust the balance and fader of
speakers.
tpage 32
20
Page 21
Advanced Operations — Discs
This chapter consists of the following sections.
• Video-specific operations*
t page 21 to 24
• Video*/audio common operations
t page 24 to 27
• Audio-specific operations
t page 28
* Including JPEG operations.
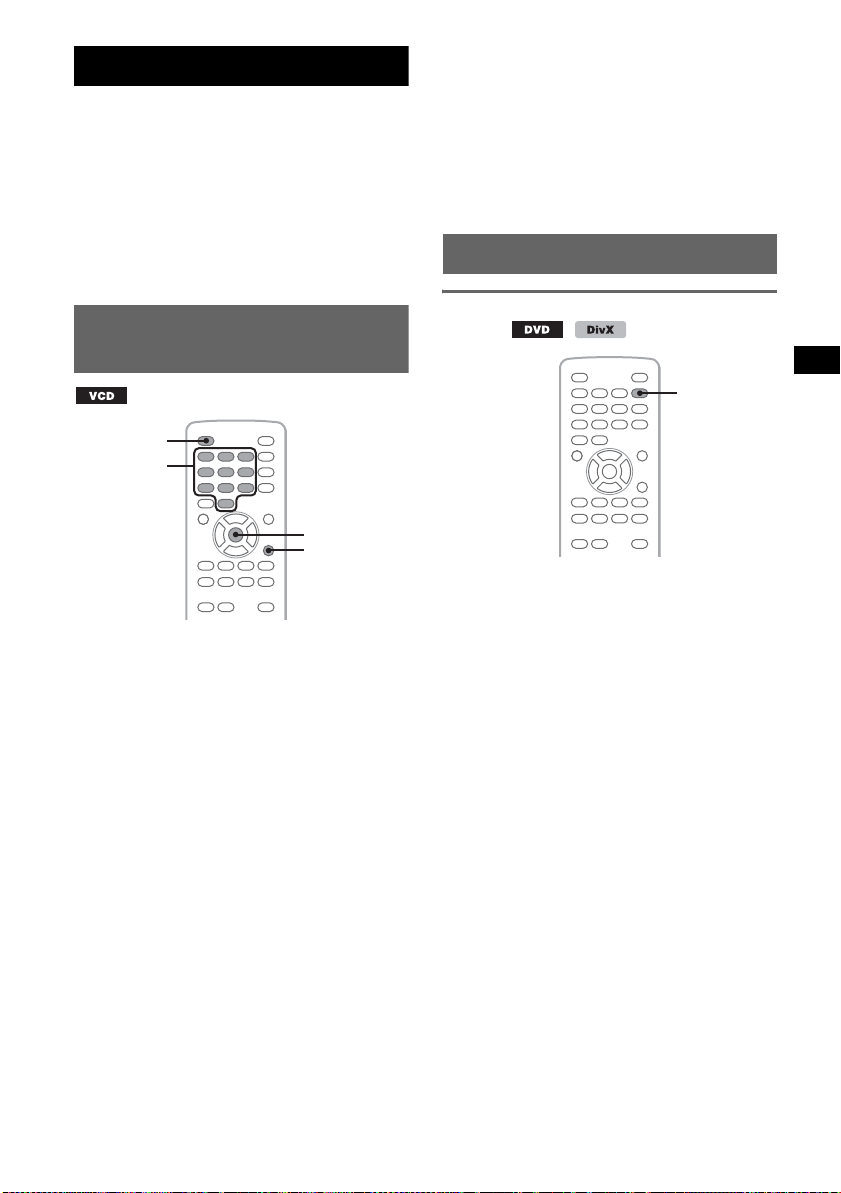
Using PBC functions
— Playback control
OFF
Number
buttons
ENTER
ZXZ
The PBC menu assists your operation
interactively while a PBC compatible VCD is
played.
1 Start playing a PBC compatible VCD.
The PBC menu appears.
2 Press the number buttons to select the
desired item, then press (ENTER).
3 Follow the instructions in the menu for
interactive operations.
To return to the previous display, press O.
O
Notes
• The items on the menu, and operation procedures
differ depending on the disc.
• During PBC playback, the track number, playback
item, etc., do not appear in the playback display.
• Resume playback is unavailable during playback
without PBC.
Tip
To resume PBC playback, stop playback by pressing
(OFF), then press u.
Configuring audio settings
Changing the audio language/
format
AUDIO
For DVD, the audio language can be changed if
the disc is recorded with multilingual tracks. For
DVD/DivX
when playing a disc recorded in multiple audio
formats (e.g., Dolby Digital).
®
, you can change the audio format
continue to next page t
Playing without the PBC function
1 During playback, press (OFF).
Playback stops.
2 Touch “SETUP,” then the “Disc” tab.
The “Disc Setting 1” display appears.
3 Touch “Play Video CD Without PBC.”
Playback starts. The PBC menu does not
appear during playback.
21
Page 22

For DVD
1 During playback, touch “DVD
CONTROL.”
2 Touch “Audio” repeatedly until the
desired audio language/format
appears.
Audio language
Audio format/channel numbers*
The audio language switches among the
available languages.
When the 4-digit input prompt appears, input
the language code (
page 63) for the desired
language.
When the same language is displayed two or
more times, the disc is recorded in multiple
audio formats.
* The format name and channel numbers appear as
follows.
Example: Dolby Digital 5.1 ch
Rear component × 2
Dolby D 3 / 2 . 1
Front component × 2 +
Center component × 1
To close the DVD control menu, touch “DVD
CONTROL.”
For DivX
®
1 During playback, touch “PLAY MODE,”
then touch “Audio” repeatedly until
the desired audio format appears.
To close the play mode menu, touch “PLAY
MODE.”
LFE component × 1
Changing the audio channel
When playing VCD/CD/MP3/WMA, you can
select the right or left channel sound to listen
through both right and left speakers.
The options are indicated below.
Stereo: Standard stereo sound (default)
1/Left: Left channel sound (monaural)
2/Right: Right channel sound (monaural)
For VCD
1 During playback, touch “PLAY MODE,”
then touch “Sound” repeatedly until
the desired audio channel appears.
Audio channel
To close the play mode menu, touch “PLAY
MODE.”
For CD/MP3/WMA
1 During playback, press (AUDIO) on the
card remote commander repeatedly
until the desired audio channel
appears.
Note
You may not be able to change the audio setting
depending on the disc.
Tip
The operation by the card remote commander
(pressing (AUDIO) repeatedly) is also available for
video discs.
Adjusting the audio output level
— DVD level
The audio output level differs depending on the
recorded format. To reduce the volume level
differences between disc and source, you can
adjust audio output level according to the
recorded format. The default level is set for PCM
format, and the level for Dolby Digital and DTS
format can be adjusted separately from the
default level.
22
Page 23
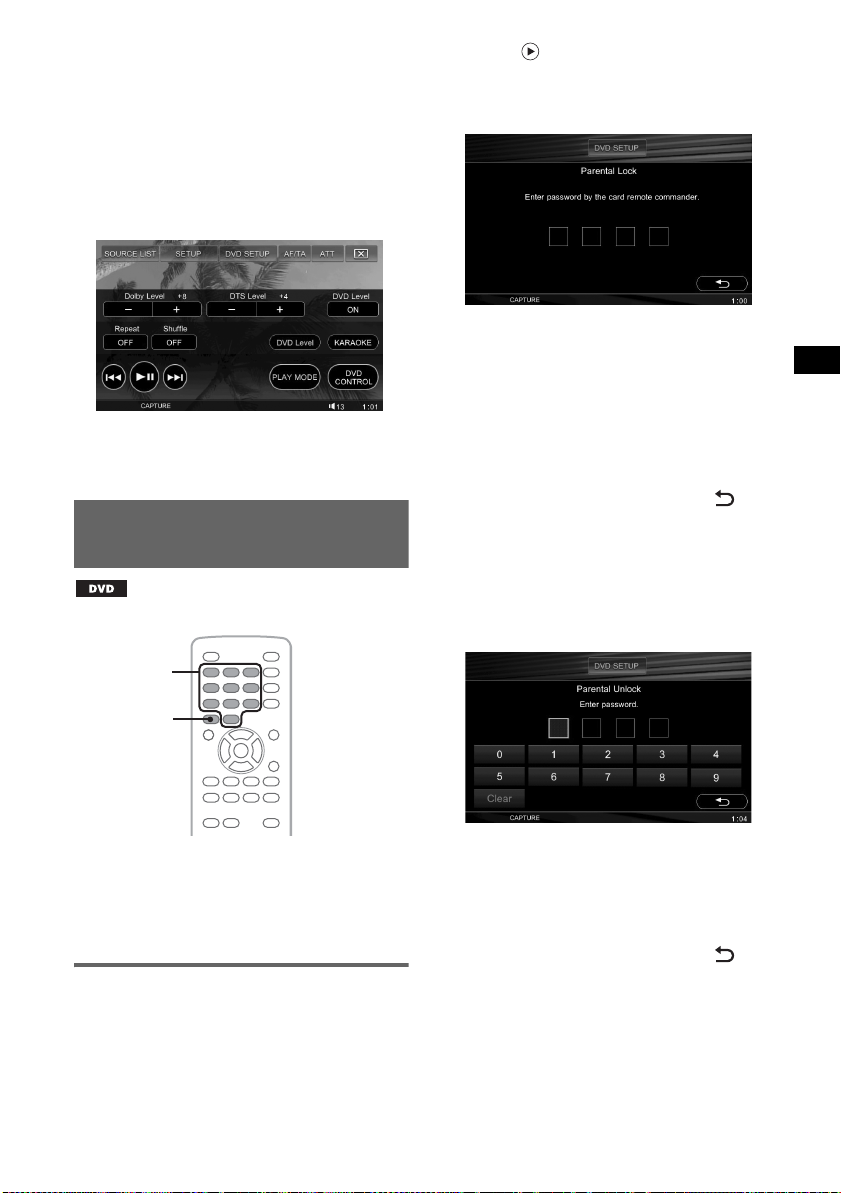
1 During playback, touch “PLAY MODE,”
then “DVD Level.”
2 Touch the “DVD Level” box to set to
“ON.”
3 Touch –/+ repeatedly to adjust the
output level for each “Dolby Level”
and “DTS Level.”
The output level is adjustable in single steps,
between –10 and +10.
To close the play mode menu, touch “PLAY
MODE.”
Locking discs
— Parental control
*
* Excluding DVD-R/DVD-R DL/DVD-RW in VR mode.
2 Touch repeatedly until the
“Parental Control” display appears,
then touch “Lock/Unlock.”
The password setting display appears.
3 Press the number buttons on the card
remote commander to enter your
password.
4 To confirm, press the number buttons
to reenter your password.
The setting is complete.
To delete an entered number, press (CLEAR) on
the card remote commander.
To return to the previous display, touch .
To close the DVD setup menu, touch “DVD
SETUP.”
Deactivating parental control
1 Repeat steps 1 to 2 above.
The parental unlock display appears.
Number
buttons
CLEAR
You can lock a disc, or set playback restrictions
according to a predetermined level such as
viewer age. Restricted scenes can be blocked or
replaced with different scenes when a parental
control compatible DVD is played.
Activating parental control
1 While the unit is off/DVD is played,
touch “DVD SETUP.”
The DVD setup menu appears.
2 Touch the number keys to enter your
current password.
“Parental control canceled.” appears, and the
parental control is deactivated.
To delete an entered number, touch “Clear.”
To return to the previous display, touch .
To close the DVD setup menu, touch “DVD
SETUP.”
Changing the password
Deactivate the parental control, then activate
again using the new password.
23
Page 24
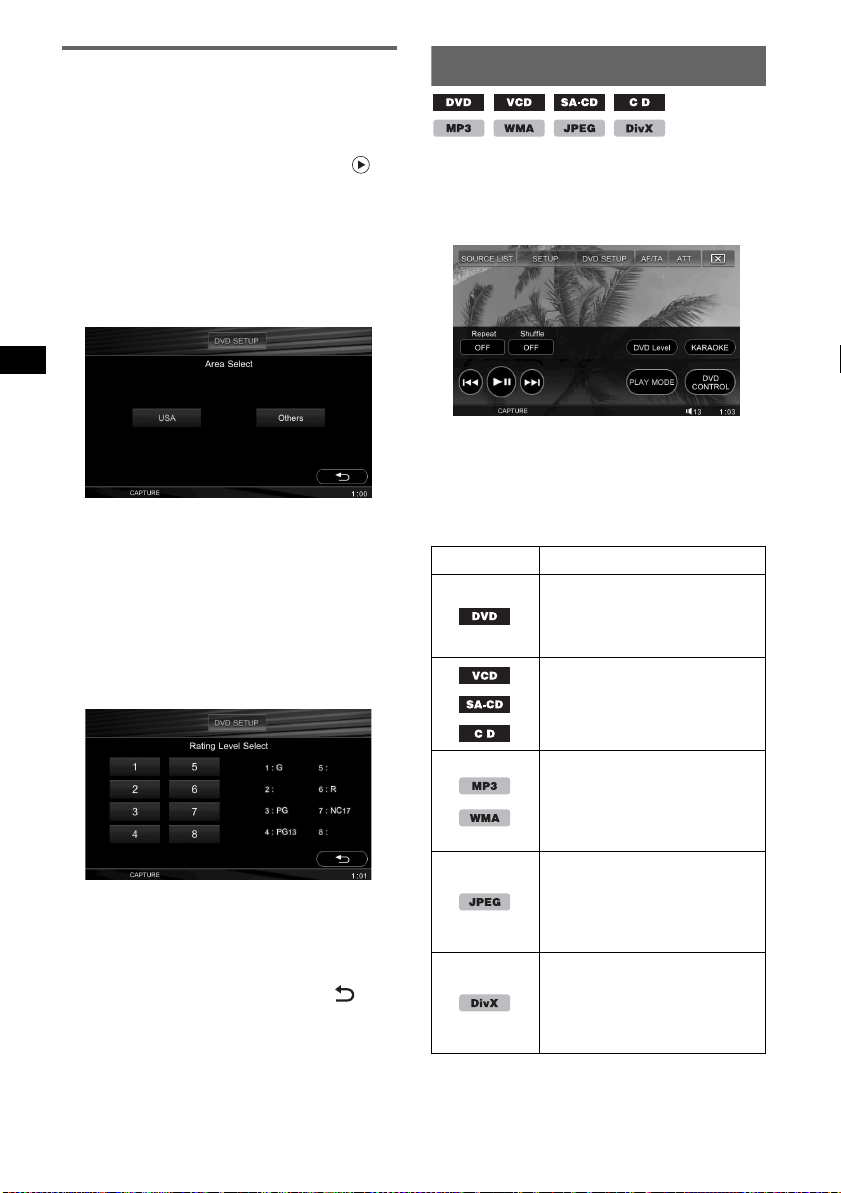
Changing the area and its movie
rating level
The restriction levels can be set depending on the
area and its movie ratings.
1 Touch “DVD SETUP,” then touch
repeatedly until the “Parental Control”
display appears.
2 Touch “Area Select.”
When parental control is already activated,
the display to enter your password appears.
To change the setting, enter your password.
The options appear.
3 Touch the desired area to apply its
movie ratings.
When you select “Others,” enter the area code
selecting from
using the number keys.
The area is selected, and the “Parental
Control” display reappears.
“Area code list” on page 63,
4 Touch “Rating Level.”
The options appear.
Repeat and shuffle play
1 During playback, touch “PLAY MODE,”
then touch the “Repeat” or “Shuffle”
box repeatedly until the desired option
appears.
Repeat or shuffle play starts.
To close the play mode menu, touch “PLAY
MODE.”
The repeat options and switching order of each
disc/format are indicated below.
Disc/format Options
OFF
Title: Repeats the current title.
Chapter: Repeats the current
chapter.
1
*
OFF
Tra ck: Repeats the current
track.
The lower the number, the stricter the
restriction level.
5 Touch the desired rating.
The setting is complete.
To return to the previous display, touch .
To close the DVD setup menu, touch “DVD
SETUP.”
24
OFF
Tra ck: Repeats the current
track.
Album: Repeats the current
album.
OFF
Image: Repeats the current
image.
Album: Repeats the current
album.
OFF
File: Repeats the current video
file.
Album: Repeats the current
album (folder).
Page 25
The shuffle options and switching order of each
disc/format are indicated below.
Disc/format Options
OFF
2
*
Title: Plays chapters in current
title in random order.
1
*
OFF
Disc: Plays tracks in current
disc in random order.
OFF
Album: Plays tracks/images/
video files in current album
(folder) in random order.
*1 Available only when playing version 1.0/1.1 VCD,
or version 2.0 VCD without PBC function.
*2 Excluding DVD-R/DVD-R DL/DVD-RW in VR
mode.
To return to normal play mode, select “OFF.”
Search items differs depending on the disc/
format as follows.
Disc/Format Items
Title*1: Starts playing from a
selected title.
Chapter*1: Starts playing from
a selected chapter.
2
*
Trac k: Starts playing from a
selected track.
Image: Starts playing from a
selected image.
File: Starts playing from a
selected file.
*1 The search item depends on the setting in DVD
setup.
*2 Available only when playing a VCD without PBC
function.
Direct search play
Number
buttons
ENTER
ZXZ
You can directly locate a desired point by
specifying the title number, chapter number, etc.
1 During playback, press the number
buttons to enter an item (track, title,
etc.) number, then press (ENTER).
Playback starts from the beginning of the
selected point.
Setting the search item (DVD only)
The search item (title or chapter) during DVD
playback can be set beforehand in DVD setup.
1 While the unit is off/DVD is played,
touch “DVD SETUP.”
The DVD setup menu appears.
2 Touch repeatedly until the “Play
Mode” display appears, then touch
“Direct Search.”
3 Touch “Title” or “Chapter.”
The setting is complete.
To return to the previous display, touch .
To close the DVD setup menu, touch “DVD
SETUP.”
25
Page 26
Enjoying karaoke
You can connect a microphone (not supplied) to
the unit, and enjoy karaoke (singing along with a
disc) by setting the unit to karaoke mode.
Before starting, connect a microphone to the
MIC input jack of the unit.
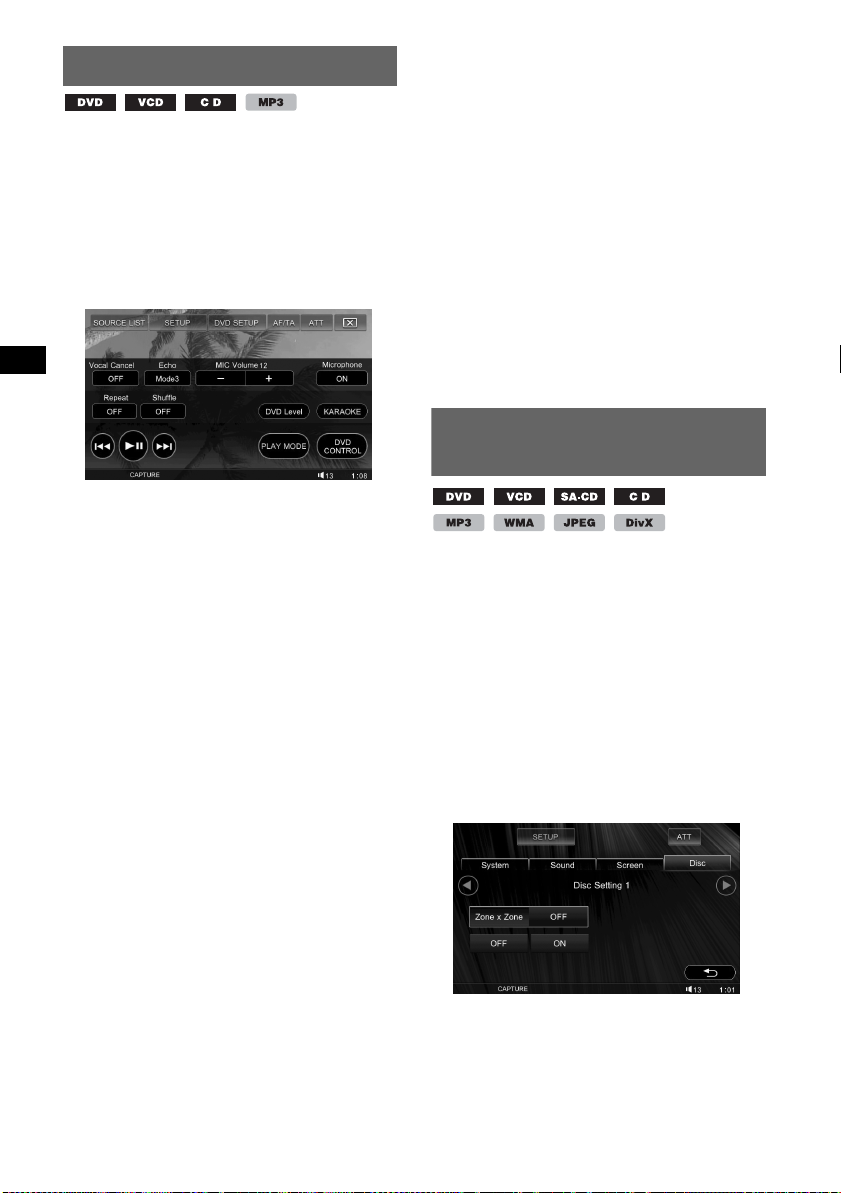
1 During playback, touch “PLAY MODE,”
then “KARAOKE.”
The karaoke mode menu appears.
Notes
• Some karaoke DVDs/VCDs/CDs may have the
instruments on one channel and vocals on the other
channel, and may ask you to select a channel (Left,
Right, or Stereo). In this case, set to “Microphone
ON” and press (AUDIO) on the card remote
commander repeatedly to set the channel.
• Some karaoke DVDs/VCDs/CDs may have a control
menu where you can cancel vocal sound, etc. In this
case, follow the instructions of the disc.
• While the karaoke mode is activated, multi-channel
sources are downmixed to 2 channels, and the
following are deactivated.
– EQ7 (page 31)
– Pro Logic II (page 33)
– Intelligent Time Alignment (page 33)
– CSO (page 34)
– HPF, LPF (page 47)
– Output of SUB OUT
• The karaoke function is unavailable with a disc in
DTS format.
Enjoying different sources in
front and rear — Zone × Zone
2 Touch the “Microphone” box to set to
“ON.”
The microphone and echo effects are
activated.
When playback is stopped, the MIC input is
deactivated.
To return to normal play mode, select “OFF.”
To close the play mode menu, touch “PLAY
MODE.”
Canceling the vocal sound
In the karaoke mode menu, touch the “Vocal
Cancel” box to set to “ON.”
Adjusting the microphone volume
In the karaoke mode menu, touch –/+ in the
“MIC Volume” box repeatedly.
The volume level is adjustable in single steps,
between 0 and 20.
Adjusting the echo
In the karaoke mode menu, touch the “Echo” box
to select the desired level.
The echo level is adjustable in single steps,
between 1 and 6.
To cancel the echo, select “OFF.”
You can simultaneously enjoy different sources
in the front and rear of the car.
Selectable sources for this unit (front) and the
rear monitor (rear) are indicated below.
Front: Any source.
Rear: Disc inserted in this unit.
1 Insert the disc to play in the rear.
2 Select the source to play in the front.
3 Touch “SETUP,” then the “Disc” tab.
The “Disc Setting 1” display appears.
4 Touch “Zone × Zone.”
The options appear.
5 Touch “ON” to activate Zone × Zone.
To operate the source in the front, use the
touch panel and buttons on the main unit.
To operate the source in the rear, use the card
remote commander.
26
Page 27
To return to the previous display, touch .
To close the setup menu, touch “SETUP.”
To deactivate Zone × Zone
Select “SETUP” c “Disc” c “Zone × Zone” c
“OFF.”
Notes
• Once (OFF) on the main unit or card remote
commander is pressed, Zone × Zone is deactivated.
• While Zone × Zone is activated, the following buttons
on the card remote commander become inactive:
(SRC), (MODE), (ATT), (VOL) +/–, (CAPTURE),
(SCREEN), (CLEAR), number buttons, m.
• While Zone × Zone is activated, the following are
deactivated.
– EQ7 (page 31)
– Balance/Fader (page 32)
– Pro Logic II (page 33)
– Intelligent Time Alignment (page 33)
– CSO (page 34)
– HPF, LPF (page 47)
– Output of SUB OUT
Tip
If “Zone × Zone” is assigned to (CSTM) on the main
unit, press it to activate/deactivate. For details on how
to assign the function on (CSTM), see
page 44.
Listing up tracks/images/video
files — LIST
Selecting a track/image/video file
2 Touch the desired track/image/video
file.
Playback of the selected track/image/video
file starts.
Note
The discs in the CD changer (if connected) cannot be
listed up.
Selecting a file type
If the disc contains multiple file types, only the
selected file type (audio/video/image) can be
played. The playback priority order of file type is
initially set to audio, video, then image (e.g., if
the disc contains video files and image files, only
video files are played). You can select the file
type to list up, then select the desired file to play.
1 During playback, touch “LIST.”
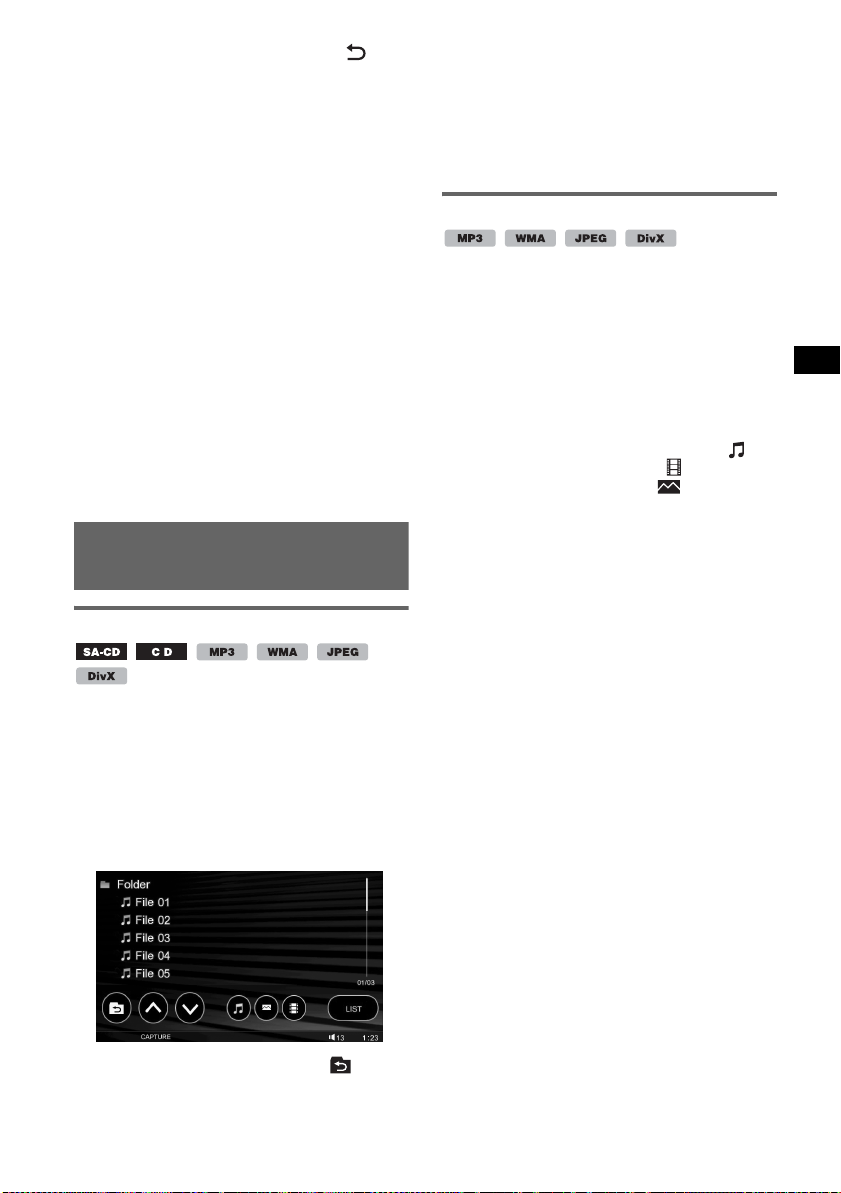
2 Touch the file type icon to list up.
To list up MP3 and WMA files, touch .
To list up DivX® files, touch .
To list up JPEG files, touch .
3 Touch the desired file.
Playback of the selected file starts.
You can list up albums/folders/tracks/images/
video files, and select a desired one to play.
This function is convenient especially for the
disc in MP3/WMA/JPEG/DivX
®
format
containing many albums/tracks, etc.
1 During playback, touch “LIST.”
The list of tracks/images/video files in the
current disc/album*/folder* appears.
To move to the upper level, touch .*
To scroll up/down the page, touch U/u.
* Only when playing MP3/WMA/JPEG/DivX®.
27
Page 28
Configuring playback settings
A
for Super Audio CD
Selecting a playback layer
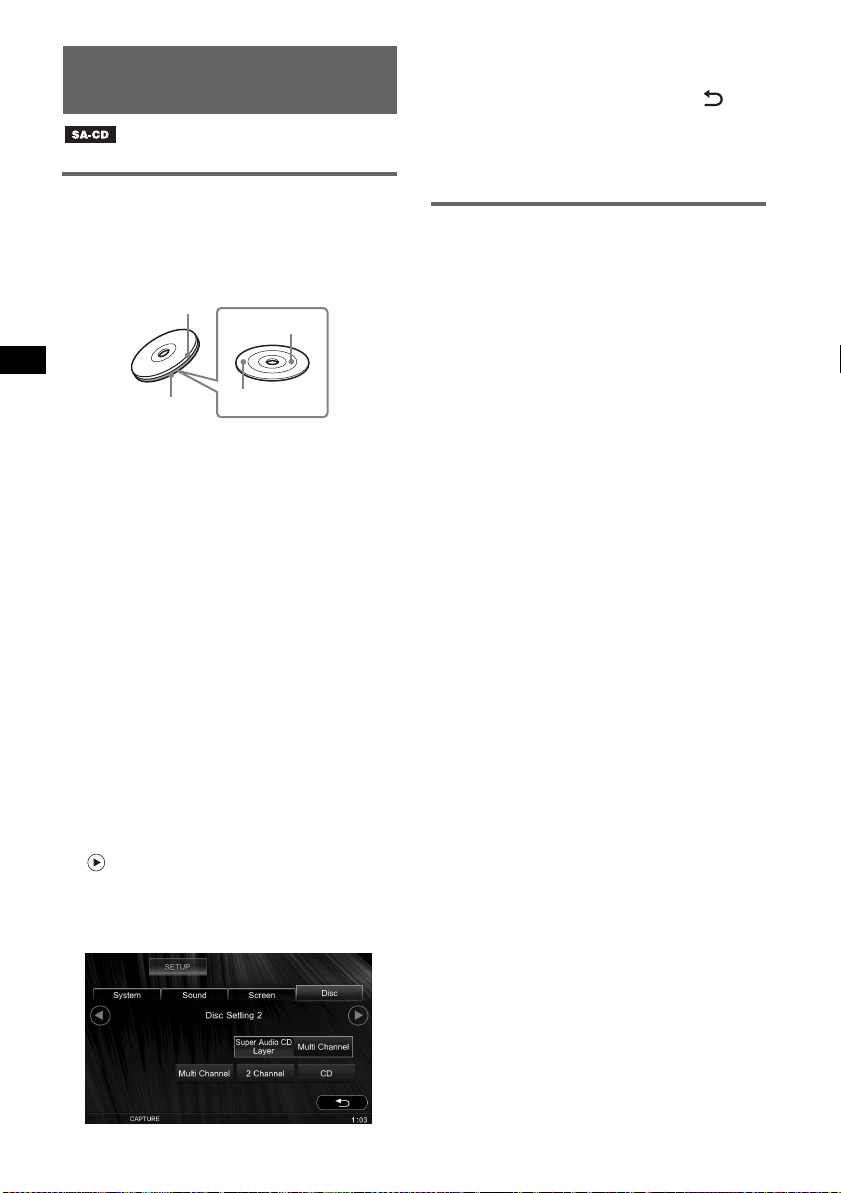
Some Super Audio CD consists of 2 layers:
Super Audio CD layer and CD layer, and Super
Audio CD layer consists of 2 areas: 2-channel
area and multi-channel area.
C
B
A CD layer
A layer that is readable by a conventional CD
player.
B Super Audio CD layer
A high density signal layer.
C 2-channel area
An area in which 2-channel stereo tracks are
recorded.
D Multi-channel area
An area in which multi-channel (up to 5.1
channels) tracks are recorded.
If the disc contains different content on its layers,
you can select a layer (to compare sound quality,
for example).
The options for “Super Audio CD Layer” are
indicated below.
Multi Channel: Plays the multi-channel area in
the Super Audio CD layer.
2 Channel: Plays 2-channel (stereo) area in the
Super Audio CD layer.
CD: Plays the CD layer.
1 Touch “SETUP,” the “Disc” tab, then
to proceed.
The “Disc Setting 2” display appears.
2 Touch “Super Audio CD Layer.”
The options appear.
D
3 Touch the desired option.
The setting is complete.
To return to the previous display, touch .
To close the setup menu, touch “SETUP.”
Note
For Super Audio CDs consisting of only a Super Audio
CD layer, that layer is played regardless of setting.
Selecting the sound quality
This unit allows you to change the sound quality
of Super Audio CD playback by switching the
sampling frequency.
The options for “Super Audio CD Mode” are
indicated below.
High Quality: Outputs at 176.4 kHz (high
sound quality).
Standard: Outputs at 44.1 kHz (standard CD
sound quality).
The setting procedure is the same as for setting
the playback layer (
Select “SETUP” c “Disc” c “Super Audio CD
Mode” c “High Quality” or “Standard.”
Note
When set to “High Quality,” EQ7 (page 31), CSO
(page 34), Intelligent Time Alignment (page 33) and
HPF/LPF (page 47) settings are deactivated. To
activate, set to “Standard.”
page 28).
28
Page 29
Advanced Operations — Radio
A
Storing and receiving stations
Caution
When tuning in stations while driving, use Best
Tuning Memory (BTM) to prevent an accident.
Storing automatically — BTM
1 Touch “SOURCE LIST,” then “TUNER.”
To change the band, touch “BAND,” then
select the desired band (FM 1, FM 2, FM 3,
MW or LW).
2 Touch “PRESET LIST,” then “BTM.”
The unit stores stations in order of frequency
in the preset list (P1 to P6).
A beep sounds when the setting is stored.
Storing manually
1 While receiving the station that you
want to store, touch “PRESET LIST.”
2 Touch “Memory,” then touch the
number in the list (P1 to P6).
The number and the confirmation display
appear on the display.
3 Touch “Yes.”
The station is stored.
Note
If you try to store another station on the same number,
the previously stored station will be replaced.
Tip
When an RDS station is stored, the AF/TA setting is
also stored (
page 30).
Receiving stored stations
1 Select the band, then touch “PRESET
LIST.”
2 Touch the desired number (P1 to P6).
RDS
Overview
FM stations with Radio Data System (RDS)
service send inaudible digital information along
with the regular radio program signal.
Display items
B
A Band number, Preset number, Frequency
(Program service name), RDS data, TA*
B Source, Stereo*2, RDS*3, TP*
C Clock display
*1 During traffic information.
*2 During FM reception.
*3 During RDS reception.
*4 During traffic program reception.
4
C
1
RDS services
This unit automatically provides RDS services as
follows:
AF (Alternative Frequencies)
Selects and retunes the station with the
strongest signal in a network. By using this
function, you can continuously listen to the
same program during a long-distance drive
without having to retune the same station
manually.
TA (Traffic Announcement)/TP (Traffic
Program)
Provides current traffic information/programs.
Any information/program received, will
interrupt the currently selected source.
PTY (Program Types)
Displays the currently received program type.
Also searches your selected program type.
CT (Clock Time)
The CT data from the RDS transmission sets
the clock.
Notes
• Depending on the country/region, not all RDS
functions may be available.
• RDS will not work if the signal strength is too weak,
or if the station you are tuned to is not transmitting
RDS data.
29
Page 30
Setting AF and TA
1 During playback/reception, touch “AF/
TA.”
2 Touch the “AF” or “TA” box to set to
“ON” or “OFF.”
To close the AF/TA menu, touch “AF/TA.”
Storing RDS stations with the AF and
TA setting
You can preset RDS stations along with the AF/
TA setting. If you use the BTM function, only
RDS stations are stored with the same AF/TA
setting.
If you preset manually, you can preset both RDS
and non-RDS stations with the AF/TA setting for
each.
1 Set AF/TA, then store the station with BTM or
manually.
Presetting the volume of traffic
announcements
You can preset the volume level of the traffic
announcements so as to not miss hearing them.
1 Press (VOL) –/+ on the main unit repeatedly
to adjust the volume level.
2 Touch “AF/TA,” then .
Receiving emergency
announcements
With AF or TA on, the emergency
announcements will automatically interrupt the
currently selected source.
Staying with one regional program
— Regional
When the AF function is on: this unit’s factory
setting restricts reception to a specific region, so
you will not be switched to another regional
station with a stronger frequency.
If you leave this regional program’s reception
area, deactivate the regional function during FM
reception.
Touch “PLAY MODE,” then the “Regional” box
to set to “OFF.”
Note
This function does not work in the UK and in some
other areas.
30
Local Link function (UK only)
This function enables you to select other local
stations in the area, even if they are not stored on
numbers.
1 During FM reception, touch “PRESET LIST,”
then a number (P1 to P6) on which a local
station is stored.
2 Within 5 seconds, touch again a number of the
local station.
Repeat this procedure until the local station is
received.
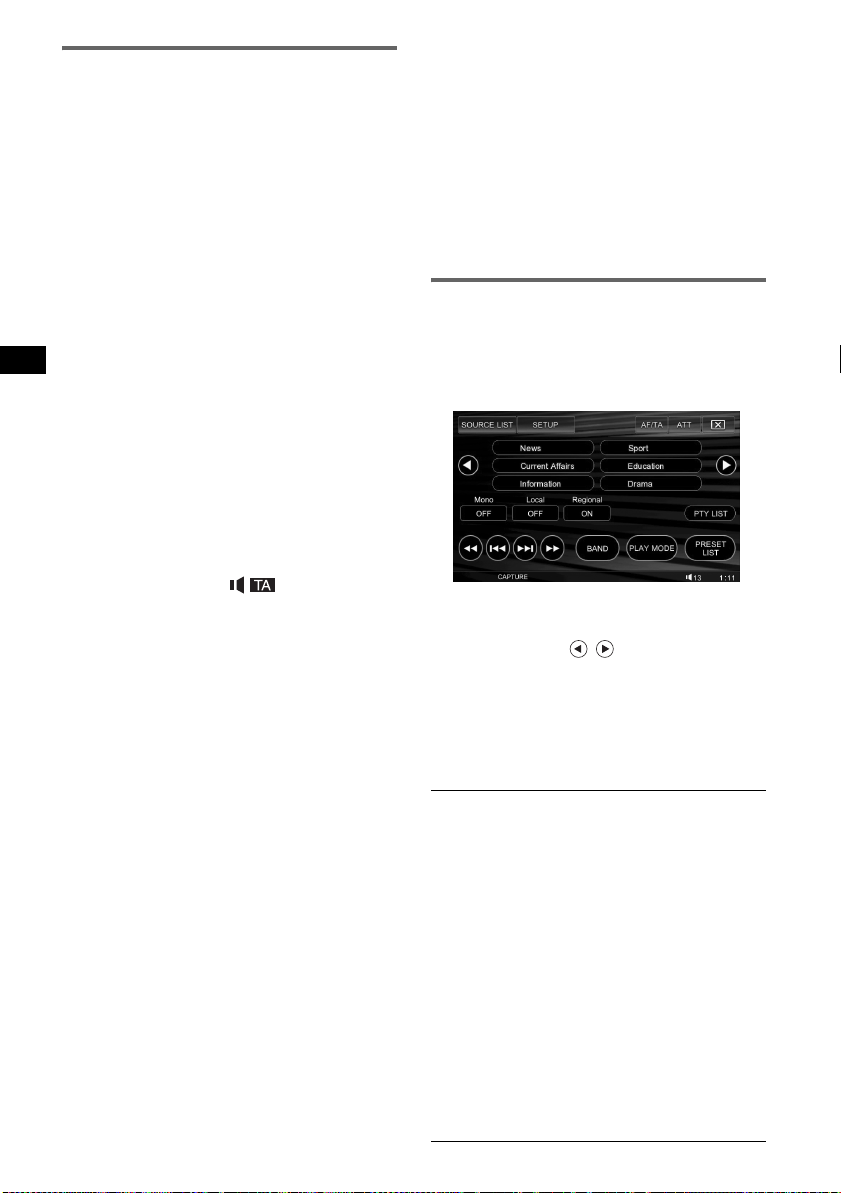
Selecting PTY
1 During FM reception, touch “PLAY
MODE,” then “PTY LIST.”
The PTY list appears if the station is
transmitting PTY data.
2 Touch the desired program type.
To return/proceed to the previous/next display
in the list, touch
The unit searches for a station broadcasting
the selected program type.
To close the play mode menu, touch “PLAY
MODE.”
Type of programs
News (News), Current Affairs (Current
Affairs), Information (Information), Sport
(Sports), Education (Education), Drama
(Drama), Cultures (Culture), Science
(Science), Varied Speech (Varied), Pop
Music (Popular Music), Rock Music (Rock
Music), Easy Listening (Easy Listening),
Light Classics M (Light Classical), Serious
Classics (Classical), Other Music (Other
Music Type), Weather & Metr (Weather),
Finance (Finance), Children’s Progs
(Children’s Programmes), Social Affairs
(Social Affairs), Religion (Religion), Phone
In (Phone In), Travel & Tourin g (Travel),
Leisure & Hobby (Leisure), Jazz Music
(Jazz Music), Country Music (Country
Music), National Music (National Music),
Oldies Music (Oldies Music), Folk Music
(Folk Music), Documentary (Documentary)
/ .
Page 31

Note
You cannot use this function in countries/regions
where no PTY data is available.
Setting CT
1 Set “CT ON” in setup (page 43).
Notes
• The CT function may not work even though an RDS
station is being received.
• There might be a difference between the time set by
the CT function and the actual time.
Sound Settings
Selecting the sound quality
— EQ7
You can select an equalizer curve from 7 music
types (Xplod, Vocal, Edge, Cruise, Space,
Gravity, and Custom).
1 During playback/reception, touch
“SETUP,” then the “Sound” tab.
The “Sound Setting” display appears.
2 Touch “EQ7.”
The options appear.
3 Touch the desired equalizer curve.
The setting is complete.
To cancel the equalizer curve, select “OFF.”
To return to the previous display, touch .
To close the setup menu, touch “SETUP.”
Notes
• EQ7 is not selectable while the karaoke mode
page 26), Zone × Zone (page 26) is activated, or
(
“Super Audio CD Mode” is set to “High Quality”
page 28).
(
• When EQ7 is activated, CSO is switched to “OFF”
page 34).
(
Tip
If “EQ7” is assigned to (CSTM) on the main unit, press
it repeatedly to select the equalizer curve. For details
on how to assign the function on (CSTM), see
page 44.
31
Page 32

Customizing the equalizer curve
— EQ7 Tune
“Custom” of EQ7 allows you to make your own
equalizer settings. You can adjust the level of 7
different bands: 62
2.5
kHz, 6.3 kHz, and 16 kHz.
Hz, 157 Hz, 396 Hz, 1 kHz,
1 During playback/reception, touch
“SETUP,” the “Sound” tab, “EQ7,” then
“Custom.”
2 Touch “Tune.”
The tuning display appears.
3 Touch +/– of each frequency to adjust
their levels.
The level is adjustable in single steps,
between –8 and +8.
To restore the factory-set equalizer curve,
touch “Reset.”
4 Touch “OK.”
The setting is complete.
To return to the previous display, touch .
To close the setup menu, touch “SETUP.”
Tip
Other equalizer types are also adjustable.
Adjusting the sound
characteristics
The sound balance between left and right
speakers (“Balance”) and front and rear speakers
(“Fader”) can be adjusted to your preference.
You can also adjust the volume level of center
speaker and subwoofer if they are connected.
1 During playback/reception, touch
“SETUP,” then the “Sound” tab.
The “Sound Setting” display appears.
2 Touch “Balance/Fader.”
The setting display appears.
3 Touch I/i to adjust “Balance.”
The level is adjustable in single steps,
between –10 and +10.
4 Touch U/u to adjust the “Fader.”
The level is adjustable in single steps,
between –10 and +10.
5 Touch +/– of “Center” and
“Subwoofer” to adjust their volume
level.*
* Adjustable only when a center speaker is
connected and set to “Center Speaker ON”
(page 34), and a subwoofer is connected and set
to “Subwoofer ON” (page 34).
The level is adjustable in single steps,
between –6 and +6.
To return to the previous display, touch .
To close the setup menu, touch “SETUP.”
Note
“Balance/Fader” is not selectable while Zone × Zone is
activated.
32
Page 33

Multi-channel output of
2-channel sources — Pro Logic II
Dolby Pro Logic II produces 5 full-bandwidth
output channels from 2-channel sources. This is
done using an advanced, high-purity matrix
surround decoder that extracts the spatial
properties of the original recording without
adding any new sounds or tonal colorations.
The Pro Logic II mode options are indicated
below.
Music: Provides a deep, wide sound space to
stereo audio recordings.
Movie: Provides enhanced sound field
directionality that approaches the quality of
discrete 5.1-channel sound to stereo television
shows and all programs encoded in Dolby
Surround.
1 During playback/reception, touch
“SETUP,” then the “Sound” tab.
The “Sound Setting” display appears.
2 Touch “Dolby Pro Logic II.”
The options appear.
Optimizing sound for the
listening position
— Intelligent Time Alignment
The unit can change the localization of sound by
delaying the sound output from each speaker to
suit your position, and simulate a natural sound
field with the feeling of being in the center of it
wherever you sit in the car.
The options for “Listening Position” are
indicated below.
Front L (1): Front left
Front R (2): Front right
Front (3): Center front
All (4): In the center of your
car
Custom: Precisely calibrated
position (page 34)
1 During playback/reception, touch
“SETUP,” then the “Sound” tab.
The “Sound Setting” display appears.
2 Touch “Listening Position.”
The setting display appears.
12
3
4
3 Touch the desired option.
To deactivate the Pro Logic II mode, select
“OFF.”
To return to the previous display, touch .
To close the setup menu, touch “SETUP.”
Notes
• This function is unavailable for Super Audio CD,
WMA, JPEG, DivX
than 2-channel) or DTS format.
• The Pro Logic II mode is not selectable while the
karaoke mode (
is activated.
®
, or discs in Dolby Digital (other
page 26) or Zone × Zone (page 26)
3 Touch the desired option.
The setting is complete.
To cancel Intelligent Time Alignment, select
“OFF.”
To return to the previous display, touch .
To close the setup menu, touch “SETUP.”
Note
Intelligent Time Alignment is not selectable while the
karaoke mode (
activated, or “Super Audio CD Mode” is set to “High
Quality” (
page 26) or Zone × Zone (page 26) is
page 28).
33
Page 34

Precisely calibrating the listening
position
— Intelligent Time Alignment Tune
You can precisely calibrate your listening
position from each speaker so that the sound
delay reaches the listener more correctly.
Before starting, measure the distance between
your listening position and each speaker.
1 During playback/reception, touch
“SETUP,” the “Sound” tab, “Listening
Position,” then “Custom.”
2 Touch “Custom Edit.”
The setting display appears.
3 Touch –/+ of each speaker to set the
distance between your listening
position and the speakers.
The distance is adjustable in 2 cm (13/16 in)
steps, between 0 and 400 cm (0 and 13
To restore the default setting, touch “Reset.”
1/10 ft).
4 Touch “OK.”
The setting is complete.
To return to the previous display, touch .
To close the setup menu, touch “SETUP.”
Note
The setting is applied only after “OK” is touched.
Speaker configuration and
volume setup
Creating a virtual center speaker
— CSO
To fully enjoy surround sound, it is adequate to
have 5 speakers (front left/right, rear left/right,
center) and 1 subwoofer. CSO (Center Speaker
Organizer) allows you to create a virtual center
speaker even if it is not connected.
1 During playback/reception, touch
“SETUP,” the “Sound” tab, then
proceed.
The “Speaker Setting” display appears.
2 Touch “Center Speaker.”
The options appear.
3 Touch “CSO.”*
* If “Center Speaker” is previously set to “ON,”
“CSO” is not selectable.
The setting is complete.
To return to the previous display, touch .
To close the setup menu, touch “SETUP.”
Notes
• CSO cannot be activated while the karaoke mode
page 26) or Zone × Zone (page 26) is activated, or
(
“Super Audio CD Mode” is set to “High Quality”
page 28).
(
• When CSO is activated, the equalizer curve setting
is switched to “OFF” (
• “Center Speaker” cannot be set to “ON” during
playback/reception.
page 31).
to
34
Setting the speaker connection
status
By sensing the setting status of the center speaker
and subwoofer, the unit adjusts your setting
options accordingly. For example, if the
connection status of the center speaker is set to
off, you can activate the virtual center speaker
(
page 34), and if it is set to on, you can adjust its
volume, etc.
Page 35

1 While the unit is off, touch “SETUP,”
the “Sound” tab, then
The “Speaker Setting” display appears.
The setting of center speaker/subwoofer
connection status made in initial settings
(
page 14) are shown.
to proceed.
2 Touch “Center Speaker” or
“Subwoofer,” then “ON” or “OFF.”
The setting is complete.
To return to the previous display, touch .
To close the setup menu, touch “SETUP.”
Note
If you set to “Center Speaker ON” without connecting
the center speaker, vocal sound is not output, and if
you set to “Subwoofer ON” without connecting the
subwoofer, bass sound is not output.
Adjusting the speaker volume
You can adjust the volume level of each
connected speaker.
The adjustable speakers are “Front R” (Front
Right), “Front L” (Front Left), “Surround L”
(Rear Left), “Surround R” (Rear Right),
“Center*,” and “Subwoofer*.”
* Adjustable only when a center speaker is connected
and set to “Center Speaker ON” (page 34), and a
subwoofer is connected and set to “Subwoofer ON”
(page 34).
1 While the unit is off, touch “SETUP,”
the “Sound” tab, then
The “Speaker Setting” display appears.
to proceed.
2 Touch “5.1ch Speaker Level.”
The setting display appears.
Monitor Settings
Adjusting the monitor angle
You can adjust the monitor angle for best
viewing.
1 Touch “SETUP,” the “System” tab,
then
The “Monitor Setting” display appears.
to proceed.
2 Touch “Monitor Angle.”
The setting display appears.
3 Touch –/+ to adjust the angle.
The adjustment is stored.
The monitor retains the angle even after the
front panel is opened and closed.
To return to the previous display, touch .
To close the setup menu, touch “SETUP.”
Touch panel calibration
Touch panel calibration is required if the
touching position does not correspond with the
proper item.
1 Touch “SETUP,” the “System” tab,
then
The “Monitor Setting” display appears.
2 Touch “Touch Panel Adjust.”
The setting display appears.
to proceed.
3 Touch the speaker, then +/– to adjust
the level.
Repeat this step to adjust all speaker volume.
To restore the default setting, touch “All
Reset.”
To return to the previous display, touch .
To close the setup menu, touch “SETUP.”
3 Touch the targets in sequence.
The calibration is complete.
To cancel calibration, touch “Cancel.”
To close the setup menu, touch “SETUP.”
35
Page 36

Setting the background screen
The background screen can be displayed during
audio playback. You can select from 3 types
(“Screen1,” “Screen2,” or “Screen3”), each of
which consists of a wallpaper and spectrum
analyzer pattern.
The navigation display (“Navigation”) can also
be selected as the background screen, if a
navigation device is connected and “Input” is set
to “Navigation” (page 45).
1 Touch “SETUP,” then the “Screen” tab.
The “Screen Setting 1” display appears.
2 Touch “Screen.”
The options appear.
3 Touch the desired option.
To return to the previous display, touch .
To close the setup menu, touch “SETUP.”
Tip
If “Screen” is assigned to (CSTM) on the main unit,
press it repeatedly to switch the background screen.
For details on how to assign the function on (CSTM),
page 44.
see
Setting the wallpaper and
spectrum analyzer pattern
You can change the wallpaper and spectrum
analyzer pattern set in “Screen1,” “Screen2,” and
“Screen3.”
The wallpaper options are indicated below.
Wallpaper1 – 4: Pre-stored images.
User1 – 4: Captured images (page 37).
All: Displays all pre-stored images and captured
images in sequence.
User All: Displays all captured images in
sequence.
1 Touch “SETUP,” the “Screen” tab, then
“Screen.”
2 Touch “Screen1,” “Screen2,” or
“Screen3” on which you want to store
the new setting.
3 Touch “Edit.”
The “Wallpaper Select” display appears.
4 Touch the desired wallpaper, then
“OK.”
To scroll the options, touch “Prev v” or
“Next V.”
5 Touch the desired spectrum analyzer
pattern, then “OK.”
Select “OFF” to deactivate the spectrum
analyzer.
The new setting is stored on the selected
option.
The new setting is applied when you touch
“SETUP” to close the setup menu.
To return to the previous display, touch .
To close the setup menu, touch “SETUP.”
36
Page 37

Capturing images for wallpaper
CAPTURE
During video/image playback, you can capture
images and store them (up to 4 images) to set as
wallpaper. You can also capture an image from
an auxiliary video device, if connected.
1 Start playing the disc or auxiliary
video device.
2 Press (CAPTURE) on the card remote
commander at the desired scene/
image.
The confirmation display appears.
3 Touch “Yes” to store the image.
The image is stored on the unit.
Notes
• Do not turn off the unit while storing the image,
otherwise the image may not be stored.
• The stored image is limited to private use only. Use
for public and profit purposes require permission of
the copyright holders.
• Stored images may differ from the original aspect
ratio, or some characters may not be displayed
correctly due to compression or elongation.
Tip
If “Capture” is assigned to (CSTM) on the main unit,
press it to capture the image. For details on how to
assign the function on (CSTM), see
page 44.
Deleting captured images
You can delete stored images.
1 Touch “SETUP,” the “Screen” tab, then
“Wallpaper Delete.”
2 Touch the image to delete, then .
The selected image appears in the right of the
display for confirmation.
Repeat this step to delete other images.
3 Touch “OK.”
The confirmation display appears.
4 Touch “Yes.”
The selected image(s) is deleted.
To return to the previous display, touch .
To close the setup menu, touch “SETUP.”
Selecting the picture quality
— Picture EQ
You can select a picture quality suitable for the
interior brightness of the car.
The options are indicated below.
Dynamic: Vivid picture with bright, clear
colors.
Theater: Brightens the monitor; suitable for
darkly-lit movies.
Sepia: Applies a sepia tone to the picture.
Standard: Standard picture quality.
Custom1, Custom2: User-adjustable settings
(page 38).
1 During video/image playback, touch
“SETUP,” then the “Screen” tab.
The “Screen Setting 1” display appears.
2 Touch “Picture EQ.”
The options appear.
3 Touch the desired option.
To return to the previous display, touch .
To close the setup menu, touch “SETUP.”
Tip
If “Picture EQ” is assigned to (CSTM) on the main
unit, press it repeatedly to switch the picture quality.
For details on how to assign the function on (CSTM),
page 44.
see
37
Page 38

Customizing the picture quality
The options “Custom1” and “Custom2” of
Picture EQ allow you to make your own picture
quality setting by adjusting the picture tones.
1 Touch “SETUP,” the “Screen” tab, then
“Picture EQ.”
2 Touch “Custom1” or “Custom2,” then
“Custom Edit.”
The setting display appears.
3 Touch “Warm,” “Normal,” or “Cool” to
select “Color Tone.”
4 Touch +/– of “Brightness” and “Color”
to adjust their levels.
To return to the previous display, touch .
To close the setup menu, touch “SETUP.”
Note
The picture quality of the back camera/navigation
device cannot be adjusted.
Selecting the aspect ratio
You can change the screen aspect ratio.
The options are indicated below.
Normal: Picture with 4:3
aspect ratio (regular picture).
Wide: Picture with 4:3 aspect
ratio enlarged to the left and
right edges of the screen, with
overflowing parts of top and
bottom cut off to fill the screen.
Full: Picture with 16:9 aspect
ratio.
Zoom: Picture with 4:3 aspect
ratio enlarged to the left and
right edges of the screen.
1 During video playback, touch
“SETUP,” then the “Screen” tab.
The “Screen Setting 1” display appears.
2 Touch “Aspect Ratio.”
The options appear.
38
3 Touch the desired option.
To return to the previous display, touch .
To close the setup menu, touch “SETUP.”
Note
The screen aspect ratio of the back camera/navigation
device cannot be changed.
Tip
If “Aspect” is assigned to (CSTM) on the main unit,
press it repeatedly to switch the aspect ratio. For
details on how to assign the function on (CSTM), see
page 44.
Page 39

General Settings
Various settings are configurable from the
following two setup menus.
• DVD setup menu (page 39)
Allows configuration of items related mainly to
DVD playback.
• Setup menu (page 42)
Allows configuration of system-related items.
DVD setup
The DVD setup menu includes the following
categories.
• Language Setting: Sets the menu, subtitle
language, etc. (page 40).
• A/V Setting: Adjusts the sound/monitor
settings (page 40).
• Parental Control: Adjusts the parental
control settings (page 41).
• Play Mode: Adjusts the settings for playback
(page 41).
• Reset DVD SETUP: Resets all setting items
in DVD setup (page 41).
Basic operation of DVD setup
You can set items in the menu by the following
procedure.
E.g., when setting “Monitor Type” to “4:3 Pan
Scan.”
1 While the unit is off/DVD is played,
touch “DVD SETUP.”
The DVD setup menu appears.
2 Touch .
The “A/V Setting” display appears.
3 Touch “Monitor Type.”
The options appear.
4 Touch “4:3 Pan Scan.”
The setting is complete.
To scroll the options (only when required), touch
“Prev v” or “Next V.”
To return to the previous display, touch .
To close the DVD setup menu, touch “DVD
SETUP.”
39
Page 40

Language settings for display or soundtrack
Select “DVD SETUP” c “Language Setting” c the desired item c the desired option. For details on this
procedure,
Item Purpose
see “Basic operation of DVD setup” on page 39.
Menu To change the disc’s menu language.
Audio To change the soundtrack language.
Subtitle To change the subtitle language recorded on the disc.
Audio/visual settings
Select “DVD SETUP” c “A/V Setting” c the desired item c the desired option. For details on this
procedure,
“z” indicates the default setting.
Item Option Purpose
Audio DRC *
Makes the sound clear when the
volume is low. Only for a DVD
conforming to Audio DRC
(Dynamic Range Control).
5.1ch Output
Switches the method of outputting
5.1-channel sources.
Monitor Type
Selects an aspect ratio suitable for
the connected monitor.
(The screen aspect ratio of this unit
also changes.)
see “Basic operation of DVD setup” on page 39.
Standard (z)
Wide Range
5.1ch (z)
Downmix
16:9 (z)
To select the standard setting.
To obtain the feeling of being at a
live performance.
To output in 5.1 channels.
To downmix to 2 channels.
To display the wide picture.
Suitable when connecting to a
wide-screen monitor or a monitor
with a wide mode function.
4:3 Letter Box
To display a wide picture with
bands on the upper and lower
positions of the screen.
Suitable when connecting to a 4:3
screen monitor.
4:3 Pan Scan
To display a wide picture on the
entire screen and automatically cut
off the portions that do not fit.
* Excluding DVD-R/DVD-R DL/DVD-RW in VR mode.
Note
Depending on the disc, “4:3 Letter Box” may be selected automatically instead of “4:3 Pan Scan,” and vice versa.
40
Page 41

Parental control settings
*
Select “DVD SETUP” c “Parental Control” c the desired item c the desired option. For details on this
procedure,
see “Basic operation of DVD setup” on page 39.
Follow the page reference for details.
Item Purpose
Lock/Unlock (page 23) To lock/unlock a disc.
Rating Level (page 24) To set the restriction level according to the selected area.
Area Select (page 24) To set the restriction standard by area.
* Excluding DVD-R/DVD-R DL/DVD-RW in VR mode.
Play mode settings
Select “DVD SETUP” c “Play Mode” c the desired item c the desired option. For details on this
procedure,
Follow the page reference for details. “z” indicates the default setting.
Item Option Purpose
Multi Disc Resume
Playlist Play
(Fo r DVD -R/DV D-R DL/DVD-RW
in VR mode only)
Direct Search (page 25)
Sets the search item of direct
search play.
* DVD VIDEO only.
Note
If parental control is applied, resume playback will not work. In this case, playback starts from the beginning of the
disc when it is inserted.
see “Basic operation of DVD setup” on page 39.
ON (z)
*
OFF
Original (z)
Playlist
Title
Chapter (z)
To store the resume settings in
memory for up to 5 discs. (The
settings remain in memory even if
you set to “OFF.”)
To not store the resume settings in
memory.
Resume playback is available only
for the current disc in the unit.
To play originally recorded titles.
To play an edited playlist.
To search for a title.
To search for a chapter.
Resetting all settings
All settings (excluding parental control setting) in DVD setup can be reset.
Select “DVD SETUP” c “Reset DVD SETUP” c “Reset All Settings” c “Yes.”
For details on this procedure, see “Basic operation of DVD setup” on page 39.
Note
Do not power off the unit while resetting, as it takes a few seconds to complete.
41
Page 42

Setup
The setup menu includes the following
categories.
• System: System settings (page 43)
• Sound: Sound/speaker settings (page 46)
• Screen: Screen settings (page 48)
• Disc: Disc playback settings (page 49)
Basic setup operation
You can set items in the menu by the following
procedure.
E.g., when setting the demonstration
1 While the unit is off, touch “SETUP.”
The setup menu appears.
2 Touch the “Screen” tab.
The “Screen Setting 1” display appears.
4 Touch “Demo.”
The options appear.
5 Touch “ON” or “OFF.”
The setting is complete.
To scroll the options (only when required), touch
“Prev v” or “Next V.”
To return to the previous display, touch .
To close the setup menu, touch “SETUP.”
3 Touch .
The “Screen Setting 2” display appears.
42
Page 43

System settings — System
Select “SETUP” c “System” c the desired category c the desired item c the desired option. For details
on this procedure,
Follow the page reference for details. “z” indicates the default setting.
see “Basic setup operation” on page 42.
System Setting
Item Option Purpose Unit status
Security Control (page 50)
Clock Adjust (page 50)
Auto OFF
Shuts off automatically after a
desired time when the unit is
off.
CT (Clock Time) (page 29, 31)
–
–
NO (z)
30sec, 30min,
60min
ON
OFF (z)
–
–
To deactivate the Auto Off
function.
To select the desired time.
To activate the CT function.
To deactivate the CT
function.
Any status.
Monitor Setting
Item Option Purpose Unit status
Dimmer
Changes the display
brightness.
Monitor Angle (page 35)
Dimmer Level
Sets the brightness level when
the dimmer is activated.
Touch Panel Adjust
(
page 35)
Auto (z)
ON
–
(–5 ~ +5)
z: 0
–
To dim the display
automatically when you
turn lights on. (Available
only when the illumination
control lead is connected.)
To dim the display.
–
To select the level.
–
Any status.
continue to next page t
43
Page 44

Key Setting
Item Option Purpose Unit status
Beep
ON (z)
To activate the operation
sound.
OFF
To deactivate the operation
sound.
Custom Key
Assigns the function to the
CSTM button on the main unit
to perform the function easily.
Rotary Commander
Changes the operative
direction of the rotary
commander controls.
Key Illumination
Capture (z),
Screen,
Picture EQ,
Aspect,
EQ7,
Zone × Zone
Normal (z)
Reverse
ON (z)
To select the function to
assign.
To use in the factory-set
position.
To use on the right side of
the steering column.
To turn on the button
illumination.
OFF
To turn off the button
illumination.
AUX Setting
Item Option Purpose Unit status
AUX 1 (page 51)
Sets the type of device
connected to the AUX IN 1
terminals to switch the
background screen
accordingly.
Video (z)
Audio
OFF
To show the picture from
the connected device.
To show the wallpaper and
spectrum analyzer on the
display.
To deactivate the AUX
input.
AUX 2 (page 51)
Sets the type of device
connected to the AUX IN 2
terminals to switch the
background screen
accordingly.
Video (z)
Audio
OFF
To show the picture from
the connected device.
To show the wallpaper and
spectrum analyzer on the
display.
To deactivate the AUX
input.
AUX 3* (page 51)
Sets the type of device
connected to the AUX IN 3/
BUS AUDIO IN terminals to
switch the background screen
accordingly.
Video (z)
Audio
OFF
To show the picture from
the connected device.
To show the wallpaper and
spectrum analyzer on the
display.
To deactivate the AUX
input.
44
Any status.
Unit off.
Page 45

No Signal Setting
Shows the wallpaper
automatically when no
external video signal is
detected.
Wallpaper (z)
Blank Screen
To show the wallpaper
automatically.
To show the no signal
(blank) screen.
Unit off.
External Video Setting
Item Option Purpose Unit status
Input (page 51)
Activates the video input from
the connected back camera/
navigation device.
Color System (page 51)
Changes the color system
according to the connected
back camera/navigation
device.
(SECAM is not supported.)
Back Camera Setting
(
page 52)
* When a device is connected to BUS CONTROL IN, “Sony BUS” appears instead of “AUX 3,” and only options
“Video” and “Audio” are selectable.
OFF (z)
Navigation
Back Camera
PAL (z)
NTSC
–
To deactivate the input.
To show the picture from
the navigation and output
the sound from the current
source.
To show the picture from
the back camera when the
back lamp lights up (or the
shift lever is set to the R
(reverse) position).
To set t o PAL.
To set t o N T S C.
–
Any status.
45
Page 46

Sound/speaker settings — Sound
Select “SETUP” c “Sound” c the desired category c the desired item c the desired option. For details
on this procedure,
see “Basic setup operation” on page 42.
Follow the page reference for details. “z” indicates the default setting.
Sound Setting
Item Option Purpose Unit status
EQ7 (page 31)
Dolby Pro Logic II (page 33)
Outputs 2-channel sources in
multi-channel.
Balance/Fader (page 32)
Listening Position (page 33)
Sets the listening position to
obtain the feeling of being in
the center of the sound field
wherever you sit in the car.
OFF (z)
Xplod, Vocal,
Edge, Cruise,
Space, Gravity,
Custom
OFF (z)
Music
Movie
Fader/Balance:
(–10 ~ +10)
z: 0
Center/
Subwoofer:
(–6 ~ +6)
z: 0
OFF (z)
Front L
Front R
Front
All
Custom
To cancel the equalizer
curve.
To select the equalizer
curve; customize the
equalizer curve.
To deactivate the Pro Logic
II mode.
To create deep, wide sound
for stereo audio recordings.
To enhance the sound field
of stereo television shows
and all programs encoded
in Dolby Surround.
To adjust the level.
To not set the listening
position.
To set to front left.
To set to front right.
To set to center front.
To set to the center of your
car.
To precisely calibrate the
listening position
(
page 34).
During playback/
radio reception.*
During DVD/
VCD/CD/MP3
playback/radio
reception.*
1
During playback/
radio reception.*
1
1
46
Page 47

Speaker Setting
Item Option Purpose Unit status
Center Speaker (page 34)
Sets the center speaker
connection status or activate
Center Speaker Organizer.
Subwoofer (page 34)
Sets the subwoofer connection
status.
Crossover Filter
Selects the cut-off frequency
of the front/rear speakers
(HPF) and subwoofer (LPF).
5.1ch Speaker Level
(
page 35)
*1 Depending on the status of other functions, configuration may not be available. For details, follow the page
reference and check the instructions on notes.
*2 Unavailable while the karaoke mode (page 26)/Zone × Zone (page 26) is activated.
CSO (z)
OFF
ON
ON (z)
OFF
LPF: 80Hz,
120Hz (z)
HPF: OFF (z)
HPF: 80Hz,
120Hz
–
To activate Center Speaker
Organizer.
To set the connection status
to off.
To set the connection status
to on.
To set the connection status
to on.
To set the connection status
to off.
To select the cut-off
frequency.
To not cut out the
frequency.
To select the cut-off
frequency.
–
During playback/
radio reception.*
Any status.
Unit off.
Unit off.
During playback/
radio reception.*
Unit off.
1
2
47
Page 48

Screen settings — Screen
Select “SETUP” c “Screen” c the desired category c the desired item c the desired option. For details
on this procedure,
see “Basic setup operation” on page 42.
Follow the page reference for details. “z” indicates the default setting.
Screen Setting 1
Item Option Purpose Unit status
Screen (page 36)
Wallpaper Delete (page 37)
Picture EQ (page 37)
Aspect Ratio (page 38)
–
–
Dynamic (z),
Theater,
Sepia,
Standard
Custom1,
Custom2
Full (z),
Normal,
Wide,
Zoom
–
–
To select the picture
quality.
To customize the picture
quality.
To select the screen aspect
ratio.
Any status.
During video/
image playback.
During video
playback.
Screen Setting 2
Item Option Purpose Unit status
Clock
Shows/hides the clock display
in the bottom right corner of
the display.
Button Color Select
Changes the button color and
activates the button effect.
Demo
ON (z)
OFF
Color1 (z) ~
Color8
Effect: ON (z),
OFF
ON (z)
OFF
To show the clock display.
To hide the clock display.
To select the button color.
To activate/deactivate the
button effect.
To activate the
demonstration.
To deactivate the
demonstration.
Any status.
Unit off.
48
Page 49

Disc playback settings — Disc
Select “SETUP” c “Disc” c the desired category c the desired item c the desired option. For details on
this procedure,
Follow the page reference for details. “z” indicates the default setting.
see “Basic setup operation” on page 42.
Disc Setting 1
Item Option Purpose Unit status
Zone × Zone (page 26)
JPEG Slide Show
Play Video CD Without
PBC (
page 21)
DivX Video On Demand
Displays the registration code
for this unit. For more
information, visit the website
below:
http://www.divx.com/vod
ON
OFF (z)
5sec (z),
10sec, 20sec,
40sec
–
Done
To activate Zone × Zone.
To deactivate Zone × Zone.
To select the slide show
interval.
–
To close the display.
During playback/
radio reception.
Unit off.
Any status.
Disc Setting 2
Item Option Purpose Unit status
Super Audio CD Mode
(
page 28)
Selects the sound quality for
Super Audio CD playback.
Super Audio CD Layer
(
page 28)
Selects the playback layer
(area) of a Super Audio CD.
High Quality
(z)
Standard
Multi Channel
(z)
2 Channel
CD
To have high sound quality.
To have standard sound
quality.
To play multi-channel area
in the Super Audio CD
layer.
To play 2-channel (stereo)
area in the Super Audio CD
layer.
To play CD layer (if
contained).
Unit off.
49
Page 50

Setting the security code
Number
buttons
CLEAR
This unit has a security function to discourage
theft. Enter a 4-digit number as your security
code.
Once the security function is activated, you need
to enter the security code to turn on the unit after
re-installing the unit in another car or charging
the battery.
Activating the security function
1 Touch “SETUP,” then the “System”
tab.
The “System Setting” display appears.
2 Touch “Security Control.”
The security code setting display appears.
Deactivating the security function
1 Repeat steps 1 to 2 above.
The security unlock display appears.
2 Touch the number keys to enter your
security code.
The confirmation display appears.
3 Touch “Yes.”
“Security canceled.” appears, and the security
function is deactivated.
To delete an entered number, touch “Clear.”
To return to the previous display, touch .
To close the setup menu, touch “SETUP.”
Setting the clock
The clock uses a 24-hour indication.
1 Touch “SETUP,” then the “System”
tab.
The “System Setting” display appears.
2 Touch “Clock Adjust.”
The setting display appears.
3 Press the number buttons on the card
remote commander to enter the
security code.
4 To confirm, press the number buttons
to reenter the security code.
The setting is complete.
The 4-digit input prompt appears when you turn
on the unit after re-installing in another car or
charging the battery. Touch the number keys to
enter your security code.
To delete an entered number, press (CLEAR) on
the card remote commander.
To return to the previous display, touch .
To close the setup menu, touch “SETUP.”
50
3 Set the hour and minute.
For example, to set to 8:30, touch “0830.”
4 Touch “Start.”
The setting is complete.
To delete an entered number, touch “Clear.”
To return to the previous display, touch .
To close the setup menu, touch “SETUP.”
Page 51

Using Optional Equipment
Auxiliary audio/video
equipment
You can connect up to 3 optional devices, such as
portable media player, game, etc., to the AUX IN
1, AUX IN 2, and AUX IN 3/BUS AUDIO IN
terminals on the unit.
Selecting auxiliary device
1 Touch “SOURCE LIST,” then “AUX.”
The AUX display appears.
2 Touch “AUX 1,” “AUX 2,” or “AUX 3” to
select the device.
Operate by the portable device itself.
Adjusting the volume level
Be sure to adjust the volume for each connected
device before playback.
The volume level is common to “AUX 1,” “AUX
2,” and “AUX 3.”
Note
The input level may be high if the sound distortion of
AUX input occurs. Check the input level by the level
meter in the bottom right corner of the display.
If the meter indicates a peak value, lower the input
level.
1 Turn down the volume on the unit.
2 Touch “SOURCE LIST,” then “AUX.”
The AUX display appears.
3 Start playback of the portable device at a
moderate volume.
4 Set your usual listening volume on the unit.
5 Touch –/+ in the “AUX Level” box repeatedly
to adjust the level.
The level is adjustable in single steps, between
–6 and +18.
Setting the type of device
By setting the type (video or audio) of each
connected device, the background screen can be
switched accordingly.
To set the type, while the unit is off, select
“SETUP” c “System” c “AUX Setting” c
“AUX 1,” “AUX 2,” or “AUX 3” (the device) c
“Video” or “Audio.”
For details, see page 44.
Back camera/navigation device
By connecting the optional back camera or
navigation device to the NAVI/CAMERA IN
terminal, you can display the picture from the
back camera/navigation device.
Displaying the picture
To display the picture from a back camera/
navigation device, you need to activate the
external video input.
To activate, select “SETUP” c “System” c
“External Video Setting” c “Input” c “Back
Camera” or “Navigation.”
For details, see page 45.
To show the picture from the navigation device,
select “SETUP” c “Screen” c “Screen” c
“Navigation.”
The navigation display appears on the
background screen, and the sound from the
current source is output.
For details, see page 36.
The picture from back camera appears when the
back lamp lights up (or the shift lever is set to the
R (reverse) position).
Notes
• When backing up your car, watch the surroundings
carefully for safety. Do not depend on the back
camera exclusively.
• The picture from a back camera/navigation device
does not appear in the rear monitor.
Setting the color system
Switching the color system to NTSC or PAL may
be necessary depending on the back camera/
navigation device.
To switch, select “SETUP” c “System” c
“External Video Setting” c “Color System” c
“NTSC” or “PAL.”
For details, see page 45.
51
Page 52

Back camera settings
Consider the safety of your surroundings.
Consider the safety of your surroundings.
You can display setting items on the picture from
the back camera to assist operation.
1 Touch “SETUP,” the “System” tab,
then repeatedly until the “External
Video Setting” display appears.
2 Touch “Back Camera Setting.”
The setting items appear.
Consider the safety of your surroundings.
Consider the safety of your surroundings.
MirroredMarker
1
2
3
Line Edit
CD changer
Selecting the changer
1 Touch “SOURCE LIST,” then “Changer.”
Album/disc/changer number
2 Touch “PLAY MODE,” then “Next Changer.”
Repeat this step until the desired changer
appears.
Displaying marker lines
Touch “Marker.”
Touch “Marker” again to hide the marker lines.
Reversing the picture
Touch “Mirrored.”
A mirror reversed picture appears.
Editing lines
1 Touch “Line Edit.”
Consider the safety of your surroundings.
Consider the safety of your surroundings.
1 Edit
2 Edit
3 Edit
2 Select the line to edit.
Touch “1 Edit,” “2 Edit,” or “3 Edit”
corresponding to the line to edit.
3 Edit the line.
To increase the length, touch B b.
To reduce the length, touch bB.
To adjust the position, touch V or v.
To restore the default setting, touch “Reset.”
To return to the previous display, touch .
To close the setup menu, touch “SETUP.”
1
2
3
Reset
Skipping albums and discs
Touch the following items on the playback
display.
To skip Touch
an album* ALBUM –/+.
albums
continuously*
a disc DISC –/+.
discs continuously and hold DISC –/+.
* When an MP3 is played.
and hold ALBUM –/+.
52
Page 53

Repeat and shuffle play
1 During playback, touch “PLAY MODE,” then
touch the “Repeat” or “Shuffle” box
repeatedly until the desired option appears.
Select To play
Repeat Track current track repeatedly.
Repeat Album*
1
current album repeatedly.
Repeat Disc current disc repeatedly.
Shuffle Album*
1
tracks in current album in
random order.
Shuffle Disc tracks in current disc in
random order.
Shuffle Changer tracks in current changer in
random order.
Shuffle All*
2
tracks in all changers in
random order.
*1 When an MP3 is played.
*2 When two or more CD changers are connected.
To return to normal play mode, select “OFF.”
Rotary commander RM-X4S
Attaching the label
Attach the indication label depending on how
you mount the rotary commander.
The following controls on the rotary commander
require a different operation from the unit.
• PRESET/DISC control
The same as ALBUM –/+ on the display or M/
m on the card remote commander (push in and
rotate).
• VOL (volume) control
The same as (VOL) –/+ on the main unit or the
card remote commander (rotate).
• SEEK/AMS control
The same as ./> or m/M on the
display or the card remote commander (rotate,
or rotate and hold).
• DSPL button
The same as (SCREEN) on the card remote
commander (press).
Changing the operative direction
The operative direction of the controls is factoryset as shown below.
To increase
To decrease
If you need to mount the rotary commander on
the right hand side of the steering column, you
can reverse the operative direction.
1 While pushing the VOL control, press and
hold (SOUND).
SOUND
DSPL
MODE
MODE
SOUND
DSPL
Location of controls
The corresponding buttons on the rotary
commander control the same functions as those
on the display, the card remote commander, or
the main unit.
SOUND
PRESET/
DISC
SOURCE
VOL
ATT
DSPL
SEEK/ AMS
MODE
OFF
OFF
53
Page 54

Additional Information
Precautions
• If your car has been parked in direct sunlight,
allow the unit to cool off before operating it.
• Power antenna (aerial) will extend automatically
while the unit is operating.
Moisture condensation
On a rainy day or in a very damp area, moisture
condensation may occur inside the lenses and
display of the unit. Should this occur, the unit will
not operate properly. In such a case, remove the disc
and wait for about an hour until the moisture has
evaporated.
Notes on discs
• To keep a disc clean, do not touch its surface.
Handle the disc by its edge.
• Keep your discs in their cases or disc magazines
when not in use.
• Do not subject discs to heat/high temperature.
Avoid leaving them in a parked car or on a
dashboard/rear tray.
• Do not attach labels, or use discs with sticky ink/
residue. Such discs may stop spinning when used,
causing a malfunction, or may ruin the disc.
To maintain high sound quality
Be careful not to splash juice or other soft drinks
onto the unit or discs.
Notes on LCD panel
• Do not press on the LCD panel as doing so can
distort the picture or cause a malfunction (i.e., the
picture may become unclear, or the LCD panel
may be damaged).
• Do not touch other than with the finger, as it may
damage or break the LCD panel.
• Clean the LCD panel with a dry soft cloth. Do not
use solvents such as benzine, thinner,
commercially available cleaners, or antistatic
spray.
• Do not use this unit outside the temperature range
5 – 45 ºC (41 – 113 ºF).
• If your car was parked in a cold or hot place, the
picture may not be clear. However, the monitor is
not damaged, and the picture will become clear
after the temperature in your car becomes normal.
• Some stationary blue, red or green dots may
appear on the monitor. These are called “bright
spots,” and can happen with any LCD. The LCD
panel is precision-manufactured with more than
99.99 % of its segments functional. However, it is
possible that a small percentage (typically 0.01 %)
of the segments may not light up properly. This
will not, however, interfere with your viewing.
• Do not use any discs with labels or stickers
attached.
The following malfunctions may result from using
such discs:
– Inability to eject a disc (due to a label or sticker
peeling off and jamming the eject mechanism).
– Inability to read audio data correctly (e.g.,
playback skipping, or no playback) due to heat
shrinking of a sticker or label causing a disc to
warp.
• Discs with non-standard shapes (e.g., heart,
square, star) cannot be played on this unit.
Attempting to do so may damage the unit. Do not
use such discs.
• Before playing, clean the discs
with a commercially available
cleaning cloth. Wipe each disc
from the center out. Do not use
solvents such as benzine,
thinner, commercially available
cleaners, or antistatic spray
intended for analog discs.
Note on playback operations of DVDs
and VCDs
Some playback operations of DVDs and VCDs may
be intentionally set by software producers. Since
this unit plays DVDs and VCDs according to the
disc contents the software producers designed, some
playback features may not be available. Also, refer
to the instructions supplied with the DVDs or
VCDs.
54
Page 55

Notes on DATA CDs and DATA DVDs
• Some DATA CDs/DATA DVDs (depending on the
equipment used for its recording, or the disc
condition) may not play on this unit.
• Finalization is required for some discs (page 55).
• The unit is compatible with the following
standards.
For DATA CDs
– ISO 9660 level 1/level 2 format, Joliet/Romeo in
the expansion format
– Multi Session
For DATA DVDs
– UDF Bridge format (combined UDF and ISO
9660)
– Multi Border
• The maximum number of:
– folders (albums): 256 (including root and empty
folders).
– files (tracks/images/videos) and folders
contained in a disc: 2,000 (if a folder/file names
contain many characters, this number may
become less than 2,000).
– displayable characters for a folder/file name: 64
(Joliet/Romeo).
Notes on finalizing discs
The following discs are required to be finalized to
play on this unit.
• DVD-R/DVD-R DL (in video mode/VR mode)
• DVD-RW in video mode
• DVD+R/DVD+R DL
•CD-R
•CD-RW
The following discs can be played without
finalization.
• DVD+RW – automatically finalized.
• DVD-RW in VR mode – finalization not required.
For details, see the manual supplied with the disc.
Notes on Multi Session CDs/Multi
Border DVDs
This unit can play Multi Session CDs/Multi Border
DVDs under the following conditions. Note that the
session must be closed and the disc must be
finalized.
• When CD-DA (Compact Disc Digital Audio) is
recorded in the first session:
The unit recognizes the disc as CD-DA and only
CD-DA of the first session is played, even if an
other format (e.g., MP3) is recorded in other
sessions.
• When CD-DA is recorded other than in the first
session:
The unit recognizes the disc as a DATA CD or
DATA DVD, and all CD-DA sessions are skipped.
• When an MP3/WMA/JPEG/DivX
Only the sessions containing the selected file type
(audio/video/image)* are played (if CD-DA or
other data exists in other sessions, they are
skipped).
* For details on how to select the file type, see
page 27.
®
is recorded:
Music discs encoded with copyright
protection technologies
This product is designed to play back discs that
conform to the Compact Disc (CD) standard.
Recently, various music discs encoded with
copyright protection technologies are marketed by
some record companies. Please be aware that among
those discs, there are some that do not conform to
the CD standard and may not be playable by this
product.
Note on DualDiscs
A DualDisc is a two sided disc product which
mates DVD recorded material on one side with
digital audio material on the other side. However,
since the audio material side does not conform to
the Compact Disc (CD) standard, playback on this
product is not guaranteed.
Playback order of MP3/WMA/JPEG/
®
DivX
files
MP3/WMA/
JPEG/DivX
®
Folder
(album)
MP3/WMA/
JPEG/DivX
(track/image/
video)
®
file
About MP3 files
• MP3, which stands for MPEG-1 Audio Layer-3, is
a music file compression format standard. It
compresses audio CD data to approximately 1/10
of its original size.
• ID3 tag versions 1.0, 1.1, 2.2, 2.3 and 2.4 apply to
MP3 only. ID3 tag is 15/30 characters (1.0 and
1.1), or 63/126 characters (2.2, 2.3 and 2.4).
• When naming an MP3 file, be sure to add the file
extension “.mp3” to the file name.
• During playback or fast-forward/reverse of a VBR
(variable bit rate) MP3 file, elapsed playback time
may not display accurately.
Note on MP3
If you play a high-bit-rate MP3, such as 384 kbps,
sound may be intermittent.
55
Page 56

About WMA files
• WMA, which stands for Windows Media Audio,
is a music file compression format standard. It
compresses audio CD data to approximately 1/22*
of its original size.
• WMA tag is 63 characters.
• When naming a WMA file, be sure to add the file
extension “.wma” to the file name.
• During playback or fast-forward/reverse of a VBR
(variable bit rate) WMA file, elapsed playback
time may not display accurately.
* only for 64 kbps
Note on WMA
Playback of the following WMA files is not supported.
– lossless compression
– copyright-protected
About JPEG files
•JPEG, which stands for Joint Photographic
Experts Group, is an image file compression
format standard. It compresses still images
approximately 1/10 to 1/100 of original size.
• When naming a JPEG file, be sure to add the file
extension “.jpg” to the file name.
Note on JPEG
Playback of the following JPEG files is not supported.
– lossless compression
– copyright-protected
Notes on the lithium battery
• Keep the lithium battery out of the reach of children.
Should the battery be swallowed, immediately
consult a doctor.
• Wipe the battery with a dry cloth to assure a good
contact.
• Be sure to observe the correct polarity when
installing the battery.
• Do not hold the battery with metallic tweezers,
otherwise a short-circuit may occur.
WARNING
Battery may explode if mistreated.
Do not recharge, disassemble, or dispose of
in fire.
Fuse replacement
When replacing the fuse, be
sure to use one matching the
amperage rating stated on the
original fuse. If the fuse blows,
check the power connection and
replace the fuse. If the fuse
blows again after replacement,
there may be an internal
malfunction. In such a case,
consult your nearest Sony
dealer.
Fuse (10A)
Removing the unit
About DivX® files
DivX®, which stands for Digital Video Express, is a
digital video file compression format standard
developed by DivX, Inc.
Maintenance
Replacing the lithium battery of the
card remote commander
Under normal conditions, the battery will last
approximately 1 year. (The service life may be
shorter, depending on the conditions of use.)
When the battery becomes weak, the range of the
card remote commander becomes shorter. Replace
the battery with a new CR2025 lithium battery. Use
of any other battery may present a risk of fire or
explosion.
+ side up
c
56
1 Remove the protection collar.
2 Remove the unit.
1Insert both release keys simultaneously
until they click.
Hook facing
inwards.
Page 57

2Pull the release keys to unseat the unit.
3Slide the unit out of the mounting.
Specifications
Monitor section
Display type: Wide LCD color monitor
Dimensions: 7.0 in
System: TFT active matrix
Number of pixels: 1,152,000 pixels
Color system: PAL/NTSC/SECAM automatic select
(Excluding when the back camera/navigation
device is selected.)
DVD/CD Player section
Signal-to-noise ratio: 120 dB
Frequency response: 10 – 20,000 Hz
Wow and flutter: Below measurable limit
Harmonic distortion: 0.01 %
Tuner section
FM
Tuning range: 87.5 – 108.0 MHz
Antenna (aerial) terminal:
External antenna (aerial) connector
Intermediate frequency: 10.7 MHz/450 kHz
Usable sensitivity: 9 dBf
Selectivity: 75 dB at 400 kHz
Signal-to-noise ratio: 67 dB (stereo), 69 dB (mono)
Harmonic distortion at 1 kHz: 0.5 % (stereo),
0.3 % (mono)
Separation: 35 dB at 1 kHz
Frequency response: 30 – 15,000 Hz
MW/LW
Tuning range:
MW: 531 – 1,602 kHz
LW: 153 – 279 kHz
Antenna (aerial) terminal:
External antenna (aerial) connector
Intermediate frequency: 10.7 MHz/450 kHz
Sensitivity: MW: 30 µV, LW: 40 µV
Power amplifier section
Outputs: Speaker outputs (sure seal connectors)
Speaker impedance: 4 – 8 ohms
Maximum power output: 52 W × 4 (at 4 ohms)
General
Outputs:
Video output terminal (rear)
Audio output terminals (front/rear)
Z×Z audio output terminals
Center output terminal
Subwoofer output terminal
Power antenna (aerial) relay control terminal
Power amplifier control terminal
Inputs:
Telephone ATT control terminal
Illumination control terminal
BUS audio input terminals
BUS control input terminal
Remote controller input terminal
Antenna (aerial) input terminal
Parking break control terminal
Microphone input terminal
Reverse input terminal
Navigation/camera input terminal
AUX audio input terminals
AUX video input terminals
Power requirements: 12 V DC car battery
(negative ground (earth))
Dimensions: Approx. 178 × 100 × 189 mm
(7 1/8 × 4 × 7 1/2 in) (w/h/d)
Mounting dimensions: Approx. 182 × 111 × 164 mm
(7 1/4 × 4 3/8 × 6 1/2 in) (w/h/d)
Mass: Approx. 2.4 kg (5 lb 5 oz)
Supplied accessories:
Card remote commander: RM-X160
Parts for installation and connections (1 set)
Extension cord for AUX audio/video input
terminals
Optional accessories/equipment:
Rotary commander: RM-X4S
BUS cable (supplied with an RCA pin cord):
RC-61 (1 m), RC-62 (2 m)
CD changer (10 discs): CDX-757MX
CD changer (6 discs): CDX-T70MX, CDX-T69
Source selector: XA-C40
AUX-IN selector: XA-300
Interface adaptor for iPod: XA-110IP
Your dealer may not handle some of the above listed
accessories. Please ask the dealer for detailed
information.
US and foreign patents licensed from Dolby
Laboratories.
MPEG Layer-3 audio coding technology and
patents licensed from Fraunhofer IIS and Thomson.
DivX, DivX Certified, and associated logos are
trademarks of DivX, Inc. and are used under license.
Note
This unit cannot be connected to a digital preamplifier
or an equalizer which is Sony BUS system compatible.
Design and specifications are subject to change
without notice.
continue to next page t
57
Page 58

• Halogenated flame retardants are not used in the
certain printed wiring boards.
• Halogenated flame retardants are not used in
cabinets.
• Paper is used for the packaging cushions.
• VOC (Volatile Organic Compound)-free vegetable
oil based ink is used for printing the carton.
Troubleshooting
The following checklist will help you remedy
problems you may encounter with your unit.
Before going through the checklist below, check the
connection and operating procedures.
General
No power is being supplied to the unit.
• Check the connection. If everything is in order, check
the fuse.
• If the unit is turned off and the display disappears, it
cannot be operated with the remote commander.
tTurn on the unit.
The power antenna (aerial) does not extend.
The power antenna (aerial) does not have a relay box.
No beep sound.
• The beep sound is canceled (page 44).
• An optional power amplifier is connected and you are
not using the built-in amplifier.
The contents of the memory have been erased.
• The reset button has been pressed.
tStore again into the memory.
• The power supply lead or battery has been
disconnected.
• The power supply lead is not connected properly.
Stored stations and correct time are erased.
The fuse has blown.
Makes noise when the position of the ignition
is switched.
The leads are not matched correctly with the car’s
accessory power connector.
The display disappears from/does not appear
on the monitor.
• The dimmer is set to “ON” (page 43).
• The display disappears if you press and hold (OFF).
tPress and hold (OFF) on the unit until the
display appears.
is touched and the Monitor Off function is
•
activated (page 11).
tTouch anywhere on the display to turn back on.
The display does not respond to your touch
correctly.
• Touch one part of the display at a time. If two or more
parts are touched simultaneously, the display will not
operate correctly.
• Adjust the touch point of the display (page 35).
58
The Auto Off function does not operate.
The unit is turned on. The Auto Off function activates
after turning off the unit.
tTurn off the unit.
Card remote commander operation is not
possible.
• If the Monitor Off function is activated (no lighting),
card remote commander operation is not possible
(page 11).
• Make sure the insulation film has been removed
(page 14).
The menu items cannot be selected.
Unavailable menu items are shown in grey.
AUX cannot be selected as the source.
All AUX input settings are set to “OFF.”
tSet “AUX 1”/“AUX 2”/“AUX 3” to “Video” or
“Audio” (page 44).
Picture
There is no picture/picture noise occurs.
• A connection has not been made correctly.
• Check the connection to the connected equipment,
and set the input selector of the equipment to the
source corresponding to this unit.
• Defective or dirty disc.
• Installation is not correct.
tInstall the unit at an angle of less than 45° in a
sturdy part of the car.
• The parking cord (light green) is not connected to the
parking brake switch cord, or the parking brake is not
applied.
Picture does not fit in the screen.
The aspect ratio is fixed on the DVD.
The picture does not appear in the rear
monitor.
• The source/mode which is not connected is selected.
If there is no input, no picture appears in the rear
monitor.
• The picture of the back camera/navigation device is
displayed on this unit.
tNo picture appears in the rear monitor if the
picture of the back camera/navigation device is
displayed on this unit.
Page 59

Sound
There is no sound/sound skips/sound cracks.
• A connection has not been made correctly.
• Check the connection to the connected equipment,
and set the input selector of the equipment to the
source corresponding to this unit.
• Defective or dirty disc.
• Installation is not correct.
tInstall the unit at an angle of less than 45° in a
sturdy part of the car.
• The MP3 file sampling rate is not 16, 22.05, 24, 32,
44.1, or 48 kHz.
• The WMA file sampling rate is not 32, 44.1, or
48 kHz.
• The MP3 file bit rate is not 8 to 384 kbps.
• The WMA file bit rate is not 32 to 384 kbps.
• The unit is in pause/reverse/fast-forward mode.
• The settings for the outputs are not made correctly.
• The DVD output level is too low (page 22).
• The volume is too low.
• The ATT function is activated, or the Telephone ATT
function (when the interface cable of a car telephone
is connected to the ATT lead) is activated.
• The center speaker or subwoofer configuration is
incorrect (page 34).
• The position of the fader control “Fader” is not set for
a 2-speaker system.
• The CD changer is incompatible with the disc (MP3/
WMA).
tPlay back with this unit.
Sound is noisy.
• Keep cords and cables away from each other.
• If an Super Audio CD is played and “Super Audio
CD Mode” is set to “High Quality,” instead set to
“Standard” (page 28).
Disc operation
The disc cannot be loaded.
• Another disc is already loaded.
• The disc has been forcibly inserted upside down or in
the wrong way.
The disc does not play back.
• Defective or dirty disc.
• The disc is not applicable.
• The DVD is not applicable due to the region code.
• The disc is not finalized (page 55).
• The disc format and file version are incompatible
with this unit (page 8, 55).
tPress Z to remove the disc.
MP3/WMA/JPEG/DivX
• Recording was not performed according to the ISO
9660 level 1 or level 2, the Joliet or Romeo in the
expansion format (DATA CD), or the UDF Bridge
format (DATA DVD) (page 55).
• The file extension is incorrect (page 55).
• Files are not stored in MP3/WMA/JPEG/DivX®
format.
• If the disc contains multiple file types, only the
selected file type (audio/video/image) can be played.
tSelect the appropriate file type using the list
(page 27).
®
files do not play back.
MP3/WMA/JPEG/DivX® files take longer to play
back than others.
The following discs take a longer time to start
playback.
– a disc recorded with a complicated tree structure.
– a disc recorded in Multi Session/Multi Border.
– a disc to which data can be added.
The disc does not start playing from the
beginning.
Resume playback or multi-disc resume playback
(page 41) has taken effect.
Certain functions cannot be performed.
Depending on the disc, you may not be able to perform
operations such as stop, search, or repeat/shuffle play.
For details, see the manual supplied with the disc.
The soundtrack/subtitle language or angle
cannot be changed.
• Use the DVD menu instead of the direct selection
button on the card remote commander (page 15).
• Multilingual tracks, multilingual subtitles, or multiangles are not recorded on the DVD.
• The DVD prohibits changing.
The operation buttons do not function.
The disc will not eject.
Press the reset button (page 14).
You forgot the password for parental control.
Enter “5776” in the password input display to unlock
(page 23).
Radio reception
The stations cannot be received.
The sound is hampered by noises.
• Connect a power antenna (aerial) control lead (blue)
or accessory power supply lead (red) to the power
supply lead of a car’s antenna (aerial) booster (only
when your car has built-in FM/MW/LW antenna
(aerial) in the rear/side glass).
• Check the connection of the car antenna (aerial).
• The auto antenna (aerial) will not go up.
tCheck the connection of the power antenna
(aerial) control lead.
• Check the frequency.
Preset tuning is not possible.
• Store the correct frequency in the memory.
• The broadcast signal is too weak.
Automatic tuning is not possible.
• Setting of the local seek mode is not correct.
tTuning stops too frequently:
Set “Local ON” (page 19).
tTuning does not stop at a station:
Set “Mono ON” (page 19).
• The broadcast signal is too weak.
tPerform manual tuning.
During FM reception, the “Stereo” indication
flashes.
• Tune in the frequency accurately.
• The broadcast signal is too weak.
tSet “Mono ON” (page 19).
continue to next page t
59
Page 60

An FM program broadcast in stereo is heard in
monaural.
The unit is in monaural reception mode.
tSet “Mono OFF” (page 19).
RDS
Seek starts after a few seconds of listening.
The station is non-TP or has weak signal.
tDeactivate TA (page 30).
No traffic announcements.
• Activate TA (page 30).
• The station does not broadcast any traffic
announcements despite being TP.
tTune in another station.
PTY displays “None.”
• The current station is not an RDS station.
• RDS data has not been received.
• The station does not specify the program type.
Error displays/Messages
On the main unit
1
Error*
• The disc is dirty or inserted upside down.*
tClean or insert the disc correctly.
• A blank disc has been inserted.
• The disc cannot play due to a problem.
tInsert another disc.
• The disc is not compatible with this unit.
tInsert a compatible disc.
• Press Z to remove the disc.
Failure
The connection of speakers/amplifiers is incorrect.
tSee the supplied installation/connections manual to
check the connection.
Loading
The changer is loading the disc.
tWait until loading is complete.
Local Seek Up/Down
The local seek mode is on during automatic tuning.
NO AF
There is no alternative frequency for the current
station.
tTouch ./> while the program service name
is flashing. The unit starts searching for another
frequency with the same PI (Program
Identification) data (“PI Seek” appears).
No playable disc in disc changer.
The disc is not inserted in the CD changer.
tInsert discs in the changer.
No magazine in disc changer.
The disc magazine is not inserted in the CD changer.
tInsert the magazine in the changer.
No playable data.
The disc is not a music file.
tInsert a music CD in this unit or MP3 playable
changer.
2
NO TP
The unit will continue searching for available TP
stations.
Offset
There may be an internal malfunction.
tCheck the connection. If the error indication
remains on in the display, consult your nearest
Sony dealer.
Reading
The unit is reading all file/album (folder) information
on the disc.
tWait until reading is complete and playback starts
automatically. Depending on the disc structure, it
may take more than a minute.
Please push RESET.
The unit and CD changer cannot be operated due to a
problem.
tPress the reset button (page 14).
“ ” or “ ”
During reverse or fast-forward, you have reached the
beginning or the end of the disc and you cannot go any
further.
“ ”
The character cannot be displayed with the unit.
Playback prohibited by region code.
The DVD playback is prohibited due to the different
region code.
Cannot play this disc.
• The disc is incompatible with this unit.
• The disc is not finalized.
No playable data.
The disc does not contain playable data.
Cannot read this disc.
• The unit cannot read the data due to some problem.
• The data is damaged or corrupted.
*1 If an error occurs during playback, the disc number
does not appear in the display.
*2 The disc number of the disc causing the error
appears in the display.
If these solutions do not help improve the situation,
consult your nearest Sony dealer.
If you take the unit to be repaired because of disc
playback trouble, bring the disc that was used at the
time the problem began.
60
Page 61

Glossary
Album
Section of a music piece or an image on a DATA
CD/DVD containing MP3/WMA audio tracks or
JPEG files.
Chapter
Subdivision of a title on a DVD. A title is composed
of several chapters.
®
DivX
Digital video technology created by DivX, Inc.
Videos encoded with DivX
the highest quality with a relatively small file size.
Dolby Digital
Digital audio compression technology developed by
Dolby Laboratories. This technology conforms to
5.1-channel surround sound. The rear channel is
stereo and there is a discrete subwoofer channel in
this format. Dolby Digital provides the same 5.1
discrete channels of high quality digital audio found
in Dolby Digital cinema audio systems. Good
channel separation is realized because all of the
channel data are recorded discretely and little
deterioration is realized because all channel data
processing is digital.
Dolby Pro Logic II
Dolby Pro Logic II creates five full-bandwidth
output channels from 2 channel sources. This is
done using an advanced, high-purity matrix
surround decoder that extracts the spatial properties
of the original recording without adding any new
sounds or tonal colorations.
DTS
Digital audio compression technology developed by
Digital Theater Systems, Inc. This technology
conforms to 5.1-channel surround. This format
comprises of stereo rear channel and there is
discrete subwoofer channel in this format. DTS
provides the same 5.1 discrete channels of high
quality digital audio. The good channel separation is
realized due to the all channel data being recorded
discretely and processed in digitally.
®
technology are among
DVD
A disc that contains up to 8 hours of moving
pictures even though its diameter is the same as a
CD.
The data capacity of a single-layer and single-sided
DVD is 4.7 GB (Giga Byte), which is 7 times that of
a CD. The data capacity of a double-layer and
single-sided DVD is 8.5 GB, a single-layer and
double-sided DVD is 9.4 GB, and double-layer and
double-sided DVD is 17 GB.
The picture data uses the MPEG 2 format, one of the
worldwide standards of digital compression
technology. The picture data is compressed to about
1/40 (average) of its original size. The DVD also
uses a variable rate coding technology that changes
the data to be allocated according to the status of the
picture. Audio information is recorded in a multichannel format, such as Dolby Digital, allowing you
to enjoy a more real audio presence.
Furthermore, various advanced functions such as the
multi-angle, multilingual, and Parental Control
functions are provided with the DVD.
DVD-RW
A DVD-RW is a recordable and rewritable disc that
is the same size as a DVD VIDEO. The DVD-RW
has two different modes: VR mode and video mode.
DVD-RWs created in video mode have the same
format as a DVD VIDEO, while discs created in VR
(Video Recording) mode allow the contents to be
programmed or edited.
DVD+RW
A DVD+RW (plus RW) is a recordable and
rewritable disc. DVD+RWs use a recording format
that is comparable to the DVD VIDEO format.
File
An MP3/WMA track, JPEG image, or a DivX
video on a DATA CD/DATA DVD. (“File” is an
exclusive definition for this unit.) A single file
consists of a single track, image, or movie.
Film based software, Video based software
DVDs can be classified as Film based or Video
based software. Film based DVDs contain the same
images (24 frames per second) that are shown at
movie theaters. Video based DVDs, such as
television dramas or sit-coms, displays images at 30
frames (or 60 fields) per second.
Scene
On a VIDEO CD with PBC (playback control)
functions, the menu screens, moving pictures and
still pictures are divided into sections called
“scenes.”
®
continue to next page t
61
Page 62

Super Audio CD
Super Audio CD is a new high-quality audio disc
standard where music is recorded in the DSD
(Direct Stream Digital) format (conventional CDs
are recorded in the PCM format). The DSD format,
using a sampling frequency 64 times higher than
that of a conventional CD, and with 1-bit
quantization, achieves both a wide frequency range
and a wide dynamic range across the audible
frequency range, and so provides music
reproduction extremely faithful to the original
sound.
Title
The longest section of a picture or music feature on
a DVD, movie, etc., in video software, or the entire
album in audio software.
Tra ck
Section of a picture or a music piece on a VIDEO
CD, CD, Super Audio CD, or MP3/WMA. An
album is composed of several tracks (MP3/WMA
only).
VIDEO CD
A compact disc that contains moving pictures.
The picture data uses the MPEG 1 format, one of a
worldwide standard of digital compression
technology. The picture data is compressed to about
1/140 of its original size. Consequently, a 12 cm
VIDEO CD can contain up to 74 minutes of moving
pictures.
VIDEO CDs also contain compact audio data.
Sounds outside the range of human hearing are
compressed while sounds we can hear are not
compressed. VIDEO CDs can hold 6 times the
audio information of conventional audio CDs.
There are 3 versions of VIDEO CDs.
• Version 1.0, 1.1: You can play only moving
pictures and sound.
• Version 2.0: You can play high-resolution still
pictures and enjoy PBC functions.
This unit conforms to all 3 versions above.
62
Page 63

Language code/area code list
Language code list
The language spellings conform to the ISO 639: 1988 (E/F) standard.
Code Language Code Language Code Language Code Language
1027 Afar
1028 Abkhazian
1032 Afrikaans
1039 Amharic
1044 Arabic
1045 Assamese
1051 Aymara
1052 Azerbaijani
1053 Bashkir
1057 Byelorussian
1059 Bulgarian
1060 Bihari
1061 Bislama
1066 Bengali;
Bangla
1067 Tibetan
1070 Breton
1079 Catalan
1093 Corsican
1097 Czech
1103 Welsh
1105 Danish
1109 German
1130 Bhutani
1142 Greek
1144 English
1145 Esperanto
1149 Spanish
1150 Estonian
1151 Basque
1157 Persian
1165 Finnish
1166 Fiji
1171 Faroese
1174 French
1181 Frisian
1183 Irish
1186 Scots Gaelic
1194 Galician
1196 Guarani
1203 Gujarati
1209 Hausa
1217 Hindi
1226 Croatian
1229 Hungarian
1233 Armenian
1235 Interlingua
1239 Interlingue
1245 Inupiak
1248 Indonesian
1253 Icelandic
1254 Italian
1257 Hebrew
1261 Japanese
1269 Yiddish
1283 Javanese
1287 Georgian
1297 Kazakh
1298 Greenlandic
1299 Cambodian
1300 Kannada
1301 Korean
1305 Kashmiri
1307 Kurdish
1311 Kirghiz
1313 Latin
1326 Lingala
1327 Laothian
1332 Lithuanian
1334 Latvian;
Lettish
1345 Malagasy
1347 Maori
1349 Macedonian
1350 Malayalam
1352 Mongolian
1353 Moldavian
1356 Marathi
1357 Malay
1358 Maltese
1363 Burmese
1365 Nauru
1369 Nepali
1376 Dutch
1379 Norwegian
1393 Occitan
1403 (Afan)Oromo
1408 Oriya
1417 Punjabi
1428 Polish
1435 Pashto;
Pushto
1436 Portuguese
1463 Quechua
1481 Rhaeto-
Romance
1482 Kirundi
1483 Romanian
1489 Russian
1491 Kinyarwanda
1495 Sanskrit
1498 Sindhi
1501 Sangho
1502 Serbo-
Croatian
1503 Singhalese
1505 Slovak
1506 Slovenian
1507 Samoan
1508 Shona
1509 Somali
1511 Albanian
1512 Serbian
1513 Siswati
1514 Sesotho
1515 Sundanese
1516 Swedish
1517 Swahili
1521 Tamil
1525 Telugu
1527 Tajik
1528 Thai
1529 Tigrinya
1531 Turkmen
1532 Tagalog
1534 Setswana
1535 Tonga
1538 Turkish
1539 Tsonga
1540 Tatar
1543 Twi
1557 Ukrainian
1564 Urdu
1572 Uzbek
1581 Vietnamese
1587 Volapük
1613 Wolof
1632 Xhosa
1665 Yoruba
1684 Chinese
1697 Zulu
1703 Not specified
Area code list
Code Area Code Area Code Area Code Area
2044 Argentina
2047 Australia
2046 Austria
2057 Belgium
2070 Brazil
2079 Canada
2090 Chile
2092 China
2115 Denmark
2165 Finland
2174 France
2109 Germany
2248 India
2238 Indonesia
2254 Italy
2276 Japan
2304 Korea
2363 Malaysia
2362 Mexico
2376 Netherlands
2390 New Zealand
2379 Norway
2427 Pakistan
2424 Philippines
2436 Portugal
2489 Russia
2501 Singapore
2149 Spain
2499 Sweden
2086 Switzerland
2528 Thailand
2184 United
Kingdom
63
Page 64

Index
Numerics
16:9 40
2000MP3 6
2000WMA 6
4:3 Letter Box 40
4:3 Pan Scan 40
5.1-channel output
(5.1ch Output) 40
5.1-channel speaker level
(5.1ch Speaker Level) 35
A
Alternative Frequencies
(AF) 29, 30
Angle (Angle) 17
Area code 63
Audio channel (Sound) 22
Audio DRC (Audio DRC) 40
Audio format (Audio) 21
Audio language
(Audio) 21, 40
Audio/visual settings
(A/V Setting) 40
Auto Off (Auto OFF) 43
Auxiliary equipment 51
Auxiliary level (AUX Level) 51
Auxiliary settings
(AUX 1, 2, 3) 44, 51
B
Back camera 51
Back camera settings
(Back Camera Setting) 52
Background screen
(Screen) 36
Balance
(Balance/Fader) 32, 46
Beep sound (Beep) 44
Best Tuning Memory
(BTM) 29
Button color and effect
(Button Color Select) 48
Button illumination
(Key Illumination) 44
C
Capture (CAPTURE) 37
Card remote commander
12, 14, 56
CD changer 52
Center Speaker Organizer
(CSO) 34, 47
Center speaker setting
(Center Speaker) 14, 34, 47
Center speaker volume
(Balance/Fader) 32, 46
Chapter (Chapter) 25
Clock adjust (Clock Adjust) 50
Clock display (Clock) 11, 48
Clock Time (CT) 29, 31, 43
Color system
(Color System) 45, 51
Crossover filter
(Crossover Filter) 47
Custom button
(Custom Key) 10, 44
D
Demonstration (Demo) 48
Dimmer level
(Dimmer Level) 43
Dimmer setting (Dimmer) 43
Direct search play
(Direct Search) 25, 41
Disc playback settings
(Disc) 49
Discs 8
DivX video on demand
(DivX Video On Demand) 49
DivX® 9, 56
Dolby Digital 21, 22
Dolby Pro Logic II 33, 46
DTS 22
DVD control menu
(DVD CONTROL) 17
DVD level adjustment
(DVD Level) 22
DVD menu 15
DVD setup menu
(DVD SETUP) 39
DVD’s top menu
(Top Menu) 15, 17
Dynamic Range Control
(DRC) 40
E
EQ7 31, 46
Equalizer
Picture
(Picture EQ) 37, 48
Sound (EQ7) 31, 46
External video input
(Input) 45, 51
F
Fader (Balance/Fader) 32, 46
Formats 9
Fuse 56
H
High Pass Filter (HPF) 47
I
Image rotate (Image Turn) 17
Initial settings
(Initial Setting) 14
Intelligent Time Alignment
33, 34
J
JPEG 9, 56
K
Karaoke 26
L
Language code 63
Language settings
(Language Setting) 40
Layer (Super Audio CD Layer)
28, 49
List up (LIST) 27
Listening position
(Listening Position) 33, 46
Lithium battery 56
Local seek mode (Local) 19
Low Pass Filter (LPF) 47
64
Page 65

M
Menu
DVD control
(DVD CONTROL) 17
DVD setup
(DVD SETUP) 39
Play mode
(PLAY MODE) 17
Setup (SETUP) 42
Menu language (Menu) 40
Monaural mode (Mono) 19
Monitor angle
(Monitor Angle) 35
Monitor Off 11
Monitor type
(Monitor Type) 40
MP3 9, 55
Multi Border DVD 55
Multi Session CD 55
Multi-disc resume playback
(Multi Disc Resume) 6, 41
N
Navigation device 51
No signal setting
(No Signal Setting) 45
NTSC 45
P
PAL 45
Parental control settings
(Parental Control) 23, 41
Picture EQ
(Picture EQ) 37, 48
Play mode menu
(PLAY MODE) 17
Play mode settings
(Play Mode) 41
Playable discs 8
Playback control (PBC) 21
Playback without PBC (Play
Video CD Without PBC) 21
Playlist play (Playlist Play) 41
Program Types (PTY) 29, 30
R
Radio Data System (RDS) 29
Region code 9
Regional (Regional) 30
Repeat play (Repeat) 24
Reset (Reset) 14
Reset DVD setup
(Reset DVD SETUP) 41
Resume play 17
Rotary commander
(Rotary Commander) 44, 53
S
Screen aspect ratio
(Aspect Ratio) 38, 48
Screen settings (Screen) 48
Security function
(Security Control) 50
Setup menu (SETUP) 42
Shuffle play (Shuffle) 24
Slide show interval
(JPEG Slide Show) 49
Slow-motion play 16
Sound/speaker settings
(Sound) 46
Spectrum analyzer 36
Subtitle language
(Subtitle) 13, 17, 40
Subwoofer setting
(Subwoofer) 14, 34, 47
Subwoofer volume
(Balance/Fader) 32, 46
Super Audio CD
Layer (Super Audio CD
Layer) 28, 49
Sound quality (Super
Audio CD Mode) 28, 49
System settings (System) 43
T
Title (Title) 25
Touch panel calibration
(Touch Panel Adjust) 35
Traffic Announcement
(TA) 29, 30
Traffic Program (TP) 29
V
Vol ume
Echo 26
Main unit 10
Microphone 26
Speaker 35
Traffic announcement 30
W
Wallpaper 36, 37
Wallpaper delete
(Wallpaper Delete) 37
WMA 9, 56
Z
Zone × Zone 26, 49
65
Page 66

W
d
a
d
Achtung
Um Feuergefahr und die Gefahr eines
elektrischen Schlags zu vermeiden,
setzen Sie das Gerät weder Regen noch
sonstiger Feuchtigkeit aus.
Um einen elektrischen Schlag zu
vermeiden, öffnen Sie das Gehäuse
nicht. Überlassen Sie Wartungsarbeiten
stets qualifiziertem Fachpersonal.
VORSICHT
Die Verwendung optischer Instrumente
zusammen mit diesem Produkt stellt ein
Gesundheitsrisiko für die Augen dar. Der LaserStrahl, den dieser CD/DVD-Player generiert,
kann die Augen schädigen. Versuchen Sie daher
nicht, das Gerät zu zerlegen. Überlassen Sie
Wartungsarbeiten stets qualifiziertem
Fachpersonal.
Dieses Etikett befindet sich an der Unterseite
des Gehäuses.
CAUTION
RADIATION WHEN OPEN AND INTERLOCKS DEFEATED.
DO NOT VIEW DIRECTLY WITH OPTICAL INSTRUMENTS.
Dieses Etikett befindet sich am internen Chassis
der Laufwerkseinheit.
Das Symbol auf dem Produkt oder seiner Verpackung
weist darauf hin, dass dieses Produkt nicht als normaler
Haushaltsabfall zu behandeln ist, sondern an einer
Annahmestelle für das Recycling von elektrischen und
elektronischen Geräten abgegeben werden muss. Durch
Ihren Beitrag zum korrekten Entsorgen dieses Produkts
schützen Sie die Umwelt und die Gesundheit Ihrer
Mitmenschen. Umwelt und Gesundheit werden durch
falsches Entsorgen gefährdet. Materialrecycling hilft, den
Verbrauch von Rohstoffen zu verringern. Weitere
Informationen über das Recycling dieses Produkts
erhalten Sie von Ihrer Gemeinde, den kommunalen
Entsorgungsbetrieben oder dem Geschäft, in dem Sie das
Produkt gekauft haben.
Geeignetes Zubehör: Fernbedienung
2
:
CLASS 1M VISIBLE/INVISIBLE LASER
Entsorgung von gebrauchten
elektrischen und elektronischen
Geräten (anzuwenden in den
Ländern der Europäischen Union
und anderen europäischen Ländern
mit einem separaten Sammelsystem
für diese Geräte)
ichtig!
Bitte nehmen Sie sich etwas Zeit, um
en Geräte-Pass vollständig
uszufüllen. Dieser befindet sich auf
er hinteren Umschlagseite dieser
Bedienungsanleitung.
Warnhinweis, wenn die Zündung Ihres
Fahrzeugs nicht über eine
Zubehörposition (ACC oder I) verfügt
Schalten Sie unbedingt die
Ausschaltautomatik ein (Seite 47).
Nach dem Ausschalten wird das Gerät dann
nach der voreingestellten Zeit automatisch
vollständig abgeschaltet, so dass der
Autobatterie kein Strom mehr entzogen wird.
Wenn Sie die Ausschaltautomatik nicht
aktivieren, müssen Sie jedes Mal, wenn Sie
die Zündung ausschalten, die Taste (OFF)
gedrückt halten, bis die Anzeige ausgeblendet
wird.
Erläuterungen zum Beenden des DemoModus (Demo) finden Sie auf Seite 52.
Wenn Sie nach dem Zurücksetzen des Geräts
die Anfangseinstellungen für die
Lautsprecher nicht vorgenommen haben,
weil die Anzeige zu schnell ausgeblendet
wurde, oder wenn Sie falsche Einstellungen
vorgenommen haben, können Sie diese
Einstellungen in anderen Menüs erneut
vornehmen bzw. ändern. Wie Sie einstellen
können, ob bestimmte Lautsprecher
angeschlossen sind, ist auf Seite 37 erläutert.
Näheres zum Einstellen der Hörposition
finden Sie auf Seite 35.
Sicherheit
• Beachten Sie stets die örtlichen Verkehrsregeln
und -vorschriften.
• Während der Fahrt
– Bedienen Sie das Gerät während der Fahrt
nicht und schauen Sie nicht darauf.
Andernfalls könnten Sie abgelenkt werden
und einen Unfall verursachen. Wenn Sie auf
das Gerät schauen oder es bedienen wollen,
parken Sie das Fahrzeug zuvor an einer
sicheren Stelle.
– Verwenden Sie die Einstellfunktionen nicht
und führen Sie auch keine anderen
Funktionen aus, die Sie vom Straßenverkehr
ablenken könnten.
Page 67

– Schauen Sie aus Sicherheitsgründen
beim Rückwärtsfahren unbedingt nach
hinten und achten Sie auf die
Umgebung, und zwar auch, wenn eine
Rückfahrkamera angeschlossen ist.
Verlassen Sie sich nicht allein auf die
Rückfahrkamera.
• Bei der Bedienung des Geräts
– Greifen Sie nicht mit der Hand oder den
Fingern in das Gerät und stecken Sie keine
Fremdkörper hinein, während es in Betrieb
ist. Andernfalls kann es zu Verletzungen oder
zu Schäden am Gerät kommen.
– Bewahren Sie kleine Gegenstände außerhalb
der Reichweite von Kindern auf.
– Achten Sie darauf, dass alle Fahrzeuginsassen
die Sicherheitsgurte anlegen, damit es bei
einer plötzlichen Bewegung des Fahrzeugs
nicht zu Verletzungen kommt.
Unfallverhütung
Das Bild erscheint erst und die KaraokeFunktion steht erst zur Verfügung, nachdem
Sie das Fahrzeug geparkt und die Parkbremse
betätigt haben.
Wenn das Fahrzeug während der
Videowiedergabe oder im Karaoke-Modus zu
fahren beginnt, erscheint die folgende
Warnmeldung und als Bild wird automatisch
das Hintergrundbild angezeigt.
Der an REAR VIDEO OUT angeschlossene
Monitor bleibt während der Fahrt
eingeschaltet.
Als Bild auf dem Display wird zwar das
Hintergrundbild angezeigt und der KaraokeModus wird deaktiviert, aber der Ton wird
weiterhin wiedergegeben.
• “Video blocked for your safety.”
• “KARAOKE function blocked.”
• “Video and KARAOKE function
blocked for your safety.”
Bedienen Sie das Gerät während des Fahrens
nicht und schauen Sie auch nicht auf den
Monitor.
Hinweise zur Installation
• Dieses Gerät muss von qualifizierten
Technikern oder Kundendienstfachleuten
installiert werden.
– Wenn Sie versuchen, dieses Gerät selbst zu
installieren, müssen Sie es wie in der
mitgelieferten Installations-/
Anschlussanleitung erläutert ordnungsgemäß
installieren.
– Bei unsachgemäßer Installation wird die
Autobatterie möglicherweise entladen und es
kann zu einem Kurzschluss kommen.
• Wenn das Gerät nicht richtig funktioniert,
überprüfen Sie bitte zuerst die Anschlüsse
anhand der Erläuterungen in der mitgelieferten
Installations-/Anschlussanleitung. Wenn die
Anschlüsse in Ordnung sind, überprüfen Sie
die Sicherung.
• Achten Sie darauf, dass die Oberfläche des
Geräts nicht beschädigt wird.
– Achten Sie darauf, dass die Oberfläche des
Geräts nicht mit Chemikalien wie
Insektiziden, Haarspray,
Insektenabwehrmitteln usw. in Berührung
kommt.
– Achten Sie darauf, dass das Gerät nicht
längere Zeit mit Gummi oder Kunststoff in
Berührung kommt. Andernfalls kann die
Gehäuseoberfläche angegriffen werden und
sich verformen.
• Befestigen Sie das Gerät bei der Installation
unbedingt sicher.
• Schalten Sie bei der Installation unbedingt die
Zündung aus. Wenn Sie das Gerät bei
eingeschalteter Zündung installieren, wird die
Autobatterie möglicherweise entladen und es
kann zu einem Kurzschluss kommen.
• Achten Sie bei der Installation darauf, keine
Leitungen oder Kabel irgendwelcher Art oder
den Treibstofftank z. B. mit einem Bohrer zu
beschädigen. Andernfalls besteht Feuer- und
Unfallgefahr.
DIESES PRODUKT WIRD UNTER DER
MPEG-4 VISUAL PATENT PORTFOLIOLIZENZ FÜR DEN PRIVATEN UND NICHT
KOMMERZIELLEN GEBRAUCH DURCH
DEN BENUTZER LIZENZIERT, UND ZWAR
FÜR DAS DECODIEREN VON MPEG-4VIDEODATEN, DIE VON EINEM BENUTZER
IM PRIVATEN, NICHT KOMMERZIELLEN
RAHMEN CODIERT WURDEN UND/ODER
VON EINEM VIDEO-ANBIETER STAMMEN,
DER ÜBER EINE LIZENZ VON MPEG LA
ZUM ANBIETEN VON MPEG-4-VIDEOS
VERFÜGT. FÜR EINEN ANDEREN ZWECK
WIRD KEINE LIZENZ ERTEILT ODER
IMPLIZIT GEWÄHRT. WEITERE
INFORMATIONEN, AUCH ZU WERBE-,
INTERNEN UND KOMMERZIELLEN
ZWECKEN UND LIZENZEN, SIND BEI
MPEG LA, LLC, ERHÄLTLICH.
HTTP://WWW.MPEGLA.COM
3
Page 68

Inhalt
Willkommen! . . . . . . . . . . . . . . . . . . . . . . . . . . . 6
Merkmale und Funktionen . . . . . . . . . . . . . .6
Urheberrechte . . . . . . . . . . . . . . . . . . . . . . . .7
Geeignete Discs und in dieser Anleitung
verwendete Symbole . . . . . . . . . . . . . . . . . . . . .8
Lage und Funktion der Teile und
Bedienelemente . . . . . . . . . . . . . . . . . . . . . . . .10
Hauptgerät . . . . . . . . . . . . . . . . . . . . . . . . . . 10
Kartenfernbedienung RM-X160 . . . . . . . . .12
Vorbereitungen
Zurücksetzen des Geräts. . . . . . . . . . . . 14
Vornehmen der
Anfangseinstellungen . . . . . . . . . . . . . . 14
Vorbereiten der
Kartenfernbedienung . . . . . . . . . . . . . . . 14
Grundfunktionen
Wiedergeben von Discs. . . . . . . . . . . . . 15
Radioempfang . . . . . . . . . . . . . . . . . . . . 19
Wiedergabe von Raumklang
Erzeugen eines idealen Klangfeldes für
Mehrkanalton . . . . . . . . . . . . . . . . . . . . . . . . . . 21
Weitere Funktionen — Discs
Verwenden der PBC-Funktionen
— Wiedergabesteuerung . . . . . . . . . . . . . . . . . 22
Konfigurieren der Audioeinstellungen. . . . . . .22
Wechseln von Audiosprache/-format . . . . .22
Einstellen des Audioausgangspegels
— DVD-Pegel . . . . . . . . . . . . . . . . . . . . . . .24
Sperren von Discs
— Kindersicherung . . . . . . . . . . . . . . . . . . . . . 24
Aktivieren der Kindersicherung . . . . . . . . .24
Wechseln des Gebiets und der
Altersfreigabestufe . . . . . . . . . . . . . . . . . . . 25
Repeat und Shuffle Play. . . . . . . . . . . . . . . . . . 26
Direktsuche . . . . . . . . . . . . . . . . . . . . . . . . . . .26
Die Karaoke-Funktion . . . . . . . . . . . . . . . . . . .27
Wiedergeben verschiedener Signalquellen vorne
und hinten — Zone × Zone . . . . . . . . . . . . . . .28
4
Auflisten von Stücken/Bildern/Videodateien
— LIST . . . . . . . . . . . . . . . . . . . . . . . . . . . . . . 29
Auswählen eines Stücks/Bildes/einer
Videodatei. . . . . . . . . . . . . . . . . . . . . . . . . . 29
Auswählen eines Dateityps . . . . . . . . . . . . . 29
Konfigurieren von Wiedergabeeinstellungen für
Super Audio CDs. . . . . . . . . . . . . . . . . . . . . . . 30
Auswählen einer Wiedergabeschicht . . . . . 30
Auswählen der Tonqualität. . . . . . . . . . . . . 30
Weitere Funktionen — Radio
Speichern und Empfangen von Sendern . . . . . 31
Automatisches Speichern von Sendern
— BTM. . . . . . . . . . . . . . . . . . . . . . . . . . . . 31
Manuelles Speichern von Sendern . . . . . . . 31
Empfangen gespeicherter Sender . . . . . . . . 31
RDS . . . . . . . . . . . . . . . . . . . . . . . . . . . . . . . . . 31
Übersicht. . . . . . . . . . . . . . . . . . . . . . . . . . . 31
Einstellen von AF und TA . . . . . . . . . . . . . 32
Auswählen des Programmtyps (PTY) . . . . 32
Einstellen der Uhrzeit (CT). . . . . . . . . . . . . 33
Klangeinstellungen
Auswählen der Tonqualität — EQ7 . . . . . . . . 33
Individuelles Einstellen der Equalizer-Kurve
— EQ7 Tune. . . . . . . . . . . . . . . . . . . . . . . . 34
Einstellen der Klangeigenschaften . . . . . . . . . 34
Mehrkanalausgabe von 2-Kanal-Signalquellen
— Pro Logic II. . . . . . . . . . . . . . . . . . . . . . . . . 35
Optimieren des Klangs an der Hörposition
— Intelligent Time Alignment . . . . . . . . . . . . 35
Präzise Kalibrierung der Hörposition
— Intelligent Time Alignment Tune . . . . . 36
Lautsprecherkonfiguration und Einstellen der
Lautstärke . . . . . . . . . . . . . . . . . . . . . . . . . . . . 36
Erzeugen eines virtuellen Center-
Lautsprechers — CSO . . . . . . . . . . . . . . . . 36
Einstellen, ob bestimmte Lautsprecher
angeschlossen sind . . . . . . . . . . . . . . . . . . . 37
Einstellen der Lautsprecherlautstärke. . . . . 37
Page 69

Monitoreinstellungen
Weitere Informationen
Einstellen des Monitorwinkels . . . . . . . . . . . . 38
Touchscreen-Kalibrierung . . . . . . . . . . . . . . . . 38
Einstellen der Hintergrundanzeige . . . . . . . . . 38
Einstellen des Hintergrundbilds und des
Spektrumanalysatormusters . . . . . . . . . . . . 39
Auslesen von Bildern für das
Hintergrundbild. . . . . . . . . . . . . . . . . . . . . . 39
Auswählen der Bildqualität — Bild-EQ . . . . . 40
Individuelles Einstellen der Bildqualität. . . 40
Auswählen des Bildseitenverhältnisses. . . . . . 41
Allgemeine Einstellungen
DVD-Konfiguration . . . . . . . . . . . . . . . . . . . . 42
Grundlegende Funktionsweise der
DVD-Konfiguration . . . . . . . . . . . . . . . . . . 42
Spracheinstellungen für Anzeige oder
Tonspur . . . . . . . . . . . . . . . . . . . . . . . . . . . . 43
Audio-/Videoeinstellungen. . . . . . . . . . . . . 43
Kindersicherungseinstellungen . . . . . . . . . . 44
Wiedergabemoduseinstellungen . . . . . . . . . 44
Zurücksetzen aller Einstellungen . . . . . . . . 45
Konfiguration . . . . . . . . . . . . . . . . . . . . . . . . . 46
Grundlegende Funktionsweise der
Konfiguration . . . . . . . . . . . . . . . . . . . . . . . 46
Systemeinstellungen — System . . . . . . . . . 47
Klang-/Lautsprechereinstellungen
— Sound . . . . . . . . . . . . . . . . . . . . . . . . . . . 50
Bildschirmeinstellungen — Screen . . . . . . 52
Disc-Wiedergabeeinstellungen — Disc . . . 53
Einstellen des Sicherheitscodes . . . . . . . . . 54
Einstellen der Uhr . . . . . . . . . . . . . . . . . . . . 55
Sicherheitsmaßnahmen . . . . . . . . . . . . . . . . . . 59
Hinweise zum LCD-Bildschirm. . . . . . . . . 59
Hinweise zu Discs . . . . . . . . . . . . . . . . . . . 59
Wiedergabereihenfolge von
MP3-/WMA-/JPEG-/DivX
Hinweise zu MP3-Dateien . . . . . . . . . . . . . 61
Hinweise zu WMA-Dateien . . . . . . . . . . . . 61
Hinweise zu JPEG-Dateien . . . . . . . . . . . . 61
Hinweise zu DivX
Wartung . . . . . . . . . . . . . . . . . . . . . . . . . . . . . 61
Ausbauen des Geräts. . . . . . . . . . . . . . . . . . . . 62
Technische Daten . . . . . . . . . . . . . . . . . . . . . . 63
Störungsbehebung. . . . . . . . . . . . . . . . . . . . . . 64
Fehleranzeigen/Meldungen . . . . . . . . . . . . 66
Glossar . . . . . . . . . . . . . . . . . . . . . . . . . . . . . . 67
Sprachcode-/Gebietscodeliste . . . . . . . . . . . . . 69
Index . . . . . . . . . . . . . . . . . . . . . . . . . . . . . . . . 70
®
-Dateien . . . . 61
®
-Dateien . . . . . . . . . . . 61
Verwenden gesondert erhältlicher
Geräte
Zusätzliche Audio-/Videogeräte . . . . . . . . . . . 55
Rückfahrkamera/Navigationsgerät . . . . . . . . . 56
Anzeigen des Bildes . . . . . . . . . . . . . . . . . . 56
Rückfahrkameraeinstellungen . . . . . . . . . . 56
CD-Wechsler . . . . . . . . . . . . . . . . . . . . . . . . . . 57
Joystick RM-X4S . . . . . . . . . . . . . . . . . . . . . . 58
Zur Installation und zum Anschluss siehe die
mitgelieferte Installations-/Anschlussanleitung.
5
Page 70

Willkommen!
Danke, dass Sie sich für dieses AV-Center von
Sony entschieden haben. Lesen Sie diese
Anleitung vor Inbetriebnahme des Geräts bitte
genau durch und bewahren Sie sie zum späteren
Nachschlagen sorgfältig auf.
Merkmale und Funktionen
Nähere Erläuterungen finden Sie auf den
angegebenen Seiten.
7 Zoll breiter VGA*1-TFT-Monitor mit
Touchscreen
Der Touchscreen ermöglicht die intuitive
Bedienung des Geräts und stellt dank neuestem
G-Prozessor*
dar.
Capture-Funktion
t Seite 39
Sie können bis zu 4 Bilder von einer Video-/
Bild-Disc (oder einem zusätzlichen Videogerät)
auslesen und speichern und als Hintergrundbild
einstellen.
DVD-, VCD-, Super Audio CD-,
CD-Wiedergabe
t Seite 8
Das Gerät ist mit verschiedenen Disc-Formaten
kompatibel.
2000MP3, 2000WMA
Bis zu 2.000 Stücke*
DVD+R DL im MP3/WMA-Format können
wiedergegeben werden.
2
Farbvideos in hoher Auflösung
3
auf einer DVD-R DL/
Für Raumklang wie Dolby Digital, Pro Logic
II, DTS Surround, Super Audio CDs mit
mehreren Kanälen usw. Wenn Sie einen
entsprechenden Verstärker und mehrere
Lautsprecher anschließen, können Sie 5.1Kanal-Ton wiedergeben lassen.
t Seite 35
Mithilfe eines hochentwickelten SurroundDecoders mit einer Matrix von hoher Klarheit
wird Ton von einer 2-Kanal-Signalquelle in
voller Bandbreite auf 5 Ausgabekanäle verteilt.
Sonys neue Sound-Engine erzeugt dank
digitaler Signalverarbeitung ein ideales
Klangfeld für den Fahrzeuginnenraum.
X-DSP zeichnet sich durch folgende Merkmale
aus.
t Seite 33
Es gibt 7 voreingestellte Equalizer-Kurven,
die sich für 7 verschiedene
Frequenzbereiche individuell anpassen
lassen.
t Seite 35
Durch eine verzögerte Tonausgabe von den
einzelnen Lautsprechern lassen sich die
Schallquellen räumlich verschieben. So
haben Sie an jeder Sitzposition im Fahrzeug
den Eindruck, sich in der Mitte des
Klangfeldes zu befinden.
Wiedergabefortsetzung für mehrere
Discs
t Seite 44
Das Gerät speichert für bis zu 5 DVD VIDEOs/
VCDs die Stelle, an der Sie die Wiedergabe
gestoppt haben, und setzt die Wiedergabe an
dieser Stelle fort, auch wenn die
wiedergegebene Disc zwischenzeitlich
ausgeworfen wurde.
6
t Seite 36
Diese Funktion erzeugt einen virtuellen
Center-Lautsprecher und simuliert ein
Mehrkanal-Klangfeld, auch wenn
tatsächlich kein Center-Lautsprecher
vorhanden ist.
Page 71

t Seite 40
Sie können aus gespeicherten Voreinstellungen
je nach Fahrzeuginnenraum bzw.
Umgebungslicht die gewünschten
Bildeinstellungen auswählen.
t Seite 27
Sie können ein Mikrofon (nicht mitgeliefert)
anschließen und damit die Karaoke-Funktion
nutzen.
t Seite 28
Sie können vorne und hinten im Fahrzeug
verschiedene Signalquellen wiedergeben.
3 AV IN und NAVI/CAMERA IN
t Seite 55
Dank 3 AV IN können (mit dem
mitgelieferten Verlängerungskabel) an der
Vorderseite des Geräts bis zu 3 gesondert
erhältliche Geräte wie tragbare Player,
Spielkonsolen usw. angeschlossen werden.
Erläuterungen dazu finden Sie in der
mitgelieferten Installations-/
Anschlussanleitung.
An NAVI/CAMERA IN können Sie eine
Rückfahrkamera oder ein Navigationsgerät
anschließen und den Eingang entsprechend
einstellen. Wenn Sie den
Rückfahrkameraeingang auswählen, erscheint
das Bild der Rückfahrkamera automatisch,
sobald der Rückfahrscheinwerfer aufleuchtet.
*1 Abkürzung für Video Graphics Array (800 × RGB
× 480 = 1.152.000).
*2 Ein dedizierter Prozessor, mit dem die grafische
Benutzeroberfläche auf dem Bildschirm
durchscheinend dargestellt wird.
*3 Je nach Länge der Stücke und Abtastfrequenz der
Aufnahme.
Urheberrechte
Dieses Produkt ist mit einer
Urheberrechtsschutztechnologie ausgestattet, die
durch US-Patente und sonstige Rechte zum
Schutz geistigen Eigentums geschützt ist. Die
Nutzung dieser Technologie im Rahmen des
Urheberrechtsschutzes muss von Macrovision
genehmigt werden und gilt nur für den privaten
oder anderen eingeschränkten Gebrauch, es sei
denn, es liegt eine spezielle Genehmigung von
Macrovision vor. Die Nachentwicklung oder
Disassemblierung ist verboten.
Hergestellt unter Lizenz von
Dolby Laboratories.
„Dolby“, „Pro Logic“ und das
Doppel-D-Symbol sind Warenzeichen von
Dolby Laboratories.
Hergestellt unter Lizenz. Die
US-Patentnummern lauten:
5,451,942; 5,956,674;
5,974,380; 5,978,762; 6,487,535. Weitere
Patente wurden in den USA und weltweit
beantragt oder bereits anerkannt. DTS und DTS
Digital Surround sind eingetragene
Markenzeichen und die DTS-Logos und Symbole sind Markenzeichen der DTS, Inc.
© 1996-2007 DTS, Inc. Alle Rechte vorbehalten.
Microsoft, Windows Media
und das Windows-Logo sind
Markenzeichen oder
eingetragene Markenzeichen
der Microsoft Corporation in den USA und/oder
anderen Ländern.
„DVD VIDEO“, „DVD-R“, „DVD-RW“,
„DVD+R“ und „DVD+RW“ sind
Markenzeichen.
„DivX“ und „DivX Certified“ sind
eingetragene Markenzeichen oder
Markenzeichen der DivX, Inc.
7
Page 72

Geeignete Discs und in dieser Anleitung verwendete Symbole
Auf diesem Gerät können verschiedene Video-/Audio-Discs wiedergegeben werden.
In der folgenden Tabelle sind die Discs aufgelistet, die von diesem Gerät unterstützt werden, sowie die
Funktionen, die bei den einzelnen Disc-Typen zur Verfügung stehen.
Disc-Symbol in dieser
Anleitung
VIDEO
Disc-Format Disc-Logo
DVD VIDEO
DVD-R*
DVD-R DL*
1
1
(Videomodus/VR-Modus)
DVD-RW*
1
(Videomodus/VR-Modus)
DVD+R*
DVD+R DL*
DVD+RW*
1
1
1
Video-CD
(Version 1.0/1.1/2.0)
Super Audio CD
Audio-CD
AUDIO
CD-ROM*
CD-R*
CD-RW*
*1 Auch Audiodateien können gespeichert werden. Näheres finden Sie auf Seite 9.
*2 Auch Video-/Bilddateien können gespeichert werden. Näheres finden Sie auf Seite 9.
Hinweis
„DVD“ wird als allgemeine Bezeichnung für DVD VIDEOs, DVD-Rs/DVD-RWs und DVD+Rs/DVD+RWs verwendet.
2
2
2
8
Page 73

In der folgenden Tabelle sehen Sie die unterstützten Komprimierungsformate mit den entsprechenden
Dateitypen und den Disc-Typen, auf denen diese Dateien gespeichert werden können.
Die verfügbaren Funktionen sind unabhängig vom Disc-Typ. Sie hängen vom Format ab. Die
Formatsymbole unten erscheinen neben der Beschreibung der Funktionen, die in dem betreffenden
Format zur Verfügung stehen.
Formatsymbol in dieser
Anleitung
Dateityp Zum Speichern verwendbarer Disc-Typ
MP3-Audiodatei
WMA-Audiodatei
JPEG-Bilddatei
DATA-DVDs
DVD -RO M
DVD -R
DVD-R DL
DVD -RW
DVD +R
DATA-CDs
CD-ROM
CD-R
CD-RW
DVD+R DL
®
DivX
-Videodatei
Tipp
Erläuterungen zu den Komprimierungsformaten finden Sie auf Seite 61.
DVD+RW
Nicht unterstützte Discs
Die folgenden Disc-Typen können mit diesem Gerät nicht wiedergegeben werden.
•8-cm-Disc
• 12-cm-Disc, bei der nur die inneren 8 cm Daten enthalten (der Rest ist transparent)
• CD-ROM mit anderen als MP3/WMA/JPEG/DivX
•CD-G
• Foto-CD
• VSD (Video-Single-Disc)
• DVD-ROM mit anderen als MP3/WMA/JPEG/DivX
•DVD-RAM
• DVD-Audio
• Active-Audio (Daten)
• SVCD (Super-Video-CD)
•CDV
• Disc, die im Format Packet Write erstellt wurde
Hinweis
Je nach Zustand der Aufnahme können auch kompatible Discs auf diesem Gerät nicht unbedingt wiedergegeben
werden.
®
-Dateien
®
-Dateien
Regionalcode
Das Regionalcodesystem dient dem Urheberrechtsschutz von
Software.
Der Regionalcode befindet sich an der Geräteunterseite. Nur DVDs,
die mit dem gleichen Regionalcode wie das Gerät gekennzeichnet
sind, können mit diesem Gerät wiedergegeben werden.
DVDs mit dem Regionalcode können ebenfalls
wiedergegeben werden.
Wenn Sie versuchen, eine andere DVD wiederzugeben, erscheint die
Meldung „Playback prohibited by region code.“ auf dem Display.
Einige DVDs sind möglicherweise nicht mit einem Regionalcode
gekennzeichnet, können aber trotzdem nicht auf allen Playern
wiedergegeben werden.
ALL
Regionalcode
9
Page 74

Lage und Funktion der Teile und Bedienelemente
Hauptgerät
1
SRC OFF
CSTM
2 3 45 7986
Näheres finden Sie auf den angegebenen Seiten.
A Disc-Einschub (hinter der Frontplatte) 15
Einlegen einer Disc.
B Taste SRC (Signalquelle) 14
Einschalten, Wechseln der Signalquelle*
(Radio/Disc/AUX).
C Taste OFF 14, 15, 22
Ausschalten/Stoppen der Signalquelle
(drücken), vollständiges Ausschalten
(gedrückt halten).
D Taste CSTM (Benutzerdefiniert) 48
Ausführen der zugewiesenen Funktion (eine
der folgenden).
Capture: 40
Auslesen und Speichern eines Bildes
während der Video-/Bildwiedergabe, das
dann als Hintergrundbild verwendet
werden kann.
Screen: 38
Wechseln zur Hintergrundanzeige.
10
XAV-W1
Picture EQ: 40
Auswählen der Bildqualität.
Aspect: 41
Auswählen des Bildseitenverhältnisses.
EQ7: 33
Auswählen eines Equalizer-Typs (Xplod/
Vocal/Edge/Cruise/Space/Gravity/Custom/
OFF).
Zone × Zone: 28
Aktivieren von Zone × Zone.
E Rücksetztaste 14
F Display/Touchscreen
G Empfänger für die
Kartenfernbedienung
H Tasten VOL (Lautstärke) –/+
Einstellen der Lautstärke.
I Taste Z (Öffnen/Schließen) 15
Öffnen/Schließen der Frontplatte bzw.
Auswerfen der eingelegten Disc.
Page 75

Display
56
Wenn keine Signalquelle ausgewählt ist:
123 4
A Taste SOURCE LIST 19, 31, 57
Öffnen der Quellenliste und Wechseln der
Signalquelle* (Radio/Disc/AUX).
B Taste SETUP 46
Aufrufen des Konfigurationsmenüs.
C Taste DVD SETUP 42
Aufrufen des DVD-Konfigurationsmenüs.
D Taste (Monitorausschaltung)
Ausschalten des Monitors und der
Tastenbeleuchtung. Zum erneuten
Einschalten berühren Sie eine beliebige
Stelle auf dem Display.
E Funktionsname der Taste CSTM 48
Der Name der Funktion, die der Taste CSTM
am Hauptgerät zugewiesen ist, wird
angezeigt.
F Uhrzeitanzeige 52
* Wenn ein gesondert erhältliches Gerät (wie ein
CD-Wechsler oder ein Schnittstellenadapter für iPod
XA-110IP) mit den BUS-Anschlüssen verbunden ist,
kann auch das gesondert erhältliche Gerät
ausgewählt werden.
11
Page 76

Kartenfernbedienung RM-X160
2
3
4
5
6
7
8
9
0
OFF ATT
1
23
44 55 66
77 88 99
CLEAR
0
TOP MENU
ENTER
ZXZ
ZxZ
SRC
SCREEN CAPTURE
MODE
AUDI O
SUBTITLE
ANGLE
MENU
VOL
qa1
qs
qd
qf
qg
qh
qj
qk
Mit der Kartenfernbedienung lässt sich die
Tonwiedergabe problemlos steuern. Verwenden
Sie für Menüfunktionen den Touchscreen.
Näheres finden Sie auf den angegebenen Seiten.
Entfernen Sie vor Gebrauch die Isolierfolie
(Seite 14).
A Taste OFF 14, 15, 22
Ausschalten/Stoppen der Signalquelle
(drücken), vollständiges Ausschalten
(gedrückt halten).
B Zahlentasten 22, 24, 27, 54
Disc:
Ansteuern von Titel/Kapitel/Stück.
12
Radio:
Einstellen gespeicherter Sender (drücken),
Speichern von Sendern (gedrückt halten).
C Taste CLEAR
Löschen einer eingegebenen Zahl.
D Taste TOP MENU
Aufrufen des Hauptmenüs auf einer DVD.
E Taste m (Mikrofon)
Aktivieren des Karaoke-Modus.
F Taste Z×Z (Zone × Zone)
Aktivieren von Zone × Zone.
Page 77

G Taste u (Wiedergabe/Pause)
Starten/Anhalten der Wiedergabe.
Q Taste SCREEN
Wechseln zur Hintergrundanzeige.
H Tasten .m/M>
Disc:
Überspringen von Kapiteln/Stücken/Szenen/
Dateien (drücken); Vorwärts-/
Rückwärtssuchen auf einer Disc (kurz
gedrückt halten); Vorwärts-/
Rückwärtssuchen in einem Stück (gedrückt
1
halten).*
Radio:
Automatisches Einstellen von Sendern
(drücken), manuelle Sendersuche (gedrückt
halten).
I Taste SRC (Signalquelle) 14
Einschalten, Wechseln der Signalquelle*2
(Radio/Disc/AUX).
J Taste MODE
Auswählen des Radiofrequenzbereichs (FM
(UKW)/MW/LW), Auswählen eines
externen Geräts*
3
.
K Taste ATT (Dämpfen des Tons)
Dämpfen des Tons. Zum Beenden der
Funktion drücken Sie die Taste erneut.
L Einstelltasten für die
DVD-Wiedergabe
(AUDIO): 23
Wechseln von Audiosprache/-format.
Bei VCD/CD/MP3/WMA Wechseln des
Audiokanals.
(SUBTITLE):
Auswählen der Untertitelsprache.
(ANGLE):
Wechseln des Blickwinkels.
R Tasten VOL (Lautstärke) +/–
Einstellen der Lautstärke.
*1 Die Vorgehensweise variiert je nach Disc
(Seite 17).
*2 Wenn ein gesondert erhältliches Gerät (wie ein
CD-Wechsler oder ein Schnittstellenadapter für
iPod XA-110IP) mit den BUS-Anschlüssen
verbunden ist, kann auch das gesondert erhältliche
Gerät ausgewählt werden.
*3 Wenn zwei oder mehr externe Geräte verwendet
werden.
*4 Bei der Wiedergabe mit PBC-Funktionen.
Hinweis
Wenn Sie das Gerät ausschalten und die Anzeige
ausgeblendet ist, können Sie es nicht mit der
Kartenfernbedienung bedienen. Drücken Sie zunächst
(SRC) am Hauptgerät oder legen Sie eine Disc ein,
um das Gerät zu aktivieren.
Tipp
Einzelheiten zum Austauschen der Batterie finden Sie
„Austauschen der Lithiumbatterie der
unter
Kartenfernbedienung“ auf Seite 61.
M Taste MENU
Aufrufen des Menüs auf einer Disc.
N Tasten </M/m/, (Cursor)/ENTER
Bewegen des Cursors und Bestätigen einer
Einstellung.
O Taste O (Zurück) 22
Wechseln zur vorherigen Anzeige, Wechseln
zum Menü auf einer VCD*
4
.
P Taste CAPTURE 39
Auslesen und Speichern eines Bildes
während der Video-/Bildwiedergabe, das
dann als Hintergrundbild verwendet werden
kann.
13
Page 78

Vorbereitungen
Zurücksetzen des Geräts
Bevor Sie das Gerät zum ersten Mal benutzen
oder wenn Sie die Autobatterie ausgetauscht
oder die Verbindungen gewechselt haben,
müssen Sie das Gerät zurücksetzen.
Drücken Sie die Rücksetztaste mit einem spitzen
Gegenstand, wie z. B. einem Kugelschreiber.
Rücksetztaste
Hinweis
Wenn Sie die Rücksetztaste drücken, werden die
eingestellte Uhrzeit und einige weitere gespeicherte
Einstellungen gelöscht.
Vornehmen der
Anfangseinstellungen
SRC OFF
Nach dem Zurücksetzen erscheint die Anzeige
für die Anfangseinstellungen der Lautsprecher.
Hinweis
Die Anzeige für die Anfangseinstellungen wird
automatisch ausgeblendet, wenn das Gerät 30
Sekunden lang nicht bedient wird.
Während des Einstellvorgangs wird die Anzeige
ausgeblendet, wenn das Gerät 15 Sekunden lang
nicht bedient wird.
1 Stellen Sie ein, ob ein Center-
Lautsprecher angeschlossen ist.
Berühren Sie „ON“, wenn ein CenterLautsprecher angeschlossen ist, und „OFF“,
wenn nicht.
2 Stellen Sie ein, ob ein
Tiefsttonlautsprecher angeschlossen
ist.
Berühren Sie „ON“, wenn ein
Tiefsttonlautsprecher angeschlossen ist, und
„OFF“, wenn nicht.
3 Stellen Sie die Hörposition ein.
Berühren Sie „Front L“, wenn sich die
Hörposition vorne links befindet, oder „Front
R“, wenn sie sich vorne rechts befindet.
4 Berühren Sie „OK“.
Nachdem Sie die Einstellungen
vorgenommen haben, wird die
Signalquellenliste angezeigt.
Präzisere Einstellungen können Sie später im
Konfigurationsmenü vornehmen.
Näheres zum Einstellen, ob bestimmte
Lautsprecher angeschlossen sind, finden Sie
unter „Einstellen, ob bestimmte Lautsprecher
angeschlossen sind“ auf Seite 37. Näheres zum
Einstellen der Hörposition finden Sie unter
„Optimieren des Klangs an der Hörposition —
Intelligent Time Alignment“ auf Seite 35.
Hinweis
Wenn Sie „Center Speaker ON“ einstellen, obwohl
kein Center-Lautsprecher angeschlossen ist, werden
keine Stimmen ausgegeben. Wenn Sie „Subwoofer
ON“ einstellen, obwohl kein Tiefsttonlautsprecher
angeschlossen ist, werden keine Bässe ausgegeben.
Nehmen Sie die Einstellungen wie unten
erläutert vor, damit Sie die verschiedenen
Klangfunktionen dieses Geräts optimal nutzen
können.
Wenn Sie die Anfangseinstellungen auslassen
wollen, drücken Sie (OFF)/(SRC) oder legen
eine Disc ein.
14
Vorbereiten der
Kartenfernbedienung
Bevor Sie die Kartenfernbedienung zum ersten
Mal benutzen, entfernen Sie die Isolierfolie.
Page 79

Grundfunktionen
Wiedergeben von Discs
Bei bestimmten Discs sind bestimmte Funktionen unter Umständen anders oder eingeschränkt.
Schlagen Sie bitte in den mit der Disc gelieferten Anweisungen nach.
1
Drücken Sie Z am Hauptgerät.
Die Frontplatte öffnet sich automatisch.
2
Legen Sie eine Disc mit der
beschrifteten Seite nach oben ein.
Die Frontplatte schließt sich automatisch und danach
beginnt automatisch die Wiedergabe.
Wenn das DVD-Menü angezeigt wird
Berühren Sie das Display an der gewünschten Stelle, um die Bedienelemente für die Auswahl
aufzurufen.
Berühren Sie b/v/V/B, um den Cursor zu bewegen, und dann „Enter“, um die Auswahl zu bestätigen.
Wenn sich die Bedienelemente durch Berühren des Displays nicht anzeigen lassen, verwenden Sie die
Kartenfernbedienung.
Wenn die Disc JPEG-Dateien enthält
Die Bildpräsentation startet automatisch.
So stoppen Sie die Wiedergabe
Drücken Sie (OFF).
So lassen Sie die Disc auswerfen
1 Drücken Sie Z am Hauptgerät.
Die Frontplatte öffnet sich automatisch und die Disc wird
ausgeworfen.
ZOFF
2 Drücken Sie Z am Hauptgerät, um die Frontplatte zu
schließen.
Hinweis
Die Frontplatte schließt sich automatisch, wenn der Warnton ertönt.
Hinweis zum DVD-Menü
Eine DVD enthält Film- oder Tonaufnahmen, die in mehrere Abschnitte eingeteilt sind. Diese
Abschnitte nennt man „Titel“. Wenn Sie eine DVD abspielen, die mehrere Titel enthält, können Sie den
gewünschten Titel im DVD-Hauptmenü auswählen. Wenn Sie DVDs abspielen, bei denen Sie Optionen
wie die Sprache(n) für Ton und Untertitel auswählen können, wählen Sie diese Optionen im DVDMenü aus.
Fortsetzung auf der nächsten Seite t
15
Page 80

Anzeigen und Bedienelemente bei der Wiedergabe
LKJ
G
IH
AFEBCD
QP
O
Bei Video-/Bild-Discs erscheint bei Berührung des Displays die folgende Anzeige.
Bei Audio-Discs erscheint während der Wiedergabe die folgende Anzeige.
NM
R S
Nr. Element Erläuterung
A Format/
Wiedergabestatus
Das aktuelle Format und der Wiedergabestatus werden angezeigt
(N, X usw.).
B Kapitel-/Titelnummer Die aktuelle Kapitel-/Titelnummer der DVD wird angezeigt.
C Spieldauer Die verstrichene Spieldauer wird angezeigt.*
1
D Audioformat Das aktuelle Audioformat einer DVD/DivX®-Datei wird
angezeigt. (Seite 22)
E AF/TA Einstellen von AF und TA bei einem RDS-Sender. (Seite 32)
F ATT Zum Dämpfen des Tons. Zum Beenden der Funktion berühren
Sie das Bedienelement erneut.
G Aktive Funktion Die aktiven Funktionen werden angezeigt (Pro Logic II, EQ7,
Karaoke, Zone × Zone oder Repeat/Shuffle Play).
16
Page 81

H ./> Berühren Sie dieses Bedienelement, um Kapitel/Stücke/Szenen/
Bilder/Dateien zu überspringen.
Berühren Sie dieses Bedienelement etwas länger, um auf einer
Video-Disc vorwärts/rückwärts zu suchen, und berühren Sie es
dann mehrmals, um die Geschwindigkeit zu ändern (× 2 t × 12
t × 120 t × 2…)*
2
. Zum Beenden der Funktion berühren Sie
u.
Berühren Sie dieses Bedienelement eine Zeit lang, um in einem
Audiostück vorwärts/rückwärts zu suchen.
Berühren Sie > im Pausemodus eine Zeit lang, um eine Video-
Disc in Zeitlupe abzuspielen. Zum Beenden der Funktion lassen
Sie das Bedienelement los.
I u Berühren Sie dieses Bedienelement, um in den Pausemodus zu
schalten/die Wiedergabe nach einer Pause fortzusetzen.
J PLAY MODE Berühren Sie dieses Bedienelement, um das
Wiedergabemodusmenü aufzurufen. Es enthält die folgenden
Optionen.
• Repeat/Shuffle (Seite 26)
• KARAOKE (nur DVD-/VCD-/CD-/MP3-Wiedergabe)
(Seite 27)
• DVD Level (nur DVD VIDEO-Wiedergabe) (Seite 24)
• Sound (nur VCD-Wiedergabe) (Seite 23)
• Image Turn (nur JPEG-Wiedergabe): Berühren Sie diese
Option, um das Bild nach links/rechts zu drehen.
• Audio (nur DivX
• Subtitle (nur DivX
mehrmals, um die Untertitel auszuschalten/die
Untertitelsprache zu wählen.*
®
-Wiedergabe) (Seite 23)
®
-Wiedergabe): Berühren Sie diese Option
3*4
K Lautstärkepegel Der Lautstärkepegel wird angezeigt. Wenn ATT eingeschaltet ist,
wird angezeigt.
L DVD CONTROL Berühren Sie dieses Bedienelement, um das DVD-Steuermenü
aufzurufen. Es enthält die folgenden Optionen.
• Audio: Berühren Sie diese Option mehrmals, um die
Audiosprache/das Audioformat auszuwählen. (Seite 22)*
• Subtitle: Berühren Sie diese Option mehrmals, um die
Untertitel auszuschalten/die Untertitelsprache zu wählen.*
• Angle: Berühren Sie diese Option mehrmals, um den
Blickwinkel zu wechseln.*
• To p M e nu: Berühren Sie diese Option, um das Hauptmenü der
DVD aufzurufen.*
• Menu: Berühren Sie diese Option, um das Menü der Disc
aufzurufen.*
3
3
3
M Stücknummer Die aktuelle Stücknummer einer VCD wird angezeigt.*
3
3*4
5
N Video CD MENU Berühren Sie dieses Bedienelement, um das Menü der VCD
aufzurufen.
Fortsetzung auf der nächsten Seite t
17
Page 82

O Disc-Informationen Bei der Super Audio CD-/CD-/MP3-/WMA-Wiedergabe wird
der aktuelle Stück-/Album-/Interpretenname, bei der JPEGWiedergabe der aktuelle Bild-/Albumname und bei der DivX
®
Wiedergabe der aktuelle Datei-/Albumname (Ordner) angezeigt.
P Stücknummer Die aktuelle Stücknummer einer Super Audio CD/CD wird
angezeigt.
Q LIST Berühren Sie dieses Bedienelement, um Stücke/Bilder/
Videodateien aufzulisten. (Seite 29)
R Stück-/Albumnummer Bei der MP3-/WMA-/JPEG-/DivX
®
-Wiedergabe werden die
aktuelle Stück- bzw. Dateinummer und die aktuelle Album- bzw.
Ordnernummer angezeigt.
S ALBUM –/+ Berühren Sie dieses Bedienelement, um ein Album (einen
Ordner) zu überspringen.
*1 Bei der JPEG-Wiedergabe und der VCD-Wiedergabe mit PBC-Funktionen erscheint keine Anzeige.
*2 Die Geschwindigkeit hängt vom Format und vom Aufnahmeverfahren ab.
*3 Nicht bei allen Discs verfügbar.
*4 Wenn die 4-stellige Eingabeaufforderung erscheint, geben Sie den Sprachcode (Seite 69) der gewünschten
Sprache ein.
*5 Bei der Wiedergabe von VCDs mit PBC-Funktionen (Seite 22) erscheint keine Anzeige.
Hinweis
Wenn eine Disc mehrere Dateitypen enthält, kann nur der ausgewählte Dateityp (Audio/Video/Bild)
wiedergegeben werden. Erläuterungen zum Auswählen des Dateityps finden Sie unter
Dateityps“ auf Seite 29.
Hinweis zu DivX®-Dateien
DivX® ist eine von DivX, Inc., entwickelte Komprimierungstechnologie für Videodateien. Dieses Produkt ist ein
offizielles DivX
®
DivX
Hinweise zur JPEG-Wiedergabe
• Wenn ein großes Bild gedreht wird, dauert es länger, bis es angezeigt wird.
• Progressive JPEG-Dateien können nicht angezeigt werden.
®
6) mit den Standardwiedergabefunktionen von DivX®-Mediendateien.
Certified-Produkt, geeignet zur Wiedergabe von DivX®-Videodateien jeder Version (einschließlich
„Auswählen eines
-
18
Page 83

Radioempfang
1
Berühren Sie „SOURCE LIST“ und
dann „TUNER“.
Die Radioempfangsanzeige erscheint.
2
Berühren Sie „BAND“.
Die Frequenzbereichsliste erscheint.
3
Berühren Sie den gewünschten Frequenzbereich (FM 1 (UKW 1), FM
2 (UKW 2), FM 3 (UKW 3), MW oder LW).
Zum Ausblenden der Frequenzbereichsliste berühren Sie „BAND“.
4
Stellen Sie einen Sender ein.
So führen Sie einen automatischen Sendersuchlauf aus
Berühren Sie
Der Suchlauf stoppt, wenn ein Sender empfangen wird. Wiederholen Sie diesen Vorgang, bis
das Gerät den gewünschten Sender empfängt.
So führen Sie einen manuellen Sendersuchlauf aus
Berühren Sie
Damit die Frequenzen schnell durchlaufen, berühren Sie
./>.
m/M so oft, bis die gewünschte Frequenz eingestellt ist.
m/M eine Zeit lang.
Fortsetzung auf der nächsten Seite t
19
Page 84

Anzeige und Bedienelemente beim Radioempfang
HFGED
C
BA
Beim Radioempfang erscheint die folgende Anzeige.
Nr. Element Erläuterung
A Senderinformationen Die aktuelle Frequenzbereichsnummer, die Speichernummer*1
oder die Frequenz*
B AF/TA Einstellen von AF und TA bei einem RDS-Sender. (Seite 32)
C ATT Zum Dämpfen des Tons. Zum Beenden der Funktion berühren
Sie das Bedienelement erneut.
D Signalquelle Die aktuelle Signalquelle wird angezeigt.
E Aktive Funktion Die aktiven Funktionen werden angezeigt (Pro Logic II, EQ7
oder Zone × Zone).
F PLAY MODE Berühren Sie dieses Bedienelement, um das
Wiedergabemodusmenü aufzurufen. Es enthält die folgenden
Optionen.
• Mono: Berühren Sie diese Option, um bei schlechtem UKW-
Empfang in den monauralen Modus zu wechseln. Um wieder
den Stereoempfang einzuschalten, wählen Sie „OFF“.
• Local: Berühren Sie diese Option, damit nur Sender mit
starken Signalen eingestellt werden. Wenn auch Sender mit
normal starken Signalen eingestellt werden sollen, wählen Sie
„OFF“.
• Regional (Seite 32)
• PTY LIST (Seite 32)
G Lautstärkepegel Der Lautstärkepegel wird angezeigt. Wenn ATT eingeschaltet ist,
wird angezeigt.
H PRESET LIST Berühren Sie dieses Bedienelement, um gespeicherte Sender
*1 Erscheint nur, wenn ein gespeicherter Sender eingestellt ist.
*2 Wenn das Gerät einen RDS-Sender empfängt, erscheint der Programmdienstname. Näheres dazu finden Sie
unter „RDS“ auf Seite 31.
Tipp
Erläuterungen zu weiteren Radiofunktionen finden Sie unter „Weitere Funktionen — Radio“ auf Seite 31.
aufzulisten oder um Sender zu speichern. (Seite 31)
2
/der Status wird angezeigt.
20
Page 85

Wiedergabe von Raumklang
Erzeugen eines idealen
Klangfeldes für Mehrkanalton
In diesem Abschnitt wird anhand eines Beispiels
erläutert, wie Sie für Mehrkanalton (5.1 Kanäle)
ein ideales Klangfeld erzeugen können. Nähere
Erläuterungen finden Sie auf den angegebenen
Seiten.
2 Wiedergeben von 2-Kanal-
Signalquellen mit Mehrkanalton
x Bei der VCD-/CD-/MP3-/AUX-
Wiedergabe oder beim Radioempfang
1Aktivieren Sie den Dolby Pro Logic II-
Modus.
tSeite 35
2Aktivieren Sie CSO, wenn kein Center-
Lautsprecher angeschlossen ist.
tSeite 36
1 Vorbereitungen
1 Stellen Sie die
Lautsprecherkonfiguration ein.
Stellen Sie ein, ob ein Center-Lautsprecher
und ein Tiefsttonlautsprecher angeschlossen
sind.
tIn den Anfangseinstellungen (Seite 14)
tIm Konfigurationsmenü (Seite 37)
2 Wählen Sie die Hörposition.
So wählen Sie eine der vordefinierten
Optionen
tSeite 35
So nehmen Sie eine präzise Kalibrierung
vor
tSeite 36
3 Stellen Sie die Lautstärke der
angeschlossenen Lautsprecher
einzeln ein.
Stellen Sie die Lautstärke für alle
Lautsprecher so ein, dass sie von der
Hörposition aus gleich laut klingen.
tSeite 37
4 Stellen Sie die Grenzfrequenz für die
Front-/Hecklautsprecher (HPF) und
den Tiefsttonlautsprecher (LPF) ein.
tSeite 51
3 Wiedergeben von Mehrkanal-
Signalquellen
x Bei der DVD-/CD-Wiedergabe im
Mehrkanalformat (Dolby Digital, DTS
usw.)
1Aktivieren Sie CSO, wenn kein Center-
Lautsprecher angeschlossen ist.
tSeite 36
x Bei der Wiedergabe des Mehrkanal-
Bereichs einer Super Audio CD
1Setzen Sie „Super Audio CD Mode“ auf
„High Quality“.
tSeite 30
Hinweis
Die HPF-/LPF-Einstellungen (Seite 51) werden
deaktiviert, wenn Sie „High Quality“ einstellen.
4 Einstellen der
Klangeigenschaften
Stellen Sie die folgenden Optionen nach
Belieben ein.
1 Stellen Sie EQ7* ein.
* Nicht verfügbar, wenn CSO aktiviert ist.
tSeite 33
2 Stellen Sie Balance und Fader für die
Lautsprecher ein.
tSeite 34
21
Page 86

Weitere Funktionen — Discs
Dieses Kapitel besteht aus folgenden
Abschnitten.
• Videospezifische Funktionen*
t Seite 22 bis 25
• Video*- und Audiofunktionen
t Seite 26 bis 29
• Audiospezifische Funktionen
t Seite 30
* Einschließlich JPEG-Funktionen.
Verwenden der PBC-Funktionen
— Wiedergabesteuerung
3 Berühren Sie „Play Video CD Without
PBC“.
Die Wiedergabe beginnt. Das PBC-Menü
erscheint während der Wiedergabe nicht.
Hinweise
• Die Menüoptionen und die Vorgehensweise
variieren je nach Disc.
• Während der PBC-Wiedergabe werden
Stücknummer, Wiedergabeelement usw. in der
Wiedergabeanzeige nicht angezeigt.
• Eine Wiedergabefortsetzung ist bei der Wiedergabe
ohne PBC nicht möglich.
Tipp
Wenn Sie die PBC-Wiedergabe fortsetzen wollen,
stoppen Sie die Wiedergabe mit (OFF) und drücken
dann u.
Konfigurieren der
Audioeinstellungen
OFF
Zahlentasten
ENTER
ZXZ
Bei der Wiedergabe einer PBC-kompatiblen
VCD können Sie Funktionen über das PBCMenü interaktiv ausführen.
O
1 Starten Sie die Wiedergabe einer
PBC-kompatiblen VCD.
Das PBC-Menü wird angezeigt.
2 Wählen Sie mit den Zahlentasten die
gewünschte Option aus und drücken
Sie dann (ENTER).
3 Gehen Sie bei den interaktiven
Funktionen wie im Menü erläutert vor.
Um zur vorherigen Anzeige zurückzuschalten,
drücken Sie O.
Wiedergabe ohne PBC-Funktionen
1 Drücken Sie während der Wiedergabe
(OFF).
Die Wiedergabe stoppt.
2 Berühren Sie „SETUP“ und dann das
Register „Disc“.
Die Anzeige „Disc Setting 1“ erscheint.
Wechseln von Audiosprache/
-format
AUDIO
Bei einer DVD können Sie die Audiosprache
wechseln, wenn auf der Disc Tonspuren in
mehreren Sprachen aufgezeichnet sind. Bei einer
DVD/DivX
wechseln, wenn auf der Disc mehrere
Audioformate aufgezeichnet sind (z.
Digital).
®
-Disc können Sie das Audioformat
B. Dolby
22
Page 87

Für die DVD-Wiedergabe
1 Berühren Sie während der Wiedergabe
„DVD CONTROL“.
2 Berühren Sie „Audio“ so oft, bis die
gewünschte Audiosprache/das
gewünschte Audioformat erscheint.
Audiosprache
Audioformat/Kanalanzahl*
Sie können für den Ton eine der verfügbaren
Sprachen einstellen.
Wenn die 4-stellige Eingabeaufforderung
erscheint, geben Sie den Sprachcode
(
Seite 69) der gewünschten Sprache ein.
Wenn dieselbe Sprache mehrmals angezeigt
wird, sind auf der Disc mehrere
Audioformate aufgezeichnet.
* Der Name des Formats und die Kanalanzahl werden
folgendermaßen angezeigt.
Beispiel: Dolby Digital-5.1-Kanal-Format
Hintere Komponente × 2
Dolby D 3 / 2 . 1
Vordere Komponente × 2 +
Mittlere Komponente × 1
Zum Ausblenden des DVD-Steuermenüs
berühren Sie „DVD CONTROL“.
Für die DivX®-Wiedergabe
1 Berühren Sie während der Wiedergabe
„PLAY MODE“ und dann „Audio“ so
oft, bis das gewünschte Audioformat
erscheint.
Zum Ausblenden des Wiedergabemodusmenüs
berühren Sie „PLAY MODE“.
LFE-Komponente × 1
Wechseln des Audiokanals
Bei der VCD-/CD-/MP3-/WMA-Wiedergabe
können Sie auswählen, welche Tonkanäle (rechts
oder links) über die Lautsprecher rechts und
links ausgegeben werden sollen.
Die Optionen sind im Folgenden angegeben.
Stereo: Standardstereoton (Standardeinstellung)
1/Left: Ton des linken Kanals (monaural)
2/Right: Ton des rechten Kanals (monaural)
Für die VCD-Wiedergabe
1 Berühren Sie während der Wiedergabe
„PLAY MODE“ und dann „Sound“ so
oft, bis der gewünschte Audiokanal
erscheint.
Audiokanal
Zum Ausblenden des Wiedergabemodusmenüs
berühren Sie „PLAY MODE“.
Für die CD-/MP3-/WMA-Wiedergabe
1 Drücken Sie während der Wiedergabe
(AUDIO) auf der Kartenfernbedienung
so oft, bis der gewünschte Audiokanal
erscheint.
Hinweis
Bei manchen Discs lassen sich die Audioeinstellungen
unter Umständen nicht ändern.
Tipp
Die Verwendung der Kartenfernbedienung
(mehrmaliges Drücken von (AUDIO)) ist auch bei
Video-Discs möglich.
23
Page 88

Einstellen des
Audioausgangspegels
— DVD-Pegel
Der Audioausgangspegel hängt vom
Aufnahmeformat ab. Um den
Lautstärkeunterschied zwischen Disc und
Signalquelle zu verringern, können Sie den
Audioausgangspegel je nach Aufnahmeformat
einstellen. Standardmäßig ist der Pegel auf das
PCM-Format eingestellt. Den Pegel für das
Dolby Digital- und DTS-Format können Sie
ausgehend vom Standardpegel getrennt
einstellen.
1 Berühren Sie während der Wiedergabe
„PLAY MODE“ und dann „DVD Level“.
2 Berühren Sie das Feld „DVD Level“,
um „ON“ einzustellen.
3 Berühren Sie mehrmals –/+, um den
Ausgangspegel für „Dolby Level“ und
„DTS Level“ einzustellen.
Der Ausgangspegel lässt sich schrittweise auf
einen Wert zwischen –10 und +10 einstellen.
Sie können eine Disc sperren oder mithilfe von
vordefinierten Kindersicherungsstufen
Wiedergabeeinschränkungen festlegen, so dass
beispielsweise Kinder keine Discs ansehen
können, die für ihr Alter nicht geeignet sind. Bei
der Wiedergabe einer auf diese Weise mit einer
Kindersicherung versehenen DVD werden
bestimmte Szenen gesperrt oder durch andere
Szenen ersetzt.
Aktivieren der Kindersicherung
1 Berühren Sie bei ausgeschaltetem
Gerät/während der DVD-Wiedergabe
„DVD SETUP“.
Das DVD-Konfigurationsmenü erscheint.
2 Berühren Sie so oft, bis die
Anzeige „Parental Control“ erscheint,
und berühren Sie dann „Lock/Unlock“.
Die Anzeige zum Definieren des Kennworts
erscheint.
Zum Ausblenden des Wiedergabemodusmenüs
berühren Sie „PLAY MODE“.
Sperren von Discs
— Kindersicherung
*
* Außer bei einer DVD-R/DVD-R DL/DVD-RW im VR-
Modus.
Zahlentasten
CLEAR
24
3 Geben Sie mit den Zahlentasten auf
der Kartenfernbedienung das
Kennwort ein.
4 Geben Sie das Kennwort zum
Bestätigen erneut mit den
Zahlentasten ein.
Die Einstellung ist damit abgeschlossen.
Zum Löschen einer eingegebenen Zahl drücken
Sie (CLEAR) auf der Kartenfernbedienung.
Um zur vorherigen Anzeige zurückzuschalten,
berühren Sie .
Zum Ausblenden des
DVD-Konfigurationsmenüs berühren Sie „DVD
SETUP“.
Page 89

Deaktivieren der Kindersicherung
1 Gehen Sie wie in Schritt 1 bis 2 oben
erläutert vor.
Die Anzeige zum Deaktivieren der
Kindersicherung erscheint.
2 Berühren Sie die Zahlentasten, um das
aktuelle Kennwort einzugeben.
„Parental control canceled.“ erscheint und die
Kindersicherung ist deaktiviert.
Zum Löschen einer eingegebenen Zahl berühren
Sie „Clear“.
Um zur vorherigen Anzeige zurückzuschalten,
berühren Sie .
Zum Ausblenden des
DVD-Konfigurationsmenüs berühren Sie „DVD
SETUP“.
Ändern des Kennworts
Deaktivieren Sie die Kindersicherung und
aktivieren Sie sie dann mit einem neuen
Kennwort.
3 Berühren Sie das gewünschte Gebiet,
um dessen Altersfreigabestufen zu
übernehmen.
Wenn Sie „Others“ auswählen, wählen Sie
anschließend mit den Zahlentasten den
Gebietscode in der
Seite 69.
Das Gebiet ist damit ausgewählt und die
Anzeige „Parental Control“ erscheint wieder.
„Gebietscodeliste“ auf
4 Berühren Sie „Rating Level“.
Die Optionen erscheinen.
Je niedriger der Wert, um so strenger ist die
Kindersicherungsstufe.
5 Berühren Sie die gewünschte
Altersfreigabe.
Die Einstellung ist damit abgeschlossen.
Um zur vorherigen Anzeige zurückzuschalten,
berühren Sie
Zum Ausblenden des DVDKonfigurationsmenüs berühren Sie „DVD
SETUP“.
.
Wechseln des Gebiets und der
Altersfreigabestufe
Sie können die Kindersicherungsstufe je nach
Gebiet und Altersfreigabe einstellen.
1 Berühren Sie „DVD SETUP“ und dann
so oft, bis die Anzeige „Parental
Control“ erscheint.
2 Berühren Sie „Area Select“.
Wenn die Kindersicherung bereits aktiviert
ist, erscheint die Anzeige zum Eingeben des
Kennworts. Geben Sie zum Ändern der
Einstellung Ihr Kennwort ein.
Die Optionen erscheinen.
25
Page 90

Repeat und Shuffle Play
1 Berühren Sie während der Wiedergabe
„PLAY MODE“ und dann das Feld
„Repeat“ oder „Shuffle“ so oft, bis die
gewünschte Option erscheint.
Repeat oder Shuffle Play beginnt.
Zum Ausblenden des Wiedergabemodusmenüs
berühren Sie „PLAY MODE“.
Im Folgenden sind die Wiederholoptionen und
die Umschaltreihenfolge bei Repeat Play für alle
Discs und Formate aufgelistet.
Disc/Format Optionen
OFF
Title: Der aktuelle Titel wird
wiederholt wiedergegeben.
Chapter: Das aktuelle Kapitel
wird wiederholt wiedergegeben.
1
*
OFF
Tra ck: Das aktuelle Stück wird
wiederholt wiedergegeben.
Im Folgenden sind die
Zufallswiedergabeoptionen und die
Umschaltreihenfolge bei Shuffle Play für alle
Discs und Formate aufgelistet.
Disc/Format Optionen
OFF
Title: Die Kapitel im aktuellen
2
*
Titel werden in willkürlicher
Reihenfolge wiedergegeben.
1
OFF
*
Disc: Die Stücke auf der
aktuellen Disc werden in
willkürlicher Reihenfolge
wiedergegeben.
OFF
Album: Die Stücke/Bilder/
Videodateien im aktuellen
Album (Ordner) werden in
willkürlicher Reihenfolge
wiedergegeben.
*1 Steht nur bei der Wiedergabe von VCDs der
Version 1.0/1.1 oder von VCDs der Version 2.0
ohne PBC-Funktionen zur Verfügung.
*2 Außer bei einer DVD-R/DVD-R DL/DVD-RW im
VR-Modus.
Wenn Sie wieder in den normalen
Wiedergabemodus schalten möchten, wählen Sie
„OFF“.
Direktsuche
26
OFF
Tra ck: Das aktuelle Stück wird
wiederholt wiedergegeben.
Album: Das aktuelle Album
wird wiederholt wiedergegeben.
OFF
Image: Das aktuelle Bild wird
wiederholt wiedergegeben.
Album: Das aktuelle Album
wird wiederholt wiedergegeben.
OFF
File: Die aktuelle Videodatei
wird wiederholt wiedergegeben.
Album: Das aktuelle Album
(Ordner) wird wiederholt
wiedergegeben.
Zahlentasten
ENTER
ZXZ
Sie können eine bestimmte Stelle direkt
ansteuern, indem Sie die Titelnummer, die
Kapitelnummer usw. angeben.
Page 91

1 Geben Sie während der Wiedergabe
mit den Zahlentasten die Nummer
eines Elements (Stück, Titel usw.) ein
und drücken Sie dann (ENTER).
Die Wiedergabe startet an der ausgewählten
Stelle.
Die Elemente, nach denen gesucht werden kann,
unterscheiden sich je nach Disc/Format wie
folgt:
Disc/Format Elemente
Title*1: Die Wiedergabe
beginnt ab dem ausgewählten
Titel.
Chapter*1: Die Wiedergabe
beginnt ab dem ausgewählten
Kapitel.
2
*
Trac k: Die Wiedergabe beginnt
ab dem ausgewählten Stück.
Image: Die Wiedergabe
beginnt ab dem ausgewählten
Bild.
File: Die Wiedergabe beginnt
ab der ausgewählten Datei.
*1 Das Element, nach dem gesucht werden kann,
hängt von der Einstellung im
DVD-Konfigurationsmenü ab.
*2 Steht nur bei der Wiedergabe einer VCD ohne
PBC-Funktionen zur Verfügung.
Einstellen des Elements, nach dem
gesucht werden kann (nur DVD)
Das Element, nach dem während der
DVD-Wiedergabe gesucht werden kann (Titel
oder Kapitel), können Sie vorab im
DVD-Konfigurationsmenü einstellen.
1 Berühren Sie bei ausgeschaltetem
Gerät/während der DVD-Wiedergabe
„DVD SETUP“.
Das DVD-Konfigurationsmenü erscheint.
2 Berühren Sie so oft, bis die
Anzeige „Play Mode“ erscheint, und
berühren Sie dann „Direct Search“.
3 Berühren Sie „Title“ oder „Chapter“.
Die Einstellung ist damit abgeschlossen.
Um zur vorherigen Anzeige zurückzuschalten,
berühren Sie
Zum Ausblenden des
DVD-Konfigurationsmenüs berühren Sie „DVD
SETUP“.
.
Die Karaoke-Funktion
Sie können ein Mikrofon (nicht mitgeliefert)
anschließen, das Gerät in den Karaoke-Modus
schalten und auf diese Weise die KaraokeFunktion (Mitsingen während der DiscWiedergabe) nutzen.
Schließen Sie als Erstes ein Mikrofon an die
Eingangsbuchse MIC am Gerät an.
1 Berühren Sie während der Wiedergabe
„PLAY MODE“ und dann „KARAOKE“.
Das Karaoke-Menü erscheint.
2 Berühren Sie das Feld „Microphone“,
um „ON“ einzustellen.
Das Mikrofon und die Echoeffekte sind damit
aktiviert.
Wenn Sie die Wiedergabe stoppen, wird der
Eingang MIC deaktiviert.
Wenn Sie wieder in den normalen
Wiedergabemodus schalten möchten, wählen Sie
„OFF“.
Zum Ausblenden des Wiedergabemodusmenüs
berühren Sie „PLAY MODE“.
Ausschalten der Singstimmen
Berühren Sie im Karaoke-Menü das Feld „Vocal
Cancel“, um „ON“ einzustellen.
Einstellen der Mikrofonlautstärke
Berühren Sie im Karaoke-Menü im Feld „MIC
Volume“ mehrmals –/+.
Der Lautstärkepegel lässt sich schrittweise auf
einen Wert zwischen 0 und 20 einstellen.
Fortsetzung auf der nächsten Seite t
27
Page 92

Einstellen des Echoeffekts
Berühren Sie im Karaoke-Menü das Feld
„Echo“, um den gewünschten Pegel einzustellen.
Der Echopegel lässt sich schrittweise auf einen
Wert zwischen 1 und 6 einstellen.
Wenn Sie den Echoeffekt deaktivieren wollen,
wählen Sie „OFF“.
Hinweise
• Bei einigen Karaoke-DVDs/-VCDs/-CDs sind die
Instrumentalstimmen einem Kanal und die
Singstimmen dem anderen Kanal zugeordnet und
Sie werden aufgefordert, einen Kanal auszuwählen
(links, rechts oder stereo). Stellen Sie in diesem Fall
„Microphone ON“ ein und drücken Sie (AUDIO) auf
der Kartenfernbedienung so oft, bis der richtige
Kanal eingestellt ist.
• Bei einigen Karaoke-DVDs/-VCDs/-CDs gibt es ein
Steuermenü, in dem Sie die Singstimmen usw.
ausschalten können. Gehen Sie in einem solchen
Fall nach den Anweisungen auf der Disc vor.
• Im Karaoke-Modus werden MehrkanalSignalquellen auf 2 Kanäle heruntergemischt und
folgende Funktionen sind ausgeschaltet.
– EQ7 (Seite 33)
– Pro Logic II (Seite 35)
– Intelligent Time Alignment (Seite 35)
–CSO (Seite 36)
– HPF, LPF (Seite 51)
– SUB OUT-Ausgabe
• Bei Discs im DTS-Format steht die KaraokeFunktion nicht zur Verfügung.
Wiedergeben verschiedener
Signalquellen vorne und hinten
— Zone × Zone
Sie können vorne und hinten im Fahrzeug
verschiedene Signalquellen wiedergeben.
Im Folgenden sind die für dieses Gerät (vorne)
und den Fondmonitor (hinten) auswählbaren
Signalquellen aufgeführt.
Vorne: Beliebige Signalquelle.
Hinten: In dieses Gerät eingelegte Disc.
1 Legen Sie die Disc ein, die hinten
wiedergegeben werden soll.
2 Wählen Sie die Signalquelle, die vorne
wiedergegeben werden soll.
3 Berühren Sie „SETUP“ und dann das
Register „Disc“.
Die Anzeige „Disc Setting 1“ erscheint.
4 Berühren Sie „Zone × Zone“.
Die Optionen erscheinen.
5 Berühren Sie „ON“, um Zone × Zone
zu aktivieren.
Zum Steuern der Signalquelle vorne
verwenden Sie den Touchscreen und die
Tasten am Hauptgerät.
Zum Steuern der Signalquelle hinten
verwenden Sie die Kartenfernbedienung.
Um zur vorherigen Anzeige zurückzuschalten,
berühren Sie
Zum Ausblenden des Konfigurationsmenüs
berühren Sie „SETUP“.
So deaktivieren Sie Zone × Zone
Wählen Sie „SETUP“ c „Disc“ c „Zone ×
Zone“ c „OFF“.
Hinweise
• Wenn Sie (OFF) am Hauptgerät oder auf der
Kartenfernbedienung einmal drücken, wird Zone ×
Zone deaktiviert.
• Solange Zone × Zone aktiviert ist, stehen die
folgenden Tasten auf der Kartenfernbedienung nicht
zur Verfügung: (SRC), (MODE), (ATT), (VOL) +/–,
(CAPTURE), (SCREEN), (CLEAR), Zahlentasten, m.
• Solange Zone × Zone aktiviert ist, sind die folgenden
Funktionen deaktiviert.
– EQ7 (Seite 33)
– Balance/Fader (Seite 34)
– Pro Logic II (Seite 35)
– Intelligent Time Alignment (Seite 35)
–CSO (Seite 36)
– HPF, LPF (Seite 51)
– SUB OUT-Ausgabe
Tipp
Wenn Sie „Zone × Zone“ der Taste (CSTM) am
Hauptgerät zugewiesen haben, können Sie die
Funktion mit dieser Taste aktivieren/deaktivieren.
Erläuterungen zum Zuweisen der Funktion zu (CSTM)
finden Sie auf
.
Seite 48.
28
Page 93

Auflisten von Stücken/Bildern/
Videodateien — LIST
Auswählen eines Stücks/Bildes/
einer Videodatei
Sie können Alben/Ordner/Stücke/Bilder/
Videodateien als Liste anzeigen lassen und das
gewünschte Element zur Wiedergabe auswählen.
Diese Funktion eignet sich besonders bei Discs
im MP3-/WMA-/JPEG-/DivX
zahlreichen Alben/Stücken usw.
1 Berühren Sie während der Wiedergabe
„LIST“.
Die Liste der Stücke/Bilder/Videodateien auf
der aktuellen Disc bzw. im aktuellen Album*/
Ordner* erscheint.
®
-Format mit
Auswählen eines Dateityps
Wenn eine Disc mehrere Dateitypen enthält,
kann nur der ausgewählte Dateityp (Audio/
Video/Bild) wiedergegeben werden. Die
Wiedergabereihenfolge der verschiedenen
Dateitypen ist werkseitig auf Audio-, Video- und
zuletzt Bilddateien festgelegt. Enthält eine Disc
beispielsweise Videodateien und Bilddateien,
werden nur die Videodateien wiedergegeben. Sie
können den gewünschten Dateityp auswählen, so
dass die entsprechende Liste angezeigt wird, und
wählen dann die gewünschte Datei aus.
1 Berühren Sie während der Wiedergabe
„LIST“.
2 Berühren Sie das Dateitypsymbol, um
die entsprechende Liste anzuzeigen.
Zum Auflisten der MP3- und WMA-Dateien
berühren Sie
Zum Auflisten der DivX®-Dateien berühren
Sie
.
Zum Auflisten der JPEG-Dateien berühren
Sie
.
.
3 Berühren Sie die gewünschte Datei.
Die Wiedergabe der ausgewählten Datei
beginnt.
Wenn Sie um eine Ebene nach oben wechseln
wollen, berühren Sie
Wenn Sie seitenweise nach oben/unten
blättern wollen, berühren Sie U/u.
* Nur bei der MP3-/WMA-/JPEG-/DivX®-
Wiedergabe.
.*
2 Berühren Sie das gewünschte Element
(Stück/Bild/Videodatei).
Die Wiedergabe des gewünschten Elements
(Stück/Bild/Videodatei) beginnt.
Hinweis
Discs in einem CD-Wechsler (falls angeschlossen)
können nicht aufgelistet werden.
29
Page 94

Konfigurieren von
A
Wiedergabeeinstellungen für
Super Audio CDs
Auswählen einer
Wiedergabeschicht
Einige Super Audio CDs enthalten 2 Schichten,
nämlich eine Super Audio CD-Schicht und eine
CD-Schicht, wobei die Super Audio CD-Schicht
ihrerseits aus 2 Wiedergabebereichen besteht,
einem 2-Kanal-Bereich und einem MehrkanalBereich.
C
B
A CD-Schicht
Mit einem herkömmlichen CD-Player lesbare
Schicht.
B Super Audio CD-Schicht
Eine Signalschicht hoher Dichte.
C 2-Kanal-Wiedergabebereich
Ein Bereich, auf dem 2-KanalStereotonspuren aufgezeichnet sind.
D Mehrkanal-Wiedergabebereich
Ein Bereich, in dem Mehrkanal-Tonspuren
(bis zu 5.1 Kanäle) aufgezeichnet sind.
Wenn eine Disc in den verschiedenen Schichten
unterschiedliche Inhalte enthält, können Sie eine
Schicht auswählen (beispielsweise zum
Vergleich der Tonqualität).
Die Optionen für „Super Audio CD Layer“ sind
unten aufgelistet.
Multi Channel: Der Mehrkanal-Bereich in der
Super Audio CD-Schicht wird wiedergegeben.
2 Channel: Der 2-Kanal-Bereich (stereo) in der
Super Audio CD-Schicht wird wiedergegeben.
CD: Die CD-Schicht wird wiedergegeben.
1 Berühren Sie „SETUP“, das Register
„Disc“ und dann
Die Anzeige „Disc Setting 2“ erscheint.
D
, um fortzufahren.
2 Berühren Sie „Super Audio CD Layer“.
Die Optionen erscheinen.
3 Berühren Sie die gewünschte Option.
Die Einstellung ist damit abgeschlossen.
Um zur vorherigen Anzeige zurückzuschalten,
berühren Sie
Zum Ausblenden des Konfigurationsmenüs
berühren Sie „SETUP“.
Hinweis
Bei Super Audio CDs, die nur eine Super Audio
CD-Schicht enthalten, wird diese unabhängig von der
Einstellung wiedergegeben.
Auswählen der Tonqualität
Bei diesem Gerät können Sie die Tonqualität der
Super Audio CD-Wiedergabe ändern, indem Sie
die Abtastfrequenz wechseln.
Die Optionen für „Super Audio CD Mode“ sind
unten aufgelistet.
High Quality: Die Tonausgabe erfolgt mit
176,4 kHz (hohe Tonqualität).
Standard: Die Tonausgabe erfolgt mit 44,1 kHz
(Standard-CD-Tonqualität).
Das Einstellverfahren ist das gleiche wie beim
Einstellen der Wiedergabeschicht (
Wählen Sie „SETUP“ c „Disc“ c „Super Audio
CD Mode“ c „High Quality“ oder „Standard“.
Hinweis
Wenn Sie „High Quality“ einstellen, werden die
Einstellungen für EQ7 (
Intelligent Time Alignment (Seite 35) und HPF/LPF
(Seite 51) deaktiviert. Wählen Sie zum Aktivieren der
Einstellungen „Standard“.
.
Seite 30).
Seite 33), CSO (Seite 36),
30
Page 95

Weitere Funktionen — Radio
B
A
RDS
Speichern und Empfangen von
Sendern
Achtung
Wenn Sie während der Fahrt Sender einstellen,
sollten Sie die BTM-Funktion
(Speicherbelegungsautomatik) verwenden.
Andernfalls besteht Unfallgefahr.
Automatisches Speichern von
Sendern — BTM
1 Berühren Sie „SOURCE LIST“ und
dann „TUNER“.
Zum Wechseln des Frequenzbereichs
berühren Sie „BAND“ und wählen dann den
gewünschten Frequenzbereich (FM 1 (UKW
1), FM 2 (UKW 2), FM 3 (UKW 3), MW
oder LW).
2 Berühren Sie „PRESET LIST“ und
dann „BTM“.
Das Gerät speichert die Sender in der
Reihenfolge der Frequenzen in der
Speicherliste (P1 bis P6).
Ein Signalton ist zu hören und die Einstellung
wird gespeichert.
Manuelles Speichern von Sendern
1 Während der zu speichernde Sender
empfangen wird, berühren Sie
„PRESET LIST“.
2 Berühren Sie „Memory“ und dann eine
Nummer in der Liste (P1 bis P6).
Die Nummer und eine Bestätigungsanzeige
erscheinen im Display.
3 Berühren Sie „Yes“.
Der Sender wird gespeichert.
Hinweis
Wenn Sie unter der gleichen Nummer einen anderen
Sender speichern, wird der zuvor gespeicherte
Sender ersetzt.
Tipp
Wenn ein RDS-Sender gespeichert wird, wird auch
die AF/TA-Einstellung gespeichert (
Empfangen gespeicherter Sender
1 Wählen Sie den Frequenzbereich und
berühren Sie dann „PRESET LIST“.
2 Berühren Sie die gewünschte Nummer
(P1 bis P6).
Seite 32).
Übersicht
UKW-Sender, die RDS (Radiodatensystem)
unterstützen, strahlen zusammen mit den
normalen Radioprogrammsignalen nicht hörbare,
digitale Informationen aus.
Informationen im Display
C
A Frequenzbereichsnummer, Speichernummer,
Frequenz (Programmdienstname), RDSDaten, TA*
B Signalquelle, Stereo*2, RDS*3, TP*
C Uhrzeitanzeige
*1 Während einer Verkehrsdurchsage.
*2 Beim UKW-Empfang.
*3 Beim RDS-Empfang.
*4 Bei Empfang eines Verkehrsfunksenders.
1
4
RDS-Funktionen
Mit diesem Gerät stehen folgende
RDS-Funktionen automatisch zur Verfügung:
AF (Alternativfrequenzen)
In einem Netzwerk wird der Sender mit den
stärksten Signalen ausgewählt und neu
eingestellt. So können Sie auch bei einer langen
Fahrt über eine große Entfernung hinweg
ununterbrochen denselben Sender empfangen,
ohne ihn manuell neu einstellen zu müssen.
TA (Verkehrsdurchsagen)/
TP (Verkehrsfunksender)
Aktuelle Verkehrsinformationen bzw.
Verkehrsfunksender werden empfangen. Wenn
solche Informationen bzw. Sendungen
empfangen werden, wird die gerade
ausgewählte Signalquelle unterbrochen.
Fortsetzung auf der nächsten Seite t
31
Page 96

PTY (Programmtypauswahl)
Der gerade empfangene Programmtyp wird
angezeigt. Außerdem kann nach dem
ausgewählten Programmtyp gesucht werden.
CT (Uhrzeit)
Mit den CT-Daten (Uhrzeitdaten), die von
RDS-Sendern ausgestrahlt werden, lässt sich
die Uhr einstellen.
Hinweise
• Je nach Land bzw. Region stehen möglicherweise
nicht alle RDS-Funktionen zur Verfügung.
• Die RDS-Funktion arbeitet möglicherweise nicht,
wenn die Sendesignale zu schwach sind oder wenn
der eingestellte Sender keine RDS-Daten ausstrahlt.
Einstellen von AF und TA
1 Berühren Sie während der
Wiedergabe/des Empfangs „AF/TA“.
2 Berühren Sie das Feld „AF“ oder „TA“,
um „ON“ oder „OFF“ einzustellen.
Zum Schließen des AF/TA-Menüs berühren Sie
„AF/TA“.
Speichern von RDS-Sendern
zusammen mit der AF- und
TA-Einstellung
Sie können zusammen mit den RDS-Sendern die
AF/TA-Einstellung speichern. Mit der
BTM-Funktion werden nur RDS-Sender mit
derselben AF/TA-Einstellung gespeichert.
Beim manuellen Speichern von Sendern können
Sie RDS- und Nicht-RDS-Sender mit
unterschiedlicher AF/TA-Einstellung speichern.
1 Stellen Sie AF/TA ein und speichern Sie die
Sender dann mit BTM oder manuell ab.
Speichern der Lautstärke von
Verkehrsdurchsagen
Sie können die Lautstärke für die
Verkehrsdurchsagen voreinstellen, so dass Sie sie
nicht überhören.
1 Drücken Sie mehrmals (VOL) –/+ am
Hauptgerät, um den Lautstärkepegel
einzustellen.
2 Berühren Sie „AF/TA“ und dann .
Unveränderter Empfang eines
Regionalsenders — Regional
Wenn die AF-Funktion aktiviert ist, wird der
Empfang dieses Geräts werkseitig auf eine
bestimmte Region beschränkt, so dass nicht zu
einem anderen Regionalsender mit einer
stärkeren Frequenz gewechselt wird.
Wenn Sie den Empfangsbereich des betreffenden
Regionalsenders verlassen, deaktivieren Sie die
Regionalsenderfunktion während des
UKW-Empfangs.
Berühren Sie „PLAY MODE“ und dann das Feld
„Regional“, um „OFF“ einzustellen.
Hinweis
Diese Funktion steht in Großbritannien und in einigen
anderen Regionen nicht zur Verfügung.
Lokalsenderfunktion (nur
Großbritannien)
Mithilfe dieser Funktion können Sie andere
Lokalsender auswählen, auch wenn diese zuvor
nicht unter einer Nummer gespeichert wurden.
1 Berühren Sie während des UKW-Empfangs
„PRESET LIST“ und dann eine Nummer (P1
bis P6), unter der ein Lokalsender gespeichert
ist.
2 Berühren Sie innerhalb von 5 Sekunden erneut
die Nummer des Lokalsenders.
Wiederholen Sie diesen Vorgang, bis das Gerät
den Lokalsender empfängt.
Auswählen des Programmtyps
(PTY)
1 Berühren Sie während des UKW-
Empfangs „PLAY MODE“ und dann
„PTY LIST“.
Die PTY-Liste erscheint, wenn der Sender
PTY-Daten ausstrahlt.
Empfangen von
Katastrophenwarnungen
Wenn AF oder TA aktiviert ist, unterbrechen
Katastrophenwarnungen automatisch die
ausgewählte Signalquelle.
32
Page 97

2 Berühren Sie den gewünschten
Programmtyp.
Um zur vorherigen/nächsten Anzeige in der
Liste zurück-/weiterzuschalten, berühren Sie
/ .
Das Gerät sucht nach einem Sender, der den
ausgewählten Programmtyp ausstrahlt.
Zum Ausblenden des Wiedergabemodusmenüs
berühren Sie „PLAY MODE“.
Programmtypen
News (Nachrichten), Current Affairs
(Aktuelles Zeitgeschehen), Information
(Informationen), Sport (Sport), Education
(Erziehung und Bildung), Drama (Hörspiele),
Cultures (Kultur), Science (Wissenschaft),
Varied Speech (Verschiedenes), Pop Music
(Pop-Musik), Rock Music (Rock-Musik),
Easy Listening (Unterhaltungsmusik), Light
Classics M (Leichte Klassik), Serious
Classics (Klassik), Other Music (Sonstige
Musik), Weather & Metr (Wetter), Finance
(Finanzberichte), Children’s Progs
(Kinderprogramme), Social Affairs
(Magazinsendungen), Religion (Religion),
Phone In (Hörertelefon), Travel & Tou ring
(Reiseinformationen), Leisure & Hobby
(Freizeitprogramm), Jazz Music (Jazz),
Country Music (Country-Musik), National
Music (Volksmusik), Oldies Music (Oldies),
Folk Music (Folk-Musik), Documentary
(Dokumentarbeiträge)
Hinweis
Sie können diese Funktion in Ländern/Regionen, in
denen keine PTY-Daten zur Verfügung stehen, nicht
verwenden.
Einstellen der Uhrzeit (CT)
1 Stellen Sie im Konfigurationsmenü
„CT ON“ ein (
Hinweise
• Die CT-Funktion steht möglicherweise nicht zur
Verfügung, auch wenn ein RDS-Sender empfangen
wird.
• Die mit der CT-Funktion eingestellte Uhrzeit ist nicht
immer korrekt.
Seite 47).
Klangeinstellungen
Auswählen der Tonqualität
— EQ7
Sie können für 7 Musiktypen eine spezielle
Equalizer-Kurve auswählen (Xplod, Vocal, Edge,
Cruise, Space, Gravity und Custom).
1 Berühren Sie während der
Wiedergabe/des Empfangs „SETUP“
und dann das Register „Sound“.
Die Anzeige „Sound Setting“ erscheint.
2 Berühren Sie „EQ7“.
Die Optionen erscheinen.
3 Berühren Sie die gewünschte
Equalizer-Kurve.
Die Einstellung ist damit abgeschlossen.
Wenn Sie die Equalizer-Kurve deaktivieren
wollen, wählen Sie „OFF“.
Um zur vorherigen Anzeige zurückzuschalten,
berühren Sie .
Zum Ausblenden des Konfigurationsmenüs
berühren Sie „SETUP“.
Hinweise
• EQ7 steht nicht zur Verfügung, wenn der Karaoke-
• Wenn Sie EQ7 aktivieren, wird CSO auf „OFF“
Tipp
Wenn Sie „EQ7“ der Taste (CSTM) am Hauptgerät
zugewiesen haben, können Sie die Equalizer-Kurve
durch mehrmaliges Drücken dieser Taste auswählen.
Erläuterungen zum Zuweisen der Funktion zu (CSTM)
finden Sie auf
Seite 27) oder Zone × Zone (Seite 28)
Modus (
aktiviert ist bzw. „Super Audio CD Mode“ auf „High
Quality“ gesetzt ist (
Seite 36).
gesetzt (
Seite 30).
Seite 48.
33
Page 98

Individuelles Einstellen der
Equalizer-Kurve — EQ7 Tune
Mit „Custom“ unter EQ7 können Sie Ihre
individuellen Equalizer-Einstellungen
vornehmen. Sie können den Pegel für 7
verschiedene Frequenzbereiche einstellen:
62
Hz, 157 Hz, 396 Hz, 1 kHz, 2,5 kHz, 6,3 kHz
und 16
kHz.
1 Berühren Sie während der
Wiedergabe/des Empfangs „SETUP“,
das Register „Sound“, „EQ7“ und
dann „Custom“.
2 Berühren Sie „Tune“.
Eine Einstellanzeige erscheint.
3 Berühren Sie +/– für die einzelnen
Frequenzbereiche, um den Pegel
einzustellen.
Der Pegel lässt sich schrittweise auf einen
Wert zwischen –8 und +8 einstellen.
Wenn Sie die werkseitig eingestellte
Equalizer-Kurve wiederherstellen wollen,
berühren Sie „Reset“.
4 Berühren Sie „OK“.
Die Einstellung ist damit abgeschlossen.
Um zur vorherigen Anzeige zurückzuschalten,
berühren Sie
Zum Ausblenden des Konfigurationsmenüs
berühren Sie „SETUP“.
Tipp
Andere Equalizer-Typen lassen sich ebenfalls
einstellen.
.
Einstellen der
Klangeigenschaften
Sie können die Tonbalance zwischen den
Lautsprechern links und rechts („Balance“) und
den Front- und Hecklautsprechern („Fader“)
nach Belieben einstellen. Sofern ein CenterLautsprecher und ein Tiefsttonlautsprecher
angeschlossen sind, können Sie außerdem deren
Lautstärke einstellen.
1 Berühren Sie während der
Wiedergabe/des Empfangs „SETUP“
und dann das Register „Sound“.
Die Anzeige „Sound Setting“ erscheint.
2 Berühren Sie „Balance/Fader“.
Eine Einstellanzeige erscheint.
3 Berühren Sie I/i, um „Balance“
einzustellen.
Der Pegel lässt sich schrittweise auf einen
Wert zwischen –10 und +10 einstellen.
4 Berühren Sie U/u, um „Fader“
einzustellen.
Der Pegel lässt sich schrittweise auf einen
Wert zwischen –10 und +10 einstellen.
5 Berühren Sie +/– für „Center“ und
„Subwoofer“, um die Lautstärke des
jeweiligen Lautsprechers
einzustellen.*
* Nur einstellbar, wenn ein Center-Lautsprecher
angeschlossen und „Center Speaker ON“
(Seite 37) eingestellt und ein
Tiefsttonlautsprecher angeschlossen und
„Subwoofer ON“ eingestellt ist (Seite 37).
Der Pegel lässt sich schrittweise auf einen
Wert zwischen –6 und +6 einstellen.
Um zur vorherigen Anzeige zurückzuschalten,
berühren Sie
Zum Ausblenden des Konfigurationsmenüs
berühren Sie „SETUP“.
Hinweis
„Balance/Fader“ kann nicht ausgewählt werden, wenn
Zone × Zone aktiviert ist.
.
34
Page 99

Mehrkanalausgabe von
2-Kanal-Signalquellen
— Pro Logic II
Optimieren des Klangs an der
Hörposition
— Intelligent Time Alignment
Mit Dolby Pro Logic II wird Ton von einer 2Kanal-Signalquelle in voller Bandbreite auf 5
Ausgabekanäle verteilt. Dies erfolgt mithilfe
eines hochentwickelten Surround-Decoders mit
einer Matrix von hoher Klarheit, der die
Raumklangeigenschaften der ursprünglichen
Aufnahme reproduziert, ohne sie durch neue
Klänge oder Klangspektren zu verfälschen.
Die Optionen für den Pro Logic II-Modus sind
unten aufgelistet.
Music: Bietet bei Stereomusikaufnahmen einen
breiten und tiefen Klangraum.
Movie: Bietet bei Stereofernsehsendungen und
allen im Dolby Surround-Format codierten
Programmquellen eine verbesserte Reproduktion
von Klangrichtungen, die der Qualität des 5.1Kanaltons nahe kommt.
1 Berühren Sie während der
Wiedergabe/des Empfangs „SETUP“
und dann das Register „Sound“.
Die Anzeige „Sound Setting“ erscheint.
2 Berühren Sie „Dolby Pro Logic II“.
Die Optionen erscheinen.
Bei diesem Gerät lassen sich durch eine
verzögerte Tonausgabe von den einzelnen
Lautsprechern die Schallquellen räumlich an die
Hörposition anpassen. Hierbei wird ein
natürliches Klangfeld simuliert und Sie haben
unabhängig von der Sitzposition den Eindruck,
sich in der Mitte des Klangfeldes zu befinden.
Die Optionen für „Listening Position“ sind unten
aufgelistet.
Front L (1): Vorne links
Front R (2): Vorne rechts
Front (3): Vorne in der
Mitte
All (4): In der Mitte des
Fahrzeugs
Custom: Präzise kalibrierte
Position (Seite 36)
12
3
4
1 Berühren Sie während der
Wiedergabe/des Empfangs „SETUP“
und dann das Register „Sound“.
Die Anzeige „Sound Setting“ erscheint.
2 Berühren Sie „Listening Position“.
Eine Einstellanzeige erscheint.
3 Berühren Sie die gewünschte Option.
Zum Deaktivieren des Pro Logic II-Modus
wählen Sie „OFF“.
Um zur vorherigen Anzeige zurückzuschalten,
berühren Sie .
Zum Ausblenden des Konfigurationsmenüs
berühren Sie „SETUP“.
Hinweise
• Diese Funktion steht für Super Audio CDs, WMA-,
JPEG-, DivX
(außer 2-Kanal-Format) bzw. DTS-Format nicht zur
Verfügung.
• Der Pro Logic II-Modus steht nicht zur Verfügung,
wenn der Karaoke-Modus (
Zone (Seite 28) aktiviert ist.
®
-Dateien und Discs im Dolby Digital-
Seite 27) oder Zone ×
3 Berühren Sie die gewünschte Option.
Die Einstellung ist damit abgeschlossen.
Wenn Sie Intelligent Time Alignment
deaktivieren wollen, wählen Sie „OFF“.
Um zur vorherigen Anzeige zurückzuschalten,
berühren Sie .
Zum Ausblenden des Konfigurationsmenüs
berühren Sie „SETUP“.
Hinweis
Intelligent Time Alignment steht nicht zur Verfügung,
wenn der Karaoke-Modus (
Zone (Seite 28) aktiviert ist bzw. „Super Audio CD
Mode“ auf „High Quality“ gesetzt ist (Seite 30).
Seite 27) oder Zone ×
35
Page 100

Präzise Kalibrierung der
Hörposition
— Intelligent Time Alignment Tune
Sie können den Abstand der Hörposition von den
einzelnen Lautsprechern präzise kalibrieren und
so die Tonverzögerung genau an die Hörposition
anpassen.
Messen Sie vorab den Abstand der einzelnen
Lautsprecher von der Hörposition.
1 Berühren Sie während der
Wiedergabe/des Empfangs „SETUP“,
das Register „Sound“, „Listening
Position“ und dann „Custom“.
2 Berühren Sie „Custom Edit“.
Eine Einstellanzeige erscheint.
3 Berühren Sie –/+ für die einzelnen
Lautsprecher, um den Abstand des
Lautsprechers von der Hörposition
einzustellen.
Der Abstand lässt sich in Schritten von 2 cm
auf einen Wert zwischen 0 und 400
einstellen.
Zum Wiederherstellen der
Standardeinstellung berühren Sie „Reset“.
cm
4 Berühren Sie „OK“.
Die Einstellung ist damit abgeschlossen.
Um zur vorherigen Anzeige zurückzuschalten,
berühren Sie
Zum Ausblenden des Konfigurationsmenüs
berühren Sie „SETUP“.
Hinweis
Die Einstellung tritt erst in Kraft, wenn Sie „OK“
berühren.
.
Lautsprecherkonfiguration und
Einstellen der Lautstärke
Erzeugen eines virtuellen CenterLautsprechers — CSO
Für einen optimalen Raumklang benötigen Sie 5
Lautsprecher (Frontlautsprecher links/rechts,
Hecklautsprecher links/rechts, CenterLautsprecher) und 1 Tiefsttonlautsprecher. Wenn
kein Center-Lautsprecher angeschlossen ist,
können Sie mit CSO (Organizer für CenterLautsprecher) einen virtuellen CenterLautsprecher erzeugen.
1 Berühren Sie während der
Wiedergabe/des Empfangs „SETUP“,
das Register „Sound“ und dann
um fortzufahren.
Die Anzeige „Speaker Setting“ erscheint.
2 Berühren Sie „Center Speaker“.
Die Optionen erscheinen.
3 Berühren Sie „CSO“.*
* Wenn „Center Speaker“ zuvor auf „ON“ gesetzt
wurde, kann „CSO“ nicht ausgewählt werden.
Die Einstellung ist damit abgeschlossen.
Um zur vorherigen Anzeige zurückzuschalten,
berühren Sie
Zum Ausblenden des Konfigurationsmenüs
berühren Sie „SETUP“.
Hinweise
• CSO kann nicht aktiviert werden, wenn der KaraokeModus (
aktiviert ist bzw. „Super Audio CD Mode“ auf „High
Quality“ gesetzt ist (
• Wenn Sie CSO aktivieren, wird für die EqualizerKurve „OFF“ eingestellt (
• Während der Wiedergabe/des Empfangs kann
„Center Speaker“ nicht auf „ON“ gesetzt werden.
.
Seite 27) oder Zone × Zone (Seite 28)
Seite 30).
Seite 33).
,
36
 Loading...