


5-005-637-61(1)
AV RECEIVER
Operating Instructions
Hướng dẫn Vận hành
GB
VN

Warning
The nameplate indicating operating voltage, etc., is
located on the bottom of the chassis.
The date of manufacture is specified on the carton
in
the following format: YYYY, where YYYY - the
year of manufacturing.
Products should be stored in the package in the
dark
, dry, clean well ventilated places isolated from
places of storage of acids and alkalis.
Storage temperature: -20 to + 60 °C.
Storage humidity: not more than 80 % without
co
densate.
n
Storage period not established.
WARNING
To prevent fire or shock hazard, do not
expose the unit to rain or moisture.
To avoid electrical shock, do not open the
binet. Refer servicing to qualified personnel
ca
only.
Disclaimer regarding services offered by third
r
ties
pa
Services offered by third parties may be changed,
suspended, or terminated without prior notice.
Important notice
Caution
IN NO EVENT SHALL WE BE LIABLE FOR ANY
INCIDENTAL, INDIRECT OR CONSEQUENTIAL
DAMAGES OR OTHER DAMAGES INCLUDING,
WITHOUT LIMITATION, LOSS OF PROFITS, LOSS OF
REVENUE, LOSS OF DATA, LOSS OF USE OF THE
PRODUCT OR ANY ASSOCIATED EQUIPMENT,
DOWNTIME, AND PURCHASER’S TIME RELATED TO
OR ARISING OUT OF THE USE OF THIS PRODUCT, ITS
HAR DWARE AND/OR ITS SOFTWARE.
Dear customer, this product includes a radio
tr
ansmitter.
Please check your vehicle operation manual or
co
ntact the manufacturer of your vehicle or your
vehicle dealer, before you install this product into
your vehicle.
Emergency calls
This BLUETOOTH car handsfree and the electronic
device connected to the handsfree operate using
radio signals, cellular, and landline networks as well
as user-programmed function, which cannot
guarantee connection under all conditions.
Therefore do not rely solely upon any electronic
devi
ce for essential communications (such as
medical emergencies).
On BLUETOOTH communication
• Microwaves emitting from a BLUETOOTH device
may affect the operation of electronic medical
devices. Turn off this unit and other BLUETOOTH
devices in the following locations, as it may cause
an accident.
– where inflammable gas is present, in a hospital,
tr
ain, airplane, or petrol station
– near automatic doors or a fire alarm
• This unit supports security capabilities that
com
ply with the BLUETOOTH standard to provide
a secure connection when the BLUETOOTH
wireless technology is used, but security may not
be enough depending on the setting. Be careful
when communicating using BLUETOOTH wireless
technology.
• We do not take any responsibility for the leakage
o
information during BLUETOOTH
f
communication.
2GB

Table of Contents
Warning. . . . . . . . . . . . . . . . . . . . . . . . . . . . . . . . . . . 2
Getting Started
Guide to Parts and Controls . . . . . . . . . . . . . . . . . . 4
Performing Initial Settings. . . . . . . . . . . . . . . . . . . . 6
Preparing a BLUETOOTH Device . . . . . . . . . . . . . . . 6
Connecting Rear Camera. . . . . . . . . . . . . . . . . . . . . 7
Radio
Listening to the Radio . . . . . . . . . . . . . . . . . . . . . . . 8
Using Radio Option Functions . . . . . . . . . . . . . . . . 8
Playback
Playing a USB Device . . . . . . . . . . . . . . . . . . . . . . . . 9
Playing a BLUETOOTH Device . . . . . . . . . . . . . . . . . 9
Searching and Playing Tracks . . . . . . . . . . . . . . . . 10
Other Settings During Playback . . . . . . . . . . . . . . 10
Handsfree Calling
Preparing a Mobile Phone. . . . . . . . . . . . . . . . . . . . 11
Receiving a Call . . . . . . . . . . . . . . . . . . . . . . . . . . . . 11
Making a Call . . . . . . . . . . . . . . . . . . . . . . . . . . . . . . 11
Available Operations During a Call . . . . . . . . . . . . . 12
Useful Functions
Apple CarPlay . . . . . . . . . . . . . . . . . . . . . . . . . . . . . . 12
Android Auto™. . . . . . . . . . . . . . . . . . . . . . . . . . . . . 12
WebLink™. . . . . . . . . . . . . . . . . . . . . . . . . . . . . . . . . 13
Using Gesture Command . . . . . . . . . . . . . . . . . . . . 13
Settings
Basic Setting Operation . . . . . . . . . . . . . . . . . . . . . 14
General Settings (General) . . . . . . . . . . . . . . . . . . 14
Sound Settings (Sound). . . . . . . . . . . . . . . . . . . . . 14
Visual Settings (Visual) . . . . . . . . . . . . . . . . . . . . . . 15
BLUETOOTH Settings (Bluetooth) . . . . . . . . . . . . . . 15
Additional Information
Updating the Firmware . . . . . . . . . . . . . . . . . . . . . . 15
Precautions. . . . . . . . . . . . . . . . . . . . . . . . . . . . . . . . 15
Specifications . . . . . . . . . . . . . . . . . . . . . . . . . . . . . . 17
Troubleshooting. . . . . . . . . . . . . . . . . . . . . . . . . . . 19
Messages . . . . . . . . . . . . . . . . . . . . . . . . . . . . . . . . 22
Connection
Connection . . . . . . . . . . . . . . . . . . . . . . . . . . . . . . . 23
3GB

Getting Started
OPTION
VOICE
HOME
ATT
Guide to Parts and Controls
Main unit
Display/touch panel
Microphone (inner panel)
I
n order for the handsfree function to work
properl
y, do not cover the microphone with
tape, etc.
USB port 1
Sup
ports audio/video playback from a
sm
artphone or USB device.
HOME
D
isplays the HOME screen.
ATT (attenuate)
Press and hold for 1 second to attenuate the
sou
nd.
To cancel, press and hold again, or press VOL +.
VOL (volume) +/–
Receptor for the remote commander
/ (pr
Functions differently depending on the selected
sour
ce:
– Radio: select a preset station.
– USB/BT Audio: move to the previous/next file.
Press and hold to:
– Radio: tune into a station automatically
(
EEK+/SEEK-).
S
– USB/BT Audio: fast-reverse/fast-forward.
OPTION
D
isplays the OPTION screen (page 5).
VOICE
Press and hold to activate the voice command
func
tion for Apple CarPlay and Android Auto.
4GB
evious/next)
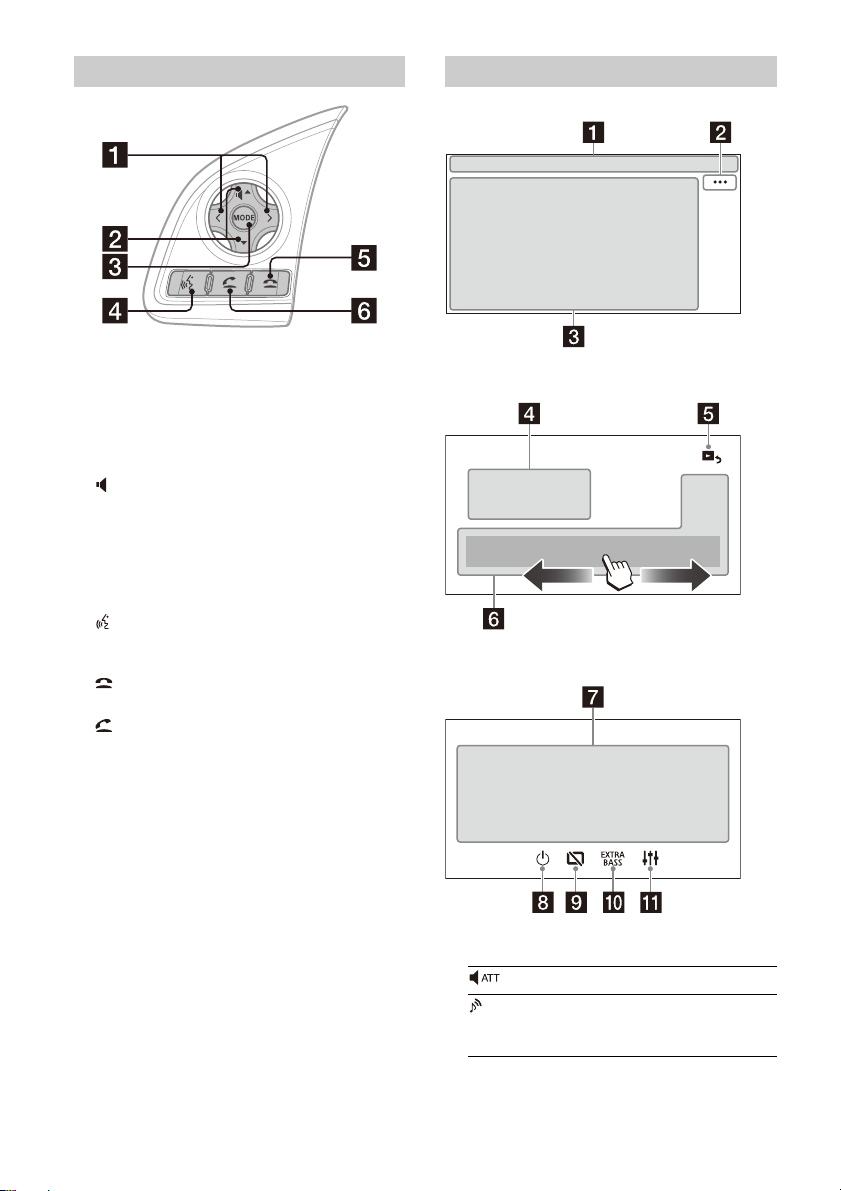
Steering wheel remote control Screen displays
Playback screen:
/
Radio:
Tune in preset radio stations. Press and hold to
tune a
utomatically.
USB/BT Audio:
Skip a track. Press and hold to fast-reverse/fastfo
rward a track.
(volume) /
Adjusts the volume. Press and hold to continue
ad
justing the volume.
MODE
C
hanges the source.
Selecting the radio band/transferring a call are
not
available with this button.
(speech)
Activates the voice command function for Apple
Ca
rPlay and Android Auto.
(on hook)
Ends a call/rejects an incoming call.
(off hook)
Answers a call.
HOME screen:
OPTION screen:
Status indication
Lights up when the sound is attenuated.
Lights up when the audio device is
playable by enabling the A2DP
(Advanced Audio Distribution Profile).
5GB
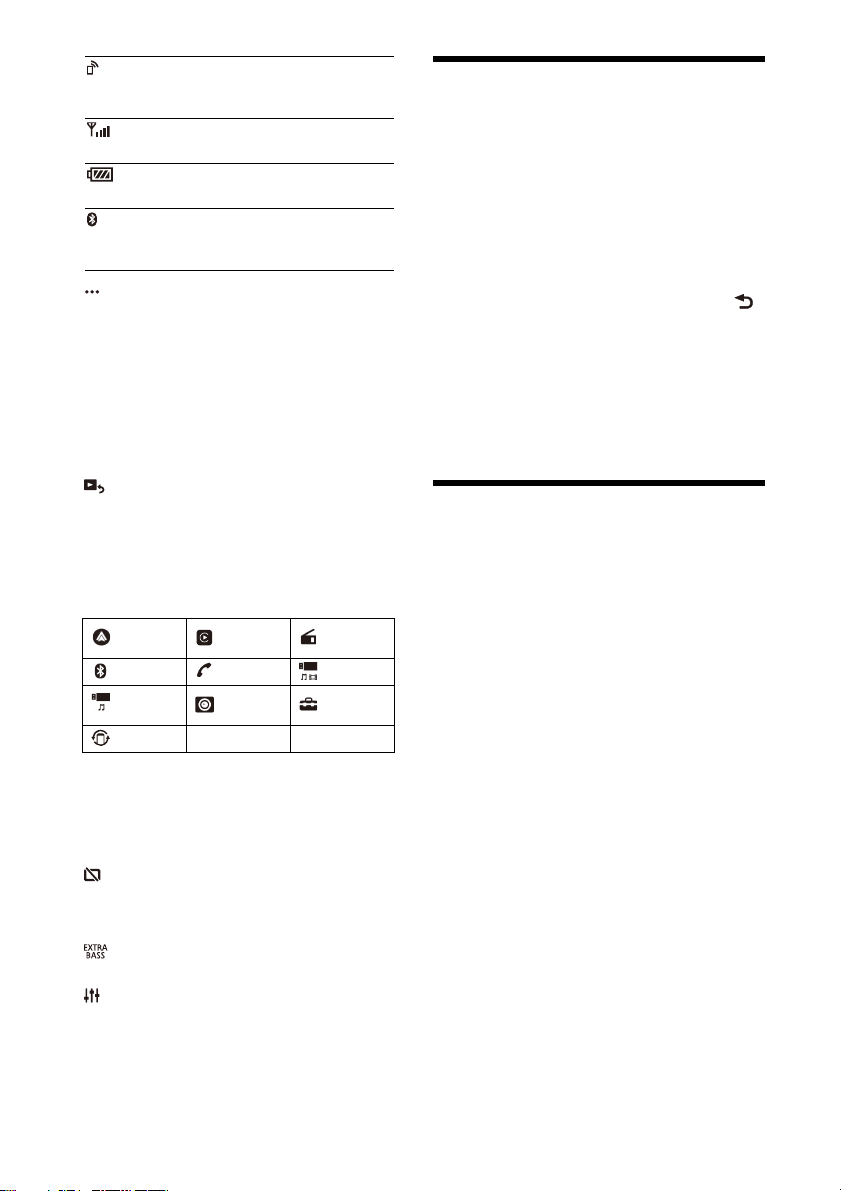
Lights up when handsfree calling is
ava
ilable by enabling the HFP (Handsfree
Profile).
Indicates the signal strength status of
th
e connected mobile phone.
Indicates the remaining battery status of
th
e connected mobile phone.
Lights up when the Bluetooth® signal is
on. F
lashes when the connection is in
progress.
(source option)
Opens the source option menu. The available
it
ems differ depending on the source.
Application specific area
Dis
plays playback controls/indications or show
th
e unit’s status. Displayed items differ
depending on the source.
Clock
Dis
plays the time which are set on the Date/
Tim
e setting (page 14).
(return to the playback screen)
Switches from the HOME screen to the playback
sc
reen.
Sources and Settings select keys
C
hanges the source or make various settings.
Flick to select the setting icon and other icons.
Touch the source icon you want to select.
Android
Auto
BT Audio Phone USB port 1
USB port 2
WebLi nk
Apple
CarPlay
Rear
era
Cam
Radio
Settings
Performing Initial Settings
You need to perform initial settings before
operating the unit for the first time, after replacing
the ca r batter y, or changing connections.
If the initial settings screen does not appear when
you tu
rn on the unit, perform the factory reset
(page 14) to initialize the unit.
1 Touch [Language], then set the display
language.
2 Touch [Set Date/Time], then set the date
and time.
3 To return to the previous display, touch ,
then touch [OK].
The startup caution appears.
4 Read through the startup caution, then if
you accept all conditions, touch [Close].
The setting is complete.
This setting can be further configured in the setting
menu (page 14).
Preparing a BLUETOOTH Device
You can enjoy music or perform handsfree calling
depending on the BLUETOOTH compatible device
such as smartphones, mobile phones, and audio
devices (hereafter “BLUETOOTH device” if not
otherwise specified). For details on connecting,
refer to the operating instructions supplied with the
device.
Before connecting the device, turn down the
v
lume of this unit; otherwise, a loud sound may
o
result.
Sound select keys
C
hanges the sound.
(standby)
Turns the unit in standby mode (USB charging is
st
ill available). To resume, press any buttons.
(monitor off)
Turns off the monitor. When the monitor is
turn
ed off, touch any part of the display to turn it
back on.
(EXTRA BASS)
Changes the EXTRA BASS setting (page 14).
(EQ10/Subwoofer)
Changes the EQ10/Subwoofer setting (page 14).
6GB

Pairing and connecting with a
BLUETOOTH device
When connecting a BLUETOOTH device for the first
time, mutual registration (called “pairing”) is
required. Pairing enables this unit and other devices
to recognize each other.
Connecting with a paired BLUETOOTH
device
To use a paired device, connection with this unit is
required. Some paired devices will connect
automatically.
1 Place the BLUETOOTH device within 1 m
(3 ft) of this unit.
2 Press HOME, then touch [Settings].
3 Touch [Bluetooth].
4 Touch [Bluetooth Connection], then set the
signal to [ON].
The BLUETOOTH signal is turned on and lights
up on the status bar of the unit.
5 Touch [Pairing].
flashes while the unit is in pairing standby
mode.
6 Perform pairing on the BLUETOOTH device
so it detects this unit.
7 Select [Xpander] shown in the display of the
BLUETOOTH device.
Repeat from step 5 if your model name does not
appear.
If the connection confirmation display appears,
oper
ate the BLUETOOTH device to approve the
connection, then touch [OK] on the unit and/or
the BLUETOOTH device.
8 If passkey* input is required on the
BLUETOOTH device, input [0000].
* Passkey may be called “passcode,” “PIN code,” “PIN
number,” “password,” etc., depending on the
BLUETOOTH device.
When pairing is made, stays lit.
9 Select this unit on the BLUETOOTH device to
establish the BLUETOOTH connection.
or lights up when the connection is made.
Notes
• The unit can only be connected with one BLUETOOTH
device at a time.
• To disconnect the BLUETOOTH connection, turn the
connection off from either the unit or the BLUETOOTH
device.
• BLUETOOTH pairing is not possible while Apple CarPlay or
Android Auto is running.
1 Press HOME, then touch [Settings].
2 Touch [Bluetooth].
3 Touch [Bluetooth Connection], then touch
[ON].
Make sure that lights up on the status bar of
the unit.
4 Activate the BLUETOOTH function on the
BLUETOOTH device.
5 Operate the BLUETOOTH device to connect
to this unit.
or lights up on the status bar.
To connect the last-connected device from
this unit
When the ignition is turned to on with the
BLUETOOTH signal activated, this unit searches for
the last-connected BLUETOOTH device, and
connection is made automatically.
Note
While streaming BLUETOOTH audio, you cannot connect
from this unit to the mobile phone. Connect from the mobile
phone to this unit instead.
Connecting Rear Camera
By connecting the optional rear camera to the
CAMERA IN terminal, you can display the picture
from the rear camera.
To display the picture from the rear camera
Press HOME, touch [Rear Camera].
7GB
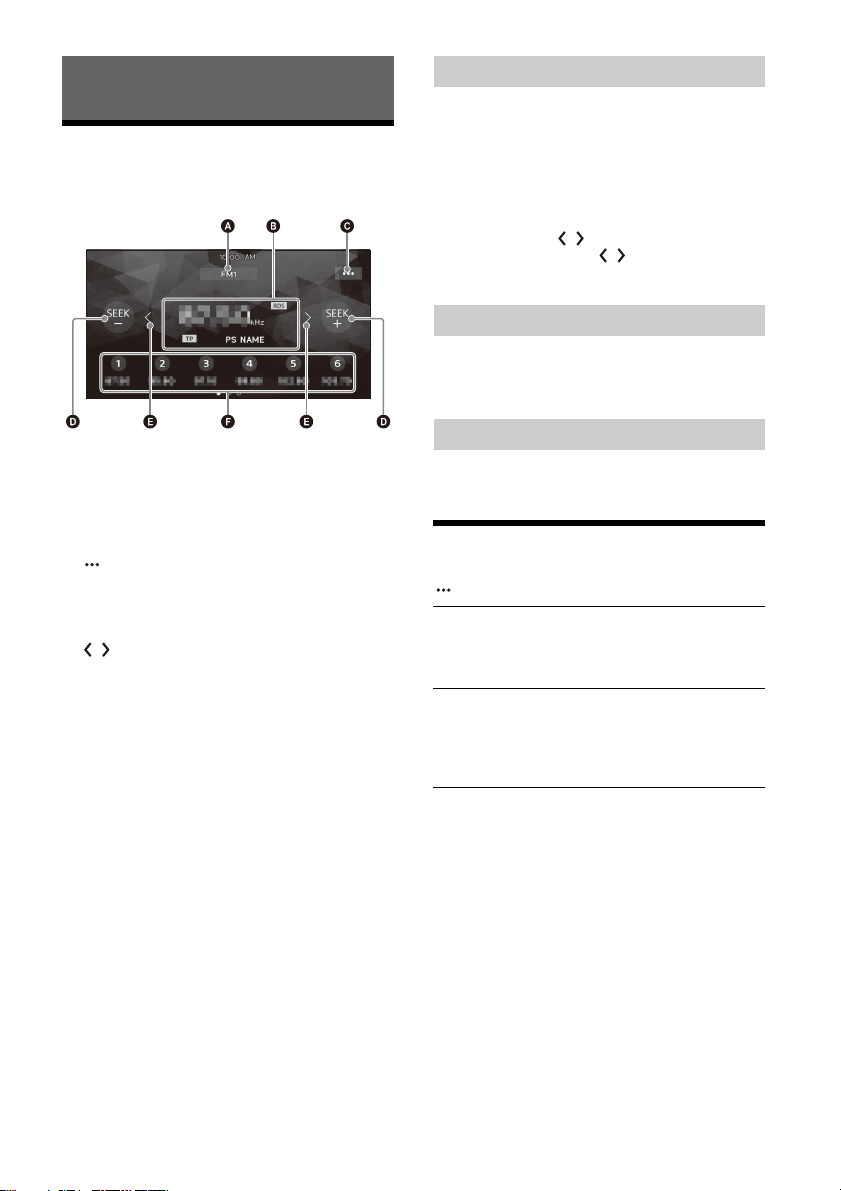
Radio
Listening to the Radio
Press HOME, then touch [Radio].
Reception controls/indications
Current band
Change the band (FM1, FM2, FM3, AM1 or AM2).
Current frequency, program service name*,
R
DS (Radio Data System) indication*
* Only available during RDS reception.
(radio option)
Open the radio option menu.
SEEK-/SEEK+
T
une in automatically.
/
Tune in manually.
Touch and hold to continuously skip
fre
quencies.
Preset numbers
S
elect a preset station. Swipe right/left to show
th
e other preset stations.
Touch and hold to store the current frequency in
that
preset.
Tuning
1 Select the desired band (FM1, FM2, FM3,
AM1 or AM2).
2 Perform tuning.
To t un e a utomati cal ly
Touc h S EE K-/ SE EK +.
Scanning stops when the unit receives a station.
To tune manually
Touc h a nd hold / to locate the approximate
frequency, then touch / repeatedly to finely
adjust to the desired frequency.
Storing manually
1 While receiving the station that you want to
store, touch and hold the desired preset
number.
Receiving stored stations
1 Select the band, then touch the desired
preset number.
Using Radio Option Functions
The following functions are available by touching
.
BTM (Best Tuning Memory)
Stores stations in order of frequency on the
preset numbers. 18 stations can be stored for FM
and 12 stations for AM as preset stations.
PTY
Select a program type from the PTY list to search
for a station broadcasting the selected program
type.
(Only available during FM reception.)
8GB

Playback
Playing a USB Device
MSC (Mass Storage Class) type USB devices*1
compliant with the USB standard can be used.
MTP (Media Transfer Protocol) type USB devices*
can be used only when connected to the USB
port 2.
*1 e.g., a USB flash drive, digital media player, Android™
phone
*2 Some digital media players or Android phones may
quire setting to MTP mode.
re
Notes
• For details on the compatibility of your USB device, visit
the support site on the back cover.
• For details on the supported file formats, see “Supported
formats for U SB playback” (page 16).
1 Turn down the volume on the unit.
2 Connect the USB device to the USB port.
3 Press HOME, then touch [USB port 1] or [USB
port 2].
Playback starts.
To rem ov e t he de vi ce
Turn the unit off or turn the ignition switch to the
ACC off position, then remove the USB device.
USB port 1 and USB port 2
When connecting the USB devices, select the USB
po
the USB port 2 according to the features to
rt 1 or
be us
ed.
Supported features
Apple CarPlay* –
Android Auto* –
WebLink™ –
FAT1 2
File system
Playable audio
fo
at
rm
FAT1 6
FAT3 2
exFAT –
MP3
WMA
FLAC
WAV –
AAC –
USB
port
1
1*2
USB
port 2
Supported features
MPEG-4 –
Playable video
format
USB connection
mod
e
: Available, –: Not supported
* Apple CarPlay and/or Android Auto may not be available
in your country or region.
WMV –
MKV –
Xvid –
MSC
MTP –
Playing a BLUETOOTH Device
You can play contents on a connected device that
supports BLUETOOTH A2DP (Advanced Audio
Distribution Profile).
1 Make a BLUETOOTH connection with the
audio device (page 7).
2 Press HOME, then touch [BT Audio].
3 Operate the audio device to start playback.
Notes
• Depending on the audio device, information such as title,
track number/time, and playback status may not be
displayed on this unit.
• Even if the source is changed on this unit, playback of the
audio device does not stop.
• BLUETOOTH pairing is not possible while Apple CarPlay is
running.
To match the volume level of the BLUETOOTH
device to other sources
You can reduce the volume level differences
between this unit and the BLUETOOTH device:
During playback, touch , then set [Input Level]
between –6 and +6.
USB
port 1
USB
port 2
9GB
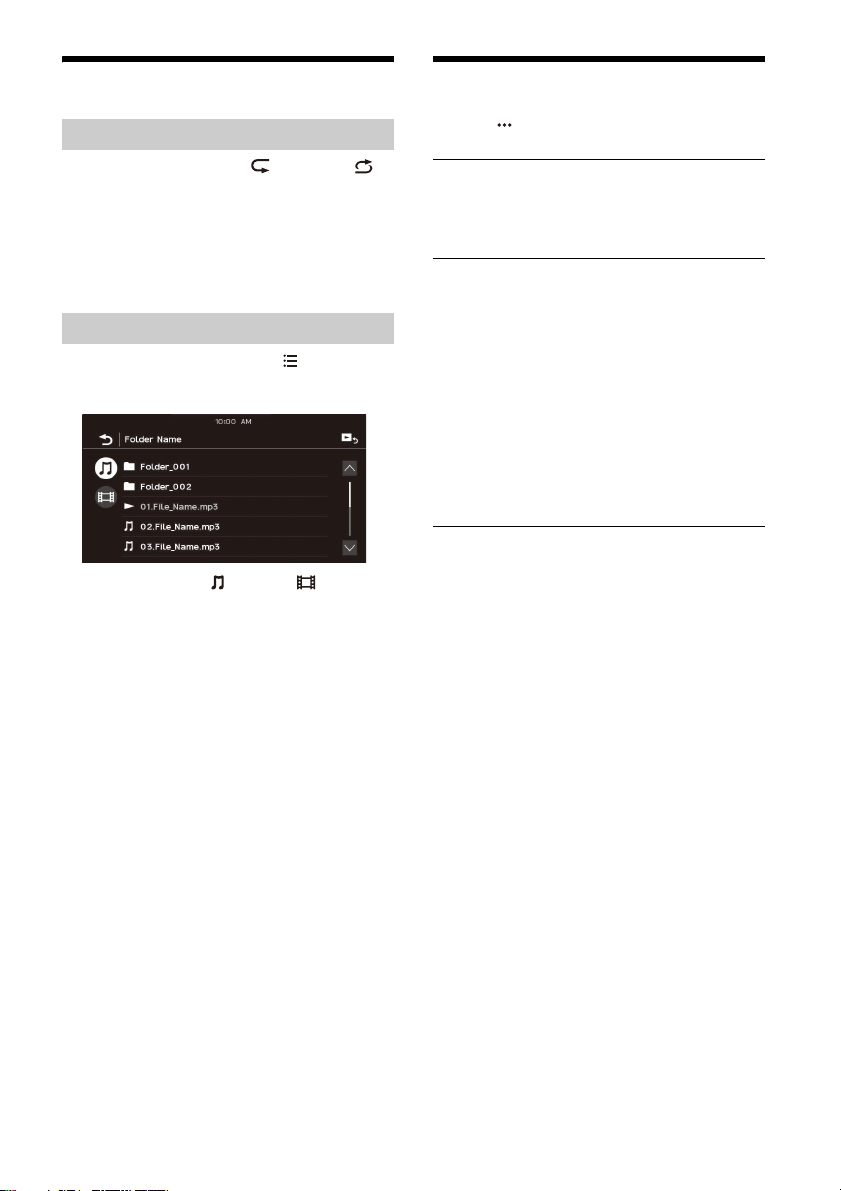
Searching and Playing Tracks
Repeat play and shuffle play
1 During playback, touch (repeat) or
(shuffle) repeatedly until the desired play
mo
de appears.
Playback in the selected play mode may take
time to start.
Available play modes differ depending on the
se
lected sound source and connected device.
Searching for a file from the list screen
1 During USB playback, touch .
The list screen from the currently played item
appears.
Furthermore, touch (audio) or (video) to
list up by file type.
2 To uch th e d es ired item.
Playback starts.
Other Settings During Playback
Further settings are available in each source by
touching . The available items differ depending
on the source.
Picture EQ
Adjusts the picture quality according to your
taste: [Dynamic], [Standard], [Theater], [Custom].
(Available only when the car is stopped and USB
vid
eo is selected).
Aspect
Selects an aspect ratio for the screen of the unit.
(Available only when the car is stopped and USB
vid
eo is selected).
Normal
Displays a 4:3 picture in its original size, with side
ba
rs to fill the 16:9 screen.
Zoom
Displays a 16:9 picture that has been converted
into
4:3 letter box format.
Full
Displays a 16:9 picture in its original size.
Captions
Enlarges the picture horizontally, while fitting
ca
ptions in the screen.
10GB
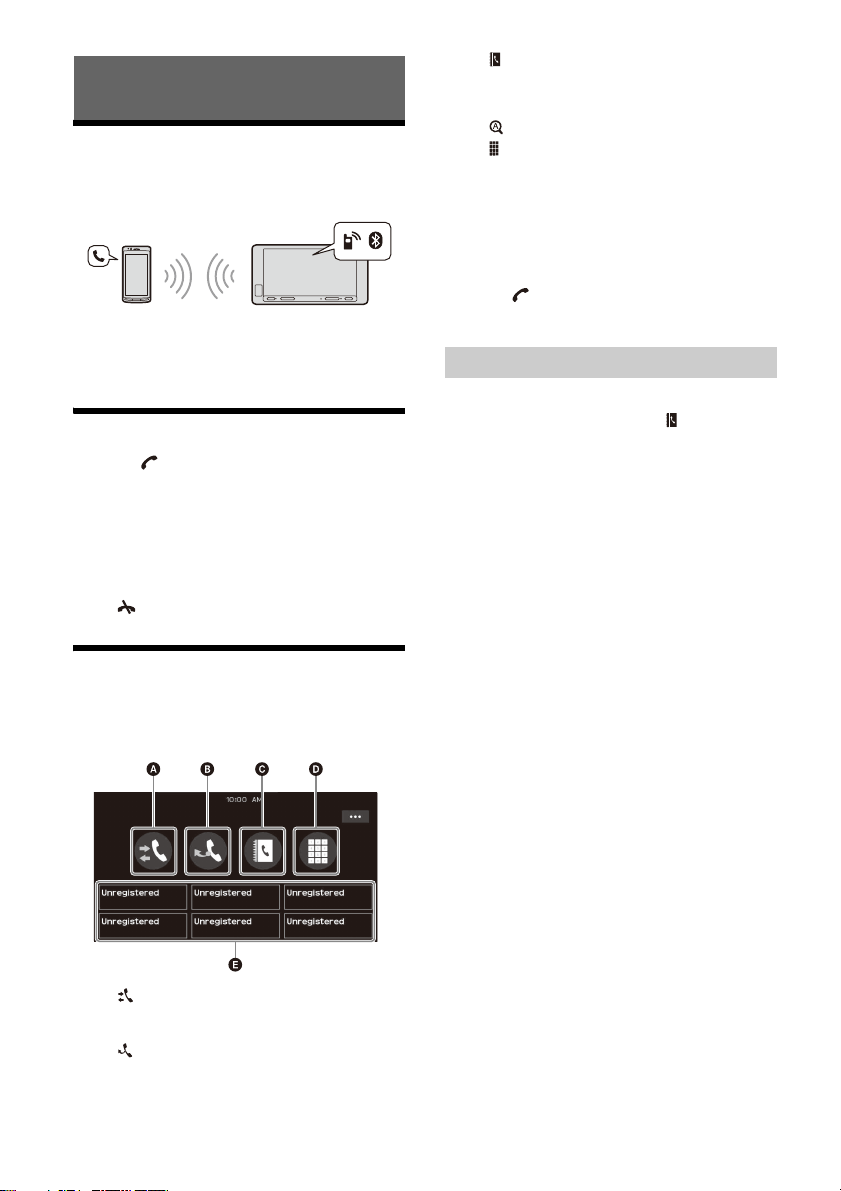
Handsfree Calling
Preparing a Mobile Phone
To use a mobile phone, connect it with this unit. For
details, see “Preparing a BLUETOOTH Device”
(page 6).
Note
The handsfree calling functions are not available when the
Apple CarPlay or Android Auto function is activated. In this
case, use the handsfree calling functions on its application.
Receiving a Call
1 Tou ch when a call is received.
The phone call starts.
Note
The ringtone and talker’s voice are output from the front
speakers. To select the speakers for handsfree calling, press
HOME, then touch [Settings] and select [Phone Call Sound]
in [Sound] (page 14).
To reject/end a call
Touch .
(contacts)*
Select a contact from the name list/number
list
. To search for the desired contact in
alphabetical order from the name list, touch
.
(dialpad)
Enter the phone number.
Fa
vorites
elect the stored contact.
S
To store the contact, see “Adding phone
numbers to Favorites” (page 11).
* The mobile phone needs to support PBAP (Phone Book
Access Profile).
3 Tou ch .
The phone call starts.
Adding phone numbers to Favorites
You can store up to 6 contacts in the Favorites.
1 On the phone screen, touch (contacts)
and select a phone number you want to
stor
e in the Favorites.
The confirmation display appears.
2 Touch [Add to Favorites].
3 Touch the desired preset in the Favorites to
store the phone number.
The contact is stored in the Favorites.
Making a Call
1 Press HOME, then touch [Phone].
2 Touch one of the call icons on the
BLUETOOTH phone display.
(call history)*
Select a contact from the call history list. The
it stores the last 20 calls.
un
(redial)
Make a call automatically to the last contact
you ma
de
.
11GB

Available Operations During a
Call
Useful Functions
To adjust the ringtone volume
Press VOL +/– while receiving a call.
To adjust the talker’s voice volume
Press VOL +/– during a call.
To adjust the volume for the other party (Mic
gain adjustment)
During a handsfree call, touch , then set
[MIC Gain] to [High], [Middle], or [Low].
To reduce echo and noise (Echo/noise
canceler mode)
During a call, touch , then set [Speech Quality] to
[Mode 1] or [Mode 2].
To switch between handsfree mode and
handheld mode
During a call, touch to switch the
phone call audio between the unit and mobile
pho
ne.
Note
Depending on the mobile phone, this operation may not be
available.
To answer an incoming call automatically
Tou ch , then set [Auto Answer] to [ON].
Apple CarPlay
Apple CarPlay lets you use your iPhone in the car in
a way that allows you to stay focused on the road.
(Available only when your iPhone is connected to
the
USB port 1.)
Notes on using Apple CarPlay
• Check the Apple CarPlay website for supported
iOS versions. Update to the latest iOS version
before use.
• For details about Apple CarPlay, refer to the
ma
nual supplied with your iPhone, or visit the
Apple CarPlay website.
• Since the GPS on your iPhone is used, place your
iP
hone where it can easily receive a GPS signal.
• Apple CarPlay may not be available in your
cou
ntry or region.
1 Connect your iPhone to the USB port 1.
To connect an iPhone, use a USB connection
cable for iPhone (not supplied).
2 Press HOME, then touch [Apple CarPlay].
Your iPhone’s display appears on the display of
the unit. Touch and control the applications.
Use of the Apple CarPlay logo means that a vehicle
user
interface meets Apple performance standards.
Apple is not responsible for the operation of this
vehicle or its compliance with safety and regulatory
standards.
Please note that the use of this product with iPhone
ma
y affect wireless performance.
12GB
Android Auto™
Android Auto extends the Android platform into the
car in a way that’s purpose-built for driving.
(Available only when your Android phone is
co
nnected to the USB port 1.)
Notes on using Android Auto
• Check the Android Auto website for supported OS
versions. Update to the latest OS version before
use.
• Your Android phone needs to support Android
Auto
.
• Download the Android Auto app on Google Play.
• For details about Android Auto, refer to the
ma
nual supplied with your Android phone, or visit
the Android Auto website.
• Since the GPS on your Android phone is used,
pl
ace your Android phone where it can easily
receive a GPS signal.
• Android Auto may not be available in your country
or r
egion.
1 Connect your Android phone to the USB
port 1.
To connect an Android phone, use an
appropriate connection cable (not supplied).
2 Press HOME, then touch [Android Auto].
The Android Auto interface will be displayed fullscreen on the display of the unit. Touch and
control the applications.
WebLink™
The “WebLink Host” app allows you to enjoy the
“WebLink Apps” such as a video or music player on
the connected iPhone/Android phone.
(Available only when your iPhone/Android phone is
connec
ted to the USB port 1.)
Notes on using WebLink™
• Check the WebLink™ website for supported OS
versions. Update to the latest OS version before
use.
• For details on compatible models, refer to the
com
patibility list on the following site:
http://abaltatech.com/WL
• Download the “WebLink Host” app available on
Go
ogle Play for your Android phone, and available
on the App Store for your iPhone.
• A network connection may be required when
con
figuring settings, such as during the initial
connection setup. Make sure that a network
connection is available on your iPhone/Android
phone.
• When using the Cast function, settings on your
iP
hone/Android phone may be required.
• For details about the “WebLink Apps”, visit the
web
site for the “WebLink Apps”.
• The WebLink™ function and/or a certain
“W
ebLink Apps” may not be available in your
country or region.
• When using the Cast function and connecting the
iPho
ne, the display direction is the same as the
display of the iPhone.
1 Connect your iPhone/Android phone with
main unit via BLUETOOTH.
2 Connect your iPhone/Android phone to the
USB port 1.
To connect an iPhone, use a USB connection
cable for iPhone (not supplied).
To connect an Android phone, use an
ap
propriate connection cable (not supplied).
3 Press HOME, then touch [WebLink].
The WebLink™ display appears on the unit.
Touch and control the apps.
Tip
You can switch the app between Apple CarPlay/Android
Auto and WebLink™ if these apps are installed on your
iPhone/Android phone.
Using Gesture Command
You can perform frequently-used operations by
swiping your finger on the reception/playback
display.
Note
The gesture commands explained below are not available
on the screens of Apple CarPlay, Android Auto and
WebLi nk™.
Do this To
Radio reception:
seek forward stations.
(The same as pressing and
ldi
ng .)
ho
Swipe left to right
Swipe right to left
Swipe upwards
Swipe downwards
Video/audio playback:
skip forward a file/track.
(The same as .)
Radio reception:
seek backward stations.
(The same as pressing and
holdi
ng .)
Video/audio playback:
skip backward a file/track.
(The same as .)
Radio reception:
receive stored stations
(go forward).
Radio reception:
receive stored stations
(go backward).
13GB
Settings
Basic Setting Operation
You can set items in the following setup categories:
General Settings (General), Sound Settings (Sound),
Vi
sual Settings (Visual), BLUETOOTH Settings
(Bluetooth)
1 Press HOME, then touch [Settings].
2 Touch one of the setup category.
The items that can be set differ depending on
the source and settings.
3 Move the scrollbar up and down to select
the desired item.
To return to the previous display
Tou ch .
To switch to the playback screen
Tou ch .
General Settings (General)
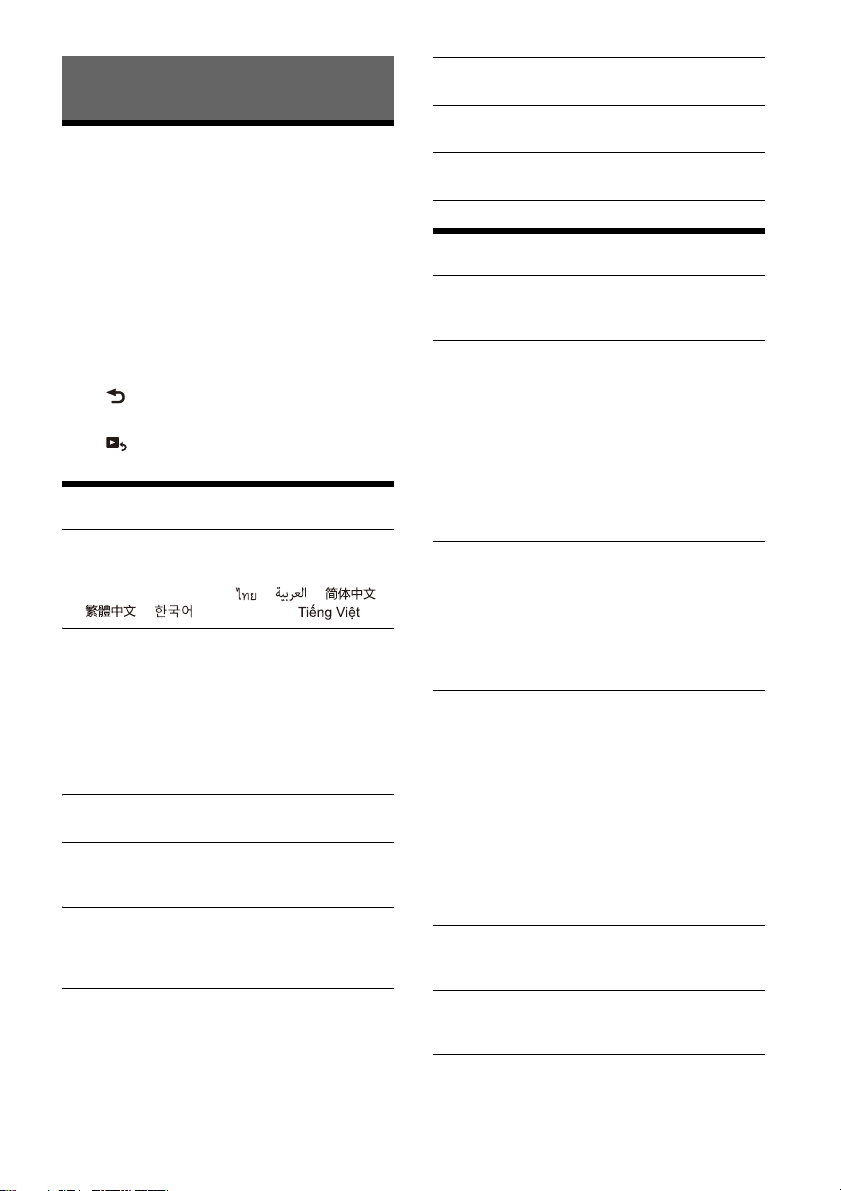
Language
Selects the display language: [English],
[Español], [Français], [Deutsch], [Italiano],
[Português], [Русский], [ ], [ ], [ ],
[ ], [ ], [Indonesian], [ ].
Date/Time
Set Date/Time
Sets the date and clock time: [Auto(RDS)],
[Ma
nual].
Date Format
Selects the format: [DD-MM-YYYY], [MM-DDYYYY
], [YYYY-MM-DD].
Time Format
Selects the format: [12-hour], [24-hour].
Beep
Activates the operation sound: [OFF], [ON].
Rear Camera
Selects the image from the rear camera: [OFF],
[ON].
Rear Camera Guide Line
Displays the rear camera guide lines: [OFF], [ON].
(Available only when [Rear Camera] is set to
[ON
].)
Driving Position
Selects the driving position to optimize usability
of Apple CarPlay and Android Auto: [Left Side],
[Right Side].
Factory Reset
Initializes all the settings to the factory settings.
Firmware Version
Updates and confirms the firmware version.
Open Source Licenses
Displays the software licenses.
Sound Settings (Sound)
EXTRA BASS
Reinforces bass sound in synchronization with
the volume level: [OFF], [1], [2].
EQ10/Subwoofer
Selects an equalizer curve and adjusts the
subwoofer level.
EQ10
Selects the equalizer curve: [Xpander], [R&B],
[Rock],
[Pop], [Dance], [Hip-Hop], [EDM], [Jazz],
[Salsa], [Custom], [OFF].
[Custom] adjusts the equalizer curve: –6 to +6.
Subwoofer
Adjusts the volume level of the subwoofer:
[OFF]
, –10 to +10.
Balance/Fader
Adjusts the balance/fader level.
Balance
Adjusts the sound balance between the left and
ri
ght speakers: [L15] to [R15].
Fader
Adjusts the sound balance between the front
and
rear speakers: [Front 15] to [Rear 15].
Crossover
Adjusts the cut-off frequency and subwoofer
phase.
High Pass Filter
Selects the cut-off frequency of the front/rear
sp
eakers: [OFF], [50Hz], [60Hz], [80Hz], [100Hz],
[120Hz].
Low Pass Filter
Selects the cut-off frequency of the subwoofer:
[OFF
, [50Hz], [60Hz], [80Hz], [100Hz], [120Hz].
]
Subwoofer Phase
Selects the subwoofer phase: [Normal],
[Rever
se].
DSO (Dynamic Stage Organizer)
Enhances audio output: [OFF], [Low], [Middle],
[High].
Phone Call Sound
Selects the speakers for handsfree calling:
[Front], [Rear], [All].
14GB
Visual Settings (Visual)
Wallpaper
Changes the wallpaper by touching the desired
color.
Dimmer for Monitor & Illum.
Dims the display and the button illumination:
[OFF], [Auto], [ON].
([Auto] is available only when the illumination
co
ntrol lead is connected and works when the
head light is turned on.)
adjusts the brightness level when the
dimmer is activated: -5 to +5.
Illum. Level on Monitor OFF
Dims the button illumination when the monitor
is turned off: [OFF], [1], [2], [3], [4].
BLUETOOTH Settings (Bluetooth)
Bluetooth Connection
Activates the BLUETOOTH signal: [OFF], [ON],
[Pairing] (enters into pairing standby mode).
Bluetooth Device Info
Displays the information of the device connected
to the unit.
(Available only when [Bluetooth Connection] is
se
t to [ON] and a BLUETOOTH device is
connected to the unit.)
Bluetooth Reset
Initializes all BLUETOOTH-related settings such as
pairing information, call history, history of
connected BLUETOOTH devices, etc.
Additional Information
Updating the Firmware
To update the firmware, visit the support site on the
back cover, then follow the online instructions.
Note
During the update, do not remove the USB device.
Precautions
• Power antenna (aerial) extends automatically.
• When you transfer ownership or dispose of your
ca
r with the unit installed, initialize all the settings
to the factory settings by performing the factory
reset ( page 14).
• Do not splash liquid onto the unit.
Notes on safety
• Comply with your local traffic rules, laws, and
regulations.
• While driving
– Do not watch or operate the unit, as it may lead
to d
istraction and cause an accident. Park your
car in a safe place to watch or operate the unit.
– Do not use the setup feature or any other
fu
nction which could divert your attention from
the road.
– When backing up your car, be sure to look back
an
d watch the surroundings carefully for your
safety even if the rear camera is connected. Do
not depend on the rear camera exclusively.
• While operating
– Do not insert your hands, fingers, or foreign
o
jects into the unit as it may cause injury or
b
damage to the unit.
– Keep small articles out of the reach of children.
– Be sure to fasten seatbelts to avoid injury in the
even
t of sudden movement of the car.
Preventing an accident
Pictures appear only after you stop the car.
If the car starts moving during video playback,
the f
ollowing caution is displayed and you
cannot watch the video.
[Video blocked for your safety.]
Do not operate the unit or watch the monitor
whil
driving.
e
15GB
 Loading...