

5-005-637-51(1)
AV RECEIVER
Operating Instructions
Petunjuk Pengoperasian
GB
ID
To switch the FM/AM tuning step, see page 14.
Untuk mengubah tingkat penalaan FM/AM, lihat halaman 15.
I.36.SI1.01082.0519
E

Warning
The nameplate indicating operating voltage, etc., is
located on the bottom of the chassis.
To reduce the risk of fire, do not cover the
ventilation opening of the appliance with
newspapers, tablecloths, curtains, etc.
Do not expose the appliance to naked flame
sources (for example, lighted candles).
WARNING
To prevent fire or shock hazard, do not
expose the unit to rain or moisture.
To avoid electrical shock, do not open the
cabinet. Refer servicing to qualified personnel
only.
Disclaimer regarding services offered by third
parties
Services offered by third parties may be changed,
suspended, or terminated without prior notice.
Important notice
Caution
IN NO EVENT SHALL WE BE LIABLE FOR ANY
INCIDENTAL, INDIRECT OR CONSEQUENTIAL
DAMAGES OR OTHER DAMAGES INCLUDING,
WITHOUT LIMITATION, LOSS OF PROFITS, LOSS OF
REVENUE, LOSS OF DATA, LOSS OF USE OF THE
PRODUCT OR ANY ASSOCIATED EQUIPMENT,
DOWNTIME, AND PURCHASER’S TIME RELATED TO
OR ARISING OUT OF THE USE OF THIS PRODUCT, ITS
HAR DWARE AND/OR ITS SOFTWARE.
Dear customer, this product includes a radio
transmitter.
Please check your vehicle operation manual or
contact the manufacturer of your vehicle or your
vehicle dealer, before you install this product into
your vehicle.
Emergency calls
This BLUETOOTH car handsfree and the electronic
device connected to the handsfree operate using
radio signals, cellular, and landline networks as well
as user-programmed function, which cannot
guarantee connection under all conditions.
Therefore do not rely solely upon any electronic
device for essential communications (such as
medical emergencies).
On BLUETOOTH communication
• Microwaves emitting from a BLUETOOTH device
may affect the operation of electronic medical
devices. Turn off this unit and other BLUETOOTH
devices in the following locations, as it may cause
an accident.
– where inflammable gas is present, in a hospital,
train, airplane, or petrol station
– near automatic doors or a fire alarm
• This unit supports security capabilities that
comply with the BLUETOOTH standard to provide
a secure connection when the BLUETOOTH
wireless technology is used, but security may not
be enough depending on the setting. Be careful
when communicating using BLUETOOTH wireless
technology.
• We do not take any responsibility for the leakage
of information during BLUETOOTH
communication.
2GB

Table of Contents
Warning. . . . . . . . . . . . . . . . . . . . . . . . . . . . . . . . . . . 2
Getting Started
Guide to Parts and Controls . . . . . . . . . . . . . . . . . . 4
Performing Initial Settings. . . . . . . . . . . . . . . . . . . . 6
Preparing a Bluetooth® Device . . . . . . . . . . . . . . . . 6
Connecting Rear Camera. . . . . . . . . . . . . . . . . . . . . 7
Radio
Listening to the Radio . . . . . . . . . . . . . . . . . . . . . . . 8
Using Radio Option Functions . . . . . . . . . . . . . . . . 8
Playback
Playing a USB Device . . . . . . . . . . . . . . . . . . . . . . . . 9
Playing a BLUETOOTH Device . . . . . . . . . . . . . . . . . 9
Searching and Playing Tracks . . . . . . . . . . . . . . . . 10
Other Settings During Playback . . . . . . . . . . . . . . 10
Handsfree Calling
Preparing a Mobile Phone. . . . . . . . . . . . . . . . . . . . 11
Receiving a Call . . . . . . . . . . . . . . . . . . . . . . . . . . . . 11
Making a Call . . . . . . . . . . . . . . . . . . . . . . . . . . . . . . 11
Available Operations During a Call . . . . . . . . . . . . . 12
Useful Functions
Apple CarPlay . . . . . . . . . . . . . . . . . . . . . . . . . . . . . . 12
Android Auto™. . . . . . . . . . . . . . . . . . . . . . . . . . . . . 12
WebLink™. . . . . . . . . . . . . . . . . . . . . . . . . . . . . . . . . 13
Using Gesture Command . . . . . . . . . . . . . . . . . . . . 13
Additional Information
Updating the Firmware . . . . . . . . . . . . . . . . . . . . . . 16
Precautions . . . . . . . . . . . . . . . . . . . . . . . . . . . . . . . 16
Specifications . . . . . . . . . . . . . . . . . . . . . . . . . . . . . . 18
Troubleshooting . . . . . . . . . . . . . . . . . . . . . . . . . . . 19
Messages . . . . . . . . . . . . . . . . . . . . . . . . . . . . . . . . . 22
Connection
Connection . . . . . . . . . . . . . . . . . . . . . . . . . . . . . . . . 23
Settings
Basic Setting Operation . . . . . . . . . . . . . . . . . . . . . 14
General Settings (General) . . . . . . . . . . . . . . . . . . 14
Sound Settings (Sound). . . . . . . . . . . . . . . . . . . . . 14
Visual Settings (Visual) . . . . . . . . . . . . . . . . . . . . . . 15
BLUETOOTH Settings (Bluetooth) . . . . . . . . . . . . . . 15
3GB
Getting Started
OPTION
VOICE
HOME
ATT
Guide to Parts and Controls
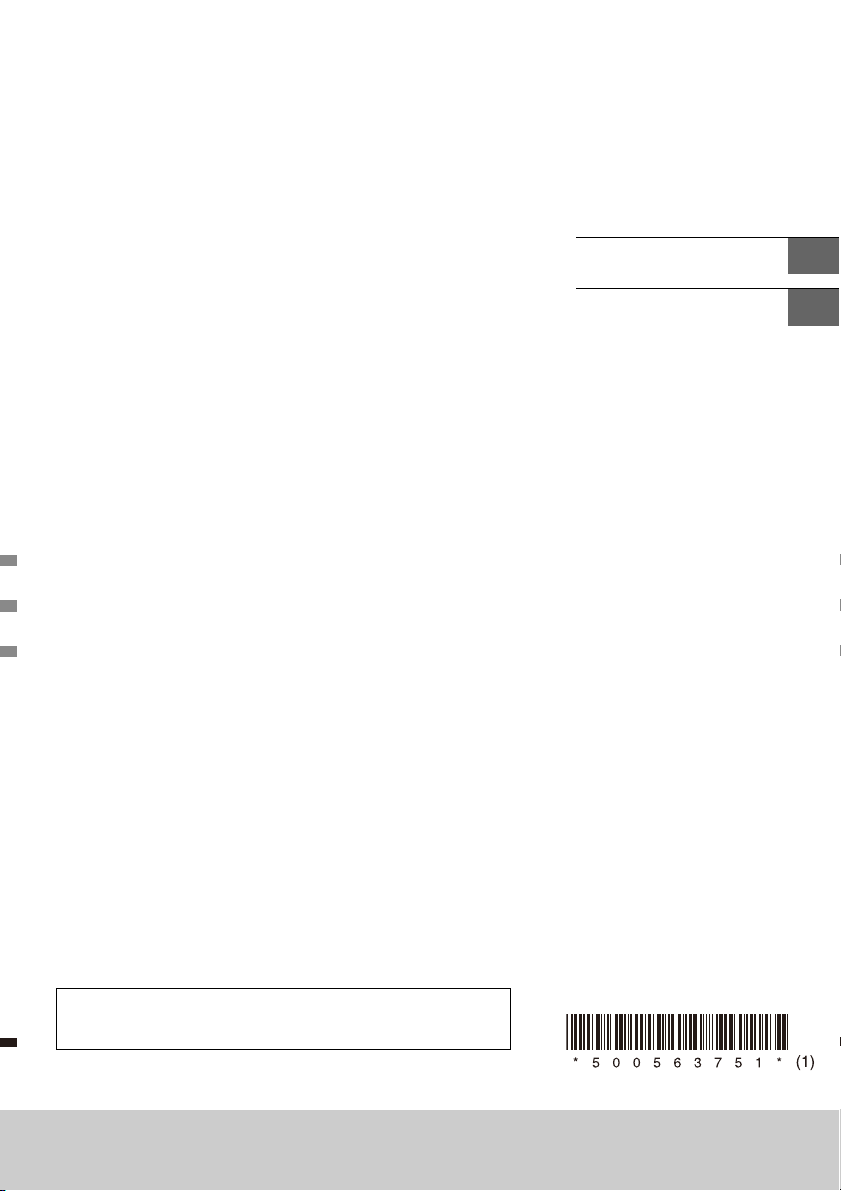
Main unit
Display/touch panel
Microphone (inner panel)
In order for the handsfree function to work
properly, do not cover the microphone with
tape, etc.
USB port 1
Supports audio/video playback from a
smartphone or USB device.
HOME
Displays the HOME screen.
ATT (attenuate)
Press and hold for 1 second to attenuate the
sound.
To cancel, press and hold again, or press VOL +.
VOL (volume) +/–
/ (previous/next)
Functions differently depending on the selected
source:
– Radio: select a preset station.
– USB/BT Audio: move to the previous/next file.
Press and hold to:
– Radio: tune into a station automatically
(SEEK+/SEEK–).
– USB/BT Audio: fast-reverse/fast-forward.
OPTION
Displays the OPTION screen (page 5).
VOICE
Press and hold to activate the voice command
function for Apple CarPlay and Android Auto.
4GB
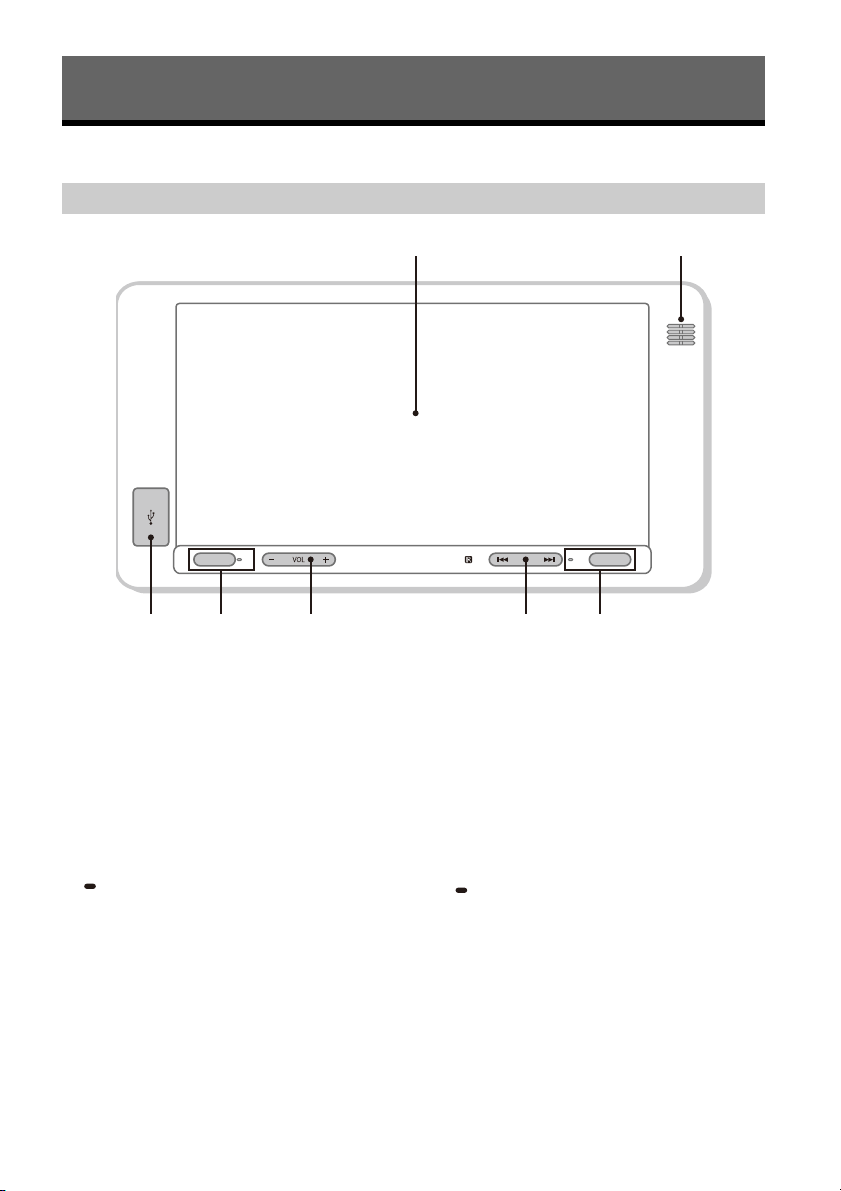
Steering wheel remote control Screen displays
Playback screen:
/
Radio:
Tune in preset radio stations. Press and hold to
tune automatically.
USB/BT Audio:
Skip a track. Press and hold to fast-reverse/fastforward a track.
(volume) /
Adjusts the volume. Press and hold to continue
adjusting the volume.
MODE
Changes the source.
Selecting the radio band/transferring a call are
not available with this button.
(speech)
Activates the voice command function for Apple
CarPlay and Android Auto.
(on hook)
Ends a call/rejects an incoming call.
(off hook)
Answers a call.
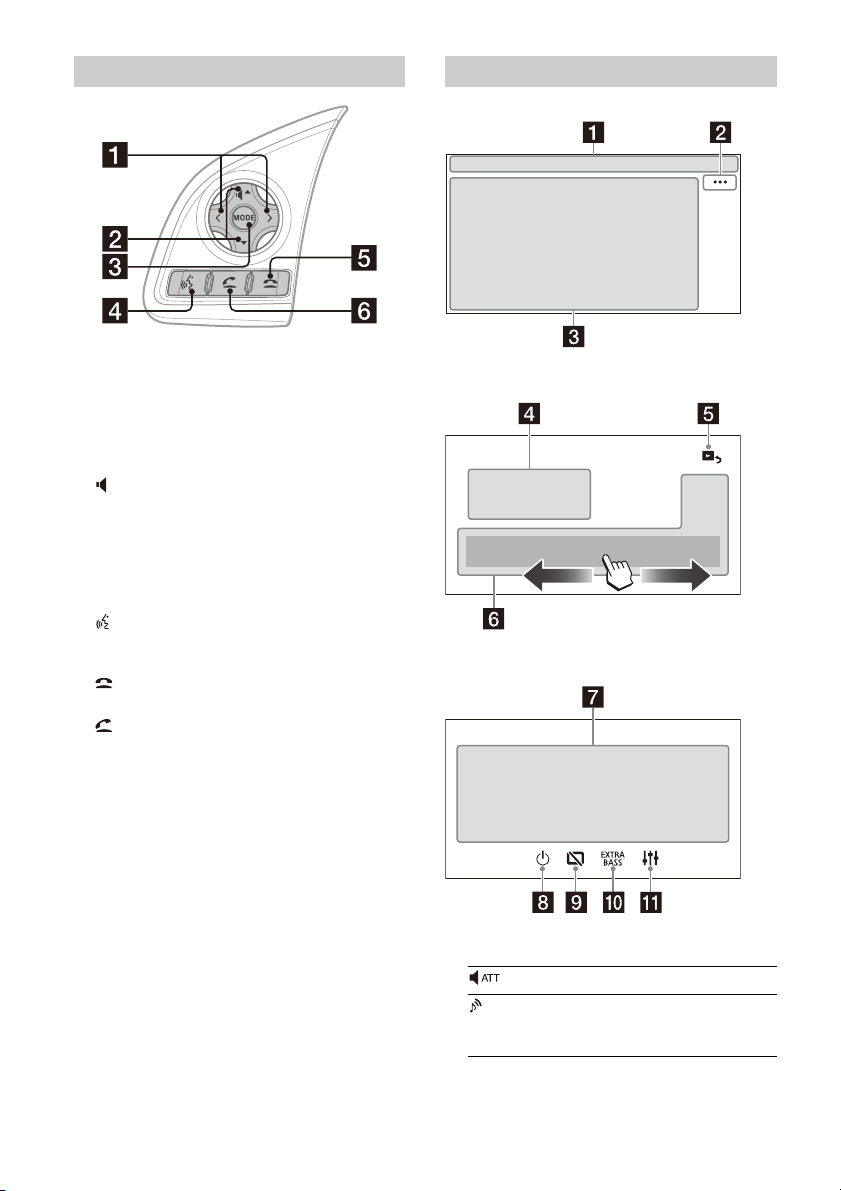
HOME screen:
OPTION screen:
Status indication
Lights up when the sound is attenuated.
Lights up when the audio device is
playable by enabling the A2DP
(Advanced Audio Distribution Profile).
5GB
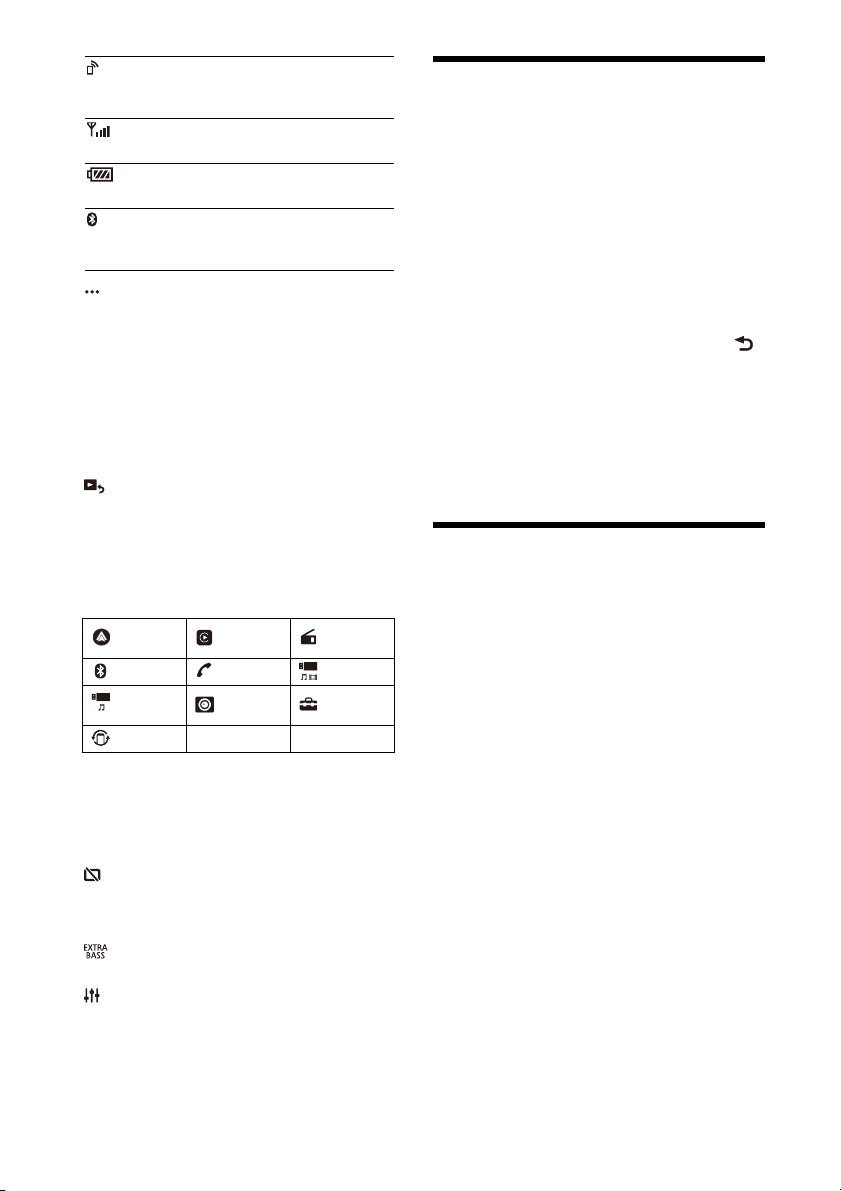
Lights up when handsfree calling is
available by enabling the HFP (Handsfree
Profile).
Indicates the signal strength status of
the connected mobile phone.
Indicates the remaining battery status of
the connected mobile phone.
Lights up when the BLUETOOTH signal is
on. Flashes when the connection is in
progress.
(source option)
Opens the source option menu. The available
items differ depending on the source.
Application specific area
Displays playback controls/indications or show
the unit’s status. Displayed items differ
depending on the source.
Clock
Displays the time which are set on the Date/
Time setting (page 14).
(return to the playback screen)
Switches from the HOME screen to the playback
screen.
Sources and Settings select keys
Changes the source or make various settings.
Flick to select the setting icon and other icons.
Touch the source icon you want to select.
Android
Auto
BT Audio Phone USB port 1
USB port 2
WebLi nk
Apple
CarPlay
Rear
Camera
Radio
Settings
Performing Initial Settings
You need to perform initial settings before
operating the unit for the first time, after replacing
the ca r batter y, or changing connections.
If the initial settings screen does not appear when
you turn on the unit, perform the factory reset
(page 14) to initialize the unit.
1 Touch [Language], then set the display
language.
2 Touch [Set Date/Time], then set the date
and time.
3 Touch [Tuning Steps], then set the FM/AM
tuning step.
4 To return to the previous display, touch ,
then touch [OK].
The startup caution appears.
5 Read through the startup caution, then if
you accept all conditions, touch [Close].
The setting is complete.
This setting can be further configured in the setting
menu (page 14).
Preparing a Bluetooth® Device
You can enjoy music or perform handsfree calling
depending on the BLUETOOTH compatible device
such as smartphones, mobile phones, and audio
devices (hereafter “BLUETOOTH device” if not
otherwise specified). For details on connecting,
refer to the operating instructions supplied with the
device.
Before connecting the device, turn down the
volume of this unit; otherwise, a loud sound may
result.
Sound select keys
Changes the sound.
(standby)
Turns the unit in standby mode (USB charging is
still available). To resume, press any buttons.
(monitor off)
Turns off the monitor. When the monitor is
turned off, touch any part of the display to turn it
back on.
(EXTRA BASS)
Changes the EXTRA BASS setting (page 14).
(EQ10/Subwoofer)
Changes the EQ10/Subwoofer setting (page 14).
6GB

Pairing and connecting with a
BLUETOOTH device
When connecting a BLUETOOTH device for the first
time, mutual registration (called “pairing”) is
required. Pairing enables this unit and other devices
to recognize each other.
Connecting with a paired BLUETOOTH
device
To use a paired device, connection with this unit is
required. Some paired devices will connect
automatically.
1 Place the BLUETOOTH device within 1 m
(3 ft) of this unit.
2 Press HOME, then touch [Settings].
3 Touch [Bluetooth].
4 Touch [Bluetooth Connection], then set the
signal to [ON].
The BLUETOOTH signal is turned on and lights
up on the status bar of the unit.
5 Touch [Pairing].
flashes while the unit is in pairing standby
mode.
6 Perform pairing on the BLUETOOTH device
so it detects this unit.
7 Select [Xpander] shown in the display of the
BLUETOOTH device.
Repeat from step 5 if your model name does not
appear.
If the connection confirmation display appears,
operate the BLUETOOTH device to approve the
connection, then touch [OK] on the unit and/or
the BLUETOOTH device.
8 If passkey* input is required on the
BLUETOOTH device, input [0000].
* Passkey may be called “passcode,” “PIN code,” “PIN
number,” “password,” etc., depending on the
BLUETOOTH device.
When pairing is made, stays lit.
9 Select this unit on the BLUETOOTH device to
establish the BLUETOOTH connection.
or lights up when the connection is made.
Notes
• The unit can only be connected with one BLUETOOTH
device at a time.
• To disconnect the BLUETOOTH connection, turn the
connection off from either the unit or the BLUETOOTH
device.
• BLUETOOTH pairing is not possible while Apple CarPlay or
Android Auto is running.
1 Press HOME, then touch [Settings].
2 Touch [Bluetooth].
3 Touch [Bluetooth Connection], then touch
[ON].
Make sure that lights up on the status bar of
the unit.
4 Activate the BLUETOOTH function on the
BLUETOOTH device.
5 Operate the BLUETOOTH device to connect
to this unit.
or lights up on the status bar.
To connect the last-connected device from
this unit
When the ignition is turned to on with the
BLUETOOTH signal activated, this unit searches for
the last-connected BLUETOOTH device, and
connection is made automatically.
Note
While streaming BLUETOOTH audio, you cannot connect
from this unit to the mobile phone. Connect from the mobile
phone to this unit instead.
Connecting Rear Camera
By connecting the optional rear camera to the
CAMERA IN terminal, you can display the picture
from the rear camera.
To display the picture from the rear camera
Press HOME, touch [Rear Camera].
7GB
Radio
Listening to the Radio
Tuning step setting is required (page 14).
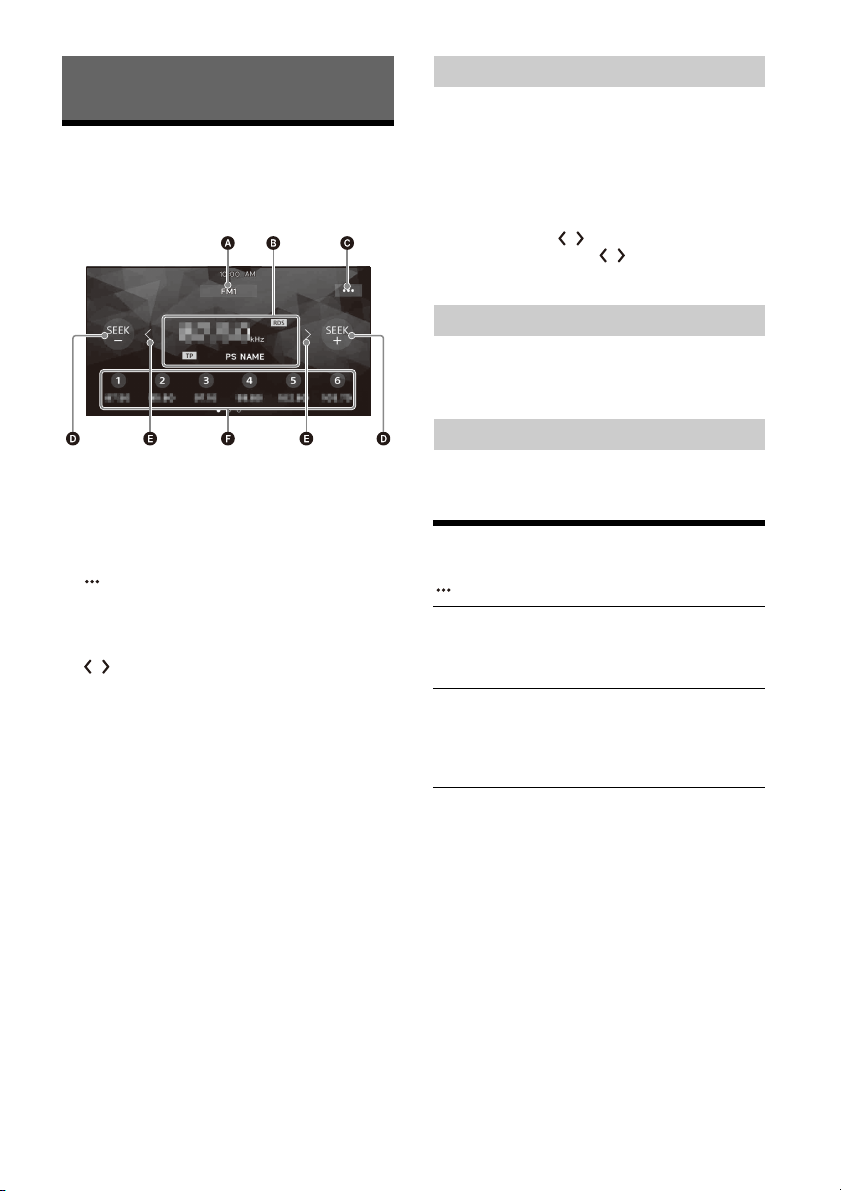
Press HOME, then touch [Radio].
Reception controls/indications
Current band
Change the band (FM1, FM2, FM3, AM1 or AM2).
Current frequency, program service name*,
RDS (Radio Data System) indication*
* Only available during RDS reception.
(radio option)
Open the radio option menu.
SEEK-/SEEK+
Tune in automatically.
/
Tune in manually.
Touch and hold to continuously skip
frequencies.
Preset numbers
Select a preset station. Swipe right/left to show
the other preset stations.
Touch and hold to store the current frequency in
that preset.
Tuning
1 Select the desired band (FM1, FM2, FM3,
AM1 or AM2).
2 Perform tuning.
To t un e a utomati cal ly
Touc h S EE K-/ SE EK +.
Scanning stops when the unit receives a station.
To tune manually
Touch and hold / to locate the approximate
frequency, then touch / repeatedly to finely
adjust to the desired frequency.
Storing manually
1 While receiving the station that you want to
store, touch and hold the desired preset
number.
Receiving stored stations
1 Select the band, then touch the desired
preset number.
Using Radio Option Functions
The following functions are available by touching
.
BTM (Best Tuning Memory)
Stores stations in order of frequency on the
preset numbers. 18 stations can be stored for FM
and 12 stations for AM as preset stations.
PTY
Select a program type from the PTY list to search
for a station broadcasting the selected program
type.
(Only available during FM reception.)
8GB
Playback
Playing a USB Device
MSC (Mass Storage Class) type USB devices*1
compliant with the USB standard can be used.
MTP (Media Transfer Protocol) type USB devices*
can be used only when connected to the USB port
2.
*1 e.g., a USB flash drive, digital media player, Android™
phone
*2 Some digital media players or Android phones may
require setting to MTP mode.
Notes
• For details on the compatibility of your USB device, visit
the support site on the back cover.
• For details on the supported file formats, see “Supported
formats for USB playback” (page 17).
1 Turn down the volume on the unit.
2 Connect the USB device to the USB port.
3 Press HOME, then touch [USB port 1] or [USB
port 2].
Playback starts.
To rem ov e t he de vi ce
Turn the unit off or turn the ignition switch to the
ACC off position, then remove the USB device.
USB port 1 and USB port 2
When connecting the USB devices, select the USB
port 1 or the USB port 2 according to the features to
be used.
Supported features
Apple CarPlay* –
Android Auto* –
WebLink™ –
FAT1 2
File system
Playable audio
format
FAT1 6
FAT3 2
exFAT –
MP3
WMA
FLAC
WAV –
AAC –
USB
port 1
1*2
USB
port 2
Supported features
MPEG-4 –
Playable video
format
USB connection
mode
: Available, –: Not supported
* Apple CarPlay and/or Android Auto may not be available
in your country or region.
WMV –
MKV –
Xvid –
MSC
MTP –
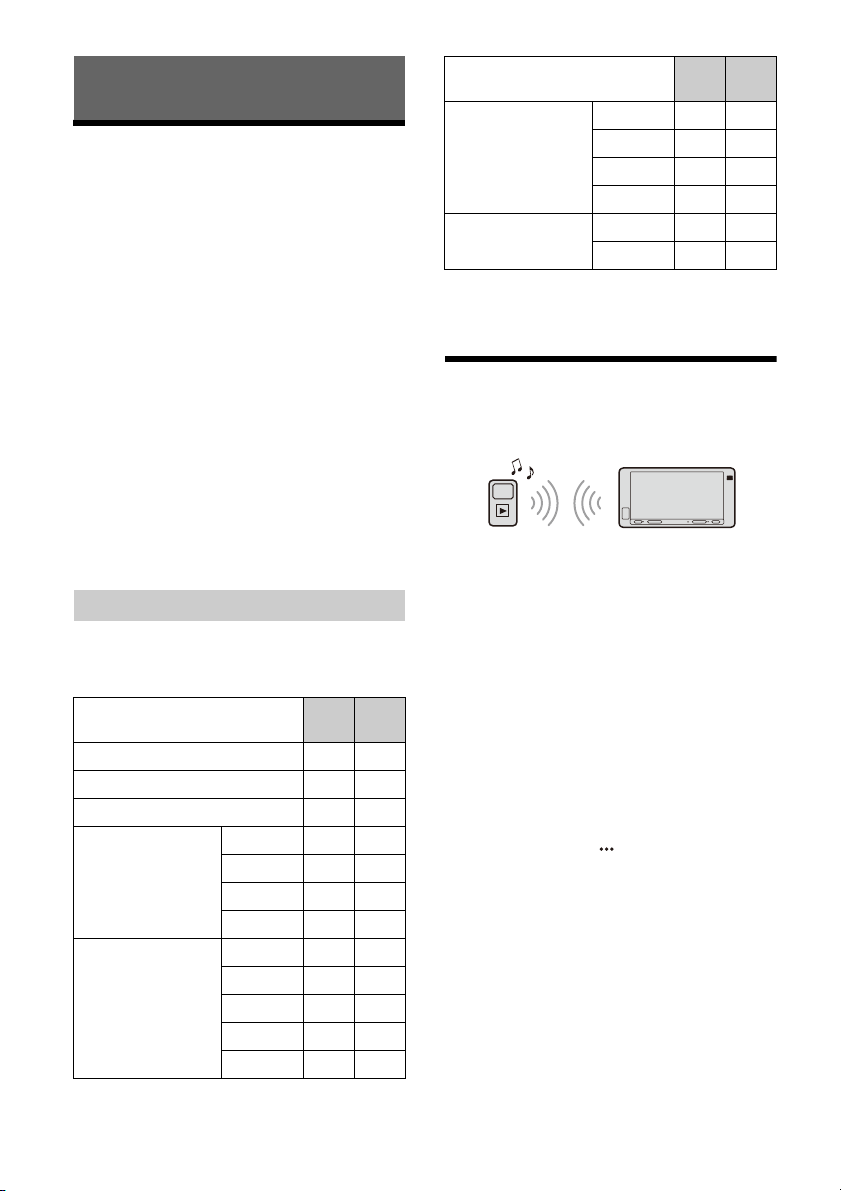
Playing a BLUETOOTH Device
You can play contents on a connected device that
supports BLUETOOTH A2DP (Advanced Audio
Distribution Profile).
1 Make a BLUETOOTH connection with the
audio device (page 7).
2 Press HOME, then touch [BT Audio].
3 Operate the audio device to start playback.
Notes
• Depending on the audio device, information such as title,
track number/time, and playback status may not be
displayed on this unit.
• Even if the source is changed on this unit, playback of the
audio device does not stop.
• BLUETOOTH pairing is not possible while Apple CarPlay is
running.
To match the volume level of the BLUETOOTH
device to other sources
You can reduce the volume level differences
between this unit and the BLUETOOTH device:
During playback, touch , then set [Input Level]
between –6 and +6.
USB
port 1
USB
port 2
9GB
Searching and Playing Tracks
Repeat play and shuffle play
1 During playback, touch (repeat) or
(shuffle) repeatedly until the desired play
mode appears.
Playback in the selected play mode may take
time to start.
Available play modes differ depending on the
selected sound source and connected device.
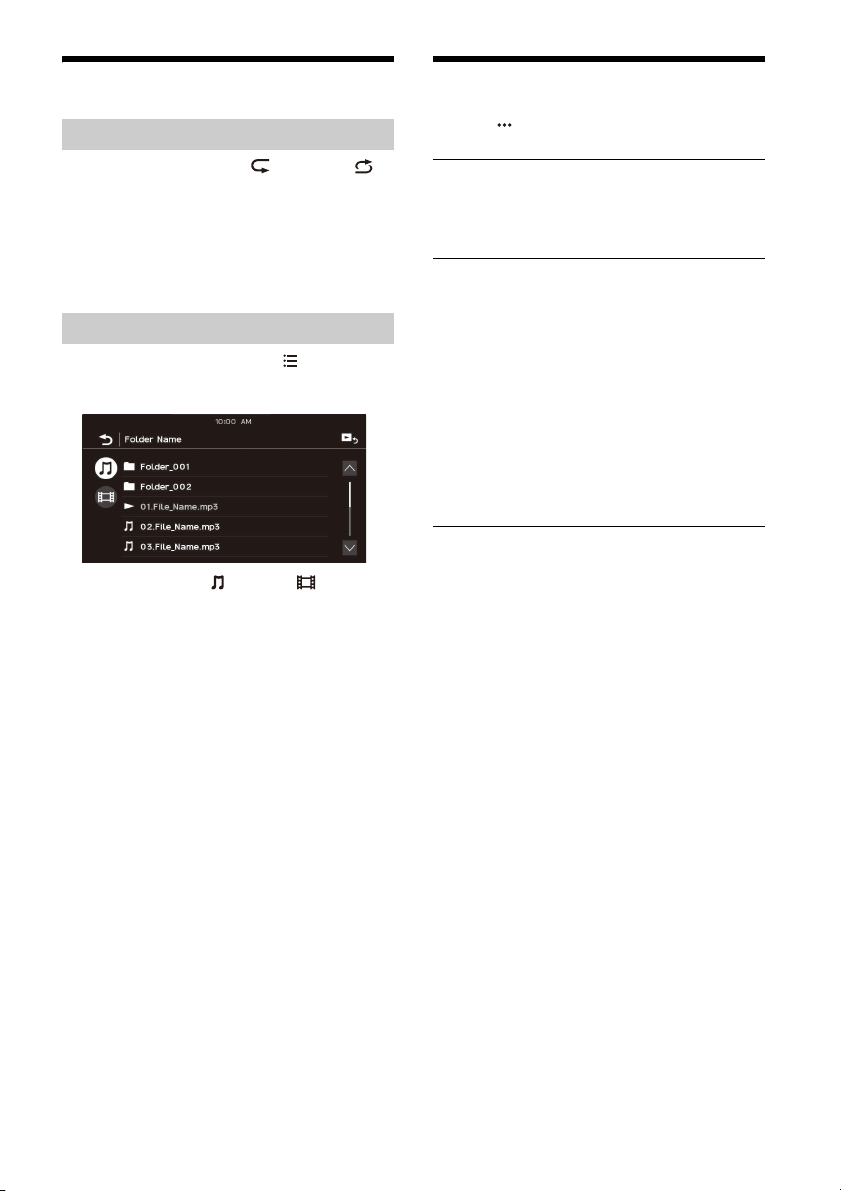
Searching for a file from the list screen
1 During USB playback, touch .
The list screen from the currently played item
appears.
Furthermore, touch (audio) or (video) to
list up by file type.
2 To uch th e d es ired item.
Playback starts.
Other Settings During Playback
Further settings are available in each source by
touching . The available items differ depending
on the source.
Picture EQ
Adjusts the picture quality according to your
taste: [Dynamic], [Standard], [Theater], [Custom].
(Available only when the parking brake is applied
and USB video is selected).
Aspect
Selects an aspect ratio for the screen of the unit.
(Available only when the parking brake is applied
and USB video is selected).
Normal
Displays a 4:3 picture in its original size, with side
bars to fill the 16:9 screen.
Zoom
Displays a 16:9 picture that has been converted
into 4:3 letter box format.
Full
Displays a 16:9 picture in its original size.
Captions
Enlarges the picture horizontally, while fitting
captions in the screen.
10GB
Handsfree Calling
Preparing a Mobile Phone
To use a mobile phone, connect it with this unit. For
details, see “Preparing a Bluetooth® Device”
(page 6).
Note
The handsfree calling functions are not available when the
Apple CarPlay or Android Auto function is activated. In this
case, use the handsfree calling functions on its application.
Receiving a Call
1 Touch when a call is received.
The phone call starts.
Note
The ringtone and talker’s voice are output from the front
speakers. To select the speakers for handsfree calling, press
HOME, then touch [Settings] and select [Phone Call Sound]
in [Sound] (page 15).
To reject/end a call
Touch .
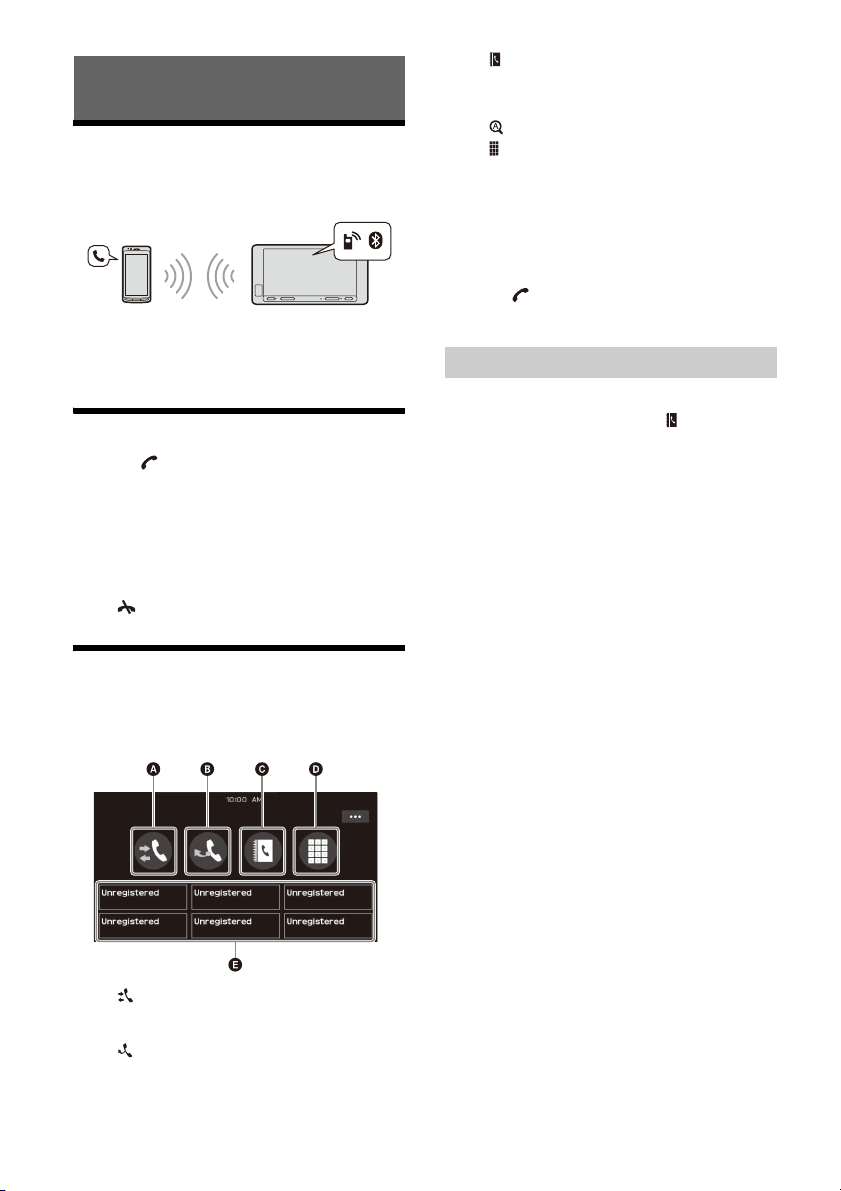
(contacts)*
Select a contact from the name list/number
list. To search for the desired contact in
alphabetical order from the name list, touch
.
(dialpad)
Enter the phone number.
Favo rites
Select the stored contact.
To store the contact, see “Adding phone
numbers to Favorites” (page 11).
* The mobile phone needs to support PBAP (Phone Book
Access Profile).
3 Tou ch .
The phone call starts.
Adding phone numbers to Favorites
You can store up to 6 contacts in the Favorites.
1 On the phone screen, touch (contacts)
and select a phone number you want to
store in the Favorites.
The confirmation display appears.
2 Touch [Add to Favorites].
3 Touch the desired preset in the Favorites to
store the phone number.
The contact is stored in the Favorites.
Making a Call
1 Press HOME, then touch [Phone].
2 Touch one of the call icons on the
BLUETOOTH phone display.
(call history)*
Select a contact from the call history list. The
unit stores the last 20 calls.
(redial)
Make a call automatically to the last contact
you made.
11GB

Available Operations During a
Call
Useful Functions
To adjust the ringtone volume
Press VOL +/– while receiving a call.
To adjust the talker’s voice volume
Press VOL +/– during a call.
To adjust the volume for the other party (Mic
gain adjustment)
During a handsfree call, touch , then set
[MIC Gain] to [High], [Middle], or [Low].
To reduce echo and noise (Echo/noise
canceler mode)
During a call, touch , then set [Speech Quality] to
[Mode 1] or [Mode 2].
To switch between handsfree mode and
handheld mode
During a call, touch to switch the
phone call audio between the unit and mobile
phone.
Note
Depending on the mobile phone, this operation may not be
available.
To answer an incoming call automatically
Touch , then set [Auto Answer] to [ON].
Apple CarPlay
Apple CarPlay lets you use your iPhone in the car in
a way that allows you to stay focused on the road.
(Available only when your iPhone is connected to
the USB port 1.)
Notes on using Apple CarPlay
• Check the Apple CarPlay website for supported
iOS versions. Update to the latest iOS version
before use.
• For details about Apple CarPlay, refer to the
manual supplied with your iPhone, or visit the
Apple CarPlay website.
• Since the GPS on your iPhone is used, place your
iPhone where it can easily receive a GPS signal.
• Apple CarPlay may not be available in your
country or region.
1 Connect your iPhone to the USB port 1.
To connect an iPhone, use a USB connection
cable for iPhone (not supplied).
2 Press HOME, then touch [Apple CarPlay].
Your iPhone’s display appears on the display of
the unit. Touch and control the applications.
Use of the Apple CarPlay logo means that a vehicle
user interface meets Apple performance standards.
Apple is not responsible for the operation of this
vehicle or its compliance with safety and regulatory
standards.
Please note that the use of this product with iPhone
may affect wireless performance.
12GB
Android Auto™
Android Auto extends the Android platform into the
car in a way that’s purpose-built for driving.
(Available only when your Android phone is
connected to the USB port 1.)
Notes on using Android Auto
• Check the Android Auto website for supported OS
versions. Update to the latest OS version before
use.
• Your Android phone needs to support Android
Auto.
• Download the Android Auto app on Google Play.
• For details about Android Auto, refer to the
manual supplied with your Android phone, or visit
the Android Auto website.
• Since the GPS on your Android phone is used,
place your Android phone where it can easily
receive a GPS signal.
• Android Auto may not be available in your country
or region.

1 Connect your Android phone to the USB
port 1.
To connect an Android phone, use an
appropriate connection cable (not supplied).
2 Press HOME, then touch [Android Auto].
The Android Auto interface will be displayed fullscreen on the display of the unit. Touch and
control the applications.
WebLink™
The “WebLink Host” app allows you to enjoy the
“WebLink Apps” such as a video or music player on
the connected iPhone/Android phone.
(Available only when your iPhone/Android phone is
connected to the USB port 1.)
Notes on using WebLink™
• Check the WebLink™ website for supported OS
versions. Update to the latest OS version before
use.
• For details on compatible models, refer to the
compatibility list on the following site:
http://abaltatech.com/WL
• Download the “WebLink Host” app available on
Google Play for your Android phone, and available
on the App Store for your iPhone.
• A network connection may be required when
configuring settings, such as during the initial
connection setup. Make sure that a network
connection is available on your iPhone/Android
phone.
• When using the Cast function, settings on your
iPhone/Android phone may be required.
• For details about the “WebLink Apps”, visit the
website for the “WebLink Apps”.
• The WebLink™ function and/or a certain
“WebLink Apps” may not be available in your
country or region.
• When using the Cast function and connecting the
iPhone, the display direction is the same as the
display of the iPhone.
1 Connect your iPhone/Android phone with
main unit via BLUETOOTH.
2 Connect your iPhone/Android phone to the
USB port 1.
To connect an iPhone, use a USB connection
cable for iPhone (not supplied).
To connect an Android phone, use an
appropriate connection cable (not supplied).
3 Press HOME, then touch [WebLink].
The WebLink™ display appears on the unit.
Touch and control the apps.
Tip
You can switch the app between Apple CarPlay/Android
Auto and WebLink™ if these apps are installed on your
iPhone/Android phone.
Using Gesture Command
You can perform frequently-used operations by
swiping your finger on the reception/playback
display.
Note
The gesture commands explained below are not available
on the screens of Apple CarPlay, Android Auto and
WebLi nk™.
Do this To
Radio reception:
seek forward stations.
(The same as pressing and
holding .)
Swipe left to right
Swipe right to left
Swipe upwards
Swipe downwards
Video/audio playback:
skip forward a file/track.
(The same as .)
Radio reception:
seek backward stations.
(The same as pressing and
holding .)
Video/audio playback:
skip backward a file/track.
(The same as .)
Radio reception:
receive stored stations
(go forward).
Radio reception:
receive stored stations
(go backward).
13GB
Settings
Basic Setting Operation
You can set items in the following setup categories:
General Settings (General), Sound Settings (Sound),
Visual Settings (Visual), BLUETOOTH Settings
(Bluetooth)
1 Press HOME, then touch [Settings].
2 Touch one of the setup category.
The items that can be set differ depending on
the source and settings.
3 Move the scrollbar up and down to select
the desired item.
To return to the previous display
Tou ch .
To switch to the playback screen
Tou ch .
General Settings (General)
Language
Selects the display language: [English],
[Español], [Français], [Deutsch], [Italiano],
[Português], [Русский], [ ], [ ], [ ],
[ ], [ ], [Indonesian].
Date/Time
Set Date/Time
Sets the date and clock time: [Auto(RDS)],
[Manual].
Date Format
Selects the format: [DD-MM-YYYY], [MM-DDYYYY], [YYYY-MM-DD].
Time Format
Selects the format: [12-hour], [24-hour].
Beep
Activates the operation sound: [OFF], [ON].
Rear Camera
Selects the image from the rear camera: [OFF],
[ON].
Rear Camera Guide Line
Displays the rear camera guide lines: [OFF], [ON].
(Available only when [Rear Camera] is set to
[ON].)
Driving Position
Selects the driving position to optimize usability
of Apple CarPlay and Android Auto: [Left Side],
[Right Side]
Tuning Steps
Sets the FM/AM tuning step of your country:
[50kHz/9kHz], [100kHz/10kHz], [200kHz/10kHz].
(Available only while the source is off and the
clock is displayed.)
Factory Reset
Initializes all the settings to the factory settings.
Firmware Version
Updates and confirms the firmware version.
Open Source Licenses
Displays the software licenses.
Sound Settings (Sound)
EXTRA BASS
Reinforces bass sound in synchronization with
the volume level: [OFF], [1], [2].
EQ10/Subwoofer
Selects an equalizer curve and adjusts the
subwoofer level.
EQ10
Selects the equalizer curve: [Xpander], [R&B],
[Rock], [Pop], [Dance], [Hip-Hop], [EDM], [Jazz],
[Salsa], [Custom], [OFF].
[Custom] adjusts the equalizer curve: –6 to +6.
Subwoofer
Adjusts the volume level of the subwoofer:
[OFF], –10 to +10.
Balance/Fader
Adjusts the balance/fader level.
Balance
Adjusts the sound balance between the left and
right speakers: [L15] to [R15].
Fader
Adjusts the sound balance between the front
and rear speakers: [Front 15] to [Rear 15].
Crossover
Adjusts the cut-off frequency and subwoofer
phase.
High Pass Filter
Selects the cut-off frequency of the front/rear
speakers: [OFF], [50Hz], [60Hz], [80Hz], [100Hz],
[120Hz].
Low Pass Filter
Selects the cut-off frequency of the subwoofer:
[OFF], [50Hz], [60Hz], [80Hz], [100Hz], [120Hz].
Subwoofer Phase
Selects the subwoofer phase: [Normal],
[Reverse].
14GB

DSO (Dynamic Stage Organizer)
Enhances audio output: [OFF], [Low], [Middle],
[High].
Phone Call Sound
Selects the speakers for handsfree calling:
[Front], [Rear], [All].
Visual Settings (Visual)
Wallpaper
Changes the wallpaper by touching the desired
color.
Dimmer for Monitor & Illum.
Dims the display and the button illumination:
[OFF], [Auto], [ON].
([Auto] is available only when the illumination
control lead is connected and works when the
head light is turned on.)
adjusts the brightness level when the
dimmer is activated: -5 to +5.
Illum. Level on Monitor OFF
Dims the button illumination when the monitor
is turned off: [OFF], [1], [2], [3], [4].
BLUETOOTH Settings (Bluetooth)
Bluetooth Connection
Activates the BLUETOOTH signal: [OFF], [ON],
[Pairing] (enters into pairing standby mode).
Bluetooth Device Info
Displays the information of the device connected
to the unit.
(Available only when [Bluetooth Connection] is
set to [ON] and a BLUETOOTH device is
connected to the unit.)
Bluetooth Reset
Initializes all BLUETOOTH-related settings such as
pairing information, call history, history of
connected BLUETOOTH devices, etc.
15GB

Additional Information
Updating the Firmware
To update the firmware, visit the support site on the
back cover, then follow the online instructions.
Note
During the update, do not remove the USB device.
Notes on LCD panel
• Do not get the LCD panel wet or expose it to
liquids. This may cause a malfunction.
Precautions
• Power antenna (aerial) extends automatically.
• When you transfer ownership or dispose of your
car with the unit installed, initialize all the settings
to the factory settings by performing the factory
reset (page 14).
• Do not splash liquid onto the unit.
Notes on safety
• Comply with your local traffic rules, laws, and
regulations.
• While driving
– Do not watch or operate the unit, as it may lead
to distraction and cause an accident. Park your
car in a safe place to watch or operate the unit.
– Do not use the setup feature or any other
function which could divert your attention from
the road.
– When backing up your car, be sure to look back
and watch the surroundings carefully for your
safety even if the rear camera is connected. Do
not depend on the rear camera exclusively.
• While operating
– Do not insert your hands, fingers, or foreign
objects into the unit as it may cause injury or
damage to the unit.
– Keep small articles out of the reach of children.
– Be sure to fasten seatbelts to avoid injury in the
event of sudden movement of the car.
Preventing an accident
Pictures appear only after you park the car and
set the parking brake.
If the car starts moving during video playback,
the following caution is displayed and you
cannot watch the video.
[Video blocked for your safety.]
Do not operate the unit or watch the monitor
while driving.
• Do not press down hard on the LCD panel as doing
so can distort the picture or cause a malfunction
(i.e., the picture may become unclear or the LCD
panel may be damaged).
• Do not touch the panel with objects other than
with your finger as it may damage or break the
LCD p anel.
• Clean the LCD panel with a dry soft cloth. Do not
use solvents such as benzine, thinner,
commercially available cleaners, or antistatic spray.
• Do not use the unit outside the temperature range
0 ºC – 40 ºC (32 ºF – 104 ºF).
• If your car was parked in a cold or hot place, the
picture may not be clear. However, the monitor is
not damaged and the picture will become clear
after the temperature in your car becomes normal.
• Some stationary blue, red, or green dots may
appear on the monitor. These are called “bright
spots” and can happen with any LCD. The LCD
panel is precision-manufactured with more than
99.99% of its segments functional. However, it is
possible that a small percentage (typically 0.01%)
of the segments may not light up properly. This
will not, however, interfere with your viewing.
Notes on the touch panel
• This unit uses a capacitive touch panel. Touch the
panel directly with your fingertip.
• Multi-touch operation is not supported on this
unit.
• Do not touch the panel with sharp objects such as
a needle, pen, or fingernail. Operation with a
stylus is not supported on this unit.
• Touching the panel with a gloved finger may cause
the unit to operate incorrectly or not respond.
• Do not let any objects contact the touch panel. If
the panel is touched by an object other than your
fingertip, the unit may not respond correctly.
• Since glass material is used for the panel, do not
subject the unit to strong shock. If cracking or
chipping occurs on the panel, do not touch the
damaged part as it may cause injury.
• Keep other electrical devices away from the touch
panel. They may cause the touch panel to
malfunction.
• If there are water droplets on the touch panel, or if
you touch the panel with wet fingertips, the touch
panel may not react correctly.
16GB

Supported formats for USB playback
USB port 1:
WMA (.wma)*
Bit rate: 48 kbps – 192 kbps (Supports variable bit
rate (VBR))*
Sampling frequency*4: 44.1 kHz
MP3 (.mp3)*
Bit rate: 48 kbps – 320 kbps (Supports variable
bit rate (VBR))*
Sampling frequency*4: 32 kHz, 44.1 kHz, 48 kHz
AAC (.m4a)*
Bit rate: 40 kbps – 320 kbps (Supports variable
bit rate (VBR))*
Sampling frequency*4: 8 kHz – 48 kHz
Bit per sample (Quantization bit): 16 bits
FLAC (.flac)*
Sampling frequency*4: 8 kHz – 48 kHz
Bit per sample (Quantization bit): 16 bits
WAV (.wav)*
Sampling frequency*4: 8 kHz – 48 kHz
Bit per sample (Quantization bit): 16 bits, 24 bits
Xvid (.avi)
Video codec: MPEG-4 Advanced Simple Profile
Audio codec: MP3 (MPEG-1 Layer3)
Bit rate: Max. 4 Mbps
Frame rate: Max. 30 fps (30p/60i)
Resolution: Max. 1280 × 720*
MPEG-4 (.mp4)
Video codec: MPEG-4 Advanced Simple Profile,
AVC Baseline Profile
Audio codec: AAC
Bit rate: Max. 4 Mbps
Frame rate: Max. 30 fps (30p/60i)
Resolution: Max. 1280 × 720*
WMV (.wmv, .avi)*
Video codec: WMV3, WVC1
Audio codec: MP3, WMA
Bit rate: Max. 6 Mbps
Frame rate: Max. 30 fps
Resolution: Max. 720 × 480*
MKV (.mkv)
Video codec: MPEG-4 Advanced Simple Profile,
AVC Baseline Profile
Audio codec: MP3, AAC
Bit rate: Max. 5 Mbps
Frame rate: Max. 30 fps
Resolution: Max. 1280 × 720*
USB port 2:
WMA (.wma)*
Bit rate: 48 kbps – 192 kbps (Supports variable bit
rate (VBR))*
Sampling frequency*4: 44.1 kHz
MP3 (.mp3)*
Bit rate: 48 kbps – 320 kbps (Supports variable
bit rate (VBR))*
Sampling frequency*4: 32 kHz, 44.1 kHz, 48 kHz
FLAC (.flac)*
Sampling frequency*4: 8 kHz – 48 kHz
Bit per sample (Quantization bit): 8 bits, 16 bits,
24 bits
1*2
3
1*2
3
1*2
3
1*6
1
5
5
1
5
5
1*2
3
1*2
3
1
*1 Copyright-protected files and multi-channel audio files
cannot be played back.
*2 DRM (Digital Rights Management) files cannot be played
back.
*3 Non-standard bit rates or non-guaranteed bit rates are
included depending on the sampling frequency.
*4 Sampling frequency may not correspond to all encoders.
*5 These numbers indicate the maximum resolution of
playable video and do not indicate the player’s display
resolution. The display resolution is 800 × 480.
*6 Displaying the tag information is not supported.
Note
Some files may not be played back even though their file
formats are supported by the unit.
About iPhone
• Compatible iPhone models:
iPhone X, iPhone 8 Plus, iPhone 8, iPhone 7 Plus, iPhone 7,
iPhone SE, iPhone 6s Plus, iPhone 6s, iPhone 6 Plus,
iPhone 6, iPhone 5s
• Use of the Made for Apple badge means that an accessory
has been designed to connect specifically to the Apple
product(s) identified in the badge, and has been certified
by the developer to meet Apple performance standards.
Apple is not responsible for the operation of this device or
its compliance with safety and regulatory standards.
Please note that the use of this accessory with an Apple
product may affect wireless performance.
Notice on license
This product contains software that Sony uses under a
licensing agreement with the owner of its copyright. We are
obligated to announce the contents of the agreement to
customers under requirement by the owner of copyright for
the software.
For details on software licenses, see page 14.
17GB

Specifications
Monitor section
Display type: Wide LCD color monitor
Dimensions: 176 mm (6.95 in)
System: TFT active matrix
Number of pixels:
1,152,000 pixels (800 × 3 (RGB) × 480)
Color system: PAL/NTSC
Radio section
FM
Tuning range:
87.5 MHz – 108.0 MHz (at 50 kHz step)
87.5 MHz – 108.0 MHz (at 100 kHz step)
87.5 MHz – 107.9 MHz (at 200 kHz step)
FM tuning step:
50 kHz/100 kHz/200 kHz switchable
Usable sensitivity: 7 dBf
Signal-to-noise ratio: 70 dB (mono)
Separation at 1 kHz: 45 dB
AM
Tuning range:
531 kHz – 1,602 kHz (at 9 kHz step)
530 kHz – 1,710 kHz (at 10 kHz step)
AM tuning step:
9 kHz/10 kHz switchable
Sensitivity: 32 μV
USB player section
Interface:
USB port 1: USB (Hi-speed)
USB port 2: USB (Full-speed)
Maximum current:
USB port 1: 1.5 A
USB port 2: 500 mA
Wireless communication
Communication System:
BLUETOOTH Standard version 3.0
Output:
BLUETOOTH Standard Power Class 2
(Max. Conducted +1 dBm)
Maximum communication range*
Line of sight approx. 10 m (33 ft)
Frequency band:
2.4 GHz band (2.4000 GHz – 2.4835 GHz)
Modulation method: FHSS
Compatible BLUETOOTH Profiles*
A2DP (Advanced Audio Distribution Profile) 1.3
AVRCP (Audio Video Remote Control Profile) 1.3
HFP (Handsfree Profile) 1.6
PBAP (Phone Book Access Profile) 1.1
Corresponding codec: SBC, AAC
1
:
2
:
*1 The actual range will vary depending on factors such as
obstacles between devices, magnetic fields around a
microwave oven, static electricity, reception sensitivity,
antenna (aerial)’s performance, operating system,
software application, etc.
*2 BLUETOOTH standard profiles indicate the purpose of
BLUETOOTH communication between devices.
Power amplifier section
Outputs: Speaker outputs
Speaker impedance: 4 Ω – 8 Ω
Maximum power output: 55 W × 4 (at 4 Ω)
General
Power requirements: 12 V DC car battery
(negative ground (earth))
Rated current consumption: 10 A
Dimensions:
Approx. 210 mm × 109 mm × 139 mm
3
/8 in × 4 3/8 in × 5 1/2 in) (w/h/d)
(8
Mass: Approx. 1.1 kg (2 lb 7 oz)
Package contents:
Main unit (1)
Ask the dealer for detailed information.
Design and specifications are subject to change
without notice.
18GB

Copyrights
The Bluetooth® word mark and logos are registered
trademarks owned by Bluetooth SIG, Inc. and any use of
such marks by Sony Group Corporation and its subsidiaries
is under license. Other trademarks and trade names are
those of their respective owners.
Windows Media is either a registered trademark or
trademark of Microsoft Corporation in the United States
and/or other countries.
This product is protected by certain intellectual property
rights of Microsoft Corporation. Use or distribution of such
technology outside of this product is prohibited without a
license from Microsoft or an authorized Microsoft subsidiary.
Apple, iPhone, and Lightning are trademarks of Apple Inc.,
registered in the U.S. and other countries.
Apple CarPlay is a trademark of Apple Inc.
IOS is a trademark or registered trademark of Cisco in the
U.S. and other countries and is used under license.
Android, Android Auto, Google and Google Play are
trademarks of Google LLC.
WebLink is a registered trademark of Abalt a
Technologies,Inc. in the U.S. and a trademark in the other
count ries.
THIS PRODUCT IS LICENSED UNDER THE MPEG-4 VISUAL
PATENT PORTFOLIO LICENSE FOR THE PERSONAL AND NONCOMMERCIAL USE OF A CONSUMER FOR DECODING VIDEO
IN COMPLIANCE WITH THE MPEG-4 VISUAL STANDARD
(“MPEG-4 VIDEO”) THAT WAS ENCODED BY A CONSUMER
ENGAGED IN A PERSONAL AND NONCOMMERCIAL ACTIVITY
AND/OR WAS OBTAINED FROM A VIDEO PROVIDER
LICENSED BY MPEG LA TO PROVIDE MPEG-4 VIDEO.
NO LICENSE IS GRANTED OR SHALL BE IMPLIED FOR ANY
OTHER USE.
ADDITIONAL INFORMATION INCLUDING THAT RELATING TO
PROMOTIONAL, INTERNAL AND COMMERCIAL USES AND
LICENSING MAY BE OBTAINED FROM MPEG LA, LLC. SEE
HTTP://WWW.MPEGLA.COM
THIS PRODUCT IS LICENSED UNDER THE AVC PATENT
PORTFOLIO LICENSE FOR THE PERSONAL AND NONCOMMERCIAL USE OF A CONSUMER TO
(i)ENCODE VIDEO IN COMPLIANCE WITH THE AVC STANDARD
(“AVC VIDEO”)
AND/OR
(ii)DECODE AVC VIDEO THAT WAS ENCODED BY A
CONSUMER ENGAGED IN A PERSONAL AND
NON-COMMERCIAL ACTIVITY AND/OR WAS OBTAINED FROM
A VIDEO PROVIDER LICENSED TO PROVIDE AVC VIDEO. NO
LICENSE IS GRANTED OR SHALL BE IMPLIED FOR ANY OTHER
USE. ADDITIONAL INFORMATION MAY BE OBTAINED FROM
MPEG LA, L.L.C. SEE HTTP://WWW.MPEGLA.COM
THIS PRODUCT IS LICENSED UNDER THE AVC PATENT
PORTFOLIO LICENSE AND VC-1 PATENT PORTFOLIO LICENSE
FOR THE PERSONAL AND NON-COMMERCIAL USE OF A
CONSUMER TO DECODE VIDEO IN COMPLIANCE WITH THE
AVC STANDARD (“AVC VIDEO”) AND/OR THE VC-1 STANDARD
(“VC-1 VIDEO”) THAT WAS ENCODED BY A CONSUMER
ENGAGED IN A PERSONAL AND NONCOMMERCIAL ACTIVITY
AND/OR WAS OBTAINED FROM A VIDEO PROVIDER
LICENSED TO PROVIDE AVC VIDEO AND/OR VC-1 VIDEO. NO
LICENSE IS GRANTED OR SHALL BE IMPLIED FOR ANY OTHER
USE. ADDITIONAL INFORMATION MAY BE OBTAINED FROM
MPEG LA, L.L.C. SEE HTTP://WWW.MPEGLA.COM
All other trademarks are trademarks of their respective
owners.
Troubleshooting
The following checklist will help you remedy
problems you may encounter with your unit.
Before going through the checklist below, check
the connection and operating procedures.
If the problem is not solved, visit the support site on
the back cover.
General
There is no beep sound.
An optional power amplifier is connected and
you are not using the built-in amplifier.
The fuse has blown.
The unit makes noise when the position of the
ignition is switched.
The leads are not matched correctly with the car’s
accessory power connector.
The display disappears from/does not appear on
the monitor.
The monitor off function is activated (page 6).
– Touch anywhere on the display to turn the
display back on.
Menu items cannot be selected.
Unavailable menu items are displayed in gray.
The USB functions do not work properly.
Do not use a USB extension cable as it may cause
deterioration of signal quality.
– Use a shorter USB cable when connecting the
USB device, or replace the USB cable with a new
one.
The unit cannot be operated.
Press and hold HOME for more than 10 seconds
to restart the unit. For your safety, do not restart
the unit while you are driving.
The clock set automatically is not accurate.
The clock data on radio waves is not accurate.
– Set the clock manually (page 14).
Touch panel operation
The touch panel does not react to your touch
correctly.
Touch one part of the touch panel at a time. If
two or more parts are touched simultaneously,
the touch panel will not react correctly.
Touch the pressure sensitive panel firmly.
The touch panel does not react when touching
with a wet fingertip or when water droplets are
on the touch panel.
– Dr y your wet fingertips well, or fully wipe water
droplets off of the touch panel.
19GB

Multi-touch is not recognized.
Multi-touch operation is not supported on this
unit.
Radio reception
The radio reception is poor.
Static noise occurs.
Connect the antenna (aerial) firmly.
The stations cannot be received.
The tuning step setting has been erased.
– Set the tuning step again (page 14).
RDS
PTY displays [PTY not found.].
The current station is not an RDS station, or the
radio reception is poor.
Picture
There is no picture/picture noise occurs.
A connection has not been made correctly.
Check the connection between this unit and
other equipment and set the input selector of the
equipment to the source corresponding to this
unit.
Installation is not correct.
– Install the unit at an angle of less than 30° in a
sturdy part of the car.
The parking lead (light green) is not connected to
the parking brake switch lead, or the parking
brake is not applied.
The picture does not fit in the screen.
The aspect ratio is fixed on the playback source.
Sound
There is no sound/sound skips/sound cracks.
A connection has not been made correctly.
Check the connection between this unit and the
connected equipment and set the input selector
of the equipment to the source corresponding to
this unit.
Installation is not correct.
– Install the unit at an angle of less than 30° in a
sturdy part of the car.
The unit is in pause/reverse/fast-forward mode.
The settings for the outputs are not made
correctly.
The volume is too low.
The ATT function is activated.
The format is not supported.
– Check if the format is supported by this unit
(page 17).
Sound is noisy.
Keep cords and cables away from each other.
USB playback
Items cannot be played.
Reconnect the USB device.
The USB port to which the USB device is
connected is not appropriate.
– Connect the USB device to the appropriate USB
port that supports the file formats (page 9).
The USB device takes longer to play.
The USB device contains large-sized files or files
with a complicated tree structure.
Audio files cannot be played.
USB devices formatted with file systems other
tha n FAT12, FAT16, FAT32 or exFAT*
unsupported.*
The USB port to which the USB device is
connected is not appropriate.
– Connect the USB device to the appropriate USB
port that supports the file systems (page 9).
*1 USB devices formatted with the exFAT file system are
available only when connected to the USB port 1.
*2 This unit supports FAT12, FAT16, FAT32 and exFAT, but
some USB device may not support all of these. For
details, refer to the o perating instructions of each USB
device or contact the manufacturer.
Operations cannot be performed.
The USB mode of the device is not set to the
appropriate mode.
– Make sure that the USB mode of the device is
set to MSC or MTP mode.
The USB port to which the USB device is
connected is not appropriate.
– Connect the USB device to the appropriate USB
port that supports the features (page 9).
2
1
are
BLUETOOTH function
The other BLUETOOTH device cannot detect this
unit.
Set [Bluetooth Connection] to [ON] (page 15).
While connecting to a BLUETOOTH device, this
unit cannot be detected by another device.
Terminate the current connection and search for
this unit from the other device.
Depending on your smartphone or mobile
phone, you may need to delete this unit from the
history of the connected smartphone or mobile
phone then pair them again (page 6).
Connection is not possible.
Check the pairing and connection procedures in
the manual of the other device, etc., and perform
the operation again.
The name of the detected device does not
appear.
Depending on the status of the other device, it
may not be possible to obtain the name.
20GB

There is no ringtone.
Raise the volume while receiving a call.
The speakers are not connected to the unit.
– Connect the speakers to the unit. To select the
speakers for ringtone, press HOME, then touch
[Settings] and select [Phone Call Sound] in
[Sound] (page 15).
The talker’s voice volume is low.
Raise the volume during a call.
The other party says that the volume is too low
or high.
Adjust the [MIC Gain] level (page 12).
Echo or noise occurs during call conversations.
Reduce the volume.
Set [Speech Quality] to [Mode 1] or [Mode 2].
(page 12).
If ambient noise other than the phone call sound
is loud, try reducing this noise.
– Shut the window if road noise is loud.
– Lower the air conditioner if the air conditioner is
loud.
The phone sound quality is poor.
Phone sound quality depends on reception
conditions of the mobile phone.
– Move your car to a place where you can
enhance the mobile phone’s signal if the
reception is poor.
The volume of the connected BLUETOOTH device
is low or high.
Volume level will differ depending on the
BLUETOOTH device.
– Reduce the volume level differences between
this unit and the BLUETOOTH device (page 9).
The sound skips during audio streaming or the
BLUETOOTH connection fails.
Reduce the distance between the unit and the
BLUETOOTH device.
If the BLUE TOOTH device is stored in a case which
interrupts the signal, remove the case while
using the device.
Several BLUETOOTH devices or other devices (e.g.
ham radio devices) which emit radio waves are
used nearby.
– Turn off the other devices.
– Increase the distance between the unit and
other devices.
Playback sound stops momentarily when this
unit is connecting to a mobile phone. This is not a
malfunction.
The connected BLUETOOTH device cannot be
controlled during audio streaming.
Check that the connected BLUETOOTH device
supports AVRCP.
Some functions do not work.
Check that the connecting device supports the
functions in question.
A call is answered unintentionally.
The connecting phone is set to start a call
automatically.
[Auto Answer] of this unit is set to [ON] (page 12).
Pairing failed due to time out.
Depending on the connecting device, the time
limit for pairing may be short. Try completing the
pairing within the time.
Cannot pair.
The unit may not be able to pair with a previously
paired BLUETOOTH device after initializing the
unit if the pairing information of the unit is on the
BLUETOOTH device. In t his c ase, delete the
pairing information of the unit from the
BLUETOOTH device, and then pair them again.
The BLUETOOTH function cannot be operated.
Turn the ignition off. Wait for a while, then turn
the ignition to the ACC position.
No sound is output from the car speakers during
a handsfree call.
If the sound is output from the mobile phone, set
the mobile phone to output the sound from the
car speakers.
Apple CarPlay
The Apple CarPlay icon does not appear on the
HOME screen.
Your iPhone is not compatible with Apple
CarPlay.
– Refer to the manual supplied with your iPhone,
or visit the Apple CarPlay website.
Disconnect your iPhone from the USB port 1 and
reconnect it again.
The USB port to which your iPhone is connected
is not appropriate.
– Connect your iPhone to the USB port 1.
Apple CarPlay may not be available in your
country or region.
Make sure a certified Lightning cable is used to
connect your iPhone and the unit.
21GB

Android Auto
The Android Auto icon does not appear on the
HOME screen.
Check your Android phone and accept the
disclaimers and permission requests required to
use Android Auto on your Android phone.
There is no Android Auto application installed on
your Android phone.
– Download and install the Android Auto
application onto your Android phone.
Your Android phone is not compatible with
Android Auto.
– Your Android phone needs to support Android
Auto. Refer to the manual supplied with your
Android phone, or visit the Android Auto
website.
Disconnect your Android phone from the USB
port 1 and reconnect it again.
The USB port to which your Android phone is
connected is not appropriate.
– Connect your Android phone to the USB port 1.
Android Auto may not be available in your
country or region.
WebLink ™
WebLink™ cannot be used.
Installing the “WebLink Host” app to your
iPhone/Android phone is required.
– Check the following site, and install the
“WebLink Host” app.
http://abaltatech.com/WL
– Check your iPhone/Android phone and accept
the disclaimers and permission to use
WebLink™ on your iPhone/Android phone.
Disconnect your iPhone/Android phone from the
USB port 1 and reconnect it again.
The USB port to which your iPhone/Android
phone is connected is not appropriate.
– Connect your iPhone/Android phone to the
USB port 1.
Restart your iPhone/Android phone.
WebLink™ may not be available in your country
or region.
There is no sound./The sound is low.
Your iPhone/Android phone is not connected to
the unit via BLUETOOTH.
– Make a BLUETOOTH connection.
The volume level of [BT Audio] is low.
– Adjust the volume level of [BT Audio].
Messages
General
Cannot play this content.
The currently selected content cannot be played
back, or skipped to the next one.
– The content is not in a supported file format.
Check supported file formats (page 17).
Device no response
The unit does not recognize the connected USB
device.
– Reconnect the USB device.
– Check that the USB device is supported by the
unit.
No Playable Data
The USB device has no playable data.
– Load music data/files into the USB device.
Overcurrent caution on USB.
The USB device is overloaded.
– Disconnect the USB device.
– Indicates that the USB device is out of order, or
an unsupported device is connected.
USB device not supported
For details on the compatibility of your USB
device, visit the support site on the back cover.
USB hub not supported
USB hubs are not supported on this unit.
BLUETOOTH
Bluetooth device is not found.
The unit cannot detect a connectable
BLUETOOTH device.
– Check the BLUETOOTH setting of the
connecting device.
No device is in the list of registered BLUETOOTH
devices.
– Perform pairing with a BLUETOOTH device
(page 6).
Handsfree device is not available.
A mobile phone is not connected.
– Connect a mobile phone (page 7).
WebLink™
Please install and start the WebLink Host app on
your phone. For more information visit
www.abaltatech.com/wl
Visit www.abaltatech.com/wl, and check the
detail.
22GB

Connection
USB port 2
USB device (for audio
playback only)*
1
from a car antenna (aerial)*
5
*
3
*
4
*
2
Connection
*1 Do not use a USB extension cable.
*2 Subwoofer (not supplied)
*3 Power amplifier (not supplied)
*4 RCA pin cord (not supplied)
*5 Depending on the type of car, use an adaptor (not
supplied) if the antenna (aerial) connector does not fit.
23GB

Petunjuk Pemeliharaan
Peringatan
Pelat nama yang berisi voltase operasional, dll.,
terletak di bagian bawah chassis.
Untuk mengurangi risiko kebakaran, jangan
menutup rongga ventilasi pada perangkat dengan
koran, taplak meja, ritai, dill.
Jauhkan perangkat dari sumber api (misalnya api
lilin).
PERINGATAN
Untuk mencegah bahaya kebakaran atau
sengatan listrik, jangan paparkan unit ke
hujan atau kelembapan.
Untuk menghindari sengatan listrik, jangan
buka kabinet. Serahkan servis kepada
personel yang berkualifikasi saja.
Penolakan mengenai servis yang ditawarkan
oleh pihak ketiga
Servis yang diberikan oleh pihak ketiga mungkin
diubah, ditangguhkan, atau dihentikan tanpa
pemberitahuan sebelumnya.
Pemberitahuan penting
Perhatian
DALAM KEJADIAN APA PUN KAMI TIDAK AKAN
BERTANGGUNG JAWAB ATAS GANTI RUGI
INSIDENTAL, TIDAK LANGSUNG, ATAU
KONSEKUENSIAL ATAU TERMASUK GANTI RUGI
LAINNYA, TIDAK TERBATAS, HILANGNYA
KEUNTUNGAN, HILANGNYA PENDAPATAN,
HILANGNYA DATA, HILANGNYA PEMANFAATAN
PRODUK ATAU PERALATAN TERKAIT, MASA TIDAK
BERFUNGSI, DAN WAKTU PEMBELIAN YANG
TERKAIT ATAU TIMBUL DARI PENGGUNAAN PRODUK
INI, PERANGKAT KERAS DAN/ATAU PERANGKAT
LUNAKNYA.
Pelanggan yth, produk ini mencakup pemancar
radio.
Harap pelajari buku panduan operasi kendaraan
atau hubungi produsen kendaraan atau dealer
kendaraan, sebelum Anda memasang produk ini ke
kendaraan.
Panggilan darurat
Perangkat handsfree mobil BLUETOOTH dan
perangkat elektronik yang tersambung dengan
handsfree ini beroperasi dengan sinyal radio,
jaringan seluler, dan telepon rumah serta fungsi
yang diprogram pengguna, yang tidak dapat
menjamin sambungan dalam semua kondisi.
Oleh karena itu, jangan semata-mata
mengandalkan perangkat elektronik ini untuk
komunikasi yang sangat penting (seperti kondisi
medis darurat).
Ten ta ng ko mu ni ka si BL UETOO TH
• Gelombang mikro yang memancar dari perangkat
BLUETOOTH mungkin memengaruhi
pengoperasian perangkat medis elektronik.
Matikan unit ini dan perangkat BLUETOOTH lain
dalam lokasi berikut ini, karena dapat
menyebabkan kecelakaan.
– lokasi yang terdapat di gas yang mudah
terbakar, di rumah sakit, kereta api, pesawat,
atau SPBU
– di dekat pintu otomatis atau alarm kebakaran
• Unit ini mendukung kemampuan keamanan yang
mematuhi standar BLUETOOTH untuk
menghadirkan sambungan aman saat teknologi
nirkabel BLUETOOTH digunakan, tetapi keamanan
mungkin tidak cukup yang tergantung pada
pengaturan ini. Berhati-hatilah saat
berkomunikasi dengan teknologi nirkabel
BLUETOOTH.
• Kami tidak bertanggung jawab atas kebocoran
informasi selama komunikasi BLUETOOTH.
2ID

Daftar Isi
Peringatan . . . . . . . . . . . . . . . . . . . . . . . . . . . . . . . . 2
Memulai
Panduan terhadap Komponen dan Kontrol. . . . . . 4
Melakukan Pengaturan Awal . . . . . . . . . . . . . . . . . 6
Menyiapkan Perangkat Bluetooth® . . . . . . . . . . . . 7
Menyambungkan Kamera Belakang . . . . . . . . . . . 8
Radio
Mendengarkan Radio . . . . . . . . . . . . . . . . . . . . . . . 8
Menggunakan Fungsi Opsi Radio. . . . . . . . . . . . . . 9
Pemutaran
Memutar Perangkat USB . . . . . . . . . . . . . . . . . . . . . 9
Memutar Perangkat BLUETOOTH . . . . . . . . . . . . . 10
Mencari dan Memutar Trek . . . . . . . . . . . . . . . . . . 10
Pengaturan Lain selama Pemutaran . . . . . . . . . . . 11
Panggilan Handsfree
Menyiapkan Ponsel . . . . . . . . . . . . . . . . . . . . . . . . . 11
Menerima Panggilan . . . . . . . . . . . . . . . . . . . . . . . . 11
Melakukan Panggilan . . . . . . . . . . . . . . . . . . . . . . . 11
Operasi yang Tersedia selama Panggilan . . . . . . . 12
Fungsi-fungsi yang Berguna
Apple CarPlay . . . . . . . . . . . . . . . . . . . . . . . . . . . . . . 13
Android Auto™. . . . . . . . . . . . . . . . . . . . . . . . . . . . . 13
WebLink™. . . . . . . . . . . . . . . . . . . . . . . . . . . . . . . . . 13
Menggunakan Perintah Gerak-Isyarat . . . . . . . . . 14
Informasi Tambahan
Memperbarui Firmware . . . . . . . . . . . . . . . . . . . . . 16
Tindakan Pencegahan. . . . . . . . . . . . . . . . . . . . . . . 16
Spesifikasi. . . . . . . . . . . . . . . . . . . . . . . . . . . . . . . . . 18
Pemecahan Masalah . . . . . . . . . . . . . . . . . . . . . . . . 19
Pesan . . . . . . . . . . . . . . . . . . . . . . . . . . . . . . . . . . . . 22
Koneksi
Koneksi . . . . . . . . . . . . . . . . . . . . . . . . . . . . . . . . . . . 23
Pengaturan
Operasi Pengaturan Dasar . . . . . . . . . . . . . . . . . . 14
Pengaturan Umum (Umum) . . . . . . . . . . . . . . . . . 14
Pengaturan Suara (Suara) . . . . . . . . . . . . . . . . . . . . 15
Pengaturan Visual (Visual). . . . . . . . . . . . . . . . . . . . 15
Pengaturan BLUETOOTH (Bluetooth) . . . . . . . . . . . 15
3ID

Memulai
OPTION
VOICE
HOME
ATT
Panduan terhadap Komponen dan Kontrol
Unit utama
Layar/panel sentuh
Mikrofon (panel dalam)
Agar mode bebas genggam berfungsi dengan
baik, jangan lapisi mikrofon menggunakan
isolasi, dll.
USB port 1
Mendukung pemutaran audio/video dari
perangkat smartphone atau USB.
HOME
Menampilkan layar HOME.
ATT (mengurangi volume)
Tekan dan tahan selama 1 detik untuk
mengurangi volume suara.
Untuk membatalkan, tekan dan tahan lagi, atau
tekan VOL +.
VOL (volume) +/–
/ (sebelumnya/berikutnya)
Berfungsi secara berbeda, yang tergantung
pada sumber yang dipilih:
– Radio: memilih stasiun yang sudah diatur
sebelumnya.
– USB/Audio BT: berpindah ke file sebelumnya/
berikutnya.
Tekan dan tahan untuk:
– Radio: menala ke suatu stasiun secara
otomatis (SEEK+/SEEK–).
– USB/Audio BT: mundur cepat/maju cepat.
OPTION
Menampilkan latar OPTION (halaman 5).
VOICE
Tekan dan tahan untuk mengaktifkan fungsi
perintah suara untuk Apple CarPlay dan Android
Auto.
4ID

Remote control roda kemudi Tampilan layar
Layar pemutaran:
/
Radio:
Lakukan penalaan pada stasiun radio preset.
Tekan dan tahan untuk menala secara otomatis.
USB/Audio BT:
Lompati trek. Tekan dan tahan untuk secara
cepat memundurkan/memajukan trek.
(volume) /
Menyetel volume. Tekan dan tahan untuk
melanjutkan penyetelan volume.
MODE
Mengubah sumber.
Memilih pita radio/mentransfer panggilan tidak
tersedia dengan tombol ini.
(ucapan)
Mengaktifkan fungsi perintah suara untuk Apple
CarPlay dan Android Auto.
(buka masuk)
Mengakhiri panggilan/menolak panggilan
masuk.
(tutup keluar)
Menjawab panggilan.
Layar HOME:
Layar OPTION:
5ID

Indikasi status
Menyala jika suara dikurangi.
Menyala jika perangkat audio dapat
diputar dengan mengaktifkan A2DP
(Profil Distribusi Audio Tingkat Lanjut).
Menyala jika panggilan handsfree
tersedia dengan mengaktifkan HFP
(Profil Handsfree).
Menunjukkan status kekuatan sinyal
ponsel yang tersambung.
Menunjukkan status baterai tersisa dari
ponsel yang tersambung.
Menyala jika sinyal BLUETOOTH menyala.
Berkedip jika sambungan sedang
berlangsung.
(opsi sumber)
Membuka menu opsi sumber. Item yang
tersedia berbeda-beda tergantung sumbernya.
Area khusus aplikasi
Menampilkan kontrol/indikasi pemutaran atau
memperlihatkan status unit. Item yang
ditampilkan berbeda-beda tergantung
sumbernya.
Jam
Menampilkan waktu yang ditetapkan di
pengaturan Tanggal/Waktu (halaman 14).
(kembali ke layar pemutaran)
Mengalihkan dari layar HOME ke layar
pemutaran.
Tombol pemilihan Sumber dan Pengaturan
Mengubah sumber atau melakukan berbagai
pengaturan.
Geser untuk memilih ikon pengaturan dan ikon
lain.
Sentuh ikon sumber yang ingin Anda pilih.
Android
Auto
Audio BT Ponsel USB port 1
USB port 2
WebLi nk
Apple
CarPlay
Kam
Belakng
Radio
Pengaturan
(siaga)
Mengubah unit ke dalam mode siaga (pengisian
daya USB masih tersedia). Untuk melanjutkan,
tekan tombol mana pun.
(monitor mati)
Mematikan monitor. Jika monitor mati, sentuh di
bagian mana pun pada layar untuk kembali
menghidupkannya.
(EXTRA BASS)
Mengubah pengaturan EXTRA BASS
(halaman 15).
(EQ10/Subwoofer)
Mengubah pengaturan EQ10/Subwoofer
(halaman 15).
Melakukan Pengaturan Awal
Anda perlu melakukan pengaturan awal sebelum
mengoperasikan unit ini untuk pertama kalinya,
setelah mengganti aki mobil, atau mengganti
sambungan.
Jika layar pengaturan awal tidak muncul saat Anda
menyalakan unit, lakukan pengaturan ulang pabrik
(halaman 15) untuk memulai pengoperasian unit.
1 Sentuh [Bahasa], lalu atur bahasa tampilan.
2 Sentuh [Atur Tanggal/Waktu], lalu atur
tanggal dan waktu.
3 Sentuh [Tingkat Penalaan], lalu atur tingkat
penalaan FM/AM.
4 Untuk kembali ke tampilan sebelumnya,
sentuh , lalu sentuh [OK].
Peringatan mulai akan muncul.
5 Baca peringatan mulai dengan teliti. Jika
Anda setuju dengan semua syarat, sentuh
[Tutup].
Pengaturan selesai.
Pengaturan ini dapat dikonfigurasi lebih lanjut di
menu pengaturan (halaman 14).
Tombol pemilihan suara
Mengubah suara.
6ID

Menyiapkan Perangkat
Bluetooth®
Anda dapat menikmati musik atau melakukan
panggilan handsfree yang tergantung pada
perangkat yang kompatibel dengan BLUETOOTH
seperti smartphone, ponsel, dan perangkat audio
(selanjutnya disebut "perangkat BLUETOOTH" jika
tidak ditentukan sebaliknya). Untuk informasi
selengkapnya tentang penyambungan, baca
petunjuk pengoperasian yang disertakan dengan
perangkat tersebut.
Sebelum menyambungkan perangkat, kurangi
volume suara unit ini. Jika tidak, mungkin suara
yang ditimbulkan unit akan terlalu lantang.
Menyandingkan dan menyambungkan
dengan perangkat BLUETOOTH
Saat menyambungkan perangkat BLUETOOTH
untuk pertama kali, pendaftaran bersama (yang
disebut "penyandingan") perlu dilakukan. Dengan
melakukan penyandingan, unit ini dan perangkat
lain dapat saling mengenali.
1 Letakkan perangkat BLUETOOTH dalam
jarak 1 m dari unit ini.
2 Tekan HOME, lalu sentuh [Pengaturan].
3 Sentuh [Bluetooth].
4 Sentuh [Koneksi Bluetooth], lalu atur sinyal
ke [NYALA].
Sinyal BLUETOOTH dinyalakan dan menyala
pada bilah status unit ini.
5 Sentuh [Pemasangan].
berkedip saat unit sedang berada dalam
mode siaga penyandingan.
6 Lakukan penyandingan pada perangkat
BLUETOOTH sehingga perangkat
mendeteksi unit ini.
7 Pilih [Xpander] yang ditampilkan di layar
perangkat BLUETOOTH.
Ulangi dari langkah 5 jika nama model tidak
muncul.
Jika layar konfirmasi sambungan muncul,
operasikan perangkat BLUETOOTH untuk
menyetujui koneksi, lalu sentuh [OK] pada unit
dan/atau perangkat BLUETOOTH.
8 Jika kunci sandi* perlu dimasukkan pada
perangkat BLUETOOTH, masukkan [0000].
* Kunci sandi mungkin saja disebut "kode sandi", "kode
PIN", "nomor PIN", "kata sandi", dll., yang tergantung
pada perangkat BLUETOOTH-nya.
Saat tersanding, terus menyala.
9 Pilih unit ini di perangkat BLUETOOTH untuk
menjalin sambungan BLUETOOTH.
atau menyala jika sambungan dibuat.
Catatan
• Unit hanya dapat disambungkan dengan satu perangkat
BLUETOOTH pada waktu bersamaan.
• Untuk memutuskan sambungan BLUETOOTH, matikan
sambungan baik dari unit maupun perangkat BLUETOOTH.
• Penyandingan BLUETOOTH tidak memungkinkan saat
Apple CarPlay atau Android Auto sedang menyala.
Menyambungkan dengan perangkat
BLUETOOTH yang tersanding
Untuk menggunakan perangkat yang tersanding,
perangkat tersebut perlu disambungkan dengan
unit ini. Beberapa perangkat yang tersanding akan
tersambung secara otomatis.
1 Tekan HOME, lalu sentuh [Pengaturan].
2 Sentuh [Bluetooth].
3 Sentuh [Koneksi Bluetooth], lalu sentuh
[NYALA].
Pastikan menyala pada bilah status unit.
4 Aktifkan fungsi BLUETOOTH pada perangkat
BLUETOOTH.
5 Operasikan perangkat BLUETOOTH agar
tersambung dengan unit ini.
atau menyala di bilah status.
Untuk menyambungkan perangkat yang
tersambung terakhir dari unit ini
Apabila kunci kontak diputar ke posisi on
sementara sinyal BLUETOOTH masih aktif, unit ini
akan mencari perangkat BLUETOOTH yang
tersambung terakhir, dan sambungan akan dijalin
secara otomatis.
Catatan
Selama streaming audio BLUETOOTH, Anda tidak dapat
melakukan penyambungan dari unit ini ke ponsel.
Sebaliknya, sambungkan dari ponsel ke unit ini.
7ID

Menyambungkan Kamera
Belakang
Dengan menyambungkan kamera belakang
opsional ke terminal CAMERA IN, Anda dapat
menayangkan gambar dari kamera belakang.
Untuk menayangkan gambar dari kamera
belakang
Tekan HOME, sentuh [Kam Belakng].
Radio
Mendengarkan Radio
Diperlukan pengaturan tingkat penalaan
(halaman 15).
Tekan HOME, lalu sentuh [Radio].
Kontrol/indikasi penerimaan
Pita saat ini
Mengubah pita (FM1, FM2, FM3, AM1, atau AM2).
Indikasi frekuensi saat ini, nama layanan
program*, RDS (Sistem Data Radio)*
* Hanya tersedia selama penerimaan RDS.
(opsi radio)
Membuka menu opsi radio.
SEEK-/SEEK+
Melakukan penalaan otomatis.
/
Melakukan penalaan manual.
Sentuh dan tahan untuk secara terus menerus
melompati frekuensi.
Nomor preset
Memilih stasiun preset. Geser kanan/kiri untuk
menampilkan stasiun preset lainnya.
Sentuh dan tahan untuk menyimpan frekuensi
saat ini dalam preset tersebut.
8ID

Menala
1 Memilih pita yang diinginkan (FM1, FM2,
FM3, AM1, atau AM2).
2 Melakukan penalaan.
Untuk menala secara otomatis
Sentuh SEEK-/SEEK+.
Pemindaian berhenti saat unit menerima
stasiun.
Untuk menala secara manual
Sentuh dan tekan / untuk menemukan
frekuensi terdekat, lalu sentuh / secara
berulang untuk menyetel ke frekuensi yang
diinginkan.
Menyimpan secara manual
1 Saat menerima stasiun yang ingin Anda
simpan, sentuh dan tahan nomor preset
yang diinginkan.
Menerima stasiun yang diinginkan
1 Pilih pita, lalu sentuh nomor preset yang
diinginkan.
Menggunakan Fungsi Opsi
Radio
Fungsi berikut tersedia dengan menyentuh .
BTM (Memori Penalaan Terbaik)
Menyimpan stasiun sesuai urutan frekuensi pada
nomor preset. 18 stasiun dapat disimpan untuk
FM dan 12 stasiun untuk AM sebagai stasiun
preset.
PTY
Pilih jenis program dari daftar PTY untuk mencari
stasiun siaran jenis program yang dipilih.
(Hanya tersedia selama penerimaan FM.)
Pemutaran
Memutar Perangkat USB
Perangkat U SB jenis MSC (Kelas Penyim panan
1
Massal)*
digunakan.
Perangkat USB jenis MTP (Media Transfer
Protocol)*
ke USB port 2.
*1 Misalnya, flash drive USB, pemutar media digital, ponsel
*2 Beberapa pemutar media digital atau ponsel Android
Catatan
• Untuk informasi selengkapnya tentang kompatibilitas
• Untuk informasi selengkapnya tentang format file yang
1 Kurangi volume pada unit.
2 Sambungkan perangkat USB ke port USB.
3 Tekan HOME, lalu sentuh [USB port 1] atau
Untuk melepaskan perangkat
Matikan unit atau putar kunci kontak ke posisi off
ACC, lalu lepas perangkat USB.
Saat menyambungkan perangkat USB, pilih USB
port 1 atau USB port 2 sesuai dengan fitur yang
akan digunakan.
yang sesuai dengan standar USB dapat
1*2
bisa digunakan hanya jika tersambung
Android™
perlu diatur ke mode MTP.
perangkat USB, kunjungi situs dukungan yang terdapat
pada sampul belakang.
didukung, lihat "Format yang didukung untuk pemutar
USB" (halaman 17).
[USB port 2].
Pemutaran dimulai.
USB port 1 dan USB port 2
USB
Fitur yang didukung
Apple CarPlay* –
Android Auto* –
WebLink™ –
FAT12
Sistem file
FAT16
FAT32
exFAT –
port 1
USB
port 2
9ID

USB
Fitur yang didukung
MP3
Format audio yang
dapat diputar
Format video yang
dapat diputar
Mode koneksi USB
: Tersedia, –: Tidak didukung
* Apple CarPlay dan/atau Android Auto mungkin tidak
tersedia di negara atau wilayah Anda.
WMA
FLAC
WAV –
AAC –
MPEG-4 –
WMV –
MKV –
Xvid –
MSC
MTP –
port 1
USB
port 2
Memutar Perangkat BLUETOOTH
Anda juga dapat memutar isi perangkat
tersambung yang mendukung A2DP (Profil
Distribusi Audio Tingkat Lanjut) BLUETOOTH.
Mencari dan Memutar Trek
Ulangi pemutaran dan acak pemutaran
1 Selama pemutaran, sentuh (ulang) atau
(acak) secara berulang sampai mode
pemutaran yang diinginkan muncul.
Dalam mode pemutaran tertentu, mungkin
perlu waktu untuk memulai pemutaran.
Mode pemutaran yang tersedia bergantung pada
sumber suara yang dipilih dan perangkat yang
tersambung.
Mencari file dari layar daftar
1 Selama pemutaran USB, sentuh .
Layar daftar dari item yang diputar saat ini
muncul.
Selanjutnya, sentuh (audio) atau (video)
untuk didaftarkan berdasarkan jenis file.
2 Sentuh item yang diinginkan.
Pemutaran dimulai.
1 Buat sambungan BLUETOOTH dengan
perangkat audio (halaman 7).
2 Tekan HOME, lalu sentuh [Audio BT].
3 Operasikan perangkat audio untuk memulai
pemutaran.
Catatan
• Tergantung pada perangkat audio, informasi seperti judul,
nomor/waktu trek, dan status pemutaran mungkin tidak
ditampilkan pada unit ini.
• Meskipun sumber diubah pada unit ini, pemutaran
perangkat audio tidak akan dihentikan.
• Penyandingan BLUETOOTH tidak memungkinkan saat
Apple CarPlay sedang berjalan.
Untuk mencocokkan level volume perangkat
BLUETOOTH dengan sumber lain
Anda dapat mengurangi perbedaan level volume
antara unit ini dan perangkat BLUETOOTH:
Selama pemutaran, sentuh , lalu atur [Level
Input] antara –6 dan +6.
10ID

Pengaturan Lain selama
Pemutaran
Pengaturan lebih lanjut tersedia di tiap sumber
dengan menyentuh . Item yang tersedia
berbeda-beda tergantung sumbernya.
Picture EQ
Menyetel kualitas gambar sesuai yang Anda
inginkan: [Dinamis], [Standar], [Teater], [Kustom].
(Hanya tersedia saat rem tangan diaktifkan dan
video USB telah dipilih).
Aspek
Memilih rasio aspek untuk layar unit.
(Hanya tersedia saat rem tangan diaktifkan dan
video USB telah dipilih).
Normal
Menampilkan gambar 4:3 dalam ukuran aslinya,
dengan bilah samping untuk ditampilkan secara
pas di layar 16:9.
Zoom
Menampilkan gambar 16:9 yang telah dikonversi
ke format kotak surat 4:3.
Penuh
Menampilkan gambar 16:9 dalam ukuran aslinya.
Ketera ngan
Memperbesar gambar secara horizontal, dengan
keterangan yang ditampilkan secara pas di layar.
Panggilan Handsfree
Menyiapkan Ponsel
Untuk menggunakan ponsel, sambungkan ponsel
tersebut dengan unit ini. Untuk informasi
selengkapnya, lihat "Menyiapkan Perangkat
Bluetooth®" (halaman 7).
Catatan
Fungsi panggilan handsfree tidak tersedia saat fungsi Apple
CarPlay atau Android Auto diaktifkan. Dalam kasus ini,
gunakan fungsi panggilan handsfree pada aplikasi ponsel.
Menerima Panggilan
1 Sentuh saat panggilan diterima.
Panggilan telepon dimulai.
Catatan
Nada dering dan suara pembicara dikeluarkan dari speaker
depan. Untuk memilih speaker panggilan handsfree, tekan
HOME, lalu sentuh [Pengaturan] dan pilih [Suara Panggilan
Telepon] di [Suara] (halaman 15).
Untuk menolak/mengakhiri panggilan
Sentuh .
Melakukan Panggilan
1 Tekan HOME, lalu sentuh [Ponsel].
2 Sentuh salah satu ikon panggilan pada layar
ponsel BLUETOOTH.
(riwayat telepon)*
Pilih salah satu kontak dari daftar riwayat
panggilan. Unit ini menyimpan 20 panggilan
terakhir.
11ID

(panggil kembali)
Lakukan panggilan secara otomatis ke
kontak yang terakhir Anda hubungi.
(kontak)*
Pilih salah satu kontak dari daftar nama/
daftar nomor. Untuk mencari kontak yang
diinginkan sesuai urutan alfabet dari daftar
nama, sentuh .
(tombol panggil)
Masukkan nomor telepon.
Favorit
Pilih kontak yang disimpan.
Untuk menyimpan kontak, lihat
"Menambahkan nomor telepon ke Favorit"
(halaman 12).
* Ponsel perlu mendukung PBAP (Profil Akses Buku
Tel ep on ).
3 Sentuh .
Panggilan telepon dimulai.
Menambahkan nomor telepon ke
Favorit
Anda dapat menyimpan hingga 6 kontak di dalam
Favorit.
1 Pada layar ponsel, sentuh (kontak) lalu
pilih nomor telepon yang ingin Anda
simpan di dalam Favorit.
Layar konfirmasi muncul.
2 Sentuh [Tambahkan ke Favorit].
3 Sentuh preset yang diinginkan di dalam
Favorit untuk menyimpan nomor telepon.
Kontak tersimpan di dalam Favorit.
Operasi yang Tersedia selama
Panggilan
Untuk menyetel volume nada dering
Tekan VOL +/– saat menerima panggilan.
Untuk menyetel volume suara pembicara
Tekan VOL +/– selama panggilan.
Untuk menyetel volume untuk lawan bicara
(Penyetelan gain mik)
Selama panggilan handsfree, sentuh , lalu atur
[MIC Gain] ke [Tinggi], [Sedang], atau [Rendah].
Untuk mengurangi echo dan kebisingan
(Mode pembatal echo/kebisingan)
Selama panggilan, sentuh , lalu atur [Kualitas
Ucapan] ke [Mode 1] atau [Mode 2].
Untuk beralih antara mode handsfree dan
mode genggam
Selama panggilan, sentuh untuk
mengalihkan audio panggilan ponsel antara unit
dan ponsel.
Catatan
Tergantung pada ponsel, pengoperasian ini mungkin tidak
tersedia.
Untuk menjawab panggilan masuk secara
otomatis
Sentuh , lalu atur [Jawab Otomatis] ke [NYALA].
12ID

Fungsi-fungsi yang Berguna
Apple CarPlay
Apple CarPlay memungkinkan Anda menggunakan
iPhone dan tetap fokus menyetir.
(Tersedia hanya jika iPhone Anda tersambung ke
USB port 1.)
Catatan penggunaan Apple CarPlay
• Periksa versi iOS apa yang didukung di situs web
Apple CarPlay. Perbarui ke versi iOS terbaru
sebelum menggunakan.
• Untuk detail tentang Apple CarPlay, baca panduan
yang disertakan dengan iPhone Anda, atau
kunjungi situs web Apple CarPlay.
• Karena GPS pada iPhone digunakan, letakkan
iPhone di tempat yang dapat menerima sinyal
GPS dengan mudah.
• Apple CarPlay mungkin tidak tersedia di negara
atau wilayah Anda.
1 Sambungkan iPhone Anda ke USB port 1.
Untuk menyambungkan iPhone, gunakan kabel
koneksi USB untuk iPhone (tidak disertakan).
2 Tekan HOME, lalu sentuh [Apple CarPlay].
Tampilan iPhone Anda muncul pada layar unit.
Sentuh dan atur aplikasi.
Dengan penggunaan logo Apple CarPlay, berarti
antarmuka pengguna kendaraan memenuhi
standar kinerja Apple. Apple tidak bertanggung
jawab atas pengoperasian kendaraan ini atau
kepatuhannya terhadap standar keselamatan dan
peraturan.
Perlu diperhatikan bahwa penggunaan produk ini
dengan iPhone mungkin memengaruhi kinerja
nirkabel.
Android Auto™
Android Auto memperluas platform Android ke
mobil dengan cara yang dikhususkan untuk
berkendara.
(Tersedia hanya jika ponsel Android Anda
tersambung ke USB port 1.)
Catatan penggunaan Android Auto
• Periksa versi OS apa yang didukung di situs web
Android Auto. Perbarui ke versi OS terbaru
sebelum menggunakan.
• Ponsel Android Anda perlu mendukung Android
Auto.
• Unduh aplikasi Android Auto di Google Play.
• Untuk informasi selengkapnya tentang Android
Auto, baca panduan yang disertakan dengan
ponsel Android Anda, atau kunjungi situs web
Android Auto.
• Karena GPS ponsel Android Anda digunakan,
letakkan ponsel Android di tempat yang dapat
menerima sinyal GPS dengan mudah.
• Android Auto mungkin tidak tersedia di negara
atau wilayah Anda.
1 Sambungkan ponsel Android Anda ke USB
port 1.
Untuk menyambungkan ponsel Android,
gunakan kabel koneksi yang sesuai (tidak
disertakan).
2 Tekan HOME, lalu sentuh [Android Auto].
Antarmuka Android Auto akan ditampilkan
secara penuh pada layar unit. Sentuh dan atur
aplikasi.
WebLink™
Aplikasi "WebLink Host" memungkinkan Anda
untuk menikmati "WebLink Apps" seperti pemutar
video atau musik pada ponsel iPhone/Android
yang tersambung.
(Tersedia hanya jika iPhone/ponsel Android Anda
tersambung ke USB port 1.)
Catatan penggunaan WebLink™
• Periksa versi OS apa yang didukung di situs web
WebLink™. Perbarui ke versi OS terbaru sebelum
menggunakan.
• Untuk detail tentang model-model yang
kompatibel, lihat daftar kompatibilitas di situs
berikut ini:
http://abaltatech.com/WL
• Unduh aplikasi "WebLink Host" yang tersedia di
Google Play untuk ponsel Android Anda, dan yang
tersedia di App Store untuk iPhone.
• Mungkin diperlukan koneksi jaringan saat
mengonfigurasi pengaturan, seperti selama
konfigurasi koneksi awal. Pastikan tersedia
koneksi jaringan di ponsel iPhone/Android Anda.
• Saat menggunakan fungsi Cast, pengaturan di
ponsel iPhone/Android mungkin diperlukan.
• Untuk detail tentang aplikasi "WebLink Apps",
kunjungi situs web aplikasi "WebLink Apps".
• Fungsi WebLink™ dan/atau aplikasi "WebLink
Apps" tertentu mungkin tidak tersedia di negara
atau wilayah Anda.
• Saat menggunakan fungsi Cast dan
menyambungkan iPhone, arah tampilan sama
dengan tampilan iPhone.
1 Sambungkan iPhone/ponsel Android Anda
dengan unit utama melalui BLUETOOTH.
2 Sambungkan iPhone/ponsel Android Anda
ke USB port 1.
Untuk menyambungkan iPhone, gunakan kabel
koneksi USB untuk iPhone (tidak disertakan).
Untuk menyambungkan ponsel Android,
gunakan kabel koneksi yang tepat (tidak
disertakan).
13ID

3 Tekan HOME, lalu sentuh [WebLink].
Tampilan WebLink™ akan muncul di unit.
Sentuh dan kontrol aplikasi.
Tips
Anda dapat beralih antara Apple CarPlay/Android Auto dan
WebLink™ jika aplikasi-aplikasi ini diinstal pada iPhone/
ponsel Android Anda.
Menggunakan Perintah GerakIsyarat
Anda dapat menjalankan operasi yang sering
digunakan dengan menggeser tampilan
penerimaan/pemutar menggunakan jari.
Catatan
Perintah gerak-isyarat yang dijelaskan di bawah ini tidak
tersedia pada layar Apple CarPlay, Android Auto dan
WebL ink ™.
Lakukan ini Untuk
Peneri maan radio:
mencari maju stasiun.
(Sama seperti menekan dan
Menggeser kiri ke
kanan
Menggeser kanan
ke kir i
Menggeser ke atas
Menggeser ke
bawah
menahan .)
Pemutar video/audio:
melompati maju file/trek.
(Sama seperti .)
Peneri maan radio:
mencari mundur stasiun.
(Sama seperti menekan dan
menahan .)
Pemutar video/audio:
melompati mundur file/trek.
(Sama seperti .)
Peneri maan radio:
menerima stasiun yang disimpan
(maju).
Peneri maan radio:
menerima stasiun yang disimpan
(mundur).
Pengaturan
Operasi Pengaturan Dasar
Anda dapat mengatur item dengan kategori
konfigurasi berikut ini:
Pengaturan Umum (Umum), Pengaturan Suara
(Suara), Pengaturan Visual (Visual), Pengaturan
BLUETOOTH (Bluetooth)
1 Tekan HOME, lalu sentuh [Pengaturan].
2 Sentuh salah satu kategori konfigurasi.
Item-item yang dapat diatur berbeda-beda
tergantung pada sumber dan pengaturannya.
3 Gerakkan tombol gulir ke atas dan ke
bawah untuk memilih item yang diinginkan.
Untuk kembali ke layar sebelumnya
Sentuh .
Untuk beralih ke layar pemutaran
Sentuh .
Pengaturan Umum (Umum)
Bahasa
Memilih bahasa tampilan: [English], [Español],
[Français], [Deutsch], [Italiano], [Português],
[Русский], [ ], [ ], [ ], [ ],
[ ], [Bahasa Indonesia].
Tanggal/Waktu
Atur Tanggal/Waktu
Mengatur tanggal dan waktu: [Otomatis (RDS)],
[Manual].
Format Tanggal
Memilih format: [DD-MM-YYYY], [MM-DD-YYYY],
[YYYY-MM-DD].
Format Waktu
Memilih format: [12 jam], [24 jam].
Bunyi
Mengaktifkan bunyi pengoperasian: [MATI],
[NYALA].
Kam Belakng
Memilih gambar dari kamera belakang: [MATI],
[NYALA].
Garis Panduan Kamera Belakang
Menampilkan garis panduan kamera belakang:
[MATI], [NYALA].
(Tersedia hanya jika [Kam Belakng] diatur ke
[NYALA].)
14ID

Posisi Mengemudi
Memilih posisi mengemudi untuk
mengoptimalkan ketergunaan Apple CarPlay
dan Android Auto: [Sisi Kiri], [Sisi Kanan]
Tingkat Penalaan
Mengatur tingkat penalaan FM/AM negara
Anda: [50kHz/9kHz], [100kHz/10kHz],
[200kHz/10kHz].
(Tersedia hanya saat sumber off dan jam
ditampilkan.)
Pengaturan Ulang Pabrikan
Menginisialisasi semua pengaturan ke
pengaturan pabrik.
Versi Firmware
Memperbarui dan mengonfirmasi versi firmware.
Lisensi Sumber Terbuka
Menampilkan lisensi perangkat lunak.
Pengaturan Suara (Suara)
EXTRA BASS
Memperkuat suara bass agar sinkron dengan
level volume: [MATI], [1], [2].
EQ10/Subwoofer
Memilih kurva ekualizer dan menyetel level
subwoofer.
EQ10
Memilih kurva ekualizer: [Xpander], [R&B],
[Rock], [Pop], [Dance], [Hip-Hop], [EDM], [Jazz],
[Salsa], [Kustom], [MATI].
[Kustom] menyetel kurva ekualizer: –6 hingga +6.
Subwoofer
Menyetel level volume subwoofer: [MATI], –10
hingga +10.
Balance/Pelesap
Menyetel level keseimbangan/fader.
Keseimban gan
Menyetel keseimbangan suara antara speaker
kiri dan kanan: [Ki15] hingga [Ka15].
Fader
Menyetel keseimbangan suara antara speaker
depan dan belakang: [Depan 15] hingga
[Belakang 15].
Crossover
Menyetel frekuensi cut-off dan fase subwoofer.
Penyaring High Pass
Memilih frekuensi cut-off dari speaker depan/
belakang: [MATI], [50Hz], [60Hz], [80Hz], [100Hz],
[120Hz].
Penyaring Low Pass
Memilih frekuensi cut-off pada subwoofer:
[MATI], [50Hz], [60Hz], [80Hz], [100Hz], [120Hz].
Fase Subwoofer
Memilih fase subwoofer: [Normal], [Balik].
DSO (Pengelola Area Dinamis)
Meningkatkan output audio: [MATI], [Rendah],
[Sedang], [Tinggi].
Suara Panggilan Telepon
Pilih speaker untuk panggilan handsfree:
[Depan], [Belakang], [Semua].
Pengaturan Visual (Visual)
Wallpaper
Mengubah gambar latar dengan menyentuh
warna yang diinginkan.
Peredup Monitor & Cahaya
Meredupkan layar dan pencahayaan tombol:
[MATI], [Otomatis], [NYALA].
([Otomatis] tersedia hanya jika kabel kontrol
pencahayaan tersambung dan berfungsi saat
lampu depan menyala.)
menyetel level kecerahan saat peredup
diaktifkan: -5 hingga +5.
Level Pencahayaan di Monitor OFF
Meredupkan pencahayaan tombol saat monitor
dimatikan: [MATI], [1], [2], [3], [4].
Pengaturan BLUETOOTH
(Bluetooth)
Koneksi Bluetooth
Mengaktifkan sinyal BLUETOOTH: [MATI],
[NYALA], [Pemasangan] (memasuki mode siaga
penyandingan).
Info Perangkat Bluetooth
Menampilkan informasi perangkat yang
tersambung dengan unit.
(Tersedia hanya jika [Koneksi Bluetooth] diatur ke
[NYALA] dan perangkat BLUETOOTH tersambung
ke unit.)
Pengaturan Ulang BT
Menginisialisasi semua pengaturan yang terkait
BLUETOOTH seperti informasi penyandingan,
riwayat panggilan, riwayat perangkat
BLUETOOTH yang tersambung, dll.
15ID

Informasi Tambahan
Memperbarui Firmware
Untuk memperbarui firmware, kunjungi situs
dukungan pada sampul belakang, lalu ikuti
petunjuk online.
Catatan
Selama proses pembaruan, jangan melepas perangkat USB.
Catatan tentang panel LCD
• Jangan sampai panel LCD basah atau terpapar
cairan. Hal itu dapat menyebabkan kerusakan.
Tindakan Pencegahan
• Antena berbantuan daya memanjang otomatis.
• Jika Anda memindahkan kepemilikan atau
menyerahkan mobil Anda untuk dihancurkan
sementara unit terpasang di dalamnya, inisialisasi
semua pengaturan ke pengaturan pabrik
(halaman 15).
• Jangan percikkan cairan ke dalam unit.
Catatan tentang keselamatan
• Patuhi aturan, undang-undang, dan peraturan lalu
lintas setempat.
• Saat sedang mengemudi
– Jangan tonton atau operasikan unit, karena
dapat mengganggu konsentrasi dan
menyebabkan kecelakaan. Parkir kendaraan di
tempat yang aman untuk menonton atau
mengoperasikan unit.
– Jangan gunakan fitur konfigurasi atau fungsi lain
yang dapat mengalihkan perhatian Anda
terhadap jalan.
– Saat memundurkan mobil, pastikan untuk
melihat ke belakang dan memantau area sekitar
dengan hati-hati demi keselamatan, meskipun
kamera belakang sudah tersambung. Jangan
mengandalkan kamera belakang saja.
• Saat mengoperasikan
– Jangan masukkan tangan, jari Anda, atau benda
asing ke dalam unit, karena dapat menyebabkan
cedera diri atau kerusakan unit.
– Jauhkan benda-benda kecil dari jangkauan
anak-anak.
– Pastikan Anda memasang sabuk untuk
menghindari cedera jikalau mobil tiba-tiba
bergerak.
Mencegah kecelakaan
Gambar akan muncul hanya setelah Anda
memarkir mobil dan mengaktifkan rem tangan.
Jika mobil mulai bergerak selama memutar
video, perhatian berikut ditampilkan dan Anda
tidak dapat menonton video.
[Video diblokir demi keselamatan Anda.]
Jangan operasikan unit atau tonton monitor saat
sedang mengemudi.
• Jangan tekan panel LCD dengan keras karena
dapat menyebabkan distorsi pada gambar atau
menyebabkan kerusakan (yaitu, gambar mungkin
tidak jelas, atau panel LCD mungkin rusak).
• Jangan sentuh panel tersebut dengan benda
selain jari, karena dapat merusak atau
memecahkan panel LCD.
• Bersihkan panel LCD dengan kain lembut yang
kering. Jangan gunakan pelarut, seperti benzena,
thinner, pembersih yang dijual bebas, atau
semprotan antistatis.
• Jangan gunakan unit di luar rentang suhu 0 ºC –
40 ºC.
• Jika mobil Anda diparkir di tempat yang dingin
atau panas, gambar mungkin tidak jernih. Namun,
monitor tidak akan rusak dan gambar akan
menjadi lebih jernih setelah suhu di dalam mobil
kembali normal.
• Beberapa titik biru, merah, atau hijau yang tidak
bergerak mungkin muncul di monitor. Titik-titik ini
disebut "titik-titik terang" dan dapat terjadi pada
semua LCD. Panel LCD ini diproduksi secara presisi
dengan lebih dari 99,99% segmennya berfungsi.
Namun, ada kemungkinan bahwa persentase
segmen yang kecil (biasanya 0,01%) mungkin
tidak menyala dengan baik. Namun, masalah ini
tidak akan mengganggu pengalaman Anda
menonton.
Catatan tentang panel sentuh
• Unit ini menggunakan panel sentuh kapasitif.
Sentuh panel secara langsung menggunakan
ujung jari.
• Pengoperasian multi-sentuh tidak didukung pada
unit ini.
• Jangan sentuh panel menggunakan benda tajam
seperti jarum, pena, atau kuku. Penggunaan
stylus tidak didukung pada unit ini.
• Menyentuh panel saat menggunakan sarung
tangan dapat mengakibatkan unit tidak beroperasi
dengan benar atau tidak merespons.
• Jangan biarkan benda lain bersentuhan dengan
panel sentuh. Jika panel disentuh menggunakan
benda selain ujung jari, unit mungkin tidak
merespons dengan benar.
16ID

• Karena panel menggunakan bahan kaca, jangan
biarkan unit terkena goncangan kuat. Jika
terdapat retakan atau garis potongan pada panel,
jangan sentuh bagian yang rusak karena dapat
menyebabkan cedera.
• Jauhkan perangkat listrik lainnya dari panel
sentuh. Perangkat listrik lain dapat merusak panel
sentuh.
• Jika terdapat tetesan air pada panel sentuh, atau
jika Anda menyentuh panel dengan jari yang
basah, panel sentuh mungkin tidak bereaksi
dengan benar.
Format yang didukung untuk pemutar
USB
USB port 1:
WMA (.wma)*
Laju bit: 48 kbps – 192 kbps (Mendukung laju bit
variabel (VBR))*
Frekuensi sampel*4: 44,1 kHz
MP3 (.mp3)*
Laju bit: 48 kbps – 320 kbps (Mendukung laju bit
variabel (VBR))*
Frekuensi sampel*4: 32 kHz, 44,1 kHz, 48 kHz
AAC (.m4a)*
Laju bit: 40 kbps – 320 kbps (Mendukung laju bit
variabel (VBR))*
Frekuensi sampel*4: 8 kHz – 48 kHz
Bit per sampel (Bit kuantisasi): 16 bit
FLAC (.flac)*
Frekuensi sampel*4: 8 kHz – 48 kHz
Bit per sampel (Bit kuantisasi): 16 bit
WAV (.wav)*
Frekuensi sampel*4: 8 kHz – 48 kHz
Bit per sampel (Bit kuantisasi): 16 bit, 24 bit
Xvid (.avi)
Codec video: MPEG-4 Profil Sederhana Tingkat
Lanjut
Codec audio: MP3 (MPEG-1 Layer3)
Laju bit: Maks. 4 Mbps
Laju bingkai: Maks. 30 fps (30p/60i)
Resolusi: Maks. 1280 × 720*
MPEG-4 (.mp4)
Codec video: MPEG-4 Profil Sederhana Tingkat
Lanjut, Profile Garis Dasar AVC
Codec audio: AAC
Laju bit: Maks. 4 Mbps
Laju bingkai: Maks. 30 fps (30p/60i)
Resolusi: Maks. 1280 × 720*
WMV (.wmv, .avi)*
Codec video: WMV3, WVC1
Codec audio: MP3, WMA
Laju bit: Maks. 6 Mbps
Laju bingkai: Maks. 30 fps
Resolusi: Maks. 720 × 480*
1*2
3
1*2
3
1*2
3
1*6
1
5
5
1
5
MKV (.mkv)
Codec video: MPEG-4 Profil Sederhana Tingkat
Lanjut, Profil Garis Dasar AVC
Code audio: MP3, AAC
Laju bit: Maks. 5 Mbps
Laju bingkai: Maks. 30 fps
Resolusi: Maks. 1280 × 720*
USB port 2:
WMA (.wma)*
Laju bit: 48 kbps – 192 kbps (Mendukung laju bit
variabel (VBR))*
Frekuensi sampel*4: 44,1 kH z
MP3 (.mp3)*
Laju bit: 48 kbps – 320 kbps (Mendukung laju bit
variabel (VBR))*
Frekuensi sampel*4: 32 kHz, 44,1 kHz, 48 kHz
FLAC (.flac)*
1*2
3
1*2
3
1
5
Frekuensi sampel*4: 8 kHz – 48 kHz
Bit per sampel (Bit kuantisasi): 8 bit, 16 bit, 24 bit
*1 File yang dilindungi hak cipta dan file audio multi-saluran
tidak dapat diputar kembali.
*2 File DRM (Manajemen Hak Digital) tidak dapat diputar
kembali.
*3 Laju bit non-standar atau laju bit yang tidak dijamin
disertakan, tergantung pada frekuensi sampelnya.
*4 Frekuensi sampel mungkin tidak sesuai dengan semua
enkoder.
*5 Angka-angka ini menunjukkan resolusi maksimal video
yang dapat diputar dan tidak menunjukkan resolusi
tampilan pemutar. Resolusi layarnya adalah 800 × 480.
*6 Menampilkan informasi tag tidak didukung.
Catatan
Beberapa file mungkin tidak diputar meskipun format
filenya didukung oleh unit.
Tentang iPhone
• Model iPhone yang kompatibel:
iPhone X, iPhone 8 Plus, iPhone 8, iPhone 7 Plus, iPhone 7,
iPhone SE, iPhone 6s Plus, iPhone 6s, iPhone 6 Plus,
iPhone 6, iPhone 5s
• Penggunaan lencana Made for Apple berarti aksesori telah
dirancang untuk disambungkan secara khusus dengan
produk Apple yang diidentifikasi dengan lencana, dan
telah disertifikasi oleh pengembang untuk memenuhi
standar kinerja Apple. Apple tidak bertanggung jawab atas
pengoperasian perangkat ini atau kepatuhannya terhadap
standar keselamatan dan peraturan.
Perlu diingat bahwa penggunaan aksesori ini dengan
produk Apple dapat memengaruhi kinerja nirkabel.
Pemberitahuan tentang lisensi
Produk ini berisi perangkat lunak yang digunakan oleh Sony
berdasarkan perjanjian lisensi dengan pemilik hak cipta.
Kami wajib memberitahukan isi perjanjian kepada
pelanggan seperti yang disyaratkan oleh pemilik hak cipta
perangkat lunak tersebut.
Untuk detail tentang lisensi perangkat lunak, baca
halaman 15.
17ID

Spesifikasi
Bagian monitor
Jenis layar: Monitor LCD lebar berwarna
Ukuran: 176 mm (6,95 inci)
Sistem: matriks TFT aktif
Jumlah piksel:
1.152.000 piksel (800 × 3 (RGB) × 480)
Sistem warna: PAL/NTSC
Bagian radio
FM
Rentang penalaan:
87,5 MHz – 108,0 MHz (pada tingkat 50 kHz)
87,5 MHz – 108,0 MHz (pada tingkat 100 kHz)
87,5 MHz – 107,9 MHz (pada tingkat 200 kHz)
Tingkat penalaan FM:
50 kHz/100 kHz/200 kHz yang dapat diubah
Sensitivitas yang dapat digunakan: 7 dBf
Rasio sinyal-terhadap-kebisingan: 70 dB (mono)
Pemisahan pada 1 kHz: 45 dB
AM
Rentang penalaan:
531 kHz – 1.602 kHz (pada tingkat 9 kHz)
530 kHz – 1.710 kHz (pada tingkat 10 kHz)
Tingkat penalaan AM:
9 kHz/10 kHz yang dapat diubah
Sensitivitas: 32 μV
Bagian pemutar USB
Antarmuka:
USB port 1: USB (Kecepatan tinggi)
USB port 2: USB (Kecepatan penuh)
Arus maksimal:
USB port 1: 1,5 A
USB port 2: 500 mA
Komunikasi nirkabel
Sistem Komunikasi:
Standar BLUETOOTH versi 3.0
Output:
Daya Standar BLUETOOTH Kelas 2
(Maks. Terkonduksi +1 dBm)
Jarak komunikasi maksimal*
Garis arah sekitar 10 m
Pita frekuensi:
Pita 2,4 GHz (2,4000 GHz – 2,4835 GHz)
Metode modulasi: FHSS
Profil BLUETOOTH yang Kompatibel*
A2DP (Profil Distribusi Audio Tingkat Lanjut) 1.3
AVRCP (Profile Kontrol Ja rak Jauh Video Audio)
1.3
HFP (Profil Handsfree) 1.6
PBAP (Profil Akses Buku Telepon) 1.1
Codec yang terkait: SBC, AAC
1
:
2
:
*1 Jarak aktualnya akan berbeda-beda yang tergantung
pada faktor-faktor seperti rintangan antar perangkat,
medan magnet d i sekitar oven microwave, listrik statis,
sensitivitas penerimaan, kinerja antena, sistem operasi,
aplikasi perangkat lunak, dll.
*2 Profil standar BLUETOOTH menunjukkan tujuan
komunikasi BLUETOOTH antar perangkat.
Bagian amplifier daya
Output: Output speaker
Impedansi speaker: 4 Ω – 8 Ω
Output daya maksimal: 55 W × 4 (pada 4 Ω)
Umum
Persyaratan daya: aki baterai DC 12 V
(ground negatif)
Konsumsi arus terhitung: 10 A
Ukuran:
Sekitar 210 mm × 109 mm × 139 mm (l/t/d)
Masa: Sekitar 1,1 kg
Isi kemasan:
Unit utama (1)
Tanyakan kepada dealer untuk informasi
selengkapnya.
Desain dan spesifikasi bisa berubah tanpa
pemberitahuan.
18ID

Hak Cipta
Merek kata dan logo Bluetooth® adalah merek dagang
terdaftar yang dimiliki oleh Bluetooth SIG, Inc. dan
penggunaan merek tersebut oleh Sony Group Corporation
dan anak perusahaannya berdasarkan lisensi. Merek
dagang dan nama dagang lain adal ah milik pemiliknya
masing-masi ng.
Windows Media adalah merek dagang terdaftar atau merek
dagang Microsoft Corporation di Amerika Serikat dan/atau
negara lain.
Produk ini dilindungi oleh hak kekayaan intelektual tertentu
dari Microsoft Corporation. Dilarang menggunakan atau
mendistribusikan teknologi semacam ini di luar produk ini
tanpa lisensi dari Microsoft atau anak perusahaan Microsoft
yang berwenang.
Apple, iPhone, dan Lightning adalah merek dagang Apple
Inc., yang terdaftar di AS dan negara-negara lain.
Apple CarPlay adalah merek dagang Apple Inc.
IOS merupakan merek dagang atau merek dagang terdaftar
Cisco di AS dan negara lain dan digunakan berdasarkan
lisensi.
Android, Android Auto, Google dan Google Play adalah
merek dagang Google LLC.
WebLink adalah merek dagang terdaftar Abalta
Technologies, Inc. di Amerika Serikat dan merek dagang di
negara lain.
PRODUK INI DILISENSIKAN BERDASARKAN LISENSI
PORTOFOLIO PATEN VISUAL MPEG-4 UNTUK PENGGUNAAN
PRIBADI DAN NON-KOMERSIAL PERANGKAT KONSUMSI
UNTUK MELAKUKAN DECODING VIDEO SESUAI DENGAN
STANDAR VISUAL MPEG-4 ("VIDEO MPEG-4") YANG DIENCODING OLEH KONSUMEN YANG TERLIBAT DALAM
AKTIVITAS PRIBADI DAN NONKOMERSIAL DAN/ATAU
DIPEROLEH DARI PENYEDIA VIDEO YANG DILISENSIKAN
OLEH MPEG LA UNTUK MENGHADIRKAN VIDEO MPEG-4.
TIDAK ADA LISENSI YANG DIBERIKAN ATAU DISIRATKAN
UNTUK PENGGUNAAN LAIN.
INFORMASI TAMBAHAN TERMASUK YANG TERKAIT DENGAN
PENGGUNAAN PROMOSI, INTERNAL DAN KOMERSIAL DAN
LISENSI MUNGKIN DIPEROLEH DARI MPEG LA, LLC. LIHAT
HTTP://WWW.MPEGLA.COM
Semua merek dagang lain adalah merek dagang dari
pemiliknya masing-masing.
Pemecahan Masalah
Daftar periksa berikut ini akan membantu Anda
mengatasi masalah yang mungkin Anda hadapi
pada unit ini.
Sebelum mengecek daftar periksa di bawah ini,
periksa prosedur penyambungan dan
pengoperasian.
Jika masalah tidak teratasi, kunjungi situs dukungan
pada sampul belakang.
Umum
Tidak ada suara bip.
Amplifier daya opsional tersambung dan Anda
tidak menggunakan amplifier bawaan.
Sekring rusak.
Unit menimbulkan kebisingan saat posisi kunci
kontak diputar.
Kabel tidak dipasangkan dengan benar dengan
konektor daya aksesori mobil.
Tampilan ini lenyap dari/tidak muncul pada
monitor.
Fungsi pematian monitor diaktifkan (halaman 6).
– Sentuh di mana saja pada layar untuk
menyalakan layar kembali.
Item menu tidak dapat dipilih.
Item menu yang tidak tersedia ditampilkan
dalam warna abu-abu.
Fungsi USB tidak bekerja dengan benar.
Jangan menggunakan kabel ekstensi USB karena
akan mengurangi kualitas sinyal.
– Gunakan kabel USB pendek saat
menyambungkan perangkat USB, atau
mengganti kabel USB dengan yang baru.
Unit tidak dapat dioperasikan.
Tekan dan tahan HOME selama lebih dari 10 detik
untuk memulai ulang unit. Demi keamanan,
jangan memulai ulang unit saat Anda
berkendara.
Jam yang diatur secara otomatis tidak akurat.
Data jam pada gelombang radio tidak akurat.
– Atur jam secara manual (halaman 14).
Pengoperasian panel sentuh
Panel sentuh tidak merespons sentuhan Anda
dengan benar.
Sentuh satu bagian panel saja pada saat
bersamaan. Jika dua bagian atau lebih disentuh
secara bersamaan, panel tidak akan merespons
dengan benar.
Sentuh panel yang peka tekanan dengan kuat.
19ID

Panel sentuh tidak merespons jika disentuh
dengan jari yang basah atau jika terdapat tetesan
air pada permukaan panel sentuh.
– Keringkan jari Anda terlebih dahulu, atau seka
tetesan air pada panel sentuh sampai bersih.
Multi-sentuh tidak dikenali.
Pengoperasian multi-sentuh tidak didukung
pada unit ini.
Penerimaan radio
Penerimaan radio lemah.
Muncul gangguan statis.
Sambungkan antena dengan kencang.
Stasiun tidak dapat diterima.
Pengaturan tingkat penalaan telah dihapus.
– Atur lagi tingkat penalaan (halaman 15).
RDS
PTY menampilkan [PTY tidak ditemukan.].
Stasiun saat ini bukan stasiun RDS, atau
penerimaan radio lemah.
Gambar
Tidak ada gambar/terjadi kebisingan gambar.
Sambungan belum dibuat dengan benar.
Periksa sambungan antara unit ini dan peralatan
lain, lalu atur selektor input peralatan ke sumber
yang sesuai dengan unit ini.
Pemasangan tidak benar.
– Pasang unit pada sudut kurang dari 30° di
bagian yang stabil pada mobil.
Kabel parkir (hijau terang) tidak tersambung
dengan kabel sakelar rem tangan, atau rem
tangan tidak diaktifkan.
Gambar tidak pas di layar.
Rasio aspek ditetapkan pada sumber pemutaran.
Suara
Tidak ada suara/suara dilompati/suara terbelah.
Sambungan belum dibuat dengan benar.
Periksa sambungan antara unit ini dan peralatan
yang tersambung, lalu atur selektor input
peralatan ke sumber yang sesuai dengan unit ini.
Pemasangan tidak benar.
– Pasang unit pada sudut kurang dari 30° di
bagian yang stabil pada mobil.
Unit berada dalam mode jeda/mundur/maju
cepat.
Pengaturan output tidak dilakukan dengan
benar.
Volume terlalu rendah.
Fungsi ATT diaktifkan.
Format tidak didukung.
– Periksa apakah format ini didukung oleh unit ini
(halaman 17).
Suaranya bising.
Jauhkan kabel cord dan kabel satu sama lain.
Pemutaran USB
Item tidak dapat diputar.
Sambungkan ulang perangkat USB.
Port USB tempat perangkat USB tersambung
tidak sesuai.
– Sambungkan perangkat USB ke port USB yang
sesuai yang mendukung format file
(halaman 9).
Perangkat USB perlu waktu lebih lama untuk
diputar.
Perangkat USB berisi file yang berukuran besar
atau file dengan struktur pohon yang rumit.
File audio tidak dapat diputar.
Perangkat USB yang diformat dengan sistem file
selain FAT12, FAT16, FAT32, atau exFAT*
didukung.*
Port USB tempat perangkat USB tersambung
tidak sesuai.
– Sambungkan perangkat USB ke port USB yang
*1 Perangkat USB yang diformat dengan sistem file exFAT
tersedia hanya jika tersambung ke USB port 1.
*2 Unit ini mendukung FAT12, FAT16, FAT32 dan exFAT tetapi
beberapa perangkat USB mungkin tidak mendukung
format tersebut. Untuk selengkapnya, baca petunjuk
pengoperasian dari tiap perangkat USB atau hubungi
produsennya.
Pengoperasian tidak dapat dilakukan.
Mode USB perangkat tidak diatur ke mode yang
sesuai.
– Pastikan bahwa mode USB perangkat diatur ke
Port USB tempat perangkat USB tersambung
tidak sesuai.
– Sambungkan perangkat USB ke port USB yang
2
sesuai dan mendukung sistem file (halaman 9).
mode MSC atau MTP.
sesuai dan mendukung fitur tersebut
(halaman 9).
1
tidak
Fungsi BLUETOOTH
Perangkat BLUETOOTH lain tidak dapat
mendeteksi unit ini.
Atur [Koneksi Bluetooth] ke [NYALA]
(halaman 15).
Saat menyambungkan ke perangkat BLUETOOTH,
unit ini tidak dapat dideteksi oleh perangkat lain.
Putuskan sambungan yang sedang terjalin dan
cari unit ini dari perangkat lain.
20ID

Tergantung pada smartphone atau ponselnya,
Anda mungkin perlu menghapus unit ini dari
riwayat smartphone atau ponsel yang
tersambung, lalu sandingkan lagi (halaman 7).
Sambungan tidak memungkinkan.
Periksa prosedur pemasangan dan
penyambungan di buku panduan perangkat lain,
dll., lalu lakukan operasi tersebut lagi.
Nama perangkat yang tersambung tidak muncul.
Tergantung pada status perangkat lain, nama
mungkin saja tidak dapat diperoleh.
Tidak ada nada dering.
Naikkan volume saat menerima panggilan.
Speaker tidak tersambung dengan unit ini.
– Sambungkan speaker ke unit ini. Untuk memilih
speaker nada dering, tekan HOME, lalu sentuh
[Pengaturan], lalu pilih [Suara Panggilan
Telepon] di [Suara] (halaman 15).
Volume suara pembicara rendah.
Naikkan volume selama melakukan panggilan.
Lawan bicara berkata bahwa volume terlalu
rendah atau terlalu tinggi.
Setel level [MIC Gain] (halaman 12).
Echo atau kebisingan terjadi selama percakapan
dalam panggilan.
Kurangi volume.
Atur [Kualitas Ucapan] ke [Mode 1] atau [Mode 2].
(halaman 12).
Jika kebisingan sekitar selain suara panggilan
telepon kencang, coba kurangi kebisingan
tersebut.
– Tutup jendela jika kondisi jalan terlalu bising.
– Turunkan level AC jika suara AC lantang.
Kualitas suara telepon buruk.
Kualitas suara telepon tergantung pada kondisi
penerimaan ponsel.
– Pindahkan mobil ke tempat yang
memungkinkan Anda meningkatkan sinyal
ponsel jika penerimaannya buruk.
Volume perangkat BLUETOOTH yang tersambung
rendah atau tinggi.
Level volume akan berbeda-beda tergantung
perangkat BLUETOOTH-nya.
– Kurangi perbedaan level volume antara unit ini
dan perangkat BLUETOOTH (halaman 10).
Suara dilompati selama streaming audio atau
sambungan BLUETOOTH gagal.
Kurangi jarak antara unit ini dan perangkat
BLUETOOTH.
Jika perangkat BLUETOOTH disimpan di kotak
yang mengganggu sinyal, keluarkan dari kotak
sambil menggunakan perangkat tersebut.
Beberapa perangkat BLUETOOTH atau perangkat
lain (misalnya, perangkat radio HT) yang
memancarkan gelombang radio digunakan di
lokasi terdekat.
– Matikan perangkat lain tersebut.
– Tambah jarak antara unit ini dan perangkat lain
tersebut.
Suara pemutaran berhenti untuk sementara
waktu saat unit ini tersambung ke ponsel. Hal ini
bukan kerusakan.
Perangkat BLUETOOTH yang tersambung tidak
dapat dikontrol selama streaming audio.
Periksa apakah perangkat BLUETOOTH yang
tersambung mendukung AVRCP atau tidak.
Beberapa fungsi tidak bekerja.
Periksa apakah perangkat yang tersambung
mendukung fungsi yang dimaksud atau tidak.
Panggilan dijawab tanpa sengaja.
Ponsel yang tersambung diatur untuk memulai
panggilan secara otomatis.
[Jawab Otomatis] dari unit ini diatur ke [NYALA]
(halaman 12).
Penyandingan gagal karena waktu habis.
Tergantung pada perangkat yang tersambung,
batas waktu pemasangan mungkin pendek.
Coba selesaikan penyandingan dalam periode
waktu tersebut.
Tidak dapat menyandingkan.
Unit mungkin tidak dapat menyandingkan
dengan perangkat BLUETOOTH yang
disandingkan sebelumnya setelah inisialisasi unit
jika informasi penyandingan unit muncul pada
perangkat BLUETOOTH. Dalam kasus ini, hapus
informasi penyandingan unit dari perangkat
BLUETOOTH, lalu sandingkan lagi.
Fungsi BLUETOOTH tidak dapat dioperasikan.
Matikan kunci kontak. Tunggu sebentar, lalu
putar kunci kontak ke posisi ACC.
Tidak ada suara yang dikeluarkan dari speaker
mobil selama panggilan handsfree.
Jika suara keluar dari ponsel, atur ponsel agar
mengeluarkan suara dari speaker mobil.
Apple CarPlay
Ikon Apple CarPlay tidak muncul pada layar
HOME.
iPhone Anda tidak kompatibel dengan Apple
CarPlay.
– Baca panduan yang disertakan dengan iPhone
Anda, atau kunjungi situs web Apple CarPlay.
Putuskan sambungan iPhone Anda dari USB port
1 lalu sambungkan kembali.
21ID

Port USB tempat iPhone tersambung tidak
sesuai.
– Sambungkan iPhone Anda ke USB port 1.
Apple CarPlay mungkin tidak tersedia di negara
atau wilayah Anda.
Pastikan Anda menggunakan kabel Lightning
yang bersertifikasi untuk menyambungkan
iPhone dengan unit.
Android Auto
Ikon Android Auto tidak muncul pada layar
HOME.
Periksa ponsel Android dan terima penafian dan
permintaan izin yang diperlukan untuk
menggunakan Android Auto pada ponsel
Android.
Tidak ada aplikasi Android Auto yang terinstal
pada ponsel Android Anda.
– Unduh dan instal aplikasi Android Auto ke
ponsel Android.
Ponsel Android Anda tidak kompatibel dengan
Android Auto.
– Ponsel Android Anda perlu mendukung
Android Auto. Baca panduan yang disertakan
dengan ponsel Android Anda, atau kunjungi
situs web Android Auto.
Putuskan sambungan ponsel Android Anda dari
USB port 1 lalu sambungkan kembali.
Port USB tempat ponsel Android tersambung
tidak sesuai.
– Sambungkan ponsel Android Anda ke USB port
1.
Android Auto mungkin tidak tersedia di negara
atau wilayah Anda.
WebLink ™
WebLink™ tidak dapat digunakan.
Wajib menginstal aplikasi "WebLink Host" ke
iPhone/ponsel Android.
– Periksa situs berikut lalu instal aplikasi
"WebLink Host".
http://abaltatech.com/WL
– Periksa iPhone/ponsel Android dan terima
penafian dan izin untuk menggunakan
WebLink™ di iPhone/ponsel Android.
Putuskan sambungan iPhone/ponsel Android
Anda dari USB port 1 lalu sambungkan kembali.
Port USB yang tersambung ke iPhone/ponsel
Android tidak tepat.
– Sambungkan iPhone/ponsel Android Anda ke
USB port 1.
Nyalakan ulang ponsel iPhone/Android.
WebLink™ mungkin tidak tersedia di negara atau
kawasan Anda.
Tidak ada suara./Suara rendah.
Ponsel iPhone/Android tidak tersambung ke unit
via BLUETOOTH.
– Buat koneksi BLUETOOTH.
Tingkat volume [Audio BT] rendah.
– Setel tingkat volume [Audio BT].
Pesan
Umum
Tidak dapat memutar konten ini.
Konten yang dipilih saat ini tidak dapat diputar,
atau dilompati ke konten selanjutnya.
– Konten tidak dalam format file yang didukung.
Periksa format file yang didukung (halaman 17).
Perangkat tidak merespons
Unit tidak mengenali perangkat USB yang
tersambung.
– Sambungkan ulang perangkat USB.
– Periksa apakah perangkat USB didukung oleh
unit ini.
Tak Ada Data yang Dapat Diputar
Perangkat USB tidak memiliki data yang dapat
diputar.
– Muat data/file musik ke dalam perangkat USB.
Peringatan Arus Berlebih di USB
Perangkat USB diberi muatan berlebih.
– Putuskan sambungan perangkat USB.
– Menunjukkan bahwa perangkat USB rusak, atau
perangkat yang tersambung tidak didukung.
Perangkat USB tidak didukung
Untuk informasi selengkapnya tentang
kompatibilitas perangkat USB, kunjungi situs
dukungan yang terdapat pada sampul belakang.
Hub tidak didukung.
Hub USB tidak didukung pada unit ini.
BLUETOOTH
Perangkat Bluetooth tidak ditemukan.
Unit ini tidak dapat mendeteksi perangkat
BLUETOOTH yang dapat disambungkan.
– Periksa pengaturan BLUETOOTH dari perangkat
yang melakukan sambungan.
Tidak ada perangkat di dalam daftar perangkat
BLUETOOTH yang terdaftar.
– Lakukan penyandingan dengan perangkat
BLUETOOTH (halaman 7).
Perangkat bebas tangan tidak tersedia.
Ponsel tidak tersambung.
– Sambungkan ponsel (halaman 7).
WebLink™
Instal dan jalankan aplikasi WebLink Host di
ponsel Anda. Untuk informasi lebih lanjut,
kunjungi www.abaltatech.com/wl
Kunjungi www.abaltatech.com/wl, dan periksa
informasi selengkapnya.
22ID

Koneksi
USB port 2
Perangkat USB (untuk
pemutar audio saja)*
1
dari antena mobil*
5
*
3
*
4
*
2
Koneksi
*1 Jangan gunakan kabel ekstensi USB.
*2 Subwoofer (tidak disertakan)
*3 Amplifier daya (tidak disertakan)
*4 Kabel konektor RCA (tidak disertakan)
*5 Tergantung pada jenis mobil, gunakan adaptor (tidak
disertakan) jika konektor antena tidak sesuai.
23ID


Situs dukungan
Jika Anda punya pertanyaan atau ingin mendapatkan
informasi dukungan terbaru tentang produk ini,
harap kunjungi situs web di bawah ini:
Support site
If you have any questions or for the latest support
information on this product, please visit
the web site below:
https://www.sony-asia.com/support
For more information on this model, refer to XAV-AX5110 on the support sites.
Untuk informasi selengkapnya tentang model ini, baca XAV-AX5110 di situs
pendukung.
©2021 Printed in Thailand
 Loading...