

Page 1

System Requirements
Computer:
PC/AT or compatible computer preinstalled with one of the following Windows operating systems:
IBM
indows XP Home Edition (Service Pack 2 or later) / Windows XP Professional (Service Pack 2 or later) /
W
Windows Vista Home Basic (Service Pack 1 or later) / Windows Vista Home Premium (Service Pack 1 or later) /
indows Vista Business (Service Pack 1 or later) / Windows Vista Ultimate (Service Pack 1 or later)
W
Excluding OS Versions not supported by Microsoft
*
Excluding Windows® XP Professional x64 Edition
*
Excluding 64-bit OS versions for use with PC application software “Media Manager for WALKMAN”
*
CPU: Pentium 4 1.0 GHz or higher
RAM: 512 MB or more
Hard Disk Drive: 380 MB or more of available space.
Display: Screen Resolution: 800 × 600 pixels (or higher) (recommended 1,024 × 768 or higher), Colors: 8-bit
or higher (16-bit recommended)
CD-ROM drive (Supporting Digital Music CD playback capabilities using WDM)
o create original CDs, a CD-R/RW drive is required.
T
Sound board
USB port (Hi-Speed USB is recommended)
Microsoft® .NET Framework 2.0 or 3.0, QuickTime®7.3(supplied), Internet Explorer 6.0 or 7.0, Windows Media
Player 10 or 11, DirectX9.0 are required. (Windows Media Player 11 recommended. Some computers that
already have Windows Media Player 10 installed may encounter file limitation (AAC, video files, etc.) that can
be transferred by dragging and dropping.)
Adobe Flash Player 8 or higher needs to be installed.
Broadband Internet connection is required to use Electronic Music Distribution (EMD) or to visit the web
site.
We do not guarantee operation with all computers even if they meet the above System Requirements.
supported by the following environments:
Not
Personally constructed computers or operating systems / An environment that is an upgrade of the original
manufacturer-installed operating system / Multi-boot environment / Multi-monitor environment / Macintosh
©2009 Sony Corporation Printed in Malaysia 4-137-988-11 (1)
Quick Start Guide
NWZ-X1050 / X1051 / X1060 / X1061
Page 2

Owner’s Record
The model and serial numbers are located on the back of the player. Record them in the
space provided below. Refer to these numbers in the spaces whenever you call upon your
Sony dealer regarding this product.
Model No. __________________________
Serial No. __________________________
For users in France
When replacing the headphones/earphones, please refer to the model of the headphones/
earphones adapted to your unit that appears below.
MDR-NC020
At high volume, prolonged listening to the personal audio player can damage
the user’s hearing.
Supplied Accessories
Please check that the following accessories are included in the package.
eadphones (1)
H
B cable (1)
US
arbuds (Size S, L) (1)
E
ttachment (1)
A
Use when connecting the player to
the optional cradle, etc.
About the Manual
The use of the player is described in this “Quick Start Guide,” in the “Operation Guide” (PDF file).
Quick Start Guide: Explains basic operations of the player, including importing,
transferring, and playing/viewing music, videos and photos. It also explains the basic
operations of Wireless LAN communication using the player.
Operation Guide: Explains advanced features of the player and offers
troubleshooting information.
Precautions: Explains important notes to prevent accidents.
For the latest information
If you have any questions or issues with this product, or would like information on
compatible items with this product, visit the following web sites.
For customers in the USA: http://www.sony.com/walkmansupport
For customers in Canada: http://www.sony.ca/ElectronicsSupport/
For customers in Europe: http://support.sony-europe.com/DNA
For customers in Latin America: http://www.sony-latin.com/index.crp
For customers in other countries/regions: http://www.sony-asia.com/support
For customers who purchased the overseas models: http://www.sony.co.jp/overseas/support/
Audio input cable (1)
P
lug adaptor for in-flight use (single/dual) (1)
OM*1*2 (1)
CD-R
Media Manager for WALKMAN*
Windows Media Player 11
Content Transfer
Operation Guide (PDF file)
uick Start Guide (this manual) (1)
Q
*1 Do not attempt to play this CD-ROM in an audio CD player.
2
Depending on the country/region in which you have purchased the player, the bundled
*
software may be different.
3
Media Manager for WALKMAN is not bundled with the packages sold in the U.S.A. Please
*
download it from the following web site:
http://www.sonycreativesoftware.com/download/wmm_lite
3
3
Page 3

4
5
Table of Contents
Supplied Accessories ...................................................3
Parts and Controls .......................................................6
How to Use the Touch Panel ...........................................................................................8
About the Home Menu ................................................................................................... 11
Getting Started ......................................................... 12
Before Connecting the Player to Your Computer ........................................... 12
Charging the Battery ......................................................................................................... 12
Settings before Using the Player ...............................................................................13
Basic Operations ....................................................... 14
Turning the Player On and Off .................................................................................... 14
Playing Music/Videos/Photos ...................................................................................... 15
Transferring Music/Videos/Photos/Podcasts
from a Computer .................................................... 16
Installing the Operation Guide and Software ...................................................16
About the Bundled Software ....................................................................................... 17
Importing Music Using Windows Media Player 11 ........................................ 20
Transferring Music Using Windows Media Player 11 .................................... 22
Transferring Music/Videos/Photos/Podcasts
Using Windows Explorer ....................................................................................... 24
Enjoying the Internet ............................................... 26
Internet Features of the Player .................................................................................... 26
Connecting to the Internet ........................................................................................... 27
Additional Information ............................................ 28
Precautions ............................................................................................................................. 28
Page 4
6
7
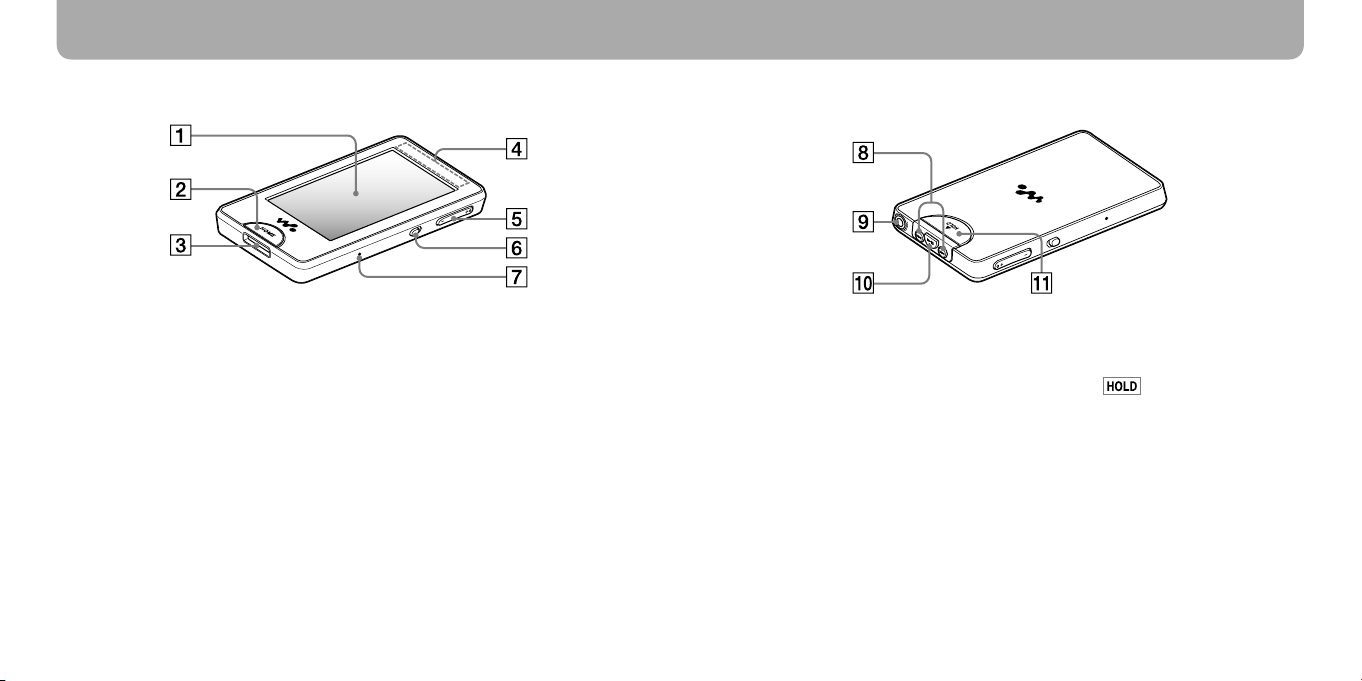
Parts and Controls
Front
Screen (touch panel)
Touch (tap) an icon, item, control button,
etc., on the screen to operate the player (
page 8).
HOME button
Press to display the Home menu ( page
11).
If you press and hold the HOME button, the
screen turns off and the player enters
standby mode.
WM-PORT jack
Use this jack to connect the supplied USB
cable, or optional peripheral devices.
Built-in antenna
Take care not to cover the antenna with
your hand or other objects during wireless
LAN communication.
VOL +*1/- button
Adjusts the volume.
NOISE CANCELING switch
Slide the NOISE CANCELING switch in the
direction of the arrow to activate the
Noise Canceling function.
RESET button
Press the RESET button with a small pin,
etc., to reset the player.
Rear
/ buttons
Press to find the beginning of a song or video,
or to fast-forward/rewind.
Headphone jack
Connects the headphones.
*1 button
Press the button to start playback of the
song or video. During playback, press the
button to pause.
HOLD switch
Slide the HOLD switch in the direction of
the arrow to disable the buttons and
touch panel.
screen when disabled.
*1 There are tactile dots. Use them to help with
button operations.
appears on the top of the
Page 5
8
9
Parts and Controls (continued)
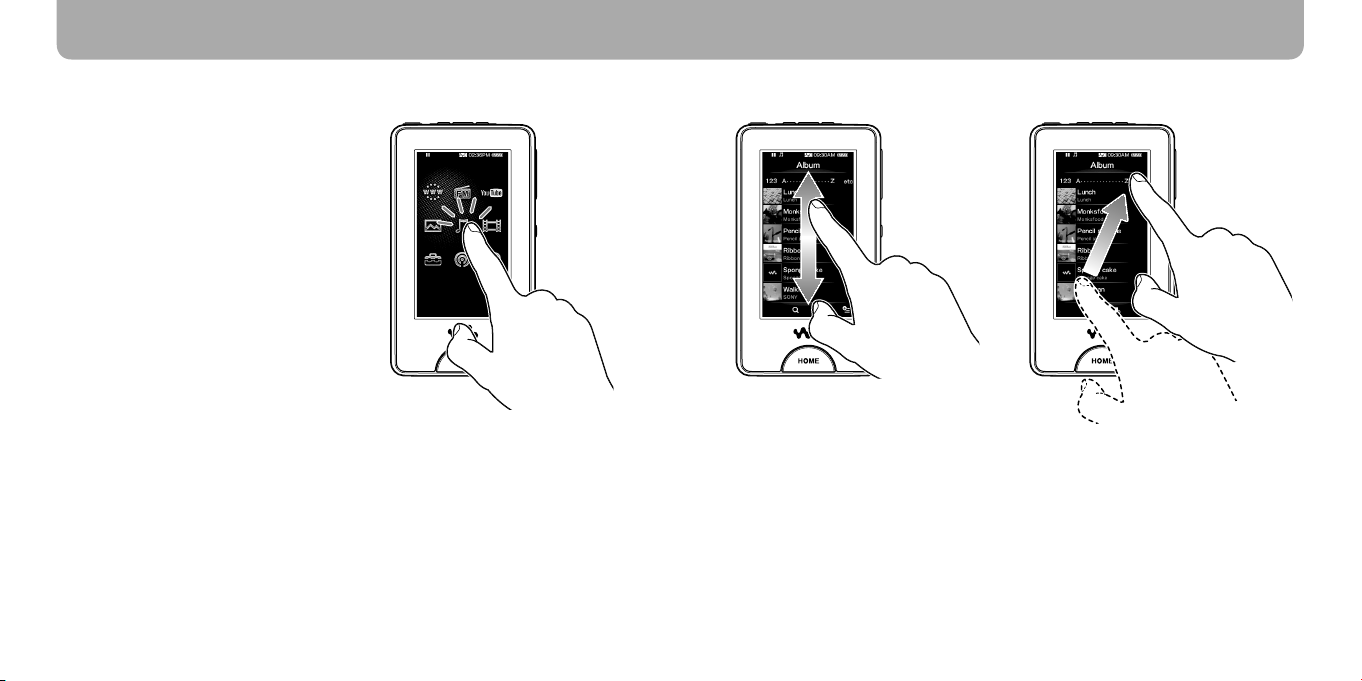
How to Use the Touch Panel
You can use the touch panel screen to
operate the player.
Tap an icon, item, control button, etc., on
the screen to operate the player. Also, drag
up or down to scroll through a list, and
flick to scroll quickly through a list or
thumbnails (reduced-size images that
appear in a list).
Notice for touch panel operations
The touch panel of the player does not
work properly when operated with:
A gloved finger.
wo or more fingers.
T
inger nail.
A f
et finger.
A w
en, ballpoint pen, pencil, stylus, etc.
A p
ouching other objects in addition to a
T
finger.
Tapping to select
Touch (tap) an icon, item, control button,
etc., to select it.
Dragging to scroll
Drag your finger up or down on the list to
scroll through the list. Also, drag the
indicator along the Seek Slider to choose a
starting point for the playback.
Flicking to scroll quickly
Flick the screen up or down with your
finger to scroll quickly through a list. Also,
flick up, down or sideways to see the next/
previous album on the album scroll screen,
or to see the next/previous image on the
scene scroll screen.
Page 6

10
11
Parts and Controls (continued)
Text input
You can use the onscreen keyboard to enter text.
Select a text field you intend to enter text into, such as a web page address entry, to bring up
the onscreen keyboard.
As you tap the Input mode key, the key assignment changes cyclically. The key assignment
maps vary depending on the language.
Example: Alphanumeric keyboard for English
Input field
Entered text is displayed here.
Predictive text field (English and Chinese only)
Predictive text or predictive conversion candidates are displayed here.
Input mode key
Note
Depending on the text field, you may not be able to change the input mode, due to character
restrictions.
Hint
You can use the predictive text function on the English and Chinese keyboards.
About the Home Menu
You can display the Home menu by pressing the HOME button of the
player. The Home menu is the starting point of each application, such
as Music, Videos, Photos, FM Radio, Internet Browser, Podcasts, etc.
Internet Browser Browse websites over wireless Internet connection.
FM Radio Listen to FM radio broadcasting.
YouTube Watch videos on YouTube via wireless Internet connection.
Photos View photos transferred to the player.
Music Listen to songs transferred to the player.
Videos Watch videos transferred to the player.
Settings Set up the player and its applications.
Podcasts Download podcast episodes via wireless Internet connection and play
them back.
NC Modes Reduce unwanted ambient noise by active noise control technology.
Page 7

12
13
Getting Started
Before Connecting the Player to Your Computer
Make sure that the OS is Windows XP (Service Pack 2 or later) or Windows Vista (Service
Pack 1 or later), and the installed Windows Media Player version on your computer is 10 or
11.
Charging the Battery
The player’s battery is recharged while the player is connected to a running computer.
About 3 hours
Charging
Hint
While charging, after a lapse of time of the “Screen Off Timer” setting, the screen turns off. To
see the charging status or other indications, press the HOME button to turn on the screen.
Notes
While the player is connected to a computer, do not turn on, restart, wake up from sleep mode,
or shut down the computer. These operations may cause the player to malfunction. Disconnect
the player from the computer before performing these operations.
ou cannot operate the player when it is connected to a computer.
Y
f you do not intend to use the player for over half a year, charge the battery at least once per 6
I
to 12 months for battery maintenance.
Fully charged
Settings before Using the Player
Selecting the display language
Be sure to set the display language before using the player. Otherwise, garbled characters
may appear on the display.
From the Home menu, select (Settings) “Language Settings” the
1
desired language setting.
Selecting the country/region
Choose the country/region for the search website to search information by using the
Related Links function of the player.
From the Home menu, select (Settings) “Service Country/Region”
1
the desired country/region “OK.”
Adjusting the date and time
Some applications of the player do not work correctly until the date and time are set. Set
the current date and time before using the player.
From the Home menu, select (Settings) “Common Settings”
1
“Clock Settings” “Set Date-Time.”
Drag or flick the year, month, date, hour and minute up or down to adjust
2
the date and time.
Select “OK.”
3
Page 8

14
15
Basic Operations
Turning the Player On and Off
To turn on the player
Press any button to turn the player on.
Hint
If appears on the top of the screen, slide the
HOLD switch in the opposite direction of the arrow to
cancel the HOLD function ( page 7).
To turn off the player
If you press and hold the HOME button, the player
enters standby mode and the screen turns off.
Furthermore, if standby mode is retained for about one
day, the player automatically turns off completely.
Hints
When the set time of the “Screen Off Timer” elapses, the screen turns off, but you can still tap
the screen to turn it on.
bout 10 minutes after the screen turns off, the player enters the standby mode. You cannot use
A
the touch panel in standby mode. Press any button of the player to turn it back on before using
it.
Playing Music/Videos/Photos
To play/view music, videos, or photos, simply tap an icon on the screen. The player
contains some sample music, videos, and photos which help you to get some basic handson experience with the player.
Hint
You can select (To List) to display the songs/videos/photos list.
Playing Music
From the Home menu, select (Music), then select .
1
Playback of the sample music starts.
o stop playback, tap .
T
Playing Videos
From the Home menu, select (Videos), then select .
1
Playback of the sample video starts.
T
o stop playback, tap .
Viewing Photos
From the Home menu, select (Photos).
1
A sample photo is displayed on the screen.
o view another photo, drag your finger sideways.
T
Page 9

16
17
Transferring Music/Videos/Photos/Podcasts from a Computer
Installing the Operation Guide and Software
You can install the Operation Guide (PDF file) and software from the supplied CD-ROM
following the steps below. When installing, you must log on to your computer as an
administrator.
Check the system requirements (back cover) before starting installation.
Insert the supplied CD-ROM into your computer.
1
The install wizard will start automatically. Follow the on-screen instructions.
I
f the install wizard does not start, click [My Computer] (Windows XP) or
[Computer] (Windows Vista) from the [start] menu of Windows, then click the
CD-ROM drive icon to start the install wizard.
When the install menu appears, click on the item you want to install on
2
the left side, and then click the [Install] button on the right lower side of
the screen.
Follow the on-screen instructions.
To install the Operation Guide (PDF file), select [
To view the Operation Guide (PDF file)
After installation completes, the icon appears on your desktop. You can view the
Operation Guide by clicking the icon. For details about how to use or set player
functions, refer to the Operation Guide (PDF file).
Note
To view the Operation Guide, you need Adobe Reader or Acrobat Reader 5.0. Adobe Reader
can be downloaded from the Internet for free.
Operation Guide].
About the Bundled Software
Windows Media Player 11
Windows Media Player can import audio data from CDs and transfer data to the player.
When you use copyright protected WMA audio files and copyright protected WMV video
files, use this software.
Transferable files: Music (MP3, WMA), Video (WMV), Photo (JPEG)
For details on operation, refer to the Help of the software or visit the following website.
http://www.support.microsoft.com/
Hint
Some computers that already have Windows Media Player 10 installed may
encounter file limitations (AAC, video files, etc.) in transferring by drag-and-drop.
If you install Windows Media Player 11 from the supplied CD-ROM, you can
solve this problem. Before installing Windows Media Player 11, make sure to
check whether your software or service supports Windows Media Player 11.
Page 10

18
19
Transferring Music/Videos/Photos/Podcasts from a Computer (continued)
Media Manager for WALKMAN*
1
Media Manager for WALKMAN can transfer music, photos or videos from
the computer to the player and import audio data from CDs. Media
Manager for WALKMAN can also subscribe to RSS feeds and transfer the
music and video files that have been downloaded from podcasts.
For details on operation, refer to the Help of the software. Audio files
(AAC) or videos can also be transferred by drag-and-drop using Windows
Explorer as well as Media Manager for WALKMAN.
Transferable files: Music (MP3, WMA, AAC*
Simple Profile, AVC (H.264/AVC) Baseline Profile, WMV*
*1 If you purchased the package in the U.S.A., please download Media Manager for WALKMAN
from the following web site:
http://www.sonycreativesoftware.com/download/wmm_lite
2
DRM files are not compatible.
*
3
Some WMV files cannot be played back after being transferred by Media Manager for
*
WALKMAN. If you retransfer them using Windows Media Player 11, they may become
playable.
2
, WAV), Photo (JPEG), Video (MPEG-4
2*3
), Podcast (music, video)
Note
Copyright protected video files, such as DVD movies or recorded digital television programs,
are not supported.
Content Transfer
Content Transfer can transfer music, videos or photos from a computer to the player by a
simple drag-and-drop operation. You can use Windows Explorer or iTunes® to drag and
drop data to Content Transfer. For details on operation, refer to the Help of the software.
Transferable files: Music (MP3, WMA, AAC*
Simple Profile, AVC (H.264/AVC) Baseline Profile, WMV*
*1 DRM files are not compatible.
2
Some WMV files cannot be played back after being transferred by Content Transfer. If you
*
retransfer them using Windows Media Player 11, they may become playable.
Hints
ATRAC files can be transferred to the player after conversion to MP3 file format. To convert
files, download MP3 Conversion Tool from the customer support website referred to in “For
the latest information.”
ou can register podcasts to the player by using iTunes® and Content Transfer. To register, drag
Y
and drop the title of a podcast from iTunes® to Content Transfer.
1
, WAV), Photo (JPEG), Video (MPEG-4
1*2
), Podcast (music, video)
Page 11

20
21
Transferring Music/Videos/Photos/Podcasts from a Computer (continued)
For details, refer to Windows Media Player 11 Help
Importing Music Using Windows Media Player 11
You can use Windows Media Player 11 to copy (rip) music from your CDs. Please follow
these instructions to rip songs from a CD to your computer.
Insert the audio CD.
1
Start up Windows Media Player 11, and then click the “Rip” tab on the top
2
of the window.
When connected to the Internet, Windows Media Player 11 obtains the CD
information (CD title, song name or artist name, etc.) and displays them in the
window.
Click “Start Rip.”
3
Windows Media Player 11 begins to import the CD.
The imported songs are indicated as “Ripped to library.” Wait until all songs have been
imported.
Hints
Imported songs are stored in the “My Music” folder (Windows XP) or “Music” folder (Windows
Vista) of the computer. Click the “Library” tab of the Windows Media Player 11 window to find
them.
Windows Media Player 11 obtains the CD information from a database on the Internet. But,
some CDs’ information may not be available in the database. If your CD’s information is
missing, you can add it after importing. For information about adding and editing CD
information, refer to the Help of Windows Media Player 11.
If you want a song not to be imported, uncheck the checkbox to the left of the song title.
Note
The imported song is limited to private use only. Use of the song beyond this limit requires
permission of the copyright holders.
Page 12
22
23
Transferring Music/Videos/Photos/Podcasts from a Computer (continued)
For details, refer to Windows Media Player 11 Help
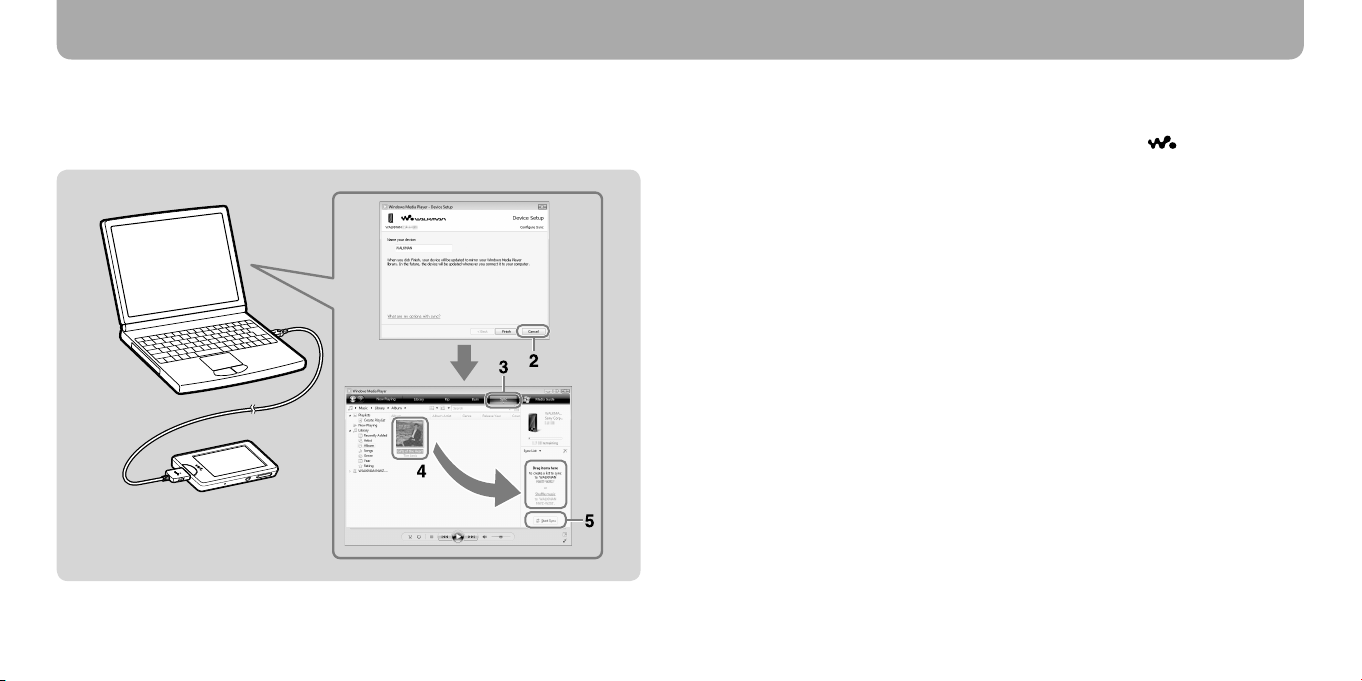
Transferring Music Using Windows Media Player 11
You can use Windows Media Player 11 to transfer music from your computer to the player.
Please follow these instructions to transfer songs from your computer to the player.
Start up Windows Media Player 11, and then connect the player to your
1
computer using the supplied USB cable.
Insert the connector of the USB cable into the player with the mark facing up.
The “Device Setup” window appears.
Click “Cancel.”
2
Close the auto play window if it appears by clicking “Cancel” or the Close icon.
I
f you click “Finish” instead of “Cancel,” the entire library data of Windows Media
Player is automatically copied to the player. If the library data size is larger than the
available storage space of the player, the copy process does not start.
Y
ou can open the “Device Setup” window at any time. To open it, right-click
“WALKMAN” on the left side of the Windows Media Player window, and then click
“Set Up Sync.”
Click the “Sync” tab on the Windows Media Player 11 window.
3
Drag and drop the desired songs to the Sync List on the right side of the
4
window.
The songs are added to the Sync List.
Click “Start Sync” to start synchronization.
5
When synchronization is complete, “You can now disconnect ‘WALKMAN_name’.”
appears on the Sync List. After completion, close Windows Media Player 11 and
disconnect the player from the computer.
Page 13

24
25
Transferring Music/Videos/Photos/Podcasts from a Computer (continued)
Transferring Music/Videos/Photos/Podcasts Using Windows Explorer
In addition to Windows Media Player 11, you can also use Windows Explorer to transfer
data from your computer to the player. Before transferring, import the desired music/
videos/photos/podcasts into your computer using appropriate software in advance.
To transfer data from your computer to the player, drag and drop data file(s) from the
computer’s folder to a folder of the player in Windows Explorer. The player appears as
[WALKMAN] in Windows Explorer when connected to your computer via the supplied
USB cable.
Playable data has hierarchy rules. To transfer data properly, see the illustrations of the next
page. Data hierarchy may differ, depending on your computer environment.
You can also transfer data using the bundled software.
Music
1st
7th
8th
9th
* Data hierarchies of “PICTURES” and “DCIM” are the same as the “PICTURE” folder.
Video Photo Podcast
1st
7th
8th
9th
1st
7th
8th
9th
Transferable files
Music: MP3, WMA, AAC*, Linear PCM
Video: MPEG-4, AVC (H.264/AVC), WMV
Photo: JPEG
* Copyright protected AAC files cannot be played back.
Note
If you transfer a podcast’s episodes to the player using Windows Explorer, you cannot download
other episodes of the podcast using the wireless LAN function of the player.
1st
2nd
3rd
Page 14

26
27
Enjoying the Internet
You can connect the player to the Internet via a wireless network to enjoy various Internet
features.
Internet Features of the Player
YouTube
You can watch YouTube videos via wireless Internet connection. You can search for desired
videos by keyword, or browse featured videos and most viewed videos.
Podcast
Besides transferring episodes from a computer to the player, you can also register podcasts
to the player. To register a podcast, use the Internet browser to open a website that
distributes podcasts, and then tap the RSS icon on the website. You can download episodes
from registered podcasts via wireless Internet connection.
You can also register podcasts by drag-and-drop from iTunes® to Content Transfer, or by
transferring them using Media Manager for WALKMAN, to download their episodes via
wireless Internet connection.
Internet browser
You can browse websites via wireless Internet connection. You can zoom in or out on a web
page, or rearrange the layout automatically for easy reading. The Internet browser supports
JavaScript.
Notes
Some web pages may not be displayed or may not work properly. Furthermore, web pages of
large volume that contain images or videos may not be displayed.
e Internet browser of the player does not support the following functions:
Th
– Flash® contents.
– Uploading/downloading files.
– Playback of streaming media, such as audio streams and video streams.
– Windows that open a new window when clicked.
Connecting to the Internet
To connect to the Internet via a wireless network, you need to select the desired access
point from a list. Usually, when the need arises for the player to connect to the Internet, the
connection confirmation screen automatically appears.
From the Home menu, select (Settings) “Wireless LAN Settings”
1
“WLAN Function On/Off” “On” “OK.”
If the “WLAN Function On/Off” setting is set to “Off” (default setting), the player
cannot connect to a wireless LAN.
From the Home menu, select (Internet Browser).
2
The connection confirmation screen appears.
Select “Yes.”
3
The Select Access Point screen appears.
On the screen, registered access points and access points that are within the
communication range of the player are displayed on a list.
Select the access point you want to connect to from the list.
4
If an encryption key is required, the entry screen appears. Select the “WEP Key” or
“WPA Key” field, enter the encryption key, then select “OK.”
The connecting dialog box appears. After establishing the connection, the Internet
browser appears.
Hints
The icon indicates wireless LAN signal strength.
or more detailed information on the wireless LAN function, refer to the Operation Guide.
F
Page 15

28
29
Additional Information
Precautions
Do not install the appliance in a confined space, such
as a bookcase or built-in cabinet.
To reduce the risk of fire, do not cover the ventilation
of the apparatus with newspapers, tablecloths, curtains,
etc. And do not place lighted candles on the apparatus.
To reduce the risk of fire or electric shock, do not
expose this apparatus to dripping or splashing, and do
not place objects filled with liquids, such as vases, on
the apparatus.
Do not expose the batteries (battery pack or batteries
installed) to excessive heat such as sunshine, fire or the
like for a long time.
Excessive sound pressure from earphones and
headphones can cause hearing loss.
Rated current consumption 500 mA
For customers who purchased the Tourist
model in Japan
Wireless LAN function designated for this product is
applicable in Australia, New Zealand, Korea, Hong
Kong, Singapore, India, the United Arab Emirates and
the Philippines.
Notice for customers: the following
information is only applicable to equipment
sold in countries applying EU directives
This product is intended to be used in the following
countries.
AD/AL/AT/BA/BE/BG/CH/CZ/DE/DK/EE/ES/FI/
FR/GB/GR/HR/HU/IE/IS/IT/LI/LT/LU/LV/MC/MD/
ME/MK/MT/NL/NO/PL/PT/RO/RS/RU/SE/SI/SK/
SM/TR/UA
Hereby, Sony Corp., declares that this equipment is in
compliance with the essential requirements and other
relevant provisions of Directive 1999/5/EC.
For details, please access the following URL:
http://www.compliance.sony.de/
The manufacturer of this product is Sony
Corporation, 1-7-1 Konan, Minato-ku, Tokyo, Japan.
The Authorized Representative for EMC and product
safety is Sony Deutschland GmbH, Hedelfinger Strasse
61, 70327 Stuttgart, Germany. For any service or
guarantee matters, please refer to the addresses given
in separate service or guarantee documents.
For customers who use this product in the
following countries:
France
The WLAN feature of this Digital Media Player shall
exclusively be used inside buildings.
Any use of the WLAN feature of this Digital Media
Player outside of the buildings is prohibited on the
French territory. Please make sure that the WLAN
feature of this Digital Media Player is disabled before
any use outside of the buildings. (ART Decision 20021009 as amended by ART Decision 03-908, relating to
radio-frequencies use restrictions.)
Italy
Use of the RLAN network is governed:
ith respect to private use, by the Legislative Decree
w
of 1.8.2003, no. 259 (“Code of Electronic
Communications”). In particular Article 104
indicates when the prior obtainment of a general
authorization is required and Art. 105 indicates
when free use is permitted;
ith respect to the supply to the public of the RLAN
w
access to telecom networks and services, by the
Ministerial Decree 28.5.2003, as amended, and Art.
25 (general authorization for electronic
communications networks and services) of the
Code of electronic communications.
Norway
Use of this radio equipment is not allowed in the
geographical area within a radius of 20 km from the
centre of Ny-Alesund, Svalbard.
Notice for users
The recorded song is limited to private use only. Use
of the song beyond this limit requires permission of
the copyright holders.
ony is not responsible for incomplete recording/
S
downloading or damaged data due to problems of
the player or computer.
e ability to display the languages on the supplied
Th
software will depend on the installed OS on your
computer. For better results, please ensure that the
installed OS is compatible with the desired language
you want to display.
We do not guarantee all the languages will be able
to be displayed properly on supplied software.
User-created characters and some special
characters may not be displayed.
epending on the types of the text and characters,
D
the text shown on the player may not be displayed
properly on device. This is due to:
The capacity of the connected player.
The player is not functioning normally.
Content information is written in the language or
the character that is not supported by the player.
f you do not intend to use the player for over half a
I
year, charge the battery at least once per 6 to 12
months for battery maintenance.
Page 16

30
31
 Loading...