

Page 1
4-288-788-41(1)
Digital Still Camera / Instruction Manual GB
Цифровой фотоаппарат / Инструкция по эксплуатации
Цифровий фотоапарат / Посібник з експлуатації UA
RU
DSC-WX30
Page 2

English
Owner’s Record
The model and serial numbers are located on the bottom. Record the serial number in the
space provided below. Refer to these numbers whenever you call your Sony dealer
regarding this product.
Model No. DSC-WX30
Serial No. ______________________________
Model No. AC-UB10/UB10B
Serial No. ______________________________
WARNING
To reduce fire or shock hazard, do not expose the unit to rain or
moisture.
IMPORTANT SAFETY INSTRUCTIONS
-SAVE THESE INSTRUCTIONS
DANGER
TO REDUCE THE RISK OF FIRE OR ELECTRIC
SHOCK, CAREFULLY FOLLOW THESE
INSTRUCTIONS
If the shape of the plug does not fit the power outlet, use an attachment plug adaptor of the
proper configuration for the power outlet.
CAUTION
[ Battery pack
If the battery pack is mishandled, the battery pack can burst, cause a fire or even chemical
burns. Observe the following cautions.
• Do not disassemble.
• Do not crush and do not expose the battery pack to any shock or force such as
hammering, dropping or stepping on it.
• Do not short circuit and do not allow metal objects to come into contact with the battery
terminals.
• Do not expose to high temperature above 60°C (140°F) such as in direct sunlight or in a
car parked in the sun.
GB
• Do not incinerate or dispose of in fire.
2
Page 3

• Do not handle damaged or leaking lithium ion batteries.
• Be sure to charge the battery pack using a genuine Sony battery charger or a device that
can charge the battery pack.
• Keep the battery pack out of the reach of small children.
• Keep the battery pack dry.
• Replace only with the same or equivalent type recommended by Sony.
• Dispose of used battery packs promptly as described in the instructions.
[ AC Adaptor
Connect the AC Adaptor to the nearest wall outlet (wall socket).
If some trouble occurs while using the AC Adaptor, immediately shut off the power by
disconnecting the plug from the wall outlet (wall socket).
The power cord (mains lead), if supplied, is designed specifically for use with this camera
only, and should not be used with other electrical equipment.
For Customers in Europe
[ Notice for the customers in the countries applying EU Directives
The manufacturer of this product is Sony Corporation, 1-7-1 Konan Minato-ku Tokyo,
108-0075 Japan. The Authorized Representative for EMC and product safety is Sony
Deutschland GmbH, Hedelfinger Strasse 61, 70327 Stuttgart, Germany. For any service or
guarantee matters please refer to the addresses given in separate service or guarantee
documents.
This product has been tested and found compliant with the limits set out in the EMC
Directive for using connection cables shorter than 3 meters (9.8 feet).
[ Attention
The electromagnetic fields at the specific frequencies may influence the picture and sound
of this unit.
[ Notice
If static electricity or electromagnetism causes data transfer to discontinue midway (fail),
restart the application or disconnect and connect the communication cable (USB, etc.)
again.
GB
GB
3
Page 4
[ Disposal of Old Electrical & Electronic Equipment (Applicable in
the European Union and other European countries with separate
collection systems)
This symbol on the product or on its packaging indicates that this product
shall not be treated as household waste. Instead it shall be handed over to
the applicable collection point for the recycling of electrical and electronic
equipment. By ensuring this product is disposed of correctly, you will help
prevent potential negative consequences for the environment and human
health, which could otherwise be caused by inappropriate waste handling
of this product. The recycling of materials will help to conserve natural
please contact your local Civic Office, your household waste disposal service or the shop
where you purchased the product.
resources. For more detailed information about recycling of this product,
[ Disposal of waste batteries (applicable in the European Union
and other European countries with separate collection systems)
This symbol on the battery or on the packaging indicates that the battery
provided with this product shall not be treated as household waste.
On certain batteries this symbol might be used in combination with a
chemical symbol. The chemical symbols for mercury (Hg) or lead (Pb) are
added if the battery contains more than 0.0005% mercury or 0.004% lead.
potentially negative consequences for the environment and human health which could
otherwise be caused by inappropriate waste handling of the battery. The recycling of the
materials will help to conserve natural resources.
In case of products that for safety, performance or data integrity reasons require a
permanent connection with an incorporated battery, this battery should be replaced by
qualified service staff only. To ensure that the battery will be treated properly, hand over
the product at end-of-life to the applicable collection point for the recycling of electrical
and electronic equipment.
For all other batteries, please view the section on how to remove the battery from the
product safely.
Hand the battery over to the applicable collection point for the recycling of waste batteries.
For more detailed information about recycling of this product or battery, please contact
your local Civic Office, your household waste disposal service or the shop where you
purchased the product.
By ensuring these batteries are disposed of correctly, you will help prevent
GB
4
Page 5

Notice for customers in the United Kingdom
A moulded plug complying with BS 1363 is fitted to this equipment for your safety and
convenience.
Should the fuse in the plug supplied need to be replaced, a fuse of the same rating as the
supplied one and approved by ASTA or BSI to BS 1362, (i.e., marked with an or
mark) must be used.
If the plug supplied with this equipment has a detachable fuse cover, be sure to attach the
fuse cover after you change the fuse. Never use the plug without the fuse cover. If you
should lose the fuse cover, please contact your nearest Sony service station.
GB
GB
5
Page 6

Refer to “Cyber-shot User Guide” (HTML) on supplied CD-ROM
For details on advanced operations, please read “Cyber-shot User Guide”
(HTML) on the CD-ROM (supplied) using a computer.
Insert the CD-ROM into the CD-ROM drive.
For Windows users:
1 Click [User Guide] t [Install].
2 Start “User Guide” from the shortcut on the desktop.
For Macintosh users:
1 Select the [User Guide] folder and copy [eng] folder stored in [User Guide]
folder to your computer.
2 After copying is complete, double-click “index.html” in [eng] folder.
Checking the supplied items
• Camera (1)
• Rechargeable battery pack NP-BN (1)
(This rechargeable battery pack cannot be used with Cyber-shot that are
supplied with the NP-BN1 battery pack.)
• Multi-use terminal USB cable (1)
• AC Adaptor AC-UB10/UB10B (1)
• Power cord (mains lead) (not supplied in the USA and Canada) (1)
• Paint pen (1)
• Wrist strap (1)
•CD-ROM (1)
– Cyber-shot application software
– “Cyber-shot User Guide”
• Instruction Manual (this manual) (1)
GB
6
Page 7
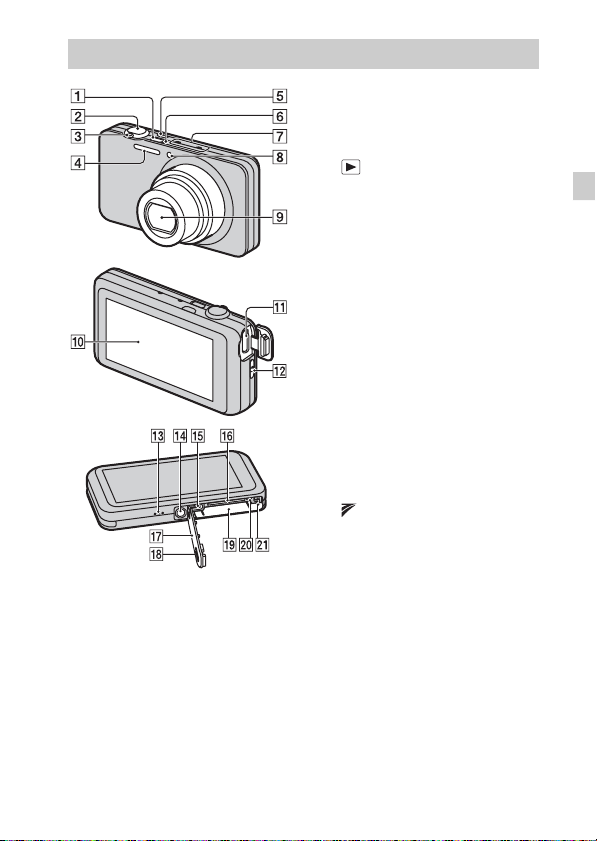
Identifying parts
A ON/OFF (Power) button
B Shutter button
C W/T (Zoom) lever
D Flash
E (Playback) button
F Power/Charge lamp
G Microphone
H Self-timer lamp/Smile Shutter
lamp/AF illuminator
I Lens
J Screen/Touch panel
K HDMI connector
L Hook for wrist strap
M Speaker
N Tripod receptacle
• Use a tripod with a screw less
than 5.5 mm (7/32 inches) long.
Otherwise, you cannot firmly
secure the camera, and damage to
the camera may occur.
O Multi connector (Type3b)
P Memory card slot
Q (TransferJet™) mark
R Battery/memory card cover
S Battery insertion slot
T Access lamp
U Battery eject lever
GB
GB
7
Page 8

Inserting the battery pack
Battery eject lever
Open the cover.
1
Insert the battery pack.
2
• While pressing down the battery eject lever, insert the battery pack as
illustrated. Make sure that the battery eject lever locks after insertion.
• Closing the cover with the battery inserted incorrectly may damage the
camera.
Charging the battery pack
For customers in the USA,
Canada
Power cord
(Mains lead)
For customers in countries/regions
other than the USA and Canada
GB
8
Power/Charge lamp
Lit: Charging
Off: Charging finished
Flash: Charging error
Page 9

Connect the camera to the AC Adaptor (supplied),
1
using the multi-use terminal USB cable (supplied).
Connect the AC Adaptor to the wall outlet (wall socket).
2
The Power/Charge lamp lights orange, and charging starts.
• Turn off the camera while charging the battery.
• You can charge the battery pack even when it is partially charged.
• When the Power/Charge lamp flashes and charging is not finished,
remove and re-insert the battery pack.
Notes
• When the Power/Charge lamp on the camera does not lit even if the AC Adaptor is
connected to the camera and the wall outlet (wall socket), it indicates that the
charging stops temporarily on standby. Charging stops and enters into standby
mode automatically when the temperature is outside of the recommended
operating temperature. When the temperature gets back within the appropriate
range, the charging resumes. We recommend charging the battery pack in an
ambient temperature of between 10°C to 30°C (50ºF to 86ºF).
• Connect the AC Adaptor (supplied) to the nearest wall outlet (wall socket). If
malfunctions occur while using the AC Adaptor, disconnect the plug from the wall
outlet (wall socket) immediately to disconnect from the power source.
• When charging is finished, disconnect the AC Adaptor from the wall outlet (wall
socket).
• Be sure to use only genuine Sony brand battery packs, multi-use terminal USB
cable (supplied) and AC Adaptor (supplied).
x
Charging time
The charging time is approximately 210 min. using the AC Adaptor
(supplied).
Note
• The above charging time applies when charging a fully depleted battery pack at a
temperature of 25°C (77°F). Charging may take longer depending on conditions of
use and circumstances.
GB
GB
9
Page 10
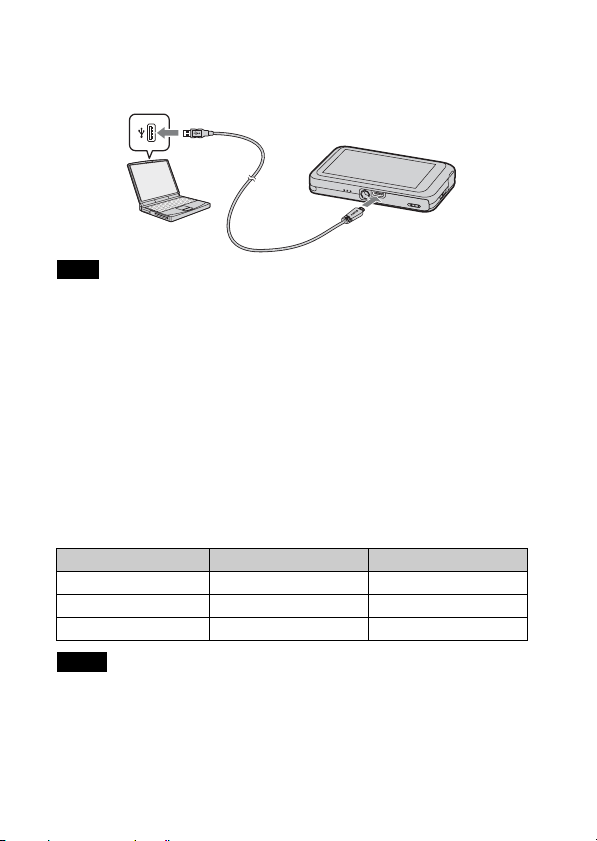
x
Charging by connecting to a computer
The battery pack can be charged by connecting the camera to a computer using
a multi-use terminal USB cable.
Note
• Note the following points when charging via a computer:
– If the camera is connected to a laptop computer that is not connected to a power
source, the laptop battery level decreases. Do not charge for an extended period
of time.
– Do not turn on/off or restart the computer, or wake the computer to resume from
sleep mode when a USB connection has been established between the computer
and the camera. The camera may cause a malfunction. Before turning on/off, or
restarting the computer or waking the computer from sleep mode, disconnect the
camera and the computer.
– No guarantees are made for charging using a custom-built computer or a
modified computer.
x
Battery life and number of images can be recorded
and played back
Battery life Number of images
Shooting (still images) Approx. 115 min. Approx. 230 images
Viewing (still images) Approx. 180 min. Approx. 3600 images
Shooting (movies) Approx. 55 min. —
Notes
• The above number of images applies when the battery pack is fully charged. The
number of images may decrease depending on the conditions of use.
• The number of images that can be recorded is for shooting under the following
conditions:
– Using Sony “Memory Stick PRO Duo” (Mark2) media (sold separately)
GB
– The battery pack is used at an ambient temperature of 25°C (77°F).
10
Page 11

• The number for “Shooting (still images)” is based on the CIPA standard, and is for
shooting under the following conditions:
(CIPA: Camera & Imaging Products Association)
– [Panel Brightness] is set to [3].
– Shooting once every 30 seconds.
– The zoom is switched alternately between the W and T ends.
– The flash strobes once every two times.
– The power turns on and off once every ten times.
• The battery life for movies applies shooting under the following conditions:
– Movie quality: AVC HD HQ
– When continuous shooting ends because of set limits (page 20), touch
(Movie button) again and continue shooting. Shooting functions such as the
zoom do not operate.
x
Supplying power
The camera can be supplied with power from the wall outlet (wall socket) by
connecting to the AC Adaptor, using the multi-use terminal USB cable
(supplied).
You can import images to a computer without worrying about draining the
battery pack by connecting the camera to a computer using the multi-use
terminal USB cable.
Notes
• Power cannot be supplied when the battery pack is not inserted in the camera.
• Power supply from the wall outlet (wall socket) is available only when the camera
is in playback mode or when a connection is made between the camera and a
computer. If the camera is in shooting mode or while you are changing the settings
of the camera, power is not supplied even if you make a USB connection using the
multi-use terminal USB cable.
• If you connect the camera and a computer using the multi-use terminal USB cable
while the camera is in playback mode, the display on the camera will change from
the playback screen to the USB connection screen. Press (Playback) button to
switch to the playback screen.
GB
GB
11
Page 12
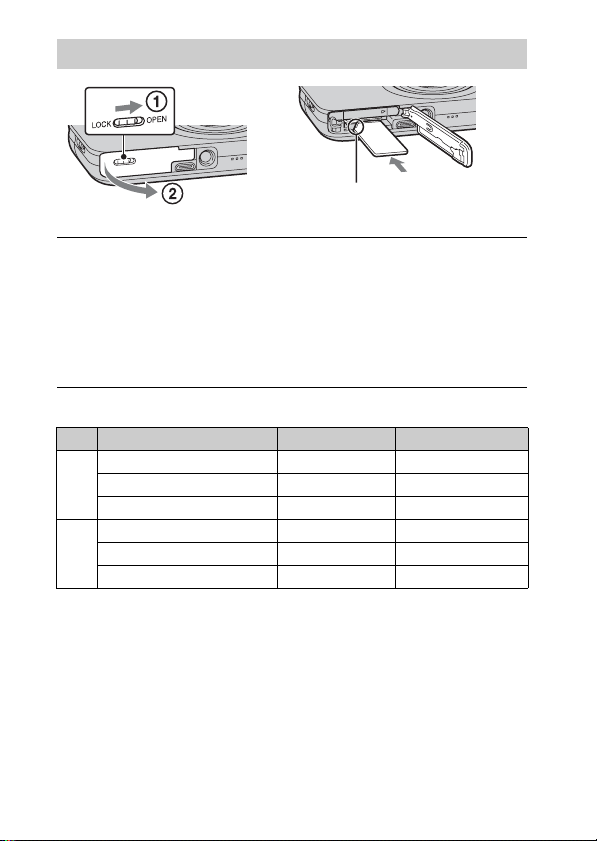
Inserting a memory card (sold separately)
Note the notched corner faces
correctly.
Open the cover.
1
Insert the memory card (sold separately).
2
• With the notched corner facing as illustrated, insert the memory card
until it clicks into place.
Close the cover.
3
x
Memory cards that can be used
Memory card For still images For movies
Memory Stick PRO Duo aa (Mark2 only)
A
Memory Stick PRO-HG Duo aa
Memory Stick Duo a —
SD memory card aa (Class 4 or faster)
B
SDHC memory card aa (Class 4 or faster)
SDXC memory card aa (Class 4 or faster)
• In this manual, products in A are collectively referred to as “Memory Stick Duo”
media, and products in B are collectively referred to as SD card.
12
GB
Page 13
x
To remove the memory card/battery pack
Memory card: Push the memory card in once to eject the memory card.
Battery pack: Slide the battery eject lever. Be sure not to drop the battery pack.
Note
• Never remove the memory card/battery pack when the access lamp (page 7) is lit.
This may cause damage to data in the memory card/internal memory.
Setting the clock
ON/OFF (Power)
Press the ON/OFF (Power) button.
1
Date & Time setting is displayed when you turn on the camera for the first
time.
• It may take time for the power to turn on and allow operation.
Select a desired language.
2
Select a desired geographic location by following the
3
on-screen instructions, then touch [Next].
Set [Daylight Savings] or [Summer Time], [Date & Time
4
Format] and [Date & Time], then touch [Next].
• Midnight is indicated as 12:00 AM, and noon as 12:00 PM.
Touch [OK].
5
Select the desired display color, following the
6
instructions on the screen, then touch [OK].
When an [In-Camera Guide] introductory message is
7
appeared on the screen, touch [OK].
GB
GB
13
Page 14
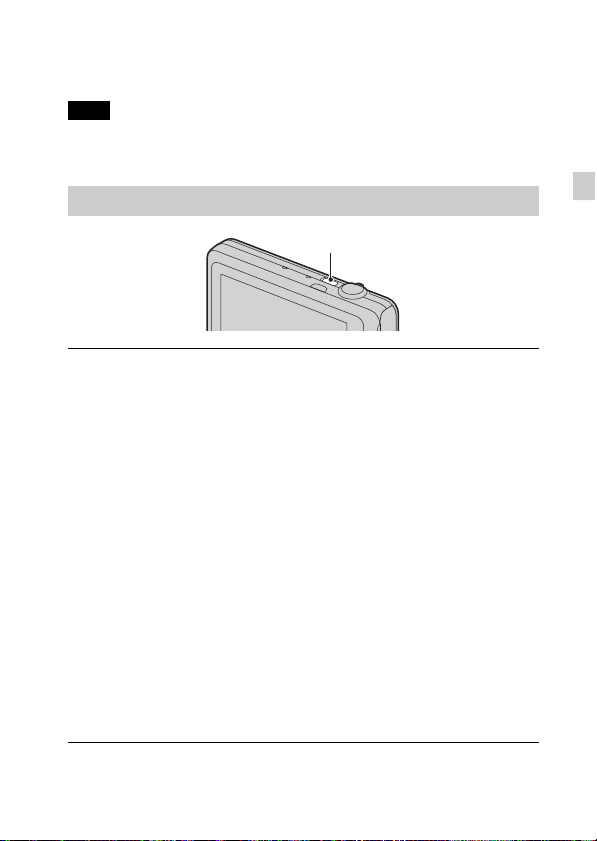
Shooting still images/movies
Shutter button
Shooting still images
Press the shutter button halfway down to focus.
1
When the image is in focus, a beep sounds and the z indicator lights.
Press the shutter button fully down to shoot an image.
2
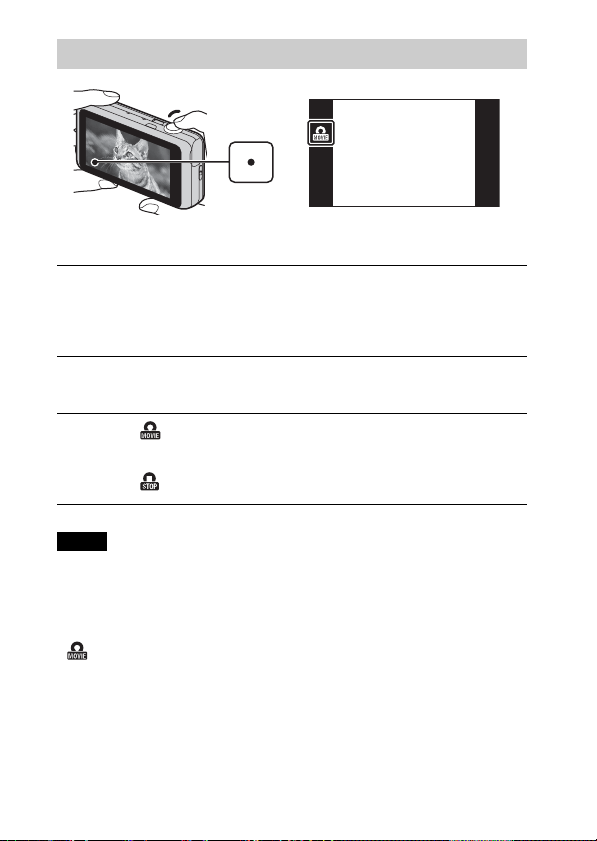
Shooting movies
Touch (Movie button) to start recording.
1
• Use the W/T (zoom) lever to change the zoom scale.
Touch (Movie button) to stop recording.
2
Notes
• The sound of the lens and lever operating will be recorded when the zoom function
operates while shooting a movie.
• Continuous shooting is possible for approximately 29 minutes at one time at the
camera’s default settings and when the temperature is approximately 25°C (77°F).
When movie recording is finished, you can restart recording by touching
(Movie button) again. Recording may stop to protect the camera depending
on the ambient temperature.
14
GB
Page 15

Viewing images
(Playback)
Press the (Playback) button.
1
• When images on a memory card recorded with other cameras are played
back on this camera, the registration screen for the data file appears.
x
Selecting next/previous image
Touch (Next)/ (Previous) on the screen.
• To play back movies, touch (Playback) in the center of the screen.
• To zoom in, touch the still image being played back.
x
Deleting an image
Touch (Delete) t [This Image].
x
Returning to shooting images
Touch on the screen.
• You can also return to shooting mode by pressing the shutter button halfway
down.
GB
GB
15
Page 16
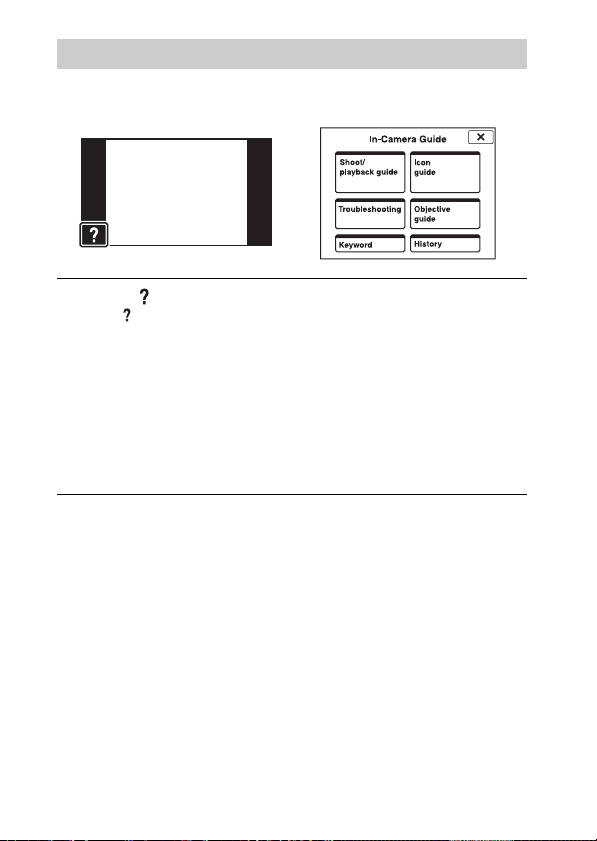
In-Camera Guide
This camera is equipped with built-in instruction guide. This allows you to
search the camera’s functions according to your needs.
Touch (In-Camera Guide).
1
• The mark will appear on the bottom left of the screen while viewing.
Select a search method from [In-Camera Guide].
2
Shoot/ playback guide: Search for various operation functions in
shooting/viewing mode.
Icon guide: Search the function and meaning of displayed icons.
Troubleshooting: Search common problems and their solution.
Objective guide: Search functions according to your needs.
Keyword: Search functions by keywords.
History: View the last 10 items displayed in [In-Camera Guide].
16
GB
Page 17
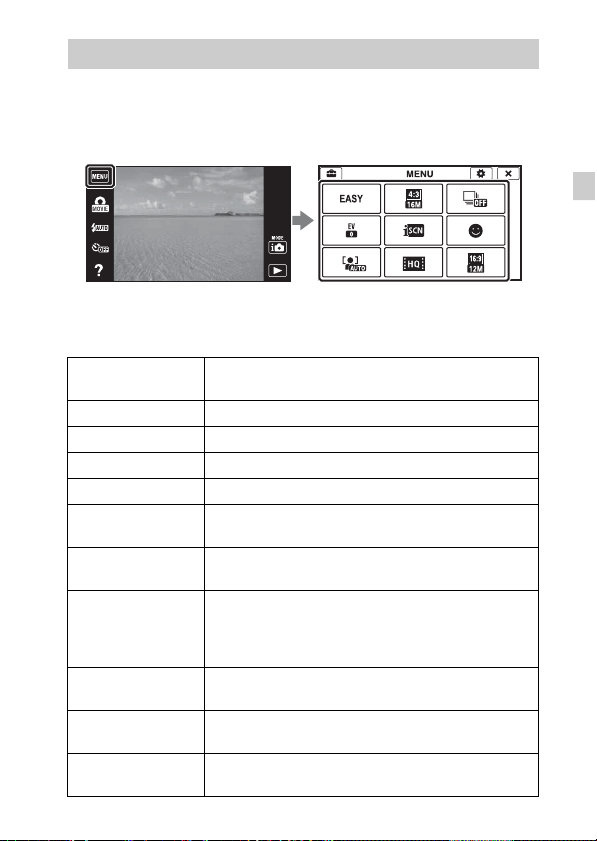
Introduction of other functions
Other functions used when shooting or playing back can be operated touching
the MENU on the screen. This camera is equipped with a Function Guide that
allows you to easily select from the functions. While displaying the guide, you
can use various functions.
x
Menu Items
Shooting
Movie shooting
scene
Easy Mode Shoot still images using minimal functions.
Movie button Shoots movies from all shooting modes quickly.
Flash Sets the flash settings.
Self-Timer Sets the self-timer settings.
Defocus Effect
Still Image
Size(Dual Rec)
Still Image Size/
Panorama Image
Size/Movie Size/
Movie Quality
Cont. Shooting
Settings
HDR Painting
effect
Area of emphasis
Select movie recording mode.
Set the level of background defocus effect when
shooting in Background Defocus mode.
Sets the still image size shot while recording a movie.
Select the image size and the quality for still images,
panoramic images or movie files.
Sets the burst shooting settings.
When [HDR Painting] is selected in Picture Effect, sets
the effect level.
When [Miniature] is selected in Picture Effect, sets the
part to focus on.
GB
GB
17
Page 18

Color hue
Extracted Color
EV Adjust the exposure manually.
ISO Adjust the luminous sensitivity.
White Balance Adjust color tones of an image.
Focus Select the focus method.
Metering Mode
Scene Recognition Set to automatically detect shooting conditions.
Soft Skin Effect Set the Soft Skin Effect and the effect level.
Smile Shutter
Smile Detection
Sensitivity
Face Detection
Anti Blink
Movie SteadyShot Sets the strength of SteadyShot in movie mode.
In-Camera Guide Search the camera’s functions according to your needs.
When [Toy camera] is selected in Picture Effect, sets the
color hue.
When [Partial Color] is selected in Picture Effect, selects
the color to extract.
Select the metering mode that sets which part of the
subject to measure to determine the exposure.
Set to automatically release the shutter when a smile is
detected.
Set the Smile Shutter function sensitivity for d etecting
smiles.
Select to detect faces and adjust various settings
automatically.
Set to automatically shoot two images and select image
in which the eyes are not blinking.
Viewing
Easy Mode Increase the text size on the screen for ease of use.
Date Select Selects the desired image to view by date.
Calendar Selects the date to be played back on Calendar.
Image Index Displays multiple images at the same time.
Slideshow Select a method of continuous playback.
Delete Delete an image.
GB
18
Send by
TransferJet
Transfer data by closely aligning two products equipped
with TransferJet.
Page 19
Paint Paints on a still image and saves it as a new file.
Retouch Retouch an image using various effects.
3D Viewing Set to play back images shot in 3D mode on a 3D TV.
View Mode Select the display format for images.
Display Cont.
Shooting Group
Protect Protect the images.
Print (DPOF) Add a print order mark to a still image.
Rotate Rotate a still image to the left or right.
Volume Adjusts the volume.
Exposure data
Number of images
in index
In-Camera Guide Search the camera’s functions according to your needs.
x
Setting items
Select to display burst images in groups or display all
images during playback.
Sets whether or not to display the shooting data (Exif
data) of the currently displayed file on the screen.
Sets the number of images displayed in the index screen.
If you touch the MENU while shooting or during playback, (Settings) is
provided as a final selection. You can change the default settings on the
(Settings ) screen.
Shooting Settings
Main Settings
Memory Card
*
Tool
Clock Settings
* If a memory card is not inserted, (Internal Memory Tool) will be displayed and
only [Format] can be selected.
Movie format/AF Illuminator/Grid Line/Clear Image
Zoom/Digital Zoom/Wind Noise Reduct./Scene Recog.
Guide/Red Eye Reduction/Blink Alert/Write Date
Beep/Histogram Setting/Panel Brightness/Language
Setting/Display color/Demo Mode/Initialize/CTRL FOR
HDMI/USB Connect Setting/USB Power Supply/LUN
Setting/Download Music/Empty Music/TransferJet/EyeFi/Power Save/Calibration
Format/Create REC.Folder/Change REC.Folder/Delete
REC.Folder/Copy/File Number
Area Setting/Date & Time Setting
GB
GB
19
Page 20

Number of still images and recordable time of movies
The number of still images and recordable time may vary depending on the
shooting conditions and the memory card.
x
Still images
(Units: Images)
Capacity
Size
16M 3 335
VGA 98 9600
16:9(12M) 3 355
x
Movies
Internal memory Memory card
Approx. 19 MB 2 GB
The table below shows the approximate maximum recording times. These are
the total times for all movie files. Continuous shooting is possible for
approximately 29 minutes. The maximum size of an MP4-format movie file is
up to approximately 2 GB.
(h (hour), m (minute))
Capacity
Size
AVC HD 24M (FX) — 10 m
AVC HD 9M (HQ) — 25 m
MP4 12M — 15 m
MP4 3M — 1 h 10 m
The number in ( ) is the minimum recordable time.
• The recordable time of movies varies because the camera is equipped with VBR
(Variable Bit Rate), which automatically adjusts image quality depending on the
shooting scene. When you record a fast-moving subject, the image is clearer but
the recordable time is shorter because more memory is required for recording.
The recordable time also varies depending on the shooting conditions, the subject
or the image quality/size settings.
GB
Internal memory Memory card
Approx. 19 MB 2 GB
(10 m)
(15 m)
20
Page 21

Notes on using the camera
Functions built into this camera
• This manual describes each of the functions of TransferJet compatible/
incompatible devices, 1080 60i-compatible devices and 1080 50i-compatible
devices.
To check if your camera supports the TransferJet function, and whether it is a
1080 60i-compatible device or 1080 50i-compatible device, check for the
following marks on the bottom of the camera.
TransferJet-compatible device:
1080 60i-compatible device: 60i
1080 50i-compatible device: 50i
• Do not watch 3D images shot with this camera for extended periods of time on
3D-compliant monitors.
• When you view 3D images shot with this camera on a 3D-compliant monitors, you
may experience discomfort in the form of eye strain, fatigue, or nausea. To prevent
these symptoms, we recommend that you take regular breaks. However, you need
to determine for yourself the length and frequency of breaks you require, as they
vary according to the individual. If you experience any type of discomfort, stop
viewing the 3D images until you feel better, and consult a physician as necessary.
Also refer to the operating instructions supplied with the device or software you
have connected or are using with this camera. Note that a child’s eyesight is still at
the development stage (particularly children below the age of 6).
Consult a pediatrician or ophthalmologist before letting your child view 3D
images, and make sure he/she observes the above precautions when viewing such
images.
On use and care
Avoid rough handling, disassembling, modifying, physical shock, or impact such as
hammering, dropping, or stepping on the product. Be particularly careful of the lens.
Notes on recording/playback
• Before you start recording, make a trial recording to make sure that the camera is
working correctly.
• The camera is neither dust-proof, nor splash-proof, nor water-proof.
• Avoid exposing the camera to water. If water enters inside the camera, a
malfunction may occur. In some cases, the camera cannot be repaired.
• Do not aim the camera at the sun or other bright light. It may cause the
malfunction of the camera.
• If moisture condensation occurs, remove it before using the camera.
• Do not shake or strike the camera. It may cause a malfunction and you may not be
able to record images. Furthermore, the recording media may become unusable or
image data may be damaged.
(TransferJet)
GB
GB
21
Page 22

Do not use/store the camera in the following places
• In an extremely hot, cold or humid place
In places such as in a car parked in the sun, the camera body may become
deformed and this may cause a malfunction.
• Under direct sunlight or near a heater
The camera body may become discolored or deformed, and this may cause a
malfunction.
• In a location subject to rocking vibration
• Near a location that generates strong radio waves, emits radiation or is strongly
magnetic place. Otherwise, the camera may not properly record or play back
images.
• In sandy or dusty places
Be careful not to let sand or dust get into the camera. This may cause the camera to
malfunction, and in some cases this malfunction cannot be repaired.
On carrying
Do not sit down in a chair or other place with the camera in the back pocket of your
trousers or skirt, as this may cause malfunction or damage the camera.
Carl Zeiss lens
The camera is equipped with a Carl Zeiss lens which is capable of reproducing sharp
images with excellent contrast. The lens for the camera has been produced under a
quality assurance system certified by Carl Zeiss in accordance with the quality
standards of Carl Zeiss in Germany.
Note on the screen and lens
The screen is manufactured using extremely high-precision technology so over
99.99% of the pixels are operational for effective use. However, some tiny black
and/or bright dots (white, red, blue or green) may appear on the screen. These dots
are a normal result of the manufacturing process, and do not affect the recording.
On camera’s temperature
Your camera and battery may get hot due to continuous use, but it is not a
malfunction.
On the overheat protection
Depending on the camera and battery temperature, you may be unable to record
movies or the power may turn off automatically to protect the camera.
A message will be displayed on the screen before the power turns off or you can no
longer record movies. In this case, leave the power off and wait until the camera and
battery temperature goes down. If you turn on the power without letting the camera
and battery cool enough, the power may turn off again or you may be unable to
record movies.
22
GB
Page 23

On charging the battery
If you charge a battery that has not been used for a long time, you may be unable to
charge it to the proper capacity.
This is due to the battery characteristics, and is not a malfunction. Charge the battery
again.
Warning on copyright
Television programs, films, videotapes, and other materials may be copyrighted.
Unauthorized recording of such materials may be contrary to the provisions of the
copyright laws.
No compensation for damaged content or recording failure
Sony cannot compensate for failure to record or loss or damage of recorded content
due to a malfunction of the camera or recording media, etc.
Cleaning the camera surface
Clean the camera surface with a soft cloth slightly moistened with water, then wipe
the surface with a dry cloth. To prevent damage to the finish or casing:
– Do not expose the camera to chemical products such as thinner, benzine, alcohol,
disposable cloths, insect repellent, sunscreen or insecticide.
GB
GB
23
Page 24

Specifications
Camera
[System]
Image device: 7.77 mm (1/2.3 type)
Exmor R CMOS sensor
Total pixel number of camera:
Approx. 16.8 Megapixels
Effective pixel number of camera:
Approx. 16.2 Megapixels
Lens: Carl Zeiss Vario-Tessar 5× zoom
lens
f = 4.5 mm – 22.5 mm (25 mm –
125 mm (35 mm film equivalent))
F2.6 (W) – F6.3 (T)
While shooting movies (16:9):
29 mm – 145 mm*
While shooting movies (4:3):
36 mm – 180 mm*
* When [Movie SteadyShot] is set
to [Standard]
SteadyShot: Optical
Exposure control: Automatic exposure,
Scene Selection (14 modes)
White balance: Automatic, Daylight,
Cloudy, Fluorescent 1/2/3,
Incandescent, Flash, One Push
Signal format:
For 1080 50i: PAL color, CCIR
standards HDTV 1080/50i
specification
For 1080 60i: NTSC color, EIA
standards HDTV 1080/60i
specification
File format:
Still images: JPEG (DCF Ver. 2.0,
Exif Ver. 2.3, MPF Baseline)
compliant, DPOF compatible
3D still images: MPO (MPF
Extended (Disparity Image))
compliant
Movies (AVCHD format):
AVCHD
Video: MPEG-4 AVC/H.264
Audio: Dolby Digital 2ch,
equipped with Dolby Digital Stereo
Creator
• Manufactured under license from
Dolby Laboratories.
Movies (MP4 format):
Video: MPEG-4 AVC/H.264
Audio: MPEG-4 AAC-LC 2ch
Recording media: Internal Memory
(Approx. 19 MB), “Memory Stick
Duo” media, SD cards
Flash: Flash range (ISO speed
(Recommended Exposure Index)
set to Auto):
Approx. 0.05 m to 5.3 m
(2 inches to 17 ft 4 3/4 inches) (W)
Approx. 1.0 m to 2.2 m
(3 ft 3 3/8 inches to 7 ft
2 5/8 inches) (T)
24
GB
Page 25

[Input and Output connectors]
HDMI connector: HDMI mini jack
Multi connector: Type3b
(AV-out/USB/DC-in):
Video output
Audio output (Stereo)
USB communication
USB communication: Hi-Speed USB
(USB 2.0)
[Screen]
Panel:
Wide (16:9), 7.5 cm (3.0 type) TFT
drive
Total number of dots:
921 600 (1 920 × 480) dots
[Power, general]
Power: Rechargeable battery pack
NP-BN, 3.6 V
AC Adaptor AC-UB10/UB10B,
5V
Power consumption (during shooting):
1.1 W
Operating temperature: 0 °C to 40 °C
(32 °F to 104 °F)
Storage temperature: –20 °C to +60 °C
(–4 °F to +140 °F)
Dimensions (CIPA compliant):
92.2 mm × 51.9 mm × 19.1 mm
(3 3/4 inches × 2 1/8 inches ×
25/32 inches) (W/H/D)
Mass (CIPA compliant) (including
NP-BN battery pack, “Memory
Stick Duo” media):
Approx. 117 g (4.1 oz)
Microphone: Stereo
Speaker: Monaural
Exif Print: Compatible
PRINT Image Matching III:
Compatible
AC Adaptor AC-UB10/UB10B
Power requirements: AC 100 V to
240 V, 50 Hz/60 Hz, 70 mA
Output voltage: DC 5 V, 0.5 A
Operating temperature: 0 °C to 40 °C
(32°F to 104°F)
Storage temperature: –20 °C to +60 °C
(–4 °F to +140 °F)
Dimensions:
Approx. 50 mm × 22 mm × 54 mm
(2 inches × 7/8 inches ×
2 1/4 inches) (W/H/D)
Mass:
For the USA and Canada:
Approx. 48 g (1.7 oz)
For countries or regions other than
the USA and Canada:
Approx. 43 g (1.5 oz)
Rechargeable battery pack
NP-BN
Used battery: Lithium-ion battery
Maximum voltage: DC 4.2 V
Nominal voltage: DC 3.6 V
Maximum charge voltage: DC 4.25 V
Maximum charge current: 0.9 A
Capacity:
typical: 2.3 Wh (630 mAh)
minimum: 2.2 Wh (600 mAh)
Design and specifications are subject to
change without notice.
GB
GB
25
Page 26
Trademarks
• The following marks are trademarks
of Sony Corporation.
, “Cyber-shot,”
“Memory Stick PRO Duo,”
“Memory Stick PRO-HG Duo,”
“Memory Stick Duo”
• Windows is registered trademark of
Microsoft Corporation in the United
States and/or other countries.
• Macintosh is registered trademark of
Apple Inc.
• SDXC logo is a trademark of SD-3C,
LLC.
• “ ” and “PlayStation” are
registered trademarks of Sony
Computer Entertainment Inc.
• In addition, system and product
names used in this manual are, in
general, trademarks or registered
trademarks of their respective
developers or manufacturers.
However, the ™ or ® marks are not
used in all cases in this manual.
• Add further enjoyment with your
PlayStation 3 by downloading the
application for PlayStation 3 from
PlayStation Store (where available.)
• The application for PlayStation 3
requires PlayStation Network
account and application download.
Accessible in areas where the
PlayStation Store is available.
Additional information on this
product and answers to frequently
asked questions can be found at
our Customer Support Website.
26
GB
Page 27

GB
GB
27
Page 28

Русский
ПРЕДУПРЕЖДЕНИЕ
Для уменьшения опасности возгорания или поражения
электрическим током не подвергайте аппарат воздействию
дождя или влаги.
ВАЖНЫЕ ИНСТРУКЦИИ ПО ТЕХНИКЕ
БЕЗОПАСНОСТИ
-СОХРАНИТЕ ЭТИ ИНСТРУКЦИИ
ОПАСНОСТЬ
ДЛЯ УМЕНЬШЕНИЯ ОПАСНОСТИ
ВОЗГОРАНИЯ ИЛИ ПОРАЖЕНИЯ
ЭЛЕКТРИЧЕСКИМ ТОКОМ СТРОГО
СОБЛЮДАЙТЕ ЭТИ ИНСТРУКЦИИ
Если форма штепсельной вилки не соответствует сетевой розетке, используйте
для сетевой розетки переходник соответствующей конфигурации.
ПРЕДУПРЕЖДЕНИЕ
[ Батарейный блок
Неправильное обращение с батарейным блоком может стать причиной его
взрыва, возгорания, а также химических ожогов. Соблюдайте следующие
меры предосторожности.
• Не разбирайте блок.
• Не подвергайте батарейный блок каким бы то ни было механическим
воздействиям: ударам, падениям или попаданиям под тяжелые предметы.
• Во избежание короткого замыкания не допускайте контакта металлических
предметов с контактами батарейного блока.
• Не допускайте нагрева батарейного блока до температуры выше 60 °C:
избегайте воздействия на него прямых солнечных лучей, а также не
оставляйте в припаркованном на солнце автомобиле.
• Запрещается сжигать блок или бросать его в огонь.
• Не следует использовать поврежденные и протекшие литий-ионные батареи.
• Для зарядки батарейного блока используйте оригинальное зарядное
устройство Sony или другое совместимое зарядное устройство.
• Храните батарейный блок в недоступном для детей месте.
RU
• Храните батарейный блок в сухом месте.
2
Page 29

• Замену следует выполнять только на батарейный блок того же или
аналогичного типа, рекомендованный Sony.
• Утилизация использованных батарейных блоков должна производиться
надлежащим образом в соответствии с инструкциями.
[ Адаптер переменного тока
Подсоедините адаптер переменного тока к ближайшей сетевой розетке.
Если при использовании адаптера переменного тока возникнут какие-либо
проблемы, немедленно отключите питание, вынув штепсельную вилку из
сетевой розетки.
Сетевой шнур (провод питания), если он прилагается, предназначен
специально для использования только с данным фотоаппаратом, и не должен
использоваться с другим электрическим оборудованием.
[ Дата изготовления изделия.
Вы можете узнать дату изготовления изделия, взглянув на обозначение “P/D:”,
которое находится на этикетке со штрих кодом картонной коробки.
Знаки, указанные на этикетке со штрих кодом картонной коробки.
P/D:XX XXXX
1 2
1. Месяц изготовления
2. Год изготовления
A-0, B-1, C-2, D-3, E-4, F-5, G-6,
H-7, I-8, J-9.
Дата изготовления литий-ионного батарейного блока указаны на боковой
стороне или на поверхности с наклейкой.
RU
RU
3
Page 30

Для покупателей в Европе
[ Примечание для покупателей в странах, где действуют
директивы ЕС
Производителем данного устройства является корпорация Sony Corporation, 17-1 Konan Minato-ku Tokyo, 108-0075 Japan. Уполномоченным представителем
по электромагнитной совместимости (EMC) и безопасности изделия является
компания Sony Deutschland GmbH, Hedelfinger Strasse 61, 70327 Stuttgart,
Germany. По вопросам обслуживания и гарантии обращайтесь по адресам,
указанным в соответствующих документах.
Данное изделие прошло испытания и соответствует ограничениям,
установленным в Директиве EMC в отношении соединительных кабелей,
длина которых не превышает 3 метров.
[ Внимание
Электромагнитные поля определенных частот могут влиять на изображение и
звук данного аппарата.
[ Уведомление
Если статическое электричество или электромагнитныe силы приводят к сбою
в передачe данных, перезапустите приложение или отключите и снова
подключите коммуникационный кабель (USB и т.д.).
[ Утилизация отслужившего электрического и электронного
оборудования (директива применяется в странах Евросоюза
и других европейских странах, где действуют системы
раздельного сбора отходов)
специальные требования по утилизации этого изделия. Переработка данных
материалов поможет сохранить природные ресурсы. Для получения более
подробной информации о переработке этого изделия обратитесь в местные
органы городского управления, службу сбора бытовых отходов или в магазин,
где было приобретено изделие.
Данный знак на устройстве или его упаковке обозначает, что
данное устройство нельзя утилизировать вместе с прочими
бытовыми отходами. Его следует сдать в соответствующий
приемный пункт переработки электрического и электронного
оборудования. Неправильная утилизация данного изделия
может привести к потенциально негативному влиянию на
окружающую среду и здоровье людей, поэтому для
предотвращения подобных последствий необходимо выполнять
RU
4
Page 31

[ Утилизация использованных элементов питания
(применяется в странах Евросоюза и других европейских
странах, где действуют системы раздельного сбора отходов)
Данный знак на элементе питания или упаковке означает, что
элемент питания, поставляемый с устройством, нельзя
утилизировать вместе с прочими бытовыми отходами.
На некоторых элементах питания данный символ может
комбинироваться с символом химического элемента. Символы
данных металлов более 0,0005% (для ртути) и 0,004% (для свинца)
соответственно.
Обеспечивая правильную утилизацию использованных элементов питания, вы
предотвращаете негативное влияние на окружающую среду и здоровье людей,
возникающее при неправильной утилизации. Вторичная переработка
материалов, использованных при изготовлении элементов питания,
способствует сохранению природных ресурсов.
При работе устройств, для которых в целях безопасности, выполнения какихлибо действий или сохранения имеющихся в памяти устройств данных
необходима подача постоянного питания от встроенного элемента питания,
замену такого элемента питания следует производить только в
специализированных сервисных центрах. Для правильной утилизации
использованных элементов питания, после истечения срока службы, сдавайте
их в соответствующий пункт по сбору электронного и электрического
оборудования.
Об использовании прочих элементов питания, пожалуйста, узнайте в разделе, в
котором даны инструкции по извлечению элементов питания из устройства,
соблюдая меры безопасности.
Сдавайте использованные элементы питания в соответствующие пункты по
сбору и переработке использованных элементов питания.
Для получения более подробной информации о вторичной переработке
данного изделия или использованного элемента питания, пожалуйста,
обратитесь в местные органы городского управления, службу сбора бытовых
отходов или в магазин, где было приобретено изделие.
ртути (Hg) или свинца (Pb) указываются, если содержание
RU
RU
5
Page 32

Обратитесь к справке “Руководство пользователя Cyber-shot” (HTML) на прилагаемом диске CD-ROM
Для получения подробных сведений об усовершенствованных
операциях прочтите “Руководство пользователя Cyber-shot”
(HTML) на диске CD-ROM (прилагается) с помощью компьютера.
Вставьте диск CD-ROM в привод CD-ROM.
Для пользователей Windows:
1 Щелкните по [Руководство пользователя] t [Установка].
2 Запустите инструкцию “Руководство пользователя”, выбрав
ярлык на рабочем столе.
Для пользователей Macintosh:
1 Выберите папку [Руководство пользователя] и скопируйте на
свой компьютер папку [ru], находящуюся в папке [Руководство
пользователя].
2 После завершения копирования дважды щелкните значок
“index.html” в папке [ru].
Проверка прилагаемых предметов
• Фотоаппарат (1)
• Перезаряжаемый батарейный блок NP-BN (1)
(Данный перезаряжаемый батарейный блок не может
использоваться с фотоаппаратами Cyber-shot, которые
поставляются с батарейным блоком NP-BN1.)
• Многофункциональный кабель USB (1)
• Адаптер переменного тока AC-UB10/UB10B (1)
• Шнур питания (не прилагается для США и Канады) (1)
• Перо (1)
• Наручный ремешок (1)
•CD-ROM (1)
– Прикладное программное обеспечение Cyber-shot
– “Руководство пользователя Cyber-shot”
• Инструкция по эксплуатации (данное руководство) (1)
RU
6
Page 33

Обозначение частей
A Кнопка ON/OFF (Питание)
B Кнопка затвора
C Рычажок W/T (увеличение)
D Вспышка
E Кнопка
(воспроизведение)
F Лампочка питания/зарядки
G Микрофон
H Лампочка таймера
самозапуска/Лампочка
режима Smile Shutter/
Подсветка АФ
I Объектив
J Экран/сенсорная панель
K Разъем HDMI
L Крючок для наручного
ремешка
M Громкоговоритель
N Гнездо штатива
• Используйте штатив с
винтом длиной менее 5,5 мм.
В противном случае Вы не
сможете плотно закрепить
фотоаппарат, что может
привести к его повреждению.
O Многофункциональный
разъем (Type3b)
P Слот карты памяти
Q Метка (TransferJet™)
R Крышка отсека батареи/
карты памяти
S Слот для вставления батареи
T Лампочка доступа
U Рычажок выталкивания
батареи
RU
RU
7
Page 34

Вставка батарейного блока
Рычажок выталкивания батареи
Откройте крышку.
1
Вставьте батарейный блок.
2
• Нажав рычажок выталкивания батареи, вставьте батарейный
блок, как показано на рисунке. Убедитесь, что рычаг
выталкивания батареи защелкнулся после вставки батареи.
• В случае закрывания крышки с неправильно вставленной
батареей, фотоаппарат можно повредить.
Зарядка батарейного блока
Для покупателей в США, Канаде
Шнур питания
Для покупателей в странах/регионах
за пределами США и Канады
RU
8
Лампочка питания/
зарядки
Высвечивается: Зарядка
Не горит: Зарядка
завершена
Мигание: Ошибка
зарядки
Page 35

Подключите фотоаппарат к адаптеру переменного
1
тока (прилагается) с помощью
многофункционального кабеля USB (прилагается).
Подсоедините адаптер переменного тока к сетевой
2
розетке.
Лампочка питания/зарядки высветится оранжевым цветом, и
начнется зарядка.
• Выключите фотоаппарат на время зарядки батареи.
• Батарейный блок можно заряжать, даже если он частично
заряжен.
• Если лампочка питания/зарядки мигает, и зарядка не
завершена, извлеките и снова вставьте батарейный блок.
Примечания
• Когда лампочка питания/зарядки на фотоаппарате не горит, даже если
адаптер переменного тока подсоединен к фотоаппарату и сетевой
розетке, это указывает на то, что зарядное устройство временно
прекратило зарядку и находится в режиме ожидания. Зарядное
устройство автоматически прекращает зарядку и переходит в режим
ожидания, если температура выходит за пределы рекомендуемой
рабочей температуры. Зарядка возобновляется, когда температура
возвращается в подходящий для зарядки диапазон. Мы рекомендуем
Вам заряжать батарейный блок при темп ературе окружающей среды от
10°C до 30°C.
• Подсоедините адаптер переменного тока (прилагается) к ближайшей
сетевой розетке. При возникновении каких-либо неисправностей во
время использования адаптера переменного тока немедленно
отключите питание, отсоединив штепсельную вилку от сетевой
розетки.
• По завершении зарядки отключите адаптер переменного тока от
сетевой розетки.
• Убедитесь, что Вы используете только оригинальный батарейный бло к
Sony, многофункциональный кабель USB (прилагается) и адаптер
переменного тока (прилагается).
RU
x
Время зарядки
Время зарядки с помощью адаптера переменного тока (прилагается)
составляет приблизительно 210 мин.
RU
9
Page 36

Примечание
• Указанное выше время зарядки относится к зарядке полностью
разряженного батарейного блока при температуре 25°C. В зависимости
от условий использования или обстоятельств зарядка может длиться
дольше.
x
Зарядка посредством подключения к компьютеру
Батарейный блок можно зарядить посредством подсоединения
фотоаппарата к компьютеру с помощью многофункционального
кабеля USB.
Примечание
• Обратите внимание на следующие особенности при зарядке через
компьютер:
– Если фотоаппарат подсоединен к ноутбуку, который не подключен к
источнику питания, уровень заряда батареи ноутбука уменьшится. Не
выполняйте зарядку в течение продолжительного периода времени.
– Не включайте/выключайте и не перезагружайте компьютер, а также
не выводите компьютер из спящего режима, когда между
компьютером и фотоаппаратом установлено USB-соединение. Это
может привести к неисправности фотоаппарата. Перед включением/
выключением или перезагрузкой компьютера или перед выводом
компьютера из спящего режима отсоедините фотоаппарат от
компьютера.
– Зарядка с помощью компьютера, выполненного на заказ, или
модифицированного компьютера не гарантируется.
10
RU
Page 37

x
Время работы батареи и количество снимков,
которые могут быть записаны и воспроизведены
Время работы
батареи
Съемка (фотоснимки) Приблиз. 115 мин. Приблиз. 230
Просмотр (фотоснимки) Приблиз. 180 мин. Приблиз. 3600
Съемка (видеозапись) Приблиз. 55 мин. —
Примечания
• Указанное выше количество изображений относится к полностью
заряженному батарейному блоку. Количество изображений может
уменьшиться в зависимости от условий использования.
• Количество изображений, которые могут быть записаны, приведено
для съемки в следующих условиях:
– Использование карты памяти Sony “Memory Stick PRO Duo” (Mark2)
(продается отдельно)
– Батарейный блок используется при температуре окружающей среды
25°C.
• Количество для пункта “Съемка (фотоснимки)” основано на стандарте
CIPA и действительно для съемки при следующих условиях:
(CIPA: Camera & Imaging Products Association)
– Опция [Яркость экрана] установленa в положение [3].
– Съемка через каждые 30 секунд.
– Увеличение поочередно переключается между предельными
значениями сторон W и T.
– Вспышка срабатывает каждый второй раз.
– Питание включается и выключается через каждые десять раз.
• Время работы в режиме видеозаписи приведено для съемки в
следующих условиях:
– Качество видеосъемки: AVC HD HQ
– Если непрерывная видеосъемка завершится из-за установленных
ограничений (стр. 22), снова прикоснитесь к кнопке (Кнопка
видеосъемки) и продолжите съемку. Такие функции съемки, как
увеличение, не работают.
Количество
изображений
изображений
изображений
RU
x
Подача питания
Питание на фотоаппарат может подаваться от сетевой розетки
посредством подсоединения к адаптеру переменного тока с
помощью многофункционального кабеля USB (прилагается).
RU
11
Page 38

При импорте изображений в компьютер можно не беспокоиться о
разрядке батарейного блока, подключив фотоаппарат к
компьютеру с помощью многофункционального кабеля USB.
Примечания
• Если батарейный блок не вставлен в фотоаппарат, подача питания
невозможна.
• Питание, подаваемое от сетевой розетки, доступно только, если
фотоаппарат находится в режиме воспроизведения или же если создано
подключение между фотоаппаратом и компьютером. Если
фотоаппарат находится в режиме фотосъемки или во время изменения
установок фотоаппарата, питание не подается даже при создании USBсоединения с помощью многофункционального кабеля USB.
• При подключении фотоаппарата к компьютеру с помощью
многофункционального кабеля USB в то время, когда он находится в
режиме воспроизведения, дисплей фотоаппарата изменится с экрана
воспроизведения на экран USB-соединения. Нажмите кнопку
(воспроизведение) для переключения на экран воспроизведения.
Вставка карты памяти (продается отдельно)
Убедитесь, что срезанный угол
расположен правильно.
Откройте крышку.
1
Вставьте карту памяти (продается отдельно).
2
• Расположив карту памяти со срезанным углом так, как на
рисунке, вставьте ее до щелчка.
Закройте крышку.
3
RU
12
Page 39

x
Используемые карты памяти
Карта памяти Для фотоснимков Для видеосъемки
Memory Stick PRO Duo aa (Только Mark2)
Memory Stick PRO-HG
A
Duo
Memory Stick Duo a —
Карта памяти SD aa (Класс 4 или
Карта памяти SDHC aa (Класс 4 или
B
Карта памяти SDXC aa (Класс 4 или
• В данном руководстве изделия в группе A собирательно именуются как
“Memory Stick Duo”, а изделия в группе B собирательно именуются как
карта SD.
x
Для извлечения карты памяти/батарейного блока
aa
выше)
выше)
выше)
Карта памяти: Нажмите карту памяти один раз для ее извлечения.
Батарейный блок: Сдвиньте рычажок выталкивания батареи.
Следите за тем, чтобы не уронить батарейный блок.
Примечание
• Никогда не вынимайте карту памяти/батарейный блок, когда горит
лампочка доступа (стр. 7). Это может привести к повреждению данных
на карте памяти/внутренней памяти.
RU
RU
13
Page 40

Установка часов
ON/OFF (Питание)
Нажмите кнопку ON/OFF (Питание).
1
При первом включении фотоаппарата будет отображена
установка даты и времени.
• Для включения питания и получения доступа к функциям
фотоаппарата может потребоваться некоторое время.
Выберите нужный язык.
2
Выберите нужную область, следуя инструкциям на
3
экране, а затем прикоснитесь к кнопке [Дал.].
Установите опцию [Летнее время], [Формат даты и
4
вр.] и [Дата и время], а затем прикоснитесь к кнопке
[Дал.].
• Полночь обозначается как 12:00 AM, а полдень как 12:00 PM.
Прикоснитесь к кнопке [OK].
5
Выберите нужный цвет дисплея, следуя
6
инструкциям на экране, а затем прикоснитесь к
кнопке [OK].
Когда на экране появится вводное сообщение
7
[Встроенная справка], прикоснитесь к кнопке [OK].
14
RU
Page 41

Фотосъемка/видеосъемка
Кнопка затвора
Фотосъемка
Нажмите кнопку затвора наполовину для
1
выполнения фокусировки.
Если изображение находится в фокусе, раздается звуковой
сигнал и высвечивается индикатор z.
Для выполнения съемки нажмите кнопку затвора
2
полностью вниз.
Видеосъемка
Прикоснитесь к кнопке (Кнопка видеосъемки),
1
чтобы начать запись.
• Используйте рычажок W/T (увеличение) для изменения
кратности увеличения.
Прикоснитесь к кнопке (Кнопка видеосъемки),
2
чтобы остановить запись.
Примечания
• Во время видеосъемки, когда срабатывает функция увеличения,
записывается шум при работе объектива и рычажка.
• Непрерывная съемка возможна в течение приблизительно 29 минут с
настройками фотоаппарата по умолчанию и при температуре около
25°C. После завершения видеозаписи можно возобновить запись, снова
прикоснувшись к кнопке (Кнопка видеосъемки). Выполнение
записи может остановиться для защиты фотоаппарата в зависимости от
температуры окружающей среды.
RU
RU
15
Page 42

Просмотр изображений
(Воспроизведение)
Нажмите кнопку (воспроизведение).
1
• При воспроизведении на данном фотоаппарате изображений
на карте памяти, записанных с помощью других
фотоаппаратов, появится экран регистрации для файла
данных.
x
Выбор следующего/предыдущего фотоснимка
Прикасайтесь к кнопкам (следующий)/ (предыдущий) на
экране.
• Для воспроизведения видеозаписей прикоснитесь к кнопке
(воспроизведение) в центре экрана.
• Прикоснитесь к воспроизводимому фотоснимку, чтобы увеличить его.
x
Удаление фотоснимка
Прикоснитесь к кнопке (удаление) t [Данный снимок].
x
Возврат к фотосъемке
Прикоснитесь к кнопке на экране.
• В режим съ емки также можно вернуться путем нажатия кно пки затвора
наполовину.
16
RU
Page 43

Встроенная справка
Данный фотоаппарат оснащен встроенной инструкцией. Это
позволяет выполнять поиск функций фотоаппарата в зависимости
от потребностей.
Прикоснитесь к кнопке (Встроенная справка).
1
• Во время просмотра в нижнем левом углу экрана появится
значок .
Выберите метод поиска из опции [Встроенная
2
справка].
Рук. по съемке/ воспроиз.: Поиск различных функций работы в
режиме съемки/просмотра.
Значок руководства: Поиск функции и значения отображаемых
значков.
Поиск и устр. неисправн.: Поиск причин и способов разрешения
стандартных проблем.
Руководство по задаче: Поиск функций в зависимости от
потребностей.
Ключевое слово: Поиск функций по ключевым словам.
История: Просмотр последних 10 пунктов, отображавшихся в
[Встроенная справка].
RU
RU
17
Page 44

Введение в другие функции
Управление другими функциями, используемыми во время съемки
или воспроизведения, можно осуществлять путем прикосновения к
значку MENU на экране. Данный фотоаппарат оснащен
функциональной справкой, которая позволяет легко выбирать
различные функции. Во время отображения справки можно
использовать различные функции.
x
Пункты меню
Съемка
Сцена
видеосъемки
Простой режим
Кнопка
видеосъемки
Вспышка Выполнение установок вспышки.
Автоспуск Выполнение установок таймера самозапуска.
Эффект
расфокус.
Размер
фотосн.(Dual Rec)
Размер фотосн./
Разм. панорам.
изобр./Размер
фильма/Качество
фильма
RU
Выбор режима видеозаписи.
Фотосъемка с использованием минимума
функций.
Быстрый переход к видеосъемке из всех режимов
съемки.
Установка уровня эффекта расфокусировки
фона во время съемки в режиме расфокусировки
фона.
Установка размера фотоснимка, снимаемого во
время видеозаписи.
Выбор размера изображения и качество для
фотоснимков, панорамных изображений или
видеофайлов.
18
Page 45

Установка
Непрер. Съемки
Эффект HDR
Живописи
Область
выделения
Цветовой тон
Выделенный цвет
EV Ручная регулировка экспозиции.
ISO Регулировка световой чувствительности.
Баланс белого Регулировка цветовых тонов изображения.
Фокус Выбор метода фокусировки.
Режим измер.
экспозиции
Распознавание
сцен
Эффект мягкой
кожи
Распознавание
улыбки
Чувствительность
к улыбке
Распознавание
лиц
Минимиз. закр.
глаз
Выполнение установок для серийной
фотосъемки.
Если в режиме Эффект картины выбрана опция
[HDR Живопись], устанавливается уровень
эффекта.
Если в режиме Эффект картины выбрана опция
[Миниатюра], задается фрагмент, на котором
выполняется фокусировка.
Если в режиме Эффект картины выбрана опция
[Дешевый фотоапп.], устанавливается цветовой
тон.
Если в режиме Эффект картины выбрана опция
[Выделение цвета], выбирается выделяемый
цвет.
Выбор режима фотометрии, устанавливающего,
какую часть объекта следует использовать для
определения экспозиции.
Установка автоматического определения
условий съемки.
Установка эффекта мягкой кожи и уровня
эффекта.
Установка для автоматического срабатывания
затвора при распознавании улыбки.
Установка чувствительности функции
Распознавание улыбки для распознавания
улыбок.
Выбор автоматического распознавания лиц и
регулировки различных настроек.
Фотоаппарат автоматически снимает два
изображения и выбирает то изображение, где не
закрыты глаза.
RU
RU
19
Page 46

Фильм SteadyShot
Встроенная
справка
Установка уровня SteadyShot в режиме
видеосъемки.
Поиск функций фотоаппарата в зависимости от
потребностей.
Просмотр
Простой режим
Выбор даты
Календарь Выбор даты для воспроизведения по календарю.
Индекс
изображений
Cлайд-шоу Выбор метода непрерывного воспроизведения.
Удалить Удаление изображения.
Отпр. с пом.
TransferJet
Рисунок
Ретуширование
3D-просмотр
Режим просмотра Выбор формата дисплея для снимков.
Отобр. Груп.
Непр. Съемки
Защитить Защита изображений.
Печать (DPOF)
Поворот. Поворот фотоснимка влево или вправо.
Объем Регулировка громкости.
RU
Увеличение размера текста на экране для более
легкого использования.
Выбор нужного изображения для просмотра по
дате.
Одновременное воспроизведение нескольких
изображений.
Передача данных посредством близкого
расположения друг к другу двух устройств,
оснащенных TransferJet.
Рисование на фотоснимке и сохранение в виде
нового файла.
Ретуширование изображения с помощью
различных эффектов.
Установка воспроизведения изображений в 3Dрежиме на 3D-телевизоре.
Выбор отображения серии изображений в
группах или отображения всех изображений во
время воспроизведения.
Добавление метки команды печати к
фотоснимку.
20
Page 47

Данные
экспозиции
Кол. изобр. в
индекс. реж.
Встроенная
справка
x
Пункты установки
Установка отображения или отключения данных
съемки (данных Exif) текущего файла на экране.
Установка количества изображений,
отображаемых на индексном экране.
Поиск функций фотоаппарата в зависимости от
потребностей.
В случае прикосновения к кнопке MENU во время съемки или
воспроизведения, в качестве окончательного выбора будет
предоставлена опция (Настройки). Вы можете изменить
настройки по умолчанию на экране (Настройки).
Настройки
съемки
Основные
настройки
Инструмент
"Карта памяти"
Настройки часов
* Если карта памяти не вставлена, будет отображаться индикация
(Инструмент "Внутр. память"), и можно будет выбрать только
опцию [Формат].
Форм.видеосъем./Подсветка АF/Линия сетки/
Увел. четк. изобр./Цифров увелич/Умен. шума
ветра/Спр.по расп.сцен/Ум. эфф. кр. глаз/Пред.о
закр.глаз./Запись даты
Звук/Настр. Гистограм./Яркость экрана/
Language Setting/Цвет индикаторов/Демонстр.
режим/Инициализац./КОНТР. ПО HDMI/Настр.
USB соедин./USB питание/Настройка LUN/
Загруз. музык/Очистить музыку/TransferJet/EyeFi/Экономия питания/Калибровка
Формат/Созд.папк.ЗАПИС/Изм папк.ЗАПИСИ/
Удал. папки ЗАП./Копировать/Номер файла
*
Устан. вр.пояса/Устан.даты и вр.
RU
RU
21
Page 48

Количество фотоснимков и время видеозаписи
Количество фотоснимков и время записи может быть разным в
зависимости от условий съемки и носителя информации.
x
Фотосъемка
(Единицы: Изображения)
Емкость
Размер
16M 3 335
VGA 98 9600
16:9(12M) 3 355
x
Видеосъемка
В таблице внизу представлена приблизительная максимальная
продолжительность записи. Это общее время для всех видеофайлов.
Непрерывная видеосъемка возможна в течение приблизительно
29 минут. Максимальный размер видеофайла в формате MP4
составляет приблизительно до 2 Гб.
Емкость
Размер
AVC HD 24M (FX) — 10 m
AVC HD 9M (HQ) — 25 m
MP4 12M — 15 m
MP4 3M — 1 h 10 m
Число в ( ) представляет собой минимальное доступное для записи время.
• Доступное для записи время видеосъемки изменяется, поскольку
фотоаппарат оснащен системой VBR (переменная скорость передачи
битов), которая автоматически регулирует качество изображения в
зависимости от сцены съемки. При записи быстродвижущихся
объектов изображение остается четким, однако доступное для записи
время будет меньше, так как для записи требуется больше памяти.
RU
Доступное для записи время также изменяется в зависимости от условий
съемки, объекта или настроек качества/размера изображения.
22
Внутренняя память Карта памяти
Приблиз. 19 Mб 2 Гб
(h (часы), m (минуты))
Внутренняя память Карта памяти
Приблиз. 19 Mб 2 Гб
(10 m)
(15 m)
Page 49

Примечания по использованию фотоаппарата
Встроенные функции фотоаппарата
• В данном рук оводстве приведено описание каждой функции TransferJet-
совместимых/несовместимых устройств, 1080 60i-совместимых
устройств и 1080 50i-совместимых устройств.
Чтобы проверить, поддерживает ли фотоаппарат функцию TransferJet
и является ли он 1080 60i-совместимым устройством или 1080 50iсовместимым устройством, проверьте следующие метки на нижней
стороне фотоаппарата.
TransferJet-совместимое устройство:
1080 60i-совместимое устройство: 60i
1080 50i-совместимое устройство: 50i
• Не просматривайте 3D-изображения, снятые этим фотоаппаратом, в
течение продолжительного периода времени на 3D-совместимых
мониторах.
• Во время просмотра 3D-изображений, снятых этим фотоаппаратом, на
3D-совместимых мониторах, у Вас могут появиться неприятные
ощущения в виде напряжения зрения, усталости или тошноты. Для
предотвращения этих симптомов рекомендуется регулярно делать
перерывы. Однако, Вам необходимо самостоятельно определить для
себя длительность и частоту требуемых перерывов, поскольку это
зависит от индивидуальных особенностей человека. При появлении
каких-либо неприятных ощущений прекратите просмотр 3Dизображений до тех пор, пока не почувствуете себя лучше, и обратитесь
к врачу в случае необходимости. Изучите также инструкцию по
эксплуатации, прилагаемую к устройству или программному
обеспечению, подключенному или используемому с этим
фотоаппаратом. Имейте в виду, что зрение детей находится на этапе
развития (особенно детей в возрасте до 6 лет).
Проконсультируйтесь с педиатром или офтальмологом перед тем, как
разрешить ребенку просмотр 3D-изображений, и убедитесь, что он
соблюдает вышеуказанные меры предосторожности во время
просмотра таких изображений.
Использование и уход
Обращайтесь с изделием осторожно, не разбирайте и не модифицируйте
его, не подвергайте его ударным и другим нагрузкам: не стучите по нему,
не роняйте его, а также не наступайте на него. Будьте особенно
осторожны с объективом.
(TransferJet)
RU
RU
23
Page 50

Примечания о записи/воспроизведении
• Перед началом записи выполните пробную запись, чтобы убедиться в
надлежащей работе фотоаппарата.
• Данный фотоаппарат не является ни пыленепроницаемым, ни
брызгозащищенным, ни водонепроницаемым.
• Избегайте попадания на фотоаппарат воды. Попадание воды внутрь
фотоаппарата может привести к его неисправности. В некоторых
случаях фотоаппарат невозможно отремонтировать.
• Не направляйте фотоаппарат на солнце или другой яркий свет. Это
может привести к неисправности фотоаппарата.
• В случае конденсации влаги удалите ее перед использованием
фотоаппарата.
• Не трясите фотоаппарат и не стучите по нему. Это может привести к
неисправности, и запись ф отоснимков станет невозможной. Более того,
может испортиться носитель информации или могут повредиться
данные фотоснимков.
Не используйте/храните фотоаппарат в следующих местах
• В чрезмерно жарком, холодном или влажном месте
В таких местах, как, например, в автомобиле, припаркованном под
прямыми лучами солнца, корпус фотоаппарата может
деформироваться, и это может привести к неисправности.
• Под прямыми лучами солнца или вблизи нагревательного прибора
Корпус фотоаппарата может обесцветиться или деформироваться, и
это может привести к неисправности.
• В месте, подверженном качающей вибрации
• Вблизи генераторов сильных радиоволн или источников излучения, а
также в местах с сильными магнитными полями. В противном случае
фотоаппарат может неправильно выполнять запись или
воспроизведение фотоснимков.
• В местах с повышенным содержанием песка или пыли
Будьте осторожны, чтобы не допустить попадания песка или пыли в
фотоаппарат. Это может привести к неисправности фотоаппарата, и в
некоторых случаях эта неисправность не может быть устранена.
О переноске
Не садитесь на стул или другое место, если фотоаппарат находится в
заднем кармане Ваших брюк или юбки, так как это может привести к
неполадкам или поломке фотоаппарата.
24
RU
Page 51

Объектив Carl Zeiss
Фотоаппарат оснащен объективом Carl Zeiss, который позволяет
воспроизводить четкие изображения с отличной контрастностью.
Объектив данного фотоаппарата и зготовлен в Германии в соответствии с
системой обеспечения качества, сертифицированной компанией Carl
Zeiss, согласно стандартам Carl Zeiss.
Примечание относительно экрана и объектива
Экран изготовлен с использованием особо высокоточной технологии,
что позволяет при эксплуатации эффективно использовать свыше
99,99% пикселов. Однако на экране могут появляться маленькие темные
и/или светлые точки (белого, красного, синего или зеленого цвета).
Такие точки являются результатом производственного процесса и
никаким образом не влияют на запись.
О температуре фотоаппарата
Фотоаппарат и батарея могут нагреваться в результате
продолжительного использования, но это не является неисправностью.
О защите от перегрева
В зависимости от температуры фотоаппарата и батареи видеосъемка
может быть невозможна, или питание может выключаться
автоматически для защиты фотоаппарата.
Перед выключением питания или перед тем, как станет невозможна
видеосъемка, на экране появится сообщение. В этом случае оставьте
питание выключенным и подождите, пока температура фотоаппарата и
батареи не снизится до приемлемого уровня. При включении питания не
остывшего в достаточной степени фотоаппарата или батареи, питание
может отключиться снова или выполнение видеосъемки может стать
невозможным.
О заряде батареи
При зарядке батареи, которая не использовалась в течение длительного
времени, зарядить ее до надлежащей емкости может быть невозможно.
Это связано с характеристиками батареи и не является неисправностью.
Зарядите батарею еще раз.
Предупреждение об авторских правах
На телевизионные программы, фильмы, видеоленты и другие материалы
может распространяться авторское право. Неправомочная перезапись
таких материалов может противоречить положениям закона об
авторском праве.
RU
RU
25
Page 52

За повреждение информации или сбой при записи не
предусмотрено никакой компенсации
Фирма Sony не может компенсировать убытки, вызванные сбоем при
записи, потерей или повреждением записанной информации вследствие
неисправности фотоаппарата или носителя информации.
Чистка поверхности фотоаппарата
Очищайте поверхность фотоаппарата мягкой тканью, слегка смоченной
водой, а затем протирайте поверхность сухой тканью. Чтобы не
повредить отделку или корпус:
– Не подвергайте фотоаппарат воздействию химических веществ, таких
как разбавитель, бензин, спирт, одноразовые салфетки, жидкость от
насекомых, солнцезащитный крем или инсектицид.
26
RU
Page 53

Технические характеристики
Фотоаппарат
[Система]
Формирователь изображения:
7,77 мм (тип 1/2,3) датчик
Exmor R CMOS
Общее количество пикселов
фотоаппарата:
Приблиз. 16,8 мегапикселов
Число эффективных пикселов
фотоаппарата:
Приблиз. 16,2 мегапикселов
Объектив: 5-кратный
вариообъектив Carl Zeiss
Vario-Tessar
f = 4,5 мм – 22,5 мм (25 мм –
125 мм (эквивалент
фотопленки 35 мм))
F2,6 (W) – F6,3 (T)
При видеосъемке в формате
(16:9): 29 мм – 145 мм*
При видеосъемке в формате
(4:3): 36 мм – 180 мм*
* Если опция [Фильм
SteadyShot] установлена в
положение [Стандартный]
SteadyShot: Оптическая
Управление экспозицией:
Автоматическая экспозиция,
выбор сцены (14 режимов)
Баланс белого: Автоматически,
дневной свет, облачный,
флуоресцентный свет 1/2/3,
лампа накаливания, вспышка,
одно касание
Формат сигнала:
Для 1080 50i: Система
цветности PAL, стандартное
CCIR формат HDTV 1080/50i
Для 1080 60i: Система
цветности NTSC, стандартное
EIA формат HDTV 1080/60i
Формат файла:
Фотосъемка: совместимая с
JPEG (DCF Ver. 2.0, Exif
Ver. 2.3, формат MPF
Baseline), совместимая с DPOF
3D-фотоснимки:
Совместимые с форматом
файлы MPO (С расширением
MPF (Диспарантное
изображение))
Видеозапись (формат
AVCHD): AVCHD
Видео: MPEG-4 AVC/H.264
Звук: Dolby Digital 2 канала с
встроенной технологией Dolb y
Digital Stereo Creator
•Изготовлено по лицензии
компании Dolby Lab oratories.
Видеозапись (формат MP4):
Видео: MPEG-4 AVC/H.264
Звук: MPEG-4 AAC-LC 2
канала
Носитель записи: Внутренняя
память (приблиз. 19 Мб),
“Memory Stick Duo”, карты
памяти SD
Вспышка: Диапазон действия
вспышки (Скорость ISO
(рекомендуемый индекс
экспозиции) установлена в
положение Авто):
Приблиз. 0,05 м до 5,3 м (W)
Приблиз. 1,0 м до 2,2 м (T)
[Входные и выходные
разъемы]
Разъем HDMI: Мини-гнездо
HDMI
RU
RU
27
Page 54

Многофункциональный разъем:
Type3b
(AV-выход/USB/DC-вход):
Выходной видеосигнал
Выходной аудиосигнал
(Стерео)
Соединение USB
Соединение USB: Hi-Speed USB
(USB 2.0)
[Экран]
Панель:
Широкоформатный (16:9),
привод TFT 7,5 см (тип 3,0)
Общее количество точек:
921 600 (1 920 × 480) точек
[Питание, общая
информация]
Питание: Перезаряжаемый
батарейный блок
NP-BN, 3,6 В
Сетевой адаптер переменного
тока AC-UB10/UB10B, 5 В
Потребляемая мощность (во
время съемки): 1,1 Вт
Рабочая температура:
от 0°C до 40°C
Температура хранения:
от –20°C до +60°C
Размеры (по стандарту CIPA):
92,2 мм × 51,9 мм × 19,1 мм
(Ш/В/Г)
Масса (по стандарту CIPA)
(включая батарейный блок
NP-BN, “Memory Stick Duo”):
Приблиз. 117 г
Микрофон: Стерео
Громкоговоритель:
Монофонический
Exif Print: Совместимый
PRINT Image Matching III:
Совместимый
RU
28
AC-UB10/UB10B Сетевой
адаптер переменного тока
Требования к питанию: от 100 В
до 240 В переменного тока,
50 Гц/60 Гц, 70 мА
Выходное напряжение: 5 В
постоянного тока, 0,5 А
Рабочая температура:
от 0°C до 40°C
Температура хранения:
от –20°C до +60°C
Размеры:
Приблиз. 50 мм × 22 мм × 54 мм
(Ш/В/Г)
Масса:
Для США и Канады:
Приблиз. 48 г
Для стран или регион ов, кроме
США и Канады:
Приблиз. 43 г
Класс защиты от поражения
электрическим током II
Перезаряжаемый
батарейный блок NP-BN
Используемая батарея: Батарея
на литиевых ионах
Максимальное напряжение: 4,2 В
постоянного тока
Номинальное напряжение: 3,6 В
постоянного тока
Максимальное напряжение
зарядки: 4,25 В постоянного
тока
Максимальный ток зарядки: 0,9 A
Емкость:
типовая: 2,3 Втч (630 мАч)
минимальная: 2,2 Втч
(600 мАч)
Конструкция и технические
характеристики могут быть
изменены без уведомления.
Page 55

Торговые марки
• Следующие знаки являются
торговыми марками Sony
Corporation.
“Memory Stick PRO Duo”,
“Memory Stick PRO-HG Duo”,
“Memory Stick Duo”
• Windows является
зарегистрированным товарным
знаком Microsoft Corporation в
Соединенных Штатах Америки
и/или других странах.
• Macintosh является товарным
знаком Apple Inc.
• Логотип SDXC является
товарным знаком SD-3C, LLC.
• “ ” и “PlayStation” являются
зарегистрированным товарными
знаками Sony Computer
Entertainment Inc.
• Кроме того, названия систем и
изделий, используемые в данном
руководстве, являются в общем
случае торговыми марками или
зарегистрированными
торговыми марками их
соответствующих
разработчиков или
производителей. Однако, знаки
™ или
случаях в данном руководстве.
• Получите дополнительные
возможности с PlayStation 3,
загрузив приложение для
PlayStation 3 из PlayStation Store
(где доступно).
• Приложение для PlayStation 3
требует учетную запись
, “Cyber-shot”,
используются не во всех
®
PlayStation Network и загрузку
приложения. Доступно в
областях, где доступно
приложение PlayStation Store.
Дополнительная информация
по данному изделию и ответы
на часто задаваемые вопросы
могут быть найдены на нашем
веб-сайте поддержки
покупателей.
Импортер на территории РФ:
ЗАО “Сони Электроникс”, 123103,
Москва, Карамышевский проезд, 6,
Россия
Название и адрес организации,
принимающей претензии от
покупателей в России:
ЗАО “Сони Электроникс”, 123103,
Москва, Карамышевский проезд, 6,
Россия
Название и адрес организации,
принимающей претензии от
покупателей в Казахстане:
Сони Оверсиз С.А.
Представительство в Казахстане
050059 Алматы, улица Иванилова,
д. 58
RU
RU
29
Page 56

Українська
ПОПЕРЕДЖЕННЯ
Щоб знизити ризик займання або ураження електричним
струмом, не піддавайте виріб впливу дощової води або
вологи.
ВАЖЛИВІ ВКАЗІВКИ З ТЕХНІКИ БЕЗПЕКИ
-ЗБЕРЕЖІТЬ ЦЮ ІНСТРУКЦІЮ
НЕБЕЗПЕКА
ЩОБ ЗМЕНШИТИ РИЗИК ВИНИКНЕННЯ
ПОЖЕЖІ АБО УРАЖЕННЯ ЕЛЕКТРИЧНИМ
СТРУМОМ, СЛІД РЕТЕЛЬНО ВИКОНУВАТИ ЦІ
ВКАЗІВКИ
Якщо форма штекера не відповідає розміру розетки, користуйтеся
перехідником потрібної конфігурації.
УВАГА!
[ Акумуляторна батарея
Якщо неправильно поводитися з акумуляторною батареєю, вона може
вибухнути, спричинити пожежу або навіть викликати хімічні опіки.
Дотримуйтеся наведених нижче застережень.
• Не розбирайте акумуляторну батарею.
• Не роздавлюйте, не бийте та не прикладайте силу до акумуляторної батареї.
Не бийте її молотком, не кидайте та не наступайте на неї.
• Не замикайте контакти акумуляторної батареї та запобігайте потраплянню
між ними металевих предметів.
• Не піддавайте акумуляторн у батарею дії температури понад 60 °C, наприклад
під впливом прямих сонячних променів у припаркованому автомобілі.
• Не підпалюйте акумуляторну батарею та не кидайте її у вогонь.
• Не торкайтеся пошкодженої літій-іонної батареї або такої, з якої витікає
рідина.
• Заряджайте акумуляторну батарею, лише використовуючи оригінальний
зарядний пристрій Sony або пристрій, який може заряджати акумуляторні
батареї.
UA
• Тримайте акумуляторну батарею поза досяжністю маленьких дітей.
• Тримайте акумуляторну батарею сухою.
2
Page 57

• Замінюйте акумуляторну батарею лише на таку саму або еквівалентну, яку
рекомендує компанія Sony.
• Швидко утилізуйте використані акумуляторні батареї, як описано в
інструкціях.
[ Адаптер змінного струму
Підключіть адаптер змінного струму до найближчої настінної розетки.
Якщо під час користування адаптером змінного струму виникне якась
проблема, негайно відключіть живлення, вийнявши штепсель із розетки.
За наявності в комплекті кабелю живлення його слід використовувати лише з
цим фотоапаратом. Він не призначений для використання з іншими
електронними пристроями.
[ Дата виготовлення виробу.
Дата виготовлення виробу зазначена на позначці «P/D:», яка знаходиться на
етикетці зі штрих-кодом на картонній коробці.
Знаки, зазначені на етикетці зі штрих-кодом на картонній коробці.
P/D:XX XXXX
1 2
1. Місяць виготовлення
2. Рік виготовлення
A-0, B-1, C-2, D-3, E-4, F-5, G-6, H-7, I-8, J-9.
Рік та місяць виробництва літієво-іонного батарейного блоку проштамповані
на боковій поверхні або на поверхні з етикеткою.
XXXXXXXXXXX
Місяць виготовлення (з 01 до 12)
Рік виготовлення
UA
UA
3
Page 58

Для споживачів з Європи
[ Примітка для покупців у країнах, де діють директиви ЄС
Цей виріб виготовлено компанією Sony Corporation, 1-7-1 Konan Minato-ku
Tokyo, 108-0075 Japan (Японія). Уповноваженим представником з питань
електромагнітної сумісності та безпеки виробу є компанія Sony Deutschland
GmbH, Hedelfinger Strasse 61, 70327 Stuttgart, Germany (Німеччина). З будьяких питань стосовно обслуговування або гарантії звертайтеся за адресами,
наданими в окремій сервісній та гарантійній документації.
Результати випробувань цього виробу демонструють його відповідність
вимогам щодо обмежень, зазначених у директиві EMC, які стосуються
використання з’єднувальних кабелів коротших за 3 м.
[ Увага
На відповідних частотах електромагнітні поля можуть впливати на якість
зображення і звука, відтворюваних виробом.
[ Примітка
Якщо під впливом статичної електрики або електромагнітного поля процес
передачі даних буде перерваний, перезапустіть пристрій або від’єднайте та
повторно приєднайте кабель, що використовується для передачі даних (USB,
тощо).
[ Утилізація старого електричного та електронного
обладнання (застосовується в Європейському союзі та
інших європейських країнах із системами роздільного
збирання сміття)
Вторинна переробка матеріалів допоможе зберегти природні ресурси. Щоб
отримати докладнішу інформацію щодо вторинної переробки цього виробу,
зверніться до місцевих органів влади, до служби утилізації побутових відходів
або до магазину, де було придбано цей виріб.
Цей символ на виробі або на упаковці означає, що цей виріб не
можна утилізувати як побутове сміття. Замість цього його
потрібно здати до відповідного приймального пункту для
вторинної обробки електричного та електронного обладнання.
Забезпечивши належну утилізацію цього виробу, ви
допоможете запобігти негативним наслідкам для
навколишнього середовища та людського здоров‘я, до яких
могла б призвести неправильна утилізація цього виробу.
UA
4
Page 59

[ Переробка використаних елементів живлення (директива
діє у межах країн Європейського Союзу та інших країн
Європизі системами роздільного збору відходів)
Даний знак на елементі живлення або упаковці означає, що
елемент живлення, який використовується для роботи цього
пристрою, не можна утилізувати разом з іншими побутовими
відходами.
На деяких елементах живлення цей знак може
елементу. Якщо елемент живлення містить більше ніж 0,0005% ртуті або
0,004% свинцю, наводиться відповідне позначення хімічного елементу ртуті
(Hg) або свинцю (Pb).
Забезпечивши належну переробку використаних елементів живлення, ви
допоможете запобігти потенційно негативним наслідкам впливу на зовнішнє
середовище та людське здоров’я, які спричиняються невідповідною
переробкою елементів живлення. Вторинна переробка матеріалів сприяє
збереженню природних ресурсів.
При роботі пристроїв, для якихіз метою безпеки, виконання яких-небудь дій
або збереження наявних у пам’яті пристроїв даних необхідна подача
постійного живлення від вбудованого елемента живлення, заміну такого
елемента живлення варто робити тільки в уповноважених сервісних центрах.
Для правильної переробки використаних елементів живлення, після
закінчення терміну їх служби, здавайте їх у відповідний пункт збору
електронного й електричного обладнання.
Стосовно використання інших елементів живлення дивіться інформацію в
розділі, у якому дані інструкції з безпечного витягнення елементів живлення із
пристрою.
Здавайте використані елементи живлення у відповідні пункт збору й
переробки використаних елементів живлення.
Для одержання більш докладної інформації про вторинну переробку даного
виробу або використаного елемента живлення, будь ласка, звертайтесь до
органу місцевої адміністрації, служби збору побутових відходів або до
магазину, в якому ви придбали виріб.
використовуватись у комбінації з позначенням хімічного
UA
UA
5
Page 60

Інформація для споживачів в Україні
Обладнання відповідає вимогам Технічного регламенту обмеження
використання деяких небезпечних речовин в електричному та електронному
обладнанні (постанова КМУ від 03.12.2008 № 1057).
Виробник:
Sony Corporation 1-7-1, Konan, Minato-ku, Tokyo, Japan, 108-0075.
Уповноважений представник в Україні:
ТОВ «Соні Україна», вул. Спаська 30, м.Київ, 04070, Україна.
Відноситься лише до адаптера змінного струму
Обладнання відповідає вимогам:
– Технічного регламенту безпеки низьковольтного електричного обладнання
(постанова КМУ від 29.10.2009 № 1149)
– Технічного регламенту з електромагнітної сумісності обладнання (постанова
КМУ від 29.07.2009 № 785)
UA
6
Page 61

Додаткова інформація у «Посібник
користувача Cyber-shot» (HTML) на компактдиску, що додається
Детальніше про розширені функції читайте у «Посібник
користувача Cyber-shot» (HTML) на компакт-диску (додається) за
допомогою комп’ютера.
Вставте компакт-диск у дисковод.
Для користувачів системи Windows:
1 Клацніть пункт [Посібник користувача] t [Установка].
2 Здійсніть запуск посібника «Посібник користувача»,
використовуючи піктограму на робочому столі.
Для користувачів Macintosh:
1 Виберіть [Посібник користувача] та скопіюйте папку [ua] з папки
[Посібник користувача] на комп’ютер.
2 Виконавши копіювання, двічі клацніть «index.html» у папці [ua].
Перевірка комплектації
• Фотоапарат (1)
• Акумуляторна батарея NP-BN (1)
(Цю акумуляторну батарею не можна використовувати з
пристроями Cyber-shot, які постачаються з акумуляторними
батареями NP-BN1).
• Багатофункціональний USB-кабель (1)
• Адаптер змінного струму AC-UB10/UB10B (1)
• Шнур живлення (не додається для моделей, призначених для США
і Канади) (1)
• Перо (1)
• Ремінець на зап’ясток (1)
• Компакт-диск (1)
– Програмне забезпечення для Cyber-shot
– «Посібник користувача Cyber-shot»
• Посібник з експлуатації (цей посібник) (1)
UA
UA
7
Page 62

Визначення частин
UA
8
A Кнопка ON/OFF (живлення)
B Кнопка затвора
C Важіль зміни плану (W/T)
(масштабування)
D Спалах
E Кнопка (відтворення)
F Індикатор живлення/
заряджання
G Мікрофон
H Індикатор автоспуску/
Індикатор режиму спуску в
момент посмішки/Підсвітка
для автофокуса
I Об’єктив
J Екран/сенсорна панель
K Роз’єм HDMI
L Гачок для ремінця на
зап’ясток
M Гучномовець
N Гніздо для штатива
• Використовуйте штатив із
довжиною гвинта менше
5,5 мм. На штативі з довшим
гвинтом неможливо надійно
зафіксувати фотоапарат, що
може призвести до його
ушкодження.
O Універсальний роз’єм
(Type3b)
P Гніздо для карти пам’яті
Q Позначка (TransferJet™)
R Кришка відсіку для батареї/
карти пам’яті
S Відсік для встановлення
батареї
T Індикатор доступу
U Важіль виштовхування
батареї
Page 63

Встановлення батареї
Важіль виштовхування батареї
Відкрийте кришку.
1
Вставте батарею.
2
• Натискаючи на важіль виштовхування, вставте батарею, як
показано на малюнку. Встановивши батарею, переконайтеся,
що важіль виштовхування батареї зафіксовано.
• Якщо закрити неправильно встановлену батарею кришкою,
можна пошкодити фотоапарат.
Заряджання батареї
Для покупців у США та Канаді
Шнур живлення
Для споживачів у інших країнах/
регіонах, ніж США і Канада
Індикатор живлення/
заряджання
Світиться: заряджання
Вимк.: Зарядження
завершено
Блимання: Помилка
заряджання
UA
UA
9
Page 64

З’єднайте фотоапарат та адаптер змінного струму
1
(додається), використовуючи
багатофункціональний USB-кабель (додається).
Підключіть адаптер змінного струму до електричної
2
розетки.
Індикатор живлення/заряджання засвітиться оранжевим світлом
і розпочнеться заряджання.
• Вимкніть фотоапарат під час заряджання батареї.
• Батарею можна заряджати, навіть якщо вона частково
заряджена.
• Якщо індикатор живлення/заряджання блимає, коли
заряджання не завершено, вийміть і встановіть акумуляторну
батарею.
Примітки
• Якщо індикатор живлення/заряджання на фотоапараті не світиться,
навіть якщо адаптер змінного струму під’єднано до фотоапарата і
електричної розетки, це означає, що заряджання тимчасово
призупинено і адаптер перебу ває в стані очікування. Якщо температура
виходить за межі рекомендованої для роботи температури, зарядний
пристрій припинить роботу і автоматично перейде в режим очікування.
Коли температура повернеться в межі відповідного діапазону,
заряджання відновиться. Радимо заряджати батарею за температури
середовища від 10°C до 30°C.
• Підключіть адаптер змінного струму (додається) до електричної
розетки. Якщо під час використання адаптера змінного струму виникне
збій у роботі, слід негайно вийняти штекер із розетки, щоб від’єднати
живлення.
• По закінченні заряджання від’єднайте адаптер змінного струму від
електричної розетки.
• Слід викор истовувати лише оригінальні батареї, багатофункціона льний
USB-кабель (додається) та адаптер змінного струму (додається) марки
Sony.
x
Тривалість зарядження
Тривалість заряджання з використанням адаптера змінного струму
(додається) становить приблизно 210 хв.
UA
10
Page 65

Примітка
• Вищезгаданий час позначає тривалість заряджання повністю
розрядженої батареї за температури 25°C. Залежно від умов
використання та обставин, заряджання може тривати довше.
x
Заряджання через підключення до комп’ютера
Батарею можна заряджати, під’єднавши фотоапарат до комп’ютера
за допомогою багатофункціонального USB-кабелю.
Примітка
• Заряджаючи пристрій через комп’ютер, зверніть увагу на такі моменти:
– Якщо фотоапарат під’єднано до ноутбука, який не підключено до
електромережі, то рівень заряду батареї ноутбука знижуватиметься.
Не заряджайте фотоапарат довше, ніж потрібно.
– Не вмикайте, не ви микайте і не перезавантажуйте ко мп’ютер, а також
не вмикайте комп’ютер з режиму cну, якщо між комп’ютером та
фотоапаратом встановлено з’єднання USB. Це може призвести до
збою в роботі фотоапарата. Перед тим як вмикати, вимикати або
перезавантажувати комп’ютер, а також вмикати його зі сплячого
режиму, від’єднайте фотоапарат від комп’ютера.
– Заряджання через несерійний або модифікований комп’ютер не
гарантується.
x
Тривалість роботи батареї та кількість зображень,
які можна записати і відтворити
UA
Тривалість роботи
батареї
Зйомка (фотографій) Прибл. 115 хв. Прибл. 230 зображень
Перегляд (фотографій) Прибл. 180 хв. Прибл. 3600 зображень
Зйомка (відео) Прибл. 55 хв. —
Кількість зображень
UA
11
Page 66

Примітки
• Вищезгадані значення дійсні лише, якщо батарею заряджено повністю.
Залежно від умов використання кількість зображень може бути
меншою.
• Згадана кількість зображень, які можна записати, стосується зйомки за
поданих нижче умов:
– Використання карти Sony «Memory Stick PRO Duo» (Mark2)
(продається окремо)
– Батарея використовується за температури середовища 25°C.
• Кількість зображень у стовпці «Зйомка (фотографій)» базується на
стандарті CIPA і відповідає зйомці за таких умов:
(CIPA: Camera & Imaging Products Association)
– Коли для пункту [Яскравість екрану] встановлено значення [3].
– Зйомка кожні 30 секунд.
– Функція зміни плану почергово перемикається між кінцевими
значеннями W і T.
– Спалах спрацьовує через раз.
– Живлення вмикається і вимикається кожний десятий раз.
• Час роботи батареї для зйомки відео відповідає зйомці за таких умов:
– Якість відео: AVC HD HQ
– Якщо відеозйомка припиняється відповідно до встановлених
обмежень (стор. 23), натисніть кнопку (Кнопка відеозйомки)
знову і продовжіть зйомку. Певні функції зйомки, зокрема
наближення, недоступні.
x
Живлення
Фотоапарат можна заряджати з електромережі, використовуючи
адаптер змінного струму або багатофункціональний USB-кабель
(додається).
Можна імпортувати зображення на комп’ютер без використання
заряду батареї, під’єднавши фотоапарат до комп’ютера за
допомогою багатофункціонального USB-кабелю.
Примітки
• Якщо батарею не встановлено у фотоапарат, живлення подаватися не
буде.
• Живлення з розетки можливе лише якщо фотоапарат перебуває в
режимі відтворення або його під’єднано до комп’ютера. Якщо
фотоапарат перебуває в режимі зйомки або якщо ви змінюєте його
налаштування, живлення не подаватиметься, навіть якщо встановити
з’єднання USB за допомогою багатофункціонального USB-кабелю.
UA
12
Page 67

• Якщо під’єднати фотоапарат до комп’ютера за допомогою
і
багатофункціонального USB-кабелю, коли фотоапарат перебуває в
режимі відтворення, на дисплеї фотоапарата екран відтворення
зміниться екраном USB-з’єднання. Щоб перейти до екрана відтворення,
натисніть кнопку (відтворення).
Встановлення карти пам’яті (продається окремо)
Перевірте, чи надрізаний кут
знаходиться у правильному положенн
Відкрийте кришку.
1
Вставте карту пам’яті (продається окремо).
2
• Вставляйте карту пам’яті надрізаним кутом, як показано на
малюнку, поки не почується клацання.
Закрийте кришку.
3
UA
UA
13
Page 68

x
Типи карт пам’яті, які можна використовувати
Карта пам’яті Для фотознімків Для відео
Memory Stick PRO Duo aa (лише Mark2)
A
Memory Stick PRO-HG Duo aa
Memory Stick Duo a —
Карта пам’яті SD aa (класу 4 або
Карта пам’яті SDHC aa (класу 4 або
B
Карта пам’яті SDXC aa (класу 4 або
• У цьому посібнику користувача карти пам’яті групи A називають
узагальнено картами «Memory Stick Duo», карти пам’яті групи B –
картами SD.
x
Вилучення карти пам’яті/акумуляторного блока
швидша)
швидша)
швидша)
Карта пам’яті: Щоб вийняти карту пам’яті, натисніть на неї один раз.
Батарея: Посуньте важіль виштовхування батареї. Будьте
обережними, щоб не впустити батарею.
Примітка
• Ніколи не вийм айте карту пам’яті/акумуляторний блок, якщо індикатор
доступу (стор. 8) світиться. Це може призвести до пошкодження даних,
що зберігаються на карті пам’яті/у внутрішній пам’яті.
14
UA
Page 69

Налаштування годинника
ON/OFF (живлення)
Натисніть кнопку ON/OFF (живлення).
1
Параметри дати й часу відображаються після першого вмикання
фотоапарата.
• Для увімкнення живлення та початку роботи може
знадобитися деякий час.
Виберіть потрібну мову.
2
Виберіть бажану область, дотримуючись вказівок
3
на екрані, потім натисніть [Далі].
Встановіть параметри [Літній час], [Формат дати і
4
часу] і [Дата і час], після чого натисніть [Далі].
• Північ зазначається як 12:00 AM, а полудень як 12:00 PM.
Торкніться кнопки [OK].
5
Виберіть бажаний колір відображення, виконуючи
6
вказівки на екрані, після чого натисніть [OK].
Коли на екрані з’явиться вступне повідомлення
7
[Довідн. функ. фотоап.], натисніть [OK].
UA
UA
15
Page 70

Фото- та відеозйомка
Кнопка затвора
Фотозйомка
Щоб виконати фокусування, натисніть кнопку
1
спуску до половини.
Коли зображення сфокусовано, лунає звуковий сигнал і
засвічується індикатор z.
Повністю натисніть кнопку спуску, щоб зробити
2
знімок.
Відеозйомка
Торкніться кнопки (Кнопка відеозйомки), щоб
1
почати запис.
• За допомогою важеля W/T (масштабування) можна наблизити
або віддалити зображення.
Торкніться кнопки (Кнопка відеозйомки), щоб
2
зупинити запис.
Примітки
• Якщо під час відеозйомки використовувати функцію масштабування,
буде записано також звук роботи об’єктива та важеля.
• Безперервна зйомка можлива лише протягом 29 хвилин за раз за умови
стандартних налаштувань фотоапарата і температури приблизно 25°C.
Завершивши відеозйомку, можна розпочати новий запис повторним
натисненням кнопки (Кнопка відеозйомки). Залежно від
температури середовища запис може бути зупинено для захисту
UA
фотоапарата.
16
Page 71

Перегляд зображень
(відтворення)
Натисніть кнопку (відтворення).
1
• Якщо зображення на карті пам’яті, записані іншими
фотоапаратами, відтворюю ться на цьому пристрої, з’являється
екран реєстрації файлу даних.
x
Вибір наступного/попереднього зображення
Торкніться на екрані кнопки (наступне)/ (попереднє).
• Щоб відтворити відео, натисніть кнопку (відтворення) у центрі
екрана.
• Щоб збільшити зображення, торкніться знімка, який відтворюється.
x
Видалення зображення
Торкніться кнопки (Видалити) t [Це зображення].
x
Повернення до режиму зйомки зображень
Торкніться кнопки на екрані.
• Повернутися до режиму зйомки можна також натисненням кнопки
спуску до половини.
UA
UA
17
Page 72

Довідн. функ. фотоап.
У цьому фотоапараті передбачено вбудований довідник функцій
фотоапарата. З його допомогою можна шукати потрібні функції
фотоапарата.
Торкніться кнопки (Довідн. функ. фотоап.).
1
• Під час перегляду у нижньому лівому куті екрана з’явиться
позначка .
Виберіть спосіб пошуку в [Довідн. функ. фотоап.].
2
Д-дка щодо з-ки/відтвор.: Пошук різних функцій у режимі
зйомки/перегляду.
Довідка щодо піктограм: Пошук функції і значень піктограм, що
відображаються.
Усунення несправностей: Пошук основних проблем і описання
шляхів їх вирішення.
Довідка щодо об'єктива: Пошук потрібних функцій.
Ключове слово: Пошук функцій за ключовими словами.
Історія: Перегляд 10 пунктів [Довідн. функ. фотоап.], що
переглядалися останніми.
18
UA
Page 73

Знайомство з іншими функціями
Інші функції, які використовуються під час зйомки чи відтворення,
можна використати, натискаючи на екрані кнопку MENU. Цей
фотоапарат пропонує підказки функцій, завдяки яким можна легко
зробити вибір потрібної функції. Під час відтворення довідки можна
користуватися різними функціями.
x
Пункти мeню
Зйомка
Сцена
відеозйомки
Спрощений
режим
Кнопка
відеозйомки
Спалах Налаштування параметрів спалаху.
Автоспуск Налаштування параметрів автоспуску.
Ефект
розмитості
Розмір
фотозн.(Dual
Rec)
Розмір фотозн./
Розмір панор.
зображення/
Розмір фільму/
Якість фільму
Налашт. Безпер.
Зйомки
Вибір режиму відеозапису.
Фотозйомка з мінімальним використанням
функцій.
Оперативна відеозйомка в усіх режимах зйомки.
Вибір рівня ефекту розфокусування фону під час
зйомки в режимі розмитого фону.
Встановлення розміру фотографії під час
відеозапису.
Вибір розміру та якості зображення для
фотографій, панорамних зображень чи
відеофайлів.
Вибір налаштувань пакетної зйомки.
UA
UA
19
Page 74

Ефект HDR
Живопису
Область
виділення
Відтінок кольору
Виділений колір
EV Налаштування експозиції вручну.
ISO Налаштування рівня світлочутливості.
Баланс білого Налаштування гамми кольорів зображення.
Фокус Вибір методу фокусування.
Режим виміру
експозиції
Розпізнавання
сцен
Вирівнювання
тону шкіри
Зйомка посмішки
Чутливість до
посмішки
Розпізнавання
обличчя
Уникн. закрит.
очей
Фільм SteadyShot
Довідн. функ.
UA
фотоап.
Якщо для режиму «Ефект картини» вибрано
значення [HDR Живопис], встановлює рівень
ефекту.
Якщо для режиму «Ефект картини» вибрано
значення [Мініатюра], визначає частину для
фокусування.
Якщо для режиму «Ефект картини» вибрано
значення [Іграшкова камера], встановлює
відтінок кольору.
Якщо для режиму «Ефект картини» вибрано
значення [Частковий колір], визначає колір, який
слід виділити.
Вибір режиму, котрий встановлює, яку частину
об’єкта слід вимірювати для визначення
експозиції.
Налаштування автоматичного виявлення умов
зйомки.
Встановлення ефекту вирівнювання тону шкіри та
ступеня вирівнювання.
Встановлення автоматичного спуску шторки
після виявлення посмішки.
Встановлення чутливості виявл ення посмішок для
функції спуску шторки в момент посмішки.
Автоматичне виявлення облич і налаштування
різних параметрів.
Встановлення автоматичної зйомки двох
зображень і вибору зображення, де об’єкт зйомки
не заплющив очі.
Встановлення рівня потужності функції
SteadyShot у режимі відео.
Пошук потрібних функцій фотоапарата.
20
Page 75

Перегляд
Спрощений
режим
Вибір дати
Календар Вибір дати для відтворення на календарі.
Мініатюра Одночасно відображаються кілька зображень.
Показ слайдів Вибір методу безперервного відтворювання.
Видалити Видалення зображення.
Надісл. через
TransferJet
Малюнок
Ретушування
3D-перегляд
Режим перегляду Вибір формату відображення знімків.
Відобр. Гр.
Безпер. Зйомки
Захистити Встановлення захисту зображень.
Друк (DPOF) Додавання позначки команди друку до знімка.
Поворот Поворот знімка вліво або вправо.
Об'єм Регулювання гучності.
Дані експозиції
К-ть зобр. в реж.
мініат.
Довідн. функ.
фотоап.
Збільшення розміру тексту на екрані для зруч ного
користування.
Вибір потрібного зображення для перегляду за
датою.
Перенесення даних шляхом розташування поруч
двох пристроїв із підтримкою технології
TransferJet.
Нанесення малюнків на фотознімок і збереження
його як нового файлу.
Ретушування зображення з використанням
різноманітних ефектів.
Налаштування відтворення зображень, знятих у
режимі 3D, на екрані 3D-телевізора.
Відтворення кадрів пакетної зйомки групами або
кожен окремо.
Відображення або приховування даних зйомки
(даних Exif) файлу, який у поточний момент
відображається на екрані.
Встановлення кількості зображень, що
відображаються в режимі перегляду мініатюр.
Пошук потрібних функцій фотоапарата.
UA
UA
21
Page 76

x
Пункти налаштування
Якщо під час зйомки або відтворення натиснути кнопку MENU, для
остаточного вибору надається параметр (Налаштування). В
екрані (Налаштування) можна змінити стандартні
налаштування.
Налаштування
зйомки
Основні
налаштування
Інструмент
"Карта пам'яті"
Налаштування
годинника
* Якщо карту пам’яті не встановлено, відобразиться індикація
(Інструмент "Внутр. пам'ять") лише з можливістю вибору параметра
[Формат].
Формат відео/Підсвітка AF/Лінія сітки/Масшт.
чітк. зобр./Цифр. масштабув./Зменш. шуму вітру/
Дов. розпізн. сцени/Зменш. черв. очей/Спов. про
закр. очі/Запис дати
Сигнал/Настр. Гистограм./Яскравість екрану/
Language Setting/Колір відображ./Демонстр.
режим/Ініціалізаці я/КОНТРОЛЬ HDMI/Нала шт.
USB з'єдн./USB живлення/Налаштуван. LUN/
Завантаж. музики/Спорожн. музику/TransferJet/
Eye-Fi/Економія живл./Калібрування
Формат/Створ. папку ЗАП./Змін. папку ЗАПИС/
Вид. пап. ЗАПИС/Копіювати/Номер файлу
*
Налаштув. зони/Налашт. дати/часу
22
UA
Page 77

Кількість фотознімків і тривалість відеозапису
Кількість фотознімків і час запису залежать від умов здійснення
зйомки та ємності карти пам’яті.
x
Фотознімки
(Одиниці: зображення)
Ємність
Розмір
16M 3 335
VGA 98 9600
16:9(12M) 3 355
x
Відео
У викладеній нижче таблиці вказана приблизна максимальна
тривалість запису. Це загальна тривалість усіх відеофайлів.
Безперервна зйомка може тривати приблизно 29 хвилин.
Максимальний розмір відеоролика у форматі MP4 — до 2 Гб.
Ємність
Розмір
AVC HD 24M (FX) — 10 m
AVC HD 9M (HQ) — 25 m
MP4 12M — 15 m
MP4 3M — 1 h 10 m
Число в дужках ( ) означає мінімальну тривалість запису.
• Тривалість відеозапису може відрізнятися, оскільки фотоапарат
обладнано системою VBR (змінна швидкість потоку), яка автоматично
налаштовує якість зображення в залежності від сцени зйомки. Під час
зйомки об’єкта, що швидко рухається, зображення є чіткішим, а час
зйомки коротший, але для запису відео необхідно більше пам’яті.
Тривалість запису також може відрізнятися в залежності від умов
зйомки, об'єкта зйомки, а також від налаштувань розміру та якості
зображення.
Внутрішня пам’ять Карта пам’яті
Прибл. 19 Мб 2 Гб
(h (години), m (хвилини))
Внутрішня пам’ять Карта пам’яті
Прибл. 19 Мб 2 Гб
(10 m)
(15 m)
UA
UA
23
Page 78

Примітки щодо використання фотоапарата
Вбудовані функції фотоапарата
• У цьому посібнику детально описано всі функції, передбачені для
пристроїв, які сумісні/несумісні з технологією TransferJet і підтримують
формати 1080 60i та 1080 50i.
Щоб дізнатися, чи фотоапарат пі дтримує функцію TransferJet і формати
1080 60i та 1080 50i, перевірте наявність на нижній панелі таких
позначок.
Пристрій із підтримкою TransferJet:
Пристрій із підтримкою формату 1080 60i: 60i
Пристрій із підтримкою формату 1080 50i: 50i
• Не переглядайте 3D-зображення, зняті за допомогою цього
фотоапарата, на сумісних 3D-моніторах протягом тривалого часу.
• Переглядаючи 3D-зображення, зняті за допомогою цього фотоапарата,
на сумісних 3D-моніторах, ви можете відчувати дискомфорт у вигляді
навантаження на очі, втоми чи нудоти. Щоб попередити це, радимо
періодично робити перерви у переглядах. Ви самі відчуєте необхідну
тривалість та частоту перерв, адже це справа кожного особисто. Якщо
ви відчули будь-який дискомфорт, перестаньте переглядати 3D-знімки
до того моменту, доки не почуватиметесь краще, та у випадку
необхідності зверніться до лікаря. Також дивіться інструкцію з
використання, що додається до пристрою чи програми, які ви
використовуєте із цим фотоапаратом. Зауважте, що зір дитини ще
розвивається (у дітей, віком до 6 років).
Перед тим, як дозволити дитині переглядати 3D-знімки, зверніться до
педіатра чи офтальмолога, та слідкуйте, щоб дитина виконувала усі
вказівки під час перегляду такого зображення.
(TransferJet)
Використання та догляд
Поводьтеся з виробом обережно, не розбирайте, не модифікуйте його, не
піддавайте фізичним струсам та ударам (наприклад, ударам молотка,
падінню) і не наступайте на виріб. Особливо обережного поводження
потребує об’єктив.
Примітки щодо запису/відтворення
• Перед початком зйомки зробіть пробні фотографії, щоб переконатися,
що фотоапарат працює належним чином.
• Цей фотоапарат не є ані пилонепроникний, ані водостійкий, а також не
має захисту від бризок.
• Уникайте потрапляння води на фотоапарат. Якщо вода потрапить у
фотоапарат, це може спричинити виникнення несправності. У певних
випадках фотоапарат не підлягатиме ремонту.
UA
24
Page 79

• Не спрямовуйте фотоапарат на сонце або інше яскраве світло. Це може
призвести до виникнення несправності фотоапарата.
• У разі утворення конденсації вологи перш ніж використовувати
фотоапарат, її слід позбутися.
• Не трясіть і не вдаряйте фотоапарат. Це може спричинити виникнення
несправності і неможливість виконання запису зображень. Крім того,
може вийти з ладу носій інформації або можуть зазнати пошкоджень
зображення.
Не використовуйте і не зберігайте фотоапарат у таких місцях
• У дуже гарячих, холодних або вологих місцях
Внаслідок зберігання у таких місцях, як наприклад салон автомобіля,
припаркованого під прямим сонячним промінням, корпус фотоапарата
може деформуватися, і це може призвести до виникнення несправності.
• Під прямим сонячним промінням або поблизу обігрівача
Корпус фотоапарата може втратити колір і деформуватися, і це може
призвести до виникнення несправності.
• У місцях, що піддаються сильній вібрації
• У місцях, де поширюються радіохвилі, випромінюється радіація або
створюються магнітні поля. Інакше фотоапарат може не виконувати
запис чи відтворення зображень належним чином.
• У піщаних або запилених місцях
Будьте обережними, щоби п ісок або пил не потрапили у фотоапар ат. Це
може призвести до несправності фотоапарата і, у деяких випадках, цю
несправність не вдасться усунути.
Перенесення
Не сідайте, тримаючи фотоапарат у задній кишені штанів чи спідниці,
оскільки це може призвести до виникнення несправності або
пошкодження фотоапарата.
Об’єктив Carl Zeiss
Цей фотоапарат обладнано об’єктивом Carl Zeiss, який дозволяє
відтворювати чіткі зображення із чудовою контрастністю. Об’єктив для
цього фотоапарата виготовлено відповідно до системи забезпечення
якості, сертифікованої компанією Carl Zeiss згідно зі стандартами
компанії Carl Zeiss у Німеччині.
Примітки щодо екрана та об’єктива
Дисплей виготовлено за використання високоточної технології, і завдяки
цьому ефективно використовується більш ніж 99,99% пікселів дисплея.
Однак на екрані можуть з’являтися крихітні чорні та/або яскраві цятки
(білого, червоного, синього або зеленого кольору). Наявність цих цяток є
звичним наслідком виробничого процесу і жодним чином не впливає на
запис зображення.
UA
UA
25
Page 80

Про температуру фотоапарата
В результаті тривалого використання фотоапарат і батарея можуть
нагріватися, що не є несправністю.
Про захист від перегрівання
З метою захисту, залежно від температури фотоапарата і батареї, вам
може не вдатися записати відео або живлення може вимкнутись
автоматично.
Перед тим, як вимкнеться живлення або відеозапис більше не буде
можливим, на екрані з’явиться повідомлення. У такому разі вимкніть
фотоапарат і почекайте, поки спаде температура фотоапарата і батареї.
Якщо увімкнути фотоапарат, не давши йому та батареї достатньо
охолонути, живлення може знову вимкнутися і ви не зможете записувати
відео.
Про заряджання батареї
Якщо батареєю не користувалися протягом тривалого часу, під час
зарядження її, можливо, не вдасться зарядити до повної потужності.
Це відбувається через характеристики батареї, а не її несправність.
Зарядіть батареї знову.
Попередження про авторські права
Телевізійні програми, фільми, відео- та інші матеріали можуть бути
захищені авторськими правами. Несанкціонований запис таких
матеріалів може суперечити положенням законів про авторські права.
Відсутність компенсації за пошкодження вмісту або
неможливість виконання запису
Компанія Sony не передбачає надання компенсації за неможливість
виконання запису чи втрату або пошкодження вмісту запису внаслідок
несправності фотоапарата, носія інформації і т. ін.
Чищення поверхні фотоапарата
Витріть поверхню фотоапарата за допомогою м’якої, трохи вологої
ганчірки, а потім витріть насухо . Для запобігання пошкодженню поверхні
або корпуса:
– Не піддавайте фотоапарат впливу хімічних речовин, таких як
розчинник, бензин, спирт, речовини для відлякування комах,
сонцезахисний крем або інсектициди, а також тканин разового
використання.
26
UA
Page 81

Технічні характеристики
Фотоапарат
[Система]
Пристрій для формування
зображення: Cенсор Exmor R
CMOS 7,77 мм (тип 1/2,3)
Загальна кількість пікселів
фотоапарата:
Прибл. 16,8 мегапікселів
Кількість ефективних пікселів
фотоапарата:
Прибл. 16,2 мегапікселів
Об’єктив: Об’єктив Carl Zeiss
Vario-Tessar з 5-разовим
оптичним збільшенням
f = 4,5 мм – 22,5 мм (25 мм –
125 мм (еквівалент 35 мм
кіноплівки))
F2,6 (W) – F6,3 (T)
Під час відеозйомки (16:9):
29 мм – 145 мм*
Під час відеозйомки (4:3):
36 мм – 180 мм*
*Коли для пункту [Фільм
SteadyShot] встановлено
значення [Стандартний]
SteadyShot: Оптичний
Керування експозицією:
Автоматична експозиція,
Вибір сцени (14 режимів)
Баланс білого: Автоматичний
режим/режим денного світла/
режим хмарної погоди/режим
флуоресцентного освітлення
1,2,3/режим освітлення лампи
розжарення/режим спалаху/
режим одного натиснення
Формат сигналу:
Для 1080 50i: Колір PAL,
стандарти CCIR специфікація
HDTV 1080/50i
Для 1080 60i: Колір NTSC,
стандарти EIA специфікація
HDTV 1080/60i
Формат файлів:
Фотознімки: Сумісні з
форматом JPEG (DCF Ver. 2.0,
Exif Ver. 2.3, MPF Baseline),
сумісні з DPOF
3D-фотознімки: сумісні з
форматом MPO
(вдосконалений формат MPF
(диспаратне зображення))
Відео (формат AVCHD):
AVCHD
Відео: MPEG-4 AVC/H.264
Аудіо: 2-канальне Dolby
Digital з Dolby Digital Stereo
Creator
• Створено по ліцензії
компанії Dolby Laboratories.
Відео (формат MP4):
Відео: MPEG-4 AVC/H.264
Аудіо: MPEG-4 з 2-канальним
звуком AAC-LC
Носій для запису інформації:
Внутрішня пам’ять
(прибл. 19 Мб), карта пам’яті
«Memory Stick Duo», карти
пам’яті SD
UA
UA
27
Page 82

Спалах: Діапазон спалаху
(Чутливість ISO
(рекомендований показник
експозиції) встановлено в
автоматичному режимі):
Прибл. від 0,05 м до 5,3 м
(сторона W)
Прибл. від 1,0 м до 2,2 м
(сторона T)
Маса (сумісність зі стандартом
CIPA) (включно з батареєю
NP-BN, «Memory Stick Duo»):
Прибл. 117 г
Мікрофон: Стерео
Гучномовець: Монофонічний
Exif Print: сумісний
PRINT Image Matching III:
сумісний
[Вхідні і вихідні роз’єми]
Роз’єм HDMI: Міні-роз’єм HDMI
Універсальний роз’єм: Type3b
(аудіовідеовихід/роз’єм USB/
вхід постійного струму):
Відеовихід
Аудіовихід (стерео)
З’єднання USB
З’єднання USB: Hi-Speed USB
(USB 2.0)
[Екран]
Панель:
Широкоформатна (16:9),
7,5 см (тип 3,0), базується на
технології TFT
Загальна кількість точок:
921 600 (1 920 × 480) точок
[Живлення, загальне]
Живлення: Акумуляторна б атарея
NP-BN, 3,6 В
Адаптер змінного струму
AC-UB10/UB10B, 5 В
Споживання електроенергії (під
час зйомки): 1,1 Вт
Температура використання:
від 0 °C до 40 °C
Температура зберігання:
від –20 °C до +60 °C
Розміри (сумісність зі стандартом
CIPA):
92,2 мм × 51,9 мм × 19,1 мм
UA
(Ш/В/Г)
28
Адаптер змінного струму
AC-UB10/UB10B
Вимоги щодо живлення: Змінний
струм від 100 В до 240 В, 50 Гц/
60 Гц, 70 мА
Вихідна напруга: Постійний струм
5В, 0,5А
Температура використання:
від 0 °C до 40 °C
Температура зберігання:
від –20 °C до +60 °C
Розміри:
Прибл. 50 мм × 22 мм × 54 мм
(Ш/В/Г)
Вага:
Для США і Канади:
Прибл. 48 г
Для країн/регіонів за межами
США і Канади: Прибл. 43 г
Page 83

Акумуляторна батарея
NP-BN
Батарея, що використовується:
Літієво-іонна батарея
Максимальна напруга:
Постійний струм 4,2 В
Номінальна напруга:
Постійний струм 3,6 В
Максимальна напруга
заряджання:
Постійний струм 4,25 В
Максимальний струм заряджання:
0,9 A
Ємність:
типова: 2,3 Вт/год (630 мА/год)
мінімальна: 2,2 Вт/год (600 мА/
год)
Дизайн та характеристики можуть
бути змінені виробником без
попереднього повідомлення.
Товарні знаки
• Подані далі знаки є товарними
знаками компанії Sony
Corporation.
, «Cyber-shot»,
«Memory Stick PRO Duo»,
«Memory Stick PRO-HG Duo»,
«Memory Stick Duo»
• Windows є зареєстрованим
товарним знаком корпорації
Microsoft Corporation в
Сполучених Штатах та/або
інших країнах.
• Macintosh є зареєстрованим
товарним знаком корпорації
Apple Inc.
• Логотип SDXC є товарним
знаком SD-3C, LLC.
• « » і логотип «PlayStation» є
зареєстрованими товарними
знаками Sony Computer
Entertainment Inc.
• Крім того, назви систем і
продуктів, які використовуються
у цьому посібнику, є товарними
знаками або зареєстрованими
товарними знаками їх
відповідних розробників або
виробників. Проте, знаки ™ або
використовуються у цьому
®
посібнику не в усіх випадках.
• Можна також користуватися
PlayStation 3 і завантажити
програму для PlayStation 3 із
PlayStation Store (де доступно).
• Програма для PlayStation 3
потребує облікового запису
PlayStation Network і
завантаження програми. Вона
доступна в регіонах, де
знаходиться PlayStation Store.
Додаткову інформацію
стосовно цього виробу та
відповіді на часті запитання
можна знайти на веб-сайті
Служби підтримки
споживачів компанії Sony.
UA
UA
29
Page 84

© 2011 Sony Corporation Printed in China
 Loading...