

Page 1
Data Projector
3-293-836-02 (1)
製品ご相談窓口のご案内
【プロジェクターの技術相談窓口】
テクニカルインフォメーションセンター
電話番号: 0466-31-5168
(電話のおかけ間違いにご注意ください)
受付時間: 月〜金曜日 午前 9 時〜午後 8 時
土、日、祝日午前 9 時〜午後 5 時
製品の品質には万全を期しておりますが、万一本機のご使用中に、正常に動作しないなどの不具合が
生じた場合は、上記の「テクニカルインフォメーションセンター」までご連絡ください。
修理に関するご案内をさせていただきます。
キャビネットおよびプリント配線板にハロゲン系難燃剤を不使用
Halogenatedflameretardantsarenotusedincabinetsandprintedwiring
boards.
簡易説明書
Quick Reference Manual______________________
Guide de référence rapide_____________________
Manual de referencia rápida ___________________
Kurzreferenz _______________________________
Guida rapida all’uso__________________________
_____________________________
お買い上げいただきありがとうございます。
電気製品は安全のための注意事項を守らないと、
火災や人身事故になることがあります。
この簡易説明書と別冊の「安全のために」および付属の CD-ROM に入っ
ている取扱説明書をよくお読みのうえ、製品を安全にお使いください。お
読みになったあとは、いつでも見られるところに必ず保管してください。
JP
GB
FR
ES
DE
IT
CS
VPL-EW5
Sony Corporation Printed in China
VPL-EX50/EX5
VPL-ES5
© 2008 Sony Corporation
Page 2

この説明書について
この説明書では、本機を接続してから
映すまでの簡単な操作方法を説明して
います。
また使用上のご注意やメンテナンスの
際に必要な情報が記載されています。
操作方法について詳しくは、付属の
CD-ROM に収録されている取扱説明書
をご覧ください。
また安全のための注意事項は、別冊の
「安全のために」をご覧ください。
CD-ROM 取扱説明
書の見かた
付属の CD-ROM には、ReadMe、取扱
説明書が収録されています(日本語、
英語、フランス語、ドイツ語、イタリ
ア語、スペイン語、中国語)。まず最
初に ReadMe をご覧ください。
準備
付属の CD-ROM に収録されている取扱
説明書を読むためには、Adobe
AcrobatReader5.0 以降が必要です。
AdobeAcrobatReader がインストール
されていない場合は、アドビシステム
ズ社のホームページからダウンロード
してください。(無料)
取扱説明書を読むには
付属の CD-ROM を、コンピュータの
CD-ROM ドライブにセットしてくださ
い。しばらくすると、CD-ROM が自動
的に起動します。読みたい取扱説明書
を選んでください。取扱説明書のファ
イルは、CD-ROM の中に収録されてい
ます。
お使いのコンピュータによっては、
CD-ROM が自動的に起動しない場合が
あります。
以下の手順で、取扱説明書のファイル
を直接開いてください。
(Windows の場合)
1「マイコンピュータ」を開く。
(Windows Vista では「コンピュー
タ」と表示されます。)
2「CD-ROM」のアイコンを右ク
リックして「エクスプローラ」を選
ぶ。
3 ウィンドウの中で「index.htm」
ファイルをダブルクリックして読み
たい取扱説明書を選ぶ。
(Macintosh の場合)
1 デスクトップの「CD-ROM」アイ
コンをダブルクリックする。
2「index.htm」ファイルをダブルク
リックして読みたい取扱説明書を選
ぶ。
ご注意
index.htm ファイルが開かない場合は、
「OperatingInstructions」フォルダから読
みたい取扱説明書を選んでダブルクリック
してください。
JP
2
この説明書について/CD-ROM 取扱説明書の見かた
Page 3

商標について
・ AdobeAcrobat は AdobeSystems
Incorporated(アドビシステムズ社)の
商標です。
・ Windows は米国 MicrosoftCorporation
の米国およびその他の国における登録
商標です。
・ Kensington は Kensington 社の登録商
標です。
・ Macintosh は AppleComputer 社の登録
商標です。
・ VESA は VideoElectronicsStandard
Association の登録商標です。
・ DisplayDataChannel は Video
ElectronicsStandardsAssociation の商
標です。
・ HDMI、HDMI ロゴおよび High
DefinitionMultimediaInterface は、
HDMILicensingLLC 社の商標または登
録商標です。
・ その他のシステム名、製品名は、一般
的に各開発メーカーの商標あるいは登
TM
録商標です。なお、本文中では
マークは明記していません。
、®
JPJP
CD-ROM 取扱説明書の見かた
JP
3
Page 4

使用上のご注意
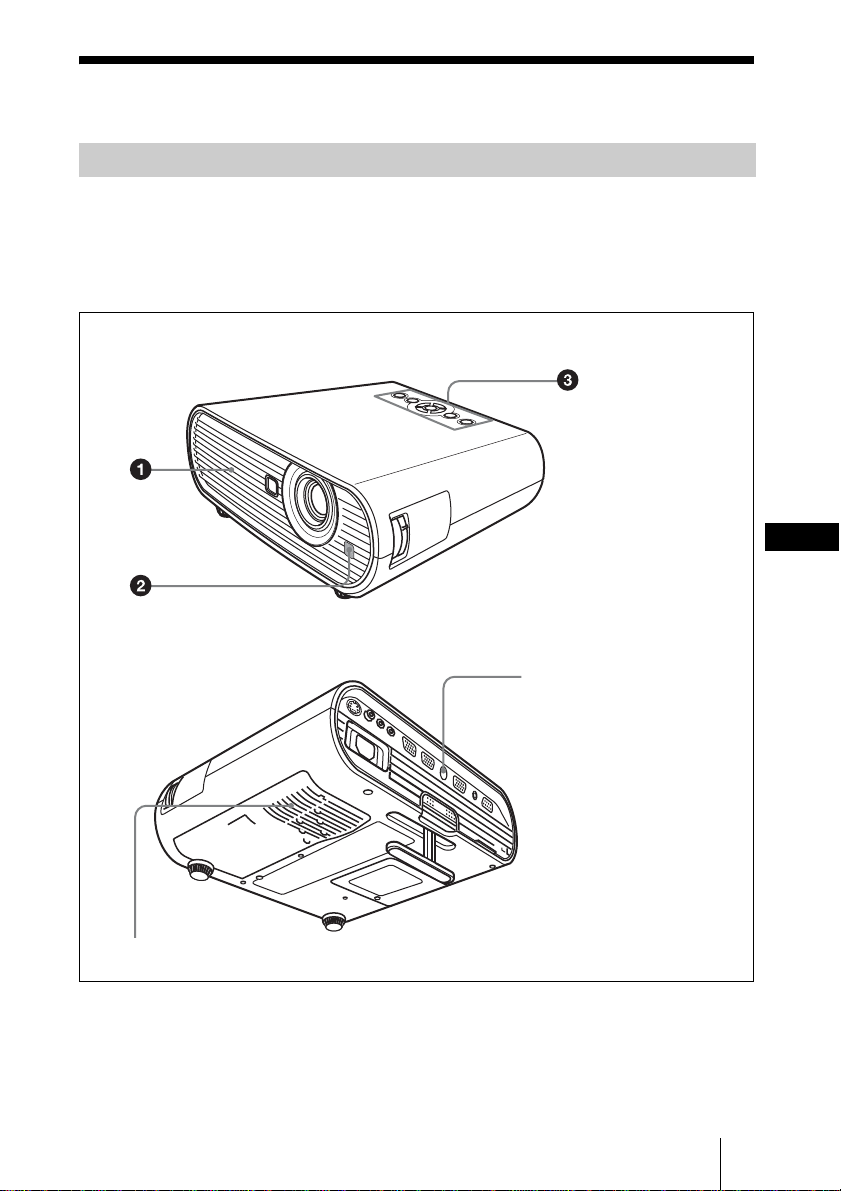
吸気・排気口についてのご注意
吸気・排気口をふさがないでください。吸気・排気口をふさぐと内部に熱がこも
り、火災や故障の原因となることがあります。以下イラストにて吸気・排気口の位
置をご確認ください。
その他注意事項については、別冊の「安全のために」をよくお読みください。
天面/前面/側面
1 排気口
2 リモコン受光部
3 インジケーター
4 吸気口
後面/側面/底面
JP
4
使用上のご注意
2
4
Page 5

画像を映す
接続する
接続するときは
・ 各機器の電源を切った状態で接続してください。
・ 接続ケーブルは、それぞれの端子の形状に合った正しいものを選んでくださ
い。
・ プラグはしっかり差し込んでください。抜くときは、必ずプラグを持って抜
いてください。
・ 接続する機器の取扱説明書もあわせてご覧ください。
画像を映す
JP
5
Page 6
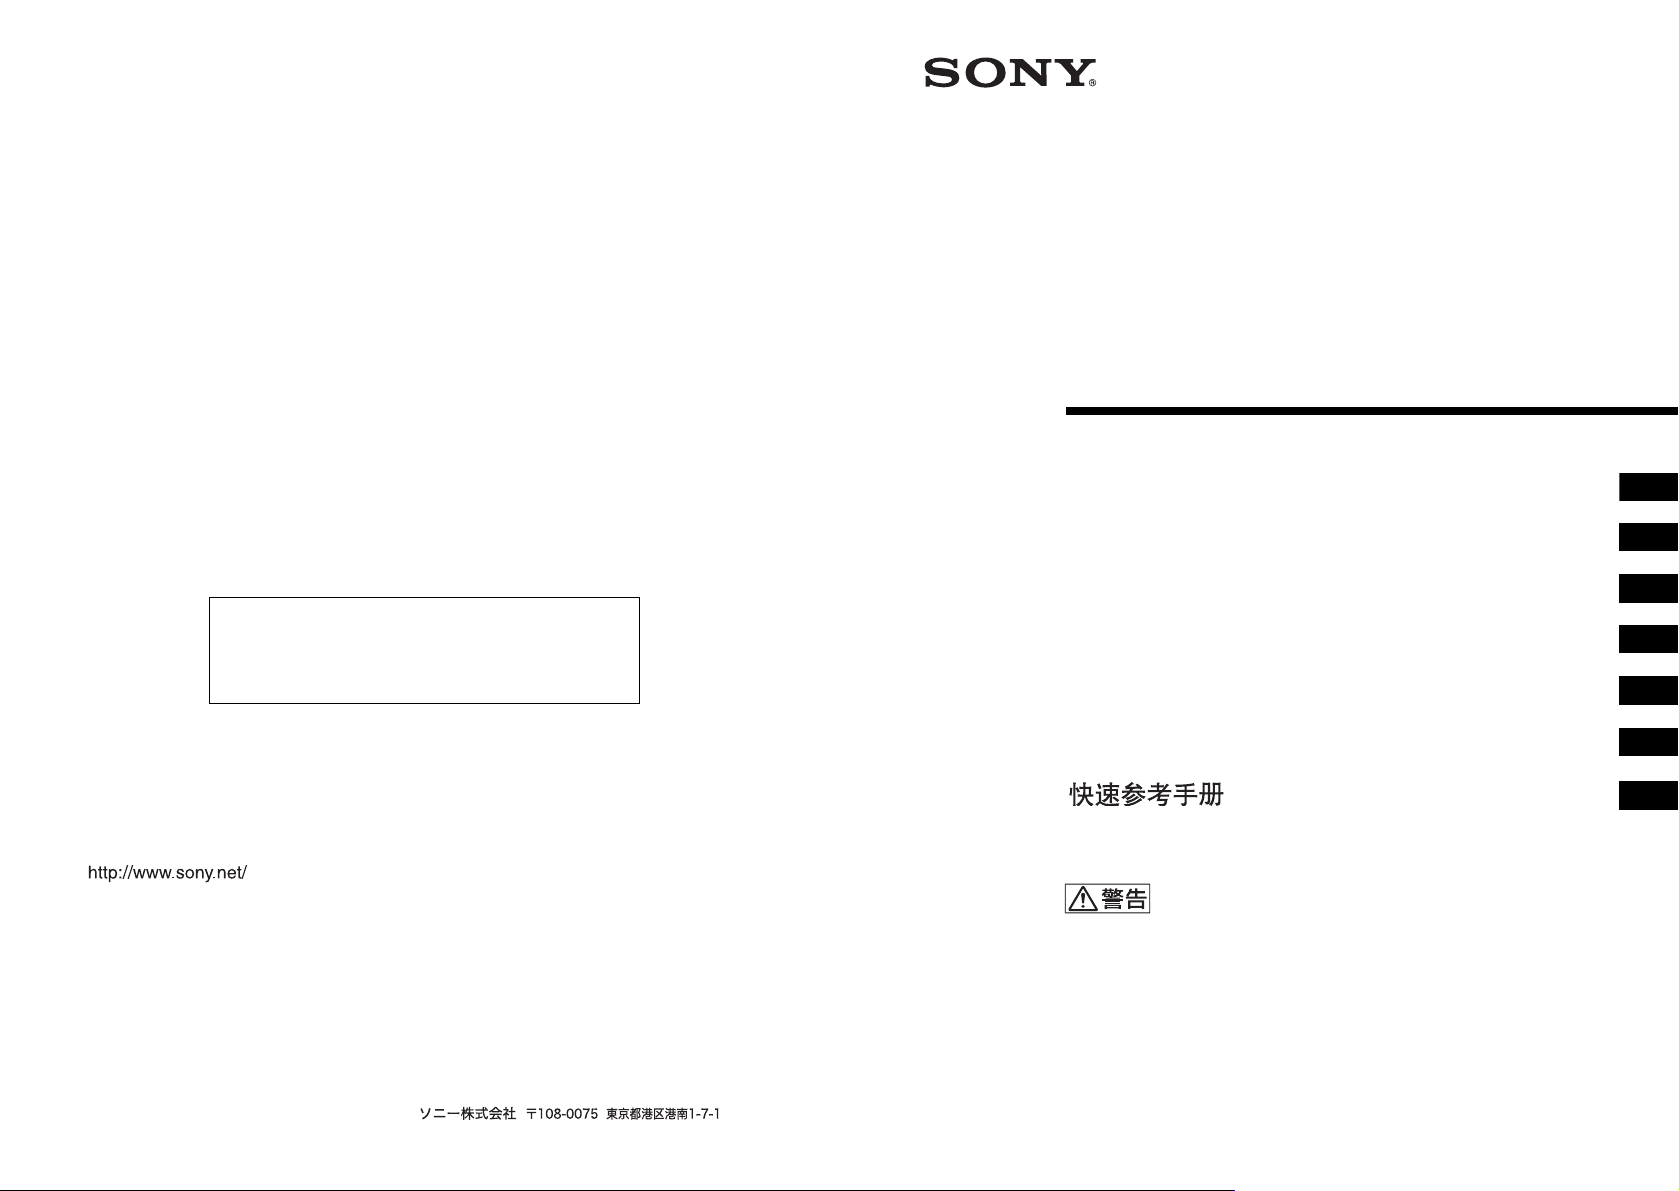
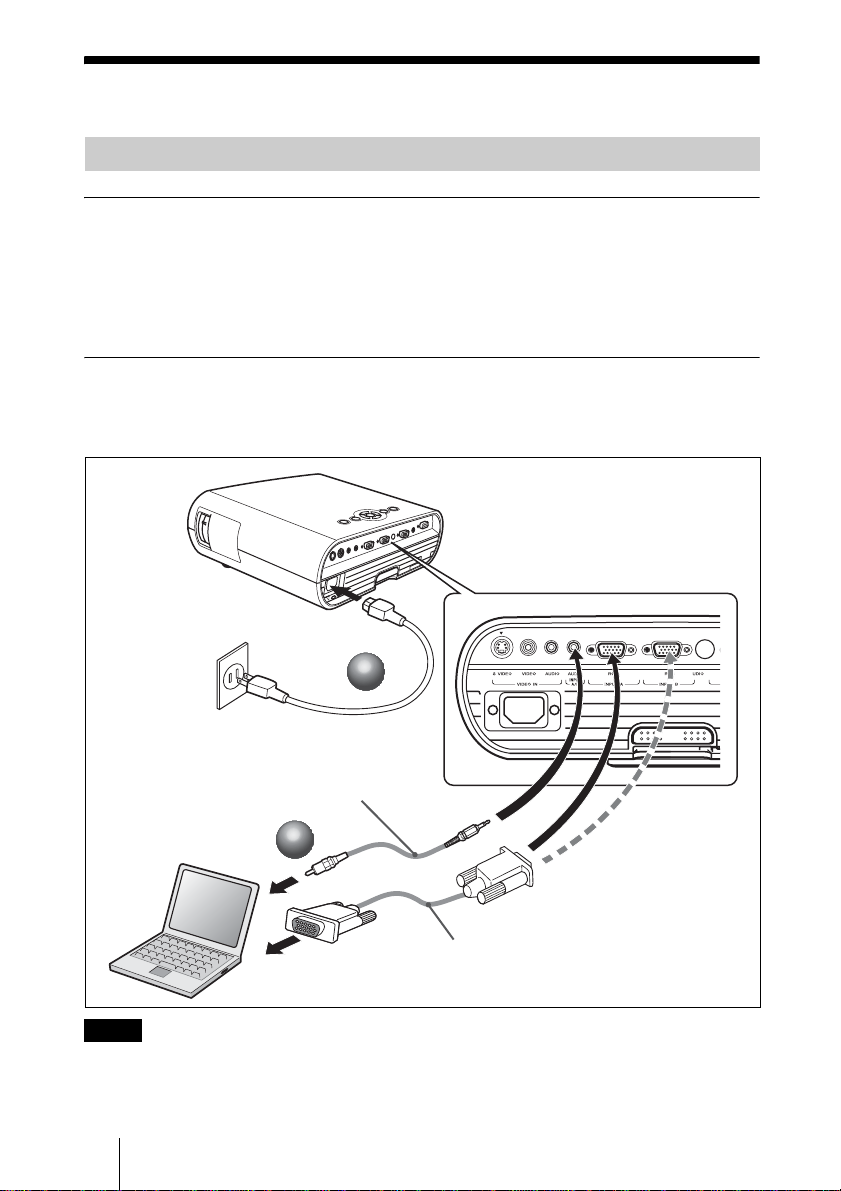
コンピューター(アナログ)との接続
a 本機の電源ケーブルをコンセントに差し込む。
b 本機とコンピューターをケーブルでつなぐ。
1
1
音声(ステレオオーディオケーブル(別売り))
抵抗無しのケーブルをお使いください
2
2
VPL-EX50
映像信号入力
HDD-sub15 ピンケーブル(付属 )
ご注意
オーディオ接続ケーブルは次の端子に接続します。
VPL-EX5/ES5:INPUTA/VIDEOINAUDIO 端子
VPL-EW5:INPUTAAUDIO 端子
VPL-EX50:INPUTA/BAUDIO 端子
JP
6
画像を映す
Page 7
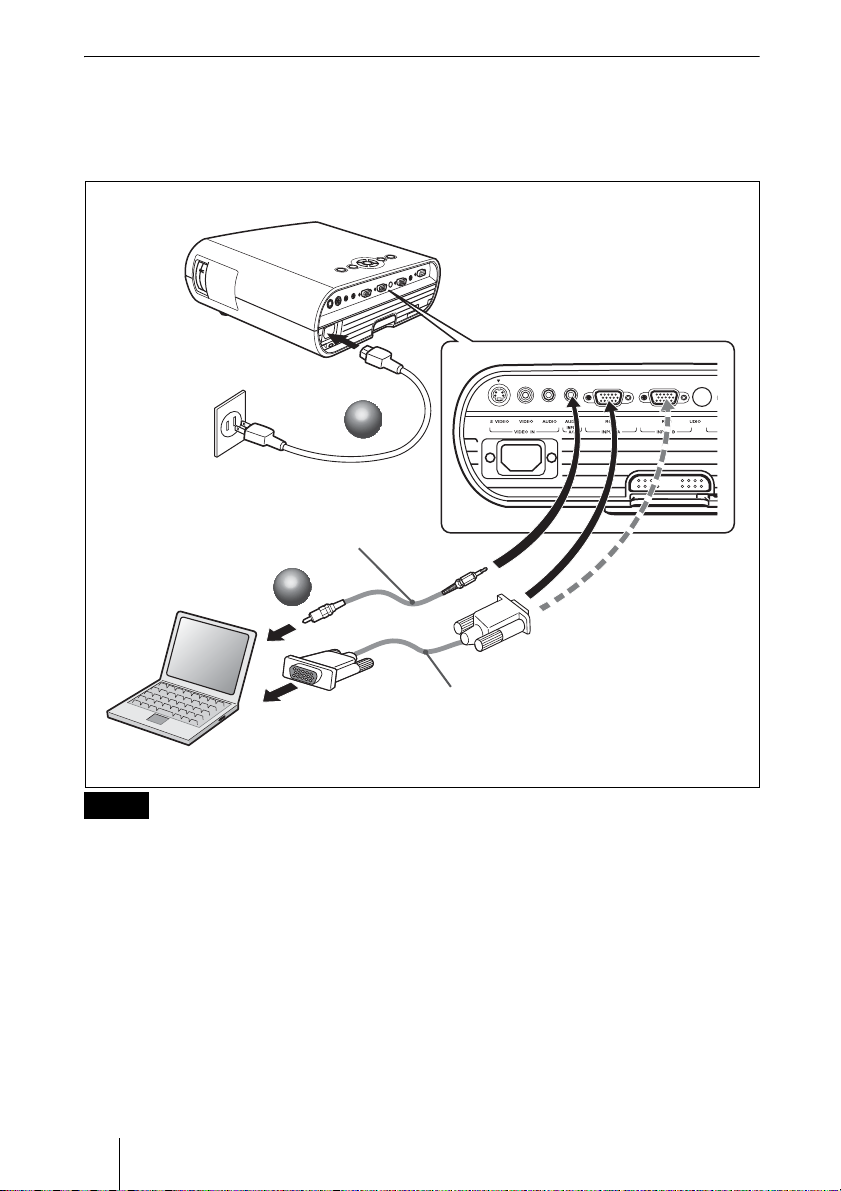
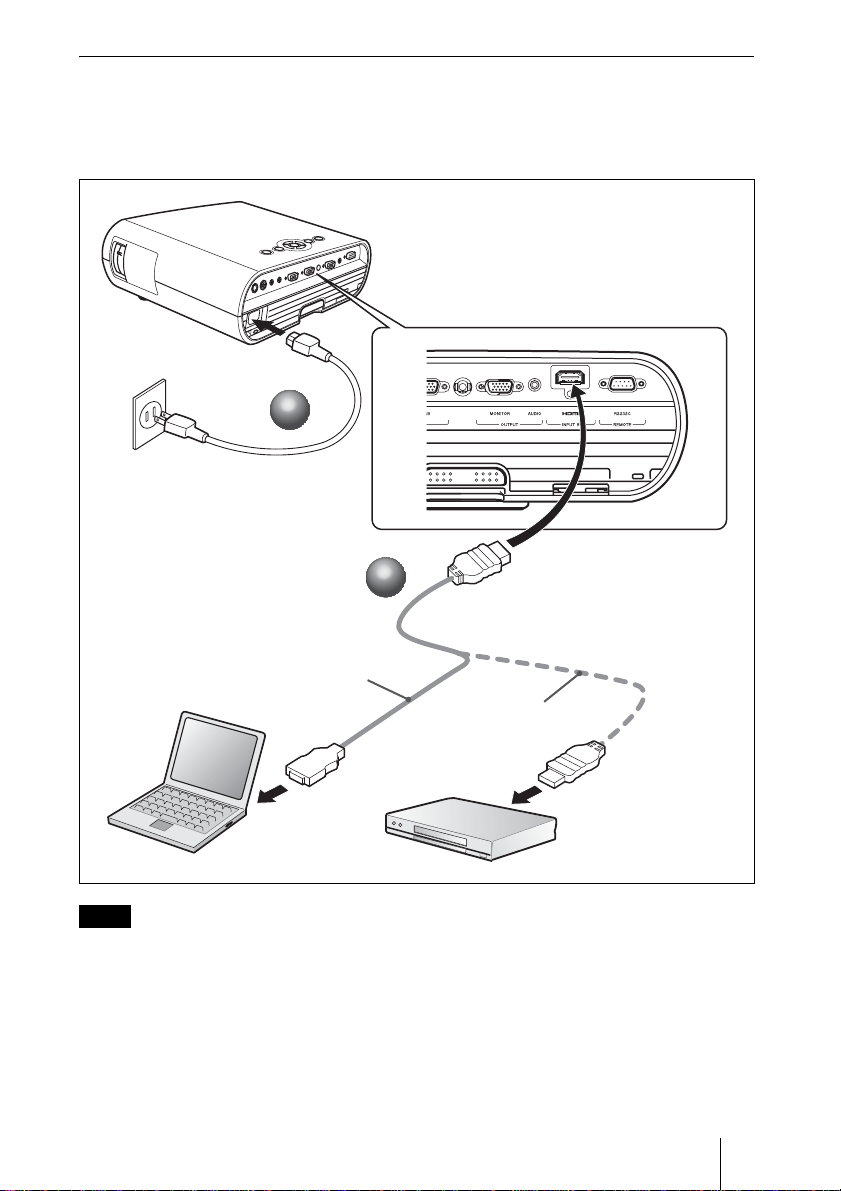
コンピューター(デジタル)やビデオ機器(デジタル)との接続(VPL-EW5
のみ)
a 本機の電源ケーブルをコンセントに差し込む。
b 本機とコンピューターやビデオ機器をケーブルでつなぐ。
VPL-EW5
1
1
2
2
HDMI-DVI-D
ケーブル(別売り)
HDMI ケーブル
(別売り)
ご注意
・ HDMI ケーブルは、HDMI ロゴの付いたケーブルをご使用ください。
・ 本機の HDMI端子は、DSD(DirectStreamDigital)信号と CEC(Consumer
ElectronicsControl)信号には対応していません。
画像を映す
JP
7
Page 8
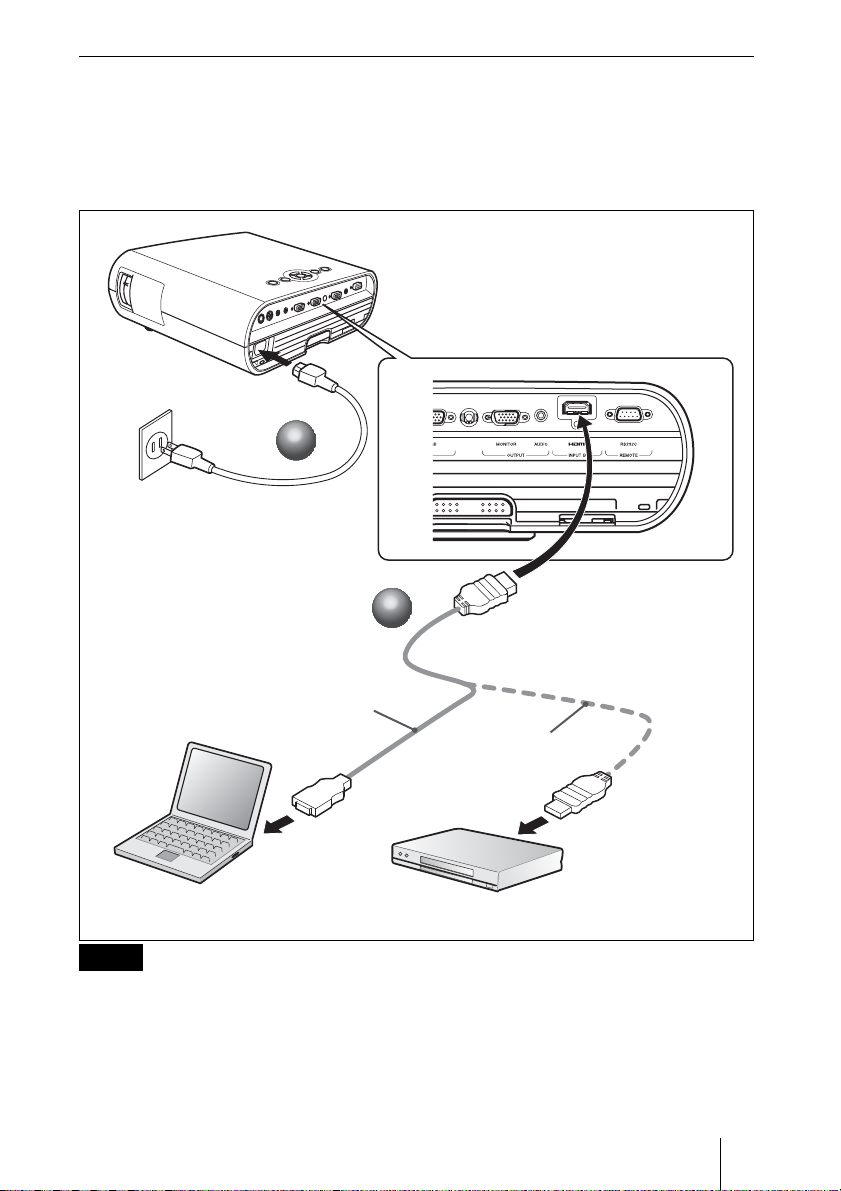
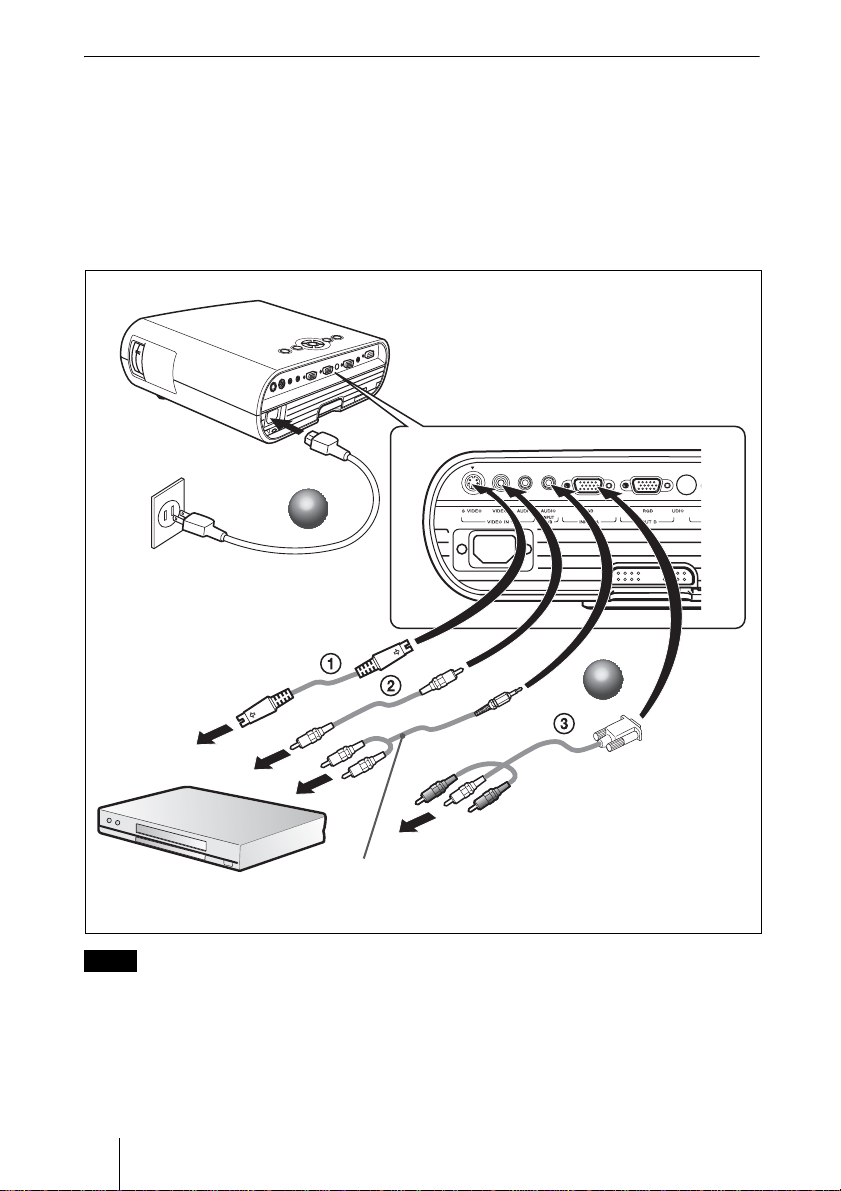
ビデオ・DVD 機器との接続
a 本機の電源ケーブルをコンセントに差し込む。
b 本機とビデオ機器をケーブルでつなぐ。
映像信号入力には以下の 3 通りの方法があります。
1 S ビデオ(ミニ DIN4-pin)ケーブル(別売り)
2 コンポジットビデオ(ピンジャック)ケーブル(別売り)
3 コンポーネント(ピンジャック× 3)ケーブル(別売り)
VPL-EX50
1
1
音声(ステレオオーディオケーブル(別売り))
抵抗無しのケーブルをお使いください
ご注意
オーディオ接続ケーブルは次の端子に接続します。
VPL-EX5/ES5:INPUTA/VIDEOINAUDIO 端子
VPL-EW5/EX50:VIDEOINAUDIO 端子
JP
8
画像を映す
2
2
Page 9
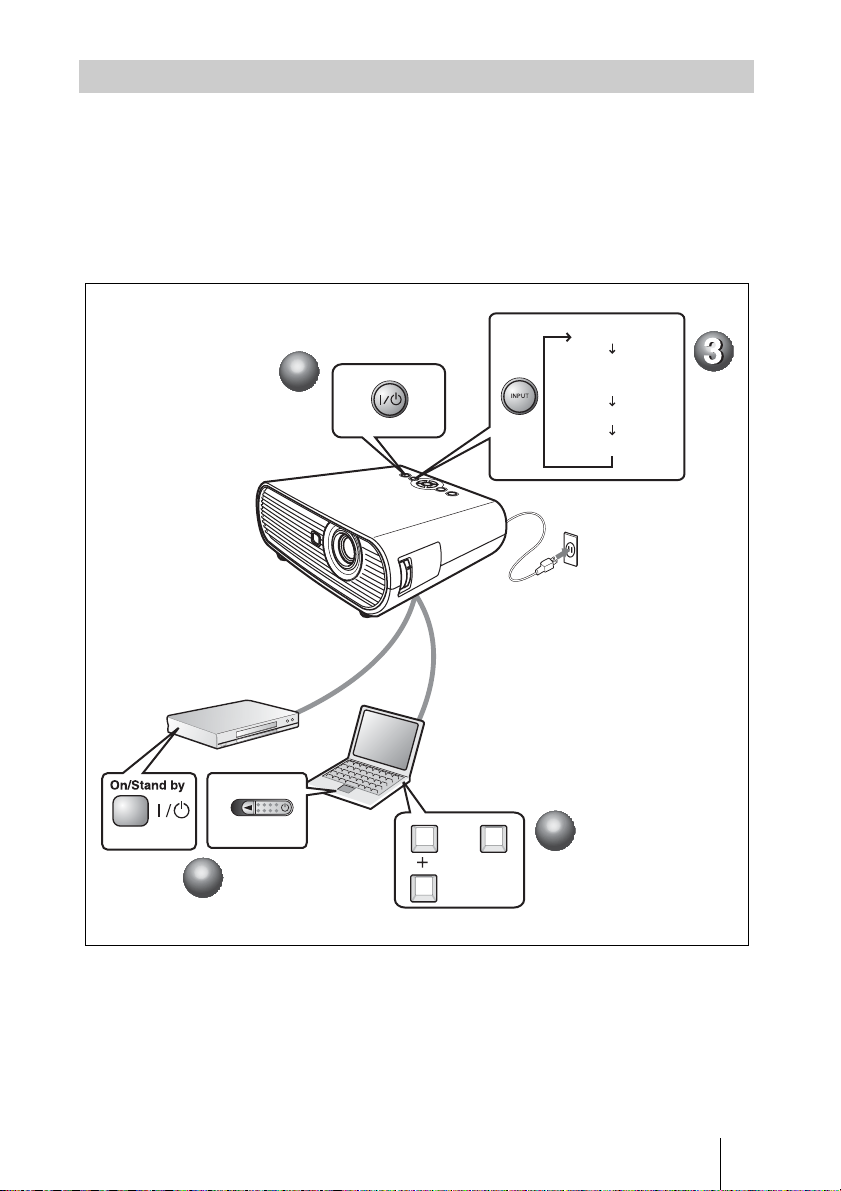
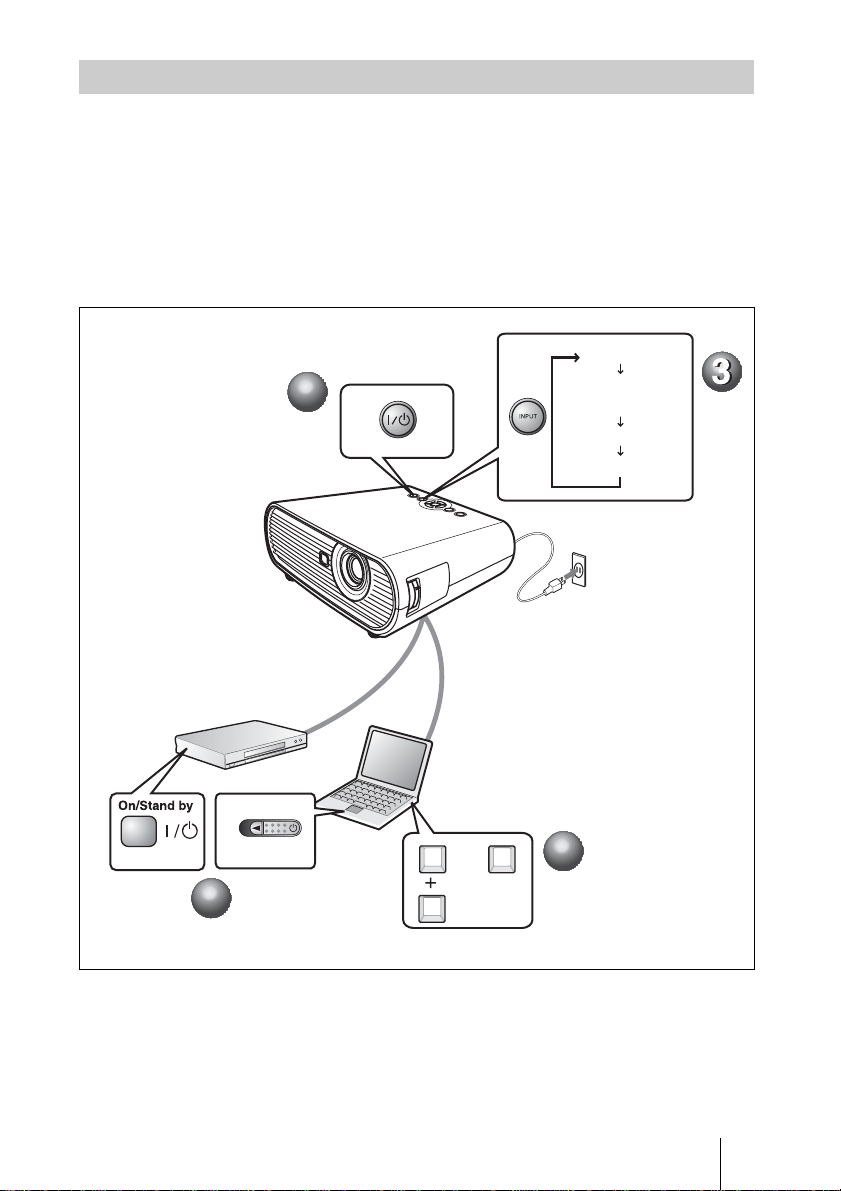
映す
a ?/1( オン / スタンバイ)キーを押す。
b 接続している機器の電源を入れる。
c リモートコマンダーまたはコントロールパネルの INPUT キーを押して、映
したい画像を選ぶ。
d コンピューターとの接続時は映像信号の出力先を切り換える。
入力 A
1
1
入力 B
(VPL-EX50/EW5 のみ)
ビデオ
Sビデオ
2
2
Power
Fn
または
4
FxF7
4
画像を映す
JP
9
Page 10

調整する
a 画像の位置を調整する。
b 画像の大きさを調整する。
c 画像のフォーカスを調整する。
画質モードを選べる画質設定メニューや、最適な画面のアスペクト比(縦横比)
を選べるスクリーン設定メニューがあります。
3
3
2
2
1
1
電源を切る
a ?/1( オン / スタンバイ)キーを押す。
b メッセージが表示されたらもう一度 ?/1( オン / スタンバイ)キーを押す。
c ファンが止まり、?/1( オン / スタンバイ)キーが赤く点灯するのを確認して
から、電源コードを抜く。(ダイレクトパワーオン / オフ機能、オフ&ゴー
機能使用時を除く。)
1
1
2
2
JP
10
画像を映す
Page 11
ランプを交換する
光源として使用されているランプは消
耗品ですので、次のような場合は新し
いランプと交換してください。
・ 光源のランプが切れたとき
・ 光源のランプが暗くなったとき
・「ランプを交換してください。」とい
うメッセージが表示されたとき
・ LAMP/COVER インジケーターが点
灯したとき(3 回点滅のくり返し)
ランプ交換時期はその使用条件によっ
て変わってきます。
交換ランプは、別売りのプロジェク
ターランプ LMP-E190 をお使いくださ
い。
それ以外のものをお使いになると故障
の原因になります。
ご注意
・ ランプが破損している場合は、テクニカ
ルインフォメーションセンターにランプ
の交換と内部の点検をご依頼ください。
・ ランプを取り出すときは、必ず取り出し
用のハンドルを持って引き出してくださ
い。
・ ランプを取り出すときは、ランプを水平
に持ち上げ、傾けないでください。ラン
プを傾けて持つと、ランプが破損するこ
とがあります。
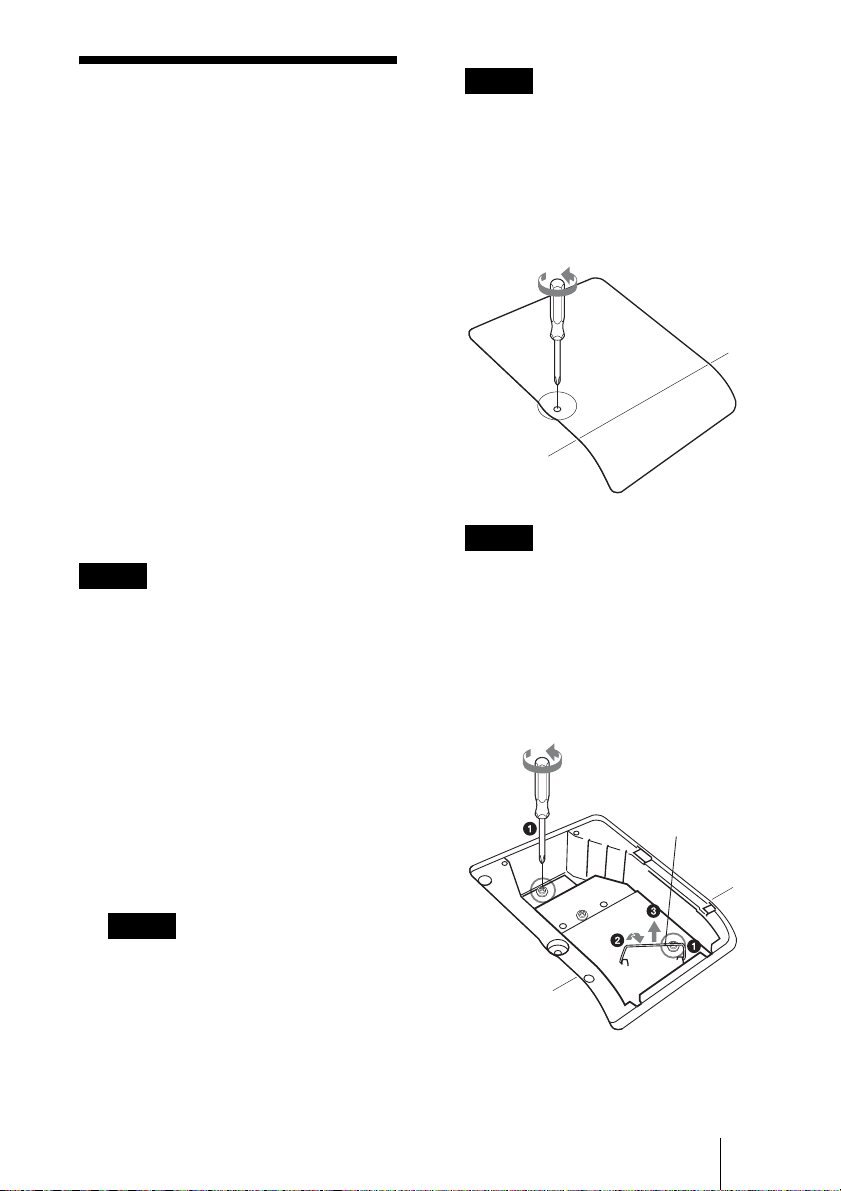
1 本機の電源を切り、電源コードをコン
セントから抜く。
ご注意
プロジェクターを、しっかりと安定させ
てください。
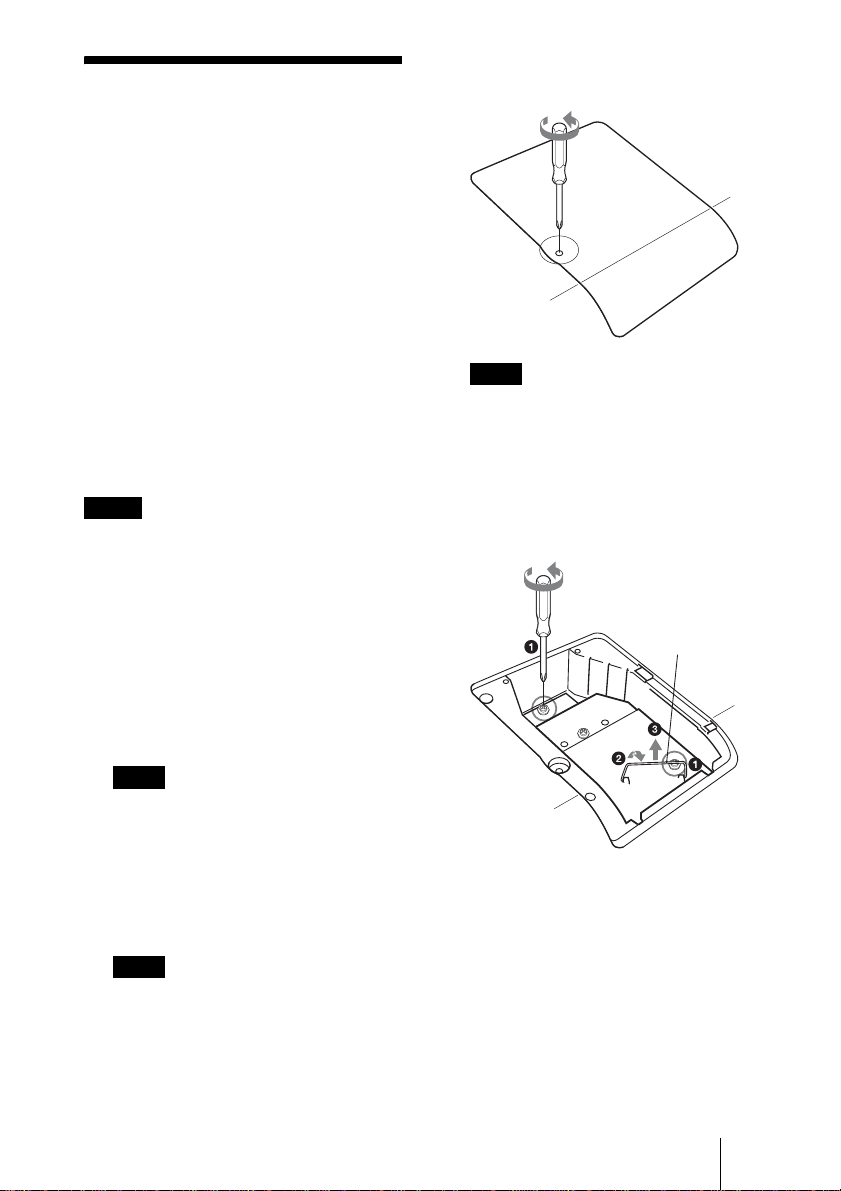
3 ランプカバーのネジ(1 本)をプラス
ドライバーでゆるめ、ランプカバーを
開く。
ご注意
安全のため、他のネジは絶対にはずさな
いでください。
4 ランプのネジ(2 本)をプラスドライ
バーでゆるめ(a)、取り出し用ハン
ドルを起こし(b)ハンドルを持っ
てランプを引き出す(c)。
ハンドル
ご注意
本機を使用した後にランプを交換する場
合は、ランプを冷やすため、1 時間以上
たってからランプを交換してください。
2 本機や机に傷がつかないよう布などを
敷き、その上で本機を裏返す。
ランプを交換する
11
JP
Page 12
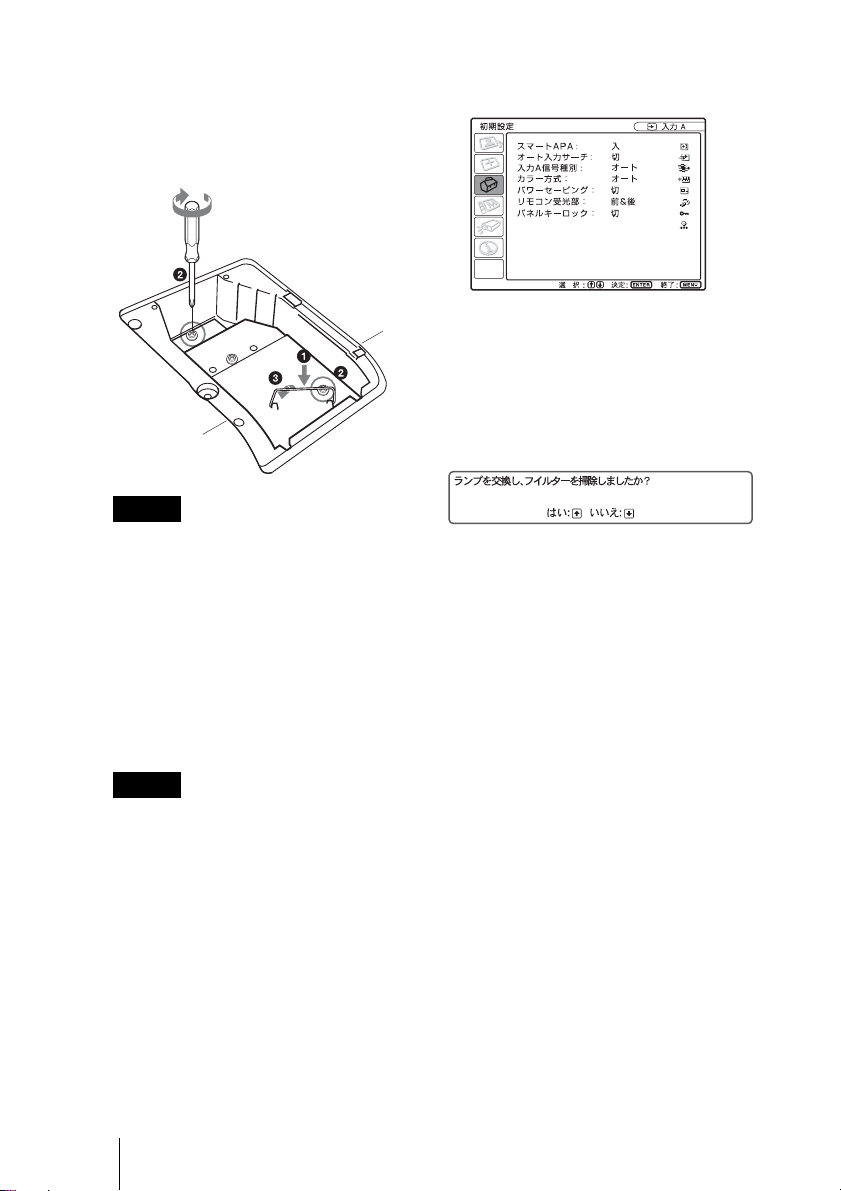
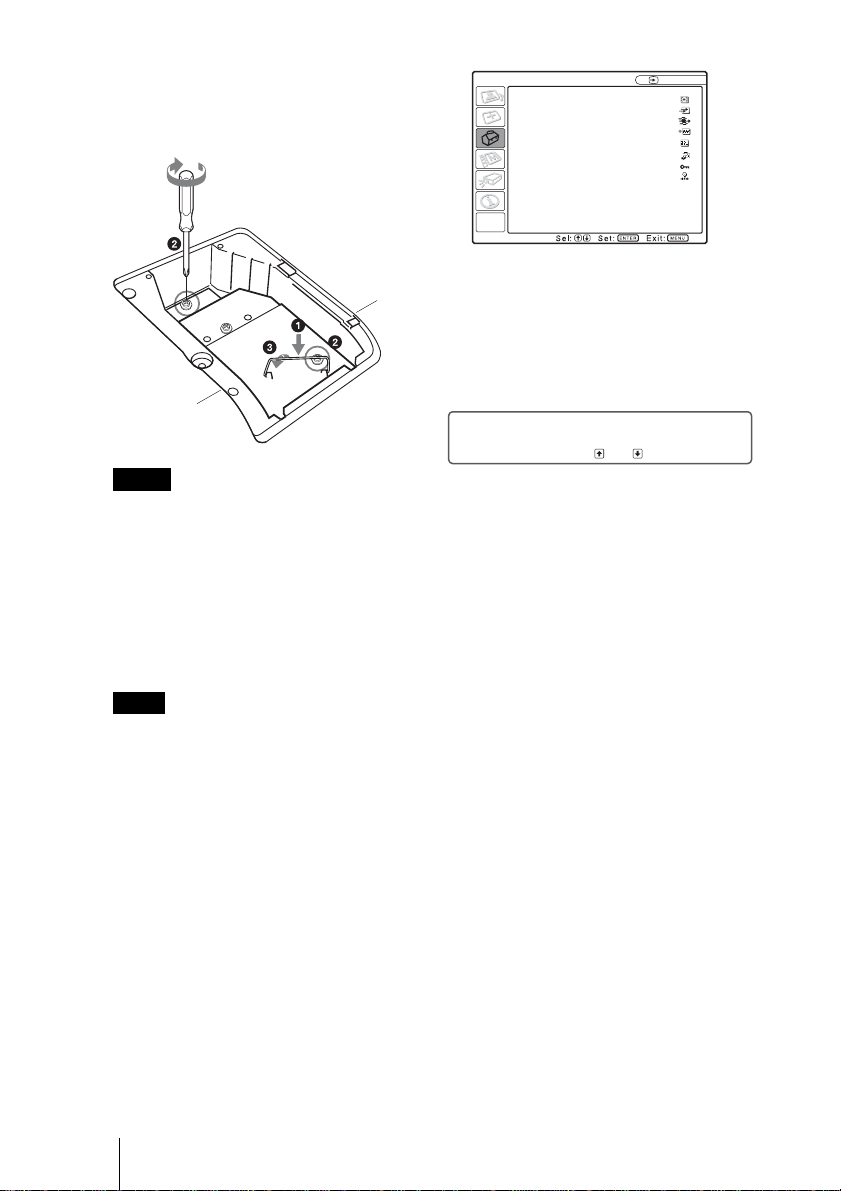
5 新しいランプを確実に奥まで押し込み
(a)、ネジ(2 本)を締め(b)、取
り出し用ハンドルを倒して元に戻す
(c)。
ご注意
・ ランプのガラス面には触れないようご
注意ください。
・ ランプが確実に装着されていないと、
電源が入りません。
・ ランプをはずした後のランプの収納部
に金属類や燃えやすい物などの異物を
入れないでください。
6 ランプカバーを閉め、ネジ(1 本)を
締める。
11「ランプタイマー初期化」を選び、
ENTER キーを押す。
ランプタイマー初期化
12V キーで「実行」を選び、ENTER
キーを押す。
ランプタイマーが 0 に初期化され、
「ランプを交換し、フィルターを掃
除しましたか?」というメッセージ
が表示されます。
フィルター掃除のしかたは、次の
「エアーフィルターをクリーニング
する」を参照してください。
13v キーで「はい」を選ぶ。
「ランプタイマー初期化が完了しま
した」というメッセージが表示され
ます。
ご注意
ランプカバーはしっかりと取り付けてく
ださい。きちんと取り付けられていない
と、電源が入りません。
7 本機の向きを元にもどす。
8 電源コードを接続する。
?/1 キーが赤色に点灯します。
9 ?/1 キーを押して電源を入れる。
10MENU キーを押して初期設定メ
ニューを選ぶ。
JP
12
ランプを交換する
Page 13
エアーフィルターを
クリーニングする
ランプ交換と合わせてエアーフィル
ターのクリーニングが必要です。エ
アーフィルターを取りはずし、掃除機
で掃除してください。
クリーニング時期は目安です。使用環
境や使いかたによって異なります。
掃除機で掃除しても汚れが取れにくい
ときは、フィルターをはずして洗って
ください。
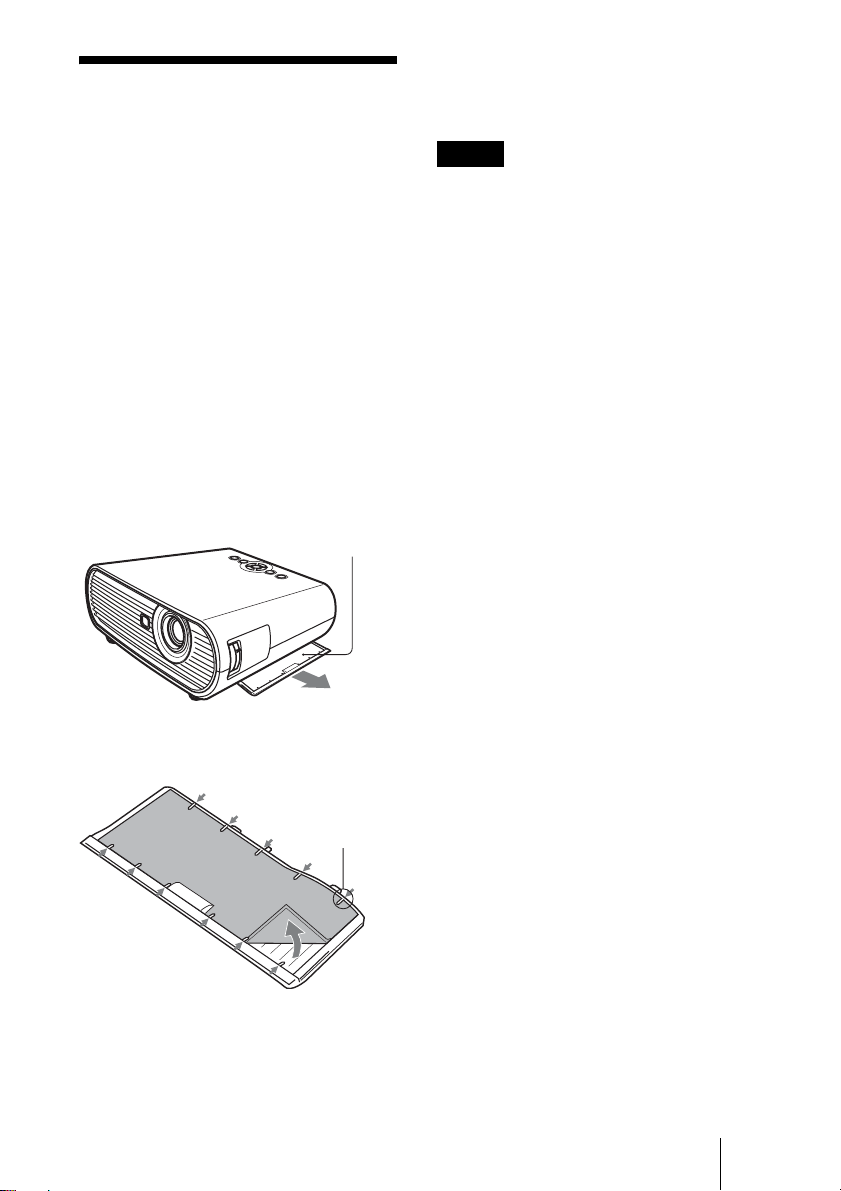
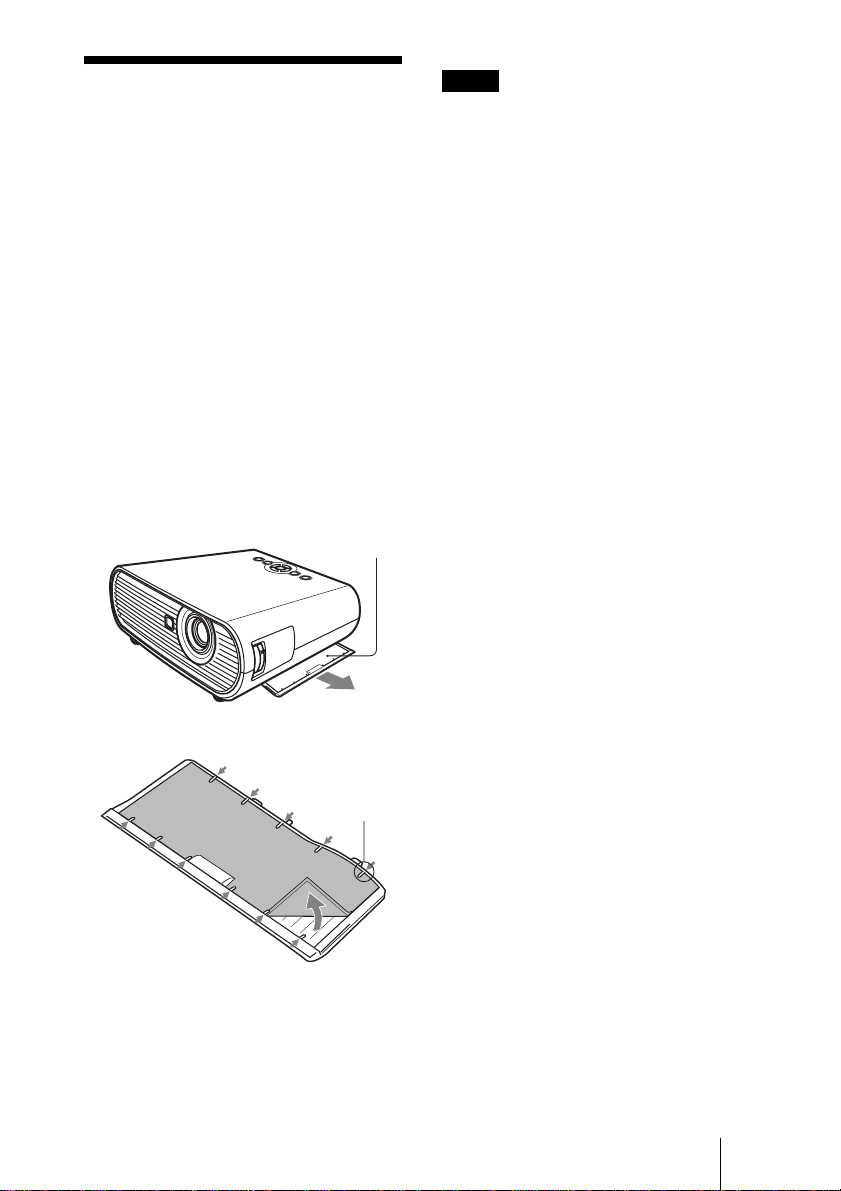
1 電源を切り、電源コードを抜く。
2 エアーフィルターカバーを引き出して
取りはずす。
エアーフィルター
5 エアーフィルターをエアーフィルター
カバーのつめにはめて、エアーフィル
ターカバーを本機に取り付ける。
ご注意
・ エアーフィルターのクリーニングを怠る
と、ゴミがたまり、内部に熱がこもって、
故障・火災の原因となることがあります。
・ エアーフィルターカバーはしっかり取り
付けてください。きちんと取り付けられ
ていないと、電源が入りません。
・ エアーフィルターには表裏があります。
フィルターを入れるときは、フィルター
カバーの形状に合わせて入れてください。
3 エアーフィルターを引き出して取りは
ずす。
つめ
4 中性洗剤を薄めた液で洗ったあと日陰
で乾かす。
エアーフィルターをクリーニングする
13
JP
Page 14
故障かな?と思ったら
修理に出す前に、もう 1 度次の点検をしてください。以下の対処を行っても直らな
い場合は、お買い上げ店またはテクニカルインフォメーションセンターにお問い合
わせください。症状について詳しくは、CD-ROM 内の取扱説明書をご覧ください。
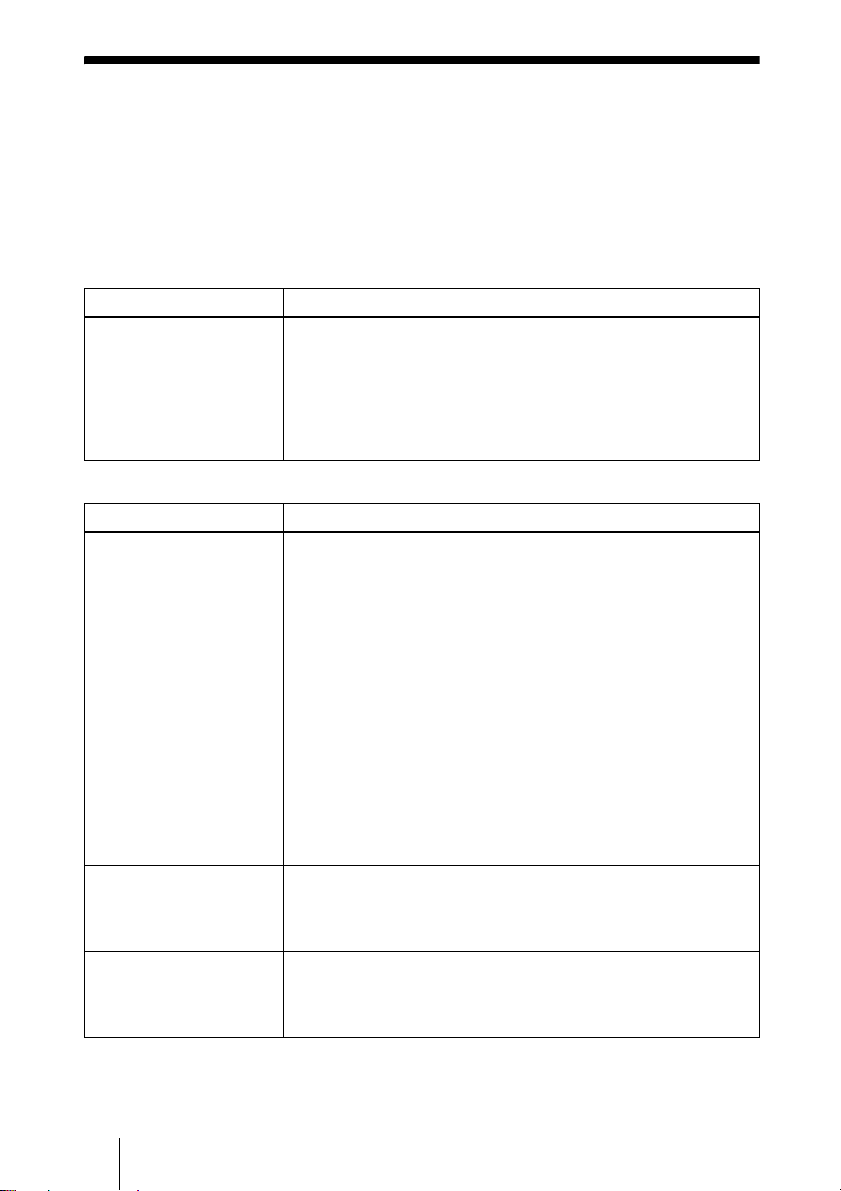
電源に関する項目
症状 原因と対処
電源が入らない。 ・ ?/1 キーで電源を切った後すぐに電源を入れた。
c 約 90 秒たってから電源を入れてください。
・ ランプカバーがはずれている。
c ランプカバーをしっかりとはめてください。
・ エアーフィルターカバーがはずれている。
c エアーフィルターカバーをしっかりとはめてください。
映像に関する項目
症状 原因と対処
映像が映らない。 ・ ケーブルがはずれている。または正しく接続されていない。
c 接続を確認してください。
・ 接続手順が正しくない。
c 本機は DDC2B(DisplayDataChannel2B)に対応しています。
お使いのコンピューターが DDC に対応している場合は、1. 本機
とコンピューターを接続し、2. 本機の電源を入れ、3. コン
ピューターを起動してください。
・ 入力切り換えが正しくない。
c 投影する映像を正しく選んでください。
・ 映像が消画(ミューティング)されている。
c PICMUTING キーを押して、ミューティングを解除してくださ
い。
・ 出力信号がコンピューターの外部モニターに出力されるように設定
されていない。あるいは外部モニターとコンピューターの液晶ディ
スプレイの両方に出力するように設定されている。
c 出力信号をコンピューターの外部モニターのみに出力するように
設定してください。
画面にノイズが出る。 ・ 入力信号のドット数と LCD パネルの画素数の関係により、特定の
画面の背景にノイズが出ることがある。
c お使いの機器のデスクトップパターンを変えてください。
画面がぼやける。 ・ フォーカスが合っていない。
c フォーカスを合わせてください。
・ 結露が生じた。
c 電源を入れたまま約 2 時間そのままにしておいてください。
JP
14
故障かな?と思ったら
Page 15
症状 原因と対処
画像がスクリーンか
らはみでている。
画面がちらつく。 ・ 信号設定メニューの「ドットフェーズ」の設定が合っていない。
・ 画像のまわりに黒い部分が残っている状態で APA キーを押した。
c スクリーンいっぱいに画像を映してから APA キーを押してくだ
さい。
c 信号設定メニューの「シフト」で正しく調整してください。
c 信号設定メニューの「ドットフェーズ」の数値を設定しなおして
ください。
インジケーターに関する項目
メッセージ 意味と対処
LAMP/COVER イン
ジケーターがオレン
ジ色点滅する。(2 回
点滅パターンの繰り
返し)
LAMP/COVER イン
ジケーターがオレン
ジ色点滅する。(3 回
点滅パターンの繰り
返し)
?/1 キーが赤色点滅す
る。(2 回点滅パター
ンの繰り返し)
?/1 イキーが赤色点
滅する。(4 回点滅パ
ターンの繰り返し)
?/1 キーが赤色点滅す
る。(6 回点滅パター
ンの繰り返し)
・ ランプカバーまたはエアーフィルターカバーがはずれている。
c カバーをしっかりはめてください。
・ ランプの交換時期がきた。
c ランプを交換してください。
・ ランプが高温になっている。
c 60 秒以上たって、ランプが冷えてから、もう一度電源を入れてく
ださい。
・ 内部が高温になっている。
c 排気口、吸気口がふさがれていないか確認してください。
・ 標高が高い場所で使用されている。
c 高地モードが「入」に設定されているか確認してください。
・ ファンが故障している。
c お買い上げ店またはテクニカルインフォメーションセンターにご
相談ください。
・ 電源コードを抜いて、?/1 インジケーターが消えるのを確認してか
ら、電源コードをコンセントに差し込み、もう一度電源を入れる。
症状が再発する場合は、電気系統が故障している。
c お買い上げ店またはテクニカルインフォメーションセンターにご
相談ください。
故障かな?と思ったら
15
JP
Page 16
主な仕様
投影方式
3LCD パネル、1 レンズ、3 原色液
晶シャッター投写方式
LCD パネルVPL-ES5:0.63 インチ SVGA
パネル、約 144 万画素(800 ×
600 ×3)
VPL-EX50/EX5:0.63 インチ
XGA パネル、約 236 万画素
(1024 ×768 ×3)
VPL-EW5:0.59 インチ WXGA パ
ネル、約 307 万画素(1280 ×
800 × 3)
ランプ 190W高圧水銀ランプ
投影画面サイズ
40 インチ〜 300 インチ
光出力
VPL-EX50
VPL-EW5
1)
ランプモード高のとき
出荷時における本製品全体の平均的な値を示
しており、JISX6911:2003 データプロジェ
クターの仕様書様式に則って記載していま
す。
測定方法、測定条件については附属書 2 に基
づいています。
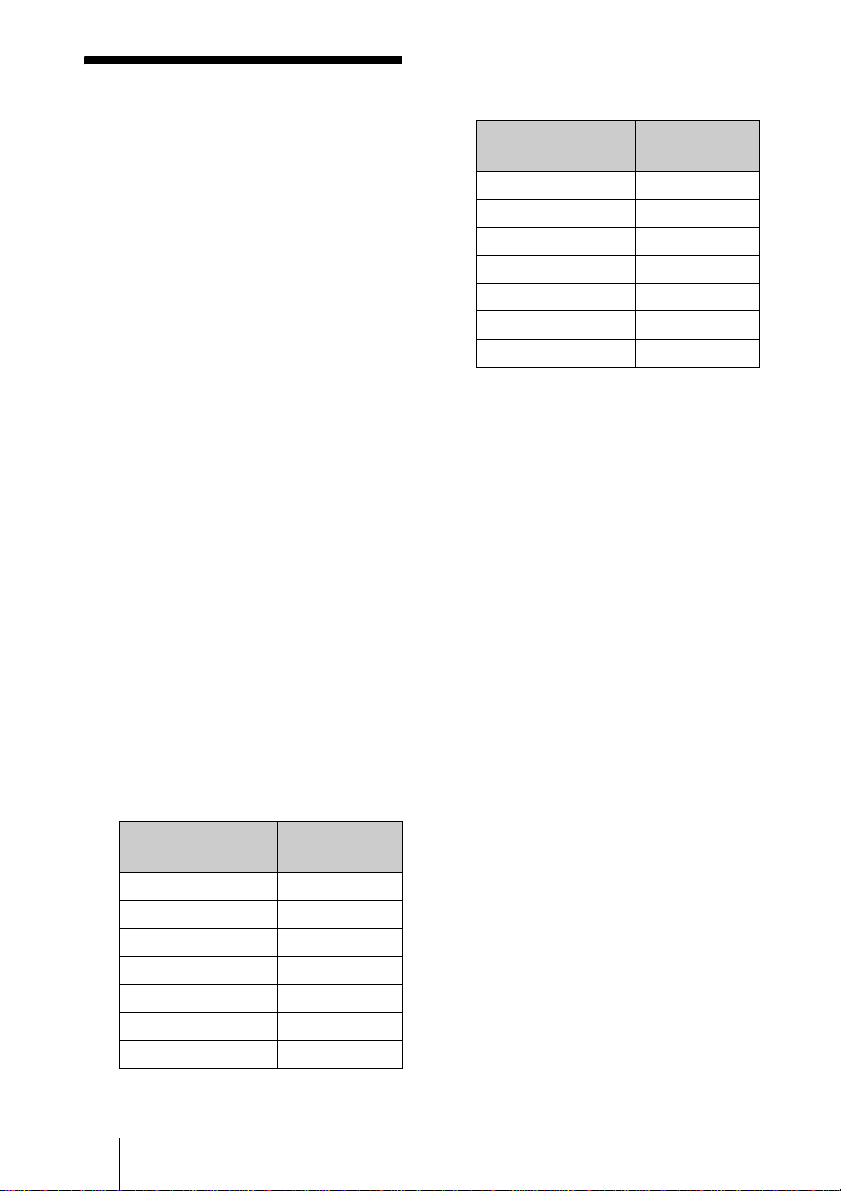
投影距離(床置き / アジャスター伸ばさ
ず、キーストーン補正あり)
VPL-EX50/EX5/ES5
投影画面サイズ
(対角)(インチ)
40 1.1〜1.4
80 2.3〜2.8
100 2.9 〜 3.5
150 4.4 〜 5.2
200 5.8 〜 7.0
250 7.3〜8.8
300 8.8 〜 10.5
1)
:2500lm
1)
/EX5/ES5:2000lm
距離(m)
(設計値のため多少の誤差あり)
VPL-EW5
(信号設定メニューの「アスペクト」が
「フル 2」のとき)
投影画面サイズ
(対角)(インチ)
40 1.2 〜 1.5
80 2.5 〜 2.9
100 3.1〜3.7
150 4.6〜5.6
200 6.2 〜 7.4
250 7.7 〜 9.3
300 9.3 〜 11.1
(設計値のため多少の誤差あり)
距離(m)
カラー方式
3.58、PAL、SECAM、
NTSC
4.43、PAL-M、PAL-N、
NTSC
PAL60 自動切り換え/手動切り
換え
(NTSC
4.43 とは、NTSC 方式で
録画されたビデオカセットを、
4.43 方式のビデオデッキで
NTSC
再生したときのカラー方式で
す。)
対応コンピューター信号
2)
fH:19 〜 92 kHz、fV:48 〜 92 Hz
(最高入力解像度信号:
SXGA1400 × 1050
fV:60Hz)
2)
接続するコンピューターの信号の解像度と周
波数は、プリセット信号の範囲内に設定して
ください。
対応ビデオ信号
15kRGB /コンポーネント 50/
60Hz、プログレッシブコンポー
ネント 50/60Hz、
DTV(480/60i、575/50i、480/
60p、575/50p、720/60p、720/
50p、1080/60i、1080/50i)、コ
ンポジットビデオ、Y/C ビデオ
JP
16
主な仕様
Page 17

外形寸法
314 × 109 × 269mm(幅/高さ
/奥行き)(突起部含まず)
質量 VPL-EX50/EW5:約 3.0kg
VPL-EX5/ES5:約 2.9kg
電源 VPL-EX50/EW5:AC100V、2.6
A、50/60Hz
VPL-EX5/ES5:AC100V、
2.2A、50/60Hz
消費電力
VPL-EX50/EW5: 最大 260W
スタンバイ時:3W
VPL-EX5/ES5:最大 225W、スタ
ンバイ時:3W
付属品
リモートコマンダー(1)
リチウム電池 CR2025(1)
HDD-sub15 ピンケーブル(1.8
m)(1)(1-832-428-11、SONY)
キャリングケース(1)
電源コード(1)
レンズキャップ(1)
取扱説明書(CD-ROM)(1)
簡易説明書(1)
安全のために(1)
保証書(1)
セキュリティラベル(1)
本機の仕様および外観は改良のため予
告なく変更することがありますが、ご
了承ください。
ご注意
お使いになる前に、必ず動作確認を行って
ください。故障その他に伴う営業上の機会
損失等は保証期間中および保証期間経過後
にかかわらず、補償はいたしかねますので
ご了承ください。
別売アクセサリー
プロジェクターランプ
LMP-E190
主な仕様
17
JP
Page 18

About the Quick
Reference Manual
This Quick Reference Manual explains
the connections and basic operations of
this unit, and gives notes on operations
and information required for maintenance.
For details on the operations, refer to the
Operating Instructions contained in the
supplied CD-ROM.
For safety precautions, refer to the
separate “Safety Regulations.”
Using the CD-ROM
Manuals
The supplied CD-ROM contains
Operating Instructions and ReadMe file in
Japanese, English, French, German,
Italian, Spanish and Chinese. First, refer
to the ReadMe file.
Preparations
To read the Operating Instructions in the
CD-ROM, Adobe Acrobat Reader 5.0 or
later is required. If the Adobe Acrobat
Reader is not installed in your computer,
you can download free Acrobat Reader
software from URL of Adobe Systems.
To read the Operating Instructions
The Operating Instructions are contained
in the supplied CD-ROM. Insert the
supplied CD-ROM into the CD-ROM
drive of your computer, and the CD-ROM
will start automatically after a while.
Select the Operating Instructions you
want to read.
The CD-ROM may not start automatically
depending on the computer. In this case,
open the Operating Instructions file as
follows:
(In case of Windows)
1 Open “My Computer.” (“Computer” is
displayed in Windows Vista.)
2 Right-click the CD-ROM icon and
select “Explorer.”
3 Double-click “index.htm” file and select
the Operating Instructions you want to
read.
(In case of Macintosh)
1 Double-click the CD-ROM icon on the
desk top.
2 Double-click “index.htm” file and select
the Operating Instructions you want to
read.
Notes
If you cannot open “index.htm” file, doubleclick on the Operating Instructions you want to
read from among those in
“Operating_Instructions” folder.
On trademarks
• Adobe Acrobat is a trademark of Adobe
Systems Incorporated.
• Windows is a registered trademark of
Microsoft Corporation in the United States
and/or other countries.
• Kensington is a registered trademark of
Kensington Technology Group.
• Macintosh is a registered trademark of
Apple, Inc.
• VESA is a registered trademark of the
Video Electronics Standards Association.
• Display Data Channel is a trademark of the
Video Electronics Standards Association.
• HDMI, HDMI logo and High-Definition
Multimedia Interface are trademarks or
registered trademarks of HDMI Licensing
LLC.
• All other trademarks and registered
trademarks are trademarks or registered
trademarks of their respective holders. In
this manual, ™ and ® marks are not
specified.
GB
About the Quick Reference Manual / Using the CD-ROM Manuals
2
Page 19
Notes on Use
Note on the Ventilation Holes
Do not block ventilation holes (exhaust/intake). If they are blocked, internal heat may
build up and cause fire or damage to the unit.
Check the positions of the ventilation holes shown in the following illustrations.
For other precautions, read the separate “Safety Regulations” carefully.
Top/Right Side/Front
a Ventilation
holes
(exhaust)
b Remote
control
detector
Rear/Right Side/Bottom
2
c Indicators
d Ventilation
holes (intake)
GB
4
Notes on Use
GB
3
Page 20
Projecting
Connecting the Projector
When you connect the projector, make sure to:
• Turn off all equipment before making any connections.
• Use the proper cables for each connection.
• Insert the cable plugs firmly. When pulling out a cable, be sure to pull it out from the
plug, not the cable itself.
• Refer also to the instruction manual of the equipment to be connected.
To connect a computer (Analog)
a Plug the AC power cord into a wall outlet.
b Connect the projector to a computer.
VPL-EX50
1
1
Stereo audio connecting cable
(not supplied)
(Use a no-resistance cable.)
2
2
HD D-sub 15 pin
cable (supplied)
Note
For stereo audio connection, connect the stereo audio connecting cable to following connectors:
VPL-EX5/ES5: INPUT A/VIDEO IN AUDIO connector
VPL-EW5: INPUT A AUDIO connector
VPL-EX50: INPUT A/B AUDIO connector
GB
4 Projecting
Page 21
To connect a computer (Digital) or video equipment (Digital) (VPL-EW5 only)
a Plug the AC power cord into a wall outlet.
b Connect the projector to a computer or video equipment.
VPL-EW5
1
1
2
2
HDMI-DVI-D cable
(not supplied)
HDMI cable
(not supplied)
Notes
• Be sure to use the HDMI cable with an HDMI logo.
• The HDMI connector of this projector is not compatible with DSD (Direct Stream Digital) Signal or
CEC (Consumer Electronics control) Signal.
Projecting
GB
5
Page 22
To connect a VCR/DVD player
a Plug the AC power cord into a wall outlet.
b Connect the projector to a video equipment.
For video signal connections, the following three connecting options are available:
1 S video (Mini DIN 4-pin) cable (not supplied)
2 Composite video (phono) cable (not supplied)
3 Component (phono
× 3) cable (not supplied)
1
1
VPL-EX50
2
2
Stereo audio connecting cable
(not supplied)
(Use a no-resistance cable.)
Notes
For stereo audio connection, connect the stereo audio connecting cable to following connectors:
VPL-EX5/ES5: INPUT A/VIDEO IN AUDIO connector
VPL-EW5/EX50: VIDEO IN AUDIO connector
GB
6 Projecting
Page 23
Projecting
a Press the I/1 (on/standby) key.
b Turn on the equipment connected to the projector.
c Press the INPUT key on the Remote Commander or the control panel to
select the input source.
d When the computer is connected, set it to output the signal to only the
external monitor.
Input-A
2
2
Power
1
1
Input-B
(VPL-EX50/EW5 only)
Video
S-Video
4
FxF7
or
Fn
4
Projecting
GB
7
Page 24

Adjusting the Projector
a Adjust the position of the picture.
b Adjust the size of the picture.
c Adjust the focus.
The projector is equipped with the Picture menu to select the picture mode, and the
Screen menu to select the appropriate aspect ratio of the picture.
3
3
2
2
1
1
Turning off the Power
a Press the I/
b When a message appears, press the I/
c Unplug the AC power cord from the wall outlet after the fan stops running
and the I/1 (on/standby) key lights in red. (Except when using the Direct
Power On/Off function or the Off & Go function.)
GB
8 Projecting
1 (on/standby) key.
1
1
2
2
1 (on/standby) key again.
Page 25
Replacing the Lamp
The lamp used as a light source is
consumable product. Thus replace the
lamp with a new one in the following
cases.
• When the lamp has burnt out or dims
• “Please replace the Lamp.” appears on
the screen
• The LAMP/COVER indicator lights up
(repeats flashing three times)
The lamp life varies depending on
conditions of use.
Use an LMP-E190 Projector Lamp as the
replacement lamp.
Use of any other lamps than the
LMP-E190 may cause damage to the
projector.
Notes
• If the lamp breaks, ask qualified Sony
personnel to replace the lamp and to check
inside.
• Pull out the lamp by holding the handle.
• When removing the lamp, make sure it
remains horizontal, then pull straight up. Do
not tilt the lamp. If you pull out the lamp
while it is tilted and if the lamp breaks.
3 Open the lamp cover by loosening the
screw with a Phillips screwdriver.
Note
For safety reasons, do not loosen any other
screws.
4 Loosen the two screws on the lamp
unit with the Phillips screwdriver
(a). Fold out the handle (b), then
pull out the lamp unit by the handle
(c).
Handle
1 Turn off the projector, and disconnect
the AC power cord from the AC
outlet.
Note
When replacing the lamp after using the
projector, wait for at least an hour for the
lamp to cool.
2 Place a protective sheet (cloth)
beneath the projector. Turn the
projector over so you can see its
underside.
Note
Be sure that the projector is stable after
turning it over.
Replacing the Lamp
GB
9
Page 26
5 Insert the new lamp all the way in until
it is securely in place (a). Tighten the
two screws (b). Fold down the
handle to replace it (c).
Notes
• Be careful not to touch the glass surface
of the lamp.
• The power will not turn on if the lamp is
not secured properly.
• Do not allow any liquid or other objects
into the slot to avoid electrical shock or
fire.
6 Close the lamp cover and tighten the
screw.
Note
Be sure to attach the lamp cover securely
as it was. If not, the projector cannot be
turned on.
7 Turn the projector back over.
8 Connect the power cord.
?/1 key lights in red.
The
9 Press the ?/1 key to turn the projector
on.
SET SETTING
Smart APA: On
Auto Input Search:
Input-A Signal Sel.:
Color System: Auto
Power Saving: Off
IR Receiver: Front & Rear
Panel Key Lock: Off
Lamp Timer Reset
Off
Auto
Input-A
12Select “Execute” with the V key, and
then press the ENTER key.
The Lamp Timer is initialized to 0,
and “Change the Lamp and clean the
Filter?” is displayed in the menu
screen.
Change the Lamp and clean the Filter?
No:
Yes:
Refer to page 11 for “Cleaning the Air
Filter”.
13Select “Yes” with the v key.
“Lamp Timer Reset Complete!” is
displayed in the menu screen.
Disposal of the used lamp
For the customers in the USA
Lamp in this product contains mercury.
Disposal of these materials may be
regulated due to environmental
considerations. For disposal or recycling
information, please contact your local
authorities or the Electronic Industries
Alliance (www.eiae.org).
10Press the MENU key, and then select
the Setup menu.
11Select “Lamp Timer Reset”, and then
press the ENTER key.
GB
10 Replacing the Lamp
Page 27
Cleaning the Air
Filter
The air filter should be cleaned whenever
you replace the lamp.
Remove the air filter, and then remove the
dust with a vacuum cleaner.
The time needed to clean the air filter will
vary depending on the environment or
how the projector is used.
When it becomes difficult to remove the
dust from the filter with a vacuum cleaner,
remove the air filter and wash it.
1 Turn the power off and unplug the
power cord.
2 Draw out the air filter cover and
remove it.
Air filter
Notes
• If you neglect to clean the air filter, dust
may accumulate, clogging it. As a result,
the temperature may rise inside the unit,
leading to a possible malfunction or fire.
• Be sure to attach the air filter cover firmly;
the power can not be turned on if it is not
closed securely.
• The air filter has a face and a reverse side.
Place the air filter so that it fits in a notch on
the air filter cover.
3 Remove the air filter.
Claws
4 Wash the air filter with a mild
detergent solution and dry it in a
shaded place.
5 Attach the air filter so that it fits into
the each claws on the air filter cover
and replace the cover.
Cleaning the Air Filter
11
GB
Page 28
Troubleshooting
If the projector appears to be operating erratically, try to diagnose and correct the
problem using the following instructions. If the problem persists, consult with
qualified Sony personnel.
For details on the symptoms, see the Operating Instructions contained in the CDROM.
Power
Symptom Cause and Remedy
The power is not turned on. • The power has been turned off and on with the ?/1 key at a short
Picture
Symptom Cause and Remedy
No picture. • A cable is disconnected or the connections are wrong.
The picture is noisy. • Noise may appear on the background depending on the
The picture is not clear. • The picture is out of focus.
interval.
c Wait for about 90 seconds before turning on the power.
• The lamp cover is not secured.
c Close the lamp cover securely.
• The air filter cover is detached.
c Attach the air filter cover securely.
c Check that the proper connections have been made.
• The connections are wrong.
c This projector is compatible with DDC2B (Digital Data
Channel 2B). If your computer is compatible with DDC, turn
the projector on according to the following procedures.
1 Connect the projector to the computer.
2 Turn the projector on.
3 Start the computer.
• Input selection is incorrect.
c Select the input source correctly.
• The picture is muted.
c Press the PIC MUTING key to release the picture muting.
• The computer signal is not set to output to an external monitor or
set to output both to an external monitor and a LCD monitor of a
computer.
c Set the computer signal to output only to an external monitor .
combination of the number of dots input from the computer and
the numbers of pixels on the LCD panel.
c Change the desktop pattern on the connected computer.
c Adjust the focus.
• Condensation has accumulated on the lens.
c Leave the projector for about two hours with the power on.
GB
12 Troubleshooting
Page 29

Symptom Cause and Remedy
The image extends beyond
the screen.
The APA key has been pressed even though there are black edges
around the image.
c Display the full image on the screen and press the APA key.
Adjust “Shift” in the Input setting menu properly.
The picture flickers. “Dot Phase” in the Input setting menu has not been adjusted
properly.
c Adjust “Dot Phase” in the Input setting menu properly.
Indicators
Message Meaning and Remedy
The LAMP/COVER
indicator flashes in orange.
(Repetition rate of 2
flashes)
The LAMP/COVER
indicator flashes in orange.
(Repetition rate of 3
flashes)
?/1 key flashes in red.
(Repetition rate of 2
flashes)
• The lamp cover or the air filter cover is detached.
c Attach the cover securely.
• The lamp has reached the end of its life.
c Replace the lamp.
• The lamp has reached a high temperature.
c Wait for 60 seconds to cool the lamp and then turn on the power
again.
• The internal temperature is unusually high.
c Check to see that nothing is blocking the ventilation holes.
• The projector is being used at a high altitude.
c Ensure that “High Altitude Mode” in the Setup menu is set to
“On.”
?/1 key flashes in red.
(Repetition rate of 4
flashes)
?/1 key flashes in red.
(Repetition rate of 6
flashes)
The fan is broken.
c Consult with qualified Sony personnel.
Unplug the AC power cord from the wall outlet after the
indicator goes out, plug the power cord to the wall outlet, and then
turn the projector on again. If the
persists, the electrical system has failed.
?/1 flashes in red and the problem
c Consult with qualified Sony personnel.
?/1
Troubleshooting
13
GB
Page 30

Specifications
Projection system
LCD panel VPL-ES5: 0.63-inch SVGA panel,
Lamp 190 W Ultra high pressure lamp
Projected picture size
Light output VPL-EX50
1)
When the Lamp Mode is set to “High.”
Throwing distance (When placed on the floor./
Adjuster not stretched, and the V Keystone
function has been done. )
GB
14 Specifications
3 LCD panels, 1 lens, 3 primary
color shutter system
about 1,440,000 pixels (800 ×
600 × 3)
VPL-EX50/EX5: 0.63-inch XGA
panel, about 2,360,000 pixels
(1024 × 768 × 3)
VPL-EW5: 0.59-inchvWXGA
panel, about 3,070,000 pixels
(1280 × 800 × 3)
40 to 300-inches (measured
diagonally)
1)
: 2500 lm
1)
VPL-EW5
/EX5/ES5: 2000 lm
VPL-EX50/EX5/ES5:
40-inch: 1.1 to 1.4 m
(3.6 to 4.6 feet)
80-inch: 2.3 to 2.8 m
(7.5 to 9.2 feet)
100-inch: 2.9 to 3.5 m
(9.5 to 11.5 feet)
150-inch: 4.4 to 5.2 m
(14.4 to 17.1 feet)
200-inch: 5.8 to 7.0 m
(19.0 to 23.0 feet)
250-inch: 7.3 to 8.8 m
(24.0 to 28.9 feet)
300-inch: 8.8 to 10.5 m
(28.9 to 34.5 feet)
VPL-EW5:
(When “Aspect” on the Signal
menu is set to “Full 2”)
40-inch: 1.2 to 1.5 m
(3.9 to 4.9 feet)
80-inch: 2.5 to 2.9 m
(8.2 to 9.5 feet)
100-inch: 3.1 to 3.7 m
(10.2 to 12.1 feet)
150-inch: 4.6 to 5.6 m
(15.1 to 18.4 feet)
200-inch: 6.2 to 7.4 m
(20.3 to 24.3 feet)
250-inch: 7.7 to 9.3 m
(25.3 to 30.5 feet)
300-inch: 9.3 to 11.1 m
(30.5 to 36.4 feet)
There may be a slight difference between the
actual value and the design value shown above.
Color system NTSC
3.58/PAL/SECAM/
4.43/PAL-M/PAL-N/
NTSC
PAL60 system, switched
automatically/manually
4.43 is the color system used
(NTSC
when playing back a video
recorded in NTSC on a
4.43 system VCR.)
NTSC
Acceptable computer signals
2)
fH: 19 to 92 kHz
fV: 48 to 92 Hz
(Maximum input signal resolution:
SXGA+ 1400 × 1050
2)
Set the resolution and the frequency of the
fV: 60 Hz)
signal of the connected computer within the
range of acceptable preset signals of the
projector.
Applicable video signals
15 k RGB 50/60 Hz, Progressive
component 50/60 Hz, DTV
(480/60i, 575/50i, 480/60p,
575/50p, 720/60p, 720/50p,
1080/60i, 1080/50i), Comp osite
video, Y/C video
Dimensions 314 × 109 × 269 mm
3
/8 × 4 3/8 × 10 5/8 inches)
(12
(w/h/d) (not including the
projection parts)
Mass VPL-EX50/EW5:
Approx. 3.0 kg (6 lb 10 oz)
VPL-EX5/ES5:
Approx. 2.9 kg (6 lb 6 oz)
Power requirements
VPL-EX50/EW5: AC 100 to 240
V, 2.6 to 1.1 A, 50/60 Hz
VPL-EX5/ES5: AC 100 to 240 V.
2.2 to 1.0 A, 50/60 Hz
Power consumption
VPL-EX50/EW5: Max.260 W (in
standby 3 W)
VPL-EX5/ES5: Max.225 W (in
standby 3 W)
Supplied accessories
Remote Commander (1)
Lithium battery CR2025 (1)
HD D-sub 15 pin cable (1.8 m) (1)
(1-832-428-11, SONY)
Carrying case (1)
AC power cord (1)
Lens cap (1)
Operating Instructions (CD-ROM)
(1)
Quick Reference Manual (1)
Page 31

Safety Regulations (1)
Security Label (1)
Design and specifications are subject to change
without notice.
Note
Always verify that the unit is operating properly
before use. SONY WILL NOT BE LIABLE FOR
DAMAGES OF ANY KIND INCLUDING, BUT
NOT LIMITED TO, COMPENSATION OR
REIMBURSEMENT ON ACCOUNT OF THE
LOSS OF PRESENT OR PROSPECTIVE
PROFITS DUE TO FAILURE OF THIS UNIT,
EITHER DURING THE WARRANTY PERIOD
OR AFTER EXPIRATION OF THE
WARRANTY, OR FOR ANY OTHER REASON
WHATSOEVER.
Optional accessories
Projector Lamp
LMP-E190
Specifications
15
GB
Page 32

A propos du Guide
de référence rapide
Ce Guide de référence rapide décrit les
raccordements et les opérations de base de
cet appareil, et fournit des remarques sur les
opérations et des informations nécessaires
pour la maintenance.
Pour des détails sur les opérations, consultez
le Mode d’emploi contenu dans le CD-ROM
fourni.
Pour en savoir plus sur les précautions de
sécurité, consultez le document séparé
« Règlements de sécurité ».
(Dans le cas de Windows)
1 Ouvrez « Poste de travail. »
(« Ordinateur » s’affiche dans Windows
Vista.)
2 Cliquez avec le bouton droit de la souris
sur l’icône du CD-ROM et sélectionnez
«Explorer».
3 Double-cliquez sur le fichier
« index.htm » et sélectionnez le mode
d’emploi que vous souhaitez lire.
(Dans le cas de Macintosh)
1 Double-cliquez sur l’icône de CD-ROM
sur le bureau.
2 Double-cliquez sur le fichier
« index.htm » et sélectionnez le Mode
d’emploi que vous souhaitez lire.
Utilisation des
manuels sur le
CD-ROM
Le CD-ROM fourni contient les fichiers
Mode d’emploi et ReadMe en japonais,
anglais, français, allemand, italien, espagnol
et chinois. Consultez d’abord le fichier
ReadMe.
Préparatifs
Vous devez utiliser Adobe Acrobat Reader
5.0 ou une version ultérieure pour lire le
Mode d’emploi sur le CD-ROM. Si Adobe
Acrobat Reader n’est pas installé sur votre
ordinateur, vous pouvez télécharger
gratuitement le logiciel Acrobat Reader de
l’URL d’Adobe Systems.
Comment lire le Mode d’emploi
Les Mode d’emploi sont enregistrées dans le
CD-ROM fourni. Introduisez le CD-ROM
fourni dans le lecteur de CD-ROM de votre
ordinateur, et le CD-ROM démarrera
automatiquement au bout d’un certain
temps. Sélectionnez le Mode d’emploi que
vous souhaitez lire.
Le CD-ROM risque de ne pas démarrer
automatiquement, selon l’ordinateur. Dans
ce cas, ouvrez le fichier du Mode d’emploi
de la façon suivante :
Remarques
Si vous ne parvenez pas à ouvrir le fichier
« index.htm », double-cliquez sur le Mode
d’emploi que vous souhaitez lire dans le
dossier « Operating_Instructions ».
Marques
• Adobe Acrobat est une marque d’Adobe
Systems Incorporated.
• Windows est une marque déposée de
Microsoft Corporation aux Etats-Unis et/
ou dans d’autres pays.
• Kensington est une marque déposée de
Kensington Technology Group.
• Macintosh est une marque déposée
d’Apple, Inc.
• VESA est une marque déposée de Video
Electronics Standards Association.
• Display Data Channel est une marque de
Video Electronics Standards Association.
• HDMI, le logo HDMI et High-Definition
Multimedia Interface sont des marques de
commerce ou des marques de commerce
déposées de HDMI Licensing LLC.
• Toutes les autres marques de commerce et
marques de commerce déposées
appartiennent à leurs propriétaires
respectifs. Dans ce manuel, les symboles
™ et ® ne sont pas spécifiés.
FR
A propos du Guide de référence rapide / Utilisation des manuels sur le CD-ROM
2
Page 33

Remarques concernant l’utilisation
Remarque sur les orifices de ventilation
Ne bloquez pas les orifices de ventilation (sortie/entrée). S’ils sont bloqués, une
surchauffe interne risque de se produire et de provoquer un incendie ou des dommages à
l’appareil.
Vérifiez les positions des orifices de ventilation indiqués dans les illustrations suivantes.
Pour les autres précautions, lisez attentivement le document séparé intitulé « Règlements
de sécurité ».
Haut/Côté droit/Avant
a Orifices de
ventilation
(sortie d’air)
b Capteur de
télécommande
FR
Arrière/Côté droit/Bas
4
c Indicateurs
d Orifices de
2
Remarques concernant l’utilisation
ventilation
(entrée)
FR
3
Page 34

Projection
Raccordement du projecteur
Lors du raccordement du projecteur :
• Mettez tous les appareils hors tension avant tout raccordement.
• Utilisez les câbles appropriés pour chaque raccordement.
• Insérez fermement les fiches de câble. Pour débrancher un câble, saisissez-le par la
fiche, ne tirez pas sur le câble proprement dit.
• Reportez-vous également au mode d’emploi de l’équipement à raccorder.
Pour raccorder un ordinateur (analogique)
a Branchez le cordon d’alimentation secteur à une prise murale.
b Raccordez le projecteur à un ordinateur.
VPL-EX50
1
1
Câble de raccordement audio stéréo
(non fourni)
(Utilisez un câble sans résistance).
2
2
Câble HD D-sub 15 broches
(fourni)
Remarque
Pour un raccordement audio stéréo, raccordez le câble de raccordement audio stéréo aux connecteurs
suivants :
VPL-EX5/ES5 : Connecteur INPUT A/VIDEO IN AUDIO
VPL-EW5 : Connecteur INPUT A AUDIO
VPL-EX50 : Connecteur INPUT A/B AUDIO
FR
4 Projection
Page 35

Pour raccorder un ordinateur (numérique) ou un appareil vidéo (numérique)
(VPL-EW5 uniquement)
a Branchez le cordon d’alimentation secteur à une prise murale.
b Raccordez le projecteur à un ordinateur ou un appareil vidéo.
VPL-EW5
1
1
2
2
Câble HDMI-DVI-D
(non fourni)
Câble HDMI
(non fourni)
Remarques
• Vous devez utiliser un câble HDMI qui porte le logo HDMI.
• Le connecteur HDMI de ce projecteur n’est pas compatible avec le signal DSD (Direct Stream Digital technologie de numérisation à très haute fréquence d’échantillonnage) ou CEC (Consumer Electronics
Control - contrôle inter-éléments).
Projection
5
FR
Page 36

Pour raccorder un magnétoscope/lecteur DVD
a Branchez le cordon d’alimentation secteur à une prise murale.
b Raccordez le projecteur à un appareil vidéo.
Pour les connexions du signal vidéo, les trois options de raccordement suivantes sont
disponibles :
1 Câble S-vidéo (Mini DIN à 4 broches) (non fourni)
2 Câble vidéo composite (phono) (non fourni)
3 Câble composante (phono × 3) (non fourni)
VPL-EX50
1
1
2
2
Câble de raccordement audio
stéréo (non fourni)
(Utilisez un câble sans résistance).
Remarque
Pour un raccordement audio stéréo, raccordez le câble de raccordement audio stéréo aux connecteurs
suivants :
VPL-EX5/ES5 : Connecteur INPUT A/VIDEO IN AUDIO
VPL-EW5/EX50 : Connecteur VIDEO IN AUDIO
FR
6 Projection
Page 37

Projection
a Appuyez sur la touche I/1 (marche/veille).
b Mettez l’appareil raccordé au projecteur sous tension.
c Appuyez sur la touche INPUT de la télécommande ou du panneau de
commande pour sélectionner la source d’entrée.
d Lorsque l’ordinateur est raccordé, faites en sorte que le signal soit émis
vers le moniteur externe uniquement.
Input-A
Input-B
1
1
(VPL-EX50/EW5
uniquement)
Video
S-Video
2
2
Power
ou
Fn
4
Projection
FR
7
4
FxF7
Page 38

Réglage du projecteur
a Réglez la position de l’image.
b Réglez la taille de l’image.
c Réglez la mise au point.
Le projecteur est équipé du menu Image pour sélectionner le mode d’image, et du
menu Ecran pour sélectionner le rapport de format de l’image.
3
3
2
2
1
1
Mise hors tension
a Appuyez sur la touche I/
b Appuyez de nouveau sur la touche I/
message apparaît.
c Débranchez la prise d’alimentation secteur de la prise murale une fois
que le ventilateur a fini de tourner et la touche I/
s’allume en rouge. (Sauf lorsque vous utilisez la fonction de mise sous/
hors tension directe et la fonction Off & Go.)
1
1
2
2
FR
8 Projection
1 (marche/veille).
1 (marche/veille) lorsqu’un
1 (marche/vielle)
Page 39

Remplacement de la
lampe
La lampe utilisée comme source d’éclairage
est un produit consommable. Par
conséquent, remplacez la lampe par une
neuve dans les cas suivants.
• Lorsque la lampe a grillé ou perdu de sa
luminosité
• « Remplacer la lampe » s’affiche sur
l’écran.
• L’indicateur LAMP/COVER s’allume
(clignote trois fois)
La durée de vie de la lampe dépend des
conditions d’utilisation.
Utilisez une lampe pour projecteur
LMP-E190 comme lampe de rechange.
L’utilisation d’une lampe autre que
LMP-E190 peut provoquer des dommages
au projecteur.
Remarques
• Si la lampe devait se casser, demandez
l’intervention du personnel qualifié Sony
qui remplacera la lampe et vérifiera
l’intérieur de l’appareil.
• Retirez la lampe en tenant la poignée.
• Lorsque vous retirez la lampe, assurez-vous
qu’elle demeure à l’horizontale, et tirez bien
droit vers le haut. N’inclinez pas la lampe. Si
vous extrayez la lampe inclinée et que la
lampe se casse.
3 Ouvrez le couvercle de la lampe en
desserrant la vis avec un tournevis
cruciforme.
Remarque
Par mesure de sécurité, ne desserrez pas
d’autres vis.
4 LDesserrez les deux vis sur la lampe à
l’aide du tournevis cruciforme (a).
Déployez la poignée (b), puis
extrayez la lampe en tirant sur la
poignée (c).
Poignée
1 Mettez le projecteur hors tension et
débranchez le cordon d’alimentation
secteur de la prise secteur.
Remarque
Avant de remplacer la lampe après avoir
utilisé le projecteur, attendez au moins une
heure pour lui permettre de se refroidir.
2 Placez une feuille de protection
(textile) sous le projecteur. Retournez
le projecteur de façon à en voir le
dessous.
Remarque
Veillez à ce que le projecteur ne bascule pas
après avoir été retourné.
Remplacement de la lampe
FR
9
Page 40

5 Introduisez la nouvelle lampe à fond
jusqu’à ce qu’elle soit correctement en
place (a). Serrez les deux vis (b).
Rabattez la poignée pour la remettre
en place (c).
Remarques
• Veillez à ne pas toucher la surface en
verre de la lampe.
• Le projecteur ne se met pas sous tension
si la lampe n’est pas correctement
installée.
• Veillez à ce qu’aucun liquide ou objet ne
tombe à l’intérieur de la fente afin
d’éviter tout risque d’électrocution ou
d’incendie.
6 Refermez le couvercle de la lampe et
serrez la vis.
RÉGLAGE
APA intelligent: On
Rech. ent. auto.: Off
Sél sign entr A: Auto
Standard coul.: Auto
Mode économique
Récepteur IR: Avant & Arrière
Verr touches: Off
Réinit. durée lampe
Sél: Régl: Sortie:
: Off
Entrée A
12Sélectionnez « Exécuter » avec la
V et appuyez sur la touche
touche
ENTER.
La durée de lampe est remise à 0, et
« Changer la lampe et nettoyer le
filtre? » s’affiche sur l’écran de menu.
Changer la lampe et nettoyer le filtre?
Oui:
Non:
Reportez-vous à page 11 pour
« Nettoyage du filtre à air ».
13Sélectionnez « Oui » avec la touche v.
« Réinitialisation de durée de lampe
terminée! » s’affiche dans l’écran de
menu.
Remarque
Assurez-vous de fixer solidement le
couvercle de lampe dans sa position
initiale. Sinon le projecteur ne peut pas être
mis sous tension.
7 Remettez le projecteur à l’endroit.
8 Branchez le cordon d’alimentation.
La touche
?/1 s’allume en rouge.
9 Appuyez sur la touche ?/1 pour
mettre le projecteur sous tension.
10Appuyez sur la touche MENU, puis
sélectionnez le menu Réglage.
11Sélectionnez « Réinit. durée lampe »,
puis appuyez sur la touche ENTER.
FR
10 Remplacement de la lampe
Page 41

Nettoyage du filtre à
air
5 Posez le filtre à air en l’engageant
dans chaque griffe du couvercle de
filtre à air, puis remettez le couvercle
en place.
Vous devez nettoyer le filtre à air chaque
fois que vous changez la lampe.
Retirez le filtre à air, puis enlevez la
poussière à l’aide d’un aspirateur.
Le temps nécessaire au nettoyage du filtre
à air varie suivant l’environnement ou les
conditions d’utilisation du projecteur.
Quand il devient difficile d’enlever la
poussière du filtre à l’aspirateur, ôtez le
filtre à air et lavez-le.
1 Mettez le projecteur hors tension et
débranchez le cordon d’alimentation.
2 Extrayez le couvercle du filtre à air et
retirez-le.
Filtre à air
3 Déposez le filtre à air.
Remarques
• Si vous ne nettoyez pas le filtre à air, la
poussière risque de s’y accumuler et de
l’obstruer. La température peut alors
augmenter à l’intérieur de l’appareil et
causer un dysfonctionnement ou un
incendie.
• Fixez le couvercle du filtre à air
correctement. Le projecteur ne peut pas être
mis sous tension si le couvercle est mal
fermé.
• Le filtre à air possède un côté avant et un côté
arrière. Placez le filtre à air de sorte qu’il
s’engage dans la rainure du couvercle du
filtre à air.
Griffes
4 Lavez le filtre à air au moyen d’une
solution détergente neutre et faites-le
sécher dans un endroit ombragé.
Nettoyage du filtre à air
11
FR
Page 42

Dépannage
Si le projecteur ne fonctionne pas correctement, essayez d’en déterminer la cause et de
remédier au problème comme il est indiqué ci-dessous. Si le problème persiste, consultez
le service après-vente Sony.
Pour des détails sur les symptômes, consultez le Mode d’emploi contenu dans le
CD-ROM fourni.
Tension
Symptôme Cause et remède
Le projecteur ne se met pas
sous tension.
Image
Symptôme Cause et remède
Pas d’image. • Un câble est débranché ou les raccordements sont incorrects.
L’image est parasitée. • Des parasites peuvent apparaître à l’arrière-plan de l’image avec
L’image n’est pas nette. • L’image est mal mise au point.
• Le projecteur a été mis hors et sous tension à brefs intervalles à
l’aide de la touche ?/1.
c Attendez environ 90 secondes avant de mettre le projecteur sous
tension.
• Le couvercle de lampe est mal fixé.
c Fermez correctement le couvercle de la lampe.
• Le couvercle du filtre à air est mal fixé.
c Reposez correctement le couvercle du filtre à air.
c Vérifiez si le raccordement a été effectué correctement.
• Les raccordements sont incorrects.
c Ce projecteur est compatible avec DDC2B (Digital Data
Channel 2B - Canal de données numériques 2B). Si votre
ordinateur est compatible avec DDC, mettez le projecteur sous
tension en procédant comme suit.
1 Raccordez le projecteur à l’ordinateur.
2 Mettez le projecteur sous tension.
3 Démarrez l’ordinateur.
• La sélection d’entrée est incorrecte.
c Sélectionnez la source d’entrée correctement.
• L’image a été masquée.
c Appuyez sur la touche PIC MUTING pour faire réapparaître
l’image.
• Le signal de l’ordinateur n’est pas réglé sur sortie vers un moniteur
externe ou réglé sur sortie vers un moniteur externe et un moniteur
LCD d’un ordinateur.
c Paramétrez le signal d’ordinateur pour une sortie seulement
vers un moniteur externe.
certaines combinaisons du nombre de pixels du signal reçu de
l’ordinateur et du nombre de pixels sur le panneau LCD.
c Changez la configuration du bureau sur l’ordinateur utilisé.
c Réglez la mise au point.
• De la condensation s’est formée sur l’objectif.
c Laissez le projecteur sous tension pendant environ deux heures.
FR
12 Dépannage
Page 43

Symptôme Cause et remède
L’image dépasse de
l’écran.
Vous avez appuyé sur la touche APA bien qu’il y ait des bandes
noires autour de l’image.
c Affichez l’image en entier sur l’écran et appuyez sur la touche
APA.
Réglez « Déplacement » correctement dans le menu Réglage de
l’entrée.
L’image tremblote. Le paramètre « Phase des points » du menu Réglage de l’entrée n’a
pas été bien réglé.
c Réglez « Phase des points » correctement dans le menu Réglage
de l’entrée.
Indicateurs
Message Signification et remède
L’indicateur LAMP/
COVER clignote en
orange. (Taux de répétition
de 2 clignotements)
L’indicateur LAMP/
COVER clignote en
orange. (Taux de répétition
de 3 clignotements)
?/1 touche clignote en
rouge. (Taux de répétition
de 2 clignotements)
• Le couvercle de la lampe ou du filtre à air est mal fixé.
c Fixez correctement le couvercle.
• La lampe a atteint la fin de sa durée de vie.
c Remplacez la lampe.
• La lampe a atteint une température élevée.
c Attendez 60 secondes pour que la lampe se refroidisse, puis
remettez le projecteur sous tension.
• La température à l’intérieur du projecteur est anormalement
élevée.
c Assurez-vous que les orifices de ventilation ne sont pas
obstrués.
• Le projecteur est utilisé à haute altitude.
c Assurez-vous que « Mode haute altit. » du menu Réglage est sur
«On».
?/1 touche clignote en
rouge. (Taux de répétition
de 4 clignotements)
?/1 touche clignote en
rouge. (Taux de répétition
de 6 clignotements)
Le ventilateur est défectueux.
c Consultez le service après-vente Sony.
Débranchez le cordon d’alimentation de la prise murale une fois le
?/1 éteint, puis rebranchez-le et remettez le projecteur sous
témoin
tension. Si le témoin
persiste, le circuit électrique est en panne.
?/1 clignote en rouge et que le problème
c Consultez le service après-vente Sony.
Dépannage
13
FR
Page 44

Spécifications
Système de projection
Panneau LCD
Lampe lampe ultra haute pression 190 W
Dimensions de l’image projetée
Sortie de lumière
1)
Lorsque Mode de lampe est sur « Haut »
Distance de projection (Lorsqu’il est placé à
terre./Dispositif de réglage non étendu, fonction
Trapèze V effectuée.)
panneaux 3 LCD, 1 lentille,
système d’obturation à
3 couleurs primaires
VPL-ES5: Panneau SVGA
0,63 pouce, 1 440 000 pixels
(800 × 600 × 3)
VPL-EX50/EX5: Panneau XGA
0,63 pouce, env. 2 360 000
pixels (1024 × 768 × 3)
VPL-EW5: Panneau WXGA
0,59 pouce, env. 3 070 000
pixels (1280 × 800 × 3)
40 à 300 pouces (mesuré en
diagonale)
1)
VPL-EX50
VPL-EW5
: 2500 lm
1)
/EX5/ES5: 2000 lm
VPL-EX50/EX5/ES5:
40-pouces : 1,1 à 1,4 m
(3,6 à 4,6 pieds)
80-pouces : 2,3 à 2,8 m
(7,5 à 9,2 pieds)
100-pouces : 2,9 à 3,5 m
(9,5 à 11,5 pieds)
150-pouces : 4,4 à 5,2 m
(14,4 à 17,1 pieds)
200-pouces : 5,8 à 7,0 m
(19,0 à 23,0 pieds)
250-pouces : 7,3 à 8,8 m
(24,0 à 28,9 pieds)
300-pouces : 8,8 à 10,5 m
(28,9 à 34,5 pieds)
VPL-EW5:
(Lorsque « Aspect » sur le menu
Signal est défini sur « Plein2 »)
40-pouces : 1,2 à 1,5 m
(3,9 à 4,9 pieds)
80-pouces : 2,5 à 2,9 m
(8,2 à 9,5 pieds)
100-pouces : 3,1 à 3,7 m
(10,2 à 12,1 pieds)
150-pouces : 4,6 à 5,6 m
(15,1 à 18,4 pieds)
200-pouces : 6,2 à 7,4 m
(20,3 à 24,3 pieds)
250-pouces : 7,7 à 9,3 m
(25,3 à 30,5 pieds)
300-pouces : 9,3 à 11,1 m
(30,5 à 36,4 pieds)
Il se peut qu’il y ait une légère différence entre la
valeur réelle et la valeur théorique indiquée
ci-dessus.
Standard couleur Système
NTSC
3.58/PAL/SECAM/
4.43/PAL-M/PAL-N/
NTSC
PAL60, sélection automatique/
manuelle
4.43 est le standard couleur
(NTSC
utilisé lors de la lecture d’une
cassette vidéo enregistrée en
NTSC sur un magnétoscope
4.43.)
Signaux d’ordinateur compatibles
NTSC
2)
fH: 19 à 92 kHz
fV: 48 à 92 Hz
(Résolution maximale du signal
d’entrée : SXGA+ 1400 × 1050
2)
Spécifiez la résolution et la fréquence du signal
fV: 60 Hz)
de l’ordinateur utilisé dans les limites des
signaux préprogrammés admissibles du
projecteur.
Signaux vidéo utilisables
RGB 15 k 50/60 Hz, composantes
progressives 50/60 Hz, DTV
(480/60i, 575/50i, 480/60p,
575/50p, 720/60p, 720/50p,
1080/60i, 1080/50i), vidéo
composite, vidéo Y/C
Dimensions 314 × 109 × 269 mm
3
/8 × 4 3/8 × 10 5/8 pouces)
(12
(l/h/p) (parties saillantes
exclues)
Poids VPL-EX50/EW5 :
Environ 3,0 kg (6 livres
10 onces)
VPL-EX5/ES5 :
Environ 2,9 kg (6 livres
6 onces)
Puissance requise
VPL-EX50/EW5: CA 100 à 240 V,
2,6 à 1,1 A, 50/60 HZ
VPL-EX5/ES5: CA 100 à 240 V,
2,2 à 1,0 A, 50/60 HZ
Puissance absorbée
VPL-EX50/EW5 : 260 W
maximum (en veille 3 W)
VPL-EX5/ES5 : 225 W maximum
(en veille 3 W)
FR
14 Spécifications
Page 45

Accessoires fournis
Présentation et caractéristiques susceptibles d’être
modifiées sans préavis préalable.
Remarque
Vérifiez toujours que l’appareil fonctionne
correctement avant l’utilisation. Sony n’assumera
pas de responsabilité pour les dommages de
quelque sorte qu’ils soient, incluant mais ne se
limitant pas à la compensation ou au
remboursement, à cause de la perte de profits
actuels ou futurs suite à la défaillance de cet
appareil, que ce soit pendant la période de garanti e
ou après son expiration, ou pour toute autre raison
quelle qu’elle soit.
Télécommande (1)
Pile au lithium CR2025 (1)
Câble HD D-sub à 15 broches
(1,8 m) (1)
(1-832-428-11, SONY)
Mallette de transport (1)
Cordon d’alimentation secteur (1)
Cache-objectif (1)
Mode d’emploi (CD-ROM) (1)
Guide de référence rapide (1)
Règlements de sécurité (1)
Etiquette de sécurité (1)
Accessoires en option
Lampe de projecteur
LMP-E190
Spécifications
15
FR
Page 46

Acerca del Manual
de referencia rápida
Dependiendo del ordenador, es posible que
el CD-ROM no se inicie automáticamente.
En tal caso, abra el archivo del Manual de
instrucciones como se indica a continuación:
Este Manual de referencia rápida describe
las conexiones y operaciones básicas de la
unidad y proporciona notas sobre las
operaciones e información necesarias para el
mantenimiento.
Para más información sobre las operaciones,
remítase al Manual de instrucciones del
CD-ROM suministrado.
Para las precauciones de seguridad, remítase
a la “Normativa de seguridad” impresa por
separado.
Empleo de los
manuales en
CD-ROM
El CD-ROM suministrado contiene el
Manual de instrucciones y el archivo
ReadMe en japonés, inglés, francés, alemán,
italiano, español y chino. Lea en primer
lugar el archivo ReadMe.
Preparativos
Para leer el Manual de instrucciones del
CD-ROM se necesita Adobe Acrobat
Reader 5.0 o posterior. Si Adobe Acrobat
Reader no está instalado en su ordenador,
puede descargar gratuitamente el software
Acrobat Reader en el URL de Adobe
Systems.
Consulta del Manual de
instrucciones
El Manual de instrucciones se encuentra en
el CD-ROM suministrado. Introduzca el
CD-ROM suministrado en la unidad de
CD-ROM de su ordenador y el CD-ROM se
iniciará automáticamente al cabo de unos
instantes. Seleccione el Manual de
instrucciones que desea leer.
(En el caso de Windows)
1 Abra “Mi PC”. (En Windows Vista
aparece “Ordenador”.)
2 Haga clic con el botón derecho en el
icono del CD-ROM y seleccione
“Explorer”.
3 Haga doble clic en el archivo
“index.htm” y seleccione el Manual de
instrucciones que desea leer.
(En el caso de Macintosh)
1 Haga doble clic en el icono del
CD-ROM del escritorio.
2 Haga doble clic en el archivo
“index.htm” y seleccione el Manual de
instrucciones que desea leer.
Notas
Si no puede abrir el archivo “index.htm”,
haga doble clic en el Manual de
instrucciones que desea leer entre los
que se encuentran en la carpeta
“Operating_Instructions”.
Sobre las marcas comerciales
• Adobe Acrobat es una marca comercial de
Adobe Systems Incorporated.
• Windows es una marca comercial
registrada de Microsoft Corporation en
Estados Unidos y/o en otros países.
• Kensington es una marca comercial
registrada de Kensington Technology
Group.
• Macintosh es una marca comercial
registrada de Apple, Inc.
• VESA es una marca comercial registrada
de Video Electronics Standards
Association.
• Display Data Channel es una marca
comercial de Video Electronics Standards
Association.
• HDMI, el logotipo HDMI y HighDefinition Multimedia Interface son
marcas comerciales o marcas comerciales
registradas de HDMI Licensing LLC.
ES
Acerca del Manual de referencia rápida / Empleo de los manuales en CD-ROM
2
Page 47

• Las restantes marcas comerciales y marcas
comerciales registradas son marcas
comerciales o marcas comerciales
registradas de sus respectivos titulares.
En este manual no se indican las marcas
™ y ®.
ES
Empleo de los manuales en CD-ROM
ES
3
Page 48

Notas sobre la utilización
Nota sobre los orificios de ventilación
No obstruya los orificios de ventilación (salida/entrada). Si se obstruyen, puede generarse
calor en el interior y producirse un incendio o que la unidad resulte dañada.
Compruebe las posiciones de los orificios de ventilación que se indican en las
ilustraciones siguientes.
Para otras precauciones, lea atentamente la “Normativa de seguridad” impresa por
separado.
Parte superior/lateral derech/frontal
a Orificios de
ventilación
(salida)
b Detector de
control
remoto
Parte trasera/lateral derech/base
2
c Indicadores
d Orificios de
ventilación
(entrada)
4
ES
4 Notas sobre la utilización
Page 49

Proyección
Conexión del proyector
Cuando conecte el proyector, asegúrese de lo siguiente:
• Apague todos los equipos antes de realizar cualquier conexión.
• Utilice los cables apropiados para cada conexión.
• Inserte firmemente los enchufes del cable. Cuando desconecte un cable, asegúrese de
tirar del enchufe, no del cable.
• Remítase también al manual de instrucciones del equipo que se va a conectar.
Para conectar un ordenador (analógico)
a Enchufe el cable de alimentación de CA a una toma mural.
b Conecte el proyector a un ordenador.
VPL-EX50
1
1
Cable de conexión de audio estéreo
(no suministrado)
(Utilice un cable sin resistencia.)
2
2
Cable HD D-sub
de 15 contactos
(suministrado)
Nota
Para la conexión de audio estéreo, conecte el cable de conexión de audio estéreo a los siguientes
conectores:
VPL-EX5/ES5: Conector INPUT A/VIDEO IN AUDIO
VPL-EW5: Conector INPUT A AUDIO
VPL-EX50: Conector INPUT A/B AUDIO
Proyección
ES
5
Page 50

Para conectar un ordenador (digital) o un equipo de vídeo (digital)
(VPL-EW5 solamente)
a Enchufe el cable de alimentación de CA a una toma mural.
b Conecte el proyector a un ordenador o equipo de vídeo.
VPL-EW5
1
1
2
2
Cable HDMI-DVI-D
(no suministrado)
Cable HDMI
(no suministrado)
Notas
• Asegúrese de usar un cable HDMI con el logotipo HDMI.
• El conector HDMI de este proyector no es compatible con señales DSD (Direct Stream Digital, Flujo
directo digital) o CEC (Consumer Electronics Control, Control de electrónica de consumo).
ES
6 Proyección
Page 51

Para conectar un reproductor de VCR/DVD
a Enchufe el cable de alimentación de CA a una toma mural.
b Conecte el proyector a un equipo de vídeo.
Para las conexiones de las señales de vídeo, dispone de las tres opciones de conexión
siguientes:
1 Cable de S-Vídeo (Mini DIN de 4 terminales) (no suministrado)
2 Cable de vídeo compuesto (fonográfico) (no suministrado)
3 Cable de componentes (fonográfico × 3) (no suministrado)
VPL-EX50
1
1
2
2
Cable de conexión de audio estéreo
(no suministrado)
(Utilice un cable sin resistencia.)
Nota
Para la conexión de audio estéreo, conecte el cable de conexión de audio estéreo a los siguientes
conectores:
VPL-EX5/ES5: Conector INPUT A/VIDEO IN AUDIO
VPL-EW5/EX50: Conector VIDEO IN AUDIO
Proyección
ES
7
Page 52

Proyección
a Pulse la tecla I/1 (encendido/espera).
b Encienda el equipo conectado al proyector.
c Pulse la tecla INPUT del mando a distancia o el panel de control para
seleccionar la fuente de entrada.
d Si el ordenador está conectado, configúrelo para que la señal se envíe
solo al monitor externo.
Input-A
Input-B
1
1
(VPL-EX50/EW5
solamente)
Video
S-Video
ES
8 Proyección
2
2
Power
o
Fn
4
4
FxF7
Page 53

Ajuste del proyector
a Ajuste la posición de la imagen.
b Ajuste el tamaño de la imagen.
c Ajuste el enfoque.
El proyector dispone del menú Imagen para seleccionar el modo de imagen y el menú
Pantalla para seleccionar la relación de aspecto correspondiente de la imagen.
3
3
2
2
1
1
Apagado de la alimentación
a Pulse la tecla I/
b Cuando aparezca un mensaje, pulse otra vez la tecla I/
espera).
c Desenchufe el cable de alimentación de CA de la toma mural cuando el
ventilador deje de funcionar y la tecla I/
en rojo. (Excepto cuando se use la función Encendido/Apagado directo
o la función Off & Go.)
1 (encendido/espera).
1
1
2
2
1 (encendido/
1 (encendido/espera) se ilumine
Proyección
9
ES
Page 54

Sustitución de la
lámpara
La lámpara que se utiliza como fuente de
luz es un producto consumible. Por lo
tanto, debe sustituir la lámpara por una
nueva en los casos siguientes.
• Cuando la lámpara se funde o disminuye
su brillo
• Cuando aparece “Por favor cambie la
lámpara.” en la pantalla
• Cuando el indicador LAMP/COVER se
enciende (parpadea repetidamente tres
veces)
La vida útil de la lámpara varía según las
condiciones de uso.
Sustitúyala por una lámpara de proyector
LMP-E190.
El uso de lámparas diferentes de la
LMP-E190 puede dañar el proyector.
Notas
• Si la lámpara se rompe, solicite a personal
especializado de Sony que sustituya la
lámpara y compruebe el interior.
• Tire de la lámpara hacia fuera utilizando el
asa.
• Al retirar la lámpara, asegúrese de que se
encuentra en posición horizontal y tire hacia
arriba. No incline la lámpara. Si tira de la
lámpara mientras está inclinada, la lámpara
se rompe.
1 Apague el proyector y desenchufe el
cable de alimentación de CA de la
toma de CA.
Nota
Asegúrese de qu e el proyector se encuentra en
una posición estable después de haberle dado
la vuelta.
3 Afloje el tornillo con el destornillador
de estrella para abrir la cubierta de la
lámpara.
Nota
Para mayor seguridad, no afloje más
tornillos.
4 Afloje los dos tornillos de la lámpara
con el destornillador Phillips (a).
Incline el asa hacia fuera (b) y, a
continuación, extraiga la lámpara por
el asa (c).
Asa
Nota
Antes de sustituir la lámpara, después de usar
el proyector, espere al menos una hora hasta
que se enfríe.
2 Coloque una lámina (paño) de
protección debajo del proyector. Dé la
vuelta al proyector de forma que vea la
parte inferior.
ES
10 Sustitución de la lámpara
Page 55

5 Introduzca por completo la lámpara
nueva hasta que quede encajada en su
sitio (a). Apriete los dos tornillos
(b). Incline el asa hacia abajo para
volverla a colocar (c).
Notas
• Tenga cuidado de no tocar la superficie
de cristal de la lámpara.
• La alimentación no se activará si la
lámpara no está bien instalada.
• No deje que ningún líquido u otros
objetos penetren en la ranura para
evitar una descarga eléctrica o un
incendio.
6 Cierre la cubierta de la lámpara y
apriete el tornillo.
AJUSTE
APA inteligente: Sí
Búsq. ent. auto.: No
Sel. señ. ent. A: Automático
Sistema de color
Ahorro de energía
Receptor IR:
Blq. tec. panel: No
Reiniciar cont. lámp.
Sel: Pon: Salir:
: Automático
Frente y detrás
Entrada A
: No
12Seleccione “Ejecutar” con la tecla V
y, a continuación, pulse la tecla
ENTER.
El contador de la lámpara se inicializa
a 0 y se muestra “Desea cambiar la
lámpara y limpiar el filtro?” en la
pantalla de menús.
Desea cambiar la lámpara y limpiar el filtro?
Sí:
No:
Consulte la página 12 para “Limpieza
del filtro de aire”.
13Seleccione “Sí” con la tecla v.
Aparece “Reinic. cont. lámp.
completa.” en la pantalla de menús.
Nota
Asegúrese de fijar la cubierta de la lámpara
como estaba. Si no lo hace, no podrá
encender el proyector.
7 Vuelva a darle la vuelta al proyector.
8 Enchufe el cable de alimentación.
La tecla ?/1 se ilumina en rojo.
9 Pulse la tecla ?/1 para encender el
proyector.
10Pulse la tecla MENU y, a
continuación, seleccione el menú
Configuración.
11Seleccione “Reiniciar cont. lámp.” y,
a continuación, pulse la tecla ENTER.
Sustitución de la lámpara
11
ES
Page 56

Limpieza del filtro de
aire
El filtro de aire debe limpiarse siempre
que se sustituya la lámpara.
Retire el filtro de aire y, a continuación,
quite el polvo con una aspiradora.
El tiempo necesario para limpiar el filtro
de aire variará en función del entorno y de
cómo se utilice el proyector.
Si resulta difícil retirar el polvo del filtro
con un aspirador, desmonte el filtro de
aire y lávelo.
1 Desactive la alimentación y
desenchufe el cable de alimentación.
2 Extraiga la cubierta del filtro de aire y
retírela.
Filtro de aire
Notas
• No descuide la limpieza del filtro de aire,
de lo contrario el polvo podría acumularse
hasta llegar a obstruirlo. Ello podría
provocar un aumento de la temperatura
en el interior de la unidad y originar un
incendio, o ser la causa de un mal
funcionamiento.
• Asegúrese de fijar bien la cubierta del filtro
del aire; la alimentación no puede activarse si
no está bien cerrada.
• El filtro de aire tiene una cara frontal y otra
inversa. Colóquelo de forma que encaje en
una hendidura de la cubierta del mismo.
3 Extraiga el filtro de aire.
Lengüetas
4 Lave el filtro de aire con una solución
detergente suave y déjelo secar a la
sombra.
5 Coloque el filtro del aire de forma que
encaje en las lengüetas de la cubierta y
vuelva a colocar la cubierta.
ES
12 Limpieza del filtro de aire
Page 57

Solución de problemas
Si el proyector parece no funcionar correctamente, intente diagnosticar y corregir el
problema utilizando las siguientes instrucciones. Si el problema no se soluciona, consulte
con personal especializado de Sony.
Para más información sobre los síntomas, remítase al Manual de instrucciones del
CD-ROM.
Alimentación
Síntoma Causa y solución
La alimentación no se
activa.
Imagen
Síntoma Causa y solución
No aparece la imagen. • Hay un cable desconectado o las conexiones son incorrectas.
La imagen aparece con
ruido.
La imagen no es nítida. • La imagen está desenfocada.
• La alimentación se ha apagado y encendido de nuevo con la tecla ?/
1 en un corto intervalo.
c Espere unos 90 segundos antes de activar la alimentación
• La cubierta de la lámpara no está sujeta.
c Cierre firmemente la cubierta de la lámpara.
• La cubierta del filtro de aire está suelta.
c Fije firmemente la cubierta del filtro del aire.
c Compruebe que ha realizado las conexiones adecuadas.
• Las conexiones son incorrectas.
c Este proyector es compatible con DDC2B (Digital Data Channel
2B, Canal de datos digitales 2B). Si el ordenador es compatible
con DDC, encienda el proyector de acuerdo con las indicaciones
siguientes.
1 Conecte el proyector al ordenador.
2 Encienda el proyector.
3 Encienda el ordenador.
• La selección de entrada es incorrecta.
c Seleccione la fuente de entrada correctamente.
• La imagen está apagada.
c Pulse la tecla PIC MUTING para liberar el apagado de la
imagen.
• La señal del ordenador no está ajustada para la salida hacia un
monitor externo ni para la salida hacia un monitor externo y un
monitor LCD de ordenador.
c Ajuste el ordenador para que envíe la señal solamente a un
monitor externo.
• Puede que aparezca ruido de fondo, en función de la combinación
del número de puntos introducidos desde el ordenador y del
número de píxeles del panel LCD.
c Cambie el patrón del escritorio del ordenador conectado.
c Ajuste el enfoque.
• Se ha acumulado condensación en el objetivo.
c Deje el proyector encendido durante unas dos horas.
Solución de problemas
13
ES
Page 58

Síntoma Causa y solución
La imagen se extiende más
allá de la pantalla.
Se ha pulsado la tecla APA aunque hay bordes negros alrededor de
la imagen.
c Muestre la imagen completa en la pantalla y pulse la tecla APA.
Ajuste correctamente “Desplazamiento” en el menú Ajuste de
entrada.
La imagen parpadea. No ha ajustado correctamente “Fase punto” en el menú Ajuste de
entrada.
c Ajuste correctamente “Fase punto” en el menú Ajuste de
entrada.
Indicadores
Mensaje Significado y solución
El indicador LAMP/
COVER parpadea en
naranja. (Frecuencia de
repetición de 2 parpadeos)
El indicador LAMP/
COVER parpadea en
naranja. (Frecuencia de
repetición de 3 parpadeos)
?/1 parpadea en
Tec la
rojo. (Frecuencia de
repetición de 2 parpadeos)
• La cubierta de la lámpara o la del filtro de aire está suelta.
c Fije la cubierta correctamente.
• La lámpara ha llegado al final de su vida útil.
c Sustituya la lámpara.
• La lámpara ha alcanzado una alta temperatura.
c Espere 60 segundos para que la lámpara se enfríe y vuelva a
activar la alimentación.
• La temperatura interna es inusualmente alta.
c Compruebe que nada bloquee los orificios de ventilación.
• Se está utilizando el proyector a una altitud elevada.
c Compruebe que la opción “Modo gran altitud” del menú
Configuración está ajustada en “Sí”.
?/1 parpadea en
Tec la
rojo. (Frecuencia de
repetición de 4 parpadeos)
Tec la
?/1 parpadea en
rojo. (Frecuencia de
repetición de 6 parpadeos)
El ventilador está averiado.
c Consulte con personal especializado de Sony.
Desenchufe el cable de alimentación de CA de la toma mural
cuando se apague el indicador
en la toma mural y encienda el proyector de nuevo. Si el indicador
?/1, enchufe el cable de alimentación
?/1 parpadea en rojo y el problema persiste, el sistema eléctrico ha
fallado.
c Consulte con personal especializado de Sony.
ES
14 Solución de problemas
Page 59

Especificaciones
Sistema de proyección
Panel LCD VPL-ES5: Panel SVGA de 0,63
Lámpara Lámpara de presión ultra alta de
Tamaño de imagen proyectada
Caudal luminoso
1)
Cuando el Modo Lámpara está establecido en
“Alto”.
Distancia de proyección (Cuando se coloca en el
suelo, el ajustador no está estirado y la función
Trapezoide V está realizada. )
3 paneles LCD, 1 objetivo, sistema
de obturación de 3 colores
primarios
pulgadas, 1.440.000 píxeles
(800 × 600 × 3)
VPL-EX50/EX5: Panel XGA de
0,63 pulgadas, 2.360.000
píxeles (1024 × 768 × 3)
VPL-EW5: Panel WXGA de 0,59
pulgadas, unos 3.070.000
píxeles (1280 × 800 × 3)
190 W
40 a 300 pulgadas (medidas en
diagonal)
1)
VPL-EX50
VPL-EW5
: 2.500 lúmenes
1)
/EX5/ES5: 2.000
lúmenes
VPL-EX50/EX5/ES5:
40 pulgadas: 1,1 a 1,4 m
(3,6 a 4,6 pies)
80 pulgadas: 2,3 a 2,8 m
(7,5 a 9,2 pies)
100 pulgadas: 2,9 a 3,5 m
(9,5 a 11,5 pies)
150 pulgadas: 4,4 a 5,2 m
(14,4 a 17,1 pies)
200 pulgadas: 5,8 a 7,0 m
(19,0 a 23,0 pies)
250 pulgadas: 7,3 a 8,8 m
(24,0 a 28,9 pies)
300 pulgadas: 8,8 a 10,5 m
(28,9 a 34,5 pies)
VPL-EW5:
(Cuando “Aspecto” en el menú
Señal está ajustado en
“Completo2”)
40 pulgadas: 1,2 a 1,5 m
(3,9 a 4,9 pies)
80 pulgadas: 2,5 a 2,9 m
(8,2 a 9,5 pies)
100 pulgadas: 3,1 a 3,7 m
(10,2 a 12,1 pies)
150 pulgadas: 4,6 a 5,6 m
(15,1 a 18,4 pies)
200 pulgadas: 6,2 a 7,4 m
(20,3 a 24,3 pies)
250 pulgadas: 7,7 a 9,3 m
(25,3 a 30,5 pies)
300 pulgadas: 9,3 a 11,1 m
(30,5 a 36,4 pies)
Es posible que exista una pequeña diferencia entre
el valor real y el valor de diseño antes mostrado.
Sistema de color
Sistema NTSC
NTSC
3.58/PAL/SECAM/
4.43/PAL-M/PAL-N/
PAL60, de conmutación
automática/manual
4.43 es el sistema de color
(NTSC
que se utiliza para reproducir
vídeos grabados en NTSC en
una videograbadora de sistema
4.43).
Señales de ordenador aceptables
NTSC
2)
fH: 19 a 92 kHz
fV: 48 a 92 Hz
(Máxima resolución de señal de
entrada: SXGA+ 1400 × 1050
2)
Ajuste la resolución y la frecuencia de la señal
fV: 60 Hz)
del ordenador conectado dentro del margen de
señales predefinidas que admite el proyector.
Señales de vídeo aplicables
RGB 15 k 50/60 Hz, Componente
progresivo 50/60 Hz DTV (480/
60i, 575/50i, 480/60p, 575/50p,
720/60p, 720/50p, 1080/60i,
1080/50i), Vídeo compuesto,
Vídeo Y/C
Dimensiones 314 × 109 × 269 mm
3
/8 × 4 3/8 × 10 5/8 pulgadas)
(12
(an/al/pr) (sin tener en cuenta
las partes que sobresalen)
Peso VPL-EX50/EW5:
Aprox. 3,0 kg (6 lb 10 oz)
VPL-EX5/ES5:
Aprox. 2,9 kg (6 lb 6 oz)
Requisitos de alimentación
VPL-EX50/EW5: 100 a 240 V
CA, 2,6 a 1,1 A, 50/60 Hz
VPL-EX5/ES5: 100 a 240 V CA,
2,2 a 1,0 A, 50/60 Hz
Consumo VPL-EX50/EW5: Máx.260 W (en
espera: 3 W)
VPL-EX5/ES5: Máx. 225 W (en
espera: 3 W)
Accesorios suministrados
Mando a distancia (1)
Pila de litio CR2025 (1)
Especificaciones
15
ES
Page 60

Cable HD D-sub, 15 terminales
(1,8 m) (1)
(1-832-428-11, SONY)
Estuche de transporte (1)
Cable de alimentación de CA (1)
Tapa del objetivo (1)
Manual de instrucciones
(CD-ROM) (1)
Manual de referencia rápida (1)
Normativa de seguridad (1)
Etiqueta de seguridad (1)
El diseño y las especificaciones están sujetos a
modificaciones sin previo aviso.
Nota
Verifique siempre que esta unidad funciona
correctamente antes de utilizarlo. SONY NO SE
HACE RESPONSIBLE POR DAÑOS DE
NINGÚN TIPO, INCLUYENDO PERO NO
LIMITADO A LA COMPENSACIÓN O PAGO
POR LA PÉRDIDA DE GANANCIAS
PRESENTES O FUTURAS DEBIDO AL
FALLO DE ESTA UNIDAD, YA SEA
DURANTE LA VIGENCIA DE LA GARANTÍA
O DESPUÉS DEL VENCIMIENTO DE LA
GARANTÍA NI POR CUALQUIER OTRA
RAZÓN.
Accesorios opcionales
Lámpara de proyector
LMP-E190
ES
16 Especificaciones
Page 61

17
ES
Page 62

Informationen zur
Kurzreferenz
Diese Kurzreferenz beschreibt die
Anschlüsse und Grundfunktionen dieses
Geräts und informiert über erforderliche
Wartungsmaßnahmen.
Nähere Informationen zu den einzelnen
Funktionen finden Sie in der
Bedienungsanleitung auf der mitgelieferten
CD-ROM.
Sicherheitshinweise finden Sie in der
separaten Druckschrift
„Sicherheitsbestimmungen“.
Verwenden der
Anleitungen auf CDROM
Die mitgelieferte CD-ROM enthält die
Bedienungsanleitung und die ReadMe-Datei
in Japanisch, Englisch, Französisch,
Deutsch, Italienisch, Spanisch und
Chinesisch. Lesen Sie zunächst die Datei
ReadMe.
Vorbereitungen
Zum Lesen der auf der CD-ROM
enthaltenen Bedienungsanleitung ist Adobe
Acrobat Reader 5.0 oder höher erforderlich.
Wenn der Adobe Acrobat Reader nicht auf
Ihrem Computer installiert ist, können Sie
die Acrobat Reader Software kostenlos von
der URL der Firma Adobe Systems
herunterladen.
Bedienungsanleitung zum Lesen
aufrufen
Die Bedienungsanleitung befindet sich auf
der mitgelieferten CD-ROM. Legen Sie die
mitgelieferte CD-ROM in das CD-ROMLaufwerk Ihres Computers ein. Kurz darauf
startet die CD-ROM automatisch. Wählen
Sie die gewünschte Bedienungsanleitung
aus.
Je nach verwendetem Computer startet die
CD-ROM möglicherweise nicht
automatisch. Öffnen Sie in diesem Fall die
Datei mit der Bedienungsanleitung wie
folgt:
(Bei Windows)
1 Öffnen Sie „Arbeitsplatz“. (Bei
Windows Vista wird „Computer“
angezeigt).
2 Klicken Sie auf das Symbol der CD-
ROM und wählen Sie „Explorer.“
3 Doppelklicken Sie auf die Datei
„index.htm“ und wählen Sie die
gewünschte Bedienungsanleitung aus.
(Bei Macintosh)
1 Doppelklicken Sie auf das Symbol der
CD-ROM auf dem Desktop.
2 Doppelklicken Sie auf die Datei
„index.htm“ und wählen Sie die
gewünschte Bedienungsanleitung aus.
Hinweise
Wenn Sie die Datei „index.htm“ nicht
öffnen können, doppelklicken Sie im Ordner
„Operating_Instructions“ auf die Datei der
Bedienungsanleitung, die Sie lesen
möchten.
Informationen zu Warenzeichen
• Adobe Acrobat ist ein Warenzeichen von
Adobe Systems Incorporated.
• Windows ist ein eingetragenes
Warenzeichen der Microsoft Corporation
in den Vereinigten Staaten und/oder in
anderen Ländern.
• Kensington ist ein eingetragenes
Warenzeichen der Kensington Technology
Group.
• Macintosh ist ein eingetragenes
Warenzeichen von Apple, Inc.
• VESA ist ein eingetragenes Warenzeichen
der Video Electronics Standards
Association.
• Display Data Channel ist ein
Warenzeichen der Video Electronics
Standards Association.
• HDMI, das HDMI-Logo und HighDefinition Multimedia Interface sind
Warenzeichen oder eingetragene
Warenzeichen von HDMI Licensing LLC.
DE
Informationen zur Kurzreferenz / Verwenden der Anleitungen auf CD-ROM
2
Page 63

• Alle anderen Warenzeichen und
eingetragene Warenzeichen sind
Warenzeichen oder eingetragene
Warenzeichen des jeweiligen Inhabers.
In dieser Anleitung werden die ™- und
®-Marken nicht angegeben.
Verwenden der Anleitungen auf CD-ROM
DE
DE
3
Page 64

Hinweise zur Benutzung
Hinweise zu den Lüftungsöffnungen
Die Lüftungsöffnungen (Einlass / Auslass) dürfen nicht blockiert werden. Andernfalls
kann es zu einem internen Hitzestau kommen, der einen Brand oder einen Schaden am
Gerät verursachen kann.
Überprüfen Sie die Lage der Lüftungsöffnungen anhand der nachfolgenden
Abbildungen.
Um Informationen zu weiteren Sicherheitsvorkehrungen zu erhalten, lesen Sie die
separate Druckschrift „Sicherheitsbestimmungen“ aufmerksam durch.
Oberseite/Rechte Seite/Vorderseite
a Lüftungsöffnun-
gen (Auslass)
b Fernbedienungs-
detektor
Rückseite/Rechte Seite/Unterseite
4
DE
4 Hinweise zur Benutzung
c Anzeigen
d Lüftungsöffnun-
2
gen (Einlass)
Page 65

Projizieren
Anschließen des Projektors
Achten Sie beim Anschließen des Projektors auf Folgendes:
• Schalten Sie alle Geräte aus, bevor Sie irgendwelche Anschlüsse vornehmen.
• Verwenden Sie die korrekten Kabel für jeden Anschluss.
• Führen Sie die Kabelstecker fest ein. Ziehen Sie ein Kabel immer am Stecker heraus,
nie am Kabel selbst.
• Informieren Sie sich auch im Handbuch des anzuschließenden Geräts.
Anschluss eines Computers (analog)
a Stecken Sie das Netzkabel in eine Netzsteckdose.
b Schließen Sie den Projektor an einen Computer an.
VPL-EX50
1
1
Stereo-Audiokabel
(nicht mitgeliefert)
(Ein widerstandsfreies
Kabel verwenden.)
2
2
15-poliges HD D-sub-Kabel
(mitgeliefert)
Hinweis
Zum Stereo-Audioanschluss das Stereo-Audiokabel an folgende Buchsen anschließen:
VPL-EX5/ES5: Anschluss INPUT A/VIDEO IN AUDIO
VPL-EW5: Anschluss INPUT A AUDIO
VPL-EX50: Anschluss INPUT A/B AUDIO
Projizieren
DE
5
Page 66

Anschluss eines Computers (digital) oder Videogerätes (nur VPL-EW5)
a Stecken Sie das Netzkabel in eine Netzsteckdose.
b Schließen Sie den Projektor an ein Computer oder an ein Videogerät an.
VPL-EW5
1
1
2
2
HDMI-DVI-D-Kabel
(nicht mitgeliefert)
HDMI-Kabel
(nicht mitgeliefert)
Hinweise
• Verwenden Sie nur ein HDMI-Kabel mit dem HDMI-Logo.
• Die HDMI-Buchse dieses Projektors ist nicht mit dem DSD (Direct Stream Digital, Digitales
Direktstrom)-Signal oder CEC (Consumer Electronics Control, Heimelektronik-Steuerung)-Signal
kompatibel.
DE
6 Projizieren
Page 67

Anschluss eines Videorecorders / DVD-Players
a Stecken Sie das Netzkabel in eine Netzsteckdose.
b Schließen Sie den Projektor an ein Videogerät an.
Für Videosignalanschlüsse stehen die folgenden drei Anschlussoptionen zur
Verfügung:
1 S-Videokabel (Mini DIN 4-polig) (nicht mitgeliefert)
2 FBAS-Videokabel (Phono) (nicht mitgeliefert)
3 Komponenten (Phono × 3)-Kabel (nicht mitgeliefert)
VPL-EX50
1
1
2
2
Stereo-Audiokabel
(nicht mitgeliefert)
(Ein widerstandsfreies Kabel verwenden.)
Hinweis
Zum Stereo-Audioanschluss das Stereo-Audiokabel an folgende Buchsen anschließen:
VPL-EX5/ES5: Anschluss INPUT A/VIDEO IN AUDIO
VPL-EW5/EX50: Anschluss VIDEO IN AUDIO
Projizieren
DE
7
Page 68

Projizieren
a Drücken Sie die Taste I/1 (Ein/Bereitschaft).
b Schalten Sie das an den Projektor angeschlossene Gerät ein.
c Drücken Sie die Taste INPUT auf der Fernbedienung oder dem
Bedienfeld zur Auswahl der Eingangsquelle.
d Wenn der Computer angeschlossen ist, stellen Sie das Ausgangssignal
auf alleinige Ausgabe über den externen Monitor ein.
Input-A
2
2
Power
1
1
Input-B
(nur VPL-EX50/EW5)
Video
S-Video
4
FxF7
oder
Fn
4
DE
8 Projizieren
Page 69

Einstellen des Projektors
a Stellen Sie die Bildposition ein.
b Stellen Sie die Bildgröße ein.
c Stellen Sie den Fokus ein.
Der Projektor verfügt über das Menü Bild zur Einstellung des Bildmodus und das Menü
Bildschirm, mit dem das geeignete Seitenverhältnis des Bilds ausgewählt werden kann.
3
3
2
2
1
1
Ausschalten der Stromversorgung
a Drücken Sie die Taste I/
b Wird eine Meldung angezeigt, drücken Sie die Taste I/
erneut.
c Ziehen Sie das Netzkabel von der Netzsteckdose ab, wenn der Ventilator
stehen bleibt und die aste I/
Verwendung der Direkt-Ein-/Ausschaltfunktion oder der Off & Go-Funktion.)
1
1
2
2
1 (Ein/Bereitschaft).
1 (Ein/Bereitschaft)
1 (Ein/Bereitschaft) rot leuchtet. (Außer bei
Projizieren
DE
9
Page 70

Auswechseln der
Lampe
Die als Lichtquelle verwendete Lampe ist
ein Verbrauchsprodukt. Ersetzen Sie
daher diese Lampe in den folgenden
Fällen durch eine neue.
• Wenn die Lampe durchgebrannt ist oder
schwach wird
• Wenn „Lampentausch erforderlich.“ auf
dem Bildschirm erscheint
• Wenn die Anzeige LAMP/COVER
aufleuchtet (dreimal wiederholtes
Blinken)
Die Lampenlebensdauer hängt von den
Benutzungsbedingungen ab.
Verwenden Sie eine Projektorlampe
LMP-E190 als Ersatzlampe.
Werden anstelle der Lampe LMP-E190
andere Lampen verwendet, kann der
Projektor beschädigt werden.
Hinweise
• Wenn die Lampe zerbricht, wenden Sie
sich an qualifiziertes Sony-Personal zum
Auswechseln der Lampe und zum Prüfen
von innen.
• Ziehen Sie die Lampe am Griff heraus.
• Achten Sie beim Herausnehmen der Lampe
darauf, dass sie horizontal bleibt, und ziehen
Sie sie gerade nach oben. Die Lampe nicht
kippen. Falls Sie die Lampeneinheit schräg
herausziehen und die Lampe bricht, können
die Bruchstücke verstreut werden und
Verletzungen verursachen.
Hinweis
Achten Sie darauf, dass der Projektor nach
dem Umdrehen stabil liegt.
3 Öffnen Sie die Lampenabdeckung
durch Lösen der Schraube mit einem
Kreuzschlitzschraubendreher.
Hinweis
Lösen Sie aus Sicherheitsgründen bitte
keine anderen Schrauben.
4 Lösen Sie die zwei Schrauben an der
Lampeneinheit mit dem
Kreuzschlitzschraubendreher (a).
Klappen Sie den Griff aus (b), und
ziehen Sie dann die Lampeneinheit am
Griff heraus (c).
Griff
1 Schalten Sie den Projektor aus, und
trennen Sie das Netzkabel von der
Netzsteckdose.
Hinweis
Lassen Sie die Lampe nach dem Gebrauch
des Projektors mindestens eine Stunde lang
abkühlen, bevor Sie sie auswechseln.
2 Legen Sie eine Schutzfolie (Tuch)
unter den Projektor. Drehen Sie den
Projektor um, so dass er auf der
Oberseite liegt.
DE
10 Auswechseln der Lampe
Page 71

5 Setzen Sie die neue Lampe vollständig
ein, bis sie richtig sitzt (a). Ziehen
Sie die zwei Schrauben an (b).
Klappen Sie den Griff wieder ein (c)
Hinweise
• Achten Sie darauf, dass Sie nicht den
Glaskörper der Lampe berühren.
• Der Projektor lässt sich nicht
einschalten, falls die Lampe nicht
einwandfrei gesichert ist.
• Achten Sie darauf, dass keine
Flüssigkeiten oder Fremdkörper in den
Steckplatz eindringen, um einen
elektrischen Schlag oder Brand zu
vermeiden.
6 Schließen Sie die Lampenabdeckung
und drehen Sie die Schraube fest.
11Wählen Sie „Lampentimer Rück“,
und drücken Sie dann die Taste
ENTER.
EINSTELLUNG
Intelligente APA: Ein
Auto. Eing. wahl:
Input-A Sig. wahl:
Farbsystem: Auto
P save-modus
IR-Empfänger: Vorn & Hinten
Tastensperre: Aus
Lampentimer Rück
Sel: Reg: Ende:
Aus
Auto
: Aus
Eingang A
12Wählen Sie „Ausführen“ mit der
V und drücken Sie dann die
Taste
Taste ENTER.
Der Lampentimer wird auf 0
zurückgestellt, und „Lampe
auswechseln und Filter reinigen?“
wird auf dem Menübildschirm
angezeigt.
Lampe auswechseln und Filter reinigen?
Ja:
Nein:
Einzelheiten zu „Reinigen des
Luftfilters“ finden Sie unter Seite 12.
13Wählen Sie „Ja“ mit der Taste v.
„Lampentimer-Rückstellung fertig!“
erscheint auf dem Menübildschirm.
Hinweis
Befestigen Sie die Lampenabdeckung
wieder vorschriftsmäßig. Anderenfalls
kann der Projektor nicht eingeschaltet
werden.
7 Drehen Sie den Projektor wieder um.
8 Schließen Sie das Netzkabel an.
Die Taste ?/1 leuchtet rot auf.
9 Drücken Sie die Taste ?/1, um den
Projektor einzuschalten.
10Drücken Sie die Taste MENU, und
wählen Sie dann das Menü
EINSTELLUNG.
Auswechseln der Lampe
11
DE
Page 72

Reinigen des
Luftfilters
Der Luftfilter sollte bei jedem
Auswechseln der Lampe gereinigt
werden.
Nehmen Sie den Luftfilter heraus, und
entfernen Sie dann den Staub mit einem
Staubsauger.
Die für die Reinigung des Luftfilters
erforderliche Zeit hängt von der
Umgebung oder der Benutzungsweise des
Projektors ab.
Wenn sich der Staub nur noch schwer mit
dem Staubsauger von dem Filter entfernen
lässt, nehmen Sie den Luftfilter heraus
und waschen ihn.
1 Schalten Sie den Projektor aus, und
ziehen Sie das Netzkabel ab.
2 Ziehen Sie die Luftfilterabdeckung
heraus und entfernen Sie sie.
Luftfilter
4 Waschen Sie den Luftfilter mit einer
milden Reinigungslösung und lassen
Sie ihn an einem schattigen Ort
trocknen.
5 Bringen Sie den Luftfilter so an, dass
er von allen Klauen an der
Luftfilterabdeckung gehalten wird,
und setzen Sie die Abdeckung wieder
ein.
Hinweise
• Falls die Reinigung des Luftfilters
vernachlässigt wird, kann er sich durch
angesammelten Staub zusetzen. Als Folge
davon kann die Temperatur im Inneren
des Projektors ansteigen, was zu einer
möglichen Funktionsstörung oder einem
Brand führen kann.
• Schließen Sie die Luftfilterabdeckung
einwandfrei; anderenfalls kann der Projektor
nicht eingeschaltet werden.
• Der Luftfilter hat eine Vorder- und eine
Rückseite. Setzen Sie den Luftfilter so ein,
dass er in der Aussparung der
Luftfilterabdeckung sitzt.
3 Nehmen Sie den Luftfilter heraus.
DE
12 Reinigen des Luftfilters
Claws
Page 73

Fehlerbehebung
Falls der Projektor nicht richtig zu funktionieren scheint, versuchen Sie zunächst, die
Störung mithilfe der folgenden Anweisungen ausfindig zu machen und zu beheben. Sollte
die Störung bestehen bleiben, wenden Sie sich an qualifiziertes Sony-Personal.
Nähere Informationen zu den einzelnen Symptomen finden Sie in der
Bedienungsanleitung auf der CD-ROM.
Stromversorgung
Symptom Ursache und Abhilfemaßnahme
Das Gerät lässt sich nicht
einschalten.
Bild
Symptom Ursache und Abhilfemaßnahme
Es wird kein Bild
angezeigt.
Das Bild ist verrauscht. • Je nach der Kombination der über den Computer eingegebenen
Das Bild ist nicht klar. • Das Bild ist unscharf.
• Der Projektor ist mit der Taste ?/1 in kurzen Abständen aus- und
eingeschaltet worden.
c Warten Sie bis zum erneuten Einschalten etwa 90 Sekunden.
• Die Lampenabdeckung ist nicht gesichert.
c Schließen Sie die Lampenabdeckung korrekt.
• Die Luftfilterabdeckung ist gelöst.
c Bringen Sie die Luftfilterabdeckung wieder fest an.
• Ein Kabel ist abgetrennt, oder die Anschlüsse sind falsch.
c Prüfen Sie, ob die Anschlüsse korrekt ausgeführt worden sind.
• Die Anschlüsse sind falsch.
c Dieser Projektor ist mit DDC2B (Digital Data Channel 2B,
Digitaler Datenkanal 2B) kompatibel. Wenn Ihr Computer mit
DDC kompatibel ist, schalten Sie den Projektor nach dem
folgenden Verfahren ein.
1 Schließen Sie den Projektor an den Computer an.
2 Schalten Sie den Projektor ein.
3 Starten Sie den Computer.
• Die Eingangswahl ist falsch.
c Wählen Sie die Eingangsquelle korrekt.
• Das Bild ist abgeschaltet.
c Drücken Sie die Taste PIC MUTING, um die Bildabschaltung
aufzuheben.
• Der Computer ist so eingestellt, dass sein Signal entweder gar
nicht oder sowohl zu einem externen Monitor als auch zum LCDMonitor des Computers ausgegeben wird.
c Stellen Sie den Computer so ein, dass die Signalausgabe nur zu
einem externen Monitor erfolgt.
Bildpunktezahl und der Pixelzahl auf dem LCD-Panel kann
Hintergrundrauschen auftreten.
c Ändern Sie das Desktopmuster am angeschlossenen Computer.
c Stellen Sie den Fokus ein.
• Kondensation hat sich auf dem Objektiv niedergeschlagen.
c Lassen Sie den Projektor etwa zwei Stunden lang eingeschaltet.
Fehlerbehebung
13
DE
Page 74

Symptom Ursache und Abhilfemaßnahme
Das Bild steht von der
Leinwand über.
Die Taste APA ist gedrückt worden, obwohl schwarze Ränder um
das Bild vorhanden sind.
c Projizieren Sie das volle Bild auf die Leinwand, und drücken Sie
die Taste APA.
Stellen Sie „Lage“ im Menü Eingangs-Einstellung korrekt ein.
Das Bild flimmert. „Punkt-Phase“ im Menü Eingangs-Einstellung wurde nicht korrekt
eingestellt.
c Stellen Sie „Punkt-Phase“ im Menü Eingangs-Einstellung
korrekt ein.
Anzeigen
Meldung Bedeutung und Abhilfemaßnahme
Die Anzeige LAMP/
COVER blinkt in Orange.
(Wiederholrate von 2
Blinkzeichen)
Die Anzeige LAMP/
COVER blinkt in Orange.
(Wiederholrate von 3
Blinkzeichen)
?/1 blinkt in Rot.
Ta st e
(Wiederholrate von 2
Blinkzeichen)
• Die Lampenabdeckung oder die Luftfilterabdeckung ist
abgenommen.
c Bringen Sie die Abdeckung korrekt an.
• Die Lampe hat das Ende ihrer Nutzungsdauer erreicht.
c Tauschen Sie die Lampe aus.
• Die Lampe ist zu heiß geworden.
c Lassen Sie die Lampe 60 Sekunden lang abkühlen, bevor Sie
den Projektor wieder einschalten.
• Die Innentemperatur ist ungewöhnlich hoch.
c Stellen Sie sicher, dass die Lüftungsöffnungen durch nichts
blockiert werden.
• Der Projektor wird in großer Höhe benutzt.
c Vergewissern Sie sich, dass „Höhenlagenmodus“ im Menü
Einrichtung auf „Ein“ gesetzt ist.
?/1 blinkt in Rot.
Ta st e
(Wiederholrate von 4
Blinkzeichen)
Ta st e
?/1 blinkt in Rot.
(Wiederholrate von 6
Blinkzeichen)
Der Lüfter ist defekt.
c Konsultieren Sie qualifiziertes Sony-Personal.
Ziehen Sie das Netzkabel von der Netzsteckdose ab, nachdem die
Anzeige
an die Netzsteckdose an, und schalten Sie den Projektor wieder ein.
Falls die Anzeige
bestehen bleibt, liegt eine Störung im elektrischen System vor.
?/1 erloschen ist, schließen Sie dann das Netzkabel wieder
?/1 in Rot blinkt und das Problem weiterhin
c Konsultieren Sie qualifiziertes Sony-Personal.
DE
14 Fehlerbehebung
Page 75

Spezifikationen
Projektionssystem
LCD-Panel VPL-ES5: 0,63-Zoll-SVGA-
Lampe 190-W-Ultra-Hochdrucklampe
Projektionsbildgröße
Lichtleistung VPL-EX50
1)
Bei Einstellung der Lichtleistung auf „Hoch“.
Projektionsentfernung (Bei Bodenstellung./
Einstellfuß nicht ausgezogen und V TrapezFunktion ausgeführt. )
Es kann eine geringe Differenz zwischen dem
tatsächlichen Wert und dem oben angegebenen
Nennwert auftreten.
Farbsystem NTSC
3 LCD-Panels, 1 Objektiv, 3-
Primärfarben-Verschlusssystem
Panel, etwa 1.440.000 Pixel
(800 × 600 × 3)
VPL-EX50/EX5: 0,63-Zoll-XGA-
Panel, etwa 2.360.000 Pixel
(1024 × 768 × 3)
VPL-EW5: 0,59-Zoll-WXGA-
Panel, etwa 3.070.000 Pixel
(1280 × 800 × 3)
40 bis 300 Zoll (diagonal
gemessen)
1)
: 2500 lm
1)
VPL-EW5
/EX5/ES5: 2000 lm
VPL-EX50/EX5/ES5:
40-Zoll: 1,1 bis 1,4 m
80-Zoll: 2,3 bis 2,8 m
100-Zoll: 2,9 bis 3,5 m
150-Zoll: 4,4 bis 5,2 m
200-Zoll: 5,8 bis 7,0 m
250-Zoll: 7,3 bis 8,8 m
300-Zoll: 8,8 bis 10,5 m
VPL-EW5:
(Wenn „Seitenverhältnis“ im
Menü Signal auf „Voll2“
eingestellt ist)
40-Zoll: 1,2 bis 1,5 m
80-Zoll: 2,5 bis 2,9 m
100-Zoll: 3,1 bis 3,7 m
150-Zoll: 4,6 bis 5,6 m
200-Zoll: 6,2 bis 7,4 m
250-Zoll: 7,7 bis 9,3 m
300-Zoll: 9,3 bis 11,1 m
3.58/PAL/SECAM/
4.43/PAL-M/PAL-N/
NTSC
PAL60-System, automatische/
manuelle Umschaltung
(Das Farbsystem NTSC
4.43 wird
verwendet, wenn ein Band, das
auf einem Videorecorder des
Systems NTSC
4.43
aufgenommen wurde,
Akzeptable Computersignale
wiedergegeben wird.)
2)
fH: 19 bis 92 kHz
fV: 48 bis 92 Hz
(Maximale
Eingangssignalauflösung:
SXGA+ 1400 × 1050
2)
Stellen Sie Auflösung und Frequenz des vom
fV: 60 Hz)
angeschlossenen Computer ausgegebenen
Signals innerhalb des Bereichs der akzeptablen
Vorwahlsignale des Projektors ein.
Verwendbare Videosignale
15 k RGB 50/60 Hz, Progressives
Komponentensignal 50/60 Hz,
DTV (480/60i, 575/50i, 480/
60p, 575/50p, 720/60p, 720/
50p, 1080/60i, 1080/50i),
FBAS-Videosignal, Y/CVideosignal
Abmessungen
314 × 109 × 269 mm (B/H/T)
(ohne hervorstehende Teile)
Gewicht VPL-EX50/EW5:
Ca. 3,0 kg
VPL-EX5/ES5:
Ca. 2,9 kg
Spannungsversorgung
VPL-EX50/EW5: 100 bis 240 V
Wechselstrom, 2,6 bis 1,1 A,
50/60 Hz
VPL-EX5/ES5: 100 bis 240 V
Wechselstrom, 2,2 bis 1,0 A,
50/60 Hz
Leistungsaufnahme
VPL-EX50/EW5: Max. 260 W
(im Bereitschaftsmodus 3 W)
VPL-EX5/ES5: Max. 225 W (im
Bereitschaftsmodus 3 W)
Mitgeliefertes Zubehör
Fernbedienung (1)
Lithiumbatterie CR2025 (1)
15-poliges HD-D-sub-Kabel
(1,8 m) (1)
(1-832-428-11, SONY)
Tragetasche (1)
Netzkabel (1)
Objektivdeckel (1)
Betriebsanleitung (CD-ROM) (1)
Kurzreferenz (1)
Sicherheitsbestimmungen (1)
Sicherheitsaufkleber (1)
Spezifikationen
15
DE
Page 76

Änderungen, die dem technischen Fortschritt
dienen, bleiben vorbehalten.
Hinweis
Bestätigen Sie vor dem Gebrauch immer, dass
das Gerät richtig arbeitet. SONY KANN
KEINE HAFTUNG FÜR SCHÄDEN JEDER
ART, EINSCHLIESSLICH ABER NICHT
BEGRENZT AUF KOMPENSATION ODER
ERSTATTUNG, AUFGRUND VON
VERLUST VON AKTUELLEN ODER
ERWARTETEN PROFITEN DURCH
FEHLFUNKTION DIESES GERÄTS ODER
AUS JEGLICHEM ANDEREN GRUND,
ENTWEDER WÄHREND DER
GARANTIEFRIST ODER NACH ABLAUF
DER GARANTIEFRIST, ÜBERNEHMEN.
Sonderzubehör
Projektorlampe
LMP-E190
DE
16 Spezifikationen
Page 77

17
DE
Page 78

Informazioni sulla
Guida rapida all’uso
La presente Guida rapida all’uso descrive i
collegamenti e il funzionamento di base di
questo apparecchio, inoltre fornisce delle
note sulle operazioni e le informazioni
necessarie per la manutenzione.
Per maggiori informazioni sul
funzionamento, fare riferimento alle
Istruzioni d’uso contenute nel CD-ROM in
dotazione.
Per le precauzioni di sicurezza, fare
riferimento alle “Norme di sicurezza”
separate.
Utilizzo dei Manuali
del CD-ROM
Il CD-ROM in dotazione contiene le
Istruzioni d’uso e il file ReadMe in
giapponese, inglese, francese, tedesco,
italiano, spagnolo e cinese. Innanzitutto fare
riferimento al file ReadMe.
Operazioni preliminari
Per leggere le Istruzioni d’uso contenute nel
CD-ROM, è necessario disporre del
programma Adobe Acrobat Reader 5.0 o
successiva. Se Adobe Acrobat Reader non è
installato sul computer, è possibile scaricare
gratis il software Acrobat Reader dall’URL
di Adobe Systems.
Come leggere le Istruzioni d’uso
Le Istruzioni d’uso sono contenute nel CDROM in dotazione. Inserire il CD-ROM
fornito nell’unità CD-ROM del computer,
poco dopo il CD-ROM si avvierà
automaticamente. Selezionare le Istruzioni
d’uso che si desidera leggere.
A seconda del computer a disposizione, il
CD-ROM potrebbe non avviarsi
automaticamente. In tal caso, aprire le
Istruzioni d’uso nel seguente modo:
(Per Windows)
1 Aprire “Risorse del computer”.
(“Computer” è visualizzato in Windows
Vista.)
2 Cliccare con il pulsante destro del mouse
sull’icona del CD-ROM e selezionare
“Explorer”.
3 Fare doppio clic sul file “index.htm” e
selezionare le Istruzioni d’uso che si
desidera leggere.
(Per Macintosh)
1 Fare doppio clic sull’icona del CD-
ROM sul desktop.
2 Fare doppio clic sul file “index.htm” e
selezionare le Istruzioni d’uso che si
desidera leggere.
Note
Se non è possibile aprire il file “index.htm”,
fare doppio clic sulle Istruzioni d’uso che si
desidera leggere dalla cartella
“Operating_Instructions”.
Marchi di fabbrica
• Adobe Acrobat è un marchio commerciale
di Adobe Systems Incorporated.
• Windows è un marchio commerciale
registrato di Microsoft Corporation negli
Stati Uniti d’America e/o in altri paesi.
• Kensington è un marchio commerciale
registrato di Kensington Technology
Group.
• Macintosh è un marchio commerciale
registrato di Apple, Inc.
• VESA è un marchio commerciale
registrato della Video Electronics
Standards Association.
• Display Data Channel è un marchio
commerciale di Video Electronics
Standards Association.
• HDMI, il logo HDMI e High-Definition
Multimedia Interface sono marchi
commerciali o marchi commerciali
registrati di HDMI Licensing LLC.
• Tutti gli altri marchi commerciali e marchi
commerciali registrati sono marchi
commerciali o marchi commerciali
registrati dei rispettivi proprietari. In
questo manuale, i marchi ™ e ® non sono
specificati.
IT
Informazioni sulla Guida rapida all’uso / Utilizzo dei Manuali del CD-ROM
2
Page 79

Note sull’uso
Nota sulle prese di ventilazione
Non ostruire le prese di ventilazione (scarico/aspirazione). In caso di ostruzione, il
surriscaldamento interno potrebbe provocare un incendio o danneggiare l’apparecchio.
Controllare le posizioni delle prese di ventilazione illustrate nelle seguenti figure.
Per ulteriori precauzioni, leggere attentamente le “Nome di sicurezza” separate.
Lato superiore/destro/anteriore
a Prese di
ventilazione
(scarico)
b Sensore del
comando a
distanza
Lato posteriore/destro/inferiore
2
c Indicatori
d Prese di
ventilazione
(aspirazione)
IT
4
Note sull’uso
IT
3
Page 80

Proiezione
Collegamento del proiettore
Nel collegare il proiettore, prestare attenzione a quanto segue:
• Spegnere tutte le apparecchiature prima di effettuare qualsiasi collegamento.
• Usare cavi adatti a ciascun collegamento.
• Inserire le spine saldamente. Quando si scollega un cavo, assicurarsi di tirarlo dalla
spina e di non tirare il cavo stesso.
• Inoltre fare riferimento al Manuale d’uso dell’apparecchiatura da collegare.
Collegamento di un computer (analogico)
a Inserire il cavo di alimentazione c.a. in una presa a muro.
b Collegare il proiettore ad un computer.
VPL-EX50
1
1
Cavo di collegamento audio stereo
(non fornito)
(Usare un cavo a resistenza nulla.)
2
2
Cavo HD D-sub a 15 pin
(fornito)
Note
Per il collegamento audio stereo, collegare il cavo di collegamento audio stereo ai seguenti connettori:
VPL-EX5/ES5: Connettore INPUT A/VIDEO IN AUDIO
VPL-EW5: Connettore INPUT A AUDIO
VPL-EX50: Connettore INPUT A/B AUDIO
IT
4 Proiezione
Page 81

Collegamento di un computer (digitale) o di apparecchiatura video (digitale)
(solo VPL-EW5)
a Inserire il cavo di alimentazione c.a. in una presa a muro.
b Collegare il proiettore al computer o all’apparecchiatura video.
VPL-EW5
1
1
2
2
Cavo HDMI-DVI-D
(non fornito)
Cavo HDMI
(non fornito)
Note
• Usare un cavo HDMI con marcatura HDMI.
• Il connettore HDMI di questo proiettore non è compatibile con il segnale DSD (Direct Stream Digital,
streaming digitale diretto) o CEC (Consumer Electronics Control, controllo elettronica di consumo).
Proiezione
5
IT
Page 82

Collegamento di un lettore VCR/DVD
a Inserire il cavo di alimentazione c.a. in una presa a muro.
b Collegare il proiettore all’apparecchiatura video.
Per il collegamento dei segnali video, sono disponibili le seguenti tre opzioni:
1 Cavo S video (Mini DIN a 4 pin) (non fornito)
2 Cavo video composito (fono) (non fornito)
3 Cavo componente (fono × 3) (non fornito)
VPL-EX50
1
1
2
2
Cavo di collegamento audio stereo
(non fornito)
(Usare un cavo a resistenza nulla.)
Nota
Per il collegamento audio stereo, collegare il cavo di collegamento audio stereo ai seguenti connettori:
VPL-EX5/ES5: Connettore INPUT A/VIDEO IN AUDIO
VPL-EW5/EX50: Connettore VIDEO IN AUDIO
IT
6 Proiezione
Page 83

Proiezione
a Premere il tasto I/1 (on/standby).
b Accendere l’apparecchiatura collegata al proiettore.
c Premere il tasto INPUT sul telecomando o sul pannello di controllo per
selezionare la sorgente d’ingresso.
d Dopo avere collegato il computer, impostare il segnale solo per la
visualizzazione sul monitor esterno.
Input-A
2
2
Power
1
1
Input-B
(solo VPL-EX50/EW5)
Video
S-Video
4
FxF7
o
Fn
4
Proiezione
IT
7
Page 84

Regolazione del proiettore
a Regola la posizione dell’immagine.
b Regola la dimensione dell’immagine.
c Regola manualmente la messa a fuoco.
Il proiettore dispone del menu Immagine per selezionare il modo immagine e del menu
Schermo per selezionare il formato immagine corretto.
3
3
2
2
1
1
Spegnimento dell’alimentazione
a Premere il tasto I/
b Quando compare un messaggio, premere di nuovo il tasto I/
standby).
c Scollegare il cavo di alimentazione c.a. dalla presa a muro dopo che la
ventola si è fermata e il tasto I/
(Eccetto quando si usa la funzione di accensione/spegnimento diretta o
la funzione Off & Go.)
IT
8 Proiezione
1 (on/standby).
1
1
2
2
1 (on/
1 (on/standby) si è illuminata in rosso.
Page 85

Sostituzione della
lampada
La lampada che costituisce la sorgente di
luce è un prodotto consumabile. Quindi
deve essere sostituita con una lampada
nuova nei casi che seguono.
• Quando la lampada è bruciata o poco
luminosa
• Compare “Sostituire la lampada e pulire
il filtro.” sullo schermo
• La spia LAMP/COVER si illumina
(sequenza di tre lampeggi)
La vita utile della lampada varia in
funzione delle condizioni d’uso.
Come lampada di ricambio, usare la
lampada per proiettore LMP-E190.
L’uso di qualsiasi altra lampada diversa
dalla LMP-E190 potrebbe danneggiare il
proiettore.
Note
• In caso di rottura della lampada,
rivolgersi a personale qualificato Sony per
eseguire la sostituzione della lampada e il
controllo all’interno.
• Estrarre la lampada afferrando la maniglia.
• Per rimuovere la lampada, tirare
direttamente verso l’alto la lampada
prestando attenzione che rimanga
orizzontale. Non inclinare la lampada. Se la
lampada viene tirata fuori mentre è inclinata
si romperà.
Nota
Assicurarsi che il proiettore sia stabile dopo
averlo capovolto.
3 Aprire il coperchio della lampada
svitando la vite con un cacciavite con
punta a croce.
Nota
Per motivi di sicurezza, non allentare
nessun’altra vite.
4 Allentare le due viti sull’unità
lampada con il cacciavite con punta a
croce (a). Sollevare la maniglia (b),
quindi usarla per estrarre l’unità
lampada (c).
Maniglia
1 Spegnere il proiettore e scollegare il
cavo di alimentazione c.a. dalla presa
c.a.
Nota
Quando si sostituisce la lampada dopo aver
usato il proiettore, aspettare almeno un’ora
che la lampada si raffreddi.
2 Posizionare un telo di stoffa protettivo
sotto il proiettore. Capovolgere il
proiettore in modo che il lato inferiore
sia visibile.
Sostituzione della lampada
IT
9
Page 86

5 Inserire completamente la nuova
lampada finché è saldamente in
posizione (a). Serrare le due viti
(b). Mettere a posto la maniglia
abbassandola (c).
11Selezionare “Reimp. timer lamp.”,
quindi premere il tasto ENTER.
REGOLAZIONE
APA intelligente: Inser.
Ricer. ingr. aut.: Disin.
Sel. segn. in. A: Auto
Standard colore: Auto
Power saving
Ricevitore IR:
Blocco tasti: Disin.
Reimp. timer lamp.
: Disin.
Selez: Imp: Esci:
Ingresso A
Anter. & Poster.
12Selezionare “Esegui” con il tasto V e
premere il tasto ENTER.
Il timer della lampada è inizializzato a
0 e nella schermata di menu viene
visualizzato “Cambiare la lampada e
pulire il filtro?”.
Note
• Prestare attenzione a non toccare la
superficie di vetro della lampada.
• L’alimentazione non si accenderà se la
lampada non è fissata correttamente.
• Fare in modo che non cadano liquidi o
altri oggetti nella sede di sostituzione
della lampada per evitare scosse
elettriche o incendi.
6 Chiudere il coperchio della lampada e
serrare la vite.
Nota
Aver cura di montare saldamente il
coperchio della lampada come era in
origine. Diversamente non sarà possibile
accendere il proiettore.
7 Girare di nuovo il proiettore.
8 Collegare il cavo di alimentazione.
?/1 si illumina in rosso.
Il tasto
9 Premere il tasto ?/1 per accendere il
proiettore.
10Premere il tasto MENU, quindi
selezionare il menu Impostazione.
Cambiare la lampada e pulire il filtro?
Sì:
No:
Vedere a pagina 11 per “Pulizia del
filtro dell’aria”.
13Selezionare “Sì” con il tasto v.
Sulla schermata di menu compare
“Timer lampada reimpostato!”.
IT
10 Sostituzione della lampada
Page 87

Pulizia del filtro
dell’aria
5 Montare il filtro dell’aria in modo che
si inserisca in ciascuna delle linguette
sul coperchio del filtro dell’aria e
rimontare il coperchio.
Il filtro dell’aria deve essere pulito ogni
volta che si sostituisce la lampada.
Smontare il filtro dell’aria, quindi togliere
la polvere con un aspirapolvere.
Il tempo necessario per pulire il filtro
dell’aria dipende dall’ambiente o dall’uso
del proiettore.
Quando si incontrano difficoltà ad
eliminare la polvere dal filtro con un
aspirapolvere, smontare il filtro aria e
lavarlo.
1 Spegnere l’alimentazione e scollegare
il cavo di alimentazione.
2 Estrarre il coperchio del filtro dell’aria
e rimuoverlo.
Filtro dell’aria
Note
• Se il filtro dell’aria non viene pulito, la
polvere potrebbe accumularsi e intasarlo.
Conseguentemente, la temperatura
all’interno dell’unità potrebbe salire e
causare guasto o incendio.
• Prestare attenzione a montare saldamente il
coperchio del filtro dell’aria: se non è chiuso
completamente, non sarà possibile accendere
l’alimentazione.
• Il filtro dell’aria ha una lato anteriore e un
lato posteriore. Posizionare il filtro dell’aria
in modo che si inserisca nella scanalatura del
coperchio.
3 Smontare il filtro dell’aria.
Linguette
4 Lavare il filtro dell’aria utilizzando
una soluzione detergente neutra ed
asciugarlo all’ombra.
Pulizia del filtro dell’aria
11
IT
Page 88

Guida alla soluzione dei problemi
Se il proiettore funziona in modo irregolare, provare a diagnosticare e correggere il
problema con le seguenti istruzioni. Se il problema permane, rivolgersi a personale Sony
qualificato.
Per maggiori informazioni sui sintomi, fare riferimento alle Istruzioni d’uso contenute nel
CD-ROM.
Alimentazione
Sintomo Causa e soluzione
L’alimentazione non si
accende.
Immagine
Sintomo Causa e soluzione
Nessuna immagine. • Un cavo è scollegato oppure i collegamenti sono errati.
L’immagine è rumorosa. • Potrebbe presentarsi del rumore sullo sfondo in funzione del
L’immagine non è nitida. • L’immagine non è a fuoco.
• L’alimentazione è stata accesa e spenta poco dopo con il tasto ?/1 .
c Attendere circa 90 secondi prima di accendere l’alimentazione.
• Il coperchio della lampada non è fissato.
c Chiudere saldamente il coperchio della lampada.
• Il coperchio del filtro dell’aria è staccato.
c Montare saldamente il coperchio del filtro dell’aria.
c Controllare che siano stati effettuati dei collegamenti
appropriati.
• I collegamenti sono errati.
c Questo proiettore è compatibile con DDC2B (Digital Data
Channel 2B, canale dati digitali 2B). Se il computer utilizzato è
compatibile con DDC, accendere il proiettore procedendo come
segue.
1 Collegare il proiettore al computer.
2 Accendere il proiettore.
3 Avviare il computer.
• La selezione dell’ingresso è errata.
c Selezionare correttamente la sorgente d’ingresso.
• L’immagine è disattivata.
c Premere il tasto PIC MUTING per annullare la disattivazione
dell’immagine.
• Il segnale dal computer non è stato impostato per la
visualizzazione su monitor esterno, oppure è stato impostato per la
visualizzazione sia su un monitor esterno che sul monitor LCD del
computer.
c Impostare il segnale del computer per la visualizzazione solo su
un monitor esterno.
rapporto fra il numero di punti del segnale d’ingresso dal computer
e il numero di pixel del pannello LCD.
c Cambiare l’impostazione del desktop del computer collegato.
c Regola manualmente la messa a fuoco
• Si è depositata della condensazione sull’obiettivo.
c Lasciare il proiettore acceso per circa due ore.
IT
12 Guida alla soluzione dei problemi
Page 89

Sintomo Causa e soluzione
L’immagine si estende
oltre lo schermo.
È stato premuto il tasto APA nonostante ci siano dei bordi neri
intorno all’immagine.
c Visualizzare sullo schermo l’immagine completa e premere il
tasto APA.
Regolare correttamente la voce “Spostamento” nel menu
Regolazione ingresso.
L’immagine sfarfalla. La voce “Fase punto” nel menu Regolazione ingresso non è stata
impostata correttamente.
c Regolare correttamente la voce “Fase punto” nel Regolazione
ingresso.
Indicatori
Messaggio Significato e rimedio
La spia LAMP/COVER
lampeggia in arancione
(frequenza di ripetizione di
2 lampeggi).
La spia LAMP/COVER
lampeggia in arancione
(frequenza di ripetizione di
3 lampeggi).
?/1 lampeggia in
Tas to
rosso (frequenza di
ripetizione di 2 lampeggi).
• Il coperchio della lampada oppure il coperchio del filtro dell’aria è
staccato.
c Fissare saldamente il coperchio.
• La lampada ha raggiunto il termine della vita utile.
c Sostituire la lampada.
• La lampada ha raggiunto una temperatura elevata.
c Attendere 60 secondi che la lampada si raffreddi, quindi
riaccendere l’alimentazione.
• La temperatura interna è insolitamente elevata.
c Verificare che le prese di ventilazione non siano ostruite.
• Il proiettore è utilizzato a una quota elevata.
c Verificare che “Modo quota el.” nel menu Impostazione sia
impostato su “Inser.”.
?/1 lampeggia in
Tas to
rosso (frequenza di
ripetizione di 4 lampeggi).
Tas to
?/1 lampeggia in
rosso (frequenza di
ripetizione di 6 lampeggi).
La ventola è guasta.
c Rivolgersi a personale Sony qualificato.
Scollegare il cavo di alimentazione c.a. dalla presa a muro dopo che
?/1 si è spenta, inserire il cavo di alimentazione nella presa a
la spia
muro, quindi riaccendere il proiettore. Se la spia
rosso e il problema permane, si è verificato un guasto nel circuito
elettrico.
?/1 lampeggia in
c Rivolgersi a personale Sony qualificato.
Guida alla soluzione dei problemi
13
IT
Page 90

Caratteristiche
tecniche
Sistema di proiezione
Pannello LCD
Lampada lampada ad altissima pressione di
Dimensione dell’immagine proiettata
Flusso luminoso
1)
Quando Modo lampada è impostato su “Alto”.
Distanza di proiezione (quando il proiettore è
sistemato sul pavimento ed è montato l’obiettivo
con zoom standard VPLL-Z4019.)
Potrebbe esserci una piccola differenza fra il
valore effettivo e il valore di progetto
precedentemente indicato.
3 pannelli LCD, 1 obiettivo,
sistema ad ottur atore a tre colori
primari
VPL-ES5: pannello SVGA da
0,63 pollici, circa 1.440.000
pixel (800 × 600 × 3)
VPL-EX50/EX5: pannello XGA
da 0,63 pollici, circa 2.360.000
pixel (1024 × 768 × 3)
VPL-EW5: pannello WXGA da
0,59 pollici, circa 3.070.000
pixel (1280 × 800 × 3)
190 W
da 40 a 300 pollici (misurata
diagonalmente)
1)
VPL-EX50
VPL-EW5
VPL-EX50/EX5/ES5:
40 pollici: da 1,1 a 1,4 m
80 pollici: da 2,3 a 2,8 m
100 pollici: da 2,9 a 3,5 m
150 pollici: da 4,4 a 5,2 m
200 pollici: da 5,8 a 7,0 m
250 pollici: da 7,3 a 8,8 m
300 pollici: da 8,8 a 10,5 m
VPL-EW5:
(Quando “Formato” sul menu
Segnale è impostato su
“Pieno 2”)
40 pollici: da 1,2 a 1,5 m
80 pollici: da 2,5 a 2,9 m
100 pollici: da 3,1 a 3,7 m
150 pollici: da 4,6 a 5,6 m
200 pollici: da 6,2 a 7,4 m
250 pollici: da 7,7 a 9,3 m
300 pollici: da 9,3 a 11,1 m
: 2500 lm
1)
/EX5/ES5: 2000 lm
Sistema colore
NTSC
Segnali da computer compatibili
2)
Impostare la risoluzione e la frequenza del
segnale del computer collegato entro
l’intervallo dei segnali preimpostati compatibili
con il proiettore.
Segnali video compatibili
Dimensioni 314 × 109 × 269 mm (l/a/p)
Peso VPL-EX50/EW5:
Alimentazione
Potenza assorbita
Accessori forniti
Design e caratteristiche tecniche sono soggetti a
modifiche senza preavviso.
3.58/PAL/SECAM/
4.43/PAL-M/PAL-N/
NTSC
PAL60, commutato
automaticamente/manualmente
4.43 è lo standard colore
(NTSC
usato per riprodurre video
registrati in NTSC su un
videoregistratore NTSC
fH: da 19 a 92 kHz
fV: da 48 a 92 Hz
(massima risoluzione del segnale
di ingresso:
SXGA+ 1400 × 1050
fV: 60 Hz)
15 k RGB 50/60 Hz, componente
progressivo 50/60 Hz, DTV
(480/60i, 575/50i, 480/60p,
575/50p, 720/60p, 720/50p,
1080/60i, 1080/50i), video
composito, video Y/C
(escluse le parti sporgenti)
Circa 3,0 kg
VPL-EX5/ES5:
Circa 2,9 kg
VPL-EX50/EW5: da 100 a 240 V
c.a., da 2,6 a 1,1 A, 50/60 Hz
VPL-EX5/ES5: da 100 a 240 V
c.a., da 2,2 a 1,0 A, 50/60 Hz
VPL-EX50/EW5: 260 W max (in
standby 3 W)
VPL-EX5/ES5: 225 W max (in
standby 3 W)
Telecomando (1)
Pila al litio CR2025 (1)
Cavo HD D-sub a 15 pin (1,8 m)
(1)
(1-832-428-11, SONY)
Custodia per il trasporto (1)
Cavo di alimentazione c.a. (1)
Copriobiettivo (1)
Istruzioni d’uso (CD-ROM) (1)
Guida rapida all’uso (1)
Normative di sicurezza (1)
Targhetta di sicurezza (1)
4.43.)
2)
IT
14 Caratteristiche tecniche
Page 91

Nota
Verificare sempre che l’apparecchio stia
funzionando correttamente prima di usarlo. LA
SONY NON SARÀ RESPONSABILE DI
DANNI DI QUALSIASI TIPO, COMPRESI,
MA SENZA LIMITAZIONE A,
RISARCIMENTI O RIMBORSI A CAUSA
DELLA PERDITA DI PROFITTI ATTUALI
O PREVISTI DOVUTA A GUASTI DI
QUESTO APPARECCHIO, SIA DURANTE
IL PERIODO DI VALIDITÀ DELLA
GARANZIA SIA DOPO LA SCADENZA
DELLA GARANZIA, O PER QUALUNQUE
ALTRA RAGIONE.
Accessori opzionali
Lampada del proiettore
LMP-E190
Caratteristiche tecniche
15
IT
Page 92

关于快速参考手册
此快速参考手册说明本机的连接和基本
操作,提供有关操作的注意事项和维护
时需要的信息。
有关操作的详细信息,请参见附带 CD-
ROM 中包含的使用说明书。
有关安全注意事项,请参见另外的 “安
全规则”。
使用 CD-ROM 手册
附带的 CD-ROM 中包含日文、英语、法
语、德语、意大利语、西班牙语和中文
版的使用说明书和 ReadMe 文件。请先
阅读 ReadMe 文件。
准备工作
要阅读 CD-ROM 中的操作说明,您需要
Adobe Acrobat Reader 5.0 或更新版本。
如果您的电脑中未安装 Adobe Acrobat
Reader,您可以从 Adobe Systems 的 URL
下载免费的 Acrobat Reader 软件。
阅读使用说明书
使用说明书包含在附带的 CD-ROM 中。
将附带的 CD-ROM 插入电脑的 CD-ROM
驱动器中,不久 CD-ROM 自动启动。选
择要阅读的使用说明书。
CD-ROM 可能无法自动启动,视电脑而
定。在这种情况下,请按如下方式打开
使用说明书:
注意
如果您无法打开 “index.htm”文件,请
在“Operating_Instructions”文件夹中双
击要阅读的使用说明书。
商标
• Adobe Acrobat 是 Adobe Systems
Incorporated 的商标。
• Windows 是 Microsoft Corporation 在美
国和 / 或其它国家 (或地区)的注册
商标。
• Kensington 是 Kensington Technology
Group 的注册商标。
• Macintosh 是 Apple, Inc. 的注册商标。
• VESA 是 Video Electronics Standards
Association 的注册商标。
• Display Data Channel 是 Video
Electronics Standards Association 的商
标。
• HDMI、 HDMI 标志和 High-Definition
Multimedia Interface 是 HDMI Licensing
LLC 的商标或注册商标。
• 所有其他商标或注册商标均为其特定
持有人的商标或注册商标。本手册中,
™ 和 ® 标记并非特指。
(对于 Windows)
1 打开 “My Computer”。(Windows
Vista 中显示 “电脑”。)
2 右击 CD-ROM 图标并选择
“Explorer”。
3 双击 “index.htm”文件并选择要阅
读的使用说明书。
(对于 Macintosh)
1 双击桌面上的 CD-ROM 图标。
2 双击 “index.htm”文件并选择要阅
读的使用说明书。
CS
2 关于快速参考手册 / 使用 CD-ROM 手册
Page 93

使用说明
4
关于通风孔的说明
不要堵塞通风孔 (排气 / 进气)。如被堵塞,内部热量可能会蓄积,导致火灾
或损坏本机。
检查通风孔的位置,如下图所示。
有关其它注意事项,请仔细阅读另外的 “安全规则”。
顶部 / 右侧 / 前面
a 通风孔 (排气)
b 遥控检测器
c 指示灯
d 通风孔 (进气)
后面 / 侧面 / 底部
2
使用说明
CS
cs
3
Page 94

投影
连接投影机
当连接投影机时,务必确认:
• 进行任何连接前关闭所有设备。
• 正确使用各连接用的电缆。
• 牢固插入电缆插头。在拔掉电缆时,务必拔插头,不可拉扯电缆本身。
• 另请参见要连接设备的使用说明书。
要连接电脑时 (模拟)
a 将 AC 电源线插入墙上电源插座。
b 将投影机连接到计算机。
VPL-EX50
1
1
立体声音频连接电缆 (非附带)
(使用无阻抗电缆。)
2
2
HD D-sub 15 芯电缆
(附带)
注意
要进行立体声音频连接时,将立体声音频连接电缆连接到以下连接器:
VPL-EX5/ES5: INPUT A/VIDEO IN AUDIO 连接器
VPL-EW5: INPUT A AUDIO 连接器
VPL-EX50: INPUT A/B AUDIO 连接器
cs
4
投影
Page 95

要连接电脑 (数码)或视频设备 (数码)时 (仅限于 VPL-EW5)
a 将 AC 电源线插入墙上电源插座。
b 将投影机连接到计算机或视频设备。
VPL-EW5
1
1
2
2
HDMI-DVI-D 电缆
(非附带)
HDMI 电缆
(非附带)
注意
• 请务必使用带有 HDMI 标志的 HDMI 电缆。
• 本投影机的 HDMI 连接器与 DSD (Direct Stream Digital,直接流数字)信号或 CEC
(Consumer Electronics control,消费电子控制器)信号不兼容。
投影
cs
5
Page 96

要连接 VCR/DVD 播放器时
a 将 AC 电源线插入墙上电源插座。
b 将投影机连接到视频设备。
对于视频信号连接,您可以选择以下三个连接选项:
1 S 视频 (微型 DIN 4 芯)电缆 (非附带)
2 复合视频 (唱机)电缆 (非附带)
3 分量 (唱机
× 3)电缆 (非附带)
1
1
VPL-EX50
立体声音频连接电缆 (非附带)
(使用无阻抗电缆。)
注意
要进行立体声音频连接时,将立体声音频连接电缆连接到以下连接器:
VPL-EX5/ES5:INPUT A/VIDEO IN AUDIO 连接器
VPL-EW5/EX50:VIDEO IN AUDIO 连接器
cs
6
投影
2
2
Page 97

投影
a 按 I/1 (打开 / 待机)键。
b 打开与投影机相连的设备。
c 按遥控器或控制面板上的 INPUT 键以选择输入信号源。
d 连接电脑时,请将其设定为仅向外接显示器输出信号。
Input-A
2
2
Power
1
1
Input-B
(仅限于
VPL-EX50/EW5
Video
S-Video
4
FxF7
或
Fn
4
)
投影
cs
7
Page 98

调整投影机
a 调整图像的位置。
b 调整图像的尺寸。
c 调整聚焦。
投影机备有 “图像设定”菜单,用于选择图像模式,备有 “屏幕设定”菜单,
用于选择适当的图像纵横比。
3
3
2
2
1
1
关闭电源
a 按 I/
b 显示信息时,再按一下 I/
c 在冷却扇停止运转且 I/
cs
1 (打开 / 待机)键。
1 (打开 / 待机)键。
1 (打开 / 待机)键变为红色后,从墙上电源插座拔下
AC 电源线。(除非正在使用直接电源开启 / 关闭功能或关机即移动功能。)
1
1
2
2
8
投影
Page 99

更换投影灯
作为光源所使用的投影灯是消耗品。
因此,在下述情况下请更换新的投影
灯。
• 投影灯烧坏或变暗时
• 屏幕上出现 “请更换灯泡。”
• LAMP/COVER 指示灯点亮 (反复闪
烁 3 次)
投影灯的寿命根据使用条件不同而不
同。
请用 LMP-E190 投影机用投影灯进行
更换。
使用 LMP-E190 以外的任何其它投影
灯均可能造成投影机损坏。
注意
• 如果投影灯损坏,请要求 Sony 专业技术人
员更换投影灯或进行检查。
• 握住把手将投影灯拉出。
• 拆下投影灯时,令投影灯处于水平状态,
然后将其径直拉出。请勿倾斜投影灯。
如果在倾斜状态下拉出投影灯,如果投
影灯损坏。
1 关闭投影机电源并从 AC 电源插座
拔下 AC 电源线。
3 用十字螺丝刀拧松螺丝,打开投影
灯盖。
注意
为了安全起见,请勿拧松其它任何螺
丝。
4 用十字螺丝刀拧松投影灯上的两个
螺丝 (a)。 折起把手 (b),然后握
住把手将投影灯拉出 (c)。
把手
注意
在使用投影机后更换投影灯时,请至少等
候 1 个小时让投影灯冷却。
2 将保护纸 (布)垫在投影机下面。
将投影机翻转以看到底面。
注意
翻转投影机之后,务必使其平稳。
更换投影灯
cs
9
Page 100

5 将新的投影灯完全插入,使其固定
到位 (a)。拧紧两个螺丝 (b)。折
下把手,使其返回原位 (c)。
注意
• 小心不要触摸投影灯的玻璃表面。
• 如果投影灯没有完全固定好,将无法
接通电源。
• 切勿将液体或其他物体落入插槽内以
避免电击或起火。
6 关上投影灯盖,拧紧螺丝。
注意
务必关严投影灯盖使其恢复原状。否
则,无法接通投影机的电源。
7 将投影机翻转过来。
12用 V 键选择 “执行”,然后按
ENTER 键。
投影灯操作时间被初始化为 0,并
在菜单屏幕上显示 “更换投影灯
并清洁滤网吗?”。
请参见第11页的“清洁空气滤网”。
13用 v 键选择 “是”。
菜单屏幕上显示 “投影灯操作时
间重设完毕 !”。
8 连接电源线。
?/1 键亮为红色。
9 按 ?/1 键接通投影机的电源。
10按 MENU 键,然后选择设置菜单。
11选择 “重设投影灯操作时间”,然
后按 ENTER 键。
cs
10
更换投影灯
 Loading...