

Page 1

To register online with Sonic Foundry, please follow the steps outlined in the registration
wizard upon first execution of this application.
Registering your product will provide you with technical support, notification of product
updates, and special promotions exclusive only to Vegas registered users.
Sonic Foundry product registration helps protect against software copyright infringement
and allows us to provide support exclusively to registered users.
To register online with Sonic Foundry, please follow the steps outlined in the registration
wizard upon installation of this product.
Registering your product will provide you with notification of product updates and special
promotions exclusive only to Vegas 2.0 registered users.
Sonic Foundry product registration helps protect against software copyright infringement
and allows us to provide support exclusively to registered users.
If you do not have access to the Internet, registration assistance (in English) is available.
Please contact our Customer Service Department at:
• Telephone*: 1-800-577-6642 (toll-free) in the US, Canada, and Virgin Islands.
+800-000-76642 (toll-free) in Australia, Denmark, France, Germany, Italy,
Sweden, UK, Netherlands, and Japan.
+608-256-3133, extension 2300 in all other countries.
• E-mail: customerservice@sonicfoundry.com
• Fax: 1-608-250-1745
* Registration assistance is available by telephone 24 hours per day, seven days per week.
Sales/Customer Service Only (in North America): 1-800-57-SONIC
Sonic Foundry, Inc. Sonic Foundry Europe
1617 Sherman Ave.
Madison, WI 53704
PO Box 2903
2601 CX Delft
Netherlands
Page 2

The information contained in this manual is subject to change without notice and does not
represent a commitment on the part of Sonic Foundry. The software described in this
manual is provided under the terms of a license agreement or non-disclosure agreement. The
software license agreement specifies the terms and conditions for its lawful use. No part of
this manual may be reproduced or transmitted in any form or by any means for any purpose
other than the purchaser’s personal use, without written permission from Sonic Foundry,
Inc.
Sonic Foundry and Vegas are trademarks of Sonic Foundry, Inc. Ligos, Ligos GoMotion, and
LSX-MPEG are trademarks of Ligos Corporation in the US and/or other countries. All other
products mentioned in this manual are trademarks or registered trademarks of their
respective holders.
© 2000 Sonic Foundry, Inc.
Page 3

Chapter Overview
1. Introduction . . . . . . . . . . . . . . . . . . . . . . . . . . . . . . . . . . .21
2. Tutorial . . . . . . . . . . . . . . . . . . . . . . . . . . . . . . . . . . . . . . .45
3. Getting Started . . . . . . . . . . . . . . . . . . . . . . . . . . . . . . . . .81
4. Basic Editing Techniques . . . . . . . . . . . . . . . . . . . . . 109
5. Advanced Editing Techniques . . . . . . . . . . . . . . . . . 141
6. Events . . . . . . . . . . . . . . . . . . . . . . . . . . . . . . . . . . . . . . 163
7. Tracks . . . . . . . . . . . . . . . . . . . . . . . . . . . . . . . . . . . . . . . 177
3
8. Audio FX . . . . . . . . . . . . . . . . . . . . . . . . . . . . . . . . . . . . 189
9. Using the Audio Mixer . . . . . . . . . . . . . . . . . . . . . . . . 213
10. Recording Audio . . . . . . . . . . . . . . . . . . . . . . . . . . . . 223
11. Advanced Video . . . . . . . . . . . . . . . . . . . . . . . . . . . . 241
12. Video FX and Masks . . . . . . . . . . . . . . . . . . . . . . . . . 263
13. Video Transitions and Motion . . . . . . . . . . . . . . . . 297
14. Saving and Rendering Projects . . . . . . . . . . . . . . . 323
15. Customizing Vegas . . . . . . . . . . . . . . . . . . . . . . . . . . 341
Troubleshooting. . . . . . . . . . . . . . . . . . . . . . . . . . . . . . . . 373
Glossary . . . . . . . . . . . . . . . . . . . . . . . . . . . . . . . . . . . . . . . 385
Index . . . . . . . . . . . . . . . . . . . . . . . . . . . . . . . . . . . . . . . . . . . . . i
Page 4

4
Page 5

Table of Contents
1. Introduction. . . . . . . . . . . . . . . . . . . . . . . . . . . . . . . . . . . .21
Welcome to Sonic Foundry Vegas™ . . . . . . . . . . . . . . . . . . . . . . . . . . . . 21
System requirements . . . . . . . . . . . . . . . . . . . . . . . . . . . . . . . . . . . . . . . . . . 22
Technical Support . . . . . . . . . . . . . . . . . . . . . . . . . . . . . . . . . . . . . . . . . . . . . 22
About this version of Vegas . . . . . . . . . . . . . . . . . . . . . . . . . . . . . . . . . . . . 23
Installing Vegas . . . . . . . . . . . . . . . . . . . . . . . . . . . . . . . . . . . . . . . . . . . . . . . 24
Starting Vegas . . . . . . . . . . . . . . . . . . . . . . . . . . . . . . . . . . . . . . . . . . . . . . . . 24
Registration. . . . . . . . . . . . . . . . . . . . . . . . . . . . . . . . . . . . . . . . . . . . . . . . . . . 25
Registering online. . . . . . . . . . . . . . . . . . . . . . . . . . . . . . . . . . . . . . . . . . . . . . . . . . . . . . . .25
Registering by telephone. . . . . . . . . . . . . . . . . . . . . . . . . . . . . . . . . . . . . . . . . . . . . . . . . . 26
Registering online from another computer. . . . . . . . . . . . . . . . . . . . . . . . . . . . . . . . . . 26
Using the online Help . . . . . . . . . . . . . . . . . . . . . . . . . . . . . . . . . . . . . . . . . . 27
5
Accessing the Help . . . . . . . . . . . . . . . . . . . . . . . . . . . . . . . . . . . . . . . . . . . . . . . . . . . . . . .27
Overview . . . . . . . . . . . . . . . . . . . . . . . . . . . . . . . . . . . . . . . . . . . . . . . . . . . . . 29
Main window. . . . . . . . . . . . . . . . . . . . . . . . . . . . . . . . . . . . . . . . . . . . . . . . . . . . . . . . . . . . 29
Toolbar . . . . . . . . . . . . . . . . . . . . . . . . . . . . . . . . . . . . . . . . . . . . . . . . . . . . . . . . . . . . . . . . . 30
Marker bar . . . . . . . . . . . . . . . . . . . . . . . . . . . . . . . . . . . . . . . . . . . . . . . . . . . . . . . . . . . . . . 30
Ruler. . . . . . . . . . . . . . . . . . . . . . . . . . . . . . . . . . . . . . . . . . . . . . . . . . . . . . . . . . . . . . . . . . . . 31
Track Header . . . . . . . . . . . . . . . . . . . . . . . . . . . . . . . . . . . . . . . . . . . . . . . . . . . . . . . . . . . . 31
Track View . . . . . . . . . . . . . . . . . . . . . . . . . . . . . . . . . . . . . . . . . . . . . . . . . . . . . . . . . . . . . . 32
Transport bar controls . . . . . . . . . . . . . . . . . . . . . . . . . . . . . . . . . . . . . . . . . . . . . . . . . . . . 32
Status bar . . . . . . . . . . . . . . . . . . . . . . . . . . . . . . . . . . . . . . . . . . . . . . . . . . . . . . . . . . . . . . . 32
Scrub control . . . . . . . . . . . . . . . . . . . . . . . . . . . . . . . . . . . . . . . . . . . . . . . . . . . . . . . . . . . . 33
Window Docking Area. . . . . . . . . . . . . . . . . . . . . . . . . . . . . . . . . . . . . . . . . . . . . . . . . . . . 33
Keyboard command reference . . . . . . . . . . . . . . . . . . . . . . . . . . . . . . . . . . . . . . . . . . . . 37
Cursor indications. . . . . . . . . . . . . . . . . . . . . . . . . . . . . . . . . . . . . . . . . . . . . . . . . . . . . . . .42
Audio Signal Flow . . . . . . . . . . . . . . . . . . . . . . . . . . . . . . . . . . . . . . . . . . . . . 43
Page 6

6
Video Signal Flow. . . . . . . . . . . . . . . . . . . . . . . . . . . . . . . . . . . . . . . . . . . . . 44
2. Tutorial. . . . . . . . . . . . . . . . . . . . . . . . . . . . . . . . . . . . . . . .45
Getting the tutorial folder . . . . . . . . . . . . . . . . . . . . . . . . . . . . . . . . . . . . . . . . . . . . . . . . . 45
Getting Started. . . . . . . . . . . . . . . . . . . . . . . . . . . . . . . . . . . . . . . . . . . . . . . . 47
1. Voiceover narration (01_voiceover.veg) . . . . . . . . . . . . . . . . . . . . . . . 47
Using the Explorer window . . . . . . . . . . . . . . . . . . . . . . . . . . . . . . . . . . . . . . . . . . . . . . . 47
Placing the video. . . . . . . . . . . . . . . . . . . . . . . . . . . . . . . . . . . . . . . . . . . . . . . . . . . . . . . . . 48
Displaying a Video Preview . . . . . . . . . . . . . . . . . . . . . . . . . . . . . . . . . . . . . . . . . . . . . . . 49
Playing back the video. . . . . . . . . . . . . . . . . . . . . . . . . . . . . . . . . . . . . . . . . . . . . . . . . . . . 50
Placing the new voiceover . . . . . . . . . . . . . . . . . . . . . . . . . . . . . . . . . . . . . . . . . . . . . . . . 50
Aligning the new voiceover with video. . . . . . . . . . . . . . . . . . . . . . . . . . . . . . . . . . . . . 51
Editing the voiceover. . . . . . . . . . . . . . . . . . . . . . . . . . . . . . . . . . . . . . . . . . . . . . . . . . . . . 52
Aligning the remaining voiceover events . . . . . . . . . . . . . . . . . . . . . . . . . . . . . . . . . . . 54
Unlocking the events. . . . . . . . . . . . . . . . . . . . . . . . . . . . . . . . . . . . . . . . . . . . . . . . . . . . . 55
Grouping the new voiceover and video . . . . . . . . . . . . . . . . . . . . . . . . . . . . . . . . . . . . 55
Saving a Vegas project (*.veg) . . . . . . . . . . . . . . . . . . . . . . . . . . . . . . . . . . . . . . . . . . . . 56
Summary . . . . . . . . . . . . . . . . . . . . . . . . . . . . . . . . . . . . . . . . . . . . . . . . . . . . . . . . . . . . . . . 57
2. Music bed (02_musicbed.veg) . . . . . . . . . . . . . . . . . . . . . . . . . . . . . . . . 58
Placing the music bed . . . . . . . . . . . . . . . . . . . . . . . . . . . . . . . . . . . . . . . . . . . . . . . . . . . . 58
Repositioning the voiceover. . . . . . . . . . . . . . . . . . . . . . . . . . . . . . . . . . . . . . . . . . . . . . . 58
Adding a volume envelope . . . . . . . . . . . . . . . . . . . . . . . . . . . . . . . . . . . . . . . . . . . . . . . 58
Setting the volume envelope. . . . . . . . . . . . . . . . . . . . . . . . . . . . . . . . . . . . . . . . . . . . . . 59
Adding equalization (EQ) to the voiceover . . . . . . . . . . . . . . . . . . . . . . . . . . . . . . . . . . 60
Summary . . . . . . . . . . . . . . . . . . . . . . . . . . . . . . . . . . . . . . . . . . . . . . . . . . . . . . . . . . . . . . . 61
3. Background video (03_background.veg). . . . . . . . . . . . . . . . . . . . . . . 62
Creating a new video track. . . . . . . . . . . . . . . . . . . . . . . . . . . . . . . . . . . . . . . . . . . . . . . . 62
Crossfading to a new video event. . . . . . . . . . . . . . . . . . . . . . . . . . . . . . . . . . . . . . . . . . 62
Inserting a transition effect . . . . . . . . . . . . . . . . . . . . . . . . . . . . . . . . . . . . . . . . . . . . . . . . 64
Summary . . . . . . . . . . . . . . . . . . . . . . . . . . . . . . . . . . . . . . . . . . . . . . . . . . . . . . . . . . . . . . . 65
4. Overlay titles (04_overlay.veg) . . . . . . . . . . . . . . . . . . . . . . . . . . . . . . . . 66
Repositioning the project . . . . . . . . . . . . . . . . . . . . . . . . . . . . . . . . . . . . . . . . . . . . . . . . . 66
Page 7

Inserting the introduction splash. . . . . . . . . . . . . . . . . . . . . . . . . . . . . . . . . . . . . . . . . . . 66
Summary . . . . . . . . . . . . . . . . . . . . . . . . . . . . . . . . . . . . . . . . . . . . . . . . . . . . . . . . . . . . . . . 70
5. Pan/Crop motion (05_panning.veg) . . . . . . . . . . . . . . . . . . . . . . . . . . . 71
Summary . . . . . . . . . . . . . . . . . . . . . . . . . . . . . . . . . . . . . . . . . . . . . . . . . . . . . . . . . . . . . . . 73
6. Fades (06_fades.veg) . . . . . . . . . . . . . . . . . . . . . . . . . . . . . . . . . . . . . . . . 74
Summary . . . . . . . . . . . . . . . . . . . . . . . . . . . . . . . . . . . . . . . . . . . . . . . . . . . . . . . . . . . . . . . 74
7. Track Motion (07_trackmotion.veg). . . . . . . . . . . . . . . . . . . . . . . . . . . . 75
Summary . . . . . . . . . . . . . . . . . . . . . . . . . . . . . . . . . . . . . . . . . . . . . . . . . . . . . . . . . . . . . . . 76
8. Velocity (08_velocity.veg) . . . . . . . . . . . . . . . . . . . . . . . . . . . . . . . . . . . . 77
Summary . . . . . . . . . . . . . . . . . . . . . . . . . . . . . . . . . . . . . . . . . . . . . . . . . . . . . . . . . . . . . . . 77
9. Rendering the project as an *.avi. . . . . . . . . . . . . . . . . . . . . . . . . . . . . . 78
Setting the format. . . . . . . . . . . . . . . . . . . . . . . . . . . . . . . . . . . . . . . . . . . . . . . . . . . . . . . . 78
Applying compression. . . . . . . . . . . . . . . . . . . . . . . . . . . . . . . . . . . . . . . . . . . . . . . . . . . . 79
3. Getting Started . . . . . . . . . . . . . . . . . . . . . . . . . . . . . . . . .81
Projects . . . . . . . . . . . . . . . . . . . . . . . . . . . . . . . . . . . . . . . . . . . . . . . . . . . . . . 81
7
Determining the proper video settings . . . . . . . . . . . . . . . . . . . . . . . . . . . . . . . . . . . . . 82
Saving the project. . . . . . . . . . . . . . . . . . . . . . . . . . . . . . . . . . . . . . . . . . . . . . . . . . . . . . . . 83
Renaming a project (using Save As...) . . . . . . . . . . . . . . . . . . . . . . . . . . . . . . . . . . . . . . 83
Capturing video media. . . . . . . . . . . . . . . . . . . . . . . . . . . . . . . . . . . . . . . . . 84
Files and events . . . . . . . . . . . . . . . . . . . . . . . . . . . . . . . . . . . . . . . . . . . . . . . 84
What type of media can you use?. . . . . . . . . . . . . . . . . . . . . . . . . . . . . . . . . . . . . . . . . . 85
Finding media files to use . . . . . . . . . . . . . . . . . . . . . . . . . . . . . . . . . . . . . . . . . . . . . . . . . 85
Previewing a media file . . . . . . . . . . . . . . . . . . . . . . . . . . . . . . . . . . . . . . . . . . . . . . . . . . . 87
Using the Media Pool. . . . . . . . . . . . . . . . . . . . . . . . . . . . . . . . . . . . . . . . . . . . . . . . . . . . . 88
Audio Peak files (*.sfk) . . . . . . . . . . . . . . . . . . . . . . . . . . . . . . . . . . . . . . . . . . . . . . . . . . . . 89
Event Basics . . . . . . . . . . . . . . . . . . . . . . . . . . . . . . . . . . . . . . . . . . . . . . . . . . 90
Inserting media . . . . . . . . . . . . . . . . . . . . . . . . . . . . . . . . . . . . . . . . . . . . . . . . . . . . . . . . . . 91
Moving events along the timeline. . . . . . . . . . . . . . . . . . . . . . . . . . . . . . . . . . . . . . . . . . 93
Removing the video’s audio. . . . . . . . . . . . . . . . . . . . . . . . . . . . . . . . . . . . . . . . . . . . . . . 95
Track Basics . . . . . . . . . . . . . . . . . . . . . . . . . . . . . . . . . . . . . . . . . . . . . . . . . . 96
Page 8

8
Scrolling and zooming . . . . . . . . . . . . . . . . . . . . . . . . . . . . . . . . . . . . . . . . . . . . . . . . . . . 96
Track number and color . . . . . . . . . . . . . . . . . . . . . . . . . . . . . . . . . . . . . . . . . . . . . . . . . . 98
View buttons . . . . . . . . . . . . . . . . . . . . . . . . . . . . . . . . . . . . . . . . . . . . . . . . . . . . . . . . . . . . 98
Track FX button. . . . . . . . . . . . . . . . . . . . . . . . . . . . . . . . . . . . . . . . . . . . . . . . . . . . . . . . . . 99
Bus assignment . . . . . . . . . . . . . . . . . . . . . . . . . . . . . . . . . . . . . . . . . . . . . . . . . . . . . . . . . 99
Arm for Record button . . . . . . . . . . . . . . . . . . . . . . . . . . . . . . . . . . . . . . . . . . . . . . . . . . . 99
Mute button. . . . . . . . . . . . . . . . . . . . . . . . . . . . . . . . . . . . . . . . . . . . . . . . . . . . . . . . . . . . 100
Solo button . . . . . . . . . . . . . . . . . . . . . . . . . . . . . . . . . . . . . . . . . . . . . . . . . . . . . . . . . . . . 100
Scribble Strip. . . . . . . . . . . . . . . . . . . . . . . . . . . . . . . . . . . . . . . . . . . . . . . . . . . . . . . . . . . 100
Volume fader. . . . . . . . . . . . . . . . . . . . . . . . . . . . . . . . . . . . . . . . . . . . . . . . . . . . . . . . . . . 101
Multipurpose slider . . . . . . . . . . . . . . . . . . . . . . . . . . . . . . . . . . . . . . . . . . . . . . . . . . . . . 101
Playback and preview . . . . . . . . . . . . . . . . . . . . . . . . . . . . . . . . . . . . . . . . 102
Playback from within Vegas. . . . . . . . . . . . . . . . . . . . . . . . . . . . . . . . . . . . . . . . . . . . . . 102
Scrubbing. . . . . . . . . . . . . . . . . . . . . . . . . . . . . . . . . . . . . . . . . . . . . . . . . . . . . . . . . . . . . . 104
Previewing to media player . . . . . . . . . . . . . . . . . . . . . . . . . . . . . . . . . . . . . . . . . . . . . . 105
Rendered video previews. . . . . . . . . . . . . . . . . . . . . . . . . . . . . . . . . . . . . . . . . . . . . . . . 105
Rendering a Vegas project . . . . . . . . . . . . . . . . . . . . . . . . . . . . . . . . . . . . 106
Creating a movie (basic) . . . . . . . . . . . . . . . . . . . . . . . . . . . . . . . . . . . . . . . . . . . . . . . . . 107
4. Basic Editing Techniques. . . . . . . . . . . . . . . . . . . . . . .109
Getting around. . . . . . . . . . . . . . . . . . . . . . . . . . . . . . . . . . . . . . . . . . . . . . . 109
Making selections . . . . . . . . . . . . . . . . . . . . . . . . . . . . . . . . . . . . . . . . . . . . 111
Selecting multiple events . . . . . . . . . . . . . . . . . . . . . . . . . . . . . . . . . . . . . . . . . . . . . . . . 111
Modifying events in selections . . . . . . . . . . . . . . . . . . . . . . . . . . . . . . . . . . . . . . . . . . . 112
Selecting a time range. . . . . . . . . . . . . . . . . . . . . . . . . . . . . . . . . . . . . . . . . . . . . . . . . . . 112
Looping playback . . . . . . . . . . . . . . . . . . . . . . . . . . . . . . . . . . . . . . . . . . . . . . . . . . . . . . . 114
Selecting events and a time range . . . . . . . . . . . . . . . . . . . . . . . . . . . . . . . . . . . . . . . . 114
Basic event editing . . . . . . . . . . . . . . . . . . . . . . . . . . . . . . . . . . . . . . . . . . . 114
Copying events. . . . . . . . . . . . . . . . . . . . . . . . . . . . . . . . . . . . . . . . . . . . . . . . . . . . . . . . . 114
Cutting events . . . . . . . . . . . . . . . . . . . . . . . . . . . . . . . . . . . . . . . . . . . . . . . . . . . . . . . . . . 116
Pasting events. . . . . . . . . . . . . . . . . . . . . . . . . . . . . . . . . . . . . . . . . . . . . . . . . . . . . . . . . . 117
Duplicating events . . . . . . . . . . . . . . . . . . . . . . . . . . . . . . . . . . . . . . . . . . . . . . . . . . . . . . 120
Page 9

Trimming events. . . . . . . . . . . . . . . . . . . . . . . . . . . . . . . . . . . . . . . . . . . . . . . . . . . . . . . . 121
Splitting events . . . . . . . . . . . . . . . . . . . . . . . . . . . . . . . . . . . . . . . . . . . . . . . . . . . . . . . . . 122
Shifting the contents of an event. . . . . . . . . . . . . . . . . . . . . . . . . . . . . . . . . . . . . . . . . . 125
Deleting events . . . . . . . . . . . . . . . . . . . . . . . . . . . . . . . . . . . . . . . . . . . . . . . . . . . . . . . . .126
Crossfading events . . . . . . . . . . . . . . . . . . . . . . . . . . . . . . . . . . . . . . . . . . . 127
Automatic crossfades . . . . . . . . . . . . . . . . . . . . . . . . . . . . . . . . . . . . . . . . . . . . . . . . . . . 127
Manually setting a crossfade . . . . . . . . . . . . . . . . . . . . . . . . . . . . . . . . . . . . . . . . . . . . . 127
Changing crossfade curves . . . . . . . . . . . . . . . . . . . . . . . . . . . . . . . . . . . . . . . . . . . . . . 128
Undo and Redo commands . . . . . . . . . . . . . . . . . . . . . . . . . . . . . . . . . . . 129
Undo command . . . . . . . . . . . . . . . . . . . . . . . . . . . . . . . . . . . . . . . . . . . . . . . . . . . . . . . . 129
Redo command. . . . . . . . . . . . . . . . . . . . . . . . . . . . . . . . . . . . . . . . . . . . . . . . . . . . . . . . . 130
Clearing the edit history. . . . . . . . . . . . . . . . . . . . . . . . . . . . . . . . . . . . . . . . . . . . . . . . . . 130
Project markers and regions . . . . . . . . . . . . . . . . . . . . . . . . . . . . . . . . . . . 131
Working with markers . . . . . . . . . . . . . . . . . . . . . . . . . . . . . . . . . . . . . . . . . . . . . . . . . . . 131
Working with regions. . . . . . . . . . . . . . . . . . . . . . . . . . . . . . . . . . . . . . . . . . . . . . . . . . . . 133
Working with command markers . . . . . . . . . . . . . . . . . . . . . . . . . . . . . . . . . . . . . . . . . 135
Using an external sound editing program. . . . . . . . . . . . . . . . . . . . . . . 138
9
Setting up the sound editing program. . . . . . . . . . . . . . . . . . . . . . . . . . . . . . . . . . . . . 138
Opening a sound editor from Vegas . . . . . . . . . . . . . . . . . . . . . . . . . . . . . . . . . . . . . . 139
5. Advanced Editing Techniques. . . . . . . . . . . . . . . . . . 141
Importing media from other projects . . . . . . . . . . . . . . . . . . . . . . . . . . . 141
Snapping events . . . . . . . . . . . . . . . . . . . . . . . . . . . . . . . . . . . . . . . . . . . . . 141
Using the event snap offset . . . . . . . . . . . . . . . . . . . . . . . . . . . . . . . . . . . . . . . . . . . . . . 142
Snapping to grid lines . . . . . . . . . . . . . . . . . . . . . . . . . . . . . . . . . . . . . . . . . . . . . . . . . . . 142
Snapping to grids and rulers . . . . . . . . . . . . . . . . . . . . . . . . . . . . . . . . . . . . . . . . . . . . . 143
Snapping to markers . . . . . . . . . . . . . . . . . . . . . . . . . . . . . . . . . . . . . . . . . . . . . . . . . . . . 144
Disable snapping. . . . . . . . . . . . . . . . . . . . . . . . . . . . . . . . . . . . . . . . . . . . . . . . . . . . . . . . 144
Ripple editing . . . . . . . . . . . . . . . . . . . . . . . . . . . . . . . . . . . . . . . . . . . . . . . . 145
Ripple editing from the Trimmer. . . . . . . . . . . . . . . . . . . . . . . . . . . . . . . . . . . . . . . . . . 145
Cutting and deleting in ripple mode. . . . . . . . . . . . . . . . . . . . . . . . . . . . . . . . . . . . . . . 146
Ripple editing across all tracks (Paste Insert) . . . . . . . . . . . . . . . . . . . . . . . . . . . . . . . 147
Page 10

10
Pitch shifting audio events . . . . . . . . . . . . . . . . . . . . . . . . . . . . . . . . . . . . 149
Time compressing/stretching. . . . . . . . . . . . . . . . . . . . . . . . . . . . . . . . . . 150
Time compressing/stretching video. . . . . . . . . . . . . . . . . . . . . . . . . . . . . . . . . . . . . . . 150
Takes . . . . . . . . . . . . . . . . . . . . . . . . . . . . . . . . . . . . . . . . . . . . . . . . . . . . . . . 151
Adding takes . . . . . . . . . . . . . . . . . . . . . . . . . . . . . . . . . . . . . . . . . . . . . . . . . . . . . . . . . . . 151
Selecting takes . . . . . . . . . . . . . . . . . . . . . . . . . . . . . . . . . . . . . . . . . . . . . . . . . . . . . . . . . 151
Deleting takes . . . . . . . . . . . . . . . . . . . . . . . . . . . . . . . . . . . . . . . . . . . . . . . . . . . . . . . . . . 152
Take names . . . . . . . . . . . . . . . . . . . . . . . . . . . . . . . . . . . . . . . . . . . . . . . . . . . . . . . . . . . . 152
Using the Trimmer window . . . . . . . . . . . . . . . . . . . . . . . . . . . . . . . . . . . 154
Working with the Trimmer window. . . . . . . . . . . . . . . . . . . . . . . . . . . . . . . . . . . . . . . 155
Opening a file in an external sound editor from the Trimmer . . . . . . . . . . . . . . . . 158
Using the Edit Details window . . . . . . . . . . . . . . . . . . . . . . . . . . . . . . . . . 159
Viewing the Edit Details window . . . . . . . . . . . . . . . . . . . . . . . . . . . . . . . . . . . . . . . . . 159
Customizing the Edit Details window . . . . . . . . . . . . . . . . . . . . . . . . . . . . . . . . . . . . . 162
6. Events. . . . . . . . . . . . . . . . . . . . . . . . . . . . . . . . . . . . . . . .163
Accessing event properties. . . . . . . . . . . . . . . . . . . . . . . . . . . . . . . . . . . . 163
Event switches. . . . . . . . . . . . . . . . . . . . . . . . . . . . . . . . . . . . . . . . . . . . . . . 164
Muting an event. . . . . . . . . . . . . . . . . . . . . . . . . . . . . . . . . . . . . . . . . . . . . . . . . . . . . . . . 164
Locking an event. . . . . . . . . . . . . . . . . . . . . . . . . . . . . . . . . . . . . . . . . . . . . . . . . . . . . . . . 165
Looping an event . . . . . . . . . . . . . . . . . . . . . . . . . . . . . . . . . . . . . . . . . . . . . . . . . . . . . . . 165
Normalize (audio only) . . . . . . . . . . . . . . . . . . . . . . . . . . . . . . . . . . . . . . . . . . . . . . . . . . 166
Maintain aspect ratio (video only). . . . . . . . . . . . . . . . . . . . . . . . . . . . . . . . . . . . . . . . . 167
Resample (video only). . . . . . . . . . . . . . . . . . . . . . . . . . . . . . . . . . . . . . . . . . . . . . . . . . . 168
Event switches in the Event Properties dialog . . . . . . . . . . . . . . . . . . . . . . . . . . . . . . 168
Event switches in the Edit Details window . . . . . . . . . . . . . . . . . . . . . . . . . . . . . . . . . 169
Audio event envelopes (ASR). . . . . . . . . . . . . . . . . . . . . . . . . . . . . . . . . . 169
Setting an audio event’s volume . . . . . . . . . . . . . . . . . . . . . . . . . . . . . . . . . . . . . . . . . 169
Setting an event’s fade in and out . . . . . . . . . . . . . . . . . . . . . . . . . . . . . . . . . . . . . . . . 170
Video event envelopes. . . . . . . . . . . . . . . . . . . . . . . . . . . . . . . . . . . . . . . . 171
Opacity envelopes . . . . . . . . . . . . . . . . . . . . . . . . . . . . . . . . . . . . . . . . . . . . . . . . . . . . . . 171
Page 11

Velocity envelope . . . . . . . . . . . . . . . . . . . . . . . . . . . . . . . . . . . . . . . . . . . . . . . . . . . . . . . 171
Envelope Edit Tool . . . . . . . . . . . . . . . . . . . . . . . . . . . . . . . . . . . . . . . . . . . . . . . . . . . . . . 174
Grouping events . . . . . . . . . . . . . . . . . . . . . . . . . . . . . . . . . . . . . . . . . . . . . 174
Creating a new group . . . . . . . . . . . . . . . . . . . . . . . . . . . . . . . . . . . . . . . . . . . . . . . . . . . 174
Removing events from a group. . . . . . . . . . . . . . . . . . . . . . . . . . . . . . . . . . . . . . . . . . . 175
Clearing a group . . . . . . . . . . . . . . . . . . . . . . . . . . . . . . . . . . . . . . . . . . . . . . . . . . . . . . . .175
Selecting all members of a group. . . . . . . . . . . . . . . . . . . . . . . . . . . . . . . . . . . . . . . . . 175
Temporarily disabling grouping . . . . . . . . . . . . . . . . . . . . . . . . . . . . . . . . . . . . . . . . . . 175
7. Tracks . . . . . . . . . . . . . . . . . . . . . . . . . . . . . . . . . . . . . . . 177
Working with Tracks. . . . . . . . . . . . . . . . . . . . . . . . . . . . . . . . . . . . . . . . . . 177
Adding an empty track . . . . . . . . . . . . . . . . . . . . . . . . . . . . . . . . . . . . . . . . . . . . . . . . . . 177
Duplicating a track . . . . . . . . . . . . . . . . . . . . . . . . . . . . . . . . . . . . . . . . . . . . . . . . . . . . . . 178
Deleting a track . . . . . . . . . . . . . . . . . . . . . . . . . . . . . . . . . . . . . . . . . . . . . . . . . . . . . . . . . 178
Naming or renaming a track . . . . . . . . . . . . . . . . . . . . . . . . . . . . . . . . . . . . . . . . . . . . . 179
Organizing tracks. . . . . . . . . . . . . . . . . . . . . . . . . . . . . . . . . . . . . . . . . . . . . 179
Reordering tracks . . . . . . . . . . . . . . . . . . . . . . . . . . . . . . . . . . . . . . . . . . . . . . . . . . . . . . . 179
Changing track color . . . . . . . . . . . . . . . . . . . . . . . . . . . . . . . . . . . . . . . . . . . . . . . . . . . . 180
Changing track height . . . . . . . . . . . . . . . . . . . . . . . . . . . . . . . . . . . . . . . . . . . . . . . . . . . 180
Track Headers. . . . . . . . . . . . . . . . . . . . . . . . . . . . . . . . . . . . . . . . . . . . . . . . 181
11
Using the audio track fader. . . . . . . . . . . . . . . . . . . . . . . . . . . . . . . . . . . . . . . . . . . . . . . 181
Muting a track . . . . . . . . . . . . . . . . . . . . . . . . . . . . . . . . . . . . . . . . . . . . . . . . . . . . . . . . . . 181
Muting all audio or video tracks . . . . . . . . . . . . . . . . . . . . . . . . . . . . . . . . . . . . . . . . . . 182
Soloing a track. . . . . . . . . . . . . . . . . . . . . . . . . . . . . . . . . . . . . . . . . . . . . . . . . . . . . . . . . . 182
Audio track envelopes . . . . . . . . . . . . . . . . . . . . . . . . . . . . . . . . . . . . . . . . 182
Adding a volume or pan envelope . . . . . . . . . . . . . . . . . . . . . . . . . . . . . . . . . . . . . . . . 183
Hiding the audio track envelopes . . . . . . . . . . . . . . . . . . . . . . . . . . . . . . . . . . . . . . . . . 185
Removing audio track volume envelopes. . . . . . . . . . . . . . . . . . . . . . . . . . . . . . . . . . 185
Video track envelopes. . . . . . . . . . . . . . . . . . . . . . . . . . . . . . . . . . . . . . . . . 186
Composite Level envelopes . . . . . . . . . . . . . . . . . . . . . . . . . . . . . . . . . . . . . . . . . . . . . . 186
Fade to Color envelopes . . . . . . . . . . . . . . . . . . . . . . . . . . . . . . . . . . . . . . . . . . . . . . . . . 186
Envelope Edit tool. . . . . . . . . . . . . . . . . . . . . . . . . . . . . . . . . . . . . . . . . . . . . . . . . . . . . . . 187
Page 12

12
Locking envelopes to events . . . . . . . . . . . . . . . . . . . . . . . . . . . . . . . . . . . . . . . . . . . . . 187
Rendering to a new track. . . . . . . . . . . . . . . . . . . . . . . . . . . . . . . . . . . . . . 187
8. Audio FX . . . . . . . . . . . . . . . . . . . . . . . . . . . . . . . . . . . . .189
Assigning an audio track to a bus . . . . . . . . . . . . . . . . . . . . . . . . . . . . . . 189
Assigning an audio track to an auxiliary bus . . . . . . . . . . . . . . . . . . . . . . . . . . . . . . . 190
Assigning audio tracks to an Assignable FX . . . . . . . . . . . . . . . . . . . . . . . . . . . . . . . 191
Setting up to record into audio tracks . . . . . . . . . . . . . . . . . . . . . . . . . . . . . . . . . . . . . 192
Using Audio FX . . . . . . . . . . . . . . . . . . . . . . . . . . . . . . . . . . . . . . . . . . . . . . 193
Bus FX. . . . . . . . . . . . . . . . . . . . . . . . . . . . . . . . . . . . . . . . . . . . . . . . . . . . . . . . . . . . . . . . . 193
Assignable FX . . . . . . . . . . . . . . . . . . . . . . . . . . . . . . . . . . . . . . . . . . . . . . . . . . . . . . . . . . 194
Adding plug-ins. . . . . . . . . . . . . . . . . . . . . . . . . . . . . . . . . . . . . . . . . . . . . . . . . . . . . . . . . 195
Saving customized FX. . . . . . . . . . . . . . . . . . . . . . . . . . . . . . . . . . . . . . . . . . . . . . . . . . . 197
Plug-in chains. . . . . . . . . . . . . . . . . . . . . . . . . . . . . . . . . . . . . . . . . . . . . . . . 198
Removing plug-ins from a chain. . . . . . . . . . . . . . . . . . . . . . . . . . . . . . . . . . . . . . . . . . 199
Saving plug-in chains . . . . . . . . . . . . . . . . . . . . . . . . . . . . . . . . . . . . . . . . . . . . . . . . . . . 200
Editing saved plug-in chains . . . . . . . . . . . . . . . . . . . . . . . . . . . . . . . . . . . . . . . . . . . . . 201
Organizing your plug-ins . . . . . . . . . . . . . . . . . . . . . . . . . . . . . . . . . . . . . . . . . . . . . . . . 201
Non Real-Time Event FX . . . . . . . . . . . . . . . . . . . . . . . . . . . . . . . . . . . . . . 202
Audio plug-ins . . . . . . . . . . . . . . . . . . . . . . . . . . . . . . . . . . . . . . . . . . . . . . . 203
Equalization (EQ). . . . . . . . . . . . . . . . . . . . . . . . . . . . . . . . . . . . . . . . . . . . . . . . . . . . . . . . 204
Compression. . . . . . . . . . . . . . . . . . . . . . . . . . . . . . . . . . . . . . . . . . . . . . . . . . . . . . . . . . . 206
Using the Noise Gate plug-in. . . . . . . . . . . . . . . . . . . . . . . . . . . . . . . . . . . . . . . . . . . . . 209
Using the Dither plug-in . . . . . . . . . . . . . . . . . . . . . . . . . . . . . . . . . . . . . . . . . . . . . . . . . 210
Additional plug-ins. . . . . . . . . . . . . . . . . . . . . . . . . . . . . . . . . . . . . . . . . . . . . . . . . . . . . . 211
9. Using the Audio Mixer . . . . . . . . . . . . . . . . . . . . . . . . .213
Using the Mixer window. . . . . . . . . . . . . . . . . . . . . . . . . . . . . . . . . . . . . . 213
Viewing the Mixer window . . . . . . . . . . . . . . . . . . . . . . . . . . . . . . . . . . . . . . . . . . . . . . 213
Using the Mixer tool bar . . . . . . . . . . . . . . . . . . . . . . . . . . . . . . . . . . . . . . . . . . . . . . . . . 214
Using the Mixer Preview fader . . . . . . . . . . . . . . . . . . . . . . . . . . . . . . . . . . . . . . . . . . . 214
Page 13

Using busses . . . . . . . . . . . . . . . . . . . . . . . . . . . . . . . . . . . . . . . . . . . . . . . . 216
Adding busses to the project . . . . . . . . . . . . . . . . . . . . . . . . . . . . . . . . . . . . . . . . . . . . . 216
Deleting busses from the project. . . . . . . . . . . . . . . . . . . . . . . . . . . . . . . . . . . . . . . . . . 217
Routing busses to hardware . . . . . . . . . . . . . . . . . . . . . . . . . . . . . . . . . . . . . . . . . . . . . 218
Working with busses . . . . . . . . . . . . . . . . . . . . . . . . . . . . . . . . . . . . . . . . . . . . . . . . . . . . 219
10. Recording Audio . . . . . . . . . . . . . . . . . . . . . . . . . . . . 223
Setting up your equipment. . . . . . . . . . . . . . . . . . . . . . . . . . . . . . . . . . . . 223
Basic setup . . . . . . . . . . . . . . . . . . . . . . . . . . . . . . . . . . . . . . . . . . . . . . . . . . . . . . . . . . . . . 223
Setup with mixer. . . . . . . . . . . . . . . . . . . . . . . . . . . . . . . . . . . . . . . . . . . . . . . . . . . . . . . . 224
Setup with digital multitrack. . . . . . . . . . . . . . . . . . . . . . . . . . . . . . . . . . . . . . . . . . . . . . 224
Arming the track for recording . . . . . . . . . . . . . . . . . . . . . . . . . . . . . . . . . 225
Using the metronome . . . . . . . . . . . . . . . . . . . . . . . . . . . . . . . . . . . . . . . . . . . . . . . . . . . 226
Using the Sound Mapper for stereo or mono recording. . . . . . . . . . . . . . . . . . . . . 226
Assigning tracks to input devices . . . . . . . . . . . . . . . . . . . . . . . . . . . . . . . . . . . . . . . . . 227
Recording . . . . . . . . . . . . . . . . . . . . . . . . . . . . . . . . . . . . . . . . . . . . . . . . . . . 227
Starting and stopping recording . . . . . . . . . . . . . . . . . . . . . . . . . . . . . . . . . . . . . . . . . . 227
Chasing MIDI Time Code . . . . . . . . . . . . . . . . . . . . . . . . . . . . . . . . . . . . . . . . . . . . . . . . 228
Recording into an empty audio track . . . . . . . . . . . . . . . . . . . . . . . . . . . . . . . . . . . . . . 229
Recording into a time selection . . . . . . . . . . . . . . . . . . . . . . . . . . . . . . . . . . . . . . . . . . . 231
Recording into an event . . . . . . . . . . . . . . . . . . . . . . . . . . . . . . . . . . . . . . . . . . . . . . . . . 232
Recording into an event with a time selection . . . . . . . . . . . . . . . . . . . . . . . . . . . . . . 232
Working with multiple recorded takes . . . . . . . . . . . . . . . . . . . . . . . . . . 234
13
Previewing takes. . . . . . . . . . . . . . . . . . . . . . . . . . . . . . . . . . . . . . . . . . . . . . . . . . . . . . . . 234
Choosing an active take after loop recording . . . . . . . . . . . . . . . . . . . . . . . . . . . . . . . 235
Renaming an event take . . . . . . . . . . . . . . . . . . . . . . . . . . . . . . . . . . . . . . . . . . . . . . . . . 236
Deleting an event take . . . . . . . . . . . . . . . . . . . . . . . . . . . . . . . . . . . . . . . . . . . . . . . . . . . 237
Specifying where recordings are stored . . . . . . . . . . . . . . . . . . . . . . . . 238
11. Advanced Video. . . . . . . . . . . . . . . . . . . . . . . . . . . . . 241
Pan/Crop . . . . . . . . . . . . . . . . . . . . . . . . . . . . . . . . . . . . . . . . . . . . . . . . . . . . 241
Page 14

14
Cropping. . . . . . . . . . . . . . . . . . . . . . . . . . . . . . . . . . . . . . . . . . . . . . . . . . . . . . . . . . . . . . . 241
Zooming. . . . . . . . . . . . . . . . . . . . . . . . . . . . . . . . . . . . . . . . . . . . . . . . . . . . . . . . . . . . . . . 243
Rotating . . . . . . . . . . . . . . . . . . . . . . . . . . . . . . . . . . . . . . . . . . . . . . . . . . . . . . . . . . . . . . . 244
Panning. . . . . . . . . . . . . . . . . . . . . . . . . . . . . . . . . . . . . . . . . . . . . . . . . . . . . . . . . . . . . . . . 245
Scrolling titles - Pan/Crop technique . . . . . . . . . . . . . . . . . . . . . . . . . . . . . . . . . . . . . . 246
Working with images . . . . . . . . . . . . . . . . . . . . . . . . . . . . . . . . . . . . . . . . . 248
Titles. . . . . . . . . . . . . . . . . . . . . . . . . . . . . . . . . . . . . . . . . . . . . . . . . . . . . . . . 249
Creating titles from images . . . . . . . . . . . . . . . . . . . . . . . . . . . . . . . . . . . . . . . . . . . . . . 249
Fading titles . . . . . . . . . . . . . . . . . . . . . . . . . . . . . . . . . . . . . . . . . . . . . . . . . . . . . . . . . . . . 250
Customizing the Video Preview window. . . . . . . . . . . . . . . . . . . . . . . . 252
Optimizing previews . . . . . . . . . . . . . . . . . . . . . . . . . . . . . . . . . . . . . . . . . . . . . . . . . . . . 253
Video properties and preferences . . . . . . . . . . . . . . . . . . . . . . . . . . . . . . 256
Project properties - Video tab. . . . . . . . . . . . . . . . . . . . . . . . . . . . . . . . . . . . . . . . . . . . . 256
Event properties . . . . . . . . . . . . . . . . . . . . . . . . . . . . . . . . . . . . . . . . . . . . . . . . . . . . . . . . 257
Resampling . . . . . . . . . . . . . . . . . . . . . . . . . . . . . . . . . . . . . . . . . . . . . . . . . . . . . . . . . . . . 258
Media file properties . . . . . . . . . . . . . . . . . . . . . . . . . . . . . . . . . . . . . . . . . . . . . . . . . . . . 259
Output properties . . . . . . . . . . . . . . . . . . . . . . . . . . . . . . . . . . . . . . . . . . . . . . . . . . . . . . . 260
Edit Decision Lists (EDL) . . . . . . . . . . . . . . . . . . . . . . . . . . . . . . . . . . . . . . 262
12. Video FX and Masks . . . . . . . . . . . . . . . . . . . . . . . . . .263
Video plug-ins . . . . . . . . . . . . . . . . . . . . . . . . . . . . . . . . . . . . . . . . . . . . . . . 263
Filters . . . . . . . . . . . . . . . . . . . . . . . . . . . . . . . . . . . . . . . . . . . . . . . . . . . . . . . 264
Using a video filter . . . . . . . . . . . . . . . . . . . . . . . . . . . . . . . . . . . . . . . . . . . . . . . . . . . . . . 264
Modifying filters. . . . . . . . . . . . . . . . . . . . . . . . . . . . . . . . . . . . . . . . . . . . . . 266
Ordering filters . . . . . . . . . . . . . . . . . . . . . . . . . . . . . . . . . . . . . . . . . . . . . . . . . . . . . . . . . 266
Keyframe animation and filters . . . . . . . . . . . . . . . . . . . . . . . . . . . . . . . . 267
Transitioning into an effect. . . . . . . . . . . . . . . . . . . . . . . . . . . . . . . . . . . . . . . . . . . . . . . 268
Video filter dictionary . . . . . . . . . . . . . . . . . . . . . . . . . . . . . . . . . . . . . . . . . 269
Correction filters . . . . . . . . . . . . . . . . . . . . . . . . . . . . . . . . . . . . . . . . . . . . . . . . . . . . . . . . 269
Creative filters . . . . . . . . . . . . . . . . . . . . . . . . . . . . . . . . . . . . . . . . . . . . . . . . . . . . . . . . . . 269
Mask filters. . . . . . . . . . . . . . . . . . . . . . . . . . . . . . . . . . . . . . . . . . . . . . . . . . . . . . . . . . . . . 269
Page 15

Add noise . . . . . . . . . . . . . . . . . . . . . . . . . . . . . . . . . . . . . . . . . . . . . . . . . . . . . . . . . . . . . . 270
Black and White. . . . . . . . . . . . . . . . . . . . . . . . . . . . . . . . . . . . . . . . . . . . . . . . . . . . . . . . .270
Brightness and Contrast . . . . . . . . . . . . . . . . . . . . . . . . . . . . . . . . . . . . . . . . . . . . . . . . . 271
Broadcast Colors. . . . . . . . . . . . . . . . . . . . . . . . . . . . . . . . . . . . . . . . . . . . . . . . . . . . . . . . 271
Chroma Keyer . . . . . . . . . . . . . . . . . . . . . . . . . . . . . . . . . . . . . . . . . . . . . . . . . . . . . . . . . .272
Gaussian Blur. . . . . . . . . . . . . . . . . . . . . . . . . . . . . . . . . . . . . . . . . . . . . . . . . . . . . . . . . . . 272
HSL Adjust . . . . . . . . . . . . . . . . . . . . . . . . . . . . . . . . . . . . . . . . . . . . . . . . . . . . . . . . . . . . . 273
Invert . . . . . . . . . . . . . . . . . . . . . . . . . . . . . . . . . . . . . . . . . . . . . . . . . . . . . . . . . . . . . . . . . . 273
Levels. . . . . . . . . . . . . . . . . . . . . . . . . . . . . . . . . . . . . . . . . . . . . . . . . . . . . . . . . . . . . . . . . . 274
Mask. . . . . . . . . . . . . . . . . . . . . . . . . . . . . . . . . . . . . . . . . . . . . . . . . . . . . . . . . . . . . . . . . . . 274
Median . . . . . . . . . . . . . . . . . . . . . . . . . . . . . . . . . . . . . . . . . . . . . . . . . . . . . . . . . . . . . . . . 275
Min and Max . . . . . . . . . . . . . . . . . . . . . . . . . . . . . . . . . . . . . . . . . . . . . . . . . . . . . . . . . . .275
Pixelate . . . . . . . . . . . . . . . . . . . . . . . . . . . . . . . . . . . . . . . . . . . . . . . . . . . . . . . . . . . . . . . . 276
Quick Blur . . . . . . . . . . . . . . . . . . . . . . . . . . . . . . . . . . . . . . . . . . . . . . . . . . . . . . . . . . . . . . 276
Sepia . . . . . . . . . . . . . . . . . . . . . . . . . . . . . . . . . . . . . . . . . . . . . . . . . . . . . . . . . . . . . . . . . . 277
Sharpen. . . . . . . . . . . . . . . . . . . . . . . . . . . . . . . . . . . . . . . . . . . . . . . . . . . . . . . . . . . . . . . . 277
Threshold . . . . . . . . . . . . . . . . . . . . . . . . . . . . . . . . . . . . . . . . . . . . . . . . . . . . . . . . . . . . . . 278
Waves . . . . . . . . . . . . . . . . . . . . . . . . . . . . . . . . . . . . . . . . . . . . . . . . . . . . . . . . . . . . . . . . . 279
Generators . . . . . . . . . . . . . . . . . . . . . . . . . . . . . . . . . . . . . . . . . . . . . . . . . . 279
15
Color Surface . . . . . . . . . . . . . . . . . . . . . . . . . . . . . . . . . . . . . . . . . . . . . . . . . . . . . . . . . . . 280
Test Pattern . . . . . . . . . . . . . . . . . . . . . . . . . . . . . . . . . . . . . . . . . . . . . . . . . . . . . . . . . . . . 280
Text . . . . . . . . . . . . . . . . . . . . . . . . . . . . . . . . . . . . . . . . . . . . . . . . . . . . . . . . . . . . . . . . . . . 280
Compositing . . . . . . . . . . . . . . . . . . . . . . . . . . . . . . . . . . . . . . . . . . . . . . . . . 285
Parent/Child track relationship . . . . . . . . . . . . . . . . . . . . . . . . . . . . . . . . . . . . . . . . . . . . 285
Masks. . . . . . . . . . . . . . . . . . . . . . . . . . . . . . . . . . . . . . . . . . . . . . . . . . . . . . . 286
Image masks . . . . . . . . . . . . . . . . . . . . . . . . . . . . . . . . . . . . . . . . . . . . . . . . . . . . . . . . . . .286
Masks and tracks. . . . . . . . . . . . . . . . . . . . . . . . . . . . . . . . . . . . . . . . . . . . . . . . . . . . . . . . 288
Video masks. . . . . . . . . . . . . . . . . . . . . . . . . . . . . . . . . . . . . . . . . . . . . . . . . . . . . . . . . . . . 289
Fine tuning masks. . . . . . . . . . . . . . . . . . . . . . . . . . . . . . . . . . . . . . . . . . . . . . . . . . . . . . . 290
Chromakeying. . . . . . . . . . . . . . . . . . . . . . . . . . . . . . . . . . . . . . . . . . . . . . . . . . . . . . . . . . 292
Compositing Modes. . . . . . . . . . . . . . . . . . . . . . . . . . . . . . . . . . . . . . . . . . . . . . . . . . . . . 295
Transitions. . . . . . . . . . . . . . . . . . . . . . . . . . . . . . . . . . . . . . . . . . . . . . . . . . . 296
Page 16

16
13. Video Transitions and Motion. . . . . . . . . . . . . . . . . .297
Transitions . . . . . . . . . . . . . . . . . . . . . . . . . . . . . . . . . . . . . . . . . . . . . . . . . . 297
Cuts . . . . . . . . . . . . . . . . . . . . . . . . . . . . . . . . . . . . . . . . . . . . . . . . . . . . . . . . . . . . . . . . . . . 297
Fading . . . . . . . . . . . . . . . . . . . . . . . . . . . . . . . . . . . . . . . . . . . . . . . . . . . . . . . . . . . . . . . . . 298
Crossfades . . . . . . . . . . . . . . . . . . . . . . . . . . . . . . . . . . . . . . . . . . . . . . . . . . . . . . . . . . . . . 298
Using Transition effects . . . . . . . . . . . . . . . . . . . . . . . . . . . . . . . . . . . . . . . 299
Adding a transition. . . . . . . . . . . . . . . . . . . . . . . . . . . . . . . . . . . . . . . . . . . . . . . . . . . . . . 299
Adding transitions to the ends of an event. . . . . . . . . . . . . . . . . . . . . . . . . . . . . . . . . 300
Understanding the A/B roll. . . . . . . . . . . . . . . . . . . . . . . . . . . . . . . . . . . . . . . . . . . . . . . 300
Converting cuts to transitions . . . . . . . . . . . . . . . . . . . . . . . . . . . . . . . . . . . . . . . . . . . . 301
Previewing a transition . . . . . . . . . . . . . . . . . . . . . . . . . . . . . . . . . . . . . . . . . . . . . . . . . . 303
Modifying a transition . . . . . . . . . . . . . . . . . . . . . . . . . . . . . . . . . . . . . . . . . . . . . . . . . . . 303
Keyframe animation. . . . . . . . . . . . . . . . . . . . . . . . . . . . . . . . . . . . . . . . . . 305
Keyframe Controller. . . . . . . . . . . . . . . . . . . . . . . . . . . . . . . . . . . . . . . . . . . . . . . . . . . . . 305
Adding a keyframe. . . . . . . . . . . . . . . . . . . . . . . . . . . . . . . . . . . . . . . . . . . . . . . . . . . . . . 306
Modifying keyframes. . . . . . . . . . . . . . . . . . . . . . . . . . . . . . . . . . . . . . . . . . . . . . . . . . . . 306
Keyframes and transition effects. . . . . . . . . . . . . . . . . . . . . . . . . . . . . . . . . . . . . . . . . . 307
Video transition dictionary . . . . . . . . . . . . . . . . . . . . . . . . . . . . . . . . . . . . 308
Additive Dissolve . . . . . . . . . . . . . . . . . . . . . . . . . . . . . . . . . . . . . . . . . . . . . . . . . . . . . . . 308
Barndoor. . . . . . . . . . . . . . . . . . . . . . . . . . . . . . . . . . . . . . . . . . . . . . . . . . . . . . . . . . . . . . . 309
Clock Wipe . . . . . . . . . . . . . . . . . . . . . . . . . . . . . . . . . . . . . . . . . . . . . . . . . . . . . . . . . . . . . 309
Cross Effect . . . . . . . . . . . . . . . . . . . . . . . . . . . . . . . . . . . . . . . . . . . . . . . . . . . . . . . . . . . . 310
Iris. . . . . . . . . . . . . . . . . . . . . . . . . . . . . . . . . . . . . . . . . . . . . . . . . . . . . . . . . . . . . . . . . . . . . 311
Linear Wipe . . . . . . . . . . . . . . . . . . . . . . . . . . . . . . . . . . . . . . . . . . . . . . . . . . . . . . . . . . . . 311
Page Peel and Page Roll . . . . . . . . . . . . . . . . . . . . . . . . . . . . . . . . . . . . . . . . . . . . . . . . . 312
Push. . . . . . . . . . . . . . . . . . . . . . . . . . . . . . . . . . . . . . . . . . . . . . . . . . . . . . . . . . . . . . . . . . . 312
Slide. . . . . . . . . . . . . . . . . . . . . . . . . . . . . . . . . . . . . . . . . . . . . . . . . . . . . . . . . . . . . . . . . . . 313
Spiral . . . . . . . . . . . . . . . . . . . . . . . . . . . . . . . . . . . . . . . . . . . . . . . . . . . . . . . . . . . . . . . . . . 313
Split . . . . . . . . . . . . . . . . . . . . . . . . . . . . . . . . . . . . . . . . . . . . . . . . . . . . . . . . . . . . . . . . . . . 314
Squeeze . . . . . . . . . . . . . . . . . . . . . . . . . . . . . . . . . . . . . . . . . . . . . . . . . . . . . . . . . . . . . . . 314
Swap . . . . . . . . . . . . . . . . . . . . . . . . . . . . . . . . . . . . . . . . . . . . . . . . . . . . . . . . . . . . . . . . . . 315
Zoom. . . . . . . . . . . . . . . . . . . . . . . . . . . . . . . . . . . . . . . . . . . . . . . . . . . . . . . . . . . . . . . . . . 315
Page 17

Track Motion. . . . . . . . . . . . . . . . . . . . . . . . . . . . . . . . . . . . . . . . . . . . . . . . . 316
Track Motion context menu . . . . . . . . . . . . . . . . . . . . . . . . . . . . . . . . . . . . . . . . . . . . . . 317
Controlling the Track Motion workspace. . . . . . . . . . . . . . . . . . . . . . . . . . . . . . . . . . . 317
Keyframing and Track Motion attributes. . . . . . . . . . . . . . . . . . . . . . . . . . . . . . . . . . . 317
Shadows and Glow . . . . . . . . . . . . . . . . . . . . . . . . . . . . . . . . . . . . . . . . . . . . . . . . . . . . . 318
Picture-in-Picture. . . . . . . . . . . . . . . . . . . . . . . . . . . . . . . . . . . . . . . . . . . . . . . . . . . . . . . .319
Animating the overlay . . . . . . . . . . . . . . . . . . . . . . . . . . . . . . . . . . . . . . . . . . . . . . . . . . . 320
Scrolling titles - Video Motion technique. . . . . . . . . . . . . . . . . . . . . . . . . . . . . . . . . . . 321
14. Saving and Rendering Projects. . . . . . . . . . . . . . . . 323
Saving your project. . . . . . . . . . . . . . . . . . . . . . . . . . . . . . . . . . . . . . . . . . . 323
Creating a copy of a project (using Save As...) . . . . . . . . . . . . . . . . . . . . . . . . . . . . . . 324
Rendering projects . . . . . . . . . . . . . . . . . . . . . . . . . . . . . . . . . . . . . . . . . . . 325
Rendering to an audio format . . . . . . . . . . . . . . . . . . . . . . . . . . . . . . . . . . . . . . . . . . . . 326
Rendering to a video format. . . . . . . . . . . . . . . . . . . . . . . . . . . . . . . . . . . . . . . . . . . . . . 327
Partial rendering and timeline playback. . . . . . . . . . . . . . . . . . . . . . . . . 327
Rendering to a streaming media format . . . . . . . . . . . . . . . . . . . . . . . . 328
17
Using rendering format controls and templates . . . . . . . . . . . . . . . . . 329
Customizing a render . . . . . . . . . . . . . . . . . . . . . . . . . . . . . . . . . . . . . . . . . 329
Custom rendering settings . . . . . . . . . . . . . . . . . . . . . . . . . . . . . . . . . . . . . . . . . . . . . . . 330
Audio tab - Custom Settings . . . . . . . . . . . . . . . . . . . . . . . . . . . . . . . . . . . . . . . . . . . . . 331
Video tab - Custom settings . . . . . . . . . . . . . . . . . . . . . . . . . . . . . . . . . . . . . . . . . . . . . . 332
Project tab - Custom settings . . . . . . . . . . . . . . . . . . . . . . . . . . . . . . . . . . . . . . . . . . . . . 333
Selecting a video format . . . . . . . . . . . . . . . . . . . . . . . . . . . . . . . . . . . . . . 335
Miscellaneous formats. . . . . . . . . . . . . . . . . . . . . . . . . . . . . . . . . . . . . . . . 336
Creating *.mp3 files . . . . . . . . . . . . . . . . . . . . . . . . . . . . . . . . . . . . . . . . . . . . . . . . . . . . . 336
Creating *.wma or *.wmv files . . . . . . . . . . . . . . . . . . . . . . . . . . . . . . . . . . . . . . . . . . . 337
Creating MPEG files . . . . . . . . . . . . . . . . . . . . . . . . . . . . . . . . . . . . . . . . . . . . . . . . . . . . . 339
15. Customizing Vegas . . . . . . . . . . . . . . . . . . . . . . . . . . 341
Page 18

18
Dockable Vegas windows. . . . . . . . . . . . . . . . . . . . . . . . . . . . . . . . . . . . . 341
Floating (undocking) a window. . . . . . . . . . . . . . . . . . . . . . . . . . . . . . . . . . . . . . . . . . . 342
Docking a window . . . . . . . . . . . . . . . . . . . . . . . . . . . . . . . . . . . . . . . . . . . . . . . . . . . . . . 342
Using the Explorer window . . . . . . . . . . . . . . . . . . . . . . . . . . . . . . . . . . . 344
Managing your media files. . . . . . . . . . . . . . . . . . . . . . . . . . . . . . . . . . . . . . . . . . . . . . . 345
Using the Explorer window Transport bar . . . . . . . . . . . . . . . . . . . . . . . . . . . . . . . . . 347
Changing the Explorer window views. . . . . . . . . . . . . . . . . . . . . . . . . . . . . . . . . . . . . 348
Changing the Ruler format . . . . . . . . . . . . . . . . . . . . . . . . . . . . . . . . . . . . 349
Grid spacing. . . . . . . . . . . . . . . . . . . . . . . . . . . . . . . . . . . . . . . . . . . . . . . . . 351
Working with the Toolbar . . . . . . . . . . . . . . . . . . . . . . . . . . . . . . . . . . . . . 351
Moving the Toolbar . . . . . . . . . . . . . . . . . . . . . . . . . . . . . . . . . . . . . . . . . . . . . . . . . . . . . 351
Resizing the Toolbar . . . . . . . . . . . . . . . . . . . . . . . . . . . . . . . . . . . . . . . . . . . . . . . . . . . . 352
Hiding and displaying the Toolbar . . . . . . . . . . . . . . . . . . . . . . . . . . . . . . . . . . . . . . . . 352
Reordering the Toolbar buttons . . . . . . . . . . . . . . . . . . . . . . . . . . . . . . . . . . . . . . . . . . 353
Adding buttons to the Toolbar . . . . . . . . . . . . . . . . . . . . . . . . . . . . . . . . . . . . . . . . . . . 354
Removing buttons from the Toolbar . . . . . . . . . . . . . . . . . . . . . . . . . . . . . . . . . . . . . . 355
Using the Time Display window . . . . . . . . . . . . . . . . . . . . . . . . . . . . . . . 356
Changing the Time Display window’s settings . . . . . . . . . . . . . . . . . . . . . . . . . . . . . 356
Changing the Time Displays colors . . . . . . . . . . . . . . . . . . . . . . . . . . . . . . . . . . . . . . . 356
Setting the Time Display to monitor MIDI time code. . . . . . . . . . . . . . . . . . . . . . . . 357
Working with project properties . . . . . . . . . . . . . . . . . . . . . . . . . . . . . . . 358
Summary tab. . . . . . . . . . . . . . . . . . . . . . . . . . . . . . . . . . . . . . . . . . . . . . . . . . . . . . . . . . . 358
Audio tab . . . . . . . . . . . . . . . . . . . . . . . . . . . . . . . . . . . . . . . . . . . . . . . . . . . . . . . . . . . . . . 359
Video tab. . . . . . . . . . . . . . . . . . . . . . . . . . . . . . . . . . . . . . . . . . . . . . . . . . . . . . . . . . . . . . . 359
Ruler tab . . . . . . . . . . . . . . . . . . . . . . . . . . . . . . . . . . . . . . . . . . . . . . . . . . . . . . . . . . . . . . 360
Using Vegas preferences. . . . . . . . . . . . . . . . . . . . . . . . . . . . . . . . . . . . . . 360
General tab. . . . . . . . . . . . . . . . . . . . . . . . . . . . . . . . . . . . . . . . . . . . . . . . . . . . . . . . . . . . . 361
Video tab. . . . . . . . . . . . . . . . . . . . . . . . . . . . . . . . . . . . . . . . . . . . . . . . . . . . . . . . . . . . . . . 362
Audio tab . . . . . . . . . . . . . . . . . . . . . . . . . . . . . . . . . . . . . . . . . . . . . . . . . . . . . . . . . . . . . . 363
Routing tab. . . . . . . . . . . . . . . . . . . . . . . . . . . . . . . . . . . . . . . . . . . . . . . . . . . . . . . . . . . . . 365
Editing tab . . . . . . . . . . . . . . . . . . . . . . . . . . . . . . . . . . . . . . . . . . . . . . . . . . . . . . . . . . . . . 366
Sync tab . . . . . . . . . . . . . . . . . . . . . . . . . . . . . . . . . . . . . . . . . . . . . . . . . . . . . . . . . . . . . . . 367
Page 19

External Monitor tab. . . . . . . . . . . . . . . . . . . . . . . . . . . . . . . . . . . . . . . . . . . . . . . . . . . . . 371
Troubleshooting. . . . . . . . . . . . . . . . . . . . . . . . . . . . . . . . 373
Why are some of my DirectX plug-ins not working correctly?. . . . . . . . . . . . . . . . 373
Why do I hear gaps in my audio playback? . . . . . . . . . . . . . . . . . . . . . . . . . . . . . . . . 373
QuickTime Video Audio/Video Synchronization Issues . . . . . . . . . . . . . . . . . . . . . . 375
Why do mono events increase 6 dB when panning a track hard?. . . . . . . . . . . . . 375
Trouble-free video: software solutions. . . . . . . . . . . . . . . . . . . . . . . . . . 375
Trouble-free video: hardware solutions . . . . . . . . . . . . . . . . . . . . . . . . . 376
Video subsystem. . . . . . . . . . . . . . . . . . . . . . . . . . . . . . . . . . . . . . . . . . . . . . . . . . . . . . . . 376
Hard disk. . . . . . . . . . . . . . . . . . . . . . . . . . . . . . . . . . . . . . . . . . . . . . . . . . . . . . . . . . . . . . . 377
CPU and RAM (memory) . . . . . . . . . . . . . . . . . . . . . . . . . . . . . . . . . . . . . . . . . . . . . . . . 378
The 2GB limitation. . . . . . . . . . . . . . . . . . . . . . . . . . . . . . . . . . . . . . . . . . . . 378
Audio proxy files (*.sfap0). . . . . . . . . . . . . . . . . . . . . . . . . . . . . . . . . . . . . 378
Interlacing and field order . . . . . . . . . . . . . . . . . . . . . . . . . . . . . . . . . . . . . 379
Timecode. . . . . . . . . . . . . . . . . . . . . . . . . . . . . . . . . . . . . . . . . . . . . . . . . . . . 382
Timecode in Vegas. . . . . . . . . . . . . . . . . . . . . . . . . . . . . . . . . . . . . . . . . . . . . . . . . . . . . . 382
Troubleshooting DV hardware issues . . . . . . . . . . . . . . . . . . . . . . . . . . . . . . . . . . . . . 384
19
Glossary . . . . . . . . . . . . . . . . . . . . . . . . . . . . . . . . . . . . . . . 385
Index . . . . . . . . . . . . . . . . . . . . . . . . . . . . . . . . . . . . . . . . . . . . . i
Page 20

20
Page 21
CHAPTER
Introduction
1
Welcome to Sonic Foundry Vegas™
Sonic Foundry Vegas is an innovative and advanced multitrack media-editing system. Vegas
was designed to create an efficient audio/video production environment without sacrificing
the quality and processing power that you expect from Sonic Foundry. Whether it’s the
standard and familiar Windows navigation commands or the clean and uncluttered
interface, you’ll find Vegas to be a tool that will be mastered in minutes. Beneath the unique
and customizable interface, you’ll find a product that is both powerful and flexible. This
table lists some of the features available in Vegas, the perfect multitrack media-editing
system for your studio or production environment:
Nondestructive editing Unlimited tracks
Unlimited undo/redo Multiple file formats (.wav/.aif) on a single track
Automatic crossfade functionality EQ and compressor inserts available on every track
Quick-edit media trimmer with direct link to
*.wav editor
Loop recording Plug-In manager
Real time event resampling 32 assignable DirectX FX sends
Audio/video scrub control DirectX Plug-In support
Edit detail list management Dual processor support
Sonic Foundry Perfect Clarity™ audio (*.pca)
24-bit/96 kHz MIDI Time Code generate & chase
26 Auxiliary outputs Dual monitor support
Internet streaming file authoring (Windows
Media Technologies 4.0 and RealNetworks G2)
Imports: .wav, .w64, .pca, .aif, .avi, .mp3, .mov
(using Microsoft DirectShow), .bmp, .gif, .jpg,
.png, .tga, .tif
Simultaneous multitrack record & play
Multiple I/O support
Ability to incorporate timeline metadata (markers/
captions) for Internet content authoring
Exports: .wav, .aif, .pca, .avi, .wma, .wmv, .rm, .mp3
(with optional plug-in), .mov (streaming), .w64
21
Includes Ligos GoMotion-powered MPEG-1 and MPEG-2
transcoding and decoding software.
CHP. 1 INTRODUCTION
Page 22

22
System requirements
Minimum requirements
• Microsoft® Windows™ 98SE, Me, 2000, or NT 4.0 SP4
• CD-ROM drive
• 40 MB hard-disk space for program installation
• Windows-compatible sound card
• Internet Explorer™ 4.0 (included on CD-ROM) or later to view online Help
• 400 MHz processor
• 128 MB RAM
• 16-bit color display
Technical Support
Visit our Web site at
http://www.sonicfoundry.com/support
. You will find technical information,
reference information, program updates, tips and tricks, and a Frequently Asked Questions
(FAQ) archive.
INTRODUCTION CHP. 1
Page 23
About this version of Vegas
The Vegas family of products includes a number of different versions including Vegas Video
and Vegas Audio, in both full and LE versions. All versions boast a suite of professional level
multi-track audio tools. Vegas Audio and Vegas Video both include a number of more
advanced audio features, while Vegas Video also includes advanced NLE video editing
features, making it a true all-in-one multimedia editing solution.
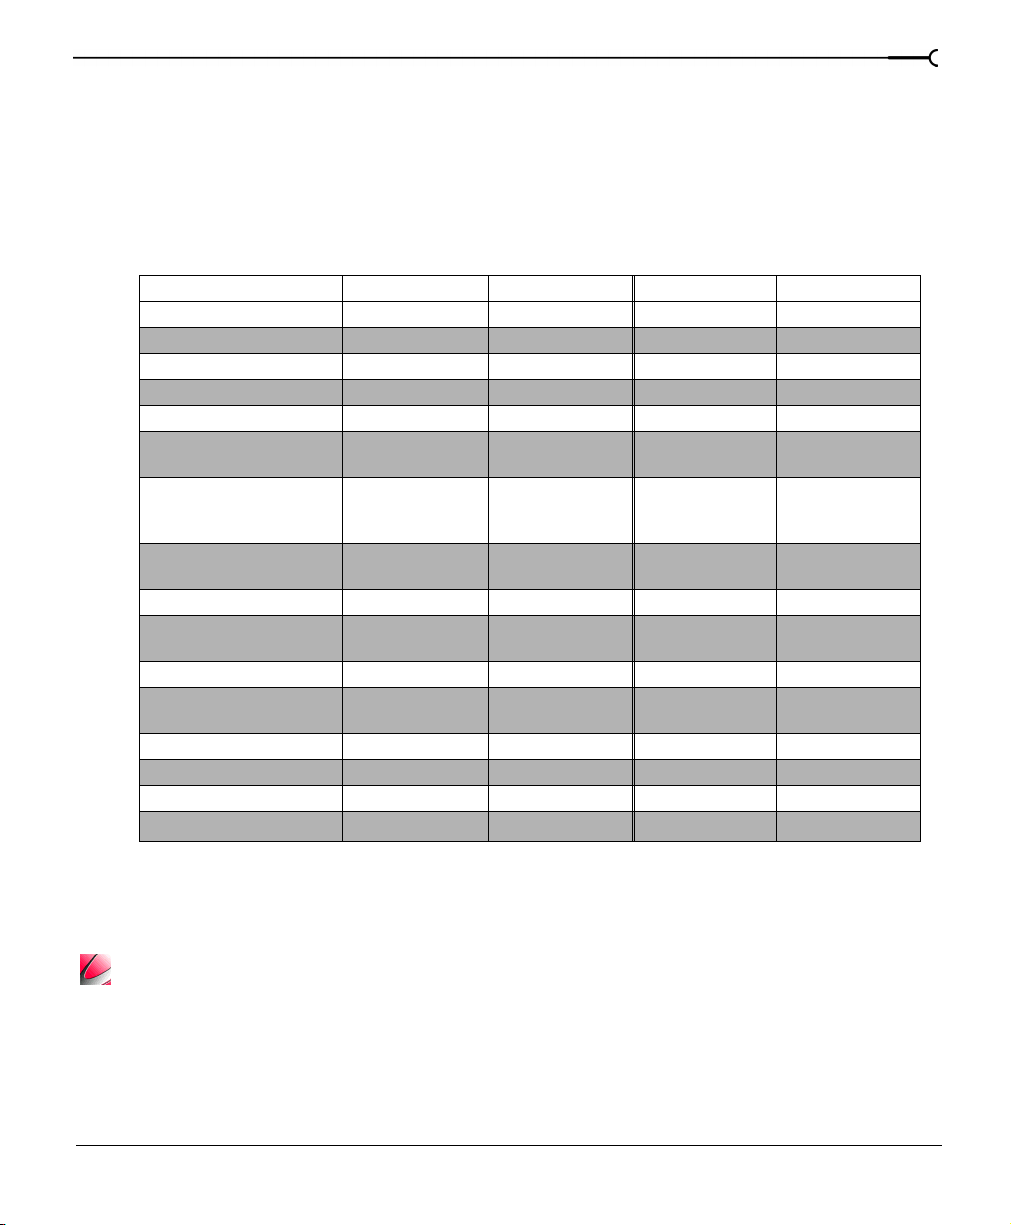
Feature Vegas Video Vegas Video LE Vegas Audio Vegas Audio LE
Video Tracks
Audio Tracks
Compositing
Video Track Level Fader
Video Track Motion
Video Preview Window: Action
Safe, Grid, Isolate Channels
Video Envelopes: Fade to
Color, and Composite Level,
Velocity
Real time effects and
processes
Video Media Generators
Transitions, FX, and DirectX
Video Plug-in Support
DirectX Audio Support
DirectX Audio PLug-ins
Included
Rubber audio
Bit Depth/Sample Rate
Overall level of video control
Ligos MPEG support
unlimited 2 1 1
unlimited 4 unlimited 8
X alpha only
X X
X
X X
X
X X X X
Xtext only
X X crossfades
XXXX
X Xpress FX
1 & 2
XX
24/96Khz 16/48Khz 24/96Khz 16/48Khz
high moderate moderate moderate
only
X Xpress FX
x x
23
1 & 2
Most versions can be immediately upgraded to a more advanced version over the Internet.
From the
menu, select
Help
Instant Upgrade
to purchase a license and unlock these more
powerful features.
This manual covers all of the features available in all of the various versions of Sonic Foundry
Vegas. Since different versions have different features, more advanced features available only in
certain versions of Vegas are marked with a special icon.
CHP. 1 INTRODUCTION
Page 24
24
Installing Vegas
To install Vegas:
Insert the Vegas CD-ROM. The Vegas Installation screen appears (if CD-ROM AutoPlay
1.
is enabled).
If CD-ROM AutoPlay is disabled, click on the button and choose
window that appears, type the CD-ROM drive’s letter and add
button to start the installation.
:\setup.exe
. In the Run
Run
. Click the OK
Click
2.
3.
4.
Install Software
Follow the screen prompts and enter the necessary information when required.
At the last screen prompt, click to conclude the installation.
Note:
Vegas uses a Windows 2000 installer
. The installation process begins.
for all versions of Windows (e.g. 98SE and
NT4). Vegas will install the Windows 2000
installer and then ask you to restart your
system.
Starting Vegas
After Vegas has been installed on your computer, there are two ways to start the program.
Using the shortcut Vegas
Double-click the Vegas icon on your desktop upon completion of the installation
procedure. This icon is a shortcut to the Vegas program located on your hard drive.
Using the Start button
The second method also allows you to start Vegas right from the desktop.
Click the button on the Taskbar. The
1.
From the
2.
INTRODUCTION CHP. 1
menu, choose
Start
Programs
.
menu appears.
Start
Page 25
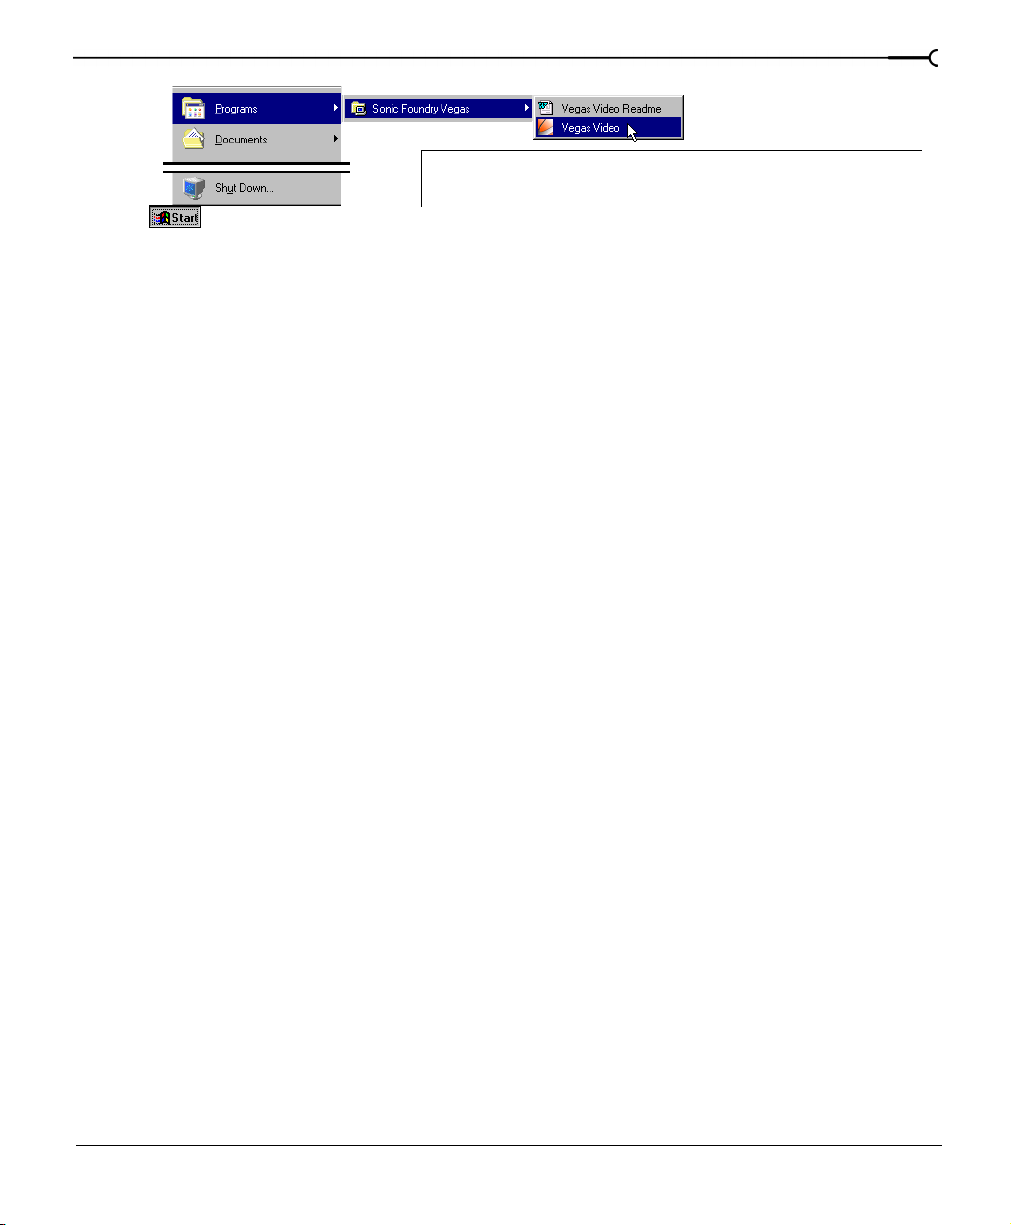
This graphic displays the default Start Menu location where Vegas was
installed. If you specified a different location during installation, navigate
to that menu location via this menu.
25
From the
3.
From the submenu, choose
4.
Programs
menu, choose
Sonic Foundry Vegas
Sonic Foundry Vegas
to start the program. The registration
. A submenu appears.
dialog window appears the first time you run Vegas. Select whether you want to use a
limited demonstration version of Vegas, purchase Vegas or if you have already purchased
Vegas you can enter your serial number. Once you have registered, this will not appear
again.
Registration
The registration dialog that appears when you start Vegas allows you to quickly and easily
register:
• Register online - instantly registers the product over the Internet.
• Register by phone - call Sonic Foundry to register manually.
• Register online from another computer - if the computer Vegas is installed on does not
have an Internet connection, but you have another computer that does.
• Not register at this time - allows you to continue using Vegas for a limited time without
registering.
Registering online
When you register online, one click is all it takes to instantly register Vegas.
To register online:
Connect your computer to the Internet.
1.
Start Vegas. In the dialog that opens, select
2.
Another dialog opens that asks you if you want to
3.
registration
•
Provide information
. Select one of these options and click Next.
- If you select this option, another dialog opens and allows you to
I would like to register online
Provide information
.
or simply
Finish my
enter some information about yourself. At your request, this information will be held in
strictest confidence and will only be used by Sonic Foundry internally to improve our
products and services. You may also elect to allow Sonic Foundry to occasionally send
you information about the latest updates to Vegas and other exciting multimedia
products.
CHP. 1 INTRODUCTION
Page 26
26
•
Finish my registration
- If you select this option, registration will be completed without
any further delay.
Vegas now automatically connects to Sonic Foundry’s registration utility and registers your
product.
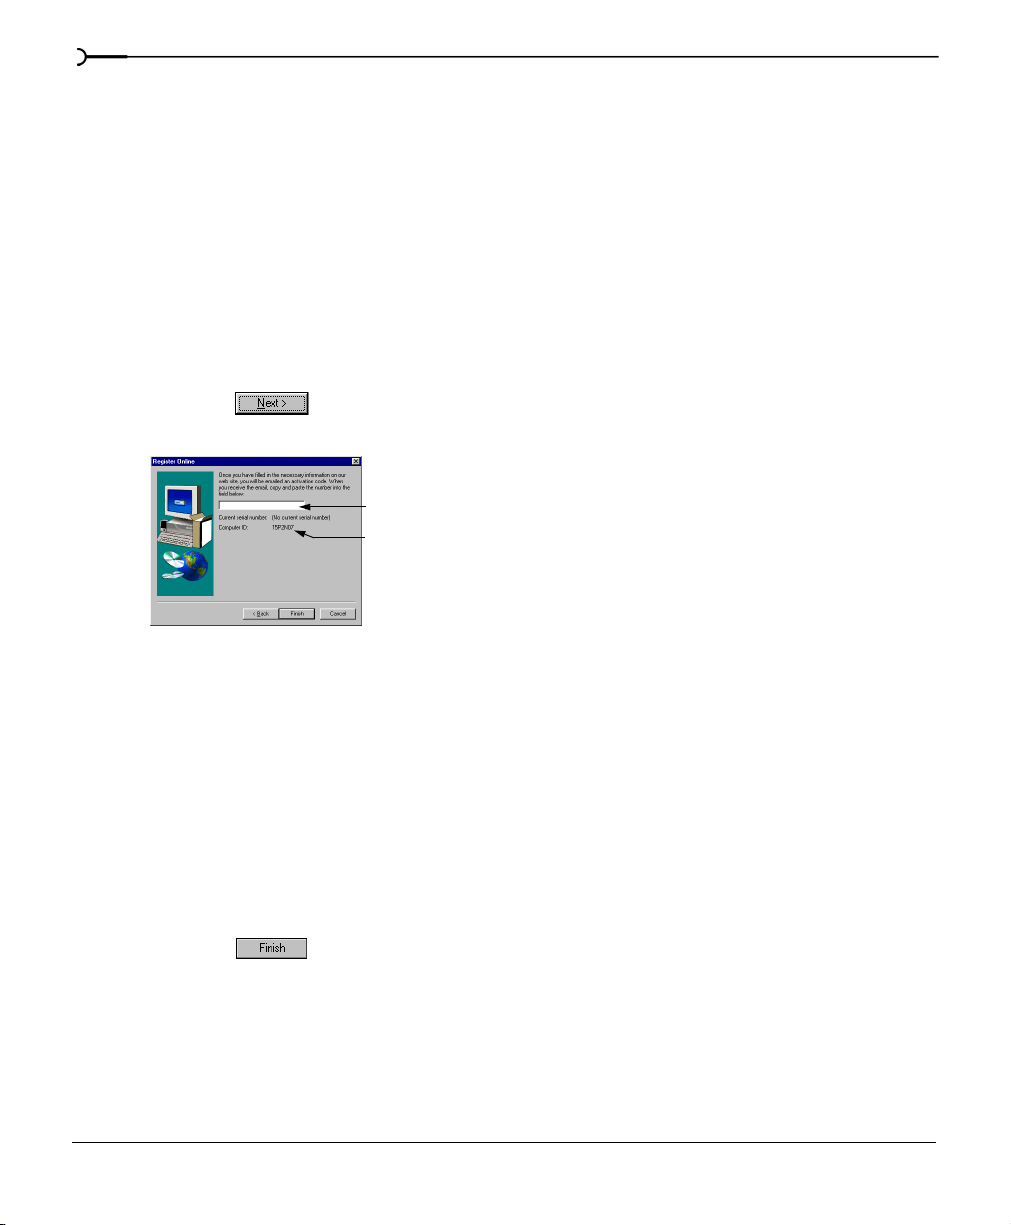
Registering by telephone
When you register by telephone, a Customer Service Representative will help you to obtain
your activation code.
To register by telephone:
Select
1.
2.
Register by phone
Click the button. A new dialog appears with a box where you can enter the
activation code. Your Computer ID number appears below this.
Please contact our Customer Service Department at:
3.
.
Enter activation code
Computer ID number
• Telephone*: 1-800-577-6642 (toll-free) in the US, Canada, and Virgin Islands.
• +800-000-76642 (toll-free) in Australia, Denmark, France, Germany, Italy, Sweden,
UK, Netherlands, and Japan.
• +608-256-3133, extension 2300 in all other countries.
• E-mail: customerservice@sonicfoundry.com
• Fax: 1-608-250-1745
* Registration assistance is available by telephone 24 hours a day, seven days per week.
When the Customer Service Representative gives you the activation code, type it in the
4.
field.
Click the button to activate Vegas and become a fully registered customer.
5.
Registering online from another computer
In situations where Vegas is installed on a computer that does not have access to the
Internet, you can use another computer that does have access to acquire and activation
code. Since the Activation (registration) Code is base on your computer’s individual
INTRODUCTION CHP. 1
Page 27
identity, it is necessary to generate a registration number based on the computer that Vegas
is installed on. Therefore, you need to begin the registration on that computer, save an
HTML file with that computer’s identity on it to a floppy, and then use that floppy on a
computer with an Internet connection to register. The Activation Code and an *.reg file
will then be sent to you via e-mail, at which point you can write the number down to use it
on the other computer, or transfer the *.reg file to the computer without the Internet
connection and double-click the file to automatically register. The Acivation Code and
*.reg file is based on your computer’s ID number and cannot be used on another machine.
Using the online Help
Vegas includes HTML online Help. To view the online Help, you need to have Internet
Explorer 4.0 or higher loaded on your system (5.0 is included on the Vegas CD-ROM).
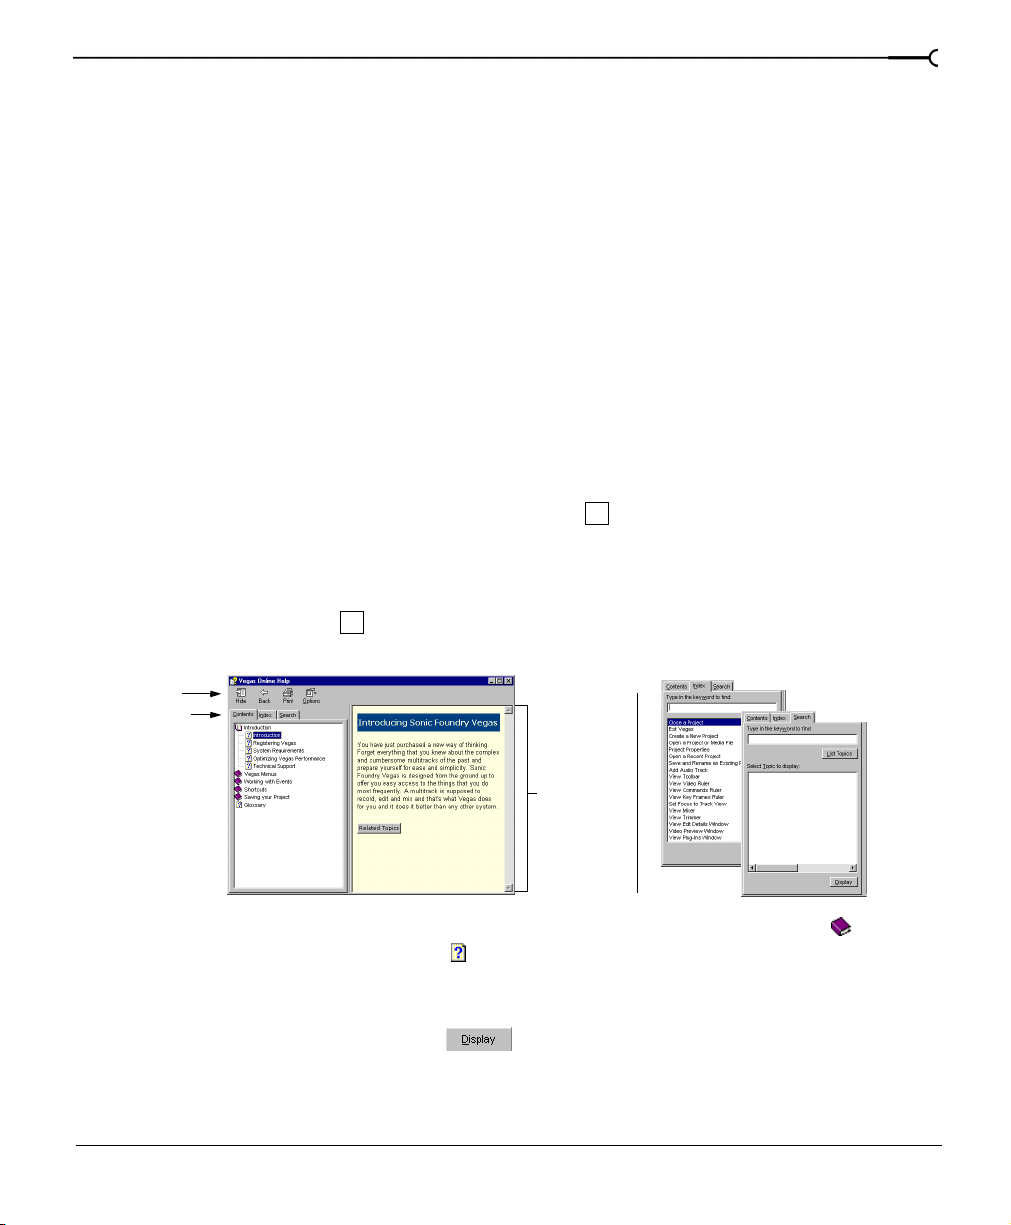
Accessing the Help
The online Help is available in two forms: in a Main Help window or What’s This? Help
window. Both forms are available via the keyboard ( ) or by clicking the
Main Help window
The Main Help window is accessed either by choosing
menu or by pressing the key. This window has three tabs that you can use to find the
F1
information that you need.
Toolbar
Contents
tab
F1
Contents
or
Index
Help
from the
Index tab
menu.
Help
Search tab
27
Information
pane
The
Contents
tab provides a list of available help topics. Click on a closed book ( ) to open
the pages, and then on a topic page ( ).
The
tab provides a complete listing of the Help topics available. Scroll through the list
Index
of available topics or type a word in the text field to quickly locate topics related to that
word. Select the topic and click the button.
CHP. 1 INTRODUCTION
Page 28
28
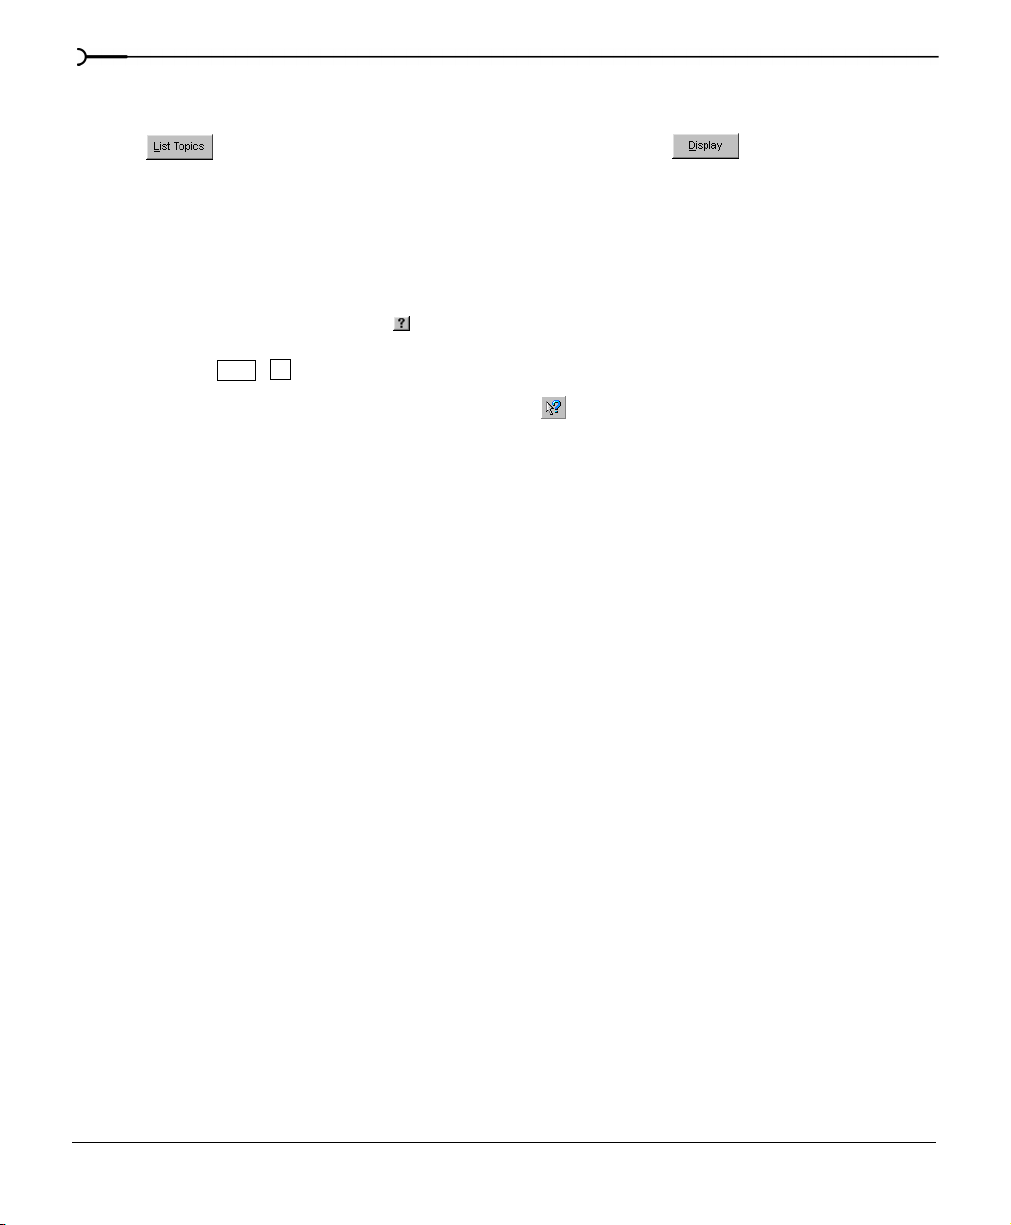
The
tab allows you to enter a keyword and display all of the topics in the online Help
Search
that contain the keyword you have entered. Type a keyword in the text field and click on
the button. Select the topic from the list and click the button.
What’s This? Help
What’s This? Help allows you to view pop-up descriptions of Vegas menus, buttons, and
dialog boxes.
To use What’s This? Help:
Click on the question mark ( ) in the upper right-hand corner of the dialog box or
1.
program workspace. Alternately, you can choose
press the keys.
The cursor changes to a question mark icon: ( ).
2.
Click on an item in the program’s interface.
3.
Tip of the Day
Shift + F1
What's This?
from the
Help
menu or
The Tip of the Day displays functional tips to increase your productivity with Vegas. To view
and scroll through the Tip of the Day messages, choose
PDF manual
Tip of the Day
from the
Help
menu.
There is a *.pdf version of the manual available on the Vegas CD-ROM. The PDF version of
the manual contains some information that was written after this manual went to press. To
view this manual, you will need Adobe
ROM). Please read the
vegas_readme.doc
®
Acrobat® Reader (also included on the Vegas CD-
for more information on the latest updates and
changes.
Help on the Web
Additional Vegas help and information is available on the Sonic Foundry Web site. From
the
menu choose
Help
Sonic Foundry on the Web
to view a listing of Web pages pertaining to
Vegas and Sonic Foundry.
INTRODUCTION CHP. 1
Page 29
Overview
Vegas is designed to be an easy-to-use program with many tools that provide power and
flexibility when creating and working with multimedia files. Many Vegas operations, menu
items, and shortcut keys are consistent with other popular Windows software applications.
The following sections are a graphical tour of the Vegas workspace.
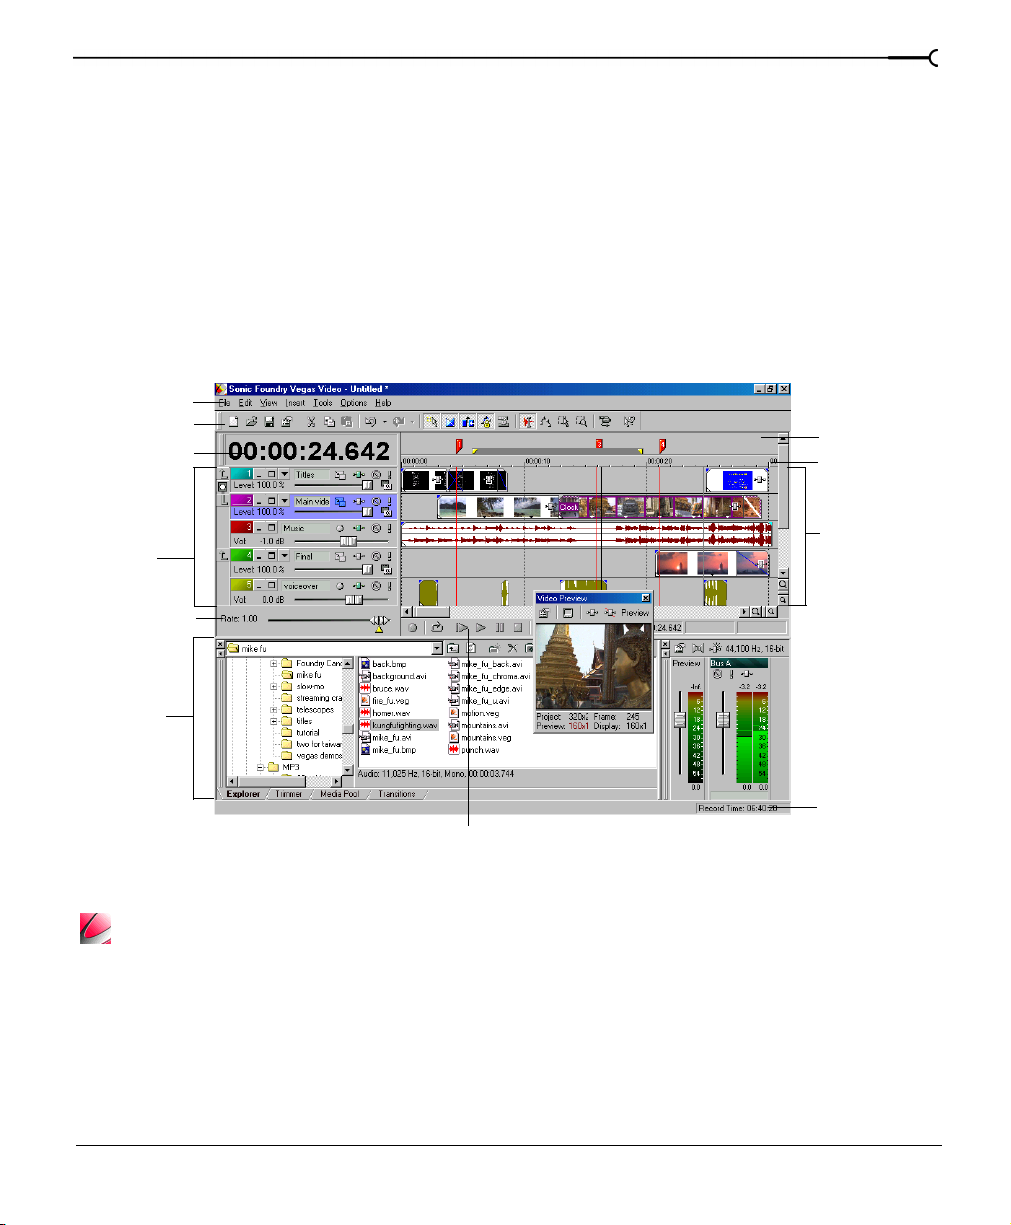
Main window
This is the window that appears when you open Vegas. The work area is subdivided into
three primary areas: the Track Header, the Track View (or timeline), and the Window
Docking Area.
Menu Bar
Toolbar
Time Display
29
Marker Bar
Ruler
Track
Header
Scrub Control
Window
Docking
Area
Transport Bar
Track View
(timeline)
Status Bar
The full version of Vegas Video has many advanced video editing features, as pictured above. Other
versions of Vegas have more limited video capabilities (for example limited to only one video track).
Please see the README file for more information.
CHP. 1 INTRODUCTION
Page 30
30
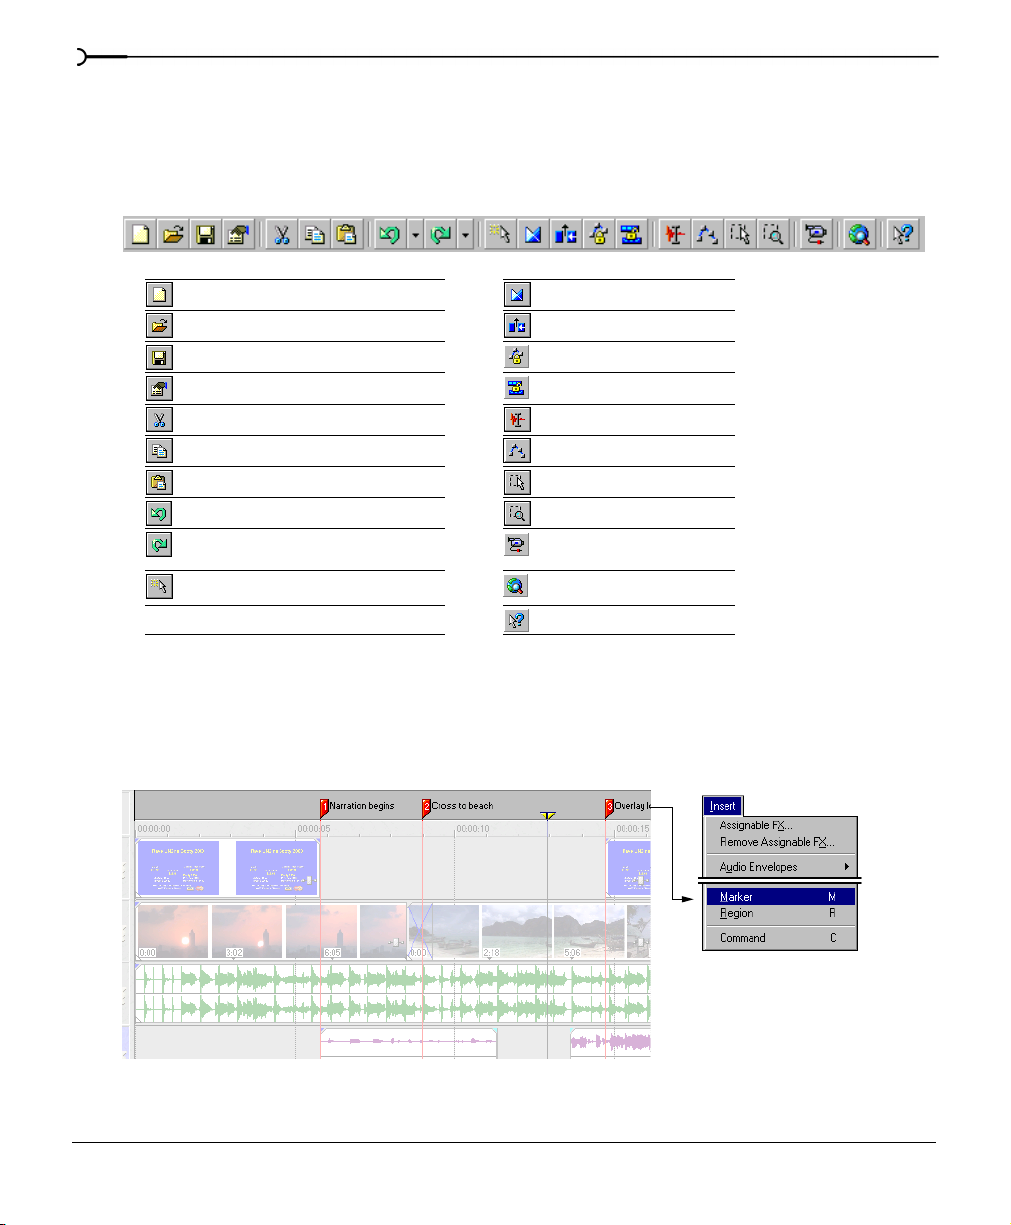
Toolbar
The Toolbar allows you to quickly access the most commonly used functions and features in
Vegas. From the
displayed.
Create new project Enable automatic crossfades
Open existing project Enable ripple edits
Save project Lock Envelopes
Open project properties Ignore Event Grouping
Cut selected events or time range Edit tool
Copy selected events or time range Envelope tool
Paste items from clipboard into project Selection tool
Undo command Zoom tool
Redo command Open Video Capture (Vegas
Enable snapping to grid lines Get Media from Web
Options
menu, choose
Customize Toolbar
Video only)
What’s This? Help
to specify which buttons are
Marker bar
The Marker bar is the area where informational tags may be placed, named, and positioned
along the project’s timeline. These can serve as cues or reminders highlighting important
events in your project.
INTRODUCTION CHP. 1
Page 31

Ruler
The Ruler is the timeline for your project. You may specify how the Ruler measures time:
seconds, measures and beats, frames, etc.
Right-click
on Ruler
Track Header
This area identifies the track order in your project and contains controls used to determine
track compositing and mixing.
Track mode
controls
31
Parent/Child
Compositing
controls
Track Number
Video Tracks
Audio Track
Multiple video tracks, compositing, and video effects are only available in the full version of Vegas
Video.
CHP. 1 INTRODUCTION
Page 32

32
Track View
All arranging and editing is done in the Track View. This area contains all of a project’s
events.
Transport bar controls
The Transport bar contains the playback and cursor positioning buttons frequently used
while working on and previewing your project.
Track View
Record into track Stop playback
Loop playback Move cursor to start of project
Play from beginning of project Move cursor to end of project
Play project from cursor position Move cursor left at grid increments
Pause project playback Move cursor right at grid increments
Status bar
The Status bar is located at the bottom of the main program window and displays
information about roughly how much space is left on your computer to record audio (Record
Time). During the rendering processes, the left side of the Status bar also contains
information about the progress of the render.
The Video Preview window also has its own status bar that displays project specific
information.
INTRODUCTION CHP. 1
Page 33

Scrub control
Click
d
The Scrub control is used to play your project forward or backward for editing purposes. You
may adjust playback speed by setting the Speed Control Marker located beneath the Scrub
control.
and drag either forwar
or backward for playback
Set playback speed
Window Docking Area
This area allows you to keep frequently used windows available, but out of the way while you
are working with a project. To dock a window, simply drag it to the Docking Area. When
windows are docked, they are stacked on top of one another. Each window has a tab at the
bottom with its name on it. Click the window’s tab to bring it to the top. Drag the handle on
the left side of a docked window to remove a window from the Docking Area and float it.
33
Drag handle to float window.
Explorer window - Alt+1
The media Explorer window is similar to the Windows Explorer. Use the Vegas Explorer
window to select media files to place into your projects.
Select drive
or folder
CHP. 1 INTRODUCTION
Preview selected
media file before
you place it
in the project
Select media to place
in the project by dragging
and dropping or
double-clicking
Page 34

34
Trimmer window - Alt+2
The Trimmer window is a good place to edit any media file. When a media file is placed in
the Trimmer window, you may take portions of the event and place them on separate tracks
by dragging and dropping. For more information, see Using the Trimmer window on page 154.
Trimmer window
Transport bar
Mixer window - Alt+3
The Mixer window gives you access to your project’s audio properties, bus assignments,
output levels, and plug-in chains.
Right-click on a
meter to change
its settings
Edit Details window - Alt+4
This window serves as a highly detailed and customizable database of all of the events in a
project. The database can be organized and sorted according to a large number of attributes.
INTRODUCTION CHP. 1
Page 35

Plug-ins window - Alt+5
This window organizes all of the plug-ins, effects, and transitions available in Vegas. These
are organized in a folder structure and include both audio and video plug-ins.
Video Preview window - Alt+6
This window displays a project’s video event during project editing and playback. For more
information, see Customizing the Video Preview window on page 252.
Video will appear during
project playback or as
the cursor is moved
during editing.
Right-click to
change Video
Preview settings
35
CHP. 1 INTRODUCTION
Page 36

36
Media Pool window - Alt+7
The Media Pool is used to organize the media files that are being used by a project. The
information about these files is displayed in a highly flexible database that can be instantly
sorted. The Media Pool can also be used to apply effects and plug-ins to media files and can
be used to set the specific properties (e.g. Interlace) of these files. For more information, see
Using the Media Pool on page 88.
Transitions window - Alt+8
The Transitions window contains all of the transitions available in Vegas. The thumbnails
display animated examples of each transition. Transitions can be dragged from this window
to the Transition roll between two video events. For more information, see Transitions on page
297.
INTRODUCTION CHP. 1
Page 37

Keyboard command reference
Project file commands
These commands refer to the overall project.
Description Keys
Create new project Ctrl+N
Open existing project or media file Ctrl+O
Save project Ctrl+S
Open project’s properties Alt+Enter
Window view commands
These commands display the dockable windows included with Vegas.
Description Keys Description Keys
Track view Alt+0 Plug-ins Alt+5
Explorer Alt+1 Video Preview Alt+6
Trimmer Alt+2 Media Pool Alt+7
Mixer Alt+3 Transitions Alt+8
Edit Details Alt+4
Edit commands
These commands refer to the event editing that you can use while you are working on a
project.
37
Description Keys Description Keys
Undo Ctrl+Z or
Redo Ctrl+Shift+Z or
Cut selection Ctrl+X or
Copy selection Ctrl+C or
Paste from clipboard Ctrl+V or
Paste repeat from
clipboard
Paste Insert Ctrl+Shift+V Mix to Video Preview Shift+M
Delete selection Delete Rebuild peaks F5
CHP. 1 INTRODUCTION
Alt+Backspace
Ctrl+Y
Shift+Delete
Ctrl+Insert
Shift+Insert
Ctrl+B Mix to Player Ctrl+Shift+M
Split event(s) S
Trim/Crop selected events Ctrl+T
Edge trim either audio or video of
grouped events independently
Open in Sound Editor Ctrl+E
Mix to new Ctrl+M
Alt+drag edge
Page 38

38
Cursor placement commands
These commands refer to cursor navigation with in the Track View.
Description Keys Description Keys
Go to beginning of selection
or view (if no selection)
Go to end of selection or view
(if no selection)
Go to beginning of project Ctrl+Home or WMove left to marker(s) Ctrl+Left Arrow
Go to end of project Ctrl+End or E Move right to marker(s) Ctrl+Right Arrow
Move left by grid marks Page Up Move left to event edit
Move right by grid marks Page Down Move right to event edit
Go to Ctrl+G Nudge cursor on timeline Left or Right Arrow
Jump to Marker # 0-9 keys (not
Home or W Center in View \
End or E Jump to opposite side of
selection
points including fade edges
points including fade edges
Move one frame Alt+Left or Right Arrow
number pad)
Number pad 5
Ctrl+Alt+Left Arrow
Ctrl+Alt+Right Arrow
Selection commands
These commands refer to creating time selections or preview ranges.
Note:
Many of the preceding Cursor
placement commands, when combined with
the Shift key, are also Selection commands.
Description Keys
Range selection (events) Shift+click range of objects
Multiple selection (events) Ctrl+click individual objects
Snap select to event edges Ctrl+Shift+Alt+ Left or Right Arrow
Recover previous selection areas Backspace
Select all Ctrl+A
Unselect all Ctrl+Shift+A
Select left by grid marks Shift+Page Up
Select right by grid marks Shift+Page Down
Make a selection during playback I (in) and O (out)
Create time selection while
dragging on an event
Expand selection one frame Shift+Alt+Left or Right Arrow
INTRODUCTION CHP. 1
Ctrl+Shift+drag with mouse
Page 39

Playback commands
These commands refer to the playback controls, which are also found on the Transport bar.
Description Keys Description Keys
Start/stop playback Spacebar Pause Enter
Stop playback Esc Record Ctrl+R
Looped playback
mode
Scrub playback Ctrl+drag on cursor
L Play back from any
window
on the timeline
Ctrl+Spacebar or F12
Event commands
These commands apply to selected events.
Description Keys Description Keys
Move selected event(s)
right one pixel
Move selected event(s) left
one pixel
Move selected event(s) up
one track
Slip: move media within
event without moving the
event
Slip Trim: moves the media
with the edge as it is
trimmed
Select next take T Slide Crossfade: moves
Select previous take Shift+T Stretch (compress) the
Right Arrow
number pad 6
Left Arrow number
pad 4
Up Arrow number
pad 8
Alt+drag inside the
event
Alt+drag edge of
event
Move selected event(s)
down one track
Move selected event(s)
right on grid
Move selected event(s) left
on grid
Trim Adjacent: trims
selected event and adjacent
event simultaneously
Slide: Trims both ends of
event simultaneously
crossfade
media in the event while
trimming
Down Arrow
number pad 2
Ctrl+Right Arrow
number pad 6
Ctrl+Left Arrow
number pad 4
Ctrl+Alt+drag edge
of event
Ctrl+Alt+drag middle
of event
Ctrl+Alt+drag over a
crossfade
Ctrl+drag edge of
event
39
CHP. 1 INTRODUCTION
Page 40

40
Track commands
These commands refer to editing functions related to the tracks in your project.
Description Keys Description Keys
New audio track Ctrl+Q Mark in point (when playing) I or [
New video track Ctrl+Shift+Q Mark out point (when playing) O or ]
Enable/disable snapping F8 Insert/Show/Hide track-volume envelope V
Snap to markers Shift+F8 Remove track-volume envelope Shift+V
Snap to grid Ctrl+F8 Insert/Show/Hide track-panning envelope P
Ripple edit mode Ctrl+L Remove track-panning envelope Shift+P
Auto crossfade mode X Insert Region R
Edit tool selection D Insert Marker M
Normal edit tool Ctrl+D Insert Command Marker C
Group selected events G Minimize all tracks ‘
Ungroup selected events U Insert Transition Number Pad: / ,
*, -
View commands
These commands refer to magnification of tracks and the events contained on them.
Description Keys Description Keys
Increase track height Ctrl+Shift+Up
Arrow
Decrease track height Ctrl+Shift+Down
Arrow
Zoom in time (incremental) Up Arrow Zoom in (audio only) Shift+Up Arrow
Zoom out time (incremental) Down Arrow Zoom out (audio only) Shift+Down Arrow
Zoom out Ctrl+Down Arrow
Zoom in Ctrl+Up Arrow
Miscellaneous commands
These commands allow you to access help related items and refresh the screen.
Description Keys Description Keys
Online help F1 Shortcut menu Shift+F10
What’s This? Help Shift+F1 Refresh screen F5
Change relative
keyframe spacing
INTRODUCTION CHP. 1
Alt+drag keyframes
Page 41

Trimmer commands
These commands apply to the Trimmer window.
41
Note:
Many of the shortcuts that apply to the
timeline (e.g. Cursor placement, Selection
commands, etc.) also work in the Trimmer.
Description Keys Description Keys
Add Media From Cursor A toggles selected stream:
audio/video/both
Add Media to Cursor Shift+A Next media file in Trimmer Ctrl+Tab
Select from Cursor to start
of project
Transfer time selection
from timeline to Trimmer
after cursor
Transfer time selection
from timeline to Trimmer
before cursor
Ctrl+Shift+A Previous media file in
Trimmer
T
Shift+T
Mouse scroll-wheel shortcuts
Description Keys
zoom in on timeline default mouse wheel behavior
vertical scroll Ctrl+wheel
horizontal scroll Shift+wheel
moves the cursor in small increments Ctrl+Shift+wheel
move cursor one frame at a time Ctrl+Shift+Alt+wheel
auto-scrolling press mouse wheel and move mouse left or right
Tab
Ctrl+Shift+Tab
CHP. 1 INTRODUCTION
Page 42

42
Cursor indications
The cursor in Vegas changes depending on which functions are available. In Windows, for
example, the cursor changes to an hourglass when the system is busy.
Cursor Indicates Modifier Description
Standard none This is the standard arrow cursor that means events can be
dragged.
Trim none Position the cursor over the edge of an event and drag to trim
Slip Trim Alt Position the cursor over the edge of an event, press Alt, and drag to
Stretch Ctrl Position the cursor over the edge of an event, press Ctrl, and
Slip Alt Press Alt and drag on the middle of a clip to move the media
Trim
Adjacent
Slide Ctrl+Alt Position the cursor over the middle of an event, press Ctrl+Alt, and
Slide
Crossfade
Ctrl+Alt Position the cursor over the boundary between two adjacent
Ctrl+Alt Position cursor over a crossfade, press Ctrl+Alt, and drag on a
the event, shorter or longer.
trim. The media within the event moves with the edge. This is useful
to preserve the beginning or end of an event while trimming.
drag the edge to stretch or compress it. This make the media
in the event play slower or faster.
within the event without moving the event itself.
events, press Ctrl+Alt, and drag. Both events are edge
trimmed simultaneously.
drag to simultaneously trim both ends.
crossfade to move it.
INTRODUCTION CHP. 1
Page 43

Audio Signal Flow
N
t
43
Audio event
Auxiliary send
Pre/Post vol.
ormalize even
Track fader
Pan track
Mute track
Track FX
Event ASR
Pre/Post vol.
Assignable FX send
Assignable FX
Input
Output
Chain
Mute
Bus Assign.
Bus Assign.
Bus Control
Master
Fader
CHP. 1 INTRODUCTION
FX
Mute
Hardware
output
Page 44

44
Video Signal Flow
Multiple video tracks and compositing are only available in Vegas Video. This diagram shows the
master order of how Vegas processes video information. The first step, Media Interpretation,
happens when media files are added to a project. Global effects are applied to the entire
project and can be used by dragging an effect onto the Video Preview window.
1. Media Interpretation (interlacing, alpha channel, etc.)
2. Media FX
3. Opacity Envelope
4. Velocity Envelope
5. Event FX & Pan/Crop
6. Transitions
7. Track Envelopes
8. Track FX
9. Track Motion
10. Parent/Child Compositing
11. Track Motion for Parent/Child Groups
12. Track Compositing
13. Video Output FX
11. Track Motion for
Parent/Child Group
10.
Parent/Child
Compositing
9. Track
Motion
12. Track Compositing
13. Video Output FX
8. Track FX
7. Track
Envelopes
3. Opacity Envelope
4. Velocity
Envelope
5. Event FX &
Pan/Crop
6. Transitions
2. Media FX
INTRODUCTION CHP. 1
Page 45

CHAPTER
Tutorial
2
Welcome to the Vegas tutorial. This chapter is designed to familiarize you with the basic
features and tools of Vegas while creating an actual project.
45
Note:
advanced video features (e.g. multiple video
tracks and compositing) found only in Vegas
Video.
This tutorial will teach you how to place media files in the project, edit them, and save them
together into a video file. The files you need to create this sample project are included on
the program’s CD-ROM in the
seconds. As you work, you will see how easy it is to master the powerful features that Vegas
has to offer. Some of the techniques are only briefly demonstrated here, however, and many
complex operations are described in a sentence or two.
There are nine separate sections or steps in the tutorial. Each step has a completed project
file included on the CD-ROM. When you have worked through section 1. Voiceover
narration, your project should look something like the included project file
These complete project files can also be used as references if you find any of the explanations
in this chapter to be unclear. If you make a mistake during the tutorial, just undo it by
pressing .
Getting the tutorial folder
Copy the sample media files to your hard drive. The tutorial folder is located on the Vegas
CD-ROM.
To install the tutorial:
This tutorial demonstrates many
\tutorials
Ctrl + Z
folder. The video length is approximately forty
01_voiceover.veg
.
Insert the CD-ROM into the disc drive.
1.
Locate the Tutorial folder on the CD-ROM and copy it to your hard drive.
2.
CHP. 2 TUTORIAL
Page 46

46
After the folder is copied, start Vegas.
3.
Note:
After copying the files to your hard
drive, you may need to re-establish the source
media file links. When opening a project file
(*.veg) for the first time, Vegas may prompt
you to find the media and re-link it to the
project. All of the files will be READ ONLY
when copied to you hard drive and you will be
unable to save changes to them unless you
change their properties.
The finished project is called
08_velocity.veg
and looks like the illustration below. The
project is designed to highlight a few of the features Vegas Video. Some aspects of the
project are fairly complex. Use the map below to go to the tutorial section that explains a
particular technique.
4. Overlay titles 5. Pan/Crop motion
6. Fades
7. Track Motion
1. Voiceover
narration
2. Music bed
3. Background
video
8. Velocity
TUTORIAL CHP. 2
Page 47

Getting Started
This tutorial is designed to walk the beginner through a complete project, while at the same
time demonstrating a few more advanced techniques. This means that some sections are
more difficult than others. By following the instructions explicitly, you should be able to
complete the project even if some of the concepts are unfamiliar. There are also a number of
terms that may be strange if you have never used Vegas or if you are new to NLE (NonLinear Editing). Here are some resources outside of this chapter that may be useful.
• Map of the user interface: (pg. 29).
• Glossary of terms: (pg. 385).
• Hold the mouse pointer over items in the user interface to see ToolTips that display the
names of the various controls.
• Press F1 and click on an item for a What’s This? Help definition.
1. Voiceover narration (01_voiceover.veg)
The first section of this project is a talking-head video that contains the main message. The
quality of the audio in the source video (
a new voiceover (
voiceover.wav
), recorded in a studio. While the audio quality of the new
talkinghead.avi
voiceover is good, there is some unwanted material that needs to be edited out and removed.
Finally, the voiceover needs to be synchronized with the video. While the concepts in this
section are fairly easy to understand, the actual process of aligning the voiceover with the
talking-head can be difficult. This is a surprisingly common technique used throughout the
television and movie industry. The finished project can be used as a reference:
) is poor and needs to be replaced with
01_tutorial.veg
47
.
Using the Explorer window
The Explorer window allows you to view and access your media files without leaving the
work area. This window works just like Windows Explorer.
To open the project folder in the Media Explorer:
Locate the
1.
Select the
2.
CHP. 2 TUTORIAL
\tutorial
folder on your hard drive.
\tutorial
folder so that its contents appear in the media list.
Page 48

48
Vegas Explorer window.
Once a media file is placed into the project, it is contained in an event.
Placing the video
In the media files list in the Explorer window, the media files needed for this project are
displayed. We are going to place the
talkinghead.avi
Media files
file ( ).
To insert the
Move the cursor over the timeline.
1.
Press to place the cursor at the beginning of the project.
2.
Double-click the media file (
3.
talkinghead
Ctrl + Home
video:
talkinghead.avi
) in the Explorer window. The video portion
(stream) is placed on a video track and the audio portion (stream) is placed on an audio
track at the cursor’s position.
timelineTrack Header
Video track
Audio track
Scribble Strip
(with track name)
empty portion of timeline
videoaudio
eventevent
A media file as it appears on the timeline in Vegas is displayed in an event. In fact, there
TUTORIAL CHP. 2
Page 49

49
are two events on the timeline for the
talkinghead.avi
: a video event that serves as a
window into the video stream of the media file and an audio event that serves as a
window into the audio stream. Edits that are made to either of these events do not affect
the source media file,
talkinghead.avi
, in any way.
It is a good idea to label the tracks using the Scribble Strip on the Track Header on the
left side of the track. Double-click on the Scribble Strip for the video track and enter
“Talkinghead.” You can name the audio track “Talkinghead narration,” but this track will
eventually be deleted.
Displaying a Video Preview
The Video Preview window shows a preview of your project.
To view and dock the Video Preview, from the
selected. Initially, the Video Preview may be hidden beneath one of the other windows at
the bottom of the program in the docking area. Click the Video Preview tab to bring the
window to the top so it can be seen.
menu, make sure
View
Video Preview
is
Video Preview tab
The Video Preview
window can also be
freely floated anywhere
in the workspace.
CHP. 2 TUTORIAL
Page 50

50
Playing back the video
To playback or preview a project:
Click the Play button ( ) on the Transport bar to start playing. Playback begins at the
1.
current cursor position. If playback starts in the middle of the project, click the Play
From Start button ( ) to start playback from the beginning.
Transport bar
Click the Stop button ( ) to stop playback.
2.
Click the audio track’s Mute button ( ) to mute the video’s audio track.
3.
Track mute
We are preparing to place and work with the new voiceover. Eventually, we will delete
the original audio, but for now it can be used as a reference.
Placing the new voiceover
A new voiceover was recorded in a studio to replace the original audio stream from
talkinghead.avi
.
Note:
The new audio track could have been
recorded straight into Vegas. For more
information, see Recording Audio on page
223.
To insert the voiceover:
In the media list, select the file titled
1.
Drag the file into the timeline below the lowest track. Vegas creates a new track for it.
2.
Click either the Play ( ) or the Play From Start ( ) button to play the voiceover.
3.
Click the Stop button ( ) to stop playback.
4.
voiceover.wav
.
During playback, the narrator pauses to review notes and cough. These are the type of
problems that will be fixed in the next section. The following is a map of the voiceover.
TUTORIAL CHP. 2
Page 51

Welcome to Sonic Foundry...
AB C DE
AB-
Um...
C-
This tutorial will...
D-
[Cough]
E-
Found in the new...
These errors (B and D) will be removed later. Also, during playback you probably saw that
the new voiceover and the video are out of sync. Next, we will align the voiceover with the
video.
Aligning the new voiceover with video
We will now position the voiceover so that it will be synchronized with the video. We will
use the poor-quality audio as a reference. Since we can see the audio waveform, sychronizing
is made easier.
To make it easier to see the audio events, we can zoom in on the project. There are a several
ways to manage the project’s view. For more information, see Changing track height on page 180.
To align the voiceover:
Alt + 0
Press or click on the timeline so the Track View (timeline) takes focus of keyboard
1.
commands.
51
Press and hold the keys.
2.
Press either the or keys. You will toggle through different Track heights.
3.
On the timeline, click and drag the mouse to select a time region.
4.
CHP. 2 TUTORIAL
Ctrl + Shift
Original audio
voiceover
Page 52

52
Click either the Play ( ) or the Play From Start ( ) button to play just the time
5.
selection. Click the Loop button ( ), on the Transport bar, to have playback loop
continuously within the selection.
Watch the Video Preview window to see if the new voiceover is roughly in the correct
6.
position. This will be fine-tuned later.
Click the Stop button ( ) to stop playback.
7.
Now would be a good time to double-click the Scribble Strip and rename the new track
“Voiceover”.
Editing the voiceover
Selection bar
When you played back the new voiceover, you noticed the interruption errors that it
contained. We will remove those errors and synchronize the remaining voiceover to the
video. Vegas allows you to edit both time and events. We will use both methods to edit the
voiceover.
Locking the original events
Time selection edits affect all tracks in the project unless a specific track is selected. Before
we start editing the voiceover, we will lock the original audio and video events, which are
our references, to prevent them from accidently being edited.
To lock events:
Select both the original video and audio events. Hold down the key while clicking
1.
Ctrl
on each of these events.
From the
2.
TUTORIAL CHP. 2
menu, choose
Edit
Switches
and then
Lock
.
Page 53

Editing a time selection
By looking at the waveform, you will see where the “um” and cough occur. You will also see
where the narrator is speaking. We will delete the “um” using time selection.
To make a time selection:
On the timeline, click and drag to make a time selection where the “um” occurs.
1.
Click the Play button ( ) to play back the error to ensure that your time selection does
2.
not include part of the voiceover that we need.
53
Increase or decrease the time selection by clicking and dragging an edge of the selection.
3.
Once the time selection is made, choose
4.
Delete
from the
menu, or press the
Edit
Delete
key to remove the “um.”
Next, we will split the event that contains the narrator’s cough and then delete the error.
Splitting an event using time selection
Splitting creates multiple events from an existing one. We will make a time selection that
contains the narrator’s cough and split it from the audio, then delete the cough.
To split the event:
On the timeline, click and drag to make a time selection where the cough occurs.
1.
CHP. 2 TUTORIAL
Page 54

54
Click the Play button ( ) to play back the error to ensure that your time selection does
2.
not include part of the voiceover that we need.
Increase or decrease the time selection by clicking and dragging an edge of the selection.
3.
Once the time selection is made, choose
4.
Split
from the
menu, or press the key to
Edit
split the event.
One event Three events
before the split after the split
Editing an event
We have the cough as a new event that can now be deleted.
To delete the cough:
Click the event with the cough.
1.
From the
2.
menu, choose
Edit
or press the key to remove the cough event.
Delete
Delete
After the edits have been made, the voiceover should look something like this:
S
"Welcome to Sonic
Foundry Vegas.
This tutorial will introduce
you to the powerful editing
and post-production features...
...found in this
new production
environment.”
Aligning the remaining voiceover events
With the voiceover edited, we need to align the remaining audio to the video. When you
move events, they snap to other event edges. You may extend or shorten an event’s length
by clicking and dragging its edges, which is useful for fine-tuning the alignment. Moreover,
you may turn off snapping by choosing
TUTORIAL CHP. 2
Enable Snapping
from the
Options
menu.
Page 55

To align the remaining audio:
Select the event that begins “This tutorial will introduce you....”
1.
Drag the event to the approximate point where the narrator is saying this. Use the
2.
original audio as a reference.
On the timeline, drag the mouse to select a time region.
3.
Click either the Play ( ) or the Play From Start ( ) button to play just the time
4.
selection. Click the Loop button ( ), on the Transport bar, to have playback loop
continuously within the selection.
Watch the Video Preview window to see if the new voiceover is close.
5.
Click the Stop button ( ) to stop playback.
6.
Repeat the above steps for the event that begins “found in this new....”
7.
Next, we will group the synchronized events with the video and delete the original audio
from the project.
Unlocking the events
Earlier, the original video and audio events were locked to prevent changes from being made
to them. Since the synchronizing work is done at this point, both of these events can be
unlocked, permitting further modification.
55
To unlock an event:
Right-click on a locked event.
1.
From the shortcut menu, select
2.
Switches
and choose
Unlock
.
Grouping the new voiceover and video
The voiceover and video are synchronized, and we want to
make sure that they stay together. The Grouping feature
will do that for us. First, we will delete the original audio.
To group events:
Select the original audio’s track by clicking it.
1.
Right-click and choose
2.
The entire track is removed from the project and the
new voiceover becomes the first track.
Press the key and click the video event and the voiceover events to select them.
3.
CHP. 2 TUTORIAL
Ctrl
from the shortcut menu.
Delete
Page 56

56
From the
4.
menu, choose
Edit
Group
and then
Create New
or press the key to group the
G
events.
Saving a Vegas project (*.veg)
A Vegas project file contains all of the information about a single project. However, it does
not contain any media, but maintains the references to media files used in the project.
To save a project:
Select one of the following to save the Vegas project:
1.
menu, choose
•From the
File
• Click the Save button ( ).
• Press on the keyboard.
Ctrl + S
The first time you save a project, the Save As dialog appears.
Save
.
Select the drive and folder where you want to store the project.
2.
Type the project name “MyTutorial” in the
3.
Click the Save button.
4.
File Name
field.
The subsequent times you save the project, the above Save As dialog is bypassed, your
existing file name is retained, and your project is updated to include any implemented
changes.
TUTORIAL CHP. 2
Page 57

Summary
In this section, we replaced the audio from the original video with a cleaner audio track
recorded in a studio. Here is what the project should look like at this point:
57
CHP. 2 TUTORIAL
Page 58

58
2. Music bed (02_musicbed.veg)
Adding background music to the
talkinghead
event is very easy. Using a Track envelope, the
volume can be lowered while the narrator speaks and then increased for the remainder of
the video.
Placing the music bed
To add the music bed to the timeline:
Press the key to move the cursor to the beginning of the project.
1.
In the media list, drag the
2.
voiceover track). A new track is created with the
Click the Play button ( ) to play the project.
3.
Ctrl + Home
musicbed.wav
file to the timeline below the lowest track (the
musicbed
event on it.
After creating the new track, double-click the Scribble Strip and rename the track
“Musicbed.”
Repositioning the voiceover
The music bed is considerably longer than the voiceover portion of the project. Eventually,
we are going to add additional video to fill out the project. If you were creating this project
from scratch, you might not know exactly where to position the voiceover, but you could
roughly position it and fine tune it later. In the case of this pre-planned tutorial, however, we
have a pretty good idea where everything needs to be: drag the voiceover group (talkinghead
video and voiceover audio) so that the
seconds.
talkinghead
event begins at approximately 4.700
Adding a volume envelope
The music bed’s volume needs to be lowered (ducked) as the narrator speaks. A track
volume envelope can be used to lower the volume, and then raise it again when the narrator
finishes speaking. We will use the voiceover’s starting and ending points as a reference for
the envelope.
To add a volume envelope:
Click the
1.
From the
2.
musicbed
Insert
appears across the track.
TUTORIAL CHP. 2
track or event.
menu, choose
Audio Envelopes
and then choose
Volume
. A blue line
Page 59

Envelope Line
59
On the
3.
musicbed
event, place the mouse pointer slightly ahead of the voiceover’s starting
point. The mouse pointer appears as a hand ( ).
Right-click and choose
4.
Add Point
from the shortcut menu. A square point appears on the
envelope line.
Repeat step 4 to add three more points on the line, for a total of four. The initial positions
5.
of the points is unimportant.
Setting the volume envelope
Now we will use the points on the envelope to lower and raise the volume so that the music
bed does not interfere with the voiceover. When you click or hover over a point,
information about it appears.
To control the volume over time:
Drag the points so that they are positioned with two near the start of the voiceover, and
1.
two at the end.
Drag the two inner points so that their volume level is at approximately -7.0 dB.
2.
You can only set one point
at a time or use the Envelope
tool to select and move
multiple points at a time.
CHP. 2 TUTORIAL
Page 60

60
Set the outer points so that their volume level is at 0.0 dB.
3.
Click the Play ( ) or the Play From Start ( ) button to play the project and check the
4.
timing of the volume envelope.
Adjust the outer and inner points along the timeline as needed.
5.
Adding equalization (EQ) to the voiceover
Now that the music is mixed in, you can hear the voiceover has a strong bass quality to it.
We will adjust that quality slightly with EQ on the first band.
To adjust the equalization:
Click the FX button ( ) on the voiceover’s track. The Track FX dialog appears.
1.
You can set the EQ settings by typing in the appropriate field, dragging the slider, or clicking
the arrow buttons between the slider and the setting field. The easiest way to adjust the EQ
is to drag the numbers on the EQ map, however.
Set the
2.
Set the
3.
Set the
4.
Close the Track FX dialog by clicking anywhere outside it.
5.
Click the Play ( ) or the Play From Start ( ) button to play the project with the new
6.
Frequency
Gain
Rolloff
to 160 Hz.
to -inf.
to 12 (dB/oct).
EQ settings.
TUTORIAL CHP. 2
Page 61

Summary
In this section, we added a music bed to a new track below the narration. The video and
audio events from the last section were grouped together so they could be moved further
down the timeline. The volume of the music was faded out (ducked) during the narration
and back in after it was over. In addition, equalization was used to improve the tone of the
voiceover. Here is what the project looks like so far:
61
CHP. 2 TUTORIAL
Page 62

62
3. Background video (03_background.veg)
In this section, we are going to add some video clips to the background. The techniques we
are going to focus on are inserting video, crossfading events, and adding transitions. This
section of the tutorial can only be completed with Vegas Video.
Creating a new video track
To add a new video event to a new video track:
Browse for a video file (
1.
Drag the media file just below the
2.
powderskier.avi
) in the Media Explorer.
musicbed
audio track. Position the new
powderskier
event at the beginning of the project.
Since the new video event is being dropped at a location that does not already contain a
video track, a new video track containing a new video event is created.
Before During drag operation. After, with new event
and new track.
Multimedia projects can get very complicated, so it may be useful to rename the track at this
point. Double-click the Scribble strip on the Track header and enter “Background”.
Crossfading to a new video event
One way to transition from one video scene to another is with a crossfade. This is a common
technique where one scene fades out while another fades in.
To crossfade between two video events:
Browse for a video file (
1.
Drag this file to the “Background” track.
2.
Position the new event to the right of the first event (
3.
mountains.avi
) in the Media Explorer.
powderskier
) overlapping by about a
second.
TUTORIAL CHP. 2
Page 63

The overlapping region between the two events has an “X” across it, indicating a crossfade.
63
Before During drag operation. After, with new event
and crossfade at the overlap.
If you preview the project, you can see the smooth transition between the two. Repeat this
procedure to add and automatically crossfade the remaining background video files:
beach.avi, fireweed.avi, boat.avi
, and
sunset.avi
. The total length of these events when
overlapped should be the same as the music bed. The events can be repositioned by dragging
them and trimmed slightly by dragging their edges. The background video track should look
something like the illustration below.
Compositing, or video mixing, in Vegas occurs from the top down. Video in higher tracks
obscures video in lower tracks. Since there are no video events above the
this video is visible on the output. The later part of the
talkinghead
the
event over it. The talking head completely obscures the lower video events at
powderskier
event has a portion of
powderskier
event,
this point in the project.
Note:
At this point, the
talkinghead
event
obscures much of the underlying background
video, especially the
mountain
and
fireweed
events. In Tutorial 7, the Track Motion tool
will be used to change this behavior. For now,
you can preview the crossfades by soloing the
background video track. Click the Solo button
( ) on the Background video track to isolate
the video from this track.
CHP. 2 TUTORIAL
Page 64

64
Inserting a transition effect
While almost all transitions in the movies and on television are either straight cuts (e.g. no
transition) or some type of fade, Vegas also has a number of more interesting transition
effects available. One of the easiest ways of doing this is to replace an existing crossfade.
To replace a crossfade transition:
From the
1.
menu, choose
View
Transitions
to open the Transitions window. This window
may already be open by default.
Click the Transitions tab in the docking area at the bottom of the workspace.
2.
Locate the Iris transition effect.
3.
Drag the Iris transition to the crossfade between the
4.
event and the
beach
fireweed
event.
A few things happen when you do this. First of all, the track appears to have doubled in size.
Second, all events before the transition are on an upper sub-track (known as the A roll) and
all events after the transition are on a lower sub-track (known as the B roll). Third, between
these two sub-tracks is a very narrow Transition roll, where the Iris transition is containted.
Compact track button
Iris transition effect
This change, from a simple track to a track composed of a number of rolls, is useful in some
situations, but is not really necessary here. You can click the Compact Track button ( ) on
the Track Header to hide this detail and simplify the track’s appearance. In Compact mode,
the two events are split by a diagonal line and the portion of the track to the left of the
transition is shifted slightly upward and the portion of the track to the right of the transition
is shifted slightly downward.
Compact track button Iris transition effect
Before we move on to the next step, select both the
events in the background video track (hold the key while clicking on each of these
musicbed
Ctrl
events). Right-click one of the selected events and, from the
New Group
TUTORIAL CHP. 2
. This will allow us to move all of these events as a unit in the next step.
event and all of the video
submenu, choose
Group
Create
Page 65

Summary
In this section, a second video track with six new video events was added to the project. The
events were arranged such that they overlapped each other by about one second. This
created an automatic crossfade at each of the overlapping sections. The final duration of all
of the events was made to equal the duration of the
musicbed
crossfades was replaced with an Iris transition effect. Here’s what the project should look like
so far:
event. Finally, one of the
65
CHP. 2 TUTORIAL
Page 66

66
4. Overlay titles (04_overlay.veg)
In this step, we’re going to insert some logos, or titles, into the beginning and ending of the
project. This section of the tutorial can only be completed with Vegas Video.
Repositioning the project
The core of the project (the voiceover, music, and background video) is finished. At this
point, we want to add a flashy introduction and nice closing. To do this, all of the events in
the current project need to be repositioned. One way to do this is to group all of the events
together and drag them.
Using the Selection tool
To insert an introduction, it is necessary to
move the contents of the project further down
the timeline to make room for the new media.
Earlier, when there were only four events in
the project, selecting and moving everything
was a matter of holding down the key,
selecting all of the events, and then dragging
them. This becomes more and more difficult
as the project becomes more complex.
Ctrl
To use the Selection tool:
Click the Lock Envelopes to Events button ( ) on the Toolbar. This makes the track
1.
Volume envelope on the music bed track move with the
Click the Selection Edit Tool button ( ) on the Toolbar.
2.
Drag a rectangle encompassing all of the events to be moved.
3.
Group all of these events: right-click one of the selected events and, from the
4.
menu, select
Drag the group of events down the timeline so that the
5.
Create New
.
musicbed
musicbed
event as it is moved.
Group
and
powderskier
events
begin at the 13.000 second mark.
Inserting the introduction splash
In this section, we are going to insert an introductory sequence at the beginning of the
project. Parts of the introduction will overlay, or appear on top of, other video events.
TUTORIAL CHP. 2
Page 67

To insert the introduction:
67
Locate
1.
Drag
2.
implosion.avi
implosion.avi
in the Media Explorer.
onto a blank location on the
timeline below the lowest track so that a new track
is created. This new event should start at the very
beginning of the project.
Drag
3.
vegas_logo.bmp
so that it ends at 13.000, when the
begins. This means that it overlaps the
onto the same track. Position it
powderskier
event
implosion
event by approximately two seconds and an
automatic crossfade is created.
Click in the Track Header on the left side of the new introduction track and drag the
4.
track to the top of the timeline, above the talking head track. This is necessary if the
logos are to appear as overlays on top of other video events.
The first track in the project now contains the introductory splash and logo. Double-click
the Scribble Strip to rename the track. Like the
talkinghead
event that appears on top of the
background video, the introduction also appears over all lower tracks.
Track Header
To insert the overlay logo:
Drag the
1.
corporate_logo.png
to a new track at the bottom of the timeline. Double-click the
Scribble Strip and rename the track “Overlay.”
Drag the Track Header of the new overlay track to the very top of the timeline so that the
2.
overlay track is track one, the introduction track is track two, and the talking head track
is track three.
Position the
3.
The default duration for an image event is five seconds. Drag the right edge of the
4.
corporate_logo
corporate_logo
event back to the 6.000 second point in the timeline. The duration of the
event so that it also ends where the
powderskier
event begins.
event is now seven seconds.
CHP. 2 TUTORIAL
Page 68

68
The
corporate_logo
event overlaps a large portion of the underlying
implosion
and
vegas_logo
events. Events in upper tracks normally completely obscure lower tracks. In this case,
however, most of the logo is transparent, so the underlying video shows through, and the
corporate_logo
Note:
appears to float over the rest of the project.
corporate logo
implosion
corporate_logo.png
The
crossfade
Vegas logo
image file used
Video Preview window preview. Notice that
the corporate logo appears over the
implosion event.
here is a *.png image file which was created in
an image-editing program. It has a transparent
Alpha Channel that is a part of the file that
allows the background video to show through.
For more information, see Creating titles from
images on page 249.
Duplicating events
To create a sense of a beginning, a middle, and an end to the project. We are going to
duplicate both of the logos (the
corporate_logo
and the
vegas_logo
) and place the copies at the
end of the project.
To duplicate an event:
Press and hold the key.
1.
Drag the
2.
corporate_logo
Ctrl
event horizontally on the
track. This instantly creates an
Overlay
identical copy of the event.
TUTORIAL CHP. 2
Page 69

Position the newly duplicated event so that it ends at the same time as the end of the
3.
music bed.
Drag the left edge of the event back to the 30.000 second mark. The duration of the event
4.
is now roughly ten seconds.
69
Duplicate the
5.
vegas_logo
event in the
Introduction
track and position it so that it ends with
the end of the music bed.
Adding sound effects to the introduction
We are going to add some sound effects to three new tracks at the bottom of the project.
To add a sound effect:
Locate the
1.
Drag
2.
the new
Repeat with the remaining two sound effects:
3.
introwarp.wav
introwarp.wav
introwarp
event.
audio file in Vegas Media Explorer.
to the timeline below the lowest track. This creates a new track with
•
introtabla.wav
introgong.wav
•
CHP. 2 TUTORIAL
: start - 0.000.
: start - 3.500 (timed to match the action of the
implosion
event).
Page 70

70
Summary
All of the media files that are going to be used have now been inserted into the project. The
events and tracks have all been repositioned to their final locations. The first track contains
the transparent overlay
video (
implosion
event) that fades into the product’s logo (
corporate_logo
event. The second track has an introductory splash
vegas_logo
event). That logo, as
well as the corporate logo, is repeated at the end of the project. The next four tracks contain
the earlier work: the voiceover, the background video, and the music bed. Finally, three
audio events were added to three new tracks at the bottom of the project as sound effects for
the introduction. Here’s what the project should look like so far:
TUTORIAL CHP. 2
Page 71

5. Pan/Crop motion (05_panning.veg)
The Pan/Crop tool can add dynamic motion to video or still image events. We’re going to
use it here to animate the
corporate_logo
tool with many advanced features, such as keyframe animation. In this tutorial, we’re going
to highlight the tool and show you how it is used, without explaining the complexity of
keyframe animation. For more information, see Keyframe animation on page 305.
event at the end of the project. This is a powerful
71
To animate the second
Right-click on the second
1.
corporate_logo
corporate_logo
event:
event and choose
Pan/Crop Event
. The Pan/Crop
Event dialog opens.
Resize the Crop area at the middle to roughly 168 X 126. Enter the numbers manually in
2.
boxes on the left side of the dialog. The small Crop area will zoom in on the
Size
the
corporate_logo
Reposition the Crop area off of the left edge of the event at roughly -73 X 63 (as
3.
pictured). Use the
event.
boxes on the left side of the dialog to enter the coordinates.
Center
Crop Area
Keyframe
Controller
Sync Cursor
On the main workspace, click on a blank space on the timeline at 00:00:32.000 seconds
4.
Keyframe
to move the cursor to that position. Use the left and right arrow keys to position the
cursor more precisely. Watch the Time Display to the upper left of the timeline to find
this position. Then, back in the Pan/Crop Event dialog, click the Sync Cursor button
( ). This button is on the very bottom of the dialog. This will position the cursor on the
Keyframe Controller at 32.000 seconds to match the cursor on the timeline.
Drag the Crop area to the right edge of the event to 564 X 59. Use the Center boxes to
5.
enter the coordinates. The Crop area will now animate, scrolling right across the
CHP. 2 TUTORIAL
Page 72

72
corporate_logo event, ending at 32 seconds. Notice that a new, gray keyframe diamond
has been created on the keyframe controller.
Keyframes
Click on the main workspace timeline at 33.000 seconds to navigate to that point. Click
6.
the Sync Cursor button ( ) in the Pan/Crop Event dialog.
Resize the Crop area to its original size (640 X 480) and position (320 X 240). A new
7.
keyframe is created. The result is that the logo appears to zoom out and away between the
two final keyframes.
Third keyframe
TUTORIAL CHP. 2
Page 73

Preview the project to see the results of this procedure (click the Play button below the
timeline or press the Spacebar on your keyboard). Again, there is a lot going on here that we
have only touched on briefly. If you are not familiar with keyframe animation techniques,
much of this might be confusing. Even if you are familiar with keyframe animation, the Pan/
Crop Event tool is a complex and powerful tool. For more information, see Pan/Crop on page
241.
Summary
73
In this section, motion was added to the last
corporate_logo
event using the Pan/Crop Event
tool. The logo flies in from the right across the screen and finally zooms back to its final
position. All of this was accomplished using keyframe animation techniques in the Pan/
Crop Event dialog.
CHP. 2 TUTORIAL
Page 74

74
6. Fades (06_fades.veg)
Fading, whether fading the volume in and out on an audio event or fading to and from black
on a video event, is a very easy process in Vegas.
To fade into a video event:
Position the cursor at the upper-left corner of the implosion
1.
event. The cursor changes to a fade icon.
Drag the corner towards the center (right) of the event to
2.
about 0.500 seconds.
The blue diagonal line that appears represents a fade in from
black that lasts half of a second.
To fade the volume (gain) of an audio event:
Position the cursor at the upper-right corner of
1.
the introgong event. The cursor changes to a
fade icon.
Drag the corner left towards the center of the
2.
event to about 11.000 seconds.
This time, a curved white line appears. The audio will smoothly and gradually fade out. This
effective technique is used repeatedly (seven times) throughout this project:
• Fade out of the introtabla
• Fade in and out of the first
• Fade in and out of the
• Fade out from the first
• Fade into the last
audio event.
talkinghead
vegas_logo
vegas_logo
corporate_logo
event.
event (very briefly).
event for a duration of about one second.
event for a duration of about three seconds.
Summary
In this easy tutorial section, instant fades, both audio and video, were created to fine tune
and polish the project.
TUTORIAL CHP. 2
Page 75

7. Track Motion (07_trackmotion.veg)
Another method of adding motion to video or still-image events in Vegas is to use the Track
Motion tool. This feature adds motion to an entire track and can be used to create picturein-picture effects and scrolling motion. In this project, the Track Motion tool is going to be
used to spin the talking head out of the way and into a picture-in-picture, revealing the
previously covered background video, specifically the mountain event.
To create a picture-in-picture:
75
Click the Tra ck Mo t io n button ( ) on the
1.
head
track.
On the timeline in the main workspace, click at
2.
talking
Track Motion button
the 19.400 second mark to move the cursor to this
position. Use the left and right arrow keys to
position the cursor more precisely. 19.4000 corresponds to where the first part of the
speaking ends. The exact time may be slightly different in your recreation of this project.
Click the Sync Cursor button ( ) at the bottom of the Track Motion dialog. This
3.
moves the Keyframe controller cursor to the same position in time as the main cursor.
Since this tool operates on the entire track (as opposed to the Pan/Crop Event tool,
which only applies to one event), you probably need to zoom in on the Keyframe
controller to reveal more detail. Click the Zoom In button to the lower right of the
Keyframe controller until only about 22 seconds of time are showing.
Click the Add Keyframe button ( ). The keyframe that is created at this point has the
4.
same attributes as the first keyframe at 0.000. Since there is no change between these two
keyframes, no animation will occur between them.
keyframe
CHP. 2 TUTORIAL
Page 76

76
Move the cursor one-half second down the Keyframe Controller.
5.
Resize the Track Motion Area to 180 X 135. Enter these values into the
6.
boxes on the
Size
left side of the Track Motion dialog. The numbers do not have to be precise.
Reposition the Track Motion Area to 102 X 162 (lower-left corner). Use the
7.
Center
to enter these values.
keyframe
Keyframe Controller
In the one-half second between the two keyframes, the
talkinghead
event will quickly shrink
from full screen to a smaller window in the lower-left corner, revealing the underlying
background video. In this project, two more details were added:
boxes
• Select the Shadow option on the Keyframe Controller
in the Track Motion dialog. This adds a drop shadow
behind the track’s contents. The Track Motion Tool
and dialog can also be used to create a shadow behind
the corporate logo track.
• The talking head track is also spun around. Click the
last keyframe on the Position bar on the Keyframe controller and set the Angle to -360°.
The track makes one complete rotation in the half-second between the two final
keyframes.
Summary
In this section, the Track Motion tool was used to create an animated picture-in-picture
effect of the talking head narration. Keyframe animation techniques were used, and a drop
shadow was added behind the insert picture for emphasis. As a result of these changes, the
previously hidden background video was revealed.
TUTORIAL CHP. 2
Page 77

8. Velocity (08_velocity.veg)
Speeding up and slowing down a video event in Vegas can be done a number of ways. One of
the easiest is to use a Velocity envelope. This feature is used to speed up the powderskier and
then dramatically slow her down again towards the end of the event.
To change the velocity:
77
Right-click the
1.
Velocity
Drag the line up. A ToolTip appears telling you the
2.
. A horizontal blue line appears on the event. This is the envelope.
powderskier
event and, from the
Insert/Remove Envelope
menu, choose
percent speed increase. Release the line to set the
speed increase to approximately 160%.
Move the cursor to the 16.000 second mark in the
3.
project above the
powderskier
event and double-click
the envelope. This adds a point (node) to the line that serves as a type of keyframe.
Double-click further down the line to add another point. Reposition the new point below
4.
the first point you added. The ToolTip displays the percentage again. Set this point to
about 28%. The entire line after this point moves. The event now plays at 160% speed
until it gets to the pair of points, where the video slows to 28% speed.
Drag the right edge of the powderskier event left to 19.000 seconds. Trim the left edge of
5.
the
mountain
event to be flush with the end of the
powderskier
event. This needs to be
done to keep the duration of the event consistent with the velocity changes. If this was
not done, the event would run out of media to play back and would display a freeze frame
after 19.000 seconds project time.
Summary
In this section, the
powerskier
envelope was animated so that the video started out playing very quickly and then
dramatically slowed down near the end.
CHP. 2 TUTORIAL
event’s speed was changed using a Velocity envelope. The
Page 78

78
9. Rendering the project as an *.avi
Rendering refers to the process of converting the Vegas project into one file and formatting
it for the desired playback method: media player, Internet streaming media, CD-ROM, etc.
The Vegas project (*.veg) itself is not altered during the rendering process.
The following procedure is broken into two sections: setting the format and applying
compression.
Setting the format
Multimedia video files can be saved in a number of formats, such as *.rm or *.mov.
To select a file format:
From the
1.
Select the drive and folder where you want to save the rendered project.
2.
Type a new name in the
3.
In the
4.
menu, choose
File
Save as type
Render As
File name
. The Render As dialog appears.
field, if necessary.
drop-down list, select
Video for Windows (*.avi)
.
Click the Save button.
5.
TUTORIAL CHP. 2
Page 79

Applying compression
Compressing video files is an important part of creating a movie. In video, the program that
compresses the video is called a codec. It is important in determining the quality and size of
the final media file.
To configure the compression:
On the Render As dialog, click the
1.
Custom button. The Custom Settings
dialog appears.
79
Click the
2.
by Radius
Format list
Click the OK button to close the Custom
3.
Video
(or
Indeo Video
.
tab, select
Cinepak Codec
) from the Video
Settings dialog.
Click the Save button on the Save As
4.
dialog.
A status bar appears in the lower-left portion
of Vegas and a dialog pops up displaying the
progress of the render. Upon completion of
the render, your new media file is ready for
distribution and playback.
Note:
You may cancel the rendering process
by clicking the Cancel button ( ) on the
status bar.
Status bar
Cancel
button
CHP. 2 TUTORIAL
Page 80

80
TUTORIAL CHP. 2
Page 81

CHAPTER
Getting Started
3
Vegas is a new way of creating multimedia productions. Whether you are an experienced
multimedia author or a budding novice, the powerful features and capabilities of Vegas are
organized to increase both your creativity and your productivity. The following chapter
summarizes the basic functions and operations of Vegas.
Projects
The process of creating a multimedia production can be an extremely complicated
undertaking, involving hundreds of shots, takes, voiceovers, music beds, and special effects.
Organization quickly becomes a critical issue in this process. In Vegas, organization is
handled by a small project file (*.veg) that saves the relevant information about source file
locations, edits, cuts, insertion points, transitions, and special effects. This project file is not
a multimedia file, but is instead used to create (render) the final file when editing is finished.
81
The greatest advantage of working with projects is not the organizational benefits, however,
but the fact that you are working on, and editing, a project file, and not the original source
files. When you copy, cut, paste, trim, and otherwise edit your movie, the process is
nondestructive. You can edit without worrying about corrupting your source files. This not
only gives you a strong sense of security, but it also gives you the freedom to experiment.
To create a new project:
From the
1.
automatically be started for you.
Enter your project settings on the various tabs:
2.
CHP. 3 GETTING STARTED
menu, choose
File
. The first time you run Vegas, a new project will
New
Page 82

82
• Summary - Enter any relevant information
and reminders about your project.
• Audio - Set up the basic audio settings.
• Video - Select the format and other video
parameters. For more information, see Project
properties - Video tab on page 256.
• Ruler - Choose the way the Ruler is
delineated (beats, seconds, etc.).
Note:
The easiest way to set the often
complex properties on the Video tab is to select
a Template that matches your media (e.g.
NTSC DV (720x480, 29.970fps)).
Click OK.
3.
From the
4.
menu, choose
File
Save
. Enter a
, browse for a location, and click the
name
button to save your project (*.veg file).
The project settings determined in step 3 can be changed at any time while you are working
on a project. From the
menu, choose
File
Properties
to change any of these settings. These
settings automatically determine the overall quality of the rendering (creation) of your final
video. Carefully setting up the properties at the beginning of your project will save a
significant amount of time later. You can override these settings when you are ready to
render the final movie.
Determining the proper video settings
Since the only way to maintain 100% quality is to match the project’s properties to the final
output properties, video files that have been captured to your hard disk from your camcorder
already contain all of the necessary project information. This procedure is useful for projects
that will eventually be sent back to a camcorder (e.g. DV In/DV out) at full frame size and
rate. Very different settings would be used for different types of projects, such as highly
compressed streaming video.
Save
To determine a project’s properties from a video file:
From the
1.
In the Project Properties dialog, click the Match Media Settings button ( ).
2.
Browse for a file that has been captured from your camcorder. This file should be
3.
menu, choose
File
Properties
.
unaltered and unedited in any way.
Click OK.
4.
GETTING STARTED CHP. 3
Page 83

Vegas will automatically detect the frame size, frame rate, pixel aspect ratio, and field order
of this file and set the Project Properties to match. In the Project Properties dialog, enter a
name for a Template and click the Save button ( ) to save this information for future use
and select the
Start all new projects with these settings
if most of your projects will typically use
these settings.
Saving the project
When you save your work, it is saved in a project file (*.veg). Project files are not a rendered
media files. The first time a project is saved you will have two options. The one you select
will affect the project’s file size and its portability.
Format Extension Definition
Vegas Project *.veg Saves all of the information about a single project. This file format does not contain any
media. It saves the references to media files used in the project and project information,
such as track FX, envelopes, bus assignments, and output properties.
Vegas Project with
External Media
To save the project:
Select one of the following save methods:
1.
*.veg
When the
be copied into the same folder as the project file. This option makes transporting the
project easy and convenient.
Copy all media with project
is selected, all of the media in the project will
83
• From the
menu, choose
File
Save
.
•Click the Save button ( ).
• Press on the keyboard.
Ctrl + S
The first time you save a project, the Save As dialog appears. In subsequent saves, the
above dialog is bypassed, your existing file name is retained, and your project is updated to
include any implemented changes.
Select the drive and folder where you want to store the project.
2.
Type the project name in the
3.
Click Save.
4.
File Name
field.
Renaming a project (using Save As...)
After you have been working with your project, you may use the
menu to save a copy of a project with a new name. This is very useful for backing up
File
Save As
different versions of a project. For more information, see Creating a copy of a project (using Save
As...) on page 324.
CHP. 3 GETTING STARTED
command in the
Page 84

84
Capturing video media
Getting video media onto your computer can be more complex than simply recording an
audio file. The Vegas Video software package therefore includes an independent Video
Capture application that can be used to capture video from you camcorder or other video
source to your computer. To run this application, click the Launch Video Capture button
( ) on the toolbar in Vegas. Video Capture is only included with Vegas Video.
Files and events
The objects you work with in Vegas are referred to as media files and events. Tr ac ks are
timeline containers where events are placed and arranged.
• Files are objects that are stored on your hard disk. In Vegas, you will mostly be working
with media files, such as music and video files. Vegas does not operate on, nor change
these files. Files can be accessed from Vegas Explorer.
• Events are periods of time on the timeline in Vegas that act as windows into media files,
either whole or in part. When dragging a media file onto the timeline, you are
automatically creating an event that contains that file’s contents. An event can contain
video, audio, still images, and some special generated media. The event window may
contain only a small portion of a much larger media file. A single media file can be used
repeatedly to create any number of different events, since each event can be trimmed
independently.
The original media file.
An event trimmed from the original media file.
The event as it appears in Vegas.
Media files (e.g. *.wav or *.avi) are on your computer’s hard drive and can be accessed from
Windows Explorer or from Vegas’ Explorer. Events contain media files, are the most basic
unit of editing in Vegas, and can be found on the timeline or in the Media Pool.
GETTING STARTED CHP. 3
Page 85

What type of media can you use?
Extension Definition
*.wav Standard audio format used on Windows-based computers
*.avi Standard audio/video format used on Windows-based computers
*.aif Standard audio format used on Macintosh computers
*.mov, *.qt Quicktime standard audio/video format used on Macintosh computers
*.bmp Standard graphic format used on Windows-based computers
*.mp3 Highly compressed audio file
*.gif 256 index color, lossless image and animation format widely used on the
Internet
*.jpg True color, lossy Internet image format
*.png True color or indexed color, lossy or lossless Internet image format
*.tga True color, lossless image format that supports Alpha Channel transparency
*.w64 Sonic Foundry proprietary Wave64 audio file that does not have a limited file
size (unlike Windows .wav files that are limited to ~2GB)
*.psd Adobe Photoshop proprietary image format (flattened)
MPEG (*.MPG) files can also be used with the full version of Vegas Video.
Finding media files to use
Media files can be located and inserted into a Vegas project by using the Vegas Explorer
window, clicking the
Explorer.
menu and choosing
File
or by dragging directly from Windows
Open
85
Vegas Explorer window
The media Explorer window in Vegas is similar to the Windows file management Explorer.
You can expand and collapse drives and folders in the tree view. The contents of selected
drives and folders appears in the list view.
CHP. 3 GETTING STARTED
Page 86

86
Delete selected items
Create new folder
Refresh view
Move up tree
Tree view
Note:
If you cannot see the Explorer window,
Add to favorites folder
List view
it may be under another window. Click the
Explorer tab at the bottom of the workspace to
display the window. If you do not see the
View
Explorer tab, from the
Explorer
to display it.
menu, choose
To find media using the Explorer window:
Play preview button
Stop preview button
Auto-preview button
Browse for Media on Web button
Change view button
Vegas windows are dockable. To access
a hidden window, click its tab to bring
it forward.
From the drop-down list or tree view, choose the drive or folder
1.
where the media is located.
Note:
Vegas is preset to display all supported
file types. However, you may change the list
view to display all files within a selected drive
or folder.
From the list view, you may place the file into your project by dragging it or double-
2.
clicking it.
Using the Open command
You may also find media using the
menu and choosing
File
Open
.
To find media using the Open command:
From the
1.
GETTING STARTED CHP. 3
menu, choose
File
or click the Open button ( ) on the Toolbar.
Open
Page 87

Browse for the media’s location in the Open dialog by doing one of the following:
2.
87
• Selecting it from the
Look in
drop-down list.
• Double-clicking drives and folders in the list view.
• Typing the file’s path in the
Select the media format from the
3.
4.
Click
to automatically place the file in the project.
Open
File name
field.
Files of type
drop-down list.
Previewing a media file
Once you have located media files, you may preview them before placing them in your
project. The Explorer window has a mini-transport bar with Play, Stop, and Auto Preview
buttons ( ). When you preview a file, its stream is sent to the Mixer window’s
preview bus (for audio files) or to the Video Preview window (for video files).
To preview a media file:
Select an event in the list view.
1.
Click the Play button ( ) to listen to the file.
2.
Click the Stop button ( ), select a different file, or place the file in the project to stop
3.
previewing to the file.
Note:
click the Auto Preview button ( ) on the
Explorer window’s transport bar.
To automatically preview selected files,
When a media file is placed on a track, one or more events are created that contain, or
reference, the entire media file. Each track can contain more that one event. Events can be
trimmed to contain only part of a larger media file.There are two basic types of tracks: audio
and video.You may place events on separate tracks, or place all events of a similar media type
(audio or video) on the same track:
Multiple audio tracks
with multiple events
CHP. 3 GETTING STARTED
Single audio track with
multiple events
Page 88

88
Video tracks have different controls and features, but video events and tracks behave in a
similar way to audio events and tracks. If a video file has associated audio, Vegas
automatically creates a new track and places the video’s audio on it as an audio event.
Using the Media Pool
Media files, both video and audio, tend to be the largest files on
your hard drive. It is therefore not always easy to move them
around and it may not be practical to store multiple copies of
these files. These files can be dragged into the Media Pool in
Vegas to organize them before any editing actually begins. From
menu, choose
View
the
not already visible. Adding a media file onto a track will also
automatically add it to the Media Pool. Information about
individual clips is visible in this window.
• You can control the information that is displayed by rightclicking on the Media Pool and choosing
submenu menu containing a list of the available fields.
• Specific fields can be hidden by dragging them off of the
Media Pool window.
• The data fields are listed along the top of the Media Pool
window and can be reordered by dragging them. Click on the
tabs along the top to instantly organize or sort the data
according to that criterion.
• The Comments field can be used to add your own annotations
to a file’s entry in the Media Pool. Double-click the field to enter text. This information is
saved with the project and is not saved with the media file itself.
• Each entry acts as a pointer to the actual source file. Video, audio, image files and
generated media can all be organized in the Media Pool. Files that are being used in the
project (on the timeline) are automatically inserted into the Media Pool.
Media Pool
Two events that contain the video (top)
and audio (bottom) streams from a single
multimedia video file; each event is
inserted on a separate track.
to open this window if it is
. This opens a
View
Right-click Media Pool menu.
Button Name Description
Remove All Unused Media From Project Removes all files in the Media Pool that are not actively being
Remove Selected Media From Project Removes the selected media file from the project, but does not
GETTING STARTED CHP. 3
used (not inserted on any tracks and the Use Count = 0).
delete the source file from your hard disk.
Page 89

Button Name Description
Remove All Unused Media From Project Removes all files in the Media Pool that are not actively being
Edit Media FX Used to add or modify effects at the media file level. All instances
Start Preview Plays a preview of the selected media file.
Stop Preview Stops the currently playing preview.
Auto Preview Automatically previews selected media files.
Views Toggles between the simplified List view and the Detailed views.
used (not inserted on any tracks and the Use Count = 0).
of this media file in a project (i.e. events) will have these effects
applied to them.
The Media Pool can also be used to control some of the more advanced aspects of individual
files and events. For more information, see Pan/Crop on page 241.
Replacing media in events in the Media Pool
The Media Pool contains and organizes events in your project. Since events are windows
into, or containers for, media files, replacing the contents of an event is possible. When
changing the media file that an event contains, every occurrence of the event on the
timeline is updated with the same contents.
To replace media in an event in the Media Pool:
Right-click an event in the Media Pool.
1.
89
Choose
2.
In the
3.
Replace
Replace Media File
from the shortcut menu.
dialog, browse for and select the file that you want to replace the
current file.
Click the Open button.
4.
Audio Peak files (*.sfk)
Audio Peak files (*.sfk) are special proprietary files that are used by Vegas (and other Sonic
Foundry applications) to save information about an audio file’s waveform. When an audio
file or a video file with an audio track is inserted into Vegas, the audio event is displayed
graphically as a waveform (or two parallel waveforms for a stereo audio file). These
waveforms take time to process and draw. Depending on the speed of your computer and the
complexity of a project, this process can significantly delay the opening of a project or audio
file. The solution to this potential problem is the Sonic Foundry Peak file (*.sfk), which
saves this waveform information, dramatically cutting down on loading time. The name of
the *.sfk file is derived from the name of the source media file. For example, when
thunder.wav is opened in Vegas, the companion peak file that is generated is named
thunder.sfk. These files are safe to delete at any time, but Vegas will have to regenerate
CHP. 3 GETTING STARTED
Page 90

90
them the next time the media file is opened. Audio Peak files are saved to the same folder as
the source media. If the source media folder is read-only (e.g. a CD-ROM), the files will be
saved to a temporary directory.
Normally, Vegas automatically handles Peak files, but there may be times when you need to
recreate the Peak files manually. To do this, from the
A related concept is the Sonic Foundry Audio Proxy File (*.sfap) that is used for the audio
stream of some types of video files. For more information, see Audio proxy files (*.sfap0) on
page 378.
Event Basics
Events are the most basic objects in a project in Vegas. An event is something that happens
in time, has a specific duration, and can be video or audio. In Vegas, there are two primary
types of events: audio events and video events.
Audio events are created from audio files on your computer (e.g. *.wav, *.au, or *.mp3) or
can be a part of a video file (e.g. *.avi). An audio event can contain an entire audio file or
only a portion of it. It can be modified with effects to change many of its characteristics,
such as speed, volume and equalization. Audio events can be mixed with other audio events.
Video events are created from video files captured to your computer (typically *.avi, *.mov,
*.qt) or images (*.bmp, *.jpg, *.png or *.tga). A video event can be the whole file or a small
section of that file. It can be modified with filters to change many of its characteristics, such
as speed, color, and size. Video events can overlay other video events and are visual elements
that appear on top of a background video, image or color. Overlays can be video files, still
images, titles or other graphics and logos. Vegas can also generate titles that are contained in
an event on the timeline and in the Media Pool.
menu, choose
View
Rebuild Peaks
.
You can see from the timeline ruler above that the duration of the event is six seconds.
Within the event, many things can happen. This is a rather complex event, with many
envelopes (blue lines) and effects modifying it; typical events may not be quite this complex.
The important concept to understand about this and other events is that it is not a set shot
or scene, but is instead a period of time filled with some type of media. It could be the video
GETTING STARTED CHP. 3
Page 91

clip of a boy jumping into the water, a six-second freeze frame, or a twenty-four-second
source video sped up to fit into the six second event. The event is a window into the media
and is distinct from the media file itself.
Video event envelopes are not available in all versions of Vegas.
There are a number of ways to work with events once they have been placed in your project.
The following sections describe basic event-editing techniques.
Inserting media
Media files may be inserted into your project by double-clicking them or by dragging them.
Either method places the media file in an event in its entirety in the Track View. After the
file is placed, it becomes an event along the project’s timeline. At this point, the contents of
the event and the media file are identical.
Drag-and-drop
You can create a new track by dragging a media file to a blank area on the timeline and
dropping it in place. Vegas tracks can contain multiple events, so you can place different
events next to each other on a track. Video and audio events cannot be mixed on the same
track.
To place multiple events:
Select multiple events in the Media Explorer or the Media Pool. Select a range of
1.
adjacent media files by holding down the key and clicking the first and last files in
the range or select files that are not adjacent by holding down the key and clicking
individual files.
Shift
Ctrl
91
Right-click and drag the files to the Track View (timeline).
2.
Before you drop the files, select a placement option from the pop-up
3.
menu.
• Add Across Tracks
• Add Across Time
• Add As Takes
CHP. 3 GETTING STARTED
Page 92

92
You will see one event on the track.
The other events are listed at takes “beneath” the
the topmost event.
For more information, see Working with multiple recorded takes on page 234.
• Video Only and Audio Only allow you to isolate either the video or audio, and add that
stream from a multimedia file either across tracks, across time or as takes.
Note:
A left-click drag-and-drop
automatically inserts the events across time.
The various modes can also be cycled through
by right-clicking (without releasing the left
mouse button) while performing the drag-anddrop operation.
Double-clicking an event
This method creates a new track and places the event at the cursor’s position along the
timeline. Once the events are placed, you can move them from one track to another or
change their position on the timeline.
Drag-and-drop or double-clicking a video event
Video event placement is the same as placing an audio event; drag-and-drop controls
timeline placement and double-clicking places the event at the cursor’s position. Media files
with video frequently include associated audio. When you insert a media file into the
timeline, the associated audio is automatically inserted into a separate audio track below the
video track. The two associated events are grouped together and behave as a single unit
when moved or otherwise edited.
GETTING STARTED CHP. 3
Page 93

Crossfades
If two events are inserted on the same track and occupy the same space, the events (both
video and audio) can be made to automatically crossfade. For more information, see Crossfades
on page 298.
When inserting multiple events across time, the events may be set to automatically crossfade
one into the next.
To set the duration of an automatic crossfade:
93
From the
1.
Click the Editing tab.
2.
Select the
3.
Set the duration of the automatic crossfade in the Cut to overlap conversion section of
4.
Options
Automatically overlap multi-selected media when added
menu, choose
Preferences.
option.
the dialog by entering an Amount in milliseconds (1000ms = one second).
To enable the automatic crossfade feature, from the
Crossfades
is selected.
Options
menu, make sure
Automatic
Moving events along the timeline
Events may be moved along the timeline individually or as a group. The left edge of an event
is its starting point. Therefore, where the left edge lines up on the ruler determines when the
event starts.
Events may overlap each other or be placed on top of each other. You may crossfade
overlapping events automatically or with envelopes.
Moving a single event
You can move an event along the timeline within a track or move it to a different track.
To move an event:
CHP. 3 GETTING STARTED
Page 94

94
Select the event by clicking on it. The event is highlighted in the track’s color.
1.
Drag the event along the timeline.
2.
If you move the event along the original track’s timeline, the event’s appearance (color)
remains the same.
However, you may move the event to a different track. When you do, the event appears
as a simple outline and you will see its original track and position on the timeline. Once
you release the mouse, the event will assume the new timeline position and track color.
Original track position
New track and position
Release the mouse to place the event.
3.
Moving multiple events
You can move multiple events along the timeline within a track or move them to a different
track, similar to the previous procedure. Selected events do not need to be within the same
track. You may select events on different tracks and move them as a group along the
timeline. Use the key, the key, or the Selection Edit tool ( ) to select multiple
Ctrl
Shift
events and drag them as previously outlined. For more information, see Selecting multiple events
on page 111.
To more precisely move an event, your can nudge it by clicking on the event on the timeline
and pressing “4” and “6” on the number pad on your keyboard to bump it one small unit at a
time. The amount of movement caused by each nudge is determined by how far the timeline
is zoomed in or out. If you zoom in far enough, each nudge can move the event one frame of
video at a time or even less.
You can arrange your video events on a single video track or on as many separate tracks as
you like. The audio portion of a video clip is inserted into the timeline as a separate audio
event. The video and audio events are connected as a single unit (grouped) however, and
may be moved together. Right-click either of the grouped events and choose
Ungroup
to
split the video from the audio. Video events are placed on video tracks. If a media file has
associated audio, Vegas creates an audio track below the video track.
GETTING STARTED CHP. 3
Page 95

95
Video event with
frame numbers
Video’s audio event
Video track
Once the event is in place, you may move the video event along the timeline, delete its
audio, and preview the event in the Video Preview window. For more information, see Drag-
and-drop or double-clicking a video event on page 92.
Moving a video event
Moving a video event is identical to moving an audio event. However, a video event may be
slightly different in that it may have audio grouped with it. If a video event has audio, Vegas
is preset to group the video event with its audio when it is placed. As a result, the video
event and its audio will always be moved together along the project’s timeline.
To move a video event:
Place the mouse pointer on the video event or its associated audio.
1.
Drag the events to the desired starting point on the timeline.
2.
Release the mouse when the events are in the desired location.
3.
Note:
Ungroup a video and audio by rightclicking either event. From the shortcut menu,
choose
Group,
and then
Clear
.
Removing the video’s audio
As mentioned earlier, video events with audio are placed together in your project. However,
you may delete the original audio completely or replace it with new audio. This feature is
nice for redubbing poor-quality audio.
To remove the audio:
Right-click either the video or its audio event to display a shortcut menu.
1.
From the shortcut menu, choose
2.
You can also access delete events by pressing the Delete key or, from the
.
Delete
CHP. 3 GETTING STARTED
Delete
.
menu, choose
Edit
Page 96

96
Track Basics
Multiple video tracks are only available in the video versions of Vegas. The height of individual
tracks can also be resized by dragging their borders on the Track header. In the example
below, the main video track is fairly large to show the details of the scene while the two
tracks above it, which are overlay titles, have been resized to be smaller. For more
information, see Changing track height on page 180.
Once an event is placed on a track, Vegas automatically displays track controls that you can
use to affect the event or events contained within the track. The following illustration
shows the track controls for an audio track. Multiple busses are only available in Vegas Video
and Audio, and not in the LE versions.
Track
number
View
Scribble Strip
Bus
Arm for
Record
Track
Effects
Mute
Solo
Scrolling and zooming
Scrolling and zooming in the workspace is simple.
• Click the scroll bar arrows in Vegas to move up and down the tracks or move forward and
back along the timeline.
• Drag the scroll bars to move up and down the tracks or move forward and back along the
timeline.
•Click the Zoom tools ( ) to reveal more or less of the timeline.
GETTING STARTED CHP. 3
Page 97

• Drag the edge of the Scroll Thumb, found on the scroll
bar, to zoom or press the up ( ) and down ( ) arrow
keys.
•Click the Zoom Edit Tool ( ) button or, from the Edit
menu, choose Editing Tool and then choose Zoom. In
this mode, drag on the timeline to draw a rectangle that
defines the zoom region.
Vegas also has mouse scroll wheel support:
• The default behavior of the Wheel is to zoom horizontally.
• Shift+Wheel scrolls horizontally (through time).
• Ctrl+Shift+Wheel moves the trackview cursor in small increments.
• Ctrl+Shift+Alt+Wheel moves the cursor in one-frame increments.
• Pressing the mouse wheel activates auto-panning.
Zooming directly controls the accuracy of your editing. Each video event has thumbnail
representations of the frames within the event. Depending on how far you have zoomed in
on a video event, this thumbnail can be one image representing the entire event, or every
frame can be displayed as a thumbnail. At the bottom of the event is a small box with the
frame offset, time or timecode in it that indicates the frame shown in the image thumbnail.
The small black arrow marks the exact position of that frame in time. When the workspace
is zoomed in far enough, each thumbnail is numbered and represents an actual frame in the
source video file. At intermediate zoom levels, marks between the frame numbers show the
location of intermediate frames. These frame marks are not visible at lower magnifications.
97
Some frames are marked
by black triangles. Most
frames are not represented.
Every black triangle
represents a frame and
the thumbnails represent
the numbered frames.
Every thumbnail represents
a single, numbered frame.
CHP. 3 GETTING STARTED
Page 98

98
Track number and color
This area identifies the track’s order number in a multitrack project. You may rearrange the
track order by dragging selected tracks up or down within the Track Header.
Track color
Change the color
by right-clicking
and choosing
Track Color, and
then selecting the
color you prefer.
View buttons
These buttons control the track’s appearance (size) in the Track View.
Minimized
Normal
Maximized
Track height can also be controlled by simply dragging the lower edge.
GETTING STARTED CHP. 3
Page 99

Track FX button
This button accesses Noise Gate, equalization (EQ), and compression FX controls for audio
tracks. For more information, see Using Audio FX on page 193. On video tracks, it accesses the
video filters, effects, and plug-ins. For more information, see Using a video filter on page 264.
99
Noise Gate FX
Equalization FX
Compression FX
Bus assignment
Multiple busses are only available in Vegas Video and Audio, and not in the LE versions. This
button allows you to assign an audio track to a specific output bus. This option is available
for projects being mixed for multiple stereo busses. (A bus is where various track signals are
mixed together and output.) For more information, see Assigning an audio track to a bus on page
189.
Select a bus
for playback
Arm for Record button
This button allows you to prepare an audio track for recording. You may record directly into
tracks. A track is ready when you see the recording meter appear on it. For more information,
see Setting up to record into audio tracks on page 192.
CHP. 3 GETTING STARTED
Page 100

100
Mute button
Solo button
This button enables you to temporarily disable playback of the track, so you can focus on
other tracks. When a track is muted, it appears grayed out on the Track View.
Before muting the track After muting the track
This button isolates a track’s events for playback, while muting the other tracks. If there is
only one track of a certain type, for example only a single video track, the button is
unnecessary and may not be displayed.
Before applying Solo to the track After applying Solo to the track
Scribble Strip
This area lets you label a track. Double-click in the strip and type the track’s name or rightclick anywhere in the Track Header and choose
Rename
type the track’s name. If you do not see the Scribble Strip, change the track’s height. For
more information, see Changing track height on page 180.
Scribble Strip
Double-click and type name
GETTING STARTED CHP. 3
from the shortcut menu and then
 Loading...