

Sony UY-S100 Operating Instructions Manual

Film Scanner
3-206-174-21 (1)
Operating Instructions
UY-S100
© 2001 Sony Corporation

WARNING
To prevent fire or shock hazard, do not
expose the unit to rain or moisture.
To avoid electrical shock, do not open the
cabinet. Refer servicing to qualified personnel
only.
THIS APPARATUS MUST BE EARTHED.
Owner’s Record
The model and serial numbers are located at the rear.
Record the serial number in the space provided below.
Refer to these numbers whenever you call upon your Sony
dealer regarding this product.
Model No. UY-S100
Serial No. _______________________________
For the Customers in the U.S.A.
This equipment has been tested and found to comply with
the limits for a Class A digital device, pursuant to Part 15 of
the FCC Rules. These limits are designed to provide
reasonable protection against harmful interference when the
equipment is operated in a commercial environment. This
equipment generates, uses, and can radiate radio frequency
energy and, if not installed and used in accordance with the
instruction manual, may cause harmful interference to radio
communications. Operation of this equipment in a residential
area is likely to cause harmful interference in which case the
user will be required to correct the interference at his own
expense.
You are cautioned that any changes or modifications not
expressly approved in this manual could void your authority
to operate this equipment.
The shielded interface cable recommended in this manual
must be used with this equipment in order to comply with the
limits for a digital device pursuant to Subpart B of Part 15 of
FCC Rules.
Description of signal words
WARNING: Used for the critical situation which may
possibly cause a death or serious injury if the
situation is not avoided.
CAUTION: Used for the critical situation which may
possibly cause a slight injury or a medium
degree of injury if the situation is not avoided.
This word is also used for the critical situation
under which a material damage will be
caused.
Note
It is forbidden to copy or duplicate copyrighted matters
without the permission of the copyright holder.
Possession of copies or duplicates of currency, coins,
securities, uncancelled stamps or postcards, revenue
stamps and other certificates of value is punishable by
law.
2

IMPORTANT SAFETY INSTRUCTIONS
When using your photographic equipment, basic safety precautions should always be followed,
including the following:
1. Read and understand all instructions before using.
2. Close supervision is necessary when any appliance is used by or near children. Do not
leave appliance unattended while in use.
3. Care must be taken as burns can occur from touching hot parts.
4. Do not operate appliance with a damaged cord or if the appliance has been dropped or
damaged — until it has been examined by a qualified service personnel.
5. Position the cord so that it will not be tripped over, pulled, or contact hot surfaces.
6. If an extension cord is necessary, a cord with a current rating at least equal to that of the
appliance should be used. Cords rated for less amperage than the appliance may overheat.
7. Always unplug appliance from electrical outlet before cleaning and servicing and when not in
use. Never yank cord to pull plug from outlet. Grasp plug and pull to disconnect.
8. Let appliance cool completely before putting away. Loop cord loosely around appliance
when storing.
9. To reduce the risk of electric shock, do not immerse this appliance in water or other liquids.
10.To reduce the risk of electric shock, do not disassemble this appliance, but take it to a
qualified service personnel when service or repair work is required. Incorrect reassembly
can cause electric shock when the appliance is used subsequently.
11.The use of an accessory attachment not recommended by the manufacturer may cause a
risk of fire, electric shock, or injury to persons.
12.Connect this appliance to a grounded outlet.
SA VE THESE INSTRUCTIONS
3
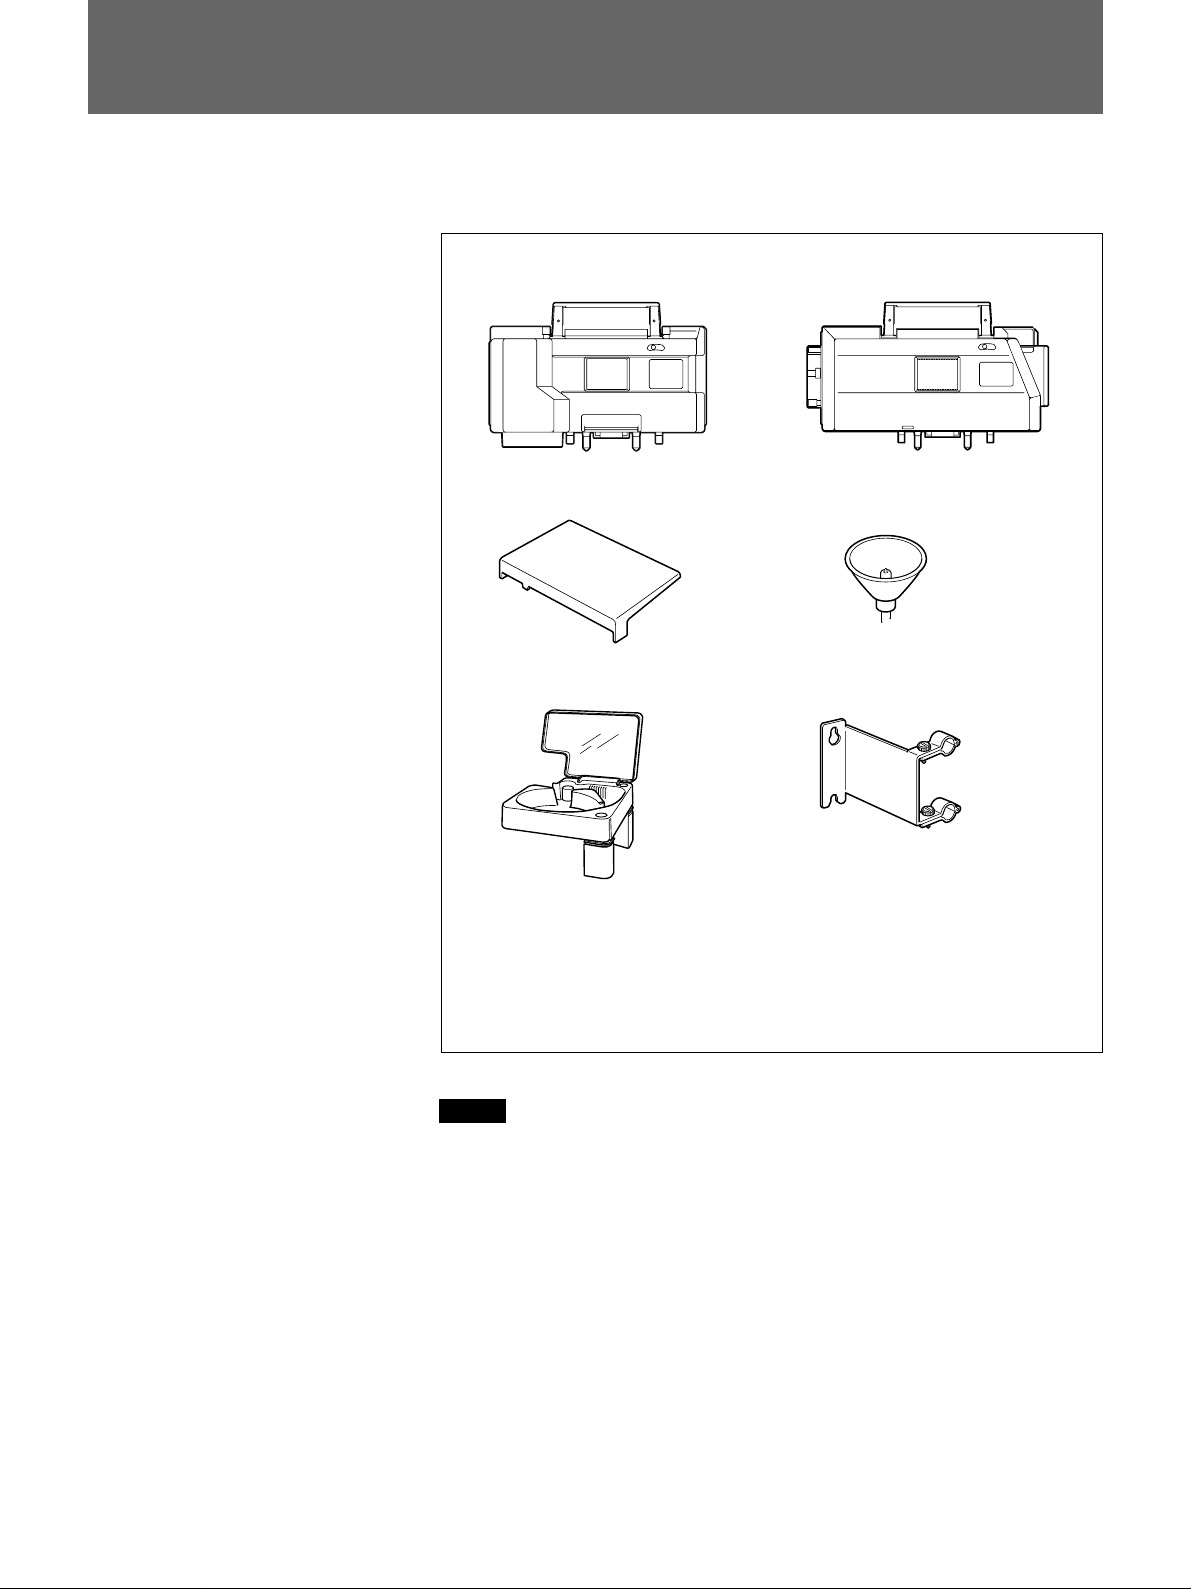
Checking the Package
The Film Scanner comes together with the following accessories. Check
that nothing is missing from your package.
Film carrier (1) Slide carrier (1)
Carrier cover (1)
Film tray (1)
AC power cord (1)
Ferrite filter (2)
CD-ROM (SCANNER DRIVER UY-S100/S90/S77) (1)
Operating Instructions (1)
Software licence agreement (1)
Warranty booklet (1)
Halogen lamp (1)
SCSI cable clamp (1)
Notes
•Retain the original carton and packing materials in case you have to
transport the unit in the future.
•Remove the carrier when transporting the Film Scanner.
•The optional UYA-S77TR film tray cannot be used with this unit. Use
the supplied film tray only.
4

Table of Contents
Introduction
Using the Film Scanner
Features ............................................................................. 6
Location and Function of Parts and Controls ................ 7
Hooking Up ........................................................................ 8
Attaching the supplied SCSI cable clamp .........................9
Setting the DIP Switch .................................................... 10
Installing the Scanner Software..................................... 11
Usable Films and Carriers.............................................. 12
Mounting/Removing the Carrier .................................... 13
Loading the Film in the Carrier ...................................... 14
Loading a sleeve film into the carrier..............................14
Loading a slide into the carrier........................................ 14
Loading an IX240 cartridge film into the carrier ............15
Maintenance, Checking and
Other Information
Turning the Power ON/OFF ............................................ 16
Precautions...................................................................... 17
About the conditions of film ends and remedies.............17
On safety..........................................................................19
On installation .................................................................19
On heat build-up..............................................................19
On cleaning......................................................................19
On repacking ...................................................................19
Maintenance .................................................................... 20
Cleaning inside the film carrier .......................................20
Cleaning cabinet ..............................................................20
Troubleshooting.............................................................. 21
Specifications.................................................................. 22
5

Features
The UY-S100 Film Scanner scans negative film or slides.
This manual contains precautions, explanations for installation,
connection, information for using the films, and so on.
For information about the procedures for scanning films using the Film
Scanner, please consult the Software Manual stored in the supplied CDROM.
Scanning various types of film is possible
By changing the carriers, scanning the following types of film is possible:
•sleeve film (color negative, color positive or monochrome)
•slide (mounted 135 film, or mounted IX240 film)
•IX240 cartridge film
Selection of four scanning resolutions
You can choose from four scanning resolutions for either 135 film or
IX240 film.
The following shows the available resolution modes and the number of
scanned pixels when 135 film is scanned in the normal cropping mode.
•LD: low definition (384 × 256 pixels)
•SD: standard definition (768 × 512 pixels)
•HD: high definition (1,536 × 1,024 pixels)
•UD: ultra definition (3,072 × 2,048 pixels)
Note
The number of scanned pixels differs according to the film type and
cropping mode (panorama, slide, etc.).
Manual adjustment of colors and density of pictures is possible
You can manually adjust the density, and colors (for color pictures) or
contrast (for monochrome pictures) of the prescanned image. In addition,
the full correction which adjusts a picture taken under different lighting
conditions from other pictures, and the lower correction which adjusts a
picture composed almost in one color, are possible.
Consult the Software Manual about procedures.
6
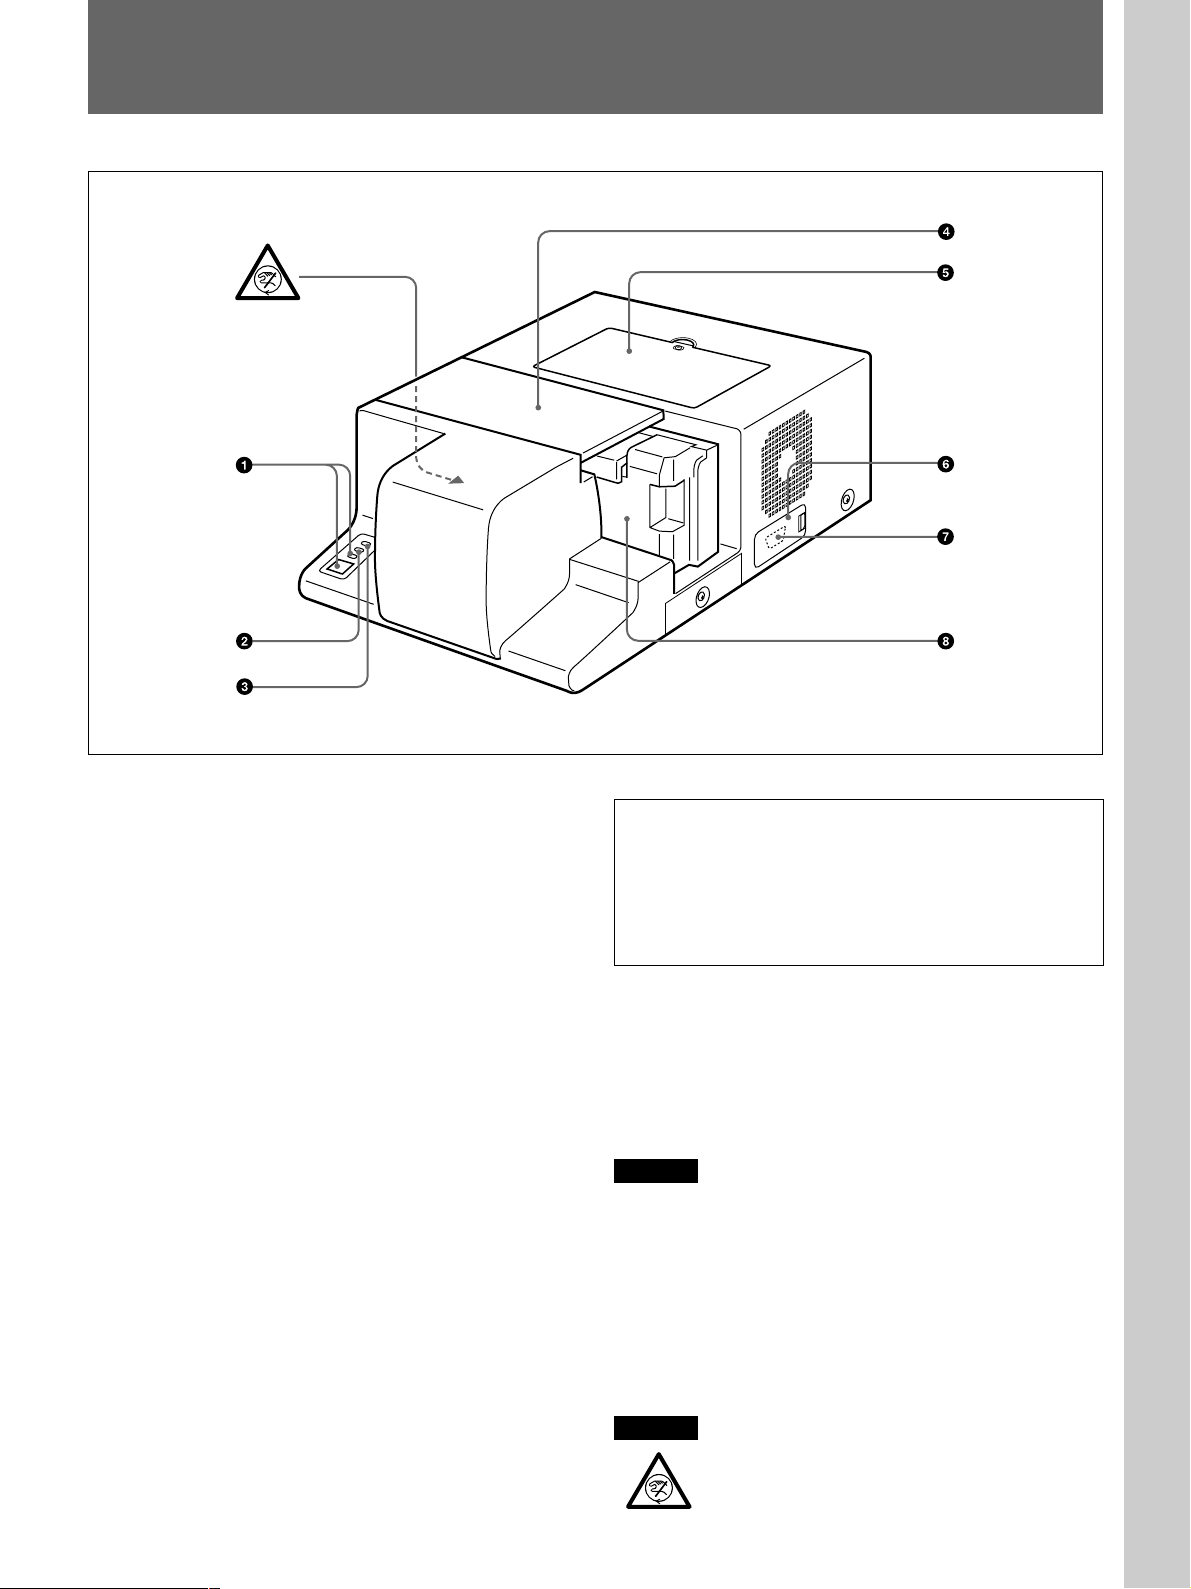
Location and Function of Parts and Controls
Introduction
1 POWER switch and indicator (green)
Press to turn the Film Scanner on or off.
The indicator lights up while the power is ON.
2 BUSY indicator (green)
Lights while the Film Scanner is in operation.
3 ALARM indicator (orange)
Lights when a problem occurs.
4 Carrier cover
Protects the carrier.
If the carrier cover is open, prescanning and scanning
cannot be performed. Also, opening the cover during
prescanning or scanning stops the operation. Make
sure to close the carrier cover.
5 Lamp cover
The halogen lamp is inside.
If the lamp cover is open, prescanning and scanning
cannot be performed. Also, opening the cover during
prescanning or scanning stops the operation. Make
sure to close the lamp cover.
Replacing the halogen lamp
The life of the halogen lamp is about 1,000 hours.
When the supplied lamp burns out, replace it with
the MPS-L60 lamp (not supplied).
For replacement of the halogen lamp, contact your
authorized Sony dealer.
6 Connector cover
The slide feeder connector is inside.
7 Slide feeder connector (D-sub 9-pin)
Connect the optional UYA-S90SF auto slide feeder.
Caution
This connector allows the connection of the UYAS90SF only. Never connect other equipment, as doing
so may cause electrical shock or damage to the
equipment.
8 Carrier
Use the correct carrier according to the types of film.
For details, see page 12.
Caution
To avoid injury, do not insert your hand or
fingers into the movable area of the carrier.
7

Hooking Up
The Film Scanner connects to the computer that supports the SCSI
interface.
Caution
Turn off the power for each device before attempting to make any
connections. Otherwise, electrical shock may be caused or the device may
be damaged.
Notes
•Connect the AC power cord last.
•For details about connections of computer, consult its manual as well.
To connect the SCSI cable
1
UY-S100 Film Scanner
SCSI cable clamp (supplied)
(See page 9.)
Computer
2
Ferrite filters (supplied)
SCSI cable
(not supplied)
to SCSI*
To remove
to AC IN
AC power cord (supplied)
DIP switch
(
See page 10
.
)
to AC outlet
* Connect to either of two SCSI connectors.
8
 Loading...