

Page 1

Video Graphic
Printer
3-798-008-15 (1)
Instructions for Use Page 2
Before operating this unit, please read this manual thoroughly
and retain it for future reference.
Mode d’emploi Page 24
Avant la mise en service de cet appareil, prière de lire
attentivement ce mode d’emploi que l’on conservera pour toute
référence ultérieure.
Gebrauchsanweisung Seite 46
Bevor Sie dieses Gerät verwenden, lesen Sie diese Anleitung
bitte sorgfältig durch, und bewahren Sie sie für später zum
Nachschlagen auf.
Manual de instrucciones página 68
Antes de utilizar la unidad, lea este manual detenidamente y
consérvelo para futuras referencias.
Istruzioni per l’uso pagina 90
Prima di usare l’apparecchio, leggete con attenzione questo
manuale e conservatelo per riferimenti futuri.
UP-880/890CE/890MD
1994 by Sony Corporation
Page 2

English
Owner’ s Record
The model and serial numbers are located at the rear.
Record these number in the space provided below.
Refer to these numbers whenever you call upon your
Sony dealer regarding this product.
Model No.
Serial No.
W ARNING
To prevent fire or shock hazard, do not expose the unit
to rain or moisture.
To avoid electrical shock, do not open the cabinet. Refer
servicing to qualified personnel only.
For UP-890CE/890MD
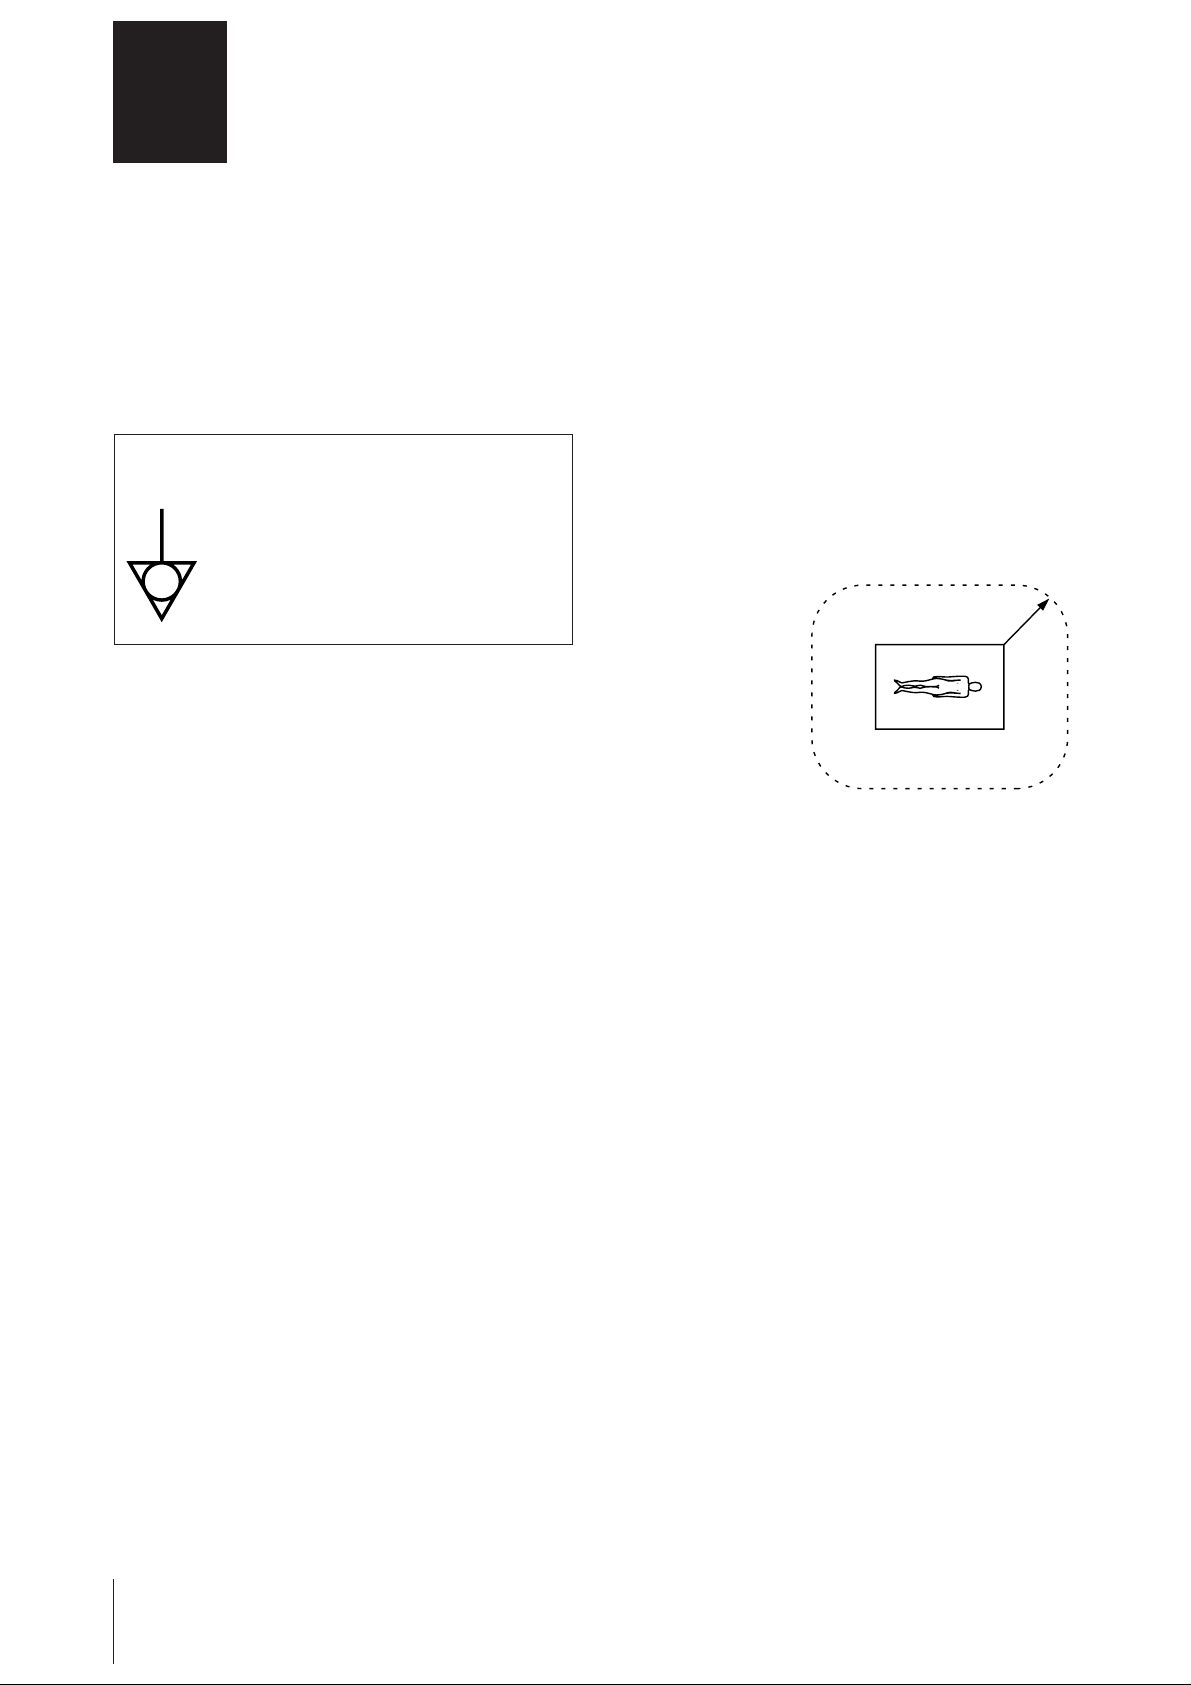
Symbols on the products
This symbol indicates the equipotential
terminal which brings the various parts of a
system to the same potential.
3.The leakage current could increase when connected to
other equipment.
4.This equipment generates, uses, and can radiate
frequency energy. If it is not installed and used in
accordance with the instruction manual, it may cause
interference to other equipment. If this unit causes
interference (which can be determined by unplugging
the power cord from the unit), try these measures:
Relocate the unit with respect to the susceptible
equipment. Plug this unit and the susceptible
equipment into different branch circuit. Consult your
dealer.
For the customers in the U.S.A.
This equipment has been tested and found to comply
with the limits for a Class A digital device, pursuant to
Part 15 of the FCC Rules. These limits are designed to
provide reasonable protection against harmful
interference when the equipment is operated in a
commercial environment.
This equipment generates, uses, and can radiate radio
frequency energy and, if not installed and used in
accordance with the instruction manual, may cause
harmful interference to radio communications. Operation
of this equipment in a residential area is likely to cause
harmful interference in which case the user will be
required to correct the interference at his own expense.
For UP-890MD
This symbol is intended to alert the
user to the presence of uninsulated
"dangerous voltage" within the
product's enclosure that may be of
sufficient magnitude to constitute a risk
of electric shock to persons.
This symbol is intended to alert the
user to the presence of important
operating and maintenance (servicing)
instructions in the literature
accompanying the appliance.
Important safequards notices for use in the
medical environments
1.All the equipments connected to this unit shall be
certified according to Standard IEC601-1, IEC950,
IEC65 or other IEC/ISO Standards applicable to the
equipments.
2.When this unit is used together with other equipment in
the patient area*, the equipment shall be either
powered by an isolation transformer or connected via
an additional protective earth terminal to system
ground unless it is certified according to Standard
IEC601-1.
* Patient Area
R1.5m
You are cautioned that any changes or modifications not
expressly approved in this manual could void your
authority to operate this equipment.
The shielded interface cable recommended in this
manual must be used with this equipment in order to
comply with the limits for a digital device pursuant to
Subpart B of Part 15 of FCC Rules.
For the customers in the United Kingdom
WARNING
THIS APPARATUS MUST BE EARTHED
IMPORTANT
The wires in this mains lead are coloured in accordance
with the following code:
Green-and-yellow: Earth
Blue: Neutral
Brown: Live
As the colours of the wires in the mains lead of this
apparatus may not correspond with the coloured
markings identifying the terminals in your plug proceed
as follows:
The wire which is coloured green-and-yellow must be
connected to the terminal in the plug which is marked by
the letter E or by the safety earth symbol Y or coloured
green or green-and-yellow.
The wire which is coloured blue must be connected to the
terminal which is marked with the letter N or coloured
black.
The wire which is coloured brown must be connected to
the terminal which is marked with the letter L or coloured
red.
2
Page 3

Table of Contents
Introduction
Preparation
Operation
Others
Overview 4
Connection 5
Before Printing 6
Setting the Type of Paper 6
Setting the DIP Switches 7
Loading Paper 10
Printing 12
Making Print-outs 12
Selecting the Printing Direction 13
Selecting the Printing Size 13
Adjusting the Contrast and Brightness 15
Precautions 16
Maintenance 17
On the Type of Paper 19
Specifications 20
Troubleshooting 21
Location and Function of Parts 22
Front 22
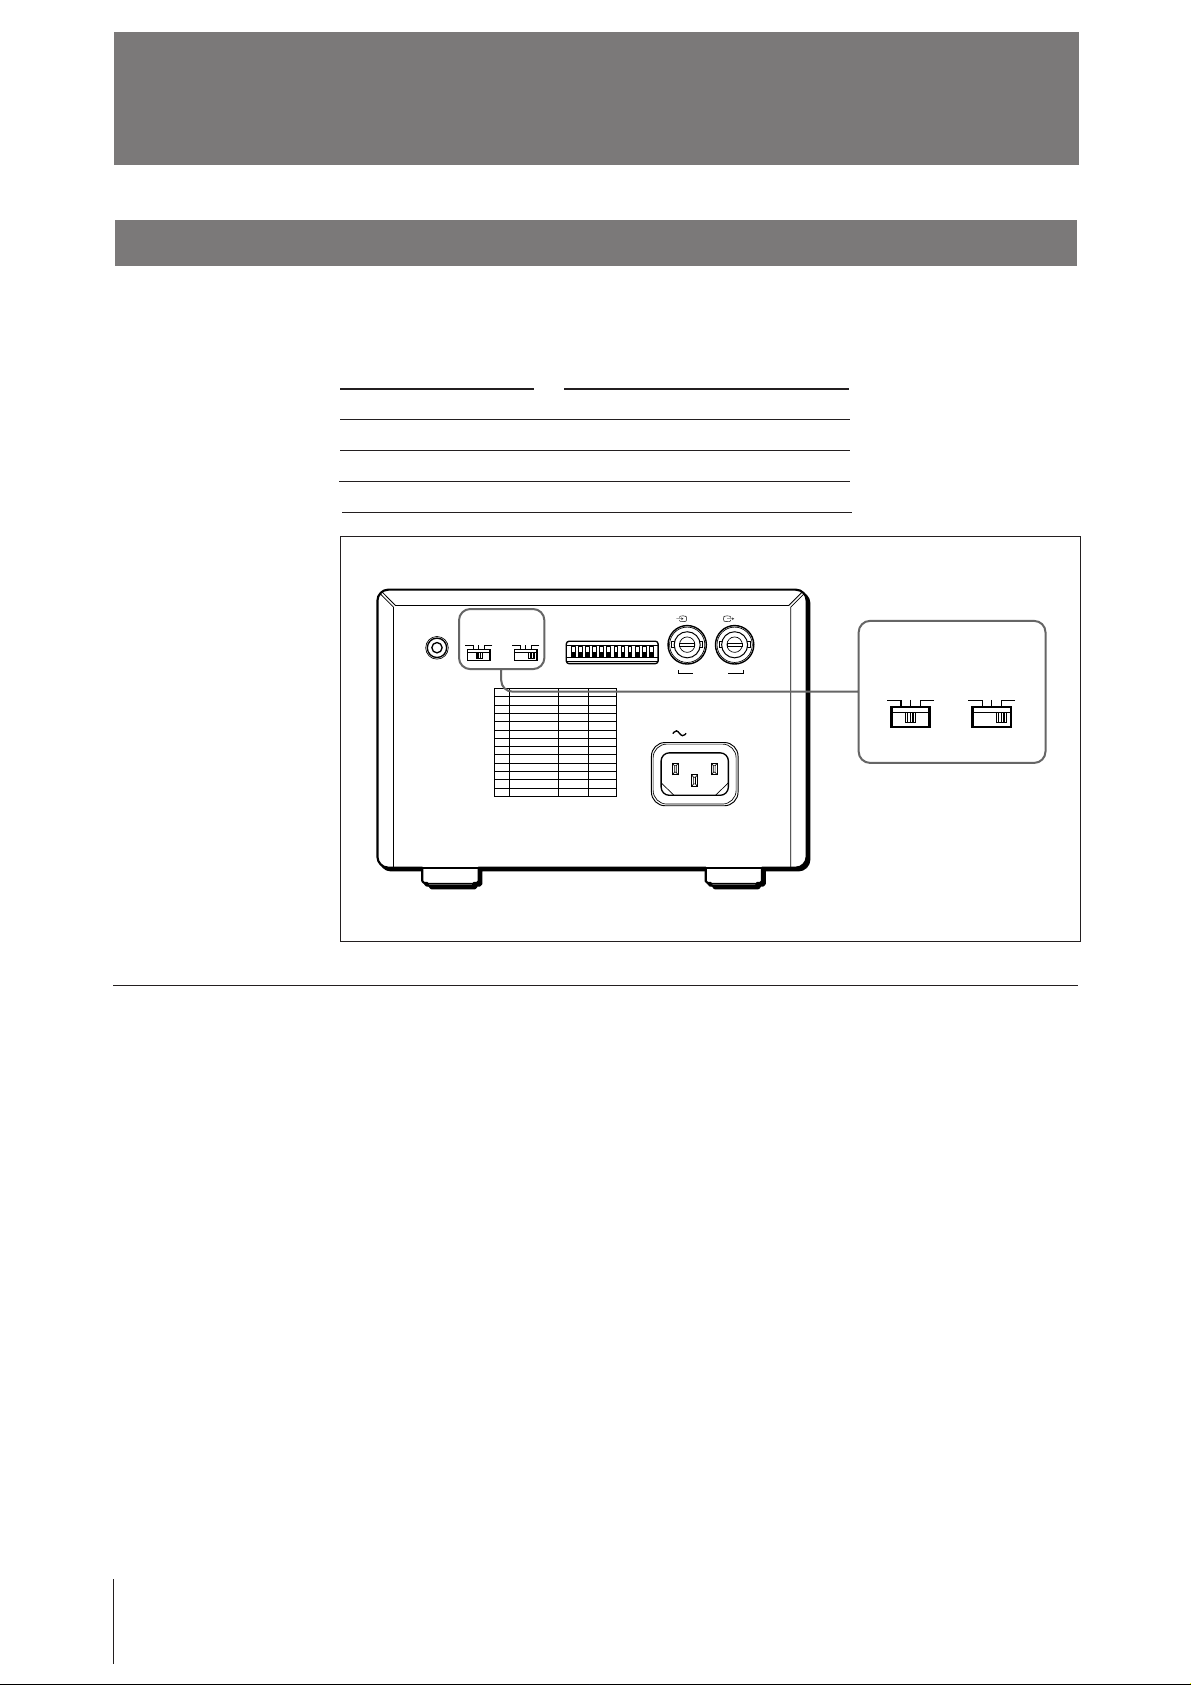
Back 23
3
Page 4

Introduction
Overview
The UP-880/890CE/890MD is a black and white video graphic printer that can be
used to print images displayed on video monitor.
Clear, consistent print quality
• High definition, 10.2 dots/mm printing using a thermal head with high-speed
drive IC.
• 256 gradations of black and white.
Fast printing
• You can make a single print-out in about 3.9 seconds in STD and NORM mode.
• You can make a maximum of 11 copies of the same image continuously.
Two way printing direction and five printing sizes selectable
• The printing direction selector on the front panel enables you to print in vertical
and horizontal directions.
• The printing size control on the front panel enables you to select five kinds of
printing size.
DIP switches to optimize the printer
• You can make print-outs starting either from the bottom or top of the image by
setting the DIRECTION DIP switch.
• You can set the print-out aspect ratio to 4:3 or 1:1 by setting the ASPECT DIP
switch.
• You can set the range to be printed by setting the SCAN DIP switch.
• You can save your paper by setting the POSTFEED DIP switch (paper saving
function).
Automatic video signal discrimination
The type of input signal, black and white (EIA or CCIR) or input color (NTSC or
PAL), is automatically discriminated and printed in same duration and size.
Alarm buzzer
The alarm buzzer prevents you from making any misoperation.
Easy and quick paper loading
You can load paper just by opening the paper lid with the OPEN/CLOSE button
and placing the paper roll.
4
Introduction
Page 5

Preparation
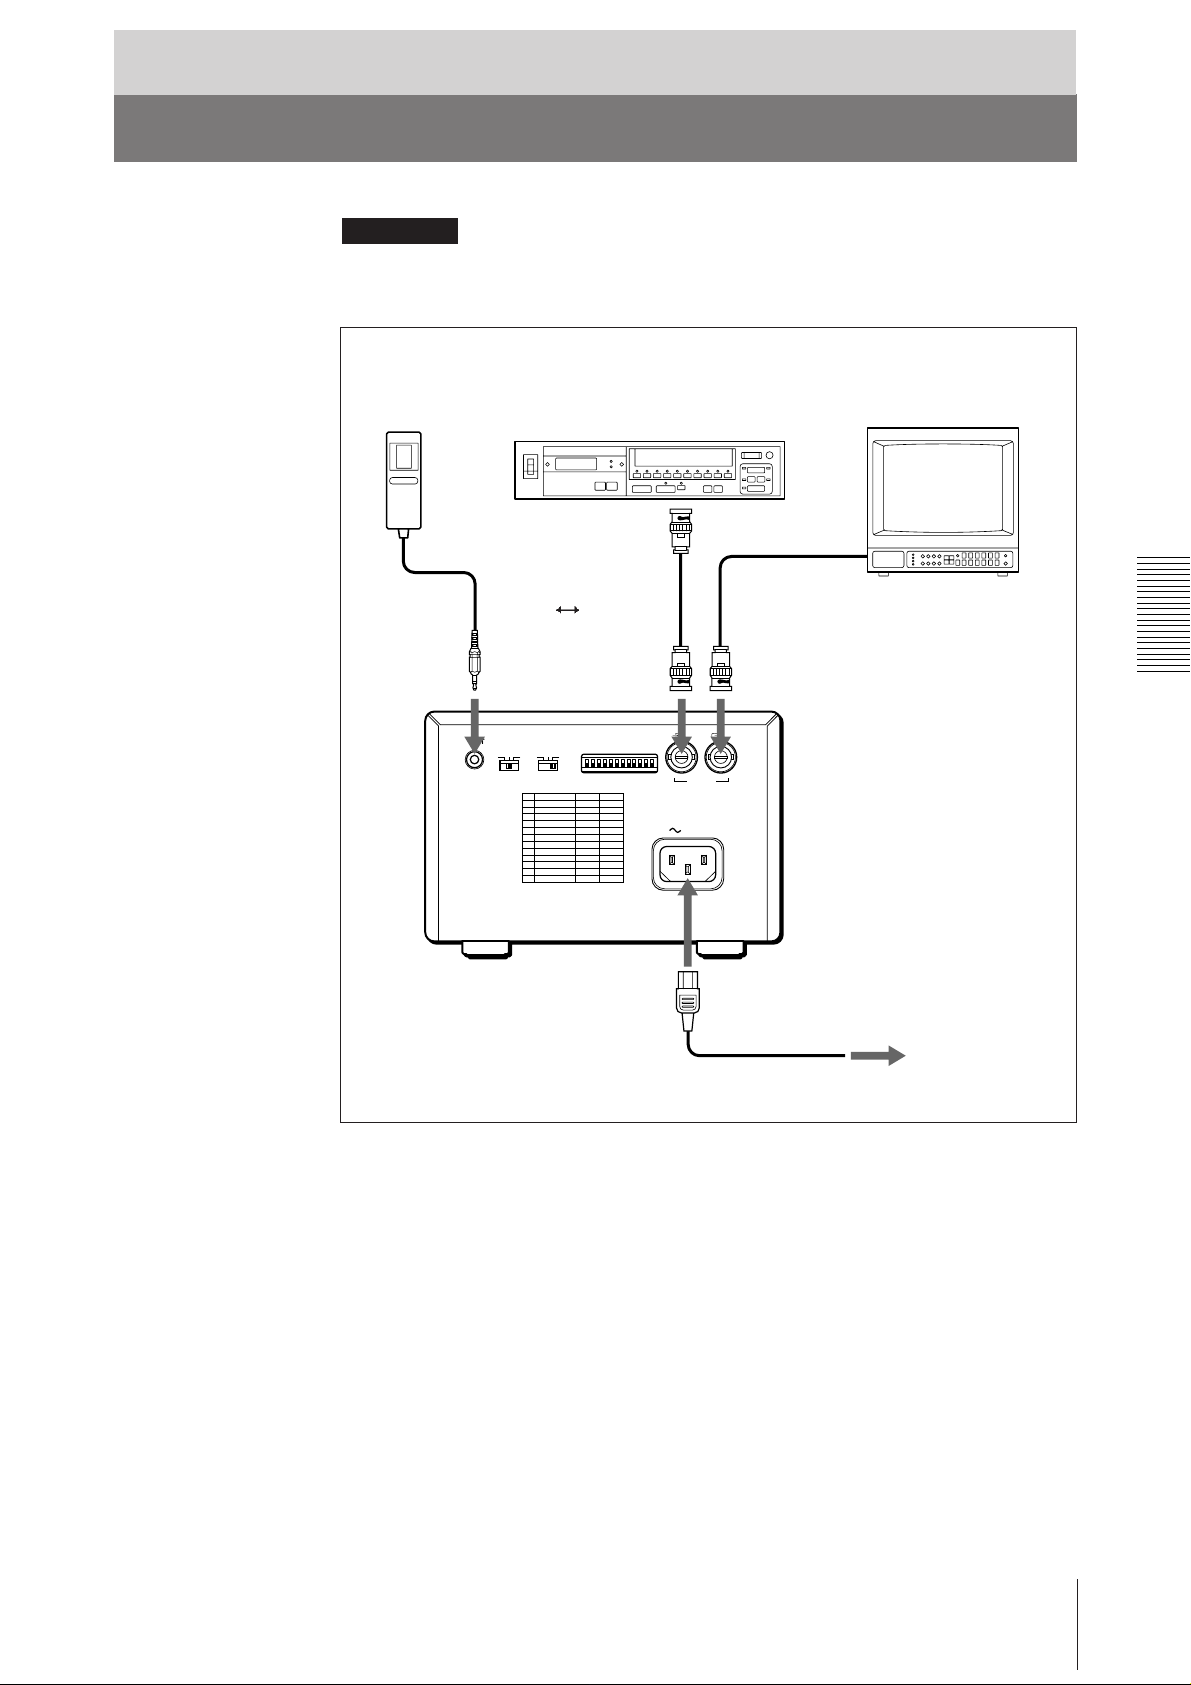
Connection
Notes
• Turn off the power to each device before making connection.
• Connect the AC power cord last.
RM-91 remote
commander*
to REMOTE
Video equipment
to video output
connector
Supplied coaxial
connecting cable
(BNC ˜ BNC)
REMOTE GAMMA TYPE
PAPER
IIIIII IIIIV
to VIDEO IN
DIP SW
OFF
ON
Color/black and white
video monitor
Connecting cable
(not supplied)
to video input
connector
to VIDEO OUT
IN OUT
VIDEO
AC IN
to AC IN
to wall outlet
Supplied AC power cord
* The RM-91 remote commander is supplied with UP-890MD only.
Preparation
5
Page 6
Before Printing
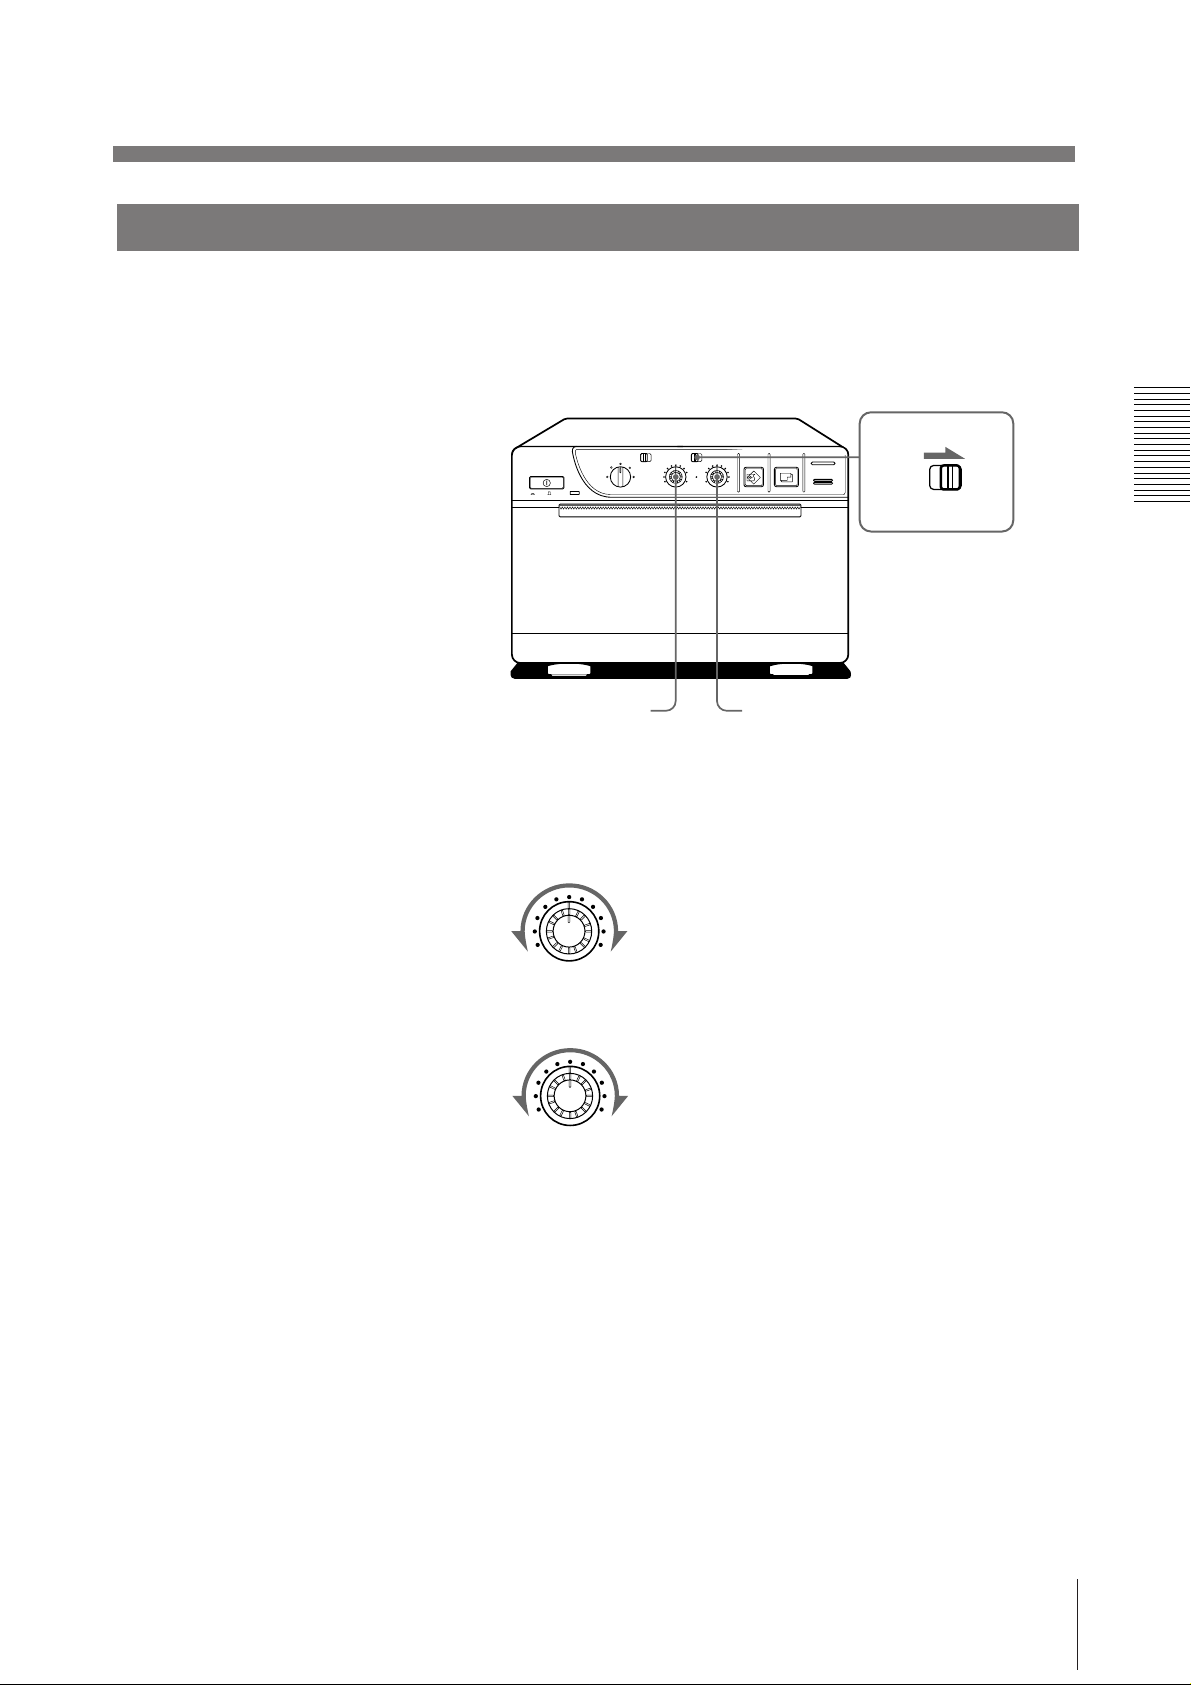
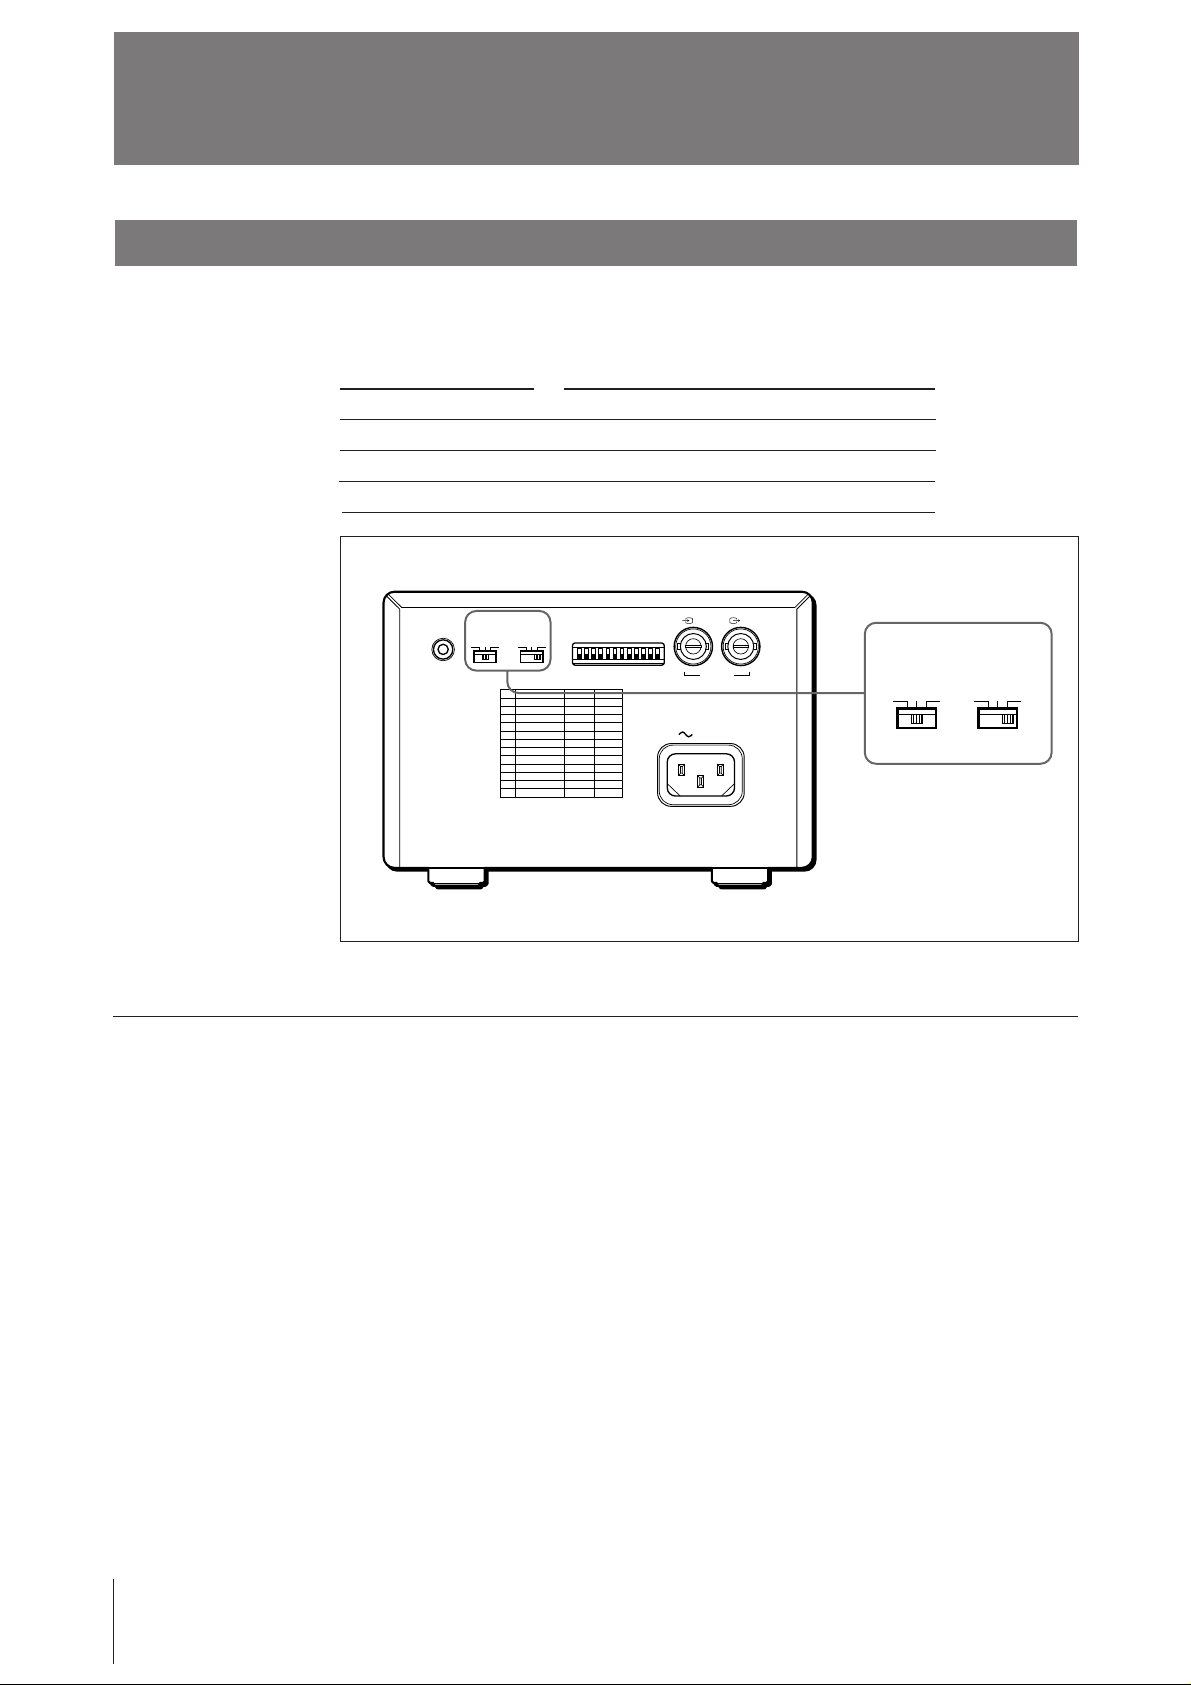
Setting the Type of Paper
Set the PAPER TYPE selector to the type of paper to be used.
The use of paper other than Sony may result in reduced printer performance and
poor print quality.
Type of paper
UPP-110S
UPP-110HD
UPP-110HA
REMOTE GAMMA TYPE
PAPER
IIIIII IIIIV
PAPER TYPE switch position
I (Normal)
II (High density)
IV (Enhanced)
DIP SW
OFF
ON
IN OUT
VIDEO
AC IN
GAMMA TYPE
IIIIII IIIIV
PAPER
When you use the UPP-110HA or UPP-110HD
When you set the PAPER TYPE selector to II or IV, set the density gradation with
the GAMMA selector.
I: Soft gradation
II: Standard
IV: Hard gradation
6
Preparation
Page 7
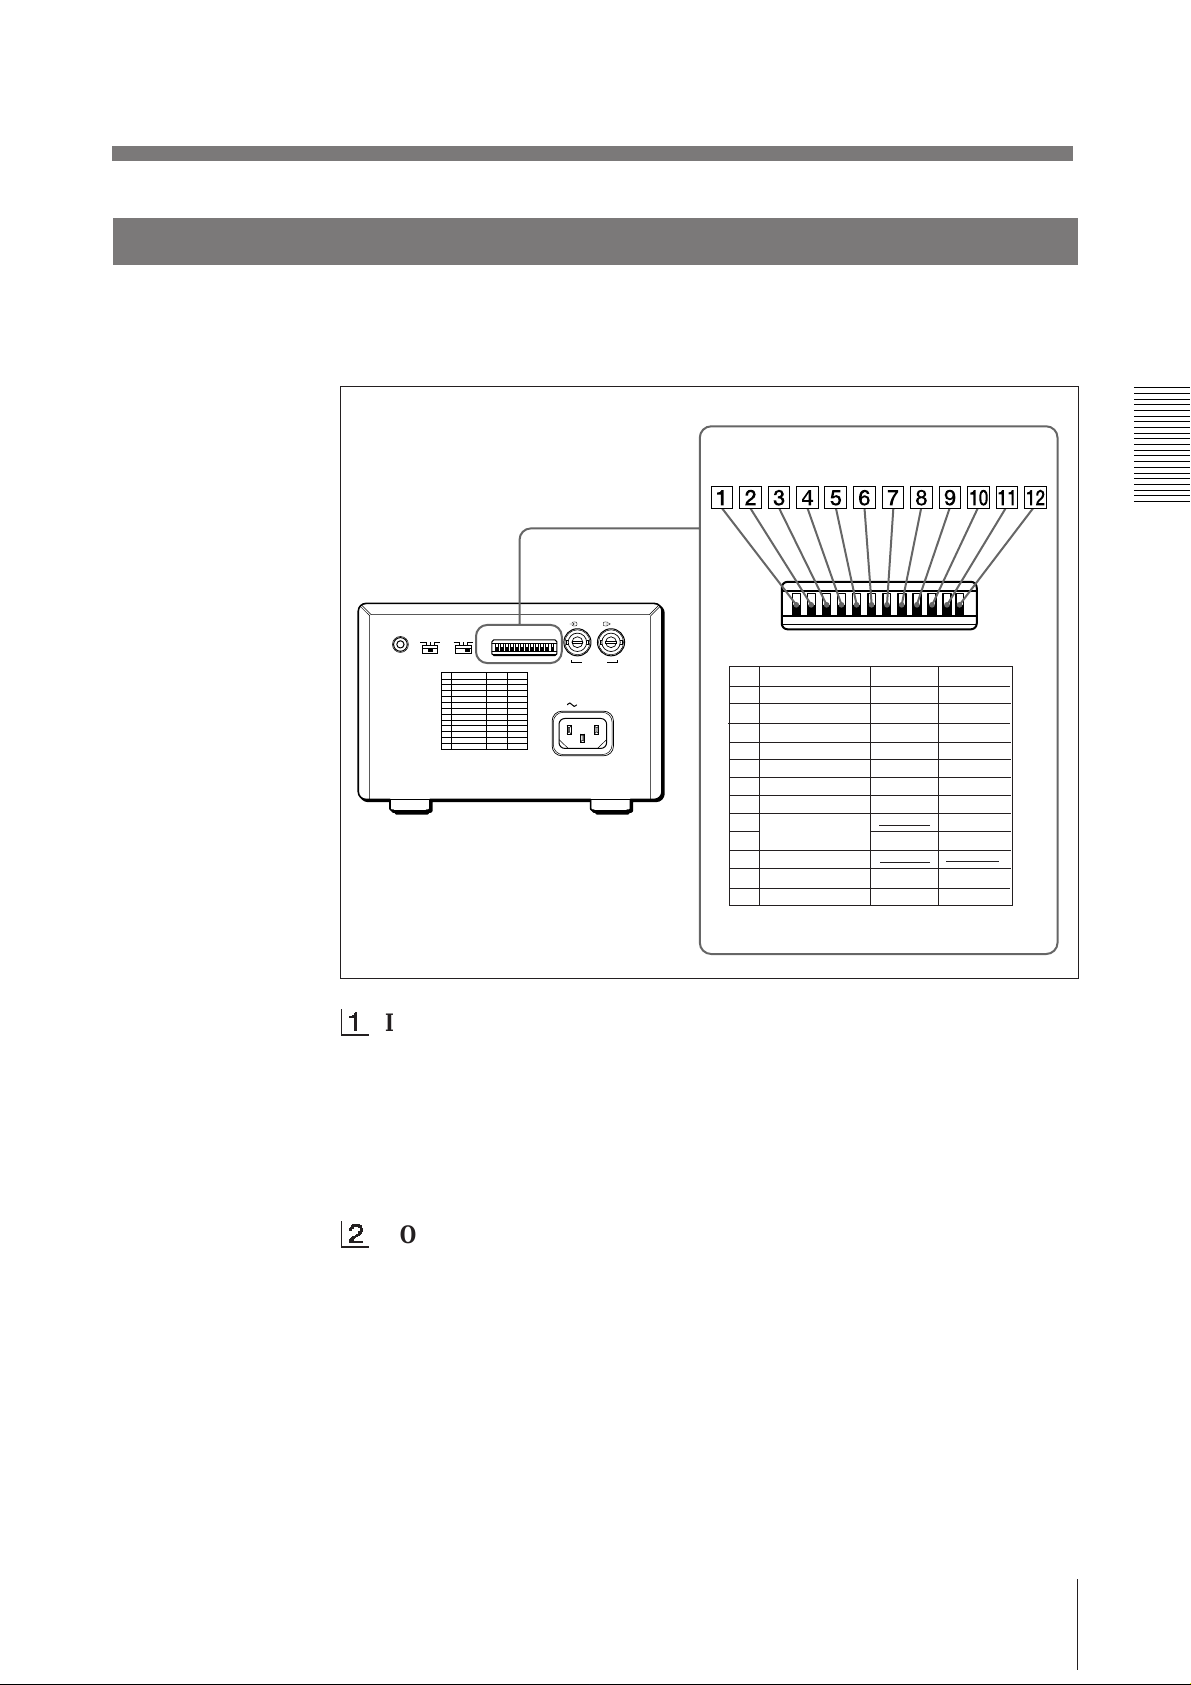
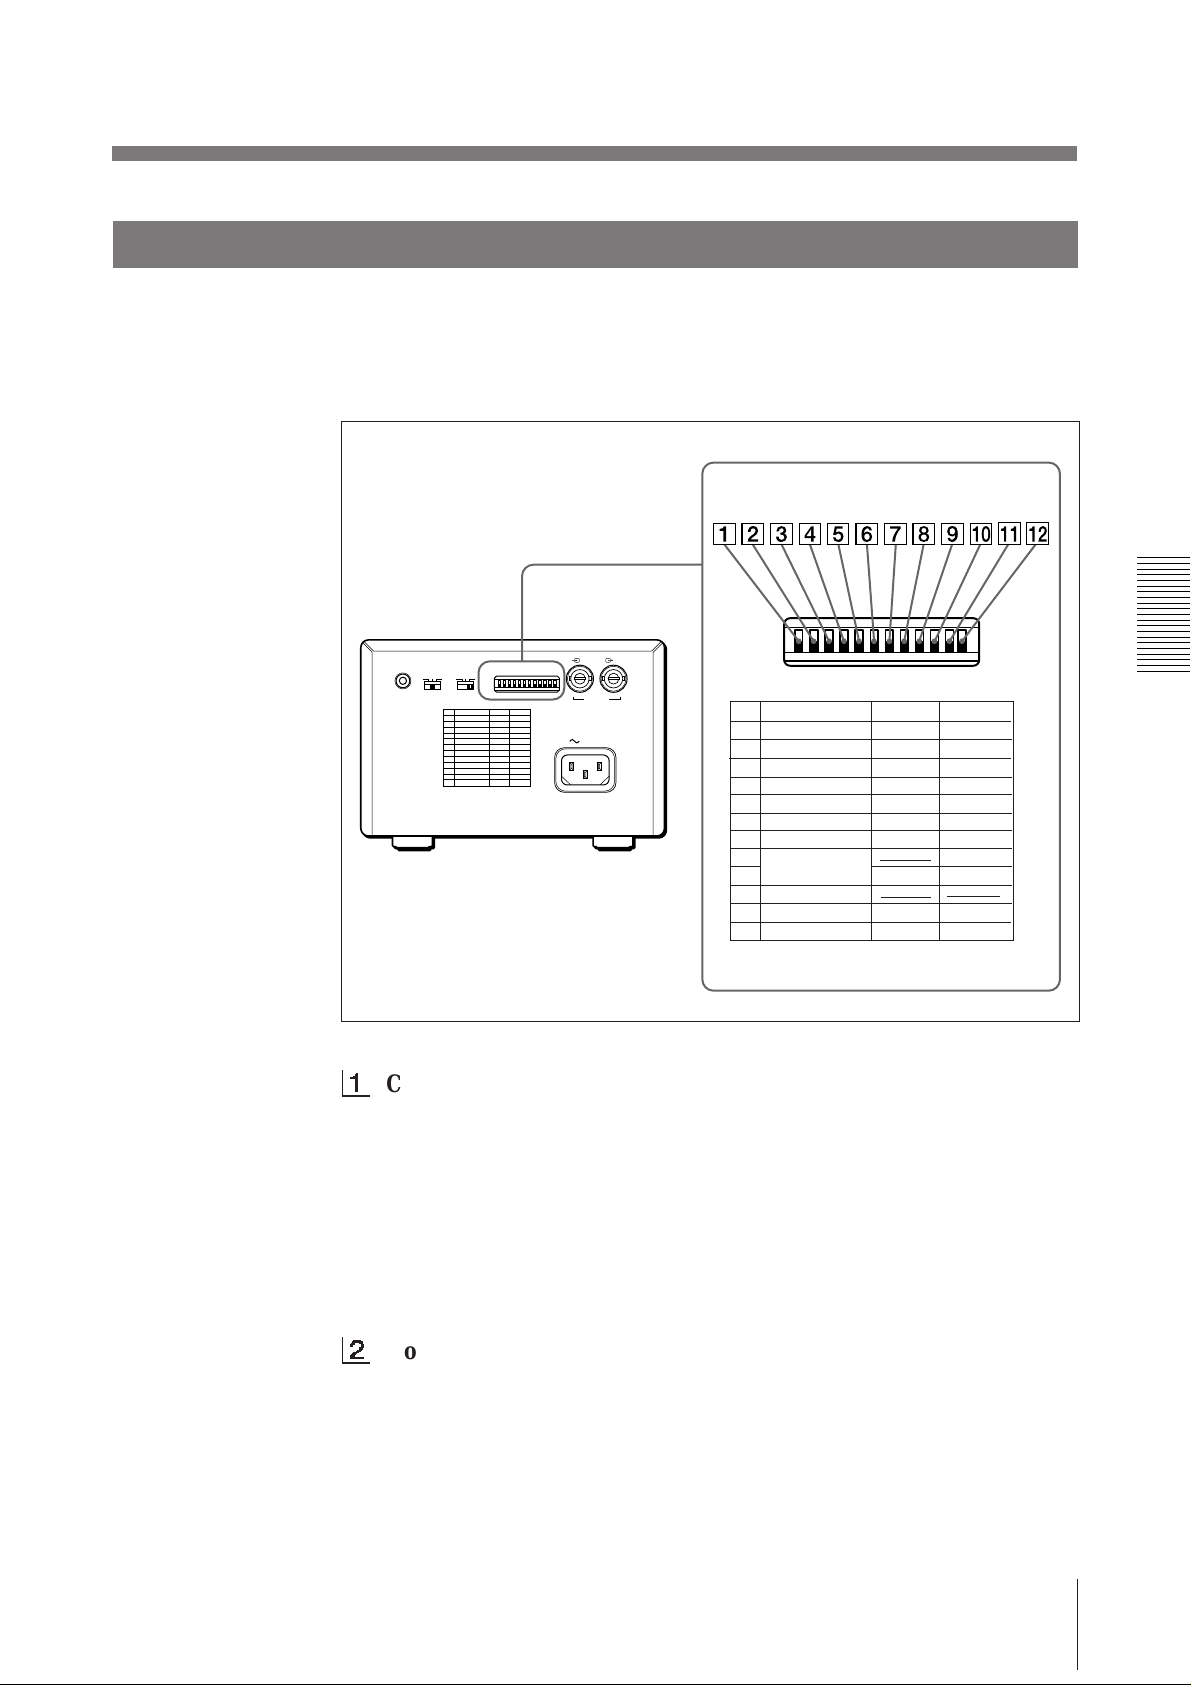
Setting the DIP Switches
Set the DIP switches according to the required print mode. Before setting the DIP
switches, turn the power off. Change the settings using a small pointed tool such as
a small screwdriver. The factory settings are as follows.
REMOTE GAMMA TYPE
PAPER
IIIIII IIIIV
DIP SW
OFF
ON
IN OUT
VIDEO
AC IN
DIP SW
OFF
ON
DIP SW FUNCTION TABLE
NO
FUNCTION
1
INTERRUPT
2
POSTFEED
3
ASPECT
4
MEMORY
5
IMAGE
6
MIRROR
7
DIRECTION
8
SCAN
9
10
RESERVED
11
INPUT
12
75
SW-ON
ON
ON
4:3
FRAME
POSI
NORM
NORM
WIDE 1
B&W
ON
SW-OFF
OFF
OFF
1:1
FIELD
NEGA
REV
REV
WIDE 2
NORM
COLOR
OFF
1
INTERRUPT ON/OFF switch
To interrupt the printing under way and print a new picture when you press
the PRINT button during printing, set this switch to ON.
To disregard that the PRINT button is pressed during printing and continue
the printing under way, set to OFF.
If you press the PRINT button during printing in OFF mode, the alarm buzzer
will sound.
2
POSTFEED ON/OFF switch
To feed out extra blank paper once a picture has been printed, set this switch
to ON.
To save paper by feeding only a short length of paper after printing a picture,
set to OFF. You can make more print-outs per roll of printing paper, but you
have to take out and cut the paper yourself.
Preparation
7
Page 8
Before Printing (continued)
275
87654321
475
50
250
9
4
5
5
7
5
4
3
3
2
3
2
30
10
7
0
3
275
87654321
475
50
250
9
4
5
5
7
5
4
3
3
2
3
2
30
10
7
0
3
275
87654321
475
50
250
9
4
5
5
7
5
4
3
3
2
3
2
30
10
7
0
3
275
87654321
475
50
250
9
4
5
5
7
5
4
3
3
2
3
2
30
10
7
0
3
3
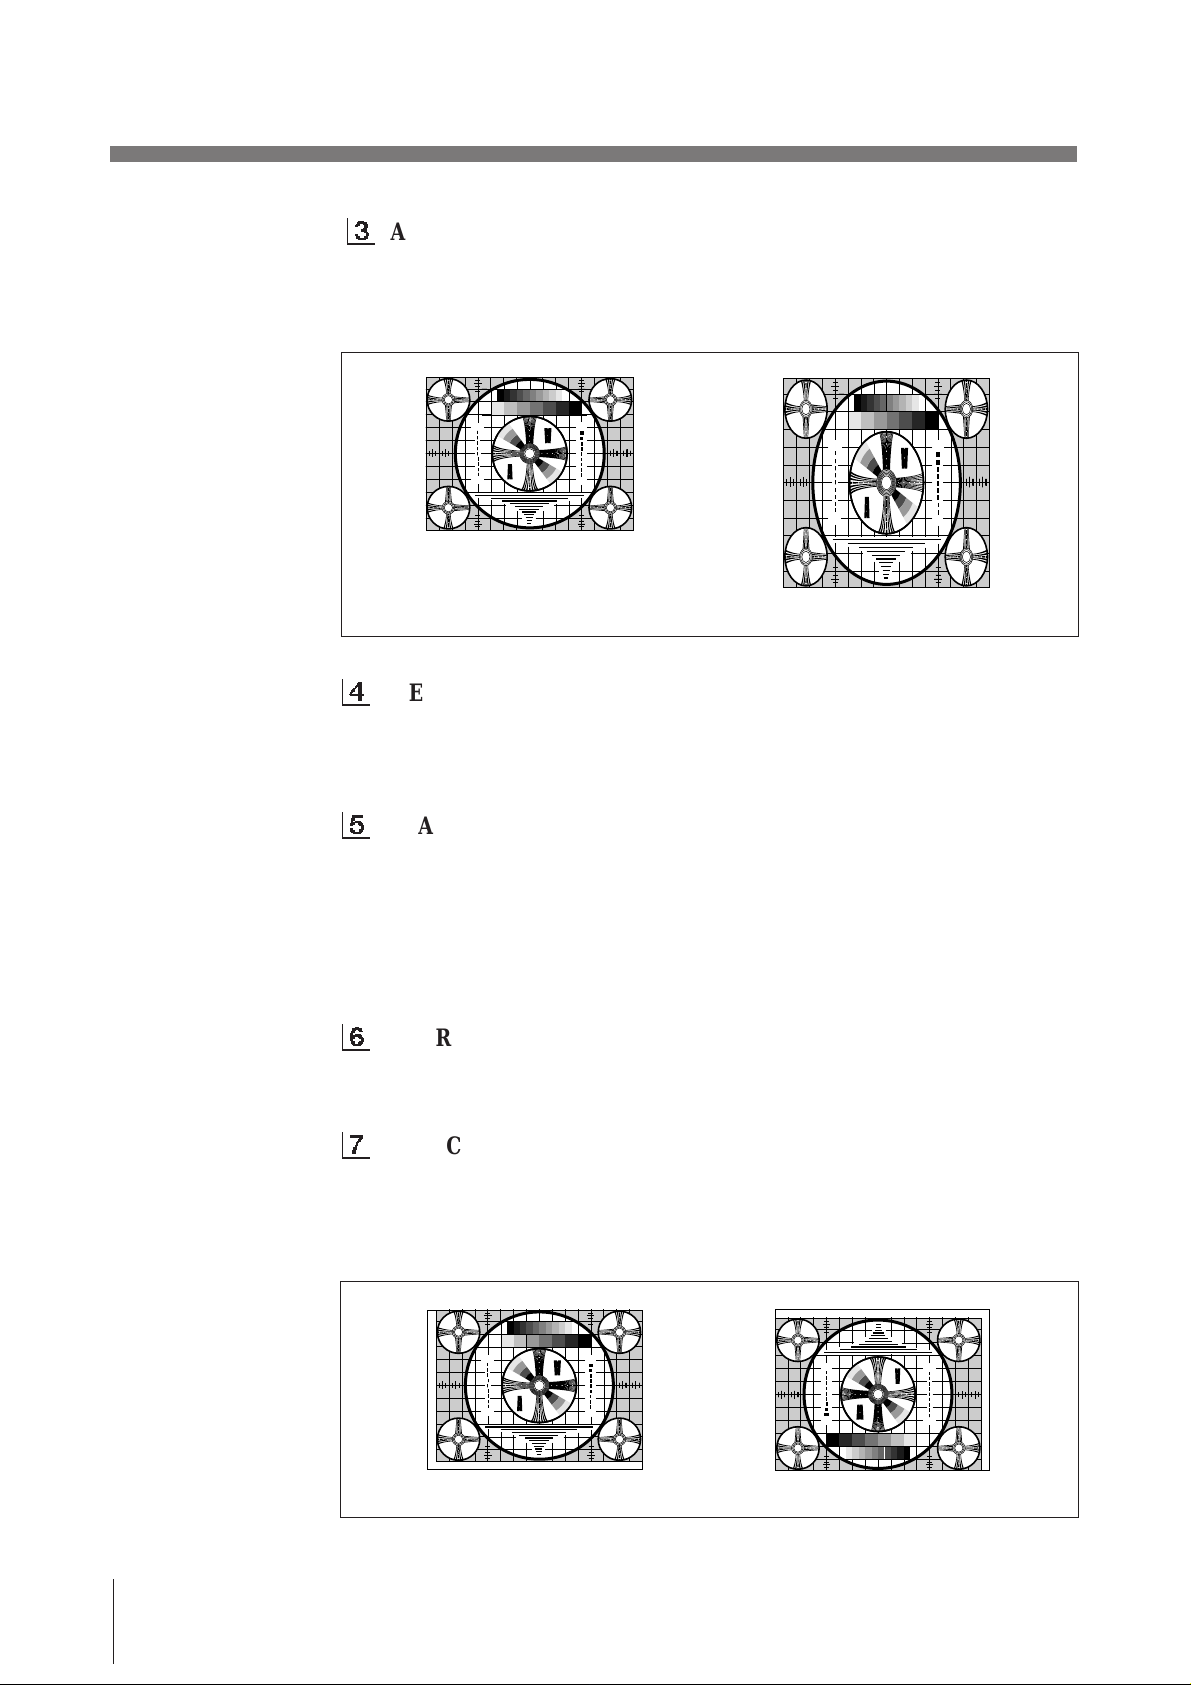
ASPECT 4:3/1:1 switch
Normally keep this switch set to 4:3. When the aspect ratio of the video
signal is 1:1, set to 1:1.
The print-out will be longer than a print-out made at 4:3.
1
2
3
3
5
2
3
30
4
3
3
4
1 357 7 531
4
3
3
4
30
3
2
5
3
3
2
1
4 : 3
5
2
3
1
3
2
3
30
4
3
3
4
4
3
3
4
30
3
2
5
3
3
2
1
1
2
3
3
5
2
3
30
4
3
3
4
1 357 7 531
4
3
3
4
30
3
2
5
3
3
2
1
5
3
1
4
3
3
4
4
3
3
4
5
3
1
1 : 1
4
MEMORY FRAME/FIELD switch
Normally keep this switch set to FRAME (ON). When printing fast-moving
pictures (such as a ball being thrown), the print-out may blur. If this happens,
set to FIELD. The print-out definition will be poorer but less blurred.
5
IMAGE POSI/NEGA switch
Normally keep this switch set to POSI (ON). To make negative print-outs, set
to NEGA (OFF).
Note
If you set the THRU/EE selector to the EE side, the unit prints positive
pictures irrespective of setting the IMAGE POSI/NEGA switch.
2
3
2
3
30
30
3
2
3
2
6
MIRROR NORM/REV switch
Normally keep this switch set to NORM (ON). To print the right and left
sides reversed, set to REV (OFF).
7
DIRECTION NORM/REV switch
Selects whether the top or bottom of the screen is to be printed first.
Normally keep this switch set to NORM (ON). Printing is done from the
bottom of the screen. To start printing from the top of the screen, set to REV
(OFF).
1
2
3
3
5
2
3
30
4
3
3
4
1 357 7 531
4
3
3
4
30
3
2
5
3
3
2
1
Preparation
8
NORM
5
2
3
1
3
2
3
30
4
3
3
4
4
3
3
4
30
3
2
5
3
3
2
1
1
2
3
3
5
2
3
30
4
3
3
4
4
3
3
4
30
3
2
3
1
3
2
5
1
2
3
3
5
2
3
30
4
3
3
4
1 357 7 531
4
3
3
4
30
3
2
5
3
3
2
1
REV
Page 9
89
275
87654321
475
50
250
9
4
5
5
7
5
4
3
3
2
3
2
30
10
7
0
3
275
87654321
475
50
250
9
4
5
5
7
5
4
3
3
2
3
2
30
10
7
0
3
275
87654321
475
50
250
9
4
5
5
7
5
4
3
3
2
3
2
30
10
7
0
3
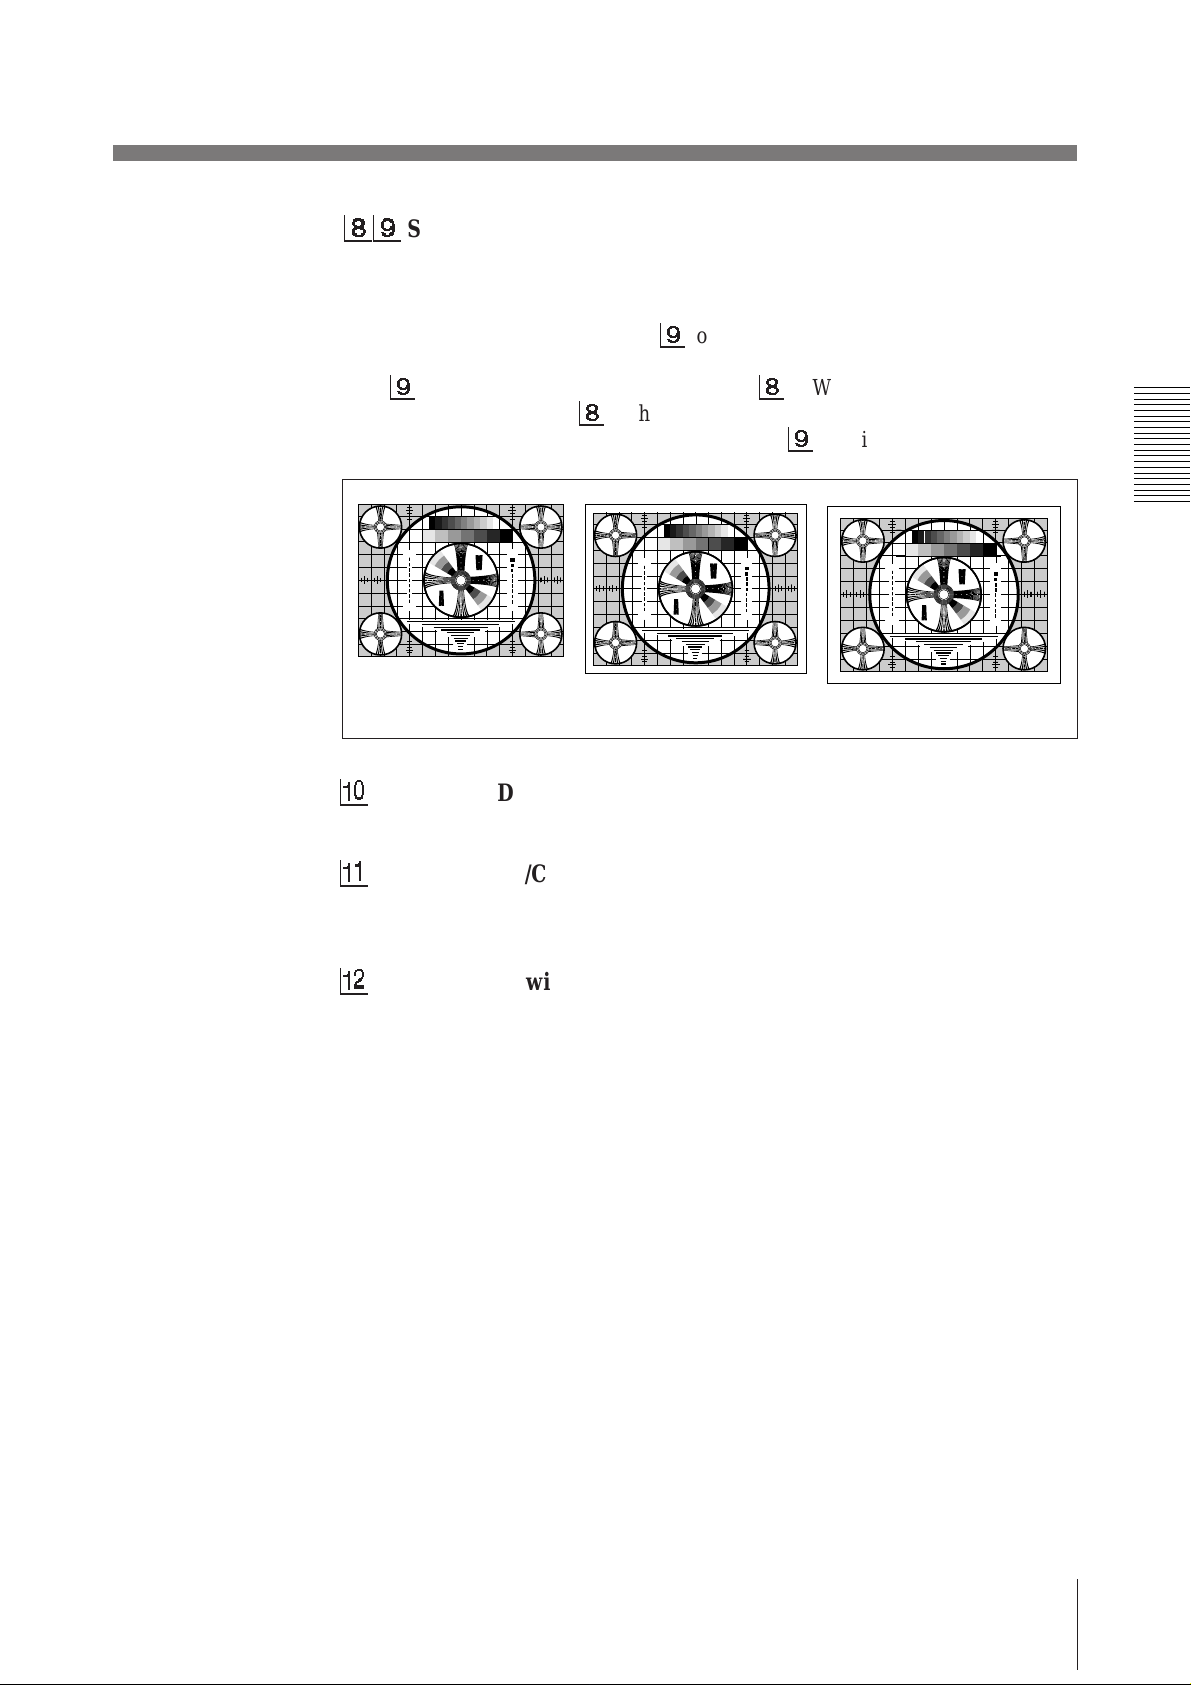
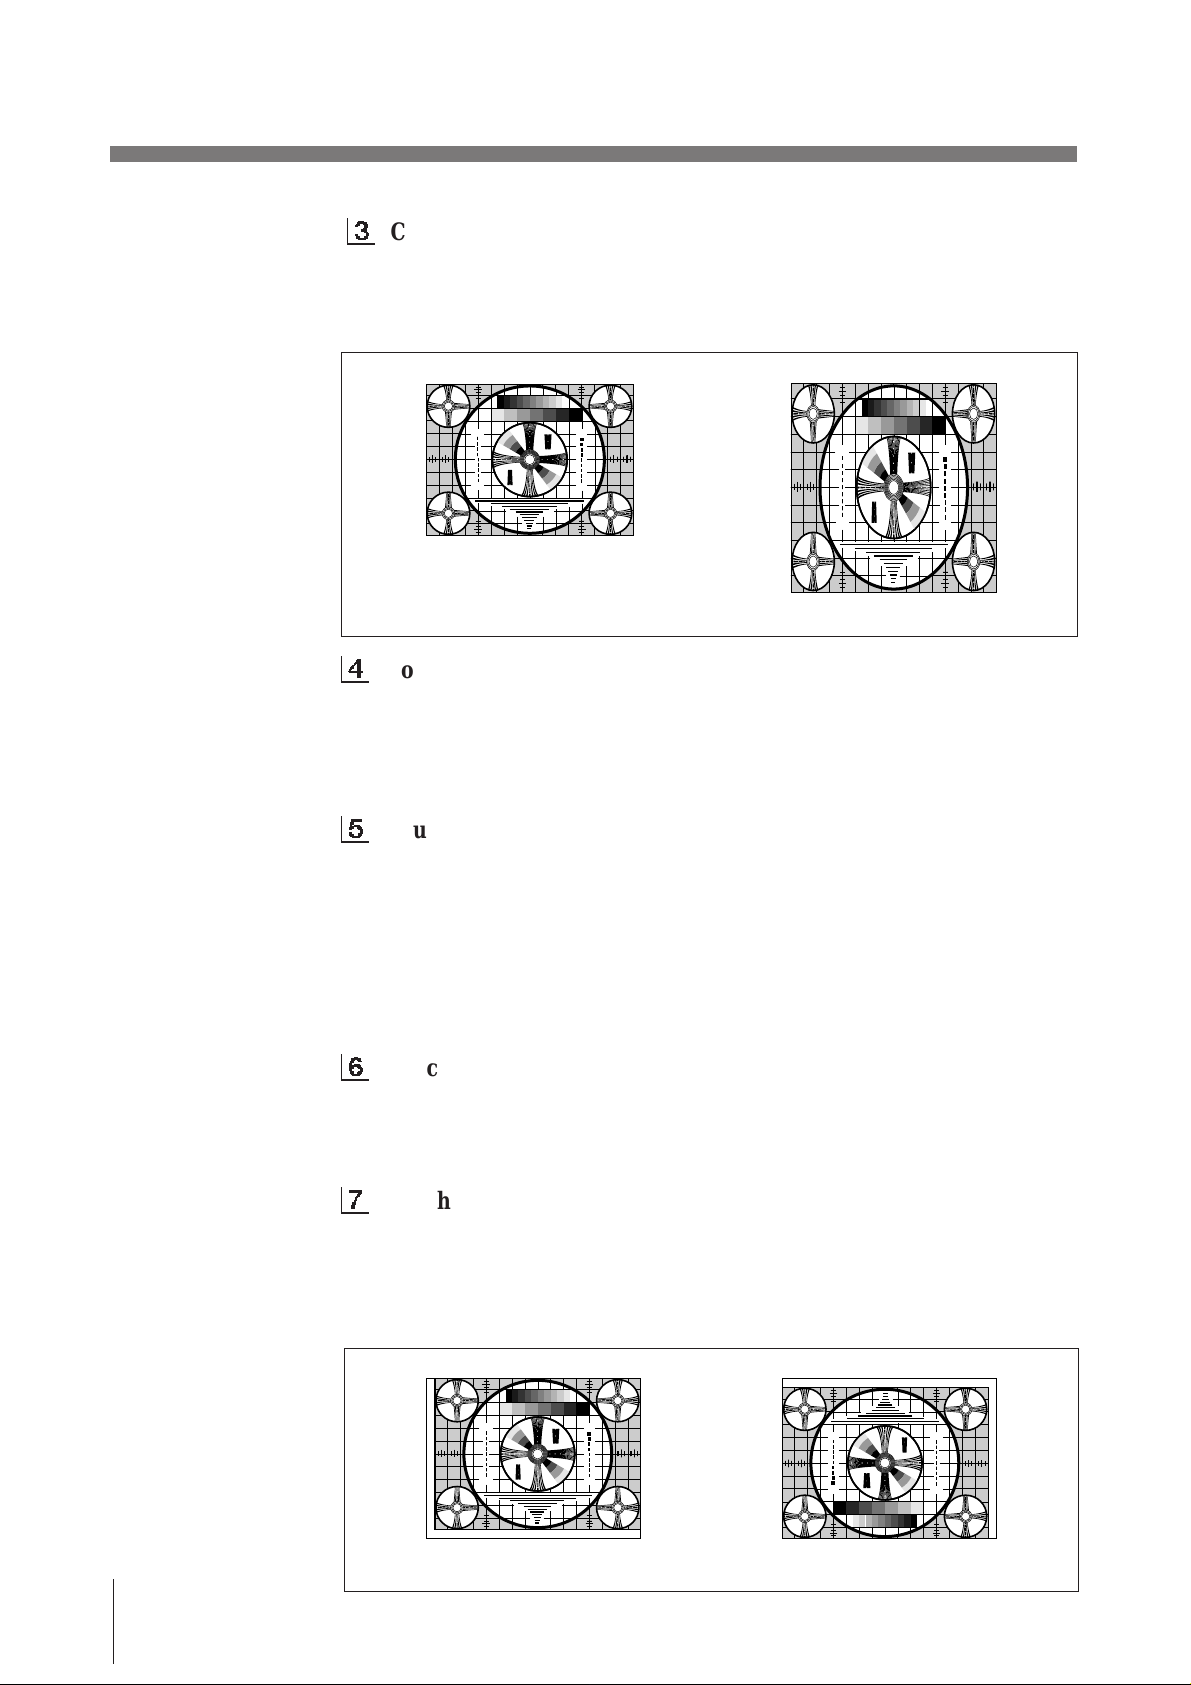
SCAN NORM/WIDE 1/WIDE 2 switch
Sets the print-out range. The print-out range is widened in the NORM, WIDE
1, and WIDE 2 order.
To print only the image displayed on the standard screen size of the video
monitor, set the SCAN switch 9 to NORM (OFF). To print when the signal
scans beyond the edge of the standard monitor screen, set the SCAN switch
9
to WIDE 1 (ON) or the SCAN switch 8 to WIDE 2 (OFF). When you
set the SCAN switch 8 to the WIDE 2 position, WIDE 2 is selected
regardless of the setting of the SCAN switch 9 position.
1
2
3
3
5
2
3
30
4
3
3
4
1 357 7 531
4
3
3
4
30
3
2
5
3
3
2
1
NORM
!º
RESERVED switch
5
2
3
1
3
2
3
30
4
3
3
4
4
3
3
4
30
3
2
5
3
3
2
1
1
2
3
3
5
2
3
30
4
3
3
4
1 357 7 531
4
3
3
4
30
3
2
5
3
3
2
1
WIDE 1
5
2
3
1
3
2
3
30
4
3
3
4
4
3
3
4
30
3
2
5
3
3
2
1
1
2
3
3
5
2
3
30
4
3
3
4
1 357 7 531
4
3
3
4
30
3
2
5
3
3
2
1
WIDE 2
Keep this switch set to ON.
!¡
INPUT B&W/COLOR switch
Set this switch to B & W (ON) when the signal to be printed is black and
white. Set to COLOR (OFF) when the signal is color.
!™
75 ON/OFF switch
Set this switch to OFF when a video monitor or other video equipment is
connected to the VIDEO OUT connector.
Set to ON when nothing is connected to the VIDEO OUT connector.
When you connect two printers to one video equipment, set the 75 switch of
one of the printer to ON, and the other to OFF.
5
2
3
1
3
2
3
30
4
3
3
4
4
3
3
4
30
3
2
5
3
3
2
1
Preparation
9
Page 10
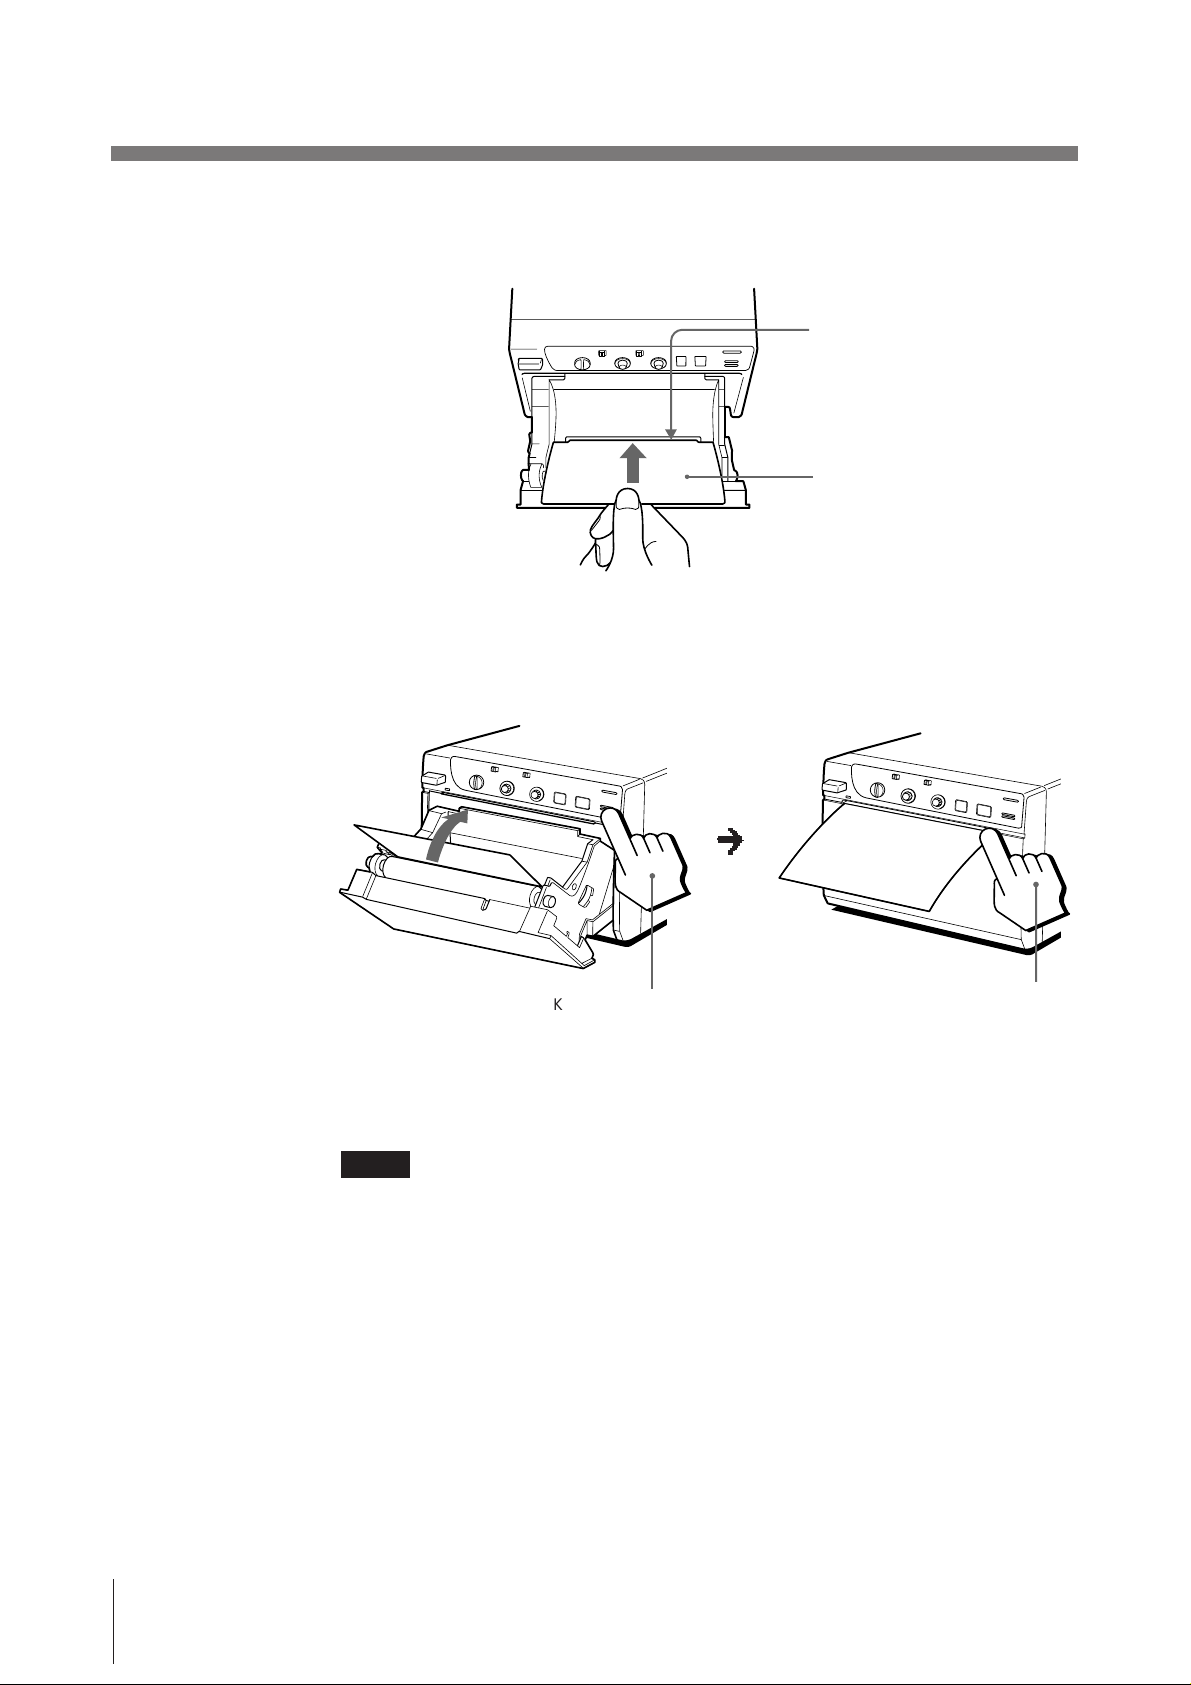
Loading Paper
Notes
• Do not fold the paper or touch the printing surface. Dust on the printing surface
will result in poor print quality.
• After loading the paper roll, pull out and cut off the first 15 to 20 cm (6 to 7
inches) to remove any slack.
• Use only UPP-110 series paper (p. 19).
• Set the PAPER TYPE selector according to the paper type (p. 6).
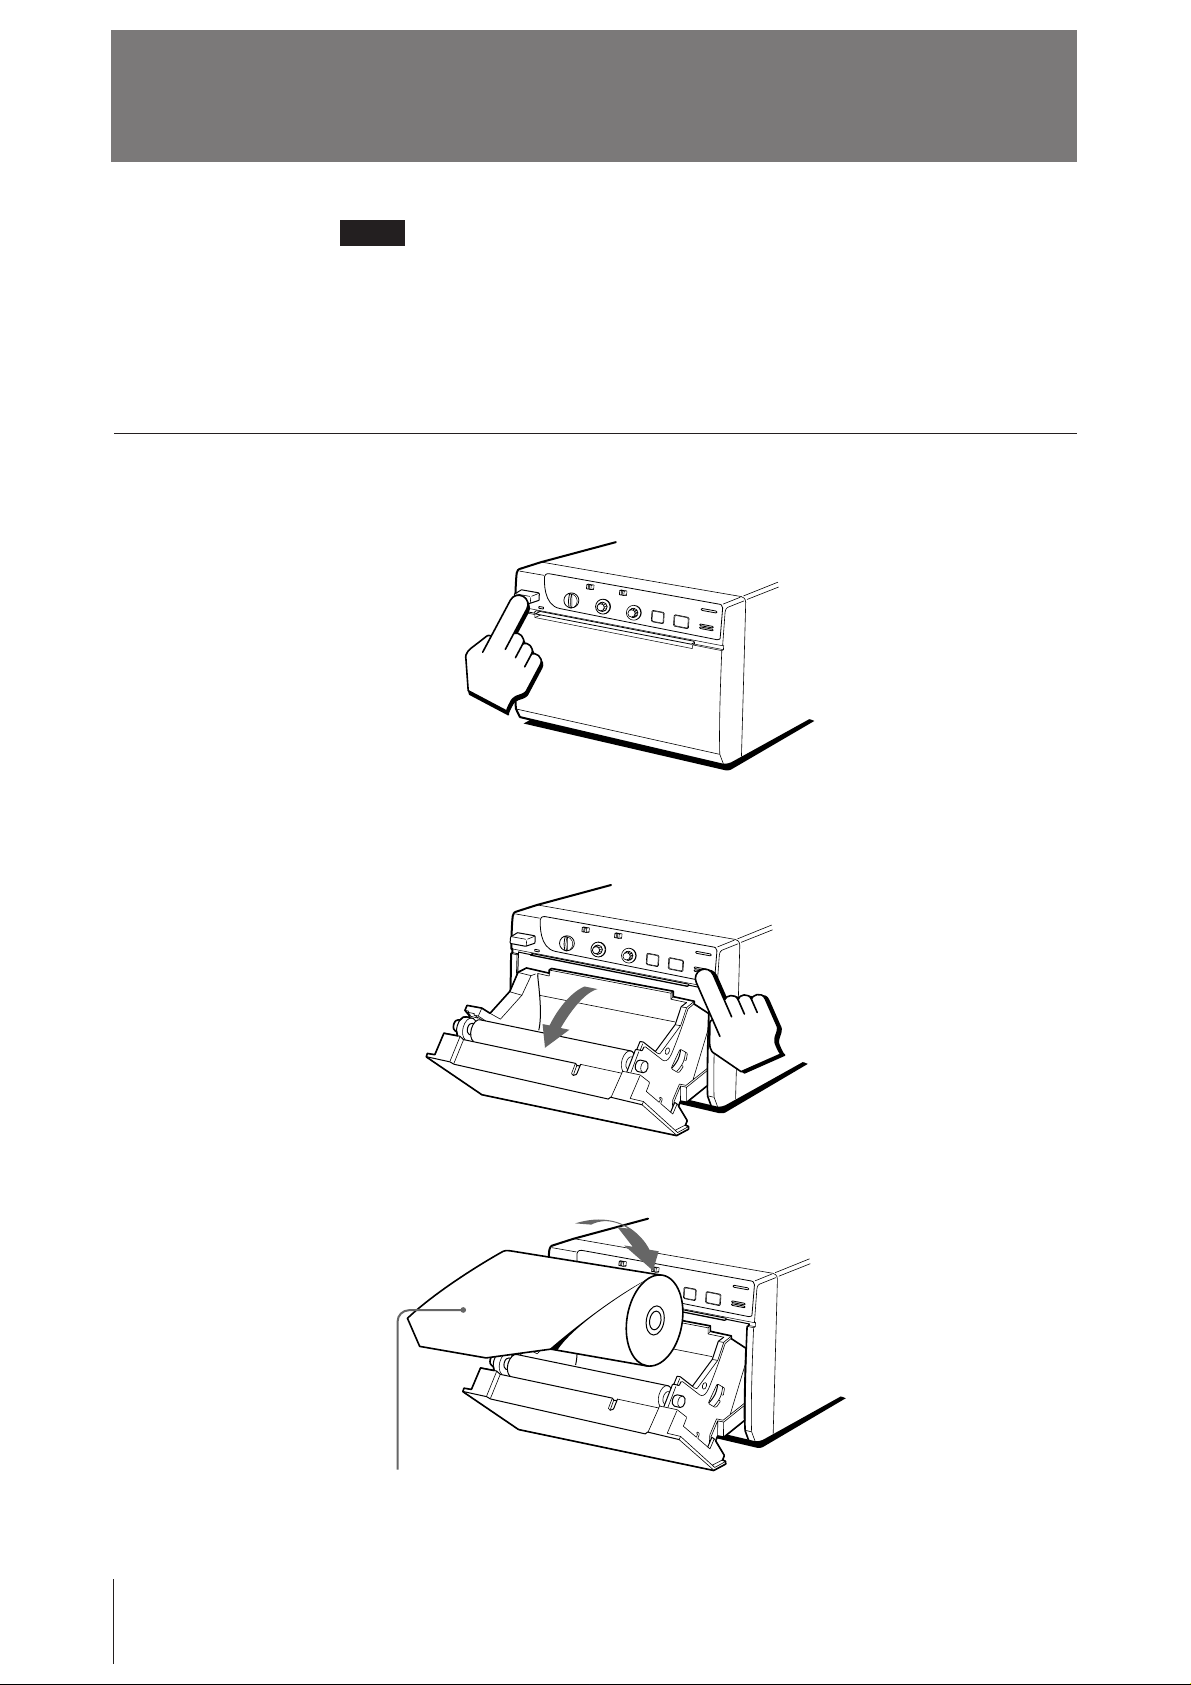
Loading
1 Press the power ON/OFF switch to turn on the printer.
7
⁄8
2 Press the OPEN/CLOSE button to open the paper lid.
3 Place the paper roll in the printer.
10
Place the paper with the thermo-sensitive
side (printing side) up.
Preparation
Page 11
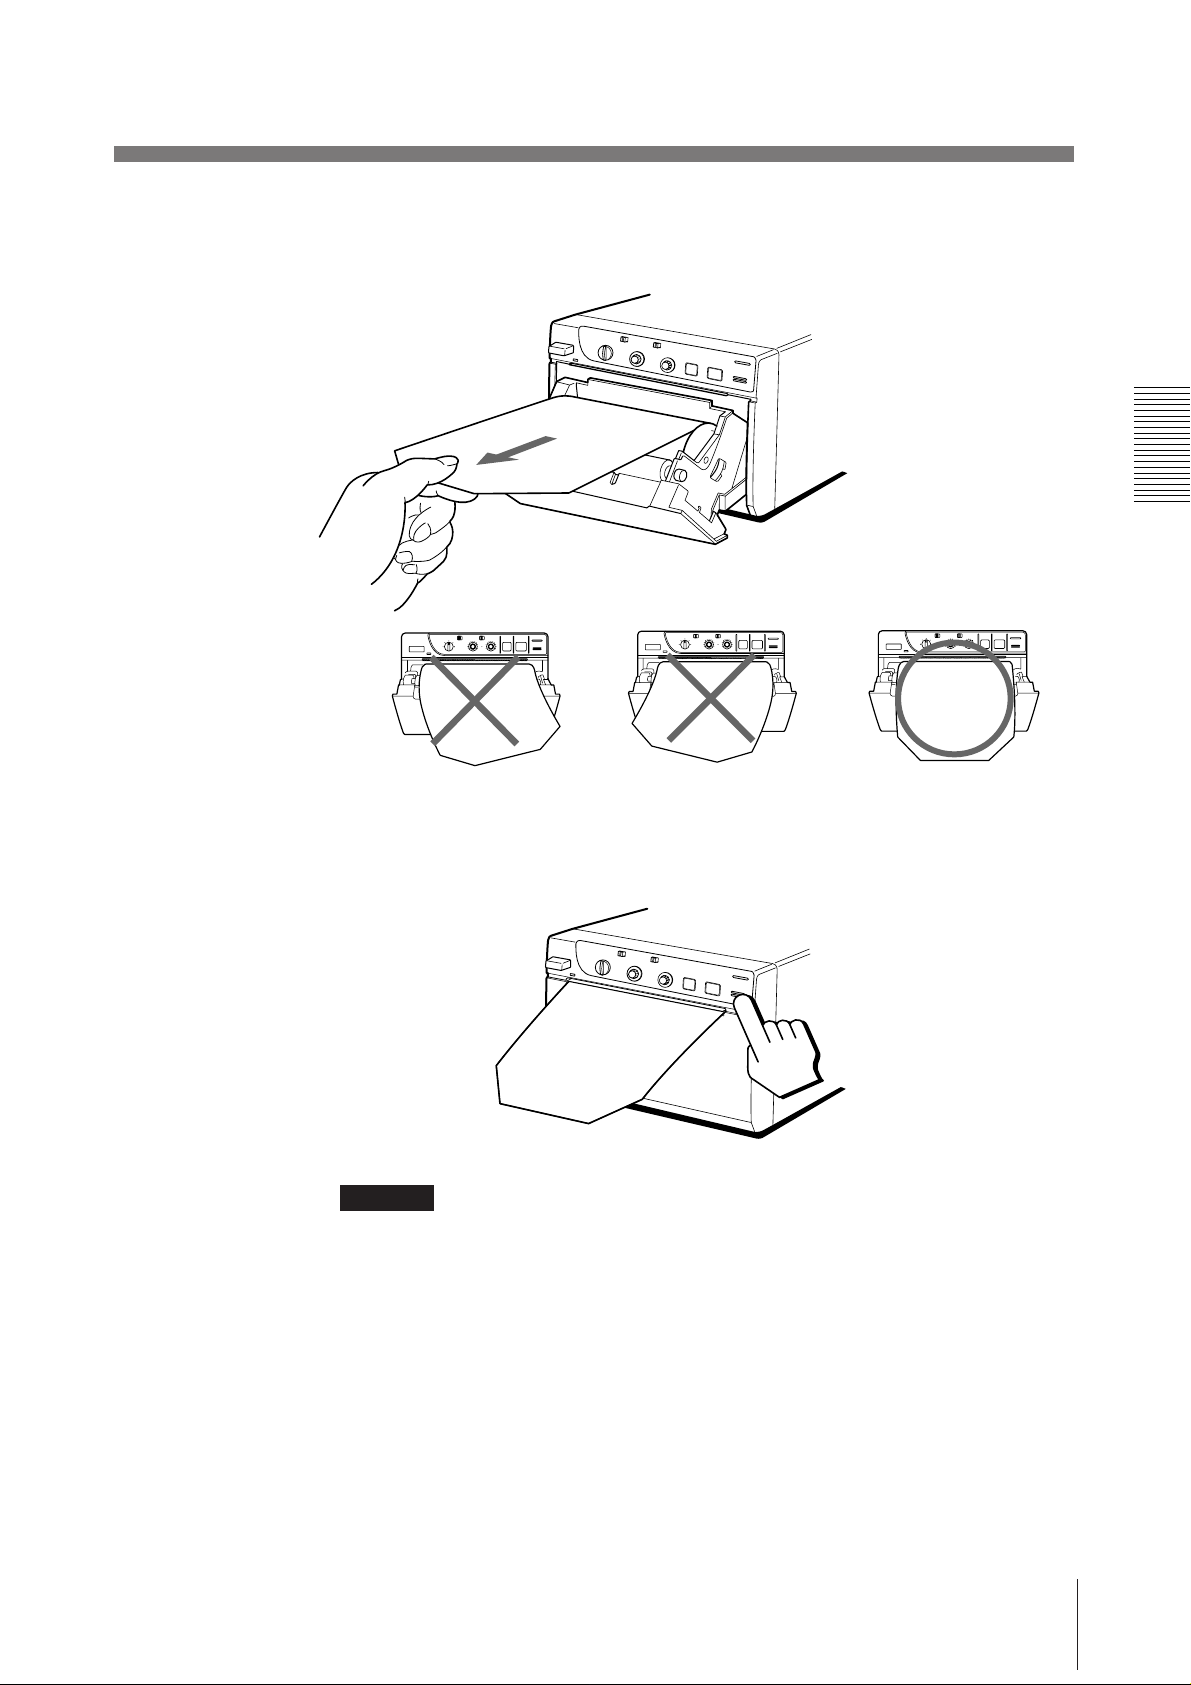
4 Pull out the first 15 to 20 cm (6 to 7
slack in the roll.
7
⁄8 inches) of the paper to remove any
5 Press the OPEN/CLOSE button to close the paper lid.
You can also close the paper lid simply by pushing it.
CAUTION
Keep fingers clear of paper lid assembly and paper cutting blade when paper lid is
closing.
Preparation
11
Page 12
Operation
Printing
Before making print-outs
• Are the connections correct? (p. 5)
• Is the paper roll loaded properly? (p. 10).
• Is the paper type set correctly? (p. 6).
• Are the DIP switches set correctly? (p. 7 – 9)
• Is the print source being input?
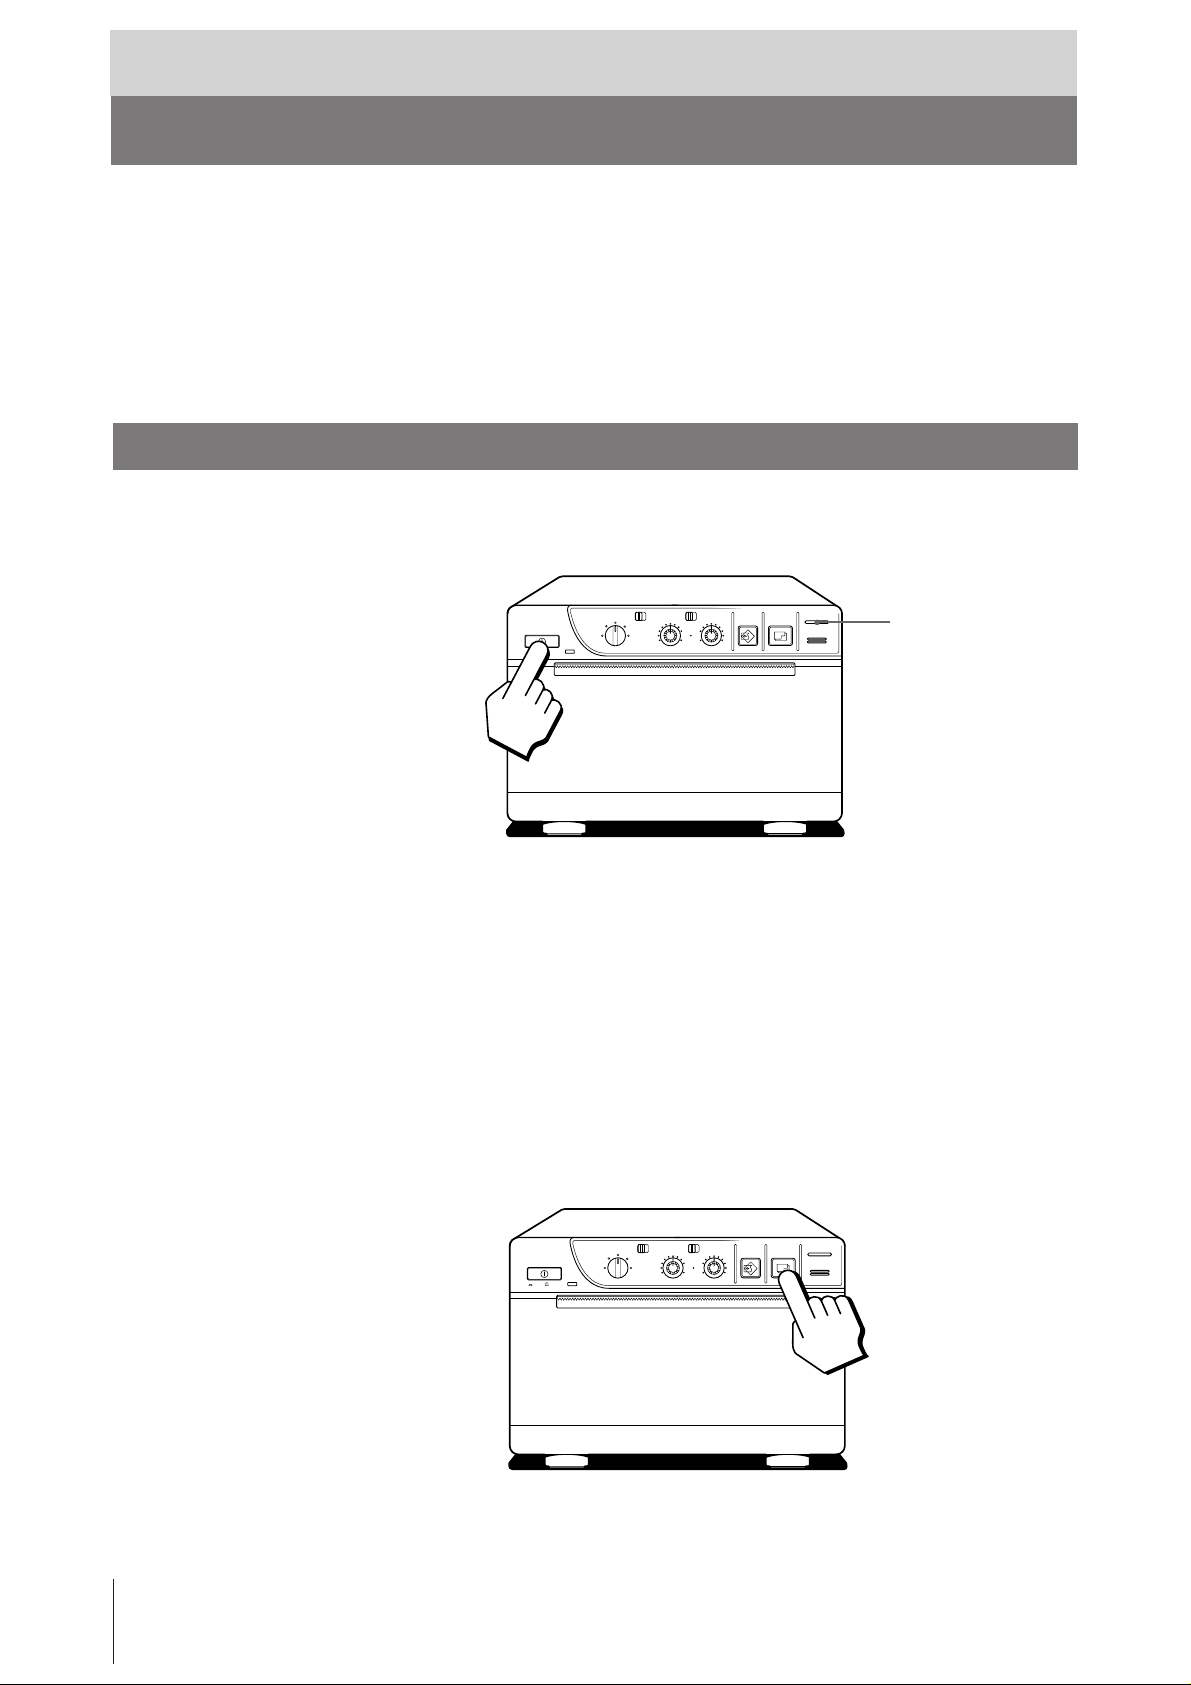
Making Print-outs
1 Press the power ON/OFF switch to turn on the printer.
The power indicator lights.
CONTR
EE
THRU
BRIGHT
COPY PRINT
PAPER EMPTY
OPEN / CLOSE
PAPER EMPTY indicator
ON/ OFF
STD SIDE
STD
NORMAL
SMALL
ZOOM 1 . 5x
ZOOM 2x
LARGE
2 Make sure that the PAPER EMPTY indicator is not lit.
If lit, load paper.
3 Select the printing direction and size.
See “Selecting the Printing Direction” and “Selecting the Printing Size” on
the next page.
4 When the picture you want to print is on the video monitor, press the PRINT
button.
The printer makes a print-out of the picture displayed at the instant you press
the PRINT button.
12
Operation
ON/ OFF
STD SIDE
STD
NORMAL
SMALL
ZOOM 1 . 5x
LARGE
ZOOM 2x
CONTR
EE
THRU
BRIGHT
COPY PRINT
PAPER EMPTY
OPEN / CLOSE
Page 13
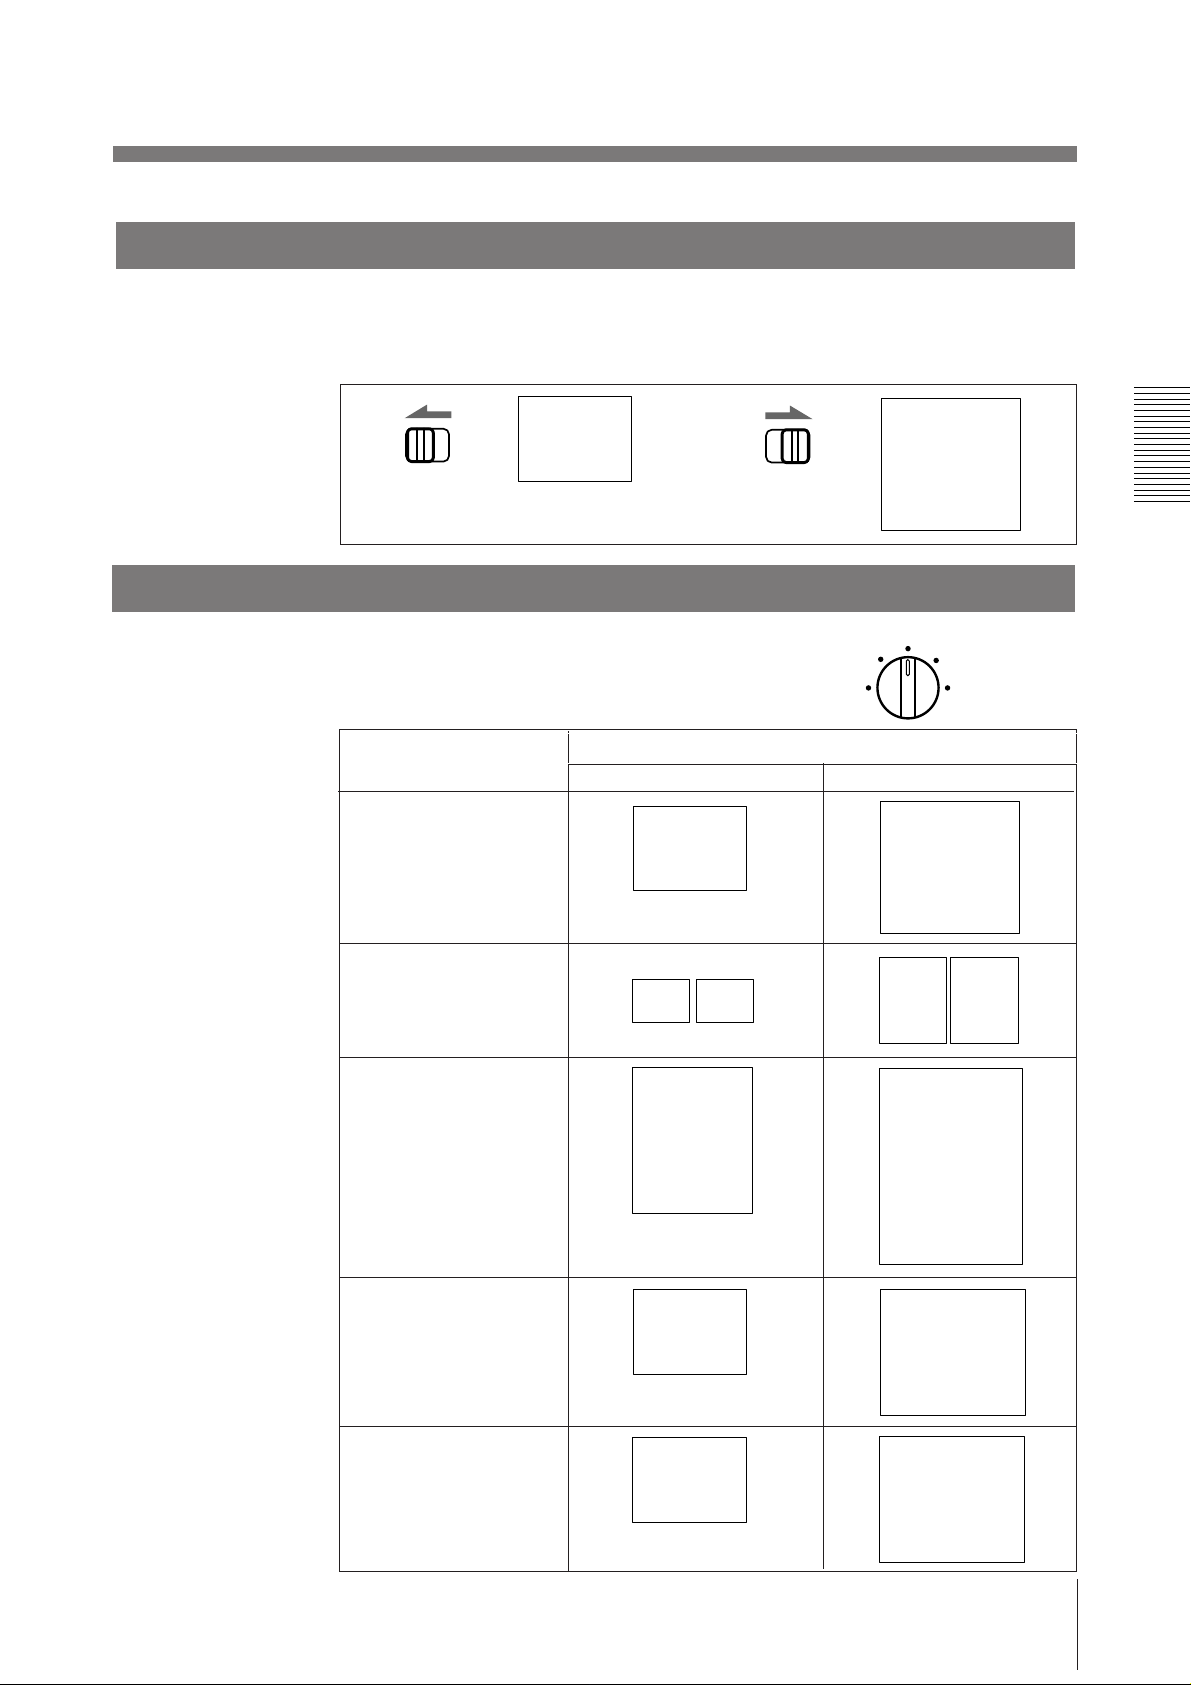
Selecting the printing direction
C
C
C
C
C
You can select the vertical or horizontal direction using the STD/SIDE selector.
To print in the vertical direction, set to STD.
To print in the horizontal direction, set to SIDE.
STD SIDE
Selecting the printing size
You can print in small or large size.
Also you can enlarge the center of the picture by
1.5 or 2 times.
Control position (mode)
NORMAL
SMALL
ABC
STD SIDE
ABC
NORMAL
SMALL
LARGE
Priting size
Vertical (STD) Horizontal (SIDE)
ZOOM 1 . 5x
ZOOM 2x
ABC
ABC
ABC ABC
ABC
ABC
LARGE
ZOOM 1.5X
ZOOM 2X
B
AB
B
ABC
AB
B
Operation
13
Page 14
Printing (continued)
To print in SMALL mode
Press the PRINT button twice. When you press the PRINT button once, the buzzer
sounds. The printer starts printing after the PRINT button is pressed twice.
Stopping printing midway
Press the OPEN/CLOSE button while printing or while copying. The printer stops
printing.
To stop printing and print another picture displayed on the video
monitor
To do this, the DIP switch 1 (INTERRUPT) must be set to ON (p. 7).
Press the PRINT button while printing or copying. The printer stops printing and
starts printing the picture displayed at the instant you press the PRINT button.
Making copies of the last print-out
Press the COPY button. The printer makes a copy of the last print-out. The last
print-out is retained in the printer’s memory until you press the PRINT button
again or turn the power off.
To copy in different sizes
You can copy the last print-out in different sizes.
Before pressing the COPY button, select the printing size as described in
“Selecting the Printing Size”.
Notes
• If you press the COPY button immediately after turning the power on, the alarm
buzzer will sound as nothing is stored in memory.
• In SMALL mode (p. 13), if you press the COPY button after you have pressed
the PRINT button only once, the alarm buzzer will sound and the printer will not
copy.
To make multiple copies of the same print-out
Press the COPY button as many times as necessary (maximum 11 copies including
the first print-out) while printing or copying the first print-out. Each time you press
the COPY button, the short buzzer sounds.
To stop copying midway
Press the OPEN/CLOSE button.
14
Operation
Page 15
Adjusting the Contrast and Brightness
You can adjust the contrast and brightness of the print-out.
1 Set the THRU/EE selector to EE.
You can check the adjusted picture on the video monitor.
ON/ OFF
STD SIDE
STD
NORMAL
SMALL
ZOOM 1 . 5x
ZOOM 2x
LARGE
CONTR
EE
THRU
BRIGHT
COPY PRINT
PAPER EMPTY
OPEN / CLOSE
THRU
EE
BRIGHTCONTR
2 Adjust the brightness with the BRIGHT control and the contrast with the
CONTR control while watching the picture on the video monitor.
Adjusting the contrast
CONTR
Weaker
Adjusting the brightness
Stronger
BRIGHT
Darker
Brighter
To directly input the video signal from the video equipment, which is
connected to the printer, to the video monitor
Set the THRU/EE selector to THRU. The video signal is directly input to the video
monitor without being processed by the printer’s circuitry.
Operation
15
Page 16

Others
Precautions
On the safety
• Check the operating voltage before operation.
• Stop operation immediately if any liquid or solid object falls into the cabinet.
• Unplug the unit from a wall outlet if you will not be using it for a long time.
• Do not disassemble the cabinet. Refer servicing to qualified personnel only.
• Do not touch the cutting blade of the printer.
• Keep fingers clear of paper lid assembly and paper cutting blade when paper lid
• Connect the power plug of the printer to a wall outlet having protective earth
On operation
Operate the unit only with a power source specified in “Specifications”.
Unplug the unit and have it checked by qualified personnel.
Disconnect the power cord by grasping the plug. Never pull the cord itself.
is closing.
terminal. The safety earth should be properly established.
On printer carriage
On installation
Do not turn the power off while the printer is printing. The thermal head may be
damaged.
Do not carry and move the printer when the paper roll is placed in the printer.
Doing so may cause malfunction.
• Place the printer on a level and stable surface during operation.
• Do not install the printer near heat sources. Avoid locations near radiators or air
ducts, or place subject to direct sunlight or excessive dust, humidity, mechanical
shock or vibration.
• Provide adequate air circulation to prevent heat build-up. Do not place the printer
on surfaces such as rugs, blankets, etc., or near materials such as curtains and
draperies.
• If the printer is subjected to wide and sudden changes in temperature, such as
when it is moved from a cold room to a warm room or when it is left in a room
with a heater that tends to produce large amounts of moisture, condensation may
form inside the printer. In such cases the printer will probably not work properly,
and may even develop a fault if you persist in using it. If moisture condensation
forms, turn off the power and leave the printer to stand for at least one hour.
16
Others
Page 17

Maintenance
Cleaning the cabinet
Do not use strong solvents to clean the printer. Thinner or abrasive cleansers will
damage the cabinet.
Cleaning the thermal head
If the print-out is dirty or white stripes appear on the print-outs, clean the thermal
head using the supplied cleaning sheet.
1 Press the power ON/OFF switch to turn on the printer.
2 Press the OPEN/CLOSE button to open the paper lid.
Others
17
Page 18
Precautions (continued)
3 Insert the cleaning sheet, with the black surface facing down, into the groove
in the paper lid.
4 Press the OPEN/CLOSE button and keep it pressed.
The paper lid closes and the printer starts cleaning the head.
When the buzzer sounds and the printer starts ejecting the cleaning sheet,
release the OPEN/CLOSE button.
Insert into groove.
Cleaning sheet (supplied)
m
Keep the button pressed.
5 Remove the cleaning sheet.
Notes
• Do not press the PRINT or COPY button while the cleaning sheet is in the
printer.
• Clean the head only when necessary. If you clean the head too often, it may
cause malfunction.
When the buzzer
sounds, release the
button.
18
Others
Page 19

On the Type of Paper
Type of paper
• Use only the Sony UPP-110 series paper. The use of other paper may result in
reduced printer performance and poor print quality.
• The following types of paper are available.
Storing paper
Printing density
TYPE I (Normal)
TYPE II (High density)
TYPE IV (Enhanced)
• Store unused or printed paper in a cool, dark place (below 30°C or 86°F). We
recommend that you store printed paper in a polypropylene pouch.
• Do not store unused or printed paper in hot or humid place.
• Do not leave unused or printed paper in direct sunlight or other bright place for
extended periods.
• Do not allow any volatile organic solvent or vinyl chloride to touch the printed
paper. Alcohol, plastic tape or film will fade the print-out.
• To attach printed paper to another piece of paper, use double-sided adhesive tape,
or water-based or solid glue.
• Do not stack printed paper on or under a diazo copy sheet. The print-out may
become discolor in black.
Type of paper
UPP-110S
UPP-110HD
UPP-110HA
Others
19
Page 20

Specifications
Thermal head
Thin-film thermal head (with built-in drive
IC) 1024-dot drive
Gradation
256
Resolution (in WIDE 1 mode)
EIA: 970 x 490 dots
CCIR: 970 x 582 dots
Print size (in NORM and WIDE 1 mode)
STD mode
EIA: 95 x 72 mm
CCIR: 95 x 71 mm
SIDE mode
EIA: 127 x 96 mm
CCIR: 127 x 95 mm
Printing speed (in STD and NORM mode)
About 3.9 seconds/screen (aspect ratio 4:3)
Picture memory
768 K x 6 bits
Input/output connectors
VIDEO IN (BNC)
EIA or CCIR
Composite video signals
1.0 Vp-p, 75 ohms/high-impedance (EIA/
CCIR automatically discriminated)
VIDEO OUT (BNC)
EIA or CCIR
Composite video signals
1.0 Vp-p, 75 ohms, loop-through/EE
switchable
REMOTE (stereo minijack)
Power requirements and consumption
UP-880: 120 V AC, 50/60 Hz, 1.8 A
UP-890CE/890MD:
120 V AC, 50/60 Hz, 1.5 A
220 to 240 V AC, 50/60 Hz, 0.8 A
Dimensions
Approx. 154 x 106 x 303 mm (w/h/d) (6
1
4
⁄4 x 12 inches)
Mass
Approx. 3.5 kg (7 lb 11 oz), Main unit only
Protection against electric shock
Class I
Protection against harmful ingress of water
Ordinary
Degree of safety in the presence of flammable
anesthetics or oxygen
Not suitable for use in the presence of
flammable anesthetics or oxygen
Mode of operation
Continuous
Supplied accessories
Paper roll (UPP-110HA) (1)
BNC – BNC connecting cable (1)
AC power cord (1)
Head cleaning sheet (1)
Remote commander RM-91 (1) supplied
with UP-890MD only
Design and specifications are subject to change
without notice.
1
⁄8 x
20
3
2
1
1 GND
2 PRINT SIGNAL (TTL)
Input of LOW pulse over 100 msec.
initiates print.
3 PRINT BUSY (TTL)
Goes HIGH during printing.
Others
Page 21

Troubleshooting
Symptom
White specks on first few
print-outs.
Printing does not start
when you press the
PRINT button.
Black borders or missing
portions around the printout.
Paper jam
Print-out is dirty.
The printer stops printing
when it prints
continuously black
pictures.
White lines or small
letters on the screen are
not printed clearly.
Small squares appear
over the whole screen.
The print-out is too dark
or too light.
The print-out seems
stretched.
Cause/remedy
When printing with a newly inserted roll of paper,
dust on the surface of the paper may cause white
specks on the print-outs.
m
Feed the paper by pressing the OPEN/CLOSE
button until clean paper appears.
• Paper is not fed.
m
Is the paper slack?
m
Is the power turned on?
m
Are all connections correct? (p. 5)
m
Did you press the PRINT button twice in
SMALL mode?
• When the alarm buzzer sounds:
m
Has the thermal head overheated?
m
Is the video signal of the picture input?
m
Is the paper loaded correctly?
• Paper is fed, but printing does not start.
m
Is the paper loaded with the thermo-sensitive
side up?
This may result according to the video signal input
to the printer.
m
Change the setting of the SCAN switches (DIP
switches 8, 9). (p. 9)
• Open the paper lid by pressing the OPEN/
CLOSE button, then pull the jammed paper
slowly and remove it.
• There is condensation within the unit.
m
Moving the unit suddenly from a cold place to
a warm place often results in condensation
forming. In the event of condensation forming,
remove the paper, turn off the power and leave
the unit for about one to two hours.
The thermal head is dirty.
m
Clean the thermal head with the supplied head
cleaning sheet. (p. 17)
This is likely to occur when the printer prints
continuously 15 or more black pictures. In such a
case, the buzzer sounds. This is because that the
protective circuit works against heat build-up of the
thermal head. Stop printing for a while.
Is the INPUT switch (DIP SWITCH !¡) set to B &
W when the input signal is a black and white
signal? (p. 9)
Is the INPUT switch (DIP switch !¡) set to COLOR
when the input singal is a color signal? (p. 9)
• Is the 75 switch (DIP switch !™) set correctly?
(p. 9)
• Is the GAMMA selector set correctly? (p. 6)
The ASPECT switch (DIP switch 3) is set to 1:1.
m
Set to 4:3. (p. 8)
Others
21
Page 22
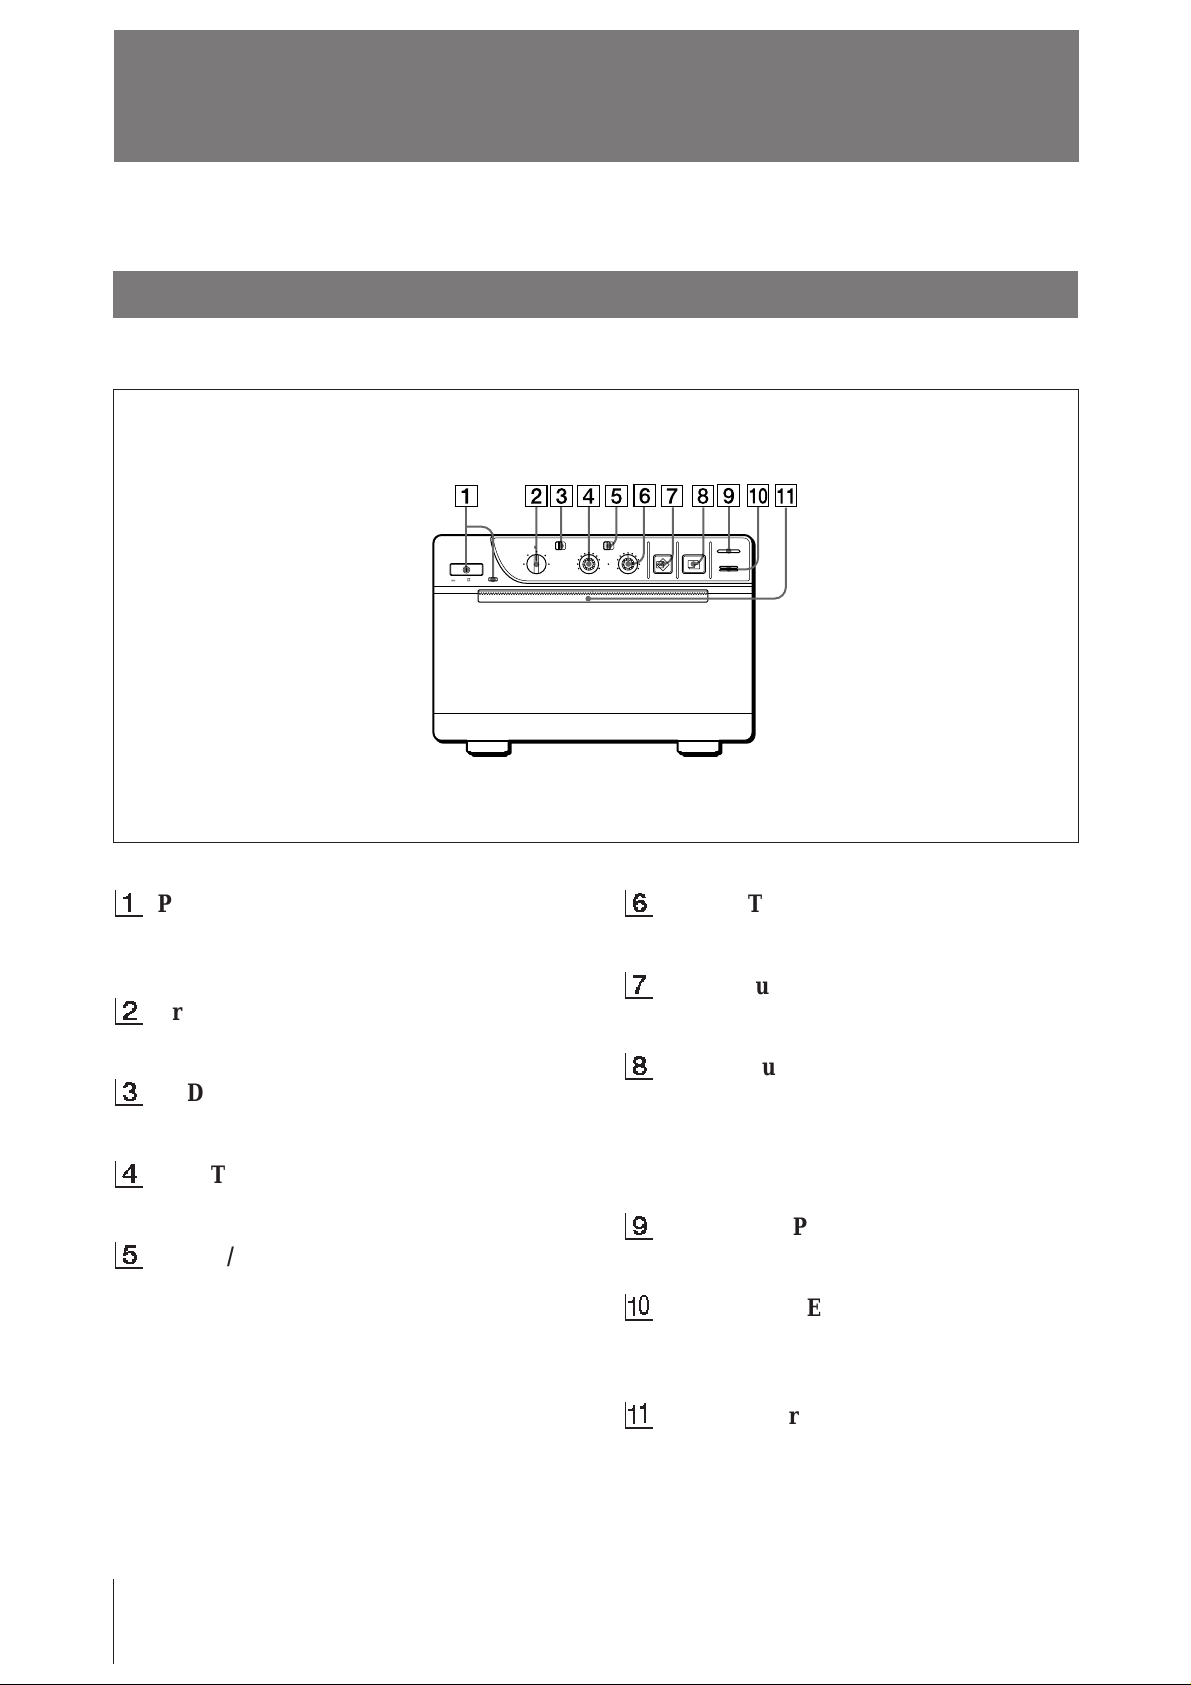
Location and Function of Parts
For details, refer to the pages indicated in parentheses.
Front
1
Power ON/OFF switch and indicator
Turns the power on. The indicator is lit while
the power is on.
2
Printing size selector (13)
Selects the printing size.
3
STD (standard)/SIDE selector (13)
Selects the printing direction.
4
CONTR (contrast) control (15)
Adjusts the contrast of the print-outs.
5
THRU/EE selector (15)
Selects the video signal output from the
VIDEO OUT connector.
THRU: Input signals are directly output to
the video monitor.
EE: Input signals are output to the video
monitor after being processed by the printer’s
circuitry.
ON/ OFF
STD SIDE
STD
NORMAL
SMALL
ZOOM 1 . 5x
ZOOM 2x
LARGE
EE
THRU
BRIGHT
CONTR
6
PAPER EMPTY
COPY PRINT
OPEN / CLOSE
BRIGHT (brightness) control (15)
Adjusts the brightness of the print-outs.
7
COPY button (14)
Prints another copy of the previous print-out.
8
PRINT button (12)
Prints the picture currently displayed on the
video monitor. The picture displayed when
you press the PRINT button is stored in
memory.
9
PAPER EMPTY indicator
Lights when the printer is out of paper.
!º
OPEN/CLOSE button (10, 14)
Opens or closes the door. Also, stops printing
midway.
!¡
Paper feeder and cutter
Cuts the printing paper.
22
Others
Page 23

Back
1
REMOTE connector (5)
Connect the RM-91 remote commander for
controlling print operation from a distance.
The RM-91 remote commander is supplied
with UP-890MD only.
2
GAMMA selector (6)
Changes the print mode to that for highdensity printing paper. The selector is
effective when the PAPER TYPE selector is
set to II or IV.
3
PAPER TYPE selector (6)
Sets the type of paper.
REMOTE GAMMA TYPE
PAPER
IIIIII IIIIV
DIP SW
OFF
ON
IN OUT
VIDEO
AC IN
6
VIDEO OUT (output) connector (BNC
type) (5)
Connect to the video input connector of the
video monitor. The output signal type
depends on the setting of the THRU/EE
selector.
7
AC IN (AC power input) connector (5)
Connect to a wall outlet using the supplied
AC power cord.
8
Equipotential terminal
Equipped only with the UP-890CE/890MD.
4
DIP SW (switches) (7 – 9)
Sets the print modes and functions.
5
VIDEO IN (input) connector (BNC
type) (5)
Connect to the video output connector of the
video equipment.
Others
23
Page 24
Français
AVERTISSEMENT
Afin d’éviter tout risque d’électrocution, ne pas exposer
cet appareil à la pluie ou à l’humidité.
Afin d’écarter tout risque d’électrocution, garder le coffret
fermé. Ne confier l’entretien de l’appareil qu’à un
personnel qualifié.
Pour UP-890CE/890MD
Symboles
Ce symbole indique la borne équipotentielle
qui ramène les différentes parties d’un
système à la même tension.
Instructions de sécurité importantes en vue d’une
utilisation dans un environnement médical
1. Tous les équipements raccordés à cet appareil
doivent être agréés suivant les normes IEC601-1,
IEC950, IEC65 ou les autres normes IEC/ISO
applicables à ces équipements.
2. Si cet appareil est utilisé conjointement avec d’autres
équipements à proximité d’un patient*, ces
équipements doivent être alimentés par un
transformateur d’isolement ou raccordés à la mise à
la terre du système par une borne de terre de
protection sauf s’ils sont agréés suivant la norme
IEC601-1.
* Proximité d’un patient
R1,5m
3. Dans le cas d’une connexion à d’autres équipements,
le courant de fuite peut augmenter.
4. Cet appareil génère, utilise et peut émettre des
radiofréquences. S’il n’est pas installé et utilisé
conformément au mode d’emploi, il peut provoquer
des interférences avec d’autres appareils. Si cet
appareil génère des interférences (ce que l’on peut
facilement contrôler en débranchant le cordon
d’alimentation de l’appareil), appliquez l’une des
mesures suivantes : Installez cet appareil à un autre
endroit en tenant compte de l’autre équipement.
Branchez cet appareil et l’autre équipement sur des
circuits d’alimentation différents. Consultez votre
revendeur.
24
Page 25

Table des matières
Introduction
Préparation
Opérations
Autres
Vue d’ensemble du système 26
Raccordement 27
Avant l’impression 28
Sélection du type de papier 28
Réglage des microcommutateurs 29
Chargement du papier 32
Impression 34
Réalisation de tirages 34
Sélection du sens d’impression 35
Sélection du format d’impression 35
Réglage du contraste et de la luminosité 37
Précautions 38
Entretien 39
A propos du type de papier 41
Spécifications 42
Dépannage 43
Localisation et fonction des composants 44
Avant 44
Arrière 45
25
Page 26

Introduction
V ue d’ensemble du système
L’UP-880/890CE/890MD est une imprimante graphique vidéo noir et blanc
pouvant être utilisée pour imprimer des images affichées sur un moniteur vidéo.
Qualité d’impression claire et homogène
• Impression haute définition 10,2 points/mm grâce à l’utilisation d’une tête
thermique à CI d’entraînement ultra-rapide.
• 256 gradations de noir et blanc.
Impression rapide
• Vous obtenez un tirage simple en environ 3,9 secondes en mode STD et NORM.
• Vous pouvez réaliser jusqu’à 11 copies en continu de la même image.
Deux sens d’impression et cinq formats d’impression
• Le sélecteur du sens d’impression sur le panneau frontal vous permet d’imprimer
dans les sens vertical et horizontal.
• La commande de format d’impression située sur le panneau frontal vous permet
de sélectionner cinq types de formats d’impression différents.
Optimisation de l’imprimante par des microcommutateurs
• Vous pouvez réaliser des tirages en commençant par le bas ou par le haut de
l’image en réglant le microcommutateur DIRECTION.
• Vous pouvez sélectionner les rapports d’image 4:3 et 1:1 commutables en réglant
le microcommutateur ASPECT.
• Vous pouvez sélectionner la plage d’impression à l’aide du microcommutateur
SCAN.
• Vous pouvez économiser du papier en réglant le microcommutateur POSTFEED
(fonction d’écomonie de paper).
Identification automatique du signal vidéo
L’imprimante identifie automatiquement le type de signal d’entrée, noir et blanc
(EIA ou CCIR) ou couleur (NTSC ou PAL), et l’imprime avec la même durée et
dans le même format.
Alarme
L’alarme retentit pour vous signaler une erreur de manipulation.
Chargement simple et rapide du papier
Pour charger le papier, il suffit d’ouvrir la réserve papier à l’aide de la touche
OPEN/CLOSE et d’installer le rouleau de papier.
26
Introduction
Page 27
Préparation
Raccordement
Remarques
• Mettez tous les appareils hors tension avant de procéder au raccordement.
• Branchez le cordon d’alimentation en dernier lieu.
Télécommande
RM-91*
Equipement vidéo
vers le connecteur de
sortie vidéo
Cable de connexion
coaxial fourni
(BNC ˜ BNC)
REMOTE GAMMA TYPE
PAPER
IIIIII IIIIV
vers VIDEO IN
DIP SW
OFF
ON
Moniteur vidéo
couleur/noir et blanc
Câble de connexion
(non fourni)
vers le connecteur
d’entrée vidéoto
vers VIDEO OUTvers REMOTE
IN OUT
VIDEO
AC IN
vers AC IN
vers une prise murale
Cordon d’alimentation
fourni
* La télécommande RM-91 est fournie avec le modèle UP-890MD uniquement.
Préparation
27
Page 28
A vant l’impression
Sélection du type de papier
Réglez le sélecteur PAPER TYPE suivant le type de papier que vous utilisez.
L’utilisation d’un papier d’une marque autre que Sony peut entraîner une altération
des performances de l’imprimante et de la qualité d’impression.
Type de papier
UPP-110S
UPP-110HD
UPP-110HA
REMOTE GAMMA TYPE
PAPER
IIIIII IIIIV
Position du sélecteur PAPER TYPE
I (Normal)
II (Haute densité)
IV (Supérieur)
DIP SW
OFF
ON
IN OUT
VIDEO
AC IN
GAMMA TYPE
IIIIII IIIIV
PAPER
Si vous utilisez UPP-110HA ou UPP-110HD
Si vous réglez le sélecteur PAPER TYPE sur II ou sur IV, réglez la gradation de la
densité à l’aide du sélecteur GAMMA.
I: Gradation douce
II: Standard
IV: Gradation dure
Préparation
28
Page 29
Réglage des microcommutateurs
Réglez les microcommutateurs suivant le mode d’impression requis. Avant de
procéder au réglage des microcommutateurs, mettez le système hors tension.
Modifiez les réglages en vous aidant d’un outil finement pointu comme un tournevis
à lame étroite. Les microcommutateurs sont réglés par défaut comme suit :
REMOTE GAMMA TYPE
PAPER
IIIIII IIIIV
DIP SW
OFF
ON
IN OUT
VIDEO
AC IN
DIP SW
OFF
ON
DIP SW FUNCTION TABLE
NO
FUNCTION
1
INTERRUPT
2
POSTFEED
3
ASPECT
4
MEMORY
5
IMAGE
6
MIRROR
7
DIRECTION
8
SCAN
9
10
RESERVED
11
INPUT
12
75
SW-ON
ON
ON
4:3
FRAME
POSI
NORM
NORM
WIDE 1
B&W
ON
SW-OFF
OFF
OFF
1:1
FIELD
NEGA
REV
REV
WIDE 2
NORM
COLOR
OFF
1
Contacteur d’interruption marche/arret (INTERRUPT
ON/OFF)
Pour interrompre un cycle d’impression et imprimer une nouvelle image
lorsque vous appuyez sur la touche PRINT en cours d’impression, réglez cet
interrupteur sur ON.
Pour que la touche PRINT soit sans effet durant l’impression et que
l’imprimante poursuive le cycle, réglez-le sur OFF.
Si vous appuyez sur la touche PRINT pendant une impression en mode OFF,
l’alarme retentit.
2
Contacteur POSTFEED march/arret (POSTFEED ON/OFF)
Pour avancer une longueur de papier supplémentaire, réglez ce commutateur
sur ON.
Pour économiser le papier en faisant seulement avancer une étroite bande de
papier après l’impression d’une image, réglez-le sur OFF. Vous pouvez
réaliser davantage de tirages par rouleau de papier d’impression en réglant ce
commutateur sur OFF, mais vous devez dans ce cas sortir le papier et le
couper manuellement.
Préparation
29
Page 30
Avant l’impression (suite)
275
87654321
475
50
250
9
4
5
5
7
5
4
3
3
2
3
2
30
10
7
0
3
275
87654321
475
50
250
9
4
5
5
7
5
4
3
3
2
3
2
30
10
7
0
3
275
87654321
475
50
250
9
4
5
5
7
5
4
3
3
2
3
2
30
10
7
0
3
275
87654321
475
50
250
9
4
5
5
7
5
4
3
3
2
3
2
30
10
7
0
3
3
Commutateur de rapport d’image (ASPECT 4:3/1:1)
En principe, réglez ce commutateur sur 4:3. Si le rapport hauteur/largeur du
signal vidéo est de 1:1, réglez-le sur 1:1.
Le tirage sera plus long qu’un tirage en 4:3.
1
2
3
3
5
2
3
30
4
3
3
4
1 357 7 531
4
3
3
4
30
3
2
5
3
3
2
1
4 : 3
5
2
3
1
3
2
3
30
4
3
3
4
4
3
3
4
30
3
2
5
3
3
2
1
1
2
3
3
5
2
3
30
4
3
3
4
1 357 7 531
4
3
3
4
30
3
2
5
3
3
2
1
5
3
1
4
3
3
4
4
3
3
4
5
3
1
1 : 1
4
Touche de mémoire (MEMORY FRAME/FIELD)
En principe, réglez ce commutateur sur FRAME (ON). Pour imprimer une
image avec un sujet en déplacement rapide (comme un ballon), le tirage
risque d’être flou. Si cela se produit, réglez-le sur FIELD. La définition ainsi
obtenue sera moins bonne, mais le tirage sera moins flou.
5
Touche d’image (IMAGE POSI/NEGA)
Réglez normalement ce commutateur sur POSI (ON). Pour réaliser des tirages
négatifs, réglez-le sur NEGA (OFF).
Remarque
Si vous réglez le sélecteur THRU/EE sur la position EE, l’appareil imprime
des images positives, quel que soit le réglage du commutateur IMAGE POSI/
NEGA.
2
3
2
3
30
30
3
2
3
2
6
Touche d’impression miroir (MIRROR NORM/REV)
Réglez normalement ce commutateur sur NORM (ON). Pour imprimer les
côtés gauche et droit inversés en miroir, réglez ce commutateur sur REV
(OFF).
7
Touche de sens d’impression (DIRECTION NORM/REV)
Déterminez si l’impression doit commencer par le haut ou par le bas de
l’image.
Normalement, laissez ce commutateur sur NORM (ON). L’impression est
alors réalisée depuis le bas de l’écran. Pour lancer l’impression à partir du
haut, réglez-le sur REV (OFF).
1
2
3
3
5
2
3
30
4
3
3
4
1 357 7 531
4
3
3
4
Préparation
30
30
3
2
5
3
3
2
1
NORM
5
2
3
1
3
2
3
30
4
3
3
4
4
3
3
4
30
3
2
5
3
3
2
1
1
2
3
3
5
2
3
30
4
3
3
4
4
3
3
4
30
3
2
3
1
3
2
5
1
2
3
3
5
2
3
30
4
3
3
4
1 357 7 531
4
3
3
4
30
3
2
5
3
3
2
1
REV
Page 31

89
275
87654321
475
50
250
9
4
5
5
7
5
4
3
3
2
3
2
30
10
7
0
3
275
87654321
475
50
250
9
4
5
5
7
5
4
3
3
2
3
2
30
10
7
0
3
275
87654321
475
50
250
9
4
5
5
7
5
4
3
3
2
3
2
30
10
7
0
3
Commutateur de balayage (SCAN NORM/WIDE 1/WIDE 2)
Ce commutateur définit la plage d’impression. La plage d’impression est
élargie selon la séquence suivante : NORM, WIDE 1 et WIDE 2.
Pour imprimer uniquement l’image affichée sur le format d’écran standard du
moniteur vidéo, réglez le commutateur SCAN 9 sur NORM (OFF). Pour
réaliser un tirage lorsque le signal balaye au-delà du bord de l’écran standard
du moniteur, réglez le commutateur SCAN 9 sur WIDE 1 (ON) ou le
commutateur SCAN 8 sur WIDE 2 (OFF). Si vous réglez le commutateur
SCAN 8 sur la position WIDE 2, WIDE 2 est sélectionné quelle que soit la
position de réglage du commutateur SCAN 9.
1
2
3
3
5
2
3
30
4
3
3
4
1 357 7 531
4
3
3
4
30
3
2
5
3
3
2
1
NORM
!º
Commutateur RESERVED
5
2
3
1
3
2
3
30
4
3
3
4
4
3
3
4
30
3
2
5
3
3
2
1
1
2
3
3
5
2
3
30
4
3
3
4
1 357 7 531
4
3
3
4
30
3
2
5
3
3
2
1
WIDE 1
5
2
3
1
3
2
3
30
4
3
3
4
4
3
3
4
30
3
2
5
3
3
2
1
1
2
3
3
5
2
3
30
4
3
3
4
1 357 7 531
4
3
3
4
30
3
2
5
3
3
2
1
WIDE 2
Réglez ce commutateur sur ON.
!¡
Commutateur de signal à imprimer noir et blanc/couleur (INPUT
B&W/COLOR)
Réglez ce commutateur sur B & W (ON) lorsque le signal à imprimer est en
noir et blanc. Réglez-le sur COLOR (OFF) si le signal est en couleur.
!™
Commutateur 75 ohms marche/arret (75 ON/OFF)
Réglez ce commutateur sur OFF si un moniteur vidéo ou un autre équipement
vidéo est raccordé au connecteur VIDEO OUT.
Réglez-le sur ON si le connecteur VIDEO OUT est libre.
Si vous raccordez deux imprimantes à un équipement vidéo, réglez le
commutateur 75 de l’une des imprimantes sur ON et l’autre sur OFF.
5
2
3
1
3
2
3
30
4
3
3
4
4
3
3
4
30
3
2
5
3
3
2
1
Préparation
31
Page 32

Chargement du papier
Remarques
• Ne pliez pas le papier et ne touchez pas la surface d’impression. La présence de
poussière sur la surface d’impression entraînera une altération de la qualité
d’impression.
• Après avoir chargé le rouleau de papier, faites sortir et coupez une bande de 15 à
20 cm de manière à tendre le papier.
• Utilisez uniquement du papier UPP-110 (p. 41).
• Réglez le sélecteur PAPER TYPE suivant le type de papier utilisé (p. 28).
Pour charger le papier
1 Appuyez sur l’interrupteur ON/OFF pour mettre l’imprimante sous tension.
2 Appuyez sur la touche OPEN/CLOSE pour ouvrir la réserve à papier.
3 Placez le rouleau de papier dans l’imprimante.
32
Placez le papier avec la face thermosensible
(face d’impression) vers le haut.
Préparation
Page 33

4 Faites sortir une bande de 15 à 20 cm (6 à 7
rouleau de papier.
1
⁄8 pouces) de manière à tendre le
5 Appuyez sur la touche OPEN/CLOSE pour refermer la réserve à papier.
Vous pouvez simplement refermer la réserve à papier en appuyant dessus.
ATTENTION
Lorsque la réserve de papier se referme, écartez les doigts de la réserve de papier et
de la lame du coupe-papier.
Préparation
33
Page 34

Opérations
Impression
Avant de réaliser des tirages
• Les connexions ont-elles été correctement réalisées ? (p. 27)
• Le rouleau de papier est-il correctement chargé ? (p. 32).
• Le type de papier est-il réglé correctement? (p. 28).
• Les microcommutateurs sont-il réglés correctement ? (p. 29–31)
• La source d’impression est-elle raccordée ?
Réalisation de tirages
1 Appuyez sur l’interrupteur ON/OFF pour mettre l’imprimante sous tension.
Le témoin d’alimentation s’allume.
ON/ OFF
STD SIDE
STD
NORMAL
SMALL
ZOOM 1 . 5x
ZOOM 2x
LARGE
CONTR
EE
THRU
BRIGHT
COPY PRINT
PAPER EMPTY
OPEN / CLOSE
Indicateur PAPER
EMPTY
2 Vérifiez si l’indicateur PAPER EMPTY n’est pas allumé.
S’il est allumé, chargez du papier.
3 Sélectionnez le sens et le format d’impression.
Reportez-vous à la section “Sélection du sens d’impression” et “Sélection du
format d’impression” à la page suivante.
4 Si l’image que vous souhaitez imprimer est affichée sur l’écran du moniteur
vidéo, appuyez sur la touche PRINT.
L’imprimante réalise un tirage de l’image affichée dès que vous appuyez sur
la touche PRINT.
34
Opérations
ON/ OFF
CONTR
EE
THRU
BRIGHT
COPY PRINT
PAPER EMPTY
OPEN / CLOSE
STD SIDE
STD
NORMAL
SMALL
ZOOM 1 . 5x
ZOOM 2x
LARGE
Page 35

Sélection du sens d’impression
C
C
C
C
C
Vous pouvez sélectionner le sens vertical ou horizontal à l’aide du sélecteur STD/
SIDE.
Pour imprimer suivant le sens vertical, réglez-le sur STD.
Pour imprimer suivant le sens horizontal, réglez-le sur SIDE.
STD SIDE
ABC
Sélection du format d’impression
Vous avez le choix entre un petit et un grand
format d’impression. Vous pouvez également
agrandir de 1,5 à 2 fois le centre de l’image.
Position de commande
(mode)
NORMAL
Vertical (STD)
ABC
SMALL
ABC ABC
STD SIDE
SMALL
LARGE
Format d’impression
ABC
NORMAL
Horizontal (SIDE)
ZOOM 1 . 5x
ZOOM 2x
ABC
ABC
ABC
LARGE
ZOOM 1.5X
ZOOM 2X
B
AB
B
ABC
AB
B
Opérations
35
Page 36

Impression (suite)
Pour imprimer en format réduit (mode SMALL)
Appuyez deux fois sur la touche PRINT. Lorsque vous appuyé sur la touche
PRINT une foirs, l’alarme retentit. L’imprimante lance l’impression après que
vous avez appuyé deux fois sur la touche PRINT.
Interruption du cycle d’impression
Appuyez sur la touche OPEN/CLOSE pendant le cycle d’impression ou de copie.
L’imprimante interrompt l’impression.
Pour stopper l’impression et imprimer une autre image affichée sur
l’écran du moniteur vidéo
Pour cela, le microcommutateur 1 (INTERRUPT) doit être réglé sur ON (p.29).
Appuyez sur la touche PRINT pendant le cycle d’impression ou de copie.
L’imprimante stoppe l’impression et réalise un tirage de l’image affichée dès que
vous appuyez sur la touche PRINT.
Réalisation d’une copie du dernier tirage
Appuyez sur la touche COPY. L’imprimante réalise une copie du dernier tirage. Le
dernier tirage est conservé dans la mémoire de l’imprimante jusqu’à ce que vous
appuyiez à nouveau sur la touche PRINT ou que vous mettiez le système hors
tension.
Copier dans un format différent
Vous pouvez copier le dernier tirage dans différents formats.
Avant d’appuyer sur la touche COPY, sélectionnez le format d’impression comme
décrit dans la section “Sélection du format d’impression”.
Remarques
• Si vous appuyez sur la touche COPY immédiatement après avoir mis
l’imprimante sous tension, l’alarme retentit étant donné qu’aucune image n’est
enregistrée dans la mémoire.
• Si, lorsque vous êtes en mode SMALL (p. 35), vous appuyez sur la touche
COPY alors que vous n’avez appuyé qu’une seule fois sur la touche PRINT,
l’alarme retentit et l’imprimante n’exécute pas la copie.
Réaliser plusieurs copies du même tirage
Appuyez sur la touche COPY autant de fois que nécessaire (11 copies au
maximum, le tirage initial compris) pendant la réalisation de l’impression ou de la
copie initiale. L’alarme retentit chaque fois que vous appuyez sur la touche COPY.
36
Pour interrompre le cycle de copie
Appuyez sur la touche OPEN/CLOSE.
Opérations
Page 37

Réglage du contraste et de la luminosité
Vous pouvez régler contraste et la luminosité des tirages.
1 Réglez le sélecteur THRU/EE sur EE.
Vous pouvez vérifier le réglage de l’image sur le moniteur vidéo.
CONTR
EE
THRU
BRIGHT
COPY PRINT
PAPER EMPTY
OPEN / CLOSE
THRU
EE
BRIGHT
ON/ OFF
NORMAL
SMALL
LARGE
CONTR
STD SIDE
STD
ZOOM 1 . 5x
ZOOM 2x
2 Réglez la luminosité au moyen de la commande BRIGHT et le contraste avec
la commande CONTR pendant que vous contrôlez l’image sur le moniteur
vidéo.
Réglage du contraste
CONTR
Plus fort
Réglage de la luminosité
BRIGHT
Moins fort
Plus sombre
Plus clair
Pour entrer directement dans le moniteur vidéo le signal vidéo de
l’équipement vidéo raccordé à l’imprimante
Réglez le sélecteur THRU/EE sur THRU. Le signal vidéo est directement entré sur
le moniteur vidéo sans avoir été traité par les circuits de l’imprimante.
Opérations
37
Page 38

Autres
Précautions
Sécurité
• Vérifiez la tension secteur avant toute utilisation.
• Interrompez immédiatement le fonctionnement de l’imprimante si un liquide ou
• Débranchez l’appareil de la prise murale si vous prévoyez de ne pas l’utiliser
• Ne démontez pas le châssis. Confiez-en exclusivement l’entretien à un personnel
• Ne touchez pas la lame du coupe-papier de l’imprimante.
• Lorsque la réserve de papier se referme, écartez les doigts de la réserve de papier
• Branchez la fiche du cordon d’alimentation sur une prise murale mise à la terre.
Faites uniquement fonctionner l’appareil avec l’une des sources d’alimentation
spécifiées dans les “Spécifications”.
un solide tombe à l’intérieur du châssis. Débranchez l’appareil et faites-le vérifier
par un personnel qualifié.
pendant une période prolongée. Débranchez le cordon d’alimentation en le tirant
par la fiche. Ne tirez jamais sur le cordon proprement dit.
qualifié.
et de la lame du coupe-papier.
L’imprimante doit être correctement reliée à la terre.
Utilisation
Ne mettez pas l’imprimante hors tension pendant un cycle d’impression. Vous
risqueriez d’endommager la tête thermique.
Transport de l’imprimante
Ne transportez et ne déplacez pas l’imprimante quand le rouleau de papier est
installé à l’intérieur. Cela risquerait de provoquer un dysfonctionnement.
Installation
• Installez l’imprimante sur une surface plane et stable.
• N’installez pas l’imprimante à proximité d’une source de chaleur comme un
radiateur, une conduite d’air chaud et ne la soumettez pas au rayonnement direct
du soleil, à de la poussière ou à une humidité excessives, à des chocs mécaniques
ou à des vibrations.
• Veillez à assurer une circulation de l’air adéquate pour éviter toute surchauffe. Ne
placez pas l’imprimante sur des surfaces telles que des tapis, etc., ou à proximité
de rideaux et de draperies.
• Si l’imprimante est soumise à des changements brusques et importants de
température, par exemple si vous la transportez d’une pièce froide à une pièce
chaude, ou si vous la laissez dans une pièce contenant un radiateur qui produit
beaucoup d’humidité, de la condensation peut se former à l’intérieur de
l’imprimante. La condensation perturbera probablement le fonctionnement de
l’imprimante et risque de provoquer une défaillance si vous persistez à l’utiliser.
Si de la condensation se forme, mettez l’imprimante hors tension et laissez-la
reposer pendant au moins une heure.
38
Autres
Page 39

Entretien
Nettoyage du châssis de l’imprimante
N’utilisez pas de solvants puissants pour nettoyer le châssis de l’imprimante. Le
diluant et les nettoyants abrasifs risquent d’altérer le fini du châssis.
Nettoyage de la tête thermique
Si les tirages présentent des souillures ou si des bandes blanches apparaissent sur
les tirages, nettoyez la tête thermique à l’aide de la feuille de nettoyage fournie.
1 Appuyez sur l’interrupteur d’alimentation ON/OFF pour mettre l’imprimante
sous tension.
2 Appuyez sur la touche OPEN/CLOSE pour ouvrir la réserve à papier.
Autres
39
Page 40

Précautions (suite)
3 Introduisez la feuille de nettoyage avec la face noire vers le bas dans la
4 Appuyez sur la touche OPEN/CLOSE et maintenez-la enfoncée.
rainure de la réserve à papier.
Introduisez dans la rainure.
Feuille de nettoyage (fournie)
La réserve à papier se referme et l’imprimante entame le nettoyage de la tête
thermique.
Lorsque l’alarme retentit et que l’imprimante commence à éjecter la feuille de
nettoyage, relâchez la touche OPEN/CLOSE.
m
Maintenez la touche enfoncée.
5 Retirez la feuille de nettoyage.
Remarques
• N’appuyez pas sur la touche PRINT ou COPY pendant que la feuille de
nettoyage se trouve dans l’imprimante.
• Ne nettoyez la tête thermique que lorsque cela s’avère nécessaire. Un nettoyage
trop fréquent risque de provoquer un dysfonctionnement.
Lorsque l’alarme retentit,
relâchez la touche.
40
Autres
Page 41

A propos du type de papier
Type de papier
• Utilisez uniquement le papier Sony UPP-110. L’utilisation d’un autre type de
papier peut entraîner une altération des performances de l’imprimante et de la
qualité d’impression.
• Les types de papier suivants sont disponibles.
Stockage du papier
Densité d’impression
TYPE I (Normal)
TYPE II (Haute densité)
TYPE IV (Supérieur)
• Rangez le papier inutilisé et le papier imprimé dans un endroit sombre et frais
(moins de 30°C). Nous recommandons de ranger le papier imprimé dans un sac
en polypropylène.
• Ne rangez pas le papier inutilisé ou imprimé dans un endroit chaud ou humide.
• Ne laissez pas le papier inutilisé ou imprimé sous le rayonnement direct du soleil
ou dans des endroits fort éclairés pendant des périodes prolongées.
• Veillez à ce qu’aucun solvant organique volatile ni de chlorure de vinyle n’entre
en contact avec le papier imprimé. L’alcool, les rubans adhésifs ou les films en
plastique entraînent une altération de la qualité des tirages.
• Pour fixer le papier imprimé sur une autre surface en papier, utilisez de l’adhésif
double face ou encore de la colle solide ou à base aqueuse.
• N’empilez pas le papier imprimé sur ou sous une diazocopie. Le tirage risque en
effet de virer au noir.
Type de papier
UPP-110S
UPP-110HD
UPP-110HA
Autres
41
Page 42

Spécifications
Tête thermique
Tête thermique à couche mince (avec CI
d’entraînement intégré)
Entraînement de 1024 points
Nuances
256
Résolution (en mode WIDE 1)
EIA: 970 x 490 points
CCIR: 970 x 582 points
Format d’impression
(en mode NORM et WIDE 1)
Mode STD
EIA: 95 x 72 mm
CCIR: 95 x 71 mm
Mode SIDE
EIA: 127 x 96 mm
CCIR: 127 x 95 mm
Vitesse d’impression (en mode STD et NORM)
Environ 3,9 secondes/écran (rapport
d’image 4:3)
Mémoire d’image
768 K x 6 bits
Connecteurs d’entrée/sortie
VIDEO IN (BNC)
EIA ou CCIR
Signaux vidéo composites
1,0 Vp-p, 75 ohms/haute impédance
(Identification EIA/CCIR automatique)
VIDEO OUT (BNC)
EIA ou CCIR
Signaux vidéo composites
1,0 Vp-p, 75 ohms, sortie directe/EE
commutable
REMOTE (miniprise stéréo)
3
2
1
Puissance de raccordement et consummation
électrique
UP-880: CA 120 V, 50/60 Hz, 1,8 A
UP-890CE/890MD:
CA 120 V, 50/60 Hz, 1,5 A
CA 220 à 240 V, 50/60 Hz, 0,8 A
Dimensions
Approx. 154 x 106 x 303 mm (l/h/p) (6
1
⁄4 x 12 pouces)
4
1
⁄8 x
Masse
Approx. 3,5 kg (7 li. 11 on.), unité principale
uniquement
Protection contre les chocs électriques
Classe I
Protection contre la pénétration néfaste d’eau
Ordinaire
Degré de sécurité en présence d’anesthésiants
inflammables ou d’oxygène
Ne convient pas à une utilisation en présence
d’anesthésiants inflammables ou d’oxygène.
Mode de fonctionnement
Continu
Accessoires fournis
Rouleau de papier (UPP-110HA) (1)
Câble de connexion BNC - BNC (1)
Cordon d’alimentation (1)
Feuille de nettoyage de la tête thermique (1)
Télécommande RM-91 (1) fournie avec UP-
890MD uniquement
La conception et les spécifications sont sujettes à
modifications sans préavis.
42
1 GND
2 PRINT SIGNAL (TTL)
Entrée d’une impulsion LOW sur 100
ms pour initialiser l’impression.
3 PRINT BUSY (TTL)
Impulsion HIGH pendant l’impression.
Autres
Page 43

Dépannage
Symptôme
Petites tâches sur les
premiers tirages.
L’impression ne démarre
pas lorsque vous appuyez
sur la touche PRINT.
Il y a des bordures noires
ou des portions
manquantes autour du
tirage.
Bourrage de papier.
Le tirage est souillé.
L’imprimante s’arrête
lorsqu’elle imprime des
images noires en continu.
Des lignes blanches ou de
petites lettres apparaissant
à l’écran ne sont pas
imprimées avec netteté.
De petits carrés
apparaissent sur tout
l’écran.
Le tirage est trop foncé ou
trop clair.
Le tirage semble étiré.
Causes/remèdes
Lors de l’impression avec un nouveau rouleau de
papier, de la poussière à la surface du papier risque de
donner de petites taches blanches sur le tirage.
m
Avancez le papier en appuyant sur la touche OPEN/
CLOSE jusqu’à ce qu’il soit propre.
• Papier n’est pas avancé.
m
Le papier est-il détendu ?
m
L’imprimante est-elle sous tension ?
m
Toutes les connexions sont-elles correctes ? (p. 27)
m
Avez-vous appuyé deux fois sur la touche PRINT en
mode SMALL ?
• Si l’alarme retentit :
m
La tête thermique surchauffe-t-elle ?
m
Le signal vidéo de l’image est-il entré ?
m
Le papier est-il chargé correctement ?
• Le papier est avancé, mais l’impression ne démarre
pas.
m
Le papier est-il chargé avec la face thermosensible
vers le haut ?
Cela peut être dû au signal vidéo entrant dans
l’imprimante.
m
Changez le réglage des commutateurs SCAN
(microcommutateurs 8, 9). (P. 31)
• Ouvrez la réserve à papier en appuyant sur la touche
OPEN/CLOSE, retirez lentement le papier coincé et
refermez-le.
• De la condensation s’est formée à l’intérieur de
l’imprimante.
m
Lorsque l’imprimante est amenée brusquement d’un
endroit froid dans un endroit chaud, il arrive
fréquemment que de la condensation se forme à
l’intérieur. Dans ce cas, retirez le papier, mettez
l’imprimante hors tension et laissez-la au repos
pendant une heure ou deux.
La tête thermique est encrassée.
m
Nettoyez la tête thermique à l’aide de la feuille de
nettoyage fournie. (p. 39)
Cela se produit lorsque l’imprimante imprime en continu
plus de 15 images noires. Dans ce cas, l’alarme retentit.
La cause en est que le circuit de protection se
déclenche pour éviter une surchauffe de la tête
thermique. Stoppez l’imprimante pendant un moment.
Le commutateur INPUT (microcommutateur !¡) est-il
réglé sur B & W lorsque le signal d’entrée est un signal
noir et blanc ? (p. 31)
Le commutateur INPUT (microcommutateur !¡) est-il
réglé sur COLOR lorsque le signal d’entrée est un signal
couleur ? (p. 31)
• Le commutateur 75 (microcommutateur !™) est-il
réglé correctement ? (p. 31)
• Le sélecteur GAMMA est-il réglé correctement ? (p.
28)
Le commutateur ASPECT (microcommutateur 3) est
réglé sur 1:1.
m
Réglez-le sur 4:3. (p. 30)
Autres
43
Page 44

Localisation et fonction des composants
Pour plus de détails, reportez-vous aux pages indiquées entre parenthèses.
Avant
1
Interrupteur et témoin d’alimentation
ON/OFF
Met l’imprimante sous tension. Le témoin est
allumé lorsque l’imprimante est sous tension.
2
Sélecteur de format d’impression (35)
Sélectionne le format d’impression.
3
Sélecteur STD (standard)/SIDE (35)
Sélectionne le sens d’impression.
4
Commande de contraste CONTR (37)
Règle le contraste des tirages.
5
Sélecteur THRU/EE (37)
Sélectionne le signal vidéo sortant du
connecteur VIDEO OUT.
THRU: Les signaux d’entrée sont
directement sortis vers le moniteur vidéo.
EE: Les signaux d’entrée sont sortis vers le
moniteur vidéo après avoir été traités par les
circuits de l’imprimante.
6
Commande de luminosité BRIGHT
(37)
Règle la luminosité des tirages.
ON/ OFF
STD SIDE
STD
NORMAL
SMALL
ZOOM 1 . 5x
ZOOM 2x
LARGE
EE
THRU
BRIGHT
CONTR
7
PAPER EMPTY
COPY PRINT
OPEN / CLOSE
Touche de copie COPY (36)
Imprime une copie supplémentaire du tirage
précédent.
8
Touche d’impression PRINT (34)
Imprime l’image affichée sur l’écran du
moniteur vidéo. Lorsque vous appuyez sur la
touche PRINT, l’image est enregistrée dans la
mémoire.
9
Indicateur d’appoint de papier PAPER
EMPTY
S’allume lorsque la réserve de papier de
l’imprimante est épuisée.
!º
Touche OPEN/CLOSE (32, 36)
Commande l’ouverture de la réserve à papier.
Permet également d’interrompre un cycle
d’impression.
!¡
Dispositif d’alimentation papier et
lame du coupe-papier
Découpe le papier d’impression.
44
Autres
Page 45

Arrière
1
Connecteur de commande à distance
REMOTE (27)
Raccordez la télécommande RM-91 pour
commander l’imprimante à distance.
La télécommande RM-91 est fournie avec la
modèle UP-890MD uniquement.
2
Sélecteur GAMMA (28)
Permet de changer le mode d’impression
pour le papier d’impression haute densité. Le
sélecteur est opérant lorsque le sélecteur
PAPER TYPE est réglé sur II ou IV.
3
Sélecteur de type de papier PAPER
TYPE (28)
Règle le type de papier.
REMOTE GAMMA TYPE
PAPER
IIIIII IIIIV
DIP SW
OFF
ON
IN OUT
VIDEO
AC IN
6
Connecteur de sortie VIDEO OUT
(type BNC) (27)
Raccordez-le au connecteur d’entrée du
moniteur vidéo. Le type du signal de sortie
dépend de la position de réglage du sélecteur
THRU/EE.
7
Connecteur d’alimentation AC IN (27)
Pour le branchement de l’imprimante à une
prise murale au moyen du cordon
d’alimentation fourni.
8
Borne équipotentielle
Equipe uniquement le modèle UP-890CE/
890MD.
4
Microcommutateurs DIP SW (29 – 31)
Règlent les modes d’impression et les
fonctions.
5
Connecteur d’entrée VIDEO IN (type
BNC) (27)
Raccordez-le au connecteur de sourtie vidéo
de l’équipement vidéo.
Autres
45
Page 46

Deutsch
VORSICHT
Um Feuergefahr und die Gefahr eines elektrischen
Schlages zu vemeiden, darf das Gerät weder Regen
noch Feuchtigkeit ausgesetzt werden.
Um einen elektrischen Schlag zu vemeiden, darf das
Gehäuse nicht geöffnet werden. Überlassen Sie
Wartungsarbeiten stets nur einem Fachmann.
Für UP-890CE/890MD
Symbole
Dieses Symbol kennzeichnet den
Anschluß für den Potentialausgleichsleiter.
Sinn des Potentialausgleichs ist das
Herstellen einer potentialgleichen
Umgebung für den Patienten.
Wichtige Sicherheitshinweise für den Gebrauch in
medizinischen Umgebungen
1. Alle Geräte, die an diese Einheit angeschlossen sind,
müssen den Standards IEC601–1, IEC950 und IEC65
oder anderen IEC–/ISO–Standards, die für die Geräte
gelten, entsprechen.
2. Wenn diese Einheit zusammen mit anderen Geräten
in der Patientenumgebung* verwendet wird, müssen
die Geräte entweder mit einem
Isolationstransformator betrieben oder über einen
zusätzlichen Schutzleitungsanschluß mit der
Gehäusemasse verbunden werden, es sei denn, sie
entsprechen dem Standard IEC601–1.
* Patientenumgebung
R1,5m
3. Der Ableitstrom kann sich beim Zusammenschluß
mehrerer Geräte summieren und höhere Werte
annehmen.
4. Dieses Gerät erzeugt und verwendet
Hochfrequenzenergie und kann diese auch
abstrahlen. Wenn das Gerät nicht entsprechend den
Anweisungen in dieser Anleitung installiert und
verwendet wird, kann es Interferenzen mit anderen
Geräten hervorrufen. Dies können Sie leicht
feststellen, indem Sie das Netzkabel vom Gerät
lösen. Versuchen Sie bei Interferenzen folgendes:
Stellen Sie das Gerät weiter entfernt vom gestörten
Gerät auf. Schließen Sie dieses Gerät und das
andere Gerät an verschiedene Stromkreise an.
Wenden Sie sich für weitere Informationen an Ihren
Händler.
Für Kunden in Deutschland
Dieses Produkt kann im kommerziellen und in
begrenztem Maße auch im industriellen Bereich
eingesetzt werden. Dies ist eine Einrichtung, weiche die
Funk-Entstörung nach Klasse B besitzt.
46
Page 47

Inhalt
Einführung
Vorbereitungen
Bedienung
Weitere
Informationen
Übersicht 48
Anschließen des Geräts 49
Vor dem Drucken 50
Einstellen des Papiertyps 50
Einstellen der DIP-Schalter 51
Einlegen von Papier 54
Drucken 56
Ausdrucken von Bildern 56
Auswählen der Druckrichtung 57
Auswählen der Druckgröße 57
Einstellen von Kontrast und Helligkeit 59
Sicherheitsmaßnahmen 60
Wartung und Pflege 61
Hinweis zum Papiertyp 63
Technische Daten 64
Störungsbehebung 65
Lage und Funktion der Teile und Bedienelemente 66
Vorderseite 66
Rückseite 67
47
Page 48

Einführung
Übersicht
Der UP-880/890CE/890MD ist ein Schwarzweiß-Videografikdrucker, mit dem
Bilder, die auf dem Videomonitor angezeigt werden, ausgedruckt werden können.
Konsistent hohe Druckqualität
• Hohe Auflösung von 10,2 Punkt/mm bei einem Thermokopf mit
Hochgeschwindigkeitsansteuer-IC
• 256 Schwarzweißabstufungen
Schnelles Drucken
• Für einen Einzelausdruck benötigt der Drucker etwa 3,9 Sekunden im Modus
STD und NORM.
• In einem einzigen Druckvorgang lassen sich hintereinander bis zu 11 Exemplare
des gleichen Bildes ausdrucken.
Zwei Druckrichtungen und fünf Druckgrößen auswählbar
• Mit dem Druckrichtungswählschalter an der Vorderseite können Sie einstellen,
ob in vertikaler oder horizontaler Richtung gedruckt werden soll.
• Mit dem Druckgrößenwählschalter an der Vorderseite können Sie fünf
verschiedene Druckgrößen einstellen.
DIP-Schalter zur Druckeroptimierung
• Sie können mit dem DIP-Schalter DIRECTION einstellen, ob die Bilder von
oben nach unten order umgekehrt gedruckt werden sollen.
• Sie können mit dem DIP-Schalter ASPECT für die Ausdrucke ein
Bildseitenverhältnis von 4:3 oder 1:1 einstellen.
• Sie können mit dem DIP-Schalter SCAN die Breite der auszudruckenden
Bildschirmanzeige einstellen.
• Sie können mit dem DIP-Schalter POSTFEED die Papiersparfunktion einstellen.
Automatische Videosignalerkennung
Der Typ des Eingangssignals, Schwarzweißsignal (EIA oder CCIR) oder
Farbsignal (NTSC oder PAL), wird automatisch erkannt und in entsprechender
Weise ausgedruckt.
Alarmsignal
Das Alarmsignal warnt Sie, wenn Sie im Begriff sind, einen Bedienungsfehler zu
machen.
Einlegen von Papier - Problemlos und schnell
Papier wird ergänzt, indem Sie einfach mit der Taste OPEN/CLOSE (ÖFFNEN/
SCHLIESSEN) den Papierfachdeckel öffnen und eine neue Papierrolle einlegen.
48
Einführung
Page 49

Vorbereitungen
Anschließen des Geräts
Hinweise
• Bevor Sie irgendwelche Anschlüsse vornehmen, schalten Sie zunächst alle
Geräte aus.
• Schließen Sie das Netzkabel zuletzt an.
Fernbedienung
RM-91*
an REMOTE
Videogerät
an Videoausgangsanschluß
mitgeliefertes
Koaxialverbindungskabel
(BNC ˜ BNC)
an VIDEO IN
REMOTE GAMMA TYPE
PAPER
IIIIII IIIIV
OFF
ON
DIP SW
Videomonitor (Farbe/
Schwarzweiß)
Verbindungskabel
(nicht mitgeliefert)
an
Videoeingangsanschluß
an VIDEO OUT
IN OUT
VIDEO
AC IN
an Buchse AC IN
an Netzsteckdose
mitgeliefertes Netzkabel
* Die Fernbedienung RM-91 wird nur mit dem UP-890MD mitgeliefert.
Vorbereitungen
49
Page 50

Vor dem Drucken
Einstellen des Papiertyps
Stellen Sie mit dem Schalter PAPER TYPE den Papiertyp ein, den Sie benutzen
wollen.
Wenn Sie anderes Papier als das von Sony verwenden, können sich die Leistung
des Druckers und die Druckqualität verschlechtern.
Papiertyp
UPP-110S
UPP-110HD
UPP-110HA
REMOTE GAMMA TYPE
PAPER
IIIIII IIIIV
Position des Schalters PAPER TYPE
I (Normal)
II (Hochauflösend)
IV (Sehr hohe Auflösung)
DIP SW
OFF
ON
IN OUT
VIDEO
AC IN
GAMMA TYPE
IIIIII IIIIV
PAPER
Bei den Papiertypen UPP-110HA oder UPP-110HD
Wenn Sie den Schalter PAPER TYPE auf II oder IV stellen, dann müssen Sie mit
dem Schalter GAMMA auch die Gradation einstellen.
I: Weiche Gradation
II: Standard
IV: Harte Gradation
Vorbereitungen
50
Page 51

Einstellen der DIP-Schalter
Die DIP-Schalter müssen auf den gewünschten Druckmodus eingestellt werden.
Bevor Sie sie einstellen, schalten Sie das Gerät aus. Ändern Sie dann die
Schalterstellungen mit Hilfe eines kleinen, spitzen Gegenstands, zum Beispiel eines
kleinen Schraubenziehers. Werkseitig sind folgende Schalterpositionen
voreingestellt.
REMOTE GAMMA TYPE
PAPER
IIIIII IIIIV
DIP SW
OFF
ON
IN OUT
AC IN
VIDEO
DIP SW
OFF
ON
DIP SW FUNCTION TABLE
NO
FUNCTION
1
INTERRUPT
2
POSTFEED
3
ASPECT
4
MEMORY
5
IMAGE
6
MIRROR
7
DIRECTION
8
SCAN
9
10
RESERVED
11
INPUT
12
75
SW-ON
ON
ON
4:3
FRAME
POSI
NORM
NORM
WIDE 1
B&W
ON
SW-OFF
OFF
OFF
1:1
FIELD
NEGA
REV
REV
WIDE 2
NORM
COLOR
OFF
1
Schalter UNTERBRECHEN EIN/AUS (INTERRUPT ON/OFF)
Wenn der Druckvorgang abgebrochen und das nächste Bild ausgedruckt
werden soll, sobald Sie während eines Druckvorgangs die Taste PRINT
(DRUCKEN) drücken, stellen Sie diesen Schalter auf ON (EIN).
Soll der Drucker einen einmal begonnenen Druckvorgang fortsetzen, auch
wenn Sie während des Druckvorgangs die Taste PRINT (DRUCKEN)
drücken, stellen Sie ihn auf OFF (AUS).
Wenn Sie während des Druckens im OFF-Modus die Taste PRINT
(DRUCKEN) drücken, ertönt ein Alarmsignal.
2
Schalter LEERPAPIER EIN/AUS (POSTFEED ON/OFF)
Soll beim Ausgeben eines fertigen Bildes ein größeres Stück unbedruckten
Papiers mit ausgegeben werden, stellen Sie diesen Schalter auf ON (EIN).
Soll aus Gründen der Papierersparnis nach dem Drucken nur ein kleines Stück
unbedruckten Papiers mit ausgegeben werden, stellen Sie diesen Schalter auf
OFF (AUS). Sie können pro Papierrolle mehr Bilder ausdrucken, aber Sie
müssen das bedruckte Papier selbst entnehmen und schneiden.
Vorbereitungen
51
Page 52

Vor dem Drucken (Fortsetzung)
275
87654321
475
50
250
9
4
5
5
7
5
4
3
3
2
3
2
30
10
7
0
3
275
87654321
475
50
250
9
4
5
5
7
5
4
3
3
2
3
2
30
10
7
0
3
275
87654321
475
50
250
9
4
5
5
7
5
4
3
3
2
3
2
30
10
7
0
3
275
87654321
475
50
250
9
4
5
5
7
5
4
3
3
2
3
2
30
10
7
0
3
3
Schalter BILDSEITENVERHÄLTNIS (ASPECT) 4:3/1:1
Im Normalfall sollte dieser Schalter auf 4:3 stehen. Ist das
Bildseitenverhältnis des Videobildes aber 1:1, stellen Sie ihn auf 1:1.
Ein solcher Ausdruck ist länger als ein Ausdruck, der mit dem Verhältnis 4:3
erstellt wurde.
1
2
3
3
5
2
3
30
4
3
3
4
1 357 7 531
4
3
3
4
30
3
2
5
3
3
2
1
4 : 3
5
2
3
1
3
2
3
30
4
3
3
4
4
3
3
4
30
3
2
5
3
3
2
1
1
2
3
3
5
2
3
30
4
3
3
4
1 357 7 531
4
3
3
4
30
3
2
5
3
3
2
1
5
3
1
4
3
3
4
4
3
3
4
5
3
1
1 : 1
4
Schalter SPEICHER VOLLBILD/HALBBILD (MEMORY
FRME/FIELD)
Im Normalfall sollte dieser Schalter auf FRAME (ON) stehen. Beim
Ausdrucken von sehr stark bewegten Bildquellen (z. B. Ballspiel) sind auf
dem Ausdruck unter Umständen mehrere Bewegungsphasen als “Nachbild”
zu sehen. Stellen Sie den Schalter in diesem Fall auf FIELD. Die Bildqualität
ist dann zwar weniger gut, der “Nachbildeffekt” läßt sich so jedoch
vermeiden.
5
Schalter BILD POSI/NEGA (IMAGE POSI/NEGA)
Im Normalfall sollte dieser Schalter auf POSI (ON) stehen. Zum Ausdrucken
von Negativen stellen Sie ihn auf NEGA (OFF).
Hinweis
Wenn Sie den Wählshalter THRU/EE auf die Seite EE stellen, druckt das
Gerät Positiv-Bilder aus, unabhängig von der Einstellung des Shalter IMAGE
POSI/NEGA.
2
3
2
3
30
30
3
2
3
2
6
Schalter SPIEGEL NORM/VERK. (MIRROR NORM/REV)
Im Normalfall sollte dieser Schalter auf NORM (ON) stehen. Wollen Sie ein
Bild spiegelverkehrt ausdrucken, stellen Sie ihn auf REV (OFF).
7
Schalter RICHTUNG NORM/EMGEK. (DIRECTION NORM/
REV)
Gibt an, ob das Bild von oben nach unten oder andersherum ausgedruckt
werden soll.
Im Normalfall sollte dieser Schalter auf NORM (ON) stehen. Dann wird beim
Ausdrucken mit dem unteren Bildschirmrand begonnen. Soll der Ausdruck
mit dem oberen Bildschirmrand beginnen, stellen Sie ihn auf REV (OFF).
1
2
3
3
5
2
3
30
4
3
3
4
1 357 7 531
4
3
3
4
30
3
2
5
3
Vorbereitungen
52
3
2
1
NORM
5
2
3
1
3
2
3
30
4
3
3
4
4
3
3
4
30
3
2
5
3
3
2
1
1
2
3
3
5
2
3
30
4
3
3
4
4
3
3
4
30
3
2
3
1
3
2
5
1
2
3
3
5
2
3
30
4
3
3
4
1 357 7 531
4
3
3
4
30
3
2
5
3
3
2
1
REV
Page 53

89
275
87654321
475
50
250
9
4
5
5
7
5
4
3
3
2
3
2
30
10
7
0
3
275
87654321
475
50
250
9
4
5
5
7
5
4
3
3
2
3
2
30
10
7
0
3
275
87654321
475
50
250
9
4
5
5
7
5
4
3
3
2
3
2
30
10
7
0
3
Schalter SCAN NORM/BREIT 1/BREIT 2 (SCAN NORM/
WIDE 1/WIDE 2)
Stellt den auszudruckenden Bildbereich ein. Dieser ist bei NORM am
schmalsten, bei WIDE 2 am breitesten, und WIDE 1 ist der Mittelwert.
Soll nur das Bild ausgedruckt werden, das der Standardanzeigegröße des
Videobildschirms entspricht, stellen Sie den Schalter SCAN 9 auf NORM
(OFF). Um auch die Bildsignale auszugeben, die über den Rand der
Standardanzeigegröße des Videobildschirms hinausgehen, stellen Sie den
Schalter SCAN 9 auf WIDE 1 (ON) oder den Schalter SCAN 8 auf WIDE
2 (OFF). Wenn Sie den Schalter SCAN 8 auf Position WIDE 2 stellen, gilt
immer der Wert WIDE 2, unabhängig von der Stellung des Schalters SCAN
9
.
1
2
3
3
5
2
3
30
4
3
3
4
1 357 7 531
4
3
3
4
30
3
2
5
3
3
2
1
5
2
3
1
3
2
3
30
4
3
3
4
4
3
3
4
30
3
2
5
3
3
2
1
1
2
3
3
5
2
3
30
4
3
3
4
1 357 7 531
4
3
3
4
30
3
2
5
3
3
2
1
5
2
3
1
3
2
3
30
4
3
3
4
4
3
3
4
30
3
2
5
3
3
2
1
1
2
3
3
5
2
3
30
4
3
3
4
1 357 7 531
4
3
3
4
30
3
2
5
3
3
2
1
NORM
WIDE 2
!º
Schalter RESERVIERT RESERVED
WIDE 1
Dieser Schalter muß immer auf ON stehen.
!¡
Schalter EINGANG S&W/FARBE (INPUT B&W/COLOR)
Stellen Sie diesen Schalter auf B & W (ON), wenn Sie ein Schwarzweißsignal
ausdrucken möchten, und auf COLOR (OFF), wenn das Signal farbig ist.
!™
Schalter 75 EIN/AUS (75 ON/OFF)
Stellen Sie diesen Schalter auf OFF, wenn ein Videomonitor oder ein anderes
Videogerät an den Anschluß VIDEO OUT angeschlossen ist.
Stellen Sie ihn auf ON, wenn an den Anschluß VIDEO OUT nichts
angeschlossen ist.
Wenn Sie zwei Drucker an ein Videogerät anschließen, stellen Sie den
Schalter 75 des einen Druckers auf ON, den des anderen auf OFF.
5
2
3
1
3
2
3
30
4
3
3
4
4
3
3
4
30
3
2
5
3
3
2
1
Vorbereitungen
53
Page 54

Einlegen von Papier
Hinweise
• Falten Sie das Papier nicht, und berühren Sie nicht die Druckoberfläche. Staub
auf der Druckoberfläche führt zu schlechten Druckergebnissen.
• Nach dem Einlegen der Papierrolle ziehen Sie die ersten 15 bis 20 cm Papier
heraus, so daß das Papier im Drucker gespannt ist und nicht durchhängt, und
schneiden das Papier ab.
• Verwenden Sie nur Papier der Serie UPP-110 (S. 63).
• Stellen Sie den Wählschalter PAPER TYPE auf den verwendeten Papiertyp ein
(S. 50).
Einlegen des Papiers
1 Schalten Sie den Drucker am Netzschalter ein.
2 Öffnen Sie mit der Taste OPEN (ÖFFNEN)/CLOSE (SCHLIESSEN) den
Papierfachdeckel.
3 Legen Sie die Papierrolle in den Drucker ein.
Vorbereitungen
54
Plazieren Sie das Papier so, daß die hitzeempfindliche
Druckoberfläche nach oben zeigt.
Page 55

4 Ziehen Sie die ersten 15 bis 20 cm Papier heraus, so daß das Papier im
Drucker gespannt ist und nicht durchhängt.
5 Schließen Sie mit der Taste OPEN (ÖFFNEN)/CLOSE (SCHLIESSEN) den
Papierfachdeckel.
Sie können den Papierfachdeckel auch schließen, indem Sie ihn einfach
zudrücken.
VORSICHT
Achten Sie darauf, mit den Händen nicht in den Bereich von Papierfachdeckel und
Papierschneideklinge zu geraten, wenn sich der Papierfachdeckel schließt.
Vorbereitungen
55
Page 56

Bedienung
Drucken
Checkliste vor dem Drucken
• Ist das Gerät korrekt angeschlossen? (S. 49)
• Ist die Papierrolle korrekt eingelegt? (S. 54).
• Ist der Papiertyp korrekt eingestellt? (S. 50).
• Sind die DIP-Schalter korrekt eingestellt? (S. 51–53)
• Wird die richtige Bildquelle eingespeist?
Ausdrucken von Bildern
1 Schalten Sie den Drucker am Netzschalter ein.
Die Netzanzeige leuchtet auf.
ON/ OFF
STD SIDE
STD
NORMAL
SMALL
ZOOM 1 . 5x
ZOOM 2x
LARGE
CONTR
EE
THRU
BRIGHT
COPY PRINT
PAPER EMPTY
OPEN / CLOSE
Anzeige PAPER EMPTY
(PAPIER LEER)
2 Die Anzeige PAPER EMPTY (PAPIER LEER) darf nicht leuchten.
Leuchtet sie, legen Sie Papier ein.
3 Wählen Sie Druckrichtung und Größe.
Näheres finden Sie unter “Auswählen der Druckrichtung” und “Auswählen
der Druckgröße” auf der nächsten Seite.
4 Wenn das auszudruckende Bild auf dem Videomonitor angezeigt wird,
drücken Sie die Taste PRINT (DRUCKEN).
Der Drucker druckt das Bild aus, das angezeigt wird, wenn Sie die Taste
PRINT (DRUCKEN) drücken.
56
Bedienung
ON/ OFF
CONTR
EE
THRU
BRIGHT
COPY PRINT
PAPER EMPTY
OPEN / CLOSE
STD SIDE
STD
NORMAL
SMALL
ZOOM 1 . 5x
ZOOM 2x
LARGE
Page 57

Auswählen der Druckrichtung
C
C
C
C
C
Sie können mit dem Wählschalter STD/SIDE als Druckrichtung vertikal oder
horizontal einstellen.
Um vertikal zu wählen, stellen Sie den Schalter auf STD.
Um horizontal zu wählen, stellen Sie den Schalter auf SIDE.
STD SIDE
ABC
Auswählen der Druckgröße
Sie können ein Bild klein oder groß
ausdrucken. Sie können auch die Bildmitte auf
das 1,5- oder 2fache vergrößern.
Position (Modus)
NORMAL
SMALL
STD SIDE
Vertikal (STD)
ABC
ABC ABC
SMALL
LARGE
Druckgröße
ABC
NORMAL
ZOOM 1 . 5x
ZOOM 2x
Horizontal (SIDE)
ABC
LARGE
ZOOM 1.5X
ZOOM 2X
B
AB
B
ABC
ABC
ABC
AB
B
Bedienung
57
Page 58

Drucken (Fortsetzung)
So drucken Sie im Modus SMALL (klein)
Drücken Sie zweimal die Taste PRINT (DRUCKEN). Wenn Sie einmal die Taste
PRINT drücken, ertönt ein Alarmsignal. Der Drucker beginnt zu drucken.
Abbrechen eines Druckvorgangs
Drücken Sie während eines Druck- oder Kopiervorgangs die Taste OPEN
(ÖFFNEN)/CLOSE (SCHLIESSEN). Der Drucker stoppt.
So stoppen Sie einen Druckvorgang und drucken ein anderes, auf
dem Videomonitor angezeigtes Bild aus
Der DIP-Schalter 1 (INTERRUPT) muß dazu auf ON stehen (S. 51).
Drücken Sie während eines Druck- oder Kopiervorgangs die Taste PRINT
(DRUCKEN). Der Drucker stoppt und beginnt, das Bild auszudrucken, das
angezeigt wurde, als Sie die Taste PRINT (DRUCKEN) drückten.
Kopieren des letzten Ausdrucks
Drücken Sie die Taste COPY (KOPIEREN). Der Drucker erzeugt eine Kopie des
letzten ausgedruckten Bildes. Das letzte Bild bleibt im Drucker gespeichert, bis Sie
die Taste PRINT (DRUCKEN) nochmals drücken oder das Gerät ausschalten.
Kopieren in einer anderen Größe
Sie können das letzte ausgegebene Bild in verschiedenen Größen kopieren.
Bevor Sie die Taste COPY (KOPIEREN) drücken, wählen Sie die Druckgröße wie
unter “Auswählen der Druckgröße” beschrieben.
Hinweise
• Wenn Sie die Taste COPY (KOPIEREN) unmittelbar nach dem Einschalten des
Geräts drücken, ertönt ein Alarmsignal, denn es ist noch nichts im
Druckerspeicher enthalten, das kopiert werden könnte.
• Wenn sich das Gerät im Modus SMALL befindet (S. 57) und Sie die Taste
COPY (KOPIEREN) drücken, nachdem Sie einmal die Taste PRINT
(DRUCKEN) gedrückt haben, ertönt ein Alarmsignal, und der Drucker kopiert
nicht.
So kopieren Sie dasselbe Bild mehrmals
Drücken Sie, während das erste Bild oder die erste Kopie erzeugt wird, die Taste
COPY (KOPIEREN) so oft wie nötig. Bis zu 11 Ausdrucke des gleichen Bildes
(einschließlich des ersten Ausdrucks) sind möglich. Bei jedem Tastendruck auf
COPY (KOPIEREN) ertönt ein kurzes Alarmsignal.
58
So brechen Sie einen begonnenen Kopiervorgang ab
Drücken Sie die Taste OPEN (ÖFFNEN)/CLOSE (SCHLIESSEN).
Bedienung
Page 59

Einstellen von Kontrast und Helligkeit
Sie können Kontrast und Helligkeit Ihrer Ausdrucke einstellen.
1 Stellen Sie den Wählschalter THRU (DURCH)/EE auf EE.
Sie können das Ergebnis der Einstellung auf dem Videomonitor überprüfen.
STD SIDE
STD
NORMAL
SMALL
LARGE
ON/ OFF
CONTR (KONTRAST)
ZOOM 1 . 5x
ZOOM 2x
CONTR
EE
THRU
BRIGHT
COPY PRINT
PAPER EMPTY
OPEN / CLOSE
THRU
EE
BRIGHT (HELLIGKEIT)
2 Stellen Sie die Helligkeit mit dem Regler BRIGHT (HELLIGKEIT) und den
Kontrast mit dem Regler CONTR (KONTRAST) ein, und überprüfen Sie
dabei das Bild auf dem Videomonitor.
Einstellen des Kontrasts
CONTR
Schwächer
Einstellen der Helligkeit
Stärker
BRIGHT
Dunkler
Heller
So können Sie das Videosignal von dem Videogerät, das an den
Drucker angeschlossen ist, direkt in den Videomonitor einspeisen
Stellen Sie den Wählschalter THRU (DURCH)/EE auf THRU (DURCH). Das
Videosignal wird nun direkt in den Videomonitor eingespeist, ohne im Drucker
verarbeitet zu werden.
Bedienung
59
Page 60

Weitere Informationen
Sicherheitsmaßnahmen
Sicherheit
• Überprüfen Sie vor Inbetriebnahme des Geräts die Betriebsspannung.
Betreiben Sie das Gerät nur an einer der unter “Technische Daten” angegebenen
Stromquellen.
• Wenn eine Flüssigkeit oder ein Fremdkörper in das Gerät gelangt, trennen Sie es
sofort von der Stromversorgung, und lassen Sie es von qualifiziertem
Fachpersonal überprüfen.
• Trennen Sie das Gerät von der Netzsteckdose, wenn Sie es längere Zeit nicht
benutzen wollen. Ziehen Sie dabei am Netzstecker, niemals am Kabel.
• Nehmen Sie das Gehäuse nicht ab. Lassen Sie solche Wartungsarbeiten
ausschließlich von qualifiziertem Fachpersonal durchführen.
• Berühren Sie die Schneideklinge des Druckers nicht.
• Achten Sie darauf, mit den Händen nicht in den Bereich von Papierfachdeckel
und Papierschneideklinge zu geraten, wenn sich der Papierfachdeckel schließt.
• Schließen Sie das Gerät an eine ordnungsgemäß geerdete Netzsteckdose an.
Bedienung
Transport
Aufstellung
Schalten Sie den Drucker nicht während eines Druckvorgangs aus. Dies könnte den
Thermokopf beschädigen.
Transportieren und bewegen Sie den Drucker nicht mit eingelegter Papierrolle.
Dies könnte zu Fehlfunktionen führen.
• Plazieren Sie den Drucker während des Betriebs auf einer waagrechten und
stabilen Oberfläche.
• Stellen Sie den Drucker nicht in der Nähe von Wärmequellen auf, zum Beispiel
nahe bei Heizkörpern oder Warmluftauslässen. Stellen Sie ihn nicht an Orten auf,
an denen er direktem Sonnenlicht, übermäßig viel Staub, hoher Luftfeuchtigkeit,
mechanischen Erschütterungen oder Vibrationen ausgesetzt ist.
• Sorgen Sie für ausreichende Luftzufuhr, damit sich das Gerät nicht überhitzt.
Stellen Sie es daher nicht auf Oberflächen wie Teppiche oder Decken oder in die
Nähe von Vorhängen oder Wandbehängen.
• Wenn der Drucker plötzlichen, starken Temperaturschwankungen ausgesetzt
wird, wenn er beispielsweise von einem kalten in einen warmen Raum gebracht
wird oder in einem Raum mit einem Heizkörper aufgestellt wird, der viel
Feuchtigkeit erzeugt, kann sich im Drucker Kondenswasser niederschlagen. In
einem solchen Fall arbeitet der Drucker in der Regel nicht korrekt. Wenn Sie ihn
dennoch längere Zeit benutzen, kann es zu Beschädigungen kommen. Hat sich im
Drucker Kondenswasser niedergeschlagen, schalten Sie ihn aus, und lassen Sie
ihn mindestens eine Stunde lang unbenutzt stehen.
Weitere Informationen
60
Page 61

Wartung und Pflege
Reinigen des Gehäuses
Verwenden Sie zum Reinigen des Geräts keine starken Lösungsmittel. Verdünner
oder Scheuermittel können die Oberfläche angreifen.
Reinigen des Thermokopfs
Sind die Ausdrucke verschmutzt oder erscheinen weiße Streifen darauf, reinigen
Sie den Thermokopf mit dem mitgelieferten Reinigungsblatt.
1 Schalten Sie den Drucker am Netzschalter ein.
2 Öffnen Sie mit der Taste OPEN (ÖFFNEN)/CLOSE (SCHLIESSEN) den
Papierfachdeckel.
Weitere Informationen
61
Page 62

Sicherheitsmaßnahmen (Fortsetzung)
3 Führen Sie das Reinigungsblatt mit der schwarzen Seite nach unten in den
Schlitz des Papierfachdeckels ein.
4 Drücken Sie die Taste OPEN (ÖFFNEN)/CLOSE (SCHLIESSEN), und
halten Sie sie gedrückt.
Der Papierfachdeckel schließt sich, und der Drucker beginnt mit der
Reinigung des Thermokopfs.
Wenn das Alarmsignal zu hören ist und der Drucker das Reinigungsblatt
ausgibt, lassen Sie die Taste OPEN (ÖFFNEN)/CLOSE (SCHLIESSEN) los.
In den Schlitz einführen
Reinigungsblatt (mitgeliefert)
m
Halten Sie die Taste gedrückt.
5 Nehmen Sie das Reinigungsblatt heraus.
Hinweise
• Drücken Sie nicht die Taste PRINT (DRUCKEN) oder COPY (KOPIEREN),
solange sich das Reinigungsblatt im Drucker befindet.
• Reinigen Sie den Thermokopf nur bei Bedarf. Zu häufiges Reinigen kann zu
Fehlfunktionen führen.
Beim Alarmsignal die
Taste loslassen
Weitere Informationen
62
Page 63

Hinweis zum Papiertyp
Papiertyp
• Verwenden Sie nur Papier der Serie UPP-110 von Sony. Anderes Papier kann zu
schlechten Druckergebnissen und Fehlfunktionen führen.
• Folgende Papiertypen sind erhältlich.
Lagern von Papier
Auflösung
TYPE I (Normal)
TYPE II (Hohe Auflösung)
TYPE IV (Sehr hohe Auflösung)
• Lagern Sie unbenutztes oder bedrucktes Papier an einem kühlen, dunklen Ort
(unter 30° C). Es empfiehlt sich, bedrucktes Papier in einer Polypropylen-Tasche
aufzubewahren.
• Bewahren Sie unbenutztes oder bedrucktes Papier nicht an einem sehr warmen
oder feuchten Ort auf.
• Lassen Sie unbenutztes oder bedrucktes Papier nicht längere Zeit in direktem
Sonnenlicht liegen, und setzen Sie es keinen anderen starken Lichtquellen aus.
• Halten Sie bedrucktes Papier von organischen Lösungsmitteln oder
Vinylchloriden fern. Kontakt mit Alkohol, Kunststoff oder Folien führt zum
Ausbleichen des Bildes.
• Wollen Sie einen Ausdruck auf ein Trägerpapier aufkleben, verwenden Sie dafür
Doppelklebeband, einen Kleber auf Wasserbasis oder nichtflüssigen Kleber.
• Legen Sie bedrucktes Papier nicht auf oder unter ein Diazo-Kopierpapier. Der
Ausdruck kann sich dadurch verfärben.
Papiertyp
UPP-110S
UPP-110HD
UPP-110HA
Weitere Informationen
63
Page 64

Technische Daten
Thermokopf
Dünnfilmthermokopf mit integriertem
Ansteuer-IC, 1024-Punkt-Ansteuerung
Gradation
256
Auflösung (Modus WIDE 1)
EIA: 970 x 490 Punkt
CCIR: 970 x 582 Punkt
Druckgröße (Modus NORM und WIDE 1)
Modus STD
EIA: 95 x 72 mm
CCIR: 95 x 71 mm
Modus SIDE
EIA: 127 x 96 mm
CCIR: 127 x 95 mm
Druckgeschwindigkeit (Modus STD und NORM)
ca. 3,9 Sekunden pro Bild bei einem
Bildseitenverhältnis von 4:3
Bildspeicher
768 KB x 6 Bit
Eingänge/Ausgänge
VIDEO IN (BNC)
EIA oder CCIR
BAS-Signale
1,0 Vp-p, 75 Ohm/hohe Impedanz
(automatische Erkennung von EIA/CCIR)
VIDEO OUT (BNC)
EIA oder CCIR
BAS-Signale
1,0 Vp-p, 75 Ohm, schaltbar:
THRU (DURCH) /EE (“DURCH” steht
für “Durchschleifen”)
REMOTE (Stereominibuchse)
3
2
1
1 GND
2 PRINT SIGNAL (TTL)
Eingang von LOW-Puls von über 100
Millisekunden startet Druckvorgang.
3 PRINT BUSY (TTL)
Schaltet beim Drucken auf HIGH.
Betriebsspannung und Leistungsaufnahme
UP-880: 120 V Wechselstrom, 50/60 Hz,
1,8 A
UP-890CE/890MD:
120 V Wechselstrom, 50/60 Hz, 1,5 A
220 bis 240 V Wechselstrom, 50/60 Hz,
0,8 A
Abmessungen
ca. 154 x 106 x 303 mm (B/H/T)
Gewicht
ca. 3,5 kg (nur Gerät)
Schutz vor elektrischem Schlag
Klasse I
Schutz vor dem Eindringen von Wasser
Normal
Grad der Gerätesicherheit bei Vorhandensein von
brennbarem anästhetischem Gemisch oder
Sauerstoff
Nicht geeignet zum Einsatz bei
Vorhandensein von brennbarem
anästhetischem Gemisch oder Sauerstoff
Betriebsmodus
Kontinuierlich
Mitgeliefertes Zubehör
Papierrolle (UPP-110HA) (1)
Verbindungskabel (BNC - BNC) (1)
Netzkabel (1)
Reinigungsblatt für den Thermokopf (1)
Fernbedienung RM-91 (1) (wird nur mit UP-
890MD geliefert)
Änderungen, die dem technischen Fortschritt
dienen, bleiben vorbehalten.
Weitere Informationen
64
Page 65

Störungsbehebung
Symptom
Weiße Flecken erscheinen
auf den ersten Ausdrucken.
Beim Drücken der Taste
PRINT startet der
Druckvorgang nicht.
Schwarze Ränder oder
unbedruckte Partien
erscheinen auf den
Ausdrucken.
Papierstau
Die Ausdrucke sind
verschmutzt.
Der Drucker stoppt beim
Drucken großer schwarzer
Partien den Druckvorgang.
Weiße Linien oder kleine
Buchstaben auf dem
Bildschirm werden nicht
scharf gedruckt.
Kleine Quadrate erscheinen
auf dem gesamten
Bildschirm.
Der Ausdruck ist zu hell
oder zu dunkel.
Der Ausdruck wird verzerrt.
Ursache/Abhilfemaßnahme
Bei einer neu eingelegten Papierrolle können wegen
Staubs auf dem Papier die ersten Ausdrucke weiße
Flecken aufweisen.
m
Transportieren Sie das Papier durch Drücken der
Taste OPEN/CLOSE weiter, bis der saubere
Papierbereich beginnt.
• Es wird kein Papier eingezogen.
m
Hängt das Papier durch?
m
Ist das Gerät eingeschaltet?
m
Wurden alle Anschlüsse korrekt vorgenommen? (S.
49)
m
Haben Sie die Taste PRINT im Modus SMALL
zweimal gedrückt?
• Wenn ein Alarmsignal ertönt:
m
Ist der Thermokopf überhitzt?
m
Wird das Videosignal des Bildes eingespeist?
m
Ist das Papier korrekt eingelegt?
• Papier wird eingezogen, aber der Druckvorgang
startet nicht.
m
Ist das Papier mit der hitzeempfindlichen Seite nach
oben eingelegt?
Dies ist je nach dem Videosignal, das in den Drucker
eingespeist wird, möglich.
m
Ändern Sie die Einstellung der Schalter SCAN, d. h.
der DIP-Schalter 8 und 9 (S. 53).
• Öffnen Sie den Papierfachdeckel mit der Taste OPEN/
CLOSE, und ziehen Sie dann das gestaute Papier
langsam heraus.
• Im Gerät hat sich Feuchtigkeit niedergeschlagen.
m
Wenn Sie das Gerät plötzlich von einem kalten in
einen warmen Raum transportieren, schlägt sich oft
Feuchtigkeit nieder. In diesem Fall nehmen Sie das
Papier heraus, schalten das Gerät aus und lassen
es ein bis zwei Stunden unbenutzt stehen.
Der Thermokopf ist verschmutzt.
m
Reinigen Sie ihn mit dem mitgelieferten
Reinigungsblatt (S. 61).
Dies ist möglich, wenn der Drucker 15 oder mehr sehr
dunkle Bilder hintereinander ausgeben muß. In diesem
Falle ertönt auch das Alarmsignal. Der Drucker ist mit
einem Schutzschaltkreis ausgestattet, der bei einer
Überhitzung des Thermokopfs einen Abbruch des
Druckvorgangs auslöst. Warten Sie eine Weile, bevor
Sie weiterdrucken.
Ist der Schalter INPUT (DIP-Schalter !¡) auf B & W
gesetzt, wenn es sich bei dem Eingangssignal um ein
Schwarzweißsignal handelt? (S. 53)
Ist der Schalter INPUT (DIP-Schalter !¡) auf COLOR
gesetzt, wenn es sich bei dem Eingangssignal um ein
Farbsignal handelt (S. 53)?
• Ist der Schalter 75 (DIP-Schalter !™) korrekt
eingestellt (S. 53)?
• Ist der Schalter GAMMA korrekt eingestellt (S. 50)?
Der Schalter ASPECT (DIP-Schalter 3) steht auf 1:1.
m
Stellen Sie ihn auf 4:3 (S. 52).
Weitere Informationen
65
Page 66

Lage und Funktion der Teile und
Bedienelemente
Nähere Erläuterungen finden Sie auf den in Klammern angegebenen Seiten.
Vorderseite
1
Netzschalter und Netzanzeige
Zum Ein- und Ausschalten des Geräts. Die
Netzanzeige leuchtet, wenn das Gerät
eingeschaltet ist.
2
Wählschalter für die Druckgröße (57)
Zum Einstellen der Druckgröße.
3
Wählschalter STD/SIDE (57)
Zum Einstellen der Druckrichtung.
4
Regler CONTR (KONTRAST) (59)
Zum Einstellen des Kontrasts der Ausdrucke.
5
Wählschalter THRU (DURCH)/EE (59)
Zum Auswählen des Videosignals, das über
den Anschluß VIDEO OUT ausgegeben wird.
THRU: Eingespeiste Signale werden direkt
an den Videomonitor weitergeleitet.
EE: Eingespeiste Signale werden an den
Videomonitor weitergeleitet, nachdem sie von
den Druckerschaltkreisen verarbeitet wurden.
ON/ OFF
STD SIDE
STD
NORMAL
SMALL
ZOOM 1 . 5x
ZOOM 2x
LARGE
EE
THRU
BRIGHT
CONTR
6
PAPER EMPTY
COPY PRINT
OPEN / CLOSE
Regler BRIGHT (HELLIGKEIT) (59)
Zum Einstellen der Helligkeit der Ausdrucke.
7
Taste COPY (KOPIEREN) (58)
Zum Ausgeben einer Kopie des zuvor
erstellten Ausdrucks.
8
Taste PRINT (DRUCKEN) (56)
Zum Ausdrucken des Bildes, das gerade auf
dem Videomonitor angezeigt wird. Das beim
Drücken der Taste PRINT angezeigte Bild
wird im Druckerspeicher gespeichert.
9
Anzeige PAPER EMPTY (PAPIER
LEER)
Leuchtet auf, wenn das Papier zu Ende ist.
!º
Taste OPEN/CLOSE (ÖFFNEN/
SCHLIESSEN) (54, 58)
Zum Öffnen und Schließen der Klappe und
zum Abbrechen eines bereits begonnenen
Druckvorgangs.
Weitere Informationen
66
!¡
Papiervorschub und
Schneideeinrichtung
Zum Schneiden des Druckpapiers.
Page 67

Rückseite
1
Anschluß REMOTE (49)
Zum Anschließen der Fernbedienung RM-91.
Damit können Sie den Druckvorgang
fernsteuern.
Die Fernbedienung RM-91 wird nur mit dem
UP-890MD geliefert.
2
Wählschalter GAMMA (50)
Zum Ändern des Druckmodus, so daß
Druckpapier mit hoher Auflösung bedruckt
werden kann. Der Wählschalter wirkt, wenn
der Wählschalter PAPER TYPE auf II oder
IV steht.
3
Wählschalter PAPER TYPE (50)
Zum Auswählen des Papiertyps.
REMOTE GAMMA TYPE
PAPER
IIIIII IIIIV
DIP SW
OFF
ON
IN OUT
VIDEO
AC IN
5
BNC-Eingangsanschluß VIDEO IN (49)
Zum Anschluß an den
Videoausgangsanschluß des Videogeräts.
6
BNC-Ausgangsanschluß VIDEO OUT
(49)
Zum Anschluß an den
Videoeingangsanschluß des Videomonitors.
Welcher Signaltyp ausgegeben wird, hängt
von der Einstellung des Wählschalters THRU/
EE ab.
7
Netzanschluß AC IN (49)
Zum Anschluß des Druckers an eine
Netzsteckdose über das mitgelieferte
Netzkabel.
4
DIP-Schalter DIP SW (51–53)
Zum Einstellen der Druckmodi und
Druckfunktionen.
8
Gleichpotentialanschluß
Nur am UP-890CE/890MD.
Weitere Informationen
67
Page 68

Español
ADVERTENCIA
Para evitar incendios o el riesgo de electrocución, no
exponga la unidad a la lluvia ni a la humedad.
Para evitar descargas eléctricas, no abra la unidad. En
caso de avería, solicite los servicios de personal
cualificado.
Para el UP-890CE/890MD
Símbolos de los productos
Este símbolo indica terminal equipotencial
que pone varias partes de un sistema al
mismo potencial.
Normas/avisos de seguridad importantes para
utilización en ambientes médicos
1. Todos los equipos conectados a esta unidad deberán
estar certificados de acuerdo con la Norma 601-1,
950, o 65 de la IEC, u otras Normas de la IEC/ISO
aplicables a los equipos.
2. Cuando vaya a utilizar esta unidad junto con otros
equipos en el área del paciente*, los equipos deberán
alimentarse mediante un transformador aislador o
conectados a través de un terminal de puesta a tierra
protector adicional al sistema de puesta a tierra, a
menos que estén certificados de acuerdo con la
Norma 601-1 de la IEC.
* Área del paciente
R1,5m
3. La fuga de corriente podría aumentar al realizar la
conexión a otro equipo.
4. Este equipo genera, utiliza y puede radiar energía de
frecuencia. Si no se instala y se utiliza de acuerdo
con el manual de instrucciones, puede producir
interferencias en otros equipos. Si esta unidad causa
interferencias (que pueden determinarse
desenchufando el cable de alimentación de la
unidad), intente las siguientes medidas: Cambie la
unidad de lugar con respecto al equipo susceptible.
Enchufe esta unidad y el equipo susceptible en
circuitos derivados diferentes. Consulte con su
proveedor.
68
Page 69

Índice
Introducción
Preparativos
Operación
Otros
Descripción general 70
Conexiones 71
Antes de imprimir 72
Ajuste del tipo de papel 72
Ajuste de los interruptores DIP 73
Inserción del papel de impresión 76
Impresión 78
Impresión de una imagen 78
Selección del sentido de impresión 79
Selección del tamaño de la impresión 79
Ajuste del contraste y el brillo 81
Precauciones 82
Mantenimiento 83
Acerca del tipo de papel 85
Especificaciones 86
Solución de problemas 87
Ubicación y función de las partes 88
Panel frontal 88
Panel posterior 89
69
Page 70

Introducción
Descripción general
El UP-880/890CE/890MD es un videoimpresor gráfico en blanco y negro que
puede emplearse para imprimir las imágenes visualizadas en un videomonitor.
Impresión clara y consistente
• Impresión de gran definición, 10,2 puntos/mm, empleando una cabeza térmica
con un circuito integrado excitador de alta velocidad
• 256 gradaciones entre blanco y negro
Impresión rápida
• Usted podrá realizar una impresión en unos 3,9 segundos en los modos STD y
NORM.
• Usted podrá realizar continuamente un máximo de 11 copias de la misma
imagen.
Dos sentidos de impresión y cinco tamaños de impresión
seleccionables
• El selector del sentido de impresión en el panel frontal permite imprimir en
sentido vertical y horizontal.
• El control del tamaño de la impresión en el panel frontal permite seleccionar
cinco tamaños de impresión.
Interruptores DIP para optimizar el videoimpresor
• Usted podrá realizar la impresión comenzando desde la parte inferior o la
superior de la imagen ajustando el interruptor DIRECTION DIP.
• Usted podrá ajustar el formato a 4:3 o 1:1 con el interruptor ASPECT DIP.
• Usted podrá ajustar el área que desea imprimir con el interruptor SCAN DIP.
• Usted podrá economizar papel ajustando el interruptor POSTFEED DIP(función
de ahorro de papel).
Discriminación automática de la señal de vídeo
El tipo de señal de vídeo de entrada, en blanco y negro (EIA o CCIR) o en color
(NTSC o PAL), se discrimina automáticamente e imprime con la misma duración y
tamaño.
Zumbador de alarma
El zumbador de alarma evita que usted realice cualquier operación errónea.
Carga fácil y rápida del papel de impresión
Usted podrá cargar el rollo de papel simplemente abriendo la tapa del rollo de
papel con la tecla OPEN/CLOSE y colocando el rollo.
70
Introducción
Page 71

Preparativos
Conexiones
Notas
• Antes de realizar las conexiones, desconecte la alimentación de todos los
dispositivos empleados.
• Conecte el cable de alimentación de CA en último lugar.
Telemando
RM-91*
a REMOTE
Equipo de vídeo
al conector de
salida de vídeo
Cable conector coaxial
suministrado
(BNC ˜ BNC)
REMOTE GAMMA TYPE
PAPER
IIIIII IIIIV
a VIDEO IN
DIP SW
OFF
ON
Videomonitor en color/
blanco y negro
Cable conector (no
suministrado)
al conector de
entrada de vídeo
a VIDEO OUT
IN OUT
VIDEO
AC IN
a AC IN
a una toma de la red
Cable de alimentación de
CA suministrado
* El telemando RM-91 se suministra sólo con el UP-890MD.
Preparativos
71
Page 72

Antes de imprimir
Ajuste del tipo de papel
Ajuste el selector PAPER TYPE al tipo de papel que vaya a utilizar.
Si utiliza papel que no sea Sony puede disminuir el rendimiento del videoimpresor
y resultar en una impresión de mala calidad.
Tipo de papel
UPP-110S
UPP-110HD
UPP-110HA
REMOTE GAMMA TYPE
IIIIII IIIIV
Posición del selector PAPER TYPE
I (Normal)
II (Alta densidad)
IV (Incrementado)
PAPER
DIP SW
OFF
ON
Cuando utilice el UPP-110HA o el UPP-110HD
IN OUT
VIDEO
AC IN
GAMMA TYPE
IIIIII IIIIV
PAPER
72
Cuando ponga el selector PAPER TYPE en II o IV, ajuste la densidad de gradación
con el selector GAMMA.
I: Gradación suave
II: Gradación normal
IV: Gradación intensa
Preparativos
Page 73

Ajuste de los interruptores DIP
Ajuste los interruptores DIP de acuerdo con el modo de impresión requerido.
Antes de ajustar los interruptores DIP, desconecte la alimentación. Cambie los
ajustes empleando una herramienta puntiaguda pequeña, como un destornillador
pequeño. Los ajustes de fábrica son los siguientes.
REMOTE GAMMA TYPE
PAPER
IIIIII IIIIV
DIP SW
OFF
ON
IN OUT
VIDEO
AC IN
DIP SW
OFF
ON
DIP SW FUNCTION TABLE
NO
FUNCTION
1
INTERRUPT
2
POSTFEED
3
ASPECT
4
MEMORY
5
IMAGE
6
MIRROR
7
DIRECTION
8
SCAN
9
10
RESERVED
11
INPUT
12
75
SW-ON
ON
ON
4:3
FRAME
POSI
NORM
NORM
WIDE 1
B&W
ON
SW-OFF
OFF
OFF
1:1
FIELD
NEGA
REV
REV
WIDE 2
NORM
COLOR
OFF
1
Interruptor de activación/desactivación de interrupción
(INTERRUPT ON/OFF)
Para interrumpir la impresión que se está llevando a cabo e imprimir otra
imagen cuando presione la tecla PRINT durante la impresión, ponga el
interruptor en ON.
Para hacer caso omiso de la presión de la tecla PRINT durante la impresión y
continuar la impresión que se está llevando a cabo, póngalo en OFF.
Si presiona la tecla PRINT durante la impresión en el modo OFF, sonará el
zumbador de alarma.
2
Interruptor de activación/desactivación de posavance (POSTFEED
ON/OFF)
Póngalo en ON para que avance papel extra después de haberse impreso la
imagen.
Para economizar papel haciendo que avance un poco solamente después de
haberse impreso la imagen, ponga el interruptor en OFF. Usted podrá realizar
más impresiones por rollo de papel de impresión con este interruptor en OFF.
Sin embargo, tendrá que extraer y cortar manualmente el papel.
Preparativos
73
Page 74

Antes de imprimir (continuación)
275
87654321
475
50
250
9
4
5
5
7
5
4
3
3
2
3
2
30
10
7
0
3
275
87654321
475
50
250
9
4
5
5
7
5
4
3
3
2
3
2
30
10
7
0
3
275
87654321
475
50
250
9
4
5
5
7
5
4
3
3
2
3
2
30
10
7
0
3
275
87654321
475
50
250
9
4
5
5
7
5
4
3
3
2
3
2
30
10
7
0
3
3
Interruptor de formato 4:3/1:1 (ASPECT 4:3/1:1)
Normalmente deje este interruptor en 4:3. Cuando el formato de la señal de
vídeo sea 1:1, póngalo en 1:1.
La impresión será más larga que en 4:3.
1
2
3
3
5
2
3
30
4
3
3
4
1 357 7 531
4
3
3
4
30
3
2
5
3
3
2
1
4 : 3
5
2
3
1
3
2
3
30
4
3
3
4
4
3
3
4
30
3
2
5
3
3
2
1
1
2
3
3
5
2
3
30
4
3
3
4
1 357 7 531
4
3
3
4
30
3
2
5
3
3
2
1
5
3
1
4
3
3
4
4
3
3
4
5
3
1
1 : 1
4
Interruptor de cuadro/campo de la memoria (MEMORY FRAME/
FIELD)
Normalmente deje este interruptor en FRAME (ON). Para imprimir imágenes
de movimiento rápido (como una pelota lanzada), la impresión puede resultar
borrosa. Cuando suceda esto, ponga el interruptor en FIELD. La defición de
la impresión empeorará, pero será menos borrosa.
5
Interruptor de imagen positiva/negativa (IMAGE POSI/NEGA)
Normalmente deje este interruptor en POSI (ON). Para realizar impresiones
negativas, póngalo en NEGA (OFF).
2
3
2
3
30
30
3
2
3
2
Nota
Si ajusta este selector THRU/EE en el lado EE, la unidad imprimirá imágenes
positivas independientemente del ajuste del interruptor IMAGE POSI/NEGA.
6
Interruptor de espejo normal/invertido (MIRROR NORM/REV)
Normalmente deje este interruptor en NORM (ON). Para imprimir con los
lados derecho e izquierdo invertidos, póngalo en REV (OFF).
7
Interruptor de sentido normal/opuesto (DIRECTION NORM/
REV)
Para seleccionar impresión desde la parte superior o la inferior de la pantalla.
Normalmente deje este interruptor en NORM (ON). La impresión se realizará
desde la parte inferior de la pantalla. Para iniciar la impresión desde la parte
superior de la pantalla, ponga este interruptor en REV (OFF).
1
2
3
3
5
2
3
30
4
3
3
4
1 357 7 531
4
3
3
4
30
3
2
74
Preparativos
5
3
3
2
1
5
2
3
1
3
2
3
30
4
3
3
4
4
3
3
4
30
3
2
5
3
3
2
1
1
2
3
3
5
2
3
30
4
3
3
4
4
3
3
4
30
3
2
3
1
3
2
5
1
2
3
3
5
2
3
30
4
3
3
4
1 357 7 531
4
3
3
4
30
3
2
5
3
3
2
1
REVNORM
Page 75

89
275
87654321
475
50
250
9
4
5
5
7
5
4
3
3
2
3
2
30
10
7
0
3
275
87654321
475
50
250
9
4
5
5
7
5
4
3
3
2
3
2
30
10
7
0
3
275
87654321
475
50
250
9
4
5
5
7
5
4
3
3
2
3
2
30
10
7
0
3
Interruptor de exploración normal/amplia 1/amplia 2 (SCAN
NORM/WIDE 1/WIDE 2)
Establece el área de impresión. El área de impresión puede ampliarse en el
orden de NORM, WIDE 1 y WIDE 2.
Para imprimir solamente la imagen visualizada en el tamaño de pantalla
estándar del videomonitor, ponga el interruptor SCAN 9 en NORM (OFF).
Para imprimir cuando la exploración de la señal sobrepase los bordes de la
pantalla del videomonitor estándar, ponga el interruptor SCAN 9 en WIDE
1 (ON) o el SCAN 8 en WIDE 2 (OFF). Cuando haya puesto el interruptor
SCAN 8 en la posición WIDE 2, se seleccionará WIDE 2
independientemente de la posición del interruptor SCAN 9.
1
2
3
3
5
2
3
30
4
3
3
4
1 357 7 531
4
3
3
4
30
3
2
5
3
3
2
1
5
2
3
1
3
2
3
30
4
3
3
4
4
3
3
4
30
3
2
5
3
3
2
1
1
2
3
3
5
2
3
30
4
3
3
4
1 357 7 531
4
3
3
4
30
3
2
5
3
3
2
1
5
2
3
1
3
2
3
30
4
3
3
4
4
3
3
4
30
3
2
5
3
3
2
1
1
2
3
3
5
2
3
30
4
3
3
4
1 357 7 531
4
3
3
4
30
3
2
5
3
3
2
1
NORM
WIDE 2WIDE 1
!º
Interruptor de reservado (RESERVED)
Deje este interruptor en ON.
!¡
Interruptor de la señal de entrada de blanco y negro/color (INPUT
B&W/COLOR)
Ponga este interruptor en B & W (ON) cuando la señal de entrada que desee
imprimir sea de blanco y negro. Póngalo en COLOR (OFF) cuando la señal
sea de color.
!™
Interruptor de activación/desactivación de 75 ohmios (75 ON/
OFF)
Ponga este interruptor en OFF cuando conecte un videomonitor u otro equipo
de vídeo al conector VIDEO OUT.
Póngalo en ON cuando no conecte nada al conecetor VIDEO OUT.
Cuando desee conectar dos videoimpresores a un equipo de vídeo, ponga el
interruptor 75 de uno de los videoimpresores en ON, y el del otro en OFF.
5
2
3
1
3
2
3
30
4
3
3
4
4
3
3
4
30
3
2
5
3
3
2
1
Preparativos
75
Page 76

Inserción del papel de impresión
Notas
• No doble el papel ni toque la superficie de impresión. El polvo en esta superficie
resultará en una impresión de mala calidad.
• Después de insertar el papel, ténselo tirando de él hacia afuera y corte los
primeros 15 a 20 cm.
• Utilice solamente papel de la serie UPP-110 (pág. 85).
• Ajuste el selector PAPER TYPE de acuerdo con el tipo de papel (pág. 72).
Inserción
1 Presione el interruptor ON/OFF para conectar la alimentación del
videoimpresor.
2 Presione la tecla OPEN/CLOSE para abrir la tapa del rollo de papel.
3 Coloque el rollo de papel en el videoimpresor.
76
Coloque el papel con la cara termosensible (cara de
impresión) hacia arriba.
Preparativos
Page 77

4 Tire hacia afuera del papel unos 15 a 20 cm para tensarlo.
5 Presione la tecla OPEN/CLOSE para cerrar la tapa del rollo de papel.
Usted también podrá cerrar la tapa del rollo de papel empujándola
simplemente.
PRECAUCION
Mantenga alejados los dedos de la junta de la tapa del rollo de papel y de la
cuchilla de corte al cerrar la tapa del rollo de papel.
Preparativos
77
Page 78

Operación
Impresión
Antes de imprimir
• ¿Están realizadas correctamente las conexiones? (pág.71)
• ¿Está correctamente insertado el rollo de papel de impresión? (pág.76).
• ¿Está correctamente ajustado el tipo de papel? (pág.72).
• ¿Están correctamente ajustados los interruptores DIP? (pág.73–75)
• ¿Está entrando la fuente de impresión?
Impresión de una imagen
1 Presione el interruptor ON/OFF para conectar la alimentación del
videoimpresor.
Se encenderá el indicador de alimentación.
CONTR
EE
THRU
BRIGHT
COPY PRINT
PAPER EMPTY
OPEN / CLOSE
Indicador PAPER EMPTY
ON/ OFF
STD SIDE
STD
NORMAL
SMALL
ZOOM 1 . 5x
ZOOM 2x
LARGE
2 El indicador PAPER EMPTY no deberá estar encendido.
Si lo está, inserte un rollo de papel.
3 Seleccione el sentido de impresión y el tamaño.
Consulte “Selección del sentido de impresión” y “Selección del tamaño de la
impresión” de la página siguiente.
4 Cuando en la pantalla del vidoemonitor aparezca la imagen que desee
imprimir, presione la tecla PRINT.
El videoimpresor imprimirá la imagen visualizada en el momento de
presionar la tecla PRINT.
78
Operación
ON/ OFF
CONTR
EE
THRU
BRIGHT
COPY PRINT
PAPER EMPTY
OPEN / CLOSE
STD SIDE
STD
NORMAL
SMALL
ZOOM 1 . 5x
ZOOM 2x
LARGE
Page 79

Selección del sentido de impresión
C
C
C
C
C
Usted podrá seleccionar el sentido de impresión vertical u horizontal con el selector
STD/SIDE.
Para imprimir en sentido vertical, póngalo en STD.
Para imprimir en sentido horizontal, póngalo en SIDE.
STD SIDE
ABC
STD SIDE
Selección del tamaño de la impresión
La impresión podrá realizarse en tamaño pequeño
o grande. Además podrá ampliarse el centro de la
imagen 1,5 o 2 veces el tamaño original.
Posición del control
(modo)
NORMAL
Vertical (STD)
Tamaño de la impresión
ABC
SMALL (pequeño)
ABC ABC
NORMAL
SMALL
LARGE
Horizontal (SIDE)
ABC
ZOOM 1 . 5x
ZOOM 2x
ABC
LARGE (grande)
ZOOM 1.5X
ZOOM 2X
B
AB
B
ABC
ABC
ABC
AB
B
Operación
79
Page 80

Impresión (continuación)
Para imprimir en el modo SMALL
Presione dos veces la tecla PRINT. Si presiona una vez la tacla PRINT, sonará un
zumbador. El videoimpresor comenzará a imprimir al presionar dos veces la tecla
PRINT.
Parada de la impresión que se está llevando a cabo
Presione la tecla OPEN/CLOSE durante la impresión o la copia. El videoimpresor
dejará de funcionar.
Parada de la impresión para imprimir otra imagen mostrada en la
pantalla
Para ello, el interruptor DIP 1 (INTERRUPT) deberá estar en ON (pág.73).
Presione la tecla PRINT durante la impresión o la copia. El videoimpresor cesará
la impresión y comenzará a imprimir la imagen visualizada en el momento de
presionar la tecla PRINT.
Copia de la imagen previamente impresa
Presione la tecla COPY. El videoimpresor realizará una copia de la imagen
previamente impresa. La última impresión se conservará en la memoria del
videoimpresor hasta que vuelva a presionar la tecla PRINT o hasta que desconecte
la alimentación.
Copia en tamaños diferentes
Usted podrá realizar una copia de la imagen previamente impresa a tamaños
diferentes.
Antes de presionar la tecla COPY, seleccione el tamaño de la impresión como se
ha descrito en “Selección del tamaño de la impresión”.
Notas
• Si presiona la tecla COPY inmediatamente después de haber conectado la
alimentación, sonará un zumbador de alarma porque no estará almacenado nada
en la memoria.
• En el modo SMALL (pág.79), si presiona la tecla COPY después de presionar
sólo una vez la tecla PRINT, sonará un zumbador de alarma y el videoimpresor
no realizará la copia.
Copia múltiple de la misma impresión
Presione la tecla COPY cuantas veces sea necesario (11 copias como máximo
incluyendo la primera impresión) durante la impresión o la copia de la primera
impresión. Cada vez que presione la tecla COPY, el zumbador sonará brevemente.
80
Parada de la copia que se está llevando a cabo
Presione la tecla OPEN/CLOSE.
Operación
Page 81

Ajuste del contraste y el brillo
Usted podrá ajustar el contraste y el brillo de impresión.
1 Ponga el selector THRU/EE en EE.
Usted podrá comprobar la imagen ajustada en el videomonitor.
ON/ OFF
STD SIDE
STD
NORMAL
SMALL
LARGE
CONTR
ZOOM 1 . 5x
ZOOM 2x
CONTR
EE
THRU
BRIGHT
COPY PRINT
PAPER EMPTY
OPEN / CLOSE
THRU
EE
BRIGHT
2 Ajuste el brillo con el control BRIGHT y el contraste con el control CONTR
observando la imagen en el videomonitor.
Ajuste del contraste
CONTR
Más débil
Ajuste del brillo
Más intenso
BRIGHT
Más oscuro
Más brillante
Para introducir directamente en el videomonitor la señal de vídeo del
equipo de vídeo, que está conectado al videoimpresor
Ponga el selector THRU/EE en THRU. La señal de vídeo se introducirá
directamente en el videomonitor sin ser procesada en el circuito del videoimpresor.
Operación
81
Page 82

Otros
Precauciones
Seguridad
• Antes de utilizar el videoimpresor, verifique la tensión de operación.
Alimente la unidad solamente con la fuente de alimentación indicada en
“Especificaciones”.
• Si dentro de la unidad cae algún objeto sólido o un líquido, detenga
inmediatamente la operación. Desenchufe la unidad y haga que sea revisada por
personal cualificado.
• Cuando no vaya a emplear la undiad durante mucho tiempo, desenchúfela de la
red. Desconecte el cable de alimentación tirando del enchufe. No tire nunca del
propio cable.
• No desarme la unidad. En caso de avería, solicite los servicios de personal
cualificado solamente.
• No toque la cuchilla de corte del videoimpresor.
• Mantenga alejados los dedos de la junta de la tapa del rollo de papel y de la
cuchilla de corte al cerrar la tapa del rollo de papel.
• Conecte el enchufe de alimentación del videoimpresor a una toma de la red que
posea terminal de puesta a tierra. La puesta a tierra de seguridad deberá
realizarse adecuadamente.
Operación
Transporte
Instalación
No desconecte la alimentación mientras la unidad esté imprimiendo. Si lo hiciese,
la cabeza térmica podría dañarse.
No transporte ni mueva el videoimpresor mientras el rollo de papel esté colocado.
Si lo hiciese, podría causar problemas.
• Coloque el videoimpresor sobre una superficie estable y nivelada mientras esté en
funcionamiento.
• No instale la unidad cerca de fuentes térmicas. Evite lugares cercanos a
radiadores o conductos de aire cálido, o sometidos a la luz solar directa, polvo
excesivo, humedad, golpes o vibraciones.
• Ventile adecuadamente la unidad para evitar su recalentamiento. No coloque la
unidad sobre superficies tales como alfombras, mantas, etc., ni cerca de
materiales tales como cortinas o tapices.
• Si expone la impresora a cambios de temperatura bruscos y repentinos, como al
desplazarla de una sala fría a otra cálida o si la deja en una sala con un calefactor
que tienda a producir un alto nivel de humedad, es posible que se condense
humedad en el interior de dicha impresora. En tales casos, es probable que ésta
no funcione correctamente y que desarrolle incluso fallos de funcionamiento si
sigue utilizándola en tales circunstancias. Si se condensa humedad, desactive la
alimentación y no utilice la impresora durante al menos una hora.
82
Otros
Page 83

Mantenimiento
Limpieza del exterior
Para limpiar el videoimpresor, no emplee disolventes fuertes. Un diluidor de
pintura o los limpiadores abrasivos dañarán la caja.
Limpieza de la cabeza térmica
Cuando la impresión resulte sucia o aparezcan bandas blancas en la impresión,
emplee la hoja limpiadora que se suministra para limpiar la cabeza térmica.
1 Presione el interruptor ON/OFF para conectar la alimentación del
videoimpresor.
2 Presione la tecla OPEN/CLOSE para abrir la tapa del rollo de papel.
Otros
83
Page 84

Precauciones (continuación)
3 Inserte la hoja limpiadora de la cabeza térmica, con la superficie negra hacia
abajo, en la ranura de la tapa del rollo de papel.
4 Mantenga presionada la tecla OPEN/CLOSE.
La tapa del rollo de papel se cerrará y el videoimpresor comenzará a limpiar
la cabeza térmica.
Cuando suene el zumbador y el videoimpresor comience a expulsar la hoja
limpiadora, suelte la tecla OPEN/CLOSE.
Inserte en la ranura.
Hoja limpiadora (suministrada)
m
Mantenga presionada la tecla.
5 Extraiga la hoja limpiadora.
Notas
• No presione nunca la tecla PRINT ni COPY mientras la hoja limpiadora esté
insertada en el videoimpresor.
• Limpie la cabeza térmica solamente cuando sea necesario. Si la limpiase con
demasiada frecuencia, podría provocar el mal funcionamiento del videoimpresor.
Al sonar el zumbador,
suelte la tecla.
84
Otros
Page 85

Acerca del tipo de papel
Tipo de papel
• Utilice solamente papel de la serie UPP-110 Sony. Si utiliza otro papel puede
disminuir el rendimiento del videoimpresor y resultar en una impresión de mala
calidad.
• Se encuentran disponibles los siguientes tipos de papel.
Densidad de la impresión
TYPE I (Normal)
TYPE II (Alta densidad)
TYPE IV (Incrementado)
Almacenamiento del papel
• Guarde el papel no utilizado o impreso en un lugar fresco y oscuro (menos de
30°C). Recomendamos guardar el papel impreso en una bolsa de polipropileno.
• No guarde el papel no utilizado o impreso en lugares cálidos ni húmedos.
• No deje el papel no utilizado o impreso expuesto a la luz solar directa ni a otro
tipo de iluminación intensa durante mucho tiempo.
• No permita que ningún disolvente orgánico volátil ni cloruro de vinilo entre en
contacto con el papel impreso. El alcohol y las cintas o películas plásticas harán
que la impresión se desvanezca.
• Para pegar el papel impreso sobre otro papel, emplee cinta plástica por ambas
caras, o pegamento basado en agua o sólido.
• No apile el papel impreso sobre ni debajo de hojas de copia con diazoación
recién reveladas. De lo contrario, la impresión puede descolorarse en negro.
Tipo de papel
UPP-110S
UPP-110HD
UPP-110HA
Otros
85
Page 86

Especificaciones
Cabeza térmica
Cabeza térmica de película fina (con IC
excitador incorporado), excitación de 1024
puntos
Gradación
256
Definición (en el modo WIDE 1)
EIA: 970 x 490 puntos
CCIR: 970 x 582 puntos
Tamaño de la impresión (en los modos NORM y
WIDE 1)
Modo STD
EIA: 95 x 72 mm
CCIR: 95 x 71 mm
Modo SIDE
EIA: 127 x 96 mm
CCIR: 127 x 95 mm
Velocidad de impresión (en los modos STD y
NORM)
Aprox. 3,9 segundos/pantalla (formato 4:3)
Memoria de imagen
768 K x 6 bitios
Conectores de entrada/salida
VIDEO IN (BNC)
EIA o CCIR
Señales de vídeo compuestas
1,0 Vp-p, 75 ohmios/alta impedancia
(EIA/CCIR discriminada
automáticamente)
VIDEO OUT (BNC)
EIA o CCIR
Señales de vídeo compuestas
1,0 Vp-p, 75 ohmios, paso directo/EE
conmutable
REMOTE (minitoma estéreo)
Alimentación y consumo
UP-880: 120 V CA, 50/60 Hz, 1,8 A
UP-890CE/890MD:
120 V CA, 50/60 Hz, 1,5 A
220 a 240 V CA, 50/60 Hz, 0,8 A
Dimensiones
Aprox. 154 x 106 x 303 mm (an/al/prf)
Masa
Aprox. 3,5 kg, unidad principal solamente
Protección contra descargas eléctricas
Clase I
Protección contra entrada de agua perjudicial
Ordinaria
Grado de seguridad en presencia de oxígeno o
anestesias inflamables
No adecuado para utilizarse en presencia de
oxígeno o anestesias inflamables
Modo de funcionamiento
Continuo
Accesorios suministrados
Rollo de papel de impresión (UPP-110HA)
(1)
Cable conector (BNC - BNC) (1)
Cable de alimentación de CA (1)
Hoja limpiadora de la cabeza térmica (1)
Telemando RM-91 (1) suministrado sólo
con el UP-890MD
Diseño y especificaciones sujetos a cambio sin
previo aviso.
86
3
2
1
1 Masa (GND)
2 Señal de impresión (PRINT SIGNAL)
(TTL)
Entrada de pulso de nivel bajo durante
100 mseg para iniciar la impresión.
3 Impresor ocupado (PRINT BUSY)
(TTL)
Pasa a nivel alto durante la impresión.
Otros
Page 87

Solución de problemas
Síntoma
En las primeras
impresiones aparecen
manchas blancas.
La impresión no se inicia al
presionar la tecla PRINT.
Bordes negros o partes
perdidas alrededor de la
impresión.
Atasco del papel
La impresión resulta sucia.
El videoimpresor se para al
imprimir continuamente
imágenes negras.
Las líneas blancas o las
letras pequeñas de la
pantalla no se imprimen
claramente.
En toda la pantalla
aparecen cuadrados
pequeños.
La impresión es demasiado
oscura o clara.
La impresión resulta
alargada.
Causa/solución
Al imprimir un rollo de papel recién insertado, el polvo
de la superficie del papel puede causar manchas
blancas en las impresiones.
m
Haga que el papel avance hasta que salga limpio
presionando la tecla OPEN/CLOSE.
• El papel no avanza.
m
¿Está tenso el papel?
m
¿Está conectada la alimentación?
m
¿Son correctas las conexiones? (pág. 71)
m
¿Ha presionado dos veces la tecla PRINT en el
modo SMALL?
• Cuando suene el zumbador:
m
¿Se ha recalentado la cabeza térmica?
m
¿Está la señal de vídeo de la imagen?
m
¿Está correctamente insertado el papel?
• El papel avanza, pero no se inicia la impresión.
m
¿Está insertado el papel con la cara termosensible
hacia arriba?
Esto puede producirse de acuerdo con la señal de vídeo
que se introduce en el videoimpresor.
m
Cambie el ajuste de los interruptores SCAN
(Interruptores DIP 8, 9). (pág. 75)
• Abra la tapa del rollo de papel presionando la tecla
OPEN/CLOSE, y después extraiga el papel atascado
tirando lentamente del mismo.
• Se ha condensado humedad en la unidad.
m
Si traslada repentinamente la unidad de un lugar
frío a otro cálido, es posible que se condense
humedad en su interior. En tal caso, extraiga el
papel, desconecte la alimentación, y deje la unidad
sin utilizar durante una o dos horas.
La cabeza térmica está sucia.
m
Limpie la cabeza térmica con la hoja limpiadora
suministrada. (pág. 83)
Esto puede ocurrir cuando el videoimpresor imprima
continuamente 15 o más imágenes negras. En tal caso,
sonará el zumbador. Esto se debe a que se ha activado
el circuito protector contra recalentamiento de la cabeza
térmica. Detenga la impresión durante cierto tiempo.
¿Está el interruptor INPUT (interruptor DIP !¡) en B &
W cuando la señal de entrada es de blanco y negro?
(pág. 75)
¿Está el interruptor INPUT (interruptor DIP !¡) en
COLOR cuando la señal de entrada es de color? (pág.
75)
• ¿Está el interruptor 75 (interruptor DIP !™)
correctamente ajustado? (pág. 75)
• ¿Está el interruptor GAMMA correctamente ajustado?
(pág. 72)
El interruptor ASPECT (interruptor DIP 3) está en 1:1.
m
Póngalo en 4:3. (pág. 74)
Otros
87
Page 88

Ubicación y función de las partes
Con respecto a los detalles, consulte las páginas indicadas entre paréntesis.
Panel frontal
1
Interruptor e indicador de
alimentación (ON/OFF)
Conecta la alimentación. El indicador
permanecerá encendido mientras la
alimentación esté conectada.
2
Selector de tamaño de la impresión
(79)
Selecciona el tamaño de la impresión.
3
Selector de sentido normal (STD)/
inverso (SIDE) (79)
Selecciona el sentido de impresión.
4
Control de contraste (CONTR) (81)
Ajusta el contraste de las impresiones.
ON/ OFF
STD SIDE
STD
NORMAL
SMALL
ZOOM 1 . 5x
ZOOM 2x
LARGE
EE
THRU
BRIGHT
CONTR
6
PAPER EMPTY
COPY PRINT
OPEN / CLOSE
Control de brillo (BRIGHT) (81)
Ajusta el brillo de las impresiones.
7
Tecla de copia (COPY) (80)
Imprime otra copia de la impresión anterior.
8
Tecla de impresión (PRINT) (78)
Imprime la imagen que está visualizándose
en el videomonitor. La imagen visualizada
en el momento de presionar la tecla PRINT
se almacenará en la memoria.
9
Indicador de falta de papel (PAPER
EMPTY)
Se encenderá cuando el videoimpresor
carezca de papel.
88
5
Selector de salida (THRU/EE) (81)
Selecciona la salida de la señal de vídeo a
través del conector VIDEO OUT.
THRU: Las señales de entrada saldrán
directamente al videomonitor.
EE: Las señales de entrada saldrán al
videomonitor después de haberse procesado
en los circuitos del videoimpresor.
Otros
!º
Tecla de apertura/cierre (OPEN/
CLOSE) (76, 80)
Abre o cierra la puerta. Además, cesa la
impresión que está realizándose.
!¡
Alimentador y cortador de papel
Corta el papel de impresión.
Page 89

Panel posterior
1
Conector para control remoto
(REMOTE) (71)
Conéctele el telemando RM-91 para controlar
a distancia la operación de impresión.
El telemando RM-91 se suministra sólo con el
UP-890MD.
2
Selector de impresión (GAMMA) (72)
Cambia el modo de impresión para papel de
alta densida. Este selector será útil cuando el
selector PAPER TYPE esté ajustado a II o IV.
3
Selector de tipo de papel (PAPER
TYPE) (72)
Para seleccionar el tipo de papel.
REMOTE GAMMA TYPE
PAPER
IIIIII IIIIV
DIP SW
OFF
ON
IN OUT
VIDEO
AC IN
5
Conector de entrada de vídeo (VIDEO
IN) (Tipo BNC) (71)
Conéctelo al conector de salida de vídeo del
equipo de vídeo.
6
Conector de salida de vídeo (VIDEO
OUT) (Tipo BNC) (71)
Conéctelo al conector de entrada de vídeo del
videomonitor. El tipo de la señal de salida
dependerá del ajuste del selector THRU/EE.
7
Conector de entrada de CA (AC IN)
(71)
Conéctelo a una toma de la red empleando el
cable de alimentación de CA suministrado.
4
Interruptores de modo de impresión
(DIP SW) (73 – 75)
Ajustan los modos de impresión y las
funciones.
8
Terminal equipotencial
Provisto solamente con el UP-890CE/890MD.
Otros
89
Page 90

Italiano
ATTENZIONE
Per evitare il pericolo di incendi o scosse elettriche, non
esporre l’apparecchio alla pioggia o all’umidità.
Per evitare scosse elettriche, non aprire l’apparecchio.
Per le riparazioni rivolgersi solo a personale qualificato.
Per UP-890CE/890MD
Simboli sui prodotti
Questo simbolo indica il terminale
equipotenziale che porta i vari componenti
di un sistema allo stesso potenziale.
Importanti avvertenze per l’uso in ambienti medicali
1. Tutte le apparecchiature collegate a questo
apparecchio devono essere certificate conformi agli
standard CEI601-1, CEI950, CEI65 o ad altri standard
CEI/ISO applicabili alle apparecchiature.
2. Quando questo apparecchio viene utilizzato insieme
ad altre apparecchiature nell’area del paziente*, è
necessario che esso venga alimentato da un
trasformatore isolato oppure che venga collegato per
mezzo di un terminale di messa a terra aggiuntivo alla
messa a terra del sistema, a meno che esso non
venga certificato conforme allo standard CEI601-1.
* Area del paziente
R1,5m
3. Se collegato ad altre apparecchiature, la corrente di
dispersione potrebbe aumentare.
4. Questo apparecchio genera, utilizza e può irradiare
energia di frequenza e, se non viene installato in
conformità alle istruzioni del manuale, può provocare
interferenze ad altre apparecchiature. Se ciò dovesse
succedere (per determinare ciò è sufficiente
scollegare il cavo dall’apparecchio) adottare le misure
seguenti: collocare l’apparecchio in una diversa
postazione. Collegare questo apparecchio e
l’apparecchiatura in questione a circuiti diversi.
Consultare il vostro rivenditore.
90
Page 91

Indice
Introduzione
Preparazione
Funzionamento
Varie
Presentazione 92
Collegamenti 93
Prima di stampare 94
Impostazione del tipo di carta 94
Regolazione degli interruttori DIP 95
Inserimento della carta 98
Stampa 100
Stampa di un’immagine 100
Selezione dell’orientamento di stampa 101
Selezione del formato di stampa 101
Regolazione del contrasto e della luminosità 103
Precauzioni 104
Manutenzione 105
Carta per la stampante 107
Caratteristiche tecniche 108
Soluzione dei problemi 109
Posizione e funzione delle parti e dei comandi 110
Pannello anteriore 110
Pannello posteriore 111
91
Page 92

Introduzione
Presentazione
L’UP-880/890CE/890MD è una stampante grafica video in bianco e nero che può
essere usata per stampare immagini da apparecchi video.
Qualità di stampa chiara e stabile
• Stampa ad alta definizione di 10,2 punti/mm grazie alla testina termica con
circuiti integrati di pilotaggio ad alta velocità.
• 256 gradazioni di bianco e nero.
Rapidità di stampa
• E’ possibile stampare una singola immagine in circa 3,9 secondi nel modo STD e
NORM.
• E’ possibile eseguire consecutivamente un massimo di 11 copie della stessa
immagine.
Selezione di due orientamenti di stampa e di cinque formati di stampa
• Il selettore dell’orientamento di stampa sul pannello anteriore consente di
stampare con orientamento verticale e orizzontale.
• Il comando del formato di stampa sul pannello anteriore consente di selezionare
cinque tipi di formato.
Interruttori DIP per l’ottimizzazione della stampante
• E’ possibile stampare a partire dalla parte inferiore o dalla parte superiore
dell’immagine impostando l’interruttore DIRECTION DIP.
• E’ possibile regolare il rapporto di formato degli stampati da 4:3 o 1:1
impostando l’interruttore ASPECT DIP.
• E’ possibile regolare il campo da stampare impostando l’interruttore SCAN DIP.
• E’ possibile ottenere un effettivo risparmio di carta impostando l’interruttore
POSTFEED DIP (funzione risparmio carta).
Discriminazione automatica del segnale video
Il tipo di segnale video bianco e nero in ingresso (EIA o CCIR) o segnale a colori
in ingresso (NTSC o PAL) viene automaticamente discriminato e stampato nello
stesso tempo e formato.
Cicalino di avvertimento
La funzione di cicalino di avvertimento evita che vengano commessi degli errori
nell’uso dell’apparecchio.
Inserimento della carta facile e veloce
E’ possibile inserire la carta semplicemente aprendo il coperchio della carta con il
tasto OPEN/CLOSE e inserendo il rotolo della carta.
92
Introduzione
Page 93

Preparazione
Collegamenti
Note
• Spegnere tutti gli apparecchi prima di eseguire i collegamenti.
• Collegare il cavo di alimentazione CA per ultimo.
Telecomando
RM-91*
a REMOTE
Apparecchio video
al connettore di
uscita video
Cavo di collegamento
coassiale in dotazione
(BNC ˜ BNC)
REMOTE GAMMA TYPE
PAPER
IIIIII IIIIV
a VIDEO IN
DIP SW
OFF
ON
Monitor a colori/
bianco e nero
Cavo di collegamento
(non in dotazione)
al connettore di
ingresso video
a VIDEO OUT
IN OUT
VIDEO
AC IN
a AC IN
alla presa a muro
Cavo di alimentazione CA in
dotazione
* Il telecomando RM-91 è in dotazione solo con l’UP-890MD.
Preparazione
93
Page 94

Prima di stampare
Impostazione del tipo di carta
Impostare l’interruttore del tipo di carta (PAPER TYPE) sul tipo di carta da usare.
L’uso di carta per stampa diversa dalla carta per stampa Sony può causare
prestazioni di stampa ridotte e qualità di stampa scadente.
Tipo di carta
UPP-110S
UPP-110HD
UPP-110HA
REMOTE GAMMA TYPE
Posizione dell’interruttore del tipo di carta (PAPER TYPE)
I (Normale)
II (Alta densità)
IV (Superiore)
PAPER
IIIIII IIIIV
DIP SW
OFF
ON
IN OUT
VIDEO
AC IN
GAMMA TYPE
IIIIII IIIIV
PAPER
Uso del tipo di carta UPP-110HA o UPP-110HD
Quando si imposta l’interruttore del tipo di carta (PAPER TYPE) su II o IV,
occorre regolare la gradazione della densità con l’interruttore GAMMA.
I: Gradazione leggera
II: Gradazione standard
IV: Gradazione forte
Preparazione
94
Page 95

Regolazione degli interruttori DIP
Regolare gli interruttori DIP a seconda del modo di stampa desiderato. Prima di
regolare gli interruttori DIP, spegnere la stampante. Quindi eseguire la regolazione
servendosi di un oggetto piccolo e appuntito, come un piccolo cacciavite. Le
regolazioni eseguite in fabbrica sono come segue.
REMOTE GAMMA TYPE
PAPER
IIIIII IIIIV
DIP SW
OFF
ON
IN OUT
VIDEO
AC IN
DIP SW
OFF
ON
DIP SW FUNCTION TABLE
NO
FUNCTION
1
INTERRUPT
2
POSTFEED
3
ASPECT
4
MEMORY
5
IMAGE
6
MIRROR
7
DIRECTION
8
SCAN
9
10
RESERVED
11
INPUT
12
75
SW-ON
ON
ON
4:3
FRAME
POSI
NORM
NORM
WIDE 1
B&W
ON
SW-OFF
OFF
OFF
1:1
FIELD
NEGA
REV
REV
WIDE 2
NORM
COLOR
OFF
1
Interruttore di interruzione acceso/spento (INTERRUPT ON/OFF)
Se si desidera interrompere la stampa in corso e stampare un’immagine
nuova, quando si preme il tasto PRINT durante la stampa, regolare questo
interruttore su ON.
Se si desidera trascurare il fatto che il tasto PRINT è premuto durante la
stampa e continuare la stampa in corso, regolare questo interruttore su OFF.
Se si preme il tasto PRINT quando la funzione PRINTING è disattivata entra
in funzione il cicalino di avvertimento.
2
Interruttore di inserimento carta dopo la stampa acceso/spento
(POSTFEED ON/OFF)
Perché la stampante inserisca altra carta vergine ogni volta che viene stampata
un’immagine, regolare questo interruttore su ON.
Per risparmiare carta inserendone solo una minima quantità dopo la stampa di
un’immagine, regolare questo interruttore su OFF. E’ possibile ottenere un
numero maggiore di stampe da un rotolo di carta ma è necessario estrarre e
tagliare la carta.
Preparazione
95
Page 96

Prima di stampare (continua)
275
87654321
475
50
250
9
4
5
5
7
5
4
3
3
2
3
2
30
10
7
0
3
275
87654321
475
50
250
9
4
5
5
7
5
4
3
3
2
3
2
30
10
7
0
3
275
87654321
475
50
250
9
4
5
5
7
5
4
3
3
2
3
2
30
10
7
0
3
275
87654321
475
50
250
9
4
5
5
7
5
4
3
3
2
3
2
30
10
7
0
3
3
Interruttore di formato (ASPECT 4:3/1:1)
Normalmente, lasciare questo interruttore su 4:3. Se il rapporto di formato
del segnale video è 1:1, regolare questo interruttore su 1:1.
Lo stampato risulterà più lungo di quello ottenuto col rapporto 4:3.
1
2
3
3
5
2
3
30
4
3
3
4
1 357 7 531
4
3
3
4
30
3
2
5
3
3
2
1
4 : 3
5
2
3
1
3
2
3
30
4
3
3
4
4
3
3
4
30
3
2
5
3
3
2
1
1
2
3
3
5
2
3
30
4
3
3
4
1 357 7 531
4
3
3
4
30
3
2
5
3
3
2
1
5
3
1
4
4
5
3
1
1 : 1
4
Interruttore di memoria FRAME/FIELD (MEMORY FRAME/
FIELD)
Normalmente, lasciare questo interruttore su FRAME (ON). Quando si
stampano immagini in rapido movimento (come il movimento di una palla
che viene lanciata), la stampa può risultare confusa. In questi casi, regolare
l’interruttore su FIELD. La stampa sarà meno definita ma più chiara.
5
Interruttore di immagine positive/negativa (IMAGE POSI/NEGA)
Normalmente, lasciare questo interruttore su POSI (ON). Per eseguire
stampati negativi, regolare questo interruttore su NEGA (OFF).
Nota
Se si imposta il selettore THRU/EE sul lato EE, l’apparecchio stampa
immagini in positivo indipendentemente dall’impostanzione dell’interruttore
IMAGE POSI/NEGA.
2
3
2
3
30
3
3
4
4
3
3
30
3
2
3
2
6
Interruttore speculare NORM/REV (MIRROR NORM/REV )
Normalmente, lasciare questo interruttore su NORM (ON). Affinché il lato
destro e sinistro vengano stampati invertiti, regolare questo interruttore su
REV (OFF).
7
Interruttore di orientamento NORM/REV (DIRECTION NORM/
REV)
Usare questo interruttore per selezionare se stampare prima la parte superiore
o quella inferiore dell’immagine su schermo.
Normalmente, lasciare questo interruttore su NORM (ON). La stampa viene
eseguita a partire dal lato inferiore dello schermo. Per iniziare la stampa dalla
parte superiore dello schermo, regolare questo interruttore su REV (OFF).
1
2
3
3
5
2
3
30
4
3
3
4
1 357 7 531
4
96
Preparazione
3
3
4
30
3
2
5
3
3
2
1
NORM
5
2
3
1
3
2
3
30
4
3
3
4
4
3
3
4
30
3
2
5
3
3
2
1
1
2
3
3
5
2
3
30
4
3
3
4
4
3
3
4
30
3
2
3
1
3
2
5
1
2
3
3
5
2
3
30
4
3
3
4
1 357 7 531
4
3
3
4
30
3
2
5
3
3
2
1
REV
Page 97

89
275
87654321
475
50
250
9
4
5
5
7
5
4
3
3
2
3
2
30
10
7
0
3
275
87654321
475
50
250
9
4
5
5
7
5
4
3
3
2
3
2
30
10
7
0
3
275
87654321
475
50
250
9
4
5
5
7
5
4
3
3
2
3
2
30
10
7
0
3
Interruttori di modo di scansione (SCAN NORM/WIDE 1/WIDE
2)
Usare questi interruttori per regolare il campo di stampa. Il campo di stampa
viene esteso nell’ordine NORM, WIDE 1 e WIDE 2.
Per stampare solo l’immagine visualizzata sul formato schermo standard del
monitor, regolare l’interruttore SCAN 9 su NORM (OFF). Per stampare
quando il segnale si estende oltre i bordi dello schermo monitor standard,
regolare l’interruttore SCAN 9 su WIDE 1 (ON) o l’interruttore SCAN
su WIDE 2 (OFF). Quando si regola l’interruttore SCAN 8 sulla posizione
WIDE 2, questa regolazione viene rispettata indipendentemente dalla
posizione dell’interruttore SCAN 9.
8
1
2
3
3
5
2
3
30
4
3
3
4
1 357 7 531
4
3
3
4
30
3
2
5
3
3
2
1
5
2
3
1
3
2
3
30
4
3
3
4
4
3
3
4
30
3
2
5
3
3
2
1
1
2
3
3
5
2
3
30
4
3
3
4
1 357 7 531
4
3
3
4
30
3
2
5
3
3
2
1
5
2
3
1
3
2
3
30
4
3
3
4
4
3
3
4
30
3
2
5
3
3
2
1
1
2
3
3
5
2
3
30
4
3
3
4
1 357 7 531
4
3
3
4
30
3
2
5
3
3
2
1
NORM
!º
Interruttore riservato (RESERVED)
WIDE 1
WIDE 2
Lasciare questo interruttore su ON.
!¡
Interruttore di ingresso (INPUT B&W/COLOR)
Regolare questo interruttore su ON (B & W) quando il segnale in ingresso da
stampare è in bianco e nero. Regolarlo su OFF (COLOR) quando il segnale è
a colori.
!™
Interruttore di impedenza 75 acceso/spento (75 ON/OFF)
Regolare questo interruttore su OFF quando si collega un monitor o un altro
apparecchio video al connettore VIDEO OUT.
Regolare questo interruttore su ON quando non si collega un apparecchio al
connettore VIDEO OUT.
Quando si desidera collegare due stampanti all’apparecchio video, regolare
l’interruttore 75 di una stampante su ON e quello dell’altra su OFF.
5
2
3
1
3
2
3
30
4
3
3
4
4
3
3
4
30
3
2
5
3
3
2
1
Preparazione
97
Page 98

Inserimento della carta
Note
• Non piegare la carta e non toccare la superficie di stampa della carta. Tracce di
sporco sulla superficie di stampa possono causare una scarsa qualità di stampa.
• Quando si inserisce il rotolo di carta, eliminare eventuali allentamenti tirando
fuori e tagliando via i primi 15-20 cm di carta.
• Utilizzare soltanto carta della serie UPP-110 (vedere pag.107).
• Regolare il selettore del tipo di carta (PAPER TYPE) in base al tipo di carta
(vedere pag. 94).
Inserimento della carta
1 Premere l’interruttore ON/OFF per accendere la stampante.
2 Premere il tasto OPEN/CLOSE per aprire il coperchio del comparto carta.
3 Inserire il rotolo di carta nella stampante.
98
Collocare la carta con la facciata termosensibile (superficie di
stampa) rivolta verso l’alto.
Preparazione
Page 99

4 Tirare fuori i primi 15-20 cm di carta per eliminare eventuali allentamenti del
rotolo.
5 Premere il tasto OPEN/CLOSE per chiudere il coperchio del comparto carta.
E’ anche possibile chiudere il coperchio premendolo con la mano.
ATTENZIONE
Nel chiudere il coperchio del comparto carta, tenere le dita lontano dal coperchio
stesso e dalla lama tagliacarta.
Preparazione
99
Page 100

Funzionamento
Stampa
Prima di stampare
• Assicurarsi che i collegamenti siano corretti (vedere pag. 93)
• Controllare che il rotolo di carta sia inserito correttamente (vedere pag. 98).
• Assicurarsi che il tipo di carta sia corretto (vedere pag. 94).
• Assicurarsi che gli interruttori DIP siano regolati correttamente (vedere pag. 95–
97)
• Assicurarsi che la fonte di ingresso da cui stampare sia collegata al connettore di
ingresso.
Stampa di un’immagine
1 Premere l’interruttore ON/OFF per accendere la stampante.
L’interruttore di alimentazione si illumina.
ON/ OFF
STD SIDE
STD
NORMAL
SMALL
ZOOM 1 . 5x
ZOOM 2x
LARGE
CONTR
EE
THRU
BRIGHT
COPY PRINT
PAPER EMPTY
OPEN / CLOSE
Indicatore fine carta
(PAPER EMPTY)
2 Controllare che l’indicatore di fine carta (PAPER EMPTY) sia spento.
Se è illuminato, inserire della carta.
3 Selezionare l’orientamento e il formato della carta.
Vedere “Selezione dell’orientamento di stampa” e “Selezione del formato di
stampa” alla pagina successiva.
4 Quando l’immagine che si desidera stampare viene visualizzata sullo schermo
del monitor, premere il tasto PRINT.
La stampante esegue uno stampato dell’immagine visualizzata nell’istante in
cui si preme il tasto PRINT.
100
Funzionamento
ON/ OFF
STD SIDE
STD
NORMAL
SMALL
ZOOM 1 . 5x
ZOOM 2x
LARGE
CONTR
EE
THRU
BRIGHT
COPY PRINT
PAPER EMPTY
OPEN / CLOSE
 Loading...