

Page 1

MULTI CHANNEL AV RECEIVER
STR-ZA3000ES/STR-ZA2000ES/STRZA1000ES
Preparation
Before using
Procedure to start using the receiver [1]
Supplied accessories [2]
Notes on installing the receiver [3]
Function for conversion of video signals [4]
Digital audio formats supported by the receiver [5]
Notes on connecting cables [6]
Using HDMI connections [7]
Installing and connecting speakers
Installing speakers [8]
Connecting speakers (for STR-ZA3000ES) [9]
Connecting speakers (for STR-ZA2000ES/STR-ZA1000ES) [10]
Connecting the speakers in zone 2 [11]
Connecting audio-visual devices and the antennas (aerials)
Connecting a TV (for STR-ZA3000ES) [12]
Connecting a TV (for STR-ZA2000ES/STR-ZA1000ES) [13]
Connecting devices with HDMI jacks (for STR-ZA3000ES) [14]
Connecting devices with HDMI jacks (for STR-ZA2000ES/STR-ZA1000ES) [15]
Connecting devices with jacks other than HDMI jacks [16]
Connecting the antennas (aerials) [17]
Connecting another amplifier in zone 2/3 [18]
Page 2

Connecting to the network
System requirements for a wired LAN connection [19]
Connecting the receiver to the network (for STR-ZA3000ES) [20]
Connecting the receiver to the network (for STR-ZA2000ES/STR-ZA1000ES) [21]
Turning on the receiver/preparing the remote control
Inserting batteries into the remote control [22]
Turning on the receiver [23]
Initial setup of the receiver
Setting up the receiver using the Easy Setup [24]
Enjoying Video and Sound
Basic operations
Using the menu on the TV screen [25]
Enjoying video/sound from the connected device [26]
Listening to the radio
Listening to FM/AM radio [27]
Presetting FM/AM radio stations (Preset Memory) [28]
Tuning to a station directly (Direct Tuning) [29]
Changing the AM tuning scale [30]
Enjoying sound effects
Selecting a sound field (Sound Field) [31]
Resetting sound fields to the default settings [32]
Adjusting the equalizer (Equalizer) [33]
Enjoying clear and dynamic sound at a low volume (Sound Optimizer) [34]
Enjoying more natural sound with speakers installed in the ceiling (In-Ceiling Speaker
Mode) [35]
Page 3

Enjoying high-fidelity sound (Pure Direct) [36]
Using the Multi-Zone Features
Enjoying sound in two rooms (multi-zone feature using the receiver with
2 pairs of speakers)
Connecting the speakers in zone 2 [37]
Setting the speakers for zone 2 [38]
Enjoying sound in zone 2/3 [39]
Enjoying sound in two rooms (multi-zone feature using the receiver and
another amplifier)
Connecting another amplifier in zone 2/3 [40]
Setting the volume control for zone 2/3 (Line Out) [41]
Setting the zone 2 HDMI audio output of connected devices (Zone2 Audio Out) [42]
Setting the priority for the main zone (Priority) [43]
Enjoying sound in zone 2/3 [44]
Using Other Features
Interlocking with BRAVIA TV and other devices (“BRAVIA” Sync)
What is “BRAVIA” Sync? [45]
Preparing for “BRAVIA” Sync [46]
Interlocking other devices using an HDMI connection (“BRAVIA” Sync) [47]
Configuring video and sound settings
Enjoying sound of TV broadcasts from the receiver [48]
Switching the monitors that output the HDMI video signals [49]
Switching between digital and analog audio (Input Mode) [50]
Using other video/audio input jacks (Input Assign) [51]
Saving and recalling various settings for the receiver (Custom Preset)
Page 4

About Custom Preset [52]
Recalling the settings saved to the scene [53]
Saving the settings to a preset [54]
Items for which you can save settings and the default values for each item [55]
Configuring speaker settings
Adjusting the sound balance automatically (Auto Calibration) [56]
Using bi-amplifier connections [57]
Using the sleep timer
Using the sleep timer (Sleep) [58]
Checking information on the receiver
Viewing information on the display panel [59]
Adjusting Settings
Input Setup
Changing the assignment and display for the input jacks [60]
Changing the name for each input (Name) [61]
Speaker Setup
Performing automatic calibration (Auto Calibration) [62]
Calibrating the phase characteristics of the speakers (Automatic Phase Matching) [63]
Selecting the Auto Calibration type (Calibration Type) [64]
Selecting the speaker pattern (Speaker Pattern) [65]
Setting the assignment for the speaker terminals (SB Speaker Assign) [66]
Adjusting the speaker size (Size) [67]
Adjusting the speaker distance (Distance) [68]
Adjusting the speaker level (Level) [69]
Outputting a test tone from each speaker (Test Tone) [70]
Page 5

Setting the crossover frequency of the speakers (Crossover Frequency) [71]
Adjusting the equalizer (Equalizer) [72]
Lifting up the sound of the center speaker (Center Speaker Lift Up) [73]
Setting the height from the floor to the ceiling speakers (Ceiling Speaker Height) [74]
Selecting the unit of measurement (Distance Unit) [75]
Network Setup
Setting up a network (Internet Setup) [76]
Checking the network information (Information) [77]
Enabling the network function even when this receiver is in standby mode (Network
Standby) [78]
Enjoying Hi-Fi System sound (Music Connect) [79]
Audio Setup
Playing audio signals with high-quality sound (Digital Legato Linear (D.L.L.)) [80]
Enjoying clear and dynamic sound at a low volume (Sound Optimizer) [81]
Selecting a sound field (Sound Field) [82]
Selecting the HD-D.C.S. effect type (HD-D.C.S. Type) [83]
Enjoying more natural sound with speakers installed in the ceiling (In-Ceiling Speaker
Mode) [84]
Enjoying high-fidelity sound (Pure Direct) [85]
Setting the low-pass filter for the subwoofer output (Subwoofer Low Pass Filter) [86]
Synchronizing audio with video output (A/V Sync) [87]
Selecting the language of digital broadcasts (Dual Mono) [88]
Compressing the dynamic range (Dynamic Range Compressor) [89]
HDMI Setup
Up-converting video signals to 4K (4K Scaling) [90]
Controlling HDMI devices (Control for HDMI) [91]
Passing HDMI signals through (Pass Through) [92]
Setting the HDMI audio signal output of connected devices (Audio Out) [93]
Setting the zone 2 HDMI audio output of connected devices (Zone2 Audio Out) [94]
Setting the level of the subwoofer (Subwoofer Level) [95]
Page 6

Selecting the method to use the HDMI OUT B jack (HDMI Out B Mode) [96]
Setting the priority for the main zone (Priority) [97]
Speeding up the display when switching the HDMI input (Fast View) [98]
Zone Setup
Presetting the volume in the main zone (Main Preset Volume) [99]
Turning on/off the power for zone 2/3 (Power) [100]
Selecting the source signals for zone 2/3 (Input) [101]
Adjusting the volume for zone 2/3 (Volume) [102]
Presetting the volume in zone 2/3 (Zone2/3 Preset Volume) [103]
Setting the volume control for zone 2/3 (Line Out) [104]
System Setup
Selecting the language (Language) [105]
Tuning on/off the display for the volume level or sound field (Auto Display) [106]
Setting standby mode (Auto Standby) [107]
Changing the volume display (Volume Display) [108]
Switching the brightness of the display panel (Dimmer) [109]
Using the sleep timer (Sleep) [110]
Checking the software version (Software Version) [111]
Updating the software using the USB flash drive (USB Update) [112]
Setting the tuner (Tuner Setup) [113]
Install Setup
Turning on control mode for maintenance (External Control) [114]
Switching on/off the 12V trigger output (Trigger 1/2/3) (STR-ZA3000ES) [115]
Switching on/off the 12V trigger output (Trigger) (STR-ZA2000ES/STR-ZA1000ES) [116]
Displaying a test screen (Test Picture) [117]
Locking settings of the receiver (Settings Lock) [118]
Easy Setup
Setting up the receiver using the Easy Setup [119]
Page 7

Using the menu on the display panel
Operating the receiver with the menu on the display panel [120]
Viewing information on the display panel [121]
Reverting to the factory default settings
Reverting to the factory default settings [122]
Parts and Controls
Receiver
Front panel [123]
Rear panel (STR-ZA3000ES) [124]
Rear panel (STR-ZA2000ES/STR-ZA1000ES) [125]
Indicators on the display panel [126]
Remote control
Remote control [127]
Announcements
Specifications
Specifications [128]
Supplied accessories [129]
Trademarks
Trademarks [130]
Software License Information
Software License Information [131]
Page 8

Troubleshooting
Error messages
PROTECTOR [132]
UPDATE FAILED [133]
FAN STOPPED (for STR-ZA3000ES) [134]
List of messages after Auto Calibration measurements [135]
Network features message list [136]
Power
The receiver is turned off automatically. [137]
The receiver does not turn on after performing USB Update. [138]
Image
No image appears on the TV. [139]
No 3D image appears on the TV. [140]
No 4K image appears on the TV. [141]
No image is output from the TV when the receiver is in standby mode. [142]
The GUI menu does not appear on the TV screen. [143]
The display panel is turned off. [144]
Sound
No sound or only a very low level of sound is heard, no matter which device is selected.
[145]
There is severe humming or noise. [146]
No sound or only a very low level of sound is heard from specific speakers. [147]
There is no sound from a specific device. [148]
The left and right sound is unbalanced or reversed. [149]
Dolby Digital or DTS multi-channel sound is not reproduced. [150]
The surround effect cannot be obtained. [151]
A test tone is not output from the speakers. [152]
A test tone is output from a different speaker than the speaker displayed on the TV
Page 9

screen. [153]
No sound is output from the TV when the receiver is in standby mode. [154]
Tuner
The FM reception is poor. [155]
The FM stereo reception is poor. [156]
You cannot tune to radio stations. [157]
USB devices
A USB device is not recognized. [158]
A USB device cannot be connected to the USB port. [159]
Network connection
An error message appears. [160]
Cannot connect to the network. [161]
“BRAVIA” Sync (Control for HDMI)
The Control for HDMI function does not work. [162]
The Audio Return Channel (ARC) function does not work. [163]
Remote control
The remote control does not function. [164]
If the problem is not solved
Reverting to the factory default settings [165]
Resetting sound fields to the default settings [166]
Customer support websites [167]
[1] Preparation Before using
Procedure to start using the receiver
Page 10
See the following topics in this order to start using the receiver properly.
(for other models)
1. Installing speakers
2. Connecting speakers (for STR-ZA3000ES)
Connecting speakers (for STR-ZA2000ES/STR-ZA1000ES)
3. Connecting a TV (for STR-ZA3000ES)
Connecting a TV (for STR-ZA2000ES/STR-ZA1000ES)
4. Connecting devices with HDMI jacks (for STR-ZA3000ES)
Connecting devices with HDMI jacks (for STR-ZA2000ES/STR-ZA1000ES)
5. Connecting devices with jacks other than HDMI jacks
6. Connecting the receiver to the network (for STR-ZA3000ES)
Connecting the receiver to the network (for STR-ZA2000ES/STR-ZA1000ES)
7. Attaching the front cover onto the front panel
8. Inserting batteries into the remote control
9. Turning on the receiver
10. Setting up the receiver using the Easy Setup
[2] Preparation Before using
Supplied accessories
Quick Setup Guide (1)
Startup Guide (1)
Reference Guide (1)
Remote control (1)
R03 (size AAA) batteries (2)
AC power cord (mains lead) (1)
AM loop antenna (aerial) (1)
FM wire antenna (aerial) (1)
(for USA and Canadian models)
Page 11
Optimizer microphone (1)
COMPONENT VIDEO IN: HDMI OUT (*1), COMPONENT VIDEO MONITOR OUT (*2)
Front cover (1)
[3] Preparation Before using
Notes on installing the receiver
Do not install the appliance in a confined space, such as a bookcase.
Sufficient space around the receiver is needed to release heat. When placing the receiver
in a rack, leave more than 44.45 mm (1.75 in) space above the receiver, and more than
44.45 mm (1.75 in) space along the sides of the receiver. The rack behind the receiver
should be open. If you place the receiver with its back against the wall, leave more than
88.9 mm (3.5 in) space between the receiver and the wall.
Make sure to use a “WS-RE1” dedicated rack mount kit for this receiver when mounting
the receiver on a rack mount.
Place the receiver in a location with adequate ventilation to prevent heat buildup and
prolong the life of the receiver.
Do not place the receiver near heat sources, or in a place subject to direct sunlight,
excessive dust, or mechanical shock.
Do not place anything on top of the cabinet that might block the ventilation holes and
cause malfunctions.
Magnets are attached to both the front panel and front cover. Do not place cards with
magnetic stripes, such as bank cards or ID passes, near the receiver. These cards may
become unusable due to the effects of the magnets on the receiver.
[4] Preparation Before using
Function for conversion of video signals
The receiver is equipped with a function for converting video signals. Video signals and
component video signals can be output as HDMI video signals (*1).
The correspondence of the INPUT jacks to the OUTPUT jacks is shown below.
HDMI IN: HDMI OUT
Page 12

VIDEO IN: HDMI OUT (*1), MONITOR VIDEO OUT (*2), ZONE2 VIDEO OUT (*2)
*1
Video signals are upconverted and upscaled (up to 4K) when outputting to HDMI OUT A jack.
Video signals are upconverted but video resolution is the same as the input video source when
outputting to HDMI OUT B jack.
*2
The same type of signal as the input signal is output.
Note
When video signals from a VCR, etc., are upconverted on this receiver and then viewed
on your TV, the image on the TV screen may appear distorted horizontally or no image
may be seen depending on the status of the video signal output.
If you are using image improvement circuitry with your VCR, it may impact the video
signal conversion. It is recommended that you turn off this function on your VCR.
Converted HDMI image output does not support “x.v.Color,” Deep Color, or 3D.
HDMI video signals cannot be converted to component video signals or video signals.
1080p component video signals cannot be upconverted.
When [4K Scaling] is set to [Auto], if the HDMI input signals are 1080p@23.98/24 Hz and
a 4K-compatible TV is connected to HDMI OUT A jack, the HDMI input signals are
automatically upscaled to 4K images and output from the HDMI OUT A jack.
When [HDMI Out B Mode] is set to [Zone2], component video signals or video signals
selected in zone 2 can be output from the HDMI OUT B jack.
If you select different component video signals or video signals in the main zone and
zone2 when [HDMI Out B Mode] is set to [Zone2], only audio signals can be output from
HDMI OUT B jack and the screen will blackout.
[5] Preparation
Before using
Digital audio formats supported by the receiver
The digital audio formats that this receiver can decode depend on the digital audio output
jacks of the connected device. This receiver supports the following audio formats. The words
in brackets are those indicated on the display panel.
Dolby Digital [DOLBY DIGITAL]
Maximum number of channels: 5.1
Connection with the receiver: COAXIAL/OPTICAL, HDMI
Dolby Digital EX [DOLBY DIGITAL EX]
Maximum number of channels: 6.1
Connection with the receiver: COAXIAL/OPTICAL, HDMI
Dolby Digital Plus [DOLBY DIGITAL+] (*)
Page 13

Maximum number of channels: 7.1
Connection with the receiver: HDMI
Dolby TrueHD [DOLBY TrueHD] (*)
Maximum number of channels: 7.1
Connection with the receiver: HDMI
DTS [DTS]
Maximum number of channels: 5.1
Connection with the receiver: COAXIAL/OPTICAL, HDMI
DTS-ES Discrete [DTS-ES Dscrt]
Maximum number of channels: 6.1
Connection with the receiver: COAXIAL/OPTICAL, HDMI
DTS-ES Matrix [DTS-ES Mtrx]
Maximum number of channels: 6.1
Connection with the receiver: COAXIAL/OPTICAL, HDMI
DTS 96/24 [DTS 96/24]
Maximum number of channels: 5.1
Connection with the receiver: COAXIAL/OPTICAL, HDMI
DTS-HD High Resolution Audio [DTS-HD HI RES] (*)
Maximum number of channels: 7.1
Connection with the receiver: HDMI
DTS-HD Master Audio [DTS-HD MSTR] (*)
Maximum number of channels: 7.1
Connection with the receiver: HDMI
DSD [DSD] (*)
Maximum number of channels: 5.1
Connection with the receiver: HDMI
Multi Channel Linear PCM (*) [LINEAR PCM]
Maximum number of channels: 7.1
Connection with the receiver: HDMI
*
Audio signals are output in another format if the playback device does not correspond to the
actual format. For details, refer to the operating instructions of the playback device.
[6] Preparation Before using
Notes on connecting cables
Page 14

Be sure to disconnect the AC power cord (mains lead) before connecting cables.
It is not necessary to connect all of the cables. Connect cables according to the
availability of jacks on the connected device.
Use a High Speed HDMI cable. 1080p, Deep Color, 4K or 3D images may not be
displayed properly if you use a Standard HDMI cable.
We do not recommend using an HDMI-DVI conversion cable. If you connect an HDMI-DVI
conversion cable to a DVI-D device, the sound and/or image may be lost. Connect
separate audio cables or digital connecting cables, then reassign the input jacks if the
sound is not output correctly. For details, see “Using other video/audio input jacks (Input
Assign).”
When connecting optical digital cables, insert the plugs straight until they click into place.
Do not bend or tie optical digital cables.
Hint
All of the digital audio jacks are compatible with 32 kHz, 44.1 kHz, 48 kHz, and 96 kHz
sampling frequencies.
If you want to connect several digital devices, but cannot find an unused
input
See “Using other video/audio input jacks (Input Assign).”
[7] Preparation Before using
Using HDMI connections
High-Definition Multimedia Interface (HDMI) is an interface that transmits video and audio
signals in digital format. Connecting devices made by Sony that are “BRAVIA” Synccompatible makes operations simpler. See “Interlocking other devices using an HDMI
connection (“BRAVIA” Sync).”
HDMI features
Digital audio signals transmitted by HDMI can be output from the speakers and the PRE
OUT jacks on this receiver (the PRE OUT jacks are only for STR-ZA3000ES). This signal
supports Dolby Digital, DTS, DSD, and Linear PCM. For details, see “Digital audio formats
supported by the receiver.”
The receiver can receive Multi Channel Linear PCM (up to 8 channels) with a sampling
frequency of 192 kHz or less via an HDMI connection.
Analog video signals input to the VIDEO jack or COMPONENT VIDEO jacks can be
output as HDMI signals. Audio signals input to the OPTICAL IN, COAXIAL IN and
ANALOG IN jacks can be output as HDMI signals with converted analog video signals
Page 15

from the HDMI OUT B jack when [HDMI Out B Mode] is set to [Zone2].
This receiver supports High Bitrate Audio (DTS-HD Master Audio, Dolby TrueHD), Deep
Color, “x.v.Color,” and 4K or 3D transmission.
To enjoy 3D images, connect a 3D-compatible TV and video device (Blu-ray Disc Player,
Blu-ray Disc recorder, PlayStation 3, etc.) to the receiver using High Speed HDMI cables,
put on 3D glasses, and then play 3D-compatible content.
To enjoy 4K images, connect a 4K-compatible TV or video device (Blu-ray Disc Player,
etc.) to the receiver using High Speed HDMI cables, and then play 4K-compatible
content.
The HDMI jacks designated as being “HDCP 2.2” support High-bandwidth Digital Content
Protection System Revision 2.2 (HDCP 2.2). Connect these HDMI jacks to jacks that
support HDCP 2.2 on a TV or a player. Refer to the operating instructions of the
connected device for details.
Note
Depending on the TV or video device, 4K or 3D images may not be displayed. Check the
HDMI video formats supported by the receiver.
Refer to the operating instructions of each connected device for details.
[8] Preparation
Installing and connecting speakers
Installing speakers
This receiver allows you to use up to a 7.2-channel system (7 speakers and two
subwoofers).
Typical examples of speaker system configurations are as follows.
5.1-channel speaker system
To fully enjoy theater-like multi-channel surround sound, you need five speakers (two front
speakers, a center speaker, and two surround speakers) and a subwoofer.
7.1-channel speaker system using surround back speakers
You can enjoy high-fidelity reproduction of recorded sound from a DVD or Blu-ray Disc in
6.1-channel or 7.1-channel format.
5.1 -channel speaker system and zone 2
If you make a 5.1ch connection in the main zone, you can also enjoy the sound in another
location (“Zone 2”) by connecting additional zone 2 speakers.
Note
You cannot use the surround back speakers and the front high speakers simultaneously.
Page 16
[9] Preparation Installing and connecting speakers
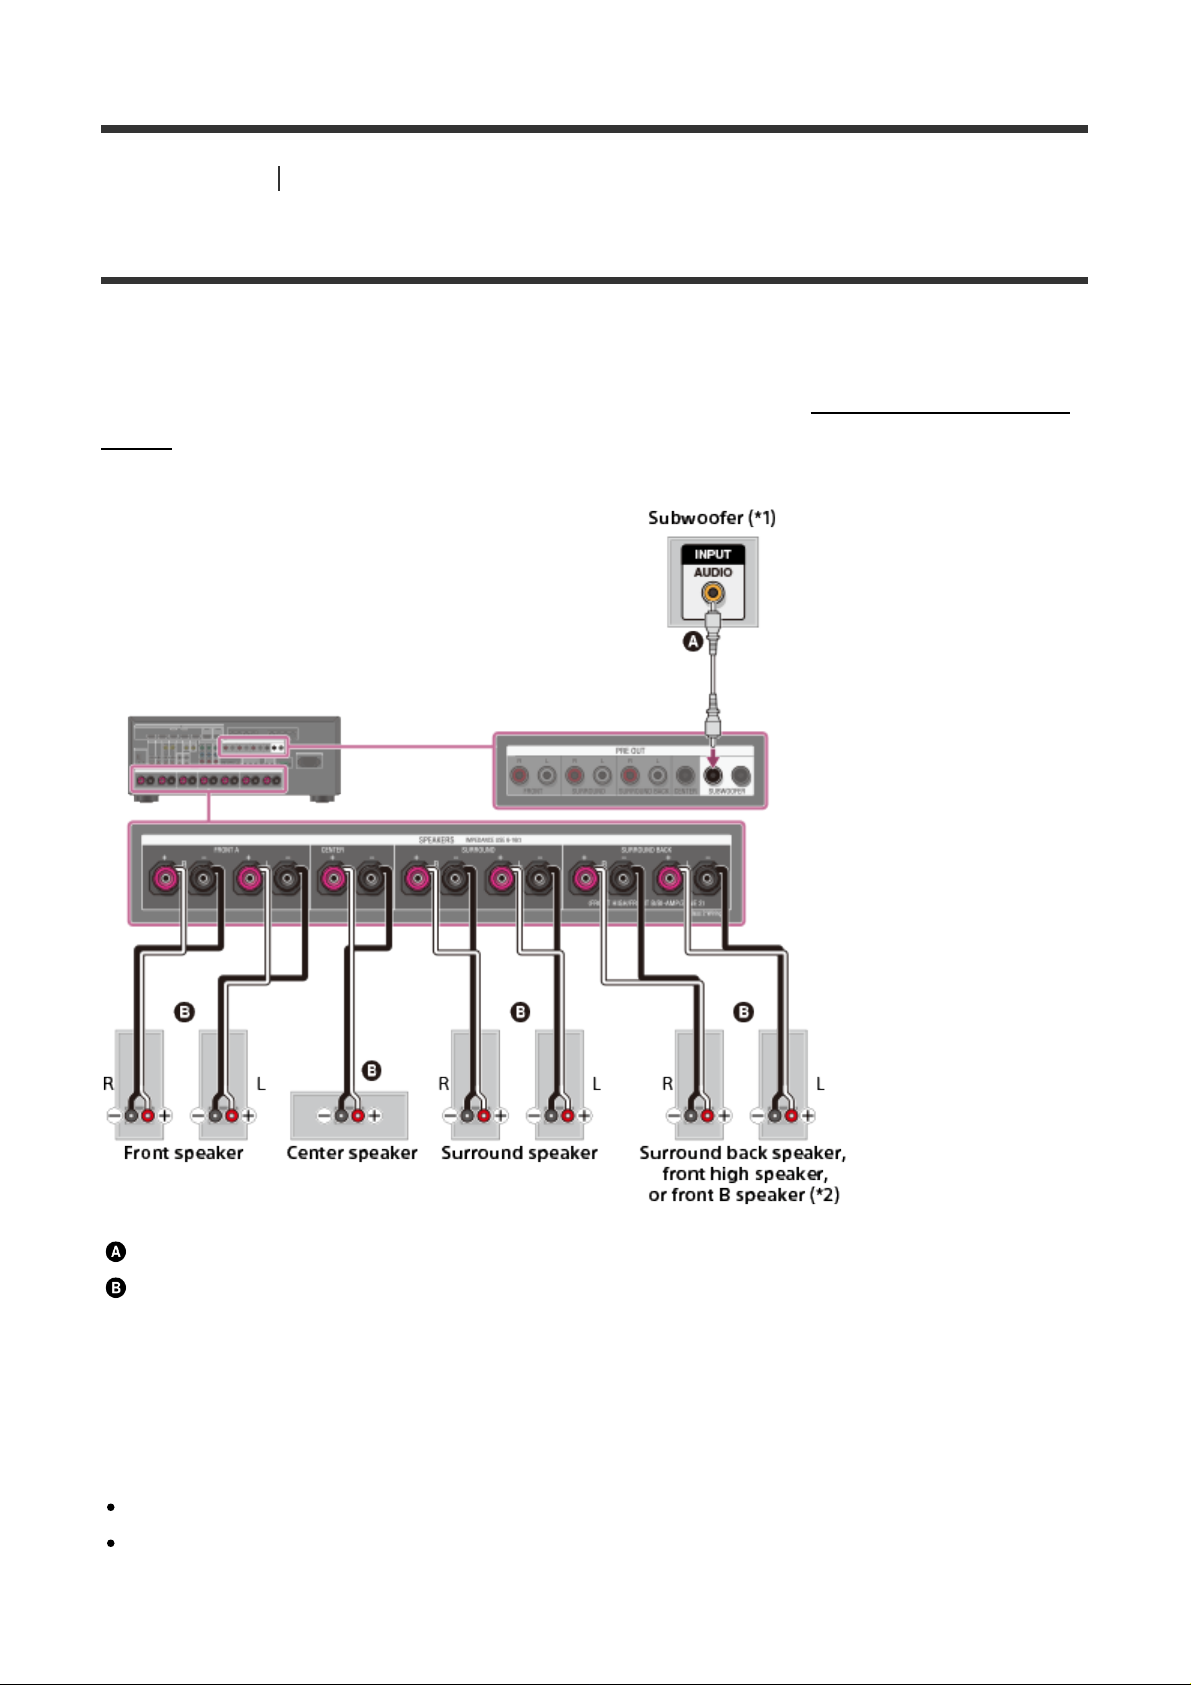
Connecting speakers (for STR-ZA3000ES)
Connect each speaker as illustrated below.
Be sure to disconnect the AC power cord (mains lead) before connecting cables.
For details on how to connect speaker cables to the receiver, see “How to connect speaker
cables.”
Monaural audio cable (not supplied)
Speaker cable (not supplied)
*1
If you connect a subwoofer with an auto standby function, turn off this function when watching
movies. If the auto standby function is turned on, it switches to standby mode automatically based
on the level of the input signal to the subwoofer, and the sound may not be output.
*2
Notes on connections to the SPEAKERS SURROUND BACK/FRONT HIGH/FRONT B/BIAMP/ZONE 2 terminals
If connecting only one surround back speaker, connect it to the L (+/-) terminals.
If you have an additional front speaker system, connect it to these terminals. In this case,
perform the following procedure:
Page 17
1. Select [Speaker Pattern] in the Speaker Setup menu, then select a speaker pattern
that does not have surround back and front high speakers.
2. Set [SB Speaker Assign] in the Speaker Setup menu to [Front B].
You can select the front speaker system you want by using the SPEAKERS button on the
receiver.
You can connect the front speakers to this terminal using a bi-amplifier connection. In this
case, set [SB Speaker Assign] in the Speaker Setup menu to [Bi-Amp].
Note
After you have installed and connected your speakers, be sure to select the speaker
pattern you want using [Speaker Pattern] in the Speaker Setup menu.
[10] Preparation
Installing and connecting speakers
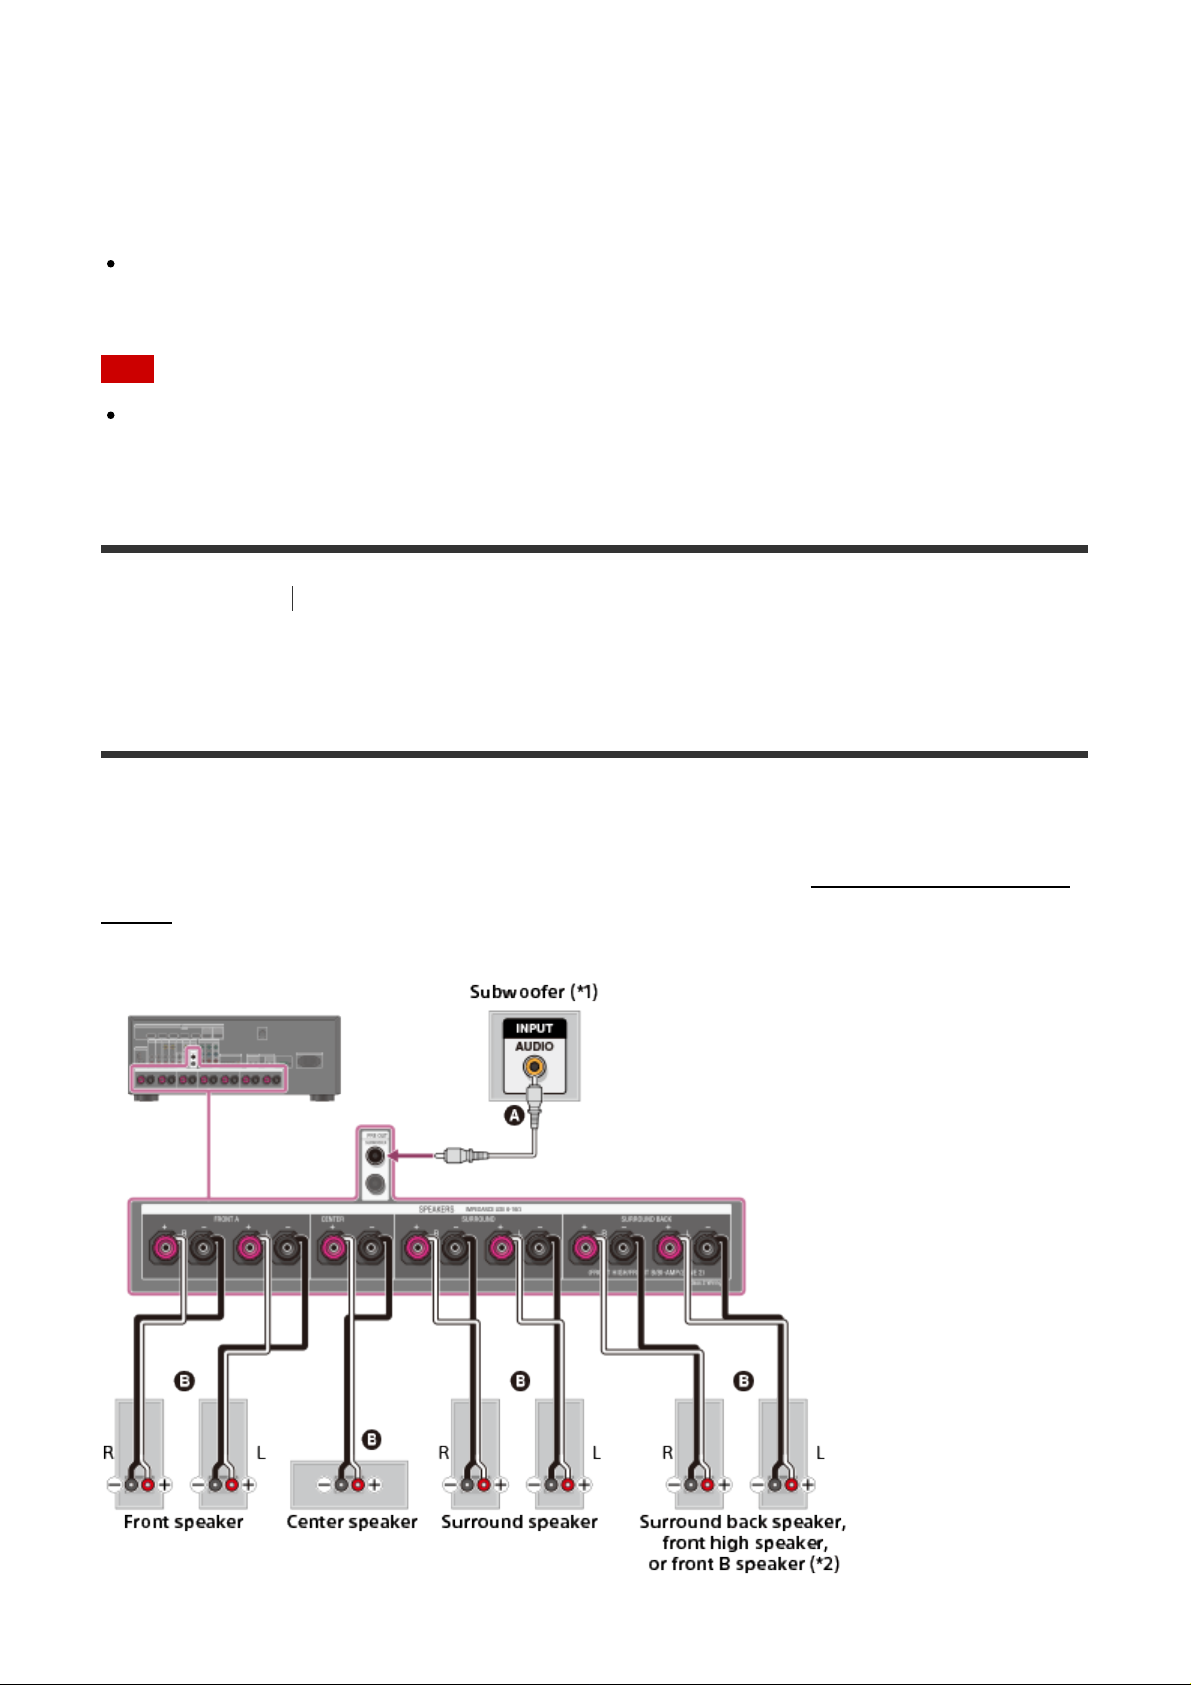
Connecting speakers (for STR-ZA2000ES/STRZA1000ES)
Connect each speaker as illustrated below.
Be sure to disconnect the AC power cord (mains lead) before connecting cables.
For details on how to connect speaker cables to the receiver, see “How to connect speaker
cables.”
Page 18

Monaural audio cable (not supplied)
Speaker cable (not supplied)
*1
If you connect a subwoofer with an auto standby function, turn off this function when watching
movies. If the auto standby function is turned on, it switches to standby mode automatically based
on the level of the input signal to the subwoofer, and the sound may not be output.
*2
Notes on connections to the SPEAKERS SURROUND BACK/FRONT HIGH/FRONT B/BIAMP/ZONE 2 terminals
If connecting only one surround back speaker, connect it to the L (+/-) terminals.
If you have an additional front speaker system, connect it to these terminals. In this case,
perform the following procedure:
1. Select [Speaker Pattern] in the Speaker Setup menu, then select a speaker pattern
that does not have surround back and front high speakers.
2. Set [SB Speaker Assign] in the Speaker Setup menu to [Front B].
You can select the front speaker system you want by using the SPEAKERS button on the
receiver.
You can connect the front speakers to this terminal using a bi-amplifier connection. In this
case, set [SB Speaker Assign] in the Speaker Setup menu to [Bi-Amp].
Note
After you have installed and connected your speakers, be sure to select the speaker
pattern you want using [Speaker Pattern] in the Speaker Setup menu.
[11] Preparation
Installing and connecting speakers
Connecting the speakers in zone 2
You can enjoy sound from a device connected to the receiver in a zone other than the main
zone. For example, you can watch a DVD in the main zone and listen to a CD in zone 2.
Connect each speaker as illustrated below.
Be sure to disconnect the AC power cord (mains lead) before connecting cables. For details
on how to connect speaker cables to the receiver, see “How to connect speaker cables.”
Page 19
TV
HDMI cable (not supplied)
Speakers
Speaker cable (not supplied)
Note
The following settings are required for this connection.
Set [ HDMI Out B Mode] in the HDMI Setup menu to [ Zone2]
Set [ Zone2 Audio Out] in the HDMI Setup menu to [Zone2 TV + AMP]
Turn the volume of the TV down or set [Zone2 Audio Out] in the HDMI Setup menu to
[AMP] if you do not want to output sound from the TV in zone 2.
You cannot remedy the time gap between video on zone 2 TV and audio from zone 2
speakers using the A/V Sync function.
When using this zone 2 connection, you need to set up the SPEAKERS SURROUND
BACK/FRONT HIGH/FRONT B/BI-AMP/ZONE 2 terminals. For details, see “Setting the
speakers for zone 2.”
[12] Preparation
Connecting audio-visual devices and the antennas (aerials)
Connecting a TV (for STR-ZA3000ES)
Connect a TV to the HDMI OUT or MONITOR VIDEO OUT jack. You can operate this
receiver using a GUI (Graphical User Interface). GUI is used only for HDMI OUT A jack.
Be sure to disconnect the AC power cord (mains lead) before connecting cables.
To watch 4K resolution content
The HDMI jacks designated as being “HDCP 2.2” (HDMI IN 2/IN 3, HDMI OUT A/OUT B)
support High-bandwidth Digital Content Protection System Revision 2.2 (HDCP 2.2).
Page 20
Connect these HDMI jacks to jacks that support HDCP 2.2 on a TV or a player. Refer to the
operating instructions of the connected device for details.
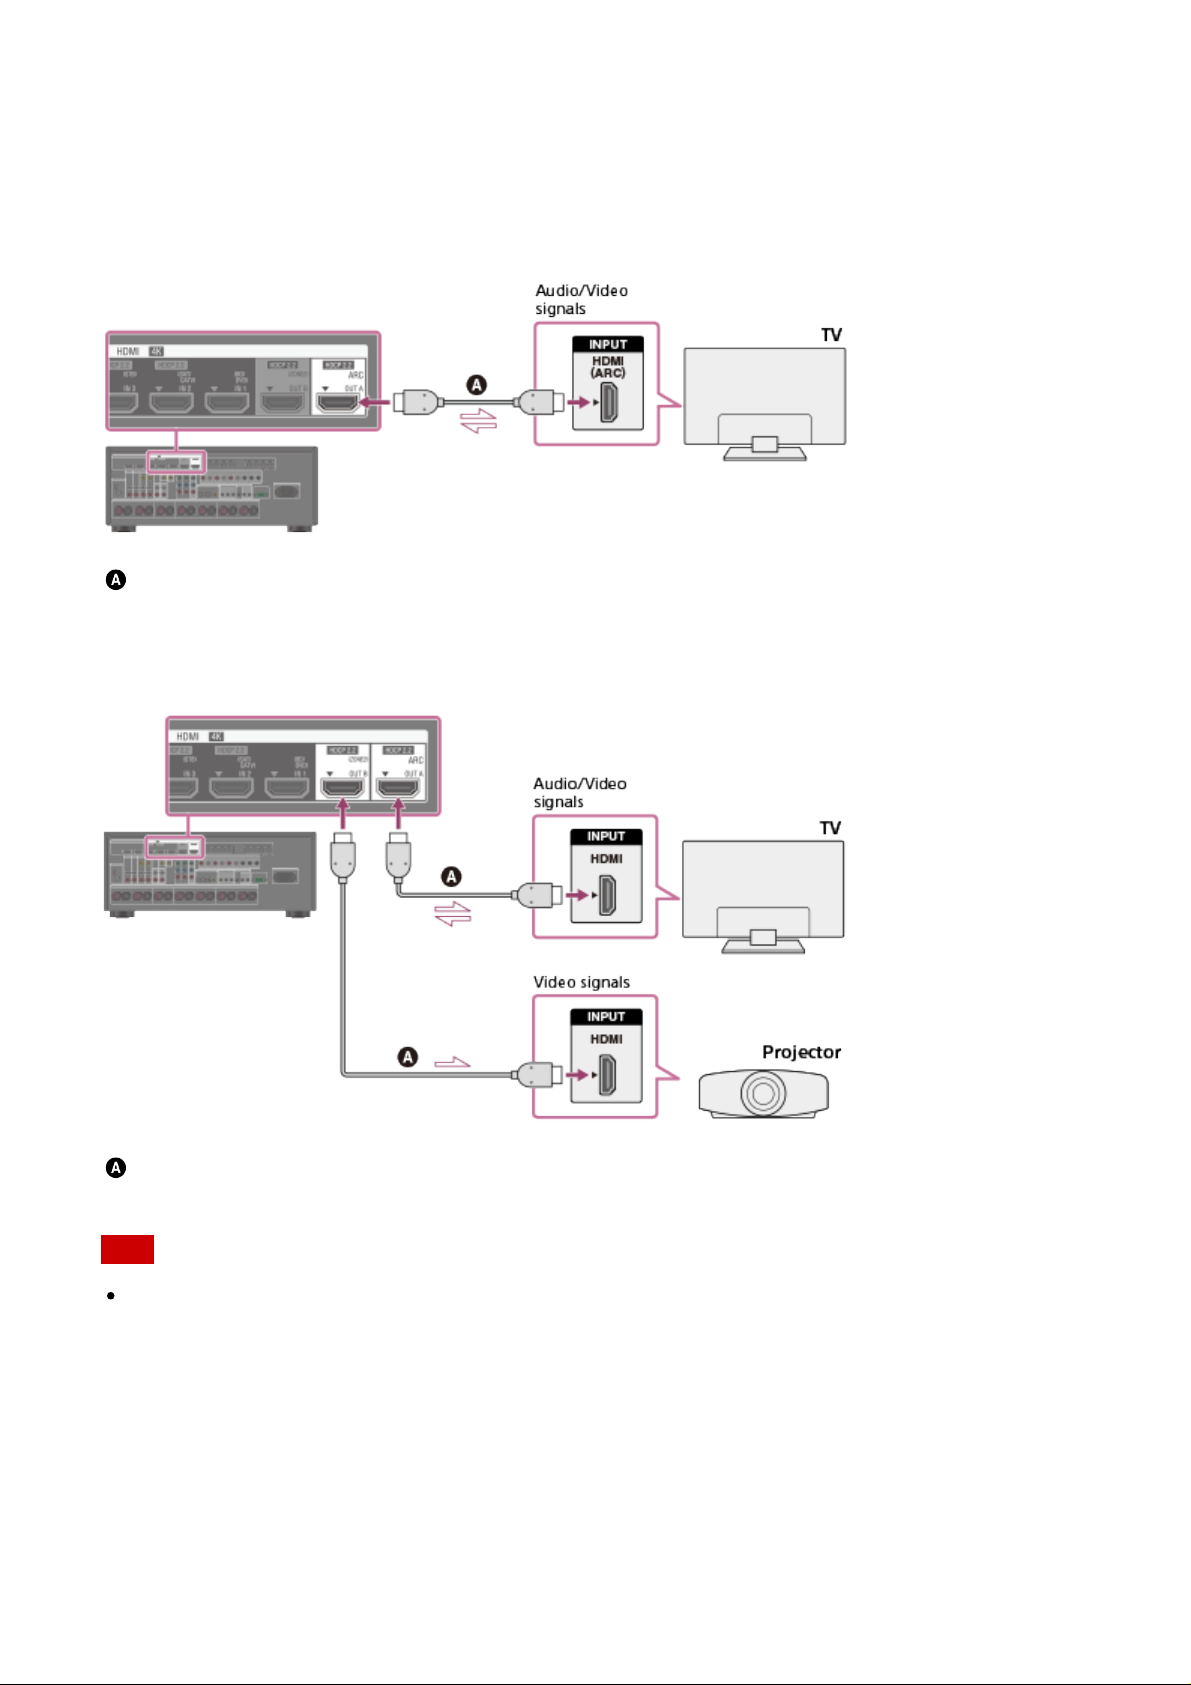
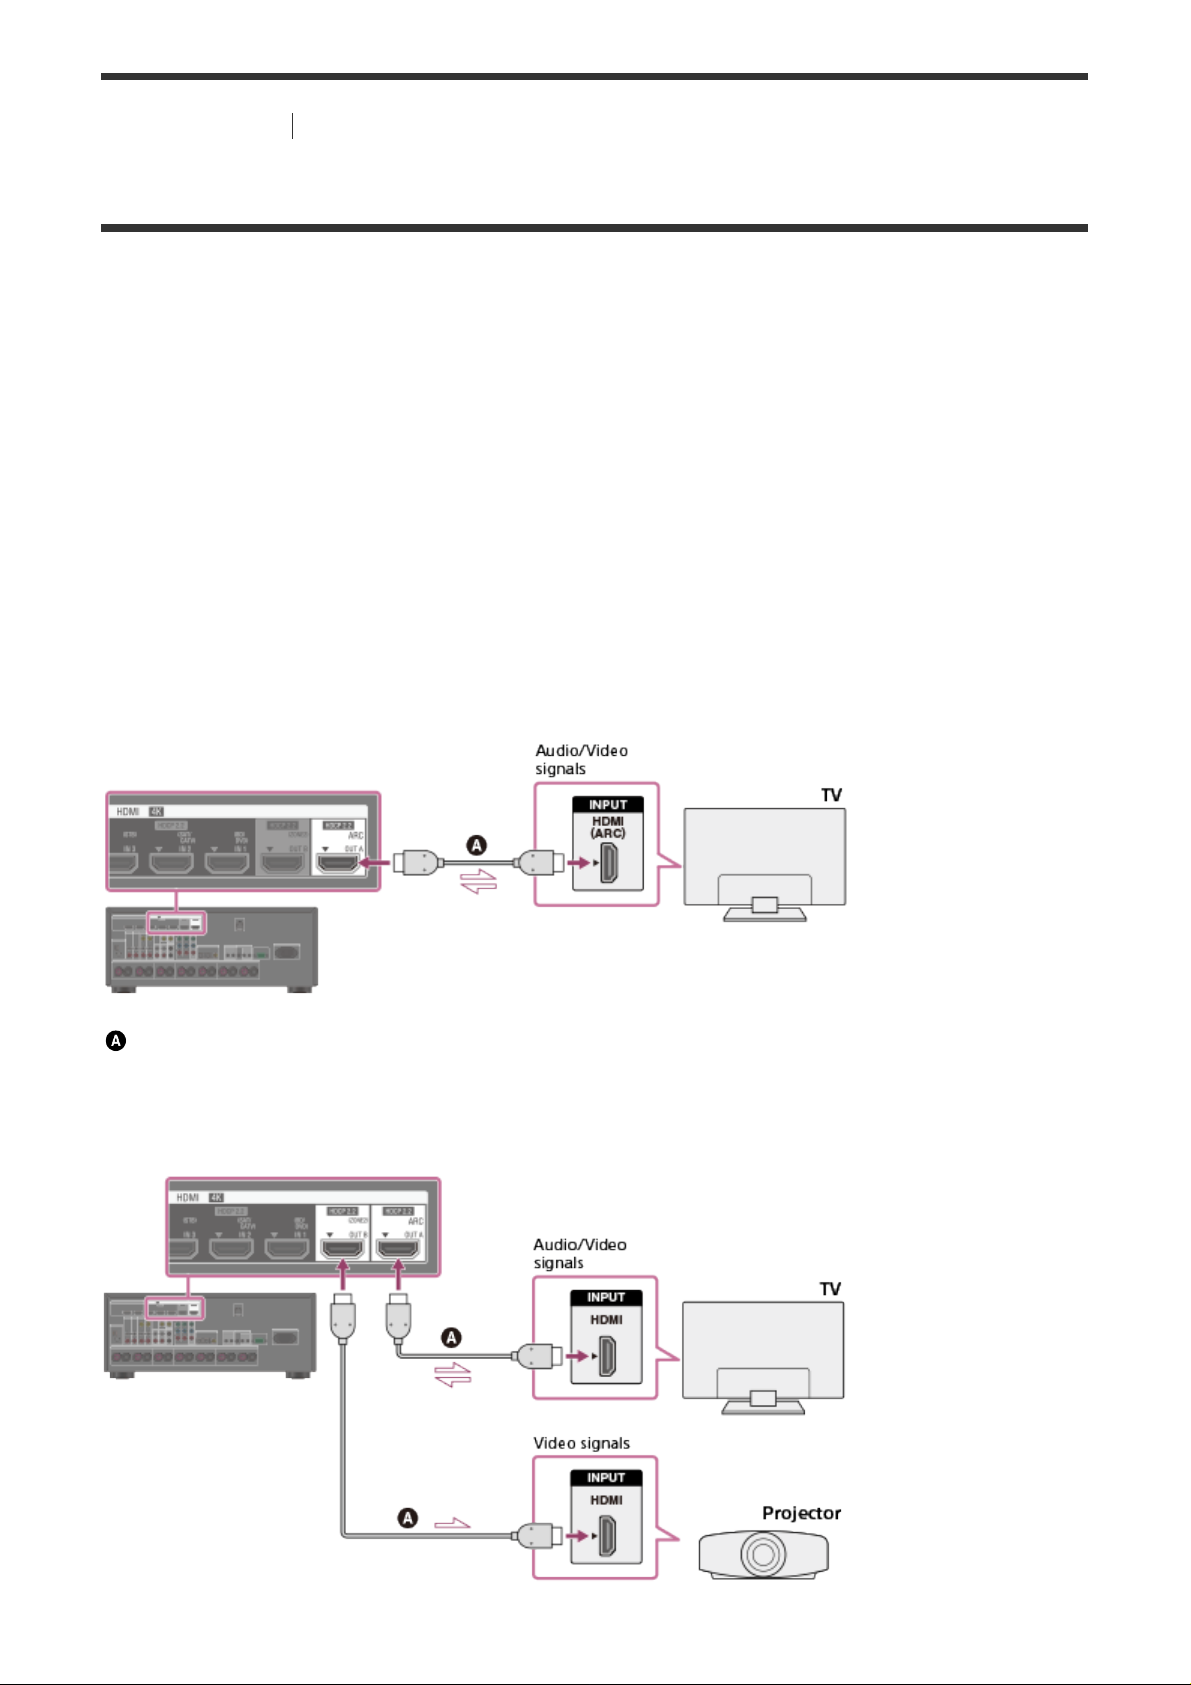
Connecting a TV compatible with the Audio Return Channel (ARC)
function via an HDMI connection
To use the ARC function, set [HDMI Out B Mode] to [Main] and [Control for HDMI] to [On].
HDMI cable (not supplied)
Sony recommends that you use an HDMI-authorized cable or HDMI cable made by Sony.
Connecting a TV and a projector
HDMI cable (not supplied)
Sony recommends that you use an HDMI-authorized cable or HDMI cable made by Sony.
Note
For this connection, set [HDMI Out B Mode] in the HDMI Setup menu to [Main].
Connecting a TV incompatible with the Audio Return Channel (ARC)
function via an HDMI connection
The solid lines show recommended connections and the dashed lines show alternative
connections.
Page 21
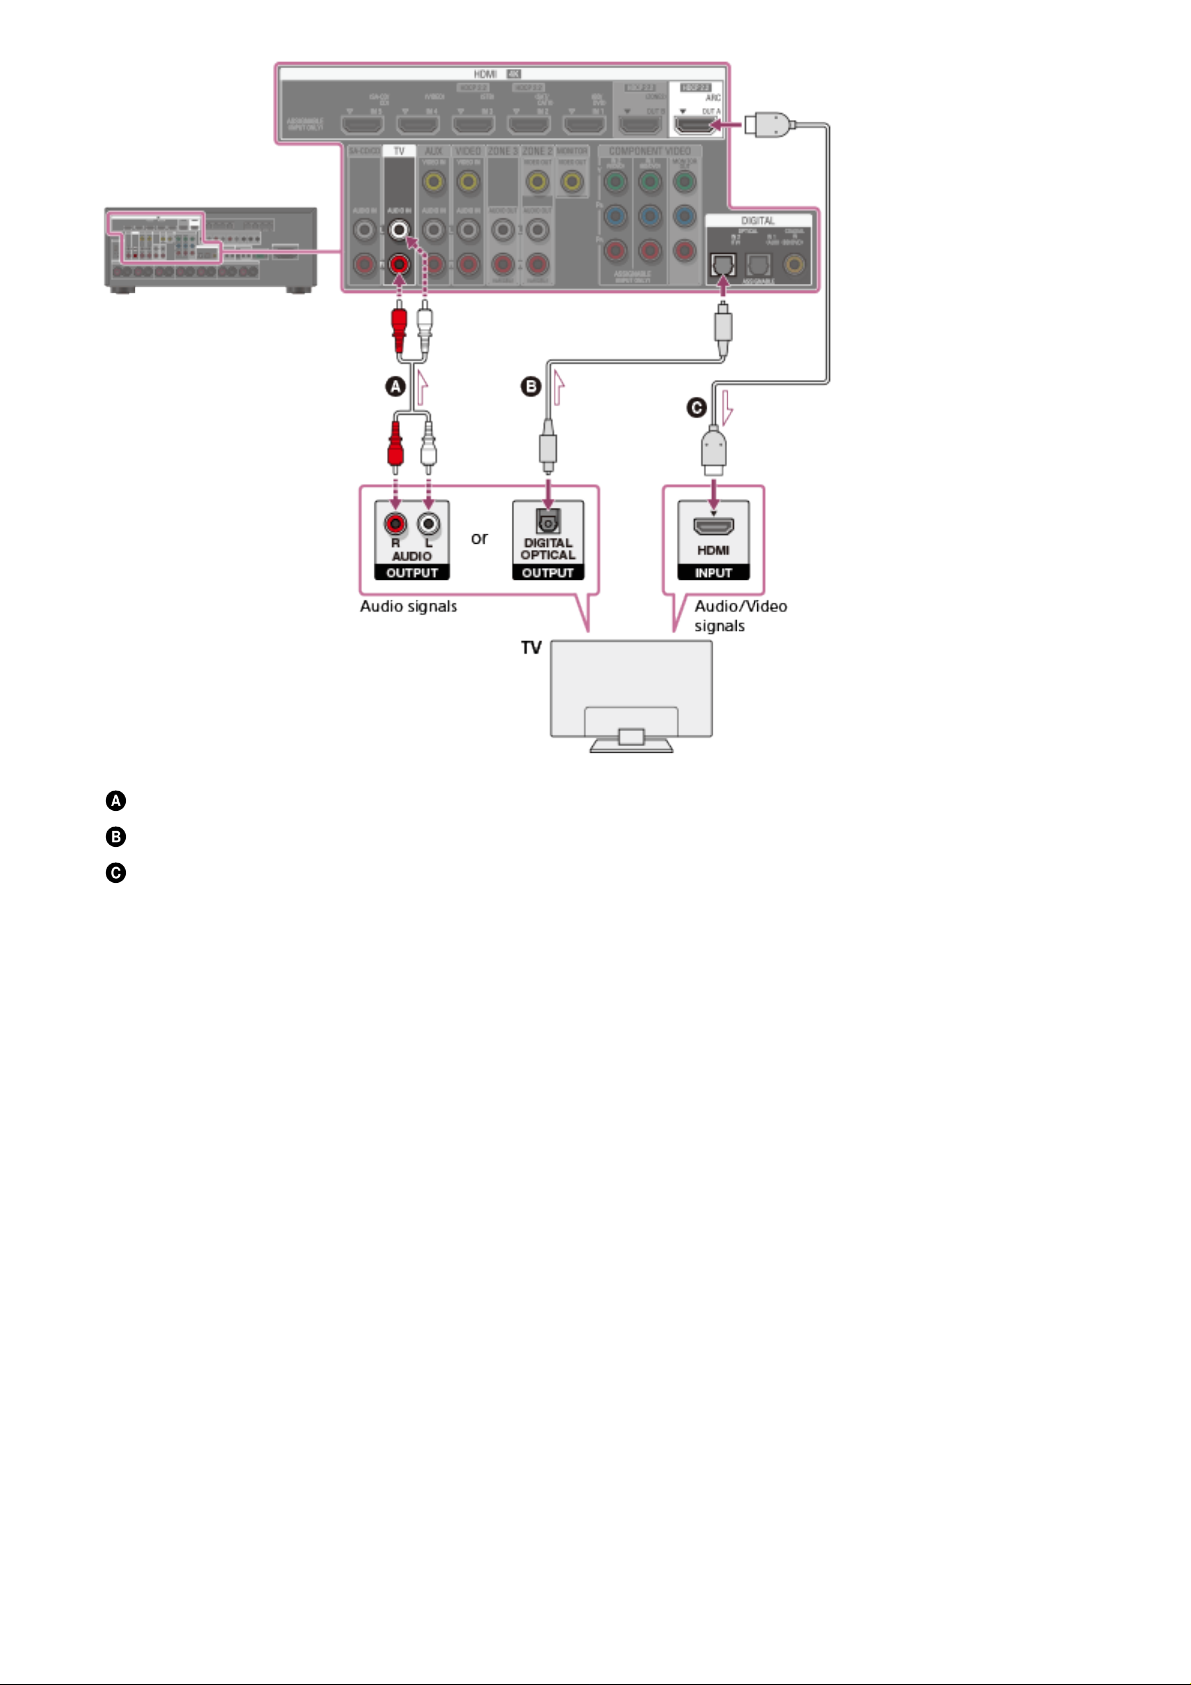
Audio cable (not supplied)
Optical digital cable (not supplied)
HDMI cable (not supplied)
Sony recommends that you use an HDMI-authorized cable or HDMI cable made by Sony.
Connecting a TV without HDMI jacks
The solid lines show recommended connections and the dashed lines show alternative
connections.
Page 22
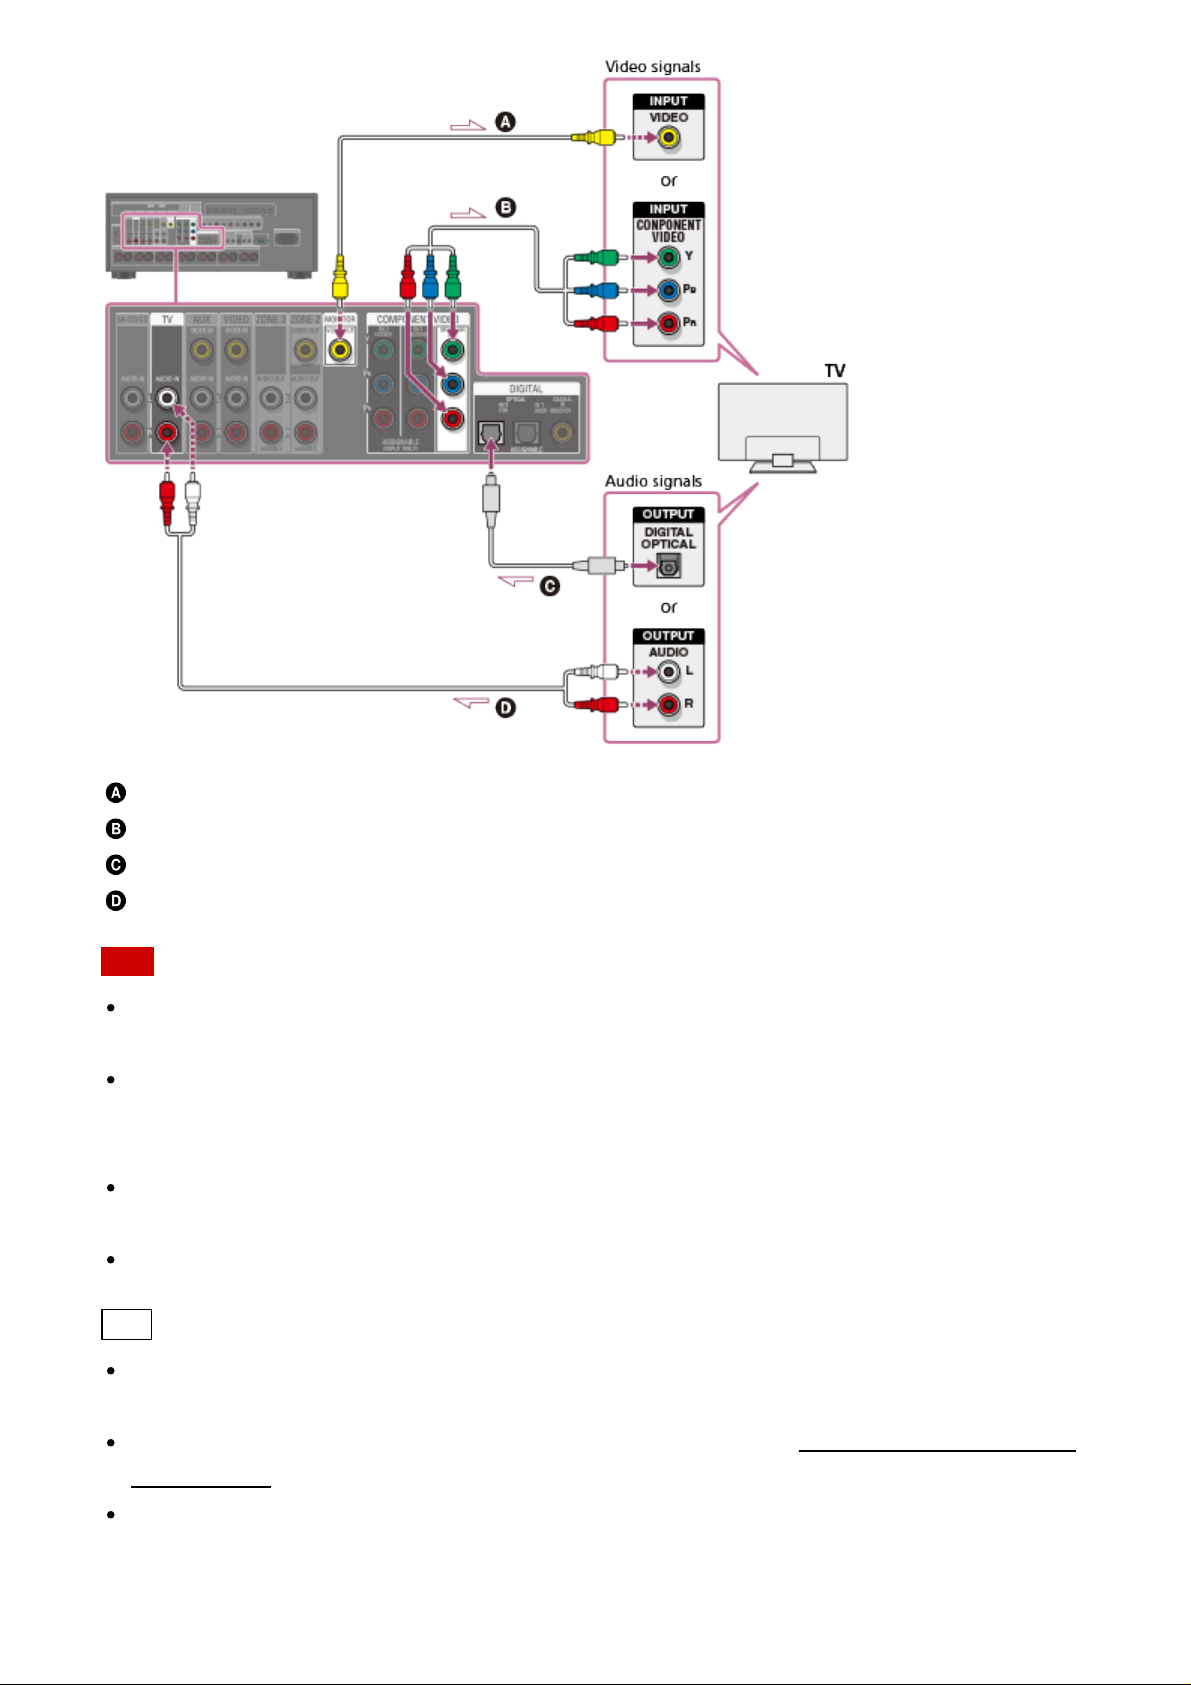
Video cable (not supplied)
Component video cable (not supplied)
Optical digital cable (not supplied)
Audio cable (not supplied)
Note
Connect a TV monitor or a projector to the HDMI OUT or MONITOR VIDEO OUT jack on
the receiver.
Depending on the status of the connection between the TV and the antenna (aerial), the
image on the TV screen may be distorted. If this is the case, place the antenna (aerial)
farther away from the receiver.
When connecting an optical digital cable, insert the plugs straight until they click into
place.
Do not bend or tie optical digital cables.
Hint
All of the digital audio jacks are compatible with 32 kHz, 44.1 kHz, 48 kHz, and 96 kHz
sampling frequencies.
The receiver has a video conversion function. For details, see “Function for conversion of
video signals.”
When connecting a TV to the receiver via the TV IN jacks of the receiver, set the sound
output jack of the TV to [Fixed] if it can be switched between either [Fixed] or [Variable].
Page 23
[13] Preparation Connecting audio-visual devices and the antennas (aerials)
Connecting a TV (for STR-ZA2000ES/STR-ZA1000ES)
Connect a TV to the HDMI OUT or MONITOR VIDEO OUT jack. You can operate this
receiver using a GUI (Graphical User Interface). GUI is used only for HDMI OUT A jack.
Be sure to disconnect the AC power cord (mains lead) before connecting cables.
To watch 4K resolution content
The HDMI jacks designated as being “HDCP 2.2” (HDMI IN 2, HDMI OUT A) support Highbandwidth Digital Content Protection System Revision 2.2 (HDCP 2.2). Connect these HDMI
jacks to jacks that support HDCP 2.2 on a TV or a player. Refer to the operating instructions
of the connected device for details.
Connecting a TV compatible with the Audio Return Channel (ARC)
function via an HDMI connection
To use the ARC function, set [HDMI Out B Mode] to [Main] and [Control for HDMI] to [On].
HDMI cable (not supplied)
Sony recommends that you use an HDMI-authorized cable or HDMI cable made by Sony.
Connecting a TV and a projector
Page 24

HDMI cable (not supplied)
Sony recommends that you use an HDMI-authorized cable or HDMI cable made by Sony.
Note
For this connection, set [HDMI Out B Mode] in the HDMI Setup menu to [Main].
Connecting a TV incompatible with the Audio Return Channel (ARC)
function via an HDMI connection
The solid lines show recommended connections and the dashed lines show alternative
connections.
Audio cable (not supplied)
Optical digital cable (not supplied)
HDMI cable (not supplied)
Sony recommends that you use an HDMI-authorized cable or HDMI cable made by Sony.
Connecting a TV without HDMI jacks
The solid lines show recommended connections and the dashed lines show alternative
connections.
Page 25

Video cable (not supplied)
Component video cable (not supplied)
Optical digital cable (not supplied)
Audio cable (not supplied)
Note
Connect a TV monitor or a projector to the HDMI OUT or MONITOR VIDEO OUT jack on
the receiver.
Depending on the status of the connection between the TV and the antenna (aerial), the
image on the TV screen may be distorted. If this is the case, place the antenna (aerial)
farther away from the receiver.
When connecting an optical digital cable, insert the plugs straight until they click into
place.
Do not bend or tie optical digital cables.
Hint
All of the digital audio jacks are compatible with 32 kHz, 44.1 kHz, 48 kHz, and 96 kHz
sampling frequencies.
The receiver has a video conversion function. For details, see “Function for conversion of
video signals.”
When connecting a TV to the receiver via the TV IN jacks of the receiver, set the sound
output jack of the TV to [Fixed] if it can be switched between either [Fixed] or [Variable].
Page 26
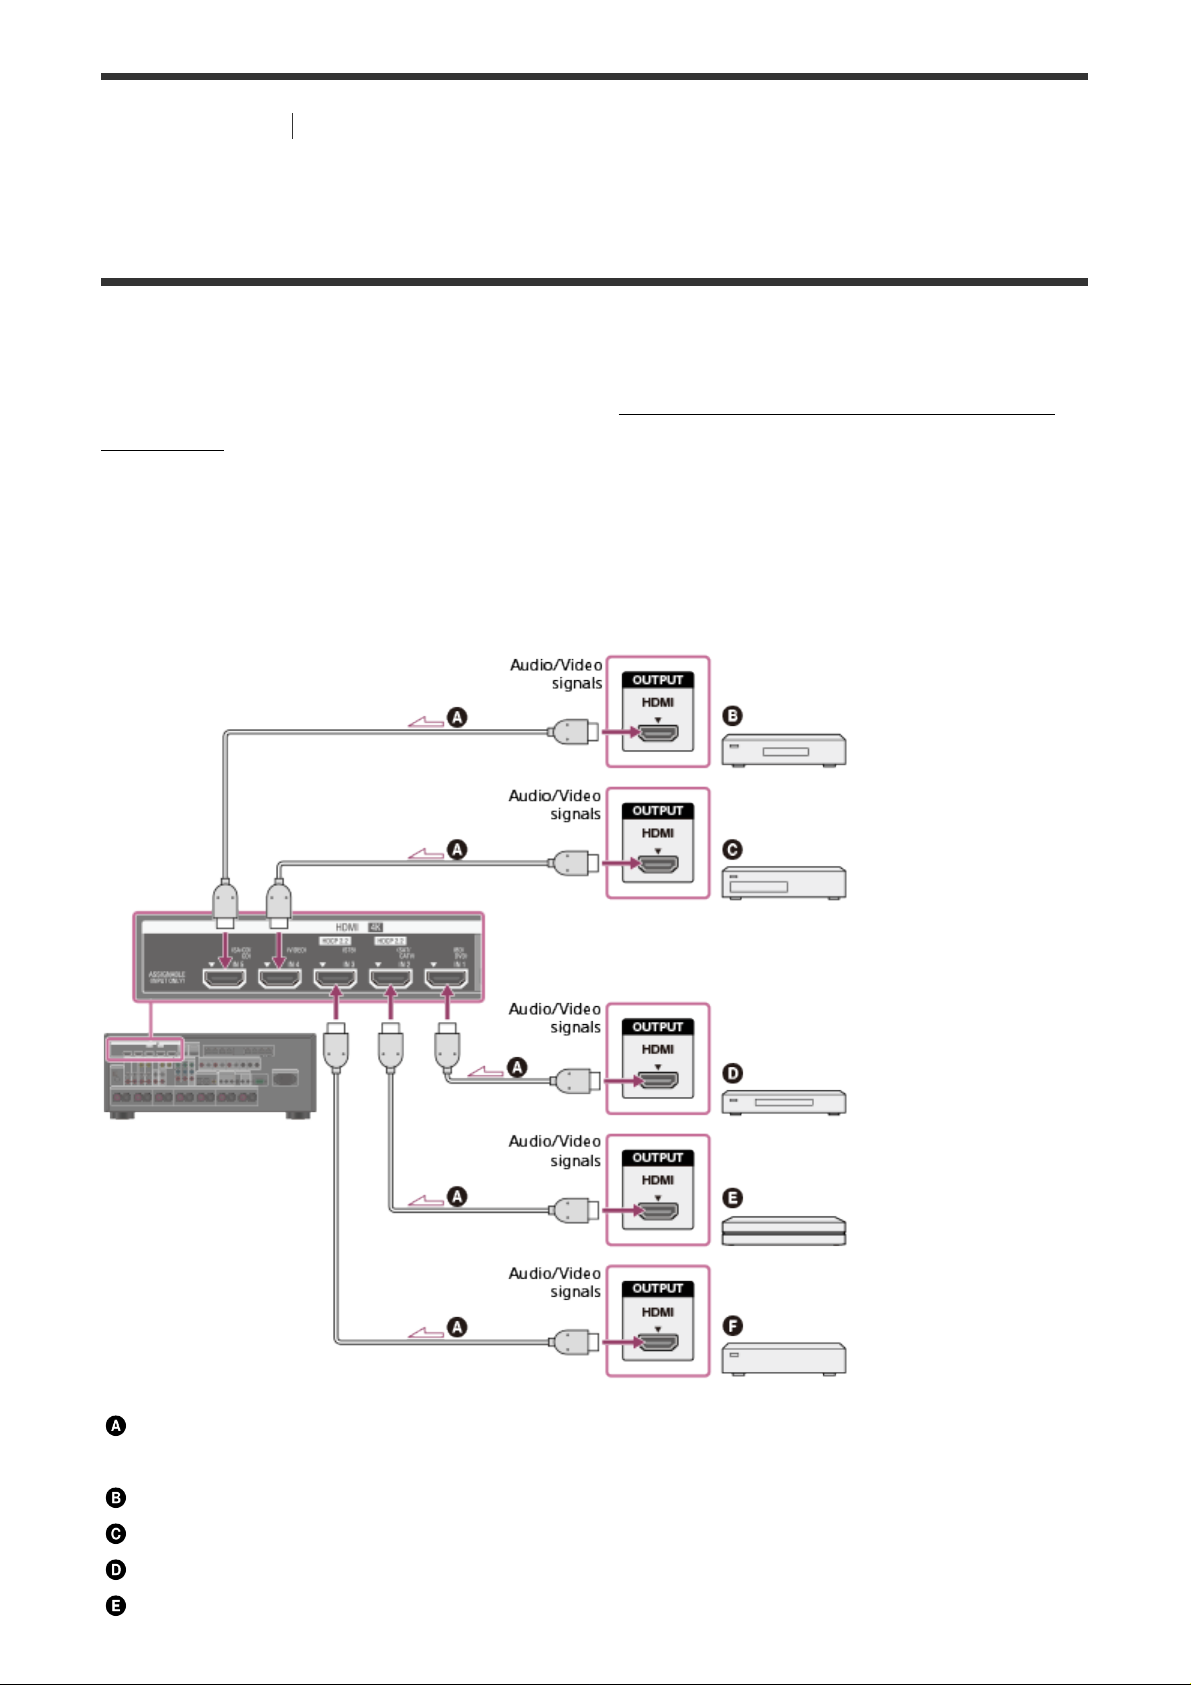
[14] Preparation Connecting audio-visual devices and the antennas (aerials)
Connecting devices with HDMI jacks (for STRZA3000ES)
Connect devices to the receiver as illustrated below.
Before connecting cables, be sure to disconnect the AC power cord (mains lead).
If your device does not have an HDMI jack, see “Connecting devices with jacks other than
HDMI jacks.”
The HDMI jacks designated as being “HDCP 2.2” (HDMI IN 2/IN 3, HDMI OUT A/OUT B)
support High-bandwidth Digital Content Protection System Revision 2.2 (HDCP 2.2). To
watch 4K resolution content, connect these HDMI jacks to jacks that support HDCP 2.2 on a
TV or a player. Refer to the operating instructions of the connected device for details.
HDMI cable (not supplied)
Sony recommends that you use an HDMI-authorized cable or HDMI cable made by Sony.
Super Audio CD player, CD player
DVD recorder
Blu-ray Disc Player, DVD player
4K Media Player
Page 27

Set-top box
Note
This HDMI connection is an example. You can connect each HDMI device to any HDMI
input, including the HDMI input on the front panel.
Hint
The image quality depends on the connecting jack. We recommend that you connect your
devices via an HDMI connection if they have HDMI jacks.
[15] Preparation
Connecting audio-visual devices and the antennas (aerials)
Connecting devices with HDMI jacks (for STRZA2000ES/STR-ZA1000ES)
Connect devices to the receiver as illustrated below.
Before connecting cables, be sure to disconnect the AC power cord (mains lead).
If your device does not have an HDMI jack, see “Connecting devices with jacks other than
HDMI jacks.”
The HDMI jacks designated as being “HDCP 2.2” (HDMI IN 2, HDMI OUT A) support Highbandwidth Digital Content Protection System Revision 2.2 (HDCP 2.2). To watch 4K
resolution content, connect these HDMI jacks to jacks that support HDCP 2.2 on a TV or a
player. Refer to the operating instructions of the connected device for details.
Page 28
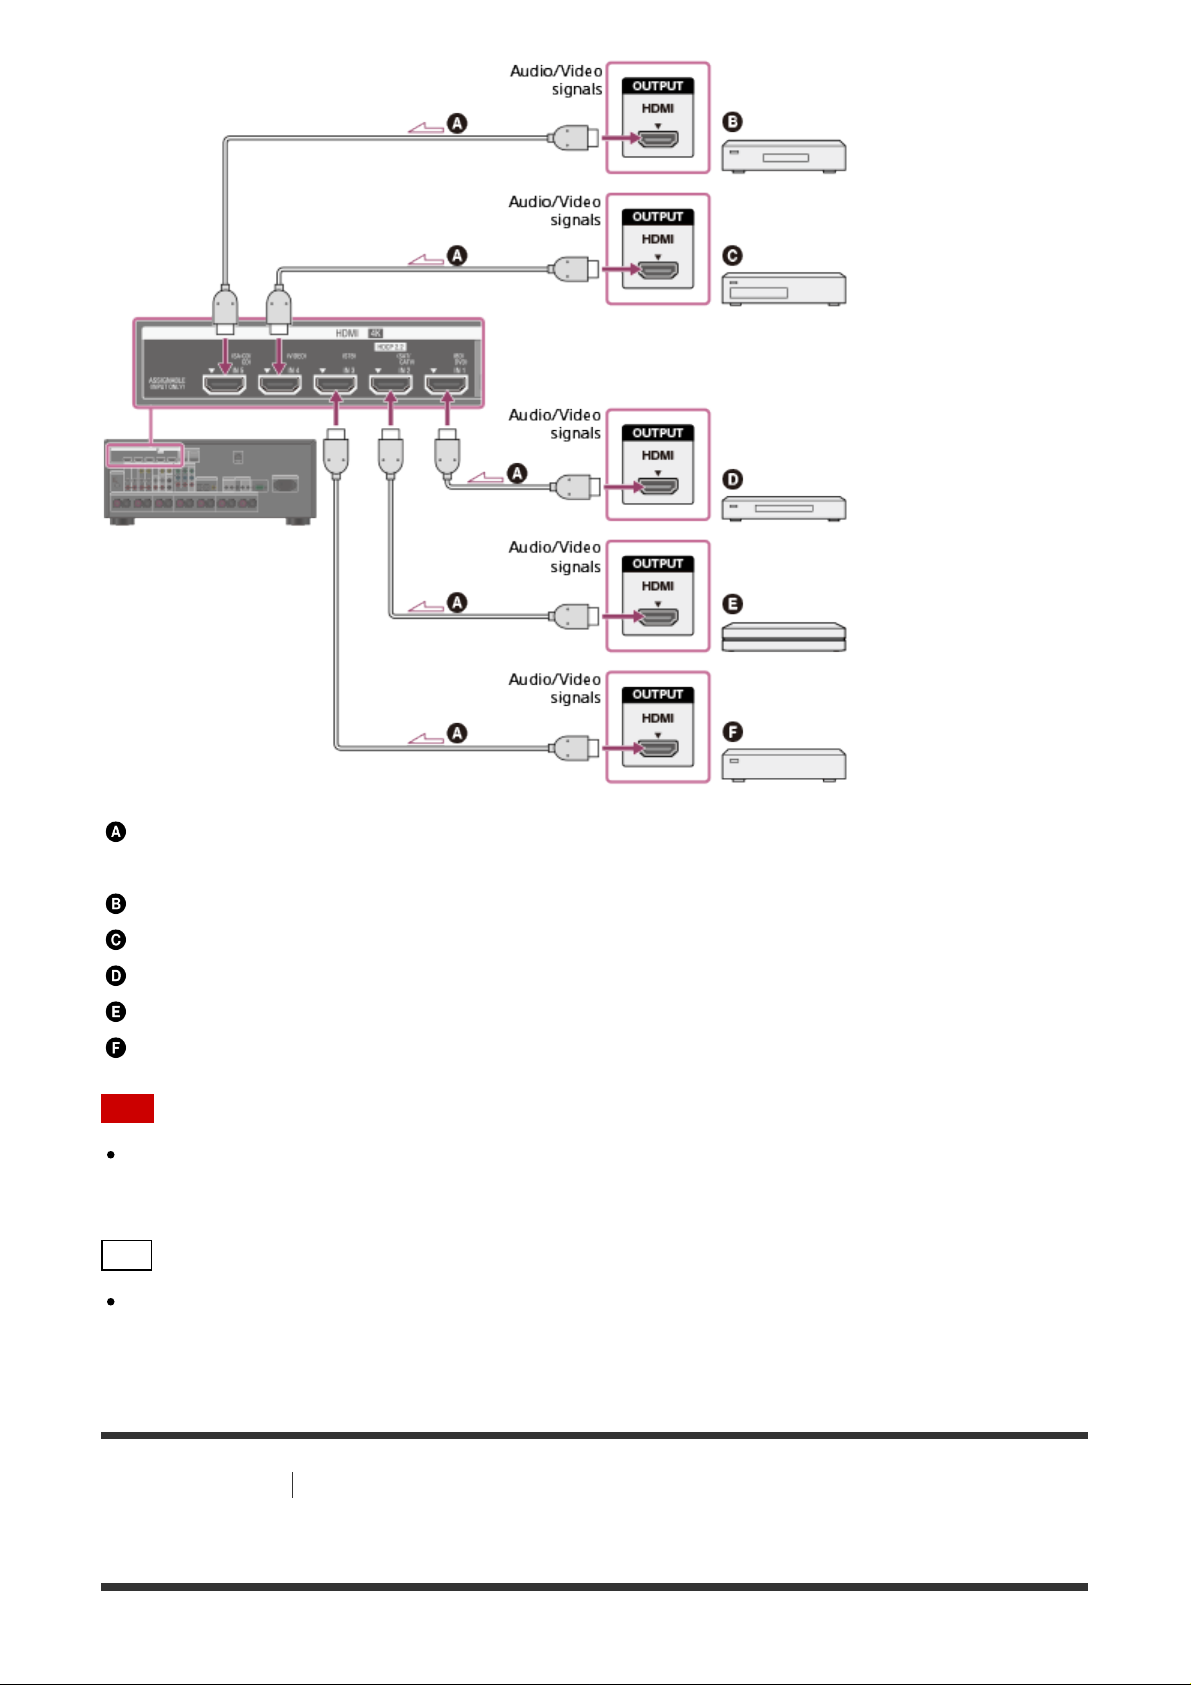
HDMI cable (not supplied)
Sony recommends that you use an HDMI-authorized cable or HDMI cable made by Sony.
Super Audio CD player, CD player
DVD recorder
Blu-ray Disc Player, DVD player
4K Media Player
Set-top box
Note
This HDMI connection is an example. You can connect each HDMI device to any HDMI
input, including the HDMI input on the front panel (for STR-ZA2000ES only).
Hint
The image quality depends on the connecting jack. We recommend that you connect your
devices via an HDMI connection if they have HDMI jacks.
[16] Preparation
Connecting audio-visual devices and the antennas (aerials)
Connecting devices with jacks other than HDMI jacks
Page 29
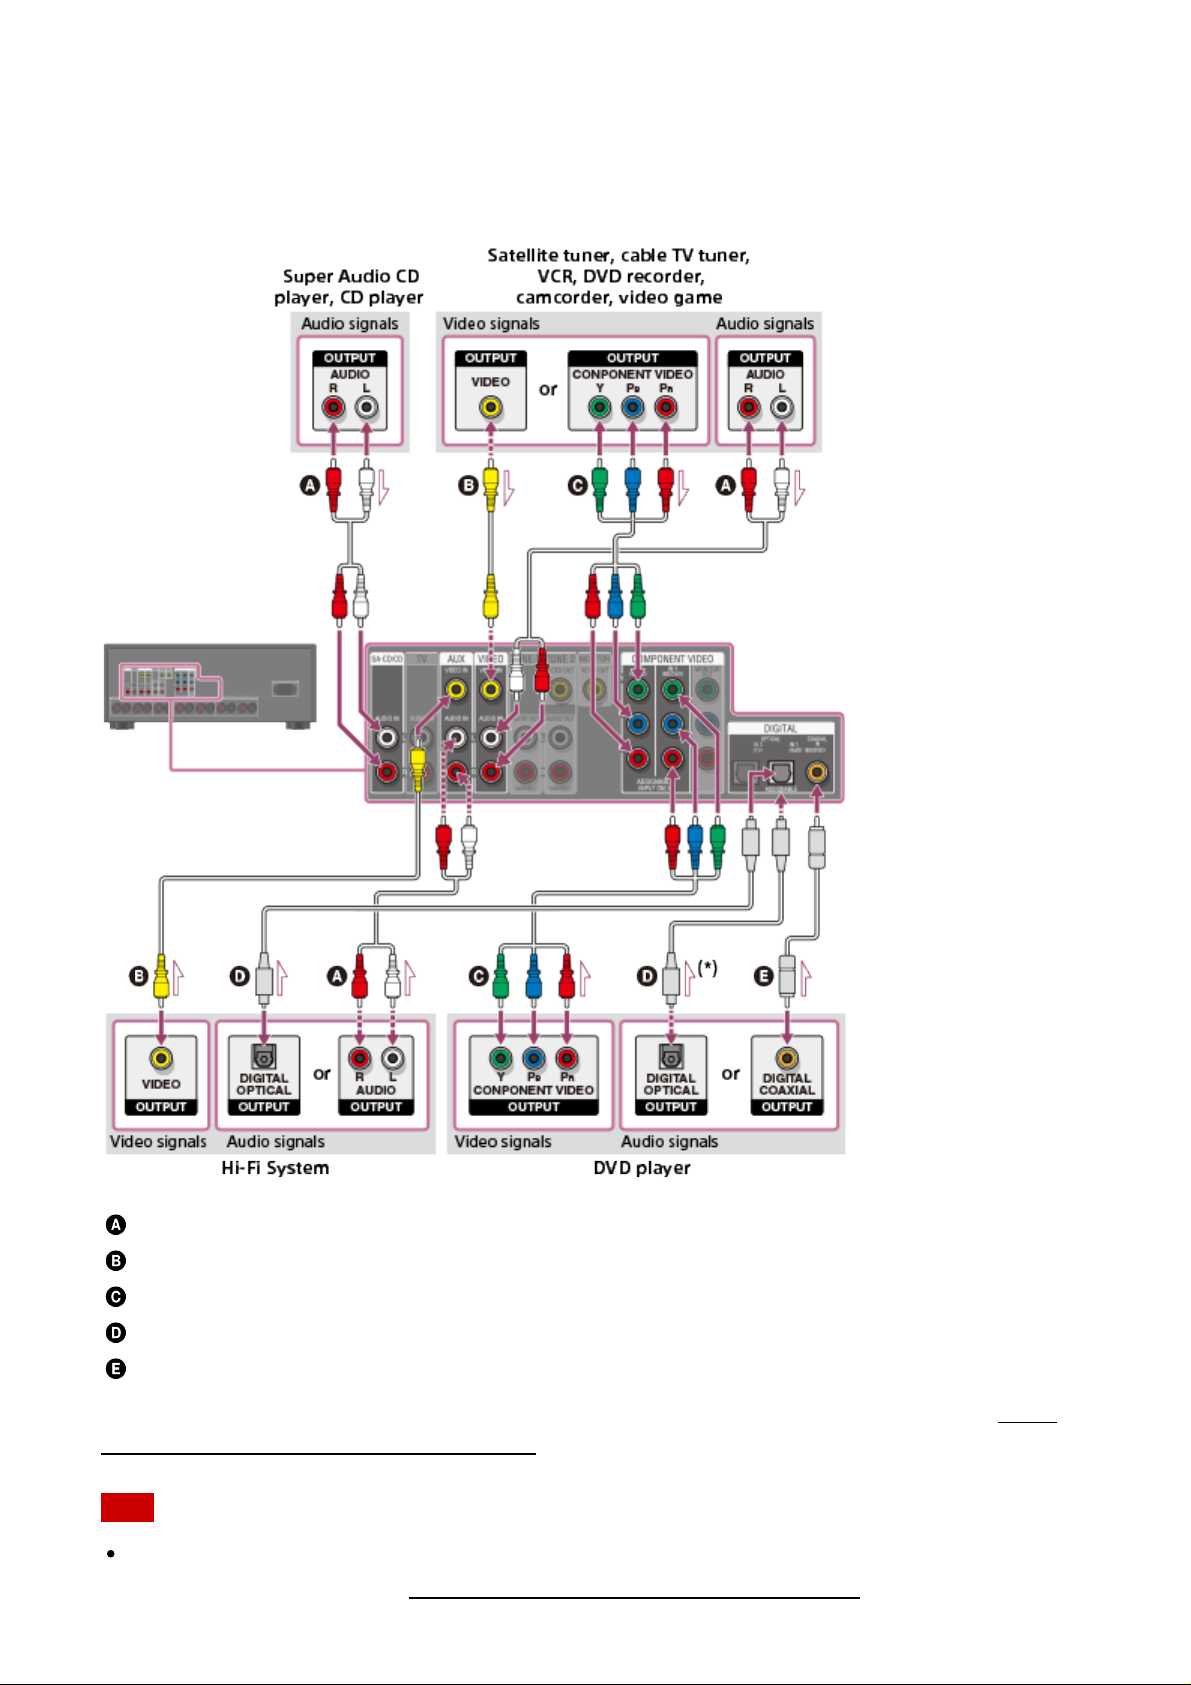
Connect devices to the receiver as illustrated below.
The solid lines show recommended connections and the dashed lines show alternative
connections.
Be sure to disconnect the AC power cord (mains lead) before connecting cables.
Audio cable (not supplied)
Video cable (not supplied)
Component video cable (not supplied)
Optical digital cable (not supplied)
Coaxial digital cable (not supplied)
*
If you connect devices with an OPTICAL jack, reassign the input jacks. For details, see “Using
other video/audio input jacks (Input Assign).”
Note
You can rename each input so that the name can be displayed on the display panel of the
receiver. For details, see “Changing the name for each input (Name).”
Page 30
Hint
Connecting another amplifier using the ZONE 2 VIDEO/AUDIO
The image quality depends on the connecting jack. We recommend that you connect your
devices via an HDMI connection if they have HDMI jacks.
[17] Preparation
Connecting audio-visual devices and the antennas (aerials)
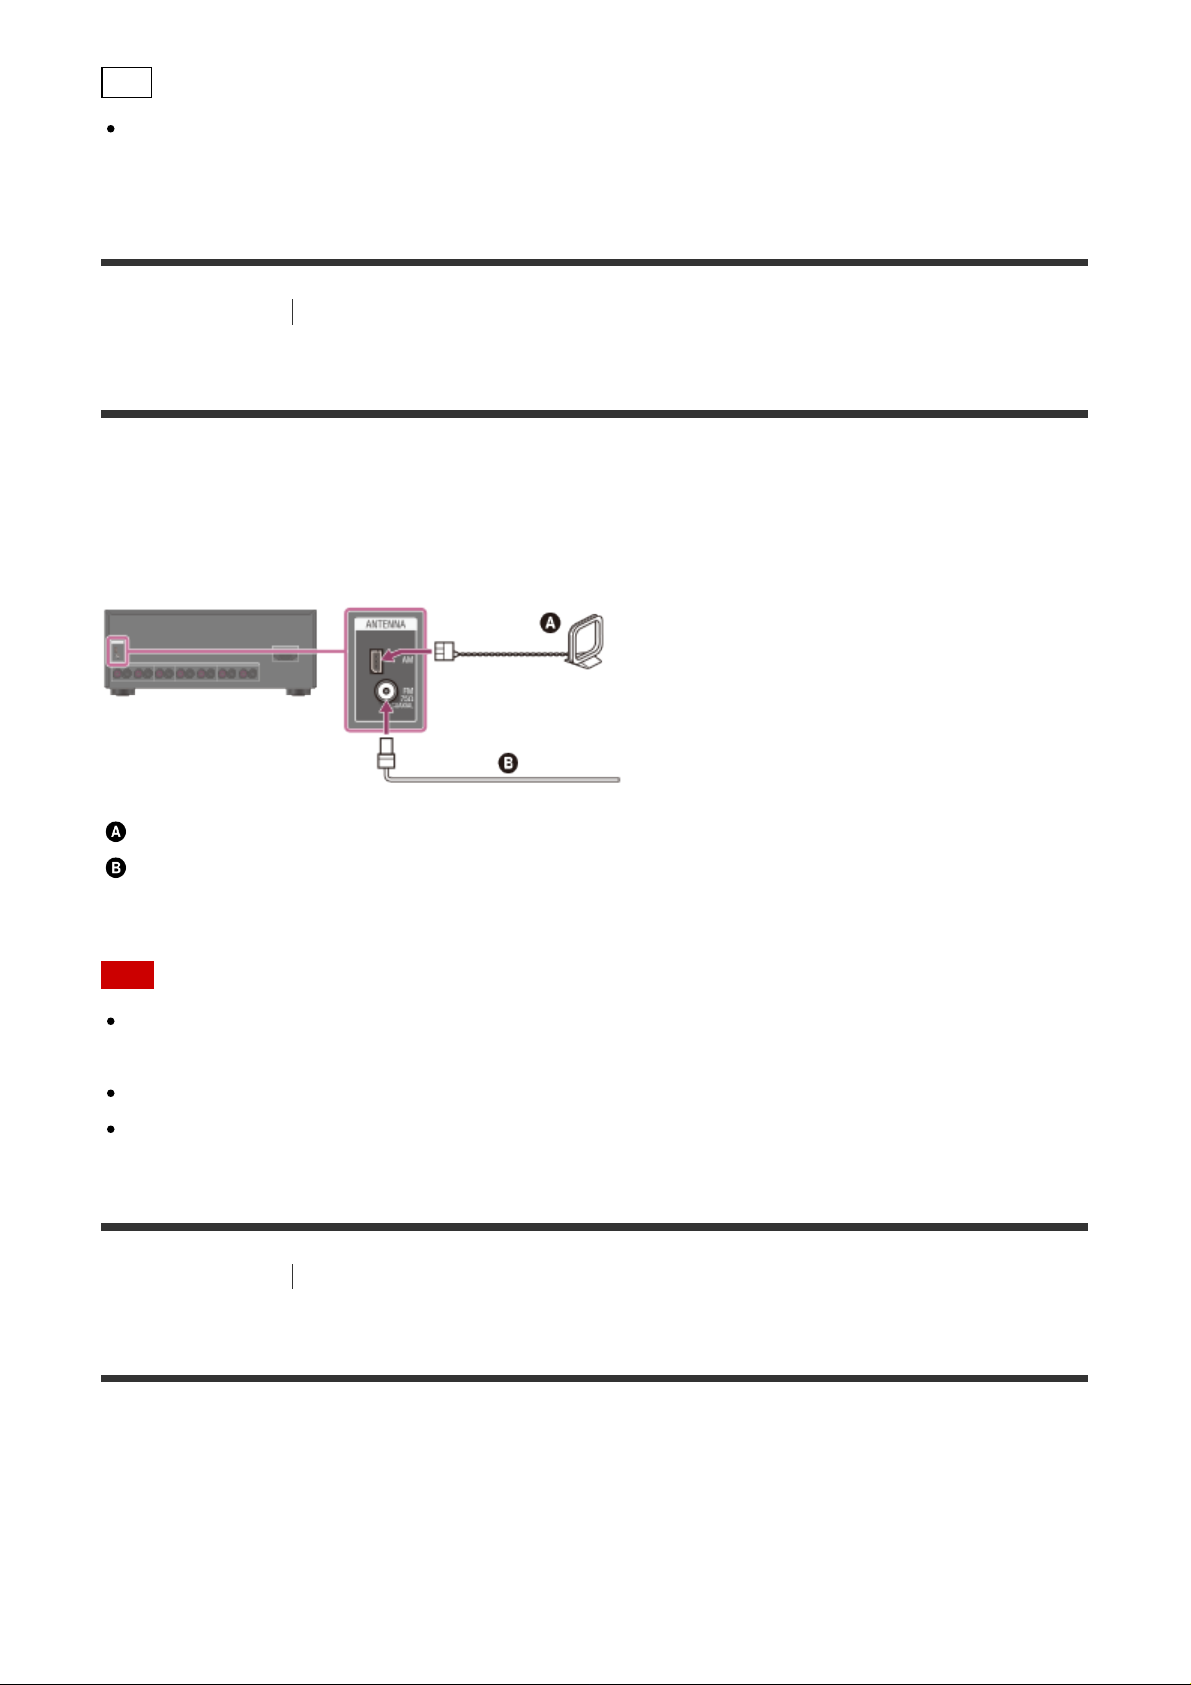
Connecting the antennas (aerials)
Connect the supplied antennas (aerials) to the receiver as illustrated below.
Be sure to disconnect the AC power cord (mains lead) before connecting the antennas
(aerials).
AM loop antenna (aerial) (supplied)
FM wire antenna (aerial) (supplied) (*)
*
The illustration above is for USA and Canadian models.
Note
To prevent noise pickup, keep the AM loop antenna (aerial) away from the receiver and
other devices.
Be sure to fully extend the FM wire antenna (aerial).
After connecting the FM wire antenna (aerial), keep it as horizontal as possible.
[18] Preparation
Connecting audio-visual devices and the antennas (aerials)
Connecting another amplifier in zone 2/3
You can enjoy image (*) and sound from a device connected to the receiver in a zone other
than the main zone. For example, you can watch a DVD in the main zone and listen to a CD
in zone 2.
*
For a connection using the HDMI OUT B jack only
Page 31

OUT jack
TV monitor
Speakers
Other amplifier/receiver
Video cable (not supplied)
Audio cable (not supplied)
Note
Stream input signals cannot be output even when outputting optical/coaxial audio signals.
When outputting optical/coaxial audio signals, set the audio output to PCM on the
connected device. For details, refer to the operating instructions of the connected device.
Connecting another amplifier using the HDMI OUT B jack
HDMI video/audio input signals, optical/coaxial audio input signals are output to zone 2 using
HDMI OUT B jack on the receiver.
Speakers
TV
Other amplifier/receiver
HDMI cable (not supplied)
Page 32

Note
The following settings are required for this connection.
Set [ HDMI Out B Mode] in the HDMI Setup menu to [ Zone2]
Set [ Zone2 Audio Out] in the HDMI Setup menu to [Zone2 AMP]
When outputting optical/coaxial audio signals, set the audio output to PCM on the
connected device. For details, refer to the operating instructions of the connected device.
Connecting another amplifier using the ZONE 3 AUDIO OUT jack
Speakers
Other amplifier/receiver
Audio cable (not supplied)
Note
Only devices connected to the analog audio input jacks and the built-in tuner (FM/AM)
can output signals to Zone 3. No signals are output from devices connected to only the
digital input jacks.
[19] Preparation
Connecting to the network
System requirements for a wired LAN connection
The following system environment is required to use the network function of the receiver via
a wired LAN connection.
Router
Use a router compatible with transmission speeds of 100 Mbps or greater.
We recommend that you use a router equipped with a built-in DHCP (Dynamic Host
Configuration Protocol) server because the default setting on the receiver is DHCP.
Page 33

This function automatically assigns IP addresses to devices on the LAN.
LAN cable
We recommend using a normal shielded type cable for a wired LAN to avoid electric
noise.
Some flat-type LAN cables are easily affected by noise.
A CAT5e or greater Ethernet cable is required for transmission speed of 1,000 Mbps.
(CAT6 is recommended.) (for STR-ZA3000ES)
[20] Preparation
Connecting to the network
Connecting the receiver to the network (for STRZA3000ES)
The following illustration is an example configuration of a home network with the receiver,
and a computer.
Computer
LAN cable (not supplied)
Wireless access point, etc.
Network camera, etc.
Router
Modem
Internet
Note
Page 34

Connect a router to one among ports 1 to 8 of the receiver using only one LAN cable. Do
not connect the same router to the receiver using more than one LAN cable. It may cause
a malfunction.
Ports No. 1 and No. 2 support PoE (Power over Ethernet, Alternative A). If you connect a
PoE-compatible device to one of these ports, power will be supplied to the device from
the receiver.
You can also connect a device that does not support PoE to the PoE port.
The PoE port lights in red while supplying power.
This receiver supports PoE Class 3.
[21] Preparation
Connecting to the network
Connecting the receiver to the network (for STRZA2000ES/STR-ZA1000ES)
The following illustration is an example configuration of a home network with the receiver,
and a computer.
Computer
LAN cable (not supplied)
Router
Modem
Internet
[22] Preparation Turning on the receiver/preparing the remote control
Inserting batteries into the remote control
Page 35

Insert two R03 (size AAA) batteries (supplied) into the remote control. Make sure that the +
and - ends are in the correct position when installing batteries.
Note
Do not leave the remote control in an extremely hot or humid place.
Do not use a new battery with an old one.
Do not mix manganese batteries with other kinds of batteries.
Do not expose the remote control sensor to direct sunlight or lights. Doing so may cause
a malfunction.
If you do not intend to use the remote control for an extended period of time, remove the
batteries to avoid possible damage from battery leakage and corrosion.
When the receiver no longer responds to the remote control, replace both of the batteries
with new ones.
[23] Preparation
Turning on the receiver/preparing the remote control
Turning on the receiver
When you have made all connections with the other devices, connect the AC power cord
(mains lead), then turn on the receiver.
1. Connect the supplied AC power cord (mains lead) to the AC IN terminal on the receiver
firmly, then connect the AC power cord (mains lead) to a wall outlet.
AC IN terminal
AC power cord (mains lead) (supplied)
Page 36

*
Space remains between the plug and the rear panel even when the power cord (mains lead) is
inserted firmly. The cord is supposed to be connected this way. This is not malfunction.
2. Press (on/standby) to turn on the receiver.
You can also turn on the receiver using MAIN (on/standby) on the remote control.
To turn off the receiver, press MAIN (on/standby) again.
Note
After you turn off the receiver, [STANDBY] flashes on the display panel. Do not
disconnect the AC power cord (mains lead) while [STANDBY] is flashing. This may cause
a malfunction.
[24] Preparation
Initial setup of the receiver
Setting up the receiver using the Easy Setup
When you turn on the receiver for the first time or after the receiver is initialized, the Easy
Setup screen appears on the TV screen. You can set up the following settings for the
receiver by following the instructions on the Easy Setup screen.
Auto Calibration
Perform automatic calibration in accordance with your speaker system configuration and
arrangement.
Internet Setup
Configure settings to connect the receiver to the network.
Note
Switch the input of the TV to the input to which the receiver is connected to use this
function.
If the Easy Setup screen does not appear or you want to display the Easy Setup screen
Page 37

manually, you can display it by selecting [Setup] - [Easy Setup] from the home menu.
[25] Enjoying Video and Sound Basic operations
Using the menu on the TV screen
You can display the menu of the receiver on the TV screen.
1. Switch the input of the TV to the input to which the receiver is connected.
2. Press HOME to display the home menu on the TV screen.
3. Press / / / repeatedly to select the menu you want, then press to enter the
menu.
Home menu items
Watch: Select to display video from the connected device.
Listen: Select to listen to sound from the connected device.
Custom Preset: Select to save various settings for the receiver and recall those settings.
Sound Effects: Select to enjoy sound effects.
Setup: Select to adjust the various settings for the receiver.
Hint
When [OPTIONS] appears in the lower right portion of the TV screen, you can display the
function list by pressing OPTIONS and selecting a related function.
To return to the previous screen, press RETURN.
To exit the menu, press HOME to display the home menu, then press HOME again.
[26] Enjoying Video and Sound
Basic operations
Enjoying video/sound from the connected device
Page 38

1. Switch the input of the TV to the input to which the receiver is connected.
2. Press HOME.
The home menu is displayed on the TV screen.
Depending on the TV, the home menu may take some time to appear on the TV
screen.
3. Select [Watch] or [Listen] from the home menu.
The menu item list appears on the TV screen.
4. Select the device you want.
5. Turn on the device and start playback.
6. Press +/– to adjust the volume.
You can also use MASTER VOLUME on the receiver.
7. Press 2CH/A.DIRECT, A.F.D., MOVIE or MULTI ST. to enjoy the surround sound.
You can also use 2CH/A.DIRECT, A.F.D., MOVIE or MULTI ST. on the receiver. For
details, see “Selecting a sound field (Sound Field).”
Note
Before you turn off the receiver, be sure to turn down the volume level to avoid damaging
your speakers.
Hint
You can select the device you want by pressing the input buttons on the remote control or
the receiver.
You can adjust the volume differently using the MASTER VOLUME knob on the receiver
or the +/– buttons on the remote control.
To turn the volume up or down quickly
Turn the knob quickly.
Press and hold one of the buttons.
Page 39

To make fine adjustments
Turn the knob slowly.
Press one of the buttons and release it immediately.
[27] Enjoying Video and Sound Listening to the radio
Listening to FM/AM radio
You can listen to FM and AM broadcasts through the built-in tuner. Before operation, be
sure you have connected the FM and AM antennas (aerials) to the receiver.
1. Select [Listen] - [FM TUNER] or [AM TUNER] from the home menu.
The FM/AM screen appears.
To switch the screen mode, press OPTIONS and select [Simple] or [Full] in [FM/AM
Display] from the options menu.
FM/AM screen (Simple mode)
The Simple mode screen appears in the default setting.
1. Band indication
You can select [FM] or [AM] by pressing the FM or AM.
2. Frequency indication
You can tune to a station automatically by pressing TUNING +/-. The receiver stops
scanning whenever a station is received.
You can also select a preset station by pressing PRESET +/-.
FM/AM screen (Full mode)
You can select and operate each item on the screen by pressing / / / and .
Page 40

1. Band indication
You can select [FM] or [AM] by pressing / repeatedly.
2. Frequency indication
You can tune to a station automatically by pressing / repeatedly (Auto Tuning).
Press to scan from lower to higher frequency stations or press to scan from
higher to lower stations.
The receiver stops scanning whenever a station is received.
3. Preset station list
You can tune to a station by selecting the preset number from the list.
[28] Enjoying Video and Sound Listening to the radio
Presetting FM/AM radio stations (Preset Memory)
You can store up to 30 FM and 30 AM stations as your favorite stations.
1. Select [Listen] - [FM TUNER] or [AM TUNER] from the home menu.
If the Simple mode screen appears, switch to the Full mode screen.
2. Tune to the station that you want to preset.
3. Press OPTIONS.
4. Select [Preset Memory] from the options menu.
5. Select a preset number.
The station is stored as the selected preset number.
6. Repeat steps 1 to 5 to store another station.
You can store stations as follows:
AM band: AM 1 to AM 30
Page 41

FM band: FM 1 to FM 30
[29] Enjoying Video and Sound Listening to the radio
Tuning to a station directly (Direct Tuning)
You can enter the frequency of a station directly.
1. Select [Listen] - [FM TUNER] or [AM TUNER] from the home menu.
If the Simple mode screen appears, switch to the Full mode screen.
2. Press / / / to select the Frequency indication and then press .
3. Enter the frequency using / / / .
i. Press
ii. Press
/ to select a digit.
/ to change the digit.
4. Press .
Note
If the tuned frequency is invalid or out of range, [---.-- M H z ] or [---- kHz] appears and
then the screen returns to the current frequency.
Make sure you have entered the right frequency. If not, repeat steps 3 and 4. If you still
cannot tune to a station, the frequency may not be in use in your area.
Hint
Adjust the direction of the AM loop antenna (aerial) for optimum reception upon tuning to
an AM station.
The tuning scale for direct tuning is shown below:
USA and Canada
FM: 100 kHz
AM: 10 kHz (*)
other area
FM: 50 kHz
AM: 9 kHz
*
The AM tuning scale can be changed. For details, see “ Changing the AM tuning scale.”
Page 42

[30] Enjoying Video and Sound Listening to the radio
Changing the AM tuning scale
You can change the AM tuning scale to either 9 kHz or 10 kHz using the buttons on the
receiver.
Be sure to use the buttons on the receiver to perform this operation.
1. Turn off the receiver.
2. Hold down TUNING MODE and press (on/standby) on the receiver.
The current AM tuning scale is changed to 9 kHz (or 10 kHz). To reset the scale to 10
kHz (or 9 kHz), repeat the procedure above.
Note
Depending on the settings, the receiver may take some time to change the AM tuning
scale.
All preset stations will be erased when you change the tuning scale.
[31] Enjoying Video and Sound
Enjoying sound effects
Selecting a sound field (Sound Field)
You can select from a variety of sound field modes according to speaker connections or
input sources.
1. Select [Setup] - [Audio Setup] from the home menu.
2. Select [Sound Field].
3. Select the sound field you want.
For details on each sound field, see the following topics.
2-channel sound mode
Auto Format Direct (A.F.D.)
Movie mode
Multi Stereo
Note
Page 43

The sound fields for movie may not work, depending on the input or the speaker pattern
you select, or with audio formats.
The receiver may play signals at a lower sampling frequency than the actual sampling
frequency of the input signals, depending on the audio format.
[Pro Logic IIx] may not appear, depending on the speaker pattern you select.
Some speakers or the subwoofer may not output sound, depending on the sound field
setting.
If there is any noise present, the noise may be different, depending on the sound field you
select.
Hint
You can also select [Sound Field] in [Sound Effects] from the home menu.
You can also use 2CH/A.DIRECT, A.F.D., MOVIE or MULTI ST. on the remote control or
the receiver to select a sound field.
[32] Enjoying Video and Sound
Enjoying sound effects
Resetting sound fields to the default settings
Be sure to use the buttons on the receiver to perform this operation.
1. Turn off the receiver.
2. Hold down MULTI ST. and press (on/standby) on the receiver.
[S.F. INITIALIZED!] appears on the display panel and all sound fields are reset to their
default setting.
[33] Enjoying Video and Sound Enjoying sound effects
Adjusting the equalizer (Equalizer)
You can use the following parameters to adjust the tonal quality (bass/treble level) of the
front, center, surround/surround back and front high speakers.
Page 44

Level (dB)
Frequency (Hz)
Bass
Treble
1. Select [Setup] - [Speaker Setup] from the home menu.
2. Select [Equalizer].
3. Select [Front Speaker], [Center Speaker], [Surround] or [Front High].
4. Select [Bass] or [Treble].
5. Adjust the gain.
Note
This function does not work in the following cases:
[2ch Analog Direct] is selected.
[Pure Direct ] is set to [On].
Frequencies for [Bass] and [Treble] are fixed.
Depending on the audio format, the receiver may play signals at a lower sampling
frequency than the original sampling frequency of the input signals.
Hint
You can also select [Equalizer] in [Sound Effects] from the home menu.
[34] Enjoying Video and Sound
Enjoying sound effects
Enjoying clear and dynamic sound at a low volume
(Sound Optimizer)
You can enjoy clear and dynamic sound at low volume levels using the Sound Optimizer.
After the Auto Calibration is performed, the sound level is optimized to suit your environment.
1. Select [Setup] - [Audio Setup] from the home menu.
2. Select [Sound Optimizer].
3. Select the setting you want.
Normal: Adjusts for the reference level of a movie.
Low: Adjusts for a CD or other software whose average sound pressure level is
Page 45

processed highly.
Off
Note
This function does not work in the following cases:
[2ch Analog Direct] is selected.
[Pure Direct ] is set to [On].
The receiver may play signals at a lower sampling frequency than the actual sampling
frequency of the input signals, depending on the audio format.
Hint
You can also select [Sound Optimizer] in [Sound Effects] from the home menu.
[35] Enjoying Video and Sound
Enjoying sound effects
Enjoying more natural sound with speakers installed in
the ceiling (In-Ceiling Speaker Mode)
Set whether or not to use in-ceiling speaker mode with the current input.
In a setup where the front and center speakers are installed in the ceiling, lowering the audio
output position to the screen height allows you to enjoy a more natural experience.
1. Select [Setup] - [Audio Setup] from the home menu.
2. Select [In-Ceiling Speaker Mode].
3. Select [On].
Note
This function does not work in the following cases:
[2ch Analog Direct] is selected.
A speaker pattern with the front high speakers is selected.
[Pro Logic II], [Pro Logic IIx] or [Neo:6] is selected.
[Pure Direct ] is set to [On].
This function may not work depending on the audio format.
The receiver may play signals at a lower sampling frequency than the actual sampling
frequency of the input signals depending on the audio format.
Hint
Page 46

You can also switch this function on/off for each input on the Input Setup screen.
You can also select [In-Ceiling Speaker Mode] in [Sound Effects] from the home menu.
You can also switch the function on/off by pressing IN-CEILING SP on the remote control
or the receiver.
To obtain optimal effects in the listening environment, configure the [Ceiling Speaker
Height] setting and perform Auto Calibration.
[36] Enjoying Video and Sound
Enjoying sound effects
Enjoying high-fidelity sound (Pure Direct)
You can enjoy higher-fidelity sound from all inputs using the Pure Direct function. When the
Pure Direct function is on, the display panel lights off to suppress noise that affects sound
quality.
1. Select [Setup] - [Audio Setup] from the home menu.
2. Select [Pure Direct].
3. Select [On].
Canceling Pure Direct
The Pure Direct function will be canceled when you perform the following:
Select [Off] in step 3.
Press PURE DIRECT.
Change the sound field.
Change the scene setting on the TV (Scene Select).
Change the setting of [Equalizer], [Sound Optimizer], [Dynamic Range Compressor] or
[In-Ceiling Speaker Mode].
Note
[Equalizer], [Sound Optimizer], [Dynamic Range Compressor] and [In-Ceiling Speaker
Mode] do not work when the Pure Direct function is selected.
Hint
You can also use PURE DIRECT to turn the Pure Direct function on or off.
You can also select [Pure Direct] in [Sound Effects] from the home menu.
[37] Using the Multi-Zone Features
Enjoying sound in two rooms (multi-zone feature
Page 47

using the receiver with 2 pairs of speakers)
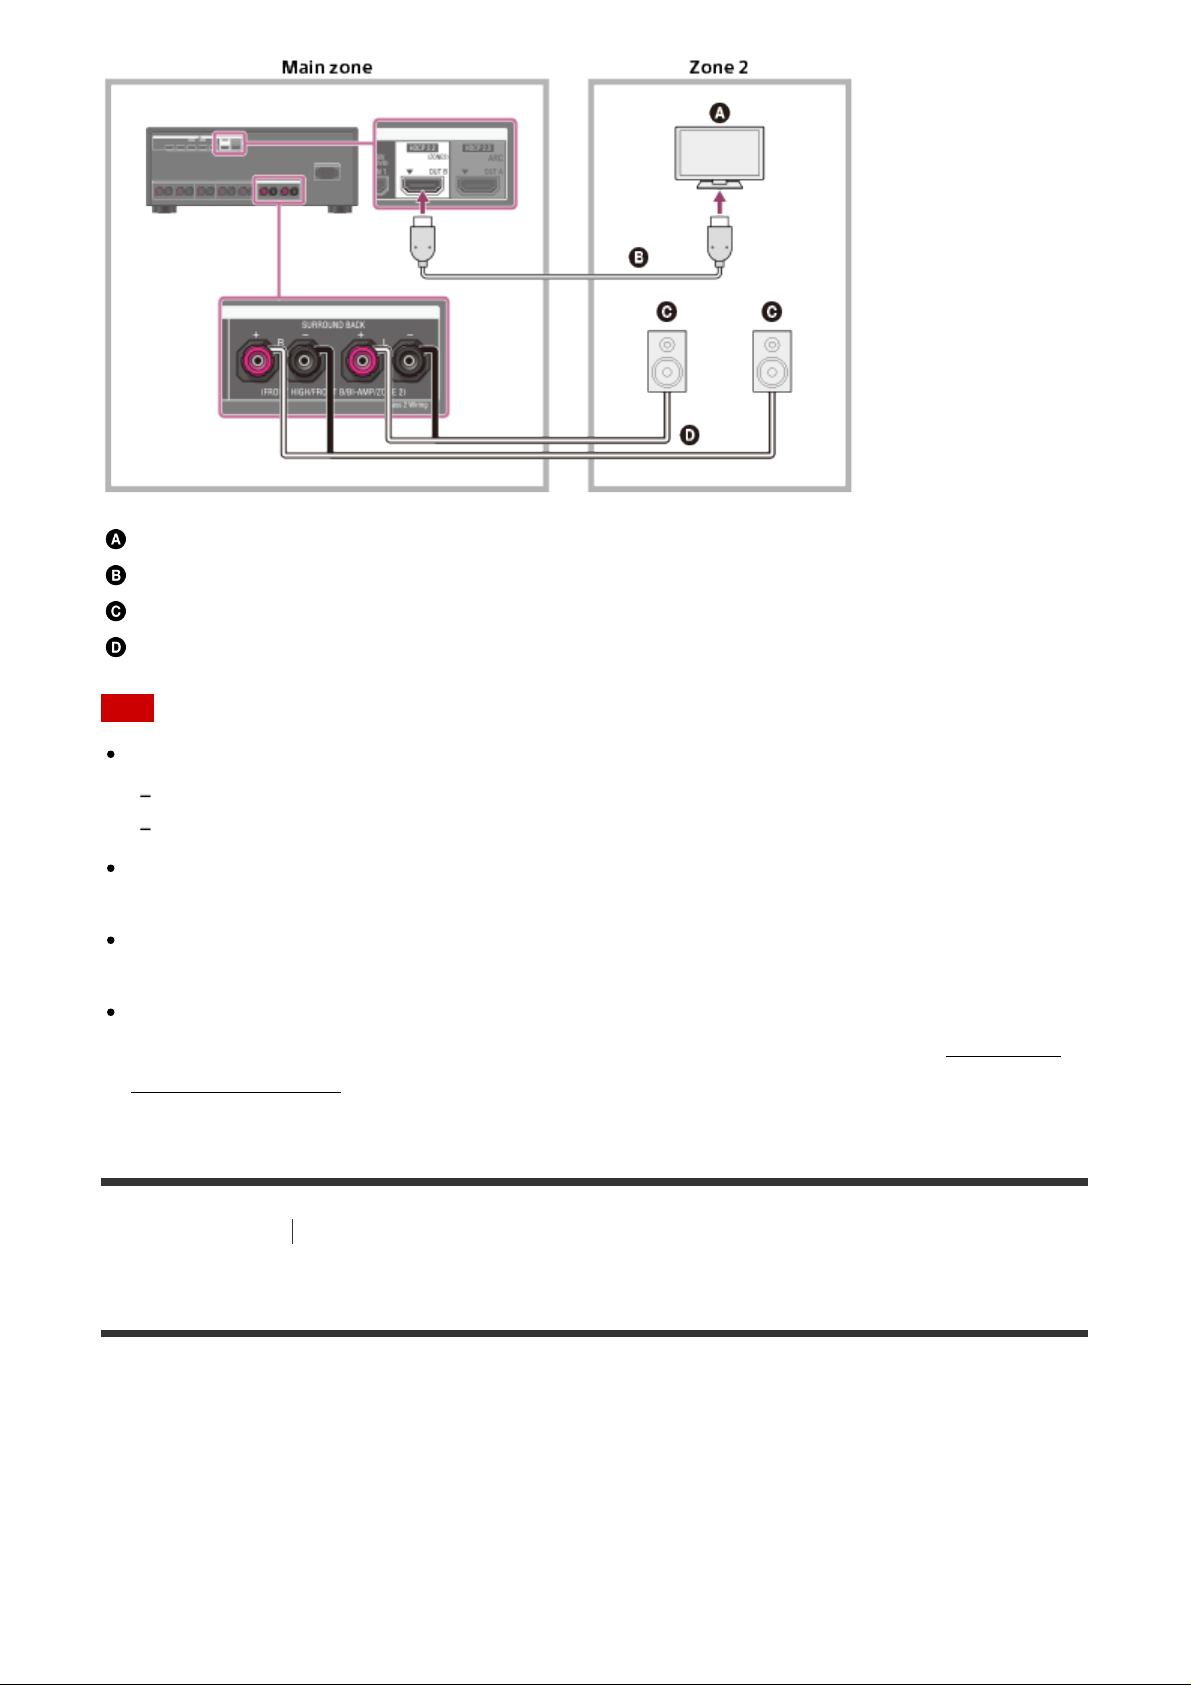
Connecting the speakers in zone 2
You can enjoy sound from a device connected to the receiver in a zone other than the main
zone. For example, you can watch a DVD in the main zone and listen to a CD in zone 2.
Connect each speaker as illustrated below.
Be sure to disconnect the AC power cord (mains lead) before connecting cables. For details
on how to connect speaker cables to the receiver, see “How to connect speaker cables.”
TV
HDMI cable (not supplied)
Speakers
Speaker cable (not supplied)
Note
The following settings are required for this connection.
Set [ HDMI Out B Mode] in the HDMI Setup menu to [ Zone2]
Set [ Zone2 Audio Out] in the HDMI Setup menu to [Zone2 TV + AMP]
Turn the volume of the TV down or set [Zone2 Audio Out] in the HDMI Setup menu to
[AMP] if you do not want to output sound from the TV in zone 2.
You cannot remedy the time gap between video on zone 2 TV and audio from zone 2
speakers using the A/V Sync function.
When using this zone 2 connection, you need to set up the SPEAKERS SURROUND
BACK/FRONT HIGH/FRONT B/BI-AMP/ZONE 2 terminals. For details, see “Setting the
speakers for zone 2.”
[38] Using the Multi-Zone Features
Enjoying sound in two rooms (multi-zone feature
Page 48

using the receiver with 2 pairs of speakers)
Setting the speakers for zone 2
In the case of “Connecting another amplifier in zone 2/3,” adjust the volume using
When the speakers in zone 2 are connected to the SPEAKERS SURROUND BACK/FRONT
HIGH/FRONT B/BI-AMP/ZONE 2 terminals of the receiver, configure the settings so that the
sound selected in zone 2 is output from the speakers connected to the SPEAKERS
SURROUND BACK/FRONT HIGH/FRONT B/BI-AMP/ZONE 2 terminals.
1. Select [Setup] - [Speaker Setup] from the home menu.
2. Select [Speaker Pattern].
3. Set a speaker pattern without surround back and front high speakers.
4. Select [SB Speaker Assign] - [Zone2].
Note
If a speaker pattern with surround back speakers or front high speakers is set, you cannot
set the SPEAKERS SURROUND BACK/FRONT HIGH/FRONT B/BI-AMP/ZONE 2
terminals for a bi-amplifier connection or a zone 2 connection.
[39] Using the Multi-Zone Features
using the receiver with 2 pairs of speakers)
Enjoying sound in two rooms (multi-zone feature
Enjoying sound in zone 2/3
You can enjoy sound from the receiver in zone 2 or zone 3 by the following procedure.
1. Turn on the amplifier in zone 2 or zone 3.
In the case of “Connecting the speakers in zone 2,” skip this step.
2. Press ZONE2 or ZONE3.
The power in zone 2 or zone 3 turns on and output is enabled in zone 2 or zone 3.
3. Press one of the input buttons to select the source signals you want to output.
4. Adjust to a suitable volume.
In the case of “Connecting the speakers in zone 2,” adjust the volume using
MASTER VOLUME on the receiver while [ZONE2 INPUT - xxx (input name)] is
shown on the display panel.
Page 49

the receiver in zone 2 or zone 3. If you set [Zone2 Line Out] or [Zone3 Line Out] to
[Variable], you can also adjust the volume in zone 2 or zone 3 using MASTER
VOLUME on the receiver while [ZONE2 INPUT - xxx (input name)] is shown on the
display panel.
Exiting zone 2 or zone 3 operation
Press ZONE2 or ZONE3.
The power in zone 2 or zone 3 turns off and output is disabled in zone 2 or zone 3.
Available input for zone 2 or zone 3 operations
For zone 2, HDMI signals, component video signals, optical/coaxial audio signals, analog
video and audio signals are output. For zone 3, only analog audio signals are output.
Zone 2: SOURCE (*1), BD/DVD, GAME, STB, SAT/CATV, VIDEO, AUX, TV, SACD/CD, TUNER (*2)
Zone 3: SOURCE (*1), VIDEO, AUX, TV, SA-CD/CD, TUNER (*2)
*1
The signals of the current input in main zone are output when [SOURCE] is selected.
*2
When [FM TUNER ] or [AM TUNER] are selected at the same time in the main zone and zone 2 or
zone 3, the item most recently selected will be set.
Note
When the receiver is in standby mode, the (on/standby) indicator on the front panel
lights up in amber if the receiver in zone 2 or zone 3 is turned on.
Audio signals are not output to zone 2 when receiving a DSD signal via HDMI.
Digital audio signals are output to zone 2 only when receiving a 2ch PCM signal. Digital
audio stream signals such as Dolby Digital signals are not output to zone 2. When
outputting optical/coaxial audio signals, set the audio output to PCM on the connected
device. For details, refer to the operating instructions of the connected device.
If you change the sound field or speaker settings in the main zone while the input for zone
2 is set to SOURCE or the same input is selected in the main zone and zone 2, the sound
may also be momentarily interrupted in zone 2.
[40] Using the Multi-Zone Features
Enjoying sound in two rooms (multi-zone feature
using the receiver and another amplifier)
Connecting another amplifier in zone 2/3
You can enjoy image (*) and sound from a device connected to the receiver in a zone other
than the main zone. For example, you can watch a DVD in the main zone and listen to a CD
in zone 2.
*
Page 50

For a connection using the HDMI OUT B jack only
Connecting another amplifier using the ZONE 2 VIDEO/AUDIO
OUT jack
TV monitor
Speakers
Other amplifier/receiver
Video cable (not supplied)
Audio cable (not supplied)
Note
Stream input signals cannot be output even when outputting optical/coaxial audio signals.
When outputting optical/coaxial audio signals, set the audio output to PCM on the
connected device. For details, refer to the operating instructions of the connected device.
Connecting another amplifier using the HDMI OUT B jack
HDMI video/audio input signals, optical/coaxial audio input signals are output to zone 2 using
HDMI OUT B jack on the receiver.
Speakers
TV
Page 51

Other amplifier/receiver
HDMI cable (not supplied)
Note
The following settings are required for this connection.
Set [ HDMI Out B Mode] in the HDMI Setup menu to [ Zone2]
Set [ Zone2 Audio Out] in the HDMI Setup menu to [Zone2 AMP]
When outputting optical/coaxial audio signals, set the audio output to PCM on the
connected device. For details, refer to the operating instructions of the connected device.
Connecting another amplifier using the ZONE 3 AUDIO OUT jack
Speakers
Other amplifier/receiver
Audio cable (not supplied)
Note
Only devices connected to the analog audio input jacks and the built-in tuner (FM/AM)
can output signals to Zone 3. No signals are output from devices connected to only the
digital input jacks.
[41] Using the Multi-Zone Features
using the receiver and another amplifier)
Enjoying sound in two rooms (multi-zone feature
Setting the volume control for zone 2/3 (Line Out)
You can set variable or fixed volume control for the ZONE 2 AUDIO OUT/ZONE 3 AUDIO
OUT jacks.
1. Select [Setup] - [Zone Setup] from the home menu.
Page 52

2. Select [Zone2 Line Out] or [Zone3 Line Out].
3. Select the setting you want.
Variable:
Select when you cannot adjust the volume level on the amplifier in zone 2 or zone 3.
The volume level of the receiver output in zone 2 or zone 3 will become adjustable.
Fixed:
Select to adjust the volume on the amplifier in zone 2 or zone 3. The volume level of
the receiver output in zone 2 or zone 3 on the receiver will be fixed.
Note
When [Variable] is set, the volume is turned down by default. Turn up the volume while
listening to the sound after completing setup.
[42] Using the Multi-Zone Features
using the receiver and another amplifier)
Enjoying sound in two rooms (multi-zone feature
Setting the zone 2 HDMI audio output of connected
devices (Zone2 Audio Out)
You can set the zone 2 HDMI audio signal output for playback devices connected to the
receiver via an HDMI connection.
1. Select [Setup] - [HDMI Setup] from the home menu.
2. Select [Zone2 Audio Out].
3. Select the setting you want.
AMP:
Recommended setting when a TV is connected directly to HDMI OUT B jack.
Sound is output from the speakers connected to the receiver.
Sound is not output from the TV speakers.
Zone2 TV + AMP:
Recommended setting when a TV is connected directly to HDMI OUT B jack.
Sound is output from the TV speakers and the speakers connected to the receiver.
Zone2 AMP:
Recommended setting when another amplifier is connected to HDMI OUT B jack.
Sound is output from the another receiver connected to HDMI OUT B jack.
Sound is not output from ZONE 2 SPEAKER OUT terminals and ZONE 2 AUDIO
Page 53

OUT jacks.
Note
You can only configure this setting only when [HDMI Out B Mode] is set to [Zone2].
When a video device (projector, etc.) is connected to the ZONE 2 HDMI OUT jack, sound
may not be output from the receiver. In this case, set [Zone2 Audio Out] to [AMP].
When a TV which does not support audio content protection is connected to the HDMI
OUT B jack, specific audio may not be output from the receiver. In this case, set [Zone2
Audio Out] to [AMP].
When [Zone2 Audio Out] is set to [Zone2 TV + AMP] or [AMP], audio signals will be
downmixed. The following restrictions apply to downmixing.
Audio signals are not output to zone 2 when receiving a DSD signal.
If you change the sound field or speaker settings in the main zone while the input for zone 2 is set
to SOURCE or the same input is selected in the main zone and zone 2, the sound may also be
momentarily interrupted in zone 2.
The D.L.L. function does not work in the main zone.
The volume level of sound from ZONE 2 SPEAKER OUT terminals and HDMI OUT B jack may be
different from sound that is not downmixed.
No sound will be output to zone 2 if you play a DTS-CD with different HDMI inputs
selected in the main zone and zone 2.
You cannot remedy the time gap between video output on the TV connected to HDMI
OUT B jack and audio output from the speaker connected to ZONE 2 SPEAKER OUT
terminals using the A/V Sync function.
[43] Using the Multi-Zone Features
Enjoying sound in two rooms (multi-zone feature
using the receiver and another amplifier)
Setting the priority for the main zone (Priority)
Lets you set the priority when you select the same input for both the main zone and zone 2.
1. Select [Setup] - [HDMI Setup] from the home menu.
2. Set [Priority].
Main & Zone2:
You can enjoy the same input in the main zone and zone 2. However, there may be
some interference in the audio and video signals in the main zone and zone 2.
Main Only:
You can enjoy good audio and video quality in the main zone. There is no output in
zone 2.
Page 54

Note
This function is enabled only when [HDMI Out B Mode] is set to [Zone2].
[44] Using the Multi-Zone Features
using the receiver and another amplifier)
Enjoying sound in two rooms (multi-zone feature
Enjoying sound in zone 2/3
You can enjoy sound from the receiver in zone 2 or zone 3 by the following procedure.
1. Turn on the amplifier in zone 2 or zone 3.
In the case of “Connecting the speakers in zone 2,” skip this step.
2. Press ZONE2 or ZONE3.
The power in zone 2 or zone 3 turns on and output is enabled in zone 2 or zone 3.
3. Press one of the input buttons to select the source signals you want to output.
4. Adjust to a suitable volume.
In the case of “Connecting the speakers in zone 2,” adjust the volume using
MASTER VOLUME on the receiver while [ZONE2 INPUT - xxx (input name)] is
shown on the display panel.
In the case of “Connecting another amplifier in zone 2/3,” adjust the volume using
the receiver in zone 2 or zone 3. If you set [Zone2 Line Out] or [Zone3 Line Out] to
[Variable], you can also adjust the volume in zone 2 or zone 3 using MASTER
VOLUME on the receiver while [ZONE2 INPUT - xxx (input name)] is shown on the
display panel.
Exiting zone 2 or zone 3 operation
Press ZONE2 or ZONE3.
The power in zone 2 or zone 3 turns off and output is disabled in zone 2 or zone 3.
Available input for zone 2 or zone 3 operations
For zone 2, HDMI signals, component video signals, optical/coaxial audio signals, analog
video and audio signals are output. For zone 3, only analog audio signals are output.
Zone 2: SOURCE (*1), BD/DVD, GAME, STB, SAT/CATV, VIDEO, AUX, TV, SACD/CD, TUNER (*2)
Zone 3: SOURCE (*1), VIDEO, AUX, TV, SA-CD/CD, TUNER (*2)
*1
Page 55

The signals of the current input in main zone are output when [SOURCE] is selected.
*2
When [FM TUNER ] or [AM TUNER] are selected at the same time in the main zone and zone 2 or
zone 3, the item most recently selected will be set.
Note
When the receiver is in standby mode, the (on/standby) indicator on the front panel
lights up in amber if the receiver in zone 2 or zone 3 is turned on.
Audio signals are not output to zone 2 when receiving a DSD signal via HDMI.
Digital audio signals are output to zone 2 only when receiving a 2ch PCM signal. Digital
audio stream signals such as Dolby Digital signals are not output to zone 2. When
outputting optical/coaxial audio signals, set the audio output to PCM on the connected
device. For details, refer to the operating instructions of the connected device.
If you change the sound field or speaker settings in the main zone while the input for zone
2 is set to SOURCE or the same input is selected in the main zone and zone 2, the sound
may also be momentarily interrupted in zone 2.
[45] Using Other Features
Sync)
Interlocking with BRAVIA TV and other devices (“BRAVIA”
What is “BRAVIA” Sync?
The “BRAVIA” Sync function allows communication between products made by Sony such
as TVs, Blu-ray Disc Players, DVD players, and AV amplifiers that support the Control for
HDMI function.
Control for HDMI is a mutual control function standard used by HDMI CEC (Consumer
Electronics Control) for HDMI (High-Definition Multimedia Interface).
We recommend that you connect the receiver to products featuring “BRAVIA” Sync.
[46] Using Other Features Interlocking with BRAVIA TV and other devices (“BRAVIA”
Sync)
Preparing for “BRAVIA” Sync
Turn on the Control for HDMI function of the receiver and the connected device to
individually.
1. Select [Setup] - [HDMI Setup] from the home menu.
2. Select [Control for HDMI].
Page 56

3. Select [On].
The Control for HDMI function of the receiver is turned on.
4. Press HOME to exit the GUI menu.
5. Select the HDMI input of the receiver and TV to match the HDMI input of the connected
device, so that the image from the connected device is displayed.
6. Turn on the Control for HDMI function of the connected device.
For details on setting the TV and connected device, refer to the operating instructions of
the respective devices.
7. Repeat steps 5 and 6 for other devices for which you want to use the Control for HDMI
function.
Note
Perform the steps above again if you unplug the HDMI cable or change the connection.
This function is enabled only when [HDMI Out B Mode] is set to [Main].
[47] Using Other Features
Sync)
Interlocking with BRAVIA TV and other devices (“BRAVIA”
Interlocking other devices using an HDMI connection
(“BRAVIA” Sync)
By connecting devices made by Sony that support the “BRAVIA” Sync function using an
HDMI cable (not supplied), operations are simplified as follows:
Enjoying an input source from a connected device immediately (One-Touch Play)
Enjoying TV sound from the speakers connected to the receiver (System Audio Control)
Turning off the receiver and connected devices simultaneously with the TV (System
Power-Off)
Selecting the optimum picture quality and sound field automatically (Scene Select)
Home Theatre Control
Operating the receiver menu using the TV remote control (Remote Easy Control)
Note
The “One-Touch Play,” “System Audio Control,” and “System Power-Off” functions can be
used with devices not made by Sony. However, compatibility with all devices not made by
Sony is not guaranteed.
Page 57

The “Scene Select” and “Home Theatre Control” functions are Sony's proprietary
functions. These cannot operate with devices not made by Sony.
Devices incompatible with “BRAVIA” Sync cannot activate these features.
The Control for HDMI function does not work on devices connected to the HDMI OUT B
jack of the receiver.
[48] Using Other Features
Configuring video and sound settings
Enjoying sound of TV broadcasts from the receiver
If your TV supports the Audio Return Channel (ARC) function, set the receiver by the
following procedure to output the sound of the TV from the speakers connected to the
receiver.
1. Select [Setup] - [HDMI Setup] from the home menu.
2. Select [Control for HDMI].
3. Select [On].
If you connect to a TV that is not compatible with the Audio Return
Channel (ARC) function or you want to select an audio signal using a
cable other than an HDMI cable (e.g. via an optical digital cable or an
audio cable)
Switch the audio input mode. For details, see “Switching between digital and analog audio
(Input Mode).”
Note
Be sure to turn off the volume of the TV or activate the muting function of the TV.
[49] Using Other Features
Configuring video and sound settings
Switching the monitors that output the HDMI video
signals
If you have connected two monitors to the HDMI OUT A and HDMI OUT B jacks, you can
switch the output for these two monitors using the HDMI OUTPUT button on the remote
control.
Page 58

1. Turn on the receiver and the two monitors.
2. Press HDMI OUTPUT.
Each time you press the button, the output will be switched as follows:
HDMI A - HDMI B (*) - HDMI A+B (*) - HDMI OFF
*
Unavailable when [HDMI Out B Mode] is set to [Zone2].
Note
[HDMI A+B] may not work if the compatible video formats of the monitors connected to
the HDMI OUT A jack and the HDMI OUT B jack of the receiver are different.
[HDMI A+B] may not work depending on the playback device you connect.
Hint
You can also use HDMI OUT on the receiver to switch the monitor.
[50] Using Other Features
Configuring video and sound settings
Switching between digital and analog audio (Input Mode)
When you connect devices to both digital and analog audio input jacks on the receiver, you
can fix the audio input mode to either device, or switch from one to the other, depending on
the type of material you intend to watch.
1. Press the input buttons to select the input.
2. Press OPTIONS.
3. Select [Input Mode].
Auto: Gives priority to digital audio signals. If there is more than one digital
connection, HDMI audio signals have priority.
If there is no digital audio signals, analog audio signals are selected. When TV input
is selected, priority is given to Audio Return Channel (ARC) signals. If your TV
Note
supports the ARC function, digital optical audio signals are selected.
Optical: Specifies input of digital audio signals to the OPTICAL jack.
Coaxial: Specifies input of digital audio signals to the COAXIAL jack.
Analog: Specifies input of analog audio signals to the AUDIO IN (L/R) jacks.
Page 59

Depending on the input, [Input Mode] may be dimmed on the TV screen and other modes
cannot be selected.
When [2ch Analog Direct] is being used, audio input is set to [Analog]. You cannot select
other modes.
[51] Using Other Features
Configuring video and sound settings
Using other video/audio input jacks (Input Assign)
You can reassign video and/or audio signals to other input jacks if the default settings of the
jacks do not correspond to your connected device.
E.g. When connecting a DVD player to the OPTICAL IN 1 (AUX) and COMPONENT VIDEO
IN 2 (VIDEO) jacks of the receiver:
Assign [BD/DVD] to the OPTICAL IN 1 (AUX) jack.
Assign [BD/DVD] to the COMPONENT VIDEO IN 2 (VIDEO) jack.
1. Select [Setup] - [Input Setup] from the home menu.
2. Select [BD/DVD].
3. Press repeatedly to select [COAX] under [OPTICAL / COAXIAL] and /
repeatedly to select [OPT 1].
4. Press repeatedly to select [IN 1] under [COMPONENT] and / repeatedly to
select [IN 2].
Assignable HDMI input jacks (for STR-ZA3000ES/STR-ZA2000ES)
IN 1:
BD/DVD (*), SAT/CATV, GAME, STB, VIDEO, AUX, TV, SA-CD/CD
IN 2:
BD/DVD, SAT/CATV (*), GAME, STB, VIDEO, AUX, TV, SA-CD/CD
IN 3:
BD/DVD, SAT/CATV, GAME, STB (*), VIDEO, AUX, TV, SA-CD/CD
IN 4:
BD/DVD, SAT/CATV, GAME, STB, VIDEO (*), AUX, TV, SA-CD/CD
IN 5:
BD/DVD, SAT/CATV, GAME, STB, VIDEO, AUX, TV, SA-CD/CD (*)
IN 6:
Page 60

BD/DVD, SAT/CATV, GAME (*), STB, VIDEO, AUX, TV, SA-CD/CD
None:
BD/DVD, SAT/CATV, GAME, STB, VIDEO, AUX (*), TV (*), SA-CD/CD
Assignable HDMI input jacks (for STR-ZA1000ES)
IN 1:
BD/DVD (*), SAT/CATV, GAME, STB, VIDEO, AUX, TV, SA-CD/CD
IN 2:
BD/DVD, SAT/CATV (*), GAME, STB, VIDEO, AUX, TV, SA-CD/CD
IN 3:
BD/DVD, SAT/CATV, GAME (*), STB, VIDEO, AUX, TV, SA-CD/CD
IN 4:
BD/DVD, SAT/CATV, GAME, STB (*), VIDEO, AUX, TV, SA-CD/CD
IN 5:
BD/DVD, SAT/CATV, GAME, STB, VIDEO, AUX, TV, SA-CD/CD (*)
None:
BD/DVD, SAT/CATV, GAME, STB, VIDEO (*), AUX (*), TV (*), SA-CD/CD
Assignable COMPONENT VIDEO input jacks
IN 1:
BD/DVD (*), SAT/CATV, GAME, STB, VIDEO, AUX, TV, SA-CD/CD
IN 2:
BD/DVD, SAT/CATV, GAME, STB, VIDEO (*), AUX, TV, SA-CD/CD
None:
BD/DVD, SAT/CATV (*), GAME (*), STB (*), VIDEO, AUX (*), TV (*), SA-CD/CD (*)
Assignable OPTICAL / COAXIAL input jacks
OPT 1:
BD/DVD, SAT/CATV, GAME, STB, VIDEO, AUX (*), TV, SA-CD/CD
OPT 2:
BD/DVD, SAT/CATV, GAME, STB, VIDEO, AUX, TV (*), SA-CD/CD
COAX:
BD/DVD (*), SAT/CATV, GAME, STB, VIDEO, AUX, TV, SA-CD/CD
None:
BD/DVD, SAT/CATV (*), GAME (*), STB (*), VIDEO (*), AUX, TV, SA-CD/CD (*)
*
Default setting
Page 61

Note
When you assign the digital audio input, the Input Mode setting may change
automatically.
One reassignment is allowed for each input.
If no sound is output from the assigned jacks, also check the Input Mode settings.
[52] Using Other Features
Preset)
Saving and recalling various settings for the receiver (Custom
About Custom Preset
You can save various settings with the player, monitor, etc., according to your listening and
viewing style. You can register those settings for “one-touch” operation, and then recall the
environment created with the settings easily.
For example, by saving the settings in the [1: Movie] preset as follows, you can switch the
settings of the receiver all at one time without switching each setting for [Input], [Calibration
Type], and [Sound Field] individually.
Input: BD/DVD
Sound Field: HD-D.C.S.
Calibration Type: No Change
[53] Using Other Features Saving and recalling various settings for the receiver (Custom
Preset)
Recalling the settings saved to the scene
1. Select [Custom Preset] from the home menu.
2. Select a preset you want.
Hint
You can recall the setting(s) saved for [1: Movie], [2: Music], [3: Party] or [4: Night]
directly by pressing CUSTOM PRESET 1, CUSTOM PRESET 2, CUSTOM PRESET 3 or
CUSTOM PRESET 4 on the remote control.
Page 62

[54] Using Other Features Saving and recalling various settings for the receiver (Custom
Preset)
Saving the settings to a preset
1. Select [Custom Preset] from the home menu.
2. Press OPTIONS with a preset for which you want to edit settings among from [1:
Movie], [2: Music], [3: Party] or [4: Night] selected.
3. Select the menu you want from the options menu.
Edit:
Allows you to customize and save the settings to suit your preferences.
Import:
Loads the present settings of the receiver and saves those settings with the preset.
[Input] and [Volume] are set to [No Change].
Note
Settings items saved as [No Change] are not changed from the present settings even
when you recall the preset. Select [Edit], then uncheck the box for a setting item on the
edit screen to set [No Change].
Hint
You can overwrite [1: Movie], [2: Music], [3: Party] or [4: Night] with the present settings
by holding down CUSTOM PRESET 1, CUSTOM PRESET 2 CUSTOM PRESET 3 or
CUSTOM PRESET 4 for 3 seconds in the same way as you do when you select [Import]
from the menu.
When you select [3: Party], zone 2 and zone 3 are turned on automatically and you can
simultaneously enjoy the same music as the main zone in these zones.
[55] Using Other Features
Preset)
Saving and recalling various settings for the receiver (Custom
Items for which you can save settings and the default
values for each item
1: Movie
Preset Name: Movie
Input: BD/DVD
Page 63

Tuner Preset: No Change
Volume: No Change
HDMI OUT: No Change
Party Mode: No Change
Sleep: No Change
Sound Field: HD-D.C.S.
Sound Optimizer: No Change
In-Ceiling Speaker Mode: No Change
Pure Direct: No Change
Calibration Type: No Change
Front Bass: No Change
Front Treble: No Change
Center Bass: No Change
Center Treble: No Change
Surround Bass: No Change
Surround Treble: No Change
Front High Bass: No Change
Front High Treble: No Change
2: Music
Preset Name: Music
Input: SA-CD/CD
Tuner Preset: No Change
Volume: No Change
HDMI OUT: No Change
Party Mode: No Change
Sleep: No Change
Sound Field: Multi Stereo
Sound Optimizer: No Change
In-Ceiling Speaker Mode: No Change
Pure Direct: No Change
Calibration Type: No Change
Front Bass: No Change
Front Treble: No Change
Center Bass: No Change
Center Treble: No Change
Surround Bass: No Change
Surround Treble: No Change
Front High Bass: No Change
Front High Treble: No Change
3: Party
Preset Name: Party
Input: No Change
Page 64

Tuner Preset: No Change
Volume: -23.0 dB
[56] Using Other Features Configuring speaker settings
HDMI OUT: No Change
Party Mode: On
Sleep: Off
Sound Field: Multi Stereo
Sound Optimizer: Off
In-Ceiling Speaker Mode: No Change
Pure Direct: No Change
Calibration Type: No Change
Front Bass: No Change
Front Treble: No Change
Center Bass: No Change
Center Treble: No Change
Surround Bass: No Change
Surround Treble: No Change
Front High Bass: No Change
Front High Treble: No Change
4: Night
Preset Name: Night
Input: No Change
Tuner Preset: No Change
Volume: -44.5 dB
HDMI OUT: No Change
Party Mode: No Change
Sleep: 0:30:00
Sound Field: No Change
Sound Optimizer: Normal
In-Ceiling Speaker Mode: No Change
Pure Direct: No Change
Calibration Type: No Change
Front Bass: No Change
Front Treble: No Change
Center Bass: No Change
Center Treble: No Change
Surround Bass: No Change
Surround Treble: No Change
Front High Bass: No Change
Front High Treble: No Change
Page 65

Adjusting the sound balance automatically (Auto
Calibration)
This receiver is equipped with a D.C.A.C. (Digital Cinema Auto Calibration) function which
allows you to perform automatic calibration. For details on performing this function, see the
following topics:
Before you perform Auto Calibration
Connecting the optimizer microphone
Selecting the front speakers
Performing automatic calibration (Auto Calibration)
[57] Using Other Features Configuring speaker settings
Using bi-amplifier connections
If you are not using surround back speakers or front high speakers, you can connect the
front speakers to the SPEAKERS SURROUND BACK/FRONT HIGH/FRONT B/BIAMP/ZONE 2 terminals using a bi-amplifier connection.
Connect the jacks on the Lo (or Hi) side of the front speakers to the SPEAKERS FRONT A
terminals, and connect the jacks on the Hi (or Lo) side of the front speakers to the
SPEAKERS SURROUND BACK/FRONT HIGH/FRONT B/BI-AMP/ZONE 2 terminals.
Make sure that metal fittings of Hi/Lo attached to the speakers have been removed from the
speakers to avoid receiver malfunction.
Page 66

After you have made the bi-amplifier connection, set [SB Speaker Assign] in the Speaker
Setup menu to [Bi-Amp].
Note
You can only set [SB Speaker Assign] if the speaker pattern is set to a setting that does
not have surround back and front high speakers.
[58] Using Other Features
Using the sleep timer
Using the sleep timer (Sleep)
You can set the receiver to turn off automatically at a specified time.
1. Select [Setup] - [System Setup] from the home menu.
2. Select [Sleep].
3. Set specified time.
2:00:00
1:30:00
1:00:00
0:30:00
Off
[SLEEP] lights up on the display panel of the receiver when sleep timer is being used.
Hint
You can check the remaining time before the receiver turns off on the System Setup
screen. Also, the remaining time appears on the bottom right of the TV screen when it
becomes 1 minute or less.
The sleep timer will be canceled if you perform the following:
Update the software of the receiver.
Turn the receiver on or off.
[59] Using Other Features Checking information on the receiver
Viewing information on the display panel
Page 67

The display panel provides various information on the status of the receiver, such as the
sound field.
1. Select the input for which you want to check information.
2. Press DISPLAY repeatedly.
Each time you press DISPLAY, the display will change cyclically as follows:
Input name you entered (*1) or default input name, Sound field currently applied (*2) →
Input name you entered (*1) or default input name, Stream information (*3) → Input
name you entered, default input name (*1)
When listening to FM and AM radio
Band, Preset number, Preset station name (*1), Sound field currently applied (*2) →
Band, Preset number, Frequency, Sound field currently applied (*2)
*1
Index name appears only when you have assigned one to the input or preset station. Index name
does not appear if only blank spaces have been entered or it is same as the input name.
*2
[PURE.DIRECT] appears on the display panel when the Pure Direct function is activated.
*3
Stream Information is not displayed when analog signals are input. This may happen even when
digital signals are input.
Note
Characters or marks in some languages may not be displayed.
[60] Adjusting Settings
Input Setup
Changing the assignment and display for the input jacks
You can customize the settings for each input according to your preferences and usage.
Select [Setup] - [Input Setup] from the home menu, then set each item shown below.
Input
You can change the settings of [Icon], [Name], [Watch/Listen], [Show/Hide], [HDMI],
[OPTICAL / COAXIAL], [COMPONENT], [VIDEO IN], [AUDIO IN], [Input Mode], [Preset
Sound Field], [In-Ceiling Speaker Mode], [A/V Sync], [Subwoofer Low Pass Filter],
[Subwoofer Level], [Trigger 1] (for STR-ZA3000ES), [Trigger 2] (for STR-ZA3000ES),
[Trigger 3] (for STR-ZA3000ES) and [Trigger] (for STR-ZA2000ES/STR-ZA1000ES) for the
desired input.
Note
The settings of [AUDIO IN] on the Input Setup screen are fixed.
Page 68

Icon
You can set the icon displayed on the Watch/Listen menu.
Name
You can change the name displayed on the Watch/Listen menu. For details on how to set
the name for each input, see “Changing the name for each input (Name).”
Watch/Listen
You can set whether an input is displayed on the Watch menu or the Listen menu.
Watch: Displays an input to the Watch menu.
Listen: Displays an input to the Listen menu.
Watch/Listen: Displays an input to both the Watch and Listen menus.
Show/Hide
You can set whether or not an input is displayed.
Show: Shows the input.
Hide: Hides the input.
HDMI
You can assign HDMI input jacks for each input.
OPTICAL / COAXIAL
You can set the digital audio input jack(s) assigned to each input. For details, see “Using
other video/audio input jacks (Input Assign).”
OPT 1
OPT 2
COAX
None
COMPONENT
You can set the video input jack(s) assigned to each input. For details, see “Using other
video/audio input jacks (Input Assign).”
IN 1
IN 2
None
VIDEO IN
You can set the composite video input jack(s) assigned to VIDEO IN 1 (VIDEO) or VIDEO IN
2 (AUX) input signal. For details, see “Using other video/audio input jacks (Input Assign).”
AUDIO IN
Indicates an analog signal is being input. For details, see “Using other video/audio input
Page 69

jacks (Input Assign).”
Input Mode
You can set the input mode for each input. For details, see “Switching between digital and
analog audio (Input Mode).”
Preset Sound Field
You can assign a default “Sound Field” to each input source that will be selected
automatically when you select the input source.
In-Ceiling Speaker Mode
You can select whether or not to use the In-Ceiling Speaker Mode with the current input.
A/V Sync
You can delay the output of audio to minimize the time gap between audio output and visual
display.
Subwoofer Low Pass Filter
You can turn on or off the low-pass filter for the subwoofer output. The low-pass filter works
when PCM signals are input via an HDMI connection. You can set the function for each input
to which an HDMI input jack is assigned independently. Turn the function on if you connect a
subwoofer without the crossover frequency function.
Subwoofer Level
You can set the level of the subwoofer to 0 dB or +10 dB when PCM signals are input via an
HDMI connection. You can set the level for each input to which an HDMI input jack is
assigned independently.
Trigger 1 to 3 (for STR-ZA3000ES)
Trigger (for STR-ZA2000ES/STR-ZA1000ES)
You can select input options for use of the 12V Trigger function.
[61] Adjusting Settings Input Setup
Changing the name for each input (Name)
You can enter up to 8 characters for each input name.
1. Select [Setup] - [Input Setup] from the home menu.
2. Select the input name you want to change.
Page 70

3. Select [Name].
An on-screen keyboard appears on the TV screen.
4. Press / / / and to select characters one by one to enter the name.
5. Select [Enter].
The name you entered is registered.
[62] Adjusting Settings Speaker Setup
Performing automatic calibration (Auto Calibration)
You can perform automatic calibration from where you are sitting.
1. Select [Setup] - [Speaker Setup] from the home menu.
2. Select [Auto Calibration].
3. Follow the instructions on the TV screen, then press to select [Start].
The measurement starts in 5 seconds.
The measurement process will take approximately 30 seconds with a test tone.
When the measurement ends, a beep sounds and the screen switches.
4. Select the item you want.
Save: Saves the measurement results and exits the setting process.
Retry: Performs the Auto Calibration again.
Discard: Exits the setting process without saving the measurement results.
For details on the measurement results, see “Checking Auto Calibration results.”
5. Save the measurement results.
Select [Save] in step 4.
Calibration Matching
When Auto Calibration is executed, this function works automatically, matching the distance
and level of the right and left speakers. You can set this function only after the D.C.A.C.
measurement process has been completed and the results of the D.C.A.C. measurement
are saved. The setting is valid until you change it.
Note
Page 71

If an error code or warning message appears on the screen in step 3, see “List of
messages after Auto Calibration measurements.”
Hint
You can also perform automatic calibration by pressing the AUTO CAL button on the
remote control. If you use the AUTO CAL button, the following restrictions apply to the
operation:
Prior settings relating to the Auto Calibration will be skipped.
You can only use the display panel for the operation.
The Auto Calibration function will be canceled if you perform the following during the
measurement process:
Turn the receiver on or off.
Press the input buttons on the remote control or on the receiver.
Press
Press SPEAKERS on the receiver.
Press HDMI OUTPUT .
Press AMP MENU.
Press HOME.
Press AUTO CAL.
Change the volume level.
.
[63] Adjusting Settings Speaker Setup
Calibrating the phase characteristics of the speakers
(Automatic Phase Matching)
You can set the A.P.M. (Automatic Phase Matching) function in the D.C.A.C. (Digital Cinema
Auto Calibration). This calibrates the phase characteristics of the speakers for wellcoordinated surround sound.
1. Select [Setup] - [Speaker Setup] from the home menu.
2. Select [Automatic Phase Matching].
3. Select the setting you want.
Auto: Switches the A.P.M. function on or off automatically.
Off
Note
This function does not work in the following cases:
Page 72

[2ch Analog Direct] is being used.
[Auto Calibration] has not been performed.
The receiver may play signals at a lower sampling frequency than the actual sampling
frequency of the input signals, depending on the audio format.
[64] Adjusting Settings
Speaker Setup
Selecting the Auto Calibration type (Calibration Type)
You can select a calibration type after you have performed the Auto Calibration and saved
the settings.
1. Select [Setup] - [Speaker Setup] from the home menu.
2. Select [Calibration Type].
3. Select the setting you want.
Full Flat: Makes the measurement of frequency from each speaker flat.
Engineer: Sets to “the Sony listening room standard” frequency characteristics.
Front Reference : Adjusts the characteristics of all of the speakers to match the
characteristics of the front speaker.
Off
Note
This function does not work when [2ch Analog Direct] is being used.
The receiver may play signals at a lower sampling frequency than the actual sampling
frequency of the input signals, depending on the audio format.
[65] Adjusting Settings
Speaker Setup
Selecting the speaker pattern (Speaker Pattern)
You can select the speaker pattern according to the speaker system which you are using.
1. Select [Setup] - [Speaker Setup] from the home menu.
2. Select [Speaker Pattern].
Page 73

3. Select the speaker pattern you want.
[66] Adjusting Settings Speaker Setup
Setting the assignment for the speaker terminals (SB
Speaker Assign)
You can set the assignment for the SPEAKERS SURROUND BACK/FRONT HIGH/FRONT
B/BI-AMP/ZONE 2 terminals.
1. Select [Setup] - [Speaker Setup] from the home menu.
2. Select [SB Speaker Assign].
3. Set [SB Speaker Assign] to any of the following settings.
Zone2
When using the zone 2 connection.
Bi-Amp
When using the bi-amplifier connection.
Front B
When using the front B speaker connection.
Off
When none of the connections above are used.
Note
When you change the connection from a bi-amplifier or speakers front B to surround back
or front high speakers connection, set the [SB Speaker Assign] to [Off], then set up the
speakers again.
You can only set the assignment for the SPEAKERS SURROUND BACK/FRONT
HIGH/FRONT B/BI-AMP/ZONE 2 terminals if the speaker pattern is set to 2/0, 2/0.1, 3/0,
3/0.1, 2/2, 2/2.1, 3/2, or 3/2.1.
[67] Adjusting Settings
Speaker Setup
Adjusting the speaker size (Size)
Page 74

You can adjust the size of each speaker (front left/right, front high left/right, center, surround
left/right, surround back left/right).
1. Select [Setup] - [Speaker Setup] from the home menu.
2. Select [Size].
3. Select the speaker on the screen for which you want to adjust the size.
4. Select the size you want.
Large: If you connect large speakers that will effectively reproduce bass
frequencies, select [Large]. Select [Large] usually.
Small: If the sound is distorted, or you hear a lack of surround effects when using
multi channel surround sound, select [Small]. You can activate the bass redirection
circuitry and output the bass frequencies of each channel from the subwoofer or
other [Large] speakers.
Hint
The surround back speakers will be set to the same setting as that of the surround
speakers.
When the front speakers are set to [Small], the center, surround, and surround back/front
high speakers are also automatically set to [Small].
If you do not use the subwoofer, the front speakers are automatically set to [Large].
[68] Adjusting Settings
Speaker Setup
Adjusting the speaker distance (Distance)
You can adjust the distance from where you are sitting to each speaker (front left/right, front
high left/right, center, surround left/right, surround back left/right, subwoofer).
1. Select [Setup] - [Speaker Setup] from the home menu.
2. Select [Distance].
3. Select the speaker on the screen for which you want to adjust the distance from where
you are sitting.
4. Adjust the distance.
Page 75

[69] Adjusting Settings Speaker Setup
Adjusting the speaker level (Level)
You can adjust the level of each speaker (front left/right, front high left/right, center, surround
left/right, surround back left/right and subwoofer).
1. Select [Setup] - [Speaker Setup] from the home menu.
2. Select [Level].
3. Select the speaker on the screen for which you want to adjust the speaker level.
4. Adjust the level.
[70] Adjusting Settings Speaker Setup
Outputting a test tone from each speaker (Test Tone)
You can output a test tone from each speaker in sequence.
1. Select [Setup] - [Speaker Setup] from the home menu.
2. Select [Test Tone].
3. Select the setting you want.
Off
Auto: The test tone is output from each speaker in sequence.
Front L, Center, Front R, Surround R, Surround L, Sur Back (*), Sur Back L, Sur
Back R, Front High L, Front High R, Subwoofer: You can select which speakers
will output the test tone.
*
[Sur Back] appears when only one surround back speaker is connected.
4. Adjust the speaker level.
Hint
You can set a test tone by pressing the TEST TONE button on the remote control. In this
Page 76

case, you can only use the display panel for the operation.
To adjust the level of all speakers at the same time, press +/–. You can also use
MASTER VOLUME on the receiver.
The adjusted value is shown on the TV screen during adjustment.
[71] Adjusting Settings
Speaker Setup
Setting the crossover frequency of the speakers
(Crossover Frequency)
You can set the bass crossover frequency of speakers for which the speaker size has been
set to [Small] in the Speaker Setup menu. A measured speaker crossover frequency is set
for each speaker after the Auto Calibration is performed.
1. Select [Setup] - [Speaker Setup] from the home menu.
2. Select [Crossover Frequency].
3. Select the speaker for which you want to adjust the crossover frequency on the screen.
4. Set the crossover frequency of the selected speaker.
Note
The surround back speakers will be set to the same setting as that of the surround
speakers.
[72] Adjusting Settings
Speaker Setup
Adjusting the equalizer (Equalizer)
You can use the following parameters to adjust the tonal quality (bass/treble level) of the
front, center, surround/surround back and front high speakers.
Page 77

Level (dB)
Frequency (Hz)
Bass
Treble
1. Select [Setup] - [Speaker Setup] from the home menu.
2. Select [Equalizer].
3. Select [Front Speaker], [Center Speaker], [Surround] or [Front High].
4. Select [Bass] or [Treble].
5. Adjust the gain.
Note
This function does not work in the following cases:
[2ch Analog Direct] is selected.
[Pure Direct ] is set to [On].
Frequencies for [Bass] and [Treble] are fixed.
Depending on the audio format, the receiver may play signals at a lower sampling
frequency than the original sampling frequency of the input signals.
Hint
You can also select [Equalizer] in [Sound Effects] from the home menu.
[73] Adjusting Settings
Speaker Setup
Lifting up the sound of the center speaker (Center
Speaker Lift Up)
By using the front high speakers, you can lift up the sounds of the center speaker to an
appropriate height on the screen, allowing you to enjoy natural sound without discomfort.
1. Select [Setup] - [Speaker Setup] from the home menu.
2. Select [Center Speaker Lift Up].
3. Select the setting you want.
1 - 10
Off
Page 78

Hint
This function does not work in the following cases:
There is no center speaker.
There are no front high speakers.
The [ 2ch Stereo], [2ch Analog Direct], and [ Multi Stereo] sound fields are being used.
[74] Adjusting Settings Speaker Setup
Setting the height from the floor to the ceiling speakers
(Ceiling Speaker Height)
Set the height from the floor to the ceiling speakers. You can enjoy the [In-Ceiling Speaker
Mode] function more by configuring this setting and performing Auto Calibration.
1. Select [Setup] - [Speaker Setup] from the home menu.
2. Select [Ceiling Speaker Height].
3. Adjust the height.
Note
This function does not work when a speaker pattern that includes front high speakers is
selected.
[75] Adjusting Settings
Speaker Setup
Selecting the unit of measurement (Distance Unit)
You can select the unit of measurement for setting distances.
1. Select [Setup] - [Speaker Setup] from the home menu.
2. Select [Distance Unit].
3. Select the setting you want.
meter: The distance is displayed in meters.
Page 79

feet: The distance is displayed in feet.
[76] Adjusting Settings Network Setup
Setting up a network (Internet Setup)
You can set up a wired LAN connection by the following procedure.
1. Select [Setup] - [Network Setup] from the home menu.
2. Select [Internet Setup].
3. Select [Auto].
4. Select [OK].
The receiver starts connecting to the network. For details, refer to the messages that
appear on the TV screen.
If using a fixed IP address
Select [Manual] in step 3. The IP address input display appears on the TV screen.
Enter the value for [IP Address] using the on-screen keyboard. Press / / / and
to select the characters one by one, then select [Enter] to confirm the values.
Enter the values for [Subnet Mask] and [Default Gateway], then select [Next].
Hint
See [Information] when checking the network settings.
[77] Adjusting Settings
Network Setup
Checking the network information (Information)
1. Select [Setup] - [Network Setup] from the home menu.
2. Select [Information].
You can check the settings (*) for [Connection Status], [IP Address Setting], [IP
Address], [Subnet Mask], [Default Gateway], and [MAC Address].
*
The setting items during setup differ depending on the network environment and connection type.
Page 80

[78] Adjusting Settings Network Setup
Enabling the network function even when this receiver is
in standby mode (Network Standby)
1. Select [Setup] - [Network Setup] from the home menu.
2. Select [Network Standby].
3. Set to [On] or [Off].
On : The network function works even when the receiver is in standby mode, and
the receiver resumes operation when controlled over the network.
Off : The network function turns off when the receiver is in standby mode. The
receiver takes more time to resumes operation when powered on again.
Note
When the receiver is in standby mode, the (on/standby) indicator on the front panel
lights up in amber if [Network Standby] is set to [On].
The top of the cabinet may become hot. This is because part of the circuit(s) inside the
receiver is(are) still turned on, and is not a malfunction.
[79] Adjusting Settings
Network Setup
Enjoying Hi-Fi System sound (Music Connect)
Configure settings to enable the receiver to link with a Hi-Fi System device.
1. Select [Setup] - [Network Setup] from the home menu.
2. Select [Music Connect].
3. Select the setting you want.
Connected Device: Select the connected device to enable the function. Select
[Remove Connected Device] to disable the function.
Input for Music Connect: Select the input to link with.
Page 81

Preset Volume: Select the default volume for Music Connect input.
Output Zone: Select the output zone of the Hi-Fi System device.
Note
For details on how to configure settings for this function, consult your nearest Sony
dealer.
[80] Adjusting Settings
Audio Setup
Playing audio signals with high-quality sound (Digital
Legato Linear (D.L.L.))
The D.L.L. function is Sony proprietary technology that allows low-quality digital and analog
audio signals to be played with high-quality sound.
1. Select [Setup] - [Audio Setup] from the home menu.
2. Select [Digital Legato Linear].
3. Select the setting you want.
Auto 1: This function is available for lossy compression audio formats and analog
audio signals.
Auto 2: This function is available for Linear PCM signals, as well as lossy
compression audio formats and analog audio signals.
Off
Note
This function works when [2ch Stereo], [A.F.D.] or [Multi Stereo] is selected. However,
this function does not work in the following cases:
The [ In-Ceiling Speaker Mode] function is being used.
[FM TUNER] or [AM TUNER] is selected as the input.
Linear PCM signals with a sampling frequency other than 44.1 kHz are being received.
Dolby Digital Plus, Dolby Digital EX, Dolby TrueHD, DTS 96/24, DTS-ES Matrix 6.1, DTS- HD
Master Audio, or DTS-HD High Resolution Audio signals are being received.
When zone 2 is on (depending on the zone 2 or HDMI settings).
Page 82

[81] Adjusting Settings Audio Setup
Enjoying clear and dynamic sound at a low volume
(Sound Optimizer)
You can enjoy clear and dynamic sound at low volume levels using the Sound Optimizer.
After the Auto Calibration is performed, the sound level is optimized to suit your environment.
1. Select [Setup] - [Audio Setup] from the home menu.
2. Select [Sound Optimizer].
3. Select the setting you want.
Normal: Adjusts for the reference level of a movie.
Low: Adjusts for a CD or other software whose average sound pressure level is
processed highly.
Off
Note
This function does not work in the following cases:
[2ch Analog Direct] is selected.
[Pure Direct ] is set to [On].
The receiver may play signals at a lower sampling frequency than the actual sampling
frequency of the input signals, depending on the audio format.
Hint
You can also select [Sound Optimizer] in [Sound Effects] from the home menu.
[82] Adjusting Settings
Audio Setup
Selecting a sound field (Sound Field)
You can select from a variety of sound field modes according to speaker connections or
input sources.
1. Select [Setup] - [Audio Setup] from the home menu.
2. Select [Sound Field].
3. Select the sound field you want.
Page 83

For details on each sound field, see the following topics.
Note
2-channel sound mode
Auto Format Direct (A.F.D.)
Movie mode
Multi Stereo
The sound fields for movie may not work, depending on the input or the speaker pattern
you select, or with audio formats.
The receiver may play signals at a lower sampling frequency than the actual sampling
frequency of the input signals, depending on the audio format.
[Pro Logic IIx] may not appear, depending on the speaker pattern you select.
Some speakers or the subwoofer may not output sound, depending on the sound field
setting.
If there is any noise present, the noise may be different, depending on the sound field you
select.
Hint
You can also select [Sound Field] in [Sound Effects] from the home menu.
You can also use 2CH/A.DIRECT, A.F.D., MOVIE or MULTI ST. on the remote control or
the receiver to select a sound field.
[83] Adjusting Settings
Audio Setup
Selecting the HD-D.C.S. effect type (HD-D.C.S. Type)
Select the HD-D.C.S. effect type you want. For details on effect types, see “Movie mode.”
1. Select [Setup] - [Audio Setup] from the home menu.
2. Select [HD-D.C.S. Type].
3. Select the setting you want.
Dynamic
Theater
Studio
Note
Page 84

This function works only when the sound field is set to [HD-D.C.S.].
[84] Adjusting Settings Audio Setup
Enjoying more natural sound with speakers installed in
the ceiling (In-Ceiling Speaker Mode)
Set whether or not to use in-ceiling speaker mode with the current input.
In a setup where the front and center speakers are installed in the ceiling, lowering the audio
output position to the screen height allows you to enjoy a more natural experience.
1. Select [Setup] - [Audio Setup] from the home menu.
2. Select [In-Ceiling Speaker Mode].
3. Select [On].
Note
This function does not work in the following cases:
[2ch Analog Direct] is selected.
A speaker pattern with the front high speakers is selected.
[Pro Logic II], [Pro Logic IIx] or [Neo:6] is selected.
[Pure Direct ] is set to [On].
This function may not work depending on the audio format.
The receiver may play signals at a lower sampling frequency than the actual sampling
frequency of the input signals depending on the audio format.
Hint
You can also switch this function on/off for each input on the Input Setup screen.
You can also select [In-Ceiling Speaker Mode] in [Sound Effects] from the home menu.
You can also switch the function on/off by pressing IN-CEILING SP on the remote control
or the receiver.
To obtain optimal effects in the listening environment, configure the [Ceiling Speaker
Height] setting and perform Auto Calibration.
[85] Adjusting Settings
Audio Setup
Enjoying high-fidelity sound (Pure Direct)
Page 85

You can enjoy higher-fidelity sound from all inputs using the Pure Direct function. When the
Pure Direct function is on, the display panel lights off to suppress noise that affects sound
quality.
1. Select [Setup] - [Audio Setup] from the home menu.
2. Select [Pure Direct].
3. Select [On].
Canceling Pure Direct
The Pure Direct function will be canceled when you perform the following:
Select [Off] in step 3.
Press PURE DIRECT.
Change the sound field.
Change the scene setting on the TV (Scene Select).
Change the setting of [Equalizer], [Sound Optimizer], [Dynamic Range Compressor] or
[In-Ceiling Speaker Mode].
Note
[Equalizer], [Sound Optimizer], [Dynamic Range Compressor] and [In-Ceiling Speaker
Mode] do not work when the Pure Direct function is selected.
Hint
You can also use PURE DIRECT to turn the Pure Direct function on or off.
You can also select [Pure Direct] in [Sound Effects] from the home menu.
[86] Adjusting Settings
Audio Setup
Setting the low-pass filter for the subwoofer output
(Subwoofer Low Pass Filter)
You can turn the low-pass filter for the subwoofer output on or off. You can set the function
for each input to which an audio input jack is assigned independently. Turn the function on if
you connect a subwoofer without the crossover frequency function.
1. Select [Setup] - [Audio Setup] from the home menu.
2. Select [Subwoofer Low Pass Filter].
3. Select the setting you want.
Page 86

On: Always activates the low-pass filter with a cutoff frequency of 120 Hz.
Off: Does not activate the low-pass filter.
Note
This function does not work when [2ch Analog Direct] is being used.
[87] Adjusting Settings
Audio Setup
Synchronizing audio with video output (A/V Sync)
You can delay the output of audio to minimize the time gap between audio output and a
visual display.
This function is useful when using a large LCD or plasma monitor or a projector. You can set
the function for each input independently.
1. Select [Setup] - [Audio Setup] from the home menu.
2. Select [A/V Sync].
3. Select the setting you want.
HDMI Auto: The time gap between the audio output and visual display of a monitor
connected via an HDMI connection will be adjusted automatically. This function is
available only when the monitor supports the A/V Sync function.
0 ms – 300 ms: You can adjust the delay from 0 ms to 300 ms in 10 ms intervals.
Note
The receiver may play signals at a lower sampling frequency than the actual sampling
frequency of the input signals, depending on the audio format.
[88] Adjusting Settings
Audio Setup
Selecting the language of digital broadcasts (Dual Mono)
You can select the language you want when listening to a digital broadcast with dual audio.
This function only works for Dolby Digital sources.
Page 87

1. Select [Setup] - [Audio Setup] from the home menu.
2. Select [Dual Mono].
3. Select the setting you want.
Main: Sound in the main language will be output.
Sub: Sound in the sub language will be output.
Main/Sub: Sound in the main language will be output through the front left speaker
and sound in the sub language will be output through the front right speaker
simultaneously.
[89] Adjusting Settings Audio Setup
Compressing the dynamic range (Dynamic Range
Compressor)
You can compress the dynamic range of the soundtrack. This may be useful when you want
to watch movies at a low volume late at night, etc.
This function only works for Dolby Digital and Dolby TrueHD sources.
1. Select [Setup] - [Audio Setup] from the home menu.
2. Select [Dynamic Range Compressor].
3. Select the setting you want.
Auto: The dynamic range is compressed automatically when there is a flag in the
sound source that recommends using the Dynamic Range Compressor function.
On: The dynamic range is compressed as intended by the recording engineer.
Off
Note
This function does not work when [Pure Direct] is set to [On].
[90] Adjusting Settings
HDMI Setup
Up-converting video signals to 4K (4K Scaling)
Page 88

You can up-convert video signals to 4K and output them through the HDMI OUT A jack of
the receiver.
1. Select [Setup] - [HDMI Setup] from the home menu.
2. Select [4K Scaling].
3. Select the setting you want.
Auto: Enables video scaling control of 4K HDMI output automatically if you connect
a 4K-compatible TV.
Off: Only upscales video signals from VIDEO IN, COMPONENT VIDEO IN jacks up
to 1080p.
Note
This function works only when video signals from the VIDEO IN, COMPONENT VIDEO
IN, or HDMI IN jacks are being received. HDMI video input signals must be
1080p@23.98/24 Hz.
The HDMI OUT B jack does not support 4K Scaling. Video signals are output in the same
resolution as the input resolution.
[91] Adjusting Settings
HDMI Setup
Controlling HDMI devices (Control for HDMI)
You can turn the Control for HDMI function on or off. For details, see “Preparing for
“BRAVIA” Sync.”
1. Select [Setup] - [HDMI Setup] from the home menu.
2. Select [Control for HDMI].
3. Select the setting you want.
On
Off
Note
When you set [Control for HDMI] to [On], [Audio Out] may be changed automatically.
When the receiver is in standby mode, the (on/standby) indicator on the front panel
Page 89

lights up in amber if [Control for HDMI] is set to [On].
This function is enabled only when [HDMI Out B Mode] is set to [Main].
[92] Adjusting Settings
HDMI Setup
Passing HDMI signals through (Pass Through)
You can output HDMI signals to the TV even when the receiver is in standby mode.
1. Select [Setup] - [HDMI Setup] from the home menu.
2. Select [Pass Through].
3. Select the setting you want.
Auto: The receiver outputs HDMI signals to the TV from the HDMI OUT jack when
the TV is turned on while the receiver is in the standby mode.
Sony recommends this setting if you are using a “BRAVIA” Sync-compatible Sony
TV. This setting saves power in the standby mode compared to the [On] setting.
On: The receiver continuously outputs HDMI signals from the HDMI OUT jack when
in standby mode.
Off: The receiver does not output HDMI signals when in standby mode. This setting
saves power in the standby mode compared to the [On] setting.
Note
When the receiver is in standby mode, the (on/standby) indicator on the front panel
lights up in amber if [Pass Through] is set to [On] or [Auto].
The top of the cabinet may become hot. This is because part of the circuit(s) inside the
receiver is(are) still turned on, and is not a malfunction.
When [Auto] is selected, it may take a little more time for the image and sound to be
output to the TV than when [On] is selected.
This function is only supported by the HDMI OUT A jack.
[93] Adjusting Settings
HDMI Setup
Setting the HDMI audio signal output of connected
devices (Audio Out)
Page 90

You can set the HDMI audio signal output of playback devices connected to the receiver via
an HDMI connection.
1. Select [Setup] - [HDMI Setup] from the home menu.
2. Select [Audio Out].
3. Select the setting you want.
AMP: HDMI audio signals from playback devices are only output to the speakers
connected to the receiver. Multi-channel sound can be played back as it is.
TV+AMP: The sound is output from the speaker of the TV and the speakers
connected to the receiver.
Note
Audio signals are not output from the speaker of the TV when [Audio Out] is set to [AMP].
When [TV+AMP] is selected, the sound quality of the playback device depends on the
sound quality of the TV, such as the number of channels and the sampling frequency, etc.
If the TV has stereo speakers, the sound output from the receiver is in the same stereo as
the TV, even when playing back multi-channel source.
When you connect the receiver to a video device (projector, etc.), sound may not be
output from the receiver. In this case, select [AMP].
[94] Adjusting Settings
HDMI Setup
Setting the zone 2 HDMI audio output of connected
devices (Zone2 Audio Out)
You can set the zone 2 HDMI audio signal output for playback devices connected to the
receiver via an HDMI connection.
1. Select [Setup] - [HDMI Setup] from the home menu.
2. Select [Zone2 Audio Out].
3. Select the setting you want.
AMP:
Recommended setting when a TV is connected directly to HDMI OUT B jack.
Sound is output from the speakers connected to the receiver.
Sound is not output from the TV speakers.
Zone2 TV + AMP:
Page 91

Recommended setting when a TV is connected directly to HDMI OUT B jack.
Sound is output from the TV speakers and the speakers connected to the receiver.
Zone2 AMP:
Recommended setting when another amplifier is connected to HDMI OUT B jack.
Sound is output from the another receiver connected to HDMI OUT B jack.
Sound is not output from ZONE 2 SPEAKER OUT terminals and ZONE 2 AUDIO
OUT jacks.
Note
You can only configure this setting only when [HDMI Out B Mode] is set to [Zone2].
When a video device (projector, etc.) is connected to the ZONE 2 HDMI OUT jack, sound
may not be output from the receiver. In this case, set [Zone2 Audio Out] to [AMP].
When a TV which does not support audio content protection is connected to the HDMI
OUT B jack, specific audio may not be output from the receiver. In this case, set [Zone2
Audio Out] to [AMP].
When [Zone2 Audio Out] is set to [Zone2 TV + AMP] or [AMP], audio signals will be
downmixed. The following restrictions apply to downmixing.
Audio signals are not output to zone 2 when receiving a DSD signal.
If you change the sound field or speaker settings in the main zone while the input for zone 2 is set
to SOURCE or the same input is selected in the main zone and zone 2, the sound may also be
momentarily interrupted in zone 2.
The D.L.L. function does not work in the main zone.
The volume level of sound from ZONE 2 SPEAKER OUT terminals and HDMI OUT B jack may be
different from sound that is not downmixed.
No sound will be output to zone 2 if you play a DTS-CD with different HDMI inputs
selected in the main zone and zone 2.
You cannot remedy the time gap between video output on the TV connected to HDMI
OUT B jack and audio output from the speaker connected to ZONE 2 SPEAKER OUT
terminals using the A/V Sync function.
[95] Adjusting Settings
HDMI Setup
Setting the level of the subwoofer (Subwoofer Level)
You can set the level of the subwoofer to 0 dB or +10 dB when multi-channel PCM signals
are input via an HDMI connection. The level for each input to which an HDMI input jack is
assigned can be set independently.
1. Select [Setup] - [HDMI Setup] from the home menu.
Page 92

2. Select [Subwoofer Level].
3. Select the setting you want.
Auto: Automatically sets the level to 0 dB or +10 dB, depending on the audio
stream.
+10 dB
0 dB
[96] Adjusting Settings HDMI Setup
Selecting the method to use the HDMI OUT B jack
(HDMI Out B Mode)
The HDMI OUT B jack can be used for zone 2.
1. Select [Setup] - [HDMI Setup] from the home menu.
2. Select [HDMI Out B Mode].
3. Select the setting you want.
Main : Uses the jack for HDMI OUT B. Recommended when you enjoy TV or
projector content in only one room (main zone).
Zone2 : Uses the jack for zone 2. Recommended when you enjoy video and sound
from a device connected to the receiver in a zone other than the main zone (zone 2).
Note
When [Zone2] is selected, the Control for HDMI function and Fast View function do not
work.
When [Main] is selected, HDMI IN audio signals cannot be output to zone 2 speakers and
the PRE OUT jacks unless the input for zone 2 is SOURCE or the same input is selected
in the main zone and zone 2.
[97] Adjusting Settings
HDMI Setup
Setting the priority for the main zone (Priority)
Page 93

Lets you set the priority when you select the same input for both the main zone and zone 2.
1. Select [Setup] - [HDMI Setup] from the home menu.
2. Set [Priority].
Main & Zone2:
You can enjoy the same input in the main zone and zone 2. However, there may be
some interference in the audio and video signals in the main zone and zone 2.
Main Only:
You can enjoy good audio and video quality in the main zone. There is no output in
zone 2.
Note
This function is enabled only when [HDMI Out B Mode] is set to [Zone2].
[98] Adjusting Settings
HDMI Setup
Speeding up the display when switching the HDMI input
(Fast View)
You can set the Fast View function for the HDMI inputs.
1. Select [Setup] - [HDMI Setup] from the home menu.
2. Select [Fast View].
3. Select the setting you want.
Auto: You can select HDMI input faster than normal selection.
Off: The Fast View function is not available.
Note
This function is enabled only when [HDMI Out B Mode] is set to [Main].
If you select [Off], it takes more time for images to appear after switching the input.
However, the sound quality is improved because the receiver receives signals only from
the selected HDMI input jack.
Page 94

[99] Adjusting Settings Zone Setup
Presetting the volume in the main zone (Main Preset
Volume)
Set the volume to be used when the receiver is turned on.
1. Select [Setup] - [Zone Setup] from the home menu.
2. Select [Main Preset Volume].
3. Adjust the volume.
[100] Adjusting Settings Zone Setup
Turning on/off the power for zone 2/3 (Power)
You can turn on or off the power for zone 2 or zone 3 by the following procedure.
1. Press ZONE2 or ZONE3 on the remote control or on the receiver.
Note
The receiver in zone 2 or zone 3 remains turned on even when this receiver is in standby
mode (To turn off the amplifier power for zone 2 or zone 3, press ZONE2 or ZONE3 on
the remote control or on the receiver.).
When the receiver is in standby mode, the (on/standby) indicator on the front panel
lights up in amber if the receiver in zone 2 or zone 3 is turned on.
The top of the cabinet may become hot. This is because part of the circuit(s) inside the
receiver is(are) still turned on, and is not a malfunction.
Hint
You can also turn on or off the power for zone 2 or zone 3 by setting [Zone2 Power] or
[Zone3 Power] in [Zone Setup] from the home menu.
[101] Adjusting Settings
Zone Setup
Selecting the source signals for zone 2/3 (Input)
Page 95

You can select the source signals for zone 2 or zone 3 using the following procedure.
1. Press ZONE2 or ZONE3 on the remote control or on the receiver.
2. Press the input button of the source signals you want to output.
The power turns on in zone 2 or zone 3, then the input switches to the selected input.
Hint
When the power is on in zone 2 or zone 3, you can also select the source signals for zone
2 or zone 3 by setting [Zone2 Input] or [Zone3 Input] in [Zone Setup] from the home
menu.
[102] Adjusting Settings
Zone Setup
Adjusting the volume for zone 2/3 (Volume)
You can adjust the volume for zone 2 or zone 3 using the following procedure in the
following cases:
When using the connections described in “Connecting the speakers in zone 2.”
When using the connections described in “Connecting another amplifier in zone 2/3,” and
when [Zone2 Line Out] or [Zone3 Line Out] is set to [Variable].
1. Press ZONE2 or ZONE3 on the remote control or on the receiver.
2. Adjust the volume.
Note
If [Zone2 Line Out] or [Zone3 Line Out] is set to [Fixed], adjust the volume using another
amplifier in zone 2 or zone 3.
Hint
When the power is on in zone 2 or zone 3, you can also adjust the volume for zone 2 or
zone 3 by setting [Zone2 Volume] or [Zone3 Volume] in [Zone Setup] from the home
menu.
You can preset the volume in each zone. For details, see “Presetting the volume in zone
2/3 (Zone2/3 Preset Volume).”
Page 96

[103] Adjusting Settings Zone Setup
Presetting the volume in zone 2/3 (Zone2/3 Preset
Volume)
Set the volume in zone 2 or zone 3 when turning on the receiver.
1. Select [Setup] - [Zone Setup] from the home menu.
2. Select [Zone2 Preset Volume] or [Zone3 Preset Volume].
3. Adjust the volume.
[104] Adjusting Settings Zone Setup
Setting the volume control for zone 2/3 (Line Out)
You can set variable or fixed volume control for the ZONE 2 AUDIO OUT/ZONE 3 AUDIO
OUT jacks.
1. Select [Setup] - [Zone Setup] from the home menu.
2. Select [Zone2 Line Out] or [Zone3 Line Out].
3. Select the setting you want.
Variable:
Select when you cannot adjust the volume level on the amplifier in zone 2 or zone 3.
The volume level of the receiver output in zone 2 or zone 3 will become adjustable.
Fixed:
Select to adjust the volume on the amplifier in zone 2 or zone 3. The volume level of
the receiver output in zone 2 or zone 3 on the receiver will be fixed.
Note
When [Variable] is set, the volume is turned down by default. Turn up the volume while
listening to the sound after completing setup.
[105] Adjusting Settings
System Setup
Page 97

Selecting the language (Language)
You can select the language of messages on the screen.
1. Select [Setup] - [System Setup] from the home menu.
2. Select [Language].
3. Select the language you want.
[106] Adjusting Settings System Setup
Tuning on/off the display for the volume level or sound
field (Auto Display)
This function allows you to turn the information display which appears on the TV screen on
or off when the volume level or sound field, etc. of the receiver is changed.
1. Select [Setup] - [System Setup] from the home menu.
2. Select [Auto Display].
3. Select the setting you want.
On
Off
[107] Adjusting Settings System Setup
Setting standby mode (Auto Standby)
You can set the receiver to switch to standby mode automatically when you do not operate
the receiver or when no signals are input to the receiver.
1. Select [Setup] - [System Setup] from the home menu.
Page 98

2. Select [Auto Standby].
3. Select the setting you want.
On: The receiver switches to standby mode after approximately 20 minutes.
Off
Note
This function does not work in the following cases:
[FM TUNER] or [AM TUNER] is selected as the input.
The software of the receiver is being updated.
If you use the Auto Standby mode and the sleep timer at the same time, the sleep timer
has priority.
[108] Adjusting Settings
System Setup
Changing the volume display (Volume Display)
Set the volume display on the display panel and GUI.
1. Select [Setup] - [System Setup] from the home menu.
2. Select [Volume Display].
3. Select the setting you want.
Relative : Indicates the volume in dB.
Absolute : Indicates the number of steps.
[109] Adjusting Settings System Setup
Switching the brightness of the display panel (Dimmer)
Switch the brightness of the display panel between 3 levels.
1. Select [Setup] - [System Setup] from the home menu.
2. Select [Dimmer].
Page 99

3. Select the setting you want.
[110] Adjusting Settings System Setup
100%
60%
0%
Using the sleep timer (Sleep)
You can set the receiver to turn off automatically at a specified time.
1. Select [Setup] - [System Setup] from the home menu.
2. Select [Sleep].
3. Set specified time.
2:00:00
1:30:00
1:00:00
0:30:00
Off
[SLEEP] lights up on the display panel of the receiver when sleep timer is being used.
Hint
You can check the remaining time before the receiver turns off on the System Setup
screen. Also, the remaining time appears on the bottom right of the TV screen when it
becomes 1 minute or less.
The sleep timer will be canceled if you perform the following:
Update the software of the receiver.
Turn the receiver on or off.
[111] Adjusting Settings System Setup
Checking the software version (Software Version)
Page 100

You can check the current software version of the receiver.
1. Select [Setup] - [System Setup] from the home menu.
2. Check [Software Version].
[112] Adjusting Settings System Setup
Updating the software using the USB flash drive (USB
Update)
Update the receiver software using the USB flash drive.
1. Copy the file for updating to the top level directory (just under the root directory) of the
USB flash drive.
2. Connect the USB flash drive to the SETTING (USB) port of the receiver.
3. Select [Setup] - [System Setup] from the home menu.
4. Select [USB Update] to enter.
[UPDATING...XXX%] appears on the display panel while updating. When the update
completes, receiver will restart automatically.
[113] Adjusting Settings System Setup
Setting the tuner (Tuner Setup)
Configure the FM mode and Name Input settings. This function only works while the [FM
TUNER] or [AM TUNER] input is selected.
For details, see “Selecting the FM reception method (FM Mode)” or “Naming preset stations
(Name Input).”
[114] Adjusting Settings Install Setup
 Loading...