

Page 1

4-249-847-12(1)
FM Stereo
FM/AM Receiver
Operating Instructions
STR-LV700R
©2003 Sony Corporation
Page 2
WARNING
To prevent fire or shock hazard, do not
expose the unit to rain or mo ist u r e.
To prevent fire, do not cover the ventil at ion of the
apparatus with newspapers, tablecloths, curtains, etc.,
and do not place lighted candles on the apparatus.
To prevent fire or shock hazard, do not place obje c ts
filled with liquids, such as vases , on the ap pa ratus.
Do not install the appliance in a confined space,
such as a bookcase or built-in cabi ne t.
Do not dispose of batteries with
general house waste; dispose of
them correctly as chemical waste.
About this manual
The instructions in this manual desc r ibe how se t up
your system, and how to use the remote, receiver, and
Network Media to enjoy a variety of media.
This receiver incorporates Dolby* Digital and Pro
Logic Surround and the DTS** Digital Surro und
System.
Screen examples in this manual
The screens used in t his manual t o illustrate p rocedures
may differ slightly from the ones on your screen.
* Manufactured under licence from Dolby
Laboratories.
“Dolby”, “Pro Logic” and the double-D symbol are
trademarks of Dolby Laboratories.
**“DTS” and “DTS Digital Surround” are trade marks
of Digital Theater Systems, Inc.
GB
2
Page 3

Table of contents
Overview......................................................5
Preparations
Verifying the setup procedure......................8
— Preparing the receiver
Step 1: Verifying the connection procedure
for your type of output devices....9
Step 1a: Connecting digital components....10
Step 1b:Connecting analogue
components................................13
Step 1c: Connecting antennae................... .15
Step 2: Connectin g spe ake rs.. .... ... ............16
Step 3: Connecting the AC power cord....18
Step 4: Inserting batterie s into
the remote..................................18
Step 5: Setting up the speake rs............. ... .19
Step 6: Adjusting the speaker levels and
balance.......................................21
— Preparing Network Media
Step 1: Ve ri fying your VAIO computer
model.........................................22
Step 2: Updating your software................22
Step 3: Connectio ns........... .... .... ...............23
Step 4: VAIO compute r setup..................30
Step 5: Preparations needed to use
Network Media...................... ... .34
Step 6: Setting the receiver IP address
acquisition method.....................35
Step 7: Restarting the receiv er..................36
Using the receiver
— Basic operations
Selecting a component ...............................37
Receiving radio broadcasts ........................37
Using the Radio Data System (RDS).........39
About the indications on the display..........41
— Enjoying surround sound
Using only the front speakers ....................42
Enjoying higher fidelity sound ..................42
Selecting a sound field............................... 43
Customising sound fields...........................45
— Miscellaneous operations and
settings
Changing the aud io input mode of digit al
components..........................................47
Selecting the digital audio input decoding
priority.................................................47
Recording audio.........................................48
Using the Sleep Timer ...............................48
Using Network Media
Optimising Network Media....................... 49
— Watching video saved on the VAIO
computer
Watching video..........................................57
Sorting the video capsule list..................... 59
Deleting video capsules.............................59
Write-protecting video capsules................60
Changing video settings.. ... .... .................... 60
Searching with index images.....................61
Searching for a scene by specifying
a time................................... ... .... ......... 62
Starting playback from the poi nt where you
stopped playback.................................62
— L istening to music saved on t he VAIO
computer
Listening to music..................................... 63
Sorting the folders or playlist .................... 65
— View i ng pho tographs saved on the
VAIO computer
Viewing photographs................................. 66
Viewing a photograph list..........................68
Changing slide show settings.................. ..69
GB
3
Page 4

— Watching broadcasts received by
the VAIO computer
Watching television broadcasts..................70
Changing the television image quality.......72
— Recording broadcasts received by
the VAIO computer
Recording television broadcasts ................73
Timer recording .........................................75
Changing the recording quality..................76
Changing Network Media
settings
Setting the receiver IP address...................77
Updating the receiver software..................78
Selecting the Network Media language.....79
Resetting Network Media ..........................79
Registering the receiver on the VAIO
computer (restricting access to the VAIO
computer).............................................80
Appendix
Using the remote........................................82
Precautions.................................................87
Troubleshooting.........................................88
Specifications.............................................93
Trademarks and copyrights........................94
List of button locations and
reference pages....................................95
Index .......................................................... 96
GB
4
Page 5
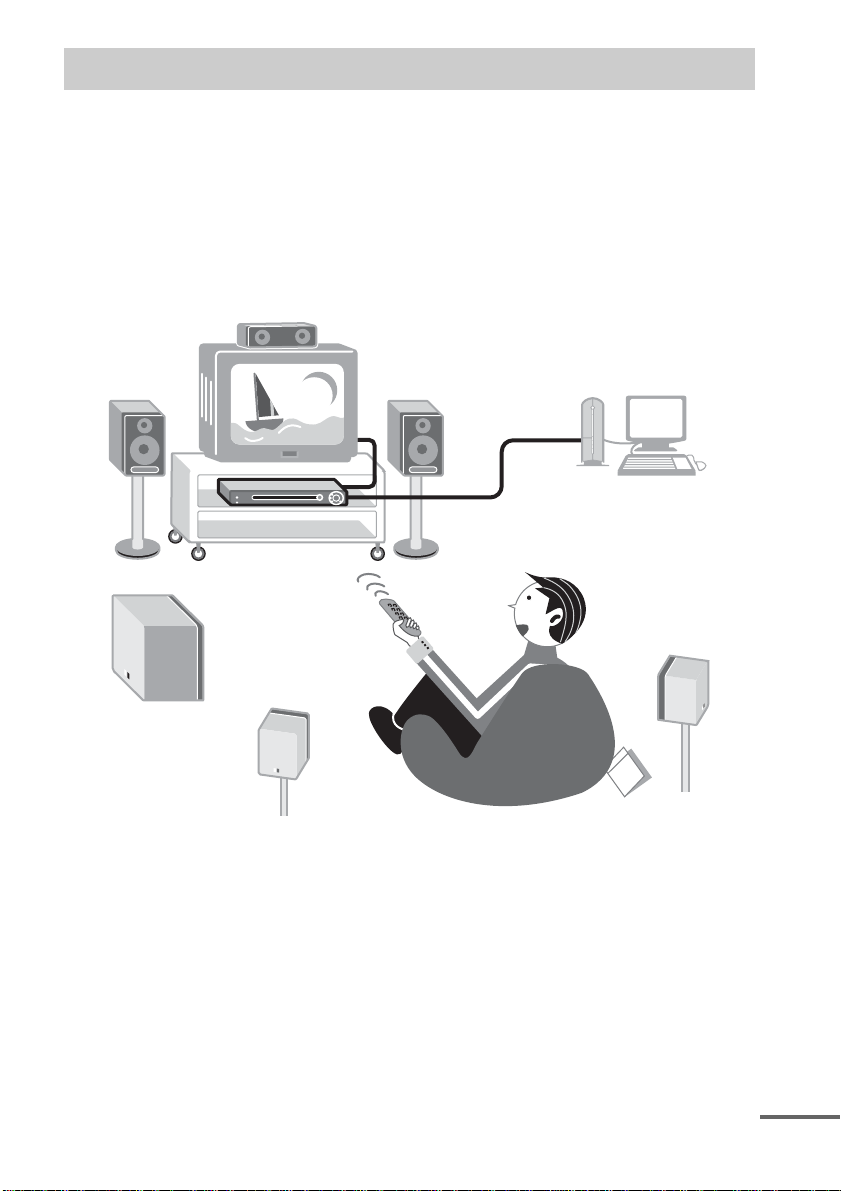
Overview
The receiver support s t he Dolby Pro Logic II syst em used in creating 5.1-channel audio from t w ochannel sources such as television or video, and allows you to enjoy high quality dig ital surround
sound. The receiver is also equipped with Network Media, which allows you to view photographs (still
images), wa tch video, or play ba ck music on a VAIO comput er through the 5.1- channel spe aker sys tem
and television connected to the receiv er. It even allows you to access data saved on V A IO computers
in remote locations by establishing network connections to the receiver in the same way you would
access a DVD or othe r source. Furthermore, if you connect a VAIO computer capable of receiving
television broadca st s to the receiver, you ca n w atch these broadcas ts on your television or co ntrol
programme reco rding on the VAIO com puter from the rec ei ver.
continued
GB
5
Page 6
Connecting several VAIO computers to the receiver
You can connect several VAIO co m puters through a ro ut er (equipped with a hub) or a standard hub.
When you do so, you can select which VAIO computer to use as the data source.
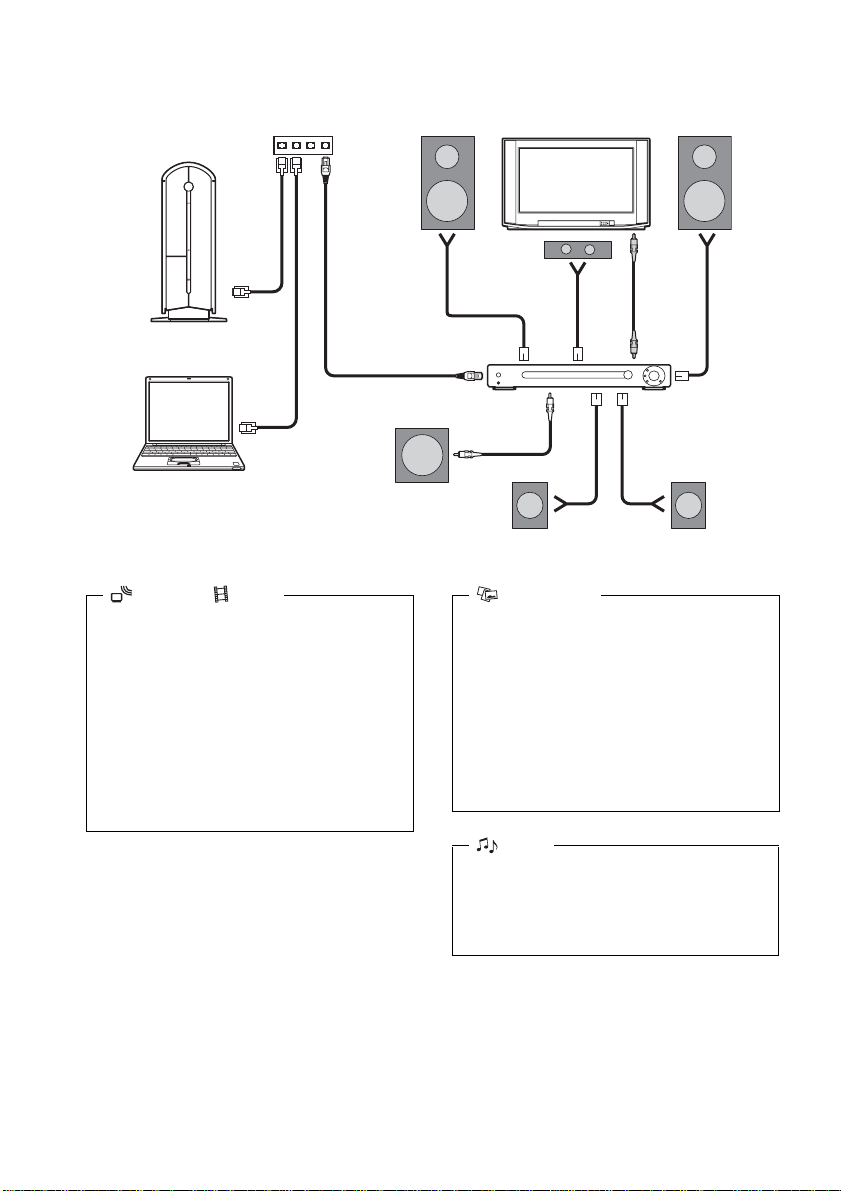
What you can do with Network Media
Television/ Video
• Playing video stored on the VAIO computer
(page 57).
• Viewing a television broadcast with the
VAIO computer and saving it (page 70) .
• Setting the timer to record a television
broadcast received by the VAIO computer
(page 75).
• When playing back video saved on the
VAIO computer, use the film roll feature to
find a particular scene (page 61).
Note
With Network Media, you can watch television
programmes received by the VAIO computer,
view photographs, listen to music, or watch
video saved on the V A IO computer. However,
you cannot access data on computers other than
VAIO computers.
GB
6
Photographs
• Viewing photographs (still images) on the
VAIO computer as slide shows on your
television (page 66).
• Playing background music during a slide
show (page 67).
• Viewing a thum bnail index of your
photographs (page 68).
• Selecting the photographs that you want to
view (page69).
Music
• Listenin g to mu sic saved on the VAIO
computer (page 63).
• Cueing up (page 64).
• Continuous playback (page 64).
Page 7

Network Media multimedia compatibility
Media Playable material Playable files
Video Video capsules recorded with Giga Pocket or
Network Media on the VAIO computer
Music Playlists saved on the VAIO computer with
SonicStage or SonicStage Premium
Photographs Photographs (still images) saved on the VA IO
computer with PictureG ear Studio
photographs (still images) saved in a specific
folder on the VAIO computer
1)
Network Media only allows you to view video capsules recorded on the VAIO computer with Giga Pocket and
2)
.
3)
and
4)
.
video capsules recorded on the VAIO computer with Network Media. You cannot view other video files with this
function. The displayed names of video cabinets and video capsules are as they are created with Giga Pocket. For
details about Giga Pocket, refer to the documenta ti on supplied with your VAIO computer or Giga Pocket Help.
2)
You can only listen to playlists handled by SonicStage or SonicStage Premium. You cannot listen to other music
files or music purchased from an Internet electronic music distribution (EMD) service with Network Media. The
displayed names of playlist folders and playlists are as cre a te d w ith SonicStage or SonicStage Prem ium. For
details about SonicStage or SonicStage Premium, refer to the documentation supplied with your VAIO computer
or SonicStage Help.
3)
PictureGear Studio must be installed on your VAIO computer to perform this operation. When Picture Gear Studio
is installed, you can use its Photo Collection feature to store still images on the Photo Server. For details, refer to
PictureGear Studio Help.
4)
If PictureGear Studio is not installed on your VAIO computer, save still images in folders in the C:\Documents
and Settings\All Users\Photo Server\VAIO Media folder. Still images stored in any othe r loc a tion are not
detected by Network Media, and thus cannot be viewed. The name of the designated folder may vary. For details,
start your VAIO computer, click Start, point to All Programs, VAIO Media, Server Administration, and then
click Phot o S e rver Readme .
You can play back any video capsule other
1)
.
than the followin g:
• Playlist video capsules.
• Video capsules conta ini ng only
administrative in fo rm ation.
• Video capsules set to be re cord ed wi th t he
recording timer.
• Video capsules with viewing restrictions.
•MP3 files
• ATRAC3 files
• ATRAC3 plus files
• WAV files
• Bitmap files
•JPEG files
• GIF files
• TIFF files
• PNG files
GB
7
Page 8
Preparations
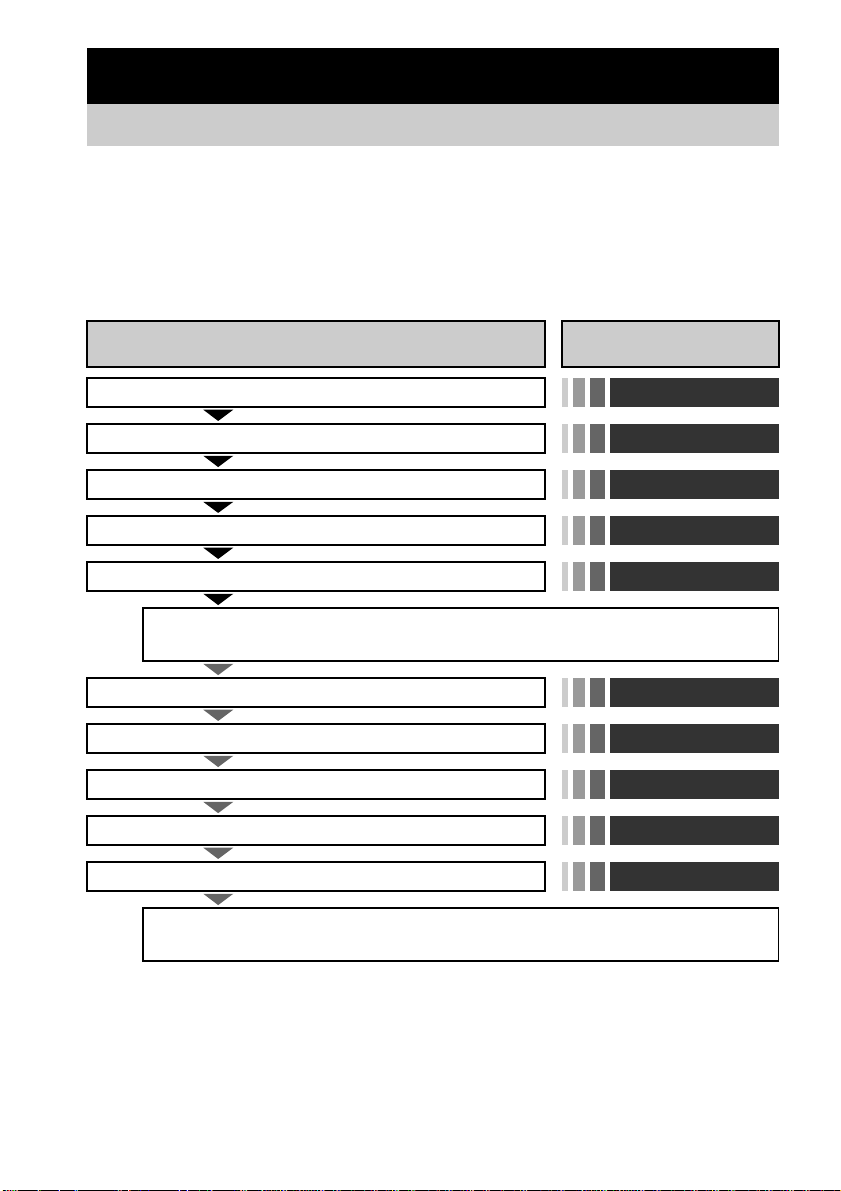
Verifying the setup procedure
Before you can use the receiver or Network Media, you must first set them up correctly. The setup
procedures for both are outlined below. For details about each setup step, simply see the appropriate
section in the operating instructions, as indic at ed next to each ste p.
Note
Before you proceed, make sure that you verify the contents of the STR-LV700R package. For a complete lis t of t he
supplied items, see page 94. If any item is missing and/or damaged, consult your nearest Sony dealer.
Setup procedures For details
Step 1: Connect your television, DVD player, etc. Pages 9 – 15
Step 2: Connect your speakers
Step 3: Connect the power cord to the receiver
Step 4: Insert batteries into the remote
Step 5: Set your speakers
Receiver setup
complete
Step 1: Verify the model of your VAIO computer
Step 2: Update the software of your VAIO computer
Step 3: Connect the receiver to your VAIO computer
Step 4: Make preliminary settings on your VAIO computer
Step 5: Set the receiver IP address acquisition method
Network Media setup
complete
For details about how to use the receiver,
,
see “Using the receiver” (page 37).
For details about how to use Network Media,
,
see “Using Network Media” (page 49).
Pages 16 – 17
Page 18
Page 18
Pages 19 – 21
Page 22
Page 22
Pages 23 – 29
Pages 30 – 34
Page 35
When setup is complete
“Using the re cei ver” d escr ib es how to use mul t i-c han nel play ba ck, adju st soun d ef fect s, as we ll as th e
detailed use of the receiver and the remote. Refer to it as necessary.
“Using Network Media” describes how to play back files on your computer with Network Media. Refer
to is as necessary.
GB
8
Page 9
— Preparing the receiver
This section descri bes how to set up the recei ver before using it.
Step 1: Verifying the connection procedure for your type of output devices
Specific connection procedures for your output devices are explained in steps 1a, 1b, and 1c. Refer to
the table below to proc eed.
Output device list
Preparations
Output device Pages
DVD player With digital output jacks
With analogue output jacks only
Television 14
Satellite tuner With digital output jack s
With analogue output jacks only
MD deck/tape deck With digital output jacks
With analogue output jacks only
VCR 14
Antennae 15
1)
When your device comes wit h ja ck s su c h as digit al o ptic a l output or digital coaxial output jac k s.
2)
When you device only comes with jacks such as audio out L/R jacks.
1)
2)
1)
2)
1)
2)
10
14
10 – 11
13 – 14
12
13
Before you get started
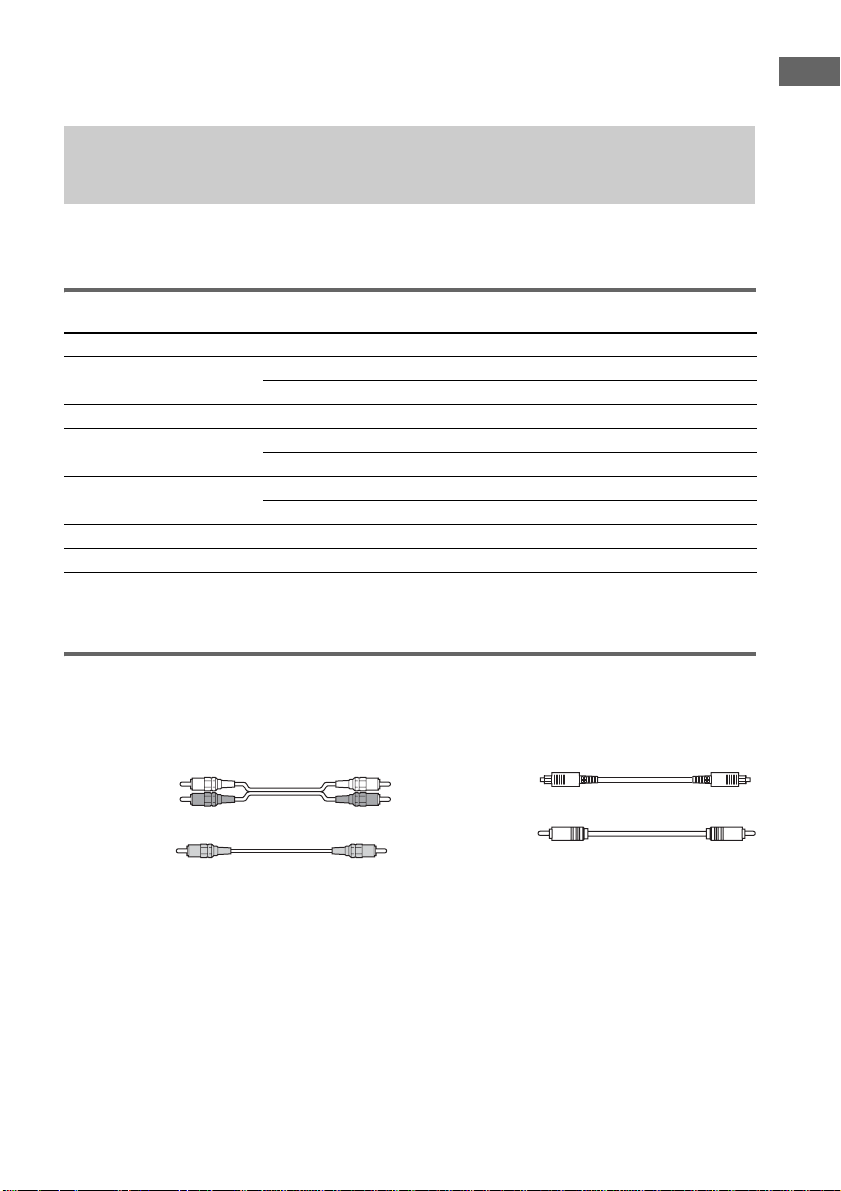
The connection diagrams on the subsequent pages assume the use of the following optional cables (A
to D).
A Audio cable
White (L)
Red (R)
B Video cable
Yellow
Notes
• Turn off the power to all components before making any connections.
• Be sure to make connections firmly to avoid hum and noise.
• Connect the yellow connector of the video cable to the VIDEO IN jack of the receiver.
• Connect the red connector of the audio cable to the AUDIO IN R jack, and the white connector t o the AUDIO IN
L jack of the receiver
• When connecting optical digital cables, inser t the ca ble plugs straight in until they click into place.
• Do not bend or tie optical digita l ca bl es .
C Optical digital cable
D Coaxial digital cable
GB
9
Page 10
.
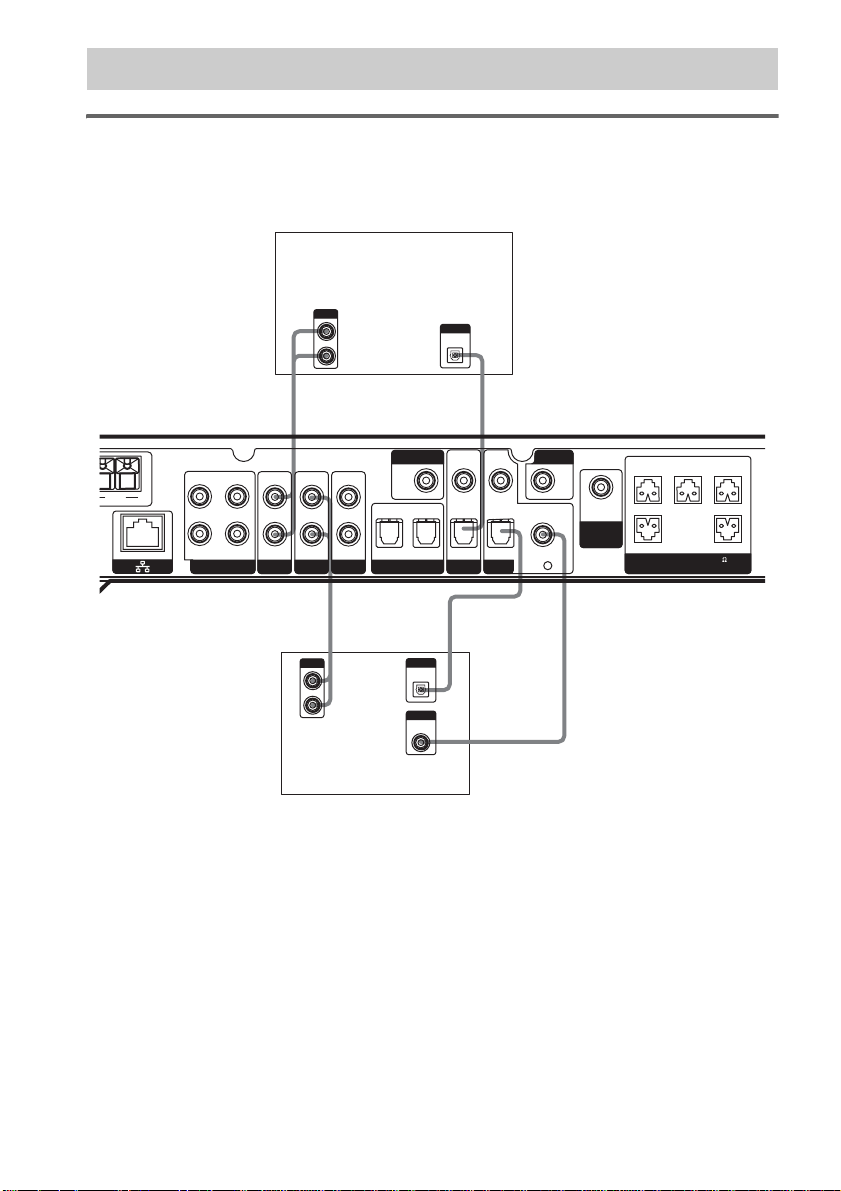
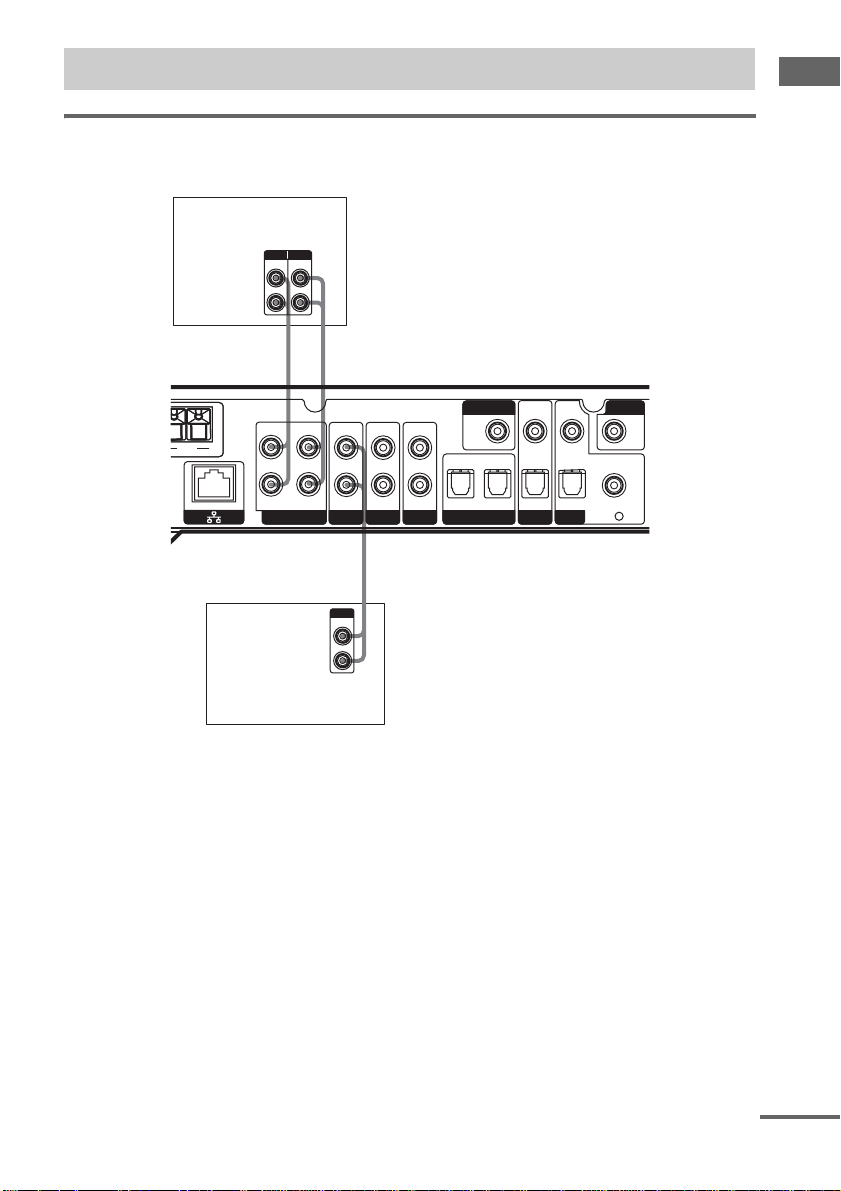
Step 1a: Connecting digital components
Connecting a DVD player, video, or satellite tuner
For details about the necessary cab les (A–D), see page 9.
1 Connecting audio
Satellite tuner
OUTPUT
L
R
DIGITAL
OPTICAL
OUT
CA
VIDEO
VIDEO
MONITOR
AM
L
R
OUT
IN IN IN IN
HDD/MD VIDEODVD
TV/SAT TV/SAT
OUT
OPT OUT OPT IN
A
OUTPUT
L
R
DIGITAL
OPTICAL
OUT
OUTPUT
DIGITAL
IN
OPT IN
C
1)
D
IN
OPT IN COAX IN
DVDHDD/MD
1)
VIDEO
IN
AUDIO
OUT
SUB
WOOFER
CENTER FRONT L
FRONT R
+–+–+–
–+–+
SURR R SURR L
(IMPEDANCE USE 6-16 )
SPEAKERS
DVD player
1)
Connect to the COAX IN or the OPT IN jack. We recommend connecting to the COAX IN jack.
Notes
• All the digital audio jacks are compatibl e with 32 kHz, 44.1 kHz, 48 kHz, and 96 kHz sampling freque nc ie s.
• To play back the multi -cha nnel surround sound through this recei ve r, you ma y ha ve to ch ange the digital output
setting of the connected component. For details, refer to the o pe ra ting instructions suppli ed with the component.
• When you connect the audio output of your televisi on to the VIDEO IN (AUDIO) jack of the receiver, you can
listen to the television audio through the receiver. If you do so, also connect the video output of your television to
the VIDEO IN (VIDEO) jack of the receiver.
10
GB
Page 11
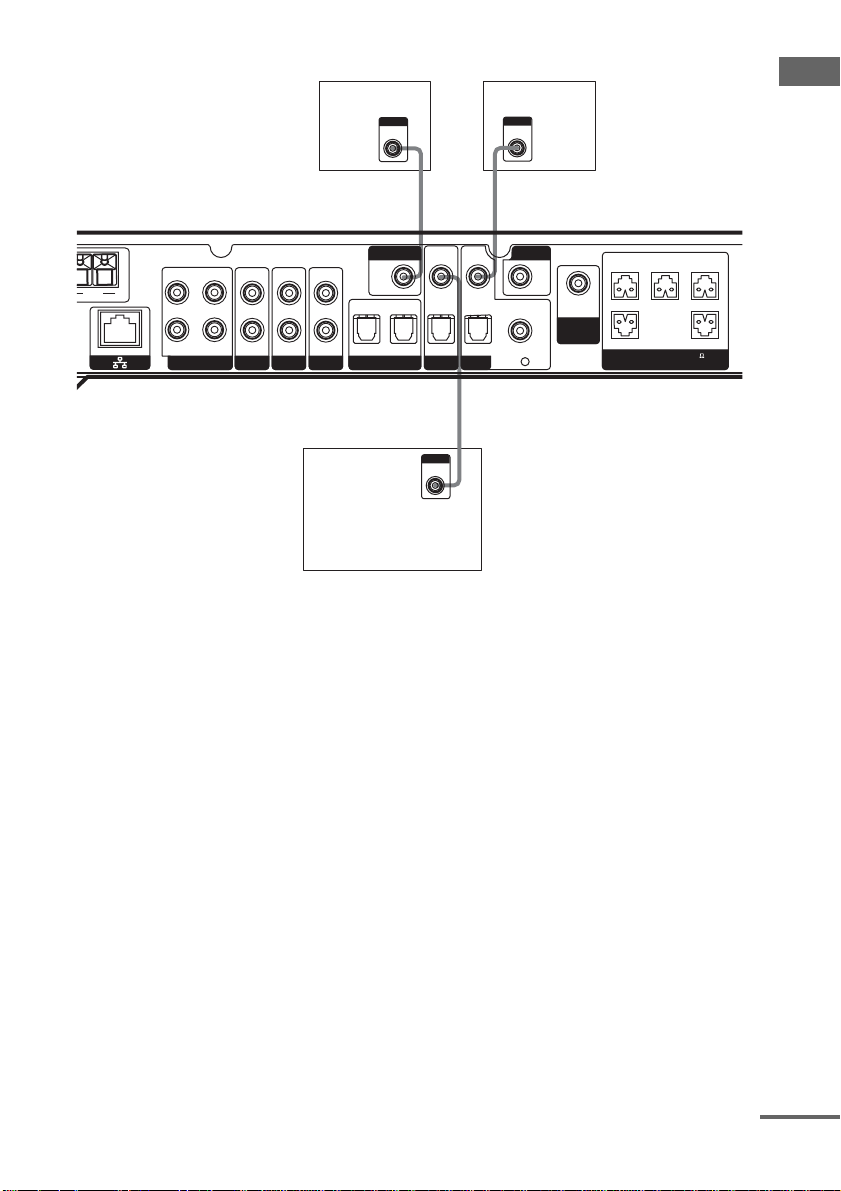
2 Connecting video
Television DVD player
INPUT
VIDEO
OUTPUT
VIDEO
BB
VIDEO
VIDEO
MONITOR
AM
L
R
OUT
IN IN IN IN
HDD/MD VIDEODVD
TV/SAT TV/SAT
OUT
OPT OUT OPT IN
IN
OPT IN
VIDEO
IN
OPT IN COAX IN
DVDHDD/MD
IN
AUDIO
OUT
SUB
WOOFER
CENTER FRONT L
FRONT R
+–+–+–
–+–+
SURR R SURR L
(IMPEDANCE USE 6-16 )
SPEAKERS
B
OUTPUT
VIDEO
Satellite tuner
Note
When you connect the audio output of your television to the VIDEO IN (AUDIO) jack of the receiver, you can listen
to the television audio through the receiver. If you do so, also connect the video output of your te le vision to the
VIDEO IN (VIDEO) jack of the receiver. If you want to connect a satellite tuner or similar device, connect the audio
and video as illustrated above.
Preparations
continued
11
GB
Page 12
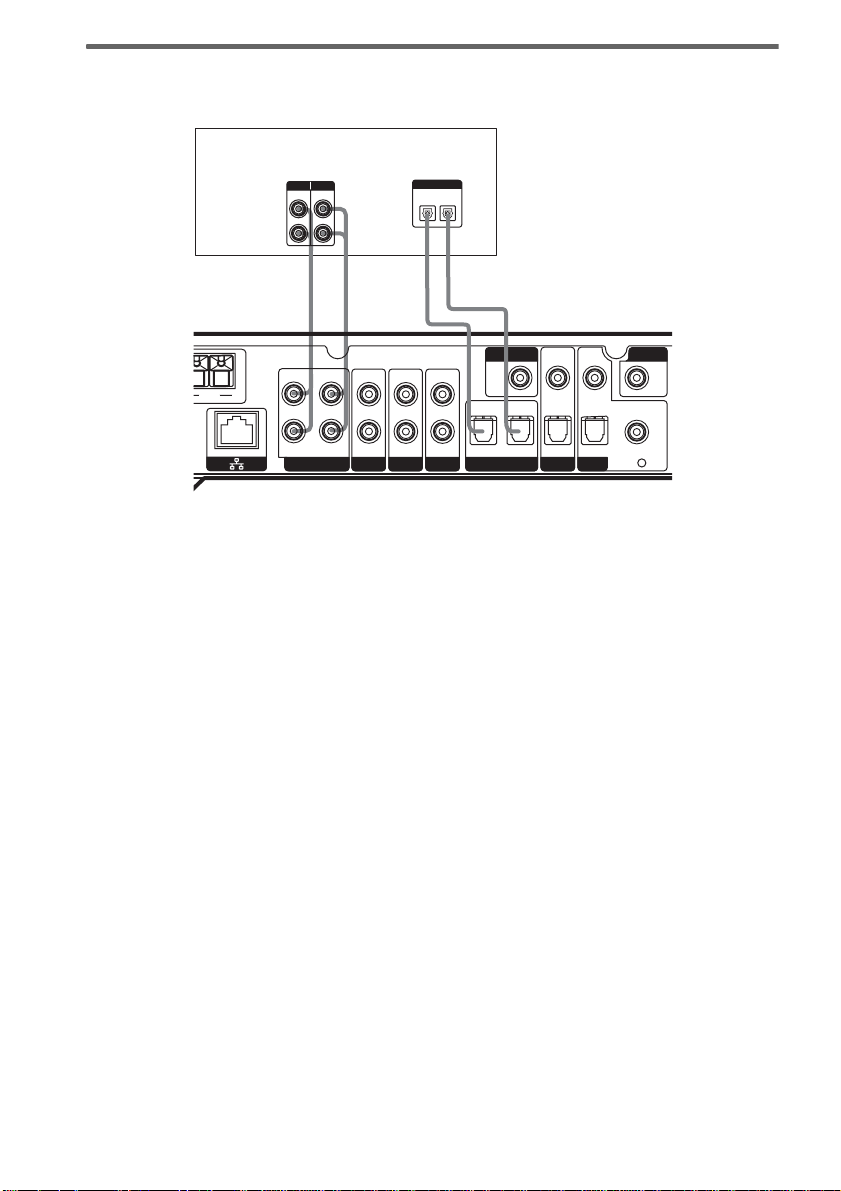
Connecting an MD or tape deck
For details about the necessary cab les (A–D), see page 9.
Audio recorder, MD/tape deck
INPUT OUTPUT
LINE
LINE
L
R
DIGITAL
OPTICAL
IN
OUT
A A
OUT
l
AM
L
R
OUT
IN IN IN IN
HDD/MD VIDEODVD
CC
l
l
IN
OUT
OPT OUT OPT IN
MONITOR
VIDEO
IN
OPT IN
l
OUT
IN
TV/SAT TV/SAT
VIDEO
IN
OPT IN COAX IN
DVDHDD/MD
VIDEO
IN
Notes
• All the digital audio jacks are compatibl e with 32 kHz, 44.1 kHz, 48 kHz, and 96 kHz sampling freque nc ie s.
• You cannot record digi tal multi-channel surround sound digitally.
• Because there is no output to the HDD/MD OUT or OUTPUT jacks when playing back video or audio with
Network Media, it is not possible to recor d au dio with the receiver.
12
GB
Page 13
Step 1b: Connecting analogue components
Connecting an audio component
For details about the necessary cables ( A–D), see page 9.
Audio recorder,
MD/tape deck
INPUT OUTPUT
LINE
LINE
L
R
Preparations
AA
OUT
AM
AM
L
R
OUT
l
l
HDD/MD VIDEODVD
IN
IN IN IN IN
TV/SAT TV/SAT
MONITOR
OUT
OPT OUT OPT IN
VIDEO
IN
OPT IN
VIDEO
IN
OPT IN COAX IN
DVDHDD/MD
VIDEO
IN
A
OUTPUT
LINE
L
R
Satellite tuner
continued
13
GB
Page 14
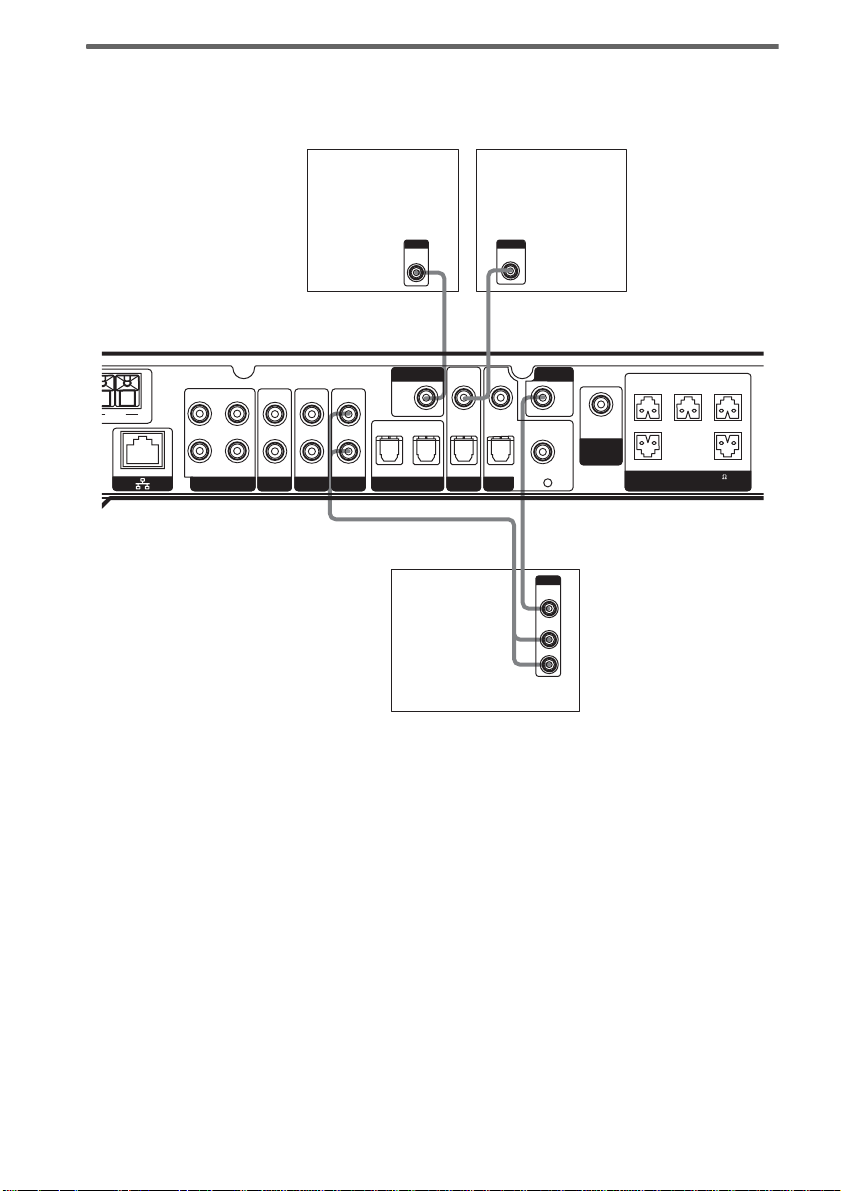
Connecting a video component
When you connect your television to the MONITOR jack, you can watch the video from t he selected
input (for details, see page 57). For details about the necessary cables (A
Television Satellite tuner
–D), see page 9.
INPUT
VIDEO
IN
OUTPUT
VIDEO
B B
VIDEO
VIDEO
MONITOR
AM
L
R
OUT
IN IN IN IN
HDD/MD VIDEODVD
TV/SAT TV/SAT
OUT
OPT OUT OPT IN
IN
OPT IN
IN
OPT IN COAX IN
DVDHDD/MD
A
B
OUTPUT
VIDEO
VIDEO
OUT
AUDIO
OUT
IN
L
R
AUDIO
OUT
SUB
WOOFER
CENTER FRONT L
FRONT R
+–+–+–
–+–+
SURR R SURR L
(IMPEDANCE USE 6-16 )
SPEAKERS
VCR
14
GB
Page 15

Step 1c: Connecting antennae
V
O
V
Connect the supplied AM loop antenna and FM wire antenna.
FM wire antenna
(supplied)
AM loop antenna
(supplied)
Preparations
ANTENNA
ANTENNA
75
75
FM
FM
U
U
AM
AM
L
R
OUT
IN IN IN IN
TV/SAT T
MONITOR
OUT
OPT OUT OPT IN
HDD/MDHDD/MD VIDEODVD
Notes
• To prevent noise pickup, keep the AM loop antenna away from the receiver and other components.
• Be sure to fully extend the FM wire antenna.
• After connecting the FM wir e antenna, keep it as horizontal as possible.
15
GB
Page 16
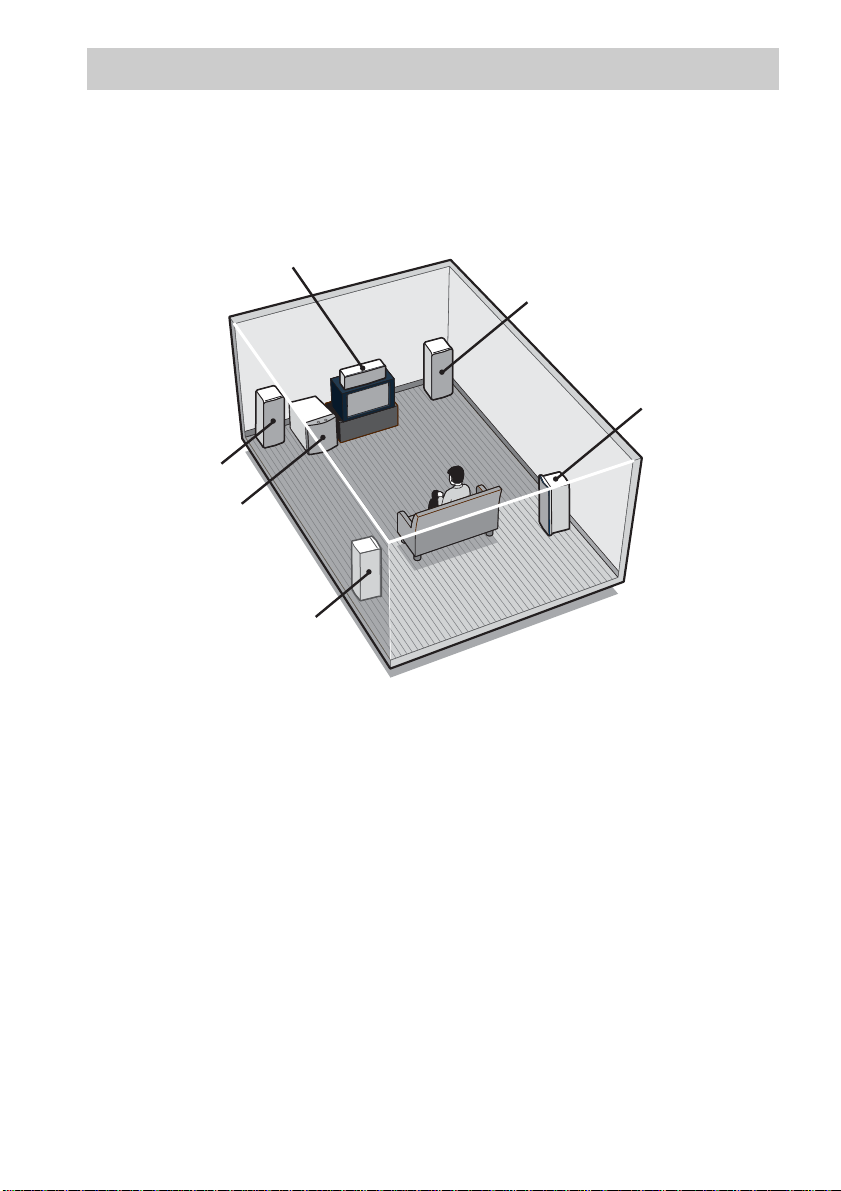
Step 2: Connecting speakers
Connect your spe akers to the receive r. Y ou can connect up to a 5. 1- channel speaker system to the
receiver. To fully enj o y cinema quality mul ti -c hannel surround soun d, you need five speakers (two
front, one centre, and two surround speakers) and a subwoofer.
5.1-channel speaker configuration example
Centre speaker
Front speaker (R)
Surround speaker (R)
Front speaker (L)
Subwoofer
Surround speaker (L)
16
Notes
• The subwoofer is not a directiona l de vic e , th ere f ore you can place it wherever you want.
• When connecting the speaker cables, make that you attach the suppli ed spea ke r plugs to the cables. Refer to the
separate sheet for details.
Speaker impedance
To fully enjoy multi -channel surround so und, make sure that you c onnect speakers of a nom i nal
impedance o f 6 Ω or more to the FRONT, CENTER, and SURROUND jacks of the receiver. If you are
unsure of the nominal impedance of your speakers refe r to their documenta t i on. (The nominal
impedance of mos t s pe akers appears on their rear. )
GB
Page 17
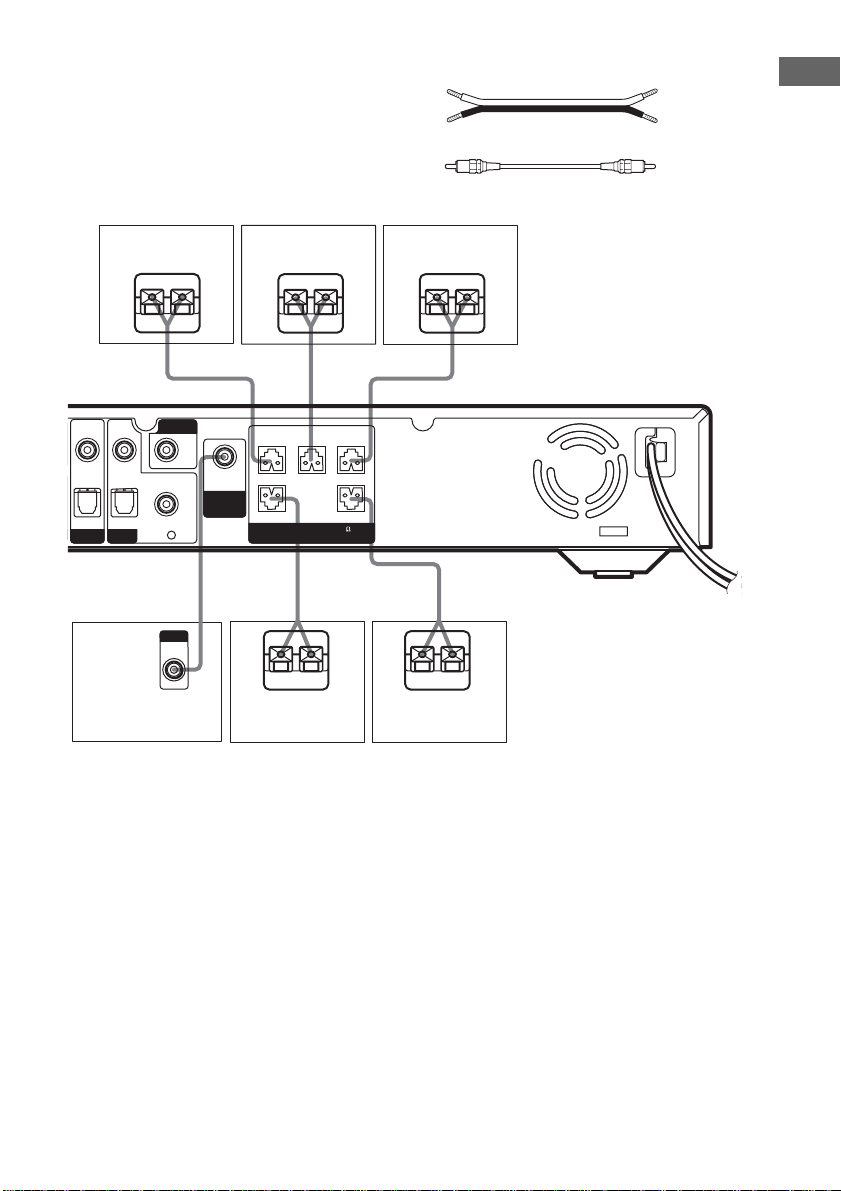
Necessary cables
A Speaker cables (not supplied)
B Monaural audio cable (not supplied)
AUDIO
OUT
SUB
WOOFER
Centre speaker
E
CENTER FRONT L
FRONT R
+–+–+–
–+–+
SURR R SURR L
(IMPEDANCE USE 6-16 )
SPEAKERS
AB
e
Front speaker (R)
Ee
VIDEO
VIDEO
IN
IN
OPT IN COAX IN
OPT IN
DVD
TV/SAT
AAA
VIDEO
IN
INPUT
AUDIO
IN
Black
Front speaker (L)
e
E
E
e
(+)
(–)
Preparations
e
A
E
Subwoofer
Surround speaker
(R)
Surround speaker
(L)
17
GB
Page 18
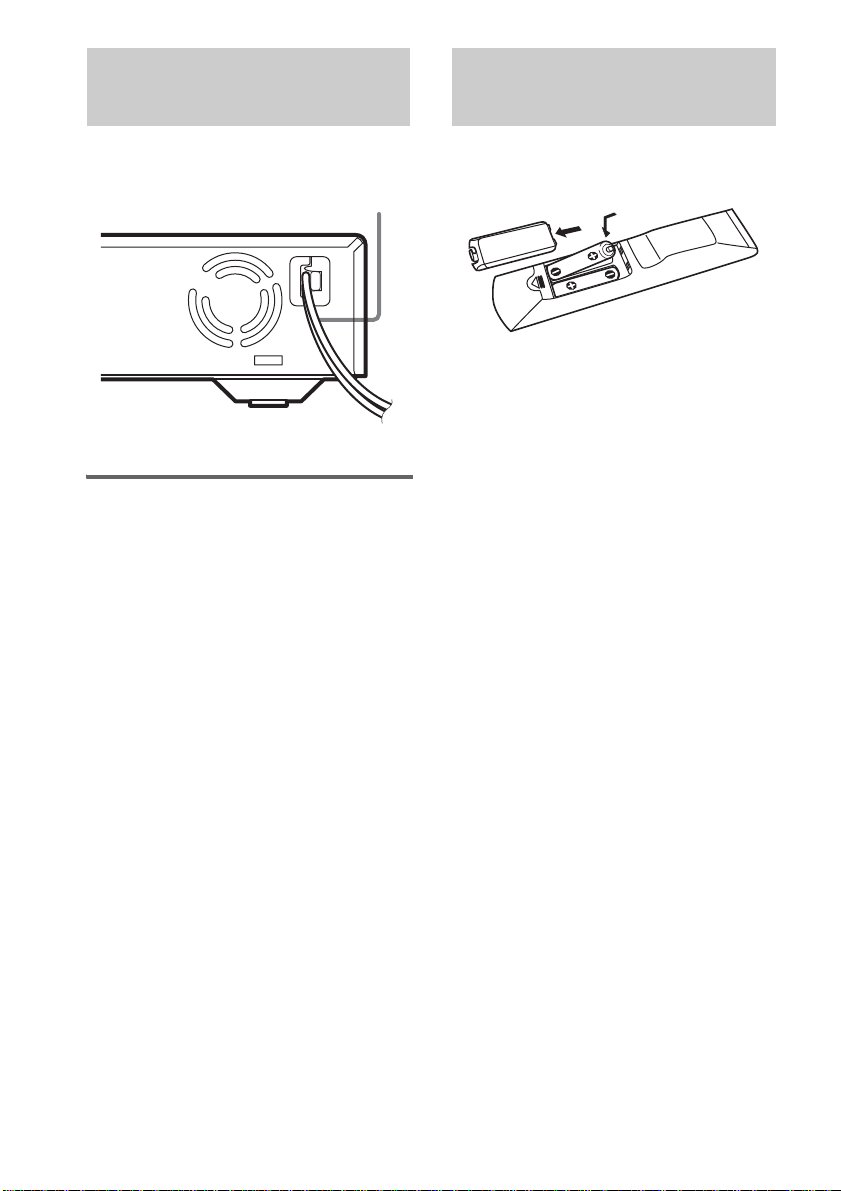
Step 3: Connecting the AC
Step 4: Inserting batteries
power cord
Connect the AC power cord of the receiver to
the power outlet.
AC power cord
To power outlet
Initial setup
Before using the receiver for the first time,
initialise the receiver by performing the
following pr ocedure.
This procedure ca n al so be used to return the
settings that you have made to their defaults.
1 Press the ?/1 button on the receiver to
turn it off.
2 Hold down the ?/1 button for 5
seconds.
The following items are reset or cleared
when INITIAL appears on the display:
• All the sound field paramete rs are reset to
their defaults.
•All SET UP, LEVEL, and TONE
parameters are reset to their defaults.
• The sound fiel ds memorised for each
programme source and preset stations are
cleared.
• The master volume is set to VOL MIN.
into the remote
Insert two R6 (size AA) batteries with the + and
– properly oriented in t he b at t er y compartment.
Tip
Under normal conditions, the batteries should last
about six months. When the remote no longer operates
the control centre, replace both batteries with new
ones.
Notes
• Do not leave the remote in an extremely hot or humid
place.
• Do not use a new battery with an old one.
• Do not expose the remote sensor of the control centre
to direct sunlight or lighting equipment. Doing so
may cause malfunctions.
• If you do not use the remote for an ex te nde d pe riod
of time, remove the batterie s to a void possible
damage from battery leaka ge and c or ro sion.
• Turn off the power to all components before making
any connections.
• Be sure to make connections firmly to avoid hum and
noise.
18
GB
Page 19
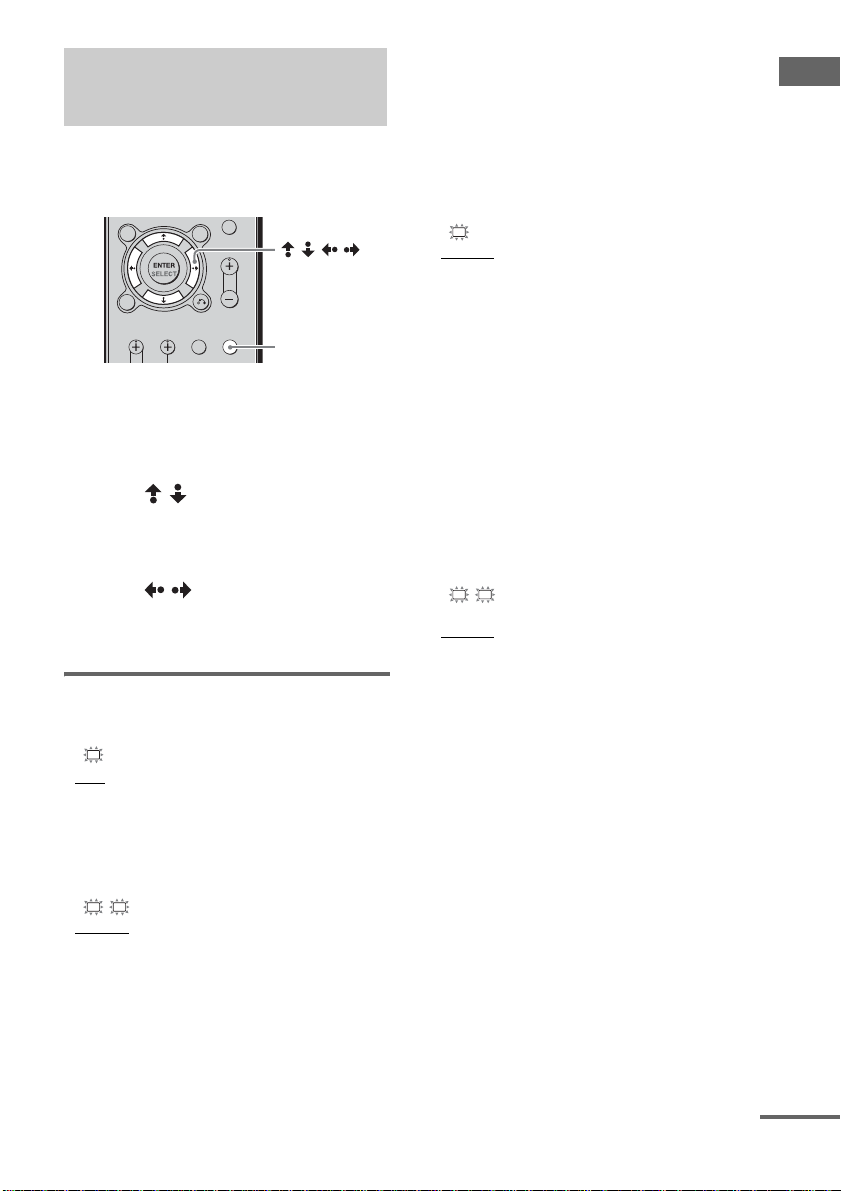
Step 5: Setting up the speakers
You can use the SET UP menu to set the size
and distance of the speakers connected to this
system.
///
MAIN MENU
1 Press ?/1 to turn on the system.
2 Press the black MAIN MENU button
repeatedly until SET UP appears on
the display.
3 Press / to select the menu item
that you want.
For details, see “Speaker setup parame ters”,
below.
4 Press / to select the parameter.
5 Repeat steps 3 and 4 until you have set
all the items that follow.
Speaker setup parameters
The initial settings are underlined.
SW
x (SUB WOOFER) (Subwoofer)
• YES
If you connect a subwoofer, select YES.
• NO
If you do not connect a subwoofer, sele ct NO. This
activates the bass redirection c irc uitry and outputs
the LFE signals from other speakers.
L
R
x (FRONT) (Front speakers)
•LARGE
If you connect large speakers that will effectively
reproduce bass frequencies, select LARGE.
Normally, select LARGE.
• SMALL
If the sound is distorted, or you feel a lac k of
surround effects when using multi-channel surround
sound, select SMALL to activate the bass redirection
circuitry and output the front channel bass
frequencies from the subwoofer. W hen the front
speakers are set to SMALL, the centre, and surround
speakers are also automatically set to SMALL
(unless previously set to NO).
C
x (CENTER) (Centre speaker)
• LARGE
If you connect a large speaker that will effe c tively
reproduce bass frequencies, sele c t LARGE.
Normally, select LARGE. However, if the front
speakers are set to SMALL, you cannot set the centre
speaker to LARGE.
• SMALL
If the sound is distorted, or you feel a lack of
surround effects when using multi-channel surround
sound, select SMALL to activate the bass redirection
circuitry and output the centre channel bass
frequencies from the front spe a ke rs (i f set to
LARGE) or subwoofer.
• NO
If you do not connect a centre speaker, sele ct NO.
The sound of the centre channel will be output from
the front speakers.
SR
SL
x (SURROUND) (Surround
speakers)
• LARGE
If you connect large speakers that will effe c tive ly
reproduce bass frequencies, sele c t LARGE.
Normally, select LARGE. However, if the front
speakers are set to SMALL, you cannot set the
surround speakers to LARGE.
• SMALL
If the sound is distorted, or you feel a lack of
surround effects when using multi-channel surround
sound, select SMALL to activate the bass redirection
circuitry and output the surround channe l ba ss
frequencies from the subwoofer or othe r LARGE
speakers.
• NO
If you do not connect surround speakers, selec t NO.
Preparations
continued
19
GB
Page 20
Tip
The LARGE and SMALL settings of each speaker
determine whether the internal sound processor will
cut the bass signal from that channel. When the bass is
cut from a channel, the bass redirection circuitry sends
the corresponding bass frequencies to the subwoofer or
other LARGE speakers.
However, it is best not to cut them, if possible.
Therefore, even when using small spea kers , you c an
set them to LARGE if you want to output the bass
frequencies from that speaker . On the oth er ha nd, if
you are using a large speaker, but prefer not to have
bass frequencies output from that speaker, set it to
SMALL.
If the overall sound level is lower than you prefer, set
all speakers to LARGE. If there is not enough bass,
you can use the equaliser to boost the bass levels. To
adjust the bass, see page 46.
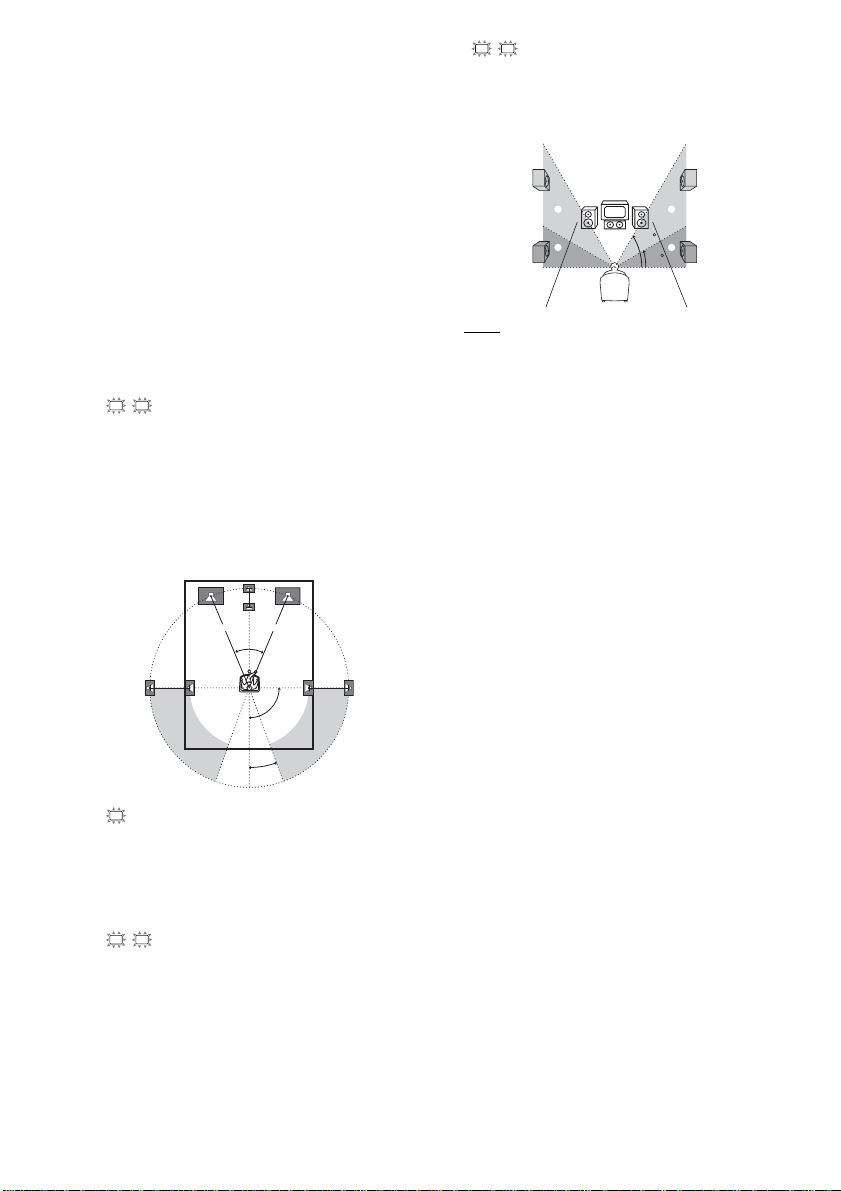
L
R
x DIST. X.X m
(Front speaker distance)
Initial setting: 3.0 m
Lets you set the distance from your listening position
to the front speakers (A). You can adjust this distance
from 1.0 m to 7.0 m in 0.1 m steps.
If both front speakers are not placed at an equal
distance from your listening position, set the distance
to the closest speaker.
A A
45˚
SR
SL
x PL.
(Surround speaker placement)
*
Lets you specify the height of your sur ro und spe a ke r s
for proper implementation of the surround effects in
the Cinema Studio EX modes (page 43).
B
A
B
60
A
30
• LOW
Select if the height of your surround spea ke r s
corresponds to section A.
• HIGH
Select if the height of your surround spea ke r s
corresponds to section B.
* This se tup item is not available when the surround
speaker parameter is set to NO.
20
90˚
20˚
C
x DIST. X.X m
(Centre speaker distance)
Initial setting: 3.0 m
Lets you set the distance from your listening position
to the centre speaker. You can adjust this distance from
1.0 m to 7.0 m in 0.1 m steps.
SR
SL
x DIST. X.X m
(Surround speaker distance)
Initial setting: 3.0 m
Lets you set the distance from your listening position
to the surround speakers. You can adjust this distance
from 1.0 m to 7.0 m in 0.1 m steps.
If both surround speakers are not placed at an equal
distance from your listening position, set the distance
to the closest speaker.
GB
Page 21
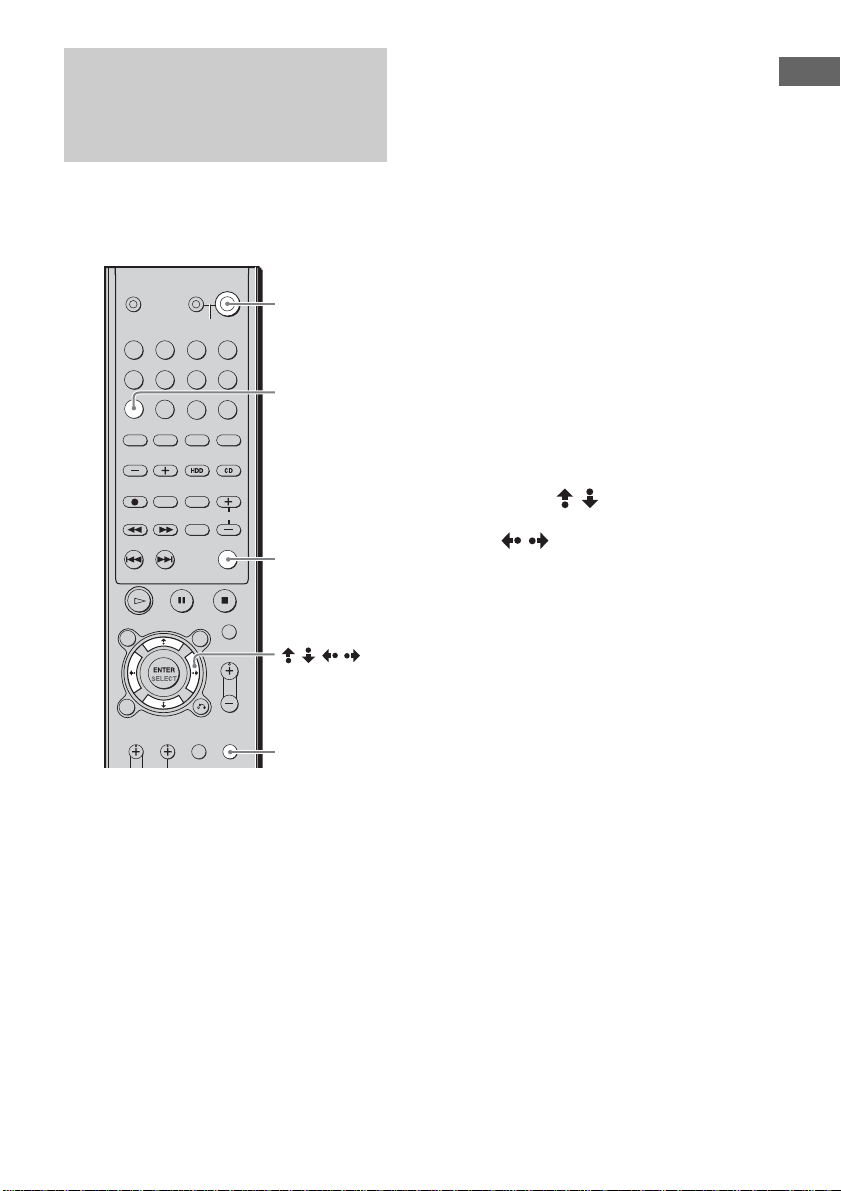
Step 6: Adjusting the speaker levels and balance
— TEST TONE
Use the remote while seated in your listening
position to adjust the level of each speaker.
?/1
TEST TONE
ALT
///
MAIN MENU
1 Press ?/1 to turn on the receiver.
2 Rotate VOLUME on the receiver
clockwise.
3 Turn on the subwoofer.
4 Press the ALT button.
5 Press the TEST TONE button on the
remote.
You will hear the te st tone from each
speaker sequentially.
Front (left) t Centre t Front (right) t
Surround (right) t Surround (left) t
Subwoofer
6 Adjust the LEVEL parameters so that
the level of the test tone from each
speaker sounds the same when you
are in your main listening position.
To adjust the balance and lev el of sp eakers,
press the black MAIN MENU button
repeatedly until LEVEL appears on the
display, press / to select the para meter
that you want to adjus t (pa ge 4 5) , a nd t hen
press / to select the setting.
7 Press the TEST TONE button on the
remote again to turn off the test tone.
Tip
You can adjust the level of all th e speakers at the same
time. Rotate VOLUME on the system or press
VOLU ME +/– on the remote.
Notes
• The front balance, centre level, surround level, and
subwoofer level are shown on the display during
adjustment.
• To enjoy better sound quality, do not turn the volume
of the subwoofer too high.
Preparations
21
GB
Page 22
— Preparing Network Media
This section describes how to set up Network Media and your VAIO computer before using them.
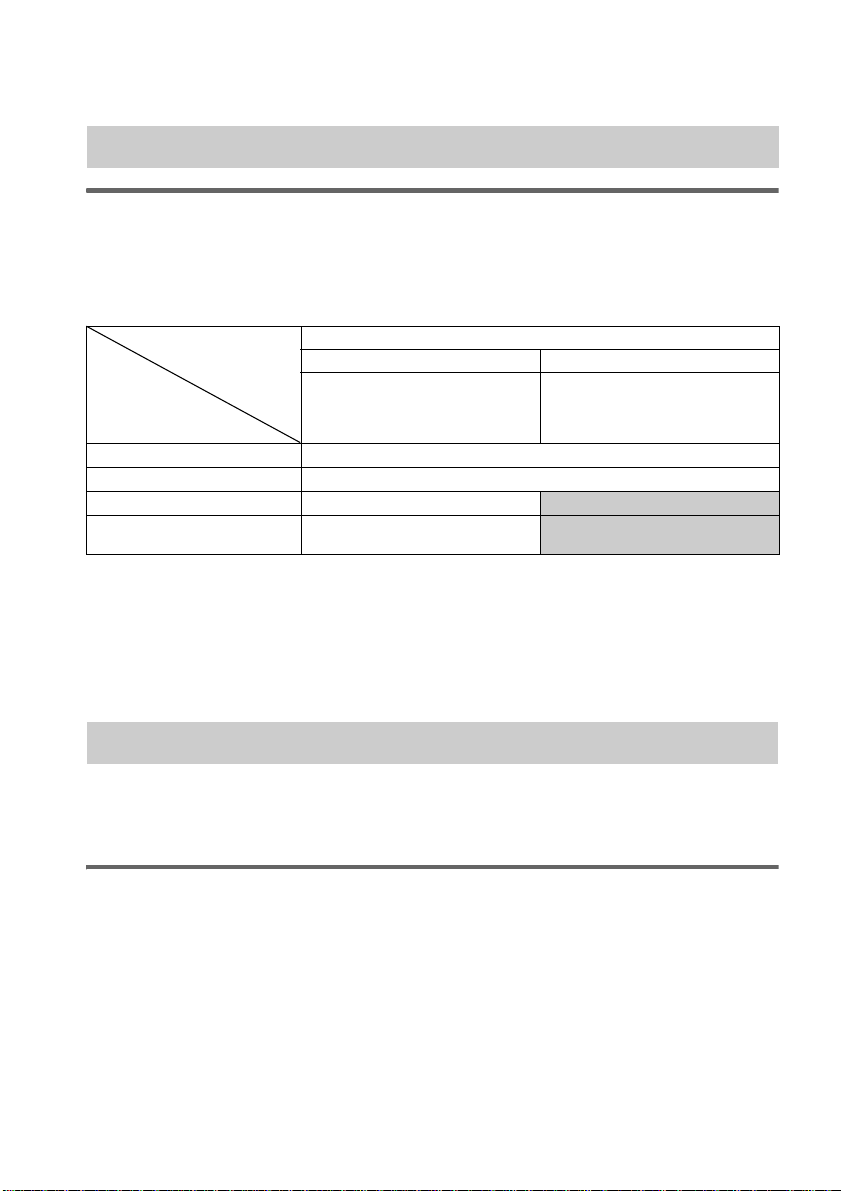
Step 1: Verifying your VAIO computer model
VAIO computer models that can be connected to the receiver
and use Network Media
VAIO computer models marketed from October 2003 running Windows XP Professional or Windows
XP Home Edition.
Functions depend on the model of VAIO computer connected.
VAIO computer models marketed from October 2003
Models
Supported
functions
Music playback
Photograph viewing
Video playback
Television viewing and
recording
Notes
• VAIO computer models market e d before Oct obe r 2003 do not support the functions above.
• Depending on the configu rati on of your VAI O com put er, the re ma y be some ope r at ion restr ic t ions. For details
about these restrictions and up-to-date information, vis it the S ony home audio customer support Web site at
http://www.vaio-link.com/info/lv700R/EN/
Models with Giga Pocket Models without Giga Pocket
PCV-W series
PCV-RZ4 series
PCV-RS3 series
Yes No
Yes No
PCS-RS3 series without
Giga Pocket
All Sony Notebooks with
VAIO Media
Yes
Yes
22
Step 2: Updating your software
To be able to use Network Media, you must first update the software of the VAIO computer connected
to the receiver. Be sure that you use the sof tw are update corresp onding to the VAIO computer
connected to the receiver.
Updating software
On the home audio customer support Web site (http://www.vaio-link.com/info/lv700R/EN/), locate
your model of VAIO computer. Download the update that corresponds to your model and follow the
instructions on the screen to perform the update.
GB
Page 23
Step 3: Connections
Evaluating your home network
You can connect the receiver to your VAIO computer(s) using the Ethernet port of your computer(s),
a router with a buil t-in network switch, or a network switchin g device.
These examples of home networks can help you determine the best connection method for the receiver
and VAIO computer(s).
Optional equipment and cables may be ne cessary to connect yo ur network media rece iver and VAIO
computer(s).
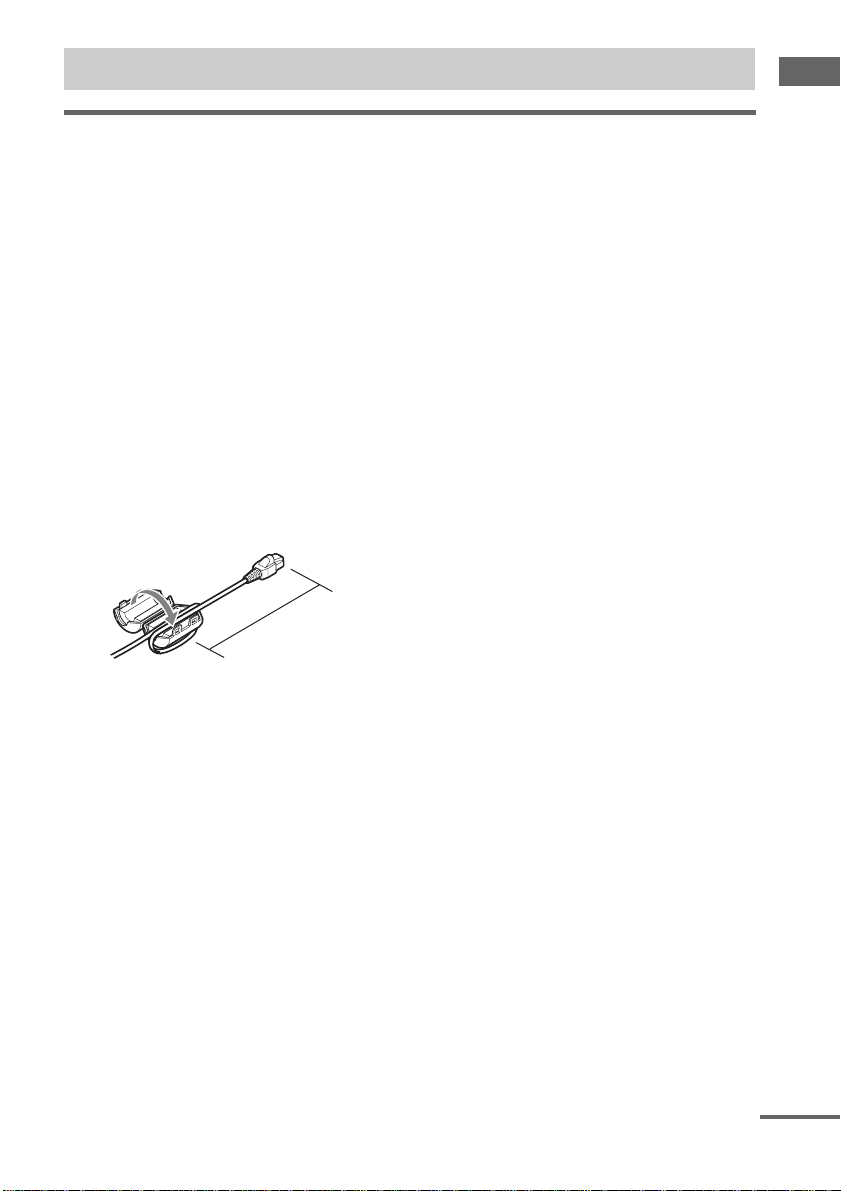
Attaching the ferrite core to the network cable
Before connecting th e receiver to your network or VAIO comp ut er, make sure that you at t ach the
supplied ferrite core. The ferrite core is used to reduce electrical interference.
1 Open the ferrite core and place is approximately 10 to 12 cm from one end of the network
cable.
2 Wrap the network cable lengthwise around the ferrite core, so that the cable runs
through the groove at the centre of the core.
3 Close the ferrite core around the network cable.
Note
Make sure that the ferrite core is secure arou nd the net wor k cable.
10 to 12 cm
Praparations
continued
23
GB
Page 24
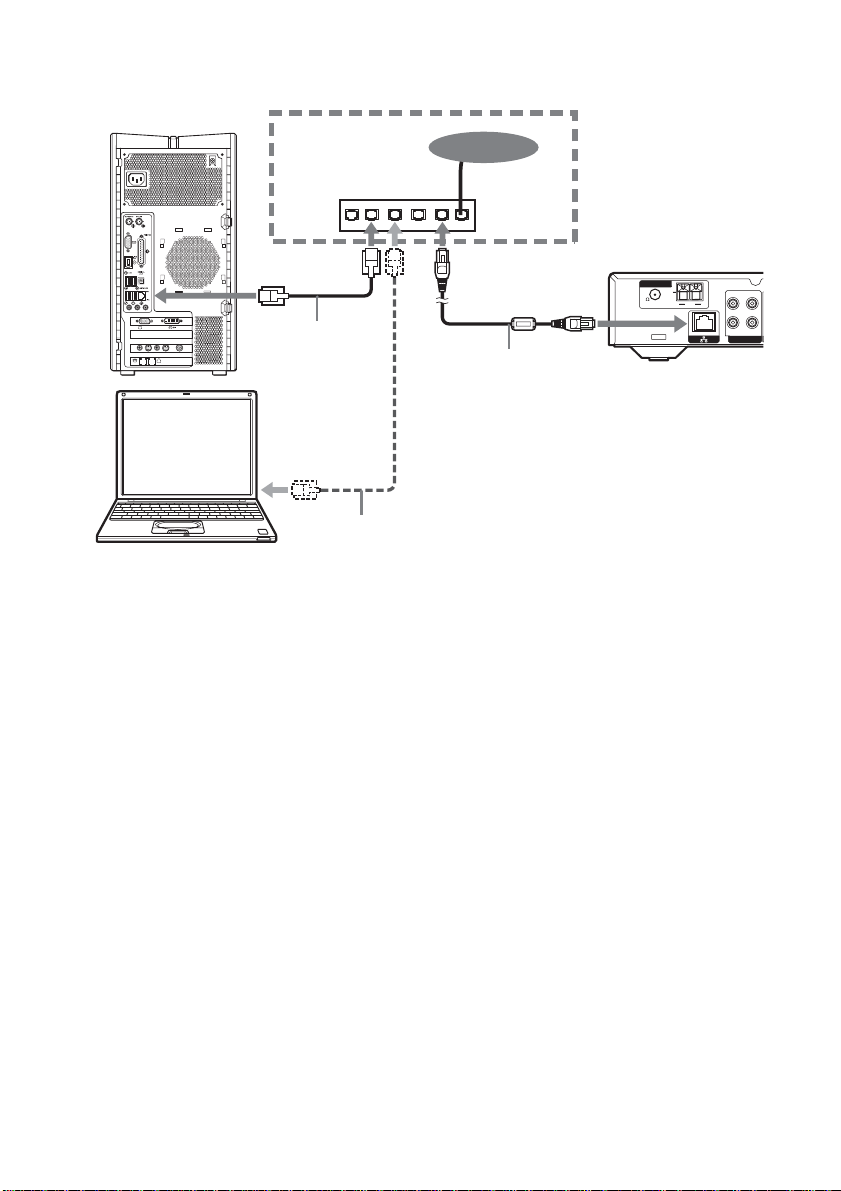
Home network 1: DSL or cable modem equipped with a built-in router
and network switch ports
VAIO computer 1
MONITOR
USB
HEADPHONES
MIC
LINE IN
MONITOR
VHF/UHF
AUDIO
AUDIO
S VIDEO/VIDEO S VIDEO/VIDEO
–
–
–
–
VIDEO OUTPUT
VIDEO1 INPUT
LINEPHONE
DSL or cable modem
with a built-in router
and network swit ch po rts
(sold separately)
LAN LINE
To Ethernet port
Network cable
(sold separately)
Internet
1)
ANTENNA
U
To Ethernet port
Network cable with
ferrite core
2)
(supplied)
75
FM
AM
STR-LV700R
L
R
OUT
IN
HDD/MD
To Ethern et port
Network cable
VAIO computer 2
1)
Use a DSL or cable modem that supports 100Base- TX.
2)
Attach the suppli ed ferrite core to the supplied netwo rk cable before connecting the cabl e t o th e compatible with
(sold separately)
the receiver.
Note
Connections may vary depending on your network. Contact your Internet service provider for connection
information.
Home network 1 connection method
1 Connect the receiver to your DSL or cable modem (sold separately) using the network cable
(supplied) with the ferrite core (supplied).
2 Connect the Ethernet jack of each VAIO computer to jacks on the DSL/modem using additional
network cables (sold separately).
Notes
• This connection method may vary depending on factors specific to your network.
• Refer to the documenta tion of your DSL or cable modem to verify that it is equi ppe d wit h a built- in router and
network switch ports.
24
GB
Page 25
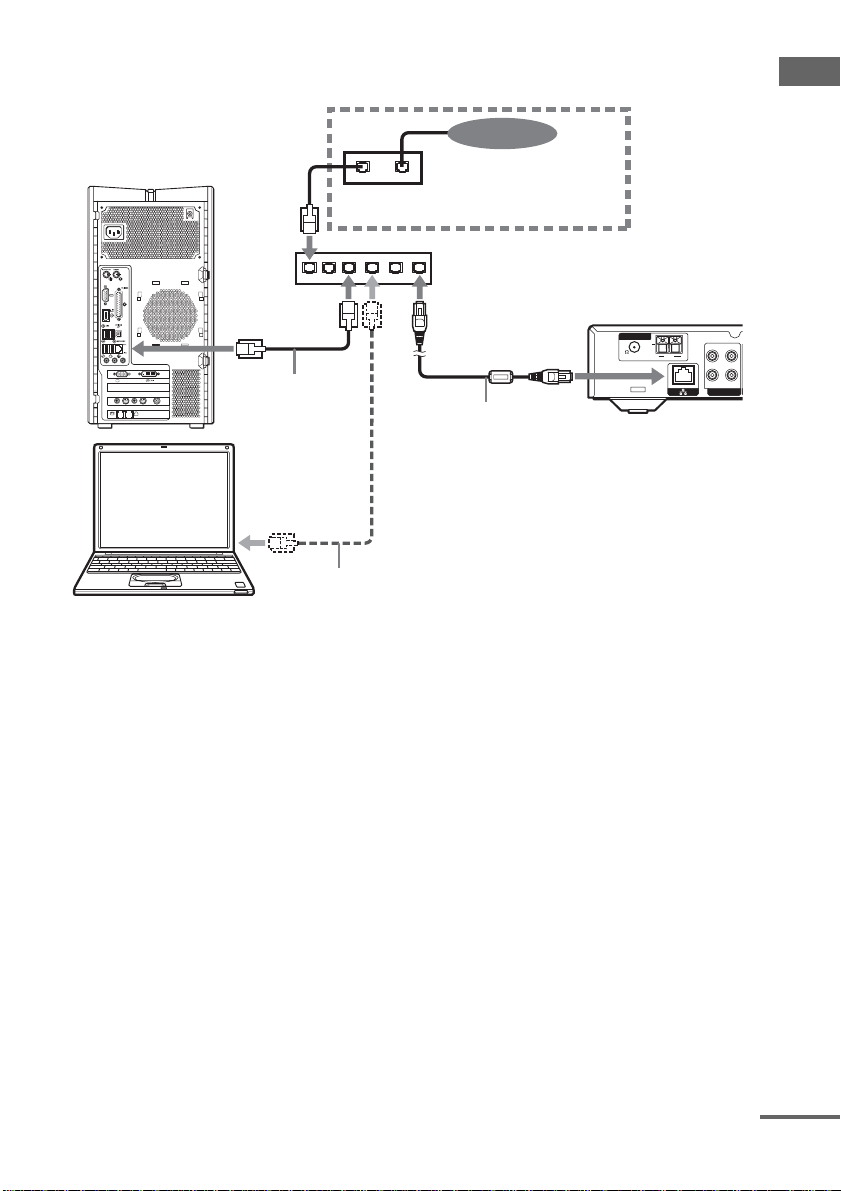
Home network 2: DSL or cable modem equipped with a built-in router,
but without network switch ports
Internet
Praparations
VAIO computer 1
MONITOR
USB
HEADPHONES
MIC
LINE IN
MONITOR
VHF/UHF
AUDIO
AUDIO
S VIDEO/VIDEO S VIDEO/VIDEO
–
–
–
–
VIDEO OUTPUT
VIDEO1 INPUT
LINEPHONE
To Ethernet port
Network cable
(sold separately)
LINELAN
DSL or cable modem with
a built-in router
Generic hub
To Ethernet port
Network cable with
ferrite core
3)
1)
2)
(supplied)
ANTENNA
U
75
FM
AM
STR-LV700R
L
R
OUT
IN
HDD/MD
To Ethern et port
Network cable
(sold separately)
VAIO computer 2
1)
Connections may vary depending on your ne twor k. Con ta ct your In te rn et servi ce pr ovider for connection
information.
2)
Use a network switch that supports 100Ba se - TX.
3)
Attach the supplied ferr ite c or e to th e supplied network cable before c onne c ting the cable to the receiver.
Note
Use equipment and network cables that support 100Base-TX.
Home network 2 connection method
1 Connect the receiver to a network switching device (sold separately) using the network cable
(supplied) with the ferrite core (supplied).
2 Connect the Ethernet jack of each VAIO computer to jacks on the network switch using additional
network cables (sold separately).
3 Connect the network switching device to the DSL or cable modem using a network cable (sold
separately).
Note
This connection method may vary dep en ding on factors specific to your network.
continued
25
GB
Page 26
Home network 3: DSL or cable modem without a built-in router
Internet
VAIO computer 1
LINELAN
without a built-in router
1)
DSL or cable modem
(sold separately)
Router device with a built-in network
MONITOR
USB
HEADPHONES
MIC
LINE IN
MONITOR
VHF/UHF
AUDIO
AUDIO
S VIDEO/VIDEO S VIDEO/VIDEO
–
–
–
–
VIDEO OUTPUT
VIDEO1 INPUT
LINEPHONE
To Ethernet port
Network cable
(sold separately)
LANWAN
2)
switch
(sold separately)
To Ethernet port
Network cable with
ferrite core
3)
(supplied)
ANTENNA
U
75
FM
AM
STR-LV700R
L
R
OUT
IN
HDD/MD
To Ethern et port
Network cable
VAIO computer 2
1)
Connections may vary depen ding on your network. Contact your Interne t se rv ic e prov ide r for co nne c tion
information.
2)
Use a router with a built-in network switc h that supports 100Base-TX.
3)
Attach the supplied ferrite core to the supplied network cable before connecting the cable to the receiver.
(sold separately)
Note
Use equipment and cables that suppor t 100Base-TX.
Home network 3 connection method
1 Connect the receiver to a router device with a network switch (sold separately) using the network
cable (supplied) with the ferrite core (supplied).
2 Connect the Ethernet jack of each VAIO computer to jacks on the router device using additional
network cables (sold separately).
3 Connect the WAN jack of the router device to the LAN jack on the DSL or cable modem using a
network cable (sold separately).
Note
This connection method may vary depending on factors specific to your network.
26
GB
Page 27
Home network 4: The network cable is connected to a LAN, shared in
a residential complex
LAN
VAIO computer 1
Router device with a built-in network
1)
(sold separately)
switch
Praparations
MONITOR
VHF/UHF
–
To Ethernet port
Network cable
(sold separately)
USB
HEADPHONES
MIC
LINE IN
MONITOR
AUDIO
AUDIO
S VIDEO/VIDEO S VIDEO/VIDEO
–
–
–
VIDEO OUTPUT
VIDEO1 INPUT
LINEPHONE
LANWAN
To Ethern et port
Network cable with
ferrite core
2)
(supplied)
ANTENNA
U
75
FM
AM
STR-LV700R
L
R
OUT
IN
HDD/MD
To Ethernet port
Network cable
VAIO computer 2
1)
Use a router with a built-in network switc h that supports 100Base-TX.
2)
Attach the supplied ferr ite c or e to th e supplied network cable before c onne c ting the cable to the receiver.
(sold separately)
Notes
• Connections may vary depending on your network. Contact your Inter ne t se rv ic e provider for connection
information.
• Use equipment and cables that support 100Base-TX.
Home network 4 connection method
1 Connect the receiver to a router device with a built-in network switch (sold separately) using the
network cable (supplied) with the ferrite core (supplied).
2 Connect the Ethernet jack of each VAIO computer to jacks on the router device using additional
network cables (sold separately).
3 Connect the WAN jack on the router device to the LAN jack (residential complex).
Note
This connection method may vary dep en ding on factors specific to your network.
continued
27
GB
Page 28
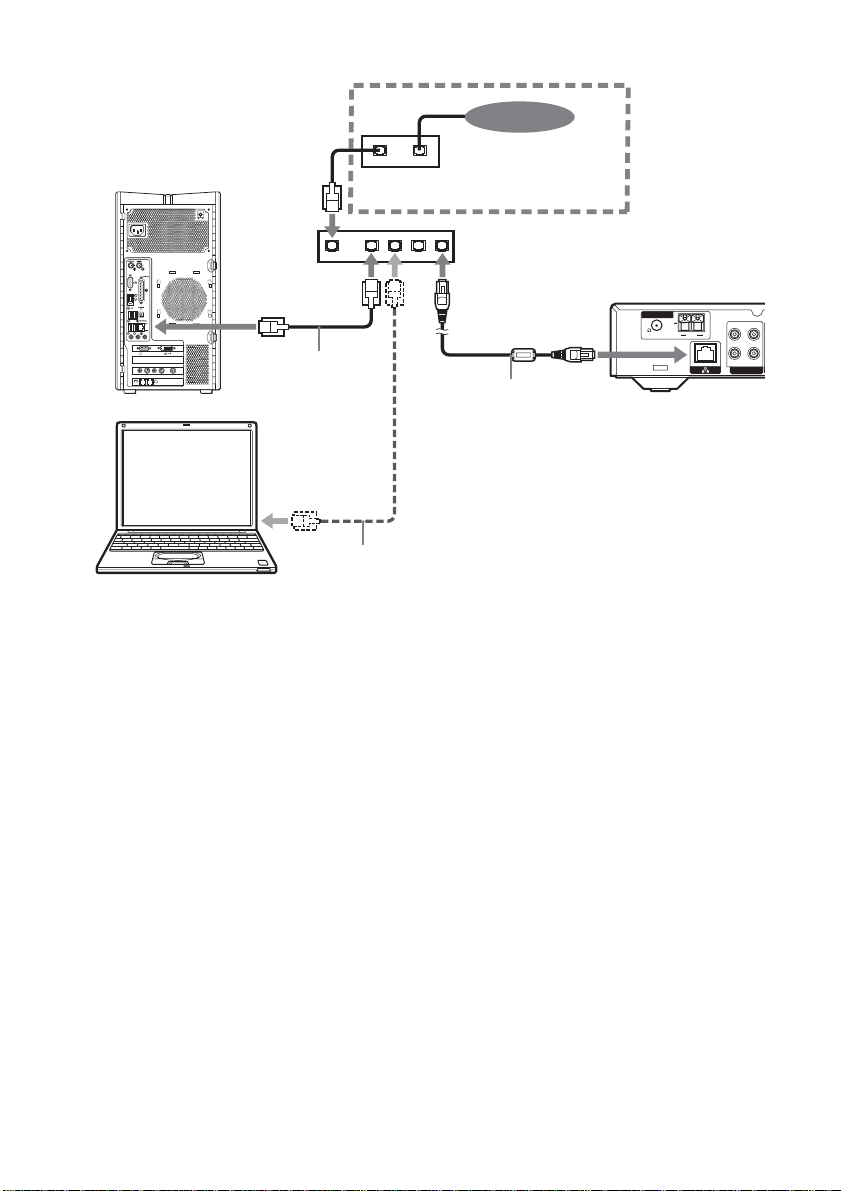
Home network 5: The VAIO computer is connected to the Internet with
a built-in modem
Attach the supplied ferrite core to the
supplied network cable before connecting
Connected to the
Internet using a
built-in modem.
MONITOR
USB
HEADPHONES
MIC
LINE IN
MONITOR
AUDIO
AUDIO
S VIDEO/VIDEO S VIDEO/VIDEO
–
–
–
–
VIDEO OUTPUT
VIDEO1 INPUT
LINEPHONE
VAIO computer
the cable to the receiver.
To Ethern et port
VHF/UHF
Cross-wired
cable
Connection
adapter
Network cable
with ferrite core
(supplied)
To Ethern et port
ANTENNA
U
75
FM
AM
STR-LV700R
L
R
OUT
IN
HDD/MD
Home network 5 connection method
1 Connec t the cross-wired cable (supplied) to the Ethernet jack of your VAIO computer.
2 Connec t the other end of the cross-wired cable to the connection adapter (supplied).
3 Connec t the network cable (supplied) with the ferrite core (supplied) to the connection adapter.
4 Connec t the other end of the network cable to the Ethernet jack of the receiver.
Notes
• This connection method may vary depending on factors specific to your network.
• In home networks 5 and 6, the VAIO computer must have a fixed IP address for the LAN connection.
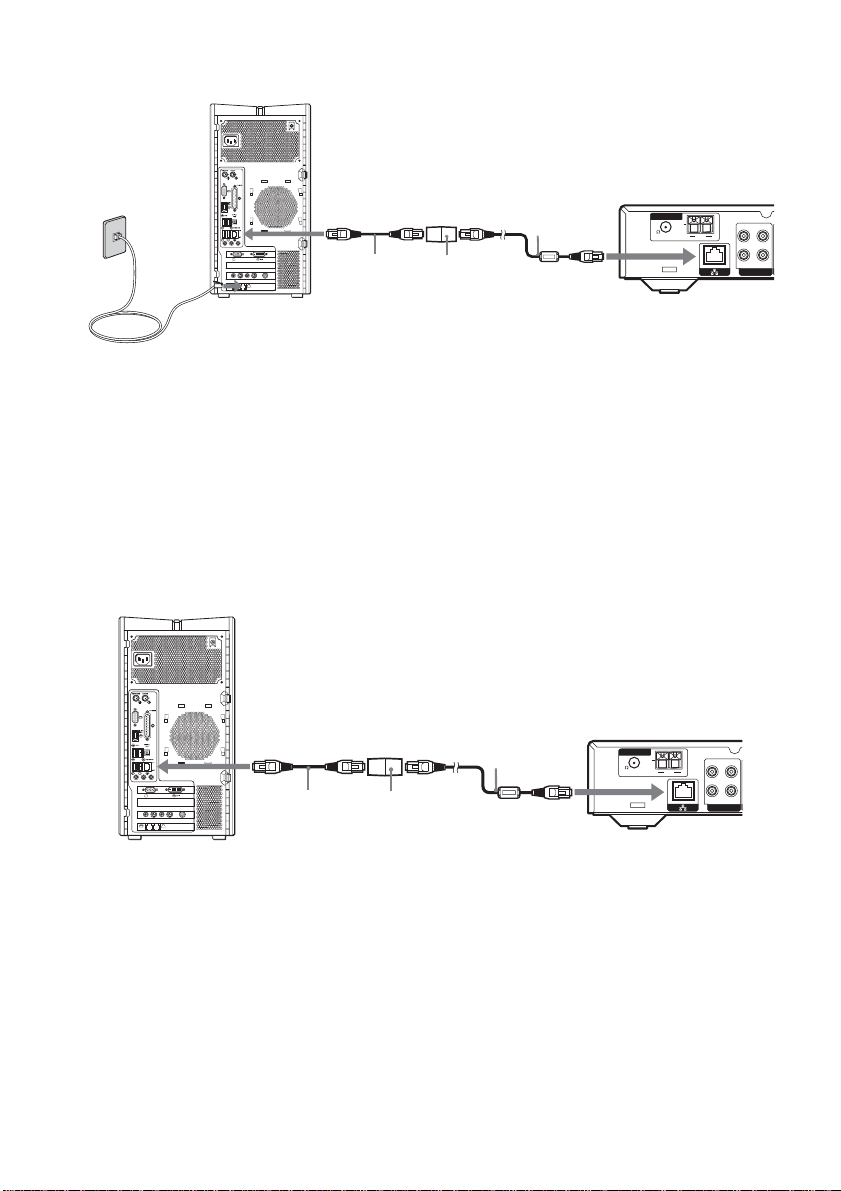
Home network 6: The VAIO computer is not connected to the Internet
28
Attach the supplied ferrite core to the
supplied network cable before connecting
the cable to the receiver
MONITOR
USB
HEADPHONES
MIC
LINE IN
MONITOR
VHF/UHF
AUDIO
AUDIO
S VIDEO/VIDEO S VIDEO/VIDEO
–
–
–
–
VIDEO OUTPUT
VIDEO1 INPUT
LINEPHONE
VAIO computer
To Ethernet port
Cross-wired
cable
Connection
adapter
Network cable
with ferrite core
(supplied)
To Ethern et port
ANTENNA
U
75
FM
AM
STR-LV700R
Home network 6 connection method
1 Connec t the cross-wired cable (supplied) to the Ethernet jack of your VAIO computer.
2 Connec t the other end of the cross-wired cable to the connection adapter (supplied).
3 Connec t the network cable (supplied) with the ferrite core (supplied) to the connection adapter.
4 Connec t the other end of the network cable to the Ethernet jack of the receiver.
Notes
• This connection method may vary depending on factors specific to your network.
• In home networks 5 and 6, the VAIO computer must have a fixed IP address for the LAN connection.
GB
L
R
OUT
IN
HDD/MD
Page 29
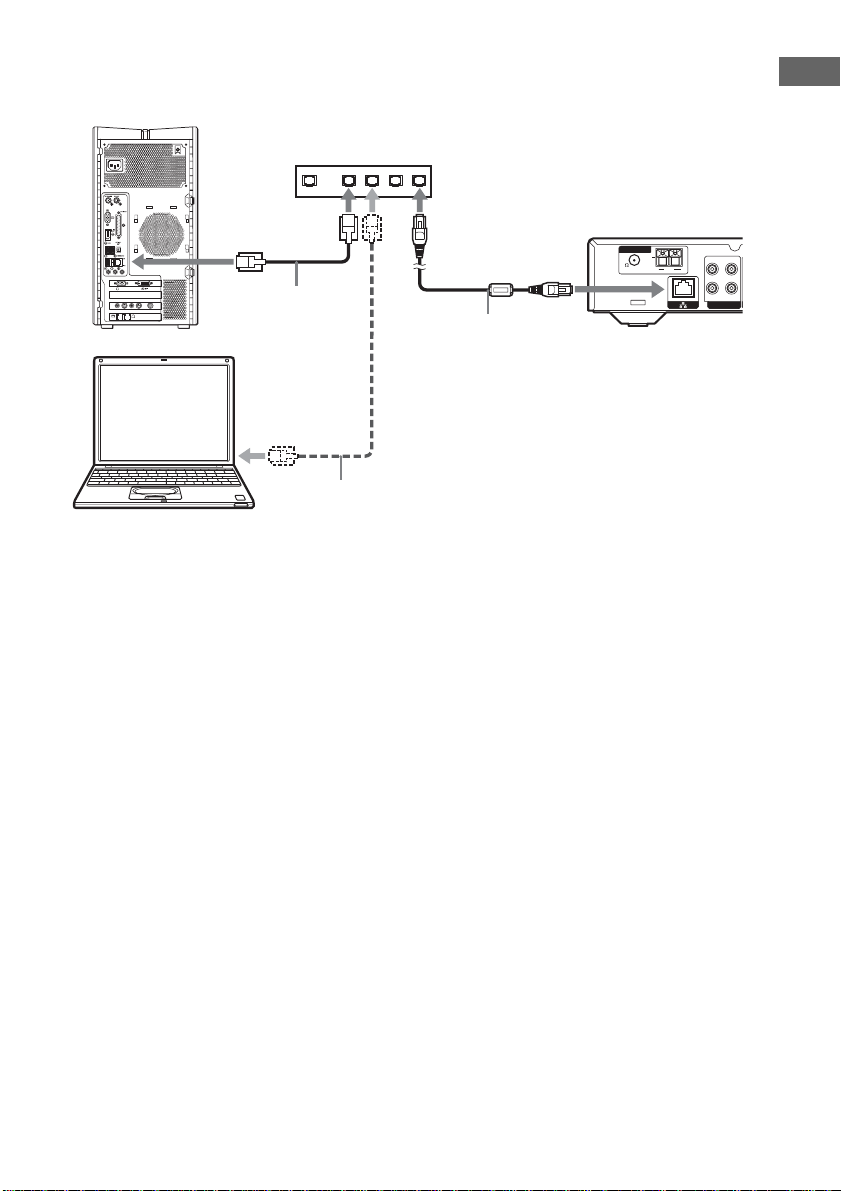
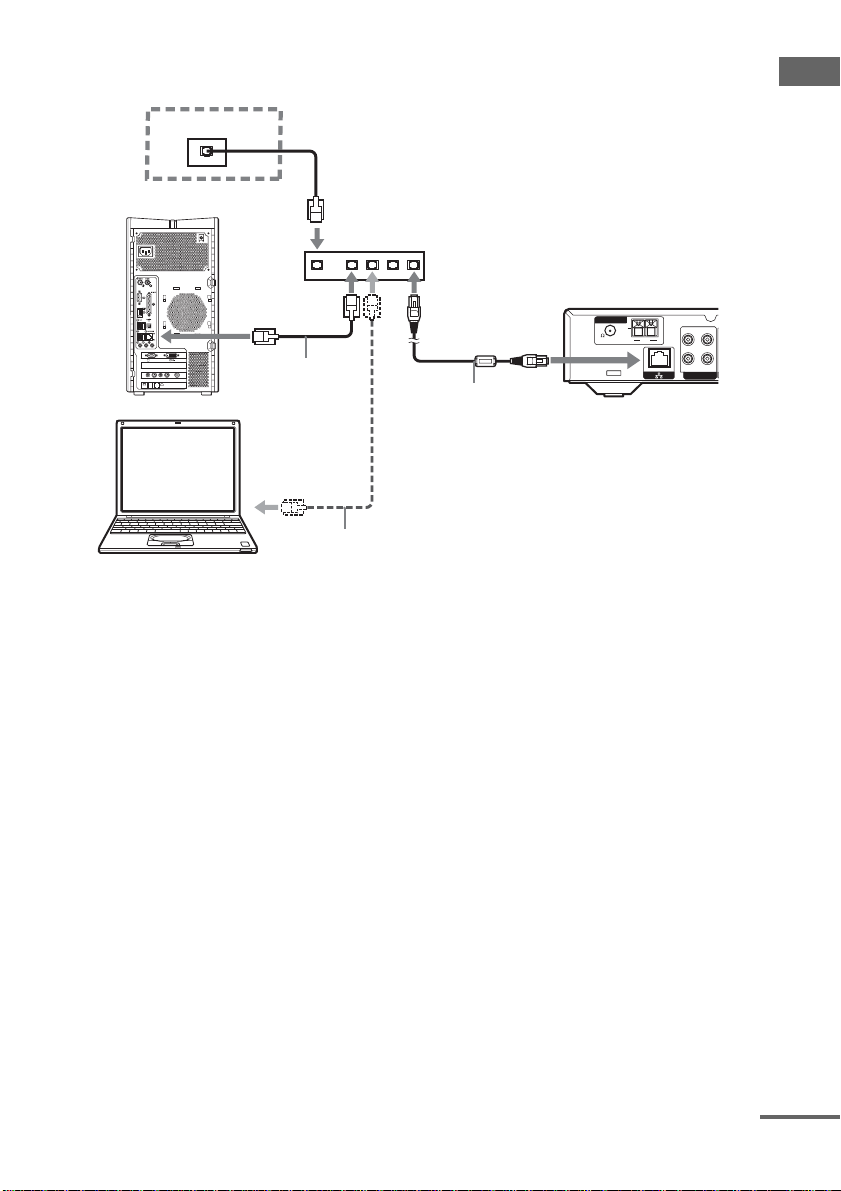
Home network 7: Connecting multiple VAIO computers (under
conditions similar to those of home networks 5 and 6)
VAIO computer 1
Network switch
with a built-in network switch
MONITOR
VHF/UHF
To Ethernet port
Network cable
(sold separately)
USB
HEADPHONES
MIC
LINE IN
MONITOR
AUDIO
AUDIO
S VIDEO/VIDEO S VIDEO/VIDEO
–
–
–
–
VIDEO OUTPUT
VIDEO1 INPUT
LINEPHONE
LANWAN
separately)
To Ethernet port
Network cable with
ferrite core
1)
3)
(supplied)
or router device
2)
75
ANTENNA
(sold
FM
STR-LV700R
U
L
AM
R
OUT
IN
HDD/MD
To Ethernet port
Network cable
(sold separately)
VAIO computer 2
1)
If connecting to a multiple-port network switching device (sold separately), the VAIO computer requires a fixed
IP address.
2)
Use a router device or a multiple-port network switching device that supports 100Base-TX. A WAN connection
is not necessary.
3)
Attach the supplied ferr ite c or e to th e supplied network cable before c onne c ting the cable to the receiver.
Note
Connections may vary depending on your network. Contact your Internet service provider for connection
information.
Home network 7 connection method
1 Connect the receiver to a router device with a built-in network switch or a multiple-port network
switching device using the network cable (supplied) with the ferrite core (supplied).
2 Connect the Ethernet jack of each VAIO computer to jacks on the router device using additional
network cables (sold separately).
3 When using a router device with a built-in network switch, a WAN connection is not necessary.
Notes
• This connection method may vary de pe nding on factors specific to your network.
• If you are using a multiple-port network switching device, your VAIO computer must have a fixed IP address.
Praparations
29
GB
Page 30

Step 4: VAIO computer setup
To be able to use Netw ork Media, you must fir st st art VAIO Media Music Server, Photo Serv er , and
Giga Pocket Se rv er. Con fig ure Mus ic Serv er and P hot o S erve r a ccor di ng t o t he i ns tru cti ons in sect i on
4a, “VAIO Media preparations (starting services) ” (page 30), and Giga Pocket Server acco rding the
instructions in section 4b, “Starting Giga Pocket Server” (page 30).
Note
If you reset your VAIO computer (recovery), you must make these settings again.
Step 4a: VAIO Media preparations (starting services)
To be able to use Network Media with th e V A IO computer conne ct ed to the receiver, y ou m ust first
make VAIO Media settings.
1 On the Start menu, point to All Programs, VAIO Media, Server Administration,
and then click Console.
The VAIO Media Console dialog box appears.
2 Under Access Control Settings, select the Access this computer from other
computers on the network check box, and then select No device registration
needed in a secure network environment.
3 Under Start and Stop Servers, verify that all the server applications are enabled.
Note
If any server application is disabled, click Start All.
4 Close the VAIO Media Console dialog box.
Note
A message may appear at this point, but it disappears automatically.
30
Step 4b: Starting Giga Pocket Server
To be able to use Network Media with the television and video functions of the VAIO computer
connected to the r eceiver, you must first st ar t Giga Pocket Server. N ot e that the necessary o per ations
depend on the marketing date of your VAIO computer, so follow the instructions for your model.
1 On the Start menu, point to All Programs, Giga Pocket, All Software, and then
click Giga Pocket Server.
The Giga Pocket Server password setting dialog box appea rs .
2 Click Set password.
Follow the instructions on the screen to proceed.
Note
If the Giga Pocket Server password is a lready se t, the Giga P ocket window appears instead of the Giga Pocket
Server password setting dialog box. Clic king Hide concludes this procedure.
3 When the Giga Pocket Server window appears, click Hide.
The Giga Pocket Server password is now set, an d yo u can use Network Media with your VAIO
computer.
Note
Add Giga Pocket Server to your Windows Start menu, for easier access.
GB
Page 31

Step 4c: Assigning a fixed IP address to the VAIO computer
In the environm ents, it is necessary to assig n a fi xed IP address to the VAIO compute r with the
following procedure.
• Home networks 5 and 6 (page 28).
• Home networ k 7 (page 29) without a rout er equipped with a hu b.
Note
Do not make these settings if you are using a route r or a route r equ ipped with a hub.
1 On the Start menu, click My Computer.
The My Computer window appears.
2 Under Other Places, click My Network Places.
Click here.
Praparations
The My Network Places window appears.
3 Under Networ k Tasks, click View network connections.
The Network Connections window appears.
Click here.
continued
31
GB
Page 32

4 Right-click Local Area Connection and click Properties.
Click here.
The Local Area Con n ection Properties dial og box appears.
5 On the General tab, select Internet Protocol (TCP/IP), and then click Properties.
Select this.
Click here.
32
The Internet Protocol (TCP/IP) Properties dialog box appears.
6 Select Use the following IP address, and then type the following addresses in IP
address and Subnet mask.
When connecti ng the re ceiver t o more than one VAIO com puter, enter a di fferent ad dress fo r each
VAIO computer.
IP address 169.254.XXX.XXX
(Type 169.254 as is and replace each XXX by any three-digit number from 001 to 254.
For example, type: 222.222.)
Subnet mask 255.255.0.0
GB
Page 33

1 Select this option.
2 Type the values above.
7 Click OK.
The fixed IP ad dres s of the VAI O comp ut er is se t. Cl os e th e Local Area Connection Properties
dialog box an d Network Connections window.
Praparations
33
GB
Page 34

Step 5: Preparations needed to use Network Media
To be able to use Netw ork Media, you must f irst st art your VAIO computer, turn on your tele vi sion,
and then select the video input connected to the receiver.
?/1
1)
N.MEDIA
1)
Short for Network Media.
1 If you are using a hub or router equipped with a hub, turn i t on.
2 Turn on the VAIO computer.
3 Once the VAIO computer is running, start Giga Pocket Server.
Tip
We recommend that you add Giga Pocket Server to the Windows Start menu.
4 Turn on your television and select the input connected to the receiver.
Tip
If you are using a Sony television, you can turn on the television and select the input with the remote.
5 Press the ?/1 button on the remote to turn on the receiver.
6 Press the N.MEDIA button to set the receiver input to N.MEDIA.
The first time you use the re ceiver or after resetti ng it, the Language Select screen appears. If this
is not the case, sk ip steps 7 to 10.
7 Use / / / to select the desired language, and then press the SELECT button.
Note
By default, the receiver la ngua ge is English.
8 Use / / / to select OK, and then press the SELECT button.
A confirmation message in the selected language appears, prompting you to restart the receiv er to
apply the languag e change.
9 Press the SELECT button to close the message.
10Press the ?/1 button to restart the receiver.
The Network Me di a f unction screen app ears on the television. (The appearanc e of the screen
depends on the Net w or k Media default sett in gs (page 52).)
If you follow the pr ocedure described in “U seful setting 3: Setting the VAIO computer to start
automatically” (page 53), if the VAIO computer is on standby or hibernating, the VAIO computer
starts automatically when you use Network Media.
Note
For about 20 seconds after you conn ect the power cord, even if you switch the receive r input to N.MEDIA,
nothing appears on the televis ion sc r e en.
Tip
You can also select N.MEDIA by pressing INPUT SELECT OR on the receiver.
34
GB
Page 35

Step 6: Setting the receiver IP address acquisition method
Depending on the environment in which you are using Network Media, use the following procedure to
select the method of acquiring an IP a ddress for the recei ver.
///
SELECT
1 Press the blue MAIN MENU button.
The main menu appears.
2 Select Se tt ings, and press the SELECT button.
The Settings screen appears.
3 Use / to select System Settings, and then press the SELECT button.
The System Settings screen appears.
4 Use / to select IP Address, and then press the SELECT button.
The IP Address screen appears.
Settings
IP Address
Obtain an IP address automatically (using router)
Obtain an IP address automatically (not using router)
Specify an IP address
Current Settings:
IP Address:
000
000
000
SELECT
Subnet Mask:
:Select
RETURN
OK
:Return
000
000..
000..
000..
000
CANCEL
5 Use / to select the item appropriate to the environment in which you are using
Network Media, and then press the SELECT button.
• When using Network Media with a router
c Select Obtain an IP address automatically (using router).
• When using this function without a router
c Select Obtain an IP address automatically (not using router).
6 Use / / / to select OK, and then press the SELECT button.
Tip
To set the receiver IP address, see page77.
Praparations
35
GB
Page 36

Step 7: Restarting the receiver
When the preparations necessary to use Network Media are complete, restart the receiver.
?/1
TV ?/1
1 Press the ?/1 button to turn off the receiver.
The display panel goes off and the screen goes blank.
2 Press the TV ?/1 button to turn off the television.
Note
You cannot use the remote supplied with the receiver to control a television not made by Sony.
3 On the Start menu, click Turn Off Computer.
4 Click Turn Off to turn off the VAIO computer.
36
Choose the function that you want to use. For each function, you must have performed the necessary
operations described in “Prepa rations needed to use Network Media” (page 34).
• Watching video ( page 57).
• Listening to music (page63).
• Viewing photographs (still images ) s aved on the VAIO comput er (page 66).
• Watching a television broadcast received by the VAIO computer (page 70).
• Recording a television broadcast rec ei v e d by the VAIO computer (page 73).
• Useful Network Media settings (pages 49–56).
• Changing Netw or k Media settings (page 77).
If you have a problem...
See “Troubleshoo ting” (page 88).
GB
Page 37

Using the receiver
— Basic operations
This section describes basic operations possible with the receiver.
Selecting a component
1 Press INPUT SELECTOR repeatedly
to select the input.
The selected input appears on the display.
To select the Display
DVD player DVD
VCR VIDEO
Hard disk or MD deck HDD/MD
Satellite tuner TV/SAT
Network Media N.MEDIA
Built-in tun er (FM) Tuner (FM)
Built-in tun e r (AM) Tuner (AM)
Receiving radio broadcasts
Before receiving radio broadcasts, make sure
that you conne cte d the FM and A M ant enn a e to
the receiver (page 15).
Use the remote for the tuner operation.
Automatic tuning
If you do not know the fre quency of the station
that you want, yo u can let the receiver scan all
the available stations in your area.
1 Press the FM or AM button repeatedly
Note
For details about how to use Network Media with
the receiver, see chapter 3.
2 Turn on the selected component and
start playback.
3 Rotate VOLUME to adjust the volume.
To mute the sound
Press MUTING to mute the sound. MUTING
appears on the display when the sound is mu ted.
To cancel muting, press it again, raise the
volume or turn off the receiver.
Using headphones
Connect your headphone to the PHONES jack
of the receiver. When you connect headphones
the output to speakers is automatically
interrupted.
to select the FM or AM band.
You can also use INPUT SELECTOR on
the system. The last station received is
tuned in.
2 Press the TUNING MODE button
repeatedly to select AUTO T..
3 Press the TUNING + or TUNING –
button.
Press the TUNING + button to scan from
low to high; press the TUNING – butto n to
scan from high to low.
The receiver stops scanning whenever a
station is received.
When the receiver reaches either end
of the band
Scanning is repeated in the same dire ct ion.
4 To continue scanning, press the
TUNING + or TUNING – button again.
Using the receiver
continued
37
GB
Page 38

Manual tuning
You can tune in stations in 50 kHz steps for the
FM band and 9 kHz steps for the AM band.
1 Press the FM or AM button repeatedly
to select the FM or AM band.
You can also use INPUT SELECTOR on
the system. The last station rec eiv e d is
tuned in.
2 Press the TUNING MODE button
repeatedly to select MANUAL T..
3 Press the TUNING + or TUNING –
button repeatedly t o tune in the sta tion
that you want.
Press the TUNING + button to change the
frequency from low to high.
Press the TUNING – button to change the
frequency from hig h to low.
Tip
If STEREO flashes on the d is p lay and the FM stereo
reception is poor, press the FM MODE button to
improve the sound. You will not be able to en joy the
stereo effect, but the sound will be le ss distorted.
Note
If STEREO does not appear at all when an FM
broadcast is received normally, press the FM MODE
button to display the STEREO indication.
Preset tuning
After you have tuned in stations using automatic
tuning or manual tuning, you can preset them to
the receiver. You can then tune in any of the
preset stations directly. Up to 30 FM or AM
stations ca n be pres et. The r eceiver also sca ns all
the stations t hat you have preset.
Before tuning in preset stations, be sure to preset
them by performing “Presetting radio stations”.
Presetting radio stations
1 Press the FM or AM button repeatedly
to select the FM or AM band.
You can also use INPUT SELECTOR on
the system. The last station rec eiv e d is
tuned in.
2 Tune in the station that you want to
preset using automatic tuning or
manual tuning (page 37).
3 Press the MEMORY button.
MEMORY ap pears on the display f or a few
seconds.
Perform steps 4 t o 5 before MEMORY
disappears.
4 Press the SHIFT button to select the
memory page and press the PRESET
CH/ALBUM + or PRESET CH/
ALBUM – button to select a preset
number.
If MEMORY disappears before you press
the preset numbe r, return to step 3.
5 Press the MEMORY button again to
store the station.
If MEMORY disappears before you can
store the station, return to step 3.
6 Repeat steps 2 to 5 to preset another
station.
Tuning in preset stations
1 Press the FM or AM button repeatedly
to select the FM or AM band.
You can also use INPUT SELECTOR on
the system. The las t s ta ti on received is
tuned in.
2 Press the PRESET CH/ALBUM + or
PRESET CH/ALBUM – button
repeatedly to select the preset station
that you want.
Each time that you pr ess the button, the
receiver tunes in one preset sta tion at a time,
in the corresponding order and direction as
follows:
tA1yA2y...yA0yB1yB2y...yB0T
tC0y...yC2yC1T
Tips
• In step 2, press the SHIFT button to select a memory
page (A, B, or C).
• You can also use the P RESET TUNING +/– buttons
on the receiver to tune in preset stations.
38
GB
Page 39

Using the Radio Data System (RDS)
This receiver also allows you to use the RDS
(Radio Data System), which enables radio
stations to send additional information along
with the r egul ar s ignal . You can also disp lay t he
RDS information.
Receiving RDS broadca sts
Simply select a station on the FM band
using automatic tuning, manual tuning
(page 37), or preset tuning (page 38).
When you tune in a station that provides RDS
services, t he RDS indicator appears and the
programme station name appears on the display.
Note
RDS may not work properly if the station you tuned in
is not transmitting the RD S signal properly or if th e
signal strength is weak.
Displaying RDS information
While receiving an RDS station, press the
black DISPLAY button.
Each time that you press the button, the RDS
information on the displa y changes cyclical ly as
follows:
Programme Station name t Frequency t
Programme Type indication
indication
2)
t Current Time indication (24hour time) t Sound field currently applied t
Volume
1)
Type of programme being broadcast (see pa ge 39).
2)
Text messages sent by the RD S sta tion.
Notes
• If there is an emergency announcem ent by
governmental authorities, ALARM flashes on the
display.
• When the message consis ts of nine ch ara c te rs or
more, the message scrolls across the display.
• If a station does not provide a particular RDS service,
NO XXXX (such as NO TEXT) appears on the
display.
1)
t Radio Text
Description of programme types
Programme
type indication
NEWS News programmes
AFFAIRS Topical programmes that expand
INFO Programmes offering information
SPORT Sports pr ogra mmes
EDUCATE Educational programmes, such as
DRAMA Radio plays and serials
CULTURE Programmes a bout nat ional or
SCIENCE Programmes about natural s cience
VARIED Other types of programmes such
POP M Popular music programmes
ROCK M Rock music programmes
EASY M Easy lis te ning
LIGHT M Instrumental, vocal, and chair
CLASSICS Major orchestra performances,
OTHER M Music that does not fit into any
WEATHER Weather information
FINANCE Stock market reports and trading,
CHILDREN Children programmes
SOCIAL Programmes about people and the
RELIGION Programmes of religious content
PHONE IN Programmes where members of
TRAVEL Programmes about travel. Not for
LEISURE Programmes on recreational
Description
on current events
on a wide variety of subjects,
including consumer affair s an d
medical advice
“how-to” and advice programmes
regional culture, such as language
and social concerns
and technology
as celebrity interviews, game
shows, and comedy
music
chamber mu s ic, opera, etc.
category above, such as rhythm
and blues and reggae
etc.
things that affect them
the public express their views by
phone or in public forums
announcements that are located by
TP/TA.
activities such as gardening,
fishing, cooking, etc.
continued
39
Using the receiver
GB
Page 40

Programme
type indication
JAZZ Jazz programmes
COUNTRY Country music programmes
NATION M Programmes featuring local
OLDIES Programmes featu ring oldies
FOLK M Folk music programmes
DOCUMENT Investigative features
NONE Any programmes not defined
Description
popular music
above
40
GB
Page 41

About the indications on the display
12 34 5
907
8 6
Using the receiver
SLEEP
LFE
LCR
SLSW
SSB
DIGITAL D.RANGE EQ
SR
;
DTS
PL II
;
OPT COAX
A SLEEP: Appears when sleep timer is
activated.
B Playback channel indicators: The letters
(L, C, R, etc. ) ind ic ate th e pl ay back c han nels .
The boxes around the letters vary to show how
the receiver downmixes th e source sound
(based on the speakers settings).
L (Front Left), R (Front Right), C (Centre
(monaural)), SL (Surround Left), SR
(Surround Right), S (Surround (monaural or
the surround components obta ine d by Pro
Logic processing)), SW (subwoofer)
Example:
Recording format (Front /Surround): 3/2
Output channel: Surround speakers absent
Sound Field: A.F.D. AUTO
LCR
SW
SSB
SL SR
C ; DIGITAL: Appears when the receiver is
decoding signals recorded in the Dolby Digital
format.
D ; PL II: PL appears when a 2-channel
signal is applied with DOLBY PL or
C.ST .EX A–C. PL II appears when Dolby Pro
Logic II processing (PLII MOV or PLII
MUS) is applied. However, this indicator does
appear if the ce ntr e and surr oun d sp eak ers are
set to NO, and A.F.D. AUTO, DOLBY PL,
PLII MOV, or PLII MUS are selected.
E D.RANGE: Appears when dynamic range
compression is activated (page 45).
F Tuner indicators: Appears when using the
receiver to tune in radio stations, et c. See
pages 37–39 for tuner operation s .
RDS
MEMORY
STEREO MONO
G COAX: Appears when the sou rce signal is a
digital signal input through the COAX
terminal.
H OPT: Appears when the source signal is a
digital signal input through the OPT terminal.
I DTS: Appears when DTS sign al s are inpu t.
J : Appears whe n th e disc being played
LFE
back contains the LFE (Low Frequency
Effect) channel and the LFE channel signal is
actually being reproduced.
41
GB
Page 42

— Enjoying surround sound
This section des cr ibes how to obtain the best possible sound quality from your system.
Using only the front speakers
In this mode, the receiver outputs the sound
from the front left and right speakers only. There
is no sound from t h e subwoofer.
Listening to 2-cha nn el st e r eo
sources (2CH STEREO)
Standard 2-channel stereo sources completely
bypass the sound field processing and multichannel surround formats are dow nmixed to 2
channels.
2CH
Press the 2CH butt on on the remote.
2CH ST . appears on the display and the receiver
switches to the 2CH STEREO mode.
Notes
• You can also use the SOUND FIELD button to
perform this operation.
• No sound is output from the subwoofer in the 2CH
STEREO mode. To listen to the 2-channel ste r eo
sources using the front left and right speakers, and a
subwoofer, set to A.F.D. AUTO.
Enjoying higher fidelity sound
— AUTO FORMAT DIRECT
The Auto Format Direct (A.F.D.) mode allows
you to select the decoding mode that you wa nt
for your audio so und.
A.F.D. mode
(display)
A.F.D. AUTO
(A.F.D. AUTO)
PRO LOGIC
(DOLBY PL)
PRO LOGIC II MOVIE
(PLII MOV)
PRO LOGIC II MUSIC
(PLII MUS)
Decoding the input audio
signal automatically
In this mode, the receiver automatically detects
the type of audio si gnal being input (Dol by
Digital, DTS, standard 2-channel stereo, etc.)
and performs the p ro per decoding if neces sa ry.
This mode presents the sound as it was recorded/
encoded, witho u t adding any surround effects.
However, if ther e are no low freque ncy signals
(Dolby Digital LFE, etc.) it will generate a low
frequency sign al for output to the subw oofer.
Decoding mode
As encoded
Dolby Pro Logic
Dolby Pro Logic II
42
A.F.D.
GB
Page 43

Press the A.F.D. button repeatedly to
select A.F.D. AUTO.
The receiver automatically detects the type of
audio signal inpu t an d performs the prope r
decoding if necessary.
Tip
You can also use t he SOUND FIELD button t o
perform this operation.
Selecting a sound field
You can take advantage of surround so und
simply by select in g one of the receiver’ s pr eprogrammed so und fields. They bring t he
exciting and pow erful sound of cinemas and
concert halls into your home.
Using the receiver
Enjoying stereo sound in
multi-channel (2-channe l
decoding mode)
This mode lets you specify the type of decoding
for 2-channel au di o sources. This receiver can
reproduce 2-channel sound on 5 channels
through Dolby Pro Logic II or 4 channels
through Dolby Pro Logic.
Press A.F.D. repeatedly to select the 2-
channel decoding mode.
Tip
You can also use t he SOUND FIELD button t o
perform this operation.
x PRO LOGIC
Performs Dolby Pro Logic decoding. The source
recorded on 2 channels is decoded into 4.1 ch a nne ls.
x PRO LOGIC II MOVIE
Performs Dolby Pro Logic II Movie mode decoding.
This setting is ideal for movies encoded in Dolby
Surround. In addition, this mode can reproduce sound
in 5.1-channel when watching video of dubbed or old
movies.
x PRO LOGIC II MUSIC
Performs the Dolby Pro Logic II Music mode
decoding. This setting is ideal for norm a l ste reo
sources such as CDs.
Note
Dolby Pro Logic and Dol by Pro Logic II decoding do
not function for DTS format signals.
If you connect a subwoofer
When the audio signal is 2-channel ster eo or if
the source signal doe s not include on LFE
signal, the receiver generates a low frequ ency
signal for output to the subwoofer.
Selecting a sound field for
movies
Press the MOVIE button repeatedly to
select the sound field you that want.
SOUND FIELD
A.F.D.
MOVIE
MUSIC
2CH
The selected sound field appears in the display.
Sound field Display
CINEMA STUDIO EX A DCS C.ST.EX A
CINEMA STUDIO EX B DCS C.ST.EX B
CINEMA STUDIO EX C DCS C.ST.EX C
Tip
You can also us e the S OUND FIELD button to
select a sound fie ld.
About DCS (Digital Cinema
Sound)
Sound fields with DCS marks use DCS
technology.
DCS is the name of the surround technology for
home theatres developed by Sony. DCS uses the
DSP (Digital Signal Processor) technology to
reproduce the sound characteristics of an actual
cinema studio.
When played at home, DCS creates a powerful
theatrical effect that mimics th e ar t istic
combination of sound and action as envisioned
by the movie direct or.
continued
43
GB
Page 44

x C.ST.EX A (CINEMA STUDIO EX A) DCS
Reproduces the sound characteristics of the Sony
Pictures Entertainment “Cary Grant Theatre” cinema
production studio. This is a standard mode, great for
watching most types of movies.
x C.ST.EX B (CINEMA STUDIO EX B) DCS
Reproduces the sound characteristics of the Sony
Pictures Entertainment “Kim Novak Theatre” cinema
production studio. This mode is ideal for watching
science-fiction or action movies with a lot of sound
effects.
x C.ST.EX C (CINEMA STUDIO EX C) DCS
Reproduces the sound characteristics of the Sony
Pictures Entertainment scoring stage. This mode is
ideal for watching musicals or movies where orchestra
music is featured in the soundtrack.
About CINEMA STUDIO EX modes
CINEMA STUDIO EX modes are suitable for
watching movies on DVDs for example, that
feature multi -cha nnel surrou nd eff ects. You ca n
reproduce the sou nd characteristics of Sony
Pictures Entertainment’s dubbing studio in your
home.
CINEMA STUDIO EX modes consist of the
following three elements.
• Virtual Multi Dimension
Creates five sets of virtual speaker s fr om a
single pair of surr ound speakers.
• Screen Depth Matching
Creates the sensation that th e sound is coming
from inside the screen like in cinemas.
• Cinema Studio Reverberation
Reproduces the type of reverberation found in
cinemas.
CINEMA STUDIO EX modes integrate these
three elements simultaneously.
Notes
• The effects provided by the vir tual speakers may
cause increased noise in the playback signal.
• When listening with sound fields that employ the
virtual speakers, you will not be able to he a r any
sound coming directly from the surround speakers.
Selecting a so und field for
music
Press the MUSIC button repeatedly to
select the sound fiel d that you want.
SOUND FIELD
A.F.D.
MOVIE
MUSIC
2CH
The selected sound field appears in the di splay.
Sound field Display
HALL HALL
JAZZ CLUB JAZZ
LIVE CONCERT CONCERT
Tip
You can also use the SOUND FIELD button to
select a sound field.
x HALL
Reproduces the acoustics of a clas sic a l co nc ert ha ll.
x JAZZ (JAZZ CLUB)
Reproduces the acoustics of a jazz cl ub.
x CONCERT (LIVE CONCERT)
Reproduces the acoustics of a 300-sea t am phi the a tr e .
To turn off the surround effect
Press the 2CH or A.F.D. button.
Tips
• The receiver memorises the last sound field selected
for each programme source (Sound Field Link).
Whenever you select a programme source, the sound
field that was last applied is automatically applied
again. For example, if you watch a DVD with HALL
as the sound field, change to a different progr amme
source, then return to the DVD, HALL will be
applied again.
• You can identify the encoding format of DVD
software, for example, by looking at the logo on th e
package.
– : Dolby Digital discs
– : Dolby Surround encoded
programs
– : DTS Digital Surround encoded
programmes
44
GB
Page 45

Customising sound fields
By adjusting the LEVEL menu and TONE
menu, you can customise the sound fields to suit
your particular listening situation.
Note on the displayed
parameters
Adjustable param eters vary depend ing on the
selected sound field. If a parameter appears
dimmed, it may not be available to the selected
sound field or it may be impossible to change it.
///
MAIN MENU
Adjusting the LEVEL menu
You can adjust t h e balance and level of each
speaker. These settings are applied to al l s ound
fields.
1 Start playing a source encoded with
multi-channel surround effects (DVD,
etc.).
2 Press the black MAIN MENU button
repeatedly until LEVEL appears on the
display.
3 Press / to select the parameter.
For details, see “LEVEL m enu
parameters”, below.
4 While monitoring the sound, press /
to adjust the selected parameter.
You can select any p ar am eter except
EFCT. The EFCT. parameter setting is
stored independently for each sound field.
5 Repeat steps 3 and 4 to adjust the other
parameters.
LEVEL menu parameters
L
R
x BAL. XXX (Front speaker balance)
Initial setting: BALANCE
Lets you adjust the balance between the front left and
right speakers. You can adjust in the range of L (+1 to
+8), BALANCE (0), R (+1 to +8) in 17 steps.
x CTR XXX dB
(Centre speaker level)
x SUR.L. XXX dB
(Surround speaker (L) level)
x SUR.R. XXX dB
(Surround speaker (R) level)
x S.W. XXX dB
(Subwoofer level)
Initial setting: 0 dB
You can adjust this parameter from –10 dB to +10 dB
in 1 dB steps.
D.RANGE
x COMP.
(Dynamic range compressor)
Lets you compress the dynamic range of the
soundtrack. This may be useful when you wa nt to
watch movies at low volumes.
• OFF
The dynamic range is not compres sed.
• STD
The dynamic range is compressed as intended by the
recording engineer.
• MAX
The dynamic range is compres sed dramatically.
Tip
The dynamic range compress or lets you c ompress the
dynamic range of the soundtrack based on the dynamic
range information included in the Dolby Digital signal.
STD is the initial setting, but it only ena cts light
compression.
Therefor e, we recommend using the MAX sett ing.
This greatly compresses the dy na mi c range and lets
you watch movies late at night at low volumes. Unlike
analogue limiters, th e levels are predetermined and
provide a very natural compre ssion.
Note
Dynamic range compression is possible with Dolby
Digital sources only.
x EFCT. XXX (Effect leve l)
Lets you adjust t h e s ize of the current sur round
effect. This paramet er is displayed only when
C.ST.EX A, C.ST.EX B, C.ST.EX C,
CONCERT, JAZZ, or HALL is selected.
• MIN
The surround effect decreases.
• STD
Normal surround effect is applied.
• MAX
The surround effect increases.
continued
45
Using the receiver
GB
Page 46

Adjusting th e T ONE menu
You can adjust th e t onal quality (bass, tr eble
level) of each sp eaker using the TONE menu.
1 Start playing a source encoded with
multi-channel surround effects (DVD,
etc.).
2 Press the black MAIN MENU button
repeatedly until TONE appears on the
display.
3 Press / to select the parameter.
For details, see “ TONE men u p ar ameter s” ,
below.
4 While monitoring the sound, press /
to adjust the selected parameter.
5 Repeat steps 3 and 4 to adjust the other
items.
TONE menu parameters
x BASS XXX dB
(Front speaker bass level)
x TREB. XXX dB
(Front speaker treble level)
Initial setting: 0 dB
You can adjust these parameters from –6 dB to +6 dB
in 1 dB steps.
46
Resetting the sound field
parameters to their default
settings
1 Press the ?/1 button on the receiver to
turn it off.
2 Pressing the SOUND FIELD button of
the receiver, press the
turn it on.
S.F CLR appears on the display and all the
sound field parameters are reset to their
default settings.
GB
?/1 button to
Page 47

— Miscellaneous operations and settings
This section describes other operations and settings possible with the receiver.
Changing the audio input
Selecting the digital audio
Using the receiver
mode of digital
components
— INPUT MODE
You can change the audio input mode of
components for w h i ch this receiver has di gital
audio input jacks.
1 Press INPUT SELECTOR to select
the input.
2 Press the INPUT MODE button
repeatedly to select the audio input
mode.
The selected audio input mode appears on
the display.
Audio input modes
• AUTO I N
Gives priority to the digital audio signal and
specifies analogue audio signal input to the
AUDIO IN (L/R) jacks when there is no
digital audio signal.
• OPT IN
Specifies the digital audio signal input to the
DIGITAL OPTICAL input jacks.
• COAX IN
Specifies the digital audio signal input to the
DIGITAL COAXIAL input jack.
• ANALOG
Specifies the a nalogue audio signal input to
the AUDIO IN (L/R) jacks.
input decoding priority
Lets you specify the input mode for t h e digital
signal input to the digital input jacks.
1 Press the black MAIN MENU button
repeatedly until SET UP appears on
the display.
2 Press / to select to select DEC.
XXXX.
3 Press / to select the setting that
you want.
Digital audio input decoding
priority
• AUTO
Automatically changes the input mode
between DTS, Dolb y D i gi ta l , or PCM.
• PCM
PCM signals are given priority (to prevent
interruptions when pl ayback starts). Even
when other signals are input, the sound is
output. When set to AUTO and the sound
from the digital audio jacks (for CD, et c. ) is
interrupted w hen p layba ck s tarts , set to PCM.
47
GB
Page 48

Recording audio Using the Sleep Timer
Make sure that all y our components are
correctly connected before recording audio.
Recording audio on MD, tape, or
hard disk
You can use the receiver to record audio on mini
disks (MD), tapes, or to your hard disk with the
appropriate software. For details about how to
perform this procedure, refer to the
documentatio n of your MD player, tape pl ayer,
or audio record er.
1 Press INPUT SELECTOR to select a
connected component (programme
source).
2 Prepare the selected component for
recording.
For example, in sert a VCD into your V C D
player.
3 Insert an MD or tape into the audio
recording device, and adjust the
recording level.
4 Start recording on the audio recording
device, and then start playback.
Notes
• Audio adjustment does not affect the signal output
from the HDD/MD OUT jack of the receiver.
• You cannot record sign al s using copy-protection
technology.
• You cannot output audio input to a digital input jack
to an analogue output jack. Connect to an analogue
input jack.
• You cannot record audio pl ayed ba c k with Network
Media.
You can set the receiver to tu rn off automatically
at a specific time by using the remote.
1 Press the black MAIN MENU button
repeatedly until SET UP appears on
the display.
2 Press / to select OFF.
3 Press / to select the time.
The display changes cyclically as foll ow s:
OFF (sleep mode disabled) t 2:00:00
(shutdown in two hours) t 1:30:00
(shutdown in one and a half hour) t
1:00:00 (shutdown in one hour) t 0:30:00
(shutdown in half an hour)
When using the Sle ep Ti m er, SLEEP
appears on the disp la y.
Tip
To check the remaining time before the receiver turns
off, perform steps 1 and 2 above. The remaining time
appears on the display.
48
GB
Page 49

Using Network Media
Optimising Network Media
With the following settings, you can configure the VAIO computer to start automatically when you
start Network Media (page 53) or select the VAIO computer to be connected to each function that you
use (page 49).
Useful setting 1 : Setting the VAIO co mputer normally co nnected
You can pr e-selec t the VA IO comput er to be conn ected t o each functi on of Ne twork Media (t elevisi on,
video, music, photographs). Doing so prevents you from having to make the selection each time you
use Network Media. In this manual, the VAIO computer connected automatically to each function is
referred to as the “VAIO compute r normally connected”. Even if there is only one VAIO c o mputer to
which the receiv er c an be connected, you can still select the VA IO computer normally connected.
The following description uses the video function as an example. First turn on the television and select
the input connected to the receiver. Start the VAIO computer that you want to set as the VAIO
computer norma lly connected.
?/1
N.MEDIA
Using Network Media
OPTIONS
///
SELECT
1 On the remote, press the ?/1 button to turn on the receiver.
continued
49
GB
Page 50

2 Press the N.MEDIA button to switch the receiver input to N.MEDIA.
The main menu appears.
Main Menu
TV Watch and record TV programs
VIDEO Watch video clips
MUSIC Listen to music
PHOTO View photos
:Scroll Up/Down
Tip
You can also select N.MEDIA by pressing INPUT SELECT OR on the receiver.
SELECT
Settings
:Select
3 Use / to select VIDEO-Watch video clips, and then press the SELECT button.
The Select a Server screen appears. It cont ai ns the list of VAIO co m put ers to which you can
connect.
Note
The Select a Server scree n nam e varie s a ccor ding to the function used (e.g. Select a Video Server, etc.). For
simplicity, we used Select a Server throughout the document.
Select a Video Server
Available home servers:
Home
Office
OPTIONS
RETURN
SELECT
:Select
:Return
:Options
Icon Meaning Status of VAIO computer
VAIO computer that was already
connected to the receiver with Network
Media.
VAIO computer to be connected for the
first time.
VAIO computer that was already
connected to the receiver with Network
Media.
Can be connected.
Can be connected.
Status unknown
1)
.
50
GB
1)
Even in the status of the VAIO computer is unknown, if you press the SELECT button, select Connect, and
then press the SELECT button again, you may be able to connect to the computer. Any of the following are
possible if the connection is still no t es ta bli she d after waiting a while.
• The VAIO computer is on standby or hibernati ng.
cStart the VAIO computer. If you follow the instructions described in “Useful setting 3: Setting the VAIO
computer to star t automatically” (page 53), when you conne ct to the VAIO computer it automatically
starts from standby or hiberna tion.
• The VAIO computer is off.
cStar t the VAIO computer.
• The network connection c ann ot be est a blished.
cMake sure that the network connectors are correctly connected. If you are using a hub or a router equipped
with a hub, make sure that it is on.
Page 51

Tips
• If the VAIO computer d o es not appear in the Select a Server screen, press the OPTIONS button and on the
OPTIONS menu, select Refresh, and then p res s the SELECT button. Note that it may take some time until
the VAIO com p u ter appears.
• To change the VAIO computer name, on the Start menu, click Contro l Panel, Performance a nd
Maintenance, and then System. On the Computer Name tab of the System Properties dialog box, click
Change, type a new name, and then click OK. Note that you need to restart the VAIO computer for the change
in name to become effec tive .
The computer name appears here.
4 Use / to select the VAIO computer that you want to set as the VAIO computer
normally connected, and then press the SELECT button.
A submenu appears.
5 Use / to select Connect Automatically, and then press the SELECT button.
The selected VAIO computer becomes the VAIO compute r no rm ally connected so that on
subsequent occasions a conne ction is automatically e stablished to this VAIO computer. The VAIO
computer norma lly connected appear s w i t h a next to it.
Notes
• The VAIO computer normally connected setting is lost if you unplug the power cord or update the receiver
software (page 78). In which case you must perform the proc e dur e abov e agai n.
• You must set the VAIO computer normally connected separately for each function (television, video, music,
photographs) that you use.
Tip
To cancel the VAIO computer norma ll y connected setting, in the Select a Server screen select the VAIO
computer that you want to cancel, and then press the SELECT button. Select Delete from list, and then in select
OK in the confirmation message that a ppears. To display t he VAIO comp uter for whi ch you have canc elled the
setting again, in the Select a Server screen, press the OPTIONS button, select Refresh, and then press the
SELECT button.
Using Network Media
continued
51
GB
Page 52

Useful setting 2: Selecting the first screen to appea r when you
switch to Network Media (startup menu)
When you swit ch the rec eiver i nput to Networ k Media, you ca n select the fir st scre en that appears. You
can choose to displ ay the main menu eac h t im e you switch or alwa ys display a particular function
screen (e.g. the video cabinet screen in the video func tion).
By default, the startup menu of the function used m o st recently appears. (If you did not previously set
the VAIO computer normally connected as described in Useful setting 1, then the Select a Server
screen appears.)
MAIN MENU
///
SELECT
1 Press the blue MAIN MENU button.
The main menu appears.
Main Menu
TV Watch and record TV programs
VIDEO Watch video clips
MUSIC Listen to music
PHOTO View photos
:Scroll Up/Down
SELECT
Settings
:Select
2 Use / to select Settings, and then press the SELECT button.
The Settings scre en appears.
Settings
System Settings
TV Settings
Video Settings
Photo Settings
52
RETURN
SELECT
:Return
:Select
3 Use / to select System Settings, and then press the SELECT button.
The System Setti ngs screen appears.
Settings
System Settings
Device Registration
Startup Menu
IP Address
Firmware Update
Factory Default
Device Information
Language
RETURN
SELECT
GB
:Return
:Select
Page 53

4 Use / to select Startup M enu and then press the SELECT button.
The Startup Menu screen appears.
Settings
Startup Menu
Startup Menu
Main Menu
TV
Video
Music
Photo
Last Function Used
OK CANCEL
RETURN
SELECT
:Return
:Select
5 Use / to select the item that you want to set as the startup menu, and press the
SELECT button.
• Main Menu
• TV (television programme screen)
• Video (Video Capsul e screen)
• Music (Music screen)
• Photo (Photo screen)
• Last Function Used
1)
Last Function Used is set by default.
1)
(menu screen of function used most recently)
6 Use / / / to select OK, and then press the SELECT button.
Note
If you disconnect the power cord, all the settings except the IP address are lost. When you reconnect the power
cord, you must make the settings again.
Useful setting 3: Setting the VAIO computer to start
automatically
Using Network Media
You can configure the VAIO c omput er so that it starts automatically when you e st ablish a connection
from the receiver with Network Media. (The VAIO computer does not start when you turn on the
receiver. It starts when you attempt to establ ish a connection with Netwo rk Media.) This is convenient
if the VAIO comput er is remote from the receiver.
To use this function, the VAIO computer must be on standby or hibernating. To verify VAIO computer
settings, see page 56.
Notes
• Depending on the settings a nd co nfigur a ti on of the conne c ted VAI O com put er, you ma y not be able to use this
function. You may also not be able to use this function with a notebook VAIO computer or a VAIO computer
connected through a wireless LAN.
• You can use this function to star t the VAIO computer automatically when it is on st andby or hibernating. When
the receiver is off, the VAIO computer goes on standby or hibernates as determined by the power options the VAIO
computer. Depending on these settings, it may take a considerable time before the VAIO computer goes on standby
or hibernates.
continued
53
GB
Page 54

1 On the Start menu, click Control Panel, Performance and Maintenance, and then
System.
The System Properties dialog box appears.
2 On the Hardware tab, click Device Manager.
The Device Manager window appears.
54
3 Double-click Network adapters.
The display change s as il l us tr ated below.
GB
Page 55

4 Double-click the network device connected to the receiver.
The properties dialog box of the device appears .
The network device connected to the receiver
has a Power Management tab. If there is more
than one network device, select the network
device with the Power Management tab.
5 On the Power Management tab, select the Allow this device to bring the
computer out of st andby check box, and then select the Only allow management
stations to bring the computer out of standby ch eck box.
1 Select this check box.
Using Network Media
2 Select this check box.
6 Click OK.
7 Close the Device Manager window and click OK in the System Properties dialog
box.
continued
55
GB
Page 56

Verifying or setting the time for the VAIO computer to go on standby
With the fo llowin g proced ure, y ou can v erify or set the t ime when the VA IO compu ter go es on standby .
If you set the VAIO computer to automatically go on standby when the receiver is turned off, you do
not need perform any oper ations on the VAIO compute r, which may be in a re mote locatio n. I f you do
not do so, it is then necessary to perfor m operations on the connected VAIO com puter, to put it on
standby or turn it off.
By default, the VAIO computer automatically goes on standby when it is idle for a few minutes.
1 On the Start menu, click Control Panel, Performance and Maintenance, and then
Power Options.
The Power Options Properties dialog box appears.
2 On the Power Schemes tab, select the times for System standby and/or System
hibernates.
Set these times to at least three minutes. If you set them to None, the computer does not go on
standby or hibern at e.
56
Tip
With the settings in the screen above, the VAIO computer automatical ly goe s on st andby 20 minutes after the
receiver is turned off.
3 Click OK.
GB
Page 57

— Watching video saved on the VAIO computer
This section describes how to watch video stored on your VAIO computer and make var io us videorelated settin gs.
1 Press the blue MAIN MENU button.
Watching video
You can watch video capsules recorde d an d
saved on the VAIO computer with Giga Pocket
or video capsule saved on the VAIO computer
with Network Media on a television connected
to the receiver. To be able to do so, you must
first perform “Step 5: Preparations needed to use
Network Media” (pa ge 3 4).
Note
You can only watch video capsules recorded and saved
on the VAIO computer with Giga Pocket or video
capsules saved on the VAIO computer with Network
Media. You cannot watch other movie files with
Network Media. Video cabinet and video capsule
names shown are those created with Giga Pocket. For
details about Giga Pocket, refer to the documentation
supplied with the VAIO computer or Giga Pocket
Help.
DISPLAY
REW/FWD
H
(Playback)
OPTIONS
FUNCTION
AUDIO
X
(Pause)
x
(Stop)
MAIN
MENU
/
RETURN
SELECT
The main menu appea rs .
Main Menu
TV Watch and record TV programs
VIDEO Watch video clips
MUSIC Listen to music
PHOTO View photos
:Scroll Up/Down
SELECT
Settings
:Select
While using a different Network Media
function, you ca n al so press the function
selection button to select the video function.
Tip
When no VAIO computer normally con n ect ed i s
set, the Select a Server screen appears. Use /
to select the VAIO co mpute r to be con nected ,
then press the SELECT button. On the submenu
select Connect, and then pre ss the SELECT
button. If there are no VAIO computers in the
Select a Server screen, press the OPTIONS
button, and on the OPTIONS menu select
Refresh, and then press the SELECT button.
Note that it may take some time until the VAIO
computers appear.
2 Use / to select VIDEO-Watch
video clips, and then press the
SELECT button.
A video cabinet list appears.
Video
: Video cabinet
: Cabinet
containing video
that you have
not watched.
All Libraries
All Video Capsules
My Cabinet
Movies
Music Videos
Exercise Videos
SELECT
:Select
OPTIONS
:Options
17 clip(s)
8 clip(s)
5 clip(s)
2 clip(s)
2 clip(s)
Using Network Media
Note
Some special characte rs ca nnot be displayed on
the screen.
continued
57
GB
Page 58

When the Select a Server screen
appears
If no VAIO computer normally connected is set,
the Select a Server screen appears. Use /
to select the VAIO computer to be connected,
press the SELECT button, an d t h en select
Connect.
To set the VAIO computer connecte d normally ,
see page 49.
To watch video saved on a
different VAIO computer
When there is more than one VAIO computer
connected to the receiver, you can select the
VAIO computer to which you want to connect.
To do so, press the OPTIONS button. On the
OPTIONS menu, select Select a Server, and
then press the SELECT button. In the Select a
Server screen, select the VAIO computer to be
connected, sele ct Connect, an d then press the
SELECT button.
3 Use / to select the video cabinet
containing the video (video capsules)
that you want to watch, and then press
the SELECT button.
The video cabinet op ens and the video
capsule list appears.
: Normal
video capsule
: Video capsule
that you want to watch.
: Video capsule
being recorded.
: Video capsule
with timer setting.
Connected
server name
Video
6/10
European Vacation
21:00
6/9
Susan's Graduation
20:00
6/6
Grandma's Birthday
22:00
6/3
Charlotte's Web
21:00
Thu
6/2
Friends
20:00
Fri
5/30
Elmo's Fun in the Sun
22:00
5/27 Friends22:00
5/20 Friends20:00
5/18 Friends
20:00
SELECT
OPTIONS
:Select
:Return
: Video capsule that
cannot be played back.
With Network Media, you can only play
back video capsules with the , , or
.
4 Use / to select the video (video
capsule) that you want to watch, and
then press the H (Playback) button.
Video playback starts.
To watch video in fast reverse or
fast forward
Press the REW or FWD button.
Press the FWD button once for smooth fast
forward playback or press twice successively for
fast forward playback.
To stop video playback
Press the x (Stop) button. This returns to the
Video Capsules screen.
To pause video playback
Press the X (Pause) bu tton. Press the H
(Playback) button to resume playback.
To switch the soundtrack on a
bilingual broadcast
Press the AUDIO button. This cycles through
the audio modes se quentially.
Main (stereo) c SAP (stereo L) c Main/SAP
(stereo R) c ...
To display and exit the screen
display
Press the blue DISPLAY button. Each ti me you
press the blue DISPLAY button, the screen
display appears or disappears.
To return to the previous menu
screen
Press the RETURN but to n.
Notes
• To fast forward while playing a video capsule, press
and release the FWD but ton on the remote once to
fast forward at approximate ly 1.5 to 2 times normal
playback speed. If you press the FWD button again,
the video fast forwards in approximately 30-second
intervals. Press the H (Playback) button to resume
normal playback. When you fast for ward video
capsules recorded at high quality, the remote
response may sometimes be somewhat slow.
• When you use Network Medi a to play back video
capsules being recorded by Giga Pocket, the time
search function is not available .
58
GB
Page 59

Sorting the video capsule
Deleting video capsules
list
You can sort the vid eo capsules screen in
ascending or desce ndi ng order of names or
recording date.
OPTIONS
/
SELECT
1 In the video capsules screen, press the
OPTIONS button.
The OPTIONS menu appears.
Video
OPTIONS
6/10
European Vacation
21:00
Return
6/9
Susan's Graduation
20:00
Select a server...
6/6
Grandma's Birthday
22:00
Sort
6/3
Charlotte's Web
21:00
Video settings...
Thu
6/2
Friends
20:00
Fri
5/30
Elmo's Fun in the Sun
22:00
SELECT
OPTIONS
:Select
:Return
2 Use / to select Sort, and then
press the SELECT button.
A submenu appears.
Video
OPTIONS
6/10
European Vacation
21:00
Return
6/9
Susan's Graduation
20:00
Select a server...
6/6
Grandma's Birthday
22:00
Date ascend
Sort
6/3
Charlotte's Web
21:00
Date descend
Video settings...
Thu
6/2
Friends
20:00
Name ascend
Fri
5/30
Elmo's Fun in the Sun
22:00
Name descend
You can delete vide o capsules saved on the
VAIO computer.
///
SELECT
1 In the video capsules screen, select a
video capsule that you want to delete,
and then press the SELECT button.
A submenu appea rs .
2 Use / to select Delete, and then
press the SELECT button.
A confirmation message appears.
3 Use / to select OK, and then
press the SELECT button.
The selected video ca psule is deleted from
the VAIO computer .
Note
Write-protected video capsule s cannot be deleted
through Network Media.
Using Network Media
SELECT
OPTIONS
:Select
:Return
3 Use / to select the sorting order of
the display, and then press the
SELECT button.
The order of the items on the screen
changes.
59
GB
Page 60

Write-protecting video
Changing video settings
capsules
—Read-only
You can write-protect video capsules so that
they cannot be delet ed.
/
SELECT
1 In the video capsules screen, select a
video capsule that you want to writeprotect, and then press the SELECT
button.
A submenu appears.
2 Use / to select Read-only, and
then press the SELECT button.
This write-protects the selected video
capsule.
To release write-protection
Select the write-protected video capsul e and
press the SELECT button. On the submenu,
select Read-only OFF, and then press the
SELECT button.
When using the video function, you can
configure Network Media in such a way that you
do not need to confirm whether you are using the
same VAIO computer with the television
function.
OPTIONS
///
SELECT
1 While the video cabinet list or video
capsule list is displayed, press the
OPTIONS button.
The OPTIONS menu appears.
2 Use / to select Video Settings,
and then press the SELECT button.
The Video Settings screen appears.
3 Use / to select Yes or No, and
then press the SELECT button.
4 Use / to select OK, and then
press the SELECT button.
This returns to the list screen.
Note
If the VAIO computer normally connected for the
television function is different f ro m the VAI O
computer normally connected for the video function,
television programmes recorde d with Network Media
60
GB
Page 61

are recorded on the VAIO computer used with the
television function.
A programme
recorded with Network
Media is saved on this
VAIO computer.
VAIO computer
normally connected for
the television function.
Searching with index images
— Film roll feature
Receiver
Television
VAIO computer
normally connected
for the video function.
You can display index images (in the shape of a
film roll), use th em t o locate the scene that you
want to watch.
///
SELECT
1 During playback or when playback is
paused, press / .
The film roll area appears on the screen.
Cursor
SELECT
:Move/ :Toggle Film Roll/
:Play
2 Use / to move the cursor ( )
to the scene that you want to watch,
and then press the SELECT button.
Playback starts at the scene that yo u
selected.
To clear the film roll
Press .
Using Network Media
61
GB
Page 62

Searching for a scene by
Starting playback from
specifying a time
— Time search feature
You can specify the time count of a scene to
move it.
Number buttons
(used when ALT
is lit).
12/ENTER (used
when ALT is lit).
ALT
CLEAR
1 During playback or when playback is
paused, press the ALT button so that it
lights, and then press the orange
ENTER button.
A dialog box allowi ng you to specify the
time count appea r s on the display.
2 Press the number buttons to enter the
time.
For example, to move to the scene at time
count 1 hour 30 min ut es , en ter -13-.
3 Press the orange ENTER button.
Playback starts at the input time count.
Tip
If you enter the wrong time count by mistake, press the
ALT button so tha t it lights, and then press the
CLEAR button to delete the time count you entered.
the point where you
stopped playback
— Resume feature
You can start playback fr om the point whe re you
last stopped playback.
/
SELECT
1 On the video capsules screen, select a
video capsule that you want to watch,
and then press the SELECT button.
A submenu appears.
2 Use / to select Resume, and then
press the SELECT button.
Playback starts from the point where you
last stopped.
Tip
The resume feature remember s position where
playback stopped for the five video cap sules watched
most recently. If you watch more than five video
capsules, the resume featu r e in fo rm ation of the least
recent video capsule is lost and you can no longer use
this feature with that video capsule until you watch it
again.
62
GB
Page 63

— Listening to music saved on the VAIO computer
This section describes how to listen to music stored on your VAIO computer.
Tip
Listening to music
You can liste n t o m usic saved on the VAIO
computer with SonicStage or SonicStage
Premium, through the speakers connec ted to the
receiver. To be able to do so, you must first
perform “Step 5: Preparations needed to us e
Network Media” (pa ge 3 4).
Note
You can only listen to playlists handled by SonicStage
or SonicStage Premium (excluding WMA files). You
cannot listen to other music files with Network Media.
The playlist fol der an d pl ayli st na mes s how n are thos e
created with SonicStage or Sonic St ag e Premium. For
details about SonicStage or SonicStage Premium, refer
to the documentation supplied with the VAIO
computer or Help.
REW/FWD
PREV/NEXT
H
(Playback)
OPTIONS
FUNCTION
X
(Pause)
x
(Stop)
MAIN MENU
/
RETURN
SELECT
1 Press the blue MAIN MENU button.
The main menu appears.
Main Menu
TV Watch and record TV programs
VIDEO Watch video clips
MUSIC Listen to music
PHOTO View photos
:Scroll Up/Down
SELECT
Settings
:Select
When no VAIO computer normally con n ect ed i s
set, the Select a Server screen appears. Use /
to select the VAIO co mpute r to be con nected ,
then press the SELECT button. On the submenu
select Connect, and then pre ss the SELECT
button. If there are no VAIO computers in the
Select a Server screen, press the OPTIONS
button, and on the OPTIONS menu select
Refresh, and then press the SELECT button.
Note that it may take some time until the VAIO
computers appear.
2 Use / to select MUSIC-Listen to
music, and then press the SELECT
button.
A folder scre en appears.
Connected server name
Music (MyMusicServer)
All Libraries
: Folder
: Playlist
Tip
To sort folders and playlists, see page 65.
Note
Some special characte rs ca nnot be displayed on
the screen.
When the Select a Server screen
appears
If no VAIO computer normally connected is set,
the Select a Server scree n appears. Use /
to select the VAIO computer to be connected,
press the SELECT button, and then select
Connect.
To set the VAIO computer normally connected,
see page 49.
All Playlists
Rock and Roll
ATRAC3s - Reggae
MP3s - Romantic Time
WAVs - Sound FX
MP3s - Movie Soundtracks
OPTIONS
:Play
Using Network Media
:Options
While using a different Network Med ia
function, you can al s o pr ess the function
selection b utton to se lect the mus ic
function.
continued
63
GB
Page 64

To listen to music saved on a
different VAIO computer
When there is more than one VAIO computer
connected to the receiver, you can select the
VAIO computer to which you want to connect.
To do so, press the OPTIONS button. On the
OPTIONS menu, select Select a Server, and
then press the SELECT button. In the Select a
Server screen, select the VAIO computer to be
connected, sele ct Connect, an d then press the
SELECT button.
3 Use / to select the playlist that
you want to play back, and then press
the H (Playback) button. You can
also use / to select the folder
containing the playlist that you want to
play back, and then press the SELECT
button.
The selected fold er opens.
Connected server name.
Music (MyMusicServer)
All Libraries
All Playlists
Rock and Roll
ATRAC3s - Reggae
MP3s - Romantic Time
WAVs - Sound FX
MP3s - Movie Soundtracks
OPTIONS
:Play
:Options
4 If you selected a folder in step 3, use
/ to select a playlist, and then
press the H (Playback) button.
Playback of the first track in the playlist
starts.
Jacket image
Music (MyMusicServer)
Playlist name
Playback status
Tip
If you saved a jacket image on the connec ted
VAIO computer with SonicStage, then it appears
on the screen. If there is no such image, a preset
image appears instead. Fo r deta il s about how to
save a jacket image, ref er to the documentation
supplied with the VAIO computer or Help.
Women in Music
1
I Don't Know Why
Respect
2
Last Farewell
3
Big Yellow Taxi
4
Sound of Music
5
6
Boyfriend
7
Dancing in the Street
Good to Go
8
Smooth Operator Singer
RETURN
:Return
Track name
Artist name
00:02
OPTIONS
00:02 2:54
:Options
Playback
position
To restart playback of the
current track
Press the PREV button once.
To jump to the previous or next
track
To jump to the previous track, press the PREV
button twice succ essively. To jump to the next
track, press the NEXT button.
To fast reverse or fast forward
Press the REW button or FWD button. Press the
H (Playback) button to resume normal
playback.
To stop playback
Press the x (Stop) button.
To pause playback
Press the X (Pause) bu tton. Press the H
(Playback) button to resume playback.
To return to the previous menu
screen
Press the RETURN but to n.
To repeat playback
Depending on the selected playback mode
(page 65), you can repeat the playback of a
single track or of all the tracks in the playlist.
1 During playback, or when playback is
paused or stopped, press the
OPTIONS button.
The OPTIONS menu appears.
2 Use / to select Repeat, and then
press the SELECT button.
A submenu appears.
3 Use / to select On, and then press
the SELECT button.
64
GB
Page 65

Playback modes
You can select va rious playback modes when
you listen to music. In a ddition to n o rmal
playback (playin g back all tracks), you ca n
select single-track playback, or shuffle
playback.
1 During playback or when playback is
paused, press the OPTIONS button.
The OPTIONS menu appears.
2 Use / to select Play mode, and
then press the SELECT button.
A submenu appears.
3 Use / to select the playback
mode, and then press the SEL ECT
button.
The Track playback mode only plays back
the current track.
Sorting the folders or playlist
You can sort the fol der and playlist screens in
ascending or descending order of names.
OPTIONS
/
SELECT
1 In the folder screen or playlist screen,
press the OPTIONS button.
The OPTIONS menu appears.
Music (MyMusicServer)
All Libraries
OPTIONS
All Playlists
Return
Rock and Roll
Select a server...
ATRAC3s - Reggae
Sort
MP3s - Romantic Time
WAVs - Sound FX
MP3s - Movie Soundtracks
OPTIONS
:Play
:Options
2 Use / to select Sort, and then
press the SELECT button.
A submenu appea rs .
Music (MyMusicServer)
All Libraries
OPTIONS
All Playlists
Return
Rock and Roll
Select a server...
ATRAC3s - Reggae
Name ascend
Sort
MP3s - Romantic Time
Name descend
WAVs - Sound FX
MP3s - Movie Soundtracks
Using Network Media
OPTIONS
:Play
:Options
3 Use / to select the sorting order of
the display, and then press the
SELECT button.
The order of the items on the screen
changes.
65
GB
Page 66

— Viewing photographs saved on the VAIO computer
This section describes how to view photographs stored on your VAIO computer and make various
photograph-r el ated settings.
1 Press the blue MAIN MENU button.
Viewing photographs
— Slide show
You can view photographs (still images) saved
on the VAIO computer on your television. To be
able to do so, you mus t f ir st perform “Step 5:
Preparations needed to use Network Medi a”
(page 34).
Note
With Network Media you can open the folders and
view the photographs (still images) saved on the VAIO
computer with PictureGear Studio, and still images
saved in a specific folder on the VAIO computer.
When PictureGear Studio is installed on the VAI O
computer, using the PictureGe ar St udi o Photo
Collection feature, you can st or e st ill images on the
photo server. For details, ref er to P ic ture G e ar St udi o
Help.
If PictureGear Studio is not installed on the VAIO
computer, save the sti ll images in a folder in the
C:\Documents and Settings\A ll Users \ P ho to
Server\VAIO Media folder. To display this folder, on
the Start menu click My Computer. In the My
Computer window, double-click Local Disk (C:),
Documents and Settings, All Users, Photo Server,
and then VAIO Media. You cannot view still ima ges
that are not stored in th is folder with Network Media.
Note that depending on the version of VAIO Media ,
this folder may be dif ferent. For details, see Photo
Server Help.
PREV/NEXT
H
(Playback)
OPTIONS
FUNCTION
X
(Pause)
x
(Stop)
MAIN MENU
/
RETURN
SELECT
The main menu appears.
Main Menu
TV Watch and record TV programs
VIDEO Watch video clips
MUSIC Listen to music
PHOTO View photos
:Scroll Up/Down
SELECT
Settings
:Select
While using a diffe re nt N et w ork Media
function, you can a ls o pr ess the function
selection butto n t o select the photograph
function.
Tip
When no VAIO computer normally connected is
set, the Se lect a Server screen appears. Use /
to select the VAIO comp uter to be c onnec ted,
then press the SELECT button. On the submenu
select Connect, and then press the SELECT
button. If there are no VAIO computers in the
Select a Server screen, press the OPTIONS
button, and on the OPTIONS menu select
Refresh, and then press the SELECT button.
Note that it may take so me time until the VAIO
computers appear.
2 Use / to select PHOTO-View
photos, and then press the SELECT
button.
The folder screen appears.
Connected server name.
Photo (MyPhotoServer)
All Libraries
: Folder
: Album
:
Photographs
in the folder
Notes
• Only the photographs in this folder are
displayed. You cannot view other da ta in the
folder.
• You can use the slide show and list features
with albums and photographs.
Trav el
Sports
European Vacation
Soccer Practice
BMPs
Sunday Picnic
Photos located in "VAIO Media" folder
OPTIONS
:Play
:Options
319 Shot(s)
45 Shot(s)
25 Shot(s)
59 Shot(s)
100 Shot(s)
66
GB
Page 67

When the Select a Server screen
appears
If no VAIO computer normally connected is set,
the Select a Server screen appears. Use /
to select the VAIO computer to be connected,
press the SELECT button, and then select
Connect.
To set the VAIO computer connected normally,
see page 49.
To view photographs saved on a
different VAIO computer
When there is more t han one VAIO comput er
connected to the receiver, you can select the
VAIO computer to wh i ch you want to connect.
To do so, press the OPTIONS button. On the
OPTIONS menu, select Se le ct a Server, and
then press the SELECT button. In the Select a
Server screen, select the VAIO compute r t o be
connected, select Connect, and then press the
SELECT button.
3 Use / to select the folder
containing the album that you want to
view, and then press the SEL ECT
button.
The selected folder opens.
Photo (MyPhotoServer)
All Libraries
U.S. Canada
Spain
Asia
Italy
Brazil
Miscellaneous travel
Photos located in "VAIO Media" folder
OPTIONS
:Play
:Options
319 Shot(s)
45 Shot(s)
25 Shot(s)
59 Shot(s)
100 Shot(s)
4 Use / to select the album or
photographs that y ou want to view, and
then press the H (Playback) button.
The slide show starts and the photographs
appear successively.
To clear the screen display
Press the blue DISPLAY button .
To view the previous photograph
Press the PREV button.
To view the next photograph
Press the NEXT button.
To stop a slide show
Press the x (Stop) button.
To pause a slide show
Press the X (Pause) button. Press the H
(Playback) button to resume the slide show.
To return to the Folder screen
Press the RETURN button.
Tip
You can change th e display interval of the slide show
(page 69).
Note
During a slide show, the photographs on displa y ma y
be temporarily distorted.
Playing background music
during a slide show
You can play backg round music saved on t he
VAIO computer during a slide show.
1 During slide show playback, press the
OPTIONS button.
The OPTIONS menu appears.
2 Use / to select Background
music on, and then press the
SELECT button.
The background music list appears.
Connected server name.
Background Music (MyMusicServer)
All Libraries
All Playlists
: Folder
: Playlist
Tip
If no VAIO computer normall y connected is set,
the Select a Server screen appears. Use / to
select the VAIO computer to be connected, press
the SELECT button, select Connect, and then
press the SELECT button.
Rock and Roll
ATRAC3s - Reggae
MP3s - Romantic Time
WAVs - Sound FX
MP3s - Movie Soundtracks
Deep
OPTIONS
:Play
:Options
3 Use / to select the playlist that
you want to use, and then press the
SELECT button.
The slide show re appears and the
background music is played back.
To change the background music
Repeat steps 1 to 3, above.
continued
67
Using Network Media
GB
Page 68

To stop the background music
During background music playback, press the
OPTIONS button. On the OPTIONS menu,
select Background music off, and t hen press
the SELECT button.
Tip
The background music does not stop even when the
slide show ends. To stop the background music, exit
the Photo menu or cancel the ba ck gr ound music.
Note
To be able to play background music VAIO Media
Music Server must be started ( page 30).
Viewing a photograph list
— Index feature
You can view a thumbnail index of the
photographs (still images) saved on the VAIO
computer.
PAGE +/-
OPTIONS
MAIN
MENU
/
SELECT
1 Press the blue MAIN MENU button.
The main menu appears.
2 Use / to select PHOTO-View
photos, and then press the SELECT
button.
The folder screen appears.
3 Use / to select the folder
containing the album that you want to
view, and then press the SEL ECT
button.
The selected folder opens.
4 Use / to select the album that you
want to view, and then press the
SELECT button.
A submenu appears.
68
GB
Page 69

5 Select Show index, and then press
the SELECT button.
Nine thumbnails app ea r.
Photo (MyPhotoServer)
European Vacation 300 shot(s)
1
2
3
4
5
6
7
8
9
RETURN
:Play
:Return
If all the thumbnails cannot fit on a single
screen, use the PAGE +/- buttons display more.
Note
Depending on the type of your television , the
screen may temporarily appear to be distorted
when consulting a thumbnail index.
Starting a slide show from a
selected photograph
1 Use / / / to select the
photographs that y ou want to view, and
then press the SELECT button.
A submenu appears.
2 Use / to select Start slide show,
and then press the SELECT button.
The slide show starts from the selected
photograph.
Tips
• You can also start the slide show with the H
(Playback) button.
•Press the x (Stop) button to return to the thumbnail
index.
Viewing a single photograph
1 Use / / / to select the
photographs that y ou want to view, and
then press the SELECT button.
A submenu appears.
2 Use / to select Show selected
picture, and then press the SELECT
button.
The selected photo gr aph is displayed fullsize.
To start a slide show from the
photograph that you are viewing
Press the H (Playback) button.
Changing slide show settings
You can change the interval at which each
photograph in the slide show is displayed and
the slide show loop settings.
OPTIONS
///
SELECT
1 In the folder screen, press the
OPTIONS button.
The OPTIONS menu appears.
2 Use / to select Photo Settings,
and then press the SELECT button.
The Photo Settings screen appears .
Settings
Photo Settings
Slide Show Interval
3 sec
Slide Show Repeat
On
SELECT
:Select
10 sec
7 sec
5 sec
Off
OK
RETURN
:Return
Manual
CANCEL
3 Under Slide Show Interval, select
the time with / / / , and then
press the SELECT button.
4 Under Slide Show Repeat, select On
or Off wi th / / / , and then
press the SELECT button.
5 Use / / / to select OK, and
then press the SELECT button.
This returns to the Folder screen.
Using Network Media
69
GB
Page 70

— Watching broadcasts received by the VAIO computer
This section describes how to watch television broadcasts received by your VAIO computer and make
various television-relat ed set tin gs .
1 Press the blue MAIN MENU button.
Watching television broadcasts
You can watch television broadcasts received by
the VAIO computer. To be able to do so, you
must first perform “Step 5: Preparations needed
to use Network Media” (page 34).
Notes
• To watch television broadcasts, the VAIO computer
must be equipped with an antenna. For details, refer
to the documentation supplied with the VAIO
computer.
• With some models of VAIO comput e r, it is no t
possible to watch televis ion ( pa ge 22).
Number
buttons
(used when
ALT is lit).
AUDIO
OPTIONS
FUNCTION
DISPLAY
CH +/-
ALT
12/ENTER
(used when
ALT is lit).
MAIN MENU
/
SELECT
The main menu appears.
Main Menu
TV Watch and record TV programs
VIDEO Watch video clips
MUSIC Listen to music
PHOTO View photos
:Scroll Up/Down
SELECT
Settings
:Select
While using a diffe re nt N et w ork Media
function, you can a ls o pr ess the function
selection button to select the television
function.
Tip
When no VAIO computer normally connected is
set, the Se lect a Server screen appears. Use /
to select the VAIO comp uter to be c onnec ted,
then press the SELECT button. On the submenu
select Connect, and then press the SELECT
button. If there are no VAIO computers in the
Select a Server screen, press the OPTIONS
button, and on the OPTIONS menu select
Refresh, and then press the SELECT button.
Note that it may take so me time until the VAIO
computers appear.
2 Use / to select TV-Watch and
record TV programs, and then press
the SELECT button.
The television sc reen appears.
Connected
server name
TV
Channel
2 ch TVStation
Stereo
70
GB
LIVE [Standard]
OPTIONS
RECORD
:Options
Current broadcast
Page 71

When the Select a Server screen
appears
If no VAIO computer normally connected is set,
the Select a Server screen appears. Use /
to select the VAIO computer to be connected,
press the SELECT button, and then select
Connect.
To set the VAI O c omp ut er norma ll y co nnec te d,
see page 49.
To watch a television broadcast
received by a different VAIO
computer
When there is more t han one VAIO comput er
connected to the receiver, you can select the
VAIO computer to wh i ch you want to connect.
To do so, press the OPTIONS button. On the
OPTIONS menu, select Se le ct a Server, and
then press the SELECT button. In the Select a
Server screen, select the VAIO compute r t o be
connected, select Connect, and then press the
SELECT button.
3 Select the channel with the CH +/-
buttons.
You can also press the ALT button so that it
lights, an d then change the channel w ith the
number buttons.
For example, t o change to ch annel 12, pre ss
number buttons 1 and 2 s uccessively, and
then press the orange ENTER button.
Note
The channels changes three to fiv e se co n ds after
you press the orange ENTER button.
To switch the soundtrack on a
bilingual broadcast
Press the AUDIO button. Thi s cycles through
the audio modes se quentially.
Main (stereo) c SAP (stereo L) c Main/SAP
(stereo R) c ...
To display and exit the screen
display
Press the blue DISPLAY button. Each time you
press the blue DISPLAY button, the screen
display appears or di sappears.
To watch a broadcast from a
device connected to the line
input of the VAIO computer
Press the OPTIONS button. On the OPTIONS
menu, select Select an input, and then press the
SELECT button. The available external inputs
appear. Select one and press the SELECT
button.
Notes
• It is not possible to watch a video signal with
copyguard protection.
• If another VAIO computer or receiver on your home
network is already streaming the television broadcast
received by the VAIO computer equipped with an
antenna, you cannot watch television broadcasts with
Network Media.
• If Giga Po cket running on the VAIO computer is
recording (timer recording), then you cannot connect
to the VAIO computer with Network Media. If Giga
Pocket running on the VAIO computer starts
recording (timer recording) while you are watching a
television broadcas t, the reco rdi ng take s prece dence.
• After 12 hours of continuous television watching, the
screen may go blank for 10 to 20 seconds. This is not
a malfunction. Television function automa tically
resumes.
Using Network Media
71
GB
Page 72

Changing the television image quality
You can select the image quality used w h e n
watching television broadcasts.
OPTIONS
///
SELECT
1 When watching a television broadcast
received by the VAIO computer, press
the OPTIONS button.
The OPTIONS menu appears.
2 Use / to select TV Settings, and
then press the SELECT button.
The TV Settings screen ap pears.
Settings
TV Settings
REC Mode
High Quality
Standard Long Play
Live Mode
High Quality
Standard Low Bandwidth
OK CANCEL
RETURN
REC Mode
High Quality
Live Mode
High Quality
SELECT
:Return
:Select
Standard Long Play
Standard Low Bandwidth
72
3 Under Live Mode, use / / / to
select High Quality (high image
quality), Standard (medium image
quality), or Low Bandwidth (low
image quality).
4 Select OK, and then press the
SELECT button.
The television screen reappears.
Note
Selecting High Qu ality places a large load on the
network. Depending on your environme nt
configuration, the video and audio may be choppy.
GB
Page 73

— Recording broadcasts received by the VAIO computer
This secti on de scri bes how to rec ord t elevi sio n broa dca sts r ecei ved by yo ur VA IO comp uter and m ake
recording-re la ted settings.
1 Press the blue MAIN MENU button.
Recording television broadcasts
On the VAIO computer you can save (rec ord)
television broadcast s received by the VAIO
computer. To be able to do so, you must first
perform “Step 5: Preparations needed to us e
Network Media” (pa ge 3 4).
Notes
• To record television broadcast s, the VAIO comput er
must be equipped with an antenna. For details, refer
to the documentation supplie d wit h the VA IO
computer.
• With some models of VAIO c omputer, it is not
possible to watch television (page 22).
Number
buttons
(used when
ALT is lit).
REC
REC STOP
12/ENTER
(used when
ALT is lit).
FUNCTION
DISPLAY
CH +/-
ALT
MAIN MENU
/
The main menu appea rs .
Main Menu
TV Watch and record TV programs
VIDEO Watch video clips
MUSIC Listen to music
PHOTO View photos
:Scroll Up/Down
SELECT
Settings
:Select
While using a different Network Media
function, you ca n al so press the function
selection button to select the televis ion
function.
Tip
When no VAIO computer normally con n ect ed i s
set, the Select a Server screen appears. Use /
to select the VAIO co mpute r to be con nected ,
then press the SELECT button. On the submenu
select Connect, and then pre ss the SELECT
button. If there are no VAIO computers in the
Select a Server screen, press the OPTIONS
button, and on the OPTIONS menu select
Refresh, and then press the SELECT button.
Note that it may take some time until the VAIO
computers appear.
2 Use / to select TV-Watch and
record T V prog rams, and then press
the SELECT button.
The television scr ee n appears.
Connected
server name
TV
Channel
2 ch TVStation
Stereo
Using Network Media
SELECT
LIVE [Standard]
OPTIONS
RECORD
:Options
Current broadcast
continued
73
GB
Page 74

When the Select a Server screen
appears
If no VAIO computer normally connected is set,
the Select a Server screen appears. Use /
to select the VAIO computer to be connected,
press the SELECT button, an d t h en select
Connect.
To set the VAIO computer normally connected,
see page 49.
To record a broadcast received
by a different VAIO computer
When there is more than one VAIO computer
connected to the receiver, you can select the
VAIO computer to which you want to connect.
To do so, press the OPTIONS button. On the
OPTIONS menu, select Select a Server, and
then press the SELECT button. In the Select a
Server screen, select the VAIO computer to be
connected, sele ct Connect, an d then press the
SELECT button. Recording is performed on the
VAIO computer selected in the Select a Serv er
screen.
3 Select the chann el with the CH +/-
buttons.
You can also pr ess the ALT button so that it
lights, and then change the channel with the
number buttons.
For example, to change to channel 12, press
number buttons 1 and 2 successively, a nd
then press the ora nge ENTER button.
Note
The channels changes three to five se c onds a f te r
you press the orange ENTER button.
4 Press the REC button.
The screen pauses, and after a short delay
recording starts . Re cording stops
automatically 30 minutes later.
To extend the recording time
Press the REC button. Each press in creases
the recording time by 30 minutes up to a
maximum of 6 hour s.
For example, to re cord for 2 hours, press the
REC button four times.
To change the recording quality
See page 76.
5 Press the REC STOP button.
Recording sto ps soon after. The display
then freezes tem porarily, but resu m es
normal display momentarily.
Notes
• When recording, it is not possi ble to ch ange the
recording mode (High Quality, Standard, Long
Play). To change the recording mode, stop
recording. For details see page 76.
• When recording, it is not possible to select a different
function.
• When recording a programme on the VAIO
computer, it is not possible to start playing the same
programme from the beginning with Network Media.
• It takes approxim a te ly 20 se c onds before pressing
the REC or REC STOP button takes effect. Allow
sufficient time to take this into account before you
start recording.
• When recording stops, the display freezes for
approximately 20 seconds.
To display and exit the screen
display
Press the blue DISPLAY button. Each ti me you
press the blue DISPLAY button, the screen
display appears or disappears.
74
GB
Page 75

Timer recording
You can set the timer to record a television
broadcast received by the VAIO computer.
Number buttons
(used when ALT
is lit).
ALT
OPTIONS
///
SELECT
RETURN
1 When watching a television broadcast
received by the VAIO computer, press
the OPTIONS button.
The OPTIONS menu appears.
OPTIONS
Return
Select a Server...
Select an input
Timer programming...
TV settings...
OPTIONS
SELECT
:Select
:Options
2 Use / to select Timer
programming, and then press the
SELECT button.
The Timer Programming screen app ears.
Timer Programming (MyVAIOServer)
Date
--/--
SELECT
:Select
Channel
Start Time
--:--
:Return
REC Mode
--------
----
Day
----
RETURN
3 Use / to select the top row, and
then press the SELECT button.
The Change Timer screen appears.
4 Use / to select the month in the
Start Date/Time, and then press the
SELECT button.
It is now possible to change the month
setting.
5 Use / to select the month, and
then press the SELECT button.
This month is set.
6 Repeat steps 4 and 5 to set the
duration, channel, and recording
mode.
Tips
• You can also press the ALT button so that it
lights, enter a numeric value with the number
buttons, and then press the orange ENTER
button to enter the numeric value.
• The minimum recording time is 3 minutes.
7 To record the same broadcast at the
same time each week, select
Recurrence ON, and then press the
SELECT button.
8 Select OK, and then press the
SELECT button.
The timer is set. When the set time arrives,
the VAIO computer automatically begins
recording.
Notes
• You can set the timer for a program me as long as one
year in advance. For example, on November 1st, you
can set the timer to rec ord programmes up to the
October 31st of the following year.
• If you there is a timer recording more than one year
ahead of time already set with Giga Pocket, it cannot
be correctly modified with Network Me dia . C ha nge
the setting using the timer screen of Giga Pocket on
the VAIO computer.
• If you change a timer recording made with Giga
Pocket, the details are lost. Change the sett in g u si n g
the timer screen of Giga Pocket on the VAIO
computer.
Using Network Media
continued
75
GB
Page 76

To cancel a timer recording
1 In step 3 of “Timer recording”, use /
to select the timer recording that
you want to cancel, and then press the
SELECT button.
A submenu appears.
2 Use / to select Cancel Timer
programming, and then press the
SELECT button.
A confirmation message appears.
3 Use / to select OK, and then
press the SELECT button.
This cancels the timer recording.
To change a timer recording
1 In step 3 of “Timer recording”, use /
to select the timer recording that
you want to change, and then press the
SELECT button.
A submenu appears.
2 Use / to select Change Timer
programming, and then press the
SELECT button.
3 Change the timer recording settings,
select OK, and then press the SELECT
button.
The timer recording settings are changed.
Changing the recording quality
You can change the recording mode.
Read this section along w ith “Recording
television broadc as ts” (page 73).
OPTIONS
///
SELECT
1 When watching a television broadcast
received by the VAIO computer, press
the OPTIONS button.
The OPTIONS menu appears.
2 Use / to select TV Settings, and
then press the SELECT button.
The TV Settings screen appears.
Settings
TV Settings
REC Mode
High Quality
Standard Long Play
Live Mode
High Quality
Standard Low Bandwidth
OK CANCEL
RETURN
REC Mode
High Quality
Live Mode
High Quality
SELECT
:Return
:Select
Standard Long Play
Standard Low Bandwidth
76
3 Use / / / to select High
Quality (high ima ge quality) ,
Standard (medium image quality), or
Long Play (low image quality) as the
recording mode.
4 Select OK, and then press the
SELECT button.
The television screen reappears.
Note
When recording, it is not possi ble to ch an g e th e
recording mode (High Quality, Standard, Long
Play).
GB
Page 77

Changing Network Media settings
Setting the receiver IP address
By default the receiver acquires an IP address
automatically. Use the following procedure to
specify an IP address, if necessary. N ot e t hat
when the receiver is used in a environmen t
containing a router, you should not spec if y t he
receiver IP address (page 35).
1 On the main menu, select Settings,
and then press the SELECT button.
The Settings screen appears.
Settings
System Settings
TV Settings
Video Settings
Photo Settings
RETURN
SELECT
:Return
:Select
2 Use / to select System
Settings, and then press the SELECT
button.
The System Settings screen appears.
3 Use / to select IP Address, and
then press the SELECT button.
The IP Address screen appears.
Settings
IP Address
Obtain an IP address automatically (using router)
Obtain an IP address automatically (not using router)
Specify an IP address
Current Settings:
SELECT
IP Address:
Subnet Mask:
:Select
RETURN
000
000
000
000
000..
000..
000..
000
OK
CANCEL
:Return
4 Use / to select Specify an IP
address, and then press the SELECT
button.
5 Use / / / to select the item
that you want to set, press the
SELECT button, Use / to enter
the numeric values of the IP address
and subnet mask, and then press the
SELECT button.
Tip
You can also press the ALT button so that it
lights, and then enter the value with the number
buttons on the remote.
6 Use / / / to select OK, and
then press the SELECT button.
Tip
When either Obtain an IP address automatically
option is selected, the IP address automatically
acquired appears.
Changing Network Media settings
77
GB
Page 78

Updating the receiver software
You can downl oad software u pdates for the
receiver from the Internet with the VAIO
computer. For details, visi t the Sony home audio
customer support Web site at
http://www.vaio-link.com/info/lv700R/EN/,
locate your model of VA IO computer.
Internet
1 Download
2 Update
Receiver
VAIO computer
Tip
To ensure that you have the most recent version of the
receiver software and to avoid possible problems, we
recommend that you visit the ho me aud io cu stomer
support Web site regular ly.
1 On the main menu, select Settings,
and then press the SELECT button.
The Settings scre en appears.
Settings
System Settings
TV Settings
Video Settings
Photo Settings
RETURN
SELECT
:Return
:Select
2 Use / to select System
Settings, and then press the SELECT
button.
The System Settings screen appears.
3 Use / to select Firmware
Update, and then press the SELECT
button.
The Firmware Update screen appears .
Tip
A message indicating that the operation cannot be
cancelled and the remote disabled appears, but
Network Media restarts automatically in step 5.
4 Use / / / to select OK, press
the SELECT button, and then wait for
about 10 seconds.
You can now download data from the
VAIO computer.
Note
You cannot cancel the download once it starts.
While the download is in progress, the r eceiver
buttons and the remote are disable d.
5 On the VAIO computer, start the update
utility, and then start the update.
Follow the instru ct i on on the home audio
customer support Web site and the Readme
file supplied with the update utility.
Note
During the update, never disconnect the power
cord, network cable, or turn off the receiver.
The update procedure takes approximat el y
three minutes. When the update is
complete, the receiver internal power
momentarily goes off, Network Media
restarts, and the main menu appears after
approximately 20 s econds.
Tip
After the update, all the custom settings except the IP
address are reset to their defaults.
78
GB
Page 79

Selecting the Network
Resetting Network Media
Media language
You can select t he language used by Networ k
Media. By default, this language is English.
Note
Modifyi ng this setting does not affect the language of
the messages displayed by the rece ive r on its display.
1 On the main menu, select Settings,
and then press the SELECT button.
The Settings screen appears.
2 Use / to select System
Settings, and then press the SELECT
button.
The System Settings screen appears.
Settings
System Settings
Device Registration
Startup Menu
IP Address
Firmware Update
Factory Default
Device Information
Language
RETURN
SELECT
:Return
:Select
3 Use / to select Language, and
then press the SELECT button.
The Language Set tin g screen appears.
4 Use / / / to select the desired
language, and then press the SELECT
button.
5 Use / / / to select OK, and
then press the SELECT button.
A confirmation message in the selected
language appears, prompting you to restart
the receiver to app ly the language change.
6 Press the SELECT button to close the
message.
7 Press the ?/1 button to restart the
receiver.
The Network Media function screen
appears on the televi si on in the language
that you selected. (The appearance of the
screen depends on the Network Media
default settings (page 52).)
Completely resetting Network
Media
The following procedure resets the following
settings to their defaults.
• Startup Menu
•IP Address
• REC Mode (page 76)
• Live Mode (page 72)
• Video Server Confirmation
• Slide Show Interval (page 69)
• Slide Show Re peat (page 69)
• Language Setting (page 79)
1 On the main menu, select Settings,
and then press the SELECT button.
The Settings screen appears.
Settings
System Settings
TV Settings
Video Settings
Photo Settings
RETURN
SELECT
:Return
:Select
2 Use / to select System
Settings, and then press the SELECT
button.
The System Set ti ngs screen appea rs.
3 Use / to select Factory
Defaults, and then press the SELECT
button.
The Default S ettings screen appears.
Changing Network Media settings
continued
79
GB
Page 80

4 Use / / / to select OK, and
then press the SELECT button.
All the settings are reset to their defaults.
Resetting Network Media except
the IP address
This reset all t he Network Media se ttings to thei r
default, but retain the IP addres s se tting, follow
the procedure bel ow . Perform this procedu re
when you do not wa nt to reset network-relate d
settings.
/
ENTER
MAIN MENU
1 Press the black MAIN MENU button
repeatedly, until SET UP appears on
the receiver display.
2 Use / to select N.M. RESET.
3 Press the black ENTER button.
CONFIRM appears on the di splay.
4 To reset, press the black ENTER
button.
N.M. RESET appears on the display and
the Network Media settings are reset.
Registering the receiver on the VAIO computer (restricting access to the VAIO computer)
You can configure the VAIO computer to
restrict its access to the receiver only.
Receiver operation
1 On the main menu, select Settings,
and then press the SELECT button.
The Settings screen appears.
Settings
System Settings
TV Settings
Video Settings
Photo Settings
RETURN
SELECT
:Return
:Select
2 Use / to select System
Settings, and then press the SELECT
button .
The System Settings screen appears.
3 Use / to select Device
Registration, and then press the
SELECT button.
The Registration screen appears.
4 Use / / / to select OK, and
then press the SELECT button.
A screen appears as the registration stands
by for you to perform the registration
procedure on the V A IO computer. If you
fail to complete the registration procedure
on the VAIO computer within about 5
minutes, registration fails.
Perform the following procedure on the
VAIO computer.
80
GB
Page 81

VAIO computer operation
1 On the Start menu, point to All
Programs, VAIO Media, Server
Administration, and then click
Console.
The VAIO Media Console dialog box
appears.
2 Under Access Control Settings,
select the Access this computer
from other computers on the
network check box, select Register
the devices accessing this
computer, and then click Registered
Devices.
The List of Registered Devices dialog box
appears.
3 Click Register.
The Device Registr at i on di a log box
appears.
4 Clear the Use the confirmation
number to register your device
check box, and then click Start
Registration.
The Receiving Registration Request
dialog box appears.
5 When the Registration
Confirmation dialog box appears,
click Yes.
The receiver is added to the List of
Registered Devices.
6 Close the List of Registered
Devices and VAIO Media Console
dialog boxes.
Receiver operations
When the Registration Completed message
appears on the television screen connected to the
receiver, press the SELECT button, completing
the receiver registration on the VAIO computer.
The System Settings screen reappears.
Changing Network Media settings
81
GB
Page 82

Appendix
Using the remote
You can use the remote to perform a variet y of
operations.
Controlling other co mponents
and the receiver
You can use the receiver remote to control a
number of othe r Sony c ompon ents conn ected t o
the receiver. For det ails about the remote bu ttons
used for Network Media operations, see
page 85.
Remote
button
1-9, 0/101) w;CD player/
> 10/11
2CH/TEST
TONE 3
12/ENTER
A.F.D. 3 Receiver Selects the A.F.D.
ALT 8 Remot e Press this button,
AM 2 Receiver Selects the AM band.
ANT/ -/--1) w;TV/VCR Selects the channel
AV ?/1 1 TV/VCR/Hard
AV MENU q;VCR/Satellite
DISPLAY qhTV/VCR/
DVD 2 Receiver Allows you to watch
ENTER qj VCR/Satellite
FM 2 Receiver Selects the FM band.
Operation Function
VCD player/
MD deck
Television/
VCR/Satellite
tuner
1)
w; CD player/
VCD player/
MD deck/Tape
deck
Television S elects chann el 11.
Receiver Selects the 2CH
1)
w;CD player/
VCD player/
MD deck/Tape
deck
Television S elects chann el 12.
disk audio
recorder/
CD player/
VCD player/
DVD player/
MD deck
tuner/DVD
player
VCD player/
DVD player
tuner/DVD
player
Selects the track
number. Pressing 0
enters 10.
Selects the channel
number.
Selects track numbers
higher than 10.
STEREO mode.
Starts or stops the test
tone.
Sets the channel o r
track number selected
with the number
buttons.
mode.
lighting it, before using
functions printed in
orange on the remote.
input mode (1 or 2
characters).
Turns the audio and
video components on
or off.
Displays the me nu.
Selects inform ation
displayed on the
television screen.
DVD.
After selecting a menu
item, press to enter the
selection.
82
GB
Page 83

Remote
button
FM MODE 5Receiver Selects FM monaural
HDD
FUNCTION
HDD CD 6
HDD/MD 2Receiver Outputs audio from the
INPUT
MODE qf
MAIN
MENU qd
MEMORY wsReceiver Store s radi o sta ti ons.
MOVIE 3 R ece iver Selects a sound field.
MUSIC 3 Rece iver Selects a sound field.
MUTING 9Receiver Mutes the receiver
N.MEDIA 2Receiver Plays ba ck or di spla ys
PRESET
CH/ALBUM
+/– 7
RETURN/
EXIT O qs
SHIFT wd Receiver Press repeatedly to
SOUND
FIELD 3
SYSTEM
STANDBY
(Press
AV ?/1
while
holding
down ?/1)
1
Operation Function
or stereo re ce p tion.
Hard disk audio
recorder
Receiver Selects the digital
Receiver Selects a receiver
Hard disk audio
recorder/CD
player
Receiver Scans and selects
TV/VCR/
Satellite tuner
VCD player/
DVD player
Satellite tuner Exits the menu.
Receiver Selects the sound field.
Control centre/
TV/VCR/
Satellite tuner/
Hard disk audio
recorder/CD
player/VCD
player/DVD
player/MD
deck/Tape deck
Changes the function
of the hark disk audio
recorder.
audio recorder or MD
player.
audio input mode.
menu.
audio output.
the data on your VAIO
computer with
Network Media.
Selects the MP3 album.
preset stations.
Selects preset chann els.
Returns to th e pr evious
menu.
select a memory page
to preset radio stations
or tune in preset
stations.
Turns off the system
and other Sony audio/
video components.
Remote
button
TOP MENU qkDVD player Di splays the DVD title.
TUNING +/– waReceiver Scans radio stations.
TUNING
MODE 4
TV ?/1 1 TV Turns the television on
TV CH +/– qgTV Selects preset
TV/SAT 2 Rec eive r Allows you to watch
TV/VIDEO qgTV Selects input signal:
TV VOL + /– qgTV Adjusts the volume of
VIDEO 2 Receiver Allows you to watch
VOLUME
+/– qa
WIDE qg TV Selects the wide-
?/1 1 Receiver Turns the receiv er on or
H ql VCR/Hard disk
X ql VCR/Hard disk
Operation Function
Satellite tuner Displays the guid e
Receiver Changing the tuning
Receiver Adjusts the receiver
audio recorder/
CD player/
VCD player/
DVD player/
MD deck/
Tape deck
audio recorder/
CD player/
VCD player/
DVD player/
MD deck/
Tape deck
menu.
mode.
or off.
television channels.
broadcasts from the
satellite tuner.
television input or
video input.
the television.
video.
volume.
picture mode (only for
Sony televisions that
support wide-picture
mode).
off.
Starts playback.
Pauses playback or
recording. (Also sta r ts
recording with
components in re cord
standby.)
Appendix
continued
83
GB
Page 84

Remote
button
x ql VCR/Hard disk
./> qlVCR/Hard disk
m/M ql Hard disk audio
/// qjVCR/Satellite
1)
You must press the ALT button, lighting it, before
you can use these buttons.
Notes
• Pressing an input button (VIDEO, HDD/MD, DVD,
TV/SAT) may not always successf ull y change the
input. If this happens, press the TV/VIDEO button
to select the television as the input signal.
• The explanations above are intended to serve as an
example only. Therefore, dependi ng on the
components, the operations above ma y not be
possible or may operate diffe rent ly tha n de sc r ibe d.
• Before you use the / / / button for receiver
operation, press the black MAIN MENU button. To
operate other components, press the TOP MENU or
AV M ENU button after pressing the input button.
Operation Function
audio recorder/
CD player/
VCD player/
DVD player/
MD deck/
Tape deck
audio recorder/
CD player/
VCD player/
DVD player/
MD deck/
Tape deck
recorder/
CD player/
VCD player/
DVD player/
MD deck
VCR/
Tape deck
tuner/DVD
player
Stops playback.
Skips tracks.
Searches tracks
(forward or backward).
Fast forwards or
rewinds.
Selects a menu item.
Changing the default sett ings
of an input button on the
remote
By default, the input buttons of the remote are
assigned to the following components.
Input button Assignment
VIDEO VCR (VTR mode 31))
HDD/MD Audio recorder
DVD DVD player (category code 1
TV/SAT Television
1)
For use with Sony VCRs.
2)
For use with Sony DVD players.
If the default settings of the input buttons on the
remote do not match your system components,
you can change them. For example, if you have
a VCD player, but do not have an MD deck, you
can assign HDD/MD to your V C D pl ayer.
?/1
AV ?/1
Input buttons
Numbered
buttons
2)
)
84
VOLUME –
GB
Page 85

While pressing the input button on the
remote (for example, HDD/MD) that you
want to assign to a component, press two
numeric buttons, then release the input
button.
In the example above, press the HDD/MD
button, 3, 3, then release the HDD/MD button.
For assignable components and buttons to be
pressed, refer to th e t able below.
To operate
VCR (command mode VTR 31))1 3
VCR (command mode VTR 2
CD player 2 1
Hard disk audio recorder 2 2
MD deck 2 3
Tape deck A 2 4
Tape deck B 3 1
DVD player (category code 1
DVD player (category code 2
DVD player (category code 3
VCD player 3 3
TV 3 4
Receiver 1 1
Tuner 1 2
Buttons
Press
1)
)1 4
2)
)3 2
2)
)4 4
2)
)4 1
first
Press
second
Using the remote with
Network Media
This section describes the remote buttons used
with Network Media. The blue characte rs on the
remote identify Network Media buttons. For
details about the remote buttons used for
receiver operations, see page 82.
Appendix
1)
Sony VCRs are operated with a VTR 2 or 3 setting.
These correspond to 8 mm and VHS respectively.
2)
Sony DVD players and recorders can be set to
DVD1, DVD2, or DVD3. Most Sony DVD
recorders are category 3.
To return to the assignments bef or e the ch ange,
repeat the op erations above.
To reset all the input buttons to
their default settings
Press the ?/1, AV ?/1, and VOLUME –
buttons at the same time.
The ALT button blinks three times a nd the input
buttons are reset to their default settings.
continued
85
GB
Page 86

Remote
button
Operation Function
1-9, 0/101) qjTV Selects the channel
number.
Video Specifies the time for a
time search.
12/ENTER
1)
qjTV Confirms the channe l
number specified with
the number buttons.
Video Confirms the time
search time speci f ied
with the number
buttons.
ALT 6 TV/Video Press this button,
lighting it, before using
functions printed in
orange on the remote.
AUDIO 5 TV/video Selects the playback
mode for multiplexed
audio
CH/PAGE 4TV Selects the television
channel.
Photographs Changes the thumbnail
page.
CLEAR1) qfTV Clears the channel
number specified with
the number buttons.
Video Clears the time search
time specified with the
number buttons.
DISPLAY 3TV/video/
music/
photographs
FUNCTION qaTV/video/
music
Displays Network
Media information on
the televisio n scr een
Switches to another
available Network
Media function.
MAIN
MENU 8
TV/video/
music/
Displays the Network
Media main menu.
photographs
MASTER
VOL 9
TV/video/
music/
Adjusts the receiver
volume.
photographs
N.MEDIA 2TV/video/
music/
photographs
OPTIONS qdTV/video/
music/
photographs
PREV/
NEXT qf
Music Selects the track.
Photographs Changes the thumbnail
Switches the receiver
input to Network
Media.
Display the availab le
options on the
displayed screen.
page.
Remote
button
Operation Function
REC qh TV Saves (records)
television programmes
on the VAIO computer.
REC STOP qhTV Stops recording
television programmes
on the VAIO computer.
RETURN q;TV/video/
music/
Returns to the previous
screen.
photographs
REW/FWD qgVideo/music Fast forwards or fast
reverses video or
music.
TV ?/1 qk TV/video/
music/
Turns a Sony television
on or off.
photographs
?/1 1 TV/video/
music/
Turns the receiver on or
off.
photographs
H
(Playback)
7
Video Plays back vide o sa ve d
on the VAIO computer.
Music Plays back tracks a
playlist.
Photographs Starts slide shows .
X (Pause) 7Video/music/
photographs
x (Stop) 7 Video/music/
photographs
///,
SELECT qs
TV/video/
music/
photographs
Pauses playback or
slide shows.
Stops playback or slide
shows.
Selects menu items and
confirm the sele ction
with the SELECT
button.
1)
Press the ALT button, turning it on, before thes e
operations.
Note
The TV ?/1 button can only be used to operat e Sony
televisions.
86
GB
Page 87

Precautions
Safety
Should any solid object or liquid fall onto the cabinet,
unplug the receiver and have it checked by qualified
personnel before operating it any furt he r.
Power sources
• Before operating the unit, check that the operating
voltage is identical to your local power supply. The
operating voltage is indicated on the nameplate at the
rear of the re ce iver.
• The unit is not disconnected from the A C power
source (mains) as long a s it is connect ed to the pow er
outlet, even if the unit itse lf has been turned off.
• If you are not going to use the receiver for a
prolonged period, be sure to disconne ct the rec eive r
from the power outlet. To disconnect the AC power
cord, grasp the plug itself; never pull the cord.
• The AC power cord must be replaced only at a
qualified servicing centre.
Heat buildup
Although the unit heats up during operation, this is not
a malfunction. It is also not a malfunction for the upper
left corner of the unit to heat up while the power is on.
If you continuously use this unit at a high volume, the
cabinet temperature o f th e top, side, and bottom rises
considerably. To avoid burning yourself, do not touch
the cabinet.
Positioning
• Place the receiver in a location with adequate
ventilation to prevent heat build up and prolong the
life of the receiver.
• Do not place the receiver near heat sources, or in a
location subject to direct sunlight, excessive dust, or
mechanical shock.
• Do not place anything on top of the cabine t tha t
might block the ventilation holes and cause
malfunctions.
• Use caution when placing the unit or spe ak ers on
surfaces that have been specially treat ed (wi th wa x,
oil, polish, etc.) as staining or discolo ration of the
surface may result.
Operation
Before connecting other compo nen ts, be sure to turn
off and unplug the receiver.
Cleaning
Clean the cabinet, pa nel, and c ontro ls wi th a so ft clo th
slightly moistened with a mild detergent solution. Do
not use any type of abrasive pad, scouring powder , or
solvent such as alcohol or benzine.
If you have any questions or problems concerning your
receiver, consult your nearest S ony de a le r.
Appendix
87
GB
Page 88

Troubleshooting
If you experience any of the following
difficulties while using the receiver or Network
Media, use this trou bl eshooting section to h el p
you remedy the probl ems. Should any proble m
persist, consult your nearest Sony dealer.
General troubleshooting
Cannot turn on the receiver.
• Verify that the power cord is correctly connected
to the power supply.
• Verify that all the cables are correctly connected
to the receiver (see pages 9–18).
• If the receiver is connected t o a multi-plug adapt er
with a power switch, for example, make sure that
the adapter is on and that the receiver power cor d
is correctly connected.
There is no sound no matter which component
is selected.
• Check th a t b ot h the receiver and all compon ents
are turned on.
• Check that you have selected th e cor r ect
component on the receiver.
• Check that the headphones a re not conn ecte d.
• Check that the VOLUME control is not set to
MIN.
• Check that all the speaker cables are connected
correctly.
•Press the MUTING button on th e rem ote to
cancel the muting function.
• The protection circu it ma y be activated. Turn off
the receiver, eliminate the short-circuit problem,
and turn on the power again after about
20 seconds.
There is no sound from a specific component.
• Check that the component is connected correctly
to the audio input jacks for that com pone nt.
• Check that the cable(s) u s ed fo r t h e co n n ection is
(are) fully inserted into the jacks on both the
receiver a n d th e co mponent.
• Check that you have selected th e cor r ect
component on the receiver.
There is no sound from one of the front
speakers.
• Connect headphones to the PHONES jack to
verify that sound is output from the headphones. If
only one channel is output from the he ad phone s,
the component may not be correctly connected to
the receiver. Check that all the cables are fully
inserted into the j acks on both th e receiver and th e
component. If both channels are output from the
headphones, the front speaker m ay not be
correctly connecte d t o the receiver. Check the
connection of the front speaker whic h is not
outputting any sound.
The multi-channel surround effect of the
Dolby Digital or DTS is not obtained.
• Check that the DVD software, etc., is recorded in
Dolby Digital or DTS.
• If you connect the DVD player, etc., to the digital
input jack on this system, ch eck th e au d io setting
(for digital audio output) of the compone nt .
• Check that the audio tra ck i s c orrect ly s elect ed on
the DVD player. (Check the audio setting of the
DVD menu.)
There is no sound when performing DTS-CD
playback, etc.
• Select the desired digital component, and then set
DEC. XXXX to DEC. AUTO in the SET UP
menu.
There is noise when playing back CD.
• Select the desired digital component, and then set
DEC. XXXX to DEC. AUTO in the SET UP
menu.
Sound is choppy when starting CD playback.
• Select the desired digital component, and then set
DEC. XXXX to DEC. PCM in the SET UP
menu.
Cannot record audio.
• Check that you have selected the correct
component on the receiver.
• Select the compone nt fr om which you want to
record with INPUT SELECTOR.
• If you want to record audio from a digit al
component to a component connected to the
analogue HDD/MD jack, check that INPUT
MODE is ANALOG (page 47).
• You cannot output audi o input to a digital input
jack to an analogue output jack. Connect to an
analogue input jack.
The left and right sounds are unbalanced or
reversed.
• Check that the speakers and compo nents are
connected correctly and securely.
• Adjust balanc e par a me te r s in the LEVEL menu.
There is severe humming or noise.
• Check that the speakers and compo nents are
connected securely.
88
GB
Page 89

• Check that the connecting cables are away from
transformers or moto r s, and a t le ast 3 m away
from a television or fluorescent light.
There is no sound from the centre speaker.
• Make sure that the sound field function is on
(press the SOUND FIELD button).
• Select the CINEMA STUDIO EX mode
(page 43).
• Adjust the speaker level (page 21).
• Make sure that the centre speaker is set to
SMALL or LARGE (page 19).
There is no sound or only very low-level
sound from the surround speakers.
• Make sure that the sound field function is on
(press the SOUND FIELD button).
• Select the CINEMA STUDIO EX mode
(page 43).
• Adjust the speaker level (page 21).
• Make sure that the surround speakers are set to
SMALL or LARGE (page 19).
There is no sound from the active subwoofer.
• Check that you have selected the subwoofer on the
receiver.
• Check that the su bwoo fe r is se t to YES (page19).
• Depending on the sound field, audio may not be
output at the SUB WOOFER jack.
The surround effect cannot be obtained.
• Make sure that the sound field function is on
(press the A.F.D., MOVIE or MUSIC button).
• Sound fields do not functio n for signals with a
sampling frequency of more than 48 kHz.
Radio stations cannot be tuned in.
• Check that the antennae are connected securely.
Adjust the antennae and connect an external
antenna if necessary.
• The signal strength of the stations is too weak
(when tuning in with automatic tuning). Use
manual tuning.
• Make sure that you set the tuni ng interval
correctly (when tuning in AM stations manually).
• No stations have been preset or the preset station s
have been cleared (when scanning preset
stations). Preset stations (page 38).
• Press the black DISPLAY button so that the
frequency appears on the display.
RDS does not work.
• Make sure that you have tuned in an FM RDS
station.
• Select a stronger FM station.
The RDS information that you want does not
appear.
• Contact the radio station and find out whether they
provide the serv ic e in question. If so, th e service
may be temporarily out of order.
There is no picture or an unclear picture
appears on the television screen or monitor.
• Select the appropriate input on the receiver.
• Set your television to the appropriate input mode.
The receiver is very hot and the fan does not
work.
• During operation, the receiver can get
considerably hot, but this is not a sign of
malfunction. The fan starts automatically when
necessary.
Network Media
Network Media does not function.
• Verify that the remote batteries are correctly
inserted and that they are not spent (page 18)
• Press the N.MEDIA button on the remote before
attempting to use Network Media.
• If the screen freezes and the remote stops
functioning, or it become s impossible to turn off
the receiver, Network Media may have become
unstable. Reset Network Media (page80
“Resetting Network Media except the IP
address”). Alternatively, disconnect the power
cord from the power supply, and then reconnect it.
After resetting Network Media or reconnecting
the power cord, wait for approximately 20
seconds.
Note that all the Network Media settings are reset
to their defaults except the IP address, after
performing these operation s.
• If you turn off the receiver, it goe s on st an dby
(waiting for remote operat ions). It still consumes
a small amount of power in this state. If you want
to completely turn off the receiver, disconnect it
from the power supply. Doing so resets all the
Network Media settings exc ep t the IP address.
Note that for about 20 seconds after conne c ting
the power cord to th e power s upply, s witchi ng the
receiver input to N.MEDIA has no effect on the
television.
• If Network Media still does not function properly
20 seconds or more after connecting the power
cord to the power supply, it may be
malfunctioning. Consult your Sony service
representative.
Appendix
continued
89
GB
Page 90

The VAIO computer does not start (cannot be
started when on standby or hibernating).
• Verify that th e V AIO computer settings are
correct (page 30).
• Verify that the network connection is correct by
verifying the following:
– If your receiver and VAIO computer (one unit
each) are directly connected, verify that you are
using a cross-wired cable (page 23).
– Make sure that the hub or router is on. For
details, refer to the documentation supplied
with the hub or router.
– Turn on the router before turning on the
receiver.
– Verify that the receiver and hub or router are
connected with network cables (page 23).
– Make sure th at the IP address acquisition
method is consistent with the network
configuration (page 35).
• Verify that the na me of the VAIO computer to
which you want to connect appears in the Select a
Server screen (p ag e49). Any VAIO computer to
which you already connected appears on this
screen.
• If you disconnect the amplifier power cord, all the
registered VAIO computer informatio n is lost,
therefore you must connec t th e amplifier to the
VAIO computer. (In this situation, all the receiver
settings except the IP add ress are reset.)
• When you connect the receiver to a VAIO
computer for the first time, you cannot use
Network Media to start the VAIO comput er from
standby.
• In some instances, you ma y not be able to start
some VAIO computers with Network Media If
you are using a wireless LAN or other type of
network card, you may also not be able to start the
VAIO computer. If you are using a notebook
VAIO computer, you cannot start it when it is
hibernating.
VAIO computers can only be started from standby
and hibernation with Network Media when the
computer network connector is used.
The audio and video from Network Media do
not reach the television.
• Verify that the receiver is on (page 18).
• Verify that the receiver and television are
correctly connected (page 14).
• Verify that the te le vision video input is switch e d
to the video input from the receiver .
• Verify that the r eceiver input is switched to
Network Media (N.MEDIA appears on the
receiver display) (page 34).
• Audio from Network Media is not output from the
television speakers. Listen with the receiver
speakers.
• Verify that Giga Pocket Serv er is running. For
details, refer to the G iga Pocket Server
documentation.
• It is possible that the VAIO computer operation
has become unstable. Restart the VAIO computer,
and then start Giga Pocket Server.
The video stops intermittently or is distorted,
and/or the audio stops intermittently.
• There may not be enough networ k ba ndwi dth.
Verify the following:
– The network cables are 100Base-T compliant.
– The hub or router is 100Base-T compliant.
• There may be an exce ssive load on the connected
VAIO computer or on the network. Setting the
television function of Network Media Live Mode
to High Quality increases the load. Select
Standard or Low Bandwidth instead (page 72).
• If the VAIO computer runs anti-vir us software,
scanning the files on the hard disk increases the
load on the VAIO computer. Quit any anti-virus
softwar e when using Netw ork Media or avoid
connecting the receiver during virus scans.
The television screen is dark.
• To protect the television tube, if the system is idle
for 15 minutes while Network Media is displaying
the menu screen or playing music, the screen is
automatically darkened (this is not a malfunction).
Press a remote button to restore the screen to its
normal brightness. To protect the tube, do not
leave the menu screen displayed for long periods.
Cannot connect to the VAIO computer. (The
“Cannot connect to the server” message
appears).
• Verify that the VAIO computer is on. (To be able
to start the VAIO computer with Netwo rk Med ia,
the VAIO computer must be on standby
hibernating, and you must have previously
performed the procedure outlined in Useful
setting 3 (page 53 ).)
• Verify that the receiver IP ad dress can be obtaine d
correctly.
When the IP Address setting is Obtain an IP
address automatically, and the acquisition is
performed correctly, th e IP address ap pears in the
IP Address screen. If there is no IP address in the
IP Address screen, verify the following:
– If your receiver and VAIO computer (one unit
each) are directly connected, verify that you are
using a cross-wired cable (page 23).
90
GB
Page 91

– Make sure that the hub or router is on. For
details, refer to the documentation supplied
with the hub or router.
– Turn on the router before turning on the
receiver.
– Verify that the receiver and hub or router are
connected with network cables.
– Make sure that the IP address acquisition
method is consistent with the network
configuration (page 35).
• Make sure that the VAIO computer setup is
correct (page 3 0 ).
• It is possible that the VAIO computer operation
has become unstable. Restart the VAIO compute r,
and then star t G i g a Pocket Server . For details,
refer to the Giga Pocket Server docum en tation.
• If you cannot connect to the VAIO computer
using Network Media, restart the VAIO computer.
• If the Windows XP Internet Connection Firewall
function is enabled, you may be unable to connect
to the VAIO computer. D isa ble the Internet
Connection Firewall function.
The receiver cannot b e registered with the
VAIO computer.
• Verify that the network co nnections are corre ct by
verifying the following:
– If your receiver and VAIO computer (one unit
each) are directly connected, verify that you are
using a cross-wired cable (page 23).
– Make sure that the hub or router is on. For
details, refer to the documentation supplied
with the hub or router.
– Turn on the router before turning on the
receiver.
– Verify that the receiver and hub or router are
connected with network cables.
– Make sure that the IP address acquisition
method is consistent with the network
configuration (page 35).
The VAIO computer does not appear in the
Select a Server screen.
•Press the OPTIONS button, select Refresh, and
then press the SELECT button (page 50). It may
take some time until the display to appear on the
screen.
• Verify that Giga Pocket Server is runni ng. For
details, refer to the Giga Pocket Server
documentation.
• Verify that Music Server and Photo Server are
running. For details, see “Step 4a: VAIO Media
preparations (starting serv ic es ) ” (pa ge 30).
• It is not enough for the VAIO computer to be
running to be able to establish a connect ion with
the Network Media televis ion and video
functions . You must also be logged on to the
VAIO computer. Make sure that you log on to the
VAIO computer when you turn it on .
However, if the VAIO computer is set up to log on
automatically when it starts, you do not need to
perform this operation.
No longer able to connect after resetting the
VAIO computer.
• Set up the VAIO computer again follo wing the
procedures outlined in “Step 4: VAIO computer
setup” (page 30).
The Select a Server screen appears every
time.
• If the Select a Server s cree n app ears ev ery time
you switch from the main menu to one of the
Network Media functions (tele visi on, vide o,
music, photographs), then in the Select a Server
screen set the VAIO computer normal ly
connected. (It is necessary to set the VAIO
computer normally connected for each f unc ti on
separately (page 49).)
Connecting to the VAIO computer takes an
unusually long time.
• If you are using the receiver withou t a rout er, it
may take up to 30 seconds until the I P a ddr e ss is
automatically assigned, and the receiver and the
VAIO computer are connec ted after tu rning on the
receiver.
• Set the receiver to a fixed IP address to sho rten the
connection time . For details, see “Changing
Network Media settings” (pag e 77).
• Make sure that the receiver IP address does not
conflict with other addresses on the network.
IP address 169.254.XXX.XXX
(Enter 169.254 unchanged,
then for XXX enter arbitrary
3-digit values (e.g.: 222.222).
Subnet mask 255.255.0.0
Note
If you are using a router, do not assign a fixed IP
address to the receiver .
Recording stops.
• Recording time was not extended. Except for
timer recording, recording automatically stops 30
minutes afte r yo u pres s the REC button. Press the
REC button again to extend the recording time by
30 minutes with each press (up to a max im u m of
6 hours) (page 75).
continued
91
Appendix
GB
Page 92

• There may not be enough remaini ng ha rd disk
space on the VAIO computer. Delete any
unnecessary data, to create space.
There is a delay between pressing the REC
button and the start of recording. Same after
pressing REC STOP and the end of recording.
• It takes approximately 20 seconds before pressing
the REC or REC STOP button takes effect.
Allow sufficient time to take this into account
before you start recording.
Cannot watch television broadcasts.
• If Giga Pocket is performing a timer recording,
you cannot watch television with Network Media.
Furthermore, you cannot connect to a VAIO
computer that is providing a television signal to a
media receiver other than the receiver or Pico
Player.
There is a delay between pressing the CH +/buttons and the channel change.
• It may take between 3 and 5 seconds f or the
channel to change after you pre ss the CH +/-
buttons.
The television broadcast displayed with
Network Media is lagging the actual
broadcast.
• When watching televisi on broa dc as ts with
Network Media, there is a signal lag of
approximately 15 seconds from the actual
television broadcast.
Cannot operate the DVD player with the
remote.
• You can only operate Sony DVD players with the
receiver remote.
• Change the DVD player category code to 2 or 3
(page 84).
Reference sections for clearing
the memory
To clear See
All memorised settings page 18
Adjusted sound fields page46
92
Remote control
The remote does not function.
• Point the remote at th e r e m ote sensor on the
receiver.
• Remove any obstacles bet ween the remote a nd the
receiver.
• Check that all the batteries are in the correct
direction or that your rechargeable bat teri es are
not spent.
• Replace all the dry cell batteries in the remote with
new ones, if necessary.
• Make sure that you sel ect the correct input on the
remote.
• Make sure that the VTR mode of the VCR or the
category code of the DVD player assigned to the
remote input buttons is cor re c t (p a ge 84).
GB
Page 93

Specifications
Amplifier section
POWER OUTPUT
Rated power output in stereo mod e
(8 Ω 1 kHz, DIN) 50 W + 50 W
Reference power output
(4 Ω 1 kHz, DIN) FRONT
1)
Depending on the sound field settings and the
source, there may be no sound output.
Frequency response 20 Hz – 20 kHz
DVD, TV/SAT, HDD/MD
Inputs (analogue) Impedance: 50 kΩ
DVD, TV/SAT, HDD/MD
2)
Input short.
3)
Weighted network, input le ve l.
Inputs (digital)
DVD (coaxial) Impedance: 75 Ω
S/N: 90 dB
(A, 20 kHz LPF)
DVD, TV/SAT,
HDD/MD (optical)
Sampling frequency
COAX, OPT 96 kHz
Outputs
LINE (subw oofer) Voltage: 2 V
S/N: 90 dB
(A, 20 kHz LPF)
FM tuner section
Tuning range 87.5 – 108.0 MHz
Antenna terminals 75 Ω, unbalanced
Intermediate frequency 10.7 MHz
Sensitivity
Mono: 18.3 dBf, 2.2 µV/75 Ω
Stereo: 38.3 dBf, 22.5 µV/75 Ω
Useable sensitivity 11.2 dBf, 1 µV/75 Ω
S/N
Mono: 76 dB
Stereo: 70 dB
Harmonic distortion at 1 kHz
Mono: 0.3%
Stereo: 0.5%
Separation 45 dB at 1 kHz
Frequency response 30 Hz – 15 kHz,
Selectivity 60 dB at 400 kHz
1)
: 75 W/ch
1)
CENTER
SURROUND
75 W/ch
Sensitivity: 500 mV
S/N2): 84 dB
(A, 500 mV
Impedance: 1 kΩ
+0.5/–2 dB
: 75 W
1)
:
3)
)
AM tuner section
Tuning range 531 – 1,602 kHz
Antenna Loop antenna
Intermediate frequency 450 kHz
Usable sensitivity 50 dB/m (at 999 kHz)
S/N 54 dB (at 50 mV/ m)
Harmonic distortion 0.5% (50 mV/m, 400 Hz )
Selectivity
At 9 kHz: 35 dB
Video section
Input
VIDEO: 1 Vp-p 75 Ω
Output
MONITOR: 1 Vp-p 75 Ω
Network Media section
Hardware decoder
MPEG2
Maximum 8 Mbps, 720 ×
480 pixels, 30 fps
MPEG1
1.41 Mbps, 352 × 240
pixels, 30 fps
Playable file formats
Giga Pocket video
MPEG2, MPEG 1
SonicStage music
ATRAC3, ATRAC3plus,
WAV, MP3. WMA is not
supported.
Photo Server images
BMP, TIFF, GIF, JPEG,
PNG
Interface
Network
100Base-TX
Compatible computers
VAIO computers bought
after October 2003,
running Windows XP
Professional or Windows
XP Home Edition
General
Power requirements 230 V AC, 50/60 Hz
Power consumption 95 W
Dimensions 430 × 65 × 288 mm
including projections and
controls
Mass (approx.) 3 .2 kg
Appendix
continued
93
GB
Page 94

Package contents
AM loop antenna (1)
Allen screwdriver (1)
Connection adapter (1)
Cross-wired cable (1)
FM wire antenna (1)
Network cable (approx. 170 cm, 1)
Network cable fe r r ite core (1)
R6 (AA) batteries ( 2)
Remote control (1)
Speaker cable ferrite core (5)
Speaker plug (5)
Design and specifications are subject to change
without notice.
Trademarks and copyrights
• Sony, VAIO, the VAIO logo, Giga Pocket,
SonicStage, PictureGear Studio, VAIO Media,
VAIO Media Music Server, VAIO Media Video
Server, VAIO Media Photo Server, VAIO Media
Console, and Network Media are trademar ks a nd/or
registered trademarks of Sony.
• Microsoft and Windows are regi stered tradema rks of
Microsoft Corporation.
• All other product names are tra de ma r ks a nd/ or
registered trademarks of their r es pe ctive owne r s.
94
Television programmes, films, videotapes, CDs,
and other materials may be copyrigh te d. S uc h
materials recorded with this device are for your
personal use only. Unauthorised recordi ng of suc h
material may be contrary to the provisions of the
copyright laws. The law prohibits add ing a ny
modifications to the r eco r de d ma terials including
but not limited to motion pictures, images and audio,
without authorisation from the co pyr ight holder.
Some of these materials may be duplicationprotected to disable unlawful recor ding.
GB
Page 95

List of button locations and reference pages
Illustrati
1 2 354
67
8
How to use this page
Use this page to find the location of buttons and other
parts of the system mentioned in the text .
Main unit
Alphabetical order
Display 2
INPUT SELECTOR 3 (37, 38,
47)
MUTING 6 (37)
PHONES jack 8
PRESET TUNING +/– 4 (38)
SOUND FIELD 7 (43)
VOLUME 5 (21, 37)
Symbols
?/1 (power) 1
on number
DISPLAY 7 (41)
Name of button/part Reference page
r
RR
Appendix
GB
95
Page 96

Index
A
Analogue com ponents 13
Antennae
Appendix
Assigning a fixed IP address to
Audio input mode
Automatic tuning
15
82
the VAIO computer
47
37
31
B
Background music 67
Batteries
18
C
Cables 9
Changing
Network Media settings
slide show s ettings
the audio input mode of
digital components
the default settings of an
input button on th e remote
84
the recording quality
the television imag e quality
72
video settings
Connecting
analogue compon en ts
antennae
digital component s
procedure
18
speakers
the AC power cord
Connections
Copyrights
Customising sound fields
60
15
9, 13, 15, 16,
16
23
94
77
69
47
76
13
10
18
45
D
Deleting video capsules 59
Digital audio input dec odi ng
47
priority
Digital component s
10, 47
E
Evaluating your home network
23
F
Film roll feature 61
Fixed IP address
31
G
Giga Pocket Server 30
H
Hibernation 53
High fidelity sound
I
Image quality 72
Index feature
Input mode
Insertin g b atteries into the
remote
IP address
68
47
18
31, 35, 77
L
Language 79
Listening to music saved on the
VAIO computer
63
M
Manual tuning 38
63
Music
N
Network Media preparation 22,
34, 36
Network Media settings
O
Optimising Network Media 49
Output devices
Overview
9, 10, 13, 15
5
42
77
P
Photographs 66
Playing background music
during a slide show
Power cord
Precautions
Preparations needed to use
Network Media
Preparing Network Media
34, 36
Preparing the receiver
Preset tuning
18
87
67
34
22,
8, 9
38
R
Radio 37
Radio Data System
39
RDS
Receiver
37
Receiver preparation
Receiving radio broadcast s
Recording
audio
quality
television broadcasts
Registering the receiv er on the
VAIO computer
Remote
18, 82, 84, 85
Resetting Network Media
Restarting the receiver
Restricting access to the VAIO
computer
Resume feature
39
8, 9
37
48
76
73
80
79
36
80
62
S
Searching
for a scene by specifying a
time
62
with index images
Selecting
a component
a sound field
the digital audio input
decoding priority
the Network Media
language
the startup menu
61
37
43
47
79
52
96
GB
Page 97

Setting
the receiver IP ad dress
the receiver IP ad dress
acquisition method
Network Media
preparation
the VAIO computer
normally connected
the VAIO computer to st art
automatically
Setting up the speakers
Setup procedure
22, 23, 30, 34, 35, 36
Sleep Timer
Slide show settings
Software update
Sorting
the folders or playl ist
the video capsule list
Sound field
Speakers
Specifications
Standby
Starting
a slide show from a selected
photograph
Giga Pocket Server
playback from the point
where you stopped
playback
Startup menu
35
53
8, 9, 18, 19,
48
69
22, 78
43, 45
16, 19, 42
93
53
69
62
52
T
Television 70
Television image quality
Time search feature
Timer recording
Trademarks
Troubleshooting
Tuning
37
automatically
manually
preset stations
62
75
94
88
37
38
38
19
30
65
59
72
49
77
U
Updating software 22
Updating the receiver software
78
Using
Networ k Media
only the front speakers
the Radio Data System
the receiver
the remote to control
components
the remote with Network
Media
the Sleep Timer
49
42
39
37
82
85
48
V
VAIO computer
normally connected
30
setup
Verifying your VAIO computer
model
22
57
Video
Video settings
Viewing
a photograph list
a single photograph
photographs saved on the
60
VAIO computer
49
68
69
66
W
Watching
television
video saved on the VAIO
Write-protecting video capsules
60
computer
70
57
97
GB
Page 98

Page 99

Page 100

Sony Corporation
Printed in Malaysia
 Loading...