


©2011 Sony Corporation Printed in Malaysia
STR-DA5700ES
4-287-974-11(1)
Multi Channel
AV Receiver
Operating Instructions
WARNING
To reduce the risk of fire, do not c over the ventilation
opening of the apparatus with newspapers,
tablecloths, curtains, etc. Do not place the naked
flame sources such as lighted candles on the
apparatus.
Do not install the appliance in a confined space, such
as a bookcase or built-in cabinet.
To reduce the risk of fire or electric shock, do not
expose this apparatus to dripping or splashing, and
do not place objects filled with liquids, such as
vases, on the apparatus.
As the main plug is used to disconnect the unit from
the mains, connect the unit to an easily accessible
AC outlet. Should you notice an abnormality in the
unit, disconnect the main plug from the AC outlet
immediately.
Do not expose batteries or apparatus with batteryinstalled to excessive heat such as sunshine, fire or
the like.
The unit is not disconnected from the mains as long
as it is connected to the AC outlet, even if the unit
itself has been turned off.
Excessive sound pressure from earphones and
headphones can cause hearing loss.
This symbol is intended to alert
the user to the presence of the Hot
Surface that may be hot if it is
touched during the normal
operation.
This equipment has been tested and found to comply
with the limits set out in the EMC Directive using a
connection cable shorter than 3 meters.
Notice for customers:
the following information is only
applicable to equipment sold in
countries applying EU directives.
The manufacturer of this product is Sony
Corporation, 1-7-1 Konan Minato-ku Tokyo, 1080075 Japan. The Authorized Representative for
EMC and product safety is Sony Deutschland
GmbH, Hedelfinger Strasse 61, 70327 Stuttgart,
Germany. For any service or guarantee matters,
please refer to the addresses given in separate
service or guarantee documents.
Disposal of Old
Electrical & Electronic
Equipment (Applicable
in the European Union
and other European
countries with separate
collection systems)
This symbol on the product or
on its packaging indicates that
this product shall not be treated as household waste.
Instead it shall be handed over to the applicable
collection point for the recycling of electrical and
electronic equipment. By ensuring this product is
disposed of correctly, you will help prevent potential
negative consequences for the environment and
human health, which could otherwise be caused by
inappropriate waste handling of this product. The
recycling of materials will help to conserve natural
resources. For more detailed information about
recycling of this product, please contact your local
Civic Office, your household waste disposal service
or the shop where you purchased the product.
Disposal of waste
batteries (applicable in
the European Union and
other European
countries with separate
collection systems)
This symbol on the battery or on
the packaging indicates that the battery provided
with this product shall not be treated as household
waste. On certain batteries this symbol might be
used in combination with a chemical symbol. The
chemical symbols for mercury (Hg) or lead (Pb) are
added if the battery contains more than 0.0005%
mercury or 0.004% lead. By ensuring these batteries
are disposed of correctly, you will help prevent
potentially negative consequences for the
environment and human health which could
GB
2

otherwise be caused by inappropriate waste
handling of the battery. The recycling of the
materials will help to conserve natural resources. In
case of products that for safety, performance or data
integrity reasons require a permanent connection
with an incorporated battery, this battery should be
replaced by qualified service staff only. To ensure
that the battery will be treated properly, hand over
the product at end-of-life to the applicable collection
point for the recycling of electrical and electronic
equipment. For all other batteries, please view the
section on how to remove the battery from the
product safely. Hand the battery over to the
applicable collection point for the recycling of waste
batteries. For more detailed information about
recycling of this product or battery, please contact
your local Civic Office, your household waste
disposal service or the shop where you purchased
the product.
About This Manual
• The instructions in this manual are for model
STR-DA5700ES (the receiver). Check your model
number by looking at the lower right corner of the
front panel.
• The instructions in th is manual describe mostly the
operation of the receiver with the supplied remote
control. You can also use the buttons or knobs on
the receiver if they have the same or similar names
as those on the remote control.
On Copyrights
This receiver incorporates Dolby* Digital and Pro
Logic Surround and the DTS** Digital Surround
System.
* Manufactured under license from Dolby
Laboratories.
Dolby, Pro Logic, Surround EX, and the doubleD symbol are trademarks of Dolby Laboratories.
** Manufactured under license under U.S. Patent
No’s: 5,956,674, 5,974,380, 5,978,762,
6,487,535, 6,226,616, 7,212,872, 7,003,467,
7,272,567, 7,668,723, 7,392,195, 7,333,929,
7,548,853 & other U.S. and worldwide patents
issued and pending. DTS-HD, the Symbol, &
DTS-HD and the Symbol together are registered
trademarks & DTS-HD Master Audio is a
trademark of DTS, Inc. Product includes
software. © DTS, Inc. All Rights Reserved.
This receiver incorporates High-Definition
Multimedia Interface (HDMI™) technology.
HDMI, the HDMI logo and High-Definition
Multimedia Interface are trademarks or registered
trademarks of HDMI Licensing LLC.
The font type (Shin Go R) installed in this receiver
is provided by MORISAWA & COMPANY LTD.
These names are the trademarks of MORISAWA &
COMPANY LTD., and the copyright of the font also
belongs to MORISAWA & COMPANY LTD.
iPhone, iPod, iPod classic, iPod nano, and iPod
touch are trademarks of Apple Inc., registered in the
U.S. and other countries.
continued
3
GB

All other trademarks and registered trademarks are
of their respective holders. In this manual, ™ and ®
marks are not specified.
“Made for iPod,” and “Made for iPhone” mean that
an electronic accessory has been designed to
connect specifically to iPod or iPhone, respectively,
and has been certified by the developer to meet
Apple performance standards. Apple is not
responsible for the operation of this device or its
compliance with safety and regulatory standards.
Please note that the use of this accessory with iPod
or iPhone may affect wireless performance.
DLNA and DLNA CERTIFIED are trademarks and/
or service marks of the Digital Living Network
Alliance.
MPEG Layer-3 audio coding tech nology and patents
licensed from Fraunhofer IIS and Thomson.
“BRAVIA” Sync is a trademark of Sony
Corporation.
“x.v.Colour” and “x.v.Colour” logo are trademarks
of Sony Corporation.
®
“PlayStation
” is a registered trademark of Sony
Computer Entertainment Inc.
restrictions on content usage, content owners may
require Microsoft to revoke the device’s ability to
consume PlayReady-protected content. Revocation
should not affect unprotected content or content
protected by other content access technologies.
Content owners may require you to upgrade
PlayReady to access their content. If you decline an
upgrade, you will not be able to access content that
requires the upgrade.
“WALKMAN” and “WALKMAN” logo are
registered trademarks of Sony Corporation.
“Android” is a registered trademark or a trademark
of Google Inc.
“AVCHD” and the “AVCHD” logo are trademarks
of Panasonic Corporation and Sony Corporation.
Microsoft, Windows, Windows Vista, and Windows
Media are trademarks or registered trademarks of
Microsoft Corporation in the United States and/or
other countries.
This product contains technology subject to certain
intellectual property rights of Microsoft. Use or
distribution of this technology outside of this
product is prohibited without the appropriate
license(s) from Microsoft.
Content owners use Microsoft PlayReady™ content
access technology to protect their intellectual
property, including copyrighted content. This device
uses PlayReady technology to access PlayReadyprotected content and/or WMDRM-protected
content. If the device fails to properly enforce
GB
4

Main features of the receiver
Compatible with a variety of connections and formats
Feature Description Page
Multi-channel The receiver can output up to 9.1 channels.
Compatible with various
standards
HDMI The receiver is equipped with five HDMI input jacks (of which two
Network The receiver is equipped with four LAN ports that have switching
USB You can easily play back iPhone/iPod content via the receiver
Multi-zone You can enjoy music or video from other rooms. 71
The receiver is equipped with speaker terminals for the front height
channel. (Up to 7 channels can be output simultaneously with
connected speakers.)
The receiver is compatible with various audio formats, such as
Dolby TrueHD, DTS-HD Master Audio, DSD, multi-channel
Linear PCM, FLAC, etc.
HDMI IN 3 and IN 4 are the “for AUDIO” jacks which take sound
quality into account) on the back panel, and one HDMI jack on the
front panel. You can connect various equipment using an HDMI
connection.
The receiver is compatible with various HDMI standards, such as
Deep Colour, x.v.Colour, 3D transmission, Audio Return Channel
(ARC), etc.
You can operate the receiver and other equipment in conjunction
with each other using the Control for HDMI function.
hub functions.
The receiver is compatible with Internet video streaming. 57
The receiver allows you to play back content on a home network
via the DLNA-compliant home network function.
using a USB connection.
You can easily play back content on USB device/WALKMAN via
the receiver using a USB connection.
You can easily enjoy content on your computer via the receiver
using a USB connection.
22, 24
21
26, 28, 30,
32
36, 80
76
45
60
55, 59
54
54
Better image and sound quality
Feature Description Page
Image up-conversion The receiver upscales or downscales analog video signals. The
signals can be upscaled to 1080p using an HDMI output jack. The
receiver also upscales or downscales analog video signals for
zone 2.
D.C.A.C. The receiver is equipped with the D.C.A.C. (Digital Cinema Auto
Calibration) function. Additionally, the receiver compensates
sound output for each speaker and improves surround effects via
the Speaker Relocation function and the A.P.M. (Automatic Phase
Matching) function.
20
93, 95
continued
GB
5

Feature Description Page
Sound fields The receiver creates optimum sound in accordance with various
High quality
reproduction of
compressed audio files
H.A.T.S. The H.A.T.S. (High quality digital Audio Transmission System)
speaker connections or input sources. (The receiver’s
preprogrammed sound fields are Dolby Pro Logic IIz, DTS Neo:X,
HD-D.C.S., etc.)
You can play back compressed audio files in high quality using the
D.L.L. (Digital Legato Linear) function.
function transmits signals from a Super Audio CD player
connected via an HDMI connection in high quality.
65, 67
99
105
Useful functions
Feature Description Page
Easy and accessible
operations
Flexible functions The Sound Optimizer function optimizes audio output in
The receiver is equipped with a GUI (Graphical User Interface).
You can operate the receiver intuitively using a menu displayed on
the TV screen.
You can set the basic settings of the receiver easily using the Easy
Setup.
A multifunction rem ote control for operating connected equi pment
and the Multi-zone function, and a simple remote control
performing normal operations are supplied with the receiver.
You can recall various settings of the receiver all at one time with
the press of the EASY AUTOMATION button.
accordance with the volume level.
The Advanced Auto Volume function adjusts the volume to its
optimum level automatically.
The A/V Sync function adjusts the time gap between audio output
and the visual display.
The Pass Through function outputs HDMI signals to the TV even
when the receiver is in standby mode.
51
48
15
83
69
70
100
79
Others
Feature Description Page
Environment-friendly
function
More useful You can operate the receiver using a smartphone equipped with
GB
6
The Auto Standby function switches the receiver to standby mode
automatically if you do not operate the receiver for a specific
period of time or when there is no signal input to the receiver.
“ES Remote” application software*.
* Compatible with iPhone/iPod touch and Android phone
110
83

Table of Contents
Main features of the receiver ........................ 5
Description and location of parts ................. 9
Getting Started
Read the following before you connect any
equipment .............................................. 19
1: Installing speakers .................................. 22
2: Connecting the monitor .......................... 26
3: Connecting the video equipment ........... 28
4: Connecting the audio equipment ........... 37
5: Connecting to the network ..................... 44
6: Preparing the receiver and the remote
control ................................................... 46
7: Setting up the receiver using the Easy
Setup ..................................................... 48
8: Setting up connected equipment ............ 50
9: Preparing a computer to use as
a server .................................................. 50
Guide to on-screen display operation ......... 51
Enjoying images/sound
Enjoying images/sound from the connected
equipment .............................................. 53
PC ............................................................... 54
USB Device/WALKMAN .......................... 54
iPhone/iPod ................................................55
DLNA ......................................................... 56
Internet video ............................................. 57
FM/AM ......................................................58
Enjoying an iPhone/iPod
Playing files on an iPhone/iPod ................. 59
Playing via a Network
Playing files on a home network
(DLNA) .................................................60
Tuning
Listening to FM/AM radio .........................61
Enjoying Sound Effects
Selecting the sound field ............................64
Using the Sound Optimizer function ..........69
Adjusting the equalizer ...............................70
Using the Advanced Auto Volume
function ..................................................70
Using Multi-zone Features
What you can do with the Multi-zone
function ..................................................71
Making a multi-zone connection ................71
Setting the speakers in zone 2 ....................73
Switching the zone setting of the remote
control ....................................................73
Operating the receiver from another zone
(ZONE 2/ZONE 3 operations) ..............74
Using Other Features
Using “BRAVIA” Sync features ................76
Switching the monitors that output the HDMI
video signals ..........................................78
Outputting the HDMI signals even when the
receiver is in standby mode
(Pass Through) ......................................79
Switching between digital and analog
audio ......................................................80
Using other video/audio input jacks ...........80
Operating the receiver using
a smartphone ..........................................83
Saving various settings for the receiver and
recalling those settings all at one time
(Easy Automation) ................................83
Using the sleep timer ..................................86
Recording using the receiver ......................86
continued
GB
7

Switching the command mode of the receiver
and the remote control ...........................87
Using a bi-amplifier connection .................89
Adjusting Settings
Using the setting menu ...............................90
Easy Setup ..................................................93
Speaker Settings .........................................93
Audio Settings ............................................99
Video Settings ...........................................101
HDMI Settings ..........................................104
Input Settings ............................................106
Network Settings ......................................107
Internet Services Settings .........................107
Zone Settings ............................................108
System Settings ........................................110
Network Update ........................................111
Operating without using the GUI .............111
Using the Remote Control
Operating each equipment using the remote
control ..................................................119
Turning off all connected equipment
(SYSTEM STANDBY) .......................120
Programming the remote control ..............120
Performing several commands in sequence
automatically (Macro Play) .................124
Setting remote control codes that are not
stored in the remote control .................125
Clearing the memory of the multifunction
remote control ......................................127
Additional Information
Precautions ...............................................129
Troubleshooting ........................................130
Specifications ............................................142
Index .........................................................146
GB
8
Description and location of parts
Front panel
To remove the cover
Press PUSH.
When you remove the cover, keep it out of
reach from children.
A ?/1 ON/STANDBY
Press to turn the receiver on or off. When
the power is on, the lamp above the button
lights up in green. If “Control for HDMI”
(page 105), “Pass Through” (page 105),
or “Network Standby” (page 107) is set to
“On,” or the power for zone 2 or zone 3 is
turned on, the lamp above the button
lights up in amber when in the standby
mode.
B SPEAKERS (A/B/A+B/OFF)
(page 49)
C SOUND OPTIMIZER (page 69)
To open the cover
Slide the cover to the left.
D MEMORY/ENTER, TUNING MODE,
TUNING (page 61)
E Remote sensor
Receives signals from remote control.
F 2CH/A.DIRECT, A.F.D., MOVIE/
HD-D.C.S., MUSIC (page 64, 65, 65,
67)
G Display window (page 11)
H DIMMER
Press repeatedly to adjust brightness of
the display window.
I DISPLAY MODE (page 118)
J INPUT MODE (page 80)
continued
9
GB

K HD-D.C.S. lamp, BERLIN
PHILHARMONIC HALL lamp, TRUE
CONCERT MAPPING lamp
(page 65)
L EASY AUTOMATION 1, 2 (page 83)
M HDMI OUT (A/B/A+B/OFF)
(page 78)
N PHONES jack
Connects to headphones.
O TONE MODE, TONE
Press TONE MODE repeatedly to select
BASS or TREBLE, then turn TONE to
adjust the bass/treble level of speakers.
P AUTO CAL MIC jack (page 93)
Connect the supplied optimizer
microphone for “Auto Calibration” to the
this jack.
Q iPhone/iPod ( (USB) port and
VIDEO IN jack) (page 54, 55, 59)
R VIDEO 2 IN jacks (page 35)
S MULTI CHANNEL DECODING lamp
Lights up when multi-channel audio
signals are decoded.
T ZONE SELECT, POWER (page 71)
Press SELECT repeatedly to select zone
2, zone 3 or main zone. Each time you
press POWER, the output signals for the
selected zone will be turned on or off.
U INPUT SELECTOR
Turn to select the input source to play
back.
To select the input source for zone 2 or
zone 3, press ZONE SELECT (w;) to
select zone 2 or zone 3 first (“ZONE 2
[input name]” or “ZONE 3 [input name]”
appears on the display window), then turn
INPUT SELECTOR to select the input
source.
V HDMI IN 6 (VIDEO 2) jack (page 36)
W MASTER VOLUME (page 53)
10
GB
Indicators on the display
A SW
Lights up when subwoofer(s) is (are)
connected and the audio signal is output
from the PRE OUT SUBWOOFER
jack(s).
B Playback channel indicator
The letters (L, C, R, etc.) indicate the
channels being decoded. Based on the
speaker settings, the boxed letter(s) vary
to show how the receiver downmixes or
upmixes the source sound.
L
Front Left
R
Front Right
C
Center (monaural)
LH
Left High
RH
Right High
SL
Surround Left
SR
Surround Right
S
Surround (monaural or the surround
equipment obtained by Pro Logic
processing)
SBL
Surround Back Left
SBR
Surround Back Right
SB
Surround Back (the surround back
equipment obtained by 6.1 channel
decoding)
Example:
Recording format: 5.1
Speaker pattern: 3/0.1
Sound Field: A.F.D. Auto
C INPUT indicator
Lights up to indicate the current input.
AUTO
The INPUT MODE is set to “AUTO.”
HDMI
COAX
OPT
MULTI (MULTI CHANNEL INPUT)
ARC (page 80)
D HDMI OUT A + B (page 78)
E SLEEP (page 86)
F MEM
Lights up when the preset memory
function is activated.
continued
11
GB

G ZONE 2/ZONE 3 (page 71)
H L.F.E.
Lights up when the disc being played
back contains an L.F.E. (Low Frequency
Effects) channel. The L.F.E. channel
signal is actually being reproduced, the
bars underneath the letters light up to
indicate the level. Since the L.F.E. signal
is not recorded in all parts of the input
signal, the bar indication will fluctuate
(and may turn off) during playback.
I Speaker system indicator
(page 49)
J BI-AMP (page 89)
K D.C.A.C. (page 93)
Lights up when the measurement results
of the “Auto Calibration” function are
applied.
L D.L.L. (page 99)
M H.A.T.S. (page 105)
N Tuning indicator
Lights up when the receiver tunes to a
radio station.
ST
Stereo reception
MONO
FM mode is set to the monaural mode.
RDS (page 62)
PRESET
The tuning mode is set to the preset mode.
O VOLUME
Displays the current volume.
P D.RANGE
Lights up when dynamic range
compression is activated.
Q Dolby Digital Surround indicator
Lights up with one of the respective
indicators when the receiver is decoding
the corresponding Dolby Digital format
signals.
;D
Dolby Digital
;D+
Dolby Digital Plus
;D EX
Dolby Digital Surround EX
R DTS-HD indicator
Lights up when the receiver is decoding
DTS-HD.
DTS-HD
Lights up constantly with the one of the
following indicators.
MSTR
DTS-HD Master Audio
HI RES
DTS-HD High Resolution Audio
S ;TrueHD
Lights up when the receiver is decoding
Dolby TrueHD.
T Dolby Pro Logic indicator
Lights up with one of the respective
indicators when the receiver performs
Dolby Pro Logic processing. This matrix
surround decoding technology can
enhance input signals.
;PL
Dolby Pro Logic
;PLII
Dolby Pro Logic II
;PLIIx
Dolby Pro Logic IIx
;PLIIz
Dolby Pro Logic IIz
U A.P.M. (page 95)
Lights up when the A.P.M. (Automatic
Phase Matching) function is activated.
V EQ
Lights up when the equalizer is activated.
W L-PCM
Lights up when Linear PCM (Pulse Code
Modulation) signals are input.
X DSD
Lights up when the receiver is receiving
DSD (Direct Stream Digital) signals.
Y DTS(-ES) indicator
Lights up when DTS or DTS-ES signals
are input.
12
GB

DTS
Lights up when the receiver is decoding
DTS signals.
DTS-ES
Lights up with the either following
indicator, depending on the input signal
decoding format.
96/24
DTS 96/24 (96 kHz/24 bit) decoding
DISC
DTS-ES Discrete 6.1
MTX
DTS-ES Matrix 6.1
Z NEO:X
Lights up when DTS Neo:X Cinema/
Music/Game decoding is activated.
13
GB

Rear panel
A (USB) port (page 40)
B RS232C port
Used for maintenance and service.
C DIGITAL INPUT/OUTPUT section
OPTICAL IN/OUT jacks
(page 26, 30, 32, 41)
COAXIAL IN jacks
(page 29, 37)
HDMI IN/OUT* jacks
(page 26, 28, 30, 32)
D LAN ports (switching hubs)
(page 45)
E VIDEO/AUDIO INPUT/OUTPUT
section (page 26, 29, 30, 32, 34)
AUDIO IN/OUT jacks
VIDEO IN/OUT* jacks
AUDIO OUT jacks
VIDEO OUT jack
(page 71)
F COMPONENT VIDEO INPUT/
OUTPUT section (page 26, 29, 32)
, PR IN/OUT* jacks
Y, P
B
G ANTENNA section
FM ANTENNA jack
(page 42)
AM ANTENNA jack
(page 42)
14
GB
H Control jacks for Sony equipment
and other external equipment
IR REMOTE IN/OUT
jacks (page 71)
Connect an IR repeater (not supplied) to
use the Multi-zone function.
TRIGGER OUT jacks
(page 109)
Connect to interlock on/off of the power
supply of other 12V TRIGGER compliant
equipment, or the amplifier/receiver of
zone 2 or zone 3.
I AUDIO INPUT/OUTPUT section
AUDIO IN/OUT jacks
(page 37, 41, 43)
MULTI CHANNEL INPUT
jacks (page 29, 37)
PRE OUT jacks
Connect to an external power amplifier.
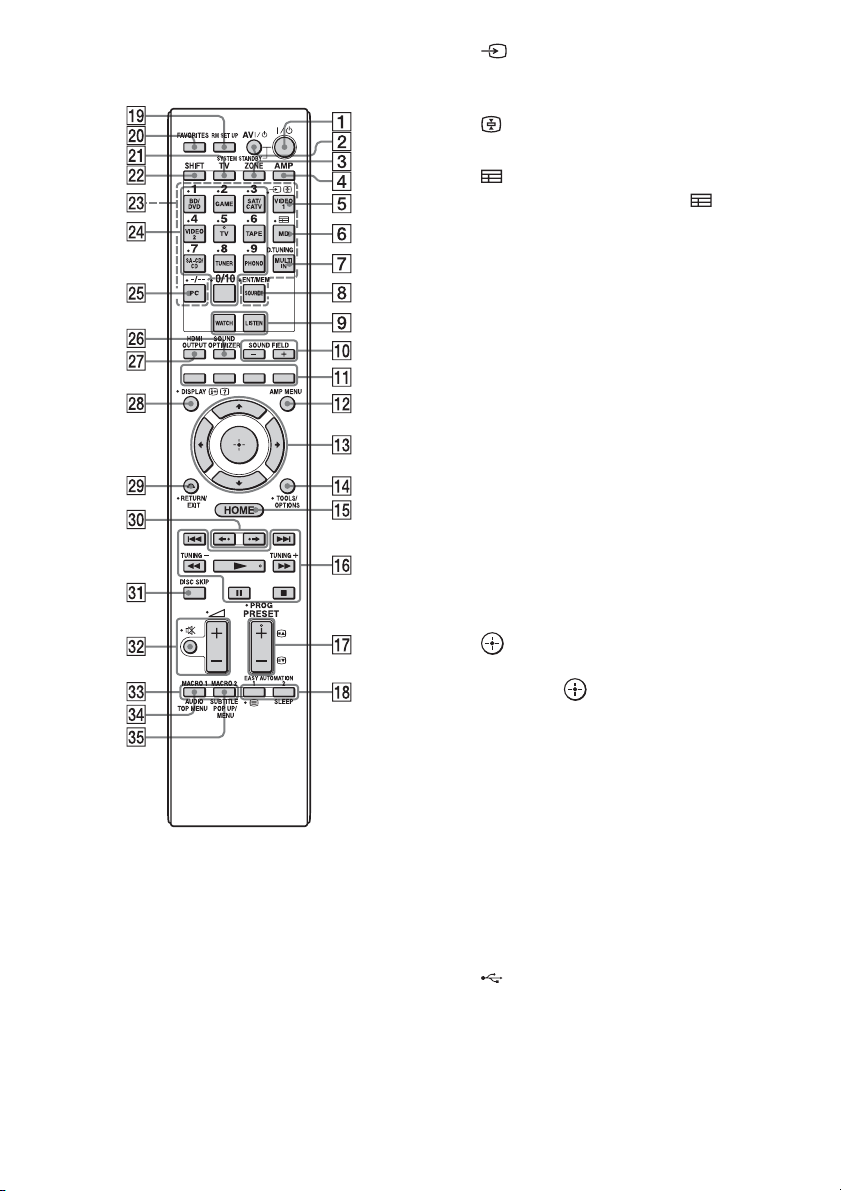
Remote control
Use the supplied remote control to operate this
receiver and other equipment. The remote
control is pre-programmed to operate Sony
video/audio equipment initially.
Note
Do not expose the remote sensor to direct sunlight or
lighting apparatuses. Doing so may cause a
malfunction.
Tip
When the receiver no longer responds to the remote
control, replace all the batteries with new ones.
J SPEAKERS section (page 24)
* You must connect the HDMI OUT or MONITOR
OUT jack to your TV to watch the selected input
image (page 26).
continued
15
GB
Multifunction remote control
(RM-AAL038)
A ?/1 (on/standby)
Press to turn the receiver on or off.
B AV ?/1 (on/standby) (page 120)
Press to turn on or off the video/audio
equipment that the remote is assigned to
operate.
C ZONE (page 71)
D AMP
Press to enable the receiver operation for
main zone.
E (Input select)
Press TV (wa), then press to select the
input signal (TV or video).
(Text hold)
In text mode: Holds the current page.
F (Guide)
Press SHIFT (ws), then press (Guide)
to display the on-screen program guide.
G D.TUNING (page 61)
Press SHIFT (ws), then press D.TUNING
to enter direct tuning mode.
H ENT/MEM
Press to enter the value or track using
SHIFT (ws) and the numeric buttons
(wf), or press ENT/MEM, then press the
numeric buttons (wf) to select a preset
number to which a station is stored during
tuner operation.
I WATCH, LISTEN (page 53)
J SOUND FIELD +/– (page 64, 65, 67)
K Color buttons
Work according to the guide on the TV
screen.
L AMP MENU (page 111)
M V/v/B/b
Press V/v/B/b to select the menu items.
Then press to enter the selection.
N TOOLS/OPTIONS (page 51, 58, 63)
Press to display and select items from
option menus.
O HOME (page 51)
Press to display the home menu on the TV
screen.
1)
1)
1)
P m/M
./>
1)
, x
, X
, N
1) 2)
,
Press to operate the DVD player, Blu-ray
Disc Player, CD player, MD deck, tape
deck, equipment connected to the front
(USB) port or to the network, or
Internet video, etc.
TUNING +/–
Press to select station.
16
GB

Q PRESET + 2)/–
Press to select preset stations.
PROG +
2)
/–
Press TV (wa), then press PROG +/– to
operate the TV, satellite tuner, etc.
2)
c
/C
In text mode: Selects the next or previous
page.
R EASY AUTOMATION 1, 2 (page 83)
/ (Text)
Press TV (wa), then press / (Text) to
display text information.
SLEEP (page 86)
S RM SET UP (page 87)
T FAVORITES (page 57)
U TV
Press to change the remote control button
function to the one printed in yellow to
enable the TV operation.
V SHIFT
Press to change the remote control button
function to the one printed in pink.
W Input buttons
Press one of the buttons to select the
equipment you want to use. When you
press any of the input buttons, the receiver
turns on.
X Numeric buttons
Press SHIFT (ws), then press to input
numbers.
Press TV (wa), then press to select
channel numbers of the TV.
Y -/--
Press SHIFT (ws), then press -/-- to
– select track numbers over 10 of the CD
player, DVD player, Blu-ray Disc
Player, or MD deck.
– select channel numbers over 10 of the
TV, Satellite tuner or the VCR.
Z SOUND OPTIMIZER (page 69)
wj HDMI OUTPUT (page 78)
wk DISPLAY
Press to display the control panel on the
TV screen when playing back content via
Internet video or a home network.
, (Info, Text reveal)
Displays information such as current
channel number and screen mode.
In text mode: Reveals hidden information
(e.g., answers to a quiz).
wl RETURN/EXIT O
Press to return to the previous menu or
exit the menu.
e; B·/·b
Briefly replay or fast forward the current
scenes.
ea DISC SKIP
Press to skip a disc when using a multidisc changer.
es (Volume) +/– (page 53)
(Muting) (page 53)
After pressing TV (wa), you can also
adjust and mute the volume level of the
TV using these buttons.
ed MACRO 1, MACRO 2 (page 124)
ef TOP MENU
Opens or closes the BD-ROM’s or DVD’s
Top Menu.
AUDIO
Press SHIFT (ws), then press AUDIO to
select audio format/track.
eg POP UP/MENU
Opens or closes the BD-ROM’s Pop-up
Menu, or the DVD’s menu.
SUBTITLE
Press SHIFT (ws), then press SUBTITLE
to select the subtitle language when
multilingual subtitles are recorded on a
BD-ROM/DVD VIDEO.
1)
See the table on page 119 for information on the
buttons that you can use to control each
equipment.
2)
The tactile dot is attached to these buttons (5/TV,
N, PRESET +/PROG +, c). Use as a mark of
operation.
continued
17
GB
Note
The above explanation is intended to serve as
examples.
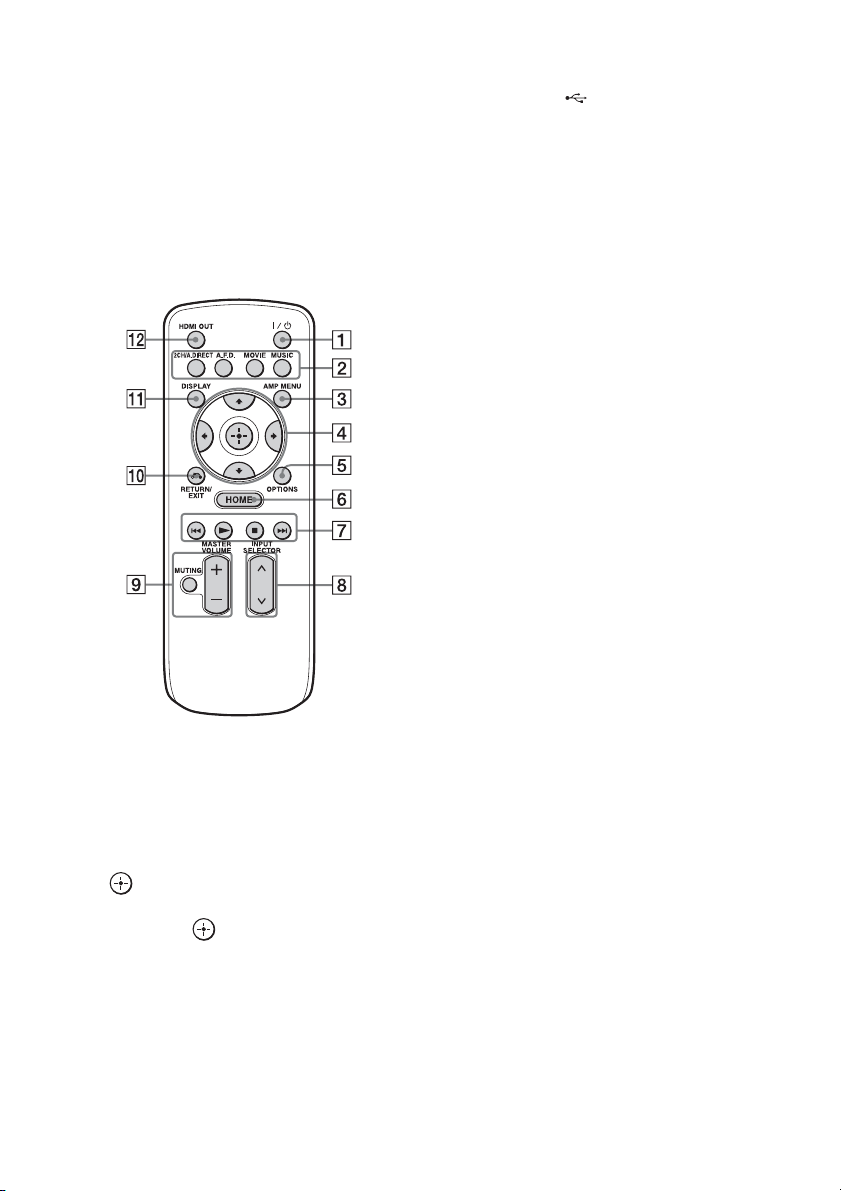
Simple remote control
(RM-AAU124)
This remote control can only be used to
operate the receiver. You can control the main
functions of the receiver with simple
operations using this remote control.
G N, x, ./>
Press to operate the equipment connected
to the front (USB) port or to the
network, or Internet video, etc.
H INPUT SELECTOR
I MASTER VOLUME +/– (page 53)
MUTING (page 53)
J RETURN/EXIT O (page 51)
K DISPLAY
Press to display the control panel on the
TV screen when playing back content via
Internet video or a home network.
L HDMI OUT (page 78)
A ?/1 (on/standby)
Press to turn a receiver on or off.
B 2CH/A.DIRECT, A.F.D., MOVIE,
MUSIC (page 64, 65, 67)
C AMP MENU (page 111)
D V/v/B/b
Press V/v/B/b to select the menu item.
Then press to enter/confirm the
selection.
E OPTIONS (page 51, 58, 63)
F HOME (page 51)
GB
18

Getting Started
Read the following before you connect any equipment
Before connecting cords, make sure to disconnect the AC power cord (mains lead).
Installing Speakers
See “1: Installing speakers” (page 22).
v
Connecting the monitor and video
equipment
The image quality depends on the connecting jack. See the
illustration on the right. Select the connection according
to the jacks on your equipment.
The receiver has a video conversion function. For details,
see “Function for conversion of video signals” (page 20).
Q: Does your monitor have an HDMI jack?
t No: See the connection for a TV monitor without an HDMI jack in “2: Connecting the monitor” (page 26)
and “3: Connecting the video equipment” (page 28).
t Yes : See the connection for a TV monitor with an HDMI jack in “2: Connecting the monitor” (page 26) and
“3: Connecting the video equipment” (page 28).
Digital Analog
High quality image
v
Connecting the audio equipment
See “4: Connecting the audio equipment” (page 37).
Getting Started
v
Preparing the receiver and the remote control
See “6: Preparing the receiver and the remote control” (page 46).
v
Setting the receiver
See “7: Setting up the receiver using the Easy Setup” (page 48).
v
Setting the audio output settings on the connected equipment
See “8: Setting up connected equipment” (page 50).
For details on a multi-zone connection, see page 71.
For details on a bi-amplifier connection, see page 89.
19
GB
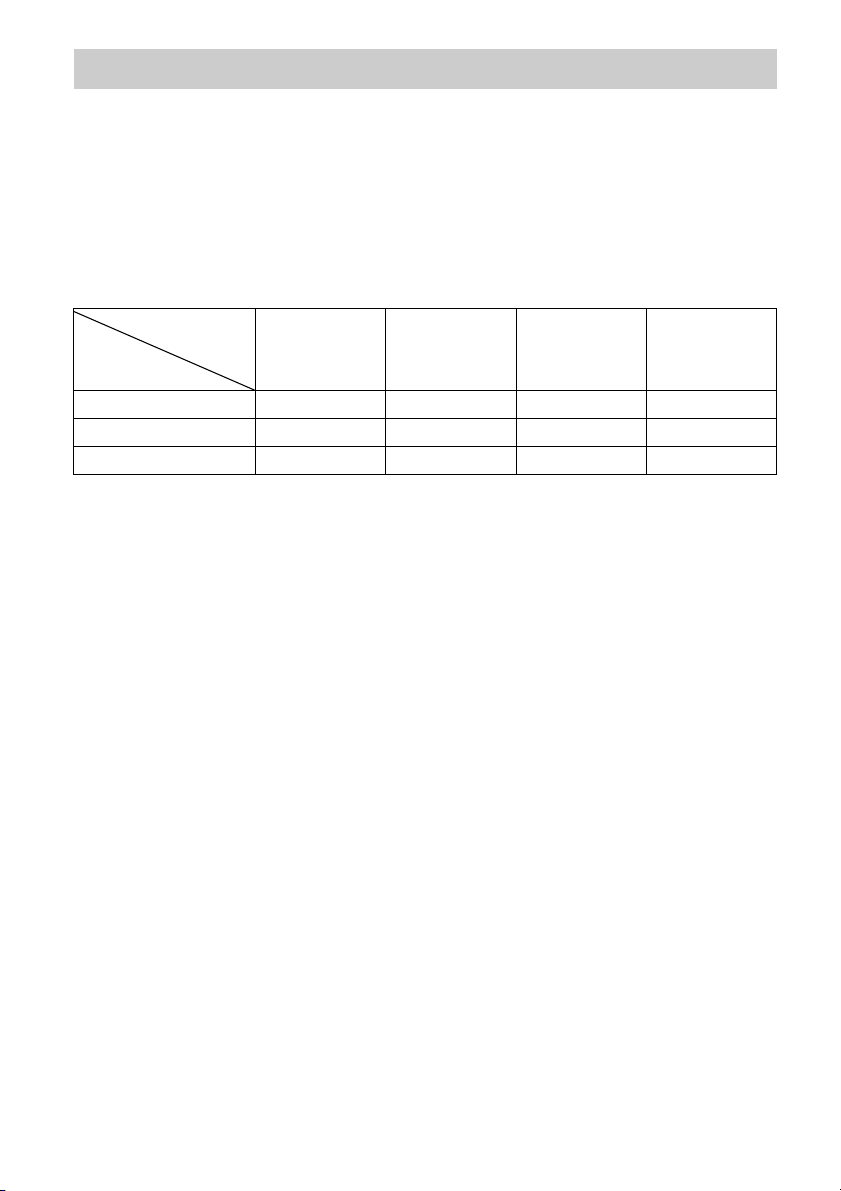
Function for conversion of video signals
This receiver is equipped with a function for converting video signals.
• Composite video signals can be output as HDMI video and component video signals.
• Component video signals can be output as HDMI video and video signals.
As the factory default setting, video signals input from the connected equipment are output to the
HDMI OUT or MONITOR OUT jacks as shown in the table below.
We recommend you set the video conversion function to match the resolution of the monitor you
are using.
For details on the video converting function, see “Video Settings” (page 101).
OUTPUT jack
HDMI OUT A/B
INPUT jack
HDMI IN a –––
VIDEO IN aa* a* a
COMPONENT VIDEO IN aa* a* –
a : Video signals are output.
– : Video signals are not output.
* Video signals may not be output, depending on the setting in “Resolution” (page 101).
(up to 1080p)
Note on converting video
signals
Video signals for which the resolution has
been converted may not be output from the
COMPONENT VIDEO MONITOR OUT
jacks or the HDMI OUT jacks simultaneously.
If you connect equipment to both the
COMPONENT VIDEO MONITOR OUT
jacks and the HDMI OUT jacks, priority is
given to the output from the HDMI OUT jacks.
COMPONENT
VIDEO MONITOR
OUT
(up to 1080i)
MONITOR VIDEO
OUT
To connect a recording
equipment
When recording, connect the recording
equipment to the VIDEO OUT jacks of the
receiver. Connect cords for input and output
signals to the same type of jack, as VIDEO
OUT jacks do not have an up-conversion
function.
The HDMI OUT and the MONITOR OUT
jacks cannot be used for recording.
VIDEO 1 OUT
To display Closed Caption
Set “Resolution” to “Direct” in the Video
Settings menu when receiving a signal that
supports Closed Captions.
Use the same kind of cords for the input/output
signals.
20
GB
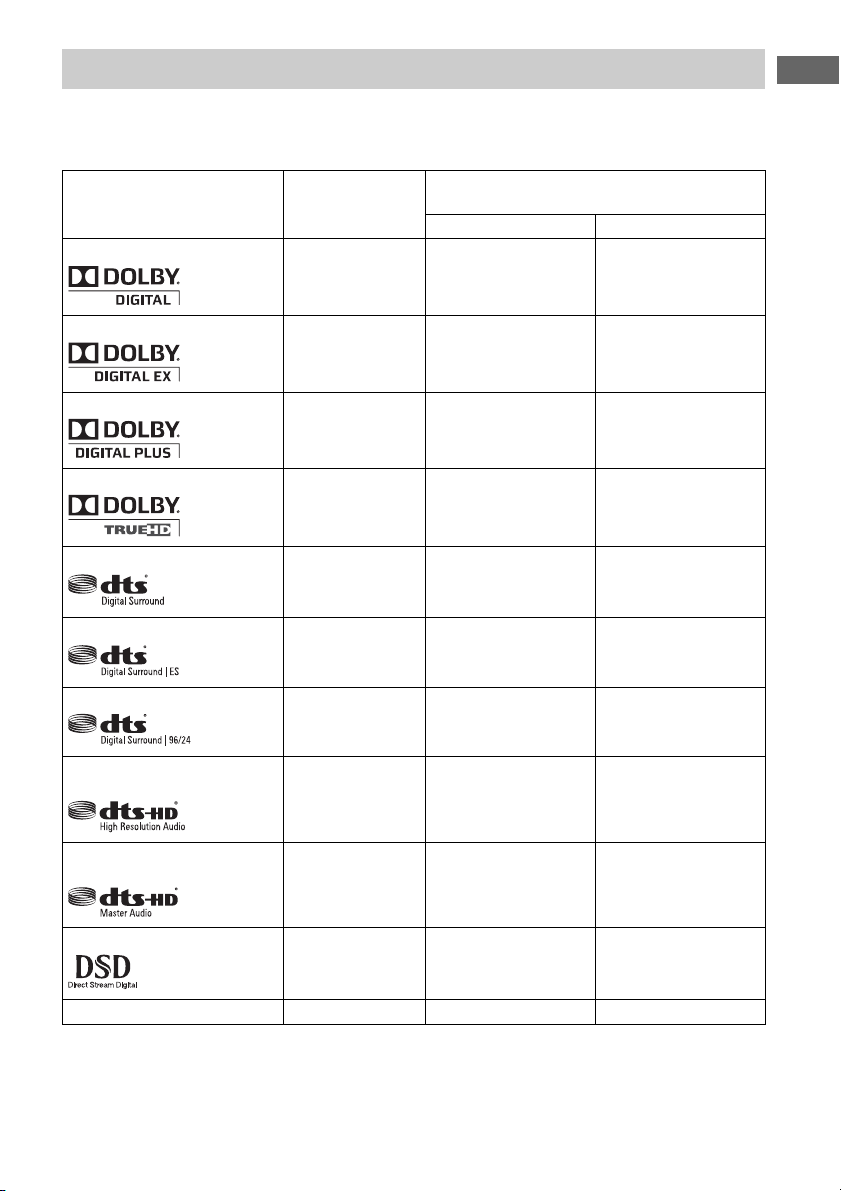
Digital audio formats supported by the receiver
Digital audio formats that this receiver can decode depend on digital audio input jacks of the
equipment connected.
This receiver supports the following audio formats.
Connection between the playback
equipment and the receiver
COAXIAL/OPTICAL HDMI
aa
aa
× a
× a
aa
aa
Audio format
Dolby Digital
Dolby Digital EX
Dolby Digital Plus*
Dolby TrueHD*
DTS
DTS-ES
Maximum number
of channels
5.1ch
6.1ch
7.1ch
7.1ch
5.1ch
6.1ch
Getting Started
DTS 96/24
5.1ch
aa
DTS-HD
High Resolution Audio*
7.1ch
× a
DTS-HD
Master Audio*
7.1ch
× a
DSD*
Multi-Channel Linear PCM*
5.1ch
7.1ch
× a
× a
* Audio signals are output in another format if the playback equipment does not correspond to the format. For
details, refer to the operating instructions of the playback equipment.
21
GB
1: Installing speakers
This receiver allows you to use up to a 9.1
channel system (9 speakers and one
subwoofer).
Examples of speaker system
configuration
9.1 channel speaker system
You can enjoy high-quality multi-channel
surround sound maximally just you would in
an ideal dubbing theater.
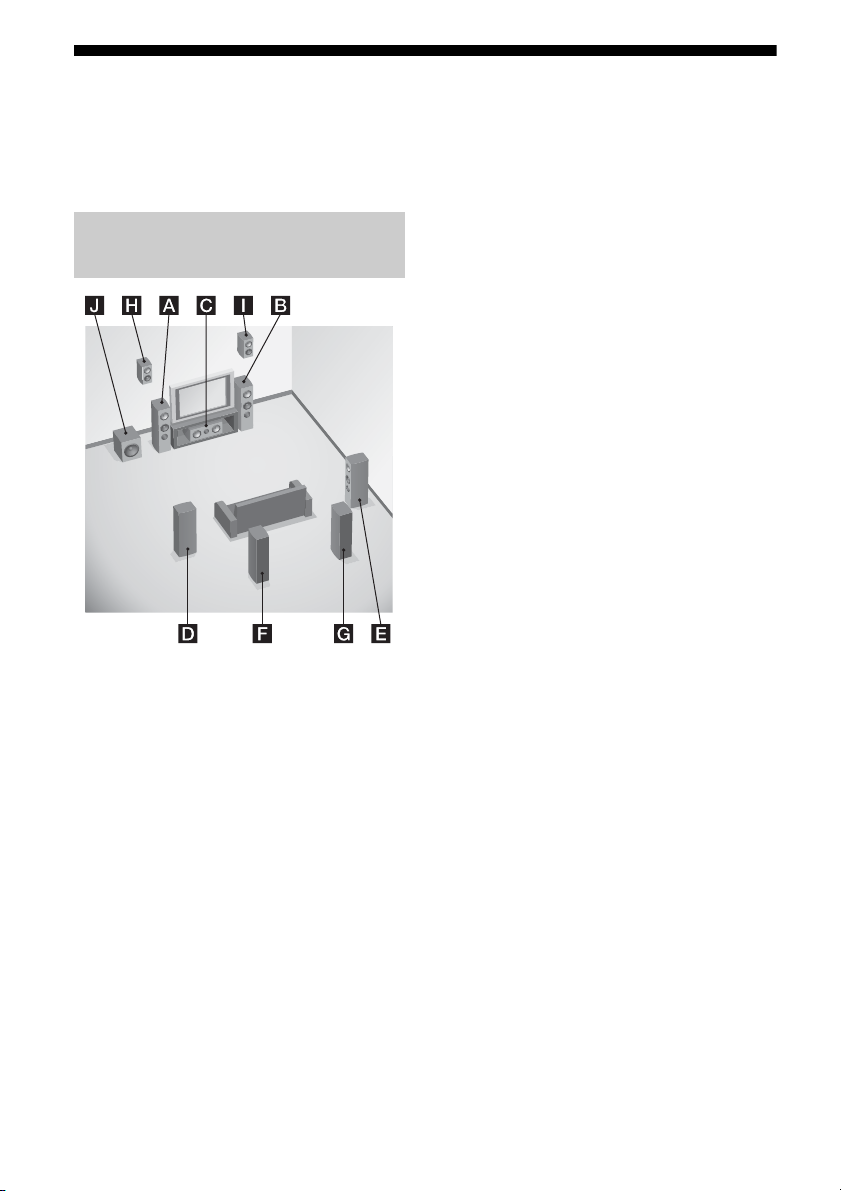
AFront left speaker
BFront right speaker
CCenter speaker
DSurround left speaker
ESurround right speaker
FSurround back left speaker
GSurround back right speaker
HLeft high speaker
IRight high speaker
JSubwoofer
7.1 channel speaker system
using surround back speakers
You can enjoy high fidelity reproduction of
DVD or Blu-ray Disc software recorded sound
in 6.1 channel or 7.1 channel format.
AFront left speaker
BFront right speaker
CCenter speaker
DSurround left speaker
ESurround right speaker
FSurround back left speaker
GSurround back right speaker
JSubwoofer
7.1 channel speaker system
using front high speakers
You can enjoy vertical sound effects (e.g., Pro
Logic IIz mode, Neo:X mode).
AFront left speaker
BFront right speaker
CCenter speaker
DSurround left speaker
ESurround right speaker
HLeft high speaker
IRight high speaker
JSubwoofer
5.1 channel speaker system
To fully enjoy theater-like multi-channel
surround sound requires five speakers (two
front speakers, a center speaker, and two
surround speakers) and a subwoofer (5.1
channel system).
AFront left speaker
BFront right speaker
CCenter speaker
DSurround left speaker
ESurround right speaker
JSubwoofer
22
GB
Recommended speaker
placement
7.1 channel speaker system
• The angle A shown in the illustration
should be the same.
• If you cannot place the speakers at the
optimum angle, separate the surround
speakers and the surround back speakers
adequately and arrange them as
symmetrically as possible.
• You can calibrate speaker positioning using
“Speaker Relocation” even if you cannot
place the speakers at the optimum angle
(page 95). Arrange each pair of the surround
speakers and the surround back speakers
spread further back than 90 degrees to
operate “Speaker Relocation” effectively.
• Install the front high speakers at a position as
near as possible to the wall in front of the
seating position and behind the speakers.
The position should be at an angle of 25 to
30 degrees and at a height of 180 to 200 cm
(190 cm is recommended). When you use a
screen, arrange them slightly to the side of
each end of the screen.
6.1 channel speaker system
• Place the surround back speaker behind the
seating position.
Tip
Since the subwoofer does not emit highly directional
signals, you can place it wherever you want.
Getting Started
23
GB
Connecting speakers
Before connecting cords, make sure to disconnect the AC power cord (mains lead).
AB
A Monaural audio cord (not supplied)
B Speaker cords (not supplied)
AFront speaker A (L)
BFront speaker A (R)
CCenter speaker
DSurround speaker (L)
ESurround speaker (R)
FSurround back speaker (L)
GSurround back speaker (R)
HFront high speaker (L)
IFront high speaker (R)
JSubwoofer
5)
B
BB
B
1)
If you have an additional front speaker
system, connect them to the FRONT B/
FRONT HIGH terminals. You can select the
front speaker system you are using with
SPEAKERS on the front panel (page 9).
2)
If you connect only one surround back
speaker, connect it to the SURROUND
2) 4)
2) 4)
3) 4)
3) 4)
BACK (ZONE 2) L terminals.
3)
If you use front high speakers, connect them
to the FRONT B/FRONT HIGH terminals.
4)
You can connect both the surround back
speakers and the front high speakers.
However, sound cannot be output from the
FRONT B/FRONT
HIGH terminals
surround back speakers and the front high
speakers simultaneously.
1)
24
GB
You can set whether or not to output sound
from the front high speakers using “Sound
Field Mode” (page 68). However, “Sound
Field Mode” may not work, depending on
the sound field setting or input signals.
5)
When you connect a subwoofer with an auto
standby function, turn off the function when
watching movies. If the auto standby
function of the subwoofer is set to on, it goes
into standby automatically based on the level
of the input signal to the subwoofer, and the
sound may not be output.
You can connect two subwoofers to the
receiver. The same signals are output from
each of the PRE OUT SUBWOOFER jacks.
Tip
You can loosen or tighten the SPEAKERS terminal
easily using the supplied speaker cord connection
tool.
Set “Speaker Connection” in the Speaker
Settings menu (page 96) according to the
speaker system you are using.
Getting Started
Loosen
Tighten
Speaker cord
connection tool
To enable 9.1 channel playback
The receiver can only output up to 7 channels
simultaneously using the speaker terminals.
You can output up to 9 channels
simultaneously by connecting the PRE OUT
SUR BACK jacks or the PRE OUT FRONT
HIGH jacks to a power amplifier.
Power amplifier
Tip
The same signal is output from both the SPEAKERS
terminals and the PRE OUT jacks. For example, if
you want to connect just the front speakers to
another amplifier, connect that amplifier to the PRE
OUT FRONT L and R jacks.
ZONE 2 connection
Only if you do not use surround back speakers
and front high speakers, you can assign the
SURROUND BACK (ZONE 2) terminals F
and G to the speakers of the zone 2. Set the
SURROUND BACK (ZONE 2) terminals to
“Zone 2 Speaker” in “Speaker Connection” in
the Speaker Settings menu (page 96).
See “Using Multi-zone Features” (page 71)
for details on connection and operation in
zone 2.
25
GB
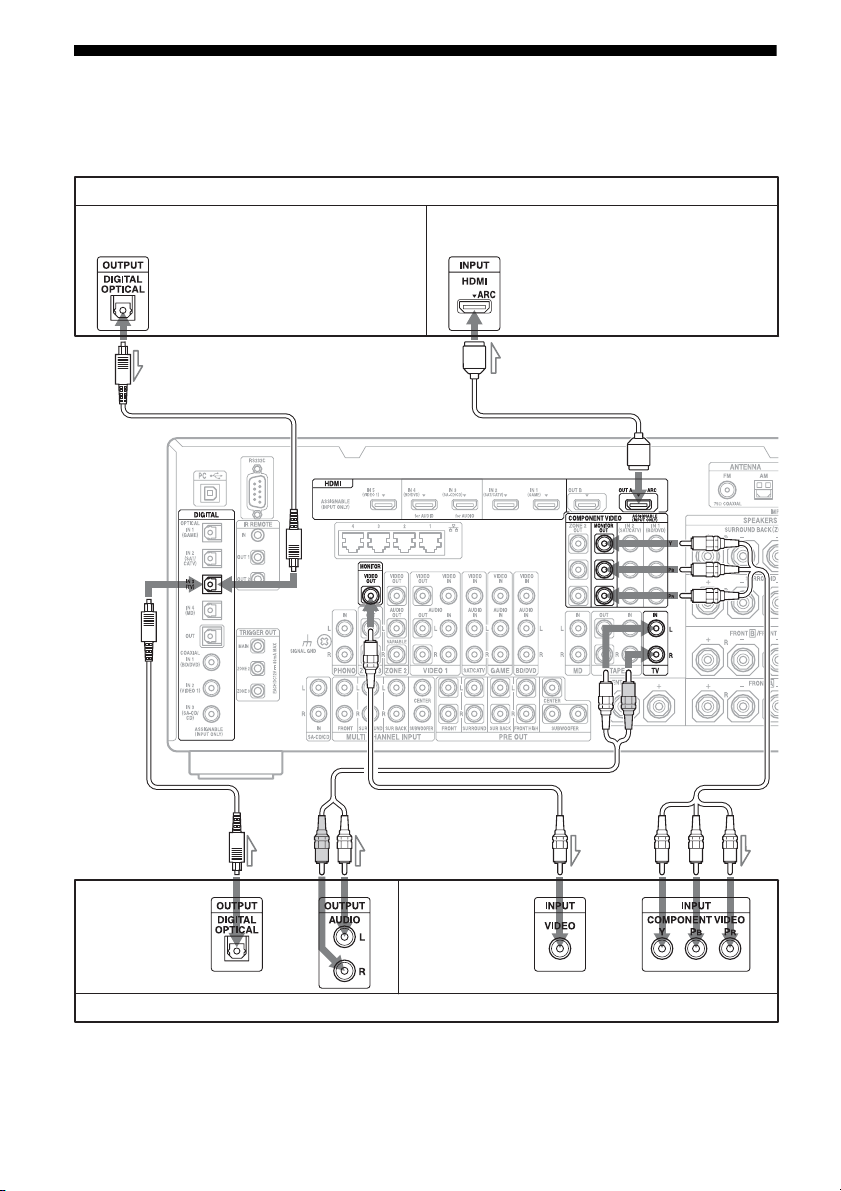
2: Connecting the monitor
You can watch the selected input image when you connect the HDMI OUT or MONITOR OUT
jacks to a TV. You can operate this receiver using a GUI (Graphical User Interface).
TV monitor with an HDMI jack
Audio signals
If you connect the receiver to an Audio
Return Channel (ARC)-compatible TV’s
HDMI jack via an HDMI cable, this
connection is not necessary.
Video signals
If you connect the receiver to an Audio
Return Channel (ARC)-compatible TV,
connect it to an HDMI jack designated by
“ARC” on the TV.
A
AB
Audio signals Video signals
or or
E
CD
TV monitor without an HDMI jack
It is not necessary to connect all the cords. Connect cords according to the jacks of your equipment.
GB
26

A Optical digital cord (not supplied)
B Audio cord (not supplied)
C Video cord (not supplied)
D Component video cord (not supplied)
E HDMI cable (not supplied)
We recommend that you use a Sony HDMI
cable.
Getting Started
TV type Audio Return Channel
(ARC)
HDMI equipped Compatible* E –
Incompatible EA or B**
Non-HDMI equipped – D or CA or B**
* You can output the TV’s sound (multi-channel surround sound) from the receiver only by connecting the
TV with an HDMI cable.
** If you want to output multi-channel surround sound from the receiver, use A for the audio connection
Required cable (cord)
Video Audio
Notes
• If you connect the TV to the receiver using video
cord, set “Playback Resolution” to “480i/576i”
(page 103).
• When connecting optical digital cords, insert the
plugs straight until they click into place.
• Do not bend or tie optical digital cords.
Tip
The sound of the TV is output from the speakers
connected to the receiver if you connect the audio
output jack of the TV and the TV IN jacks of the
receiver. In this configuration, set the sound output
jack of the TV to “Fixed” if it can be switched
between either “Fixed” or “Variable.”
27
GB
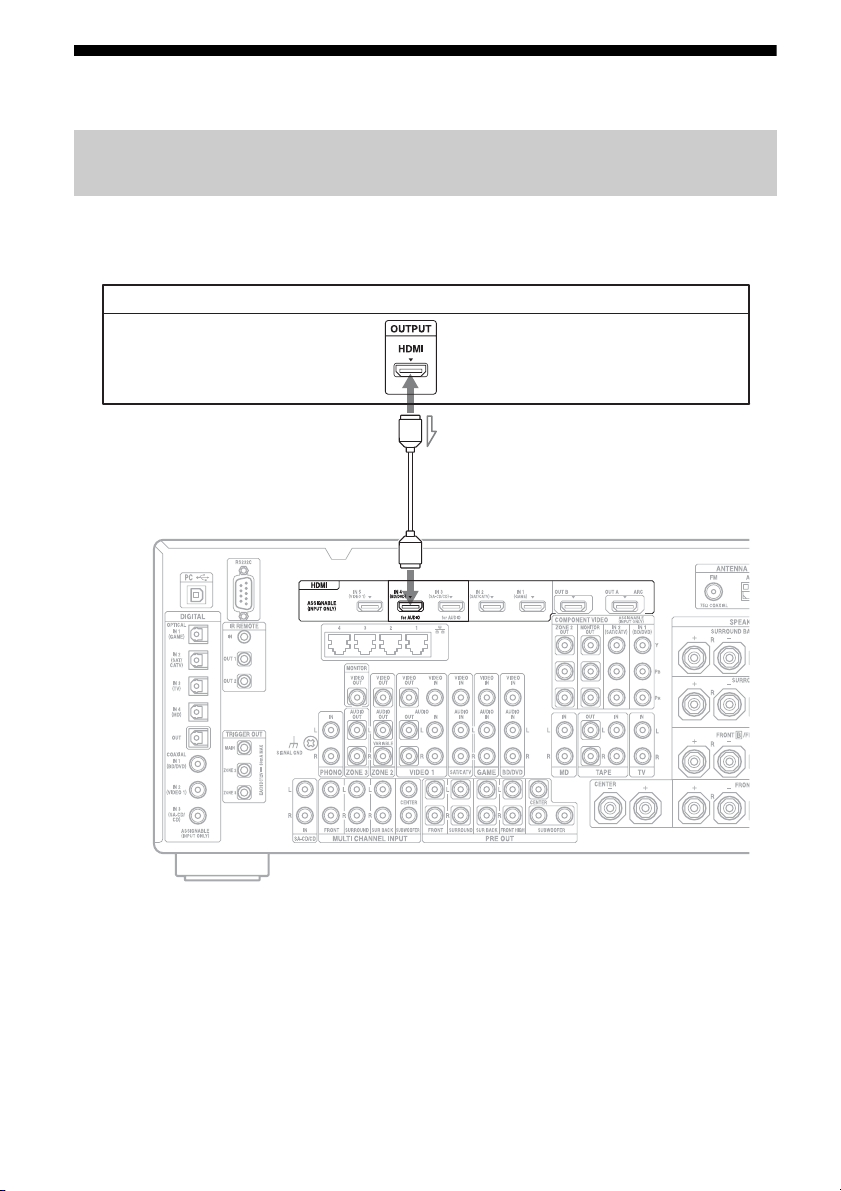
3: Connecting the video equipment
Connections required for watching content recorded on a Blu-ray Disc
or DVDs
To connect equipment with HDMI jacks
If your equipment does not have an HDMI jack, see page 29.
DVD player, Blu-ray Disc Player
Video/audio signals
A
*
A HDMI cable (not supplied)
We recommend that you use a Sony HDMI
cable.
* You can connect any equipment with HDMI
output jacks to the HDMI IN jacks of the receiver.
GB
28
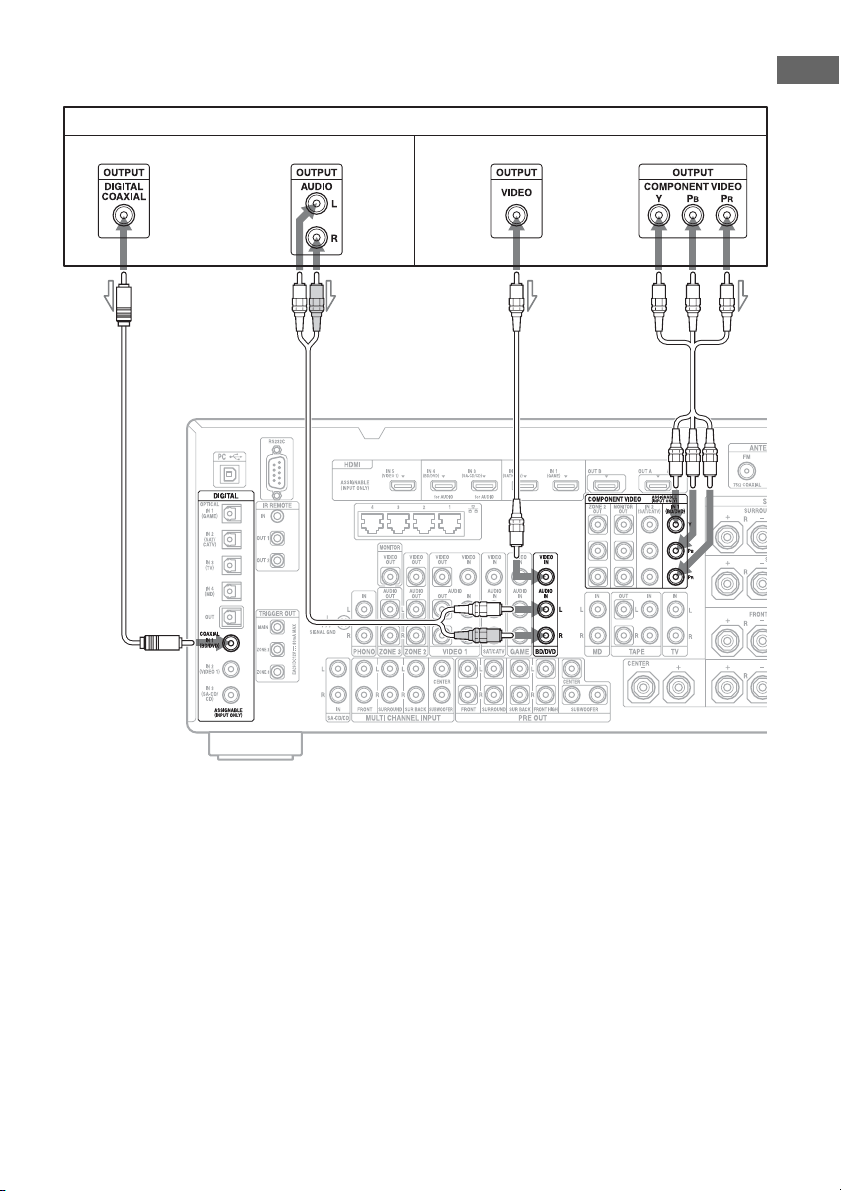
To connect equipment with jacks other than HDMI jacks
It is not necessary to connect all the cords. Connect cords according to the jacks of your equipment.
Blu-ray Disc Player, DVD player
Audio signals Video signals
or or
AB CD
Getting Started
A Coaxial digital cord (not supplied)
B Audio cord (not supplied)
C Video cord (not supplied)
D Component video cord (not supplied)
29
GB
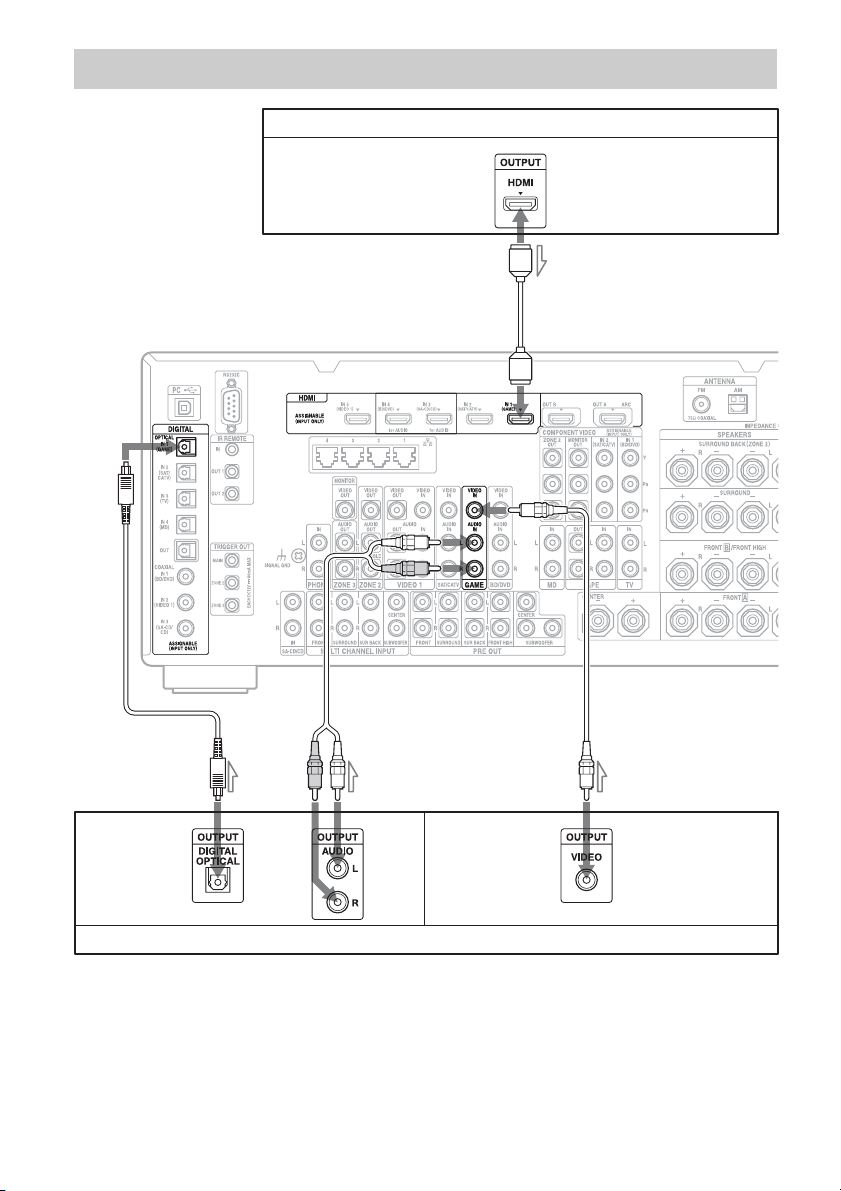
Connections required for playing video games
PlayStation 3 (video game with an HDMI jack)
Video/audio signals
A
BC D
Audio signals Video signals
or
Video game without an HDMI jack
It is not necessary to connect all the cords. Connect cords according to the jacks of your equipment.
GB
30
 Loading...