

Sony SNC-VL10N User Manual

Netw ork Camera
3-619-676-13 (1)
User’s Guide
Software Version 1.4
SNC-VL10N/VL10P
© 2002 Sony Corporation

Owner's Record
The model and serial numbers are locate d at the bottom.
Record these numbers in the spaces provided below.
Refer to these numbers whenever you call upon your
Sony dealer regarding this product.
Model No. ____________________
Serial No. ____________________
WARNING
To prevent fire or shock hazard, do not
expose the unit to rain or moisture.
For AC Adaptor
T o av oid electrical shock, do not open the
cabinet. Refer servicing to qualified
personnel only.
Important
Nameplate is located on the bottom.
For customers in the U.S.A.
This equipment has been tested and found to comply
with the limits for a Class B digital device, pursuant to
Part 15 of the FCC Rules. These limits are designed to
provide reasonable protection against harmful
interference in a residential installat ion. This equipment
generates, uses, and can radiate radio frequency energy
and, if not installed and used in accordance with the
instructions, may cause harmful interference to radio
communications. However, there is no guarantee that
interference will not occur in a particular install ation. If
this equipment does cause h armful int erference to radio
or television reception, which can be determined by
turning the equipment of f and on, the user is encourage d
to try to correct the interference by one or more of the
following measures:
– Reorient or relocate the receiving antenna.
– Increase the separation between the equipment and
receiver.
– Connect the equipment into an outlet on a circuit
different from that to which the receiver is connected.
– Consult the dealer or an experienced radio/TV
technician for help.
Y o u are cautioned that any c hanges or modif ications not
expressly approved in this manual could void your
authority to operat e t his equipment.
If you have any questions about this product, you may
call:
Sony's Business Information Center (BIC) at
1-800-686-SONY (7669)
or Write to: Sony Customer Information Services
Center
6900-29, Daniels Parkway, PMB 330
Fort Myers, Florida 33912
Declaration of Conformity
Trade Name: SONY
Model: SNC-VL10N
SNC-VL10P
Responsible Party: Sony Electronics Inc.
Address: 680 Kinderkamack Road,
Oradell, NJ 07649 U.S.A.
Telephone Number:201-930-6972
This device complies with part 15 of the FCC Rules.
Operation is subject to the following two conditions:
(1) this device may not cause harmful interference,
and
(2)this device must accept any interference received,
including interference that may cause undesired
operation.
Caution for U.S.A.
When operating the unit on 48V DC, use a UL listed
power supply evaluated as a limited power source or as
a Class 2 power supply, rated 48V DC, 200 mA min.
Caution f or other countries
When operating the unit on 48V DC, use an EN60950 or
IEC60950 applied power supply evaluated as a limited
power source, rated 48V DC, 200 mA min.
Voor de klanten in Nederland
• Dit apparaat bevat een vast ingebouwde batterij die
niet vervangen hoeft te worden tijdens de levensduur
van het apparaat.
• Raadpleeg uw leverancier indien de batterij toch
vervangen moet worden. De batterij mag alleen
vervangen worden door vakbekwaam
servicepersoneel.
• Gooi de batterij mi et weg maar le v er deze in als klein
chemisch afval (KCA).
• Le ver het apparaat aan het einde v an de lev ensduur in
voor recycling, de batterij zal dan op correcte wijze
verwerket worden.
The shielded interface cable recommended in this
manual must be used with this equipment in order to
comply with the limi ts for a digital device pursuant to
Subpart B of Part 15 of FCC Rules.
2

NOTICE TO USERS
© 2002 Sony Corporation. All rights reserved. This
manual or the software described herein, in whole or in
part, may not be reproduced, translated or reduced to
any machine readable form without prior written
approval from Sony Corp oration .
SONY CORPORATION PROVIDES NO
WARRANTY WITH REGARD TO THIS MANUAL,
THE SOFTWARE OR OTHER INFORMATION
CONTAINED HEREIN AND HEREBY EXPRESSLY
DISCLAIMS ANY IMPLIED WARRANTIES OF
MERCHANTABILITY OR FITNESS FOR ANY
PARTICULAR PURPOSE WITH REGARD TO THIS
MANUAL, THE SOFTWARE OR SUCH OTHER
INFORMATION. IN NO EVENT SHALL SONY
CORPORATION BE LIABLE FOR ANY
INCIDENTAL, CONSEQUENTIAL OR SPECIAL
DAMAGES, WHET H ER BASED ON TORT,
CONTRACT, OR OTHERWISE, ARISING OUT OF
OR IN CONNECTION WITH THIS MANUAL, THE
SOFTWARE OR OTHER INFORMATION
CONTAINED HEREIN OR TH E USE THEREOF.
Sony Corporation reserves the right to make any
modification to t his manual or the information containe d
herein at any time withou t notice.
The software described herein may also be gove rned by
the terms of a separate user license agreement.
CCD IRIS™ is a trademark of Sony Corporation.
Microsoft, Windows, Internet Explorer and MS-DOS
are registered trademarks of Microsoft Corporation in
the United States and/or other countries.
Netscape is a registered trademark of Netscape
Communications Corporation in the U.S. and other
countries.
Java is a trademark of Sun Microsystems, Inc. in the
United States and other countries.
UNIX is a registered trademark of The Open Group in
the US and other countries.
Linux is a registered trademark of Linus Torvalds.
Pentium is a registered trademark of Intel Corporation or
its subsidiaries in the United States and other countries.
All other company and pr oduct names are trademar ks or
registered trademarks of the respective companies or
their respective makers.
3

Table of Contents
Overview
How to Use This Manual ...................................... 5
Precautions .............................................................5
Operating the Camera
Logging In to Homepage — Login Page .............6
Configuration of Main Viewer Page .................... 7
Menu Section ..................................................... 7
Image Control Section ....................................... 8
Monitoring the Image from the Camera ............. 8
About Viewers .................................................... 8
Controlling the Monitor Image from the Image
Control Section ................................................ 9
Controlling the Monitor Image Using the
Menu .............................................................. 10
Controlling the Monitor Image Using the Java
Applet Viewer ................................................ 12
Changing the Access Right — Re-login Page ...12
When You Have Trouble — FAQ Page .............. 12
Lower Half of Sensor I/O Setting Page ............26
Others
Assigning the IP Address to the Camera Using
ARP Commands ...................................................28
Assigning the IP Address .................................28
Confirming the Setup ........................................28
Connecting the Camera to a Network ................29
Connecting to a Local Network (LAN) ............29
Connection Using a Cable Modem ...................29
Connection Using an xDSL Modem ................30
Connection Using a USB Modem ....................30
Connection Using IEEE802.3af Compliant
Power Supply Equipment ...............................31
Administrating the Camera
Logging in as Administrator ..............................13
Configuration of Menu Page .............................. 13
Configuring the System
— System Setting Page ....................................... 14
Setting the User
— User Setting Page ............................................15
Configuring the Network
— Network Setting Page .....................................16
Common Items .................................................16
LAN ................................................................. 17
Cable Modem ...................................................17
xDSL Interface .................................................18
PSTN Interface .................................................18
Setting the Security
— Security Setting Page ..................................... 19
Setting the Camera
— Camera Setting Page ...................................... 20
Sending Images via E-mail at Alarm
— SMTP Setting Page ......................................... 21
Sending Images to FTP Server at Alarm
— FTP Setting Page ............................................ 23
Configuring the Serial Port
— Serial Setting Page ..........................................25
Configuring the Sensor I/O Port
— Sensor I/O Setting Page .................................25
Upper Half of Sensor I/O Setting Page ............ 25
4
Table of Contents

Overview
How to Use This Manual
This manual explains how to operate the SNC-VL10N/
VL10P Network Camera from a client PC.
This manual is written to b e rea d on the computer
display.
As this section gives tips on using this manual, read it
before you operate the camera.
Precautions
Operating or stor ag e loca tion
Avoid operating or storing the camera in the following
locations:
• Extremely hot or cold places (Operating temperature:
-10°C to +50°C [14°F to 122°F])
• Exposed to direct sunlight for a lon g ti me, or cl ose t o
heating equipment (e.g., near heaters)
• Close to sources of strong magnetism
• Close to sources of powerful electromagnetic
radiation, such as radios or TV transmitters
Jumping to the related page
When you read this manual on the computer display,
click on the sentence to jump to the related page.
Software display examples
Note that the displays shown in this manual are
explanatory exampl es. S ome displ ays may be di fferent
from the ones which appear as you operate the
application software.
Printing this man ua l
Depending on your system, certain displays or
illustrations in this manual, when printed out, may differ
from those as portrayed on your screen.
Installation Manual (printed matter)
The supplied Installation Manual describes the names
and functions of parts and controls of the Network
Camera, connecting examples and how to set up the
camera. Be sure to read the Installation Manual before
operating.
Transportation
When transporting the camera, repack it as originally
packed at the factory or in materials of equal quality.
Cleaning
• Use a blower to remove dust from the lens or optical
filter.
• Use a soft, dry cloth to clean the external surfaces of
the camera. Stubborn stains can be removed using a
soft cloth dampened with a small quantity of deter gent
solution, then wipe dry.
• Do not use volatile solvents such as alcohol, benzene
or thinners as they may damage the surface finishes.
About the fan
To prevent internal heat buildup, the camera has a builtin fan. If the frame rate of the camera becomes 1 fps
although the other frame rate value has been set using
the Frame Rate menu on the W eb screen, the built- in fan
may be damaged. In this case, contact your authorized
Sony dealer.
About the MAC address
The MAC address of the camera may change when the
main board has been replaced by the service personnel.
About the software
For the latest software information, contact your
authorized Sony dealer.
How to Use This Manual / Precautio ns
5
Operating the Camera
The Operating the Camera section explains how to
monitor the image from the camera using the Web
browser. F or setting the camera, see “ Administrating the
Camera” on page 13.
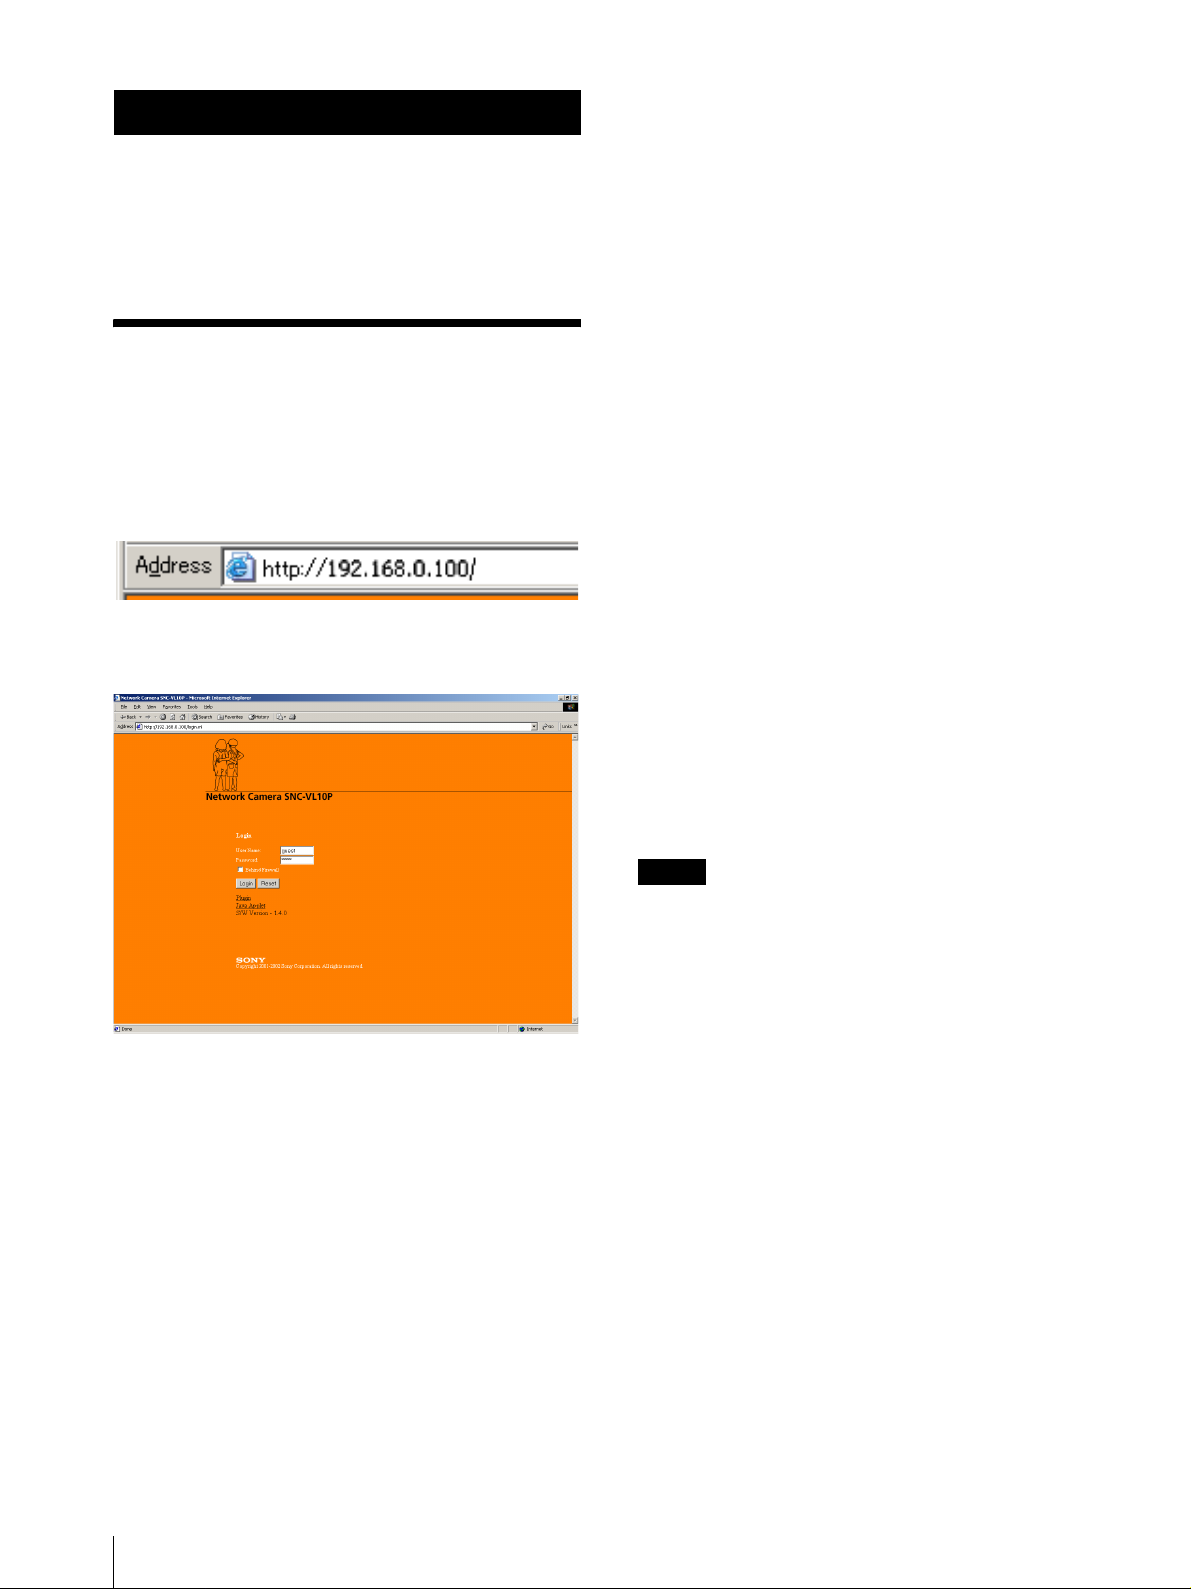
Logging In to Homepage
— Login Page
1
Start the W eb browser on the computer and type the
IP address of the camera you want to monitor.
The Login page of Network Camera SNC-VL10
is displayed.
Other Functions on Login Page
Reset button
Resets to the user name and password before typing.
Behind Firewall check box
If a firewall is on the network where the camera is
installed and you access the camera from outside the
firewall, select this check box. Then the “Firewall
Viewer” opens to a llow you to view the monitor image
of the camera. (The same function is available after you
logged in, by clicking Firewall on the Main Viewer
page.)
Plugin
When you use Netscape Navigator Ver. 4.7 as a Web
browser, click this item to open the “Plugin Download”
page to allow you to download the plugin required for
the Netscape. (The same function is av ai lable after you
logged in, by clicking Plugin on the Main Viewer page.)
For details, see “About Viewers” on page 8.
Java Applet
When you use an OS other than Windows, such as
Macintosh, Linux and UNIX, or Netscape Navigator
Ver. 6.0, click this item to start the Java Applet viewer.
(The same function is available after you logged in, by
clicking Java Applet on the Main Viewer page.)
For details, see “About Viewers” on page 8.
2
Type your user name and password in the User
Name and Password areas.
If you do not know your user name and password,
consult your network administrator.
The user name “guest” and its password are set as
default settings. You can monitor the camera
images with these settings.
3
Click Login.
If you entered the user name and password that are
not for Administrator, the Main Viewer page
appears. (See “Configuration of Main Viewer
Page” on page 7.)
If you entered the user name and password for
Administrator, the Menu page appears. (See
“Configuration of Menu Page” on page 13.)
S/W Version
Displays the camera software version.
Notes
• When you jump to another page, viewer or setting
menu, use the button s on this softw are. The use of the
buttons on the W eb bro wser such as the Back button is
not guaranteed.
• If you are using Netscape Navigator Ver. 4.7 and the
viewer image freezes, click the Reload button on the
Netscape Navigator.
• If you are using a Proxy server, the image may be
distorted or the software may operate incorrectly due
to the use of old data in the cache memory of the P roxy
server.
6
Logging In to Homepage — Login Page
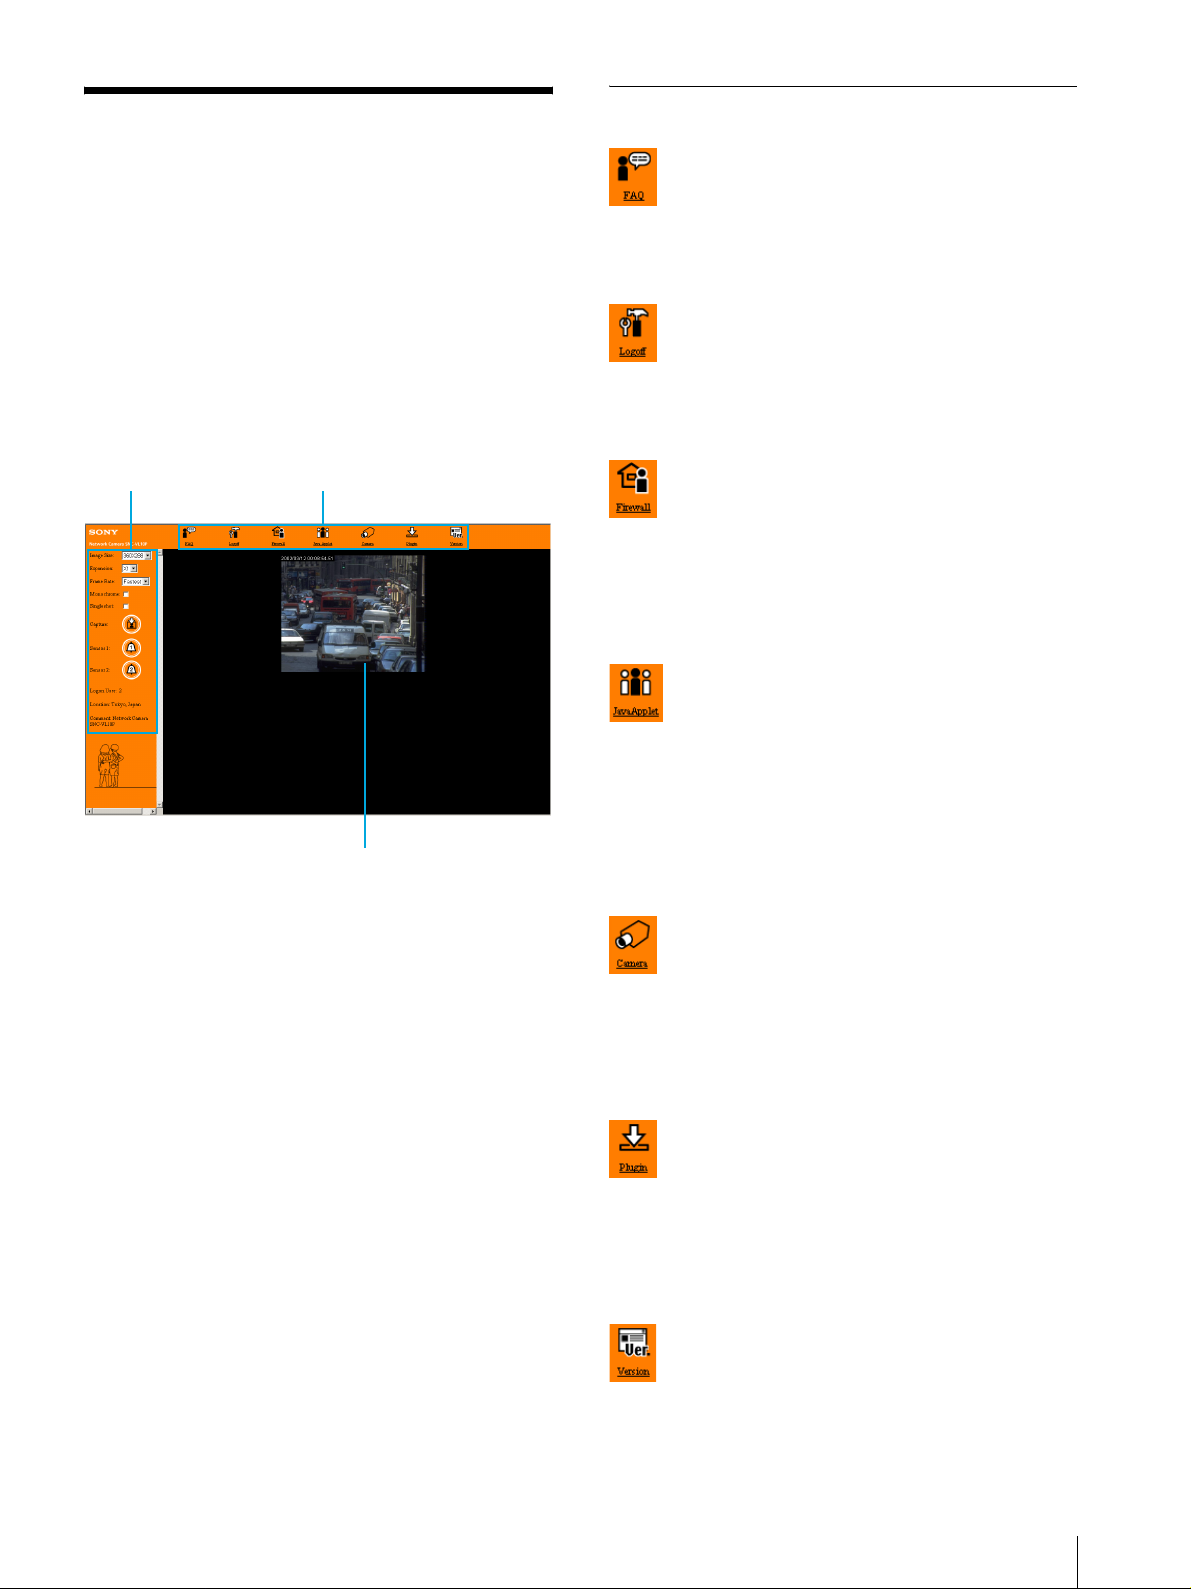
Configuration of Main Viewer Page
When you log in with an access right other than
Administrator, the Main Viewer page is displayed.
When you log in as Administrator, select Home on the
Menu page ( page 13) to display the Main Viewer page.
This section briefly explains the functions of the parts
and controls on the Main Viewer page. For a detailed
explanation on each part or control, see the specified
pages.
Main Viewer page
Menu Section
FAQ
Displays the FAQ page.
See “When You Have Trouble — FAQ Page” on page
12.
Logoff
Displays the Re-login page.
See “Changing the Access Right — Re-login Page” on
page 12.
Image control section
Menu section
Monitor image
Firewall
If a firewall is on the network where the camera is
installed and you access the camera from outside the
firewall, click this item. Then the “Firewall Vi ewer”
opens.
See “About Viewers” on page 8.
JavaApplet
When you monitor the camera image with a computer
whose OS is not Windows, such as Macintosh, Linux
and UNIX, or using Netscape Navigator Ver.6.0, click
this item. Then the “Jav a Applet V iewer” opens to allo w
you to view the monitor image of the camera.
See “Controlling the Monitor Image Using the Java
Applet Viewer” on page 12.
Camera
Displays the Camera Setting page. (The
Camera&Sensor access right is required for this
function.)
See “Setting the Camera — Camera Setting Page” on
page 20.
Plugin
When you monitor the camera image using Netscape
Navigator Ver. 4.7, click this item to open the “Plugin
Download page.” (Downloading is required only for the
first time you access the camera.)
For details, see “About Viewers” on page 8.
Version
Displays the camera software version.
Configuration of Main Viewer Page
7
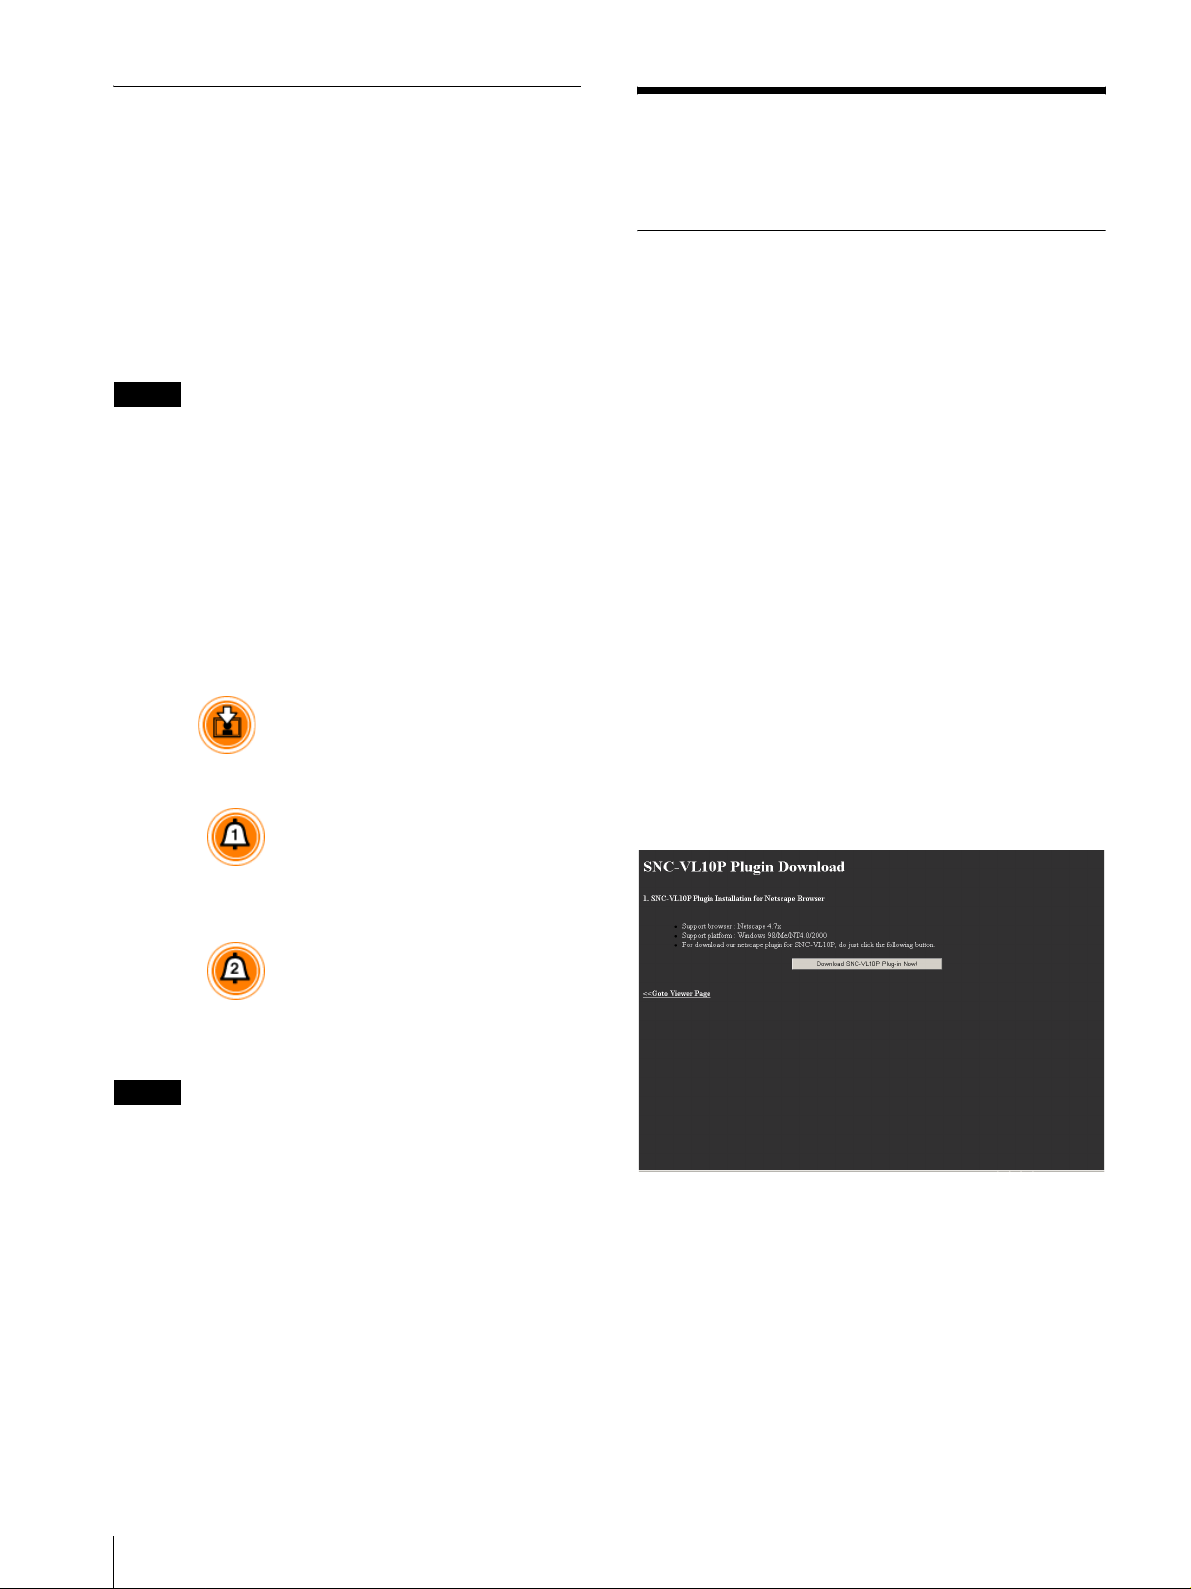
Image Control Section
Image Size
Selects the image size.
See “Selecting the image size” on page 9.
Monitoring the Image from the Camera
Expansion
Selects the image expansion ratio.
See “Expanding the image” on page 9.
Frame Rate
Selects the frame rate to transmit images.
See “Selecting the frame rate” on page 9.
Note
An approximate frame rate is displayed on the status bar
located on the bottom of t he W eb bro wser. This does not
indicate the exact frame rate.
Monochrome
Select this check box to display the image in
monochrome.
See “Displaying the monit or image in monochro me” on
page 10.
Singleshot
Select this check box to freeze the monitor image.
See “Freezing the monitor image” on page 10.
Capture
Click to capture the monitor image.
See “Capturing the monitor image” on page 10.
About Viewers
The Network Camera us es Wavelet algorithm to
compress and transmit images. Therefore, in order to
view images from the camera, you need to download
Active-X Control or a vie wer plugin depe nding on your
Web browser and/or OS.
Using the Internet Explorer
Active-X Control is necessary. When you log in the
camera using the Internet Explorer for the f irst time, the
Active-X Control is automatically downloaded. The
monitor image automatically appears when you enter
the Main Viewer page.
Using the Netscape Navigator Ver. 4.7
You need to download the plugin for Netscape
Navigator stored in the camera. When you log in the
camera using Netscape Navigator for the first time, the
“Plugin Download” page appears. Click Download
SNC-VL10 Plug-in Now! and follow the instructions
on the screen.
Plugin Download page
Sensor 1
Click to output an alarm from sensor output 1 of the
Sensor I/O port on the camera.
See “Outputting an Alarm” on page 10.
Sensor 2
Click to output an alarm from sensor output 2 of the
Sensor I/O port on the camera.
See “Outputting an Alarm” on page 10.
Note
Sensor 1 and Sensor 2 are disabled for the users whose
access right is None.
Logon User
Displays the number of users currently accessing this
camera.
Location
Displays the location of the camera.
For setting the location, see “Conf iguring the System —
System Setting Page” on page 14.
Comment
Displays the comment.
For setting the comment, see “Configuring the System
— System Setting Page” on page 14.
8
Monitoring the Image from the Camera
Using an OS other than Windows such as
Macintosh, UNIX and Linux or Netscape
Navigator Ver . 6.0
Java Applet viewer is necessary. When you log in the
camera for the first time, click Java Applet on the Login
page or the Main Viewer page to start the Java Applet
viewer. (See “Controllin g th e Monitor Image Using the
Java Applet Vi ewer” on page 12.)
Java Applet Viewer page
When there is a firewall on t h e network
where the camera is installed
To monitor the camera image outside the firewall, a
Firewall vie wer is necessary.
T o start the Fire wall vie wer , sel ect the Behind Fi re wall
check box on the Login page, or click Firewall on the
Main Viewer page.
Firewall Viewer page
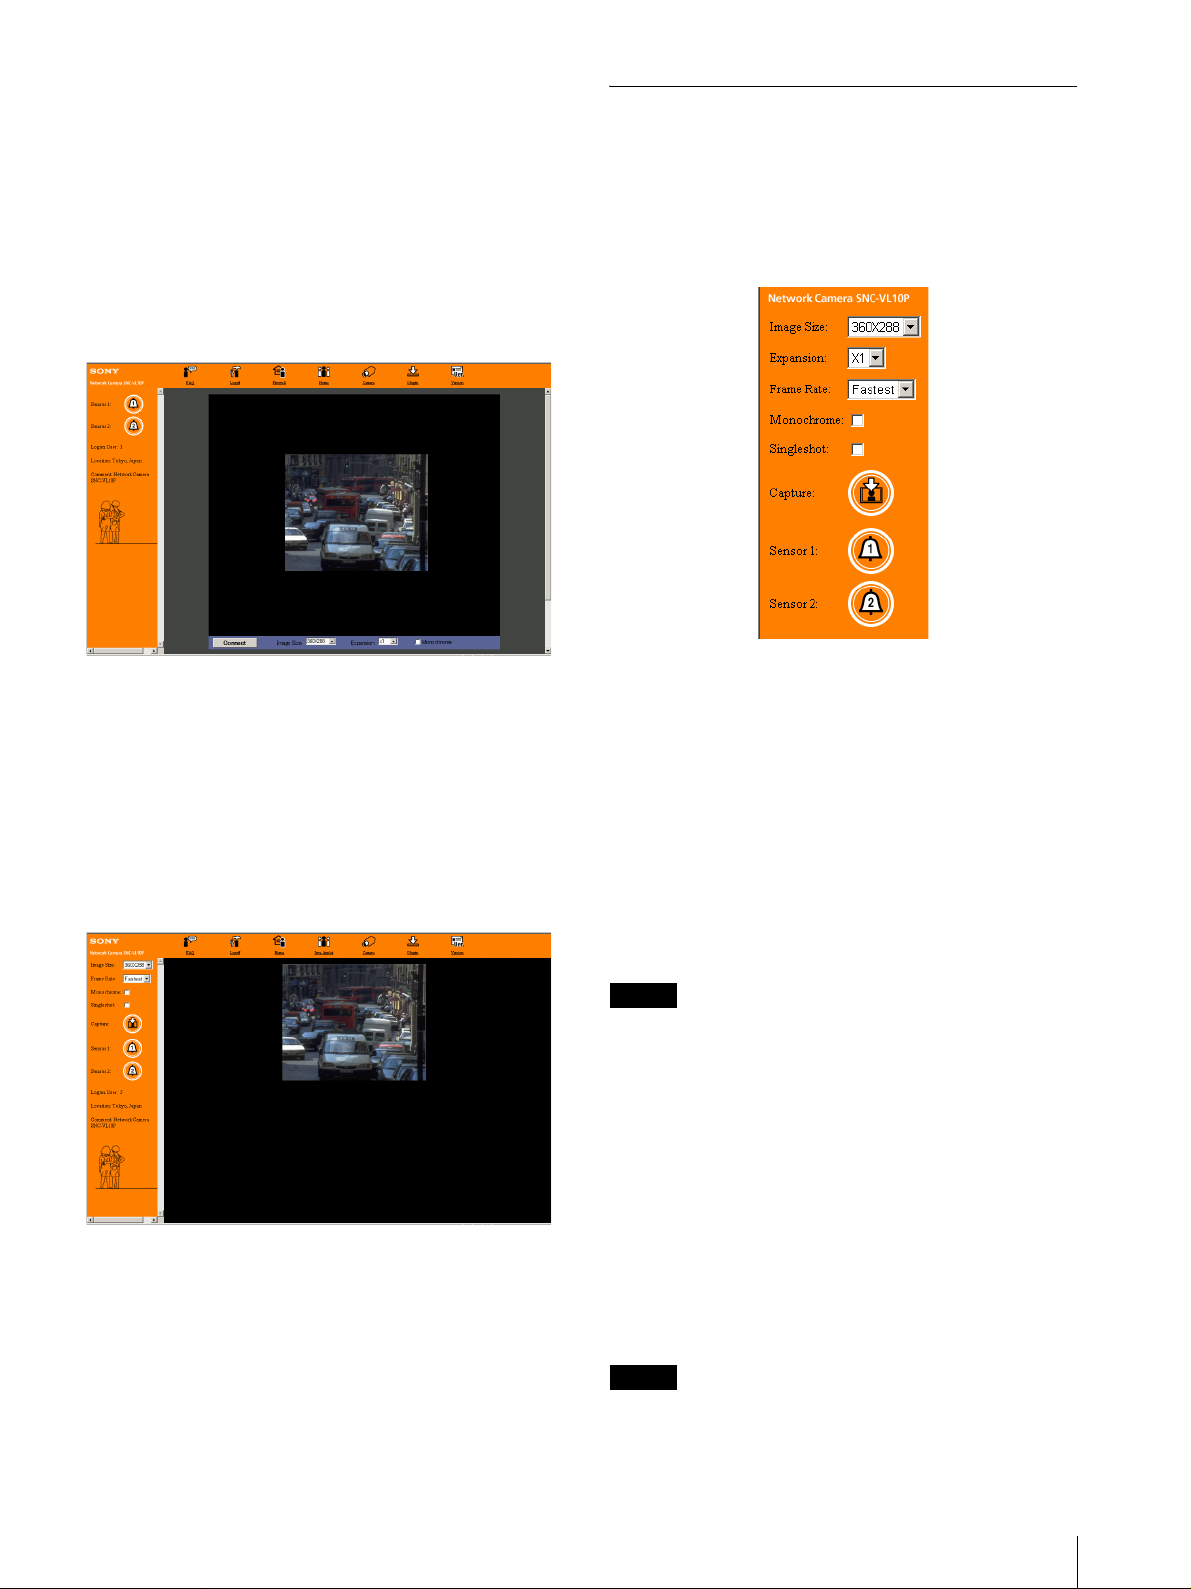
Controlling the Monitor Image from the Image Control Sect io n
You can control the monitor image from the image
control section on th e viewer page.
Image control section
Selecting the image size
Click the down-arrow button in the Image Size box and
select the image size from the drop-down list.
Y ou can sel ect the image size from among the follo wing:
SNC-VL10N:
720
× 486, 720 × 243, 360 × 243, 180 × 121, 90 × 60
SNC-VL10P:
720
× 576, 720 × 288, 360 × 288, 180 × 144, 90 × 72
Expanding the image
Click the down-arrow button in the Expansion box and
select the expansion ratio from th e drop-down list:
×2, ×3 or ×4.
×1,
Notes
• The available expansion ratios depend on the selected
image size.
• The expansion ratios cannot be selected when using
the Firewall viewer.
Selecting the frame rate
Click the down-arrow button in the Frame Rate box and
select the frame rate with which the images are
transmitted, f rom the drop-do wn li st: 1 fps, 3 fps, 5 fps,
15 fps or Fastest. “fps” indicates the number of frames
transmitted per second. With Fastest, t he camera
transmits the maximum number of frames as possible
for the connected line. The maximum frame rate is 30
fps for the SNC-VL10N, and 25 fps for the SNC-VL10P .
Note
If heat builds up inside the camera, the images are
transmitted at 1 fps although another frame rate v alue is
Monitoring the Image from the C a m era
9
selected in the Frame Rate box. In this case, contact
your authorized Sony dealer.
See “Configuring the Sensor I/O Port — Sensor I/O
Setting Page” on page 25.
Displaying the monitor image in
monochrome
Select the Monochrome check box. By removing the
check mark, the color monitor image is restored.
Freezing the monitor image
Select the Singleshot chec k box. The monitor image
freezes. By removing the check mark, the monitor
image in motion is restored .
Capturing the monitor image
Click the Capture icon. The monitor image freezes and
the “Save As” dialog ap pears. T ype the f ile name, select
the file format, specify the destination to which the file
is to be stored, and click Save.
Note
Sensor 1 and Sensor 2 are di sabled for the users who se
access right is None.
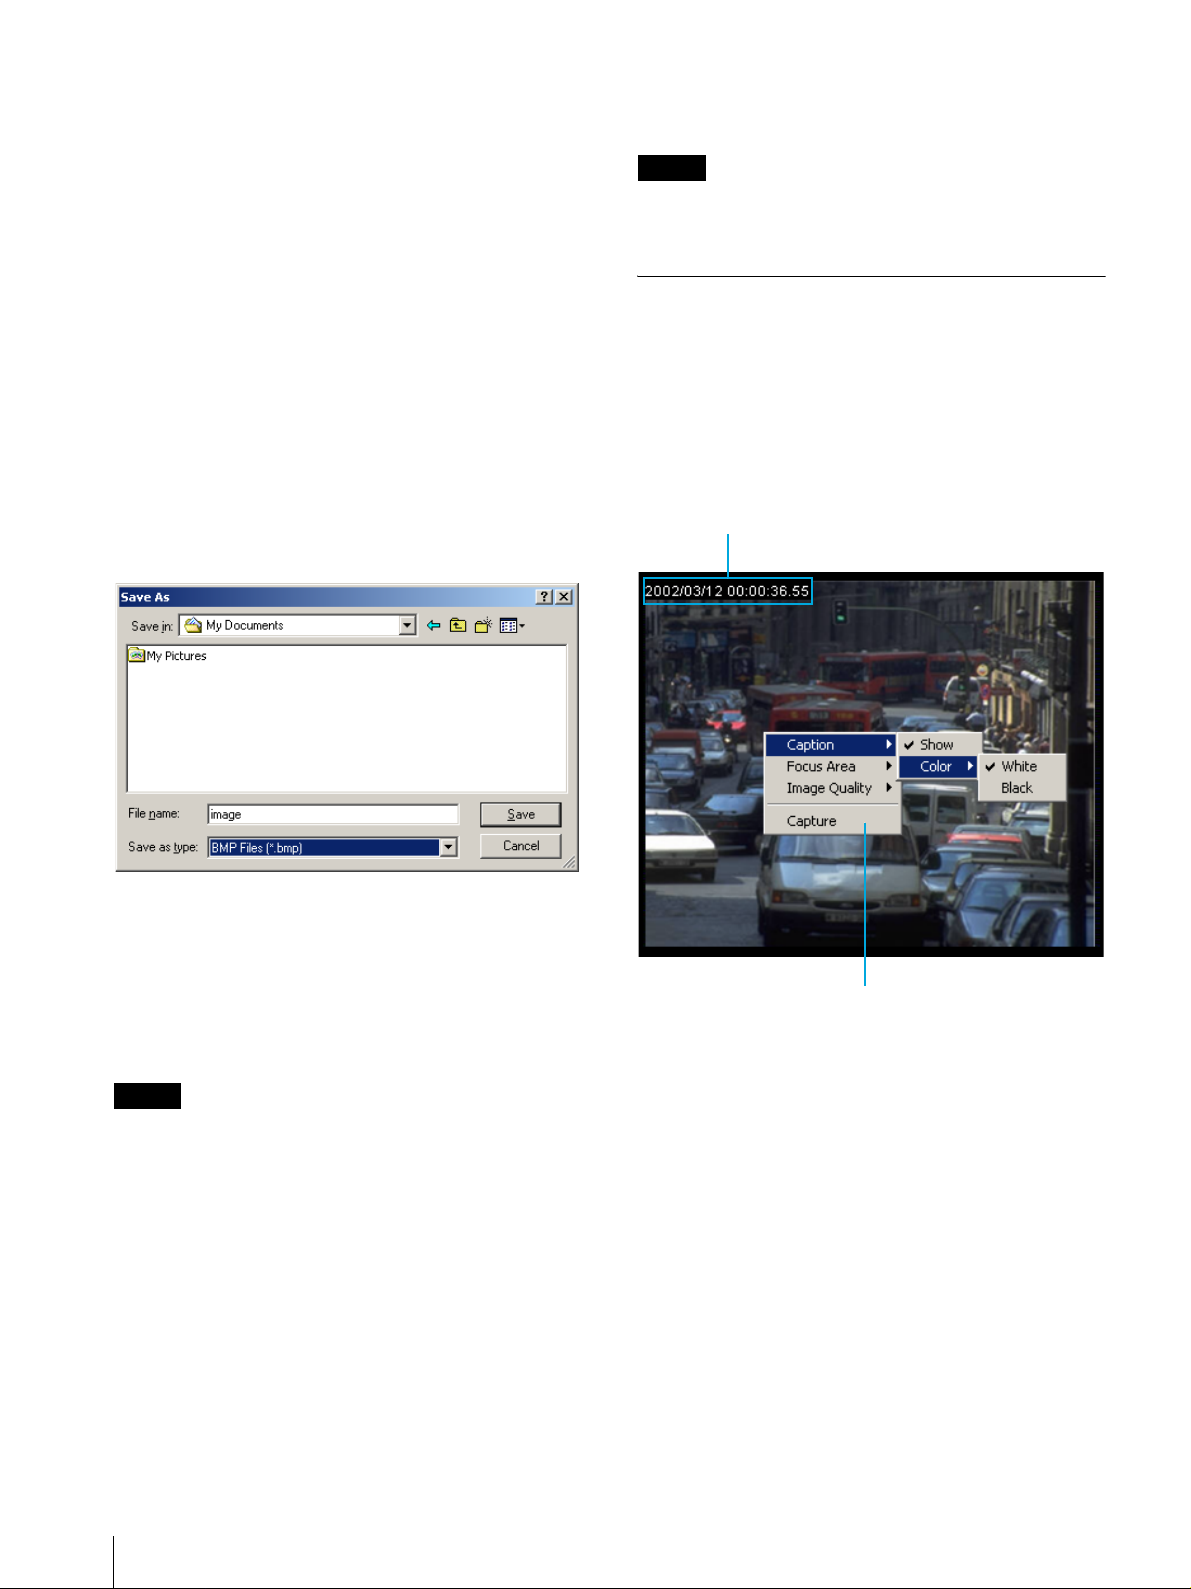
Controlling the Monitor Image Using the Menu
When you right-click on the mo nitor image, the ima ge
control menu appears.
Caption
Specifies the caption on the monitor image.
Caption
About the file format
You can save images in BMP format (.bmp) or in the
Wavelet compression format (.eye). You can view the
images saved as in the Wavelet compression format
(.eye) using a Web browser. Double-click the file and
specify the Web browser from the “Application
Selection” dialog, then the image appears.
Note
The camera always saves the images in the × 1
expansion ratio, regardless of the expansion ratio in
which the image is displayed on the Web browser.
Outputting an Alarm
Click the Sensor 1 or Sensor 2 icon.
When you click Sensor 1, the alarm is output from
sensor output 1 of the Sensor I/O port located on the rear
panel of the camera. When you click Sensor 2, the
alarm is output from sensor output 2 of the Sensor I/O
port.
The alarm setting is made on the menu page for
Administrator.
Menu
Show
Enables or disables the capti on display. Click Show to
show the check mark to display the caption. Click it
again to remove the check mark to make the caption
disappear.
Color
Selects the caption color. When you click White to
show the check mark, the caption is displayed with
white letters on a black background. When you select
Black, the caption is displayed with black le tters on a
white background.
10
Monitoring the Image from the Camera
 Loading...