

Schlage Wireless Locks
User Guide
Contents
Programming and User Codes .......................................... 2
Programming Code ........................................................... 2
User Codes ....................................................................... 2
Turn Lock Feature ............................................................... 2
Replacing the Batteries ...................................................... 3
BE369 Deadbolt ................................................................ 3
FE599 Lever Lock ............................................................. 3
Restoring Factory Settings ................................................ 4
Vacation Mode ..................................................................... 4
Manual Programming ......................................................... 4
Manual Programming Functions ....................................... 5
Emergency Key Override ................................................... 6
BE369 ................................................................................ 6
FE599 ................................................................................ 6
Troubleshooting .................................................................. 6
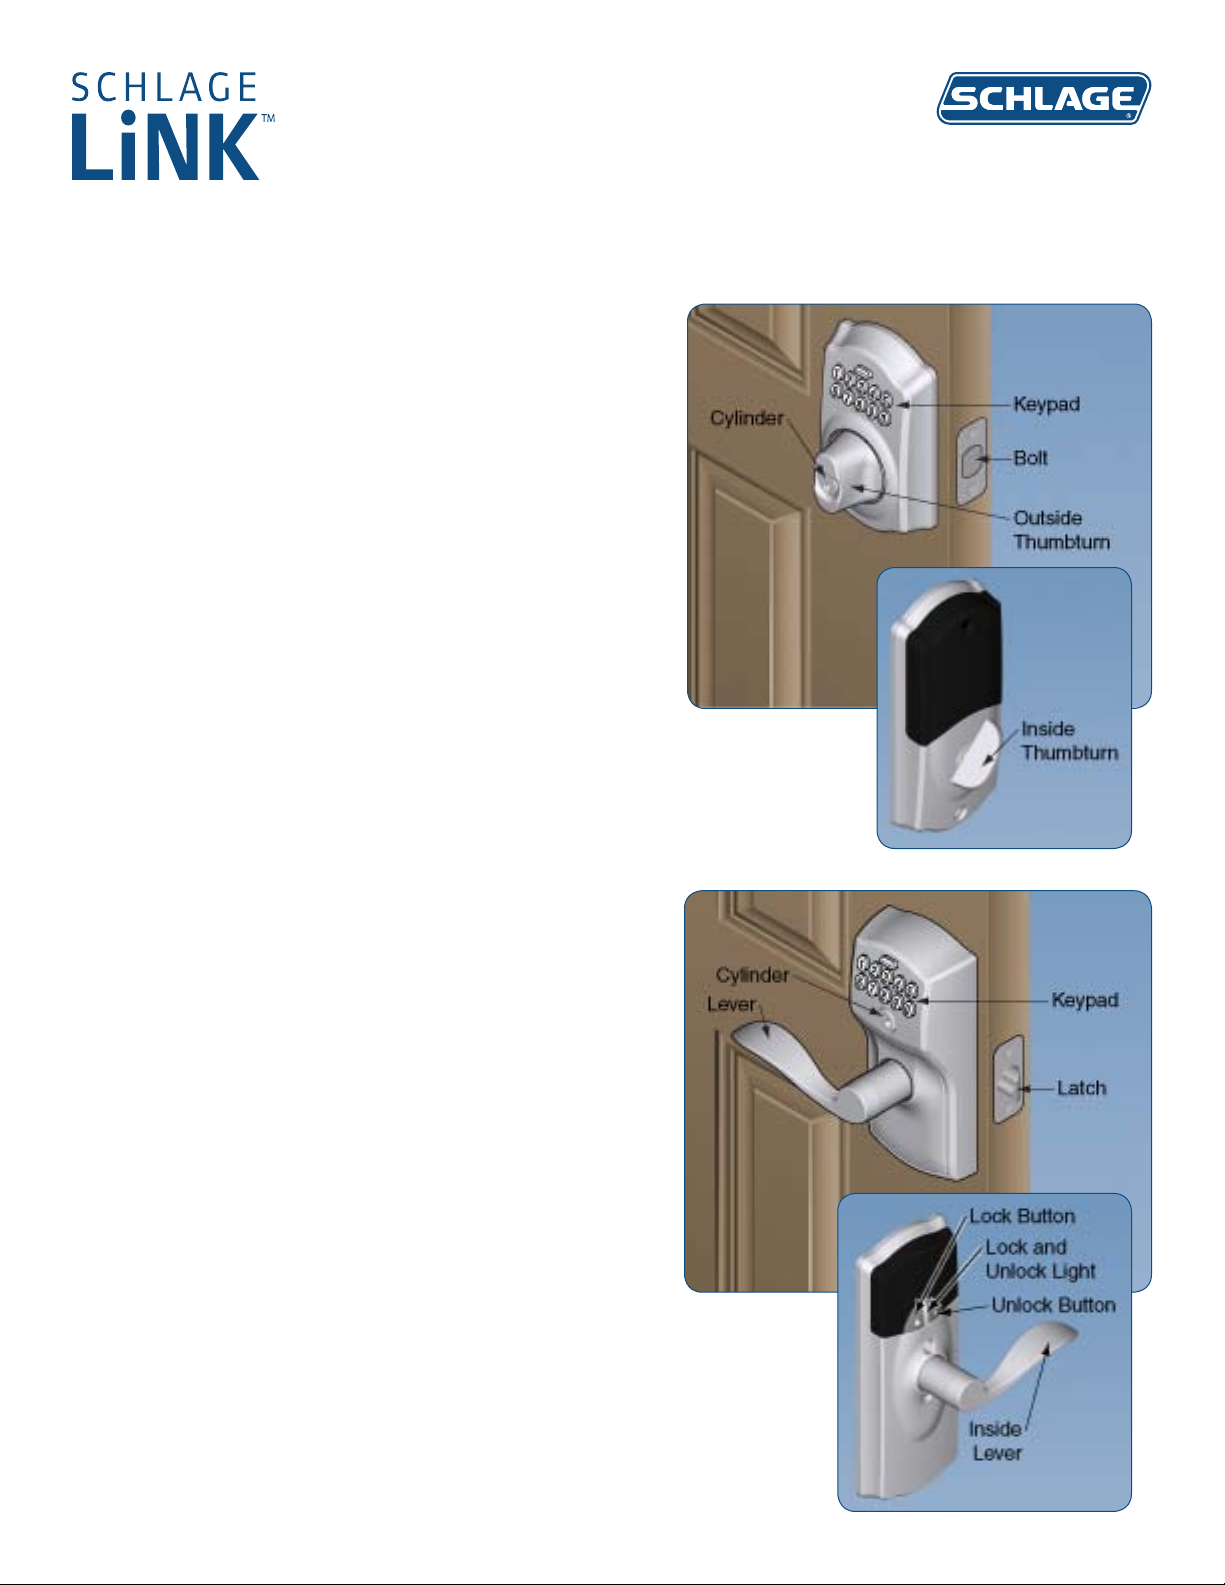
Lock Parts
Keypad
• Located on the outside of the lock.
• Used to enter codes for programming and unlocking.
Thumbturns
• On the BE369 Deadbolt only.
• The inside thumbturn may be rotated at any time to retract (unlock) or extend (lock) the bolt.
• The outside thumbturn can be rotated to retract the bolt after a valid user code has been
entered.
• The outside thumbturn can also be rotated to extend the bolt after the
Schlage button has been pressed when Turn Lock feature is enabled.
BE369 Deadbolt
Lever
• On the FE599 Lever Lock only.
• The inside lever can be rotated at any time to retract the latch.
• The outside lever can be rotated at any time, but will only retract the
latch when the lock is unlocked.
Cylinder
• Located on the outside of the lock.
• Used only in emergency situations to unlock the lock. See
Emergency Key Override on page 6 for more information.
Lock and Unlock Buttons
• On the FE599 Lever Lock only.
• Used to put the lock in a locked or unlocked state.
• When these buttons are used, the lock will remain locked or unlocked
until locked or unlocked using the buttons, web interface or phone
application.
FE599 Lever Lock
Lock and Unlock Light
• On the FE599 Lever Lock only.
• Lights red when inside lock button is pressed.
• Lights green when inside unlock button is pressed.
• Lights only when an inside button is pressed. Does not remain lit.
Programming and User Codes
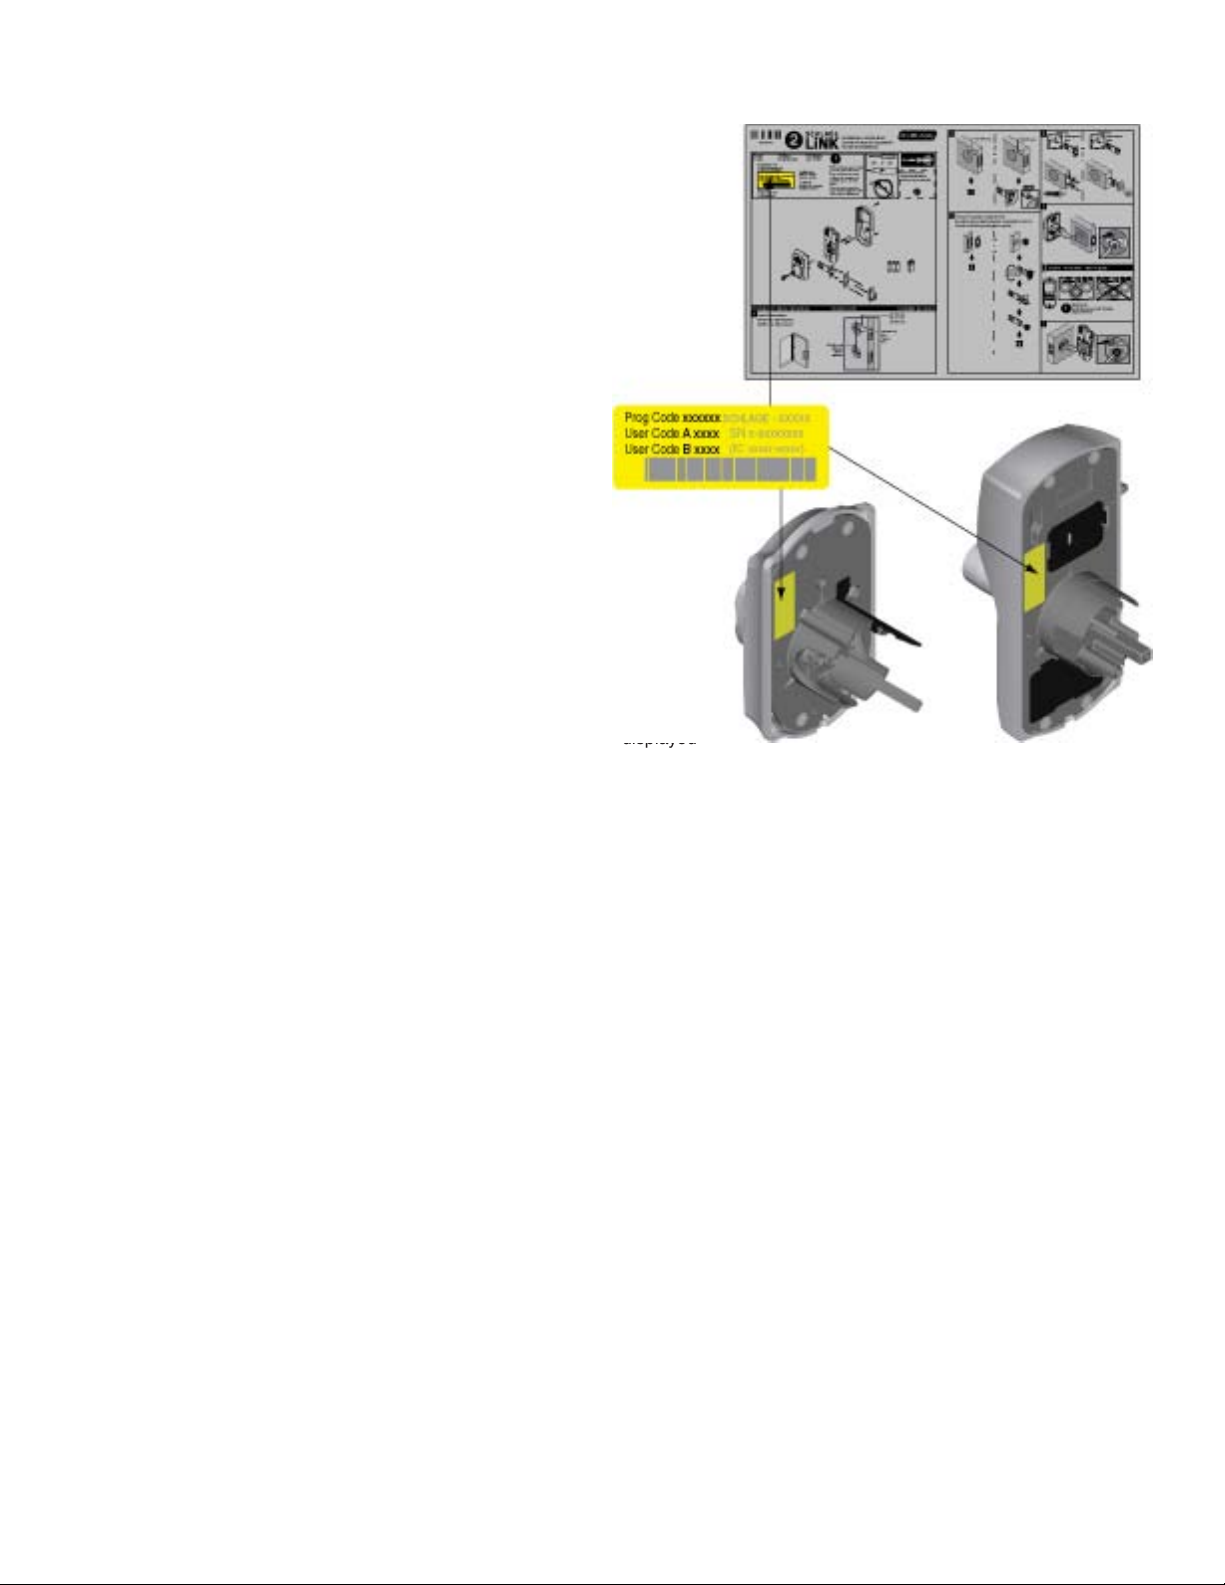
All locks are pre-programmed with a programming code and two user codes. The
programming code and user codes can be changed at any time.
All pre-programmed codes can be found on the yellow sticker on the front of the
Installation Instructions that come with the lock. An identical label is also located
on the inside (part that faces the door) of the keypad.
Programming Code
• Used to manually program the lock using the keypad.
• Used to put the lock into enrollment mode.
• Can only be changed by manually using the keypad. See Manual
Programming Functions on page 5 for more information.
• CANNOT be used to unlock the lock.
• CAN be used to take a lock out of vacation mode at the
keypad. See Vacation Mode on page 4 for more information.
• If you change your programming code and then forget it, you
can reset your lock back to factory settings. See Restoring
Factory Settings on page 4 for more information.
• The web interface is not affected by a change to the programming code.
User Codes
• Used to unlock the lock.
• May be added and deleted manually, using the keypad.
• User codes are assigned to names in the web portal and can be changed,
added or deleted using the web portal.
• If you add a new code to the lock manually, the new code will be displayed
on the web portal with an assigned name of New User (#), which can be
changed at any time.
Turn Lock Feature
When the Turn Lock feature (available on BE369 Deadbolt only) is disabled, a valid user code must be entered at the keypad in order to
lock the lock from the outside.
The Turn Lock feature is enabled by default.
See Manual Programming Functions on page 5 for instructions to disable this feature.
2
Replacing the Batteries
BE369 Deadbolt
a. Remove cover screws.
b. Remove screw on upper left to release upper battery tray.
Hold battery tray in place while loosening screw.
c. Upper battery tray will be released. Fully remove tray and
remove three old AA batteries.
d. Remove 9V battery.
e. Remove the 9V connector from the old 9V battery.
f. Replace all batteries with new, high-quality batteries.
Reverse steps to replace battery tray and cover. Be careful
not to pinch wires when replacing the cover.
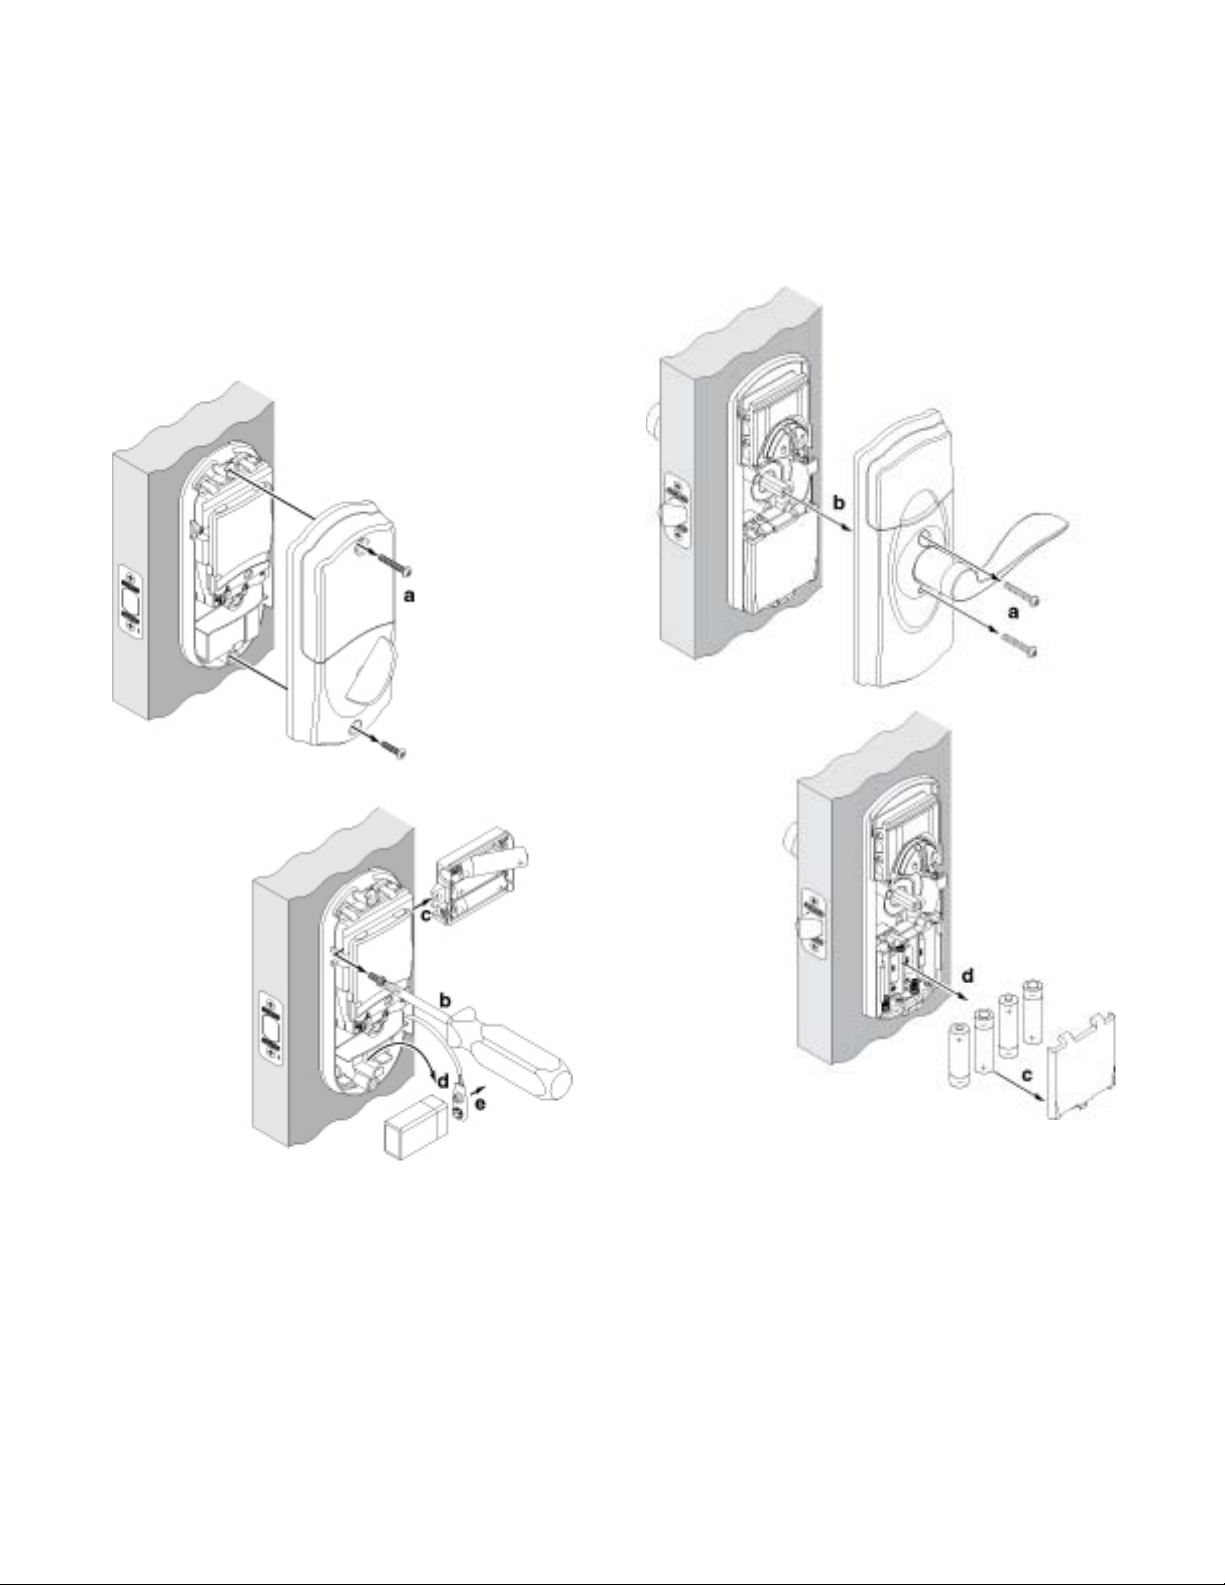
FE599 Lever Lock
a. Remove cover screws.
b. Remove cover.
c. Remove battery cover.
d. Remove four old AA batteries.
e. Replace batteries with 4 new, high-quality AA batteries.
Reverse steps to replace the battery cover and lock cover.
3

Restoring Factory Settings
Restoring the factory settings will:
• Restore the original programming code
• Restore the pre-programmed user codes
If you have an active account at www.schlagelink.com, the user codes listed in the web interface for the lock will be restored in the
physical lock when lock reconnects with the bridge. The original pre-programmed user codes will also be added to the web interface.
Restoring factory settings WILL NOT exclude the lock from the bridge.
DO NOT reset your lock unless you are able to locate the original programming code. Customer service cannot
retrieve a lost programming code.
1. For FE599, disconnect the batteries. For BE369, disconnect the 9V battery.
2. On the lock keypad, press and release the Schlage button.
3. Reconnect the battery and wait until the Schlage button is no longer lit.
4. Within ten (10) seconds, press and hold the Schlage button until it lights green and the lock beeps.
Vacation Mode
Vacation mode is used to disable all user codes at the keypad. If a valid user code is entered while the lock is in vacation mode, the
Schlage button will first light green and then red, and the lock will not unlock.
If you will be away from your home for a period of time in which no one should have access to your lock, it is a good idea to use vacation
mode to prevent repeated access attempts.
Vacation mode can be disabled at the keypad by entering the six-digit programming code.
Manual Programming
During normal operation, Schlage Wireless Locks should be managed through the web interface at www.schlagelink.com. If internet
access is temporarily lost, changes to the lock can be entered manually at the lock’s keypad. When Internet access is restored, the lock
will automatically update the web interface with any changes. See Manual Programming Functions on page 5 for more information.
Lights/Beeps Legend Programming Legend
Three Lights
and Three Beeps
One Long Flash
and One Long Beep
One Long Flash
and Two Beeps
1
Step Confirmation
• A correct entry was made during
1
programming and accepted by the
lock.
Function Confirmation
• A set of steps was completed
1
successfully.
Error
• An incorrect entry was made during
programming.
• For other errors, see the
troubleshooting section.
Backlight
• Entire keypad glows blue during
programming and when the Schlage
button is pressed before pressing any
codes.
Programming Code (six numbers)
• See Programming Code on page 2 for
more information.
Schlage Button
• Used for programming
• Used to turn on the backlight
User Code (four numbers)
• See User Codes on page 2 for more
information
Keypad Numbers
• Used for programming
• Used to enter a user code to unlock the
lock
1 Beeps will sound only when the beeper is turned on. Low battery beeps will sound even when the beeper is disabled.
4

Manual Programming Functions
Press the keys on the keypad as shown in the following steps. Wait for the confirmation indicator before proceeding to the next step. If
you make a mistake, wait for all lights and beeps to stop and then start over from the beginning.
Add
Delete
Change
Enable Vacation
Mode
(Disable All)
Enable/Disable
Beeper
Press
(Six
Numbers)
Wait For
3 Lights + 3 Beeps
Press
(Six
Numbers)
Wait For
3 Lights + 3 Beeps
Press
(Six
Numbers)
Wait For
3 Lights + 3 Beeps
Press
(Six
Numbers)
Wait For
3 Lights + 3 Beeps
Press
(Six
Numbers)
Wait For
Press
Wait For
3 Lights + 3 Beeps
Press
Wait For
3 Lights + 3 Beeps
Press
Wait For
3 Lights + 3 Beeps
Press
Success!
1 Long Light + 1 Long Beep
Press
Success!
Press New
(Four
Numbers)
Wait For
3 Lights + 3 Beeps
Press Unwanted
(Four
Numbers)
Wait For
3 Lights + 3 Beeps
Press New
(Six
Numbers)
Wait For
3 Lights + 3 Beeps
Disable Vacation
Mode
(Enable All1)
Press Same New
(Four
Numbers)
Success!
1 Long Light + 1 Long Beep
Press Same Unwanted
(Four
Numbers)
Success!
1 Long Light + 1 Long Beep
Press Same New
(Six
Numbers)
Success!
1 Long Light + 1 Long Beep
Press
(Six
Numbers)
Success!
1 Long Light + 1 Long Beep
Delete All
3 Lights + 3 Beeps
Press
2
(Six
Numbers)
Wait For
3 Lights + 3 Beeps
Press
1 Long Light + 1 Long Beep
Press
Wait For
3 Lights + 3 Beeps
Press
Press
(Six
Numbers)
Success!
1 Long Light + 1 Long Beep
(Six
Enable/Disable3
Turn Lock Feature
Numbers)
Wait For
3 Lights + 3 Beeps
Press
1 Long Light + 1 Long Beep
Success!
Press
(Six
Put Lock in
Enrollment Mode
4
Numbers)
Wait For
3 Lights + 3 Beeps
1 Enable All User Codes function is available only when user codes are currently disabled.
2 Delete All User Codes function will remove ALL user codes, but will not change the programming code. User Codes cannot be recovered after this function is completed.
3 The Turn Lock Feature is available only on the BE369 (deadbolt). When this feature is disabled, a valid user code must be entered in order to lock the lock from the
outside. The Turn Lock feature is enabled by default.
4 Bridge must be put into enrollment mode before lock for successful enrollment/exclusion.
Success!
Blinking
5

Emergency Key Override
If the battery fails completely, or if there is an electronic error, the lock can be unlocked manually using the key.
BE369
FE599
Troubleshooting
Problem Lights/Beeps Cause Solution at Lock Solution on Web
Entering a valid user code
using the keypad does not
unlock lock.
Schlage button does not light
when pressed
There is a delay before the
lock unlocks after a valid user
code is entered.
The Schlage button blinks
red, even when no buttons
have been pressed.
Cannot add a new user code. Red (when
Cannot delete a user code at
the keypad.
Green then
Red/Hi then
Low
none Lock keypad is locked out
Red then
Green/Low then
Hi
Fast red blink. Battery is critically low. Replace battery. See
attempted via
keypad)
none (when
attempted via
web)
Red The first user code entry did
Lock is in vacation mode. Enter six-digit programming
code.
Wait 30 seconds and try
because too many incorrect
codes have been entered.
Battery is dead. Replace battery. See
Battery is low. Replace battery. See
19 user codes already exist. Delete at least one existing user code. Then add
When adding a user at the
keypad, the first user code
entry did not match the
second.
First four digits match
first four digits of the
programming code.
User code already exists in
lock.
not match the second.
again.
Replace the Battery.
Replace the Battery.
Replace the Battery.
new user code.
Try again. Make sure you
enter the same code twice.
Change the programming
code or select a different
user code to add.
Select a different user code.
Try again. Make sure you
enter the same code twice.
Uncheck Vacation
checkbox.
none
none
none
none
none
Select a different
user code to add.
none
6

Problem Lights/Beeps Cause Solution at Lock Solution on Web
Cannot change the
programming code.
Cannot delete all user codes
at the keypad.
Pressing the Schlage
button when the deadbolt
is unlocked does not allow
locking (deadbolt only).
Thumbturn does not spin
freely when deadbolt is
locked (deadbolt only).
Pressing the Schlage
button when deadbolt is
locked unlocks the deadbolt
(deadbolt only).
Thumbturn is difficult to
rotate or does not rotate
smoothly (deadbolt only).
After entering a valid code on
the deadbolt keypad, Schlage
button flashes green and
then amber. Otherwise, lock
appears to function normally
(deadbolt only).
Red User code already in lock
matches the first four digits
of the programming code you
are trying to add.
Select a different
programming code, or delete
the user code that matches
the first four digits you want
to use.
The first programming code
entry did not match the
Try again. Make sure you
enter the same code twice.
second.
Red The first programming code
entry did not match the
Try again. Make sure you
enter the same code twice.
second.
none Turn Lock feature is disabled. Enable the Turn Lock feature.
See Manual Programming
Functions on page 5 for
more information.
none Deadbolt is malfunctioning. Call Customer Service at
(877) 288-7707.
none Lock was installed improperly. Cam needs to be rotated to
proper position. Check step
7 in the deadbolt installation
instructions (located at part2.
schlage.com).
none Deadbolt was not adjusted to
the correct backset position.
Deadbolt needs to be
adjusted to correct position.
Check step 3 in the deadbolt
installation instructions
(located at part2.schlage.
com).
Green then
Orange
AA batteries need to be
replaced.
Replace AA batteries.
Replacing the Batteries on
page 3 for more information.
none
none
none
none
none
none
none
none
©2009 Schlage Lock Company
lock user guide Rev. 06/09-b
 Loading...