

Page 1
S O NY
Remote Commander RM-V60
Operating Instructions
© 1997 by Sony Corporation Printed in China
For the customers in the U.S.A.
WARNING
This equipment has been tested and found to comply with the limits
for a Class B digital device, pursuant to Part 15 of the FCC Rules.
These limits are designed to pro\ ide reasonable protection against
harmful interference in a residential installation. This equipment
generates, uses, and can radiate radio frequency energy and, if not
installed and used in accordance with the instructions, may cause
harmful interference to radio communications. Howe\'er, there is
no guarantee that interference will not occur in a particular
installation. If this equipment does cause harmful interference to
radio or television reception, which can be determined by turning
the equipment off and on, the user is encouraged to try to correct the
interference by one or more of the following measures:
• Reorient or relocate the receiving antenna.
• increase the separation between the equipment and receiver.
• Connect the equipment into an outlet on a circuit different from
that to which the receiver is connected.
• Consult the dealer or an experienced radio/TV technician for help.
You are cautioned that any changes or modifications not expressly
approved in this manual could void your authority to operate this
equipment.
For the customers in Canada
The DBS operation works only for digital satellite broadcast system
in the U.S.A.
Setting Up the Remote Commander
Before you can start using the Commander, you must first set it up.
This manual describes everything you need to know to set up the
Commander, including:
• Installing the batteries.
• Presetting the Commander with the codes for your TV, VCR, Cable
box, DBS tuner, and other audio components.
- Presetting the Remote Commander
The Commander is preset at the factory to operate Sony brand
components.
If you're using the Commander with a Sony component, you won't
need to preset the Commander before you start using it.
To set up the Commander to use with other (non-Sony)
manufacturers' components, you'll need to follow the instructions in
this manual to preset the Commander with the correct code number
for your components.
Button
TV TV
VCR VCR
DBS/CBL
RECEIVER
CD CD player
TAPE
AVI
AV2
Component that can be preset
DBS tuner/Cable box
Receiver
Tape deck/MD deck/DAT deck
VCR/Cable box/DBS tuner/
LD player/Receiver/CD player/
Tape deck/MD deck/DAT deck
Factory setting
Sony TV
Sony VHS VCR
(VTR3)
Sony DBS tuner
Sony Receiver
Sony CD player
Sony tape deck
Sony 8n\m VCR
(VTR2)
Sony LD player
3-861-126-11(1)
Note
The Commander can be set up to operate only one component per
button - unless their code numbers happen to be the same. For
example, you cannot set up the Commander to operate a Sony TV
and a Panasonic TV simultaneously (because they use different code
numbers).
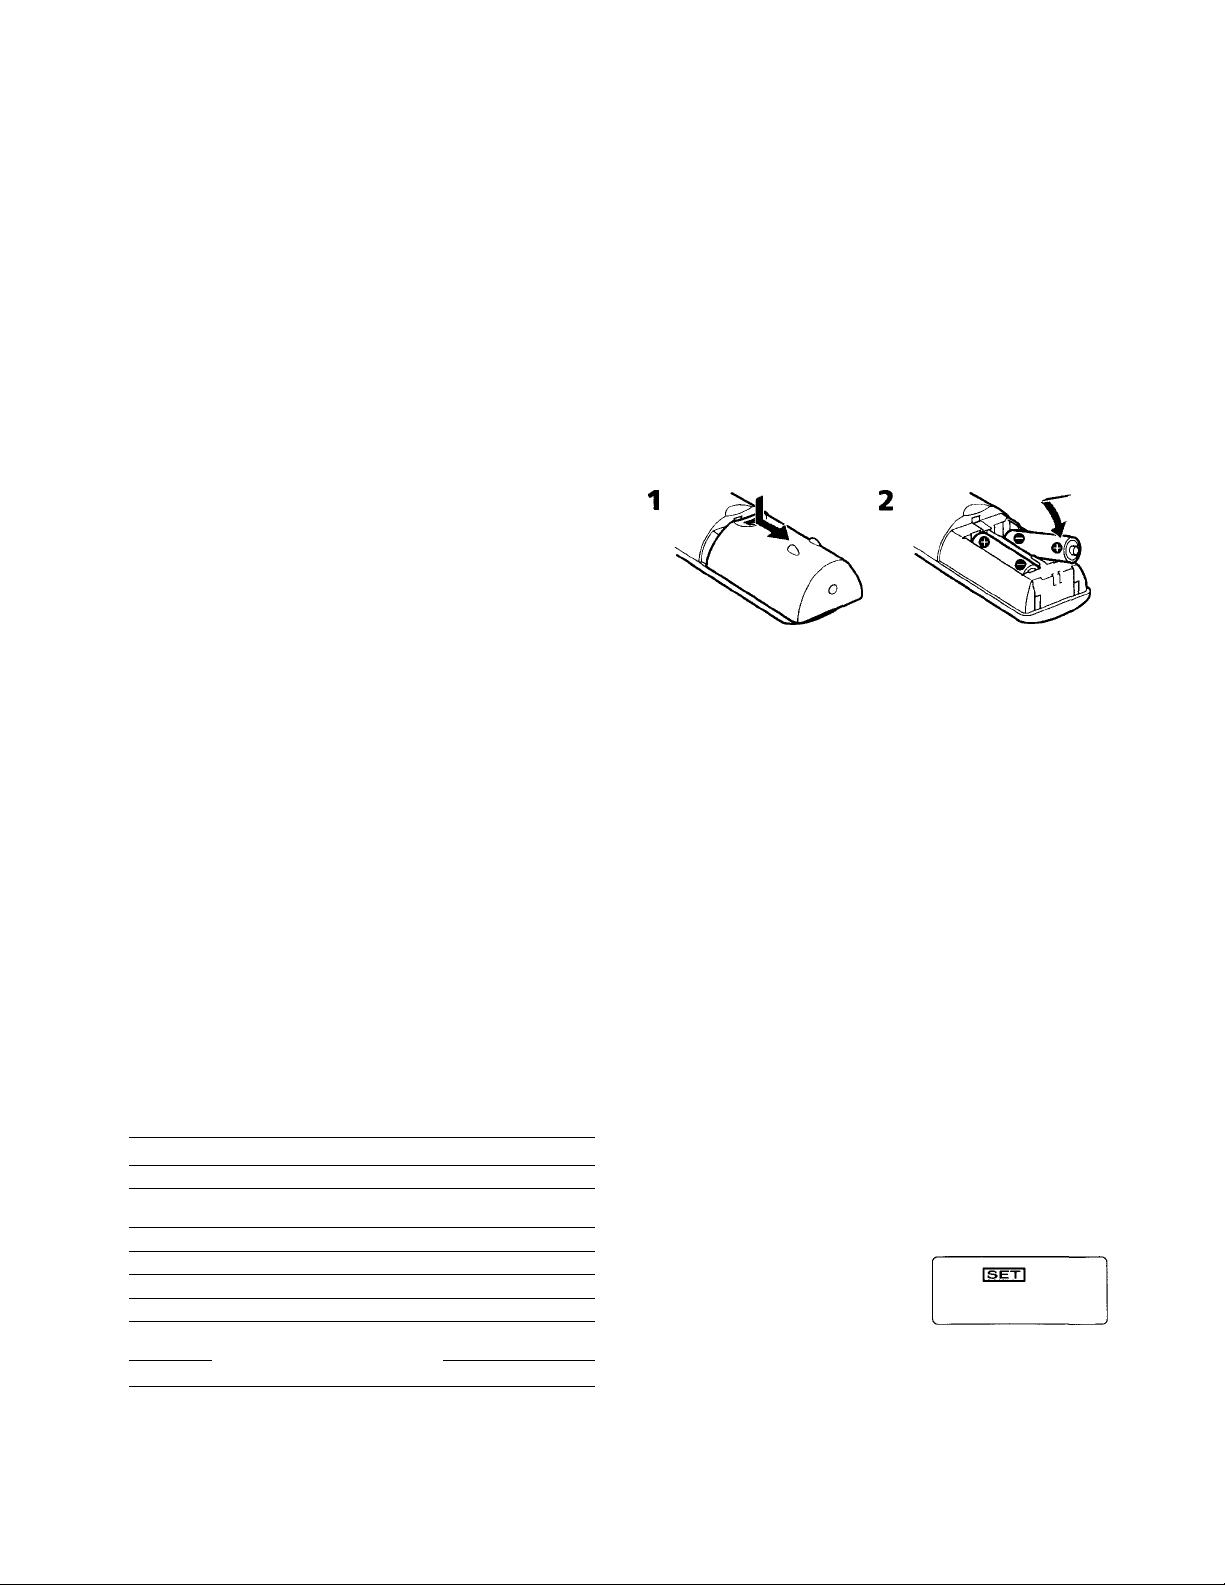
Installing the Batteries
Slide open the battery compartment and insert two size AA (R6)
batteries (not supplied).
Be sure to line up the + and - on the batteries with the -r and - on the
battery compartment.
When to replace the batteries
Under normal conditions, batteries will last up to six months. If the
Commander does not operate properly, the batteries might be worn
out. When the display dims, replace the batteries with new ones.
Notes
• Replace both batteries with new ones.
• Do not take more than 20 minutes to replace the batteries;
otherwise, your setting of the code numbers will be erased.
Notes on Batteries
• Do not mix old batteries with new ones or mix different types of
batteries together.
• If the electrolyte irrside the battery should leak, wipe the
contaminated area of the battery compartment with a cloth and
replace the old batteries with new ones. To prevent the electrolyte
from leaking, remove the batteries when you plan not to use the
Commander for a long period of time.
Setting the Code
Follow the steps 1 and 2 below for each component you plan to use
with the Commander.
Step 1; Entering the Code Number
1 See the tables in "Component Code numbers", and find the code
number in double figures for the desired component.
If more than one code number is listed, use the number that's
listed first to complete the steps below.
For example, if you're setting up a Philips' VCR, you would use
the codé number 13.
If your component isn't listed, see "Searching for the Correct
Code".
2' Press the SET button with a bail-point pen tip etc., and release it.
SET
©
Display window
Page 2

3 l'iv» tlu' W W'K. l'tlîS Oïl . UK'FIN i R.CP. V.\ri\ W'I.oi
\\ 2 InilK'n that >. ot iV'poiuis to tlio dosirod compvMAOtit
l oi l ■'hS (, hl , 1 ATI \\ 1 and A\ 2 buttons, press eaeh buttim
repealedK until the desired component is displavevi t,svv Vx'lowA
W lu'n \ ou pt\'ss lltese buttoris ti^^r tlie first time, lli«.' comp^,menl
and its code number that is preset at tlie tactcir\ are dispLu ed.
DBS/CBL
TAPE
DBS 01 —► CATV 00
TAPE 01
MD 01
DAT 01
Z]
AVI
VCR 02 — CATV 00 — DBS 01 —► LD 01 — RECVR 01
c
DAT 01 *
---------
MDOl •<
---------
TAPE 01
----
-------
CD 01
AV2
2
LD 01 —>■ RECVR 01 — CD 01 — TAPE 01 — MD 01
c
DBS 01
--
-------
CATV 00
---
-------
VCR 01 ••
-------
DAT 01
For example, it vou're setting up a MD plaver, press the TAPE
button repeated))'until "MD 01" is displayed. -
Note
The Commander is not preset at the factory to operate a Cable box
(CATV).
4 Enter the component's code number. For example, if you're
entering the code for a Philips' VCR, you would press 1, then
press 3.
You can also enter the code number pressing the CH + or CH -.
#) (#
CH
k'CF?
ISETl
5 Press the ENTER button to store the code number in the
Commander's memory.
(enter)
CCR
If the code number is not preset, "NG" is displayed. In this case,
start over the procedure again.
6 Go to"Step 2: Checking if the Code Number Works " to finish
setting up.
2
2
Searching for the Correct Code
It \ ouA o tried all the ci>de numbers listed Iv’r vour component and
YOU still caniTot get the Commander to work (or it vour component is
not listed in this manual), trv these steps
1 Power on the component vou want to set up willi its power
switch.
2 Press the SET button with a ball-point
pen tip etc., and release it.
3 Press the TV, VCR, DBS/CBL,
RECEIVER, CD, TAPE,-AV1 or AV2
button on the commander that
corresponds to the component.
4 Press and release the CH+ button. Then
press and release the POWER button.
5 Repeat step 4 until the correct code number is found.
Each time you press the CH+ button and then the POWER button,
a new code number appears on the display.
Keep trying until your component operates as follows:
• TV, VCR, Cable box, DBS tuner, rt'ceiver, or LD player : the
power turns off.
• CD player, tape deck, DAT deck, MD deck or LD player (those
components whose power cannnot be turned off using the
remote commander):playback starts.
(Make sure that the power is already turned on and that a tape
or disc is inserted.)
• Cable box or TV without a power switch: the Channel + function
works.
6 When the correct code is found, press
the ENTER button to store the code
number in the Commander's memory.
7 Turn on the component again; and press
the CH and VOL buttons. Check that
the Commander is operating the other
functions of your component such as
charmel and volume control.
If the component does not operate
properly, repeat steps 1 to 6 and search
for another code.
If you still carmot get the Commander to work properly, see
"T roubleshooting."
SET
o
TV VCR D6S/CBL AVI
'CD'C!?'
RECEIVER CD TAPE AV2
oooo
'enter)
VOL
ft
is e
CH
r@)
Step 2: Checking if the Code Number Works
1 Power on the component you want to set up with its power
switch.
2 Aim the commander at the component
and press the POWER button.
The component should power off.
that the commander is operating the
other fimctions of your component, such
'
as channel and volume control.
ft
B
ft
If the Commander Doesn't Seem to Be Working...
• First, try repeating these setup procedures using the other codes
listed for your component (see "Component Code Numbers").
• If - after trying all the codes listed for your component - you sHll
cannot get the Commander to work properly, try the search
method described in "Searching for the Correct Code"
Tip
Use the label (supplied) to write down the code numbers of your
components. Then affix the label to the back of the Commander.
Page 3

Controlling the Volume of Video
Components Connected to an Audio
System
The Commander is factory preset based on the assumption that you
hear the sound of your video components from your TV's speakers,
and that you hear the sound of your audio components from the
loudspeakers via your receiver (or amplifier).
Even if you are operating a \'ideoT»r audio component, this feature
enables you to control the volume of your TV or receiver without
first having to press the Commander's TV or RECEIVER button.
Buttons of the Commander Controls the volume of
TV TV
VCR
DBS/CBL
RECEIVER
CD
TAPE
AVI
AV2 Component that is set up on the AV2
For example, to control the volume for your VCR channels, you
don't need to press the TV button.
* If you set up a VCR, a cable box, a DBS tuner or a LD player, the
Commander controls the TV's volume. If you set up a CD player, a tape
deck, an MD deck or a DAT deck, the Commander controls the
receiver's (or amplifier's) volume.
Changing the Factory Preset of the Volume Control
If your video components are connected to an audio system, you
probably hear your TV or VCR's sound from the loudspeakers via
your receiver (or amplifier), not from your TV speakers. In this case,
you need to change the factory preset so that you can control the
volume of your video components without first having to switch to
the receiver. To change the factory preset of the volume control,
follow the procedures below.
You can change this either before or after you set up the Commander
to work with your component.
1 Press the SET button with a bail-point pen tip etc., and release it.
TV
TV
Receiver (or amplifier)
Receiver (or amplifier)
Receiver (or amplifier)
Component that is set up on the AVI
button*
button*
Using the Remote Commander
Operating a Component
1 Press the TV, VCR, DBS/CBL,
RECEIVER, CD, TAPE, AVI, or AV2
button that correspond to your desired
component.
The selected component appears on the display.
When you select 'TAPE, you may have to press the TAPE button
again to select "TAPE A" or "TAPE B".
If you have selected AVI or AV2, the preset component appears
followed by "1" (for AVI) or "2"(for AV2),e.g. "MD 1".
2 Point the Commander directly at the component.
3 Press the button for the function you want to use.
See "Remote Button Descriptions" for complete descriptions of the
buttons on the Commander.
Notes on Using the Remote Commander
Basically, use this Commander in the same way as the Commanders
supplied with your components.
• Using this Commander will not increase the functions of your
components. The functions of the Commander are limited to the
functions of the components themselves. For example, if your TV
does not have a MUTING function, the MUTING button on this
Commander will not function with your TV.
• Some functions of the component may not work with this
Commander.
• If your cable box can control volume, be sure to set its volume
switch to a medium position. If the volume on the cable box is
turned down completely, you will not be able to adjust your TV's
volume with the Commander.
TV VCR OBSÆBL AVI
OOO'O
RECEIVER CD TAPE AV2
oooo
SET
©
2 Press the MUTING button.
ÇET|
IvolII
the currently set component
3 ©To control the component's sound from the loudspeakers via
your receiver, press the MUTING button repeatedly until
"RECVR" is displayed.
©To control the component's sound from the TV speakers, press
the MUTING button repeatedly until "TV" is displayed.
4 Press the ENTER button to store your settig in the
Commander's memory.
(ewteh)
5 If you haven't done yet so, finish setting up the component by
completing the procedures in "Step 1: Entering the Code
Number".
Page 4

Remote Button Descriptions
Operating a TV
Preiis before operating a TV.
To turn on and off.
To change the input mode.
To change the channel. For
example, to change to
channel 5, press 0 and 5 (or,
press 5 and ENTER).
To display the current
channel on TV.
To enter the selection.
To move the cursor upward,
m
downward, to the right, or
to the left.
Volume up: +
Volume down: To mute the volume on the
TV.
To operate SLEEP function
S3
on the TV. (Works only for a
TV with the SLEEP
function.)
To call up the MENU
m
display.
Channel up: +
Channel down: To operate JUMP,
FLASHBACK or CHANNEL
RETURN function on the TV
depending on the setting of
the TV's manufacturer.
To set up the Commander.
BÎ
Operating a Cable box
[T] Press the buttvm on which
the desired component is
assigned before operating.
To turn on and off.
[3] To change the channel. For
example, to change to
channel 5, press 0 and 5 (or,
press 5 and ENTER).
[4| Channel up: +
Channel down: -
O To operate JUMP,
FLASHBACK or CHANNEL
RETURN function on the
Cable box depending on the
setting of the manufacturer.
To set up the Commander.
Notes
• There may be causes you may
turn on/off the cable box by
pressing the CH+ or CHbuttons on the Commander.
• If your cable box can corntrol
volume, be sure to set its volume
control to a medium position. If
the volume on the cable box is
turned down completely, you
will not be able to adjust your TV's volume with the
Commander.
Operating a VCR
m Press the button on which
. the desired component is
_
assigned before operating.
To turn on and off.
To switch the signals
supplied to the TV (from
antenna or VCR).
[4\To change the channel.
For example, to change to
channel 5, press 0 and 5 (or,
press 5 and ENTER).
fSl To display the pn-screen
menu (Sony VCR only).
To record, press ► while
pressing #.
To pause.
To rewind.
To play.
To fast-forward.
To stop.
Channel up: +
Channel down: To set up the Commander.
Operating a DBS tuner
m Press the button on which
the desired component is
assigned before operating.
To turn on and off.
To switch the output of the
DBS receiver to the TV.
(When you connect a TV
cable or antenna to the DBS
receiver, the output swiches
between a TV and DBS
program.)
Ï4] To change the channel.
For example, to change to
channel 5, press 0 and 5 (or,
press 5 and ENTER).
To turn on the display.
To bring up the Master
Guide.
[T1 To scroll through the Master
Guide.
To use favorite function.
To call up the MENU
display.
m To bring up the Station - ^
Index when a program
guide is not displayed.
To select the channel that's
highlighted.
ITÎ1 Channel up: +
Channel down: To page through the guide
when a program guide is
displayed.
[Ï3 To tune to the last tuned
station.
[Î3 To set up the Commander.
Page 5

Operating a Receiver
Q] Press tlu' button on which
the dosirod component is
assigned betöre operating.
in To turn on and off.
n To select the input source;
1 selects VIDEO 1
2 selects VIDEO 2
3 selects VIDEO 3
4 selects TUNER
" 5 selects CD PLAYER
6 selects TAPE DECK
8 selects TV
9 selects CABLE BOX
(7 and 0 do not have an
assigned funciton).
ÏÂ] Volume up: +
Volume down; -
[§ To mute the volume on a
receiver.
n Presetting frequency up: +,
down; - ,
Tuning frequency up: +,
down; [7] To shift band (FM/AM).
iSl To set up the Commander.
Operating a Tape
E Press the button on which
the desired component is
assigned before operating.
Each time you press TAPE,
TAPE A or TAPE B appears
by turn.
n To select the tape deck:
1 selects Deck A (dual
cassette deck only*)
2 selects Deck B (dual
cassette deck only*)
0 functions as ◄reverse
button, or swiches play
sides.
[3] To record, press ► while
pressing # /First release ►,
then release #.
3] To pause.
^ To rewind.
£ To play.
7^ To fast-forward.
^ To stop.
9] To select the tape deck; Deck
A or Deck B (dual cassette
deck only**)
SS To set up the Commander.
* If your tape deck's commander
has two sets of tape operating
buttons and has no A/B button
for deck selection, use the
numeric buttons (1 and 2):
button 1 selects Deck A, and
button 2 selects Deck B.
**If your tape deck's commander
has one set of tape operating
buttons, and has an A/B button
for the deck selection, use the
RECALL button to select Deck A
or Deck B.
Operating a CD player, an MD deck or a DAT deck Operating a LD player
Press the button on which
m
the desired component is
assigned before operating.
To turn on and off.
To select the track number.
0 selects track 10.
To select track numbers
above 10, see the
descriptions on the DISP
button below.
To select numbers 10 and
a
above.
For example, to select track
15, press DISP and then
press 5.
To record, press ► while
pressing #/First release ►,
then release •. (for MD deck
only)
To pause.
To select the previous track.
To play.
To select next track.
To stop.
Next track: +
Previous track: -
To select next disc.
To set up the Commander.
m Press the button on which
the desired component is
assigned before operating.
121 To turn on and off.
[3] To select the track number. 0
selects track 10.
To select track numbers
above 10, see the
descriptions on the DISP
button below.
3] To select numbers above 10
and above.
For example, to select track
15, press DISP and then
press 5.
^ To pause.
6 To seek the previous picture.
7_ To play.
^ To seek the next picture.
9. To stop.
¡3 Chapter up : +
Chapter down: -
ITi] To set up the Commander.
Page 6

Display window
Volume indicator
SET indicator
Transmission indicator
Current operation of the commander
Code number
Component Code Numbers
TV and VCR Codes
Brand Component Code No.
Sony
Admiral (M.Wards)
Aiwa VCR 41,50,44
Akai VCR
AOC VCR
Audio Dynamic
Bell & Howell VCR 33,46 .
(M. Wards)
Brocsoruc VCR
Canon
Citizen
Craig
Criterion
Croslex TV 11
Curtis Mathis
Daewoo VCR
Daytron TV 13
DBX VCR 17,39,40
Dimensia VCR
Emerson
Fisher VCR 33, -37, 38, 36
Funai
VCR
TV 01
VCR
TV 02,14, 09
VCR
TV 14, 09,38
TV •!
VCR
VCR 35
VCR
TV
VCR
VCR
TV 03,19,23
TV
TV/VCR Combo
VCR
TV 22,13, 20,21,23, 03,15, 42
TV/VCR Combo 21 & 23, 22
TV 25
VCR
01 (VTRl: Beta)
02 (VTR2: 8 mm)
03 (VTR3: VHS)
30
52,53,54
12
17,40
20,22,17
03,12
12,11
18, 35
22, 23, 20,21
15
07, 41,12
44,15,12
35,36,03,41
36&44
07
44,22, 23,19,20, 21,41
41
Brand
CK'norai Hkvtric
Goldstar
Go Video VCR
Hitachi
HQ
Instant Replay VCR
]C Penny VCR
JVC
Kenwood VCR 17, 39, 35,40
KTV TV
LXI (Sears) ■ VCR 41, 35, 08, 36, 37, 33, 38
Magnavox
Marantz VCR
Marta VCR
Memorex VCR
Minolta
Mitsubishi / MG A VCR
Multitech
NEC VCR
Olympic VCR
Optimus VCR 27
Orion
Panasonic VCR 09,10,11,12
Pentax VCR
Philco VCR
Philips VCR
Pioneer
Portland TV
Quasar VCR
Radio Shack TV
RCA/PROSCAN VCR
Realistic VCR 12, 33, 31, 38, 27, 41
Sansui VCR
Singer VCR
Componen!
VCR
TV
TV/VCR Combo 27 & 24, 25
VCR
TV
TV/VCR Combo
VCR 11,07,08,38
TV
VCR
TV
VCR 17, 47, 48, 49, 39, 40
TV 28,29
TV
VCR
TV 11,12,13,03,43,47
TV/VCR Combo 11,18,47 & 12,13
VCR
TV
VCR 28,41, 24
TV
VCR
TV
TV/VCR Combo
TV
TV 11
VCR 11
TV
TV
■ TVt^VCR Cornbo 18, 48 & 12,09,10
TV
TV/VCR Combo
Code No.
32, 07, 12
02, 18,03, 07
35
03,13,12, 30, 46
TV «xle & 35
51,42,43
31,13,03, 32
15
12,11
12, 08, 07, 33,17, 39,40
03, 02, 30, 07
33,13, 03, 23, 34
02,03,11,25,19,12
13,11,12,10
17, 39,40
35
12,38
08, 07
26, 27, 28, 29, 56, 57
24,03,12
17, 39,40
03,12
12,11
55
18,16,17,07, 49
18&11,12
08,07
11,12
11,13,03
13,11,12
37,18,19
03,08
11,12, 09,10,06
18, 07, 48
02,12, 24, 23
07,08,11,12,13,14,15,16,29
02, 03, 04, 05,06, 07, 08, 44,45
18&11
17
18
Page 7

Brand Component Code No,
Siinisung
Sanyo VCR 33, 38
Scott VCR
Sharp VCR 30, 31
Shintom VCR 18
Signature 2000 VCR 41, 30, 38
(M. Wards)
Sylvania
Symphonic VCR 41
Tashiro
Tatung
Teac VCR 17,39,41,40
Technics VCR 12,11
Toshiba VCR
Videch TV
Wards VCR 30, 31,38, 34, 35
Yamaha VCR 33,17,39, 40 Denon
Zenith
\'CK 25, 1(1, 24
T\’
TV/\'CR Combo 23, 27 & 24, 25, 29
TV
TV
TV
TV
VCR 13,11,12, 41
TV
TV
TV/VCR Combo 23 & 41
VCR . 35
VCR 17, 39,40
TV 19,14
TV
VCR 34 Emerson
TV
20. 12, 13,03
25
15, 16, 24, 38, 26, 27, 28, 29
23, 12
14,13,15
14,09
11,12,03
23, 39, 40
15,14
31, 03,12
13, 03,15,12 Aiwa
09,10 Fisher
Cable Box Codes
Brand Code No.
Hamlin/Regal 22, 23, 24, 25, 26
Jerrold/G.I. 01, 02, 03,04, 05,06,07, 08,18, 22
Oak 27, 28, 29
Panasonic 19, 20, 21
Pioneer 14,15
Scientific Atlanta 09,10,11
Tpcom 16,17
Zenith 12,13
Separate Components
Tape Deck Codes
Brand
St>n\’
Aiwa
Denon
Fisher
JCV
Kenwood
Nakamichi
Onkyo
Panasonic
Philips
Pioneer
RCA
Sansui
Sharp
Teac
Technics
Yamaha
CD Player Codes
Brand
Sony
Hitachi
JVC
Kardon
Kenwood
LXI
Magnavox
Nakamichi
Onkyo
Optimus
Panasonic
Philips
Pioneer
RCA
Sansui
DBS Tuner Codes Sanyo
Brand Code No.
Sony
Hitachi
Hughes 04
Insight 04
Panasonic -03
RCA/PROSCAN 09,02
Toshiba 06,07
01
05
Shewood
Sharp
Teac
Technics . -. .
Yamaha
Code No.
01
16, 22, 23
13
30
03,04
07,08
15
09,10, 21
19
24
02, 20,
26,27
15,18
13
14,17
05, 06, 19
11,12
Code No.
01
30,32
24
45
27,42
44
05,06, 07
40
08,09,10
46
22,23
14
17,18, 36
47
29
22,26
02,13
12,38, 39
14,16, 34
27
41
24,28
15,25, 37
03,04, 29
19, 20, 21
Page 8

Receiver/Amplifier Codes
Brand
S<in\
Aiwa
Donoii
Fisher
JVC 05, 06, 40
Kenwood
Magnavox
Nakamichi
Onkyo 09, 20
Panasonic 21
Philips 24
Pioneer
RCA
Sansui 16,17, 23
Sharp
Teac 15,18,19
Technics 07, 08, 21
Yamaha
Code No.
01
22, 27
12, 13, 14
34
J)3, 04
35
16
02, 25
28, 29, 31
12,30
10,11
MD Deck Codes
Brand Code No.
Sony 01
DAT Deck Codes
Brand Code No.
Sony 01
LD (MDP) Player Codes
Brand
Sony 01,02, 03,04
Hitachi 12
Kenwood
Magnavox 06
Panasonic 13,14,07
Philips 15
Pioneer * 05
Samsung 16
Sanyo
Sharp 08,17
Code No.
10,11
09
Mini Hi-Fi component system codes
Brand Code No. for each section
Receiver CD Tape
J\'C Ob
05
Kenwood
Marantz
McIntosh 39
Onkyo 09 17 09
Panasonic 21 29
Pioneer
RCA
Sansui
Sharp
Sounde-sigh
Teac
Technics 21 29 19
Yamaha
04
03 08
32 26 28
25
26 11
17 16
30 28
12
36 35 -
15 - 14
07
08
10
11 20 12
Ob 04
05 03
09
43
13 20
24
03 05
04
19 11
08
07
-
19
25
18
13
06
Troubleshooting
If you have problems setting up or using the Commander:
• When setting up the Commander, carefully go through the
procedures described in "Setting the Code." If the code that's
listed first for your component doesn't work, try all the codes for
your component - in the order in which they're listed. If all the
codes fail to work (or if your component is not listed in this
manual), try using the procedures in "Searching for the Correct
Code."
• Check that you're aiming the Commander directly at the
component, and that there are no obstructions between the
Commander and the component.
• Make sure the batteries you're using are not worn out, and that
they're inserted correctly.
• Check that the button of the TV, VCR, DBS/CBL, RECEIVER, CD,
TAPE, AVI or AV2 is pressed to choose your desired component.
• Check that the component has infrared remote capability. For
example, if your component didn't come with a remote
commander, it probably isn't capable of being controlled by a
remote commander.
• If your video components are connected to an audio system, make
sure you've set up the Commander as described in "Controlling
the Volume of Video Components Coimected to an Audio System".
For the customers in the U.S.A.
Customer Support Information
If - after you've read through this manual - you still cannot get the
Remote Commander to work properly, call the Sony Customer
Support Helpline at 1-800-822-2217. -
Brand
Sony
Admiral 33
Aiwa
Denon
Garrard
Harman
Jensen 37
Code No. for each section
Receiver CD
01
22
27
12
19
38
01 01
33 30 3224 13
37
43
31
Tape
16
-
29
Specifications
Operable distance • Approx. 7 m (23 ft) (varies depending of the
Power requirements Two size AA (R6) batteries (not supplied)
Battery life Approx. 6 months (varies depending on frequency of
Dimensions Approx. 70 x 212 x 37 mm (w/h/d) (2 x 8 Vk x
Mass Approx. 150 g (5 oz.) (not including batteries)
Supplied accessory Label (2)
Design and specifications are subject to change without notice.
component of each manufacturer)
use)
1 '/2 in.)
 Loading...