

Page 1

Index
A
Aanleerfunctie 12
Automatisch uitschakelen
van de afstandsbediening 32
van de schermverlichting 33
B
Batterijen 5
Blokkeren van de toetsen 30
C, D, E, F
Codenummers 7
COMMANDER OFF uitschakeltoets 6
Component-keuzetoetsen
toevoegen van een extra functie 23
toewijzen van andere apparatuur 26
G
Geluiddempingstoets (¤) 6, 18
Geluidssterkte regelen 6, 17
Geluidssterktetoetsen (Á +/–) 6, 17
H, I, J, K
Hold beveiliging 30
Inschakelcommando
SYSTEM CONTROL toetsen 18
Toevoegen aan de component-
keuzetoetsen 23
L, M, N, O
LCD scherm
automatische uitschakeltijd 33
helderheid 33
P, Q, R
Preset Lock beveiliging 31
PROGRAM zenderkeuzetoets 6
S
Schermverlichting
batterijen voor 5
bijregelen 33
Schermverlichtingstoets (
SYSTEM CONTROL toetsen
bedieningsreeksen 18
programmeren voor vaak gebruikte
functies 28
) 6, 33
T, U
Toewijzen van andere apparatuur aan de
component-keuzetoetsen 26
Uitschakelcommando
Zie “Systeem-uitschakelfunctie” 19
V
Verhelpen van storingen 35
Vooringestelde componenten 7
W, X, Y, Z
Wijzigen/wissen
aangeleerde signalen 15, 25, 29
bedieningsreeks (SYSTEM CONTROL)
21
Wissen
Zie “Wijzigen/wissen”.
Sony Corporation Printed in Japan
Page 2

3-862-793-11(1)
Integrated Remote
Commander
Operating Instructions
Gebruiksaanwijzing
RM-AV2000T
© 1998 by Sony Corporation
EN
NL
Page 3

Welcome!
The RM-AV2000T Remote Commander provides centralized control of all your AV
components from a single remote commander and saves the trouble of operating
different AV components with different remote control devices. The following are its
main features.
Centralized control of Sony AV components with this one remote commander
This Commander is preset at the factory to operate Sony brand components, so you can
use it out of the box as a control center for your Sony AV components.
Remote control signals for non-Sony components are also preset
This Commander is preset for most major brands components including Sony. You can
remote control your components by setting their code numbers.
Learning function for programming other remote control signals you need
This Commander has a learning function, to learn remote control signals to operate
non-preset components or functions. In addition, the Commander can learn remote
control signals (infrared signals only) of non-Audio V isual components such as airconditioners, lights, etc. (some specific appliances or functions may not be available).
Reassigning new components
You can assign Component Select Buttons to freely operate other components. This is
useful when you have more than two of the same kind of AV components.
System Control function allows one-touch operation to execute a series of
commands
You can program up to 16 consecutive operation steps to execute a series of operations
by pressing a single button.
Easy-to-operate touch key LCD with blue back light
This Commander has a touch key LCD that changes the key display according to the
selected component. The Commander is easy to operate as only the keys necessary to
operate the selected component are displayed. The display backlight allows operation
even in the dark.
The CE mark on the unit is valid only for products marketed in the European
Union.
EN
2
Page 4

Table of Contents
Getting Started
Installing the Batteries ......................................................................................................... 5
When to replace the batteries.............................................................................................. 5
Location and Function of Controls ....................................................................................... 6
Basic Operations
Setting the Code for Preset Audio and Visual Components ................................................. 7
Setting a Component Code ................................................................................................. 8
Checking if the code number works .................................................................................. 9
Operating Your Components with the Remote Commander .............................................. 10
Using Non-Preset Remote Control Operations — Learning Function ................................ 12
Changing or erasing the function of a learned key or button ...................................... 15
Advanced Features
Controlling the Volume of Visual Components Connected to an Audio System................. 17
Executing a Series of Commands — System Control Function .......................................... 18
Programming a series of commands to the SYSTEM CONTROL buttons ................ 19
Executing the programmed commands ..........................................................................20
Changing the programmed commands .......................................................................... 21
Adding an Extra Function to the Component Select Buttons............................................. 23
Programming the Power-On Command of the Selected Component (for Sony
Components only) ........................................................................................................... 23
Adding a Command that is Required when Selecting a Component ........................ 24
Turning Off the Power of All Components by a Single Button Operation
— System Power-Off Function (for Sony Components only) ........................................... 25
Assigning Other Components to the Component Select Buttons ...................................... 26
Programming a Frequently Used Key Operation to SYSTEM CONTROL Buttons ................ 28
EN
Continued
EN
3
Page 5

Table of Contents
(continued)
Using Other Functions
Locking the Controls — Hold Function............................................................................... 30
Protecting your settings and “learned” signals — Preset Lock Function .......................... 31
Changing the Auto Power-Off Time of the Commander ..................................................... 32
Adjusting the Backlight of the Display Window................................................................. 33
Additional Information
Precautions ......................................................................................................................... 34
Maintenance ....................................................................................................................... 34
Specifications...................................................................................................................... 34
Troubleshooting ..................................................................................................................35
Appendix
Table of Preset Functions.................................................................................................... 37
TV.......................................................................................................................................... 37
VCR 1, 2, 3 ........................................................................................................................... 37
DVD (DVD player) ............................................................................................................. 38
VD (LD player) ................................................................................................................... 38
SAT (Satellite tuner) ...........................................................................................................39
CBL (Cable box) .................................................................................................................. 39
AMP (Amplifier).................................................................................................................40
CD (CD player) ................................................................................................................... 40
MD deck............................................................................................................................... 41
DAT deck ............................................................................................................................. 41
DECK B/A (Tape deck) ..................................................................................................... 42
FM/AM (TUNER) (FM/AM tuner) ................................................................................ 42
DSP (Digital Surround Processor).................................................................................... 42
Quick Reference of Operations........................................................................................... 43
Index ................................................................................................................................... 44
EN
4
Page 6

Getting Started
}
}
]
}
]
}
]
]
}
]
Installing the Batteries
Slide open the battery compartment lid
and insert six R6 (size AA) batteries (not
supplied). Be sure to line up the + and –
on the batteries with the + and – on the
battery compartment.
]
}
When to replace the batteries
Batteries for remote control
operation (Four R6 (size AA)
batteries)
Under normal conditions, batteries will
last up to six months. If the Commander
does not operate properly, batteries
might be worn out and i is displayed
on the LCD touch panel. When the
display dims, replace the batteries with
new ones.
Note
Do not take more than one hour to replace the
batteries; otherwise, your setting of the code
numbers (page 7) and learned remote control
signals (page 12) will be erased.
Batteries for backlight (Two R6
(size AA) batteries)
When the backlight for the touch keys
grows dim, replace its batteries.
Notes on batteries
• Do not mix old batteries with new ones or
mix different types of batteries together.
• If the electrolyte inside the battery should
leak, wipe the contaminated area of the
battery compartment with a cloth and replace
the old batteries with new ones. To pr event
the electrolyte from leaking, remove the
batteries when you plan not to use the
Commander for a long period of time.
(for backlight)
(for remote control
operation)
EN
5
Page 7
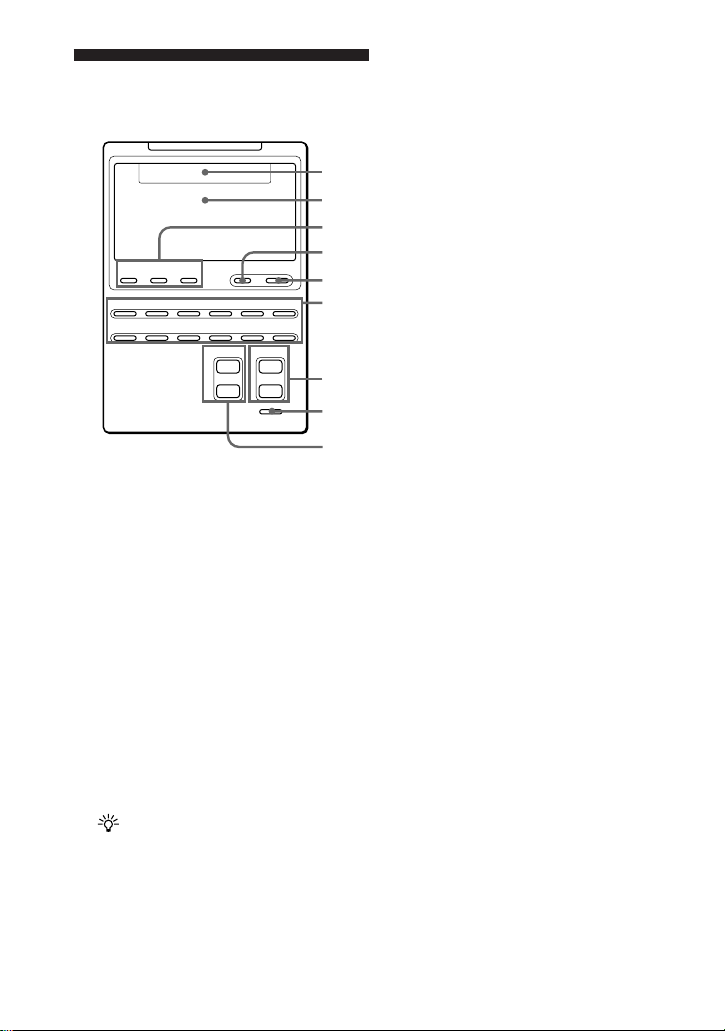
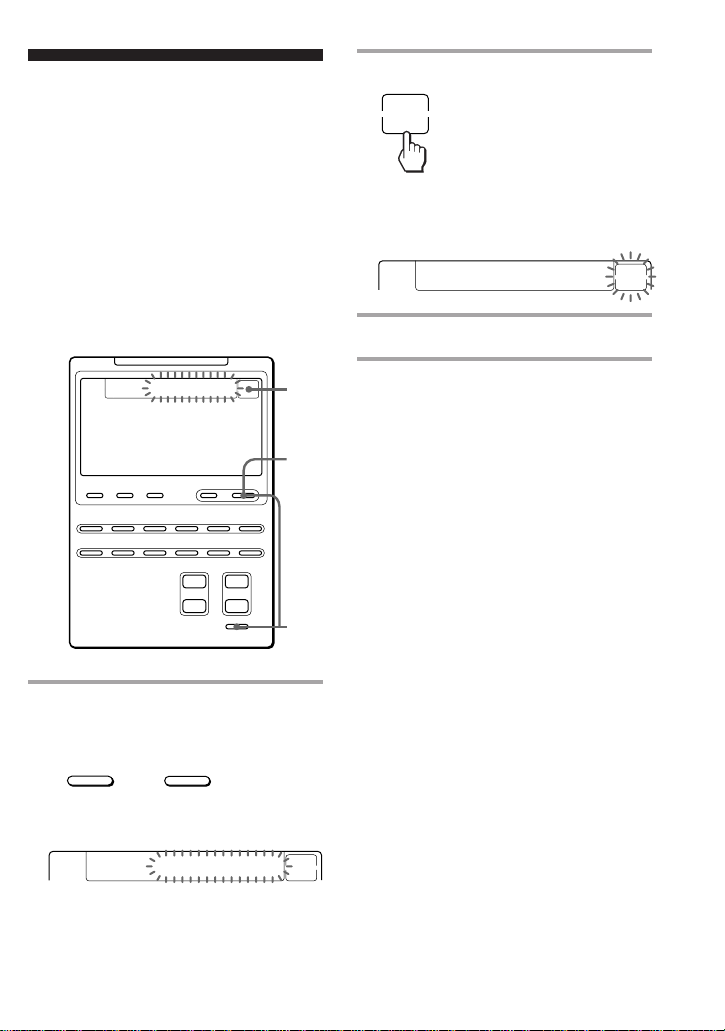
Location and Function
of Controls
1
2
3
OFF
Á
¤
4
5
6
7
8
9
PROGRAM
+
–+–
=
e
+
SYSTEM CONTROL COMMANDER
123
TV VCR1 VCR2 VCR3 DVD SAT/CBL
AMP CD MD/DAT DECK B/A TUNER DSP
1 Component display area
Displays the name of the component
selected.
2 LCD touch key display
The keys used for operating each
component are displayed.
Note
Do not press the touch keys using sharp
objects such as pins or ball-point pens.
3 SYSTEM CONTROL buttons
(page 18)
You can program up to 16 consecutive
key operations to each of the three
SYSTEM CONTROL buttons . You
can automatically carry out the entire
program by pressing one button.
4 button
Used to light up the LCD display in
the dark. Press the button once to
turn on the light, and once again to
turn it off. You can also set the
backlight to go off automatically after
a certain period of time (page 33).
5 COMMANDER OFF button
Turns the power of the Commander
off.
6 Component Select buttons
Selects the component to control.
7 Á +/– buttons*
Adjust the volume.
8 ¤ button*
Mutes the volume.
9 PROGRAM + +/ – = buttons
Select the programme.
* The Commander controls or mutes the TV’s
volume when you select a visual component.
The Commander controls or mutes the
amplifier’s volume when you select an audio
component.
You can change this setting also (page 17).
Note on the power on and off of the
Remote Commander
To turn on the power, pr ess any button except
the COMMANDER OFF button.
To turn off, press COMMANDER OFF, or if
you don’t use the Commander, it automatically
turns off after 10 minutes. This interval can
also be changed (page 32).
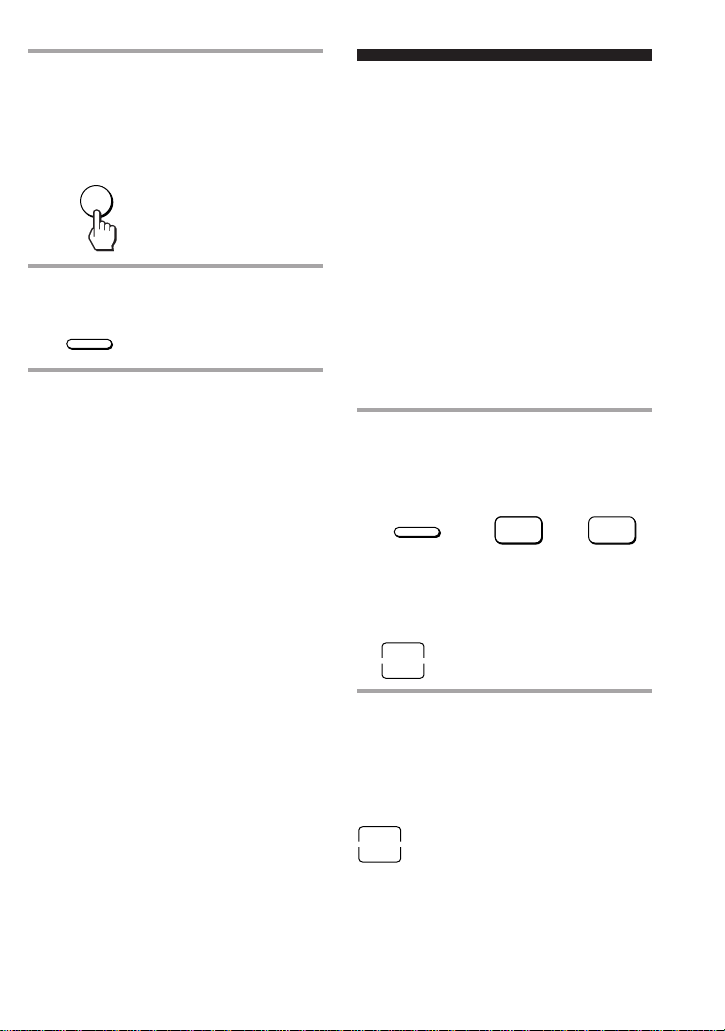
To turn off the key touch
confirmation beep
Press the ≥ key. “OFF” is displayed and the
Commander no longer makes the key touch
confirmation beep. To switch the key touch
confirmation beep back on, press the ≥ key
again.
EN
6
Page 8

Basic Operations
Setting the Code for
Preset Audio and Visual
Components
The Commander is preset at the factory
to operate Sony brand AV components
(see the table below). If you are using the
Commander with factory-set Sony
components, skip the following
procedures.
You can use the Commander with other
preset AV components also. To use with
other AV components, you need to follow
the procedures to set the correct codes for
each component.
Component
Select
Button
TV
VCR1
VCR2
VCR3
DVD
SAT/CBL
AMP
CD
MD/DAT
DECK B/A
TUNER
DSP
* Analog audio compact cassette deck
Preset
component(s)
TV
VCR
VCR
VCR
DVD player
(DVD)/LD
player (VD)
Satellite tuner
(SAT)/Cable
box (CBL)
Amplifier
CD player
MD deck/DAT
deck
Cassette deck*
FM/AM tuner
Surround
processor
Factory setting
Sony TV
Sony Beta VCR
(VTR1)
Sony 8mm VCR
(VTR2)
Sony VHS VCR
(VTR3)
Sony DVD
player
Sony satellite
tuner
Sony amplifier
Sony CD player
Sony MD deck
Sony cassette
deck
Sony FM/AM
tuner
Sony digital
surround
processor
See “Table of Preset Functions” (page 37)
for the functions of keys and buttons as
for each component.
Continued
EN
7
Page 9

Setting the Code for Preset Audio
and Visual Components
(continued)
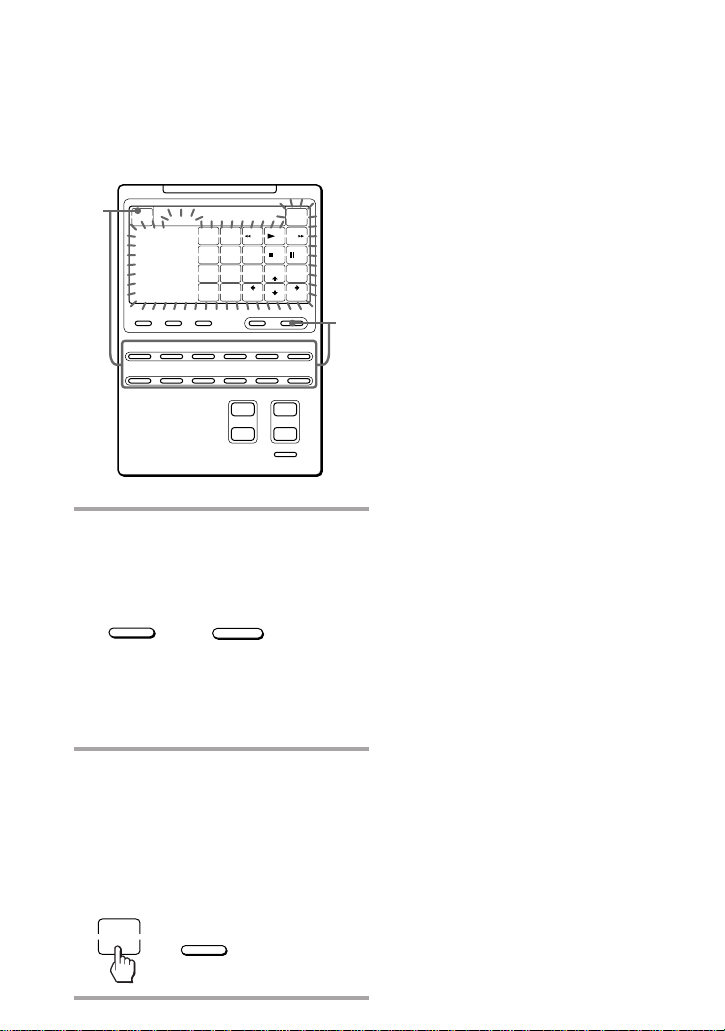
Setting a Component Code
3 Press the Component Select
button* for the desired
component.
TV
TV
+
+
–
=
CHANNEL
DISPLAY
e
+
–
OFF
Á
¤
123
456
7809
4
3
ENTER
SYSTEM CONTROL COMMANDER
123
TV VCR1 VCR2 VCR3 DVD SAT/CBL
AMP CD MD/DAT DECK B/A TUNER DSP
Example: To set up a Philips’ TV
1 See the tables in the supplied
“Component Code Numbers”,
and find the double digit code
number for the desired
component.
If more than one code number is
listed, use the number that is listed
first.
For example, to set up a Philips’ TV,
you would use the code number 11.
6
2
The selected component remains
displayed, and the 0 – 9, ENTER and
DISPLAY keys flash.
TV
123
456
7809
ENTER
* When you set the component code of the
DVD or SAT/CBL button, press
repeatedly until the desired component is
displayed.
DISPLAY
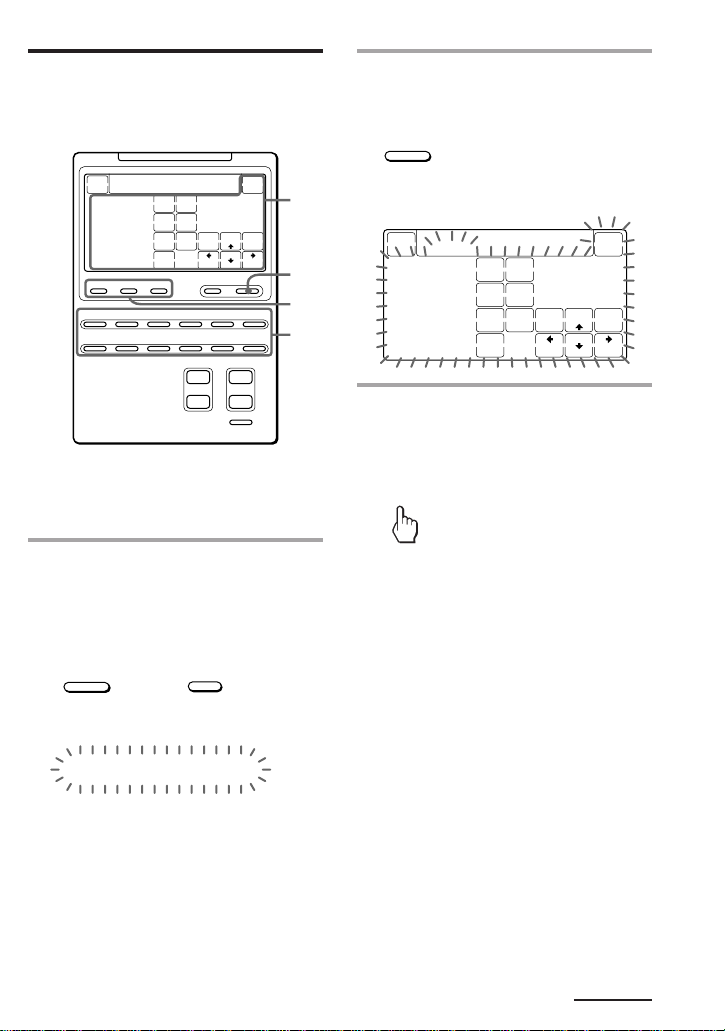
4 Press the double digit component
code number followed by the
ENTER key on the touch-key
display.
123
456
7809
ENTER
2 While pressing COMMANDER
OFF, press ¤.
COMMANDER
OFF
All the component names in the
display flash.
TV VCR123 SAT DECK
EN
8
+
¤
DVD
CD FM/AM DSPMD CBLAMP
A beep sounds, and the code numbers
and “ENTER” appear twice.
1
m
AB
ENTER
1
m
Page 10

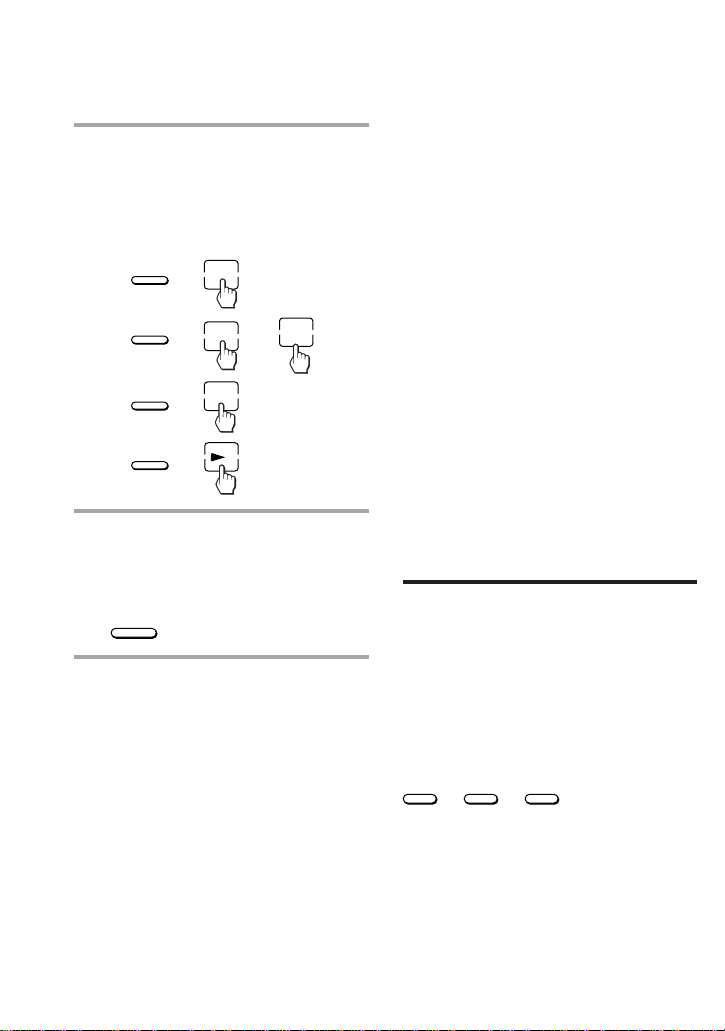
5 If you want to set a code for
another component, repeat Steps
3 and 4.
6 Press COMMANDER OFF.
COMMANDER
OFF
Checking if the code number
works
1 Press the corresponding
Component Select button for the
component you have set up.
TV
Notes
• If you press a component code number that is
not on the table in the supplied “Component
Code Numbers”, the Commander beeps and
“NG” flashes after you press the ENTER key.
If this happens,check the component code
number, and try setting again.
• If you don’t input anything into the
Commander for over two minutes between
each step, the setup procedure will be
canceled. To set the code, you must again
press ¤ while pressing COMMANDER OFF.
To check which code number is
set
Press the DISPLAY key. The code
number and “ENTER” appear twice.
The Commander turns on and the
touch-keys appear on the display.
123
456
7809
-/--
1
-
TV
GREEN
YELLOW
RED
INPUT
TV
TELETEXT
BLUE
u
2 Power on the component with its
power switch.
3 Aim the Commander at the
component and press the u key
in the touch-key display.
When the remote control signal is
sent, is displayed on the display.
u
The component should power off.
Continued
EN
9
Page 11
Setting the Code for Preset Audio
and Visual Components
(continued)
4 If you have succeeded, check that
the Commander is operating the
other functions of your
component, such as channel and
volume control.
See “Operating Your Components
with the Remote Commander” for
details.
If the Commander does not seem to
be working...
Try repeating these setup procedures on page 7
using the other codes listed for your
components in the tables in the supplied
“Component Code Numbers”.
Notes on keys which have
“learned” a remote control
signal already
If another signal has already been
programmed on that key or button by the
learning function (page 12), that
“learned” signal will work even after you
set the component code number. To use
it as a preset component key or button,
first erase its learned signal.
Note on the touch-key display
When you set a component code number,
only the keys that have been preset with
the signals for the desired component
will be displayed. Preset signal of each
key varies according to the brand.
By using the learning function, you can
program remote control signals to both
the displayed keys and keys that are not
displayed (see page 12).
Operating Your
Components with the
Remote Commander
When you operate a non-Sony
component, make sure you set the
component code first (page 7).
u
CD
123
456
7809
-/--
1
-
123
TV VCR1 VCR2 VCR3 DVD SAT/CBL
AMP CD MD/DAT DECK B/A TUNER DSP
D.SKIP
ENTER
CLEAR
SYSTEM CONTROL COMMANDER
PROGRAM
+
–+–
=
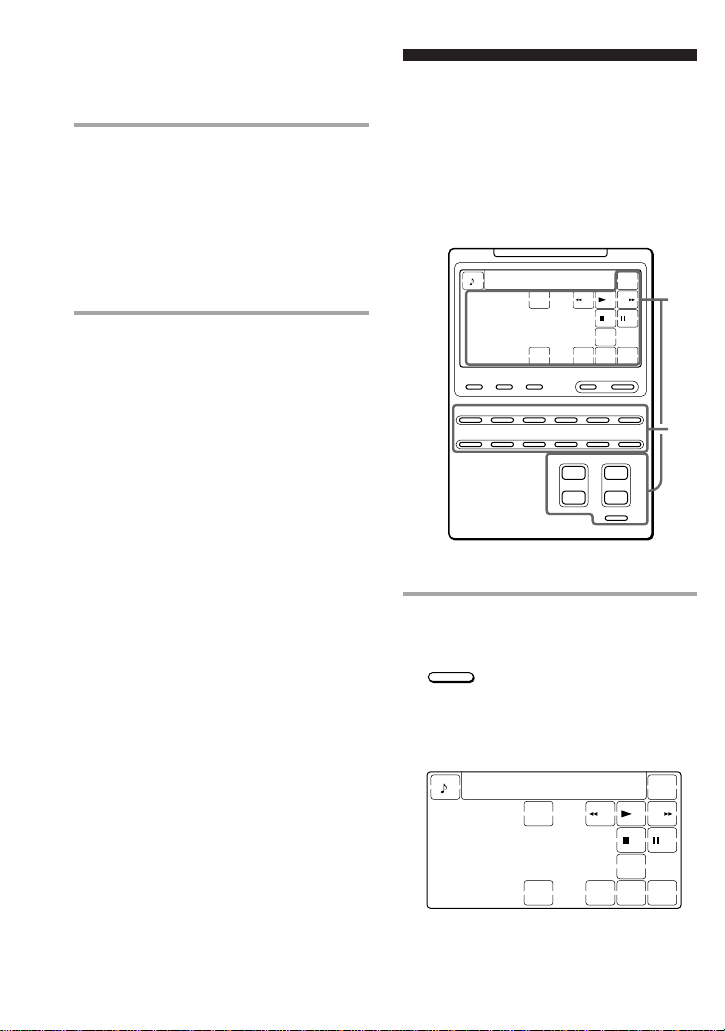
Example: To play a CD player
1 Press the desired Component
Select button.
CD
The Commander comes on and the
keys for operating the selected
component are displayed.
ENTER
D.SKIP
CLEAR
123
456
7809
-/--
1
-
ON OFF
PGM
CONTINUE
SHUFFLE
REPEAT
e
OFF
Á
+
¤
CD
PGM
CONTINUE
SHUFFLE
REPEAT
2
1
u
10
EN
Page 12

2 Press the desired key in the touch
key display.
When the remote control signal is
sent, is displayed on the display.
You may also use the Á +/– buttons,
the ¤ button and the PROGRAM +/–
buttons if necessary.
3 When you are done using the
Commander, press
COMMANDER OFF to power off
the Commander.
COMMANDER
OFF
Note
The remote control signals may be different for
some components or functions. In this case,
program the remote control signals with the
learning function (see page 12). Note, however,
that components and functions that do not
support the remote control of infrared signals
will not work with this Commander.
When you operate a Sony VCR
Select the VCR1, 2, or 3 button to match
the VTR1, 2 or 3 switch on your VCR. If
your VCR does not have a VTR1, 2, or 3
switch, select VCR1, 2, or 3 according to
the type of VCR as follows.
Betamax VCR1
8mm VCR2
VHS VCR3
When you operate a VCR REC
(record) key
In order to avoid recording by mistake,
the REC key does not work by itself. To
record, you must press the ( key while
pressing the REC key.
When you operate a double
cassette deck
You need to select deck A or B before
operating. To select the deck, press
DECK B/A to switch the display between
“DECK A” and “DECK B”.
If the remote control for your cassette
deck has only one set of operating
buttons and has an A/B button for
selecting a deck, press the D.SKIP key in
the touch-key display instead.
To control the volume
Press the Á +/– buttons to control the
volume, and the ¤ button to mute.
When you select a visual component, the
TV’s volume will be controlled, and
when you select an audio component, the
amplifier’s volume will be controlled.
You can change this setting also
(page 17).
Continued
11
EN
Page 13
Operating Your Components with
SYSTEM CONTROL COMMANDER
OFF
e
TV VCR1 VCR2 VCR3 DVD SAT/CBL
AMP CD MD/DAT DECK B/A TUNER DSP
PROGRAM
Á
–
+–+
=
+
123
¤
P+P–V+V
–
MU
VCR1
RESET
123
456
7809
2
-
-/--
1
-
RED
YELLOW
RETURN
ANT SW
BLUE
INPUT
u
EXECUTE
GREEN
TV
REC
MENU
LEARNNG
3
2
6
the Remote Commander
(continued)
About the input select of a TV
It is also possible to select directly as
follows when you are connecting more
than two VCRs.
“INPUT” + “0” : TV tuner
“INPUT” + “1” : VIDEO1
“INPUT” + “2” : VIDEO2
“INPUT” + “3” : VIDEO3
“INPUT” + “4” : VIDEO4
“INPUT” + “5” : VIDEO5
“INPUT” + “6” : VIDEO6
When you use a Sony TV, the above
commands are preset. For other brands, it
is possible to “teach” the above doublekey operations using the learning
function (see next page).
Using Non-Preset
Remote Control
Operations
— Learning Function
To operate non-preset components or
functions, use the following “learning”
procedure to “teach” any of the
programmable buttons and keys to
operate the functions of another remote
control. You can also use the learning
function to change the signal of
individual keys and buttons after setting
the component code number (page 7).
It is useful if you make a memo of the
learned key functions in the supplied
“LCD Touch Key Display Table”.
Note
Some specific remote control signals may not
be learned.
EN
12
Page 14

Example: To program the (
(Play) signal of your component
to the VCR1 ( (Play) key of the
Commander
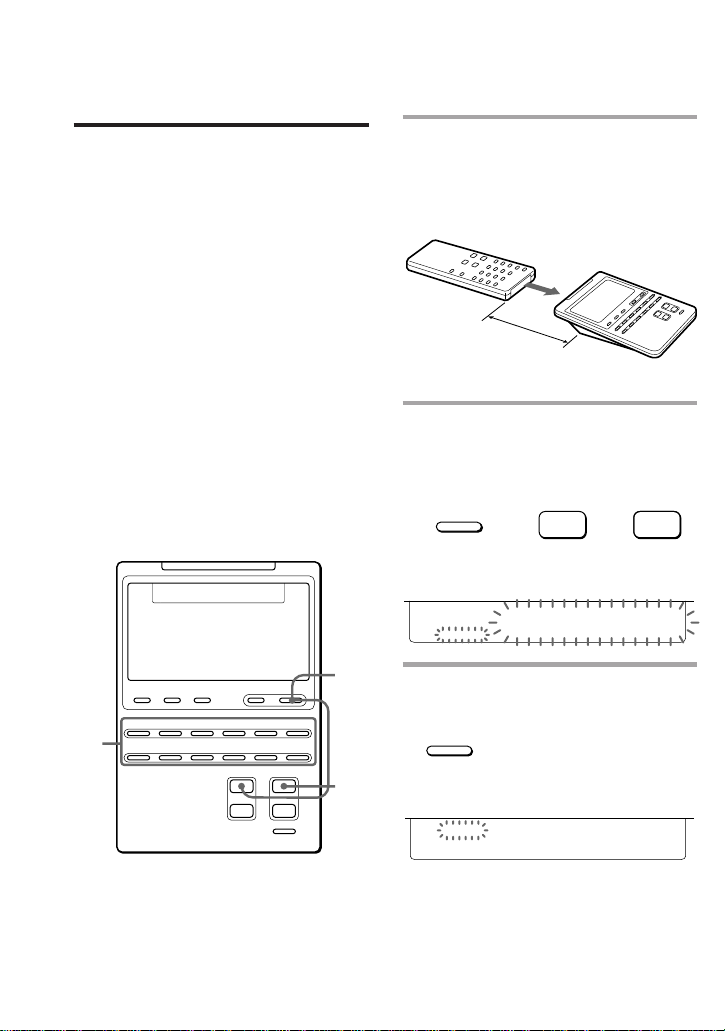
1 Place the RM-AV2000T head to
head with your component’s
remote control.
Remote control for
your component
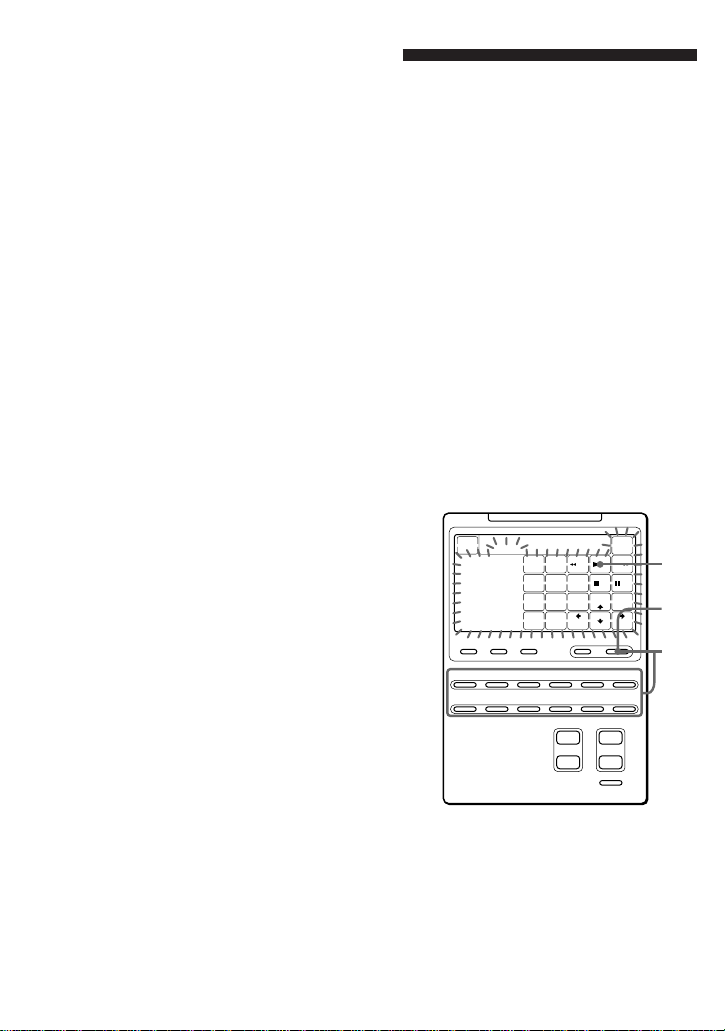
3 Press the key or button on the
Commander you want to “teach”.
“LEARN” flashes and the only
pressed key remains on the display.
LEARNNG
VCR1
about 5 – 10 cm
(2 – 4 inches)
away
RM-AV2000T
2 While pressing COMMANDER
OFF, press the Component Select
button for the component whose
signals are to be learned.
COMMANDER
OFF
All the learnable keys flash.
RESET
123
456
7809
-/--
1
-
Display for PROGRAM, Á and ¤ buttons
The “P+ P– V+ V– MU” display
indicates if PROGRAM +/–, Á +/–
and ¤ buttons are learnable or not.
Note on the flashing display
The keys or buttons that are already preset
for that component flash twice while those
that are not preset flash once.
+
LEARNNG
P+P–V+V
2
-
–
MU
VCR1
VCR1
INPUT
REC
ANT SW
To teach on the PROGRAM +/–,
Á +/– or ¤ buttons
Press the corresponding button. “LEARN”
flashes, “P+”, “P–”, “V+”, “V–”, or “MU”
remains on the display.
4 Press and hold down the button
of your component’s remote
control until you hear a beep.
u
“LEARN” stops flashing and stays lit.
When the signal has been learned
successfully, the learned keys stay lit
and the other learnable keys flash.
If you hear beeps and “NG”
flashes on the display
Learning did not succeed. Try Steps 3 and
4 again.
Certain signals may require the learning
procedure more than once to complete
learning. In this case, try Step 4 again if
“NG” appears after Step 4.
Continued
13
EN
Page 15
Using Non-Preset Remote Control
Operations — Learning Function
(continued)
5 Repeat Steps 3 and 4 to teach
functions to other keys or
buttons.
To learn another component’s
remote control signal
After positioning the two remote
commanders as in Step 1 on page 13, press
the corresponding Component Select
button, and then follow Steps 3 and 4 on
page 13 to perform learning.
6 Press COMMANDER OFF.
COMMANDER
OFF
Notes
• If you do not perform learning steps within
two minutes, learning mode ends.
• If you do not perform Step 4 within 10
seconds after Step 3, the display turns back to
the display in Step 2. (All the learnable keys
flash.) In this case, perform Step 3 again
while the display is flashing,
• If “NG” appears while learning, the memory
is full. To free memory, clear learned
functions from keys that you do not use often
(page 15). Then continue the learning steps.
• If you touch a key by mistake, while pressing
“RESET” key, press the mistaken key. Then
repeat from Step 2 to continue learning.
If the Commander does not seem to
be working
If the learned key or button does not operate
properly, teach once again. (For example, if the
volume becomes very loud after pressing the
Á + button only once, noise may have
interfered during the learning procedure.)
For accurate learning
•Do not move the remote units during
the learning procedure.
•Be sure to keep holding down the
button of your component’s remote
control until you hear the confirmation
beep.
•Use fresh battery in both remote units.
•Avoid learning in places under direct
sunlight or a strong fluorescent light.
•The remote control detector area may
differ depending on each remote unit. If
learning does not work, try changing
the positions of the two remote control
units.
IMPORTANT
Be sure to place the Commander out
of the reach of small children or pets.
Components such as air-conditioners,
heaters, electric appliances, and
electric shutters or curtains receiving
an infrared signal can be dangerous if
misused.
When you teach the signals for a
double cassette deck
Press DECK B/A to select deck A or B.
When you teach the REC (record)
signal for VCR1, 2, or 3
In Step 3, while pressing the REC key,
press the ( key to display both keys,
then follow Steps 4 to 6. The Commander
can not learn the remote control signal
with just the REC key lit up.
When you teach signals on the
Á or ¤ buttons
For components other than TV or AMP,
be sure to read the notes on pages 17 and
18.
14
EN
Page 16

To display only the frequently
used keys
You can hide keys you do not use. This
makes operations even easier to
understand, when the components have
many keys.
After Step 2 on page 13, while pressing
the RESET key, press the key you want to
hide (flashing). The pressed key changes
to slower flashing and will no longer be
displayed during remote control
operations.
To display it again, perform the same
procedure again.
Note
You can not hide a key which has “learned”
any signal.
Changing or erasing the
function of a learned key or
button
To change the learned function, clear it
first and perform learning again.
To clear the learned function of a
single key or button
RESET
RESET
LEARNNG
P + P – V + V –
123
456
7809
-/--
1
-
2
-
VCR1
MU
INPUT
ANT SW
u
REC
1 After Step 2 on page 13, while
pressing the RESET key, press the
key or button you want to erase.
RESET
+
The cleared key flashes together with
other learnable keys.
Continued
15
EN
Page 17
Using Non-Preset Remote Control
Operations — Learning Function
(continued)
To clear all signals learned for a
specific component
RESET
LEARNNG
2
P+P–V+V
123
456
7809
-/--
1
-
2
-
SYSTEM CONTROL COMMANDER
123
TV VCR1 VCR2 VCR3 DVD SAT/CBL
AMP CD MD/DAT DECK B/A TUNER DSP
–
MU
YELLOW
VCR1
RED
GREEN
BLUE
INPUT
TV
ANT SW
RETURN
PROGRAM
+
–+–
=
u
REC
MENU
EXECUTE
e
OFF
1
Á
+
¤
1 While pressing COMMANDER
OFF, press the corresponding
Component Select button.
COMMANDER
OFF
+
CD
Note
If you perform the steps above when no signal
is “learned”, the component code setting
(page 7) will be reset to the factory setting.
Note that for DECK B/A, if you reset either
deck (A or B), the component code for both A
and B will be reset to the factory setting.
When you want to clear signals
learned for DECK B/A
Press DECKB/A to display “DECK A”or
“DECK B”. You can not clear both decks at
the same time.
2 While pressing the RESET key,
press that Component Select
button again. The Commander
beeps, and the learned contents
are cleared. The keys for the
component return to their
original states before learning.
16
RESET
EN
+
CD
Page 18

Advanced Features
Controlling the Volume
of Visual Components
Connected to an Audio
System
The Commander is factory preset based
on the assumption that you hear the
sound of your visual components from
your TV speakers, and that you hear the
sound of your audio components from
the loudspeakers connected to your
amplifier.
The following table shows the factory
setting of which volume would be
controlled for each component.
Component
Select button
TV
VCR1,2,3
SAT/CBL
DVD
AMP
CD
MD/DAT
DECK B/A
TUNER
DSP
This feature enables you to control the
volume of your TV or amplifier without
having to select TV or AMP each time
you want to control the volume.
For example, to control the volume while
using a VCR, you don’t need to press the
TV button to control the TV volume.
Controls the volume of
TV
TV
TV
TV
amplifier
amplifier
amplifier
amplifier
amplifier
amplifier
Notes
• If you have programmed any signal on the
Á or ¤ buttons by learning (page 12) for
certain components, that signal will be
transmitted instead of controlling the volume
of TV or amplifier when you select that
component.
• When the Á or ¤ buttons of TV or AMP
have “learned” any signal, that signal will be
transmitted only when you select TV or AMP.
When you select other components, the
original signals preset for TV or AMP will be
transmitted.
To change the Factory Preset of
the Volume Control
However, if your visual components are
connected to an audio system, you
probably hear TV or VCR sound from the
loudspeakers via your amplifier, not
from your TV speakers. In this case, you
need to change the factory preset so that
you can control the volume of your
visual components without first having
to switch to the amplifier.
RESET
LEARNNG
P+P–V+V
SC1 SC2 SC3 MU
OFF
123
CENTER REAR
456
7809
-/--
1
-
SYSTEM CONTROL COMMANDER
123
TV VCR1 VCR2 VCR3 DVD SAT/CBL
AMP CD MD/DAT DECK B/A TUNER DSP
DVD
TV VCR123 SAT DECK
–
RED
INPUT
D.SKIP
AUDIO
SUB
VIDEO1 VIDEO2 VIDEO3 VDP/AUX TV
WOOFER
TV
GREEN
SUBTITLE
SUBTITLE
ON/OFF
TAPE DAT/MD
TELETEXT
YELLOW
TITLE
ANT SW
SOUND
DVD MENU
GENRE
FIELD
BLUE
RETURN
ENTER
T.TONE
2
-
CLEAR
SHIFT
BAND
PROGRAM
+
+
–
=
AB
u
CD FM/AM DSPMD CBLAMP
ON OFF
DISPLAY
ANGLE
REC
CD
PHONO
TUNER
PGM
MENU
EXECUTE
MODE
CONTINUE
SHUFFLE
REPEAT
e
OFF
1
Á
+
–
¤
Continued
17
EN
Page 19

Controlling the Volume of Visual
Components Connected to an
Audio System (continued)
1 While pressing COMMANDER
OFF, press Á + and Á –.
Á
COMMANDER
OFF
You hear a beep and the volume
control setting of visual components
(TV, VCR1, 2 and 3, SAT/CBL, and
DVD) changes to the displayed
component.
When set to
amplifier volume
When set to
TV volume
Notes
• If you have already programmed the Á or
¤ button of each component any signals by
“learning”, the procedure above will not
change the function of the Á and ¤ buttons.
• If you have programmed volume control
signals on Á or ¤ buttons of TV or AMP by
the “learning” function (page 12), you can
only use that signal when you select TV or
AMP. For other component, the preset
volume control signals for TV or AMP
(depending on the above setting procedure)
will be transmitted. To use the new signals,
you need to program each button for each
component by the learning procedure
(page 12).
+
++
–
V+V
V+V
NG
V+V
–
AMP
MU
–
AMP
MU
TV
–
MU
Executing a Series of
Commands
— System Control Function
With the System Control function, you
can program a series of operating
commands, and execute them by
pressing just one button.
For example, when you watch a video, a
series of operations like the ones below
are necessary.
Example:
1 Power on the TV.
2 Power on the video (VCR 1).
3 Power on the amplifier.
4 Set the imput selector of the amplifier
to VIDEO 1.
5 Set the input mode of the TV to
VIDEO.
6 Start video playback.
You can program up to 16 consecutive
operation steps to each of the SYSTEM
CONTROL 1, 2 or 3. At the factory,
SYSTEM CONTROL 1 and 2 are not
programmed yet, but a series of Poweron Commands for Sony Components is
programmed on the SYSTEM CONTROL
3 button.
18
EN
Page 20
Programming a series of
commands to the SYSTEM
CONTROL buttons
RESET
LEARN
TV
P+P–V+V
–
SC1 MU
RED
123
456
7809
-/--
1
-
SYSTEM CONTROL COMMANDER
123
TV VCR1 VCR2 VCR3 DVD SAT/CBL
AMP CD MD/DAT DECK B/A TUNER DSP
INPUT
TV
GREEN
TELETEXT
YELLOW
BLUE
2
-
PROGRAM
+
–+–
=
Example: To program the
procedure on the left to the
SYSTEM CONTROL 1 button
u
MENU
EXECUTE
e
OFF
Á
+
¤
2 Press the Component Select
buttton for the component to
operate.
TV
The keys for the selected component
3
5
1
2
flash.
RESET
123
456
7809
-/--
1
-
3 Press key(s) or button(s) for the
desired operation.
For example; to turn on the TV, press
one of the numeric keys.
1
LEARN
P+P–V+V
SC1 MU
2
-
TV
–
RED
INPUT
TV
GREEN
TELETEXT
YELLOW
MENU
BLUE
u
EXECUTE
1 While pressing COMMANDER
OFF, press one of the SYSTEM
CONTROL buttons (in this case,
SYSTEM CONTROL 1).
COMMANDER
OFF
All the component names flash.
TV VCR123 SAT DECK
If a series of commands is already
programmed on that button
That program will be displayed. (Note
that the SYSTEM CONTROL 3 button
is factory preset with standard Poweron Command for nearly all Sony
Components.) To program a new
series of operations, clear the program
first (see page 21).
SYSTEM CONTROL
+
1
DVD
CD FM/AM DSPMD CBLAMP
AB
The remote control signal for the
pressed key is transmitted, so you can
check that each component actually
operates the way you want.
Continued
19
EN
Page 21
Executing a Series of Commands
— System Control Function
(continued)
4 Repeat Steps 2 and 3 and
program the buttons and keys for
the series of operations.
In this example, press the following
buttons and keys.
m
m
m
VCR1
AMP
TV
VCR1
m
m
m
m
INPUT
u
u
m
VIDEO1
5 When you have programmed all
the keys, press COMMANDER
OFF.
COMMANDER
OFF
Notes
• If you interrupt the procedure at any point
for over two minutes, the setting mode ends
and the series of commands will be
programmed to that point. In this case, clear
the program and start again from Step 1 to
set the entire program from the beginning.
You can not continue from where you let off.
• If a SYSTEM CONTROL button has already
“learned” a remote control signal (see page
28), “NG”flashes and you hear a beep to
inform you that you can not program on this
button. Clear the learned contents first (see
page 29).
•If you change the component code number
(page 7) or program a new signal by learning
(page 12) on a key or button that has been
programmed in the series of commands of
the System Control function, the new signal
will be transmitted when you press the
corresponding SYSTEM CONTROL button.
Tip for programming on SYSTEM
CONTROL button
After the series of input commands is executed,
the Commander displays the touch keys of the
component of the final step. By programming
an often-used component’s command as the
final step, you can save the step of pressing a
Component Select button when you start
operating that component.
Executing the programmed
commands
Press the desired SYSTEM CONTROL
button (1, 2 or 3). The programmed
remote control signals are transmitted in
the programmed order to operate each
component.
SYSTEM CONTROL
1 2 3
20
At the same time that each remote
control signal is transmitted, the
corresponding key is displayed.
EN
Page 22

Notes on System Control
Operation
•If the remote control detectors of the
components are too far apart, or if
something is blocking them, some of
the components may not operate
consecutively even after you press the
SYSTEM CONTROL button.
•If some of the components did not
operate correctly because of the above
or for any other reason, always set all
the components back to the states they
were in before you pressed the SYSTEM
CONTROL button. Failure to do this
can result in incorrect operation when
you press the SYSTEM CONTROL
button again.
•Some components may not always be
powered on by the System Control
function. This is because the power of
the component gets on and off
alternatively when receiving the power
on/off signal. In this case, check the
operating component’s power on/off
state before using the System Control
function.
•Some of the components may not
accept consecutive remote control
signals. For example, a TV generally
does not react to next signal right after
the Power-on signal. So, a series of
commands such as TV Power-on and
input select may not work properly. In
this case, insert other signals like the
example below;
TV Power-on n VCR Power-on
n VCR play back n TV input select
Changing the programmed
commands
To clear programmed commands
1 While pressing COMMANDER
OFF, press one of the SYSTEM
CONTROL 1, 2, or 3 button.
COMMANDER
OFF
The key operations programmed for
that button are displayed in order.
SYSTEM CONTROL
+
1
2 While pressing the RESET key,
press the same SYSTEM
CONTROL button (1, 2, or 3)
again.
RESET
The contents of its program are
cleared and all the component names
flash.
RESET
When you want to set a new program
to this SYSTEM CONTROL button,
follow the Steps 2 – 5 on pages 19 and
20.
SYSTEM CONTROL
+
LEARNNG
TV VCR123 SATDECK
SC1
1
DVD
CD FM/AM DSPMD CBLAMP
AB
Continued
21
EN
Page 23

Executing a Series of Commands
— System Control Function
(continued)
To set SYSTEM CONTROL 3 back
to the factory setting (Power-on
commands for Sony
components)
1 While pressing COMMANDER
OFF, press SYSTEM CONTROL 3.
COMMANDER
OFF
The programmed key operations are
displayed in order.
SYSTEM CONTROL
+
3
2 While pressing the RESET key,
press SYSTEM CONTROL 3.
3 While pressing the RESET key
again, press SYSTEM CONTROL
3 again.
RESET
The series of the Power-on commands
for Sony Components are set and the
programmed operations are displayed
in order.
SYSTEM CONTROL
+
3
22
RESET
The contents of its program are
cleared and all the components names
flash.
EN
SYSTEM CONTROL
+
3
Page 24

Adding an Extra
Function to the
Component Select
Buttons
Programming the Power-On
Command of the Selected
Component (for Sony
Components only)
When using Sony components, you can
program the Power-on signal for each
component on a Component Select
button. You can select the desired
component and power it on by just
pressing that Component Select button.
RESET
LEARNNG
P+ P– V +V –
SC1 SC2 SC3 MU
OFF
123
CENTER REAR
456
7809
-/--
1
-
SYSTEM CONTROL COMMANDER
123
TV VCR1 VCR2 VCR3 DVD SAT/CBL
AMP CD MD/DAT DECK B/A TUNER DSP
DVD
TV VCR123 SAT DECKAB
RED
INPUT
D.SKIP
AUDIO
SUB
VIDEO1 VIDEO2 VIDEO3 VDP/AUX TV
WOOFER
TV
GREEN
SUBTITLE
SUBTITLE
ON/OFF
TAPE DAT/MD
YELLOW
TELETEXT
TITLE
ANT SW
SOUND
DVD MENU
GENRE
FIELD
BLUE
RETURN
ENTER
T.TONE
2
-
CLEAR
BAND
SHIFT
PROGRAM
+
–+–
=
u
CD FM/AM DSPMD CBLAMP
ON OFF
DISPLAY
ANGLE
REC
CD
PHONO
TUNER
PGM
MENU
EXECUTE
MODE
CONTINUE
SHUFFLE
REPEAT
e
OFF
1
Á
+
¤
Example: To program the TV
button
1 While pressing COMMANDER
OFF, press Á – and the desired
Component Select button.
COMMANDER
OFF
When the Power-on command is
programmed, you will hear a beep
and “u ON” appears on the display.
(The display goes off when you
release the buttons.)
u
ON
To clear the Power-on command
Repeat the procedure above.
You will hear a beep and the following
display appears.
u
Notes
• When a signal has been already learned for a
Component Select button (see paga 24), the
Power-on command can not be programmed.
• When you program another signal using the
learning function to a Component Select
button (page 24) for which a Power-on
command has been already programmed, the
learned signal overwrites the Power-on
command. If the learned signal is cleared
afterward, the Power-on command will also
be erased and the button will return to its
status before being programmed.
Á
++
–
TV
Continued
23
EN
Page 25
Adding an Extra Function to the
Component Select Buttons
(continued)
Example : To program the input
select signal of your amplifier to
the CD button
Adding a Command that is
Required when Selecting a
Component
In addition to the original function of
selecting the operating keys and buttons
of the desired component, the
Component Select button can have
another remote control signal by
“learning” (see page 12).
For example, if you always have to
change input select of the amplifier to CD
when listening to the CD player, program
the signal of “changing the amplifier’s
input select” to the CD button of this
Commander. Then whenever you pr ess
the CD button, it automatically works as
the original CD Component Select button
and changes also the amplifier input
select to CD.
+
+
–
=
PROGRAM
e
+
–
5
OFF
Á
2
¤
SYSTEM CONTROL COMMANDER
123
TV VCR1 VCR2 VCR3 DVD SAT/CBL
AMP CD MD/DAT DECK B/A TUNER DSP
3
1 Place the RM-AV2000T head to
head with your component’s
remote control.
Remote control of
your component
about 5 – 10 cm
(2 – 4 inches) away
RM-AV2000T
2 While pressing COMMANDER
OFF, press Á + and PROGRAM
+.
DVD
CD FM/AM DSPMD CBLAMP
PROGRAM
+
+
COMMANDER
OFF
Á
++
+
“LEARN” appears and all the
component names flash.
LEARN NG
SC1 SC2 SC3
TV VCR123 SAT DECK
3 Press the desired Component
Select button.
CD
The selected component name stays
lit and “LEARN” flashes.
LEARN NG
CD
AB
24
EN
Page 26
4 Press and hold down the button
on your component’s remote
control (amplifier in this example)
until you hear a beep.
INPUT SELECT
CD
5 Press COMMANDER OFF.
COMMANDER
OFF
To clear the learned function of
the Component Select button
1 While pressing COMMANDER OFF,
press Á + and PROGRAM +.
2 While pressing the RESET key, press
the Component Select button which
you want to clear .
Note
Even if that Component Select button has been
programmed with the Power-on command
(page 23), you can program any signal on it by
the procedure above. However, the new signal
overwrites the Power-on command, and even
after you clear this new signal, the Power-on
command will not resume.
Turning Off the Power
of All Components by a
Single Button
Operation
— System Power-Off Function (for
Sony Components only)
When the System Power-Off function is
active, you can turn off all Sony
components just by pressing the
COMMANDER OFF button for three
seconds.
To set the System Power-Off
function
1 While pressing COMMANDER
OFF, press PROGRAM – and
Á +.
COMMANDER
OFF
When the System Power-Off function
is set, “u OFF” appears on the
display. (The display goes off when
you release the buttons.)
u
OFF
PROGRAM
++
–
=
Á
+
To cancel the System Power-Off
function
Repeat the procedure above. The
following display appears when the
System Power-Off function is disabled.
u
25
EN
Page 27

Assigning Other
Components to the
Component Select
Buttons
You can assign another component to
any empty Component Select button.
For example, if you have two VCRs and
two CD players, you can use the VCR3
button as the Component Select button
for your second CD player.
Note
Once you assign another component to a
Component Select button, the setting of the
component code number will be erased. The
component code number will not return even if
you reset the newly assigned component and
turn back to the original component.
RESET
LEARNNG
P+P–V+V
SC1 SC2 SC3 MU
OFF
123
CENTER REAR
456
7809
-/--
1
-
SYSTEM CONTROL COMMANDER
123
TV VCR1 VCR2 VCR3 DVD SAT/CBL
AMP CD MD/DAT DECK B/A TUNER DSP
DVD
TV VCR123 SAT DECK
–
RED
INPUT
D.SKIP
AUDIO
SUB
VIDEO1 VIDEO2 VIDEO3 VDP/AUX TV
WOOFER
TV
GREEN
SUBTITLE
SUBTITLE
ON/OFF
TAPE DAT/MD
YELLOW
TELETEXT
TITLE
ANT SW
SOUND
DVD MENU
GENRE
FIELD
BLUE
RETURN
ENTER
T.TONE
2
-
CLEAR
BAND
SHIFT
PROGRAM
+
+
–
=
AB
u
CD FM/AM DSPMD CBLAMP
ON OFF
DISPLAY
ANGLE
REC
CD
PHONO
TUNER
PGM
MENU
EXECUTE
MODE
CONTINUE
SHUFFLE
e
3
REPEAT
OFF
1
2
Á
+
–
¤
Example: To assign a CD player
to the VCR3 button
1 While pressing COMMANDER
OFF, press VCR3.
COMMANDER
OFF
The keys for that component (VCR3)
flash.
RESET
LEARNNG
P+P–V+V
123
456
7809
-/--
1
-
VCR3
+
VCR 3
–
MU
INPUT
REC
ANT SW
2
-
u
2 While pressing VCR3, press CD.
VCR3
The Commander beeps and the keys
for the new component (CD) flash.
The new component name (CD) flash
and the original component name
(VCR3) stays lit.
RESET
LEARNNG
P+P–V+V
123
456
7809
-/--
1
-
+
ENTER
CD
VCR 3
–
MU
2
-
CD
D.SKIP
CLEAR
SHUFFLE
PGM
CONTINUE
u
REPEAT
26
EN
Page 28

When you assign a cassette deck
(DECK B/A) to another Component
Select button
You cannot assign both decks A and B at a
time to one button.
If the desired deck (A or B) is not displayed,
finish the procedure by pressing
COMMANDER OFF and press DECK B/A
to select the desired deck, and then start
over from Step 1.
3 •If the newly assigned
component is a Sony
component, press
COMMANDER OFF to finish
this procedure.
•If you need to set the
component code, follow the
steps on pages 7 – 10.
•If you need to program some
signals by the “learning”
function, follow the Steps 1 and
3 to 6 on pages 13 and 14.
Note
If you hear beeps and “NG” flashes on the
display when you press the Component Select
button at Step 1, you can not assign another
component because some of the keys or
buttons are already programmed with the
learning function (see page 12).
Try the above procedure again after clearing
the learned signals for that component.
To assign an LD player (VD) or
Cable box (CBL) to another
Component Select button
If the desired component (“VD” or
“CBL”) is not displayed, before Step 3,
repeat Step 2 again so that the desired
component (“VD” or “CBL”) flashes on
the display.
To use the Commander after
assigning other components
Press the reassigned Component Select
button. The keys of the new component
are displayed and you can use the
desired component. Note however that
only the original component name is
displayed.
(In this example, the display would be
like the one below.)
Original component
name
123
456
7809
-/--
1
-
2
-
keys for operating
a CD player
D.SKIP
CLEAR
VCR 3
SHUFFLE
PGM
CONTINUE
u
REPEAT
To reset a Component Select
button to its original setting
1 While pressing COMMANDER OFF,
press the Component Select button
which you want to reset.
2 While pressing the RESET key, press
that Component Select button again.
The setting for that Component Select
button returns to the factory setting.
Note
If you have programed some signals on any of
the keys or buttons with the learning function
(see page 12) after you reassigned your
component, the two steps above only clears the
“learned” signals. In this case, perform Step 2
again to reset to the original Component Select
button.
27
EN
Page 29

Programming a
Frequently Used Key
Operation to SYSTEM
CONTROL Buttons
In addition to their original System
Control functions (see page 18), SYSTEM
CONTROL 1, 2 or 3 buttons can be
programmed to “learn” any remote
control signal.
As they operate independently from
other buttons, SYSTEM CONTROL 1, 2
or 3 buttons can work as one-touch
buttons without any preceding operation
such as pressing a Component Select
button to select a component.
This is useful if you prefer having the
SYSTEM CONTROL button as a “onetouch” button for a single operation
rather than executing a series of
commands.
RESET
LEARNNG
P+P–V+V
SC1 SC2 SC3 MU
OFF
123
CENTER REAR
456
7809
-/--
1
-
SYSTEM CONTROL COMMANDER
123
TV VCR1 VCR2 VCR3 DVD SAT/CBL
AMP CD MD/DAT DECK B/A TUNER DSP
DVD
TV VCR123 SAT DECK
–
CD FM/AM DSPMD CBLAMP
RED
INPUT
D.SKIP
AUDIO
SUB
VIDEO1 VIDEO2 VIDEO3 VDP/AUX TV
WOOFER
TV
GREEN
SUBTITLE
SUBTITLE
ON/OFF
TAPE DAT/MD
TELETEXT
YELLOW
TITLE
ANT SW
SOUND
DVD MENU
GENRE
FIELD
BLUE
RETURN
ENTER
T.TONE
2
-
CLEAR
SHIFT
BAND
PROGRAM
+
–+–
=
DISPLAY
ANGLE
REC
CD
MENU
MODE
SHUFFLE
TUNER
PGM
CONTINUE
e
+
AB
u
ON OFF
PHONO
EXECUTE
REPEAT
OFF
Á
¤
3
5
2
Example: To store the On/Off
signal of an air-conditioner to
the SYSTEM CONTROL 2 button
1 Place the RM-AV2000T head to
head with the remote control of
the air-conditioner.
Remote control of
your component
about 5 – 10 cm
(2 – 4 inches) away
RM-AV2000T
2 While pressing COMMANDER
OFF, press PROGRAM + and
Á +.
COMMANDER
OFF
“LEARN” appears and the display
that stands for the learnable SYSTEM
CONTROL buttons flash in the
display panel.
LEARN
SC1 SC2 SC3
If a signal has been learned on that
button, the display stays lit. If you
want to program on that button, clear
the signal first (page 29).
PROGRAM
++
+
+
TV VCR123 SAT DECK
DVD
CD FM/AM DSPMD CBLAMP
Á
+
AB
28
EN
Page 30

3 Press the SYSTEM CONTROL
button you want to teach.
SYSTEM CONTROL
2
“LEARN” flashes and the display for
the pressed SYSTEM CONTROL
button stays lit.
LEARNNG
SC2
4 Press and hold down the button
of the remote control of the
air-conditioner until you hear a
beep.
AIR CONDITIONER
ON/OFF
“LEARN” display stops flashing and
stays lit.
If you hear beeps and “NG”
flashes on the display
Learning did not succeed. Try Steps 3 and
4 again.
5 Press COMMANDER OFF.
COMMANDER
OFF
To clear the learned remote
control signal
1 While pressing COMMANDER OFF,
press PROGRAM + and Á +.
2 While pressing the RESET key, press
SYSTEM CONTROL 1, 2, or 3.
29
EN
Page 31

Using Other Functions
Locking the Controls
— Hold Function
To prevent accidental operation, you can
lock all the buttons with the Hold
function.
u
CD
123
456
7809
-/--
1
-
123
TV VCR1 VCR2 VCR3 DVD SAT/CBL
AMP CD MD/DAT DECK B/A TUNER DSP
If the ≥ key is not displayed, press any
button except SYSTEM CONTROL or
COMMANDER OFF before you start.
D.SKIP
PGM
ENTER
CLEAR
SYSTEM CONTROL COMMANDER
SHUFFLE
PROGRAM
+
–+–
=
CONTINUE
e
+
REPEAT
OFF
Á
¤
1
To unlock the control
While pressing the “OFF” key, press
COMMANDER OFF. “OFF” disappears
from the display.
1 While pressing the ≥ key, press
COMMANDER OFF.
COMMANDER
+
The Commander beeps and “OFF” is
displayed.
OFF
EN
30
OFF
Page 32
Protecting your
TV VCR123 SAT DECK
AB
CD FM/AM DSPMD CBLAMP
DVD
u
ON
settings and “learned”
signals
— Preset Lock function
You can lock the Commander so that you
can not change, add, or clear any of your
component code settings (page 7),
“learned” signals (pages 12, 24, 28, etc.),
System Control settings, (page 18),
volume setting (page 17), or System
Power-off setting (page 25).
DVD
TV VCR123 SAT DECK
SYSTEM CONTROL COMMANDER
123
TV VCR1 VCR2 VCR3 DVD SAT/CBL
AMP CD MD/DAT DECK B/A TUNER DSP
CD FM/AM DSPMD CBLAMP
PROGRAM
+
–+–
=
e
+
AB
u
OFF
OFF
Á
¤
2
3
1
2 Press the u OFF key.
u
OFF
All the component names stop
falshing and stay lit, and “u ON”
flashes.
3 Press COMMANDER OFF.
When the preset lock is on
If you try to set a component code
number (page 7) or perform learning
(page 12), you will hear beeps and “NG”
flashes on the display.
To unlock the preset lock
To unlock the preset lock, follow the
same procedure as the above and press
“u ON” in Step 2. “u OFF” appears on
the display.
1 While pressing COMMANDER
OFF, press ¤.
COMMANDER
OFF
All the component names flash and
“uv OFF” key appears.
¤
+
DVD
TV VCR123 SAT DECK
CD FM/AM DSPMD CBLAMP
AB
u
OFF
EN
31
Page 33

123
456
7809
Changing the Auto
Power-Off Time of the
Commander
The Commander is preset at the factory
to switch the power off automatically
after 10 minutes if left unused (Auto
Power-Off). To change this time, perform
the following procedure.
You can set the Auto Power-Off time up
to 90 minutes, in units of 10 minutes, or
disable the Auto Power-Off function.
Note
The Auto Power-Off function only turns off the
power of the Commander, but not of the
component.
OFF
123
456
7809
SYSTEM CONTROL COMMANDER
123
TV VCR1 VCR2 VCR3 DVD SAT/CBL
AMP CD MD/DAT DECK B/A TUNER DSP
PROGRAM
+
+
–
=
DISPLAY
e
+
–
2
3
OFF
Á
1
¤
1 While pressing COMMANDER
OFF, press PROGRAM + and
Á –.
COMMANDER
OFF
The number which shows the current
Power-Off time of the Commander
stays lit, and other numbers flash.
PROGRAM
++
+
+
Á
–
2 Press one of the 1 – 9 keys to
select the Auto Power-Off time, or
press the 0 key to disable the
Auto Power-off function.
For example, to set the Auto PowerOff time to 20 minutes, press the 2
key.
2
The Commander beeps, and “2” stops
flashing and stays lit.
3 Press COMMANDER OFF.
COMMANDER
OFF
EN
32
Page 34

Adjusting the Backlight
of the Display Window
The Commander is preset at the factory
to bright backlight, and to switch off the
backlight automatically after 10 seconds.
To change this setting, perform the
following procedure.
You can adjust the backlight AutomaticOff time (from 10 seconds to 90 seconds
in the units of 10 seconds) and the
brightness (bright or dim).
OFF
123
456
2
789
OFF
Á
¤
3
4
1
PROGRAM
+
–+–
=
e
+
SYSTEM CONTROL COMMANDER
123
TV VCR1 VCR2 VCR3 DVD SAT/CBL
AMP CD MD/DAT DECK B/A TUNER DSP
The number which shows current
Automatic-Off time and the arrow
indicating the current brightness of
the backlight stay lit. Other numbers
and the opposite arrow will flash.
123
456
789
2 Press one of the 1 – 9 keys to
select the Off time.
For example, to set the Automatic-Off
time to 20 seconds, press the 2 key.
2
The Commander beeps and “2 “ stops
flashing and stays lit.
3 Press the > or . key, to select the
brightness.
To brighten, press >, to dim, press ..
1 While pressing COMMANDER
OFF, press .
COMMANDER
OFF
+
e
The Commander beeps and the
chosen arrow stays lit.
4 Press COMMANDER OFF.
COMMANDER
OFF
33
EN
Page 35

Additional Information
Precautions
•Do not drop the unit or give a shock to
the unit, or it may cause a malfunction.
•Do not leave the unit in a location near
heat sources, or in a place subject to
direct sunlight, excessive dust or sand,
moisture, rain or mechanical shock.
•Do not put foreign objects into the unit.
Should any liquid or solid object fall
into the unit, have it checked by
qualified personnel before operating
the unit any further.
•Do not expose the remote control
detectors of your components to direct
sunlight or other strong illumination.
Too much light there can interfere with
remote control operations.
•Be sure to place the Commander out of
the reach of small children or pets.
Components such as air-conditioners,
heaters, electric appliances, and electric
shutters or curtains receiving an
infrared signal can be dangerous if
misused.
Specifications
Operating distance
Approx. 10 meters (32.8 ft) (varies depending
on components of different manufacturers)
Power requirements
Remote control: Four R6 (size AA) batteries
Backlight: Two R6 (size AA) batteries
Battery life
Approx. 6 months (varies depending on
frequency of use)
Dimensions
Approx. 120 × 175 × 45 mm
3
(4
/4 × 7 × 1 13/16 in.) (w × h × d)
Mass
290 g (10.22 oz) (not including batteries)
Design and specifications are subject to change
without notice.
Maintenance
Clean the surface with a soft cloth
slightly moistened with water or a mild
detergent solution. Do not use any type
of solvent such as alcohol, benzine or
thinner as they may damage the finish of
the surface.
EN
34
Page 36

Troubleshooting
If you have problems setting up or using the Remote Commander, first check the
batteries (page 5), then check the items below.
Symptom
You cannot operate the
components.
You cannot operate the
components even after
setting the component
code numbers.
You cannot operate a
component even after
you programmed the
remote control signals
with the “learning”
function.
“NG” flashes during
learning.
“NG” displays during
learning.
Remedy
• Go closer to the component. The maximum operating distance is
approximately 10 m (32.8 ft).
• Check that you are aiming the Commander directly at the compoent,
and that there are no obstructions between the Commander and the
component.
• Power on the components first, if necessary.
• Make sure you have pressed the correct Component Select button. In
case of SAT/CBL, DVD or DECK B/A, make sure the desired
component is displayed.
• Check that the component has infrared remote capability. For example,
if your component didn’t come with a remote commander, it probably
isn’t capable of being controlled by a remote commander.
• If your visual components are connected to an audio system, make sure
you’ve set up the Commander as described in “Controlling the Volume
of Visual Components Connected to an Audio System”. (page 17)
• Set the component code correctly (page 7). If the code that is listed first
for your component doesn’t work, try all the codes for your component
in the order in which they are listed in the supplied “Component Code
Numbers”.
• Some features may not be preset. If some or all of the keys do not
function correctly even after you have set the component codes, then
use the learning function to program the remote control signals for the
component. (page 12)
• Make sure that the Remote Commander has learned the correct signals.
If not, try the learning procedure again. (page 12)
• Clear infrequently used learned keys (page 15), then carry out learning
operations.
• See “For accurate learning” on page 14 and try the learning procedure
again. (page 12)
• Another remote control signal has been already programmed on that
key or button by the learning function. Clear learned functions (page
15) and then try the learning procedure again. (page 12)
Continued
35
EN
Page 37

Troubleshooting (continued)
Symptom
A system control
program does not
function correctly.
The power of the
Commander turns off by
itself.
Remedy
• Make sure that you have programmed the commands in the correct
order. (page 18)
• Try changing the orientation of the Commander. If that does not help,
try placing the components as close to each other as possible.
• Check the status of the components and make sure that you have set the
components properly to receive commands from the SYSTEM
CONTROL buttons.
• This Commander is preset at the factory to switch the power off
automatically after 10 minutes if left unused. (Auto Power-Off, page 32)
You can change the power-off time from 10 to 90 minutes, or set the
Commander not to power off automatically.
36
EN
Page 38

Appendix
Table of Preset
Functions
TV
KEY DISPLAY
u
0 – 9
-/--
1
-
2
-
RED, GREEN,
YELLOW,
BLUE
INPUT
TV
TELE TEXT
MENU
>
?
.
/
EXECUTE
PROGRAM +/–
Á +/–
¤
FUNCTION
To turn off.
To change the programme.
Also to turn on.
To select double-digit
numbers.
Works in the same way as the
TV’s commander.
To select a number between
20 and 29.
Fastext buttons.
To change the input mode.
To turn on.
To return from teletext to TV.
To switch to Teletext.
To call up the MENU display.
To move the cursor upward.
To move the cursor to the left.
To move the cursor
downward.
To move the cursor to the
right.
To execute items selected
from the screen.
Programme up: +
Programme down: –
Volume up: +
Volume down: –
To mute the volume on the
TV. Press again to turn
muting off.
Using Fastext
With Fastext you can access pages with
one key stroke. When a Fastext page is
broadcast, a colour-coded menu will
appear at the bottom of the screen. The
colours of this menu correspond to the
red, green, yellow and blue keys on the
Remote Commander.
Press the key which corresponds to the
colour-coded menu. The page will be
displayed after some seconds.
VCR 1, 2, 3
KEY DISPLAY
u
0 – 9
-/--
1
-
2
-
INPUT
0
(
)
REC
p
P
ANT SW
PROGRAM +/–
FUNCTION
To turn on and off.
To change the programme.
To select double-digit
numbers. Works in the same
way as the VCR’s
commander.
To select a number between
20 and 29.
To change the input mode.
To rewind.
To play.
To fast-forward.
To record, press ( while
pressing REC. First release
(, then release REC.
To stop.
To pause.
To switch the antenna output.
Programme up: +
Programme down: –
Continued
37
EN
Page 39

Table of Preset Functions
(continued)
DVD (DVD player)
KEY DISPLAY
u
0 – 9
ENTER
AUDIO
DISPLAY
0
(
)
p
P
SUB TITLE
SUB TITLE
ON/OFF
ANGLE
TITLE
DVD MENU
MENU
>
?
.
/
EXECUTE
CLEAR
RETURN
PROGRAM
PROGRAM
FUNCTION
To turn on and off.
Number buttons: To set items
selected from the screen.
To enter the setting. To set
items selected from the
screen.
To change the sound.
To show the current play
status on the screen.
To go backward.
To play.
To go forward.
To stop.
To pause.
To switch the subtitle.
To turn the subtitle on and
off.
To switch angle.
To display the title menu.
To display the DVD menu.
To set or adjust menu items.
To move the cursor upward.
To move the cursor to the left.
To move the cursor
downward.
To move the cursor to the
right.
To execute items selected
from the screen.
To clear the selected
characters from the screen.
To return to the last previous
screen.
+
To proceed to the next
+
location or track.
–
To proceed to the previous
=
location or track.
VD (LD player)
KEY DISPLAY
u
0 – 9
-/--
1
-
ENTER
0
(
)
p
P
CLEAR
PROGRAM
PROGRAM
FUNCTION
To turn on and off.
To select the track number. 0
selects track 10.
To select track numbers
above 10, see the descriptions
on the
To select numbers 10 and
above.
For example, to select track
15, press
To enter the setting.
To go backward.
To play.
To go forward.
To stop.
To pause.
To clear the selected
characters from the screen.
+
To proceed to the next
+
location or track.
–
To proceed to the previous
=
location or track.
-/--
key below.
1
-
-/--
and then press 5.
1
-
38
EN
Page 40

SAT (Satellite tuner)
KEY DISPLAY
u
0 – 9
-/--
1
-
RETURN
MENU
>
?
.
/
EXECUTE
PROGRAM +/–
FUNCTION
To turn on and off.
To change programme.
To select double-digit
numbers. Works in the same
way as the satellite tuner’s
commander.
To tune to the last tuned
station.
To call up the MENU display.
To move the cursor upward.
To move the cursor to the left.
To move the cursor
downward.
To move the cursor to the
right.
To bring up the Station Index
when a programme guide is
not displayed.
To select the channel that is
highlighted.
Programme up : +
Programme down : –
CBL (Cable box)
KEY DISPLAY
u
0 – 9, ENTER
-/--
1
-
RETURN
PROGRAM +/–
FUNCTION
To turn on and off.
To change the programme.
To select double-digit
numbers.
To tune to the last tuned
station.
Programme up :+
Programme down : –
Continued
39
EN
Page 41

Table of Preset Functions
(continued)
AMP (Amplifier)
KEY DISPLAY
u
VIDEO 1
VIDEO 2
VIDEO 3
VDP/AUX
TV
TAPE
DAT/MD
CD
TUNER
PHONO
MENU
>
?
.
/
SHIFT
PROGRAM +/–
Á +/–
¤
FUNCTION
To turn on and off.
To select the input source:
VIDEO 1
To select the input source:
VIDEO 2
To select the input source:
VIDEO 3
To select the input source:
VDP or AUX
To select the input source: TV
To select the input source:
TAPE
To select the input source:
DAT/MD
To select the input source: CD
To select the input source:
TUNER
To select the input source:
PHONO
To call up the MENU display.
To move the cursor upward.
To move the cursor to the left.
To move the cursor
downward.
To move the cursor to the
right.
To shift band (FM/AM).
Presetting frequency up: +,
down: –
Tuning frequency up: +,
down: –
Volume up: +
Volume down: –
To mute the volume on the
AMP. Press again to turn
muting off.
CD (CD player)
KEY DISPLAY
u
0 – 9
-/--
1
-
ENTER
D.SKIP
0
(
)
p
P
PGM
CLEAR
SHUFFLE
CONTINUE
REPEAT
PROGRAM
PROGRAM
FUNCTION
To turn on and off.
To select the track number. 0
selects track 10.
To select track numbers
above 10, see the descriptions
on the
To select numbers 10 and
above.
To enter the setting.
To select next disk.
To go backward.
To play.
To go forward.
To stop.
To pause.
To use for program play.
To clear the setting.
To play in random order.
To select continuous play
mode.
To select repeat play mode.
+
To select the next track.
+
–
To select the previous track.
=
-/--
button below.
1
-
40
EN
Page 42

MD deck
KEY DISPLAY
u
0 – 9
-/--
1
-
ENTER
0
(
)
REC
p
P
PGM
CLEAR
SHUFFLE
CONTINUE
REPEAT
PROGRAM
PROGRAM
FUNCTION
To turn on and off.
To select the track number. 0
selects track 10.
To select track numbers
above 10, see the descriptions
-/--
on the
button below.
1
-
To select numbers 10 and
above.
To enter the setting.
To go backward.
To play.
To go forward.
To record, press ( while
pressing REC.
First release (, then release
REC.
To stop.
To pause.
To use for program play.
To clear the setting.
To play in random order.
To select continuous play
mode.
To select repeat play mode.
+
To select the next track.
+
–
To select the previous track.
=
DAT deck
KEY DISPLAY
u
0 – 9
ENTER
0
(
)
REC
p
P
R
REPEAT
PROGRAM
PROGRAM
FUNCTION
To turn on and off.
To select a program number.
To enter the setting.
To rewind.
To play.
To fast-forward.
To record, press ( while
pressing REC.
First release (, then release
REC.
To stop.
To pause.
Record muting.
To select repeat play mode.
+
To proceed to the next track.
+
–
To proceed to the previous
=
track.
Continued
41
EN
Page 43

Table of Preset Functions
(continued)
DECK B/A (Tape deck)
KEY DISPLAY
D.SKIP
0
9
(
)
REC
p
P
R
FUNCTION
To select the tape deck : Deck
A or B (dual cassette deck
only).
To rewind.
To reverse.
To play.
To fast-forward.
To record, press ( while
pressing REC. First release
(, then release REC. To
record, press 9 while
pressing REC. First release
9, then release REC.
To stop.
To pause.
Record muting.
FM/AM (TUNER)
(FM/AM tuner)
KEY DISPLAY
u
1 – 9, 0
-/--
1
-
ENTER
9
(
BAND
PROGRAM +
PROGRAM –
FUNCTION
To turn on and off.
Number buttons
To select numbers 10 and
above.
To enter the setting.
Tuning down.
Tuning up.
To select FM/AM.
Preset tuning +.
Preset tuning –.
DSP (Digital Surround
Processor)
KEY DISPLAY
CENTER
REAR
SUB WOOFER
AUDIO
DISPLAY
9
(
SOUNDFIELD
GENRE
T.TONE
MODE
>
?
.
/
FUNCTION
Center speaker level +/– keys
Rear speaker level +/– keys
Subwoofer level +/– keys
To select the DPC mode.
To change the display.
Input select <.
Input select >.
To turn on/off the sound
fields.
To select a sound field genre.
To make a test tone.
To select a sound field mode.
Digital processing control .
Digital processing control <.
Digital processing control .
Digital processing control >.
42
EN
Page 44

Quick Reference of Operations
To
Set a component code
Program to the keys or
buttons on a
component (learning
function)
Assign other
Components to the
Component Select
buttons
Change the volume
control setting
Program the System
Control function
Set the System PowerOff function
Program the Power-on
command to the
Component Select
buttons
Program a command
to the SYSTEM
CONTROL buttons or
Component Select
buttons
Set the Auto PowerOff time
Set the Auto-Off time/
brightness of the
Backlight
Lock the Remote
Commander
Select the input select
of a TV directly
Start recording
Press
COMMANDER OFF + ¤
COMMANDER OFF + Component Select
COMMANDER OFF Component Select
+
(Button to be assigned)
v
Component Select
(Button to be
assigned)
COMMANDER OFF + Á + + Á –
COMMANDER OFF + SYSTEM CONTROL (1, 2, 3)
COMMANDER OFF + PROGRAM – + Á +
COMMANDER OFF + Á – + Component Select
COMMANDER OFF + PROGRAM + + Á +
COMMANDER OFF + PROGRAM + + Á –
COMMANDER OFF +
≥ + COMMANDER OFF
INPUT + 0 – 6 keys
REC + (
Component Select
+
(of the new
component)
For details, see
page 7
page 12
page 26
page 17
page 18
page 25
page 23
page 24, 28
page 32
page 33
page 30
page 12
page 11
43
EN
Page 45

Index
A
Assigning other components
to Component Select buttons 26
Auto Power-Off
of the Commander 32
of the backlight 33
B
Backlight
batteries 5
adjusting 33
Batteries 5
C, D
Clearing/Changing
a learned signal 15, 25, 29
System Control function 21
Code number 7
COMMANDER OFF button 6
Component Select buttons
to add an extra function 23
to assign other components 26
E, F, G
Erasing
See “Clearing/Changing”
H, I, J, K
Hold Function 30
L
LCD
auto-off time 33
brightness 33
Learning Function 12
Light (
Locking the controls 30
) button 6, 33
M, N, O
Muting (¤) button 6, 18
P, Q, R
Power-On command
System Control Function 18
Adding an Extra Function to the
Component Select button 23
Power-off command
See “System Power-Off function” 19
Preset components 7
Preset Lock Function 31
PROGRAM buttons 6
S
SYSTEM CONTROL buttons
System Control Function 18
Programming a frequently used
command 28
System Power-Off function 19
T, U
Troubleshooting 35
V, W, X, Y, Z
Volume (Á +/–) buttons 6, 17
Volume Control 6, 17
44
EN
Page 46

Page 47

Kenmerken
Met de veelzijdige RM-AV2000T afstandsbediening kunt u al uw audio/videoapparatuur vanuit één punt bedienen; geen verwarring meer met voor elk toestel een
andere afstandsbediening, allemaal anders en lastig uiteen te houden. Hieronder de
voornaamste voordelen van deze universele afstandsbediening.
Gereed voor de centrale bediening van Sony audio/video-componenten
Deze afstandsbediening is reeds in de fabriek gereed gemaakt voor de bediening van
Sony apparatuur, dus na uitpakken hebt u onmiddellijk een geïntegreerd regelcentrum
voor al uw Sony audio/video-componenten.
Bedieningssignalen voor andere merken ook al vooringesteld
Bij aflevering is de afstandsbediening ook al geschikt voor alle andere grote merken.
Voor het bedienen van audio/video-apparatuur hoeft u slechts het codenummer ervan
in te voeren.
Aanleerfunctie voor het programmeren van uiteenlopende bedieningssignalen
Met de aanleerfunctie kunt u de signalen die nog niet vast zijn ingebouwd eenvoudig
overnemen van elke andere afstandsbediening. Dit geldt ook voor de bediening van
andere apparatuur dan audio/video: verlichting, airconditioning enz. (maar alleen
infrarode signalen en niet altijd voor alle functies).
Flexibel aan te passen toetsen voor elk gewenst apparaat
De component-keuzetoetsen zijn vrijelijk om te schakelen voor de bediening van elke
gewenste component. Dit komt goed van pas als u bepaalde apparatuur dubbel heeft,
zoals twee videorecorders e.d.
Programmeergeheugen voor automatische bedieningsreeksen
Voor optimaal bedieningsgemak kunt u tot 16 afzonderlijke stappen onder een enkele
toets vastleggen, om ingewikkelde functies geheel te automatiseren.
Handige tiptoetsen op LCD scherm met blauwe achtergrond-verlichting
Nadat u een component hebt gekozen, toont het LCD scherm van de afstandsbediening
alleen de toetsen die u daarvoor nodig hebt. Dit maakt de bediening overzichtelijk en
intuïtief. Het LCD scherm heeft een achtergrondverlichting voor prettige bediening,
ook in het donker of bij gedempt licht.
Het CE merkteken op het apparaat is alleen geldig voor de producten die in de
Europese Unie worden verkocht.
NL
2
Page 48

Inhoudsopgave
Voorbereidingen
Batterij-inleg......................................................................................................................... 5
W anneer de batterijen te vervangen .................................................................................. 5
Plaats en functie van de bedieningsorganen ....................................................................... 6
Basisbediening
Instellen van de code voor vaste audio/video-apparatuur................................................... 7
Kiezen van de code voor een component ......................................................................... 8
Controleren of het codenummer werkt............................................................................. 9
Op afstand bedienen van uw apparatuur........................................................................... 10
Overnemen van nieuwe bedieningssignalen — Aanleerfunctie......................................... 12
Wijzigen of wissen van een aangeleerde functie ........................................................... 15
Geavanceerde functies
Volumeregeling voor video-apparatuur aangesloten op een stereo-installatie ................ 17
Uitvoeren van een reeks bedieningsfuncties — SYSTEM CONTROL toetsen ..................... 18
Programmeren van een reeks bedieningsfuncties voor de SYSTEM CONTROL
toetsen ............................................................................................................................... 19
Uitvoeren van de reeks bedieningsfuncties.................................................................... 20
Wijzigen van de geprogrammeerde functies .................................................................. 21
Toevoegen van een extra functie aan de component-keuzetoetsen.................................. 23
Programmeren van de inschakelcode voor componenten (alleen voor Sony
apparatuur)....................................................................................................................... 23
Toevoegen van een extra code bij de keuze van een component ................................ 24
Uitschakelen van alle componenten met een enkele toets
— Systeem-uitschakelfunctie (alleen voor Sony apparatuur) ......................................... 25
Toewijzen van andere apparatuur aan de component-keuzetoetsen................................. 26
Programmeren van een vaak gebruikte functie voor de SYSTEM CONTROL toetsen ........ 28
NL
Wordt vervolgd
NL
3
Page 49

Inhoudsopgave
(vervolg)
Nuttige extra functies
Blokkeren van de toetsen — Hold beveiliging................................................................... 30
Beveiligen van uw instellingen en aangeleerde signalen — Preset Lock functie.............. 31
Wijzigen van de automatische uitschakeltijd van de afstandsbediening........................... 32
Regelen van de verlichting van het uitleesvenster ............................................................ 33
Aanvullende informatie
Voorzorgsmaatregelen........................................................................................................ 34
Onderhoud .......................................................................................................................... 34
Technische gegevens .......................................................................................................... 34
Verhelpen van storingen..................................................................................................... 35
Aanhangsels
Overzicht van vooringestelde functies ............................................................................... 37
TV (TV -toestel) .................................................................................................................... 37
VCR 1, 2, 3 (videorecorders) ............................................................................................. 37
DVD (DVD-speler) ............................................................................................................. 38
VD (LaserDisc-speler) ........................................................................................................ 38
SAT (satelliet-ontvanger)................................................................................................... 39
CBL (kabel-TV ontvanger) ................................................................................................ 39
AMP (versterker) ................................................................................................................40
CD (compact disc speler)................................................................................................... 40
MD (minidisc-recorder) ..................................................................................................... 41
DAT (digitaal cassettedeck) .............................................................................................. 41
DECK B/A (cassettedeck) ................................................................................................. 42
FM/AM TUNER (FM/AM tuner) ................................................................................... 42
DSP (Digitale Surround-akoestiek Processor)................................................................ 43
Beknopt bedieningsoverzicht ............................................................................................. 43
Index .................................................................................................................. achterpagina
NL
4
Page 50

Voorbereidingen
}
}
]
}
]
}
]
]
}
]
Batterij-inleg
Schuif het batterijdeksel achterop de
afstandsbediening open en plaats hierin
zes stuks R6 (AA-formaat) batterijen (niet
bijgeleverd). Zorg dat alle batterijen met
de + en – polen in de juiste richting ligen,
zoals aangegeven met de + en – in het
batterijvak.
]
}
(voor
schermverlichting)
(voor
afstandsbediening)
Wanneer de batterijen te
vervangen
Batterijen van de
afstandsbediening (vier stuks R6
(AA-formaat) batterijen)
Onder normale omstandigheden zullen
de batterijen ongeveer zes maanden
meegaan. Als uw apparatuur niet meer
zo vlot op de afstandsbediening reageert,
kunnen de batterijen bijna leeg zijn,
hetgeen wordt aangegeven door de i
aanduiding op het LCD scherm. Als
deze aanduiding minder helder oplicht,
dient u de batterijen door nieuwe te
vervangen.
Opmerking
Zorg dat het vervangen van de batterijen niet
meer dan een uur in beslag neemt, anders
kunnen de vastgelegde codenummers (zie blz.
7) en de aangeleerde functies (zie blz. 12) uit
het geheugen verdwijnen.
Batterijen voor de
schermverlichting (twee stuks R6
(AA-formaat) batterijen)
W anneer de achtergrondverlichting van
het LCD scherm geleidelijk zwakker
oplicht, dient u beide batterijen hiervoor
door nieuwe te vervangen.
Omtrent batterijen
• Gebruik geen oude en nieuwe batterijen door
elkaar en vooral geen verschillende typen
batterijen tegelijk.
• Mocht de elektrolyt uit een batterij lekken,
veeg de vervuilde delen van het batterijvak
dan grondig schoon met een doekje en
vervang de oude batterijen door nieuwe. Om
batterijlekkage te voorkomen, kunt u beter de
batterijen uit de afstandsbediening
verwijderen wanneer u denkt het apparaat
geruime tijd niet te gebruiken.
NL
5
Page 51

Plaats en functie van
de bedieningsorganen
PROGRAM
+
–+–
=
e
SYSTEM CONTROL COMMANDER
123
TV VCR1 VCR2 VCR3 DVD SAT/CBL
AMP CD MD/DAT DECK B/A TUNER DSP
1 Component-aanduiding
Hier wordt de naam van de te
bedienen component aangegeven.
2 LCD scherm en toetsenpaneel
Hier verschijnen de tiptoetsen voor de
bediening van elke gekozen
component.
Opmerking
Tracht nooit de tiptoetsen te bedienen met
een spits voorwerp zoals een balpen of
potlood.
3 SYSTEM CONTROL bedieningsreeks-
toetsen (zie blz. 18)
Voor elk van de deze drie SYSTEM
CONTROL toetsen kunt u 16
achtereenvolgende bedieningsfuncties
programmeren. Dit biedt u de
mogelijkheid om ingewikkelde
functies volautomatisch te starten met
een enkele toets.
4 schermverlichtingstoets
Druk hierop om de verlichting van
het LCD scherm in te schakelen. Bij
nogmaals drukken gaat het licht weer
uit. U kunt de schermverlichting ook
zo instellen dat deze na een bepaald
aantal seconden automatisch dooft
NL
6
(zie blz. 33).
+
OFF
Á
¤
5 COMMANDER OFF
1
6 Component-keuzetoetsen (TV,
2
3
4
7 Á +/– toetsen*
5
6
7
8 ¤ geluiddempingstoets*
9 PROGRAM + +/ – =
8
9
* Na het kiezen van een video-component kunt
In- en uitschakelen van de
afstandsbediening
Om de afstandsbediening in te schakelen,
drukt u op elke gewenste toets behalve de
COMMANDER OFF toets.
Voor uitschakelen drukt u op de
COMMANDER OFF toets; als u dit nalaat en
de afstandsbediening niet meer gebruikt, zal
deze na 10 minuten automatisch worden
uitgeschakeld. Deze tijdsduur kunt u
desgewenst ook anders instellen (zie blz. 32).
Uitschakelen van de
bedieningspieptoon
Druk op de ≥ toets. De aanduiding “OFF”
verschijnt en de afstandsbediening zal bij
indrukken van een toets geen pieptoon meer
laten horen. Om de pieptoon weer in te
schakelen, drukt u nogmaals op de ≥ toets.
afstandsbediening-uitschakeltoets
Om de afstandsbediening uit te
schakelen als u deze niet meer
gebruikt.
VCR1, enz.)
Voor het kiezen van het apparaat dat
u wilt bedienen.
Voor het instellen van de
geluidssterkte.
Voor het afzetten van de
geluidsweergave.
zenderkeuzetoetsen
Voor het kiezen van een TV- of
radiozender.
u met de afstandsbediening het TV-geluid
instellen of desgewenst afzetten.
Na het kiezen van een audio-component kunt
u met de afstandsbediening de
geluidsweergave via de versterker instellen
of desgewenst afzetten.
U kunt echter deze instellingen ook wijzigen
(zie blz. 17).
Page 52

Basisbediening
Instellen van de code
voor vaste audio/
video-apparatuur
De afstandsbediening is in de fabriek
gereed gemaakt voor de bediening van
Sony audio/video-apparatuur (zie de
onderstaande tabel). Als u de
afstandsbediening wilt gebruiken voor
deze Sony componenten, kunt u de
hierna volgende paragrafen overslaan.
U kunt de afstandsbediening echter ook
gebruiken voor de audio/videoapparatuur van andere merken. Voor de
bediening van andere componenten
dient u wel eerst de onderstaande
aanwijzingen te volgen om de juiste
code(s) voor de apparatuur vast te
leggen.
Componentkeuzetoets
TV
VCR1
VCR2
VCR3
DVD
SAT/CBL
AMP
CD
MD/DAT
DECK B/A
Voor de
bediening van
TV-toestel
Videorecorder
Videorecorder
Videorecorder
Videodiscspeler (DVD of
LaserDisc)
Satellietontvanger/
Kabel-TV
ontvanger
Versterker
Compact disc
speler
Minidisc-
recorder/DAT
cassettedeck
Cassettedeck*
Fabrieksinstelling
Sony TV-toestel
Sony Beta
videorecorder
(VTR1)
Sony 8-mm
videorecorder
(VTR2)
Sony VHS
videorecorder
(VTR3)
Sony DVD-speler
Sony satellietontvanger
Sony versterker
Sony CD-speler
Sony minidiscrecorder
Sony cassettedeck
Componentkeuzetoets
TUNER
DSP
* Gewone analoge audio-cassettedecks
Voor de
bediening van
FM/AM tuner
Akoestiekprocessor
Fabrieksinstelling
Sony FM/AM
tuner
Sony Digital
Surround
Processor
Zie het “Overzicht van vooringestelde
functies” (op blz. 37) voor de functies van
de diverse toetsen voor de afzonderlijke
componenten.
Wordt vervolgd
NL
7
Page 53

TV
123
456
7809
ENTER
DISPLAY
TV VCR123 SAT DECK
AB
CD FM/AM DSPMD CBLAMP
DVD
Instellen van de code voor vaste
audio/video-apparatuur (vervolg)
Kiezen van de code voor een
component
Op het scherm gaan nu de
afkortingen voor alle typen
componenten knipperen.
TV
123
456
7809
4
3
ENTER
SYSTEM CONTROL COMMANDER
123
TV VCR1 VCR2 VCR3 DVD SAT/CBL
AMP CD MD/DAT DECK B/A TUNER DSP
CHANNEL
+
–+–
=
Voorbeeld: voor bediening van
een Philips TV-toestel
1 Zie de tabellen in de bijgeleverde
lijst met “Componentcodenummers” om de juiste
twee-cijfer code voor het te
bedienen apparaat te vinden.
Als er meer dan één codenummer
vermeld staat, kiest u het eerste
daarvan.
Om de afstandsbediening
bijvoorbeeld in te stellen op bediening
van een Philips TV kiest u
codenummer 11.
2 Houd nu de COMMANDER OFF
toets ingedrukt en druk daarbij
op de ¤ toets.
+
¤
NL
COMMANDER
OFF
8
DISPLAY
e
+
OFF
Á
¤
6
2
3 Druk op de component-
keuzetoets* voor het gewenste
type apparaat.
TV
De naam van het gekozen apparaat
blijft branden en nu gaan de
cijfertoetsen 0 – 9, de ENTER en de
DISPLAY toets knipperen.
* Voor het kiezen van een component-code
voor de DVD of SAT/CBL toets drukt u
net zovaak op de toets tot de gewenste
component wordt aangegeven.
4 Voer de twee-cijfer code voor het
betreffende apparaat in en druk
op de ENTER toets in het
tiptoetsenpaneel op het scherm.
123
456
7809
ENTER
Er klinkt een pieptoon en de
codecijfers en “ENTER” verschijnen
tweemaal achtereen.
1
m
ENTER
1
m
Page 54

5 Als u nog een code voor een
ander apparaat wilt invoeren,
herhaalt u de stappen 3 en 4.
6 Druk op de COMMANDER OFF
toets.
COMMANDER
OFF
Opmerkingen
• Als u een codenummer invoert dat niet
voorkomt in de bijgeleverde lijst met
“Component-codenummers”, laat de
afstandsbediening na indrukken van de
ENTER toets een pieptoon horen en gaat de
aanduiding “NG” knipperen. In dit geval
controleert u het codenummer en probeert u
het opnieuw.
• Als het invoeren wordt onderbroken en er
verstrijken meer dan 2 minuten tussen twee
stappen, dan vervalt de instelprocedure. Dan
zult u voor het invoeren van de code
opnieuw op de ¤ toets moeten drukken
terwijl u de COMMANDER OFF toets
ingedrukt houdt.
Controleren welk codenummer
er is ingevoerd
Druk op de DISPLAY toets. Het
codenummer en de aanduiding
“ENTER” verschijnen dan tweemaal
achtereen.
Controleren of het
codenummer werkt
1 Druk op de component-
keuzetoets voor het apparaat dat
u hebt ingesteld.
TV
De afstandsbediening wordt
ingeschakeld en de tiptoetsen voor
het apparaat verschijnen op het
scherm.
123
456
7809
-/--
1
-
TV
YELLOW
RED
GREEN
BLUE
INPUT
TV
TELETEXT
u
2 Schakel het te bedienen apparaat
in met de aan/uit-schakelaar op
het apparaat zelf.
3 Richt de afstandsbediening op het
voorpaneel van het apparaat en
druk op de u toets in het
tiptoetsenscherm.
Tijdens het verzenden van het
bedieningssignaal verschijnt het
symbool op het scherm.
u
Nu hoort het apparaat te worden
uitgeschakeld.
Wordt vervolgd
NL
9
Page 55

Instellen van de code voor vaste
audio/video-apparatuur (vervolg)
4 Als het tot zover goed verloopt,
kunt u controleren of de andere
functies van het apparaat ook
goed reageren op de
afstandsbediening, zoals de
zenderkeuze en de
volumeregeling.
Zie “Op afstand bedienen van uw
apparatuur” voor nadere
bijzonderheden.
Als de afstandsbediening niet goed
lijkt te werken...
Probeer of het beter lukt door de procedure (zie
blz. 7) te herhalen met een andere code voor
uw component aangegeven in de bijgeleverde
“Component-codenummers” tabellen.
Toetsen waarvoor al een
afstandsbedieningssignaal is
“aangeleerd”
Als er voor een bepaalde toets al eerder
een signaal is geprogrammeerd met de
aanleerfunctie (zie blz. 12), zal de
“aangeleerde” functie blijven werken,
ook al stelt u een ander componentcodenummer in. Voor gebruik als een
vaste component-bedieningstoets zult u
dan eerst de “aangeleerde” functie
moeten wissen.
Betreffende het toetsenpaneel
op het scherm
Na instellen van een componentcodenummer zullen op het scherm alleen
de toetsen verschijnen die in de fabriek
vast voor het betreffende apparaat zijn
geprogrammeerd. De signalen van de
toetsen verschillen van merk tot merk.
Met de aanleerfunctie kunt u signalen
van een andere afstandsbediening
overnemen voor zowel de aangegeven
toetsen als de toetsen die nog niet
worden aangegeven (zie blz. 12).
NL
10
Op afstand bedienen
van uw apparatuur
Om een apparaat van een ander merk
dan Sony te bedienen, zult u eerst de
betreffende component-code moeten
instellen (zie blz. 7)
u
CD
123
456
7809
-/--
1
-
123
TV VCR1 VCR2 VCR3 DVD SAT/CBL
AMP CD MD/DAT DECK B/A TUNER DSP
D.SKIP
ENTER
CLEAR
SYSTEM CONTROL COMMANDER
PROGRAM
+
+
–
=
Voorbeeld: Afspelen van een
compact disc in uw CD-speler
1 Druk op de betreffende
component-keuzetoets.
CD
De afstandsbediening wordt
ingeschakeld en de tiptoetsen voor
het gekozen apparaat verschijnen op
het scherm.
ENTER
D.SKIP
CLEAR
123
456
7809
-/--
1
-
ON OFF
PGM
CONTINUE
SHUFFLE
REPEAT
e
OFF
Á
+
–
¤
CD
PGM
CONTINUE
SHUFFLE
REPEAT
2
1
u
Page 56

2 Druk op de gewenste toets in het
toetsenpaneel.
Tijdens het verzenden van het
bedieningssignaal verschijnt het
symbool op het scherm.
Vervolgens kunt u de
geluidsweergave naar wens instellen
met de Á +/– toetsen en de ¤ toets
en kunt u bijvoorbeeld bij radioontvangst een zender kiezen met de
PROGRAM +/– toetsen.
3 Wanneer u naderhand de
afstandsbediening niet meer
gebruikt, drukt u op de
COMMANDER OFF toets om de
afstandsbediening uit te
schakelen.
COMMANDER
OFF
Opmerking
De afstandsbedieningssignalen kunnen voor
bepaalde componenten en functies wel eens
ietwat afwijken. Dan kunt u het juiste
bedieningssignaal beter zelf programmeren
met de aanleerfunctie (zie blz. 12). Het is
echter alleen mogelijk functies te
programmeren die net als deze
afstandsbediening werken met infrarode
stralen.
Instellen van de geluidssterkte
Druk op de Á +/– toetsen om de
geluidssterkte te regelen en op de ¤
toets om het geluid te dempen. Als u
instelt op een video-component kunt u
met de afstandsbediening het TV-geluid
instellen of afzetten, en als u kiest voor
een audio-component kunt u met de
afstandsbediening de geluidsweergave
via de versterker instellen of afzetten. U
kunt deze instellingen ook wijzigen (zie
blz. 17).
Voor bediening van een Sony
videorecorder
Druk op de VCR1, 2 of 3 toets die
overeenkomt met de VTR1, 2 of 3 stand
van de schakelaar op uw videorecorder.
Heeft uw videorecorder een dergelijke
bedieningskeuzeschakelaar niet, dan
kiest u de VCR1, 2 of 3 toets als volgt.
Betamax videorecorder VCR1
8-mm videorecorder VCR2
VHS videorecorder VCR3
Gebruik van de REC opnametoets
voor een videorecorder
Om vergissingen te voorkomen, werkt de
REC opnametoets niet als u deze alleen
indrukt. Om te gaan opnemen drukt u
op de ( weergavetoets terwijl u de REC
opnametoets ingedrukt houdt.
Voor bediening van een dubbel
cassettedeck
Van tevoren zult u eerst moeten kiezen
voor deck A of deck B. Hiervoor drukt u
op de DECK B/A toets, om over te
schakelen tussen “DECK A” en “DECK
B”.
Als de afstandsbediening van uw dubbel
cassettedeck slechts één stel
bedieningstoetsen heeft, met een A/B
schakelaar voor keuze van het deck, kunt
u in plaats hiervan de D.SKIP toets in het
toetsenpaneel op het scherm gebruiken.
Wordt vervolgd
11
NL
Page 57

Op afstand bedienen van uw
SYSTEM CONTROL COMMANDER
OFF
e
TV VCR1 VCR2 VCR3 DVD SAT/CBL
AMP CD MD/DAT DECK B/A TUNER DSP
PROGRAM
Á
–
+–+
=
+
123
¤
P+P–V+V
–
MU
VCR1
RESET
123
456
7809
2
-
-/--
1
-
RED
YELLOW
RETURN
ANT SW
BLUE
INPUT
u
EXECUTE
GREEN
TV
REC
MENU
LEARNNG
3
2
6
apparatuur (continued)
Kiezen van het ingangssignaal
voor een TV-toestel
Als er op uw TV meer dan twee
videorecorders zijn aangesloten, kunt u
deze met de cijfertoetsen als volgt direct
kiezen.
“INPUT” + “0” : TV-afstemming
“INPUT” + “1” : VIDEO 1
“INPUT” + “2” : VIDEO 2
“INPUT” + “3” : VIDEO 3
“INPUT” + “4” : VIDEO 4
“INPUT” + “5” : VIDEO 5
“INPUT” + “6” : VIDEO 6
Voor een Sony TV-toestel zijn de
bovenstaande functies vast ingesteld.
Voor een ander merk kunt u deze
functies, waarvoor twee toetsen nodig
zijn, overnemen van de TVafstandsbediening met de aanleerfunctie
(zie de volgende bladzijde).
Overnemen van
nieuwe
bedieningssignalen
— Aanleerfunctie
Voor het bedienen van componenten of
functies die niet vast zijn ingesteld, kunt
u de volgende “aanleer” procedure
volgen om de afstandsbediening een
nieuwe functie te laten overnemen van
een andere afstandsbediening. U kunt
deze aanleerfunctie bijvoorbeeld ook
gebruiken om de functie van
afzonderlijke toetsen te wijzigen na
instellen van een componentcodenummer (zie afb. 7).
Na het overnemen van een functie is het
aanbevolen deze bij wijze van
geheugensteuntje te noteren in het
bijgeleverde “Overzicht van de LCD
tiptoetsen”.
Opmerking
Er kunnen wel eens signalen zijn die de
afstandsbediening niet kan overnemen of
“aanleren”.
NL
12
Page 58

Voorbeeld: Programmeren van het
(
(weergave) bedieningssignaal
van uw component onder de VCR1
(
(weergave) toets van de
afstandsbediening
1 Leg de RM-AV2000T recht
tegenover de afstandsbediening
van het apparaat dat u wilt
bedienen.
Afstandsbediening van
uw componenten
ongeveer 5 – 10
cm tussenruimte
RM-AV2000T
2 Houd de COMMANDER OFF
toets ingedrukt en druk daarbij
op de component-keuzetoets voor
het apparaat waarvan u een
functie wilt overnemen.
COMMANDER
OFF
Op het scherm gaan nu alle toetsen
die u kunt programmeren knipperen.
RESET
123
456
7809
-/--
1
-
+
LEARNNG
P+P–V+V
2
-
–
MU
VCR1
VCR1
INPUT
u
REC
ANT SW
De aanduiding “P+ P– V+ V– MU”
bovenin het scherm geeft aan of de
PROGRAM +/–, Á +/– en ¤ toetsen
ook geschikt zijn voor het aanleren
van andere functies of niet.
Betreffende de knipperende
toetsen
De toetsen waarvoor al een functie voor de
gekozen component is ingesteld knipperen
tweemaal en de toetsen die nog niet zijn
ingesteld knipperen eenmaal.
3 Druk op de toets van de
afstandsbediening waaronder u
een functie wilt overnemen of
“aanleren”.
De aanduiding “LEARN” knippert en
alleen de ingedrukte toets blijft in het
scherm zichtbaar.
LEARNNG
Overnemen van functies voor de
PROGRAM +/–, Á +/– en ¤ toetsen
Druk op de betreffende toets. De
aanduiding “LEARN” knippert en de
“P+”, “P–”, “V+”, “V–” of “MU”
aanduiding bovenin het scherm blijft
verlicht.
VCR1
Aanduiding voor de PROGRAM, Á en ¤
toetsen
Wordt vervolgd
13
NL
Page 59

Overnemen van nieuwe
bedieningssignalen
— Aanleerfunctie (vervolg)
4 Druk op de toets van de andere
afstandsbediening en houd deze
ingedrukt tot u een pieptoon
hoort.
De aanduiding “LEARN” stopt met
knipperen en blijft branden. Als het
bedieningssignaal succesvol is
overgenomen, blijft de toets met de
nieuwe functie verlicht en gaan de
andere beschikbare toetsen weer
knipperen.
Als er pieptonen klinken en de
aanduiding “NG” op het scherm
knippert
Dan is er bij het aanleren iets misgegaan.
Probeer de stappen 3 en 4 nogmaals.
Voor bepaalde signalen kan het nodig zijn
de aanleerprocedure meer dan eens uit te
voeren. In dat geval hoeft u slechts stap 4
opnieuw te proberen, als de aanduiding
“NG” pas na stap 4 verschijnt.
5 Herhaal de stappen 3 en 4 voor
elke functie die u onder een toets
wilt overnemen.
Overnemen van signalen van nog
een andere afstandsbediening
Plaats deze en de andere afstandsbediening
weer tegenover elkaar zoals in stap 1 op
blz. 13, druk op de betreffende componentkeuzetoets en volg weer de stappen 3 en 4
op blz. 13 en 14 voor het aanleren van de
toetsfunctie.
6 Druk op de COMMANDER OFF
toets.
COMMANDER
OFF
NL
14
Opmerkingen
• Als u de stappen voor het aanleren niet
binnen twee minuten uitvoert, vervalt de
aanleerfunctie.
• Als u stap 4 niet binnen 10 seconden na stap
3 uitvoert, keert het scherm terug naar de
aanduidingen van stap 2. (Dan knipperen
weer alle voor aanleren beschikbare toetsen.)
In dit geval voert u stap 3 opnieuw uit terwijl
de scherm-aanduidingen knipperen.
• Als er tijdens het aanleren “NG” wordt
aangegeven, is het geheugen van de
afstandsbediening vol. Om dan plaats te
maken voor een nieuwe functie, zult u de
aangeleerde toetsfuncties die u zelden
gebruikt moeten wissen (zie blz. 16). Daarna
kunt u het overnemen van de nieuwe functie
opnieuw proberen.
• Als u per ongeluk de verkeerde toets indrukt,
houdt u ter correctie de “RESET” toets
ingedrukt en drukt u daarbij weer op die
verkeerde toets. Vervolgens herhaalt u de
procedure vanaf stap 2, nu met de juiste
toets.
Als de afstandsbediening niet goed
lijkt te werken
Als de apparatuur niet goed reageert op de
toets met de nieuwe functie, doe het
overnemen van de functie dan opnieuw. (Als
bijvoorbeeld de geluidssterkte plotseling veel
luider wordt na slechts eenmaal kort
indrukken van de Á + toets, dan kan het
aanleren zijn verstoord door ruis of andere
externe effecten.)
Voor zorgvuldig aanleren van
nieuwe functies
•Zorg dat de
afstandsbedieningseenheden tijdens het
aanleren niet bewegen.
•Blijf voor het overnemen de toets van
de andere afstandsbediening ingedrukt
houden tot u een pieptoon hoort.
•Zorg dat beide
afstandsbedieningseenheden zijn
voorzien van verse batterijen.
•Verricht het overnemen niet in de volle
zon en niet onder felle tl-buizen of
andere fluorescerende lampen.
•De plaats waar het signaal uit de
afstandsbediening komt kan wel eens
verschillen. Als het aanleren niet lukt,
verschuif dan de beide
afstandsbedieningseenheden tegenover
elkaar ietwat en probeer het opnieuw.
Page 60

BELANGRIJK
Houd de afstandsbediening buiten
het bereik van kleine kinderen en
huisdieren. Bepaalde elektrische
apparatuur zoals voor
airconditioning, verwarming of het
openen en sluiten van gordijnen of
rolluiken kan gevaarlijk zijn wanneer
er per ongeluk op een toets van de
afstandsbediening wordt gedrukt.
Voor het aanleren van signalen
voor een dubbel cassettedeck
Druk eerst op de DECK B/A toets om te
kiezen voor cassettedeck A of B.
Overnemen van het REC signaal
(voor opnemen) voor
videorecorder VCR1, 2 of 3
Houd bij stap 3 de REC toets ingedrukt
en druk daarbij de ( weergavetoets in
zodat beide toetsen oplichten en volg dan
de stappen 4 t/m 6. De
afstandsbediening kan het signaal voor
opnemen niet aanleren als alleen de REC
toets oplicht.
Overnemen van signalen voor de
Á en ¤ toetsen
Voor andere componenten dan de TV of
AMP (versterker) dient u de
opmerkingen op blz. 17 en 18 te lezen.
Houd na stap 2 op blz. 13 de RESET toets
ingedrukt en druk op de toets die u wilt
weglaten (die knippert). De ingedrukte
toets gaat dan langzamer knipperen en
wordt daarna voor die component niet
meer aangegeven.
Om de toets weer te zien, herhaalt u deze
handeling.
Opmerking
Een toets waarvoor al een signaal is
“aangeleerd”, kunt u niet in één keer
onzichtbaar maken.
Wijzigen of wissen van een
aangeleerde functie
Om een aangeleerde functie door een
andere te vervangen, zult u die functie
eerst moeten wissen, om dan een nieuwe
functie over te nemen.
Wissen van een aangeleerde
functie van een enkele toets
RESET
RESET
LEARNNG
P+P–V+V
123
456
7809
-/--
1
-
2
-
VCR1
–
MU
INPUT
REC
ANT SW
u
Aangeven van alleen de
regelmatig gebruikte toetsen
U kunt zorgen dat de toetsen die u niet
gebruikt niet op het scherm verschijnen.
Dit vereenvoudigt de bediening van
apparatuur met een groot aantal toetsen
die u niet gebruikt.
1 Houd na stap 2 op blz. 13 de
RESET toets ingedrukt en druk
op de toets waarvan u de functie
wilt wissen.
RESET
+
De toets waarvan de functie is gewist
gaat nu weer knipperen samen met de
andere beschikbare toetsen.
Wordt vervolgd
15
NL
Page 61

Overnemen van nieuwe
bedieningssignalen
— Aanleerfunctie (vervolg)
Wissen van alle aangeleerde
signalen voor een bepaalde
component
RESET
LEARNNG
2
P+P–V+V
123
456
7809
-/--
1
-
2
-
SYSTEM CONTROL COMMANDER
123
TV VCR1 VCR2 VCR3 DVD SAT/CBL
AMP CD MD/DAT DECK B/A TUNER DSP
–
MU
YELLOW
VCR1
RED
GREEN
BLUE
INPUT
TV
ANT SW
RETURN
PROGRAM
+
–+–
=
u
REC
MENU
EXECUTE
e
OFF
Á
+
¤
1 Houd de COMMANDER OFF
toets ingedrukt en druk daarbij
op de betreffende componentkeuzetoets.
COMMANDER
OFF
+
CD
1
2 Houd nu de RESET toets
ingedrukt en druk daarbij
nogmaals op de betreffende
component-keuzetoets. De
afstandsbediening laat een
pieptoon horen en de aangeleerde
functies zijn dan gewist. De
toetsen voor dat apparaat krijgen
dan weer hun oorspronkelijke
functies die zij vóór het aanleren
hadden.
RESET
Opmerking
Als u de bovenstaande stappen uitvoert terwijl
er nog geen nieuwe functies waren
overgenomen, dan keren de componentcodeinstellingen (zie blz. 7) nu terug naar de
fabrieksinstellingen.
Als u dit voor DECK B/A doet, zal bij het
wissen van alle functies voor één cassettedeck
(A of B) de componentcode-instelling voor
beide cassettedecks terugkeren naar de
fabrieksinstelling.
+
CD
16
Wissen van aangeleerde signalen
voor DECK B/A
Druk op de DECK B/A toets om te kiezen
voor “DECK A” of “DECK B”. U kunt geen
signalen wissen voor beide cassettedecks
tegelijk.
NL
Page 62

Geavanceerde functies
Volumeregeling voor
video-apparatuur
aangesloten op een
stereo-installatie
De afstandsbediening is in de fabriek
vooringesteld volgens het principe dat u
het geluid van uw video-apparatuur
hoort via de luidsprekers van uw TVtoestel en de geluidsweergave van alle
stereo-apparatuur via de luidsprekers
aangesloten op uw versterker.
De volgende tabel toont de
fabrieksinstellingen voor de
volumeregeling van de verschillende
componenten.
Componentkeuzetoets
TV
VCR1,2,3
SAT/CBL
DVD
AMP
CD
MD/DAT
DECK B/A
TUNER
DSP
Zo kunt u eenvoudigweg de
geluidssterkte van de TV of de versterker
regelen zonder hiervoor telkens te
hoeven overschakelen van de
geluidsbron naar de TV of AMP, enkel
voor de volumeregeling.
Om bijvoorbeeld de geluidssterkte bij
video-weergave (met VCR bediening) in
te stellen, hoeft u niet op de TV toets te
drukken om het TV-geluid te regelen.
Regelt de geluidssterkte
van de
TV
TV
TV
TV
versterker
versterker
versterker
versterker
versterker
versterker
Opmerkingen
• Als u voor de Á of ¤ toetsen voor bepaalde
componenten een nieuw signaal hebt
overgenomen (“aangeleerd”, zie blz. 12), zal
bij de bediening van een dergelijk apparaat
het nieuwe signaal worden doorgegeven, in
plaats van de geluidsregeling van de TV of
de versterker.
• Als u voor de Á of ¤ toetsen voor de TV of
AMP stand een nieuw signaal hebt
overgenomen of “aangeleerd”, zal dat
nieuwe signaal alleen worden doorgegeven
wanneer u voor de bediening van de TV of
de versterker (AMP) hebt gekozen. Bij de
bediening van andere componenten zult u
zonder probleem wel het geluid van de TV of
de versterker kunnen regelen.
Wijzigen van de
fabrieksinstelling voor de
volumeregeling
Als uw video-apparatuur echter is
aangesloten op een stereo-installatie, zult
u waarschijnlijk ook het geluid van uw
TV en uw videorecorder willen horen via
de luidsprekers aangesloten op uw
versterker, in plaats van alleen via de TVluidsprekers. In dat geval dient u de
fabrieksinstelling om te schakelen zodat
u de geluidssterkte van uw videoapparatuur kunt regelen zonder eerst de
afstandsbediening te hoeven
omschakelen naar de versterker.
RESET
LEARNNG
P+P–V+V
SC1 SC2 SC3 MU
OFF
123
CENTER REAR
456
7809
-/--
1
-
SYSTEM CONTROL COMMANDER
123
TV VCR1 VCR2 VCR3 DVD SAT/CBL
AMP CD MD/DAT DECK B/A TUNER DSP
DVD
TV VCR123 SAT DECK
–
RED
INPUT
D.SKIP
AUDIO
SUB
VIDEO1 VIDEO2 VIDEO3 VDP/AUX TV
WOOFER
TV
GREEN
SUBTITLE
SUBTITLE
ON/OFF
TAPE DAT/MD
TELETEXT
YELLOW
TITLE
ANT SW
SOUND
DVD MENU
GENRE
FIELD
BLUE
RETURN
ENTER
T.TONE
2
-
CLEAR
SHIFT
BAND
PROGRAM
+
+
–
=
AB
u
CD FM/AM DSPMD CBLAMP
ON OFF
DISPLAY
ANGLE
REC
CD
PHONO
TUNER
PGM
MENU
EXECUTE
MODE
CONTINUE
SHUFFLE
REPEAT
e
OFF
1
Á
+
–
¤
Wordt vervolgd
17
NL
Page 63

Volumeregeling voor videoapparatuur aangesloten op een
stereo-installatie
(vervolg)
1 Houd de COMMANDER OFF
toets ingedrukt en druk daarbij
de Á + en Á – toets allebei in.
Á
COMMANDER
OFF
Er klinkt een pieptoon en de
volumeregeling voor de videoapparatuur (TV, VCR1, 2 en 3, SAT/
CBL en DVD) wordt overgeschakeld
naar het aangegeven toestel (AMP of
TV).
Bij instellen op de
versterkervolumeregeling
Bij instellen op de
TV-volumeregeling
Opmerkingen
• Als u voor de Á of ¤ toetsen voor bepaalde
componenten een nieuw signaal hebt
overgenomen of “aangeleerd”, zal de
bovenstaande procedure de functie van de
Á en ¤ toetsen niet veranderen.
• Als u voor de Á of ¤ toetsen voor de TV of
AMP stand een nieuw signaal hebt
overgenomen of “aangeleerd”, zal dat
nieuwe signaal alleen worden doorgegeven
wanneer u voor de bediening van de TV of
de versterker (AMP) hebt gekozen. Bij de
bediening van andere componenten zult u
wel het geluid van de TV of de versterker
(afhankelijk van de bovenstaande instelling)
kunnen regelen. Voor het gebruik van een
nieuwe functie zult u die ook voor de andere
component(en) moeten programmeren met
de aanleerfunctie (zie blz. 12).
NL
18
+
++
–
NG
V+V
–
AMP
MU
V+V
V+V
Uitvoeren van een
reeks
bedieningsfuncties
— SYSTEM CONTROL toetsen
Voor de SYSTEM CONTROL toetsen
kunt u een hele reeks bedieningsfuncties
achtereen programmeren, om
ingewikkelde functies volautomatisch te
starten met een enkele toets.
Ook voor de meest algemene dingen,
zoals het afspelen van een videoband,
kan al een reeks handelingen nodig zijn.
Bijvoorbeeld:
1 TV inschakelen.
2 Videorecorder inschakelen (VCR1)
3 Versterker inschakelen.
4 Ingangskeuzeschakelaar van de
–
AMP
MU
TV
–
MU
versterker instellen op VIDEO 1.
5 Ingangskeuzeschakelaar van het TV-
toestel instellen op VIDEO.
6 Afspelen van de videoband.
Voor elk van de SYSTEM CONTROL
toetsen, 1, 2 en 3, kunt u 16
achtereenvolgende bedieningsfuncties
programmeren. In de fabriek zijn de
SYSTEM CONTROL toetsen 1 en 2 nog
niet geprogrammeerd, maar er is wel een
reeks inschakel-commando’s voor Sony
apparatuur geprogrammeerd voor
SYSTEM CONTROL toets 3.
Page 64

Programmeren van een reeks
bedieningsfuncties voor de
SYSTEM CONTROL toetsen
RESET
LEARN
TV
P+P–V+V
–
SC1 MU
RED
123
456
7809
-/--
1
-
SYSTEM CONTROL COMMANDER
123
TV VCR1 VCR2 VCR3 DVD SAT/CBL
AMP CD MD/DAT DECK B/A TUNER DSP
INPUT
TV
GREEN
TELETEXT
YELLOW
BLUE
2
-
PROGRAM
+
–+–
=
u
3
MENU
EXECUTE
e
5
OFF
1
2
Á
+
¤
Voorbeeld: programmeren van
de links aangegeven reeks
stappen voor de SYSTEM
CONTROL 1 toets
1 Houd de COMMANDER OFF
toets ingedrukt en druk daarbij
op een van de SYSTEM
CONTROL toetsen (in dit geval
SYSTEM CONTROL 1).
COMMANDER
OFF
Op het scherm gaan nu de
afkortingen voor alle typen
componenten knipperen.
SYSTEM CONTROL
+
1
Als er al een reeks
bedieningsfuncties voor de
gekozen toets is geprogrammeerd
Dan worden die bedieningsfuncties
nu aangegeven. (Overigens is
SYSTEM CONTROL toets nummer 3
al in de fabriek geprogrammeerd met
inschakel-commando’s voor vrijwel
alle soorten Sony apparatuur.) Om
een nieuwe bedieningsreeks te
programmeren, zult u eerst de
bestaande reeks moeten wissen (zie
blz. 21).
2 Druk op de component-
keuzetoets voor het te bedienen
apparaat.
TV
De tiptoetsen voor de gekozen
component gaan knipperen.
RESET
LEARN
TV
P+P–V+V
–
SC1 MU
RED
2
-
GREEN
YELLOW
INPUT
TV
TELETEXT
MENU
BLUE
123
456
7809
-/--
1
-
3 Druk op de toets(en) voor de
gewenste bedieningsfunctie.
Om bijvoorbeeld het TV-toestel in te
schakelen, drukt u op een van de
cijfertoetsen.
1
u
EXECUTE
TV VCR123 SAT DECK
DVD
CD FM/AM DSPMD CBLAMP
AB
Het afstandsbedieningssignaal van de
gekozen toets wordt uitgezonden, dus
u kunt onmiddellijk controleren of de
component naar behoren reageert.
Wordt vervolgd
19
NL
Page 65

Uitvoeren van een reeks
bedieningsfuncties — SYSTEM
CONTROL toetsen (vervolg)
4 Herhaal de stappen 2 en 3 voor
elk van de toetsfuncties in de
gewenste bedieningreeks.
In dit voorbeeld drukt u op de
volgende toetsen.
m
m
m
VCR1
AMP
TV
VCR1
m
m
m
m
INPUT
u
u
m
VIDEO1
5 Wanneer u alle functies hebt
geprogrammeerd, drukt u op de
COMMANDER OFF toets.
COMMANDER
OFF
Opmerkingen
• Als het programmeren langer dan twee
minuten wordt onderbroken, vervalt de
invoerstand en zal de bedieningsreeks slechts
tot op dat punt gelden. Om dan de gehele
reeks in te voeren zult u de gedeeltelijke
reeks moeten wissen, om dan opnieuw vanaf
stap 1 te gaan programmeren.
• Als u voor een SYSTEM CONTROL toets al
een afstandsbedieningssignaal hebt
overgenomen of “aangeleerd” (zie blz. 28),
gaat de aanduiding “NG” knipperen en
klinkt er een pieptoon om u te waarschuwen
dat deze toets niet voor programmeren
beschikbaar is. Dan zult u de aangeleerde
functie eerst moeten wissen (zie blz. 29).
• Als u het component-codenummer wijzigt
zie blz. 7) of een nieuwe functie van een
andere afstandsbediening overneemt door
“aanleren” (zie blz. 12) voor een SYSTEM
CONTROL toets waaraan eerder een reeks
functies was toegewezen, dan vervalt die
reeks en zal bij indrukken van de SYSTEM
CONTROL toets alleen het nieuwe signaal
worden verzonden.
Tip voor het programmeren van een
SYSTEM CONTROL toets
Na het uitvoeren van een reeks
bedieningsfuncties geeft het scherm van de
afstandsbediening de tiptoetsen voor de
component van de laatst uitgevoerde functie
aan. Door als laatste een functie voor de
geluidsbron of een vaak gebruikte component
te kiezen, bespaart u zich de stap om voor
verdere bediening eerst op de betreffende
component-keuzetoets te drukken.
20
Uitvoeren van de reeks
bedieningsfuncties
Druk op de gewenste SYSTEM
CONTROL toets (1, 2 of 3). De
geprogrammeerde bedieningssignalen
worden verzonden in de door u gekozen
volgorde voor de bediening van de
betreffende componenten.
SYSTEM CONTROL
1 2 3
Bij het verzenden van elk signaal toont
het scherm de bijbehorende toets.
NL
Page 66

Opmerkingen betreffende de
bedieningsreeksen
•Als de te bedienen componenten te ver
uiteen staan of als er een obstakel voor
staat, kunnen niet alle componenten
naar behoren werken wanneer u op de
SYSTEM CONTROL toets drukt.
•Als er om de bovenstaande of een
andere reden iets mis gaat met de
bedieningsreeks, dan zult u alle
componenten terug moeten stellen in
de oorspronkelijke stand voor u de
SYSTEM CONTROL bedieningsreeks
verzond. Anders loopt u de kans dat
de bediening bij het opnieuw
indrukken van de SYSTEM CONTROL
toets weer mis gaat.
•Het inschakelen van componenten kan
bij een bedieningsreeks wel eens
problemen geven. Het signaal voor
inschakelen is vaak hetzelfde als voor
uitschakelen. Om moeilijkheden te
voorkomen is het aanbevolen eerst te
controleren of de betreffende
componenten voor de bedieningsreeks
al naar behoren ingeschakeld zijn of
juist nog uit staan.
•Bepaalde componenten kunnen niet
onmiddellijk reageren op twee
opeenvolgende signalen. Zo zal een
TV-toestel na inschakelen wat tijd nodig
hebben alvorens het kan reageren op
het volgende signaal. Houd hier
rekening mee en programmeer de
signalen bijvoorbeeld om en om, als
volgt;
TV inschakelen n Videorecorder
inschakelen n Afspelen videoband
starten n TV instellen op videoweergave
Wijzigen van de
geprogrammeerde functies
Wissen van geprogrammeerde
signalen
1 Houd de COMMANDER OFF
toets ingedrukt en druk daarbij
op een van de SYSTEM
CONTROL toetsen 1, 2 of 3.
COMMANDER
OFF
De bedieningsfuncties die zijn
geprogrammeerd voor die toets
worden in volgorde aangegeven.
SYSTEM CONTROL
+
1
2 Houd nu de RESET toets
ingedrukt en druk daarbij
nogmaals op dezelfde SYSTEM
CONTROL toets (1, 2 of 3).
RESET
De gehele bedieningsreeks wordt dan
gewist en op het scherm gaan de
afkortingen voor alle typen
componenten knipperen.
RESET
Voor het vastleggen van een nieuwe
reeks functies onder deze SYSTEM
CONTROL toets volgt u de stappen 2
t/m 5 op blz. 19 ig en 20.
SYSTEM CONTROL
+
LEARNNG
TV VCR123 SATDECK
SC1
1
DVD
CD FM/AM DSPMD CBLAMP
AB
Wordt vervolgd
21
NL
Page 67

Uitvoeren van een reeks
bedieningsfuncties — SYSTEM
CONTROL toetsen (vervolg)
Terugstellen van SYSTEM
CONTROL toets 3 op de
fabrieksinstelling (inschakelen
van Sony componenten)
1 Houd de COMMANDER OFF
toets ingedrukt en druk daarbij
op SYSTEM CONTROL toets 3.
COMMANDER
OFF
De bedieningsfuncties die zijn
geprogrammeerd worden in volgorde
aangegeven.
SYSTEM CONTROL
+
3
2 Houd nu de RESET toets
ingedrukt en druk daarbij
nogmaals op SYSTEM CONTROL
toets 3.
RESET
SYSTEM CONTROL
+
3
3 Herhaal de laatste stap: houd de
RESET toets ingedrukt en druk
daarbij weer op SYSTEM
CONTROL toets 3.
RESET
De reeks inschakelcommando’s voor
Sony apparatuur is weer geldig en
wordt in volgorde op het scherm
aangegeven.
SYSTEM CONTROL
+
3
22
De gehele bedieningsreeks wordt dan
gewist en op het scherm gaan de
afkortingen voor alle typen
componenten knipperen.
NL
Page 68

Toevoegen van een
extra functie aan de
componentkeuzetoetsen
Programmeren van de
inschakelcode voor
componenten (alleen voor
Sony apparatuur)
Bij gebruik van Sony componenten kunt
u de inschakelcode voor elk apparaat
programmeren onder een componentkeuzetoets. Zo kunt u met één druk op
de component-keuzetoets een bepaald
apparaat inschakelen en tegelijk instellen
op de bediening ervan.
Voorbeeld: Programmeren van
de TV toets
1 Houd de COMMANDER OFF
toets ingedrukt en druk daarbij
de Á – toets en de gewenste
component-keuzetoets in.
COMMANDER
OFF
Wanneer het inschakelcommando is
geprogrammeerd, klinkt er een
pieptoon en verschijnt de aanduiding
“u ON” op het scherm. (De schermaanduiding verdwijnt wanneer u de
toetsen loslaat.)
u
ON
Á
++
–
TV
RESET
LEARNNG
P+P–V+V
SC1 SC2 SC3 MU
OFF
123
CENTER REAR
456
7809
-/--
1
-
SYSTEM CONTROL COMMANDER
123
TV VCR1 VCR2 VCR3 DVD SAT/CBL
AMP CD MD/DAT DECK B/A TUNER DSP
DVD
TV VCR123 SAT DECK
–
RED
INPUT
D.SKIP
AUDIO
SUB
VIDEO1 VIDEO2 VIDEO3 VDP/AUX TV
WOOFER
TV
GREEN
SUBTITLE
SUBTITLE
ON/OFF
TAPE DAT/MD
YELLOW
TELETEXT
TITLE
ANT SW
SOUND
DVD MENU
GENRE
FIELD
BLUE
RETURN
ENTER
T.TONE
2
-
CLEAR
BAND
SHIFT
PROGRAM
+
–+–
=
AB
CD FM/AM DSPMD CBLAMP
ON OFF
DISPLAY
ANGLE
REC
CD
PHONO
TUNER
PGM
MENU
EXECUTE
MODE
CONTINUE
SHUFFLE
REPEAT
e
OFF
Á
+
¤
u
inschakelcommando
Herhaal de bovenstaande handeling.
Dan klinkt er een pieptoon en verschijnt
de volgende aanduiding.
u
1
Opmerkingen
• Als er voor een component-keuzetoets al een
signaal is overgenomen of “aangeleerd” (zie
blz. 24), kan er geen inschakelcommando
voor die toets worden geprogrammeerd.
• Als u met “aanleren” een nieuwe functie van
een andere afstandsbediening overneemt (zie
blz. 24) voor een component-keuzetoets
waarvoor al een inschakelcommando is
geprogrammeerd, dan zal het nieuw
aangeleerde signaal dat inschakelcommando
overschrijven. Als u later het aangeleerde
signaal annuleert, zal ook het
inschakelcommando gewist worden en keert
de toets terug naar de oorspronkelijke
toestand voordat er iets onder
geprogrammeerd werd.
Wissen van het
Wordt vervolgd
23
NL
Page 69

Toevoegen van een extra functie
aan de component-keuzetoetsen
(vervolg)
Toevoegen van een e xtra
code bij de keuze van een
component
Naast de oorspronkelijke functie van het
instellen op een component en het laten
verschijnen van de bedieningstoetsen
daarvoor, kunt u voor een componentkeuzetoets nog een extra
afstandsbedieningssignaal overnemen
met de “aanleerfunctie” (zie blz. 12).
Als u bijvoorbeeld voor het luisteren naar
een compact disc altijd de versterker
moet instellen op CD-weergave, dan
kunt u het signaal voor “versterker op
CD-weergave” toewijzen aan de CD toets
van deze afstandsbediening. Dan kunt u
met één druk op de CD componentkeuzetoets de tiptoetsen voor de CDspeler laten verschijnen en tegelijk de
versterker instellen op weergave van een
CD.
SYSTEM CONTROL COMMANDER
123
TV VCR1 VCR2 VCR3 DVD SAT/CBL
AMP CD MD/DAT DECK B/A TUNER DSP
3
NL
24
PROGRAM
+
–+–
=
e
+
5
OFF
Á
2
¤
Voorbeeld: Programmeren van
het CD-weergave signaal voor
uw versterker onder de CD
component-keuzetoets van de
afstandsbediening
1 Leg de RM-AV2000T recht
tegenover de afstandsbediening
van het apparaat dat u wilt
bedienen.
Afstandsbediening van
uw componenten
ongeveer 5 – 10 cm
tussenruimte
RM-AV2000T
2 Houd de COMMANDER OFF
toets ingedrukt en druk daarbij
de Á + toets en de PROGRAM +
toets tegelijk in.
DVD
CD FM/AM DSPMD CBLAMP
PROGRAM
+
+
COMMANDER
OFF
Á
++
+
De aanduiding “LEARN” verschijnt
en de afkortingen voor alle typen
componenten gaan knipperen.
LEARN NG
SC1 SC2 SC3
TV VCR123 SAT DECKAB
3 Druk op de betreffende
component-keuzetoets.
CD
De naam van de gekozen component
blijft branden en “LEARN” gaat
knipperen.
LEARN NG
CD
Page 70

4 Houd de over te nemen toets op
de afstandsbediening van de
betreffende component (in dit
geval de versterker) ingedrukt tot
u een pieptoon hoort.
INPUT SELECT
CD
5 Druk op de COMMANDER OFF
toets.
COMMANDER
OFF
Wissen van de aangeleerde
functie van een componentkeuzetoets
1 Houd de COMMANDER OFF toets
ingedrukt en druk daarbij de Á +
toets en de PROGRAM + toets tegelijk
in.
2 Houd nu de RESET toets ingedrukt en
druk daarbij op de componentkeuzetoets waarvan u de extra functie
wilt wissen.
Opmerking
Ook al is voor de betreffende componentkeuzetoets al een inschakelcode
geprogrammeerd (zie blz. 23), dan nog kunt u
daarvoor in de plaats een nieuw signaal
overnemen door “aanleren” op de
bovenstaande wijze.
Het nieuwe signaal overschrijft dan de
inschakelcode en deze verdwijnt geheel, zodat
ook bij wissen van het nieuwe signaal de
inschakelcode niet terugkomt.
Uitschakelen van alle
componenten met een
enkele toets
— systeem-uitschakelfunctie
(alleen voor Sony apparatuur)
Door het instellen van de systeemuitschakelfunctie kunt u alle
componenten van Sony in één keer
uitschakelen, door de COMMANDER
OFF toets drie seconden lang in te
drukken.
Instellen van de systeemuitschakelfunctie
1 Houd de COMMANDER OFF
toets ingedrukt en druk daarbij
de PROGRAM – toets en de Á +
toets tegelijk in.
COMMANDER
OFF
Wanneer de systeem-uitschakelfunctie
geactiveerd is, verschijnt de
aanduiding “u OFF” op het scherm.
(De scherm-aanduiding verdwijnt
wanneer u de toetsen loslaat.)
u
OFF
Wissen van de systeemuitschakelfunctie
Herhaal de bovenstaande handeling.
Na het wissen van de systeemuitschakelfunctie verschijnt de volgende
aanduiding.
PROGRAM
++
–
=
Á
+
u
NL
25
Page 71

Toewijzen van andere
apparatuur aan de
componentkeuzetoetsen
Als u een extra component afzonderlijk
wilt bedienen, kunt u die component
toewijzen aan een andere componentkeuzetoets die u niet gebruikt. Als u
bijvoorbeeld twee videorecorders heeft
en twee compact disc spelers, kunt u de
VCR3 toets gebruiken als de componentkeuzetoets voor uw tweede CD-speler.
Opmerking
Als u een andere component toewijst aan een
component-keuzetoets, komt de instelling van
het component-codenummer (voor een ander
merk) te vervallen. Dit componentcodenummer zal niet terugkomen, ook al
verwijdert u de nieuw gekozen component en
stelt u de toets terug op de oorspronkelijke
component.
RESET
LEARNNG
P+P–V+V
SC1 SC2 SC3 MU
OFF
123
CENTER REAR
456
7809
-/--
1
-
SYSTEM CONTROL COMMANDER
123
TV VCR1 VCR2 VCR3 DVD SAT/CBL
AMP CD MD/DAT DECK B/A TUNER DSP
DVD
TV VCR123 SAT DECK
–
RED
INPUT
D.SKIP
AUDIO
SUB
VIDEO1 VIDEO2 VIDEO3 VDP/AUX TV
WOOFER
TV
GREEN
SUBTITLE
SUBTITLE
ON/OFF
TAPE DAT/MD
YELLOW
TELETEXT
TITLE
ANT SW
SOUND
DVD MENU
GENRE
FIELD
BLUE
RETURN
ENTER
T.TONE
2
-
CLEAR
BAND
SHIFT
PROGRAM
+
–+–
=
AB
u
CD FM/AM DSPMD CBLAMP
ON OFF
DISPLAY
ANGLE
REC
CD
PHONO
TUNER
PGM
MENU
EXECUTE
MODE
CONTINUE
SHUFFLE
e
3
REPEAT
OFF
1
2
Á
+
¤
Voorbeeld: Toewijzen van een
CD-speler aan de VCR3
component-keuzetoets
1 Houd de COMMANDER OFF
toets ingedrukt en druk daarbij
de VCR3 toets in.
COMMANDER
OFF
De tiptoetsen voor het oorspronkelijk
te bedienen apparaat (VCR3) gaan
knipperen.
RESET
LEARNNG
P+P–V+V
123
456
7809
-/--
1
-
VCR3
+
VCR 3
–
MU
INPUT
REC
ANT SW
2
-
2 Houd nu de VCR3 toets
ingedrukt en druk daarbij de CD
toets in.
VCR3
De afstandsbediening laat een
pieptoon horen en de tiptoetsen voor
de nieuw gekozen component (CD)
gaan knipperen.
Ook de naam van de nieuwe
component (CD) knippert, terwijl de
oorspronkelijke componentnaam
(VCR3) blijft branden.
RESET
LEARNNG
P+P–V+V
123
456
7809
-/--
1
-
+
ENTER
CD
VCR 3
–
MU
2
-
CD
D.SKIP
PGM
CLEAR
SHUFFLE
CONTINUE
REPEAT
u
u
26
NL
Page 72

Toewijzen van een cassettedeck
(DECK B/A) aan een andere
component-keuzetoets
U kunt geen twee cassettedecks, A en B,
toewijzen aan een enkele componentkeuzetoets.
Als het gewenste cassettedeck (A of B) niet
wordt aangegeven, verricht u de toewijzing
aldus: u houdt de COMMANDER OFF
toets ingedrukt en drukt daarbij op de
DECK B/A toets om in te stellen op het
gewenste cassettedeck en dan herhaalt u de
toewijzing vanaf stap 1.
3 •Als de nieuw gekozen
component een Sony apparaat
is, drukt u op de
COMMANDER OFF toets om
de procedure af te ronden.
•Als u voor een ander merk het
component-codenummer moet
invoeren, volgt u de
aanwijzingen op blz. 7 – 10.
•Als u extra
afstandsbedieningssignalen wilt
overnemen met de
“aanleerfunctie”, volgt u
hiervoor de stappen 1 en 3 t/m
6 op blz. 13 en 14.
Opmerking
Als er pieptonen klinken en de aanduiding
“NG” gaat op het scherm knipperen bij
indrukken van de component-keuzetoets in
stap 1, dan kunt u geen andere component
toewijzen omdat voor bepaalde toetsen al een
andere functie is overgenomen met de
“aanleerfunctie” (zie blz. 12).
Wis dan eerst de aangeleerde signalen en
probeer het toewijzen opnieuw.
Toewijzen van een LaserDiscspeler (VD) of kabel-TV
ontvanger (CBL) aan een andere
component-keuzetoets
Als het gewenste apparaat (“VD” of
“CBL”) niet wordt aangegeven, dient u
vóór stap 3, eerst stap 2 te herhalen,
zodat de aanduiding voor het gewenste
apparaat (“VD” of “CBL”) in het
uitleesvenster knippert.
Gebruik van de
afstandsbediening na het
toewijzen van andere
componenten
Druk op de nieuw toegewezen
component-keuzetoets. De tiptoetsen
voor de nieuwe component verschijnen
en u kunt dat apparaat nu gaan
bedienen. Overigens wordt hierbij nog
steeds de oorspronkelijke
componentnaam aangegeven.
(In ons voorbeeld zou het scherm nu het
volgende te zien geven.)
Oorspronkelijke componentnaam
VCR 3
2
-
D.SKIP
CLEAR
SHUFFLE
123
456
7809
-/--
1
-
Bedieningstoetsen voor een
CD-speler
PGM
CONTINUE
u
REPEAT
Terugstellen van een componentkeuzetoets op de
oorspronkelijke instelling
1 Houd de COMMANDER OFF toets
ingedrukt en druk daarbij de
component-keuzetoets in die u wilt
terugstellen.
2 Houd nu de RESET toets ingedrukt en
druk daarbij opnieuw op dezelfde
component-keuzetoets.
Die component-keuzetoets keert dan
terug naar de oorspronkelijke
fabrieksinstelling.
Opmerking
Als u extra bedieningssignalen voor de toetsen
hebt overgenomen met de “aanleerfunctie” (zie
blz. 12) na het toewijzen van een andere
component aan de component-keuzetoets, dan
zult u met de twee stappen hierboven slechts
de aangeleerde functies wissen. In dat geval
herhaalt u daarna stap 2 om de componentkeuzetoets terug te stellen op de
oorspronkelijke instelling.
27
NL
Page 73

Programmeren van een
vaak gebruikte functie
voor de SYSTEM
CONTROL toetsen
Naast de oorspronkelijke functie voor
bedieningsreeksen (zie blz. 18) kunt u
voor de SYSTEM CONTROL toetsen 1, 2
en 3 ook extra
afstandsbedieningssignalen overnemen
met de “aanleerfunctie”.
Aangezien de SYSTEM CONTROL
toetsen 1, 2 en 3 geheel afzonderlijk van
de andere toetsen werken, kunt u ze ook
gebruiken voor directe één-toets
bediening, zonder bijvoorbeeld eerst de
betreffende component te hoeven kiezen
met een component-keuzetoets.
Deze één-toets bediening kan een handig
alternatief zijn voor het gewone gebruik
van de SYSTEM CONTROL toetsen voor
bedieningsreeksen.
RESET
LEARNNG
P+P–V+V
SC1 SC2 SC3 MU
OFF
123
CENTER REAR
456
7809
-/--
1
-
SYSTEM CONTROL COMMANDER
123
TV VCR1 VCR2 VCR3 DVD SAT/CBL
AMP CD MD/DAT DECK B/A TUNER DSP
DVD
TV VCR123 SAT DECK
–
CD FM/AM DSPMD CBLAMP
RED
INPUT
D.SKIP
AUDIO
SUB
VIDEO1 VIDEO2 VIDEO3 VDP/AUX TV
WOOFER
TV
GREEN
SUBTITLE
SUBTITLE
ON/OFF
TAPE DAT/MD
TELETEXT
YELLOW
TITLE
ANT SW
SOUND
DVD MENU
GENRE
FIELD
BLUE
RETURN
ENTER
T.TONE
2
-
CLEAR
SHIFT
BAND
PROGRAM
+
–+–
=
DISPLAY
ANGLE
REC
CD
MENU
MODE
SHUFFLE
TUNER
PGM
CONTINUE
e
+
AB
u
ON OFF
PHONO
EXECUTE
REPEAT
OFF
Á
¤
3
5
2
Voorbeeld: Overnemen van het
aan/uit-signaal voor een
airconditioning voor de SYSTEM
CONTROL 2 toets
1 Leg de RM-AV2000T recht
tegenover de afstandsbediening
van de airconditioning.
Afstandsbediening van
uw componenten
ongeveer 5 – 10 cm
tussenruimte
RM-AV2000T
2 Houd de COMMANDER OFF
toets ingedrukt en druk daarbij
de PROGRAM + toets en de Á +
toets tegelijk in.
COMMANDER
OFF
De aanduiding “LEARN” verschijnt
en de afkortingen voor de SYSTEM
CONTROL toetsen 1, 2 en 3 en voor
alle typen componenten gaan
knipperen.
LEARN
SC1 SC2 SC3
Als er voor de betreffende toets al een
signaal is geprogrammeerd, blijft de
aanduiding daarvoor branden. Als u
die toets toch wilt gebruiken, zult u
eerst het geprogrammeerde signaal
moeten wissen (zie blz. 29).
PROGRAM
++
+
+
TV VCR123 SAT DECK
DVD
CD FM/AM DSPMD CBLAMP
Á
+
AB
28
NL
Page 74

3 Druk op de SYSTEM CONTROL
toets waarvoor u een signaal wilt
overnemen (“aanleren”).
SYSTEM CONTROL
2
De aanduiding “LEARN” gaat
knipperen en alleen de ingedrukte
SYSTEM CONTROL toets blijft in het
scherm zichtbaar.
LEARNNG
SC2
4 Houd de over te nemen toets op
de afstandsbediening van het
betreffende apparaat (in dit geval
de airconditioning) ingedrukt tot
u een pieptoon hoort.
AIR CONDITIONER
ON/OFF
De aanduiding “LEARN” stopt met
knipperen en blijft branden.
Als er pieptonen klinken en de
aanduiding “NG” op het scherm
knippert
Dan is er bij het overnemen iets misgegaan.
Probeer de stappen 3 en 4 nogmaals.
Wissen van de aangeleerde
functie van de toets
1 Houd de COMMANDER OFF toets
ingedrukt en druk daarbij de
PROGRAM + toets en de Á + toets
tegelijk in.
2 Houd nu de RESET toets ingedrukt en
druk daarbij op de SYSTEM
CONTROL toets 1, 2 of 3 waarvan u de
functie wilt wissen.
5 Druk op de COMMANDER OFF
toets.
COMMANDER
OFF
29
NL
Page 75

Nuttige extra functies
Blokkeren van de
toetsen
— Hold beveiliging
Om vergissingen te voorkomen, kunt u
alle toetsen blokkeren met de Hold
beveiliging.
u
CD
123
456
7809
-/--
1
-
123
TV VCR1 VCR2 VCR3 DVD SAT/CBL
AMP CD MD/DAT DECK B/A TUNER DSP
Als de ≥ toets niet wordt aangegeven,
drukt u eerst op een willekeurige toets,
behalve de SYSTEM CONTROL toetsen
of de COMMANDER OFF toets, voor u
begint.
D.SKIP
PGM
ENTER
CLEAR
SYSTEM CONTROL COMMANDER
SHUFFLE
PROGRAM
+
–+–
=
CONTINUE
e
+
REPEAT
OFF
Á
¤
Opheffen van de
toetsbeveiliging
Houd de “OFF” toets ingedrukt en druk
daarbij de COMMANDER OFF toets in.
De aanduiding “OFF” verdwijnt van het
scherm.
1
1 Houd de ≥ toets ingedrukt en
druk daarbij de COMMANDER
OFF toets in.
COMMANDER
+
De afstandsbediening laat een
pieptoon horen en de aanduiding
“OFF” verschijnt.
OFF
NL
30
OFF
Page 76

Beveiligen van uw
TV VCR123 SAT DECK
AB
CD FM/AM DSPMD CBLAMP
DVD
u
ON
instellingen en
aangeleerde signalen
— Preset Lock functie
U kunt de afstandsbediening beveiligen
tegen het wijzigen, toevoegen of wissen
van de gemaakte componentcodeinstellingen (zie blz. 7), “aangeleerde”
extra signalen (zie blz. 12, 24, 28 enz.),
SYSTEM CONTROL bedieningsreeksen
(zie blz. 18), volumeregeling-aanpassing
(zie blz. 17) of systeem-uitschakelfunctie
(zie blz. 25).
DVD
TV VCR123 SAT DECK
SYSTEM CONTROL COMMANDER
123
TV VCR1 VCR2 VCR3 DVD SAT/CBL
AMP CD MD/DAT DECK B/A TUNER DSP
1 Houd de COMMANDER OFF
toets ingedrukt en druk daarbij
de ¤ toets in.
COMMANDER
OFF
+
CD FM/AM DSPMD CBLAMP
PROGRAM
+
–+–
=
¤
e
+
AB
u
OFF
OFF
Á
¤
2
3
1
2 Druk op de u OFF toets.
u
OFF
De namen van de componenten
stoppen met knipperen en blijven
branden en nu knippert de “u ON”
toets.
3 Druk op de COMMANDER OFF
toets.
Met de Preset Lock beveiliging
ingeschakeld
Als u tracht een componentcodenummer
in te stellen (zie blz. 7) of een nieuwe
functie over te nemen (zie blz. 12) zullen
er pieptonen klinken en gaat de
aanduiding “NG” op het scherm
knipperen.
De Preset Lock beveiliging
uitschakelen
Om de Preset Lock beveiliging uit te
schakelen volgt u opnieuw de
bovenstaande aanwijzingen, maar drukt
u in stap 2 op de “u ON” toets. Dan
verschijnt er “u OFF” op het scherm.
De “u OFF” toets verschijnt en de
afkortingen voor alle typen
componenten gaan knipperen.
DVD
TV VCR123 SAT DECK
AB
CD FM/AM DSPMD CBLAMP
u
OFF
NL
31
Page 77

123
456
7809
Wijzigen van de
automatische
uitschakeltijd van de
afstandsbediening
De afstandsbediening is in de fabriek
ingesteld om 10 minuten na het laatste
gebruik automatisch uit te schakelen
(automatische uitschakelfunctie). Om de
tijd voor het uitschakelen te wijzigen,
gaat u als volgt te werk.
U kunt de automatische uitschakeltijd
verlengen in stappen van 10 minuten tot
maximaal 90 minuten, of u kunt u deze
functie desgewenst ook geheel
annuleren, zodat de afstandsbediening
niet vanzelf uitschakelt.
Opmerking
De automatische uitschakelfunctie zorgt alleen
voor uitschakelen van de afstandsbediening en
heeft geen invloed op enig ander apparaat.
OFF
123
456
7809
SYSTEM CONTROL COMMANDER
123
TV VCR1 VCR2 VCR3 DVD SAT/CBL
AMP CD MD/DAT DECK B/A TUNER DSP
PROGRAM
+
+
–
=
DISPLAY
e
+
–
2
3
OFF
Á
1
¤
1 Houd de COMMANDER OFF
toets ingedrukt en druk daarbij
de PROGRAM + en Á – toets
allebei in.
COMMANDER
OFF
Op het scherm blijft nu het cijfer dat
de geldende uitschakeltijd van de
afstandsbediening aangeeft branden,
terwijl de andere cijfers knipperen.
PROGRAM
++
+
+
Á
–
2 Druk op een van de cijfertoetsen 1
- 9 om het veelvoud van 10
minuten voor de automatische
uitschakeltijd te kiezen, of druk
op cijfertoets 0 toets om de
automatische uitschakelfunctie te
annuleren.
Om bijvoorbeeld de automatische
uitschakeltijd in te stellen op 20
minuten, drukt u op cijfertoets 2.
2
De afstandsbediening laat een
pieptoon horen en op het scherm
stopt het cijfer “2” met knipperen en
blijft branden.
NL
32
3 Druk op de COMMANDER OFF
toets.
COMMANDER
OFF
Page 78

Regelen van de
verlichting van het
uitleesvenster
De afstandsbediening wordt vanaf de
fabriek geleverd met een uitleesvenster
dat bij inschakelen helder oplicht, om
automatisch 10 seconden na het laatste
gebruik automatisch uit te schakelen.
Om deze instelling te wijzigen, gaat u als
volgt te werk.
U kunt de automatische uitschakeltijd
van de schermverlichting verlengen (in
stapjes van 10 seconden tot maximaal 90
seconden) en u kunt bovendien de
helderheid kiezen (fel of minder fel).
OFF
123
456
2
789
OFF
Á
¤
3
4
1
PROGRAM
+
–+–
=
e
+
SYSTEM CONTROL COMMANDER
123
TV VCR1 VCR2 VCR3 DVD SAT/CBL
AMP CD MD/DAT DECK B/A TUNER DSP
123
456
789
2 Druk op een van de cijfertoetsen 1
– 9 om het veelvoud van 10
seconden voor de automatische
uitschakeltijd te kiezen.
Om bijvoorbeeld de automatische
uitschakeltijd in te stellen op 20
seconden, drukt u op cijfertoets 2.
2
De afstandsbediening laat een
pieptoon horen en op het scherm
stopt het cijfer “2” met knipperen en
blijft branden.
3 Druk op de > of . toets om de
helderheid van het scherm te
kiezen.
Voor een feller verlicht scherm drukt
u op de > toets en voor een minder fel
scherm op de . toets.
1 Houd de COMMANDER OFF
toets ingedrukt en druk daarbij
de
toets in.
COMMANDER
OFF
+
Op het scherm blijft nu het cijfer dat
de geldende uitschakeltijd van de
achtergrondverlichting aangeeft
branden, samen met de pijl die de
gekozen helderheid aangeeft. De
andere cijfers en de andere pijl
knipperen.
e
De afstandsbediening laat een
pieptoon horen en de gekozen pijl
blijft branden.
4 Druk op de COMMANDER OFF
toets.
COMMANDER
OFF
33
NL
Page 79

Aanvullende informatie
Voorzorgsmaatregelen
•Laat de afstandsbediening niet vallen
en behoed het apparaat tegen heftige
schokken, om storingen in de werking
te vermijden.
•Leg het apparaat niet te dicht bij een
warmtebron en stel het niet bloot aan
direct zonlicht, veel stof of zand, vocht,
regen of mechanische schokken.
•Pas op dat er geen vloeistof of kleine
voorwerpen in de afstandsbediening
terechtkomen. Als er vloeistof of een
voorwerp in het apparaat terechtkomt,
dient u het eerst door een deskundige
te laten nakijken, alvorens het weer in
gebruik te nemen.
•Zorg dat er geen direct zonlicht of fel
lamplicht op de
afstandsbedieningssensors van uw
apparatuur valt. Bij te fel licht kan de
afstandsbediening niet naar behoren
werken.
•Houd de afstandsbediening buiten het
bereik van kleine kinderen en
huisdieren. Bepaalde elektrische
apparatuur zoals voor airconditioning,
verwarming of het openen en sluiten
van gordijnen of rolluiken kan
gevaarlijk zijn wanneer er per ongeluk
op een toets van de afstandsbediening
wordt gedrukt.
Technische gegevens
Reikwijdte
Ongeveer 10 meter (kan verschillen voor
apparatuur van andere merken)
Stroomvoorziening
Afstandsbediening: vier stuks R6 (AAformaat) batterijen
Schermverlichting: twee stuks R6 (AAformaat) batterijen
Gebruiksduur batterijen
Ongeveer 6 maanden (afhankelijk van hoe
intensief de afstandsbediening wordt
gebruikt)
Afmetingen
Ongeveer 120 × 175 × 45 mm (b/h/d)
Gewicht
290 gram (zonder batterijen)
Wijzigingen in ontwerp en technische gegevens
voorbehouden, zonder kennisgeving.
Onderhoud
Veeg de buitenkant van het apparaat
schoon met een zacht doekje, licht
bevochtigd met water en zonodig wat
milde vloeibare zeep. Gebruik voor het
reinigen geen vluchtige stoffen als
alcohol, benzine of thinner, aangezien
dergelijke middelen de afwerking van
het apparaat kunnen aantasten.
NL
34
Page 80

Verhelpen van storingen
Mocht u problemen hebben met het instellen of het gebruik van de afstandsbediening,
controleer dan eerst de batterijen (zie blz. 5) en neem vervolgens de onderstaande lijst
met controlepunten even door.
Probleem
De apparatuur reageert
niet op de
afstandsbediening.
Bepaalde apparatuur
reageert niet, ook na
instellen van een
componentcodenummer.
Bepaalde apparatuur
reageert niet, ook na
overnemen van de
afstandsbedieningssignalen
met de “aanleerfunctie”.
Tijdens het “aanleren”
van een nieuwe functie
knippert de aanduiding
“NG”.
Tijdens het “aanleren”
van een nieuwe functie
blijft de aanduiding
“NG” steeds branden.
Oplossing
• Probeer de bediening van wat dichterbij. De maximale reikwijdte van
de afstandsbediening is ongeveer 10 meter.
• Richt de afstandsbediening recht op het te bedienen apparaat en zorg
dat er geen obstakels tussen u en het apparaat staan.
• Schakel de apparatuur eerst in en probeer het dan opnieuw.
• Controleer of u de juiste component-keuzetoets hebt ingedrukt. In het
geval van SAT/CBL, DVD of DECK B/A zorgt u dat de gewenste
component wordt aangegeven.
• Controleer of het te bedienen apparaat wel geschikt is voor infraroodafstandsbediening. Als er bij het apparaat geen afstandsbediening
geleverd werd, is het wellicht niet geschikt voor bediening op afstand.
• Als uw video-apparatuur is aangesloten op een stereo-installatie,
controleert u dan of de afstandsbediening wel is ingesteld zoals
beschreven onder “Volumeregeling voor video-apparatuur aangesloten
op een stereo-installatie” (zie blz. 17).
• Zorg dat het juiste component-codenummer is gekozen (zie blz. 7). Als
het eerste codenummer voor uw component niet werkt, probeer dan
alle volgende codenummers uit, in de volgorde zoals vermeld in de
bijgeleverde lijst met “Component-codenummers”.
• Bepaalde functies kunnen niet vooringesteld zijn. Als sommige of zelfs
alle toetsen niet goed werken na het instellen van het componentcodenummer, gebruik dan de “aanleerfunctie” om de
afstandsbedieningssignalen voor het apparaat over te nemen in deze
afstandsbediening (zie blz. 12).
• Controleer of de afstandsbediening de juiste signalen heeft
overgenomen. Zo niet, verricht het “aanleren” van de gewenste
functie(s) dan opnieuw (zie blz. 12).
• Wis de functies die u zelden gebruikt uit het geheugen (zie blz. 15) en
probeer het “aanleren” van de gewenste functie opnieuw.
• Lees de aanwijzingen onder “Voor zorgvuldig aanleren van nieuwe
functies” op blz. 14 en probeer het “aanleren” van de gewenste functie
opnieuw (zie blz. 12).
• Mogelijk is er al een andere bedieningsfunctie voor de betreffende toets
overgenomen of “aangeleerd”. Wis de aangeleerde functie(s) (zie blz.
15) en probeer het “aanleren” van de gewenste functie opnieuw (zie blz.
12).
Wordt vervolgd
35
NL
Page 81

Verhelpen van storingen (vervolg)
Probleem
Een bedieningsreeks
heeft niet het gewenste
resultaat.
De afstandsbediening
wordt vanzelf
uitgeschakeld.
Oplossing
• Controleer of de bedieningsfuncties in de juiste volgorde zijn
geprogrammeerd (zie blz. 18).
• Houd de afstandsbediening op een ander punt gericht. Als dat niet
helpt, zet dan de verschillende componenten iets dichter naar elkaar
toe.
• Controleer de uitgangsstand (aan of uit, enz.) van de betreffende
componenten en zorg dat ze alle in gereedheid zijn voor de ontvangst
van de SYSTEM CONTROL bedieningssignalen.
• De afstandsbediening is in de fabriek ingesteld om 10 minuten na het
laatste gebruik automatisch uit te schakelen (automatische
uitschakelfunctie, zie blz. 32). U kunt de automatische uitschakeltijd
verlengen in stappen van 10 minuten tot maximaal 90 minuten, of u
kunt u deze functie ook geheel annuleren, zodat de afstandsbediening
niet vanzelf uitschakelt.
36
NL
Page 82

Aanhangsels
Overzicht van
vooringestelde functies
TV (TV-toestel)
SCHERMAANDUIDING
u
0 – 9
-/--
1
-
2
-
RED, GREEN,
YELLOW, BLUE
INPUT
TV
TELE TEXT
MENU
>
?
.
/
EXECUTE
PROGRAM +/–
Á +/–
¤
FUNCTIE
Uitschakelen.
Zenderkeuze. Ook voor
inschakelen.
Keuze van twee-cijfer
zendernummers. Werkt net
als de afstandsbediening van
het TV-toestel zelf.
Keuze van een
zendernummer van 20 tot
29.
Fastext toetsen.
Keuze van het
ingangssignaal.
Inschakelen.
Ook om terug te keren van
teletekst naar de gewone TV.
Overschakelen naar
teletekst.
Oproepen van het MENU
scherm.
Cursor omhoog verplaatsen.
Cursor naar links
verplaatsen.
Cursor omlaag verplaatsen.
Cursor naar rechts
verplaatsen.
Uitvoeren van een op het
scherm gekozen punt.
Zender met hoger nummer:
+
Zender met lager nummer: –
Geluid harder zetten: +
Geluid zachter zetten: –
Geluid van de TV dempen.
Nogmaals drukken om weer
geluid te horen.
Fastext gebruiken
Met Fastext hebt u met een druk op de
knop toegang tot bepaalde teletekstpagina’s. Wanneer een Fastext-pagina
wordt ontvangen, verschijnt een menu
met kleurcodes onder aan het scherm.
De kleuren van dit menu komen overeen
met de rode, groene, gele en blauwe
toetsen op de afstandsbediening.
Druk op de toets die overeenkomt met de
kleurcode in het menu. Na enige
seconden wordt de pagina weergegeven.
VCR 1, 2, 3 (videorecorders)
SCHERMAANDUIDING
u
0 – 9
-/--
1
-
2
-
INPUT
0
(
)
REC
p
P
ANT SW
PROGRAM +/–
FUNCTIE
In- en uitschakelen
Zenderkeuze
Keuze van twee-cijfer
zendernummers. Werkt net
als de afstandsbediening van
de videorecorder zelf.
Keuze van een
zendernummer van 20 tot
29.
Keuze van het
ingangssignaal.
Band terugspoelen.
Video afspelen.
Band snel vooruitspoelen.
Voor opnemen: druk op de
( toets terwijl u de REC
toets ingedrukt houdt. Laat
eerst de ( toets los en dan
de REC toets.
Stoppen
Pauzeren
Omschakelen van het
antennesignaal.
Zender met hoger nummer:
+
Zender met lager nummer: –
Wordt vervolgd
37
NL
Page 83

Overzicht van vooringestelde
functies (vervolg)
DVD (DVD-speler)
SCHERMAANDUIDING
u
0 – 9
ENTER
AUDIO
DISPLAY
0
(
)
p
P
SUB TITLE
SUB TITLE
ON/OFF
ANGLE
TITLE
DVD MENU
MENU
>
?
.
/
EXECUTE
CLEAR
RETURN
PROGRAM
PROGRAM
NL
38
FUNCTIE
In- en uitschakelen
Cijfertoetsen: Voor keuze
van bepaalde punten op het
scherm.
Invoeren van uw keuze.
Voor vastleggen van een op
het scherm gekozen punt.
Omschakelen van het geluid.
Aangeven van de
ingeschakelde afspeelfunctie
op het scherm.
Terugkeren naar een eerdere
passage.
Afspelen
Vooruit zoeken
Stoppen
Pauzeren
Omschakelen van de
ondertitels.
In- en uitschakelen van de
ondertitels.
Verstellen van de beeldhoek.
Aangeven van het titelmenu.
Aangeven van het DVD
menu.
Voor instellen of kiezen van
menu-onderdelen.
Cursor omhoog verplaatsen.
Cursor naar links
verplaatsen.
Cursor omlaag verplaatsen.
Cursor naar rechts
verplaatsen.
Uitvoeren van een op het
scherm gekozen punt.
Wissen van de gekozen
lettertekens van het scherm.
Terugkeren naar het vorige
scherm.
+
Doorgaan naar het volgende
+
onderdeel, muziekstuk of
scène.
–
Terugkeren naar het vorige
=
onderdeel, muziekstuk of
scène.
VD (LaserDisc-speler)
SCHERMAANDUIDING
u
0 – 9
-/--
1
-
ENTER
0
(
)
p
P
CLEAR
PROGRAM
PROGRAM
FUNCTIE
In- en uitschakelen
Keuze van het
scènenummer. Gebruik de 0
toets voor scène 10.
Zie voor het kiezen van
scènenummers 10 en hoger
de beschrijving van de
toets hieronder.
Keuze van de scènenummers
10 en hoger.
Kies bijvoorbeeld scène
nummer 15 met een druk op
-/--
en dan toets 5.
1
-
Invoeren van uw keuze.
Terugkeren naar een eerdere
passage.
Afspelen
Vooruit zoeken
Stoppen
Pauzeren
Wissen van de gekozen
lettertekens van het scherm.
+
Doorgaan naar de volgende
+
passage of scène.
–
Terugkeren naar de vorige
=
passage of scène.
-/--
1
-
Page 84

SAT (satelliet-ontvanger)
SCHERMAANDUIDING
u
0 – 9
-/--
1
-
RETURN
MENU
>
?
.
/
EXECUTE
PROGRAM +/–
FUNCTIE
In- en uitschakelen
Zenderkeuze
Keuze van twee-cijfer
zendernummers. Werkt net
als de afstandsbediening van
de satelliet-ontvanger zelf.
Afstemmen op de laatst
ontvangen zender.
Oproepen van het MENU
scherm.
Cursor omhoog verplaatsen.
Cursor naar links
verplaatsen.
Cursor omlaag verplaatsen.
Cursor naar rechts
verplaatsen.
Oproepen van de Station
Index als er geen zendergids
wordt aangegeven.
Keuze van de zender die
verlicht wordt aangegeven.
Zender met hoger nummer:
+
Zender met lager nummer: –
CBL (kabel-TV ontvanger)
SCHERMAANDUIDING
u
0 – 9, ENTER
-/--
1
-
RETURN
PROGRAM +/–
FUNCTIE
In- en uitschakelen
Zenderkeuze
Keuze van twee-cijfer
zendernummers.
Afstemmen op de laatst
ontvangen zender.
Zender met hoger nummer:
+
Zender met lager nummer: –
Wordt vervolgd
39
NL
Page 85

Overzicht van vooringestelde
functies (vervolg)
AMP (versterker)
SCHERMAANDUIDING
u
VIDEO 1
VIDEO 2
VIDEO 3
VDP/AUX
TV
TAPE
DAT/MD
CD
TUNER
PHONO
MENU
>
?
.
/
SHIFT
PROGRAM +/–
Á +/–
¤
NL
40
FUNCTIE
In- en uitschakelen
Keuze van de ingangsbron:
VIDEO 1
Keuze van de ingangsbron:
VIDEO 2
Keuze van de ingangsbron:
VIDEO 3
Keuze van de ingangsbron:
videoplatenspeler of AUX
Keuze van de ingangsbron:
TV
Keuze van de ingangsbron:
TAPE voor cassetteweergave
Keuze van de ingangsbron:
DAT cassette/MD minidiscspeler
Keuze van de ingangsbron:
CD voor compact discs
Keuze van de ingangsbron:
TUNER voor radioontvangst
Keuze van de ingangsbron:
PHONO voor platenspeler
Oproepen van het MENU
scherm.
Cursor omhoog verplaatsen.
Cursor naar links
verplaatsen.
Cursor omlaag verplaatsen.
Cursor naar rechts
verplaatsen.
Omschakelen van
afstemband (FM/AM)
Voorinstelfrequentie hoger:
+, lager: –
Afstemfrequentie hoger: +,
lager: –
Geluid harder zetten: +
Geluid zachter zetten: –
Geluid van de versterker
dempen. Nogmaals drukken
om weer geluid te horen.
CD (compact disc speler)
SCHERMAANDUIDING
u
0 – 9
-/--
1
-
ENTER
D.SKIP
0
(
)
p
P
PGM
CLEAR
SHUFFLE
CONTINUE
REPEAT
PROGRAM
PROGRAM
FUNCTIE
In- en uitschakelen
Keuze van
muziekstuknummers.
Gebruik de 0 toets voor
muziekstuk 10.
Zie voor het kiezen van
muziekstuknummers 10 en
hoger de beschrijving van de
-/--
toets hieronder.
1
-
Keuze van de
muziekstuknummers 10 en
hoger.
Invoeren van uw keuze.
Keuze van de volgende disc.
Terugkeren naar een eerdere
passage.
Afspelen
Vooruit zoeken
Stoppen
Pauzeren
Voor programma-weergave.
Wissen van de gemaakte
instelling.
Afspelen in willekeurige
volgorde.
Afspelen in normale
volgorde.
Herhaalde weergave.
+
Keuze van het volgende
+
muziekstuk.
–
Keuze van het voorgaande
=
muziekstuk.
Page 86

MD (minidisc-recorder)
SCHERMAANDUIDING
u
0 – 9
-/--
1
-
ENTER
0
(
)
REC
p
P
PGM
CLEAR
SHUFFLE
CONTINUE
REPEAT
PROGRAM
PROGRAM
FUNCTIE
In- en uitschakelen
Keuze van
muziekstuknummers.
Gebruik de 0 toets voor
muziekstuk 10.
Zie voor het kiezen van
muziekstuknummers 10 en
hoger de beschrijving van de
-/--
toets hieronder.
1
-
Keuze van de
muziekstuknummers 10 en
hoger.
Invoeren van uw keuze.
Terugkeren naar een eerdere
passage.
Afspelen
Vooruit zoeken
Voor opnemen: druk op de
( toets terwijl u de REC
toets ingedrukt houdt. Laat
eerst de ( toets los en dan
de REC toets.
Stoppen
Pauzeren
Voor programma-weergave.
Wissen van de gemaakte
instelling.
Afspelen in willekeurige
volgorde.
Afspelen in normale
volgorde.
Herhaalde weergave.
+
Keuze van het volgende
+
muziekstuk.
–
Keuze van het voorgaande
=
muziekstuk.
DAT (digitaal cassettedeck)
SCHERMAANDUIDING
u
0 – 9
ENTER
0
(
)
REC
p
P
R
REPEAT
PROGRAM
PROGRAM
FUNCTIE
In- en uitschakelen
Keuze van
muziekstuknummers.
Invoeren van uw keuze.
Terugspoelen
Afspelen
Vooruit zoeken
Voor opnemen: druk op de
( toets terwijl u de REC
toets ingedrukt houdt. Laat
eerst de ( toets los en dan
de REC toets.
Stoppen
Pauzeren
Opnamedemping
Herhaalde weergave.
+
Keuze van het volgende
+
muziekstuk.
–
Keuze van het voorgaande
=
muziekstuk.
Wordt vervolgd
41
NL
Page 87

Overzicht van vooringestelde
functies (vervolg)
DECK B/A (cassettedeck)
SCHERMAANDUIDING
D.SKIP
0
9
(
)
REC
p
P
R
FUNCTIE
Keuze van het cassettedeck:
A of B (alleen voor dubbel
cassettedeck)
Terugspoelen
Achterkant-weergave
Voorkant-weergave
Vooruitspoelen
Voor opnemen: druk op de
( toets terwijl u de REC
toets ingedrukt houdt. Laat
eerst de ( toets los en dan
de REC toets. Voor
opnemen op de achterkant
drukt u op de 9 toets
terwijl u de REC toets
ingedrukt houdt. Laat eerst
de 9 toets los en dan de
REC toets.
Stoppen
Pauzeren
Opnamedemping
FM/AM TUNER (FM/AM tuner)
SCHERMAANDUIDING
u
1 – 9, 0
-/--
1
ENTER
9
(
BAND
PROGRAM +
PROGRAM –
NL
42
-
FUNCTIE
In- en uitschakelen
Cijfertoetsen: voor keuze van
zendernummers.
Keuze van de
zendernummers 10 en hoger.
Invoeren van uw keuze.
Afstemmen op een zender
met lagere frequentie.
Afstemmen op een zender
met hogere frequentie.
Keuze van de FM/AM
afstemband.
Voorkeurzender met hoger
nummer: +
Voorkeurzender met lager
nummer: –
DSP (Digitale Surroundakoestiek Processor)
SCHERMAANDUIDING
CENTER
REAR
SUB WOOFER
AUDIO
DISPLAY
9
(
SOUNDFIELD
GENRE
T.TONE
MODE
>
?
.
/
FUNCTIE
Middenluidspreker harder/
zachter +/- toetsen.
Akoestiekluidsprekers
harder/zachter +/- toetsen.
Lagetonen-luidspreker
harder/zachter +/- toetsen.
Keuze van de DPC
signaalverwerking.
Omschakelen van de
aanduidingen.
Ingangskeuze: <
Ingangskeuze: >
In- en uitschakelen van de
klankbeelden.
Keuze van een klankbeeld-
genre.
Weergave van een testtoon.
Keuze van een klankbeeld.
Digitale signaalverwerking:
Digitale signaalverwerking:
<
Digitale signaalverwerking:
Digitale signaalverwerking:
>
Page 88

Beknopt bedieningsoverzicht
Voor het
Kiezen van een
componentcode
Overnemen van de
toetsfunctie(s) van een
andere afstandsbediening
(aanleerfunctie)
Toewijzen van andere
apparatuur aan de
component-keuzetoetsen
Omschakelen van de
volumeregeling
Programmeren van
SYSTEM CONTROL
bedieningsreeksen
Instellen van de systeemuitschakelfunctie
Toewijzen van een
inschakelcommando aan
de componentkeuzetoetsen
Programmeren van een
commando voor een
SYSTEM CONTROL toets
of component-keuzetoets
Drukt u op
COMMANDER OFF + ¤
COMMANDER OFF + Component-keuzetoets
Component-keuzetoets
COMMANDER OFF
(die u een nieuwe
+
functie wilt geven)
v
Component-keuzetoets
(die u een nieuwe
functie wilt geven)
COMMANDER OFF + Á + + Á –
COMMANDER OFF + SYSTEM CONTROL (1, 2, 3)
COMMANDER OFF + PROGRAM – + Á +
COMMANDER OFF + Á – +
COMMANDER OFF + PROGRAM + + Á +
Component-keuzetoets
+
(voor de nieuw toe te
wijzen component)
Componentkeuzetoets
Zie voor
details blz.
blz. 8
blz. 12
blz. 26
blz. 17
blz. 18
blz. 25
blz. 23
blz. 24, 28
Instellen van de
automatische
uitschakeltijd
Instellen van de
uitschakeltijd/helderheid
van de schermverlichting
Blokkeren van de
afstandsbedieningstoetsen
Direct kiezen van het TVingangssignaal
Beginnen met opnemen
COMMANDER OFF + PROGRAM + + Á –
COMMANDER OFF +
≥ + COMMANDER OFF
INPUT + 0 – 6 toetsen
REC + (
blz. 32
blz. 33
blz. 30
blz. 12
blz. 11
43
NL
 Loading...