

Page 1
3-066-295-13 (1)
Portable Video Printer
Operating Instructions
Mode d’emploi
Manual de instrucciones
PVP-MSH
2001 Sony Corporation
US
FR
ES
Page 2

English
Before operating the unit, please read this instructions thoroughly, and
retain it for future reference.
WARNING
To prevent fire or shock hazard, do not expose the unit to rain or moisture.
CAUTION
You are cautioned that any changes or modifications not expressly approved
in this manual could void your authority to operate this equipment.
Note:
This equipment has been tested and found to comply with the limits for a
Class B digital device, pursuant to Part 15 of the FCC Rules. These limits
are designed to provide reasonable protection against harmful interference
in a residential installation. This equipment generates, uses, and can
radiate radio frequency energy and, if not installed and used in accordance
with the instructions, may cause harmful interference to radio
communications. However, there is no guarantee that interference will not
occur in a particular installation. If this equipment does cause harmful
interference to radio or television reception, which can be determined by
turning the equipment off and on, the user is encouraged to try to correct
the interference by one or more of the following measures:
– Reorient or relocate the receiving antenna.
– Increase the separation between the equipment and receiver.
– Connect the equipment into an outlet on a circuit different from that to
which the receiver is connected.
– Consult the dealer or an experienced radio/TV technician for help.
2-US
Page 3

For the customers in Canada
This class B digital apparatus complies with Canadian ICES-003.
For the customers in Germany
Directive:EMC Directive 89/336/EEC.
This equipment complies with the EMC regulations when used under the
following circumstances:
• Residential area
• Business district
• Light-industry district
(This equipment complies with the EMC standard regulations EN55022 Class B.)
92/31/EEC
This mark indicates that this product is a genuine accessory for Sony video
products. When purchasing Sony video products, Sony recommends that
you purchase accessories with this “GENUINE VIDEO ACCESSORIES”
mark.
This mark indicates the Intelligent Accessory Shoe System for use with
Sony video products. Video components and accessories equipped with
this system are designed to make effective recording simple.
3-US
Page 4

Table of Contents
Before You Begin
Identifying the parts and lamp indications ...................................................... 5
Preparation
Inserting the print cartridge ................................................................................ 7
Attaching the printer.......................................................................................... 10
Preparing the power supply ............................................................................. 12
Inserting the print paper ................................................................................... 13
Making prints - Standard print
Printing images whenever you want to .......................................................... 15
Printing images recorded on “Memory Stick” ............................................... 18
Printing images with the date........................................................................... 20
Making prints of split screens - Split printing
Printing a single image ...................................................................................... 21
Printing images recorded on “Memory Stick” in recording order ............. 22
Printing images with print marks .................................................................... 23
Additional Informatin
Precautions .......................................................................................................... 24
Troubleshooting.................................................................................................. 26
Maintenance information .................................................................................. 29
Specification ........................................................................................................ 32
4-US
Page 5
BBefore You Begin
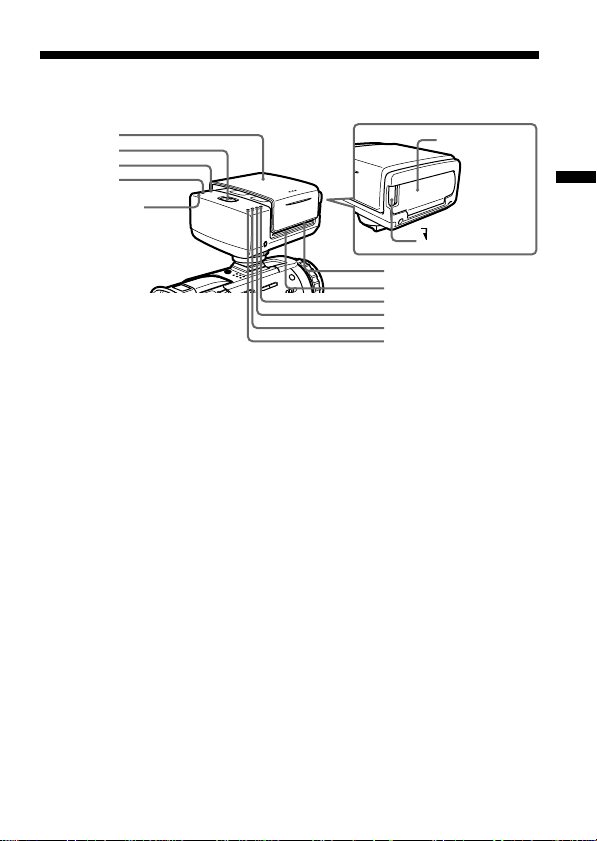
Identifying the parts and lamp indications
Printer cover
PRINT button
POWER lamp
PAPER lamp
CARTRIDGE lamp
POWER lamp (green)
Lit
•The printer cover is open.
PAPER lamp (red)
Fast flashing
•Print paper error
Slow flashing
•Print paper not inserted
CARTRIDGE lamp (red)
Fast flashing
•Ribbon error
•Run out of ribbon
Slow flashing
•Ribbon not inserted
Print cartridge
lid
PRINT CARTRIDGE
Paper feeder
Paper dispenser
Print lamp •••• (4)
Print lamp ••• (3)
Print lamp •• (2)
Print lamp • (1)
Before You Begin
OPEN
5-US
Page 6

Identifying the parts and lamp indications (continued)
Print lamp 1 (orange)
Lit
•Cyan is being printed.
Print lamp 2 (orange)
Lit
•Magenta is being printed.
Print lamp 3 (orange)
Lit
•Yellow is being printed.
Print lamp 4 (orange)
Lit
•Overcoat is being printed.
Print lamps 1 and 2 flashing simultaneously
Fast flashing
•Printer internal error
Print lamps 3 and 4 flashing simultaneously
Fast flashing
•The temperature inside the printer has risen.
6-US
Page 7
BPreparation
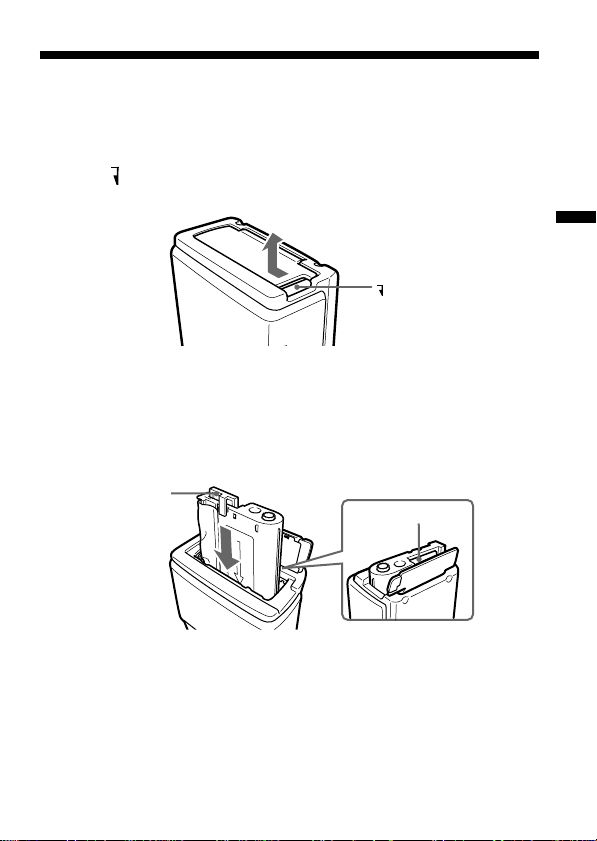
Inserting the print cartridge
Be sure to use the specified print cartridge.
A single new print cartridge allows you to make 20 prints.
1 Slide PRINT CARTRIDGE OPEN knob on the side of this unit in
the direction of the arrow, and open the print cartridge lid.
Preparation
PRINT CARTRIDGE
OPEN
2 Insert the print cartridge as far as possible in the direction of
the arrow on the cartridge case until it clicks into the cartridge
compartment.
Insert the print cartridge so that the printing head is located between
the ribbon and the cartridge case.
Ribbon protector
(blue cover)
The ribbon protector is located between the ribbon and the cartridge
case. This protector prevents the ribbon from being tangled when
inserting the print cartridge into the cartridge compartment.
Insert the print cartridge as it is into the cartridge compartment
without removing the ribbon protector. When the print cartridge is
inserted, the ribbon protector comes loose. Dispose of the ribbon
protector after the print cartridge is inserted.
Printing head
7-US
Page 8
Inserting the print cartridge (continued)
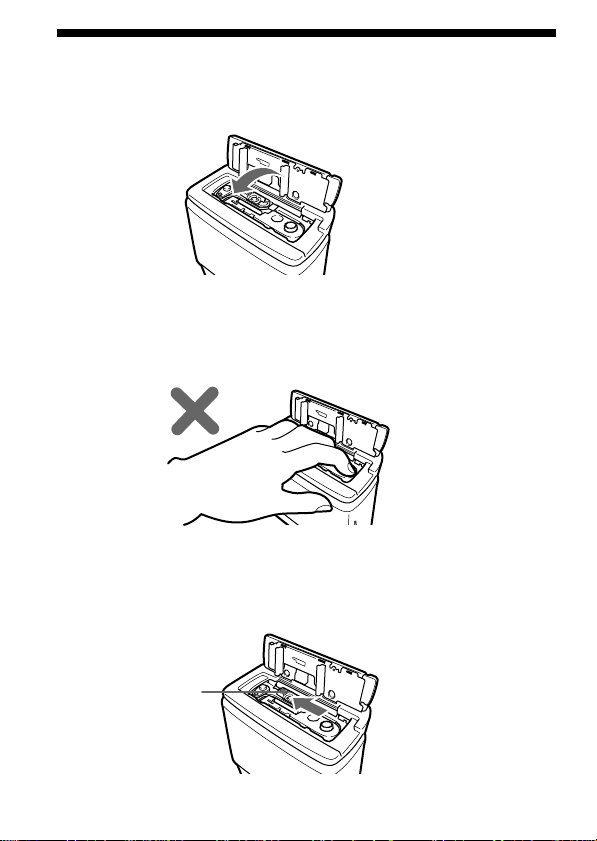
3 Close the print cartridge lid completely.
PNote
The inside of this unit sometimes heats up. Do not put your hand inside the
print cartridge compartment.
Removing the print cartridge
Slide the removal switch to the end in the direction of the arrow, and
remove the print cartridge.
8-US
Removal switch
Page 9
PNotes
•If the print cartridge is not inserted when the power is turned on, the
CARTRIDGE lamp flashes slowly. The CARTRIDGE lamp flashes fast
when an error occurs on the print cartridge or when the ribbon has run
out.
•If the removal switch is not slid to the end, you may not be able to
remove the print cartridge.
When the print cartridge cannot be inserted easily
Remove the print cartridge, and then re-insert it.
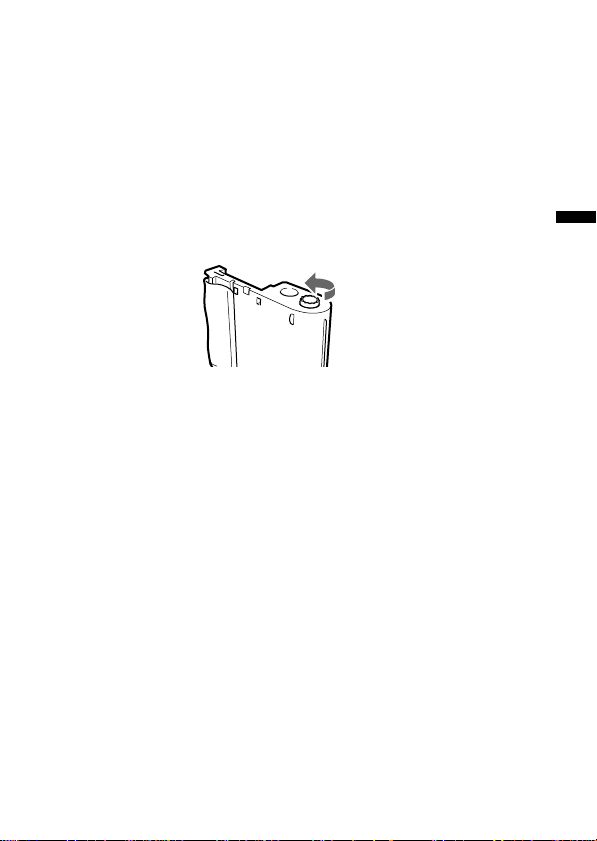
Turn in the direction of the arrow to take up ribbon slack only if ribbon
slack prevents the print cartridge from being inserted correctly.
PNotes
• Do not remove the print cartridge when print paper is inserted. This may
cause this unit to malfunction.
• Do not remove the print cartridge until you use it up. If you reinsert the print
cartridge before you use it up, the possible number of prints per print
cartridge roll may be reduced by one.
Preparation
9-US
Page 10
Attaching the printer
Before attaching this unit to your camcorder, make sure that your
camcorder is turned off.
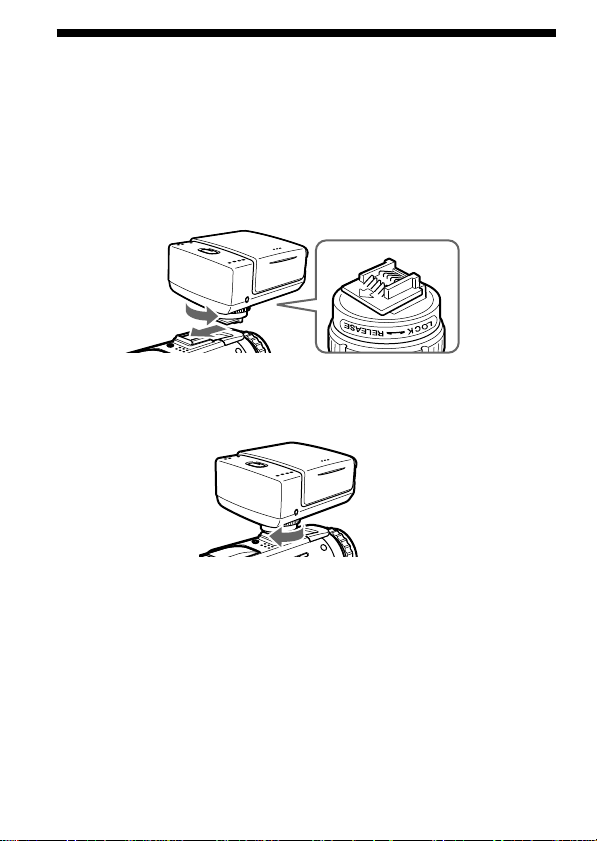
1 Turn the knob in the direction of the arrow (RELEASE) to
loosen. Then, check the direction of the arrow on the shoe
attachment section on this unit, and firmly insert this unit
until it contacts the inside of the accessory shoe.
2 Turn the knob in the direction of the arrow (LOCK), and firmly
tighten until the knob comes to a stop.
PNotes
•If you cannot insert this unit, turn the knob in the direction of the arrow
(RELEASE) to unlock.
•Do not insert this unit backwards. Be sure to insert this unit in the direction of
the arrow.
• Do not lift up your camcorder by this unit.
• Attach this unit to your camcorder firmly. Otherwise, it may become detached
from your camcorder.
10-US
Page 11
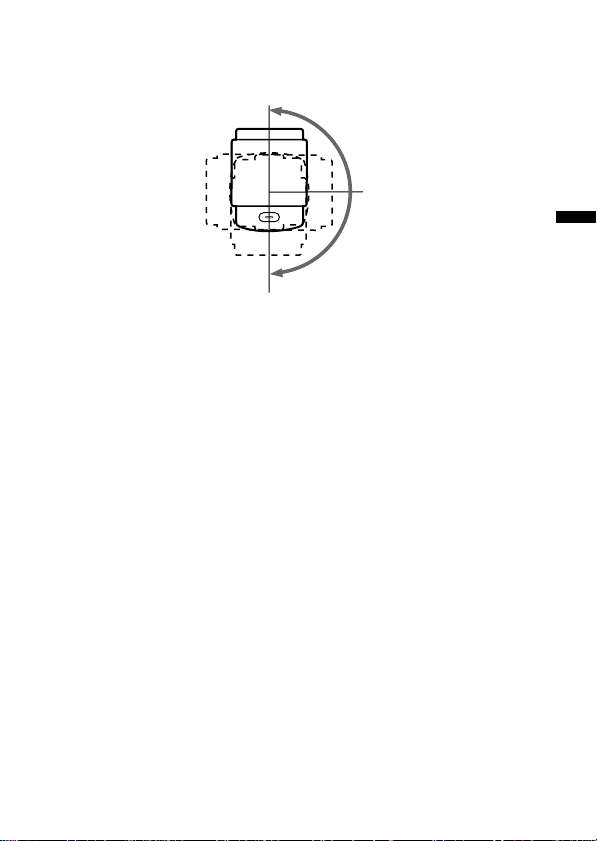
Rotating the printer
This unit rotates toward about 180º in the clockwise direction.
0º
90º
180º
PNote
Do not rotate this unit forcibly more than 180º in the clockwise direction. Doing
so may destroy this unit.
To remove the printer
Turn the knob in the direction of the arrow (RELEASE) to loosen, and then
pull out this unit in the direction opposite to the arrow to remove it.
Preparation
11-US
Page 12
Preparing the power supply
Be sure to use a fully charged battery, the AC power adaptor or the AC
power adaptor/charger.
Printing is not possible if the battery is low. However, recording may be
possible depending on how much the battery power remains. The
remaining battery time indicator does not indicate the possible printing
time.
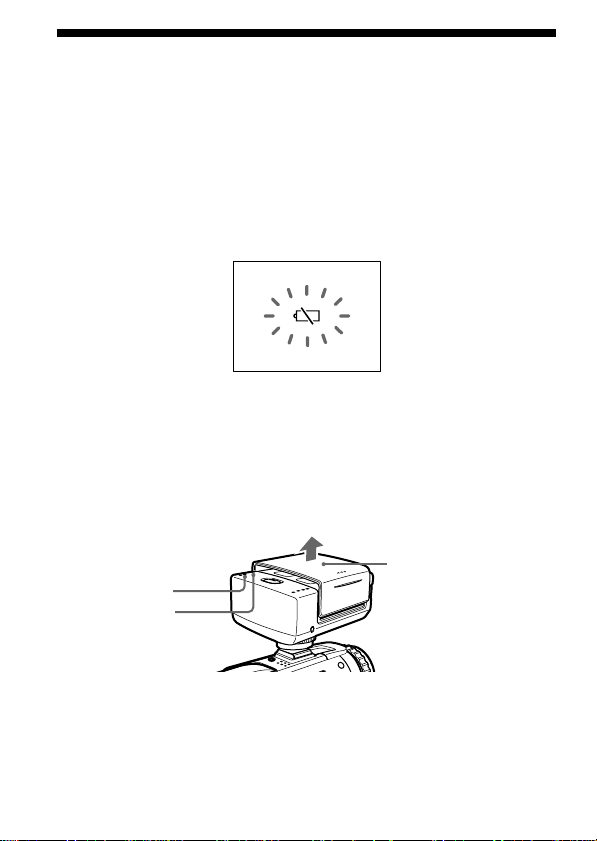
If you press PRINT or insert the print paper while the battery is low, the
warning indicator, E, will be displayed on the LCD screen. Replace with a
fully charged battery.
1 Set the POWER switch on your camcorder to MEMORY.
2 Slide the printer cover in the direction of the arrow to open
while holding your camcorder.
The POWER lamp lights, the sound of motor operation stops, and the
PAPER lamp flashes slowly after several seconds.
Printer cover
PAPER lamp
POWER lamp
PNote
While recording or playback mode, this unit cannot be turned on.
12-US
Page 13

Inserting the print paper
Be sure to use the specified print paper.
The descriptions in this manual are for the DCR-TRV30.
For details on camcorder operation, refer to the operating instructions of
your camcorder.
1 Perform steps1 and 2 on page 12, and prepare the power
supply.
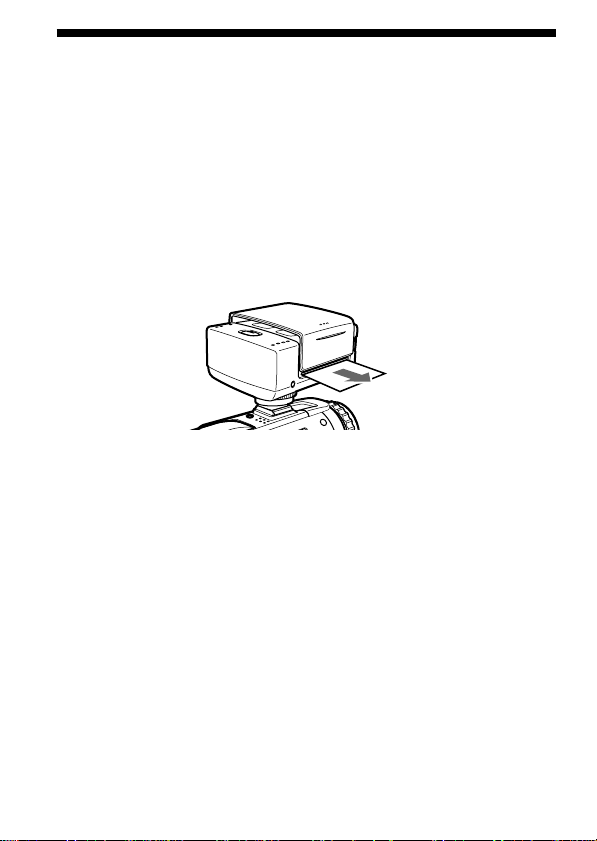
2 Make sure that the PAPER lamp is flashing slowly, and then
insert a sheet of print paper into the paper feeder straight
making sure that the print surface is facing up.
Insert the print paper until less than 3 cm of print paper is protruding
from this unit.
Press the print paper into the paper feeder for about two seconds after
the beep.
The print paper starts to be automatically drawn in.
Less than
3 cm
•When the CARTRIDGE lamp is flashing slowly, check the print
cartridge.
•If print paper is not inserted, the PAPER lamp flashes slowly. The
PAPER lamp flashes fast when an error occurs.
Preparation
PNote
After you have inserted the print paper, do not close the printer cover until
printing ends. Doing so may cause this unit to malfunction.
13-US
Page 14
Inserting the print paper
PNotes
• The print paper will not be automatically drawn in unless it is firmly inserted
as far as possible and the print paper is lightly pressed for about two seconds.
• Do not insert print paper from the opposite side of the paper feeder or from
the paper dispenser. Doing so may cause this unit to malfunction.
• Do not insert print paper at an angle. Doing so may cause this unit to
malfunction.
(continued)
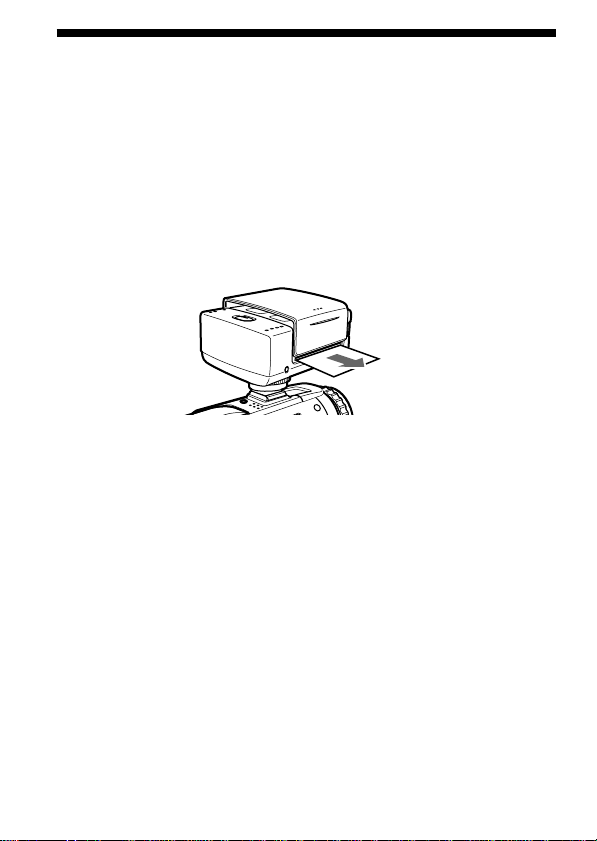
To remove drawn in print paper
Turn off your camcorder once, and then set again to MEMORY. The print
paper is automatically ejected.
Pull out the print paper in the direction of the arrow.
PNote
Do not pull out drawn in print paper forcibly. Doing so may cause this unit to
malfunction.
Supplied print paper
Your printer is provided with the following print paper. Select the paper
type to suit your specific requirements:
•Standard type
•Sticker type/Standard size
•Sticker type/9 split size
14-US
Page 15
BMaking prints - Standard print
You can print images whenever you want to or print images recorded on
“Memory Stick.”
Printing images whenever you want to
Be sure to use a fully charged battery when using the battery to make
prints.
1 Insert the print cartridge and attach this unit to your
camcorder.
2 Set the POWER switch on your camcorder to MEMORY.
3 Open the printer cover, then make sure that the PAPER lamp
is flashing slowly. Insert a sheet of print paper.
4 Keep pressing PRINT lightly until a still image appears.
The CAPTURE indicator appears.
CAPTURE
5 Press PRINT deeper.
PREPARING appears on the LCD screen.
Making prints - Standard print
PREPARING
While the ribbon is being aligned, the print paper is sometimes
inserted and ejected from the left and right sides of the body without
the LCD screen turning off even if POWER lamp lights.
The image on screen when PRINT is pressed in is printed. This image
is not recorded on “Memory Stick” or tape.
15-US
Page 16
Printing images whenever you want to (continued)
6 Printing is started.
The image on the LCD screen disappears.
During printing, the print lamps 1 to 4 light in order, and the print
paper is fed back and forth four times.
When printing ends, the image appears on the LCD screen.
It takes about 160 seconds to make a print.
7 When printing ends, draw out the print paper in the direction
of the arrow.
PNotes
• The image area of the printed area may differ slightly from the image on your
camcorder or TV.
• The quality of printed images sometimes deteriorates considerably or printing
is not performed if prints are made at a high temperature exceeding the
guaranteed operating temperature range.
• The possible number of prints is sometimes reduced if prints are made at a
low temperature exceeding the guaranteed operating temperature range for
the battery pack.
• The color of printed images sometimes changes slightly depending on the
ambient temperature conditions during printing.
• The possible number of prints is reduced if you use a battery with little
remaining battery power.
16-US
Page 17

To cancel printing
The print paper is automatically ejected by turning off your camcorder
once, and then setting the POWER switch on your camcorder to MEMORY.
To resume printing, insert new print paper and repeat the procedure from
step 4.
If you cannot print even by pressing PRINT
The print paper is automatically ejected by turning off your camcorder
once, and then setting the POWER switch on your camcorder to MEMORY.
To resume printing, insert new print paper and repeat the procedure from
step 4.
Making prints - Standard print
17-US
Page 18

Printing images recorded on “Memory
Stick”
Be sure to use a fully charged battery when using the battery to make
prints.
Insert a recorded “Memory Stick” into your camcorder.
1 Insert the print cartridge and attach this unit to your
camcorder.
2 Set the POWER switch on your camcorder to MEMORY.
3 Play back the still image you want to print by operating your
camcorder.
4 Open the printer cover, then make sure that the PAPER lamp
is flashing slowly. Insert a piece of print paper.
5 Press PRINT deeper.
PREPARING appears on the LCD screen.
PREPARING
While the ribbon is being aligned, the print paper is sometimes
inserted and ejected from the left and right sides of the body without
the LCD screen turning off even if POWER lamp lights.
6 Printing is started.
The image on the LCD screen disappears.
During printing, priht lamps 1 to 4 light in order, and the print paper
is fed back and forth four times.
When printing ends, the image appears on the LCD screen.
It takes about 160 seconds to make a print.
18-US
Page 19

7 When printing ends, draw out the print paper in the direction
of the arrow.
Printing the index screen
Display the index screen in step 3.
Printing images recorded on tape
Start from step 3 after capturing the image on “Memory Stick” as a still
image.
* You can also print images superimposed with a still image by the
MEMORY MIX function.
Note, however, that when making split prints, be sure to record the
images first to “Memory Stick” before printing them.
19-US
Making prints - Standard print
Page 20

Printing images with the date
Be sure to use a fully charged battery when using the battery to make
prints.
1 Insert the print cartridge and attach this unit to your
camcorder.
2 Set the POWER switch on your camcorder to MEMORY.
3 Play back the still image you want to print by operating your
camcorder.
4 Open the printer cover, then make sure that the PAPER lamp
is flashing slowly. Insert the print paper.
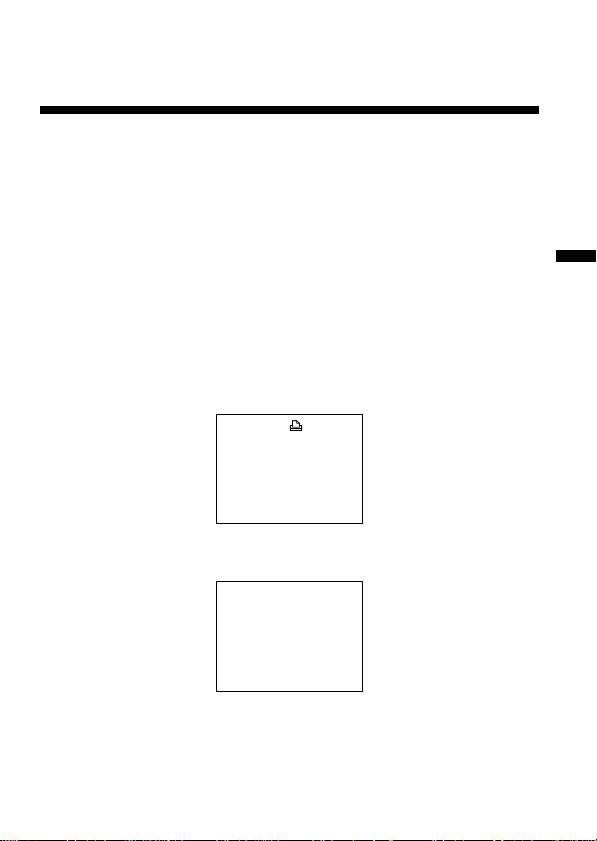
5 Select DATE/TIME in in the menu settings of your
camcorder, then press the SEL/PUSH EXEC dial on your
camcorder.
6 Select DATE or DAY & TIME, then press the SEL/PUSH EXEC
dial on your camcorder.
PR I NT SET
9PIC PRINT
/
TIME
OFF
DATE
RETURN DATE
DAY & TIME
[MENU] : END
The actual screen may differ from the illustration above.
7 Perform steps 5 to 7 of “Printing images whenever you want
to.”
PNote
The date cannot be entered in 9 - division prints (SAME, MULTI or MARKED)
or index prints.
20-US
Page 21

BMaking prints of split screens – Split printing
You can print images recorded on “Memory Stick” to print paper (Sticker
type/9 split size).
Printing a single image
Be sure to use a fully charged battery when using the battery to make
prints.
Insert a recorded “Memory Stick” into your camcorder.
1 Insert the print cartridge and attach this unit to your
camcorder.
2 Set the POWER switch on your camcorder to MEMORY.
3 Play back the still image you want to print by operating your
camcorder.
4 Open the printer cover, then make sure that the PAPER lamp
is flashing slowly. Insert the print paper. (Sticker type/9 split
size).
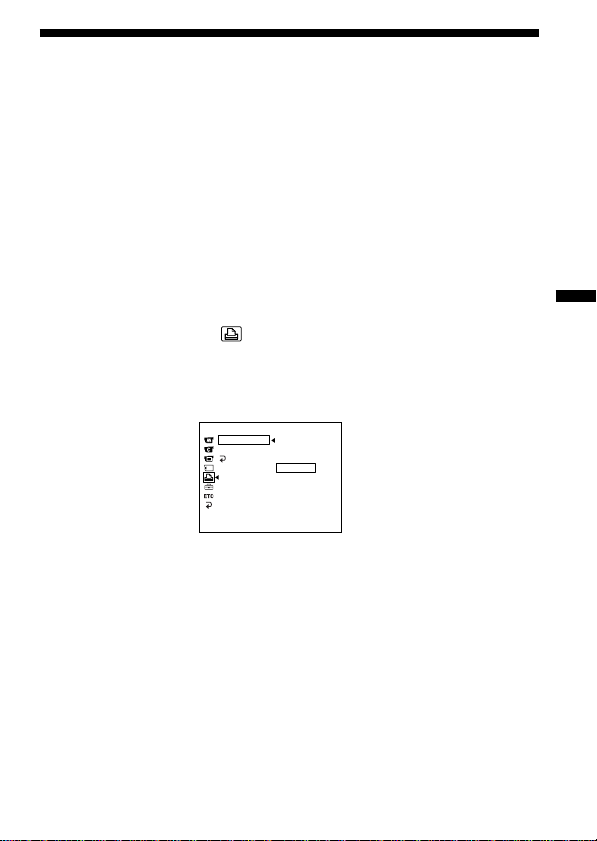
5 Select 9PIC PRINT in in the menu settings of your
camcorder, then press the SEL/PUSH EXEC dial on your
camcorder.
6 Select SAME, then press the SEL/PUSH EXEC dial on your
camcorder.
PR I NT SET
9PIC PRINT RETURN
SAME
DATE/TIME
RETURN MULTI
MARKED
[MENU] : END
Making prints of split screens – Split printing
The actual screen may differ from the illustration above.
7 Perform steps 5 to 7 of “Printing images whenever you want
to.”
PNotes
• You cannot print the display on the LCD screen.
• The following images cannot be propely devided:
– Index screen
– Multi screen
• You cannot print moving pictures.
21-US
Page 22

Printing images recorded on “Memory
Stick” in recording order
Be sure to use a fully charged battery when using the battery to make prints.
Insert a recorded “Memory Stick” into your camcorder.
1 Insert the print cartridge and attach this unit to your
camcorder.
2 Set the POWER switch on your camcorder to MEMORY.
3 Play back the still image you want to print by operating your
camcorder.
4 Open the printer cover, then make sure that the PAPER lamp
is flashing slowly. Insert the print paper. (Sticker type/9 split
size)
5 Select 9PIC PRINT in in the menu settings of your
camcorder, then press the SEL/PUSH EXEC dial on your
camcorder.
6 Select MULTI, then press the SEL/PUSH EXEC dial on your
camcorder.
The actual screen may differ from the illustration above.
Nine still images are displayed divided in order from the playback
screen selected in step 3.
If the number of still images is less than nine, all of the images up to
the last image are displayed.
In MULTI mode, you cannot select respective images you want to
print or change the order of images to print out.
PR I NT SET
9PIC PRINT RETURN
SAME
DATE/TIME
RETURN MULTI
MARKED
[MENU] : END
7 Perform steps 5 to 7 of “Printing images whenever you want
to.”
PNotes
• You cannot print the display on the LCD screen.
• The following images cannot be propely devided:
– Index screen
– Multi screen
• You cannot print moving pictures.
22-US
Page 23
Printing images with print marks
Be sure to use a fully charged battery when using the battery to make prints.
Refer to the operating instructions of your camcorder to output print
marks on still images.
Insert a recorded “Memory Stick” into your camcorder.
1 Insert the print cartridge and attach this unit to your
camcorder.
2 Set the POWER switch on your camcorder to MEMORY.
3 Play back the still image with PRINT MARK by operating your
camcorder.
4 Open the printer cover, then make sure that the PAPER lamp
is flashing slowly. Insert the print paper. (Sticker type/9 split
size)
5 Select 9PIC PRINT in in the menu settings of your
camcorder, then press the SEL/PUSH EXEC dial on your
camcorder.
6 Select MARKED, then press the SEL/PUSH EXEC dial on your
camcorder.
PR I NT SET
9PIC PRINT RETURN
SAME
DATE/TIME
RETURN MULTI
MARKED
[MENU] : END
The actual screen may differ from the illustration above.
Still images marked with PRINT MARK are displayed divided in
order.
7 Perform steps 5 to 7 of “Printing images whenever you want
to.”
PNotes
• You cannot print the display on the LCD screen.
• The following images cannot be propely devided:
– Index screen
– Multi screen
• You cannot print moving pictures.
Making prints of split screens – Split printing
23-US
Page 24

BAdditional Information
Precautions
About this printer
•This printer can be used only on printer-compatible camcorders.
•Attach this unit to your camcorder making sure that your camcorder is
turned off. Otherwise this unit may operate incorrectly.
•Never close the printer cover during printing. Doing so may cause a
paper jam or other trouble.
•If you disconnect the power source such as the battery pack during
printing, the platen roller may not move back to the original position.
Install the charged battery pack, and perform the operation again.
•During printing, the print paper is inserted and ejected in the paper
dispenser. Do not place any objects that may prevent the print paper
from being inserted and ejected from the body.
•Only the power switch on your camcorder can be operated while print
paper is being fed into or out of the body. Other operations are not
possible. You can operate your camcorder after the print paper has
stopped being fed.
•During printing, do not draw out the print paper. Doing so might cause
this unit to malfunction.
•During printing, do not touch the print surface.
•During printing, do not subject the body to vibration or shock.
•We recommend making repeat prints from images stored on “Memory
Stick.” Repeat prints cannot be made of the same screen if it is not
recorded on “Memory Stick.”
•Printing images recorded continuously, multi screen, is not possible. To
print those images, store them on “Memory Stick” in advance.
•You cannot operate this unit while SLIDE SHOW is executed on your
camcorder.
•Be sure to insert paper into the paper feeder one sheet at a time.
Otherwise, print paper may overlap when being fed into this unit. If this
happens, printing defects may occur or this unit may malfunction.
•This unit may malfunction if you print in the direct sunlight. Use this
printer out of the direct sunlight such as in the shade.
24-US
Page 25

About the print cartridge
•Do not touch the ribbon or leave it in a dusty place.
Fingerprints or dust on the ribbon sometimes prevent good-looking
prints from being made.
•Avoid storing the print cartridge in high temperature or humid locations,
dusty locations or direct sunlight.
About print paper
•Lines or small squares are printed on the reverse side of print paper. Use
the side with nothing printed as the print surface.
•Use only the specified print paper. Use of other paper may cause this
unit to malfunction.
•Before you start printing, do not write on the print paper or print on the
print paper on a word processor.
When writing on the print surface of print paper after printing, use an
oil-based pen. Printing on the print surface is not possible on a word
processor.
•When handling print paper, do not touch the print surface.
•Do not load sticker print paper whose seals have been peeled off. Doing
so might cause paper jams.
•Do not fold or bend print paper. Doing so might cause paper jams.
•Do not leave print paper in dusty locations. Fingerprints or dust on the
ribbon sometimes prevent good-looking prints from being made.
•Store print paper in the bag which it first came in.
•Avoid storing print paper in high temperature or humid locations, dusty
locations or direct sunlight.
If you use up the supplied print paper and print cartridge
Purchase the specified color print pack, CPPM-NR40 (Standard type) or
CPPM-SC40 (Sticker type), for this unit.
Additional Information
25-US
Page 26

Troubleshooting
If you run into any problem using this unit, use the following table to
troubleshoot the problem. If the problem persists, disconnect the power
source and contact your Sony dealer or local authorized Sony service
facility.
Symptom Cause and/or Corrective Actions
Print paper cannnot be
drawn in the paper feeder.
Images do not become still
images even you press
PRINT.
26-US
•The printer is not attached correctly.
t Attach it correctly.
•The battery power is low.
t Use the battery pack charged fully.
•The print cartridge is not inserted.
t Insert the print cartridge.
•You have inserted print paper into the
paper feeder right after you turned the
power source on or right after you
opened the printer cover.
t Remove the print paper once.
Make sure that the PAPER lamp is
flashing slowly, and then insert print
paper into the paper feeder.
•The POWER switch on your camcorder is
not set to MEMORY.
t Set it to MEMORY.
•The print paper is not inserted properly.
t Press the print paper into the paper
feeder for about two seconds after the
beep sounds.
•Printing images continuously makes the
inside of the printer heat up. When this
happens, you may not be able to insert
print paper.
t Leave this unit until it cools down,
then insert print paper into the paper
feeder again.
•SLIDE SHOW is executed on your
camcorder.
t Cancel SLIDE SHOW or inset the
print paper again after SLIDE SHOW
has completed.
•Print paper or the print cartridge is not
inserted.
t Insert the print paper or the print
cartridge.
Page 27

Symptom Cause and/or Corrective Actions
When you print images
recorded on the “Memory
Stick”, printing does not
start even you press
PRINT.
The print cartridge cannot
be removed from the
cartridge compartment.
You cannot insert the
print cartridge.
•You have pressed PRINT lightly.
tPress PRINT deeper.
•Print paper is inserted.
t Remove the print paper.
•Printing is executed.
t Remove the print cartridge after the
printing is completed.
•Removal switch is not slid to the end.
t Slide it to the end.
•The ribbon is jammed in the cartridge
compartment.
t Contact your Sony dealer or local
authorized Sony service facility.
•If you disconnect the power source such
as the battery pack during printing, the
platen roller may not move back to the
original position.
t Install the charged battery pack, set
the POWER switch on your
camcorder to MEMORY and open
the LCD panel and the printer cover.
•If you disconnect the power source such
as the battery pack during printing, the
platen roller may not move back to the
original position.
t Install the charged battery pack, set
the POWER switch on your
camcorder to MEMORY and open
the LCD panel and the printer cover.
(Continued on the following page)
Additional Information
27-US
Page 28

Troubleshooting (continued)
Symptom Cause and/or Corrective Actions
The print lamps 3 and 4
are flashing fast.
The CARTRIDGE lamp is
flashing fast.
Printing stops midway,
and the PAPER lamp is
flashing fast.
You cannot select SAME,
MULTI or MARKED in
the menu settings on your
camcorder.
The printed image has a
black frame.
You cannot remove print
paper.
•The inside of the printer has become too
hot.
t Leave this unit until it cools down,
then resume printing images.
•The ribbon has run out.
t Replace the print cartridge with a
new one.
•You have left the printer cartridge in
high temperature so that the ribbon is
damaged.
t Replace the print cartridge with a
new one.
•An error has occured during printing.
t Turn off your camcorder once, and
then set it to MEMORY again.
t Charge the battery, and reinstall it.
•Print paper is not inserted, and the still
image to print is not played back.
t Insert print paper, and play back the
still image to print.
•A frame sometimes appears when you
use this unit on a camcorder other than
the one you used for recording images
to “Memory Stick.” This is not a
malfunction.
•Print paper is jammed.
t Contact your Sony dealer or local
authorized Sony facility.
28-US
Page 29

Maintenance information
About the influence of dirt on the printer
Printed images may have red, blue, or white dots or thin lines on their
surface due dirt or dust entering the printer. This is not a malfunction.
These symptoms may become worse depending on the storage conditions
of the print paper or print cartridge.
See “Precautions” for details when handling print paper and the print
cartridge.
About cleaning printer heads
We recommend that you clean the printer heads with the head cleaner
(supplied) when you exchange the print cartridge. If printed images have
thin lines, remove the print cartridge, and clean the heads. Handle the
print cartridge with care. See “Inserting the print cartridge” for details
when inserting the print cartridge.
How to clean the printer heads
Insert and remove the head cleaner several times to clean the printer head.
Store the head cleaner in the specified case (supplied) after cleaning the
printer head.
Additional Information
29-US
Page 30

Maintenance information (continued)
About the color of printed images
Printing images continuously or printing images at a high temperature
may cause the color of the printed images to change.
About the influence of dirt on the platen roller
Printed images may have red, blue, or white dots periodically in horizontal
direction due dirt or dust on the platen roller which is inside of the printer.
If this happens, clean the platen roller with the platen roller cleaner.
How to clean the platen roller
Perform steps 1 to 7 of “Printing images whenever you want to.” Note
that insert the platen roller cleaner instead of print paper in step 3 making
sure that the surface of the platen roller cleaner is facing up.
Cleaner part
Front side Back side
Less than 3 cm
Store the platen roller cleaner in the bag which it first came in.
30-US
Page 31

PNotes
• If you insert the platen roller cleaner in the wrong direction, it will not be
drawn in the paper feeder.
• Insert the platen roller cleaner vertically against the body. Inserting
inappropriately causes a malfunction.
• You can clean the platen roller 3 times per platen roller cleaner. You cannot
use it more than 3 times.
• Because cleaning the platen roller can be done by printing an image on the
platen roller cleaner, the printed image may not be clear. This is not a
malfunction.
• The number of printed image per print cartridge roll will be reduced by one
after cleaning the platen roller.
On purchasing cleaners
Contact your Sony dealer or local authorized Sony service facility and
inform them of the following product numbers:
•Head cleaner (1-772-863-11)
•Platen roller cleaner (1-772-862-11)
Additional Information
31-US
Page 32

Specifications
Print method: Variable dot thermal transfer
Print resolution: 254 dpi
Number of printed dots: 640 × 480 (paper feed direction)
Print speed: 3.05 mm (1/8 in.)/second
Size of print pape: 91 × 55 mm (3 5/8 × 2 1/4 in.)
Print area size: 64 × 48 mm (2 5/8 × 1 15/16 in.)
Printing time (approx.): 160 seconds
Number of prints per print cartridge roll: 20
Power consumption: 5 W
Guaranteed operating temperature for printing:
10 °C to 35 °C (50 °F to 95 °F)
Storage temperature: -20 °C to + 55 °C (-4 °F to +131 °F)
Print cartridge storage temperature: -20 °C to + 55 °C (-4 °F to +131 °F)
Dimensions (approx.):
67 × 78 × 97 mm (2 3/5 × 3 1/10 × 3 4/5 in.) (h/w/d)
Mass (approx.): 305 g (10 3/4 oz)
32-US
Page 33

Page 34

Français
Avant d’utiliser cet appareil, veuillez lire ce mode d’emploi avec attention et le
conserver pour toute référence future.
AVERTISSEMENT
Pour éviter tout risque d’incendie ou d’electrocution, n’exposez pas cet
appareil á la pluie ni á l’humidité.
Pour les clients au Canada
Cet appareil numérique de la class B est conforme à la norme NMB-003 du
Canada.
Ce sigle indique qu’il s’agit d’un accessoire d’origine pour les produits
vidéo Sony. Lorsque vous achetez des produits vidéo Sony, Sony vous
conseille de n’acheter que des accessoires portant la mention “GENUINE
VIDEO ACCESSORIES” (accessoires d’origine Sony).
Ce logo indique le système de griffe porte-accessoires intelligente, conçu
pour les produits vidéo Sony. Les composants et accessoires munis de ce
système permettent une prise de vues plus simple et efficace.
2-FR
Page 35

Table des matières
Informations préliminaires
Identification des éléments et des voyants ...................................................... 4
Préparatifs
Insertion de la cartouche couleur ....................................................................... 6
Fixation de l’imprimante ..................................................................................... 9
Préparation de la source d’alimentation ......................................................... 11
Insertion du papier photo ................................................................................. 12
Tirages – Impression standard
Impression instantanée d’images ..................................................................... 14
Impression d’images enregistrées sur un “Memory Stick”.......................... 17
Impression d’images avec la date .................................................................... 19
Tirages d’écrans divisés – Impression divisée
Impression d’une seule image .......................................................................... 20
Impression des images d’un “Memory Stick” dans l’ordre de leur
enregistrement .................................................................................................... 21
Impression d’images marquées au préalable ................................................. 22
Informations complémentaires
Précautions .......................................................................................................... 23
En cas de problème ............................................................................................ 25
Entretien de l’imprimante ................................................................................. 28
Spécifications....................................................................................................... 31
3-FR
Page 36

BInformations préliminaires
Identification des éléments et des
voyants
Couvercle de
l’imprimante
Touche PRINT
Voyant POWER
Voyant PAPER
Voyant
CARTRIDGE
Voyant POWER (vert)
Allumé
•Couvercle d’imprimante ouvert
Voyant PAPER (rouge)
Clignotement rapide
•Erreur d’alimentation du papier
Clignotement lent
•Absence de papier
Voyant CARTRIDGE (rouge)
Clignotement rapide
•Erreur de ruban
•Epuisement du ruban
Clignotement lent
•Absence de ruban
Couvercle de la
cartouche couleur
PRINT CARTRIDGE
Entrée du papier
Sortie du papier
Voyant d’impression •••• (4)
Voyant d’impression ••• (3)
Voyant d’impression •• (2)
Voyant d’impression • (1)
OPEN
4-FR
Page 37

Voyant d’impression 1 (orange)
Allumé
•Impression de la couleur cyan
Voyant d’impression 2 (orange)
Allumé
•Impression de la couleur magenta
Voyant d’impression 3 (orange)
Allumé
•Impression de la couleur jaune
Voyant d’impression 4 (orange)
Allumé
•Impression de la pellicule de protection
Clignotement simultané des voyants d’impression 1 et 2
Clignotement rapide
•Erreur interne de l’imprimante
Clignotement simultané des voyants d’impression 3 et 4
Clignotement rapide
•Augmentation de la température à l’intérieur de l’imprimante
Informations préliminaires
5-FR
Page 38

BPréparatifs
Insertion de la cartouche couleur
Seule la cartouche couleur spécifiée doit être utilisée.
Une cartouche couleur permet d’effectuer 20 tirages.
1 Poussez le bouton PRINT CARTRIDGE OPEN sur le côté de
l’imprimante dans le sens de la flèche et ouvrez le couvercle
de la cartouche couleur.
PRINT CARTRIDGE
OPEN
2 Insérez la cartouche couleur à fond dans le sens de la flèche
marquée sur le boîtier de la cartouche jusqu’à ce qu’elle
s’encliquette dans son logement.
Insérez la cartouche couleur de sorte que la tête d’impression se
trouve entre le ruban et le boîtier de la cartouche.
Protection du
ruban
(couvercle bleu)
La protection du ruban se trouve entre le ruban et le boîtier de la
cartouche. Elle empêche le ruban de s’emmêler lors de l’insertion de la
cartouche couleur dans son logement.
Insérez la cartouche telle quelle dans son logement sans enlever la
protection du ruban. Lorsque la cartouche couleur est insérée, la
protection du ruban se détache. Vous pouvez l’enlever lorsque la
cartouche est en place.
6-FR
Tête d’impression
Page 39

3 Fermez bien le couvercle de la cartouche couleur.
PRemarque
L’intérieur de l’appareil peut être chaud. Ne touchez pas l’intérieur du logement
de la cartouche.
Retrait de la cartouche couleur
Poussez le bouton de libération de la cartouche dans le sens de la flèche et
enlevez la cartouche couleur.
Bouton de libération
Préparatifs
7-FR
Page 40

Insertion de la cartouche (suite)
PRemarques
• Si la cartouche couleur n’est pas insérée lorsque vous allumez l’imprimante, le
voyant CARTRIDGE clignotera lentement. Ce voyant clignote plus
rapidement en cas d’erreur de cartouche couleur ou d’épuisement du ruban.
• Vous ne pourrez pas enlever la cartouche couleur si vous ne poussez pas à
fond le bouton de libération.
Si la cartouche couleur ne peut pas être insérée facilement
Retirez la cartouche et réinsérez-la.
Tournez dans le sens de la flèche pour tendre le ruban si celui-ci empêche
d’insérer correctement la cartouche.
PRemarques
• N’enlevez pas la cartouche couleur quand du papier photo est inséré. Ceci
peut entraîner une panne.
• Ne retirez pas la cartouche couleur tant qu’elle n’est pas épuisée. Si vous
réinsérez la cartouche avant qu’elle soit vide, le nombre de tirages sera réduit
(un tirage en moins).
8-FR
Page 41

Fixation de l’imprimante
Avant de fixer l’imprimante au camescope, assurez-vous que celui-ci est
éteint.
1 Tournez le bouton dans le sens de la flèche (RELEASE) pour le
desserrer. Vérifiez ensuite le sens de la flèche sur fixation de
l’imprimante et insérez la fixation fermement dans la griffe
porte-accessoires du camescope pour que le contact
s’établisse.
2 Tournez le bouton dans le sens de la flèche (LOCK) et serrez
bien le bouton (jusqu’à l’arrêt).
PRemarques
• Si vous ne pouvez pas insérer l’imprimante, tournez le bouton dans le sens de
la flèche (RELEASE) pour le desserrer.
• N’insérez pas l’imprimante dans le sens inverse. Elle doit être insérée dans le
sens de la flèche.
• Ne saisissez pas le camescope par l’imprimante.
• Fixez bien l’imprimante au camescope, sinon elle pourrait se détacher du
camescope.
Préparatifs
9-FR
Page 42

Fixation de l’imprimante (suite)
Rotation de l’imprimante
L’imprimante tourne d’environ 180° dans le sens horaire.
0º
90º
180º
PRemarque
Ne pas tourner l’imprimante à plus de 180° dans le sens horaire sinon elle peut
être endommagée.
Pour retirer l’imprimante
Tournez le bouton dans le sens de la flèche (RELEASE) pour le desserrer et
tirez l’imprimante dans le sens opposé à la flèche.
10-FR
Page 43

Préparation de la source d’alimentation
Il faut utiliser une batterie pleine, l’adaptateur secteur ou l’adaptateur
secteur/chargeur pour alimenter le camescope.
Il n’est pas possible d’imprimer lorsque la batterie est faible. Par contre,
vous pouvez peut-être encore photographier. L’indicateur d’autonomie de
la batterie n’indique pas le temps d’impression disponible.
Si vous appuyez sur PRINT ou insérez le papier photo lorsque la batterie
est faible, l’indicateur d’avertissement E apparaîtra sur l’écran LCD. Dans
ce cas, remplacez la batterie par une batterie pleine.
1 Réglez le commutateur POWER du camescope sur MEMORY.
2 Faites glisser le couvercle de l’imprimante dans le sens de la
flèche pour l’ouvrir tout en tenant le camescope.
Le voyant POWER s’allume, le son de fonctionnement du moteur
s’arrête et le voyant PAPER clignote lentement quelques secondes plus
tard.
Couvercle d’imprimante
Voyant PAPER
Voyant POWER
Préparatifs
PRemarque
L’imprimante ne peut pas être allumée pendant l’enregistrement ou la lecture.
11-FR
Page 44

Insertion du papier photo
Seul le type de papier spécifié peut être utilisé.
Les descriptions de ce mode d’emploi sont destinées au DCR-TRV30.
Pour le détail sur le fonctionnement du camescope, reportez-vous à son
mode d’emploi.
1 Effectuez les étapes 1 et 2 de la page 11 et préparez la source
d’alimentation.
2 Assurez-vous que le voyant PAPER clignote lentement et
insérez une feuille de papier photo tout droit dans le chargeur
de papier, en dirigeant bien la surface d’impression vers le
haut.
Insérez le papier jusqu’à ce que moins de 3 cm de papier ressorte de
l’imprimante.
Appuyez sur le papier photo environ deux secondes après le bip pour
l’insérer dans le chargeur de papier.
Le papier photo est automatiquement attiré dans l’imprimante.
Moins de
3 cm
•Si le voyant CARTRIDGE clignote lentement, vérifiez la cartouche
couleur.
•Si aucun papier photo n’est inséré, le voyant PAPER clignote lentement.
Il clignote rapidement en cas d’erreur.
PRemarque
Après l’insertion du papier photo, ne fermez pas le couvercle de l’imprimante
tant que l’impression n’est pas terminée. L’imprimante risque de mal
fonctionner.
12-FR
Page 45

PRemarques
• Le papier photo n’est pas automatiquement attiré s’il n’est pas inséré à fond et
maintenu légèrement enfoncé pendant deux secondes environ.
• N’insérez pas le papier photo par l’autre côté du chargeur de papier ni par la
sortie du papier. Ceci peut entraîner une panne.
• N’insérez pas le papier photo de biais. L’imprimante risque de mal
fonctionner.
Pour retirer le papier photo
Eteignez le camescope puis remettez-le sur MEMORY. Le papier est
automatiquement éjecté.
Tirez le papier dans le sens de la flèche.
PRemarque
Ne tirez pas sur le papier en forçant. Ceci peut entraîner une panne.
Papier photo fourni
Le type de papier photo suivant est fourni avec l’imprimante. Sélectionnez
le papier approprié selon ce que vous voulez imprimer.
• Papier photo standard
• Papier photo autocollant/format standard
• Papier photo autocollant/format 9 photos
Préparatifs
13-FR
Page 46

BTirages – Impression standard
Vous pouvez imprimer des images au moment où vous les prenez, ou bien
imprimer les photos enregistrées sur vos “Memory Stick”.
Impression instantanée d’images
Si vous utilisez une batterie pour imprimer, celle-ci doit être pleine.
1 Insérez la cartouche couleur et fixez l’imprimante au
camescope.
2 Réglez le commutateur POWER du camescope sur MEMORY.
3 Ouvrez le couvercle de l’imprimante, puis assurez-vous que le
voyant PAPER clignote lentement. Insérez une feuille de
papier photo.
4 Appuyez légèrement sur PRINT et maintenez la pression
jusqu’à ce qu’une image fixe apparaisse sur le camescope.
L’indicateur CAPTURE apparaît.
CAPTURE
5 Appuyez à fond sur PRINT.
PREPARING apparaît à l’écran LCD.
PREPARING
Pendant l’alignement du ruban, le papier photo est inséré et éjecté
plusieurs fois de suite, des côtés gauche et droit de l’imprimante.
L’écran LCD ne s’éteint pas à ce moment, même si le voyant POWER
s’allume.
L’image affichée lorsque vous appuyez sur PRINT est imprimée, mais
elle n’est pas enregistrée à ce moment sur le “Memory Stick” ni sur la
cassette.
14-FR
Page 47

6 L’impression commence.
L’image sur l’écran LCD disparaît à ce moment.
Pendant l’impression les voyants d’impression 1 à 4 s’allument dans
l’ordre et le papier ressort et rentre quatre fois.
Lorsque l’impression est terminée, l’image apparaît sur l’écran LCD.
L’impression d’une photo dure environ 160 secondes.
7 Lorsque l’impression est terminée, sortez le papier photo dans
le sens de la flèche.
PRemarques
• L’image de la zone imprimée peut être légèrement différente de la zone visible
sur le camescope ou le téléviseur.
• Si l’image est imprimée à une température supérieure à la plage de
températures recommandée, la photo sera de qualité médiocre ou bien rien ne
sera imprimé.
• Le nombre de tirages maximal peut être inférieur au nombre théorique si les
tirages sont effectués à une température inférieure à la température de
fonctionnement garantie pour la batterie.
• La couleur des photos peut légèrement varier d’une photo à l’autre. Cela
dépend de la température ambiante au moment de l’impression.
• Le nombre maximal de tirages sera inférieur au nombre théorique si vous
utilisez une batterie presque vide.
Tirages – Impression standard
15-FR
Page 48

Impression instantanée d’images (suite)
Pour annuler l’impression
Le papier photo est automatiquement éjecté lorsque vous éteignez le
camescope et réglez le commutateur POWER du camescope sur
MEMORY. Pour continuer à imprimer, insérez une nouvelle feuille de
papier et répétez la procédure depuis l’étape 4.
Si vous ne pouvez pas imprimer en appuyant sur PRINT
Le papier photo est automatiquement éjecté lorsque vous éteignez le
camescope et réglez le commutateur POWER du camescope sur
MEMORY. Pour continuer à imprimer, insérez une nouvelle feuille de
papier et répétez la procédure depuis l’étape 4.
16-FR
Page 49

Impression d’images enregistrées sur
un “Memory Stick”
Si vous utilisez une batterie pour imprimer, celle-ci doit être pleine.
Insérez un “Memory Stick” enregistré dans le camescope.
1 Insérez la cartouche couleur et fixez l’imprimante au
camescope.
2 Réglez le commutateur POWER du camescope sur MEMORY.
3 Affichez l’image que vous voulez imprimer sur le camescope.
4 Ouvrez le couvercle de l’imprimante, puis assurez-vous que le
voyant PAPER clignote lentement. Insérez une feuille de
papier photo.
5 Appuyez à fond sur PRINT.
PREPARING apparaît sur l’écran LCD.
PREPARING
Pendant l’alignement du ruban, le papier photo est inséré et éjecté
plusieurs fois de suite, des côtés gauche et droit de l’imprimante.
L’écran LCD ne s’éteint pas à ce moment même si le voyant POWER
s’allume.
6 L’impression commence.
L’image sur l’écran LCD disparaît à ce moment.
Pendant l’impression les voyants d’impression 1 à 4 s’allument dans
l’ordre et le papier ressort et rentre quatre fois.
Lorsque l’impression est terminée, l’image apparaît sur l’écran LCD.
L’impression d’une photo dure environ 160 secondes.
17-FR
Tirages – Impression standard
Page 50

Impression d’images enregistrées sur un “Memory
Stick” (suite)
7 Lorsque l’impression est terminée, sortez le papier photo dans
le sens de la flèche.
Impression de l’écran d’index
Affichez l’écran d’index à l’étape 3.
Impression d’images enregistrées sur une cassette
Commencez par l’étape 3 après avoir enregistré l’image sur un “Memory
Stick” sous forme d’image fixe.
* Vous pouvez aussi imprimer des images incrustées dans une image fixe
en utilisant la fonction MEMORY MIX.
Lors de l’impression divisée, il faut d’abord enregistrer les images
superposées sur un “Memory Stick” avant de les imprimer.
18-FR
Page 51

Impression d’images avec la date
Si vous utilisez une batterie pour imprimer, celle-ci doit être pleine.
1 Insérez une cartouche couleur et fixez l’imprimante au
camescope.
2 Réglez le commutateur POWER du camescope sur MEMORY.
3 Affichez l’image que vous voulez imprimer sur le camescope.
4 Ouvrez le couvercle de l’imprimante et assurez-vous que le
voyant PAPER clignote lentement. Insérez le papier photo.
5 Sélectionnez DATE/TIME dans des réglages de menus du
camescope, puis appuyez sur la molette SEL/PUSH EXEC du
camescope.
6 Sélectionnez DATE ou DAY & TIME, puis appuyez sur la
molette SEL/PUSH EXEC du camescope.
PR I NT SET
9PIC PRINT
/
TIME
OFF
DATE
RETURN DATE
DAY & TIME
[MENU] : END
Sur votre camescope, l’écran peut être différent de cette illustration.
7 Effectuez les étapes 5 et 7 de “ Impression instantanée
d’images”.
PRemarque
La date ne peut pas être incrustée lors de l’impression d’un écran divisé en 9
(SAME, MULTI ou MARKED) ou lors de l’impression de l’écran d’index.
19-FR
Tirages – Impression standard
Page 52

BTirages d’écrans divisés – Impression divisée
Les images enregistrées sur un “Memory Stick” peuvent être imprimées
sur du papier photo (autocollant/divisé en 9).
Impression d’une seule image
Si vous utilisez une batterie pour imprimer, celle-ci doit être pleine.
Insérez un “Memory Stick” dans le camescope.
1 Insérez une cartouche couleur et fixez l’imprimante au
camescope.
2 Réglez le commutateur POWER du camescope sur MEMORY.
3 Affichez l’image que vous voulez imprimer sur le camescope.
4 Ouvrez le couvercle de l’imprimante et assurez-vous que le
voyant PAPER clignote lentement. Insérez le papier photo
(papier autocollant/divisé en 9).
5 Sélectionnez 9PIC PRINT dans des réglages de menus du
camescope, puis appuyez sur la molette SEL/PUSH EXEC du
camescope.
6 Sélectionnez SAME, puis appuyez sur la molette SEL/PUSH
EXEC du camescope.
PR I NT SET
9PIC PRINT RETURN
DATE/TIME
SAME
RETURN MULTI
MARKED
[MENU] : END
Sur votre camescope, l’écran peut être différent de cette illustration.
7 Effectuez les étapes 5 et 7 de “ Impression instantanée
d’images”.
PRemarques
• Les indications affichées à l’écran ne peuvent pas être imprimées.
• Les images suivantes ne peuvent pas être divisées:
– Ecran d’index
– Multi-écran
• Les images animées ne peuvent pas être imprimées.
20-FR
Page 53

Impression des images d’un “Memory
Stick” dans l’ordre de leur enregistrement
Si vous utilisez une batterie pour imprimer, celle-ci doit être pleine.
Insérez un “Memory Stick” dans le camescope.
1 Insérez la cartouche couleur et fixez l’imprimante au
camescope.
2 Réglez le commutateur POWER du camescope sur MEMORY.
3 Affichez l’image que vous voulez imprimer sur le camescope.
4 Ouvrez le couvercle de l’imprimante et assurez-vous que le
voyant PAPER clignote lentement. Insérez le papier photo
(papier autocollant/divisé en 9).
5 Sélectionnez 9PIC PRINT dans des réglages de menus du
camescope, puis appuyez sur la molette SEL/PUSH EXEC du
camescope.
6 Sélectionnez MULTI, puis appuyez sur la molette SEL/PUSH
EXEC du camescope.
PR I NT SET
9PIC PRINT RETURN
SAME
DATE/TIME
RETURN MULTI
MARKED
[MENU] : END
Sur votre camescope, l’écran peut être différent de cette illustration.
Neuf images fixes sont affichées dans l’ordre, à partir de l’écran
sélectionné à l’étape 3.
Si le “Memory Stick” contient moins de neuf images, toutes les images
présentes seront affichées.
En mode MULTI, vous ne pouvez pas sélectionner les images ni
changer l’ordre des images à imprimer.
7 Effectuez les étapes 5 et 7 de “ Impression instantanée
d’images”.
PRemarques
• Les indications affichées à l’écran ne peuvent pas être imprimées.
• Les images suivantes ne peuvent pas être divisées:
– Ecran d’index
– Multi-écran
• Les images animées ne peuvent pas être imprimées.
21-FR
Tirages d’écrans divisés – Impression divisée
Page 54

Impression d’images marquées au
préalable
Si vous utilisez une batterie pour imprimer, celle-ci doit être pleine.
Consultez le mode d’emploi du camescope pour le marquage des images à
imprimer.
Insérez un “Memory Stick” enregistré dans le camescope.
1 Insérez une cartouche couleur et fixez l’imprimante au
camescope.
2 Réglez le commutateur POWER du camescope sur MEMORY.
3 Affichez l’image avec PRINT MARK sur le camescope.
4 Ouvrez le couvercle de l’imprimante, puis assurez-vous que le
voyant PAPER clignote lentement. Insérez le papier photo.
(Autocollant/divisé en 9).
5 Sélectionnez 9PIC PRINT dans des réglages de menu sur le
camescope, puis appuyez sur SEL/PUSH EXEC sur le
camescope.
6 Sélectionnez MARKED, puis appuyez sur la molette SEL/PUSH
EXEC du camescope.
PR I NT SET
9PIC PRINT RETURN
SAME
DATE/TIME
RETURN MULTI
MARKED
[MENU] : END
Sur votre camescope, l’écran peut être différent de cette illustration.
Les images marquées avec PRINT MARK apparaissent dans l’ordre
sur un écran divisé.
7 Effectuez les étapes 5 à 7 de “Impression instantanée
d’images.
PRemarques
• Les indications affichées à l’écran ne peuvent pas être imprimées.
• Les images suivantes ne peuvent pas être divisées :
– Ecran d’index
– Multi-écran
• Les images animées ne peuvent pas être imprimées.
22-FR
Page 55

BInformations complémentaires
Précautions
Imprimante
•Cette imprimante ne peut être utilisée qu’avec les camescopes
compatibles.
•Avant de fixer l’imprimante au camescope, assurez-vous que celui-ci est
éteint, sinon l’imprimante ne fonctionnera pas normalement.
•Ne fermez jamais le couvercle de l’imprimante pendant l’impression. Le
papier peut se coincer ou un autre problème peut se produire.
•Si vous débranchez la source d’alimentation, batterie ou adaptateur
secteur, pendant l’impression, le cylindre d’exposition risque de ne pas
revenir à sa position d’origine. Le cas échéant, installez une batterie
rechargée et recommencez.
•Pendant l’impression, le papier est inséré et éjecté dans la sortie de
papier. Ne posez pas d’objets obstruant cette sortie et empêchant
l’insertion et l’éjection du papier photo.
•Seul le commutateur d’alimen du camescope peut être activé pendant
l’insertion ou l’éjection du papier de l’imprimante. Aucune autre fonction
ne peut être utilisée. Vous pouvez utiliser les autres fonctions du
camescope lorsque le papier photo a cessé de bouger.
•Pendant l’impression, ne tirez pas sur le papier photo. L’imprimante
risque d’être endommagée.
•Pendant l’impression, ne touchez pas la surface d’impression.
•Pendant l’impression, ne soumettez pas l’imprimante à des vibrations ni
à des chocs.
•Pour l’impression répétée d’une image, il est conseillé de sauvegarder
d’abord l’image sur un “Memory Stick”. Il n’est pas possible d’imprimer
plusieurs fois de suite le même écran, s’il n’a pas été enregistré sur un
“Memory Stick” au préalable.
•L’impression d’images enregistrées en continu et de multi-écrans n’est
pas possible. Pour imprimer ces images, sauvegardez-les d’abord sur un
“Memory Stick”.
•Il n’est pas possible d’utiliser l’imprimante pendant un diaporama.
•Veillez à insérer le papier dans le chargeur feuille par feuille. Sinon, deux
feuilles risquent d’être chargées et des erreurs d’impression ou une
panne peut se produire.
•Cet appareil peut mal fonctionner si vous imprimez en plein soleil.
Utilisez l’imprimante si possible à l’ombre.
Informations complémentaires
23-FR
Page 56

Précaution (suite)
Cartouche couleur
•Ne touchez pas le ruban et ne laissez pas la cartouche à un endroit
poussiéreux.
Les empreintes digitales et la poussière empêchent d’obtenir de bons
tirages.
•Evitez d’exposer la cartouche couleur à une température élevée, à
l’humidité, à la poussière ou à la lumière directe du soleil.
Papier photo
•Des lignes ou petits carreaux sont imprimés sur la face arrière du papier
photo. La face sur laquelle l’image doit être imprimée est la face
entièrement blanche.
•N’utilisez que le papier photo spécifié à l’exclusion de tout autre.
L’emploi d’un autre type de papier peut détériorer l’imprimante.
•Avant d’imprimer, n’écrivez rien sur le papier photo et n’imprimez rien
dessus à l’aide d’un éditeur de texte.
Si vous voulez écrire quelque chose sur la photo, faites-le après
l’impression et utilisez un stylo feutre gras. Il n’est pas possible
d’imprimer sur la surface d’impression à l’aide d’un éditeur de texte.
•Lorsque vous maniez le papier photo, ne touchez pas la surface
d’impression.
•N’insérez pas de papier photo si des autocollants ont été enlevés. Ceci
peut causer un incident papier.
•Ne pliez et courbez pas le papier photo. Ceci peut causer un incident
papier.
•N’entreposez pas le papier photo à un endroit poussiéreux. Les
empreintes digitales et la poussière empêchent d’obtenir de bons tirages.
•Rangez toujours le papier dans le sac dans lequel il était emballé.
•Evitez d’entreposer le papier photo à une température élevée, à
l’humidité, à la poussière ou à la lumière directe du soleil.
Lorsque le papier photo et la cartouche couleur fournis
sont épuisés
Procurez-vous le kit d’impression couleur, CPPM-NR40 (type standard) ou
CPPM-SC40 (type autocollant) spécifié pour cette imprimante.
24-FR
Page 57

En cas de problème
Si un problème quelconque se présente, consultez la liste suivante pour
essayer de le résoudre. Si ce n’est pas possible, débranchez l’appareil et
contactez votre revendeur Sony ou un service après-vente agréé Sony.
Symptômes Causes et/ou Solutions
Le papier photo n’est pas
attiré dans le chargeur de
papier.
Les images ne se figent pas
même lorsque vous
appuyez sur PRINT.
•L’imprimante n’est pas fixée correctement.
t Fixez-la correctement.
•La charge de la batterie est faible.
t Utilisez une batterie pleine.
•La cartouche couleur n’est pas insérée
dans l’imprimante.
t Insérez la cartouche couleur.
•Vous avez inséré le papier photo dans le
chargeur de papier tout de suite après la
mise sous tension de l’imprimante ou
après l’ouverture du couvercle
d’imprimante.
t Retirez le papier photo. Assurez-vous
que le voyant PAPER clignote
lentement, puis insérez le papier photo
dans le chargeur de papier.
•Le commutateur POWER de votre
camescope n’est pas réglé sur MEMORY.
t Réglez-le sur MEMORY.
•Le papier photo n’est pas inséré
correctement.
t Enfoncez le papier photo dans le
chargeur de papier pendant environ
deux secondes après le bip.
•L’imprimante chauffe lors de l’impression
continue d’images. Le cas échéant, il peut
être impossible d’insérer le papier photo.
t Laissez refroidir l’imprimante puis
insérez le papier photo une nouvelle
fois dans le chargeur.
•Vous êtes en train d’utiliser la fonction
SLIDE SHOW.
t Désactivez cette fonction ou insérez à
nouveau le papier photo lorsque le
diaporama est terminé.
•Il n’y a pas de papier photo ni de
cartouche de papier dans l’imprimante.
t Insérez du papier photo ou la
cartouche couleur.
(voir page suivante)
25-FR
Informations complémentaires
Page 58

En cas de problème (suite)
Symptômes Causes et/ou Solutions
Lorsque vous imprimez
des images enregistrées
sur le “Memory Stick”,
l’impression ne démarre
pas lorsque vous appuyez
sur PRINT.
La cartouche couleur ne
peut pas être retirée de
son logement.
Impossible d’insérer la
cartouche couleur
•Vous n’avez pas appuyé suffisamment
fort sur PRINT.
t Appuyez plus fort sur PRINT.
•Du papier photo est inséré.
t Retirez le papier photo.
•Impression en cours.
t Retirez la cartouche couleur lorsque
l’impression est terminée.
•Le bouton de libération n’est pas poussé
à fond.
t Poussez-le à fond.
•Le ruban est coincé dans le logement de
la cartouche.
t Contactez votre revendeur Sony ou
un service après-vente Sony.
•Si vous débranchez la source
d’alimentation, batterie ou adaptateur
secteur, pendant l’impression, le
cylindre d’exposition ne reviendra pas à
sa position d’origine.
t Installez une batterie rechargée,
réglez le commutateur POWER du
camescope sur MEMORY et ouvrez
le panneau LCD et le couvercle de
l’imprimante.
26-FR
Page 59

Symptômes Causes et/ou Solutions
Les voyants d’impression
3 et 4 clignotent
rapidement.
Le voyant CARTRIDGE
clignote rapidement.
L’impression s’arrête en
cours, et le voyant PAPER
clignote rapidement.
Vous ne pouvez pas
sélectionner SAME,
MULTI ou MARKED
dans les réglages de
menus du camescope.
L’image imprimée a un
pourtour noir.
Vous ne pouvez pas
retirer le papier photo.
•L’intérieur de l’imprimante est trop
chaud.
t Laissez refroidir l’imprimante, puis
continuez à imprimer.
•Le ruban est fini.
t Remplacez la cartouche couleur par
une neuve.
•Vous avez laissé la cartouche couleur à
une haute température et le ruban est
endommagé.
t Remplacez la cartouche couleur par
une neuve.
•Une erreur s’est produite pendant
l’impression.
t Eteignez le camescope et réglez-le à
nouveau sur MEMORY.
t Chargez la batterie et réinstallez-la.
•Il n’y a pas de papier photo dans
l’imprimante et l’image que vous voulez
imprimer n’est pas affichée.
t Insérez du papier photo et affichez
l’image que vous voulez imprimer.
•Un pourtour peut apparaître si vous
utilisez l’imprimante sur un autre
camescope que celui que vous avez
utilisé pour enregistrer l’image sur le
“Memory Stick”. Il ne s’agit pas d’une
anomalie.
•Le papier est coincé.
t Contactez votre revendeur Sony ou
un service après-vente Sony.
Informations complémentaires
27-FR
Page 60

Entretien de l’imprimante
Influence de la saleté sur l’imprimante
Lorsque de la saleté ou de la poussière pénètre dans l’imprimante, les
images imprimées peuvent présenter des points ou lignes rouges, bleus ou
blancs. Il ne s’agit pas d’une anomalie. Ces symptômes peuvent empirer si
vous n’entreposez pas le papier photo ou la cartouche couleur à l’abri de la
saleté ou de la poussière.
Voir “Précautions” pour le détail sur le maniement du papier photo et de
la cartouche couleur.
Nettoyage de la tête d’impression
Il est conseillé de nettoyer la tête d’impression avec les feuilles de
nettoyage de tête (fournies) lorsque vous changez de cartouche couleur. Si
les images imprimées présentent de fines lignes, retirez la cartouche
couleur et nettoyez la tête. Maniez la cartouche couleur avec précaution.
Voir “Insertion de la cartouche couleur” pour le détail sur l’insertion de la
cartouche couleur.
Comment procéder pour nettoyer la tête
Insérez et retirez plusieurs fois de suite la feuille de nettoyage pour
nettoyer la tête.
Rangez la feuille dans l’étui (fourni) après avoir nettoyé la tête
d’impression.
28-FR
Page 61

Couleur des images imprimées
L’impression continue d’images ou l’impression à une température élevée
peut entraîner un changement de couleur des images imprimées.
Influence de la saleté sur le cylindre d’exposition
Les images imprimées peuvent présenter des points rouges, bleus ou
blancs dans le sens horizontal si de la saleté ou de la poussière s’est
déposée sur le cylindre d’exposition à l’intérieur de l’imprimante.
Le cas échéant, nettoyez le cylindre d’exposition avec la feuille de
nettoyage de cylindre d’exposition.
Comment procéder pour nettoyer le cylindre d’exposition
Effectuez les étapes 1 à 7 de “Impression instantanée d’images”. Insérez la
feuille de nettoyage au lieu du papier photo à l’étape 3 en vous assurant
que la partie nettoyante du papier est dirigée vers le haut.
Partie nettoyante
Face avant Face avant
Moins de 3 cm
Informations complémentaires
Rangez la feuille de nettoyage dans le sac dans lequel il était emballé.
29-FR
Page 62

Entretien de l’imprimante (suite)
PRemarques
• Si vous insérez la feuille de nettoyage dans le mauvais sens, elle ne sera pas
attirée dans le chargeur de papier.
• Insérez la feuille de nettoyage verticalement à l’imprimante. Si vous ne
l’insérez pas correctement, un dysfonctionnement se produira.
• Vous pouvez nettoyer 3 fois le cylindre d’exposition avec une feuille de
nettoyage. N’utilisez pas plus de 3 fois la feuille.
• Bien qu’il soit possible de nettoyer le cylindre en imprimant une image sur la
feuille de nettoyage, l’image imprimée ne sera pas nette. Il ne s’agit pas d’une
anomalie.
• Le nombre d’images imprimées par cartouche est inférieur d’une image après
le nettoyage du cylindre d’exposition.
Achat de nouvelles feuilles de nettoyage
Contactez votre revendeur Sony ou un service après-vente Sony et
indiquez-leur les numéros de produit suivants:
•Nettoyeur de tête (1-772-863-11)
•Nettoyeur de cylindre d’exposition (1-772-862-11)
30-FR
Page 63

Spécifications
Méthode d’impression: Transfert thermique variable à points
Résolution de l’impression: 254 ppp
Nombre de points imprimés: 640 × 480 (sens d’alimentation du papier)
Vitesse d’impression: 3,05 mm (1/8 po)/seconde
Taille du papier photo: 91 × 55 mm (3 5/8 × 2 1/4 po)
Format d’impression: 64 × 48 mm (2 5/8 × 1 15/16 po)
Durée d’impression (approx.): 160 secondes
Nombre de tirages par cartouche: 20
Consommation: 5 W
Température de fonctionnement garantie pour l’impression:
10 °C à 35 °C (50 °F à 95 °F)
Température d’entreposage:
-20 °C à + 55 °C (-4 °F à +131 °F)
Température d’entreposage de la cartouche couleur:
-20 °C à +55 °C (-4 °F à +131 °F)
Dimensions (approx.):
67 × 78 × 97 mm (2 3/5 × 3 1/10 × 3 4/5 po.) (l/h/p)
Poids (approx.): 305 g (10 3/4 on)
Informations complémentaires
31-FR
Page 64

Español
Antes de utilizar la unidad, lea detenidamente este manual de
instrucciones, y consérvelo para futuras referencias.
AVISO
Para evitar incendios o el riesgo de electrocución, no exponga la unidad a
la lluvia ni a la humedad.
Nombre del producto: Portable Video Printer (Videoimpresore portátil)
Modelo: PVP-MSH
Para los usuarios en México
Esta marca indica que este producto es un accesorio genuino para un
producto de vídeo Sony. Cuando se adquieren productos de vídeo Sony,
se recomienda que los accesorios adquiridos lleven la marca “GENUINE
VIDEO ACCESSORIES”.
Esta marca indica el sistema de zapata para accesorios inteligente para
utilizarse con productos de vídeo Sony. Los componentes y los accesorios
de vídeo provistos de este sistema han sido diseñados para facilitar la
videofilmación efectiva.
2-ES
Page 65

Índice
Antes de comenzar
Identificación de partes e indicación de lámparas........................................... 4
Preparativos
Inserción del cartucho de impresión ................................................................. 6
Fijación de la impresora....................................................................................... 9
Preparación de la fuente de alimentación ....................................................... 11
Inserción del papel de impresión ..................................................................... 12
Realización de impresiones - Impresión estándar
Impresión de imágenes en cualquier momento ............................................. 14
Impresión de imágenes grabadas en un “Memory Stick” ............................ 17
Impresión de imágenes con la fecha ................................................................ 19
Realización de impresiones de pantallas divididas
- Impresión dividida
Impresión de una sola imagen.......................................................................... 20
Impresión de imágenes grabadas en un “Memory Stick” en el orden de
grabación ............................................................................................................. 21
Impresión de imágenes con marcas de impresión......................................... 22
Información adicional
Precauciones ........................................................................................................ 23
Solución de problemas....................................................................................... 25
Información sobre el mantenimiento............................................................... 28
Especificaciones .................................................................................................. 31
3-ES
Page 66

BAntes de comenzar
Identificación de partes e indicación de
lámparas
Cubierta de la
impresora
Botón PRINT
Lámpara POWER
Lámpara PAPER
Lámpara
CARTRIDGE
Tapa del cartucho
de impresión
PRINT CARTRIDGE
Alimentador de papel
Dispensador de papel
Lámpara de impresión •••• (4)
Lámpara de impresión ••• (3)
Lámpara de impresión •• (2)
Lámpara de impresión • (1)
Lámpara de alimentación (POWER) (verde)
Encendida
•La cubierta de la impresora está abierta.
Lámpara de papel de impresión (PAPER) (roja)
Parpadeo rápido
•Error del papel de impresión
Parpadeo lento
•No hay papel de impresión insertado.
Lámpara del cartucho de impresión (CARTRIDGE) (roja)
Parpadeo rápido
•Error de la cinta
•La cinta ha finalizado.
Parpadeo lento
•No hay cinta insertada.
OPEN
4-ES
Page 67

Lámpara de impresión 1 (anaranjada)
Encendida
•Se está imprimiendo el azul verdoso.
Lámpara de impresión 2 (anaranjada)
Encendida
•Se está imprimiendo el magenta.
Lámpara de impresión 3 (anaranjada)
Encendida
•Se está imprimiendo el amarillo.
Lámpara de impresión 4 (anaranjada)
Encendida
•Se está imprimiendo la capa superpuesta.
Lámparas de impresión 1 y 2 parpadeando simultáneamente
Parpadeo rápido
•Error interno de la impresora
Lámparas de impresión 3 y 4 parpadeando simultáneamente
Parpadeo rápido
•La temperatura del interior de la impresora ha aumentado.
Antes de comenzar
5-ES
Page 68

BPreparativos
Inserción del cartucho de impresión
Cerciórese de utilizar el cartucho especial especificado.
Con un cartucho de impresión nuevo podrá realizar 20 impresiones.
1 Deslice el mando PRINT CARTRIDGE OPEN de la parte lateral
de esta unidad en el sentido de la flecha, y después abra la
tapa del cartucho de impresión.
PRINT CARTRIDGE
OPEN
2 Inserte el cartucho de impresión lo más posible en el sentido
de la flecha de la caja del cartucho hasta que chasquee en el
compartimiento de dicho cartucho.
Inserte el cartucho de impresión de forma que la cabeza de impresión
quede situada entre la cinta y la caja del cartucho.
Protector de la
cinta
(cubierta azul)
El protector de la cinta está situado entre la cinta y la caja del cartucho.
Este protector evita que la cinta se enrede al insertar el cartucho de
impresión en su compartimiento.
Inserte el cartucho de impresión en su compartimiento tal como está
sin extraer el protector de la cinta. Cuando el cartucho esté insertado,
el protector de la cinta se aflojará. Después de haber insertado el
cartucho de impresión, tire el protector de la cinta.
6-ES
Cabeza de impresión
Cabeza de impresión
Page 69

3 Cierre completamente la tapa del cartucho de impresión.
PNota
El interior de esta unidad puede estar a veces caliente. No inserte la mano en el
interior del compartimiento del cartucho de impresión.
Extracción del cartucho de impresión
Deslice el mando de extracción en el sentido de la flecha, y extraiga el
cartucho de impresión.
Mando de extracción
Preparativos
7-ES
Page 70

Inserción del cartucho de impresión (continuación)
PNotas
• Si no hay cartucho de impresión insertado cuando conecte la alimentación, la
lámpara CARTRIDGE parpadeará lentamente. La lámpara CARTRIDGE
parpadeará rápidamente cuando ocurra un error en el cartucho de impresión o
cuando finalice la cinta.
• Si no desliza el mando de extracción hasta el final, no podrá extraer el
cartucho de impresión.
Si el cartucho de impresión no puede insertarse fácilmente
Extraiga el cartucho de impresión y vuelva a insertarlo.
Gire en el sentido de la flecha para tensar la cinta solamente si la holgura
de ésta impide insertar correctamente el cartucho de impresión.
PNotas
• No extraiga el cartucho de impresión cuando haya papel insertado. Esto
podría causar el mal funcionamiento de la unidad.
• No extraiga el cartucho de impresión hasta que se haya agotado. Si reinserta
el cartucho de impresión antes de haberse agotado, el número de impresiones
por rollo de cartucho puede reducirse en uno.
8-ES
Page 71

Fijación de la impresora
Antes de fijar esta unidad a su videocámara, cerciórese de que la
alimentación de ésta esté desconectada.
1 Gire el mando en el sentido de la flecha (RELEASE) para
aflojar. Después compruebe el sentido de la flecha de la
sección de fijación de la zapata de esta unidad, e inserte
firmemente esta unidad hasta que entre en contacto con el
interior de la zapata para accesorios.
2 Gire el mando en el sentido de la flecha (LOCK), y apriételo
firmemente hasta que se pare.
PNotas
• Si no puede insertar esta unidad, gire el mando en el sentido de la flecha
(RELEASE) para desbloquear.
• No inserte esta unidad hacia atrás. Cerciórese de insertarla en el sentido de la
flecha.
• No levante la videocámara tomándola por esta unidad.
• Fije esta unidad firmemente a su videocámara. De lo contrario podría
desprenderse de la misma.
Preparativos
9-ES
Page 72

Fijación de la impresora (continuación)
Giro de la impresora
La unidad puede girar unos 180° hacia la derecha.
0º
90º
180º
PNota
No gire la unidad a la fuerza hacia la derecha más de 180°. Di lo hiciese, podría
estropearla.
Para desmontar la impresora
Gire el mando en el sentido de la flecha (RELEASE) para aflojar la unidad,
y después tire de ella en sentido opuesto al de la flecha para desmontarla.
10-ES
Page 73

Preparación de la fuente de
alimentación
Cerciórese de utilizar una batería completamente cargada, el adaptador de
alimentación de CA, o el adaptador de alimentación de CA/cargador.
Si la batería está débil, no podrá imprimir. Sin embargo, será posible
grabar dependiendo de la energía restante de la batería. El indicador de
tiempo restante de batería no indica el tiempo impresión posible.
Si presiona PRINT o inserta el papel de impresión mientras la batería esté
débil, en la pantalla de cristal líquido aparecerá el indicador de advertencia
E. Reemplace la batería por otra completamente cargada.
1 Ponga el selector POWER de su videocámara en MEMORY.
2 Sujete su videocámara y deslice la cubierta de la impresora en
el sentido de la flecha para abrirla.
La lámpara POWER se encenderá, el sonido de operación del motor se
parará, y la lámpara PAPER parpadeará lentamente después de varios
segundos.
Cubierta de la impresora
Lámpara PAPER
Lámpara POWER
Preparativos
PNota
La alimentación de esta unidad no podrá conectarse en el modo de grabación ni
en el de reproducción.
11-ES
Page 74

Inserción del papel de impresión
Cerciórese de utilizar el papel de impresión especificado.
Las descripciones de este manual son para la DCR-TRV30.
Con respecto a los detalles sobre la operación de su videocámara, consulte
el manual de instrucciones de la misma.
1 Realice los pasos 1 y 2 de la página 11 para preparar la fuente
de alimentación.
2 Cerciórese de que la lámpara PAPER esté parpadeando
lentamente, y después inserte en línea recta una hoja de
papel de impresión en el alimentador de papel, cerciorándose
de que la superficie de impresión esté encarada hacia arriba.
Inserte el papel de impresión hasta que sobresalga 3 cm de esta
unidad.
Empuje el papel en el alimentador de papel durante unos dos
segundos después de haber oído un pitido.
El papel de impresión será automáticamente atraído.
Menos de
3 cm
•Cuando la lámpara CARTRIDGE parpadee lentamente, compruebe el
cartucho de impresión.
•Si el papel de impresión no está insertado, la lámpara PAPER parpadeará
lentamente. La lámpara PAPER parpadeará rápidamente cuando ocurra
un error.
PNota
Después de haber insertado el papel de impresión, no cierre la cubierta de la
impresora hasta que finalice la impresión. Si lo hiciese, podría causar el mal
funcionamiento de esta unidad.
12-ES
Page 75

PNotas
• El papel de impresión será atraído automáticamente si no se inserta
firmemente hasta donde entre y se presiona ligeramente después de unos dos
segundos.
• No inserte el papel de impresión desde el lado opuesto del alimentador de
papel ni desde el dispensador de papel.
• No inserte el papel de impresión en ángulo. Si lo hiciese, podría causar el mal
funcionamiento de esta unidad.
Para extraer el papel de impresión insertado
Desconecte la alimentación de su videocámara, y después ponga el selector
POWER en MEMORY. El papel de impresión saldrá automáticamente
expulsado.
Tire del papel en el sentido de la flecha.
PNota
No extraiga a la fuerza el papel de impresión. Si lo hiciese, esta unidad podría
funcionar mal.
Papel de impresión suministrado
Su impresora se suministra con el papel de impresión siguiente. Seleccione
el tipo de papel adecuado a sus requisitos específicos.
•Tipo estándar
•Tipo de pegatina/tamaño estándar
•Tipo de pegatina/tamaño de 9 divisiones
Preparativos
13-ES
Page 76

B
Realización de impresiones - Impresión estándar
Usted podrá, siempre que lo desee, imprimir imágenes, o las imágenes
grabadas en un “Memory Stick”.
Impresión de imágenes en cualquier
momento
Para imprimir, cerciórese de utilizar una batería completamente cargada.
1 Inserte el cartucho de impresión y fije esta unidad a su
videocámara.
2 Ponga el selector POWER de su videocámara en MEMORY.
3 Abra la cubierta de la impresora, y después cerciórese de que
la lámpara PAPER esté parpadeando lentamente. Inserte una
hoja de papel de impresión.
4 Mantenga ligeramente presionado PRINT hasta que aparezca
una imagen.
Aparecerá el indicador CAPTURE.
CAPTURE
5 Presione PRINT a fondo.
En la pantalla de cristal líquido aparecerá PREPARING.
PREPARING
Mientras la cinta esté alineándose, es posible que a veces el papel de
impresión se inserte y expulse por los lados izquierdo y derecho del
cuerpo sin que se desactive la pantalla de cristal líquido aunque la
lámpara POWER esté encendida.
Se imprimirá la imagen de la pantalla cuando presionó PRINT. Esta
imagen no se grabará en el “Memory Stick” ni en la cinta.
14-ES
Page 77

6 Se iniciará la impresión.
Desaparecerá la imagen de la pantalla de cristal líquido.
Durante la impresión, las lámparas de impresión PRINT 1 a 4 se
encenderán por orden, y el papel de impresión se desplazará hacia
atrás y hacia delante cuatro veces.
Cuando finalice la impresión, la imagen aparecerá en la pantalla de
cristal líquido.
La impresión tardará unos 160 segundos en realizarse.
7 Cuando finalice la impresión, extraiga el papel de impresión
en el sentido de la flecha.
PNotas
• El área de la imagen del área impresa puede ser ligeramente diferente al de la
imagen de su videocámara o televisor.
• La calidad de las imágenes impresas puede deteriorarse considerablemente a
veces, o es posible que la impresión no se realice si la realiza a una
temperatura que sobrepase la gama de temperaturas de operación
garantizada.
• El número de impresiones posibles puede reducirse a veces si realiza las
impresiones a una temperatura inferior a la de la gama de temperaturas de
operación garantizada para la batería.
• El color de las imágenes impresas puede cambiar ligeramente a veces
dependiendo de las condiciones de la ambiental durante la impresión.
• El número posible de impresiones se reducirá si utiliza una batería con poca
energía de batería restante.
Realización de impresiones - Impresión estándar
15-ES
Page 78

Impresión de imágenes en cualquier momento
(continuación)
Para cancelar la impresión
El papel de impresión saldrá automáticamente expulsado si desconecta la
alimentación de la impresora, y después pone el selector POWER de su
videocámara en MEMORY. Para reanudar la impresión, inserte nuevo
papel y repita el procedimiento desde el paso 4.
Si no puede imprimir aunque presione PRINT
El papel de impresión saldrá automáticamente expulsado si desconecta la
alimentación de la impresora, y después pone el selector POWER de su
videocámara en MEMORY. Para reanudar la impresión, inserte nuevo
papel y repita el procedimiento desde el paso 4.
16-ES
Page 79

Impresión de imágenes grabadas en un
“Memory Stick”
Para imprimir con una batería, cerciórese de que ésta esté completamente
cargada.
Inserte el “Memory Stick” grabado en su videocámara.
1 Inserte el cartucho de impresión y fije esta unidad a su
videocámara.
2 Ponga el selector POWER de su videocámara en MEMORY.
3 Reproduzca la imagen fija que desee imprimir accionando su
videocámara.
4 Abra la cubierta de la impresora, y después cerciórese de que
la lámpara PAPER esté parpadeando lentamente.
5 Presione PRINT a fondo.
En la pantalla de cristal líquido aparecerá PREPARING.
PREPARING
Mientras la cinta esté alineándose, es posible que a veces el papel de
impresión se inserte y expulse por los lados izquierdo y derecho del
cuerpo sin que se desactive la pantalla de cristal líquido aunque la
lámpara POWER esté encendida.
6 Se iniciará la impresión.
Desaparecerá la imagen de la pantalla de cristal líquido.
Durante la impresión, las lámparas de impresión 1 a 4 se encenderán
por orden, y el papel de impresión se desplazará hacia atrás y hacia
delante cuatro veces.
Cuando finalice la impresión, la imagen aparecerá en la pantalla de
cristal líquido.
La impresión tardará unos 160 segundos en realizarse.
17-ES
Realización de impresiones - Impresión estándar
Page 80

Impresión de imágenes grabadas en un “Memory
Stick” (continuación)
7 Cuando finalice la impresión, extraiga el papel de impresión
en el sentido de la flecha.
Impresión de la pantalla de índice
Haga que se visualice la pantalla de índice en el paso 3.
Impresión de imágenes grabadas en una cinta
Comience en el paso 3 después de haber captado la imagen en un
“Memory Stick” como imagen fija.
* Usted también podrá imprimir imágenes superpuestas con una imagen
fija utilizando la función MEMORY MIX.
Sin embargo, tenga en cuenta que cuando realice impresiones divididas
tendrá que grabar primero las imágenes en un “Memory Stick” antes de
imprimirlas.
18-ES
Page 81

Impresión de imágenes con la fecha
Para imprimir con una batería, cerciórese de que ésta esté completamente
cargada.
1 Inserte el cartucho de impresión y fije esta unidad a su
videocámara.
2 Ponga el selector POWER de su videocámara en MEMORY.
3 Reproduzca la imagen fija que desee imprimir accionando su
videocámara.
4 Abra la cubierta de la impresora, y después cerciórese de que
la lámpara PAPER esté parpadeando lentamente.
5 Seleccione DATE/TIME en de los ajustes del menú de su
videocámara, y después presione el dial SEL/PUSH EXEC de
ésta.
6 Seleccione DATE o DAY & DATE, y después presione el dial
SEL/PUSH EXEC de su videocámara.
PR I NT SET
9PIC PRINT
/
TIME
OFF
DATE
RETURN DATE
DAY & TIME
[MENU] : END
La pantalla real puede diferir de la mostrada en la ilustración de
arriba.
Realización de impresiones - Impresión estándar
7 Realice los pasos 5 a 7 de “ Impresión de imágenes en
cualquier momento”.
PNota
La fecha no podrá introducirse en las impresiones de 9 divisiones (SAME,
MULTI, o MARKED) ni en las impresiones de índice.
19-ES
Page 82

BRealización de impresiones de pantallas
divididas - Impresión dividida
Usted podrá imprimir imágenes grabadas en un “Memory Stick” en papel
de impresión (Tipo de pegatina/tamaño de 9 divisiones).
Impresión de una sola imagen
Para imprimir con una batería, cerciórese de que ésta esté completamente
cargada.
Inserte el “Memory Stick” grabado en su videocámara.
1 Inserte el cartucho de impresión y fije esta unidad a su
videocámara.
2 Ponga el selector POWER de su videocámara en MEMORY.
3 Reproduzca la imagen fija que desee imprimir accionando su
videocámara.
4 Abra la cubierta de la impresora, y después cerciórese de que
la lámpara PAPER esté parpadeando lentamente. Inserte el
papel de impresión (Tipo de pegatina/tamaño de 9 divisiones).
5 Seleccione 9PIC PRINT en de los ajustes de los ajustes del
menú de su videocámara, y después presione el dial SEL/PUSH
EXEC de ésta.
6 Seleccione SAME y después presione el dial SEL/PUSH EXEC de
su videocámara.
PR I NT SET
9PIC PRINT RETURN
DATE/TIME
SAME
RETURN MULTI
MARKED
[MENU] : END
La pantalla real puede diferir de la mostrada en la ilustración de arriba.
7 Realice los pasos 5 a 7 de “Impresión de imágenes en
cualquier momento”.
PNotas
•
Usted no podrá imprimir la imagen visualizada en la pantalla de cristal líquido.
• Las imágenes siguientes no podrán dividirse apropiadamente:
– Pantalla de índice
– Pantalla múltiple
• Usted no podrá imprimir imágenes móviles.
20-ES
Page 83

Impresión de imágenes grabadas en un
“Memory Stick” en el orden de grabación
Para imprimir con una batería, cerciórese de que ésta esté completamente
cargada.
Inserte el “Memory Stick” grabado en su videocámara.
1 Inserte el cartucho de impresión y fije esta unidad a su
videocámara.
2 Ponga el selector POWER de su videocámara en MEMORY.
3 Reproduzca la imagen fija que desee imprimir accionando su
videocámara.
4 Abra la cubierta de la impresora, y después cerciórese de que
la lámpara PAPER esté parpadeando lentamente. Inserte el
papel de impresión (Tipo de pegatina/tamaño de 9 divisiones).
5 Seleccione 9PIC PRINT en de los ajustes de los ajustes del
menú de su videocámara, y después presione el dial SEL/PUSH
EXEC de ésta.
6 Seleccione MULTI y después presione el dial SEL/PUSH EXEC
de su videocámara.
La pantalla real puede diferir de la mostrada en la ilustración de arriba.
Se visualizarán nueve imágenes fijas divididas por orden de la
pantalla de reproducción seleccionada en el paso 3.
Si número de imágenes fijas es inferior a nueve, se visualizarán todas
hasta la última.
En el modo MULTI no podrá seleccionar imágenes las imágenes que
desee imprimir, ni cambiar el orden de impresión de las imágenes.
PR I NT SET
9PIC PRINT RETURN
SAME
DATE/TIME
RETURN MULTI
MARKED
[MENU] : END
7 Realice los pasos 5 a 7 de “Impresión de imágenes en
cualquier momento”.
PNotas
• Usted no podrá imprimir la imagen visualizada en la pantalla de cristal
líquido.
• Las imágenes siguientes no podrán dividirse apropiadamente:
– Pantalla de índice
– Pantalla múltiple
• Usted no podrá imprimir imágenes móviles.
21-ES
Realización de impresiones de pantallas divididas - Impresión dividida
Page 84

Impresión de imágenes con marcas de
impresión
Cerciórese de utilizar una batería completamente cargada cuando la use
para imprimir.
Con respecto a la escritura de marcas de impresión en imágenes fijas,
consulte el manual de instrucciones de su videocámara.
Inserte el “Memory Stick” grabado en su videocámara.
1 Inserte el cartucho de impresión y fije esta unidad a su
videocámara.
2 Ponga el selector POWER de su videocámara en MEMORY.
3 Reproduzca la imagen fija con PRINT MARK que desee
imprimir accionando su videocámara.
4 Abra la cubierta de la impresora, y después cerciórese de que
la lámpara PAPER esté parpadeando lentamente. Inserte el
papel de impresión (Tipo de pegatina/tamaño de 9 divisiones).
5 Seleccione 9PIC PRINT en de los ajustes de los ajustes del
menú de su videocámara, y después presione el dial SEL/PUSH
EXEC de ésta.
6 Seleccione MARKED y después presione el dial SEL/PUSH EXEC
de su videocámara.
PR I NT SET
9PIC PRINT RETURN
SAME
DATE/TIME
RETURN MULTI
MARKED
[MENU] : END
La pantalla real puede diferir de la mostrada en la ilustración de arriba.
Se visualizarán las imágenes fijas marcadas con PRINT MARK
divididas por orden.
7 Realice los pasos 5 a 7 de “ Impresión de imágenes en
cualquier momento”.
PNotas
• Usted no podrá imprimir la imagen visualizada en la pantalla de cristal líquido.
• Las imágenes siguientes no podrán dividirse apropiadamente.
– Pantalla de índice
– Pantalla múltiple
• Usted no podrá imprimir imágenes móviles.
22-ES
Page 85

BInformación adicional
Precauciones
Acerca de esta impresora
•Esta impresora solamente podrá utilizarse con videocámaras compatibles
con impresora.
•Fije esta unidad a su videocámara después de asegurarse de que la
alimentación de la videocámara esté desconectada. De lo contrario esta
unidad podría funcionar mal.
•No cierre nunca la cubierta de la impresora durante la impresión. Si lo
hiciese, el papel podría atascarse o podrían producirse otros problemas.
•Si desconecta la fuente de alimentación, como la batería, durante la
impresión, el rodillo puede no volver a su posición original. Instale una
batería completamente cargada y vuelva a realizar la operación.
•Durante la impresión, el papel se inserta y expulsa en el dispensador de
papel. No coloque ningún objeto que pueda impedir la inserción y la
extracción.
•Mientras el papel de impresión esté insertando o extrayéndose del
cuerpo, solamente podrá accionar el selector de alimentación de su
videocámara. No será posible ninguna otra operación. Usted podrá
accionar su videocámara después de que el papel se haya parado.
•Durante la impresión, no tire hacia fuera del papel de impresión. Si lo
hiciese la unidad podría funcionar mal.
•Durante la impresión, no toque la superficie de impresión.
•Durante la impresión, no someta el cuerpo a vibraciones ni a golpes.
•Le recomendamos que realice impresiones repetidas de las imágenes
almacenadas en un “Memory Stick”. Las impresiones repetidas de la
misma pantalla no podrán realizarse si las imágenes no están grabadas
en un “Memory Stick”.
•No es posible la impresión de imágenes grabadas continuamente,
pantalla múltiple. Para imprimir tales imágenes, almacénelas con
antelación en un “Memory Stick”.
•Usted no podrá utilizar esta unidad mientras esté ejecutando SLIDE
SHOW en su videocámara.
•Cerciórese de insertar papel en el alimentador de papel, una hoja cada
vez. De lo contrario, el papel podría superponerse cuando se alimentase
en esta unidad. Si ocurriese esto, podrían producirse defectos de
impresión o la unidad podría funcionar mal.
•Esta unidad puede funcionar mal si imprime bajo la luz solar directa.
Utilice esta impresora fuera de la luz solar directa.
Información adicional
23-ES
Page 86

Precauciones (continuación)
Acerca del cartucho de impresión
•No toque la cinta ni la deje en un lugar polvoriento.
Las huellas dactilares o el polvo en la cinta podrían impedir la
consecución de impresiones de buen aspecto.
•Evite guardar el cartucho de impresión en lugares de alta temperatura y
humedad, polvorientos, o expuestos a la luz solar directa.
Acerca del papel de impresión
•En la parte posterior del papel de impresión se han impreso líneas o
cuadrados pequeños. Utilice la cara de impresión en la que no haya nada
impreso.
•Utilice solamente el papel de impresión especificado. La utilización de
otro tipo de papel podría causar el mal funcionamiento de la unidad.
•Antes de iniciar la impresión, no escriba en el papel de impresión, ni
imprima en este papel utilizado un procesador de texto.
Para escribir en la superficie del papel de impresión después de
imprimir, utilice un rotulador basado en aceite. La impresión en la
superficie de impresión no podrá realizarse con un procesador de texto.
•Cuando maneje el papel de impresión, no toque la superficie de
impresión.
•No cargue papel de impresión de pegatinas cuyos sellos se hayan
despegado. Si lo hiciese, el papel podría atascarse.
•No pliegue ni doble el papel de impresión. Si lo hiciese, el papel podría
atascarse.
•No deje el papel de impresión en lugares polvorientos. Las huellas
dactilares o el polvo en la cinta podrían impedir la consecución de
impresiones de buen aspecto.
•Guarde el cartucho y el papel de impresión en la bolsa original.
•Evite guardar el papel de impresión en lugares de alta temperatura y
humedad, polvorientos, o expuestos a la luz solar directa.
Cuando haya terminado el papel y el cartucho de impresión
Adquiera el paquete de impresión en color especificado, CPPM-NR40 (tipo
estándar) o CPPM-SC40 (tipo pegatina) para esta unidad.
24-ES
Page 87

Solución de problemas
Si surge algún problema al utilizar esta unidad, utilice la tabla siguiente
para solucionarlo. Si el problema persiste, desconecte la fuente de
alimentación y póngase en contacto con su proveedor Sony o con un centro
de reparaciones autorizado por Sony.
Síntoma Causa y/o solución
El papel de impresión no
puede insertarse en el
alimentador de papel.
Las imágenes no se
convierten en fijas incluso al
presionar PRINT.
•La impresora no está correctamente fijada.
t Fíjela correctamente.
•La batería está débil.
t Utilice una batería completamente
cargada.
•El cartucho de impresión no está insertado.
t Insértelo.
•Ha insertado el papel de impresión en el
alimentador de papel inmediatamente
después de haber conectado la alimentación
o de haber abierto la cubierta de la
impresora.
t Extraiga el papel de impresión.
Cerciórese de que la lámpara PAPER
esté parpadeando lentamente, y
después inserte el papel de impresión
en el alimentador de papel.
•El selector POWER de su videocámara no
está en MEMORY.
t Póngalo en MEMORY.
•El papel de impresión no está
adecuadamente insertado.
t Presione el papel de impresión dentro
del alimentador de papel durante unos
dos segundos de haber oído pitidos.
•La impresión continua de imágenes hace
que se caliente el interior de la impresora.
Cuando suceda esto quizás no pueda
insertarse el papel de impresión.
t
Deje que la unidad se enfríe, y después
vuelva a insertar el papel de impresión
en el alimentador de papel.
•En su videocámara se ha ejecutado SLIDE
SHOW.
t Cancele SLIDE SHOW o vuelva a
insertar el papel de impresión después
de haber finalizado SLIDE SHOW.
•El papel o el cartucho de impresión no está
insertado.
t Insértelo.
(Continúa en la página siguiente)
25-ES
Información adicional
Page 88

Solución de problemas (continuación)
Síntoma Causa y/o solución
Al imprimir imágenes
grabadas en un “Memory
Stick”, la impresión no se
inicia aunque se presione
PRINT.
El cartucho de impresión
no puede extraerse de su
compartimiento.
No es posible insertar el
cartucho de impresión.
•Ha presionado ligeramente PRINT.
t Presione PRINT a fondo.
•Hay papel de impresión insertado.
t Extráigalo.
•Se está ejecutando la impresión.
t Extraiga el cartucho de impresión
después de haber finalizado la
impresión.
•El mando de extracción no está
deslizado hasta el final.
t Deslícelo hasta el final.
•La cinta está atascada en el
compartimiento del casete.
t Póngase en contacto con su
proveedor Sony o con un centro de
reparaciones autorizado por Sony.
•Si desconecta la fuente de alimentación,
como la batería, durante la impresión, el
rodillo puede no volver a su posición
original.
t Instale una batería completamente
cargada, ponga el selector POWER
de su videocámara en MEMORY, y
abra el panel de cristal líquido y la
cubierta de la impresora.
•Si desconecta la fuente de alimentación,
como la batería, durante la impresión, el
rodillo puede no volver a su posición
original.
t Instale una batería completamente
cargada, ponga el selector POWER
de su videocámara en MEMORY, y
abra el panel de cristal líquido y la
cubierta de la impresora.
26-ES
Page 89

Síntoma Causa y/o solución
Las lámparas de
impresión 3 y 4
parpadean rápidamente.
La lámpara CARTRIDGE
parpadea rápidamente.
La impresión se para en el
medio, y la lámpara
PAPER parpadea
rápidamente.
No es posible seleccionar
SAME, MULTI, o
MARKED en los ajustes
del menú de su
videocámara.
La imagen impresa posee
un marco negro.
No es posible extraer el
papel de impresión.
•El interior de la impresora se ha
calentado demasiado.
t Deje la unidad hasta que se enfríe, y
después reanude la impresión de
imágenes.
•La cinta se ha agotado.
t Reemplace el cartucho de impresión
por otro nuevo.
•Ha dejado el cartucho de impresión en
un lugar con alta temperatura y la cinta
se ha dañado.
t Reemplace el cartucho de impresión
por otro nuevo.
•Ha ocurrido un error durante la
impresión.
t Desconecte la alimentación de su
videocámara, y después ajústela
MEMORY.
t Cargue la batería y vuelva a
instalarla.
•El papel de impresión no está insertado,
y la imagen fija a imprimirse no está
visualizada.
t Inserte papel de impresión, y ponga
en reproducción la imagen fija que
desee imprimir.
•El marco aparecerá a veces cuando se
utilice esta unidad con una videocámara
diferente a la utilizada para grabar
imágenes en un “Memory Stick”. Esto
no significa mal funcionamiento.
•El papel de impresión está atascado.
t Póngase en contacto con su
proveedor Sony o con un centro de
reparaciones autorizado por Sony.
Información adicional
27-ES
Page 90

Información sobre el mantenimiento
Acerca de la influencia de la suciedad en la impresora
Las imágenes impresas pueden tener puntos o líneas finas de color rojo,
azul, o blanco en su superficie debido a la suciedad o el polvo en el rodillo
que se encuentra en el interior de la impresora. Esto no significa mal
funcionamiento. Estos síntomas pueden empeorar dependiendo de las
condiciones de almacenamiento del papel o del cartucho de impresión.
Con respecto a los detalles sobre cómo manejar el papel y el cartucho de
impresión, consulte “Precauciones”.
Acerca de la limpieza de las cabezas de la impresora
Le recomendamos que limpie las cabezas de la impresora con el limpiador
de cabezas (suministrado) cuando cambie el cartucho de impresión. Si las
imágenes impresas tienen líneas finas, extraiga el cartucho de impresión y
limpie las cabezas. Maneje el cartucho con cuidado. Con respecto a los
detalles sobre la inserción del cartucho de impresión, consulte “Inserción
del cartucho de impresión”.
Forma de limpiar las cabezas de la impresora
Inserte y extraiga varias veces el limpiador de cabezas a fin de limpiar
éstas.
Después de haber limpiado las cabezas, guarde el limpiador de cabezas en
la caja especificada (suministrada).
28-ES
Page 91

Acerca del color de las imágenes impresas
La impresión continua de imágenes o la impresión de éstas a gran
temperatura puede causar el cambio del color de las imágenes impresas.
Acerca de la influencia de la suciedad en el rodillo
Las imágenes impresas pueden tener periódicamente puntos rojos, azules,
o blancos en sentido horizontal debido a la suciedad o el polvo en el
rodillo del interior de la impresora. Cuando suceda esto, limpie el rodillo
con el limpiador del rodillo.
Forma de limpiar el rodillo
Realice los pasos 1 a 7 de “ Impresión de imágenes en cualquier
momento”. Inserte el limpiador del rodillo en vez del papel de impresión
en el paso 3, cerciorándose de que la superficie del limpiador del rodillo
esté encarada hacia arriba.
Parte de limpieza
Cara frontal Cara posterior
Menos de 3 cm
Guarde el limpiador del rodillo en su bolsa original.
29-ES
Información adicional
Page 92

Información sobre el mantenimiento (continuación)
PNotas
• Si inserta el limpiador del rodillo en sentido erróneo, no entrará en el
alimentador de papel.
• Inserte el limpiador del rodillo verticalmente contra el cuerpo. La inserción
inapropiada causará un mal funcionamiento.
• Usted podrá limpiar el rodillo 3 veces por cada limpiador del rodillo. No
podrá utilizarlo más de 3 veces.
• Como la limpieza del rodillo se realiza imprimiendo una imagen en el
limpiador, la imagen impresa puede no ser clara. Esto no significa mal
funcionamiento.
• El número de imágenes impresas por cartucho de impresión se reducirá en
uno después de haber limpiado el rodillo.
Acerca de la adquisición de limpiadores
Póngase en contacto con su proveedor Sony o con un centro de
reparaciones autorizado por Sony e indíqueles los números de productos
siguientes:
•Limpiador de cabezas (1-772-863-11)
•Limpiador del rodillo (1-772-862-11)
30-ES
Page 93

Especificaciones
Método de impresión: Transferencia térmica de puntos variables
Resolución de impresión: 254 dpi (puntos por pulgada)
Número de puntos impresos: 640 × 480 (sentido de alimentación del papel)
Velocidad de impresión: 3,05 mm/segundo
Tamaño del papel de impresión: 91 × 55 mm
Tamaño del área de impresión: 64 × 48 mm
Tiempo de impresión (aprox.): 160 segundos
Número de puntos por rollo de cartucho: 20
Consumo: 5 W
Temperatura de operación garantizada para impresión: 10 °C a 35 °C
Temperatura de almacenamiento: -20 °C a 55 °C
Temperatura de almacenamiento del cartucho de impresión:
-20°C a 55°C
Dimensiones (aprox.): 67 × 78 × 97 mm (al/an/prf)
Masa (aprox.): 305 g
Información adicional
31-ES
Page 94

Page 95

Page 96

Sony Corporation Printed in Japan
 Loading...