

Page 1
3-856-727-11(1)
Ster eo
Turntable System
Operating Instructions
Mode d’emploi
Manual de Instrucciones
Ch
EN
F
E
C
PS-LX300H
© 1996 by Sony Corporation
3
Page 2

WARNING
Precautions
To prevent fire or shock
hazard, do not expose
the unit to rain or
moisture.
For the customers in the
U.S.A.
This symbol is intended to alert the user
to the presence of uninsulated
“dangerous voltage” within the
product’s enclosure that may be of
sufficient magnitude to constitute a risk
of electric shock to persons.
This symbol is intended to alert the user
to the presence of important operating
and maintenance (servicing) instructions
in the literature accompanying the
appliance.
On safety
• Before operating the unit, check that
the operating voltage of your unit is
identical with that of your local
power supply.
• Should any solid object or liquid fall
into the cabinet, unplug the unit and
have it checked by qualified
personnel before operating it any
further.
• Unplug the unit from the wall outlet
if it is not to be used for an extended
period of time. To disconnect the
cord, pull it out by the plug. Never
pull the cord itself.
• The unit is not disconnected from the
AC power source (mains) as long as it
is connected to the wall outlet, ever if
the unit itself has been turned off.
• The nameplate indicating operating
voltage, power consumption, etc. is
located on the rear exterior.
On placement
• Place the unit on a level surface.
• Avoid placing the unit near electrical
appliances (such as a television, hair
dryer, or fluorescent lamp) which
may cause hum or noise.
• Place the unit where it will not be
subject to any vibration, such as from
speakers, slamming of doors, etc.
• Keep the unit away from direct
sunlight, extremes of temperature,
and excessive dust and moisture.
Owner’s Record
The model number and serial numbers
are located at the rear. Record these
numbers in the spaces provided below.
Refer to these numbers whenever you
call upon your Sony dealer regarding
this product.
Model No. PS-LX300H
Serial No.
EN
2
Keep the carton and packing materials.
They provide an ideal container to
transport the unit.
If you have any question or problem
concerning your unit that is not covered
in this manual, please consult your
nearest Sony dealer.
On repacking
Page 3

Welcome!
Thank you for purchasing the Sony
Stereo Turntable System. Before
operating the unit, please read this
manual thoroughly and retain it for
future reference.
Convention
The following icon is used in this
manual:
Indicates hints and tips for
making the task easier.
TABLE OF CONTENTS
Getting Started
Unpacking 3
Assembling the Turntable 4
Hooking up the Turntable 4
Adjusting the Turntable 5
Operations
Playing a Record 6
Additional Information
Maintenance 7
Troubleshooting 8
Specifications 8
Parts and Controls 9
EN
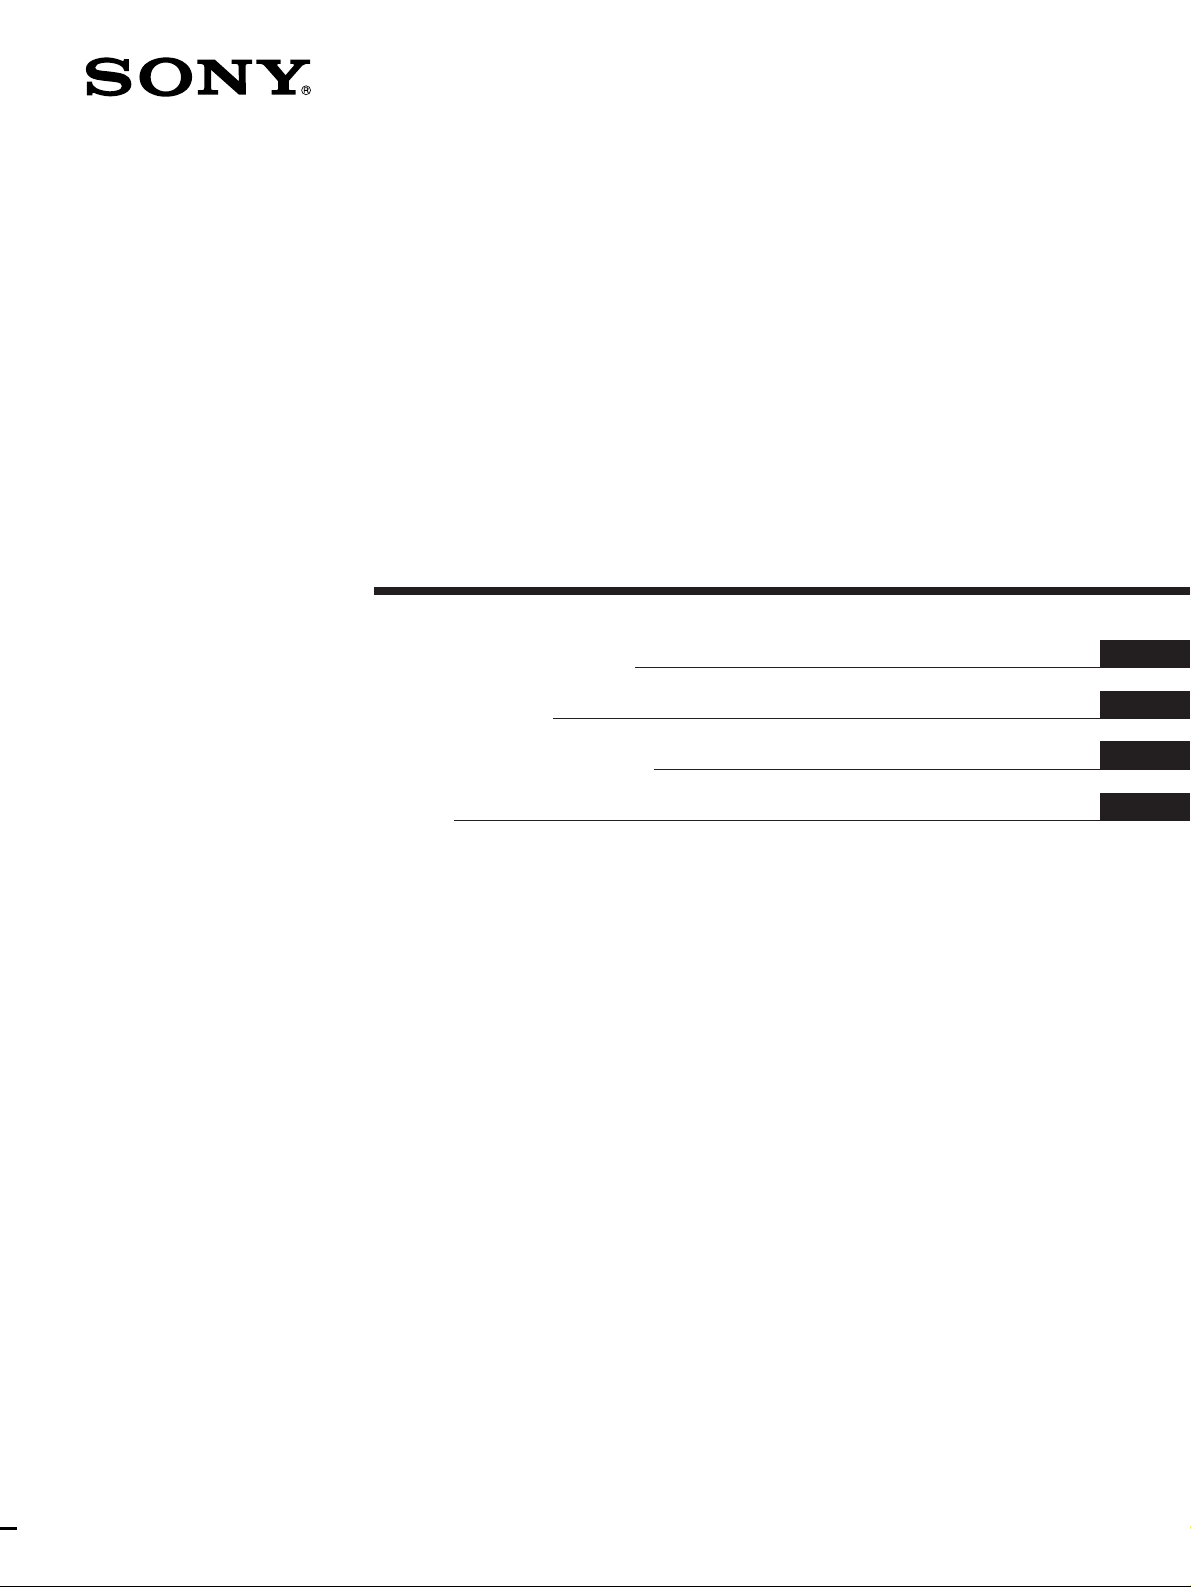
Unpacking
Check that you received the following items with your turntable:
• Platter (with drive belt) (1)
• Rubber mat (1)
• Dust cover (with hinges) (1)
• Counter weight (1)
• Cartridge and headshell (1)
• 45 r/min adaptor (1)
• Plug adaptor (except for U.S.A. and Europe models) (1)
EN
3
Page 4
Getting Started
PHONO
Assembling the Turntable
7 Insert the hinges on the dust cover into the hinge
pockets on the rear of the cabinet.
4
7
2
5
1
3
6
1 If your turntable is equipped with a voltage
selector, be sure to set the selector to your line
voltage.
2 Carefully, place the platter on the spindle.
3 Using the ribbon, loop the drive belt around the
motor pully. After looping the belt, do not forget
to remove the ribbon.
Hooking up the Turntable
The phono cables and earth lead come attached to the
rear of the cabinet.
1 Connect the cable with the red plug to the right
PHONO R input jack on the amplifier and
connect the cable with the white plug to the left
PHONO L input jack.
Amplifier
4 Place the rubber mat on the platter.
5 Slide the counter weight onto the shaft at the rear
of the tone arm and turn 3 or 4 times in the
direction of the arrow.
6 Insert the headshell into the front of the tone arm.
Turn the locking collar in the direction of the
arrow until the headshell is secure.
2 Connect the earth lead to the earth terminal on the
amplifier.
Amplifier
Note
Be sure to connect the earth lead. Failure to do so will result
in a humming noise from the turntable.
Mains lead hookups
Connect the mains lead to an AC wall outlet after
completing all of the previous connections.
If the power cord plug does not match with your AC
wall outlet, use the supplied plug adaptor.
/ to a wall outlet
EN
4
Page 5
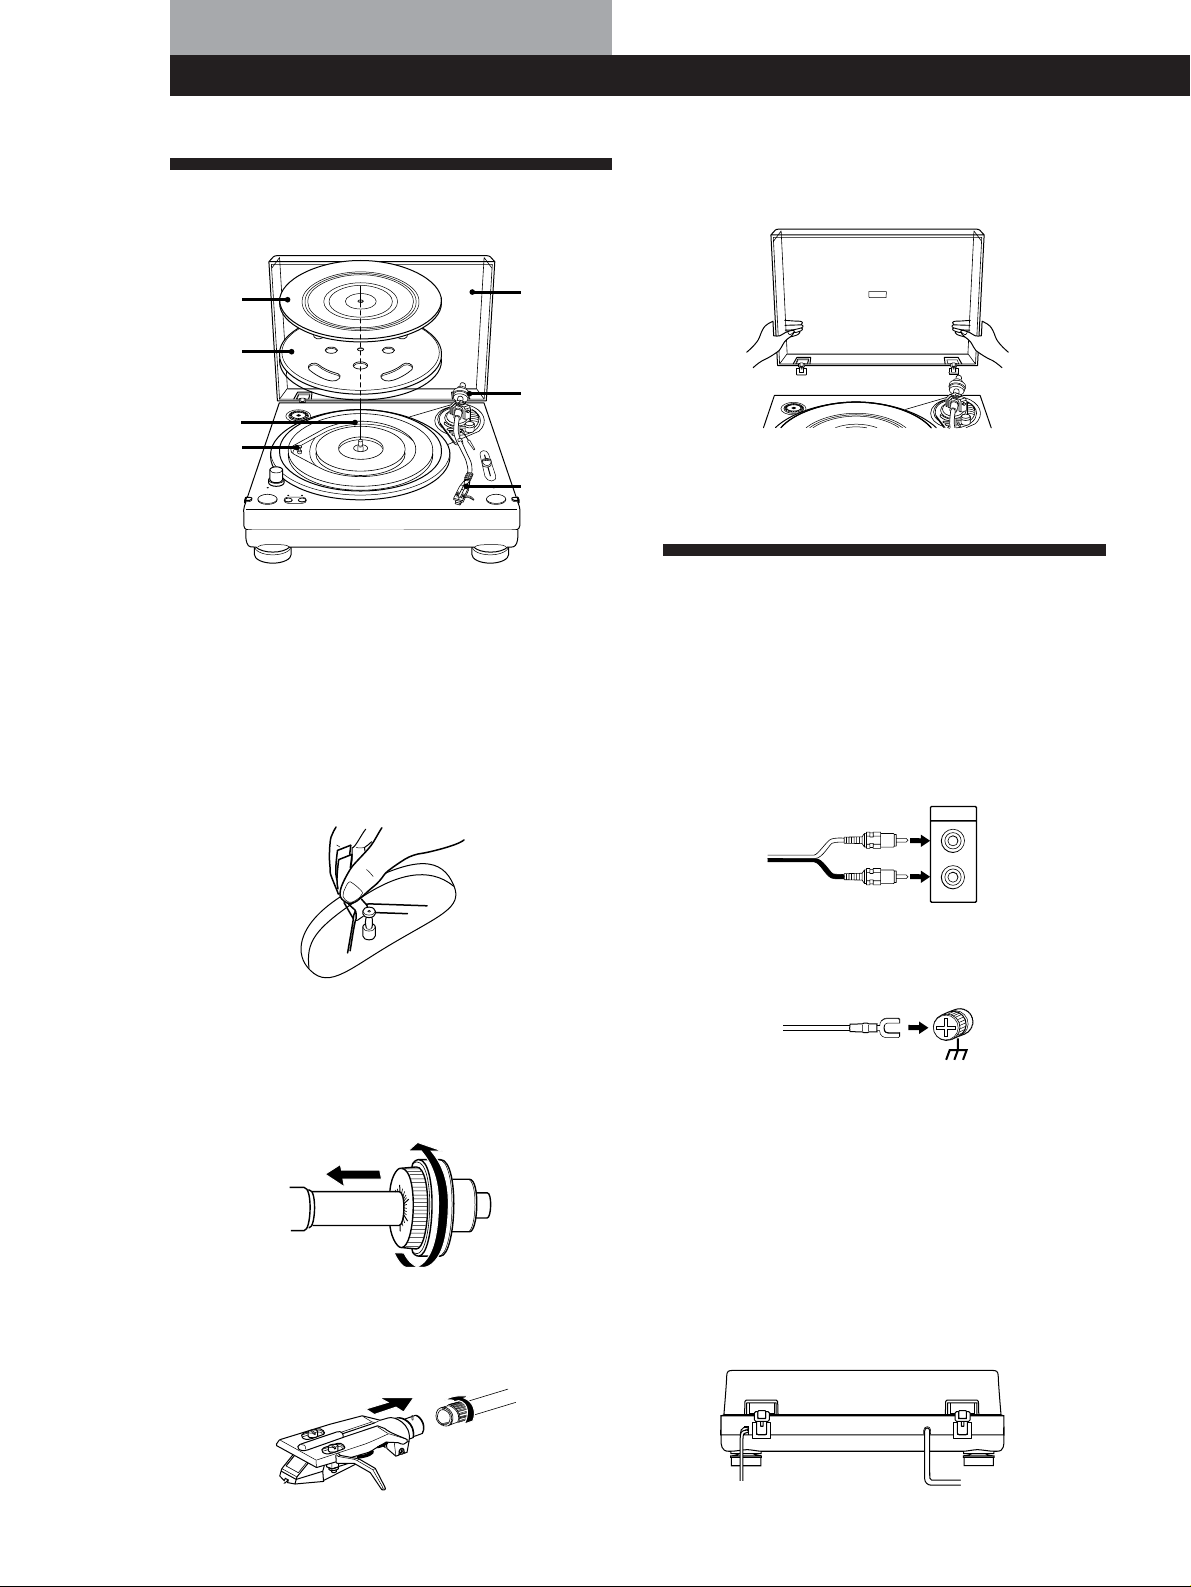
Adjusting the turntable
Getting Started
6 Set the cueing lever to up position and return the
tone arm to the arm stand.
Before attempting to play any records, be sure to
complete the following steps to insure proper tone arm
balance, tracking force and anti-skating adjustment.
Failure to complete these adjustments will result in
inferior sound quality and may cause permanent
damage to the stylus and record.
1 Make sure the turntable is level.
The insulator feet allow you to make slight
adjustments to the height of the turntable.
2 Set the ANTI-SKATING dial to “0”.
K
S
A
-
I
T
T
I
N
N
G
A
0
3
1
2
3 Remove the protective cover from the cartridge,
move the tone arm to the space between the arm
stand and the platter.
Take care not to damage the stylus.
7 Since the tracking force is zero when the tone arm
is properly balanced, set the tracking force scale
ring so that “0” lines up with the index line.
Hold the counter weight with your other hand so
that it will not turn together with the scale ring.
Turn this ring so that the
“0” lines up with the index
line.
8 When using the supplied cartridge, turn the
counter weight so that 2.5 reading lines up with
the index line. The supplied cartridge requires 2.5
grams of tracking force.
Turn the counter weight
so that 2.5 reading lines
up with the index line.
When optionally available cartridge is used
Turn the counter weight counterclockwise to align the
tracking force scale ring to the correct tracking force.
The tracking force scale ring is marked in 0.1 g steps
and one full turn of the counter weight yields a tracking
force of 3 g.
4 While using the finger lift to support the
headshell, set the cueing lever to the down
position. Take care not to damage the stylus.
0
1
A
N
T
I
-
S
K
A
T
2
I
N
G
3
5 Balance the tone arm by turning the counter
weight either clockwise or counterclockwise.
When the tone arm is properly balanced
It will float parallel to the platter when released.
It should not tilt toward either the headshell or counter
weight.
9 Set the ANTI-SKATING dial to the same setting
as the tracking force scale ring.
The numbers on the ANTI-SKATING dial
correspond to 1 g of tracking force.
EN
5
Page 6
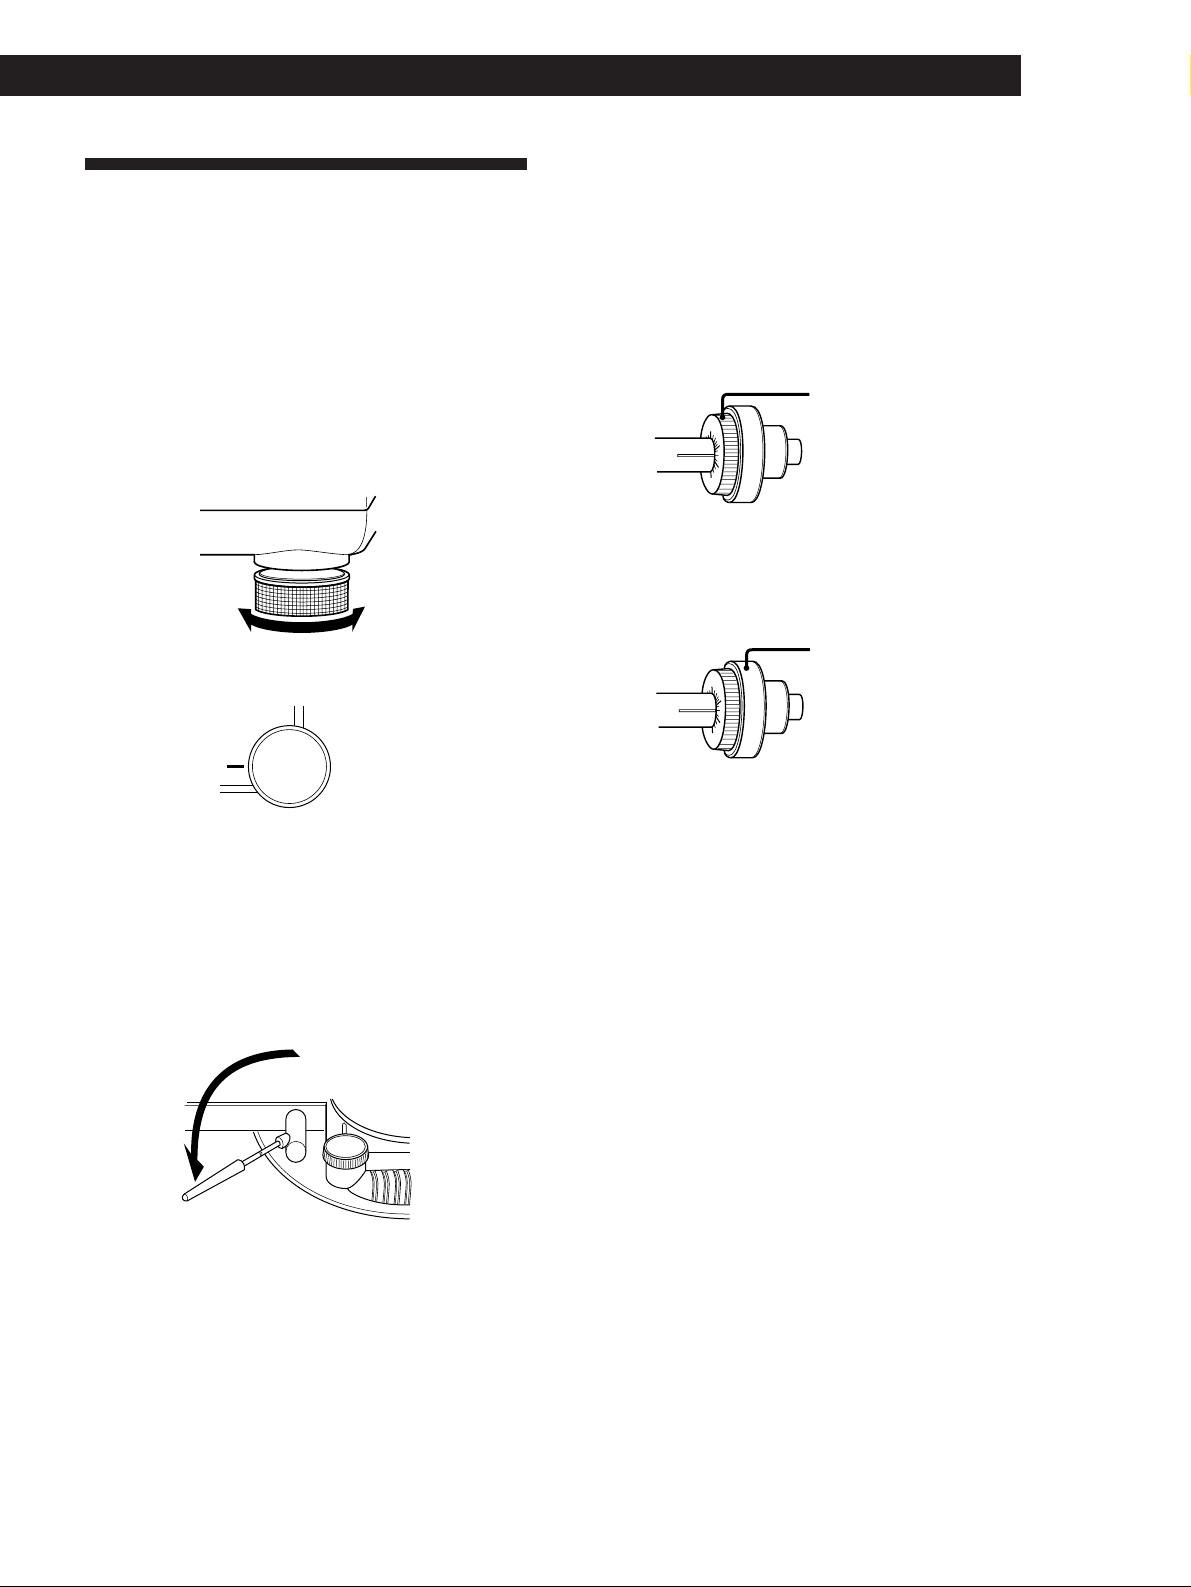
Operations
45
33
Playing a Record
1
2
3
1 Place a record on the platter.
6,7
6
3
6
4
5
8 Adjust the volume on your amplifier.
To stop playing
1 Set the cueing lever to up position to lift up the
tone arm, return the tone arm to the arm stand.
Attach the protective cover onto the cartridge to
prevent damage to the stylus.
2 Press the START/STOP button.
The platter stops rotating.
3 Press POWER to turn the turntable off.
To pause playback
Lift the cueing lever to raise stylus off the record
during playback.
To listen to a different part of the record
1 Lift the cueing lever to raise stylus during
playback.
2 Move the tone arm to the position you desire.
3 Lower the cueing lever.
Note
Place only one record on the platter at a time. If two or
more records are stacked on the platter, the stylus will
not make proper contact with the grooves and the
quality of reproduction will be impaired.
2 Press POWER to turn on the record turntable.
The strobo lamp lights up.
3 Set the PITCH CONTROL to the center position
and press 33 or 45 to select the platter speed.
The indicator for the selected speed lights up.
4 Press START/STOP.
The platter starts rotating.
If you select 33 r/min when the turntable is
connected to a 50 Hz power source, the innermost
row of the strobo dots should appear to stand
still.
50 Hz
60 Hz
33
45
33
45
To play a 17-cm record
Place the supplied 45 r/min adaptor on the spindle.
When you have finished using the adaptor, put it back
in the adaptor tray.
Adjusting the pitch
You can make fine adjustments to the platter speed by
using the PITCH CONTROL.
Slide toward “FAST” to increase the platter speed.
The strobo dots for the original speed flow backward.
Slide toward “SLOW” to decrease the platter speed.
The strobo dots for the original speed flow forward.
If the strobo dots do not stand still when the PITCH
CONTROL is set to the center position
Use the platter speed controls (33 or 45) on the bottom
of the turntable to adjust the platter speed so that the
respective strobo dots appear to stand still.
Turn toward + to increase the platter speed.
Turn toward – to decrease the platter speed.
5 Remove the protective cover from the cartridge.
6 Set the cueing lever to the up position.
Move the tone arm to the desired position over
the record.
7 Set the cueing lever to the down position.
The tone arm descends slowly to the record and
playback begins.
EN
6
Page 7
Additional Information
Maintenance
Stylus and Record Care
In order to prevent premature stylus and record wear,
the stylus and record should be cleaned before
playback.
To clean the stylus, brush it from back to front using a
good quality stylus cleaning brush. Do not clean the
stylus with your finger tip. When using a fluid stylus
cleaner, make sure not to moisten the stylus too much.
To clean your records, wipe thoroughly using a good
quality record cleaner.
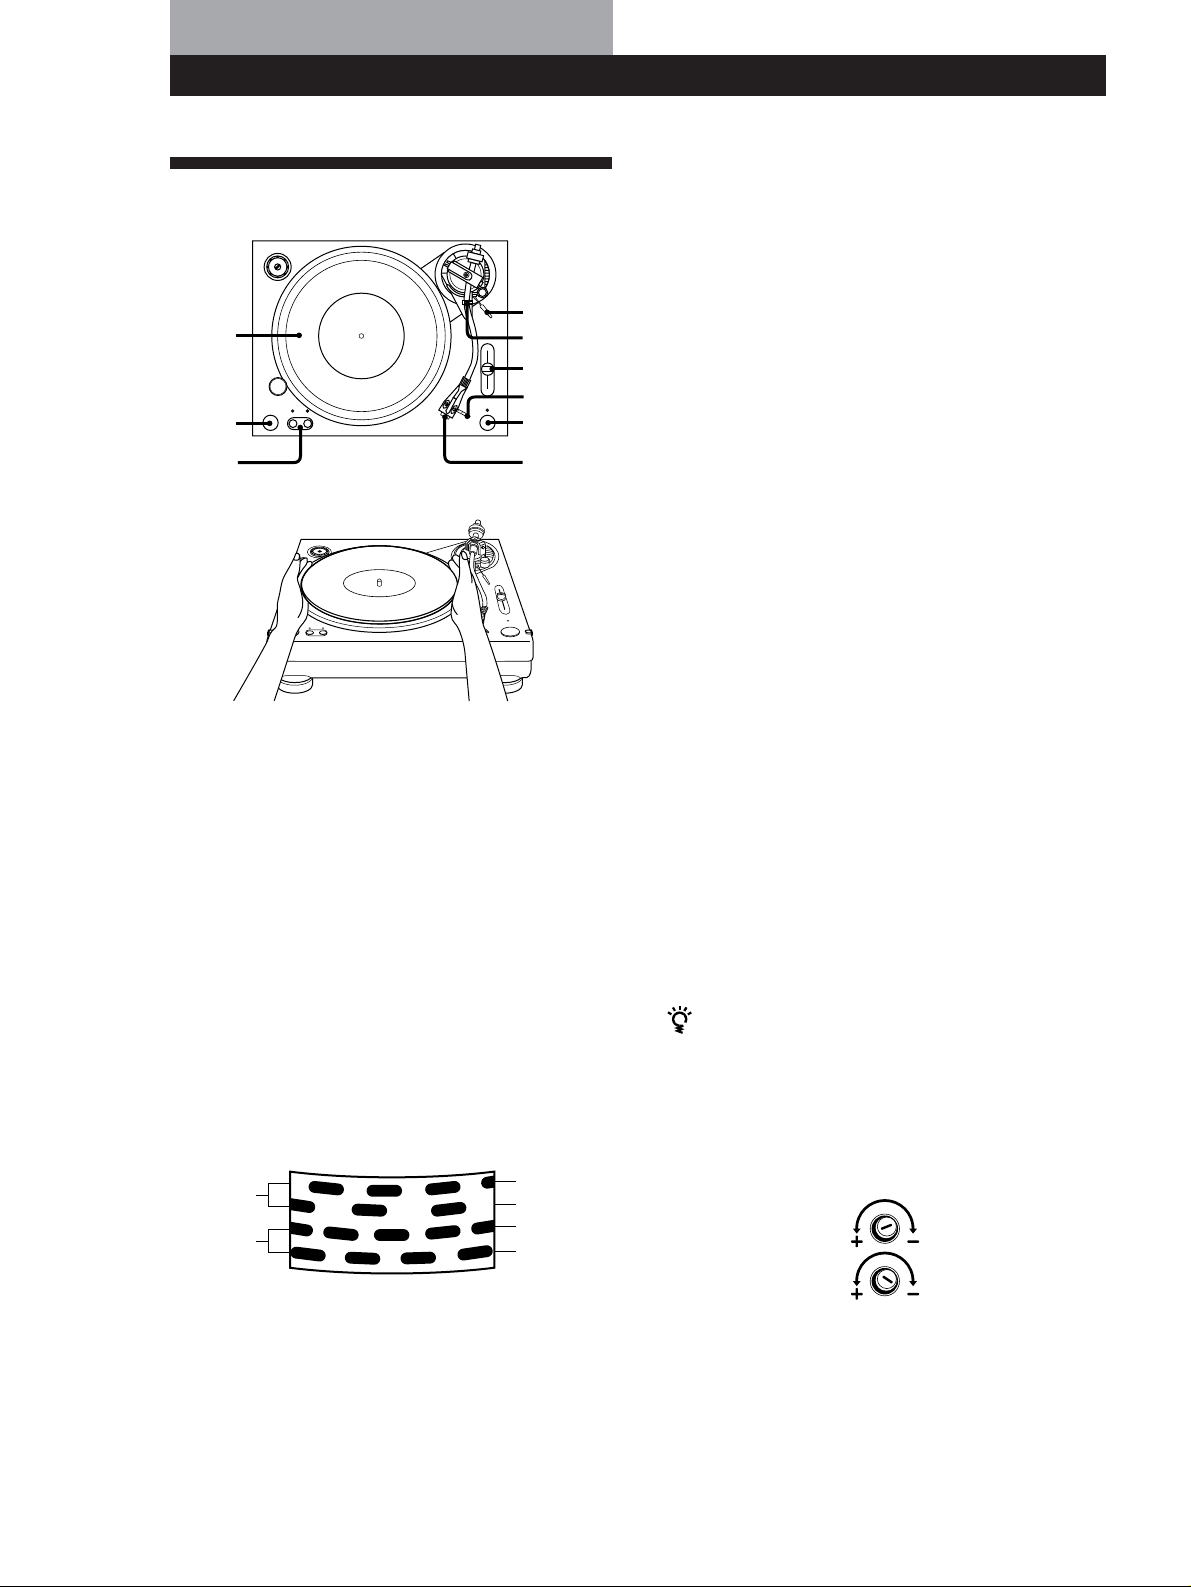
Cleaning the Shell Terminals
If you notice a drop in sound quality, excessive noise,
or hum, this may be a result of incomplete contact due
dust or dirt on the shell terminals. Remove the shell
from the tone arm and wipe the terminals lightly with
a soft cloth, and reattach the shell to the tone arm.
To replace the stylus
1 Turn off the turntable and amplifier.
2 Turn the locking collar and remove the cartridge
from the tone arm.
3 Grasp the stylus holder and pull it away from the
body of the cartridge.
4 Insert the new stylus by pushing it into the
cartridge receptacle.
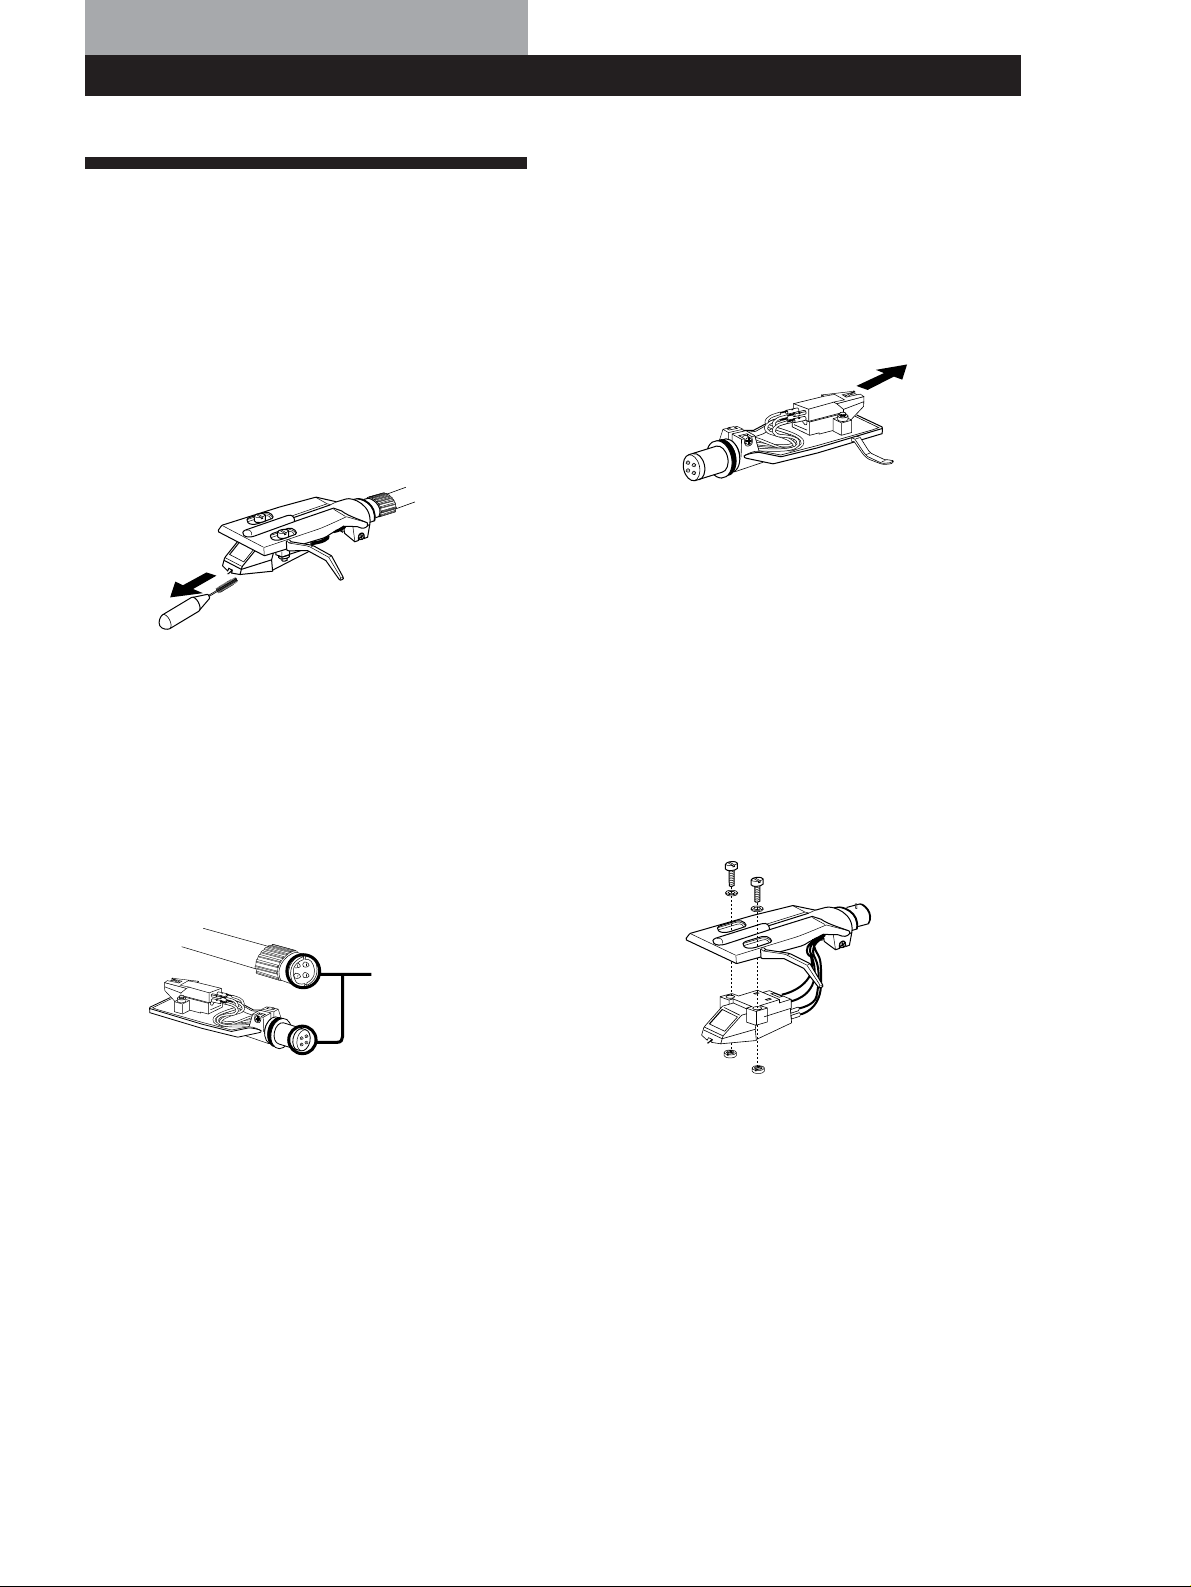
Replacing the Cartridge
If you find it necessary to replace the cartridge detach
the headshell from the tone arm and follow the
directions below.
1 Remove the screws holding the cartridge to the
headshell.
2 Detach the four lead wires from the cartridge by
pulling on the lead terminals with a small pair of
pliers (etc.).
The cartridge should now be completely detached
from the headshell.
Shell terminals
Cleaning the Cabinet and Dust Cover
Clean the cabinet and dust cover periodically using a
soft dry cloth. If stains are difficult to remove, use a
cloth moistened with a mild detergent solution. Do not
use solvents such as alcohol, benzine or thinner, since
they will damage the finish.
Replacing the Stylus
The life expectancy of the stylus tip is about 500 hours.
To preserve maximum sound quality and avoid
damage to your records, we recommend replacing the
stylus within this time limit.
Additional replacement styli (CN-251) are available
from your Sony dealer.
3 Check the location and polarity of each of the
terminal pins on the new cartridge and connect
the lead wires accordingly.
The terminal polarity of the lead wires on the
accessory headshell are shown below.
Red: Right channel
White: Left channel
Green: Right channel earth
Blue: Left channel earth
Be careful not to mix the polarities.
EN
7
Page 8

Additional Information
Troubleshooting
Before going through the check list below, first make
sure that:
• The power cord is securely connected.
• The speaker cords are securely connected.
Should any problem persist after you have made these
checks, consult your nearest Sony dealer.
The tone arm skips, skates or does not advance.
b The turntable is not level. Place the turntable on a
level surface.
b Incorrect tracking force. Follow the instructions on
page 5 and set the tracking force to the appropriate
value for the cartridge being used. (The supplied
cartridge requires 2.5 grams of tracking force.)
b Incorrect anti-skating adjustment. Make sure the
ANTI-SKATING dial is set to the same value shown
on the tracking force ring (see page 5).
b The record is dirty or scratched.
Clean the record with a commercially available
record cleaning kit, or replace the record.
Poor sound quality, excessive noise, intermittent sound,
etc…
b Check the tone arm locking collar to make sure the
headshell is securely attached to the tone arm (see
page 4).
b Make sure the earth lead is connected to the earth
terminal on the amplifier (see page 4).
b Incorrect tracking force. Follow the instructions on
page 5 and set the tracking force to the appropriate
value for the cartridge being used. (The supplied
cartridge requires 2.5 grams of tracking force.)
b The stylus is dirty or worn. Remove dust on the
stylus using a stylus cleaning brush, or replace the
worn stylus (see page 7).
b Dust or dirt has collected on the record. Clean the
record using a good quality record cleaner.
b Check that the cartridge lead wires inside the
headshell are firmly attached.
Rumble or low-frequency howl*.
b The turntable is placed too close to speakers. Move
speakers away from the turntable.
Tempo is incorrect.
b Incorrect r/min. Set the r/min setting to match the
one indicated on the record. (Select “33” for 33 1/3 r/
min records or “45” for 45 r/min records.)
b The PITCH CONTROL is not set to the center
position.
b Incorrect platter speed. Adjust the fine controls on the
bottom of the turntable while watching the strobo
dots to obtain correct platter speed (see page 6).
The drive belt is deteriorated.
b Replace the drive belt. For details, please make a
contact with Sony dealer.
Platter does not rotate.
b Make sure the power cord is inserted all the way into
an AC wall outlet.
b The drive belt is not completely hooked onto the
motor pulley. Make sure the belt is hooked
completely around the motor pulley (see page 4).
The drive belt is broken.
b Replace the drive belt. For details, please make a
contact with Sony dealer.
Sound is too low or distorted.
b The turntable is not connected to the PHONO inputs
on the amplifier (see page 4).
* This phenomenon, called “acoustic feedback”, occurs
when vibrations from the speakers are transmitted
through the air or via solid objects (such as shelves, a
cabinet, or the floor) to the turntable where they are
picked up by the stylus, amplified and reproduced
through the speakers.
Specifications
Motor and Platter
Drive system Belt-drive
Motor DC motor
Platter 331 mm dia. die-cast aluminum alloy
Speeds 33 1/3 and 45 r/min, 2 speed
Wow and flutter Less than 0.1% (WRMS)
Signal to noise ratio More than 55 dB (DIN-B) with supplied
cartridge
Tone Arm
Type Universal “S” shaped tubular arm
Effective arm length 230 mm
Overhang 15 mm
Usable cartridge weight 3 g (min.) to 8 g (max.)
General
Power requirements U.S.A. model: 120V AC, 60 Hz
Europe model: 220 – 240 V AC, 50/60
Hz
Other countries: 110 – 120/220 – 240 V
AC, 50/60 Hz
Power consumption 6 W
Dimensions Approx. 450 x 160 x 360 mm (w/h/d)
(17 3/4 x 6 3/8 x 14 1/4 inches)
Mass 7kg (15 lb 7 oz)
Supplied Accessories
45 r/min adaptor (1)
Platter (with drive belt) (1)
Rubber mat (1)
Cartridge and headshell (1)
Counter weight (1)
Dust cover (1)
Plug adaptor (except for U.S.A. and Europe models) (1)
Design and specifications are subject to change without notice.
EN
8
Page 9
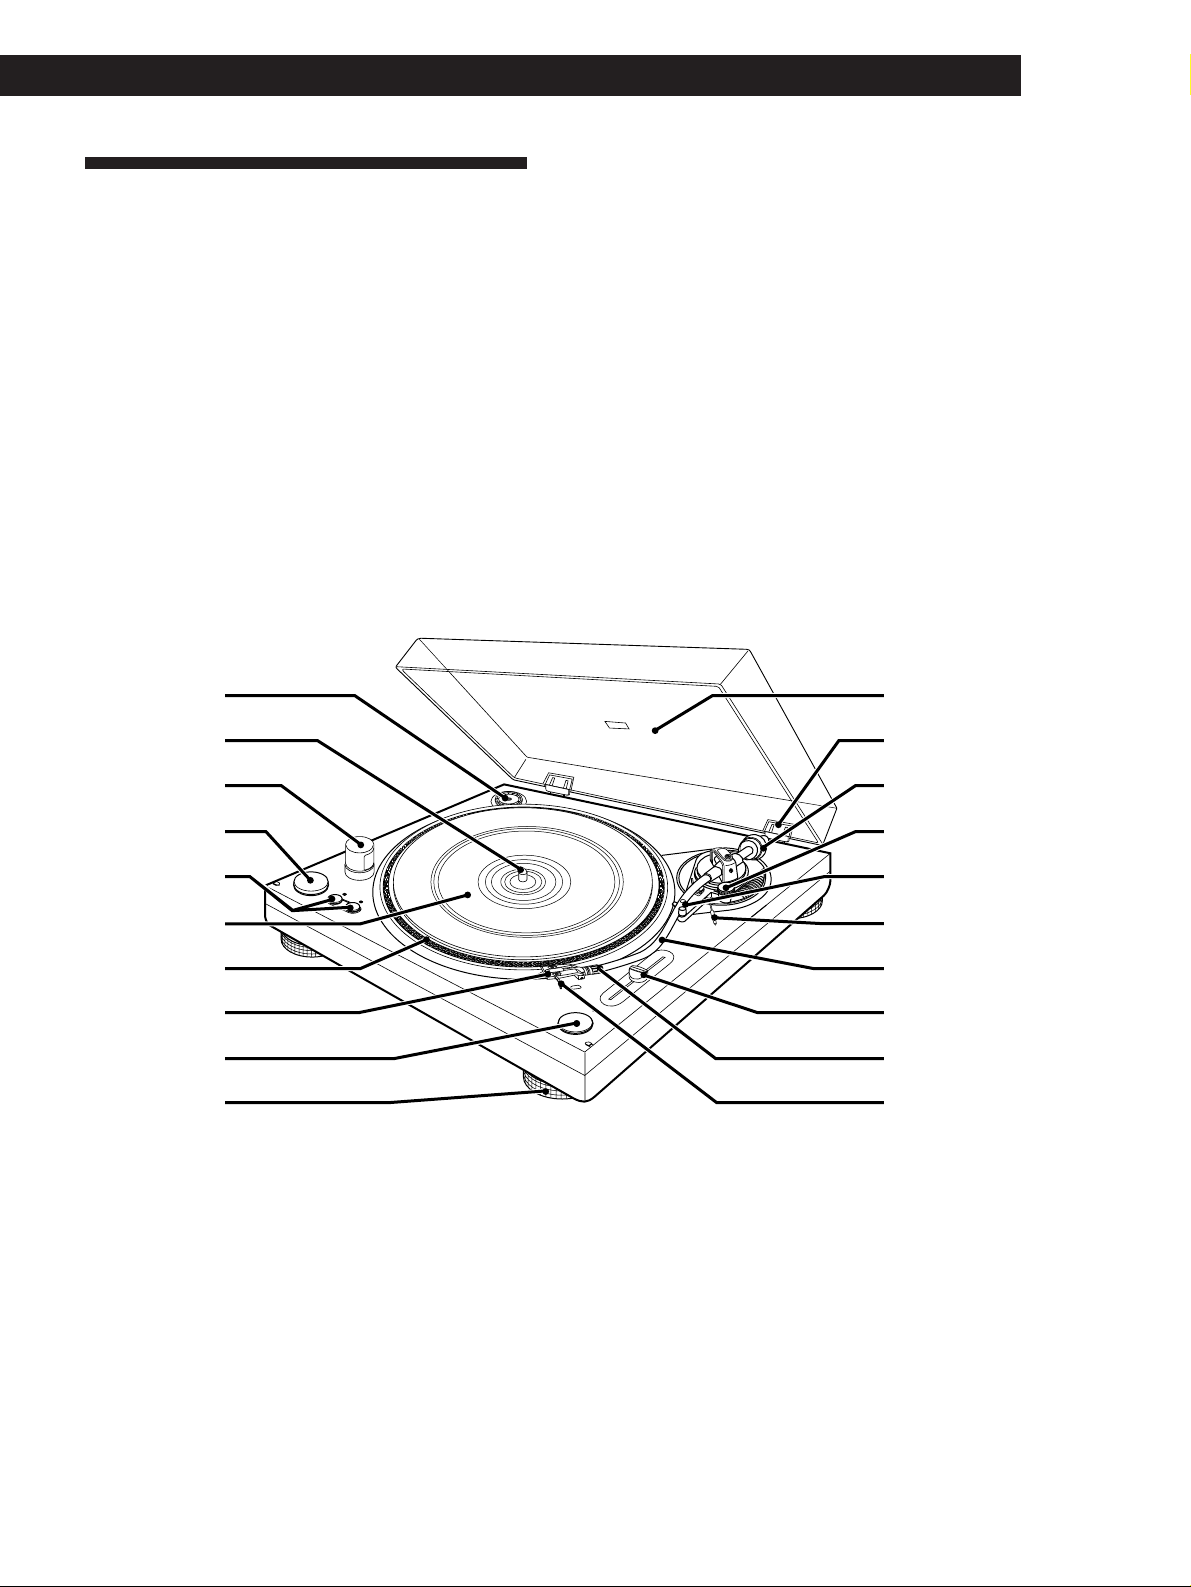
Parts and Contr ols
Additional Information
1 45 r/min adaptor
2 Spindle
3 Strobo lamp
4 POWER button
5 Speed select buttons and indicators
6 Rubber mat
7 Platter
8 Cartridge and headshell
9 START/STOP button
!º Insulator
1
2
3
!¡ Dust cover
!™ Hinge
!£ Counter weight
!¢ ANTI-SKATING dial
!∞ Arm stand
!§ Cueing lever
!¶ Tone arm
!• PITCH CONTROL
!ª Locking collar
@º Finger lift
!¡
!™
!£
4
5
6
7
8
9
!º
!¢
!∞
!§
!¶
!•
!ª
@º
EN
9
Page 10

AVERTISSEMENT
Précautions
Afin d’éviter tout risque
d’incendie ou
d’électrocution, ne pas
exposer cet appareil à la
pluie ou à l’humidité.
Sécurité
• Avant d'utiliser la platine, vérifiez
que sa tension de fonctionnement est
identique à celle du courant secteur
local.
• Si un solide ou un liquide tombait
dans le coffret, débranchez la platine
et faites-la vérifier par un technicien
qualifié avant de la remettre en
service.
• Débranchez la platine de la prise
secteur si vous prévoyez de ne pas
l'utiliser pendant un certain temps.
Pour débrancher le cordon, tirez sur
la fiche et non pas sur le cordon.
• La platine n'est pas déconnectée de la
source d'alimentation secteur tant
qu'elle reste branchée sur la prise
secteur, même si elle a été mise hors
tension.
• La plaque signalétique indiquant la
tension de fonctionnement, la
consommation ou autres paramètres,
se trouve à l'arrière de la platine.
Installation
• Installez la platine sur une surface de
niveau.
• Evitez d'installer la platine près d'un
appareil électrique (télévision, sèchecheveux ou lampe fluorescente) qui
pourrait provoquer un
bourdonnement ou des parasites.
• Ne pas placer la platine dans un
endroit exposé à des vibrations, par
exemple près d'enceintes ou d'une
porte qui risque de claquer.
• Protégez la platine des rayons du
soleil, des températures extrêmes et
d'une poussière ou humidité
excessive.
Remballage
Ne pas jeter le carton ni les matériaux
d'emballage. Ils offrent une protection
idéale pour le transport de la platine.
Pour toute question ou tout problème
au sujet de cet appareil, non couverts
dans ce manuel, veuillez consulter votre
revendeur Sony le plus proche.
F
2
Page 11
Bienvenue !
Merci d'avoir choisi cette platine
tourne-disque Sony. Avant de la mettre
en service, veuillez lire attentivement le
mode d'emploi et le conserver pour
toute référence future.
Convention
L'icône suivante est utilisée dans le
mode d'emploi:
Elle indique des conseils et
suggestions qui facilitent les
opérations.
TABLE DES MA TIÈRES
Préparatifs
Déballage 3
Assemblage de la platine tourne-disque 4
Raccordement de la platine tourne-disque 4
Réglage de la platine tourne-disque 5
Fonctionnement
Lecture d'un disque 6
Informations complémentaires
Entretien 7
Guide de dépannage 8
Spécifications 8
Nomenclature 9
F
Déballage
Vérifiez si tous les éléments suivants se trouvent dans l'emballage:
• Plateau (avec courroie) (1)
• Contre-plateau (1)
• Couvercle (avec charnières) (1)
• Contrepoids (1)
• Cartouche et tête de lecture (1)
• Adaptateur 45 tours (1)
• Adaptateur de fiche (sauf modèles pour les Etats-Unis et l'Europe) (1)
F
3
Page 12

Préparatifs
PHONO
Assemblage de la platine
tourne-disque
7 Insérez les charnières sur le couvercle dans les
gonds à l'arrière de la platine.
4
7
2
5
1
3
6
1 Si votre platine présente un sélecteur de tension,
veillez à le régler sur la tension locale.
2 Posez avec précaution le plateau sur l'axe.
3 A l'aide du ruban, faites passer la courroie
derrière la poulie de moteur. Quand la courroie
est en place, n'oubliez pas de retirer le ruban.
Raccordement de la platine
tourne-disque
Les cordons à fiches cinch et le fil de masse sont fixés à
l'arrière de la platine.
1 Raccordez le cordon avec la fiche rouge à la prise
d'entrée PHONO R (droite) de votre amplificateur
et le cordon avec la fiche blanche à la prise
d'entrée PHONO L (gauche).
Amplificateur
2 Raccordez le fil de masse à la borne de masse de
l'amplificateur.
4 Posez le contre-plateau sur le plateau.
Amplificateur
5 Poussez le contrepoids jusqu'à l'extrémité arrière
du bras de lecture et tournez 3 ou 4 fois dans le
sens de la flèche.
Remarque
N'oubliez pas de raccorder la platine à la masse, sinon un
bourdonnement sera audible.
Raccordement au secteur
Raccordez le cordon secteur à une prise murale lorsque
6 Insérez la tête à l'avant du bras de lecture.
Tournez le collier dans le sens de la flèche jusqu'à
ce que la tête soit bien fixée.
F
4
toutes les connexions sont terminées.
Si la prise du cordon secteur ne rentre pas dans la prise
murale, utilisez l'adaptateur de fiche fourni.
/ à une prise
murale
Page 13

Réglage de la platine tourne-
Préparatifs
6 Remettez le relève-bras en position haute et
ramenez le bras de lecture sur le repose-bras.
disque
Avant d'écouter une disque, veuillez effectuer toutes
les opérations suivantes pour équilibrer le bras de
lecture, régler la force d'appui et le système de
compensation de poussée latérale (antiskating). Si vous
n'effectuez pas tous ces réglages, vous n'obtiendrez pas
la qualité de son que vous êtes en droit d'attendre, et le
saphir ou vos disques risquent d'être endommagés.
1 Assurez-vous que la platine est de niveau.
Avec les pieds isolants, vous pouvez ajuster avec
précision la hauteur de la platine.
2 Réglez la molette ANTI-SKATING sur “0”.
K
S
A
-
I
T
T
I
N
N
G
A
0
3 Enlevez le couvercle de protection de la
cartouche, bougez le bras de lecture jusqu'à la
position entre le repose-bras et le plateau.
Faites attention de ne pas endommager le saphir.
3
1
2
7 Comme la force d'appui est nulle quand le bras
est correctement équilibré, réglez la bague
graduée de force d'appui de sorte que “0” soit
aligné sur le repère (ligne).
Tenez le contrepoids avec l'autre main pour qu'il ne
tourne pas avec la bague graduée.
Tournez cette bague pour
que “0” soit aligné sur le
repère.
8 Si vous utilisez la cartouche fournie, tournez le
contrepoids de sorte que la valeur 2,5 soit alignée
sur le repère. La force d'appui doit être de 2,5
grammes pour la cartouche fournie.
Tournez le contrepoids
pour que la valeur 2,5 soit
alignée sur le repère.
Si vous utilisez une cartouche disponible en option
Tournez le contrepoids dans le sens inverse des
aiguilles d'une montre pour aligner la bague graduée
sur la force d'appui correcte.
La bague de réglage de la force d'appui est graduée par
intervalles de 0,1 g, et un tour complet du contrepoids
représente une force d'appui de 3 g.
4 Tout en tenant la tête de lecture par l'onglet,
mettez le relève-bras en position basse. Veillez à
ne pas endommager le saphir.
0
1
A
N
T
I
-
S
K
A
T
2
I
N
G
3
5 Equilibrez le bras en tournant le contrepoids dans
un sens ou dans l'autre.
Quand le bras de lecture est bien équilibré
Il doit rester parallèle au plateau quand vous le
relâchez.
Il ne doit pencher ni vers l'arrière (côté contrepoids) ni
vers l'avant (côté tête).
9 Réglez la molette ANTI-SKATING sur la même
valeur que la bague graduée.
Les nombres sur la molette ANTI-SKATING
correspondent à une force d'appui de 1 g.
F
5
Page 14

Fonctionnement
45
33
Lecture d'un disque
1
2
6,7
6
3
6
4
8 Ajustez le volume sur l'amplificateur.
Pour arrêter la lecture
1 Mettez le relève-bras en position haute pour
relever le bras de lecture et ramener le bras sur le
repose-bras.
Posez le cache sur la cartouche pour éviter
d'endommager le saphir.
2 Appuyez sur la touche START/STOP.
La plateau cesse de tourner.
3 Appuyez sur POWER pour éteindre la platine
tourne-disque.
3
5
1 Posez un disque sur le plateau.
Remarque
Ne poser qu'un seul disque à la fois sur le plateau. Si
vous posez plusieurs disques les uns sur les autres, le
saphir ne touchera pas correctement les sillons et la
reproduction du son ne sera pas parfaite.
2 Appuyez sur l'interrupteur POWER pour mettre
la platine en service.
La lampe stroboscopique s'allume.
3 Réglez le curseur PITCH CONTROL sur la
position centrale et appuyez sur 33 ou 45 pour
sélectionner la vitesse du plateau.
Le témoin de la vitesse sélectionnée s'allume.
4 Appuyez sur START/STOP.
Le plateau se met à tourner.
Si vous sélectionnez 33 tours quand la platine est
raccordée à une source d'alimentation de 50 Hz, la
rangée intérieure des points du stroboscope doit
sembler s'arrêter.
50 Hz
60 Hz
33
45
33
45
5 Enlevez le cache qui protège la cartouche.
Pour interrompre la lecture
Mettez le relève-bras en position haute pour élever le
saphir pendant la lecture.
Pour écouter une autre partie du disque
1 Mettez le relève-bras en position haute pour
élever le saphir pendant la lecture.
2 Amenez le bras de lecture à la position souhaitée.
3 Baissez le relève-bras.
Pour écouter un 45 tours
Posez l'adaptateur 45 tours fourni sur l'axe.
Quand vous avez terminé, rangez l'adaptateur à
l'emplacement réservé.
Réglage de la vitesse
Vous pouvez régler avec précision la vitesse du plateau
en utilisant le curseur PITCH CONTROL.
Poussez le curseur vers “FAST” pour augmenter la
vitesse du plateau.
Les points du stroboscope correspondant à la vitesse
originale semblent aller vers l'arrière.
Poussez le curseur vers “SLOW” pour réduire la
vitesse du plateau.
Les points du stroboscope correspondant à la vitesse
originale semblent aller vers l'avant.
Si les points du stroboscope ne semblent pas
s'arrêter quand le curseur PITCH CONTROL est à la
position centrale
Utilisez les réglages de vitesse 33 ou 45 sur le socle de la
platine tourne-disque pour ajuster la vitesse du plateau
de sorte que les points du stroboscope correspondant à
chaque vitesse semblent s'arrêter.
Tournez vers + pour augmenter la vitesse du plateau.
Tournez vers – pour diminuer la vitesse du plateau.
6 Mettez le relève-bras en position haute.
Amenez le bras de lecture à la position souhaitée
au-dessus du disque.
7 Mettez le relève-bras en position basse.
Le bras de lecture descend lentement sur le disque
F
6
et la lecture commence.
Page 15

Informations complémentaires
Entretien
Nettoyage du saphir et des disques
Pour éviter une usure prématurée du saphir et des
disques, nettoyez-les avant la lecture.
Pour nettoyer le saphir, brossez-le de l'arrière vers
l'avant avec une petite brosse spéciale saphirs de bonne
qualité. Ne nettoyez pas le saphir avec les doigts. Si
vous utilisez un liquide de nettoyage spécial,
n'imprégnez pas trop la tête de lecture de liquide.
Pour nettoyer les disques, essuyez-les bien avec un
liquide spécial disques de bonne qualité.
Nettoyage des bornes de la tête
Une baisse de la qualité du son, un bruit excessif ou un
bourdonnement peuvent provenir d'un contact
insuffisant dû à de la poussière ou saleté sur les bornes
de la tête. Enlevez la tête du bras et essuyez les bornes
légèrement avec un chiffon doux, puis remettez la tête
sur le bras.
Pour remplacer le saphir
1 Mettez l'amplificateur et la platine hors tension.
2 Tournez le collier et enlevez la cartouche du bras
de lecture.
3 Saisissez le bloc saphir et sortez-le de la
cartouche.
4 Insérez le nouveau saphir dans la douille de la
cartouche.
Remplacement de la cartouche
Si vous pensez qu'il est nécessaire de remplacer la
cartouche, détachez la tête de lecture du bras et
procédez de la manière suivante.
1 Enlevez les vis qui servent à fixer la cartouche à la
tête.
2 Débranchez les quatre fils de la cartouche en
tirant sur les bornes avec une pincette, par
exemple.
Vous pouvez maintenant détacher complètement
la cartouche de la tête.
Bornes de la tête
Nettoyage du coffret et du couvercle
Nettoyez régulièrement le coffret et le couvercle avec
un chiffon doux et sec. Pour enlever les tâches rebelles,
utilisez un chiffon imprégné d'une solution détergente
neutre. Ne jamais utiliser de solvants, tels que de
l'alcool, de la benzine ou du diluant, qui pourraient
abîmer la finition.
Remplacement du saphir
La durée de vie d'un saphir est de 500 heures environ.
Pour obtenir le meilleur son possible et éviter
d'endommager vos disques, il est conseillé de respecter
cette limite.
Vous trouverez chez votre revendeur Sony des saphirs
de rechange (CN-251).
3 Vérifiez l'emplacement et la polarité de chaque
broches sur la nouvelle cartouche et raccordez les
fils en conséquence.
La polarité des bornes des fils de la tête de lecture
est la suivante:
Rouge: Canal droit
Blanc: Canal gauche
Vert: Masse canal droit
Bleu: Masse canal gauche
Veillez à respecter la polarité.
F
7
Page 16

Informations complémentaires
Le plateau ne tourne pas.
Guide de dépannage
Avant de passer en revue la liste suivante, vérifiez que:
• Le cordon d'alimentation est correctement branché.
• Les cordons des enceintes sont correctement
branchés.
Si un problème persiste après les vérifications
suivantes, consultez votre revendeur Sony.
Le bras de lecture glisse, patine ou n'avance pas.
b La platine n'est pas installée de niveau. Installez-la de
niveau.
b La force d'appui n'est pas réglée correctement. Suivez
les instructions de la page 5 et réglez la force d'appui
en fonction de la cartouche utilisée. (Avec la
cartouche fournie, vous devez régler la force sur 2,5
grammes.)
b La compensation de poussée latérale n'est pas
correcte. Veillez à régler la molette ANTI-SKATING
sur la même valeur que la bague de réglage de la
force d'appui (voir page 5).
b Le disque est sale ou rayé.
Nettoyez le disque avec un kit de nettoyage en vente
dans le commerce ou changez de disque.
Son de mauvaise qualité, bruit excessif, son intermittent,
etc.
b Vérifiez si collier du bras de lecture est bien serré et la
tête bien en place sur le bras (voir page 4).
b Vérifiez si le fil de masse est raccordé à la masse de
l'amplificateur (page 4).
b La force d'appui n'est pas correcte. Suivez les
instructions de la page 5 et réglez la force d'appui en
fonction de la cartouche utilisée. (La cartouche
fournie exige une force de 2,5 grammes.)
b Le saphir est sale ou usé. Enlevez la poussière sur le
saphir avec une petite brosse douce, ou remplacez le
saphir usé (voir page 7).
b De la poussière ou saleté s'est accumulée sur le
disque. Nettoyez le disque avec un liquide de
nettoyage de bonne qualité, spécial disques.
b Vérifiez que les fils de la cartouche à l'intérieur de la
tête sont bien branchés.
Bourdonnement ou hurlement de basse fréquence*.
b La platine est installée trop près des enceintes.
Eloignez les enceintes de la platine.
Le tempo n'est pas correct.
b Vous n'avez pas choisi la vitesse correspondant au
disque. (Sélectionnez “33” pour les disques 33 1/
tours et “45” pour les 45 tours.)
b Le curseur PITCH CONTROL n'est pas à la position
centrale.
b La vitesse du plateau n'est pas correcte. Ajustez les
commandes sur le socle de la platine en regardant les
points stroboscopiques pour obtenir la vitesse
correcte (voir page 6).
La courroie est abîmée.
b Remplacez-la. Pour les détails, veuillez contacter
votre revendeur Sony.
F
8
3
b Assurez-vous que le cordon d'alimentation est bien
inséré dans la prise murale.
b La courroie de caoutchouc est mal placée derrière la
poulie du moteur. Faites-la bien passer derrière la
poulie (voir page 4.)
La courroie s’est rompue.
b Pour les détails, veuillez contacter votre revendeur
Sony.
Le son est trop faible ou déformé.
b La platine n'est pas raccordée aux entrées PHONO de
l'amplificateur (voir page 4).
*
Ce phénomène est appelé “rétroaction acoustique” et il se
produit quand des vibrations provenant des enceintes sont
transmises par l'air ou des objets solides (étagère, coffret,
sol, etc.) à la platine où elles sont captées par le saphir,
amplifiées et reproduites à nouveau par les enceintes.
Spécifications
Moteur et plateau
Système d'entraînement Courroie
Moteur Moteur CC
Plateau 331 mm de diamètre alliage
Vitesse 2 vitesses, 33 1/3 tpm, 45 tpm
Pleurage et scintillement Inférieur à 0,1% (WRMS)
Rapport signal sur bruit Supérieur à 55 dB (DIN-B) avec la
Bras de lecture
Type Bras tubulaire, universel en “S”
Longueur effective du bras
Saillie 15 mm
Poids des cartouches utilisables
Généralité
Alimentation électrique Modèle pour les Etats-Unis: secteur
Consommation 6 W
Dimensions Env. 450 x 160 x 360 mm (l/h/p)
Poids Env. 7 kg
Accessoires fournis
Adaptateur 45 tours (1)
Plateau avec courroie (1)
Contre-plateau (1)
Cartouche et tête de lecture (1)
Contrepoids (1)
Couvercle (1)
Adaptateur de fiche (sauf modèles pour les Etats-Unis et l'Europe)
(1)
La conception et les spécifications peuvent être modifiées sans
préavis.
d'aluminium moulé
cartouche fournie
230 mm
3 g (min.) à 8 g (max.)
120 V, 60 Hz
Modèle pour l'Europe: secteur
220-240 V, 50/60 Hz
Modèle pour les autres pays: secteur
110-120 V ou 220-240 V, 50/60 Hz
Page 17

Nomenclature
Informations complémentaires
1 Adaptateur 45 tours
2 Axe
3 Lampe stroboscopique
4 Interrupteur d'alimentation (POWER)
5 Sélecteurs de vitesse et témoins
6 Contre-plateau
7 Plateau
8 Cartouche et tête de lecture
9 Touche de marche/arrêt (START/STOP)
!º Pied isolant
1
2
3
!¡ Couvercle
!™ Charnière
!£ Contrepoids
!¢ Molette de compensation de poussée latérale
(ANTI-SKATING)
!∞ Repose-bras
!§ Relève-bras
!¶ Bras de lecture
!• Curseur de réglage précis de la vitesse
(PITCH CONTROL)
!ª Collier de serrage
@º Onglet
!¡
!™
!£
4
5
6
7
8
9
!º
!¢
!∞
!§
!¶
!•
!ª
@º
F
9
Page 18

ADVERTENCIA
Precauciones
Para evitar incendios o
descargas eléctricas, no
exponga la unidad a la
lluvia ni a la humedad.
Seguridad
• Antes de utilizar la unidad,
compruebe si su tensión de
alimentación es idéntica a la de la red
local.
• Si dentro de la unidad cae algún
objeto sólido o líquido, desenchúfela
y haga que sea revisada por personal
cualificado.
• Cuando no vaya a utilizar la unidad
durante mucho tiempo, desenchúfela
de la toma de la red. Para
desconectar el cable, tire del enchufe.
No tire nunca del propio cable.
• La unidad no se desconectará de la
fuente de alimentación de CA (red)
mientras esté enchufada en una toma
de dicha red, incluso aunque haya
desconectado su alimentación.
• La placa de características en la que
se indica la tensión de alimentación,
el consumo, etc., se encuentra en la
parte exterior posterior.
Ubicación
• Coloque la unidad sobre una
superficie nivelada.
• Evite colocar la unidad cerca de
aparatos eléctricos (como un
televisor, un secador del pelo, o una
lámpara fluorescente) porque podrían
causar zumbidos y ruidos.
• Coloque la unidad donde no quede
expuesta a vibraciones de, por
ejemplo, altavoces, puertas al
cerrarse, etc.
• mantenga la unidad alejada de la luz
solar directa, temperaturas
extremadas, y polvo y humedad
excesivos.
Reempaque
Guarde la caja de cartón y el material
amortiguador. Estos elementos serán
ideales para transportar la unidad.
Si tiene alguna pregunta o problema en
relación con su unidad que este manual
no pueda resolver, póngase en contacto
con su proveedor Sony.
E
2
Page 19

¡Bienvenido!
Muchas gracias por la adquisición de
este giradiscos estéreo Sony. Antes de
utilizar la unidad, lea detenidamente
este manual de instrucciones, y
guárdelo para futuras referencias.
Convencionalismo
En este manual se utiliza el icono
siguiente:
Indica sugerencias y consejos
para facilitar la tarea.
ÍNDICE
Preparativos
Desembalaje 3
Ensamblaje del giradiscos 4
Conexión del giradiscos 4
Ajuste del giradiscos 5
Operaciones
Reproducción de un disco 6
Información adicional
Mantenimiento 7
Solución de problemas 8
Especificaciones 8
Partes y controles 9
E
Desembalaje
Compruebe si ha recibido los ítemes siguientes con su giradiscos:
• Plato (con correa impulsora) (1)
• Esterilla de caucho (1)
• Cubierta guardapolvo (con bisagras) (1)
• Contrapeso (1)
• Cápsula y casco portacápsula (1)
• Adaptador para 45 rpm (1)
• Adaptador de enchufe (excepto los modelos para EE.UU. y Europa) (1)
E
3
Page 20

Preparativos
PHONO
Ensamblaje del giradiscos
7 Inserte las bisagras de la cubierta guardapolvo en
las ranuras de la parte posterior de la caja.
4
7
2
5
1
3
6
1 Si su giradiscos dispone de selector de tensión,
cerciórese de ajustarlo a la tensión de la red.
2 Coloque cuidadosamente el plato en el eje.
3 Utilizando la cinta, pase la correa impulsora
alrededor de la polea del motor. Después de
haber colocado la correa, no se olvide de quitar la
cinta.
Conexión del giradiscos
Los cables fono y el conductor de puesta a tierra están
fijados a la parte posterior de la caja.
1 Conecte el cable con clavija roja a la toma de
entrada PHONO R, y el cable con clavija blanca a
la toma PHONO L del amplificador.
Amplificador
2 Conecte el conductor de puesta a tierra al terminal
de puesta a tierra del amplificador.
Amplificador
4 Coloque la esterilla de caucho sobre el plato.
5 Deslice el contrapeso a lo largo del eje de la parte
posterior del brazo fonocaptor, y gírelo 3 o 4 veces
en el sentido de la flecha.
Nota
Cerciórese de conectar el conductor de puesta a tierra. Si no
lo hiciese, el giradiscos podría producir ruido de zumbido.
Conexión del cable de alimentación
Conecte el cable de alimentación en una toma de la red
de CA después de haber finalizado todas las
conexiones anteriores.
6 Inserte el casco portacápsula en la parte frontal
del brazo fonocaptor. Gire el anillo de bloqueo en
el sentido de la flecha hasta que el casco
portacápsula haya quedado seguro.
E
4
Si el enchufe del cable de alimentación no entra en la
toma de la red de CA, utilice el adaptador de enchufe
suministrado.
/ a una toma de
la red
Page 21

Ajuste del giradiscos
Antes de intentar reproducir discos, cerciórese de
realizar los pasos siguientes para asegurar el equilibrio
adecuado, la fuerza de apoyo sobre el surco, y la
compensación de la fuerza centrípeta del brazo
fonocaptor. Si no realizase estos ajustes, la calidad del
sonido sería deficiente y la aguja y el disco podrían
dañarse irreparablemente.
1 Cerciórese de que el giradiscos esté nivelado.
Las patas aislantes le permitirán ajustar
ligeramente la altura del giradiscos.
2 Ponga el dial ANTI-SKATING en “0”.
Preparativos
6 Coloque la palanca de elevación/descenso del
brazo hacia arriba y devuelva el brazo a su
soporte.
7 Como la fuerza de apoyo sobre el surco es cero
cuando el brazo fonocaptor está adecuadamente
equilibrado, ajuste el anillo de la escala de fuerza
de apoyo sobre el surco de forma que “0” quede
alineado con la línea de referencia.
Sujete el contrapeso con la otra mano para que no
gire con el anillo de la escala.
Gire este anillo de forma
que “0” quede alineado
con la línea de referencia.
8 Cuando utilice la cápsula suministrada, gire el
contrapeso de forma que la indicación 2,5 quede
alineada con la línea de referencia. La cápsula
suministrada requiere 2,5 gramos de fuerza de
apoyo sobre el surco.
K
S
A
-
I
T
T
I
N
N
G
A
0
3
1
2
3 Quite la cubierta protectora de la cápsula, y
mueva el brazo fonocaptor al espacio entre el
soporte del mismo y el plato.
Tenga cuidado de no dañar la aguja.
4 Utilizando la uña de elevación para sujetar el
casco portacápsula, coloque la palanca de
elevación/descenso del brazo hacia abajo. Tenga
cuidado de no dañar la aguja.
0
1
A
N
T
I
-
S
K
A
T
2
I
N
G
3
5 Equilibre el brazo fonocaptor girando el
contrapeso hacia la derecha o hacia la izquierda.
Gire el contrapeso de
forma que la indicación
2,5 quede alineada con la
línea de referencia.
Cuando utilice otra cápsula opcional
Gire el contrapeso hacia la izquierda para alinear el
anillo de la escala de fuerza de apoyo sobre el surco con
el valor correcto de tal fuerza. El anillo de la escala de
fuerza de apoyo sobre el surco está marcado en pasos
de 0,1 g, y una vuelta completa del contrapeso
corresponde a una fuerza de apoyo sobre el surco de
3 g.
9 Ajuste el dial ANTI-SKATING al mismo valor que
el del anillo de la escala de fuerza de apoyo sobre
el surco.
Los números del dial ANTI-SKATING
corresponden a una fuerza de apoyo sobre el
surco de 1 g.
Cuando el brazo fonocaptor esté adecuadamente
equilibrado
Flotará paralelo al plato cuando lo suelte. No deberá
inclinarse hacia el casco portacápsula ni hacia el
contrapeso.
E
5
Page 22

Operaciones
45
33
Reproducción de un disco
6,7
1
2
3
1 Coloque el disco sobre el plato.
Nota
Coloque un solo disco cada vez sobre el plato. Si
apilase dos o más discos sobre el plato, la aguja no haría
el contacto adecuado con los surcos y la calidad de la
reproducción se reduciría.
2 Presione POWER para conectar la alimentación
del giradiscos. La lámpara estroboscópica se
encenderá.
3 Ponga PITCH CONTROL en la posición central y
presione 33 o 45 para seleccionar la velocidad del
plato. El indicador para la velocidad seleccionada
se encenderá.
4 Presione START/STOP.
El plato comenzará a girar.
Si ha seleccionado 33 rpm cuando el giradiscos
esté conectado a una fuente de alimentación de
50 Hz, la fila interior de puntos estroboscópicos
deberá permanecer fija.
50 Hz
60 Hz
5 Quite la cubierta protectora de la cápsula.
6 Ponga la palanca de elevación/descenso del brazo
hacia arriba.
Mueva el brazo fonocaptor hasta la posición
deseada sobre el disco.
6
3
6
4
5
33
45
33
45
8 Ajuste el volumen en su amplificador.
Para parar la reproducción
1 Ponga la palanca de elevación/descenso del brazo
hacia arriba para levantar el brazo, y devuelva
éste a su soporte.
Coloque la cubierta protectora de la cápsula para
evitar que se dañe la aguja.
2 Presione la tecla START/STOP.
El plato dejará de girar.
3 Presione POWER para desconectar la
alimentación del giradiscos.
Para realizar una pausa en la reproducción
Levante la palanca de elevación/descenso del brazo
para hacer que la aguja se separe del disco durante la
reproducción.
Para escuchar una parte diferente del disco
1 Levante la palanca de elevación/descenso del
brazo para hacer que la aguja se separe del disco
durante la reproducción.
2 Mueva el brazo fonocaptor hasta la posición
deseada.
3 Baje la palanca de elevación/descenso del brazo.
Para reproducir un disco de 17 cm
Coloque el adaptador para 45 rpm suministrado en el
eje. Cuando haya finalizado de utilizar el adaptador,
devuélvalo a su bandeja.
Ajuste del paso
Usted podrá realizar ajustes precisos de la velocidad
del plato utilizando PITCH CONTROL.
Deslícelo hacia “FAST” para aumentar la velocidad
del plato.
Los puntos estroboscópicos para la velocidad original
se moverán hacia atrás.
Deslícelo hacia “SLOW” para reducir la velocidad del
plato.
Los puntos estroboscópicos para la velocidad original
se moverán hacia adelante.
Si lo puntos estroboscópicos no permanecen fijos
con PITCH CONTROL en la posición central
Utilice los controles de velocidad del plato (33 o 45) de
la base del giradiscos para ajustar la velocidad del plato
de forma que los puntos estroboscópicos respectivos
permanezcan fijos.
Gírelo hacia + para aumentar la velocidad del plato.
Gírelo hacia – para reducir la velocidad del plato.
7 Ponga la palanca de elevación/descenso del brazo
hacia abajo.
E
6
El brazo fonocaptor descenderá lentamente sobre
el disco y se iniciará la reproducción.
Page 23

Información adicional
Mantenimiento
Cuidado de la aguja y de los discos
Para evitar el desgaste prematuro de la aguja y del
disco, ambos deberán limpiarse antes de la
reproducción.
Para limpiar la aguja, cepíllela de la parte posterior a la
frontal utilizando un cepillo de limpieza de agujas de
buena calidad. No limpie la aguja con la punta de un
dedo. Cuando utilice un limpiador líquido de agujas,
cerciórese de no humedecer demasiado la aguja.
Reemplazo de la aguja
La duración útil de la aguja será de unas 500 horas.
Para conservar la máxima calidad del sonido y evitar
dañar sus discos, le recomendamos que reemplace la
aguja dentro de este límite de tiempo.
Usted podrá adquirir agujas de repuesto (CN-251) en
su proveedor Sony.
Para reemplazar la aguja
1 Desconecte la alimentación del giradiscos y del
amplificador.
2 Gire el collar de bloqueo y extraiga la cápsula del
brazo fonocaptor.
3 Sujete el portaagujas y tire de él hacia afuera del
cuerpo de la cápsula.
4 Inserte la nueva aguja empujándola dentro del
receptáculo de la cápsula.
Para limpiar sus discos, frótelos bien utilizando un
limpiador de discos de buena calidad.
Limpieza de los terminales del casco
portacápsula
Si nota la pérdida de la calidad del sonido, ruido
excesivo, o zumbido, es posible que esto se deba al mal
contacto producido por polvo o suciedad en los
contactos del casco portacápsula. Quite el casco
portacápsula del brazo fonocaptor, frote ligeramente
los terminales con un paño suave, y vuelva a instalar el
casco portacápsula en el brazo fonocaptor.
Terminales del
casco portacápsula
Limpieza de la caja y de la cubierta
guardapolvo
Limpie periódicamente la caja y la cubierta
guardapolvo utilizando un paño suave y seco. Si las
manchas son difíciles de eliminar, utilice un paño
ligeramente humedecido en una solución poco
concentrada de detergente. No utilice disolventes tales
como alcohol, bencina, ni diluidor de pintura, porque
podría dañar el acabado.
Reemplazo de la cápsula
Si cree que necesita reemplazar la cápsula, quite el
casco portacápsula del brazo fonocaptor y realice lo
indicado a continuación.
1 Quite los tornillos que sujetan la cápsula al casco
portacápsula.
2 Desconecte los cuadro conductores de la cápsula
tirando de ellos con unos alicates pequeños (etc.).
De esta forma, la cápsula habrá quedado
completamente desmontada del casco
portacápsula.
3 Compruebe la ubicación y la polaridad de cada
terminal de la nueva cápsula, y conecte
adecuadamente los conductores.
A continuación se indica la polaridad de los
terminales de los conductores del casco
portacápsula accesorio.
Rojo: Canal derecho
Blanco: Canal izquierdo
Verde: Masa del canal derecho
Azul: Masa del canal izquierdo
Tenga cuidado de no cambiar las polaridades.
E
7
Page 24

Información adicional
El plato no gira.
Solución de problemas
Antes de pasar a la lista de comprobaciones siguiente,
cerciórese de que:
• El cable de alimentación esté firmemente conectado.
Los cables de los altavoces estén firmemente conectados.
•
Si el problema persiste después de haber realizado
estas comprobaciones, consulte a su proveedor Sony.
El brazo fonocaptor salta, patina, o no avanza.
b El giradiscos no está nivelado. Colóquelo sobre una
superficie nivelada.
b
Fuerza de apoyo sobre el surco incorrecta. Siga las
instrucciones de la página 5 y ajuste la fuerza de apoyo
sobre el surco al valor apropiado para la cápsula que
esté utilizando. (La cápsula suministrada requiere 2,5
gramos de fuerza de apoyo sobre el surco.)
b Ajuste incorrecto de la compensación de la fuerza
centrípeta. Cerciórese de que el dial ANTI-SKATING
está ajustado al valor mostrado en el anillo de la
fuerza de apoye sobro el surco (consulte la página 5).
b El disco está sucio o rayado.
Límpielo con un juego de limpieza de discos
analógicos adquirido en un establecimiento del ramo,
o reemplace el disco.
Calidad de sonido deficiente, ruido excesivo, sonido
intermitente, etc...
b Compruebe el collar de bloqueo del brazo fonocaptor
para ver si el casco portacápsula está fijado con
seguridad al brazo fonocaptor (consulte la página 4).
b Cerciórese de que el conductor de puesta a tierra esté
conectado al terminal de puesta a tierra del
amplificador (consulte la página 4).
b Ajuste incorrecto de la compensación de la fuerza
centrípeta. Cerciórese de que el dial ANTI-SKATING
está ajustado al valor mostrado en el anillo de la
fuerza de apoyo sobre el surco (consulte la página 5).
b La aguja está sucia o gastada. Elimine el polvo de la
aguja utilizando un cepillo limpiador de agujas, o
reemplace la aguja gastada (consulte la página 7).
b El disco tiene polvo o está sucio. Limpie el disco
utilizando un limpiador de discos de buena calidad.
b
Compruebe si los conductores de la cápsula del interior
del casco portacápsula están firmemente conectados.
Se oye zumbido o aullido de baja frecuencia*.
b El giradiscos está colocado demasiado cerca de los
altavoces. Aléjelo de los altavoces.
El tempo es incorrecto.
b La velocidad del plato (rpm) es incorrecta. Ajústela
de acuerdo con la indicada en el disco. (Seleccione
“33” para discos de 33 1/3 rpm o “45” para discos de
45 rpm.)
b PITCH CONTROL no está en la posición central.
b Velocidad incorrecta del plato. Ajuste los controles
de la base del giradiscos observando los puntos
estroboscópicos hasta obtener la velocidad correcta
del plato (consulte la página 6).
La correa impulsora está deteriorada.
E
8
b Reemplácela. Para más detalles, póngase en cjntacto
con su proveedor Sony.
b Cerciórese de que el cable de alimentación esté
completamente insertado en la toma de la red de CA.
b la correa impulsora no está completamente colocada
alrededor de la polea del motor. Cerciórese de que
esté completamente colocada alrededor de la polea
(consulte la página 4).
La correa impulsora está rota.
b Reemplácela. Para más detalles, póngase en cjntacto
con su proveedor Sony.
El sonido es bajo o se oye distorsionado.
b El giradiscos no está conectado a las entradas
PHONO del amplificador (consulte la página 4).
*E
ste fenómeno, denominado “retroalimentación acústica”,
ocurre cuando las vibraciones de los altavoces se transmiten
a través del aire o de objetos sólidos (como estantes, un
armario, o el piso) al giradiscos, éste los capta con la aguja,
se amplifican, y se reproducen a través de los altavoces.
Especificaciones
Motor y plato
Sistema impulsor Por correa
Motor De CC
Plato 331 mm de diá., aleación de aluminio
Velocidades 33 1/3 y 45 rpm, 2 velocidades
Fluctuación y trémolo Inferiores al 0,1% (valor eficaz
Relación señal/ruido Más de 55 dB (DIN-B) con la cápsula
Brazo fonocaptor
Tipo Brazo tubular universal en forma de
Longitud efectiva del brazo
Proyección 15 mm
Peso utilizable de cápsula 3 g (mín.) a 8 g (máx.)
Generales
Alimentación Modelo para EE.UU.: 120 V CA, 60 Hz
Consumo 6W
Dimensiones Aprox. 450 x 160 x 360 mm (an/al/prf)
Masa 7 kg
Accesorios suministrados
Adaptador para 45 rpm (1)
Plato (con correa impulsora) (1)
Esterilla de caucho (1)
Cápsula con casco portacápsula (1)
Contrapeso (1)
Cubierta guardapolvo (1)
Adaptador de enchufe (excepto los modelos para EE.UU. y
Europa) (1)
El diseño y las especificaciones están sujetos a cambio sin previo
aviso.
presofundida
ponderado)
“S”
230 mm
Modelo para Europa: 220 - 240 V CA,
50/60 Hz
Modelo para otros países: 110 - 120/
220 - 240 V CA, 50/60 Hz
Page 25

Partes y contr oles
Información adicional
1 Adaptador para 45 rpm
2 Eje
3 Lámpara estroboscópica
4 Tecla de alimentación (POWER)
5 Teclas selectoras e indicadores de velocidad
6 Esterilla de caucho
7 Plato
8 Cápsula y casco portacápsula
9 Tecla de inicio/parada (START/STOP)
!º Aislador
1
2
3
!¡ Cubierta guardapolvo
!™ Bisagra
!£ Contrapeso
!¢ Dial de compensación de la fuerza centrípeta
(ANTI-SKATING)
!∞ Soporte del brazo
!§ Palanca de elevación/descenso del brazo
!¶ Brazo fonocaptor
!• Control de paso (PITCH CONTROL)
!ª Collar de bloqueo
@º Uña de elevación
!¡
!™
!£
4
5
6
7
8
9
!º
!¢
!∞
!§
!¶
!•
!ª
@º
E
9
Page 26

警告
注意事項
為防火災或觸電危險,請勿
讓機器受雨淋或置於潮濕
處。
有關安全事項
•在操作此裝置前請先檢查您的裝置的操
作電壓是否適用於室內電源
•如果有固體物或液體掉入或洒入機器
內,在繼續操作前拔掉插頭並請懂行者
查看。
•如果較長的時間不用時,將此裝置從牆
上的電源插座中拔下。拔出插頭,拆下
電源線,切勿直接拽拉電源線。
•如果此裝置接在牆上的電源插座中,則
不能切斷主交流電源,既使本裝置自身
關閉也不行。
•機身背部裝有標有操作電壓,功率消耗
等的產品名牌,
部件更換注意事項
•將本裝置放置在水平位置。
•為防止電器間的相互干擾和產生噪音,
請勿將其放置在家電(如電視、吹發器
或者熒光燈)附近。
•切勿將本裝置放置在揚聲器和門等有振
動的地方。
•切勿將本裝置直接放置在陽光下直射,
高溫和灰塵及濕度過大的地方。
有關重新包裝
保留包裝泡沫和包裝材料。他們將會提供
理想的運輸用包裝箱。
如果您有在此說明書中沒有說明的問題,
請與離您最近的索尼代理商聯系。
C
2
Page 27

歡迎光臨
歡迎您購買索尼立體聲唱機系統。在操作
此裝置前,請通讀此說明書並將其保存以
備后用。
協定
下列標示為說明書中使用標示:
顯示標示和指針以便快速完成工
作。
目錄
開始啟動
打開包裝 3
唱機的組裝 4
唱機的接線 4
唱機的調整 5
操作
播放唱片 6
附加說明
維修保養 7
故障排除 8
規格 8
部件和控制件 9
打開包裝
檢查您是否全部收到唱機的以下各項部件。
•托盤(備有驅動帶)(1)
•橡皮墊(1)
•防塵罩(帶挂鉤)(1)
•配重(1)
•夾架及觸頭(1)
•45轉/分的適配器
•插頭適配器(除美國和歐洲模式)(1)
C
C
3
Page 28

開始啟動
唱機的組裝
7 將防塵罩的掛鉤插入唱機后部掛鉤環中。
4
7
2
5
1
3
6
1 如果您的唱機裝有變壓器,一定將該變壓器電壓設
定在與主電源相同的電壓上。
2 輕輕地將托盤裝在轉動軸上。
3 使用帶子將電機的滑輪纏繞起來,纏繞后切勿忘記
取下帶子。
唱機的接線
將音響電纜和接地線接至唱機后部。
1 將紅色插頭的電纜插入擴音器的右邊的PHONO R插
孔,并將白色插頭的電纜插入左邊的PHONO L插
孔。
擴音器
PHONO
2 將接地線接至擴音器的接地端子。
4 將橡膠墊放置在托盤上。
5 將配重滑至轉軸后部,并且按箭頭方向轉動兩三
次。
6 將觸頭插入轉臂前部。按箭頭所指方向旋轉鎖定插
頭直至觸頭切實插入。
擴音器
注意
確實將接地線接地。否則將會導致唱機出現噪音。
接電源線
在所有事先連接完畢后,將主線接至牆上的交流電源插
座。
如果電源線插頭不適合牆上的電源插孔,可使用隨機所
帶的插頭適配器。
/ 至主電源插座
C
4
Page 29

唱機的調整
開始啟動
6 設定彈杆至較高位置,并返回唱片滑杆至滑杆支
架。
在播放唱片時,切實保証按下列步驟執行以確保唱片滑
杆平衡、接觸力量適當以及抗串動調整。如果不按照所
列步驟執行,則會導致音質間斷以及觸頭和唱片損壞。
1 確保唱機放置平穩。
隔離器的底架可以微調唱機的高度。
2 將ANTI-SKATING盤撥至“0”。
K
S
A
-
I
T
T
I
N
N
G
A
0
3
1
2
3 取消底座的保護罩,將唱片滑杆移至座架和唱機之
間。
小心不要損壞唱片唱針。
4 在使用手指提升以支撐頭罩,將彈杆設定在較低位
置。小心千萬不要損壞唱片唱針。
7 因為滑杆平衡時的滑力為零,所以設定滑力鈕以使
索引線對准“0”。
用另一支手抓住配重以使其不能與刻度盤同轉。
旋轉此鈕以使“0”線對准索
引線。
8 使用隨機所帶刻度盤旋轉將配重調至2.5讀數線對准
索引線。所供底盤需要2.5克的軌跡滑動力。
旋轉配重將讀數線對准2.5
克。
在使用備用拾音器的情況下。
順時針旋轉配重將軌跡滑動力調至正確值。軌跡滑動力刻
度表標為0.1克檔,每旋轉一整轉為3克的軌跡滑動力。
9 設定ANTI-SKATING撥盤至與軌跡滑動力一致的設
定值。
ANTI-SKATING盤的數碼相應于1克軌跡滑動力。
0
1
A
N
T
I
-
S
K
A
T
2
I
N
G
3
5 通過對配重進行順時針或逆時針的調整使唱片唱針
平衡。
在唱片唱針達到平衡狀態
在放松時,將平衡于唱機。
不應傾向套頭方向或配重方向。
C
5
Page 30

45
33
操作
播放唱片
1
2
3
1 將唱片放置在唱機托盤上。
6,7
6
3
6
4
5
停止播放
1 將標桿位置設定在較高位置以提升唱片滑桿,並將
唱片滑桿調至托架上,將保護罩套在托盤上以防觸
針的損坏。
2 按壓START/STOP(開始/停止)按扭。
唱機轉盤停止旋轉。
3 按電源關閉唱片轉盤。
放音暫停
在播放時,提起唱片滑桿,升起觸針停止唱片。
享听唱片的各個部分
1 在播放時,提起唱片滑桿,升起觸針停止唱片播
放。
2 將唱片滑桿放至調至您所需位置。
3 降低唱片桿位置。
播放17厘米唱片
將所提供的45轉/分的適配器裝在中軸上。用完后放回適
配器托盤。
注意
及時將唱片放置在唱機托盤上,如果兩個或兩個以上的唱
片放置在唱機托盤上,擺動觸頭會導致與唱片滑槽接觸不
良,影響放音質量。
2 按壓POWER(電源)開關旋轉唱機轉盤。其閃光燈
閃亮。
3 設定PITCH CONTROL(音調控制)按扭至中央位
置,並按33和45鍵選擇唱機旋轉速度。
4 按壓START/STOP(開始/停止)按扭。
唱機開始旋轉。
如果您在唱機接在50 Hz電源時選擇33轉/分,頻閃
圓點的最內行應成靜止狀態。
50 Hz
60 Hz
33
45
33
45
調整音質
您可通過間隔控制(PITCH CONTROL)對速度進行微
調。
向前滑動 "FAST"(快速)滑鈕增大托盤速度。
原始速度閃光點線向回退。
向 "SLOW"(慢速)方向滑動滑鈕降低大托盤速度。
閃光虛點標示退回速度降低。
是否在間隔控制 (PITCH CONTROL) 設定在中央
時,閃光虛線消失。
使用旋轉盤底部的唱機速度控制(33或45)調整唱機速
度,直至速度調整到出現相應的閃光線。
向前轉+增大唱機速度。
向前轉–降低唱機速度。
5 去掉唱機的保護蓋。
6 將標位尺撥至較高位置。並將唱片滑桿位置調至超
過唱片位置。
7 將唱片滑桿設定在較下的位置。
唱片滑桿將放慢唱片,並返傳重新開始播放。
8 調整放大器的音量。
C
6
Page 31

附加說明
維修保養
觸頭及唱片保養
為防止觸頭及唱片臟圬或磨損,觸頭及唱片應在播放前
進行清裡。
用高質觸頭清洗刷從后至前對觸頭進行清理。切勿用指
尖清理觸頭。在用液體觸頭清理劑清理時,切勿將觸頭
沾得過濕。
用高質唱片清洗器對唱片擦扶唱片表面。
更換觸頭
1 關閉唱機和擴音器。
2 旋轉鎖定插頭,取下觸頭。
3 抓住觸頭,將其從轉臂上拔下。
4 插入新的觸頭,將其推至轉臂插孔。
更換拾音器
需要更換拾音器時,先將觸頭卸下,并按下列步驟執
行。
1 擰下固定套頭和拾音器的螺絲。
2 用一把小鉗子拔出端子,卸下四條接線。
拾音器應全部從套頭上卸下。
清理唱頭端子
如果唱機的音響效果降低,過於吵雜或有交流聲,這有
可能是由於插頭端子上的臟物或灰塵導致接觸不良造成
的。將罩套從滑臂上取下,用軟布輕輕擦扶,並且重新
將頭套裝在滑臂上。
套頭端子
清理唱頭外殼和防塵蓋
用軟布定期清理唱頭外殼與防塵蓋。如有鏽圬難以清
除,則可用帶有柔和去圬劑的濕布擦試。切勿使用諸如
酒精、苯醇或者稀料,會導致表面的損坏。
更換觸頭
觸頭觸針壽命大約為500小時。為最大限度保証音質和避
免唱片損坏,我們建議周期性更換觸頭。
索尼公司代理店備有另售 (CN-251)更換件。
3 附屬裝置上的接線的輸出端子極性如下。
檢查新夾架的各個端子針的輸出端子極性和位置,
并與相應的接線連接。
紅色﹕ 左孔
白色﹕ 右孔
綠色﹕ 左孔接地
藍色﹕ 右孔接地
小心切勿混淆輸出端子的極性。
C
7
Page 32

附加說明
故障排除
在進行故障排除前需要檢查下列清單,首先確認﹕
•電源線是否起始連接好。
•揚聲器的接線是否連接好。
如果出現問題,請進行如下檢查,并與您最近的索尼代
理商進行聯系。
彈性臂發生跳躍,滑行或停止不前
b 唱機放置不平。將唱機放置在水平表面上。
b 滑動表面不平。根據第5頁的說明將使用的夾架的滑動
力值設定在適當位置(附有的夾架需要2.5克的滑動力)
b 錯誤的抗滑力調整。確認ANTI-SKATING盤的數值已設
定在滑動力標環的同樣數值上。(見第5頁)
b 唱片上有臟物和划傷
用商店賣的唱片清潔劑清洗,或者更換唱盤。
音質不良,噪音過大,間斷聲音等情況
b 檢查轉臂鎖定,確認套頭切實解除在轉臂上。(見第4頁)
b 確認接地線切實接在擴音器的接地端子(見第4頁)。
b 錯誤的滑動力。根據第5頁的說明將滑動力設定至正在
使用的夾架適當值。(所供夾架需要2.5克的滑動力)
b 觸頭臟污或磨損。用觸頭清洗刷去除觸頭上的臟物或者
更換已磨損的觸頭。(見第7頁)
b 灰塵和臟物積留在唱片表面上。使用高質觸頭清洗劑清
洗唱片。
b 檢查夾架中導線是否連接牢固
噪聲或者低頻和尖鳴聲*
b 唱機放置的地方距揚聲器過近。將揚聲器從唱機上拆
下。
暫停異常
b 轉數錯誤,將轉數設定在與唱片上標示的一個同樣數值
上。(選擇“33”用于33 1/3轉/分的唱片或者“45”用于
45轉/分的唱片)。
b PITCH CONTROL沒有設定在中央位置。
b 托盤速度異常。調整唱機底部的微調控制,察看閃光虛
線,使托盤速度正確。(見第6頁)。
傳動皮帶變質。
b 請更換傳動皮帶。詳請洽詢Sony銷售店。
托盤不轉。
b 確認電源接線是否插入交流電源插孔。
b 驅動帶沒有完全套在電機滑輪上。確認驅動帶已套在電
機滑輪上。(見第4頁)
傳動皮帶折斷。
b 請更換傳動皮帶。詳請洽詢Sony銷售店。
聲音過低或失真
b 唱機沒有連接在擴音器的PHONO 輸入端子(見第4頁)。
規格
電機和托盤
驅動系統 皮帶驅動
電機 直流電機
托盤 331 mm直徑 鑄模鋁合金
速度 33
低音和高音 低于0.1%(WRMS)
噪音信號比 大于55 dB(DIN-B)附有夾架
轉臂
型號萬向 “S”管形臂
有效臂長 230 mm
懸掛 15 mm
使用夾架重量 3克(最小)至8克(最大)
總括
電源要求 美國式﹕120 V AC, 60 Hz
電源消耗﹕ 6瓦
尺寸 大約 450×160×360 mm(寬×高×深)
毛重 7千克
輔助設備
45轉/分適配器(1)
托盤(備有驅動帶) (1)
橡皮墊(1)
夾架和套頭(1)
配重(1)
防塵罩(1)
插頭適配器(除美國和歐洲式以外) (1)
設計和規格以更改值為准,恕不另行通知。
1
/3 和45轉/分,2檔
歐洲式﹕220-240 V AC, 50/60 Hz
其它國家﹕110-120/220-240 V
交流,50/60 Hz
* 此種現象叫作“音響反饋”,發生在揚聲器的振動通過空氣
或物體(諸如罩、機體和地板)傳到正在用觸頭拾曲或者揚聲
器擴音和播放時的唱機。
C
8
Page 33

部件和控制件
附加說明
1 45轉/分適配器
2 驅動軸
3 閃光燈
4 電源按鈕
5 速度選擇按鈕和顯示器
6 橡膠墊
7 托盤
8 夾架和套頭
9 開始/停止按鈕
!º 隔離器
1
2
3
!¡ 防塵器
!™ 掛鉤
!£ 配重
!¢ ANTI-SKATING刻度盤
!∞ 轉臂托架
!§ 標示杆
!¶ 拾音器臂
!• PITCH CONTROL
!ª 鎖定器
@º 指升器
!¡
!™
!£
4
5
6
7
8
9
!º
!¢
!∞
!§
!¶
!•
!ª
@º
C
9
Page 34

Sony Corporation Printed in Korea
2
 Loading...