

Page 1
4-570-704-11 (1)
4K Memory Player
Operating Instructions
Before operating the unit, please read this manual thoroughly
and retain it for future reference.
PMW-PZ1
© 2015 Sony Corporation
Page 2

Table of Contents
Parts Identification............................................................. 3
Front..........................................................................................3
Rear ...........................................................................................4
Connection Examples......................................................... 5
Connection to a 4K Monitor .....................................................5
Connection to a 4K Projector....................................................5
Preparation .........................................................................6
Playable Formats.......................................................................6
SxS Memory Cards ...................................................................6
XQD Memory Cards.................................................................6
External Storage Devices ..........................................................6
Power Supply............................................................................7
Using the Unit for the First Time..............................................7
Playing Back Files ..............................................................8
Displaying the List Screen and Thumbnail Screen...................8
List Screen Display and Operations..........................................8
Thumbnail Screen Display and Operations ..............................8
File Playback Display and Operations......................................9
Mouse Operations...................................................................10
Copying Files .................................................................... 11
Copy Screen Display and Operations .....................................11
Menus ................................................................................12
Basic Menu Operations...........................................................12
Menu Items and Setting Values ..............................................12
Usage Precautions ............................................................ 13
Warning Messages............................................................13
Specifications .................................................................... 14
Appendix ........................................................................... 15
Recommended Media (XQD Memory Cards)........................15
Licenses ............................................................................. 16
MPEG-4 Visual Patent Portfolio License ...............................16
MPEG-2 Video Patent Portfolio License................................16
End User License Agreement (EULA) ...................................16
2
Page 3
Parts Identification
For details on each function and how to use them, see the pages in the parentheses.
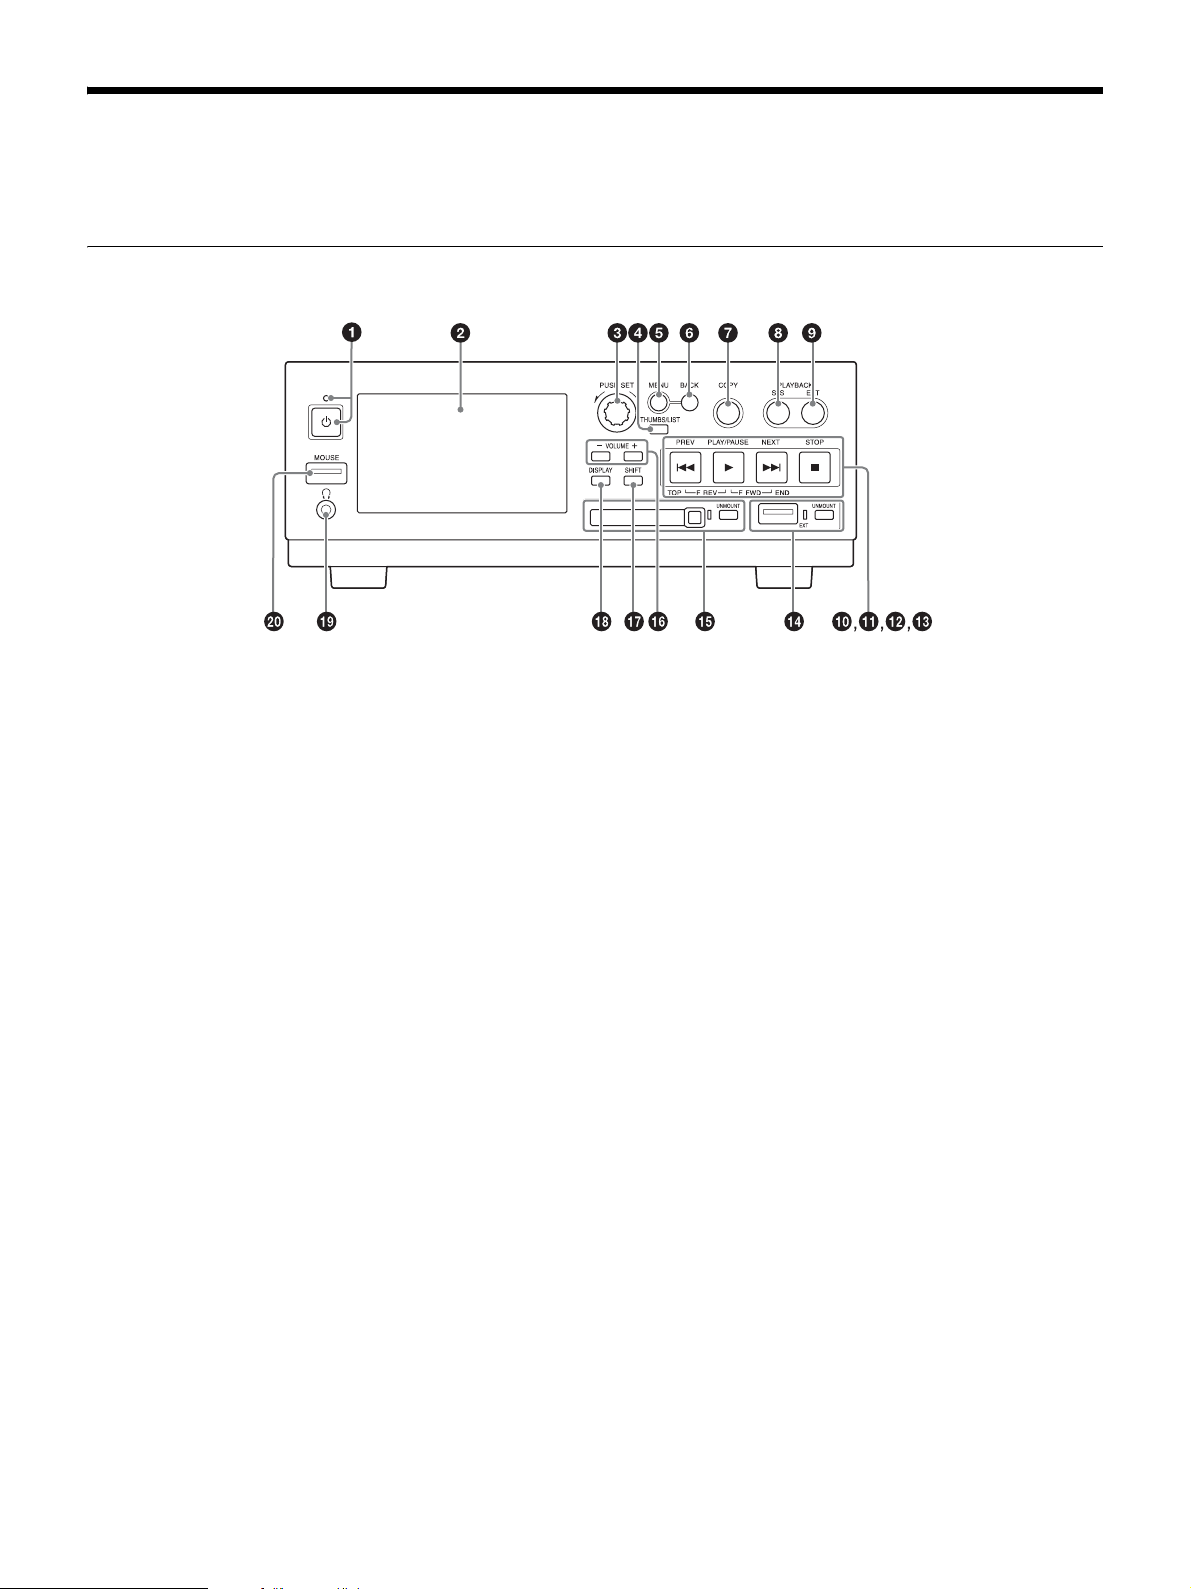
Front
a Power button and indicator (page 7)
b LCD display
List screen (page 8)
Thumbnail screen (page 8)
File playback screen (page 9)
Copy screen (page 11)
Menu screen (page 12)
c PUSH SET dial
Use this to select files and menu items. General operation consists
of turning the dial left or right and pressing it to confirm selections.
d THUMBS/LIST button
Switch between displaying the list screen or thumbnail screen in the
display.
e MENU button
Switch between displaying the menu screen or list/thumbnail screen
in the display.
f BACK button
Return to the previous screen in the display. When pressed in the list
screen or thumbnail screen, this returns to the previous (higher)
level.
g COPY button (page 11)
Switch to the copy screen in the display. When pressed in the copy
screen, this displays the list screen or thumbnail screen.
h PLAYBACK SxS button
Access the SxS memory card, and display the file list.
i PLAYBACK EXT button
Access the external storage device, and display the file list.
j PREV button / k PLAY/PAUSE button /
l NEXT button / m STOP button
List/thumbnail screen operations (page 8)
File playback operations (page 9)
n EXT (external storage) connector (USB3.0) and
UNMOUNT button and indicator (page 6)
o SxS memory card slot and UNMOUNT button and indicator
(page 6)
p VOLUME (–/+) buttons
Adjust the volume for the audio output from the front panel
headphones jack.
q SHIFT button
Use this to perform various operations during file playback (page 9).
r DISPLAY button
Superimpose text information (file names, playback status, etc.) on
the LCD display during file playback.
By configuring menu settings, you can also superimpose text
information on the displays of monitors or projectors connected to
the rear panel connectors (3G/HD SDI MONITOR OUT, 4K/HD
OUT) (page 12).
s Headphones jack (stereo mini jack)
Use this to monitor audio during +1 speed playback. Audio is muted
during all other playback situations.
For details on storage device transmission speed, see page 7.
t MOUSE connector (USB2.0)
Connect a USB mouse (page 10).
3
Page 4
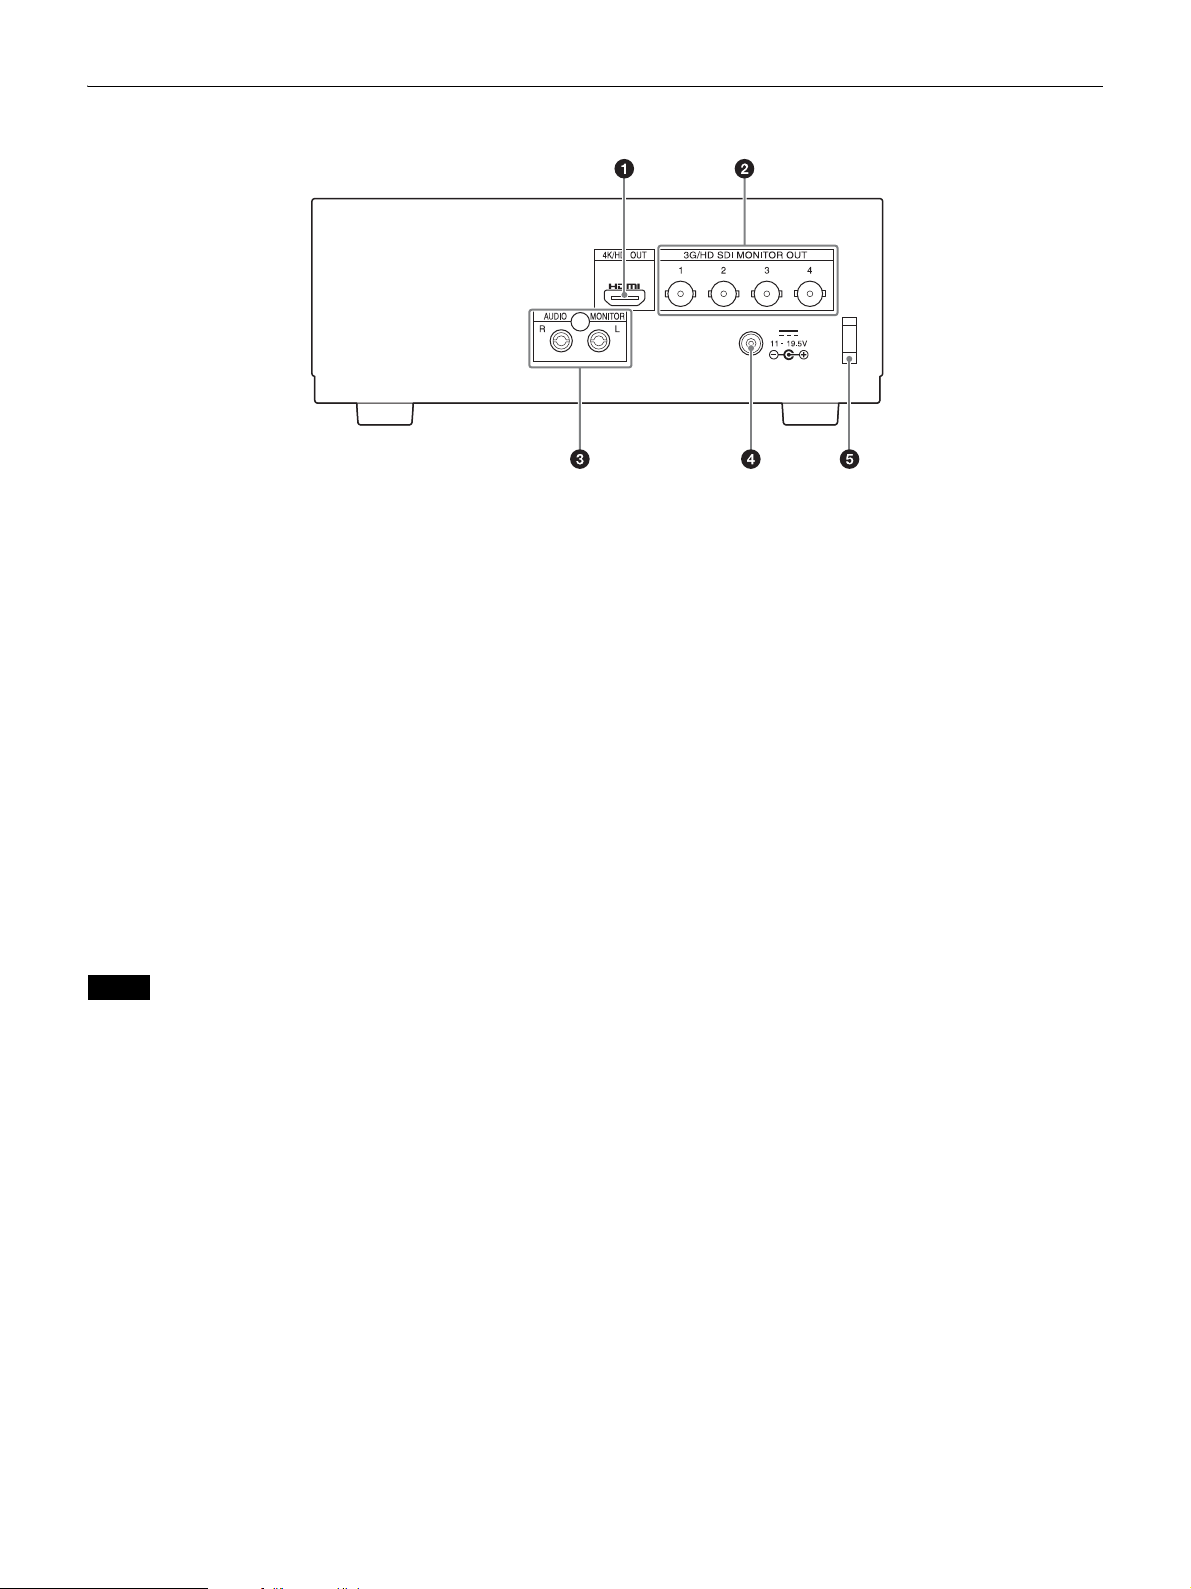
Rear
a 4K/HD OUT connector (HDMI 19-pin)
Output video and audio being played back on the unit to a 4K
monitor or other HDMI device. When not playing back a file, a
screen identical to that of the unit’s LCD display will be output.
For details on storage device transmission speed, see page 7.
b 3G/HD SDI MONITOR OUT connectors 1 to 4 (BNC type)
Output video and audio played back on the unit to a 4K monitor or
other SDI device.
3G-SDI and HD SDI signals are supported.
When not playing back a file, a screen identical to that of the unit’s
LCD display will be output.
For details on storage device transmission speed, see page 7.
c AUDIO MONITOR connector (phono jack)
Output the audio being played back on the unit.
For details on storage device transmission speed, see page 7.
d DC power input connector (EIAJ compliant)
Connect to an AC power supply via the supplied AC adapter or the
AC-DN10 (not supplied) (page 7).
Note
When disconnecting the AC adapter, be sure to press the power button to turn
off the unit (page 7) and wait for the indicator to light red beforehand.
e Cable clamp
Use this to secure the supplied cable.
4
Page 5
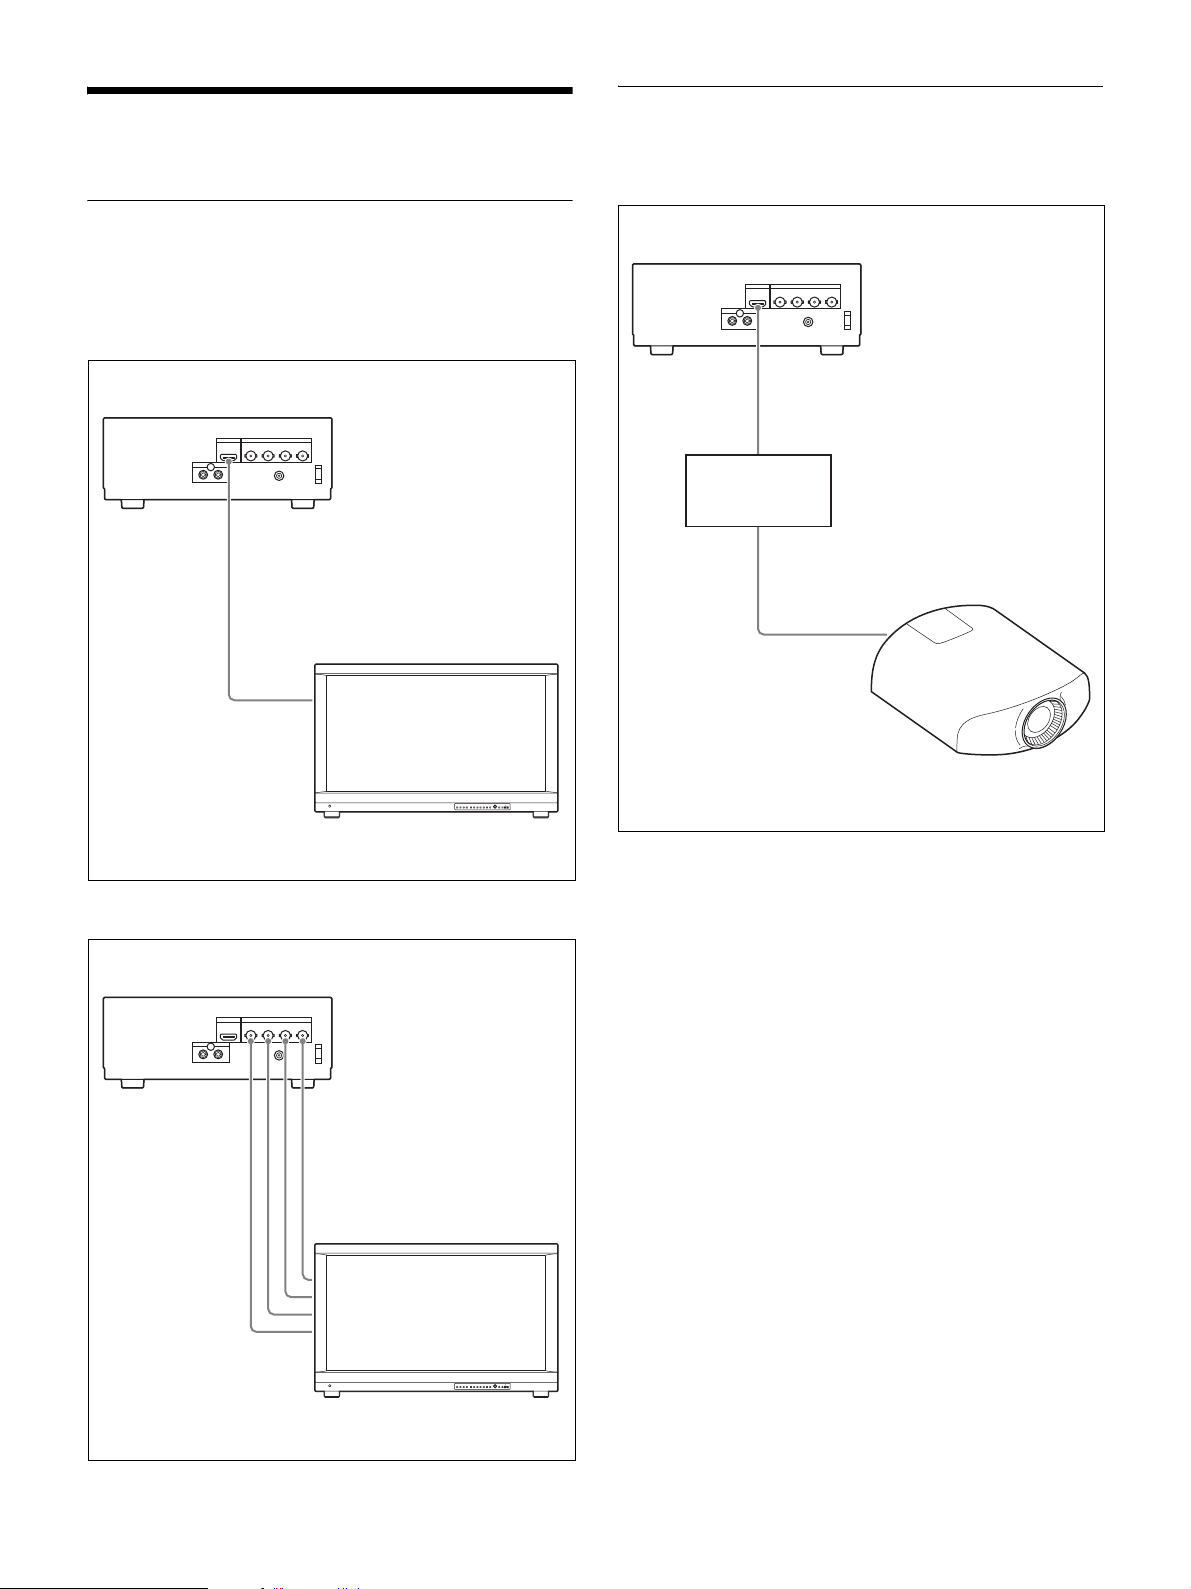
Connection Examples
Connection to a 4K Projector
For details on the projector, refer to the operating instructions for
the projector.
Connection to a 4K Monitor
For details on the monitor, refer to the operating instructions for the
monitor.
HDMI connection
PMW-PZ1 (rear)
4K/HD OUT
HDMI cable
HDMI input
PMW-PZ1 (rear)
4K/HD OUT
HDMI cable
HDMI input
Audio amp +
speakers
HDMI input
HDMI cable
VPL-VW1100ES
Video Projector
SDI connection
PMW-PZ1 (rear)
BNC cable
Professional Video Monitor
PVM-X300
3G/HD SDI MONITOR OUT
SDI input
Professional Video Monitor
PVM-X300
5
Page 6

Inserting/ejecting SxS memory cards
Preparation
Playable Formats
The unit can play back files that conform to the following file
systems and recording formats.
File systems
• SxS memory cards, XQD memory cards1): exFAT
• External storage devices: exFAT, NTFS
1) When using a QDA-EX1 XQD ExpressCard adapter.
Recording formats
• XAVC Intra 4096 × 2160: 23.98P/25P/29.97P/50P/59.94P
• XAVC Intra 3840 × 2160: 23.98P/25P/29.97P/50P/59.94P
• XAVC Long 3840 × 2160: 23.98P/25P/29.97P/50P/59.94P
• XAVC Intra 1920 × 1080: 23.98P/25P/29.97P/50P/59.94P
• XAVC Long 1920 × 1080: 23.98P/25P/29.97P/50P/59.94P
(Recording rate of up to 600 Mbps)
Note
Be sure to insert the XQD Express Card adapter in the proper orientation.
Inserting it in an improper orientation may damage the card slot.
SxS Memory Cards
Use the following Sony SxS memory cards. Operation is not
guaranteed for other memory cards.
•SxS PRO+
SBP-128B, SBP-64B: XAVC 4K (4096 × 2160,
3840 × 2160), XAVC HD (1920 × 1080)
•SxS PRO
SBP-64A, SBP-32: XAVC HD (1920 × 1080)
These cards comply with the ExpressCard standard.
You can also use XQD cards by using an adapter (not supplied).
For details and precautions on using SxS memory cards, refer to the
operating instructions for the SxS memory card.
Inserting SxS memory cards
Eject leverSxS memory card
Mount indicator
UNMOUNT button
Be sure to insert SxS memory cards in the proper orientation and
direction. When an SxS memory card is inserted and the unit
recognizes it properly, the mount indicator lights.
Ejecting SxS memory cards
1 Press the UNMOUNT button to the right of the SxS
memory card slot.
The mount indicator blinks while the unmount procedure is
processing.
2 Verify that the mount indicator has turned off, and then
press the SxS memory card slot’s eject lever to eject the
card.
Notes
• If you eject an SxS card while the mount indicator is lit, the data on the
card may be damaged. Do not eject the card while it is being accessed
(e.g., when copying is in progress).
• Formatting or error recovery for SxS memory cards cannot be performed
on the unit.
XQD Memory Cards
You can use the unit to play back files stored on the following XQD
memory cards by using a QDA-EX1 XQD ExpressCard adapter (not
supplied).
• XQD G/XQD S (EB Stream)
• XQD N
For details on recording formats and recommended media, see
“Recommended Media (XQD Memory Cards)” (page 15).
Note
Be sure to insert the XQD Express Card adapter in the proper orientation.
Inserting it in an improper orientation may damage the card slot.
External Storage Devices
File playback
You can connect a USB drive, SSD/HDD, or other external storage
device, and play back files stored on the device. (Transmission
speeds depend on the external storage device.)
Notes
• If the mount indicator does not light even when a device is connected, try
reconnecting the device.
6
Page 7

• If an external storage device was previously connected to and operated on
the unit and you want to connect the device to other equipment, be sure to
verify the file system of the equipment beforehand.
Bulk copying files
You can bulk copy files from the SxS memory card to the external
storage device.
Note
Normal accessing cannot be performed in the following cases.
• When multiple external storage devices are connected via a USB hub
• When multiple partitions exist on the external storage device
• When a folder or file name includes double-byte characters or certain
symbols
Turning the unit on
Press the power button while the power button indicator is lit
red.
The indicator lights green, and the unit starts up. (The startup
procedure takes about 2 minutes.)
When startup is complete, the list screen (page 8) or thumbnail
screen (page 8) appears.
Turning the unit off
1 Pause file playback, and press the UNMOUNT button on
the front panel of the unit.
Safely removing external storage devices
Press the UNMOUNT button to the right of the EXT connector,
verify that the mount indicator has turned off, and then remove the
external storage device.
Notes
• If you eject an external storage device while the mount indicator is lit, the
data on the device may be damaged. Do not eject the device while it is
being accessed (e.g., when copying is in progress).
• Formatting or error recovery for external storage devices cannot be
performed on the unit.
• If the transmission speed of the external storage device is slow, playback
may not be smooth.
• External storage devices that are bus-powered and have a current
consumption 900 mA may not operate properly.
Power Supply
Connecting the power supply
Using the supplied AC adapter
DC power input connector
2 Press and hold the power button for at least 1 second, and
release it when the power indicator starts blinking green.
When the unit turns off, the power indicator lights red.
Note
A forced shutdown occurs when you press and hold the power button for
approx. 5 seconds. As this may negatively affect the unit’s internal SSD, do
not perform this unless necessary.
Using the Unit for the First Time
When using the unit for the first time, configure the following menu
items (page 12).
• TIME ZONE
• LOCAL DATE
• LOCAL TIME
PMW-PZ1 (rear)
AC adapter
(supplied)
Using the AC-DN10 (not supplied)
DC power input connector
AC-DN10
(not supplied)
PMW-PZ1 (rear)
XLR 4-pin DC power
adapter cable (supplied)
AC power cable
(not supplied)
to AC power
outlet
to AC power
outlet
7
Page 8

Playing Back Files
Displaying the List Screen and Thumbnail Screen
THUMBS/LIST button
Press the THUMBS/LIST button to display the list screen or
thumbnail screen.
List Screen Display and Operations
List screen display
The above is an example of an SxS memory card’s list. [EXT] is
displayed in a for an external storage device, but you can refer to
the following for the other items.
a Drive selected for playback (SxS or EXT)
h Folder path
Displays the folder currently being displayed and the folder above it.
i File list
Displays the file name, recording format, data size, file length, date,
etc. of each file. Files that cannot be played back by the unit will be
indicated by an icon on their thumbnails.
j Information on current file
Displays information on the currently selected file. (File name, file
length, file number/total number of files, recording format, date,
etc.)
List screen operations
Function Operation
Selecting a file Turn the PUSH SET dial. When a folder is
Playing back a selected
file
Opening the selected file
in a paused state
Displaying the previous
(higher) level in the
directory
Switching to the
thumbnail screen
Switching to the menu
screen
Accessing the SxS
memory card
Accessing the external
storage device
Switching to the copy
screen
Displaying file
information
selected, press the dial to display the next
(lower) level in the directory. You can also
press the PREV and NEXT buttons.
• When you press the PREV button while
holding the SHIFT button, the first file of
the current folder will be selected.
• When you press the NEXT button while
holding the SHIFT button, the last file of
the current folder will be selected.
Press the PLAY/PAUSE button.
Press the PUSH SET dial.
Press the BACK button.
Press the THUMBS/LIST button.
Press the MENU button (page 12).
Press the PLAYBACK SxS button.
Press the PLAYBACK EXT button.
Press the COPY button (page 11).
Turn the PUSH SET dial while holding the
SHIFT button. (Scroll horizontally.)
b Volume label
c Storage capacity (remaining/total)
d File loading status
This may appear when the file list screen is displayed. Playback
cannot be started while files are being loaded.
e Playback mode icon
Indicates the status of the [PLAY MODE] menu item setting as an
icon. This does not appear when the playback mode is [Single Clip
Normal].
f Warning indicator (page 13)
g Power supply voltage indicator
This appears when the power supply voltage is less than 18.0 V. A
warning indicator will also appear if the voltage drops below the
value configured in the [DC IN VOLTAGE ALARM] menu item.
Thumbnail Screen Display and Operations
Thumbnail screen display
When you press the THUMBS/LIST button in the list screen, the file
list is displayed as thumbnails as follows.
8
Page 9

File name Unplayable file
Thumbnail screen operations
Function Operation
Selecting a file Turn the PUSH SET dial. When a folder is
Playing back a selected
file
Opening the selected file
in a paused state
Displaying the previous
(higher) level in the
directory
Switching to the list
screen
Switching to the menu
screen
Accessing the SxS
memory card
Accessing the external
storage device
Switching to the copy
screen
selected, press the dial to display the next
(lower) level in the directory. You can also
press the PREV and NEXT buttons.
• When you press the PREV button while
holding the SHIFT button, the first file of
the current folder will be selected.
• When you press the NEXT button while
holding the SHIFT button, the last file of
the current folder will be selected.
Press the PLAY/PAUSE button.
Press the PUSH SET dial.
Press the BACK button.
Press the THUMBS/LIST button.
Press the MENU button (page 12).
Press the PLAYBACK SxS button.
Press the PLAYBACK EXT button.
Press the COPY button (page 11).
File Playback Display and Operations
File playback display
During file playback, the video is displayed on the unit’s LCD
display and the monitor connected to the unit.
When you press the DISPLAY button on the front panel, the
following text information is superimposed on the display.
a File name
b Playback timecode
c Playback status (PLAY/PAUSE/F.FWD/F.REV)
d Power supply voltage
This appears when the power supply voltage is less than 18.0 V.
File playback operations
Function Operation
Playing/pausing Press the PLAY/PAUSE button.
Fast forwarding (F.FWD)
(×2 t ×4 t ×8 t ×16
t ×32 t ×64 t ×128)
Fast rewinding (F.REV)
(×2 t ×4 t ×8 t ×16
t ×32 t ×64 t ×128)
Moving to the last frame
of the file currently being
played back
Moving to the starting
frame of the file currently
being played back
Playing the file currently
being played back from
the beginning
Playing from the
beginning of the previous
file in the list
Playing from the
beginning of the next file
in the list
Stopping playback and
returning to the previous
screen
Press the NEXT button while holding the
PLAY/PAUSE button. The playback speed
changes with each press.
Press the PREV button while holding the
PLAY/PAUSE button. The rewind speed
changes with each press.
Press the NEXT button while holding the
SHIFT button. (During continuous playback,
you will move to the last frame of the last
file.)
Press the PREV button while holding the
SHIFT button. (During continuous playback,
you will move to the starting frame of the first
file.)
Press the PREV button. (If pressed within 1
sec. of the start point, the previous file will be
played back.)
Press the PREV button within 1 sec. of the
current file’s start point.
The first file in the list will always be played
back from its start point.
Press the NEXT button.
For the last file in the list, this moves to the
last frame of the file.
Press the STOP button.
Notes
• The visual appearance of fast forward and fast rewind operations depends
on the file format.
• Audio that has been set to non-audio will be muted.
9
Page 10

• Lists are created in the XDROOT folder based on the metadata stored in
the folder.
In other folders, lists are created as each file is loaded. Therefore,
depending on the number of files, list display may take longer.
Mouse Operations
You can operate the unit using a mouse connected to the MOUSE
connector on the front panel.
If the mouse is not recognized, try reconnecting it.
Displaying the mouse operation items
When you click a drive type (SxS or EXT) in the list screen or
thumbnail screen, the following items appear.
Mouse operation items
Function Mouse operation
Moving to the end of the current file Right-click and drag down.
Stopping playback and returning to
the file list screen
Double-click.
You can perform the following operations by selecting the items.
However, operations cannot be performed while copying is in
progress.
• Switching the selected drive (SxS/EXT)
• Switching between the list screen and thumbnail screen
• Displaying the copy screen
• Displaying the menu screen
• Safely removing SxS memory cards
• Safely removing external storage devices
File playback operations
Function Mouse operation
Starting playback Double-click a file in the list screen
Playing/pausing Click (during fast forward/fast
Fast forwarding (×2 t ×4 t ×8
t ×16 t ×32 t ×64 t ×128)
Fast rewinding (×2 t ×4 t ×8 t
×16 t ×32 t ×64 t ×128)
Moving to the beginning of the next
file
Moving to the beginning of the
previous file
Moving to the beginning of the
current file
or thumbnail screen.
rewind, this pauses playback, while
clicking again returns playback to
×1 speed).
Playback switches between play
and pause with each press.
Click and drag to the right during
playback. The playback speed
changes with each press.
Click and drag to the left during
playback. The rewind speed
changes with each press.
Right-click and drag to the right.
Right-click and drag to the left.
Right-click and drag up.
10
Page 11

Copying Files
Copy Screen Display and Operations
You can bulk copy files from the SxS memory card to the external
storage device.
When you perform copying, a folder is created in the root of the
external storage device, and all of the data stored on the SxS memory
card will be copied to that folder.
Displaying the copy screen
When you connect the copy source (SxS memory card) and copy
destination (external storage device) devices and press the COPY
button, the following screen appears.
ab
Canceling the copying operation
To cancel while copying is in progress, turn the PUSH SET dial to
select [Cancel], and press the dial.
Then select [OK] to cancel copying.
Note
When you cancel copying, the files and folders copied up to that point will
remain on the external storage device.
a Copy source SxS memory card information
b Copy destination external storage device information
Copy operations
1 Turn the PUSH SET dial to select [Copy].
2 Press the dial.
Copying starts, and the following screen appears.
Notes
• A log is created in the copy destination folder.
• If the file system of the external storage device differs from that of the SxS
memory card, the copy operation may not complete properly.
• The size displayed before copying starts is a simple estimate. If the storage
capacity proves insufficient after copying starts, the copy operation may
be canceled.
• Be especially careful of power or cable disconnections during copy
operations. If a power or cable disconnection occurs while copying is in
progress, you may need to perform a recovery of the external storage
device. In such cases, connect the device to a computer, and perform the
recovery operation on the computer.
11
Page 12

Menus
Basic Menu Operations
When you press the MENU button, the following menu screen
appears.
1 Turn the PUSH SET dial to select a menu item, and press
the dial to confirm.
Setting values appear.
2 Turn the PUSH SET dial to select a setting value, and press
the dial to confirm. Then select [OK] or [Cancel],
depending on the item.
To return to the previous screen without configuring the setting,
press the BACK button.
Menu Items and Setting Values
(Bold and underlined values indicate defaults.)
Item Description Setting values
PLAY MODE Continuous playback
mode used during
playback
SORT TYPE File sorting method Name
Single Clip Normal
single file, and stop at the last frame
when playback ends.
Single Clip Repeat: Repeat
playback of a single file.
All Clip Normal: Continuously
play back all files in the folder.
All Clip Repeat: Repeat
continuous playback of all files in
the folder.
Duration: File length
Date Created: Creation date
(year, month, day)
Format: Format
Resolution: Resolution
Frame Rate: Frame rate
Type: File type
Size: File size
Date Modified: Modification date
Start TC: Timecode of the
beginning of the file
: File name
: Play back a
Item Description Setting values
SORT ORDER File sorting sequence Ascending: Ascending order
Descending: Descending order
DISPLAY
CHARACTER
CHARACTER
TYPE
CHARACTER
SDI/HDMI
OUT
PHONE
VOLUME
AUDIO
MONITOR
SELECT
SDI MODE Selection of Level A
COPY VERIFY Verify function for
LCD
BRIGHTNESS
WARNING
MESSAGE
ALL RESET Restoring default
TIME ZONE Difference from
LOCAL DATE Year, month, day Year, Month, Day
LOCAL TIME Hour, minute, second Hour, Minute, Second
DC IN
VOLTAGE
ALARM
VERSION Model name / serial
Perform operation
identical to that of
DISPLAY button
Background color of
text display area
Whether to
superimpose
DISPLAY button
text information on
SDI/HDMI outputs
Volume for
headphones audio
output
Channel for
headphones audio
output
or Level B for the 3G
data mapping type
copying operations
LCD brightness
adjustment
Displaying warning
messages in progress
menu setting values
(excluding TIME
ZONE, LOCAL
DATE, LOCAL
TIME)
UTC
Value at which low
voltage warnings are
started
number, software
version, hardware
version display
: Disable
Off
On: Enable
with Background Outline: Black
with Translucent Background
Semi-transparent
outline: White letters with black
outlines
without Background: No
background
: Do not display on SDI/
Off
HDMI
SDI: Display on SDI
HDMI: Display on HDMI
SDI/HDMI: Display on both
SDI/HDMI
to 99
0
to CH6 (MIX supported)
L: CH1
to CH6 (MIX supported)
R: CH2
3G Level A (1.5G is output for
1.5G only formats.)
3G Level B
1.5G only formats.)
Disable: Disable
Enable
1 to 8
–
OK: Execute
Cancel
00:00 UTC
–12:00 to +13:00
Preset date and time
Preset date and time
11.0 to 11.9
increments)
–
(1.5G is output for
: Enable
to 15
: Cancel
to 15.0 V (0.1 V
:
12
Page 13

Usage Precautions
Warning Messages
If the unit is suddenly taken from a cold to a warm location, or if
ambient temperature suddenly rises, moisture may form on the outer
surface of the unit and/or inside of the unit. This is known as
condensation. If condensation occurs, turn off the unit and wait until
the condensation clears before operating the unit. Operating the unit
while condensation is present may damage the unit.
The LCD panel fitted to this unit is manufactured with high
precision technology, giving a functioning pixel ratio of at least
99.99%. Thus a very small proportion of pixels may be “stuck”,
either always off (black), always on (red, green, or blue), or flashing.
In addition, over a long period of use, because of the physical
characteristics of the liquid crystal display, such “stuck” pixels may
appear spontaneously. These problems are not a malfunction.
The fan and battery are consumable parts that will need periodic
replacement.
When operating at room temperature, a normal replacement cycle
will be about 5 years.
However, this replacement cycle represents only a general guideline
and does not imply that the life expectancy of these parts is
guaranteed. For details on parts replacement, contact your dealer.
The life expectancy of the AC adapter and the electrolytic capacitor
is about 5 years under normal operating temperatures and normal
usage (8 hours per day; 25 days per month). If usage exceeds the
above normal usage frequency, the life expectancy may be reduced
correspondingly.
If the warning indicator appears on the screen, select the
[WARNING MESSAGE] menu item to display the warning
message.
Warning message Description Solution
LOW VOLTAGE A voltage lower than the
BACKUP BATTRY
LOW
FAN STOPPED The internal fan has
UNDERFLOW Data readout of the
value configured in the
DC LOW VOLTAGE
ALARM menu item has
been detected.
The CMOS backup
battery voltage is low.
stopped.
playback file was too
slow.
Check the power supply
voltage.
Request battery
replacement from a Sony
service representative
(fees apply).
Replace the fan.
Use a storage device
with a faster transfer
speed.
13
Page 14

Specifications
General
Power supply
11 V to 19.5 V
Power consumption
Approx. 30 W (during 4K XAVC Intra 60P playback)
Approx. 35 W (during copy from SxS memory card to external
storage device)
Operating temperature
5°C to 40°C (41°F to 104°F)
Storage temperature
–20°C to +55°C (–4°F to +131°F)
Dimensions (WHD) (approx. values)
212 × 84 × 200 mm (8
Mass
Approx. 2.3 kg (5 lb. 1.1 oz.)
File systems
SxS, XQD: exFAT
External storage devices: exFAT, NTFS
Playback formats (video)
XAVC Intra 4096 × 2160: 23.98P/25P/29.97P/50P/59.94P
XAVC Intra 3840 × 2160: 23.98P/25P/29.97P/50P/59.94P
XAVC Long 3840 × 2160: 23.98P/25P/29.97P/50P/59.94P
XAVC Intra 1920 × 1080: 23.98P/25P/29.97P/50P/59.94P
XAVC Long 1920 × 1080: 23.98P/25P/29.97P/50P/59.94P
Playback formats (audio)
Linear PCM 24 bits, 48 kHz
4 channels / up to 6 channels
Media drive
Media type: SxS Memory Card (ExpressCard/34) slot (1)
Inputs/outputs
3G/HD-SDI Monitor output
BNC (4), 3G-SDI/HD-SDI, 4K/QFHD: 2-sample interleave
output, SMPTE 424/425 Level A/B, SMPTE 292M standards
HDMI/4K/HD output
Type A 19-pin (1), output up to 4K 60P 4:2:0 8-bit
Analog audio output
Phono jack (L, R) –11 dBu (reference level)
Headphones output
Stereo mini jack (1)
Mouse connector
Supports Microsoft USB Basic Optical Mouse (1)
External storage connector
Supports Sony USM128GQX USB 3.0 flash drives (1)
DC input
DC jack, 11 V to 19.5 V
3
/8 × 3 3/8 × 7 7/8 in.)
Supplied accessories
AC adapter (19.5 V (excluding AC cable))
XLR 4-pin - DC power adapter cable
Before Using this Unit (1)
Operating Instructions (CD-ROM) (1)
Optional accessories
AC-DN10 AC adapte r
QDA-EX1 XQD ExpressCard adapter
Design and specifications are subject to change without notice.
Notes
• Always verify that the unit is operating properly before use.
SONY WILL NOT BE LIABLE FOR DAMAGES OF ANY
KIND INCLUDING, BUT NOT LIMITED TO,
COMPENSATION OR REIMBURSEMENT ON ACCOUNT
OF THE LOSS OF PRESENT OR PROSPECTIVE PROFITS
DUE TO FAILURE OF THIS UNIT, EITHER DURING THE
WARRANTY PERIOD OR AFTER EXPIRATION OF THE
WARRANTY, OR FOR ANY OTHER REASON
WHATSOEVER.
• SONY WILL NOT BE LIABLE FOR CLAIMS OF ANY
KIND MADE BY USERS OF THIS UNIT OR MADE BY
THIRD PARTIES.
• SONY WILL NOT BE LIABLE FOR THE TERMINATION
OR DISCONTINUATION OF ANY SERVICES RELATED
TO THIS UNIT THAT MAY RESULT DUE TO
CIRCUMSTANCES OF ANY KIND.
• SxS and SxS PRO are registered trademarks of Sony Corporation.
• The terms HDMI and HDMI High-Definition Multimedia Interface, and
the HDMI Logo are trademarks or registered trademarks of HDMI
Licensing LLC in the United States and other countries.
• The ExpressCard word mark and logos are owned by the Personal
Computer Memory Card International Association (PCMCIA) and any
use of such marks by Sony Corporation is under license. Other trademarks
and trade names are those of their respective owners.
The products or system names appearing in this document are trademarks or
registered trademarks of their respective owners.
Miscellaneous functions
Display
3.5-inch color LCD monitor: 960 (H) × 3 (RGB) × 540 (V), 16:9
14
Page 15

Appendix
Recommended Media (XQD Memory Cards)
Yes: Recommended media
No: Normal operation not guaranteed
Format XQD G
XQD S
(EB Stream)
32/64/128 GB 32/64 GB 16/32/64 GB
XAVC-I 4096×2160 59.94P Yes No No
50P Yes No No
29.97P Yes No No
25P Yes No No
23.98P Yes No No
3840×2160 59.94P Yes No No
50P Yes No No
29.97P Yes No No
25P Yes No No
23.98P Yes No No
1920×1080 59.94P Yes No No
50P Yes No No
29.97P Yes Yes No
25P Yes Yes No
23.98P Yes Yes No
XAVC-L 3840×2160 59.94P Yes Yes No
50P Yes Yes No
29.97P Yes Yes No
25P Yes Yes No
23.98P Yes Yes No
1920×1080 59.94P Yes Yes Yes
50P Yes Yes Yes
29.97P Yes Yes Yes
25P Yes Yes Yes
23.98P Yes Yes Yes
XQD N Discontinued
XQD H
XQD S
(non EB
Stream)
15
Page 16

Licenses
MPEG-4 Visual Patent Portfolio License
THIS PRODUCT IS LICENSED UNDER THE
MPEG-4 VISUAL PATENT PORTFOLIO LICENSE FOR THE
PERSONAL AND NON-COMMERCIAL USE OF A
CONSUMER FOR
(i) ENCODING VIDEO IN COMPLIANCE WITH THE MPEG-4
VISUAL STANDARD (“MPEG-4 VIDEO”)
AND/OR
(ii) DECODING MPEG-4 VIDEO THAT WAS ENCODED BY A
CONSUMER ENGAGED IN A PERSONAL AND NONCOMMERCIAL ACTIVITY AND/OR WAS OBTAINED FROM
A VIDEO PROVIDER LICENSED BY MPEG LA TO PROVIDE
MPEG-4 VIDEO.
MPEG-2 Video Patent Portfolio License
ANY USE OF THIS PRODUCT OTHER THAN CONSUMER
PERSONAL USE IN ANY MANNER THAT COMPLIES WITH
THE MPEG-2 STANDARD FOR ENCODING VIDEO
INFORMATION FOR PACKAGED MEDIA IS EXPRESSLY
PROHIBITED WITHOUT A LICENSE UNDER APPLICABLE
PATENTS IN THE MPEG-2 PATENT PORTFOLIO, WHICH
LICENSE IS AVAILABLE FROM MPEG LA, L.L.C., 250
STEELE STREET, SUITE 300, DENVER, COLORADO 80206.
“PACKAGED MEDIA” means any storage media storing MPEG-2
video information such as DVD movie which are sold/distributed to
general consumers. Disc replicators or sellers of the PACKAGED
MEDIA need to obtain licenses for their own business from MPEG
LA. Please contact MPEG LA for any further information. MPEG
LA, L.L.C., 250 STEELE STREET, SUITE 300, DENVER,
COLORADO 80206
http://www.mpegla.com
NO LICENSE IS GRANTED OR SHALL BE IMPLIED FOR ANY
OTHER USE. ADDITIONAL INFORMATION INCLUDING
THAT RELATING TO PROMOTIONAL, INTERNAL AND
COMMERCIAL USES AND LICENSING MAY BE OBTAINED
FROM MPEG LA, LLC. SEE
HTTP://WWW.MPEGLA.COM
MPEG LA is offering licenses for (i) manufacturing/sales of any
storage media storing MPEG-4 Visual video information (ii)
distribution/broadcasting of MPEG-4 Visual video information in
any manner (such as online video distribution service, internet
broadcasting, TV broadcasting). Other usage of this product may be
required to obtain license from MPEGLA. Please contact MPEG LA
for any further information. MPEG LA, L.L.C., 250 STEELE
STREET, SUITE 300, DENVER, COLORADO 80206,
http://www.mpegla.com
End User License Agreement (EULA)
On the basis of license contracts between Sony and the software
copyright holders, this product uses open software.
To meet the requirements of the software copyright holders, Sony is
obligated to inform you of the content of these licenses.
For the content of these licenses, see each document in the “License”
folder of the supplied CD-ROM.
• Software license: “License” folder > “License1.pdf”
• Microsoft: “License” folder > “License2.pdf”
• McAfee: “License” folder > “License3.pdf”
 Loading...